


K504 & K503 K502,
Pacer Gait Trainer
K502, K503 & K504 Product Manual

Contents
Important information |
3 |
|
|
Safety messages |
4-5 |
|
|
Recommended use |
6 |
|
|
User and item dimensions |
6 |
|
|
Check your order |
7 |
|
|
Basic components |
|
|
|
Frame |
8 |
|
|
Casters |
10 |
|
|
Accessories |
|
|
|
Clamps |
11 |
|
|
Hand loops |
12-13 |
|
|
Arm prompts |
14-16 |
|
|
Chest prompt |
17 |
|
|
Hip positioner |
18-19 |
|
|
Hip positioner pad |
20 |
|
|
Pelvic support |
21-22 |
|
|
Thigh prompts |
23 |
|
|
Ankle prompts |
24 |
|
|
Tray |
25 |
|
|
Attendant guide bar |
26 |
|
|
Operation |
27-29 |
|
|
Maintenance, cleaning, and warranty |
30 |
|
|
Materials and user modifications |
31 |
|
|
© 2016 Rifton Equipment
2

IMPORTANT
Please save this product manual for future reference. Additional copies are available at http://www.rifton.com/customer-service/product-manuals.
Key for users
Use this key to determine which sections of this product manual apply to you.
Technical Users For professionals who order and set up Rifton products.
Home Users For care-givers who use Rifton products on a regular basis.
Maintenance Personnel For anyone who is responsible for service or re-ordering of Rifton products and parts.
3

 WARNING
•Thoroughly read and understand the information in this product manual before attempting to use this product. If the procedures and instructions in this product manual are not followed, serious injury or death could occur.
•A qualified professional must assess the appropriateness and safety of all equipment for each user.
•This product is intended for use by clients of unreliable judgment. Adult supervision is required at all times.
•To prevent falls and injuries:
○Do not use this product on rough and uneven terrain, around swimming pools, or near stairways.
○Ensure the appropriate use of straps and supports at all times. Straps and supports are provided for the safety of the user and must be carefully adjusted for comfort and security.
○Tighten all adjustment knobs before use and immediately after making any adjustments.
○Position accessories so that the client’s weight is centered between the casters.
•Do not use this product for clients outside the height and weight limits specified in this manual.
•To prevent structural failure, which may result in serious injury or death:
○Inspect this product and accessories regularly for loose or missing screws, metal fatigue, cracks, broken welds, missing attachments, general instability or other signs of excessive wear.
○Immediately remove this product from use when any condition develops that might make operation unsafe.
○Do not use Rifton components or products for any purpose other than their intended use.
•Adequately supervise use of the Pacer to prevent:
○Excessive movement and speed
○Sudden stops from hitting a curb, cracks, or debris
4

 WARNING
•Use adequate accessories to ensure that user’s feet remain within boundaries of the Pacer frame.
•Use special care and supervision when using the Pacer under conditions which might affect stability, including:
○Uneven ground
○Ramps, slopes, or hills
○Clients who experience strong involuntary movements or seizures
5
Recommended use 

The Pacer gait trainer is a Class 1 medical device. It is designed to help a user learn to walk. For a user lacking active use of his or her trunk and leg muscles, the Pacer provides the necessary support during gait training and requires little or no weight-bearing.
The medium Pacer is recommended for users with elbow height of 24"– 34" (61– 86 cm). The maximum working load for the medium Pacer is 150 lbs (68 kgs).
The large Pacer is recommended for users with elbow height of 31"– 46" (79–117 cm). The maximum working load for the large Pacer is 200 lbs (91 kgs).
The PacerXL is recommended for users with elbow height of 35"– 50" (89–127 cm). The maximum working load for the PacerXL is 275 lbs (125 kgs).
User and item dimensions
User dimensions - inches (cm) |
K502 medium |
K503 large |
K504 XL |
Elbow height |
24-34 (61-86) |
31-46 (79-117) |
35-50 (89-127) |
|
|
|
|
Key user dimension: elbow height
Measure the vertical distance from the bent elbow to the floor while the user is standing upright. Choose the gait trainer that allows for growth.
Important: Make sure that the chest prompt width is adequate, allowing for growth. User’s weight must not exceed the maximum working load.
Small and medium prompts are recommended for most users of the medium Pacer.
Item Dimensions - inches (cm) |
Medium |
|
Large |
XL |
||
Arm prompt height |
24-34 |
(61-86) |
31-46 |
(79-117) |
35-50 (89-127) |
|
|
|
|
|
|
|
|
Overall width |
|
26 |
(66) |
|
27½ (70) |
32 (81) |
|
|
|
|
|
|
|
Overall length |
|
32 |
(81) |
|
38 (97) |
45 (114) |
|
|
|
|
|
|
|
Chest Prompt height (top edge) |
28-38 |
(71-97) |
35-50 |
(89-127) |
38½-53½ (98-136) |
|
|
|
|
|
|
||
Frame height |
21-26 |
(53-66) |
28-38 (71-97) |
31½-41½ (80-105) |
||
|
|
|
|
|||
Folded |
32 x 26 x 17 |
38 x 27½ x 17½ |
45 x 32 x 17½ |
|||
|
(81 x 66 x 43) |
(97 x 70 x 44) |
(114 x 81 x 44) |
|||
|
|
|
|
|
|
|
Frame weight - lbs (kg) |
|
15 (7) |
|
27½ (13) |
45 (20) |
|
|
|
|
|
|
|
|
Max. working load - lbs (kg) |
150 |
(68) |
|
200 (91) |
275 (125) |
|
|
|
|
|
|
||
Chest prompt circumference |
22-40 (56-102) |
28-50 |
(71-127) |
28-50 (71-127) |
||
|
|
|
|
|
|
|
6

Check your order 

The Pacer frame and accessories that you specified in your order are shipped together in a single carton (except for the guide bar). Use the diagrams in this manual to make sure your order is complete.
If your shipment is incomplete or in any way damaged on arrival, please call Customer Service, 800.571.8198.
7
Basic components 

Frame 


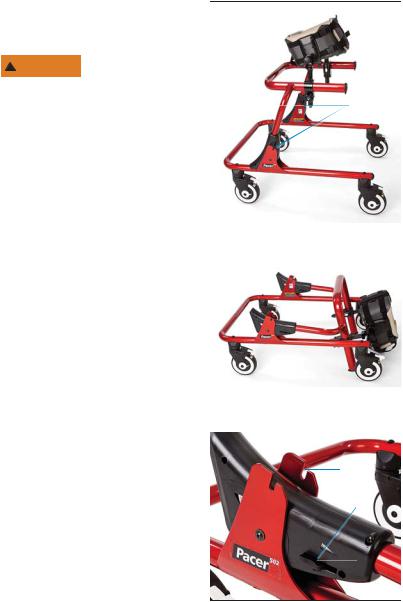
Installation
To prevent unintended  WARNING collapse, fully engage
both latches.
Lift top of frame into upright position. Both latches should automatically click into notches in the bottom frame (see Figures 8a, b and c).
Figure 8a
Figure 8b
Figure 8c
Latches
Notch
Latch
8
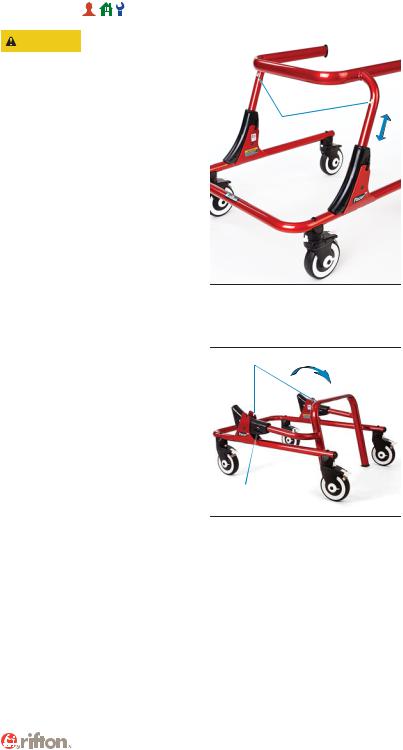
Adjustments
CAUTION |
Make sure both sides |
|
of frame engage, are |
level, and are adjusted to equal height.
To adjust the height of the frame (see Figure 9a).
1.Pull triggers up while holding top bar.
2.Raise or lower top bar to desired position.
3.Release triggers.
4.Push or pull on top bar until triggers click securely and firmly into position.
To collapse the Pacer for easy storage or transport, (see Figure 9b).
1.Set vertical adjustment of frame and all prompts to lowest position.
2.Stand behind the Pacer and lift latches all the way up while pulling the top frame down.
3.The top frame will pivot all the way to floor level.
Triggers
Figure 9a
Notches
Latch
Figure 9b
9

Casters 


Adjustments
A.Swivel lock (A) prevents the caster from swiveling. To engage the swivel lock:
1.Line up lever (A) with one of the two notches in the caster housing and press lever into notch.
2.Locking all four casters will keep the user traveling in a straight line.
3.Locking only the two rear casters will prevent the user from veering sideways while walking.
B.Caster brake (B) stops wheel rotations completely. To engage caster brake:
4.Press bottom part of brake pedal all the way down.
5.Release brake by depressing upper part of brake pedal.
C.Caster drag (C) provides resistance for strong users who may move too fast or too suddenly. To engage caster drag:
6.Rotate dial (C) from the rabbit (fast) to the turtle (slow) for desired resistance.
7.To disengage wheel drag, rotate dial back to the rabbit.
D.Directional lock (D) allows the caster to turn in one direction only, helpful for users who may involuntarily roll backward while trying to walk. To engage the directional lock:
8.Push lever down until it snaps into place.
9.When the directional lock is engaged, the caster will make a clicking noise while moving forward and lock when pushed backward.
A
Figure 10a
Figure 10b
B
C
D
10
 Loading...