

RIDGID SeeSnake MINIPak User Manual

SeeSnake
®
MINI
Pak
• Français – 17
• Castellano – pág. 27
SeeSnak e®MINIPak Manual
WARNING!
Read this Operator’s Manual
carefully before using this
tool. Failure to understand
and follow the contents of
this manual may result in
electrical shock, fire and/or
serious personal injury.

Ridge Tool Company
ii
Table of Contents
Recording Form for Machine Serial Number..............................................................................................................1
Safety Symbols..............................................................................................................................................................2
General Safety Rules
Work Area Safety........................................................................................................................................................2
Electrical Safety ..........................................................................................................................................................2
Personal Safety ..........................................................................................................................................................2
Equipment Use and Care............................................................................................................................................3
Battery Tool Use and Care ........................................................................................................................................3
Service........................................................................................................................................................................3
Specific Safety Information..........................................................................................................................................3
MINI
Pak
Safety ..........................................................................................................................................................4
Description, Specifications and Standard Equipment
Description..................................................................................................................................................................4
Specifications..............................................................................................................................................................4
Standard Equipment ..................................................................................................................................................5
Optional Equipment ....................................................................................................................................................5
MINI
Pak
Components ..................................................................................................................................................5
Icon Legend ..................................................................................................................................................................6
Pre-Operation Inspection ............................................................................................................................................6
Work Area and Equipment Set Up ..............................................................................................................................6
MINI
Pak
Placement ....................................................................................................................................................6
Front Cover/Tilt Stand ................................................................................................................................................6
Connecting The MINI
Pak
............................................................................................................................................7
Connection Icons ........................................................................................................................................................7
Powering The SeeSnake MINI
Pak
............................................................................................................................8
Operating Instructions..................................................................................................................................................8
Starting Up..................................................................................................................................................................9
Inspecting The Line ....................................................................................................................................................9
Locating The Camera Using The Sonde ....................................................................................................................9
Line Tracing The SeeSnake Pushrod ......................................................................................................................10
Monitor Settings........................................................................................................................................................10
Maintenance Instructions ..........................................................................................................................................11
Cleaning....................................................................................................................................................................11
Accessories ................................................................................................................................................................11
Transport And Storage ..............................................................................................................................................11
Service And Repair ....................................................................................................................................................11
Disposal ......................................................................................................................................................................11
Battery Disposal..........................................................................................................................................................11
Troubleshooting..........................................................................................................................................................12
Lifetime Warranty ........................................................................................................................................Back Cover
SeeSnake®MINI
Pak

SeeSnake
®
MINI
Pak
SeeSnake
®
MINI
Pak
SeeSnake®MINI
Pak
Record Serial Number below and retain product serial number which is located on nameplate.
Serial
No.

Ridge Tool Company
2
SeeSnake®MINI
Pak
General Safety Rules
WARNING
Read all safety warnings and instructions. Failure to follow
the warnings and instructions may result in electric shock,
fire and/or serious injury.
SAVE ALL WARNINGS AND INSTRUCTIONS
FOR FUTURE REFERENCE!
Work Area
• Keep work area clean and well lit. Cluttered or dark
areas invite accidents.
• Do not operate equipment in explosive atmo-
spheres, such as in the presence of flammable
liquids, gases, or dust. Equipment can create sparks
which may ignite the dust or fumes.
• Keep children and by-standers away while oper-
ating equipment. Distractions can cause you to lose
control.
Electrical Safety
• Avoid body contact with earthed or grounded surfaces such as pipes, radiators, ranges and refrigerators. There is an increased risk of electrical shock
if your body is earthed or grounded.
• Do not expose equipment to rain or wet condi-
tions. Water entering equipment will increase the risk
of electrical shock.
• Do not abuse the cord. Never use the cord for
carrying, pulling or unplugging the equipment.
Keep cord away from heat, oil, sharp edges or
moving parts. Damaged or entangled cords increase
the risk of electric shock.
• If operating equipment in a damp location is un-
avoidable, use a ground fault circuit interrupter
(GFCI) protected supply. Use of a GFCI reduces
the risk of electric shock.
• Keep all electrical connections dry and off the
ground. Do not touch equipment or plugs with
wet hands. This reduces the risk of electrical shock.
Personal Safety
• Stay alert, watch what you are doing and use common sense when operating equipment. Do not
use equipment while you are tired or under the influence of drugs, alcohol or medication. A moment
of inattention while operating equipment may result in
serious personal injury.
• Use personal protective equipment. Always wear
eye protection. Protective equipment such as dust
mask, non-skid safety shoes, hard hat, or hearing
protection used for appropriate conditions will reduce
personal injuries.
• Do not overreach. Keep proper footing and balance
at all times. This enables better control of the equipment in unexpected situations.
• Dress properly. Do not wear loose clothing or jew-
elry. Keep your hair, clothing, and gloves away
from moving parts. Loose clothes, jewelry, or long
hair can be caught in moving parts.
Safety Symbols
In this operator’s manual and on the product, safety symbols and signal words are used to communicate important safety
information. This section is provided to improve understanding of these signal words and symbols.
This is the safety alert symbol. It is used to alert you to potential personal injury hazards. Obey all safety messages that follow this
symbol to avoid possible injury or death.
DANGER indicates a hazardous situation which, if not avoided, will result in death or serious injury.
WARNING indicates a hazardous situation which, if not avoided, could result in death or serious injury.
CAUTION indicates a hazardous situation which, if not avoided, could result in minor or moderate injury.
NOTICE indicates information that relates to the protection of property.
This symbol means read the operator’s manual carefully before using the equipment. The operator’s manual contains important
information on the safe and proper operation of the equipment.
This symbol means always wear safety glasses with side shields or goggles when handling or using this equipment to reduce
the risk of eye injury.
This symbol indicates the risk of electrical shock.
NOTICE
DANGER
WARNING
CAUTION

Ridge Tool Company
3
SeeSnake®MINI
Pak
Equipment Use and Care
• Do not force equipment. Use the correct equipment
for your application. The correct equipment will do the
job better and safer at the rate for which it is designed.
• Do not use equipment if the switch does not turn it
ON and OFF. Any equipment that cannot be controlled with the switch is dangerous and must be repaired.
• Disconnect the plug from the power source and/or
the battery pack from the equipment before making
any adjustments, changing accessories, or storing.
Such preventive safety measures reduce the risk of injury.
• Store idle equipment out of the reach of children
and do not allow persons unfamiliar with the equipment or these instructions to operate the equipment. Equipment can be dangerous in the hands of
untrained users.
• Maintain equipment. Check for misalignment or bind-
ing of moving parts, missing parts, breakage of parts
and any other condition that may affect the equipment’s operation. If damaged, have the equipment
repaired before use. Many accidents are caused by
poorly maintained equipment.
• Use the equipment and accessories in accordance
with these instructions, taking into account the
working conditions and the work to be performed.
Use of the equipment for operations different from
those intended could result in a hazardous situation.
• Use only accessories that are recommended by
the manufacturer for your equipment. Accessories
that may be suitable for one piece of equipment may
become hazardous when used with other equipment.
• Keep handles dry and clean; free from oil and
grease. Allows for better control of the equipment.
Battery Tool Use And Care
• Recharge only with the charger specified by the
manufacturer. A charger that is suitable for one type
of battery pack may create a risk of fire when used with
another battery pack.
• Use equipment only with specifically designated
battery packs. Use of any other battery packs may
create a risk of injury and fire.
• Do not probe battery with conductive objects.
When battery pack is not in use, keep it away
from other metal objects, like paper clips, coins,
keys, nails, screws or other small metal objects
that can make a connection from one terminal to
another. Shorting the battery terminals together may
cause burns or a fire.
• Under abusive conditions, liquid may be ejected
from the battery; avoid contact. If contact accidentally occurs, flush with water. If liquid contacts
eyes, additionally seek medical help. Liquid ejected
from the battery may cause irritation or burns.
• Use and store batteries and chargers in dry, ap-
propriate temperature areas. Extreme temperatures
and moisture can damage batteries and result in leakage, electrical shock, fire or burns.
See charger man-
ual for more information.
• Do not cover charger while in use. Proper ventilation
is required for correct operation. Covering charger in
use could result in fire.
• Properly dispose of batteries. Exposure to high
temperatures can cause the batteries to explode, so do
not dispose of in a fire. Some countries have regulations concerning battery disposal. Please follow all
applicable regulations.
Service
• Have your equipment serviced by a qualified repair
person using only identical replacement parts. This
will ensure that the safety of the equipment is maintained.
• Remove the batteries and refer servicing to qualified
service personnel under any of the following conditions:
• If liquid has been spilled or objects have fallen into
product;
• If product does not operate normally by following
the operating instructions;
• If the product has been dropped or damaged in
any way; or,
• When the product exhibits a distinct change in
performance.
Specific Safety Information
WARNING
This section contains important safety information that is
specific to this equipment.
Read these precautions carefully before using the MINI
Pak
to reduce the risk of electrical shock or other serious personal injury.
SAVE THESE INSTRUCTIONS!
Keep this manual with the machine for use by the operator.

Ridge Tool Company
4
SeeSnake®MINI
Pak
If you have any question concerning this Ridge Tool
product:
– Contact your local RIDGID®distributor.
– Visit www.RIDGID.com or www.RIDGID.eu to find
your local Ridge Tool contact point.
– Contact Ridge Tool Technical Services Department
at rtctechservices@emerson.com, or in the U.S.
and Canada call (800) 519-3456.
MINI
Pak
Safety
• An improperly grounded electrical outlet can cause
electrical shock and or severely damage equipment. Always check work area for a properly grounded
electrical outlet. Presence of a three prong or GFCI outlet does not insure that the outlet is properly grounded.
If in doubt, have the outlet inspected by a licensed electrician.
• Power the MINI
Pak
only with a specifically desig-
nated battery or a double insulated power supply.
• Do not operate this equipment if operator or machine is standing in water. Operating machine while
in water increases the risk of electrical shock.
• The MINI
Pak
is not waterproof. Only the camera
and push cable are waterproof. Do not expose the
equipment to water or rain. This increases the risk of
electrical shock.
• Do not use where a danger of high voltage contact
is present. The equipment is not designed to provide high voltage protection and isolation.
• Read and understand this operator’s manual, the
reel operators’ manual, and the instructions for any
other equipment in use and all warnings before operating the MINI
Pak
. Failure to follow all instruction
may result in property damage and/or serious personal injury.
• Always use appropriate personal protective equip-
ment while handling and using equipment in drains.
Drains may contain chemicals, bacteria and other substances that may be toxic, infectious, cause burns or
other issues. Appropriate personal protective equipment always includes safety glasses, and may include
equipment such as drain cleaning gloves or mitts, latex
or rubber gloves, face shields, goggles, protective
clothing, respirators and steel toed footwear.
• If using drain cleaning equipment at the same time
as using drain inspection equipment, only wear
RIDGID Drain Cleaning Gloves. Never grasp the ro-
tating drain cleaning cable with anything else, including
other gloves or a rag. They can become wrapped
around the cable, causing hand injuries. Only wear
latex or rubber gloves under RIDGID Drain Cleaner
Gloves. Do not use damaged drain cleaning gloves.
• Practice good hygiene. Use hot, soapy water to wash
hands and other exposed body parts exposed to drain
contents after handling or using drain inspection equipment. Do not eat or smoke while operating or handling drain inspection equipment. This will help prevent
contamination with toxic or infectious material.
Description, Specifications And
Standard Equipment
Description
The SeeSnake®MINI
Pak
is a modern, hand-portable
monitor and camera control unit for use with a SeeSnake
Pipe Inspection diagnostic system.
The MINI
Pak
is designed to easily connect with a
SeeSnake reel and camera and provide a clear image of
the camera’s field of view. It provides readily accessible
controls for adjusting the camera and the display, and for
controlling the 512 Hz in-line Sonde built in to most
SeeSnake cameras, which allows the operator to locate
the camera when it is underground. The MINI
Pak
also enables the operator to connect an external transmitter to the
SeeSnake cable and use a standard locator to line-trace
the path of the SeeSnake cable in a pipe.
The MINI
Pak
is used in conjunction with any SeeSnake
reel configuration
(see Figure 8)
. Other auxiliary equip-
ment used with the SeeSnake MINI
Pak
includes:
• Rechargeable batteries (Ridge CAT # 32743).
• A RIDGID locator/receiver (such as the SR-20, the
SR-60, the Scout™ or the NaviTrack®II).
• A RIDGID transmitter (such as the ST-510, the ST-305,
the ST-33Q, the NaviTrack®Brick or the NaviTrack®10watt transmitter).
• The Count
Plus
Cable Counter cable-measurement
system, normally built into SeeSnake pipe inspection
systems.
Specifications
Weight ...........................4.25 lbs (1.93kg) w/o Battery
Dimensions:
Depth...........................14" (35.5 cm)
Width ...........................7.6" (19.2 cm)
Height..........................10" (26.8 cm)
Power Source................100-240VAC/50-60Hz, AC or
18 VDC Rechargeable Battery
Battery Type..................18 V Li-Ion, 2.2 Ah
Power Rating.................14-16 VDC 25W

Ridge Tool Company
5
SeeSnake®MINI
Pak
Figure 1 – MINI
Pak
Components
Monitor
MINI
Pak
Keypad
Front Cover
Front Cover Handle
Front Cover Release
Operating Environment:
Temperature................32°F to 104°F (0°C to 40°C)
Humidity ......................5% to 95% RH
Storage Temperature....14°F to 158°F (-10°C to 70°C)
Altitude ........................13120 feet (4000 meters)
LCD Display:
Resolution ...................320 x 240
Size of LCD Panel.......5.7" (144.8 mm)
Dot Pitch........................0.36 mm H x 0.12mm x 3
(R,G,B) W
Display Size (H x V).....4.6" x 3.47"
(117.8 mm x 88.2 mm)
Contrast Ratio .............350:1
Brightness ...................500 cd/m2
Standard Equipment
• MINI
Pak
• 100-220VAC to 15VDC Power Converter and Supply
• Operator’s Manual
• Instructional DVD
Optional Equipment
Cat # (US) Cat # (EU)
18 V Li-Ion Rechargeable Battery 32743 28218
Battery Charger 32068 32073
Dual Battery Kit with Charger 32648 32693
Single Battery Kit with Charger 32708 32713
The MINIPak is protected under U.S. and international
patents.
Figure 2 – MINI
Pak
Keypad
Power Key
Menu Key Combination
(Dimmer + Sonde)
Image Flip
Key
Sonde Key
Brightness
Key
Zero Key
MINI
Pak
Components
Figure 3 – Rear View
Battery
Dock
Carrying Handle
SeeSnake
System
Connector
Transmitter
Clip-on
Terminal
DC Jack and
Video Port
Figure 4 – Tilt-Stand
Front Cover/Tilt-Stand
Battery

electrical shock, fire, and other causes, and to prevent damage to the MINI
Pak
.
1. Check work area for:
• Adequate lighting.
• Flammable liquids, vapors or dust that may ignite.
If present, do not work in area until sources have
been identified and corrected. The MINI
Pak
is not
explosion proof. Electrical connections can cause
sparks.
• Clear, level, stable dry place for operator. Do not use
the machine while standing in water.
• Clear path to electrical outlet, that does not contain
any potential sources of damage for the power
cord, when using external power.
2. Inspect the work to be done if possible, determine the
drain access point(s), size(s) and length(s), presence of drain cleaning chemicals or other chemicals, etc. If chemicals are present, it is important to
understand the specific safety measures required to
work around those chemicals. Contact the chemical manufacturer for required information.
3. Determine the correct equipment for the application.
The SeeSnake MINI
Pak
is made to view inspections done with an inspection camera. Inspection
equipment for other applications can be found by
consulting the Ridge Tool Catalog, online at
www.RIDGID.com or www.RIDGID.eu.
4. Make sure all equipment has been properly inspected.
5. Evaluate the work area and determine if any barriers
are needed to keep bystanders away. Bystanders can
distract the operator during use. If working near traffic, erect cones or other barriers to alert drivers.
6. If needed, remove fixture (water closet, sink, etc.)
to allow access.
MINI
Pak
Placement
Place the MINI
Pak
to allow easy access and viewing
while manipulating the camera and pushrod for an inspection. Make sure that the location is not wet and will not
let the MINI
Pak
and other equipment get wet during use.
The MINI
Pak
is not waterproof and exposure to wet conditions can cause electrical shock or equipment damage.
Place camera and reel as instructed in their Operator’s
Manual. Ensure the MINI
Pak
and cable reel are stable.
Front Cover/Tilt Stand
The MINI
Pak
front cover protects the unit during transportation and storage. When operating in its horizontal position (not tilted), the front cover helps to reduce glare.
Pre-Operation Inspection
WARNING
Before each use, inspect your SeeSnake MINI
Pak
and correct any problems to reduce the risk of serious injury from electrical shock or other causes
and prevent machine damage.
1. Confirm that the power is off, any external power
and cords are disconnected, and the battery is removed. Inspect the cords, cables and connectors
for damage or modification.
2. Clean any dirt, oil or other contamination from the
SeeSnake MINI
Pak
to aid in inspection and to prevent
the unit from slipping from your grip while transporting
or using.
3. Inspect the MINI
Pak
for any broken, worn, missing,
misaligned or binding parts, or any other condition
which might prevent safe, normal operation.
4. Inspect any other equipment being used per its instructions to make sure it is in good usable condition.
5. If any problems are found, do not use the unit until the
problems are corrected.
Work Area and Equipment
Set Up
WARNING
Set up the MINI
Pak
and work area according to
these procedures to reduce the risk of injury from
Ridge Tool Company
6
SeeSnake®MINI
Pak
Power Key
Dimmer Key
Sonde Key
Zero Key
Image Flip Key
Icon Legend
the connectors, align the guide pin to the guide socket,
push the connector straight in and tighten the outer
locking sleeve.
NOTE! A guide ridge molded into the top of the cable
connector will point up when the plug is correctly
aligned.
When connecting/disconnecting the SeeSnake
system cable, turn only the locking sleeve. To prevent
damage, do not bend or twist the connector or cable.
External Monitor
4. The MINI
Pak
may be used with an external SeeSnake
monitor by connecting an RCA cable from the Video
Out port on the external monitor. Connect the other
end of the cable to the yellow MINI
Pak
video input
port on the back of the MINI
Pak
, marked with .
Ridge Tool Company
7
SeeSnake®MINI
Pak
NOTICE
If desired, the front cover and its handle can be used as
a tilt stand for easier viewing.
1. Tilt the unit back slightly and then pull forward on
the front cover latch to free the rotating front cover.
2. Rotate the front cover and front cover handle toward
the bottom of the unit until it latches in place.
Figure 5 – MINI
Pak
with Tilt Stand Deployed
3. To return the front cover to its horizontal position,
squeeze the front cover handle and latch together to
release, and rotate upward until it latches in position.
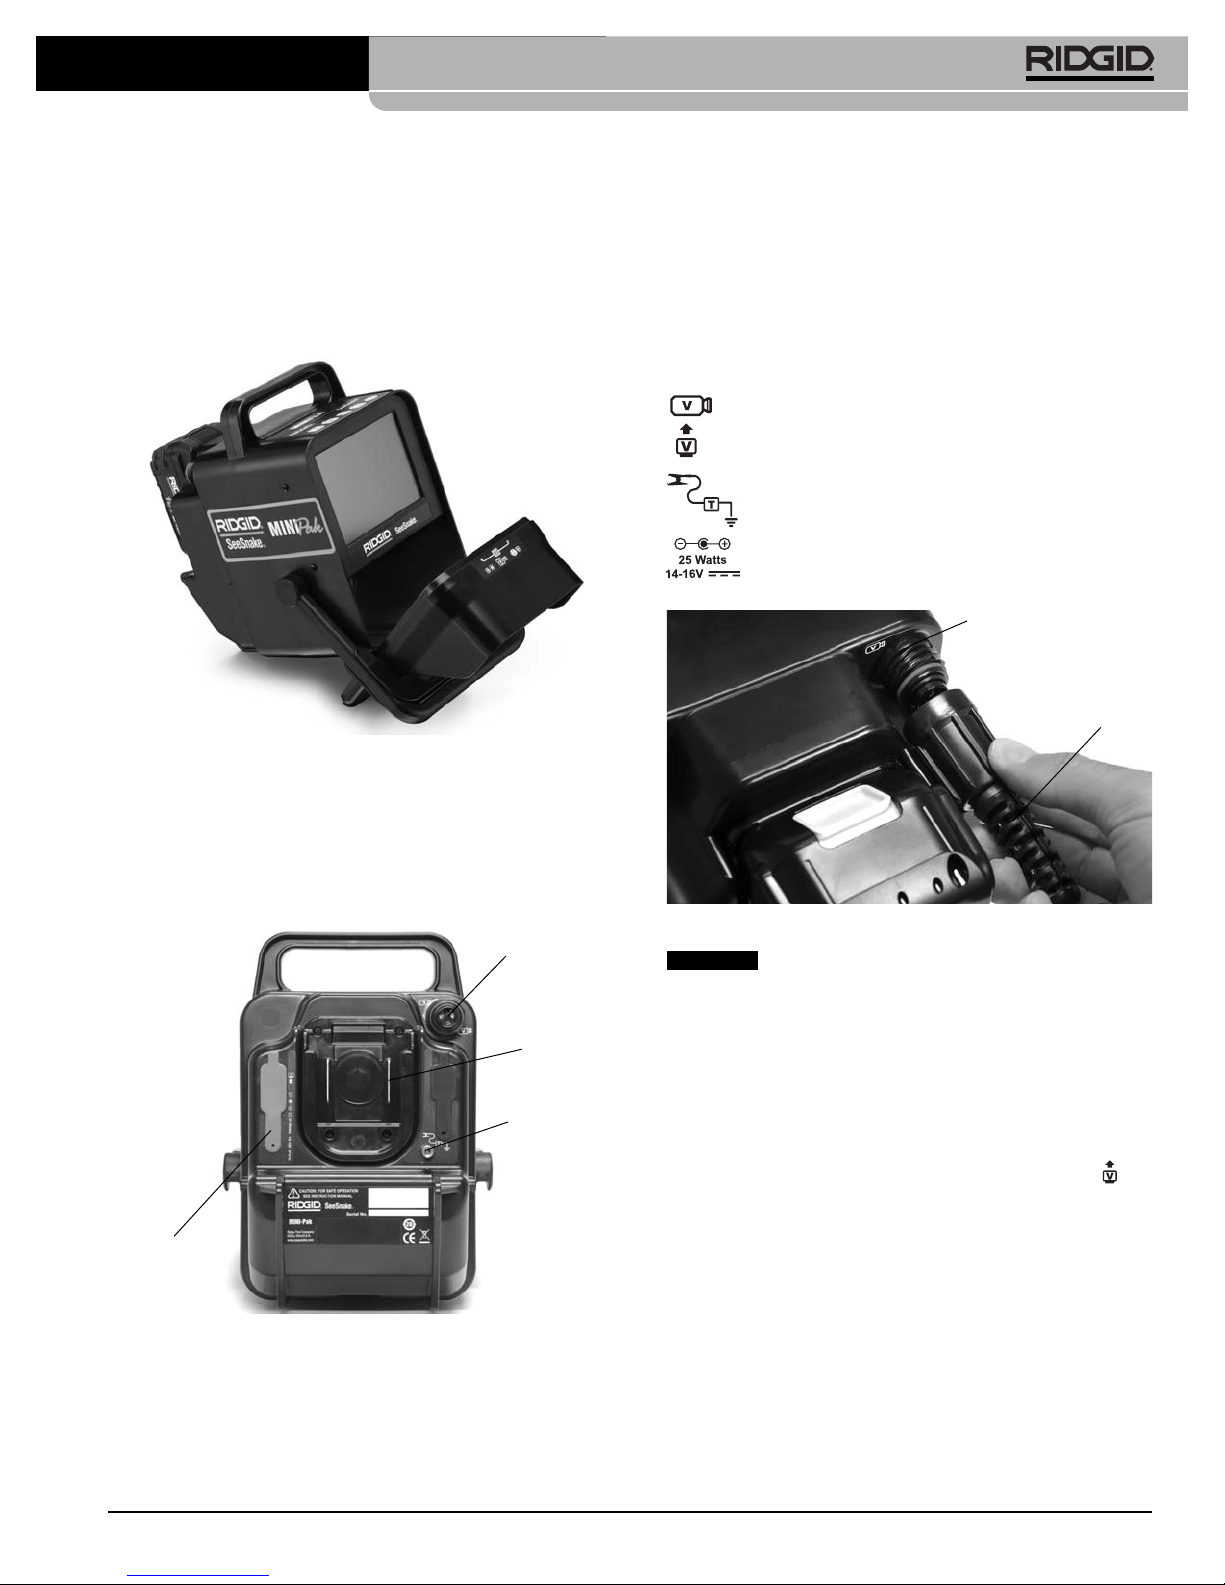
Connecting the MINI
Pak
Figure 6 – DVD
Pak
Connections
SeeSnake System Cable
Unwrap the SeeSnake System Cable from its holder
and match the System Cable plug to the matching
SeeSnake System Connector on the MINI
Pak
. To join
Battery
Dock
Transmitter
Clip-on
Terminal
DC Jack and
Video Port
SeeSnake System Connector
Connection Icons
Video In Plug
Transmitter Clip-on Terminal
MINI
Pak
Power Jack
Figure 7 – Connecting System Plug To CCU
SeeSanke
System
Connector
SeeSnake System
Connector
Guide
Ridge

Ridge Tool Company
8
SeeSnake®MINI
Pak
Figure 8 – MINI
Pak
with SeeSnake
Powering The SeeSnake MINI
Pak
The SeeSnake MINI
Pak
can either be powered with
RIDGID Li-Ion rechargeable battery or plugged in to
an outlet using a supplied AC/DC power converter.
Battery power is the preferred powering method to reduce the risk of electrical shock. Additionally, the
power converter is not rated for outdoor use and
should only be used indoors.
Battery Power
With dry hands, slide a fully charged battery onto the battery dock on the back of the MINI
Pak
. Make sure that the
battery locks onto the dock.
See the Battery Charger op-
erator’s manual for more information.
Batteries supplied for the MINI
Pak
are rated at 2.2 amphours. When fully charged, depending on use (recording
time, etc.) the MINI
Pak
will run for approximately 5 hours
(actual time may vary). Battery Status on screen indicator
indicates battery charge level
(Figure 9)
.
Figure 9 – Battery Charge Level
Outlet Power
For plug in operation, a double insulated AC/DC power
supply is supplied to reduce wall outlet voltage to the correct voltage for the MINI
Pak
.
The external power supply is intended for in-
door use only.
To power the system up with the power cord, locate
the power supply. The power supply cord has two sections, one of which plugs into a standard 110-120V twobladed outlet (US) at one end and plugs into a power
supply at the other end. The second section runs from
the power supply to the back of the MINI
Pak
and plugs
into the jack marked 25 Watts—14-16V at the left side
of the back of the unit
(Figure 6)
.
With dry hands, connect the two sections together and insert the jack plug into the jack on the back of the MINI
Pak
.
Route the cord along a clear path and with dry hands plug
the power supply into a matching outlet. If using an extension cord ensure it is of adequate wire gauge. For
cords of 25 feet, a minimum gauge of 18AWG is required. For cords greater than 25 feet, a minimum gauge
of 16 AWG is required.
To remove all power to the unit, unplug the power
plug and remove the battery.
Operating Instructions
WARNING
Always wear eye protection to protect your eyes
against dirt and other foreign objects.
When inspecting drains that might contain hazardous chemicals or bacteria, wear appropriate protective equipment, such as latex gloves, goggles,
face shields or respirators, to prevent burns and infections.
Do not operate this equipment if operator or machine is standing in water. Operating machine while
in water increases the risk of electrical shock.
Rubber soled, non-slip shoes can help prevent slipping and electric shock, especially on wet surfaces.
Follow operating instructions to reduce the risk of
injury from electrical shock and other causes.
NOTICE
Fully charged
(Green Icon)
Low on charge
(Red Icon)
Shut-down warning
(flashes and beeps)

Starting Up
1. Check that the unit is properly set up.
2. Place the camera head into the reel’s guide hoop and
turn the MINI
Pak
’s power on by pressing the Power
Key . After booting, you should see the words
“CountPlus” (if your unit includes a CountPlus distance counter) and a version number on the monitor
screen. If you do not see an image on the monitor
after boot-up (about 5 seconds), check to make sure
its power is turned on and the system cable is correctly connected and secured.
3. The MINI
Pak
screen will remain blue if the MINI
Pak
does not detect any video data from the camera. If
screen remains blue check the connections.
Figure 10 – MINI
Pak
Controls
Image Flip Key: Flips the camera image on the display
screen 180° each time it is pressed.
Dimmer Key: Adjusts camera LED brightness.
Zero Key: Sets a temporary zero-point for measuring in-
termediate distances. Long press (> 2 sec) resets both the
system counter and any temporary counter to zero
(CountPlus Only).
Sonde Key: Powers the built-in 512 Hz Sonde ON or
OFF.
Power Key: Powers the camera, camera control unit
and display ON or OFF.
Once the start-up instructions above are complete, the
display should be showing a view from the camera
head. Monitoring the camera is simply a matter of watching the screen as you push the camera through the
pipe.
Inspecting The Line
1. Power up the MINI
Pak
if it is OFF.
2. Put the camera head in the line.
3. Proceed with pipe inspection as described in your
SeeSnake manual.
Brightness Adjustment
You may find you need to increase or decrease the
camera LED brightness while inspecting the inside of a
line, depending on conditions. To do so simply press the
Brightness Key and raise or lower the brightness
level using the Arrow Key . Press the Menu Key
when done.
Image Rotation
While doing an inspection the camera may become rotated in the line and present an inverted image. The
Flip Key will rotate the image on the screen (flip it
vertically) for easier viewing.
Count
Plus
Control
If you are using a SeeSnake reel equipped with the
Count
Plus
distance counter, the measured distance will
appear on the display. If you want to set an interim zeropoint to measure distance from some location (such as a
junction or pipe-head) pressing the Zero Key will start
a temporary distance count, with the number displayed in
square brackets [0.0]. A second short press will return to
the main count. A long press (3 seconds) will re-zero
the main distance counter.
For details on using the Count
Plus
see the Count
Plus
manual. Count
Plus
parameters such as date and time are
set using the Count
Plus
menu key and going to the
Count
Plus
Tools menu. Count
Plus
text overlays are man-
aged with the Count
Plus
keypad as described in the
Count
Plus
Operator's Manual.
Locating The Camera Using The Sonde
Many SeeSnake pipe inspection systems have a built-in
Sonde which transmits a locatable 512 Hz signal. When
the Sonde is turned on, a locator such as the RIDGID
SR-20, SR-60, Scout™ or NaviTrack®II set to 512 Hz will
be able to detect it, allowing you to detect the camera’s location underground.
To turn the SeeSnake Sonde ON while using the
MINI
Pak,
press the Sonde Key . A Sonde icon will appear on the display while the Sonde is ON. The display
may also show some lines of interference from the
Sonde’s transmission.
These will vanish when the Sonde is turned OFF by
again pressing the Sonde Key .
The most workable approach to tracking the Sonde is to
run the pushrod into the pipe about five or ten feet (1.5
to 3 meters) and use the locator to find the Sonde’s
position. If desired, you can then extend the pushrod a
similar distance further down-pipe and locate the Sonde
again starting from the previous located position. To
Ridge Tool Company
9
SeeSnake®MINI
Pak
Power Key
Image Flip
Key
Sonde Key
Brightness
Key
Zero Key

Figure 12 – Line Tracing the Pushrod
If you don’t have the SimulTrace™ feature, use a line
transmitter and a locator to line-trace the pushrod. When
the signal fades, switch the locator to Sonde mode at the
frequency of the in-line Sonde, usually 512 Hz. Pick the
signal up from where the line-trace frequency started to
weaken and zero in on the in-line Sonde. Because locating frequencies from transmitters can cause distortion of the image on the monitor, it is best to turn Sonde
and line transmitters off while inspecting the interior of a
line and turn them on only when ready to do a locate.
Monitor Settings
For more detailed control of the monitor display, press
the Dimmer Key and the Sonde Key simultaneously. A menu of display control options will appear:
Color
Contrast
Brightness
Units
Figure 13 – Display Control Menu
A count-down display will appear and count from 10 to 1
while a menu item is displayed. The count will reset to 10
each time a key is pressed to change a menu item or setting.
Scroll through the options by pressing the Zero Key
until the desired option is highlighted. To increase the
setting of the highlighted option, press the Sonde Key
. To decrease the value of the highlighted option,
press the Dimmer Key . When all three options are set
to your satisfaction, press the Dimmer Key and the
Sonde Key simultaneously to return to the normal display.
Ridge Tool Company
10
SeeSnake®MINI
Pak
locate the Sonde, turn the locator on and set it to Sonde
mode. Scan in the direction of the Sonde’s probable location until the locator detects the Sonde. Once you
have detected the Sonde, use the locator indications to
zero in on its location precisely. For detailed instructions
on Sonde locating, consult the Operator’s Manual for the
locator model you are using.
Line Tracing The SeeSnake Pushrod
In addition to being able to trace a Sonde built into the
system camera, the MINI
Pak
also enables you to trace the
line of the SeeSnake push cable underground, using a
standard RIDGID locator such as the NaviTrack®II, the
Scout™, the SR-20 or the SR-60. To line-trace the
SeeSnake push cable, simply connect a line transmitter
with one connector well-grounded using the grounding
stake, and the other connector clipped to the MINI
Pak
’s
Transmitter Clip-on Terminal. The Transmitter Clip-on
Terminal is a metal lug located just to the right of the battery.
(See Figure 11.)
Set the line transmitter and the locator to the same frequency, such as 33 kHz and use the locator to trace the
line
(Figure 12).
The camera’s built-in Sonde may be on
at the same time, and if your locator is equipped with
SimulTrace™ capability, you can follow the pushrod all the
way to the camera’s location and then detect the Sonde in
the camera as you approach it above ground.
Figure 11 – MINIPak Transmitter Clip-on Terminal

Ridge Tool Company
11
SeeSnake®MINI
Pak
The Color, Contrast, and Brightness choices increase
and decrease the value of the appropriate display characteristic on a sliding scale.
The Units option toggles between Auto-detection, Feet,
and Meters for the unit of measurement used in displaying distance counts. Auto-detection (Compact reel only)
detects the type of camera (NTSC or PAL) and automatically sets the units to feet (NTSC) or meters (PAL).
Maintenance Instructions
Cleaning
WARNING
Make sure all cords and cables are disconnected
and the battery removed prior to cleaning the
MINI
Pak
to reduce the risk of electrical shock.
Do not use liquid or abrasive cleaners on the MINI
Pak
.
Clean the MINI
Pak
with damp cloth. Only use cleaners approved for use on LCD screens to clean the screens.
Do not allow any liquid to enter the MINI
Pak
.
Accessories
WARNING
The following accessories have been designed to
function with the MINI
Pak
. Other accessories suitable for use with other equipment may become
hazardous when used with the MINI
Pak
. To reduce
the risk of serious injury, only use accessories
specifically designed and recommended for use
with the MINI
Pak
, such as those listed below.
Transport And Storage
Remove batteries before shipping. Do not expose to
heavy shocks or impacts during transport. If storing for an
extended period, remove batteries. Store within temperature range of 14°F to 158°F (-10°C to. 70°C).
Store electrical devices in a dry place to reduce the risk of
electrical shock.
Protect against excessive heat. The unit should be situated away from heat sources such as radiators, heat
registers, stoves or other products (including amplifiers)
that produce heat.
Service And Repair
WARNING
Improper service or repair can make the MINI
Pak
unsafe to operate.
Service and repair of the MINI
Pak
must be performed by
a RIDGID Independent Authorized Service Center.
For information on your nearest RIDGID Independent
Service Center or any service or repair questions:
• Contact your local RIDGID distributor.
• Visit www.RIDGID.com or www.RIDGID.eu to find
your local Ridge Tool contact point.
• Contact Ridge Tool Technical Services Department
at rtctechservices@emerson.com, or in the U.S. and
Canada call (800) 519-3456.
Disposal
Parts of the unit contain valuable materials and can be recycled. There are companies that specialize in recycling
that may be found locally. Dispose of the components in
compliance with all applicable regulations. Contact your
local waste management authority for more information.
For EC Countries: Do not dispose of
electrical equipment with household
waste!
According to the European Guideline
2002/96/EC for Waste Electrical and
Electronic Equipment and its implementation into national legislation, electrical equipment that is
no longer usable must be collected separately and disposed of in an environmentally correct manner.
Battery Disposal
For USA and Canada: The RBRC™
(Rechargeable Battery Recycling Corporation) Seal on the battery packs
means that RIDGID has already paid
the cost of recycling the lithium-ion
battery packs once they have reached
the end of their useful life.
RBRC™, RIDGID®, and other battery suppliers have developed programs in the USA and Canada to collect and
Catalog #
Description
US EU
32743 28218 18 V Li-Ion rechargeable battery
32068 32073 Battery charger
32648 32693 Dual battery kit with charger
32708 32713 Single battery kit with charger
Various RIDGID SeekTech
®
or NaviTrack®Locator
Various RIDGID SeekTech
®
or NaviTrack
®
Transmitters
 Loading...