

RIDGID SeeSnake CS1000 Operator's Manual

Operator’s Manual
WARNING!
Read this Operator’s Manual carefully before using
this tool. Failure to understand and follow the contents of this manual may
result in electrical shock,
fire and/or serious personal injury.
Record product serial number below as it appears on the nameplate.
Serial
No.
TM
Original Instructions – English – 1

TM
Table of Contents
Recording Form for Machine Serial Number ����������������������������������������������������������������������������������������������������������������������������� 1
Safety Symbols ����������������������������������������������������������������������������������������������������������������������������������������������������������������������������������3
General Safety Rules
Work Area Safety ������������������������������������������������������������������������������������������������������������������������������������������������������������������������������3
Electrical Safety ��������������������������������������������������������������������������������������������������������������������������������������������������������������������������������3
Personal Safety ��������������������������������������������������������������������������������������������������������������������������������������������������������������������������������� 3
Equipment Use and Care ������������������������������������������������������������������������������������������������������������������������������������������������������������������3
Battery Use and Care ������������������������������������������������������������������������������������������������������������������������������������������������������������������������ 4
Service ���������������������������������������������������������������������������������������������������������������������������������������������������������������������������������������������� 4
Specific Safety Information
CS1000 Safety ��������������������������������������������������������������������������������������������������������������������������������������������������������������������������������� 4
Description, Specifications, and Standard Equipment
Description ���������������������������������������������������������������������������������������������������������������������������������������������������������������������������������������� 5
Specifications ������������������������������������������������������������������������������������������������������������������������������������������������������������������������������������5
Standard Equipment �������������������������������������������������������������������������������������������������������������������������������������������������������������������������6
Components ���������������������������������������������������������������������������������������������������������������������������������������������������������������������������������������6
Pre-Operation Inspection ���������������������������������������������������������������������������������������������������������������������������������������������������������������� 7
Work Area and Equipment Setup
Placement ����������������������������������������������������������������������������������������������������������������������������������������������������������������������������������������8
Connecting the CS1000 ��������������������������������������������������������������������������������������������������������������������������������������������������������������������9
Powering the CS1000 �����������������������������������������������������������������������������������������������������������������������������������������������������������������������9
Interface Overview
Software Overview �������������������������������������������������������������������������������������������������������������������������������������������������������������������������10
Keypad Overview ���������������������������������������������������������������������������������������������������������������������������������������������������������������������������� 12
Operating Instructions
Starting a Job ���������������������������������������������������������������������������������������������������������������������������������������������������������������������������������� 15
Capturing and Creating Media �������������������������������������������������������������������������������������������������������������������������������������������������������� 15
Adding Job Information �������������������������������������������������������������������������������������������������������������������������������������������������������������������18
Reviewing a Job ������������������������������������������������������������������������������������������������������������������������������������������������������������������������������ 18
Adding a New Session ��������������������������������������������������������������������������������������������������������������������������������������������������������������������19
Closing a Job ���������������������������������������������������������������������������������������������������������������������������������������������������������������������������������� 21
Powering OFF the CS1000 �������������������������������������������������������������������������������������������������������������������������������������������������������������22
Configuring the CS1000
Customizing Settings ����������������������������������������������������������������������������������������������������������������������������������������������������������������������23
Delivering Reports ��������������������������������������������������������������������������������������������������������������������������������������������������������������������������25
SeeSnake HQ Software ������������������������������������������������������������������������������������������������������������������������������������������������������������������ 27
Maintenance Instructions
Software Updates ����������������������������������������������������������������������������������������������������������������������������������������������������������������������������28
Cleaning ������������������������������������������������������������������������������������������������������������������������������������������������������������������������������������������28
Accessories ��������������������������������������������������������������������������������������������������������������������������������������������������������������������������������������28
Transport and Storage �������������������������������������������������������������������������������������������������������������������������������������������������������������������28
Service and Repair �������������������������������������������������������������������������������������������������������������������������������������������������������������������������28
Disposal ���������������������������������������������������������������������������������������������������������������������������������������������������������������������������������������������29
Battery Disposal ������������������������������������������������������������������������������������������������������������������������������������������������������������������������������29
Troubleshooting �������������������������������������������������������������������������������������������������������������������������������������������������������������������������������29
Issue Tag Icons and Descriptions �����������������������������������������������������������������������������������������������������������������������������������������������30
Lifetime Warranty ��������������������������������������������������������������������������������������������������������������������������������������������������������������Back Cover
2 – English

TM
Safety Symbols
In this operator’s manual and on the product, safety symbols and signal words are used to communicate important safety
information� This section is provided to improve understanding of these signal words and symbols�
This is the safety alert symbol� It is used to alert you to potential personal injury hazards� Obey all safety messages that follow
this symbol to avoid possible injury or death�
DANGER
WARNING
CAUTION
NOTICE
This symbol means read the operator’s manual carefully before using the equipment� The operator’s manual contains important
information on the safe and proper operation of the equipment�
This symbol means always wear safety glasses with side shields or goggles when handling or using this equipment to reduce
the risk of eye injury�
This symbol indicates the risk of electrical shock�
DANGER indicates a hazardous situation which, if not avoided, will result in death or serious injury�
WARNING indicates a hazardous situation which, if not avoided, could result in death or serious injury�
CAUTION indicates a hazardous situation which, if not avoided, could result in minor or moderate injury�
NOTICE indicates information that relates to the protection of property�
General Safety Rules
WARNING
Read all safety warnings and instructions. Failure to follow the warnings and instructions may result in electric
shock, re, and/or serious injury.
SAVE THESE INSTRUCTIONS!
Work Area Safety
• Keep your work area clean and well lit. Cluttered or
dark areas invite accidents�
• Do not operate equipment in explosive atmospheres,
such as in the presence of flammable liquids, gases,
or dust. Equipment can create sparks which may ignite
the dust or fumes�
• Keep children and bystanders away while operating
equipment. Distractions can cause you to lose control�
Electrical Safety
• Avoid body contact with earthed or grounded sur-
faces such as pipes, radiators, ranges, and refrigerators. There is an increased risk of electrical shock if your
body is earthed or grounded�
• Do not expose equipment to rain or wet conditions.
Water entering equipment will increase the risk of electrical shock�
• Do not abuse the cord. Never use the cord for carrying,
pulling, or unplugging the power tool� Keep cord away
from heat, oil, sharp edges, and moving parts� Damaged
or entangled cords increase the risk of electric shock�
• If operating equipment in a damp location is un-
avoidable, use a ground fault circuit interrupter
(GFCI) protected supply. Use of a GFCI reduces the
risk of electric shock�
• Keep all electrical connections dry and off the
ground. Do not touch equipment or plugs with wet
hands to reduce the risk of electrical shock�
Personal Safety
• Stay alert, watch what you are doing, and use com-
mon sense when operating equipment. Do not use
equipment while you are tired or under the influence of
drugs, alcohol, or medication� A moment of inattention
while operating equipment may result in serious personal injury�
• Use personal protective equipment. Always wear eye
protection� The appropriate use of protective equipment
such as a dust mask, non-skid safety shoes, a hard hat,
and hearing protection will reduce personal injuries�
• Do not overreach. Keep proper footing and balance at
all times� This enables better control of the equipment in
unexpected situations�
• Dress properly. Do not wear loose clothing or jewel-
ry� Keep your hair, clothing, and gloves away from moving parts� Loose clothes, jewelry, and long hair can be
caught in moving parts�
Equipment Use and Care
• Do not force equipment. Use the correct equipment
for your application� The correct equipment will do the
job better and safer at the rate for which it is designed�
• Do not use equipment if the power switch does not
turn it ON and OFF. Any equipment that cannot be controlled with the power switch is dangerous and must be
repaired�
English – 3

TM
• Disconnect the plug from the power source and/or
the battery pack from the equipment before making
adjustments, changing accessories, or storing. Pre-
ventive safety measures reduce the risk of injury�
• Store idle equipment out of the reach of children
and do not allow persons unfamiliar with the equipment or these instructions to operate the equipment.
Equipment can be dangerous in the hands of untrained
users�
• Maintain equipment. Check for misalignment or bind-
ing of moving parts, missing parts, breakage of parts,
and any other condition that may affect the equipment’s
operation� If damaged, have the equipment repaired before use� Many accidents are caused by poorly maintained equipment�
• Use the equipment and accessories in accordance
with these instructions; taking into account the
working conditions and the work to be performed.
Use of the equipment for operations different from those
intended could result in a hazardous situation�
• Use only accessories that are recommended by the
manufacturer for your equipment. Accessories that
may be suitable for one piece of equipment may become
hazardous when used with other equipment�
• Keep handles dry, clean, and free from oil and grease.
This allows for better control of the equipment�
moisture can damage batteries and result in leakage,
electrical shock, fire or burns� See charger manual for
more information�
• Do not cover charger while in use. Proper ventilation
is required for correct operation� Covering charger in use
could result in fire�
• Properly dispose of batteries. Exposure to high tem-
peratures can cause the batteries to explode; do not dispose of in a fire� Some countries have regulations concerning battery disposal� Follow all applicable regulations�
Service
Ensure a qualified repair person services your equipment
using only identical replacement parts to maintain the safety
of the tool� Remove the batteries and refer servicing to quali-
fied service personnel under any of the following conditions:
• If liquid has been spilled or objects have fallen into product�
• If the product does not operate normally when following
the operating instructions�
• If the product has been dropped or damaged�
• When the product exhibits a distinct change in perfor-
mance�
Specic Safety Information
Battery Use and Care
WARNING
Read the battery charger manual before using the charger
or batteries. Failure to read, understand and follow the
contents of the charger manual may result in extensive
property damage, severe personal injury, or death.
• Recharge only with the charger specified by the
manufacturer. A charger suitable for one type of battery
pack may create a risk of fire when used with another
battery pack�
• Use equipment only with specifically designated
battery packs. Use of any other battery packs may create a risk of injury and fire�
• Do not probe battery with conductive objects. Short-
ing of battery terminals may cause sparks, burns, or
electrical shock� When the battery pack is not in use,
keep it away from other metal objects, like paper clips,
coins, keys, nails, screws or other small metal objects
that can make a connection from one terminal to another� Shorting the battery terminals together may cause
burns or a fire�
• Under abusive conditions, liquid may eject from bat-
tery; avoid contact. If contact occurs, flush with water� If
liquid contacts eyes, seek medical help� Liquid ejected
from the battery may cause irritation or burns�
• Use and store batteries and chargers in dry, appro-
priate temperature areas. Extreme temperatures and
WARNING
This section contains important safety information that is
specic to the CS1000. Read these precautions carefully
before using the CS1000 to reduce the risk of electrical
shock, re, or other serious personal injury.
SAVE ALL WARNINGS AND INSTRUCTIONS
FOR FUTURE REFERENCE!
Keep this manual with the equipment for use by the operator�
CS1000 Safety
• The equipment is intended for indoor use when used
with the AC power supply. When powered by battery
protect it from exposure to weather� This product is not
water resistant� Do not expose the equipment to moisture or rain� Water entering the unit housing can increase
the risk of safety hazards and electrical shock� Only the
camera and cable in a SeeSnake Pipe Inspection Reel
are water-resistant�
• An improperly grounded electrical outlet can cause
electrical shock and/or severely damage equipment.
Always check work area for a properly grounded elec-
trical outlet� Presence of a three-prong or GFCI outlet
does not ensure that the outlet is properly grounded� If in
doubt, have the outlet inspected by a licensed electrician�
• Power the CS1000 only with a specifically designat-
ed battery or a double insulated power supply. This
minimizes the risk of electrical hazards from moisture or
faulty electrical outlets�
4 – English

TM
• Do not operate this equipment if operator or CS1000
is standing in water. Operating CS1000 while in water
increases the risk of electrical shock�
• The CS1000 is not waterproof. It is dust resistant and
splash-resistant� Only the camera and push cable are
waterproof� Do not expose the equipment to water or
rain� This increases the risk of electrical shock�
• Do not use where a danger of high voltage contact is
present. The equipment is not designed to provide high
voltage protection and isolation�
• Read and understand this operator’s manual, the
reel operator’s manual, the instructions for any
other equipment in use and all warnings before operating the CS1000. Failure to follow all instructions and
warnings may result in property damage and/or serious
personal injury�
• Always use appropriate personal protective equip-
ment when handling and using equipment in drains.
Drains may contain chemicals, bacteria, and other substances that may be toxic, infectious, cause burns or
other issues� Appropriate personal protective equipment
always includes safety glasses and may include drain
cleaning gloves or mitts, latex or rubber gloves, face
shields, goggles, protective clothing, respirators, and
steel toed footwear�
• If using drain cleaning equipment at the same time
as drain inspection equipment, only wear RIDGID
drain cleaning gloves. Never grasp the rotating drain
cleaning cable with anything else, including other gloves
or a rag� They can become wrapped around the cable
and cause hand injuries� Only wear latex or rubber
gloves under RIDGID drain cleaner gloves� Do not use
damaged drain cleaning gloves�
• Practice good hygiene. Use hot, soapy water to wash
hands and other body parts exposed to drain contents
after handling or using drain inspection equipment� Do
not eat or smoke while operating or handling drain inspection equipment� This will help prevent contamination
from toxic or infectious material�
The information supplied with this product cannot
cover all possible conditions and situations that may
occur, and should be used in conjunction with appropriate training, sound judgment, and good work practices. These factors cannot be built into the product, but
must be supplied by the operator.
The EC Declaration of Conformity (890-011-320�10) will
accompany this manual as a separate booklet when
required�
Description, Specications, and
Standard Equipment
Description
The CS1000 is designed to provide a convenient accessi-
ble portal for all your pipe inspection, recording, monitoring,
and report generation needs� Use the CS1000 with RIDGID
SeeSnake reels and cameras to make a complete inspec-
tion system�
The CS1000 will help you organize your inspections by
grouping all the associated still photos, videos, Autolog
videos, text notes, job location information, and customer
information into “Jobs�” Jobs give you a convenient way to
transfer inspection data from the CS1000, and they form
the basis for creating “Reports” in the CS1000� As you work
with your CS1000, Jobs are automatically assembled from
the information you collect during the inspection process;
making organization easy to understand�
Your CS1000 is fully compatible with SeeSnake HQ�
SeeSnake HQ is a new report generating software that you
can use to quickly generate customized reports for your cus-
tomer that can then be emailed, printed, burned onto DVD,
or exported for viewing online� You can download the latest
version of SeeSnake HQ for free at www�hq�seesnake�com�
Specications
Table 1
SeeSnake CS1000 Specifications
Weight:
without batteries 14�65 lb [6�64 kg]
Closed dimensions:
Length 14�3 in [36�3 cm]
Width 11�9 in [30�2 cm]
Height 12�4 in [31�5 cm]
LCD display:
Working resolution VGA 640 x 480 pixels
Display size (HxV) 12�1 in [30�7 cm]
Contrast ratio 700:1
Brightness 500 cd/m
Power source
Battery type 18 V Li-Ion Rechargeable
Operating environment:
Temperature
Storage temperature
Humidity 5% to 95% RH
Altitude 13,120 ft [4,000 m]
100-240VAC/50-60Hz
1�5A or 18 VDC
32°F to 104°F
[0°C to 40°C]
14°F to 158°F
[−10°C to 70°C]
2
English – 5

TM
Standard Equipment
• CS1000
• Operator’s Manual
• Quick Start Guide
• Instructional DVD
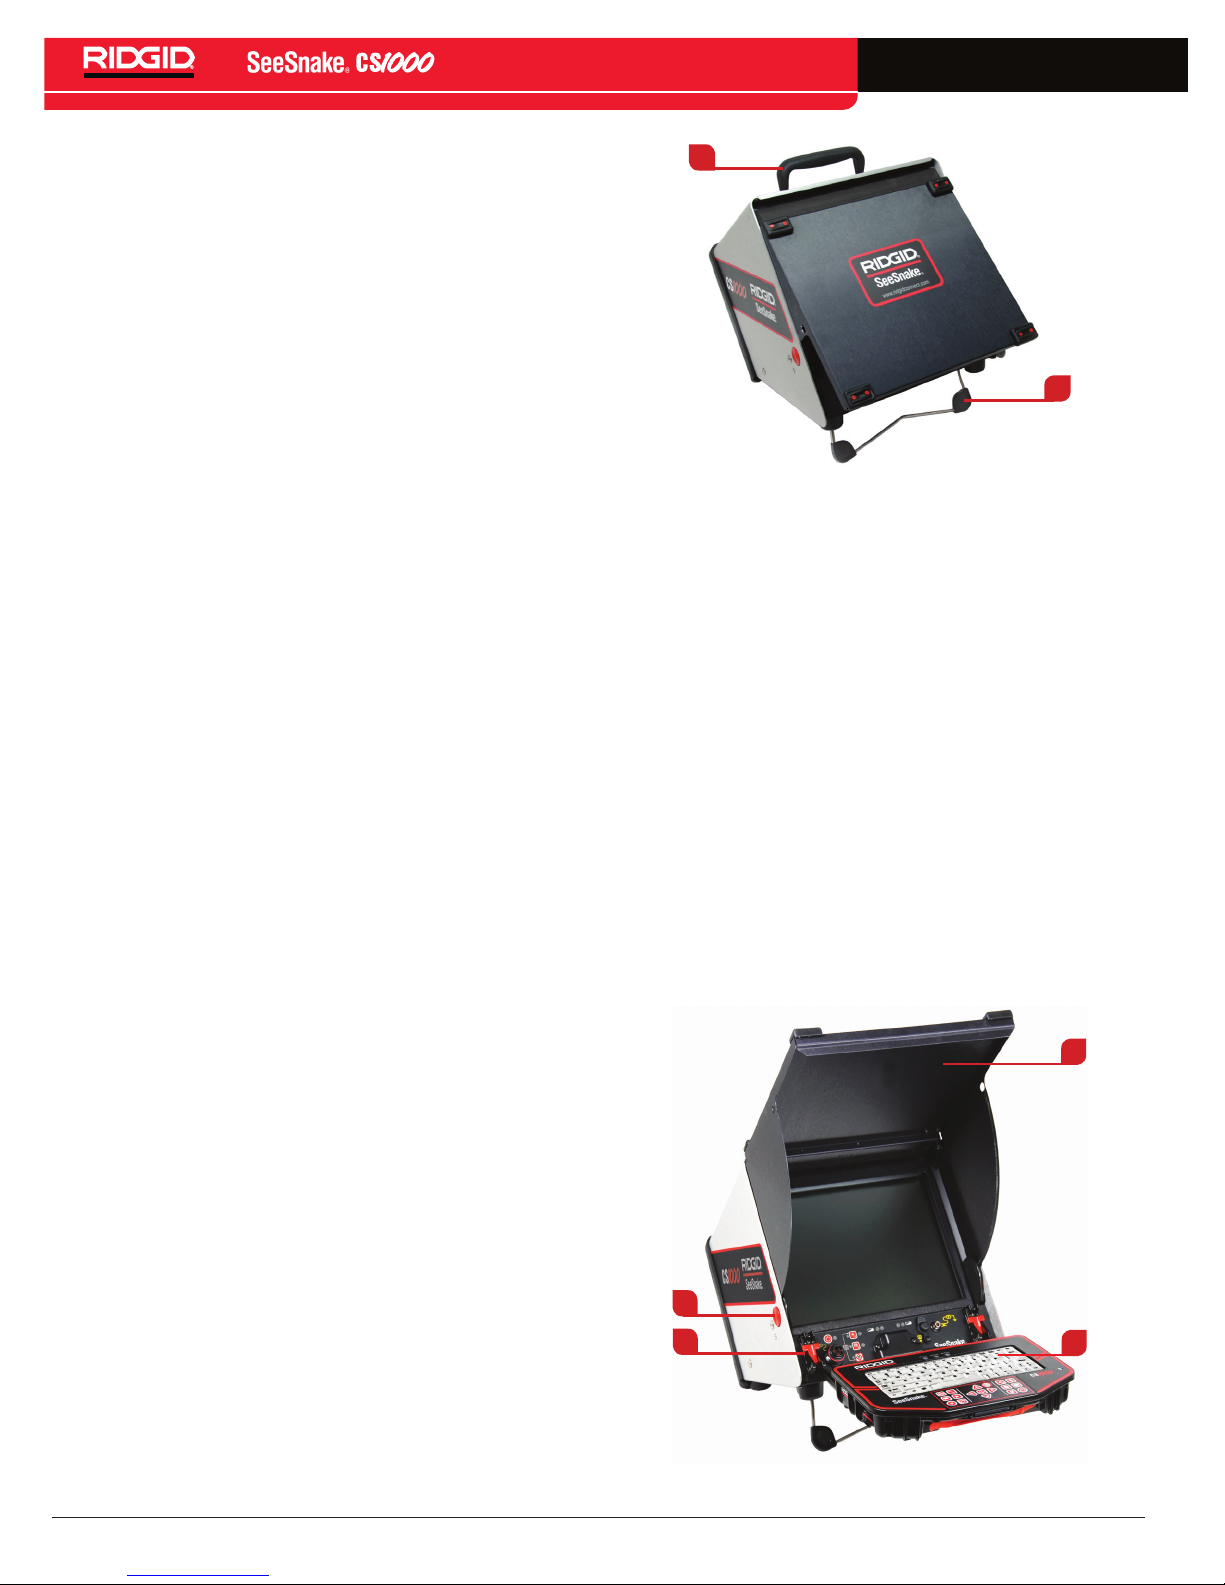
Components
Front Cover
Keyboard LED Indicators
LCD Screen
Microphone
Figure 3 – CS1000 Keyboard
USB Ports Video Out Port
Mini Keypad
Tilt Stand
SeeSnake System Connector
Figure 1 – CS1000 Front View
Serial Number Label
External Power Cord
Keyboard
Factory Interface PortConnector Cover
Figure 4 – Keyboard Connections
Main Keypad
Battery Indicator LEDs
Video OutKeyboard Latch
Optional Batteries
Figure 2 – CS1000 Rear View
6 – English
SeeSnake System Connector
Cover (Connector Not Used)
Transmitter Clip-on
Terminal
Figure 5 – Mini Keypad and ConnectionsIcon
Legend
TM
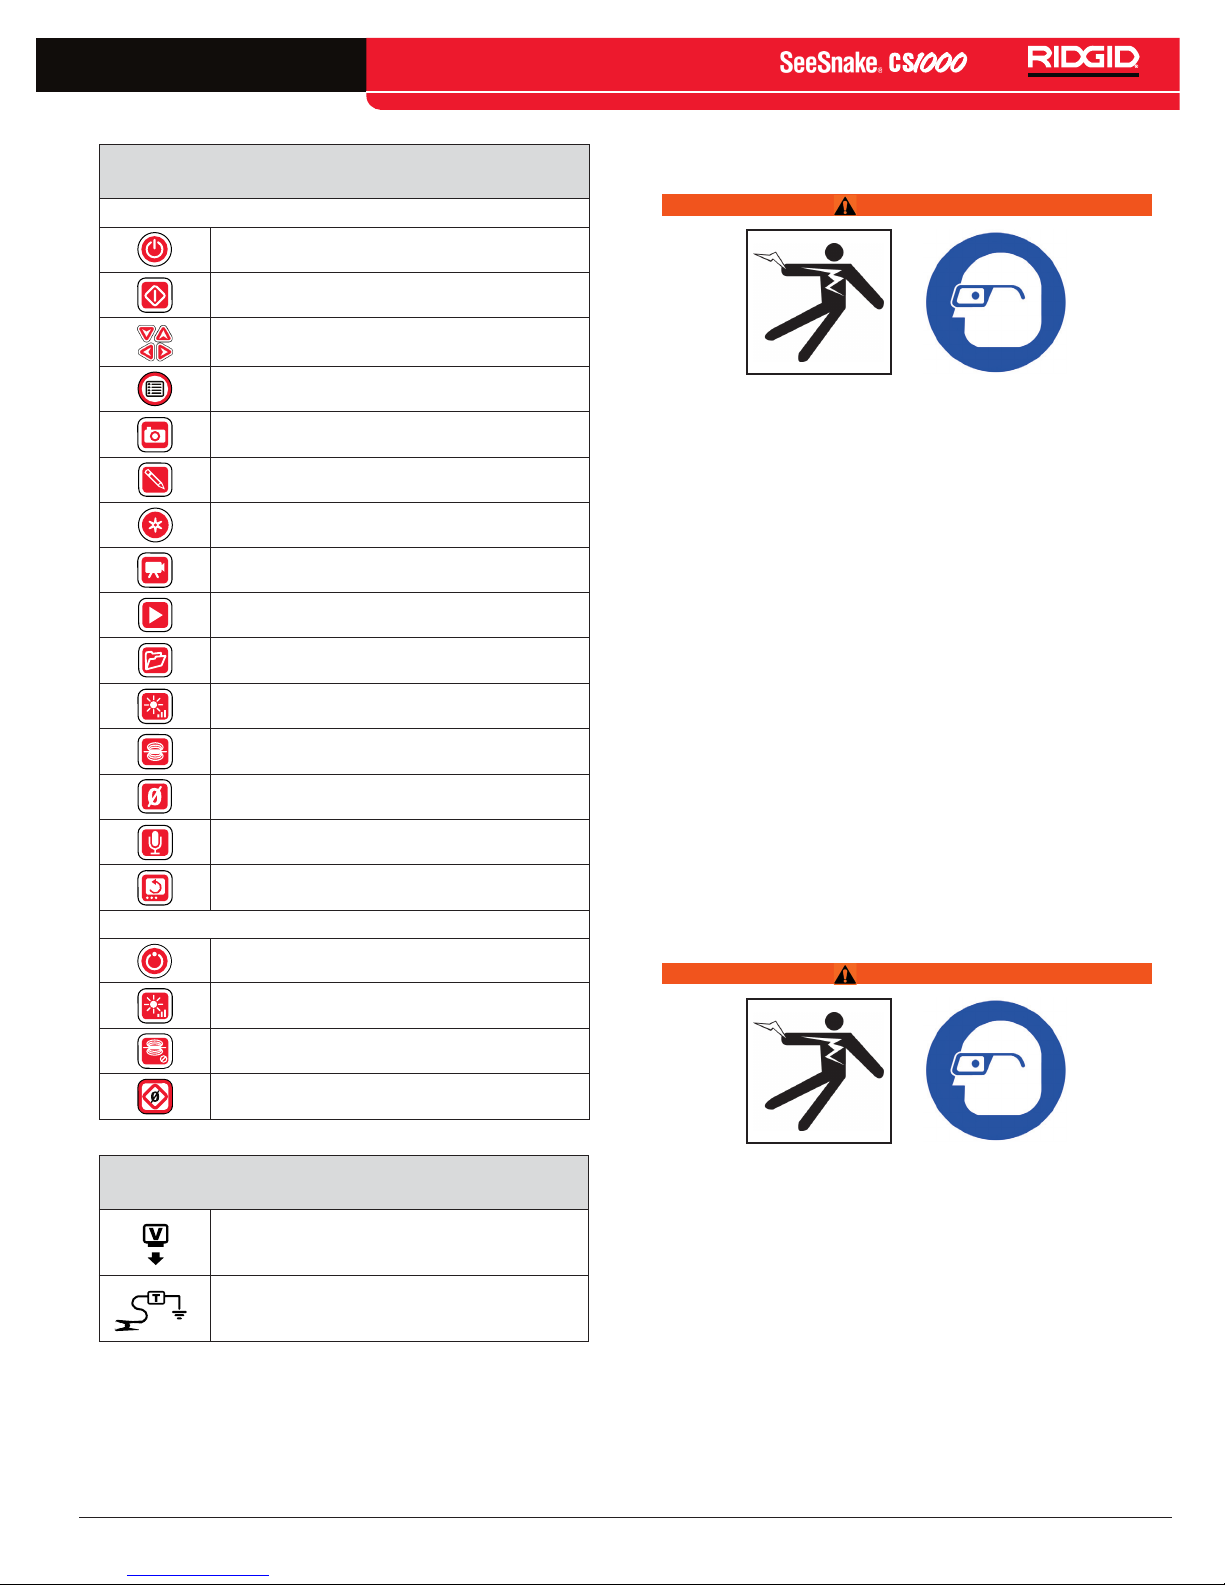
Table 2
CS1000 Keypads and Icons
Main Keypad
Power Key
Select Key
Arrow Keys
Menu Key
Photo Key
Photo Tag Key
Autolog Key
Video Key
Job Review Key
Job Manager Key
LED Brightness Key
Sonde Key
Zero Key
Microphone Mute Key
Pre-Operation Inspection
WARNING
Before each use, inspect your CS1000 and correct any
problems to reduce the risk of serious injury from electrical shock or other causes and prevent machine damage.
1� Confirm that the power is OFF, that any external power
and cords are disconnected, and that the battery is removed� Inspect the cords, cables, and connectors for
damage or modification�
2� Clean any dirt, oil, or other contamination from the
CS1000 to aid in inspection and to prevent the unit
from slipping from your grip during transport or use�
3� Inspect the CS1000 for any broken, worn, missing, mis-
aligned or binding parts, or any other condition which
might prevent safe, normal operation�
4� Inspect any other equipment being used per its instruc-
tions to make sure it is in good, usable condition�
5� If any problems are found, do not use the unit until the
problems are corrected�
Image Flip Key
Mini Keypad
Power Key
LED Brightness Key
Sonde Key
Zero Key
Table 3
Connection Icons
Video Out
Transmitter Clip-on Terminal
Work Area and Equipment Setup
WARNING
Set up the CS1000 and work area in accordance with
these procedures to reduce the risk of injury from electrical shock, re, and other causes and to prevent damage
to the CS1000.
1� Check work area for the following:
• Adequate lighting�
• Flammable liquids, vapors, or dust that may ignite�
If present, do not work in area until sources have
been identified and corrected� The CS1000 is not
explosion proof� Electrical connections can cause
sparks�
• Clear, level, stable dry place for operator� Do not use
the machine while standing in water�
English – 7
TM
• Clear path to electrical outlet that does not contain
any potential sources of damage for the power cord
when using external power�
2� Inspect the work to be performed� If possible, deter-
mine the drain access points, sizes and lengths� Determine the presence of drain cleaning chemicals or other
chemicals� If chemicals are present, it is important to
understand the specific safety measures required to
work around the chemicals� Contact the chemical manufacturer for required information�
3� Determine the correct equipment for the application�
The CS1000 is made to view and record inspections
with a SeeSnake inspection camera�
4� Make sure all equipment has been properly inspected�
5� Evaluate the work area and determine if any barriers
are needed to keep bystanders away� Bystanders can
distract the operator during use� If working near traffic,
erect cones or other barriers to alert drivers�
6� If needed, remove fixture (water closet, sink, etc�) to
allow access�
Placement
Place the CS1000 to allow easy access and viewing while
manipulating the camera and push cable for inspection�
Setup the CS1000 so its screen is easy to see� Adjust the
controls so they are easy to reach during use� In brightly lit
areas, point the screen away from bright light sources and/
or use the monitor’s front cover as a sun shade to reduce
glare� Make sure that the location is not wet and will not let
the CS1000 and other equipment get wet during use� The
CS1000 is not waterproof and exposure to wet conditions
can cause electrical shock or equipment damage�
Place camera and reel as instructed in their operator’s
manual� Ensure the CS1000 and cable reel are stable�
Tilt Stand
You can use the tilt stand to customize the viewing angle of
the screen and the positioning of keyboard depending on
the inspection environment and personal preference�
1
2
Figure 6 – Placing the CS1000 and Setting Up the
Tilt Stand
Front Cover
The CS1000 front cover serves two purposes: it protects the
unit during transportation and storage, and it acts as a sun
hood to reduce glare during inspections�
Opening the Front Cover
1� Depress the orange Front Cover Release Buttons (See
Item 1, Figure 7) on each side of the unit�
2� Raise the front cover (See Item 2, Figure 7) to its up-
permost position where it will lock securely into place�
3� Lower the keyboard (See Item 3, Figure 7) into its op-
erating position�
4� (Optional) Use the keyboard latches (See Item 4, Fig-
ure 7) to adjust and secure the position of your keyboard� Pull the red T-shaped latches toward you to lock
the keyboard into an upwardly angled position�
2
1� Use the handle (See Item 1, Figure 6) on the top of the
CS1000 to place the unit in the desired location�
2� Tilt the unit back slightly and pull forward on the tilt
stand (See Item 2, Figure 6) until it locks in place�
3� To store the tilt stand, tilt the unit back slightly, and push
the tilt stand toward the back of the unit until it lays flat
against the base of the unit�
8 – English
1
4
Figure 7 – Opening the Front Cover
3
TM
Closing the Front Cover
1� Disconnect all connections, including USB�
2� Fold up the keyboard�
3� Keeping fingers clear of the front cover, depress the or-
ange Front Cover Release Buttons on both sides of the
unit to drop the cover to the lower position� Press front
cover into place until it locks�
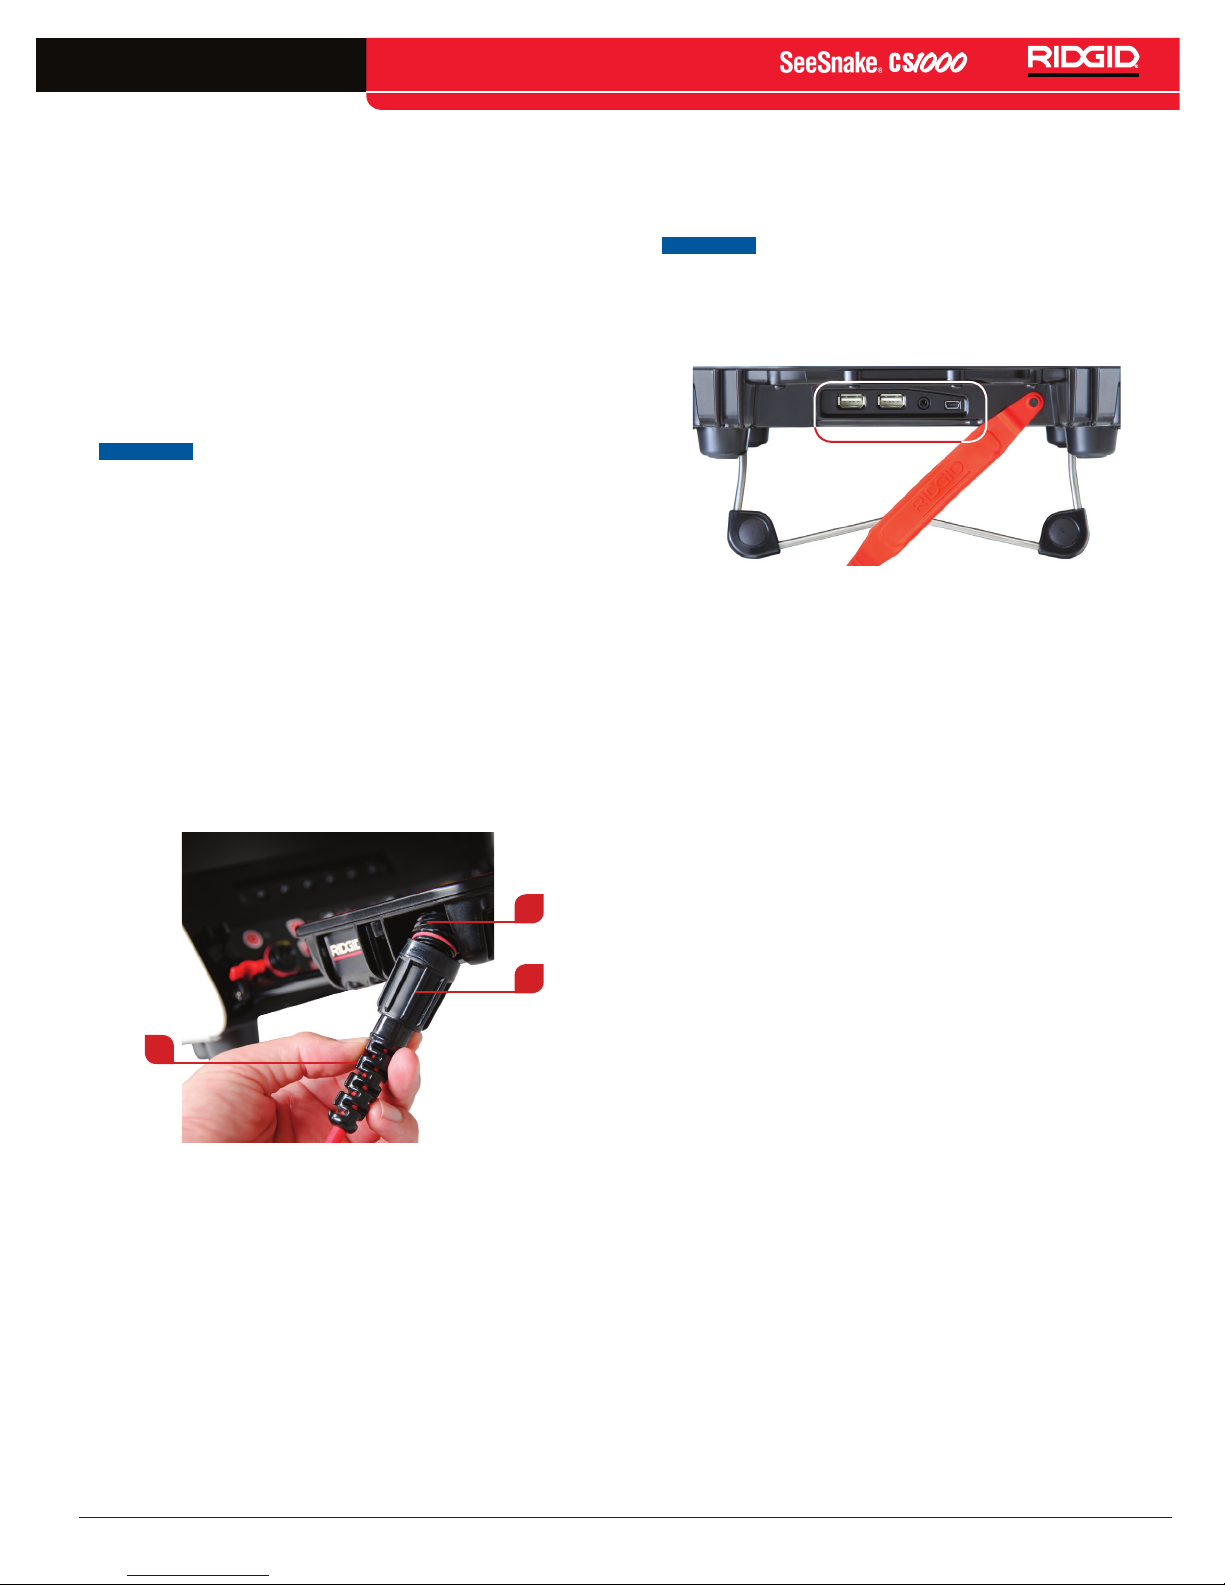
Connecting the CS1000
System Connector
NOTICE
System Cable, twist only the locking sleeve! To prevent
damage to pins, never bend or twist the connector or
cable!
1� Unwrap the SeeSnake System Cable from its holder
and insert the System Cable plug into the SeeSnake
System Connector (See Item 1, Figure8) on the front
edge of the keyboard�
2� To join the connectors, align the guide pin to the guide
socket, push the connector straight in� A guide ridge
(See Item 2, Figure 8) molded into the top of the cable
connector will point up when the plug is correctly
aligned�
3� Tighten the outer locking sleeve (See Item 3, Figure8)�
When connecting or disconnecting the
Additional CS1000 Ports
There are four ports located behind the red rubber connec-
tor cover on the front edge of the keyboard�
NOTICE
containing the USB ports, Video Out Port, and Factory
Interface Port are not internally sealed. Keep the connector cover in place in wet or moist conditions to pre-
vent damage to the ports.
The areas behind the connector cover,
Figure 9 – CS1000 Ports
USB Ports
The two USB ports are suitable for thumb drives or other
storage devices� Use any one USB port at a time�
Video Out Port
The Video Out Port enables you to connect the CS1000 to an
external monitor for video display� The Video Out Port only
outputs audio on video playback and not during recording�
1
3
2
Figure 8 – Connecting SeeSnake System Cable to
CS1000 System Connection
Factory Interface Port
To perform diagnostics the manufacturer will use the Fac-
tory Interface Port� Do not use the Factory Interface Port for
other devices�
Powering the CS1000
The CS1000 can be powered with one or two RIDGID Li-Ion
rechargeable battery or plugged into an outlet using a AC
power converter� Battery power is the preferred powering
method to reduce the risk of electrical shock� The power
converter is not rated for outdoor use� Only use the CS1000
indoors when powered with the AC converter�
When fully charged, one 18 V Li-Ion battery rated at 2�2Ah
will power the CS1000 for approximately 1�75hours; and
two batteries will power the CS1000 for approximately 4�5
hours� Actual battery operation time will vary with battery
rating and use�
Battery Power
• With dry hands, insert one or two 18 V Li-Ion batteries
into the battery docks in the back of the unit� The unit
can be tilted forward and rested on the closed face for
convenience�
• Only recharge the batteries with the approved charger�
Attempting to charge batteries with the wrong charger
can damage the batteries�
English – 9
TM
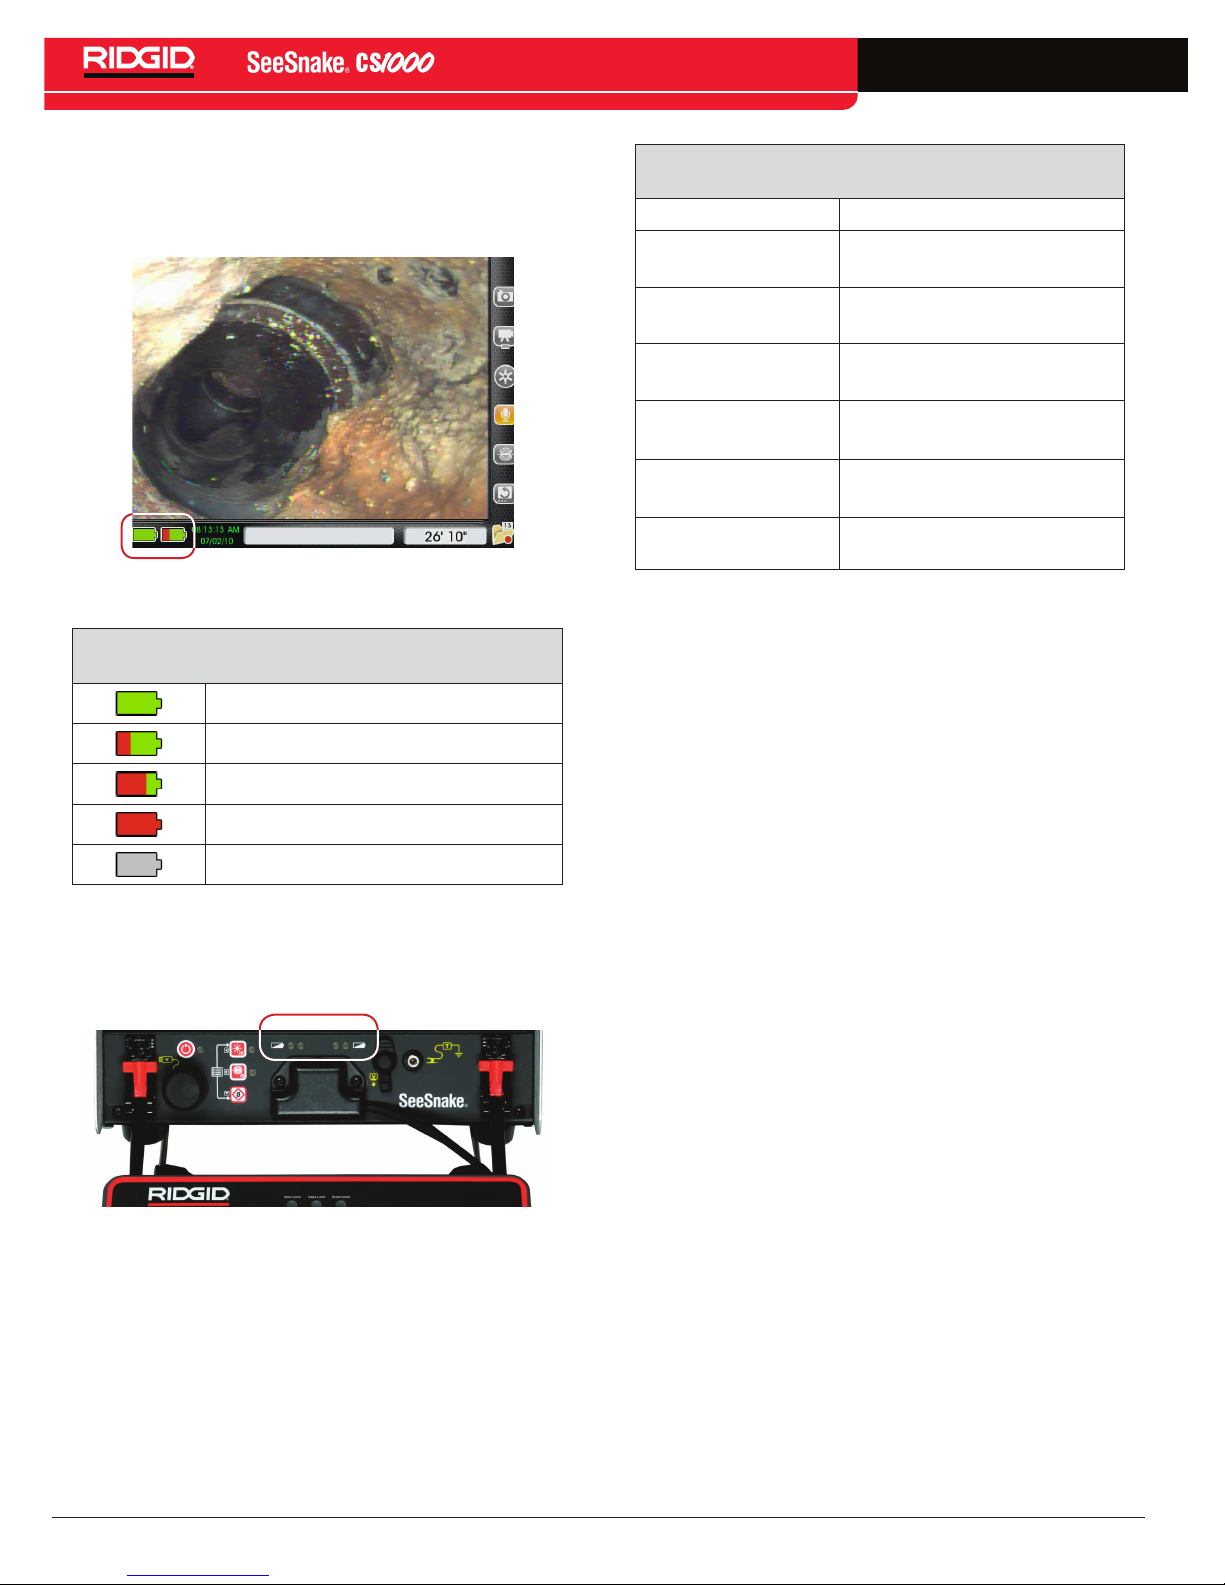
Checking Battery Status: Icons
You can monitor your battery levels using the two battery
icons in the bottom left corner of the screen� Table 4 shows
the on-screen battery indicator icons�
Figure 10 – On-Screen Battery Icons
Table 4
On-Screen Battery Icons
Full charge
Partial charge
Battery low
No charge
AC power
Table 5
Battery Status LED Indicators
LED Behavior Meaning
Left LED is Green
Right LED is OFF
Left LED is Green
Right LED is Red
Left LED is OFF
Right LED is Red
Blinking red and beeps
Solid red and continu-
ous tone
Slow blink
Battery full charge
Battery partial charge
Battery low
Replace batteries immediately�
Shutdown in 1 min
Dead batteries�
Shutdown in 5 sec
External power in use�
Beeps when disconnected
Outlet Power
NOTE: The provided external power supply is intended for
indoor use only.
For plug-in operation, a double insulated AC power cord is
supplied to reduce wall outlet voltage to the correct voltage
for the CS1000�
1� To power the system using AC power with the power
cord, locate the power cord on the back of the unit� Unhook the Velcro® strap and remove the plug from its
holder�
Checking Battery Status: LEDs
The CS1000 has four battery indicator LEDs, two for each
battery, located just below the screen�
Figure 11 – Battery Indicator LEDs
When the unit is turned ON and there are batteries in the
battery docks, the LEDs on the CS1000 will reflect the state
of each battery as shown in Table 5�
2� With dry hands, plug the power cord into an approved
outlet� If using an extension cord ensure the use of adequate wire gauge� For cords no greater than 25 ft [7�6
m] long, use a wire gage of at least 18 AWG is required�
For cords longer than 25 ft [7�6 m], use a wire gauge of
at least 16 AWG�
3� Never power the unit from AC using the power cord in
a wet environment�
Sometimes you may need to move locations during a job� If
you are running your CS1000 using AC power and have at
least one battery in the rear battery docks, you can unplug
the CS1000 to move it without powering it OFF�
Interface Overview
Software Overview
The on-screen interface has three regions: Live View, Dash-
board, and Status Bar�
Live View
The largest area of the screen, where the live video feed
appears, is called “Live View” (See Item 1, Figure 12)�
10 – English
 Loading...