

Page 1
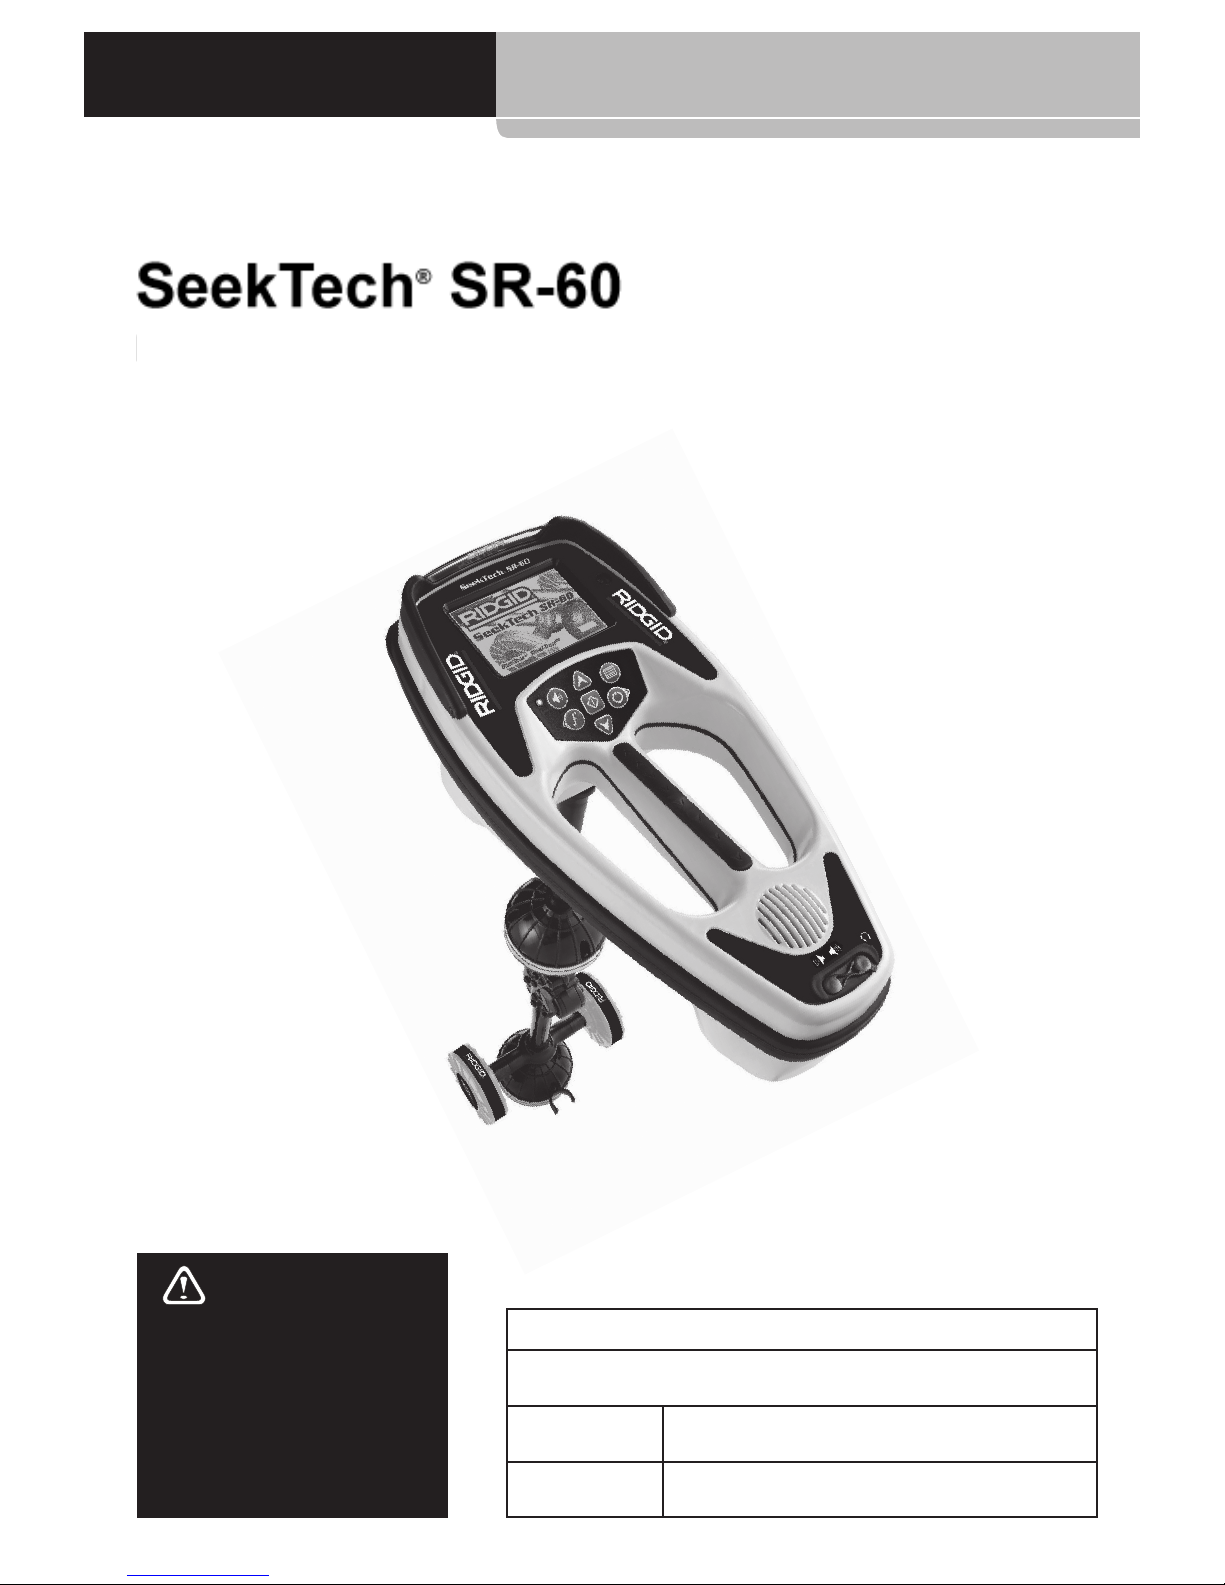
SeekTech® SR-60
Record the Serial Number of your unit below and retain for your records. See
Information screen for serial number and software version.
Serial
Number
Software
Version
WARNING!
Read this operator’s manual
carefully before using this
tool. Failure to understand
and follow the contents of
this manual may result in
electrical shock, fire and/or
serious personal injury.
Pipe, Cable and Sonde Locator
SeekTech SR60
Patents Pending
Page 2

SeekTech SR-60
Ridge Tool Company
2
Original instructions
General Safety Information .................................................................................................................................................................... 3
SR-60 Components ..........................................................................................................................................................................6
Introduction to the SR-60 ........................................................................................................................................................................7
Getting Started .................................................................................................................................................................................. 7
Display Elements ............................................................................................................................................................................... 7
Set up .................................................................................................................................................................................................12
Line Tracing with the SR-60 ...................................................................................................................................................................14
Active Line Tracing .........................................................................................................................................................................14
Depth Warnings .........................................................................................................................................................................................17
Operating Tips for Active Line Tracing ....................................................................................................................................18
Passive Line Tracing .......................................................................................................................................................................21
OmniSeek Locating ........................................................................................................................................................................22
Sonde Locating ...........................................................................................................................................................................................23
Location Methods ...........................................................................................................................................................................24
Tilted Sondes ....................................................................................................................................................................................25
Measuring Depth (Sonde Mode) ...............................................................................................................................................26
SimulTrace .........................................................................................................................................................................................26
Custom User Frequencies ......................................................................................................................................................................29
Menus and Settings ..................................................................................................................................................................................30
Optional Features ..........................................................................................................................................................................32
Menu Tree ..........................................................................................................................................................................................36
Operating With the Distortion Line ..........................................................................................................................................36
Informational Locating .................................................................................................................................................................37
Notes on Accuracy ..........................................................................................................................................................................37
A Better Way of Locating ........................................................................................................................................................................39
Advantages of the Omnidirectional Antenna ......................................................................................................................39
SR-60 Maintenance ..................................................................................................................................................................................40
Transportation and Storage ........................................................................................................................................................40
Icons and Symbols .....................................................................................................................................................................................42
Glossary -- Definitions ...................................................................................................................................................................43
Trouble Shooting Guide .........................................................................................................................................................................46
Specifications ...................................................................................................................................................................................47
Frequencies Table ...........................................................................................................................................................................47
Exact Frequency Values (SR-60) .................................................................................................................................................47
Default Settings ...............................................................................................................................................................................47
Standard Equipment .....................................................................................................................................................................47
Optional Equipment ......................................................................................................................................................................47
Manufacturers Frequency Table ...............................................................................................................................................48
Table of Contents
Page 3

SeekTech SR-60
Ridge Tool Company
3
SAVE THESE INSTRUCTIONS
Keep this manual with the machine for use by the operator. The
CE declaration of conformity (890-011-320) will accompany this
manual as a separate booklet when required.
Work Area Safety
Keep your work area clean and well lit. • Cluttered
benches and dark areas may cause accidents.
Do not operate electrical devices or power tools in •
explosive atmospheres, such as in the presence of
flammable liquids, gases, or heavy dust. Electrical
devices or power tools create sparks, which may ignite
the dust or fumes.
Keep bystanders, children, and visitors away while •
operating tool. Distractions can cause you to lose
control.
Electrical Safety
Do not operate the system with electrical compo- •
nents removed. Exposure to internal parts increases
the risk of injury.
Avoid exposure to rain or wet conditions. • Keep bat-
tery out of direct contact with water. Water entering
electrical devices increases the risk of electric shock.
Do not probe high voltage lines. •
Battery Precautions
Use only the size and type of battery specified. Do •
not mix cell types (e.g. do not use alkaline with rechargeable). Do not use partly discharged and fully
charged cells together (e.g. do not mix old and new).
Recharge batteries with charging units specified by •
the battery manufacturer. Using an improper charger
can overheat and rupture the battery.
Properly dispose of the batteries. • Exposure to high
temperatures can cause the battery to explode, so do
not dispose of in a fire. Some countries have regulations concerning battery disposal. Please follow all applicable regulations.
Personal Safety
Stay alert, watch what you are doing, and use com- •
mon sense. Do not use diagnostic tools while tired or
under the influence of drugs, alcohol, or medications. A
moment of inattention while operating diagnostic instruments may result in serious personal injury.
Gloves should always be worn for health and safety •
reasons. Sewer lines are unsanitary and may contain
harmful bacteria and viruses.
Do not overreach. Keep proper footing and balance •
at all times. Proper footing and balance enables better
control of the tool in unexpected situations.
Use safety equipment. • Always wear eye protection.
Dust mask, non-skid safety shoes, hardhat, or hearing
protection must be used for appropriate conditions.
Use proper accessories. • Do not place this product on
any unstable cart or surface. The product may fall causing serious injury to a child or adult or serious damage
to the product.
Prevent object and liquid entry. • Never spill liquid of
any kind on the product. Liquid increases the risk of
electrical shock and damage to the product.
Avoid Traffic. Pay close attention to moving vehicles •
when using on or near roadways. Wear visible clothing or reflector vests. Such precautions may prevent
serious injury.
General Safety Information
WARNING
Read and understand all instructions. Failure to follow all instructions listed below may result in electric
shock, fire, and/or serious personal injury!
Page 4
SeekTech SR-60
Ridge Tool Company
4
SR-60 Use and Care
Use equipment only as directed. • Do not operate the
SR-60 unless you have read the operator’s manual.
Do not immerse the antennas in water. Store in a •
dry place. This will reduce the risk of electric shock and
instrument damage.
Store idle equipment out of the reach of children •
and other untrained persons. Equipment is danger-
ous in the hands of untrained users.
Maintain the instrument with care. • Properly main-
tained diagnostic instruments are less likely to cause
injury.
Check for breakage of parts, and any other condi- •
tions that may affect the SR-60’s operation. If dam-
aged, have the instrument serviced before using. Many
accidents are caused by poorly maintained tools.
Use only accessories that are recommended by the •
manufacturer for the SR-60. Accessories that may be
suitable for one instrument may become hazardous
when used on another.
Keep handles dry and clean, and free from oil and •
grease. Allows for better control of the instrument.
Protect against excessive heat. • The product should
be situated away from heat sources such as radiators,
heat registers, stoves, or other products that produce
heat.
Service
Diagnostic instrument service must be performed •
only by qualified repair personnel. Service or main-
tenance performed by unqualified repair personnel
could result in injury.
When servicing a diagnostic instrument, use only •
identical replacement parts. Follow instructions in
the maintenance section of this manual. Use of unauthorized parts or failure to follow maintenance instructions may create a risk of electrical shock or injury.
Follow instructions for changing accessories. • Ac-
cidents are caused by poorly maintained equip ment.
Provide proper cleaning. • Remove battery before
cleaning. Do not use liquid cleaners or aerosol cleaners.
Use a damp cloth for cleaning.
Conduct a safety check. • Upon completion of any serv-
ice or repair of this product, ask the service technician
to perform safety checks to determine that the product
is in proper operating condition.
Damage to the product that requires service. • Remove
the batteries and refer servicing to qualified service
personnel under any of the following conditions:
If liquid has been spilled or objects have fallen into ·
product.
If product does not operate normally by following ·
the operating instructions.
If the product has been dropped or damaged in ·
any way.
When the product exhibits a distinct change in ·
performance.
CAUTION
Remove batteries entirely before shipping.
Ridge Tool
For information on your nearest RIDGID Independent Service
Center or any service or repair questions:
• ContactyourlocalRIDGIDdistributor.
• Visit www.RIDGID.comor www.RIDGID.eutofind your local
RIDGID contact point.
• Contact RIDGID Technical Services Department at rtctech-
services@emerson.com, or in the U.S. and Canada call (800)
519-3456.
Page 5
SeekTech SR-60
Ridge Tool Company
5
DANGER
Important Notice
Always insert and connect the earth grounding rods before turning on the transmitter. Never pull out an earth
grounding rod as long as the generator is switched on!
Never pull the earth grounding rod or disconnect the
ground lead if the other lead is connected to a utility.
In any correspondence, please give all the information shown on
the nameplate of your locator including model number and serial number.
DANGER
Important Notice
The SR-60 is a diagnostic tool that senses electromagnetic fields emitted by objects underground. It is
meant to aide the user in locating these objects by recognizing characteristics of the field lines and displaying them on the screen. As electromagnetic field lines
can be distorted and interfered with, it is important
to verify the location of underground objects before
digging.
Several utilities may be underground in the same area.
Be sure to follow local guidelines and one-call service
procedures.
Exposing the utility is the only way to verify its existence, location, and depth.
Ridge Tool Co., its affiliates and suppliers, will not be
liable for any injury or any direct, indirect, incidental
or consequential damages sustained or incurred by
reason of the use of the SR-60.
Page 6

SeekTech SR-60
Ridge Tool Company
6
SR-60 Components
Figure 1: SR-60 Components
Battery Compartment
Serial Number Label
USB Connector
Serial Port Connector
DIsplay Screen
Keypad
Handle
Speaker
Antenna Mast
Upper Omnidirectional
Antenna Node
Folding Joint
Guidance Antennas
Lower Omnidirectional
Antenna Node
Headphone Jack
Folding Mast Snap
Note:
USB/Serial Ports are
for loading new software
Page 7
SeekTech SR-60
Ridge Tool Company
7
IMPORTANT!
Do not snap or whip the SR-60 mast to open or close it.
Open it and close it by hand only.
Introduction to the SR-60
Getting Started
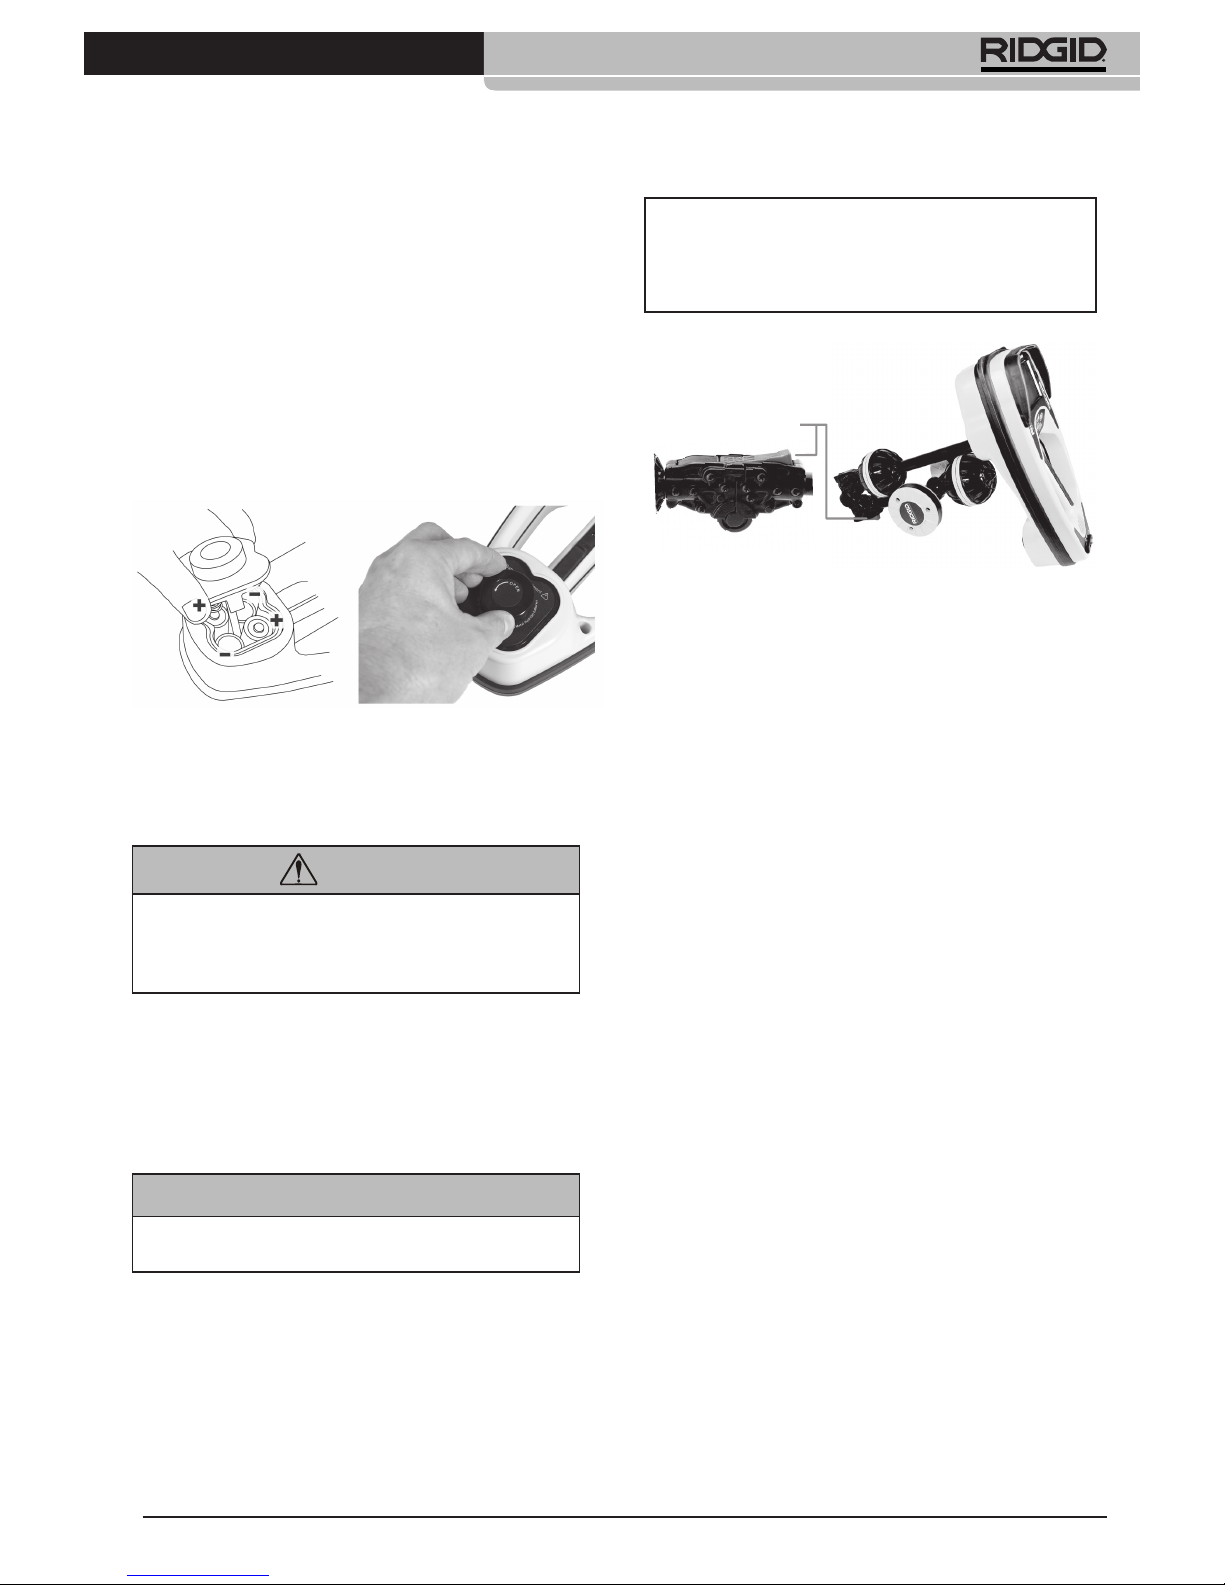
Installing/Changing Batteries
To install batteries into the SR-60, turn the unit over to access the
battery compartment. Turn the knob on the battery cover counter clockwise. Pull straight up on the knob to remove the cover.
Insert the batteries as shown on the inside decal and make sure
they drop to full contact. Fit the cover into the case and turn the
knob clockwise while lightly pressing down to close. The battery
cover can be installed in either orientation.
When the SR-60 is powered on, it takes a few seconds to check
the batteries. Until then the battery level will show as “empty”.
SR-60 Modes
The SR-60 operates in three distinct modes. They are:
Active Line Trace Mode,1. used when a chosen frequency
can be put onto a long conductor using a Line Transmitter,
for locating conductive pipes, lines, or cables.
Passive Trace Mode,2. used for tracing electrical lines that are
already carrying 60 Hz current (U.S.), 50 Hz current (Europe),
or radio frequencies.
Sonde Mode,3. used for locating Sondes in pipes, conduits,
or tunnels that are non-conductive or cannot otherwise be
traced.
Note that the two Tracing modes, Active and Passive, are identical except for the frequencies used. No transmitter is used in
Passive Trace mode.
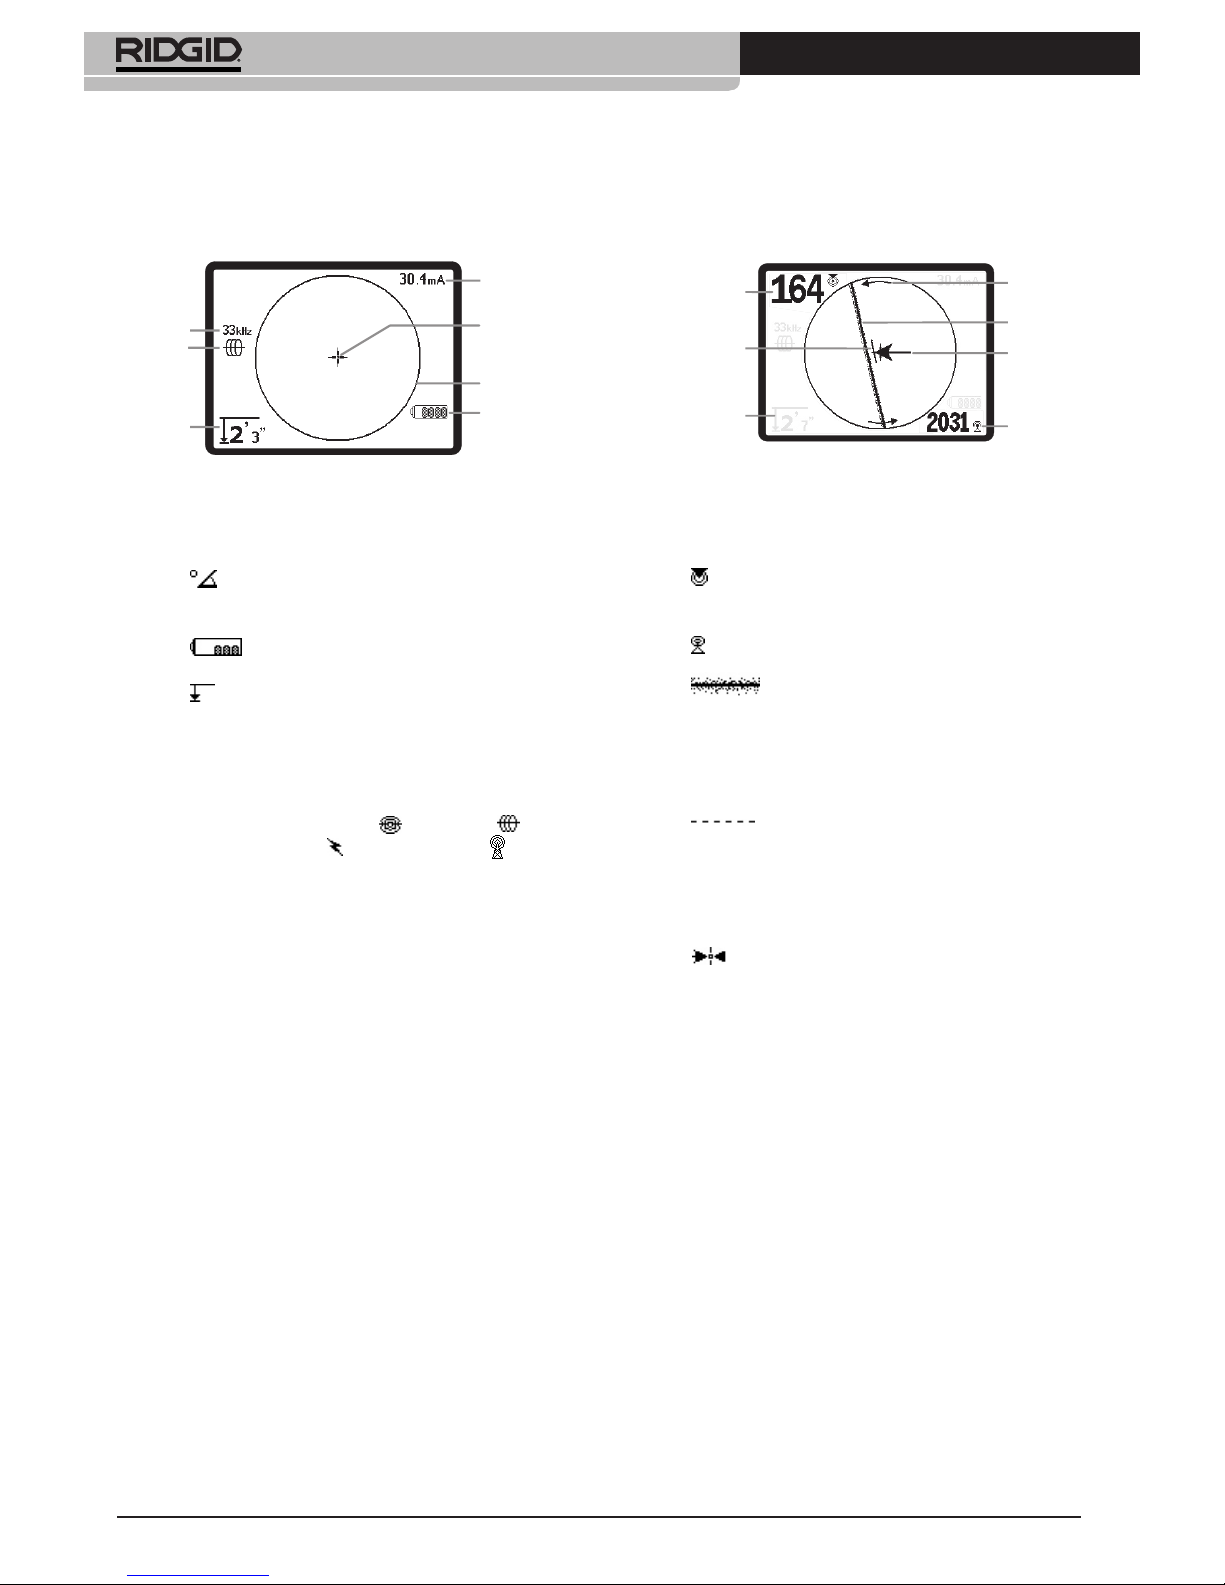
Display Elements
Beginning operators or experienced operators can use the SR-60
with equal ease. While the SR-60 offers advanced features that
make the most complex locate easier, many of its features can
be turned off or hidden, making the SR- 60 simple to use in basic
locating in uncomplicated situations.
The “basic features” of the SR-60 are on by default. They can be
customized easily to suit the user’s requirements. The use of the
various elements displayed is covered in later sections of this
manual.
Folding Mast
To begin operation, unfold the antenna mast and lock the folding joint into place. When locating is complete, press the red release lever to fold the antenna mast for storage.
CAUTION
Do not allow debris or moisture into battery compartment. Debris or moisture may short the battery contacts, leading to rapid discharge of the batteries, which
could result in electrolyte leakage or risk of fire.
Figure 2: Battery Case
Figure 3: Folding Antenna Mast and Release Button
Release Button
Note: Avoid dragging the lower antenna node on the
ground while locating with the SR-60. It may cause signal
noise which will interfere with results, and may eventually
damage the antenna.
Page 8
SeekTech SR-60
Ridge Tool Company
8
Display Elements: Line Trace Mode
In Active Line Trace Mode, the following features will also be
displayed:
•
Proximity Signal – Numerical indication showing
how close the signal source is to the locator. Displays
from 1 to 999. (Line Trace modes only.)
•
Signal Strength – Strength of signal as sensed by
the lower Omnidirectional antenna.
•
Tracing Line – The Tracing Line represents
the approximate axis of the detected field. It represents
detected distortion in the field by appearing less focused. (See page 34 for information on setting the sensi-
tivity and how to enable or disable the distortion response
in the Tracing Line.)
•
Distortion Line – If the normal distortion
response of the Tracing Line is disabled, a second line
is shown, which represents the signal from the upper
antenna node. By comparing the two lines, the user can
estimate the degree of distortion present in a signal.
(See page 36.)
•
Guidance Arrows – The Guidance Arrows serve
to steer the operator toward the center of the detected
field, by showing when the signals reaching the left and
right Guidance Antennas are out of balance or equal.
The two signals are equal when crossing the center
of an undistorted field. If the signals are unequal, the
Guidance Arrows show which way the field appears to
be relative to the receiver.
mA Current Strength – • Proportional to current on
the line. Switches to Signal Angle when Signal Angle is
greater than 35°.
Guidance Line • Shows the alignment of the target line
and helps determine when the locator is directly over
the target line. It will be longest when directly aligned
with the target line. Rotation Arrows will appear to indicate which way the SR-60 should be turned to align it
with the field.
Common Display Elements
The display screen in Active Line Trace, Passive Line Trace or
Sonde mode will show the following features:
•
Signal Angle – Field tilt from the horizontal; an-
gle toward the field’s center; numeric value displayed
in degrees.
•
Battery Level – Indicates level of remaining
battery capacity.
•
Measured Depth/Distance – Displays the mea-
sured depth when receiver is touching the ground directly over signal source. Displays computed distance
when the antenna mast is pointed at a signal source
in some other manner. Displays feet/inches (U.S.A. default) or meters (European default).
Mode – • Icon for Sonde
, Line Trace , Power
(Passive Line Trace)
, or Radio Frequency
mode.
Frequency – • Shows current frequency setting in hertz
or kilohertz.
+ Crosshairs (Map Center) – • Shows operator’s position
relative to the target center.
Measured Depth/
Distance
Proximity Signal
Guidance Line
Rotation
Arrows
Tracing Line
Guidance
Arrows
Signal
Strength
Figure 5: Display Elements (Line Trace Mode)
Frequency
Mode
Measured
Depth/
Distance
Current
Strength/
Signal Angle
Crosshairs
(Map Center)
Active View
Area
Battery Level
Figure 4: Common Display Elements
Page 9
SeekTech SR-60
Ridge Tool Company
9
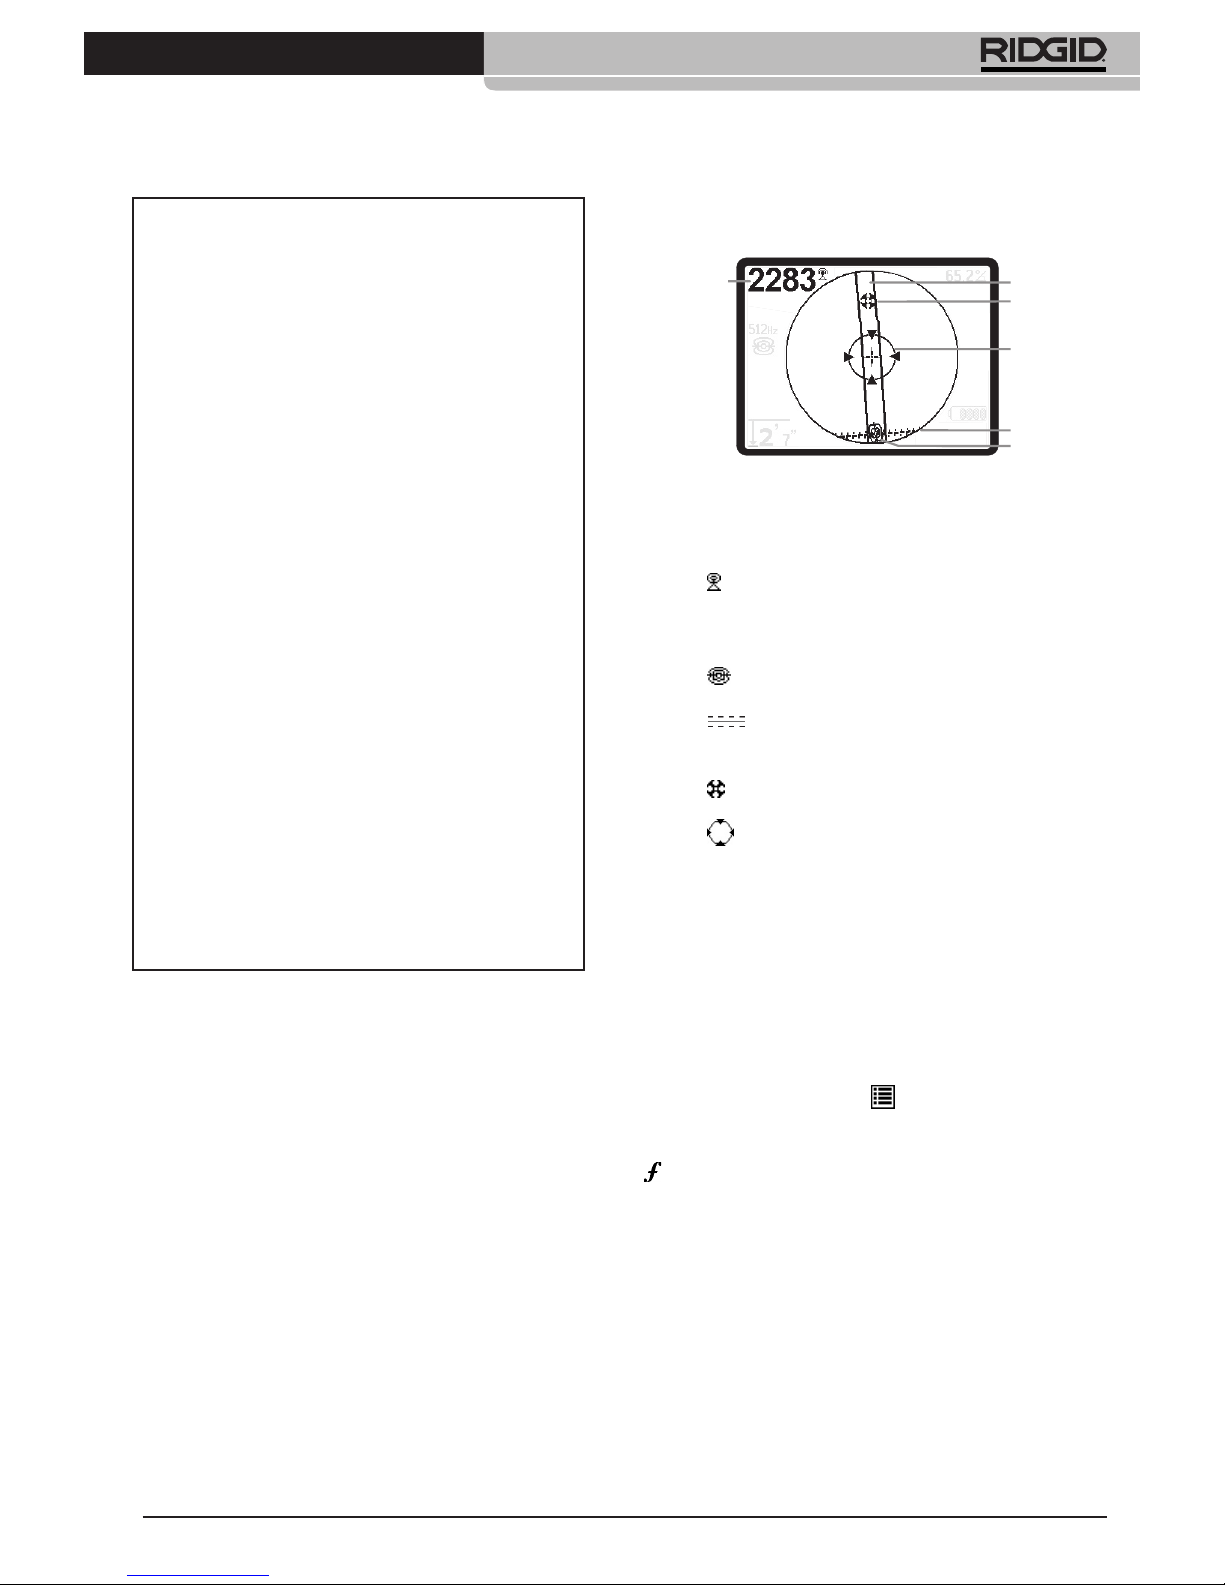
Display Elements: Sonde Mode
In Sonde mode, the screen elements include several features
that are unique to Sonde locating.
•
Signal Strength – Strength of signal as sensed by
the lower Omnidirectional antenna.
| | Pipe Direction – • Represents the approximate di-
rection of the pipe in which the Sonde is lying.
•
Sonde Icon – Appears when approaching the lo-
cation of a Sonde.
• Equator – Represents the mid-line of the
Sonde’s field perpendicular to the axis of the Poles. (See
page 28.)
•
Pole Icon – Represents the location of either of the
two Poles of the Sonde’s dipole field. (See page 28.)
•
Zoom Ring – Appears when the locator moves
close to a Pole.
The use of these features is described in the Active Line Tracing,
Passive Line Tracing, and Sonde Locating sections.
Default Frequencies
The Master Frequency Menu contains a large set of frequencies, but only some of these are made currently available. They
are made “Currently Available” by checking them in the Master
Frequency Menu.
The frequencies which are currently available will appear on the
Main Menu when the Menu Key
is pressed.
Currently available frequencies can be checked in the Main Menu,
in which case they will appear when using the Frequency Key
. If they are unchecked in the Main Menu, they will not appear
when using the Frequency Key to cycle through frequencies.
Note: The Tracing Line reflects the approximate axis of
the conductor being traced, but is modified by a degree
of “distortion” in the form of varying cloudiness, or loss
of focus, in the Tracing Line. The Tracing Line will appear
to grow unfocused in proportion to the distortion in the
field being detected. It ranges from a clear line (no distortion present), through slightly distorted, to moderately
unfocused, growing to a wide, cloud-like band of particles
depending on the degree of distortion in the detected field.
It represents the best possible calculation of the location
and bearing of the line combined with the degree of distortion sensed by the receiver’s Omnidirectional Antennas.
When the distortion response of the tracing line is turned
off, a separate Distortion Line will be displayed. The
Distortion Line can be used to analyze distortion when it
is out of alignment with the Tracing Line. (The dashed line
can be disabled separately, as well, which will leave a single Tracing Line displayed with no distortion response).
The default setting is to have the distortion response enabled
in the Tracing Line. This incorporates the information provided by these two lines into a single, easy-to-read presentation,
making the SR-60 easier to use.
(For more information about distortion, see pages 34 and 36.)
Note: The screen elements in Passive Trace Mode are the same
as those seen in Active Line Trace mode. Mode is determined
by the type of target source (Sonde or Line). For example, selecting the 512 Hz frequency from the Sonde mode section
of the frequency menu puts the SR-60 into Sonde mode. (A
frequency which appears in more than one category, such as
33 kHz, must be selected from the correct category.)
Signal
Strength
Zoom
Ring
Pipe
Direction
Pole Icon
Equator
Sonde Icon
Figure 6: Display Elements: Sonde Mode
Page 10
SeekTech SR-60
Ridge Tool Company
10
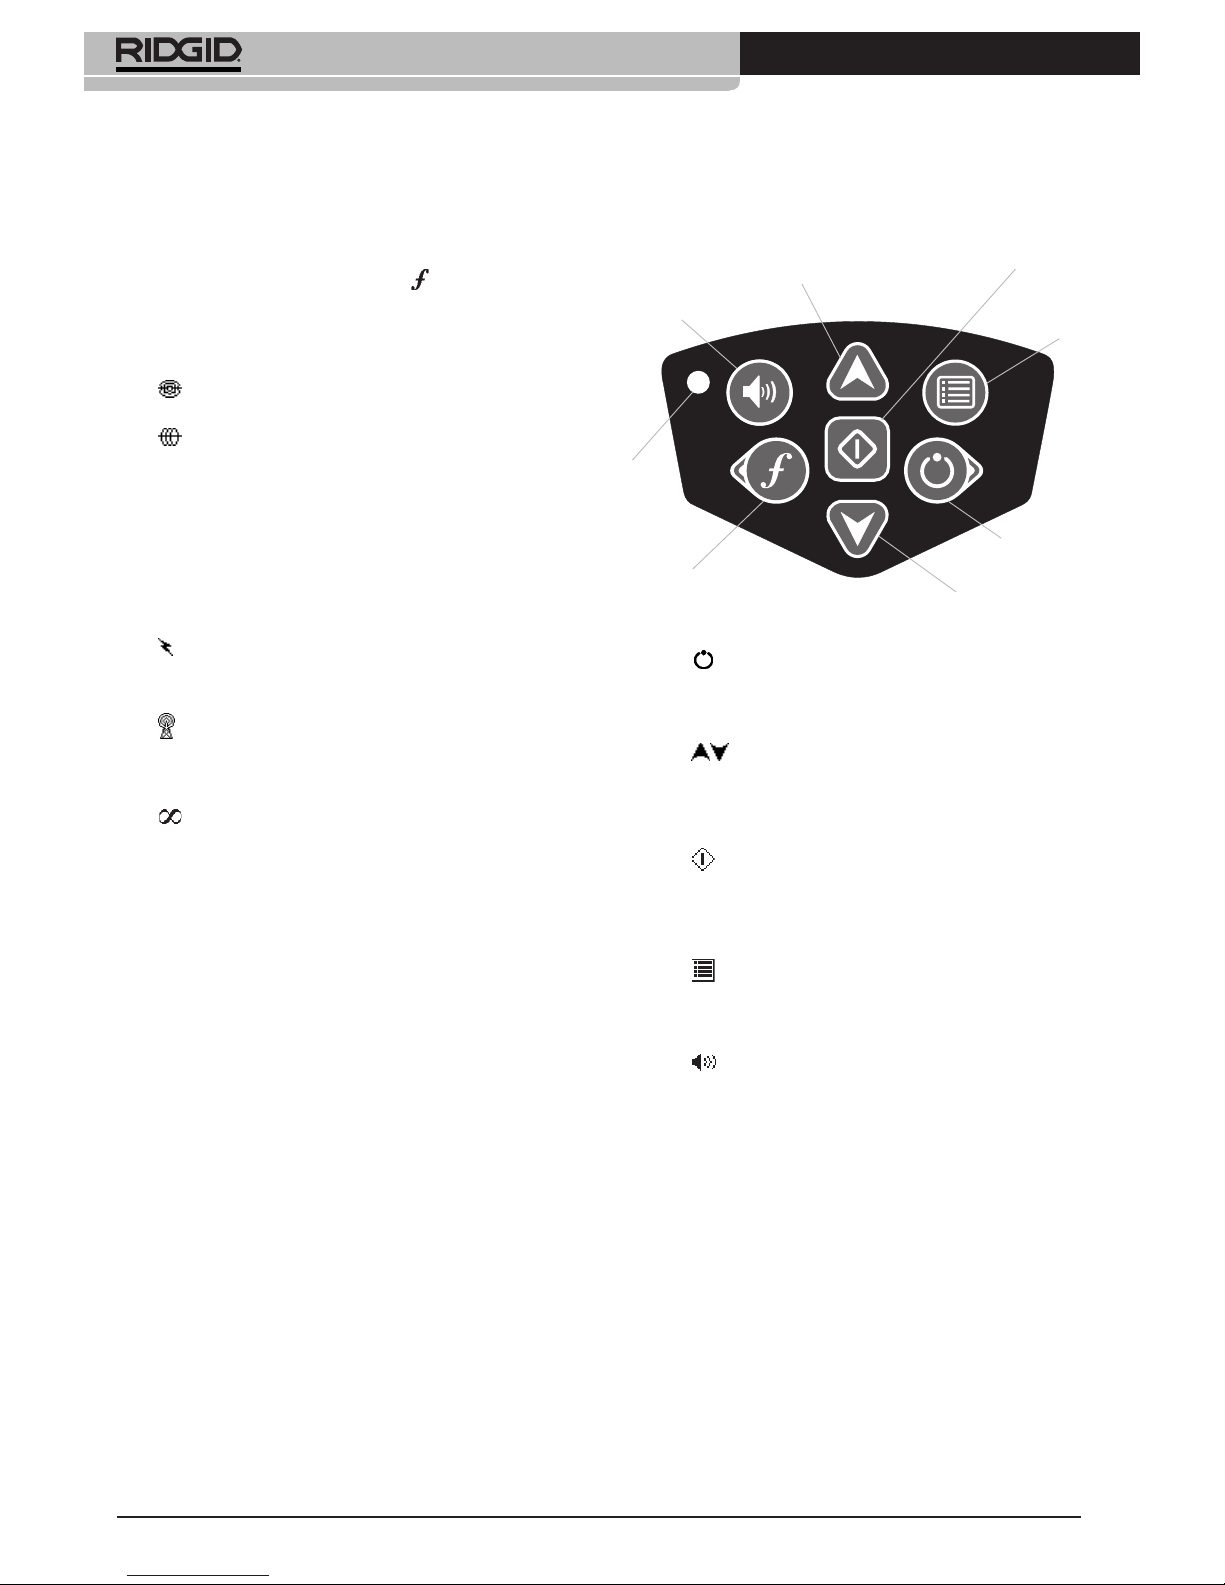
Keypad
•
Power/Right Key – Powers SR-60 on. Powers the
SR-60 down after a 3-second countdown. The countdown can be interrupted before shutdown by pressing
any key. Used to move to the right in some screens.
•
Up and Down Keys – Used for locating choices
during menu selection; used for setting volume level
when the Volume Control Key has been pressed. If
Signal Focus is activated, the Up and Down Keys will
change the Signal Focus setting up and down.
•
Select Key – Used to make a choice during Menu
selection; in normal operation, to force a Measured
Depth reading and re-center audio tone. Can be used
to force a “quick-check” trace-line and Measured Depth
display.
•
Menu Key – Used to display a “tree” of choices in-
cluding frequency selections, display element choices,
brightness and contrast, and restoring default settings.
In a menu, will move up one level.
•
Volume Control Key – Used to raise or lower the
volume setting; will cycle the volume by steps, increasing to maximum and then mute. Pressing the Volume
Key opens the volume control panel if it is closed. When
open, the control panel will close after ten seconds if no
keys are pressed. Volume can also be raised and lowered using the Up and Down Keys when the Volume
screen is open.
Frequencies which appear in the Main Menu and are checked for
activation are called “Checked-Active”.
Frequencies that are “Checked-Active” can be cycled through
simply by pressing the Frequency Key
(See figure 7). A frequency chosen by pressing the Frequency Key becomes the “In
Use” frequency.
Frequencies currently available by default include:
Sonde Mode
512 Hz* •
Active Line Trace Mode
128 Hz* •
1 kHz* •
8 kHz* •
33 kHz* •
93 kHz* •
50 Hz* •
Power (Passive Line Trace Mode)
60 Hz (9 •
th
)*
<4 kHz* •
Radio Frequency
4 kHz – 15 kHz (L)* •
15 kHz – 35 kHz (H)* •
OmniSeek (multi-range <4 kHz – 35 kHz)*
(* = Checked-Active Frequencies)
Figure 7: Keypad
Menu Key
Power ON/OFF
Key/Right
Down Key
Menu Navigation/
Signal Focus
Item Select/PushButton Depth Report
Up Key
Menu Navigation/
Signal Focus
Volume Control Key
Light Sensor
Frequency Key/Left
Page 11
SeekTech SR-60
Ridge Tool Company
11
•
Frequency / Left Key – Used to set the In-Use
Frequency of the SR-60 from the set of CheckedActive frequencies. Each short press cycles to the next
Checked-Active frequency. (The list of frequencies that
have been set to Checked-Active status can be modified via the Menu Key.)
A long press on the Frequency Key
will display a scrollable list of all currently active frequencies to choose
from, by highlighting and pressing Select again.
Light Sensor – • In Automatic mode, the light sensor
controls when the backlight goes on or off depending
on ambient light. Placing a thumb over the light sensor
will force the backlight on.
Operation Time
Using alkaline cells, typical operation time is from about 12 to 24
hours depending on sound volume and how often the backlight
is on. Other factors that affect the operation time will include
chemistry of the battery (many of the new high performance
batteries, such as the “Duracell
®
ULTRA” last 10%-20% longer
than conventional alkaline cells under high demand applications). Operation at lower temperatures will also reduce battery
life.
The SR-60 display can also show random symbols when the battery power is too low to drive the internal logic circuits correctly.
This is remedied by simply putting fresh batteries into the unit.
To preserve battery life, the SR-60 will automatically shut down
after 1 hour of no key presses. Simply power the unit on to
resume use.
Low Battery Warning
When the battery gets low, a battery icon will periodically appear in the map area on the screen. This indicates that the batteries need to be changed and that the unit will soon shut down. A
tone will sound at ten-minute intervals.
Just before complete shut down there will be a non-interruptible
power down sequence. An extended buzz will sound when the
SR-60 is about to go into shutdown sequence.
Starting Up
After pressing the Power Key on the keypad, the RIDGID logo
displays, and the software version number will appear in the
lower right corner of the screen.
Make a note of the software version in the box on page 1.
If technical support from Ridge is needed, it will be helpful to
have it available.
Figure 8: Scrollable List of Frequencies
Figure 9: Low-Battery Warning
Note: Voltage on rechargeable batteries may sometimes
drop so quickly that the unit will just shut down. The unit will
power down and restart. Just replace the batteries and power
the unit back on.
Figure 10: Start-up Screen
Page 12
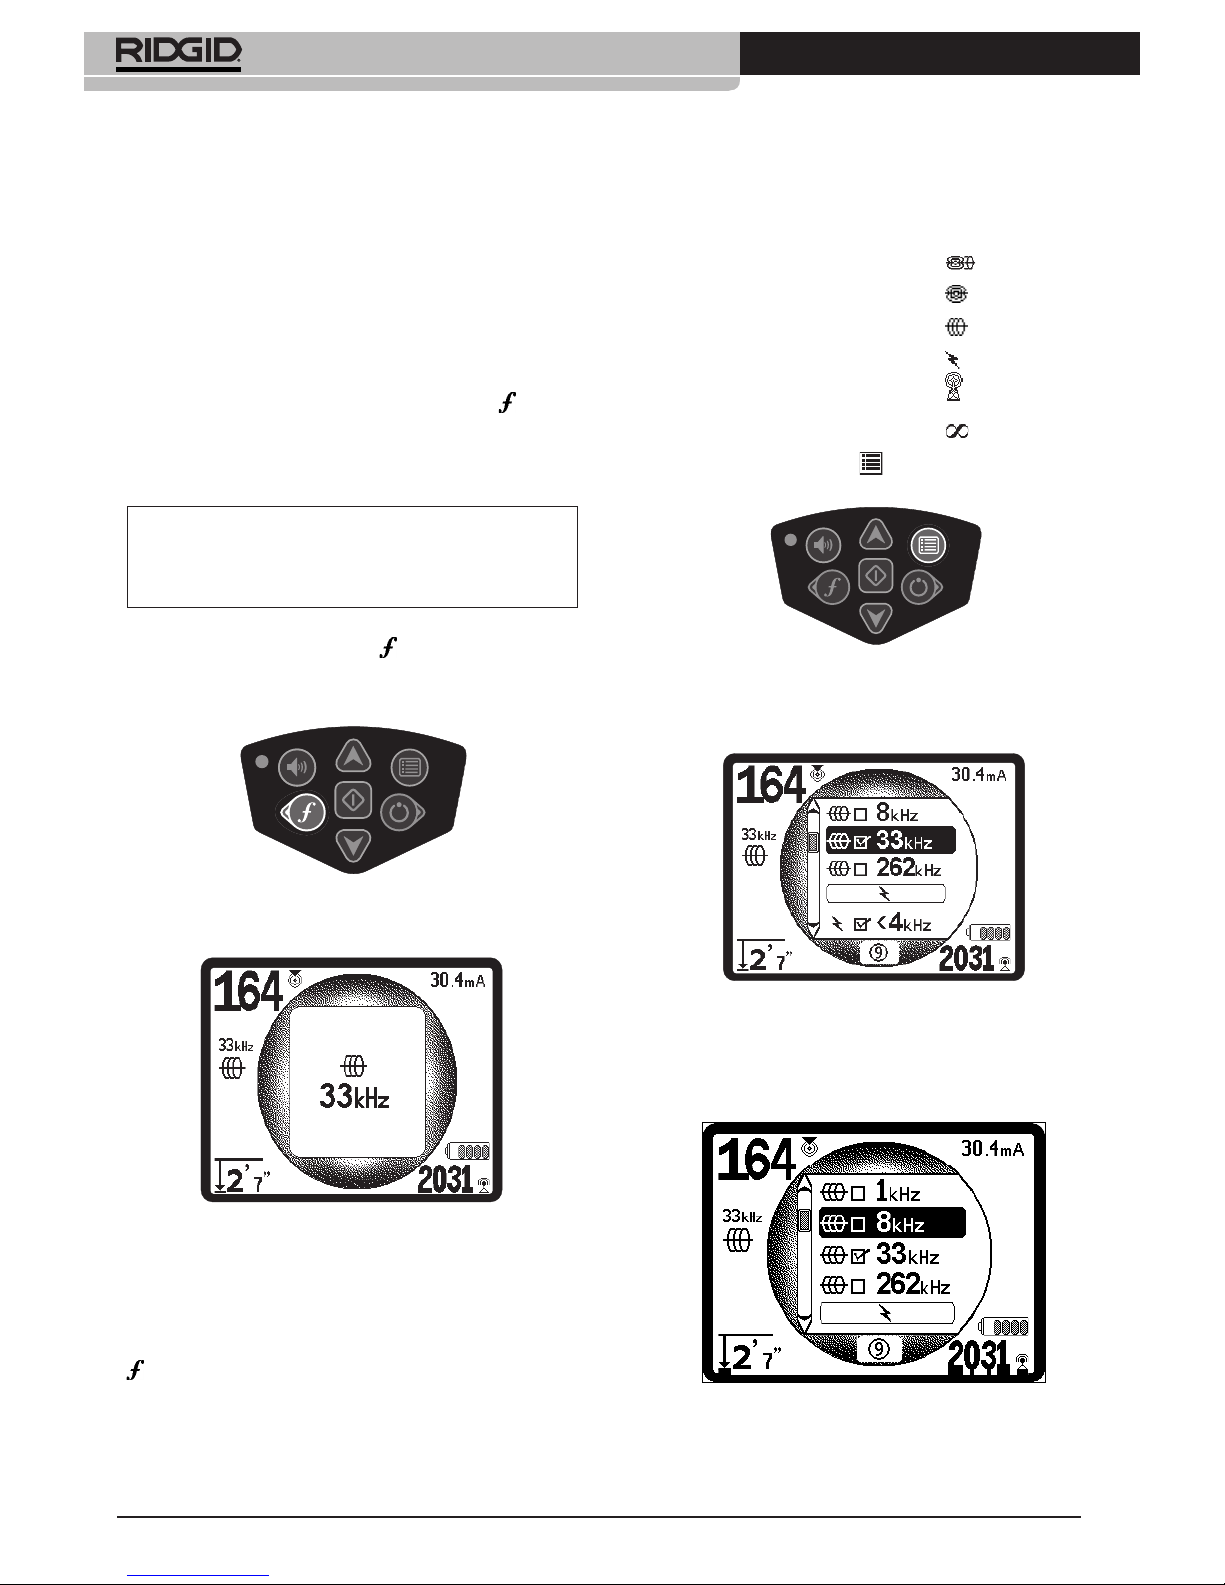
Figure 14: Main Menu
Figure 15: Highlighting a Desired
Frequency (8 kHz)
SeekTech SR-60
Ridge Tool Company
12
Set up
Once the SR-60 is up and running, the next step is to set up the
frequencies needed to match the transmitter frequency being
used, or the frequency of the line to be located. Each frequency
is selected for use by choosing it from a list in the Main Menu.
If the box on the Main Menu for that frequency is checked, the
frequency is “Checked-Active”.
Checked-Active frequencies are already selected for use and appear in sequence when pressing the Frequency Key
. (For example, the line trace frequency of 33 kHz is available by pressing
the Frequency Key and advancing through the list until 33 kHz
is reached.)
A long press on the Frequency Key
will bring up a scrollable
list of all Checked Active frequencies.
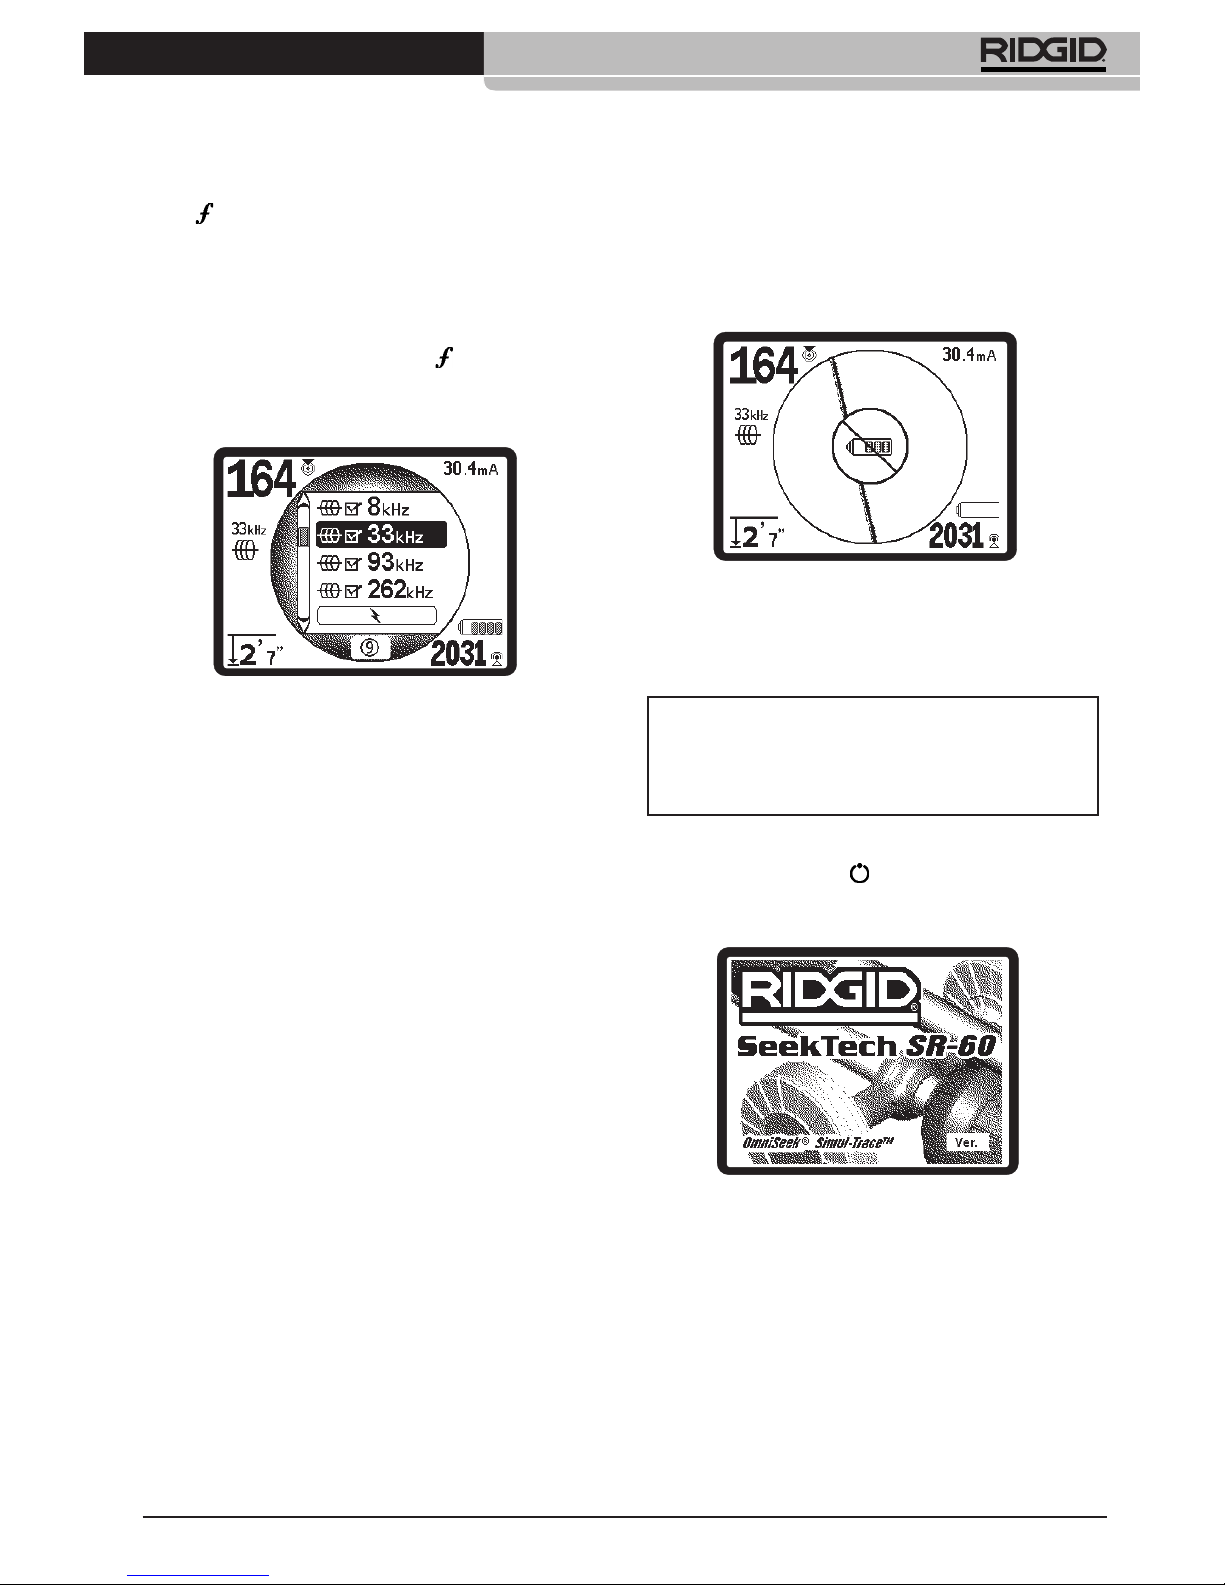
Activating Frequencies
Frequencies can be chosen for the set of Checked-Active frequencies so they will become available using the Frequency Key
Frequencies can also be deactivated to keep the frequency
set smaller.
Each frequency is activated by choosing it from a list in the Main
Menu (See figure 14). Frequencies are grouped by category:
SimulTrace (512 Hz + 33 kHz)
(if active)
Sonde
Active Line Trace
Power (Passive Line Trace)
Radio
OmniSeek (multi-RF bands)
Push the Menu Key 1.
:
The Main Menu screen is then activated:
Using the Up and Down Keys, highlight the frequency 2.
desired (Figure 15). In this example, the operator is activat-
ing the 8 kHz frequency.
Note: When a frequency is highlighted in the Main Menu,
pressing the Frequency Key will display its exact frequency
value. For example, 8 kHz = 8192 Hz.
Figure 11: Frequency Key
Figure 12: Line Trace Frequency Selected with
Frequency Key
Figure 13: Menu Key
Page 13
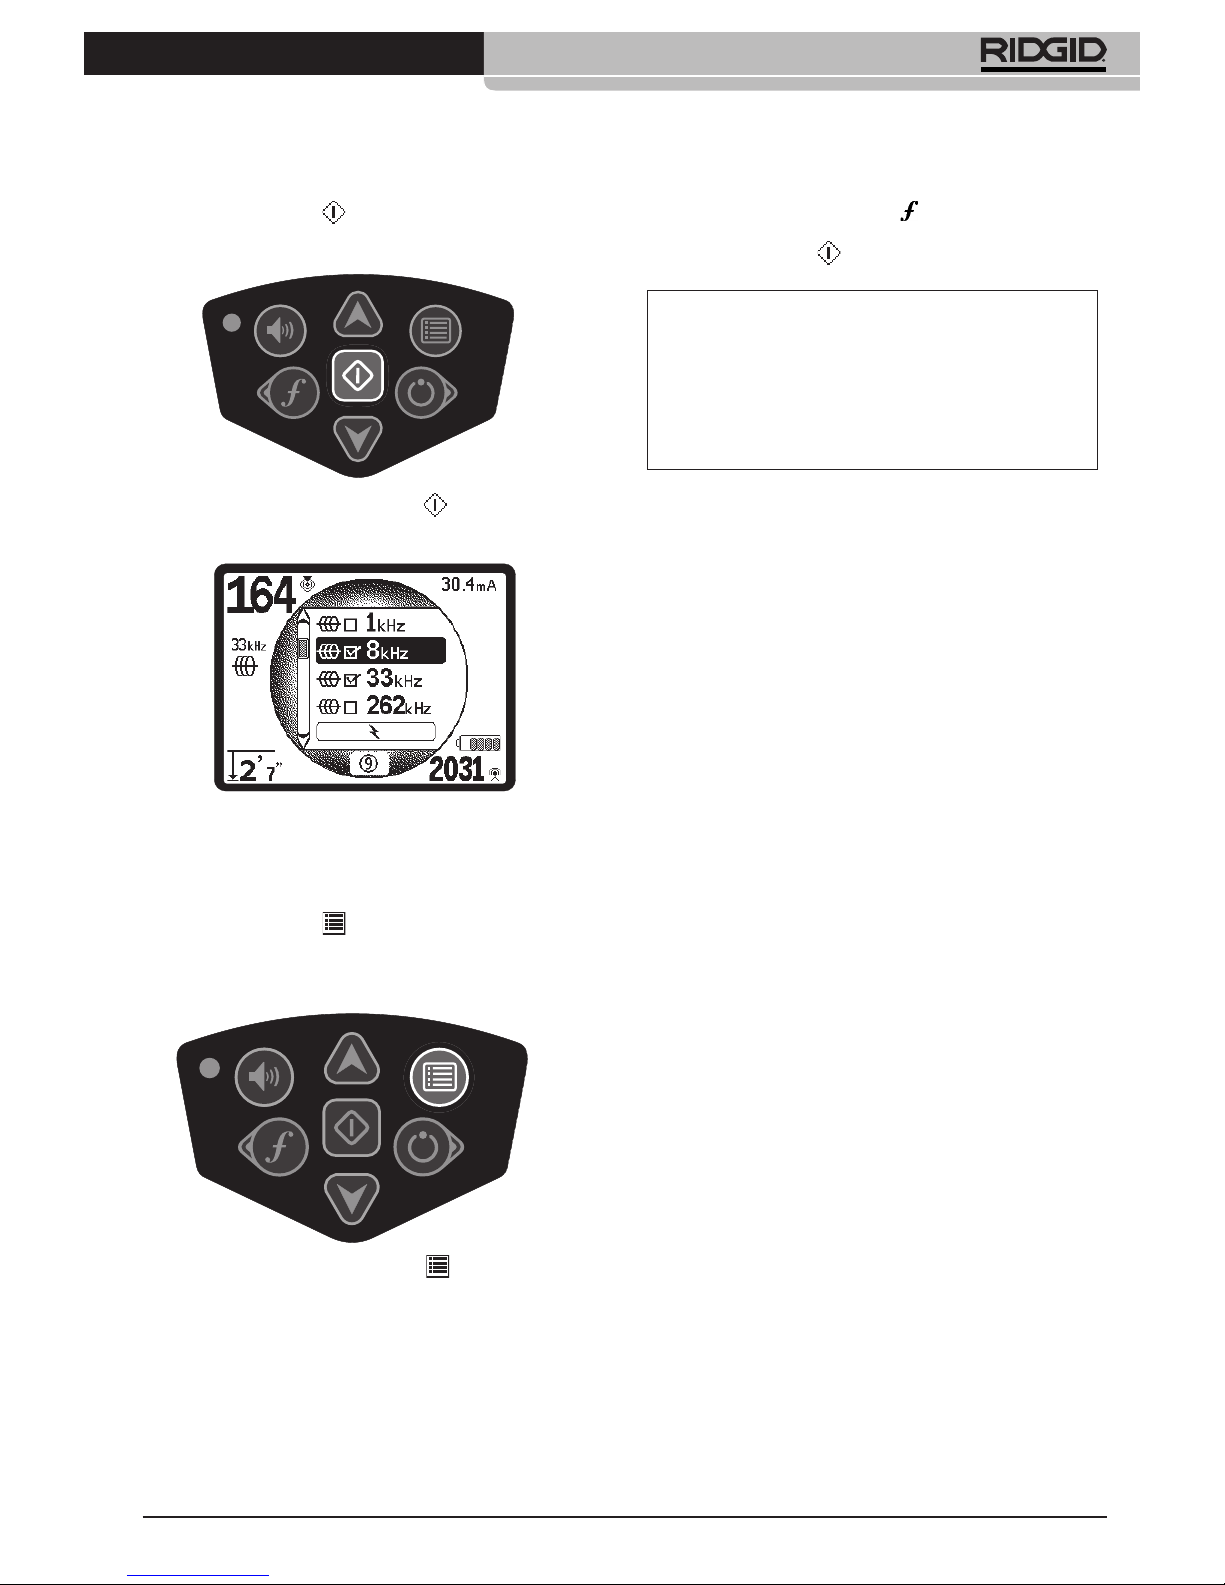
Figure 16: Select Key
Figure 17: Desired Frequency Checked
Figure 18: Menu Key
SeekTech SR-60
Ridge Tool Company
13
Press the Select Key3. (shown below) to check the box
for each frequency to be used.
Frequencies that have been selected for use will show a check in
the box next to them.
Press the Menu Key 3.
again to accept the choice and
exit. Letting the unit countdown and exit automatically will
have the same effect.
The Main Menu lists all frequencies available for activation. For
information on adding additional frequencies to the Main Menu
so they can be chosen for activation, see Frequency Selection
Control on page 34.
A long press on the Frequency Key
will bring up a list of all
Checked Active Frequencies. To use one, simply scroll down to it
and press the Select Key
.
If you find that your transmitter signal at 93 kHz cannot be detected by the SR-60, set the locator’s frequency to 93-B kHz,
which is set to the older value. Both 93 and 93-B frequencies
can be found under the Line Trace category of the Frequency
Selection sub-menu.
Sounds of the SR-60
The sound level is driven by the proximity to the target. The closer to the target, the higher the sound pitch will be. A rising tone
indicates increasing signal.
In Active Line Trace or Passive Line Trace mode, sound is on one
continuous curve and does not re-scale.
In Line Tracing modes, the default distortion response also activates an audio signal proportionate to the distortion in the detected field. When there is no distortion present, the sound of
the SR-60 is a clear warbling sound when on the left side of the
detected field, with a slight click added when on the right side
of the detected field. If distortion is detected a sound similar to
AM radio static sound can be heard, which gets stronger as the
degree of distortion increases, similar to the unfocusing that signals distortion visually around the Tracing Line. If the distortion
response feature is disabled, the static sound does not occur.
In Sonde Mode, if the sound level reaches its highest point, it
will “re-scale” to a medium level and continue signaling from the
new starting point.
In Sonde Mode, the pitch will “ratchet” upward. That is, it will rise
and then re-scale (fall) in pitch while approaching the Sonde.
Moving away from the Sonde, it will drop to a lower pitch and remain there as long as one moves away from the Sonde. Moving
back toward the Sonde again it will resume rising in steps starting from the level it had reached previously. This serves as an
indication when the locator receiver is getting closer or further
away from the Sonde.
Note on 93 kHz Frequency Use
The SR-60 offers two 93 kHz frequencies for Line Tracing.
The default 93 kHz frequency has an actual cycle count of
93,623 cycles per second.
But some older transmitters use a different value for the
nominal 93 kHz frequency, 93,696 cycles per second. This
is found in the SR-60 listed as “93k-B”.
Page 14

Figure 19: Count-Down Screen
(Shutting Down)
SeekTech SR-60
Ridge Tool Company
14
Line Tracing with the SR-60
There are two major ways to look for lines underground with the
SR-60. They are called Active and Passive. The difference is that
in Active Line Tracing, a current is placed on a conductor using a
transmitter, and that specific signal is then sought for using the
locator. Passive tracing does not use a transmitter and seeks for
any signal that may be picked up at particular frequencies.
Active Line Tracing
In active line tracing, underground lines are energized with a
Line Transmitter. This active signal is then traced using the SR-60.
A Line Transmitter is different from a Sonde in that it is used to
energize a conducting target line, rather than acting as a target
for a locate itself, the way a Sonde does. Line transmitters energize lines by direct connection with clips, or by directly inducing
the signal using a clamp, or by inducing the signal using inductive coils built into the transmitter.
If desired, force the sound to re-center at a medium level (in any
mode) by pressing the Select Key during operation. See also the
Directional Sound section, below.
Key Items in Using the SR-60
PROXIMITY SIGNAL reflects the proximity of the locator to the
target utility; the closer the locator moves to the center of the
detected field, the higher the Proximity Signal number gets. The
Proximity Signal is calculated from the ratio of the signals received at the lower and upper antennas, adjusted for scalability.
SIGNAL STRENGTH represents the strength of the field being
detected by the lower antenna node of the SR-60, converted
mathematically for scalability. In a clear and undistorted field,
you can locate based on Signal Strength alone.
DISTORTION is the degree to which the field detected is deformed. In an undistorted environment, current on a long conductor produces a field which is cylindrical, down the conductor. If multiple fields are present, the detected field is pushed
or pulled out of shape and the different antennas will pick up
different field strengths. On the SR-60, distortion is reflected by
the Tracing Line growing unfocused instead of sharp, or by disagreement among the Guidance Arrows, Tracing Line, and Signal
Strength.
TRACING LINE indicates the direction and degree of distortion
in the detected field.
GUIDANCE ARROWS are driven by the signals received at the
guidance antennas of the SR-60. When the fields detected by
these side antennas are equal, the arrows will center. If one
is receiving a stronger field signal than the other, the arrows
will point toward the probable center of the target conductor.
Moving in the direction indicated by the arrows will bring you
closer to the center of the detected field. A small “guidance line”
at the end of a guidance arrow indicates the degree of alignment
with the conductor’s field. It will be at its maximum length when
correctly aligned with the conductor, with the guidance antenna
axis crossing the field at 90°. Rotational guidance arrows on the
perimeter of the screen will indicate the direction you need to
turn to align with the detected conductor.
DIRECTIONAL SOUND from stereo speakers will let you follow a
line by sound, while staying visually alert for nearby traffic or obstacles. The Sound Pointer speakers are designed to be clipped
to a jacket or vest on either shoulder.
Stereo sound from the speakers will fade to the left or right. The
louder side indicates the direction toward the center of the detected field. Sound will balance when over the center of the line.
The operator can stay centered on the line using sound signals
instead of the visual cues on the screen. The SR-60 comes withclip-on speakers designed to be attached to the left and right
shoulders of a safety vest for this purpose.
Shutting Down
Pressing the Power Key at any time during operation will start a
count-down of 3 seconds, during which the shut-down tone will
sound. At the end of the count-down, the SR-60 will shut down.
Page 15
Figure 20: Line Trace Frequency Chosen with the
Frequency Key (This screen will flash briefly when a new
frequency is chosen)
Figure 21: Tracing Line Showing
Low Distortion
SeekTech SR-60
Ridge Tool Company
15
Direct Connect Mode: The transmitter is attached by direct metal-to-metal connection to the target conductor at some access
point such as a valve, a meter, or other point. Important: The
connection between the transmitter and the conductor must
be a clean, firm connection. The transmitter is also connected
to a ground stake providing a strong open path to ground.
Important: A weak ground connection is the most frequent
cause of a poor tracing circuit. Make sure the transmitter is well
connected to ground, and has enough exposure to the ground
to allow current to flow through the circuit.
Inductive Clamp Mode: The transmitter is connected to an inductive clamp which is then closed around a pipe or cable. The
transmitter energizes the clamp, which then induces a current
in the conductor. Important: Make sure the SR-60 is set to trace
mode and set to the same frequency as the transmitter. Do not
clamp onto a live conductor. This mode works best when both
ends of the conductor are grounded.
Inductive Mode: The transmitter is placed over the conductor.
There is no direct connection; the internal coils of the transmitter generate a strong field through the ground which induces
a current in the underground conductor of interest. Important:
If the transmitter is too close to the SR-60 in this mode, it can
cause “air-coupling” which means the locator is reading more on
the signal from the transmitter’s field, than on the target conductor. (See page 15.) Note: When using Inductive Mode, it is always
possible to move the transmitter to a different point along the
target line. This will sometimes improve the circuit and provide
a better signal.
Energize the target conductor according to the transmit-1.
ter manufacturer’s instructions, using one of the methods described above. Select the transmitter frequency.
Set the frequency on the SR-60 to the same frequency
used on the transmitter, using the Frequency Key
.
Be sure the frequency has a line trace icon . Push the
Menu Key
to return to the operating screen. To activate
frequencies not yet made active, see Frequency Selection
Control on page 34.
Observe the Proximity Signal to ensure that the receiver 2.
is picking up the transmitted signal. The Proximity Signal
should peak over the line and drop off on either side.
When tracing, the direction of the detected field will
be shown on the screen by the Tracing Line. The Tracing
Line will be a clear, single line if the field being detected is
undistorted.
If other fields are interfering in some way, the distortion
caused by those fields will be reflected by a blurring of
the Tracing Line. The more distorted the detected field, the
broader the cloud around the Tracing Line will be. This alerts
the operator that the apparent axis of the line may be influenced by other fields, and requires careful evaluation.
The Tracing Line has three important functions. It repre-
sents the location, and the direction, of the signal being
traced. It reflects changes in direction of the target utility—
when the utility makes a turn, for example. And it helps recognize signal distortion. It does this by becoming cloudier
as distortion increases. Disagreement between different indicators can also indicate distortion.
WARNING
Connect ground and power leads of the transmitter
before powering the transmitter on, to avoid electric
shock. See warning on page 5.
Page 16

SeekTech SR-60
Ridge Tool Company
16
Use the Guidance Arrows, Proximity Number, Signal 3.
Strength, and Tracing Line to guide the line trace. These
pieces of information are generated from discrete signal
characteristics to help the operator understand the quality of the locate. An undistorted signal emitted from a line
is strongest directly over that line. (Note: Unlike the Signal
Trace lines, the guidance arrows require that the user orient
the locator so that the guidance arrows point 90 degrees to
the Signal Trace line. (See figure 23.))
Note: An undistorted line will also be clear rather than
blurred on the screen, and the sound accompanying the image
will have no “static” in it.
Note: Confidence in the accuracy of a locate can be increased
by maximizing the Proximity Signal (and/or Signal Strength), balancing the Guidance Arrows and centering the Tracing line on
the screen. Confirm a locate by testing whether the Measured
Depth reading is stable and reasonable. Agreement among all
these indicators means the probability of an accurate locate is
high.
As always, the only way to be certain of the location of a utility is
through visual confirmation by exposing the utility.
The accuracy of position and depth measurement improves as
the SR-60 lower antenna node is placed closer and closer to the
target utility. Rechecking the Measured Depth and position periodically during the excavation process can help avoid damage
to a target utility and may identify additional utility signals that
were not noticed prior to excavation.
When line tracing, it is important to remember that tees, curves,
other conductors in the vicinity, and nearby masses of metal can
add distortion to the field, requiring closer scrutiny of the data to
determine the true path of the target utility.
Clarifying the situation can be done by assessing whether the
distortion is due to a poor signal that needs to be improved, a local interference such as a near-by car, or a tee or turn in the line.
Circling the last location of a clear signal at a distance of about
20 feet (6.5 m) can clarify if the distortion is coming from a local
turn or tee in the line, and enable the operator to again pick up
the line nearby.
Always cross check the locate by ensuring that:
The Tracing Line shows little or no distortion response •
(blurriness).
The Proximity Signal and the Signal strength maximize •
when the Tracing Line crosses the map center.
The Measured Depth increases appropri ately as the •
unit is raised vertically and the Tracing Line remains
aligned.
Measured Depth readings should be taken as estimates and
actual depths should be independently verified by potholing or other means prior to excavating.
If the signal is clear, the SR-60 will often show a straight signal
line with very little distortion right up to a 90-degree tee, show
a small amount of distortion as it follows around the curve, and
then show a clear signal again as it resumes its travel after the
tee. It shows very clearly when the line is turning.
Figure 22: Tracing Line Showing
High Distortion
WARNING
Care should be taken to watch for signal interference
that may give inaccurate readings. The Tracing Line is
only representative of the position of the buried utility if the field is UNDISTORTED. Do NOT base a locate
solely on the Tracing Line.
Maximized
Maximized
Figure 23: High Probability Locate
Page 17

SeekTech SR-60
Ridge Tool Company
17
Measuring Depth (Line Tracing Modes)
The SR-60 calculates Measured Depth by comparing the strength
of the signal at the lower antenna to that at the upper antenna.
Measured Depth is measured correctly in an undistorted field
when the bottom antenna is touching the ground directly above
the signal source and the antenna mast is vertical.
To measure depth, place the locator on the ground, directly 1.
above the Sonde or the line.
Measured Depth will be shown in the lower left hand 2.
corner.
Measured Depth will be accurate only if the signal is undis-3.
torted and the antenna mast is held vertical.
Testing for the consistency of the Measured Depth reading can
be done by raising the SR-60 a known distance (say, 12 inches
(33 cm)) and observing whether the Measured Depth indicator
increases by the same amount. Small variation is acceptable, but
if the Measured Depth does not change, or changes drastically,
it is an indication of a “distorted” field, or very low current on the
line.
Push-Button Depth
Holding the Select Key will display a short count-down followed
by a calculated depth report. This “Push-button Depth”, calculated on more signal samples, will be more precise than the running Depth indication.
Push-button Depth will generate a brief count-down screen followed by a calculation screen, which changes to a depth report
screen when the calculation is complete.
Depth Warnings
Certain conditions make depth readings less precise or less reliable. When using Pushbutton Depth, a warning will appear when
these conditions occur:
Figure 24: Push-Button Depth Report
Note: Exposing the utility is the only way to verify its exist-
ence, location, and depth.
Motion of the SR-60 during
sampling.
Depth is varying greatly.
Signal Strength is varying
greatly.
Extreme offset between guidance line and tracing line (right
or left).
Clipping (Signal too high).
Averaged depth will be
inaccurate.
Distortion level too high to read
depth accurately.
Page 18

SeekTech SR-60
Ridge Tool Company
18
Current and Signal Angle Reading
The Current Strength (mA) and Signal Angle indicator ( ) in the
upper right corner of the screen will display the current detected
on the traced line, in milliamps, when the computed angle to the
center of the detected field is less than 35° and the SR-60 crosses
the center of the field.
When moving across the center of the field the current display
will retain the displayed current value until the guidance arrows
reverse again, at which point the display will be updated. The
update occurs whenever the guidance arrows reverse.
When the angle to the center exceeds 35°, the Signal Angle indicator will again replace the Current indicator, and the display will
show the computed angle to the center of the detected field.
Clipping (Tracing Modes)
Occasionally the Signal Strength will be strong enough that the
receiver will be unable to process the whole signal, a condition
known as “clipping”. When this occurs, a warning symbol
will appear on the screen. It means that the signal is particularly
strong. If clipping persists, remedy it by increasing the distance
between the antennas and the target line OR by reducing the
strength of the current from the transmitter.
When clipping occurs, the SR-60 will automatically attenuate the
signal to dampen it. When the signal strength received falls below the clipping threshold, the attenuation stops automatically.
The SR-60 screen will indicate the starting of attenuation and the
stopping of attenuation by showing these images:
Operating Tips for Active Line Tracing
1. The SR-60 quickly identifies distorted fields. If the guidance
arrows are centered on the screen, and the Trace Line is
not centered (or if the Proximity Signal number and Signal
Strength are not maximized), then distortion is creating
a complex non-circular field. This is also reflected by the
Tracing line dissolving, or growing unfocused in a cloudy
pattern proportional to the distortion detected.
2. To improve the tracing circuit:
Move the ground stake position away from the line to a.
be traced.
Use a larger ground contact surface (such as a shovel b.
blade).
Make sure that the line is not commonly bonded to an-c.
other utility. (Undo common bonds only if safe to do
so.)
Try changing the frequency used.d.
Move the transmitter to a different point on the line, if e.
possible. Try locating from the other direction along the
line, for example.
3. Circling the last location of a clear signal at a distance of
about 20 feet (6.5 m) can clarify if the distortion is coming
from a local turn or tee in the line, and enable the operator
to again pick up the line nearby.
4. If the Tracing Line will not center or if it moves across the
screen erratically, then the SR-60 may not be receiving a
clear signal. The Measured Depth and the Proximity Signal
may also be unstable under these circumstances:
a. Check the transmitter to be sure that it is operating and
well grounded. Good connection and good grounding
can remedy low current problems.
b. Test the circuit by pointing the lower antenna at either
transmitter lead. If a strong signal is not shown, improve
the circuit.
c. Check that the SR-60 and transmitter are operating on
the same frequency.
d. Try a higher frequency, until the line can be picked up
dependably. Using lower frequencies can overcome
bleed-over problems. Higher frequencies can overcome resistance and inject more current onto the line.
Figure 25: Attenuation On Figure 26: Attenuation Off
Note: Measured Depth Display is disabled under clipping
conditions.
Page 19

SeekTech SR-60
Ridge Tool Company
19
e. Re-locate the ground connection for a better circuit.
Ensure there is enough contact (ground stake is sufficiently deep) especially in dryer soils.
f. In extremely dry soil, wetting the area around the
ground stake will improve the circuit. Be aware the
moisture will dissipate and evaporate, reducing the
quality of the circuit over time.
5. Using the numeric Signal Angle Indicator is another way to
check for distorted signals. Move the SR-60 perpendicularly to both sides of the traced line until the numeric Signal
Angle indicator reads 45 degrees. Be sure to keep the lower
Omnidirectional antenna node at the same height, and the
locator mast vertical. If there is little or no distortion the
traced line should be in the middle and the distance to each
45 degree point should be approximately the same on either side. If the signal is undistorted, then the distance from
the line center to the 45° point is approximately equal to the
depth.
Note: Another technique is to move the same distance to the
right and left of the traced line, say 24 inches (60 cm) and check
that the Signal Strength readings are similar.
6. While tracing, the Proximity Signal and Signal Strength
should maximize, and the Measured Depth minimize, at the
same place where the guidance arrows center on the display. If this is not the case, the utility may be changing direction or other coupled signals may be present.
7. Higher frequencies bleed over to adjacent utilities more
readily, but may be needed to overcome breaks in tracer
wires or go over insulating couplers. If the line is ungrounded at the far end, higher frequencies may be the only means
to make the line traceable. (See Informational Locating, on
page 37.)
8. When using the transmitter inductively, be sure to begin the
locate about 30 feet (10 m) away to avoid “direct coupling”
(also know as air coupling). This occurs when the SR-60 picks
up the signal from the transmitter directly through the air
and not from the line to be traced. An unrealistic Measured
Depth reading when over the line can also indicate air coupling is occurring.
9. While tracing, the mapping display operates best under the
following conditions:
The line is level.a.
The SR-60 Locator is above the target utility elevation.b.
The SR-60 antenna mast is held approximately vertical.c.
If these conditions are not met, pay close attention to maximizing Signal Strength.
In general, if the SR-60 is used in a zone over the target line within a sweep area of about two “depths” of the line, the map will be
useful and accurate. Be aware of this when using the map if the
target or line is very shallow. The width of the useful search area
for the map can be small if the line is extremely shallow.
See the section on Suppression on page 33 for information on noise
suppression options.
*URXQG
$
$
$
VDPH GLVWDQFH
$
(QHUJL]HG 3LSH
= same distance
Figure 27: Checking for Distortion
Ground
Energized Pipe
Page 20

SeekTech SR-60
Ridge Tool Company
20
Figure 28: Screen Display in Different Locations (Line Tracing)
Current Strength
Page 21

SeekTech SR-60
Ridge Tool Company
21
Passive Line Tracing
In passive mode, the SR-60 is looking for electromagnetic “noise”
that has found its way onto a buried utility line by any available
means. Electromagnetic signals can get onto buried utility lines
in a variety of ways.
The most common way is by means of direct connection to some
signal source. All operating electronic devices that are connected to AC power will radiate a certain amount of electronic “noise”
back onto the power lines they are connected to. Examples of
such devices include computers, copy machines, refrigerators,
anything with an electric motor, TV sets, air conditioning units,
etc.
Another common way electromagnetic noise can get onto the
line is by way of induction that can operate without any direct
physical connection to the buried line. In some areas for example,
buried utilities act as antennas for high powered, low frequency
radio transmissions (submarine navigational and communication signals in the UK for example) and will reradiate these signals. These reradiated signals can be very useful for locating.
Similarly, buried lines that run side by side near each other, particularly for longer distances will tend to bleed signals onto each
other. This effect is more pronounced for higher frequencies.
Due to coupling, all metallic lines in an area may be energized.
Because of this, it is possible to locate lines passively, but it is difficult to identify which line the locator is tracing.
Pipes can also have 60 Hz signal randomly induced into them
by nearby power-line fields, and other frequencies can be picked
up on phone lines, for example, from the energy of radio-broadcast towers in the vicinity. In short, frequencies can show up on
buried conductors in numerous ways, and these can be picked
up passively, if the fields are strong enough.
Select a Passive Line Trace Frequency (1.
or icon).
Choose an orderly pattern of search that will cover the area 2.
you are interested in.
Use the Tracing Line, Depth, and Signal Strength to steer you 3.
to the lines which have that frequency energizing them.
If possible, once you have found a target of interest, find an 4.
accessible point and do an Active Trace on it to confirm your
results.
The SR-60 has multiple Passive Line Trace frequency settings.
Power frequencies (identified with the power icon
) are used to
locate signals generated as the result of power transmissions,
usually 50 or 60 Hz. To reduce the effects of inherent noise from
line-load or neighboring devices the SR-60 can be set to locate
various multiples (or harmonics) of the base 50/60 Hz frequency
up to 4,000 Hz. (<4 kHz setting.)
The 50/60 Hz 9x multiple is the setting most commonly used to
locate 50/60 Hz signal. In well-balanced high voltage electric distribution systems, the 5x multiple may work better. The 100 Hz
(in 50 Hz countries) and 120 Hz (in 60 Hz countries) frequency
settings are particularly useful for pipelines that have been
equipped with cathodic protection using rectifiers.
As in Active Line Tracing, the Tracing Line will reflect distortion in
the detected field by appearing unfocused or cloudy in proportion to the distortion. This “distortion response” is useful in recognizing when the field being traced is being distorted by other
fields of metallic objects in the vicinity.
There are also two higher radio frequency bands
to help
locate lines passively. They are:
4 kHz to 15 kHz (LF) •
15 kHz to 35 kHz (HF) •
The Radio Frequency and <4 kHz bands can be useful in discriminating when tracing in a noisy environment. They are also very
helpful in finding lines on blind searches. When searching over
a wide area where the location of targets is unknown, one useful approach is to have multiple frequencies selected for use and
to check the area at a number of frequencies in sequence looking for meaningful signals. Even more convenient is to use the
OmniSeek setting described below.
Figure 29: 60
9th
Hz Passive Trace Frequency
Page 22

Figure 30: Selecting OmniSeek
Figure 31: OmniSeek with Secondary
Tracing Line
SeekTech SR-60
Ridge Tool Company
22
The display will show the main tracing line and identify the band
in which it is found. In Figure 31, the <4 kHz band is being displayed as the closest signal being seen by the locator. Notice
there is also a dashed secondary tracing line being shown. If
signals are also being detected from other frequency bands,
dashed lines (called Secondary Trace Lines) will indicate their apparent location.
In Figure 32, the Tracing Line, in the<4 kHz band, is showing some
distortion. Two other signals are being detected in the bands
15 - 35 kHz and 4 - 15 kHz. If the operator wants to follow these
secondary signals up more closely, he can switch to the particular bands to see which one is being picked up in each band.
This enables you to do a Passive Locate more effectively if there
is, for example, a lot of 60 Hz noise in the environment. It is important to keep in mind that what you are seeing are traces of
signals from the various broadband frequencies. The operator
has to use the data to develop an understanding of what he is
seeing. If one or two secondary tracing lines are showing out of
alignment with the main tracing line, this can be an indication
of another utility, especially if it is at a deeper depth. But it can
also be due to simple signal energy on the same utility in different frequency bands. Often greater distortion will be present on
other frequencies bands and this may cause the secondary tracing lines to appear out of alignment with the main tracing line.
In general, directly connected Active Line Tracing is more reliable than Passive Line Tracing.
OmniSeek Locating
The SR-60 has an advanced capability for passive locating called
OmniSeek. The OmniSeek mode
is a universal passive search
mode that can simultaneously detect frequencies in three passive
search bands (<4 kHz, 4 - 15 kHz, and >15 kHz). Whichever signal
has the highest Proximity
will be displayed. This enables you
to sweep an area without having to switch between frequency
bands.
To use OmniSeek, select it from the Main Menu:
The SR-60 will then search all three passive frequency bands simultaneously. The trace with the closest proximity value will be
displayed more prominently on the screen, and its corresponding frequency will appear on the left of the main screen. The
OmniSeek symbol
on the screen indicates the other filters
are also running. If a closer proximity is detected from another
frequency band, the displayed frequency value will shift to that
band.
WARNING
In Passive Line tracing, or when signals are extremely weak, the Measured Depth will generally read
too deep, and the actual buried depth may be much
shallower.
Figure 32: OmniSeek
15 - 35 kHz Band
Secondary Tracing Line 1
Secondary Tracing Line 2
Tracing Line
Page 23

Figure 33: Earth’s Dipole Field
SeekTech SR-60
Ridge Tool Company
23
Operating Tips for Passive Line Tracing
In Passive Locating if you are looking for a known line, be 1.
sure you are using the best frequency for the line in question. This may be, for example, 50/60 Hz (1) for a power line,
or it may turn out that 50/60 Hz (9) produces a more reliable
response on a particular line.
If seeking a cathode-protected pipe in Passive Mode, use 2.
higher-frequency (greater than 4 kHz) to pick up har monics.
Remember that pipes can carry currents that will show up 3.
on a Passive Trace as well as cables will; the only guarantee
of a locate is exposure and visual inspection.
In general, Passive Trace locating is less reliable than Active 4.
Line Tracing because Active Line Tracing offers the positive
identification of the signal from the transmitter.
Especially in Passive Line Tracing, knowing that you have 5.
found something is not the same as knowing what you
have found. It is essential to use all the indicators available,
such as Measured Depth, Signal Strength, etc., to confirm a
locate. If it is possible to access part of a passively-located
cable, it can then be energized using a transmitter and positively traced.
While Passive Line Trace is most often used on 50/60 Hz 6.
power lines, other cables such as phone lines, CATV lines,
etc., can be energized in operation, or by transient radio
frequencies in the region and may appear on Passive Line
Trace searches.
Verify a passive locate by finding a known termination point 7.
and hooking up a transmitter to it to do an active locate on
the line, if this is possible.
Sonde Locating
The SR-60 can be used to locate the signal of a Sonde (transmitter) in a pipe, so that its location can be identified above ground.
Sondes can be placed at a problem point in the pipe using a
camera, push rod, or cable. They can also be flushed down the
pipe. A Sonde is often used for locating non-conducting pipe
and conduit.
The field of a Sonde is different in form from the circular field
around a long conductor such as a pipe or cable. It is a dipole
field like the field around the Earth, with a north Pole and a south
Pole.
In the Sonde’s field, the SR-60 will detect the points at either
end where the field lines curve down toward the vertical, and
it will mark these points on the map display with a “Pole” icon
(
). The SR-60 will also show a line at 90 degrees to the Sonde,
centered between the Poles, known as the “Equator”, much like
the Equator on a map of the Earth if the planet were viewed sideways (See figure 33).
Note that because of the SR-60’s Omnidirectional antennas, the
signal stays stable regardless of orientation. This means the signal will increase smoothly when approaching the Sonde, and decrease smoothly moving away.
IMPORTANT!
Signal strength is the key factor in determining the
Sonde’s location. Take care to maximize the Signal
Strength prior to marking an area for excavation.
The following assumes that the Sonde is in a horizontal pipe, the ground is approximately level and the
SR-60 is held with the antenna mast vertical.
Note: A Pole is found where field lines turn vertical. The
Equator occurs when the field lines are horizontal.
Page 24

Figure 35: Poles and Equator of a Sonde
SeekTech SR-60
Ridge Tool Company
24
When locating a Sonde, first set up the locate:
Activate the Sonde • before putting it in the line. Select
the same Sonde frequency on the SR-60 and make sure
it is receiving the signal.
After the Sonde has been sent into the pipe, go to the suspected
Sonde location. If the direction of the pipe is unknown, push the
Sonde a shorter distance into the line (~15 feet (5m) from the access is a good starting point).
Location Methods
There are three major parts to locating a Sonde. The first
step is to localize the sonde. The second part is pinpointing.
The third is verifying its location.
Step 1: Localize the sonde
Hold the SR-60 so the mast is pointing outward. Sweep •
the antenna mast in the suspected direction of the
Sonde while observing the Signal Strength and listening to the sound. The signal will be highest when the
mast is pointing toward the Sonde.
Lower the SR-60 to its normal operating position (an- •
tenna mast vertical) and walk in the direction of the
Sonde. Approaching the Sonde, the Signal Strength will
increase and the audio tone will rise in pitch. Use the
Signal Strength and the sound to maximize the signal.
Maximize the Signal Strength. When it appears to be at •
its highest point, place the SR-60 close to the ground
over the high-signal point. Be careful to hold the receiver at a constant height above the ground as distance
affects Signal Strength.
Note the Signal Strength and move away from the high •
point in all directions. Move the SR-60 far enough in all
directions to verify that the Signal Strength drops significantly on all sides. Mark the point of highest Signal
Strength with a yellow Sonde Marker (clipped to antenna mast for convenience). This is the suspected Sonde
location.
If while “getting closer” the Equator appears on the screen, follow it in the direction of an increasing Signal Strength to localize
the Sonde.
If a Pole appears before the Equator appears, localize the Sonde
by centering the Pole in the cross-hairs.
Step 2: Pinpoint the Sonde
The Poles should appear on either side of the maximum signal point, an equal distance on either side if the Sonde is level.
If they are not visible on the screen at the point of maximum
Signal Strength, move from the maximum point perpendicular
to the dotted line (Equator) until one appears. Center the locator
over the Pole.
Where the Poles occur depends on the Sonde’s depth. The deeper the Sonde, the further away from it the Poles will be.
The dotted line represents the Equator of the Sonde. If the
Sonde is not tilted, the Equator will intersect the Sonde at
maximum Signal Strength and minimum Measured Depth.
Note: Being on the Equator does not mean that the loca-
tor is over the Sonde. Always verify the locate by maximizing Signal Strength and marking both Poles.
Figure 34: Dipole Field
Pole Pole
Ground
Equator
Page 25

Figure 36: Sonde Locate: Equator
SeekTech SR-60
Ridge Tool Company
25
Mark the first Pole location found with a red triangu- •
lar Pole marker. After centering on the Pole, a doubleline indicator will appear. This line represents how the
Sonde is lying underground, and in most cases also represents the pipe’s approximate direction.
When the locator gets close to a Pole, a zoom ring •
will appear centered on the Pole, allowing precision
centering.
The second Pole will be a similar distance from the •
Sonde location in the opposite direction. Locate it
in the same manner and mark it with a red triangular
marker.
If the Sonde is level, the three markers should be •
aligned and the red Pole markers should be similar distances from the yellow Sonde marker. If they are not,
a tilted Sonde may be indicated. (See Tilted Sondes, be-
low.) It is generally true that the Sonde will be on the
line between the two Poles, unless there is extreme distortion present.
Step 3: Verify the locate
It is important to verify the Sonde’s location by cross- •
checking the receiver’s information and maximizing
Signal Strength. Move the SR-60 away from the maximum Signal Strength, to make sure that the signal drops
off on all sides. Make sure to move the unit far enough
to see a significant signal drop in each direction.
Double-check the two Pole locations. •
Notice that the Measured Depth reading at the maxi- •
mum Signal Strength location is reasonable and consistent. If it seems far too deep or too shallow, recheck
that there is an actual maximum Signal Strength at that
location.
Notice that the poles and the point of highest Signal •
Strength lie on a straight line.
It doesn’t matter whether you locate the Poles first, or the Equator
first, and then the Poles, or one Pole, then the Equator, and then
the other Pole. You can even locate the Sonde using just the
Signal Strength, and then verify your result with the Poles and
Equator. What is important is that you verify all the data points,
and mark the Sonde’s position where the signal is highest.
Tilted Sondes
If the Sonde is tilted, one Pole will move closer to the Sonde and
the other farther away so that the Sonde location no longer lies
midway between the two Poles. The Signal Strength of the nearer Pole becomes much higher than that of the more distant Pole
if the Sonde is vertical (as it could be if it fell into a break in the
line); however, it can still be located.
If the Sonde is vertical what is seen on the screen is a single Pole
at the point of maximum Signal Strength. (The Ridgid Floating
Sonde is designed to have a single Pole “visible” and is weighted
to maintain the Sonde on a vertical axis. See Note below.)
It is important to realize that a severely tilted Sonde can cause
the Pole locations and the Equator to appear offset because of
the angle of the Sonde; but maximizing the Signal Strength will
still guide to the best location for the Sonde.
Floating Sondes
Some Sondes are designed to be flushed or to drift down a pipe
pushed by water flow. Because these Sondes swing much more
freely than a torpedo-shaped Sonde in a pipe, they can be oriented any which way. This means the Equator may be distorted by tilting, and the location of the Poles may vary. The only
guarantee of having located a floating Sonde is maximizing the
Signal Strength and double-checking that the signal falls away
on every side of the maximum signal location.
IMPORTANT!
Being on the Equator does not mean one is over the
Sonde. Seeing two Poles aligned on the display is not
a substitute for centering over each Pole separately
and marking their locations as described above.
For best accuracy, the SR-60 should be held with the
mast oriented vertically. The antenna mast must be
vertical when marking the Poles and Equator, or their
locations will be less accurate.
Page 26

SeekTech SR-60
Ridge Tool Company
26
Measuring Depth (Sonde Mode)
The SR-60 calculates Measured Depth by comparing the
strength of the signal at the lower antenna to the upper antenna.
Measured Depth is approximate; it will usually reflect the physical depth when the mast is held vertical and the bottom antenna
is touching the ground directly above the signal source, assum-
ing no distortion is present.
To measure depth, place the locator on the ground, directly 1.
above the Sonde or the line.
Measured Depth will be shown in the lower left hand corner 2.
of the SR-60’s display screen.
Measured Depth will be accurate only if the signal is undis-3.
torted. Measured Depth Display is disabled under clipping
conditions.
Clipping (Sonde Mode)
Occasionally the Signal Strength will be strong enough that the
receiver will be unable to process the entire signal, a condition
known as “clipping”. When this occurs, a warning symbol
will
appear on the screen. It means that the signal is particularly
strong.
SimulTrace
The SR-60 has a new capability for use in specialized locating
situations which enables you to trace a pushcable and a Sonde
simultaneously. This capability is called SimulTrace. When it is activated, the SR-60 will display a tracing line tuned to 33 kHz at
the same time as it seeks on the 512 Hz frequency for a Sonde.
By following the 33 kHz signal, the locator can follow the pushcable along a pipe, for example, and can simultaneously detect
the Sonde emitting a 512 Hz signal when it is within detection
range.
Some modern pushcable and camera systems are equipped to
inject the 33 kHz signal onto the pushcable automatically. If you
are using an earlier pushcable and camera system, you can inject the 33 kHz signal onto the pushcable by using an Inductive
Clamp with several turns of the pushcable looped around the
jaws. Plug the Inductive Clamp into a transmitter set to 33 kHz
and turn it on.
To activate the SimulTrace mode, select it from the Main Menu
frequency list and toggle it into Active Status (it is off by default).
Then, select SimulTrace
from the menu of frequencies.
Once you have activated the SimulTrace mode, follow the general rules of active line tracing to find and follow the pushcable.
When you are within detection distance of the Sonde, the screen
will automatically shift to Sonde mode and will display the equator and the poles as described above. When SimulTrace is active,
the screen will continue to display a faint tracing line representing the pushcable on 33 kHz even when it is in Sonde mode. This
is especially useful if you are following a pipeline whose location
and bearing is questionable. Note: If no signal from either a line
at 33 kHz or a 512 Hz Sonde can be detected, the magnifying
glass will appear to indicate the unit is seeking for a signal.
Note: If following a moving Sonde, it may be easiest to
“chase” a pole, and then to pinpoint the actual position of
the Sonde only after the Sonde has stopped moving.
Note: Holding the Select Key will display a short countdown followed by a calculated depth report. This
“Pushbutton Depth”, calculated on more signal samples,
will be more precise than the running Depth indication.
(See Depth Warnings on page 17.)
Figure 37: Selecting SimulTrace Mode
Figure 38: SimulTrace Mode:
No-Signal Icon
Page 27

SeekTech SR-60
Ridge Tool Company
27
Figure 39: Screen Display in Different Locations (Sonde)
Page 28

SeekTech SR-60
Ridge Tool Company
28
Figure 40: Tilted Sonde, Poles, and Equator
Note the right-hand Pole is closer to the Equator, due to tilt.
Normal
Tilted
Maximum Signal Strength
Page 29

SeekTech SR-60
Ridge Tool Company
29
Custom User Frequencies
SR-60 users can set and use custom frequencies. By setting the
SR-60 to a user-defined frequency, you can use it with transmitters from any manufacturer, even if the transmitter has unusual
frequencies or has drifted from its nominal frequencies.
Up to 30 user-defined frequencies can be created, changed, stored, and deleted as needed.
To create a new frequency, scroll down the Main Menu to
Frequency Selection Control
. Then select the Sonde,
Line Trace, or Power category for your user-defined frequen-
cy. The first option on the category list will be User-Defined
Frequency option. To manage User-Defined Frequencies, highlight it and press Select.
A screen with spaces for a six-digit frequency will appear. It can
accept frequencies from 00000 to 490,000 Hz. For each digit, the
Up Arrow
increases the number and the Down Arrow de-
creases it. The Left
and Right Arrow Keys move you from
column to column.
By moving all the way to the left, using the Left Arrow Key
,
you can highlight the icon of the magnifying glass. This will reveal a drop-down list of frequencies (Figure 43) which are used
by manufacturers of other transmitters. Pressing Select
will
automatically fill in the user-defined frequency values with the
highlighted number.
A list of frequencies used by various manufacturers’ transmitters
and locators is included in the User Manual.
Alternatively, you can define a user-defined frequency by setting
each digit in turn from right to left with the arrow keys.
Press the Select Key
to save the user-defined frequency you
have set. Custom frequencies can be easily identified by a “+” in
their menu list name.
Changing a User-Defined Frequency
To edit a user-defined frequency:
Press the Menu Key 1.
to show the list of available frequencies. Scroll down to the user-defined frequency you wish to
edit.
Press the Frequency Key 2.
. The user-defined frequency
window with the frequency you selected will appear.
Figure 41: User-Defined Frequency
(Line Trace Mode)
Figure 42: Custom Frequency Setting
Figure 43: Choosing a Frequency Value
Figure 44: User-Defined Frequency
in Main Menu
Page 30

Figure 45: Editing a User-Defined Frequency
(Note: Trash Icon for deleting Frequency appears
when Frequency is set to 0)
Figure 46: User-Defined Frequency Screen
Figure 47: Main Menu
SeekTech SR-60
Ridge Tool Company
30
Use the arrow keys to move through the digits and increase 3.
or decrease them.
When the frequency is correct, press the Select Key 4.
to
save the new value.
To delete a user-defined frequency:
Press the Menu Key 1.
to show the list of active frequencies. Scroll down to the user-defined frequency you wish to
edit.
Press the Frequency Key 2.
. The user-defined frequency
window with the frequency you selected will appear.
For each digit that is not set to zero, select the digit and use 3.
the Down arrow key to reduce it to zero.
When all digits in the frequency are set to zero, the “trash 4.
can” icon will appear. Press the Select Key
. The user-de-
fined frequency will be deleted.
Menus and Settings
Pressing the Menu Key brings up a series of choices which let
the operator configure the SR-60 as preferred (See figure 47). The
menu is a context-sensitive list of options. The entry point into
the menu list is set to the currently active frequency.
Auto Menu Exit Count-down Timer
While traversing the menu tree, a counter appears at the bottom of the screen counting down. When it reaches zero, it will
automatically move back up one level of the menu tree until it
reaches the operating screen again. It resets to nine with each
key press, or each time it goes up one menu level, until it reaches
the operating screen.
In sequence from the top of the menu down, the Main Menu
presents the following items:
1.
SimulTrace (512 Hz + 33 kHz) (If activated)
2.
Currently Available Sonde frequencies
(Checked-Active or not)
3.
Currently Available Active Line Trace fre quencies
(Checked-Active or not)
4.
Currently Available Power (Passive Line Trace)
frequencies (Checked-Active or not)
5.
Currently Available Radio Frequencies
(Low and High) (Checked-Active or not)
6.
OmniSeek Mode
7.
Depth Measurement Units Setting
8.
Backlight Control
9. Auto-Shutdown Control
10.
LCD Contrast Control
Page 31

Figure 48: Selecting Units (Feet/Meters)
SeekTech SR-60
Ridge Tool Company
31
11. Display Elements Control (Sub-menus will
display when selected for Sonde or line tracing
modes.)
12.
Frequency Selection Control (Sub-menus will
display for categories of frequencies that can
be selected.)
13.
Information Menu including software version
and unit serial number (Sub-menu for restoring factory defaults will display on Information
screen.)
See the Menu Tree on page 36 for a complete list.
SimulTrace Mode
The SimulTrace mode is off by default and can be activated by
selecting it in the Frequency Selection Control sub-menu. It provides simultaneous tracing of a 512 Hz Sonde and a 33 kHz line
for easier tracking of underground pipes using a Sonde.
Currently Available Sonde Frequencies
Frequencies that have been set to “Checked-Active” status appear with a check box next to them. If the checkbox is checked,
the frequency can be accessed using the Frequency Key
.
Frequencies are checked or unchecked by highlighting them
and pressing the Select Key. To return to the operating screen,
press the Menu Key. See the Frequency List on page 10.
Currently Available Active Line Trace Frequencies
Frequencies that have been set to “Checked-Active” status appear with a check box next to them. If the checkbox is checked,
the frequency will be activated and can then be accessed using
the Frequency Key
. Frequencies are checked or unchecked by
highlighting them and pressing the Select Key. To return to the
operating screen, press the Menu Key. See the Frequency List on
page 10.
Currently Available Passive Line Trace Frequencies
As with other frequency categories, these items will appear in
the “Checked-Active” set when checked. See the Frequency List on
page 10.
Currently Available Radio Frequencies
As with other frequency categories, these items will appear in
the “Checked-Active” set when checked. See the Frequency List on
page 10.
OmniSeek Mode
The OmniSeek mode allows simultaneous tracing in multiple
high-frequency bands: <4 kHz, 4 - 15 kHz, and 15 - 35 kHz.
Change of Depth Units
The SR-60 can display Measured Depth in either Feet or Meters
(Figure 48). Feet are shown in feet-and-inches format; meters are
in decimal format. To change these settings, highlight the Depth
Units selection in the menu and press the Select Key to toggle
between feet or meters. Use the Menu Key to save the section
and exit.
Back Light Control
A light detector built into the upper left corner of the keypad
senses low light levels. The backlight can be forced on by blocking the light to this sensor.
The automatic LCD backlight is factory set to only switch on under fairly dark conditions. This is to conserve battery power. As
the batteries near depletion, the backlight will appear dim.
To set the backlight to be always off, highlight the light bulb icon
in the tools section of the menu. Press the Select Key to toggle it
between Auto, always ON and always OFF.
Page 32

Figure 49: Setting Backlight Mode
(On/Off/Auto)
Figure 50: Contrast Setting Option
Figure 51: Increasing/Decreasing Contrast
SeekTech SR-60
Ridge Tool Company
32
LCD Contrast
When this is selected by pressing the Select Key, the contrast can
be adjusted (Figure 50). Use the Up and Down Keys to make the
screen lighter or darker (Figure 51). Extreme temperature changes may make the LCD appear dark (hot) or light (cold). Setting
the contrast to extreme dark or light may make the LCD difficult
to read.
Use the Menu Key to save the setting and exit. In this menu, one
can also exit by pressing the Select Key to save the setting and
exit.
Display Elements Menu
Advanced features of the SR-60 can be enabled by using the
Menu Key to show the menu tree. Select the Display Elements
selection menu. Then select the mode (Line Trace or Sonde) you
want to change.
Selecting the icon representing two small display screens will
bring up the Display Elements Menu for either Trace
or
Sonde
mode. The SR-60 is shipped with some of the elements
switched off for simplicity. To toggle an element on or off, press
the Up or Down Key to highlight the screen element icon for that
feature. Then use the Select Key to check or uncheck the box.
Checked display elements are selected to be on for that mode.
Personal preferences and the type of locating being done will
dictate which optional elements the operator wants displayed.
Optional Features
Optional Features in the Display Elements Menu include:
Race Track and Watermark
The “Race Track” is a circular track around the center of the Active
View Area on the screen. The Watermark is a marker which appears in the outer ring of the display, traveling along the Race
Track (Figure 54).
“Race Track”
with Watermark
and Pointer
Auto Menu Exit
Countdown Timer
Signal Focus
Control
Distortion Line
On/Off
Current Strength
Signal Angle
Tracing Line
Distortion
Ties Audio to
Signal Strength
Center Signal
Strength Option
Signal Strength
On/Off
Guidance
Arrows
No Signal Icon
(Suppression)
Figure 52: Display Elements
(Line Trace Modes)
Auto Menu Exit
Countdown Timer
Signal Focus Control
“Race Track” with
Watermark and
Pointer
Sound Muting > 99’
Figure 53: Display Elements
(Sonde Mode)
Current Strength
Signal Angle
No Signal Icon
(Suppression)
Page 33

Figure 55: No-Signal Icon
Figure 56: Display of Signal Strength
at Screen Center
SeekTech SR-60
Ridge Tool Company
33
The Watermark is a graphic representation of the highest Signal
Strength reached (in Sonde mode) or the highest Proximity Signal
level reached (in Line Tracing modes). It is “chased” by a solid
Level Pointer
which shows the current Signal Strength. If the
Signal Strength Level Pointer goes higher than the Watermark,
the Watermark moves up accordingly to show the new highest
level graphically. The Watermark, like the high-water ring in a
bathtub, shows the highest level reached.
This provides an additional, visual way to track the maximum signal. If you are trying to trace a line by noticing its highest Signal
Strength level, Watermark serves as a visual aid.
The Watermark and Race Track are a single option that is off
by default but can be set on in the Display Elements selection
menu.
No-Signal Icon (Suppression)
IF this feature is selected “on”, when the SR-60 is not receiving
any meaningful signal on the selected frequency, it will display
a moving magnifying glass icon, indicating no signal is being
detected (Figure 55). The sound will also mute when no signal is
found. This reduces the confusion of trying to interpret the random noise that some locators display in the absence of a signal.
Depth suppression – If the Measured Depth is greater •
than the threshold depth (by default, 99’/30 m in Sonde
mode and 30’/10 m in Line Trace mode), the map is
suppressed, and the magnifying glass appears.
Noise suppression – If the signal is seen to be too noisy, •
the map may also be suppressed.
Center Signal Strength Option
Selecting this option in the Menu Selection screen will force
the number representing Signal Strength to be displayed in the
center of the display area anytime when a Proximity Signal is not
available (Figure 56). This may occur when signal is weak. When
a Proximity Signal again becomes available, the Signal Strength
number returns to the lower right corner of the screen as usual.
(Line Trace Mode only).
Signal Focus Control
The Signal Focus Control feature essentially acts something like
a magnifying glass on the signal. It reduces the sample bandwidth of the signal that the receiver examines, and gives a display based on a more sensitive read of the incoming signals.
The tradeoff in using the Signal Focus Control setting is that the
display, while more precise, will update more slowly. The Signal
Focus Control can be set at 4 Hz (wide), 2 Hz, 1 Hz, .5 Hz, and
.25 Hz (narrow). The narrower the selected bandwidth used, the
greater detection distance and precision the receiver will show,
but with a lower update rate of data on the display.
Figure 54: “Race-track” with Watermark and Level Pointer
Watermark
Pointer
Racetrack
Page 34

Figure 58: Selecting a Frequency Category
Figure 59: Highlighting a Frequency
to Activate
SeekTech SR-60
Ridge Tool Company
34
Note this means that when using a more narrow Signal Focus
Control setting, it is necessary to move the receiver along the
line more slowly. This is a trade-off for the improved focus, and
will avoid missing data updates at the slower rate.
When it is selected on, the Signal Focus Control is changed to
narrower or wider settings using the Up (narrower) and Down
(wider) Keys.
Signal Focus Control is useful when you need to focus in on a
particular signal with detail.
Sound Muting —>99 feet
This option automatically mutes sound when Measured Depth is
greater than 99 feet (30 m). If it is unchecked, the sound will not
mute automatically.
Tracing Line Response
The Tracing Line distortion response checkbox sets the sensitivity of the Target Line’s distortion display to low, medium, or highor disables it altogether. The higher the setting, the more sensitive the “distortion cloud” around the Tracing Line becomes.
If the distortion response is disabled, the Tracing Line will become a single solid line, and the screen will show a second,
dashed, line called the Distortion Line. (See page 36 for a descrip-
tion of using this alternative display.)
Frequency Selection Control
Additional available frequencies on the Master Frequency Menu
can be added to the Main Menu list of available frequencies by
going to the Frequency Selection Control sub-menu
and selecting the desired mode. All frequencies available in the
SR-60 for that mode will be displayed.
Checked frequencies are already “Currently Available” – that is,
selected to appear in the Main Menu. From there, they can be set
to “Checked-Active” status to make them available by use of the
Frequency Key
. Checking a frequency to add it to the Main
Menu will set the unit to operating in that frequency and place it
in Checked-Active status.
To select additional frequencies, highlight and select the
Frequency Selection Control
sub-menu. Highlight the
category of the desired frequency (Figure 58). Press the Select
Key
.
Then use the Up and Down Keys to scroll through the available
frequencies. Highlight the desired frequency to add it to the currently available list (Figure 59).
Checking a frequency (using the Select Key) will enable it to be
included in the “Currently Available” list of frequencies on the
Main Menu (Figure 60). Once on the Main Menu, it can be set
to “Checked-Active” status, and then be put into use using the
Frequency Key .
Signal Focus
Control
Figure 57: Signal Focus Control
Page 35

Figure 60: Setting a Frequency to
“Currently Available” Status
Figure 62: Restore Defaults Option
Figure 63: Defaults Restored
(Line Trace Mode)
Figure 61: Information Screen
SeekTech SR-60
Ridge Tool Company
35
To switch to a “Currently Available” frequency that is not yet
“Checked-Active”, press the Menu Key
and scroll down to
the desired frequency; if it is not checked, press the Select Key to
toggle the checkbox to “checked”. This sets the status of that frequency to “Checked-Active”. Press the Menu Key to return to the
operating display, which will now be set to the frequency just
activated. The SR-60 will show the chosen frequency and its icon
on the left of the screen.
Selected frequencies in the Checked-Active set can be switched
while the SR-60 is in use, by pressing the Frequency Key. The
SR-60 will cycle down the list through the set of active frequencies from low to high, group by group, and repeat. Unchecking a
frequency in the Main Menu will deactivate it, and it will then not
appear when pressing the Frequency Key.
Information Screen and Restoring Defaults
Information Screen
The information screen appears at the bottom of the menus
choices list. Pressing the Select Key displays information about
your locator, including software version, serial number of the receiver, and its calibration date (Figure 61).
Restore Factory Defaults
Pressing Select a second time will display the Restore Factory
Defaults option. (See Figure 62.)
Use the Up and Down Keys to highlight either the “check” symbol to restore factory defaults, or the “X” symbol to NOT restore
them.
Pressing the Menu Key without changing either checkbox will
exit the option and leave things as they were.
Note: If a frequency appears missing, look to make sure it
is currently available in the Main Menu frequencies list. If it
is, select it using the Select Key. If not, go to the Frequency
Selection menu and the appropriate sub-category and
select it there, checking the box to make it “Currently
Available” and bring it into the Main Menu list. Make sure
it is “checked” at both menu levels for it to appear in the
current working set of frequencies.
Page 36

Figure 65: Screen Display with Distortion Line
(Line Trace Mode)
SeekTech SR-60
Ridge Tool Company
36
Menu Tree
The following figure shows options and controls built into the
SR-60 menus.
Operating With the Distortion Line
If the Tracing Line’s distortion response (blurring) is disabled, the
detected field will be shown with two lines, one solid (the Tracing
Line
) and one dashed (the Distortion Line ).
(The dashed Distortion Line can be separately selected to be on
or off in the Display Elements menu.) The dashed Distortion Line
is the signal as seen by the upper antenna node and the solid
Tracing Line is the signal as seen by the lower node.
The Tracing Line without the dynamic distortion response (blurring) still represents the location, and the direction, of the signal
being traced. It still reflects changes in direction of the target
utility. And it helps recognize signal distortion, when compared
to the dashed Distortion Line — if something is interfering with
the signal and distorting its shape, the Distortion Line could be
significantly offset or skewed.
The Tracing Line represents the signal received by the lower antenna node. The Distortion Line represents the signal received
by the upper antenna node. If these two do not align, or they do
not reflect the same information as the Guidance Arrows about
where the center of the field is, then the operator knows he is
looking at some kind of distortion.
The two lines may also move randomly if a weak signal is being received, indicating that the locator circuit needs to be
improved.
The balance of the Tracing Line and the Distortion line combine
to give the operator much the same information as the Tracing
Line with its distortion response enabled, but in a different
graphical form. Advanced operators may find this more useful in
discriminating the primary signal from the impact of distortion.
Figure 64: SR-60 Menu Tree
Activated Frequencies
Sonde 512
Line Trace 126 Hz, 1 kHz, 8 kHz, 33 kHz, 93 kHz
Power 50^9 (450 Hz), <4 kHz
Radio L( 4 - 15 kHz), H (15 - 35 kHz)
OmniSeek
<4 kHz + 4 - 15 kHz + 15 - 35 kHz
Depth Units Feet, Meters
Backlight On/Off/Auto
Auto Shutdown 1 HR, Off
LCD Contrast Increase/Decrease
Display Elements
Sonde Mode Trace Mode
*=
Line Trace Display Only
Watermark »
Signal Focus Setting »
No-Signal Indicator »
Sound Signals »
Center Signal Strength* »
Signal Strength »
Signal Angle Indicator »
Distortion Line Response* »
(Hi, Med, Low)
Tracing Line Distortion * »
Sound Mute > 99’ »
Guidance Arrows* »
Frequency Selection
»
SimulTrace™: 512 Hz + 33 kHz
Sonde: » Custom Frequencies, 16, 512,
640, 850, 8k, 16k, 33k
Line Trace: » Custom Frequencies,
128 Hz, 1 kHz, 8 kHz, 33 kHz, 51 kHz,
93 kHz, 93 kHz-B
Power: » Custom Frequencies, 50 Hz,
60 Hz, 100 Hz, 120 Hz, 50^5 (250 Hz),
60^5 (300 Hz), 50^9(450 Hz), 60^9
(540 Hz), <4 kHz
RF: » L (4 - 15 kHz), H (15 - 35 kHz)
»
OmniSeek: <4 kHz + 4 - 15 kHz +
15 - 35 kHz
Information Menu
Restore Defaults, Clear Custom
Frequencies, Cancel
Page 37

Figure 66: Over a Circular Field
Figure 67: Over a Distorted Field
SeekTech SR-60
Ridge Tool Company
37
Informational Locating
The normal shape of a field around a long conductor such as a
pipe or cable is circular (cylindrical in three dimensions). When
over the center of a circular field, the operator can observe the
following indicators:
Maximum Signal Strength. •
Maximum Proximity Signal (Line Trace Mode). •
Centered Tracing line with minimized distortion. •
Guidance arrows centered, agreeing with Tracing line. •
Minimum Measured Depth. •
Sound pitch and volume will increase until they maxi- •
mize over the target utility.
The experienced operator learns to “see” the ground situation
by knowing how the different pieces of information provided by
the SR-60 relate to each other. While a simple straightforward locate of a circular field is fast and easy, tracing a line which is near
other large conductors such as power lines, phone lines, gas
mains, rebar, or even buried scrap metal can lead to questions
which can only be correctly answered by taking all the available
information into account.
By comparing the Guidance Arrows, the Tracing Line, Signal
Strength, Signal Angle, Measured Depth, and Proximity Signal,
an operator can see which way the field is being distorted.
Comparing the field information with an educated view of the
ground, noticing where transformers, meters, junction boxes,
manholes, and other indicators are located can help in understanding what is causing field distortion. It is important to remember, especially in complex situations, that the only guarantee of the location of a particular line or pipe is visual inspection,
such as by potholing.
Compound or complex fields will produce different indications
on the SR-60 that will show what is happening. Some examples
might be:
Disagreement between guidance arrows, Tracing Line •
and Distortion Indicator.
Inconsistent or unrealistic Measured Depth signal. •
Fluctuating random indications (also caused by very •
weak signal).
Inconsistent Proximity Signal compared to guidance ar- •
rows (Active or Passive Line Trace modes).
Signal strength maximizing off to one side of the •
conductor.
Generally, distortion is likely to be worse at higher frequencies,
compared to lower frequencies. This is due to the tendency of
higher frequency signals to “jump” to adjacent conductors. Large
iron and steel objects such as vault and manhole covers, trench
plates, structural supports, rebar and vehicles can significantly
distort even the lowest frequencies. In general, passive locating is more subject to distortion than active locating, especially
in regards to depth measurements. Power transformers, buried
and overhead power lines are a common source of strong distortion. It may be impossible to get an accurate locate close to a
large power transformer.
Notes on Accuracy
Measured Depth, Proximity, and Signal Strength measurements
rely on a strong signal being received by the SR-60. Remember
that the SR-60 is used above ground to sense electromagnetic
fields emitted from underground lines (electrical conductors
like metal cables and pipes) or Sondes (actively transmitting
beacons).
Page 38

Figure 68: Bleed-over
SeekTech SR-60
Ridge Tool Company
38
When the fields are simple and undistorted, then the information from sensed fields is representative of the buried object.
If those fields are distorted and there are multiple interacting
fields, it will cause the SR-60 to locate inaccurately. Locating is
not an exact science. It does require the operator to use judgment and look for all the information available beyond what the
instrument readings may be. The SR-60 will give the user more
information, but it is up to the operator to interpret that informa-
tion correctly. No locator manufacturer will claim that an operator should follow the information from their instrument exclusively. A wise operator treats the information gained as a partial
solution to the problem of locating and combines it with knowledge of the environment, utilities practices, visual observation,
and familiarity with the instrument to arrive at an informed
conclusion.
Locating accuracy should not be assumed under the following
conditions:
When other cables or utilities are present.1. “Bleed over”
may produce distorted fields and illuminate cables or pipes
unintentionally. Use lower frequencies when possible and
if possible eliminate connections between the two cables
(such as common bonding to ground).
When tees, turns, or splits are present in the line.2. When
following a clear signal that suddenly becomes ambiguous,
try seeking in a circle of about 20’ around the last known
point to see whether the signal picks up again. This may
reveal a branch, joint, or some other change in the line. Be
alert to “split opportunities” or sudden changes of direction
in the utility being traced. Turns or tees can cause a sudden
increase in the Distortion Indicator response.
When Signal Strength is low.3. A strong signal is necessary
for accurate locating. A weak signal can be improved by
changing the grounding of the circuit, frequency, or transmitter connection. Worn or damaged insulation, bare-concentric cables, and iron pipes exposed to ground will compromise Signal Strength through leakage to ground.
Far-end grounding4. will change Signal Strength significantly. Where far-end grounding cannot be established a higher
frequency will provide a stronger signal. Improving ground
conditions for the locating circuit is a primary remedy to a
poor signal.
When soil conditions vary.5. Extremes in moisture, either
very dry or water-saturated, may affect measurements.
For example, ground that is saturated with salty water will
shield the signal severely and be very difficult to locate in,
especially at high frequencies. In contrast, adding water to
very dry soil around a ground stake can make a major improvement in signal.
In the presence of large metal objects.6. Simply walking
past a parked car during a trace, for example, can cause an
unexpected increase or decrease in Signal Strength, which
will revert to normal when past the distorting object. This
effect is stronger at high frequencies, which “couple” more
readily onto other objects.
The SR-60 cannot change the underlying conditions of a difficult
locate, but changing frequency, grounding conditions, transmitter location, or isolating the target line from a common ground
can change the results, by making a better ground connection,
avoiding signal splits, or reducing distortion. Other locating receivers will give an indication that they may be over the line but
they have less ability to determine the quality of the locate.
The SR-60 provides more information. If all of the indicators are
aligned and in agreement, mark-outs can be made with more
confidence. If the field is distorted it shows immediately. This
allows the operator to do something to isolate the target line,
change the grounding, connection point, move the transmitter,
or change the frequency to get better reception with less distortion. For extra certainty, take steps to inspect the situation, such
as by requesting potholing.
In the final analysis, there is one “most important” component
in the locating task – the operator. The SR-60 provides an unprecedented amount of information to be able to make the correct decision rapidly and accurately.
Page 39

SeekTech SR-60
Ridge Tool Company
39
Advantages of the Omnidirectional Antenna
Unlike the coils used in many simple locator devices, the
Omnidirectional antenna detects fields on three separate axes,
and can combine these signals into a “picture” of the apparent strength, orientation, and direction of the complete field.
Omnidirectional antennas offer definite advantages:
The Mapping Display
The mapping display enabled by the Omnidirectional antennas
provides a graphic view of a signal’s characteristics and a bird’s
eye view of the signal from underground. It is used as a guide for
tracing underground cables and pipes, and can be used to better
pinpoint Sondes. It can also be used to provide more information for complex locates.
The use of lines (representing the signals sensed by upper and
lower antennas) and guidance arrows (pointing toward the center of the detected field) combine to give the locator a graphic
picture of the receiver’s location, and where the target utility or
Sonde is. At the same time the operating screen provides all the
information needed to understand what is happening with the
field being located – its Signal Strength, continuous distance,
Signal Angle, and proximity to the target. The information available at one moment on the SR-60 would take multiple sample
readings with some conventional locators. A distorted or compound field will be easier to interpret when all the information is
in a single display as it is with the SR-60.
A Better Way of Locating
The SR-60 gives the operator a picture of the situation as the
receiver moves along the target area and makes it easier to understand where a target line’s electromagnetic field is. With more
complete information, an operator can understand how things
stand underground and resolve complex situations, avoid inaccurate mark-ups, and find the right line or cable more rapidly.
What the SR-60 Does
The SR-60 is used above ground to sense and trace electromagnetic fields emitted from underground or hidden lines (electrical conductors like metal cables and pipes) or Sondes (actively
transmitting beacons).
When the fields are undistorted, the information from the sensed
fields gives an accurate picture of the buried object. When the
situation is made complex by interference from more than one
line, or other factors, the SR-60 provides a display of information
that shows multiple measurements of the detected field. This
data can make it easier to understand where the problem is, by
providing clues as to whether a locate is good or bad, questionable or reliable. Instead of just laying paint in the wrong place,
the operator can see clearly when a difficult locate needs reevaluation.
The SR-60 provides more of the critical information the operator
needs to understand the situation underground.
What It Does Not Do
The SR-60 locates by sensing electromagnetic fields surrounding
conductive objects; it does not sense the underground objects
directly. It provides more information about the shape, orientation, and direction of fields than other locators but it does not
magically interpret that information or provide an x-ray image of
underground objects.
A distorted, complex field in a noisy environment requires intelligent human thought to analyze correctly. The SR-60 cannot
change the results of a difficult locate, even though it shows all
the information about those results. Using what the SR-60 shows,
a good operator can improve locating results by “making the circuit better”, changing frequency, grounding or the transmitter’s
location on the target line.
Figure 69: Mapping Display
Page 40

SeekTech SR-60
Ridge Tool Company
40
Orientation to the Signal
Because of the multiple signals being processed by each
Omnidirectional antenna, the target’s signal always gets stronger as the receiver gets closer to the target. How the unit is held
does not affect Signal Strength. The user can approach from any
direction and does not need to know the orientation or direction
of the pipe or wire.
Locating Sondes
Used with a Sonde, the SR-60 eliminates Nulls and “Ghost Peaks”.
A conventional locator signal often sees a signal increase followed by a null (better described as no signal registering on the
antenna) and then a peak. This can confuse the operator who
may interpret a smaller peak as the target.
The main peak is in the center, and two false peaks are outside the two nulls.
The SR-60 uses measurements of the complete field to direct
the user to the target. Finding a Sonde using Signal Strength is a
very direct process.
The only way to go is “up” toward the maximum signal.
More on Informational Locating
Because of the SR-60’s advanced processing and display, the information provided by the SR-60 makes it clear when a locate is
reliable, and when one is suspect.
A good locator can understand the underground picture with
much less effort by using the combined information provided
by:
Proximity Signal/Signal Strength •
Tracing Line •
Distortion Indicator •
Guidance Arrows and Directional Sound •
Continuous Measured Depth indications •
These indicators show what the antennas are “sensing” as they
move through the field. They signal when a field is being distorted out of shape by interference from other cables, pipes, or conductive objects nearby. When significant distortion is present,
the indicators will not agree. Knowing distortion is present allows the operator the option of taking action to reduce it or at
least account for it. (For example, both location and Measured
Depth reading become suspect in distorted fields.)
The other side of having more information is verification that a
locate is reliable. If all of the indicators are in agreement and reasonable then the degree of confidence in a locate can be much
higher.
SR-60 Maintenance
Transportation and Storage
Before transporting, make sure that the unit is off to preserve
battery power.
When transporting, make sure that the unit is secure and does
not bounce around or get bumped by loose equipment. The
SR-60 should be stored in a cool dry place.
Installing/Using Accessories
The SR-60 also comes with Sonde and Pole Markers that can be
used to mark Pole or Sonde locations above ground. There are
two (2) red markers to mark the Poles and one (1) yellow marker
to mark the Sonde. The markers can also be used to temporarily
mark points to come back to while scouting a target area or tracing a line. If appropriate: replacements can be ordered from your
Ridgid dealer.
Figure 70: The signal from a Sonde as “seen” by a
conventional locator
False Peaks
Nulls
Peak
Note: If storing the SR-60 for an extended period, remove
the batteries completely.
If shipping the SR-60, remove the batteries entirely from
the unit.
Peak
Figure 71: Sonde signal as “seen”
by the SR-60
Page 41

SeekTech SR-60
Ridge Tool Company
41
Maintenance and Cleaning
Keep the SR-60 clean with a damp cloth and some mild de-1.
tergent. Do not immerse in water.
When cleaning, do not use scraping tools or abrasives as 2.
they may permanently scratch the display. NEVER USE
SOLVENTS to clean any part of the system. Harsh chemicals
can cause cracking of the Case.
Locating Faulty Components
For troubleshooting suggestions, please refer to the trouble-shooting guide on page 46. If necessary, contact RIDGE Tool Technical
Service. We will establish a plan of action to get your SR-60 working for you.
Service and Repair
All repairs made by Ridge service facilities are warranted
against defects in material and workmanship.
If you have any questions regarding the service or repair of this
machine, call or write to:
Ridge Tool
For information on your nearest RIDGID Independent Service
Center or any service or repair questions:
• ContactyourlocalRIDGIDdistributor.
• Visit www.RIDGID.com or www.RIDGID.eu to find your local
RIDGID contact point.
• Contact RIDGID Technical Services.Department at rtctech-
services@emerson.com, or in the U.S. and Canada call (800)
519-3456.
For EC Countries: Do not dispose of electrical
equipment with household waste! According
to the European Guideline 2002/96/EC for
Waste Electrical and Electronic Equipment
and its implementation into national legislation, electrical equipment that is no longer
usable must be collected separately and
disposed of in an environmentally correct
manner.
For EC countries: Defective or used battery packs/batteries
must be recycled according to the guideline 2006/66/EEC.
IMPORTANT!
Instrument should be taken to a RIDGID Independent
Authorized Service Center or returned to the factory.
Remove batteries before shipping.
CAUTION
Remove batteries entirely before shipping.
Page 42

SeekTech SR-60
Ridge Tool Company
42
Icons and Symbol
Figure 72: Icons and Symbols
KEYPAD ICONS
Menu Navigation/Signal Focus
Menu Selection
SondeMode: Force Depth/Re-center Audio
Line Trace Mode: Force Depth, Force current, Re-center Audio
Signal Strength Proximity Setting: Force Map On
Menu Navigation/Signal Focus
DISPLAY ICONS DISPLAY ICONS (Con’t) MENU ICONS
Sonde Frequency
Proximity Signal
Tools Menu
Power ON / OFF Key
Menu Key
Frequency Key
Sound Key
Screen Contrast Adjust
Auto Power Off Setting
Display Elements
Frequency Selection Control
Information Screen
Factory Settings Reset
Frequency Settings Reset
Menu Timeout Counter
Go Up One Level
(press menu key)
Measured Depth/
Distance Settings
Signal Strength
Audio Level
Battery Level
Backlight settings
Low Battery Warning (flashing)
Level Pointer
(Signal Strength)
Watermark
(Signal Strength)
No Signal
Signal Focus
Signal Angle Indicator
Milliamp, Current
Active Trace Frequency
Radio Frequency
Passive Line Trace Frequency
Measured Distance/Depth
Simutrace
OmniSeek
Tracing Line
Line Direction Gradient
Pole Icon
Rotational Guidance Arrows
Distortion Line
Equator
Pipe Direction
Depth Greater Than 30 Feet/10 Meter Threshold
Page 43

SeekTech SR-60
Ridge Tool Company
43
Glossary - Definitions
Active Line Tracing
A mode of locating using a Line Transmitter to inject a chosen frequency onto a hidden conductor; the
frequency is then detected by the SR-60 to trace the conductor.
Active View Area
The area within the circle in the center of the operating screen, where the Tracing Line or Sonde Pole
and Equator symbols appear.
Bleed over
Coupling of the signal from the target line onto adjacent conductors by any means (resistive, capacitive, or inductive). Bleed-over makes the signal appear to be coming from a different conductor than
the one being traced by setting up a field of the same frequency in a nearby conductor.
Checked-Active
Frequencies
A frequency is said to be “Checked-Active” when it has been checked on the main menu; this enables it
to be accessed by the use of the Frequency Key during operation of the SR-60. The “In Use” frequency
is always one of the Checked-Active set.
Clear Signal
A clear signal is a field caused by current through a conductor which is strong enough to be detected unambiguously by a receiver such as the SR-60. Clear signals depend on good conductivity, good
grounding, and adequate current through the target conductor.
Clipping
The condition of receiving a signal too strong to be processed all at once by the signal processor; in the
SR-60 this condition will cause a warning signal to flash. The signal peaks are too high and are “clipped”
off.
Common Bonding
The use of a connector to ground more than one line through the same ground connection. Phone
lines, for example, are often bonded to ground via the electrical service ground line. Common bonding
can be a cause of ambiguous signals in locating.
Compound Field
An electromagnetic field caused by the combination or two or more fields in proximity to each other.
A compound field has multiple lobes and a complex energy pattern which can require analysis to interpret correctly when locating.
Coupling
The transfer of energy (without direct electrical contact) between two or more cables or components
of a circuit. This can occur through induction, through common bonding, or other means.
Crosshairs
A symbol in the center of the Active View Area representing the location of the SR-60, relative to the
detected field.
Current Strength
The calculated level of current based on field strength detected by the Omnidirectional antennas
of the SR-60; expressed approximately in milliamps (mA). An accurate depth measure is required for
accuracy.
Currently Available
Frequencies
Frequencies which have been checked in the Master Frequency Menu are said to be “Currently
Available”; they appear on the Main Menu when the Menu Key is pressed, and can be set to “CheckedActive” status.
Default
Default values are those settings which the SR-60 uses if the operator does not choose alternative settings; they can be restored from the Information Menu.
Depth See Measured Depth.
Page 44

SeekTech SR-60
Ridge Tool Company
44
Glossary - Definitions
Distortion
The impact of near-by fields, other conductors, magnetic flux, or other interference on a circular electro-magnetic field. Distortion is detected by comparing the information from the SR-60’s Tracing Line,
Proximity Signal, Signal Strength, Measured Depth Display, and Signal Angle readings. The Tracing Line
will grow less focused in response to more distortion in the detected field.
Distortion Line
A dashed line which is displayed when the Tracing Line’s distortion response property is disabled. It
can be used to analyze distortion in the detected field.
Distortion Response
A property of the Tracing Line which shows the degree of distortion detected by displaying a varying
cloud of particles around the Tracing Line; the blurriness of the line is proportional to the detected
distortion. This property is enabled by default and can be disabled in the display.
Frequency
The number of times per second that an electro-magnetic field forms and collapses (or shifts from
positive to negative in the case of alternating current). Expressed in hertz (Hz) (cycles per second), or in
kilohertz (kHz) (thousands of cycles per second).
Guidance Arrows
The two arrowheads which represent detection from the gradient-coil antennas in the “side-wheels” of
the SR-60 antenna system. The Guidance Arrows provide an indication of where the center of the field
currently being traced lies.
‘In Use’ Frequency
The frequency the SR-60 is currently set to detect. The default ‘in use’ frequency is 33 kHz. The “in use”
frequency is selected using the Frequency Key from the set of frequencies that are “Checked-Active”.
Informational
Locating
An advance in the science and art of locating underground utilities and Sondes through the combination of multiple pieces of information in an integrated display. Depends on Omnidirectional antenna
arrays for real-time information.
Level Pointer
On the SR-60, a solid pointer which moves around a circular track indicating the current Signal Strength
being detected. See Watermark.
Master Frequency
Menu
The set of all frequencies that can be used on the SR-60. It is accessed through the Frequency Selection
sub-menu.
Measured Depth/
Distance
The calculated depth or distance to the Sonde or to the apparent center of the conductor being traced.
This is a virtual measurement and may be inaccurate if distortion is present. Physical depth must be
verified by potholing before excavating.
Mode
A distinct operating state or method in which a system can be used. The SR-60 has three modes: Active
Line tracing, Passive Line Tracing, and Sonde Locating.
Omnidirectional
Antenna
A proprietary antenna technology which combines detection of electro-magnetic fields on three axes
simultaneously. The SR-60 uses two Omnidirectional antennas.
OmniSeek
An advanced mode enabling the simultaneous search for signals on several frequency bands simultaneously: <4 kHz, 4 - 15 kHz and 15 - 35kHz.
Page 45

SeekTech SR-60
Ridge Tool Company
45
Glossary - Definitions
Operating Screen
The display screen of the instrument as seen when locating. It includes an Active View area, where the
Tracing Line appears in Line Trace modes, and where Pole and Equator icons appear in Sonde mode.
It also includes Measured Depth, Signal Strength, Signal Angle, current and Proximity Signal values,
depending on the mode and choice of options in use.
Passive Line Tracing
A mode of tracing a line which does not use a transmitter to place current on the line. It is used when
tracing lines which are energized from external sources such as 50/60 Hz electrical cables or conductors reflecting transient RF energy, etc.
Pole
Where the field lines from the Sonde exit the ground vertically. One of the two ends of a dipole field,
such as the magnetic field of the Earth, or the field around a Sonde. The SR-60 displays a Pole icon
when it detects the Poles of a Sonde.
Proximity Signal
A computed signal which reflects how close the operator is getting to the target utility in Line Trace
modes. It is calculated based on the signal received by the two Omnidirectional antenna nodes of the
SR-60.
Race Track
An optional circular track around the outside of the Active View Area in which the Level Marker moves
to show current Signal Strength graphically. It also contains the Watermark which shows the highest
level of Signal Strength reached.
Signal Angle The field angle measured relative to the horizontal plane.
Signal Strength
The relative strength of the total field signal detected by the lower Omnidirectional antenna in three
dimensions.
SimulTrace™
An advanced locating mode which makes it possible to simultaneously trace a pushcable emitting a
33 kHz signal and also detect a 512 k Sonde when it comes in range of the locator.
Sonde
A self contained transmitter, often battery-powered, which is used to signal a point within an underground pipe, tunnel, or conduit.
Tracing Circuit
The complete flow of energy from a transmitter, through a conductor, to ground, and from ground
to the transmitter. When the tracing circuit is compromised for some reason, a weak signal and poor
detection will result.
Watermark
An optional display icon which shows the highest level of Signal Strength detected. It travels in the
Race Track and moves up when the Level Pointer reaches a new high point, providing a graphic indication of the highest signal detected. See Level Pointer.
Page 46

SeekTech SR-60
Ridge Tool Company
46
Trouble Shooting Guide
PROBLEM PROBABLE FAULT LOCATION
SR-60 locks up during
use.
Power the unit off, and then back on. Remove the batteries if the unit will not switch off. If batteries are
low, replace them.
SR-60 will not pick up
the signal.
Check that the correct mode and frequency is set. Examine circuit for possible improvements. Relocate
transmitter, change grounding, frequency, etc.; or modify Signal Focus Control settings (Page 33).
While tracing, lines are
“jumping” all over the
screen in the mapping
display.
This indicates that the SR-60 is not picking up the signal or there is interference.
Make sure that the transmitter is well connected and grounded. Point the SR-60 at either lead to be sure
that there is a complete circuit.
Try a higher frequency, or connecting to a different point in the line, or switching to inductive mode.
Try to determine the source of any noise and eliminate it. (Bonded grounding, etc.)
Check SR-60 batteries are fresh and fully charged.
While locating a Sonde,
lines are “jumping” all
over the screen.
Check the batteries in the Sonde to see that they are working.
Sonde may be too far away; try starting with it closer in if possible, or do an area search.
Verify signal by placing lower antenna close to Sonde. Note – Sondes have difficulty emitting signals
through cast iron and ductile iron lines.
Distance between Sonde
and either Pole is not
equal.
Sonde may be tilted or there may be a cast-iron-to-plastic transition.
Unit acts erratic, won’t
power down.
Batteries may be low. Replace with fresh batteries and power on.
Display appears completely dark or completely light when it is
switched on.
Power the unit off and then back on.
Adjust the LCD screen contrast.
There is no sound. Adjust the sound level in the sound menu. Verify Proximity Signal is greater than zero.
SR-60 will not power on.
Check orientation of batteries.
Check that the batteries are charged.
Check to see that the battery contacts are OK.
Unit may have blown a fuse. (Factory service is required.)
Page 47

SeekTech SR-60
Ridge Tool Company
47
Specifications
Weight w/ batteries • ........................................5.4 lbs. (2.5 kg)
Weight w/o batteries • .....................................4.7 lbs. (2.1 kg)
Dimensions
Length • .................................................................. 14” (35.56 cm)
Width • ......................................................................7” (17.78 cm)
Height • ..................................................................31” (78.74 cm)
Power Source
4 C-size batteries, 1.5V Alkaline (ANSI/NEDA 14A, IEC •
LR14) or 1.2V NiMH or NiCad rechargeable batteries
Power Rating: 6V, 550 mA •
Signal Strength •
Non-linear in function. 2000 is 10x higher than
1000, 3000 is 10x higher than 2000, etc.
Operating Environment
Temperature -4°F to 122°F (-20°C to 50°C) •
Humidity 5% to 95% RH •
Storage Temperature -4°F to 140°F (-20°C to 60°C) •
Default Settings
Depth units = Feet & inches •
Volume = 2 (two settings above mute) •
Backlight = Auto •
Frequency = 33 kHz (Line Trace Mode) •
Standard Equipment
Item Cat. #
SR-60 Locator • 30123
Markers and Mast Holder • 12543
Operator’s Manual •
4 C-cell batteries (Alkaline) •
Training Video (DVD) •
Optional Equipment
Additional Sonde Markers • 12543
ST-33Q Transmitter • 21948
ST-510 Transmitter • 21953
Inductive Clamp (4.75”) • 20973
Remote Sonde • 16728
Float Sonde • 19793
Exact Frequency Values (SR-60)
Sonde
16 Hz
512 Hz
640 Hz
850 Hz
8 kHz
16 kHz
33 kHz
16.0
512.0
640.0
850.0
8192
16384
32768
Passive Line
Trace
50 Hz
50 Hz
5th
50 Hz
9th
60 Hz
60 Hz
5th
60 Hz
9th
50
250
450
60
300
540
Active Line
Trace
European
128 Hz
1 kHz
8 kHz
33 kHz
93 kHz
93 kHz-B
128
1024
8192
32768
93,696.0
93,622.9
Frequencies Table
The following table shows the frequencies available in the SR-60. The default frequencies shown are in Checked-Active status as shipped.
Optional frequencies may be added as described on page 34.
Default Frequencies:
Active Line Trace ..................... 128 Hz, 1 kHz, 8 kHz
33 kHz, 93 kHz
Power Line Trace...................... 50 Hz (9th), <4 kHz
Radio Frequencies .................. Low (4 - 15 kHz)
High (>15 kHz)
OmniSeek ................................... <4 kHz + 4 - 15 kHz +
15 - 35 kHz
Optional Frequencies:
Sonde ............................................ 16 Hz, 512 Hz, 640 Hz, 850 Hz,
8 kHz, 16 kHz, 33 kHz
SimulTrace .................................. 512 Hz + 33 kHz
Passive Line Trace ................... 50 Hz, 50 Hz (5th), 50 Hz (9th),
60 Hz, 60 Hz (5th), 60 Hz (9th),
100 Hz, 120 Hz
The seekTech SR-60 is protected under U.S. Patents
7009399, 7136765, and other Patents Pending.
Page 48

SeekTech SR-60
Ridge Tool Company
48
Manufacturers Frequency Table
Displayed
Option
Company
Available
Frequencies
Model
Exact
frequency (Hz)
Notes
Dyna
3M Dynatel
™
577 Hz
8 kHz
33 kHz
200 kHz
2273 577
8192
32768
200012
200 KHz not present
in European model of
the ST-510.
Fish FISHER 820 Hz
8.2 kHz
82 kHz
TW-8800 821
8217
82488
Gen
Gen-Eye
™
512 Hz
8 kHz
65 kHz
LCTX 512/8/65 512
8192
65536
Gold
GOLDAK 117.5 kHz 3300 11750
Not recommended for
use with the ST-510
transmitter.
Not present in
European model of
the ST-510.
Heath Heath Consultants
Incorporated
8.1 kHz
81 kHz
480 kHz
ALLPRO 8128
81326
480323
480 KHz not present
in European model of
the ST-510.
McLau
McLAUGHLIN
®
9.5 kHz
38 kHz
VERIFIER 9499
37997
Made by Takachiho
Sanyo Co., Ltd.
Metro
METROTECH
®
982 Hz
9.8 kHz
82 kHz
83 kHz
9890
810 for 83 kHz
982
9820
82488
83080
MicroE Microengineering 76.8 kHz Xmtr-101 76802
Mytan MyTana 76.8 kHz PT20 76802
Phorn
PipeHorn 480 kHz 479956
Not present in
European model of
the ST-510.
RD
Radio Detection
(Same as Gen-Eye
™
above)
512 Hz
8 kHz
33 kHz
65 kHz
82 kHz
200 kHz
(Same as LCTX
512/8/65 above)
512
8193
32768
65538
81865
200000
200 KHz not present
in European model of
the ST-510.
Page 49

SeekTech SR-60
Ridge Tool Company
49
Displayed
Options
Company
Available
Frequencies
Model
Exact
Frequence (Hz)
Notes
RIDGID (Old) Ridge Tool Co. 512 Hz
8 kHz
33 kHz
51 kHz
200 kHz
512
8192
32768
51712
200000
200 k changed to
93 kHz in European
model of the ST-510.
RIDGID (New) Ridge Tool Co. 128 Hz
1 kHz
8 kHz
33 kHz
93 kHz
262 kHz
128
1024
8192
32768
93623
262144
262 k, changed to
93 kHz in European
model of the ST-510.
RIDGID-B (New) Ridge Tool Co. 128 Hz
1 kHz
8 kHz
33 kHz
93 kHz
128
1024
8192
32768
93696
Older 93 kHz value.
Ryco RYCOM 815 Hz
82 kHz
8876 815
82318
SeekTech-B 128 Hz
1 kHz
8 kHz
33 kHz
93 kHz*
262 kHz
128
1024
8192
32768
93696
262144
Older 93 kHz value.
Schon Schonstedt
Instrument Company
575 Hz TraceMaster 575
Ssurf SubSurface 8 kHz
27 kHz
PL-2000 8055
26721
Made by FUJI TECOM.
SubS
SUBSITE
®
ELECTRONICS
Ditch Witch
®
1 kHz
8 kHz
29 kHz
80 kHz
950 1170
8009
29430
80429
Telex 577 Hz 577
 Loading...