

Page 1
OPERATOR’S MANUAL
MANUEL D’UTILISATION
MANUAL DEL OPERADOR
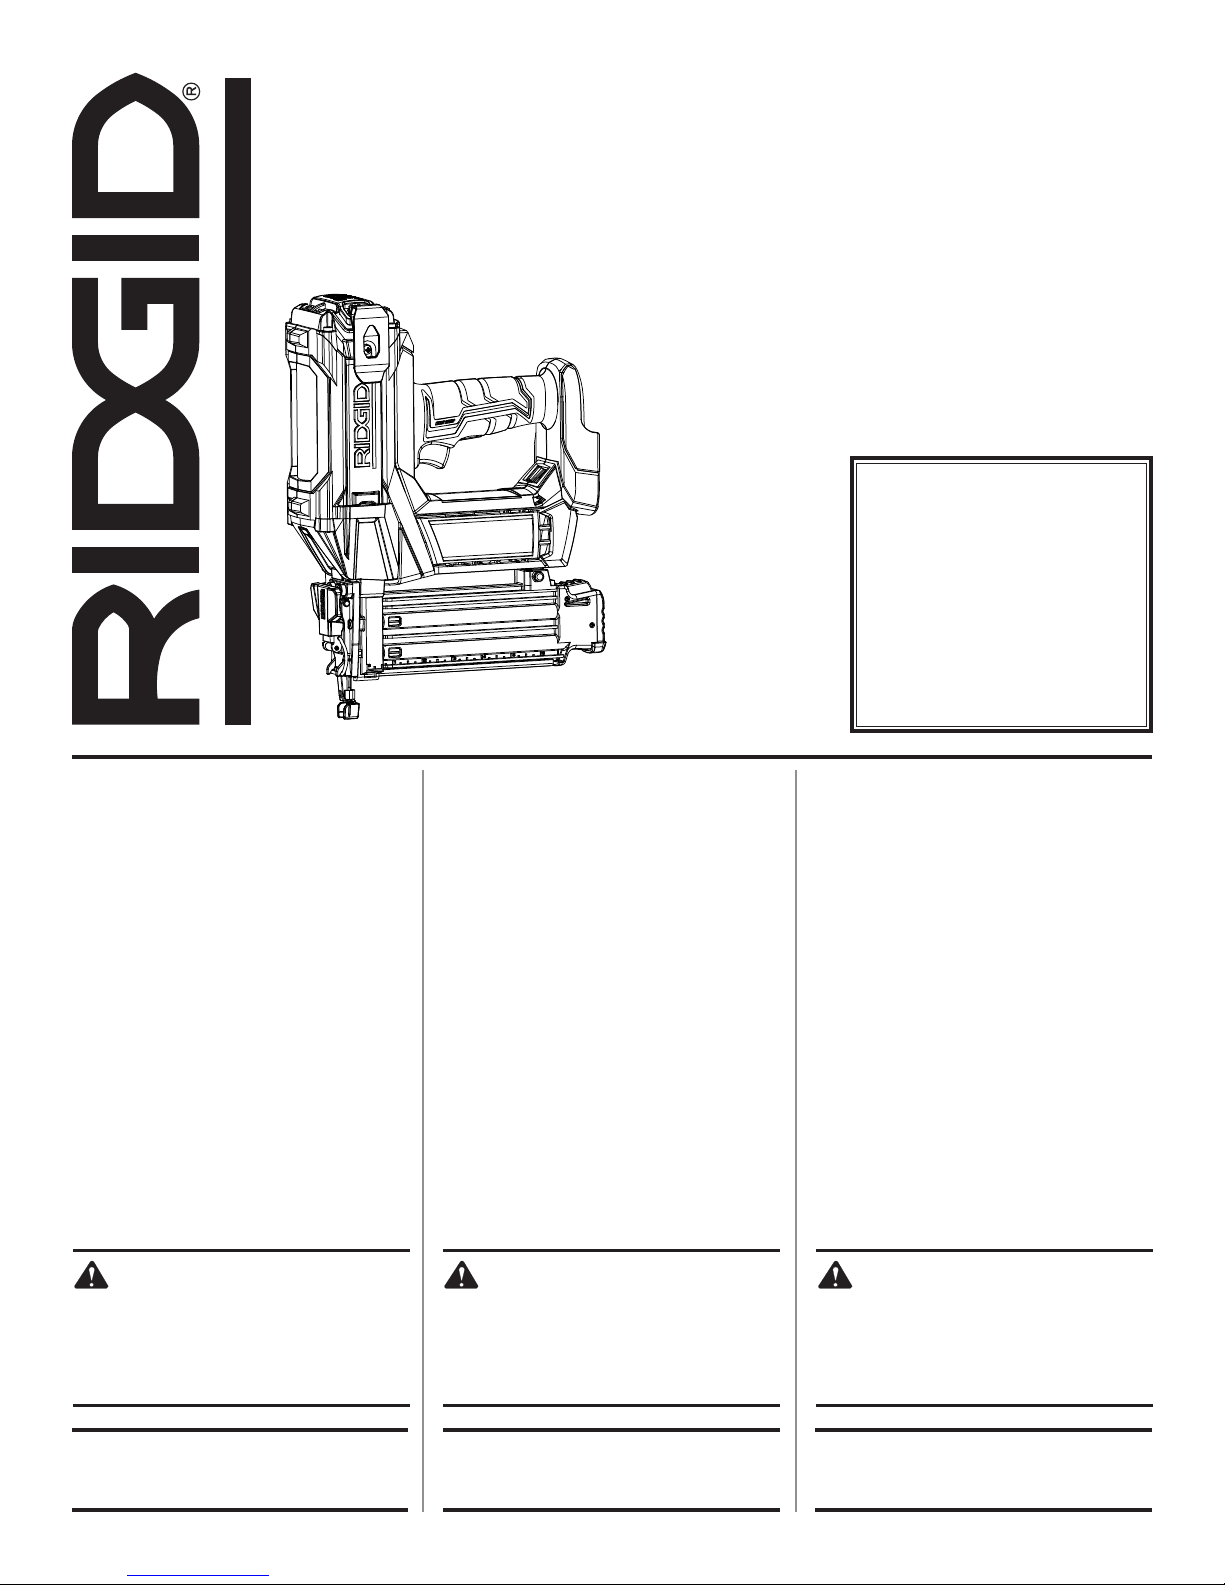
18V BRAD NAILER
CLOUEUSE À PARQUET DE 18V
CLAVADORA DE PUNTILLAS DE 18V
R09890
To register your RIDGID
product, please visit:
http://register.RIDGID.com
Pour enregistrer votre
produit de RIDGID,
s’il vous plaît la visite :
http://register.RIDGID.com
Para registrar su producto
de RIDGID, por favor visita:
http://register.RIDGID.com
TABLE OF CONTENTS
****************
General Power Tool
Safety Warnings .......................2-3
Nailer Safety Warnings .............3-5
Symbols ....................................... 6
Glossary of Terms ........................ 7
Features ....................................... 8
Assembly ..................................... 8
Operation ................................ 8-11
Accessories ............................... 11
Troubleshooting ......................... 11
Maintenance .............................. 12
Illustrations ............................13-15
Parts Ordering
and Service ...................Back page
WARNING:
To reduce the risk of injury, the
user must read and understand
the operator’s manual before
using this product.
TABLE DES MATIÈRES
****************
Avertissements de sécurité
relatives aux outils électriques .... 2-3
Avertissements de
sécurité relatifs cloueuse .............3-5
Symboles ........................................ 6
Glossaire ......................................... 7
Caractéristiques ............................. 8
Assemblage .................................... 8
Utilisation ................................... 8-11
Accessoires .................................. 11
Dépannage ................................... 11
Entretien ....................................... 12
Illustrations ..............................13-15
Commande de pièces
et réparation .................. Page arrière
AVERTISSEMENT :
Pour réduire les risques de
blessures, l’utilisateur doit lire
et veiller à bien comprendre
le manuel d’utilisation avant
d’utiliser ce produit.
ÍNDICE DE CONTENIDO
****************
Advertencias de seguridad
generales para la herramienta
eléctrica ......................................2-3
Advertencias de
seguridad para clavador .............3-5
Símbolos ........................................ 6
Glosario de Términos .....................7
Características ............................... 8
Armado .......................................... 8
Funcionamiento ........................8-11
Accesorios ................................... 11
Corrección de problemas ............11
Mantenimiento ............................. 12
Ilustraciones ............................13-15
Pedidos de
piezas y servicio........ Pág. posterior
ADVERTENCIA:
Para reducir el riesgo de
lesiones, el usuario debe leer
y comprender el manual del
operador antes de usar este
producto.
SAVE THIS MANUAL FOR
FUTURE REFERENCE
CONSERVER CE MANUEL
POUR FUTURE RÉFÉRENCE
GUARDE ESTE MANUAL
PARA FUTURAS CONSULTAS
Page 2

GENERAL POWER TOOL SAFETY WARNINGS
Use personal protective equipment. Always wear eye
WARNING
Read all safety warnings and all instructions.
Failure to follow the warnings and instructions may
result in electric shock, fire and/or serious injury.
Save all warnings and instructions for future reference.
The term “power tool” in the warnings refers to your mainsoperated (corded) power tool or battery-operated (cordless)
power tool.
WORK AREA SAFETY
Keep work area clean and well lit. Cluttered or dark
areas invite accidents.
Do not operate power tools in explosive atmospheres,
such as in the presence of flammable liquids, gases
or dust. Power tools create sparks which may ignite the
dust or fumes.
Keep children and bystanders away while operating a
power tool. Distractions can cause you to lose control.
ELECTRICAL SAFETY
Power tool plugs must match the outlet. Never modify
the plug in any way. Do not use any adapter plugs with
earthed (grounded) power tools. Unmodified plugs and
matching outlets will reduce risk of electric shock.
Avoid body contact with earthed or grounded surfaces
such as pipes, radiators, ranges and refrigerators.
There is an increased risk of electric shock if your body
is earthed or grounded.
Do not expose power tools to rain or wet conditions.
Water entering a power tool will increase the risk of
electric shock.
Do not abuse the cord. Never use the cord for carrying,
pulling or unplugging the power tool. Keep cord away
from heat, oil, sharp edges or moving parts. Damaged
or entangled cords increase the risk of electric shock.
When operating a power tool outdoors, use an
extension cord suitable for outdoor use. Use of a cord
suitable for outdoor use reduces the risk of electric shock.
If operating a power tool in a damp location is
unavoidable, use a ground fault circuit interrupter
(GFCI) protected supply. Use of a GFCI reduces the
risk of electric shock.
Use this product only with batteries and chargers listed
in tool/appliance/battery pack/charger correlation
supplement 988000-302.
PERSONAL SAFETY
Stay alert, watch what you are doing and use common
sense when operating a power tool. Do not use a
power tool while you are tired or under the influence of
drugs, alcohol or medication. A moment of inattention
while operating power tools may result in serious personal
injury.
protection. Protective equipment such as dust mask,
non-skid safety shoes, hard hat, or hearing protection
used for appropriate conditions will reduce personal
injuries.
Prevent unintentional starting. Ensure the switch is in
the off-position before connecting to power source
and/or battery pack, picking up or carrying the tool.
Carrying power tools with your finger on the switch or
energising power tools that have the switch on invites
accidents.
Remove any adjusting key or wrench before turning
the power tool on. A wrench or a key left attached to
a rotating part of the power tool may result in personal
injury.
Do not overreach. Keep proper footing and balance
at all times. This enables better control of the power tool
in unexpected situations.
Dress properly. Do not wear loose clothing or
jewellery. Keep your hair, clothing and gloves away
from moving parts. Loose clothes, jewellery or long hair
can be caught in moving parts.
If devices are provided for the connection of dust
extraction and collection facilities, ensure these are
connected and properly used. Use of dust collection
can reduce dust-related hazards.
Do not use on a ladder or unstable support. Stable
footing on a solid surface enables better control of the
power tool in unexpected situations.
POWER TOOL USE AND CARE
Do not force the power tool. Use the correct power
tool for your application. The correct power tool will
do the job better and safer at the rate for which it was
designed.
Do not use the power tool if the switch does not turn
it on and off. Any power tool that cannot be controlled
with the switch is dangerous and must be repaired.
Disconnect the plug from the power source and/or
the battery pack from the power tool before making
any adjustments, changing accessories, or storing
power tools. Such preventive safety measures reduce
the risk of starting the power tool accidentally.
Store idle power tools out of the reach of children and
do not allow persons unfamiliar with the power tool
or these instructions to operate the power tool. Power
tools are dangerous in the hands of untrained users.
Maintain power tools. Check for misalignment or
binding of moving parts, breakage of parts and any
other condition that may affect the power tool’s
operation. If damaged, have the power tool repaired
before use. Many accidents are caused by poorly
maintained power tools.
2 - English
Page 3

GENERAL POWER TOOL SAFETY WARNINGS
Keep cutting tools sharp and clean. Properly maintained
cutting tools with sharp cutting edges are less likely to
bind and are easier to control.
Use the power tool, accessories and tool bits etc.
in accordance with these instructions, taking into
account the working conditions and the work to be
performed. Use of the power tool for operations different
from those intended could result in a hazardous situation.
BATTERY TOOL USE AND CARE
Recharge only with the charger specified by the
manufacturer. A charger that is suitable for one type
of battery pack may create a risk of fire when used with
another battery pack.
Use power tools only with specifically designated
battery packs. Use of any other battery packs may create
a risk of injury and fire.
When battery pack is not in use, keep it away from
other metal objects, like paper clips, coins, keys, nails,
NAILER SAFETY WARNINGS
screws or other small metal objects, that can make a
connection from one terminal to another. Shorting the
battery terminals together may cause burns or a fire.
Under abusive conditions, liquid may be ejected from
the battery; avoid contact. If contact accidentally
occurs, flush with water. If liquid contacts eyes,
additionally seek medical help. Liquid ejected from the
battery may cause irritation or burns.
SERVICE
Have your power tool serviced by a qualified repair
person using only identical replacement parts. This will
ensure that the safety of the power tool is maintained.
When servicing a power tool, use only identical
replacement parts. Follow instructions in the
Maintenance section of this manual. Use of unauthorized
parts or failure to follow Maintenance instructions may
create a risk of shock or injury.
Always assume that the tool contains fasteners.
Careless handling of the nailer can result in unexpected
firing of fasteners and personal injury.
Do not point the tool towards yourself or anyone
nearby. Unexpected triggering will discharge the fastener
causing an injury.
Do not actuate the tool unless the tool is placed firmly
against the workpiece. If the tool is not in contact with
the workpiece, the fastener may be deflected away from
your target.
Disconnect the tool from the power source when the
fastener jams in the tool. While removing a jammed
fastener, the nailer may be accidentally activated if it is
plugged in.
Use caution while removing a jammed fastener. The
mechanism may be under compression and the fastener
may be forcefully discharged while attempting to free a
jammed condition.
Do not use this nailer for fastening electrical cables.
It is not designed for electric cable installation and may
damage the insulation of electric cables thereby causing
electric shock or fire hazards.
Hold power tool by insulated gripping surfaces, when
performing an operation where the nail may contact
hidden wiring. Nails contacting a “live” wire may make
exposed metal parts of the power tool “live” and could
give the operator an electric shock.
Know your power tool. Read operator’s manual
carefully. Learn its applications and limitations, as well
as the specific potential hazards related to this tool.
Following this rule will reduce the risk of electric shock,
fire, or serious injury.
Always wear eye protection with side shields marked
to comply with ANSI Z87.1. Everyday glasses have only
impact resistant lenses. They are not safety glasses.
Following this rule will reduce the risk of serious personal
injury.
Eye protection which conforms to ANSI specifications
and provides protection against flying particles both
from the FRONT and SIDE should ALWAYS be worn
by the operator and others in the work area when
loading, operating or servicing this tool. Eye protection
is required to guard against flying fasteners and debris,
which could cause severe eye injury.
The employer and/or user must ensure that proper
eye protection is worn. We recommend Wide Vision
Safety Mask for use over eyeglasses or standard safety
glasses that provide protection against flying particles
both from the front and side. Always use eye protection
which is marked to comply with ANSI Z87.1.
Additional safety protection will be required in some
environments. For example, the working area may
include exposure to noise level which can lead to hearing
damage. The employer and user must ensure that any
necessary hearing protection is provided and used by the
operator and others in the work area. Some environments
will require the use of head protection equipment. When
required, the employer and user must ensure that head
protection conforming to ANSI Z89.1-1997 is used.
3 - English
Page 4

NAILER SAFETY WARNINGS
Keep fingers away from trigger when not driving
fasteners to avoid accidental firing
Use safety equipment. Always wear eye protection.
Dust mask, nonskid safety shoes, hard hat, or hearing
protection must be used for appropriate conditions.
Protect your lungs. Wear a face or dust mask if the
operation is dusty. Following this rule will reduce the
risk of serious personal injury.
Protect your hearing. Wear hearing protection during
extended periods of operation. Following this rule will
reduce the risk of serious personal injury.
Battery tools do not have to be plugged into an
electrical outlet; therefore, they are always in
operating condition. Be aware of possible hazards
when not using your battery tool or when changing
accessories. Following this rule will reduce the risk of
electric shock, fire, or serious personal injury.
Do not place battery tools or their batteries near fire
or heat. This will reduce the risk of explosion and possibly
injury.
Do not crush, drop or damage battery pack. Do not
use a battery pack or charger that has been dropped
or received a sharp blow. A damaged battery is subject
to explosion. Properly dispose of a dropped or damaged
battery immediately.
Batteries can explode in the presence of a source
of ignition, such as a pilot light. To reduce the risk of
serious personal injury, never use any cordless product
in the presence of open flame. An exploded battery can
propel debris and chemicals. If exposed, flush with water
immediately.
Do not charge battery tool in a damp or wet location.
Do not use, store, or charge battery packs or products
in locations where the temperature is less than 50°F
or more than 100°F. Do not store outside or in vehicles.
Under extreme usage or temperature conditions,
battery leakage may occur. If liquid comes in contact
with your skin, wash immediately with soap and water.
If liquid gets into your eyes, flush them with clean
water for at least 10 minutes, then seek immediate
medical attention. Following this rule will reduce the risk
of serious personal injury.
Use the tool only for its intended use. Do not discharge
fasteners into open air.
Use the tool only for the purpose for which it was
designed.
.
Use only the fasteners recommended for this tool.
Use of the wrong fasteners could result in poor fastener
feeding, jammed fasteners, and nails leaving the tool at
erratic angles. If fasteners are not feeding smoothly and
properly, discontinue their use immediately. Jammed
and improperly feeding fasteners could result in serious
personal injury.
Never use this tool in a manner that could cause a
fastener to be directed toward anything other than
the workpiece.
Do not use the tool as a hammer.
Always carry the tool by the handle.
Do not alter or modify this tool from the original design
or function without approval from the manufacturer.
Always be aware that misuse and improper handling
of this tool can cause injury to yourself and others.
Never clamp or tape the trigger or workpiece contact
in an actuated position.
Never leave tool unattended if the battery is installed.
Do not operate this tool if it does not contain a legible
warning label.
OPERATION
Do not use tool if trigger does not actuate properly.
Any tool that cannot be controlled with the trigger is
dangerous and must be repaired.
Check operation of the workpiece contact mechanism
frequently. Do not use the tool if the workpiece contact
mechanism is not working correctly as accidental driving
of a fastener may result. Do not interfere with the proper
operation of the workpiece contact mechanism.
Do not use a tool that does not work correctly.
Always assume that the tool contains nails.
Do not carry the tool from place to place holding the
trigger. Accidental discharge could result.
Always handle the tool with care:
• Respect the tool as a working implement.
• Never engage in horseplay.
• Never pull the trigger unless nose is directed toward
the work.
• Keep others a safe distance from the tool while tool
is in operation as accidental actuation may occur,
possibly causing injury.
4 - English
Page 5

NAILER SAFETY WARNINGS
Choice of triggering method is important. Check
manual for triggering options.
The nailer is designed for single-hand use. Do not hold
the tool by the front of the magazine. Do not put hands,
head, or other parts of your body near the bottom of the
magazine where the nail exits the tool, as serious personal
injury could result.
Do not point the tool toward yourself or anyone
whether it contains nails or not.
Do not actuate the tool unless you intend to drive a
fastener into the workpiece.
Always ensure that the workpiece contact is fully
positioned above the workpiece. Positioning the
workpiece contact only partially above the workpiece
could cause the fastener to miss the workpiece
completely and result in serious personal injury.
Do not drive nails near edge of material. The workpiece
may split causing the nail to ricochet, injuring you or a
co-worker. Be aware that the fastener may follow the
grain of the wood, causing it to protrude unexpectedly
from the side of the work material or deflect, possibly
causing injury.
Keep hands and body parts clear of immediate work
area. Hold workpiece with clamps when necessary to
keep hands and body out of potential harm. Be sure
the workpiece is properly secured before pressing the
fastener against the material. The workpiece contact may
cause the work material to shift unexpectedly.
Keep face and body parts away from back of the tool
cap when working in restricted areas. Sudden recoil
can result in impact to the body, especially when nailing
into hard or dense material.
During normal use the tool will recoil immediately
after driving a fastener. This is a normal function of
the tool. Do not attempt to prevent the recoil by holding
the nailer against the work. Restriction to the recoil can
result in a second fastener being driven from the nailer.
Grip the handle firmly, let the tool do the work and do not
place second hand on top of tool or near exhaust at any
time. Failure to heed this warning can result in serious
personal injury.
Do not drive fasteners on top of other fasteners or with
the tool at an overly steep angle as this may cause
deflection of fasteners which could cause injury.
LOADING TOOL
Do not load the tool with fasteners when any one of
the operating controls is activated.
When loading tool:
Never place a hand or any part of body in fastener
discharge area of tool.
Never point tool at anyone.
Do not pull the trigger or depress the workpiece
contact as accidental actuation may occur, possibly
causing injury.
SAVE THESE INSTRUCTIONS
Refer to them frequently and use them to instruct others
who may use this tool. If you loan someone this tool, loan
them these instructions also.
5 - English
Page 6
SYMBOLS
The following signal words and meanings are intended to explain the levels of risk associated with this product.
SYMBOL SIGNAL MEANING
DANGER:
WARNING:
CAUTION:
NOTICE:
Some of the following symbols may be used on this product. Please study them and learn their meaning. Proper
interpretation of these symbols will allow you to operate the product better and safer.
Indicates a hazardous situation, which, if not avoided, will result in death or
serious injury.
Indicates a hazardous situation, which, if not avoided, could result in death or
serious injury.
Indicates a hazardous situation, that, if not avoided, may result in minor or
moderate injury.
(Without Safety Alert Symbol) Indicates information considered important, but
not related to a potential injury (e.g. messages relating to property damage).
SYMBOL NAME DESIGNATION/EXPLANATION
Safety Alert Indicates a potential personal injury hazard.
Read Operator’s Manual
Eye Protection
To reduce the risk of injury, user must read and understand
operator’s manual before using this product.
Always wear eye protection with side shields marked to comply
with ANSI Z87.1.
Wet Conditions Alert Do not expose to rain or use in damp locations.
Hot Surface
Keep Hands Away Keep hands and body away from the discharge area of the tool.
Recycle Symbol
V Volts Voltage
min Minutes Time
Direct Current Type or a characteristic of current
n
o
.../min Per Minute Revolutions, strokes, surface speed, orbits etc., per minute
No Load Speed Rotational speed, at no load
To reduce the risk of injury or damage, avoid contact with any hot
surface.
This product uses lithium-ion (Li-ion) batteries. Local, state or
federal laws may prohibit disposal of batteries in ordinary trash.
Consult your local waste authority for information regarding available
recycling and/or disposal options.
6 - English
Page 7

GLOSSARY OF TERMS
Activate (operating controls)
To move an operating control so that it is in a position
that allows the tool to be actuated or that satisifes one
requirement for the tool to be actuated.
Actuate (tool)
To cause movement of the tool component(s) intended to
drive a fastener.
Actuation system
The use of a trigger, workpiece contact, and/or other
operating control, separately or in some combination or
sequence, to actuate the tool.
• Single sequential actuation
An actuation system in which there is more than one
operating control and the operating controls must
be activated in a specific sequence to actuate the
tool. Additional actuation can occur when a specific
operating control, other than a workpiece contact, is
released and re-activated.
• Contact actuation
An actuation system in which there is more than one
operating control and the operating controls can be
activated in any sequence to actuate the tool. Additional
actuation can occur when any operating control is
released and re-activated.
Fastener
A staple, pin, brad, nail, or other fastening device which is
designed and manufactured for use in the tools within the
scope of this standard.
Jam
An obstruction in the feed or drive areas of the tool.
Operating control
A control that separately, or as part of an actuation system,
can cause the actuation of a tool.
Trigger
A tool operating control activated by a tool operator’s fingers.
Workpiece
The intended object into which a fastener is to be driven
by a tool.
Workpiece contact
An operating control element or assembly on the tool
intended to be activated by the material to be fastened.
7 - English
Page 8
FEATURES
PRODUCT SPECIFICATIONS
Fastener Type .............................................18 ga. brad nail
Fastener Range
...................................... 5/8 in. to 2-1/8 in.
ASSEMBLY
Magazine Capacity
............................................... 105 nails
WARNING:
Do not use this product if it is not completely
assembled or if any parts appear to be missing or
damaged. Use of a product that is not properly and
completely assembled or with damaged or missing
parts could result in serious personal injury.
If any parts are damaged or missing, please call 1-866-539-1710 for assistance.
WARNING:
Do not attempt to modify this product or create
accessories or attachments not recommended
for use with this product. Any such alteration
or modification is misuse and could result in a
hazardous condition leading to possible serious
personal injury.
OPERATION
Staircases
WARNING:
Do not allow familiarity with products to make you
careless. Remember that a careless fraction of a
second is sufficient to inflict severe injury.
WARNING:
Always remove battery pack from the tool when
you are assembling parts, making adjustments,
cleaning, or when not in use. Removing battery
pack will prevent accidental starting that could
cause serious personal injury.
WARNING:
Always wear eye protection with side shields
marked to comply with ANSI Z87.1. Failure to do
so could result in objects being thrown into your
eyes, resulting in possible serious injury.
APPLICATIONS
You may use this tool for the purposes listed below:
Finish and Trim (Interior and Exterior)
Door & Window Casing
Door Jambs
Baseboard
Crown Molding
Cabinetry
Cap and Shoe Molding
Molding
Door and Window Trim
Chair Rail
Brickmold
Hardwood Flooring
Paneling
Furniture
ATTACHING THE BELT CLIP
See Figure 1, page 13.
The belt clip can be installed on the left or right side of the
nailer, depending on operator preference.
Alignbeltclipandscrewwithrightorleftsidescrewhole.
UsingaPhillipsheadscrewdriver(notincluded),tighten
securely.
INSTALLING/REMOVING BATTERY PACK
See Figure 2, page 13.
To install, place the battery pack in the tool. Align raised
rib on battery pack with the groove inside the tool.
Make sure the latches on both sides of the battery pack
snap into place and the battery pack is secured in the
tool before beginning operation.
NOTE: Squeeze LED worklight grip switch to activate nailer.
To remove, locate latches on both sides of the battery
pack and depress to release the battery pack from the
tool.
For complete charging instructions, see the operator’s
manuals for your battery pack and charger.
8 - English
Page 9
OPERATION
NO-MAR PAD
See Figure 3, page 13.
The no-mar pad attached to the nose of the tool helps
prevent marring and denting when working with softer
woods.
WARNING:
Remove the battery pack from the tool before
removing or replacing the no-mar pad. Failure to
do so could result in serious personal injury.
The pad can be removed by pulling it down and away from
the nose. To replace the pad, fit it into place over the nose
and push up at the back to reseat.
On-board storage for the pad is located on the magazine of
the tool. An extra no-mar pad is provided in the on-board
storage area.
LOADING THE TOOL WITH NAILS
See Figures 4 and 5, pages 13 and 14.
Remove battery pack from the tool.
With the nose of the tool pointed away from you, squeeze
magazine release button located at the rear of the
magazine and slide the magazine cover open.
Place brad nails in the channel with nail tips pointing down
and resting on bottom of the channel.
WARNING:
Keep the tool pointed away from yourself and
others when loading nails. Failure to do so could
result in possible serious personal injury.
Push the magazine cover closed until it securely snaps
into place.
Make sure that the magazine is securely locked in place.
WARNING:
Use only the nails recommended for use with this
tool. The use of any other nails can result in tool
malfunction, leading to serious injuries.
WARNING:
Never load nails with the workpiece contact or
trigger activated. Doing so could result in possible
serious personal injury.
SETTING THE AIR POWER
See Figure 6, page 14.
The amount of air power required will depend on the size of
the nail and the workpiece material.
Begin testing the depth of drive by driving a test nail into
the same type of workpiece material used for the actual job.
Remove battery pack from the tool.
Move power adjustment lever to the right to increase air
power or to the left to decrease air power.
It may be possible to achieve the desired depth with air
power adjustments alone. If finer adjustments are needed,
use the depth of drive adjustment.
DEPTH OF DRIVE ADJUSTMENT
See Figure 7, page 14.
The driving depth of the nail may be adjusted beyond air
power. It is advisable to test the depth on a scrap workpiece
to determine the required depth for the application.
To determine depth of drive, first adjust the air power and
drive a test nail. To achieve the desired depth, use the depth
of drive adjustment on the tool. Harder materials and longer
nails will require more force to drive the nail.
Remove battery pack from the tool.
Turn the depth of drive adjustment left or right to change
the driving depth.
Reinstall battery and activate the tool by pressing the
worklight grip switch.
Drive a test nail after each adjustment until the desired
depth is set.
NOTE: Set depth of drive at the shallowest depth that
will meet your needs.
USING THE MODE SELECTOR SWITCH
See Figures 8 - 9, pages 14 and 15.
WARNING:
Never wedge or hold back the workpiece contact
mechanism during operation of the tool. Doing so
could result in possible serious injury.
This tool is shipped from the factory with the mode selector
switch set in the Single Sequential Actuation mode. The
mode selector switch can also be set for Contact Actuation
mode.
SINGLE SEQUENTIAL ACTUATION MODE
Single sequential actuation provides the most accurate
fastener placement.
Remove battery pack from the tool.
Slide the selector to position ( ).
9 - English
Page 10
OPERATION
WARNING:
The nailer will not function properly if the selector
is not securely seated in either position ( ) or
( ). Always assure the selector is seated properly
to avoid an unexpected nail discharge and possible
serious personal injury.
Reinstall battery and activate the tool by pressing the
worklight grip switch.
Grip the tool firmly to maintain control. Position the nose
of the tool onto the work surface.
Push the tool against the work surface to depress the
workpiece contact.
Squeeze the trigger to drive a fastener.
NOTE: Hold trigger until drive cycle is complete. If depressing
the trigger does not drive a fastener, release the trigger and
lift the tool away from the workpiece, then replace and try
driving the fastener again.
CONTACT ACTUATION MODE
Contact actuation allows very fast repetitive fastener
placement.
Remove battery pack from the tool.
Slide the selector to position ( ).
Reinstall battery and activate the tool by pressing the
worklight grip switch.
Grip the tool firmly to maintain control.
Squeeze and hold the trigger. Push the tool against the
work surface to depress the workpiece contact and drive
a nail. To drive another nail, lift the tool and press the
contact against the work surface again.
NOTE: Hold trigger and keep workpiece contact
depressed until drive cycle is complete.
Always remove your finger from the trigger when the
desired number of nails has been driven.
NOTE: In Contact Actuation Mode, the tool may also be
operated by depressing the workpiece contact against the
surface and squeezing the trigger.
LED WORKLIGHT
See Figure 10, page 15.
To turn on the LEDs, press LED worklight grip switch
while firmly holding tool during operation.
DIAGNOSTIC FEEDBACK
The LED Worklight provides feedback to indicate whether
the battery pack is charged sufficiently and/or if the tool is
functioning properly.
If worklight is flashing, install fully charged battery. If light
continues to flash, see Troubleshooting section for more
information.
If the LED light goes out on your nailer, the unit has timed
out for your protection. Lift tool from the workpiece and
release trigger to activate the nailer before beginning next
drive cycle.
REMOVING NAILS FROM THE TOOL
See Figure 11, page 15.
WARNING:
Remove the battery pack before removing nails
or clearing a jammed nail. Failure to do so could
result in serious personal injury.
Remove battery pack from the tool.
To remove a strip of nails from the tool, depress the
magazine release button located at the rear of the
magazine and slide the magazine open.
Remove nails.
Close the magazine.
CLEARING A JAMMED FASTENER
See Figure 12 - 13, page 15.
WARNING:
Remove the battery pack from the tool before
clearing a jammed fastener. Failure to do so could
result in serious personal injury.
WARNING:
During normal use the tool will recoil immediately
after driving a fastener. This is a normal function
of the tool. Do not attempt to prevent the recoil
by holding the nailer against the work. Restriction
to the recoil can result in a second fastener being
driven from the nailer. Failure to heed this warning
can result in serious personal injury.
DRY-FIRE LOCKOUT
When the magazine has 0-5 nails remaining, the dry-fire
lockout feature will not allow continued operation.
To resume operation, reload the tool with nails.
Driving too deeply into the material, excess debris, or
jammed nails may lead to the driver mechanism being stuck
at its bottom position.
The driver mechanism can usually be returned to its
operating position by depressing the workpiece contact
against a scrap piece of wood and squeezing the trigger.
If this does not automatically return the driver mechanism
into the tool, the tool may be jammed.
If a nail or fastener becomes jammed in the tool, remove
the battery pack and keep the tool pointed away from you
while clearing the jam.
Remove battery pack from the tool.
Remove fasteners from the tool.
10 - English
Page 11

OPERATION
Pull up on the latch and open the jam release.
Locate and remove the elevation screw cover using a flat
blade screwdriver.
Turn the elevation screw clockwise to move the driving
mechanism back and free the nail jam.
Remove the bent nail.
Close the jam release and latch.
Reinstall nails.
Reinstall battery and activate the tool by pressing the
worklight grip switch.
ACCESSORIES
To order parts and maintenance kits, call 1-866-539-1710.
Maintenance kit ...................................................................................................................................................... 203685001
WARNING:
Current attachments and accessories available for use with this tool are listed above. Do not use any attachments
or accessories not recommended by the manufacturer of this tool. The use of attachments or accessories not
recommended can result in serious personal injury.
TROUBLESHOOTING
PROBLEM POSSIBLE CAUSE SOLUTION
Work-contacting element does not depress fully - tool does not operate
Tool operates properly, but fasteners do
not drive fully
Tool operates properly, but fasteners are
driven too deep
Tool jams frequently Incorrect nails
Tool stops and LED flashes rapidly Battery is low or has no charge
Tool has charged battery and LED is
slowly flashing or LED does not turn
off after approximately ten seconds of
non-use
Low nails
Work-contacting element is jammed
Air power is too low
Depth of drive isn’t deep enough
Nail is too long for wood hardness
Piston seals are worn or damaged.
Air power is too high
Depth of drive is too deep
Damaged nails
Loose magazine
Dirty magazine
Trigger released too early
Tool has malfunctioned Take tool to nearest authorized repair
Remove battery and replenish nails
Remove battery and clear debris
Increase air power
Adjust depth of drive
Use nail length that is appropriate for
wood
Replace one or both pistons (mainte-
nance kit required).
Decrease air power
Adjust depth of drive
Verify that nails are the correct size
Replace nails
Tighten screws
Clean magazine
Recharge battery
Remove battery and reinstall.
center
NOTE: MAINTENANCE INFORMATION BEGINS ON PAGE 12 AFTER FRENCH
AND SPANISH LANGUAGE SECTIONS. ILLUSTRATIONS START ON PAGE 13.
These products have a 90-Day Satisfaction Guarantee Policy, as well as a Three-year Limited Warranty.
For Warranty and Policy details, please go to www.RIDGID.com or call (toll free) 1-866-539-1710.
11 - English
Page 12

AVERTISSEMENTS DE SÉCURITÉ RELATIVES AUX OUTILS
ÉLECTRIQUES
défaut à la terre (GFCI). L’utilisation d’un GFCI réduit le
AVERTISSEMENT
Lire tous les avertissements et toutes les
instructions. Ne pas suivre l’ensemble des
avertissements et des instructions peut entraîner
une électrocution, un incendie ou des blessures
graves.
Conserver les avertissements et les instructions à des
fins de référence ultérieure. Le terme « outil motorisé »,
utilisé dans tous les avertissements ci-dessous désigne tout
outil fonctionnant sur secteur (câblé) ou sur piles (sans fil).
SÉCURITÉ DU LIEU DE TRAVAIL
Garder le lieu de travail propre et bien éclairé. Les
endroits encombrés ou sombre s sont propices aux
accidents.
Ne pas utiliser d’outils électriques dans des
atmosphères explosives, par exemple en présence
de liquides, gaz ou poussières inflammables. Les
outils électriques produisent des étincelles risquant
d’enflammer les poussières ou vapeurs.
Garder les enfants et badauds à l’écart pendant
l’utilisation d’un outil électrique. Les distractions
peuvent causer une perte de contrôle.
SÉCURITÉ ÉLECTRIQUE
Les fiches des outils électriques doivent correspondre
à la prise secteur utilisée. Ne jamais modifier la fiche,
de quelque façon que ce soit. Ne jamais utiliser
d’adaptateurs de fiche avec des outils mis à la terre.
Les fiches et prises non modifiées réduisent le risque de
choc électrique.
Éviter tout contact du corps avec des surfaces mises
à la terre, telles que tuyaux, radiateurs, cuisinières et
réfrigérateurs. Le risque de choc électrique est accru
lorsque le corps est mis à la terre.
Ne pas exposer les outils électriques à l’eau ou
l’humidité. La pénétration d’eau dans ces outils accroît
le risque de choc électrique.
Ne pas maltraiter le cordon d’alimentation. Ne jamais
utiliser le cordon d’alimentation pour transporter
l’outil et ne jamais débrancher ce dernier en tirant sur
le cordon. Garder le cordon à l’écart de la chaleur,
de l’huile, des objets tranchants et des pièces en
mouvement. Un cordon endommagé ou emmêlé accroît
le risque de choc électrique.
Pour les travaux à l’extérieur, utiliser un cordon
spécialement conçu à cet effet. Utiliser un cordon
conçu pour l’usage extrérieur pour réduire les risques de
choc électrique.
S’il est nécessaire d’utiliser l’outil électrique dans un
endroit humide, employer un dispositif interrupteur de
risque de décharge électrique.
Utiliser ce produit seulement avec la piles et
le chargeurs indiqués dans le supplément de
raccordement pour chargeur/outils/piles/appareil n˚
988000-302.
SÉCURITÉ PERSONNELLE
Rester attentif, prêter attention au travail et faire
preuve de bon sens lors de l’utilisation de tout
outil électrique. Ne pas utiliser cet outil en état de
fatigue ou sous l’influence de l’alcool, de drogues
ou de médicaments. Un moment d’inattention pendant
l’utilisation d’un outil électrique peut entraîner des
blessures graves.
Utiliser l’équipement de sécurité. Toujours porter une
protection oculaire. L’équipement de sécurité, tel qu’un
masque filtrant, de chaussures de sécurité, d’un casque
ou d’une protection auditive, utilisé dans des conditions
appropriées réduira le risque de blessures.
Éviter les démarrages accidentels. S’assurer que
le commutateur est en position d’arrêt avant de
brancher l’outil. Porter un outil avec le doigt sur son
commutateur ou brancher un outil dont le commutateur
est en position de marche peut causer un accident.
Retirer les clés de réglage avant de mettre l’outil en
marche. Une clé laissée sur une pièce rotative de l’outil
peut causer des blessures.
Ne pas travailler hors de portée. Toujours se tenir
bien campé et en équilibre. Ceci permettra de mieux
contrôler l’outil en cas de situation imprévue.
Porter une tenue appropriée. Ne porter ni vêtements
amples, ni bijoux. Garder les cheveux, les vêtements
et les gants à l’écart des pièces en mouvement. Les
vêtements amples, bijoux et cheveux longs peuvent se
prendre dans les pièces en mouvement.
Si les outils sont équipés de dispositifs de
dépoussiérage, s’assurer qu’ils sont connectés et
correctement utilisés. L’usage de ces dispositifs de
dépoussiérage peut réduire les dangers présentés par
la poussière.
Ne pas utiliser l’outil sur une échelle ou un support
instable. Une bonne tenue et un bon équilibre permettent
de mieux contrôler l’outil en cas de situation imprévue.
UTILISATION ET ENTRETIEN DES OUTILS
ÉLECTRIQUES
Ne pas forcer l’outil. Utiliser l’outil approprié pour
l’application. Un outil approprié exécutera le travail
mieux et de façon moins dangereuse s’il est utilisé dans
les limites prévues.
2 - Français
Page 13

AVERTISSEMENTS DE SÉCURITÉ RELATIVES AUX OUTILS
ÉLECTRIQUES
Ne pas utiliser l’outil si le commutateur ne permet
pas de le mettre en marche ou de l’arrêter. Tout outil
qui ne peut pas être contrôlé par son commutateur est
dangereux et doit être réparé.
Débrancher l’outil et/ou retirer le bloc-piles avant
d’effectuer des réglages, de changer d’accessoire ou
de remiser l’outil. Ces mesures de sécurité préventives
réduisent les risques de démarrage accidentel de l’outil.
Ranger les outils motorisés hors de la portée des
enfants et ne laisser personne n’étant pas familiarisé
avec l’outil ou ces instructions utiliser l’outil. Dans les
mains de personnes n’ayant pas reçu des instructions
adéquates, les outils sont dangereux.
Entretenir les outils motorisés. Vérifier qu’aucune
pièce mobile n’est mal alignée ou bloquée, qu’aucune
pièce n’est brisée et s’assurer qu’aucun autre
problème ne risque d’affecter le bon fonctionnement
de l’outil. En cas de dommages faire réparer l’outil
avant de l’utiliser de nouveau. Beaucoup d’accidents
sont causés par des outils mal entretenus.
Garder les outils bien affûtés et propres. Des outils
correctement entretenus et dont les tranchants sont bien
affûtés risquent moins de se bloquer et sont plus faciles
à contrôler.
Utiliser l’outil, les accessoires et embouts, etc.
conformément à ces instrutions pour les applications
pour lesquelles ils sont conçus, en tenant compte des
conditions et du type de travail à exécuter. L’usage
d’un outil motorisé pour des applications pour lesquelles
il n’est pas conçu peut être dangereux.
UTILISATION ET ENTRETIEN DE LA PILE
Ne recharger qu’avec l’appareil spécifié par le
fabricant. Un chargeur approprié pour un type de pile
peut créer un risque d’incendie s’il est utilisé avec un
autre type de pile.
Utiliser exclusivement le bloc-pile spécifiquement
indiqué pour l’outil. L’usage de tout autre bloc peut
créer un risque de blessures et d’incendie.
Lorsque le bloc-piles n’est pas en usage, le garder
à l’écart d’articles tels qu’attaches trombones,
pièces de monnaie, clous, vis ou autres petits objets
métalliques risquant d’établir le contact entre les deux
bornes. La mise en court-circuit des bornes de piles peut
causer des irritations ou des brûlures.
En cas d’usage abusif, du liquide peut s’échapper des
piles. Éviter tout contact avec ce liquide. En cas de
contact accidentel, rincer immédiatement les parties
atteintes avec de l’eau. En cas d’éclaboussure dans
les yeux consulter un médecin. Le liquide s’échappant
des piles peut causer des irritations ou des brûlures.
DÉPANNAGE
Les réparations doivent être confiées à un technicien
qualifié, utilisant exclusivement des pièces identiques
à celles d’origine. Ceci assurera le maintien de la sécurité
de l’outil.
Utiliser exclusivement des pièces identiques à celles
d’origine pour les réparations. Se conformer aux
instructions de la section Entretien de ce manuel.
L’usage de pièces non autorisées ou le non-respect des
instructions peut présenter des risques de choc électrique
ou de blessures.
AVERTISSEMENTS DE SÉCURITÉ RELATIVES AUX CLOUEUSE
Toujours présumer que l’outil contient des attaches.
La manipulation inadéquate de la cloueuse peut
provoquer un tir accidentel d’attaches et causer des
blessures.
Ne pas pointer l’outil vers soi ou d’autres personnes.
L’actionnement accidentel entraînera le tir d’une attache
et causera des blessures.
Ne pas actionner l’outil s’il n’est pas fermement
appuyé sur la pièce à clouer. Lorsque l’outil n’est pas en
contact avec la pièce à clouer, l’attache peut être déviée
de sa cible.
Débrancher l’outil de la source d’alimentation
lorsque les confitures de fixation de l’outil. Tout en
retirant une agrafe coincée, l’agrafeuse peut être activé
accidentellement s’il est branché po.
Être prudent lors du retrait d’une attache bloquée.
Le mécanisme peut être comprimé et l’attache peut être
projetée avec force pendant la tentative de délogement.
Ne pas utiliser cette cloueuse pour fixer du câblage
électrique. Cet outil n’est pas conçu pour fixer du
câblage électrique et peut endommager l’isolant des
câbles et des risques d’électrocution et d’incendie.
Lorsque l’outil est utilisé pour un travail risquant de
le mettre en contact avec des fils électriques cachés,
le tenir par les surfaces de prise isolées. Le contact
d’un dispositif de fixation avec un fil sous tension «
électrifie » les pièces métalliques exposées de l’outil et
peut électrocuter l’utilisateur.
3 - Français
Page 14

AVERTISSEMENTS DE SÉCURITÉ RELATIVES AUX CLOUEUSE
Apprendre à connaître l’outil. Lire attentivement le
manuel d’utilisation. Apprendre les applications et
les limites de l’outil, ainsi que les risques spécifiques
relatifs à son utilisation. Le respect de cette consigne
réduira les risques d’incendie, de choc électrique et de
blessures graves.
Toujours porter une protection oculaire aven écran
de protection latéra certifiée conforme à la norme
ANSI Z87.1. Les lunettes de vue ordinaires ne sont
munies que de verres résistants aux chocs. Ces dernières
ne sont PAS des lunettes de sécurité. Le respect de cette
règle réduira les risques de blessures graves.
Lors du chargement, de l’utilisation ou de l’entretien
de cet outil, l’opérateur et les personnes se trouvant
sur le lieu de travail doivent TOUJOURS porter
un dispositif oculaire à protection FRONTALE et
LATÉRALE, conforme aux normes ANSI. Une telle
protection est requise, car les clous / agrafes et débris
projetés peuvent causer des lésions oculaires graves.
Il incombe à l’employeur et / ou l’utilisateur de veiller
à ce qu’une protection oculaire adéquate soit utilisée.
Nous recommandons d’utiliser un masque facial à champ
de vision se portant par-dessus des lunettes de vue ou de
sécurité et potégeant des débris projetés sur le devant et
les côtés. Toujours porter une protection oculaire certifiée
conforme à la norme ANSI Z87.1.
Des équipements de protection supplémentaires sont
requis dans certains environnements. Par exemple,
le lieu de travail peut présenter un niveau de bruit
susceptible d’entraîner des lésions auditives. Il incombe à
l’opérateur et à l’utilisateur qu’une protection audidive soit
fournie et utilisée par l’opérateur et les autres personnes
se trouvant sur le lieu de travail. Certains environnements
requièrent le port d’un casque. Il incombe à l’employeur
et / ou l’utilisateur de veiller à ce qu’un casque conforme
à la norme ANSI Z89.1-1997 soit utilisé.
Excepté pour planter des clous, garder les doigts à
l’écart de la gâchette, pour éviter un déclenchement
accidentel.
Utiliser l’équipement de sécurité. Toujours porter une
protection oculaire. Suivant les conditions, le port d’un
masque antipoussière, de chaussures de sécurité, d’un
casque ou d’une protection auditive est recommandé.
Protection respiratoire. Porter un masque facial ou
un masque antipoussière si le travail produit de la
poussière. Le respect de cette consigne réduira les
risques de blessures graves.
Protection auditive. Porter une protection auditive
lors de l’utilisation prolongée. Le respect de cette règle
réduira les risques de blessures graves.
Les outils fonctionnant sur piles n’ayant pas besoin
d’être branchés sur une prise secteur, ils sont toujours
en état de fonctionnement. Tenir compte des dangers
possibles lorsque l’outil n’est pas en usage et lors du
remplacement des piles. Le respect de cette consigne
réduira les risques d’incendie, de choc électrique et de
blessures graves.
Ne pas placer les outils électriques sans fil ou leurs
piles à proximité de flammes ou d’une source de
chaleur. Ceci réduira les risques d’explosion et de
blessures.
Ne pas écraser, faire tomber ou endommager le bloc-
piles. Ne jamais utiliser un bloc-piles ou un chargeur
qui est tombé, a été écrasé, a reçu un choc violent ou a
été endommagé de quelque façon que ce soit. Une pile
endommagée risque d’exploser. Éliminer immédiatement
toute pile endommagée, selon une méthode appropriée.
Les piles peuvent exploser en présence d’une source
d’allumage, telle qu’une veilleuse. Pour réduire les
risques de blessures graves, ne jamais utiliser un appareil
sans fil, quel qu’il soit, en présence d’une flamme
vive. En explosant, une pile peut projeter des débris
et des produits chimiques. En cas d’exposition, rincer
immédiatement les parties atteintes avec de l’eau.
Ne pas recharger un outil fonctionnant sur piles
dans un endroit humide ou mouillé. Ne pas utiliser,
remiser ou charger le bloc-piles ou produits dans des
emplacements où la température est inférieure 10 °C
(50 °F) à ou supérieure à 38 °C (100 °F). Ne pas ranger
l’outil à l’extérieur ou dans un véhicule.
Si l’outil est utilisé de façon intensive ou sous des
températures extrêmes, des fuites de piles peuvent se
produire. En cas de contact du liquide avec la peau,
rincer immédiatement la partie atteinte avec de l’eau
savonneuse, puis neutraliser avec du jus de citron ou
du vinaigre. En cas d’éclaboussure dans les yeux, les
rincer à l’eau fraîche pendant au moins 10 minutes,
puis contacter immédiatement un médecin. Le respect
de cette règle réduira les risques de blessures graves.
L’outil ne doit être utilisé que pour les applications
pour lesquelles il est conçu. Ne pas décharger des
clous dans le vide.
Cet outil pneumatique ne doit être utilisé que pour les
applicactions pour lesquelles il est conçu.
Utiliser seulement les agrafes recommandées pour
cet outil. L’utilisation du mauvais type d’agrafes pourrait
nuire au débit des agrafes et entraîner des bourrages
d’agrafes ainsi que l’éjection des clous de l’outil à des
angles irréguliers. Si le débit des agrafes n’est pas
constant et fluide, cesser de les utiliser sur le champ.
Les bourrages et un débit d’agrafes irrégulier peuvent
occasionner des blessures graves.
Ne jamais utiliser cet outil de façon à ce qu’un clou
puisse être dirigé vers quoi que ce soit d’autre que la
pièce à clouer.
Ne pas utiliser cet outil comme un marteau.
4 - Français
Page 15

RÈGLES DE SÉCURITÉ RELATIVES AUX CLOUEUSE
Toujours transporter l’outil par la poignée.
Ne pas altérer ou modifier cet outil, ni l’utiliser
pour des fonctions autres que celles prévues, sans
autorisation préalable de son fabricant.
Ne jamais oublier qu’un usage incorrect ou abusif
de cet outil peut mettre l’opérateur et les autres
personnes présentes en danger.
Ne jamais bloquer la gâchette ou le contact de la
cloususe en position de déclenchement avec du ruban
adhésif ou un quelconque autre système.
Ne jamais laisser l’outil sans surveillance avec le bloc-
piles installée.
Ne pas utiliser cet outil s’il ne comporte pas
d’autocollant d’avertissement.
UTILISATION
Ne pas utiliser l’outil si la gâchette ne fonctionne pas
correctement. Tout outil qui ne peut pas être contrôlé
par la gâchette est dangereux et doit être réparé.
Vérifier le mécanisme de contact de la tête de l’outil
fréquemment. Ne pas utiliser l’outil si le mécanisme
de déclenchement par contact ne fonctionne pas
correctement, car l’éjection accidentelle d’une agrafe
pourrait se produire. Ne pas empêcher le fonctionnement
correct du mécanisme de contact de la tête de la
cloueuse.
Ne pas utiliser un outil qui ne fonctionne pas
correctement.
Toujours présumer que l’outil contient des clous /
agrafes.
Ne pas transporter l’outil avec le doigt sur la gâchette.
Un clou pourrait être éjecté accidentellement.
Toujours manipuler l’outil avec précaution :
• Respecter cet outil comme tout équipement de travail.
• Ne pas l’utiliser l’utiliser comme un jouet,
• Ne jamais appuyer sur la gâchette si la tête de l’outil
n’est pas dirigée vers la pièce à clouer.
• Garder toutes les personnes présentes à distance sûre
de l’outil, car un éventuel déclenchement accidentel
pourraît entraîner des blessures.
Le choix de la méthode de déclenchement est
important. Voir les options de déclenchement dans
le manuel.
Les outils pneumatiques sont conçus pour une
utilisation à une main. Ne pas tenir l’outil par la face
avant du chargeur. Tenir les mains, la tête et toute autre
partie du corps à distance du point d’éjection des clous,
près du chargeur, afin d’éviter des blessures graves.
Ne pointer l’outil ni vers soi, ni vers quiconque, qu’il
contienne des clous ou non.
N’actionner l’outil que pour planter un clou dans la
pièce à assujettir.
Toujours s’assurer que la surface de contact est
exactement positionnée sur la pièce à clouer. Un
positionnement seulement partiel de la surface de contact
sur la pièce à clouer peut occasionner des blessures
graves car l’agrafe risque d’être éjectée complètement
à côté de la pièce.
Ne pas planter de clous près du bord du matériau.
La pièce à clouer peut se fendre, causant un ricochet du
clou, qui risque alors de blesser l’opérateur ou une autre
personne présente. Soyez prudent, car la fixation peut
suivre le grain du bois et causer un ressortir inopinément
par le côté du matériau travaillé ou déroger de sa
trajectoire représentant ainsi un risque de blessure.
Garder les mains et toutes les parties du corps à
l’écart du point à clouer. Au besoin, assujettir la pièce à
clouer avec des serre-joint pour garder les mains à l’écart
de la zone dangereuse. S’assurer que la pièce à clouer
est correctement assujettie avant d’appuyer la cloueuse
à sa surface. Le contact de la cloueuse peut causer un
déplacement inopiné de la pièce.
Lors du travail dans des endroits confinés, garder le
visage et le corps à l’écart de l’arrière de l’outil. Un
recul brusque peut projeter la cloueuse contre le corps,
en particulier lors du clouage de matériaux denses.
Durant l’utilisation normale de l’outil, un recul se
produit lorsqu’un clou est planté. Ce recul est normal.
Ne pas essayer de l’empêcher en maintenant l’outil contre
la pièce à clouer. Empêcher le recul pourrait causer
l’éjection d’un second clou. Tenir la poignée fermement,
laisser l’outil exécuter le travail et ne jamais placer l’autre
main sur le dessus de l’outil ou près de l’échappement.
Le non respect de cette mise en garde peut entraîner des
blessures graves.
Ne pas planter un clou sur un autre ou avec l’outil à
un angle trop prononcé, car le clou pourrait dévier et
blesser quelqu’un.
CHARGEMENT DE L’OUTIL
Ne pas charger l’outil lorsque l’une des commandes
de déclenchement est activée.
Lors du chargement de l’outil :
Ne jamais placer une main ou une partie quelconque
du corps devant la tête de l’outil.
Ne jamais pointer l’outil sur qui que ce soit.
Ne pas appuyer sur la gâchette ou sur le mécanisme
de contact, car l’outil pourrait éjecter un clou, risquant
blesser quelqu’un.
CONSERVER CES INSTRUCTIONS
Les consulter fréquemment et les utiliser pour instruire
les autres utilisateurs éventuels. Si cet outil est prêté, il
doit être accompagné de ces instructions.
5 - Français
Page 16

SYMBOLES
Les termes de mise en garde suivants et leur signification ont pour but d’expliquer le degré de risques associé à l’utilisation
de ce produit.
SYMBOLE SIGNAL SIGNIFICATION
DANGER :
AVERTISSEMENT :
ATTENTION :
AVIS :
Certains des symboles ci-dessous peuvent être utilisés sur produit. Veiller à les étudier et à apprendre leur signification.
Une interprétation correcte de ces symboles permettra d’utiliser produit plus efficacement et de réduire les risques.
Indique une situation dangereuse qui, si elle n’est pas évitée, aura pour
conséquences des blessures graves ou mortelles.
Indique une situation dangereuse qui, si elle n’est pas évitée, pourrait entraîner
des blessures graves ou mortelles.
Indique une situation dangereuse qui, si elle n’est pas évitée, pourraît entraîner
des blessures légères ou de gravité modérée.
(Sans symbole d’alerte de sécurité) Indique les informations jugées
importantes sans toutefois représenter un risque de blessure (ex. : messages
concernant les dommages matériels).
SYMBOLE NOM DÉSIGNATION / EXPLICATION
Symbole d’alerte de sécurité Indique un risque de blessure potentiel.
Lire le manuel d’utilisation
Protection oculaire
Pour réduire les risques de blessures, l’utilisateur doit lire et veiller à
bien comprendre le manuel d’utilisation avant d’utiliser ce produit.
Toujours porter une protection oculaire avec écrans latéraux
certifiée conforme à la norme ANSI Z87.1.
Avertissement concernant
l’humidité
Surface brûlante
Garder les mains à l’écart Garder les mains et le corps à l’écart de de la décharge de l’outil.
Symbole de recyclage
V Volts Tension
min Minutes Temps
Courant continu Type ou caractéristique du courant
n
o
.../min Par minute Tours, coups, vitesse périphérique, orbites, etc., par minute
Vitesse à vide Vitesse de rotation à vide
Ne pas exposer à la pluie ou l’humidité.
Pour éviter les risques de blessures ou de dommages, éviter tout
contact avec les surfaces brûlantes.
Ce produit utilise les piles de lithium-ion (Li-ion). Les réglementations
locales ou gouvernementales peuvent interdire de jeter les piles dans
les ordures ménagères. Consulter les autorités locales compétentes
pour les options de recyclage et/ou l’élimination.
6 - Français
Page 17

GLOSSAIRE
Activer (commandes de l’outil)
Mettre une commande sur une position déclenchant ou
permettant de déclencher l’outil.
Actionner (outil)
Causer le mouvement des pièces conçues pour chasser
une agrafe.
Système de déclenchement
Gâchette, déclencheur par contact et / ou autre commande
qui, utilisées séparément ou conjointement déclenchent
l’outil.
• Déclenchement par séquence unique
Système de déclenchement comprenant plus d’une
commande et dont les commandes doivent être
actionnées dans un ordre donné pour déclencher
l’outil. Le déclenchement peut être répété lorsqu’une
commande, autre que le déclencheur par contact, est
relâchée, puis actionnée de nouveau.
• Déclenchement par contact
Système de déclenchement comprenant plus d’une
commande et dont les commandes doivent être
actionnées dans n’importe quel ordre pour déclencher
l’outil. Le déclenchement peut être répété lorsqu’une
commande est relâchée, puis actionnée de nouveau.
Pièce de fixation
Agrafe, cheville, clou de finition ou autre pièce de fixation
conçue et fabriquée pour être utilisée pour les outils
répondant à cette norme.
Blocage
Obstruction dans le système d’alimentation ou de décharge
de l’outil.
Commande
Dispositif qui, séparément ou en conjonction avec un
système, peut causer le déclenchement de l’outil.
Gâchette
Commande de l’outil actionnée par le doigt de l’opérateur.
Pièce
Objet dans lequel un clou, une agrafe ou autre pièce de
fixation est enfoncé par l’outil.
Contact de déclenchement
Pièce ou partie de l’outil conçue pour le déclencher par
contact avec la pièce à assujettir.
7 - Français
Page 18

CARACTÉRISTIQUES
FICHE TECHNIQUE
Type de pièces de fixation .......... Clou à parquet de calibre 18
Tailles .................................15,87 à 53,98 mm (5/8 à 2-1/8 po)
ASSEMBLAGE
Capacité du magasin ...............................................105 clous
AVERTISSEMENT :
Ne pas utiliser le produit s’il n’est pas complètement
assemblé ou si des pièces semblent manquantes
ou endommagées. L’utilisation d’un produit
dont l’assemblage est incorrect ou incomplet ou
comportant des pièces endommagées ou absentes
représente un risque de blessures graves.
Si des pièces manquent ou sont endommagées, veuillez appeler aul 1-866-539-1710 pour obtenir de l’aide.
AVERTISSEMENT :
Ne pas essayer de modifier cet outil ou de créer des
pièces et accessoires non recommandés. De telles
altérations ou modifications sont considérées comme
un usage abusif et peuvent créer des conditions
dangereuses, risquant d’entraîner des blessures
graves.
UTILISATION
Moulures
AVERTISSEMENT :
Ne pas laisser la familiarité avec l’outil faire oublier la
prudence. Ne pas oublier qu’une fraction de seconde
d’inattention peut entraîner des blessures graves.
AVERTISSEMENT :
Toujours retirer la pile de l’outil au moment
d’assembler des pièces, d’effectuer des réglages
et de procéder au nettoyage, ou lorsque l’outil n’est
pas utilisé. Le fait de retirer la pile permet d’empêcher
un démarrage accidentel pouvant entraîner des
blessures graves.
AVERTISSEMENT :
Toujours porter une protection oculaire avec écrans
latéraux certifiée conforme à la norme ANSI Z87.1. Si
cette précaution n’est pas prise, des objets peuvent
être projetés dans les yeux et causer des lésions
graves.
APPLICATIONS
Cet outil peut être utilisé pour les applications ci-dessous :
Finition et décoration (intérieur et extérieur)
Encadrement de portes et fenêtres
Montants de porte
Plinthes
Moulure couronnée
Ébénisterie
Moulures de plinthes et cimaises
Escaliers
Cadres de portes et fenêtres
Protections murales
Coffrages
Planchers en bois
Panneautage
Fabrication de meubles
AGRAFE POUR COURROIE
Voir la figure 1, page 13.
L’agrafe pour courroie peut être installée du côté gauche ou
droit de la cloueuse, selon les préférences de l’utilisateur.
Aligner l’agrafe pour courroie et la vis avec l’orifice pour vis
droit ou gauche.
Utiliser un tournevis à tête cruciforme (non fourni) pour visser
fermement.
INSTALLATION / RETRAIT DU BLOC-PILES
Voir le figure 2, page 13.
Pour insérer, insérer le bloc-piles dans l’outil. Aligner la
nervure du bloc-piles sur la rainure intérieure de l’outil.
S’assurer que ses deux loquets latéraux s’engagent
correctement et vérifier que le bloc-piles est bien fixé avant
d’utiliser l’outil.
NOTE : Presser l’interrupteur d’éclairage DEL sur la prise pour
réactiver la cloueuse.
Pour retirer, appuyer sur les deux loquets se trouvant sur
les côtés du bloc-piles pour le séparer de l’outil.
Pour prendre connaissance des consignes de chargement,
consulter le manuel d’utilisation des piles et des chargeurs.
8 - Français
Page 19

UTILISATION
COUSSINET DE PROTECTION
Voir la figure 3, page 13.
Le coussinet de protection empêche de marquer ou d’érafler
les bois tendres.
AVERTISSEMENT :
Retirer la pile de l’outil avant de retirer le coussinet de
protection ou de le remettre en place. Ne pas prendre
cette précaution peut entraîner des blessures graves.
Le coussinet peut être retiré en le tirant vers le bas et vers
l’avant. Pour remettre le coussinet en place, le placer sur la
tête et le pousser vers le haut pour l’engager.
Un compartiment de rangement du coussinet est prévu sur le
magasin de l’outil. Ce compartiment contient un coussinet de
rechange.
CHARGEMENT DES CLOUS Á PARQUET
Voir les figures 4 et 5, pages 13 et 14.
Retirer le bloc-piles de l’outil.
Tout en éloignant le nez de l’outil de votre corps, presser
le bouton de dégagement du magasin situé à l’arrière du
magasin et glisser le couvercle pour ouvrir le magasin.
Insérer les clous à parquet dans la rainure en positionnant
les pointes de clous vers le bas et les faire reposer au fond
de la rainure.
AVERTISSEMENT :
Veiller à ne pointer l’outil ni vers soi, ni vers d’autres
personnes lors du chargement de clous. Ne pas
respecter cette consigne peut provoquer des
blessures graves.
Refermer le couvercle du magasin en veillant à ce qu’il
s’encliquette.
S’assurer que le magasin est correctement verrouillé.
AVERTISSEMENT :
Utiliser exclusivement les clous recommandés
pour cet outil. L’usage d’autres clous peut causer
un mauvais fonctionnement de l’outil, susceptible
d’entraîner des blessures graves.
RÉGLAGE DE LA PUISSANCE D’AIR
Voir la figure 6, page 14.
Le réglage de puissance d’air dépend de la dimension des clous
et du type de matériau à clouer.
Commencer par tester la profondeur d’enfoncement en plantant
l’un des clous à utiliser dans un morceau du même bois que
la pièce à clouer.
Retirer le bloc-piles de l’outil.
Déplacer le levier de réglage de puissance vers la droite
pour augmenter la puissance d’air ou vers la gauche pour
diminuer la puissance d’air.
Il est possible d’obtenir la profondeur désirée simplement en
réglant la puissance d’air. Si des réglages fins sont nécessaires,
utiliser le réglage de profondeur d’enfoncement.
RÉGLAGE DE PROFONDEUR D’ENFONCEMENT
Voir la figure 7, page 14.
La profondeur d’enfoncement du clou peut être réglée audelà de la puissance d’air. Il est recommandé de faire un essai
sur une chute afin de déterminer la profondeur requise pour
l’application.
Pour déterminer la profondeur, régler d’abord la puissance
d’air, puis planter un clou d’essai. Pour obtenir la profondeur
nécessaire, utiliser le réglage de profondeur d’enfoncement
de l’outil. Les matériaux plus durs et des clous plus longs
nécessiteront une force d’enfoncement plus grande du clou.
Retirer le bloc-piles de l’outil.
Tourner le réglage de profondeur d’enfoncement gauche ou
droit pour modifier la profondeur d’enfoncement.
Installer la pile et réactiver l’outil en appuyant sur l’interrupteur
du témoin situé sur la prise.
Faire un essai d’enfoncement d’un clou après chaque
réglage, jusqu’à ce que la profondeur désirée soit obtenue.
NOTE : Régler la profondeur d’enfoncement selon la
profondeur minimale qui conviendra au travail à effectuer.
UTILISATION DU SÉLECTEUR DE MODE DE
LA GÂCHETTE
Voir les figures 8 et 9, pages 14 et 15.
AVERTISSEMENT :
Ne jamais caler ou bloquer le mécanisme de sûreté
de déclenchement par contact pendant que l’outil
est en fonctionnement. Cela pourrait entraîner des
blessures graves.
AVERTISSEMENT :
Ne jamais charger les clous avec la gâchette ou le
mécanisme de déclenchement par contact activé.
Cela pourrait entraîner des blessures graves.
Cet outil est expédié de l’usine alors que le sélecteur de mode
de la gâchette est réglé en mode « commande séquentielle
simple ». Il est également possible de régler le sélecteur de
mode de la gâchette en mode « commande de contact ».
DÉCLENCHEMENT PAR SÉQUENCE UNIQUE
Le mode de déclenchement par séquence unique permet le
placement le plus précis des agrafes.
Retirer le bloc-piles de l’outil.
Glisser le sélecteur à la position ( ).
9 - Français
Page 20

UTILISATION
AVERTISSEMENT :
La cloueuse ne fonctionnera pas correctement si le
sélecteur n’est pas positionné fermement sur ( ) ou
( ). Toujours s’assurer que le sélecteur est
positionné correctement afin d’éviter un tir accidentel
du clou et les risques de blessures graves.
Réinstaller la pile et réactiver l’outil en appuyant sur
l’interrupteur du témoin situé sur la prise.
Saisir l’outil fermement pour maintenir le contrôle. Placer la
tête de l’outil contre la pièce à clouer.
Appuyer l’outil contre la pièce à agrafer pour actionner le
dispositif de déclenchement par contact.
Appuyer sur la gâchette pour tirer une agrafe.
NOTE : Tenez la gâchette jusqu’à ce cycle d’entraînement
est terminée. Si le fait d’appuyer sur la gâchette ne permet
pas d’enfoncer une pièce de fixation, relâcher la gâchette et
soulever l’outil de la pièce à travailler, puis le replacer et essayer
de nouveau d’enfoncer une pièce de fixation.
DÉCLENCHEMENT PAR CONTACT
Le déclenchement par contact permet de planter un grand
nombre de clous très rapidement.
Retirer le bloc-piles de l’outil.
Glisser le sélecteur sur la position ( ).
Réinstaller la pile et réactiver l’outil en appuyant sur
l’interrupteur du témoin situé sur la prise.
Saisir l’outil fermement pour maintenir le contrôle.
Appuyer sur la gâchette et la maintenir enfoncée. Appuyer
l’outil contre la pièce à clouer pour actionner le dispositif de
déclenchement par contact et planter un clou. Pour enfoncer
un autre clou, soulever l’outil et appuyer à nouveau le nez
contre la surface de travail.
NOTE : Tenez la gâchette et garder le déclenchement
par contact enfoncé jusqu’à ce cycle d’entraînement est
terminée.
Toujours retirer son doigt de la gâchette dès que la quantité
de clous désirée est enfoncée.
NOTE : En mode de déclenchement par contact, les clous
peuvent également être plantés en appuyant la tête de l’outil
sur la pièce et en pressant la gâchette.
AVERTISSEMENT :
Durant l’utilisation normale de l’outil, un recul se
produit lorsqu’un clou est planté. Ce recul est
normal. Ne pas essayer de l’empêcher en maintenant
l’outil contre la pièce à clouer. Cela pourrait causer
l’éjection d’un second clou. Le non respect de cette
mise en garde peut entraîner des blessures graves.
VERROUILLAGE DE TIR À VIDE
Lorsque le magazine a 0-5 clous restants, le verrouillage de tir
à vide empêche le fonctionnement de l’outil.
Pour continuer le travail, recharger la cloueuse.
LAMPES DE TRAVAIL À DEL
Voir la figure 10, page 15.
Pour allumer le témoin DEL, appuyer sur l’interrupteur de
témoin DEL sur la prise tout en maintenant fermement l’outil
pendant le fonctionnement normal.
DIAGNOSTIC RÉTROACTIF
Le témoin DEL offrent une rétroaction indiquant la charge
suffisante du bloc-piles et le fonctionnement adéquat de l’outil.
Installer un bloc-piles complètement chargé lorsque le témoin
clignotent. Si le clignotement du témoin n’est pas interrompu,
consulter le chapitre Dépannage pour obtenir plus de détails.
Si le témoin DEL de la cloueuse s’éteignent, cela signifie que
l’outil a effectué un arrêt de protection. Soulever l’outil de
la pièce à clouer et relâcher la gâchette afin de réactiver la
cloueuse avant de recommencer un nouveau cycle de clouage.
RETRAIT DE CLOUS DE L’OUTIL
Voir la figure 11, page 15.
AVERTISSEMENT :
Retirer le bloc-piles avant de retirer ou de dégager les
clous. Ne pas prendre cette précaution peut causer
des blessures graves.
Retirer le bloc-piles de l’outil.
Pour retirer une bande de clous de l’outil, presser le bouton
de dégagement du magasin situé à l’arrière du magasin et
ouvrir en faisant glisser le magasin.
Retirer les clous.
Fermer le magasin.
DÉBLOCAGE D’UNE AGRAFE
Voir la figure 12 et 13, page 15.
AVERTISSEMENT :
Retirer le bloc-piles de l’outil avant de retirer
ou débloquer une agrafe. Ne pas prendre cette
précaution peut entraîner des blessures graves.
Un enfoncement trop profond dans le matériau, une quantité
excessive de débris ou des clous coincés peuvent provoquer
le blocage de la mécanisme d’entraînement vers le bas.
La mécanisme d’entraînement peut habituellement être remise
en position de fonctionnement en appuyant sur l’élément de
contact contre un échantillon de bois et en appuyant sur la
gâchette.
Si la mécanisme d’entraînement ne se réinsère pas
automatiquement dans l’outil, le mécanisme de l’outil peut
être coincé.
Si un clou ou une agrafe se bloque dans l’outil, retirer le blocpiles et garder l’outil pointé à l’ecart de soi pour le débloquer.
Retirer le bloc-piles de l’outil.
Retirer les clous de l’outil.
Soulever le loquet et ouvrir le mécanisme.
10 - Français
Page 21

UTILISATION
Repérer et retirer le capuchon de la vis d’élévation avec un
tournevis à lame plate.
Tourner la vis d’élévation vers la droite pour déplacer le
mécanisme d’entraînement vers l’arrière afin de déloger le
clou coincé.
Retirer le clou tordu.
Refermer le couvercle de déblocage et le verrouiller.
Insérer des clous.
Réinstaller la pile et réactiver l’outil en appuyant sur
l’interrupteur du témoin situé sur la prise.
ACCESSOIRES
Pour la commande de pièces et kits d’entretien, appeler le 1-866-539-1710.
Trousse d’entretien ........................................................................................................................................................... 203685001
AVERTISSEMENT:
Les outils et accessoires disponibles actuellement pour cet outil sont listés ci-dessus. Ne pas utiliser d’outils ou
accessoires non recommandés pour cet outil. L’utilisation de pièces et accessoires non recommandés peut entraîner
des blessures graves.
DÉPANNAGE
PROBLÈME CAUSE POSSIBLE SOLUTION
La pièce de déclenchement par contact
n’est pas complètement enfoncée - l’outil
ne fonctionne pas
L’outil fonctionne correctement, mais les
pièces de fixation ne s’enfoncent pas
complètement
L’outil fonctionne correctement, mais les
pièces de fixation s’enfoncent trop
L’outil se bloque fréquemment Clous de type incorrects
L’outil s’arrête et le témoin DEL clignotent
rapidement
Quantité faible de clous
La pièce de déclenchement par contact
est bloquée
La puissance d’air est trop faible
La distance d’enfoncement n’est pas
assez grande
Le clou est trop long et ne convient pas à
la dureté du bois
Les joints de piston sont usés ou brisés
La puissance d’air est trop élevée
La distance d’enfoncement est trop
profonde
Clous endommagés
Magasin desserré
Magasin encrassé
Le bloc-piles est faible ou épuisée
Gâchette relâchée trop tôt
Retirer la pile et recharger des clous
Retirer la pile et déloger les débris
Augmenter la puissance d’air
Régler la profondeur d’enfoncement
Utiliser une longueur de clou selon le bois
à clouer
Remplacer un ou les deux pistons (trousse
d’entretien requise)
Diminuer la puissance d’air
Régler la profondeur d’enfoncement
S’assurer que les clous sont de taille
correcte
Remplacer les clous
Serrer les vis
Nettoyer le magasin
Recharger le bloc-piles
Retirer le bloc-piles et réinstaller
Outil a chargé la pile et DEL clignote
lentement ou sont les DEL ne s’éteint pas
après approxmimately dix secondes de
non-utilisation
NOTE : SECTION ENTRETIEN COMMENÇANT SUR 12 DE PAGE APRÈS LA
SECTION ESPAÑOL. ILLUSTRATIONS COMMENÇANT SUR LA PAGE 13.
Ce produit est accompagné d’une politique de satisfaction de 90 jours et d’une garantie
limitée de trois (3) ans. Pour obtenir les détails de la garantie et de la politique,
visiter le site www.RIDGID.com ou appeler (sans frais) au 1-866-539-1710.
L’outil n’a pas fonctionné correctement Apporter l’outil au centre de réparations
autorisé le plus près
11 - Français
Page 22

ADVERTENCIAS DE SEGURIDAD GENERALES
PARA LA HERRAMIENTA ELÉCTRICA
de circuito con pérdida a tierra (GFCI) para tener un
ADVERTENCIA
Lea y comprenda todas las instrucciones. El
incumplimiento de las instrucciones señaladas abajo
puede causar descargas eléctricas, incendios y
lesiones corporales serias.
Guarde todas las advertencias e instrucciones para futuras
consultas. El término “herramienta eléctrica” empleado en
todos los avisos de advertencia enumerados abajo se refiere a
las herramientas eléctricas de cordón (alámbricas) y de baterías
(inalámbricas).
SEGURIDAD EN EL ÁREA DE TRABAJO
Mantenga limpia y bien iluminada el área de trabajo.
Un área de trabajo mal despejada o mal iluminada propicia
accidentes.
No utilice herramientas motorizadas en atmósferas
explosivas, como las existentes alrededor de líquidos,
gases y polvos inflamables. Las herramientas eléctricas
generan chispas que pueden encender el polvo y los vapores
inflamables.
Mantenga alejados a los niños y circunstantes al
maniobrar una herramienta eléctrica. Toda distracción
puede causar pérdida del control de la herramienta.
SEGURIDAD ELÉCTRICA
Las clavijas de las herramientas eléctricas deben
corresponder a las tomas de corriente donde se
conectan. Nunca modifique la clavija de ninguna forma.
No utilice ninguna clavija adaptadora con herramientas
eléctricas dotadas de contacto a tierra. Conectando
las clavijas originales en las tomas de corriente donde
corresponden se disminuye el riesgo de una descarga
eléctrica.
Evite el contacto del cuerpo con las superficies de
objetos que estén haciendo tierra o estén conectados a
ésta, como tuberías, radiadores, estufas y refrigeradores.
Existe un mayor riesgo de descargas eléctricas si el cuerpo
está haciendo tierra.
No exponga las herramientas eléctricas a la lluvia ni a
condiciones de humedad. La introducción de agua en
una herramienta eléctrica aumenta el riesgo de descargas
eléctricas.
No maltrate el cordón eléctrico. Nunca utilice el cordón
para trasladar, desconectar o tirar de la herramienta
eléctrica. Mantenga el cordón alejado del calor, del
aceite, de bordes afilados y de piezas móviles. Los
cordones eléctricos dañados o enredados aumentan el
riesgo de descargas eléctricas.
Al utilizar una herramienta eléctrica a la intemperie,
use un cordón de extensión apropiado para el exterior.
Usando un cordón adecuado para el exterior se disminuye
el riesgo de descargas eléctricas.
Si inevitablemente debe utilizar una herramienta
eléctrica en un lugar húmedo, utilice un interruptor
suministro protegido. El uso de un GFCI disminuye el riesgo
de descarga eléctrica.
Usar este producto únicamente con la baterías y el
cargadors indicados en el folleto de la herramienta/
aparato/paquete de baterías/cargador complementario
988000-302.
SEGURIDAD PERSONAL
Permanezca alerta, preste atención a lo que esté
haciendo y aplique el sentido común al utilizar
herramientas eléctricas. No utilice la herramienta
eléctrica si está cansado o se encuentra bajo los efectos
de alguna droga, alcohol o medicamento. Un momento de
inatención al utilizar una herramienta eléctrica puede causar
lesiones corporales serias.
Use equipo de seguridad. Siempre póngase protección
ocular. El uso de equipo de seguridad como mascarilla para
el polvo, calzado de seguridad, casco y protección para los
oídos en las circunstancias donde corresponda disminuye
el riesgo de lesiones.
Evite un arranque accidental de la unidad. Asegúrese
de que el interruptor esté en la posición de apagado
antes de conectar la herramienta. Portar las herramientas
eléctricas con el dedo en el interruptor, o conectarlas con
el interruptor puesto, propicia accidentes.
Retire toda llave o herramienta de ajuste antes
de encender la herramienta eléctrica. Toda llave o
herramienta de ajuste dejada en una pieza giratoria de la
herramienta eléctrica puede causar lesiones.
No estire el cuerpo para alcanzar mayor distancia.
Mantenga una postura firme y buen equilibrio en todo
momento. De esta manera se logra un mejor control de la
herramienta eléctrica en situaciones inesperadas.
Vístase adecuadamente. No vista ropas holgadas ni
joyas. Mantenga el cabello, la ropa y los guantes alejados
de las piezas móviles. Las ropas holgadas, las joyas y el
cabello largo pueden engancharse en las piezas móviles.
Si se suministran dispositivos para conectar mangueras
de extracción y captación de polvo, asegúrese de que
éstas estén bien conectadas y se usen correctamente.
El uso de un recolector de polvo puede reducir los peligros
relacionados con el polvo.
No utilice la unidad al estar en una escalera o en un
soporte inestable. Una postura estable sobre una superficie
sólida permite un mejor control de la herramienta eléctrica
en situaciones inesperadas.
EMPLEO Y CUIDADO DE LA HERRAMIENTA
ELÉCTRICA
No fuerce la herramienta eléctrica. Utilice la herramienta
eléctrica adecuada para cada trabajo. La herramienta
eléctrica adecuada efectúa mejor y de manera más segura
el trabajo, si además se maneja a la velocidad para la que
está diseñada.
2 - Español
Page 23

ADVERTENCIAS DE SEGURIDAD GENERALES
PARA LA HERRAMIENTA ELÉCTRICA
No utilice la herramienta si el interruptor no enciende o
no apaga. Cualquier herramienta eléctrica que no pueda
controlarse con el interruptor es peligrosa y debe repararse.
Desconecte la clavija del suministro de corriente o
retire el paquete de pilas de la herramienta eléctrica,
según sea el caso, antes de efectuarle cualquier ajuste,
cambiarle accesorios o guardarla. Tales medidas
preventivas de seguridad reducen el riesgo de poner en
marcha accidentalmente la herramienta eléctrica.
Guarde las herramientas eléctricas desocupadas fuera
del alcance de los niños y no permita que las utilicen
personas no familiarizadas con las mismas o con estas
instrucciones. Las herramientas eléctricas son peligrosas
en manos de personas no capacitadas en el uso de las
mismas.
Preste servicio a las herramientas eléctricas. Revise
para ver si hay desalineación o atoramiento de piezas
móviles, ruptura de piezas o cualquier otra condición
que pueda afectar el funcionamiento de la herramienta.
Si está dañada la herramienta eléctrica, permita que
la reparen antes de usarla. Numerosos accidentes son
causados por herramientas eléctricas mal cuidadas.
Mantenga las herramientas de corte afiladas y limpias.
Las herramientas de corte bien cuidadas y con bordes bien
afilados, tienen menos probabilidad de atascarse en la pieza
de trabajo y son más fáciles de controlar.
Utilice la herramienta eléctrica, los accesorios y brocas,
hojas y cuchillas de corte, ruedas de esmeril, etc. de
conformidad con estas instrucciones, tomando en
cuenta las condiciones de trabajo y la tarea por realizar.
Si se utiliza la herramienta eléctrica para operaciones
diferentes de las indicadas podría originar una situación
peligrosa.
EMPLEO Y CUIDADO DE LA HERRAMIENTA
DE BATERÍAS
Sólo cargue el paquete de baterías con el cargador
especificado por el fabricante. Un cargador adecuado para
un tipo paquete de baterías puede significar un riesgo de
incendio si se emplea con un paquete de baterías diferente.
Utilice las herramientas eléctricas sólo con los paquetes
de baterías específicamente indicados. El empleo de
paquetes de baterías diferentes puede presentar un riesgo
de incendio.
Cuando no esté utilizándose el paquete de baterías,
manténgalo lejos de otros objetos metálicos, como
clips, monedas, llaves, clavos, tornillos o otros objetos
metálicos, pequeños que puedan establecer conexión
entre ambas terminales. Establecer una conexión directa
entre las dos terminales de las baterías puede causar
irritación y quemaduras.
Si se maltratan las baterías, puede derramarse líquido
de las mismas; evite todo contacto con éste. En caso
de contacto, lávese con agua. Si el líquido llega a tocar
los ojos, además busque atención médica. El líquido de
las baterías puede causar irritación y quemaduras.
SERVICIO
Permita que un técnico de reparación calificado preste
servicio a la herramienta eléctrica, y sólo con piezas
de repuesto idénticas. De esta manera se mantiene la
seguridad de la herramienta eléctrica.
Al dar servicio a una herramienta eléctrica, sólo utilice
piezas de repuesto idénticas. Siga las instrucciones
señaladas en la sección Mantenimiento de este manual.
El empleo de piezas no autorizadas o el incumplimiento
de las instrucciones de mantenimiento puede significar un
riesgo de descarga eléctrica o de lesiones.
ADVERTENCIAS DE SEGURIDAD PARA CLAVADORA
Siempre suponga que la herramienta contiene
sujetadores. El manejo descuidado de la clavadora
puede hacer que se accione el gatillo inesperadamente y
que se disparen sujetadores que podrían causar lesiones
personales.
No apunte la herramienta hacia su cuerpo ni hacia otra
persona que se encuentre cerca. Un accionamiento
inesperado del gatillo disparará el sujetador y eso causará
lesiones.
No accione la herramienta a menos que esté firmemente
colocada contra la pieza de trabajo. Si la herramienta no
entra en contacto con la pieza de trabajo, el sujetador puede
desviarse.
Desconecte la herramienta de la fuente de alimentación
cuando se atasque un sujetador. Mientras retira
un sujetador atascado, la clavadora podría activarse
accidentalmente si estuviera enchufada.
Sea precavido al retirar el sujetador atascado. El
mecanismo puede encontrarse sometido a compresión y
el sujetador podría salir disparado con fuerza al tratar de
arreglar un atascamiento.
No utilice esta clavadora para sujetar cables de
electricidad. No está diseñada para la instalación de cables
de electricidad y puede dañar el aislamiento de los cables
y causar descargas eléctricas o riesgo de incendio.
Sujete la herramienta eléctrica por las superficies
aisladas de sujeción al efectuar una operación en la
cual el sujetador pueda entrar en contacto con cables
ocultos. Los sujetadores que entren en contacto con un
cable “con carga” pueden hacer que la electricidad se
transmita a las piezas metálicas expuestas de la herramienta
eléctrica y eso podría provocar una descarga eléctrica en el
operador.
3 - Español
Page 24

ADVERTENCIAS DE SEGURIDAD PARA CLAVADORA
Familiarícese con su herramienta eléctrica. Lea
cuidadosamente el manual del operador. Aprenda sus
usos y limitaciones, así como los posibles peligros
específicos de esta herramienta. Con el cumplimiento
de esta regla se reduce el riesgo de una descarga eléctrica,
incendio o lesión seria.
Use siempre protección ocular con protecciones
laterales con la marca de cumplimiento de la norma
Z87.1 del ANSI. Los anteojos comunes sólo tienen lentes
resistentes a los impactos. No son gafas de seguridad. Si
se cumple esta regla, se reduce el riesgo de lesiones serias.
Al cargar, utilizar y dar servicio a esta herramienta,
el operador y demás personas SIEMPRE deben
llevar puesta protección ocular que cumpla con las
especificaciones ANSI y ofrezca protección contra
partículas que salgan disparadas del FRENTE y de los
LADOS. Se requiere protección ocular como protección
contra sujetadores y desechos que salgan disparados, los
cuales pueden causar lesiones oculares serias.
Tanto el patrón como el operador deben asegurarse de
que se use protección ocular adecuada. Recomendamos
la careta protectora de visión amplia encima de los anteojos
normales o de los anteojos de seguridad que ofrecen
protección frontal y lateral contra partículas que salen
disparadas. Siempre póngase protección ocular con la
marca de cumplimiento de la norma ANSI Z87.1.
En algunos entornos se requiere protección adicional.
Por ejemplo, en el área de trabajo puede haber exposición
a un nivel de ruido que puede dañar el oído. El patrón y el
operador deben asegurarse de contar con toda la protección
auditiva necesaria y de que sea usada por el operador
mismo y demás personas presentes en el área de trabajo. En
algunos entornos se requiere el uso de equipo de protección
para la cabeza. Cuando se requiera, el patrón y el operador
deben asegurarse de que la protección usada para la cabeza
cumpla con la norma ANSI Z89.1-1997.
Mantenga los dedos alejados cuando los sujetadores no
estén introducidos, para evitar incendios accidentales.
Use equipo de seguridad. Siempre póngase protección
ocular. Cuando lo exijan las circunstancias debe ponerse
careta contra el polvo, zapatos de seguridad antiderrapantes,
casco o protección auditiva.
Protéjase los pulmones. Use una careta o mascarilla
contra el polvo si la operación genera mucho polvo. Con
el cumplimiento de esta regla se reduce el riesgo de lesiones
corporales serias.
Protéjase los oídos. Durante períodos prolongados de
utilización del producto, póngase protección para los
oídos. Con el cumplimiento de esta regla se reduce el riesgo
de lesiones corporales serias.
Las herramientas de baterías no se necesitan conectar
a una toma de corriente; por lo tanto, siempre están en
condiciones de funcionamiento. Esté consciente de los
posibles peligros cuando no esté usando la herramienta
de baterías o cuando esté cambiando los accesorios de
la misma. Con el cumplimiento de esta regla se reduce el
riesgo de una descarga eléctrica, incendio o lesión corporal
seria.
No coloque herramientas de baterías ni las baterías
mismas cerca del fuego o del calor. De esta manera se
reduce el riesgo de explosiones y de lesiones.
No aplaste, deje caer o dañe la batería. Nunca utilice una
batería o cargador que se ha caído, aplastado, recibido
un golpe contundente o ha sido dañado(a) de alguna
manera. Las baterías dañadas pueden sufrir explosiones.
Deseche de inmediato toda batería que haya sufrido una
caída o cualquier daño.
Las baterías pueden explotar en presencia de una fuente
de inflamación, como una luz guía. Para reducir el riesgo
de lesiones corporales serias, nunca use un producto
inalámbrico en presencia de llamas expuestas. La explosión
de una batería puede lanzar fragmentos y compuestos
químicos. Si ha quedado expuesto a la explosión de una
batería, lávese de inmediato con agua.
No cargue herramientas de baterías en lugares
mojados o húmedos. No lo utilice, guarde o cargue
la paquete de baterías o la unidad en lugares donde
la temperatura sea inferior a 10 °C (50 °F) o superior a
38 °C (100 °F). No guarde la herramienta a la intemperie
ni en el interior de vehículos.
En condiciones extremas de uso o temperatura las
baterías pueden emanar líquido. Si el líquido llega a
tocarle la piel, lávese de inmediato con agua y jabón,
y después neutralice los efectos con jugo de limón o
vinagre. Si le entra líquido en los ojos, láveselos con agua
limpia por lo menos 10 minutos, y después busque de
inmediato atención médica. Con el cumplimiento de esta
regla se reduce el riesgo de lesiones corporales serias.
Solamente utilice esta herramienta para el propósito
especificado. No dispare sujetadores (grapas o clavos,
según sea el caso) al aire.
Cet outil pneumatique ne doit être utilisé que pour les
applicactions pour lesquelles il est conçu.
Solamente utilice los sujetadores recomendados para
esta herramienta. El uso de los sujetadores incorrectos
podría hacer que los sujetadores no avancen bien, que se
atoren y que los clavos no salgan de la herramienta siempre
al mismo ángulo. Si los sujetadores no avanzan de manera
uniforme y correcta, interrumpa su uso de inmediato. Los
sujetadores atorados que avanzan de manera incorrecta
pueden provocar lesiones serias.
Nunca utilice esta herramienta de ninguna forma que
pueda dirigir un sujetador hacia ninguna otra cosa que
no sea la pieza de trabajo.
No use la herramienta como martillo.
Siempre porte la herramienta por el mango.
No altere ni modifique esta herramienta con respecto al
diseño o funcionamiento original sin la aprobación del
fabricante.
Siempre tenga presente que el uso y manejo indebidos
de esta herramienta puede causarle lesiones a usted y
a otras personas.
Nunca sujete con prensa o cinta adhesiva el gatillo ni el
disparador de contacto en la posición de accionamiento.
4 - Español
Page 25

ADVERTENCIAS DE SEGURIDAD PARA CLAVADORA
Nunca deje desatendida ninguna herramienta con la
paquete de baterías conectada.
No utilice esta herramienta si no tiene una etiqueta de
advertencia.
FUNCIONAMIENTO
No utilice la herramienta si no funciona correctamente
el gatillo. Una herramienta que no pueda controlarse con
el gatillo es peligrosa y debe repararse.
Verifique con frecuencia el funcionamiento del
mecanismo del disparador de contacto. No use la
herramienta si no está funcionando correctamente el
mecanismo del disparador de contacto, ya que puede
causarse por accidente el disparo de un sujetador. No
interfiera en el funcionamiento normal del mecanismo del
disparador de contacto.
No utilice la herramienta si no funciona correctamente.
Siempre suponga que la herramienta contiene
sujetadores.
No traslade la herramienta de un lugar a otro con el dedo
en el gatillo. Podría producirse un disparo accidental.
Siempre maneje con cuidado la herramienta:
• Respete la herramienta como un elemento de trabajo.
• Nunca participe en jugueteos.
• Nunca tire del gatillo a menos que la punta de la
herramienta esté dirigida hacia la superficie de trabajo.
• Mantenga a las demás personas a una distancia segura
de la herramienta mientras esté utilizándose ésta ya que
puede ocurrir un accionamiento accidental de la misma,
y posibles lesiones.
Es importante el método de disparo elegido. Estudie el
manual, en el cual se describen las diferentes formas
de disparar.
Las herramientas neumáticas están diseñadas para
usarlas con una sola mano. No sujete la herramienta por
el frente del cargador. No ponga las manos, la cabeza ni
ninguna otra parte del cuerpo cerca de la parte inferior del
cargador, por donde salen los clavos de la herramienta, ya
que se pueden producir lesiones serias.
No apunte la herramienta hacia usted mismo ni a ninguna
otra persona, ya sea que contenga sujetadores o no.
No accione la herramienta a menos que tenga la
intención de introducir un sujetador en la pieza de
trabajo.
Siempre asegúrese de que el elemento de contacto con
la pieza de trabajo esté totalmente colocado encima de
ella. Colocar el elemento de contacto con la pieza de trabajo
solamente de manera parcial encima de ella podría causar
que el sujetador no se introduzca en la pieza de trabajo por
completo y provoque lesiones serias.
No introduzca sujetadores cerca del borde del material.
La pieza de trabajo puede partirse y causar que el clavo
rebote y lo lesione a usted o a un compañero de trabajo.
Tenga presente que el tornillo pasador podría seguir la
veta de la madera, lo que puede causar que se sobresalga
inesperadamente del lado del material de trabajo o se desvíe,
lo que podría causar lesiones.
Mantenga las manos y todas las partes del cuerpo
lejos del área de trabajo inmediata. Sujete firmemente
la pieza de trabajo con prensas de mano cuando sea
necesario para proteger las manos y el cuerpo de todo
posible peligro. Asegúrese de que la pieza de trabajo esté
debidamente asegurada antes de presionar la grapadora
contra el material. El disparador de contacto puede causar
un movimiento inesperado de la pieza de trabajo.
Mantenga la cara y las demás partes del cuerpo lejos
de la tapa de la herramienta al trabajar en espacios
limitados. En una retracción súbita, la herramienta puede
golpear el cuerpo, especialmente al sujetar en material duro
o denso.
Durante el uso normal de la herramienta, ésta se retrae
de inmediato después de introducir un sujetador. Así es
el funcionamiento normal de la herramienta. No intente
impedir la retracción presionando la clavadora contra la
pieza de trabajo. Toda restricción impuesta a la retracción
puede producir la impulsión de un segundo sujetador en
la clavadora. Sujete firmemente el mango, permita a la
herramienta que haga el trabajo y no coloque la otra mano
encima de la herramienta ni cerca del escape de aire en
ningún momento. La inobservancia de esta advertencia
puede causar lesiones corporales serias.
No introduzca sujetadores encima de otros, ni con la
herramienta a un ángulo excesivamente pronunciado, ya
que esto puede causar la desviación de los sujetadores
y con ello posibles lesiones.
CÓMO CARGAR LA HERRAMIENTA
No cargue los sujetadores en la herramienta cuando
esté activado cualquiera de los controles de operación
de la misma.
Al cargar la herramienta:
Nunca coloque las manos ni ninguna parte del cuerpo
en el área de la herramienta donde sale disparado el
sujetador.
Nunca apunte la herramienta a nadie.
No tire del gatillo ni oprima el disparador de contacto, ya
que puede accionarse accidentalmente la herramienta
y causar lesiones.
GUARDE ESTAS INSTRUCCIONES
Consúltelas con frecuencia y empléelas para instruir a otras
personas que puedan utilizar esta herramienta. Si presta a
alguien esta herramienta, facilítele también las instrucciones.
5 - Español
Page 26

SÍMBOLOS
Las siguientes palabras de señalización y sus significados tienen el objeto de explicar los niveles de riesgo relacionados
con este producto.
SÍMBOLO SEÑAL SIGNIFICADO
PELIGRO:
ADVERTENCIA:
PRECAUCIÓN:
AVISO:
Es posible que se empleen en este producto algunos de los siguientes símbolos. Le suplicamos estudiarlos y aprender su
significado. Una correcta interpretación de estos símbolos le permitirá utilizar mejor y de manera más segura el producto.
Indica una situación peligrosa, la cual, si no se evita, causará la muerte o
lesiones serias.
Indica una situación peligrosa, la cual, si no se evita, podría causar la muerte
o lesiones serias.
Indica una situación peligrosa, la cual, si no se evita, podría causar lesiones
menores o leves.
(Sin el símbolo de alerta de seguridad) Indica la información que se considera
importante, pero no relacionada con lesiones potenciales (por ej. en relación
a daños a la propiedad).
SÍMBOLO NOMBRE DENOMINACIÓN/EXPLICACIÓN
Alerta de seguridad Indica un peligro posible de lesiones personales.
Lea el manual del operador
Protección ocular
Para reducir el riesgo de lesiones, el usuario debe leer y comprender
el manual del operador antes de usar este producto.
Siempre póngase protección ocular con protección lateral con la
marca de cumplimiento de la norma ANSI Z87.1.
Alerta de condiciones
húmedas
Superficie caliente
Mantenga lejos las manos
Símbolo de
reciclado
V Volts Voltaje
min Minutos Tiempo
Corriente continua Tipo o característica de corriente
n
o
.../min Por minuto
Velocidad en vacío Velocidad de rotación, en vacío
No exponga la unidad a la lluvia ni la use en lugares húmedos.
Para reducir el riesgo de lesiones corporales o daños materiales
evite tocar toda superficie caliente.
Mantenga las manos y el resto del cuerpo lejos del área de la
herramienta por donde sale disparado el sujetador.
Este producto utiliza baterías de iones de litio (Li-ion). Es posible que
algunas leyes municipales, estatales o federales prohíban desechar
las baterías en la basura normal. Consulte a las autoridades
reguladoras de desechos para obtener información en relación
con las alternativas de reciclado y desecho disponibles.
Revoluciones, carreras, velocidad superficial, órbitas, etc., por
minuto
6 - Español
Page 27

GLOSARIO DE TÉRMINOS
Activer (commandes de l’outil)
Es mover un control de accionamiento de manera que
quede en una posición en la cual se accione la herramienta
o cumpla con un requisito necesario para accionar la misma.
Accionar (la herramienta)
Es producir el movimiento de los componentes de la
herramienta específicos para introducir un sujetador.
Sistema de accionamiento
Es el gatillo, el disparador de contacto o cualquier otro
control de accionamiento, empleado(s) por separado o
en alguna combinación o secuencia, para accionar la
herramienta.
• Accionamiento secuencial sencillo
Es un sistema de accionamiento en el cual hay más
de un control de accionamiento y éstos deben ser
activados en una secuencia específica para accionar la
herramienta. Puede ocurrir un accionamiento adicional
cuando un control de accionamiento específico, que
no sea el disparador de contacto, se suelta y se vuelve
a activar.
• Accionamiento por contacto
Es un sistema de accionamiento en el cual hay más
de un control de accionamiento y éstos pueden ser
activados en cualquier secuencia para accionar la
herramienta. Puede ocurrir un accionamiento adicional
cuando cualquier control de accionamiento se suelta y
se vuelve a activar.
Sujetador
Es una grapa, clavo, puntilla o cualquier otra pieza de unión
diseñada y fabricada para utilizarse en las herramientas de
este tipo.
Atoramiento
Es una obstrucción en las zonas de alimentación o
introducción de sujetadores de la herramienta.
Control de accionamiento
Es un control que, por separado o como parte de un sistema
de accionamiento de una herramienta, sirve para accionarla.
Gatillo
Es un control de accionamiento de una herramienta el cual
maneja con los dedos el operador.
Pieza de trabajo
Es el objeto específico en el cual se introduce un sujetador
con una herramienta.
Contacto de la pieza de trabajo
Es un elemento de control de accionamiento o un conjunto
de tales elementos, el cual es activado al tocar el material
en el que va a introducirse el sujetador.
7 - Español
Page 28

CARACTERÍSTICAS
ESPECIFICACIONES DEL PRODUCTO
Tipo de sujetador .......................................Puntillas de calibre 18
Gama de sujetadores ......... 15,87 à 53,98 mm (5/8 a 2-1/8 pulg.)
ARMADO
Capacidad del cargador ...............................................105 clavos
ADVERTENCIA:
No use este producto si no está totalmente ensamblado
o si alguna pieza falta o está dañada. El uso de un
producto que no está adecuadamente y completamente
ensamblado o posee partes dañadas o faltantes puede
resultar en lesiones personales graves.
Si hay piezas dañadas o faltantes, le suplicamos llamar al 1-866-539-1710, donde le brindaremos asistencia.
ADVERTENCIA:
No intente modificar este producto ni crear aditamentos
o accesorios que no estén recomendados para usar con
este producto. Dichas alteraciones o modificaciones
constituyen un uso indebido y podrían provocar
una situación de riesgo que cause posibles lesiones
personales graves.
FUNCIONAMIENTO
Escaleras
ADVERTENCIA:
No permita que su familarización con los productos lo
vuelva descuidado. Tenga presente que un descuido de
un instante es suficiente para causar una lesión grave.
ADVERTENCIA:
Siempre retire el paquete de baterías de la herramienta
cuando esté ensamblando partes, realizando ajustes,
limpiando o cuando ésta no esté en uso. Retirando el
paquete de pilas se evita arrancar accidentalmente la
unidad, lo cual puede causar lesiones serias.
ADVERTENCIA:
Siempre póngase protección ocular con protección
lateral con la marca de cumplimiento de la norma
ANSI Z87.1. La inobservancia de esta advertencia puede
permitir que los objetos lanzados hacia los ojos puedan
provocarle lesiones graves.
USOS
Esta herramienta puede emplearse para los fines enumerados
abajo:
Acabado y ornamentación (interior y exterior)
Marcos de puertas y ventanas
Jambas de puertas
Rodapiés
Molduras de corona
Ebanistería
Molduras de dinteles y umbrales
Molduras
Ornamentación de puertas y ventanas
Guardasillas
Moldura de ladrillo
Pisos de madera
Paneles
Mobiliario
CONECTAR EL CLIP DEL CINTURÓN
Vea la figura 1, página 13.
El clip del cinturón se puede colocar del lado izquierdo o derecho
de la clavadora, según la preferencia del operador.
Alinee el clip del cinturón y el tornillo con el orificio para el tornillo
del lado izquierdo o derecho.
Utilice un destornillador de cabeza Phillips (no se incluye) para
ajustar firmemente.
INSTALAR/DESMONTAJE DEL PAQUETE DE
BATERÍAS
Vea la figura 2, página 13.
Para instalar, coloque el paquete de baterías en la herramienta.
Alinee la costilla realzada del paquete de baterías con la ranura
situada en el interior de la herramienta.
Asegúrese de que los pestillos situados en ambos lados del
paquete de baterías entren completamente en su lugar con un
chasquido, y de que el paquete quede bien fijo en la herramienta
antes de empezar a utilizar éste.
NOTA: Apriete el interruptor del mango con luz LED para reactivar
la clavadora.
Para extraer, oprima los pestillos situados en ambos lados del
paquete de baterías para soltar éste de la herramienta.
Para obtener instrucciones específicas de carga, lea el manual del
operador que se incluye con el cargador y la batería.
8 - Español
Page 29

FUNCIONAMIENTO
ALMOHADILLA PROTECTORA
Vea la figura 3, página 13.
La almohadilla protectora montada en la punta de la herramienta
evita dañar y marcar las maderas suaves con la herramienta.
ADVERTENCIA:
Retire siempre el paquete de baterías de la herramienta
antes de desmontar o volver a montar la almohadilla
protectora. La inobservancia de esta advertencia puede
causar lesiones serias.
La almohadilla puede retirarse tirando de ella hacia abajo,
separándola de la punta de la herramienta. Para volver a montar la
almohadilla, acomódela en su lugar en la punta de la herramienta
y empújela hacia arriba por la parte de atrás para asentarla.
Hay un lugar para guardar la almohadilla en el cargador de la
herramienta. En el área de guardar de la herramienta se suministra
una almohadilla protectora adicional.
CARGA DE LAS PUNTILLAS EN LA
HERRAMIENTA
Vea las figuras 4 y 5, páginas 13 y 14.
Retire el paquete de baterías de la herramienta.
Con la punta de la herramienta en dirección opuesta a su
cuerpo, presione el botón para soltar el cargador que se
encuentra en la parte trasera del cargador y deslice la tapa del
cargador para abrirlo.
Coloque clavos de puntilla en el canal con las puntas de los
clavos hacia abajo y apoyadas sobre la parte inferior del canal.
ADVERTENCIA:
Mantenga la herramienta apuntando en la dirección
opuesta a donde se encuentra usted y otras personas
mientras carga los clavos. La inobservancia de esta
advertencia puede causar lesiones serias.
Empuje la tapa del cargador para cerrarlo hasta que entre
firmemente en su lugar con un chasquido.
Asegúrese de que el cargador esté firmemente fijo en su lugar.
AJUSTE DE LA ALIMENTACIÓN DE AIRE
Vea la figura 6, página 14.
La cantidad alimentación de aire requerida depende del tamaño
de los clavos y del material de la pieza de trabajo.
Comience por probar la profundidad de penetración introduciendo
un clavo de prueba en el mismo tipo de material de la pieza de
trabajo que va a usarse en el trabajo real.
Retire el paquete de baterías de la herramienta.
Mueva la palanca de ajuste de alimentación hacia la derecha
para aumentar la alimentación de aire o hacia la izquierda para
disminuir la alimentación de aire.
Puede ser posible lograr la profundidad deseada solamente con
ajustes en la alimentación de aire. Si se necesitan ajustes más
finos, use el ajuste de profundidad de penetración.
AJUSTE DE LA PROFUNDIDAD DE
PENETRACIÓN
Vea la figura 7, página 14.
La profundidad de penetración de los calvos se puede ajustar
no solo mediante la alimentación de aire. Se recomienda probar
la profundidad de introducción en un pedazo de desecho para
determinar la profundidad requerida en cada caso en particular.
Para determinar la profundidad de introducción, primero ajuste la
alimentación de aire y luego introduzca un clavo de prueba. Para
lograr la profundidad deseada, use el ajuste de profundidad de
penetración de la herramienta. Con materiales más duros y clavos
más largos se requiere más fuerza.
Retire el paquete de baterías de la herramienta.
Gire el control del ajuste de la profundidad de penetración
hacia la izquierda o la derecha para cambiar la profundidad de
penetración.
Réinstaller el paquete de batería y reactive la herramienta
presionando el interruptor del mango con luz de trabajo.
Después de cada ajuste, introduzca un clavo de prueba hasta
lograr la profundidad deseada.
NOTA: Fije la profundidad de penetración en el valor más bajo
que le permita cumplir con sus objetivos.
USO DEL INTERRUPTOR SELECTOR DE MODO
Vea las figuras 8 y 9, página 14 y 15.
ADVERTENCIA:
Solamente utilice los clavos recomendados para esta
herramienta. Si se utilizan otros clavos puede producirse
un malfuncionamiento de la herramienta y posibles
lesiones serias.
ADVERTENCIA:
Nunca cargue los clavos teniendo activado el disparador
de contacto o el gatillo. La inobservancia de esta
advertencia puede causar lesiones serias.
ADVERTENCIA:
Nunca detenga con una cuña ni de ninguna otra forma
el mecanismo del disparador de contacto al utilizar
la herramienta. La inobservancia de esta advertencia
puede causar lesiones serias.
Esta herramienta se envía de fábrica con la configuración del
interruptor selector de modo en modo Accionamiento secuencial
sencillo. El interruptor selector de modo puede ponerse también
en modo de Accionamiento por contacto.
MODO DE ACCIONAMIENTO SECUENCIAL SENCILLO
El accionamiento secuencial sencillo permite lograr la colocación
más exacta del sujetador.
Retire el paquete de baterías de la herramienta.
Deslice el selector a la posición ( ).
9 - Español
Page 30

FUNCIONAMIENTO
ADVERTENCIA:
La clavadora no funcionará correctamente si el selector
no está asentado firmemente en la posición ( ) o en la
posición ( ). Asegúrese siempre de que el selector
esté bien asentado para evitar aplicaciones inesperadas
de clavos y posibles lesiones personales de gravedad.
Réinstaller el paquete de batería y reactive la herramienta
presionando el interruptor del mango con luz de trabajo.
Sujete firmemente la herramienta para mantener el control.
Coloque la punta de la herramienta en la superficie de trabajo.
Oprima la herramienta contra la superficie de trabajo para
oprimir el disparador de contacto.
Para introducir un sujetador, oprima el gatillo.
NOTA: Sostenga el gatillo hasta que se haya completado un ciclo de
conducción. Si al presionar el gatillo no se clava un sujetador, suelte
el gatillo, levante la herramienta y aléjela de la pieza de trabajo; luego
vuelva a colocarla e intente volver a clavar el sujetador.
MODO DE ACCIONAMIENTO POR CONTACTO
El accionamiento por contacto permite la colocación repetitiva de
sujetadores a velocidad muy rápida.
Retire el paquete de baterías de la herramienta.
Deslice el selector a la posición ( ).
Réinstaller el paquete de batería y reactive la herramienta
presionando el interruptor del mango con luz de trabajo.
Sujete firmemente la herramienta para mantener el control.
Oprima el gatillo y no lo suelte. Oprima la herramienta contra
la superficie de trabajo para oprimir el disparador de contacto
e introducir un sujetador. Para clavar otro clavo, levante la
herramienta y presione el contacto contra la superficie de
trabajo nuevamente.
NOTA: Sostenga el gatillo y mantenga presionado el contacto
con la pieza de trabajo hasta que se haya completado un ciclo
de conducción.
Retire siempre el dedo del gatillo cuando se haya aplicado la
cantidad de clavos deseada.
NOTA: En el modo de accionamiento por contacto, la herramienta
puede accionarse también presionando el disparador de contacto
contra la superficie y oprimiendo el gatillo.
ADVERTENCIA:
Durante el uso normal de la herramienta, ésta
se retrae de inmediato después de introducir un
sujetador. Así es el funcionamiento normal de
la herramienta. No intente impedir la retracción
presionando la clavadora contra la pieza de trabajo.
Toda restricción impuesta a la retracción puede producir
la impulsión de un segundo sujetador en la clavadora.
La inobservancia de esta advertencia puede causar
lesiones corporales serias.
SEGURO DE DISPARO EN SECO
Cuando el magazín tiene 0-5 clavos restantes, el seguro de disparo
en seco no permite continuar utilizando la herramienta.
Para volver a utilizar la herramienta, vuelva a cargarla con clavos.
LUCE DE TRABAJO DE LED
Vea la figura 10, página 15.
Para encender la luce de trabajo LED, presione el interruptor
del mango con luz de trabajo LED mientras sujeta firmemente
la herramienta en condiciones normales de operación.
LECTURAS DE DIAGNÓSTICO
La luce de trabajo LED sirven de lecturas para indicar si el
paquete de baterías tiene suficiente carga y si la herramienta está
funcionando correctamente.
Si la luce de trabajo titilan, coloque una batería con plena carga. Si
la luce siguen titilando, consulte la sección Solución de problemas
para obtener más información.
Si la luce LED de la clavadora se apagan, la unidad se ha apagado
para su protección. Aleje la herramienta de la pieza de trabajo y
libere el gatillo para reactivar la clavadora antes de comenzar el
próximo ciclo de clavado.
CÓMO RETIRAR LOS CLAVOS DE LA
HERRAMIENTA
Vea la figura 11, página 15.
ADVERTENCIA:
Retire de la herramienta el paquete de baterías antes de
retirar los clavos. La inobservancia de esta advertencia
puede causar lesiones serias.
Retire el paquete de baterías de la herramienta.
Para extraer una cinta de clavos de la herramienta, presione
el botón para soltar el cargador que se encuentra en la parte
trasera del cargador y deslice la tapa el cargador para abrirlo.
Extraiga los clavos.
Cierre el cargador.
CÓMO RETIRAR UN SUJETADOR ATORADO
Vea la figura 12 y 13, página 15.
ADVERTENCIA:
Retire de la herramienta el paquete de baterías antes de
retirar los clavos. La inobservancia de esta advertencia
puede causar lesiones serias.
El exceso de profundidad de clavado, el exceso de residuos o los
clavos atorados pueden hacer que el mecanismo de impulsión se
atore en su posición inferior.
Usualmente, se podrá hacer regresar el mecanismo de impulsión
a su posición operativa ejerciendo presión sobre el elemento que
entra en contacto con la pieza de trabajo contra un trozo de madera
de desecho y presionando el gatillo.
Si con esto el mecanismo de impulsión no regresa automáticamente
al interior de la herramienta, la herramienta puede estar atascada.
Si se atora un sujetador en la herramienta, desconecte la manguera
de aire y mantenga la herramienta apuntando en la dirección
opuesta a donde se encuentra usted mientras desatora el sujetador.
Retire el paquete de baterías de la herramienta.
Retire de la herramienta los sujetadores.
10 - Español
Page 31

FUNCIONAMIENTO
Tire del pestillo hacia arriba y abra el soltador.
Ubique y quite la cubierta del tornillo de elevación con un
destornillador de hoja plana.
Gire el tornillo de elevación en el sentido de las agujas del reloj
para mover el mecanismo de impulsión hacia atrás y desalojar
el clavo atorado.
Retire el sujetador doblado.
Cierre el soltador y el pestillo.
Vuelva a introducir los sujetadores
Réinstaller el paquete de batería y reactive la herramienta
presionando el interruptor del mango con luz de trabajo.
ACCESORIOS
Para pedir piezas y juegos de mantenimiento, llame al 1-866-539-1710.
Kit de mantenimiento .................................................................................................................................................................. 203685001
ADVERTENCIA:
Arriba se señalan los aditamentos y accesorios disponibles para usarse con esta herramienta. No utilice ningún aditamento o
accesorio no recomendado por el fabricante de esta herramienta. El empleo de aditamentos o accesorios no recomendandos
podría causar lesiones serias.
CORRECCIÓN DE PROBLEMA
PROBLEMA CAUSA POSIBLE SOLUCIÓN
El elemento que entra en contacto con la
pieza de trabajo no baja por completo; la
herramienta no funciona
La herramienta funciona correctamente pero
los sujetadores no se aplican bien
La herramienta funciona correctamente pero
los sujetadores penetran demasiado en la
superficie de trabajo
Pocos clavos
El elemento que entra en contacto con la
pieza de trabajo está atascado
La alimentación de aire es demasiado baja
La profundidad de penetración no es
suficiente
El clavo es demasiado largo para la dureza
de la madera
Las juntas de pistón están desgastadas o
dañadas
La alimentación de aire es demasiado alta
La profundidad de penetración es excesiva
Retire la batería y vuelva a cargar clavos
Retire la batería y limpie los restos de
material
Aumente la alimentación de aire
Ajuste la profundidad de penetración
Utilice clavos que tengan una longitud
apropiada para la madera
Remplace uno o ambos pistones (se
requiere un kit de reparación)
Reduzca la alimentación de aire
Ajuste la profundidad de penetración
La herramienta sufre atoramientos con
frecuencia
La herramienta se detiene y la luce LED
titilan rápidamente
La herramienta ha cargado la batería y el
LED se parpadea lentamente o el LED no
se apagan después de approxmimately diez
segundos de inactividad
Este producto tiene una política de satisfacción garantizada de 90 días y una garantía limitada
de tres años. Para obtener detalles sobre la garantía y la política de satisfacción garantizada,
diríjase a www.RIDGID.com o llame sin cargo al 1-866-539-1710.
Sujetadores inadecuados
Sujetadores dañados
Está flojo el cargador
Cargador sucio
La batería tiene poca carga o está
descargada
El gatillo libera demasiado pronto
La herramienta se averió Lleve la herramienta al centro de reparación
Verifique que sean del tamaño correcto los
sujetadores
Cambie los sujetadores
Apriete los tornillos
Limpie el cargador
Vuelva a cargar la batería
Retire la batería y vuelva a instalarlo
autorizado
11 - Español
Page 32

MAINTENANCE
WARNING:
When servicing, use only identical replacement
parts. Use of any other parts could create a hazard
or cause product damage.
ENTRETIEN
GENERAL MAINTENANCE
Avoid using solvents when cleaning plastic parts. Most
plastics are susceptible to damage from various types of
commercial solvents and may be damaged by their use. Use
clean cloths to remove dirt, dust, oil, grease, etc.
AVERTISSEMENT :
Utiliser exclusivement des pièces d’origine pour les
réparations. L’usage de toute autre pièce pourrait
créer une situation dangereuse ou endommager
l’produit.
MANTENIMIENTO
ADVERTENCIA:
Al dar servicio a la unidad, sólo utilice piezas de
repuesto idénticas. El empleo de piezas diferentes
podría causar un peligro o dañar el producto.
ENTRETIEN GÉNÉRAL
Éviter d’utiliser des solvants pour le nettoyage des pièces en
plastique. La plupart des matières plastiques peuvent être
endommagées par divers types de solvants du commerce.
Utiliser un chiffon propre pour éliminer la saleté, la poussière,
l’huile, la graisse, etc.
MANTENIMIENTO GENERAL
Evite el empleo de solventes al limpiar piezas de plástico.
La mayoría de los plásticos son susceptibles a diferentes
tipos de solventes comerciales y pueden resultar dañados.
Utilice paños limpios para eliminar la suciedad, el polvo, el
aceite, la grasa, etc.
12
Page 33

R09890 Fig. 3
C
A
E
B
N
L
D
I
B
A
G
H
K
A - Power adjustment lever (levier de réglage de
puissance, palanca de ajuste de alimentación)
B - Mode selector switch (commutateur du
sélecteur de mode, interruptor selector de
modo)
C - Belt clip (clip de ceinture, clip para el cinto)
D - LED worklight grip switch (l’interrupteur
d’éclairage DEL, interruptor del mango con
luz LED)
E - Switch trigger (gâchette, interruptor de
gatillo)
F - Magazine release button (bouton de
dégagement du magasin, botón para soltar)
G - Side-loading magazine (magasin à
chargement lateral, cargador de carga
lateral)
A
F
M
J
H - Scale (échelle, escala)
I - Low nail indicator windows (hublot témoin
de recharge, ventanas que indican poca
cantidad de clavos)
J - No-mar pad (bout de protection, almohadilla
protectora)
K - Workpiece contact (contact de
déclenchement, disparador de contacto)
L - Jam release (déblocage, soltador)
M- Depth of drive adjustment (réglage de
profondeur d’enfoncement, ajuste de la
profundidad de introducción)
N - LED worklight (lampe de travail LED, luce de
trabajo de LED)
Fig. 2Fig. 1
C
A - No-mar pad (bout de protection, almohadilla
protectora)
B - No-mar pad storage (rangement du
coussinet de protection, lugar para guardar
la almohadilla protectora)
Fig. 4
A
A - Magazine release button (bouton de
dégagement du magasin, botón para soltar)
B
A - Belt clip (clip de ceinture, clip para el cinto)
B - Screw (vis, tornillo)
A
B
A - Battery pack (bloc-piles, paquete de
baterías)
B - To install (pour installer, para instalar)
C - Depress latches to remove battery pack
(appuyer sur les loquets pour libérer le bloc-
piles, para soltar el paquete de baterías,
oprima los pestillos)
13
Page 34

Fig. 5
Fig. 8
A
B
A
A - Brad nails (clous à parquet, puntillas)
B - Magazine cover (magasin de couvercle, cargador del tapa)
A - Mode selector switch (commutateur du
sélecteur de mode, interruptor selector de
modo)
B - Single sequential actuation mode (mode de
déclenchement par séquence, accionamiento
por contacto)
C - Contact actuation mode (déclenchement par
contact, para disminuir la profundidad)
Fig. 6 Fig. 7 Fig. 9
B
B
A
C
C
A
A
B
B
C
A - Power adjustment lever (levier de réglage
de puissance, palanca de ajuste de
alimentación)
B - Decrease pressure (réduire la pression,
disminuir la presión)
C - Increase pressure (augmenter la pression,
aumentar la presión)
A - Depth of drive adjustment (réglage de
profondeur d’enfoncement, ajuste de la
profundidad de introducción)
B - To increase depth (pour augmenter la
profondeur, para aumentar la profundidad)
C - To decrease depth (pour réduire la
profondeur, para disminuir la profundidad)
14
A - Switch trigger (gâchette, interruptor de
gatillo)
B - Workpiece contact (contact de
déclenchement, disparador de contacto)
Page 35

Fig. 10
Fig. 12
Fig. 13
A
B
B
A
A - LED worklight grip switch (l’interrupteur
d’éclairage DEL, interruptor del mango con
luz LED)
B - LED worklight (lampe de travail LED, luce de
trabajo de LED)
Fig. 11
A
B
A - Driver mechanism (mécanisme
d’entraînement, mecanismo de impulsión)
B - Jam release latch (taquet pour déblocage,
pestillo de liberación de atascos)
C
A - Elevation screw (vis de réglage de hauteur,
cubierta del tornillo de elevación)
B - Screwdriver (tournevis, destornillador)
C - Elevation screw cover (cache-vis de réglage
de hauteur, cubierta del tornillo de elevación)
A
B
A - Magazine release button (bouton de
dégagement du magasin, botón para soltar)
B - Brad nails (clous à parquet, puntillas)
15
Page 36

OPERATOR’S MANUAL
MANUEL D’UTILISATION
MANUAL DEL OPERADOR
18V BRAD NAILER
CLOUEUSE DE FINITION DE 18V
CLAVADORA DE ACABADO DE 18V
R09890
Customer Service Information:
For parts or service, do not return this product to the store. Contact your nearest
RIDGID® authorized service center. Be sure to provide all relevant information when
you call or visit. For the location of the authorized service center nearest you, please
call 1-866-539-1710 or visit us online at www.RIDGID.com.
MODEL NO. ____________________SERIAL NO._______________________________
Service après-vente :
Pour acheter des pièces ou pour un dépannage, ne pas retourner ce produit au
magasin. Contacter le centre de réparations RIDGID® agréé le plus proche. Veiller à
fournir toutes les informations pertinentes lors de tout appel téléphonique ou visite.
Pour obtenir l’adresse du centre de réparations agréé le plus proche, téléphoner au
1-866-539-1710 ou visiter notre site www.RIDGID.com.
NO. DE MODÈLE _______________ NO. DE SÉRIE _____________________________
Información sobre servicio al consumidor:
Para piezas de repuesto o servicio, no devuelva este producto a la tienda. Comuníquese
con el centro de servicio autorizado de productos RIDGID® de su preferencia.
Asegúrese de proporcionar todos los datos pertinentes al llamar o al presentarse
personalmente. Para obtener información sobre el centro de servicio autorizado más
cercano a usted, le suplicamos llamar al 1-866-539-1710 o visitar nuestro sitio en la
red mundial, en la dirección www.RIDGID.com.
NÚM. DE MODELO _____________ NÚM. DE SERIE ___________________________
ONE WORLD TECHNOLOGIES, INC.
P.O. Box 1427
Anderson, SC 29622 USA
1-866-539-1710 www.RIDGID.com
RIDGID is a registered trademark of RIDGID, Inc., used under license.
991000195
8-14-18 (REV:03)
 Loading...