

RIDGID Quick-Acting Pipe Welding Clamps Instructions Manual
Quick-Acting Pipe Welding Clamp Instructions
Quick-Acting Pipe Welding Clamp
Instructions
WARNING
Read and understand these instructions and the warnings and
instructions for all equipment and
material being used before operat-
serious personal injury.
SAVE THESE INSTRUCTIONS!
• Use appropriate safety equipment. Always wear proper
eye and foot protection. Dust mask, face shield, hearing
protection or other equipment may be needed to reduce the
risk of injury.
• Do not use the Pipe Clamp for lifting, supporting or
transporting. It is not designed for these uses and could
allow the workpiece to fall and cause serious injury. Only
use as directed in these instructions.
• Properly support the workpieces. Use pipe stands,
tables, vises or other methods to support workpieces.
Failure to properly support the workpiece can allow it to fall
and cause serious injury.
If you have any question concerning this RIDGID
– Contact your local RIDGID distributor.
– Visit RIDGID.com to find your local RIDGID contact point.
– Contact Ridge Tool Technical Service Department at rtctech-
services@emerson.com, or in the U.S. and Canada call (800)
519-3456.
Description
RIDGID® Pipe Welding Clamps are used to align pipes/fittings
and other cylindrical workpieces for welding. It includes a quick
acting feature for fast installation and use. The wing bolts that
grip the pipe are made of stainless steel.
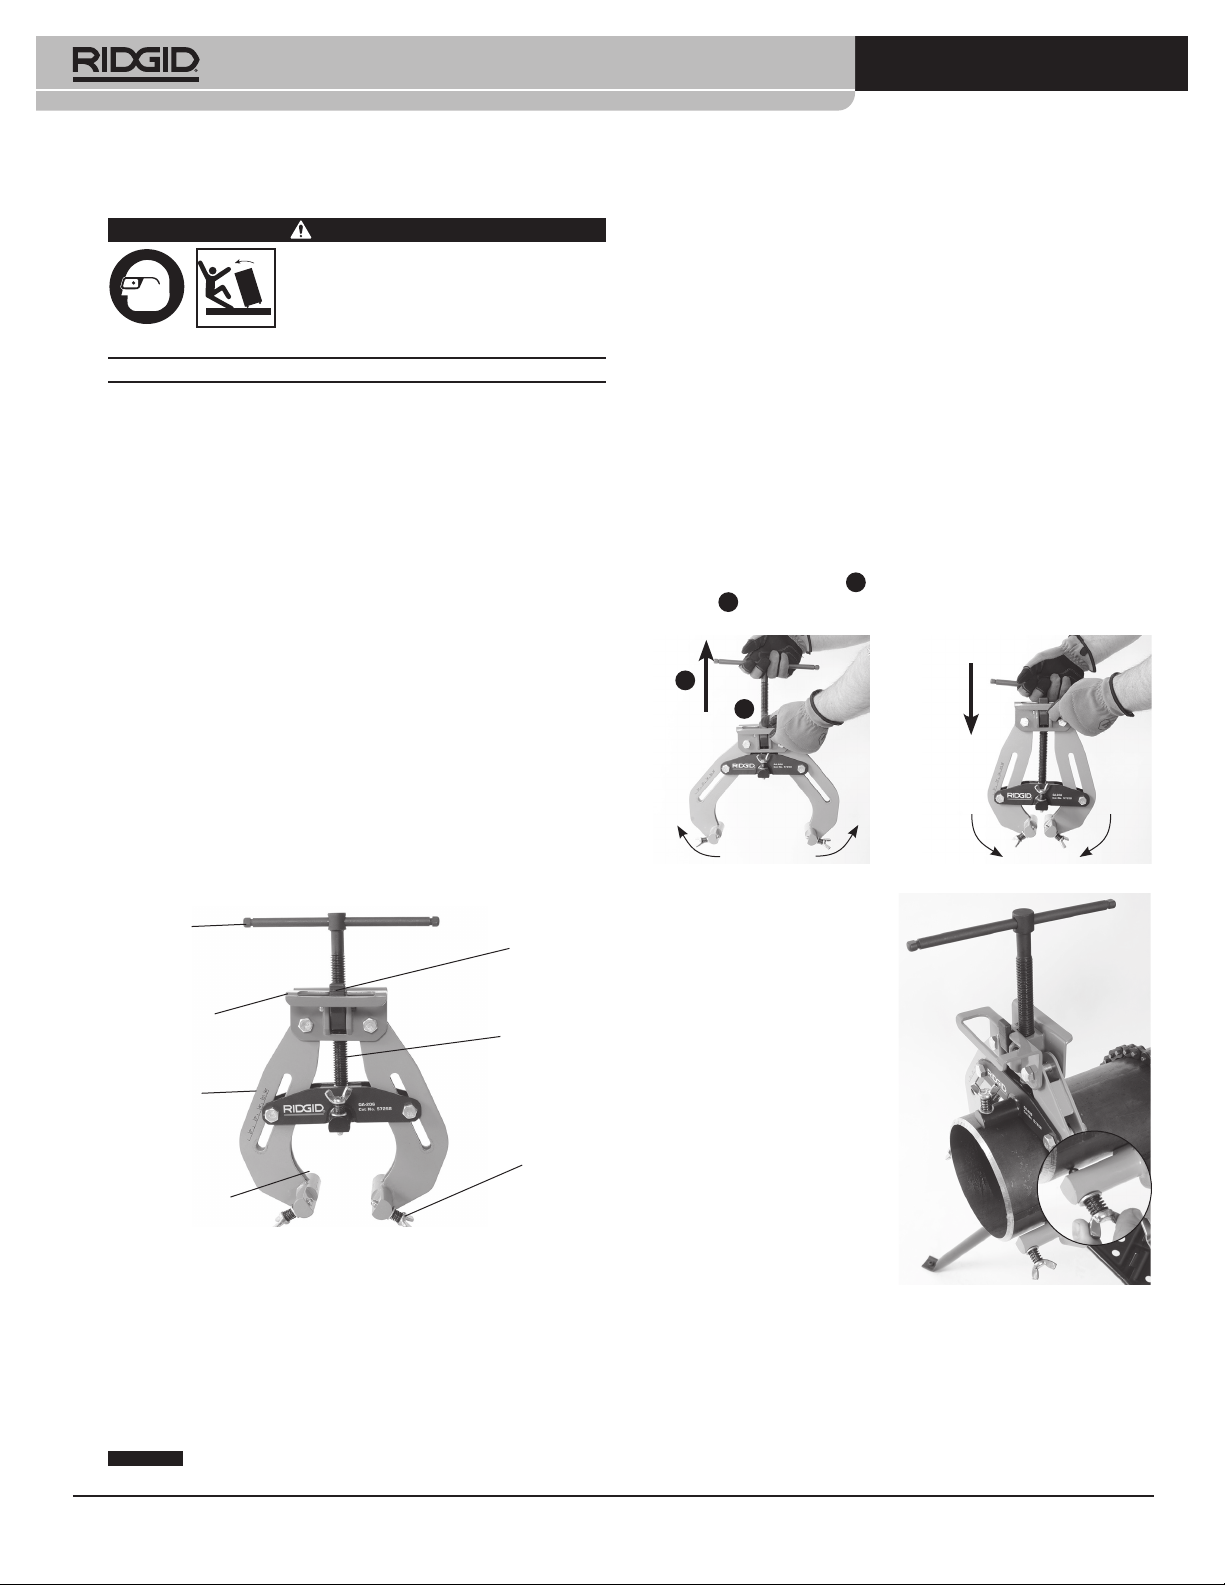
Handle
Grip
Jaws
Workpiece
Contact
Figure 1 – Quick-Acting Pipe Welding Clamp
Specifications
Model ................... QA-206 QA-412
Catalog Number
Capacity .............. 2" to 6" 4.5" to 12"
50 to 150 mm 112 to 300 mm
Weight ................. 11 lbs (5 kg) 16.7 lbs (7.6 kg)
Size ...................... 8.5" x 12.75" x 4.25" 13.75" x 18" x 4.25"
(Closed) (216 x 324 x 108 mm) (349 x 457 x 108 mm)
NOTICE
pipe can lead to contamination of the stainless steel material.
Printed 2/18
EC43395
Use of equipment for both carbon and stainless steel
ing this tool to reduce the risk of
®
product:
Feed Screw
Release
Feed Screw
Wing
...57258 57263
The Emerson logo and RIDGID logo are registered trademarks of Emerson Electric Co. or RIDGID, Inc. in the U.S. and other countries.
All other trademarks belong to their respective holders.
Bolt
©2018 RIDGID, Inc.
This contamination could cause corrosion and premature pipe
failure. To reduce the risk of ferrous contamination of stainless
steel pipe, use dedicated equipment. Alternately, a stainless steel
wire brush may be used to thoroughly clean the equipment when
switching between materials.
Inspection/Maintenance
Clean the pipe clamp to aid inspection and improve control.
Clean workpiece contact points with a wire brush to remove dirt.
Inspect before each use for proper assembly, wear, damage,
modification or other issues that could affect safe use. If any
problems are found, do not use until corrected.
Lubricate points of relative motion with a light weight general
purpose lubricating oil. Wipe off any excess oil.
Set Up/Operation
1. Make sure workpieces are secure and cannot fall.
2. Loosen the three wing bolts. The tip of the wing bolt should
not contact the workpiece when initially installed.
3. To open clamp, use one hand to hold the grip and press the
feed screw release . Use the other hand to pull the han-
2
dle and open the jaws. Stay clear of pinch points. (Figure 2).
2
1
OPEN CLOSE
Figure 2 – Opening and Closing Clamp
4. Place the jaws around a
cylindrical end of the workpiece with the wing bolts
oriented towards the end.
Push the handle to close
the jaws (Figure 2). The
three contact points should
sit squarely on the workpiece surface. Tighten the
handle to secure the clamp
to the workpiece (Figure
3). Do not overtighten.
5. Tighten all the wing bolts
until the tips lightly contact the workpiece surface. Do not overtighten
(Figure 3 inset).
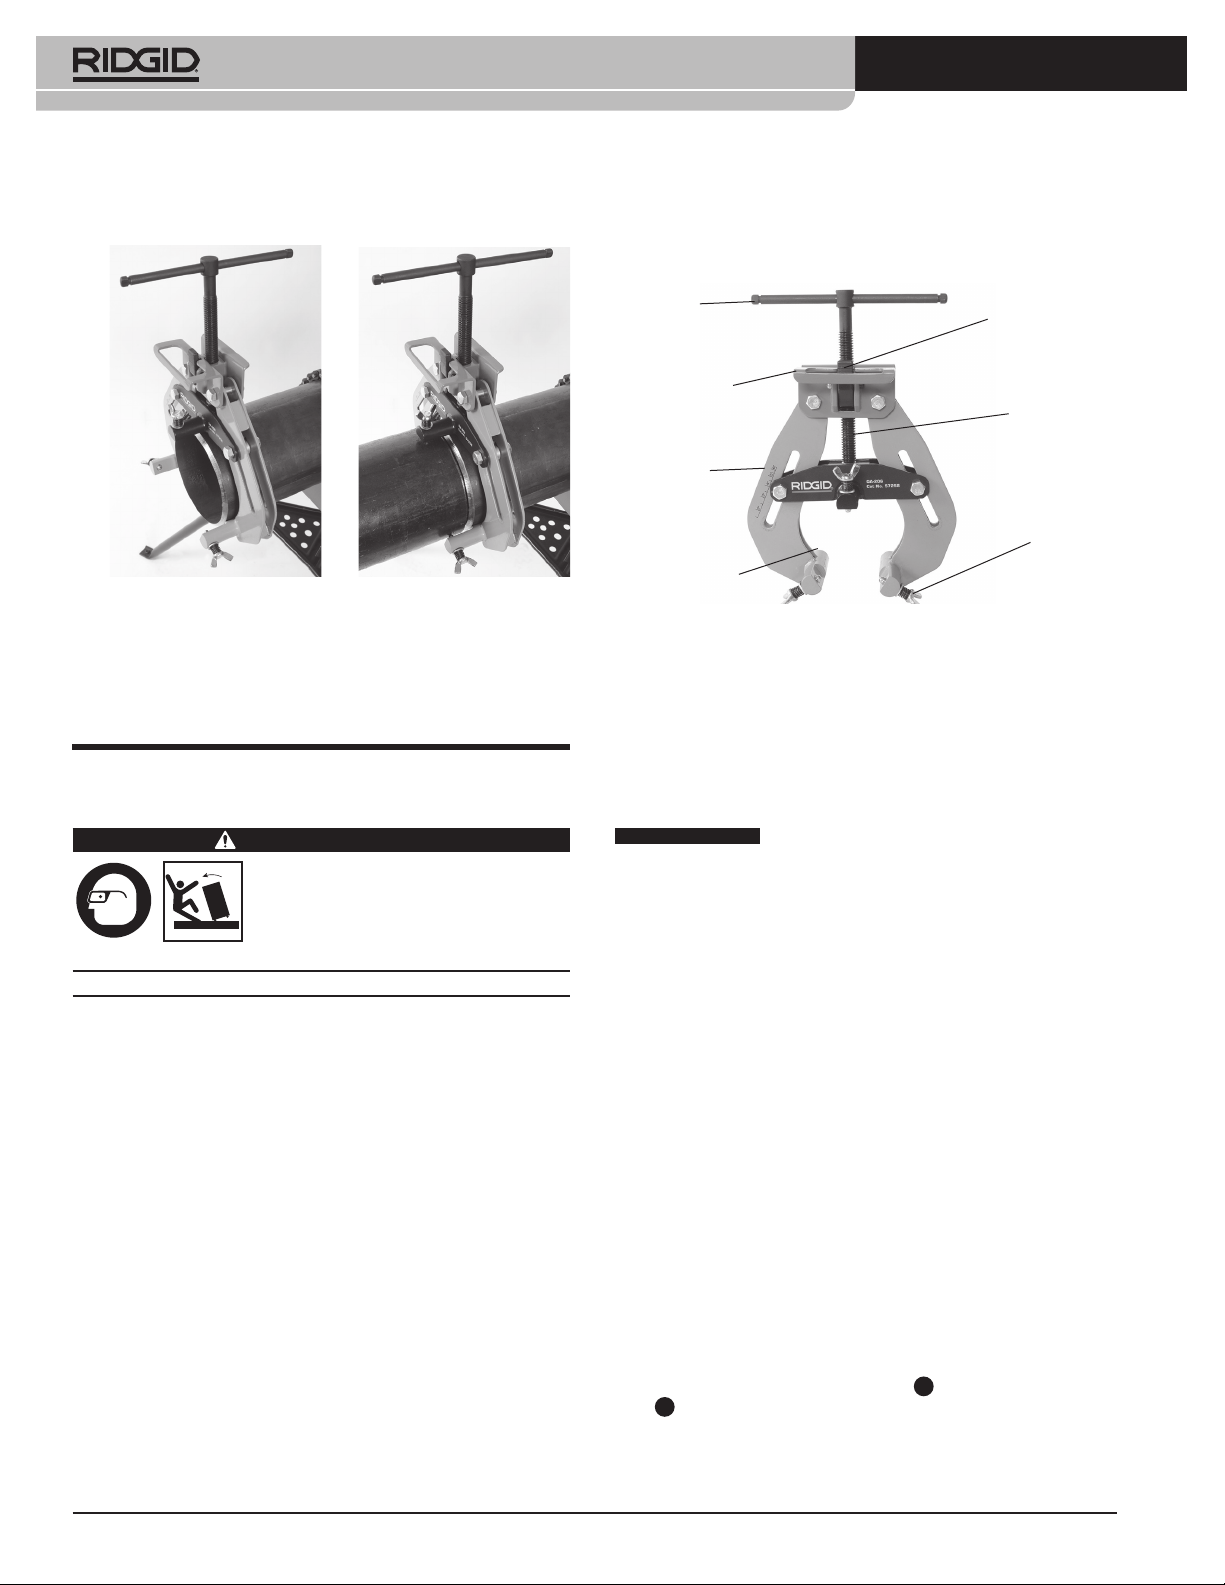
6. Loosen the handle (approximately 1 turn) and
slide the pipe clamp so
the wing bolts extend approximately 2" (50 mm) from the
end of the workpiece (Figure 4). Tighten the handle and
secure the clamp to the workpiece. Do not overtighten. Do
not use handle extensions - the tool can be damaged.
7. Loosen one wing bolt (typically the upper wing bolt)
2-3 turns. Align the second workpiece with the first and
place between the wing bolt tips, setting the desired gap
between the workpieces. Tighten the loosened wing bolt.
1
Figure 3 – Clamp On Workpiece
999-998-445.10
REV. A
Quick-Acting Pipe Welding Clamp Instructions
See Figure 5. If needed, the wing bolts can be used to
adjust alignment. If the second workpiece is a different
size from the first, start adjustment by turning each wing
bolt an equal number of turns.
Figure 4 – Wing Bolts Ex-
tended Past End
of Workpiece
Figure 5 – Aligning
Workpieces
Confirm that the workpieces are properly supported and
that the pipe clamp is not supporting the workpieces.
8. To remove the pipe clamp, loosen the handle 2 turns and
open the clamp
(Figure 2) .
Utilisation de la pince de soudage
rapide pour tuyaux
AVERTISSEMENT
Avant d’utiliser cet outil et afin de
limiter les risques de grave lésion
corporelle, familiarisez-vous avec
les instructions et consignes de
visant l’ensemble du matériel et des matériaux utilisés.
CONSERVEZ CES INSTRUCTIONS !
• Prévoyez les équipements de protection appropriés.
Portez systématiquement une protection oculaire et
des chaussures de sécurité. Un masque à poussière,
une visière et une protection auditive font partie des autres
équipements de protection individuelle qui peuvent être
éventuellement nécessaires.
• Ne jamais utiliser cette pince pour le levage, soutient ou
transport des tuyaux. Elle n’est pas prévue pour ce type
d’utilisation et risquerait de laisser la pièce s’échapper et
provoquer de graves blessures. N’utilisez la pince que selon
les instructions ci-présentes.
• Soutenez les tuyaux de manière appropriée. Servez-
vous de porte-tubes, de tables, d’étaux ou d’autres
moyens pour les soutenir. Les tuyaux mal soutenus ris-
queraient de tomber et provoquer de graves blessures.
En cas de questions visant ce produit RIDGID
– Consulter votre distributeur RIDGID local.
– Visiter RIDGID.com pour localiser le représentant RIDGID
le plus proche.
– Consultez les services techniques de Ridge Tool par courriel
adressé à rtctechservices@emerson.com, ou bien, à partir
des Etats-Unis ou du Canada, en composant le (800) 519-
3456.
sécurité suivantes, ainsi que celles
®
, veuillez :
Description
Les pinces de soudage RIDGID® servent à aligner les tuyaux,
raccords et autres éléments cylindriques à souder. Elles offrent
un système d’engagement rapide qui facilite leur installation et
utilisation. Les boulons papillon qui retiennent le tuyau sont en
acier inoxydable.
Poignée
Prise-en-main
Mâchoires
Point de
contact
Figure 1 – Pince de soudage rapide pour tuyaux
Détente de vis
d’avancement
Vis
d’avancement
Vis
papillon
Caractéristiques techniques
Modèle ................. QA-206 QA-412
Réf. Catalogue
.....57258 57263
Capacité ............... 2" à 6" 4,5" à 12”
50 à 150 mm 112 à 300 mm
Poids .................... 11 lbs (5 kg) 16,7 lbs (7.6 kg)
Dimensions .......... 8.5" x 12.75" x 4.25" 13.75" x 18" x 4.25"
(fermé) (216 x 324 x 108 mm) (349 x 457 x 108 mm)
AVIS IMPORTANT
L’utilisation de ce matériel à la fois pour les
tuyaux acier et acier inox risque de contaminer l’acier inoxydable. Une telle contamination risquerait de corroder le tuyau et
entraîner sa défaillance prématurée. Afin de limiter les risques de
contamination ferreuse des tuyaux en acier inoxydable, servezvous d’outils dédiés. Vous pouvez, alternativement, utiliser une
brosse en acier inox pour nettoyer la pince avant de changer de
type de matériaux.
Inspection et maintenance
Nettoyez la pince cylindrique afin d’en faciliter l’inspection et la
manipulation. Décrassez ses points de contact à l’aide d’une
brosse métallique. Assurez-vous de l’intégralité de l’outil et
examinez-le pour signes d’usure, de détérioration, de modification ou autres anomalies susceptibles de nuire à sa sécurité en
cours d’utilisation. Le cas échéant, n’utilisez la pince qu’après
les avoir rectifié.
Lubrifiez les mécanismes à l’aide d’une huile minérale légère du
commerce. Essuyez l’outil afin d’éliminer toute huile résiduelle.
Préparation et utilisation
1. Assurez-vous que les tuyaux sont correctement arrimés et
ne risquent pas de tomber.
2. Desserrez les trois vis papillon. Aucune des pointes de vis
papillon ne doit entrer en contact avec le tuyau lors de son
installation initiale.
3. Pour ouvrir la pince, tenez-la d’une main, puis appuyez sur
la détente de vis d’avancement . Tirez sur sa poignée
2
de l’autre main pour ouvrir ses mâchoires. Eloignez vos
mains des mécanismes (Figure 2).
1
2
 Loading...