

RIDGID Press Booster, Z3 Instructions Manual
Press Booster/Z3 Actuator Instructions
Press Booster/Z3 Actuator Instructions
WARNING
Read these instructions and the warnings and instructions for all equipment
and material being used before operating this tool to reduce the risk of serious personal injury.
SAVE THESE INSTRUCTIONS!
• Keep your fingers and hands away from pressing attachments
during press cycle. Your fingers or hands can be crushed, frac-
tured or amputated if they become caught between the attachment
r between these components and any other object.
o
• Large forces are generated during product use that can break
or throw parts and cause injury. Stand clear during use and wear
ppropriate protective equipment, including eye protection.
a
• Use proper tool, attachment and fitting combinations. Improper
combinations can result in an incomplete or improper joint, damage
the equipment, void warranties or cause severe personal injury or
death.
• Use the RIDGID Press Booster only with RIDGID 32kN Stan-
dard Series press tools. Use of other power sources can damage
the tool and/or cause serious personal injury.
• Do not modify the tool. Modifying the tool in any manner may re-
sult in personal injury.
• Do not overreach. Keep proper footing and balance at all
times. This enables better control of the power tool in unexpected
situations.
• Before operating the RIDGID Press Booster Unit, read and un-
derstand:
– These instructions,
– The Press Tool operator’s manual,
– The attachment instructions,
– The fitting manufacturer’s installation instructions,
– The instructions for any other equipment used with this tool,
Failure to follow all instructions and warnings may result in property damage and/or serious injury.
RIDGID Contact Information
If you have any questions concerning this RIDGID®product:
• Contact your local RIDGID distributor,
• Visit RIDGID.com to find your local RIDGID contact point.
• Contact Ridge Tool Technical Service Department at rtctechser vic es@em er son.com, or in the U.S. and Canada call (800) 519-3456.
Description
The RIDGID Press Booster converts multiple cycles of a press tool into
a single cycle of the Press Booster to actuate attachments requiring a
Z3 actuator, such as MegaPress
the Press Booster cycle is complete.
®
XL Press Rings. It will not retract until
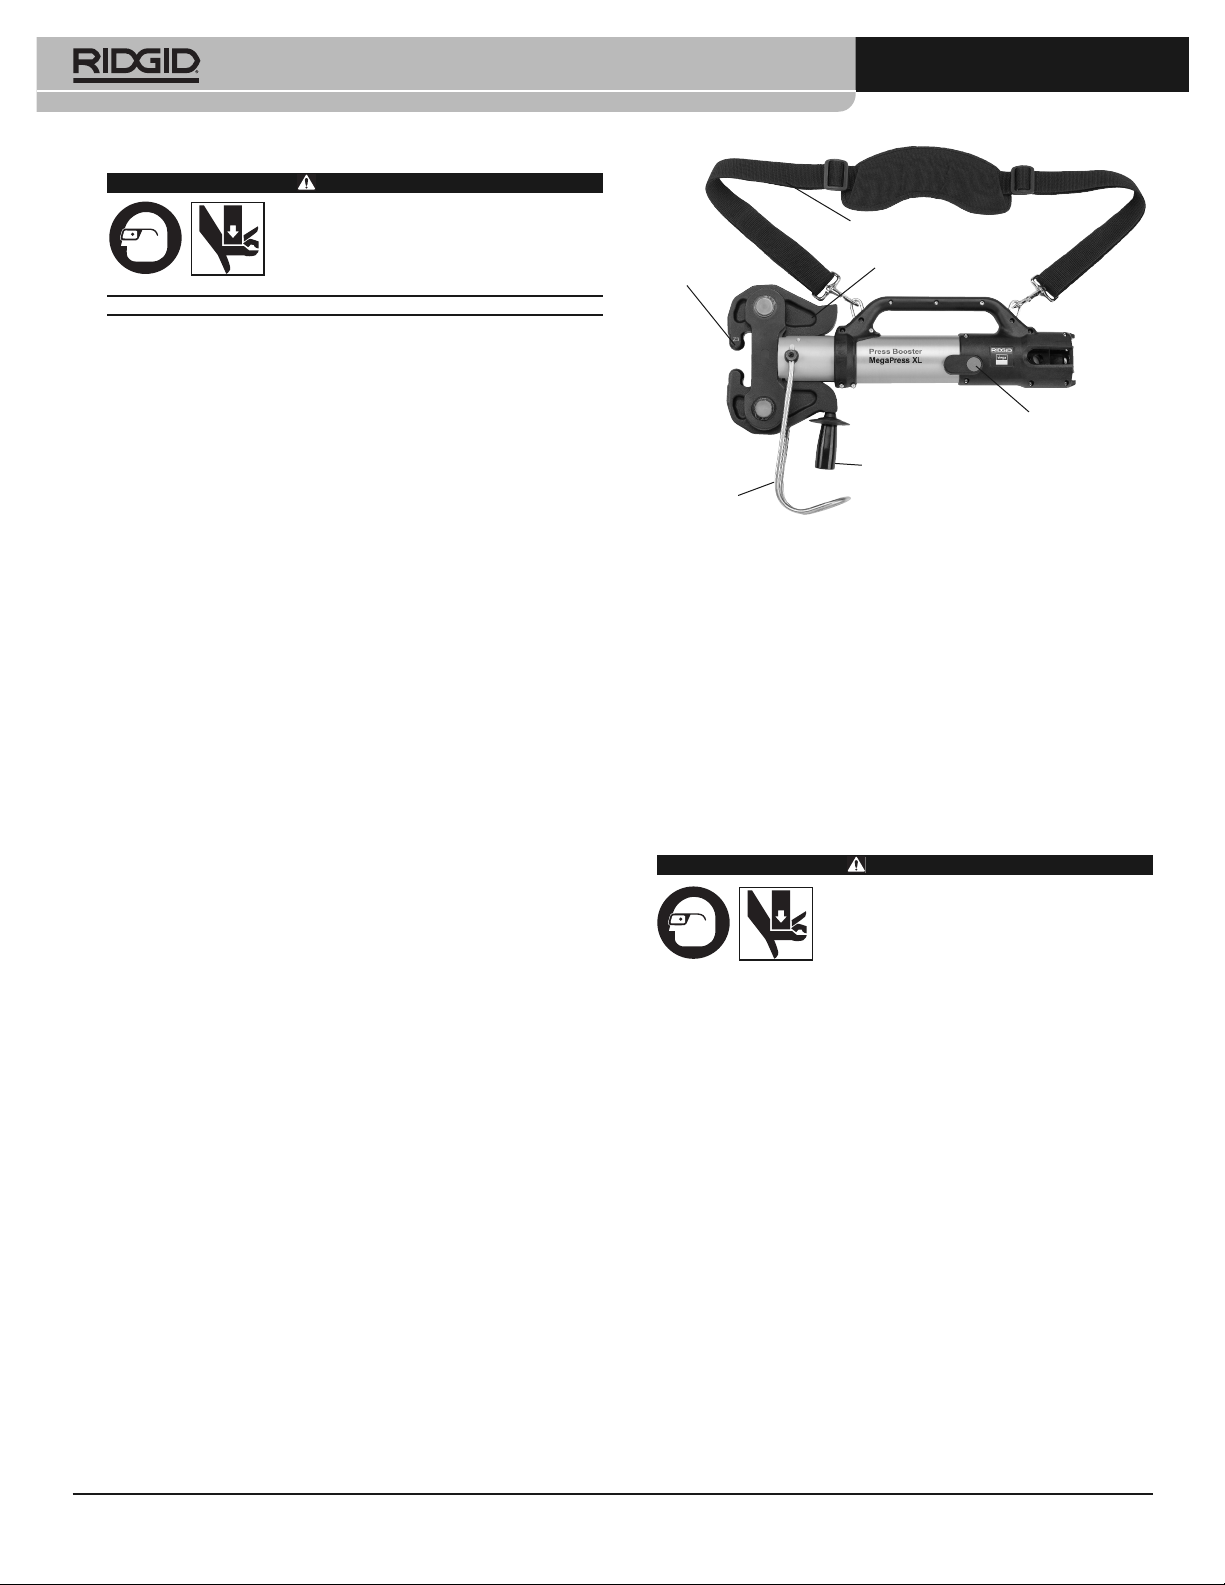
Shoulder Strap
ctuator
A
pherical Tip
S
upport
S
racket
B
Figure 1 – Press Booster/Z3 Actuator
Actuator
Arm
Handle
ressure Release
P
utton
B
Specifications
Actuator/Ring Designation...Z3
For use with........................RIDGID Standard Series 32 kN Press
Tools (such as the RP330 and RP340).
Not for use with the CT-400 and 320E.
Max. Operating Pressure .....580 bar
Hydraulics Volume................2.57 oz. (76 cm
3
)
Storage Temperature............32°F to 113°F (0°C to 45°C)
Operating Temperature........23°F to 113°F (-5°C to 45°C)
Humidity Range....................0% to 80%
Dimensions...........................19.7" × 12.2" × 3.5" (500 × 310 × 90 mm)
Weight ...................................21 lbs. (9.5 kg)
Pre-Operation Inspection
WARNING
Daily before use, inspect your tool and
correct any problems to reduce the risk
of serious injury from crushing injures,
jaw failure, and other causes, and prevent tool damage.
1. Make sure that the press tool is removed from the press booster.
2. Clean any oil, grease or dirt from the press booster. This aids inspection and improves control.
3. Inspect press booster for:
• Proper assembly, maintenance and completeness.
• Broken, worn, missing, misaligned or binding parts. Confirm
shoulder strap is in good condition.
• Oil leaks. If leaking have serviced – do not attempt to add oil.
• Presence and readability of warning label and markings.
• Any other condition which may prevent safe and normal opera-
tion.
Do not use tool until any problems have been repaired.
4. Inspect and maintain the press tool and any other equipment
being used per its instructions to make sure it is functioning properly.
MegaPress®is a registered trademark of Viega GmbH & Co.
Printed 1/18 999-995-129
EC43245 REV. A
The Emerson logo and RIDGID logo are registered trademarks of Emerson Electric Co. or RIDGID, Inc. in the U.S. and other countries.
All other trademarks belong to their respective holders.
©2018 RIDGID, Inc.
.10
ress Booster/Z3 Actuator Instructions
P
et Up/Operation
S
WARNING
Keep your fingers and hands away from
pressing attachments during press cy cle. Your fingers or hands can be
crushed, fractured or amputated if they
become caught between the attach-
ment or between these components and any other object.
Follow set up and operating instructions to reduce the risk
of injury from crushing, electrical shock and other causes
and to prevent tool damage.
Follow the press tool instructions to set up the tool and work area.
pen
O
Installing the Press Booster on Press Tool
. Make sure that the press tool is unplugged or the battery is re-
1
moved and fully open the press tool attachment mounting pin. See
Figure 2. If there is an attachment in the tool, slide it out of the tool.
2. Attach the press booster to the press tool as shown in Figure 2 and
fully close the press tool attachment mounting pin. If the press
booster does not fit on the press tool do not force it. Be aware that
the combined weight can approach 37 lbs. (17 kg).
3. Securely attach shoulder strap as shown in Figure 1. Adjust strap
length as desired.
4. Power the press tool per it’s operating instructions.
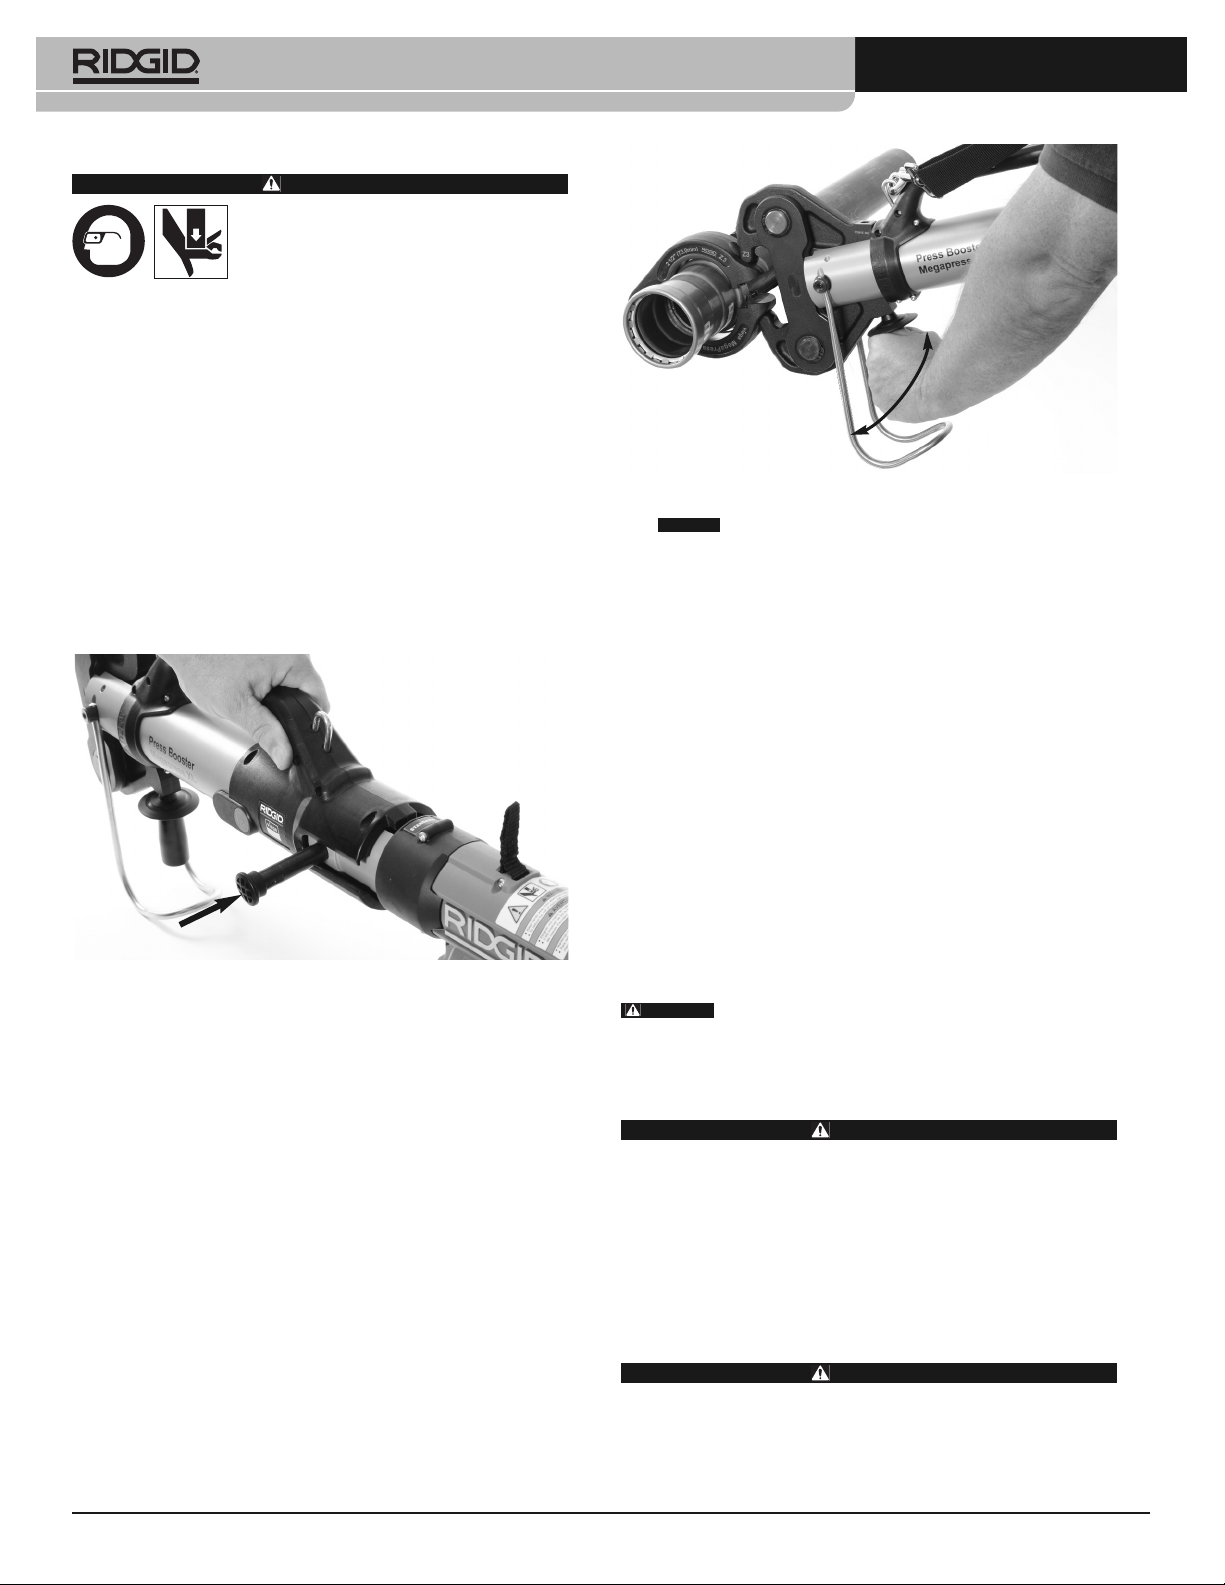
Figure 2 – Installing Press Booster on Press Tool
Pressing a Fitting with Press Ring
1. Prepare the connection per fitting manufacturer’s installation instructions. Properly install correct press ring for fitting. Confirm
press ring uses Z3 actuator.
2. Place the shoulder strap to support the press booster. Be aware
that the combined weight can approach 37 lbs. (17 kg). Place one
hand on the handle of the Press Booster and the other on the handle of the press tool.
3. Pull back on the press booster handle to open the actuator arms.
Engage actuator spherical tips into the actuator pockets in the
press ring (Figure 3). Move the press booster handle forward, mak-
ing sure tips are fully engaged in pockets. Do not attempt to hang
tool from press ring. Tool could unexpectedly drop causing serious
injury or death.
Engaged
igure 3 – Placing Actuator Tips Into Ring Pockets
F
N
OTICE
4. Operating without a press ring can cause the Press
Booster to jam. With hands on handles and away from pinch
points, operate the press tool per its instructions. Allow the press
tool to complete the cycle.
Repeat the procedure and cycle the press tool a second time. If
the Press Booster has not retracted (you are unable to disengage
the Z3 actuator tips with the pockets) cycle the press tool for a third
time.
The Press Booster should complete its cycle after 2 or 3 press cycles.
If more than three tool cycles are required for the Press Booster to
retract, the Press Booster or the Press Tool need to be serviced.
If tool must be removed before the Press Booster retracts, depress
the pressure release button (Figure 1). Any time release button is
depressed, press is NOT complete and the connection must be
pressed again to ensure completion. If the tool malfunctions during operation, use this procedure.
5. Pull back on the press booster handle to open the actuator arms
and remove the Press Booster from the actuator pockets.
6. Turn press tool OFF.
7. Inspect and test the system in accordance with fitting manufacturer
instructions, normal practice and applicable codes.
Storage
WARNING
booster in the carrying case and place in a dry, secured area that is out
of reach of children and people unfamiliar with the tool. The tool is dangerous in the hands of untrained users.
Remove press booster from press tool. Store the press
Maintenance Instructions
WARNING
Make sure press booster is removed from press tool before
performing maintenance or making any adjustment.
1. After each use, wipe any oil or dirt off the press booster with a
clean, dry, soft cloth.
2. Monthly, or more often if needed, apply a light machine oil to the
pivot points. Wipe off any excess lubricant.
Do not attempt to add hydraulic oil to the Press Booster. Have tool serviced if leaking.
Service and Repair
WARNING
Improper service or repair can make the machine unsafe to
operate.
2
Service and repair on the press booster must be performed by a
RIDGID Independent Service Center. Use only RIDGID service parts.
For information on your nearest RIDGID Independent Service Center
r any service or repair questions, see Contact Information.
o
Fiche d’utilisation de l’amplificateur
de sertissage Press Booster avec
Actionneur Z3
AVERTISSEMENT
Afin de limiter les risques d’accident
grave, familiarisez-vous avec les consignes ci-présentes, ainsi qu’avec celles
visant l’en semble du matériel et des
outil.
CONSERVEZ CES INSTRUCTIONS !
• Eloignez vos doigts et vos mains des pinces de sertissage en
cours d’opération. Les doigts et les mains risquent d’être écrasés,
fracturés ou amputés par les pinces ou entre celles-ci et tout autre
objet.
• Ce produit génère suffisamment de couple en cours d’utilisation
pour briser et projeter des pièces de manière dangereuse. Tenezvous à l’écart durant le processus de sertissage et prévoyez les
équipements de protection appropriés, notamment une protection oculaire.
• Utilisez la combinaison d’outil, de pince et de raccord de ser-
tissage appropriée. Une mauvaise combinaison de ces éléments
risque de produire des raccords incomplets ou non-étanches, d’endommager le matériel, d’annuler sa garantie ou de provoquer des
accidents graves et potentiellement mortels.
• N’utilisez le RIDGID Press Booster qu’avec les sertisseuses
série Standard RIDGID de 32kN. L’emploi de tout autre type d’appareil pourrait endommager l’outil et/ou provoquer de graves
blessures corporelles.
• Ne tentez pas de modifier cet outil. La modification de cet outil de
manière quelconque risquerait de provoquer des accidents.
• Ne vous mettez pas en porte-à-faux. Maintenez votre équilibre
et stabilité à tout moment. Cela vous permettra de mieux contrôler
l’appareil en cas d’imprévu.
• Avant d’utiliser le RIDGID Press Booster, familiarisez-vous avec :
– Les consignes ci-présentes
– Le manuel de la sertisseuse
– Les consignes visant les accessoires utilisés
– Les consignes du fabricant des raccords de sertissage
– Les consignes visant tout autre matériel utilisé avec cet outil,
Le non-respect de l’ensemble de ces consignes et avertissements
pourraient occasionner des dégâts matériels et/ou de graves
blessures corporelles.
Coordonnées RIDGID
En cas de questions visant ce produit RIDGID®, veuillez :
• Consulter le distributeur RIDGID le plus proche
• Visiter le site RIDGID.com pour localiser le représentant RIDGID le
plus proche
• Consulter les services techniques de Ridge Tool à rtctechservic es@emerson.com, ou bien en composant le (800) 519-3456 à partir
des Etats-Unis ou du Canada.
Description
Le RIDGID Press Booster converti de multiples cycles de sertisseuse
en un seul cycle amplifié capable de mouvoir les pinces de sertissage
utili sant un actionneur type Z3, tels que celui prévu pour les bagues de
sertissage MegaPress
Press Booster est complet.
matériaux utilisés avant d’utiliser cet
®
XL. Il ne se rétracte que lorsque le cycle du
ress Booster/Z3 Actuator Instructions
P
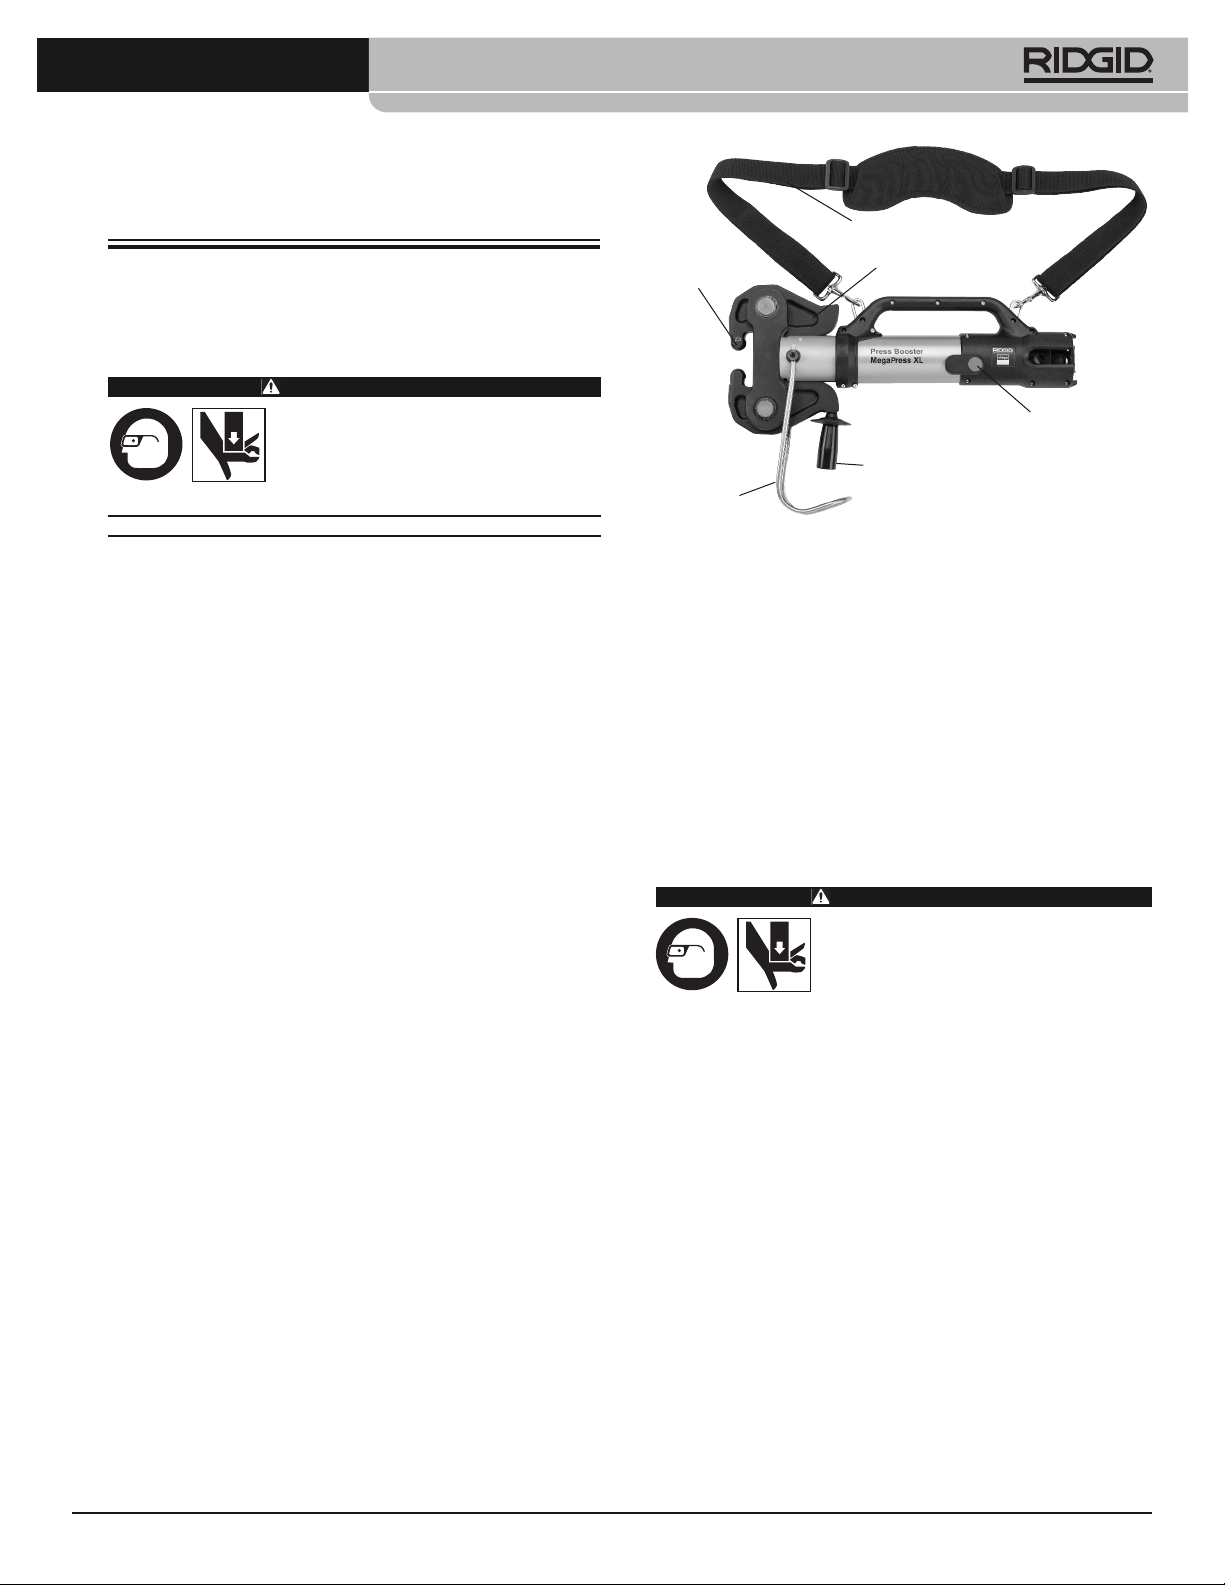
Bretelle
mbout
E
phérique de
s
’actionneur
l
Support
Figure 1 – Press Booster avec actionneur Z3
Bras de
l’actionneur
Poignée
D
Caractéristiques techniques
Désignation d’actionneur
et bague ..............................Z3
Compatibilité........................Sertisseuses RIDGID série Standard de
Pression hydraulique maxi.....580 bar
Capacité hydraulique.............2,57 oz. (76 cm
Température de stockage......32 à 113 °F (0 à 45 °C)
Température de
fonctionnement.......................23 à 113 °F (-5 à 45 °C)
Plage d’humidité.....................0% à 80%
Dimensions.............................19,7" × 12,2" × 3,5" (500 × 310 × 90 mm)
Poids .......................................21 livres (9,5 kg)
32kN telles que les RP330 et RP340.
Incompatible avec la CT-400 et la 320E.
3
)
Inspection préalable
AVERTISSEMENT
Inspectez l’outil avant chaque intervention afin de corriger toute anomalie
éven tuelle qui serait susceptible de
provoquer un accident grave ou la défaillance du matériel.
1. Retirez le Press Booster de la sertisseuse.
2. Nettoyez le Press Booster afin d’éliminer toutes traces de crasse.
Cela facilitera l’inspection et améliorera le contrôle de l’appareil.
3. Concentrez votre inspection du Press Booster sur les points sui vants:
• L’assemblage approprié, l’entretien et l’intégralité de l’outil.
• Signes d’éléments endommagés, usés, manquants, désalignés ou
grippés. Vérifiez le bon état de la bretelle.
• Fuites d’huile hydraulique. Le cas échéant, faites réviser l’outil. Ne
tentez pas de faire l’appoint.
• La présence et lisibilité des avertissements et marquages.
• Toute autre anomalie qui risquerait de compromettre la sécurité et
le bon fonctionnement de l’outil.
Corrigez toute anomalie éventuelle avant de réutiliser l’outil.
4. Inspectez et maintenez la sertisseuse et tout autre matériel utilisé
selon les consignes correspondantes afin d’assurer le bon fonctionnement de l’ensemble.
MegaPress®est une marque déposée de la société Viega GmbH & Co
étente
3
 Loading...