

Page 1

Page 2

Table of Contents
Section Page
Table of Contents ...........................................2
Safety Instructions For Miter Saw ................3
Safety Signal Words ....................................3
Before Using The Saw ..... .... ... .....................3
When Installing Or Moving The Miter Saw ....4
Before Each Use ............................................4
To Reduce the Risk of Injury From Jams, Slips
Or Thrown Pieces ........................................5
Plan Ahead To Protect Your Eyes, Hands, Face
and Ears ......................................................5
Dress For Safety ............................................6
Preparing to Make Cut ...................................6
Plan The Way You Will Hold The Workpiece
From Start To Finish. ...................................7
Whenever Saw Is Running ............................7
Before Leaving The Saw ...............................8
Glossary of Terms for Woodworking ...........8
Motor Specifications and Electrical Require-
ments .......................................................... 9
Power Supply and Motor Specifications ......9
General Electrical Connections ...................9
110-120 Volt, 60 Hz. Tool Information .........9
Motor Safety Prote c tio n .............................10
Wire Sizes ..................................................10
Unpacking and Checking Contents ............11
Tools Needed ............................................11
Unpacki ng ..... ........... ............ ........... ...........11
List of Loose Parts .....................................11
Getting to Know Your Miter Saw .................12
Assembly .......................................................13
Installing or Removing the Blade ...............13
Assembling Dust Bag ..................................15
Workpiece Clamp Installation ....................15
Four Basic Saw Controls .............................15
Alignment (Adjustments) .............................17
Miter Lock Lev er Ad justm e nt .......... .... .... ...20
Bevel Lock Lever Adjustment ....................20
Bevel Pivot Movement/Adjustment ............21
Mounting The Miter Saw ..............................22
Safety Instructions for Basic Saw
Operations ........ ............ .... ... .... .... ...........23
Before Each Use ..........................................23
To Reduce the Risk of Injury From Jams, Slips
Or Thrown Pieces ......................................23
Plan Ahead To Protect Your Eyes, Hands,
Face and Ears ............... ..........................24
Dress For Safety ..........................................24
Preparing to Make the Cut ...........................25
Section Page
Whenever Saw Is Running .. ........................26
Before Leaving The Saw: ............................26
Basic Saw Operations ..................................27
Making Common Slide Compound Cuts ... 27
Slide Cutting ............................................. 27
Chop Cutting ............................................. 28
Body and Hand Posit ion ........... ................ 28
Miter Cut ................................................... 29
Miter Scale Usage ..................................... 29
Bevel Cut .................................................. 29
Sliding Fence ............................................ 29
Vernier Bevel Scale Operation: ................ 29
Compound Cut ... .... ...................... .... .... .... . 30
Cutting Compound Miters on Picture Frames
and Boxes ............................................... 30
Cutting Bowed Material ............................. 30
Workpiece Clamp Usage .......................... 31
Workpiece Support ................................... 32
Auxiliary Fenc e ..................... .... ... .... .... ..... 32
Rough Cutting A Dado .............................. 33
Helpful Hints When Cutting Compound
Miters ....... ............ ........... ........... ........ ..... 33
Cutting Base Moldings .............................. 33
Cutting Crown Moldings ............................ 34
Two Methods of Cutting Crown Molding ... 34
Laser System ..................................... 38
Mounting the Laser System ...................... 38
Operation ... ............... ................... ............. 4 0
Changing Batteries ................................... 41
Maintenance and Lubrication .....................42
Maintenance ............................................. 42
Lubrication ................................................ 43
Motor Belt Tension .................................... 43
Accessories ..................................................44
Recommende d Ac cess o rie s ............ .... .... . 4 4
Basic Blade Requirements ....................... 44
Prohibited Accessories ................................44
Using Carbide Tipped Blades .....................44
Troubleshooti ng Guide ................................45
General .. ................... ................... ............. 4 5
Motor ...... ....................... .... .... .... ... ............. 46
Wiring Diagram .............................................46
Trouble S ho o tin g of Brake by Qual ifi ed Ser-
vice Person Only .................................... 46
Notes ..............................................................47
Repair Parts ...................................................48
Notes ..............................................................59
2
Page 3

Safety Instructions For Miter Saw
Safety is a combination of common sense, staying alert and knowing how
your miter saw works. Read this manual to understand this miter saw.
Safety Signal Words
DANGER: means if the safety infor-
mation is not followed someone will
be seriously injured or killed.
Before Using The Saw
WARNING: Some dust created by
power sa ndin g, sa win g, g rin ding ,
drilling, and other construction
activities contains chemicals
known (to the State of California)
to cause cancer, birth defects or
other repr od uc ti v e harm. Some
examples of these chemicals are:
• Lead from lead-based paints,
• Crystalline silica from bricks
and cement and other masonry
products, and
• Arsenic and chromium from
chemically-treated lumber.
Yo ur risk from these exposures
varies, depending on how often
you do this type of work. To
reduce your exposure to these
chemicals: work in a well ventilated area, and work with
approved safety equipment,
such as those dust masks that
are specially designed to filter
out microscopic particles.
WARNING: To reduce the risk of
mistakes that could cause serious, permanent inju ry, do not
plug the miter saw in until the following steps have been satisfactorily completed.
• Completely assemble and align
saw. (See “Assembly” and “Alignment” sections within.)
• Learn the use and function of the
ON-OFF switch, upper and lower
blade guards, miter lock lever , bevel
lock lever , co ver plate stop scre w,
depth adjustment clamp and head
WARNING: means if the safety information is not followed someone
could be seriously injured or killed.
CAUTION: means if the safe ty infor-
mation is not followed someone ma y
be injured.
hold down, fence slide lock knobs
and workpiece clamp. (See “Getting to Know Your Miter Saw” section within.)
• Review and understand all safety
instructions and operating procedures in this manual.
• Review the maintenance methods
for this miter saw. (See “Maintenance” section within).
Find and read the following labels on
the miter saw.
3
Page 4

Safety Instructions for Miter Saws (continued)
When Installing Or Moving The Miter Saw
Before moving the saw, lock the
miter, bevel, slide and power head
posi ti on s. Unp lu g th e po wer cor d .
To reduce the risk of back injury, get
help when you need to lift the saw.
Never carry the tool by the cord or
power head trigger handle. Damage
to insulation could cause an electric
shock. Damage to wire connections
could cause a fire.
Reduce the Risk of Dangerous
Environment. Use the miter saw in a
dry, lo ca tion, protected from rain.
Keep work area well lighted.
Place the saw so neither the user nor
bystanders are forced to stand in line
with the blade. Thrown debris could
injure people in its path.
To reduce the risk of injury from
unexpected saw movement:
• Place the miter saw on a firm level
surface where there is plenty of
room for handling and properly sup-
porting the workpiece.
• Support the miter saw so the tabl e is
level and the saw does not rock.
• Bolt, screw or clamp the saw to its
support.
• Never Stand On Tool. Serious
injury could occur if the tool tips or
you accidentally hit the cutting tool.
Do not store anything above or near
the tool where anyone might stand
on the tool to reach them.
To reduce the risk of injury or
death from electrical shock:
• Make sure your fingers do not touch
the plug’s metal prongs when plugging or unplugging the miter saw.
• This TOOL IS DOUBLE INSULATED to give you added protection. Double insulation does not take
the place of normal safety precautions when operating this tool. When
servicing this double insulated tool,
use only identical parts.
Before Each Use
Inspect your miter saw.
Disconnect The Miter Saw. To
reduce the risk of injury from accidental starting, unplug the saw, before
changing the setup, changing the
blade or adjusting anything.
Compare the direction of rotation
arrow on the guard to the direction
arrow on the blade. The blade teeth
should always point downward at the
front of the saw.
Tighten the arbor screw.
Tighten the cover plate stop screw.
Check For Damaged Parts. Check
for:
• Proper Alignment of moving parts,
• Damaged electric cords,
• Binding of moving parts,
• Broken parts,
• Stable mounting,
• Function of arm return spring and
lower guard: Push the arm all the
way down, then let it rise up until it
stops by itself. Check the lower
guard to see if it closed fully. If it did
not, follow the instructions in the
“Troubleshooting” section.
• Smooth, solid movement of sliding
assembly.
• Other conditions that may affect the
way the miter saw works.
4
Page 5

If any part of t his miter saw is missing,
bent, or broken in any way, or any
electrical parts don't work, turn the
saw off and unplug it. Replace damaged, missing, or failed parts before
using the saw again.
Keep Guards In Place, in working
order, and in proper adjustment.
Maintain Tools With Care. Keep the
miter saw clean for best and safest
performance. Follow instructions for
lubricating. DON’T put lubricants on
the blade while it’s spinning.
Remove Adjusting Keys And
Wrenches from tool before turning it
on.
T o Reduce the Risk of Injury From Jams, Slips Or Thrown Pieces
• Use Only Recommended Accessories. (See “Accessory” section
within.) Consult this owner’s manual
for recommended accessories. Follow the instructions that come with
the accessories. The use of
improper accessories may cause
risk of injury to persons.
• Choose the right 12-inch diameter
blade for the saw and the material
you plan to cut.
• Make sure the blade is sharp,
undamaged and properly aligned.
With the saw unplugged, push the
power head all the way down. Hand
spin the blade and check for clearance. Tilt the power head to 45
degrees left and right bevel and
repeat the check. If the blade hits
anything, make the adjustments
shown in “Alignment (Adjustments)”
section.
• Make sure the blade, arbor collars
and laser system are clean.
• Make sure the arbor collars' and
laser discs’ recessed side s are facing the blade.
• Using the 1/4” hex end of combination wrench (supplied) or a 1/2-inch
box end wrench, make sure the left
hand thread arbor screw is firmly
tightened counterclockwise.
• Make sure all clamps and locks are
tight and there is no excessive play
in any parts.
• Keep Work Area Clean. Cluttered
areas and benches invite accidents.
Floor must not be slippery.
To reduce the risk of burns or other
fire damage, never use the saw near
flammable liquids, vapors or gases.
Plan Ahead To Protect Your Eyes, Hands, Face and Ears
Know Your Miter Saw. Read and
understand the owner’s manual and
labels affixed to the tool. Learn its
applications and limitations as well as
the specific potential hazards peculiar
to this tool.
To reduce the risk of injury from accidental contact with moving parts,
don’t do layout, assembly, or setup
work on the miter saw while any parts
are moving.
To Red uce the Risk of Accidental
Starting. Make sure switch is “OFF”
before plugging miter saw into a
power outlet.
Plan your work.
Use The Right Tool. Don’t force tool
or attachment to do a job it was not
designed to do. Use a different tool
for any workpiece that can’t be held in
a solidly braced, fixed position.
5
Page 6

Safety Instructions for Miter Saws (continued)
CAUTION: Because of the slidin g
action of this saw, this machine
is not designed for cutting metals. Use this miter saw to cut
only wood and wood like products. Other materials may shatter, bind on the blade, start fires
or create other dangers.
Dress Fo r Safety
Any power tool can throw foreign
objects into the eyes. This can result
in permanent eye damage. Wear
safety goggles (not glasses) that
comply with ANSI Z87.1 (or in Canada CSA Z94.3-99) shown on package. Everyday eyeglasses have only
impact resistant lenses. They are not
safety glasses. Safety goggles are
available at many local retail stores.
Glasses or goggles not in compliance
with ANSI or CSA could seriously hurt
you when they break.
Do not wear loose clothing, gloves,
neckties or jewelry (rings, wrist
watches) They can get caught and
draw you into moving parts.
• Wear nonslip footwear.
• Tie back long hair.
• Roll long sleeves above the elbow.
• Noise levels vary widely. To reduce
the risk of possible hearing damage,
wear ear plugs or muffs when using
miter saw for hours at a time.
• For dusty operations, wear a dust
mask along with safety goggles.
Preparing to Make Cut
Inspect Your Workpiece. Make sur e
there are no nails or foreign objects in
the part of the workpiece to be cut.
Plan your work to reduce the risk
of thrown pieces caused when the
workpiece binds on the blade and
is torn from your hands.
Plan how you will make the cut.
Always:
• Make sure the blade is not spinning.
• Raise the blade.
• Slide the saw out above the front
edge of the workpiece before starting saw, and
• Push the sawblade down on top of
the wood and back toward the rear
of the saw to make the cut.
DANGER: NEVER pull the saw
toward you during a cut. The
blade can suddenly cli mb up on
top of the workpiece and force
itself toward you .
6
Page 7

Plan The Way You Will Hold The Work piece From Start To Finish.
• Avoid awkward operations and hand
positions where a sudden slip could
cause fingers or hand to move into
the blade.
• Don’t Overreach. Keep good footing and balance.
• Keep your face and body to one
side of sawblade, out of line with a
possible thrown piece.
• Cut only one workpiece at a time.
• Never cut Freehand:
- Brace your workpiece solidly
against the fence and table top so
it will not rock or twist during the
cut.
-Make sure there’s no debris
between the workpiece and its
supports.
- Make sure no gaps between the
workpiece, fence and table will let
the workpiece shift after it is cut in
two.
• Keep the cut off piece free to move
sideways after it's cut off. Otherwise,
it could get wedged against the
blade and thrown violently.
• Clear everything except the workpiece and related support devices
off the table before turning the miter
saw on.
• Secure W o rk. Use clamps or a
vise to help hold the wor k wh en it’s
practical.
Use extra caution with large, very
small or awkward workpieces:
• Use extra supports (tables, saw
horses, blocks, etc.) for any workpieces large enough to tip when not
held down to the table top.
• Never use another person as a substitute for a table extension, or as
additional support for a workpiece
that is longer or wider than the basic
miter saw table or to help feed, support or pull the workpiece.
• Do not u se thi s s a w to cut p i eces
too small to let you easily hold the
work while you keep the thumb side
of your index (pointer) finger against
the outside edge of the fence.
• When cutting irregularly shaped
workpieces, plan your work so it will
not slip and pinch the blade and be
torn from your hands. A piece of
molding, for example, must lie flat
against the table or fence, or be held
by a fixture or jig that will not let it
twist, rock or slip while being cut.
• Properly support round material
such as dowel rods, or tubing. They
have a tendency to roll while being
cut, causing the blade to "bite." To
avoid this, always use a fixture
designed to properly hold your
workpiece.
Whenever Saw Is Running
WARNING: Do n't al low famil iarity
(gained f rom f requent use of
your miter saw) cause a careless
mistake. A careless fraction of a
second is enough to cause a
severe injury.
Before starting your cut, observe the
miter saw while it runs. If it makes an
unfamiliar noise or vibrates excessively , stop immediately. T urn the saw
off. Unplug the saw. Do not restart
until finding and correcting the problem.
Keep Children Away. Ke ep all visitors a safe distance from the miter
saw. Make sure bystanders are clear
of the miter saw and workpiece.
7
Page 8

Safety Instructions for Miter Saws (continued)
Never confine the piece being cut
off. Never hold it, clamp it, touch it, or
use length stops against it while the
blade is spinning. It must be free to
move sideways on its own. If confined, it could get wedged against the
blade and be thrown violently.
Let the blade reach full speed
before cutting. This will help avoid
thrown workpieces.
Don’t Force Tool. It will do the job
better and safer at its designed rate.
Feed the saw into the workpiece only
fast enough to let the blade cut without bogging down or binding.
Before Leaving The Saw
Never Leave Tool Running Unattended. Turn power off. Wait for all
moving parts to stop.
Make Workshop Child Proof. Install
a padlock through the hole provided
Before freeing jammed material:
• Turn miter saw “OFF” by releasing
trigger switch.
• Wait for all moving parts to stop.
• Unplug the miter saw.
After finishing a cut:
• Keep holding the power head down.
• Release the switch, and wait for all
moving parts to stop before moving
your hands or raising power head.
• If blade doesn’t stop within 6 seconds, unplug the saw and follow the
instructions in the Trouble Shooting
section for fixing the blade brake
before using the saw again.
in the trigger to prevent unauthorized
usage. Lock the shop. Disconnect
master switches. Store tool away
from children and others not qualified
to use the tool.
Glossary of Terms for Woodworking
Arbor
The shaft on which a cutti ng tool is
mounted.
Bevel Cut
An angle cutting operation made through
the face of the workpiece.
Compound Cut
A simultaneous bevel and miter cutting
operation.
Crosscut
A cutting operation made acr oss the width
of the workpiece.
Dado
A non-through cut which produces a
square sided notch or
piece
Freehand
Doing a cut without holding the workpiece
against both the table and fence. Most
workpieces can be held down with your
trough in the work-
hand. Large or wide pieces should be
clamped to the fenc e or table.
Gum
A sticky, sap based residue from wood
products.
Heel
Misalignment of the blade.
Kerf
The amount of material removed by the
blade in a throug h cut or the slot produced
by the blade in a nonthrough or parti al cut.
Miter Cut
An angle cutting operation made across
the width of the work piece.
Offal
Unsecured peice of material after making
cut.
Resin
A sticky, sap based substance that has
hardened.
8
Page 9
Revolutions Per Minute (RPM)
The number of turns complet ed by a spinning object in one minute.
Sawblade Path
The area of the workpiece or t able top
directly in line wit h either the travel of the
blade or the part of the workpiece which
will be, or has been, cut by the blade.
Set
The distance that the tip of the sawblade
tooth is bent (or set ) outward from the
face of the blade.
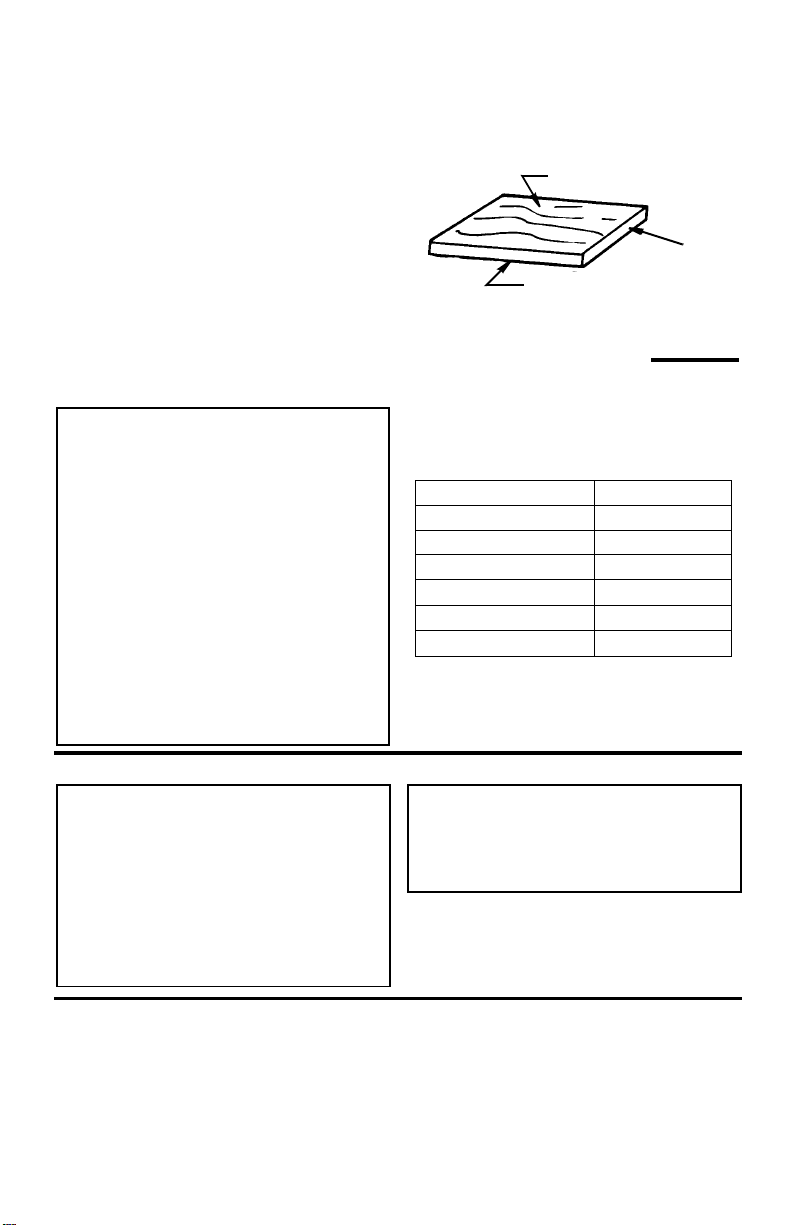
Workpiece
The item on which the cutting operation is
being performed. The surfaces of a workpiece are commonly referred to as faces,
ends, and edges.
Face
Edge
Motor Specificat ions and Electrical Requirements
Power Supply and Motor Specifications
WARNING: To reduce the risk of
electrical hazards, fire hazards
or damage to the tool, use
proper circuit protection. Your
tool is wired at the factory for
operation using the voltage
shown. Connect tool to a power
line with the appropriate voltage
and a 15-amp branch circuit.
Use a 15-amp time delay type
fuse or circuit breaker. To
reduce the risk of shock o r fire,
if powe r cord is wor n or cut, or
damaged in any way, have it
replaced immediately.
The A-C motor used on this tool is a nonreversibl e universal type, hav ing the following speci fi cations:
Voltage 120
Amperes 15
Hertz (Cycles) 60
Phase Single
RPM 4000
Shaft Rotation Clockwise
Brake Automatic
End
General Electrical Connections
DANGER: To reduce the risk of
electrocution:
1. Use only identical replacement
parts when servicing. Servicing should be performed by a
qualified service technician.
2.Do not use in rain or where
floor is wet.
110-120 Volt, 60 Hz. Tool Information
Double Insulated
The miter saw is double insul ated to provide a double layer of ins ulation between
you and the tool’s electrical system. All
exposed meta l parts are isolated from the
WARNI NG Do not permit fingers
to touch the terminals of plug
when installing or removing the
plug to or from the outlet.
If power cord is cut, or damaged in any
way, have it replaced immediately.
internal metal motor components with
protecti ng insulation.
9
Page 10

Motor Specifica tio ns a nd Ele ctrical Requirements (continued)
Polarized Plug
Y our unit has a plug that looks like the one
shown on next page.
To reduce the risk of electrical shock, this
appliance has a po lari zed plug (one blade
is wider than the other) . This plug wi ll fit in
a polarized outlet only one way, if the plug
does not fit fully in the out let, reve rse plug.
If it still does not fit, contact a qualified
electrician to install the proper outlet. Do
not change the plug in any way.
Motor Safety Protection
1. Connect this tool to a 120v, 15-amp
branch circuit wi th a 15-amp time delay
fuse or circuit br eaker. Using the wrong
size fuse can damage the motor.
2. If the motor won't start, release the trigger switch immediately . Unplug The
Tool. Check the saw blade to make
sure it turns free ly. If the blade is free,
try to start the motor again. If the motor
still does not st art, refer to the "Motor
Troubleshooting Chart."
3. If the motor suddenly stalls while cutting wood, release the trigger switch,
unplug the too l, and f ree the blade f rom
the wood. The motor may now be
restart ed and the cut finished.
4. Fuses may "blow" or circui t br eakers
may trip frequen tl y if:
WARNI NG: Double insulation
does not take the place of normal
safety precautions when operating th is tool .
a.Motor Is Overloaded-Overloading
can occur if you cut too rapidly or
make too many start/stops in a short
time.
b. Line voltages are more than 10%
above or below the nameplate voltage. For heavy loads, however, the
voltage at m ot o r term i na ls m ust equal
the voltag e specified on nameplate.
c. Improper or du ll saw blades are used.
5. Most motor troubles may be traced to
loose or incorrect connections, overload, low voltage (such as small size
wire in the supply circui t) or to overly
long supply circuit wire. Always check
the connections, the load and the supply circu it whe never motor doesn' t wor k
well. Check wire sizes and length with
the Wire Size Chart below.
Wire Sizes
NOTE: Make sure the proper extension
cord is used and is in good condit ion. The
use of any extension cor d wil l cause
some loss of power. T o keep this to a minimum and to prevent overheating and
motor burn-out, use the t able below to
determine the min imum wire size (A. W. G . )
extension cord.
For circuits that are farther than 100 feet
away from electrical service box, the wire
size must be incr eased proportionatel y in
order to deliver ample voltage to the saw
motor.
Extension Cord
Length
0-25 F t .
26-50 Ft.
10
Wire Sizes
Required for 120V
(A.W.G.)
14
12
Page 11
Unpacking and Checking Contents
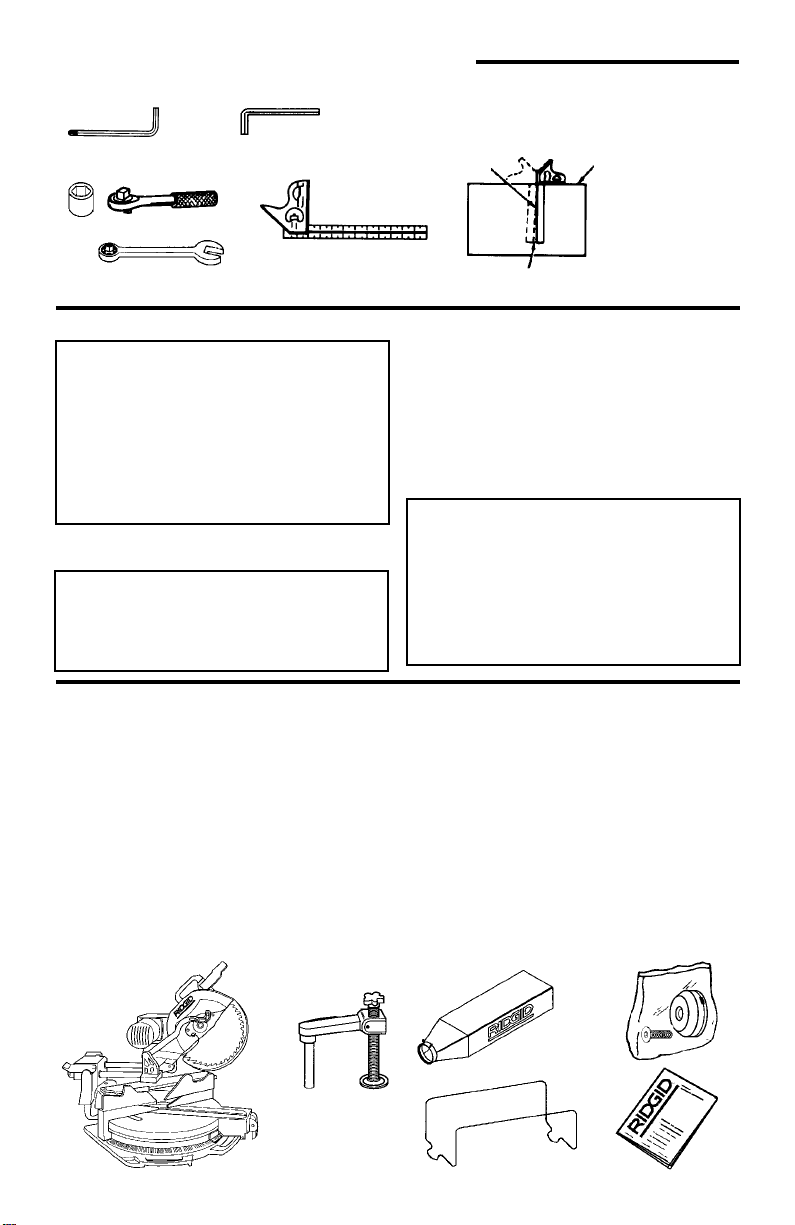
Tools Needed
Combination Square Must be True
Draw Light
Hex “L” Wrench
1/4" (su pplied)
19 mm Socket
Combination
Wrench (2) 12 mm
Hex “L” Wrench
4mm, 5mm, 6mm
Combination Square
Line on Board
Along this Edge
Should be no Gap or Overlap when Square
is Flipped Over in Dotted Position
Straight Edge of
Board 3/4" Thick
This Edge Must
be Perfectly
Straight
Unpacking
WARNING: To reduce the risk of
injury from unexpected starting
or electrical shock, do not plug
the power cord into a power
source outlet during unpacking
and assembly. This cord must
remai n unpl ug ge d whe n ever yo u
are working on the saw.
This Miter Saw is shipped complete in
one box.
WARNING: Although comp act ,
this saw is heavy. To reduce the
risk of back injury, get help whenever you have to li ft the saw.
List of Loose P arts
NOTE: Before beginning ass embly , che ck
that all parts are included. If you are missing any part, do not assem ble the saw. Email us at info@ridgidwoodworking.com if
any parts are damaged or mi ssing.
Sometimes small parts can get lost in
packaging material. Do not throw away
any packaging until saw is put together.
Check packaging for missing parts before
contacting RIDGID. A complete parts list
(Repair Parts) is at the end of the manual .
1. Before removi ng the miter saw from t he
carton tighten the slide lock knob to
guard against sudden movement.
2. Remove the miter saw from the carton by
lifting the saw with the carrying handle.
3. Place the saw on a secure, stat ionary
work surface and look the saw over
carefully.
WARNING: If any part is missing
or damaged, do not plug the saw
in until the missing or dama ge d
part is correctly replaced. To
avoid electric shock, use only
identical replacement parts when
servicing double insulated tools.
Use the list to identify the number of the
missing par t .
The following parts are included:
Part or Assembly Qty.
A Basic Saw Assembly .......................... 1
B Work p ie ce C la m p ..... ... ....................... 1
C Dust Bag............................................. 1
D Dust Bag Frame.................................. 1
E Laser System Bag Asm ...................... 1
F Operators Manual................ .......... .....1
11
C
D
E
F
A
B
Page 12

Getting to Know Your Miter Saw
1
10
2
3
5
4
6
11
12
24
20
25
21
19
18
9
7
17
8
16
1.Warning Label
2.Upper Blade Guard - Supports the
motor, handle, switch , blade an d lower
guard.
3. Lower Blade Guard - The blade g uard
helps protect your hands from the
blade in the raised position. To reduce
the risk of binding on the workpiece, it
retracts as the blade is lowered.
4.Cover Plate - Ho lds the lo wer guard
and is attached to upper guard. Prevents the arbor sc rew from backing
out when proper ly attached with the
cover plate stop screw.
5.Cover Plate Stop Screw - When this
screw is loosened, the cover plate is
rotated to the rear, allowing for blade
removal/replacement.
6.Sliding Fence(s) - Fence(s) sli de left/
right to provide maximum support for
the workpiece.
7. Table - Sits in base, supports pivot
and allows for approximat ely 62° miter
left and right.
8.Base - Supports table, hol ds accessories and allows for work bench or l eg
set mounting.
9. Miter Indicator - Indicates the angle
(miter) the blade is set at .
10.Bevel Lock Lever - Locks the miter
23
13
14
26
15
saw at a desired bevel angle.
11.Top Carrying Handle - Convenient
way to transport saw.
12. Slide Tube(s) - Allow the blade to slide
for cutting various workpiece widths.
13.Slide Lock Kn ob - Prevent s the saw’s
sliding motion by locking the carriage
in place.
14.Slide Fence Lock Knob - Locks
fence at correc t cutting position.
15.Combination Wrench - 1/4" Hex “ L”
wrench.
16. Miter Lock Lever/Miter Index
Thumbwheel - The miter lock lever
securely locks the saw at a desired
miter angle. Index points have been
provided at 0°, 15°, 22.5°, 31.6° (Crown
molding), 45°, 60° Left and Right.
17.The Repea t-A-Cut™ - Surfac e allows
pencil marks to be made and easily
erased for duplicate cuts.
18.Depth Adjustment Clamp and Head
Hold Down - Limits the saw’s down-
ward travel for use when cutting
dadoes and locks the saw in the lowered positi on for com pact storage.
19.Arbor Lock Pin - Allows the user to
keep blade from ro tating while tight ening or loosening arbor during blade
replacement or removal.
12
22
Page 13

20. Switc h In te rlock Bu tton - Prevents
trigger switch from being accidentally
engaged.
21.On/Off Trigger Switch - To prevent
the trigger from being accidentally
engaged, a loc k-of f butto n is provid ed.
To start the tool, press in the swit ch
interlock button and squeeze the trigger. Release the trigger to stop the
miter saw. Install a padlock through
the hole in the tri gger to prevent unauthorized use.
22.Bevel Index Pin - This pin provides
Assembly
indexes at 0° and 22.5°, CM, and 45°
left and right.
23.Front Carry Handles - Convenient
way to transport the saw.
24.Workpiece Clamp - Helps to hold
workpiece in position for precise cutting. Quick release allows easy movement for workpiece width adjustment.
Pin of clamp fits in either hole in rear
at fence.
25.Bevel Indicator - Indicates the angle
(bevel) the blade is set.
26.Cord Wra p Brackets
WARNING: For yo ur own safety,
never connect plug to power
source outlet until all assembly
steps are complete, and you
have read and understood the
safety and operational instructions.
Installing or Removing the Blade
WARNING: To reduce the risk of
injury from a thrown workpiece
or thrown pieces of blade, do not
use a blade larger or smaller than
12" diameter.
WARNING: To reduce the risk of
injury from u nexp ected starting,
unplug the saw whenever you are
removing or installing the blade .
NOTE: See “Mounting the Laser System”
section of the owners man ual for directions on installing the laser system.
1.Unplug t he saw from the outlet. Cutting head is up.
2.Rotat e the l ower blade g uard by hand.
Loosen, but do not remove, the cover
plate stop sc rew usi ng the Phi llip s en d
of combination wrench.
3.Lift the lower guard up and tilt t he
lower guard assembly back so the
arbor screw is expose d.
4.Fit 1/ 4” hex end of combination t ool in
arbor screw or use 1/ 2” box end
wrench.
Coverplate
Stop
Screw
Arbor
Screw
Blade
n
e
s
o
o
L
5.Press the arbor lock and hold it in
firmly while tu rni ng the wrench clockwise. The arbor lock will engage after
some turning of the wrench.
Arbor Lock
NOTE: The arbor screw has a left hand
thread. This helps prevent unwanted
loosening of the arbor screw during normal operation .
13
Page 14

Assembly (continued)
6. Remove the arbor screw, arbor
washer, outer blade collar, and the
blade.
NOTE: Pay attention to pieces removed,
noting their posit ion and direction they
face (see illustration). Wipe the blade collars clean of any sawd ust before i nst alli ng
the new blades.
CAUTION: To reduce the risk of
cuts from extremely sharp teeth:
Wear gloves when installing or
removing sawblade.
See cautions in “Using Carbide Tipped
Blades” section concerning inspection,
use, and selection o f car bide tipped and
other sawblades.
7.Install the new 12" blade (see recommended accessory list). Make sure
the rotation arrow on the blade
matches the clockwise rotation arrow
on the upper guard. The blade teet h
should always point downward at the
front of the saw.
8.Install the outer blade collar, blade
washer and arbor screw. Press the
arbor lock and turn the combination
wrench or the 1/2" wrench count er
clockwise to secure th e blade. T i ghten
arbor screw using mo derate f orce, but
do not overtighten.
9.Lower the l ower bl ade guard until the
slot in cover plate rests all the way
down on the cover plate stop screw.
Tighten the screw wi th th e Phil lip s end
of the combination wrench.
DANGER: Never use saw without
guard cover plate securely in
place. It keeps the arbor screw
from falling out if it accidentally
loosens, and prevents the spinning blade from coming off the
machine.
10.Be sur e the ar bor lock is released so
the blade turns freely.
Blade
Blade
Washer
(Hollowed Side
Toward Blade)
Arbor screw
(Left Hand Thread)
Sawblade
NOTE: The arbor lock can be damaged
by improper use. If the arbor l ock will not
hold, lower the blade down on to a scrap
piece of wood positioned against the
fence. This will serve as an alter nate locking means.
Collars
WARNING: Make sure the collars
are clean and properly arranged .
After installing a new blade,
make sure the blade clears the
table slot at the 0° and 45° bevel
positions. Lower the blade into
the table slot and check for any
contact with the base or turn
table structure. If blade contacts
table, seek authorized service.
If blade contacts insert, refer to “Alignment“section for adjustment.
14
Page 15

Assembling Dust Bag
1. Locate the dust bag frame and cloth
dust bag.
2. Clip the dust bag frame in place on the
slide tubes as shown.
3. Slide the cloth dust bag over the dust
bag frame.
4. Connect the dust elbow to the dus t port
on the upper blade guar d.
5. Clamp dust bag onto elbow.
NOTE: If connecting a 2- 1/2" wet/dry vac
hose to the saw, do not attach the dust
bag frame, dust bag and elbow to t he
saw. Connect the wet/dry vac hose
directly to the dust port on the upper blade
guard.
Workpiece Clamp Installation
The workpiece cl am p is used to help hold
the workpiece in the cor rect cutting position. It may be used on either the left side
of the miter saw or the right si de. Before
turning the saw on make sure the workpiece clamp does not interfere with the
cutting action of t he saw.
1. Align pin in clamp shaft with keyway in
fence. Inser t clamp shaft and rotate.
Clamp
Support
Shaft
Quick Relea se
Button
Four Basic Saw Controls
In order to properly adjust and align the
Sliding Compound Miter Saw there are
four basic controls that must be understood.
1. Miter lock lever and miter index wheel
To change the miter setting of the
blade:
a. Raise the miter lock lever.
b. Rotate the miter index wheel part ially
downward to di sengage the current
index and engage the next index.
c. Rotate the miter index wheel com-
pletely downward to bypass all miter
indexes.
d. Turn the table to the desi red miter
setting and lock the miter lock lever.
15
Page 16

Four Basic Saw Controls (continued)
2. B e vel lo c k le v e r/i n de x pin
To change the bevel setting of the
blade:
a. Pull the bevel lock lever forward .
Then rotate the bevel index pi n
downward. This will all ow the blade
to be tilted and at the sa me time “bypass” the preset bevel indexes.
b. T o engage the preset bevel indexes,
rotate the bevel lock index pin up.
c. Engage bevel index pin and/or bevel
lock lever before cutting.
3. Depth Adjustment Cam and Head Hold
Down
To release the blade a. While applying light downward pres-
sure on the handle, pull the depth
adjustment cam to th e right, then
raise the blade.
NOTE: It is not necessary to loosen
depth adjust ment knob.
b. Rotate the depth adjustment cam so
the flat on the cam is facing upward.
NOTE: Head Hold Down is for transport and storage purposes only. No
cutting operations should take place
while hold down is engaged.
To lock the blade in the lower position.
a. Pull the depth adjustment c am to the
right and lower the bl ade into the
table.
b. Rotate the depth adjustment cam
until slot engages pin on upper
guard.
4. Slide lock knob
Turn the slide lock knob counterclock-
wise to l oosen and cl ockw ise t o ti ghten.
Loosening the knob wi ll all ow the powerhead to slide back and forth. Tightening the knob will lock the powerhead in
place.
Bevel Lock
Lever
Bevel Index
Pin
Depth
Adjustment
Cam
Depth
Adjustment
Knob
16
Page 17

Alignment (Adju stm en ts)
WARNING: To reduce the risk of
injury from unexpected starting
or electrical shock, do not plug
the saw in. The power cord must
remai n unpl ug ge d whe n ev er y ou
are working on the saw.
NOTE: For best results, the saw must be
properaly aligned before mounting and
using the laser sys tem.
Step One: Repositioning Zero Clearance Blade Insert
The zero clearance bl ade insert needs to
be repositioned so it is temporarily out of
the way when al igning the blade. It may
be replaced after the blade is aligned.
1. Loosen the three screws that secure
the zero cleara nce blade insert on one
side of the blade.
2. Slide the zero clearance insert away
from th e blade as f a r as pos s i b le.
3. Retighten the three screws.
4. Repeat steps 1-3 for the opposite side
of the blade.
Step Two: Slide Tube Adj ustment
1. Place the powerhead in the 0° miter/0°
bevel index and lock head in lower position.
2. Check to see that the blade is appr oximately centered between the two zer o
clearance blade inserts. Also check for
play between the right slid e rail and th e
pivot assemb ly.
3. If adjustment is required loosen the jam
nuts on all four gi b screws as shown.
4. Loosen the top two gib screws.
5. Tighten or loosen the lower two gib
screws as required to center the blade
between the zero clearance inserts.
6. Tighten the lower two jam nuts.
7. To minimize play i n the sl ide tubes
gradually tighten the top two gib
screws while at the same ti m e sliding
the powerhead back and for th. Tighten
the top jam nuts.
Slide Rail
Pivot
Assembly
Gib Screw
17
Page 18

Alignment (Adju stm en ts) (cont inu ed)
Step Three: Blade Square to Fence
(Miter Alignment)
1. Place the blade in the 0° miter index
and lock the miter lock.
2. To check blade squareness to fence,
lock powerhead in lower position. Use
a combination square. Place the
square against the fence and next to
the blade as illustrated. Locate th e
square properl y so it does not contact
the set in the teeth of sawblade, giving
an inaccurate reading. The sawblade
body should contact the full length of
the square.
3. If blade contacts full length of square,
no alignment is necessary, skip a-c
below . If blade is not square to t he
fence, follow the alignment procedur e.
a. Remove sliding fences by loosening
fence lock knobs approximately two
turns. Sl ide fences toward blade an d
lif t u p to remove.
b. Loosen the three ( 3) fence lock bolts.
c. Place a combination square against
the sawblade and adju st the fence
until it is 90° to the blade.
d. Tighten the three (3) f ence lock bolts.
e. Replace sliding fences and tighten
fence lock knobs.
Adjust Miter Scale Indicator
1. Loosen the Phillips screw that holds the
indicator in place.
2. Reposition the indica tor to al ign it with
0° mark, and retight en screw.
18
Page 19

Step Four: Blade Square to Table
(Bevel Adjustment)
1. Place the saw in the 0° bevel index
position and make sure bevel lock is
disengaged.
2. Lower the blade and engage the head
hold down.
3. Use a combin ation squar e t o che ck th at
the blade i s 90° to t he t abl e. If t he b lade
does not contact the full length of th e
square:
a. Lift the bevel lock lever.
b. Loosen the two socket head screws
that secure the bevel scale.
c. Grasp the upper metal guard and
move the powerhead lef t or right unt il
the blade makes full contact with the
length of the squa re.
d. Securely tighten two socket head
screws.
Adjust Bevel Scale Indicat or
1. Loosen the Phillips screw that holes the
indicator in place.
2. Reposition the indica tor to al ign it with
0° mark and retighte n screw.
Step Five: Positioning Zero Clearance Blade Insert (When Minimal
Tear Out or Con trol of S mall Offal is
Desired)
1. Loosen the three screws that secure
the zero cleara nce blade insert on one
side of the blade.
2. Slide the zero clearance blade insert in
towards the blade until it is as close to
the blade as possib le wi thout actually
touching the blade.
3. Retighten the three screws.
4. Repeat steps 1-3 for the opposite side
of the blade.
19
Page 20

Alignment (Adju stm en ts) (cont inu ed)
Miter Lock Lever Adjustment
With the blade s et at a n “unin dexed ” mite r
position (other t han 0° , 15°, 22.5°, 31.6°,
45° and 60°) and the miter lock lever set
in the “locked” position the locking action
should feet tight and secure.
Considerable effort should be requi red t o
move the table (blade). While it is always
possi bl e to fo rc e th e tabl e to m o ve, it
should resist moving when a reasonable
amount of for ce is applied.
To check, foll ow these steps:
1. Release miter lock lever and position
blade at an “uninde xed” position. Lock
the miter lo c k le v e r.
2. Try and rotate the table/blade. If the
table easi ly moves:
a. Release the miter lock lever. Locate
the set sc rew underneath the miter
lock lever.
b. Use a 4mm hex wrench to adjust the
set screw.
c. Lock the miter lock lever and try mov-
ing the table. Readjust if necessary.
Miter
Lock Lever
20
Page 21

Bevel Lock Lever Adjustment
With the blade set at an “unindexed” bevel
posit ion ( oth er th an 0° , 22 . 5°, 3 3- 7 /8° , 45° )
and the bevel lock lever set in the “locked”
position the locking action should feel tight
and se cure.
Considerable effort should be requi red t o
move the blade. While it is always possible to force the blade to move, it should
resist moving when a reasonable amount
of force is applied.
To check, foll ow these steps:
1. Release the bevel lock lever and position the blade at an “unindexed” position. Lock the bevel lock lever.
2. Try and bevel the blade. If the blade
moves easily:
a. Release the bevel lock lever.
b. Locate the two 12mm locking jam
nuts behind the bevel lock lever.
c. Loosen the top locking jam nut.
d. To tighten the bevel lock lever mecha -
nism turn t he bott om ja m nut cl ockwi s e.
T o loosen the lock lever mechanism turn
the bottom jam nut counterclockwise.
e. Lock the beve l loc k l ever an d tr y mo v-
ing the blade. Readjust if necessary.
NOTE: When unlocked the bevel
mechanism should freely pivot. A
grating sound indicates the bevel
mechanism needs to be loosened
slightly.
Bevel Lock
Lever
Bevel Index
Pin
Bevel Pivot Movem ent / A dj ustment
Check that the mi ter saw bevels ea sily by
unlocking the bevel lock lever and tilting
the blade. NOTE: At least one thread of
the pivot bolt shou ld stick o ut past th e hex
lock nut.
If the movement is tight or there is looseness in the pivot, do the following adjustment procedure:
a. Unlock the bevel lock lever.
b. Turn the hex lock nut with 3/4" or
19mm socket.
Recheck the bevel movement and readjust if necessary.
Locking
Jam Nuts
Hex
Nut Lock
21
Page 22

Mounting The Miter Saw
WARNING: To reduce the risk of
injury from unexpected saw
movement:
a. Before moving the saw, unplug
electri c cord . L ock the miter
and bevel knobs and lock the
power head in the lower position.
b. To reduce the risk of back
injur y, hold the tool clos e to
your body when lifting. Bend
your knees so you can lift with
your legs, not your back. Lift
by using the hand-hold areas
at each side of the bottom of
the base, by the carrying handle, or the handles on the front
of base.
c. Never carry the miter saw by
the power cord or the trigger
Place the saw in the desired location
either on a work bench or other recommended leg set. The base of the saw has
eight holes to mount the mit er saw. Four
smaller holes for screws are labeled A.
Four holes for bolts are labeled B (see
illustration) . If t he saw is to be used in o ne
location, permanent ly fas ten it to the work
bench or leg set.
NOTE: When mounted on a large flat surface, the miter saw table is 4-1/2” high.
Three stacked 2 x 4’ s can be used as a
work support extension.
Portable Applications
To mount the saw to a 3/4” piece of plywood, use 4, 1/4" bolt holes or
holes. The mounting board can then be
clamped down to prevent it from tipping.
Plywood mount also helps protect saw from
damage during the rough handling associated with portable miter saw usage.
the 4 screw
grip of the plastic handle. Carrying the tool by the power
cord could cause damage to
the insulation or the wire connections resulting in electric
shock or fire.
d. Place the saw so other people
cannot stand behind it. Thrown
debris coul d i nj ure people in
its path.
e. Plac e the saw on a firm, level
surface where there is plenty
of room for handling and properly supporting the workpiece.
f. Support the saw so the table is
level and the saw does not
rock.
g.Bolt or clamp the saw to its
support.
Work Bench Applications
Mount as specifi ed in portable appli cations. Check f or workpiece clearances to
left and right of saw.
B
A
B
A
B
A
A
B
22
Page 23

Safety Instructions for Basic Saw Operations
Before Each Use
Inspect your saw.
Disconnect The Miter Saw. To
reduce the risk of injury from accidental starting, unplug the saw, before
changing the setup, changing the
blade or adjusting anything.
Compare the direction of rotation
arrow on the guard to the direction
arrow on the blade. The blade teeth
should always point downward at the
front of the saw.
Tighten the arbor screw.
Tighten the cover plate stop screw.
Check Damaged Parts. Check for:
• Proper alignment of moving parts,
• Damaged electric cords,
• Binding of moving parts,
• Broken parts,
• Stable mounting
• Function of arm return spring and
lower guard: Push the arm all the
way down, then let it rise up until it
stops by itself. Check the lower
guard to see if it closed fully. If it did
not, follow the instructions in the
“Troubleshooting” section.
• Smooth, solid movement of sliding
assembly.
• Other conditions that may affect the
way the miter saw works.
If any part of this miter saw if missing,
bent, or broken in any way, or any
electrical parts don’t work, turn the
saw off and unplug it. Replace damaged, missing, or failed parts before
using the saw again.
Keep Guards In Place, in work in g
order, and in proper adjustment.
Maintain Tools With Care. Keep the
miter saw clean for best and safest
performance. Follow instructions for
lubricating. DON’T put lubricants on
the blade while it’s spinning.
Remove Adjusting Keys And
Wrenches from tool before turning it
on.
T o Reduce the Risk of Injury From Jams, Slips Or Thrown Pieces
• Use Only Recommended Accessories. (See “Accessory” section
within.) Consult this Owner’s manual for recommended accessories.
Follow the instructions that come
with the accessories. The use of
improper accessories may cause
risk of injury to persons.
• Choose the right 12-inch diameter
blade for the saw and material you
plan to cut.
• Make sure the blade is sharp,
undamaged and properly aligned.
With the saw unplugged, push the
power head all the way down. Hand
spin the blade and check for clearance. Tilt the power-head to 45
degree bevel and repeat the check.
If the blade hits anything, make the
adjustments shown in the Maintaining “Alignment (Adjustments)” section.
• Make sure the blade, arbor collars
and laser system are clean.
• Make sure the arbor collars' and
laser discs’ recessed side s are facing the blade.
• Using 1/4” hex end of combination
wrench (supplied) or 1/2-inch box
end wrench, make sure the left hand
thread arbor screw is firmly tightened counterclockwise.
• Make sure all clamps and locks are
tight and there is no excessive play
in any parts.
23
Page 24

Safety Instructions for Basic Saw Operations (con’t.)
• Keep work area clean. Cluttered
areas and benches invite accidents.
Floor must not be slippery.
Plan Ahead To Protect Your Eyes, Hands, Face and Ears
Know your miter saw. Read and
understand the owner’s manual and
labels affixed to the tool. Learn its
application and limitations as well as
the specific potential hazards peculiar
to this tool.
To reduce the risk of injury from accidental contact with moving parts,
don’t do layout, assembly, or setup
work on the miter saw while any parts
are moving.
Reduce the Risk of Accidental
Starting. Make sure switch is “OFF”
before plugging miter saw into a
power outlet.
Dress Fo r Safety
The operation of any power miter saw
can throw foreign objects into the
eyes. This can result in permanent
eye damage. Wear safety goggles
(not glasses) that comply with ANSI
Z87.1 (or in Canada CSA Z94.3-99)
shown on package. Everyday eyeglasses have only impact resistant
lenses. They are not safety glasses.
Safety goggles are available at many
local retail stores. Glasses or goggles
not in compliance with ANSI or CSA
could seriously hurt you when they
break.
To reduce the risk of burns or other
fire damage, never use the miter saw
near flammable liquids, vapors or
gases.
Plan your work.
Use The Right Tool. Don’t force tool
or attachment to do a job it was not
designed to do. Use a different tool
for any workpiece that can’t be held in
a solidly braced, fixed position.
CAUTION: Because of the sliding action of this saw, this
machine is not designed for cutting metals. Use this miter saw
to cut only w ood , and wood like
products. Other materials may
shatter, bind on the blade, start
fires or create other dangers.
• Do not wear loose clothing, gloves,
necktie s or je w elr y ( rin gs , w ris t
watches) They can get caught and
draw you into moving parts.
• Wear nonslip footwear.
• Tie back long hair.
• Roll long sleeves above the elbow.
• Noise levels vary widely. To reduce
the risk of possible hearing damage,
wear ear plugs or muffs when using
miter saw for hours at a time.
• For dusty operations, wear a dust
mask along with safety goggles.
24
Page 25

Preparing to Make the Cut
Inspect Your Workpiece. Make sur e
there are no nails or foreign objects in
the part of the workpiece to be cut.
Plan your work to avoid thrown
pieces caused when the workpiece
binds on the blade and is torn from
your hands.
Plan how you will make the cut.
Always:
• Make sure the blade is not spinning.
• Raise the blade.
• Slide the saw out above the front
edge of the workpiece before starting saw, and
• Push the sawblade down on top of
the wood and back toward the rear
of the saw to make th e cut.
DANGER: NEVER pull the saw
toward yo u during a cut. The
blade can suddenly climb up on
top of t he workpiece and forc e
itself toward you.
Plan the way you will hold the workpiece from start to finish.
• Avoid awkward operations and hand
positions where a sudden slip could
cause fingers or hand to move into
the blade.
• Don’t Overreach. Keep good footing
and balance.
• Keep your face and body to one
side of sawblade, out of line with a
poss ible th r o wba c k.
• Cut only one workpiece at a time.
Never cut Freehand:
• Brace your workpiece solidly
against the fence and table top so it
will not rock or twist during the cut.
• Make sure there’s no debris
between the workpiece and its supports.
• Make sure no gaps between the
workpiece, fence and table will let
the workpiece shift after it is cut in
two.
• Cut only one workpiece at a time.
• Keep the cut off piece free to move
sideways after it's cut off. Otherwise,
it could get wedged against the
blade and could be thrown violently.
• Clear everything except the workpiece and related support devises
off the table before turning the miter
saw on.
• Secure Work. Use clamps or a vise
to help hold the work when it’s practical.
Use extra caution with large, very
small or awkward workpieces:
• Use extra supports (tables, saw
horses, blocks, etc.) for any workpieces large enough to tip when not
held down to the table top.
• Never use another person as a substitute for a table extension, or as
additional support for a workpiece
that is longer or wider than the basic
miter saw table or to help feed, support or pull the workpiece.
• Do not u se thi s s a w to cut p i eces
too small to let you easily hold the
work while you keep the thumb side
of your index (pointer) finger against
the outside edge of the fence.
• When cutting irregularly shaped
workpieces, plan your work so it will
not slip and pinch the blade and be
torn from your hands. A piece of
molding, for example, must lie flat or
be held by a fixture or jig that will not
let it twist, roc k or s lip w h il e be in g
cut.
25
Page 26

Safety Instructions for Basic Saw Operations (con’t.)
• Properly support round material
such as dowel rods. They have a
tendency to roll while being cut,
Whenever Saw Is Running
causing the blade to "bite." To avoid
this, always use a fixture designed
to properly hold your workpiece.
WARNING: Do n't al low famil iarity
(gained f rom f requent use of
your miter saw) cause a careless
mistake. A careless fraction of a
second is enough to cause a
severe injury.
Before starting your cut, observe the
miter saw while it runs. If it makes an
unfamiliar noise or vibrates excessively , stop immediately. Tu rn the saw
off. Unplug the saw. Do not restart
until finding and correcting the problem.
Keep Children Away. Keep all visitors a safe distance from the miter
saw. Make sure bystanders are clear
of the miter saw and workpiece.
Never confine the piece being cut
off. Never hold it, clamp it, touch it, or
use length stops against it while the
blade is spinning. It must be free to
move sideways on its own. If confined, it could get wedged against the
blade and thrown violently.
Let the blade reach full speed
before cutting. This will hel p reduce
the risk of a thrown workpiece.
Don’t Forc e Tool. It will do the job
better and safer at its designed rate.
Feed the saw into the workpiece only
fast enough to let the blade cut without bogging down or binding.
Before freeing jammed material:
• Turn miter saw “OFF” by releasing
trigger switch.
• Wait for all moving parts to stop.
• Unplug the miter saw.
After finishing a cut:
• Keep holding the power head down.
• Release the switch, and wait for all
moving parts to stop before moving
your hands or raising power head.
• If blade doesn’t stop within 6 seconds, unplug the saw and follow the
instructions in the Trouble Shooting
section for fixing the blade brake
before using the saw again.
Before Leaving The Saw:
Never Leave Tool Running Unattended.Turn power off. Wait for all
moving parts to stop.
Make workshop child-p roof. Install
a padlock through the hole provided
in the trigger to prevent unauthorized
usage. Lock the shop. Disconnect
master switches. Store tool away
from children and others not qualified
to use the tool.
26
Page 27

Basic Saw Operations
Making Common Slide Compound
Cuts
There are two types of cuts that can be
made with the slide compound miter saw;
1.Slide Cutting
a. The slide lock knob is left loose, the
cutting head is pulled towards the
operator, the sawblade is lowered into
the workpiece and then pushed to the
rear of the saw to complete the cut.
b. Used for cutting wide pieces.
2.Chop Cutting
a. The slide lock knob is tightened and
the saw handle is pushed down to
cut through the workpiece.
b. This type of cut is used mainly for
narrow pieces.
Slide Cutting
Plan your work to avoid the spinning
blade and keep the workpiece from
binding on the blade and flying out of
your hands.
DANGER: Never pull the saw
toward yo u during a cut. The
blade can suddenly climb up on
top of t he workpiece and forc e
itself toward you.
DANGER: Never lower the saw
completely in front of the workpiece and then cut only on the
forward push. The upward moving re ar porti on of the blade
could twist the workpiece from
your grasp.
Workpieces up to 13-1/2” wide and 3-1/2”
thick can be cut following the directions
below:
1. Put wood against fence and secure
with clamp as appropriate.
2.Lo osen the slide lock knob.
3.Gr asp the saw handle and pull the car-
riage until the arbor (center of sawblade) is over the fr ont edge of the
workpiece.
4.Swit ch on the saw and allow t o come to
full speed.
WARNING: For your co nv enient
use, your saw has a blade brake.
The brake is not a safety device.
Never rely on it to replace proper
use of the guard on your saw. If
the blade does not stop within 6
seconds, unplug the saw and follow the instructions in the T r ou ble Shooting section for fixing
the brake before using saw
again.
WARNING: Do not try to cut
short pieces. You cannot properly support the workpiece and
keep your hold down hand the
required distance from the blade.
5.Push the saw handle all the way down
and cut through the leading edge of the
workpiece.
6.Gently push the saw handle towards
the fence completing the cut.
7.Push power head to full rear position
after each cut.
8.Turn motor off and allow blade to come
to a complete stop before moving hands.
Push Down
Slide Back
27
Page 28

Basic Saw Operations (continued)
Chop Cutting
1. Slide the cutti ng head to the rear as far
as it will go.
2.Lock slide lock knob.
3.Position workpiece on table and against
fence and secure with clamp as appropriate.
4.Turn on saw and lower blade into workpiece.
5.After cut is complete turn off saw, allow
blade to stop rotating before allowing
cutting head to rise up.
Body and Hand Position
• Never place hands near cutting area.
Place hand at least 4" from path of
blade.
• Hold workpiece fir mly t o the fence to
prevent movement toward the blade.
• When holding the workpiece to the left
side of the blade, always use your left
hand. Use your right hand to hold the
workpiece to the right side of the blade.
• Before making a cut, make a “dry run”
with the power off so you can see the
path of the blade.
• Keep hands in position unt il trigger has
been released and the blade has completely stopped.
WARNING: Do not try to cut short
pieces, you cannot properly support the workp iece and
your hold down hand the
required distance from the blade.
keep
28
Page 29

Miter Cut
When a miter cut is required, mo ve the
saw to the desired angle. Move wi th t he
handle to the miter angle to make the cut.
There are settings on the miter scale for
angles (degrees) and crown molding.
NOTE: Remember to unlock the miter
5°
Miter Scale
lock lever before changing the miter
angle.
Miter Scale Usage
Vernier Miter Scale Operation:
The Vernier mite r scale can quickly and
accurately help the user to adjust the saw
to any 1/4° increment as illustrated below.
5-1/4°
Indicator over
5° scale mark
Vernier
Miter Indicator
1/2° Indicator l ine
over 7° scale mark
5-1/2°
Bevel Cut
When a bevel cut is required tilt the blade
to desired bevel angle. Stand to the left
side of the handle to make the cut .
Sliding Fe nce
When beveling the blade to the l eft or
right fence may have to be repositioned.
Loosen the fence locking knob and slide
the fence to the left or right as needed.
Adjust the f ence as close t o the g uard and
link as possible to pr ovide maximum support for the workpiece . Securely tighten
1/4° Indicator line
over 6° scale mark
5-3/4°
3/4° Indicator line
over 8° scale mark
knob and make a dry run with the saw of f
to check for clearance between the fence
and guard. On c ert ain extreme c ompound
cuts it may be necessary to remove a sliding fence to avoid interference. After completing bevel cut(s) remember to repl ace
and/or sli de the f ence back.
Vernier Bevel Scale Operation:
The Vernier bevel scal e can quickly and
accurately help the user to adjust the saw
to any 1/2° increment as illustrated.
29
Page 30

Basic Saw Operations (continued)
Compound Cut
When a compound cut is required, select
the desired bevel and miter positions.
Cutting C om pound Miters on
Picture Frames and Boxes
A compound miter is a cut requiring both
a miter setting and bevel setting. A compound miter i s used for making frames or
boxes that have sloping sides and are
wide at one end and narrow at the opposite end. Compound miter s are “tricky” to
make because the miter s etti ng and bevel
setting are direct ly related to each other.
Every time the miter sett ing is changed
the bevel setting mu st al so be adjusted;
likewise every adjustment to bevel
requires a corresponding adjustment to
miter . Beca use it may t ak e several trie s to
obtain the desired angle, it is advisable to
make test cuts on a scrap piece of m aterial.
Cutting Bowed Material
Before cutting a workpi ece, check to
make sure it is not bowed. If it is bowed
the workpiece must be pos itioned and cut
as illustrated. Do not position workpiece
incorrectly or try to cut the workpi ece with-
out the support of the fence. This will
cause pinchi ng of the workpiece on the
blade. The workpiece could suddenly
jump or mov e and your hand could hit the
blade.
Compound Cut Box
Hold wo rkpiece tight
against fence so
there is no gap
Correct
Incorrect
30
Page 31

Workpiece Clamp Usage
WARNING: Avoid thrown
workpieces. A void binding the
work agai n st the blade:
- Always hold or clamp your
work do wn to the saw.
- Do not hold or c la m p t he wo rk piece on both sides of the
blade. The blade can throw a
cut off piece if you confine the
workpiece on both sides of the
blade.
- Read and follow the instructions in the remainder of your
saw’s owners man ual.
- This accessory was designed
to make your miter saw operations more convenient. Read
and understand these instructions completely before use.
NOTE: The clamp can be used only in a
vertical position.
1. Place material to be cut on table of
miter saw. Secure workpiece to the
fence and table by turning knob to
tighten clamp. Do not overtighten the
clamp. It should just lightly hold the
wood against the fence and table.
2.Perform a dry run with the saw
unplugged. Af ter you believe that the
saw is complet ely s et up, pull the power
head down as if you were making an
actual cut. Check for interference s and
for potentiall y dangerous situations.
Adjust the set up so that a safe operation can be complete d.
3. Complete the cut as instructed in the
remainder of you miter saw owners
manual.
- Always perform dry runs. Make
sure the saw is unplugged.
Completely set up your saw.
Pull the blade and power head
through the full range of motion
to check for interference. The
clamp c an be used in a left or
right configuration. Make sure
that your blade, saw guard or
motor does not interfere with
the clamp. Correct any interference be fore use.
- Always tighten the clamp so
that the workpiece is secured
between the clamp and fence,
support or base. No visible gap
should be present between saw
and wood .
Workpiece
to be cut off
IMPORTANT: To help perform the safest
and most precise miter saw cut, make th e
cut and then release the power switch.
Hold the power head down and keep your
hands in place until the blade stops rotating. Then raise the power head and
remove workpiece from work table.
31
Page 32

Basic Saw Operations (continued)
Workpiece Support
Long pieces need extra supports. The
supports shoul d be placed along the
workpiece so the wor kpiece does not sag
and your hand holding the workpi ece is
positioned 4” or mor e fro m the blade p at h.
The support should let the workpiece lay
flat on the base and work table during the
cutting operation.
NOTE: When mount ed on a large flat surface, the miter saw t able is 4-1/2” high.
Three stacked 2 x 4’s can be used as a
work support ext ension.
Auxiliary Fence
Certain unusual cuts may benefit from a
fence face extensi on due to the size and
position of the workpiece. Holes are provided in the fence to attach an auxiliary
fence. Get a straight piece of wood typically 1/2 inch t hick by 4 -1/4 i nches hig h by
23 inches long. To attach auxil iary fence,
place the piece of wood on the mite r saw
fence. Mark the hole locations from the
backside of the miter saw fe nce. Drill
.200”-.250” holes, then countersi nk the
holes on front of wood to receive #10 flat
head screws. Attach the auxiliary fence
securely and make a full depth cut. This
will create the blade sl ot. Check for interference between the auxiliary fence and
lower blade guard. Correct any interfer-
ence before proceeding. The auxiliary
fence is used with t he saw in the 0° bevel
position. If a bevel cut is desired, the auxiliary fen c e will hav e to be re m o v ed.
32
Page 33

Rough C utt i ng A D ado
By using the depth adjustment cam it is
possible to rough cut a dado as shown.
On the outsi de of the depth adjustment
cam are a series of marks. Use these
marks as a refer ence to help s et the bl ade
to the correct cutting depth.
After the two outside cuts have been completed the inside material (represented
by slanted lines) is removed with a chisel.
To set the depth stop:
1. Position depth adjustment cam so it
engages locking col lar.
2. Loosen lock knob.
3. Position depth stop cam so the power-
head stops at the desired depth.
4.Cut the two outside grooves.
5.Use a wood chisel to remove the mate-
rial between the outside grooves.
6.To override depth setting pull depth
stop cam outward and rot ate so flat is
up.
NOTE: It is not neces sar y to l oosen dept h
adjustment knob.
NOTE: Because of the sawblades cutting
arc material at the beg inning or end of the
cut(s) may have to be removed with a
chisel.
Cut These Grooves
Use a Chisel to
Cutout the Middle
With Saw
Workpiece
Depth
Adjustment
Cam
Depth
Adjustment
Knob
Cutting Base Moldings
Base moldings and many other moldings
can be cut on a miter saw. The set up of
the saw depends on your molding and
your application as shown. Always make
sure moldings rest firmly against fence
and table.
F
e
n
c
e
Miter Saw Table
(Miter at 45° (Miter at 0°,
Cutting Base Molding
Bevel at 0°) Bevel at 45°)
F
e
n
c
e
33
Miter Saw Table
Page 34

Basic Saw Operations (continued)
Cutting Crown Moldings
Your compound miter saw does an excellent job of cutting crown molding. However, in order to fit properly, crown
molding must be cut with extreme accuracy.
Two Methods of Cutting Crown Molding
Crown molding may either be cut (1) flat
on the miter saw table or (2) ang led to the
table and fenc e. (See sq uare below) Most
standard (U.S.) crown m olding has a top
rear angle (angle that fits next to the ceiling) of 52° and a bottom rear an gle (angle
that fits against wall) of 38°. Your miter
saw has special mi ter s etti ngs at 31.6° lef t
and right and a bevel setti ng at 33.9° to
use when cutting crown molding flat on
the miter saw table. These settings are
identified with a “CM” mark.
Remember: Even though all of these
angles are standard, rooms are very
rarely constructed so the corners are
exactly 90°. You will need to “fine tune”
these settings and make necessary
adjustments to the cutting angle s.
F
e
n
c
e
Miter Saw Table
1.Wor kpiece Lyin g
See Chart for Bevel
and Miter Settings
Cutting Crown Molding Flat on the
Miter Saw Table
The advantage of cutting crown molding
flat on the table is that it is easier to
secure the molding at the correct cutti ng
position. Also larger pieces of crown
molding may be cut lay ing flat on the mite r
saw table.
1. Set the bevel and miter angles using
the chart belo w. Tighten the miter lo ck
knob and the bevel loc k knob.
2. Once again using the chart below cor-
rectly positions the molding.
3. Lower the head assembly, activate the
switch and make the cut. W ait until the
blade comes to a complete stop before
allowing the he ad as sembly t o ret urn to
the “UP” position and/or removing t he
workpiece.
4. ALWAYS PRETEST COMPOUND
SETTINGS ON SCRAP MATERIAL TO
CONFIRM CORRECT ANGLES.
Flat
F
e
n
c
38°
e
52°
Mit er Saw Table
2.Workp iec e Standing
Up-Side Down
(Saw at 0° Bevel/
45°Miter)
A
B
C
D
34
Page 35

Cutting Crown Molding Angled to the
Table and Fence
The advantage of cutt ing crown molding
in this position is that no bevel setting is
required. Small changes in the miter
angle can be made without affecting the
bevel angle. When using this method the
saw can be quickly and easi ly adjusted for
corners that are not 90° (square).
Making a crown molding support jig:
A crown molding support jig needs to be
constructed to help hol d the molding in
place during this cutting operation.
1.Ge t a s tr aig ht pi e ce o f wood t ypi c al ly 1/ 2
inch thick by 23-1/2 inches long (28
inches long if using the table extension)
and approximately 5 inches wide. The
actual width of this piece will depend on
overall width of the crown molding and
what the top and bottom angles are.
2.Dril l holes and temporarily m ount this
piece similar to building an Auxiliar y
Fence. However, do not cut the blade
slot at this time.
3.Pos it ion a piece of crown molding that
you are going to cut so the bott om part
(part whi ch is installed against the wall )
is against the wood fence. Make sure
the angles on the cro wn molding are
held firmly against the wood fence and
table of the miter saw. Mark the height
on the fence.
4.Remove the wood fence and cut to this
width.
5. Use small nail s an d glue t o att ach a top
piece (typic all y 1/2 inch thick by 1-1/ 2
inches wide by 23 inches long. Ma ke
sure the nails ar e no t locat ed bel ow the
sawblade.
6. Securely reattach the completed jig to
the miter saw fence and make a full
depth, 45° left and right miter cut.
Fence
Wood Fence
Mark height of
fence here
Molding
Up-side Down
Table
Top
Piece
Crown
Molding
Support Jig
Using the crown molding support jig:
1.Pos ition the molding s o the bottom (p art
which is installed against the wall) is
against the wood fence.
2.Use the chart to select the proper miter
angle. Tighten the miter lock knob.
3.Activate switch. Lower head, make the
cut. Wait until the blade comes to a
complete stop bef ore allowin g the head
assembly to return to the “UP” position
and/or removing the workpiece.
4. ALWAYS PRETEST COMPOUND
SETTINGS ON SCRAP MATERIAL TO
CONFIRM CORRECT ANGLE.
35
Page 36

Basic Saw Operations (continued)
Compound Miter Saw
Miter and Bevel Angle Settings
Wall to Crown Molding Angle: 52/38
degrees
Ceiling
Wall
Wall Angle
(deg.)
Bevel
Angle
(deg.)
60 43.0 46.8
61 42.8 46.3
62 42.5 45.7
63 42.2 45.1
64 41.9 44.6
65 41.7 44.0
66 41.4 43.5
67 41.1 42.9
68 40.8 42.4
69 40.5 41.9
70 40.2 41.3
71 39.9 40.8
72 39.6 40.3
73 39.3 39.2
74 39.0 39.2
75 38.7 38.7
76 38.4 38.2
77 38.1 37.7
78 37.8 37.2
79 37.4 36.8
80 37.1 36.3
81 36.8 35.8
82 36.5 35.3
83 36.2 34.8
84 35.8 34.4
85 35.5 33.9
86 35.2 33.4
87 34.9 33.0
88 34.5 32.5
89 34.2 32.1
90 33.9 31.6
91 33.5 31.2
92 33.2 30.7
93 32.8 30.3
94 32.5 29.9
95 32.2 29.4
96 31.8 29.0
97 31.5 28.6
98 31.1 28.2
99 30.8 27.7
100 30.4 27.3
Miter
Angle
(deg.)
Wall Angle
(deg.)
Bevel
Angle
(deg.)
101 30.1 26.9
102 29.7 26.5
103 29.4 26.1
104 29.0 25.7
105 28.7 25.3
106 28.3 24.9
107 28.0 24.5
108 27.6 24.1
109 27.2 23.7
110 26.9 23.3
111 26.5 22.9
112 26.1 22.6
113 25.8 22.2
114 25.4 21.8
115 25.0 21.4
116 24.7 21.0
117 24.3 20.7
118 23.9 20.3
119 23.6 19.9
120 23.2 19.6
121 22.8 19.2
122 22.5 18.8
123 22.1 18.5
124 21.7 18.1
125 21.3 17.8
126 21.0 17.4
127 20.6 17.1
128 20.2 16.7
129 19.8 16.4
130 19.5 16.0
131 19.1 15.7
132 18.7 15.3
133 18.3 15.0
134 17.9 14.6
135 17.6 14.3
136 17.2 14.0
137 16.8 13.6
138 16.4 13.3
139 16.0 13.0
140 15.6 12.8
36
Miter
Angle
(deg.)
Wall Angle
(deg.)
Bevel
Angle
(deg.)
141 15.3 12.3
142 14.9 12.0
143 14.5 11.6
144 14.1 11.3
145 13.7 11.0
146 13.3 10.7
147 12.9 10.3
148 12.5 10.0
149 12.2 9.7
150 11.8 9.4
151 11.4 9.0
152 11.0 8.7
153 10.8 8.4
154 10.2 8.1
155 9.8 7.8
156 9.4 7.5
157 9.0 7.1
158 8.6 6.8
159 8.3 6.5
160 7.9 6.2
161 7.5 5.9
162 7.1 5.6
163 6.7 5.3
164 6.3 4.9
165 5.9 4.6
166 5.5 4.3
167 5.1 4.0
168 4.7 3.7
169 4.3 3.4
170 3.9 3.1
171 3.5 2.8
172 3.2 2.5
173 2.8 2.2
174 2.4 1.8
175 2.0 1.5
176 1.6 1.21
177 1.2 0.9
178 0.8 0.6
179 0.4 0.3
180 0.0 0.0
Miter
Angle
(deg.)
Page 37

Wall to Crown Molding Angle: 45
degrees
Ceiling
Wall
Wall Angle
(deg.)
Bevel
Angle
(deg.)
60 37.8 50.8
61 37.5 50.2
62 37.3 49.6
63 37.1 49.1
64 36.8 48.5
65 36.6 48.0
66 36.4 47.4
67 36.1 46.9
68 35.9 46.4
69 35.6 45.8
70 35.4 45.3
71 35.1 44.8
72 34.9 44.2
73 34.6 43.7
74 34.4 43.2
75 34.1 42.7
76 33.9 42.1
77 33.6 41.6
78 33.3 41.1
79 33.1 40.6
80 32.8 40.1
81 32.5 39.6
82 32.3 39.1
83 32.0 38.6
84 31.7 38.1
85 31.4 37.7
86 31.1 37.2
87 30.9 36.7
88 30.6 36.2
89 30.3 35.7
90 30.0 35.3
91 29.7 34.8
92 29.4 34.3
93 29.1 33.9
94 28.8 33.4
95 28.5 32.9
96 28.2 32.5
97 27.9 32.0
98 27.6 31.6
99 27.3 31.1
100 27.0 30.7
Miter
Angle
(deg.)
Wall Angle
(deg.)
Bevel
Angle
(deg.)
101 26.7 30.2
102 26.4 29.8
103 26.1 29.4
104 25.8 28.9
105 25.5 28.5
106 25.2 28.1
107 24.9 27.6
108 24.6 27.2
109 24.2 26.8
110 23.9 26.3
111 23.6 25.9
112 23.3 25.5
113 23.0 25.1
114 22.7 24.7
115 22.3 24.3
116 22.0 23.8
117 21.7 23.4
118 21.4 23.0
119 21.0 22.6
120 20.7 22.2
121 20.4 21.8
122 20.0 21.4
123 19.7 21.0
124 19.4 20.6
125 19.1 20.2
126 18.7 19.8
127 18.4 19.4
128 18.1 19.0
129 17.7 18.6
130 17.4 18.2
131 17.1 17.9
132 16.7 17.5
133 16.4 17.1
134 16.0 16.7
135 15.7 16.3
136 15.4 15.9
137 15.0 15.6
138 14.7 15.2
139 14.3 14.8
140 14.0 14.4
Miter
Angle
(deg.)
Wall Angle
(deg.)
Bevel
Angle
(deg.)
141 13.7 14.1
142 13.3 13.7
143 13.0 13.3
144 12.6 12.9
145 12.3 12.6
146 11.9 12.2
147 11.6 11.8
148 11.2 11.5
149 10.9 11.1
150 10.5 10.7
151 10.2 10.4
152 9.8 10.0
153 9.5 9.6
154 9.2 9.3
155 8.8 8.9
156 8.5 8.5
157 8.1 8.2
158 7.8 7.8
159 7.4 7.5
160 7.1 7.1
161 6.7 6.7
162 6.4 6.4
163 6.0 6.0
164 5.6 5.7
165 5.3 5.3
166 4.9 5.0
167 4.6 4.6
168 4.2 4.3
169 3.9 3.9
170 3.5 3.5
171 3.2 3.2
172 2.8 2.8
173 2.5 2.5
174 2.1 2.1
175 1.8 1.8
176 1.4 1.4
177 1.1 1.1
178 0.7 0.7
179 0.4 0.4
180 0.0 0.0
Miter
Angle
(deg.)
37
Page 38

Laser System
Mounting the Laser System
WARNING: To reduce the risk of
injury from unexpected starting,
unplug the saw whenever you
are removing or installing the
blade.
NOTE: See “Installing or Removing
Blade” section of thi s manual for more
information.
1.Unp lug the saw from the outlet.
2.Rotate the lower plastic guard by hand.
Loosen, but do not remove, the cover
plate stop screw using the Phillips end
of combinatio n wrench.
3.Lif t the lowe r guard up and tilt the lower
guard assembly back so the arbor
screw is exposed.
4.Find the arbor lock between th e upper
guard and the miter saw handl e. Fit 1/4 "
hex end of combination tool in arbor
screw or use 1/2" box end wrench.
5.Press the arbor lock and hold it firmly
while turning t he wrench cloc kwise. The
arbor lock will eng age after some turning of the wrench.
NOTE: The arbor screw has a left hand
thread. This helps prevent unwanted
loosening of the arbor screw during normal operation.
Coverplate
Stop
Screw
Arbor
Screw
Blade
n
e
s
o
o
L
Arbor Lock
38
Page 39

6.Remov e the arbo r screw, arbor washer ,
and outer blade collar.
NOTE: The Exactline™ Laser System
will replace the outer blade collar.
Retain the outer blade collar, arbor
screw and blade washer to operate the
saw when the laser system is not
mounted.
7.Place the laser system onto the saw
arbor , aligni ng the double “D ” flats in t he
laser system with the flats on the arbor.
Press the arbor lock and turn the combination wrench counterclockwise to
secure the blade. Tighten arbor screw
using moderate force, but do not overtighten.
8.Lo wer th e lower blade guard until the
slot in cover plate rests all the way
down on the cover plate stop screw.
Tighten the screw with the Phillips end
of the combination wrench.
DANGER: Never use the saw
without guard cover plate
securely in place. It keeps the
arbor screw from falling out if it
accidentally loosens, and prevents the spinning blade from
coming off the machine.
9.Be sure the arbor lock is released so
the blade turns freely .
NOTE: The arbor lock can be damaged
by improper use. If t he arbor lock will not
hold, lower the blade down on to a scrap
piece of wood positioned against the
fence. This will serve as an alternate locking means.
Blade Washer
*Outer Blade
Collar
Inner Blade
Collar
(Hollow Side
Toward Blade)
*Arbor screw
(Left Hand Threa d
Supplied with
Miter Saw)
Arbor screw
(Left Hand Thread
Supplied with
Laser system)
Sawblade
Exactline™
Laser System
Blade
Inner Blade
Collar
Spindle
39
*Keep these items for use if
laser system is rem oved
Page 40

Laser System (continued)
Operation
DANGER: Laser radiation. Avoid
direct eye exposure.
When the saw is “ON” and the blade is in
its highest position, the laser system will
show up on your workpiece as a red colored broken l ine. This red broken line will
assist you in l ining up the cut mark on the
workpiece with t he blade for accurate
cuts.
1.Position your wor kpiece on the saw.
Make sure the blade i s at its highest
position.
2.Turn the saw “ON” and a broken red
line will appear on your workpiece.
3.Align this red line with the cut-off mark
on the workpiece.
4.Lo wer th e sawblade and make the cut.
As the blade gets closer to the workpiece the broken red li ne wil l become
solid. Do not move the workpiece.
5.Turn the saw “OFF” and allow the
blade to come to a complete stop
before raising.
Practice cut s will let you become familiar
with correctly lining the laser mark up with
the cut-of f mark and blade.
Broken
Red Line
40
Page 41

Changing Batteries
WARNING: To reduce the risk of
injury from unexpected starting,
unplug the saw whenever you
are removing or installing the
blade.
1. Remove the Exactline™ Laser System
from the saw.
2. Remove the two Phillips screws on the
back side of the las er system and take
off the back cover.
3. Remove the three batteries with a nonconductive devi ce (toothpick).
4. Use a soft paintbrush to gently and
carefully clean all sawdust from the
laser system.
5. Insert the new batteries. Replacement
batteries must have a rating of 1.5 volt
and 100 mah (milliampere hour) mini mum. Number 76 series or equi valent.
DANGER:
• Laser radiation when open
and interlock defeated.
• Do not attempt to acti vate the
laser.
• Avoid direct eye contact.
• The laser is activated by
means of a centrifugal switch
only while the saw motor is
running and the laser system
is mounted on the saw.
6.Rep lace the back cover and secure
with two Phillips screws.
Laser Guide
Cover
Laser Guide
Support
Screws
Aperature
Key
Key Slot
Batteries
Negative (-)
Aperature
41
Page 42

Maintenance and Lubrication
Maintenance
DANGER: Never put lubricants
on the blade while it is spinning.
WARNING: To reduce the risk of
injury from unexpected starting
or electrical shock, unplug the
power cord before working on
the saw.
WARNING: For yo ur safety, this
saw is double insulated. To
avoid e lectrical s hock, f ire or
injury, use only parts identical to
those ide nti fied i n the parts lis t.
Reassemble exactly as original
assemb ly to avoid electrical
shock.
Replacing Carbon Brushes
The carbon brushes furnished will last
approximately 50 hours of running tim e or
10,000 on/off cycles. Replace both carbon
brushes when either has less than 1/4"
length of carbon remaining. To inspect or
replace brushes, first unplug the saw. Then
remov e the bl ac k p las t ic ca p o n th e s ide of
the motor (caution, this cap is spring
loaded by the brush assembly). Then pull
out th e b rus h . Re pe at f or t h e ot h er s id e. To
reassemble reverse the procedure. The
ears on the metal end of the brush assembly go in the same hole the carbon part fits
into. Tighten the cap snugly but do not
overtighten.
NOTE: To reinst all t he same brush es, fir st
make sure the br ushes go ba ck in t he way
they came out. Otherwise a break-in
period will occur that will reduce motor
performance and increase brush wear.
Lower Blade Guard
Do not use the saw without the lower
guard. The lower blade guard is attached
to the saw for your protection. Should the
lower guard become damaged, do not
use the saw until damaged guard has
been replac ed. Develop a regular check
to make sure the lower guard i s working
properly. Clean the lower guard of any
dust or build up with a damp cl oth.
CAUTION: Do not use solvents
on the guard. They could make
the plastic "cloudy" and brittle.
W ARNING: Wh en cleanin g lower
guard unplug the saw from the outlet to avo i d u n expected start-up.
Periodically, sawdust will accumulate
under the work tabl e and base. Thi s coul d
cause difficulty in the movem ent of the
work table when setting up a miter cut.
Frequently blow out or vacuum up the
sawdust.
WARNING: If blowing sawdust,
wear proper eye protection to
keep debris from blowing into
eyes.
42
Page 43

Lubrication
Ball Bearings
All the motor bearings in thi s tool are lubr icated with a suffic ient amount of high
grade lubricant for the l if e of the unit,
therefore, no furt her lubrication is
required.
Infrequent Lubrication as Required
1. Apply automotive type oil directly on
slide tubes . It will be picked up a nd dispersed by built in fel t wicks.
2.App ly a light oil or a pressurized light
spra y o i l t o the arm pivot sh af t .
3. Apply a light oil or a pressurized light
spray oil to the torsion spring as
shown.
4. Apply a light oil or a pressurized light
spray oil to the lower guard spacer,
roller and cove r pl ate as shown.
Motor Belt Tension
The motor belt tension was properly
adjusted at th e factory. However , to che ck
the belt tension:
1. Use a Phillips screwdriver to remove
the five screws holding the belt cover
and remove the cover.
2. To check the belt tension squeeze the
belt. Using ligh t pressure the belt
should deflec t approximately 1/4".
3. To adjust the tensi on:
a. Use a Phillips screwdriver to loosen
(but do not remove) t he six motor
mount screws.
b. To increase the belt tension turn the
adjusting soc ket head set screw
clockwise. To decrease the tension
turn the adjusting set screw counterclockwise.
Cover
Spacer
Roller
Plate
Torsion
Spring
(Inside)
Arm
Pivot Shaft
NOTE: Excessive belt tension will
cause the motor to fail prematurely.
c. Securely tighten the six mot or mount
screws.
4. Replace the belt cover.
43
Page 44

Accessories
Recommended Accessories
Item SKU No.
Miter Saw Utility Vehicle ..............AC9940
Do not use any accessory unless you
have received and read complete instructions for its use.
WARNING: To reduce the risk of
injury from unsafe accessories,
use only accessories recommended.
Basic Blade Requirements
12" Diameter
1" Diameter Arbor Hole
Blades marked for slide compound miter
saw use
Blades marked for 4,500 RPM or higher
Using Carbide Tipped Blades
WARNING: To avoid the risk of
cutting tool fa il ure and thrown
shrapnel (broken pieces of
blade) read and understand all
the warnings and instructions
which come with carbide tipped
blades. Failure to heed all carbide tipped blade warnings and
safety instructions can result in
serious injury.
Carbide is a very hard but brittle materi al.
Take care when mounting, using and storing carbide blades to prevent accidental
damage. Slight shocks, such as striking a
tip during handli ng, can s erious ly d amage
Prohibited Accessories
WARNING: The use of any cutting tool except 12" saw blades
which meet the requirement
under recommended acce ssories is prohibite d. Do not use
accessories such as shape cutters or dado sets. Metal cutting
and the use of abrasive wheels
are prohibited. See WARNING
and CAUTION notes in the
“Safety Instructions for Basic
Saw Operations” section.
the blade. Fore ign objects in the workplace, such as wir e or nai ls, can also
cause ti ps to cr a ck or br eak off.
Before using a car bide tipped blade,
always examine the blade and tips for
damage. Look for bent teeth, a bent
blade, cracks, broken, missin g or loose
carbide tips. Do not use a carbide tipped
blade if damage is found or suspected.
Do not use a carbide tipped blade witho ut
all appropr iat e guards in place.
Mount blade securely in proper rotation
direction.
Never rotate a carbide tipped blade faster
than its maximum recommended speed.
44
Page 45

Trou bles ho oti n g Guid e
General
Problem Probable Cause Suggested Corrective Action
Blade hi ts table.
Angle of cut not acc u-
rate.
Can’t move miter
adjustment
Power head wobbles.
Power he ad won’t ful ly
rise or blade guard
won’t fully close
Blade bi nds, jams ,
burns wood.
Rough cuts
1. Misalignment 1. Get authorized Service.
1. Misalignment 1. See “Alignment” section.
1. Sawdust under
table
1. Vacuum or blow out dus t.
Wear Eye Protection.
1. Loose pivot points 1. See Bevel Pivot Adjust ment in
“Alignment” section.
1. Lubrication needed
2. Part failure
3. Pivot spring or
1. See “Lubrication” section.
2. Get authorized Service.
3. Get authorized Service.
guard spring not
replaced proper ly
after ser v ic e
4. Inspect/clean stops.
4. Sawdust sticking to
stops
1. Improper operation
1. See “Basic Saw Operation”
section.
2. Dull blade
3. Improper blade
2. Replace or sharpen blade.
3. Replace with 12” diameter
blade designed for the mate-
4. Bent blade - check
flatness across
rial being cut.
4. Replace blade.
expansion sl ots on
blade
Tool vibrates or
shakes
Power head hard to
pull/push down
1. Sawblade not round
2. Sawblade damaged
3. Sawblade loose
4. Other
1. Replace blade.
2. Replace blade.
3. Tighten arbor screw.
4. Get authorized Service.
1. Lube needed 1. See - “Lubrication” section.
45
Page 46

Troubl es ho otin g G uid e (cont i nu ed )
Motor
Problem Probable Cause Suggested Corrective Action
Brake does not st op
blade within 6 seconds.
Motor does not
start.
Brush sparking
when switch
released.
Wiring Diagram
Connector
1. Brushes not seated
or lightly sticking.
2. Motor brake winding
overheated from
use of prohi bited
accessory or rapid
on/off cycling.
3. Arbor screw loose.
4. Other
1. Fuse.
2. Brushes worn.
3. Other.
1. Normal automatic
brake working pro perly.
White Field
Lead
White
1. Inspect/clean/replace
brushes. See “Maintenance”
section.
2. Use only recommended
blades/accessor ies.
Let motor cool down.
3. Retighten
4. Get authorized service. See
“Troubleshooting of brake”
section.
1. Check fuse, or circuit breaker.
2. See “Maintenance” section.
3. Get authorized service.
1. None
Red
Red Brush
Lead
Brush
Armature
Cord w/Plug
Gray Brake
Trouble Shooting of Brake by
Qualified Service Person Only
1. Check commutation at no lo ad. If there
is a heavy sparki ng which follows the
curvature of the commutator: replace
the armature.
2.To continue trouble shooting, now
unplug the power cor d.
3.Install service brushes, especially if
delayed come-in of brake has been
noticed before failure.
Lead
Black
4.Check brake circuit for continuity:
remove brush caps and brushes. Use
ohmmeter to check continuity from
brass brush holder to brush holder. If
open, locate exact place using ohmmeter. As indicated by test, tighten connection or replace fi eld assembly or
replace switch.
5. After repair , check direction of blade
rotation vs. guar d arrow.
46
N.C.
N.O. Switch
White Brush
Lead
Brush
Page 47

Notes
47
Page 48

Repair Parts
Parts List For RIDGID 12" Slide Compound Miter Saw
RIDGID parts are available on-line at www.ridgidparts.com
78
82
36
Model No. MS1290LZ 0
Figure 1
69
68
7
84
5
76
6
67
66
1
72
74
75
76
76
3
10
11
9
25
28
29
81
80
79
26
27
27
17
22
21
20
18
19
h
t
n
i
i
l
t
W
c
a
r
x
e
E
s
a
L
55
56
57
58
50
4
83
16
14
13
23
24
63
m
™
e
e
t
s
y
S
61
62
4
2
41
39
40
15
37
12
54
59
64
t
u
o
65
h
t
i
t
c
W
a
x
E
s
a
L
71
42
70
32
30
33
31
45
53
44
60
48
49
45
44
34
35
73
74
71
41
40
39
44
8
46
38
49
48
45
43
41
™
m
47
e
e
t
n
i
s
l
y
S
r
e
77
51
52
48
Page 49

Repair Parts
Parts List For RIDGID 12" Compound Miter Saw
RIDGID parts are available on-line at www.ridgidparts.com
Model No. MS1290LZ 0
Figure 1
Always order by part number - not by key number
Key
Part No. Description
No.
1
2
3
4
5
6
7
8
9
10
11
12
13
14
15
16
17
18
19
20
21
22
23
24
25
26
27
28
29
30
31
32
33
34
35
36
37
38
39
40
41
42
43
830122
830008
830007
830009
828117
819179
818656
830022
823344
830131
830111
828040
830023
830024
830025
830164
830037
813312
823494
828122-1
803709-1
828059
828060
828061
830039
830123
828122
828063
830123-1
830035
830124
816755-3
816725
830264
830125
830148
830026
830033
821063
813303-7
820236-7
830034
830002
Base/Table Asm (See Fig. 2)
Scale, Bevel
Pivot Asm (See Fig. 5)
* Screw, M6 x 1.0 x 12
* Washer,12.2 x 22 x 2
* Wash er, Spring 12.7 x 22 x 0.3 3
Nut, Lock
Arm Guard Asm (See Fig. 8)
Shaft, Arm Pivot
‡Spring, Torsion
Spacer, Spring
Screw, Set Lock M6 x 10
Pin, Up Stop
Motor Asm (See Fig. 10)
* Screw M6 x 16
Screw, Set Lock M8 x 25
Handle, Lower
Screw, Pan Hd M4 x 10
• Switch
* Screw, Pan Hd Ty E M4 x 10
• Connector, Wire
Actuator, Switch
Button, Lock
Spring, Torsion
Handle, Upper
Screw, Sems M5 x 32
Screw, Wash Hd Plastite M4-14
Handle, Carry
Screw, Sems M5 x 75
Cover, Cord
* Screw, Pan Hd M5 x 35
* Screw, Pan Cr M5 x 0.8-12
Clamp, Cord
Sleeve, Cord
Clip, Cord
Strain Relief
Pulley, Motor
Pulley, Pinion
* Washer 8 x 23 x 2
* Lockwasher, M8
* Nut, Hex Lock M8 x 1.25 x 6.5
Belt, Poly, Vee
Fence, Lower
Key
Part No. Description
No.
44
45
46
47
48
49
50
51
52
53
54
55
56
57
58
59
60
61
62
63
64
65
66
67
68
69
70
71
72
73
74
75
76
77
78
79
80
81
82
83
84
830129
821063-6
830005
830006
820244-6
830004
830040
821873
809372-3
827498
821878
821875
821063-1
820238-5
817449-1
830524
830526
880062000
830522
830000
816720
823351
830016
830124-2
830017
830124-3
830036
830124-2
829994
829995
830130-1
829989
816755-10
830079
830077
SP6505
SP6505S
SP6505F
830076
830078
830015
Screw, Soc Cap M8 x 1.25 x 20
* Washer 8 x 16 x 1.2
Fence, Right Sliding
Fence, Left Sliding
* Screw, Pan Hd M6 x 20
Knob, Fence Lock
Guard Asm, Lower (See Fig. 9)
Screw, Shoulder 10-32 x 1/2
* Screw, Pan Hd 10-32 x 1/2
Sleeve, Rubber
Screw, Shoulder, 10-32 x 7/8
Screw, Shoulder, M6 x 22
* Washer 8 x 16 x 0.5
* Washer 6.5 x 13 x 0.8
* Nut, Hex Lock M6 x 1.0
Collar, Blade (Outer)
Collar, Blade (Inner)
Exactline™ Laser System
Screw Blade
(Used w/Key 61 Only)
Blade
Washer, Blade
Screw, Blade(Use W/Key 59 Only)
Wrap, Cord Front
* Screw, Pan Hd M5 x 15
Wrap, Cord Rear
* Screw, Pan Hd M5 x 20
Cover, Belt
* Screw, Pan Hd M5 x 15
Indicator, Bevel
Indicator, Miter
Screw, Sems Pn Cr L+F
Wash M4 x 8
Insert, Table
* Screw, Pan Cr M5 x 8
Clamp Asm
Bag Dust Asm
Owners, Manual
Owners, Manual, Spanish
Owners, Manual, French
Frame, Dust Bag
Elbow, Dust
Knob, Slide Lock
* St andard Hardware Item - May be purchased locally.
‡ CAUTION: See mechanical assembly caution on page 56.
• WARNING: See electrical warning on page 58.
49
Page 50

Repair Parts
Parts List For RIDGID 12" Compound Miter Saw
RIDGID parts are available on-line at www.ridgidparts.com
4
5
Model No. MS1290LZ 0
Figure 2 - Base/Tab le Assembl y
1
2
3
6
Always order by part number - Not by key number
Key
Part No. Description
No.
818656
1
830137
2
830138
3
829981
4
830136
5
822072
6
* St andard Hardware Item - May be purchased locally.
* Nut, Hex Lock M12 x 1.75
* Washer, M12 x 20 x 1.5
* Washer, M12 x 25 x 1.5
Table Asm (See Fig. 3)
Base Asm (See Fig. 4)
* Screw Hx Hd M12 x 1.75-40
50
Page 51

Repair Parts
Parts List For RIDGID 12" Compound Miter Saw
RIDGID parts are available on-line at www.ridgidparts.com
Model No. MS1290LZ 0
Figure 3 - Table Assembly
16
3
2
1
22
21
19
18
17
18
20
13
12
11
10
14
15
9
8
8
8
8
9
Always order by part number - Not by key number
4
5
6
7
8
Key
Part No. Descri ption
No.
1
2
3
4
5
6
7
8
9
10
11
830280
829984-1
829992
829990
829991
—
827449-1
820244-2
829982
830044
829983
Ta bl e A s m
(Includes Key No. 6)
Ring, Retaining
Lever, Bevel Index
Pin, Bevel Index
Spring
Shaft, Pivot
Screw, Set Lock
M8 x 1.25 x 10 Nylock
* Screw, Pan Cr M6 x 1.0 x 10
Skirt, Table
Pin, Miter Index
Spring
Key
Part No. Description
No.
830141
12
829985
13
827449
14
829988
15
829986
16
829983
17
829984
18
830046
19
830140
20
830045
21
829987
22
* St andard Hardware Item - May be purchased locally.
51
Pin, Roll R6
Pin, Miter Lock
Screw, Set Lock
M8 x 1.25 x 16 Ny loc k
Lever, Miter Lock
Plate, Mi ter Lock
Spring
Ring, Retaining
Wheel, Miter Index
Pin, Roll 3 x 25.2
Link, Miter Inde x
Screw, Shoulder M6 x 8 x 91
Page 52

Repair Parts
Parts List For RIDGID 12" Compound Miter Saw
RIDGID parts are available on-line at www.ridgidparts.com
Model No. MS1290LZ 0
Figure 4 - Base Assembly
2
1
2
3
4
6
5
6
6
7
6
Always order by part number - Not by key number
Key
Part No. Description
No.
1
2
3
4
5
6
7
829997
830166
829999
823492
823335
829998
829996
Shim, Table
* Screw, Flat M5 x 0.8 x 10
Scale, Miter
Wrench Hex “L” .25 x 120m m
Grommet, Wrench
Foot, Rubber
Base
* St andard Hardware Item - May be purchased locally.
52
Page 53

Repair Parts
Parts List For RIDGID 12" Compound Miter Saw
RIDGID parts are available on-line at www.ridgidparts.com
4
1
3
Model No. MS1290LZ 0
Figure 5 - Pivot Assembly
6
10
9
6
8
5
10
4
5
7
12
9
8
6
2
2
6
11
9
10
13
10
Always order by part number - Not by key number
Key
Part No. Descri pt io n
No.
1
2
3
4
5
6
7
830262
830146
830147
830145
830053
830048
830038
Pivot Asm Only (Other
Items Li st ed on C h art Not
Included)
Screw, Set Lock
M8 x 1.25 x 6 Ny l oc k
Guard, Cord
Screw, Shoulder M5
Washer, Rubber
Glide Tube
•Cord w/Plug
Key
Part No. Descri ption
No.
8
830146-1
9
830144-1
10
824026-7
11
830144
12
830264-1
13
—
* St andard Hardware Item - May be purchased locally.
• WARNING: See electrical warning on page 54.
53
Screw, Set Lock
M8 x 1.25 x 14 Nylock
Screw, Set Lock
M8 x 1.25 x 20
* Nut, Hex M8 x 1.25
Screw, Set Lock
M8 x 1.25 x 25
Sleeve, Cord
Tube Pivot Asm
(See Fig. 6)
Page 54

Repair Parts
Parts List For RIDGID 12" Compound Miter Saw
RIDGID parts are available on-line at www.ridgidparts.com
Model No. MS1290LZ 0
Figure 6 - Tube Pivot Assembly
1
2
3
4
5
Always order by part number - Not by key number
Key
Part No. Description
No.
1
2
3
4
5
6
—
830018
830019
830149
830020
830021
Pivot Asm. (See Fig. 5)
Bearing, Flange Down Stop
Eccentric, Plate
* Washer, 0.63 x 25 x 1/32
Spring
Knob, Down Stop
* St andard Hardware Item - May be purchased locally.
6
54
Page 55

Repair Parts
Parts List For RIDGID 12" Compound Miter Saw
RIDGID parts are available on-line at www.ridgidparts.com
4
Model No. MS1290LZ 0
Figure 7 - Pivot Sub Assembly
8
7
6
5
1
2
3
Always order by Part Number - Not by Key Number
Key
Part No. Descri ption
No.
1
2
3
4
5
6
7
8
—
830151
830010
830011
821063-7
820236-7
830012
830013
Pivot Asm. (See Fig. 5)
Screw, Shoulder M6
Clamp, Bevel
Screw, Shoulder
M8 x 1.25 x 58.5
* Washer, 8 x 16 x 1.2
* Nut, Hex M8 x 1.25
Plunger, Bevel Lock
Lever, Beve l Loc k
* St andard hardware item - May be purchased locally.
55
Page 56

Repair Parts
Parts List For RIDGID 12" Compound Miter Saw
RIDGID parts are available on-line at www.ridgidparts.com
10
9
Model No. MS1290LZ 0
Figure 8 - Arm Guard Assembly ‡
11
12
8
7
13
1
2
3
5
4
14
6
Always order by part number - Not by key number
Key
Part No. Descri pt io n
No.
1
2
3
4
5
6
7
830225
823360
816755-6
830029
830030
830155
830031-2
Arm Guard Asm
Bumper, Lower Guard
Screw, Pan Cr M5 x 16
Pin, Arbor Lock
•Spring
Screw, Set Lock M4 x 5
Nylock
Arbor Asm
Key
Part No. Descri ption
No.
8
9
10
11
12
13
14
830032
830154-1
830154
821875-1
821862
820238-2
830027
Retainer Bearing
Screw, Sems M5 x 12
Screw, Sems M5 x 25
* Screw M6 x 1.0-14
Bearing
* Washer M6 x 12 x 1.6
Key 4 x 4 x 20
* St andard hardware item - May be purchased locally.
‡ CAUTION: See Mechanical Assembly Caution below.
• WARNI NG: Uncon trolled sp ring rel ease or misinst all atio n of these p art s
may create a Hazard unl ess rep air i s done by a quali fied se rvice techn ician.
CAUTION: Mechanical Assembly, to qualified service technician.
1. Wear approved eye protection when working with coil springs
including spring, arbor lock 830030.
2. Incorrec t re-assembly of torsion spring 830111 can cause an unsafe
condition because cutting head fails to rise fully to stop, or because
spring fails through over-stress.
3. Improper reassembly of mechanisms controlling movement of
lower guard 83 0059 can cause an unsafe condition becaus e guard
fails to operate freely as cutting head is moved up and down.
56
Page 57

Repair Parts
Parts List For RIDGID 12" Compound Miter Saw
RIDGID parts are available on-line at www.ridgidparts.com
11
10
9
Model No. MS1290LZ 0
Figure 9 - Lower Guard Assembly ‡
12
13
8
7
6
•
1
2
3
4
5
Always order by part number - Not by key number
Key
Part No. Descri pt io n
No.
1
2
3
4
5
6
7
830530
816677
830529
820238-8
817449-1
826879
820732-2
•Guard, Lower
•Spring, Guard
Pivot, Lower Gua rd
Washer 1/4 x 16
* Nut, Hex Lock M6 x 1.0
Retainer, Guard
* Washer 5.5 x 16 x 0.8
Key
Part No. Descri ption
No.
8
9
10
11
12
13
820725-01
830041
820732-1
820724
828142
827409
Spacer
Link, Actuator
* Washer 7.5 x 16 x 0.6
Screw, Shoulder M5
* Screw, Flat C r M6 x 13
Bearing, Retainer
* St andard Hardware Item - May be purchased locally.
‡ CAUTION: See mechanical assembly caution on page 52.
• WARNING: See warning on page 56.
57
Page 58

Repair Parts
Parts List For RIDGID 12" Compound Miter Saw
RIDGID parts are available on-line at www.ridgidparts.com
5
Model No. MS12900
Figure 10 - Motor Assembly
2
•
3
1
4
2
3
6
Always order by part number - Not by key number
Key
Part No. Description
No.
1
2
3
4
5
6
830253
816768
830250
828064
828122-1
830027
Motor (Includes Key Nos. 2, 3, 4, 5)
Brush
Cover, Brush
Cover, Rear Motor
Screw, Wash Hd Cr M4-10
Key 4 x 4 x 20
• WARNING: Any attempt to repair or replace electrical parts on this
unit may create a hazard unless repair is done by a qualified service
technician.
6
WARNING: For your safety, this miter saw is specially insulated. To
reduce the risk of electrical shock, fire or injury, use only parts identical to those identified in the parts list. Reassemble exactly as originally assembled.
58
Page 59

Notes
59
Page 60

RIDGID® HAND HELD AND STATIONARY POWER TOOL
LIMITED THREE YEAR WARRANTY AND
90 DAY SA TISFACTION GUARANTEE POLICY
This product is ma nufactured under license from Ridgid, Inc. by One W or ld
Technologies, Inc.. All warrant y communications should be direc ted to One
World Technologies, Inc. at (toll free) 1-866-539-1710.
90-Day Satisfaction GuaranteePolicy
During the first 90 days after the date of purchase, if you are dissatisfied
with the performance of this Ridgid® tool for any reason, you may return
the tool to the dealer from which it was purchased for a full refund or
exchange. To receive a replacement tool you must present proof of purchase and return all original equipment packaged with the original product.
The replacement tool will be covered by the limited warranty for the balance of the three yea r war ra nty period.
What i s cove red under the Lim ited Three Year Warranty
This warranty covers all defects in workmanship or materials in this
RIDGID® to ol for the three year p er iod from the date of pu r ch as e. This warranty is specific to this tool. Warranties for other RIDGID® products may
vary.
How to obtain service
To obtain service for this RIDGID® t ool you m us t return it, freight prepaid, to
an authorized RIDGID® service center for hand held and stationary power
tools. You may obtain the location of the authorized service center nearest
you by calling (toll free) 1-866-539-1710 or by logging on to the RIDGID®
website at www.ridgid.com. When requesting warranty service, you must present the proof of purchase documentation, which
includes a date of purchase. The authorized service center will repair any
faulty workmanship, and either repair or replace any defective part, at our
optioon at no char ge to you.
What is not covered
This warranty applies on ly to the original purchaser at retail and may not be
transferred. This warranty only covers defects arising under normal usage
and does not c ov er any malfunction, failure or defect resulting from m is us e,
abuse, neglect, alteration, modification or repair by other than authorized
RIDGID® service center for hand held and stationary power tools. One
World Technoligies, Inc. makes no warranties, representations or promises
as to the quality or performance of its power tools other than those specifically s ta ted in t h is war r an ty.
Additi onal Li mitations
To the extent permitted by applicable law, all implied warranties, including
warranties of MERCHANTABILITY or FITNESS FOR A PARTICULAR PURPOSE, are disclaimed. Any implied warranties, including warranties of merchantability or fitness for a particular purpose, that cannot be disclaimed
under state law are limited to three years from the date of purchase. One
World Technologies, Inc. is not responsible for direct, indirect, incidental or
consequential damages. Some states do not allow limitations on how long
an implied warranty lasts and/or do not allow the exclusion or limitation of
incidental or consequential damages, so the above limitations may not
apply to you. This warranty gives you specific legal rights, and you may
also have other ri ghts which vary from state to state.
Catalog No. MS1290LZ
Model No. MS1290LZ0Serial No. ________
The model and serial numbers may be found on
a plate attached to the saw at the rear of the
miter saw base. You should record both model
and serial number in a safe place for fu ture use.
QUESTIONS OR COMMENTS?
CALL 1-866-539-1710
www.ridgid.c om
© 2004 RIDGID,INC.
Part No. SP6505 Form No. SP6505 Printed in Taiwan 2/04
Please have your Model Number and Ser ial
Number on hand when calling.
 Loading...