

Ricoh PRO C7200, PRO C7210, PRO C7210X, PRO C7200X, PRO C7200SX Operating Instructions Manual
...
Operating Instructions
Adjustment Item Menu Guide: TCRU/ORU
For safe and correct use, be sure to read Safety Information before using
the machine.


TABLE OF CONTENTS
Introduction......................................................................................................................................................... 7
How to Read This Manual................................................................................................................................. 8
Symbols...........................................................................................................................................................8
Disclaimer........................................................................................................................................................8
Notes...............................................................................................................................................................8
Manuals for This Machine................................................................................................................................. 9
Paper Feed Direction of Printed Copies (Side 1/Side 2).............................................................................10
1. Adjustment Settings for Operators
Accessing Adjustment Settings for Operators................................................................................................13
Layout of Adjustment Settings for Operators..................................................................................................14
Features of the Displayed Items and Setting Operations..............................................................................15
Notes on How Adjustment Settings Are Applied to Printed Copies.............................................................18
2. Details of Menu Items in Adjustment Settings for Operators
[Machine: Image Position]...............................................................................................................................21
0101 [Image Position: Across Feed: Side 1]/0102 [Image Position: Across Feed: Side 2]................21
0103 [Image Position: With Feed: Side 1]/0104 [Image Position: With Feed: Side 2]...................... 22
0105 [Perpendicularity Adjustment].......................................................................................................... 24
0106 [Switch Paper Edge Detection Sensor]........................................................................................... 24
0107 [Auto Adjust Image Position: No. of Printed Sheets]...................................................................... 25
[Machine: Image Quality]...............................................................................................................................26
0201 [Execute Image Quality Adjustment]...............................................................................................26
0202 [Maximum Image Density]...............................................................................................................26
0203 [Line Width]....................................................................................................................................... 26
0204 [Density Difference: Across Feed]....................................................................................................27
[Machine: Paper Feed/ Output].....................................................................................................................28
0301 [3-Tray LCIT: Fan Setting].................................................................................................................28
0302 [3-Tray LCIT: Fan Volume Setting]...................................................................................................28
0303 [Pickup Assist Setting]....................................................................................................................... 28
0304 [Correct Output Paper Curl].............................................................................................................29
0305 [Detect JAM099]..............................................................................................................................30
0306 [Detect JAM080]..............................................................................................................................31
0307 [Detect/Control JAM097/098].....................................................................................................32
0308 [Detect JAM048]..............................................................................................................................33
1

0309 [Registration Gate: Paper Buckle Amount]..................................................................................... 33
0310 [ADF Adjustment].............................................................................................................................. 34
0311 [Buffer Pass Unit Fan Activation Setting]......................................................................................... 35
0312 [Nip Width of Pressure Position 3 & 4]...........................................................................................35
[Machine: Productivity]....................................................................................................................................37
0401 [No. of Sheets for Auto Color Selection]........................................................................................ 37
0402 [Print Mode When Switching Paper Type]..................................................................................... 37
0403 [Fusing Temperature on Standby]................................................................................................... 37
0404 [Pressure Roller Cooling Fan Level].................................................................................................38
[Machine: Maintenance].................................................................................................................................39
0501 [Execute Process Adjustment]...........................................................................................................39
0502 [Screw-on Cap to Replace]............................................................................................................. 39
0503 [Execute Charger Unit Cleaning].................................................................................................... 39
0504 [Execute Cleaning Initial Setting for PCU]...................................................................................... 39
0505 [Photoconductor More Lubricant Mode]........................................................................................ 40
0506 [Execute Developer Refreshing]...................................................................................................... 40
0507 [Execute ITB Manual Lubrication]....................................................................................................41
0508 [Manually Smooth Fusing Belt]........................................................................................................41
0509 [Fusing Belt Manual Smoothing Adjustment]..................................................................................41
0510 [Fusing Belt Auto Smoothing Setting].............................................................................................. 42
0511 [Fusing Belt Smoothing Adjustment]................................................................................................ 42
0512 [Fuser Unit Speed Adjustment].........................................................................................................42
0513 [Wind Fuser Cleaning Unit at Replacement].................................................................................. 42
0514 [Temperature / Humidity Inside]..................................................................................................... 43
0515 [Temperature / Humidity Outside]..................................................................................................43
0516 [Change Special Toner]................................................................................................................... 43
0517 [Switch Print Screen]......................................................................................................................... 44
0518 [Reset Parts Counter].........................................................................................................................44
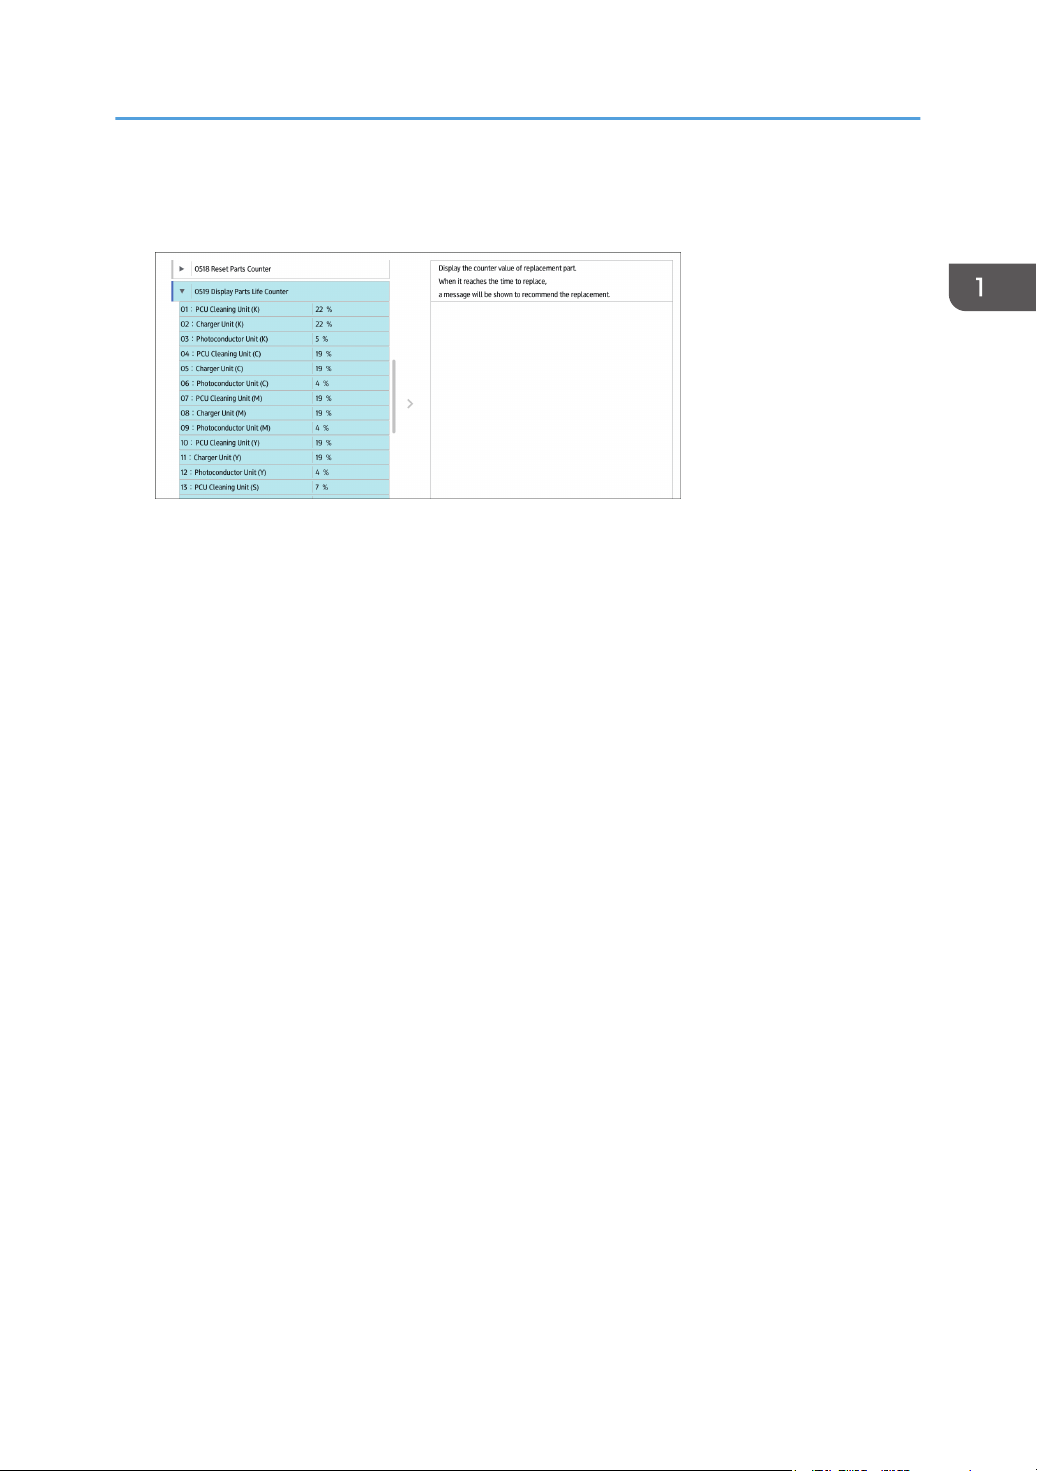
0519 [Display Parts Life Counter]..............................................................................................................46
0520 [Special Toner Position]....................................................................................................................48
[Finishing: Finisher]...........................................................................................................................................50
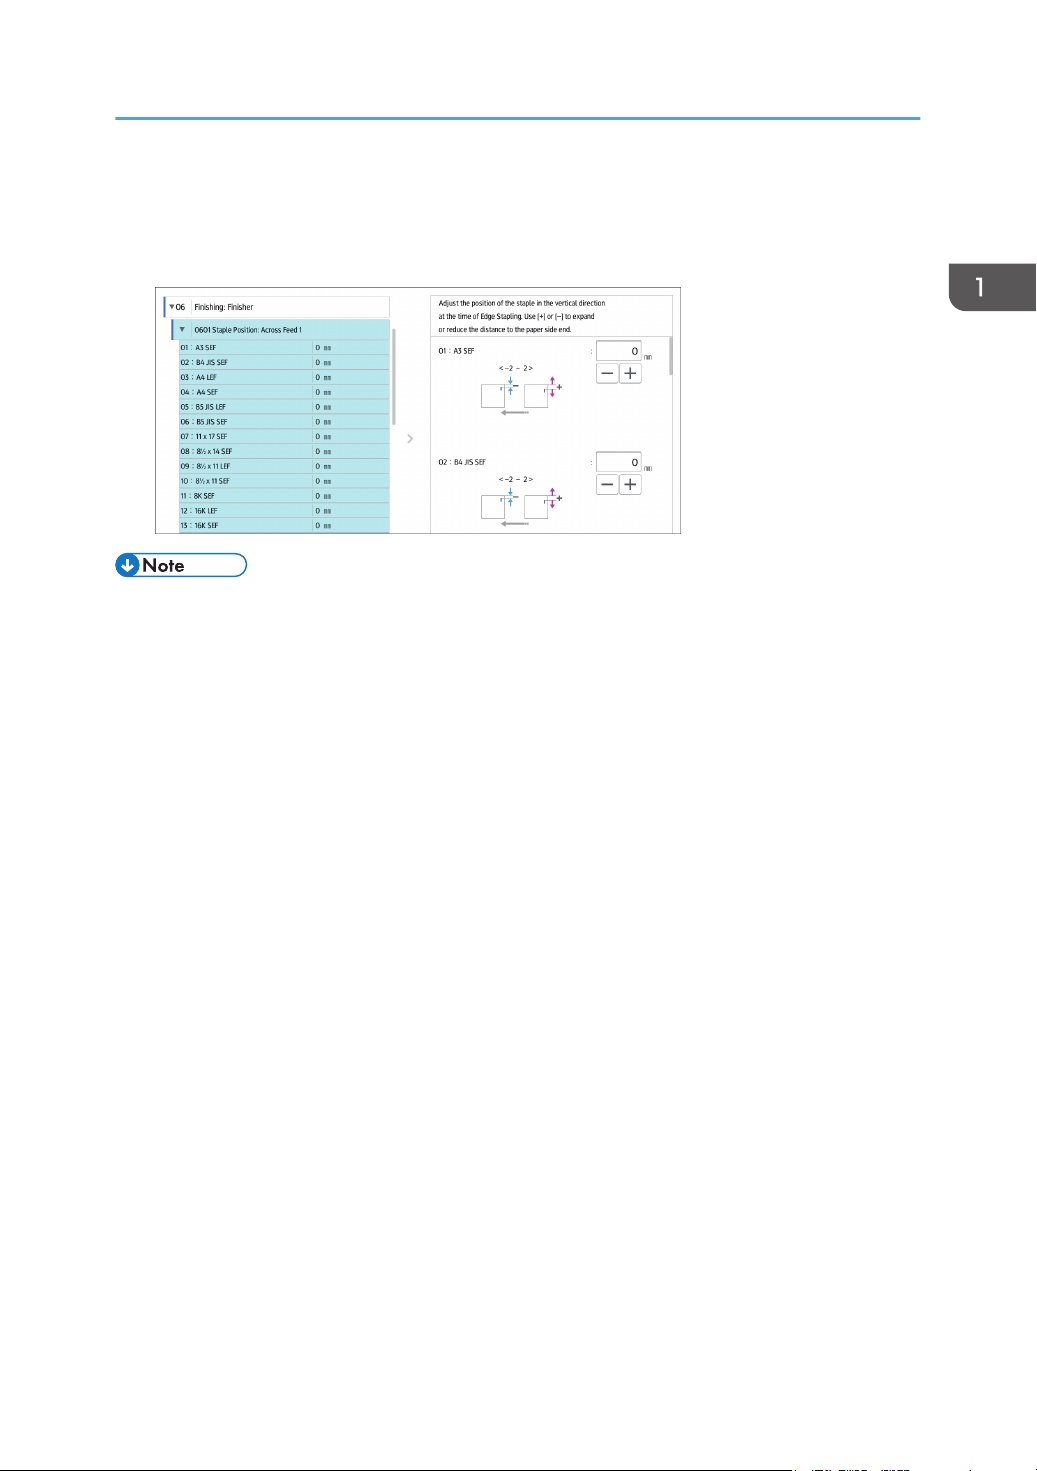
0601 [Staple Position: Across Feed 1]......................................................................................................50
0602 [Staple Position: Across Feed 2]......................................................................................................51
2

0603 [Staple Position: With Feed].............................................................................................................51
0604 [Paper Alignment for Stapling: Across Feed]..................................................................................52
0605 [Paper Alignment for Stapling: With Feed].....................................................................................53
0606 [Number of Sheets Align for Stapling]............................................................................................54
0607 [Punch Position: Across Feed].......................................................................................................... 55
0608 [Punch Position: With Feed]..............................................................................................................56
0609 [Punch Skew Correction]..................................................................................................................56
0610 [Amount of Punch Skew Correction]............................................................................................... 57
0611 [Paper Alignment in Shift Tray Setting]............................................................................................57
0612 [Paper Alignment in Shift Tray: Across Feed]..................................................................................58
0613 [Output Tray Descending Position]..................................................................................................58
0614 [Exit Guide Close Timing].................................................................................................................59
0615 [Output Trail Edge Press Setting]..................................................................................................... 59
0616 [Output Fan Setting]..........................................................................................................................59
0617 [Output Fan Level].............................................................................................................................60
0618 [Staple Position for Booklet].............................................................................................................60
0619 [Folding Position for Booklet]........................................................................................................... 61
0620 [Paper Alignment for Booklet: Across Feed]...................................................................................62
0621 [Set Number of Folds for Booklet]...................................................................................................63
0622 [Paper Alignment for Booklet: With Feed]...................................................................................... 64
0623 [Z-fold Skew Correction]..................................................................................................................65
0624 [Amount of Z-fold Skew Correction]............................................................................................... 65
0625 [Amount of Z-fold Skew Correction: Reverse]................................................................................65
0626 [Maximum No. Stacked Sheets in Output Tray]............................................................................ 66
[Finishing: Fold]................................................................................................................................................ 67
0701 [Z-fold Position 1]............................................................................................................................. 67
0702 [Z-fold Position 2]............................................................................................................................. 67
0703 [Half Fold Position: 1 sheet Fold].....................................................................................................68
0704 [Half Fold Position: Multi-sheet Fold].............................................................................................. 69
0705 [Letter Fold-out Position 1: 1 sheet Fold].........................................................................................71
0706 [Letter Fold-out Position 1: Multi-sheet Fold]...................................................................................71
0707 [Letter Fold-out Position 2: 1 sheet Fold].........................................................................................72
0708 [Letter Fold-out Position 2: Multi-sheet Fold]...................................................................................73
3

0709 [Letter Fold-in Position 1: 1 sheet Fold]........................................................................................... 73
0710 [Letter Fold-in Position 1: Multi-sheet Fold].....................................................................................74
0711 [Letter Fold-in Position 2: 1 sheet Fold]........................................................................................... 75
0712 [Letter Fold-in Position 2: Multi-sheet Fold].....................................................................................76
0713 [Double Parallel Fold Position 1]/0714 [Double Parallel Fold Position 2].................................77
0715 [Gate Fold Position 1]/0716 [Gate Fold Position 2]/0717 [Gate Fold Position 3]................. 78
0718 [Folding Unit Tray Full Detection].................................................................................................... 79
0719 [Number of Sheets Folded after Full Detection]............................................................................. 79
[Finishing: Perfect Binder]................................................................................................................................ 81
0801 [Perf Bind Cvr Sht Posit: Across Feed]............................................................................................. 81
0802 [Perf Bind Cvr Sht Posit: With Feed]................................................................................................ 81
0803 [Perfect Binding Finishing Angle].....................................................................................................81
0804 [Applying Binding Glue].................................................................................................................. 82
[Finishing: Stacker]........................................................................................................................................... 83
0901 [Ppr Align in Stack Tray: Acr Feed 1]..............................................................................................83
0902 [Ppr Align in Stack Tray: Acr Feed 2]..............................................................................................84
0903 [Paper Alignment in Stacker Tray: With Feed]............................................................................... 84
0904 [Ppr Align in 2nd Stack Tray: Acr Feed 1]......................................................................................85
0905 [Ppr Align in 2nd Stack Tray: Acr Feed 2]......................................................................................86
0906 [Ppr Align in 2nd Stack Tray: With Feed]....................................................................................... 87
0907 [Maximum Stack Quantity in Stacker Tray]....................................................................................88
[Density Difference Printing: Across Feed]..................................................................................................... 90
3. Custom Paper Settings for Administrators
Accessing Advanced Settings......................................................................................................................... 91
Description of Paper Icons...............................................................................................................................92
Deleting Saved Custom Paper Profiles........................................................................................................... 93
Backing up and Restoring Custom Paper Profiles..........................................................................................94
Backing up Custom Paper Profiles Registered Under the [CustomPaper Management] Setting.......... 94
Backing up and Restoring Custom Paper Profiles Using the External Controller's Control Panel......... 95
Paper Presets in "Advanced Settings".............................................................................................................96
Displaying the Paper Profile Version.......................................................................................................... 96
4. Details of Menu Items in Advanced Settings
[Machine: Image Position]...............................................................................................................................97
4

1101 [Image Position]................................................................................................................................ 97
1102 [Auto Adjust Image Position]......................................................................................................... 100
1103 [Image Position Feedback Correction]......................................................................................... 101
1104 [Image Position Feedback Correction: Gap]............................................................................... 101
[Machine: Image Quality]............................................................................................................................ 103
1201 [Max Image Density]..................................................................................................................... 103
1212 [Image Transfer Output].................................................................................................................103
1214 [Paper Transfer Output]................................................................................................................. 104
1216 [Paper Transfer Output Correction: Paper Edge]........................................................................ 105
1218 [Paper Transfer Output: Textured Paper Mode].......................................................................... 106
1221 [Paper Transfer Separate Voltage]............................................................................................... 107
1222 [Paper Transfer Nip Operation Mode]........................................................................................ 107
1223 [Paper Transfer Nip].......................................................................................................................108
1231 [Print Speed]................................................................................................................................... 108
1232 [Fusing Temperature]..................................................................................................................... 110
1233 [Fusing Pressure Temperature].......................................................................................................113
1234 [Print Mode When Switching Paper Type]...................................................................................114
1235 [Fusing Temperature Range]......................................................................................................... 114
1236 [Fusing Pressure Roller Cooling]....................................................................................................116
1237 [Print Speed (Sheet Interval Adj)]..................................................................................................117
1238 [Fusing Cleaning]........................................................................................................................... 117
1239 [Erase Margin]................................................................................................................................118
1240 [Fusing Nip Width: Paper Type]....................................................................................................118
1241 [Fusing Nip Width Adjustment]..................................................................................................... 119
1242 [Initial Fusing Temperature for Envelope].....................................................................................119
1243 [Fusing Belt Smoothing]................................................................................................................. 119
1244 [Fusing Pressure Roller On Before Fusing]....................................................................................120
[Machine: Paper Feed/ Output].................................................................................................................. 121
1301 [2-Tray LCIT: Paper Feed Mode]..................................................................................................121
1302 [2-Tray LCIT: Fan/Shutter].............................................................................................................121
1303 [2-Tray LCIT: Other Settings].........................................................................................................124
1311 [3-Tray LCIT]...................................................................................................................................124
1312 [Main/3-Tray LCIT/Bypass].........................................................................................................125
5

1321 [Correct Paper Curl].......................................................................................................................125
1331 [Jam Detection]...............................................................................................................................126
1341 [Motor Speed]................................................................................................................................127
6

Introduction
This manual contains detailed instructions and notes on the operation and use of this machine. For your
safety and benefit, read this manual carefully before using the machine. Keep this manual in a handy
place for quick reference.
7

How to Read This Manual
Symbols
This manual uses the following symbols:
Indicates points to pay attention to when using the machine, and explanations of likely causes of paper
misfeeds, damage to originals, or loss of data. Be sure to read these explanations.
Indicates supplementary explanations of the machine’s functions, and instructions on resolving user
errors.
This symbol is located at the end of sections. It indicates where you can find further relevant information.
[ ]
Indicates the names of keys on the machine's display or control panels.
Disclaimer
Contents of this manual are subject to change without prior notice.
In no event will the company be liable for direct, indirect, special, incidental, or consequential damages
as a result of handling or operating the machine.
Notes
The manufacturer shall not be responsible for any damage or expense that might result from the use of
parts other than genuine parts from the manufacturer with your office products.
For good output quality, the manufacturer recommends that you use genuine toner from the
manufacturer.
Some illustrations in this manual might be slightly different from the machine.
Certain options might not be available in some countries. For details, please contact your local dealer.
Depending on which country you are in, certain units may be optional. For details, please contact your
local dealer.
8

Manuals for This Machine
The following manuals are for skilled operators only.
Adjustment Item Menu Guide
This manual explains the items in [Adjustment Settings for Operators] and the advanced settings for
custom paper adjustment in "Advanced Settings".
Replacement Guide
This manual explains how to replace the machine's components.
Troubleshooting
This manual explains how to troubleshoot problems related to image quality, paper delivery, and
other aspects of machine operation.
9
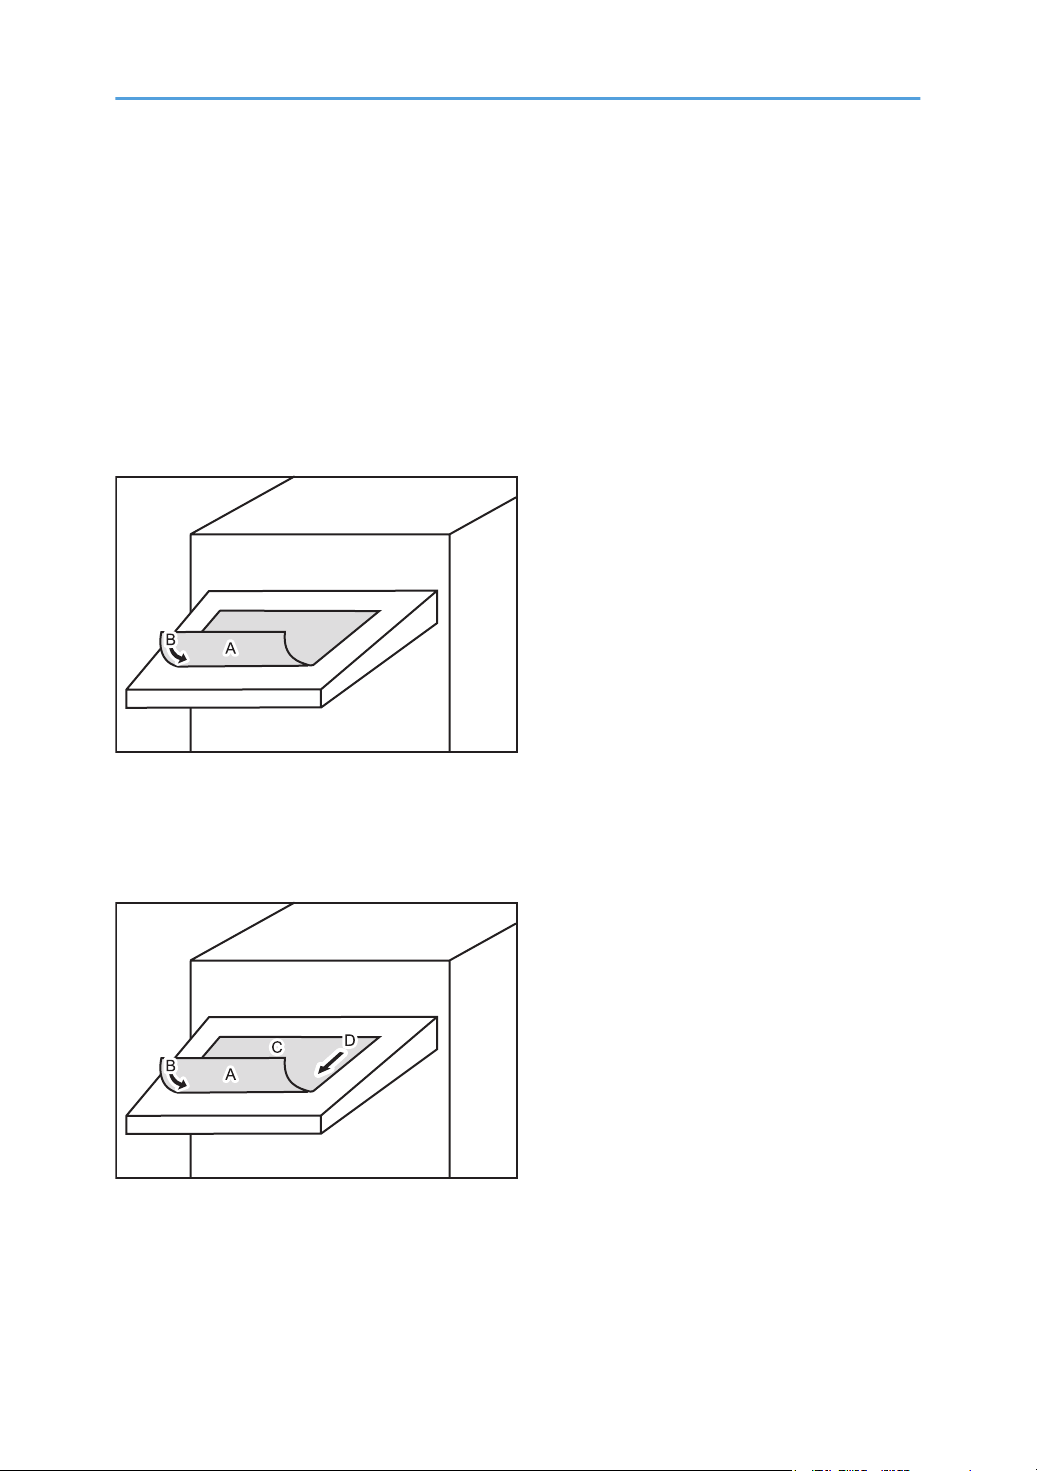
Paper Feed Direction of Printed Copies (Side
DFP406
DFP407
1/Side 2)
Depending on the setting, printed copies are fed as follows:
Side 1 is the surface of the paper printed during one-sided printing, or the surface of the first print during
duplex printing.
Side 2 is the surface of the paper printed on the back side of Side 1 during duplex printing.
Single-sided printing: Printed side face down
A. Side 1
B. Paper feed direction of Side 1
Duplex printing: Printed side face down
A. Side 1
B. Paper feed direction of Side 1
C. Side 2
D. Paper feed direction of Side 2
10
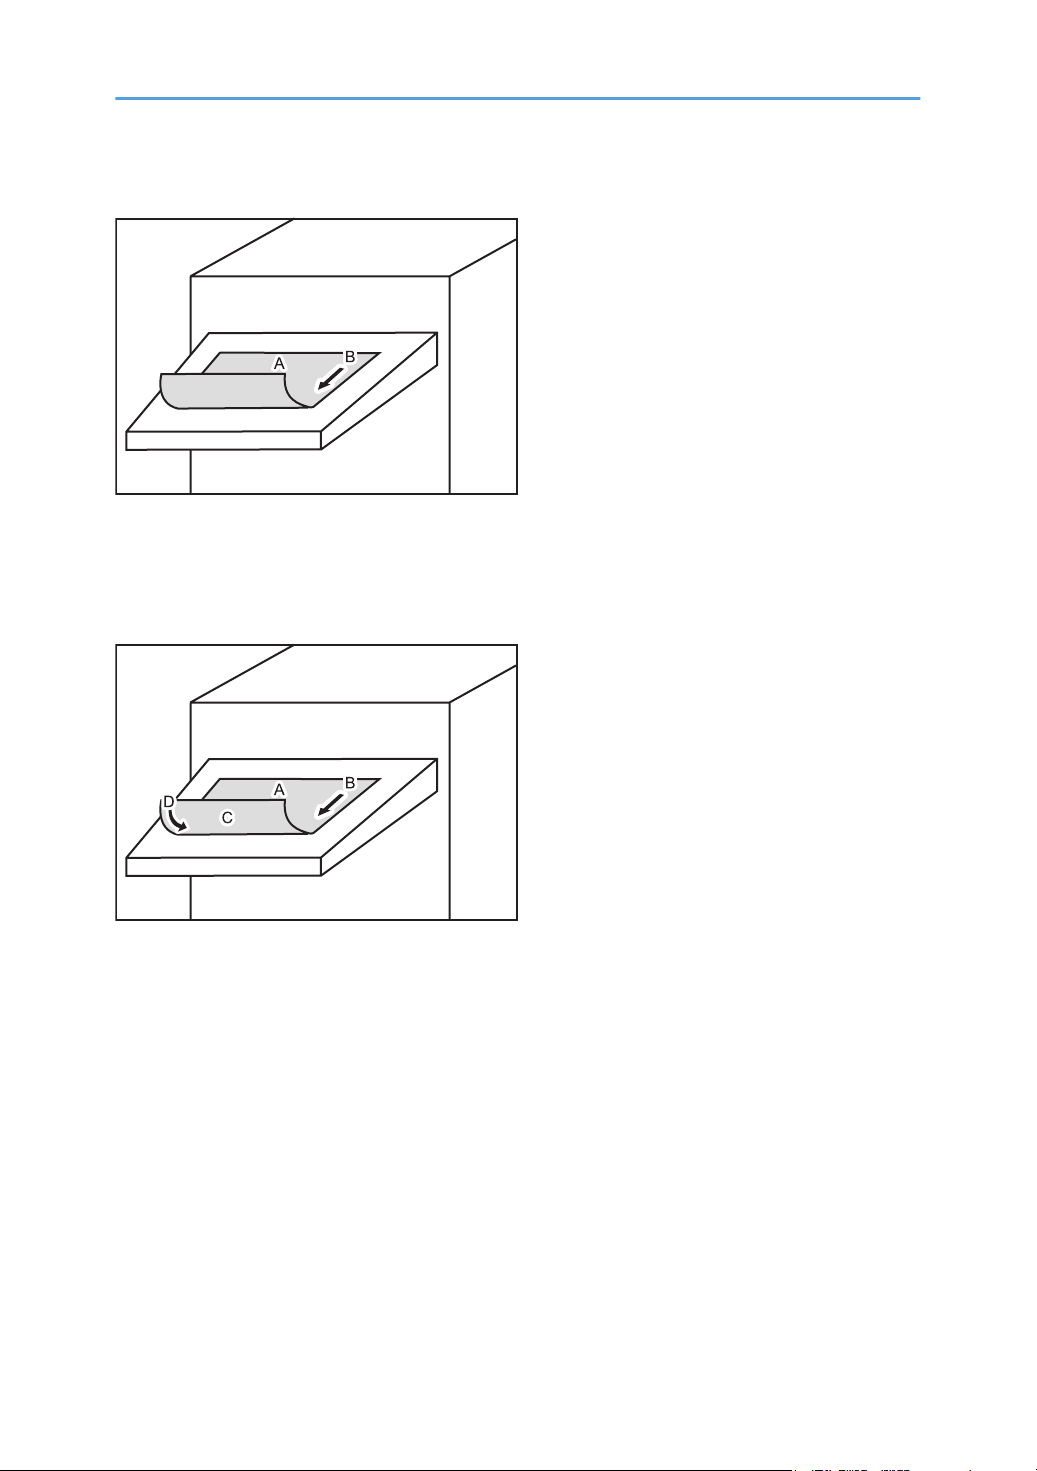
Single-sided printing: Printed side face up
DFP408
DFP409
A. Side 1
B. Paper feed direction of Side 1
Duplex printing: Printed side face up
A. Side 1
B. Paper feed direction of Side 1
C. Side 2
D. Paper feed direction of Side 2
11

12

1. Adjustment Settings for Operators
Accessing Adjustment Settings for Operators
1. Press "Login/Logout" ( ) on the top right of the screen.
The name that appears lower the "Login/Logout" icon ( ) depends on the type of administrator
logging in.
2. Enter your login user name and password, and then press [Login].
If you are logging on as the administrator for the first time, enter "admin" in User Name.
3. Press [Adjustment Settings for Operators] at the upper left of the screen.
13
1
5
324
DWP560
6
To Print Screen
1. Adjustment Settings for Operators
Layout of Adjustment Settings for Operators
This section explains how to use Adjustment Settings for Operators.
1. [ ]
Press this key to collapse the hierarchical display of the adjustment items and display the group names of those
items.
2. [Reset]
Press this key to reset the settings/modifications currently configured. You cannot reset he settings/
modifications after pressing [Apply].
3. [Apply]
Press this key to apply the settings/modifications.
4. [To Print Screen]
Press this key to display the print screen. You can use this screen to view the changes you have made.
5. Adjustment items
Adjustment items are displayed in this area. When you select an item, its configuration screen will then open.
6. Configuration screen
Configure or modify the settings of the adjustment item you select.
14
Features of the Displayed Items and Setting Operations
Features of the Displayed Items and Setting
Operations
The following operations are available for each adjustment item:
• Value setting
• Item setting
• Executing
• Display only
Value setting
Press [+] or [-] to increase or decrease the value respectively, or use the numeric keypad to enter
the value.
For some settings, move the slider right or left to increase or decrease the setting value.
A numeric keypad appears to the left when you press the input box. Use the keypad to enter a
value.
15

1. Adjustment Settings for Operators
• [×]: Press to delete the entered value character by character.
• [Clear]: Clear the entered value.
• [+/-]: Change the sign of the entered value from + (positive) to - (negative) and vice versa.
• [Enter]: Confirm the entered value.
For some items, you can select a value from the pull-down list that appears when you press the
input box. Select a value from the list.
Item setting
Select the item you require.
Executing
Press [Execute] to perform a selected function.
16
Display only
You can check the setting of the selected item.
Features of the Displayed Items and Setting Operations
17
1. Adjustment Settings for Operators
Notes on How Adjustment Settings Are Applied to Printed Copies
The adjustment settings are applied to printed copies according to the settings specified for each paper
tray, paper size, and paper weight.
Depending on the adjustment setting, the same settings specified under different categories may be
applied to printed copies concurrently.
• Settings for each paper tray
• Settings for each paper weight
• Settings for each paper size
Settings for each paper tray
These adjustment settings can be specified for each paper tray.
The settings are applied only to printed copies fed from each paper tray.
Settings for each paper weight
These adjustment settings can be specified for each paper weight.
The settings are applied only to printed copies of each paper weight*1.
This appears as [Paper Thickness] in "Tray Paper Settings".
*1
18
Notes on How Adjustment Settings Are Applied to Printed Copies
Settings for each paper size
These adjustment settings can be specified for each paper size.
The settings are applied only to printed copies of each paper size.
• For information about the paper tray, paper thickness, and tray paper size settings that can be
specified for a particular function, see the manual for the relevant function.
• In "Advanced Settings" for custom paper, there are settings identical to those in Adjustment Settings
for Operators. When printing is performed from a tray to which the custom paper setting is
allocated, the setting in "Advanced Settings" for the custom paper is applied instead of the setting
in Adjustment Settings for Operators.
19

1. Adjustment Settings for Operators
20

2. Details of Menu Items in Adjustment Settings for Operators
[Machine: Image Position]
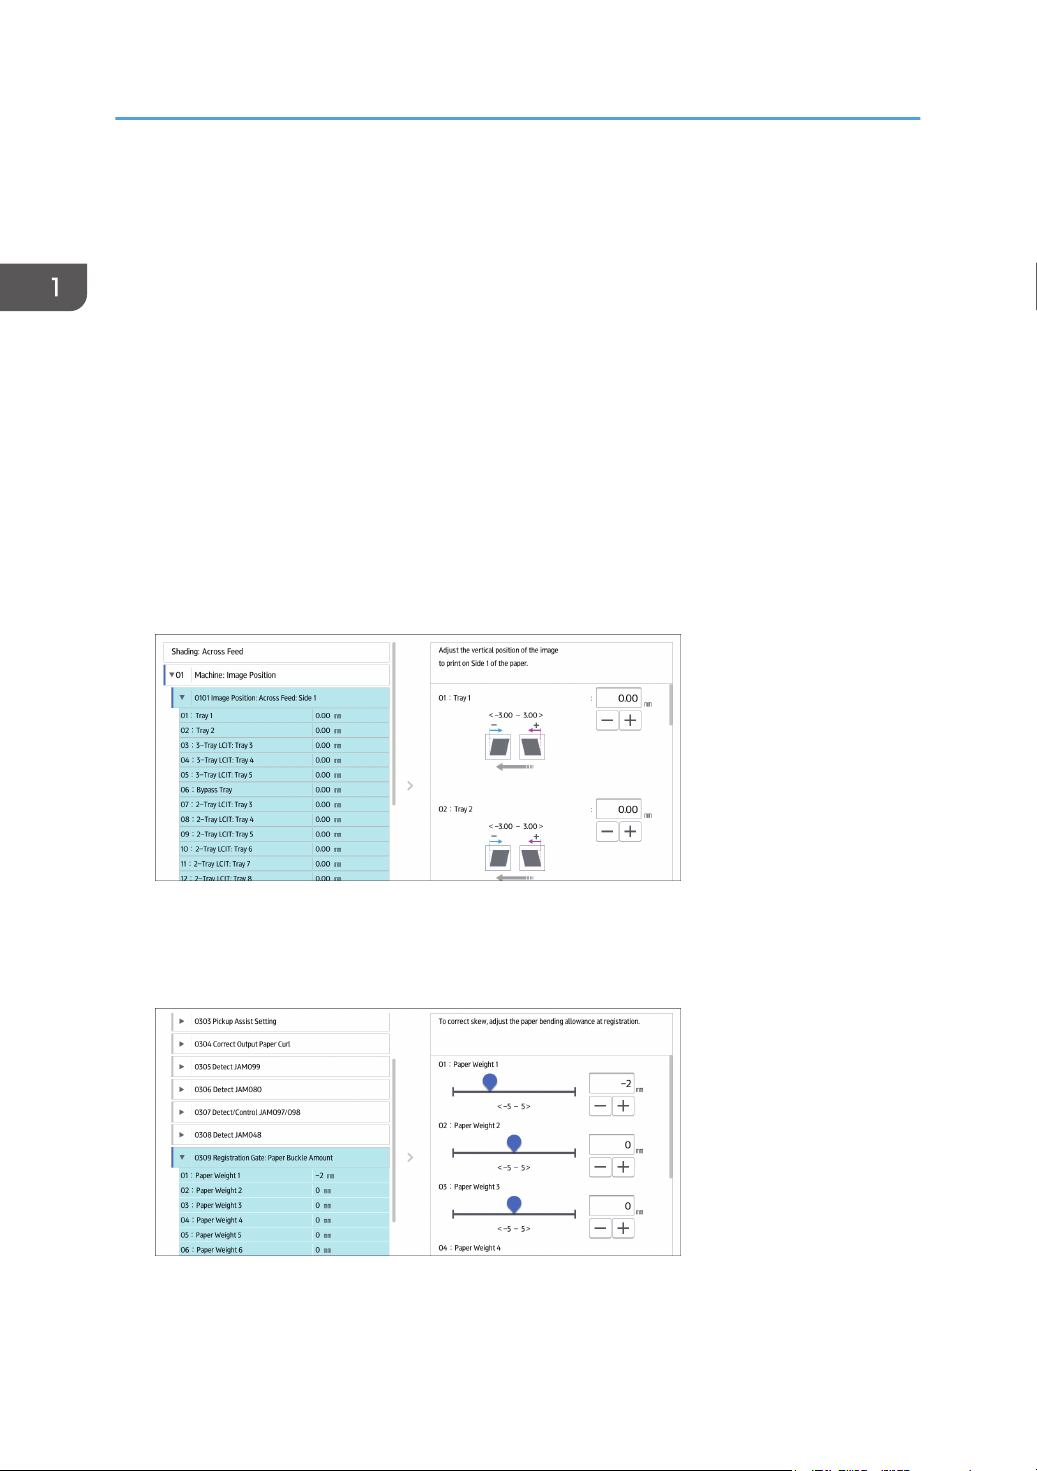
0101 [Image Position: Across Feed: Side 1]/0102 [Image Position: Across Feed: Side 2]
Adjust the vertical position of the image to print on Side 1/2 of the paper.
• Depending on the setup, the print side (Side 1/Side 2) with respect to the delivery and paper feed
directions may vary. For details, see page 10 "Paper Feed Direction of Printed Copies (Side 1/
Side 2)"
• This setting is not effective for paper fed from paper trays with custom paper presets. For such
paper, the value specified in [Across Feed] in [Image Position: Side 1]/[Image Position: Side 2] in
1101 [Image Position] in "Advanced Settings" takes precedence.
21
2. Details of Menu Items in Adjustment Settings for Operators
Setting Items
[Tray 1] 0.0 3.0 -3.0 0.1 mm
[Tray 2]
[3-Tray LCIT: Tray 3]
[3-Tray LCIT: Tray 4]
[3-Tray LCIT: Tray 5]
[Bypass Tray]
[2-Tray LCIT: Tray 3]
[2-Tray LCIT: Tray 4]
[2-Tray LCIT: Tray 5]
[2-Tray LCIT: Tray 6]
[2-Tray LCIT: Tray 7]
[2-Tray LCIT: Tray 8]
Default
Value
Max.
Value
Min.
Value
Step Unit
[Extended Option Tray]
0103 [Image Position: With Feed: Side 1]/0104 [Image Position: With Feed: Side 2]
Adjust the horizontal position of the image to print on Side 1/2 of the paper.
• Depending on the setup, the print side (Side 1/Side 2) with respect to the delivery and paper feed
directions may vary. For details, see page 10 "Paper Feed Direction of Printed Copies (Side 1/
Side 2)"
• If the leading-edge margin on Side 1 of the paper is too narrow, paper jams may occur.
22
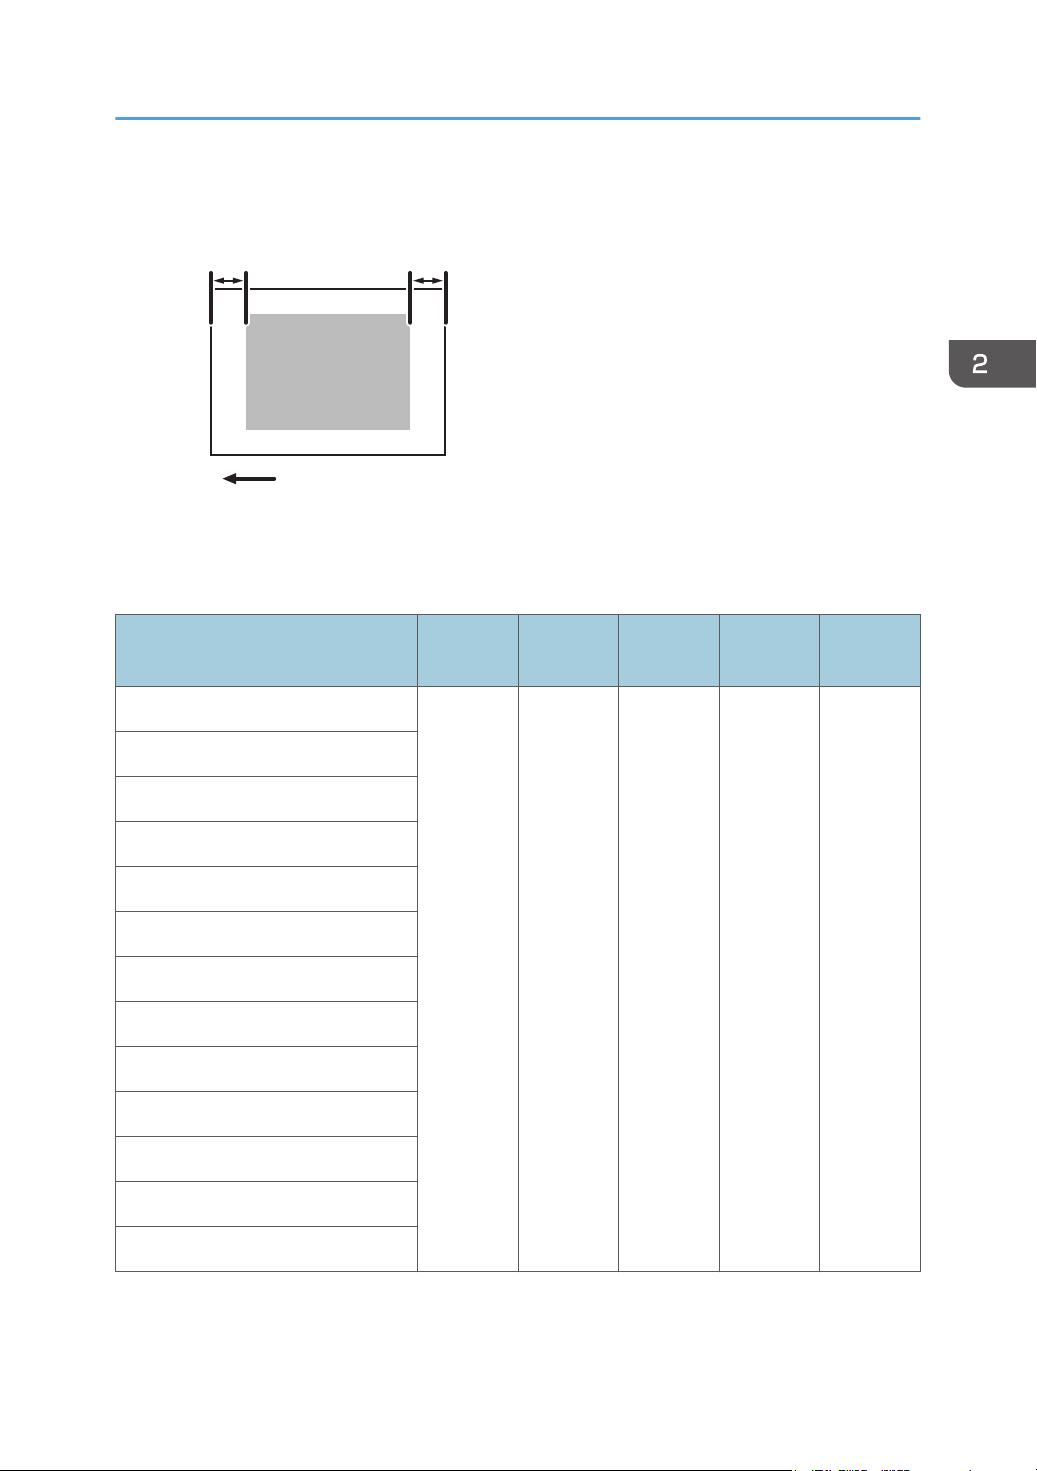
Paper feed direction
Leading-edge margin Trailing-edge margin
CEZ586
[Machine: Image Position]
• If the trailing-edge margin on Side 1 of the paper is too narrow, paper jams may occur when
printing on the back side of paper during duplex printing.
• This setting is not effective for paper fed from paper trays with custom paper presets. For such
paper, the value specified in [With Feed] in [Image Position: Side 1]/[Image Position: Side 2] in
1101 [Image Position] in "Advanced Settings" takes precedence.
Setting Items
[Tray 1] 0.0 3.0 -3.0 0.1 mm
[Tray 2]
[3-Tray LCIT: Tray 3]
[3-Tray LCIT: Tray 4]
[3-Tray LCIT: Tray 5]
[Bypass Tray]
[2-Tray LCIT: Tray 3]
[2-Tray LCIT: Tray 4]
[2-Tray LCIT: Tray 5]
[2-Tray LCIT: Tray 6]
[2-Tray LCIT: Tray 7]
[2-Tray LCIT: Tray 8]
[Extended Option Tray]
Default
Value
Max.
Value
Min.
Value
Step Unit
23
2. Details of Menu Items in Adjustment Settings for Operators
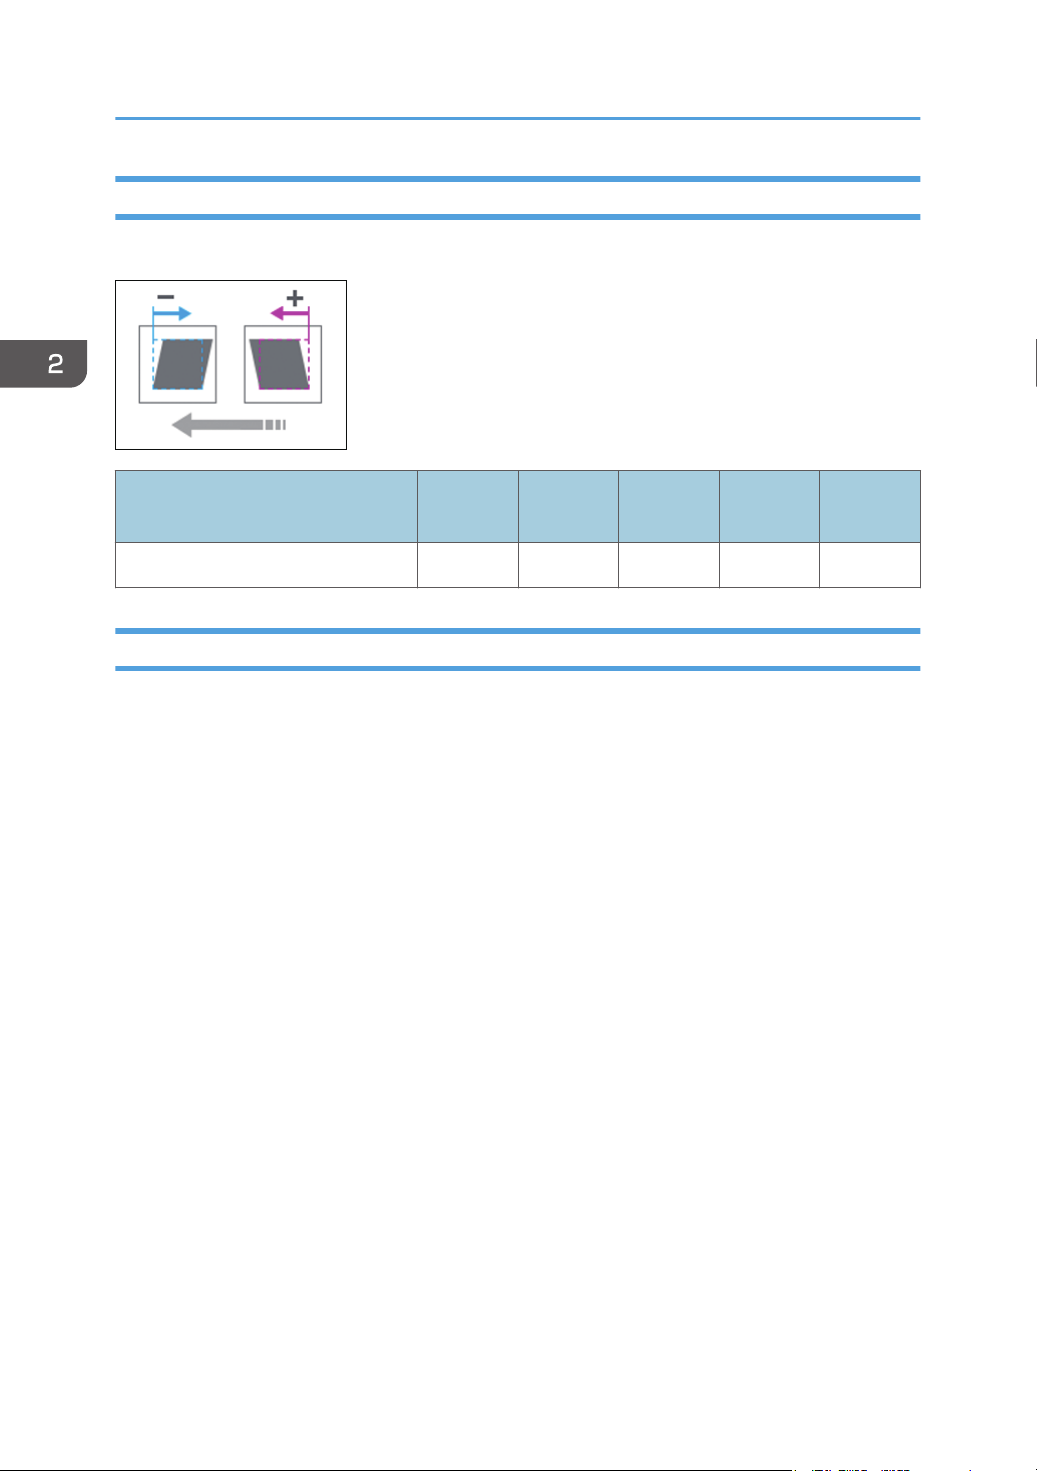
0105 [Perpendicularity Adjustment]
Correct the perpendicularity of image.
Setting Item
[Perpendicularity Adjustment] 0 20 -20 1 None
Default
Value
Max.
Value
Min.
Value
Step Unit
0106 [Switch Paper Edge Detection Sensor]
Select accuracy of paper edge detection sensor to correct image position in feeding direction. [High
Accuracy] makes max. accuracy. Select [Normal] if paper jam occurs due to registration gap.
24
[Machine: Image Position]
Setting Items Values Default Vaule
[Tray 1] [Normal]
[Tray 2]
[3-Tray LCIT: Tray 3]
[3-Tray LCIT: Tray 4]
[3-Tray LCIT: Tray 5]
[Bypass Tray]
[2-Tray LCIT: Tray 3]
[2-Tray LCIT: Tray 4]
[2-Tray LCIT: Tray 5]
[2-Tray LCIT: Tray 6]
[2-Tray LCIT: Tray 7]
[2-Tray LCIT: Tray 8]
[Extended Option Tray]
[High Accuracy]
[Normal]
0107 [Auto Adjust Image Position: No. of Printed Sheets]
Set No. of Printed Sheets during Auto Adjust Image Position.
Setting Items
[Side 1: Normal/High Accuracy] 10 100 1 1 None
[Side 2: Normal]
[Side 2: High Accuracy] 14 5
[Align Side1&2: Normal/Hi Acc.] 10 1
Default
Value
Max.
Value
Min.
Value
Step Unit
25
2. Details of Menu Items in Adjustment Settings for Operators
[Machine: Image Quality]
0201 [Execute Image Quality Adjustment]
Execute the following adjustment manually: image density /reduce density diff. in across direction /
reduce density diff. in feeding direction / reduce color dispersion.
Setting Items Remarks
[Adjust Image Density] Press [Execute].
[Density Difference: With Fd]
[Color Registration]
0202 [Maximum Image Density]
Adjust max. image density for each color. Use [+] or [-] to increase or decrease adhesion amount. After
the setting change, the image density is adjusted automatically before print start.
Setting Items
[Black] 0 5 -5 1 None
[Cyan]
[Magenta]
[Yellow]
[Special]
*1
*1
This function is available for Pro C7200X, Pro C7210X, Pro C7200SX, and Pro C7210SX.
Default
Value
Max.
Value
Min.
Value
Step Unit
0203 [Line Width]
Adjust laser beam for image data writing. Halftone dot and fine line becomes thicker when laser beam
increases. After setting change, image density is adjusted automatically before print start.
26
[Machine: Image Quality]
Setting Items
Default
Value
Max.
Value
Min.
Value
Step Unit
[Black] 0 5 -5 1 None
[Cyan]
[Magenta]
[Yellow]
[Special]
*1
*1
This function is available for Pro C7200X, Pro C7210X, Pro C7200SX, and Pro C7210SX.
0204 [Density Difference: Across Feed]
Adjust the image density difference in the vertical direction. Use [+] or [-] to increase or decrease the
density of lower part of image.
• Depending on the machine's other settings, this setting may have no effect.
Setting Items
Default
Value
Max.
Value
Min.
Value
Step Unit
[Black] 0 10 -10 1 None
[Cyan]
[Magenta]
[Yellow]
[Special]
*1
*1
This function is available for Pro C7200X, Pro C7210X, Pro C7200SX, and Pro C7210SX.
27

2. Details of Menu Items in Adjustment Settings for Operators
[Machine: Paper Feed/ Output]
0301 [3-Tray LCIT: Fan Setting]
Set fan operation for 3-tray LCIT. When it is [ON], air is blown to the edge of sheets to separate them in
close contact.
Setting Items Values Default Value
[3-Tray LCIT: Tray 3] [Auto Select]
[3-Tray LCIT: Tray 4]
[3-Tray LCIT: Tray 5]
[On]
[Off]
[Auto Select]
0302 [3-Tray LCIT: Fan Volume Setting]
Adjust the fan volume for 3-tray LCIT to separate sheets in close contact. Use [+] or [-] to increase or
decrease the fan volume.
• This setting is not effective for paper fed from paper trays with custom paper presets. For such
paper, the value specified in [Fan Level] in 1311 [3-Tray LCIT] in "Advanced Settings" takes
precedence.
Setting Items
[3-Tray LCIT: Tray 3] 50 100 10 10 %
[3-Tray LCIT: Tray 4]
Default
Value
Max.
Value
Min.
Value
Step Unit
[3-Tray LCIT: Tray 5]
0303 [Pickup Assist Setting]
Set the operation of the Paper Feed Roller. By setting it [ON], the contact time of Paper Feed Roller
becomes longer and it makes paper feeding easier.
28
 Loading...