

Page 1

Operating Instructions
Troubleshooting: TCRU/ORU
For safe and correct use, be sure to read Safety Information before using
the machine.
Page 2

Page 3

TABLE OF CONTENTS
Introduction......................................................................................................................................................... 6
How to Read This Manual................................................................................................................................. 7
Symbols...........................................................................................................................................................7
Disclaimer........................................................................................................................................................7
Notes...............................................................................................................................................................7
1. Before You Begin
About This Manual............................................................................................................................................. 9
Guide to Components......................................................................................................................................10
About the Display for Options.........................................................................................................................11
Before you change a setting............................................................................................................................12
About Printing Surfaces....................................................................................................................................13
2. Troubleshooting Service Call Problems (SC Codes)
What Are SC Codes?...................................................................................................................................... 15
If an SC code appears:............................................................................................................................... 15
SC Code List..................................................................................................................................................... 16
3. Troubleshooting Image Quality Problems
Toner Spotting/Staining.................................................................................................................................. 17
Paper Is Spotted with Toner........................................................................................................................ 17
Black Spots...................................................................................................................................................18
Streaks (1).................................................................................................................................................... 19
Streaks (2).................................................................................................................................................... 21
Streaks (3).................................................................................................................................................... 22
Streaks (4).................................................................................................................................................... 22
Two 13-mm Long Vertical Streaks..............................................................................................................23
Two 14-mm Wide Streaks.......................................................................................................................... 25
Stained Paper Edges................................................................................................................................... 27
Stained Background.................................................................................................................................... 27
Ghosting....................................................................................................................................................... 28
Scratched Images and Stained Paper Edges............................................................................................ 29
Toner Scatter.....................................................................................................................................................31
Toner Scatter (1).......................................................................................................................................... 31
Toner Scatter (2).......................................................................................................................................... 32
Toner Scatter (3).......................................................................................................................................... 34
1
Page 4

Color Loss......................................................................................................................................................... 37
White Spots.................................................................................................................................................. 37
Blister-like White Spots................................................................................................................................38
Mottling.........................................................................................................................................................39
Density Problems.............................................................................................................................................. 42
Uneven Image Density................................................................................................................................ 42
Uneven Density from Top to Bottom........................................................................................................... 45
Fainter Leading Edge...................................................................................................................................46
Fainter Trailing Edge....................................................................................................................................48
Uneven Density within 90 mm (3.5 in.) of the Trailing Edge....................................................................49
Periodic Density Fluctuation........................................................................................................................ 51
Entire Image Faint........................................................................................................................................ 52
Color Is Too Dense...................................................................................................................................... 53
Broken Thin Lines..........................................................................................................................................54
Blurred Images............................................................................................................................................. 55
Dropouts (Character Voids)........................................................................................................................56
Afterimages.................................................................................................................................................. 58
White Streaks............................................................................................................................................... 59
Shock jitter: When the paper is inserted.................................................................................................... 60
Gloss Problems.................................................................................................................................................63
Vertical Glossy Lines....................................................................................................................................63
Insufficient Gloss.......................................................................................................................................... 64
Fusing Problems................................................................................................................................................65
Insufficient Toner Fusing...............................................................................................................................65
Improving Image Quality When Using Different Types of Paper............................................................ 66
4. Troubleshooting Paper Delivery Problems
Frequent Paper Misfeeds.................................................................................................................................69
Wrapped Around the Upper Fixing Side Separation Plate..................................................................... 70
Messages Reporting Paper Misfeeds.............................................................................................................73
If (J049) Appears.........................................................................................................................................73
If (J050) Appears.........................................................................................................................................75
If (J080) Appears.........................................................................................................................................77
If (J082) Appears.........................................................................................................................................78
2
Page 5

If (J099/J424/J425/J439/J440) Appears........................................................................................... 80
If (J430/J431/J445/J446/J460/J461) Appears................................................................................81
If (J085/J086/J087) Appears When Using Coated Paper...................................................................82
Paper Skew.......................................................................................................................................................83
Wrong Detection of Skew............................................................................................................................... 84
Double Feeding................................................................................................................................................85
Wrong Detection of Double Feeding............................................................................................................. 88
Paper Misfeeding.............................................................................................................................................89
Paper Feed Problems Affecting Image Quality..............................................................................................93
The Image Is Positioned Incorrectly............................................................................................................93
Image Scaling Error on the Side 1 of Paper..............................................................................................94
Image Scaling Error on the Side 2 of Paper..............................................................................................95
Paper Edges Are Soiled (1)........................................................................................................................ 96
Paper Edges Are Soiled (2)........................................................................................................................ 96
Paper Edges Are Soiled (3)........................................................................................................................ 98
Scratches, Streaks, or Vertical Creases Appear on the Image................................................................99
Decurling Results in Scratches, Streaks, or Creases............................................................................... 100
The Leading/Trailing Edge Margin Is Long............................................................................................102
Curling........................................................................................................................................................103
Ear-fold.......................................................................................................................................................104
Cleaning the Paper Feed Path...................................................................................................................... 106
Cleaning Paper Trays 1-3........................................................................................................................ 107
Cleaning the Paper Feed Path for Paper Trays 1-3................................................................................108
Cleaning the Paper Feed Path in the Drawer..........................................................................................110
Cleaning the Paper Feed Path in the Wide LCT......................................................................................122
Cleaning the Paper Feed Path in the LCT................................................................................................ 124
Cleaning the Paper Feed Path in the Multi Bypass Tray........................................................................ 125
Cleaning the Paper Feed Rollers and Paper Feed Belt in the Interposer.............................................. 125
Cleaning the Rollers and Guide Boards in the Finisher..........................................................................128
5. Post-Processing Option Troubleshooting
Finisher SR5090/Booklet Finisher SR5100................................................................................................135
Delivered Sheets Are Not Stacked Properly...........................................................................................135
Large Delivered Sheets Are Not Stacked Properly................................................................................ 136
3
Page 6

Trailing edge of stapled sheets close to the paper exit.......................................................................... 138
Sheets cannot be stapled properly.......................................................................................................... 139
Finisher SR5110/Booklet Finisher SR5120................................................................................................141
Delivered Sheets Are Not Stacked Properly...........................................................................................141
Large Delivered Sheets Are Not Stacked Properly................................................................................ 142
Trailing edge of stapled sheets close to the paper exit.......................................................................... 144
Sheets cannot be stapled properly.......................................................................................................... 146
The Edge Is Rolled.....................................................................................................................................146
Carbonless Sheets Are Not Stacked In an Aligned Manner.................................................................148
Stitching missing, incorrect stitching position, ear-fold, or misaligned occurs......................................151
Paper is stained..........................................................................................................................................151
Paper jam occurs on thin coated paper of Paper Weight 2 or less...................................................... 152
Scratches on the edge of the stapled paper occur.................................................................................153
Paper jam occurs while saddle stitching..................................................................................................153
Multi-Folding Unit.......................................................................................................................................... 155
Inaccurate Folding (Folding Deviation)...................................................................................................155
Folding Deviation...................................................................................................................................... 156
Folds soiled by multi-sheet folding...........................................................................................................161
Edges of letter fold bent............................................................................................................................ 162
Z-Folding is Not Performed Properly.......................................................................................................164
Folded Sheets Are Not Stacked Properly................................................................................................165
High Capacity Stacker.................................................................................................................................. 167
Delivered Sheets Are Severely Curled.................................................................................................... 167
The Machine Wrongly Detects That the Tray Is Full............................................................................... 169
The Paper Press Leaves an Impression on the Paper..............................................................................170
Paper Pressed Down Insufficiently........................................................................................................... 171
Paper of Paper Weight 1 does not align correctly.................................................................................171
Interposer........................................................................................................................................................173
Paper jam due to paper misfeeding or double feeding occurs.............................................................173
Vertical lines and scratches occur at random positions..........................................................................175
6. Improving Throughput
Reducing the Waiting Time Prior to Printing................................................................................................ 177
4
Page 7

Improving Throughput When Printing on Coated Paper with a Thickness Equivalent to Paper Weight 7 or
Higher.............................................................................................................................................................178
Reducing the Waiting Time When Different Types of Paper are Used..................................................... 180
Reducing the Time the Machine Takes to Return from Standby Mode..................................................... 182
5
Page 8

Introduction
This manual contains detailed instructions and notes on the operation and use of this machine. For your
safety and benefit, read this manual carefully before using the machine. Keep this manual in a handy
place for quick reference.
6
Page 9

How to Read This Manual
Symbols
This manual uses the following symbols:
Indicates points to pay attention to when using functions. This symbol indicates points that may result in
the product or service becoming unusable or result in the loss of data if the instructions are not obeyed.
Be sure to read these explanations.
Indicates supplementary explanations of the product's functions and instructions on resolving user errors.
Indicates where you can find further relevant information.
[ ]
Indicates the names of keys or buttons on the product or display.
Disclaimer
Contents of this manual are subject to change without prior notice.
In no event will the company be liable for direct, indirect, special, incidental, or consequential damages
as a result of handling or operating the machine.
Notes
The manufacturer shall not be responsible for any damage or expense that might result from the use of
parts other than genuine parts from the manufacturer with your office products.
For good output quality, the manufacturer recommends that you use genuine toner from the
manufacturer.
Some illustrations in this manual might be slightly different from the machine.
Certain options might not be available in some countries. For details, please contact your local dealer.
Depending on which country you are in, certain units may be optional. For details, please contact your
local dealer.
Two kinds of size notation are employed in this manual.
7
Page 10

8
Page 11

1. Before You Begin
About This Manual
If the machine will not print, does not print as expected, or exhibits any other problem, find the problem
in this manual and troubleshoot accordingly.
• Before you replace any unit:
• To prevent electrical shock, turn off the printer controller on the machine control panel,
switch off the main power switch then the AC power switch, and then disconnect the
machine from the power supply.
• Allow the machine to cool for at least 30 minutes before replacing a part.
9
Page 12
1
2
3
1
2
5
4
6
3
ECH004
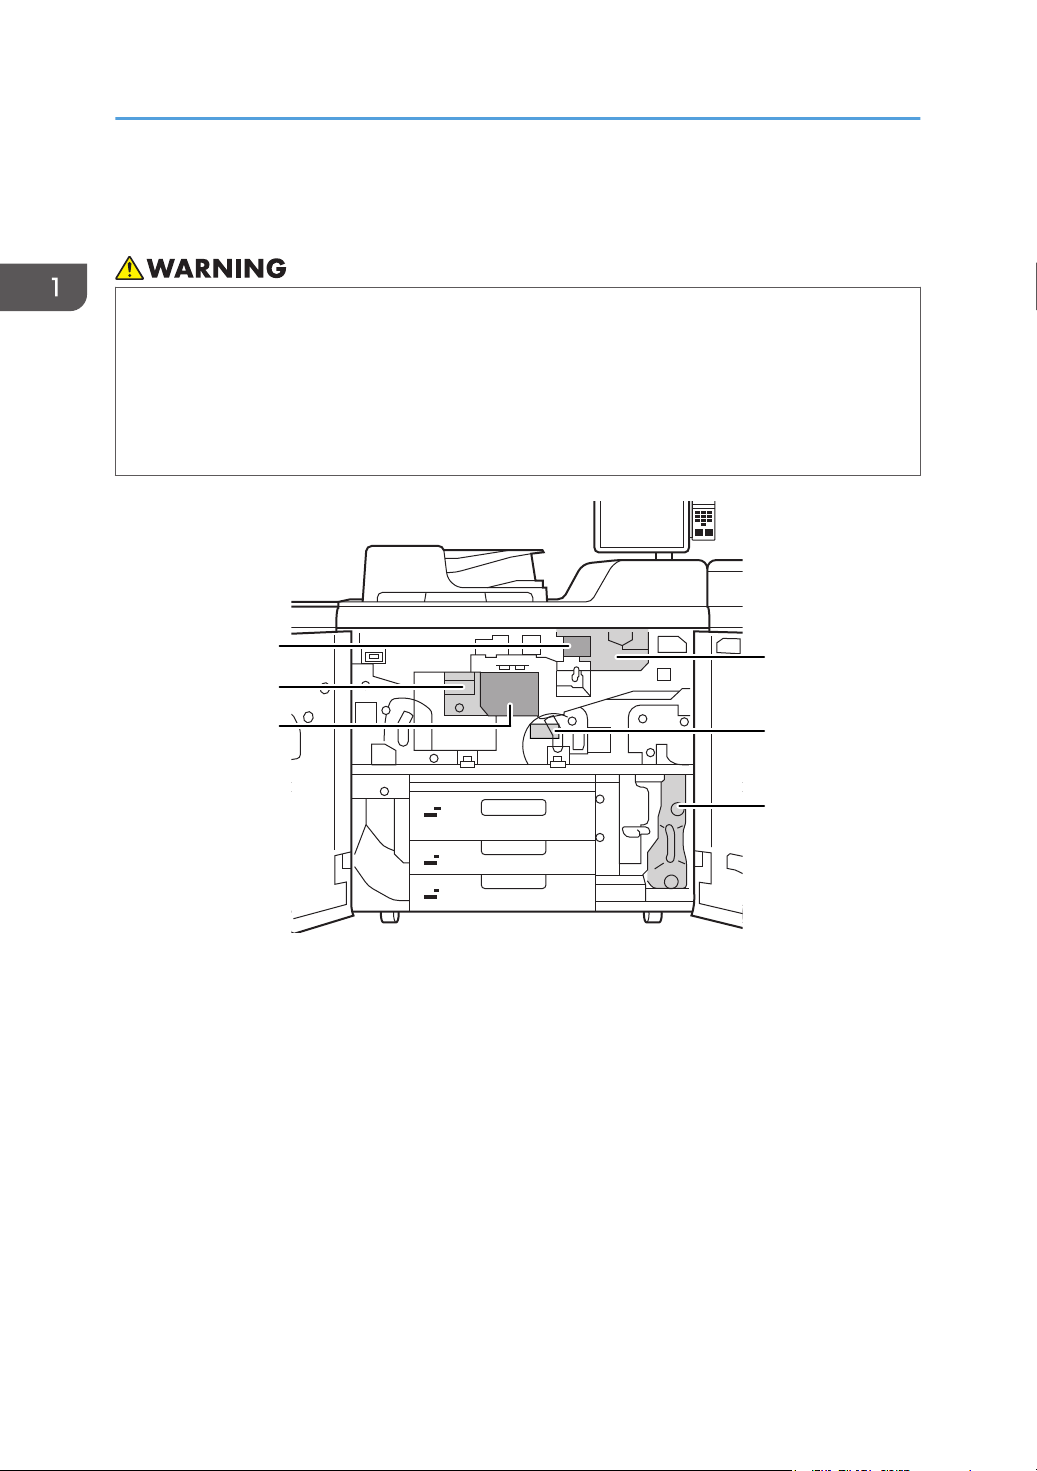
1. Before You Begin
Guide to Components
• Do not remove any covers or screws other than those explicitly mentioned in this manual. Inside
this machine are high voltage components that are an electric shock hazard and laser
components that could cause blindness. Contact your sales or service representative if any of the
machine's internal components require maintenance, adjustment, or repair.
• Do not attempt to disassemble or modify this machine. Doing so risks burns and electric shock.
Note again that exposure to the laser components inside this machine risks blindness.
1. Developer Outlet/Inlet
2. Fusing Unit
3. Cleaning Unit for Intermediate Transfer Belt
4. Development Unit
5. Paper Transfer Unit
6. Waste Toner Bottle
10
Page 13

About the Display for Options
About the Display for Options
This machine displays all of the adjustment items in the Adjustment Settings for Operators menu and
advanced settings for custom paper regardless of whether or not the items are for options. Note that any
modifications to the option settings do not take effect unless the applicable options are installed on this
machine.
• For details about the options available for this machine, see "Guide to Functions of the Machine's
Options", Preparation.
11
Page 14

1. Before You Begin
Before you change a setting
• When changing the current settings, make a note of their present values before changing them.
• If the problem persists even though the setting has been changed, restore the value noted.
• Operating the machine with the changed setting may cause problems, such as inferior printed
images.
12
Page 15
DSM008
DSM009
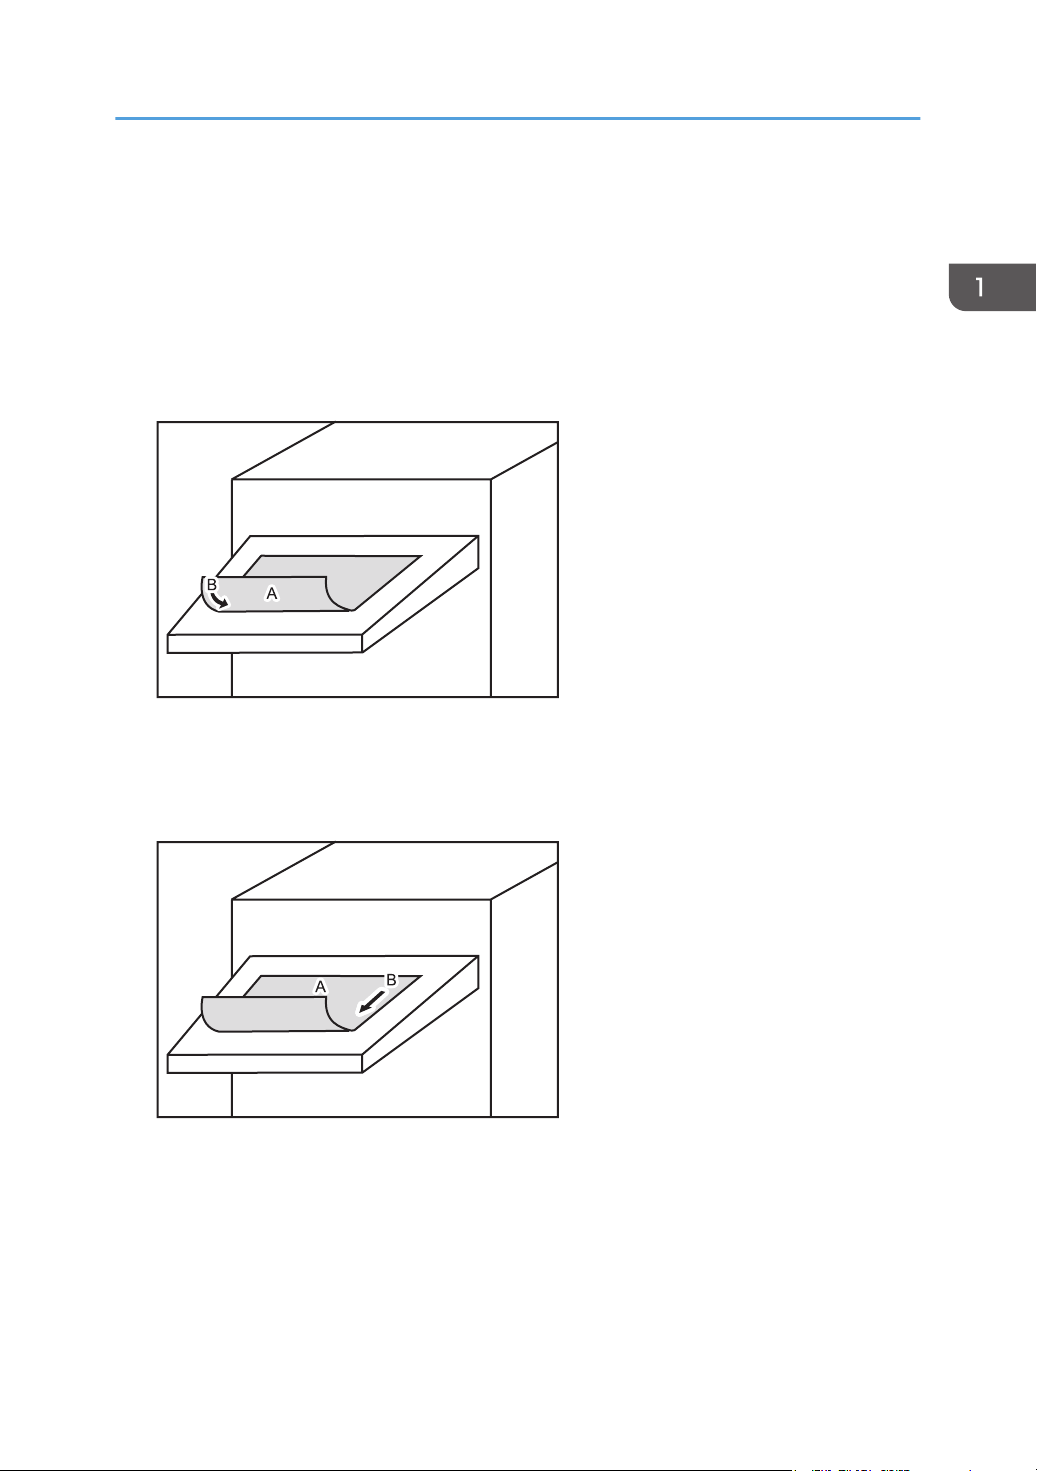
About Printing Surfaces
About Printing Surfaces
Depending on the setting, printed copies are fed as follows:
Side 1 is the surface of the paper printed during one-sided printing, or the surface of the first print during
duplex printing.
Side 2 is the surface of the paper printed on the back side of Side 1 during duplex printing.
Single-sided printing: Printed side face down
A. Side 1
B. Paper feed direction of Side 1
Single-sided printing: Printed side face up
A. Side 1
B. Paper feed direction of Side 1
13
Page 16
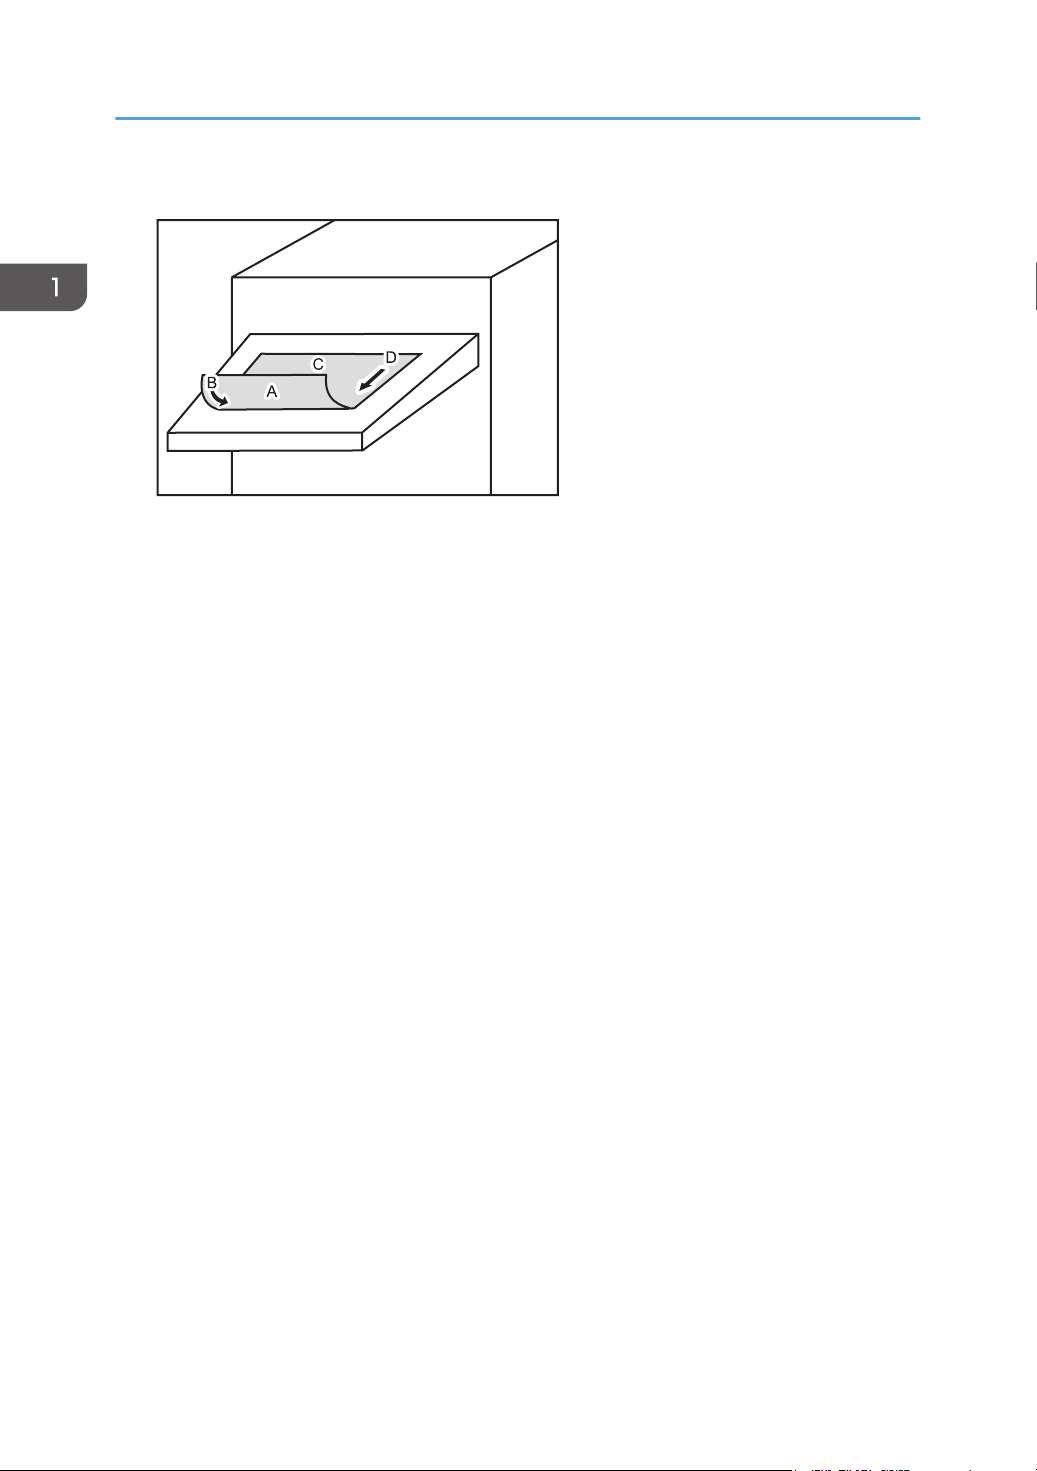
DSM010
1. Before You Begin
Duplex printing
A. Side 1
B. Paper feed direction of Side 1
C. Side 2
D. Paper feed direction of Side 2
14
Page 17

2. Troubleshooting Service Call Problems (SC Codes)
What Are SC Codes?
If an error occurs during operation, the machine displays an SC code ("SCnnn", where "nnn" is a threedigit number). The machine stops and cannot be used when an SC code is displayed.
If an SC code appears:
1. Write down the SC number.
2. Turn off the main power switch.
3. Wait a few moments, then turn the machine on again.
In most cases, cycling the machine off and on will restore it to full operation.
4. If the SC code reappears, check it against the SC code table. For details, see page 16
"SC Code List".
Check for the SC code in the table.
If the SC code is listed in the table, carry out the recommended procedure.
If the SC code is not listed in the table, contact your service representative.
15
Page 18

2. Troubleshooting Service Call Problems (SC Codes)
SC Code List
This table contains a list of selected SC codes. If the SC code that is displayed on the control panel is
listed in this table, carry out the recommended procedure. If the SC Code is not listed in this table,
contact your service representative.
• If the error persists after replacing the unit, contact your service representative.
Code Error Procedure
332-01 Toner supply motor 1 error (left bottle) Check that toner supply motor 1 operates
properly.
332-05 Toner supply motor 2 error (right bottle) Check that toner supply motor 2 operates
properly.
336-01 Developer imperfect setting (K) Check the developer.
410-01 Remaining potential: Vr detection error (K) Replace the photoconductor unit.
411-01 Charge potential: Vd adjustment error (K) Replace the charge unit.
412-01 Exposure potential: Vpl adjustment error (K) Replace the charge unit.
16
Page 19
3. Troubleshooting Image Quality
CEZ538
Problems
Toner Spotting/Staining
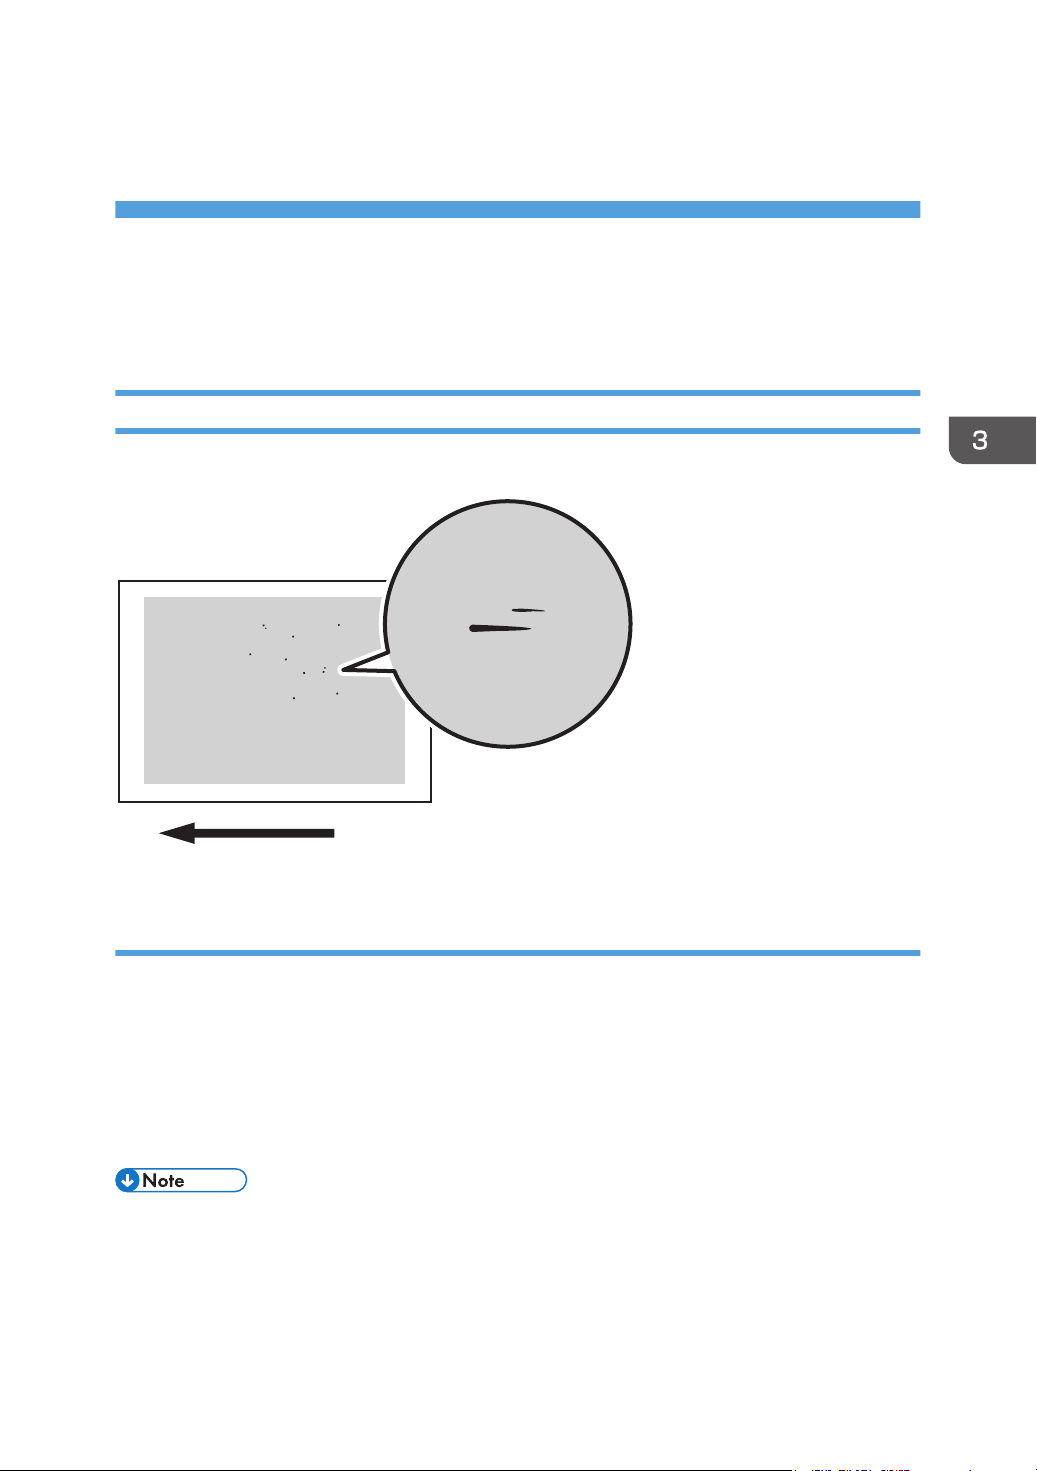
Paper Is Spotted with Toner
Paper is soiled with toner spots of 0.5–1 mm (0.02–0.04 inches) in diameter.
Cause:
Toner fragments have slipped through the cleaning web, which cleans the pressure roller, and readhered to paper.
This may occur if:
• Printing on both sides of paper
• Printing on uncoated (especially rough-textured) paper
• Printing a single-dot halftone image
• To adjust the following settings, pre-register the type of paper in use as a custom paper. For details
about registering custom papers, see "Registering a Custom Paper", Preparation.
17
Page 20
3. Troubleshooting Image Quality Problems
Solution:
Increasing the temperature when using thin paper with a thickness equivalent to Paper Weight 0 or 1
may cause paper curling, resulting in paper jams at the fusing unit. Carry out steps from Step 6 when
using thin paper with a thickness equivalent to Paper Weight 0 or 1.
1. In [Advanced Settings] for the custom paper in use, select 1206: [Fusing Temperature],
and then increase the temperature by 5 degrees in [Heat Roller Temp].
2. Print the image. Is the problem resolved?
Yes Finished!
No Go to the next step.
3. Increase the temperature an additional 5 degrees in [Heat Roller Temp].
4. Print the image. Is the problem resolved?
Yes Finished!
No Go to the next step.
5. Have changes to the settings resulted in glossy lines or paper misfeed?
Yes Decrease the temperature by 10 degrees, and then go to the next step.
No Go to the next step.
6. In [Advanced Settings] for the custom paper in use, select 1209: [Fusing Cleaning], and
then set [Cleaning Interval] to 0.01.
7. Print the image. Is the problem resolved?
Yes Finished!
No No further improvement is likely. Contact your service representative.
• Decreasing the value in [Cleaning Interval] will shorten the replacement cycle of the cleaning web.
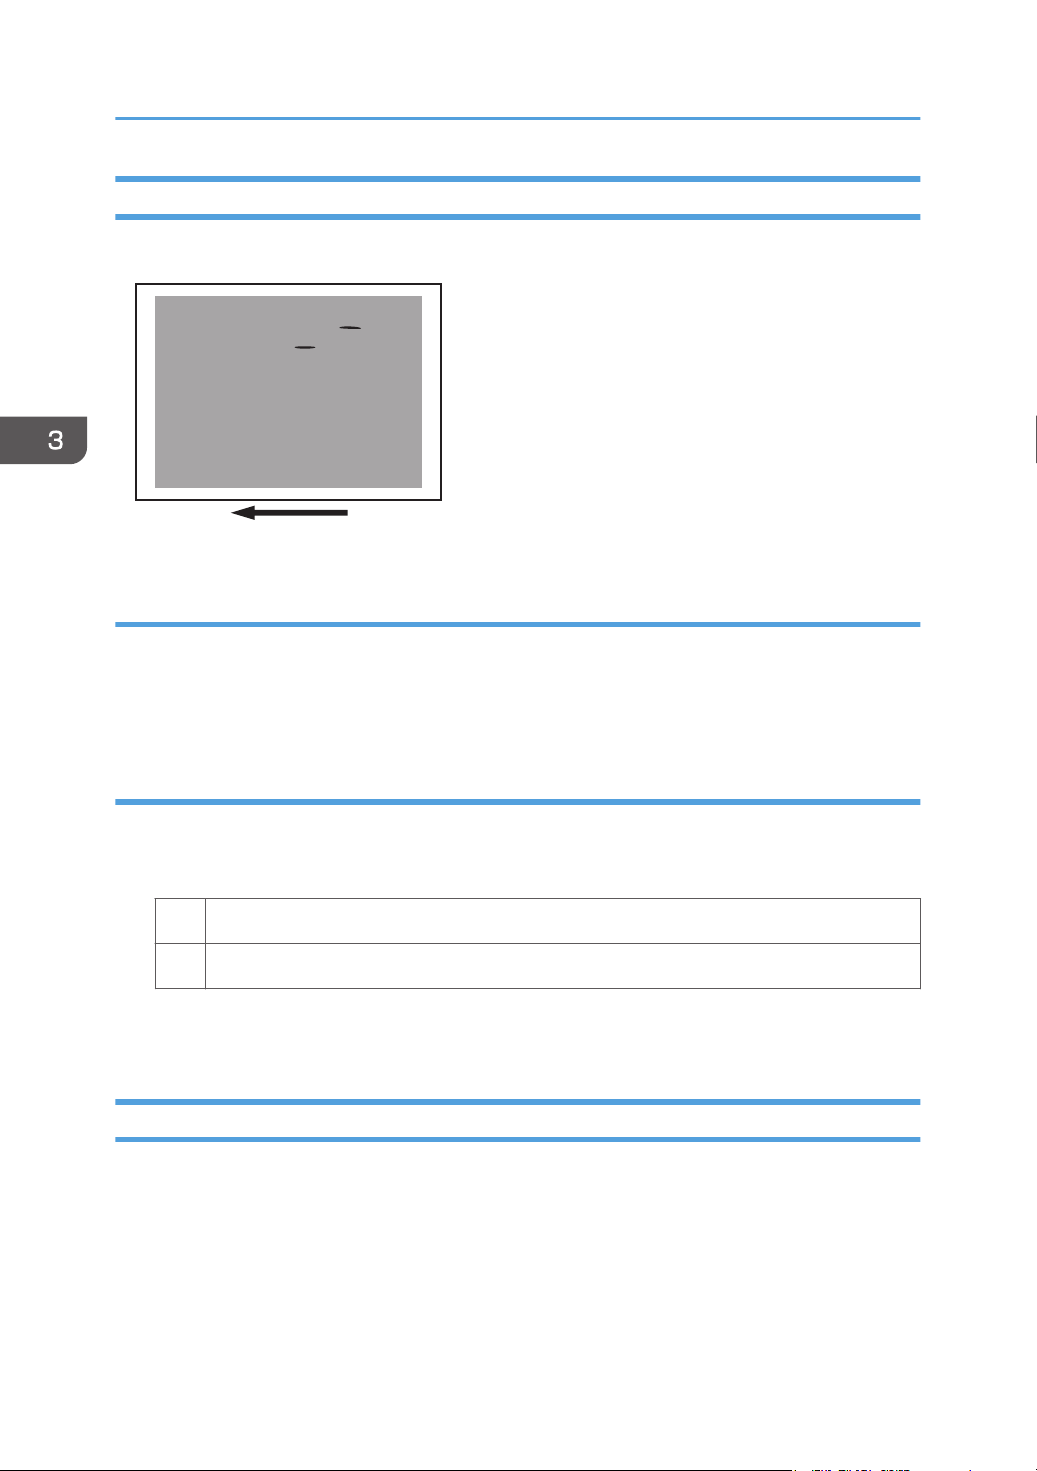
Black Spots
Black spots appear at 314 mm (12.4 inches) intervals.
18
Page 21
CZC307
314 mm (12.4 in.)
Cause:
The drum is scratched or stained.
Toner Spotting/Staining
Solution:
1. Detach the photoconductor unit and check the drum surface. Is the surface scratched?
Yes Replace the photoconductor unit.
No Contact your service representative.
2. If the problem persists, contact your service representative.
• For details about replacing the photoconductor unit, see Replacement Guide.
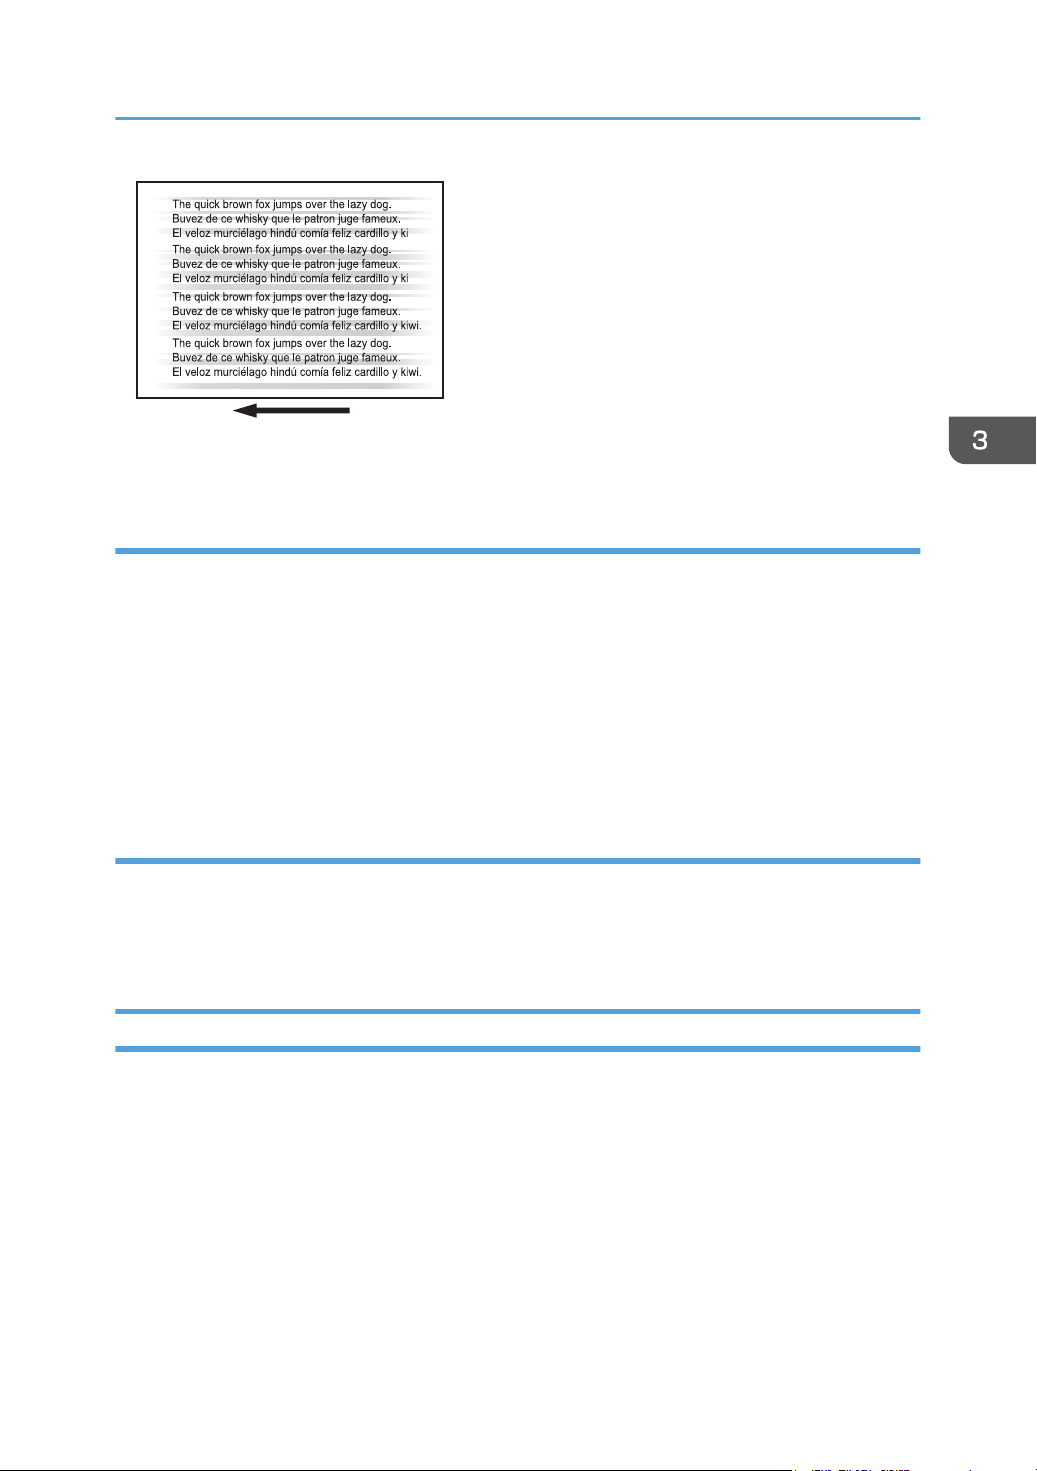
Streaks (1)
Streaks parallel to the paper feed direction appear.
19
Page 22
CZC346
3. Troubleshooting Image Quality Problems
Cause:
• The charger is stained.
• The cleaning unit for PCU has worn out.
• The drum surface is scratched.
Solution:
1. In the [Main Unit: Maintenance] group on the [Adjustment Settings for Operators] menu,
select 0522: [Execute Charger Cleaning] and execute [Charger Cleaning].
2. Print the image. Is the problem resolved?
Yes Finished!
No Go to the next step.
3. Detach the charge unit and check its surface. Is the surface stained?
Yes Contact your service representative.
No Go to the next step.
4. Detach the photoconductor unit and check the drum surface. Is the surface stained or
scratched?
Stained: Replace the cleaning unit for PCU.
Scratched: Replace the photoconductor unit.
Neither: Contact your service representative.
20
5. If the problem persists even though you have replaced the cleaning unit for PCU or
photoconductor unit, contact your service representative.
Page 23
CWH401
Toner Spotting/Staining
• For details about replacing the charge unit, cleaning unit for PCU and photoconductor unit, see
Replacement Guide.
Streaks (2)
Extended, blurred streaks parallel to the paper feed direction appear. The streaks also appear
randomly in the margins.
Cause:
If the temperature or humidity is low, remaining toner might be missed by the cleaning blade of the
cleaning unit for intermediate transfer belt or transfer unit, causing streaks to appear sporadically.
Solution:
1. Is the printed side affected by the problem?
Yes Go to the next step.
No Contact your service representative.
2. Replace the cleaning unit for intermediate transfer belt.
3. If the problem persists even though you have replaced the cleaning unit for intermediate
transfer belt, contact your service representative.
• For details about replacing the cleaning unit for intermediate transfer belt, see Replacement Guide.
21
Page 24
CEZ542
3. Troubleshooting Image Quality Problems
Streaks (3)
Streaks appear in solid-filled areas.
Cause:
If the toner contains small clumps, they disintegrate in the development unit, producing streaks.
This problem may occur if the machine is left unattended for a long period or the toner bottle is kept out
of its moisture-proof bag for a long period.
Solution:
1. Print 350 full-page, solid-fill A3 or DLT sheets.
2. Print the image. Is the problem resolved?
Yes Finished!
No Replace the toner bottle.
3. Print 350 full-page, solid-fill A3 or DLT sheets.
4. If the problem persists, contact your service representative.
Streaks (4)
Irregular black streaks appear, running parallel to the feed direction.
This occurs on both sides regardless of whether printing one-sided or duplex.
22
Page 25
DTH009
Toner Spotting/Staining
These are not toner streaks. You can remove them by rubbing them with an eraser or similar.
Cause:
If the machine remains in standby mode without paper or toner in it for a long time, friction between the
pressure roller and the cleaning web may cause dust to accumulate, resulting in streaks.
This may occur when either of the following conditions is met:
• The Low Power Mode Timer function in System Settings, which specifies the length of time before
switching to low-power mode, is set to a long time.
• Paper with excessive dust is used.
• The printing amount each month is small (less than approx. 30,000 pages).
Solution:
1. Set the Low Power Mode Timer function in System Settings to the initial value of 15
minutes.
2. If the problem persists, contact your service representative.
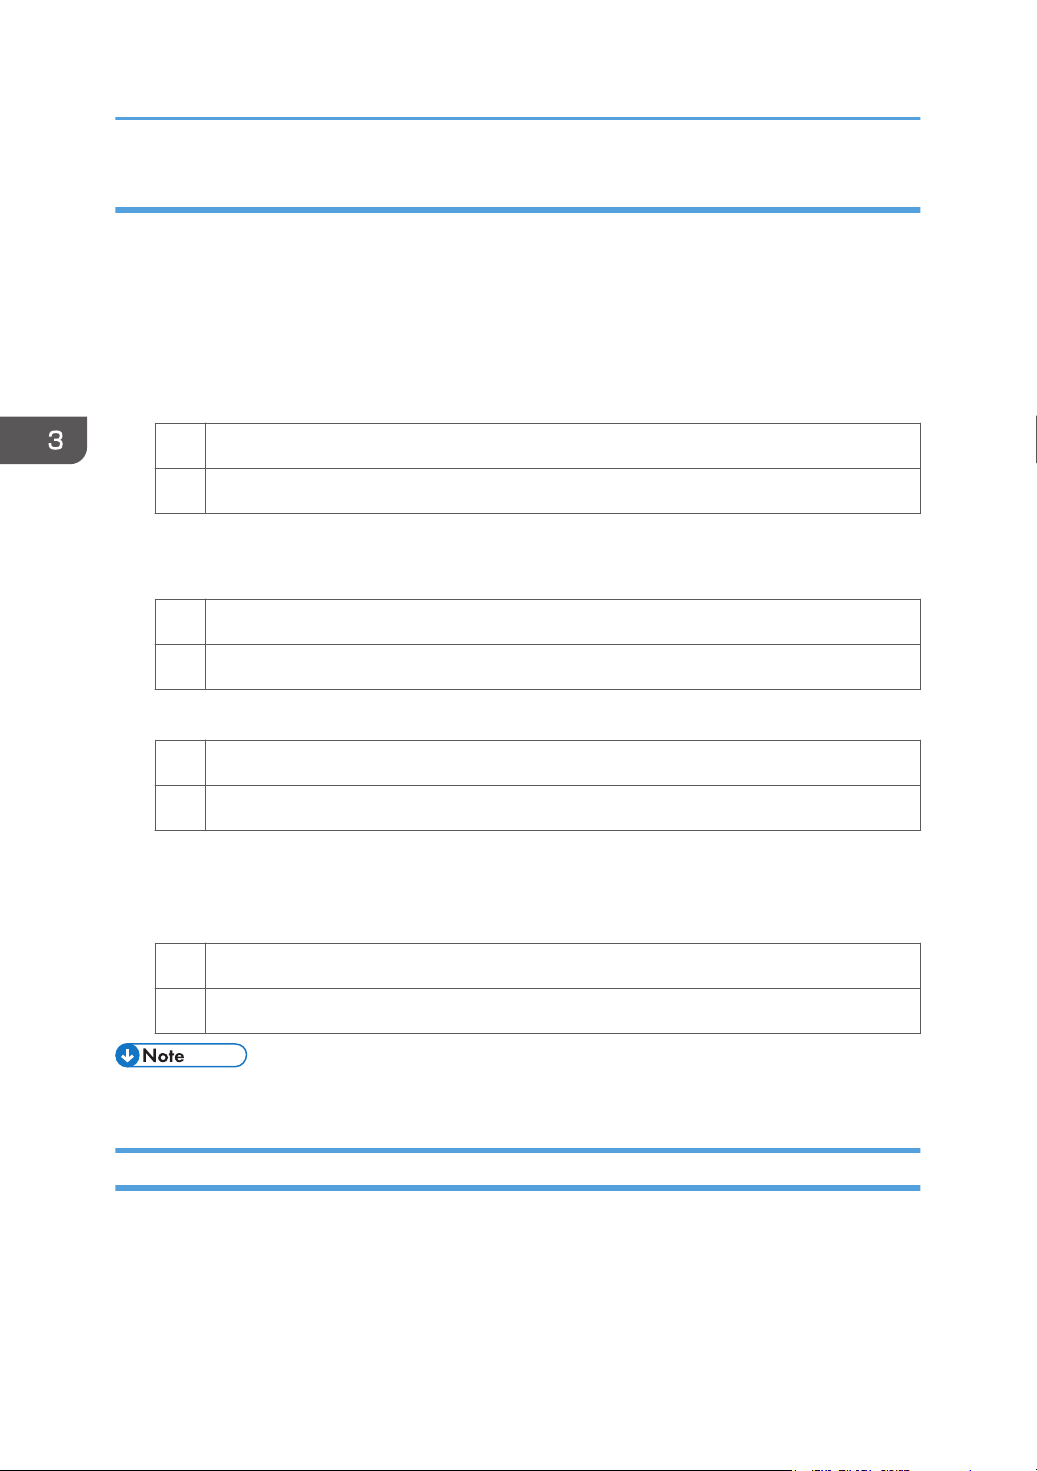
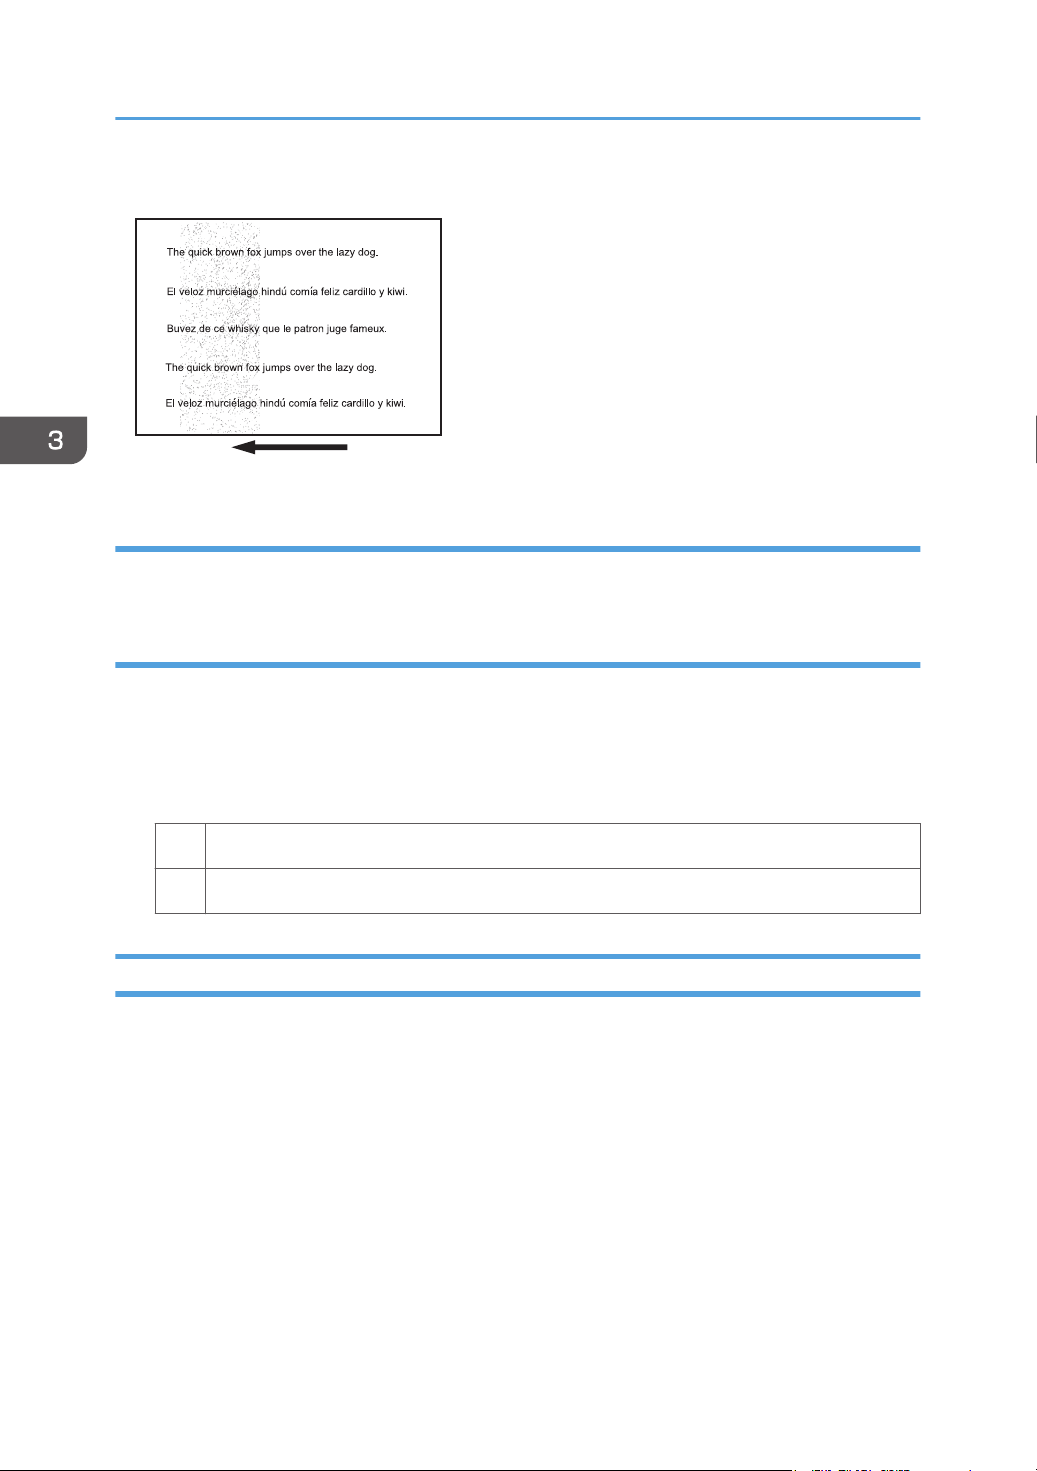
Two 13-mm Long Vertical Streaks
Two 13-mm long vertical streaks appear within 50 mm (2.0 inches) from the leading edge.
23
Page 26
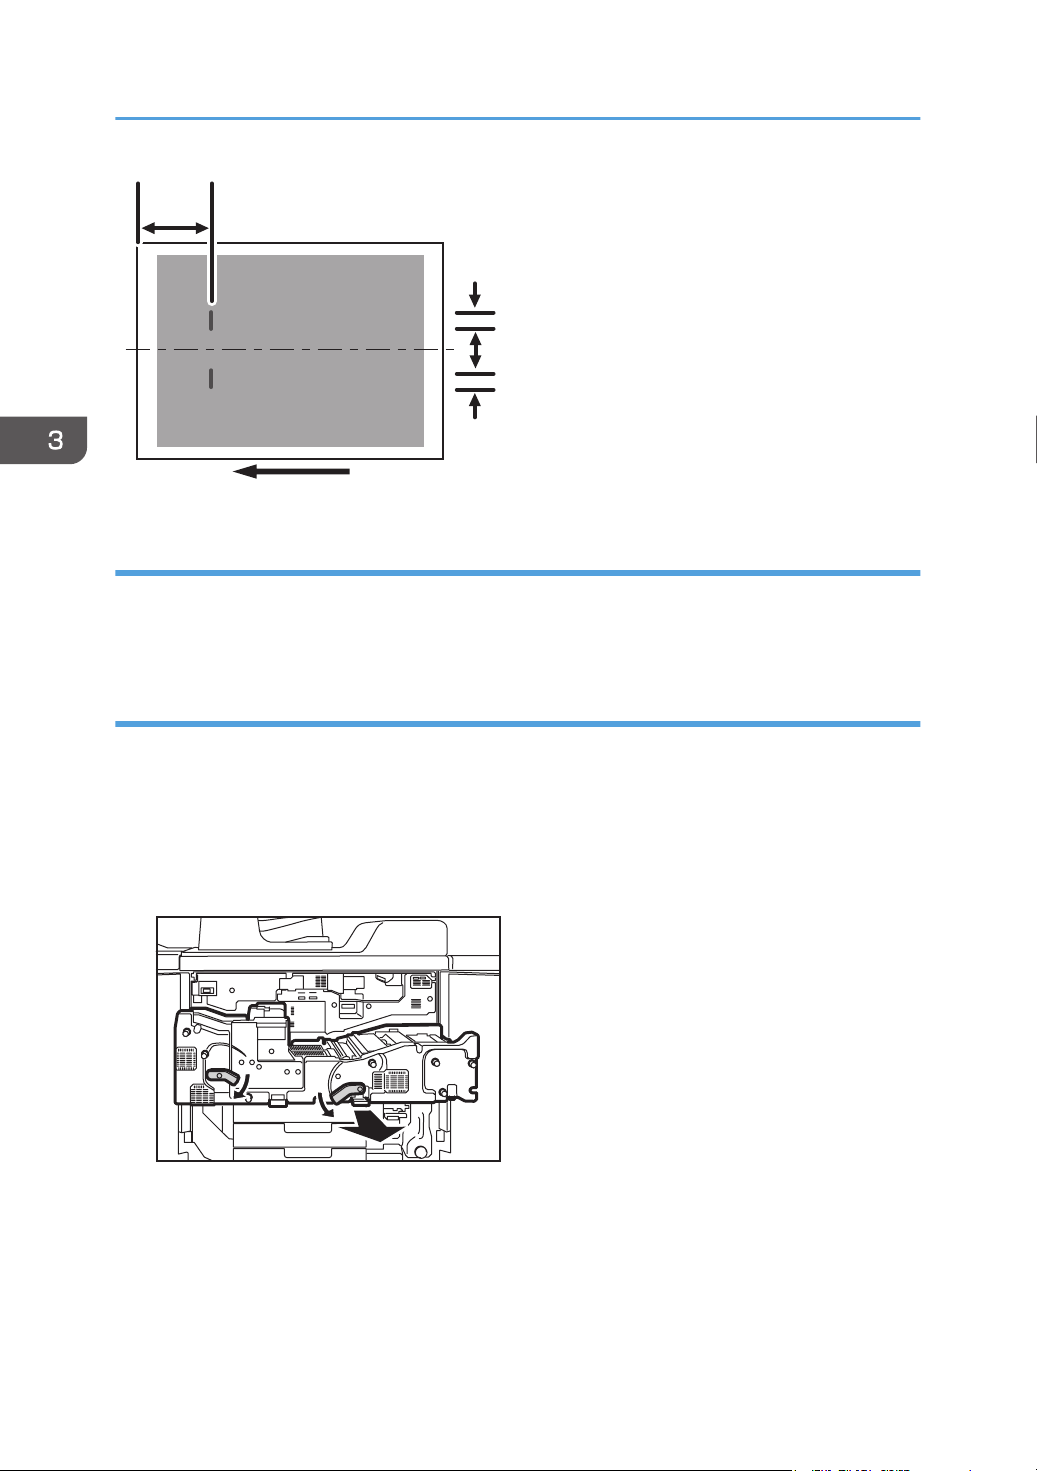
50 mm
(2.0 in.)
13 mm
(0.5 in.)
13 mm
(0.5 in.)
67 mm
(2.6 in.)
CZC313
CZC300
3. Troubleshooting Image Quality Problems
Cause:
The invert exit drive rollers or invert exit idle rollers in the drawer are soiled.
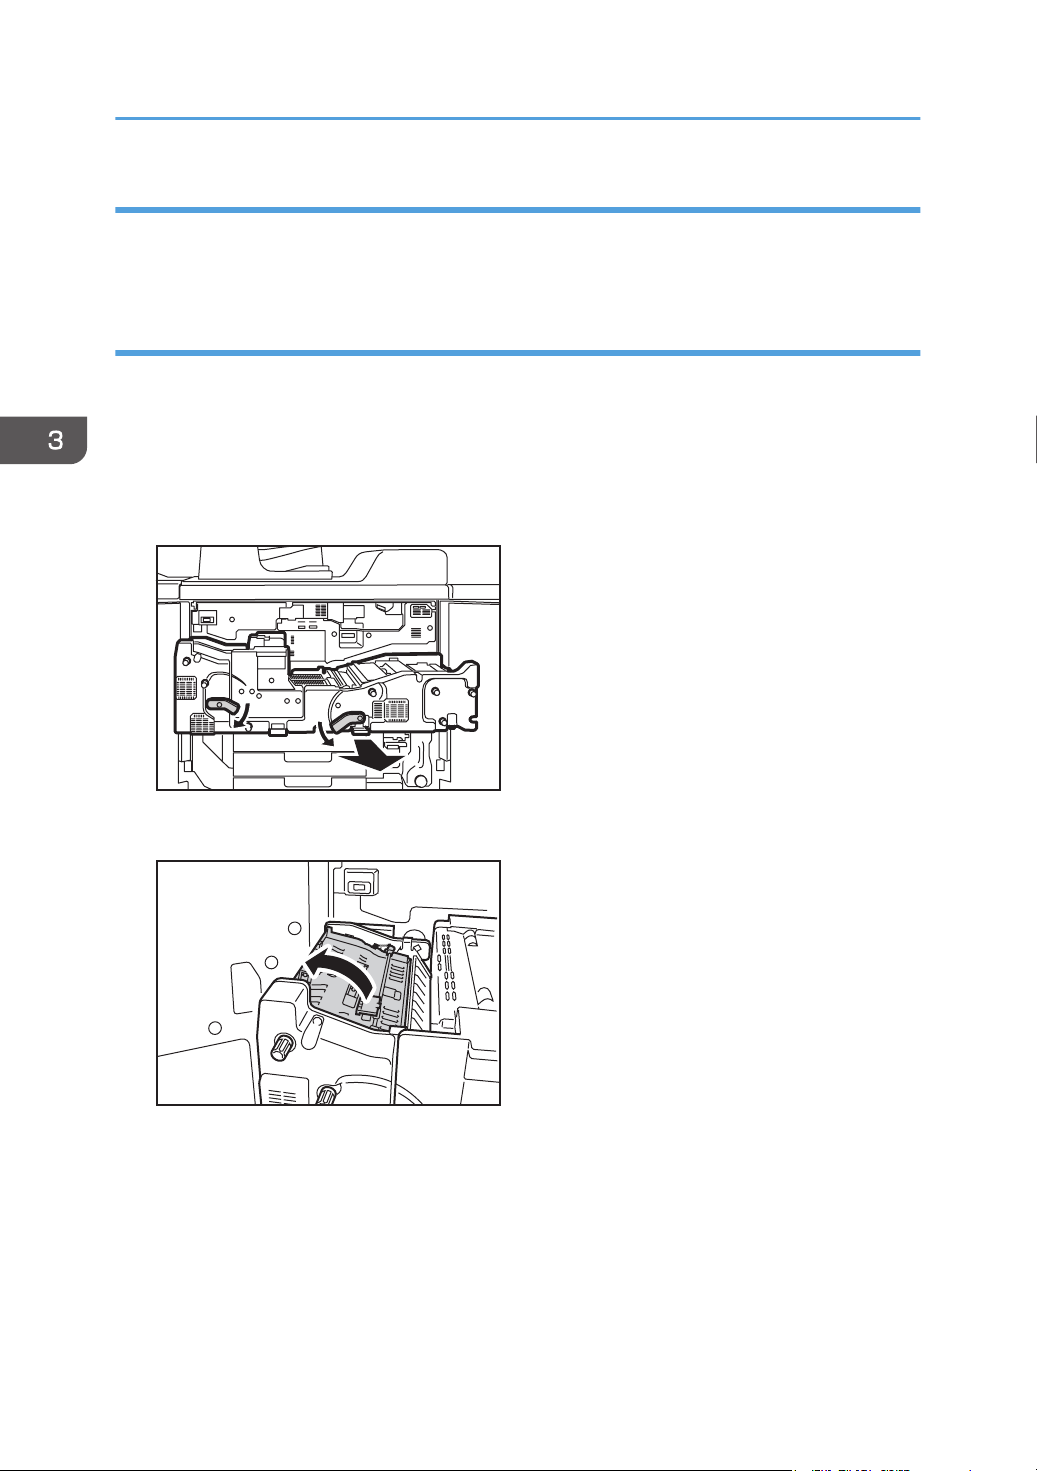
This may occur if sheets are delivered face down after one-sided printing.
Solution:
Clean the rollers, sensors, and guide boards in the drawer.
1. Make sure that the system is turned off and the machine power cord is disconnected from
the power source.
2. Open the front covers.
3. Lower the levers C1 and C2, and then pull the drawer out completely until it stops.
24
Page 27
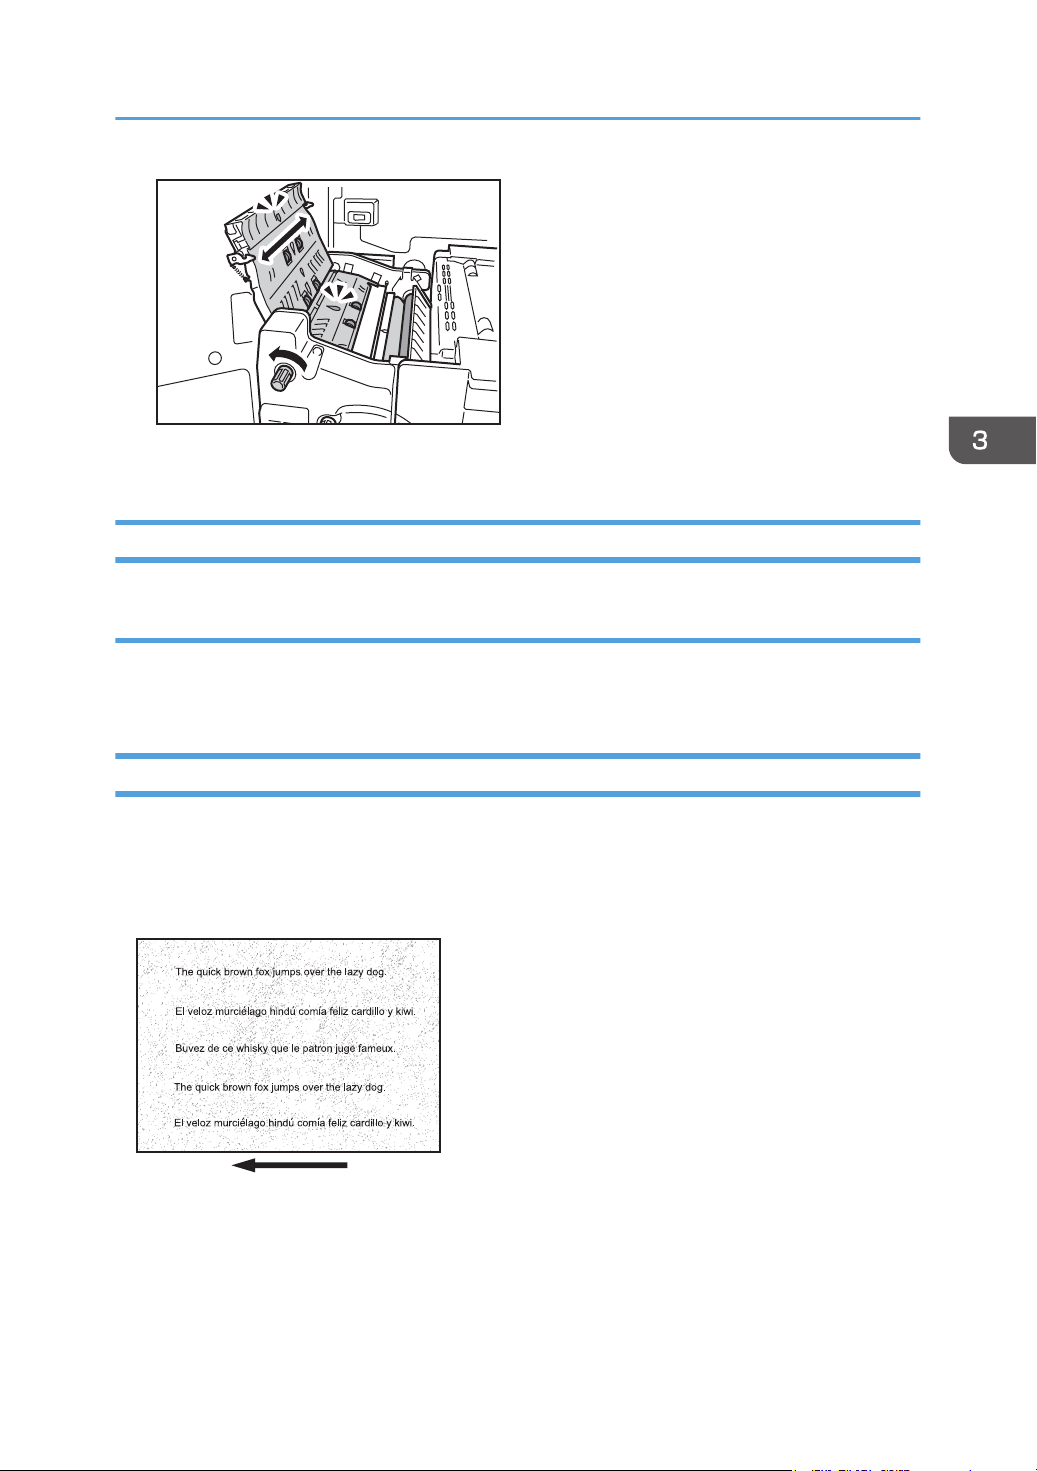
4. Pull down and open the cover D4.
CZC301
CZC302
14 mm
(0.5 in.)
14 mm
(0.5 in.)
64 mm
(2.5 in.)
CZC314
5. Clean the rollers, sensors, and guide boards.
For details about cleaning the parts, see page 106 "Cleaning the Paper Feed Path".
Toner Spotting/Staining
6. After cleaning, restore the machine so that it resumes operation.
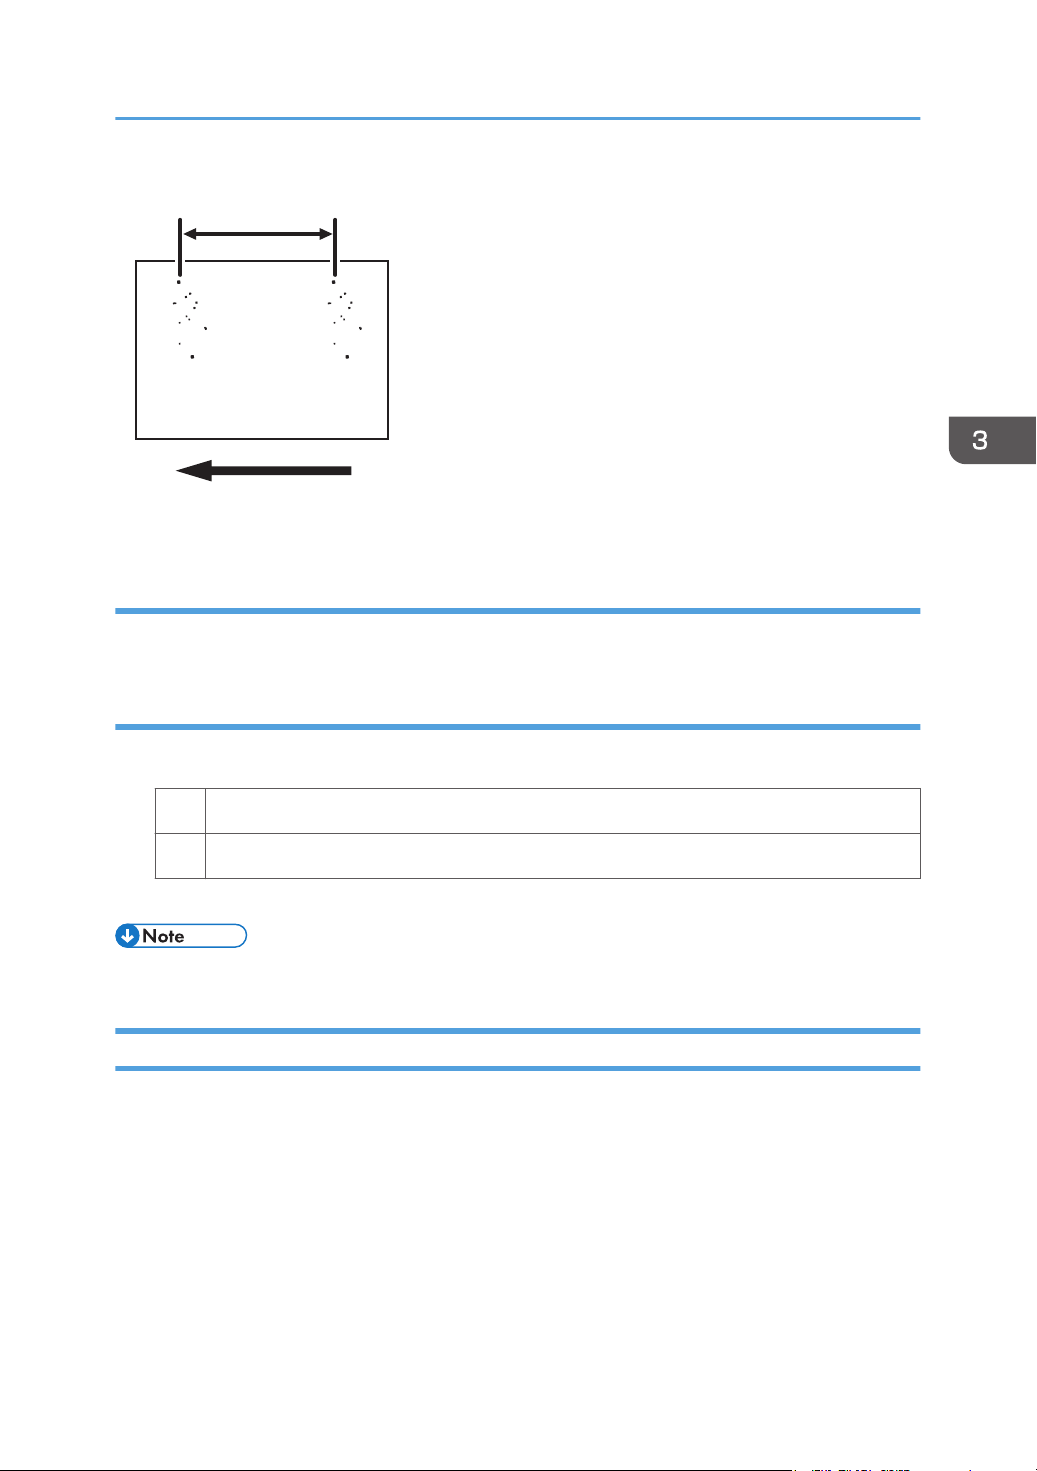
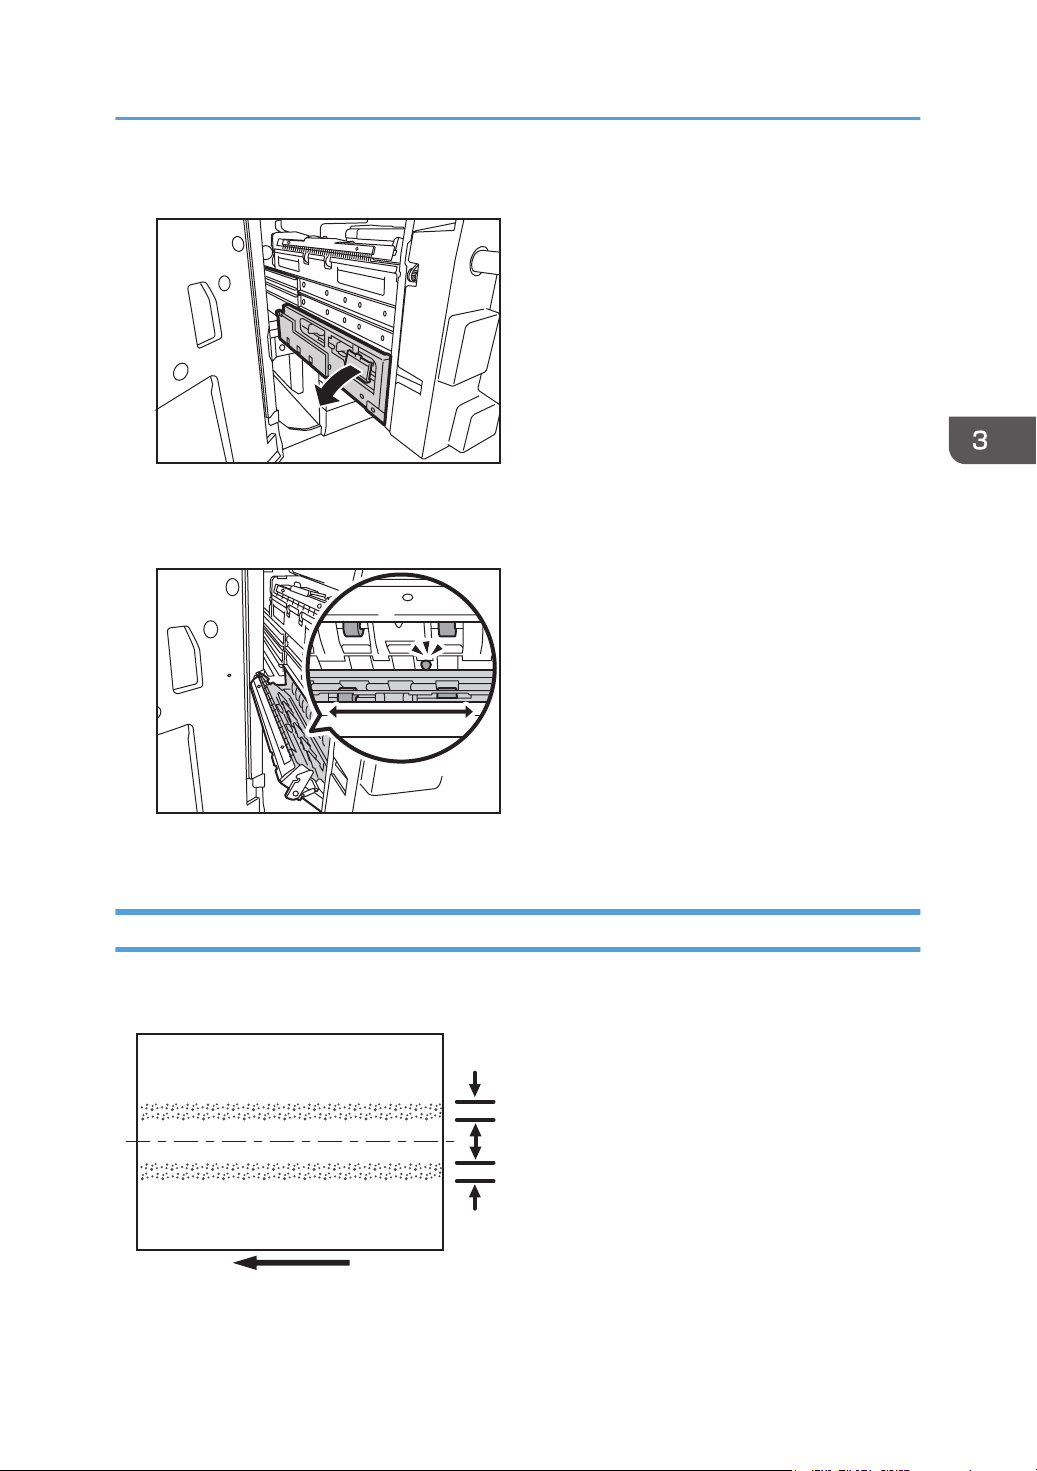
Two 14-mm Wide Streaks
Two 14-mm wide streaks parallel to the paper feed direction appear.
25
Page 28
CZC300
CZC341
3. Troubleshooting Image Quality Problems
Cause:
The exit drive rollers, exit idle rollers, exit relay drive rollers, or exit relay idle rollers in the drawer are
soiled.
Solution:
Clean the rollers, sensors, and guide boards in the drawer.
1. Make sure that the system is turned off and the machine power cord is disconnected from
the power source.
2. Open the front covers.
3. Lower the levers C1 and C2, and then pull the drawer out completely until it stops.
26
4. Pull up and open the cover D3.
5. Clean the rollers while turning the knob D1. Clean the sensors and guide boards also.
For details about cleaning the parts, see page 106 "Cleaning the Paper Feed Path".
Page 29
CZC342
CEZ543
Toner Spotting/Staining
6. After cleaning, restore the machine so that it resumes operation.
Stained Paper Edges
Solution:
1. If the paper edges are stained, carry out the procedure in page 65 "Insufficient Toner
Fusing".
Stained Background
Random "powdered" dots appear, creating a dirty background.
The background may be partially or completely stained.
Completely stained background
27
Page 30
CEZ544
3. Troubleshooting Image Quality Problems
Partially stained background
Cause:
This may occur because of wearing of the developer, drum unit, or charger.
Solution:
1. If a message prompting replacement of a unit has appeared, replace the unit.
2. In the [Main Unit: Image Quality] group on the [Adjustment Settings for Operators] menu,
select 0202: [Adjust Image Density] and execute [Adjust Image Density].
3. Print the image. Is the problem resolved?
Yes Finished!
No Contact your service representative.
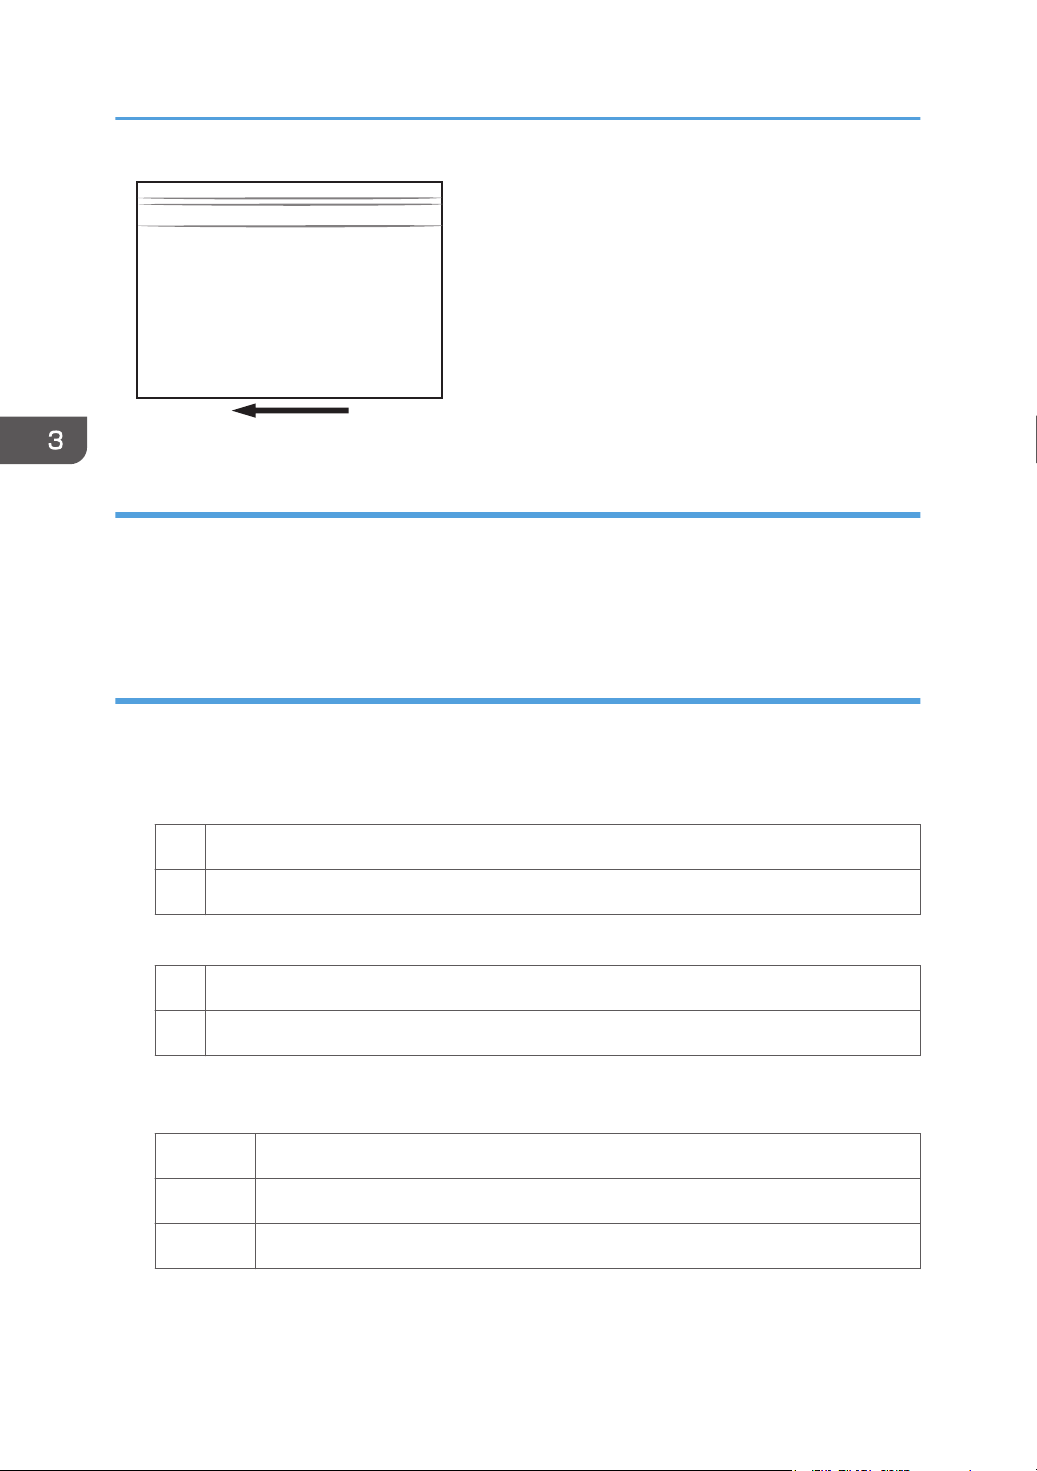
Ghosting
A ghost image of an image to be printed appears at a distance of 314 mm (12.4 in.) to the side of the
intended image.
28
Page 31

314 mm (12.4 in.)
R
R
R
R
R
R
CZC308
Toner Spotting/Staining
Cause:
The image transfer current is transmitted to the drum, where a potential difference occurs between a
developed area and non-developed area and causes the intended image to be reproduced.
This may occur if:
• Solid filled images or bold characters are printed in black on a halftone background
• Printing is done at low temperature or humidity
• Many screening lines are used
Solution:
1. In the [Main Unit: Image Quality] group on the [Adjustment Settings for Operators] menu,
select 0202: [Adjust Image Density] and execute [Adjust Image Density].
2. Print the image. Is the problem resolved?
Yes Finished!
No Contact your service representative.
Scratched Images and Stained Paper Edges
Scratched images or soiled paper edges appear.
29
Page 32

CNT008
3. Troubleshooting Image Quality Problems
Cause:
When a relatively stiff, thick paper is delivered, the entrance guide board for the transfer unit is warped
toward the intermediate transfer belt due to the stiffness of the paper. The edge of the entrance guide
board comes into contact with the toner on the belt to cause images to be scratched and paper edges to
be soiled.
This may occur if:
• Paper with a thickness equivalent to Paper Weight 7 is used
• Paper with its grain parallel to the paper feed direction is used. For example, A3/DLT long grain
paper is delivered, A4/LT short grain paper is delivered from its long edge, or A4/LT long grain
paper is delivered from its short edge.
• Paper is stored at low temperature or humidity
Solution:
Change the direction of paper grain for paper delivery.
• When storing paper at low humidity, wrap the paper in coated paper or a plastic sheet.
30
Page 33

Toner Scatter
CEZ545
Toner Scatter (1)
Toner is scattered around a solid-fill print.
Toner Scatter
Cause:
This may occur if printed at low temperature or humidity.
• To adjust the following settings, pre-register the type of paper in use as a custom paper. For details
about registering custom papers, see "Registering a Custom Paper", Preparation.
Solution:
The solution depends on which side of the paper the problem occurs on.
• If the problem occurs on side 1 of the paper, perform the solution described in (a).
• If the problem occurs on side 2 of the paper, perform the solution described in (b).
• If the problem occurs on both sides, perform the solutions described in (a), and then (b).
(a) If the problem occurs on side 1
1. Adjust the setting for the side 1 of the paper. In [Advanced Settings] for the custom paper
in use, select [Machine: Image Quality] and increase the absolute value of [Side 1] by 5%
in 1203: [Paper Transfer Output].
Example: If the present current is −40 A, change it to −42 A.
31
Page 34

CZC309
5 mm (0.2 in.)
3. Troubleshooting Image Quality Problems
2. Print the image. Is the problem resolved?
Yes Finished! If the problem also occurs on side 2 of the paper, perform the solution described
in "(b) If the problem occurs on side 2".
No Increase the absolute value of the negative current by another 5%.
3. Repeat Step 2. If the problem persists, contact your service representative.
(b) If the problem occurs on side 2
1. Adjust the setting for the side 2 of the paper. In [Advanced Settings] for the custom paper
in use, select [Machine: Image Quality] and increase the absolute value of [Side 2] by 5%
in 1203: [Paper Transfer Output].
Example: If the present current is −40 A, change it to −42 A.
2. Print the image. Is the problem resolved?
Yes Finished!
No Increase the absolute value of the negative current by another 5%.
3. Repeat Step 2. If the problem persists, contact your service representative.
Toner Scatter (2)
Parts of a line that is 5 mm (0.2 inches) or less from an image exhibit splatter.
32
Page 35

Toner Scatter
Cause:
Air contained between images is compressed and blows off parts of a line.
This may occur if:
• Printing is done at high temperature or humidity
• Using coated or other slippery paper
• Printing line images at less than 5 mm (0.2 inches) intervals
• To adjust the following settings, pre-register the type of paper in use as a custom paper. For details
about registering custom papers, see "Registering a Custom Paper", Preparation.
Solution:
The solution depends on the area in which the line splatter occurs. If the splatter occurs 15 mm (0.6
inches) or less from the leading edge, follow Procedure (a) on the following page; otherwise, follow
Procedure (b) on the following page.
a) Line splatter that is 15 mm (0.6 inches) or less from the leading edge
Increase the leading edge margin to more than 15 mm (0.6 inches) using one of the following
procedures:
1. Select [Machine: Image Position] in [Advanced Settings] for the custom paper in use and
specify the following for 1101: [Image Position].
• On side 1 of the paper: Adjust to [ ] direction with [With Feed] of [Image Position: Side
1].
• On side 2 of the paper: Adjust to [ ] direction with [With Feed] of [Image Position: Side
2].
2. Adjusting the mask width at the leading edge
Select [Machine: Image Quality] in [Advanced Settings] for the custom paper in use, and then
specify [Leading Edge] in 1210: [Erase Margin].
3. Adjusting the file's leading edge margin
Increase the leading edge margin in the print settings for the image to be printed.
For details about adjusting the shift image and adjusting the mask width at the leading edge,
see Adjustment Item Menu Guide.
If you cannot increase the leading edge margin to more than 15 mm (0.6 inches), contact
your service representative.
b) Line splatter that is in an area more than 15 mm (0.6 inches) from the leading edge
1. Select [Machine: Image Quality] in [Advanced Settings] for the custom paper in use, select
1202: [Image Transfer Output].
33
Page 36

3. Troubleshooting Image Quality Problems
2. Check the present value. Is it the upper limit?
Yes Go to Step 5.
No Go to the next step.
3. Increase the absolute value of the current by 5 A in [Image Transfer Output].
4. Print the image. Is the problem resolved?
Yes Finished!
No Increase the value by 5 A. If the problem persists even though you have increased
the value to the upper limit (150 A), go to the next step.
5. Do you mind if image density is low?
Yes Contact your service representative.
No Go to the next step.
6. Select [Machine: Image Quality] in [Advanced Settings] for the custom paper in use, select
1201: [Max Image Density].
7. Check the present value. Is it the lower limit?
Yes Contact your service representative.
No Decrease the value by 1 in [Max Image Density].
8. Print the image. Is the problem resolved?
Yes Finished!
No Repeat Steps 5 to 7. If the problem persists even though you have decreased the
value to the lower limit, contact your service representative.
Toner Scatter (3)
Parts of a line or character exhibit splatter. This may occur in a line or character that is 8 to 13 mm (0.3
to 0.5 inches) from the trailing edge and 20 mm (0.8 inches) or less from the left edge facing the paper
feed direction.
34
Page 37

8-13 mm (0.3-0.5 in.)
20 mm (0.8 in.)
CNT009
Toner Scatter
Cause:
A shock jitter occurs when the trailing edge of the paper leaves the paper guide during paper transfer
and causes toner scattering.
This may occur if paper with a thickness equivalent to Paper Weight 4 or higher is used.
• To adjust the following settings, pre-register the type of paper in use as a custom paper. For details
about registering custom papers, see "Registering a Custom Paper", Preparation.
• Changing the transfer current may produce either or both of the following side effects:
• Reduction in toner yields
• Occurrence of banding (streaks)
Solution:
1. Select [Machine: Image Quality] in [Advanced Settings] for the custom paper in use,
select 1202: [Image Transfer Output].
2. Check the present value. Is it lower than 100 A?
Yes Carry out all of the following:
(1) Increase the value by 5 A in 1202: [Image Transfer Output].
(2) Set [Trailing Edge] of 1204: [Paper Transfer Output Correction: Paper Edge] to
"200%".
(3) Set [Trailing Edge Length] of 1204: [Paper Transfer Output Correction: Paper Edge] to
"30 mm".
No No further improvement is likely. Contact your service representative.
35
Page 38

3. Troubleshooting Image Quality Problems
3. Print the image. Is the problem resolved?
Yes Finished!
No Repeat Steps 1 to 3. If the problem persists even though you have increased the value to
100 A, contact your service representative.
36
Page 39

Color Loss
CEZ549
White Spots
White spots of 0.2–0.3 mm (0.008–0.01 inches) in diameter appear.
Color Loss
Cause:
This may occur if printed at low temperature or humidity.
• To adjust the following settings, pre-register the type of paper in use as a custom paper. For details
about registering custom papers, see "Registering a Custom Paper", Preparation.
• If you reduce the paper transfer current to eliminate white spots, copies may become too faint.
Solution:
The solution depends on which side of the paper the problem occurs on.
• If the problem occurs on side 1 of the paper, perform the solution described in (a).
• If the problem occurs on side 2 of the paper, perform the solution described in (b).
• If the problem occurs on both sides, perform the solutions described in (a), and then (b).
(a) If the problem occurs on side 1
1. Adjust the setting for the side 1 of the paper. Select [Machine: Image Quality] in
[Advanced Settings] for the custom paper in use, decrease the absolute value of [Side 1]
by 5 A in 1203: [Paper Transfer Output].
Example: If the present current is −100 A, change it to −95 A.
37
Page 40

3. Troubleshooting Image Quality Problems
2. Print the image. Is the problem resolved?
Yes Finished! If the problem also occurs on side 2 of the paper, perform the solution described
in "(b) If the problem occurs on side 2".
No Decrease the absolute value of the negative current by another 5 A.
3. Repeat Step 2. If the image is lighter in density but the problem persists, reset the current
to the original value and go to Step 4.
4. Select [Machine: Image Quality] in [Advanced Settings] for the custom paper in use,
decrease the absolute value by 5 A in 1202: [Image Transfer Output].
Example: If the present current is 80 A, change it to 75 A.
5. Print the image. Is the problem resolved?
Yes Finished!
No Decrease the absolute value of the negative current by another 5 A.
6. Repeat Step 5. If the image is lighter in density but the problem persists, contact your
service representative.
(b) If the problem occurs on side 2
1. Adjust the setting for the side 2 of the paper. Select [Machine: Image Quality] in
[Advanced Settings] for the custom paper in use, decrease the absolute value of [Side 2]
by 5 A in 1203: [Paper Transfer Output].
Example: If the present current is −100 A, change it to −95 A.
2. Print the image. Is the problem resolved?
Yes Finished!
No Decrease the absolute value of the negative current by another 5 A.
3. Repeat Step 2. If the image is lighter in density but the problem persists, contact your
service representative.
Blister-like White Spots
White spots 0.3–0.5 mm (0.01–0.02 inches) in diameter surrounded by denser spots (blister-like white
spots) appear.
38
Page 41

CEZ602
Color Loss
Cause:
This may occur if a solid image is printed on coated paper, if a solid image is printed during duplex
printing, or if printing is done at low temperature.
Solution:
If blister-like white spots appear, carry out the procedure in page 65 "Insufficient Toner Fusing".
Mottling
Mottling occurs in solid-filled areas.
Normal
39
Page 42

3. Troubleshooting Image Quality Problems
Mottled
Cause:
The transfer electric field on the concave portion of paper is weakened to cause a decrease in
transcription.
This may occur if:
• Using paper with a rough surface
• Continuously printing an image that consumes little toner
• Printing is done at high temperature or humidity
Solution:
Before you perform the solution procedure, make sure that the use rate of the replacement parts does
not exceed 100%. To check this, select 0516: [Display Parts Life Counter] of the [Main Unit:
Maintenance] group in [Adjustment Settings for Operators].
For details about checking the counter, see Adjustment Item Menu Guide.
If the [Display Parts Life Counter] has exceeded 100%, replace the corresponding part.
For details about replacing the parts, see Replacement Guide.
1. In the [Main Unit: Image Quality] group on the [Adjustment Settings for Operators] menu,
select 0202: [Adjust Image Density] and execute [Adjust Image Density].
2. Print the image. Is the problem resolved?
Yes Finished!
No Go to the next step.
3. Print 100 full-page, solid-fill A4 or LT sheets. Is the problem resolved?
Yes Finished!
No Reload with new paper.
40
Page 43

4. Print the image. Is the problem resolved?
Yes Finished!
No Replace the paper with smoother paper.
5. If the problem persists, contact your service representative.
Color Loss
41
Page 44

cez552
cez553
3. Troubleshooting Image Quality Problems
Density Problems
Uneven Image Density
The density is uneven.
Solution:
The solution depends on the type of unevenness.
Carry out the appropriate procedure from those in the following table:
(A) The density is uneven across the entire image.
Affected area Solution
The density from
top to bottom is
uneven.
The sides are
fainter or denser.
1. In the [Main Unit: Image
Quality] group on the
[Adjustment Settings for
Operators] menu, select
0202: [Adjust Image
Density] and execute
[Adjust Image Density].
2. If the problem persists, see
page 45 "Uneven
Density from Top to
Bottom".
1. In the [Main Unit: Image
Quality] group on the
[Adjustment Settings for
Operators] menu, select
0202: [Adjust Image
Density] and execute
[Adjust Image Density].
2. If the problem persists,
contact your service
representative.
42
Page 45

Affected area Solution
cez554
cez555
cez556
Density Problems
The top and
bottom are fainter
or denser.
(B) The density is uneven in a part of the image.
Affected area Solution
The leading edge
is fainter.
1. In the [Main Unit: Image
Quality] group on the
[Adjustment Settings for
Operators] menu, select
0202: [Adjust Image
Density] and execute
[Adjust Image Density].
2. If the problem persists,
contact your service
representative.
1. In the [Main Unit: Image
Quality] group on the
[Adjustment Settings for
Operators] menu, select
0202: [Adjust Image
Density] and execute
[Adjust Image Density].
The trailing edge
is fainter.
2. If the problem persists, see
page 46 "Fainter
Leading Edge".
1. In the [Main Unit: Image
Quality] group on the
[Adjustment Settings for
Operators] menu, select
0202: [Adjust Image
Density] and execute
[Adjust Image Density].
2. If the problem persists, see
page 48 "Fainter
Trailing Edge".
43
Page 46

cez558
cez559
CWH402
3. Troubleshooting Image Quality Problems
Affected area Solution
The center is
fainter or denser
Wavy
unevenness
1. In the [Main Unit: Image
Quality] group on the
[Adjustment Settings for
Operators] menu, select
0202: [Adjust Image
Density] and execute
[Adjust Image Density].
2. If the problem persists,
contact your service
representative.
1. In the [Main Unit: Image
Quality] group on the
[Adjustment Settings for
Operators] menu, select
0202: [Adjust Image
Density] and execute
[Adjust Image Density].
2. If the problem persists,
contact your service
representative.
(C) The density is uneven in the direction perpendicular to the paper feed direction at regular
intervals.
Affected area Solution
Periodic vertical
density fluctuation
1. In the [Main Unit: Image
Quality] group on the
[Adjustment Settings for
Operators] menu, select
0202: [Adjust Image
Density] and execute
[Adjust Image Density].
2. If the problem persists, see
page 51 "Periodic
Density Fluctuation".
44
Page 47

Uneven Density from Top to Bottom
CEZ561
The density is uneven from top to bottom.
Density Problems
• You can adjust the density of halftone images, but not that of solid fills.
Cause:
This may occur at high temperature or humidity.
Solution:
1. In the [Main Unit: Image Quality] group on the [Adjustment Settings for Operators] menu,
select 0206: [Density Difference: Across Feed].
Decreasing the value makes the area above the center denser and that below fainter.
Increasing the value makes the area above the center fainter and that below denser.
2. Turn off the power and the main power switch, and then turn the main power switch back
on.
The setting specified in step 1 will be in effect.
3. Print the image. Is the problem resolved?
Yes Finished!
No Replace the charge unit and photoconductor unit.
4. If unit replacement does not resolve the problem, contact your service representative.
45
Page 48

CEZ562
3. Troubleshooting Image Quality Problems
• For details about replacing the charge unit and photoconductor unit, see Replacement Guide.
Fainter Leading Edge
The leading edge is fainter.
Cause:
At low temperature or when using thin coated paper, this may occur if the paper transfer current is
insufficient.
At high temperature, this may occur if the paper transfer current is excessive.
• This solution only works when the thickness of the paper is equivalent to Paper Weight 4 or higher.
Do not try this as a solution when using paper with a thickness equivalent to Paper Weight 3 or
lower, as it may cause paper misfeeding.
• To adjust the following settings, pre-register the type of paper in use as a custom paper. For details
about registering custom papers, see "Registering a Custom Paper", Preparation.
Solution:
Be sure to perform Step "(a) Increase the current value" first, and then Step "(b) Decrease the current
value".
46
Page 49

Density Problems
(a) Increase the current value
1. Select [Machine: Image Quality] in [Advanced Settings] for the custom paper in use, and
then record the set values of [Leading Edge] and [Leading Edge Length] in 1204: [Paper
Transfer Output Correction: Paper Edge].
2. For [Leading Edge Length], is the set value the upper limit?
Yes Go to Step 7.
No Increase the set value by 5 percentage points.
3. Print the image. Is the problem resolved?
Yes Finished!
No Go to the next step.
4. For [Leading Edge], is the set value lower than 200?
Yes Increase the set value by 10 percentage points.
No Reset [Leading Edge] to the initial value and repeat the steps from Step 2.
5. Print the image. Is the problem resolved?
Yes Finished!
No Repeat the steps from Step 4.
6. If the problem is not resolved by repeating the steps from Step 4 to increase the value of
[Leading Edge] to "200", reset it to the value noted in Step 1 and go to Step "(b) Decrease
the current value".
7. For [Leading Edge], is the set value lower than 200?
Yes Increase the set value by 10 percentage points.
No Switch to a different paper type.
8. Print the image. Is the problem resolved?
Yes Finished!
No Repeat the steps from Step 7.
9. If the problem is not resolved by repeating the steps from Step 7 to increase the value of
[Leading Edge] to "200", reset it to the value noted in Step 1 and go to Step "(b) Decrease
the current value".
47
Page 50

CEZ563
3. Troubleshooting Image Quality Problems
(b) Decrease the current value
1. Select [Machine: Image Quality] in [Advanced Settings] for the custom paper in use and
decrease [Leading Edge] of 1204: [Paper Transfer Output Correction: Paper Edge] by
10%.
2. Print the image. Is the problem resolved?
Yes Finished!
No Decrease the value by a further 10 percentage points.
3. Repeat Step 2. If the problem is not resolved by decreasing the value by a total of 50
percentage points, reset it to the value noted in Step "(a) Increase the current value" and
contact your service representative.
Fainter Trailing Edge
The trailing edge is fainter.
Cause:
This may occur because of insufficient or excessive paper transfer current when using paper weighing
approximately 160 g/m2 (60 lb. Cover) or heavier at low temperature or humidity.
• To adjust the following settings, pre-register the type of paper in use as a custom paper. For details
about registering custom papers, see "Registering a Custom Paper", Preparation.
48
Page 51

Density Problems
Solution:
1. Measure in millimeters how far the fainter area extends from the trailing edge.
2. Select [Machine: Image Quality] in [Advanced Settings] for the custom paper in use,
select 1204: [Paper Transfer Output Correction: Paper Edge] and configure the following
setting.
In [Trailing Edge Length], enter the value you measured in Step 1 plus an additional 10 mm.
3. Select [Machine: Image Quality] in [Advanced Settings] for the custom paper in use and
record the set values of [Trailing Edge] in 1204: [Paper Transfer Output Correction: Paper
Edge].
4. Increase the scaling factor in the above setting by 10 percentage points.
5. Print the image. Is the problem resolved?
Yes Finished!
No Increase the scaling factor by 5 percentage points.
6. Repeat Step 5. If the problem persists even though you have increased the scaling factor
by 50 percentage points, restore the value noted in Step 3 and go to the next step.
7. Decrease the scaling factor in the above setting by 10 percentage points.
8. Print the image. Is the problem resolved?
Yes Finished!
No Decrease the scaling factor by 5 percentage points.
9. Repeat Step 8. If the problem persists even though you have decreased the scaling factor
by 50 percentage points, restore the value noted in Step 3 and contact your service
representative.
Uneven Density within 90 mm (3.5 in.) of the Trailing Edge
Printing in the area extending approximately 90 mm (3.5 inches) from the trailing edge is fainter or
denser.
49
Page 52

90 mm
(3.5 in.)
90 mm
(3.5 in.)
CEZ564
3. Troubleshooting Image Quality Problems
Cause:
This may occur if:
• Printing is done at low temperature or humidity
• Printing a single-dot halftone image
• To adjust the following settings, pre-register the type of paper in use as a custom paper. For details
about registering custom papers, see "Registering a Custom Paper", Preparation.
Solution:
The solution depends on whether the area within 90 mm (3.5 inches) of the trailing edge is denser or
fainter.
<If the area within 90 mm (3.5 inches) of the trailing edge is fainter>
1. Select [Machine: Paper Feed / Output] in [Advanced Settings] for the custom paper in use
and check the set values of [Transfer Timing Roller] in 1351: [Motor Speed]. Is it the upper
limit value?
Yes Contact your service representative.
No Go to the next step.
2. Increase the value in [Transfer Timing Roller] by 0.1 percentage point.
3. Print the image. Is the problem resolved?
Yes Finished!
50
Page 53

CWH407
Density Problems
No Repeat Steps 2 and 3. If the problem persists even though you have increased the value to
+1.0%, contact your service representative.
<If the area within 90 mm (3.5 inches) of the trailing edge is denser>
1. Select [Machine: Paper Feed / Output] in [Advanced Settings] for the custom paper in use
and check the set values of [Transfer Timing Roller] in 1351: [Motor Speed]. Is it the lower
limit value?
Yes Contact your service representative.
No Go to the next step.
2. Decrease the value in [Transfer Timing Roller] by 0.1 percentage point.
3. Print the image. Is the problem resolved?
Yes Finished!
No Repeat Steps 2 and 3. If the problem persists even though you have decreased the value
to -1.0%, contact your service representative.
Periodic Density Fluctuation
The vertical density fluctuates periodically.
51
Page 54

CEZ585
3. Troubleshooting Image Quality Problems
Solution:
Before you perform the solution procedure, make sure that the environmental conditions where you are
using the machine meet those recommended for use. For details on the environmental conditions for use,
see "Where to Put Your Machine", Maintenance and Management.
The solution depends on the interval.
• To adjust the following settings, pre-register the type of paper in use as a custom paper. For details
about registering custom papers, see "Registering a Custom Paper", Preparation.
Interval Solution
Approximately 12-18 mm (0.5-0.7 inches) Contact your service representative.
Approximately 60 mm (2.4 inches) Select [Machine: Paper Feed / Output] in [Advanced
Settings] for the custom paper in use and adjust the
set value of [Transfer Timing Roller] in 1351: [Motor
Speed] according to the paper type and thickness.
If the problem persists, contact your service
representative.
Approximately 95 mm (3.7 inches) Contact your service representative.
Approximately 314 mm (12.4 inches) Replace the photoconductor unit. If the problem
persists, contact your service representative.
• For details about replacing the photoconductor unit, see Replacement Guide.
Entire Image Faint
The entire image is fainter than normal.
52
Page 55

CEZ568
Density Problems
Cause:
This may occur if:
• Continuously printing an image that consumes little toner
• The machine has not been used for a long time
• The machine is located somewhere very humid and has not been used for a while
Solution:
1. In the [Main Unit: Image Quality] group on the [Adjustment Settings for Operators] menu,
select 0202: [Adjust Image Density] and execute [Adjust Image Density].
2. Print the image. Is the problem resolved?
Yes Finished!
No Go to the next step.
3. Increase the value by 1 in 0204: [Maximum Image Density].
4. Select 0202: [Adjust Image Density] and execute [Adjust Image Density].
5. Print the image. Is the problem resolved?
Yes Finished!
No Repeat Steps 3 to 5. If the problem persists even though you have increased the value to
5, contact your service representative.
Color Is Too Dense
The entire image is denser than normal.
53
Page 56

3. Troubleshooting Image Quality Problems
Cause:
This may occur if:
• Continuously printing an image that consumes much toner
• The machine has not been used for a long time
• The machine is located somewhere very humid and has not been used for a while
Solution:
1. In the [Main Unit: Image Quality] group on the [Adjustment Settings for Operators] menu,
select 0202: [Adjust Image Density] and execute [Adjust Image Density].
2. Print the image. Is the problem resolved?
Yes Finished!
No Go to the next step.
3. Decrease the value by 1 in 0204: [Maximum Image Density].
4. Select 0202: [Adjust Image Density] and execute [Adjust Image Density].
5. Print the image. Is the problem resolved?
Yes Finished!
No Repeat Steps 3 to 5. If the problem persists even though you have decreased the value to
-5, contact your service representative.
Broken Thin Lines
Thin lines (1 dot lines in 1200 dpi images) break.
54
Page 57

CEZ569
Density Problems
Cause:
Oblique (approximately 45°) thin lines or thin lines printed in faint colors are likely to contain breaks.
Solution:
1. In the [Main Unit: Image Quality] group on the [Adjustment Settings for Operators] menu,
select 0202: [Adjust Image Density] and execute [Adjust Image Density].
2. Print the image. Is the problem resolved?
Yes Finished!
No Go to the next step.
3. Increase the value by 1 in 0205: [Line Width].
4. Select 0202: [Adjust Image Density] and execute [Adjust Image Density].
5. Print the image. Is the problem resolved?
Yes Finished!
No Repeat Steps 3 to 5. If the problem persists even though you have increased the value to
5, contact your service representative.
Blurred Images
Lens-shaped blurred images appear at 314 mm (12.4 inches) intervals.
55
Page 58

314 mm (12.4 in.) 314 mm (12.4 in.)
CZC310
3. Troubleshooting Image Quality Problems
Cause:
If the machine is left unattended for a long period in an environment where temperature and humidity
are high, corona products on the drum absorb moisture to prevent a buildup or removal of static
electricity on the drum.
Solution:
1. In the [Main Unit: Maintenance] group on the [Adjustment Settings for Operators] menu,
select 0502: [Execute Photoconductor Refreshing] and execute [Photoconductor
Refreshing].
2. Print the image. Is the problem resolved?
Yes Finished!
No Contact your service representative.
Dropouts (Character Voids)
Dropouts (character voids) occur when characters or lines are printed.
56
Page 59

CNT003
Cause:
This may occur if:
• Continuously printing an image that consumes much toner
Density Problems
• The machine has not been used for a long time
• The machine is located somewhere very humid and has not been used for a while
Solution:
1. In the [Main Unit: Image Quality] group on the [Adjustment Settings for Operators] menu,
select 0202: [Adjust Image Density] and execute [Adjust Image Density].
2. Print the image. Is the problem resolved?
Yes Finished!
No Go to the next step.
3. Decrease the value by 1 in 0204: [Maximum Image Density].
4. Select 0202: [Adjust Image Density] and execute [Adjust Image Density].
5. Print the image. Is the problem resolved?
Yes Finished!
No Repeat Steps 3 to 5. If the problem persists even though you have decreased the value to
-5, contact your service representative.
57
Page 60

CZC311
3. Troubleshooting Image Quality Problems
Afterimages
An afterimage of the image printed just before the intended image appears.
Cause:
This may occur when the image record on the intermediate transfer belt has largely changed. For
example, this may occur when a solid-fill image is printed after horizontal lines are printed continuously.
A potential difference occurs between an image portion and non-image portion on the intermediate
transfer belt as a result of continuous printing of horizontal lines, causing the horizontal lines to become
obvious on the next solid-fill image.
This may occur if:
• Printing is done at high temperature or humidity
• Printing on thin coated paper (Paper Weight 3 or lower) or on transparent film
• Printing an extremely different type of image
• To adjust the following settings, pre-register the type of paper in use as a custom paper. For details
about registering custom papers, see "Registering a Custom Paper", Preparation.
Solution:
1. In the [Main Unit: Image Quality] group on the [Adjustment Settings for Operators] menu,
select 0202: [Adjust Image Density] and execute [Adjust Image Density].
2. Print the image. Is the problem resolved?
Yes Finished!
No Go to the next step.
58
Page 61

CZC312
Density Problems
3. Select [Machine: Image Quality] in [Advanced Settings] for the custom paper in use and
decrease the value of [Side 1] or [Side 2] in 1203: [Paper Transfer Output] by 10 A.
Example: -200 A to -190 A
4. Print the image. Is the problem resolved?
Yes Finished!
No Repeat Steps 3 and 4. If the problem persists even though you have decreased the value
to -100 A, contact your service representative.
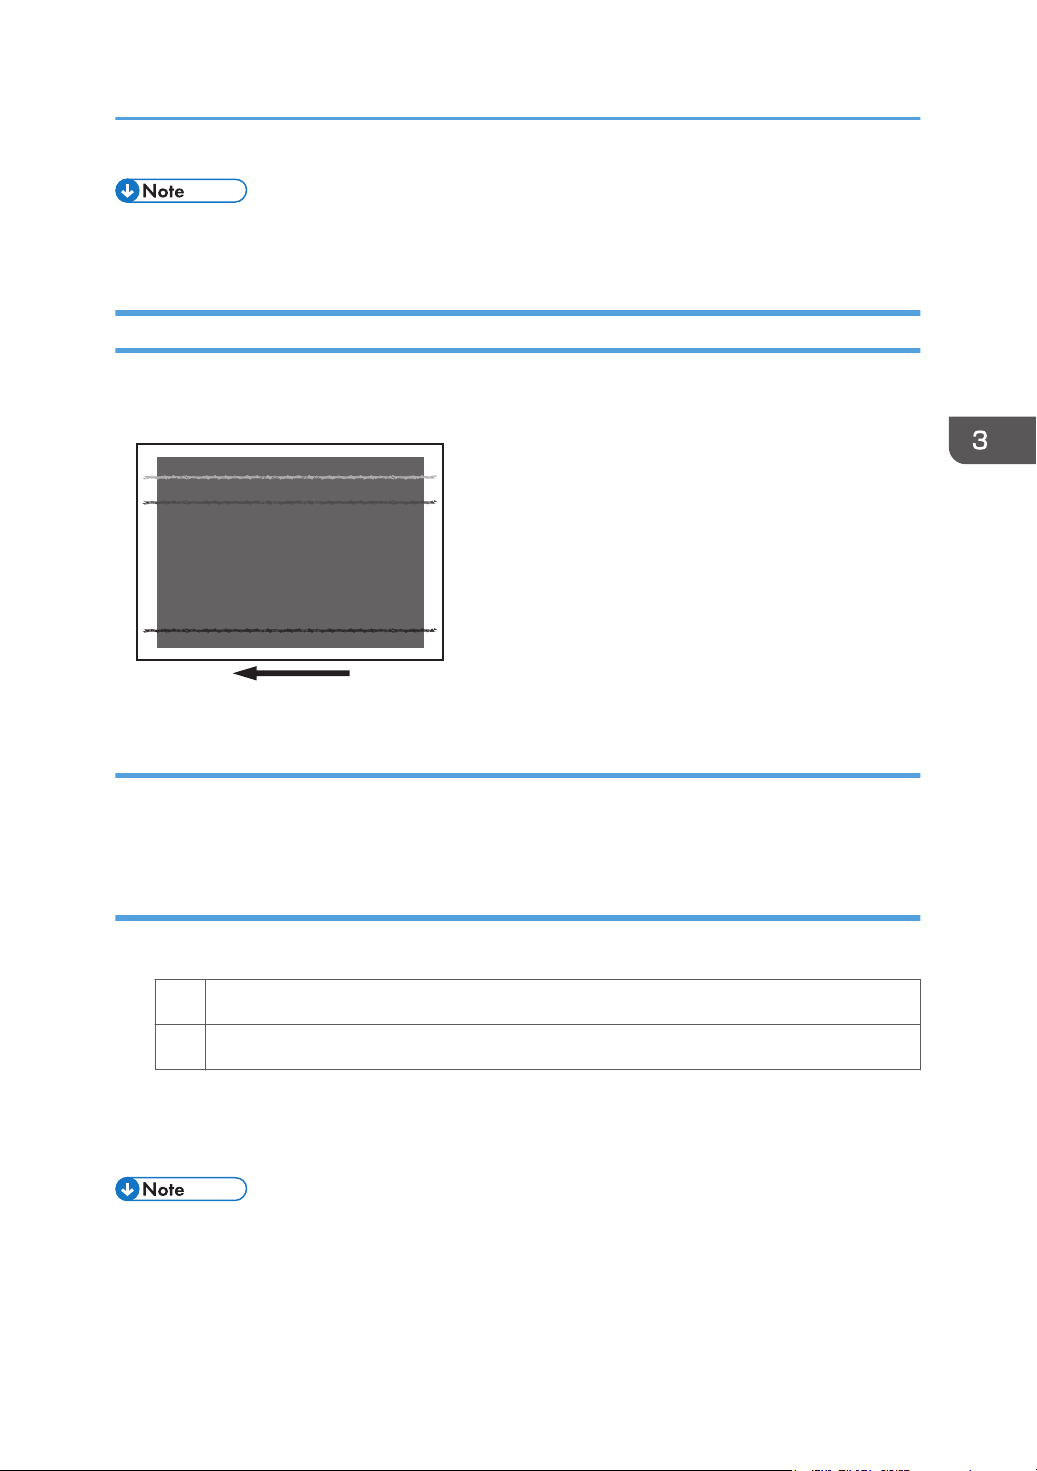
White Streaks
White streaks perpendicular to the paper feed direction appear.
Cause:
A separating discharge occurs between the intermediate transfer belt and paper edge during paper
transfer, which causes a streak-like electric charge on the intermediate transfer belt. This residual electric
charge may cause white streaks during image transfer.
This may occur at low temperature or humidity.
• To adjust the following settings, pre-register the type of paper in use as a custom paper. For details
about registering custom papers, see "Registering a Custom Paper", Preparation.
Solution:
1. Select [Machine: Image Quality] in [Advanced Settings] for the custom paper in use,
select [Trailing Edge Length in 1204: Paper Transfer Output Correction: Paper Edge].
59
Page 62

270 mm
(106.3 in.)
ECG078
3. Troubleshooting Image Quality Problems
2. Check the present value. Is it the upper limit?
Yes Go to Step 5.
No Go to the next step.
3. Increase the value by 5 mm in [Trailing Edge Length].
4. Print the image. Is the problem resolved?
Yes Finished!
No Go to the next step.
5. Select [Machine: Image Quality] in [Advanced Settings] for the custom paper in use,
select [Trailing Edge in 1204: Paper Transfer Output Correction: Paper Edge].
6. Check the present value. Is it the lower limit?
Yes Reset the value back to the factory-default settings and perform steps from Step 1 again.
No Decrease the value by 20% in [Trailing Edge].
7. Print the image. Is the problem resolved?
Yes Finished!
No Repeat Steps 5 to 7. If the problem persists even though you have decreased the value to
the lower limit, contact your service representative.
Shock jitter: When the paper is inserted
Horizontal black streaks occur at the position 270 mm from the leading edge of the paper due to the
shock when the paper is inserted.
60
Page 63

Density Problems
Cause:
Horizontal black streaks might occur at the position 270 mm from the leading edge of the paper due to
the shock when the paper is inserted being transmitted to the paper transfer part.
This may occur if:
• When printing on a paper with length longer than 270 mm
• Thick paper is used
• Printing a halftone image
• To adjust the following settings, pre-register the type of paper in use as a custom paper. For details
about registering custom papers, see "Registering a Custom Paper", Preparation.
Solution:
1. Can you change the paper length to 270 mm or less?
Yes Go to the next step.
No Go to Step 3.
2. Print a paper with length of 270 mm or less. Is the problem resolved?
Yes Finished!
No Contact your service representative.
3. Select [Machine: Paper Feed / Output] in [Advanced Settings] for the custom paper in use
and check the set value of [Fusing Belt] in 1351: [Motor Speed].
4. Decrease the value by 0.1% in [Fusing Belt].
5. Print the image. Is the problem resolved?
Yes Finished!
No Repeat Steps 4 to 6. If the problem persists even though you have lowered the setting
value to -0.4%, go to step 7.
6. Select [Machine: Paper Feed / Output] in [Advanced Settings] for the custom paper in use
and check the set value of [Process Speed Setting] in 1351: [Motor Speed].
7. Decrease the value of [Process Speed Setting]. Is it okay that productivity will be
reduced?
Yes Go to the next step.
61
Page 64

3. Troubleshooting Image Quality Problems
No Contact your service representative.
8. Decrease the value by one level in [Process Speed Setting].
9. Print the image. Is the problem resolved?
Yes Finished!
No Repeat Steps 8 to 10. If the problem persists even though you have decreased the value
to [Low], contact your service representative.
62
Page 65

Gloss Problems
DTH012
251 mm
(10 inches)
251 mm
(10 inches)
Vertical Glossy Lines
Glossy lines perpendicular to the paper feed direction appear.
Gloss Problems
Cause:
Glossy lines perpendicular to the paper feed direction may appear 251 mm (10 inches) from the
boundary of the margin and the solid image (in the paper feed direction).
Solution:
1. Print the image on twenty sheets. Do glossy lines appear on the tenth sheet and later
sheets?
Yes Go to the next step.
No You cannot resolve the problem with this procedure. Contact your service representative.
2. Select [Machine: Image Quality] in [Advanced Settings] for the custom paper in use,
select 1206: [Fusing Temperature] and decrease the value in [Heat Roller Temp] by 5
degrees.
63
Page 66

3. Troubleshooting Image Quality Problems
3. Print the image on twenty sheets. Do glossy lines appear on the tenth sheet and later
sheets?
Yes Repeat Step 2 and 3. If the problem persists even though the setting has reached its
minimum value, contact your service representative. If the problem is resolved, go to the
next step.
No Go to the next step.
4. Check the toner fusion. Is it satisfactory?
Yes Finished!
No Restore the previous setting and contact your service representative.
Insufficient Gloss
The image is not glossy enough.
Solution:
If the gloss of the image is not glossy enough, carry out the procedures in Procedure 1, "Changing the
fusing temperature" and Procedure 2, "Changing the process speed" of page 65 "Insufficient Toner
Fusing".
64
Page 67

Fusing Problems
Fusing Problems
Insufficient Toner Fusing
This section explains how to resolve the problem of insufficient toner fusing on printed copies.
• To adjust the following settings, pre-register the type of paper in use as a custom paper. For details
about registering custom papers, see "Registering a Custom Paper", Preparation.
• Changing the fusing temperature or changing the process speed may produce one or more of the
following side effects:
• Paper curling
• Paper misfeeding
• Blisters
• Glossy lines
• Change of gloss
• If one or more of the above side effects occurs, adjust the fusing temperature and process speed by
decreasing the fusing temperature and increasing the process speed.
• Check the toner fusibility as follows:
• The printed image does not come off.
• The toner does not come off even if it is lightly rubbed by a nail.
• The toner does not come off even if it is rubbed by the cloth for cleaning the exposure glass.
Solution:
Carry out the following sequence of procedures. Terminate the sequence as soon as the problem is
resolved.
Procedure 1: Changing the fusing temperature
1. Select [Machine: Image Quality] in [Advanced Settings] for the custom paper in use,
select 1206: [Fusing Temperature] and increase the temperature in [Heat Roller
Temp] by 5 degrees.
2. Print the image and check toner fusion. Is the problem resolved?
Yes Finished!
No Increase the temperature an additional 5 degrees.
65
Page 68

3. Troubleshooting Image Quality Problems
3. Repeat Step 2 until the temperature reaches 185 degrees. Is the problem resolved?
Yes Finished!
No Go to the next step.
4. Check the type of your machine. Is it Pro 8300S?
Yes No further improvement is likely. Contact your service representative.
No Perform Procedure 2, "Changing the process speed".
Procedure 2: Changing the process speed
This procedure is available only for Pro 8320S, Pro 8310S, Pro 8320 and Pro 8310.
This will slow down the printing to give the toner more time to fuse. However, because of this,
throughput will be reduced.
Example when printing on A4/LT paper:
<Pro 8320S/ Pro 8320>
If the process speed is changed from [High] to [Middle]: 136 111 (cpm/ ppm)
If the process speed is changed from [Middle] to [Low]: 111 96 (cpm/ ppm)
<Pro 8310S/ Pro 8310>
If the process speed is changed from [High] to [Low]: 111 96 (cpm/ ppm)
Pro 8310S and Pro 8310 do not have the [Middle] setting.
1. Select [Machine: Paper Feed / Output] in [Advanced Settings] for the custom paper
in use, select [Process Speed Setting] in 1351: [Motor Speed].
2. Decrease the value by one level.
If the present value is [High], select [Middle]. If it is [Middle], select [Low].
3. Print the image and check toner fusion. Is the problem resolved?
Yes Finished!
No If the problem persists, the machine may be faulty or the paper unsupported. Contact
your service representative.
Improving Image Quality When Using Different Types of Paper
Because different types of paper vary in terms of quality, thickness and other factors, various sets of
fusing conditions are configured to ensure better print quality. However, using certain types of paper
66
Page 69

Fusing Problems
may result in glossy streaks or poor fusing, depending on the combination of the paper type and the
image being printed.
The following procedure will reduce productivity, but will help if image quality is important.
Conditions where image quality may be improved
• The paper types to be used vary significantly in terms of set temperature.
• The paper types to be used vary significantly in terms of paper width.
• The number of pages to be printed is small, but many copies need to be printed.
Solution:
1. In the [Main Unit: Image Quality] group on the [Adjustment Settings for Operators] menu,
select 0212: [Productivity Priority Mode], and then change the setting from [Normal] to
[Productivity Priority].
• In [Normal] Productivity Priority Mode, fusing may be poor when switching from thinner paper to
thicker paper due to the fusing temperature being too low for the thicker paper. Conversely, when
switching from thicker paper to thinner paper, glossy streaks or other issues may result due to the
fusing temperature being too high for the thinner paper.
• If Productivity Priority Mode is set to [Fusing Priority], a longer waiting time will be required
because it takes longer to adjust the fusing temperature when switching between different paper
brands, thicknesses, sizes, and other properties. This will reduce productivity.
67
Page 70

3. Troubleshooting Image Quality Problems
68
Page 71

4. Troubleshooting Paper Delivery Problems
Frequent Paper Misfeeds
Depending on the cause of the problem, do one of the following:
Coated or another type of unsupported paper is loaded in the machine's tray.
Load paper not supported by the machine's paper tray (Trays 1-3) in the wide LCT or another paper
tray that supports the paper.
For details about the size and type of paper that can be loaded in the paper trays, see "Recommended
Paper Sizes and Types", Preparation.
The side fences in the paper tray are too close together.
If the distance between the side fences is less than the paper width, it may interfere with paper transfer
and so cause paper misfeeds.
Adjust the side fences to match the paper width.
When you close the paper tray, the side fences may become misaligned due to the weight of the paper.
To prevent this, close the paper tray slowly.
For details about loading paper, see "Loading Paper", Preparation.
The side fences in the paper tray are too far apart.
If the side fences are too far apart, paper misfeeds may occur due to wrong paper size detection.
Adjust the side fences to match the paper width.
For details about loading paper, see "Loading Paper ", Preparation.
The paper size/orientation/type is not specified correctly.
In tray paper settings, specify the size, orientation, and type of the paper in use.
For details about tray paper settings, see "Changing Tray Paper Settings", Preparation.
Too many sheets of paper are loaded in the paper tray.
When loading paper, do not exceed the limit.
For details about how many sheets can be loaded in the paper trays, see "Recommended Paper Sizes
and Types", Preparation.
The edges of the sheets are rough.
Turn the sheets the other way up or smooth the edges before loading.
69
Page 72

4. Troubleshooting Paper Delivery Problems
Sheets are curled or wavy.
• Flatten curls and waviness before loading paper.
• Turn the sheets the other way up or smooth the edges before loading.
• Stacking too many sheets may cause the sheets on top to curl greatly. If this happens, reduce the
number of stacked sheets.
Sheets absorbed moisture and became limp.
Sheets that will not be used for a long time should be protected from moisture by, for example, storing
them in a sealed bag.
If the machine is plugged in, the heater inside the paper tray starts operating when the main power is off
to prevent sheets from absorbing moisture.
The paper feed sensor is stained with paper dust.
Clean the paper feed sensor. For details about cleaning the paper feed sensor, see page 106
"Cleaning the Paper Feed Path".
The paper feed performance is less sufficient because the paper transport roller is soiled
with toner.
Clean the paper transport roller. For details about cleaning the paper transport roller, see page 106
"Cleaning the Paper Feed Path".
Wrapped Around the Upper Fixing Side Separation Plate
A paper jam occurs because the margin at the leading edge of the paper is insufficient, and the paper
stacks to the fixing side separation plate.
Cause:
This may occur if:
• Printing on thin paper
• Printing on coated paper
• When the leading edge of the paper is a solid-fill image and the toner adhesion amount is large
• When the leading margin is insufficient
• To adjust the following settings, pre-register the type of paper in use as a custom paper. For details
about registering custom papers, see "Registering a Custom Paper", Preparation.
70
Page 73

Frequent Paper Misfeeds
Solution:
1. Is it okay to extend the margin at the leading edge of the paper?
Yes Go to the next step.
No Contact your service representative.
2. Is it okay not to print some part of the image on the leading edge of the paper?
Yes Go to the next step.
No Go to Step 6.
3. Select [Machine: Image Quality] in [Advanced Settings] for the custom paper in use and
increase the value for [Leading Edge] in 1210: [Erase Margin] by 0.5 mm.
4. Print the image. Is the problem resolved?
Yes Finished!
No Go to the next step.
5. Is the margin at the leading edge of the paper 10 mm or less?
Yes Repeat Steps 3 to 5.
No Replace the fusing unit. If the problem persists, contact your service representative.
6. Is it okay to change the image position?
Yes Go to the next step.
No Contact your service representative.
7. Select [Machine: Image Position] in [Advanced Settings] for the custom paper in use and
increase the value for [With Feed] of [Image Position: Side 1] in 1101: [Image Position]
by 0.5 mm.
8. Print the image. Is the problem resolved?
Yes Finished!
No Go to the next step.
9. Is the margin at the leading edge of the paper 10 mm or less?
Yes Repeat Steps 7 to 9.
71
Page 74

4. Troubleshooting Paper Delivery Problems
No Replace the fusing unit. If the problem persists, contact your service representative.
• For details about how to replace the fusing unit, see Replacement Guide.
72
Page 75

CWH406
Messages Reporting Paper Misfeeds
Messages Reporting Paper Misfeeds
Paper misfeeds are reported by messages and jam codes.
Resolve the problem according to the jam code.
If (J049) Appears
Cause:
Paper is skewed.
Solution:
Depending on the cause of the problem, do one of the following:
The side fences in the paper tray are too far apart.
If the side fences are too far apart, the paper may be skewed.
Adjust the side fences to match the paper width.
When you close the paper tray, the side fences may become misaligned due to the weight of the paper.
To prevent this, close the paper tray slowly.
For details about loading paper, see "Loading Paper", Preparation.
The paper size/orientation/type is not specified correctly.
In tray paper settings, specify the size, orientation, and type of the paper in use.
For details about tray paper settings, see "Changing Tray Paper Settings", Preparation.
This problem occurs when the two-tray wide LCT is used.
If a paper size is A5 or smaller and paper thickness is 0, use the small tab end fence.
73
Page 76

4. Troubleshooting Paper Delivery Problems
• For details about how to attach the small tab end fence, see "Loading Paper into the Two-tray
Wide Large Capacity Tray", Preparation.
• Replace the small tab end fence after use.
Colored paper or transparencies are loaded in the paper tray.
Paper edges may not have been detected correctly.
Adjust the color paper edge detection.
1. Select [Machine: Paper Feed / Output] in [Advanced Settings] for the custom paper in use, select
1341: [Jam Detection] and make a note of the present value in [Paper Edge Detection].
2. Increase the value in [Paper Edge Detection].
3. Print the image. Is the problem resolved?
Yes Finished!
No Keep increasing the value until the problem is resolved.
If the problem persists even though the setting has reached its maximum value, restore the
value noted in step 1 and go to the next step.
4. Decrease the value in [Paper Edge Detection].
5. Print the image. Is the problem resolved?
Yes Finished!
No Keep decreasing the value until the problem is resolved.
If the problem persists even though the setting has reached its minimum value, restore the
value noted in step 1 and go to the next step.
6. Select [Machine: Paper Feed / Output] in [Advanced Settings] for the custom paper in use, select
1341: [Jam Detection] and set [Skew Detection] to [Off].
7. Print the image. Is the problem resolved?
Yes Finished!
No Contact your service representative.
An envelope is used.
If an envelope flap at the trailing edge is oblique, a skew may be wrongly detected when the envelope
is transferred with its flap open.
Disable the skew detection function.
74
Page 77

Messages Reporting Paper Misfeeds
<If custom paper is used>
1. Select [Machine: Paper Feed / Output] in [Advanced Settings] for the custom paper in use,
select 1341: [Jam Detection] and set [Skew Detection] to [Off].
<If custom paper is not used>
1. In the [Main Unit: Paper Feed/ Output] group on the [Adjustment Settings for Operators]
menu, set 0304: [Skew Detection] to [Off].
The skew detection level is too high.
The skew detection level may be too high.
Decrease the skew detection level.
1. In the [Main Unit: Paper Feed/ Output] group on the [Adjustment Settings for Operators] menu,
increase the value in 0305: [Skew Detection Level].
Increase the value to reduce the detection level.
2. Print the image. Is the problem resolved?
Yes Finished!
No Keep increasing the value until the problem is resolved.
If the problem persists even though the setting has reached its maximum value, go to the
next step.
3. In the [Main Unit: Paper Feed/ Output] group on the [Adjustment Settings for Operators] menu,
select 1341: [Jam Detection] and set [Skew Detection] to [Off].
• If the skew detection level is reduced or the skew detection function is disabled, no misfeed report
will be displayed. However, this may result in paper skew feeding. If you do not want this result,
contact your service representative.
• If the machine wrongly detects skew, see page 84 "Wrong Detection of Skew".
If (J050) Appears
Cause:
Sheets cannot be positioned properly by image position adjustment.
Solution:
Depending on the cause of the problem, do one of the following:
75
Page 78

4. Troubleshooting Paper Delivery Problems
The side fences in the paper tray are too far apart.
If the side fences are too far apart, the paper may shift.
Adjust the side fences to match the paper width.
When you close the paper tray, the side fences may become misaligned due to the weight of the paper.
To prevent this, close the paper tray slowly.
For details about loading paper, see "Loading Paper", Preparation.
The paper size/orientation/type is not specified correctly.
In tray paper settings, specify the size, orientation, and type of the paper in use.
For details about tray paper settings, see "Changing Tray Paper Settings", Preparation.
Colored paper or transparencies are loaded in the paper tray.
Paper edges may not have been detected correctly.
Adjust the color paper edge detection.
1. Select [Machine: Paper Feed / Output] in [Advanced Settings] for the custom paper in use, select
1341: [Jam Detection] and make a note of the present value in [Paper Edge Detection].
2. Increase the value in [Paper Edge Detection].
3. Print the image. Is the problem resolved?
Yes Finished!
No Keep increasing the value until the problem is resolved.
If the problem persists even though the setting has reached its maximum value, restore the
value noted in step 1 and go to the next step.
4. Decrease the value in [Paper Edge Detection].
5. Print the image. Is the problem resolved?
Yes Finished!
No Keep decreasing the value until the problem is resolved.
If the problem persists even though the setting has reached its minimum value, restore the
value noted in step 1 and go to the next step.
6. Select [Machine: Image Position] in [Advanced Settings] for the custom paper in use, select 1101:
[Image Position] and set [Deactivate Image Position Adjustment Across Feed] to [Deactivate Only
Jam Detection].
7. Print the image. Is the problem resolved?
76
Yes Finished!
Page 79

Messages Reporting Paper Misfeeds
No Contact your service representative.
• When you set [Deactivate Image Position Adjustment Across Feed] to [Deactivate Only Jam
Detection], the printed image may become misaligned.
Sheets of mixed type, thickness, or color are loaded in the paper tray.
Load identical sheets in the paper tray.
To disable the function for detecting paper misalignment
<If using customer paper>
Select [Machine: Image Position] in [Advanced Settings] for the custom paper being used, select 1101:
[Image Position] and set [Deactivate Image Position Adjustment Across Feed] to [Deactivate Only Jam
Detection].
<If not using custom paper>
Under [Adjustment Settings for Operators] menu, in the [Main Unit: Image Position] group, set 0105:
[Deactivate Image Position Adjustment Across Feed] to [Deactivate] or [Deactivate Only Jam Detection].
• Setting [Deactivate Image Position Adjustment Across Feed] to [Deactivate] or [Deactivate Only
Jam Detection] may cause the printed image to be misaligned.
If (J080) Appears
Cause:
The paper feed is delayed.
This may occur if slippery paper with a low paper-to-paper friction coefficient is used.
Solution:
1. Select [Machine: Paper Feed / Output] in [Advanced Settings] for the custom paper in
use, select 1341: [Jam Detection] and set [Registration Jam Detection with Feed Direction]
to [Off].
2. Print the image. Is the problem resolved?
Yes Finished!
No Contact your service representative.
77
Page 80

ECG079
4. Troubleshooting Paper Delivery Problems
• When you set [Registration Jam Detection with Feed Direction] to [Off], the printed image may
become misaligned at the leading edge.
If (J082) Appears
Cause:
This may occur if:
• When printing on a paper with rigidity of Paper Weight 5
• When printing on a paper with rigidity of Paper Weight 6 or more
• When printing on a paper with high smoothness such as coated paper
• When printing on a paper of B5 , A4 , or 81/211
Solution:
1. Is it possible to pull out the drawer unit inside the main unit and operate the lever of the
paper transfer unit?
Yes Go to the next step.
No Contact your service representative.
2. Open the front cover, then pull out the drawer unit.
The lever is located in the recess of the drawer unit.
78
Page 81

3. Lower the lever in the direction of the arrow.
ECG080
ECG081
ECG082
4. Check that the indicator decal on the back of the lever is visible.
Messages Reporting Paper Misfeeds
The height of the paper transfer unit is changed to allow the applicable types of paper to be fed.
5. Print the image. Is the problem resolved?
Yes Finished!
No Contact your service representative.
79
Page 82

4. Troubleshooting Paper Delivery Problems
• To feed paper other than the target paper after printing, return the lever to its original position.
When lever operation is performed when feeding paper other than the target paper, it may cause
a paper jam in the post-processing device.
If (J099/J424/J425/J439/J440) Appears
Cause:
Double feeding has occurred.
• To adjust the following settings, pre-register the type of paper in use as a custom paper. For details
about registering custom papers, see "Registering a Custom Paper", Preparation.
Solution:
Depending on the cause of the problem, do one of the following:
Coated or another type of unsupported paper is loaded in the machine's tray.
Load paper not supported by the machine's paper tray (Trays 1-3) in the wide LCT or another paper
tray that supports the paper.
For details about the size and type of paper that can be loaded in the paper trays, see "Recommended
Paper Sizes and Types", Preparation.
Sheets are stuck to each other.
Fan the paper before loading it to loosen the sheets.
For details about fanning the paper, see "Fanning the paper", Preparation.
The edges of the sheets are rough.
Turn the sheets the other way up or smooth the edges before loading the paper.
Paper is loaded in two-tray wide LCT
1. Select [Machine: Paper Feed / Output] in [Advanced Settings] for the custom paper in use and set
[Prevent Double Feed (Weaker Blow)] for [Paper Feed Mode:Fan Level] in 1311: [2-Tray LCIT].
2. If the problem persists, set [Prevent Double Feed (Weakest Blow)] for [Paper Feed Mode:Fan Level]
in 1311: [2-Tray LCIT].
<When using thin paper that is easy to blow with air such as recycled paper>
In addition to changing the setting of [Paper Feed Mode:Fan Level], perform the following procedure.
80
Page 83

Messages Reporting Paper Misfeeds
1. Select [Machine: Paper Feed / Output] in [Advanced Settings] for the custom paper in use and set
[Vacuum Fan Level] in 1311: [2-Tray LCIT] to 70%.
2. If the problem persists, lower [Vacuum Fan Level] by 10% at a time. If the problem still persists even
though you have lowered the value to 50%, please contact your service representative.
If (J430/J431/J445/J446/J460/J461) Appears
This indicates a paper misfeed when using the two-tray wide LCT.
Paper misfeeding may be resolved by printing an original repeatedly.
If the jam code (J430/J431/J445/J446/J460/J461) appears more than 3 times, follow the
procedure below:
• To adjust the following settings, pre-register the type of paper in use as a custom paper. For details
about registering custom papers, see "Registering a Custom Paper", Preparation.
Solution:
The factory- set airflow of the wide LCT may not be strong enough to separate the sheets.
Increase the airflow.
1. Select [Machine: Paper Feed / Output] in [Advanced Settings] for the custom paper you
are using, select 1311: [2-Tray LCIT] and set [Paper Feed Mode:Fan Level] to [Prevent
Non Feed (Stronger Blow)].
2. Print the image. Has the problem been resolved?
Yes Finished!
No Repeat Step 2. If the jam code appears more than 3 times, set [Paper Feed Mode:Fan
Level] to [Prevent Non Feed (Strongest Blow)].
3. If the problem persists, contact your service representative.
• When setting a paper of size B5 to SRA4 with Paper Weight 8, use the small tab end fence.
For details about how to attach the small tab end fence, see "Loading Paper", Preparation.
81
Page 84

4. Troubleshooting Paper Delivery Problems
If (J085/J086/J087) Appears When Using Coated Paper
Cause:
If custom paper with a paper size of A4 or larger and a paper thickness of 4 (105.1 to 163.0 g/m2) or
less is ejected with the printed side facing down in single-sided printing, the paper may jam due to two
sheets becoming stuck together at the time of sheet inversion.
Solution:
1. Select [Machine: Paper Feed / Output] in [Advanced Settings] for the custom paper being
used, select 1351: [Motor Speed] and decrease the [Paper Feed Interval Setting].
2. Print the image. Has the problem been resolved?
Yes Finished!
No Contact your service representative.
• This procedure increases the paper feed interval. The value indicates productivity. A smaller value
means lower productivity.
• The paper deliver interval should be set to a value around 75%.
82
Page 85

Paper Skew
Paper Skew
Depending on the cause of the problem, do one of the following:
The side fences in the paper tray are too far apart.
If the side fences are too far apart, the paper may be skewed.
Adjust the side fences to match the paper width.
When you close the paper tray, the side fences may become misaligned due to the weight of the paper.
To prevent this, close the paper tray slowly.
For details about loading paper, see "Loading Paper", Preparation.
A scrap of paper or some other small fragment is jammed in the paper feed path.
Remove the fragment.
For details about cleaning the paper feed path, see page 106 "Cleaning the Paper Feed Path".
The correct degree of paper arching has not been specified.
Adjust the degree of paper arching at the registration gate.
<If using paper of Paper Weight 1 to 4>
1. In the [Main Unit: Image Position] group on the [Adjustment Settings for Operators] menu,
change the value in 0103: [Registration Gate: Paper Buckle Amount].
<If using paper of Paper Weight 5 to 7>
1. In the [Main Unit: Image Position] group on the [Adjustment Settings for Operators] menu,
change the value in 0104: [Registration Gate: Paper Buckle Amount: Thick Paper].
The skew detection level is too low.
Increase the skew detection level.
1. In the [Main Unit: Paper Feed/ Output] group on the [Adjustment Settings for Operators] menu,
select 0305: [Skew Detection Level] and reduce the value.
Reduce the value to increase the detection level.
This will allow the machine to report a paper misfeed and stop printing even for a slight skew.
83
Page 86

4. Troubleshooting Paper Delivery Problems
Wrong Detection of Skew
Depending on the cause of the problem, follow the procedure below:
An envelope is used.
If an envelope flap at the trailing edge is oblique, a skew may be wrongly detected when the envelope
is transferred with its flap open.
Disable skew detection function.
<If custom paper is used>
1. Select [Machine: Paper Feed / Output] in [Advanced Settings] for the custom paper in use,
select 1341: [Jam Detection] and set [Skew Detection] to [Off].
<If custom paper is not used>
1. In the [Main Unit: Paper Feed/ Output] group on the [Adjustment Settings for Operators]
menu, set 0304: [Skew Detection] to [Off].
• Disabling the skew detection function will allow skewed printing. If this is not acceptable, contact
your service representative.
84
Page 87

Double Feeding
Double Feeding
Depending on the cause of the problem, do one of the following:
Is the paper feed roller covered with paper dust?
Paper dust may decrease the traction of the paper feed roller and result in double feeding due to paper
slippage or insufficient separation.
Cleaning the paper feed roller will restore traction and so prevent double feeding.
For details about cleaning the paper feed roller, see page 106 "Cleaning the Paper Feed Path".
For details about removing the paper feed roller, see Replacement Guide.
The two-tray wide LCT does not have paper feed rollers.
Have you ruffled the paper sufficiently?
Double feeding may result if the paper is not ruffled properly.
Remove the paper, ruffle it, and reload it.
For details about ruffling the paper, see "Fanning the paper", Preparation.
The paper is curled.
Double feeding may occur if the paper is curled.
Type of curl
Face curl: The set paper is warped upward.
Back curl: The set paper is warped downward.
Measurement of curl
Load one sheet of paper on a flat surface, apply the scale to the leading edge of the paper, and
measure the curl at the four edges. The maximum value is the curl value.
Curl standard
Acceptable curl amount varies depending on the basic weight of the paper.
Paper weight Curl amount
Paper Weight 0 - 6
Paper Weight 7
Paper Weight 8
Face curl: 10 mm
Back curl: 10 mm
Face curl: 10 mm
Back curl: 5 mm
Face curl: 10 mm
Back curl: 3 mm
85
Page 88

4. Troubleshooting Paper Delivery Problems
Paper weight Curl amount
Paper Weight 9
Face curl: 10 mm
Back curl: 0 mm
Correcting curl
1. Place the curled surface down on a flat surface.
2. Hold the end of the paper and straighten it in the opposite direction to the curl direction so that
the paper is rounded.
If the separation pressure level has been adjusted
For any of trays 1 to 3, if the separation pressure adjuster has been changed to a non-default
separation pressure, double feeding may occur, depending on the paper type used.
Double feeding can be prevented by changing the separation pressure level back to the default
position.
Is the Pickup Assist setting enabled?
If the Pickup Assist function operates too much, it may cause double feeding with coated paper.
By disabling the Pickup Assist setting, you can prevent double feeding.
The two-tray wide LCT does not have the Pickup Assist function.
<If custom paper is used>
1. Select [Machine: Paper Feed / Output] in [Advanced Settings] for the custom paper in use,
select 1321: [Main/3-Tray LCIT/Bypass] and set [Pickup Assist] to [Off].
<If custom paper is not used>
1. In the [Main Unit: Paper Feed/ Output] group on the [Adjustment Settings for Operators]
menu, set 03089: [Pickup Assist Setting] to [Off].
Special or coated paper is used.
• Is the airflow strong enough?
The factory-set airflow of the three-tray wide LCT may not be strong enough to separate the sheets.
Increase the airflow.
<If custom paper is used>
1. Select [Machine: Paper Feed / Output] in [Advanced Settings] for the custom paper in
<If custom paper is not used>
1. In the [Main Unit: Paper Feed/ Output] group on the [Adjustment Settings for Operators]
• Is the tab fence attached?
86
use, select 1301: [3-Tray LCIT] and increase the value in [Fan Level].
menu, increase the value in 0306: [Wide LCT: Fan Level].
Page 89

Double Feeding
By attaching the tab fence, you can prevent air from leaking at the trailing edge of the paper and
improve separation.
For details about attaching the tab fence, see "Preparation" supplied with the machine.
Two-tray wide LCT is used.
The factory-set airflow of the wide LCT may not be strong enough to separate the sheets.
Increase the airflow.
1. Select [Machine: Paper Feed / Output] in [Advanced Settings] for the custom paper you are using,
select 1311: [2-Tray LCIT] and set [Paper Feed Mode:Fan Level] to [Prevent Double Feed (Weaker
Blow)].
2. If the problem persists, set [Paper Feed Mode:Fan Level] to [Prevent Double Feed (Weakest Blow)].
3. If the problem persists, select 1311: [2-Tray LCIT] and increase the value in [Blower Fan Level] by
10%.
4. If the problem persists, increase the value an additional 10% in [Blower Fan Level].
87
Page 90

4. Troubleshooting Paper Delivery Problems
Wrong Detection of Double Feeding
Depending on the cause of the problem, do one the following:
Paper with high paper-to-paper adhesion is used.
Paper with high paper-to-paper adhesion may be wrongly detected as double feeding.
Ruffle the paper well before use.
For details about ruffling paper, see "Fanning the paper", Preparation.
An envelope is being used.
The seams of envelopes may cause double feeds to be erroneously detected.
Disable the double feed detection.
<If custom paper is used>
1. Select [Machine: Paper Feed / Output] in [Advanced Settings] for the custom paper in use,
select 1341: [Jam Detection] and set [Double Feed Detection] to [Off].
<If custom paper is not used>
1. In the [Main Unit: Paper Feed/ Output] group on the [Adjustment Settings for Operators]
menu, set 0301: [Double Feed Detection] to [Off].
• In cases other than those described above, the double feed detection sensor may be soiled with
paper dust or other fragments and erroneously detecting double feeding. Contact your service
representative.
• Disabling double feed detection may reduce print image quality or cause blank sheets to be
delivered.
88
Page 91

Paper Misfeeding
Paper Misfeeding
Depending on the cause of the problem, do one of the following:
Have you ruffled the paper properly?
Not ruffling the paper properly may cause paper misfeeding.
Remove the paper, ruffle it, and reload it.
For details about ruffling paper, see "Fanning the paper", Preparation.
The side fences in the paper tray are too close together.
If the distance between the side fences is less than the paper width, it may interfere with paper transfer
and so cause paper misfeeds.
Adjust the paper guides to match the paper width.
When you close the paper tray, the side fences may become misaligned due to the weight of the paper.
To prevent this, close the paper tray slowly.
For details about loading paper, see "Loading Paper", Preparation.
The paper is curled.
Double feeding may occur if the paper is curled.
Type of curl
Face curl: The set paper is warped upward.
Back curl: The set paper is warped downward.
Measurement of curl
Load one sheet of paper on a flat surface, apply the scale to the leading edge of the paper, and
measure the curl at the four edges. The maximum value is the curl value.
Curl standard
Acceptable curl amount varies depending on the basic weight of the paper.
Paper weight Curl amount
Paper Weight 0 - 6
Paper Weight 7
Paper Weight 8
Face curl: 10 mm
Back curl: 10 mm
Face curl: 10 mm
Back curl: 5 mm
Face curl: 10 mm
Back curl: 3 mm
89
Page 92

DTH015
DTH016
A
B
C
4. Troubleshooting Paper Delivery Problems
Paper weight Curl amount
Paper Weight 9
Face curl: 10 mm
Back curl: 0 mm
Correcting curl
1. Place the curled surface down on a flat surface.
2. Hold the end of the paper and straighten it in the opposite direction to the curl direction so that
the paper is rounded.
Adjust the separation pressure level.
Each of trays 1 to 3 is provided with a separation pressure adjuster, which can be set to one of three
separation pressure levels.
• A: Default position
• B: Level 2
• C: Level 3
Set the separation pressure level according to how often paper misfeeds occur (J003 to J005, J010 to
J012).
90
Page 93

Paper Misfeeding
<If two or more misfeeds occur in a day for the same tray>
1. Set the separation pressure level for the tray to level 2 by moving the adjuster one level from
the default position toward you.
<If two or more misfeeds occur in a day for the same tray with separation pressure level 2 set>
1. Set the separation pressure level for the tray to level 3 by moving the adjuster one level from
the default position toward you.
<If two or more misfeeds occur in a day for the same tray with separation pressure level 3 set>
1. Replace the paper feed roller in the tray.
• If the separation pressure level is high, multi-feed may occur. Set an appropriate separation
pressure level according to the status of each tray so that no misfeed or multi-feed occur.
Special or coated paper is used.
• Is the airflow powerful enough?
The factory-set airflow of the three-tray wide LCT may not be strong enough to separate the sheets.
Increase the airflow.
<If custom paper is used>
1. Select [Machine: Paper Feed / Output] in [Advanced Settings] for the custom paper in
use, select 1301: [3-Tray LCIT] and increase the value in [Fan Level].
<If custom paper is not used>
1. In the [Main Unit: Paper Feed/ Output] group on the [Adjustment Settings for Operators]
menu, increase the value in 0306: [Wide LCT: Fan Level].
• Is the tab fence attached?
By attaching the tab fence, you can prevent air from leaking at the trailing edge of the paper and
improve separation.
For details about attaching the tab fence, see "Preparation" supplied with the machine.
• Is the paper feed roller covered with paper dust?
Paper dust on the surface of coated paper may reduce the traction of the paper feed roller and
cause paper misfeeding due to paper slippage or insufficient separation.
By cleaning the paper feed roller, the frictional force can be restored so that paper misfeeding will
not occur.
For details about cleaning the paper feed roller of the wide LCT, see page 106 "Cleaning the
Paper Feed Path". Two-tray wide LCT does not have paper feed rollers.
An envelope is used.
Depending on the type of envelope, air trapped inside may be squeezed out when the paper feed roller
picks up the envelope and cause slippage leading to a misfeed.
91
Page 94

CEZ500
4. Troubleshooting Paper Delivery Problems
• Is the three-tray wide LCT fan disabled?
Select [Machine: Paper Feed / Output] in [Advanced Settings] for the custom paper in use, select
1301: [3-Tray LCIT] and set [Fan Setting] to [Off].
• Have you flattened the envelope?
Flatten the envelope and all its edges to eliminate air before loading. If the envelope is curled,
decurl it before loading.
Two-tray wide LCT is used.
The factory-set airflow of the wide LCT may not be strong enough to separate the sheets.
Increase the airflow.
For details, see page 81 "If (J430/J431/J445/J446/J460/J461) Appears".
92
Page 95

Paper feed direction
Original
Output
CEZ523
Paper Feed Problems Affecting Image Quality
Paper Feed Problems Affecting Image Quality
The Image Is Positioned Incorrectly
Cause:
Depending on the paper thickness, floppiness, edge roughness, and curl, the image may become
mispositioned.
Solution:
Adjust the image position.
• When using a custom paper, select [Machine: Image Position] in [Advanced Settings] for the
custom paper in use and specify the following for 1101: [Image Position] to adjust the image
position.
• [Across Feed] of [Image Position: Side 1]
• [With Feed] of [Image Position: Side 1]
• [Across Feed] of [Image Position: Side 2]
• [With Feed] of [Image Position: Side 2]
• If you are not using a custom paper, specify the following for [Main Unit: Image Position] group in
[Adjustment Settings for Operators] group to adjust the image position.
• 0101: [Image Position: With Feed]
• 0102: [Image Position: Across Feed]
If the problem persists even though you have adjusted the setting to its maximum and minimum values,
contact your service representative.
93
Page 96

Paper feed direction
Original
Output
CEZ524
4. Troubleshooting Paper Delivery Problems
• For details about specifying settings in the [Adjustment Settings for Operators] menu and
[Advanced Settings] menu, see Adjustment Item Menu Guide.
Image Scaling Error on the Side 1 of Paper
Cause:
An image scaling error may occur because of expansion or contraction of the paper.
Solution:
Adjust the image scaling.
1. Select [Machine: Image Position] in [Advanced Settings] for the custom paper in use and
adjust the following for 1101: [Image Position].
• To adjust the horizontal scaling
[With Feed] of [Image Magnification: Side 1]
• To adjust the vertical scaling
[Across Feed] of [Image Magnification: Side 1]
Press [ ] to increase the scaling and [ ] to decrease it.
2. Print the image. Is the problem resolved?
Yes Finished!
No If the problem persists even though you have adjusted the setting to its maximum and
minimum values, contact your service representative.
94
Page 97

Paper feed direction
Original
Output
Side 1 Side 2
CEZ525
Paper Feed Problems Affecting Image Quality
Image Scaling Error on the Side 2 of Paper
Cause:
An image scaling error on the side 2 of the paper may occur because the paper expands or contracts
after the image on the side 1 of the paper has been fused.
Solution:
Adjust the scaling for the side 2 of the paper and minimize the difference in print size between the side 1
and the side 2.
1. Select [Machine: Image Position] in [Advanced Settings] for the custom paper in use and
adjust the following for 1101: [Image Position].
• To adjust the horizontal scaling
[With Feed] of [Image Magnification: Side 2]
• To adjust the vertical scaling
[Across Feed] of [Image Magnification: Side 2]
Press [ ] to increase the scaling and [ ] to decrease it.
2. Print the image. Is the problem resolved?
Yes Finished!
No Contact your service representative.
95
Page 98

33 mm
(1.3 in.)
14 mm
(0.6 in.)
14 mm
(0.6 in.)
33 mm
(1.3 in.)
DTH013
CNT012
4. Troubleshooting Paper Delivery Problems
Paper Edges Are Soiled (1)
Cause:
The exit rollers in the drawer are soiled.
Solution:
Clean the exit rollers in the drawer.
For details about cleaning the exit rollers, see page 25 "Two 14-mm Wide Streaks".
Paper Edges Are Soiled (2)
Cause:
The antistatic brushes in the exit transport and invert transport of the drawer are soiled or the anti-static
brushes in Finisher SR5090/Booklet Finisher SR5100 are soiled.
96
Page 99

CZC306
Paper Feed Problems Affecting Image Quality
Solution:
Carry out the following sequence of procedures. Terminate the sequence as soon as the problem is
resolved.
Procedure 1: Cleaning the antistatic brushes in the exit transport and inverter transport of the
drawer
Clean the antistatic brushes in the exit transport and inverter transport of the drawer with a blower
brush.
• Antistatic brushes in the exit transport and inverter transport
Procedure 2: Disabling the decurl setting and delivering sheets with their printed side facing
down
• Apply this procedure only when all of the following conditions are met.
• A back-curl is required to flatten curls with the decurler unit.
• Sheets are delivered with their printed side facing up in the post-processing machine.
1. In the [Main Unit: Paper Feed/ Output] group of [Adjustment Settings for Operators], select
0310: [Correct Output Paper Curl] and check the current correction level (Off, Small, or
Large).
2. Is the current correction level "Correction Level: Small" or "Correction Level: Large"?
Yes Go to the next step.
No Contact your service representative.
3. Is it necessary to set the current correction level?
Yes Go to the next step.
No Set [Correct Output Paper Curl] to "Correction Level: Off" (set it back to the default
value).
97
Page 100

120 mm
(4.8 in.)
40 mm
(1.6 in.)
CNT014
4. Troubleshooting Paper Delivery Problems
4. Are the sheets delivered with their printed side facing up?
Yes Go to the next step.
No Contact your service representative.
5. Is this setting essential?
Yes Contact your service representative.
No Change the setting so that the sheets are delivered with their printed side facing
down.
6. Print the image. Is the problem resolved?
Yes Finished!
No Contact your service representative.
Paper Edges Are Soiled (3)
Cause:
The paper feed speed of the decurler unit is too high.
• To adjust the following settings, pre-register the type of paper in use as a custom paper. For details
about registering custom papers, see "Registering a Custom Paper", Preparation.
• Decreasing the paper feed speed of the decurler unit may result in creases, scratches, or paper
jams if thin paper is used.
98
 Loading...