

Ricoh Pro 8200s, Pro 8210s, Pro 8220s, Pro 8210, Pro 8220 Operating Instructions Manual

Operating Instructions
Replacement Guide: TCRU/ORU
For safe and correct use, be sure to read the Safety Information in "Read This First" before using the machine.


TABLE OF CONTENTS
Introduction......................................................................................................................................................... 3
How to Read This Manual................................................................................................................................. 4
Symbols...........................................................................................................................................................4
Disclaimer........................................................................................................................................................4
Power Switch Symbols...................................................................................................................................4
Safety During Operation....................................................................................................................................5
Safety Precautions to Be Followed....................................................................................................................6
Environments Where the Machine Can be Used........................................................................................ 6
Handling power cords and power plugs..................................................................................................... 6
Handling the main machine...........................................................................................................................8
Handling the machine’s interior.................................................................................................................... 9
Handling the machine’s supplies................................................................................................................10
1. Before You Begin
What You Need...............................................................................................................................................13
General Cautions.............................................................................................................................................14
Names of Components....................................................................................................................................15
Control Panel....................................................................................................................................................16
Turning Off/On the Power..............................................................................................................................17
Turning Off the Main Power........................................................................................................................17
Turning On the Main Power........................................................................................................................18
Specifying System Auto-Reset Timer...............................................................................................................20
Preparation....................................................................................................................................................... 21
Resetting the Replaceable Parts Counter........................................................................................................22
2. Replacing the Paper Feed Rollers
Before You Begin............................................................................................................................................. 25
Tray Names..................................................................................................................................................26
Position of the paper feed rollers................................................................................................................27
Replaceable Parts........................................................................................................................................ 28
Replacing the Rollers in Tray 1........................................................................................................................30
If A3 Tray Unit Is Attached.......................................................................................................................... 34
Replacing the Rollers in Tray 2/3...................................................................................................................38
Replacing the Rollers in the Wide LCT............................................................................................................40
Replacing the Rollers in the Wide LCT 4....................................................................................................40
1

Replacing the Rollers in the Wide LCT 5/6...............................................................................................44
Replacing the Rollers in the LCT...................................................................................................................... 50
Replacing the Rollers in the LCT 4.............................................................................................................. 50
Replacing the Rollers in the LCT 5.............................................................................................................. 53
Replacing the Rollers in the LCT 6.............................................................................................................. 57
Replacing the Rollers in the Bypass Tray........................................................................................................62
Replacing the Rollers in the ADF..................................................................................................................... 66
3. Development Unit
Before You Begin............................................................................................................................................. 75
Replaceable Parts........................................................................................................................................ 75
Replacing the Charge Unit/Cleaning Unit for Photoconductor Unit/Photoconductor Unit...................... 77
4. Cleaning Unit for Intermediate Transfer Belt
Before You Begin............................................................................................................................................. 91
Replaceable Parts........................................................................................................................................ 91
Replacing the Cleaning Unit for Intermediate Transfer Belt..........................................................................92
5. Transfer Unit
Before You Begin...........................................................................................................................................101
Replaceable Parts......................................................................................................................................101
Replacing the Transfer Unit........................................................................................................................... 102
6. Fusing Unit
Before You Begin...........................................................................................................................................107
Replaceable Parts......................................................................................................................................107
Replacing the Cleaning Unit for the Fusing Unit/Fusing Assembly........................................................... 109
7. Developer
Before You Begin...........................................................................................................................................115
Replaceable Parts......................................................................................................................................115
Replacing the Developer...............................................................................................................................116
8. Waste Toner Bottle
Before You Begin...........................................................................................................................................125
Replaceable Parts......................................................................................................................................126
Replacing the Waste Toner Bottle................................................................................................................ 127
2

Introduction
This manual contains detailed instructions and notes on the operation and use of this machine. For your
safety and benefit, read this manual carefully before using the machine. Keep this manual in a handy
place for quick reference.
This manual is only for operators who have received proper training.
• Never perform any procedure in this manual if you have not received proper training.
• If you have received training and are not sure how to perform a procedure, call your service
representative.
• Even if you have received training, never attempt any procedure that is not shown in this manual.
• The contents of this manual are subject to change without prior notice. In no event will the company
be liable for direct, indirect, special, incidental, or consequential damages as a result of handling
or operating this machine.
3

How to Read This Manual
Symbols
This manual uses the following symbols:
Indicates points to pay attention to when using the machine, and explanations of likely causes of paper
misfeeds, damage to originals, or loss of data. Be sure to read these explanations.
Indicates supplementary explanations of the machine’s functions, and instructions on resolving user
errors.
This symbol is located at the end of sections. It indicates where you can find further relevant information.
[ ]
Indicates the names of keys on the machine's display or control panels.
Disclaimer
Contents of this manual are subject to change without prior notice.
In no event will the company be liable for direct, indirect, special, incidental, or consequential damages
as a result of handling or operating the machine.
Power Switch Symbols
Where symbols are used on or near switches on machines for Europe and other areas, the meaning of
each symbol conforms with IEC60417.
ON
STANDBY
4

Safety During Operation
In this manual, the following important symbols are used:
Indicates a potentially hazardous situation which, if instructions are not followed, could result in death
or serious injury.
Indicates a potentially hazardous situation which, if instructions are not followed, may result in minor
or moderate injury or damage to property.
5
Safety Precautions to Be Followed
Environments Where the Machine Can be Used
• Do not use flammable sprays or solvents in the vicinity of this machine. Also, avoid placing these
items in the vicinity of this machine. Doing so could result in fire or electric shock.
• Do not place vases, plant pots, cups, toiletries, medicines, small metal objects, or containers
holding water or any other liquids, on or close to this machine. Fire or electric shock could result
from spillage or if such objects or substances fall inside this machine.
• Keep the machine away from humidity and dust. Otherwise a fire or an electric shock might
occur.
• Do not place the machine on an unstable or tilted surface. If it topples over, an injury might
occur.
• Do not obstruct the machine's vents. Doing so risks fire caused by overheated internal
components.
• Do not place heavy objects on the machine. Doing so can cause the machine to topple over,
possibly resulting in injury.
• Make sure the room where you are using the machine is well ventilated and spacious. Good
ventilation is especially important when the machine is used heavily.
Handling power cords and power plugs
• Do not use any power sources other than those that match the specifications shown in this
manual. Doing so could result in fire or electric shock.
• Do not use any frequencies other than those that match the specifications shown. Doing so could
result in fire or electric shock.
• Do not use multi-socket adaptors. Doing so could result in fire or electric shock.
6

• Do not use extension cords. Doing so could result in fire or electric shock.
• Do not use power cords that are damaged, broken, or modified. Also, do not use power cords
that have been trapped under heavy objects, pulled hard, or bent severely. Doing so could
result in fire or electric shock.
• It is dangerous to handle the power cord plug with wet hands. Doing so could result in electric
shock.
• Touching the prongs of the power cable's plug with anything metallic constitutes a fire and
electric shock hazard.
• The supplied power cord is for use with this machine only. Do not use it with other appliances.
Doing so could result in fire or electric shock.
• If the power cord is damaged and its inner wires are exposed or broken, contact your service
representative for a replacement. Use of damaged power cords could result in fire or electric
shock.
• Be sure to disconnect the plug from the wall outlet at least once a year and check for the
following:
• There are burn marks on the plug.
• The prongs on the plug are deformed.
• If any of the above conditions exist, do not use the plug and consult your dealer or service
representative. Use of the plug could result in fire or electric shock.
• Be sure to disconnect the power cord from the wall outlet at least once a year and check for the
following:
• The power cord's inner wires are exposed, broken, etc.
• The power cord's coating has a crack or dent.
• When bending the power cord, the power turns off and on.
• Part of the power cord becomes hot.
• The power cord is damaged.
• If any of the above conditions exist, do not use the power cord and consult your dealer or
service representative. Use of the power cord could result in fire or electric shock.
7
• When disconnecting the power cord from the wall outlet, always pull the plug, not the cord.
Pulling the cord can damage the power cord. Use of damaged power cords could result in fire
or electric shock.
• Be sure to push the plug of the power cord fully into the wall outlet. Partially inserted plugs
create an unstable connection that can result in unsafe buildup of heat.
• Be sure to disconnect the plug from the wall outlet and clean the prongs and the area around
the prongs at least once a year. Allowing dust to build up on the plug constitutes a fire hazard.
• If this machine is not going to be used for several days or longer at a time, disconnect its power
cord from the wall outlet.
• When performing maintenance on the machine, always disconnect the power cord from the
wall outlet.
Handling the main machine
• The following explains the warning messages on the plastic bag used in this product's
packaging.
• Keep the polythene materials (bags, etc.) supplied with this machine away from babies
and small children at all times. Suffocation can result if polythene materials are brought into
contact with the mouth or nose.
• Be sure to locate the machine as close as possible to a wall outlet. This will allow easy
disconnection of the power cord in the event of an emergency.
• If the machine emits smoke or odours, or if it behaves unusually, you must turn off its power
immediately. After turning off the power, be sure to disconnect the power cord plug from the
wall outlet. Then contact your service representative and report the problem. Do not use the
machine. Doing so could result in fire or electric shock.
• If metal objects, or water or other fluids fall inside this machine, you must turn off its power
immediately. After turning off the power, be sure to disconnect the power cord plug from the
wall outlet. Then contact your service representative and report the problem. Do not use the
machine. Doing so could result in fire or electric shock.
8
• Do not touch this machine if a lightning strike occurs in the immediate vicinity. Doing so could
result in electric shock.
• Unplug the power cord from the wall outlet before you move the machine. While moving the
machine, take care that the power cord is not damaged under the machine. Failing to take these
precautions could result in fire or electric shock.
• After you move the machine, use the caster fixture to fix it in place. Otherwise the machine might
move or come down to cause an injury.
• Contact your service representative if you need to lift the machine (such as when relocating it to
another floor). Do not attempt to lift the machine without the assistance of your service
representative. The machine will be damaged if it topples or is dropped, resulting in malfunction
and risk of injury to users. The machine's various handling areas are for service engineer use
only. Do not touch these areas.
• Do not look into the lamp. It can damage your eyes.
• Do not hold the control panel while moving the machine. Doing so may damage the control
panel, cause a malfunction, or result in injury.
• Keep your hands away from the hinges and exposure glass when lowering the ADF. Not doing
so result in an injury if your hands or fingers are pinched.
Handling the machine’s interior
• Do not remove any covers or screws other than those explicitly mentioned in this manual. Inside
this machine are high voltage components that are an electric shock hazard and laser
components that could cause blindness. Contact your sales or service representative if any of the
machine's internal components require maintenance, adjustment, or repair.
• Do not attempt to disassemble or modify this machine. Doing so risks burns and electric shock.
Note again that exposure to the laser components inside this machine risks blindness.
• Some of this machine's internal components get very hot. For this reason, take care when
removing misfed paper. Not doing so could result in burns.
9
• The inside of the machine could be very hot. Do not touch the parts with a label indicating the
"hot surface". Otherwise, an injury might occur.
• When removing jammed paper, make sure not to trap or injure your fingers.
• When loading paper, take care not to trap or injure your fingers.
• Keep your hands clear of the booklet finisher tray when removing misfed paper, pulling out or
pushing in the finisher's staple unit. You can trap and injure your fingers if you do not.
• During operation, rollers for transporting the paper and originals revolve. A safety device has
been installed so that the machine can be operated safely. But take care not to touch the
machine during operation. Otherwise, an injury might occur.
• If the machine's interior is not cleaned regularly, dust will accumulate. Fire and breakdown can
result from heavy accumulation of dust inside this machine. Contact your sales or service
representative for details about and charges for cleaning the machine's interior.
Handling the machine’s supplies
10
• Do not incinerate toner (new or used) or toner containers. Doing so risks burns. Toner will ignite
on contact with naked flame.
• Do not store toner (new or used) or toner containers anywhere near naked flames. Doing so
risks fire and burns. Toner will ignite on contact with naked flame.
• Do not use a vacuum cleaner to remove spilled toner (including used toner). Absorbed toner
may cause a fire or explosion due to electrical contact flickering inside the vacuum cleaner.
However, it is possible to use a vacuum cleaner that is explosion-proof and dust ignition-proof. If
toner is spilled on the floor, remove the spilled toner slowly using a wet cloth, so that the toner is
not scattered.
• The following explains the warning messages on the plastic bag used in this product's
packaging.
• Keep the polythene materials (bags, etc.) supplied with this machine away from babies
and small children at all times. Suffocation can result if polythene materials are brought into
contact with the mouth or nose.

• The fusing unit becomes extremely hot during operation. To prevent minor burns, allow the
machine to cool for at least 30 minutes before you remove the fusing unit.
• The fusing unit weighs approximately around 17.0 kg (37.5 lb).
• When moving the fusing unit, lift it slowly and be careful not to strain yourself. Careless
handling or over-exertion when lifting can result in breakage of the unit or injury to yourself.
• Do not crush or squeeze toner containers. Doing so can cause toner spillage, possibly resulting
in dirtying of skin, clothing, and floor, and accidental ingestion.
• Store toner (new or used), toner containers, and components that have been in contact with
toner out of reach of children.
• If toner or used toner is inhaled, gargle with plenty of water and move into a fresh air
environment. Consult a doctor if necessary.
• If toner or used toner gets into your eyes, flush immediately with large amounts of water. Consult
a doctor if necessary.
• If toner or used toner is swallowed, dilute by drinking a large amount of water. Consult a doctor
if necessary.
• When removing jammed paper or replacing toner, avoid getting toner (new or used) on your
clothing. If toner comes into contact with your clothing, wash the stained area with cold water.
Hot water will set the toner into the fabric and make removing the stain impossible.
• Avoid getting toner on your clothes or skin when replacing toner filter. If your skin comes into
contact with toner, wash the affected area thoroughly with soap and water.
• If toner gets on your clothing, wash with cold water. Hot water will set the toner into the fabric
and may make removing the stain impossible.
SAFETY AND ECOLOGICAL NOTES FOR DISPOSAL
1. Do not incinerate toner bottles or used toner. Toner dust may ignite suddenly when exposed to an
open flame.
2. Dispose of used toner and organic photoconductors in accordance with local regulations. (These
are non-toxic supplies.)
3. Dispose of replaced parts in accordance with local regulations.
11

12
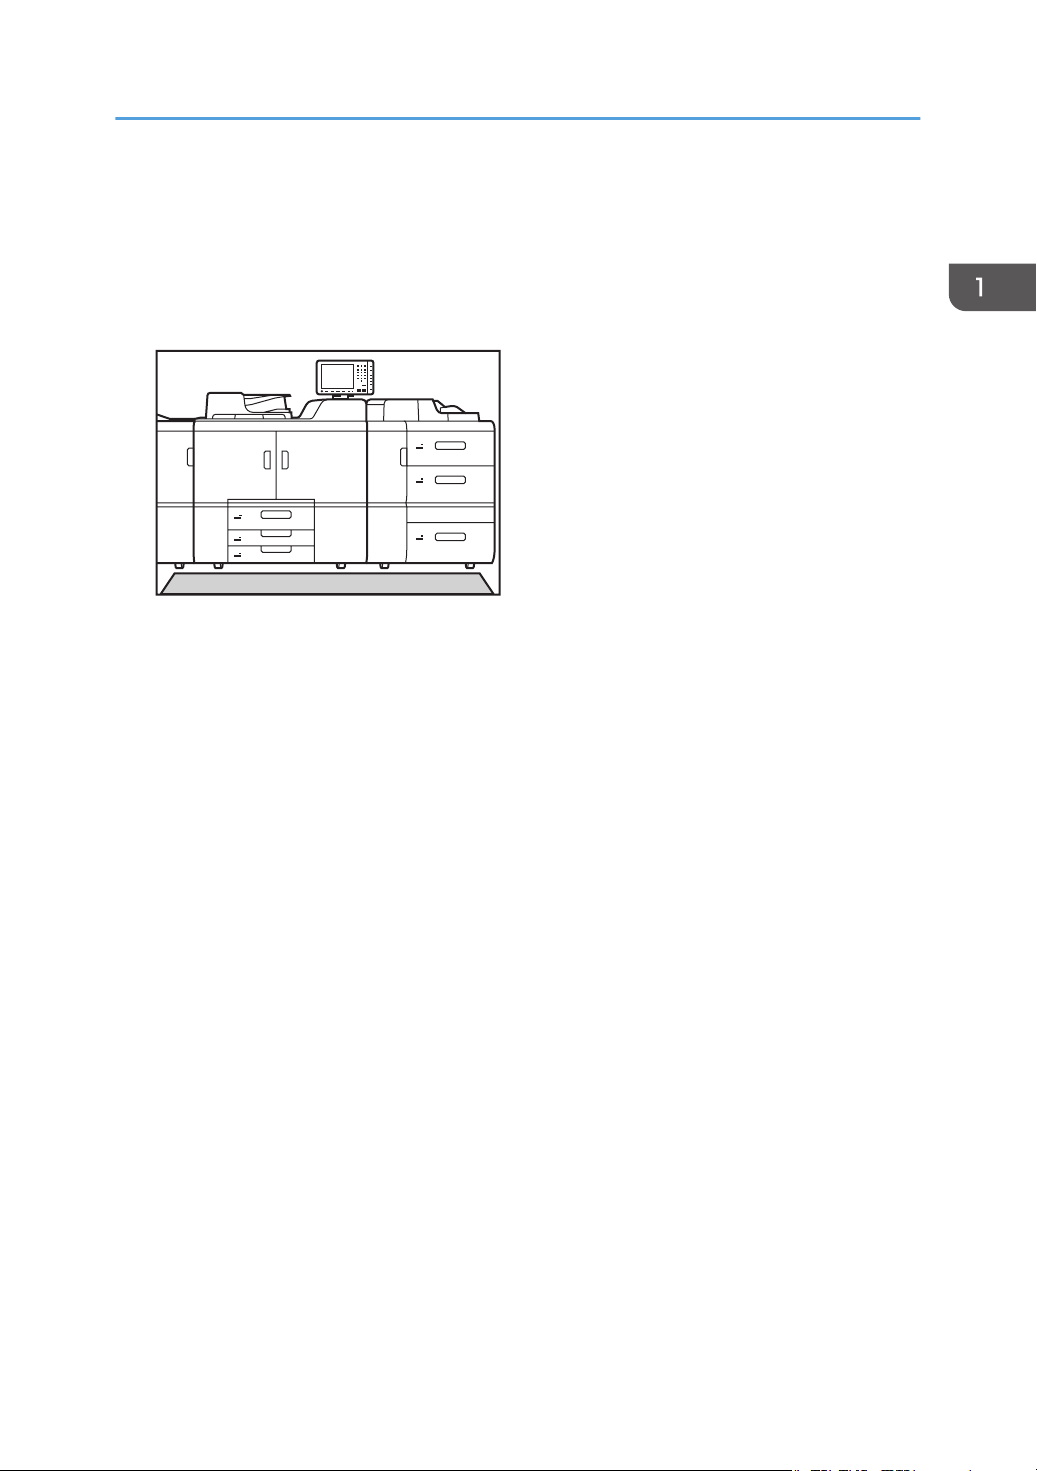
1. Before You Begin
1 2 3
CZC149
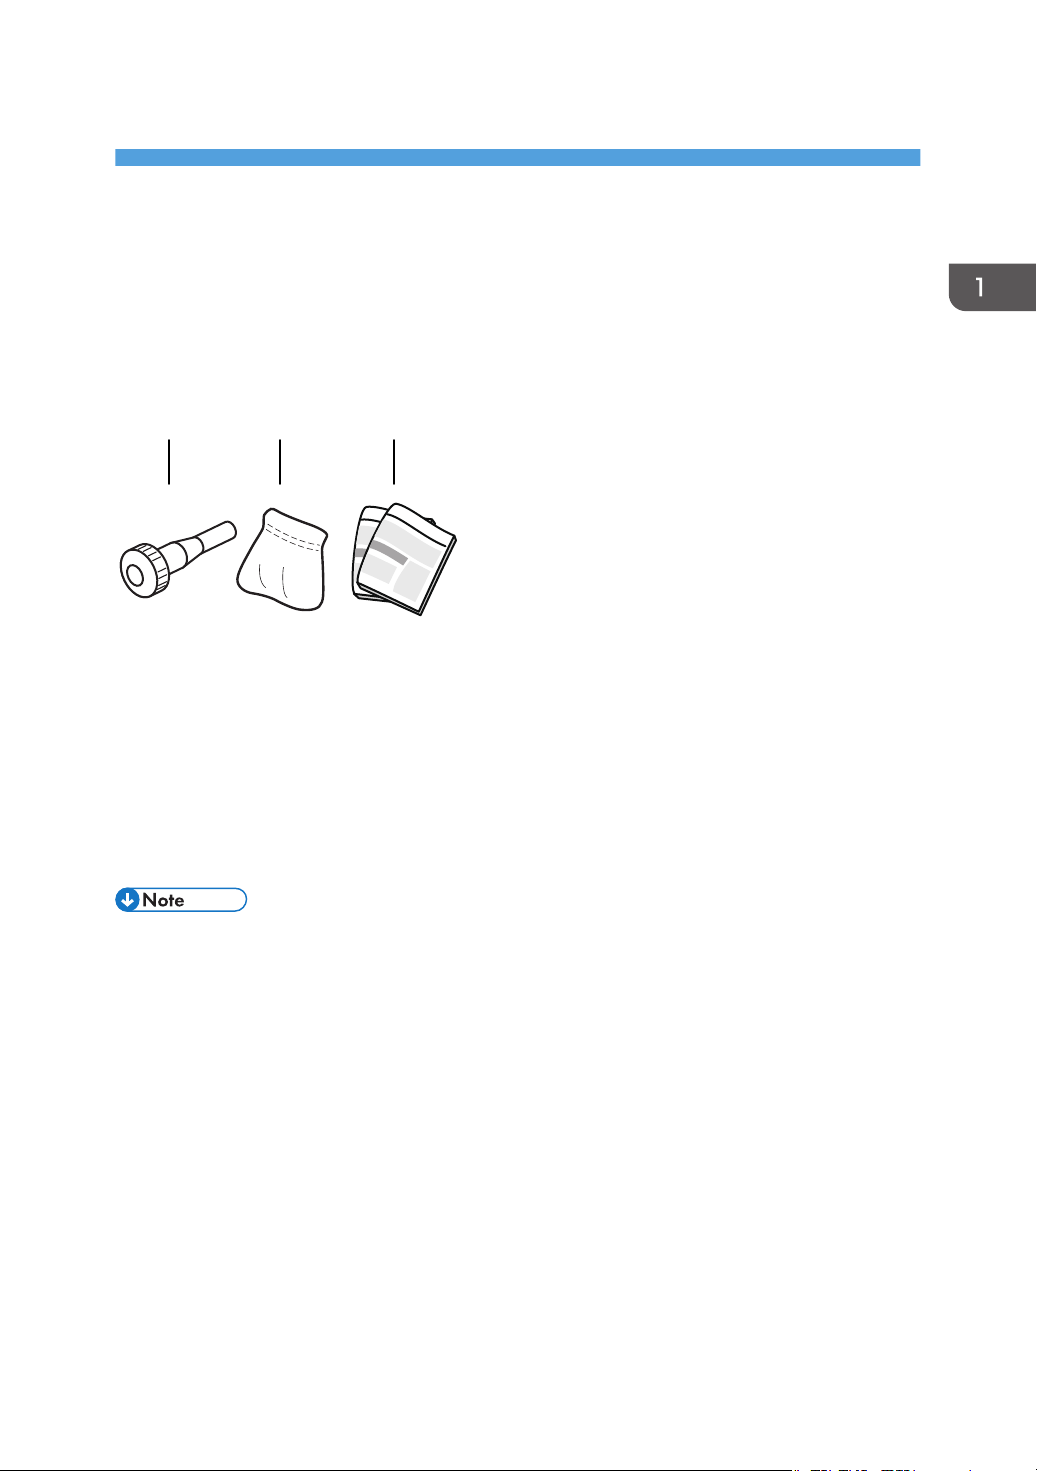
What You Need
Use only the tools and materials described in this manual. Using other tools or materials could damage
the machine or cause injury.
1. Hex screwdriver
Use this to remove black hexagonal-head screws from the machine.
2. Drum setting powder pad applicator
Needed to apply a thin coated of powder on the drum.
3. Newspaper or other paper
To prevent toner and other stains getting on the floor, spread sheets of paper out where you intend to place
the removed parts.
• The hex screwdriver and drum setting powder pad applicator are included in the maintenance kit.
Keep them somewhere safe. If the maintenance kit has any items missing, contact your service
representative.
13
CWH161
1. Before You Begin
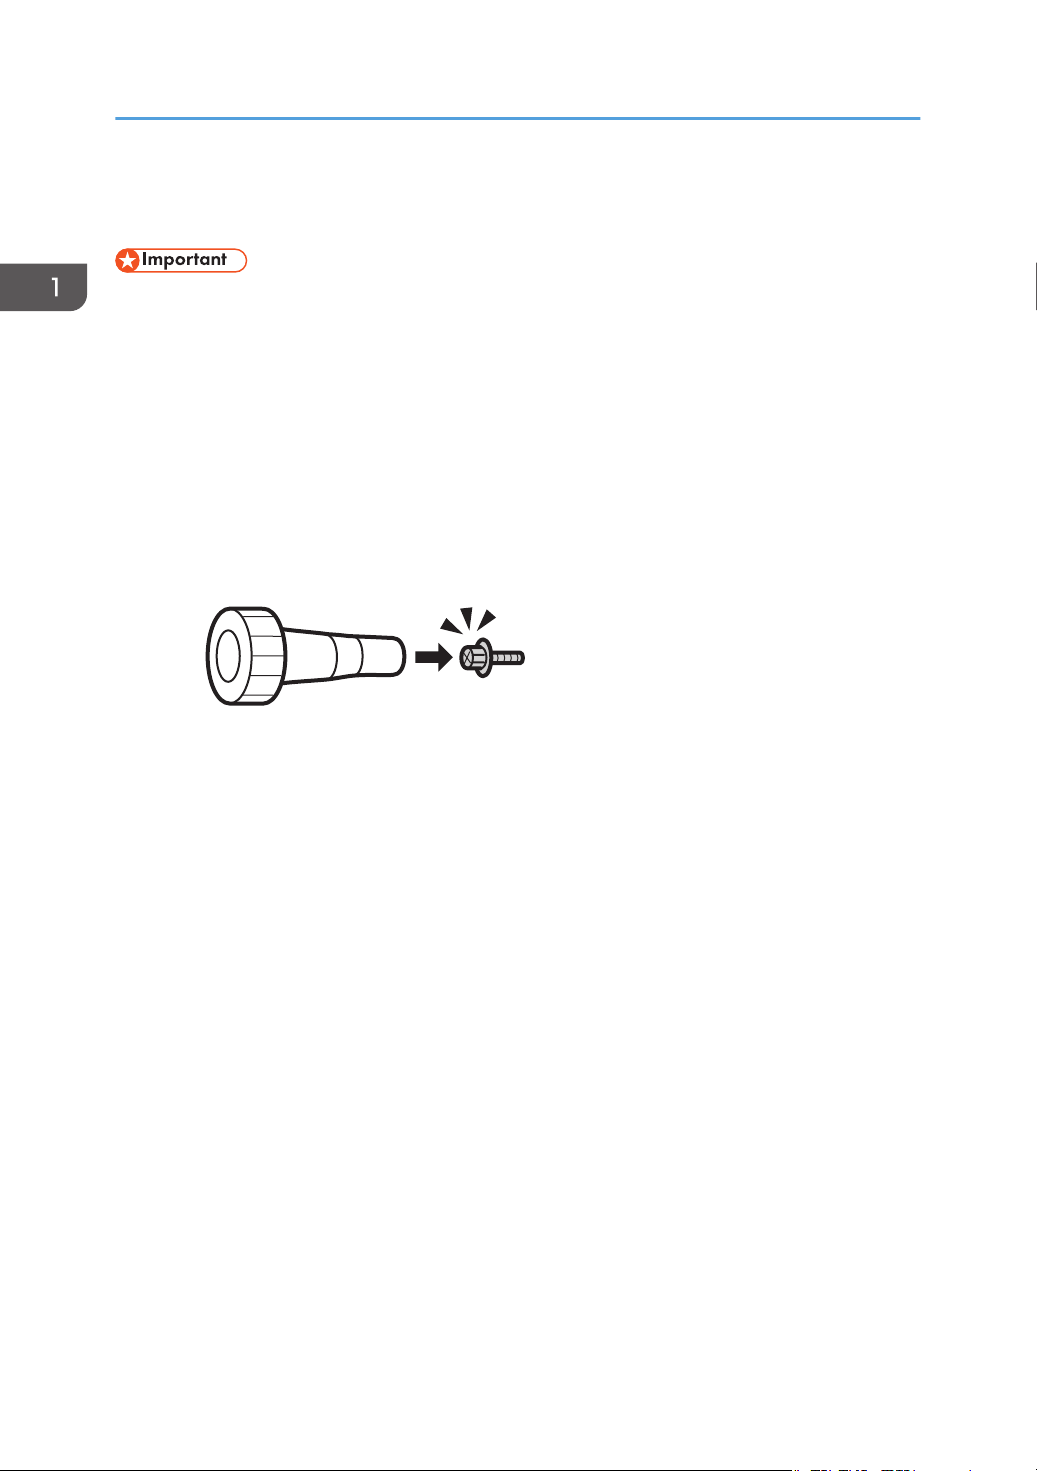
General Cautions
• Never remove any screw unless you are instructed to do so.
Handles and levers
• Purple handles and levers are for pulling or lifting parts when you move or remove them.
Purple labels on parts indicate exactly where to hold the parts when pulling or lifting them.
Screws
• Replaceable components are secured with black screws. Never remove screws that are not
black.
• The hex screwdriver is used to clench the heads of screws, so that they do not drop into the
machine during removal.
14
1
2
3
1
2
5
4
6
3
CZC136
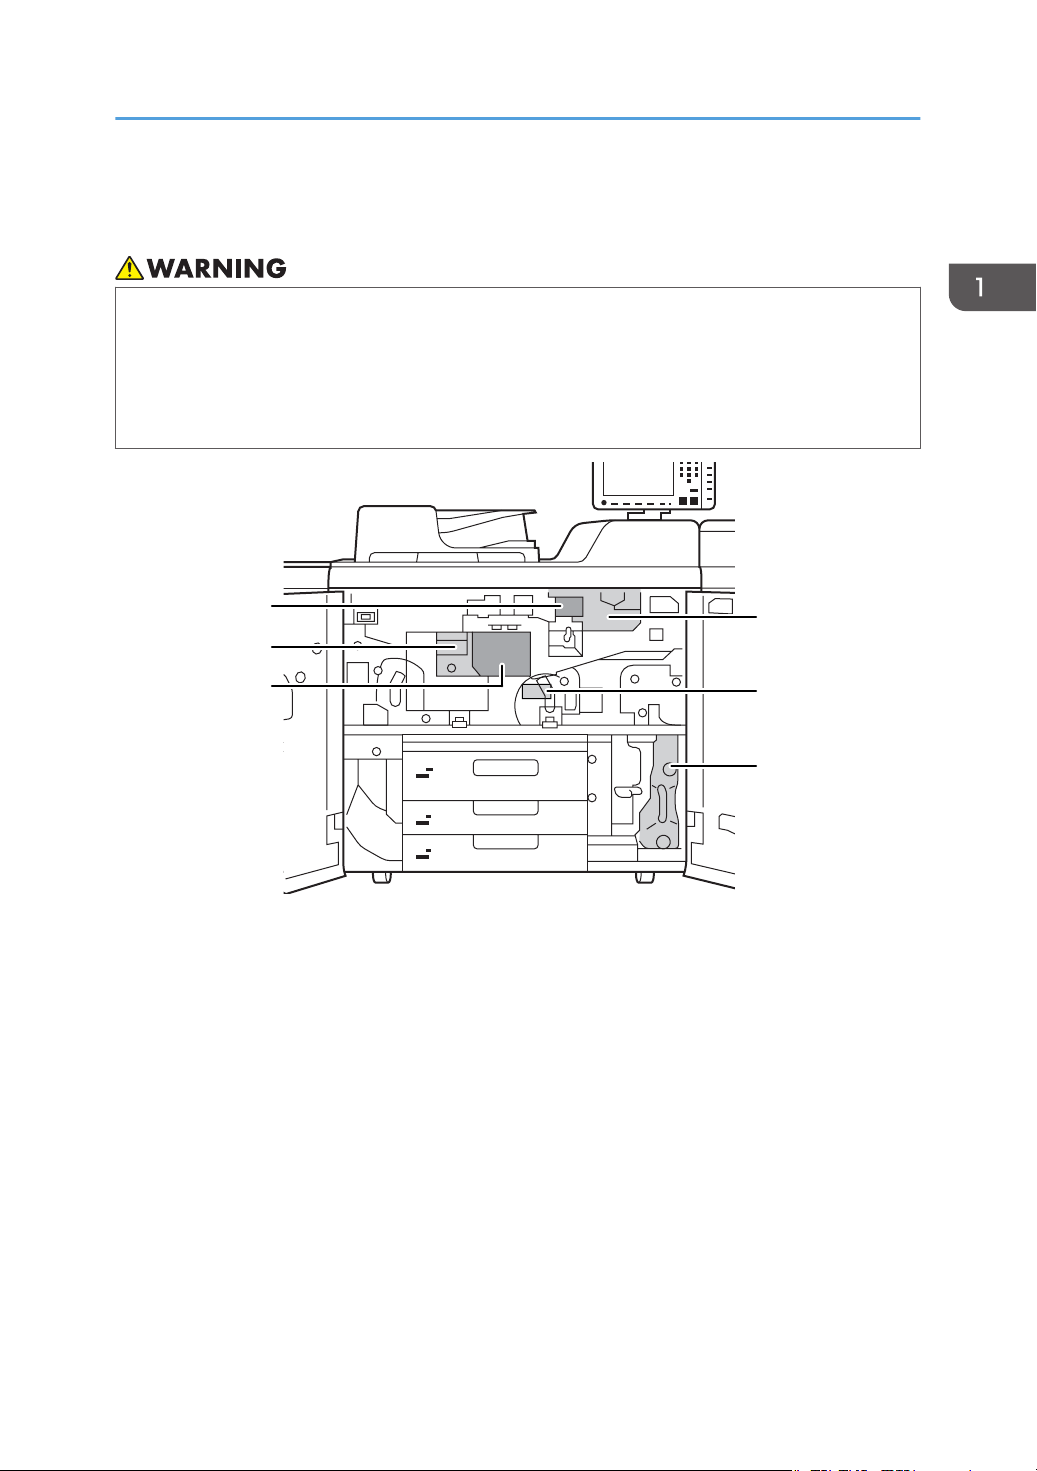
Names of Components
Names of Components
• Do not remove any covers or screws other than those explicitly mentioned in this manual. Inside
this machine are high voltage components that are an electric shock hazard. Contact your sales
or service representative if any of the machine's internal components require maintenance,
adjustment, or repair.
• Do not attempt to disassemble or modify this machine. Doing so risks burns and electric shock.
1. Developer outlet/inlet
2. Fusing unit
3. Cleaning unit for intermediate transfer belt
4. Development unit
5. Transfer unit
6. Waste toner bottle
15
3
1
2
4
5
CZC140
1. Before You Begin
Control Panel
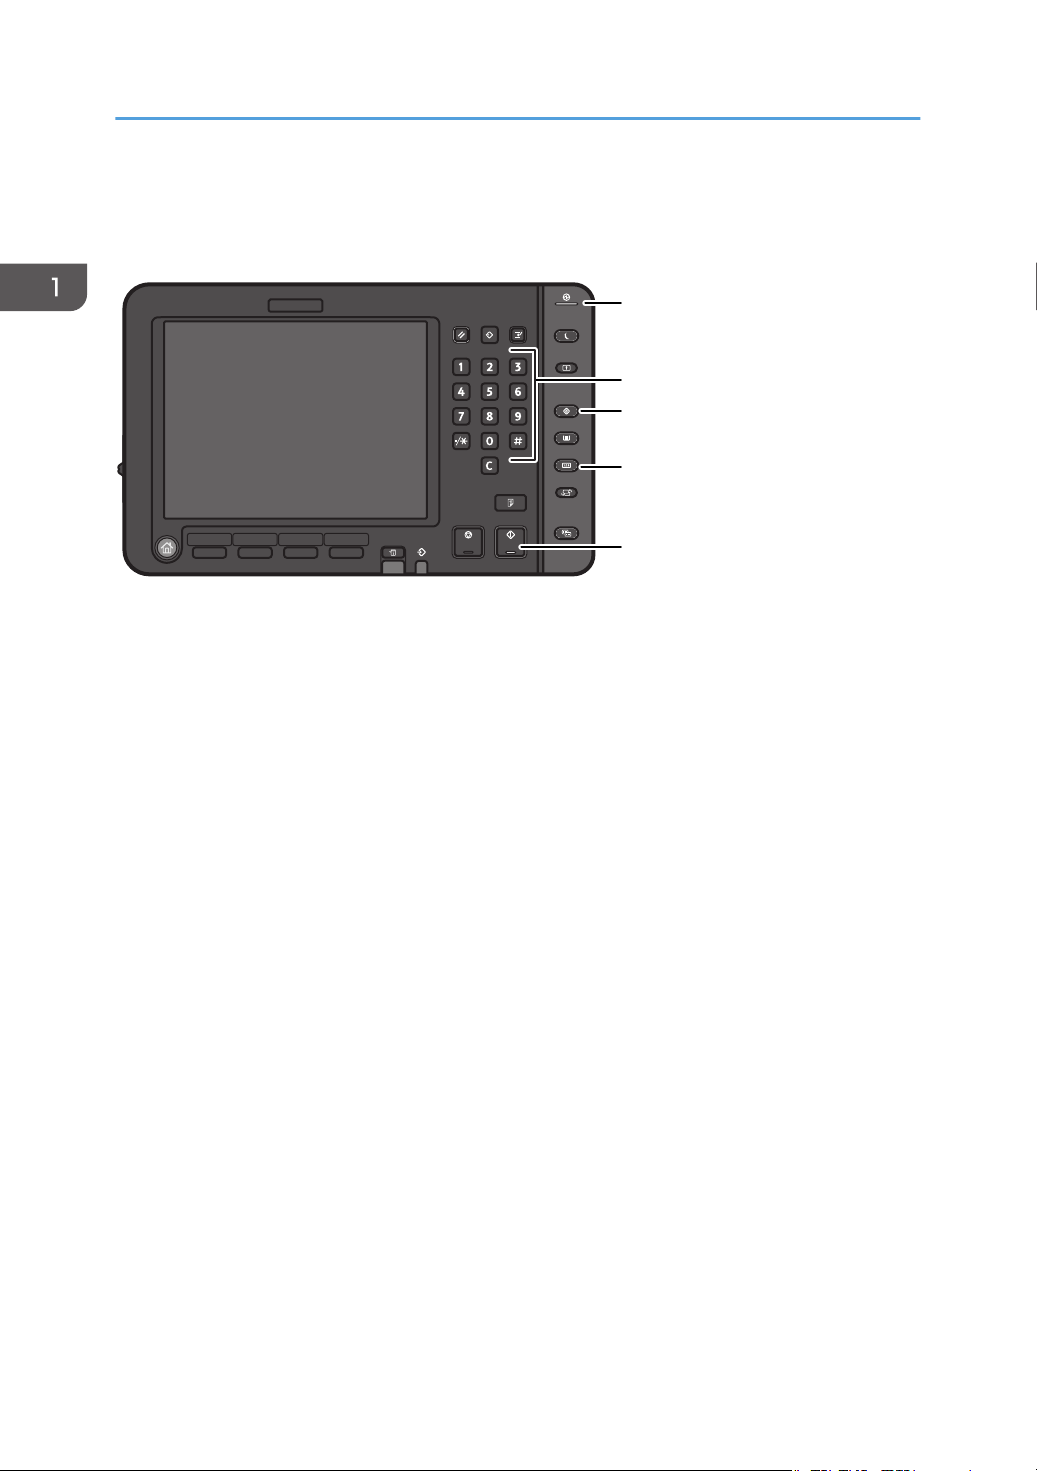
1. Main power indicator
2. Number keys
3. [User Tools] key
4. [Counter] key
5. [Start] key
16
CZC150
Turning Off/On the Power
Turning Off/On the Power
• Turn off the main power before carrying out any of the operations described in this manual.
The main power switch is on the left side of the machine. When this switch is turned on, the main power
turns on and the main power indicator lights up. When this switch is turned off, the main power turns off
and the main power indicator goes out.
Turning Off the Main Power
• When disconnecting the power cord from the wall outlet, always pull the plug, not the cord.
Pulling the cord can damage the power cord. Use of damaged power cords could result in fire
or electric shock.
• Do not turn off the power while the machine is in operation.
• Do not hold down the main power switch while turning off the main power. Doing so forcibly turns
off the machine's power and may damage the hard disk or memory and cause malfunctions.
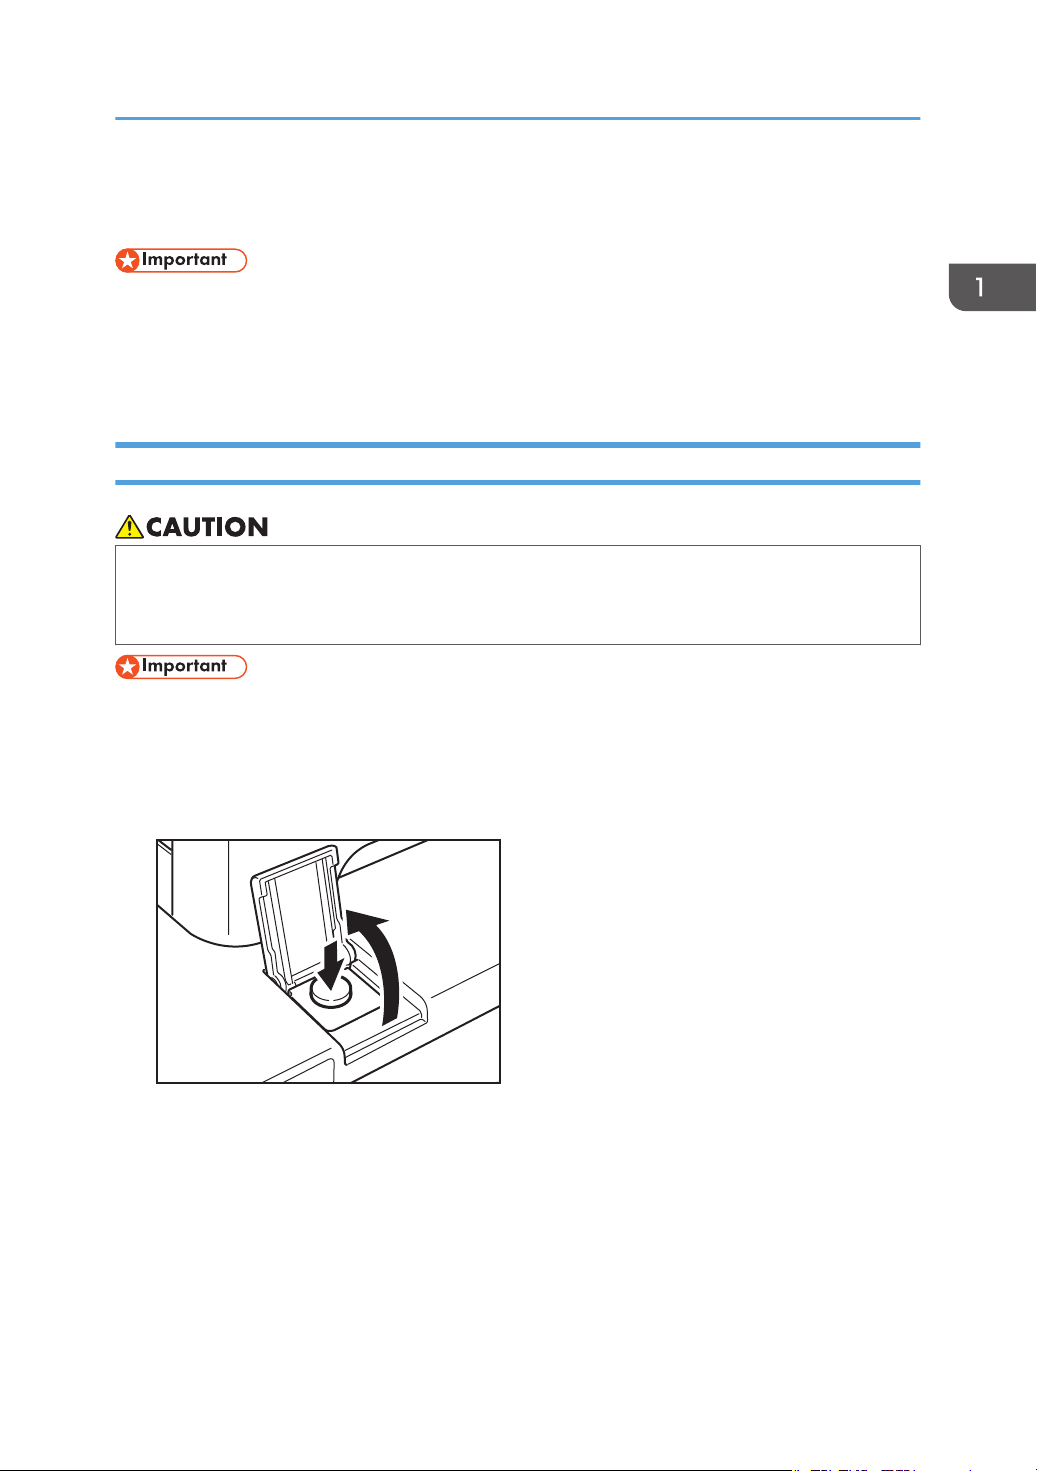
1. Open the main power switch cover, and then push the main power switch.
The main power indicator goes out.
17
1
2
3
4
5
6
CZC001
1
2
4
5
6
3
CZC173
1
2
3
4
5
6
CZC001
1. Before You Begin
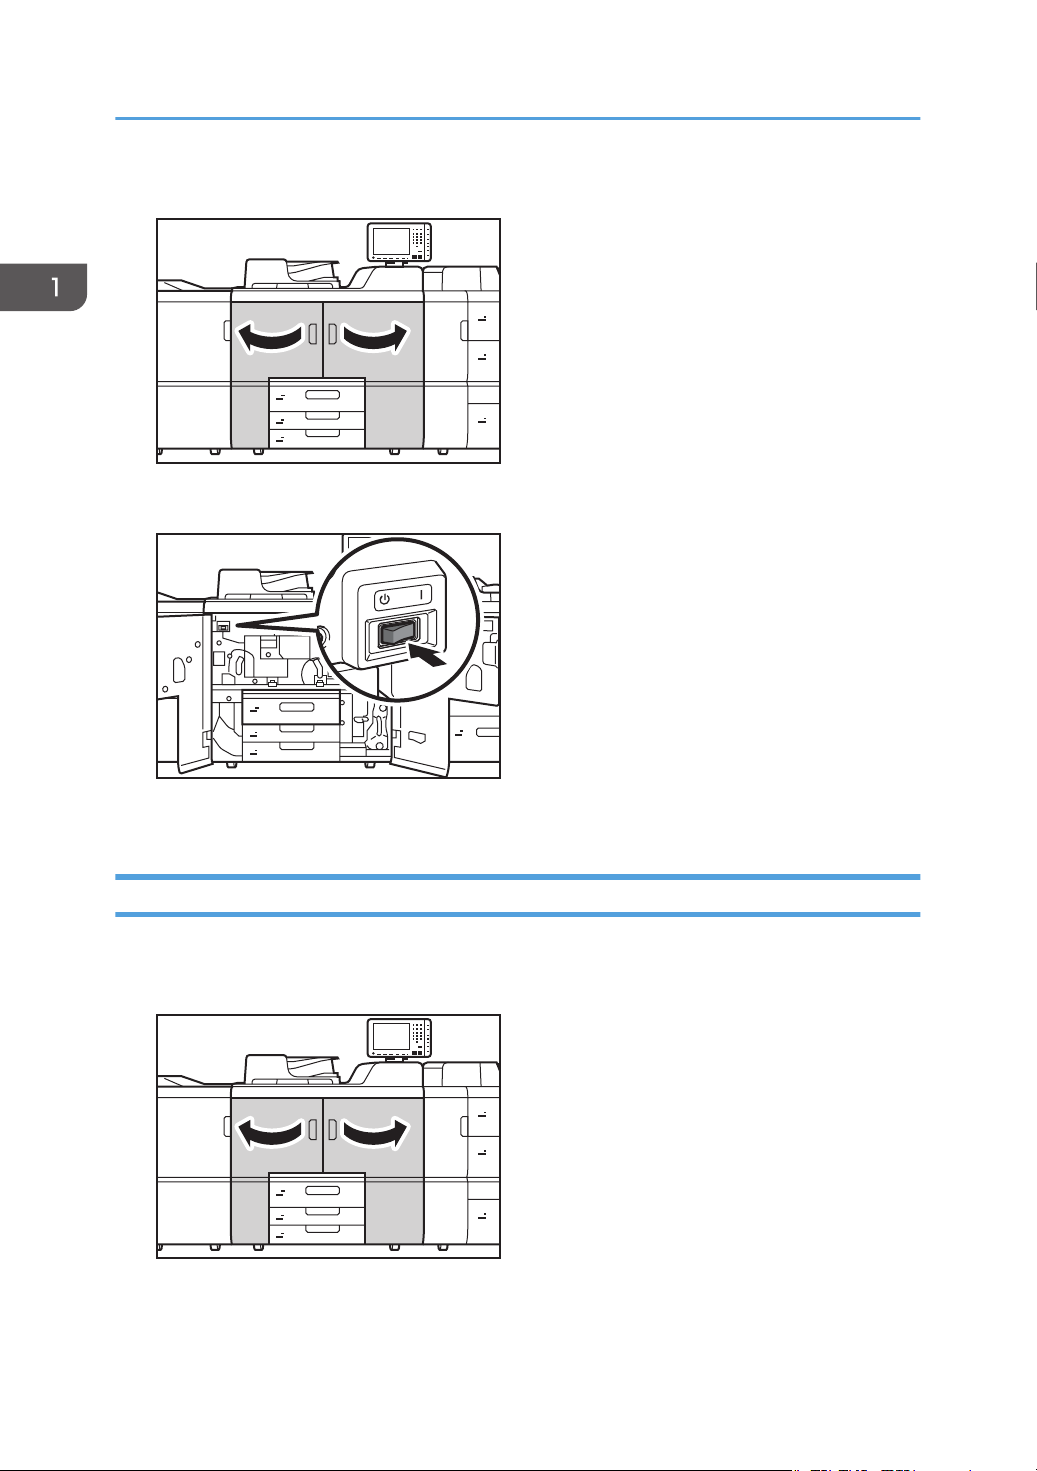
2. Open the front covers.
3. Push the AC power switch.
4. Unplug the machine and its optional devices from the wall outlet.
Turning On the Main Power
1. Plug the machine and its optional devices into the wall outlet.
2. Open the front covers.
18
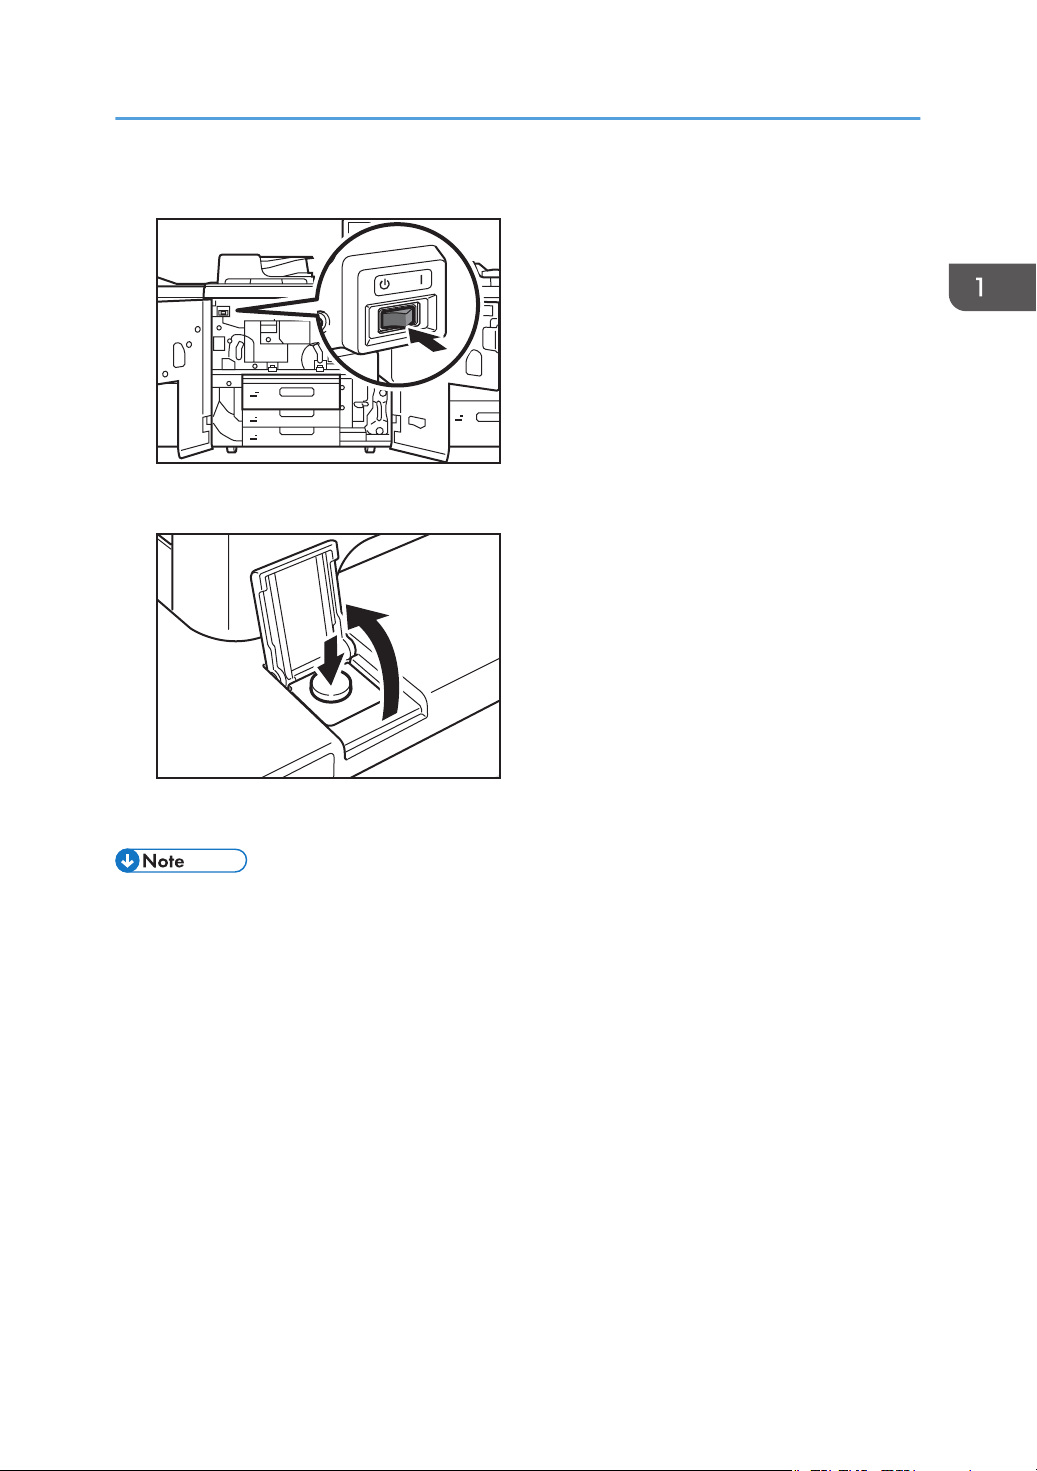
3. Push the AC power switch.
1
2
4
5
6
3
CZC172
CZC150
4. Open the main power switch cover, and push the main power switch.
Turning Off/On the Power
The main power indicator goes on.
• After you switch the main power on, a screen may appear to indicate that the machine is
initializing. Do not switch the power off during this process. Initialization takes about 16 minutes.
• If the machine does not turn on even if you press the main power switch, open the front covers and
make sure that the AC power switch is turned on. For details about the AC power switch, see "Dos
and Don'ts", About this Machine.
19

1. Before You Begin
Specifying System Auto-Reset Timer
To prevent the machine from switching screens while you are replacing parts, set [System Auto Reset
Timer] to "Off". After replacing the parts return the setting to "On", if necessary.
• For details about changing this setting, see Connecting the Machine/ System Settings, which is
supplied with this machine.
20
1
2
3
4
5
6
CZC141
Preparation
Preparation
Spread newspaper or other paper in front of the machine before removing any parts.
• The newspaper or other paper will catch small amounts of toner or shreds of dry lubricant that may
fall out of the PCUs when they are removed.
21
1
2
3
4
5
6
CZC001
1. Before You Begin
Resetting the Replaceable Parts Counter
1. Open the front covers.
2. Turn the machine on.
See page 17 "Turning Off/On the Power".
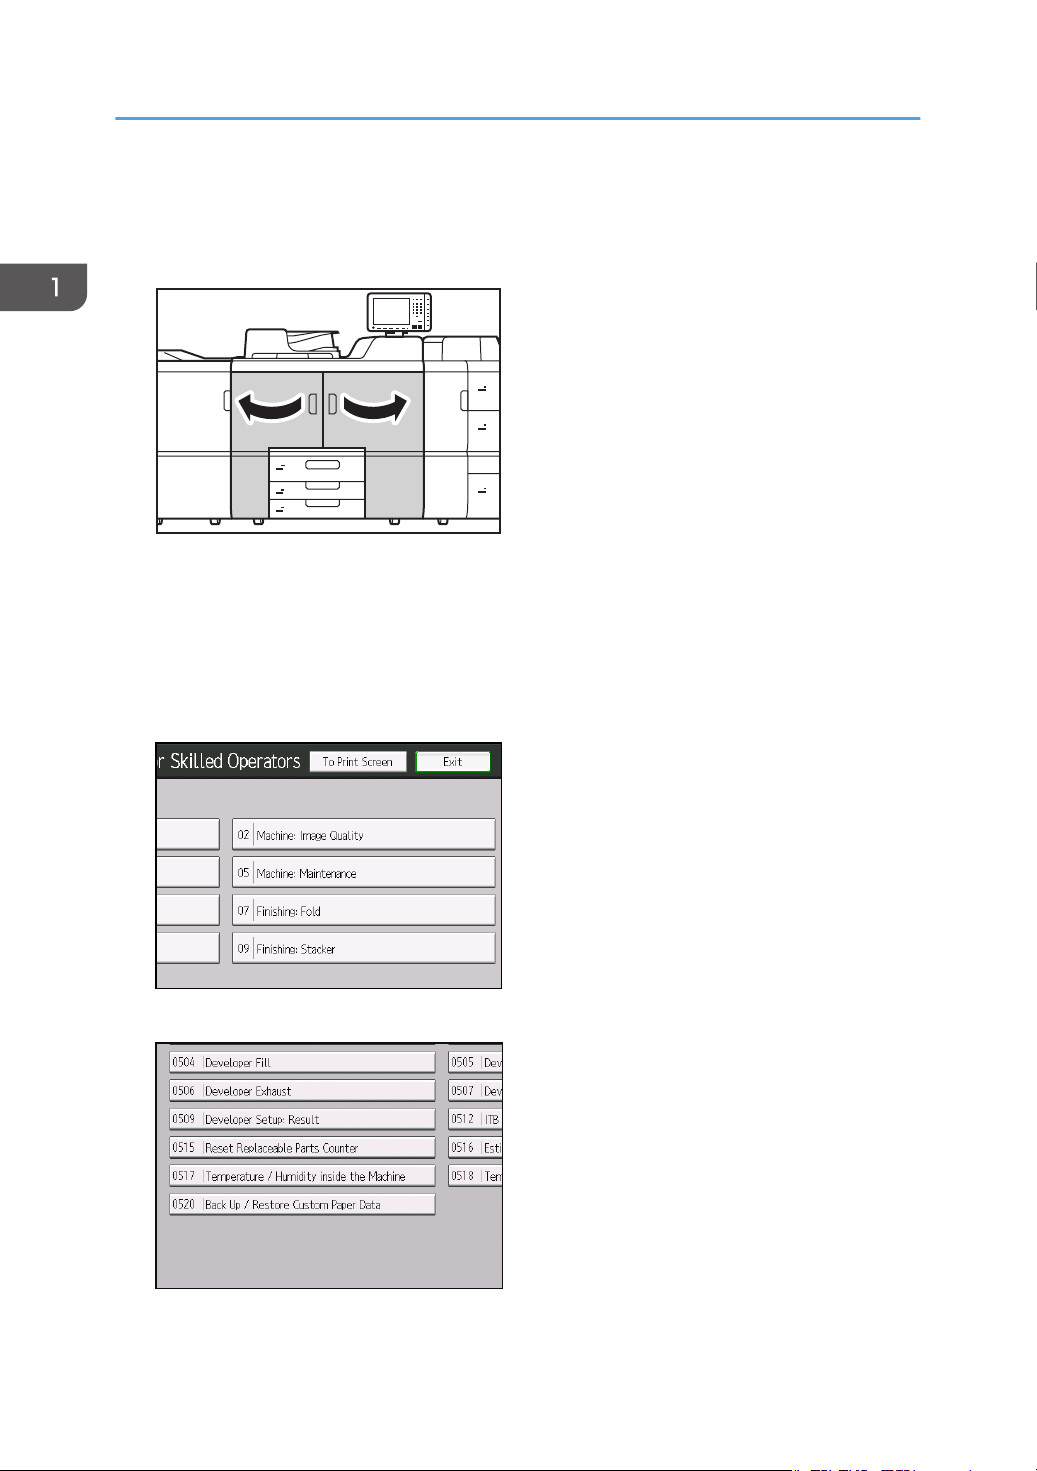
3. Access the Adjustment Settings for Skilled Operators menu.
See "Adjustment Settings for Skilled Operators", Adjustment Item Menu Guide: TCRU/ORU.
4. Press [Machine: Maintenance].
5. Press [Reset Replaceable Parts Counter].
22

6. Press the button of the part that has been replaced.
1
2
4
5
6
3
CZC006
7. Press [OK].
Resetting the Replaceable Parts Counter
8. Turn the machine off.
See page 17 "Turning Off/On the Power".
9. Close the front covers.
10. Turn the machine on.
The counter for the replaced component is reset. The setting for adjusting the machine for the
replaced component is executed automatically.
11. Access the Adjustment Settings for Skilled Operators menu.
See "Adjustment Settings for Skilled Operators", Adjustment Item Menu Guide: TCRU/ORU.
23

1. Before You Begin
12. Press [Machine: Maintenance].
13. Press [Estimated Life Already Used].
14. Make sure the counter has been reset.
24

2. Replacing the Paper Feed Rollers
Before You Begin
• The three rollers must be replaced together.
• Handle new rollers carefully and avoid touching their surfaces with bare hands.
• If you lose a snap ring, contact your service representative.
What You Need
• Hex screwdriver
Time for Replacement
A message will appear when it nears the time to replace a component.
Print the counter list.
1. Press the [Counter] key and print out the counter list.
See page 16 "Control Panel".
2. Turn the machine off.
See page 17 "Turning Off/On the Power".
25
4
5
6
4
5
6
1
2
3
6
7
2
3
4
1
5
CZC138
2. Replacing the Paper Feed Rollers
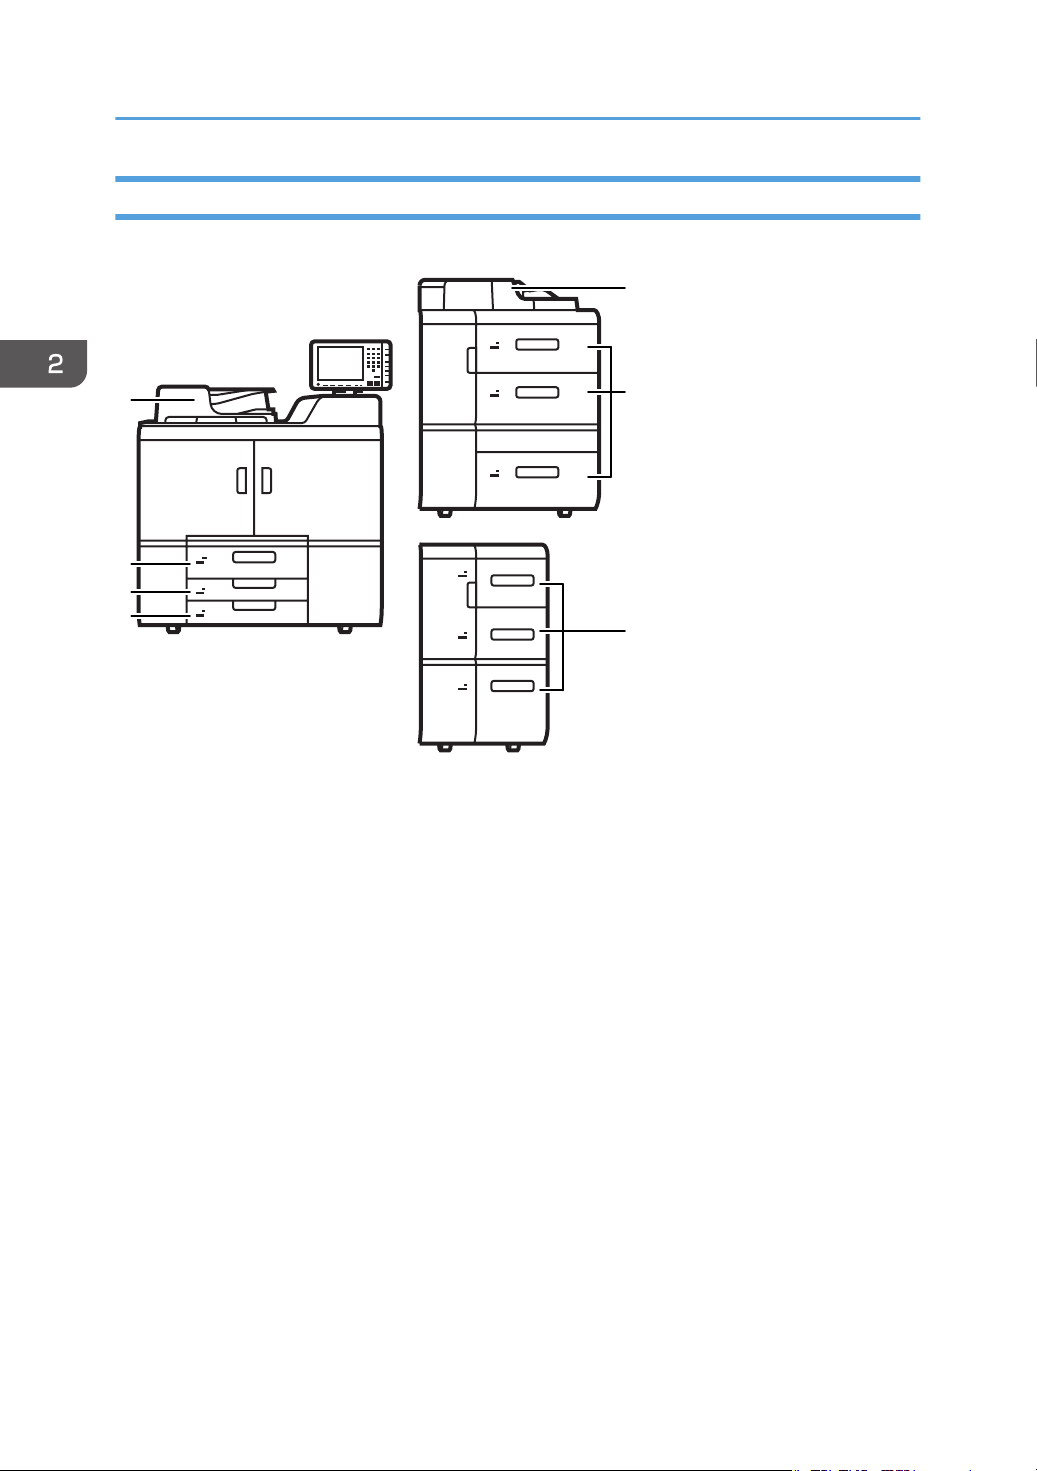
Tray Names
1. ADF
2. Tray 1
3. Tray 2
4. Tray 3
5. Multi bypass tray
6. Tray 4-6 (wide LCT)
7. Tray 4-6 (LCT)
26
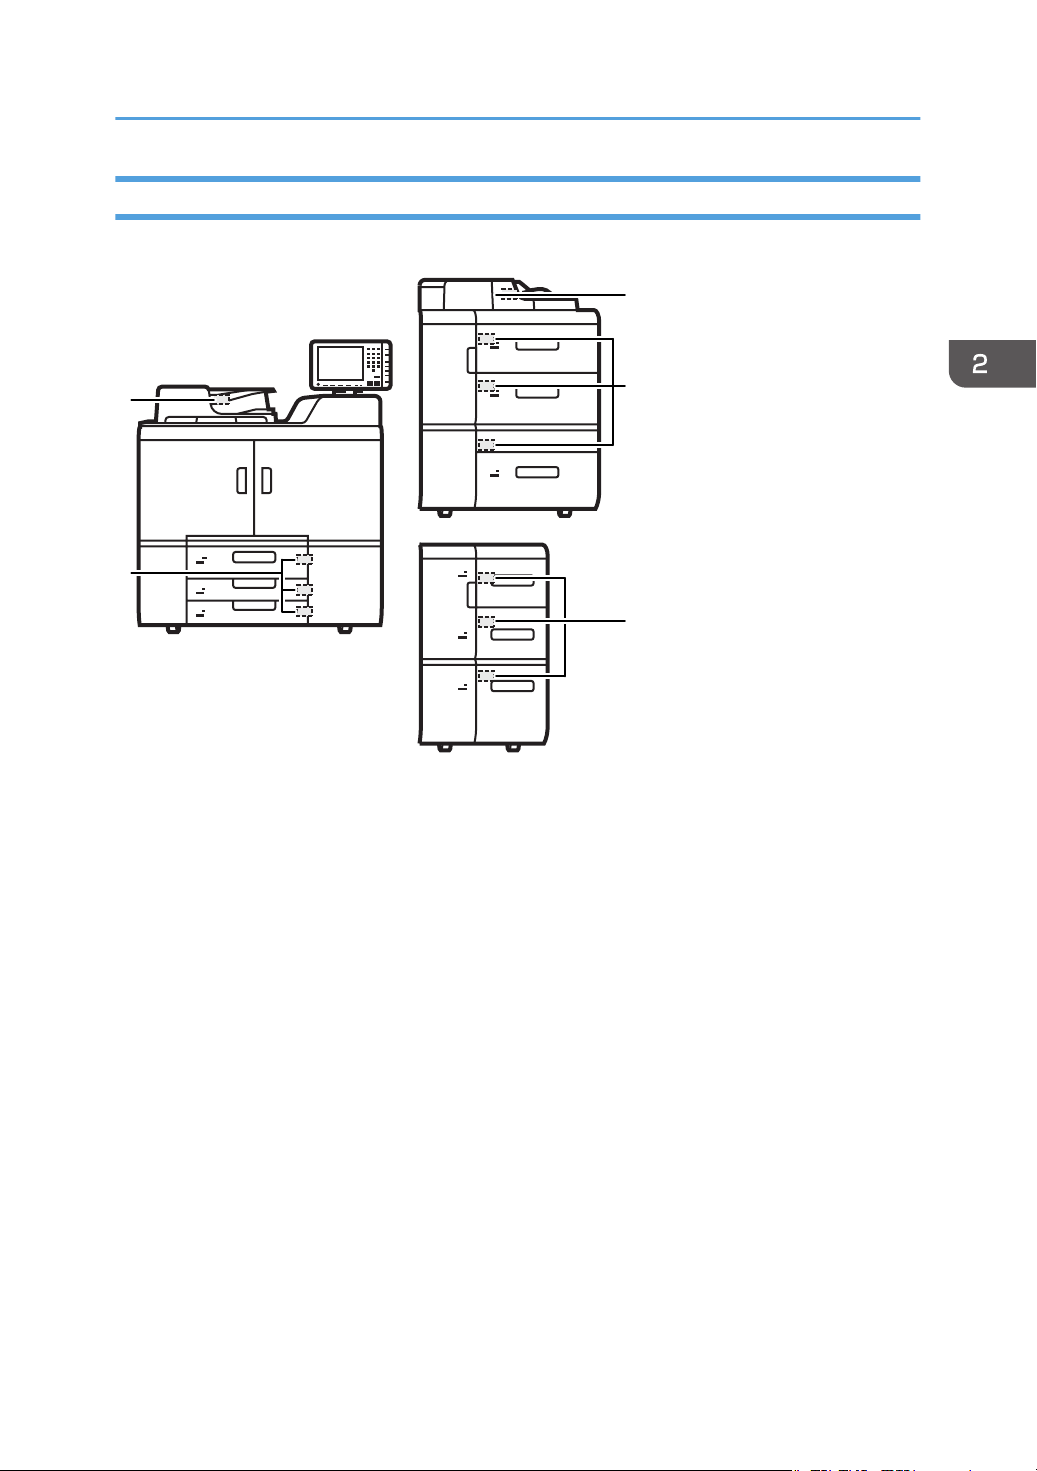
Position of the paper feed rollers
4
5
6
4
5
6
1
2
3
4
3
5
2
1
CZC139
Before You Begin
1. ADF
2. Trays 1-3
3. Multi bypass tray
4. Tray 4-6 (wide LCT)
5. Tray 4-6 (LCT)
27
1
2
3
CZC142
2
3
1
CZC143
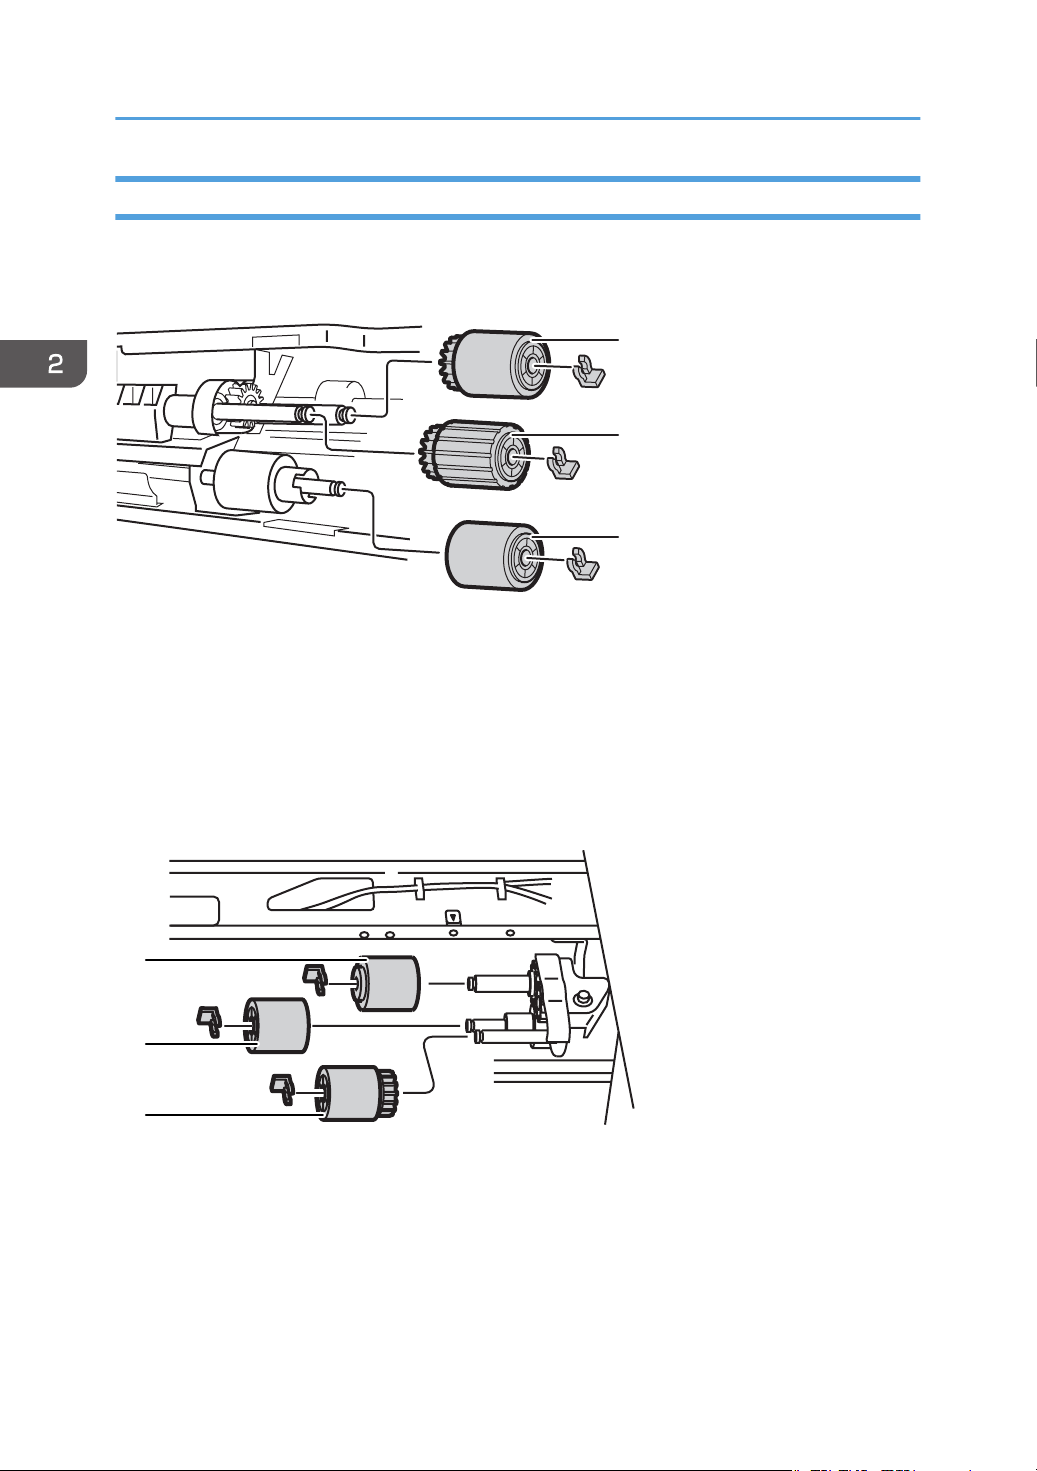
2. Replacing the Paper Feed Rollers
Replaceable Parts
Trays 1-3
1. Feed roller
2. Pick-up roller
3. Separation roller
Trays 4-6 (Wide LCD/LCD)
1. Pick-up roller
2. Feed roller
28
3. Separation roller
 Loading...