

Ricoh Pro C5210s, Pro C5200s, Pro 5210S Operating Instructions Manual

Operating Instructions
Adjustment Item Menu Guide: TCRU/ORU
For safe and correct use, be sure to read the Safety Information in "Read This First" before using the machine.


TABLE OF CONTENTS
Introduction......................................................................................................................................................... 3
How to Read This Manual................................................................................................................................. 4
Symbols...........................................................................................................................................................4
Disclaimer........................................................................................................................................................4
Notes...............................................................................................................................................................4
Manuals for This Machine................................................................................................................................. 5
Paper Feed Direction of Printed Copies (Side 1/Side 2)............................................................................... 6
1. Adjustment Settings for Skilled Operators
Displaying the [Adjustment Settings for Skilled Operators] Button.................................................................9
Accessing Adjustment Settings for Skilled Operators....................................................................................12
Layout of Adjustment Settings for Skilled Operators..................................................................................... 14
Features of the Displayed Items and Setting Operations..............................................................................15
Notes on How Adjustment Settings are Applied to Printed Copies............................................................. 17
2. Details of Menu Items in Adjustment Settings for Skilled Operators
Menu Items and Functions...............................................................................................................................19
Setting Values................................................................................................................................................... 27
[Machine: Image Position].......................................................................................................................... 27
[Machine: Image Quality]...........................................................................................................................33
[Machine: Paper Feed/ Output]................................................................................................................ 39
[Machine: Maintenance]............................................................................................................................ 42
[Preprocessing: LCT].................................................................................................................................... 46
[Finishing: Finisher].......................................................................................................................................47
[Finishing: Fold]............................................................................................................................................ 81
3. Custom Paper Settings for Administrators
Accessing Advanced Settings......................................................................................................................... 91
Access Using the Control Panel.................................................................................................................. 91
Access Using Web Image Monitor............................................................................................................ 93
Description of Paper Icons...............................................................................................................................95
Deleting Saved Custom Paper Profiles........................................................................................................... 96
Paper Presets in "Advanced Settings".............................................................................................................99
Displaying the Paper Profile Version.......................................................................................................... 99
Backing up and Restoring Custom Paper Profiles....................................................................................... 100
Backing up Custom Paper Profiles Saved in the Saved Paper Library..................................................100
1

Backing up Custom Paper Profiles Registered Under the [Edit] Setting................................................ 100
Backing up and Restoring Custom Paper Profiles Using the External Controller's Control Panel.......101
4. Details of Menu Items in Advanced Settings
Menu Items and Functions............................................................................................................................ 103
Setting Values.................................................................................................................................................112
Paper Feed Adjustment............................................................................................................................. 112
Paper Delivery Adjustment........................................................................................................................113
Image Position/Scaling Adjustment.........................................................................................................113
Line Speed Adjustment..............................................................................................................................119
Toner Adhesion Adjustment......................................................................................................................128
Transfer Adjustment................................................................................................................................... 129
Fuser Adjustment........................................................................................................................................141
Decurler Adjustment.................................................................................................................................. 149
Finishing Position Adjustment....................................................................................................................149
2

Introduction
This manual contains detailed instructions and notes on the operation and use of this machine. For your
safety and benefit, read this manual carefully before using the machine. Keep this manual in a handy
place for quick reference.
3

How to Read This Manual
Symbols
This manual uses the following symbols:
Indicates points to pay attention to when using the machine, and explanations of likely causes of paper
misfeeds, damage to originals, or loss of data. Be sure to read these explanations.
Indicates supplementary explanations of the machine’s functions, and instructions on resolving user
errors.
This symbol is located at the end of sections. It indicates where you can find further relevant information.
[ ]
Indicates the names of keys on the machine's display or control panels.
Disclaimer
Contents of this manual are subject to change without prior notice.
In no event will the company be liable for direct, indirect, special, incidental, or consequential damages
as a result of handling or operating the machine.
Notes
The manufacturer shall not be responsible for any damage or expense that might result from the use of
parts other than genuine parts from the manufacturer with your office products.
For good output quality, the manufacturer recommends that you use genuine toner from the
manufacturer.
Some illustrations in this manual might be slightly different from the machine.
Certain options might not be available in some countries. For details, please contact your local dealer.
Depending on which country you are in, certain units may be optional. For details, please contact your
local dealer.
Two kinds of size notation are employed in this manual. With this machine refer to the inch version.
4

Manuals for This Machine
The following manuals are for skilled operators only.
Adjustment Item Menu Guide
This manual explains the items in Adjustment Settings for Skilled Operators and the advanced
settings for custom paper adjustment in "System Settings".
Replacement Guide
This manual explains how to replace the machine's components.
Troubleshooting
This manual explains how to troubleshoot problems related to image quality, paper delivery, and
other aspects of machine operation.
5
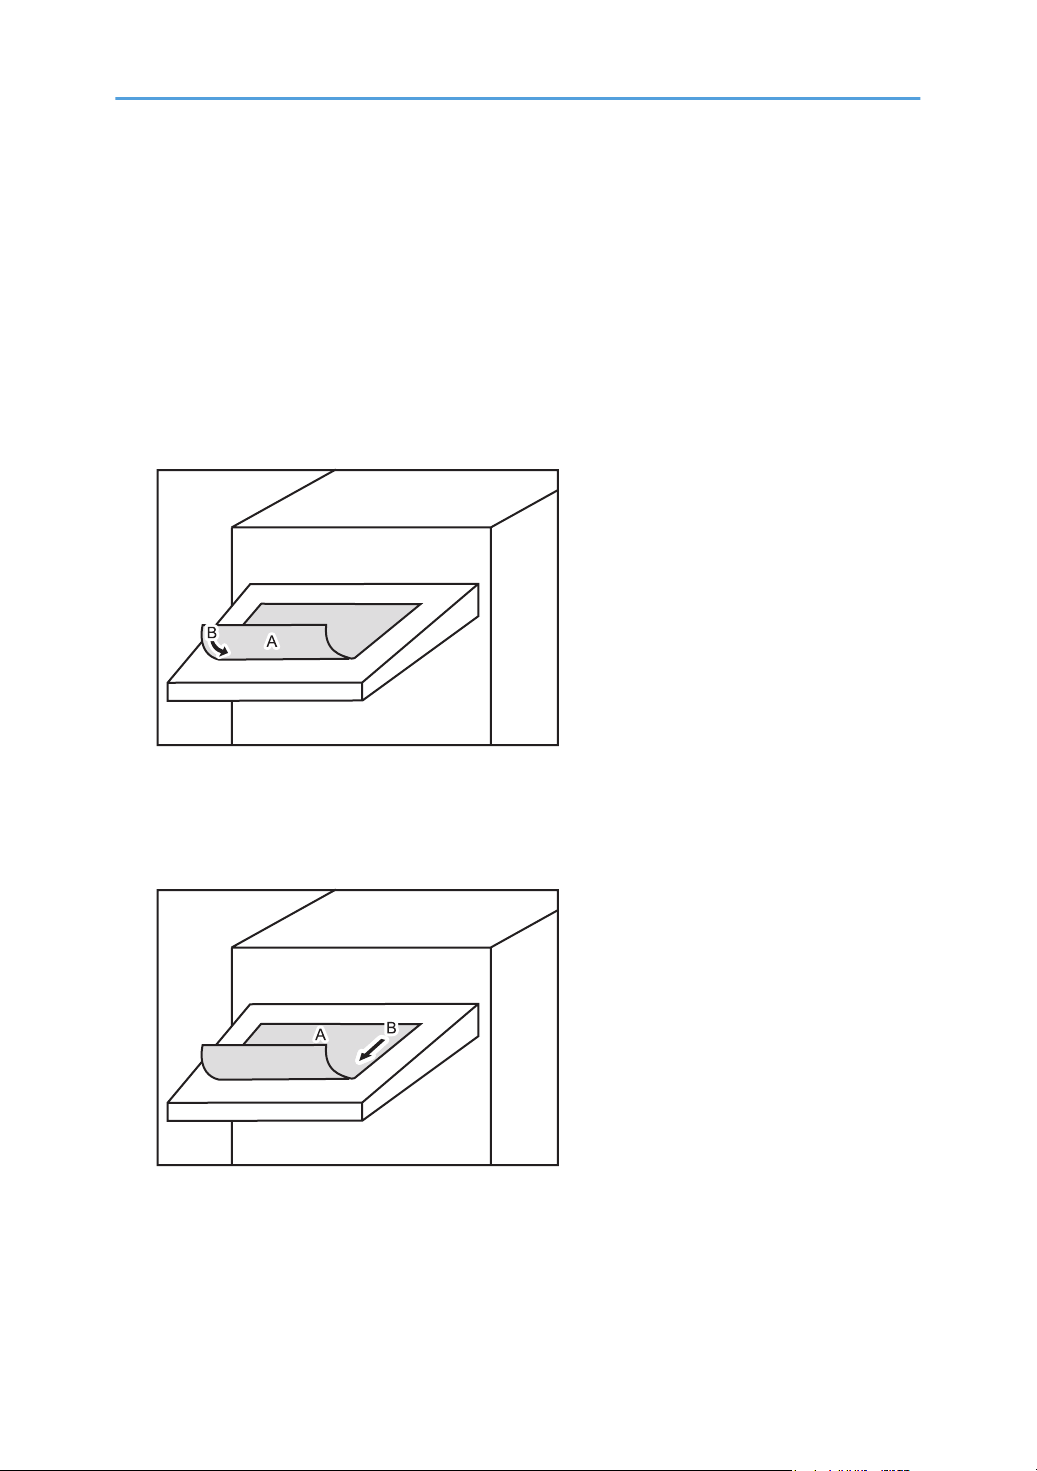
Paper Feed Direction of Printed Copies (Side
DSM008
DSM009
1/Side 2)
Depending on the setting, printed copies are fed as follows:
Side 1 is the surface of the paper printed during one-sided printing, or the surface of the first print during
duplex printing.
Side 2 is the surface of the paper printed on the back side of Side 1 during duplex printing.
Single-sided printing: Printed side face down
A. Side 1
B. Paper feed direction of Side 1
Single-sided printing: Printed side face up
A. Side 1
B. Paper feed direction of Side 1
6
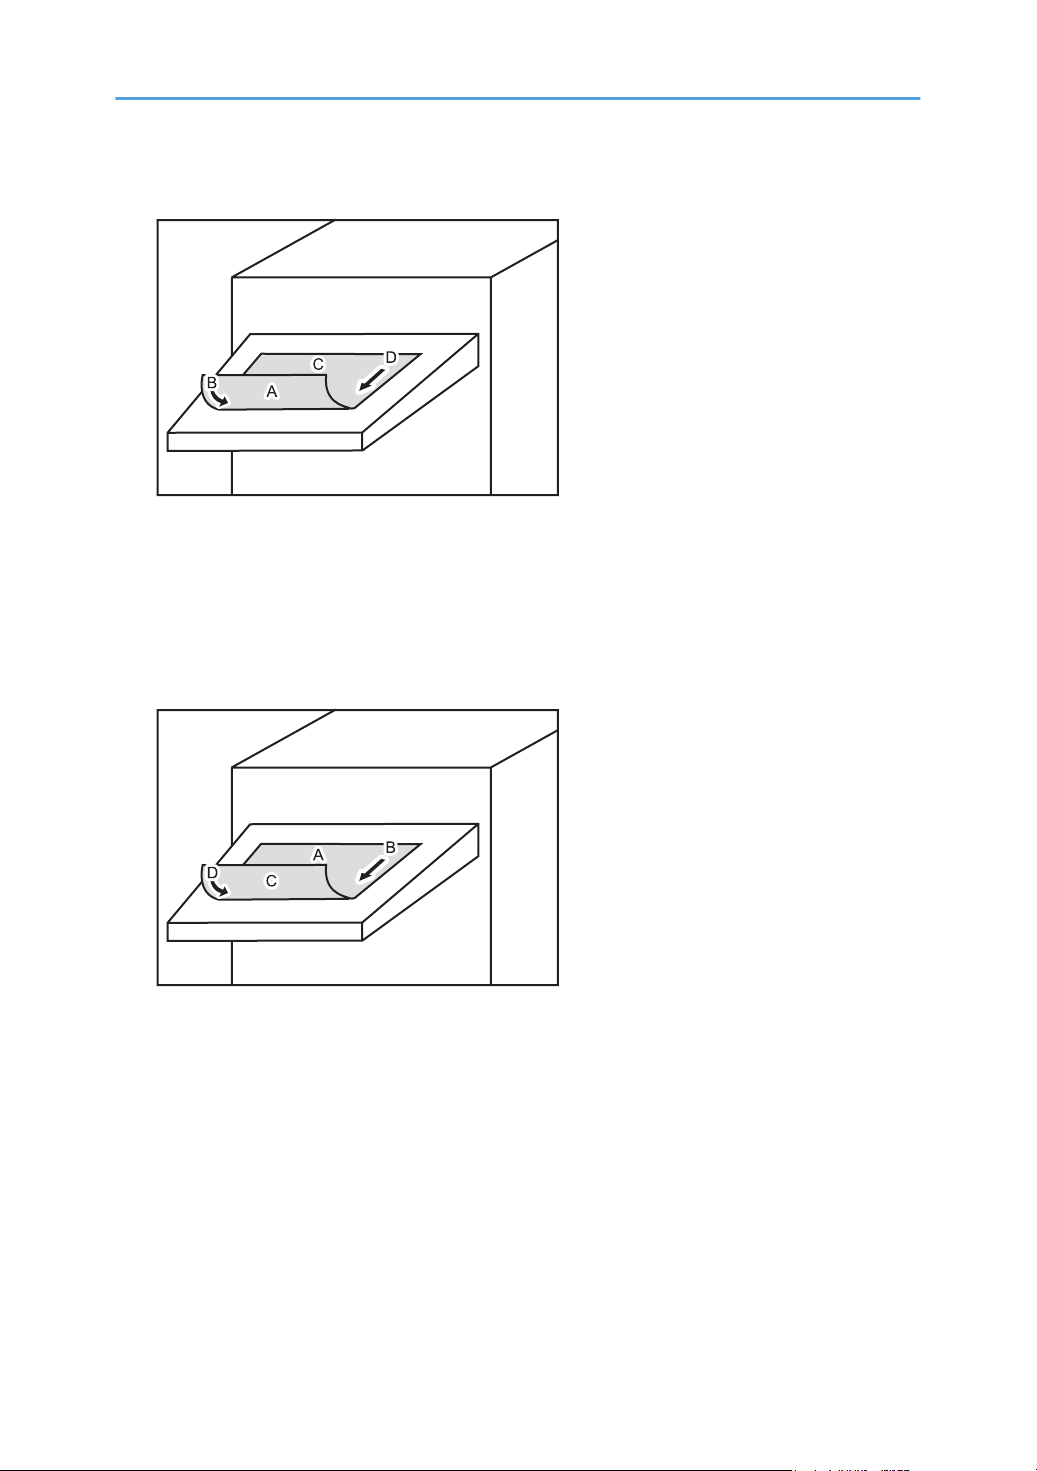
Duplex printing: Printed side face down
DSM010
DWM001
A. Side 1
B. Paper feed direction of Side 1
C. Side 2
D. Paper feed direction of Side 2
Duplex printing: Printed side face up
A. Side 1
B. Paper feed direction of Side 1
C. Side 2
D. Paper feed direction of Side 2
7

8
1. Adjustment Settings for Skilled
CUV110
Operators
Displaying the [Adjustment Settings for Skilled Operators] Button
To use the Adjustment Settings for Skilled Operators, you must first configure your machine's
Administrator Authentication Management setting.
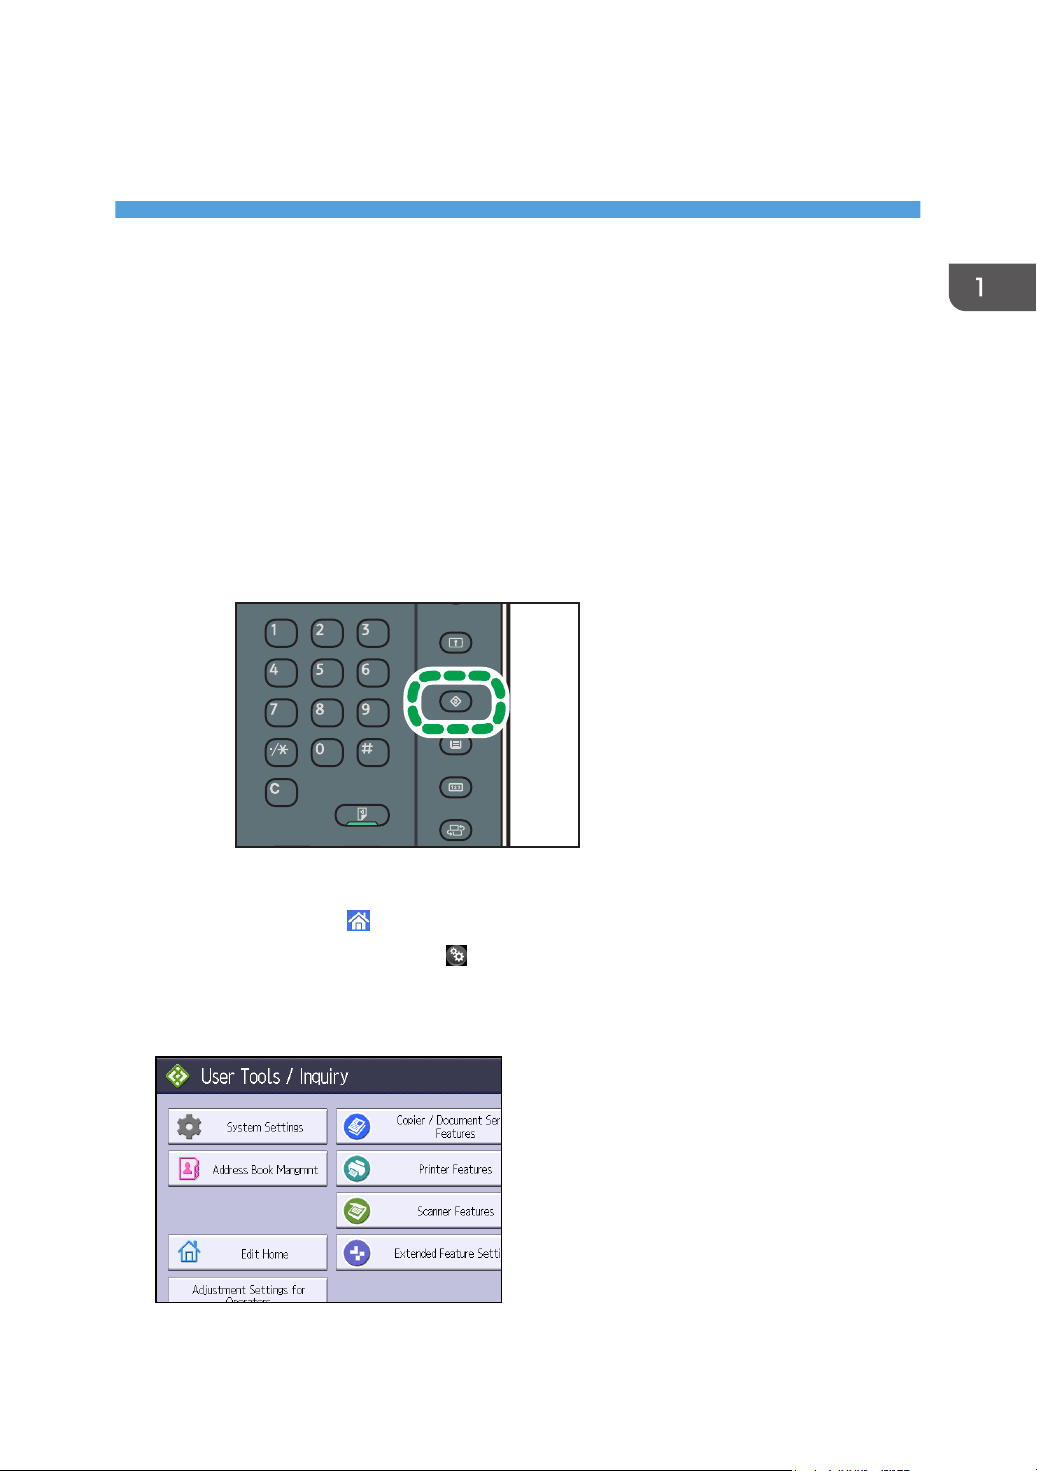
1. Display the initial settings screen.
• When using the standard operation panel
1. Press the [User Tools] key.
• When using the Smart Operation Panel (For mainly Europe and North America)
1. Press [Home] ( ) at the bottom of the screen in the center.
2. Press the [User Tools] icon ( ) on the [Home] screen.
3. Press [Machine Features].
2. Press [System Settings].
9
1. Adjustment Settings for Skilled Operators
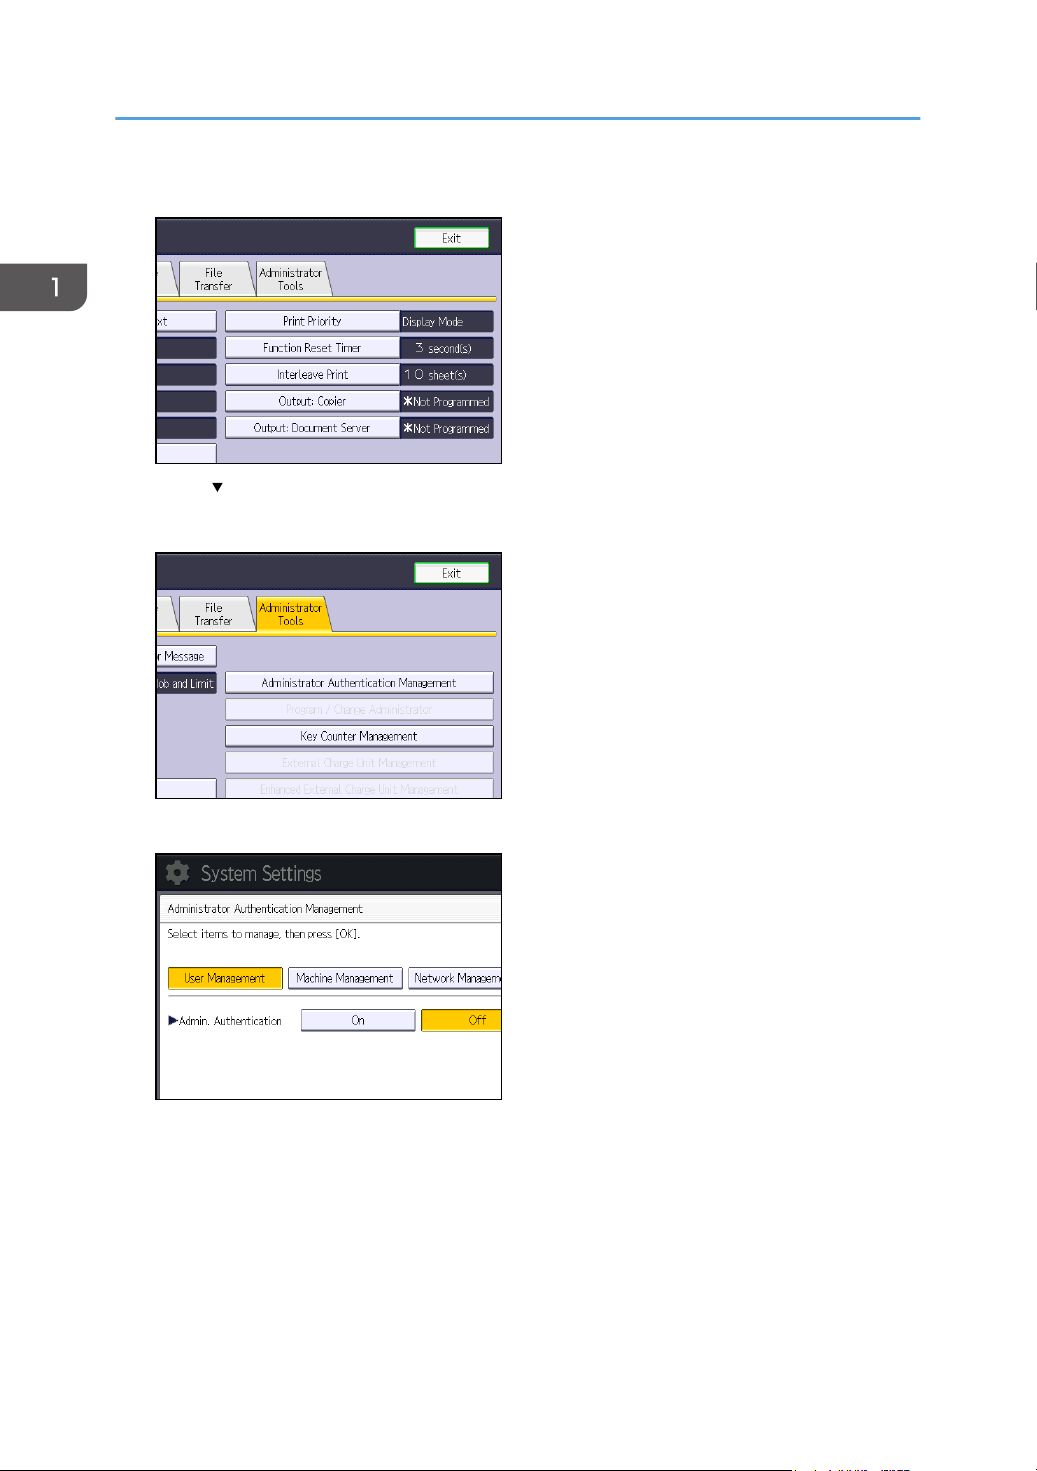
3. Press [Administrator Tools].
4. Press [ Next].
5. Press [Administrator Authentication Management].
10
6. Press [Machine Management].
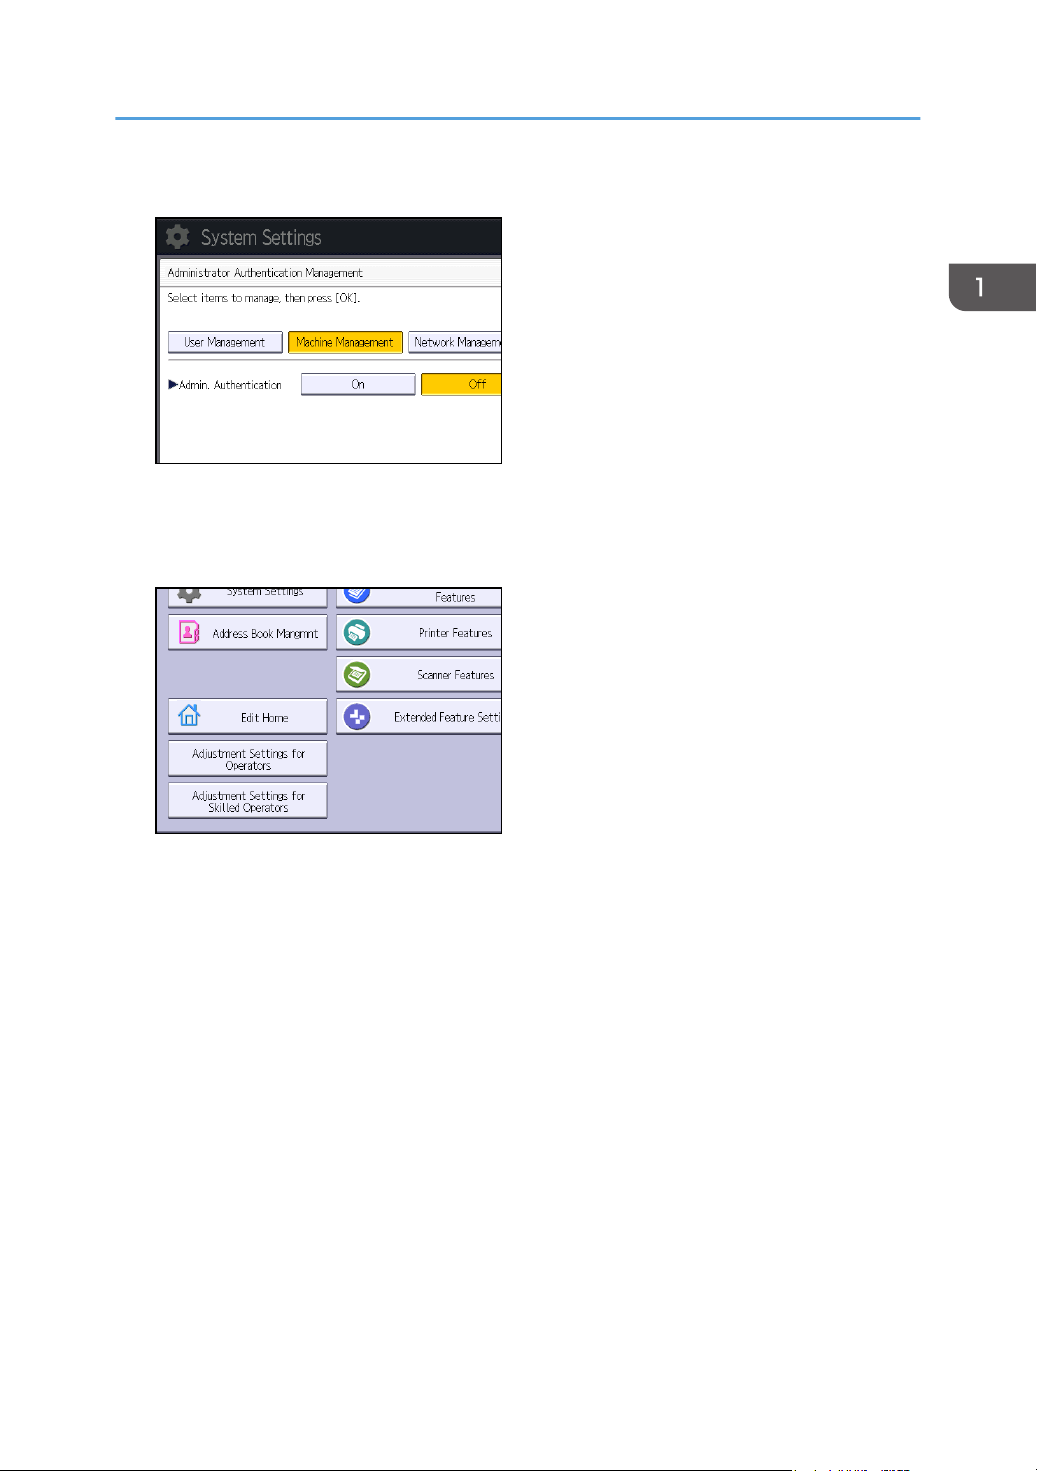
Displaying the [Adjustment Settings for Skilled Operators] Button
7. Select [On] for "Admin. Authentication".
8. Press [OK].
9. Press [Exit].
The [Adjustment Settings for Skilled Operators] button appears.
11

1. Adjustment Settings for Skilled Operators
Accessing Adjustment Settings for Skilled Operators
1. Press [Adjustment Settings for Skilled Operators].
2. Press [Login].
12
3. Enter your login user name, and then press [OK].
If you are logging on as the administrator for the first time, enter "admin".

4. Enter your login password, and then press [OK].
The Adjustment Settings for Skilled Operators appears.
Accessing Adjustment Settings for Skilled Operators
13
321
CWH201
1. Adjustment Settings for Skilled Operators
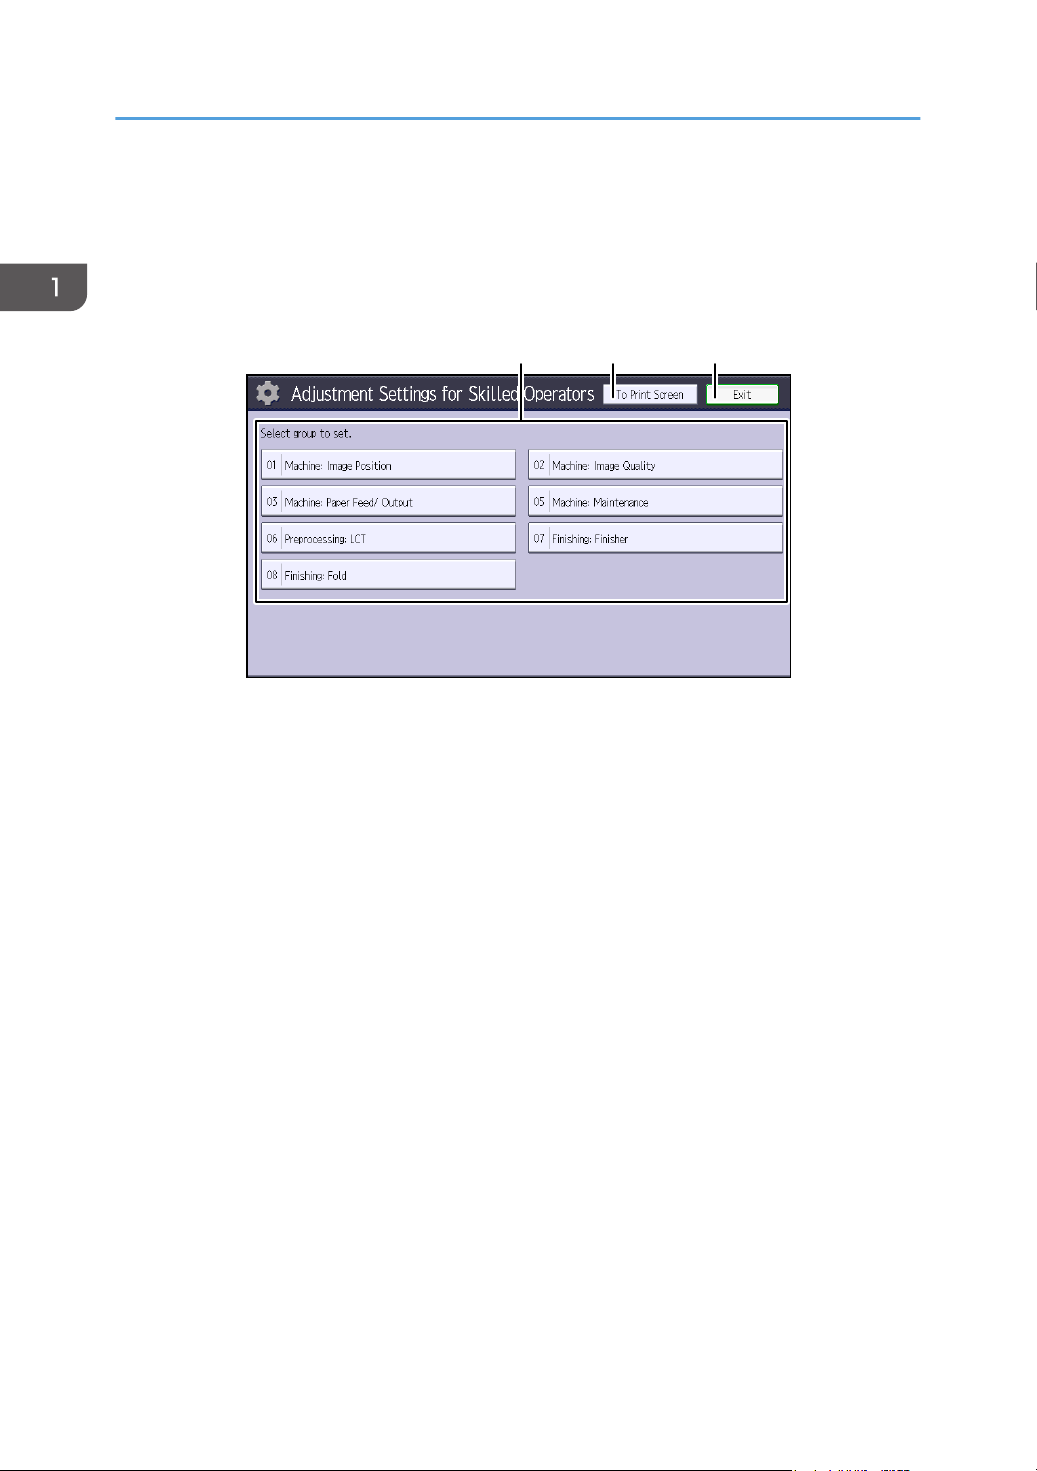
Layout of Adjustment Settings for Skilled Operators
This section explains how to use Adjustment Settings for Skilled Operators.
1. Adjustment items are displayed in this area. Select the setting you want to specify or change.
2. Press this button to display the print screen. You can use this screen to view the changes you have
made.
3. Press this button to close Adjustment Settings for Skilled Operators.
14
Features of the Displayed Items and Setting Operations
Features of the Displayed Items and Setting
Operations
The following operations are available for each adjustment item:
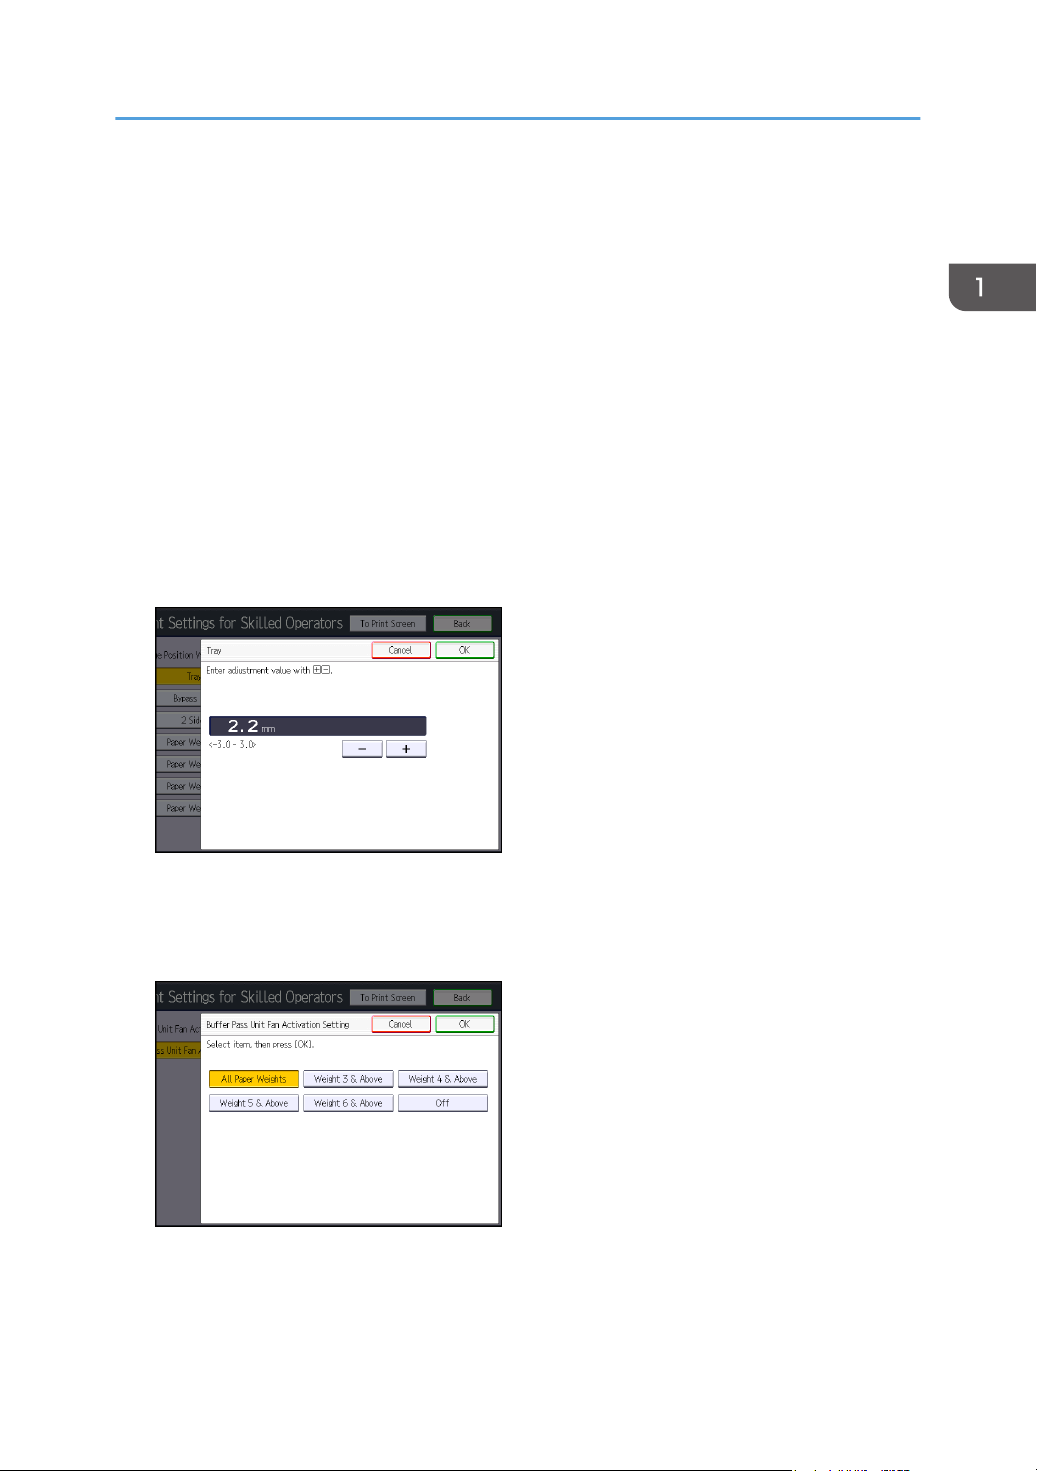
• Value setting
• Item setting
• Executing
• Display only
Value setting
Press [+] to increase the value, or [-] to decrease. You can also use the number keys to enter
numbers.
Select [OK] to apply the new setting.
Item setting
Select the item you require.
Select [OK] to apply the new setting.
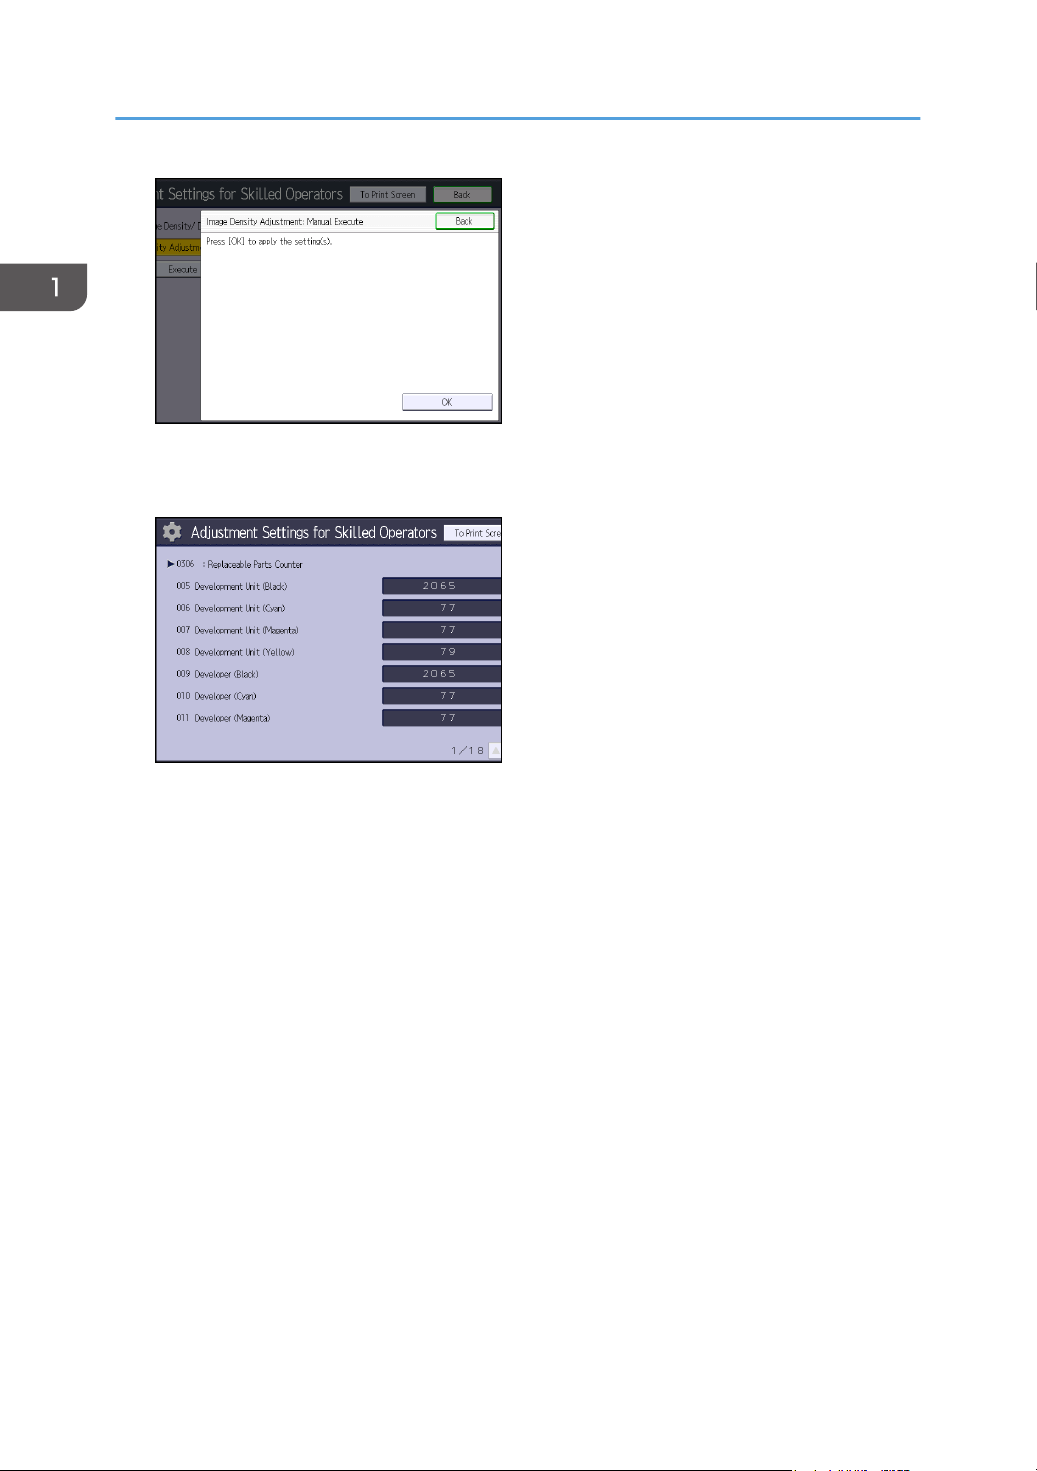
Executing
Press [OK] to perform a selected function.
15
1. Adjustment Settings for Skilled Operators
Display only
You can check the setting for the selected item.
16
Notes on How Adjustment Settings are Applied to Printed Copies
Notes on How Adjustment Settings are Applied
to Printed Copies
The adjustment settings are applied to printed copies according to the settings specified for each paper
tray, paper size, and paper weight.
Depending on the adjustment setting, the same settings specified under different categories may be
applied to printed copies concurrently.
• Settings for each paper tray
• Settings for each paper weight
• Settings for each paper size
Settings for each paper tray
These adjustment settings can be specified for each paper tray.
The settings are applied only to printed copies fed from each paper tray.
Settings for each paper weight
These adjustment settings can be specified for each paper weight.
The settings are applied only to printed copies of each paper weight.
Settings for each paper size
These adjustment settings can be specified for each paper size.
17
1. Adjustment Settings for Skilled Operators
The settings are applied only to printed copies of each paper size.
• For information about the paper tray, paper thickness, and tray paper size settings that can be
specified for a particular function, see the manual for the relevant function.
18

2. Details of Menu Items in Adjustment Settings for Skilled Operators
Menu Items and Functions
[Machine: Image Position]
For details about the following items, see page 27 "[Machine: Image Position]".
No. Item Description
0101 [Image Position: With
Feed]
0102 [Image Position: Across
Feed]
0107 [Erase Margin: Leading
Edge/Trailing Edge]
[Machine: Image Quality]
For details about the following items, see page 33 "[Machine: Image Quality]".
No. Item Description
0201 [Adjust Image Density/
DEMS]
0202 [Image Density Adjustment
Execute Interval]
0203 [Maximum Image Density] Specify the adhesion of toner to the drum surface and
Adjust the horizontal position of the print image.
Adjust the vertical position of the print image.
Adjust the mask width at the leading edge, trailing edge,
left edge, or right edge of the image.
Execute image density control manually.
DEMS can reduce the variations in thickness that occur in
the intervals between the photoconductor and
development sleeve operations.
Specify the number of sheets the machine prints in full
color before it automatically adjusts image density.
intermediate transfer belt when image density adjustment
is executed.
0204 [Line Width] Adjust the intensity of the laser for transferring image
data to the drum.
0205 [Density Difference: Across
Feed]
Adjust the image density difference between the top and
bottom of the image.
19

2. Details of Menu Items in Adjustment Settings for Skilled Operators
No. Item Description
0207 [Fusing Temperature on
Standby]
0208 [Auto Color Selection
Setting]
Adjust the set fusing temperature according to the
machine status.
Specify the number of sheets the machine prints in full
color mode before switching to black-and-white mode
when printing a job which involves full color printing
followed by black-and-white printing.
0209 [Photoconductor Special
Mode]
Increase the amount of lubricant applied to the
photoconductor.
0210 [Smooth Fusing Belt] Polish the fusing belt to eliminate the scratches caused by
paper edges.
0211 [Fusing Ability by Feed
Speed]
0212 [Slope for Envelope Nip
Width]
Specify appropriately to improve transferability to thick
paper.
Adjust the slope for nip width between the fusing belt
and the pressure roller when an envelope is being fed.
0213 [PCU Potential] Adjust the current supplied to the photoconductor unit at
high temperature and humidity.
0214 [Fusing Belt Smoothing
Setting: Uneven Gloss]
Specify whether or not to automatically execute [For
Uneven Gloss (Short Time)] for smooth fusing belt.
[Machine: Paper Feed/ Output]
For details about the following items, see page 39 "[Machine: Paper Feed/ Output]".
No. Item Description
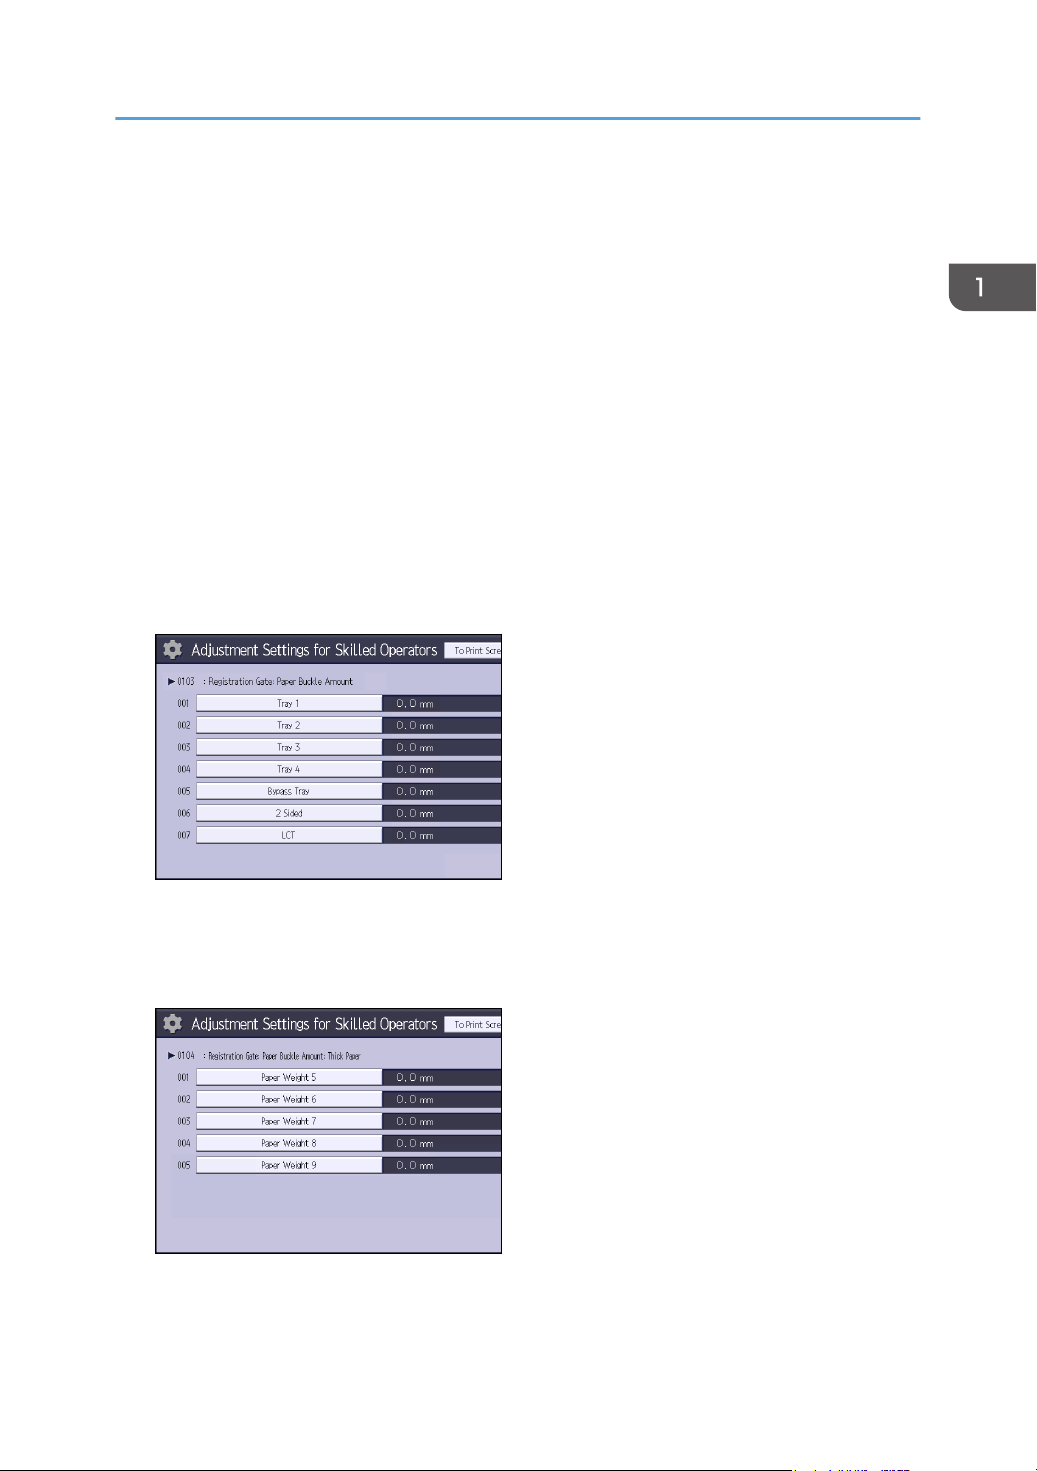
0103 [Registration Gate: Paper
Buckle Amount]
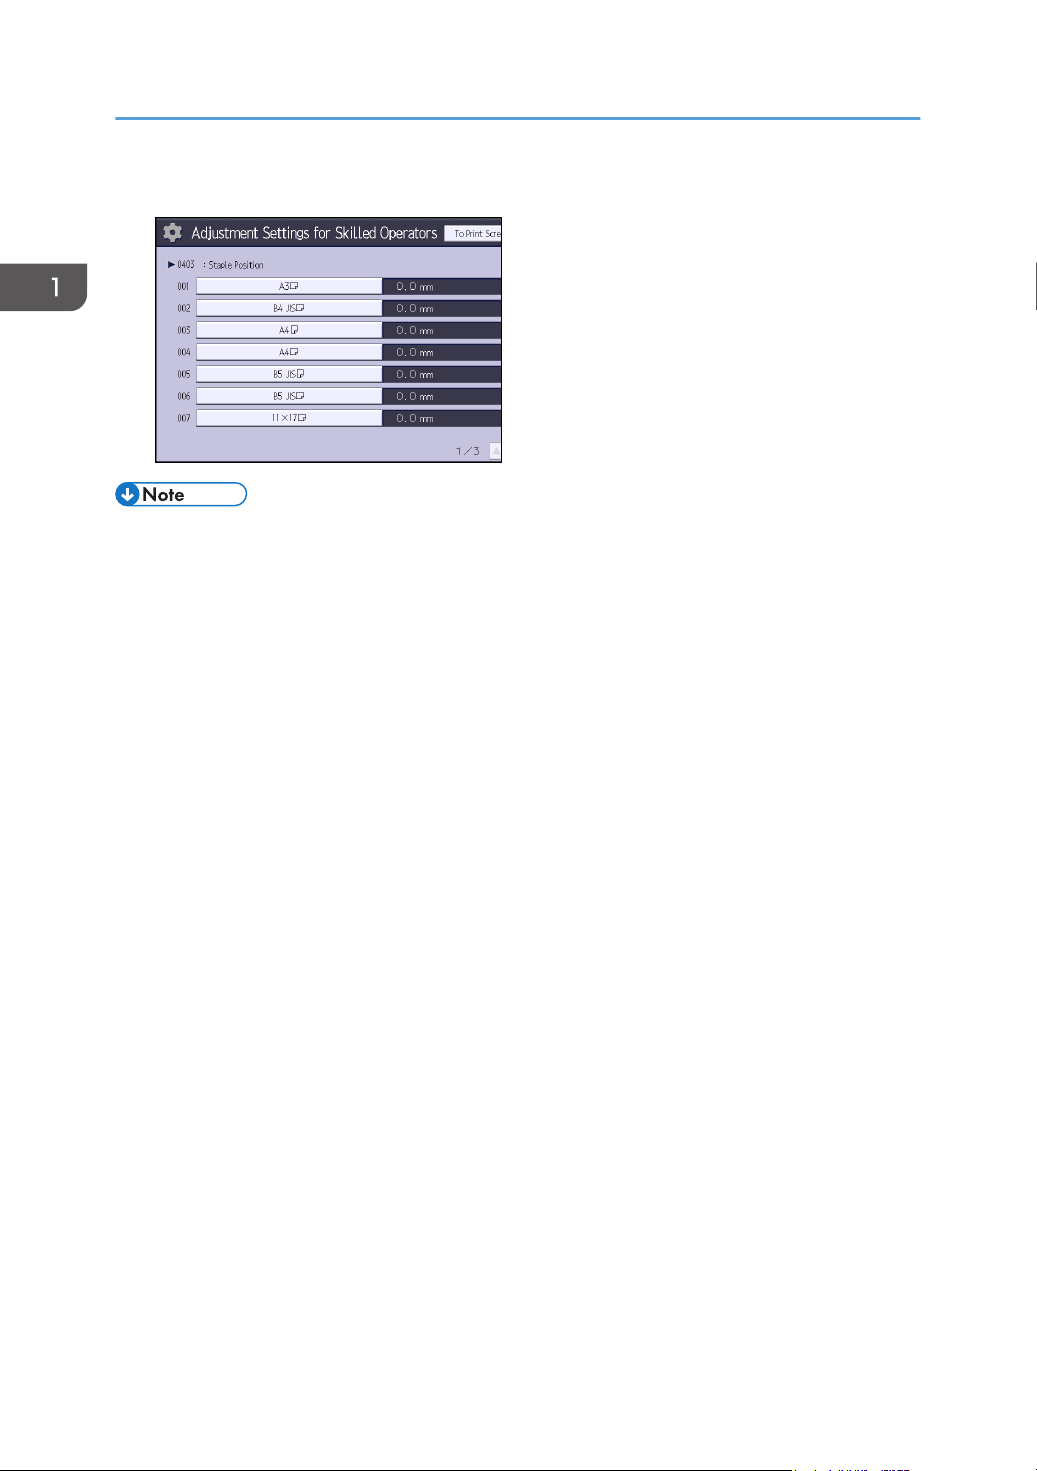
0104 [Registration Gate: Paper
Buckle Amount: Thick
Paper]
0106 [Criteria for Paper Weight] Adjust the criteria used to determine the paper weight.
0130 [Perpendicularity
Adjustment]
20
Adjust the allowable amount of buckle when the edge of
the paper is pressed against the registration unit.
Adjust the allowable amount of buckle for paper of
Paper Weight 5 to 9 when the edge of the paper is
pressed against the registration unit.
Adjust the vertical skew of the image.

No. Item Description
Menu Items and Functions
0140 [Buffer Pass Unit Fan
Select when the buffer pass unit fan is to operate.
Activation Setting]
[Machine: Maintenance]
For details about the following items, see page 42 "[Machine: Maintenance]".
No. Item Description
0301 [Execute Cleaning Initial
Setting]
0302 [Execute Process Initial
Initialize the cleaning unit for the photoconductor unit
(PCU).
Initialize print settings at once.
Setting]
0303 [ITB Manual Lubrication] Lubricate the intermediate transfer belt.
0304 [Tighten Fuser Cleaning
Tighten the cleaning web after replacing it.
Unit at Replacement]
0305 [Reset Replaceable Parts
Counter Reset the counter for replaceable parts.
Counter]
0306 [Replaceable Parts
Display the counters for replaceable units.
Counter]
0307 [Target Value for
Replaceable Part]
0308 [Execute Charge Roller
Cleaning]
0309 [Execute Developer
Refreshing]
0310 [Counter Settings for Fuser
Unit Replacement]
0702 [Temperature / Humidity
outside the Machine]
0703 [Back Up / Restore Custom
Paper Data]
Display the values at which replaceable units must be
replaced.
Clean the charge roller unit.
Replenish the developer manually.
Replace part of the developer in the development unit.
Display the counter for the fuser unit replacement.
Display the external temperature and humidity.
Back up and restore custom paper profiles.
21

2. Details of Menu Items in Adjustment Settings for Skilled Operators
No. Item Description
0704 [Switch Print Screen] Switch to the print screen if you want to output an
alignment pattern to check image misalignment with the
color controller connected.
[Preprocessing: LCT]
For details about the following items, see page 46 "[Preprocessing: LCT]".
No. Item Description
0108 [Wide LCT: Fan Level] Adjust the airflow of the wide LCT for fanning the sheets.
0109 [Wide LCT: Fan Timer] Adjust the duration of the airflow of the wide LCT for
fanning the sheets.
0110 [Pickup Assist] Specify the paper feed roller movement.
[Finishing: Finisher]
For details about the following items, see page 47 "[Finishing: Finisher]".
No. Item Description
0401 [Punch Position: With Feed] Adjust the horizontal position of the punch holes when
using Finisher SR4120 or Finisher SR4130.
0402 [Punch Position: Across
Feed]
Adjust the vertical position of the punch holes when using
Finisher SR4120 or Finisher SR4130.
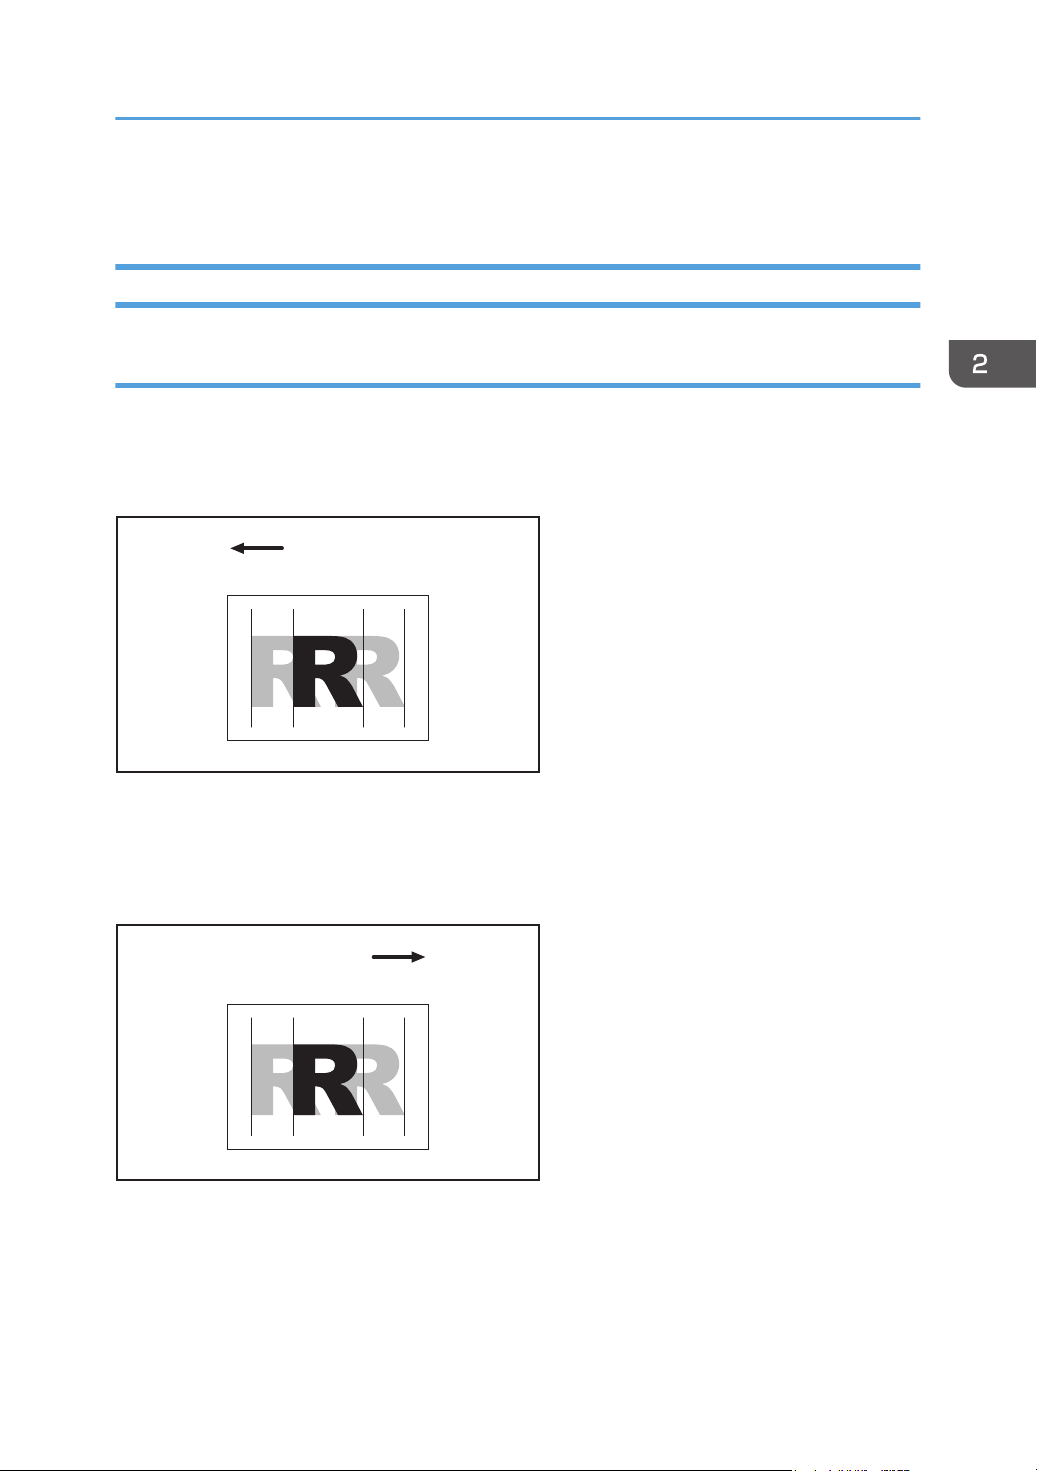
0403 [Staple Position] Adjust the vertical position of the staples when using
Finisher SR4120 or Finisher SR4130.
0404 [Staple Position for Booklet] Adjust the horizontal position of the booklet staples when
using Finisher SR4130.
0405 [Folding Position for
Booklet]
Adjust the horizontal folding position when using Finisher
SR4130.
0406 [Folding Speed for Booklet] Adjust the speed of center folding by the SR4130
finisher. By reducing the folding speed, you can make
folds crisper.
22

Menu Items and Functions
No. Item Description
0407 [Correct Punch Skew] Adjust skew correction for punching in order to reduce
punch skew due to difference in size, thickness, and
paper curl when using Finisher SR4120 or Finisher
SR4130.
0408 [Punch Skew Correction] Disable punch skew correction function if jams or
edgefolding problems occur particularly when punching
lightweight paper using Finisher SR4120 or Finisher
SR4130.
0409 [Paper Alignment in Shift
Tray: Across Feed]
0410 [Paper Alignment for
Stapling: Across Feed]
0411 [Paper Alignment for
Booklet: Across Feed]
0412 [Paper Tapping for Extra
Feed for Stapling]
0413 [Claw Shift for Center
Folding]
Adjust the width of the paper alignment jogger in the shift
tray in order to reduce vertical variation in paper
alignment due to difference in size, thickness, and paper
curl when using Finisher SR4120 or Finisher SR4130.
Adjust the width of the staple jogger for edge stapling in
order to reduce vertical variation in paper alignment due
to difference in size, thickness, and paper curl when
using Finisher SR4120 or Finisher SR4130.
Adjust the width of the staple jogger for booklets in order
to reduce vertical variation in paper alignment due to
difference in size, thickness, and paper curl when using
Finisher SR4130.
Adjust the paper tapping for extra paper feed to the
paper guide for stapling.
Adjust this setting if the paper delivered to the paper
guide for stapling overshoots or stops short of the guide.
Adjust the paper alignment in the paper feed direction
for center folding.
Adjust this setting if the paper alignment in the paper
feed direction is inaccurate because of inconsistent
paper size and paper curling when using certain types of
paper.
0801 [Staple Position: Across
Feed 1]
0802 [Staple Position: Across
Feed 2]
Adjust the vertical position of the staple (applied at an
edge) when using Finisher SR5070 or Booklet Finisher
SR5080.
Adjust the vertical position of the staples (dual) when
using Finisher SR5070 or Booklet Finisher SR5080.
23

2. Details of Menu Items in Adjustment Settings for Skilled Operators
No. Item Description
0803 [Staple Position: With
Feed]
0804 [Paper Alignment for
Stapling: Across Feed]
Adjust the horizontal position of the staples when using
Finisher SR5070 or Booklet Finisher SR5080.
Adjust the width of the staple jogger for edge stapling
when using Finisher SR5070 or Booklet Finisher
SR5080.
0805 [Paper Alignment for
Stapling: With Feed]
Adjust the travel distance of the paper edge stopper for
edge stapling when using Finisher SR5070 or Booklet
Finisher SR5080.
0806 [Number of Sheet Align for
Stapling]
0807 [Punch Position: Across
Feed]
Specify the number of sheets the staple unit aligns at a
time for stapling.
Adjust the vertical position of the punch holes when using
Finisher SR5070 or Booklet Finisher SR5080.
0808 [Punch Position: With Feed] Adjust the horizontal position of the punch holes when
using Finisher SR5070 or Booklet Finisher SR5080.
0809 [Correct Punch Skew] Specify whether or not to enable punch skew correction
when using Finisher SR5070 or Booklet Finisher
SR5080.
24
0810 [Punch Skew Correction] Adjust the amount of skew correction for punching when
using Finisher SR5070 or Booklet Finisher SR5080.
0811 [Paper Alignment in Shift
Tray Setting]
Specify the accuracy of printed paper alignment when
applying shift-sorting with Finisher SR5070 or Booklet
Finisher SR5080.
0812 [Paper Alignment in Shift
Tray: Across Feed]
Adjust the width of the paper alignment jogger in the shift
tray when using Finisher SR5070 or Booklet Finisher
SR5080.
0813 [Output Tray Descending
Position]
Specify the descending position for the finisher shift tray
when paper is delivered to it using Finisher SR5070 or
Booklet Finisher SR5080.
0814 [Exit Guide Close Timing:
Booklet Fin]
Specify when to close the exit guide after paper is
delivered to the finisher shift tray of Finisher SR5070 or
Booklet Finisher SR5080.

No. Item Description
Menu Items and Functions
0815 [Output Trail Edge Press
Setting]
Specify whether or not to press down the trailing edge of
the paper when it is delivered to the finisher shift tray of
Finisher SR5070 or Booklet Finisher SR5080.
0816 [Output Fan Setting] Specify how the shift tray fan moves when using Finisher
SR5070 or Booklet Finisher SR5080.
0817 [Output Fan Level] Adjust the airflow of the shift tray for fanning the sheets
when using Finisher SR5070 or Booklet Finisher
SR5080.
0818 [Staple Position for Booklet] Adjust the horizontal position of the booklet staples when
using Booklet Finisher SR5080.
0819 [Folding Position for
Booklet]
0820 [Paper Alignment for
Booklet: Across Feed]
Adjust the horizontal position of the folding when using
Booklet Finisher SR5080.
Adjust the width of the staple jogger for booklets when
using Booklet Finisher SR5080.
0821 [Folding Speed for Booklet] Specify the number of booklet folds to be performed
when using Booklet Finisher SR5080.
0822 [Paper Alignment for
Booklet: With Feed]
Adjust the travel distance of the paper edge stopper for
booklets when using Booklet Finisher SR5080.
0823 [Z-fold Skew Correction] Specify how to correct skew (occurring during paper
transport) when Z-folding with the folding unit.
0824 [Correct Z-fold Skew] Adjust the length of sheets moved for Z-fold skew
correction.
0825 [Correct Z-fold Skew:
Reverse]
0826 [Maximum No. Stacked
Sheets in Output Tray]
Adjust how much the registration roller rotates in reverse
for Z-fold skew correction.
Specify the amount of paper stacked in Finisher SR5070
or Booklet Finisher SR5080.
[Finishing: Fold]
For details about the following items, see page 81 "[Finishing: Fold]".
When using custom paper, settings for [Z-fold Position 1] or [Z-fold Position 2] in the [Advanced
Settings] for custom paper are prioritized.
25

2. Details of Menu Items in Adjustment Settings for Skilled Operators
No. Item Description
0601 [Half Fold Position: Multi-
sheet Fold]
0602 [Letter Fold-out Position 1:
Multi-sheet Fold]
0603 [Letter Fold-out Position 2:
Multi-sheet Fold]
0604 [Letter Fold-in Position 1:
Multi-sheet Fold]
0605 [Letter Fold-in Position 2:
Multi-sheet Fold]
0606 [Folding Unit Tray Full
Detection]
0607 [Number of Sheets Folded
after Full Detection]
Adjust the fold position of half folded sheets when using
the multi-folding unit.
Adjust the fold position for the bottom segment of letter
fold-out sheets when using the multi-folding unit.
Adjust the overall fold size of letters fold-out sheets when
using the multi-folding unit.
Adjust the fold position of the bottom segment of letter
fold-in sheets when using the multi-folding unit.
Adjust the fold position of letters fold-in sheets when
using the multi-folding unit.
Specify whether or not to automatically detect when the
folding unit tray becomes full.
Specify the number of sheets the machine prints when it
detects that the folding unit tray is full before displaying a
warning message.
0608 [Z-fold Position 1] Adjust the width of the bottom end segment of Z-folded
sheets when using the multi-folding unit.
26
0609 [Z-fold Position 2] Adjust the overall fold size of Z-fold sheets when using
the multi-folding unit.
Setting Values
(Leading Edge) (Trailing Edge)
Left
To p
Bottom
Right
Paper feed direction
(+)(-)
Default
CEZ012
(Leading edge)(Trailing edge)
Left Right
Paper feed direction
(+)
(-)
Default
CEZ013
To p
Bottom
[Machine: Image Position]
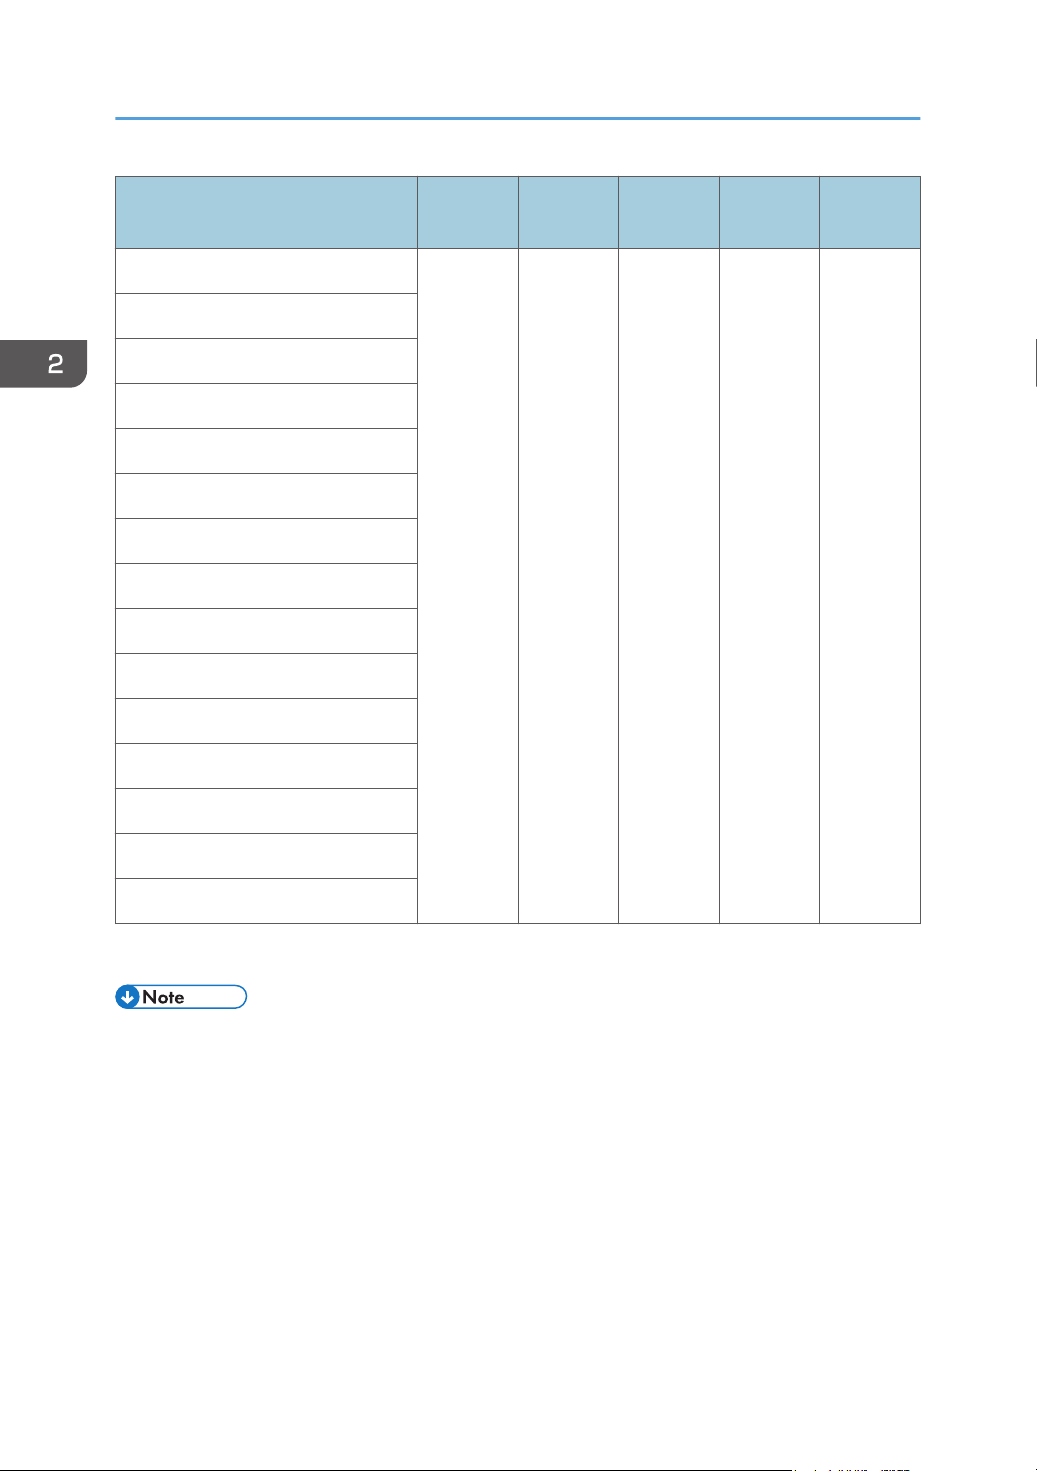
0101: [Image Position: With Feed]
Adjust the horizontal position of the print image.
You can make this adjustment to Side 1 on an individual tray basis, but not to Side 2.
Side 1
Setting Values
Press [+] to shift the image to the right (trailing edge).
Press [−] to shift the image the left (leading edge).
Side 2
Press [+] to shift the image to the left (trailing edge).
Press [−] to shift the image to the right (leading edge).
27
2. Details of Menu Items in Adjustment Settings for Skilled Operators
Setting Items
[Tray 1]
[Tray 2]
[Tray 3]
[Bypass Tray]
[2 Sided]
[LCT]
[Paper Weight 1]
[Paper Weight 2]
[Paper Weight 3]
[Paper Weight 4]
[Paper Weight 5]
[Paper Weight 6]
Default
Value
*1
Max.
Value
Min.
Value
Step Unit
9.0 -9.0 0.1 mm
[Paper Weight 7]
[Paper Weight 8]
[Paper Weight 9]
The factory-set value is preset.
*1
• If paper is delivered face-down, turn it over in the paper feed direction and check the image
position.
• If the leading-edge margin on Side 1 of the paper is too narrow, paper jams may occur.
• If the trailing-edge margin on Side 1 of the paper is too narrow, paper jams may occur when
printing on the back side of paper during duplex printing.
28
 Loading...