

Ricoh priport vt3600 Operating Instructions Manual
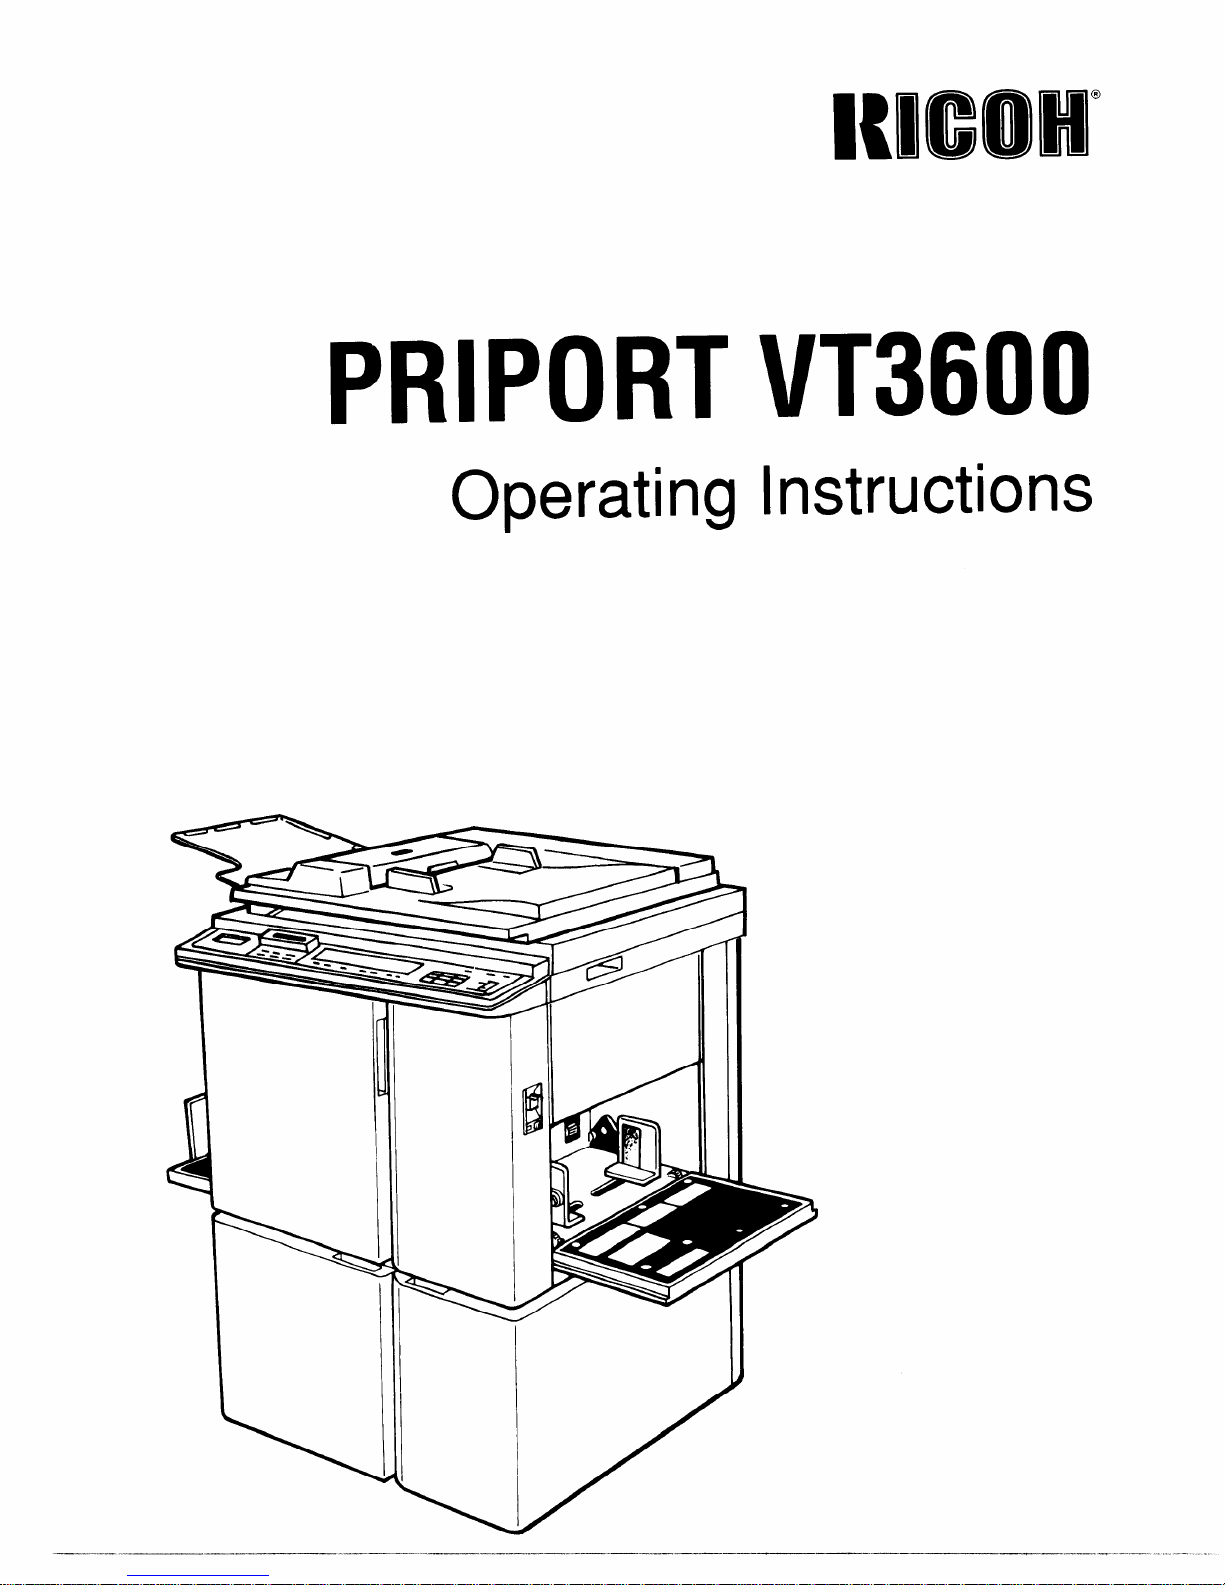
PRIPORT VT3600
Operating Instructions
-——~— —..——.
For good print quality, Ricoh recommends that you use genuine Ricoh master
and ink.
#
1
I
Ricoh shall not be responsible for any damage or expense that may result from
the use of parts other than genuine Ricoh parts in your Ricoh office product.
,
Power Source: 120V , 60Hz , more than 4.1A
Please make sure to connect the power cord to a power source as above. For
s about power connection, see page 6.
Power Comsuption: Master Making : 374W
Printing : 372W
I
Note: Some of the illustrations may be slightly different from your machine,
@ Copyright 1994
Ricoh Co., Ltd.
_—.—
——------
..—..——————
Safety During Operation
INTRODUCTION
INTRODUCTION
This manual contains detailed instructions on the operation and care of this
machine. To get the maximum versatility from this machine, all operators should
read and follow the instructions in this manual. Please keep this manual in a
handy place near the machine.
SAFETY INFORMATION
When using your machine, the following safety precautions should always be
followed.
Safety During Operation
In this manual, all safety messages are identified by
“Caution”. These words mean the following:
the words “WARNING” and
WARNING:
Important information to alert you to a situation
injury and damage to your property if instructions
Caution:
Important information on how to
avoid a situation that might cause
-
WARNING -
prevent damage to
minor injuty.
that might cause
are not followed.
your equipment, or how to
serious
IJ Do not modify or replace any parts other than the ones specified in this
manual.
Since some parts of the machine are supplied with high voltage, touch
CJ
on/y the parts specified in this manual.
IJ Do not operate the machine without covers. You might get your fingers
caught in the machine, or the machine might be damaged because of
something, such as dust, getting inside it.
IJ Since some parts of the machine are sharp and might cause injury,
touch only the parts
Caution –
–
I_JWhile copying, do not
CIWhile copying, do not
specified in this manual.
turn off the main switch.
open the door.
i
SAFETY INFORMATION
General Safety Information
IJ While copying, do not unplug the power cord.
~ While copying, do not move the machine.
CJKeep corrosive liquids, such as acid, off the machine.
CJDo not allow paper clips, staples, or other small objects to fall inside the
machine.
#Open and close the door and covers softly.
fJ Do not put anything except originals or command sheets on the machine.
n Do not spill liquid on the machine.
~ When you open or close the door or cover, don’t let go of them.
~ When you open or close the platen cover or optional document feeder, be
careful not to pinch your fingers between the platen cover or document feeder
and the back cover.
IJ If you clean rubber parts with benzine, wipe them with a dry cloth afterwards.
General Safety Information
~ Always turn the machine off when you have finished printing for the day.
u When the machine will
not be used for long periods, disconnect the power
cord.
CI If the machine must be transported by vehicle, please contact your service
representative.
..

.
Chapter I
Machine Exterior
GUIDE TO COMPONENTS
GUIDE TO COMPONENTS
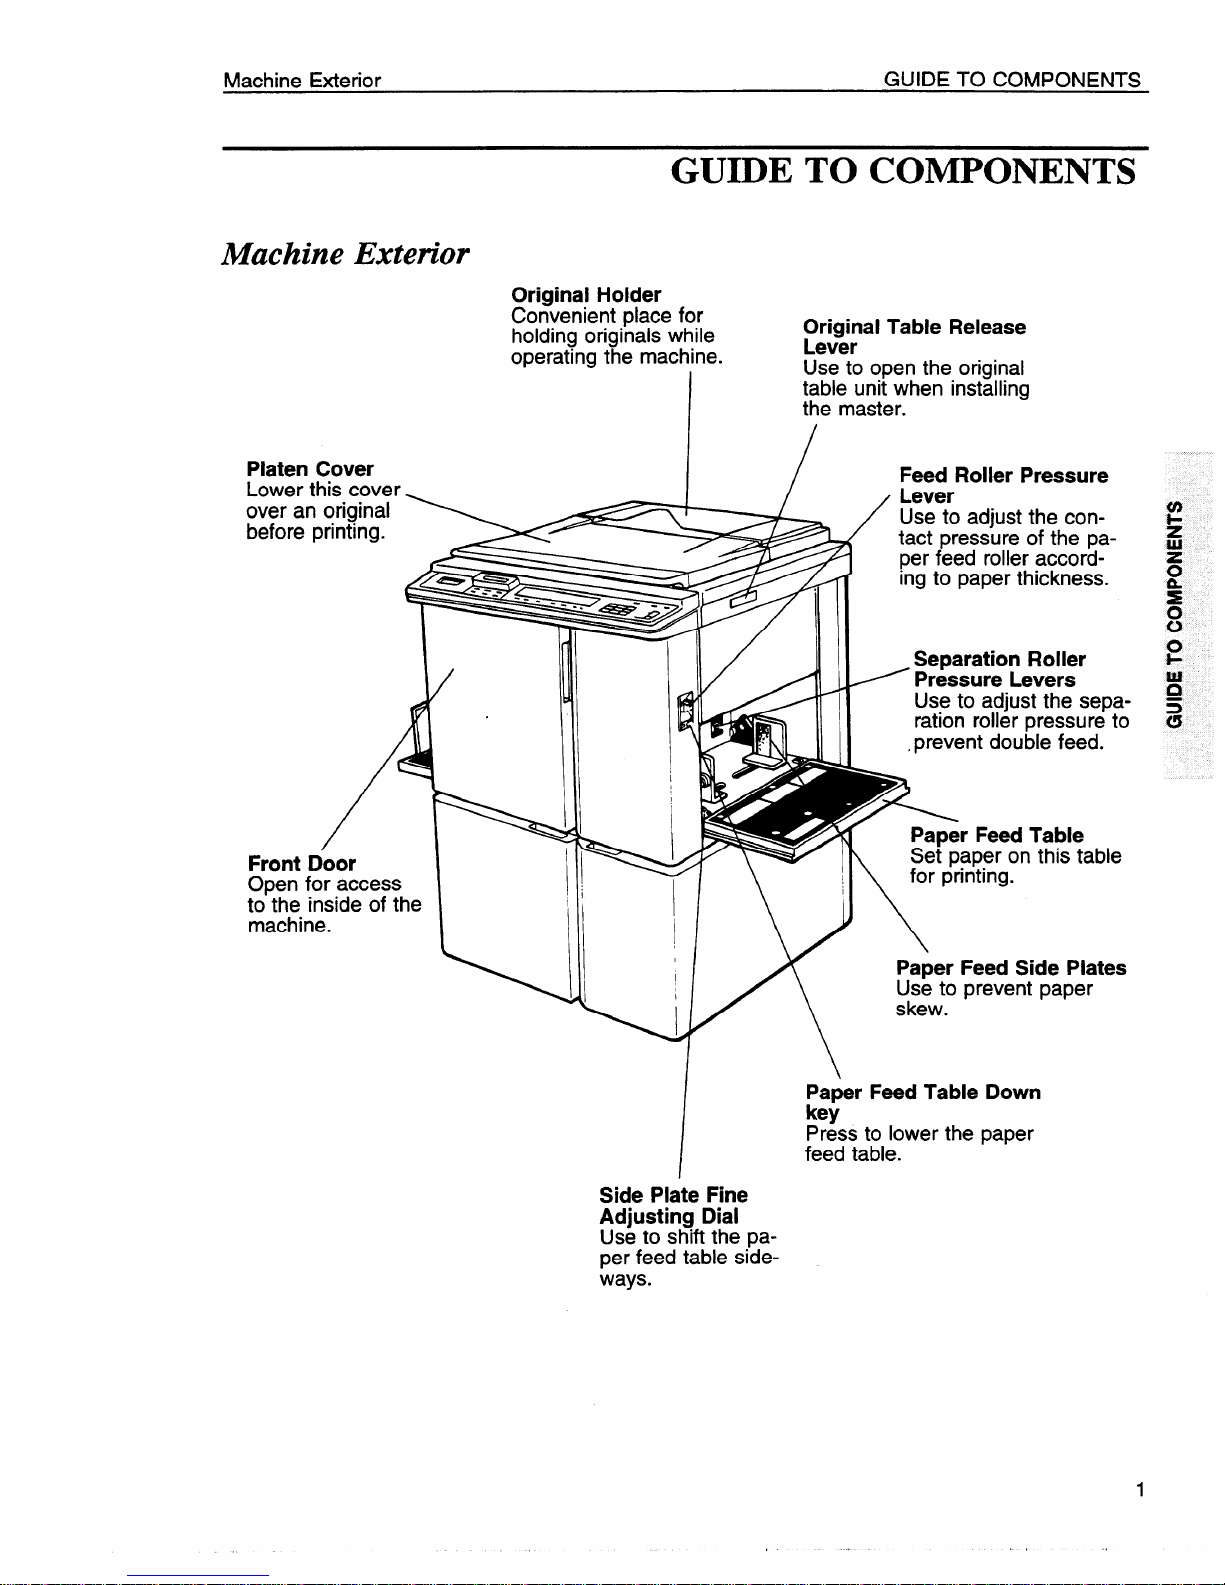
Machine Exterior
Original Holder
Convenient place for
holding originals
while
Original Table Release
operating the machine.
Lever
I
Use to open the original
table unit when installing
the master.
Platen Cover
Lower this cover
over an original
before printing.
Front Door
Open for access
too::i$eside of the
.
I
Feed Roller Pressure
/
Lever
Use to adjust the con-
tact pressure of the pa-
per feed roller according to paper thickness.
Separation Roller
= Pressure Levers
Use to adjust the separation roller pressure to
,prevent double feed.
r Feed Table
aper on this table
..
W \ !1 \ ‘orpr’nt’ng”
\
1
I
Paper Feed Side Plates
Use to prevent paper
skew.
/
Paper Feed Table Down
key
Press to lower the paper
feed table.
Side Plate Fine
Adjusting Dial
Use to shift the paper feed table sideways.
GUIDE TO COMPONENTS Operation Panel
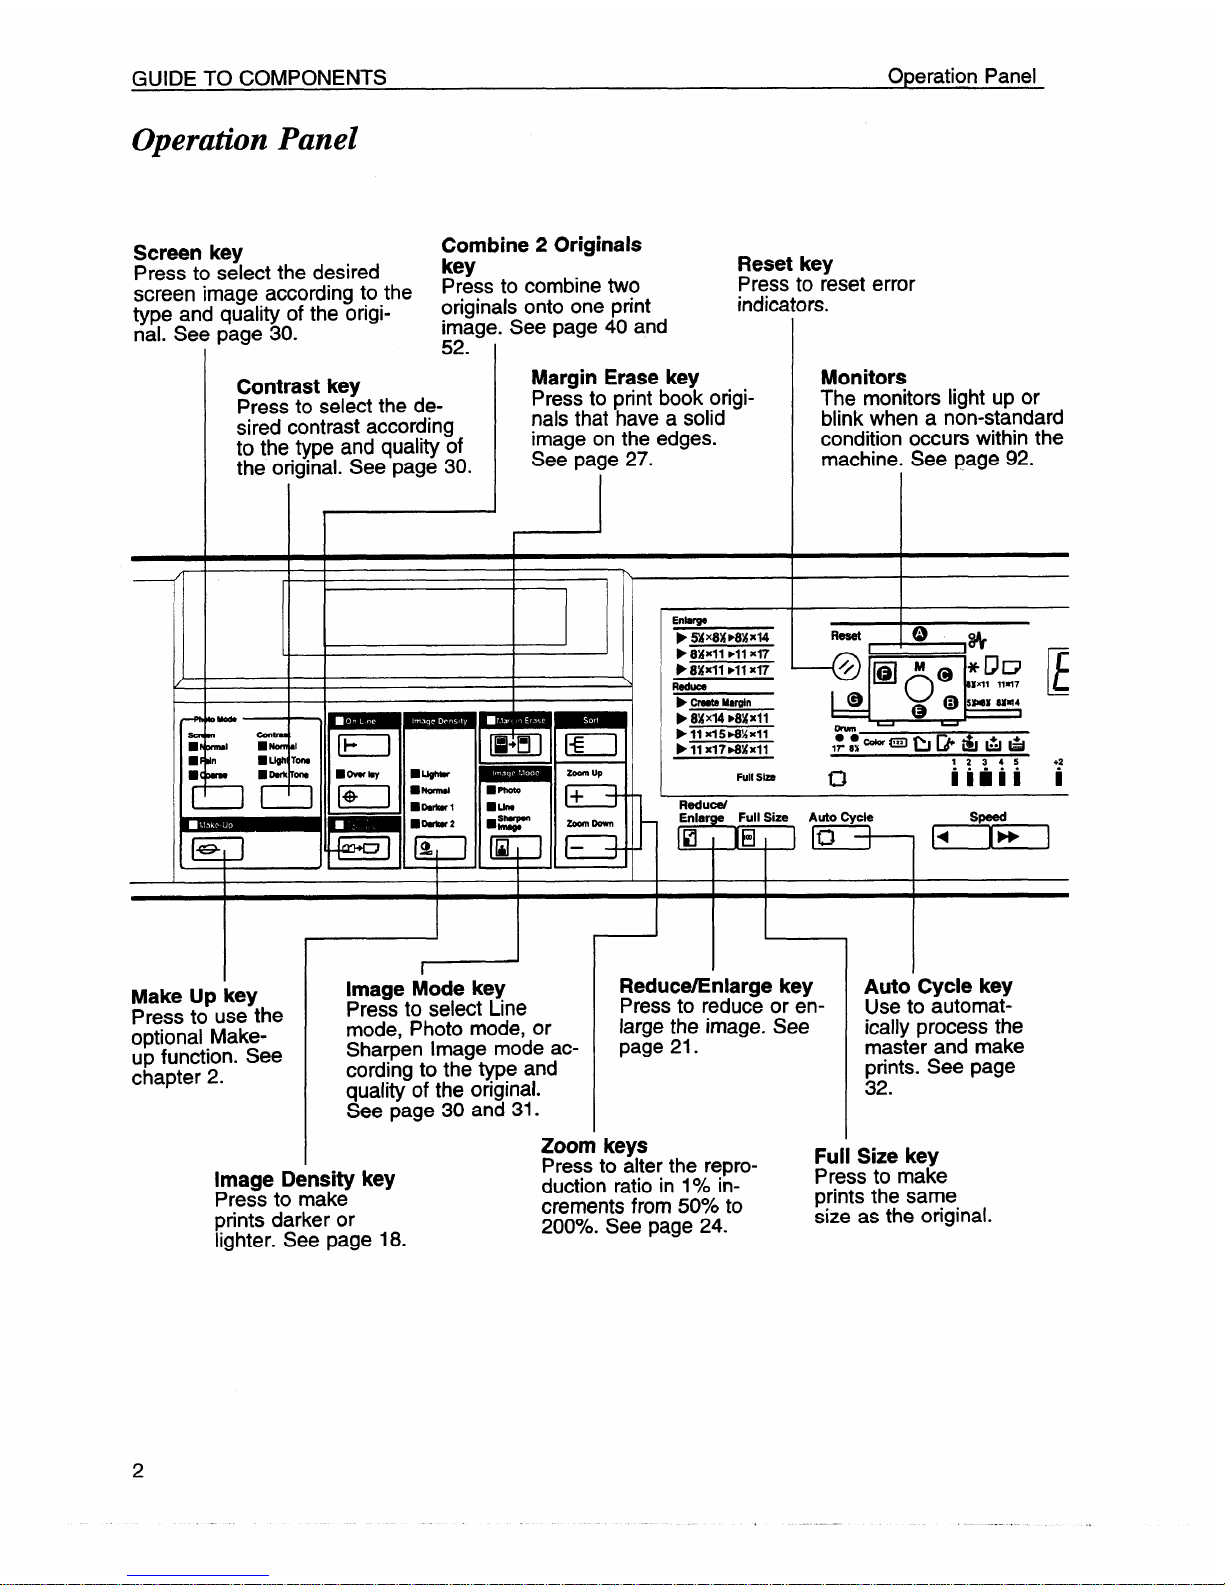
Operation Panel
Screen key
Combine 2 Originals
Press to select the desired
key
Reset key
screen image according to the
Press to combine two
Press to reset error
type and quality of the origi-
originals onto one print
indicators.
nal. See page 30.
image. See page
40 and
co
ad.
Contrast key
Press to select the desired contrast according
to the type and quality of
the original. See page 30.
Margin Erase key
Press to print book originals that have a solid
image on the edges.
See page 27.
I
I
I
I
Enhrge
p
wx8xmAJd4
p 8XXll ➤11 x~
➤ 84Jfll ➤11 X17
Reduce
➤ Create M8rgln
➤ 8XX14 ➤8XX11
P 11 X15*%X11
➤ 11 X17 MMX11
Full Slzo
Monitors
The monitors light up or
blink when a non-standard
condition occurs within the
machine. See page 92.
E
+2
i
w
El
db
I
Make Up key
Press to use the
optional Makeup function. See
chapter 2.
r
I
Image Mode key
Press to select Line
mode, Photo mode, or
Sharpen Image mode according to the type and
aualitv of the original.
I
See page 30 and 31.
Image Density key
Press to make
prints darker or
lighter. See page 18.
I
1
Reduce/Enlarge key
Press to reduce or enlarge the image. See
page 21.
Auto Cycle key
Use to automatically process the
master and make
prints. See page
32.
Size key
Zoom keys
Press to alter the repro-
Full
duction ratio in 1940in-
Press to make
crements from
50’%0to
prints the same
200?40.See page 24.
size as the original.
TROUBLESHOOTING
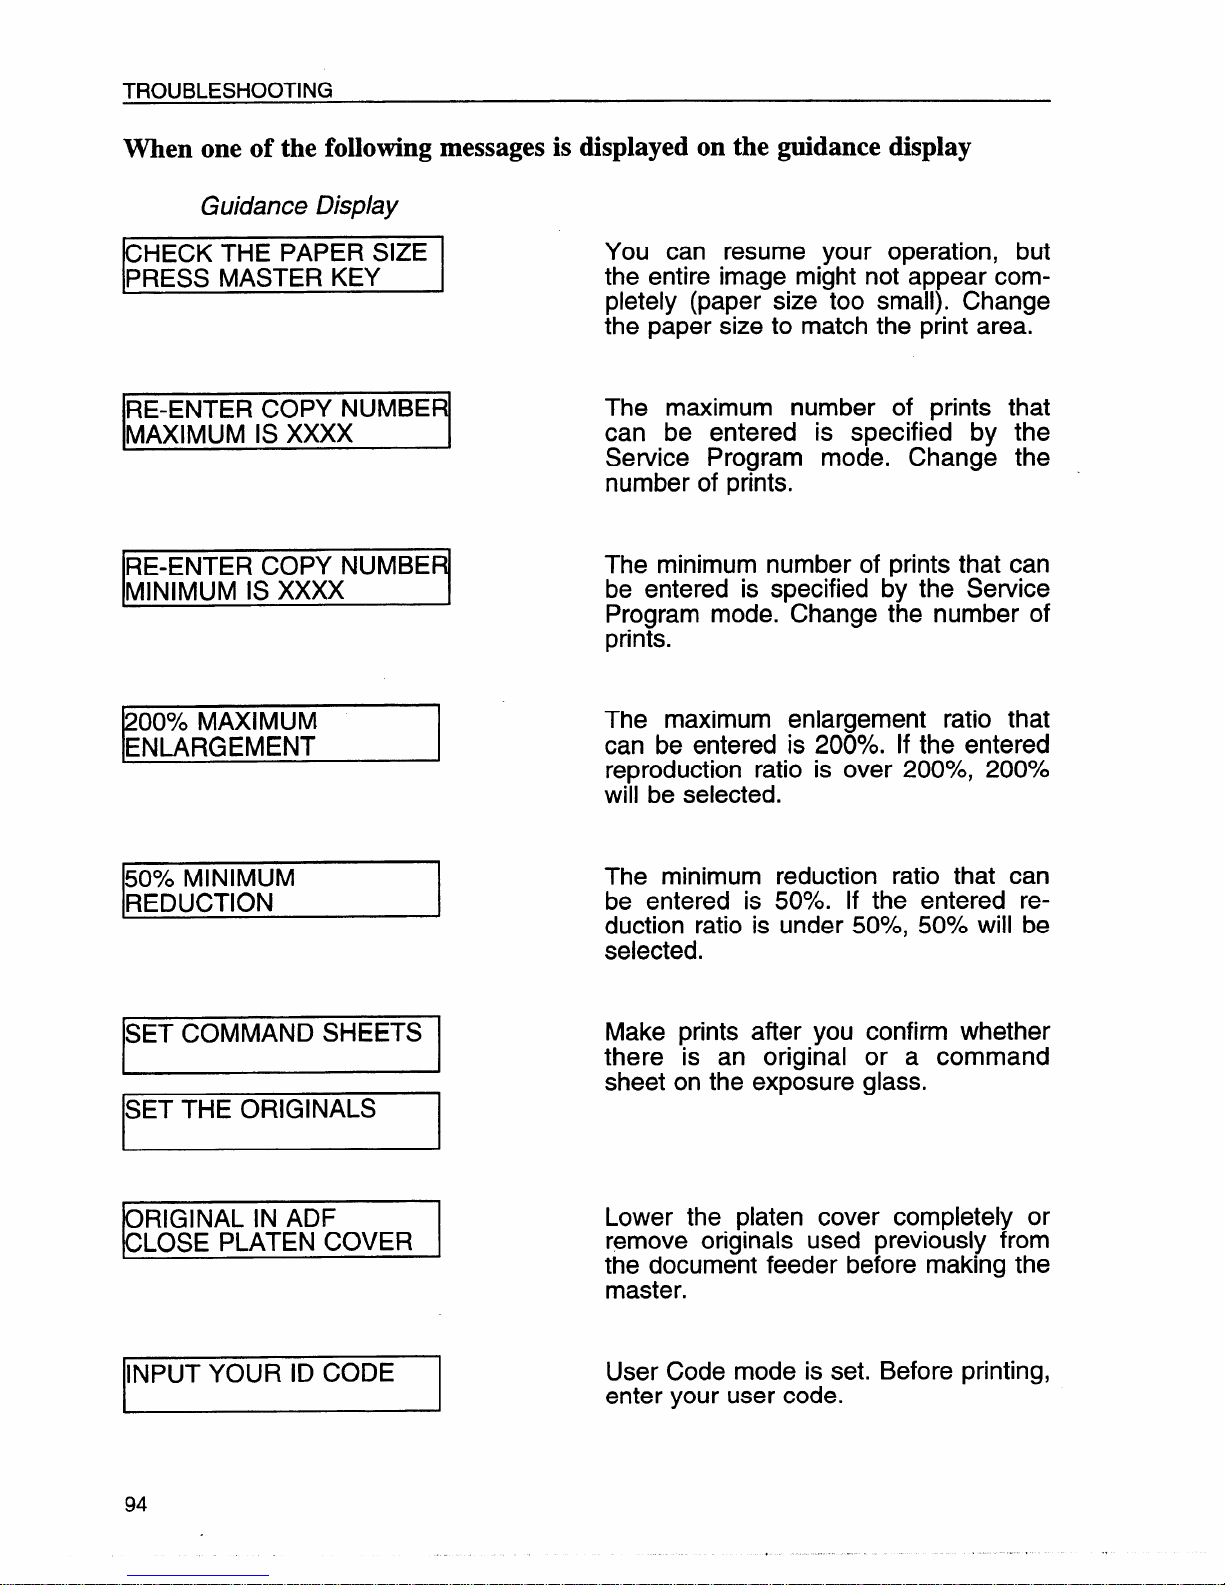
When one of the following messages is displayed on the guidance display
Guidance Display
CHECK THE PAPER SIZE
PRESS MASTER KEY
RE-ENTER COPY NUMBER
MAXIMUM IS XXXX
IRE-ENTER
cow NumERl
lMINIMUM IS xxxx
I
200% MAXIMUM
ENLARGEMENT
50?40 MINIMUM
REDUCTION
ISET COMMAND SHEETS I
SET THE ORIGINALS
ORIGINAL IN ADF
CLOSE PLATEN COVER
I
INPUT YOUR ID CODE
94
You can resume your operation, but
the entire image might not appear completely (paper size too small). Change
the paper size to match the print area.
The maximum number of prints that
can be entered is specified by the
Service Program mode. Change the
number of prints.
The minimum number of prints that can
be entered is specified by the Service
Program mode. Change the number of
prints.
The maximum enlargement ratio that
can be entered is 200940. If the entered
reproduction ratio is over 200?4, 200%
will be selected.
The minimum reduction ratio that can
be entered is 50?40. If the entered reduction ratio is under 50?4, 50?40will be
selected.
Make prints after you confirm whether
there is an original or a command
sheet on the exposure glass.
Lower the platen cover completely or
remove originals used previously from
the document feeder before making the
master.
User Code mode is set. Before printing,
enter your user code.
GUIDE TO COMPONENTS
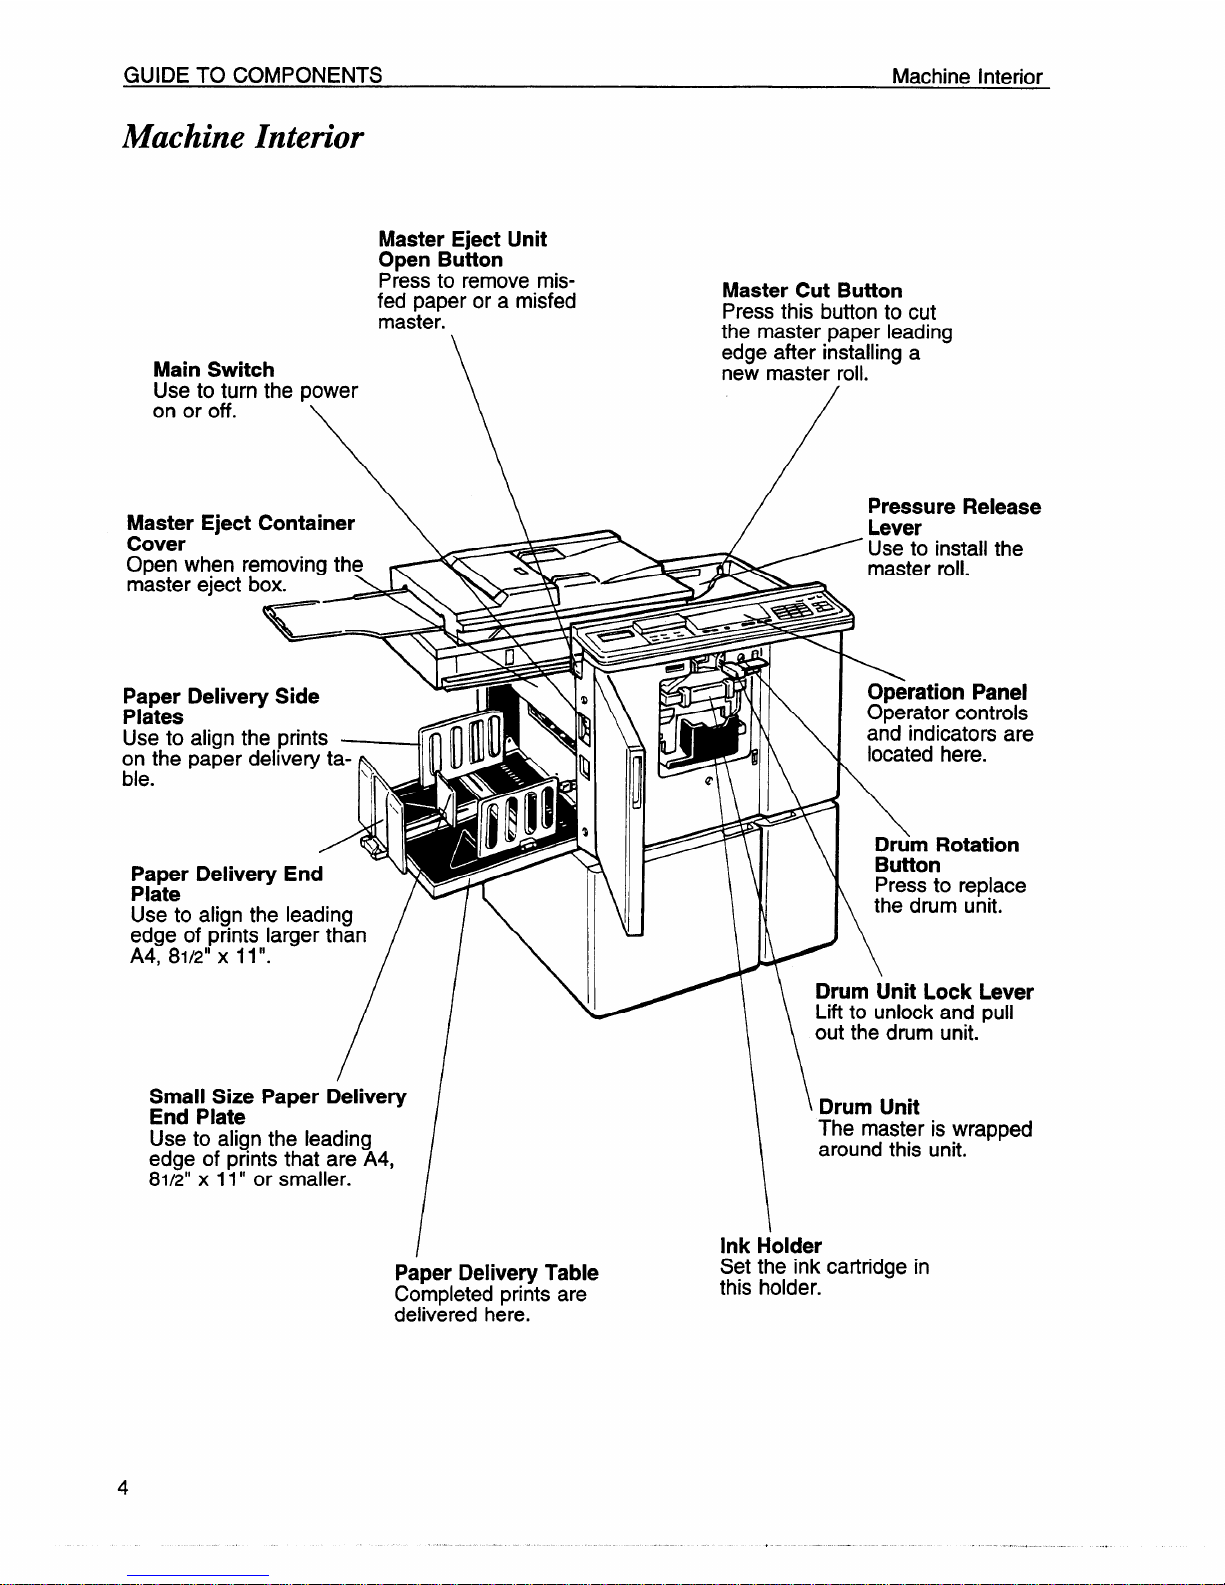
Machine Interior
Machine Interior
Master Eject Unit
Open Button
Main Switch
P~essto remove misfed paper or a misfed
master.
\
Use to turn the power
on or off.
\\
Master Cut Button
Press this button to cut
the master paper leading
edge after installing a
new master roil.
*’
Master Eject Container
Cover
Open when removing the
master eject box.
Paper Delivery Side
Plates
Use to align the prints
4
on the paper delivery ta-
ll
70!
ble.
\r
IN
Pressure Release
Lever
Use to install the
master roll.
111’d’
Operation Panel
T&
Operator controls
!JI”k‘N
and indicators are
located here.
\
/
Drum Rotation
Paper Delivery End
m> q ‘$ ‘ \
Button
Plate
Press to replace
Use to align the leading
the drum unit.
edge of prints larger than
A4, 81/2” x 11”.
//
~\
‘
Drum Unit Lock Lever
Lift to unlock and pull
out the drum unit.
Small Size Paper Delivery
End Plate
Use to align the leading
edge of prints that are A4,
81/2” x 11” or smaller.
/ ,njo,?,nzrapped
Paper Delivery Table
Set the ink cartridge in
Completed prints are
this holder.
delivered here.
INSTALLATION REQUIREMENTS
Power Connection
Power Connection
IJ Connect the power cord to an appropriate power source (as described inside
of the front cover).
n Make sure the plug is firmly inserted in the outlet.
CI
Avoid multiwiring.
~ Do
not pinch the power cord.
CI Make sure that the wall-outlet is near the machine and easily accessible,
Printing Paper OPERATION
OPERATION
Printing Paper
fJ
The following types of print paper are not recommended for this machine.
●
●
●
●
●
●
●
●
●
Paper smaller than 90 mm x 148 mm, 3.6” x 5.9”
Paper larger than 325 mm x 447 mm, 12.7” x 17.5”
Paper heavier than 209.3 g/m2, 55.6 lb
Paper lighter than 47.1 g/m2, 12.5 lb
Roughly-cut paper
Paper of different thickness in the same stack
Buckled or curled paper
Short grain paper
Low stiffness paper
n Maximum print area is as follows:
.
290 x412 mm, 11.4” x 16.2” with A3 drum.
290 x 204 mm, 11.4” x 8.0” with optional A4 drum.
A3 (297 x 420 mm), 11” x 17“, originals or printing paper can be used,
but the maximum print area is 290 x412 mm, 11.4” x 16.2” at 23°C,
73°F/65YoRH. Select Reduction mode to print the entire image of an A3,
11” x 17“ original.
IJ Correct curls in the paper before setting it in the machine. When you cannot
correct the paper curl, stack the paper with the curl face down. Otherwise the
paper might wrap around the drum or stains might appear.
IJ Store paper where it will not curl or absorb moisture. Use paper soon after it
is unpacked.
n Only use paper
shown below;
where the leading
Not OK
edge has two
El
t
OK
right angle comers,
OPERATION
Originals
Originals
~
Under the following conditions, the machine might not detect the original on
●
●
●
the exposure glass. If you press the Master Making key again, the machine
will start making master anyway.
When you set a dark original on the exposure glass.
When the original is not centered according to the size marks on the left scale.
If you do not open the platen cover at an angle of more than 25 degrees with the exposure
glass when you replace originals.
n
The maximum original size you can set on the exposure glass is 307 x 432
mm, 12” x 17”.
~ If you use paste-up originals, make sure the pasted parts hold firmly to the
base sheet. If the thickness of the paste-up original is more than 0.2
mm,
2/250”,
a shadow might appear on the prints.
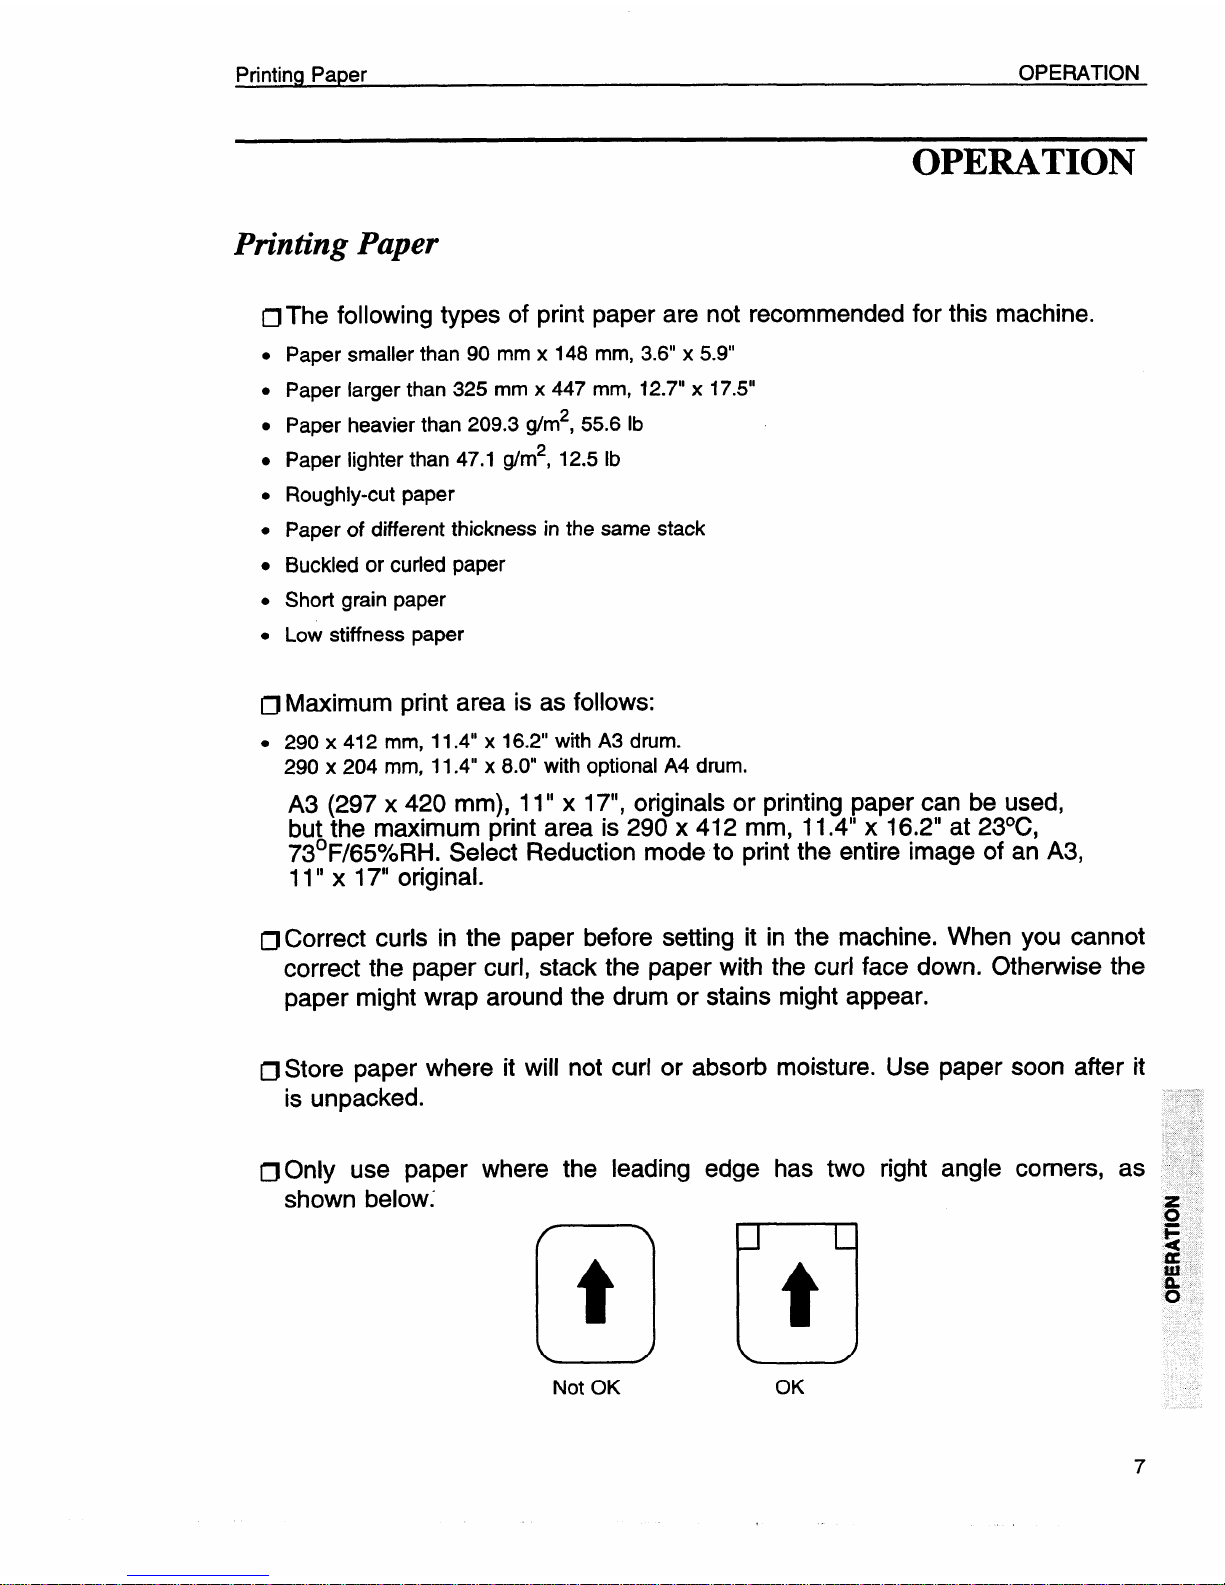
IJ The first 8 mm, 0.32” of the leading edge and the last 3 mm, 0.12“ of the
trailing edge cannot be printed. Make sure the leading edge margin is
8 mm, 0.32” and the trailing edge margin is at least 3 mm, 0.1 2“.
Original
8 mm,
0.32”
*
Print
*
at least
3 mm,
0.12”
Preparation For Printing
OPERATION
Preparation For Printing
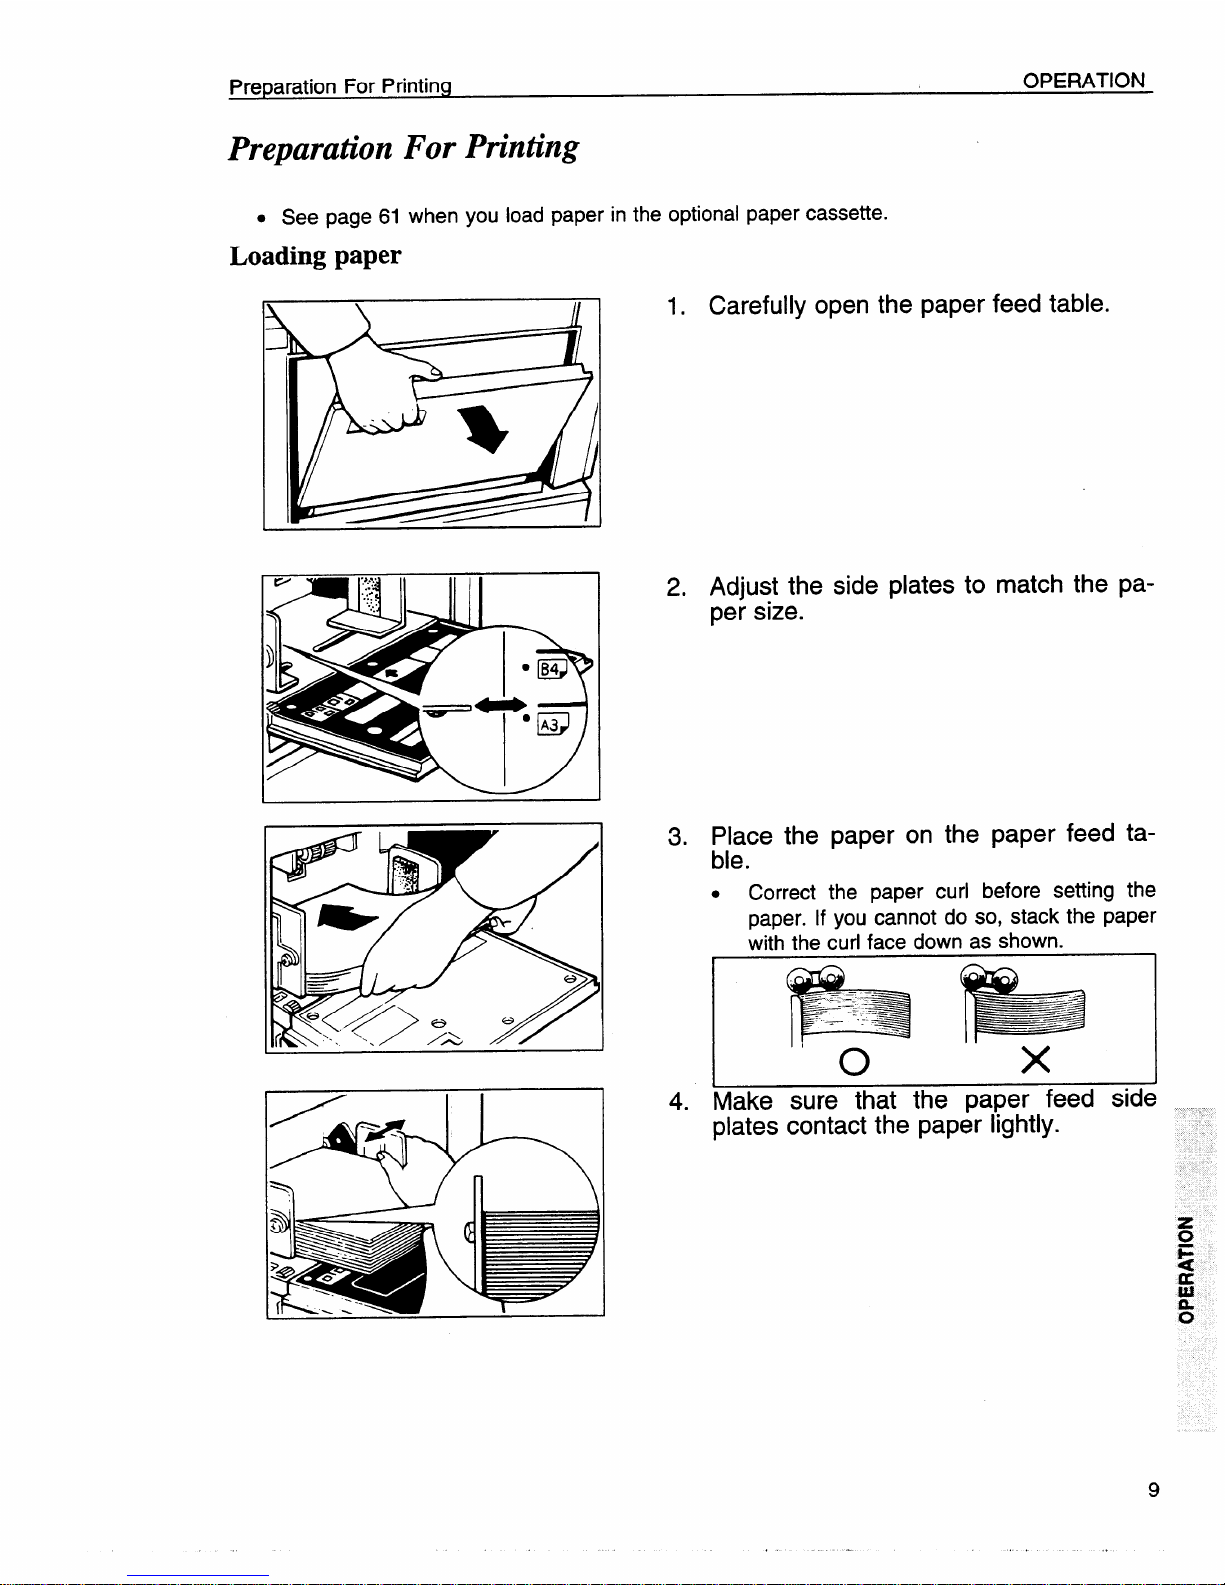
. See page 61 when you load paper in the
Loading paper
optional
paper cassette.
P~
w
:s .....
.. .
. .+
.:: .
. ..
..
)
m
Q
● B4
-00
e
-- . *3
D
1. Carefully open the paper feed table.
2. Adjust the side plates to match the paper size.
3. Place the paper on the paper feed ta-
ble.
.
Correct the paper curl before setting the
paper. If you cannot do so, stack the paper
with the curl face down as shown.
&q
4.
Make sure that the paper feed side
plates contact the paper lightly.
z
u
F
4
&
a.
o
OPERATION
Preparation For Printing
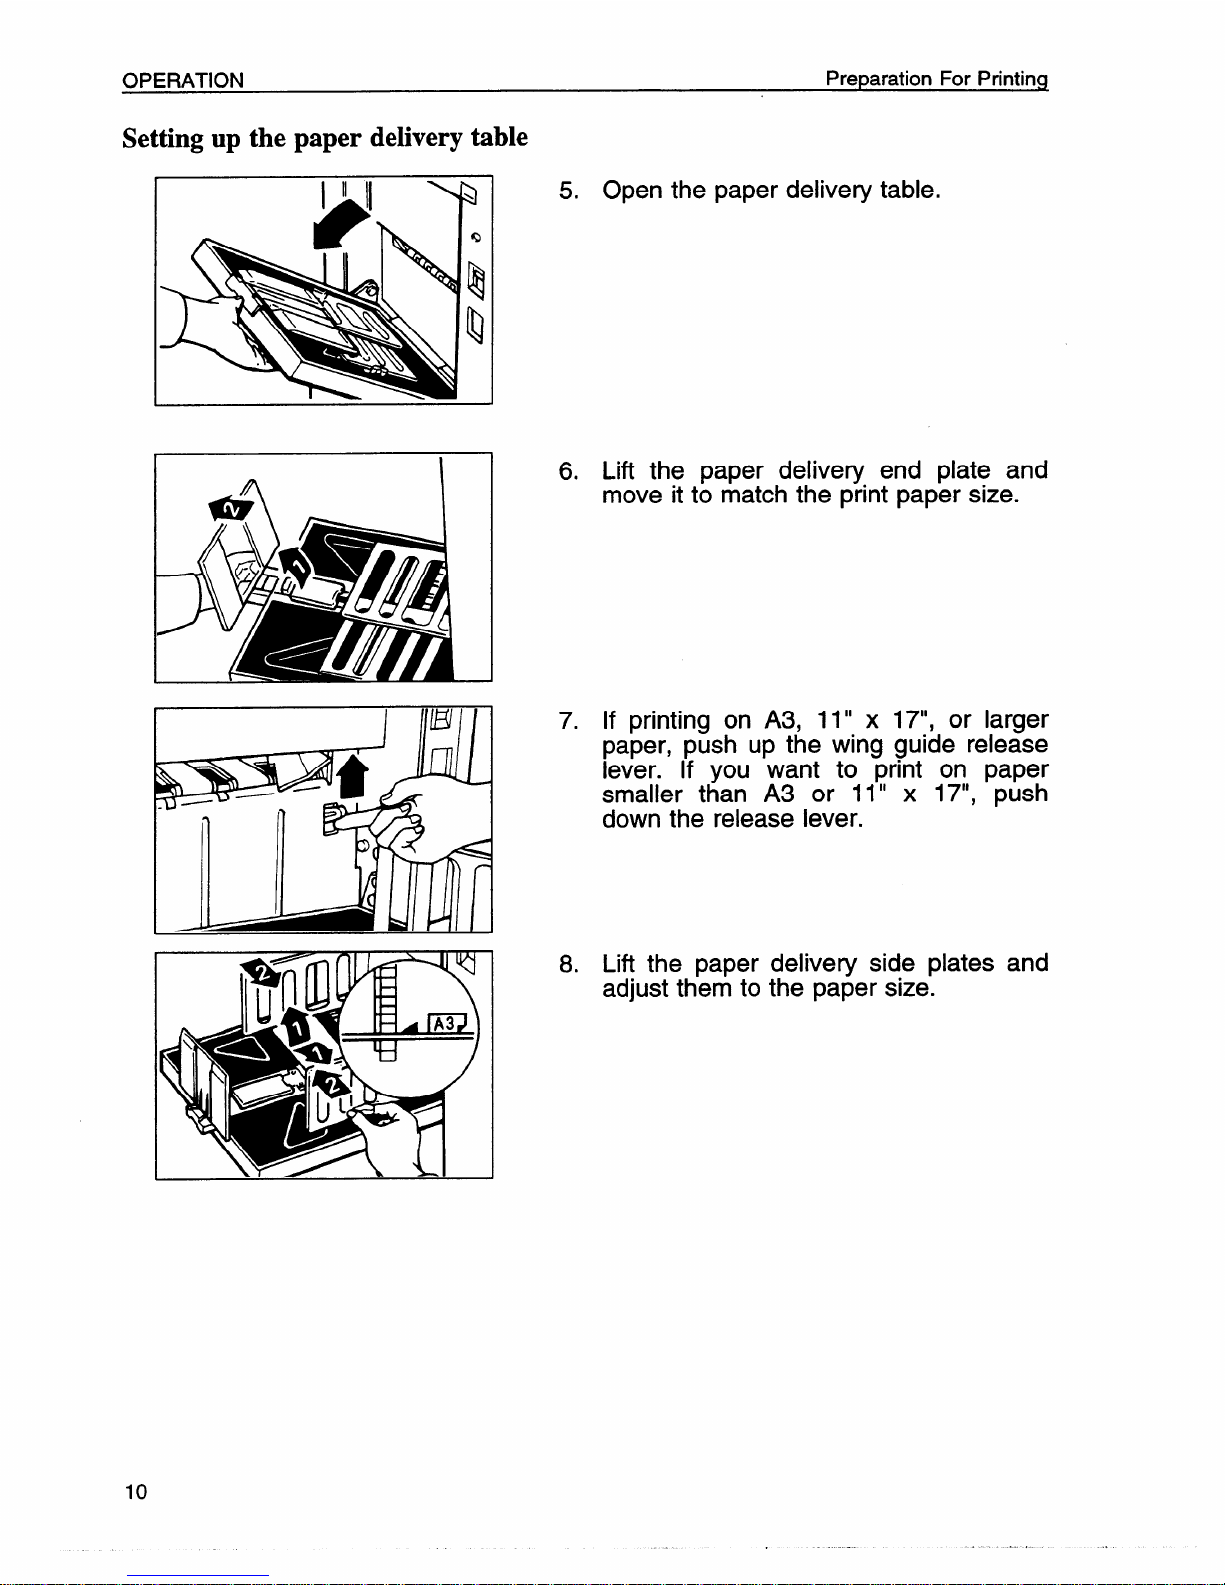
Setting up the paper delivery table
I WI I
5. Open the paper delivery table.
6. Lift the paper delivery end plate and
move it to match the print paper size.
7. If printing on A3, 11” x 17“, or larger
paper, push up the wing guide release
lever. If you want to print on paper
smaller than A3 or 11” x 17“, push
down the release lever.
8. Lift the paper delivery side plates and
adjust them to the paper size.
Preparation For Printing
OPERATION
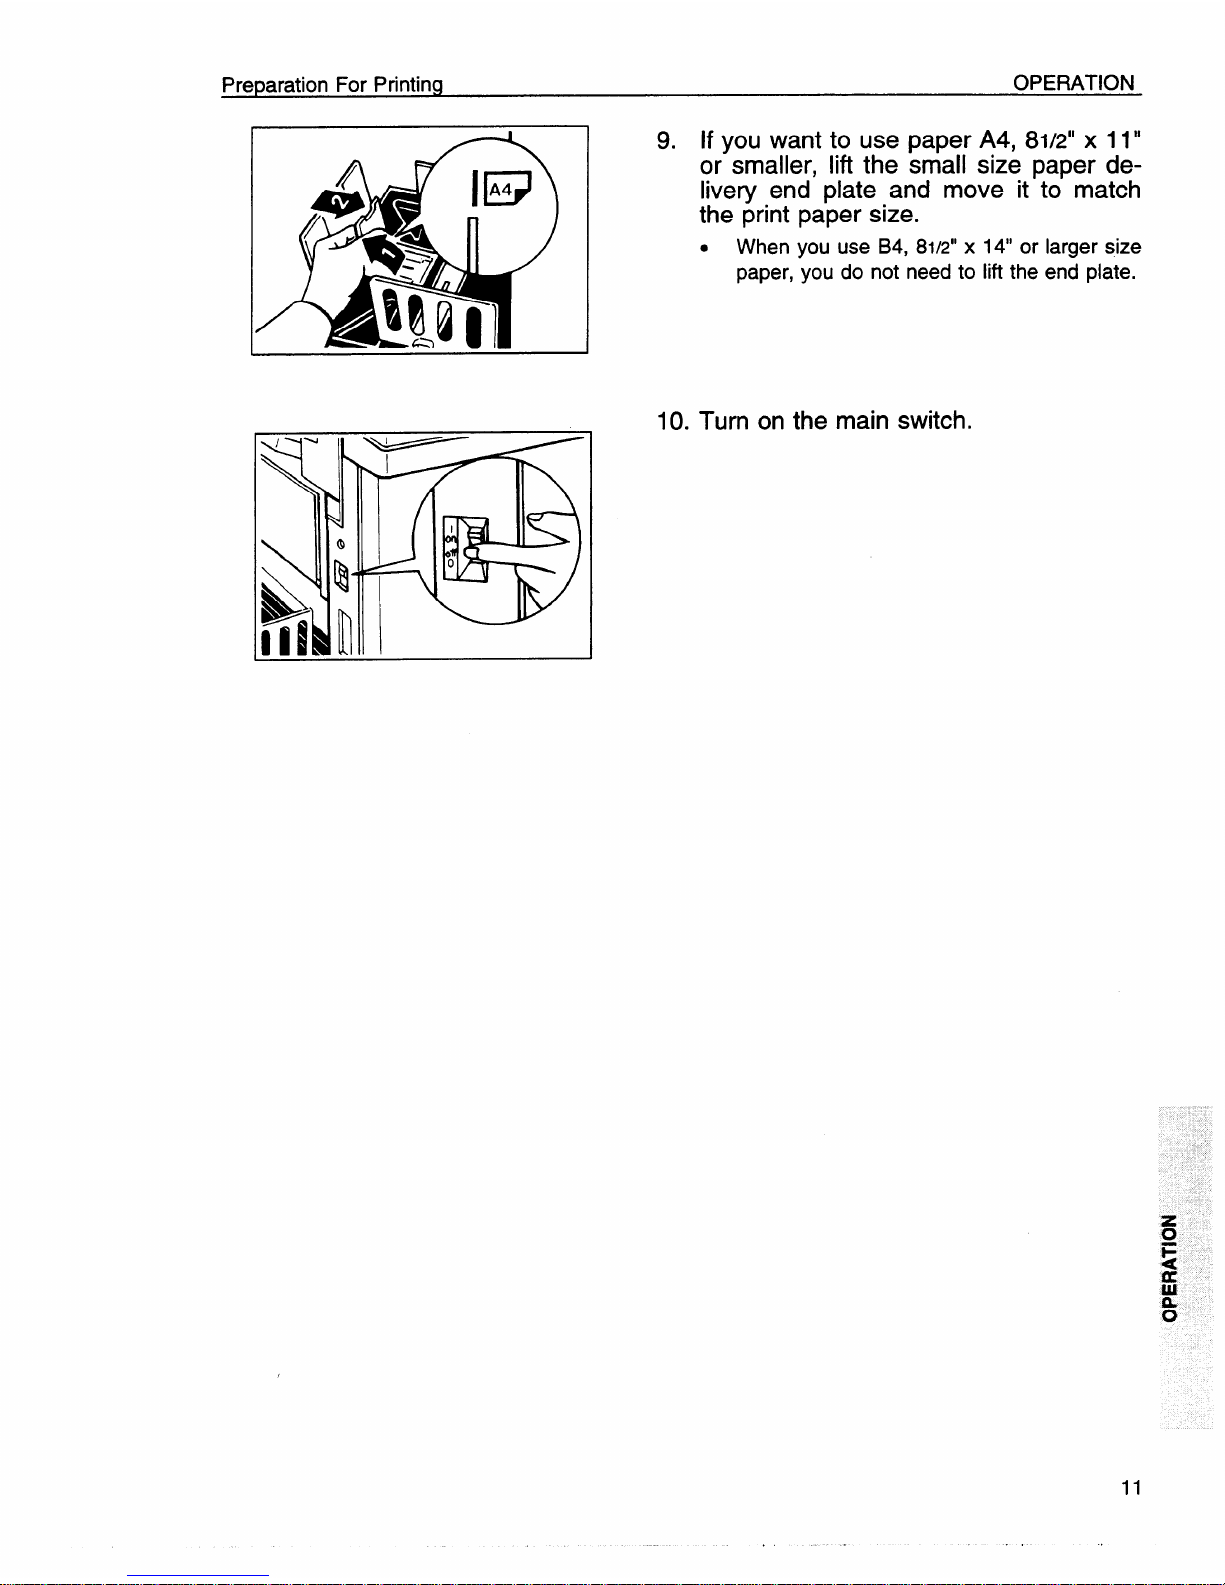
9. If you want to use paper A4, 8112”x 11”
or smaller, lift the small size paper de-
livery end plate and move it to match
the print
.
When
paper,
paper size.
you use B4, 8112”x 14“ or
you do not need to lift the
larger size
end plate.
10. Turn on the main switch.
OPERATION
Standard Printing
Standard Printing
1
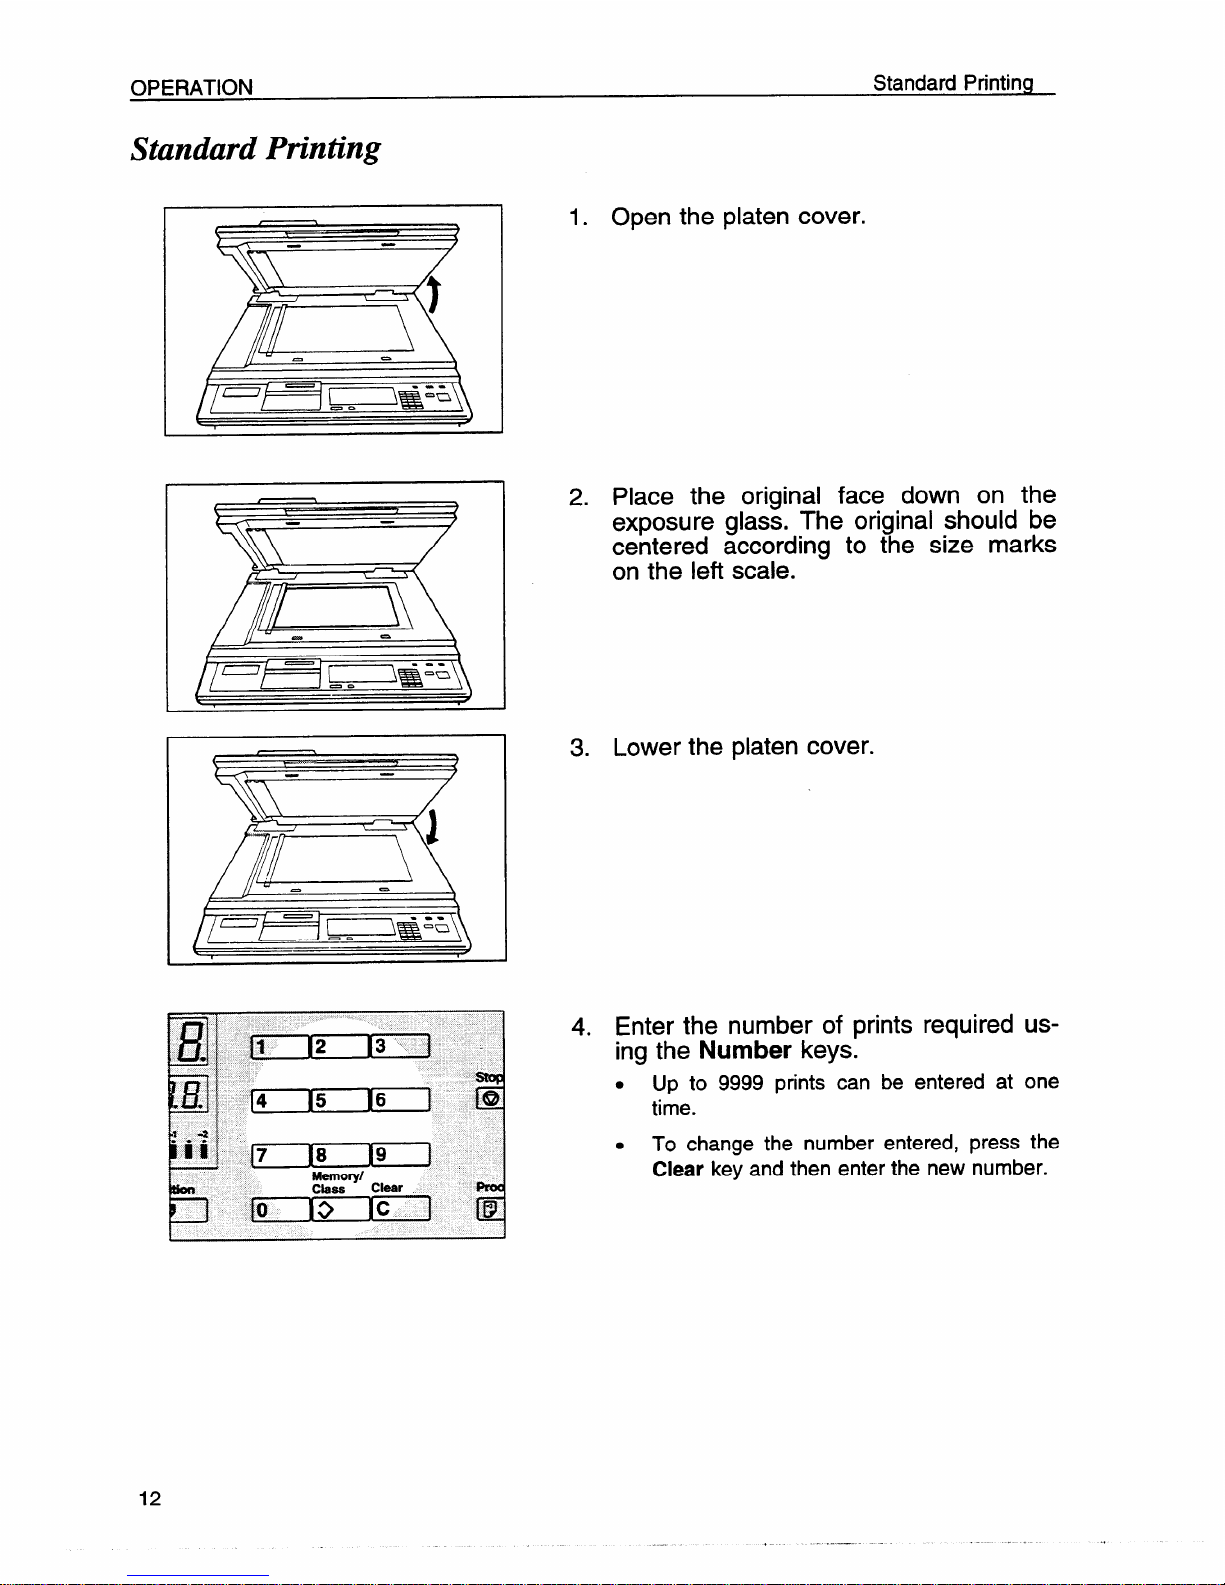
1. Open the platen cover.
2. Place the original face down on the
exposure
glass. The original should be
centered according to the size marks
on the left scale.
3.
Lower the platen cover.
4. Enter the number of prints required using the Number keys.
. Up to 9999 prints can be entered at one
time.
. To change the number entered, press the
Clear key and then enter the new number.
Standard Printing
OPERATION
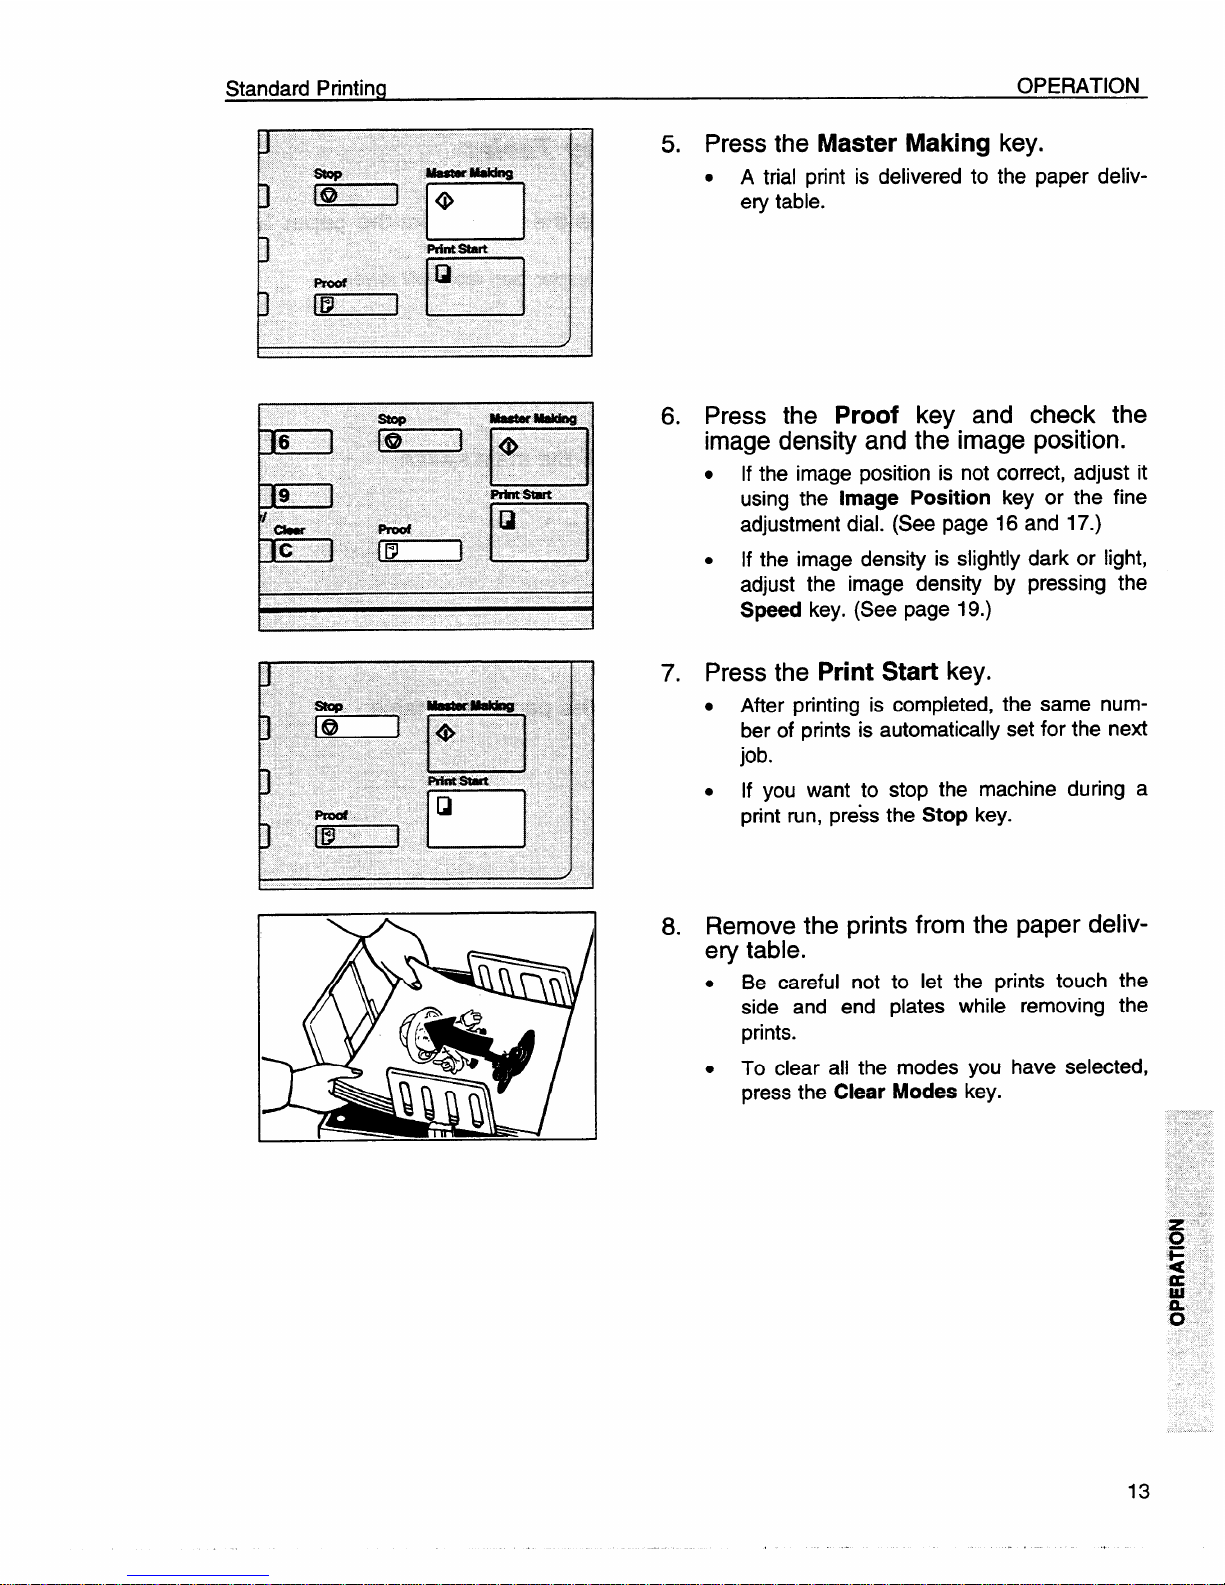
5. Press the Master Making key.
. A trial print is delivered to the paper deliv-
ery table.
6. Press the Proof key and check the
image density and the image position.
● Ifthe image position is not correct, adjust it
using the
Image Position key or the fine
adjustment dial. (See page 16 and 17.)
. If the image density is slightly dark or light,
adjust the image density by pressing the
Speed key. (See page 19.)
7. Press the Print Start key.
● After printing is completed, the same num-
ber of prints is automatically set for the next
job.
. If
you want to stop the machine during a
print run, press the
Stop key.
8. Remove the prints from the paper delivery table.
. Be careful not to let the prints touch the
side and end plates while removing the
prints.
. To clear all the modes you have selected,
press the
Clear Modes key.
13
,,

OPERATION
Restoring Paper Feed And Paper Delivery Tables
Restoring Paper Feed And Paper Delivery Tables
1. Remove the paper from the paper feed
table.
.
The paper feed table will lower.
2. Turn off the main switch.
3. Close the paper feed table.
4. Push the small size paper delivery
plate to the left, then lower it, if necessary.
5. Move the side plates to the sides, then
lower them.
.
Make sure that the side plates do not touch
the small size paper delivery end plate.
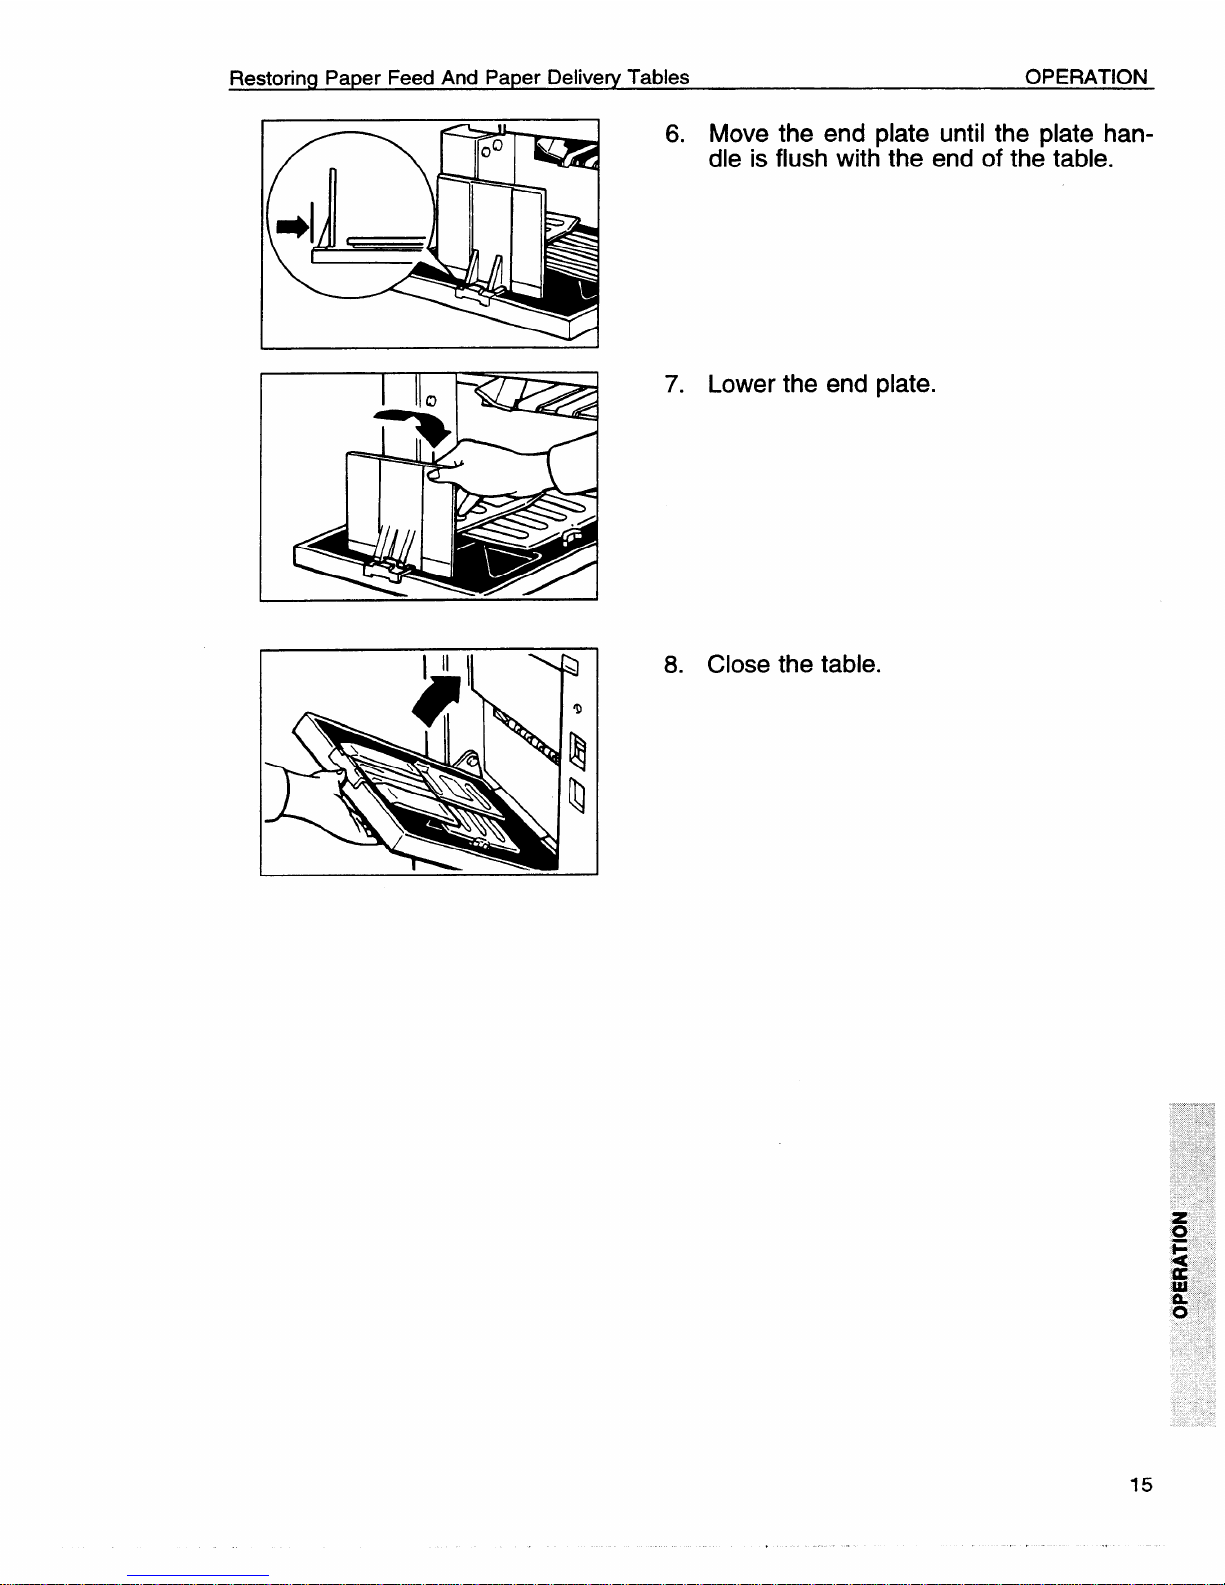
Restoring Paper Feed And Paper Delivery Tables
OPERATION
I
6. Move the end plate until the plate handle is flush with the end of the table.
7. Lower the end plate.
8. Close the table.
OPERATION
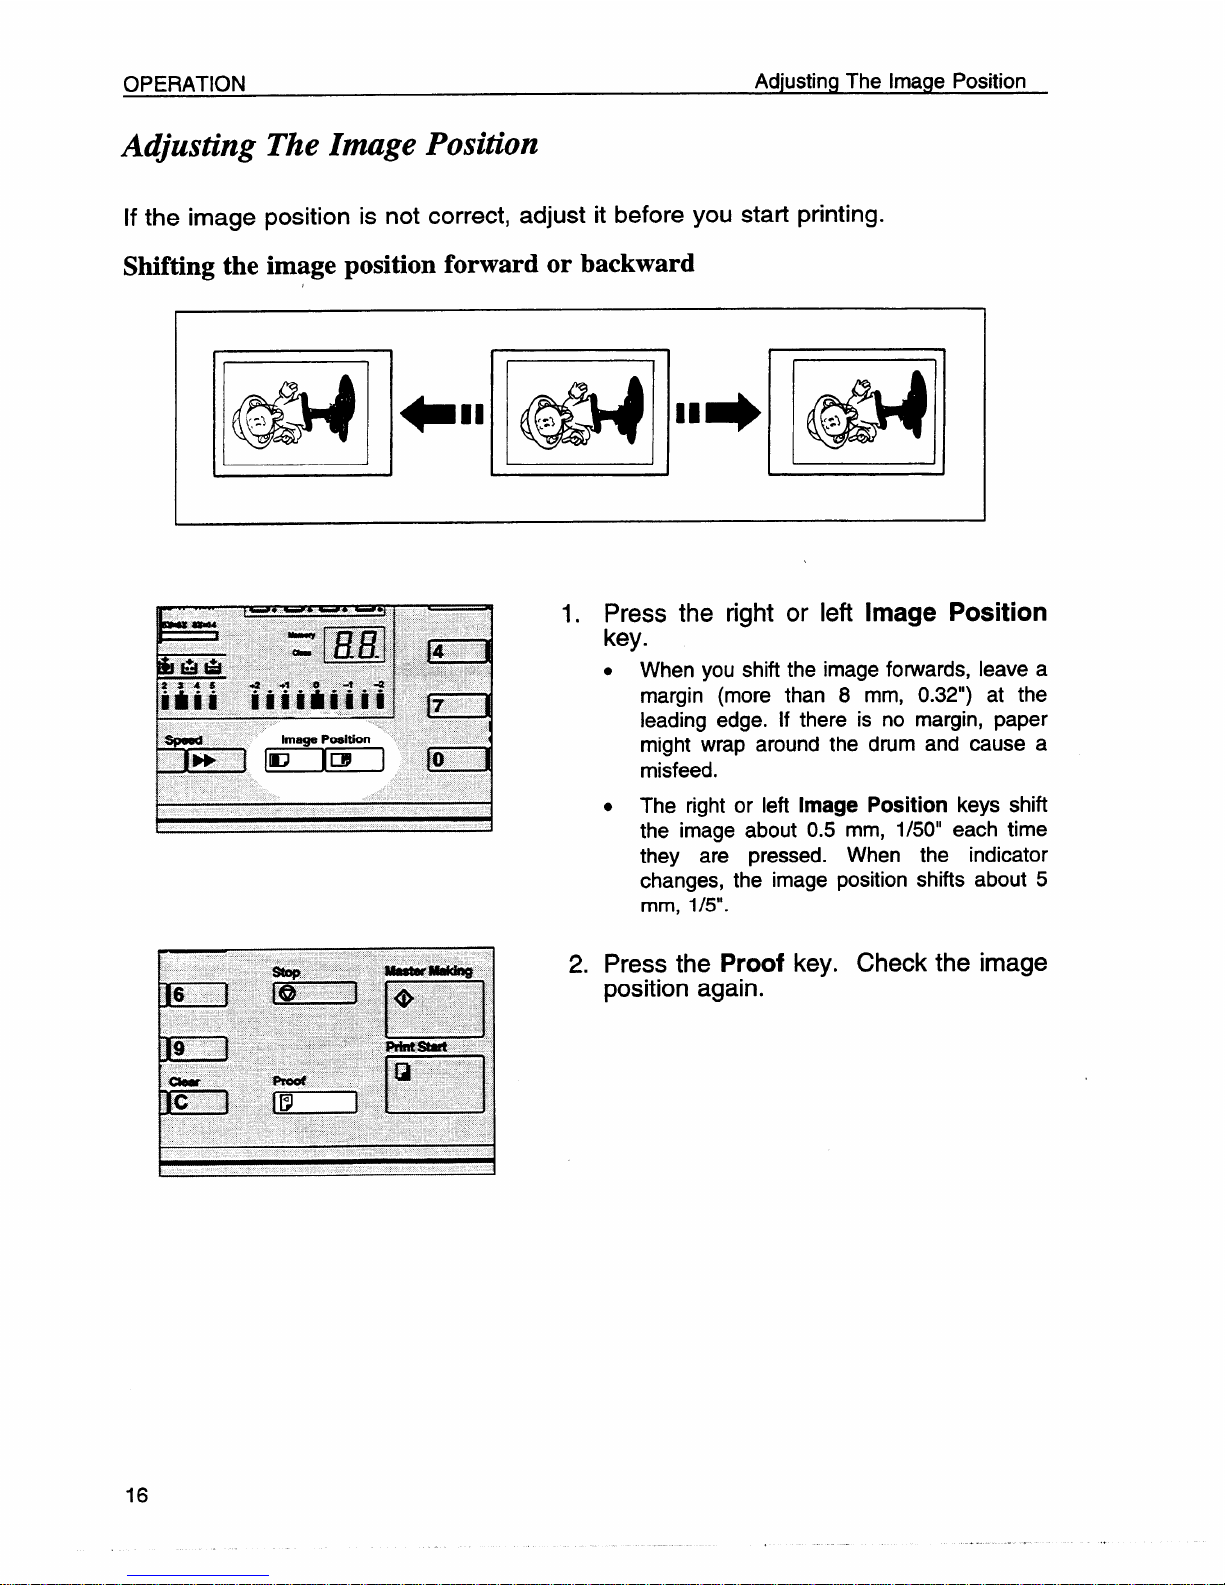
Adjusting The Image Position
A&usting
If the image
Shifting the
The Image Position
position is not correct, adjust it before you start printing.
image position forward or backward
1. Press the right or left Image Position
key.
. When you shift the image forwards, leave a
margin (more than 8 mm, 0.32”) at the
leading edge. If there is no margin, paper
might wrap around the drum and cause a
misfeed.
. The right or left
Image Position keys shift
the image about 0.5 mm, 1/50” each time
they are pressed.
When the indicator
changes, the image position shifts about 5
mm, 1/5”.
2. Press the Proof key. Check the image
position again.

Adjusting The Image Position
Shifting the image to the right or left
OPERATION
I
Shiiting the image to the right
@J+.+@
11111111111
L
Shifting the image to the left
IP-49
11111111111
d
1. Turn the adjusting dial as
illustrations.
. The image position can be shifted up to
10 mm, 2/5” each way. Each division on
the scale is 2 mm, 0.08”.
1
in the
Adjust the paper delivery side plates to
2.
the print paper position.
Press the
3.
Proof key. Check
position.
OPERATION
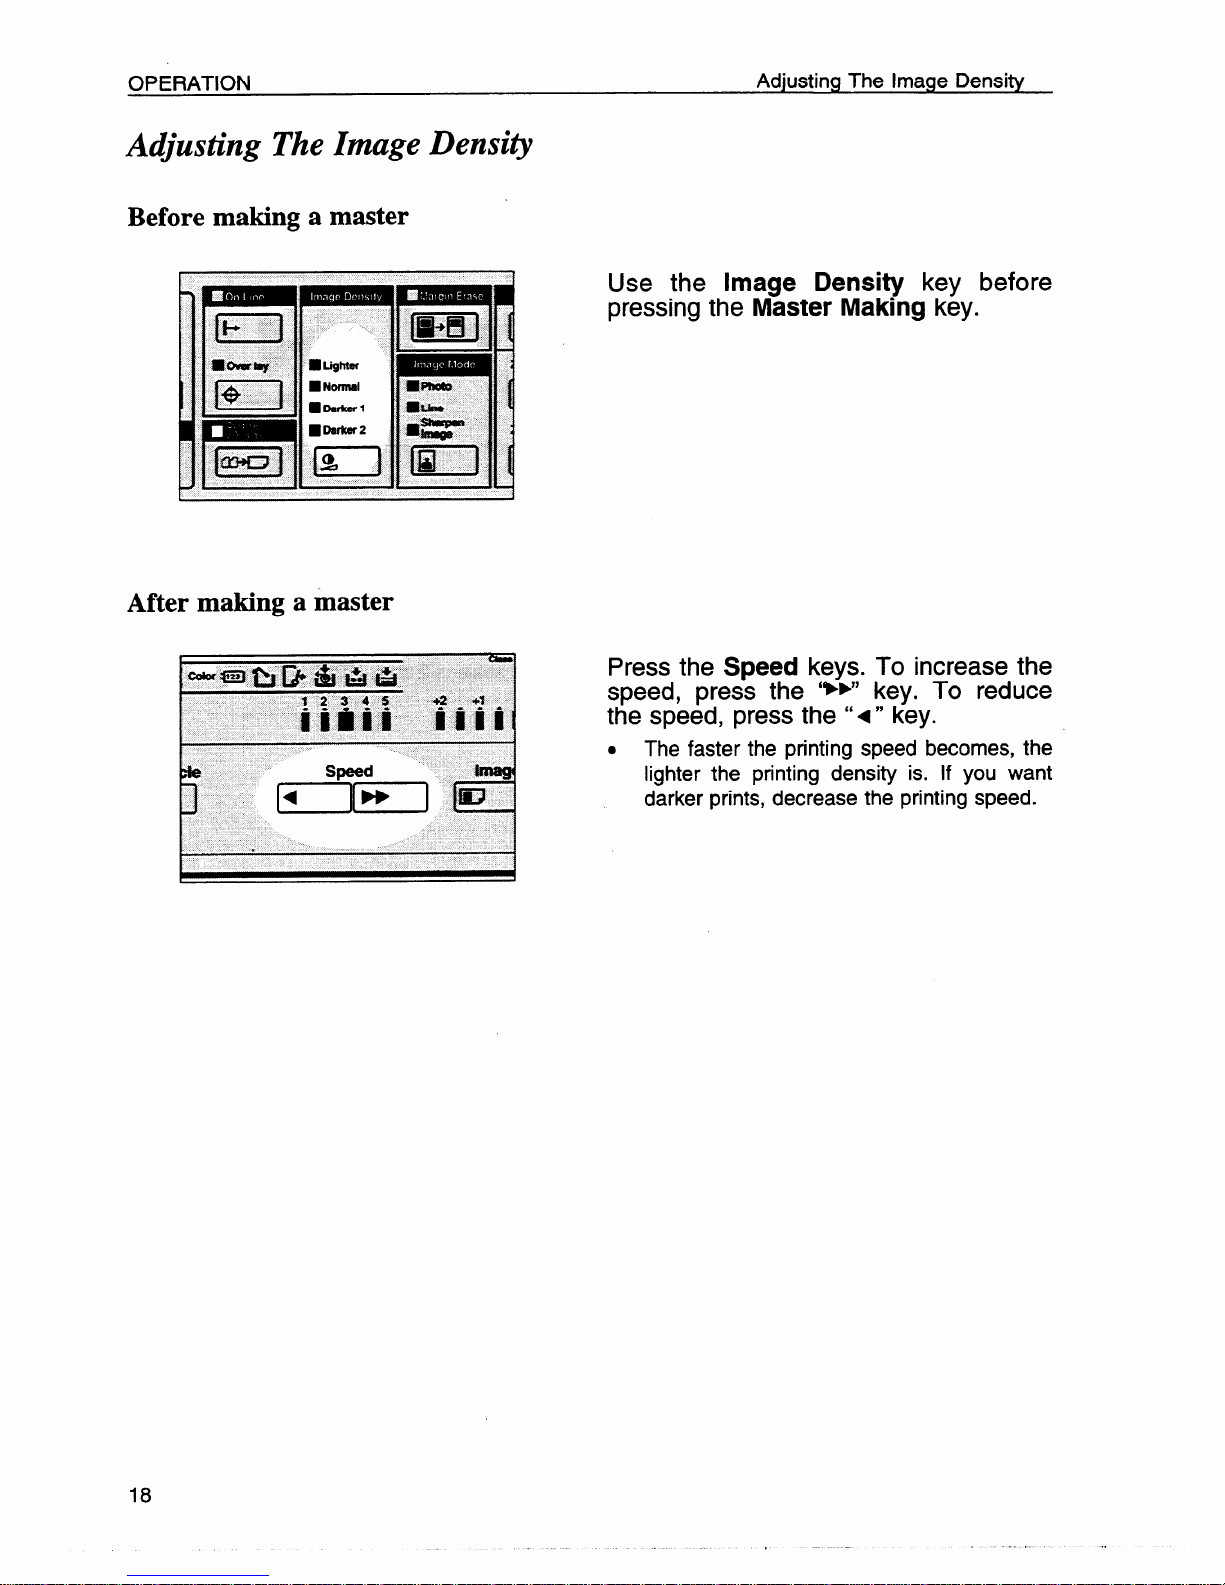
Adjusting The Image Density
Before making a master
Adjusting The Image Density
B
ti
mvawe
13E2 ::R’, :s”
IziEEl [’1 gz’-l
iDDnl
u
■ LigMtn
gDarkw2
After making a master
Use the Image Density key before
pressing the
m
n
a=
Press the
Master Making key.
Speed keys. To increase the
speed, press the ‘*~” key. To reduce
the speed, press the “4” key.
. The faster the printing speed becomes, the
lighter the printing density is. If you want
darker prints, decrease the printing speed.
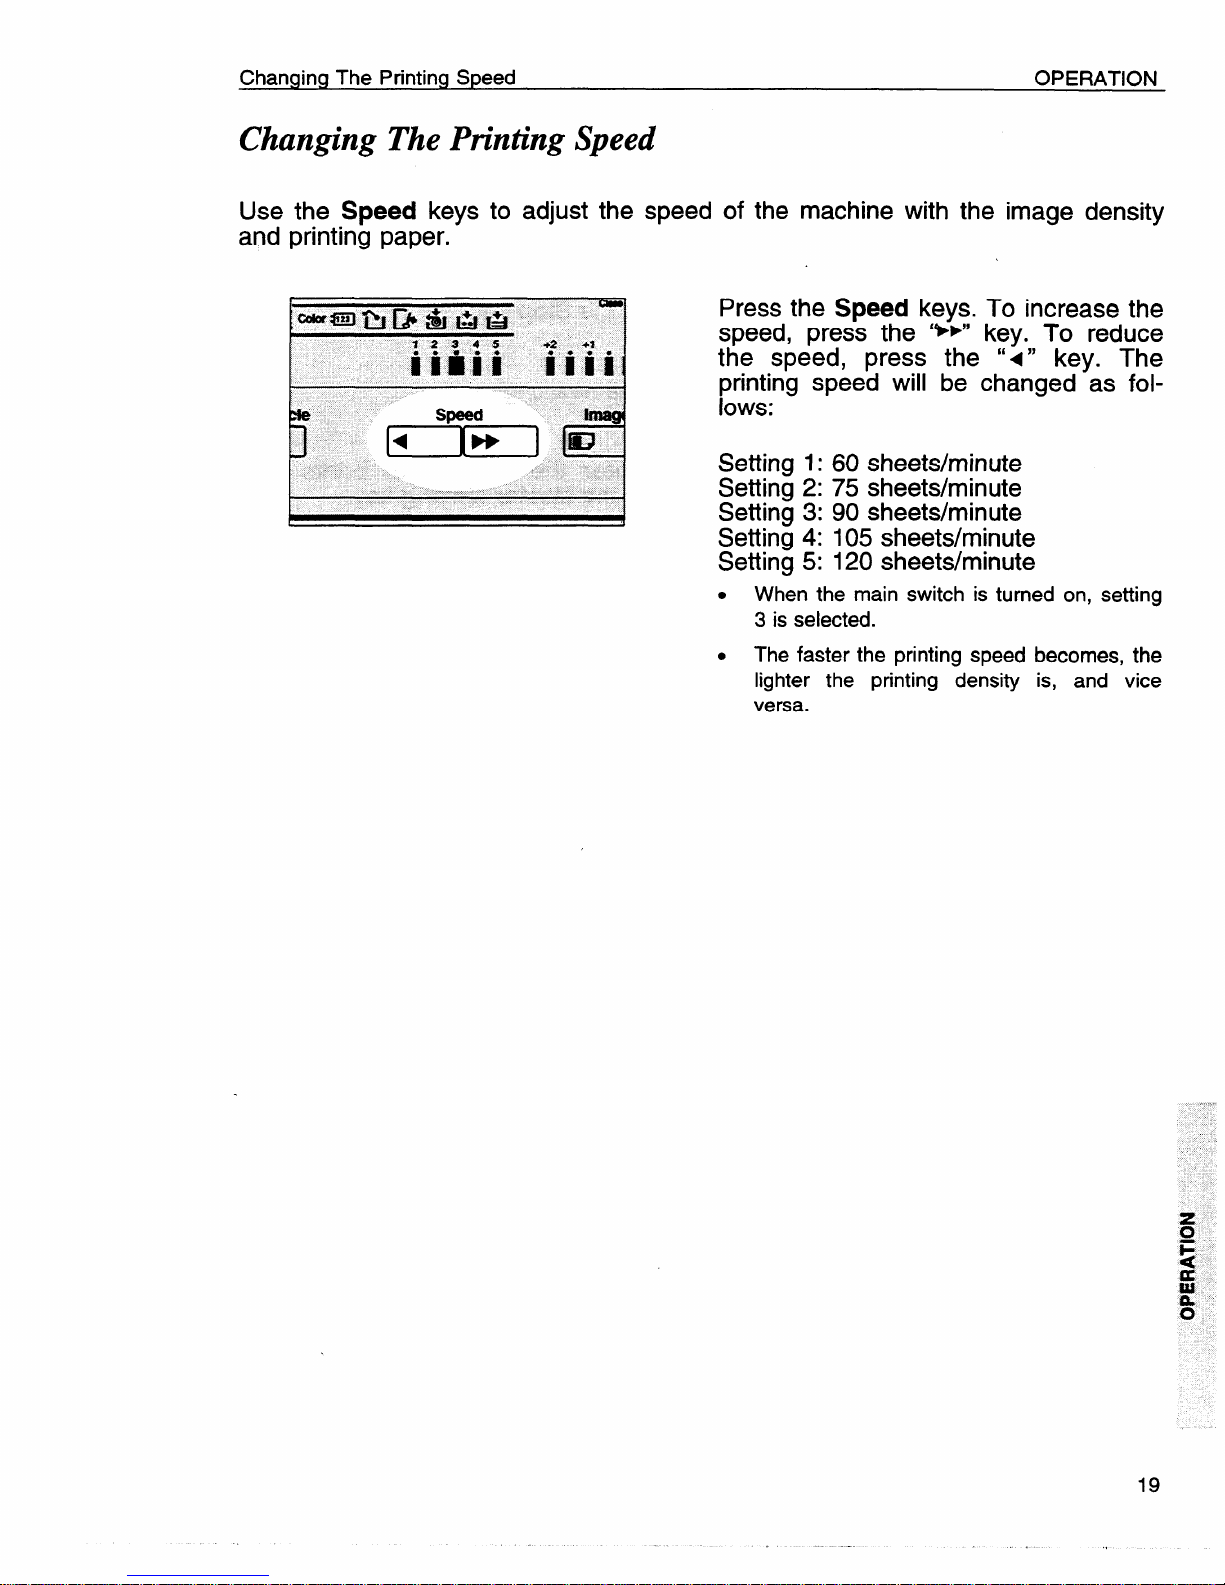
Changing The Printing Speed
Changing The Printing Speed
OPERATION
Use the Speed keys
and printing paper.
to adjust the speed of the machine with the image density
Press the
Speed keys. To increase the
speed, press the ‘**” key. To reduce
the speed, press the “<” key. The
printing speed will be changed as follows:
Setting 1:60 sheets/minute
Setting 2:75 sheets/minute
Setting 3:90 sheets/minute
Setting 4:105 sheets/minute
Setting 5:120 sheets/minute
. When the main switch is turned on, setting
3 is selected.
. The faster the printing speed
lighter the printing density
versa.
becomes, the
is, and vice
OPERATION
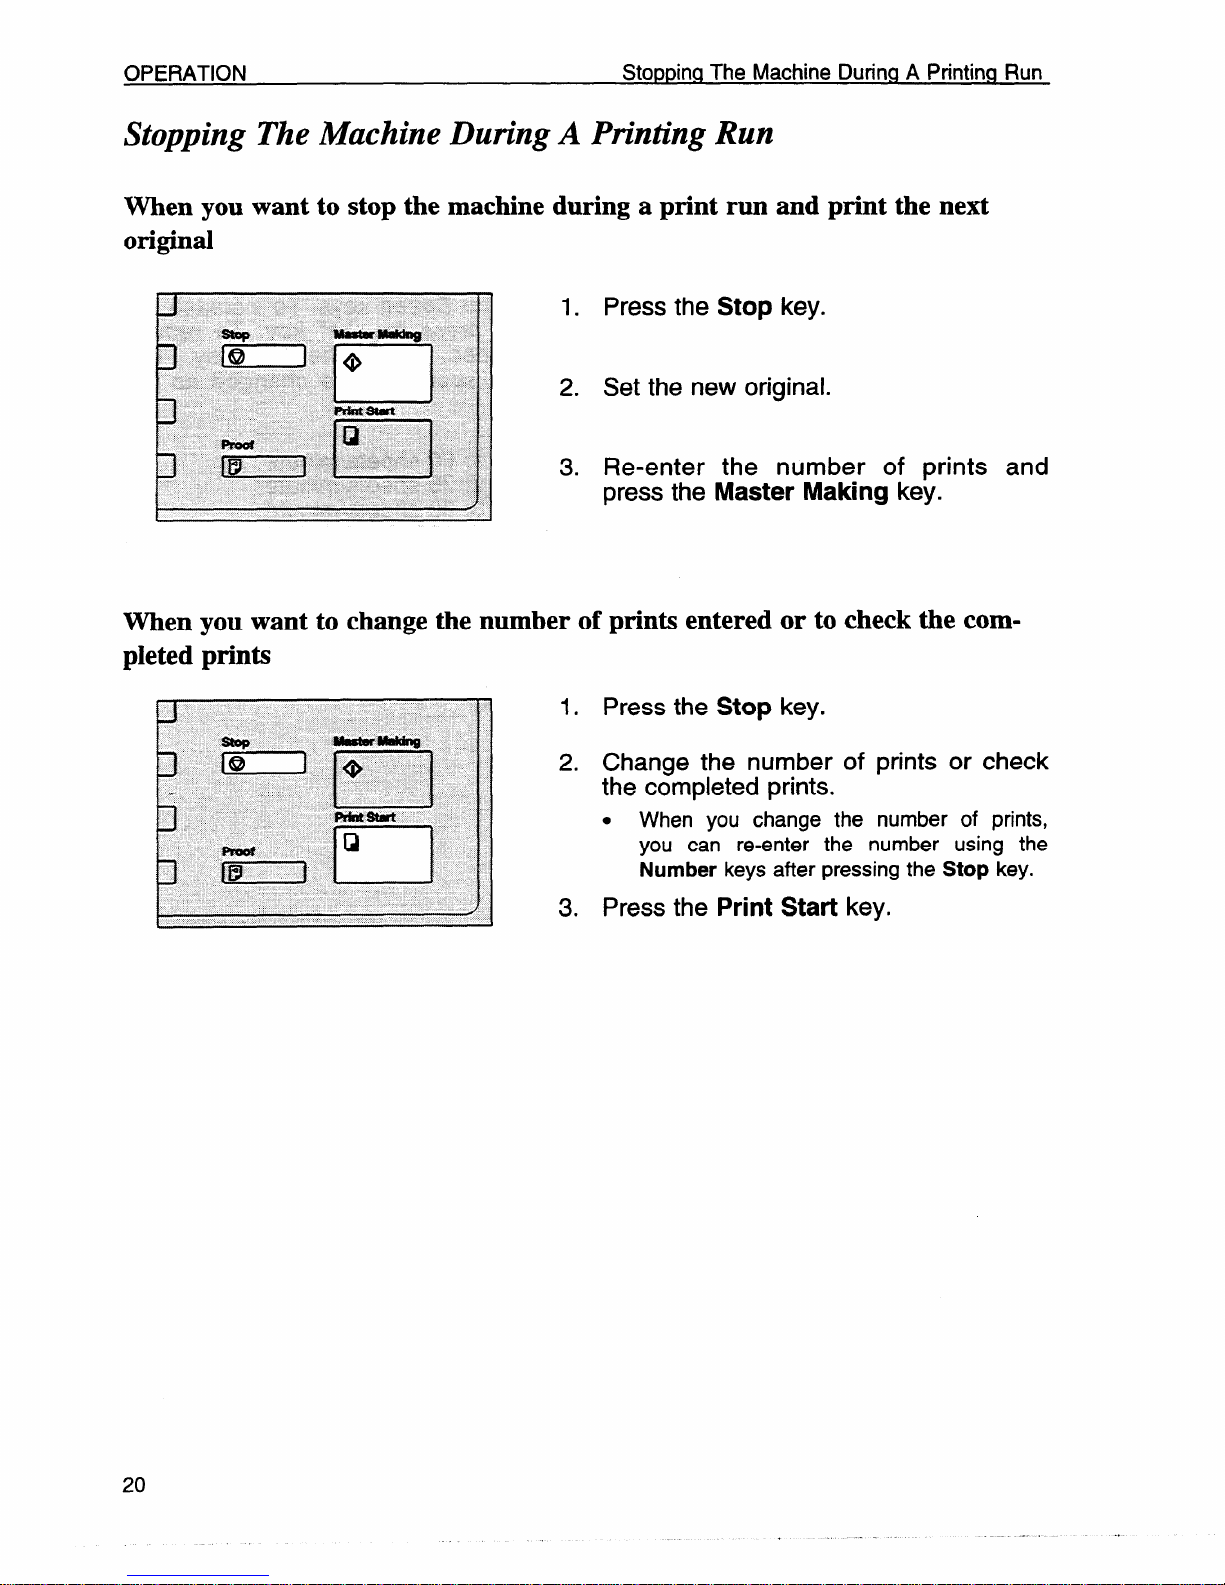
Stopping The Machine During A Printing Run
Stopping The Machine During A Printing Run
When you want to stop the machine during a print run and print the next
original
1. Press the Stop key.
2. Set the new original.
3. Re-enter
press the
the number of prints and
Master Making key.
When you want to change the number of prints entered or to check the completed prints
1. Press the Stop key.
2. Change the number
the completed prints.
.
When you change the number of prints,
you can re-enter the number using the
Number keys after pressing the Stop key.
Press the Print Start key.
3.
of prints or check
Reduce/Enlarge Printing
Reduce/Enlarge Printing
OPERATION
● The
with
center and the
this function.
leading
edge of the print image do lot shift when a print image is made
Print
t
A
Full siz,
Ro8uctm
R
P8fmr
Feed
Chmction
0
-L
Consmnt
~
Reduction
Prints can be reduced in size by using the Reduce/Enlarge key.
— A4 version —
Reduction Ratio
93%
87940
I
i?--E--
82%
71%fO
Select this ratio when you make prints with edge margins.
.....
*
B4
A4
B4
IA4
A5
I
IB5
— 81/2” x 11” version —
Reduction Original Size
Ratio
93%
7770
7490 11’’ XI5° 8112”x 11”
65?40
*
X 14“
81/2”
11” x 17” 8112”x 11”
L
8112”x 11” 51/2” x 81/2t’
Print Size
81/2” X 11“
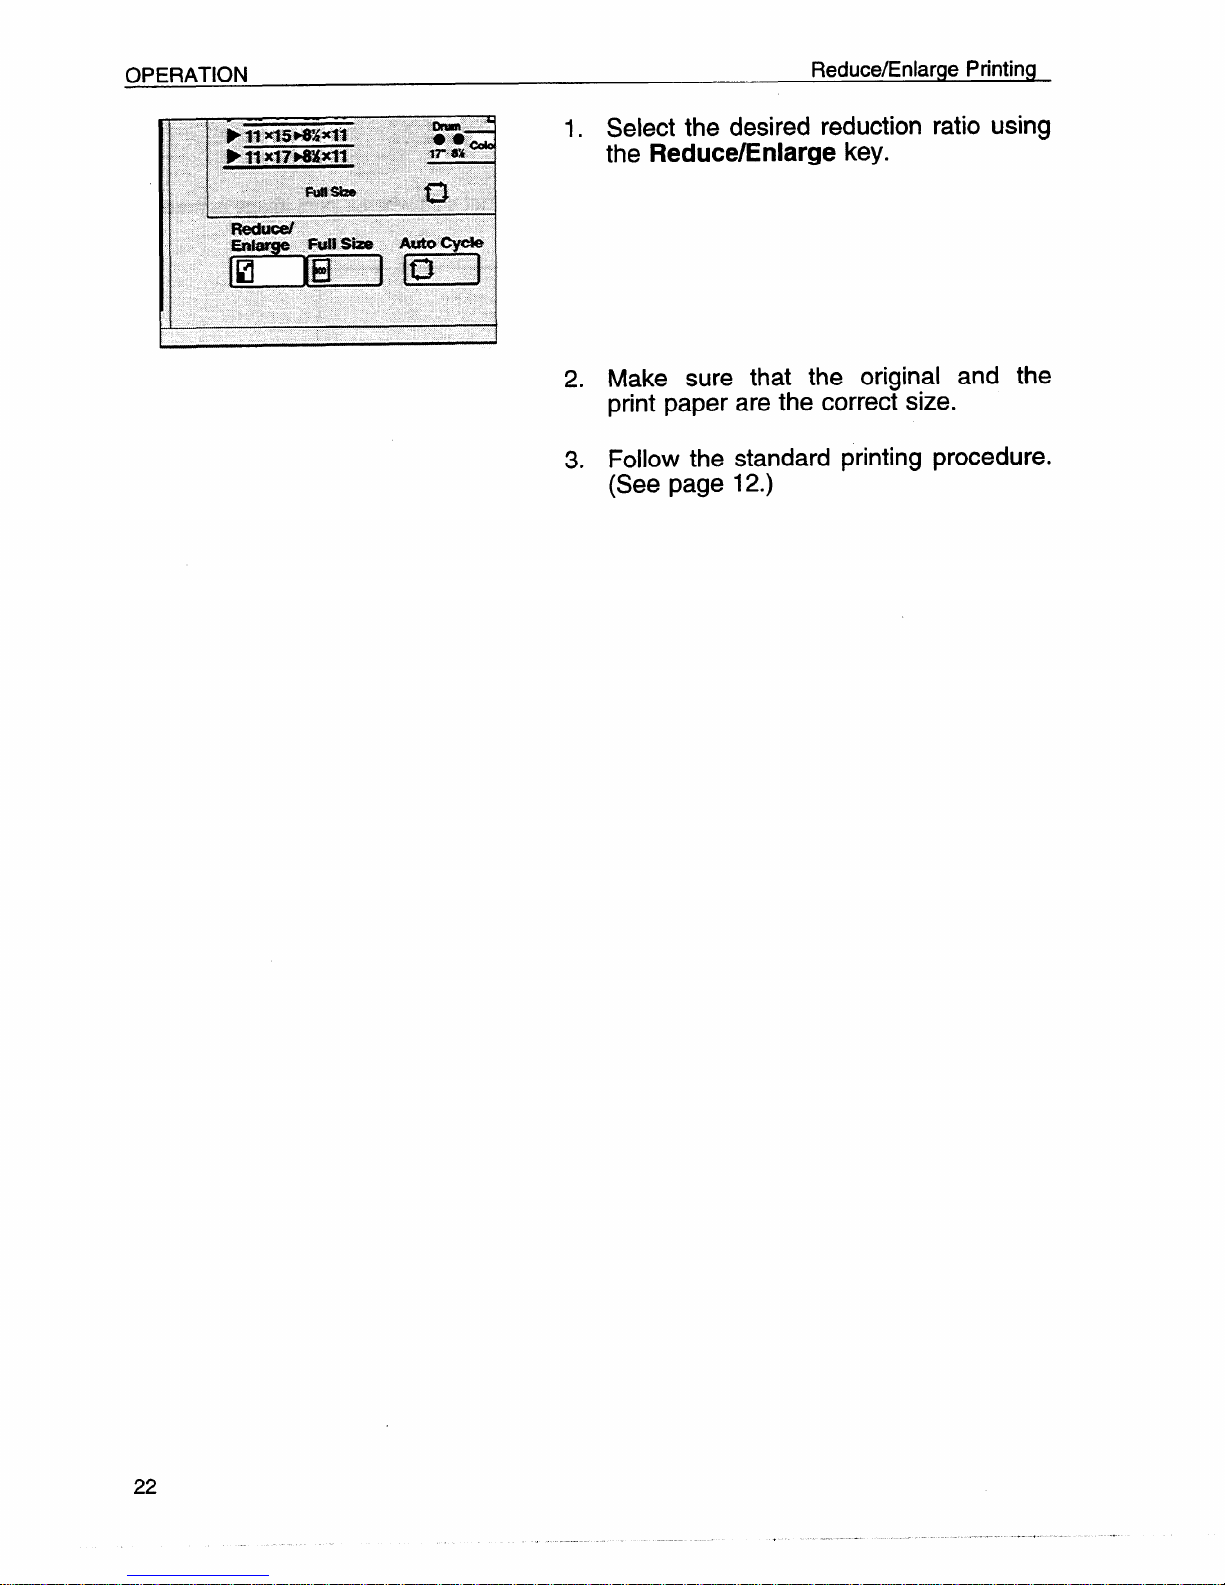
Reduce/Enlarge Printing
1. Select the desired reduction ratio using
the
Reduce/Enlarge key.
2. Make sure that the original and the
print paper are the correct size.
3. Follow the standard printing procedure.
(See page 12.)
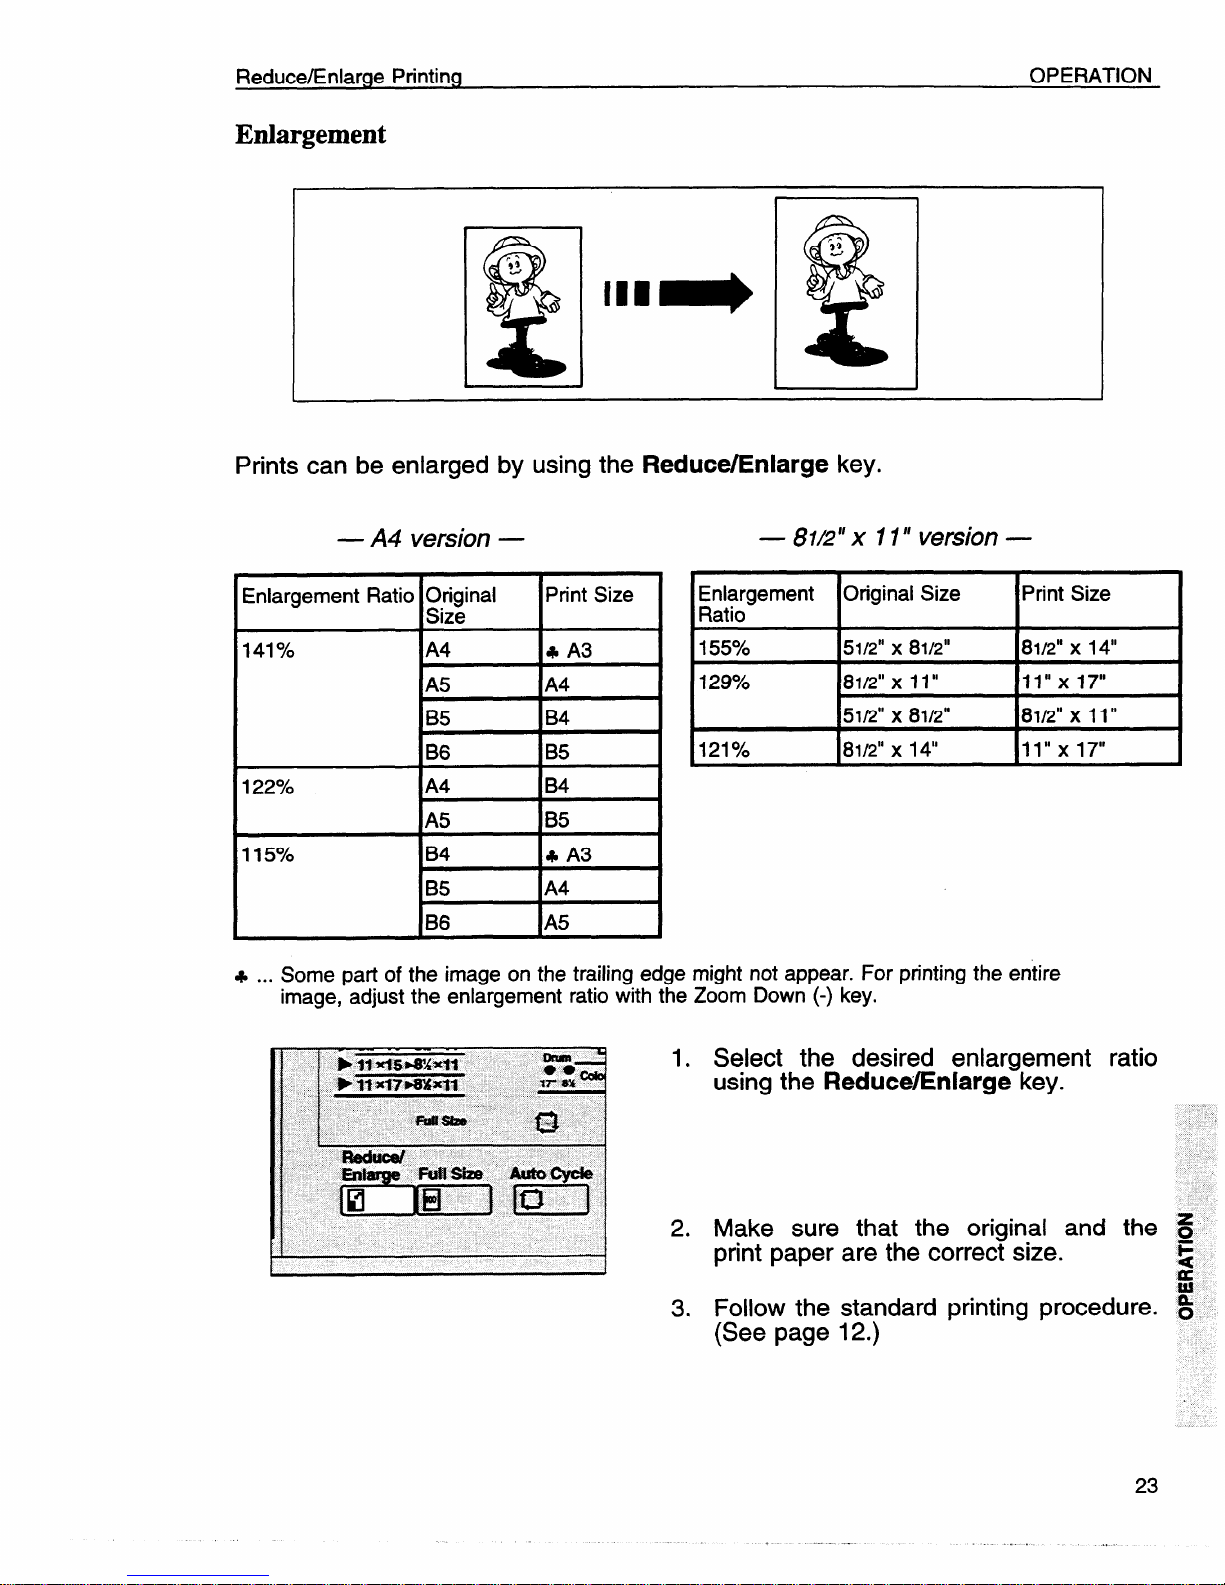
Reduce/Enlarge Printing
Enlargement
Prints can be enlarged by using the Reduce/Enlarge key.
OPERATION
— A4 version —
Enlargement Ratio O&inal
I
141Yo
122%-0
115?40
...
Some patt of the image on the trailing ed! Ie might not appear. For printing the entire
+
image, -adjust the enlargement ratio
IA4
tA5 1A4
B5
B6
A4
A5
IB4
IB5
IB6
Print Size
I
B4
B5
B4
B5
k A3
IA4
]e Zoom Down (-) key.
with 1
— 81L?”x 11” version —
~a~igement Original Size
155?40 51/2” x 8112”
129% 81/2”
121?40 81/2” x 14“
x 11” 11’’ XI7°
51/2” x 81/2”
1. Select the desired enlargement ratio
using the
ReduceEnlarge key.
Print Size
8112”x 14“
8112”x 11”
11’’ X17°
2. Make sure that the original and the S
print paper are the correct size.
3. Follow the standard printing procedure. ~
(See page 12.)
F
s
OPERATION
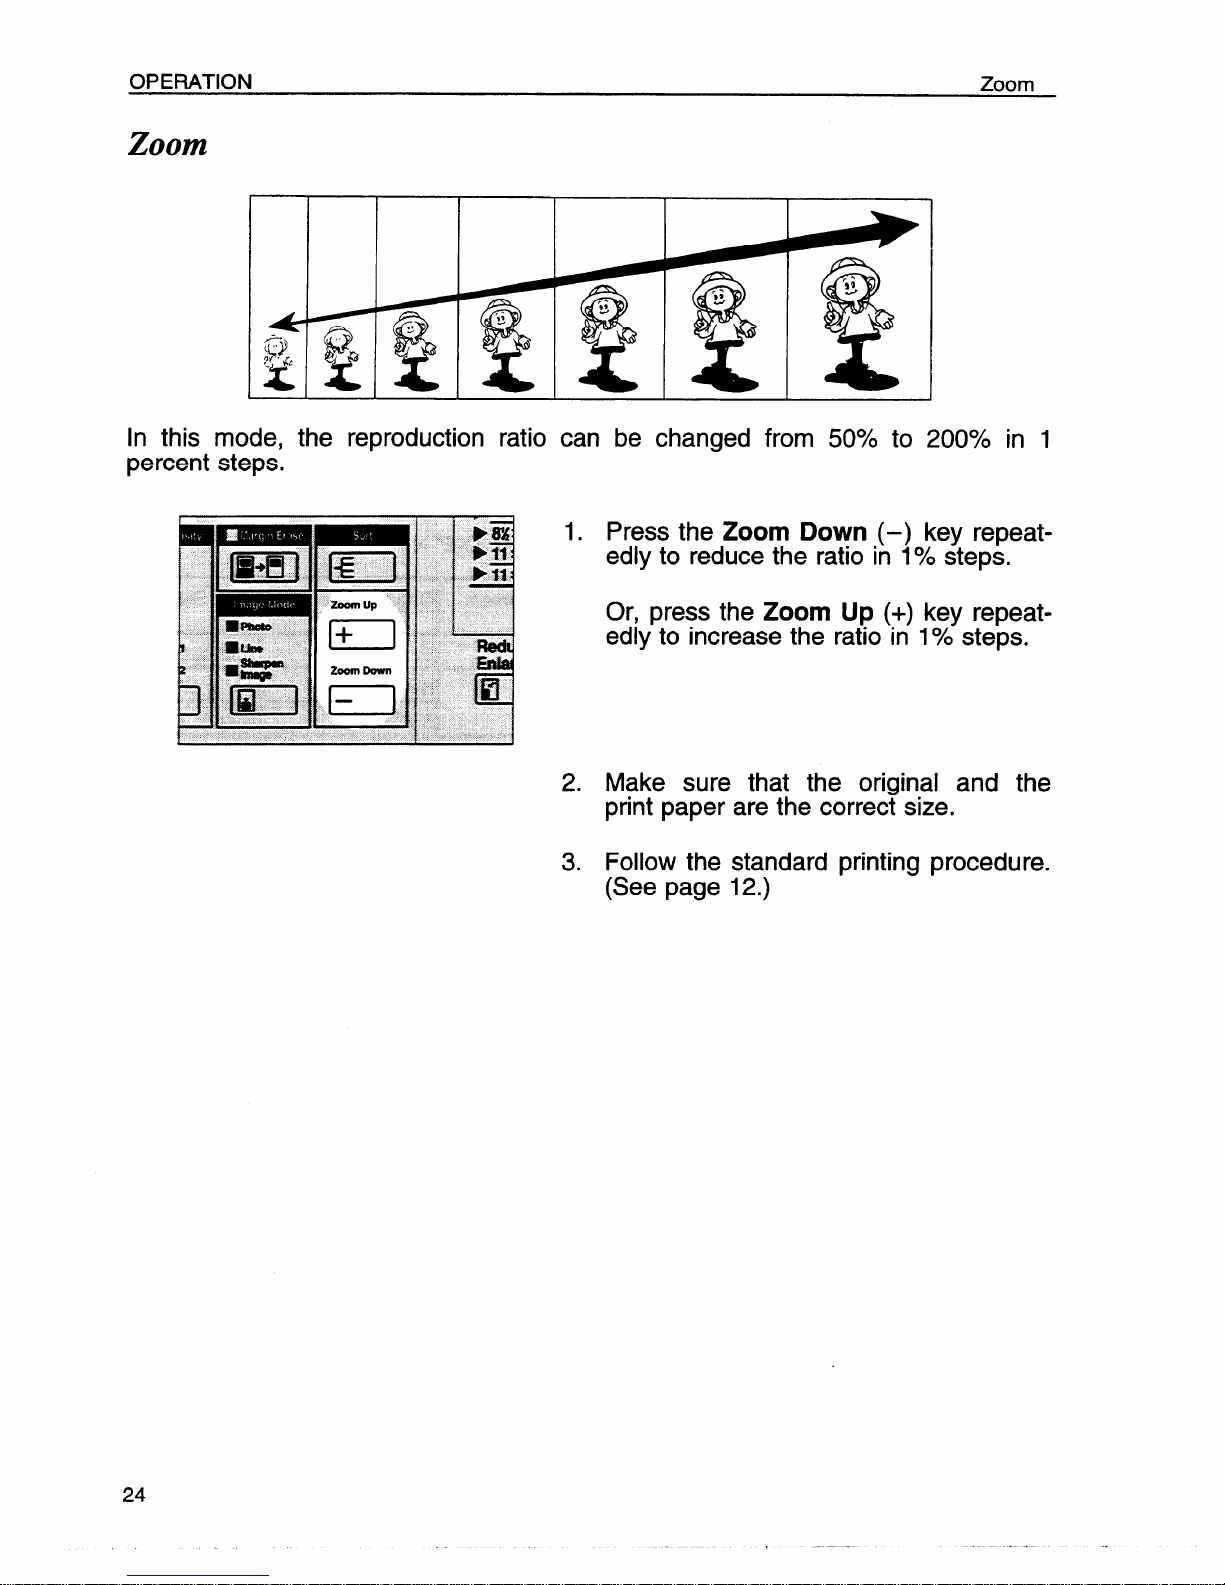
Zoom
Zoom
In this mode, the reproduction ratio can be changed from 50% to 200’XO in 1
percent steps.
1. Press the Zoom Down
edly to reduce the ratio
Or, press the
Zoom Up (+)
edly to increase the ratio in
(–) key repeat-
in 10/0steps.
key repeat-
1?40steps.
2.3.Make sure that the original and the
print paper are the correct size.
Follow the standard printing procedure.
(See page 12.)
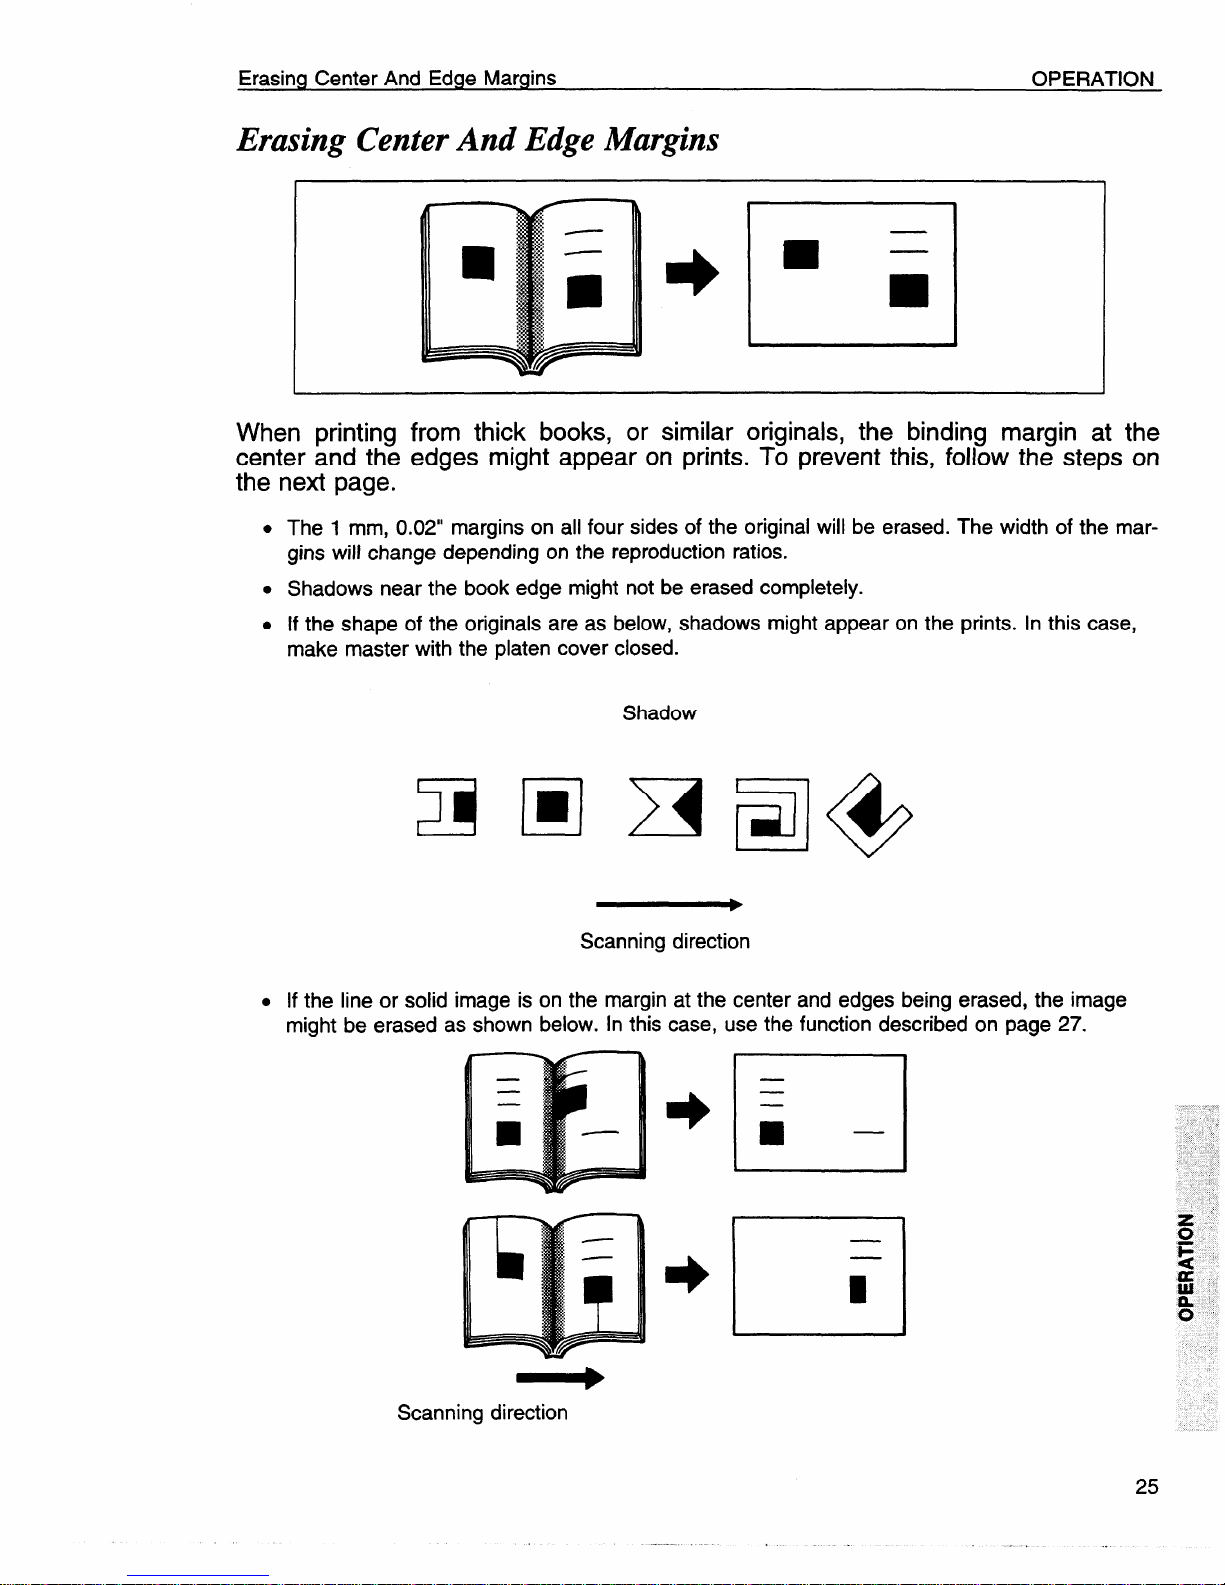
Erasing Center And Edge Margins
OPERATION
Erasing Center And Edge Margins
I
When printing from thick books, or similar originals, the binding margin at the
center and the edges might appear on prints. To prevent this, follow the steps on
the next page.
.
The 1 mm, 0.02” margins on all four sides of the original will be erased. The width of the margins will change depending on the reproduction ratios.
. Shadows near the book edge might not be erased completely.
. If the shape of the originals are as
make master with the platen cover
L
. If the line or solid image is on the margin at the center and edges being erased, the image
might be erased as shown below. In this case, use the function described on page 27.
1
J
below, shadows might appear on the prints. In this case,
closed.
Shadow
J
~F=l@
Scanning direction
t 1
b
—
El
Scanning direction
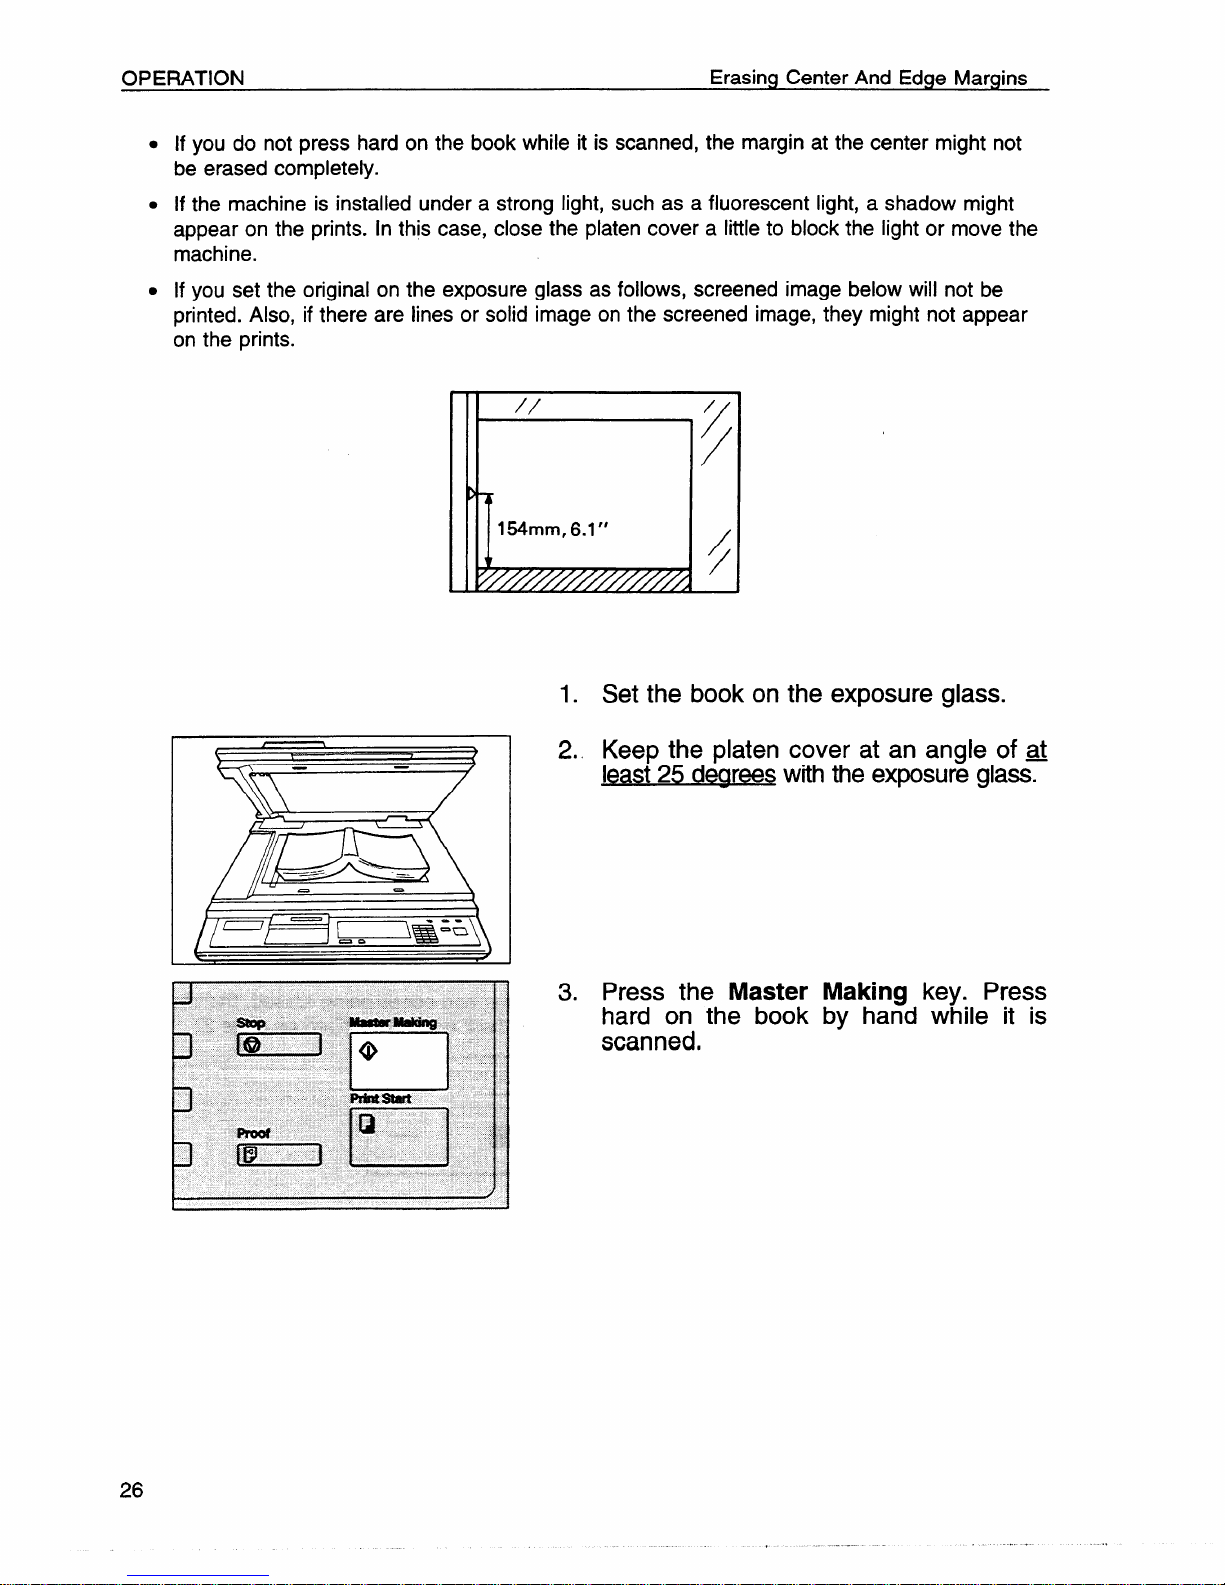
OPERATION
●
If you do not press hard on the book while it is scanned, the margin at the center might not
Erasing Center And Edge Margins
be erased completely.
●
If the machine is installed under a strong light, such as a fluorescent light, a shadow might
appear on the prints. In this case, close the platen cover a little to block the light or move the
machine.
●
If you set the original on the exposure glass as follows, screened image below will not be
printed. Also, if there are lines or solid image on the screened image, they might not appear
on the prints.
I
1.
Set the book on the exposure glass.
Keep the platen cover at an angle of ~
2.
least 25 dearees
Press the
3.
with the exposure glass.
Master Making key. Press
hard on the book by hand while it is
scanned,
 Loading...