

Ricoh PRIPORT VT2130 Operating Instructions Manual
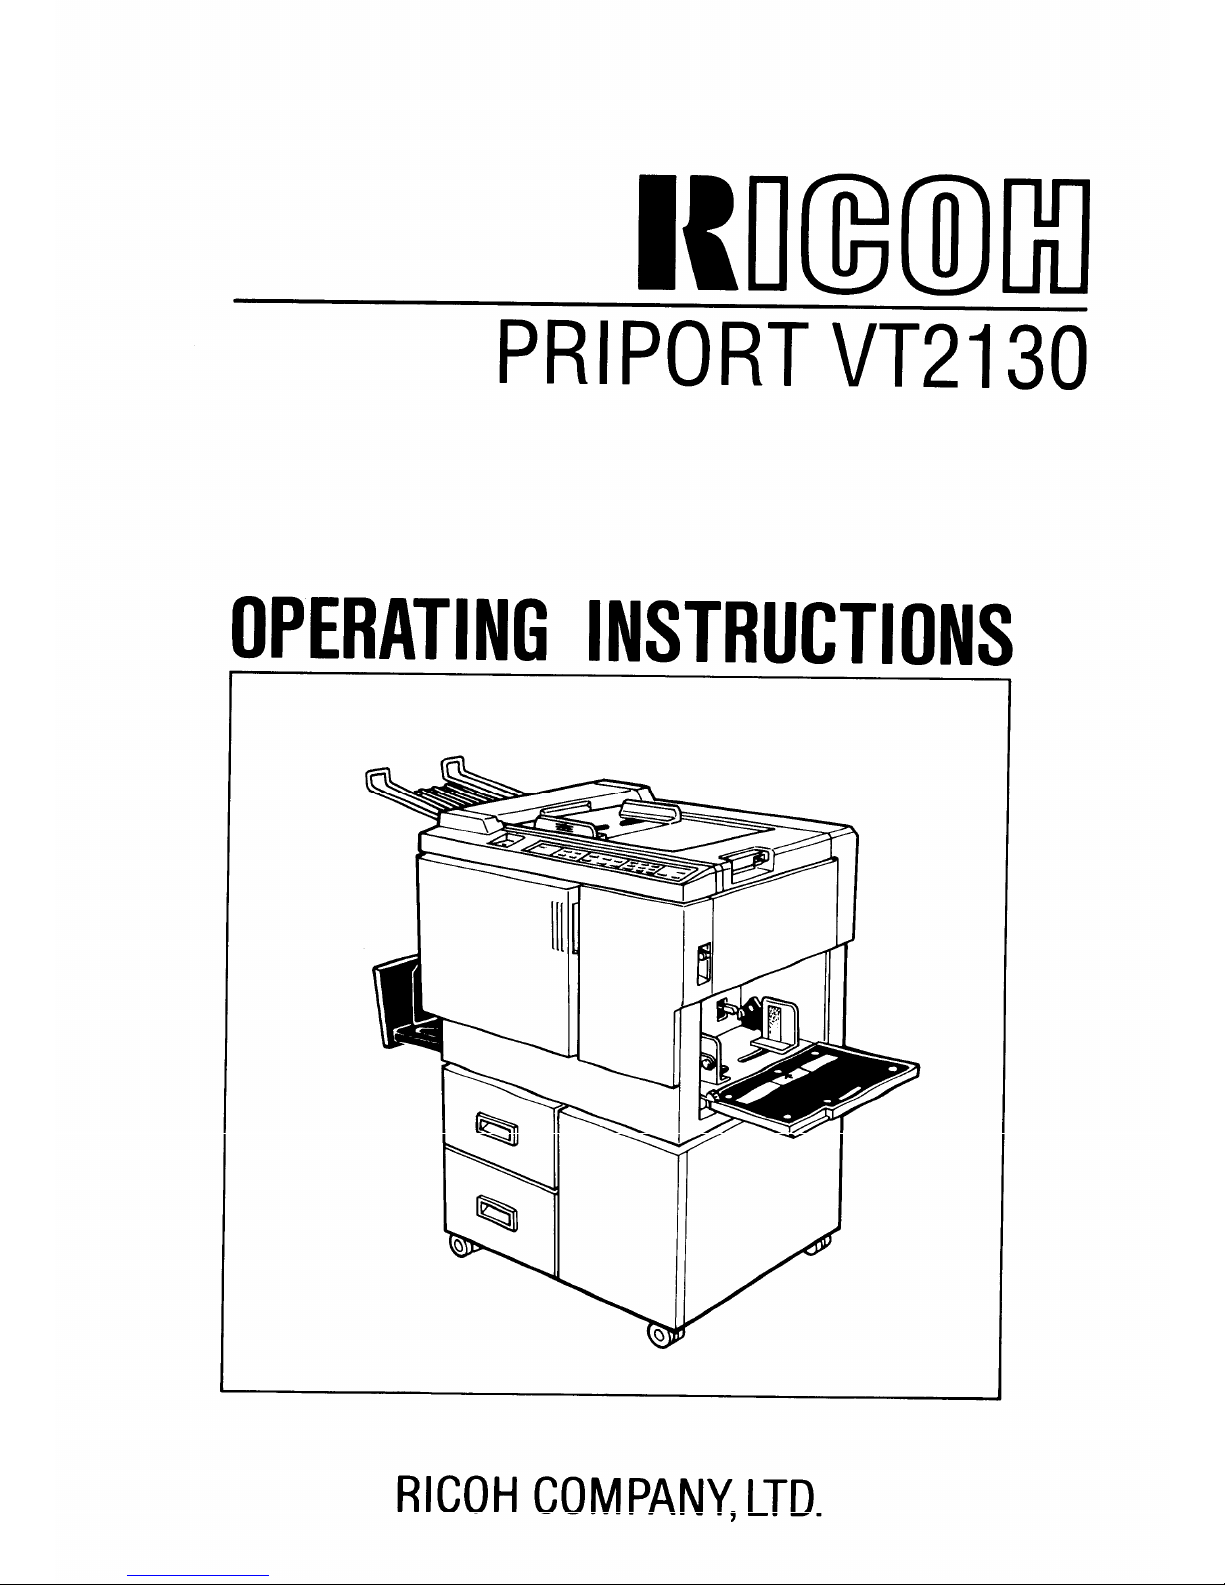
I{IIGOM
PRIPORTVT2130
OPERATINGINSTRUCTIONS
Ill
p’
RICOH COMPANY, LTD.
Note to users in the United States of America
This equipment has been tested and found to comply with the limits for a
Class A digital device, pursuant to Part 15 of the FCC Rules. These
limits are designed to provide reasonable protection against harmful
interference when the equipment is operated in a commercial
environment. This equipment generates, uses, and can radiate radio
frequency energy and, if not installed and used in accordance with the
instruction manual, may cause harmful interference to radio
communications. Operation of this equipment in a residential area is
likely to cause harmful interference in which case the user will be
required to correct the interference at his own expense.
Note to users in Canada
This digital Apparatus does not exceed the Class A limits for Radio
Frequency noise from Digital Apparatus set out in the Radio Interference
Regulations of the Canadian Department of Communications.
Remarque concernant Ies utilisateurs au Canada
Le present appareil numerique n’emet pas de bruits radioelectriques
depassant Ies Iimites applicable aux appareiis numeriques de la classe
A prescribes clans Ie R&glement sur Ie brouillage radioelectrique edicte
par Ie ministere des Communications du Canada.
INTRODUCTION
The Ricoh Priport VT2130 is a stencil duplicator which is carefully
manufactured to exacting standards of high performance.
This manual contains detailed instructions on the operation and care of the
Priport VT21 30.
To get the maximum versatility from this machine, all
operators should read and follow the instructions in this manual. Please keep
this manual in a handy place near the machine.
1.
Wide range of reproduction ratios:
4 fixed reproduction ratios (100% plus 3 reduction ratios).
2.
2 single originals can be printed on one sheet of paper.
3.
5 mono color printing with optional drum units.
TABLE OF CONTENTS
GUIDE TO COMPONENTS
1. Machine Exterior ........................2
2. Machine Interior
..........................
4
3.
Operation Panel
..........................
6
INSTALLATION REQUIREMENTS
1. Machine Environment ................. 8
2. Access to Machine .....................9
3. Power Connection ......................9
DO’S AND DON’TS
...............................
10
ORIGINALS ......................................0....
11
PRINTING PAPER
................................
13
OPERATION
1.
2.
3.
4.
5.
6.
7.
8.
9.
10.
11.
Preparation for Printing ............14
Setting the Originals ................. 16
Printing
..................................... 17
Restoring Paper Feed and
Paper Delivery Tables ............... 18
Adjusting the Image Position ...19
Changing the Paper Size .......... 21
Printing on Thick or Thin
Paper
.........................................
22
Printing on Postcard Size
Paper
.........................................
23
Various Originals
......................24
Changing the Printing Speed ...25
To Stop the Machine During a
Printing Run
..............................
26
12. Changing the Drum Unit for
Color Printing
............................
27
13. Printing in Two Colors .............. 29
SPECIAL FUNCTIONS
1. Group Printing from the Same
Original
....................................
30
2.
Combine 2 Originals ................. 32
3. Various Run Lengths Using
the Same Master ....................... 34
4. Photo Mode Printing ................. 35
REPLENISHING SUPPLIES
1. Loading Paper
...........................
36
2. Supplying Ink
............................
37
3. Master Roll Replacement .......... 38
MAINTENANCE
1. Thermal Head Cleaning ...........40
2. Platen Cover/Exposure Glass ..41
TROUBLESHOOTING
1. Indicators
..................................
42
2. When the Misfeed (8%) Indicator
3
4
5
.-.
Lights
........................................
43
When the Supply/Exchange ~)
Indicator Lights ........................ 49
Other Indicators Light ............... 51
Poor Printing
.............................
52
MISCELLANEOUS
................................
54
1. Operating Cautions ........----- 54
SPECIFICATION
...................................
56
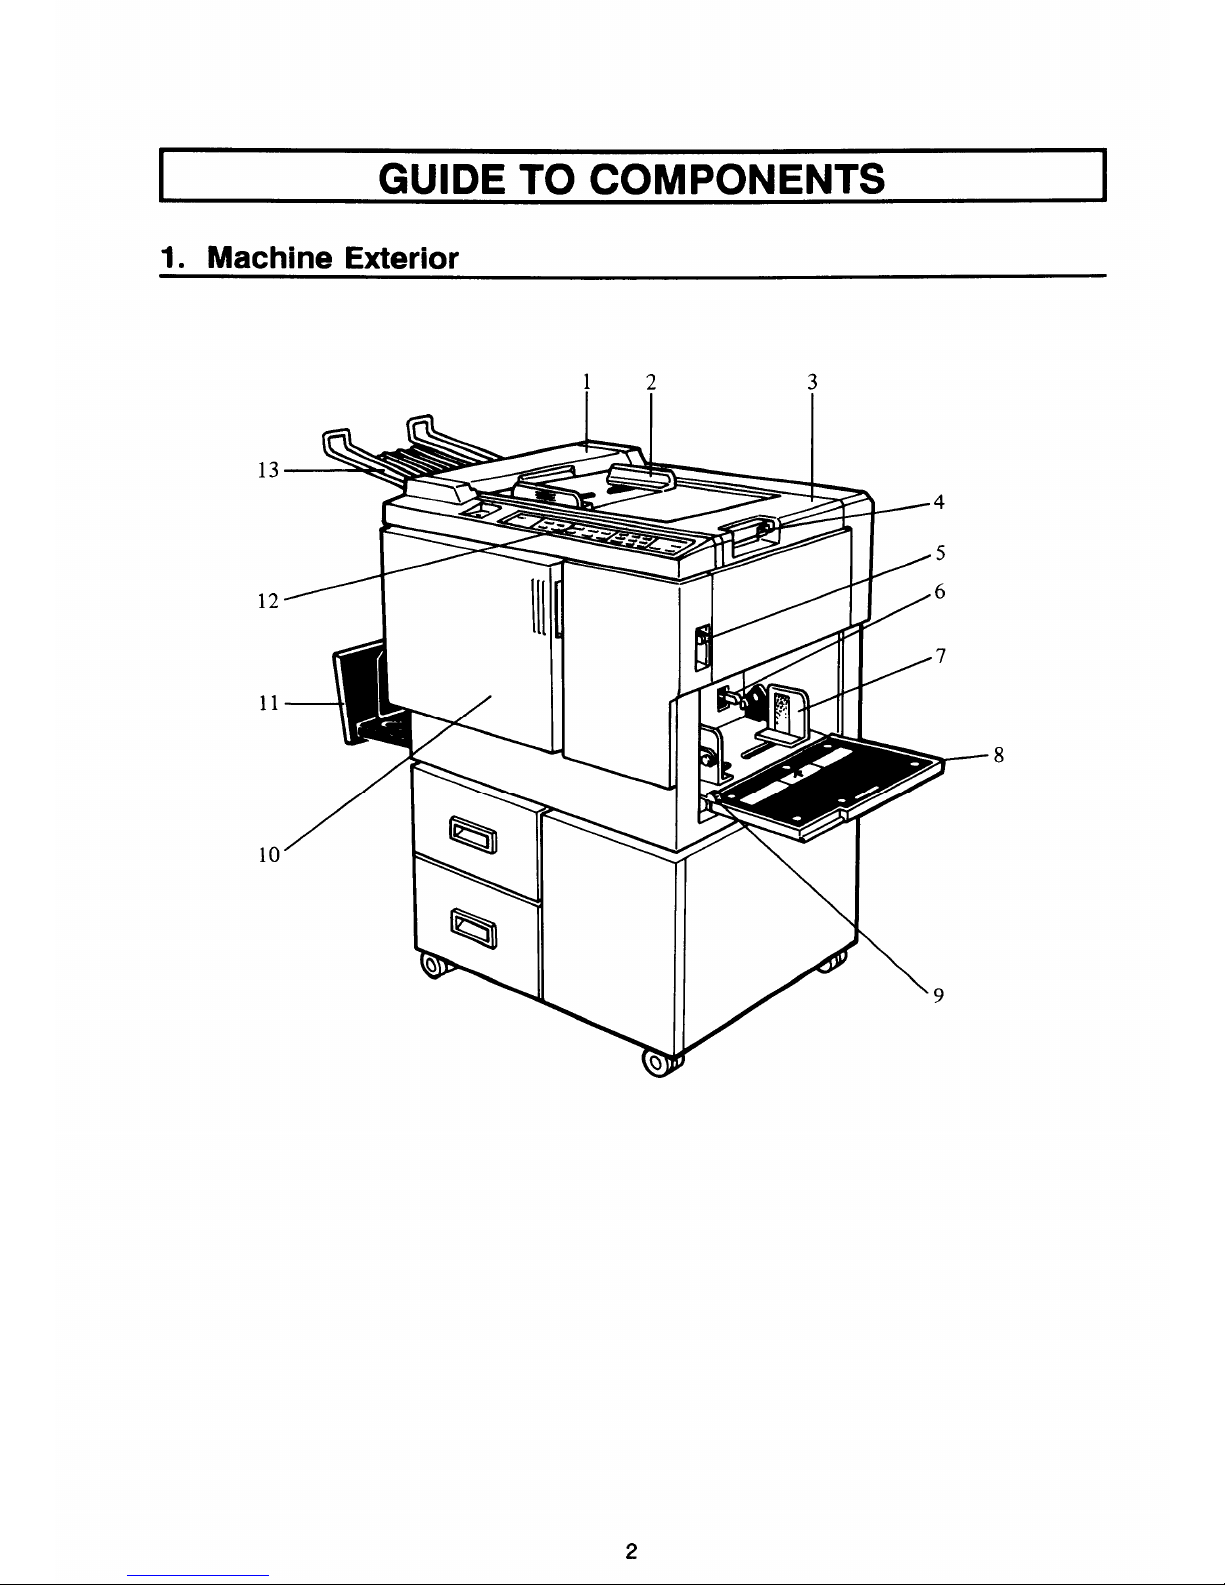
GUIDE TO COMPONENTS
1. Machine Exterior
A!
1111
b
‘%
Q
12
3
1’
5
/
6
/7
p–
8
\
9
1.Top Unit
2.Original Guides
3.Original Table
4. Original Table Release
Lever
5.Feed Roller Pressure
Lever
6.Separation Roller
Pressure Lever
7. Paper Feed Side Plate
8.Paper Feed Table
9. Side Plate Fine
Adjusting Dial
10. Front Door
11. Paper Delivery Table
12.Operation Panel
13.Original Tray
Open to remove the misfed original.
Adjust these guides to position the originals
correctly.
Place the originals on this table.
Use to open the original table unit to the left
for master installation.
Use to adjust the contact pressure of the
paper feed roller according to paper thickness.
Use to adjust the separation roller pressure to
prevent double feed.
Use to prevent paper skew.
Set the paper on this table.
Use to shift the paper feed table sideways.
Open for access to the inside of the machine.
Completed prints are delivered here.
Operator controls and indicators are located
here.
Originals used to make a master are delivered
to this tray.
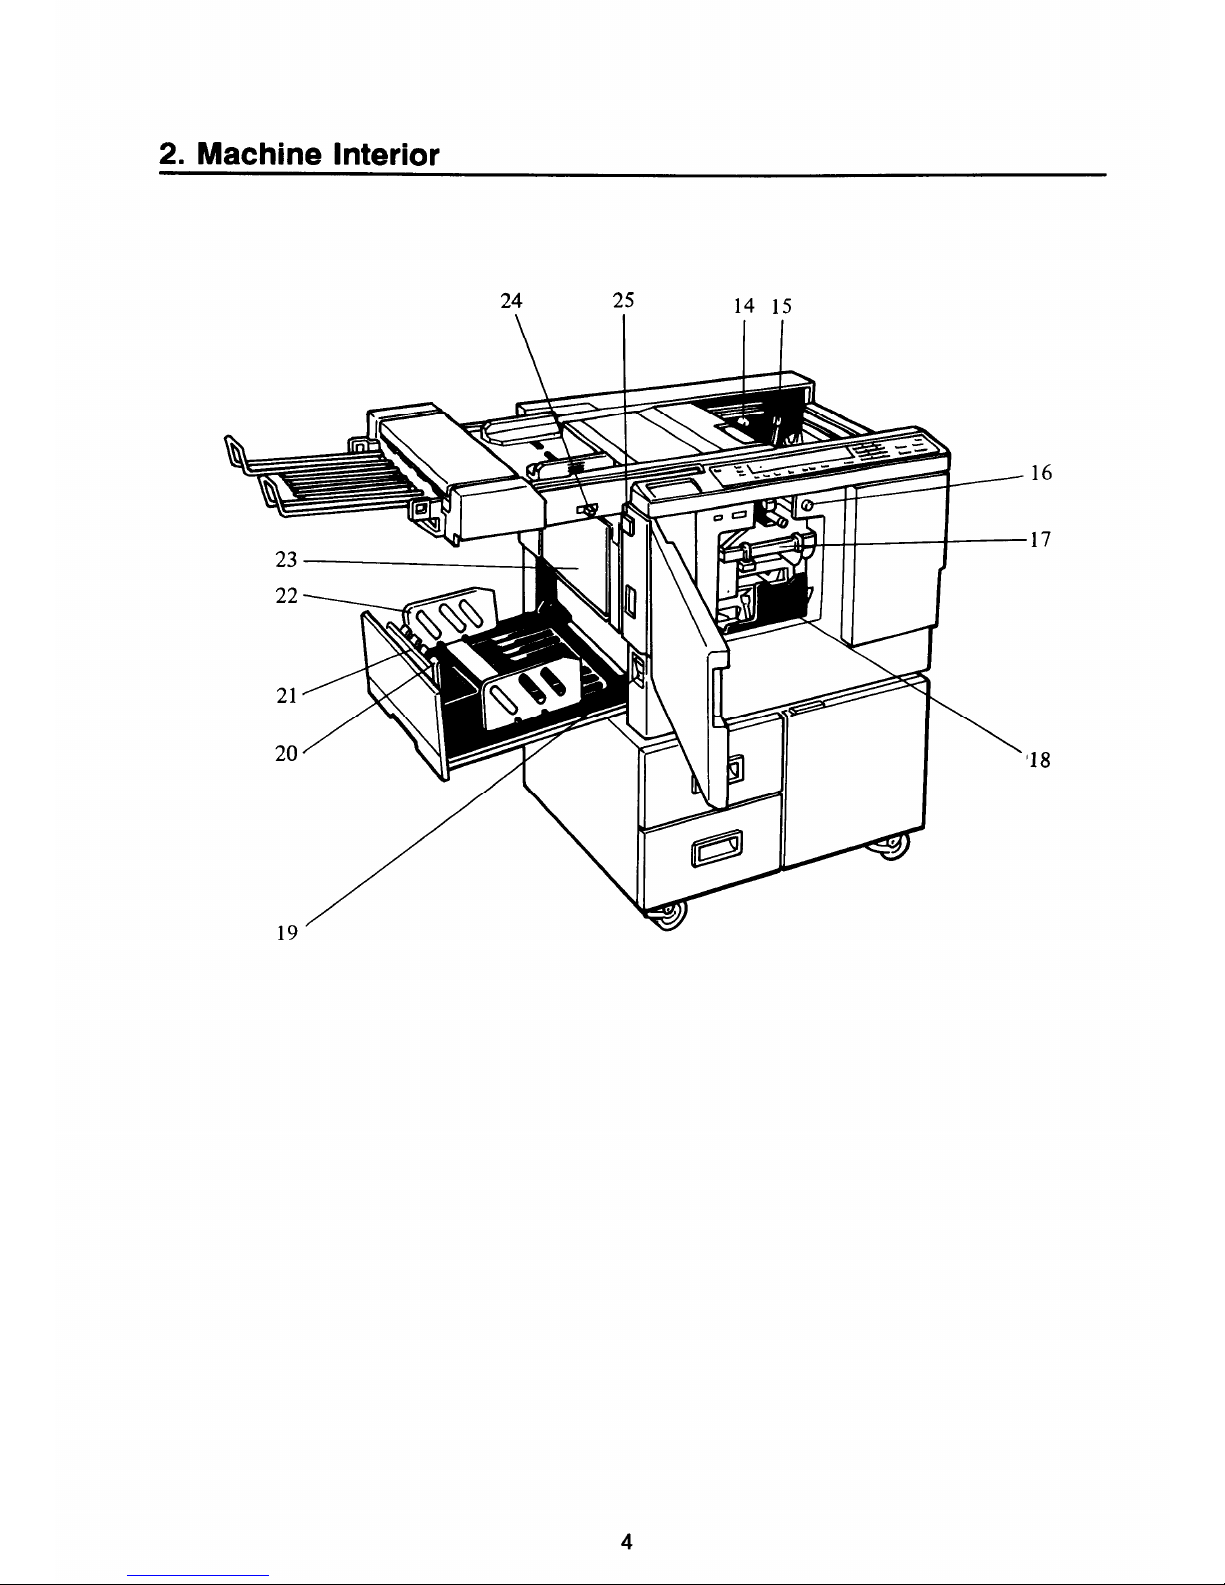
2. Machine Interior
19‘
24
25
14 15
16
17
Ii=
\
’18
4
14. Master Cut Button
Press this button to cut the master paper lead-
15.
Pressure Release Lever
16. Drum Rotation Button
17.Drum Unit
18. Ink Holder
19.Main Switch
20. Small Size Paper
Delivery End Plate
(for smaller than
81/2”x 1l“)
21. Paper Delivery End
Plate
(for larger than
81/2” x 1l“)
22. Paper Delivery Side
Plate
23. Master Eject Container
Cover
24.Printing Density Select
Switch
25.Master Eject Unit Open
Button
ing edge after installing a new master roll.
Use to install the master roll, or to clean the
thermal head.
Press to replace the drum or to remove misfed
paper.
The master paper is wrapped around this unit.
Set the ink cartridge in this holder.
Use to turn the power on or off.
Use to align the leading edge of small-sized
(less than 81/2” x 11”) prints.
Use to align the leading edge of prints larger
than 81/2” x 1l“.
Use to align the prints on the paper delivery
table.
Open when removing the master eject box.
Use to select the printing density according to
the type and quality of the original.
Press to remove misfed paper or a misfed
master.
5
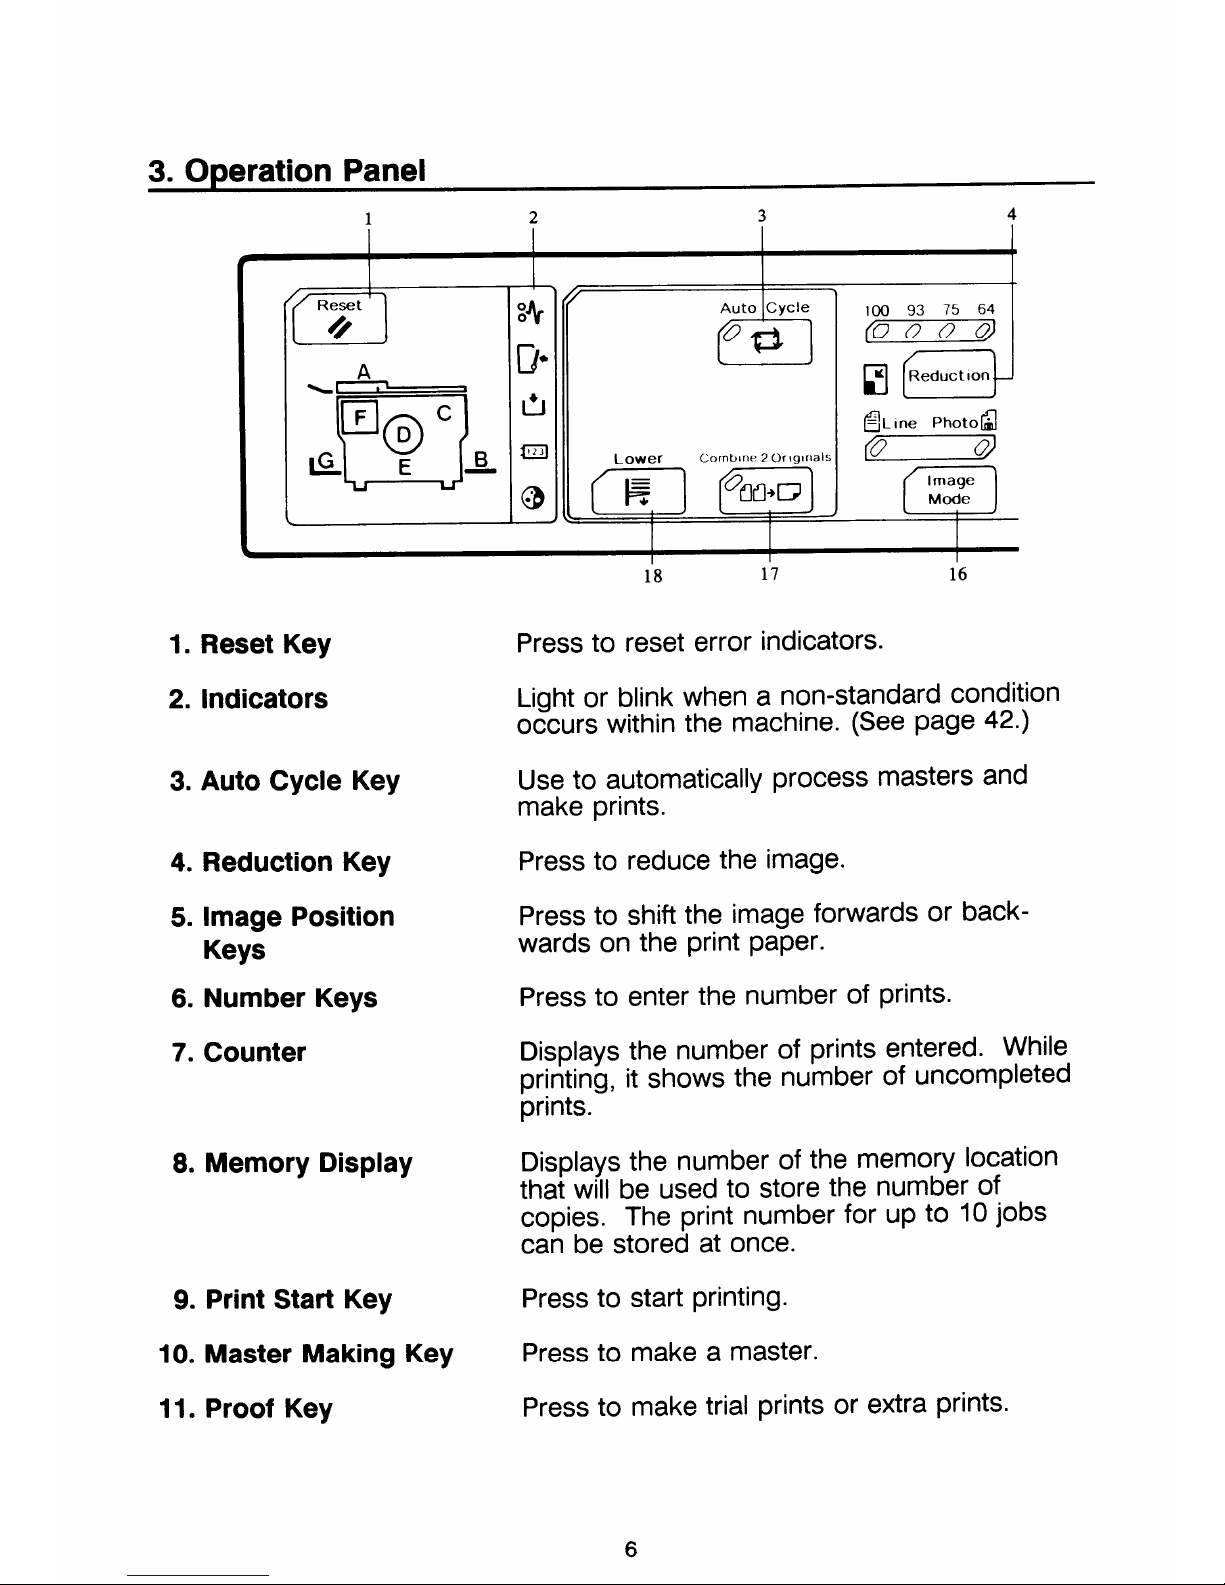
3. Operation Panel
1
2
3
4
m
r
I A
I
t
1
1
(5
Auto Cycle
OQ
Lower
Cornblne 2 originals
Q%=%
IO(I 93 75 64
(0000)
1. Reset Key
2. Indicators
3. Auto Cycle Key
4. Reduction Key
5. Image Position
Keys
6. Number Keys
7. Counter
8. Memory Display
9. Print Start Key
10. Master Making Key
11. Proof Key
18
17 16
Press to reset error indicators.
Light or blink when a non-standard condition
occurs within the machine. (See page 42.)
Use to automatically process masters and
make prints.
Press to reduce the image.
Press to shift the image forwards or back-
wards on the print paper.
Press to enter the number of prints.
Displays the number of prints entered. While
printing, it shows the number of uncompleted
prints.
Displays the number of the memory location
that will be used to store the number of
copies. The print number for up to 10 jobs
can be stored at once.
Press to start printing.
Press to make a master.
Press to make trial prints or extra prints.
6
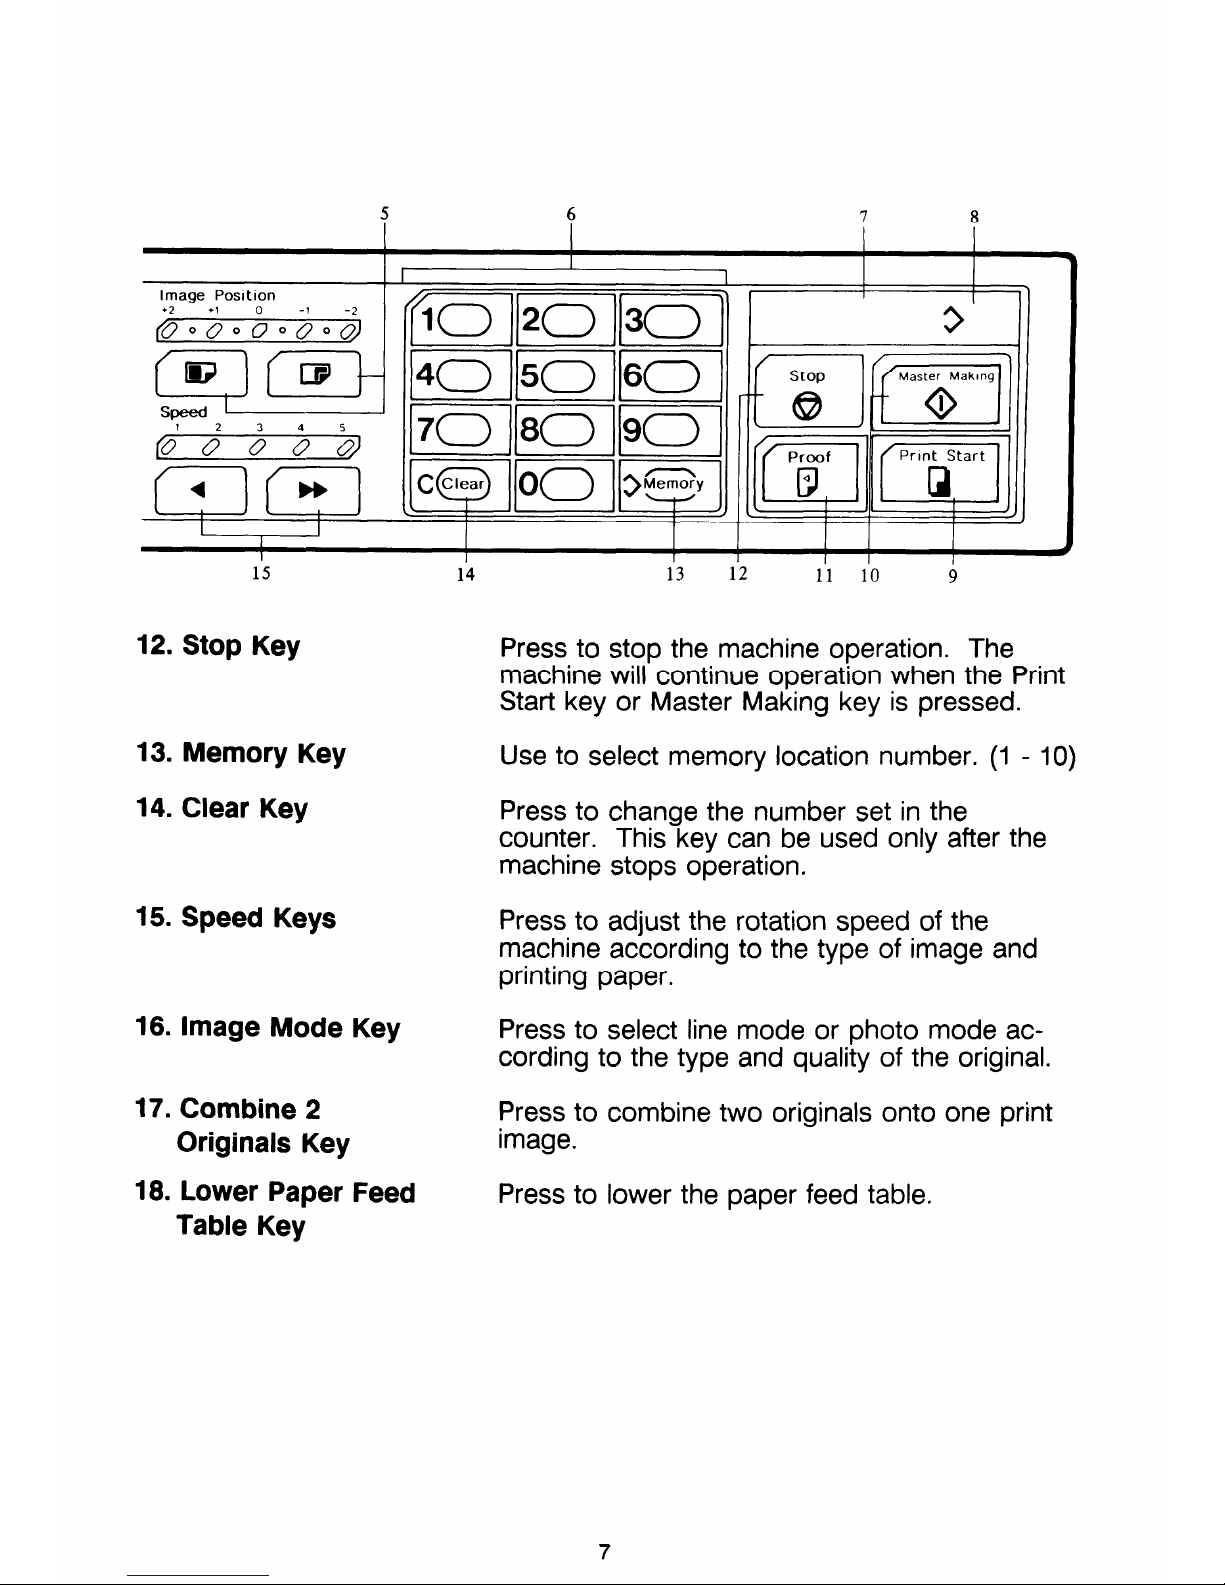
5
6
7 8
15
14
13 12
11 10
9
12. Stop Key
Press to stop the machine operation. The
machine will continue operation when the Print
Start key or Master Making key is pressed.
13. Memory Key
Use to select memory location number. (1 - 10)
14. Clear Key
Press to change the number set in the
counter. This key can be used only after the
machine stops operation.
15.
Speed Keys
Press to adjust the rotation speed of the
machine according to the type of image and
printing paper.
16.
Image Mode Key
Press to select line mode or photo mode according to the type and quality of the original.
17.
Combine 2
Press to
Originals Key
image.
18.
Lower Paper Feed
Press to
Table Key
combine two originals onto
lower the paper feed table.
one print

INSTALLATION REQUIREMENTS
1. Machine Environment
The installation location should be carefully chosen because environmental
conditions greatly affect the performance of a machine.
I ml I
- Optimum environmental conditions -
●
●
●
●
●
Temperature:
10 – 30°c
(50 - 86”F)
Humidity:
20 – 90% RH
Ventilation:
Well-ventilated and wide room.
On a strong and level base (a
sturdy desk, etc.).
The machine must be level
within 5 mm (13/64”) both front
to rear and le~ to right.
- Environments to avoid -
●
Direct sunlight or strong light
●
Locations directly exposed to
the cool air from an air con-
ditioner or reflected heat from a
space heater. (Sudden temperature changes low to high or
vice versa may cause conden-
sation within the machine.)
●
Dusty areas.
8
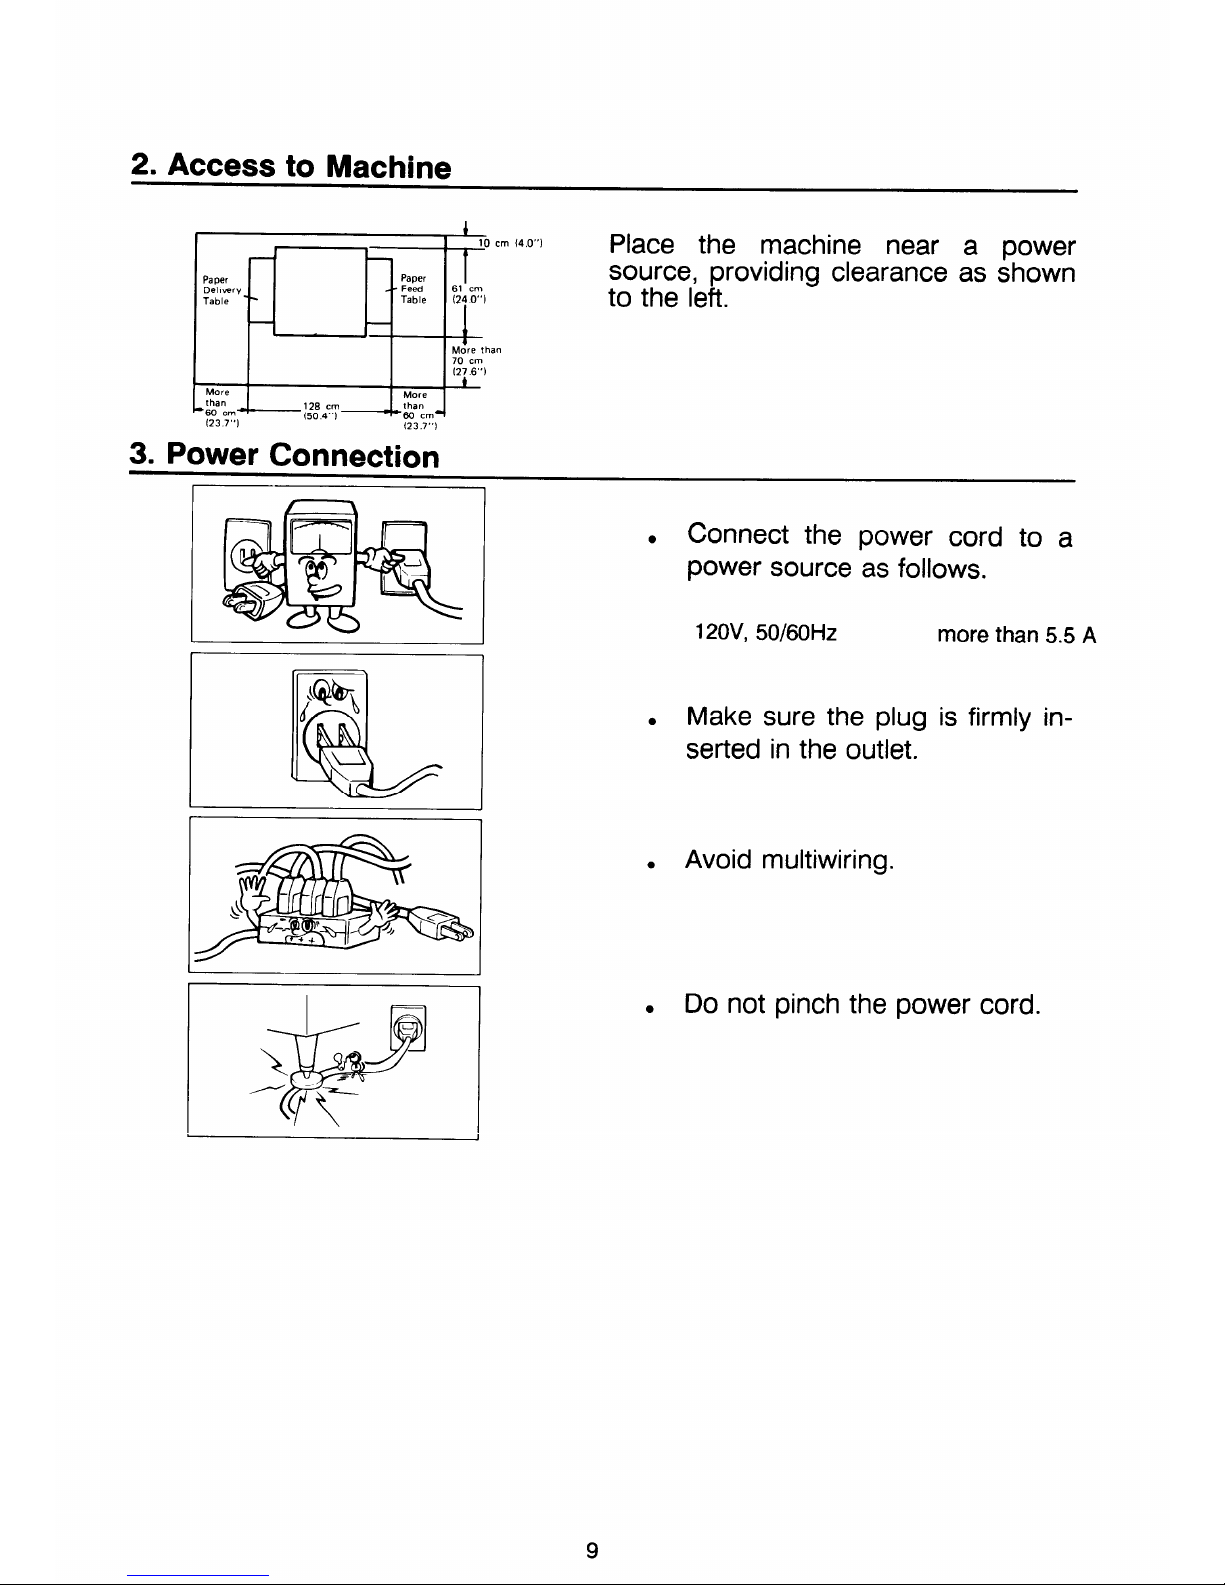
2. Access to Machine
Paper
Del, very
Table
c
than
60 cm”
(23 7“)
~
Paper
Feed
Table
10 cm {4.0”)
Place the machine near a power
clearance as shown
I
source, providing
61 cm
(24 O“)
I
to the left.
+
More than
70 cm
(27 6“)
~
(23 7’,1
3. Power Connection
I f
. Connect the
power source
120V, 50/60Hz
power cord to a
as follows.
more than 5.5 A
. Make sure the plug is firmly in-
serted in the outlet.
●
Avoid multiwiring.
. Do not pinch the power cord.
I DO’S AND DON’TS
I
- Operating Cautions -
1.
While Printing :
- Do not turn off the main switch.
- Do not unplug the
power cord.
-
Do not open the front cover.
- Do not move the machine.
2. Keep corrosive liquids, such as acid, off the machine.
3.
Do not allow paper
clips, staples, or other small objects to fall inside the
machine.
4. Always turn the machine off when
you have finished printing for the day.
5. Do not touch print paper
if your fingers are wet or oily; fingerprints may
appear on prints.
- General Cautions -
1.
Do not modify or replace any parts other than the ones specified in this
manual.
2. When the machine will not be used for long periods, disconnect the
power cord.
3.
If the machine must be transported by vehicle, please contact your
dealer.
4. Do not operate the machine with any covers off.
10
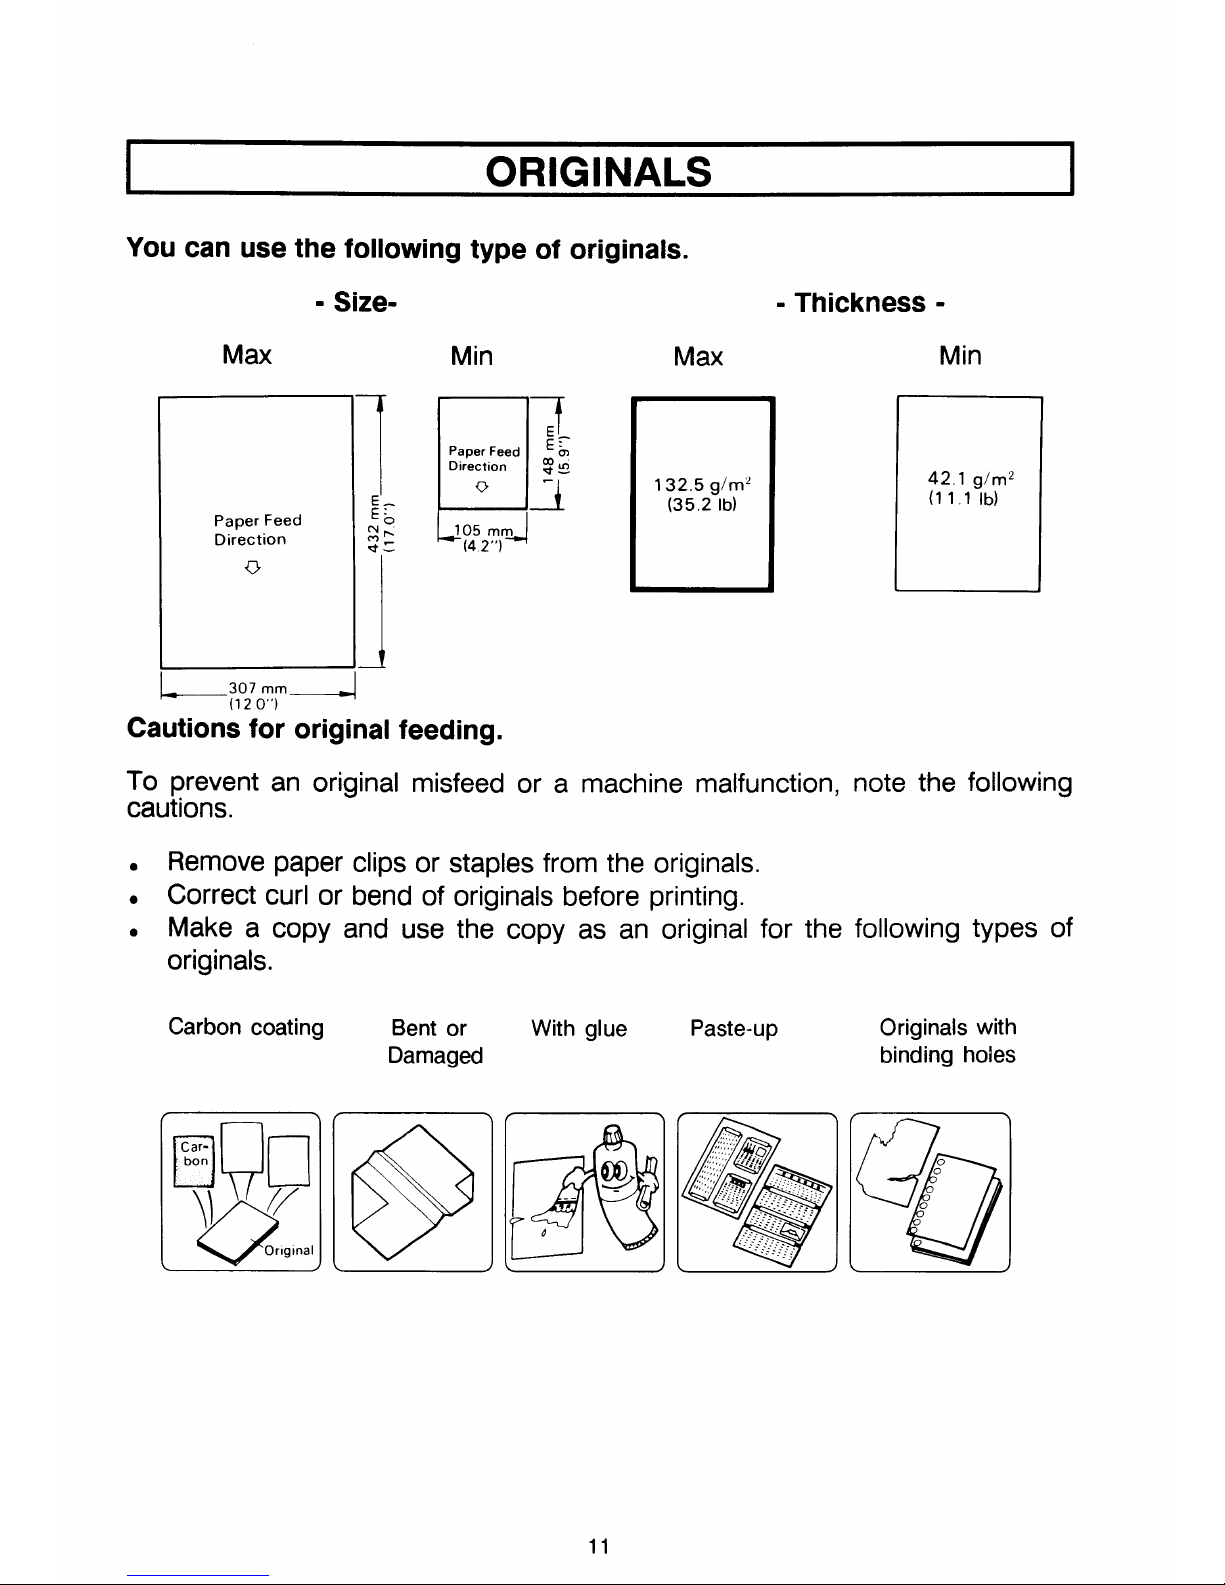
ORIGINALS
You can use the following type of originals.
- Thickness -
Max
Paper Feed
Direction
u
—307 ““—
(120”)
Min
1
7
Paper Feed
E:
Direction _
:In
-i
0’
--l
J05 mm
(4 2“)
Max
Min
132.5 g/rnz
(35.2 lb)
42.1 glmz
(11.1 lb)
Cautions for original feeding.
TO prevent an original misfeed or a machine malfunction, note the following
cautions.
. Remove paper clips or staples from the originals.
. Correct curl or bend of originals before printing.
. Make a copy and use the
originals.
Carbon coating
LIJn
Car-
bon
]] Y
o
Onglnal
Bent or
Damaged
@]
copy as an original for the
With glue
Paste-up
O@
.,,,
Q
;,::’:’..:~$
;:?
.%5
,,
47
,;.,;:,
?,,,:,
...
.:
..’..“”...”...
. .
.----......,..
...
..
- .-.
..-.$.:
........ .
.... .
. . .. .. ..
..... .. . ..
.....- .-.. .. . .
. .......
...... ..
.-. .
. ... ,.
following types of
Originalswith
binding holes
11
How to make an original when printing a part of a large original
Large original
After printing
1!
+15mm
Iii
1. Make sure the leading edge margin is
at least 15 mm (9/16“). Cut off excess
paper .if necessary.
2. Cut the upper edge of the original to
make the center line A of the image
centered.
3. Suitable original is completed.
12

I
PRINTING PAPER
I
You can use the following types of paper as printing paper:
Paper Feed
Dlrectlon
u
Min
17
J“
E
Paper Feed E ~
Dlrect!on
u Y
Avoid using the foliowing kinds
. Roughly-cut paper
.
Paper of different thicknesses In the
. Buckled or curled paper
. Short grained paper
. Low stiffness paper
Cautions for postcards printing
of
Max
215 g/mz
(57 lb)
● As postcards do not absorb ink weii,
foiiowing prints. To avoid this, piace a
Print Size
Max
- Thickness -
same stack
Min
r
50 girl+
(13.3 lb)
offset images may appear on the rear side of
sheet of paper on top of each printed postcard.
11” x 17“ size can be fed as an original or
printing paper, but the maximum printing size
is 210 x 350 mm (8.3” x 13.7”). Set 64%
reduction to print the entire image of 11” x
17“ originai.
Note:
The first 10 mm (7/16“) after the ieading
edge cannot be printed. Make sure
the lead-
ing edge margin is more than 10 mm (7/16”).
The position of center and the ieading edge
of the image
do not change in any reduction
mode.
~ ;;:,;
m_/
r
,4
10mm
Original
Print
!_.---Y
l.J!!L_!j!+Constant
-T
13
OPERATION
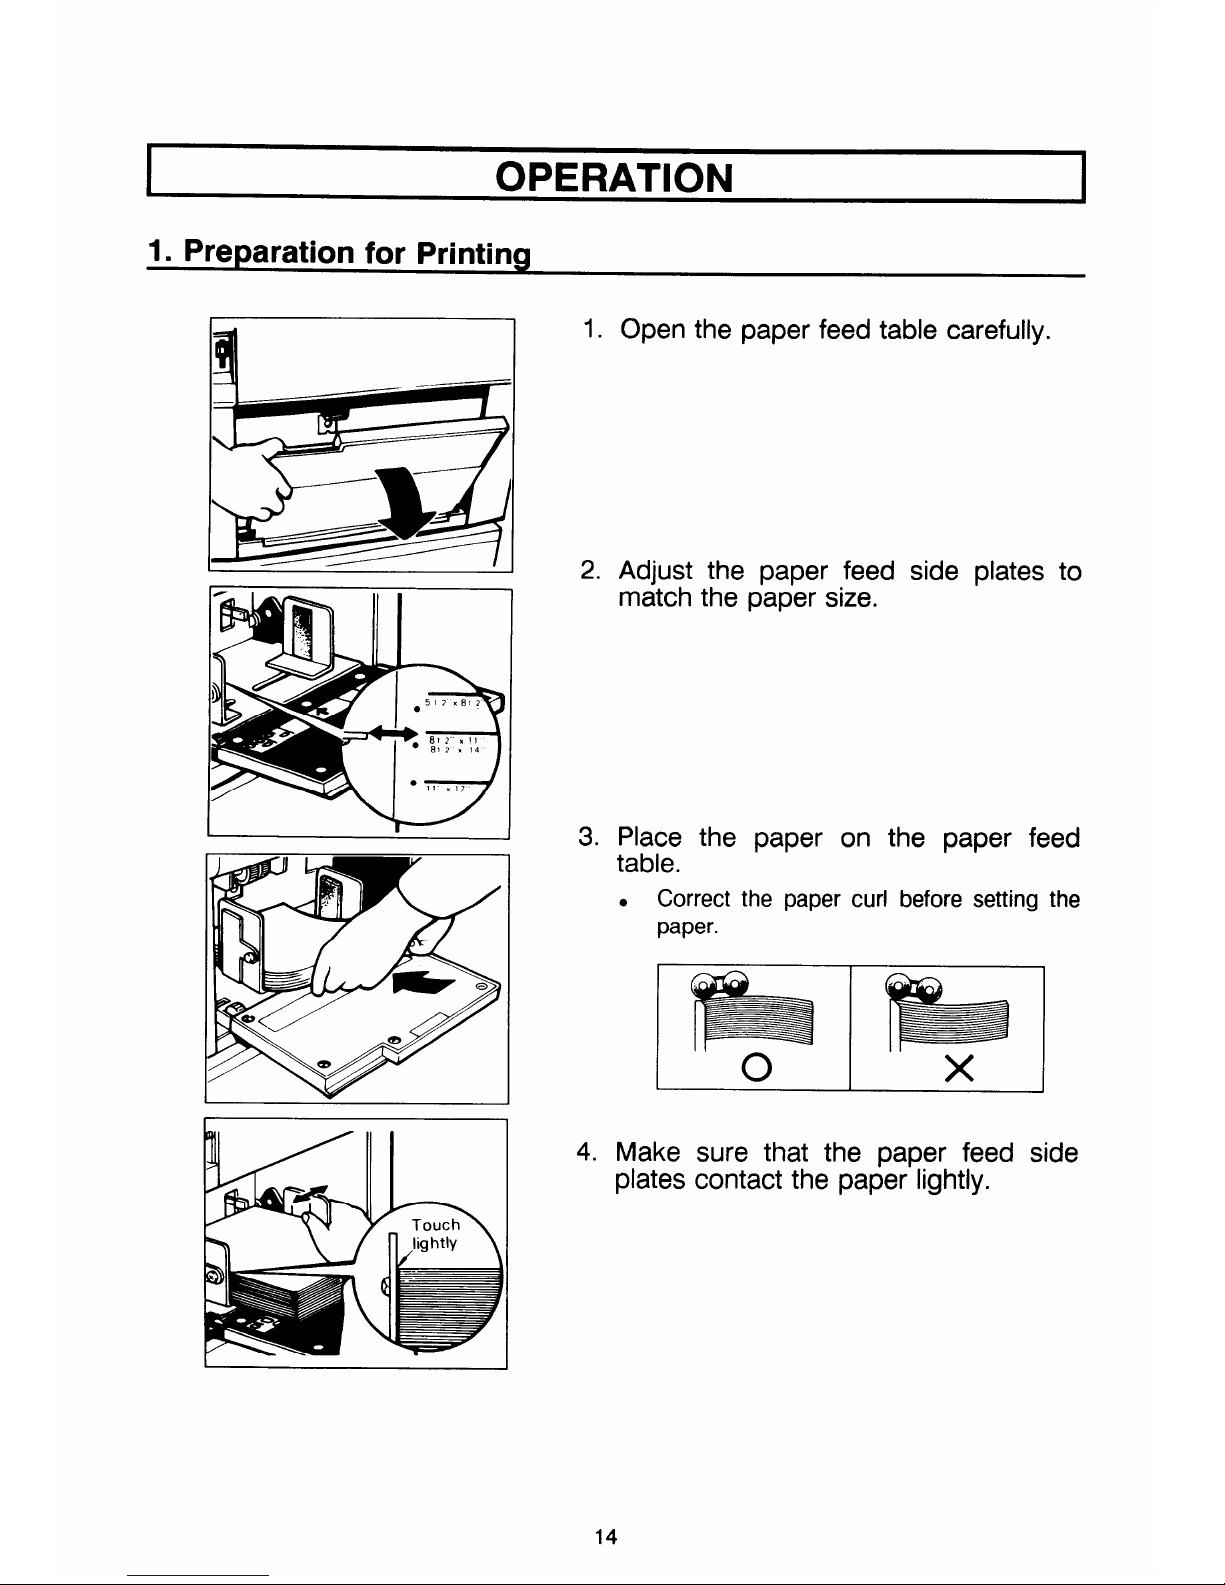
1. Preparation for Printing
1.
2.
Open the
paper
Adjust the paper feed
match the paper size.
carefully.
plates
to
3. Place the paper on the paper feed
table.
. Correct the paper curl before setting the
paper.
h b
o
x
4. Make sure that the paper feed side
plates contact the paper lightly.
14
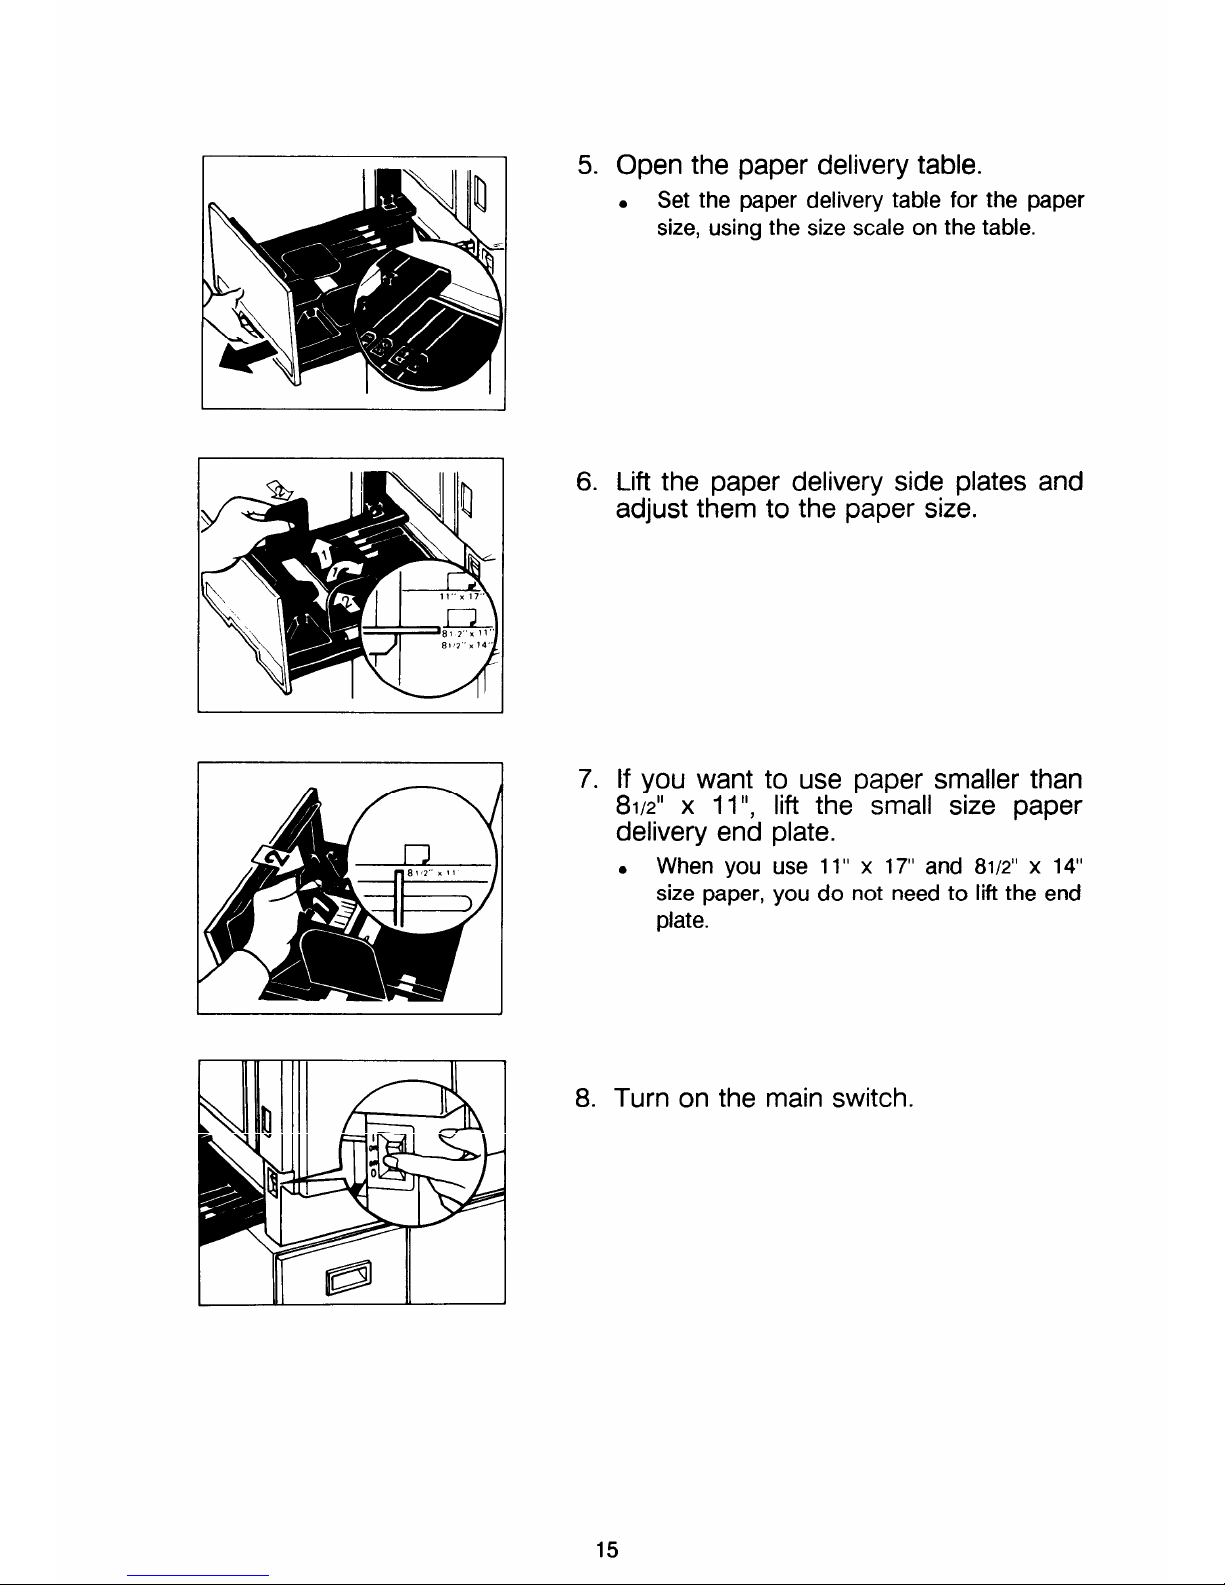
r I
5. Open the paper delivery table.
.
Set the paper delivery table for the paper
size, using the size scale on the table.
I
I
I 1
6. Lift the paper delivery side plates and
adjust them to the paper size.
7. If you want to use paper smaller than
81/2” x 11”, lift the small size paper
delivery end plate.
. When you use 11” x 17“ and 81/2”x 14“
size paper, you do not need to lift the end
plate.
8. Turn on the main switch.
15
 Loading...