

Ricoh Priport JP5800 Operating Instructions Manual
Ruby-gb3_FM.book Page 1 Tuesday, January 25, 2000 3:03 PM
JP5800
OPERATING INSTRUCTIONS
Read this manual carefully before you use this product and keep it handy for future
reference.
For safety, please follow the instructions in this manual.
Ruby-gb3_FM.book Page 1 Tuesday, January 25, 2000 3:03 PM
RICOH COMPANY, LTD.
15-5, 1 chome, Minami-Aoyama, Minato-ku, Tokyo
Telephone: Tokyo 3479-3111
JP5800 OPERATING INSTRUCTIONS
Overseas Affiliates
U.S.A.
RICOH CORPORATION
5 Dedrick Place
West Caldwell, New Jersey 07006
Phone: +1-973-882-2000
The Netherlands
RICOH EUROPE B.V.
Groenelaan 3, 1186 AA, Amstelveen
Phone: +31-(0)20-5474111
United Kingdom
RICOH UK LTD.
Ricoh House,
1 Plane Tree Crescent, Feltham,
Middlesex, TW13 7HG
Phone: +44-(0)181-261-4000
Germany
RICOH DEUTSCHLAND GmbH
Mergenthalerallee 38-40,
65760 Eschborn
Phone: +49-(0)6196-9060
France
RICOH FRANCE S.A.
383, Avenue du Général de Gaulle
BP 307-92143 Clamart Cedex
Phone: +33-(0)1-40-94-38-38
Spain
RICOH ESPAÑA S.A.
Avda. Litoral Mar, 12-14,
08005 Barcelona
Phone: +34-(0)93-295-7600
Italy
RICOH ITALIA SpA
Via della Metallurgia 12,
37139 Verona
Phone: +39-045-8181500
Hong Kong
RICOH HONG KONG LTD.
23/F., China Overseas Building,
139, Hennessy Road,
Wan Chai, Hong Kong
Phone: +852-2862-2888
Singapore
RICOH ASIA PACIFIC PTE.LTD.
260 Orchard Road,
#15-01/02 The Heeren,
Singapore 238855
Phone: +65-830-5888
Printed in The Netherlands
EE GB C232-8600

Ruby-gb3_FM.book Page 1 Tuesday, January 25, 2000 3:03 PM
Introduction
This manual contains detailed instructions on the operation and maintenance of this machine. To get
maximum versatil ity from this ma chine all opera tors sho uld careful ly read an d follow the ins tructi ons in
this manual. Please keep this manual in a handy place near the machine.
Please read the Safety Information before using this machine. It contains important information related
to USER SAFETY and PREVENTING EQUIPMENT PROBLEMS.
Notes:
Some illustrations might be slightly different from your machine.
Certain options migh t no t be av ail abl e in some countries. F or de tails, please contac t yo ur local dealer.
Two kinds of size notation are employed in this manual. With this machine refer to the metric version.
For good print quality, Ricoh recommends that you use genuine Ricoh master and ink.
Ricoh shall not be resp onsib le for any damag e or exp ense that m ight res ult fr om the u se of part s other
than genuine Ricoh parts in your Ricoh office product.
Power Source
220 – 240V, 50/60Hz, 1.6A or more
Please be sure to c onnect the power c ord to a po wer sour ce as abo ve. For d etails a bout power source,
see ⇒ P.216
“Power Connection”
.

Ruby-gb3_FM.book Page 1 Tuesday, January 25, 2000 3:03 PM
Declaration of Conformity
“The Product complies with the requirements of the EMC Directive 89/336/EEC and the Low Voltage
Directive 73/23/EEC.”
In accordance with IEC 60417, this machine uses the following symbols for the main power switch:
a
means POWER ON.
b
means POWER OFF.
Copyright © 2000 Ricoh Co., Ltd.

R
R
Ruby-gb3_FM.book Page i Tuesday, January 25, 2000 3:03 PM
Safety Information
When using your equipment, the following safety precautions should always be
followed.
Safety During Operation
In this manual, the following important symbols are used:
WARNING:
CAUTION:
R
WARNING:
Indicates a potentially hazardous situation which, if instructions
are not followed, could result in death or serious injury.
Indicates a poten tially hazar dous situation which, if inst ructions are n ot
followed, may result in minor or moderate injury or damage to property.
Connect the power cord directly into a wall outlet and never use an ex-
•
tension cord.
Disconnect the power plug (by pulling the plug, not the cable) if the
•
power cable or plug becomes frayed or otherwise damaged.
To avoid hazardous electric sho ck, do no t rem ove any covers or
•
screws other than those specified in this manual.
Turn off the power and disconnect the power plug (by pulling the plug,
•
not the cable) if any of the following conditions exists:
You spill something into the equipment.
•
You suspect that your equipment needs service or repair.
•
Your equipment's cover has been damaged.
•
i
Ruby-gb3_FM.book Page ii Tuesday, January 25, 2000 3:03 PM
R
CAUTION:
•
Protect the equipment from dampness or wet weather, such as rain, snow,
and so on.
•
Unplug the power cord from the wall outlet before you move the equipment.
While moving the equipment, you should take care that the power cord will
not be damaged under the equipment.
•
When you disconnect the power plug from the wall outlet, always pull the
plug (not the cable).
•
Do not allow paper clips, staples, or other small metallic objects to fall inside
the equi pment.
•
For environmental reasons, do not dispose of the equipment or expended
supply waste at household waste collection points. Disposal can take place
at an authorized dealer or at appropriate collection sites.
•
Be careful not to cut yourself on any sharp edges when you reach inside the
machine to remove misfed sheets of paper or masters.
•
Our products are engineered to meet high standards of quality and functionality, and we recommend that you only use the expendable supplies available at an authorized dealer.
ii
R
R
Ruby-gb3_FM.book Page iii Tuesday, January 25, 2000 3:03 PM
How to Read this Manual
Symbols
In this manual, the following symbols are used:
WARNING:
This symbol indicates a potentially hazardous situation that might result in
death or serious injury when you misuse the machine without following the instructions under this symbol. Be sure to read the instructions, all of which are described in the Safety Information section.
CAUTION:
This symbol indicates a potentially hazardous situation that might result in minor or moderate injury or property damage that does not involve personal injury
when you misuse the machine without following the instructions under this
symbol. Be sure to read the instructions, all of which are described in the Safety
Information section.
* The statements above are notes for your safety.
Important
If this instruction is not followed, paper might be misfed, originals might be
damaged, or data might be lost. Be sure to read this.
Preparation
This symbol indicates the prior knowledge or preparations required before operating the machine.
Note
This symbol indicates precautions for operation, or actions to take after misoperation.
Limitation
This symbol indicates numerical limits, functions that cannot be used together,
or conditions in which a particular function cannot be used.
Reference
This symbol indicates a reference.
[]
Keys that appear on the machine's display panel.
{}
Keys built into the machine's operation panel.
iii
Ruby-gb3_FM.book Page iv Tuesday, January 25, 2000 3:03 PM
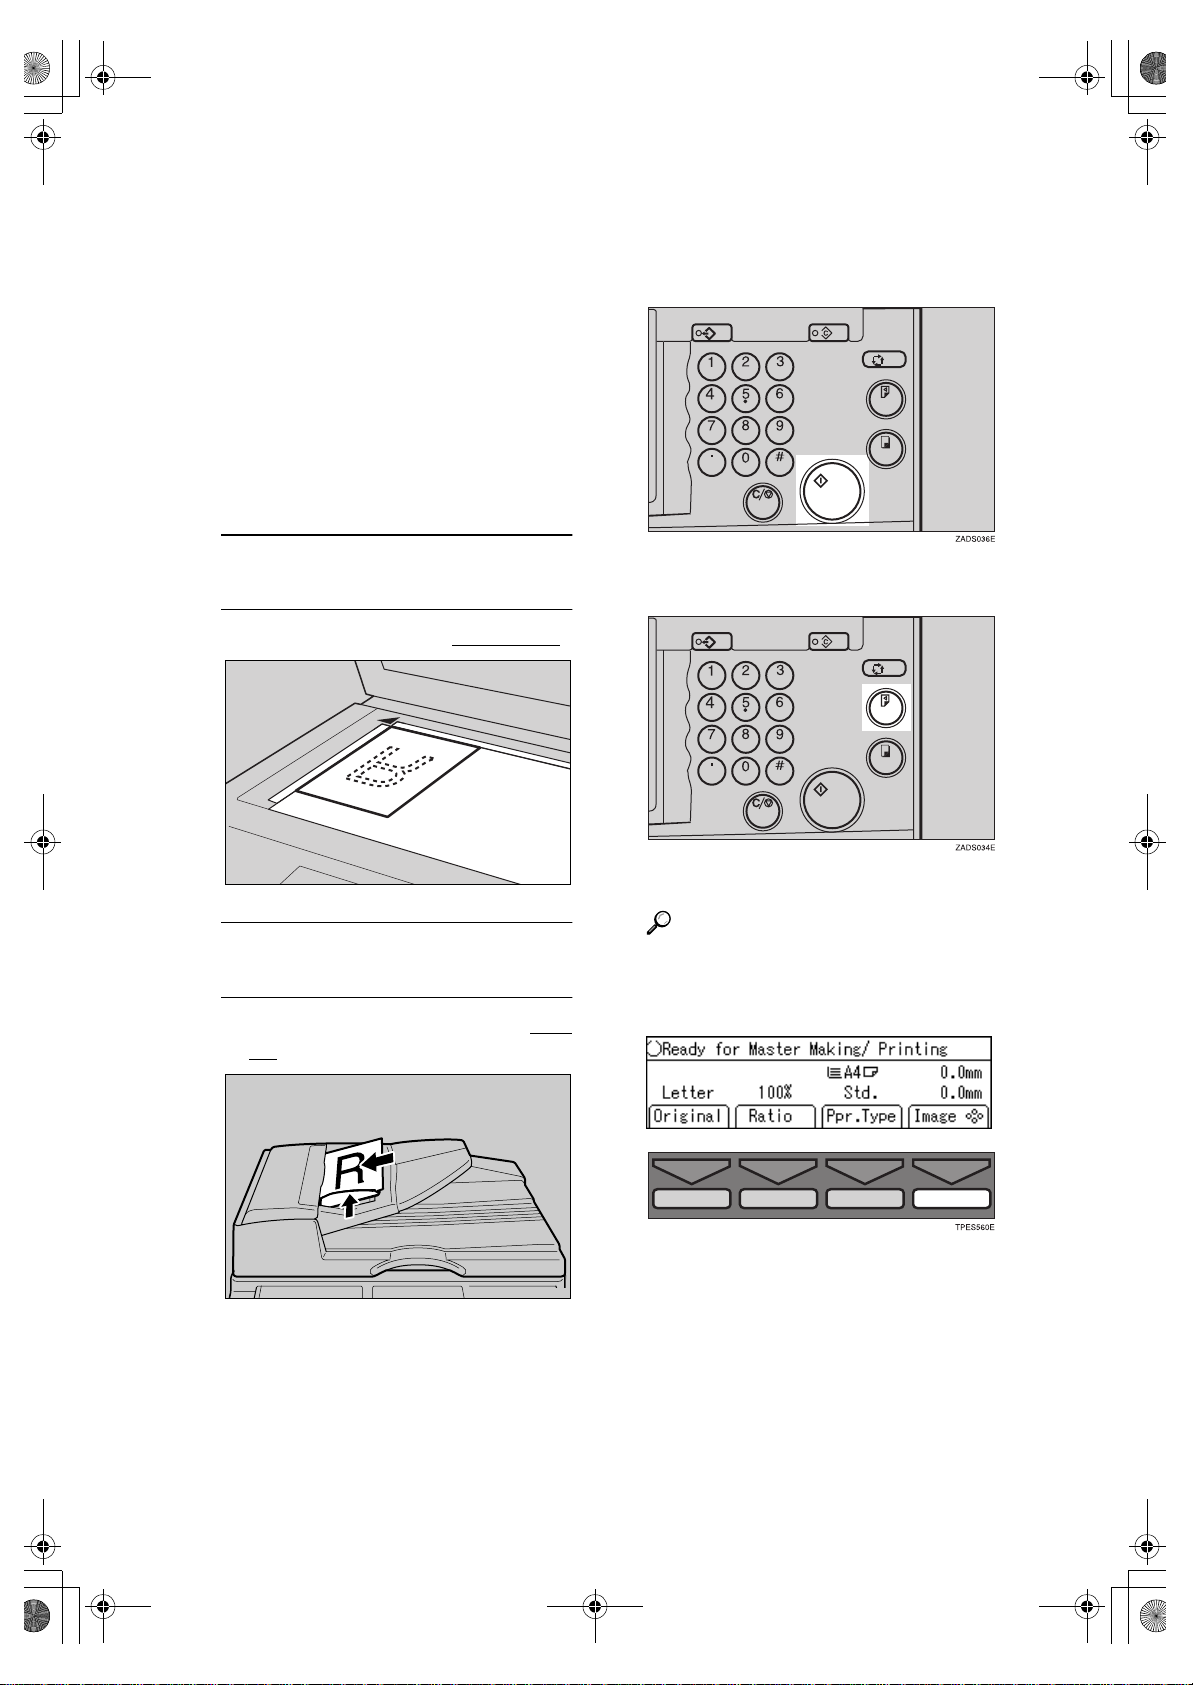
Making Prints
Before making prints using this machine, you have to make a master by
pressing the
press the
scans the original image and makes a
master. This procedure describes
how to make basic prints.
{
Start
{
key. When you
}
Start
key, the machine
}
A Set your originals in one of the
following two ways:
Placing originals o n the exposure
glass (contact glass)
A Place a single page face down.
B Press the
C Press the
{
Start
{
Proof
key.
}
key.
}
TPEH270E
Inserting originals in the optional
document feeder
A Insert a stack of originals face
up.
TPEH281E
Check the print image.
Reference
For how to change the image
position, see ⇒ P.34 “Adjusting
the Position of Printed Images”.
iv
Ruby-gb3_FM.book Page v Tuesday, January 25, 2000 3:03 PM
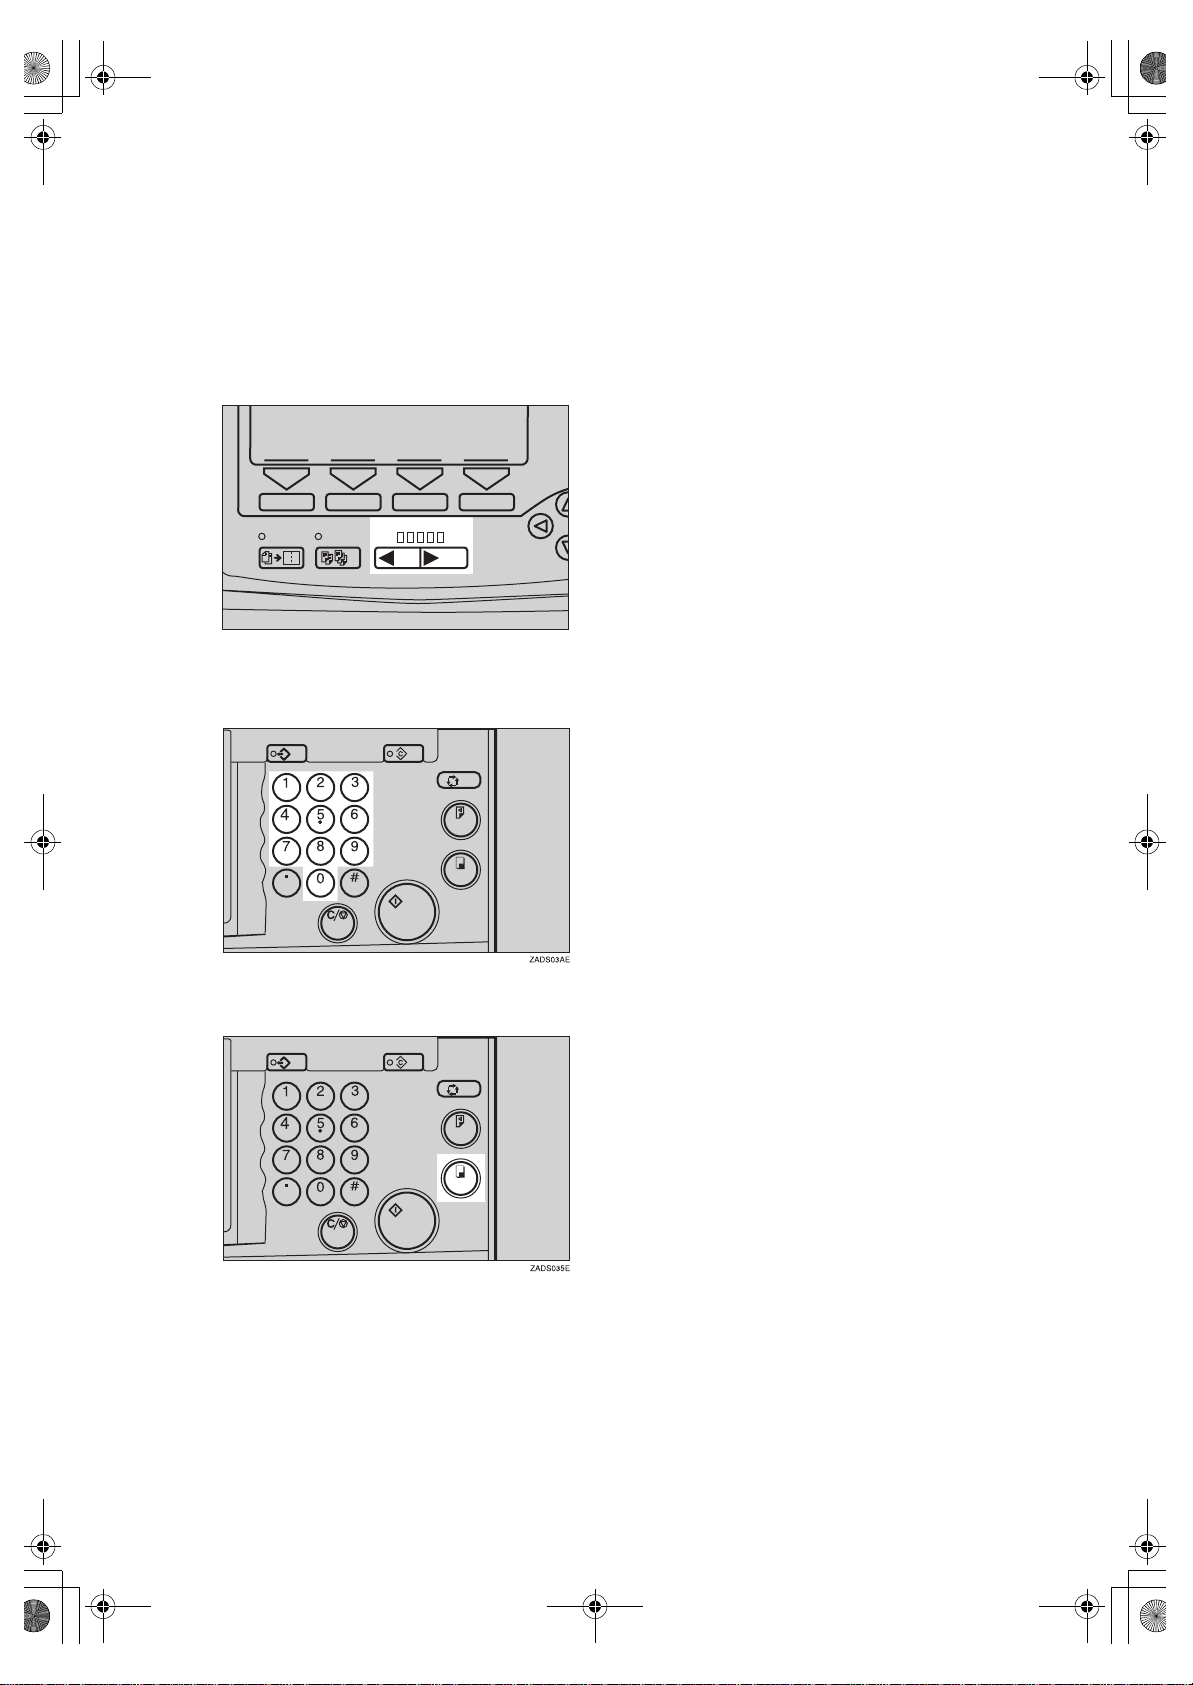
To increase the image density,
press the
key. See ⇒ P.35
{WW}
“Adjusting the Image Density of
Prints”.
To decrease the image density,
press the
key. See ⇒ P.35
{VV}
“Adjusting the Image Density of
Prints”.
12345
TPES100E
D Enter the desired number of
prints with the Number keys.
E Press the
{
Print
key.
}
When the print job has finished,
press the
key. Previously entered job set-
}
er
{
Clear Modes/Energy Sav-
tings will be cleared.
v
Ruby-gb3_FM.book Page vi Tuesday, January 25, 2000 3:03 PM
What You Can do with this Machine
Below is a quick summary of this machine's features and where to look in
this manual for more information.
❖
Standard Printing
See ⇒ P.20 “Standard Printing”.
❖
Energy Saver Mode
See ⇒ P.23 “Energy Saver Mode —
Saving Energy”
❖
Printing from the External Tray
See ⇒ P.24 “Printing from the External Tray”.
❖
Adjusting the Paper D eli very Tray Position
See ⇒ P.28 “Paper Delivery Tray Position”.
❖
Selecting the Print Paper
See ⇒ P.32 “Selecting Print Paper”.
❖
Adjusting the Print Image Position
See ⇒ P.34 “Adjusting the Position
of Printed Images”.
❖
Halftone Printing
See ⇒ P.36 “Tint Mode—Halftone
Printing”.
❖
Changing the Printing Speed
See ⇒ P.37 “Changing the Printing
Speed”.
❖
Reducing and Enlarging Using Preset
Ratios
See ⇒ P.39 “Preset Reduce/Enlarge—Reducing and Enlarging Using Preset Ratios”.
GRTINT0E
vi
*: Paper feed direction
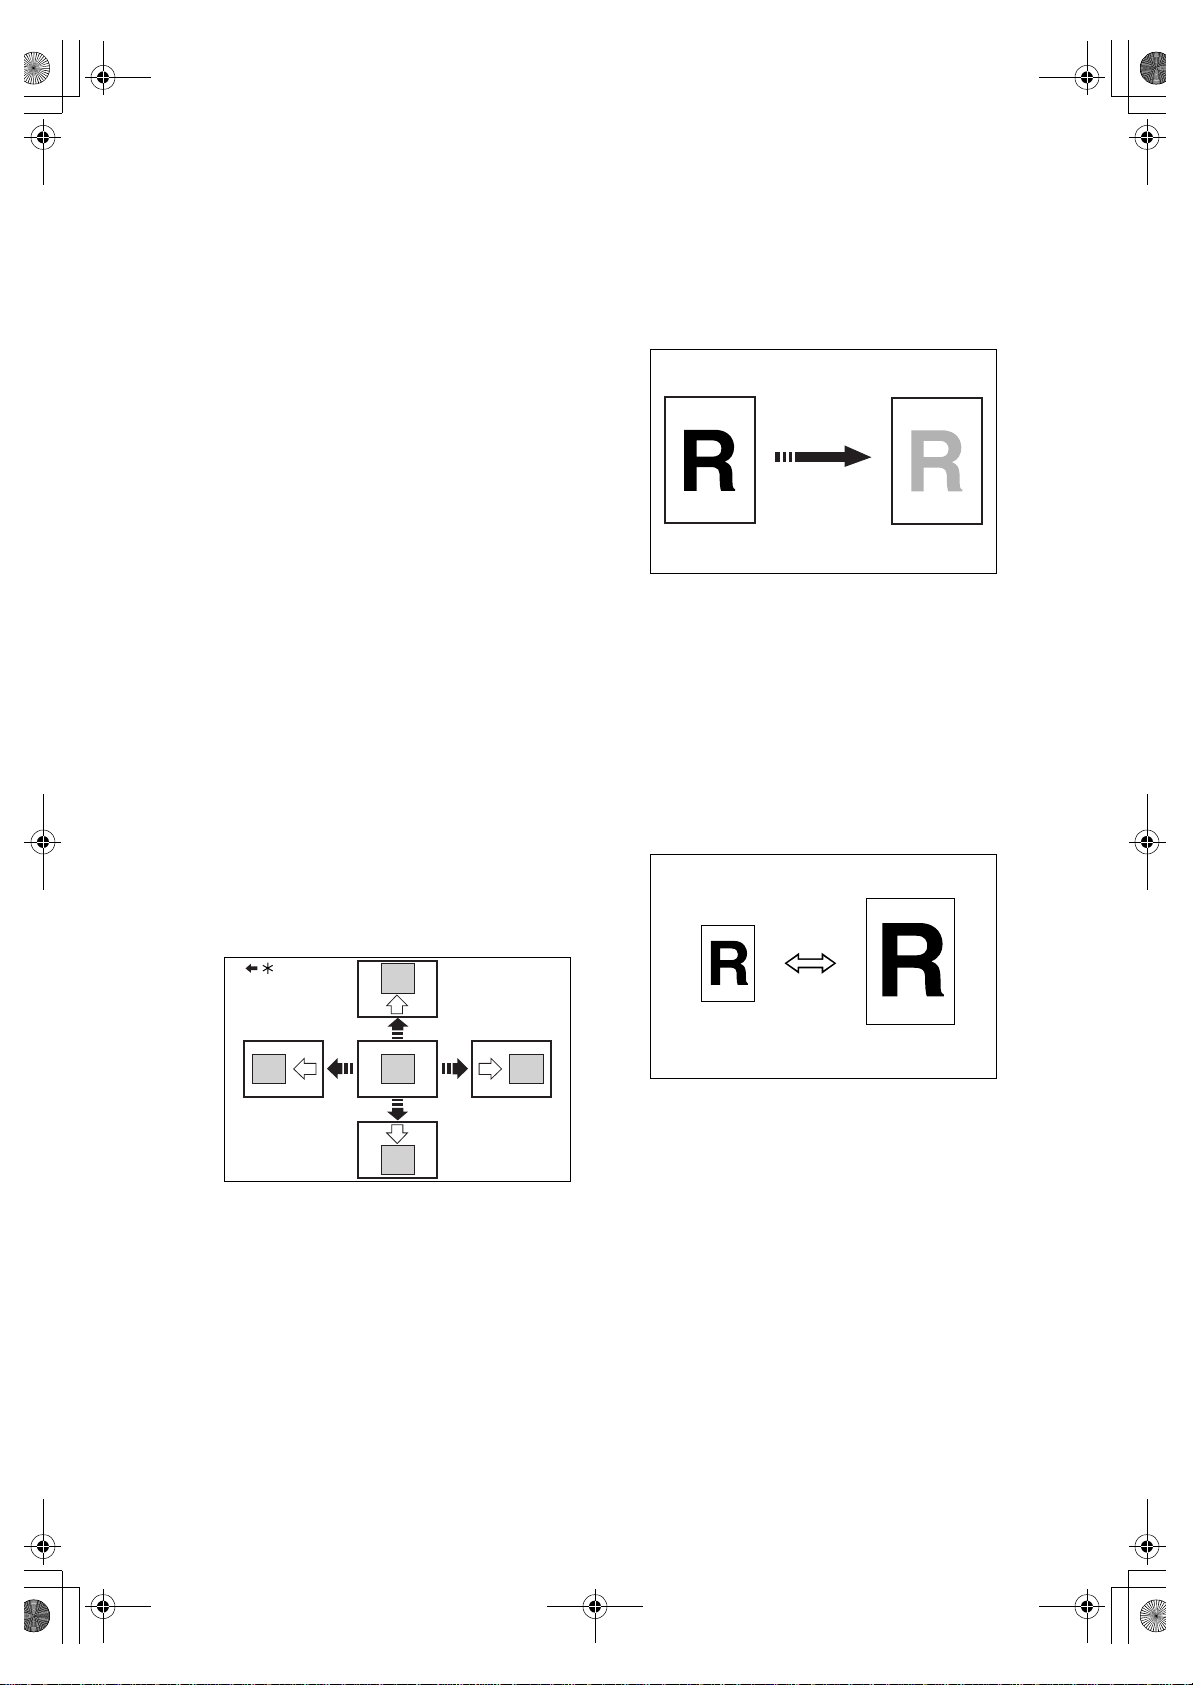
❖
Adjusting the Print Image Density
See ⇒ P.35 “Adjusting the Image
Density of Prints”.
GRRATI0E
GRPOSI0E
Ruby-gb3_FM.book Page vii Tuesday, January 25, 2000 3:03 PM
❖
Having the Machine Choose the Reproduction Ratios
See ⇒ P.41 “Auto Magnification—
Having the Machine Choose Reproduction Ratios”.
❖
Reducing and Enlarging in 1% Steps
See ⇒ P.44 “Zoom—Reducing and
Enlarging in 1% Steps”.
GRAUTO0E
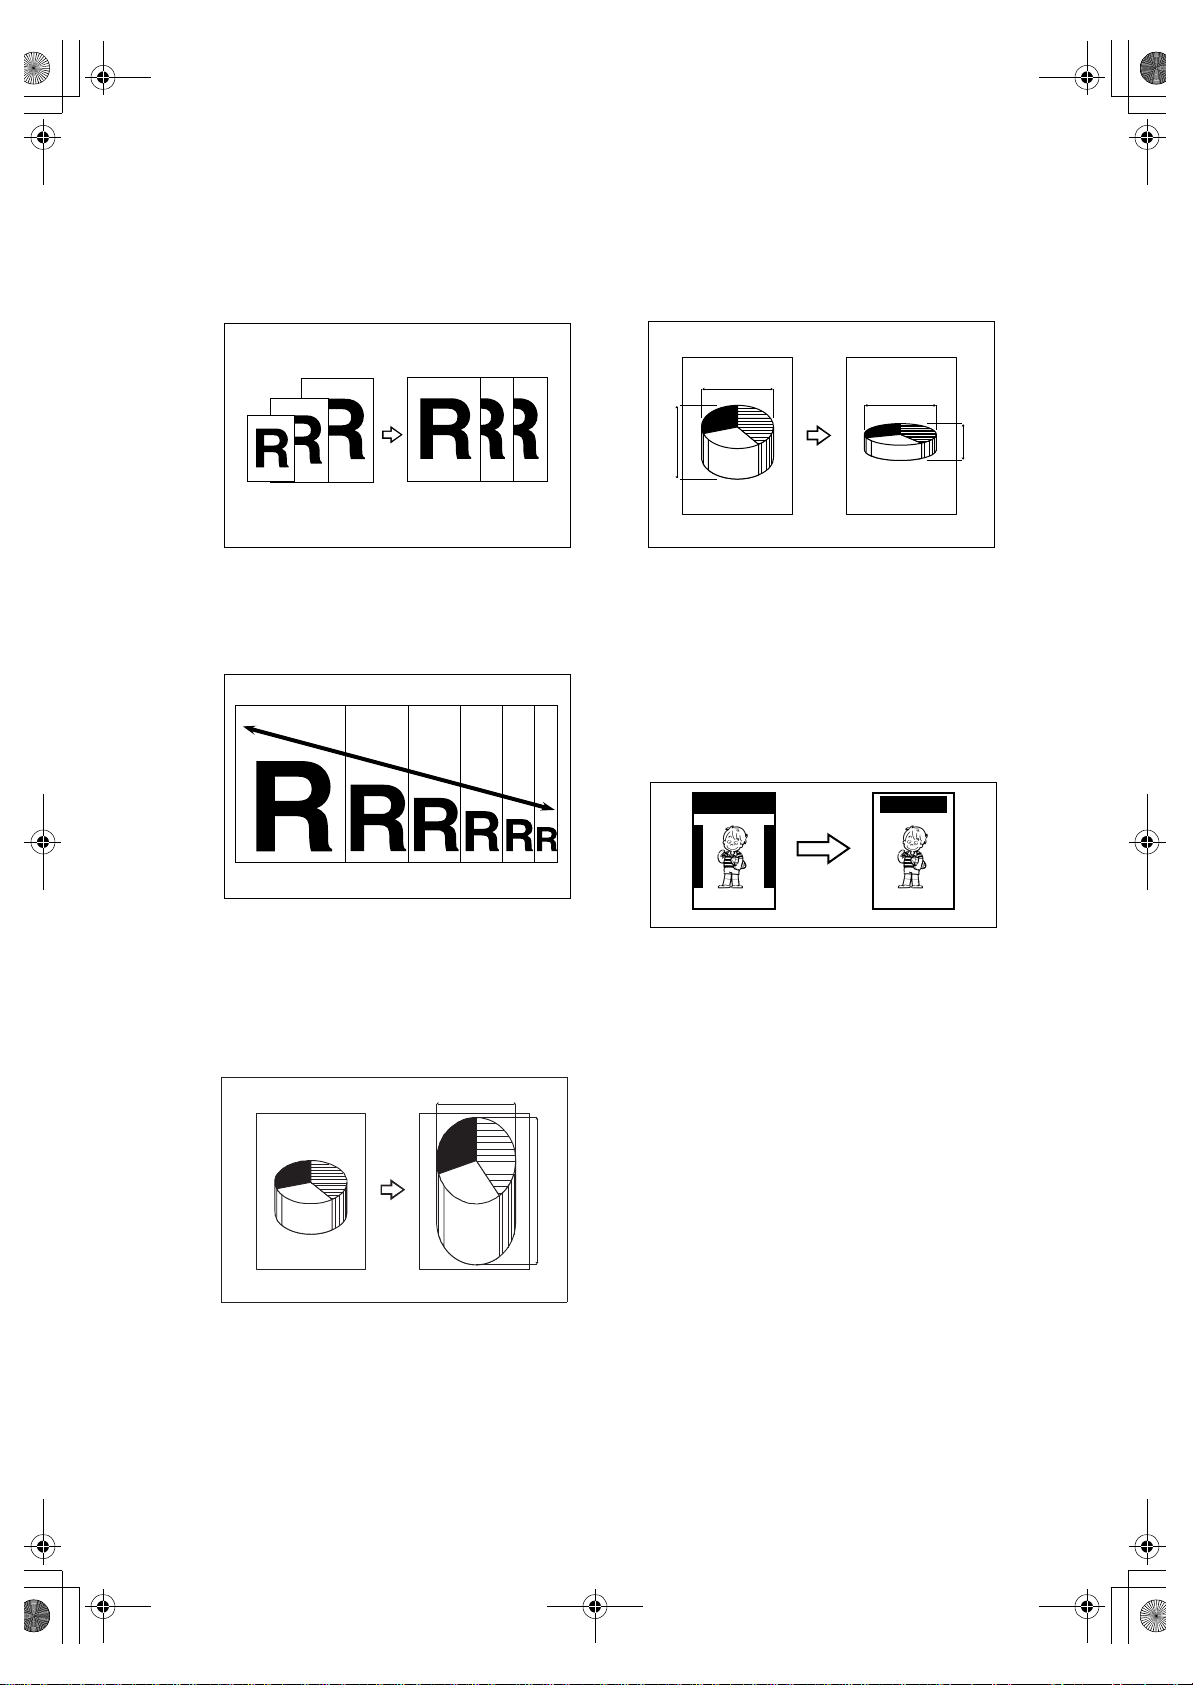
❖
Stretching and Squeezing the Image
into the Copy Area
See ⇒ P.48 “Directional Magnification (Size)—Stretching and Squeezing the Image into the Copy Area”
1
24
❖
Erasing Center and Edge Margins
3
CP2M01EE
See ⇒ P.50 “Erasing Center and
Edge Margins”.
❖
Erasing Edge Margins
See ⇒ P.51 “Edge Erase—Erasing
Edge Margins”.
❖
Stretching and Squeezing the Image
in 1% Steps
See ⇒ P.46 “Directional Magnification (%)—Stretching and Squeezing
the Image in 1% Steps”.
a%
GRZOOM0E
b%
CP2P01EE
AB AB
❖
Printing on Various Kinds of Paper
See ⇒ P.52 “Printing onto Various
Kinds of Paper”.
❖
Selecting a Mode to Match Your Original
See ⇒ P.55 “Selecting a Mode to
Match Your Original”.
❖
Saving Ink
See ⇒ P.58 “Economy Mode—Saving Ink”.
❖
Making Master and Prints at one
Stroke
See ⇒ P.59 “Auto Cycle—Making
Master and Prints in one Operation”.
GRERAS0E
vii
Ruby-gb3_FM.book Page viii Tuesday, January 25, 2000 3:03 PM
❖
Making Variable Numbers of Prints
from the Same Original Using All
Stored Data
See ⇒ P.60 “All Class Mode—Making Variable Numbers of Prints from
the Same Original Using All Stored
Data”.
❖
Making Variable Numbers of Prints
from the Same Original Using Stored
Data
See ⇒ P.62 “Auto Class Mode—
Making Variable Numbers of Prints
from the Same Original Using Stored
Data”.
GRCLAS2E
❖
Making Variable Numbers of Prints
from the Same Original
See ⇒ P.65 “Manual Class Mode
with one Original—Making Variable
Numbers of Prints from the Same
Original”.
❖
Making Variable Numbers of Prints
from Different Originals
See ⇒ P.67 “Manual Class Mode
with 2 or More Originals—Making
Variable Numbers of Prints from Different Originals”.
A
A
B
B
C
D
C D
GRCLAS2E
viii
GRCLAS2E
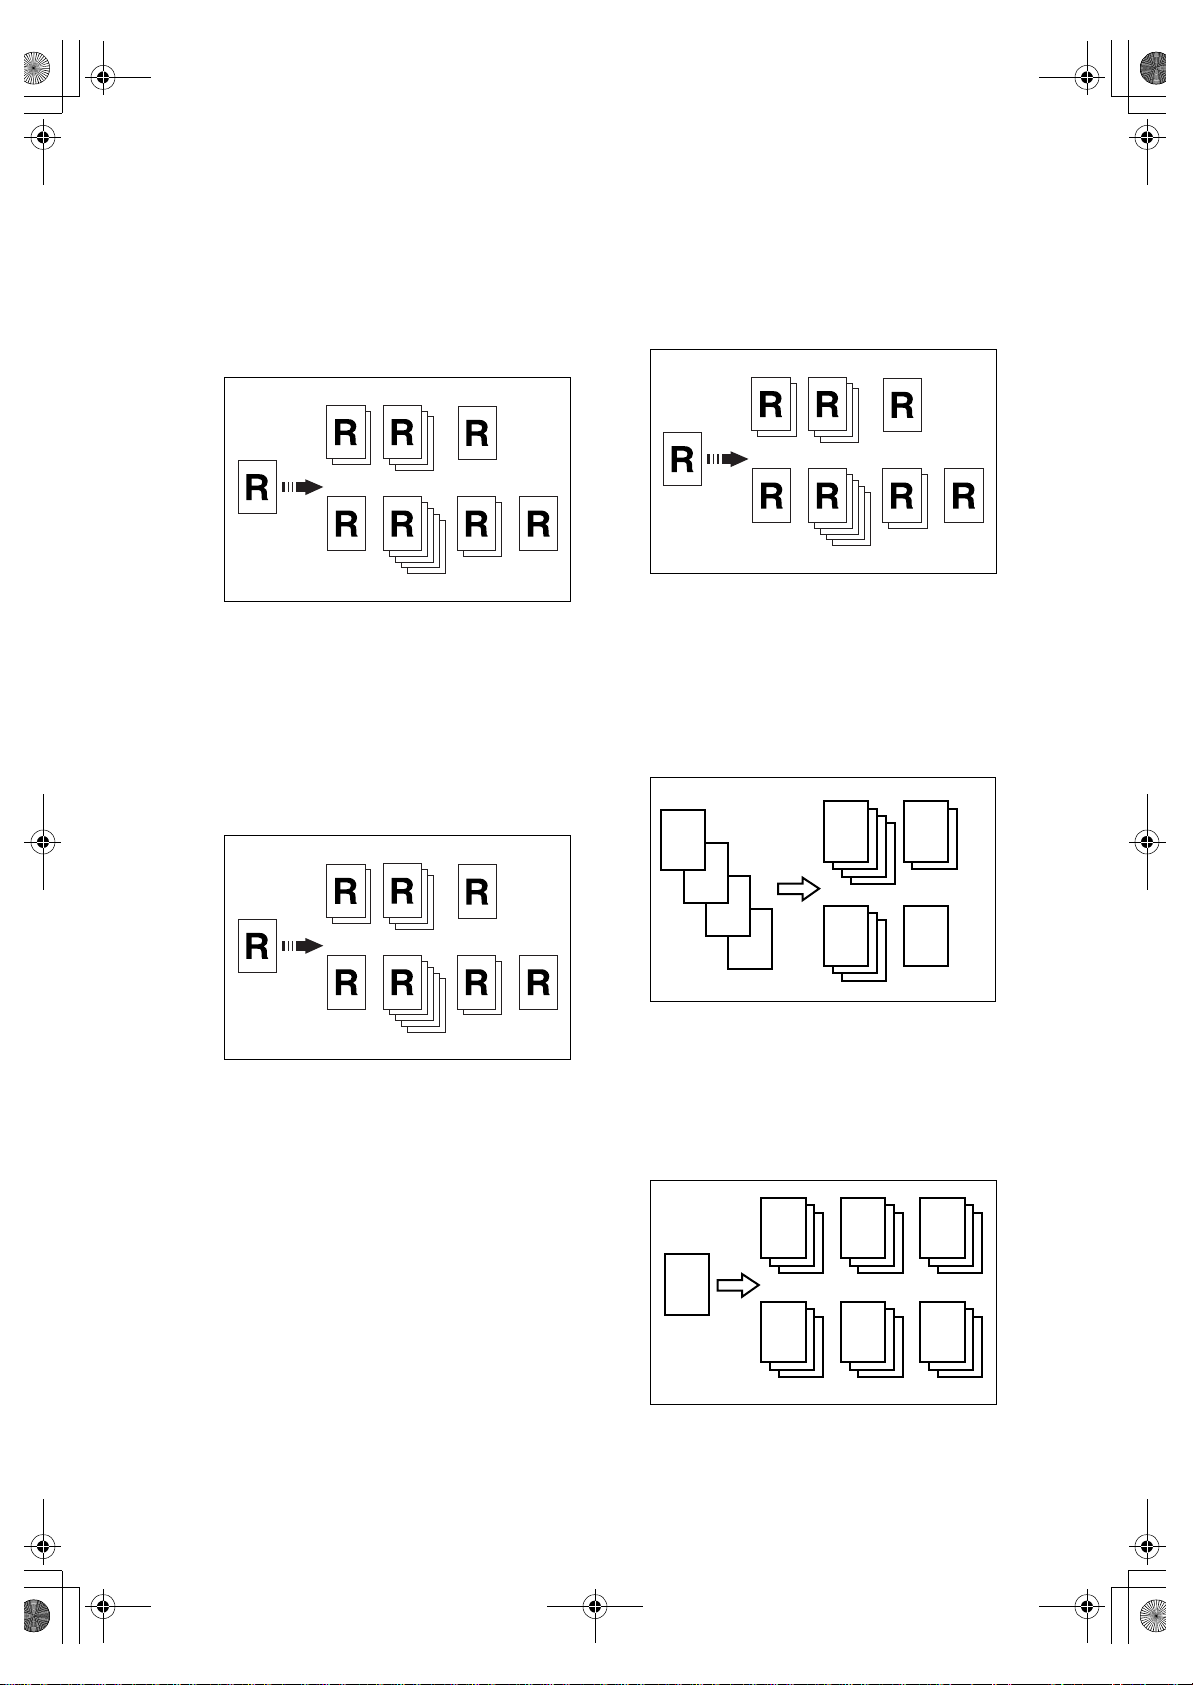
❖
Making Fixed Numbers of Prints from
the Same Original
See ⇒ P.69 “Class Mode—Making
Fixed Numbers of Prints from the
Same Original”.
R
R R
R
R R R
GRCLAS1E
GRCLAS0E
Ruby-gb3_FM.book Page ix Tuesday, January 25, 2000 3:03 PM
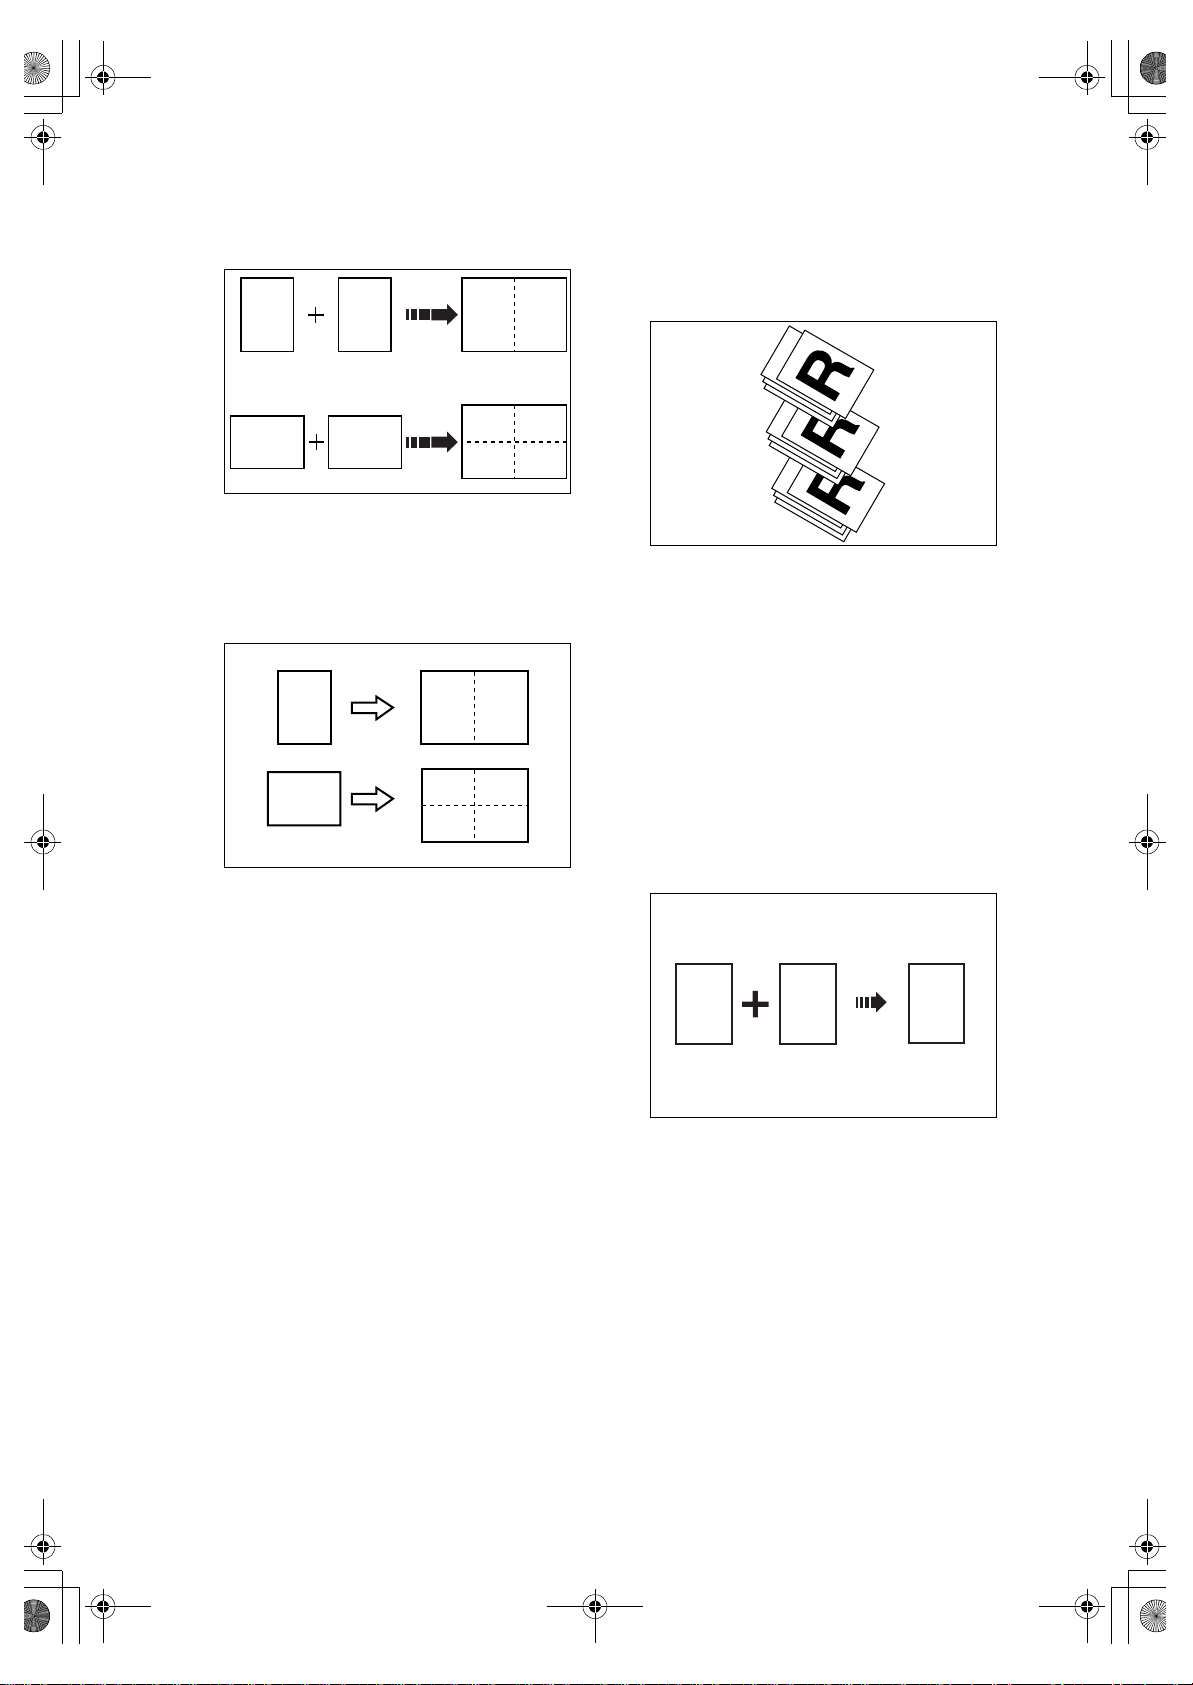
❖
Combining Originals into one Print
See ⇒ P.71 “Combine Originals—
Combining Originals into one Print”.
11
22
11
1
❖
Having Images Repeat ed on one Prin t
See ⇒ P.76 “Auto Combine Mode—
Having Images Repeated on one
Print”.
2
1 11
1
11
GRCOMB2E
11
GRACOM0E
22
❖
Separating Printing Sets on the Pa per
Delivery Tray
See ⇒ P.85 “Job Separation—Separating Printing Sets in the Paper Delivery Tray”.
❖
Conserving the Master
See ⇒ P.87 “Conserving the Master”.
❖
On Line Printing
See ⇒ P.88 “On Line Printing”.
❖
Making Color Prints
See ⇒ P.95 “Making Color Prints”.
❖
Printing in Two Colors
See ⇒ P.97 “Printing in Two
Colors”.
GRJOBS0E
❖
Skip Feed Printing
See ⇒ P.78 “Skip Feed Printing”.
❖
Storing Your Print Settings in Memory
See ⇒ P.80 “Programs—Storing
Your Print Settings in Memory”.
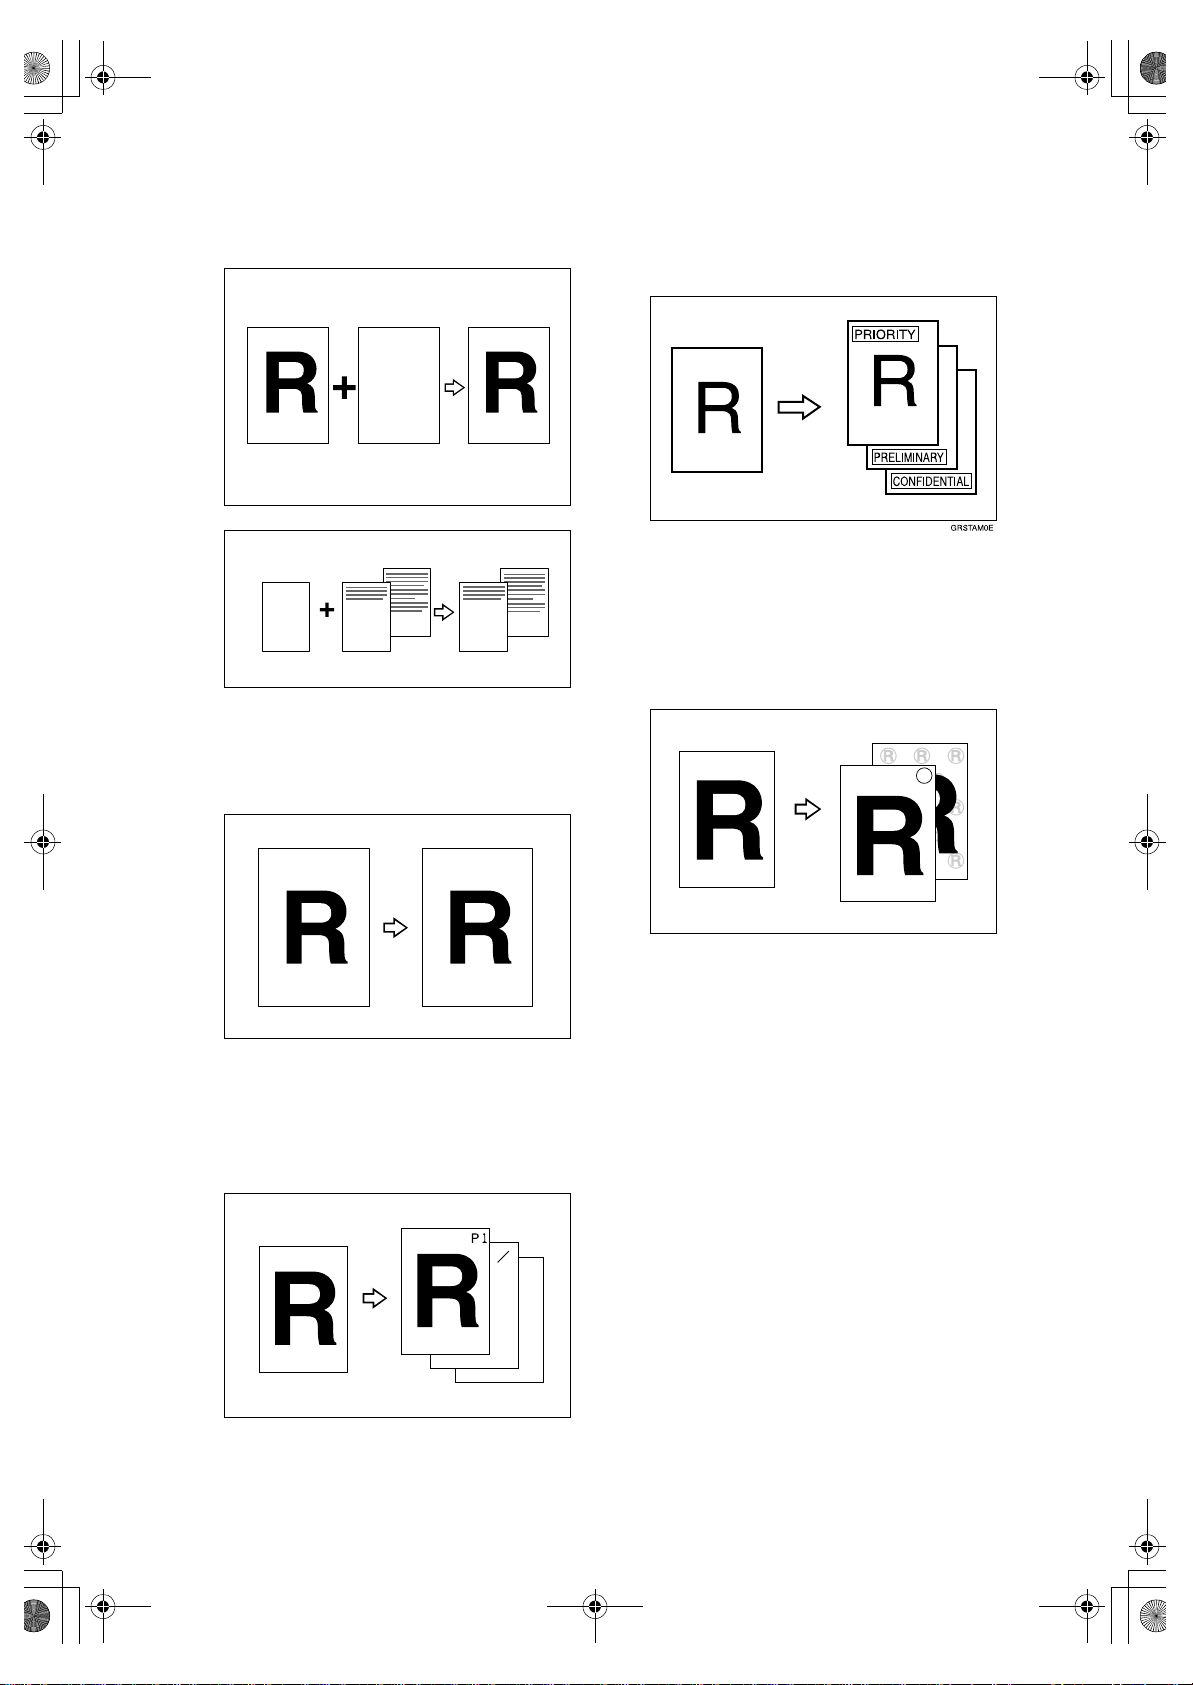
❖
Printing Confidential Documents
See ⇒ P.83 “Security Mode—Printing Confidential Documents”.
❖
Regaining the Image Density When
the Ink on the Drum Dries
See ⇒ P.84 “Quality Start Mode—
Regaining Image Density When
Drum Ink Dries”.
R
R
P
❖
Rotating Original Images
See ⇒ P.100 “Image Rotation—Rotating Original Images”.
❖
Make-up Printing
See ⇒ P.112 “Make-up Printing”.
P
GRCOLO0E
ix
Ruby-gb3_FM.book Page x Tuesday, January 25, 2000 3:03 PM
❖
Merging Images
See ⇒ P.120 “Image Overlay—
Merging Images”.
ABCDE ABCDE ABCDE ABCDE ABCDE
ABCDE ABCDE ABCDE ABCDE ABCDE
ABCDE ABCDE ABCDE ABCDE ABCDE
ABCDE ABCDE ABCDE ABCDE ABCDE
ABCDE ABCDE ABCDE ABCDE ABCDE
ABCDE ABCDE ABCDE ABCDE ABCDE
ABCDE ABCDE ABCDE ABCDE ABCDE
ABCDE ABCDE ABCDE ABCDE ABCDE
ABCDE ABCDE ABCDE ABCDE ABCDE
ABCDE ABCDE ABCDE ABCDE ABCDE
ABCDE ABCDE ABCDE ABCDE ABCDE
ABCDE ABCDE ABCDE ABCDE ABCDE
ABCDE ABCDE ABCDE ABCDE ABCDE
ABCDE ABCDE ABCDE ABCDE ABCDE
ABCDE ABCDE ABCDE ABCDE ABCDE
ABCDE ABCDE ABCDE ABCDE ABCDE
ABCDE ABCDE ABCDE ABCDE ABCDE
ABCDE ABCDE ABCDE ABCDE ABCDE
ABCDE ABCDE ABCDE ABCDE ABCDE
ABCDE ABCDE ABCDE ABCDE ABCDE
ABCDE ABCDE ABCDE ABCDE ABCDE
ABCDE ABCDE ABCDE ABCDE ABCDE
ABCDE ABCDE ABCDE ABCDE ABCDE
ABCDE ABCDE ABCDE ABCDE ABCDE
ABCDE ABCDE ABCDE ABCDE ABCDE
ABCDE ABCDE ABCDE ABCDE ABCDE
ABCDE ABCDE ABCDE ABCDE ABCDE
ABCDE ABCDE ABCDE ABCDE ABCDE
ABCDE ABCDE ABCDE ABCDE ABCDE
ABCDE ABCDE ABCDE ABCDE ABCDE
ABCDE ABCDE ABCDE ABCDE ABCDE
ABCDE ABCDE ABCDE ABCDE ABCDE
ABCDE ABCDE ABCDE ABCDE ABCDE
ABCDE ABCDE ABCDE ABCDE ABCDE
ABCDE ABCDE ABCDE ABCDE ABCDE
ABCDE ABCDE ABCDE ABCDE ABCDE
ABCDE ABCDE ABCDE ABCDE ABCDE
ABCDE ABCDE ABCDE ABCDE ABCDE
ABCDE ABCDE ABCDE ABCDE ABCDE
ABCDE ABCDE ABCDE ABCDE ABCDE
ABCDE ABCDE ABCDE ABCDE ABCDE
ABCDE ABCDE ABCDE ABCDE ABCDE
ABCDE ABCDE ABCDE ABCDE ABCDE
ABCDE ABCDE ABCDE ABCDE ABCDE
RR
❖
Having the Date Stamped on Prints
See ⇒ P.122 “Date Stamp—Having
the Date Stamped on Prints”.
GROVER0E
R
GROVER1E
❖
Having Pres et Mes sages St amped on
Prints
See ⇒ P.127 “Stamp—Having Preset
Messages Stamped on Prints”.
❖
Having Custom Messages Stamped
on Prints
See ⇒ P.129 “User Stamp—Having
Custom Messages Stamped on
Prints”.
R
'98.7.25
❖
Having Page Numbers Stamped on
Prints
See ⇒ P.124 “Page Stamp—Having
Page Numbers Stamped on Prints”.
1
– 1 –
GRUSTA0E
GRDATE0E
5
GRPAGE0E
x
Ruby-gb3_FM.book Page xi Tuesday, January 25, 2000 3:03 PM
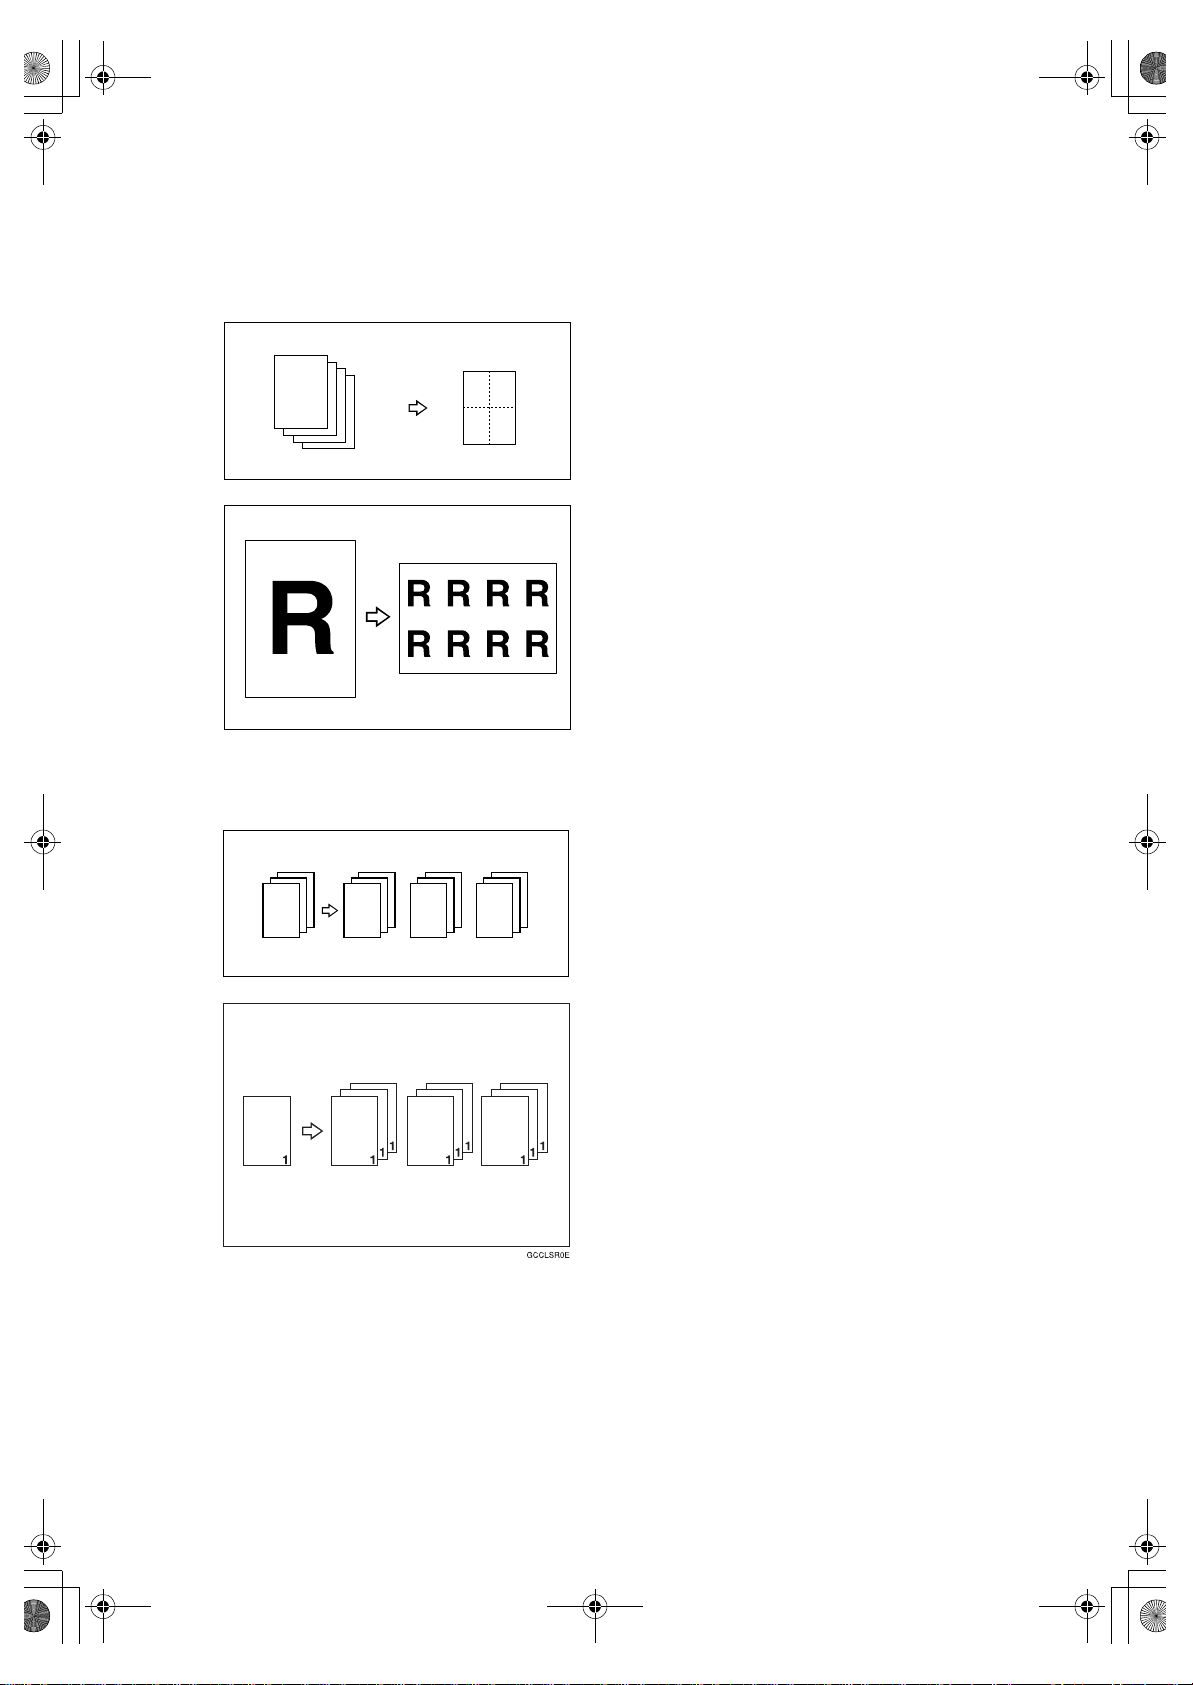
❖
Combining Originals into one Print
with the Memory Board
See ⇒ P.131 “Memory Combine—
Combining Originals into one Print
with the Memory Board”.
1
2
3
4
12
43
GRMCOM0E
❖
Sorting Prints into Sets
See ⇒ P.139 “Sort/Class Sort”.
3
2
1
3
2
1
1
GRREPE0E
3
2
3
2
1
xi

Ruby-gb3_FM.book Page xii Tuesday, January 25, 2000 3:03 PM
TABLE OF CONTENTS
Machine Exterior........................................................................................ 1
Machine Interior......................................................................................... 2
Options....................................................................................................... 4
Operation Panel......................................................................................... 6
Keys........................ ...................................................................................... 6
Indicators................... .................................................................................. .. 8
Panel Display............................................................................................. 9
Panel Display Layout .......................................................... ........................ 10
1.Operation
Print Paper ............................................................................................... 11
Originals................................................................................................... 14
Changing the Paper Size........................................................................ 16
Changing the Paper Size in Tray 1............................................................. 16
Changing the Paper Size in Tray 2............................................................. 17
Changing the Paper Size in the External Tray............................................ 17
Entering a User Code to Use the Machine............................................ 19
Standard Printing .................................................................................... 20
Removing Prints.......................................................................................... 21
Energy Saver Mode — Saving Energy................................................... 23
Printing from the External Tray.............................................................. 24
Closing the External Tray............................................................................ 26
Paper Delivery Tray Position............................. ..... .... ..... ....................... 28
Selecting the Paper Delivery Tray Position. ................... ............................. 28
Registering a Custom Position.................................................................... 29
Recalling a Custom Position....................................................................... 30
Selecting Print Paper.............................................................................. 32
Auto Paper Select....................................... ................................................ 32
Manual Paper Select................................................................ ................... 33
Adjusting the Position of Printed Images............................................. 34
Adjusting the Image Density of Prints................................................... 35
Before Making a Master.............................................................................. 35
After Making a Master................................................................................. 35
Tint Mode—Halftone Printing................................................................. 36
Changing the Printing Speed................................................................. 37
Stopping a Multi-print Run ..................................................................... 38
Stopping a Multi-print Run to Print Another Original................................... 38
Changing the Number of Prints Entered and Checking Completed Prints... 38
Preset Reduce/Enlarge—Reducing and Enlarging Using Preset Ratios
xii
... 39

Ruby-gb3_FM.book Page xiii Tuesday, January 25, 2000 3:03 PM
Auto Magnification—Having the Machine Choose Reproduction Ratios
... 41
Zoom—Reducing and Enlarging in 1% Steps....................................... 44
Directional Magnification (%)—Stretching and Squeezing
the Image in 1% Steps......................................................................... 46
Directional Magnification (Size)—Stretching and Squeezing
the Image into the Copy Area............................................................. 48
Erasing Center and Edge Margins......................................................... 50
Edge Erase—Erasing Edge Margins...................................................... 51
Printing onto Various Kinds of Paper.................................................... 52
Printing onto Thick Paper............................................................................ 52
Printing onto Thin Paper ............................................................................. 52
Printing onto Envelopes.............................................................................. 53
Printing onto Special Kinds of Paper........................................................... 53
Selecting a Mode to Match Your Original.............................................. 55
Letter/Photo Mode Printing ......................................................................... 55
Photo Mode Printing.................................................................................... 56
Pencil Mode Printing................................................................................... 57
Economy Mode—Saving Ink.................................................................. 58
Auto Cycle—Making Master and Prints in one Operation................... 59
All Class Mode—Making Variable Numbers of Prints from
the Same Original Using All Stored Data........................................... 60
Auto Class Mode— Making Variable Numbers of Prints from
the Same Original Using Stored Data ................................................ 62
Manual Class Mode with one Original—Making Variable
Numbers of Prints from the Same Original....................................... 65
Manual Class Mode with 2 or More Originals—Making Variable
Numbers of Prints from Different Originals....................................... 67
Class Mode—Making Fixed Numbers of Prints from the Same Original
... 69
Combine Originals—Combining Originals into one Print ................... 71
Auto Combine Mode—Having Images Repeated on one Print........... 76
Skip Feed Printing................................................................................... 78
Programs—Storing Your Print Settings in Memory............................. 80
Storing a Program....................................................................................... 80
Recalling a Program.................................................................................... 81
Protecting a Program..................................... ............................................. 81
Removing Program Protection.................................................................... 82
Security Mode—Printing Confidential Documents.............................. 83
Quality Start Mode— Regaining Image Density When Drum Ink Dries
Using Quality Start Manually....................................................................... 84
... 84
Job Separation—Separating Printing Sets in the Paper Delivery Tray
... 85
Conserving the Master............................................................................ 87
On Line Printing....................................................................................... 88
xiii

Ruby-gb3_FM.book Page xiv Tuesday, January 25, 2000 3:03 PM
2.Optional Functions
Optional Document Feeder..................................................................... 89
Originals....... ............................................................................................... 89
Setting Originals in the Document Feeder.................................................. 90
Combine Printing with the Document Feeder ..................... ..................... ... 91
Manual Class Mode with Two or More Originals Using the Document Feeder
Color Printing Using the Optional Color Drum..................................... 95
Making Color Prints..................................................................................... 95
Changing the Color Drum Unit.................................................................... 95
Printing in Two Colors................................................................................. 97
Changing the Drum Size......................................................................... 99
Printing Area (At 23°C/73°F, 65% RH)........................................................ 99
Master Cut Length....................................................................................... 99
Image Rotation—Rotating Original Images........................................ 100
Make-up Printing Features ................................................................... 101
Main Features........................................................................................... 101
Make-up Modes for Designated Areas...................................................... 101
Make-up Modes for Outside Designated Areas ........................................ 103
Background Patterns............................ .................................... ................. 104
... 92
Command Sheets for Make-Up Printing.............................................. 105
Command Sheets ..................................................................................... 105
Making a Command Sheet........................................................................ 105
Command Sheets and Finished Prints...................................................... 111
Make-up Printing ................................................ ..... .... ..... ..................... 112
Make-up Printing with the Optional Document Feeder...................... 114
Make-up Samples........................ ............................ .... ..... ..... ................ 117
Image Overlay—Merging Images......................................................... 120
Date Stamp—Having the Date Stamped on Prints............................. 122
Page Stamp—Having Page Numbers Stamped on Prints................. 124
Stamp—Having Preset Messages Stamped on Prints....................... 127
User Stamp—Having Custom Messages Stamped on Prints............ 129
Memory Combine—Combining Originals into one Print with
the Memory Board.................... .... ..... ............................ ..... .... ..... ....... 131
Combining Several Single– sided Originals onto one S i ngle–sided Print... 131
Repeat—Repeating an Image over the Entire Print.................................. 136
Sort/Class Sort................... ..... ..... ............................ .... ..... ..... ................ 139
Sort—Sorting into Sets (123, 123, 123).................................................... 140
Class Sort.................................................................................................. 141
3.Combination Chart
Combination Chart................................................................................ 143
xiv

Ruby-gb3_FM.book Page xv Tuesday, January 25, 2000 3:03 PM
4.User Tools
Accessing the User Tools..................................................................... 145
User Tools Menu.................................................................................... 147
1. System.................................................................................................. 147
2. Set Operation Mode.............................................................................. 149
3. Initial Setting.......................................................................................... 150
4. Mode Setting......................................................................................... 152
5. Stamp.................................................................................................... 158
6. Set User Code(s) .................................................................................. 160
User Tool Menus in Detail..................................................................... 162
1-8 Time Setting........................................................................................ 162
3-4 Reproduction Ratio............................................................................. 162
3-5 Class Enter No.................................................................................... 163
3-9 Margin Erase Area.............................................................................. 164
3-12 Del. Tray Position.............................................................................. 165
4-11 No. of Skip Feed............................................................................... 166
4-14 No. of Q.start..................................................................................... 167
4-19 Type of Paper ................................................................................... 168
5-4 Stamp Position.................................................................................... 168
5-7 Position (User).................................................................................... 170
5-8 Regist. (User)...................................................................................... 172
5-11 Position (Date).................................................................................. 173
5-14 Position (Page) ................................................................................. 174
5-15 Make/Chg. Pattern............................................................................ 175
6-1 Check Counter.................................................................................... 176
6-2 Reset Counters................................................................................... 176
6-4 Chg. User Code.................................................................................. 177
6-5 Del. User Code ................................................................................... 178
5.What to do If Something Goes Wrong
If Your Machine does not Operate as You Want................................. 179
If You Cannot Make Prints as You Want............................................. 182
Combine Originals Mode........................................................................... 182
Loading Paper........................................................................................ 183
Loading Paper in Tray 1............................................................................ 183
Loading Paper in Tray 2............................................................................ 184
Loading Paper in the External Tray........................................................... 185
x
Clearing Misfeeds............................................................................. 186
”x + A” Paper Misfeed in the Paper Feed Section................................... 186
”x + A + B” Paper Misfeed in the Paper Feed Section............................ 187
”x + A1” Paper Misfeed in the Paper Feed Section................................. 188
”x + B” Paper or Master Wrapped around the Drum............................... 188
”x + C” Paper Misfeed in the Paper Exit Section..................................... 191
”x + D” Master Misfeed in the Master Feed Section................................ 191
”x + D + B” Master Misfeed in the Master Feed Section......................... 192
xv

Ruby-gb3_FM.book Page xvi Tuesday, January 25, 2000 3:03 PM
”x + B + E” Master Misfeed in the Master Eject Section ......................... 192
”x + E” Master Misfeed in the Master Eject Section................................ 193
”x + Y” Paper Misfeed in the Paper Feed Section................................... 194
”x + Y1” Paper Misfeed in Tray 1............................................................ 194
”x + P” Original Misfeed Occurs When Using the Optional Document Feeder
”x + R1” Paper Misfeed in the Optional Sorter........................................ 196
”x + R2” Paper Misfeed in the Optional Sorter........................................ 196
”x + R3” ”x + R4” Paper Misfeed in the Optional Sorter.. ..................... . 197
When the Open Cover/Unit Indicator (M) Lights.............................. .. 198
When the Add Ink Indicator (j) Lights............................................... 200
When the Master End Indicator (C) Lights............................. ..... ....... 202
When the Master Eject Indicator (k) Lights....................................... 204
When Other Indicators are Lit.............................................................. 205
When Prints are not Delivered in a Neat Stack................................... 206
When Printing on Small Size Paper.......................................................... 206
When the Machine Cannot Detect the Paper Size.................................... 206
... 194
Poor Printing.......................................................................................... 208
Dirty Background....................................................................................... 208
Black Lines/Stained Prints ........................................................................ 211
Faint Prints................................................................................................ 211
6.Remarks
Do's and Don'ts ..................................................................................... 213
Where to Put Your Machine.................................................................. 215
Environment.............................................................................................. 215
Power Connection..................................................................................... 216
Machine Clearance................................................................................... 216
Maintaining Your Machine.................................................................... 218
Cleaning the Main Frame.......................................................................... 218
Cleaning the Optional Document Feeder.................................................. 219
7.Specifications
Main Frame............................................................................................. 221
Document Feeder (Option)................................................................... 225
Sorter (Option)........................................... .... ............................ ..... ..... .. 226
Consumables......................................................................................... 227
INDEX...................................................................................................... 228
xvi
Ruby-gb3_FM.book Page 1 Tuesday, January 25, 2000 3:03 PM
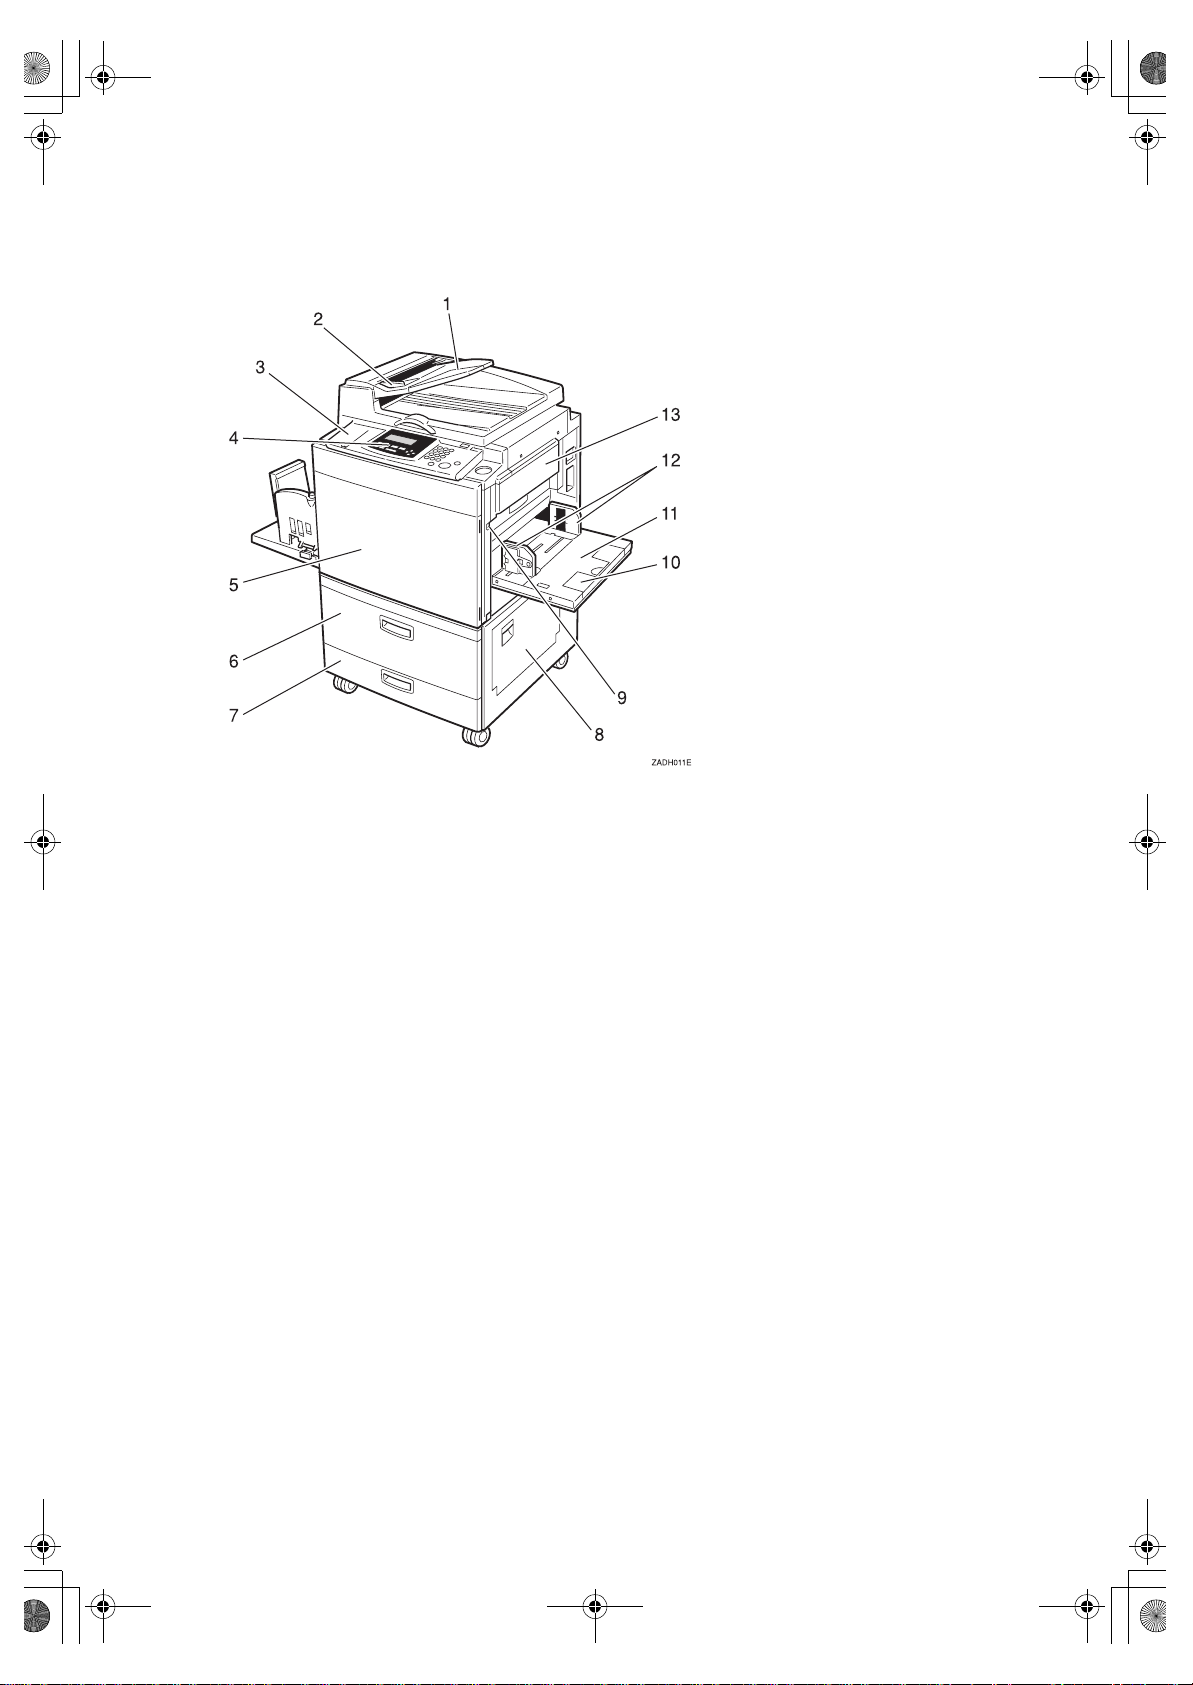
Machine Exterior
1. Platen cover or document feeder
(option)
Lower the platen cover over a single original placed on the exposure glass for copying.
If you have the optional document feeder, insert a stack of originals here. They
will be fed automatically.
(The illustration shows the document
feeder.)
2. Guide
Prevents originals being fed skewed.
3. Flip up cover
Flip up to access the keys underneath.
4. Operation panel
See ⇒ P.6 “Operation Panel”.
5. Front door
Open to access the inside of the machine.
6. Tray 1
Set paper here.
8. Right cover
Open to remove jammed paper.
9. External Tray Down key
Press to lower the external tray.
10. Extender
Pull out this extender when setting paper
larger than A4 L, 8
1
/2” × 11” L.
11. External tray
Set paper here.
12. Paper feed side plates
Prevent paper being fed skewed.
13. Master tray
Open this unit when installing the master.
7. Tray 2
Set paper here.
1
Ruby-gb3_FM.book Page 2 Tuesday, January 25, 2000 3:03 PM
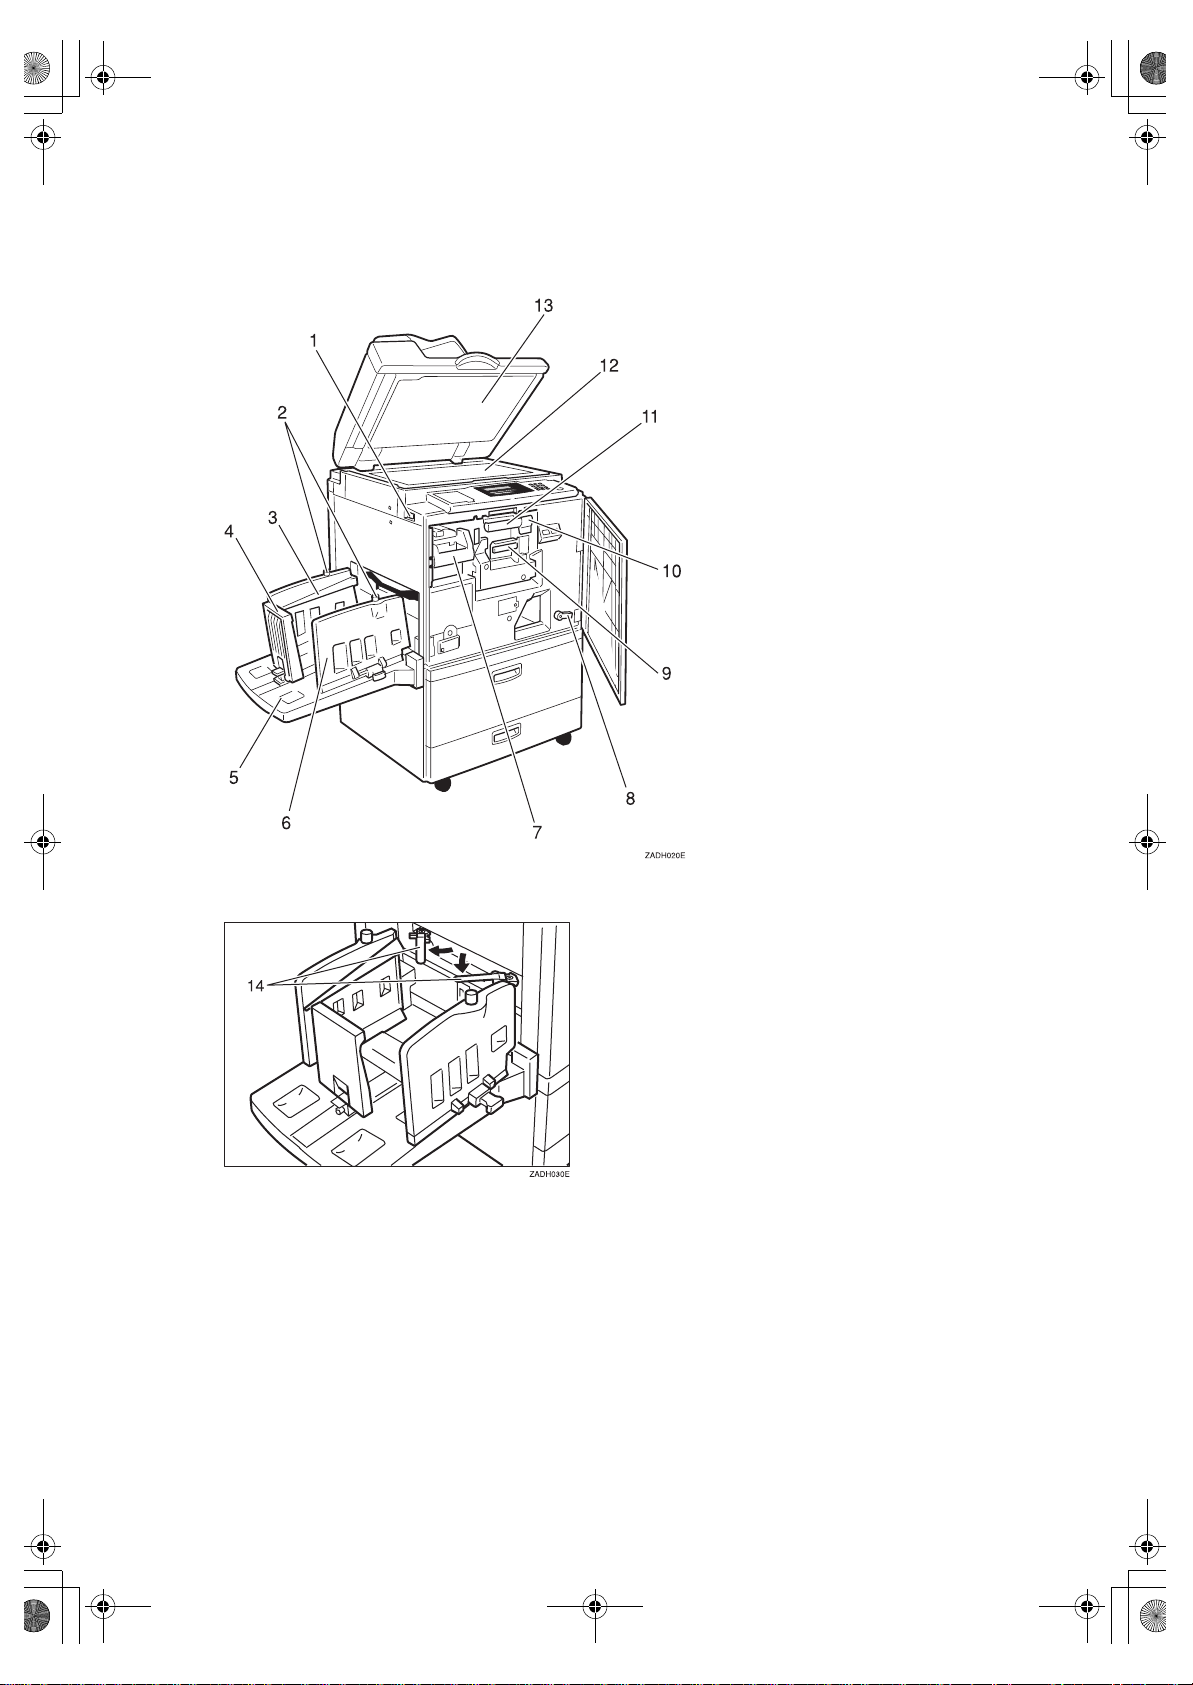
Machine Interior
1. Main switch
Use to turn the power on or off.
2. Paper alignment wing knobs
Use to lift or lower the paper alignment
wings.
3. Paper alignment wings
Lift or lower the wings depending on the
type of paper being used.
2
4. Paper delivery end plate
This plate aligns the leading edge of
prints.
5. Paper delivery tray
Completed prints are delivered here.
6. Paper delivery side plates
These plates align the prints on the paper
delivery tray.

Ruby-gb3_FM.book Page 3 Tuesday, January 25, 2000 3:03 PM
7. Handle E1
Use to pull out the master eject unit.
8. Guide plate lever
Turn to remove misfed paper.
9. Ink holder
Set the ink cartridge in this holder.
10. Drum unit lock lever B1
Lower to unlock and pull out the drum
unit.
11. Drum unit
The master is wrapped around this unit.
12. Exposure glass (Contact glass)
Position originals here face down for
printing.
13. Platen cover or document feeder
(option)
Lower this cover over an original on the
exposure glass (contact glass).
14. Trailing edge guides
Swing out these guides when you use A4,
1
8
/2" × 11"K or B5L paper.
3
Ruby-gb3_FM.book Page 4 Tuesday, January 25, 2000 3:03 PM
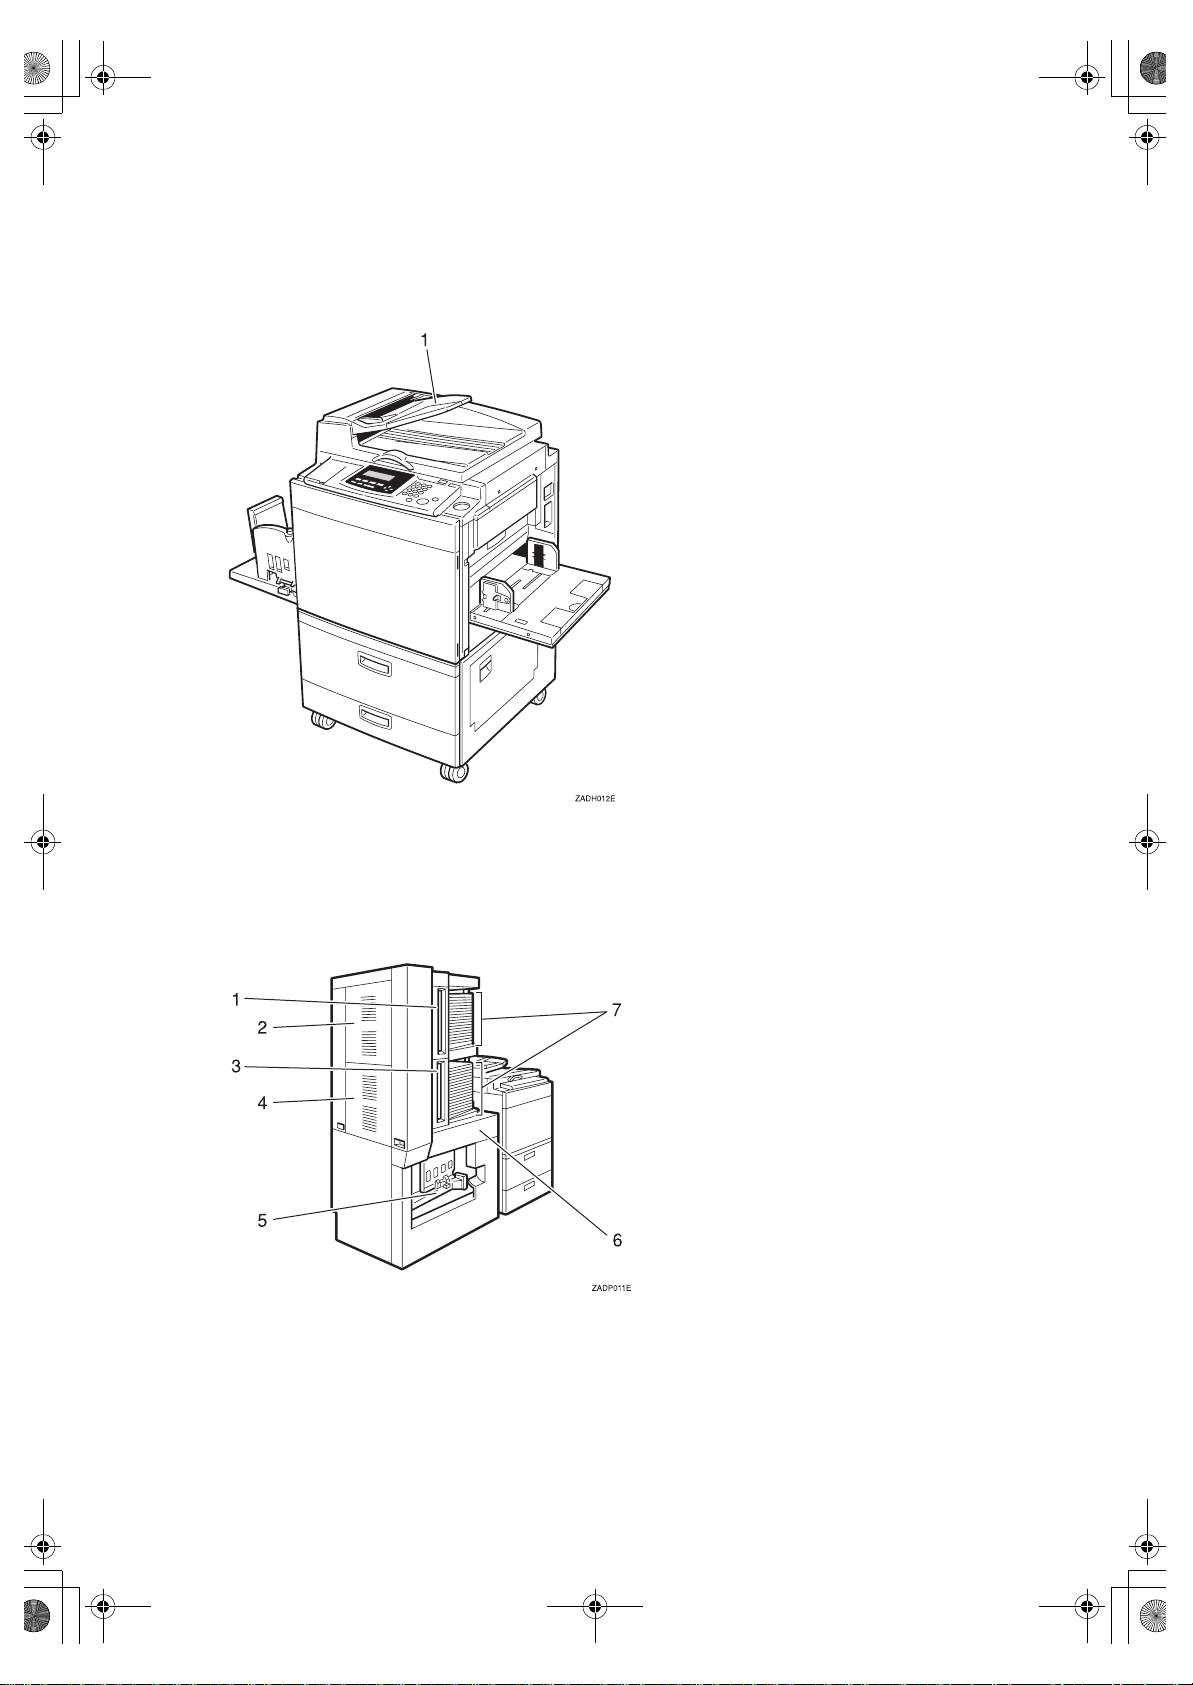
Options
❖
Document feeder
1. Document Feeder
❖
Sorter
1. Upper tray cover
2. Upper side cover
3. Lower tray cover
5. Paper delivery tray
6. Front cover
7. Trays
4. Lower side cover
4

Ruby-gb3_FM.book Page 5 Tuesday, January 25, 2000 3:03 PM
Note
❒
Other options:
• Color Drums: A3, 11" × 17" drum
• Color Drums: A4, 8
1
/2" × 11" drum
• Key Counter
• Memory Board
• PC Controller
5
Ruby-gb3_FM.book Page 6 Tuesday, January 25, 2000 3:03 PM
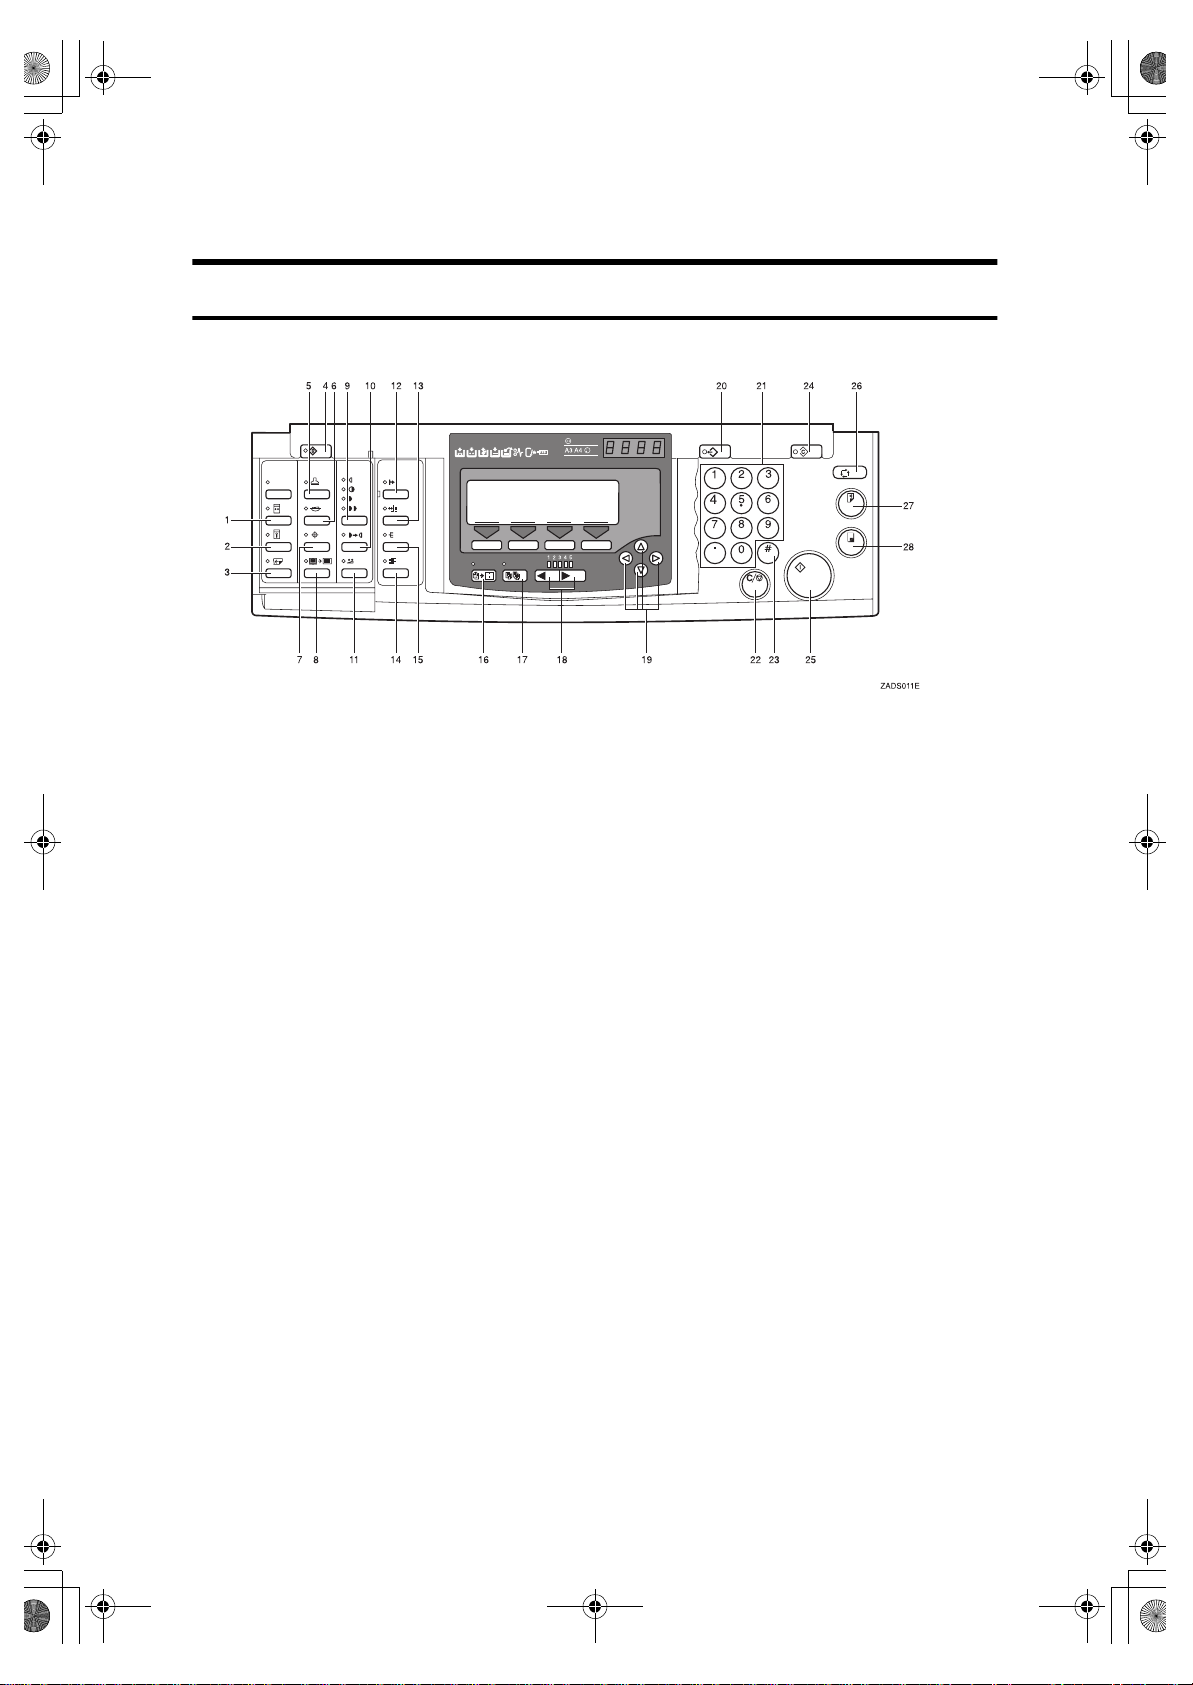
Operation Panel
Keys
key
}
}
}
key
key
}
key
}
key
key
⇒
1.
{
Quality Start
See ⇒ P.84 “Quality Start Mode— Regaining Image Density When Drum Ink Dries”.
2.
{
Security
See ⇒ P.83 “Security Mode—Printing Confidential Documents”.
3.
{
Skip Feed
Press to select skip feed printing. See
P.78 “Skip Feed Printing”.
4.
{
User Tools
Press to change the default settings to
meet your requirements.
5.
{
Press to select the optional Stamp function. See ⇒ P.122 “Date Stamp—Having
the Date Stamped on Prints”, ⇒ P.124 “Page
Stamp—Having Page Numbers Stamped on
Prints”, ⇒ P.127 “Stamp—Having Preset
Messages Stamped on Prints”, ⇒ P.129
“User Stamp—Having Custom Messages
Stamped on Prints”.
6.
{
Press to select the optional Make-up
function. See ⇒ P.112 “Make-up Printing”.
}
Stamp
Make-Up
key
}
key
}
}
key
}
key
key
}
key
}
key
}
⇒
⇒
7.
{
Overlay
Press to select the optional Image Overlay mode. See ⇒ P.120 “Image Overlay—
Merging Images”.
8.
{
Edge Erase
Press to select Edge Erase mode. See
P.51 “Edge Erase—Erasing Edge Margins”.
9.
{
Image Density
Press to make prints darker or lighter. See
P.35 “Adjusting the Image Density of
⇒
Prints”.
10.
{
Tint
Press to reproduce tinted images. See
P.36 “Tint Mode—Halftone Printing”.
11.
{
Economy Mode
Press to save ink. See ⇒ P.58 “Economy
Mode—Saving Ink”.
12.
{
On Line
See ⇒ P.88 “On Line Printing”
13.
{
Auto Delivery Adjust
Press to adjust the position of the paper
delivery end plate and paper delivery
side plates.
6

Ruby-gb3_FM.book Page 7 Tuesday, January 25, 2000 3:03 PM
key
}
key
}
⇒
14.
{
Job Separator
See ⇒ P.85 “Job Separation—Separating
Printing Sets in the Paper Delivery Tray”.
15.
{
Sorter
Press to select the optional Sort or Class
Sort function.
16.
{
Combine
Press to combine originals onto 1 print.
See ⇒ P.71 “Combine Originals—Combin-
ing Originals into one Print”, ⇒ P.131
“Memory Combine—Combining Originals
into one Print with the Memory Board”,
P.76 “Auto Combine Mode—Having Images
Repeated on one Print”.
17.
{
Class
Press to select All Class, Auto Class,
Manual Class, or Class mode. See ⇒ P.60
“All Class Mode—Making Variable Numbers of Prints from the Same Original Using
All Stored Data”, ⇒ P.62 “Auto Class
Mode— Making Variable Numbers of Prints
from the Same Original Using Stored Data”,
P.65 “Manual Class Mode with one Orig-
⇒
inal—Making Variable Numbers of Prints
from the Same Original”, ⇒ P.67 “Manual
Class Mode with 2 or More Originals—Making Variable Numbers of Prints from Different Originals”, ⇒ P.69 “Class Mode—
Making Fixed Numbers of Prints from the
Same Original”.
}
key
}
key
21. Number keys
Press to enter the desired number of
prints and data for selected modes.
key
key
}
key
key
}
}
key
key
}
22.
{
Clear/Stop
Press to stop printing.
23.
Use to enter data in selected modes.
24.
Press to clear any previously entered job
settings.
25.
Press to make a master.
26.
Use to process the master and make
prints in one operation. See ⇒ P.59 “Auto
Cycle—Making Master and Prints in one
Operation”.
27.
Press to make proof prints.
28.
Press to start printing.
key
{q}
{
Clear Modes/Energy Saver
{
}
Start
{
Auto Cycle
{
Proof
{
}
Print
18.
{W} {V}
Press to adjust the printing speed. See
P.35 “Adjusting the Image Density of
Prints”, ⇒ P.37 “Changing the Printing
Speed”.
19.
{~}{}}{|}{{}
Press to shift the image forward, backward, right, or left. See ⇒ P.34 “Adjusting
the Position of Printed Images”.
Also use to highlight items you wish to
select on the panel display.
20.
{
Program
Press to input or recall programs. See
P.80 “Programs—Storing Your Print Set-
tings in Memory”.
keys (Speed keys)
keys
key
}
⇒
⇒
7

Ruby-gb3_FM.book Page 8 Tuesday, January 25, 2000 3:03 PM
Indicators
1. Special feature indicator
Lights to indicate that special features
have been selected. To access the special
features, lift up the cover on the left side
of the operation panel.
2. Monitor indicators
These indicators light to inform you of
the status of the machine. See ⇒ P.179 “If
Your Machine does not Operate as You
Want”.
3. A3/11"
Lights when the A3, 11" × 17" drum unit
is installed. See ⇒ P.99 “Changing the
Drum Size”.
4. A4/8
Lights when the A4, 81/2" × 11" drum unit
is installed. See ⇒ P.99 “Changing the
Drum Size”.
17" drum indicator
×
1
/2" × 11" drum indicator
5. Color drum indicator
Lights when the color drum unit is installed. See ⇒ P.95 “Color Printing Using
the Optional Color Drum”.
6. Counter
Displays the number of prints entered.
While printing, it shows the number of
prints remaining.
7. Panel display
See ⇒ P.9 “Panel Display”.
8
Ruby-gb3_FM.book Page 9 Tuesday, January 25, 2000 3:03 PM
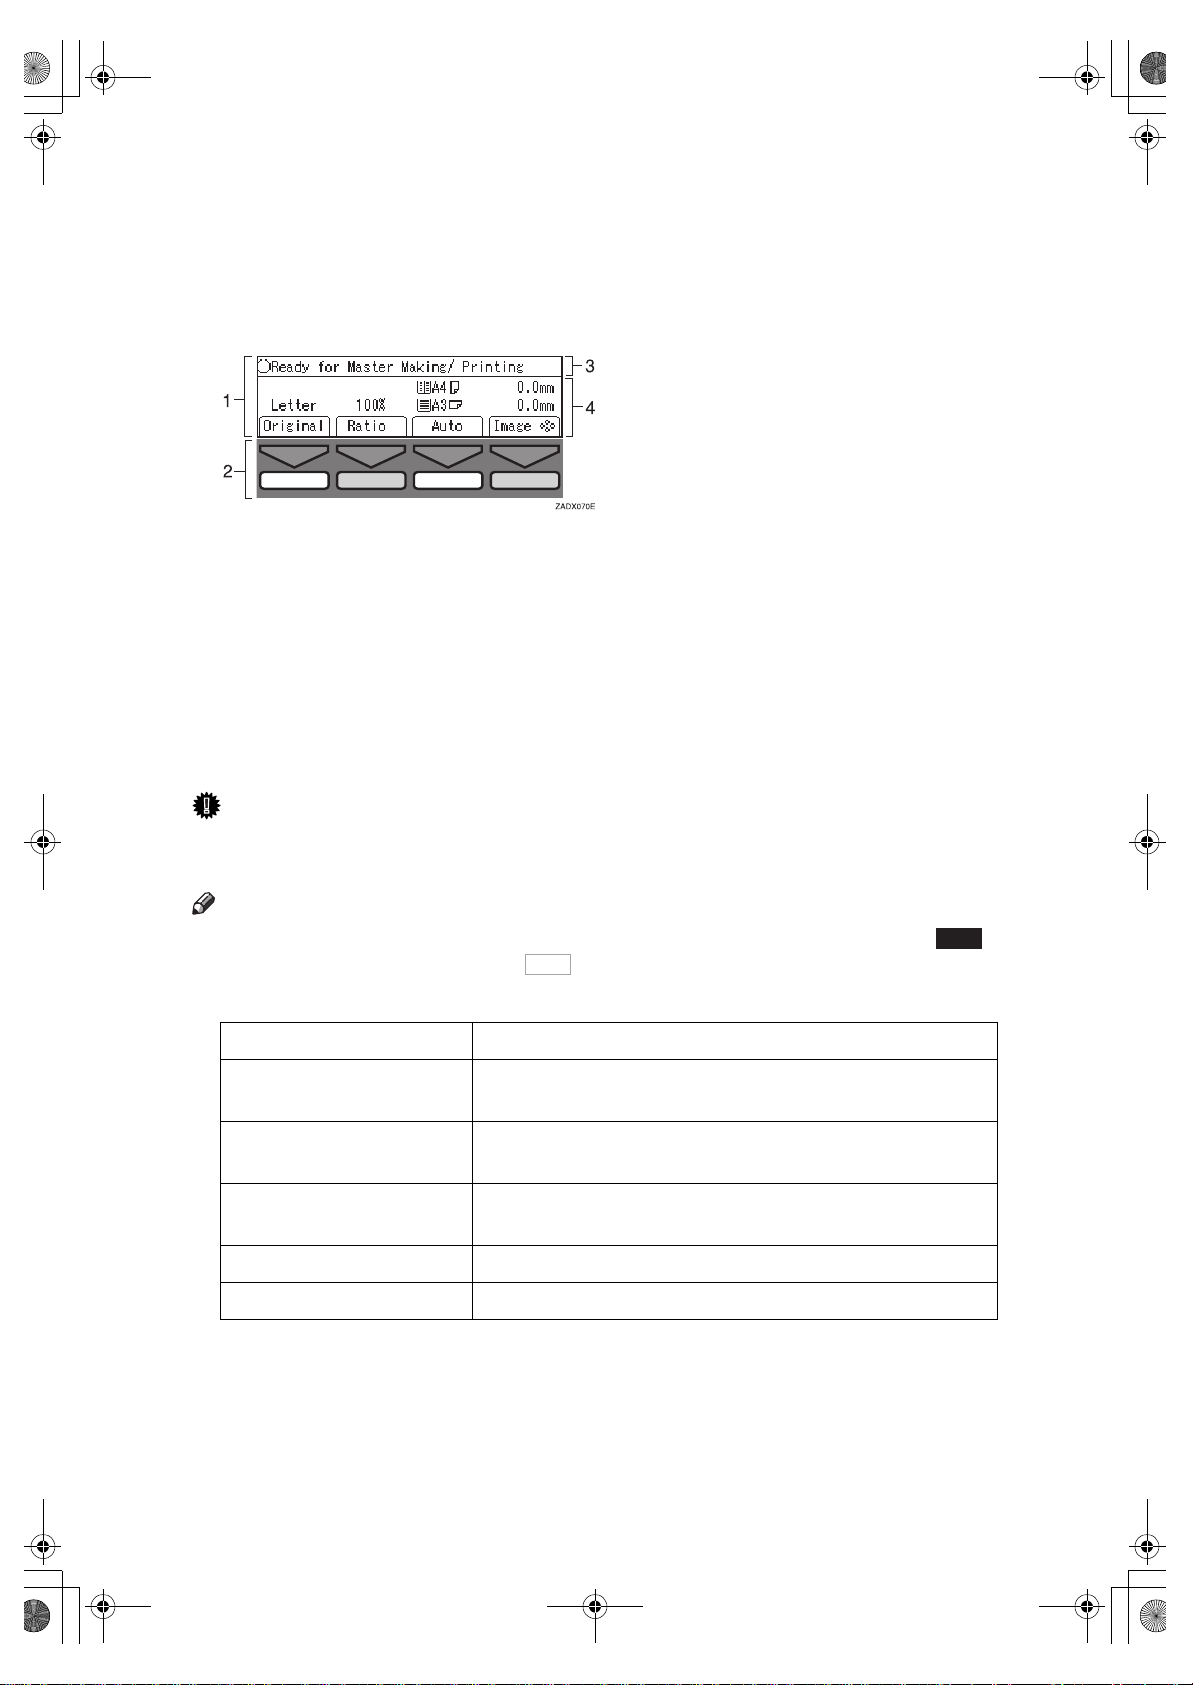
Panel Display
The panel display shows the machine status, error messages, and function menus.
1. Items for the selected function.
2. These keys correspond to the se-
lectable items shown above them on
the panel display. To select an item
shown on the panel display, press
the key directly below it.
3. Machine status or messages.
4. Items which can be selected.
Important
❒
Do not apply a strong shock or force of about 30N (about 3kgf) or more to the
panel display or it could be damaged.
Note
❒
When you select an item on the panel display, it is highlighted (e.g. ).
Items shown grayed-out (e.g. ) cannot be selected.
❒
Common panel display items:
[OK] Confirms selection of a function or enters a value.
[
[
{~}{}}{|}{{}
[
[
] Cancels selection of a function or input of a value and
Cancel
Prev.][Next
Select
] Returns to the previous display.
Exit
] When there are too many items to fit on the panel dis-
[←][→] Press to highlight items you wish to select on the panel
] Selects a value.
OK
returns to the previous display.
play, use these keys to move between pages.
display.
Auto
9
Ruby-gb3_FM.book Page 10 Tuesday, January 25, 2000 3:03 PM
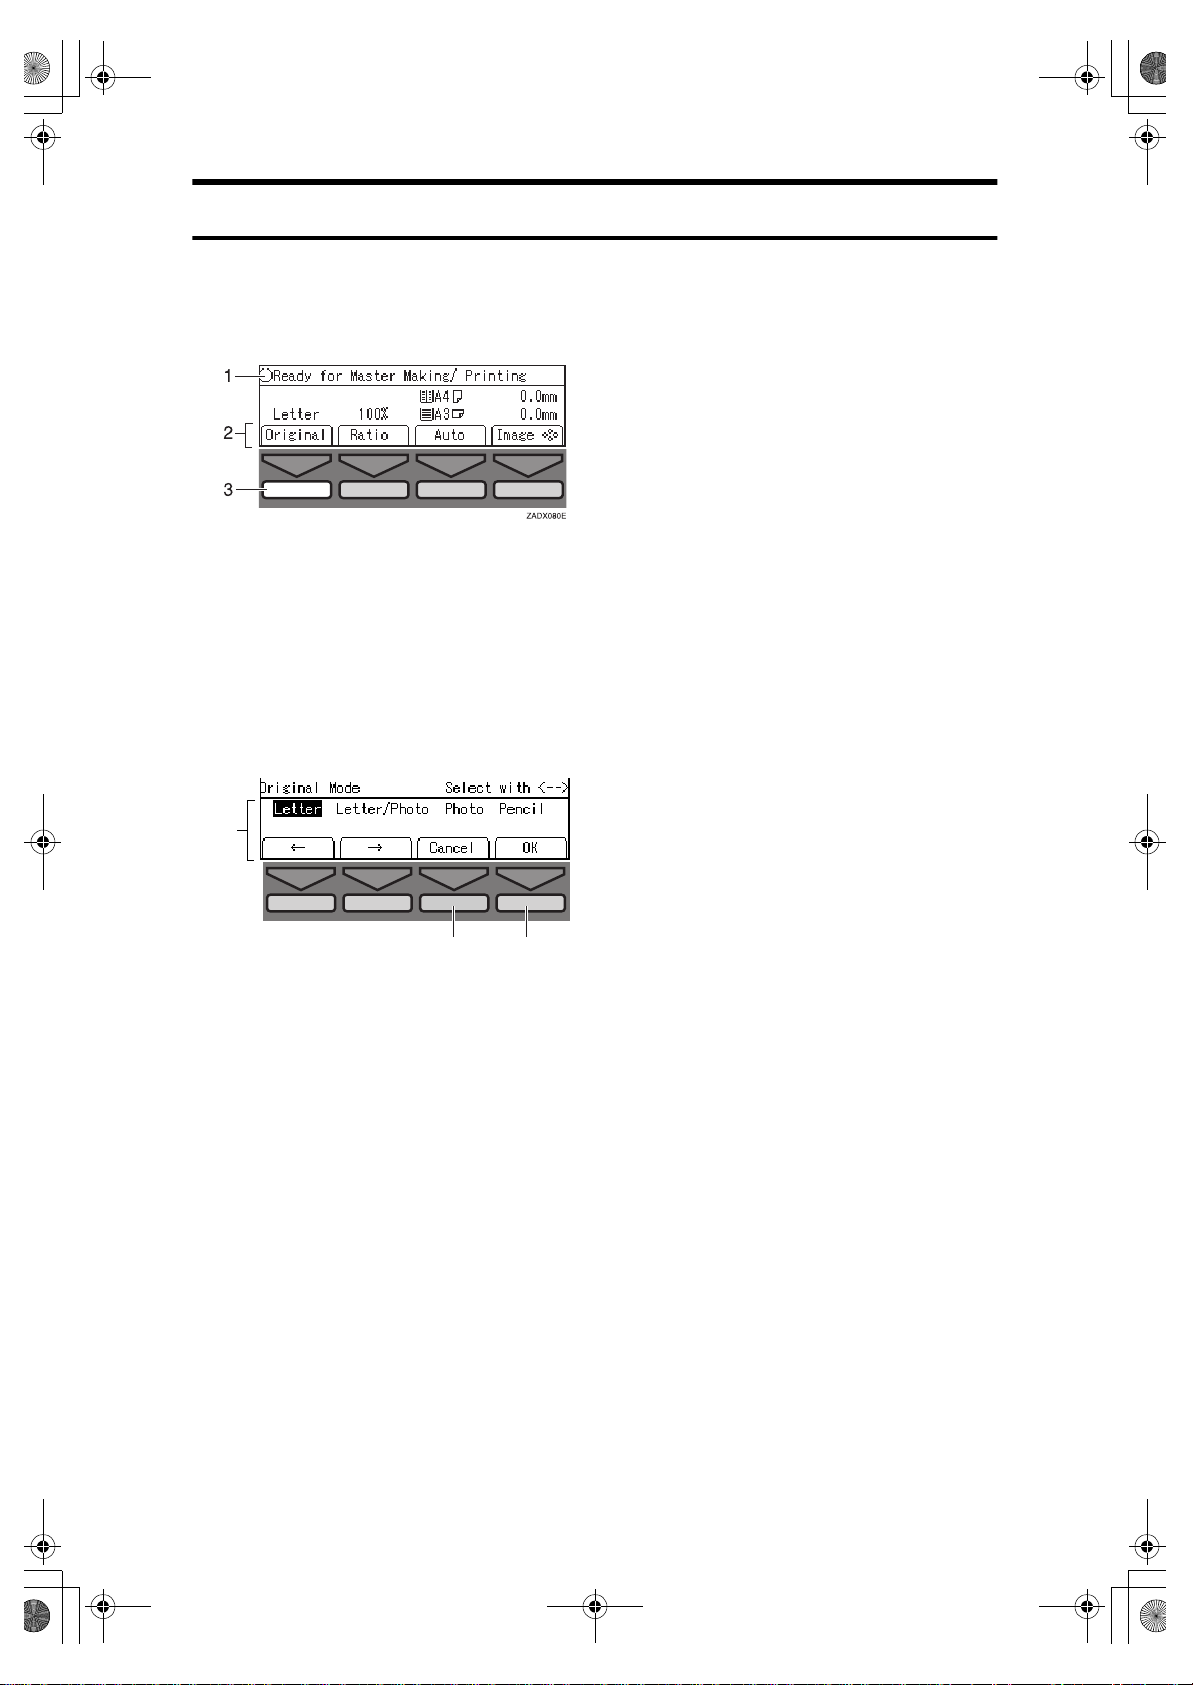
Panel Display Layout
The basic elements used on the panel display are shown below. Understanding
their meaning helps you exploit this machine's features quickly and easily.
❖
Sample display w hen selecting the [Original] key
1. Machine status or message.
2. Available functions.
3. Illustrations of displays in this
manual show the next key to be
pressed whitened out.
E.g. kmeans “Press the
[
Original
key”.
]
1
TPES510E
23
1. Available functions.
2. Cancels the settings and returns
to the previous display.
3. Confirms the settings.
10
 Loading...