

Ricoh Savin en5100WD, Lanier LW5100en, Aficio MP W5100en, Lanier LW7140en, Aficio MP W7140en Operating Instructions Manual
...Page 1
Placing Originals
1
Basic Copying
2
Advanced Copying
3
Document Server
4
Appendix
5
Operating Instructions
Copy/Document Server
Reference
For safe and correct use, be sure to read the Safety Information in "About This Machine" before using the machine.
Page 2

Introduction
This manual contains detailed instructions and notes on the operation and use of this machine. For your safety and
benefit, read this manual carefully before using the machine. Keep this manual in a handy place for quick reference.
Important
Contents of this manual are subject to change without prior notice. In no event will the company be liable for direct,
indirect, special, incidental, or consequential damages as a result of handling or operating the machine.
Do not copy or print any item for which reproduction is prohibited by law.
Copying or printing the following items is generally prohibited by local law:
bank notes, revenue stamps, bonds, stock certificates, bank drafts, checks, passports, driver's licenses.
The preceding list is meant as a guide only and is not inclusive. We assume no responsibility for its completeness or
accuracy. If you have any questions concerning the legality of copying or printing certain items, consult with your
legal advisor.
Notes:
Some illustrations in this manual might be slightly different from the machine.
Certain options might not be available in some countries. For details, please contact your local dealer.
Depending on which country you are in, certain units may be optional. For details, please contact your local dealer.
Notes:
The model names of the machines do not appear in the following pages. Check the type of your machine before
reading this manual. (For details, see "Machine Types", About This Machine.)
Type 1: en5100WD/LW5100en/Aficio MP W5100en
Type 2: en7140WD/LW7140en/Aficio MP W7140en
Certain types might not be available in some countries. For details, please contact your local dealer.
Two kinds of size notation are employed in this manual. With this machine refer to the inch version.
Page 3

Manuals for This Machine
Refer to the manuals that are relevant to what you want to do with the machine.
• Media differ according to manual.
• The printed and electronic versions of a manual have the same contents.
• Adobe® Acrobat® Reader®/Adobe Reader must be installed in order to view the manuals as PDF
files.
• A Web browser must be installed in order to view the html manuals.
• For details about the functions of RW-7140, refer to the manuals for this option.
About This Machine
Be sure to read the Safety Information in this manual before using the machine.
This manual provides an introduction to the functions of the machine. It also explains the control
panel, preparation procedures for using the machine, how to enter text, and how to install the CDROMs provided.
Troubleshooting
Provides a guide to solving common problems, and explains how to replace paper, toner, and
other consumables.
Copy/ Document Server Reference
Explains Copier and Document Server functions and operations. Also refer to this manual for
explanations on how to place originals.
Printer Reference
Explains Printer functions and operations.
Scanner Reference
Explains Scanner functions and operations.
Network Guide
Explains how to configure and operate the machine in a network environment, and use the
software provided.
General Settings Guide
Explains User Tools settings, and Address Book procedures such as registering e-mail addresses,
and user codes. Also refer to this manual for explanations on how to connect the machine.
Security Reference
This manual is for administrators of the machine. It explains security functions that you can use to
prevent unauthorized use of the machine, data tampering, or information leakage. For enhanced
security, we recommend that you first make the following settings:
1
Page 4

• Install the Device Certificate.
• Enable SSL (Secure Sockets Layer) Encryption.
• Change the user name and password of the administrator using Web Image Monitor.
For details, see “Setting Up the Machine”, Security Reference.
Be sure to read this manual when setting the enhanced security functions, or user and administrator
authentication.
PostScript 3 Supplement
Explains how to set up and use PostScript® 3TM.
UNIX Supplement
For “UNIX Supplement”, please visit our Web site or consult an authorized dealer.
This manual includes descriptions of functions and settings that might not be available on this
machine.
Information
Contains general notes on the machine, and information about the trademarks of product names
used in the manuals.
Other manuals
• Manuals for DeskTopBinder Lite
• DeskTopBinder Lite Setup Guide
• DeskTopBinder Introduction Guide
• Auto Document Link Guide
• Manuals provided are specific to machine types.
2
Page 5
What You Can Do with This Machine
BAS053S
BAS054S
This section introduces the machine's copier functions that you are likely to use most often.
Functions differ depending on machine type and options.
See p.17 "Functions Requiring Optional Configurations".
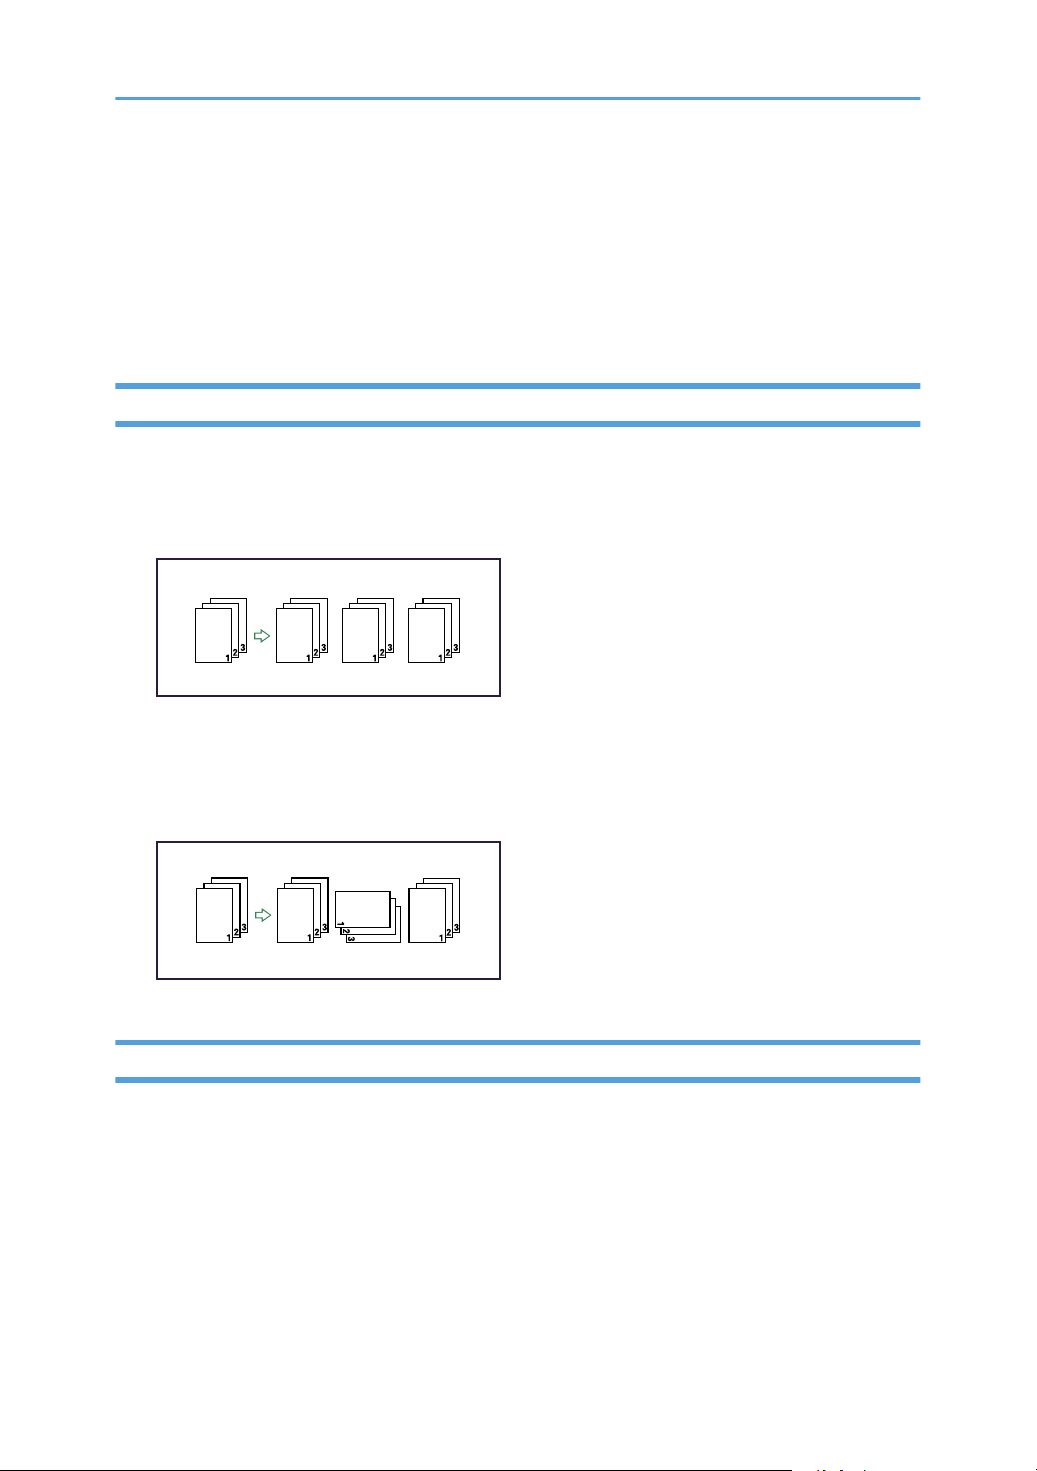
Assembling Copies as Sets in Sequential Order
Sort
Copies are assembled as sets in sequential order.
See p.77 "Sort".
Rotate Sort
Every other copy set is rotated by 90 degrees and delivered to the copy tray.
See p.77 "Sort".
Reducing/Enlarging Originals by Specifying the Paper Size
The machine automatically detects the original size, and then selects an appropriate reproduction ratio
based on the paper size you select.
Auto Reduce/Enlarge
See p.65 "Auto Reduce/Enlarge".
3
Page 6

BAS033S
Saving Paper
BAS038S
BAS039S4BAS040S
The Combine function allow you to save paper.
Combine
Combines several pages onto one side of a sheet.
See p.74 "One-Sided Combine".
Page 7
Adjusting Image
BKW013S
BKY003D
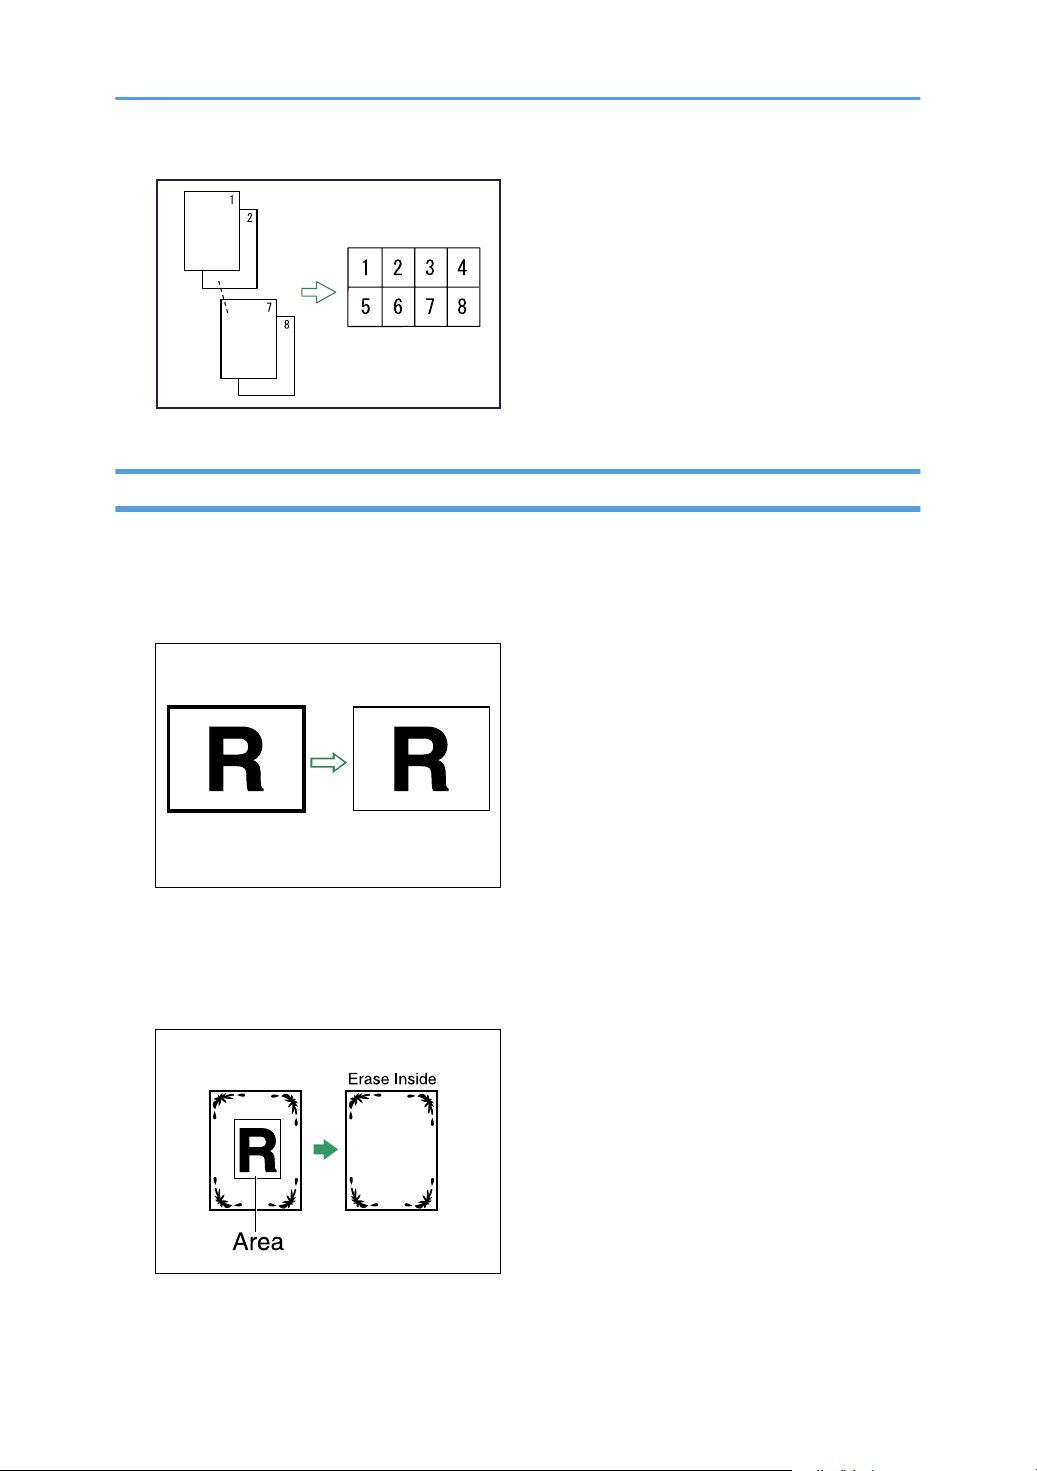
Erase Border
Erases the edge margin of the original image.
See p.124 "Erase Border (same width)" and p.125 "Erase Border (different width)"
Erase Inside
Copies the original while erasing a specified area.
See p.126 "Erase Inside"
5
Page 8
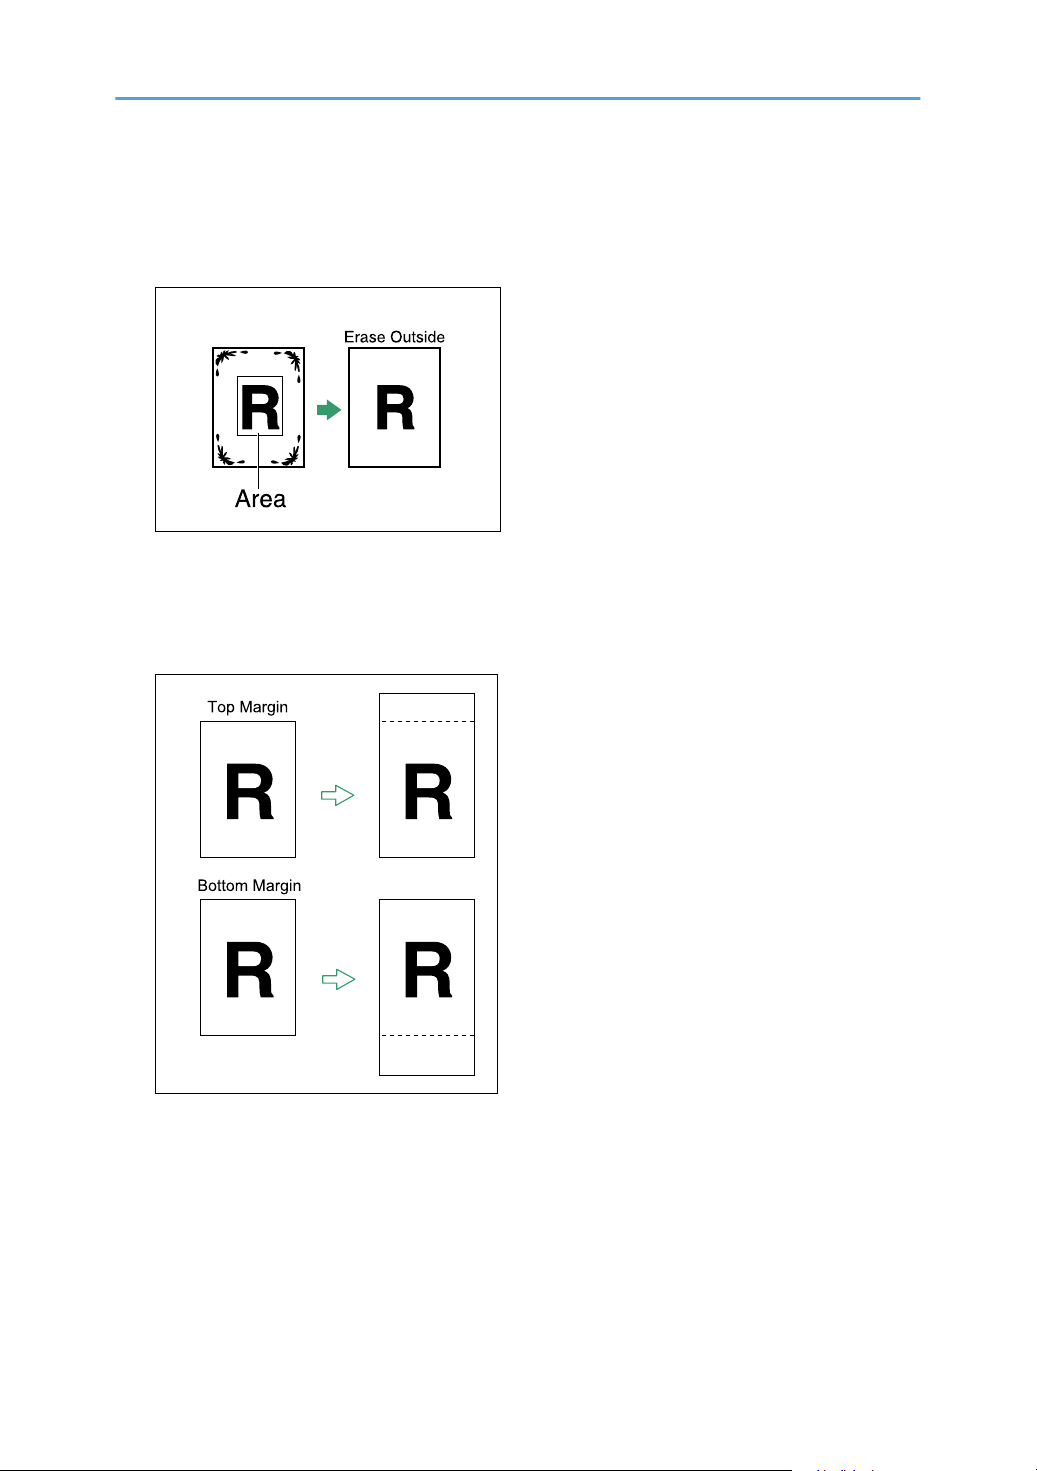
Erase Outside
BKY004D
BKY005D
Copies the original while erasing outside a specified area.
See p.128 "Erase Outside"
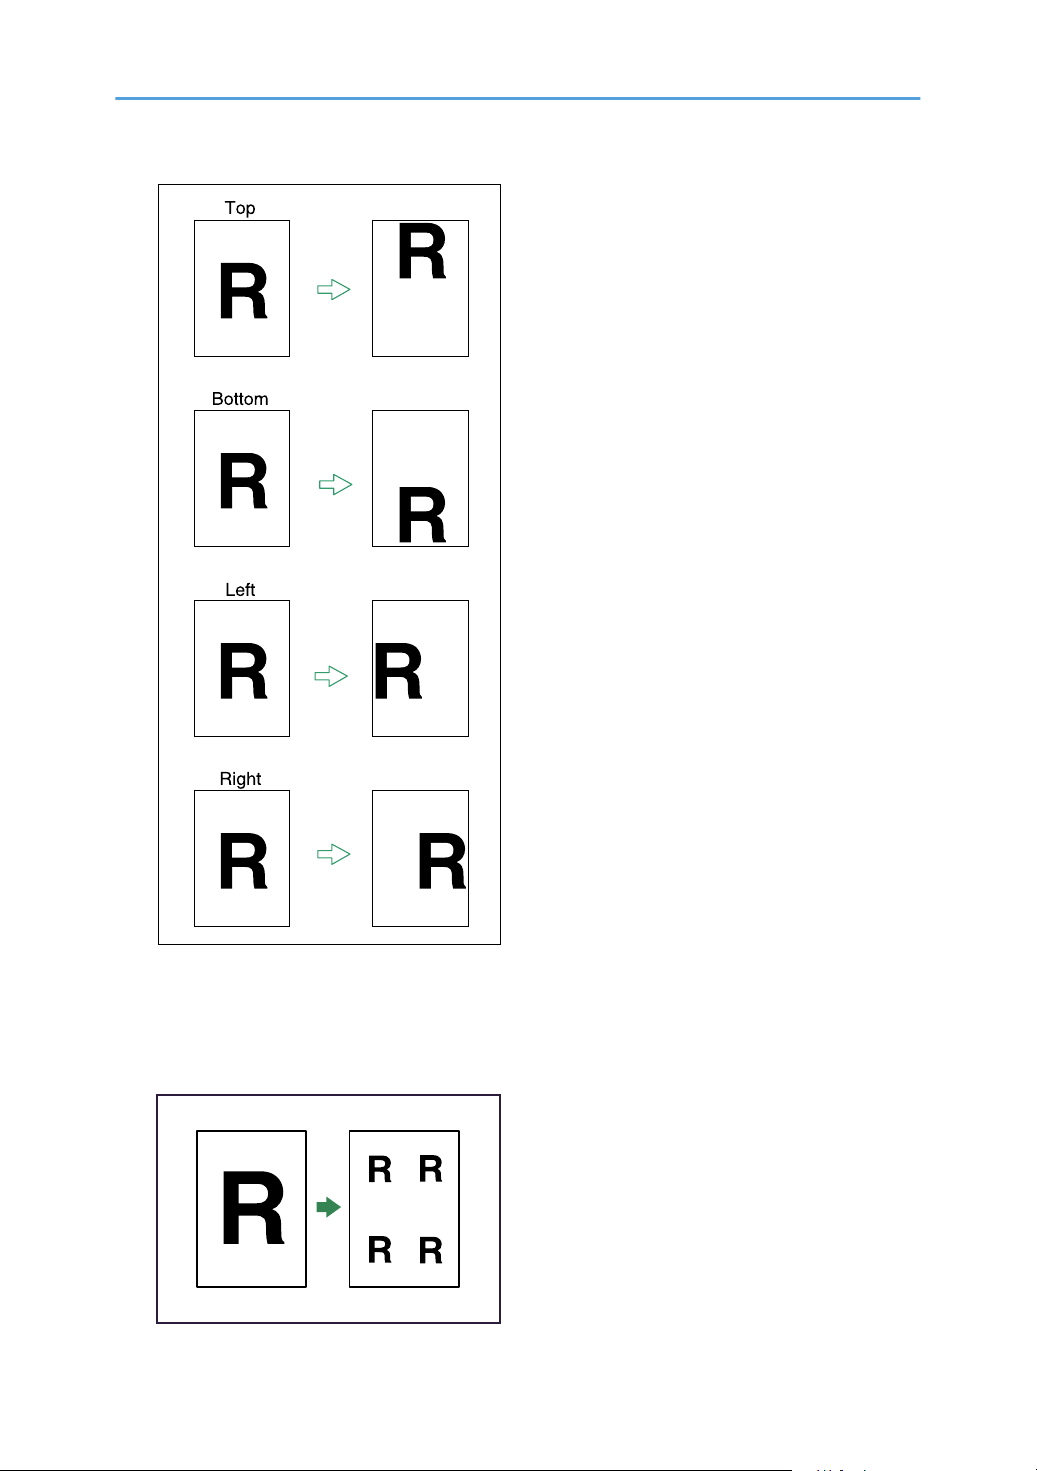
Margin Adjustment
When Synchro Cut is selected, you can create a margin on the copy's leading and trailing edge.
See p.130 "Margin Adjustment".
Adjust Print Position
6
Moves (shifts) the copy image up, down, left, or right to create a margin.
See p.141 "Adjust Print Position".
Page 9
BKY006D
Image Repeat
BAS095S
Repeatedly copies the entire image.
See p.131 "Image Repeat".
7
Page 10
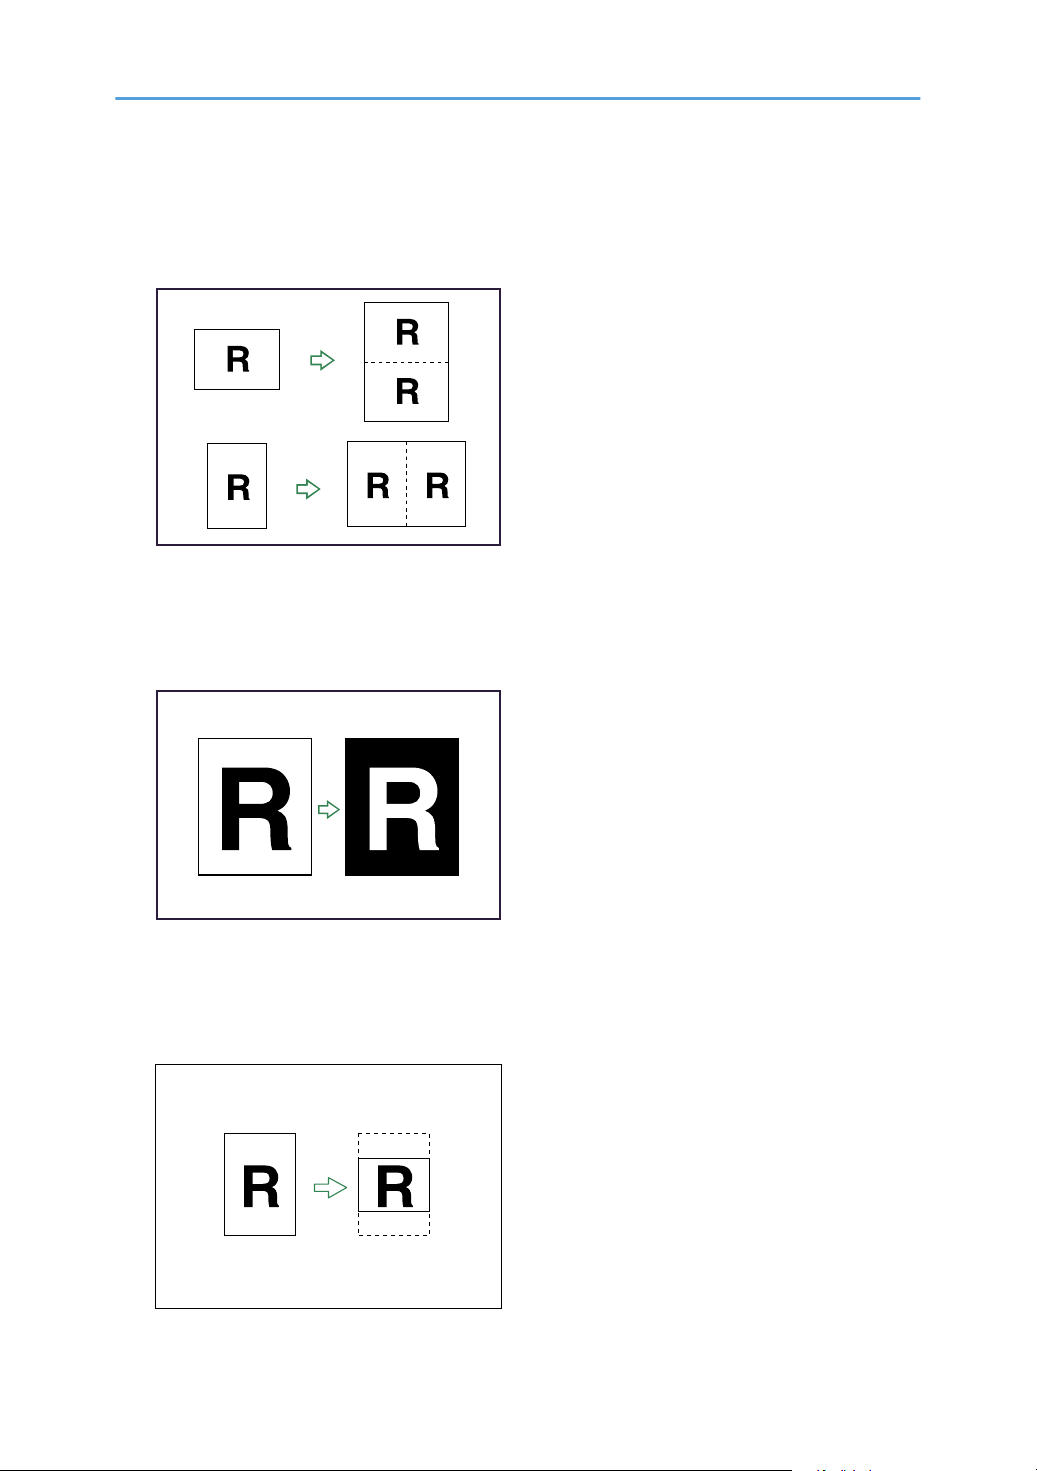
Double Copies
BAS098S
BAS100S
BKW045D
One original image is copied twice on one sheet.
See p.132 "Double Copies".
Positive/Negative
Copies an image inverted.
See p.133 "Positive/Negative".
8
Partial Copy
Copies only a specified portion of the original.
See p.134 "Partial Copy".
Page 11
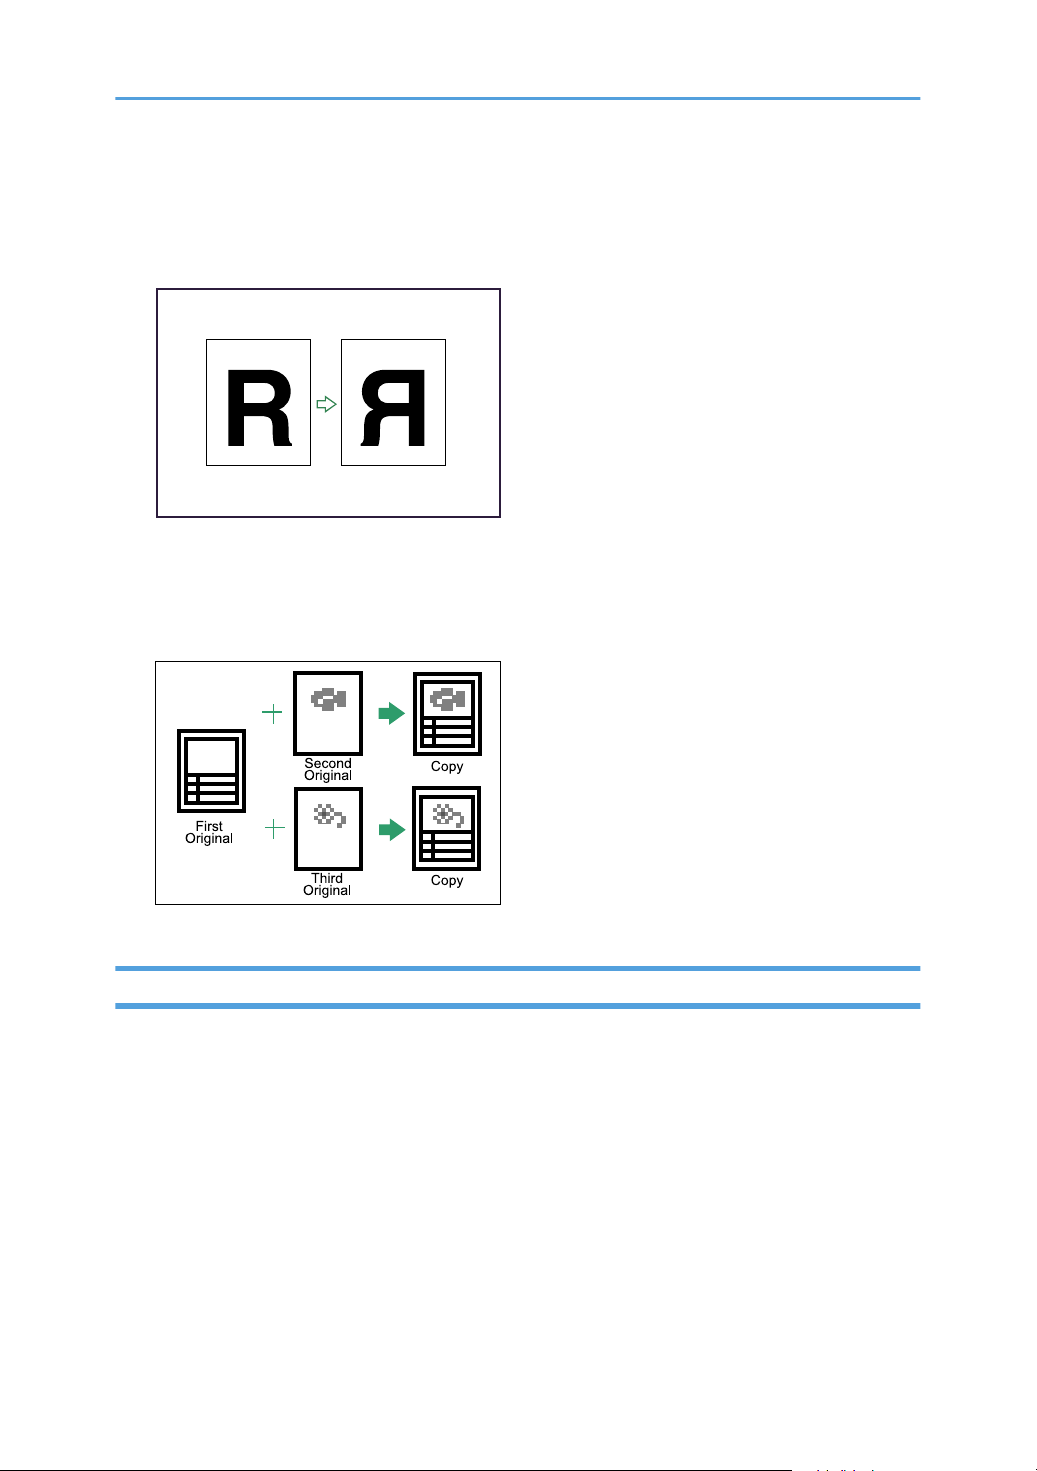
Mirror Image
BAS101S
BKY007D
Copies by reversing the image from left to right, as reflected in a mirror.
See p.135 "Mirror Image".
Format Overlay
Combines two images onto one copy.
See p.136 "Format Overlay".
Adding Stamps such as Page Number to the Copies
Background Numbering
Prints numbers on the background of copies.
See p.106 "Background Numbering".
9
Page 12

BAS070S
Preset Stamp
BKY008D
BAS073S
Preset messages are stamped on copies.
See p.107 "Preset Stamp".
User Stamp
Copies a scanned image as a stamp.
See p.110 "User Stamp".
10
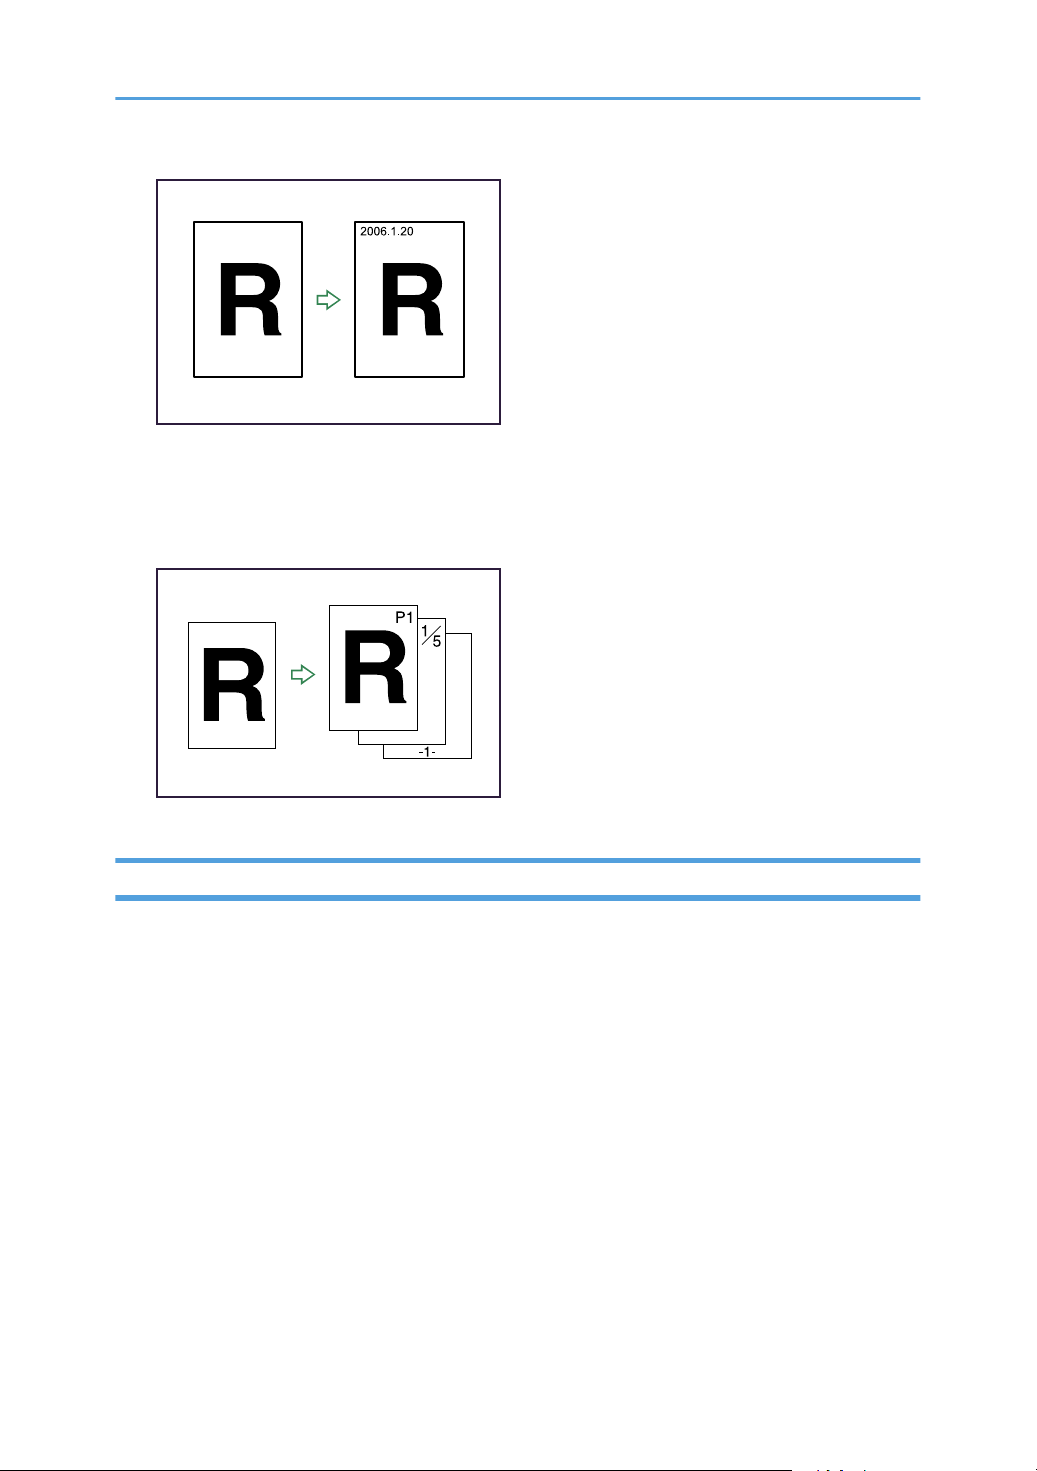
Date Stamp
Prints dates on copies.
See p.115 "Date Stamp".
Page 13
BAS076S
Page Numbering
BAS078S
Prints page numbers on copies.
See p.118 "Page Numbering".
Registering the Initial Display's Default Functions
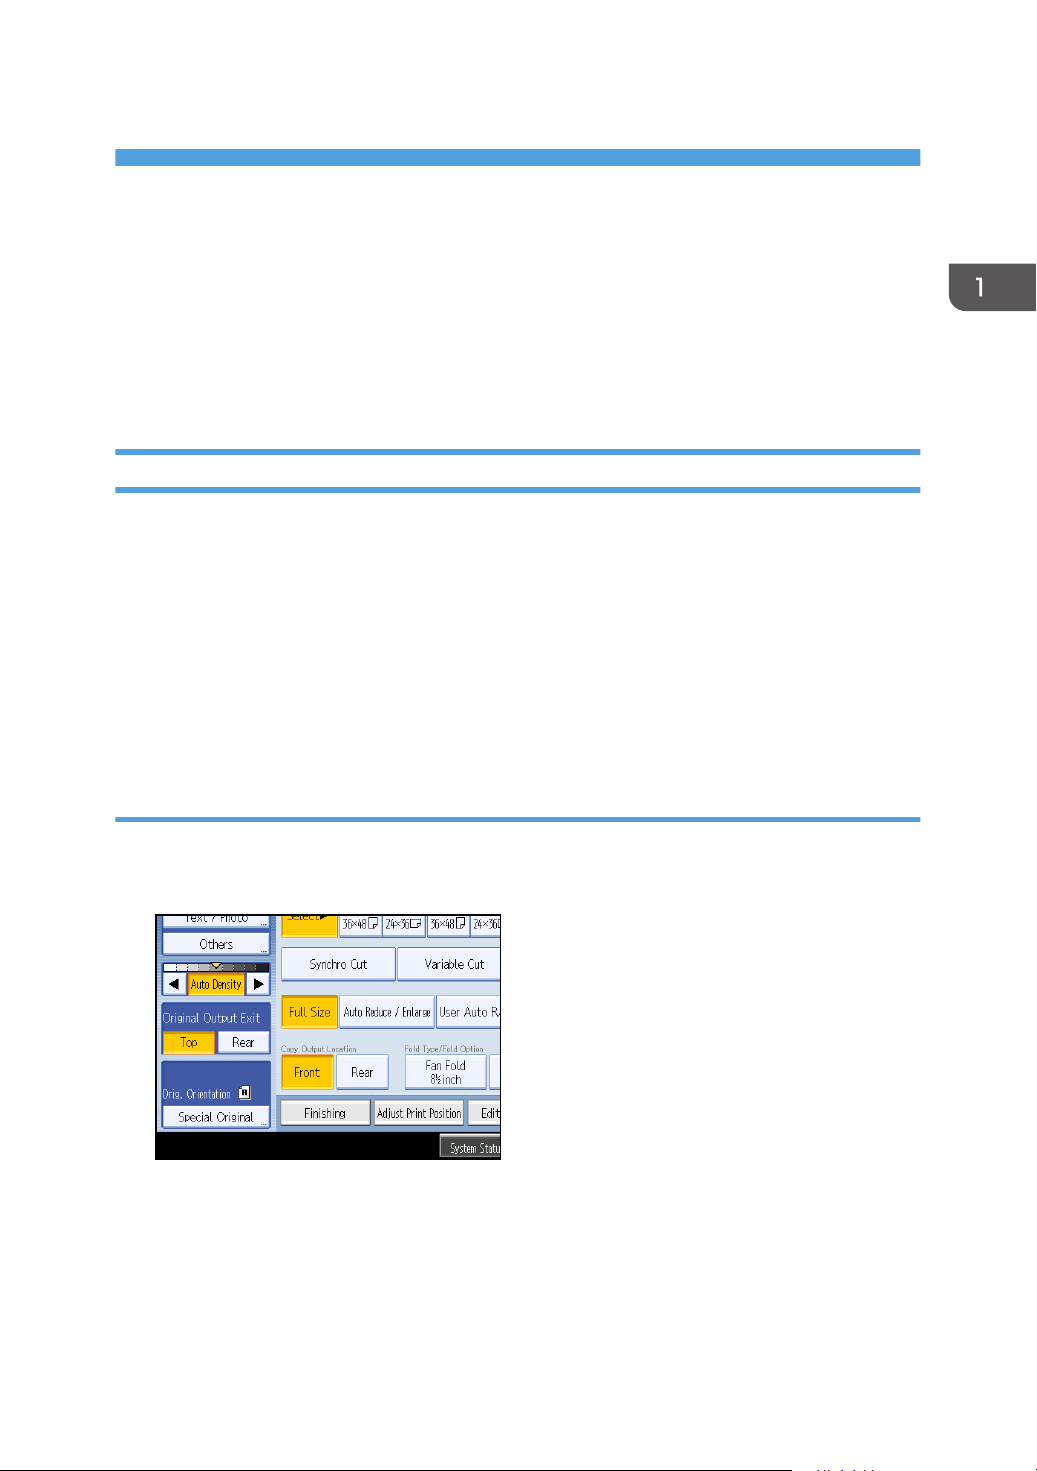
You can configure the settings of the initial screen so that the default display contain the functions you
use most often.
For example, the default setting for [Original Output Exit] is [Front], but you can change this setting to
[Rear]. For details, see “Registering the Initial Display's Default Functions”.
You can also store frequently used copy job settings in the machine memory and recall them for future
use. For details, see “Registering Frequently Used Function”.
See p.93 "Registering Frequently Used Functions".
See p.97 "Registering the Initial Display's Default Functions".
11
Page 14

TABLE OF CONTENTS
Manuals for This Machine.................................................................................................................................1
What You Can Do with This Machine...............................................................................................................3
Assembling Copies as Sets in Sequential Order.........................................................................................3
Reducing/Enlarging Originals by Specifying the Paper Size....................................................................3
Saving Paper..................................................................................................................................................4
Adjusting Image..............................................................................................................................................5
Adding Stamps such as Page Number to the Copies.................................................................................9
Registering the Initial Display's Default Functions......................................................................................11
How to Read This Manual...............................................................................................................................16
Symbols........................................................................................................................................................16
Functions Requiring Optional Configurations................................................................................................17
Display..............................................................................................................................................................18
Simplified Display........................................................................................................................................18
1. Placing Originals
Original and Copy Output Locations.............................................................................................................21
Original Output Locations...........................................................................................................................21
Copy Output Locations................................................................................................................................23
Adjusting the rear output.............................................................................................................................25
Originals...........................................................................................................................................................26
Sizes and Weights of Recommended Originals.......................................................................................26
Originals that should be scanned using the carrier sheet.........................................................................27
Non-compatible originals...........................................................................................................................28
Missing Image Area....................................................................................................................................29
Placing Originals..............................................................................................................................................30
Placing Originals on the Original Table....................................................................................................30
To stop originals feeding in.........................................................................................................................31
Original Orientation....................................................................................................................................32
Placing Custom Size Originals....................................................................................................................34
Wide Scan....................................................................................................................................................35
Setting the Carrier Sheet.............................................................................................................................36
Setting the Original Hangers......................................................................................................................37
2. Basic Copying
Basic Procedure................................................................................................................................................39
12
Page 15

Check Modes...............................................................................................................................................40
Original Counter/Reset..............................................................................................................................41
Auto Start......................................................................................................................................................41
Interrupt Copy..............................................................................................................................................41
Job Preset......................................................................................................................................................43
Copying from the Bypass Tray........................................................................................................................44
Copying onto Regular Size Paper..............................................................................................................46
Copying onto Custom Size Paper..............................................................................................................46
Copying onto Special Paper.......................................................................................................................48
Selecting the Original Type Setting................................................................................................................50
Adjusting Copy Image Density........................................................................................................................52
Auto Image Density.....................................................................................................................................52
Manual Image Density................................................................................................................................52
Combined Auto and Manual Image Density.............................................................................................53
Copy Quality................................................................................................................................................53
Selecting Copy Paper......................................................................................................................................56
Auto Paper Select........................................................................................................................................56
Manual Paper Select...................................................................................................................................57
Rotate Copy.................................................................................................................................................58
Setting the Length of Copy Paper Cut.............................................................................................................59
Synchro Cut..................................................................................................................................................59
Preset Cut......................................................................................................................................................60
Variable Cut.................................................................................................................................................62
Reducing or Enlarging Originals.....................................................................................................................64
Auto Reduce/Enlarge.................................................................................................................................65
User Auto Reduce/Enlarge.........................................................................................................................67
Preset Reduce/Enlarge...............................................................................................................................69
Zoom.............................................................................................................................................................70
Combined Copying.........................................................................................................................................74
One-Sided Combine...................................................................................................................................74
Finishing............................................................................................................................................................77
Sort................................................................................................................................................................77
Fold...............................................................................................................................................................80
13
Page 16

Storing Data in the Document Server.............................................................................................................86
Managing Jobs................................................................................................................................................88
Job List Screen..............................................................................................................................................88
Checking Jobs in the Job List.......................................................................................................................89
Changing the Order of Jobs.......................................................................................................................90
Holding Jobs................................................................................................................................................90
Deleting Jobs................................................................................................................................................91
Checking the Job History.............................................................................................................................91
Registering Frequently Used Functions...........................................................................................................93
Registering Functions in a Program............................................................................................................93
Changing a Stored Program.......................................................................................................................94
Deleting a Stored Program.........................................................................................................................95
Recalling a Stored Program........................................................................................................................95
Registering the Initial Display's Default Functions..........................................................................................97
3. Advanced Copying
Advanced Reduce/Enlarge Copying............................................................................................................99
Size Magnification.......................................................................................................................................99
Directional Magnification (%)..................................................................................................................100
Directional Size Magnification (inch)......................................................................................................102
Fine Magnification....................................................................................................................................104
Stamps............................................................................................................................................................106
Background Numbering...........................................................................................................................106
Preset Stamp..............................................................................................................................................107
User Stamp.................................................................................................................................................110
Date Stamp................................................................................................................................................115
Page Numbering.......................................................................................................................................118
Advanced Copier Functions.........................................................................................................................124
Erase Border (same width).......................................................................................................................124
Erase Border (different width)...................................................................................................................125
Erase Inside................................................................................................................................................126
Erase Outside............................................................................................................................................128
Margin Adjustment....................................................................................................................................130
Image Repeat............................................................................................................................................131
14
Page 17

Double Copies...........................................................................................................................................132
Positive/Negative.....................................................................................................................................133
Partial Copy...............................................................................................................................................134
Mirror Image.............................................................................................................................................135
Format Overlay.........................................................................................................................................136
Adjust Print Position....................................................................................................................................141
4. Document Server
Relationship between Document Server and Other Functions...................................................................145
Document Server Display..............................................................................................................................146
Simplified Display......................................................................................................................................147
Preview Display.........................................................................................................................................148
Using the Document Server...........................................................................................................................150
Storing Data...............................................................................................................................................150
Changing the User Name of a Stored Document...................................................................................154
Changing the File Name of a Stored Document....................................................................................155
Changing the Password of a Stored Document......................................................................................156
Checking the Details of a Stored Document...........................................................................................156
Searching for Stored Documents.............................................................................................................157
Printing Stored Documents........................................................................................................................159
Deleting a Stored Document....................................................................................................................165
Print Backup...............................................................................................................................................166
Displaying Stored Documents with Web Image Monitor......................................................................167
Downloading Stored Documents with Web Image Monitor.................................................................167
5. Appendix
Function Compatibility...................................................................................................................................169
Supplementary Information...........................................................................................................................171
Scan Size Limitations, by Function...........................................................................................................176
Settings Record Sheet....................................................................................................................................178
Magnification Ratio Chart.............................................................................................................................183
Measure Chart...............................................................................................................................................185
User Tools Menu (Copier/Document Server Features)..............................................................................187
INDEX...........................................................................................................................................................191
15
Page 18
How to Read This Manual
• For proper use of this product, be sure to read About This Machine first.
• Supplementary information about the copier mode is described in “Supplementary Information”.
• p.171 "Supplementary Information"
Symbols
This manual uses the following symbols:
Indicates points to pay attention to when using the machine, and explanations of likely causes of paper
misfeeds, damage to originals, or loss of data. Be sure to read these explanations.
Indicates supplementary explanations of the machine’s functions, and instructions on resolving user
errors.
This symbol is located at the end of sections. It indicates where you can find further relevant information.
[ ]
Indicates the names of keys on the machine's display or control panels.
16
Page 19

Functions Requiring Optional Configurations
Certain functions require special machine configuration and extra options as follows:
Fan Fold: Fan Folding Finisher, Cross Folding Finisher
Regular Size Fold: Cross Folding Finisher
Programmed Fold: Cross Folding Finisher
17
Page 20
Display
BKY057S
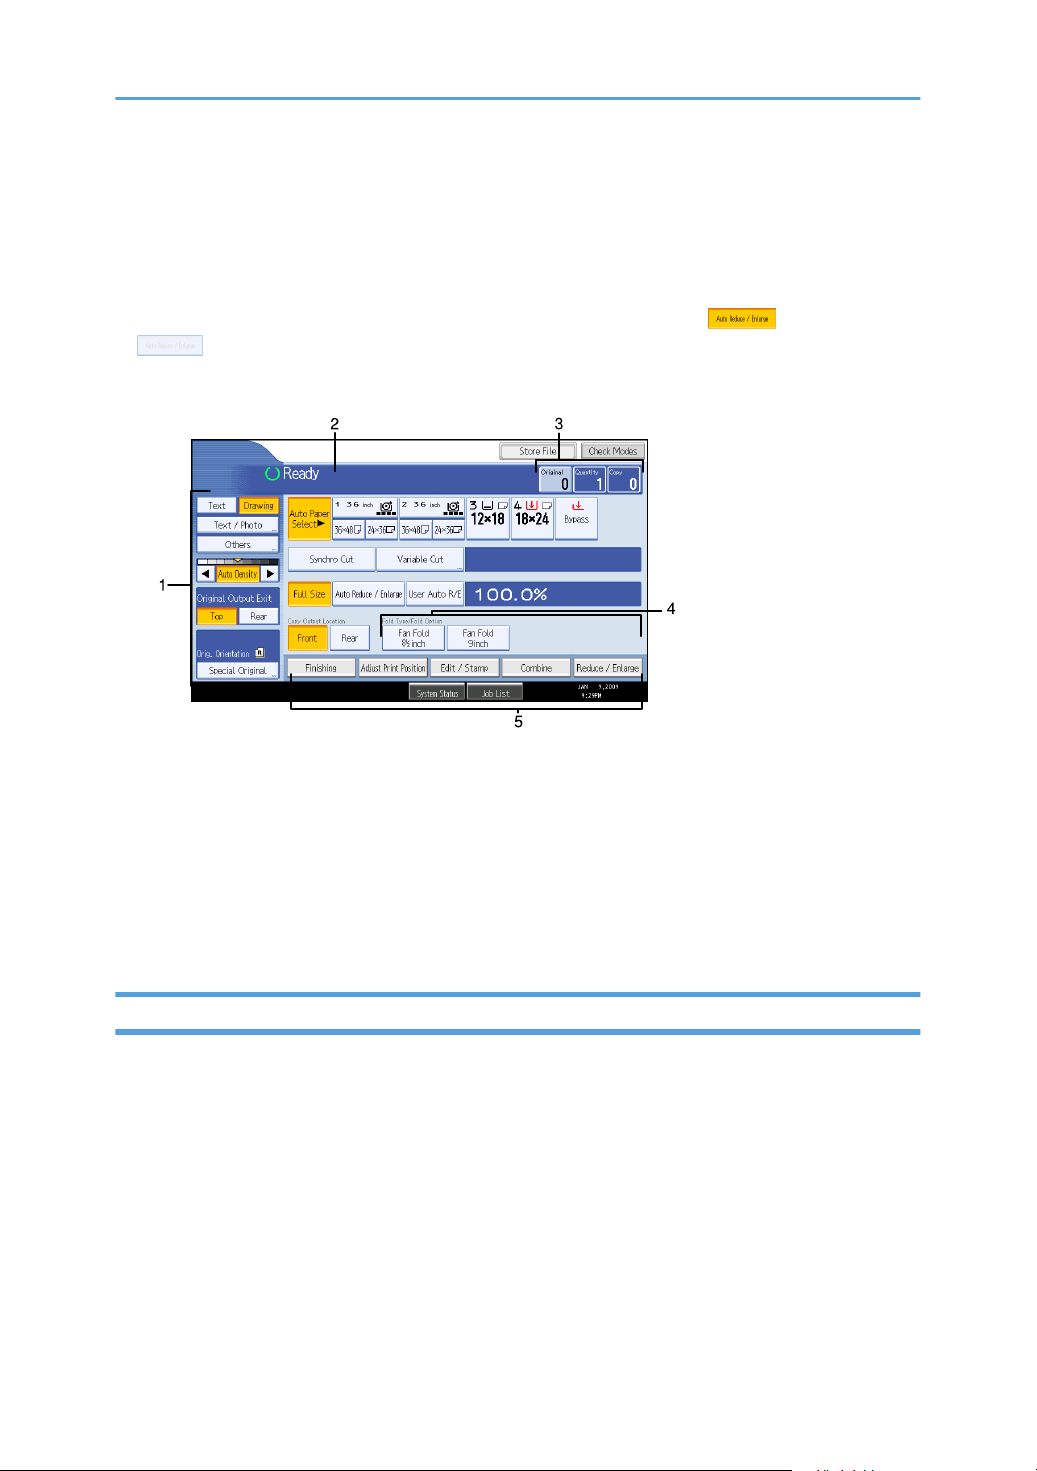
The function items displayed serve as selector keys. You can select or specify an item by lightly pressing
them.
When you select or specify an item on the display panel, it is highlighted like . Keys appearing
as cannot be used.
Initial copy display
1. Use this area to specify the original type, original orientation, image density level, and other
settings.
2. Displays operational status and messages.
3. Displays the numbers of originals scanned, copies set, and copies made.
4. Use this area to select the fold function and related options.
5. Displays available functions. Press a function to display its menu.
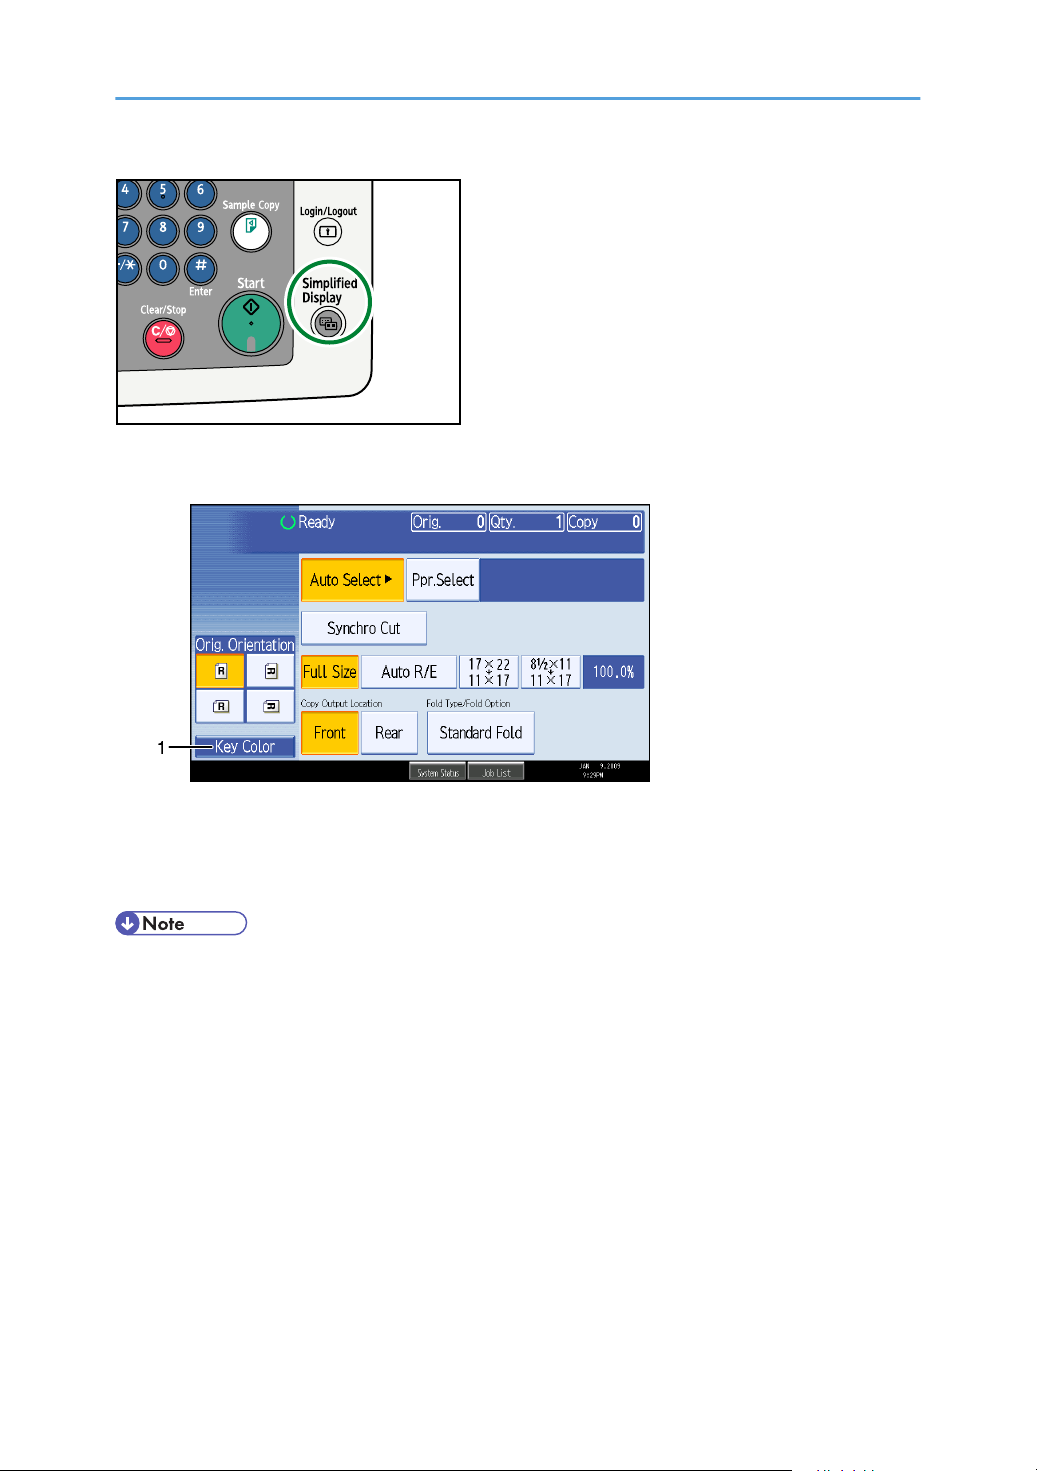
Simplified Display
This section explains how to switch to the simplified display.
When you press the [Simplified Display] key, the screen changes from the initial display to the simplified
display.
Letters and keys are displayed at a larger size, making operations easier.
18
Page 21
BKX024S
Example of a simplified display
BKY058S
1. [Key Color]
Press to increase screen contrast by changing the color of the keys.
This is available only for the simplified display.
• To return to the initial display, press the [Simplified Display] key again.
• Certain keys do not appear on the simplified display.
19
Page 22

20
Page 23
1. Placing Originals
This chapter describes original and copy output locations, the types of originals you can set, and how to
place originals.
Original and Copy Output Locations
Specify original and copy output locations before copying.
Original Output Locations
Two types of original output locations are available.
Original Upper Output
This is the basic original output location.
Originals are ejected onto the original stacker.
Original Rear Output
Originals are ejected onto the original output guides. When copying thick or hard originals, select
this output location.
Original upper output
Originals are ejected onto the original stacker.
1. Press [Top].
Originals are ejected onto the original stacker.
21
Page 24
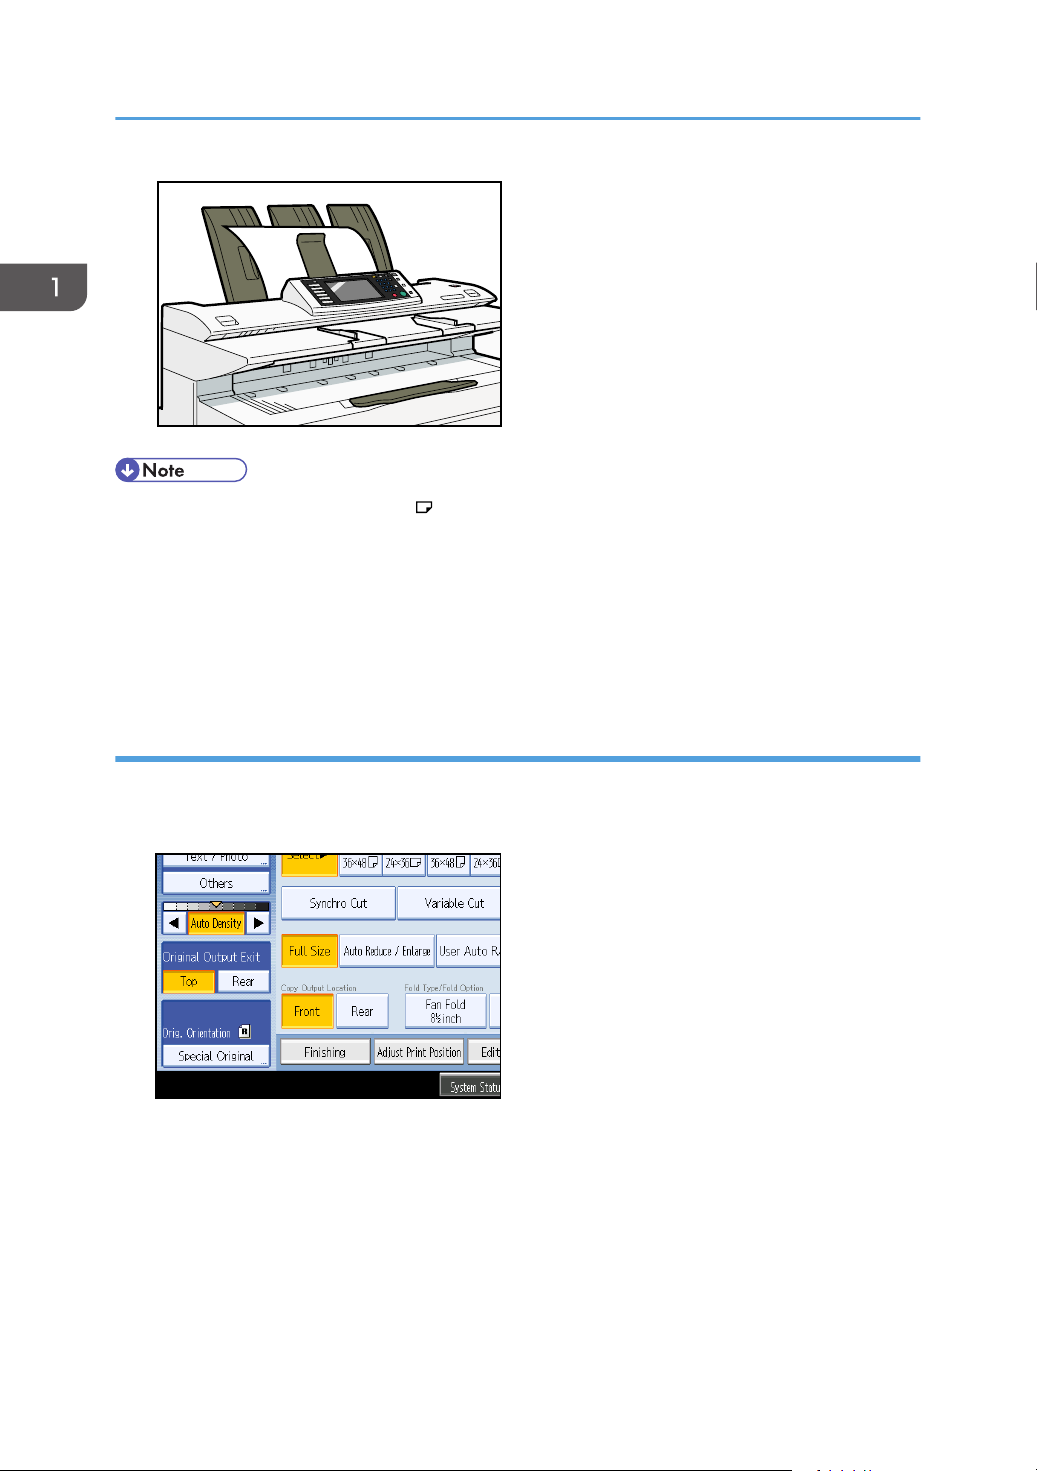
BKW019S
1. Placing Originals
• If the original is larger than A1(D) , select original rear output.
• If the original is heavier than 157 g/m2 (41.8 lb.), select original rear output.
• If the original is plain paper not heavier than 52.3 g/m2 (13.9 lb.) or translucent paper not
heavier than 80 g/m2 (21.3 lb.), select original rear output.
• When copying a rolled original, prevent it curling up on the stacker by holding its leading edge as
it is ejected.
Original rear output
Originals are ejected onto the original output guides.
1. Press [Rear].
Originals are ejected onto the original output guides.
22
Page 25
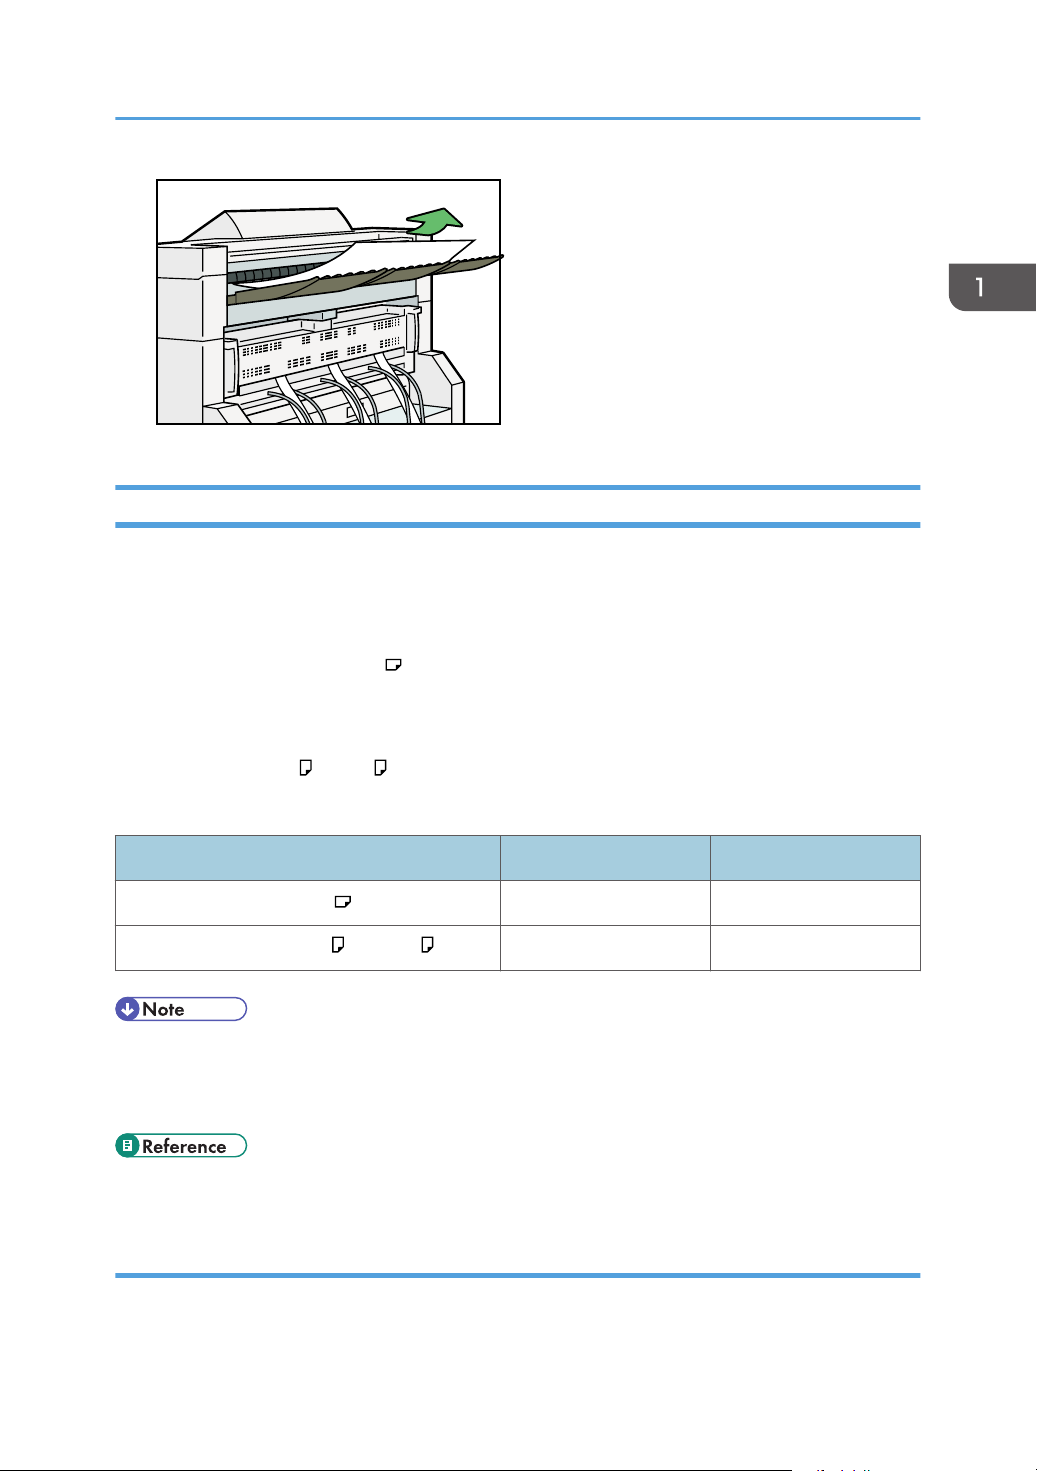
BKV034S
Copy Output Locations
Two types of copy output locations are available.
Front
Prints are delivered through the front paper output exit at the front of the machine.
When copying sizes up to A1 , we recommend selecting front copy output.
Original and Copy Output Locations
Rear
Prints are delivered through the rear paper output exit at the back of the machine.
When copying A1 K or A0 K, select rear copy output.
The table below shows you how many sheets can be stacked.
Plain paper Translucent paper
Upper copy output (A1 (D) or smaller) 100 sheets 10 sheets
Lower copy output (A1 (D) or A0 (E) ) 10 sheets 1 sheet
• If copies exceed the upper limit, paper jams may occur. Remove the copies from the stacker.
• When copying onto film, hold the leading edge of the copied film, remove it from the stacker, and
then place it on a level surface.
• p.17 "Functions Requiring Optional Configurations"
Front copy output
Prints are delivered through the front paper output exit.
23
Page 26
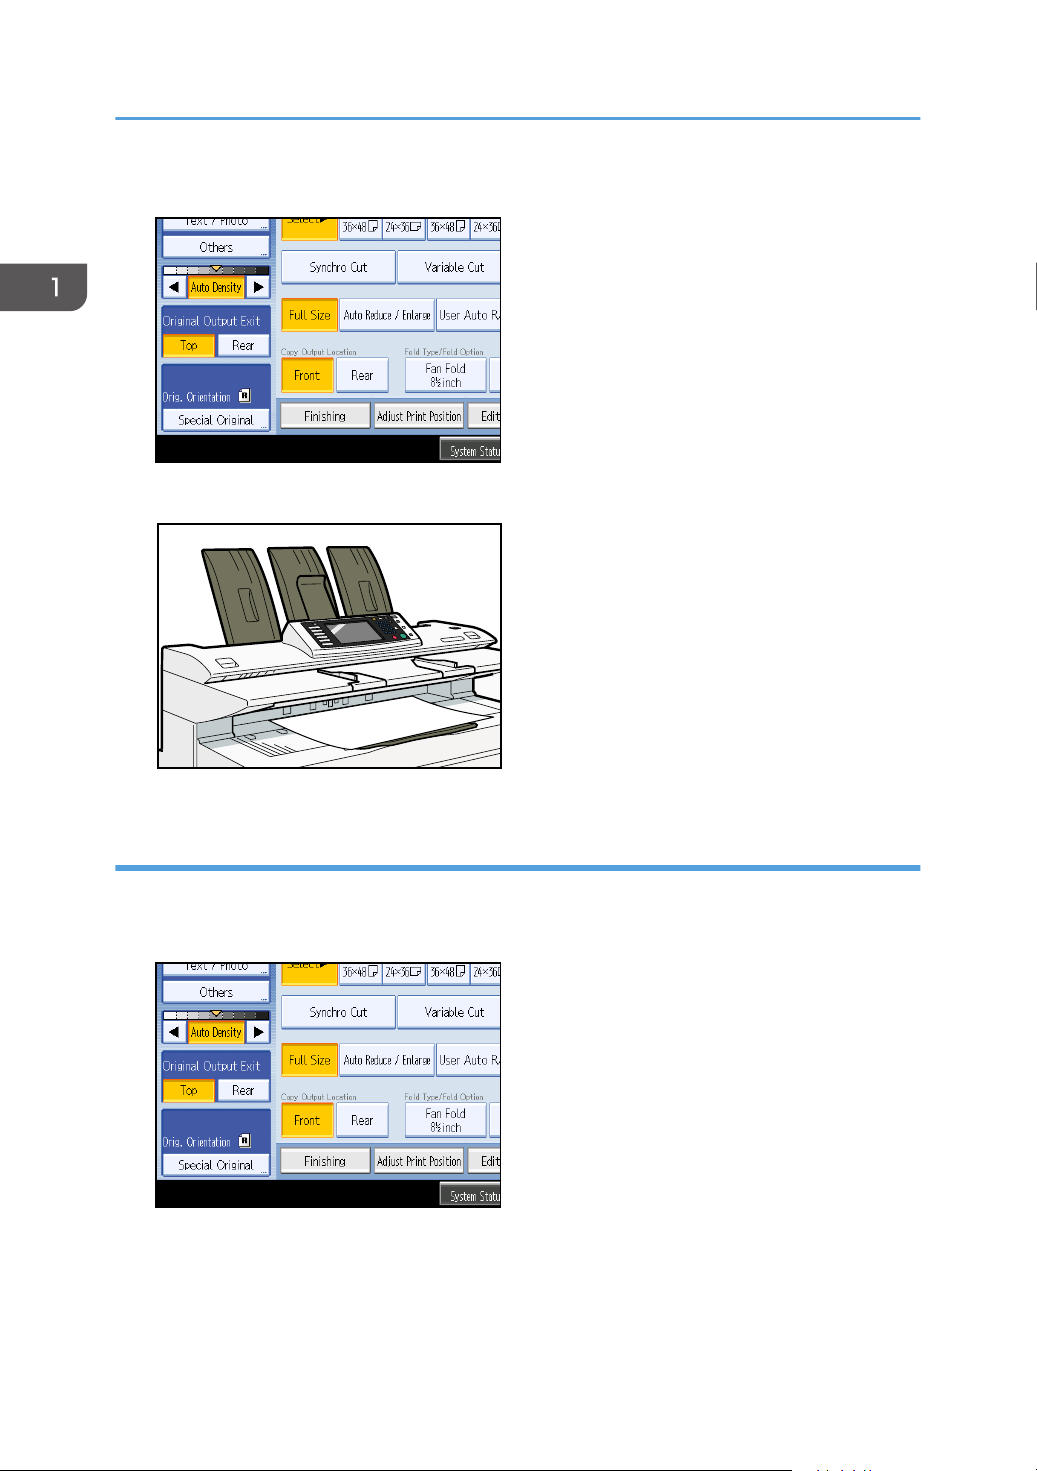
BKW007S
1. Placing Originals
1. Make sure [Front] is selected under Copy Output Location.
Prints are delivered through the front paper output exit.
Rear copy output
Prints are delivered through the rear paper output exit.
1. Select [Rear] under Copy Output Location.
Prints are delivered through the rear paper output exit.
24
Page 27
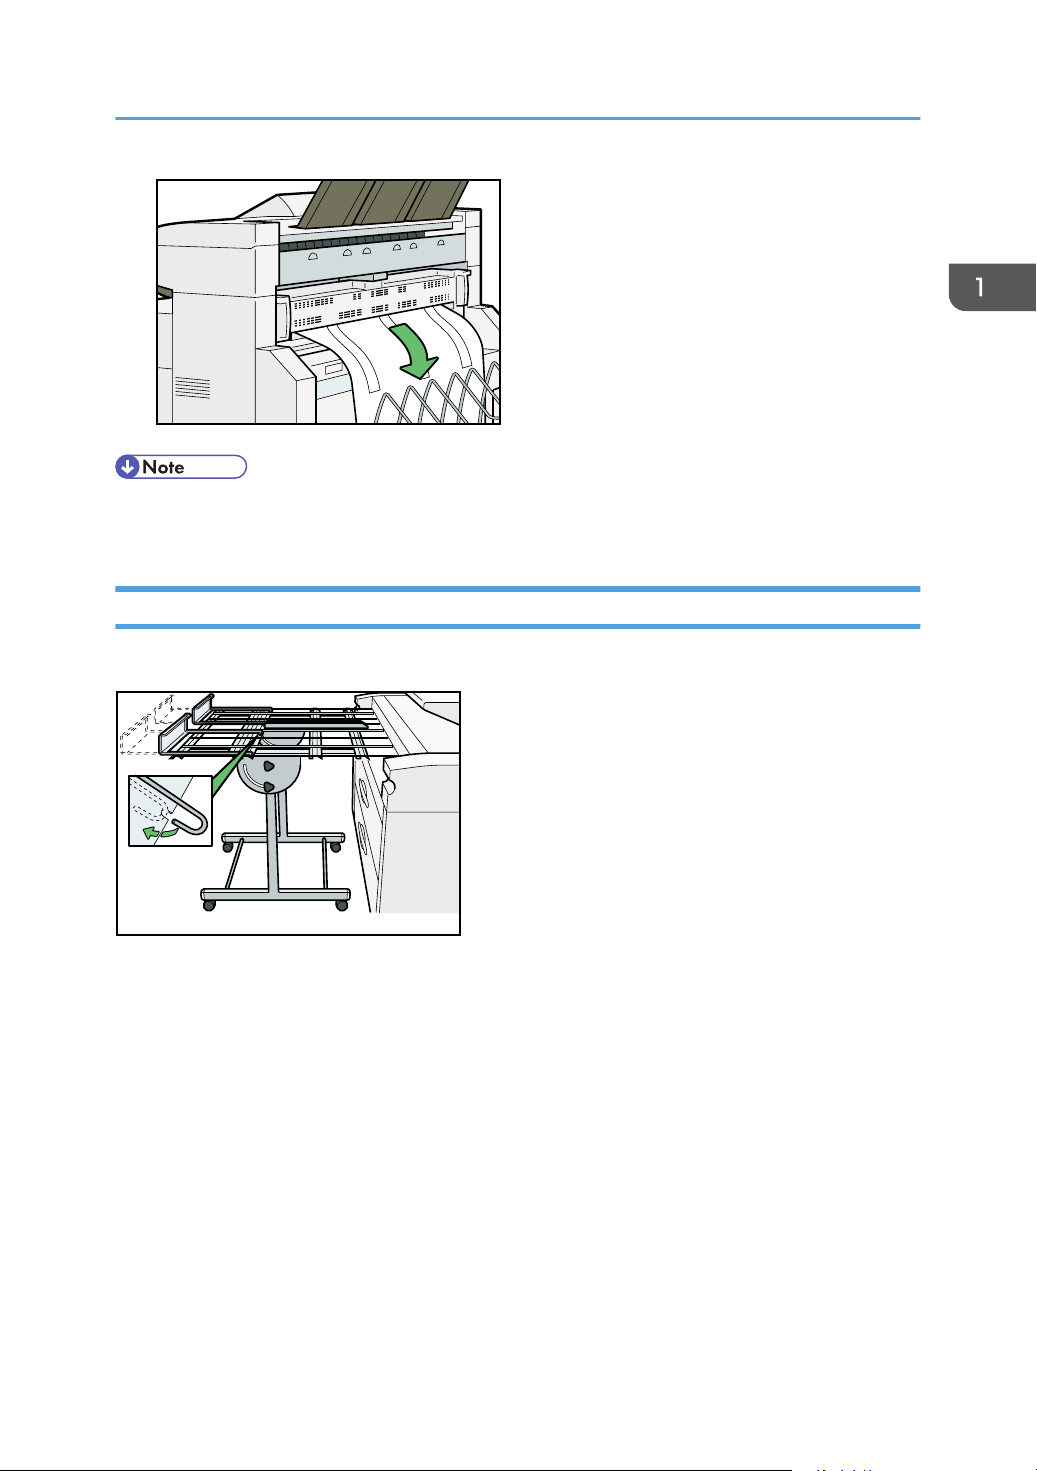
BKV033S
BKW054S
Original and Copy Output Locations
• When using thick paper, the last sheet to be ejected may remain in the output exit. If this happens,
remove it.
Adjusting the rear output
When using the rear output, adjust the hook position to the size of the copy.
25
Page 28
1. Placing Originals
Originals
This section describes the types of originals that can be placed, and missing image area.
Sizes and Weights of Recommended Originals
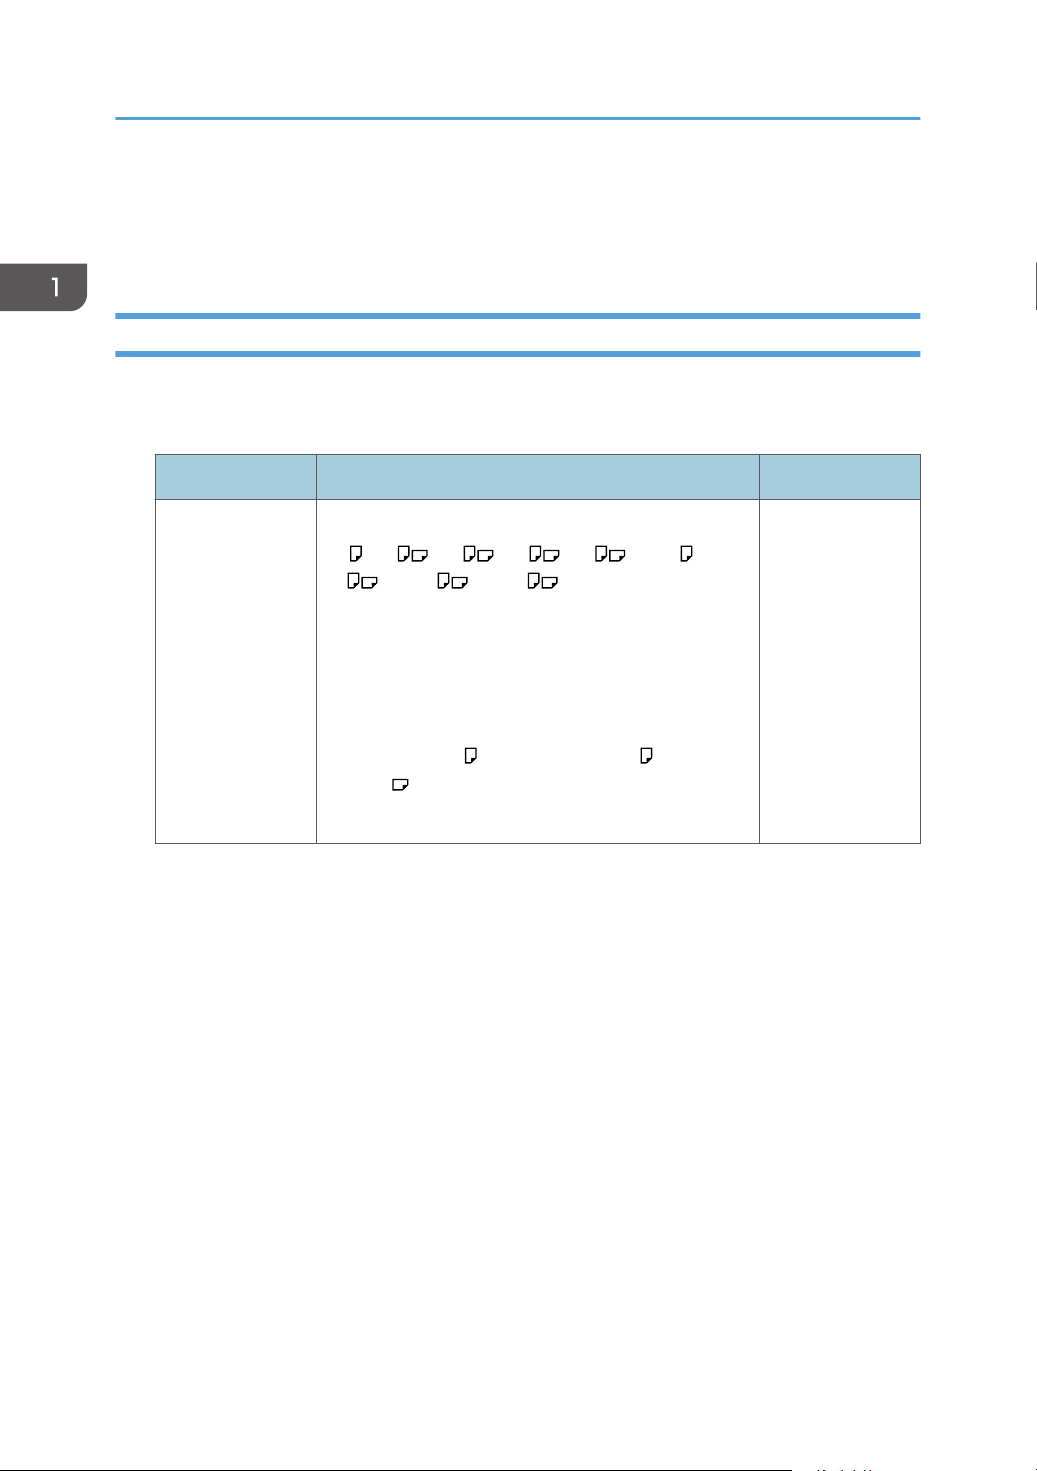
The following describes recommended paper sizes and non-compatible originals for this machine:
Metric version
Original location Original size Original weight
Original table Standard sizes:
A0 , A1 , A2 , A3 , A4 ,B1 JIS , B2
JIS , B3 JIS , B4 JIS
Custom sizes:
Length:182 - 15,000mm (Type 1)
Length:182 - 30,000mm (Type 2)
Width: 210 - 914 mm
(including B1 ISO , 625 mm × 880 mm , 440 mm ×
625 mm )
(Maximum width 950 mm)
JIS: Japanese Industrial Standard
ISO: International Organization for Standardization
20.9 - 157 g/m
and 0.03 - 1 mm
thick originals
2
26
Page 29
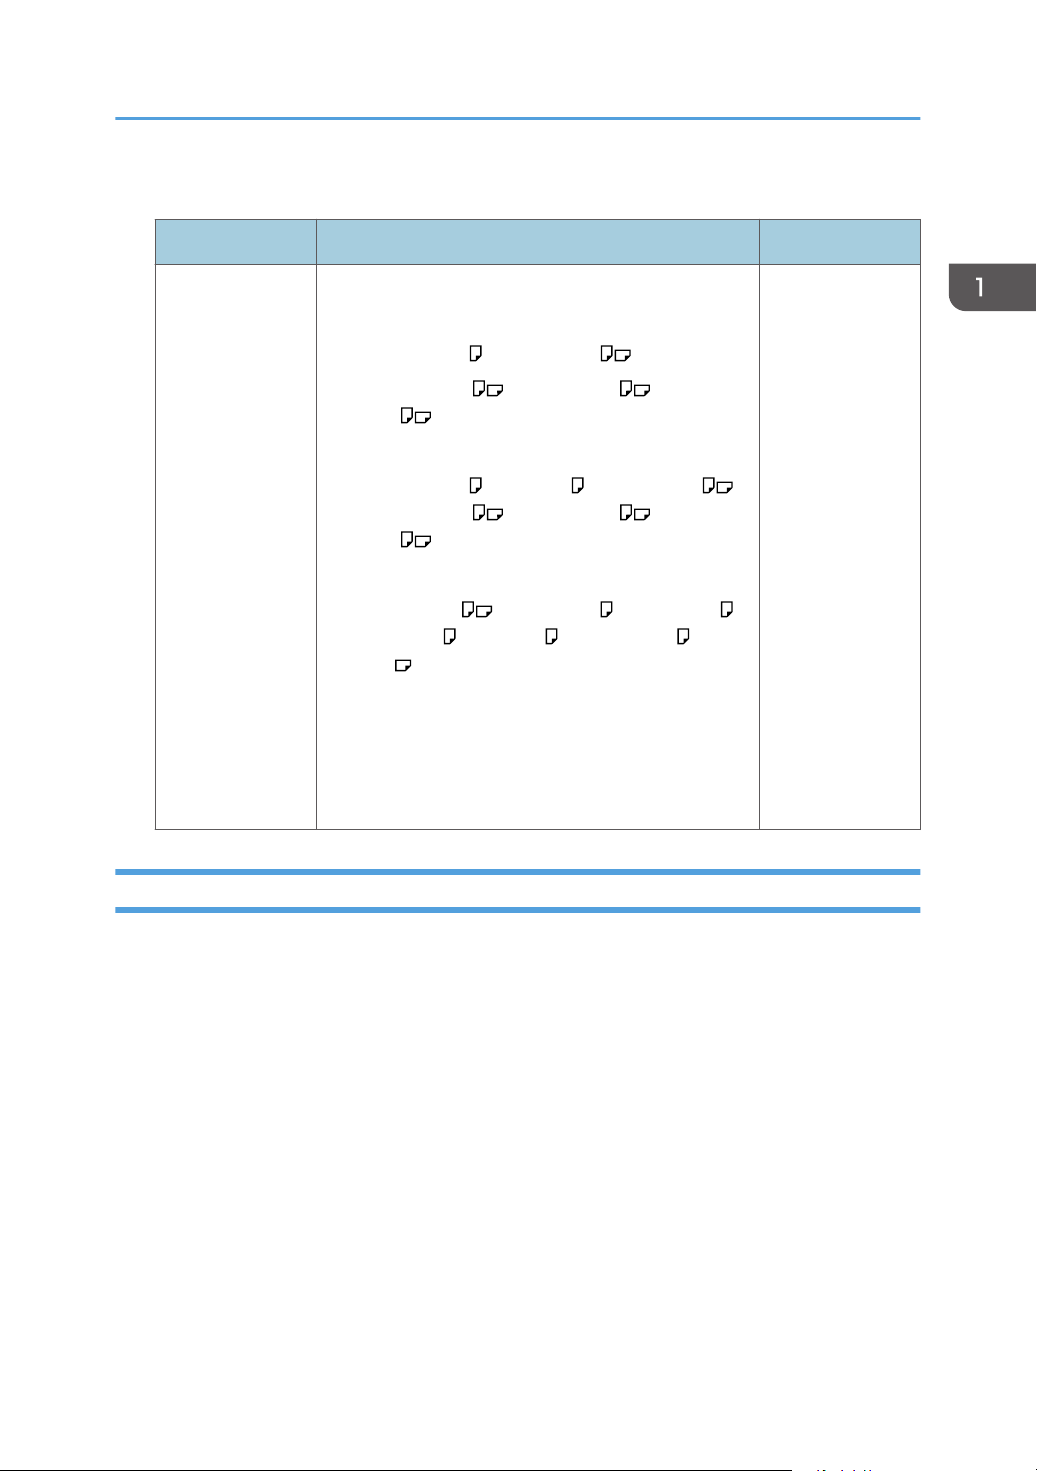
Inch version
Original location Original size Original weight
Originals
Original table Standard sizes:
• Engineering
E (34" × 44") , D (22" × 34") ,
C (17" × 22") , B (11" × 17") , A (81/2" ×
11")
• Architecture
E (36" × 48") , 30" × 42" , D (24" × 36") ,
C (18" × 24") , B (12" × 18") , A (9" ×
12")
• Other
81/2" × 12" , 81/2" × 13" , 81/2" × 14" ,
11" × 14" , 11" × 15" , 12" × 141/2" , 30" ×
21"
Custom sizes:
Length: 81/2" - 1181.2"
Width: 81/2" - 36"
(Maximum width: 37.4")
5.6 - 41.8 lb. and
1.1 Mil - 40 Mil
thick originals
Originals that should be scanned using the carrier sheet
The following types of originals should be mounted on the carrier sheet. You should also use the carrier
sheet for important originals and for originals you will copy repeatedly.
• Cut and pasted originals
• Originals with fold lines
• Wrinkled or torn originals
• Waved originals
• Punched originals
• Originals with sticky tape or adhesive
• Pasted originals
• Originals with a damaged leading edge
• Originals with surfaces that attach to glass easily such as photographs
• Originals drawn in pencil
27
Page 30

1. Placing Originals
• Originals no thicker than 52.3g/m2 (14 lb.).
• p.36 "Setting the Carrier Sheet"
Non-compatible originals
The following types of originals can cause jams, or may itself be damaged.
• Originals other than those specified in “Sizes and Weights of Recommended Originals”
• Stapled or clipped originals
• Perforated or torn originals
• Bent, folded, or creased originals
• Pasted originals
• Originals with any kind of coating, such as thermal fax paper, art paper, aluminum foil, carbon
paper, or conductive paper
• Originals with indexes, tags, or other projecting parts
• Thin and soft originals such as translucent paper
• Bound originals such as books
• Damp originals
• Badly curled originals
• Originals that vary in thickness
• Originals with sticky tape or adhesive
• Originals with thick leading edges
• Originals with wet ink or correction fluid
• Carbon-backed originals
• Originals not made of paper (such as glass, metal)
• Originals with a roll diameter smaller than 35 mm (1.4")
• Originals with a roll diameter larger than 110 mm (4.3")
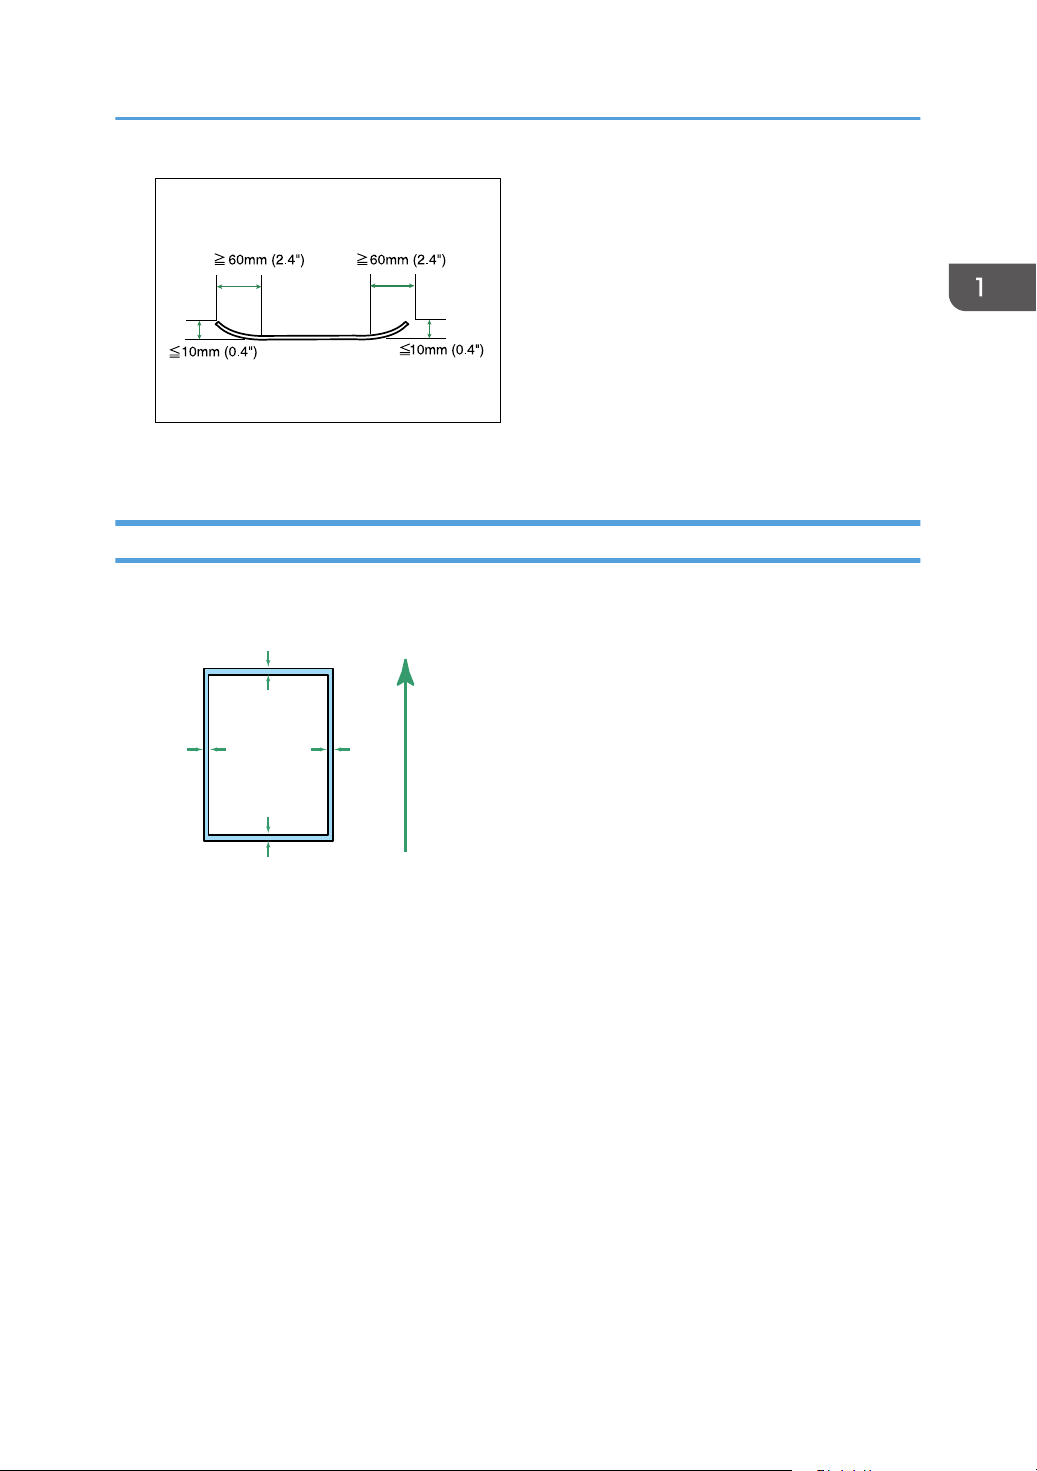
Flatten curled originals so they fit within the range shown below.
• Front and back curl; R 60 mm (2.4") or more, height 10 mm (0.4") or less
28
Page 31
BKY020S
Originals that use more than 20% of the image area, may be faint.
1
2
33
4
BKW008S
Missing Image Area
Part of the original may not be copied as shown below (full-size copying on paper roll).
Originals
1. Feed Direction
2. Less than 8.0 mm (0.32 inch)
3. 2.0±2.0 mm (0.08±0.08 inch)
4. Less than 8.0 mm (0.32 inch) (excluding cutting error)
29
Page 32
BKW001S
1. Placing Originals
Placing Originals
This section describes the procedure for placing originals on the original table.
• Set one original at a time on the original table.
• Once an original start to feed in, do not push or pull it. This may damage the original.
• If the original's rear edge is badly curled, smooth it out with both hands before scanning. If the
original is inserted as is, it may be damaged.
• When inserting an original, push it lightly against the rollers. Pushing it with force may cause an
original jam.
• When inserting an original, be careful not to put the trailing edge into the entrance of the bypass
tray. This will cause an original jam.
• Place originals after any correction fluid or ink has completely dried. Not taking this precaution will
result in a dirtied scanning glass and blemished copies.
• Dust and residue from originals drawn with a pencil can result in a dirtied scanning glass and
blemished copies. We recommend using the carrier sheet for this type of original.
Placing Originals on the Original Table
Place originals on the original table.
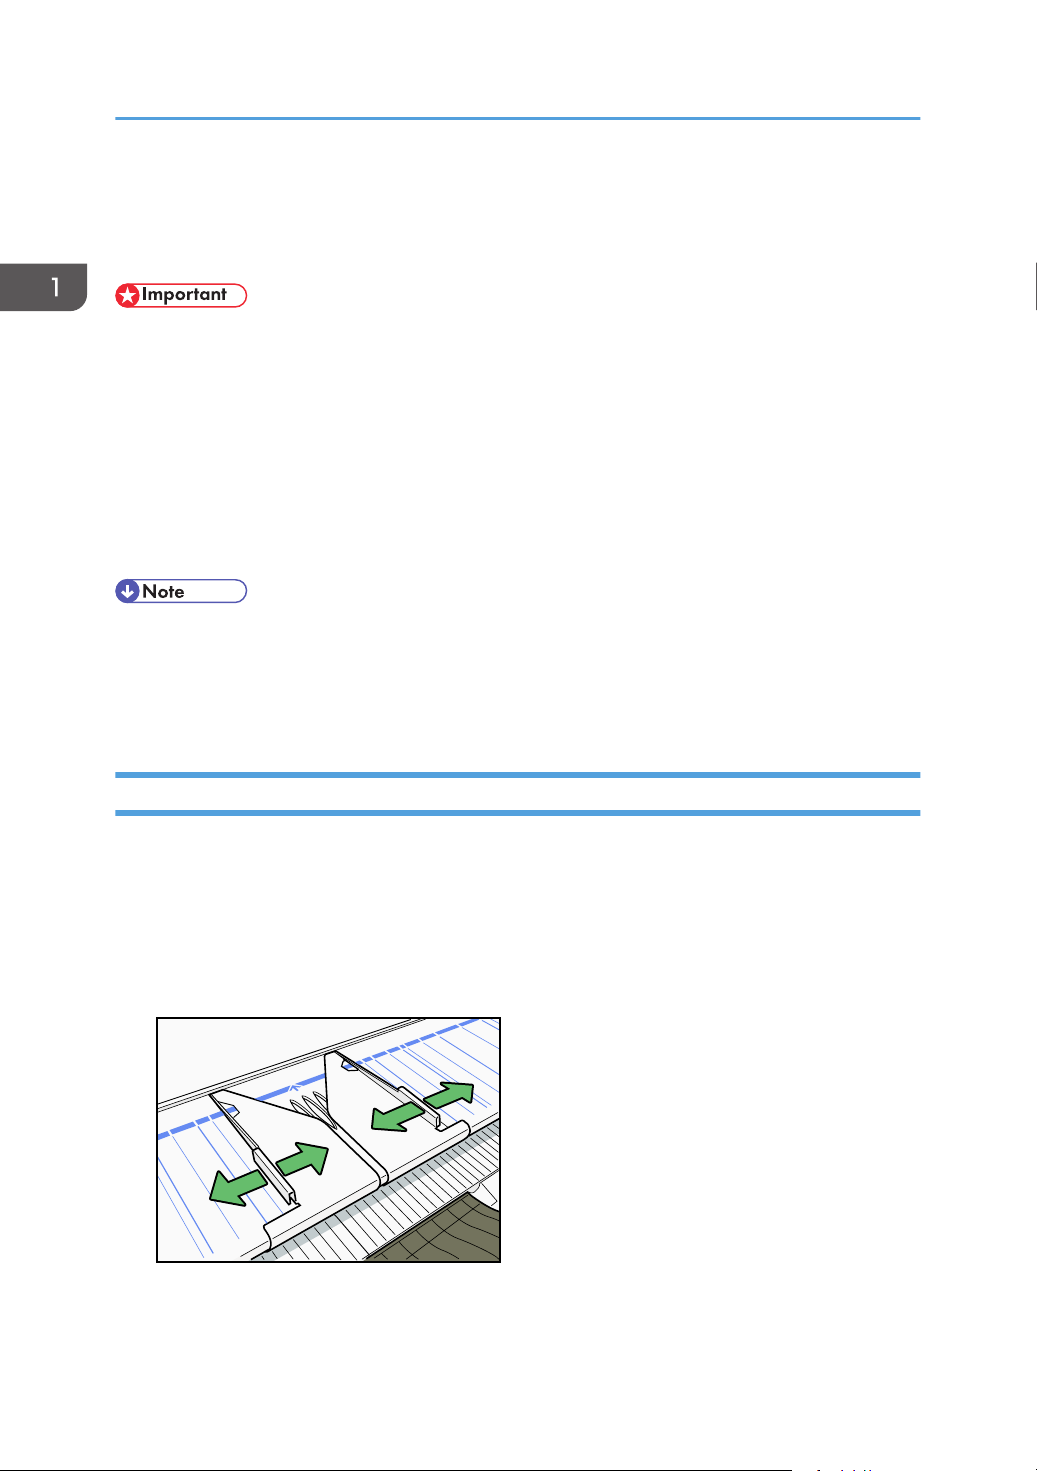
1. Make sure “Ready” appears on the screen.
2. Adjust the original guides to the size and orientation of the original.
Make sure the original guides are flush against the original. Do not push the original guide side
fence with force.
30
Page 33
BKW002S
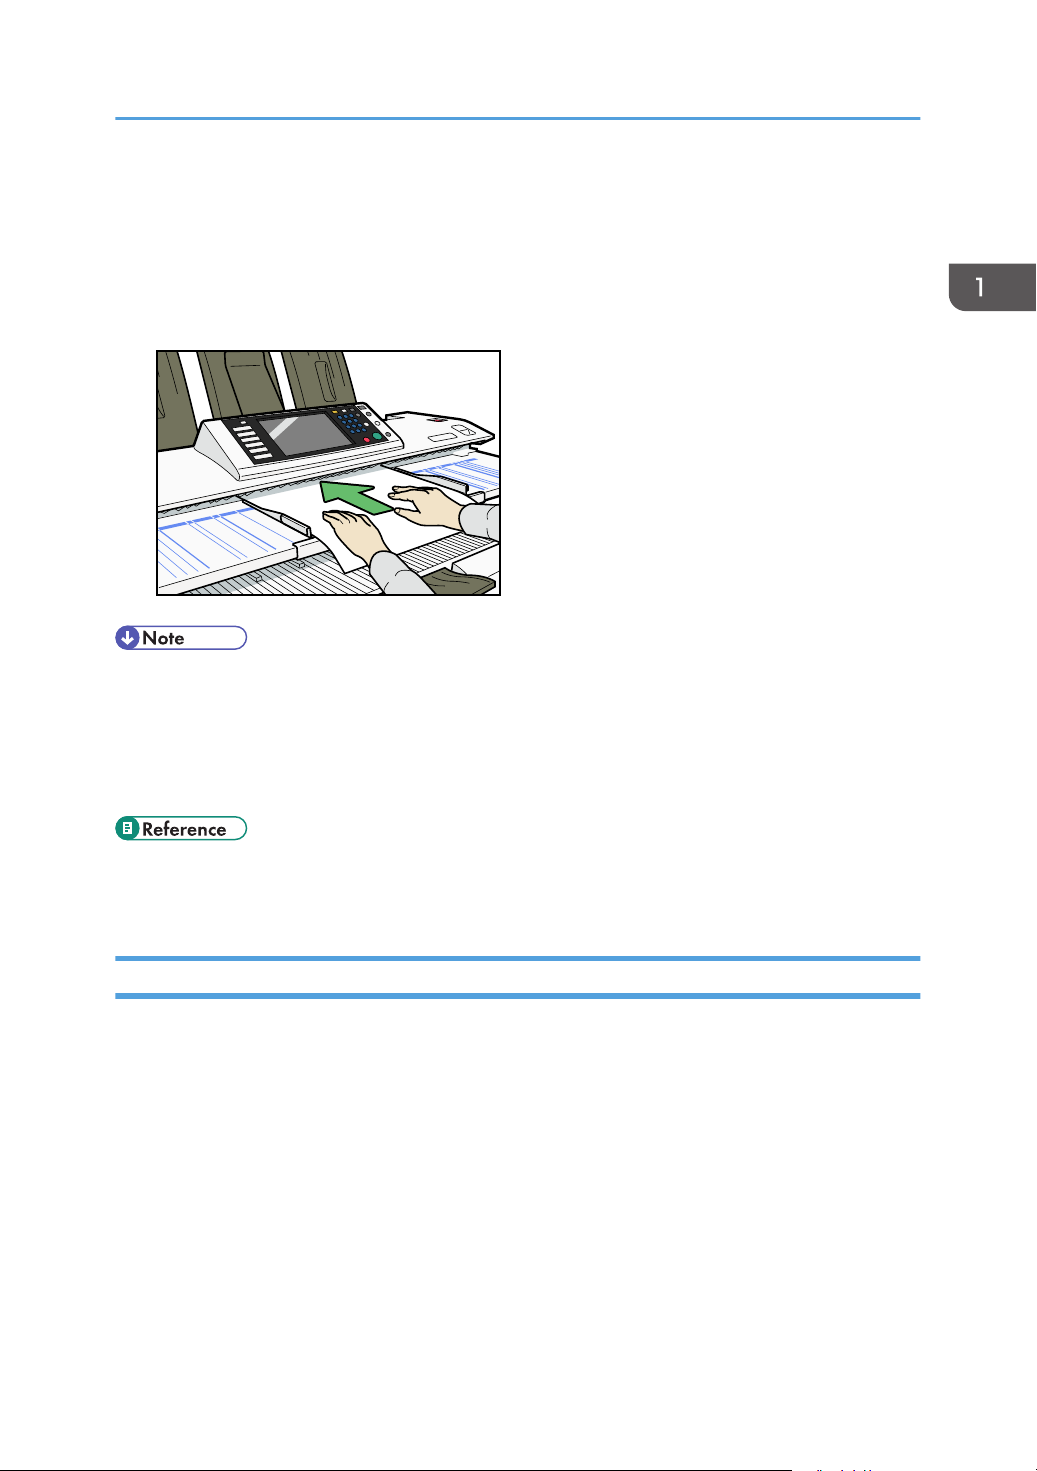
Placing Originals
3. Using both hands, carefully insert the original between the original guides, copy side
down.
Place the original centrally, so that the space on either side of its edges is even.
Then push it carefully in, so that it makes light contact with the feed rollers.
Support the original with your hands until it feeds in.
• After inserting an original, do not try to handle it. Support it, if necessary, so as not to interrupt
feeding.
• You can change the original feed delay setting if originals are repeatedly feeding in slanted, or if
you need to adjust the delay for the type of originals you are using. See “Original Feed Delay 1”,
General Settings Guide.
• p.21 "Original and Copy Output Locations"
• p.26 "Originals"
To stop originals feeding in
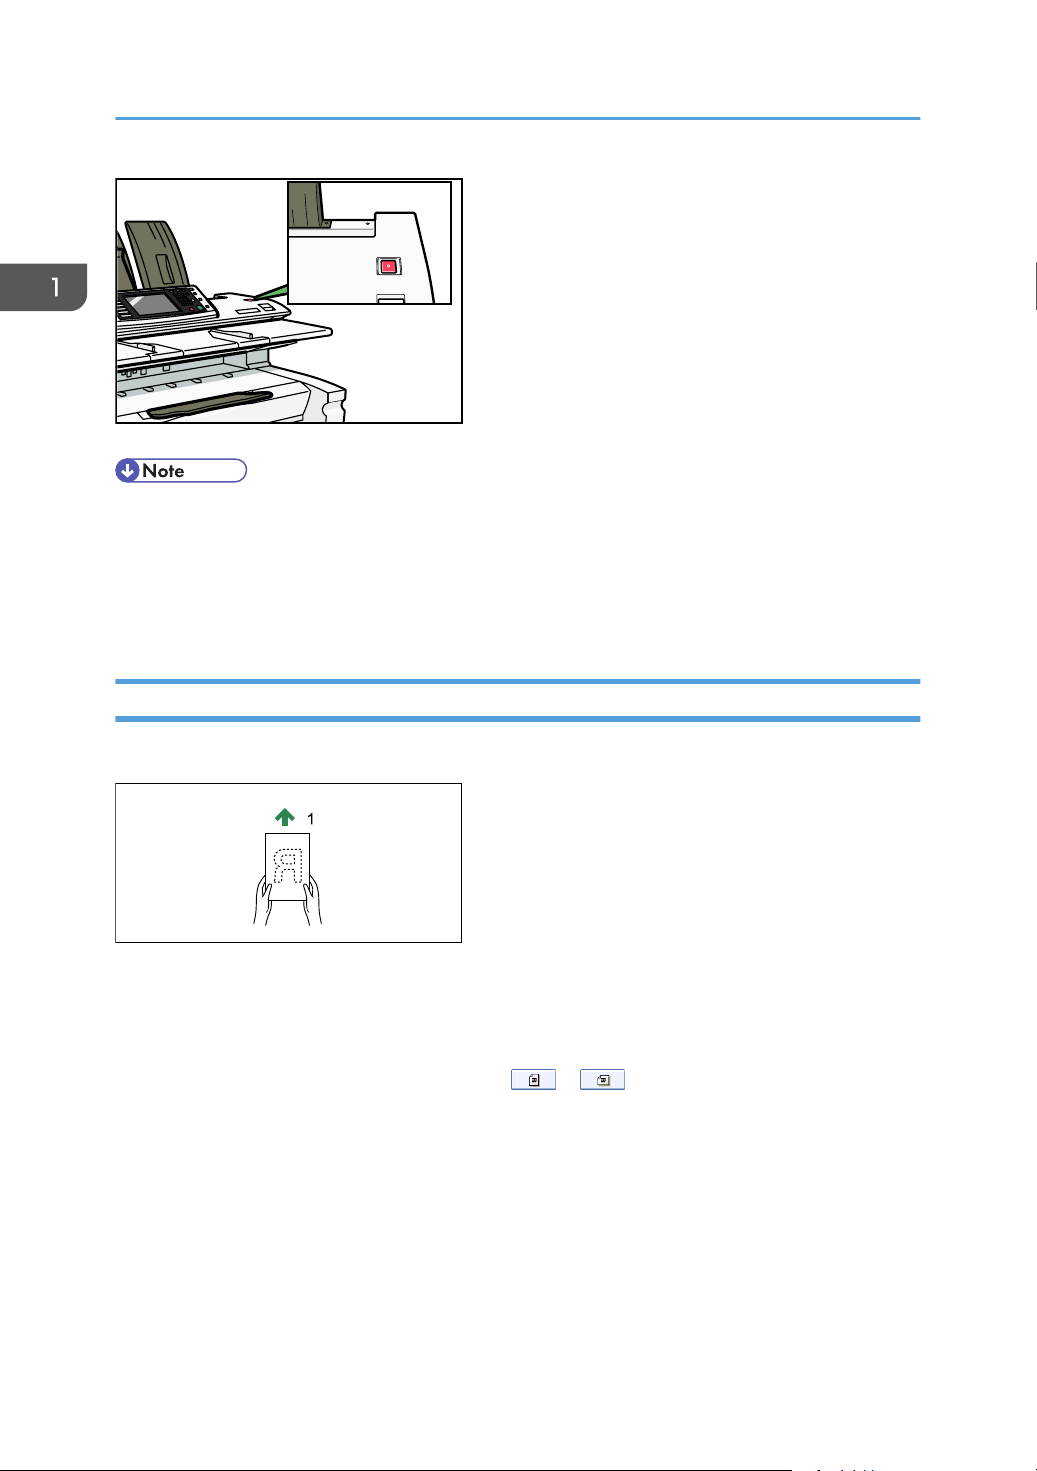
If the originals are feeding in slanted, or jamming, etc., press the [Scanner Stop] key to stop them
feeding in.
31
Page 34
BKW003S
BKY010S
1. Placing Originals
• When you press the [Scanner Stop] key, the original stops immediately, which can cause it to jam.
When this happens, see “Clearing Misfeeds”, Troubleshooting.
• When you have set original rear output as the original output location, the rear edge of the
originals is held at the output exit. To cancel this, press the [Scanner Stop] key. Only originals that
are at least 450 mm long are held by their rear edges at the output exit.
Original Orientation
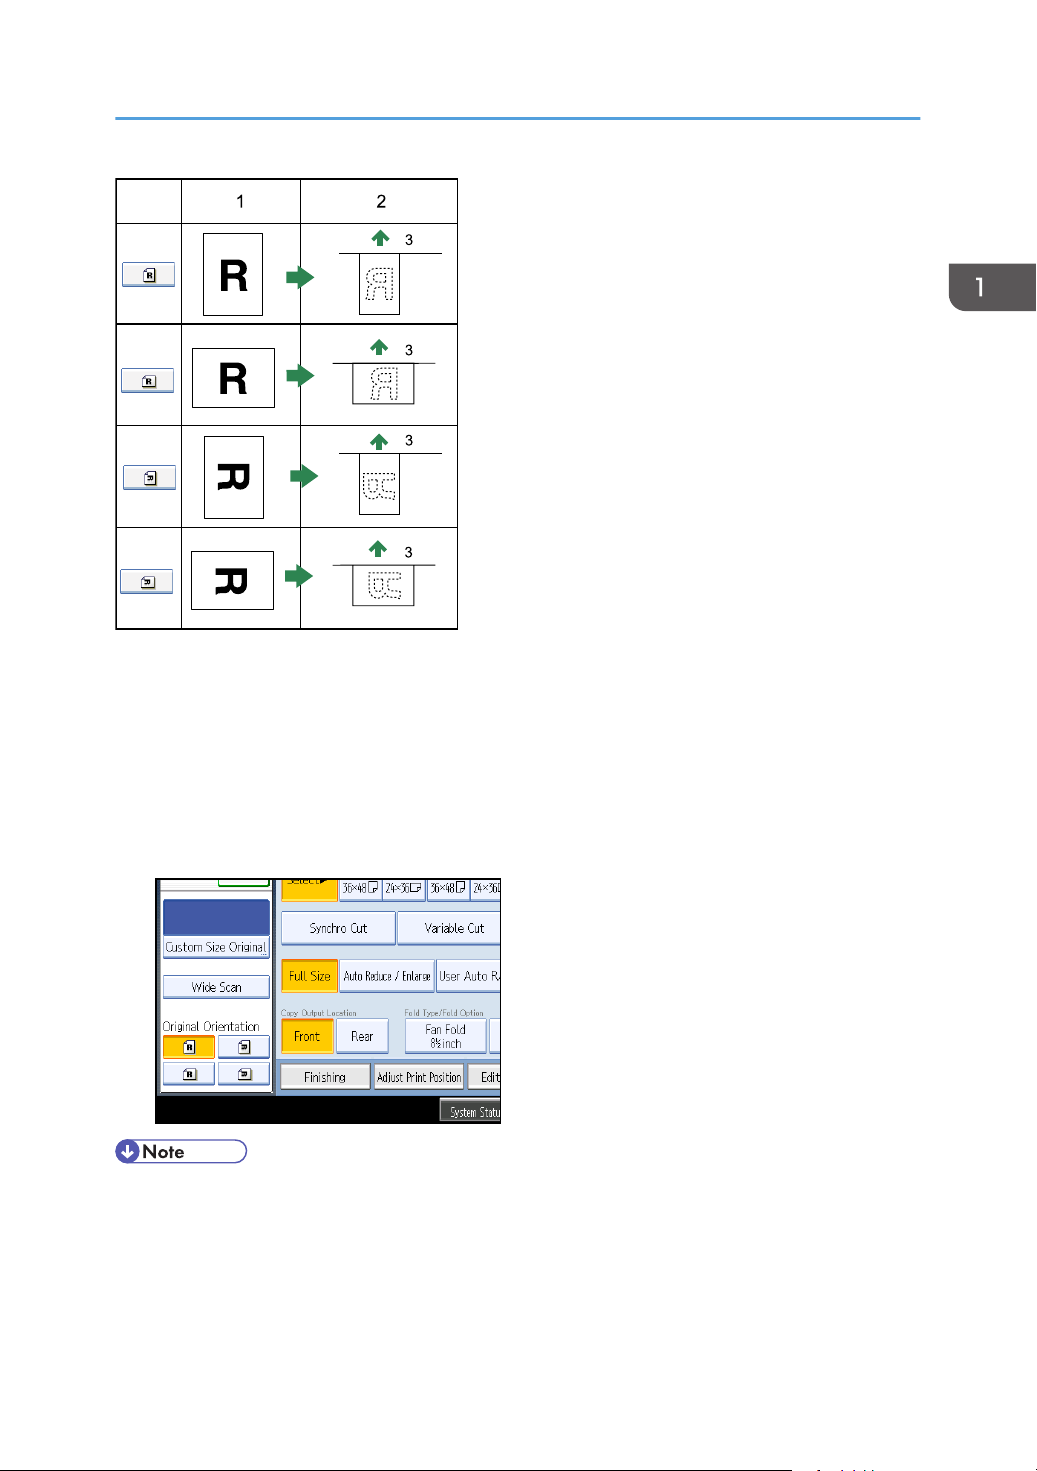
Place the original face down on the original table so that the top of the original feeds in first.
1. Original feed direction
When you cannot place the original as the above, you may not make copies as you want with particular
functions.
If this happens, change the orientation by selecting or .
The relationship between Original Orientation and the actual orientation of originals is as follows:
32
Page 35
BKY011S
1. Original
Placing Originals
2. Original on the original table
3. Original feed direction
1. Press [Special Original].
2. Under [Original Orientation], select an original orientation that is suitable for your
original.
• It is recommended that you use this function together with Auto Paper Select or Preset Reduce/
Enlarge.
33
Page 36
1. Placing Originals
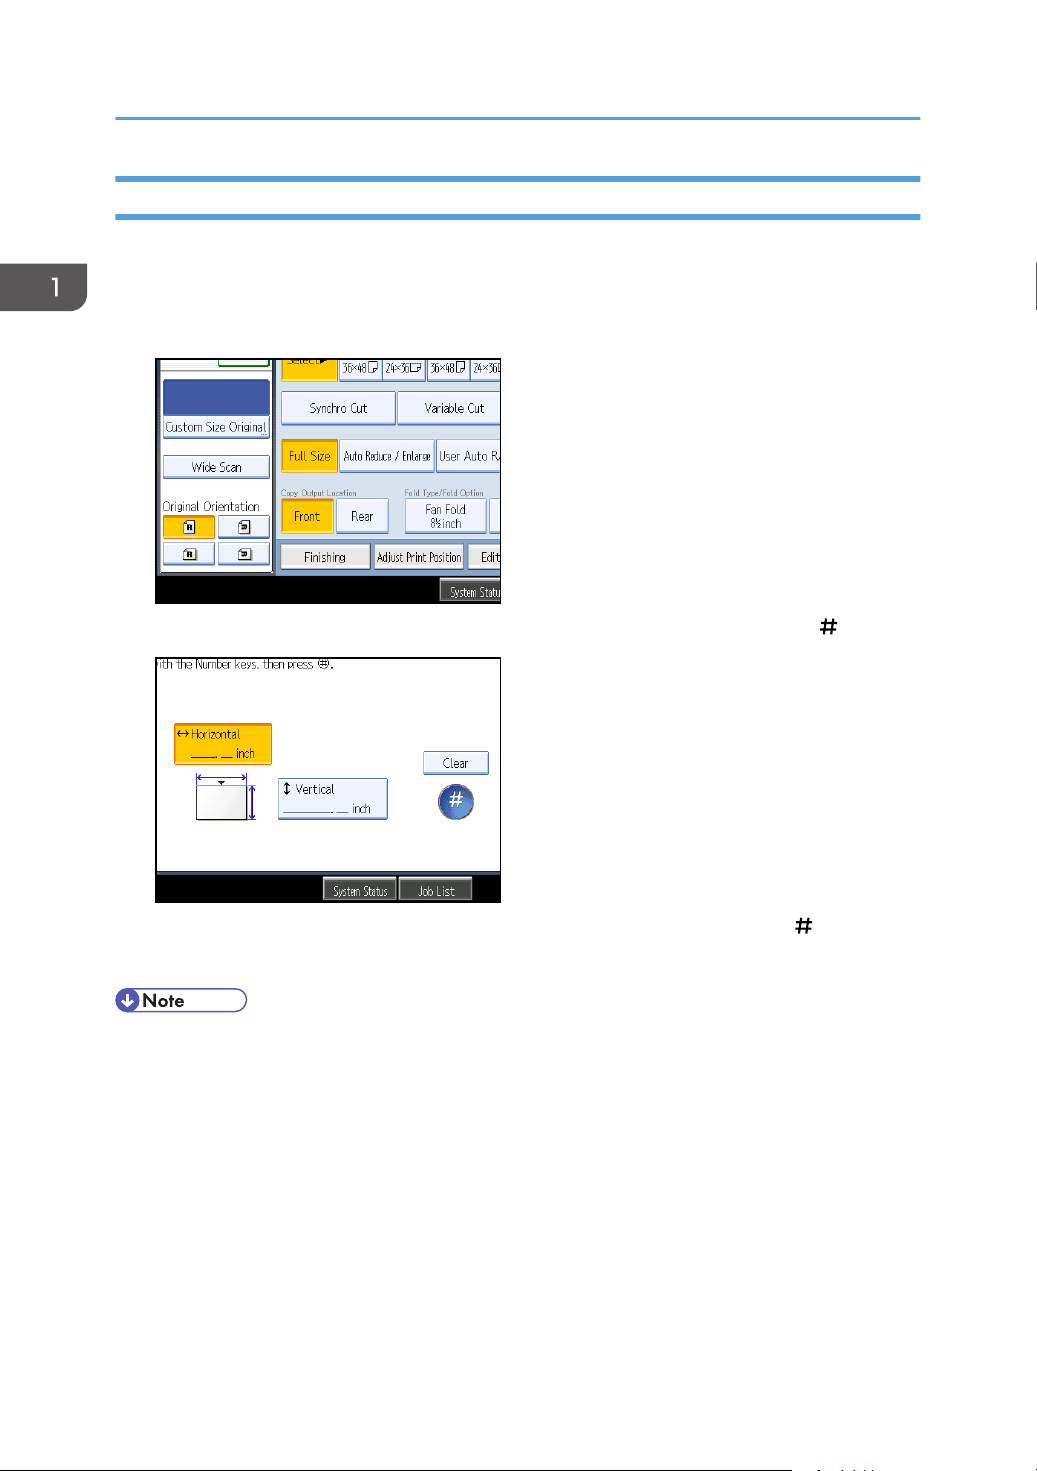
Placing Custom Size Originals
When placing custom size originals, specify the size of the originals.
1. Press [Special Original].
2. Press [Custom Size Original].
3.
Enter the horizontal size of the original with the number keys, and then press [ ].
34
4. Enter the vertical size of the original with the number keys, and then press [ ].
5. Press [OK].
• On the Type 1, originals that are 182 - 15,000 mm (7.17" - 590.5") vertically and 210 - 914 mm
(8.27" -35.9") horizontally can be specified using this function.
• On the Type 2, originals that are 182 - 30,000 mm (7.17"-1181.1") vertically and 210 - 914
mm (8.27" -35.9") horizontally can be specified using this function.
• If you do not specify the size, parts of the image may not be copied.
• If you make a mistake, press [Clear], and then enter the value again.
Page 37
BKY012D
Placing Originals
Wide Scan
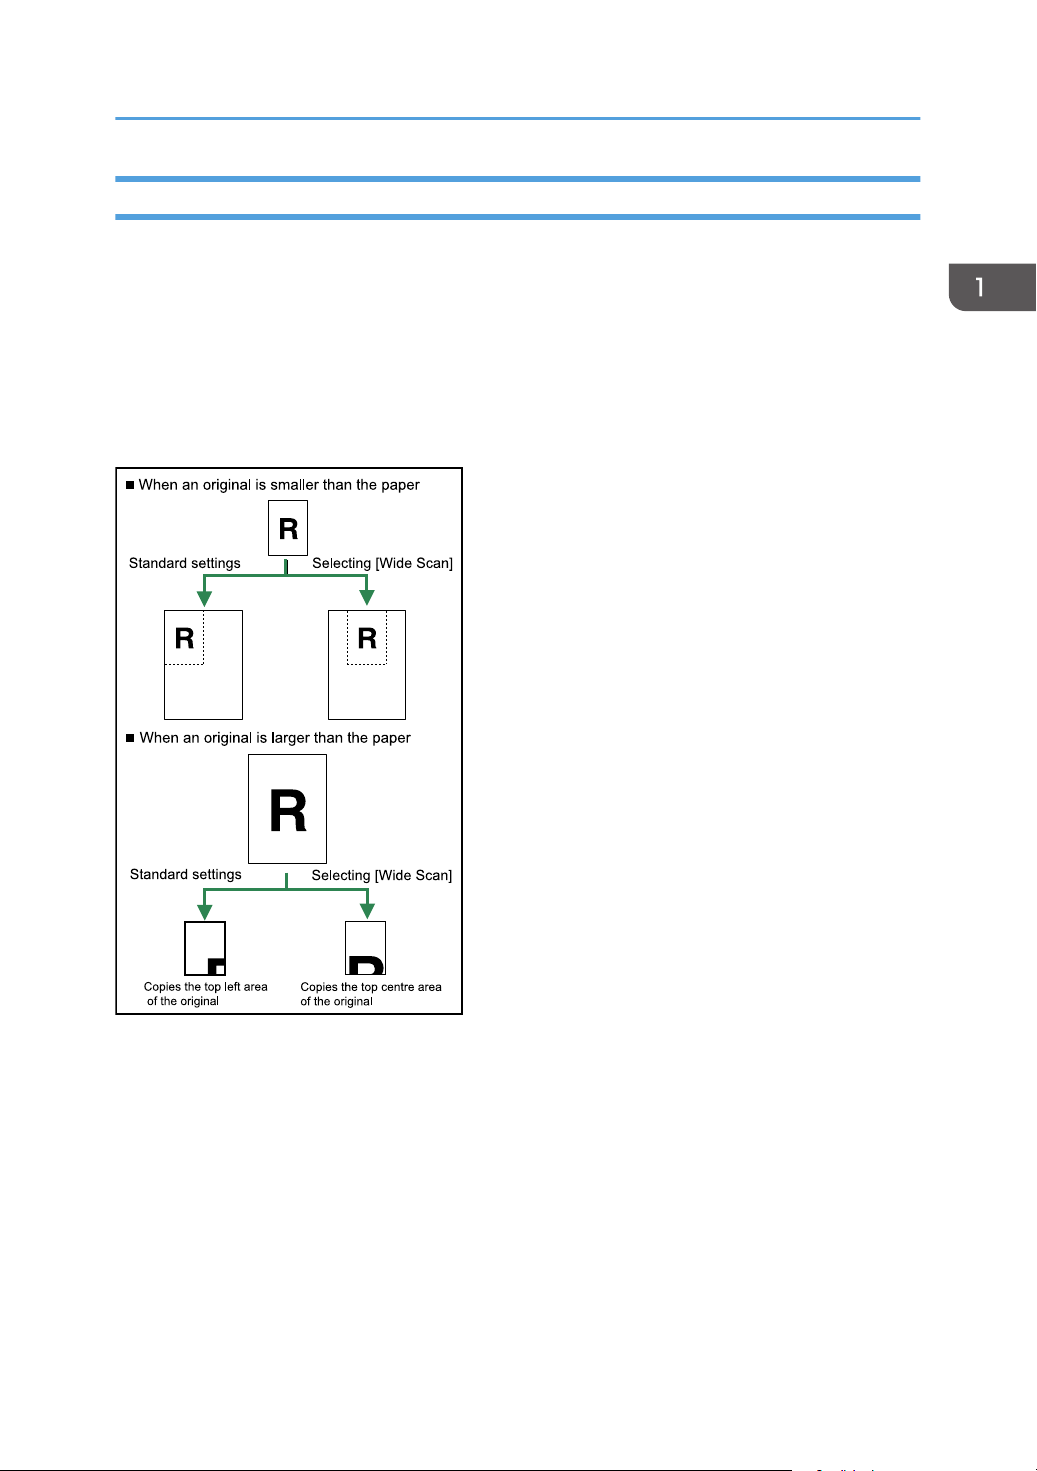
When Wide Scan is selected, the machine scans using a predetermined width, regardless of the actual
width of the original.
You can copy a custom size original without specifying its horizontal and vertical sizes.
If the paper size you want to copy onto is larger than that of the original, this function shifts the image to
the upper center of the paper.
If the paper size you want to copy onto is smaller than that of the original, this function copies the top
center part of the image.
1.
Press [Special Original].
35
Page 38
1. Placing Originals
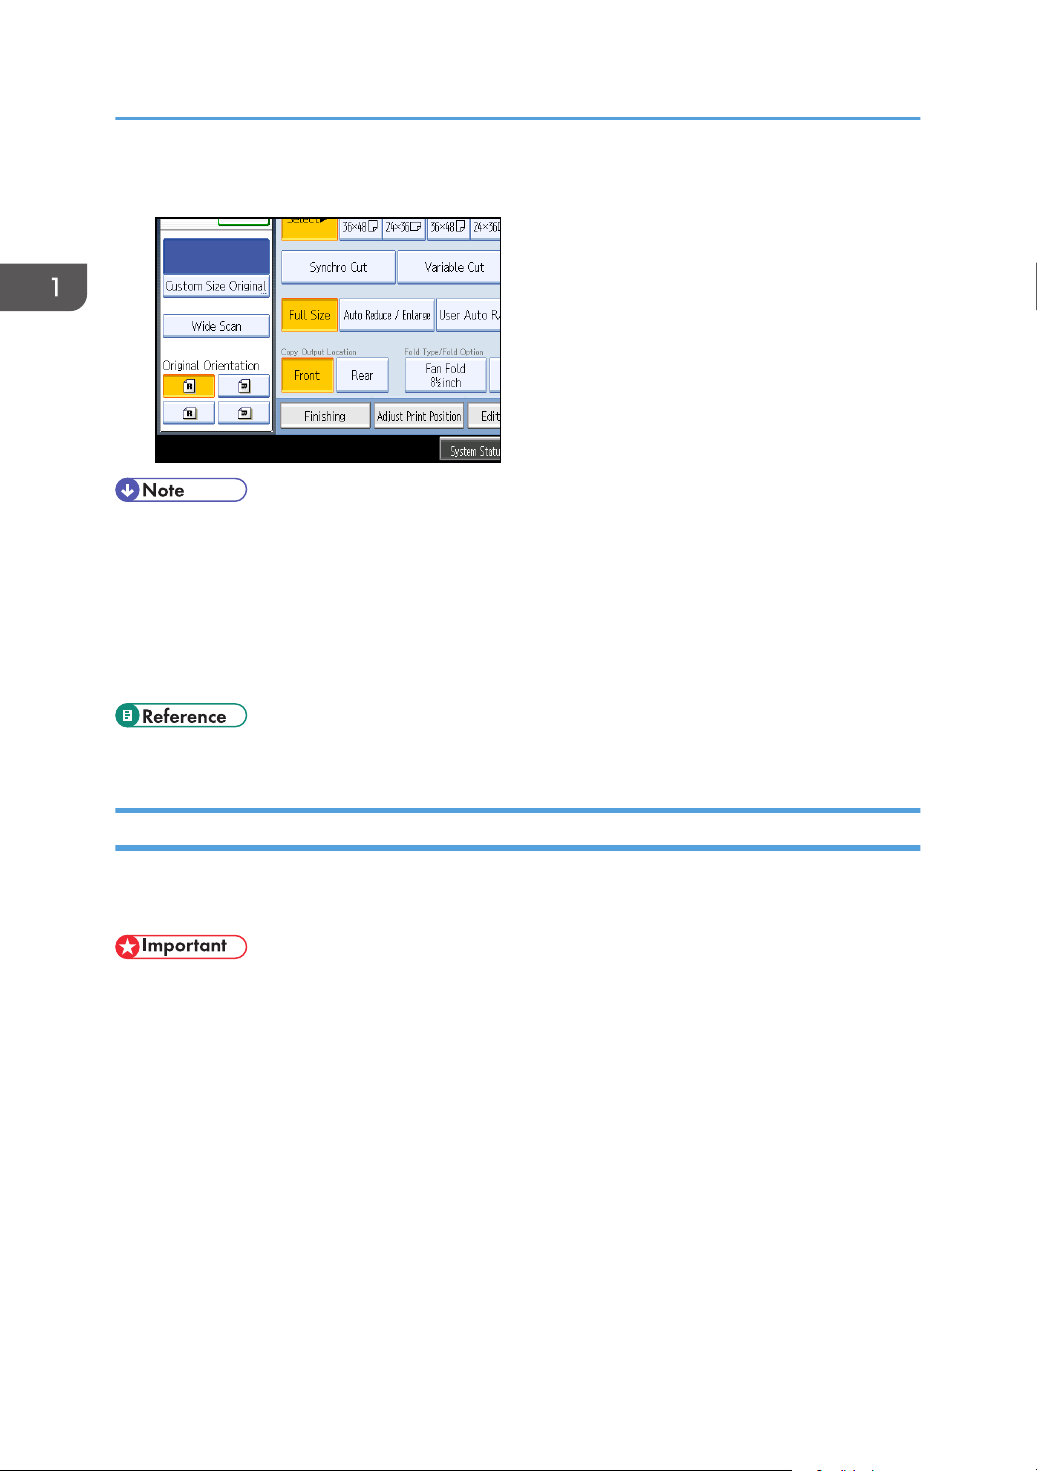
2. Press [Wide Scan].
• If you select Wide Scan, the scan width is determined by the sum of the selected paper size and a
specified reduction/enlargement ratio. The maximum width of Wide Scan is 914 mm (35.9").
• When originals are scanned and stored in Document Server using this function, the stored original
size is the paper size of the selected paper tray.
• Depending on the paper cut method you are using, some functions cannot be used with this
function. For more details, refer to “Function Compatibility”.
• p.169 "Function Compatibility"
Setting the Carrier Sheet
Use the carrier sheet when copying originals listed in “Originals that should be scanned using the carrier
sheet”, such as originals drawn in pencil, and pasted originals.
• When using the optional carrier sheet, set the original output location to original rear output. If the
original output location is set to original upper output, the original may be damaged.
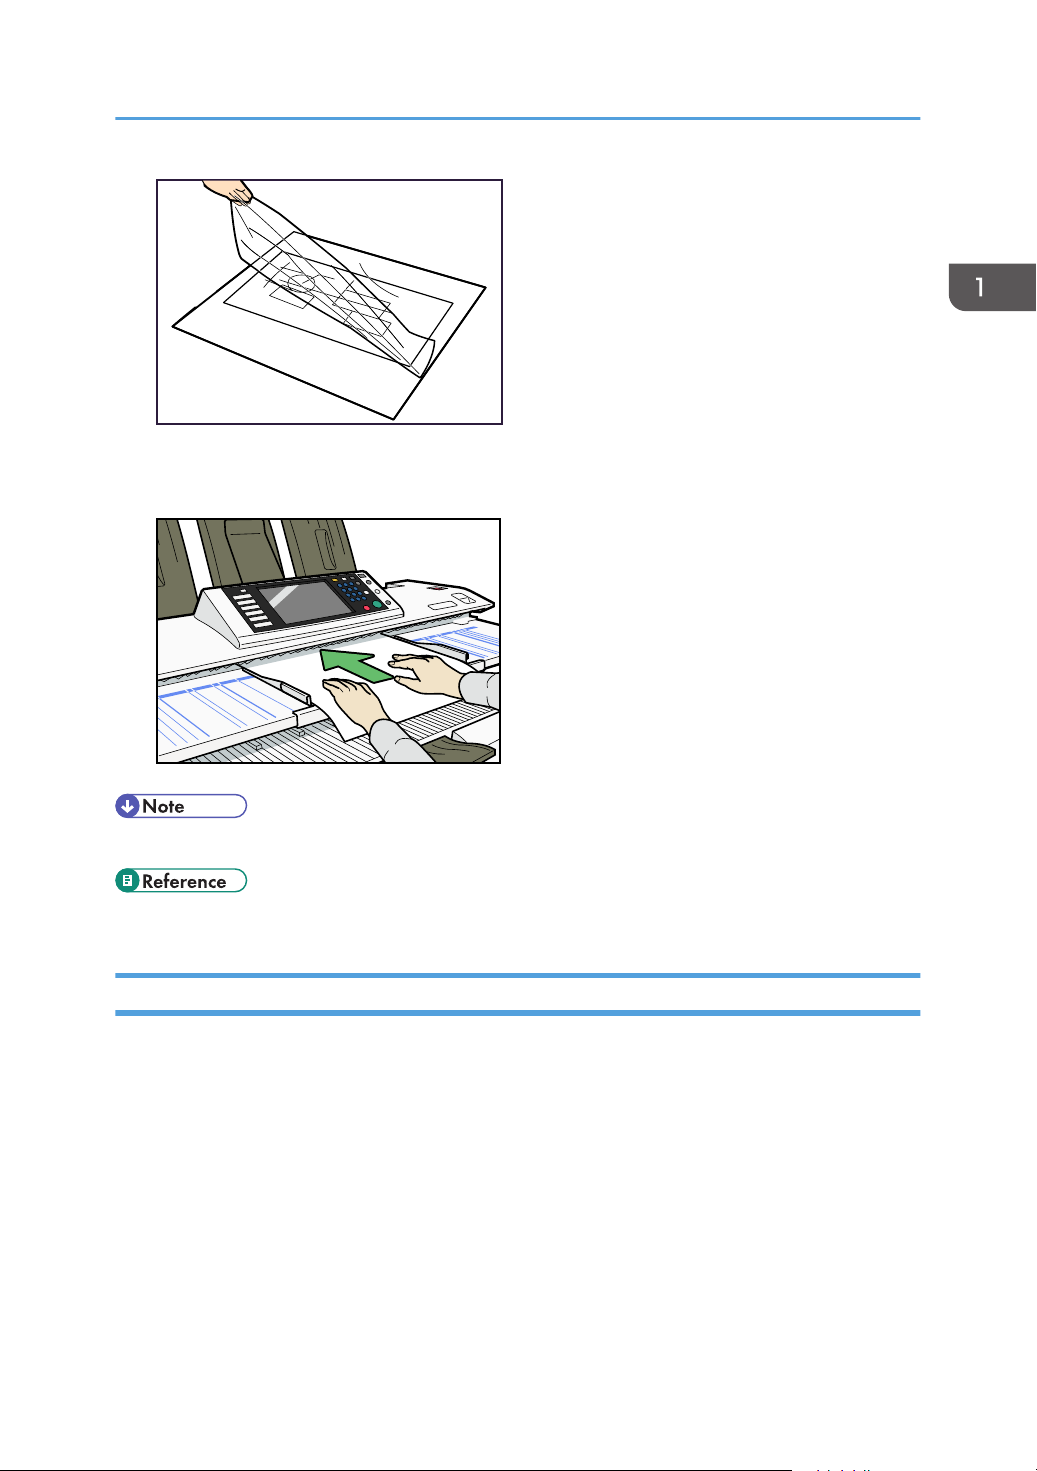
1. Open the carrier sheet with the transparent sheet face up, and then insert the original also
face up.
Align the original with the fold of the carrier sheet.
36
Page 39
BKV008S
BKW002S
Placing Originals
2. Using both hands, hold the carrier sheet face down, and carefully insert the folded edge
of the carrier sheet into the insertion area.
• When using the carrier sheet with Synchro Cut, the paper is cut to the size of the carrier sheet.
• p.27 "Originals that should be scanned using the carrier sheet"
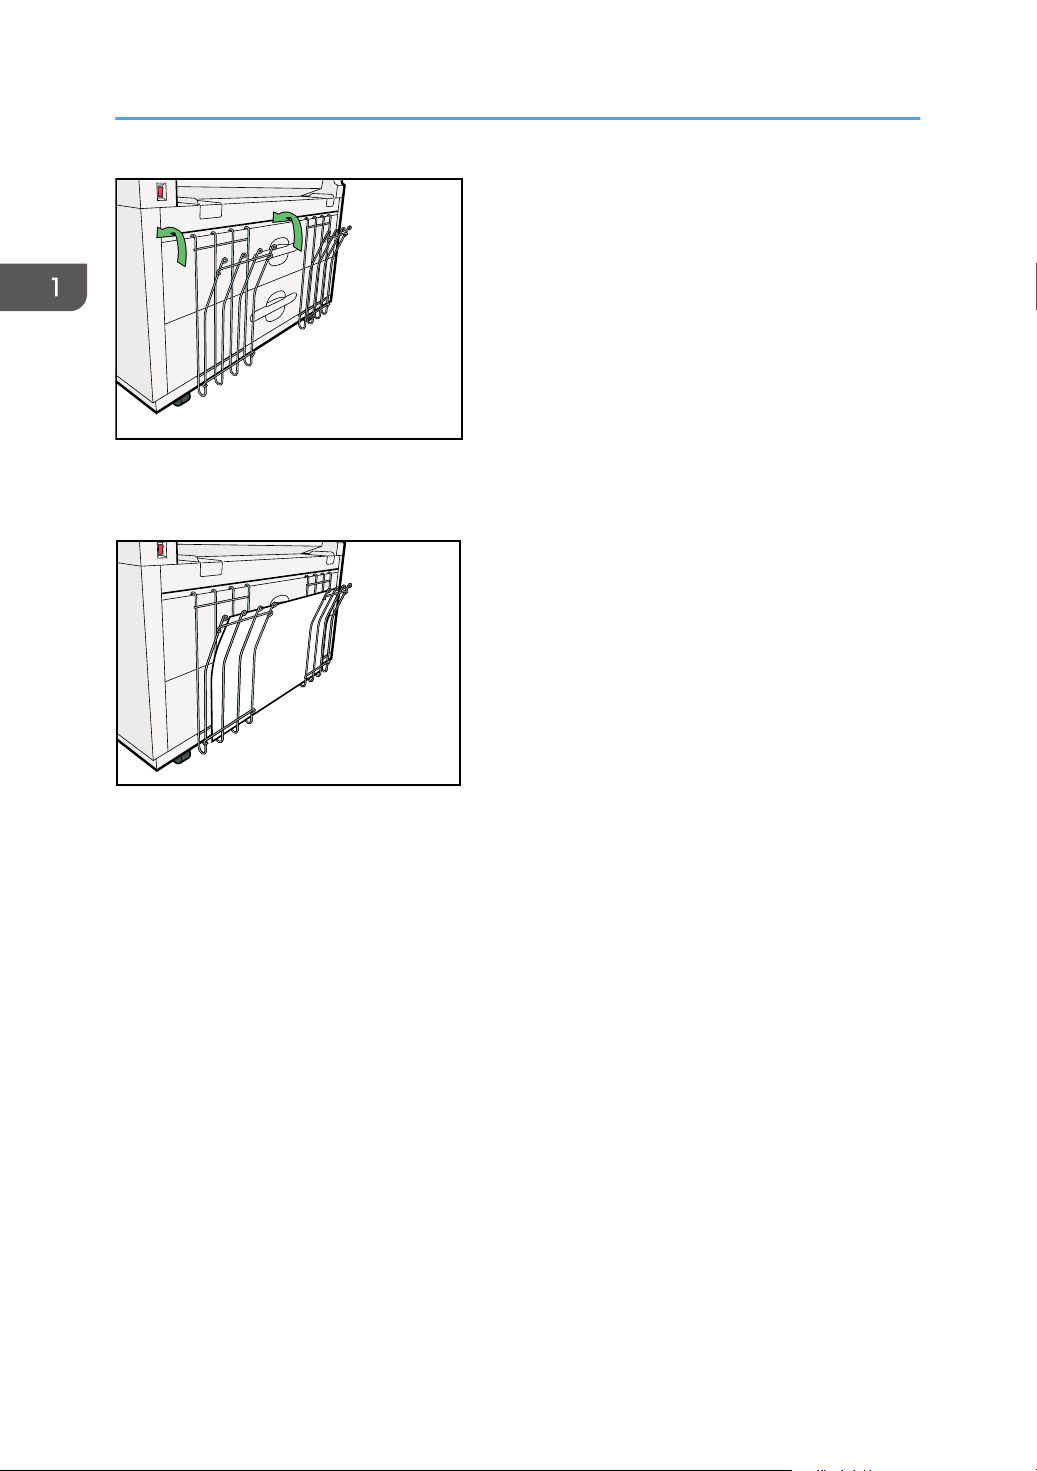
Setting the Original Hangers
The original hangers (optional) are useful when scanning two or more originals at a time.
Up to A1 (D) size originals can be placed on the hangers.
Attach each of the original hangers to the front of the machine.
37
Page 40
BKW052S
BKW053S
1. Placing Originals
Insert large originals, such as A1 (D) sheets, into the original hangers so they are in the landscape
orientation.
38
Page 41
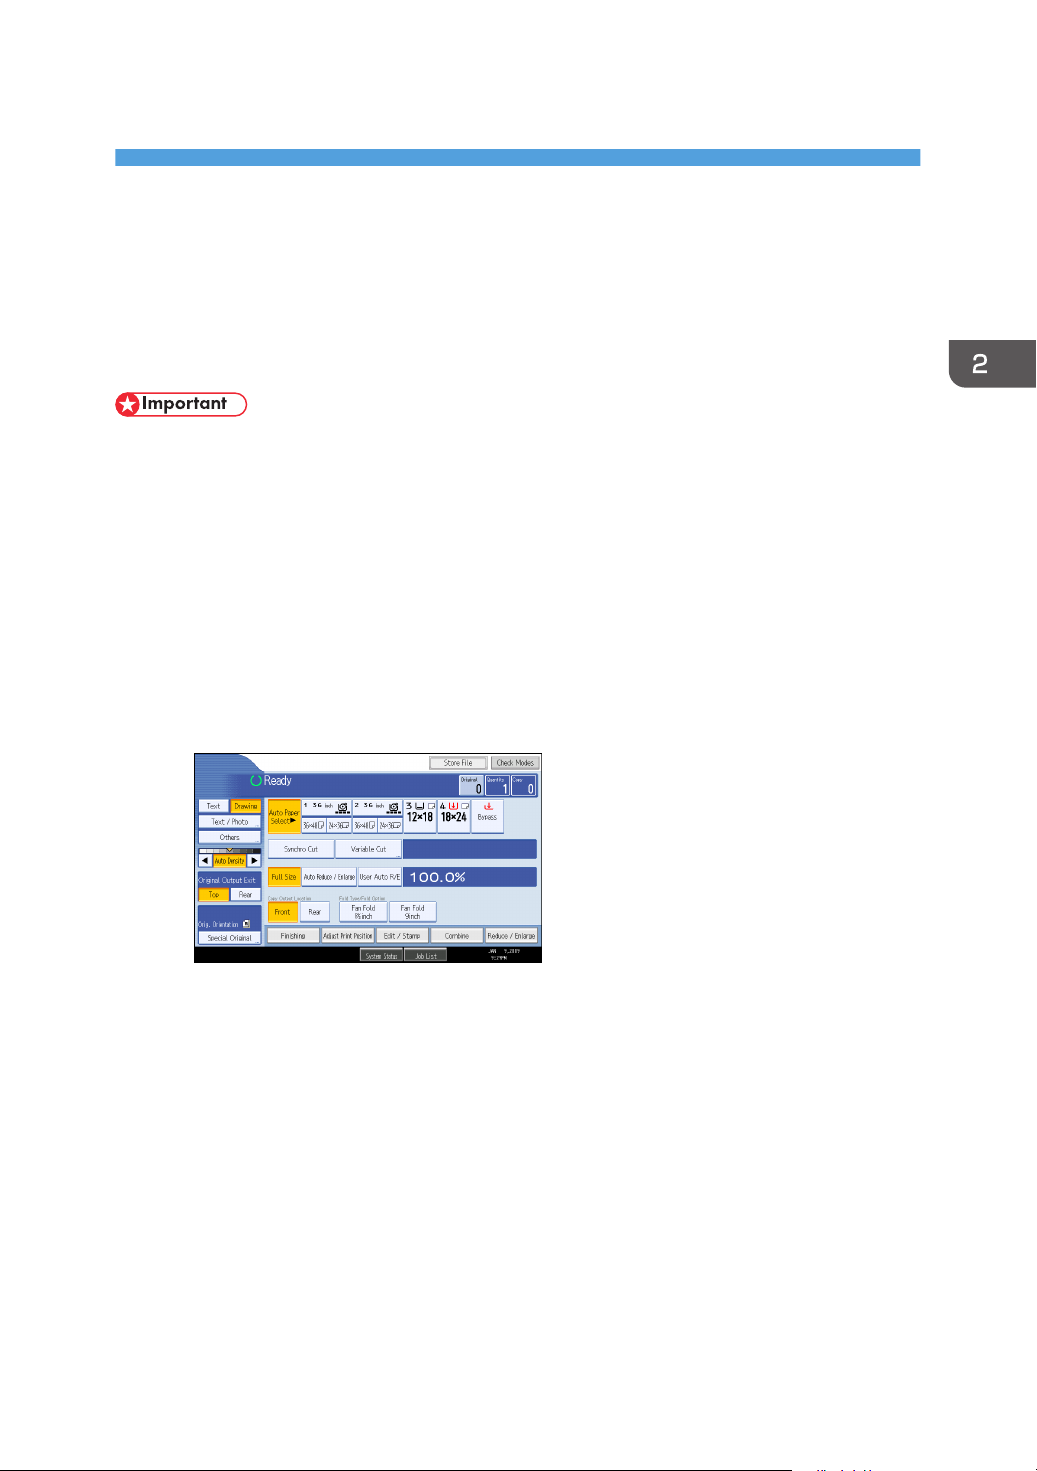
2. Basic Copying
This chapter describes the procedure for making copies in various modes.
Basic Procedure
This section describes the basic procedure for making copies.
• When User Code Authentication is set, enter your user code (up to eight digits) with the number
keys so that the machine accepts copy jobs. For details about Administrator Tools, see “System
Settings”, General Settings Guide.
• When Basic Authentication, Windows Authentication, LDAP Authentication, or Integration Server
Authentication is set, enter your login user name and password so that the machine accepts copy
jobs. Ask the administrator for the login user name and password. For details, see “When the
Authentication Screen is Displayed”, About This Machine.
1. Make sure "Ready" appears on the screen.
If any other function is displayed, press the [Copy] key on the left side of the control panel.
Initial copy screen
2. Make sure no previous settings remain.
When there are previous settings remaining, press the [Clear Modes] key.
3. Set the output locations for originals and copies, and then prepare to use them.
4. Select an [Original Orientation] that matches the orientation of your originals.
5. Make the necessary settings.
6. Enter the number of copies with the number keys.
The maximum copy quantity that can be set is 99.
7. Adjust the original guides to the width of the original, and then place the original face
down.
The original feeds into the machine automatically, and copying starts.
If [Press Start Key] is selected for [Feed Start Method], copying starts after you press the [Start] key.
39
Page 42
2. Basic Copying
• Always log off when you have finished using the machine to prevent unauthorized users from using
the machine.
• To stop the machine during a multi-copy run, press the [Clear/Stop] key after the original has fed
in. The machine stops when the current copy finishes. Press [Yes] to cancel the copy job; press [No]
to resume the interrupted copy job.
• To cancel all copy functions and return the machine to the default condition, press the [Clear
Modes] key.
• To clear entered values, press [Cancel] on the screen.
• To confirm settings, press [Check Modes].
• To stop the original feeding in, press the [Scanner Stop] key.
• If you register the settings using the program function, you can easily recall them by pressing the
[Program] key.
• The number of scanned originals is displayed in the top right corner of the screen.
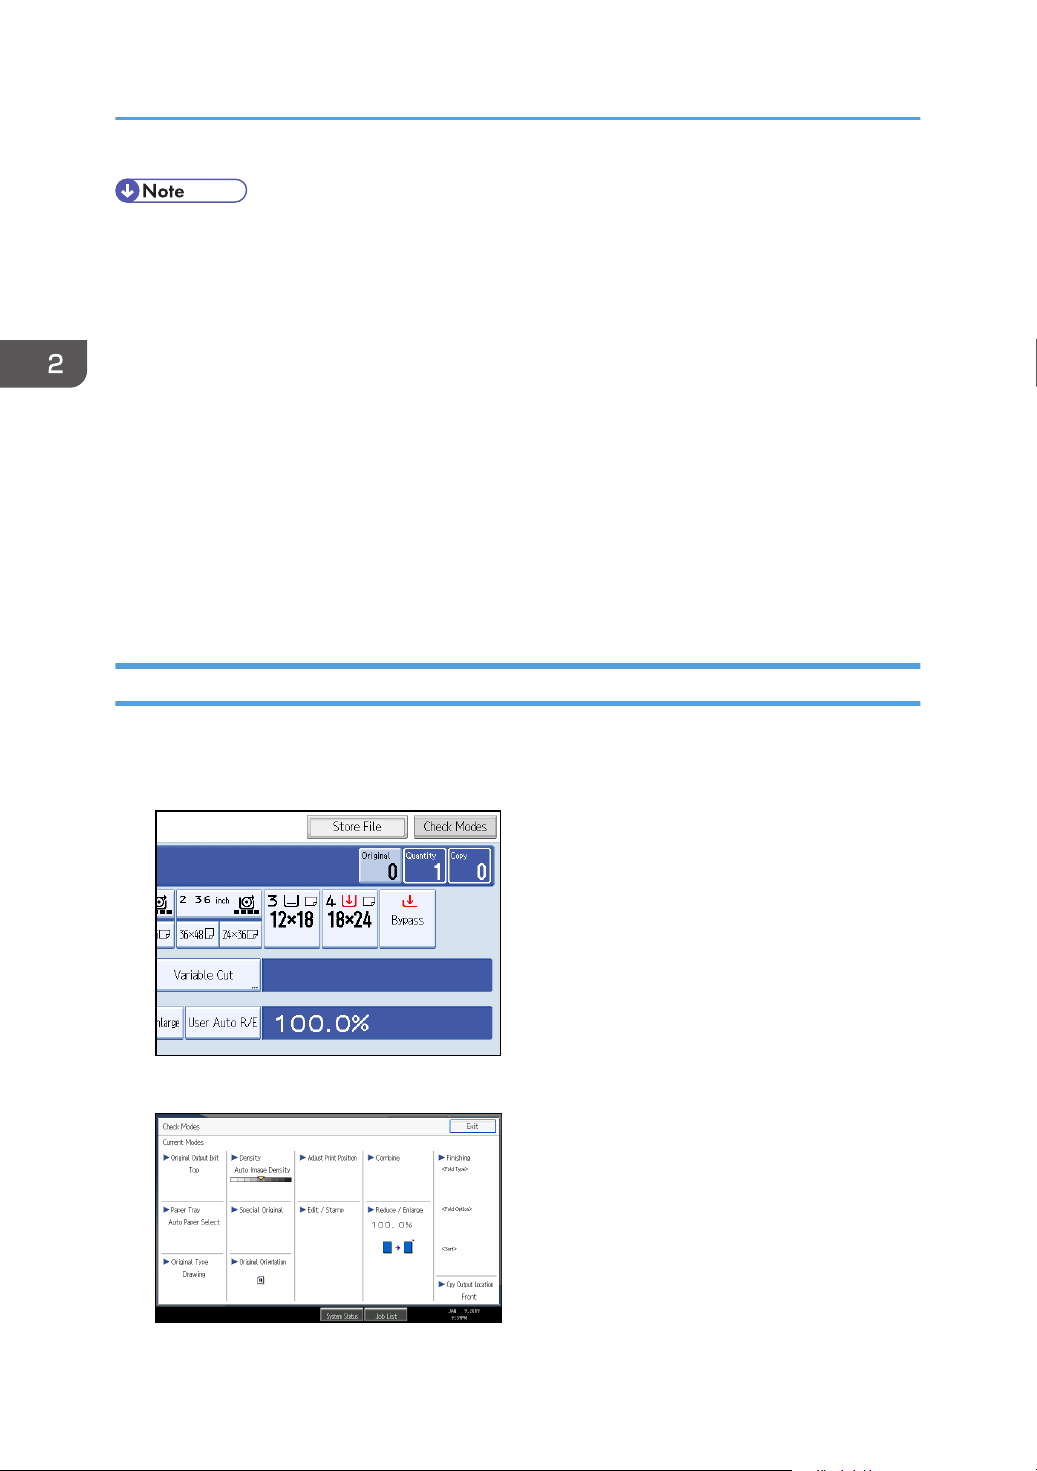
Check Modes
You can confirm the current settings on the screen.
1. Press [Check Modes].
The Check Modes screen appears.
40
Page 43
Basic Procedure
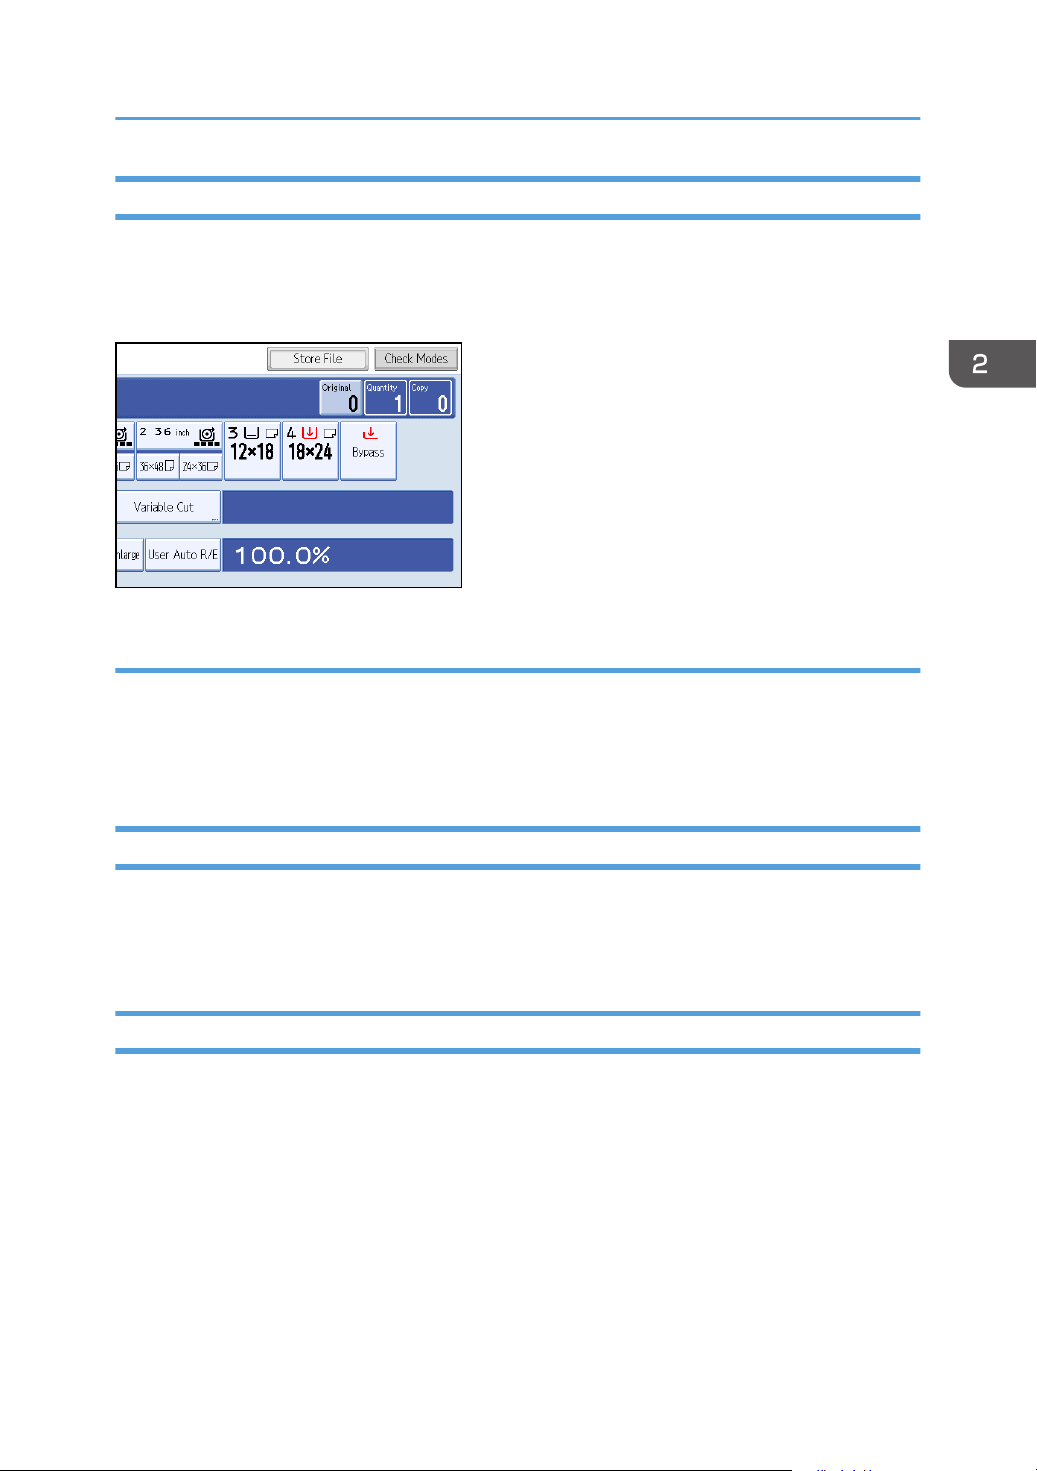
Original Counter/Reset
The number of scanned originals is displayed in the top right corner of the screen.
This allows you to check the number of originals in a job, or if any sheets have been fed together, and
the number of copies that will be stored in the copy output tray.
Resetting the original counter
Reset the number of scanned originals displayed on the screen.
1. Press [Original] in the top right corner of the screen.
The number is reset to 0.
Auto Start
If you make settings and scan the originals while the messages “Scanning originals can be started.” and
“Select copy mode and Place original.” are displayed alternately, your copies will be made once the
machine is ready.
Interrupt Copy
Use this function if you want to interrupt a long copy job to make urgently needed copies.
41
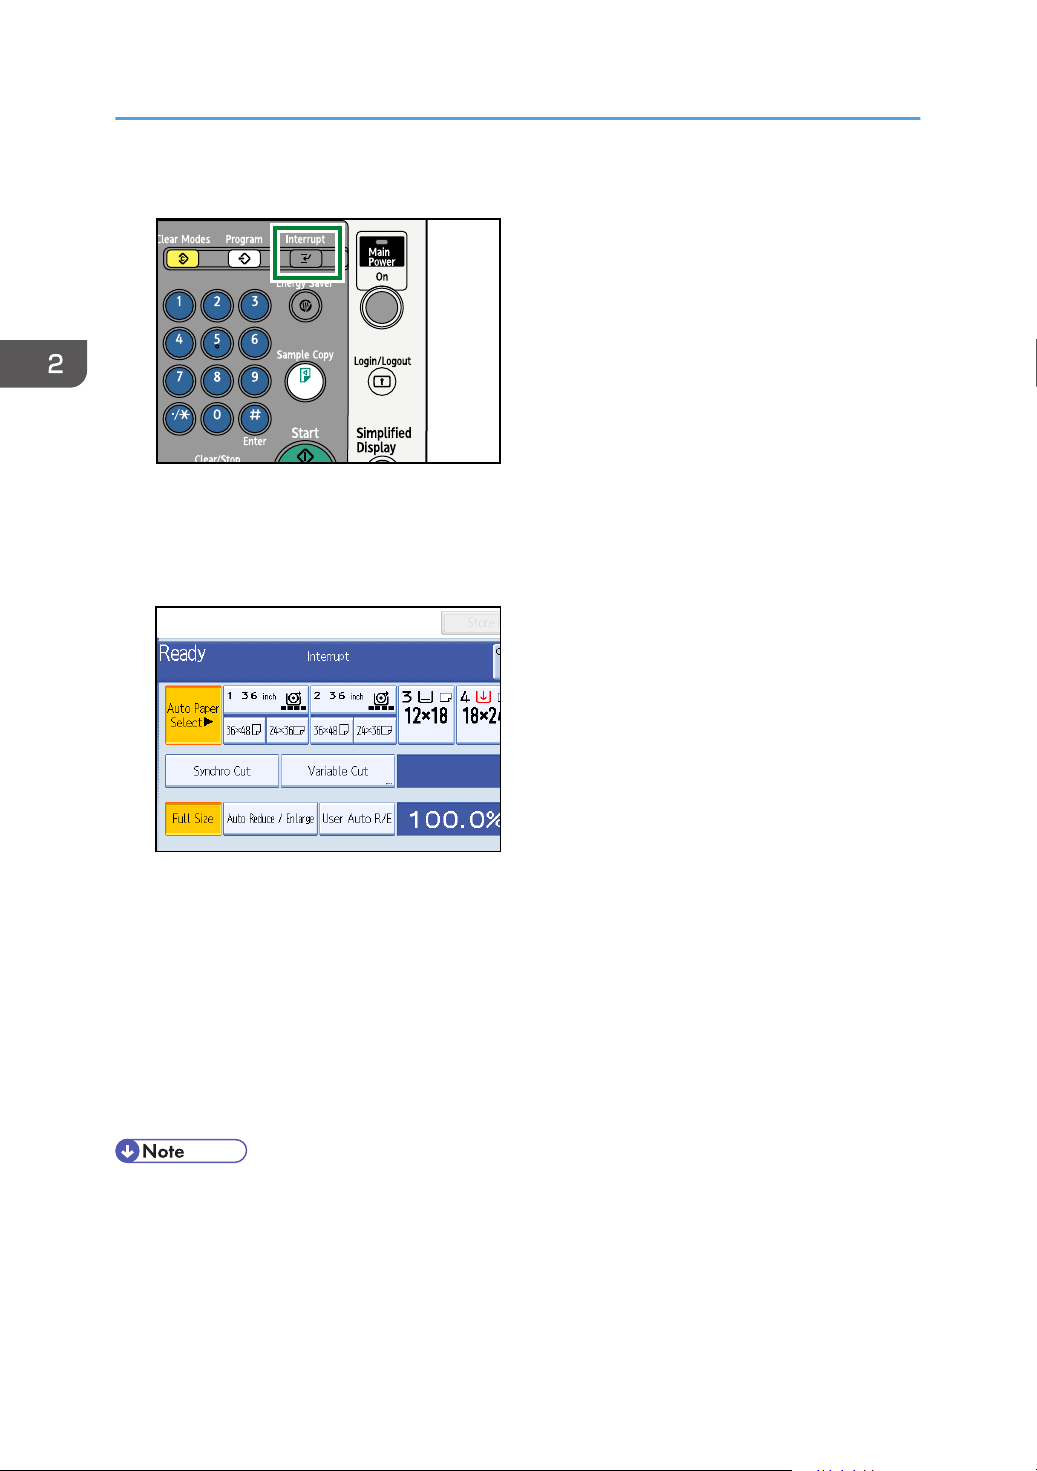
Page 44
BKY049S
2. Basic Copying
1. Press the [Interrupt] key.
The interrupt key indicator lights.
The current copy is ejected, and the machine stops making copies.
2. Make the settings for an interrupt copy job.
42
3. Place the original you want to copy face down.
The original feeds into the machine, and copying starts automatically.
4. When copying is complete, remove the originals and copies.
5. Press the [Interrupt] key again.
The interrupt key indicator goes off.
6. Replace the originals that you were copying.
The original feeds into the machine, and copying resumes automatically. To cancel copying, press
the [Clear Modes] key.
• You cannot set Job Preset for Interrupt Copy.
• The number of originals is counted from “1” when you use Interrupt Copy.
Page 45
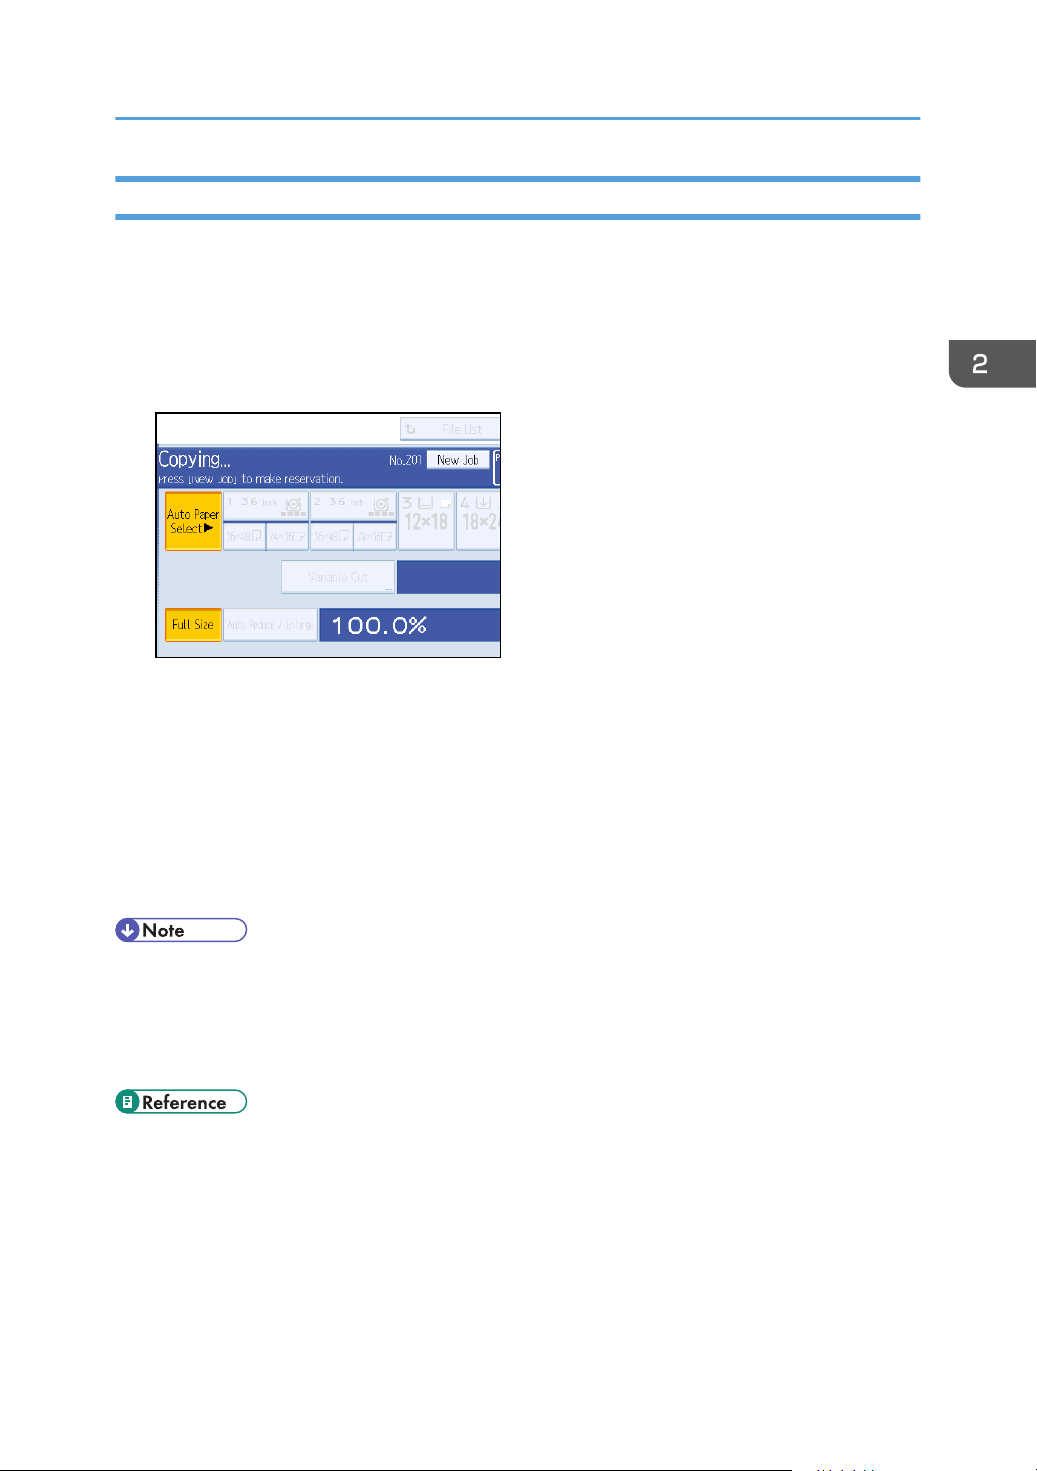
Basic Procedure
Job Preset
You can make settings for the next copy job during copying.
If a long copy job is in progress and you do not want to wait for it to finish, you can use this function to
set up the next copy job in advance. When the current copy job is finished, the next job will start
automatically.
1. Press [New Job] when "Copying..." appears.
2. Be sure message "Ready" appears, and then make settings for the next copy job.
3. Place the original.
The original feeds automatically into the machine and is then scanned.
When the job preset is complete, a confirmation dialog box appears.
4. Press [Exit].
The initial copy display appears.
After the current copy job, the next copy job starts automatically.
• You can switch the display to the current copy job by pressing [To Copying Screen]. You can
switch the display to the preset job by pressing [To Reserv. Screen].
• Preset copy jobs are registered under job numbers in the Reserv. Screen.
• You can confirm and delete preset jobs. For details about the procedures, see “Managing Jobs”.
• p.88 "Managing Jobs"
43
Page 46
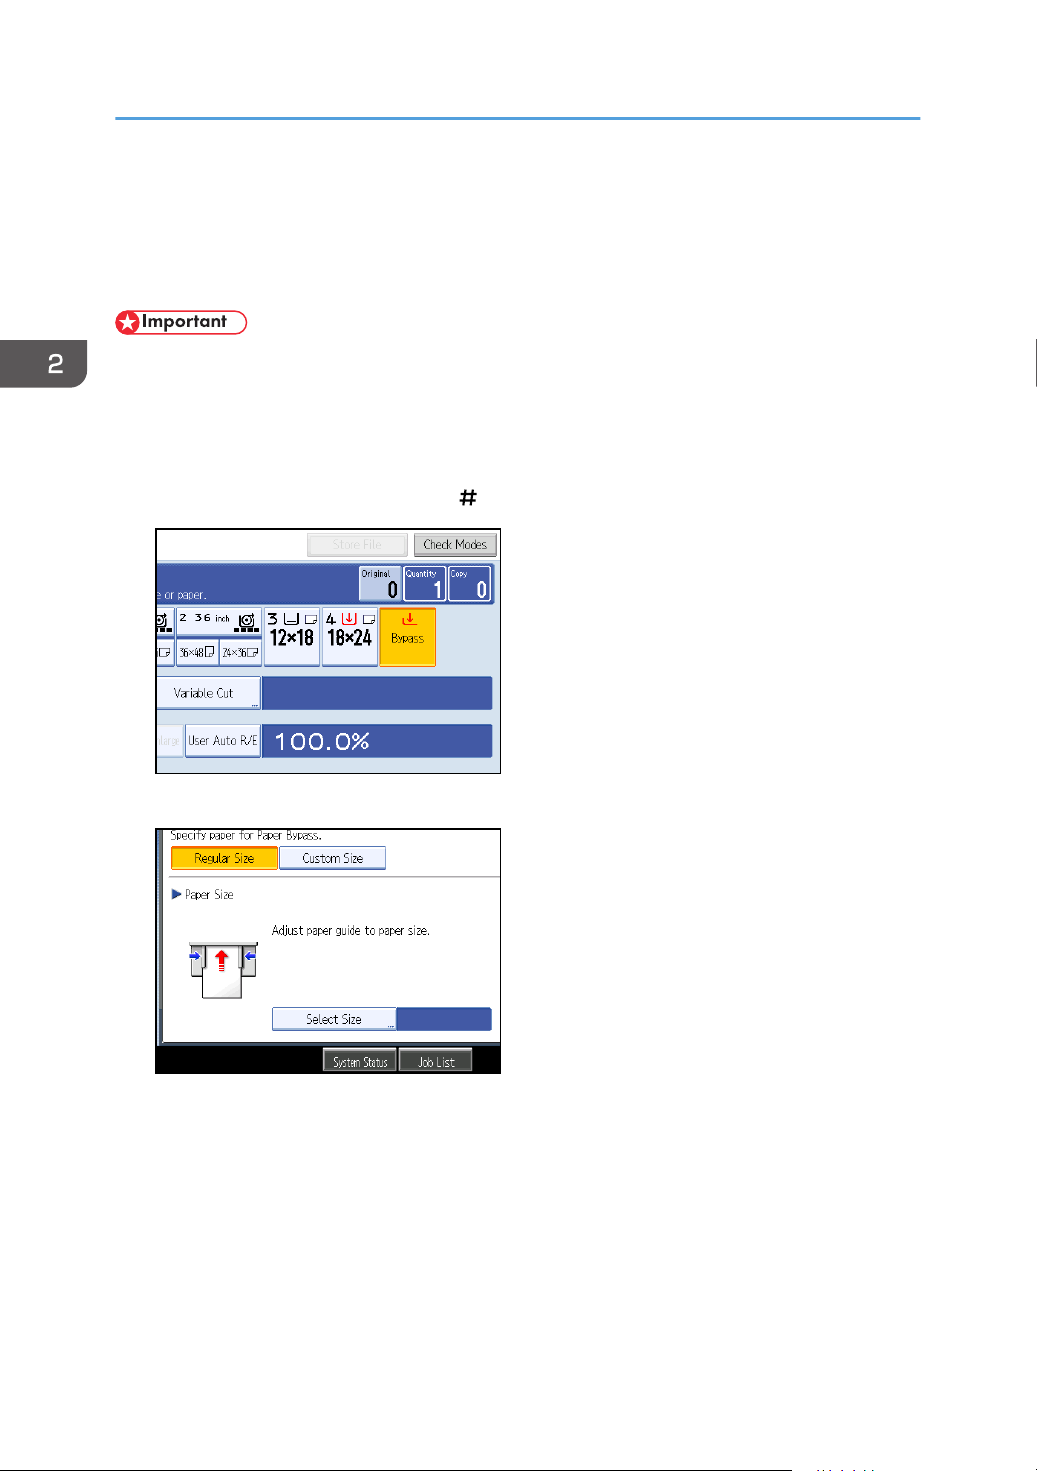
2. Basic Copying
Copying from the Bypass Tray
Use the bypass tray to copy onto paper sizes that cannot be loaded on the paper roll trays, or cut paper
tray.
• Paper that has a vertical length of 210 - 914.4 mm (8.27" - 36.00") and a horizontal length of
182 - 2000 mm (7.17" - 78.74") can be copied from the bypass tray.
• Insert the paper in the bypass tray lengthwise or sideways to fit it onto the feeding orientation.
• Insert the paper in the bypass tray lengthwise when you use A0 size paper.
1. Press [Bypass], and then press the [ ] key.
2. Select the size and type of the paper.
3. Press [OK].
4. Enter the number of copies with the number keys.
5. Place your original, and let it be scanned.
44
Page 47
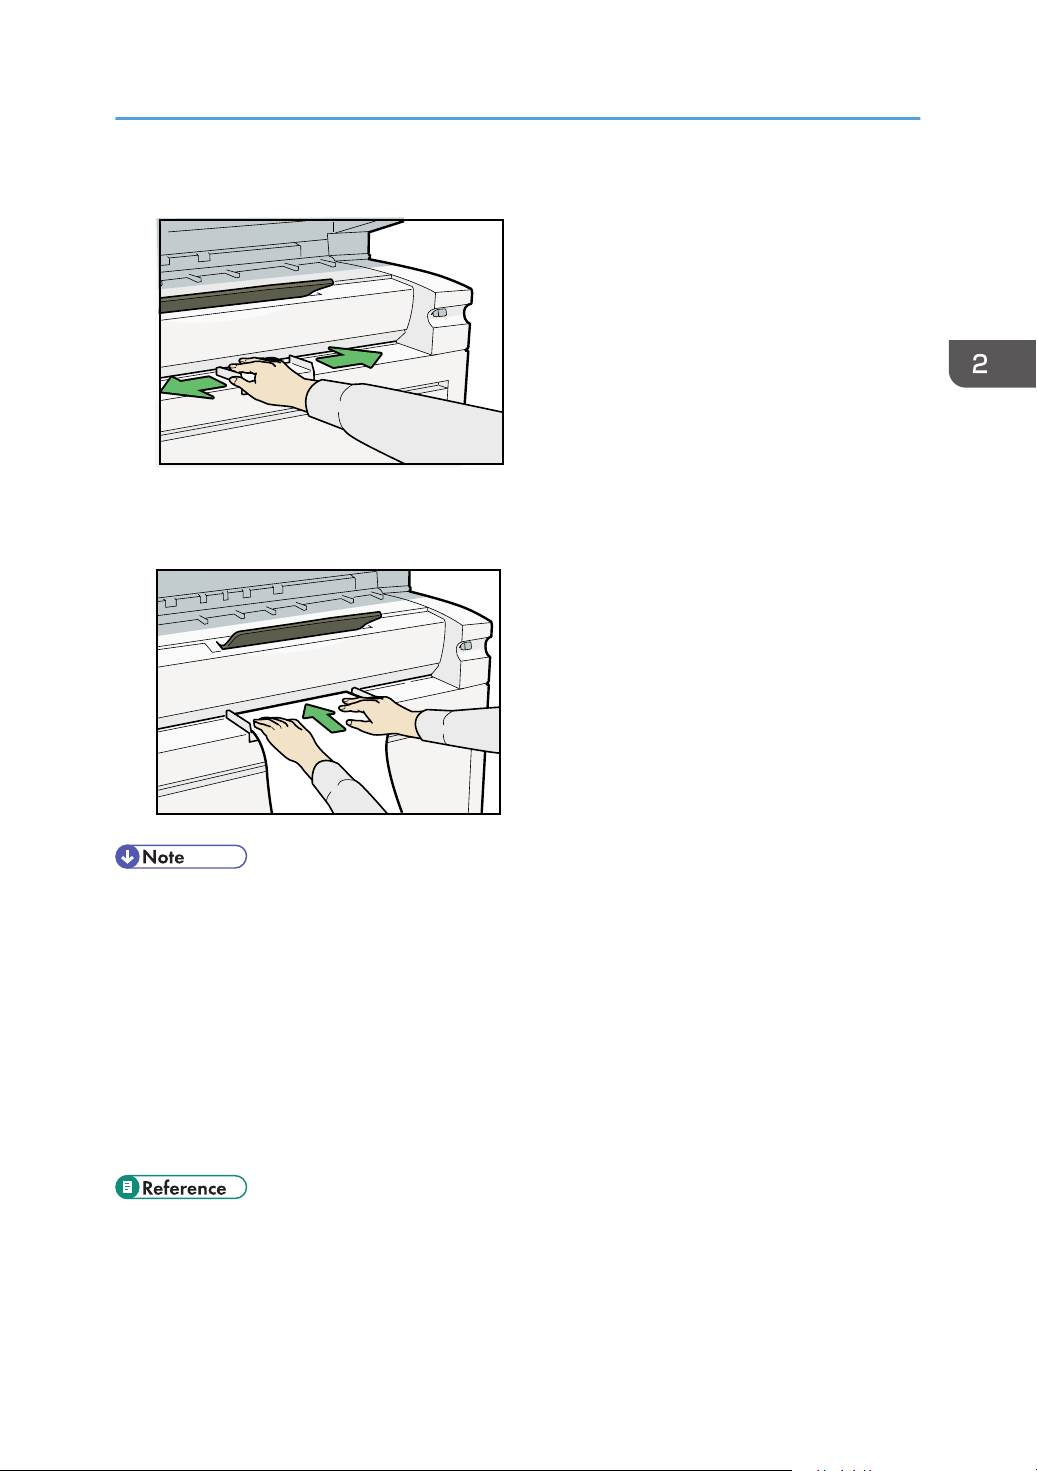
6. Adjust the bypass tray's paper guides to the size of the paper.
BKW004S
BKW005S
7. Insert the paper copy side up into the bypass tray.
The paper feeds into the machine automatically and copying starts.
Copying from the Bypass Tray
• Insert the paper until you hear the beep.
• Place the original centrally, so that the space on either side of its edges is even. Then push it
carefully in, so that it makes light contact with the feed rollers. Support the paper with your hands
until it feeds in.
• Do not copy on both sides of the paper.
• Do not use paper already copied or printed on.
• To make multiple copies, insert an additional sheet after each feeds in.
• For details about paper type and orientation that can be loaded in the bypass tray, see “Copy
Paper”, About This Machine.
• p.97 "Registering the Initial Display's Default Functions"
• p.171 "Supplementary Information"
45
Page 48
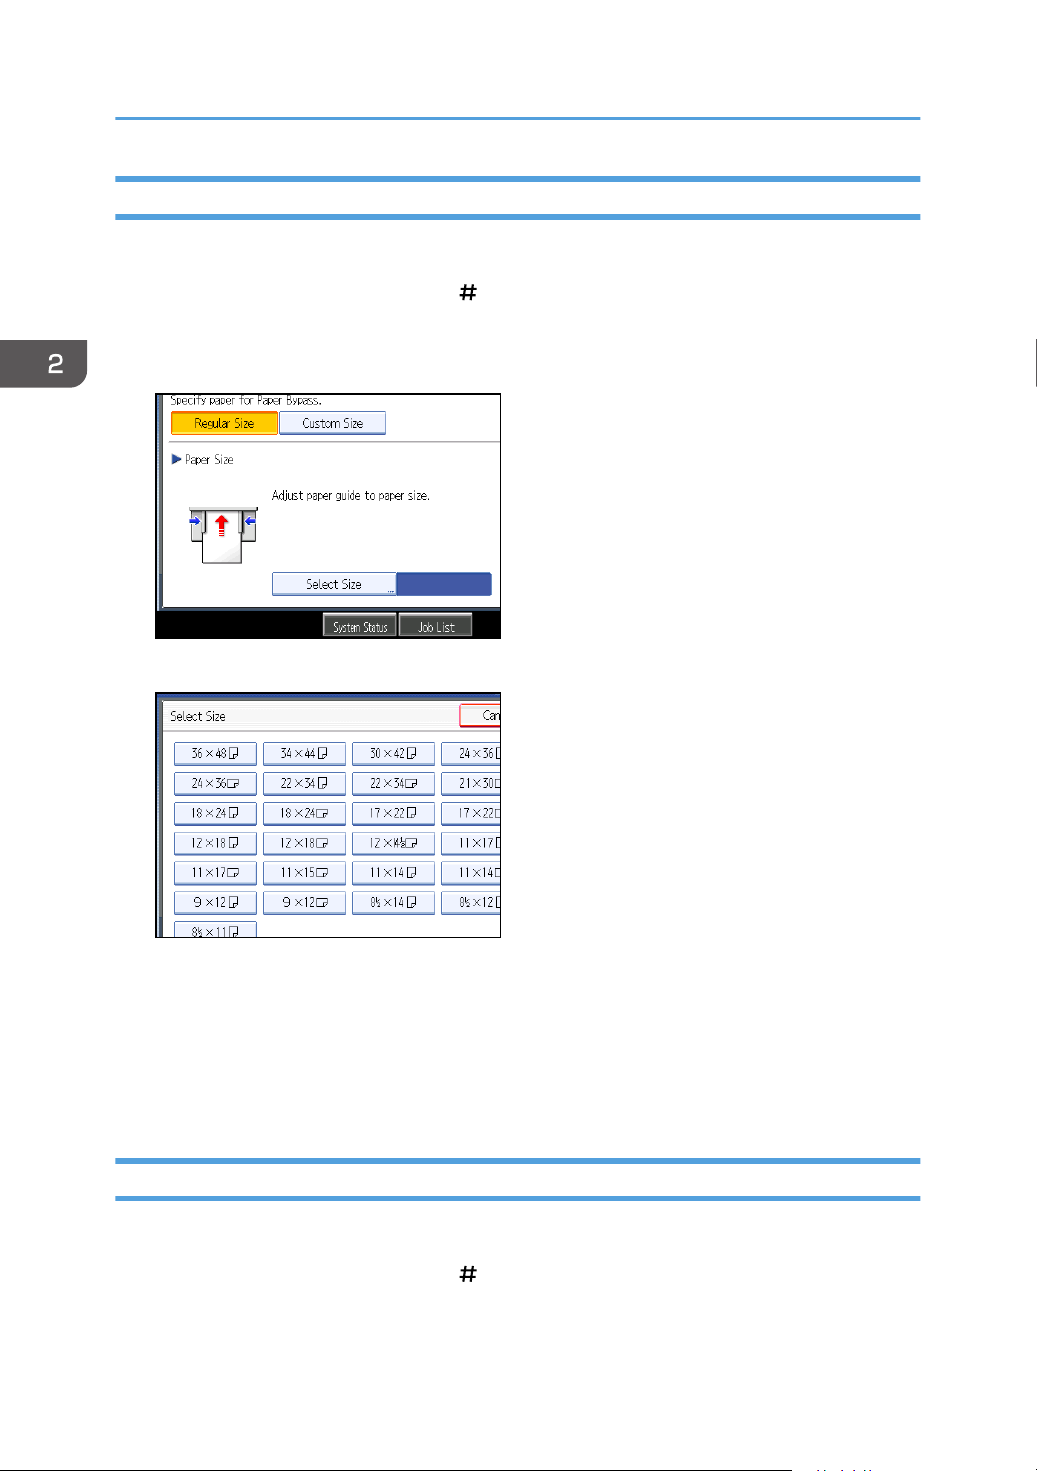
2. Basic Copying
Copying onto Regular Size Paper
Makes copies onto regular size paper from the bypass tray.
1. Press [Bypass], and then press the [ ] key.
2. Make sure that [Regular Size] is selected.
3. Press [Select Size].
4.
Select the paper size.
5. Press [OK] twice.
6. Place your original, and let it be scanned.
7. Adjust the bypass tray's paper guides to the size of the paper.
8. Insert the paper copy side up into the bypass tray.
The paper feeds into the machine automatically and copying starts.
Copying onto Custom Size Paper
Makes copies onto custom size paper from the bypass tray.
1. Press [Bypass], and then press the [
46
] key.
Page 49
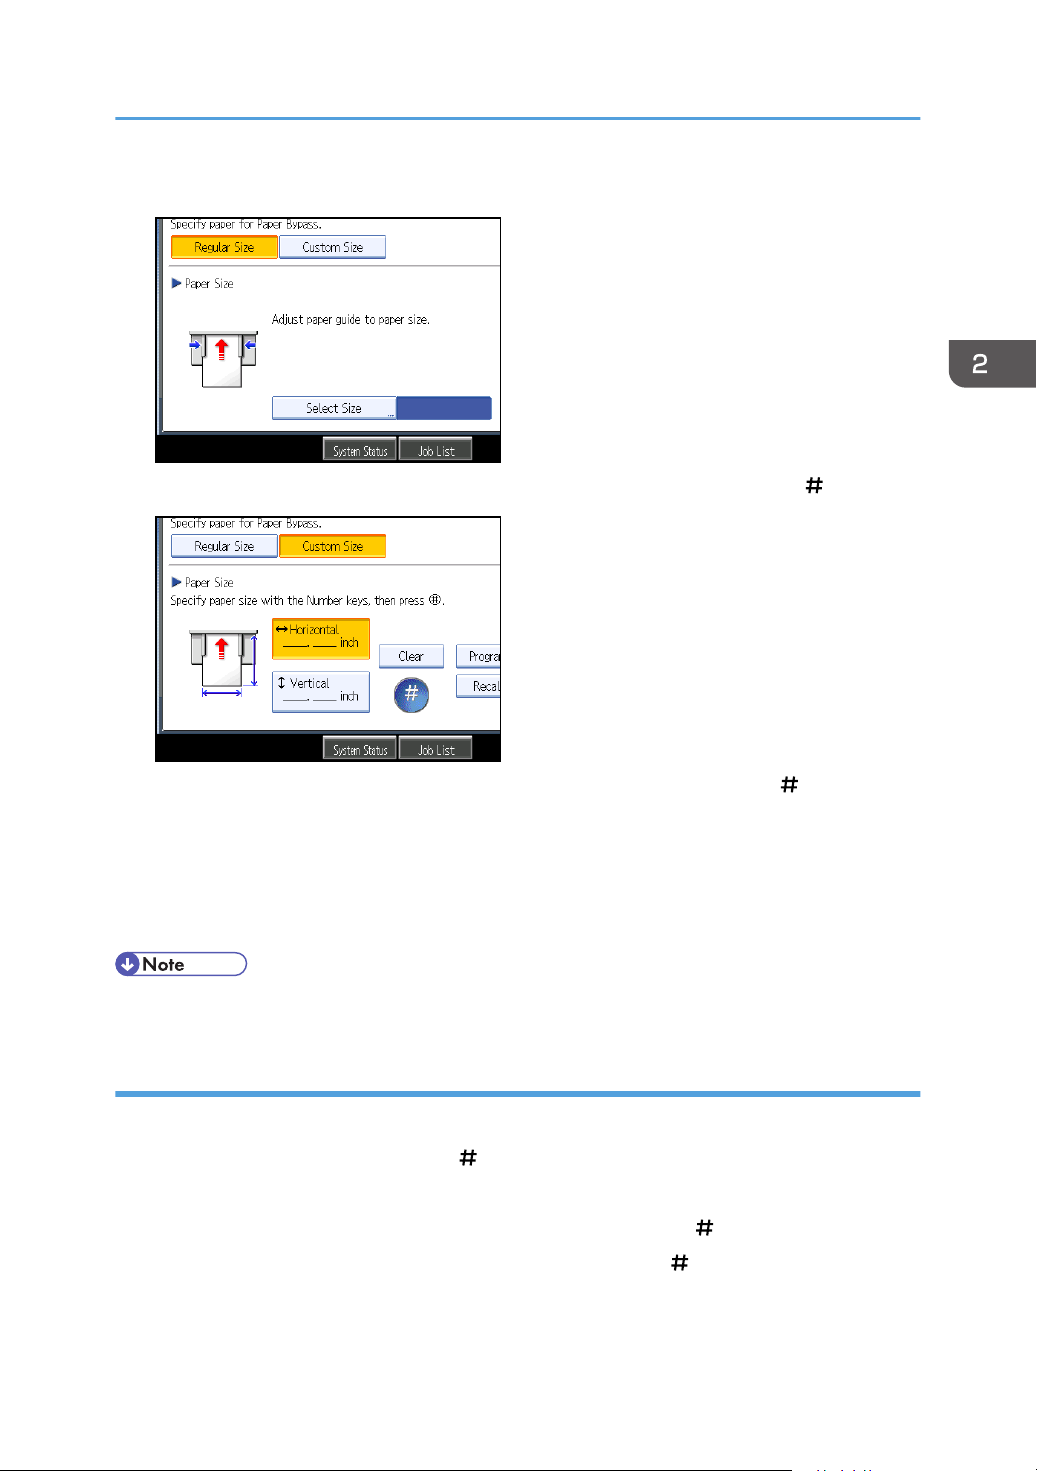
Copying from the Bypass Tray
2. Press [Custom Size].
3. Enter the horizontal size of the paper with the number keys, and then press [ ].
4. Enter the vertical size of the paper with the number keys, and then press [ ].
5. Press [OK].
6. Place your original, and let it be scanned.
7. Adjust the bypass tray's paper guides to the size of the paper.
8. Insert the paper copy side up into the bypass tray.
• If you make a mistake in step 3 or 4, press [Clear], and then enter the value again.
Registering a custom size
Register a custom paper size.
1. Press [Bypass], and then press the [ ] key.
2. Press [Custom Size].
3. Enter the horizontal size with the number keys, and then press [ ].
4. Enter the vertical size with the number keys, and then press [ ].
47
Page 50
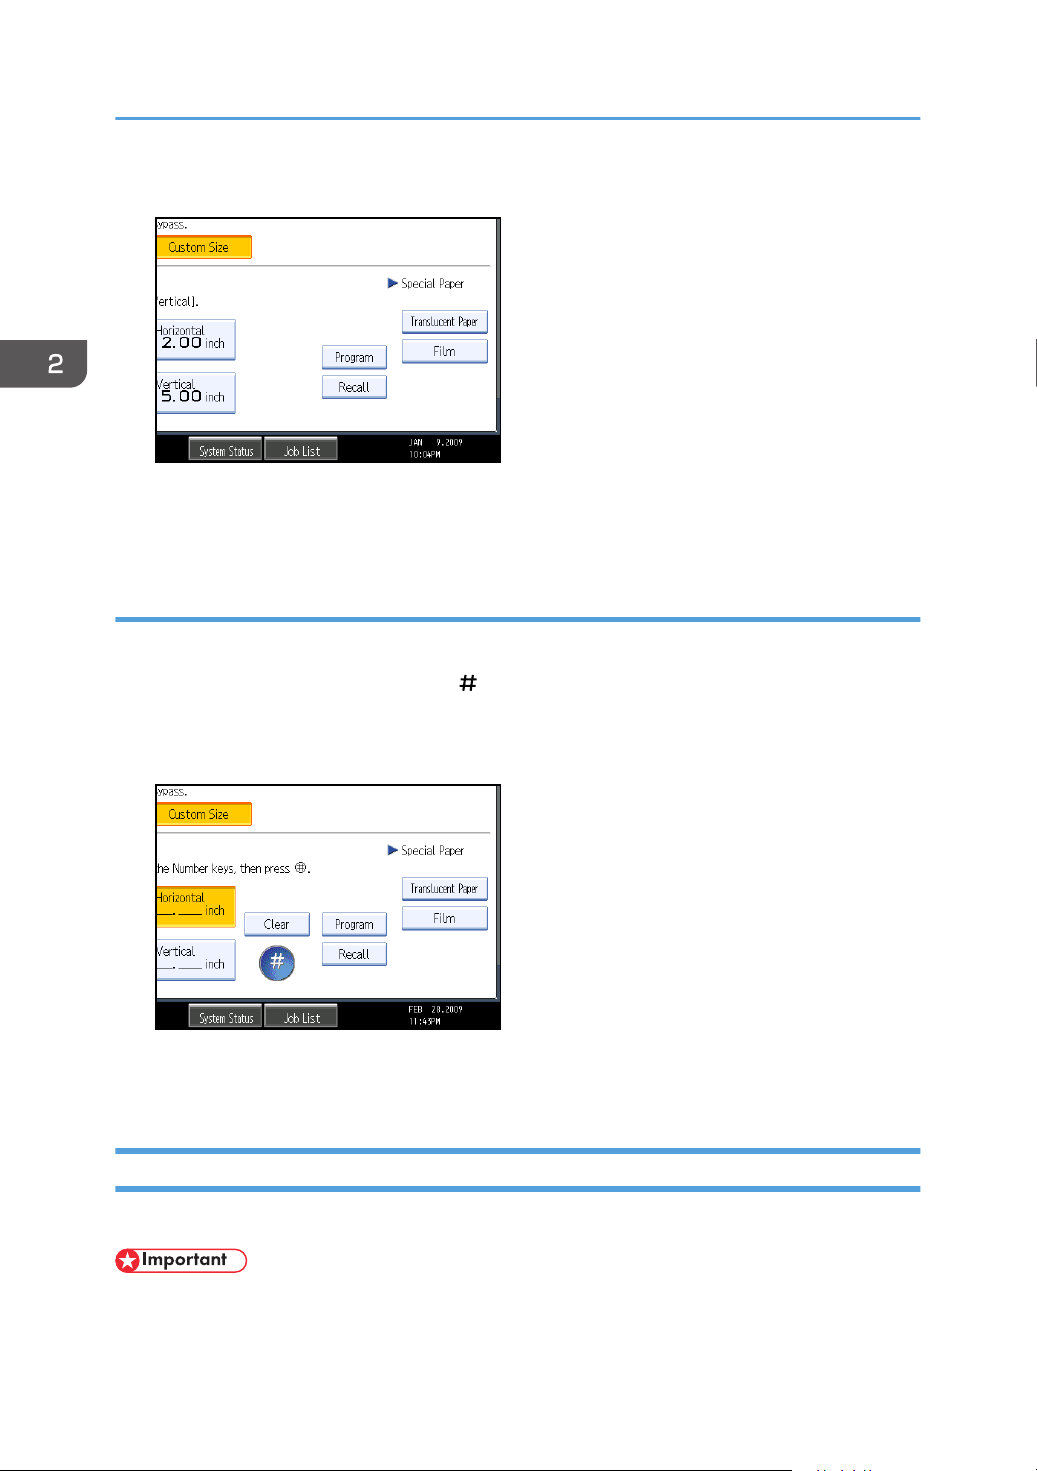
2. Basic Copying
5. Press [Program].
The confirmation screen appears.
6. Press [Exit].
Recalling the registered custom size
Recalls the registered paper size.
1. Press [Bypass], and then press the [ ] key.
2. Press [Custom Size].
3. Press [Recall].
The registered size is displayed.
4. Press [OK].
Copying onto Special Paper
When copying onto special paper such as translucent paper or films, select the type and size of paper.
48
• Remove a copied special paper every time it is ejected.
Page 51
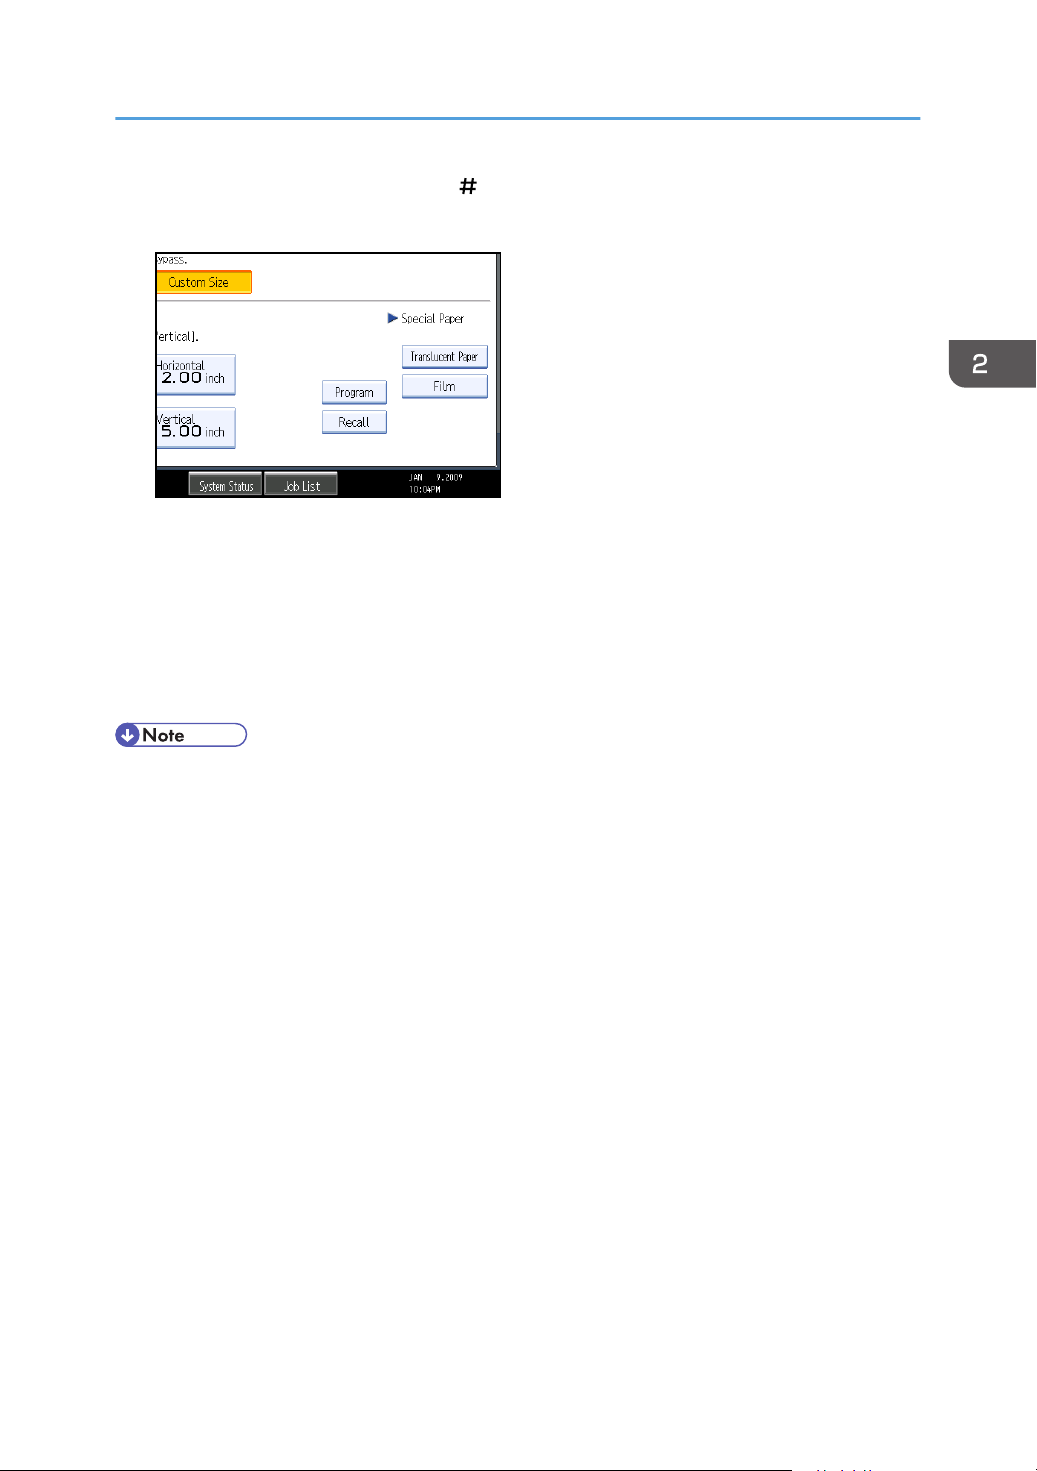
Copying from the Bypass Tray
1. Press [Bypass], and then press the [ ] key.
2. Select a paper type ([Translucent Paper] or [Film]) in the special paper settings.
3. Set the paper size.
4. Press [OK].
5. Place your original, and let it be scanned.
6. Adjust the bypass tray's paper guides to the size of the paper.
7. Insert the paper copy side up into the bypass tray.
The paper feeds into the machine automatically and copying starts.
• Printing on special paper may be slower than printing on plain paper.
49
Page 52
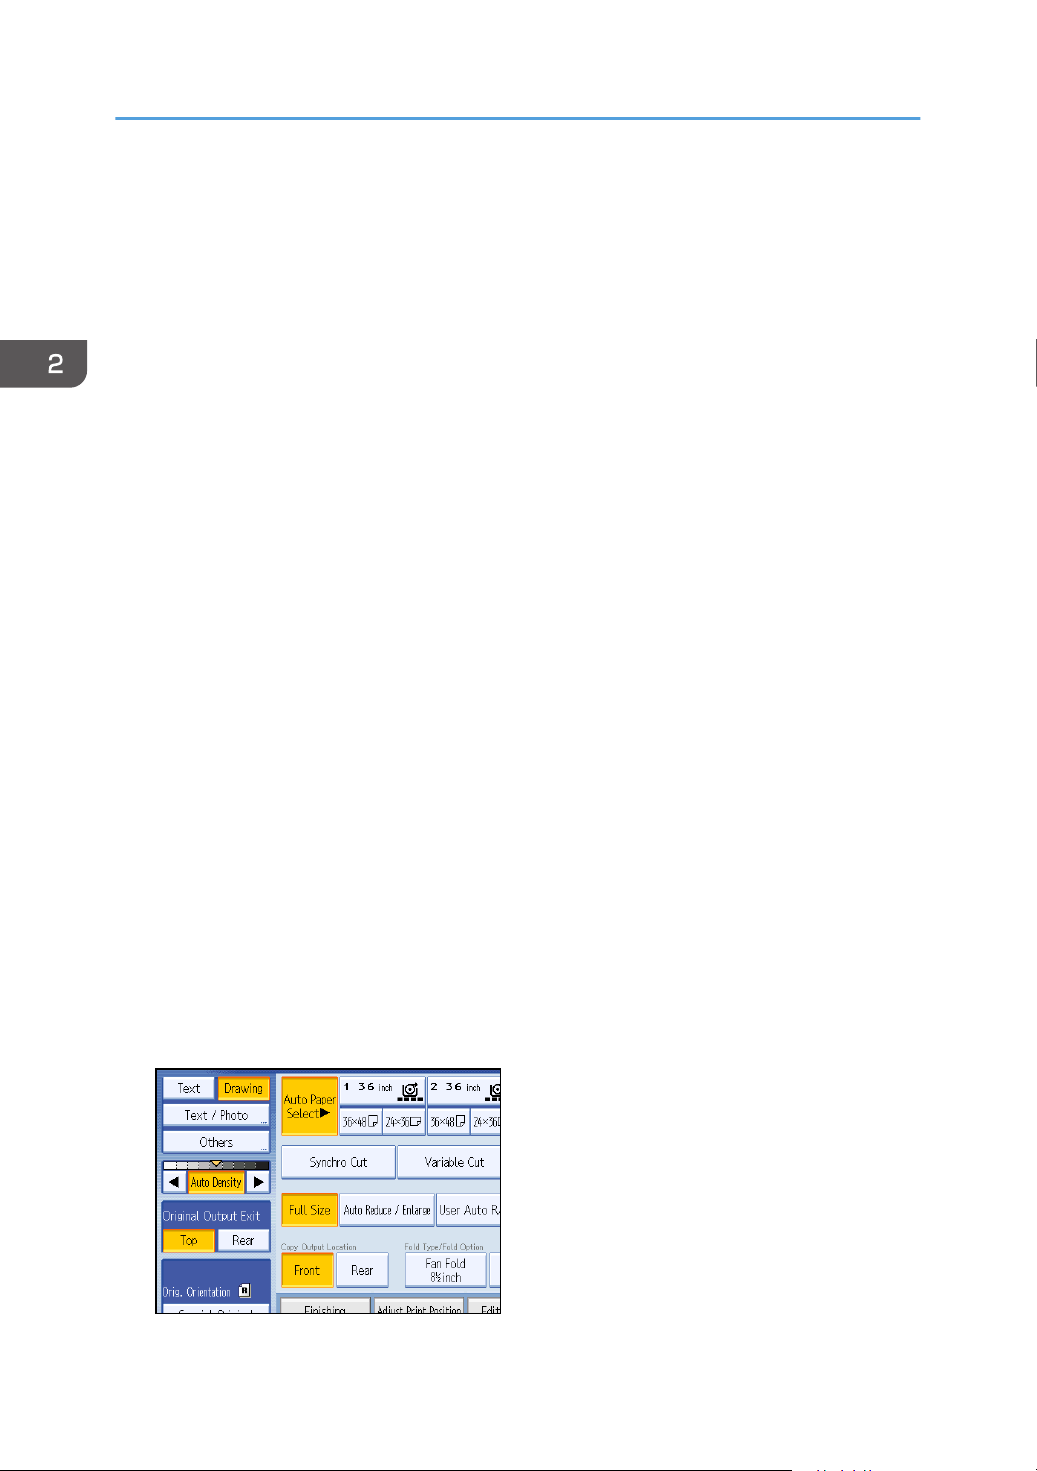
2. Basic Copying
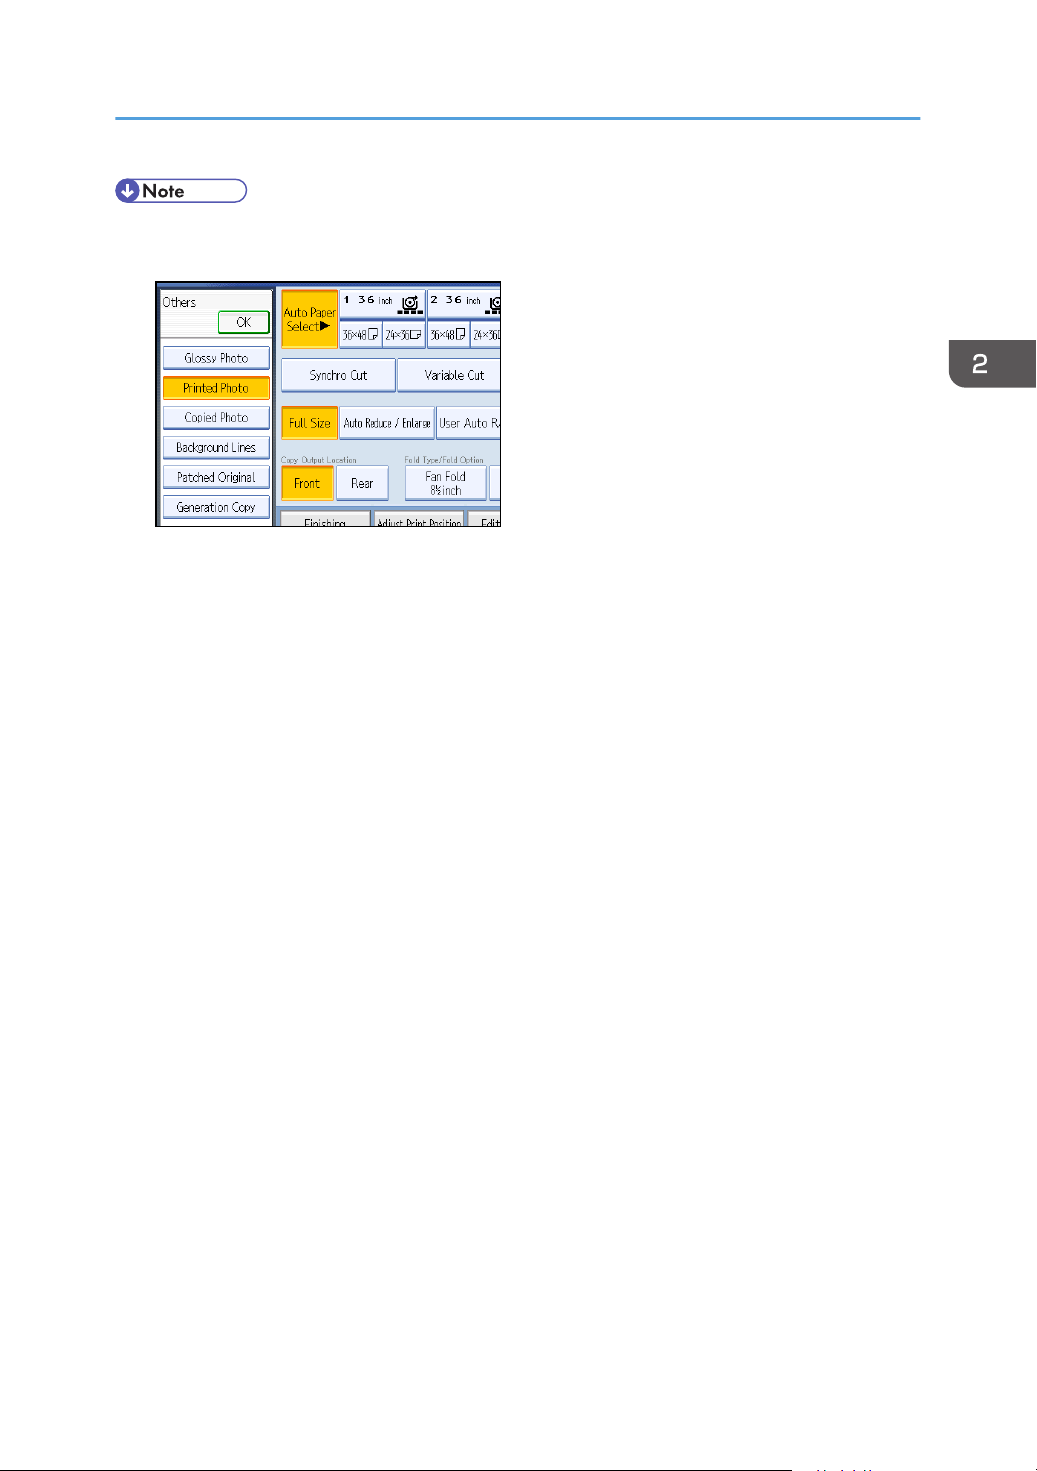
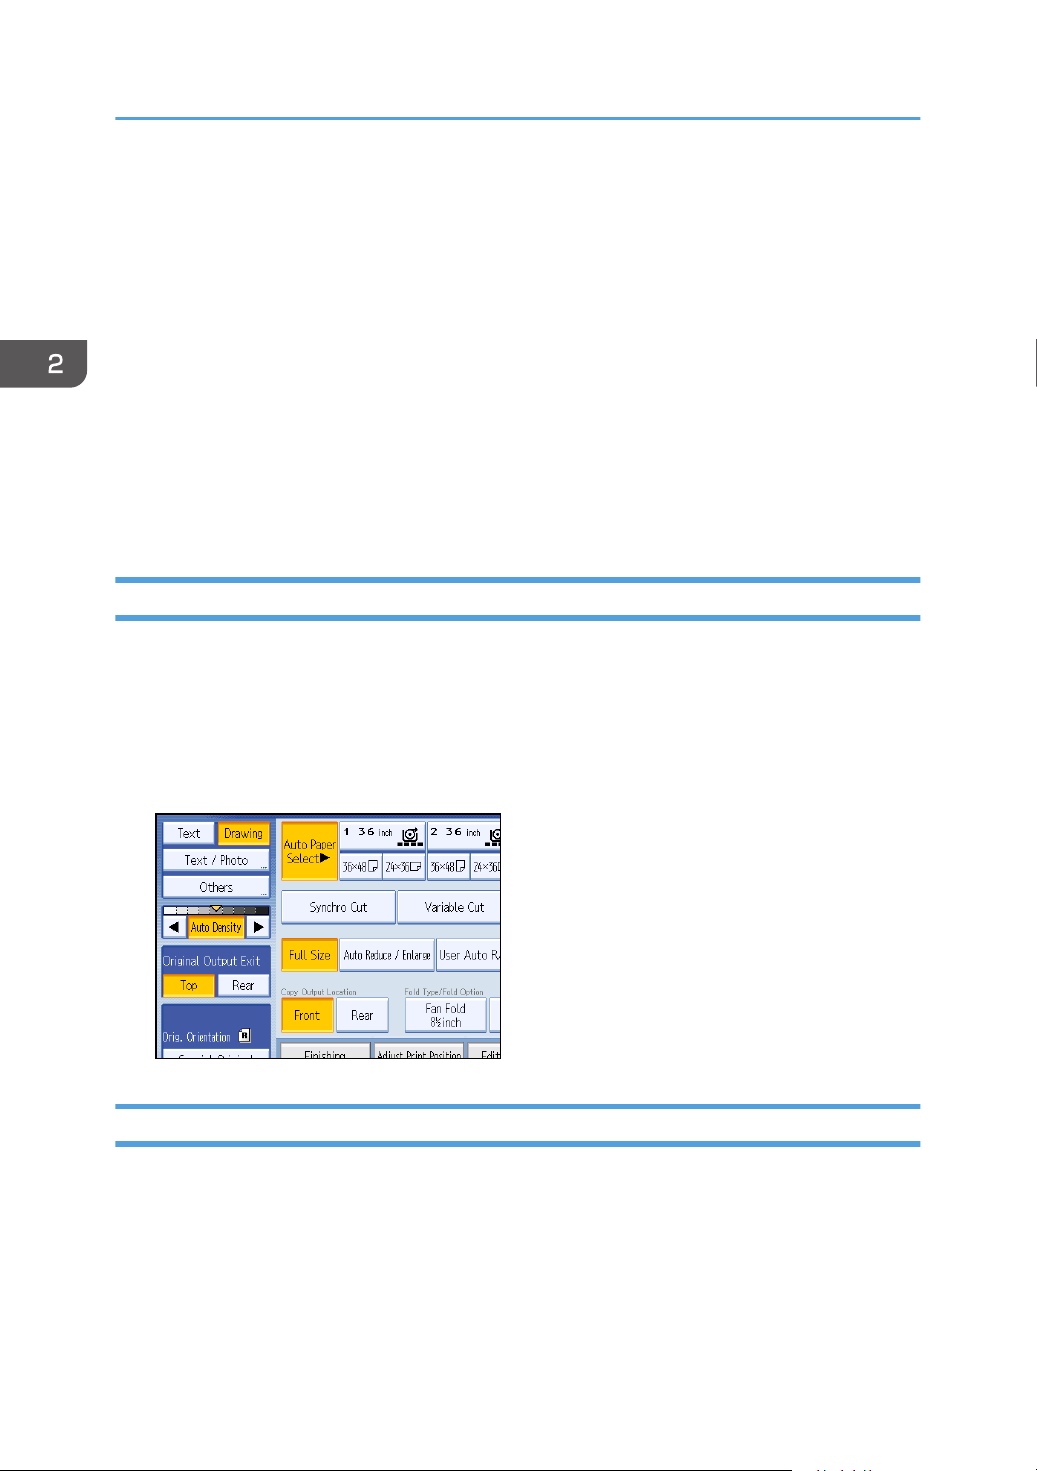
Selecting the Original Type Setting
Select one of the following nine types to match your originals:
Text
For originals that contain mainly text or printed characters.
Drawing
For drawings that contain fine lines. Faint lines are clearly reproduced.
Text/Photo
For originals that contain both text and photographs or pictures.
Glossy Photo
The machine scans the original using the settings for pictures and photographs printed on glossy
photographic paper.
Printed Photo
The machine scans the original using the settings for pictures and photographs printed in
magazines and on other documents.
Copied Photo
The machine scans the original using the settings for pictures and color copies of photographs.
Background Lines
For images drawn on section paper (green sectioned graph paper) without copying the lines on
the paper. Blue lines on originals cannot be eliminated.
Patched Original
For originals made up of several pieces of smaller originals which differ in background density.
Selecting this mode tones down the dark background of originals.
Generation Copy
For originals that are copied. The copy image can be reproduced sharply and clearly.
1. Select the original type.
50
Page 53
Selecting the Original Type Setting
• To select [Glossy Photo], [Printed Photo], [Copied Photo], [Background Lines], [Patched Original],
or [Generation Copy], select [Others] first.
• If you select [Glossy Photo], [Printed Photo], or [Copied Photo] in [Others], Auto Density is
cancelled.
• When you select [Patched Original], thick lines, text, or solid images in the original are recognized
as dark background that may not be copied.
51
Page 54
2. Basic Copying
Adjusting Copy Image Density
There are three types of adjustment available.
Auto image density
The machine automatically adjusts the image density by scanning the densities of originals. Dark
texture originals (such as newspaper or recycled paper) will be copied so that background will not
be reproduced.
Manual image density
You can adjust the density of the overall original in nine steps.
Combined auto and manual image density
Adjusts the density of an image only for dark texture originals.
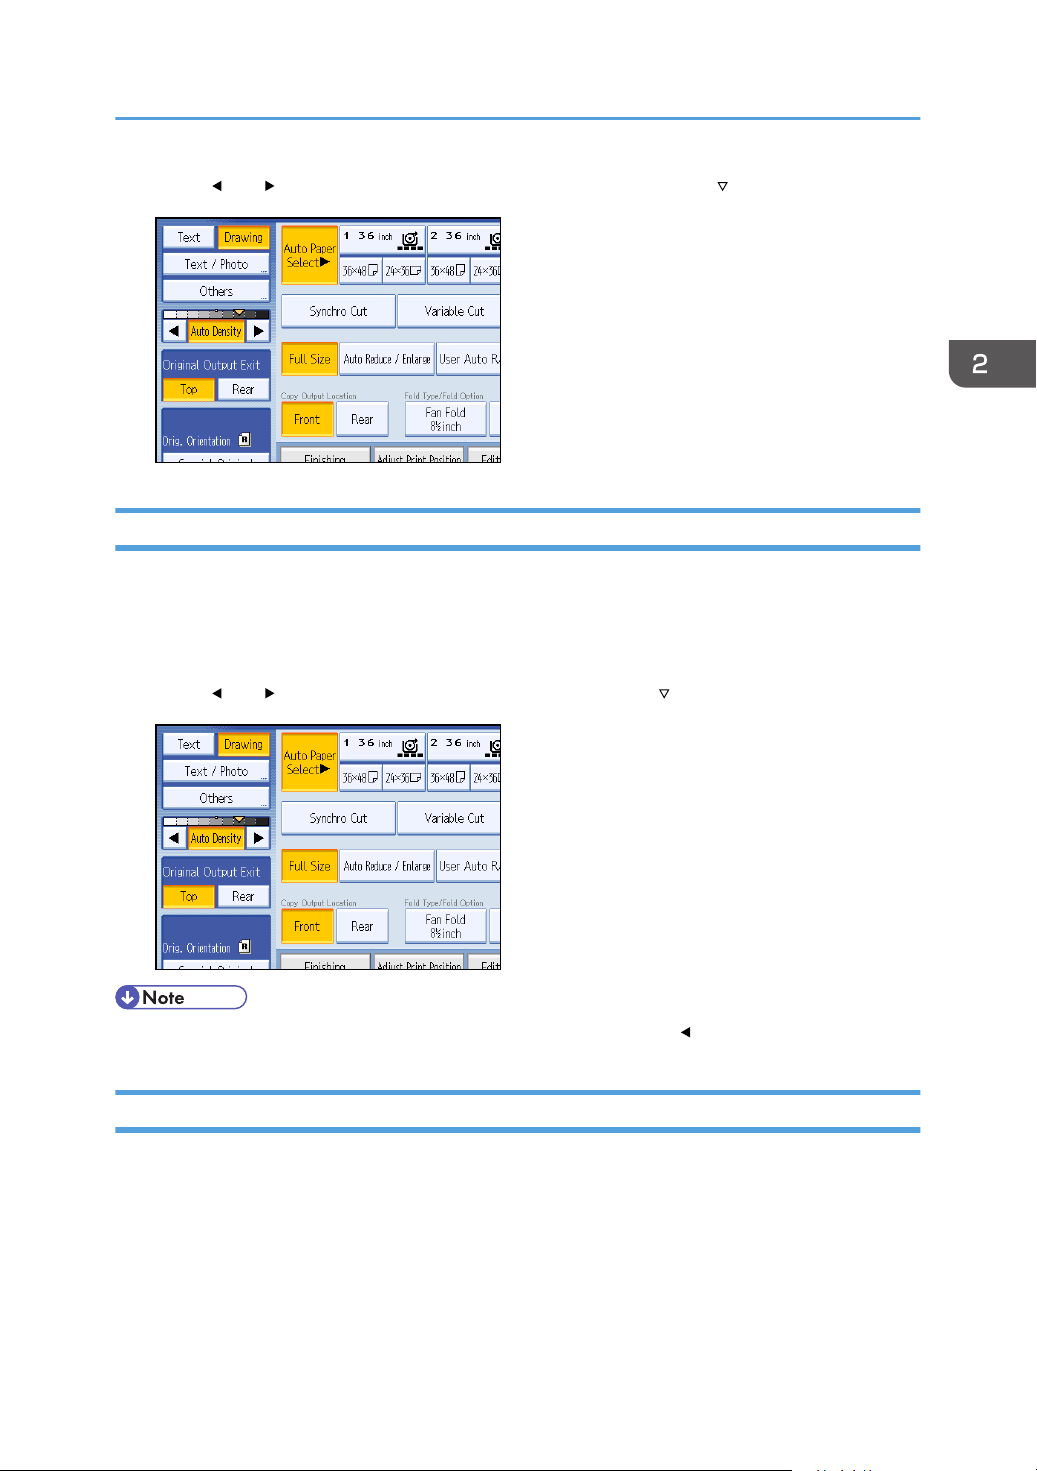
Auto Image Density
The machine automatically adjusts the image density by scanning the densities of originals. Dark texture
originals (such as newspaper or recycled paper) will be copied so that background will not be
reproduced.
1. Make sure that [Auto Density] is selected.
When [Auto Density] is not selected, press [Auto Density].
Manual Image Density
You can adjust the density of the overall original in nine steps.
1. When [Auto Density] is selected, press [Auto Density] to cancel it.
52
Page 55
Adjusting Copy Image Density
2. Press [ ] or [ ] to adjust the image density. The density indicator “ ” moves.
Combined Auto and Manual Image Density
Adjusts the density of an image only for dark texture originals.
1. Make sure [Auto Density] is selected.
When [Auto Density] is not selected, press [Auto Density].
2. Press [ ] or [ ] to adjust the density. The density indicator “ ” moves.
• If dark backgrounds still appear on copies, adjust the density using [ ].
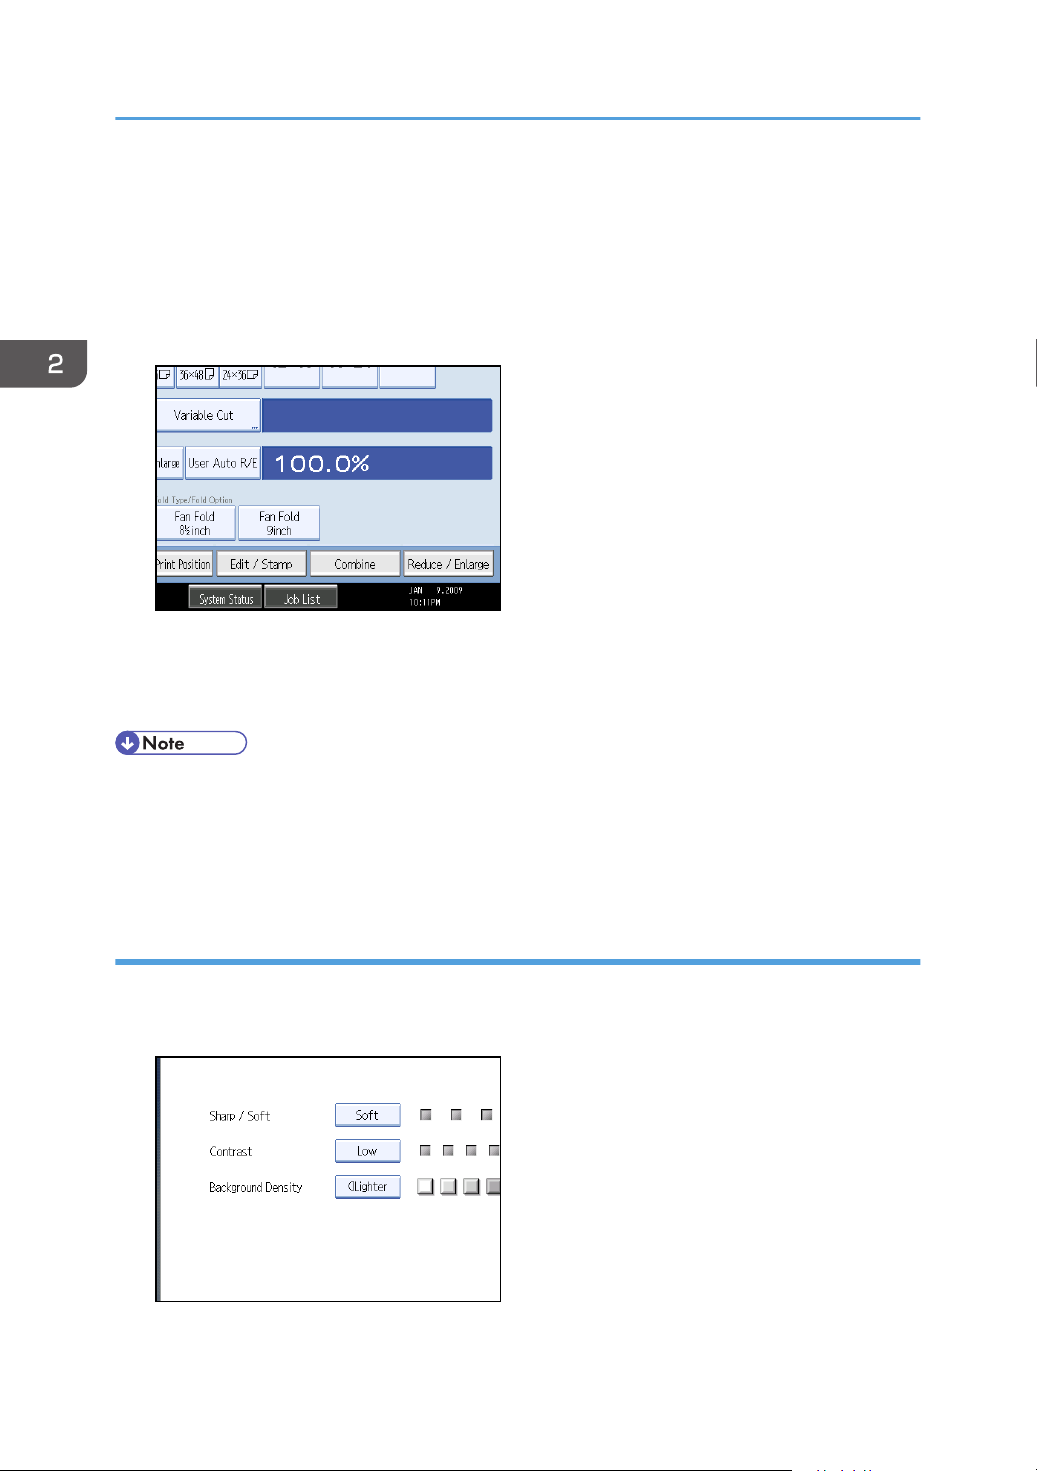
Copy Quality
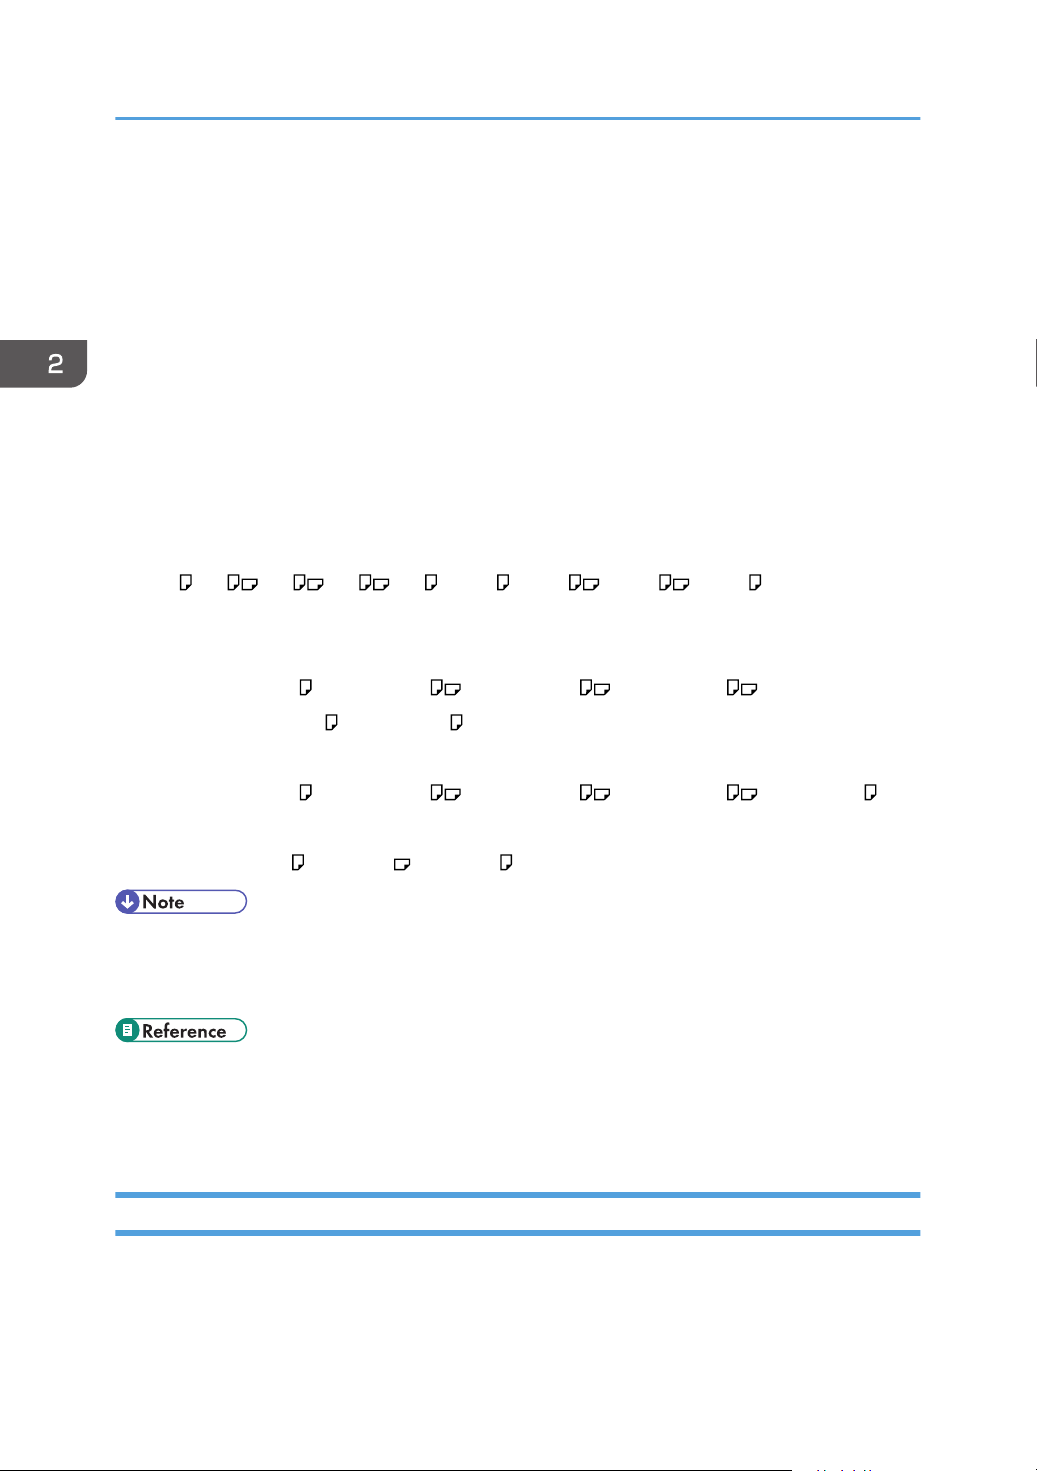
Adjusts image qualities.
The following three types of image adjustments are available:
Sharp / Soft
Adjusts the outline of an image.
53
Page 56
2. Basic Copying
Contrast
Adjusts the shades of an image.
Background Density
Adjusts the background density of an image.
1. Press [Edit / Stamp].
2. Press [Copy Quality].
3. Adjust the settings.
4. Press [OK] twice.
• [Sharp / Soft], [Contrast], and [Background Density] can each be adjusted, however, their
adjustments can affect the level of other adjustment functions.
• The adjusted settings will be deleted and the initial values will be reset, when Auto Clear has been
performed, when the [Clear Modes] key has been pressed or when the power has been turned off.
Sharp / Soft
Adjusts the outline of an image.
1. Adjust the image quality by pressing [Soft] or [Sharp].
54
2. Press [OK].
Page 57
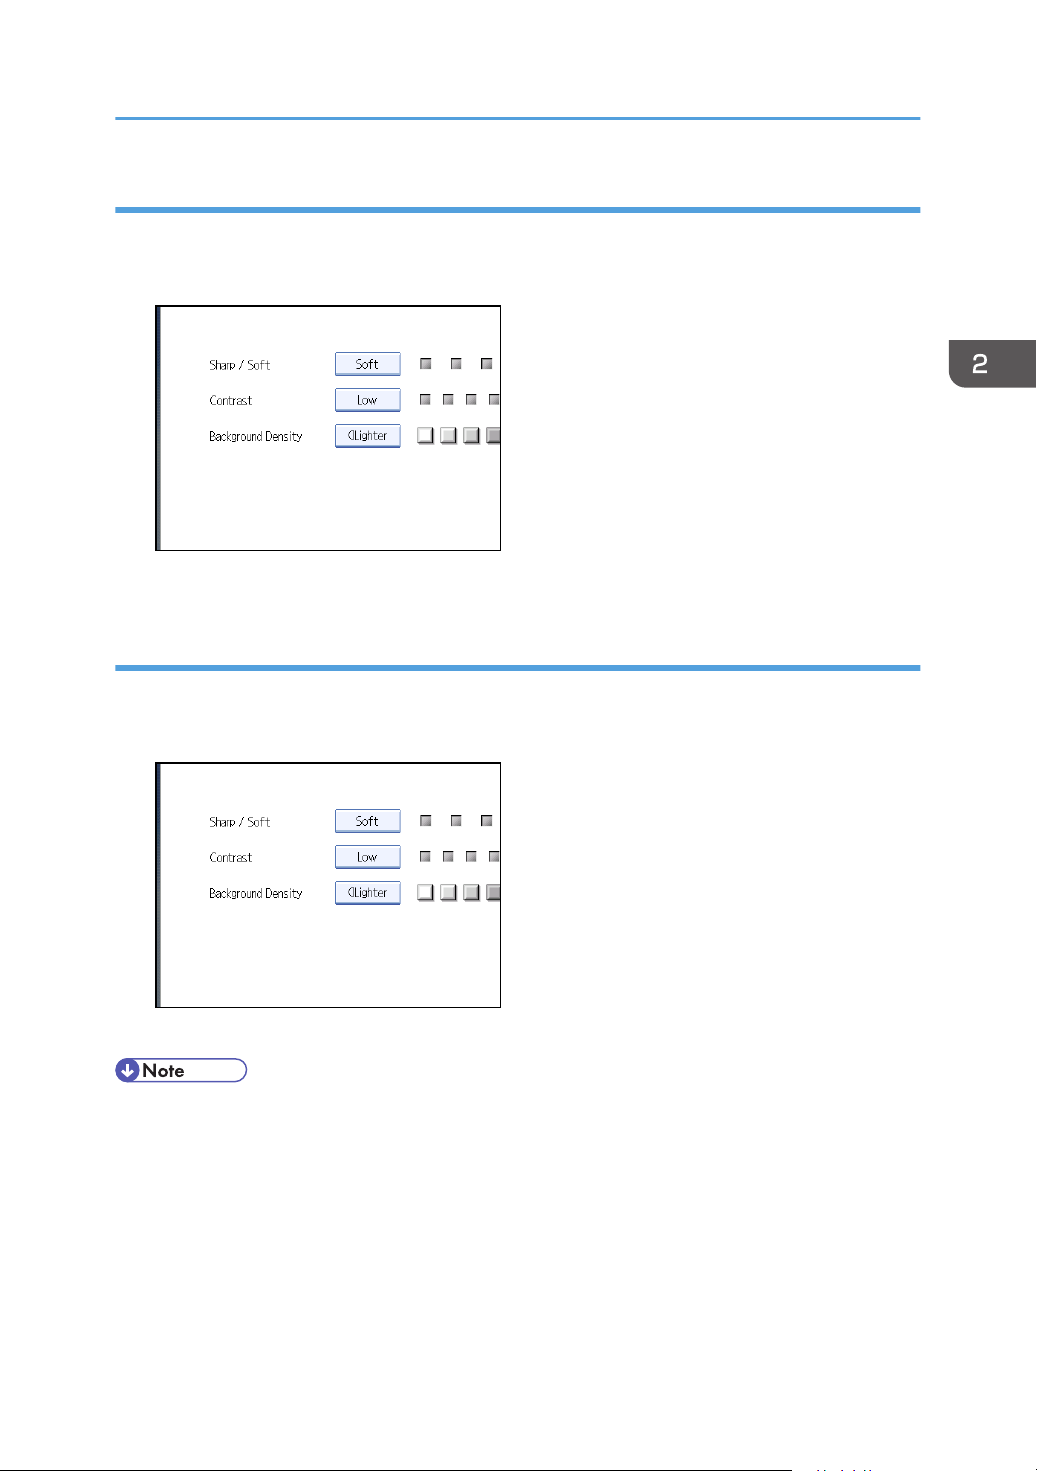
Contrast
Adjusts the shades of an image.
1. Adjust the image quality by pressing [Low] or [High].
Press [OK].
2.
Background Density
Adjusting Copy Image Density
Adjusts the background density of an image.
1. Adjust the image quality by pressing [Lighter] or [Darker].
2. Press [OK].
• Adjustments should be made lighter when copying dark textured originals, such as newspaper or
recycled paper.
55
Page 58
2. Basic Copying
Selecting Copy Paper
There are two ways to select copy paper:
Auto Paper Select
The machine selects a suitable size of copy paper automatically based on original size and
reproduction ratio.
Manual Paper Select
Choose the tray containing the paper you want to copy onto: paper roll tray, cut paper tray, or
bypass tray.
See the following lists for paper sizes and orientations that can be used with Auto Paper Select (when
copying at a ratio of 100%):
Metric version
, A1 , A2 , A3 , A4 , B1 JIS , B2 JIS , B3 JIS , B4 JIS
A0
Inch version
• Engineering
E (34" × 44") , D (22" × 34") , C (17" × 22") , B (11" × 17") ,
A (8 1/2" × 11") , 8 1/2" × 14"
• Architecture
E (36" × 48") , D (24" × 36") , C (18" × 24") , B (12" × 18") , A (9" × 12")
• Others
81/2" × 13" , 30" × 21" , 30" × 42"
• Only the paper trays set to [No Display] or [Recycled Paper] in Paper Type in Tray Paper Setting in
System Settings and also set to [Yes] in Apply Auto Paper Select can be selected in Auto Paper
Select mode.
• p.17 "Functions Requiring Optional Configurations"
• p.44 "Copying from the Bypass Tray"
• p.171 "Supplementary Information"
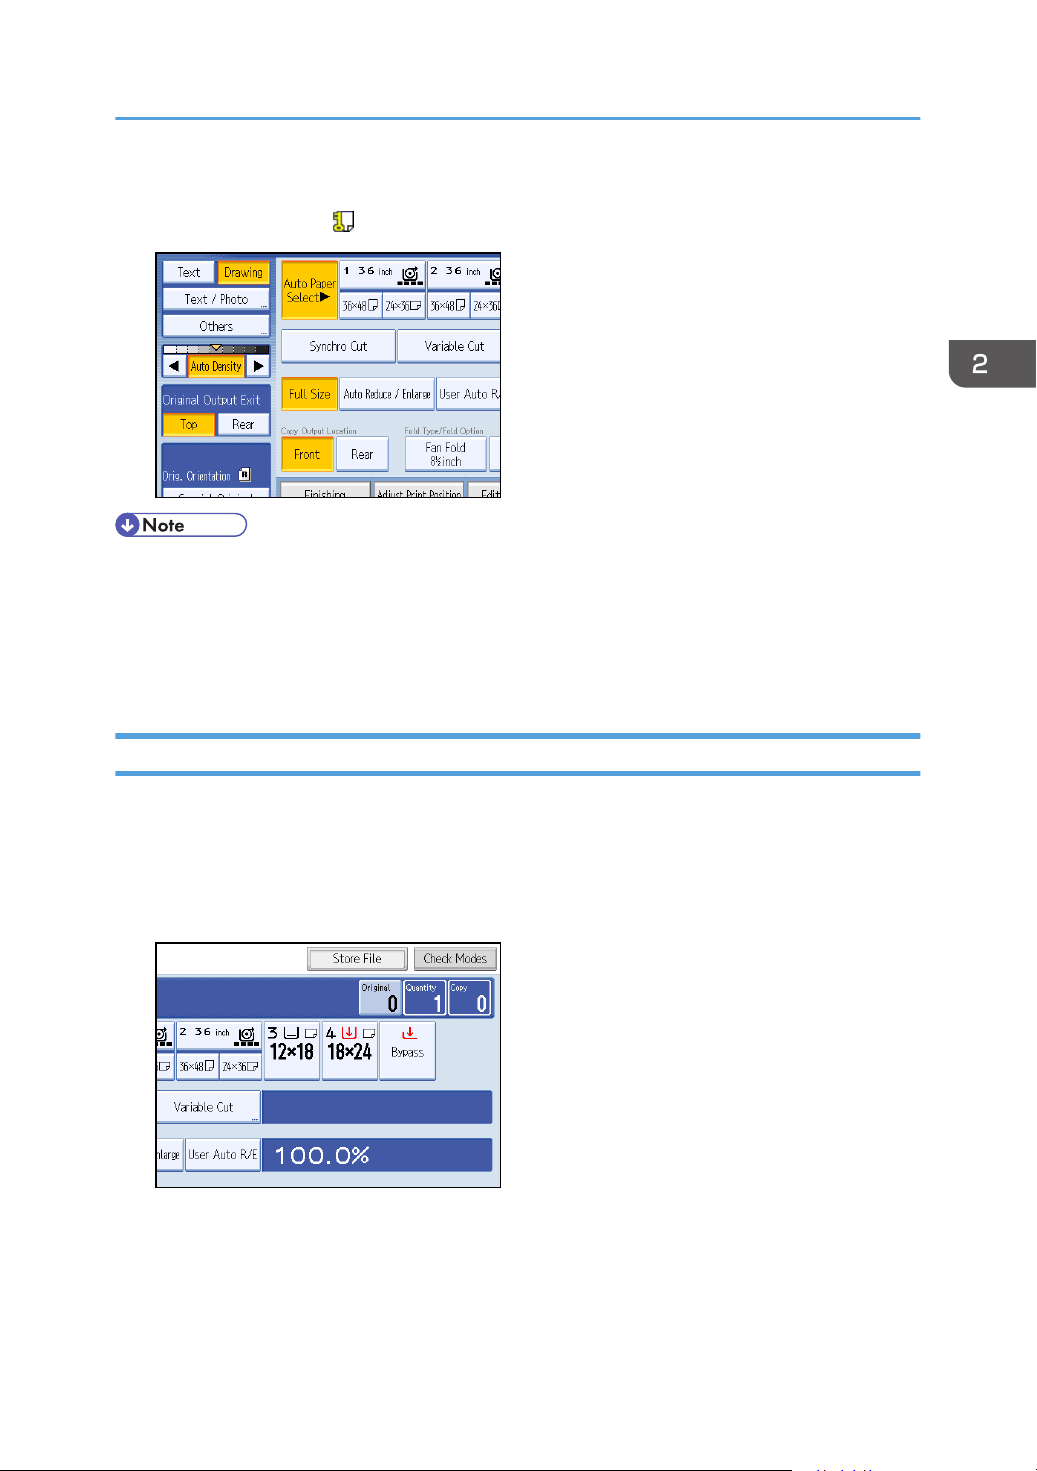
Auto Paper Select
The machine selects a suitable size of copy paper automatically based on the original size and the
reproduction ratio.
56
Page 59
Selecting Copy Paper
1. Make sure that [Auto Paper Select] is selected.
Trays with a key mark ( ) will not be automatically selected.
• If no paper suitable for the size and magnification you have specified is loaded in the paper trays,
load paper of the required size in a paper tray. Alternatively, you can select a suitable
magnification ratio for the paper currently loaded in the paper trays. After doing one of the above,
set your original again.
• Special size paper cannot be used with Auto Paper Select.
Manual Paper Select
Choose the tray containing the paper you want to copy onto: paper roll tray, cut paper tray, or bypass
tray.
1. Select the paper roll tray, cut paper tray, or bypass tray.
The indicator corresponding to the selected paper tray is highlighted.
57
Page 60
BKY021D
2. Basic Copying
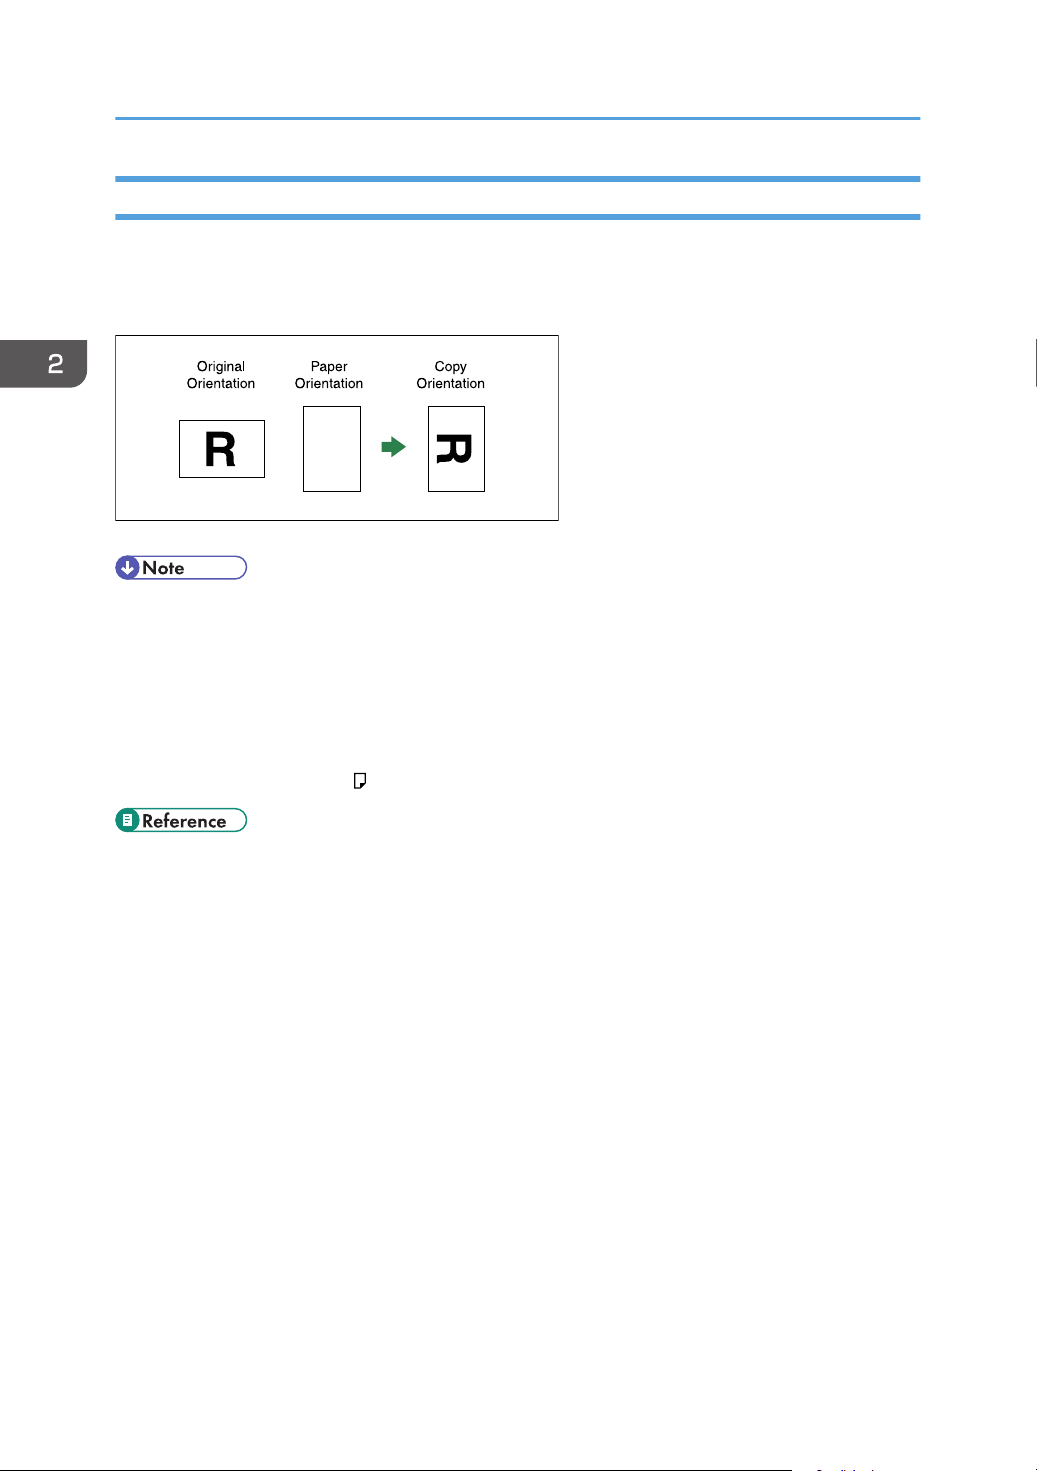
Rotate Copy
If the original's width is different to that of the paper set in the paper roll tray, or the original's orientation
is different to that of the paper set in the cut paper tray, the machine rotates the original image by 90
degrees to fit it onto the copy paper.
• This function works when [Auto Paper Select] or [Auto Reduce / Enlarge] is selected. See “Auto
Paper Select” and “Auto Reduce/Enlarge”.
• The default setting for Auto Tray Switching is [With Image Rotation]. You cannot use Rotate Copy if
this setting is changed to [Without Image Rotation] or [Off]. See “Auto Tray Switching”, General
Settings Guide.
• You cannot use Rotate Copy when copying onto A0 (E), A4 (A), or B4 JIS size paper. In this case,
place your original in the orientation.
• p.44 "Copying from the Bypass Tray"
• p.56 "Auto Paper Select"
• p.65 "Auto Reduce/Enlarge"
58
Page 61
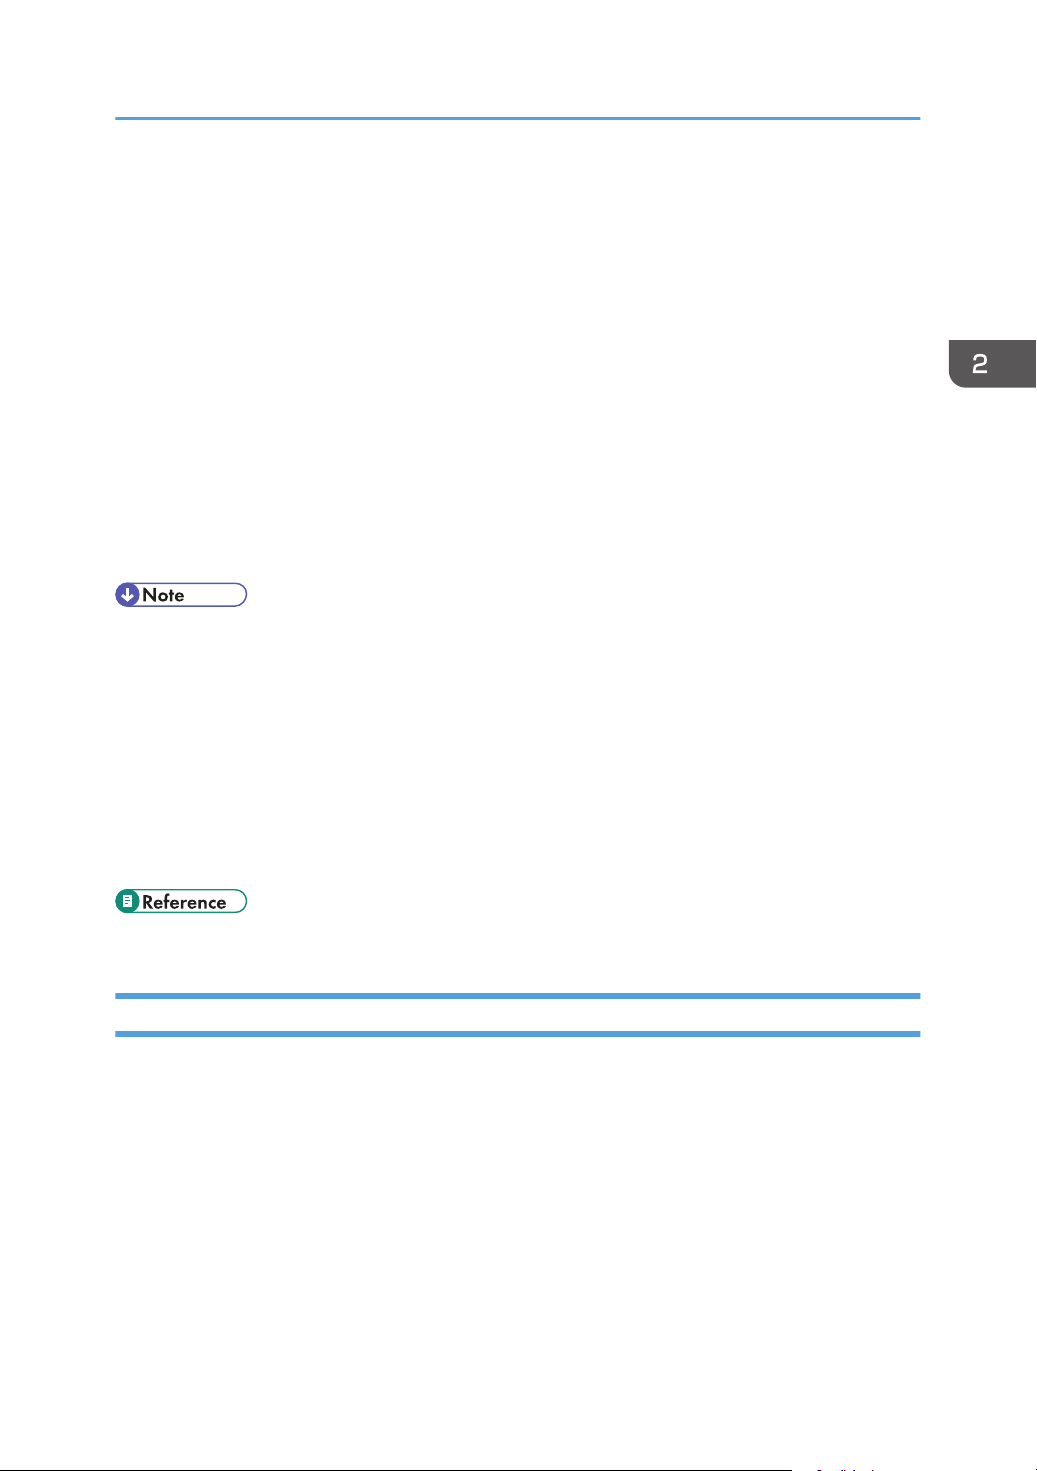
Setting the Length of Copy Paper Cut
Setting the Length of Copy Paper Cut
Specify the length to cut the paper loaded in the paper roll tray.
The following paper cut methods are available:
Synchro Cut
Cuts the paper at the same length as the original. If the copy is enlarged or reduced, the machine
calculates the appropriate length for the magnification ratio and cuts the paper.
Preset Cut
Cuts the paper at a preset size, regardless of the size of the original. You can use this to copy
different sized originals to the same size.
Variable Cut
Cuts the paper to the size entered.
• On the Type 1, the minimum cut length is 210 mm (8.27"), and the maximum length is 15,000 mm
(590.5") for plain paper of 841 mm (34" or 36") or more in width. For other paper, the maximum
length is 3600 mm (141.8"). If the length you specify exceeds the maximum, the paper will be fed
in at a slant, resulting in poor copy quality and wrinkled paper.
• On the Type 2, the minimum cut length is 210 mm (8.27"), and the maximum length is 30,000 mm
(1181.1") for plain paper of 841 mm (34" or 36") or more in width. For other paper, the maximum
length is 3600 mm (141.8"). If the length you specify exceeds the maximum, the paper will be fed
in at a slant, resulting in poor copy quality and wrinkled paper.
• You cannot cut the paper in the bypass tray.
• p.17 "Functions Requiring Optional Configurations"
Synchro Cut
Cuts the paper at the same length as the original. If the copy is enlarged or reduced, the machine
calculates the appropriate length for the magnification ratio and cuts the paper.
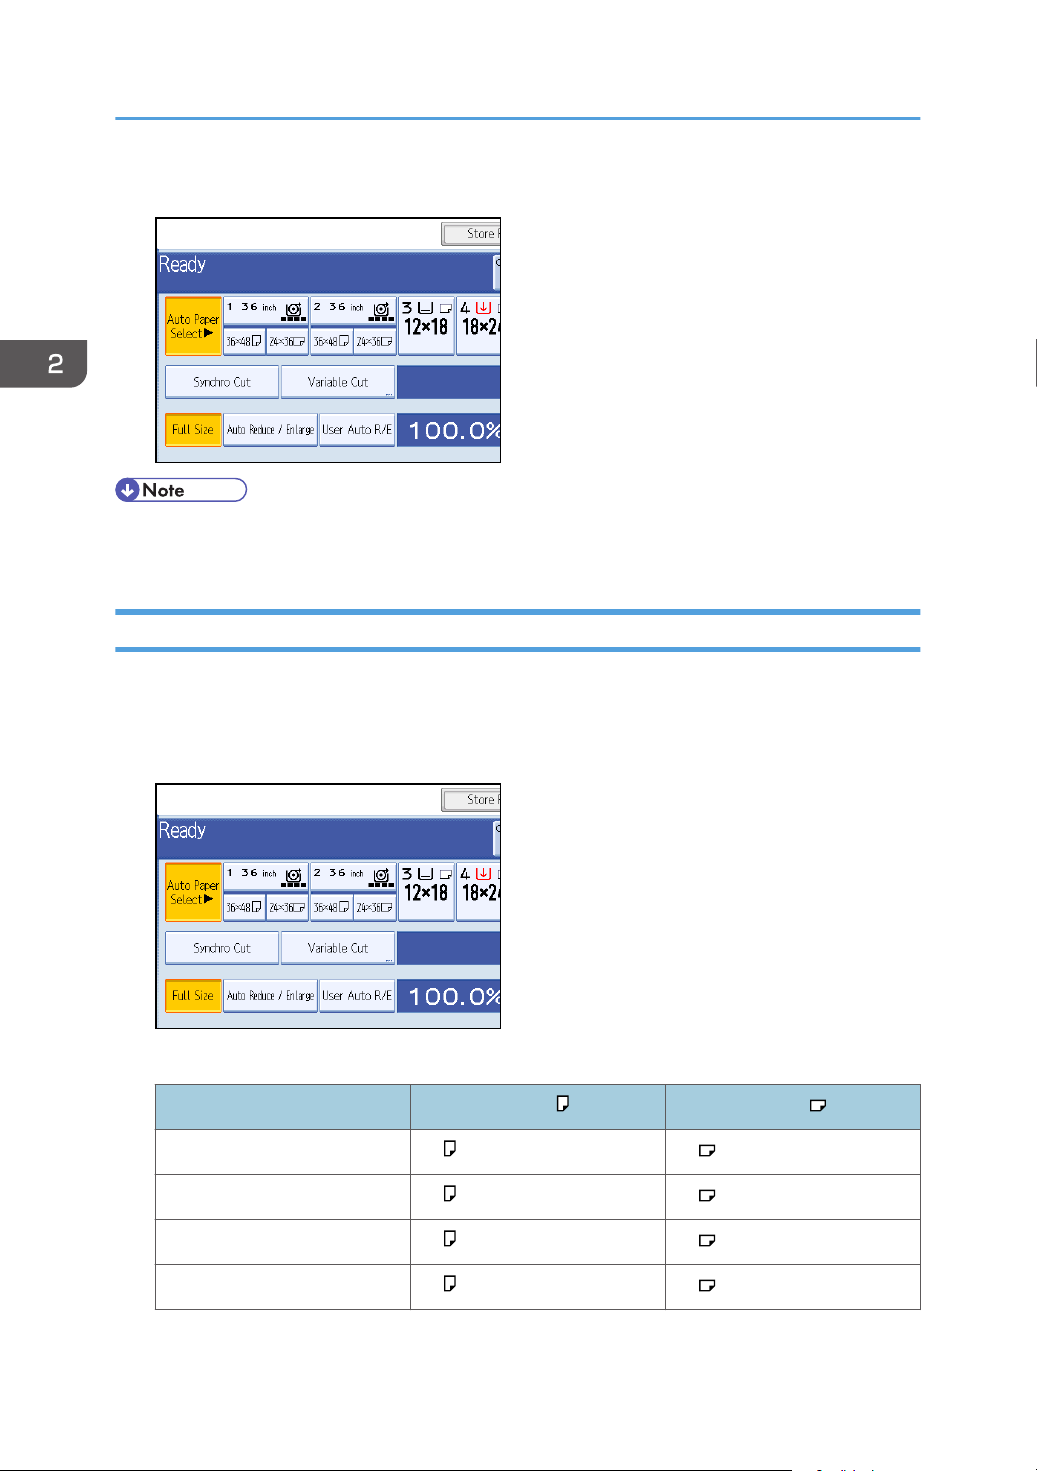
1. Select a paper roll tray.
59
Page 62
2. Basic Copying
2. Select [Synchro Cut].
• Depending on the original length and paper type, copy paper length may be different from the
original.
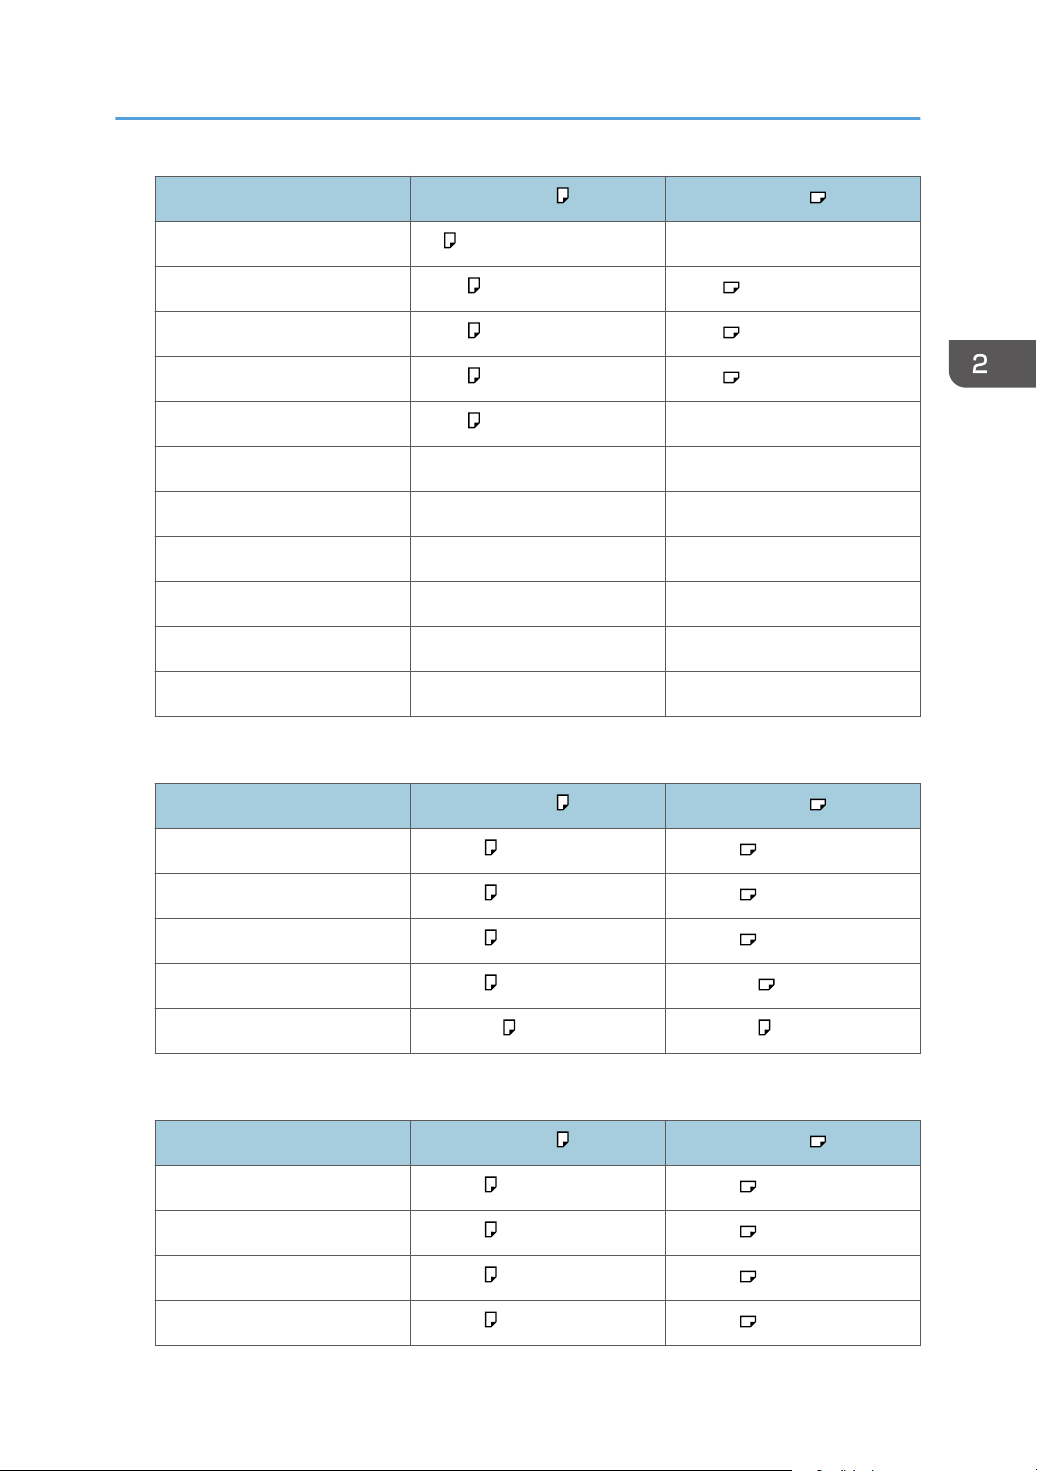
Preset Cut
Cuts the paper at a preset size, regardless of the size of the original. You can use this to copy different
sized originals to the same size.
1. Select a preset cut size of the paper roll tray 1 or 2.
Metric version
Paper roll width Preset Preset
841 mm A0 A1
594 mm A1 A2
420 mm A2 A3
60
297 mm A3 A4
Page 63
Setting the Length of Copy Paper Cut
Paper roll width Preset Preset
210 mm A4 -
728 mm B1 JIS B2 JIS
515 mm B2 JIS B3 JIS
364 mm B3 JIS B4 JIS
257 mm B4 JIS -
914 mm 1219 mm 610 mm
880 mm 1189 mm 594 mm
800 mm 1189 mm 594 mm
680 mm 841 mm 420 mm
660 mm 841 mm 420 mm
490 mm 594 mm 297 mm
Inch version (Engineering)
Paper roll width Preset Preset
34 inch 34 × 44 22 × 34
22 inch 22 × 34 17 × 22
17 inch 17 × 22 11 × 17
11 inch 11 × 17 81/2 × 11
81/2 inch 81/2 × 11 81/2 × 14
Inch version (Architecture)
Paper roll width Preset Preset
36 inch / 914 mm 36 × 48 24 × 36
30 inch 30 × 42 21 × 30
24 inch 24 × 36 18 × 24
18 inch 18 × 24 12 × 18
61
Page 64
2. Basic Copying
Paper roll width Preset Preset
12 inch 12 × 18 9 × 12
9 inch 9 × 12 -
• The preset cut size differs depending on the paper roll width. It is cut in the following sizes or
standard lengths.
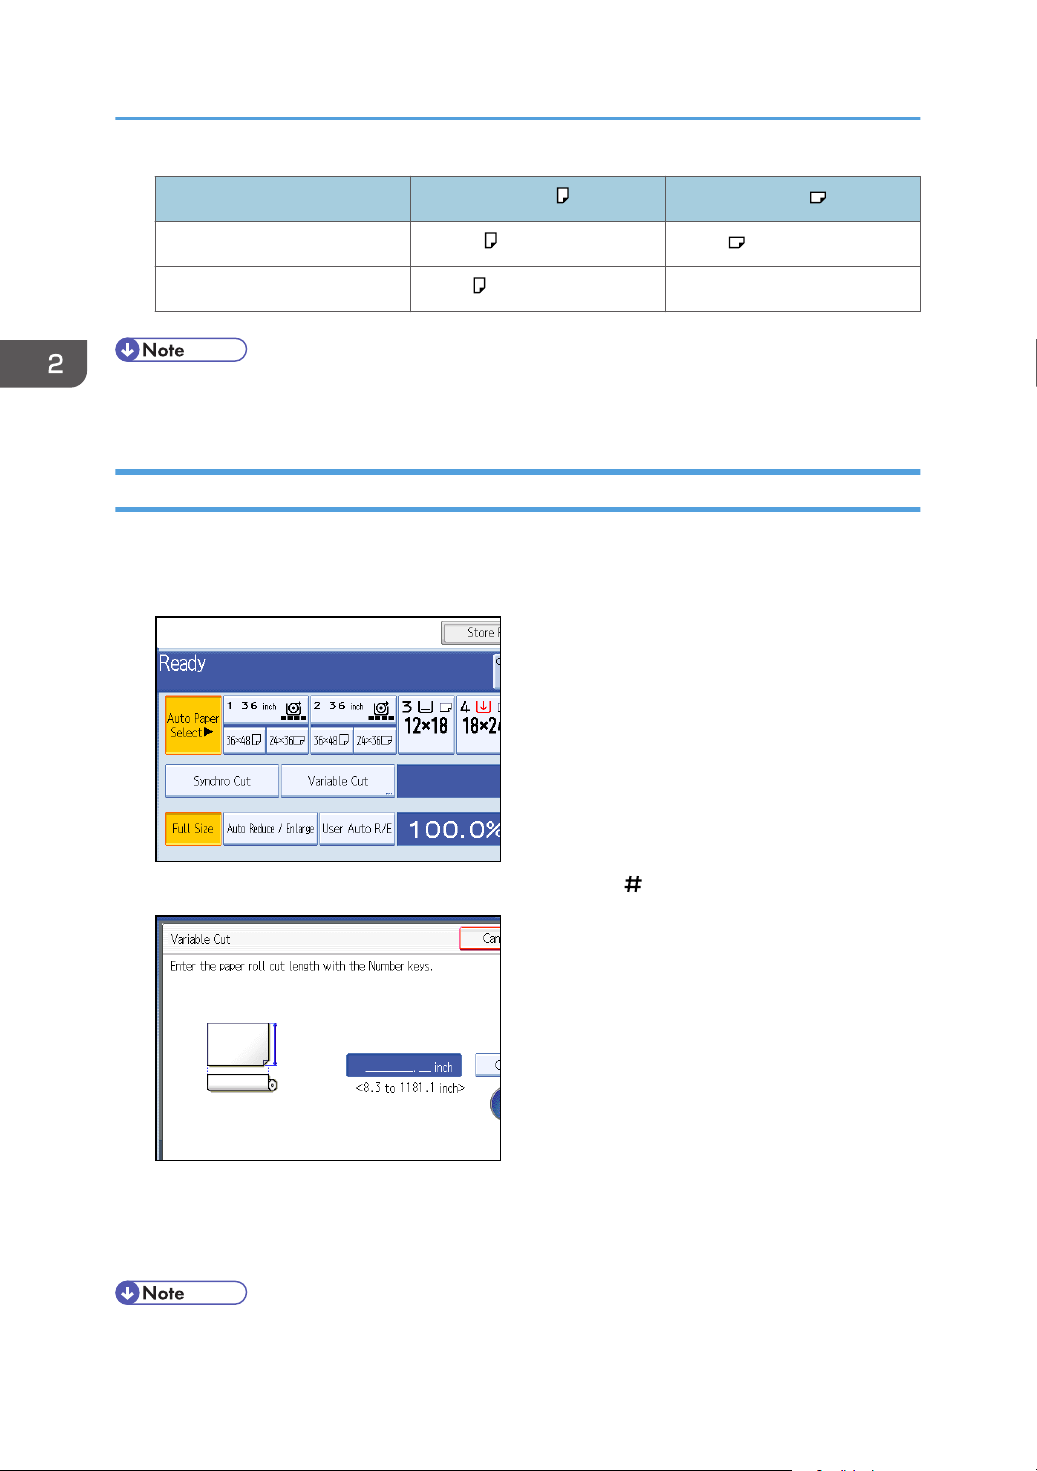
Variable Cut
Cuts the paper to the size entered.
1. Select [Variable Cut].
62
2. Enter the length with the number keys, and then press [ ].
3. Press [OK].
The entered length is displayed on the screen.
4. Select a paper roll tray.
• If you make a mistake, press [Clear] to set a new value.
Page 65

• To cancel Variable Cut, press [Cancel].
Setting the Length of Copy Paper Cut
63
Page 66
BAS030S
2. Basic Copying
Reducing or Enlarging Originals
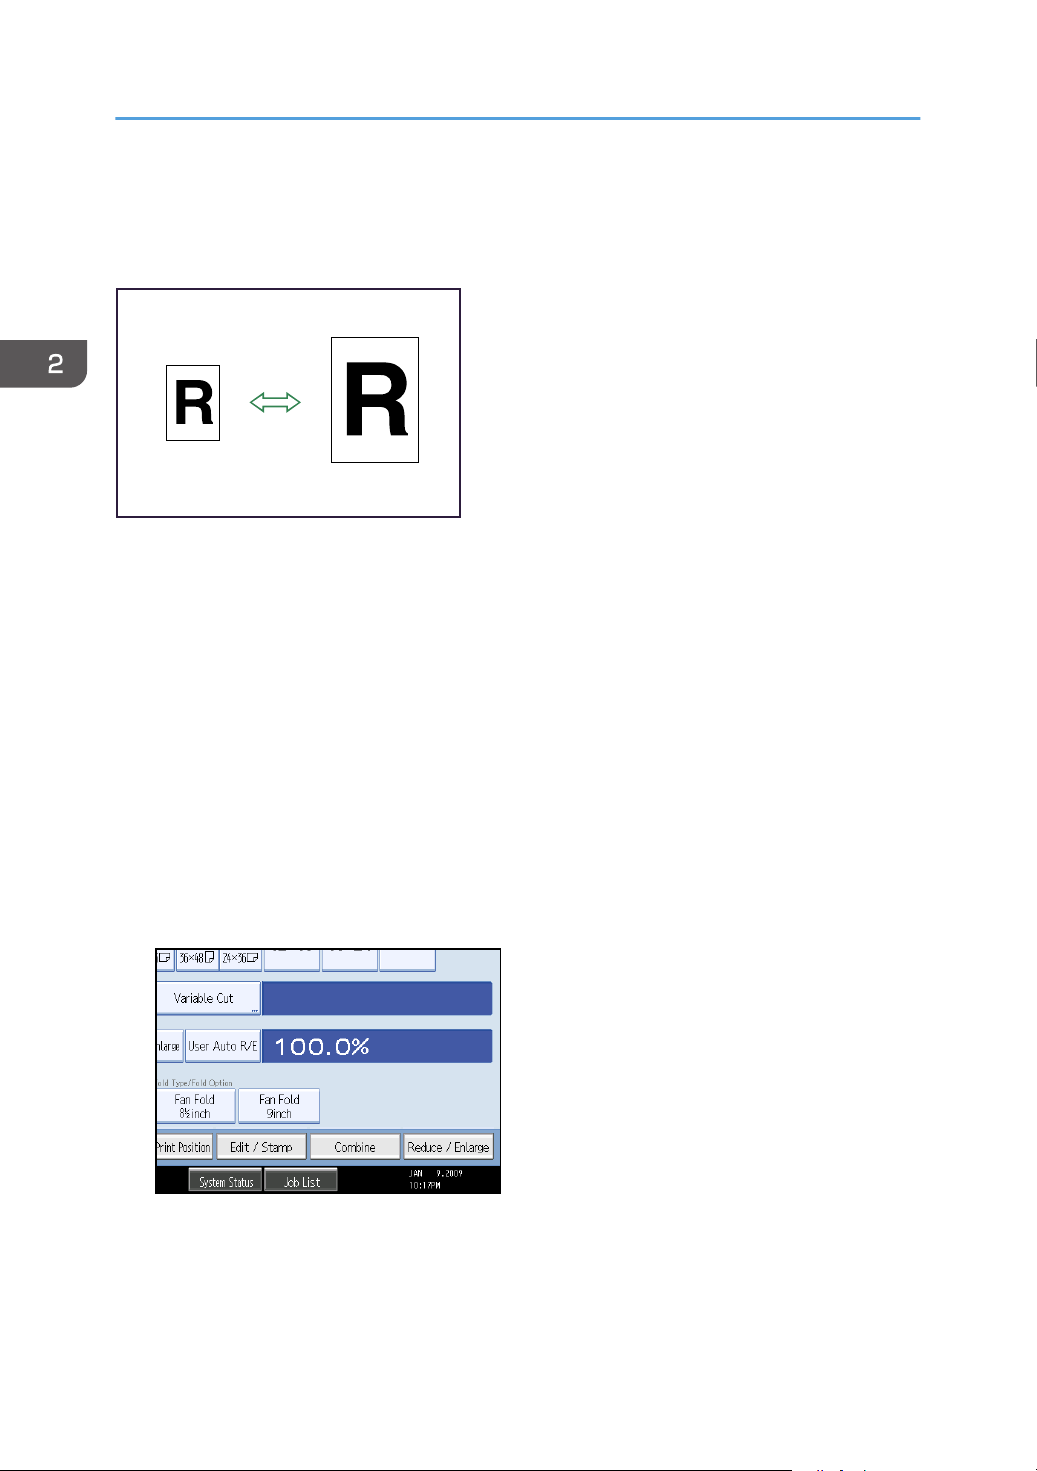
You can select a preset ratio for copying.
Metric version
Enlargement ratios: 141.4%, 200.0%, 282.8%, 400.0%
Reduction ratios: 25.0%, 35.4%, 50.0%, 70.7%
Inch version
• Engineering
Enlargement ratios: 129.4%, 200.0%, 258.8%, 400.0%
Reduction ratios: 25.0%, 32.4%, 50.0%, 64.7%
• Architecture
Enlargement ratios: 133.3%, 200.0%, 266.7%, 400.0%
Reduction ratios: 25.0%, 33.3%, 50.0%, 66.7%
1. Press [Reduce / Enlarge].
64
Page 67
BAS033S
Reducing or Enlarging Originals
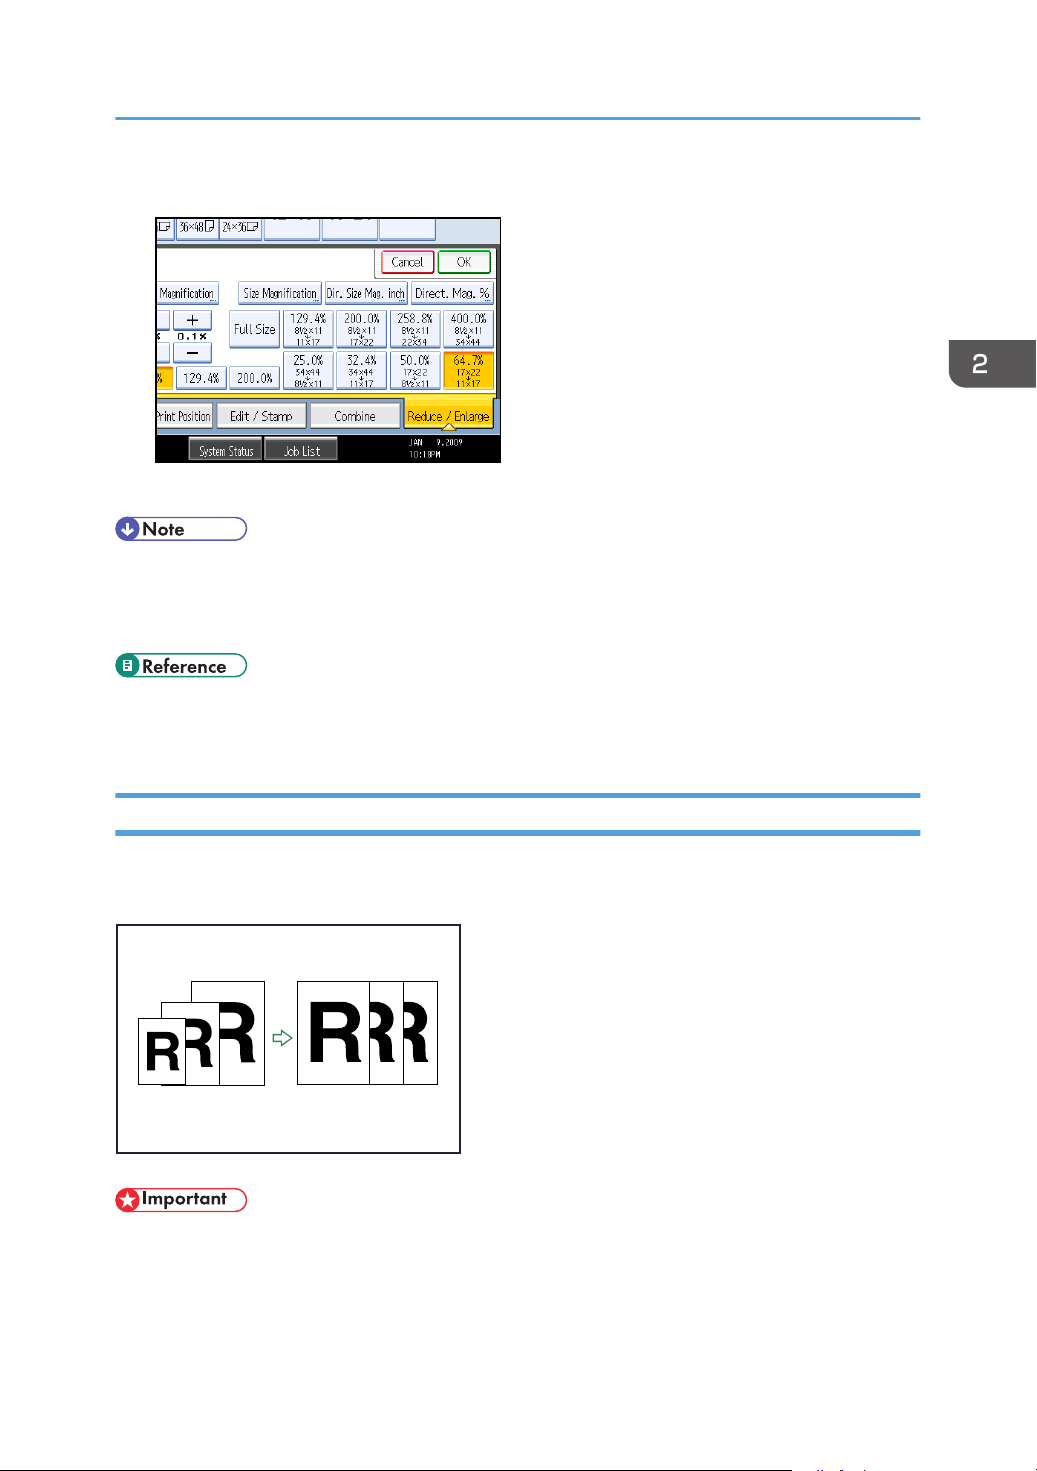
2. Select a ratio, and then press [OK].
The selected ratio appears on the display.
• Select one of the preset ratios based on the original size and paper size.
• For details about the relationship between the original and paper sizes for preset ratios, see
“Magnification Ratio Chart”.
• p.171 "Supplementary Information"
• p.183 "Magnification Ratio Chart"
Auto Reduce/Enlarge
The machine automatically detects the original size and then selects an appropriate reproduction ratio
based on the paper size you select.
• You cannot use the bypass tray with this function.
This is useful to copy different size originals to the same size paper.
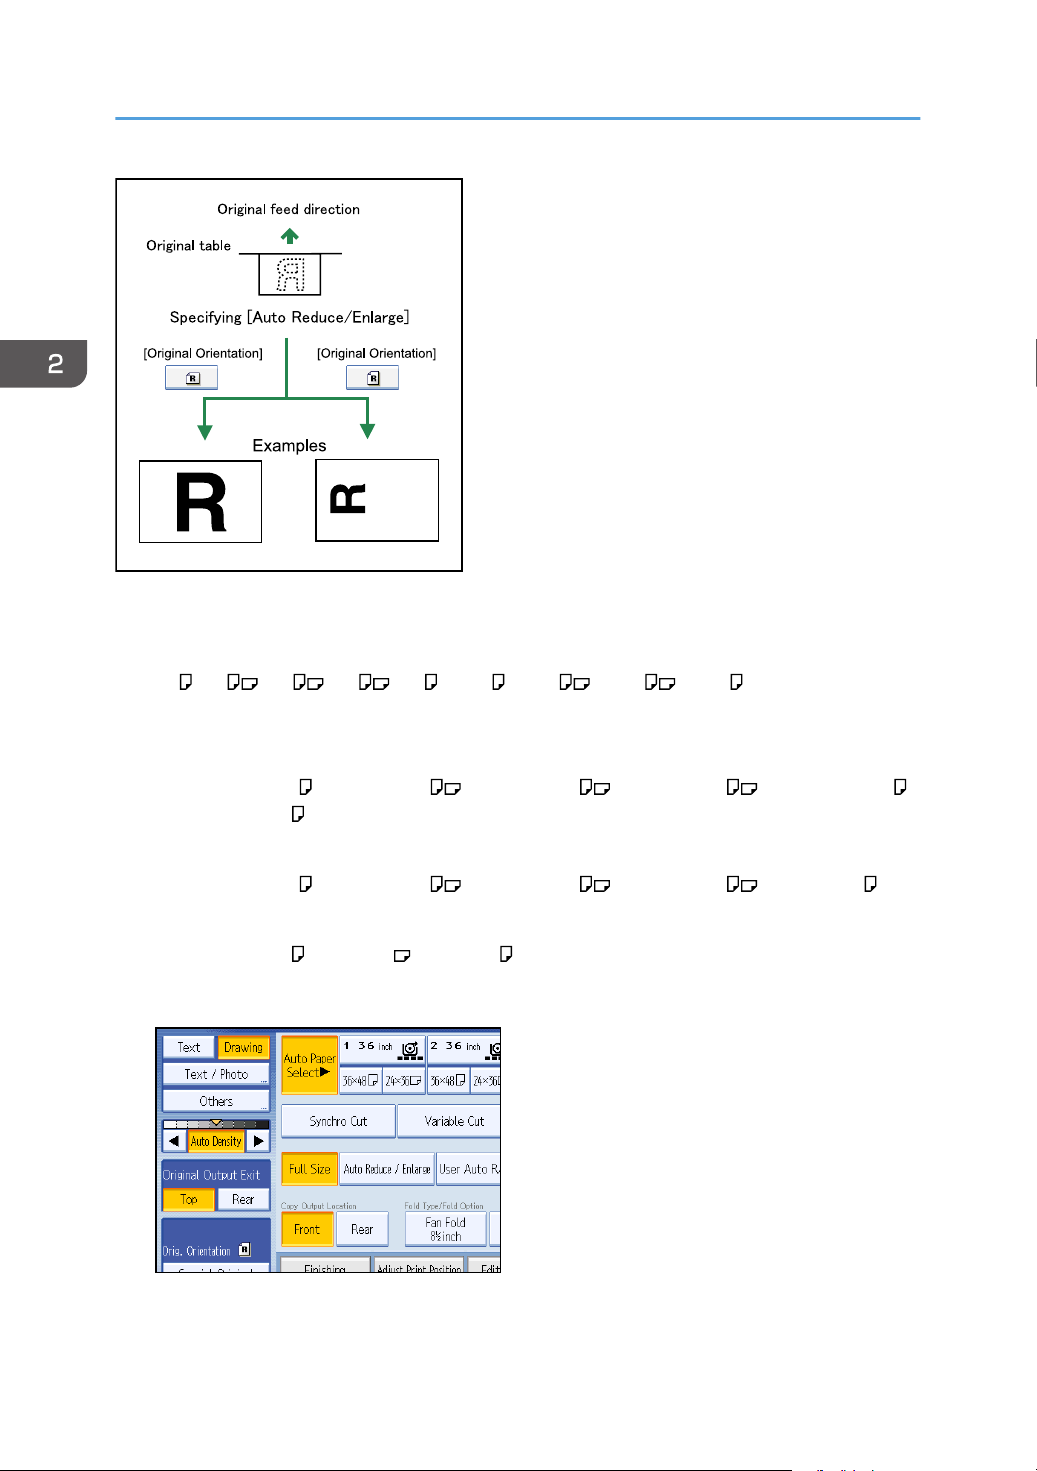
To ensure the print result you require is produced, specify Original Orientation before using Auto
Reduce/Enlarge.
65
Page 68
BKY023D
2. Basic Copying
The original sizes and orientations you can use with this function are as follows:
Metric version
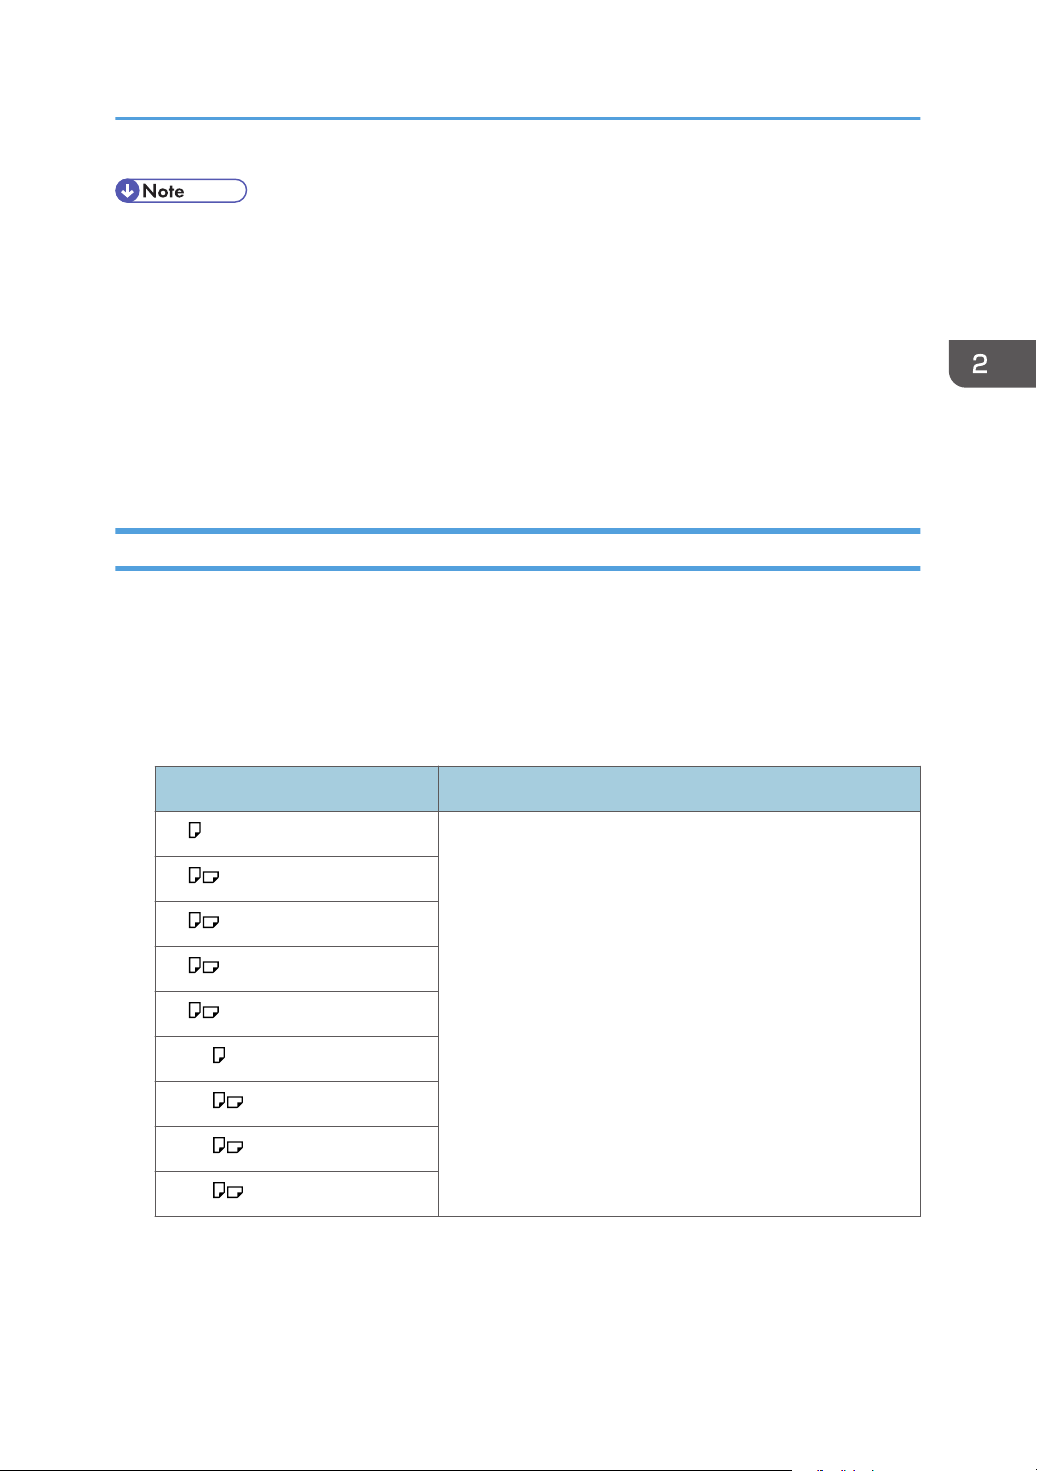
A0 , A1 , A2 , A3 , A4 , B1JIS , B2JIS , B3JIS , B4JIS
Inch version
• Engineering
E (34" × 44") , D (22" × 34") , C (17" × 22") , B (11" × 17") , A (81/2" × 11") ,
81/2" × 14"
• Architecture
E (36" × 48") , D (24" × 36") , C (18" × 24") , B (12" × 18") , A (9" × 12")
• Others
81/2" × 13" , 30" × 21" , 30" × 42"
1. Press [Auto Reduce / Enlarge].
66
2. Select the paper size.
3. Place the originals, and then press the [Start] key.
Page 69
Reducing or Enlarging Originals
• The machine selects one of the following ratios:
• Metric version
400.0%, 282.8%, 200.0%, 141.4%, 100.0%, 70.7%, 50.0%, 35.4%, 25.0%
• Inch version (Engineering)
400.0%, 258.8%, 200.0%, 129.4%, 100.0%, 64.7%, 50.0%, 32.4%, 25.0%
• Inch version (Architecture)
400.0%, 266.7%, 200.0%, 133.3%, 100.0%, 66.7%, 50.0%, 33.3%, 25.0%
• Make sure the Original Orientation setting matches the actual orientation of your original.
User Auto Reduce/Enlarge
Use this function to copy to a selected size for each original size.
When the original is set, the machine automatically enlarges or reduces the image to fit the size of the
copy paper.
You can select the following combinations:
Metric version
Original size Copy size
A0 A0, A1, A2, A3, A4, B1 JIS, B2 JIS, B3 JIS, B4 JIS
A1
A2
A3
A4
B1 JIS
B2 JIS
B3 JIS
B4 JIS
67
Page 70
2. Basic Copying
Inch version
Original size Copy size
Engineering E (34" × 44") E (34" × 44"), D (22" × 34"), C (17" × 22"), B (11" ×
17"), A (81/2" × 11")
D (22" × 34")
C (17" × 22")
B (11" × 17")
A (81/2" × 11")
E (36" × 48")
D (26" × 36")
Architecture
C (18" × 24")
E (36" × 48"), D (26" × 36"), C (18" × 24"), B (12" ×
18"), A (9" × 12")
B (12" × 18")
A (9" × 12")
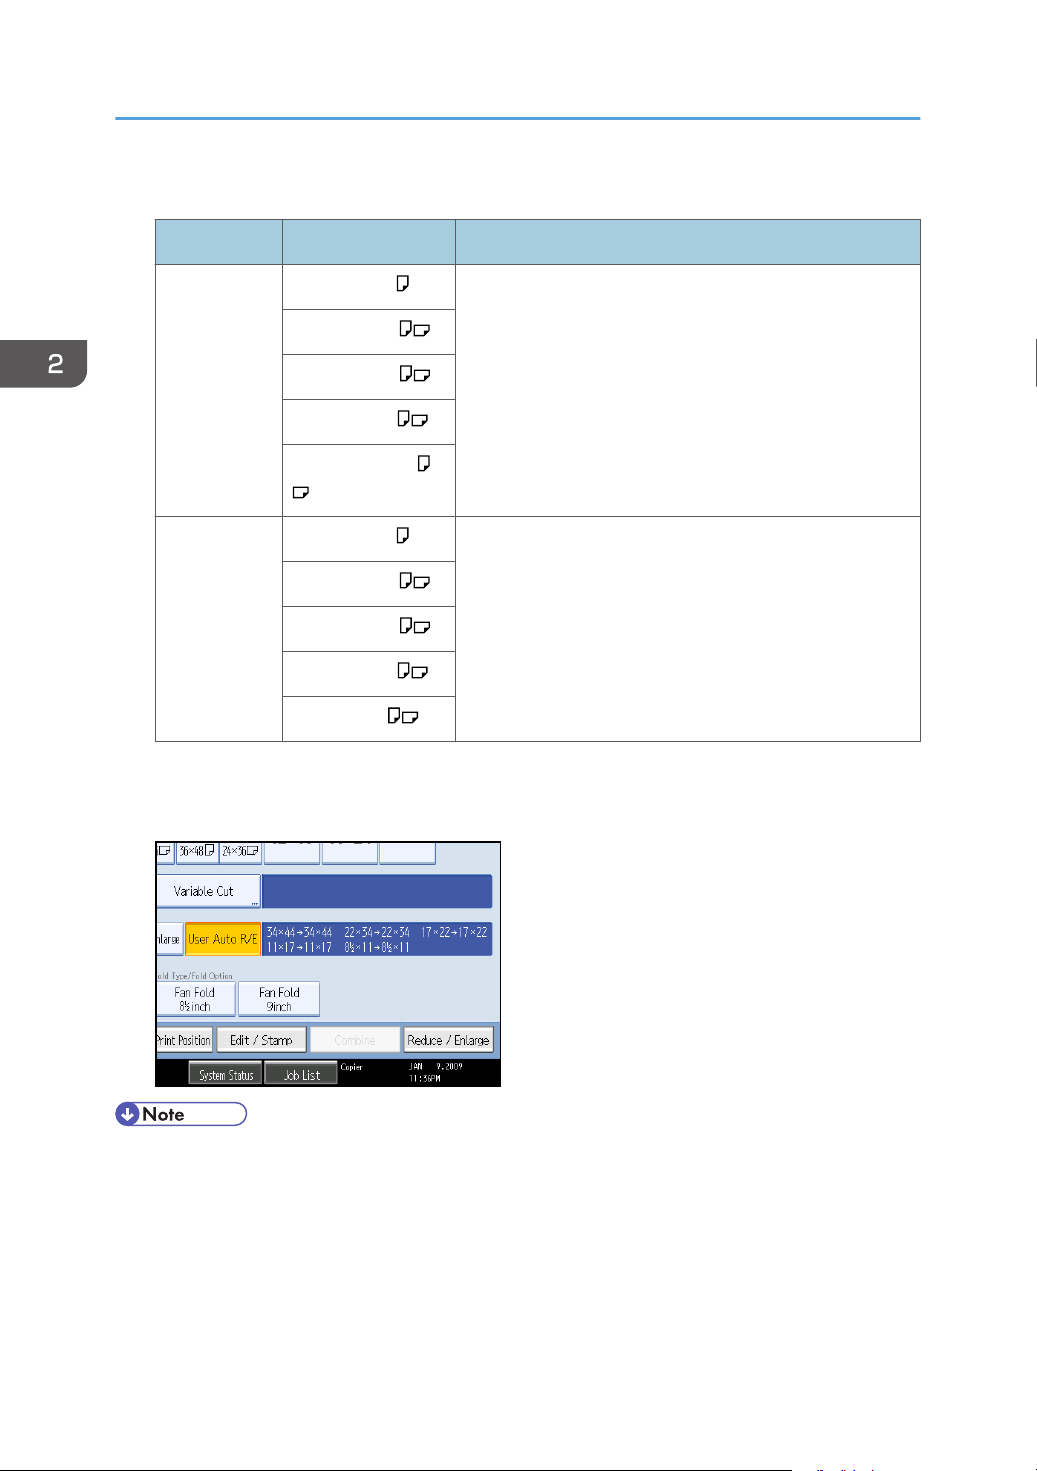
1. Press [User Auto R/E].
2. Check that the combination selected for User Auto Reduce/Enlarge is the one you want.
• The default setting is to copy at the same size (full size). You can change the combination with
Copier/Document Server Features in User Tools.
• Make sure the Original Orientation setting matches the actual orientation of your original.
• You can specify the copy paper size in the range A0 to A4 or B1 to B4. However, you cannot
change the size of the page image on an A-series original to fit B-series copy paper or vice versa.
68
Page 71
BAS030S
Reducing or Enlarging Originals
• p.17 "Functions Requiring Optional Configurations"
• p.32 "Original Orientation"
Preset Reduce/Enlarge
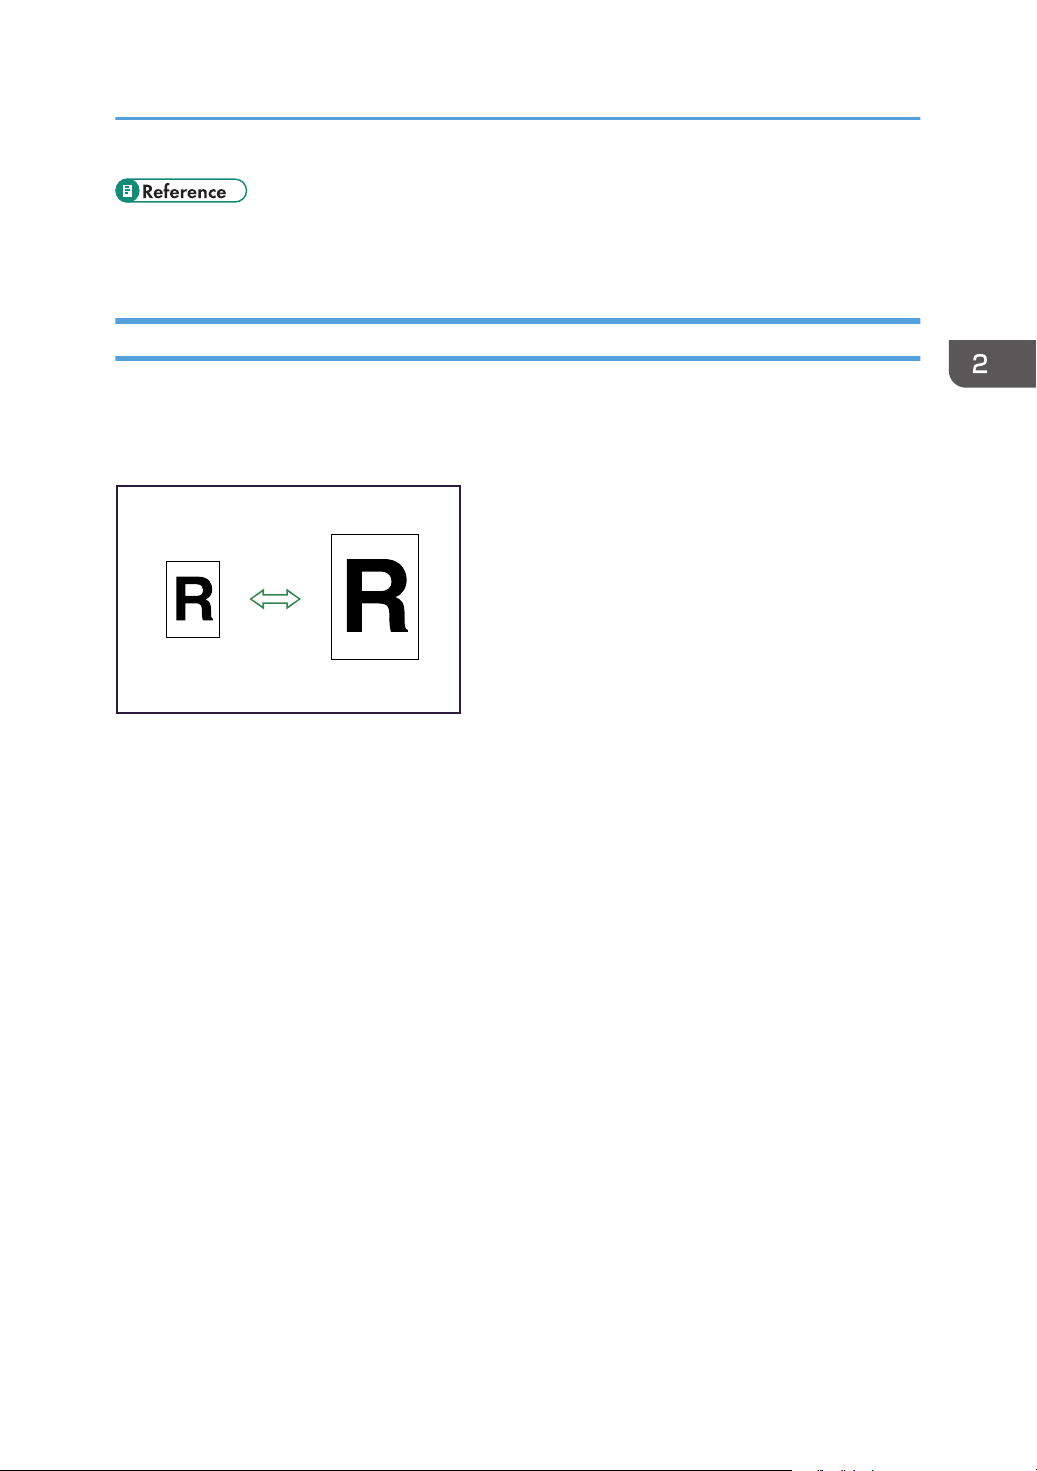
This function allows you to reduce or enlarge images by selecting a preset ratio.
You can register up to three frequently used reproduction ratios other than the preset Reduce/Enlarge
ratios.
Metric version
Enlargement ratios: 141.4%, 200.0%, 282.8%, 400.0%
Reduction ratios: 25.0%, 35.4%, 50.0%, 70.7%
Inch version
• Engineering
Enlargement ratios: 129.4%, 200.0%, 258.8%, 400.0%
Reduction ratios: 25.0%, 32.4%, 50.0%, 64.7%
• Architecture
Enlargement ratios: 133.3%, 200.0%, 266.7%, 400.0%
Reduction ratios: 25.0%, 33.3%, 50.0%, 66.7
69
Page 72
2. Basic Copying
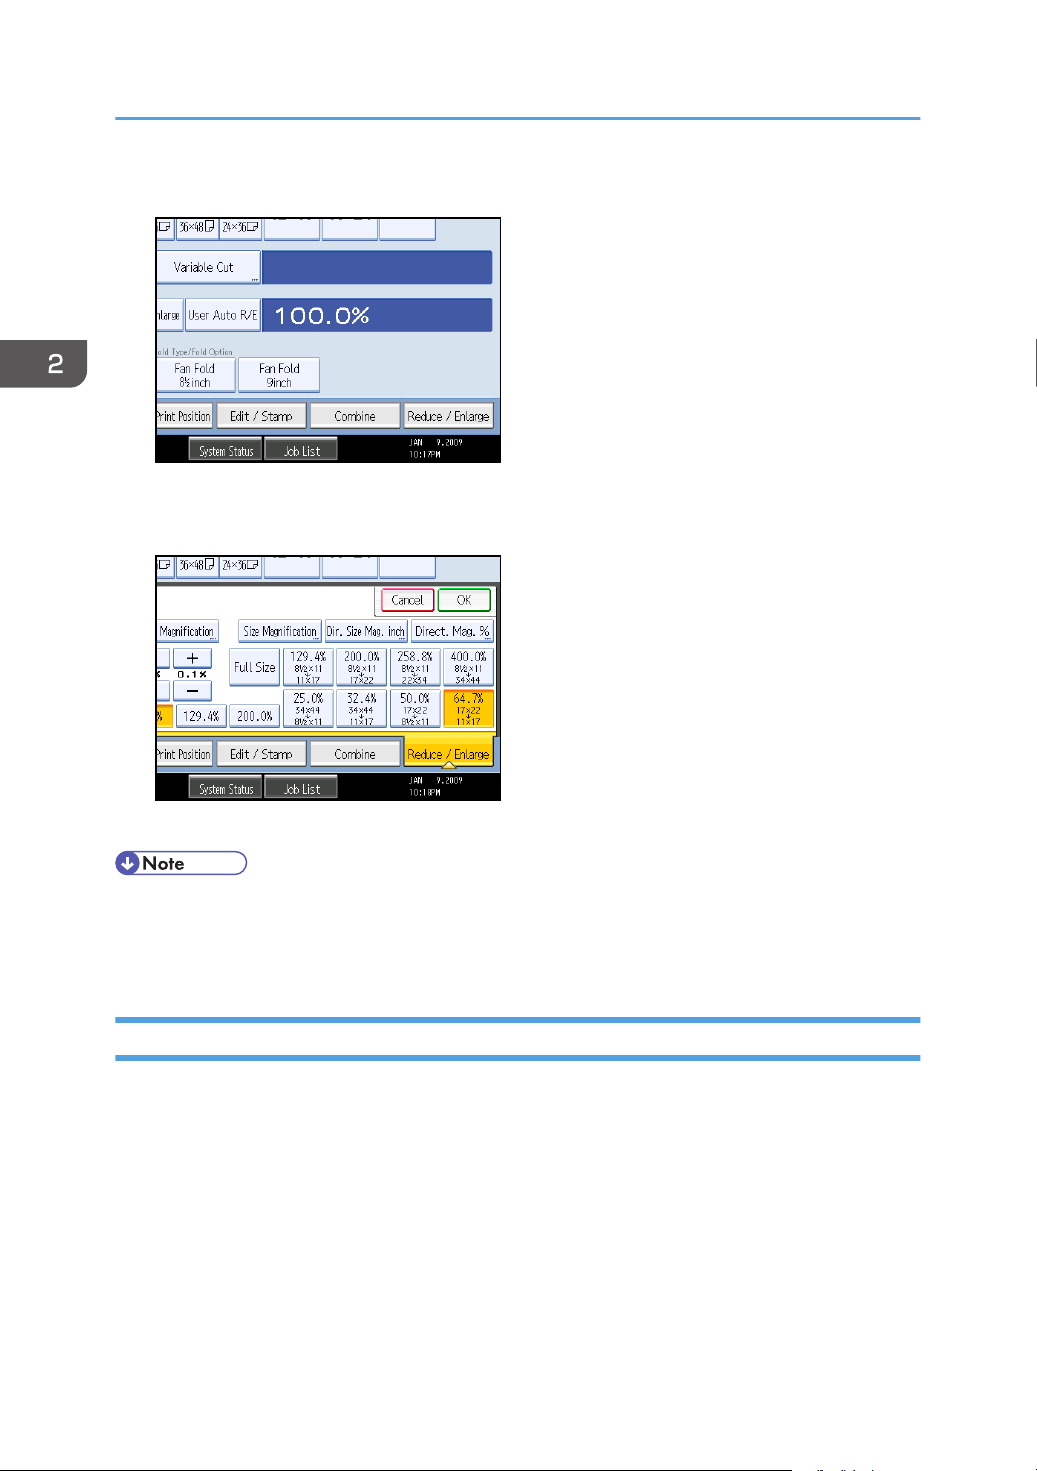
1. Press [Reduce / Enlarge].
To select a preset ratio on the initial display, press the shortcut reduce/enlarge key.
2. Select a ratio, and then press [OK].
3. Place the originals, and then press the [Start] key.
• Select one of the preset ratios based on the original size and paper size.
• For details about the relationship between the original and paper sizes for preset ratios, see
“Magnification Ratio Chart”.
Zoom
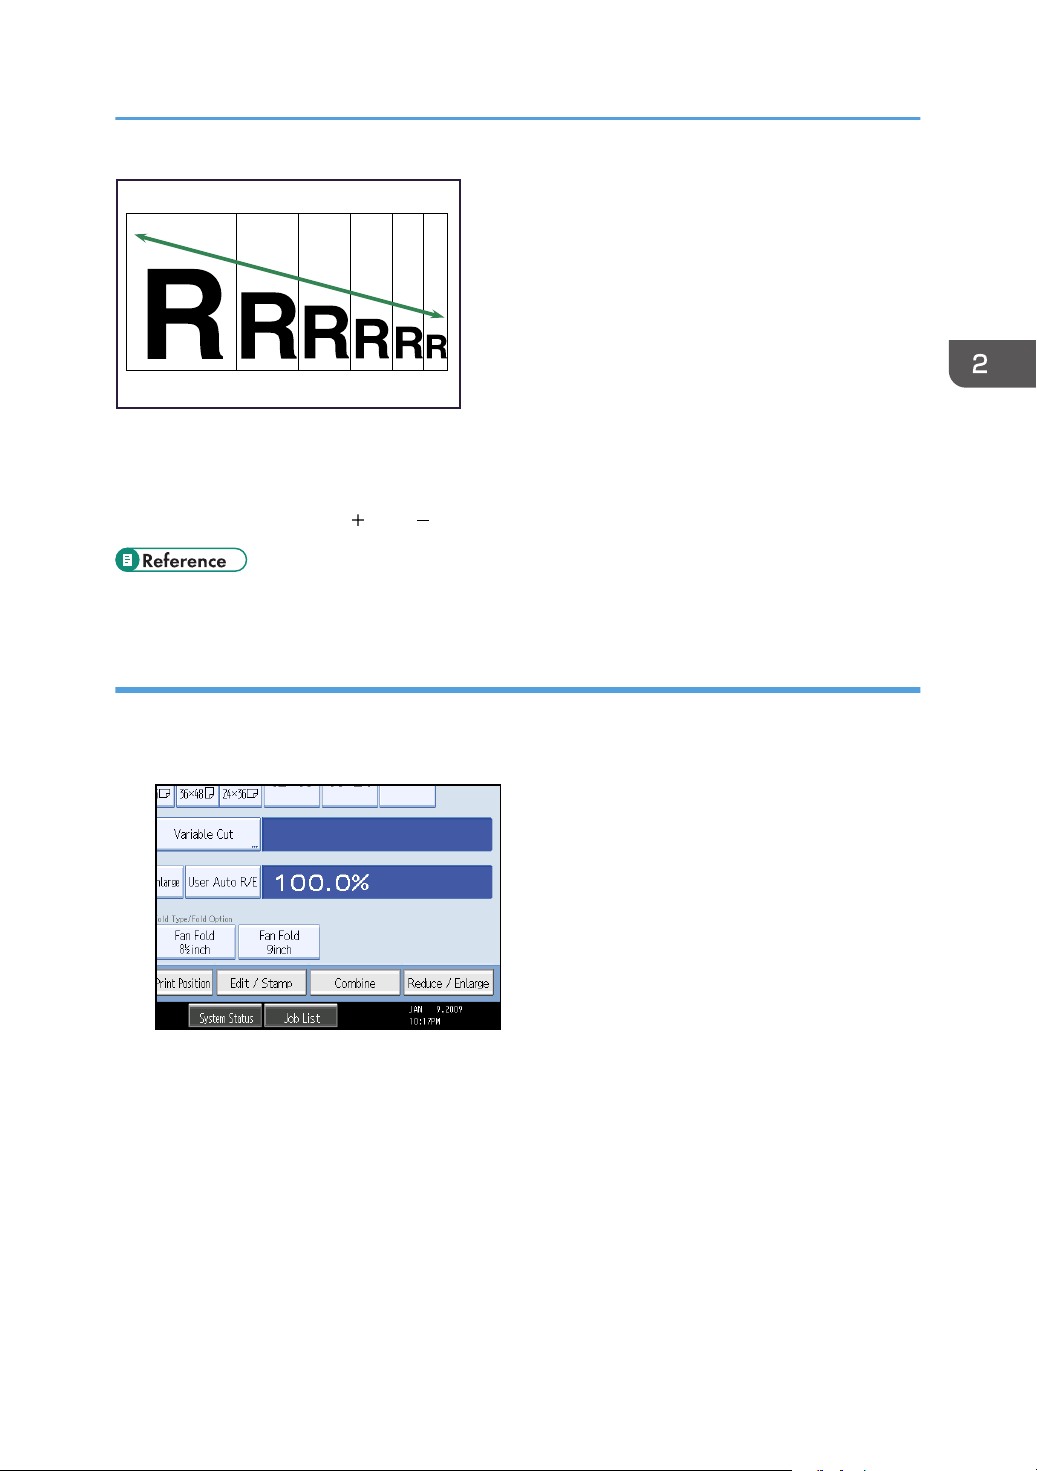
You can change the reproduction ratio in increments of 0.1%.
70
Page 73
BAS032S
You can set the ratio in the following ways.
• Entering the ratio with the number keys
• Specifying the ratio with [ ] and [ ]
• p.171 "Supplementary Information"
Entering the ratio with the number keys
Reducing or Enlarging Originals
Enter a ratio using the number keys.
1. Press [Reduce / Enlarge].
2. Press [Number keys].
71
Page 74
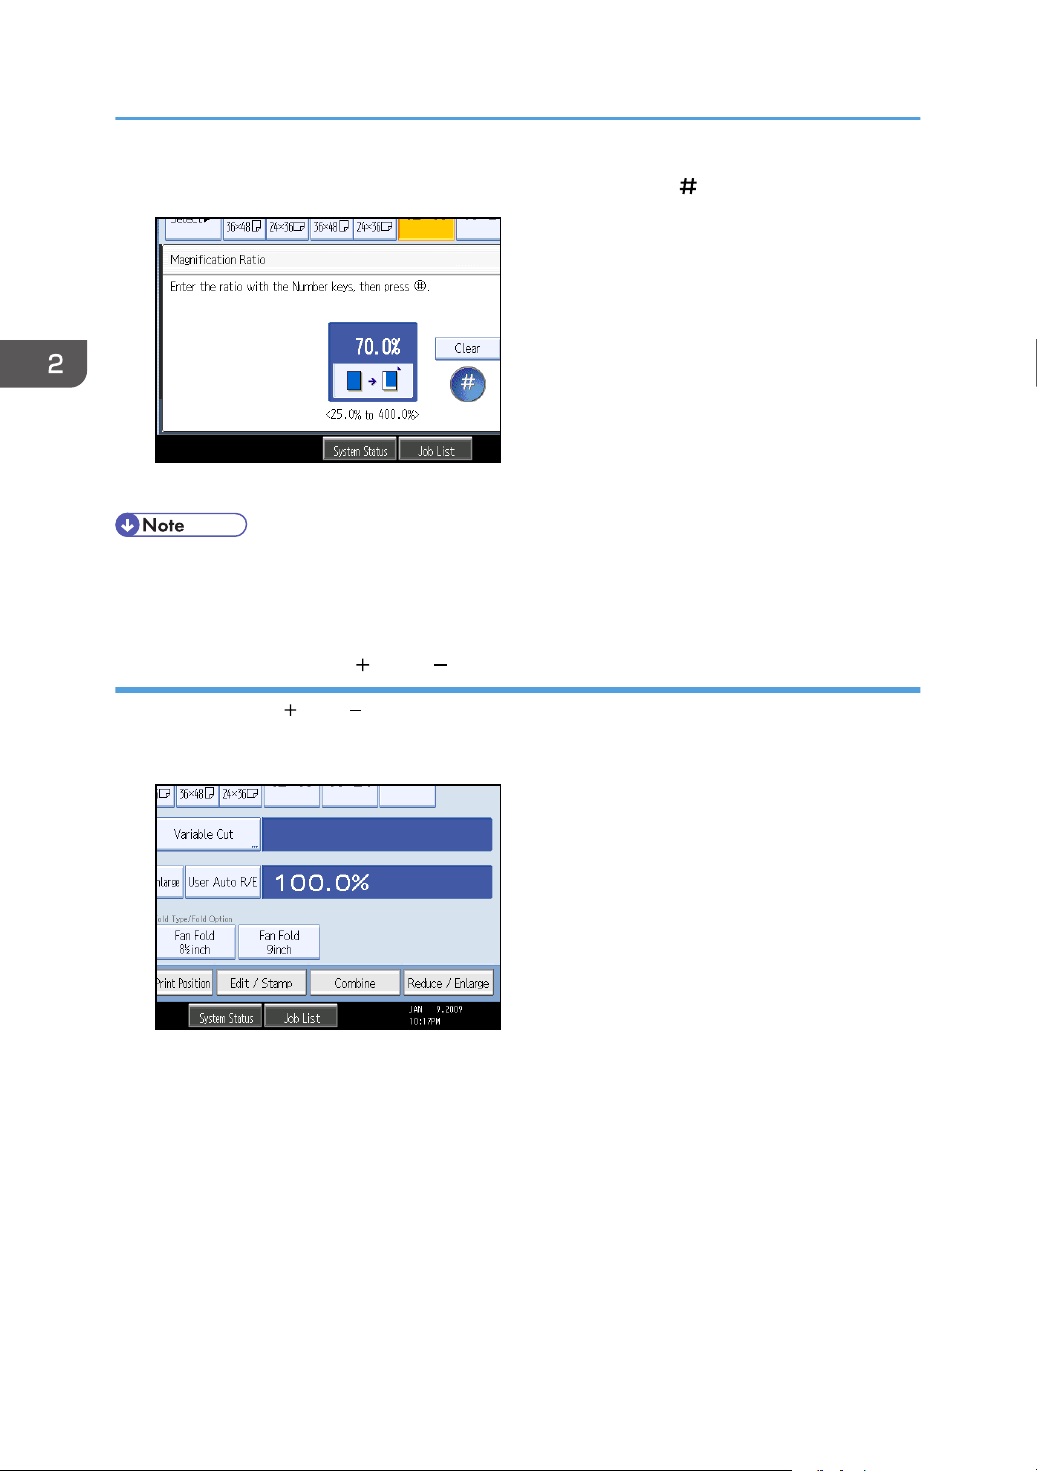
2. Basic Copying
3. Enter the desired ratio with the number keys, and then press [ ].
4. Press [OK] twice.
• Use the [.]key to enter a decimal point.
• To change the value, press [Clear], and then enter a new value.
Specifying the ratio with [ ] and [ ]
Specify a ratio using [ ] and [ ].
1. Press [Reduce / Enlarge].
2. Select a preset ratio which is close to the desired ratio.
72
Page 75
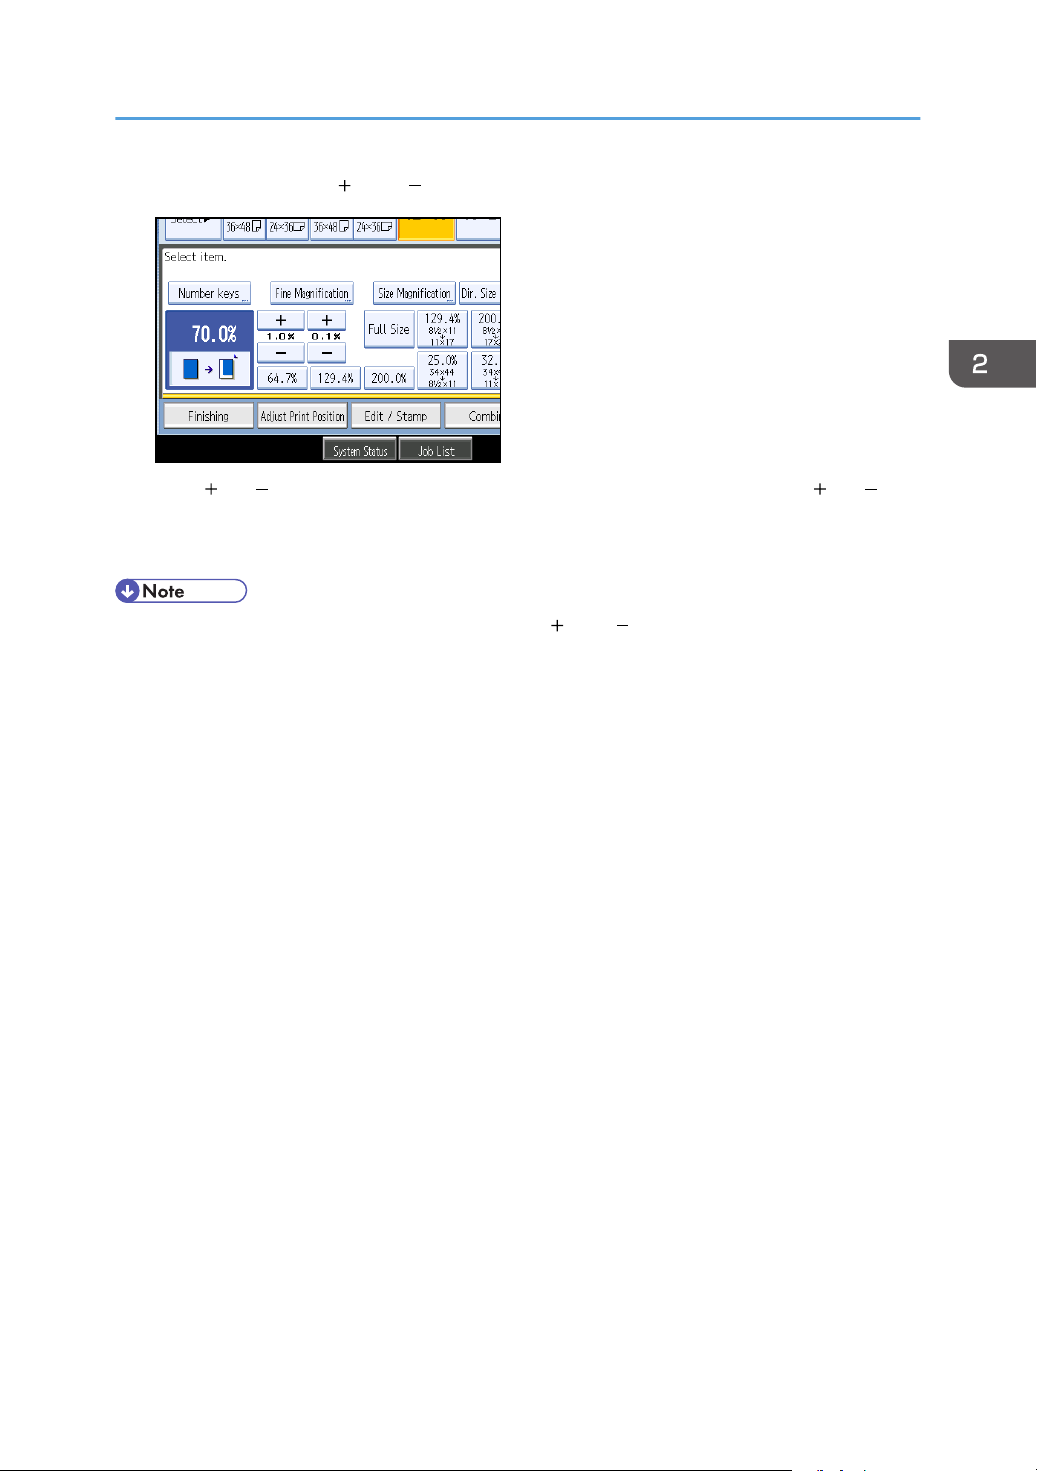
Reducing or Enlarging Originals
3. Adjust the ratio with [ ] and [ ].
Press [ ] or [ ] changes the ratio in increments of 0.1%. Pressing and holding down [ ] or [ ]
changes it in increments of 1%.
4. Press [OK].
• To change the value you specified, readjust it with [ ] and [ ].
73
Page 76
BAS038S
BAS039S
2. Basic Copying
Combined Copying
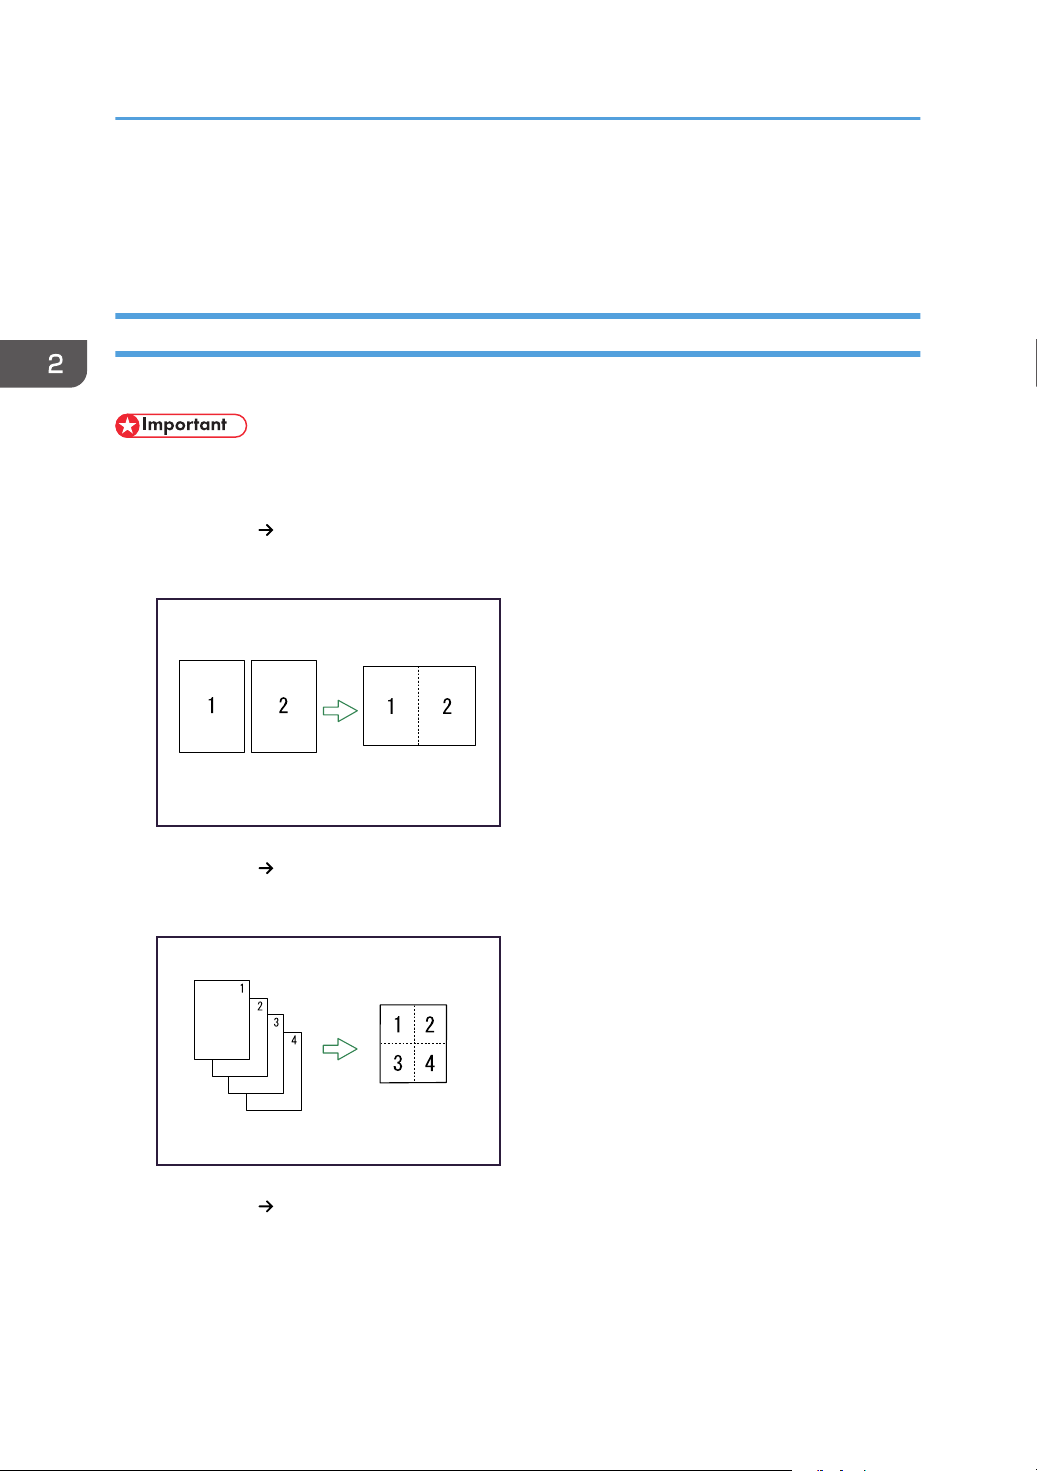
Combines several pages onto one side of a sheet.
One-Sided Combine
Combine several pages onto one side of a sheet.
• You cannot use the bypass tray with this function.
There are three types of One-Sided Combine.
1 Sided 2 Pages Combine 1 Side
Copies two 1-sided originals to one side of a sheet.
1 Sided 4 Pages Combine 1 Side
Copies four 1-sided originals to one side of a sheet.
1 Sided 8 Pages Combine 1 Side
Copies eight 1-sided originals to one side of a sheet.
74
Page 77
BAS040S
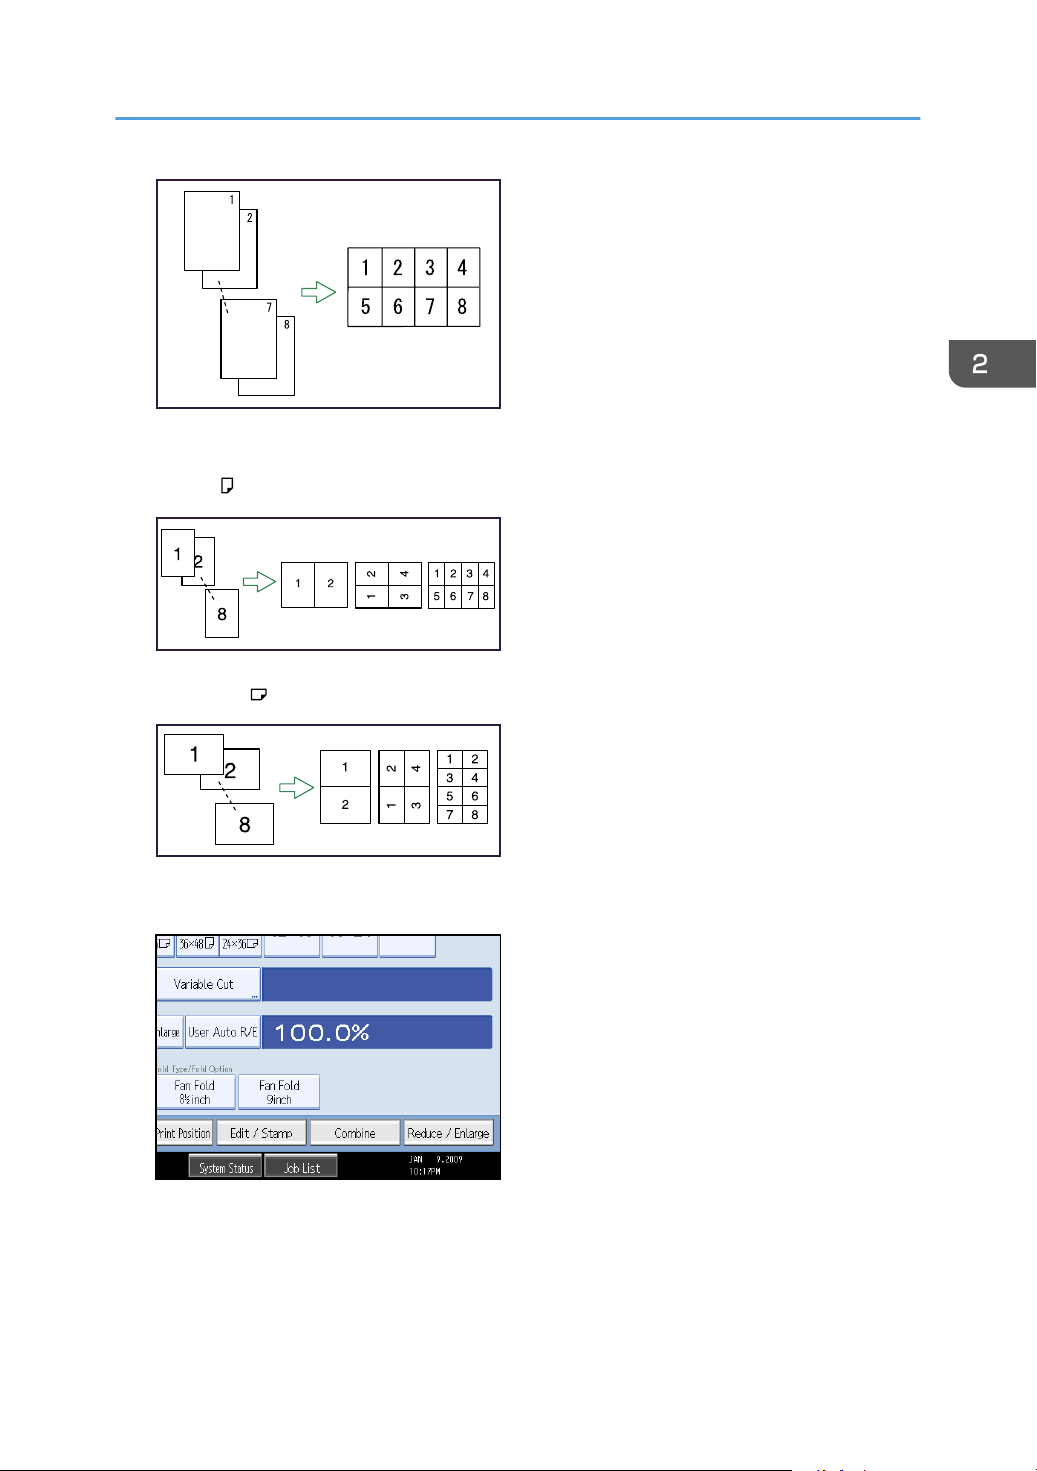
Orientation of the original and image position of combine
BAS044S
BAS045S
Portrait ( ) originals
Combined Copying
Landscape ( ) originals
1. Press [Combine].
75
Page 78
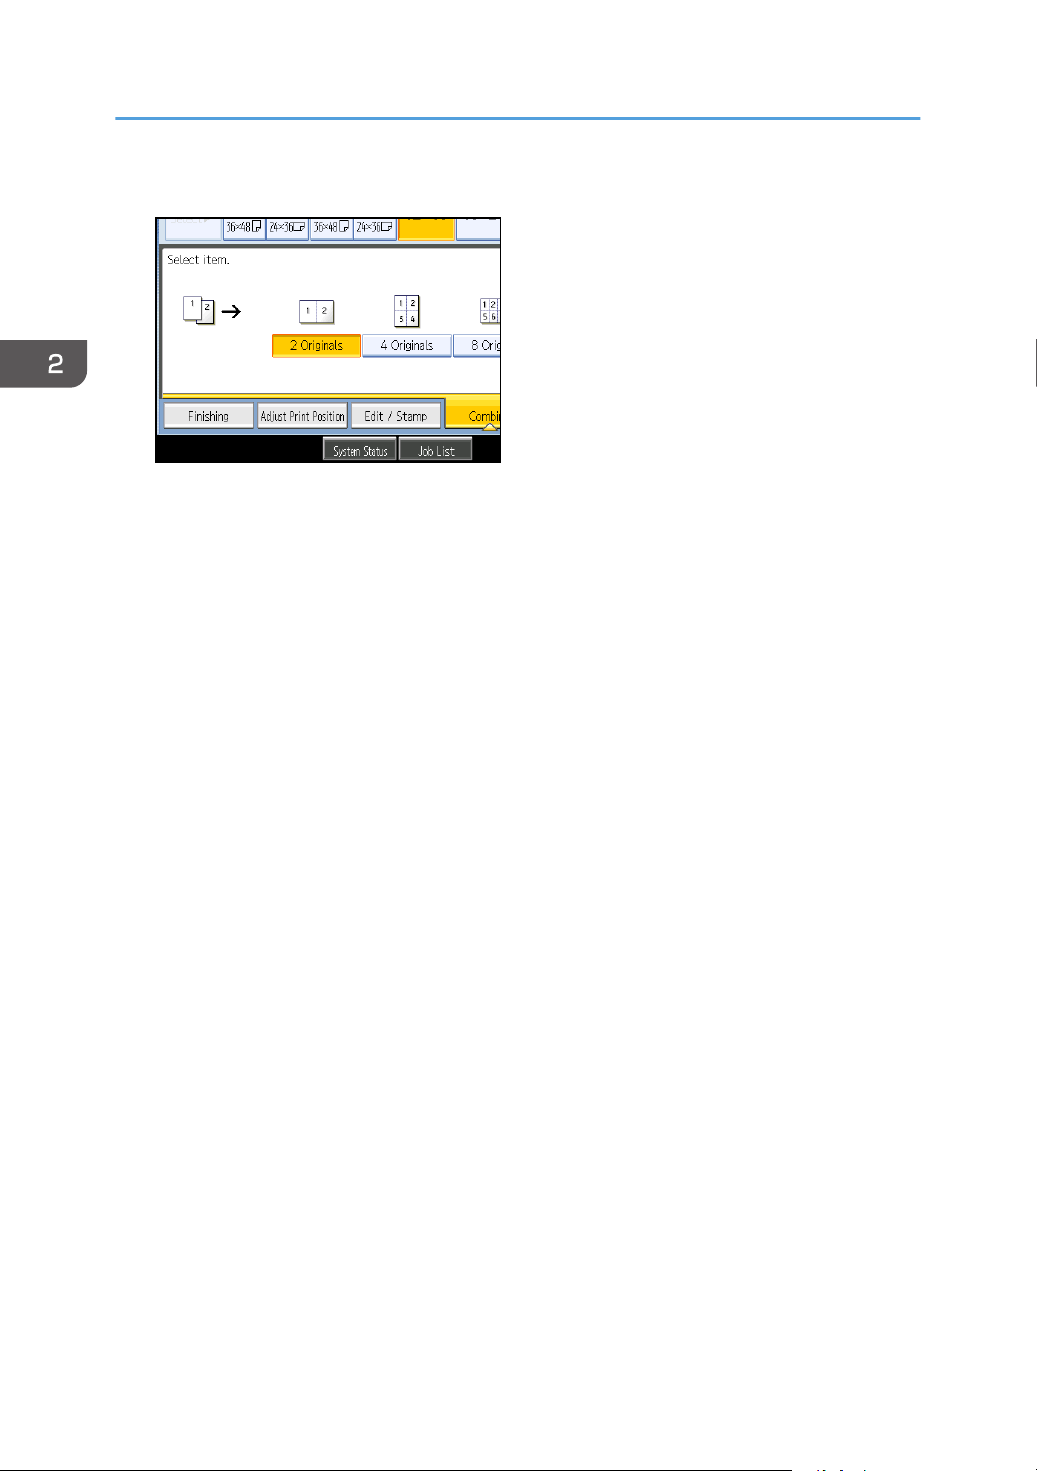
2. Basic Copying
2. Select the number of originals to combine.
3. Select the paper size.
4. Press [OK].
76
Page 79
BAS053S
BAS054S
Finishing
Finishing
You can specify how to finish the prints. You can sort the prints by page number or copy order. If you
have installed the optional folding finisher, you can also fold the prints.
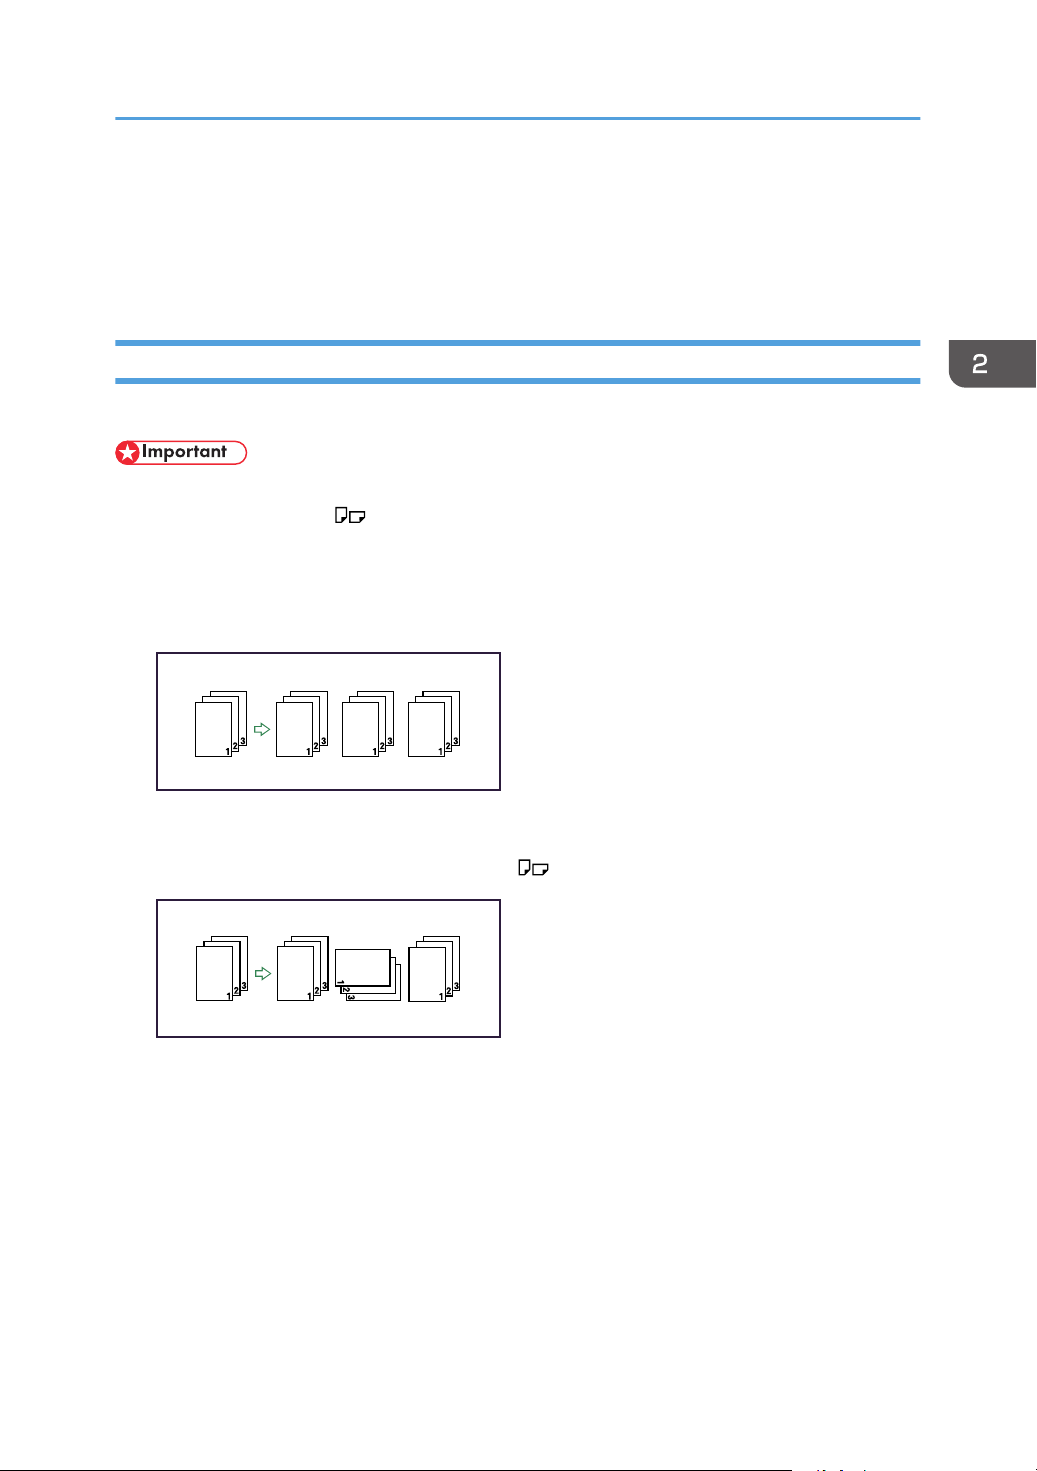
Sort
The machine assembles copies as sets in sequential order.
• To use the Rotate Sort function, two paper trays loaded with paper of the same size and type, but
in different orientation ( ), are required.
• You cannot use the bypass tray with Rotate Sort.
Sort
Copies are assembled as sets in sequential order.
Rotate Sort
Every other copy set is rotated by 90 degrees ( ) and delivered to the copy tray.
1. Make necessary settings.
77
Page 80
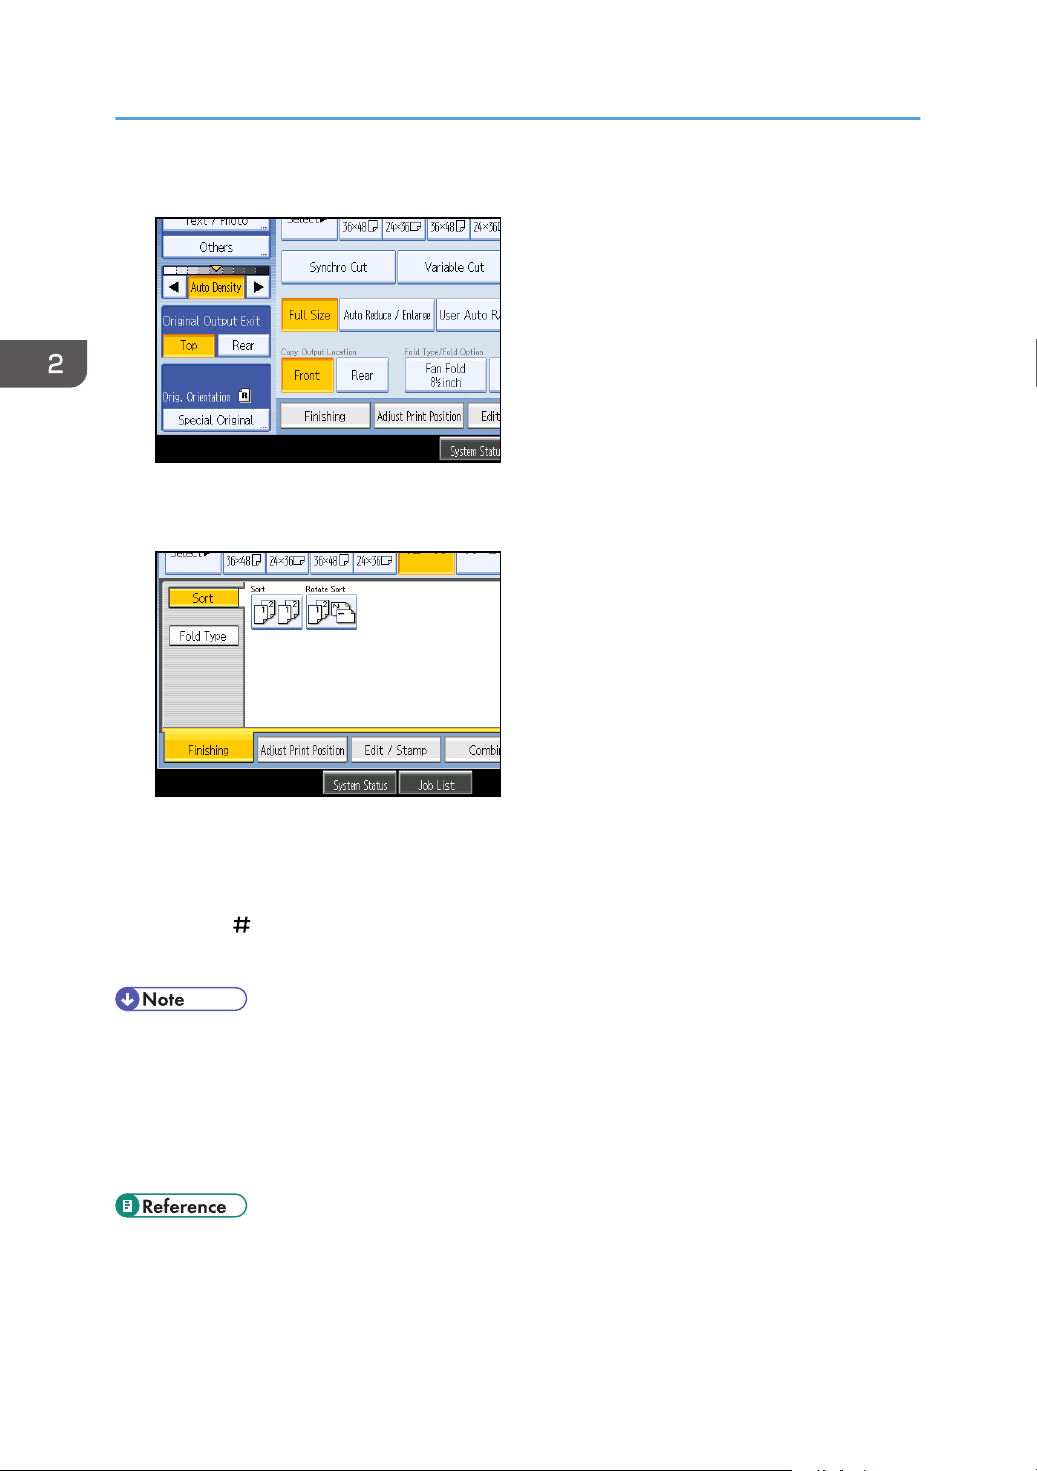
2. Basic Copying
2. Press [Finishing].
3. Press [Sort].
4. Select [Sort] or [Rotate Sort].
78
5. Press [OK].
6. Enter the number of copy sets using the number keys.
7. Place your original, and let it be scanned.
Press the [ ] key after all the originals have been scanned.
The machine starts copying.
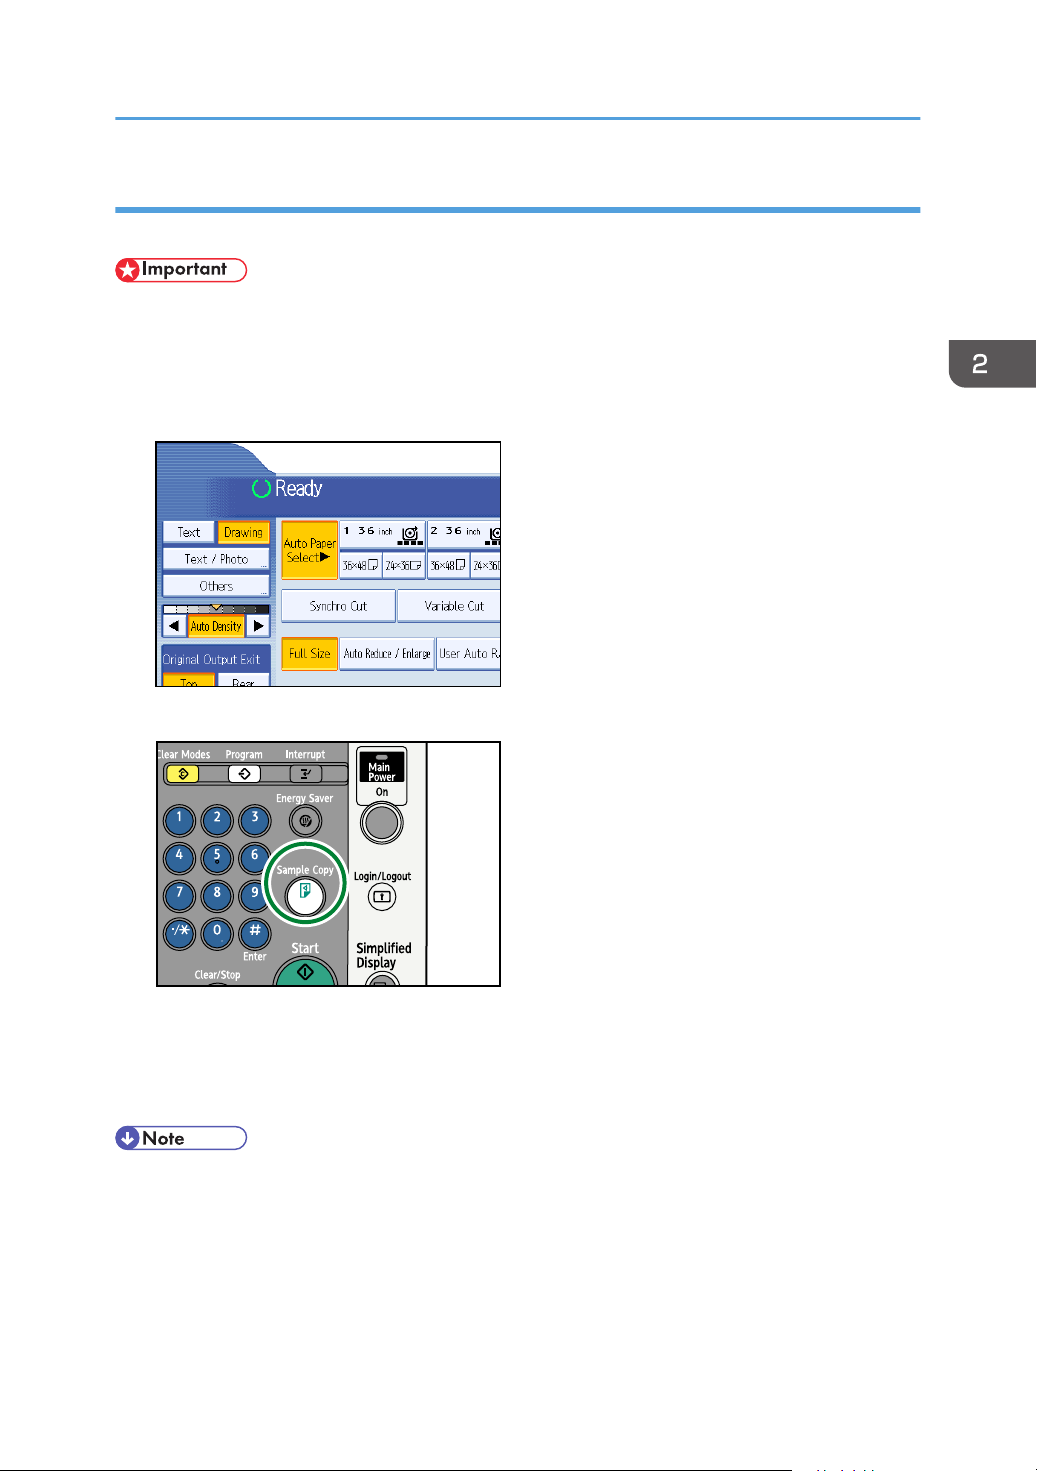
• To use Sample Copy, select [Press Start Key] under [Feed Start Method] in System Settings. You
cannot make sample copy when [Auto] is selected.
• To confirm the type of finishing, press the [Sample Copy] key in step 7.
• To cancel Sort or Rotate Sort, press [Clear].
• Special size paper cannot be used with Rotate Sort.
• p.17 "Functions Requiring Optional Configurations"
• p.171 "Supplementary Information"
Page 81
Sample Copy
BKY050S
Use this function to check the copy settings before making a long copy run.
• This function can be used only when the Sort function is selected.
• To use Sample Copy, select [Press Start Key] under [Feed Start Method] in System Settings. You
cannot make sample copy when [Auto] is selected.
1. Select Sort and any other necessary functions, and then place the originals.
Finishing
2. Press the [Sample Copy] key.
One copy set is delivered as a sample.
3. If the sample is acceptable, press [Continue].
The number of copies made is the number specified, minus one for the proof copy.
• If you press [Suspend] after checking the results, return to step 1 to adjust the copy settings as
necessary. Depending on the combination of functions, you may not be able to change some
settings.
79
Page 82
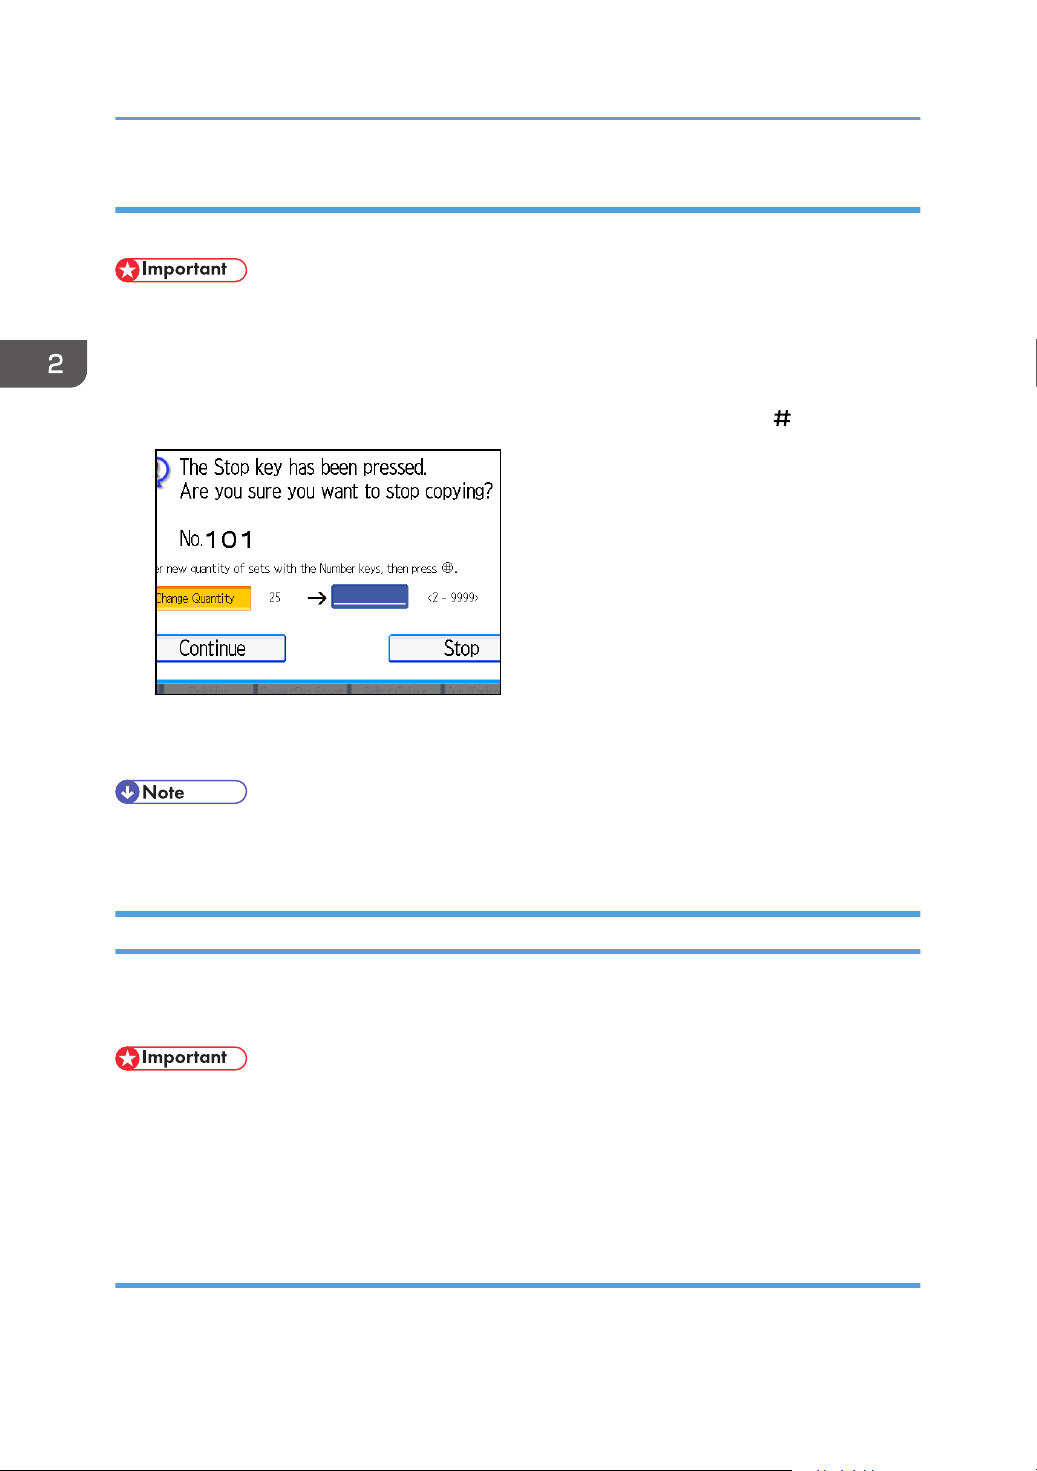
2. Basic Copying
Changing the number of sets
You can change the number of copy sets during copying.
• This function can only be used when the Sort function is selected.
1. While "Copying..." is displayed, press the [Clear/Stop] key.
2. Press [Change Quantity].
3. Enter the number of copy sets with the number keys, and then press the [
4. Press [Continue].
Copying starts again.
• The number of sets you can enter in step 3 differs depending on when the [Clear/Stop] key is
pressed.
] key.
Fold
The fold function is optional.
Automatically folds copies after they are printed.
• If you select Fan Fold, you must select the rear copy output as the copy output location.
• For details about the Fold function, see the manuals for your folding finisher.
• Actual results might differ from the illustration. Depending on sheet length, fold widths will vary for
each panel.
Fan Fold
The sheet is folded several times parallel to its leading edge, enabling it be opened like a fan.
80
Page 83
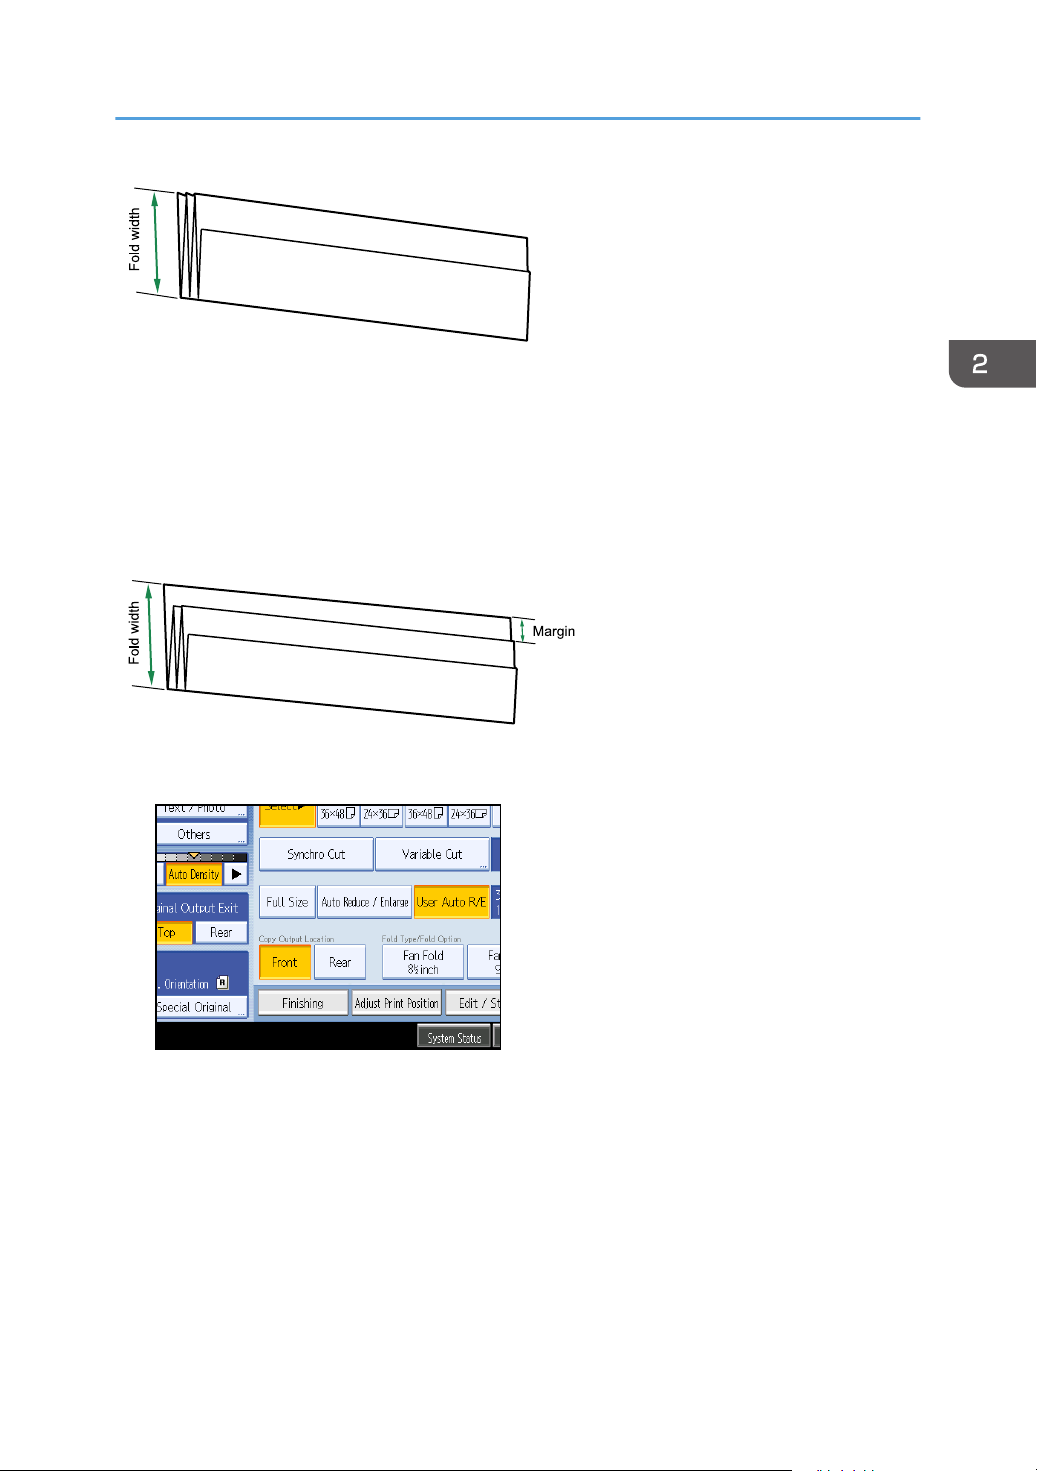
BKY027S
BKY028S
Finishing
If the Fan Folding Finisher is installed, you can select a fold width of 140, 170, 210, or 297 mm
(81/2", 9", 11", or 12").When [210mm(Margin Fold)] is selected, paper is folded so as to have a
binding margin.
If the Cross Folding Finisher is installed, you can select a fold width of 140, 170, or 210 mm (81/2", 9",
or 11").
When [210mm(Margin Fold)] is selected, paper is folded so as to have a binding margin.
1. Press [Finishing].
2. Press [Fold Type].
3. Press [Fan Fold].
81
Page 84
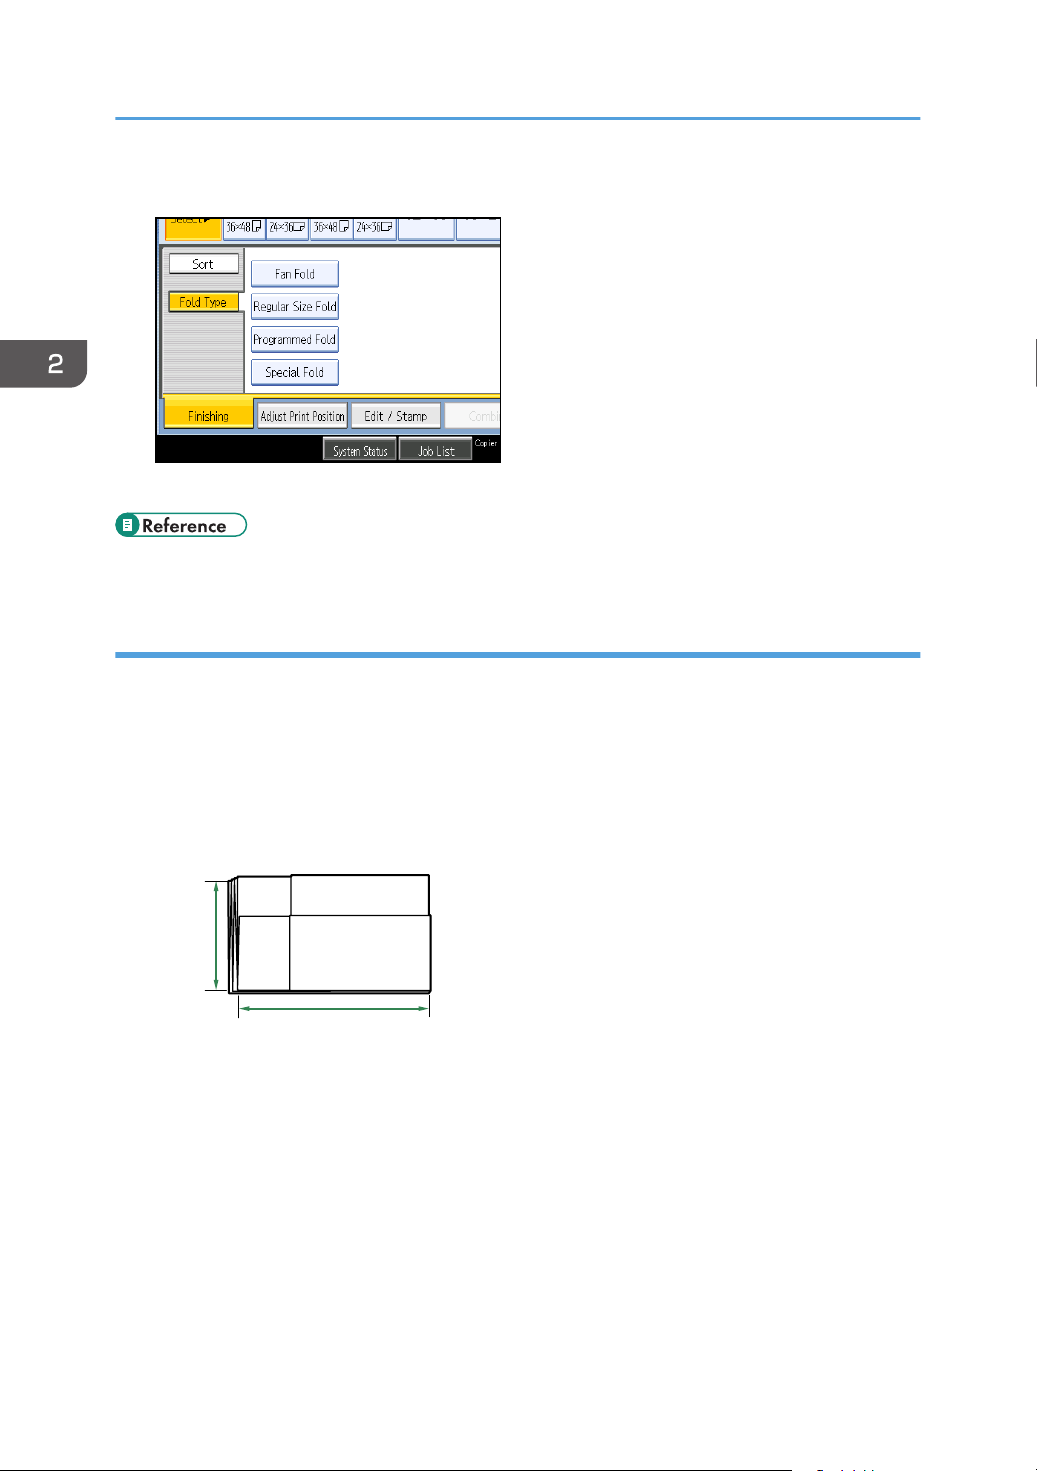
1
2
BKY031S
2. Basic Copying
4. Select a fold width for Fan Fold.
5. Press [OK].
• p.17 "Functions Requiring Optional Configurations"
Regular Size Fold (Cross-Fold)
The machine folds fan-folded prints again, crosswise into halves or thirds. These are called regular-size
folds (cross-folds).
The following types of regular-size fold (cross-fold) are available:
Standard Fold
This fold is usual for drawings. The folded size is A4 (81/2" × 11").
1. 297 mm (Engineering: 11 inch, Architecture: 12 inch)
2. 210 mm (Engineering: 8.5 inch, Architecture: 9 inch)
Narrow Std. Fold
This fold is for fitting prints into a ring binder pouch. The folded size is 170 - 297 mm (6.7" -
11.7").
82
Page 85
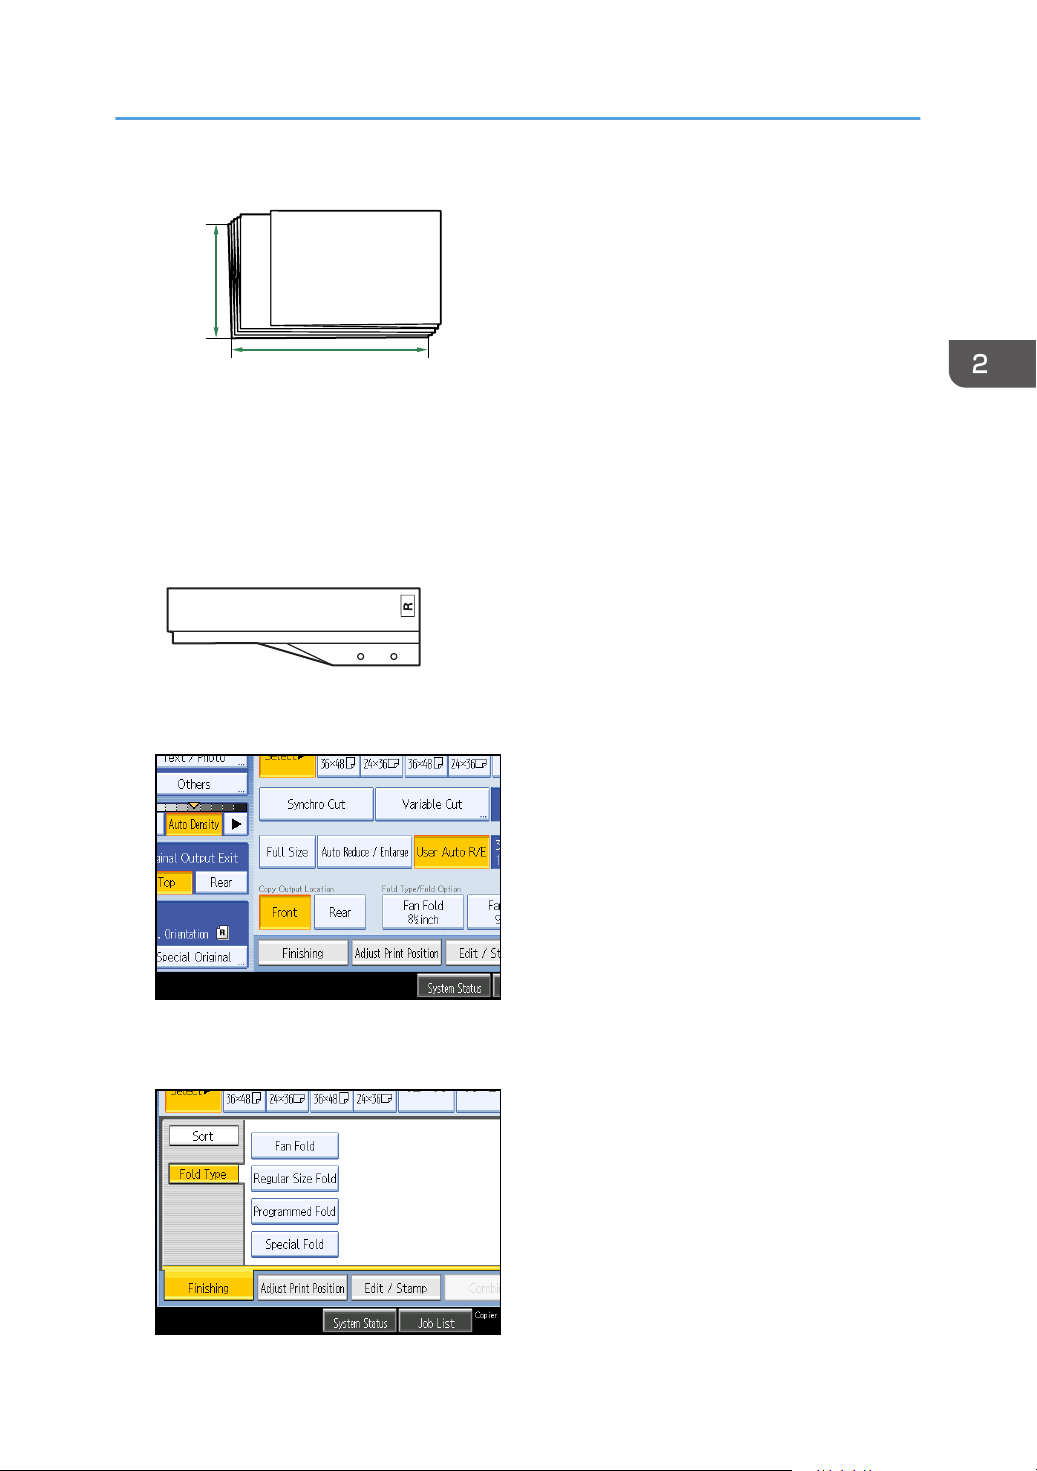
1
2
BKY032S
1. 297 mm (Engineering: 11 inch, Architecture: 12 inch)
BKW049S
2. 170 mm (Engineering: 8.5 inch, Architecture: 9 inch)
Margin Fold
This fold is for prints with binding margins. The folded size is A4 (81/2" × 11").
Finishing
1. Press [Finishing].
2. Press [Fold Type].
3. Press [Regular Size Fold].
83
Page 86
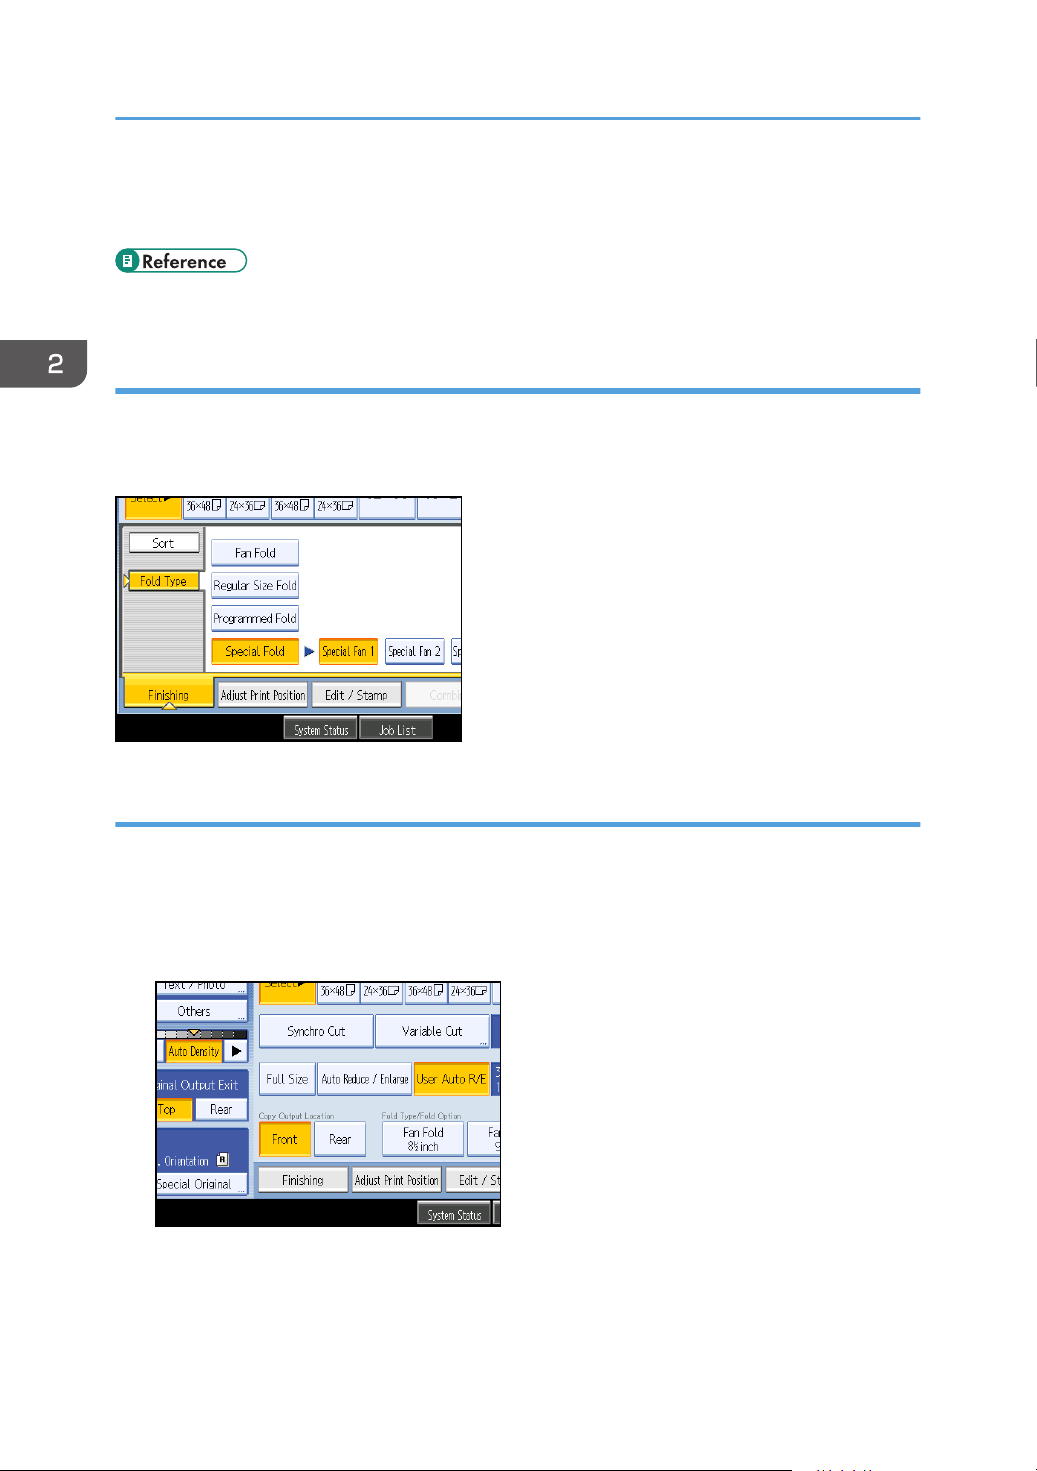
2. Basic Copying
4. Select the fold type.
5. Press [OK].
• p.17 "Functions Requiring Optional Configurations"
Special Fold
You can specify a special fold, and then register that fold under “Special Fan 1”, “Special Fan 2”,
“Special Fold 1”, and “Special Fold 2”. For details about specifying special folds, contact your sales or
service representative.
Programmed Fold
You can register folds for standard-size prints according to print size. If you use this function, the
registered regular-size fold is automatically applied to standard-size prints.
You can register four types of programmed fold under No.1 to No.4.
1. Press [Finishing].
2. Press [Fold Type].
84
Page 87
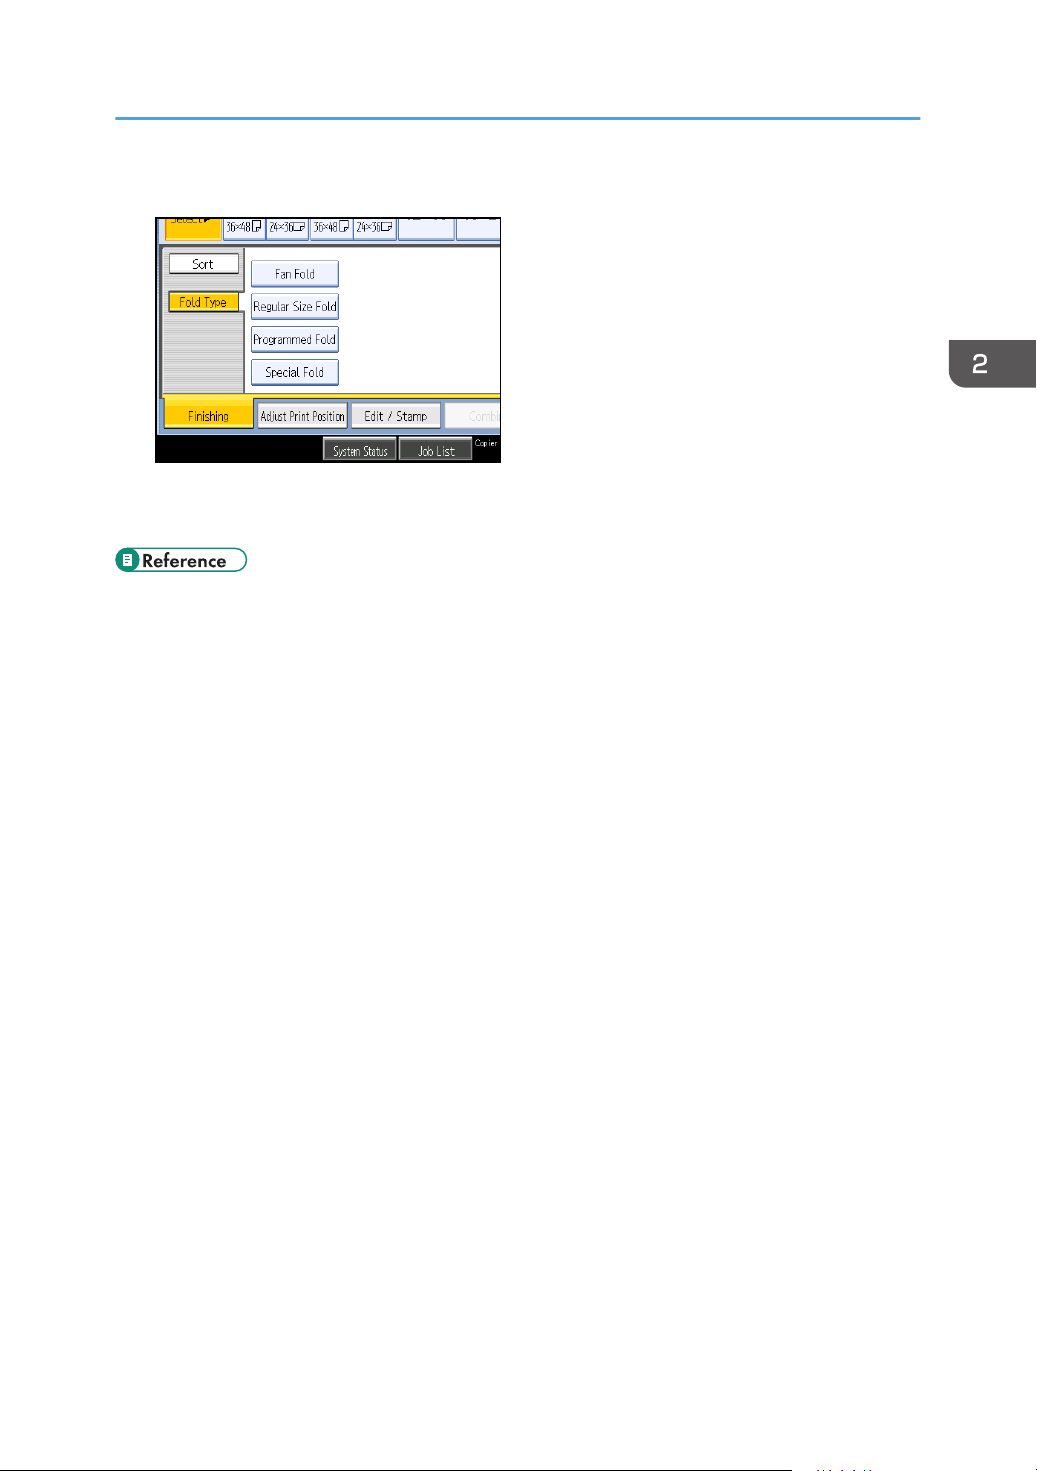
3. Press [Programmed Fold].
4. Select the fold width.
5. Press [OK].
• p.17 "Functions Requiring Optional Configurations"
Finishing
85
Page 88
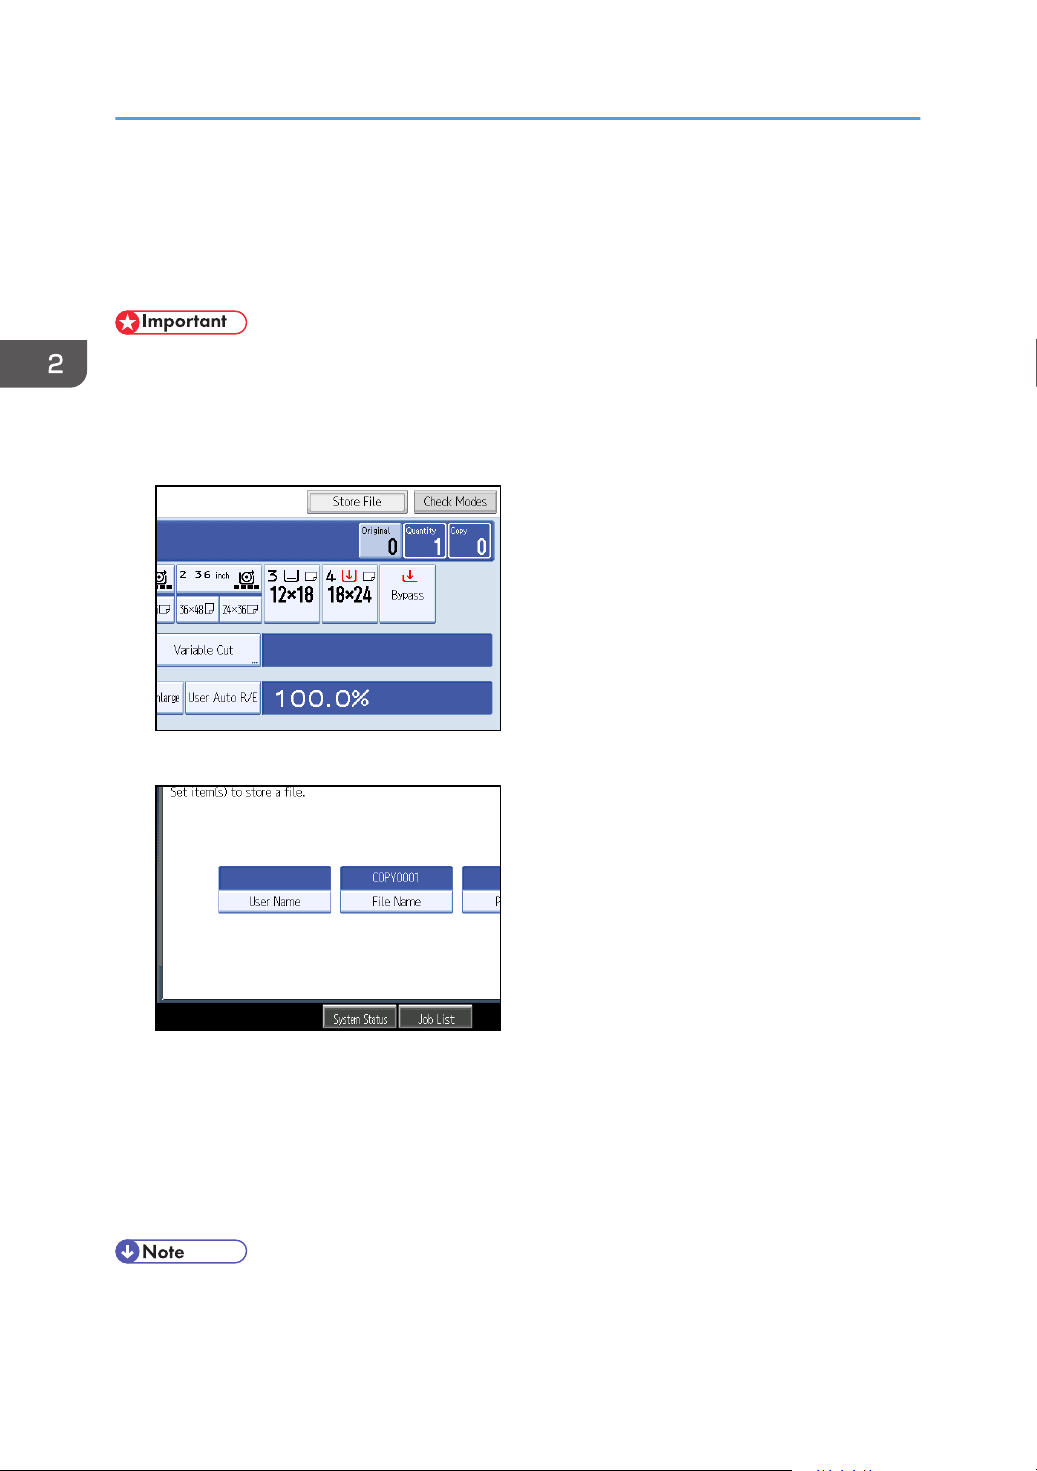
2. Basic Copying
Storing Data in the Document Server
The Document Server enables you to store documents being read with the copy feature on the hard disk
of this machine. Thus you can print them later applying necessary conditions.
• Machine failure can result in data loss. Important data stored on the hard disk should be backed
up. The manufacturer shall not be responsible for any damage that might result from the loss of
data.
1. Press [Store File].
2. Enter a file name, user name, or password if necessary.
3. Press [OK].
4. Make the scanning settings for the original.
5. Adjust the original guides to the width of the original, and then place the original face
down.
The original feeds into the machine automatically, and copying starts. The scanned data is also
stored in the memory.
• To stop scanning, press the [Clear/Stop] key. To resume a paused scanning job, press [Continue]
in the confirmation display. To delete scanned images and cancel the job, press [Stop].
86
Page 89
Storing Data in the Document Server
• Press the [ ] key after all the originals have been scanned.
• Data stored in the Document Server is set to be deleted after three days by the factory default. You
can specify the period after which the stored data is deleted automatically. For details about
changing settings, see “Administrator Tools”, General Settings Guide.
• To check if the document has been stored, press the [Document Server] key.
• If you want to store another document, do so after copying is complete.
• For details about the Document Server, see “Using the Document Server”.
• For details about printing stored documents, see “Printing a Stored Document”.
• For details about setting user name, file name, and password, see “Storing Data”.
• Depending on the security setting, [Access Privileges] may appear instead of [User Name]. For
details about specifying [Access Privileges], consult the administrator.
• p.150 "Using the Document Server"
• p.159 "Printing Stored Documents"
87
Page 90
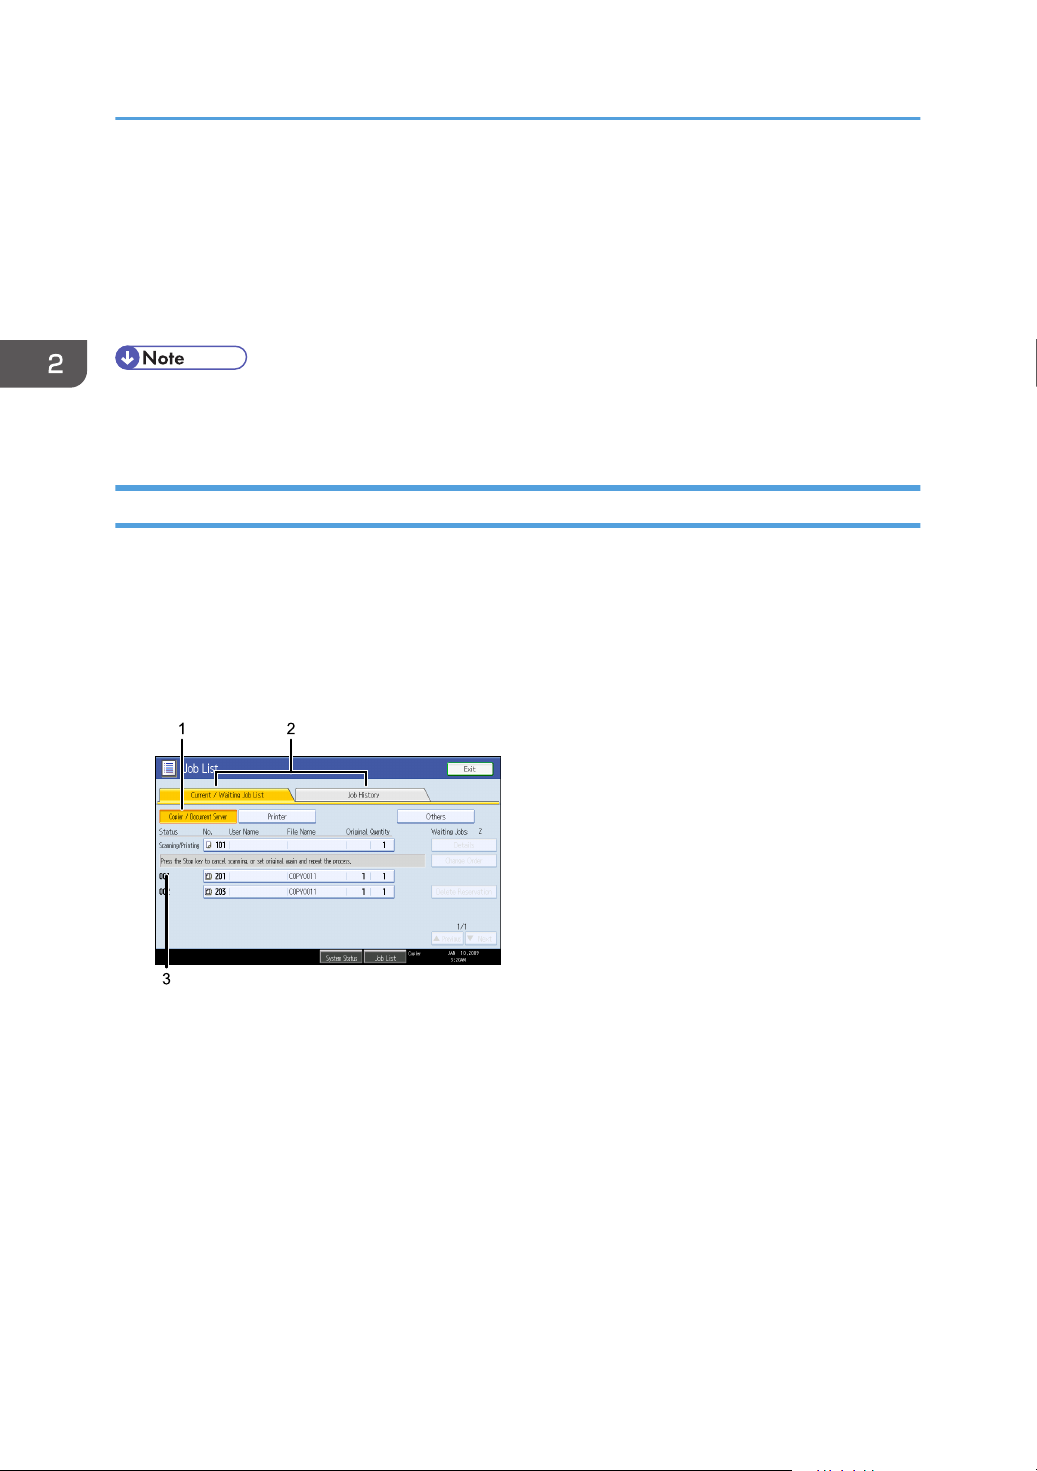
BKY059S
2. Basic Copying
Managing Jobs
Jobs printed using Copy, Document Server, or Printer mode are temporarily stored in the machine, and
then executed in order. The Job List function allows you to manage these jobs.
For example, you can cancel incorrect job settings or print an urgent document.
• You cannot use the Job List function when Interrupt Copy is active.
• Documents printed using the scanner function are not displayed in the job list.
Job List Screen
This section explains displays and icons that appear in the Job List screen.
The Job List screen varies depending on whether Job Order is selected with Print Priority for the System
Settings. For details about the setting procedure, see “System Settings”, General Settings Guide.
When [Job Order] is not selected:
The job list is displayed for each of the functions.
When [Job Order] is selected:
The job list is displayed for all functions in the order of print jobs.
88
Page 91
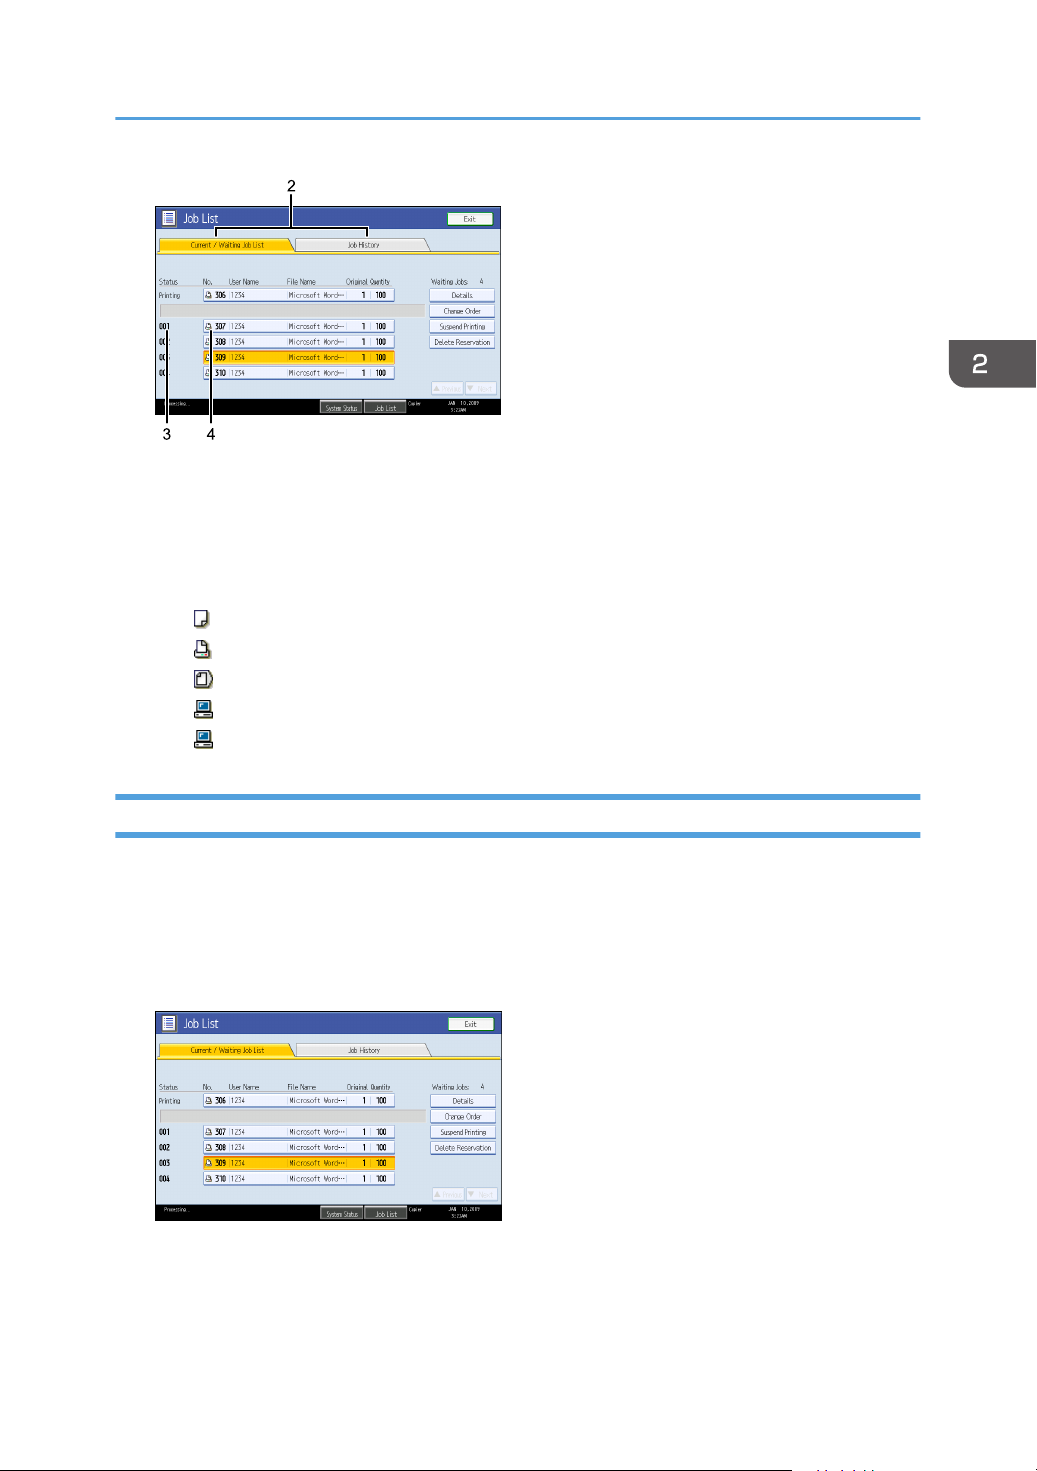
BKY060S
1. Switches between job lists for each function.
2. Switches between [Current / Waiting Job List] and [Job History].
3. Displays reserved job numbers.
4. Displays the function used to print jobs.
: Job printed using copy function
: Job printed using printer function
: Job printed using Document Server function
: Job printed using DeskTopBinder
: Job printed using Web Image Monitor
Managing Jobs
Checking Jobs in the Job List
You can check the contents of jobs in the job list.
1. Press [Job List].
2. Select the job whose contents you want to check.
3. Press [Details], and then check the contents.
4. Press [Exit].
89
Page 92
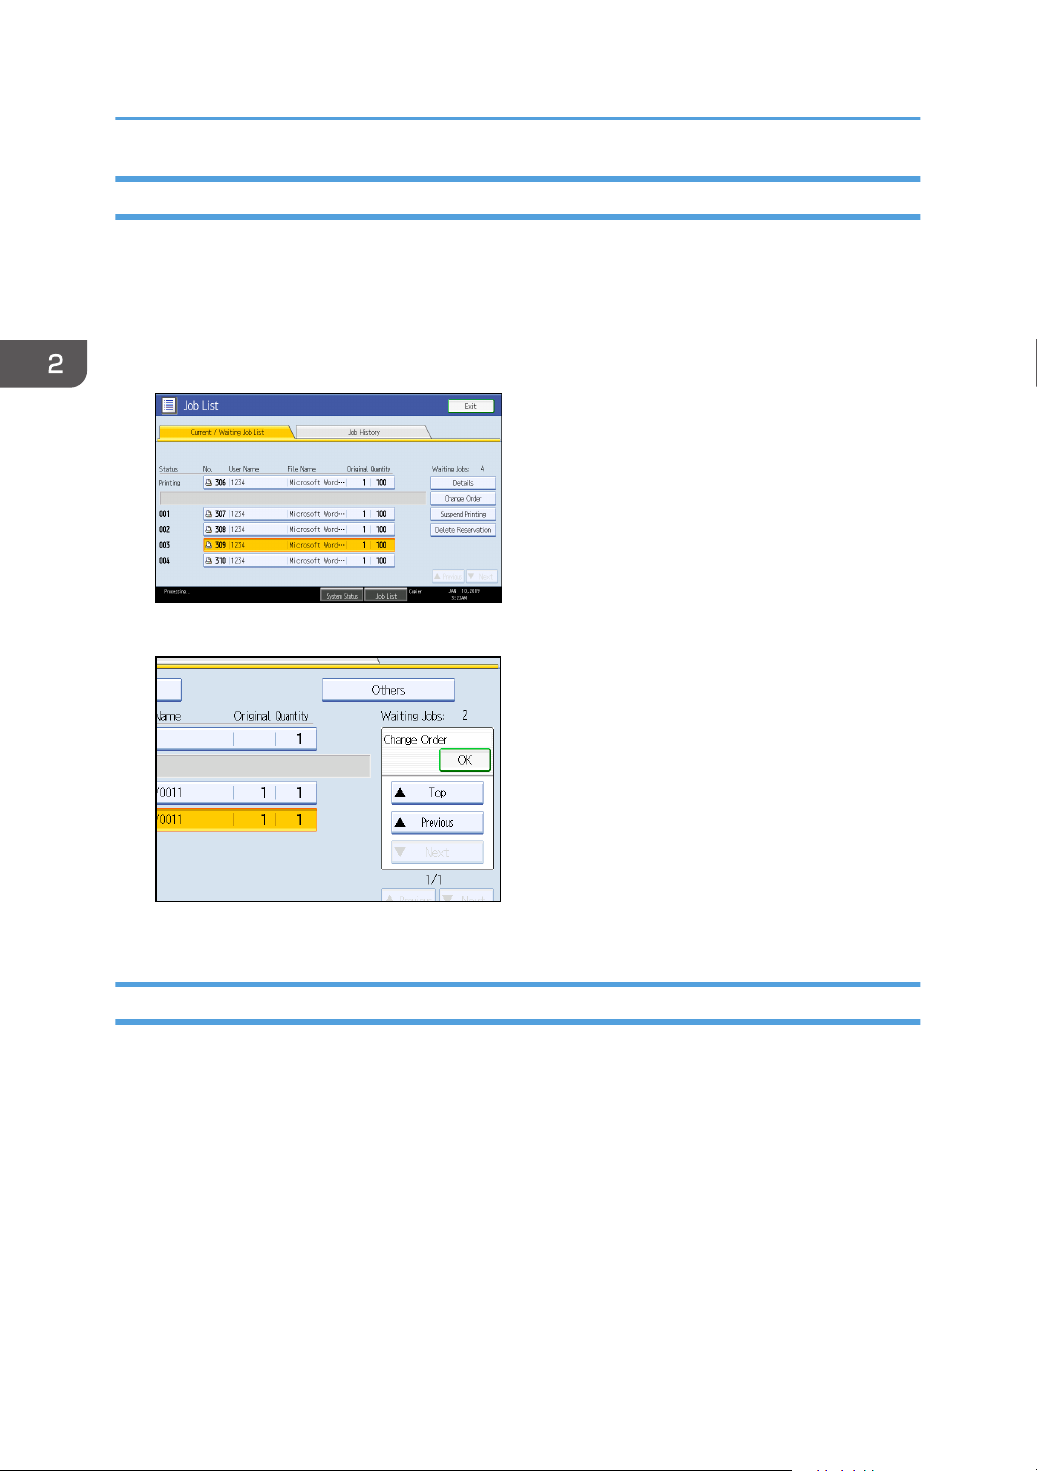
2. Basic Copying
Changing the Order of Jobs
You can change the order of jobs in the job list.
1. Press [Job List].
2. Select the job whose order you want to change.
3. Press [Change Order].
4.
Change the order using [Top], [Previous], or [Next].
5. Press [OK].
Holding Jobs
You can hold jobs that are queued or currently printing.
1. Press [Job List].
2. Select the job you want to hold.
90
Page 93
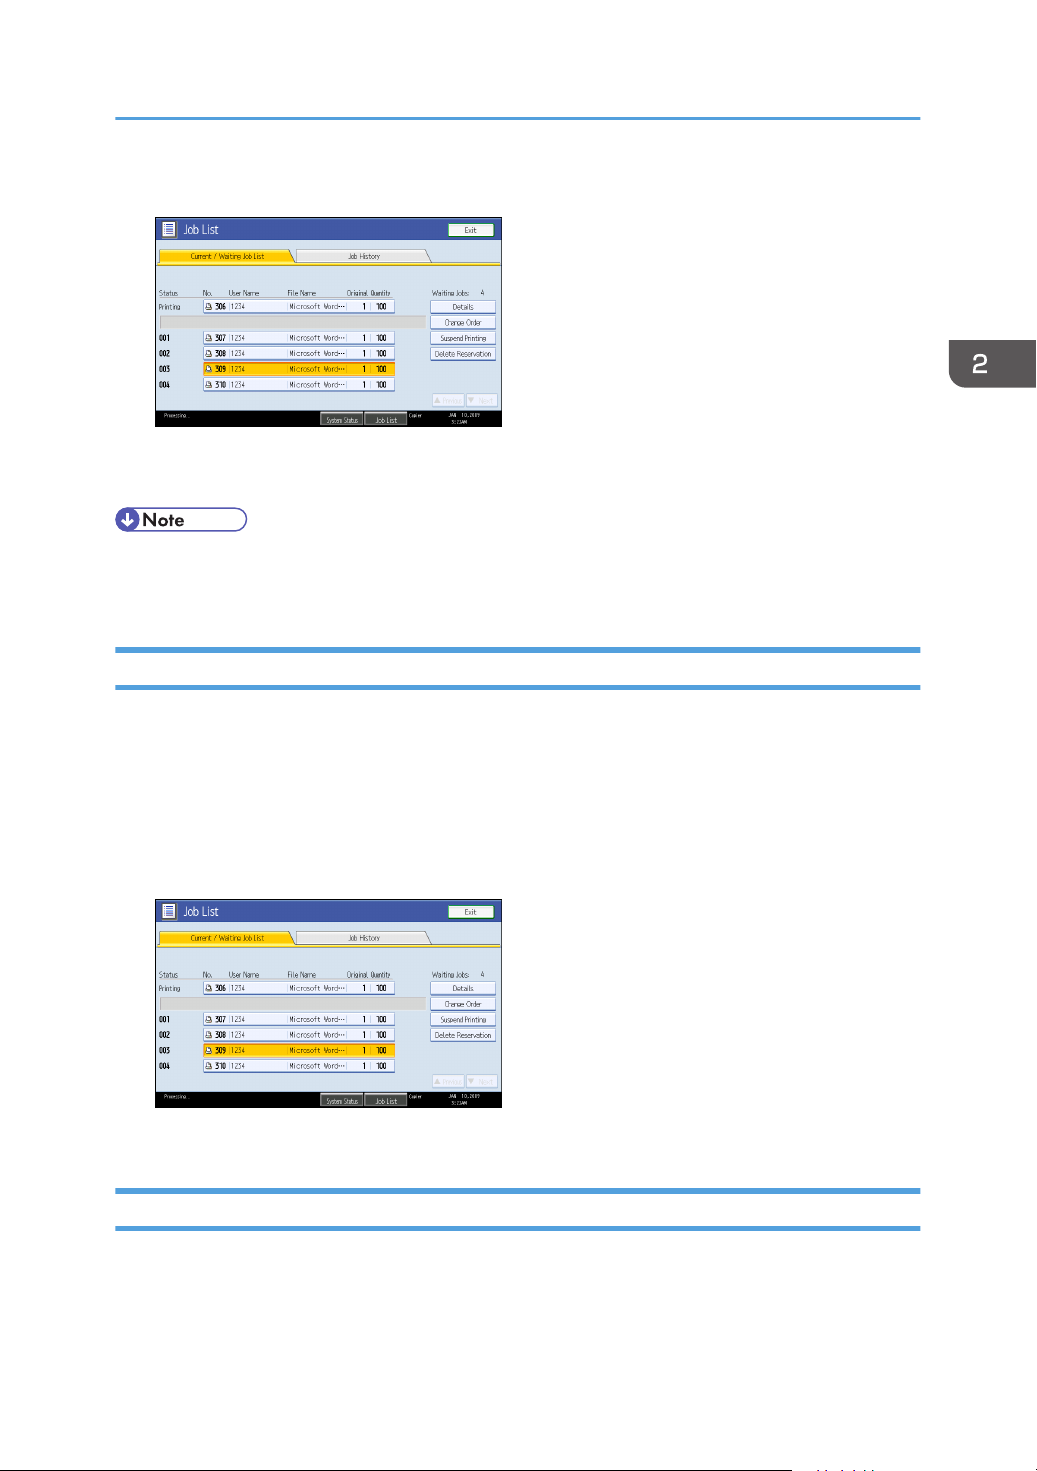
3. Press [Suspend Printing].
The selected job and the jobs that follow it are suspended. "Suspended" is displayed at the left of
the jobs in the job list that are suspended.
• To resume the suspended jobs, press [Resume Printing].
• This function is available only if [Job Order] is specified.
Deleting Jobs
Managing Jobs
You can delete a job that is queued or currently printing.
1. Press [Job List].
2. Select the job you want to delete.
To delete two or more print jobs, select them.
3. Press [Delete Reservation].
4. Press [OK].
Checking the Job History
You can view the history and contents of completed print jobs.
1. Press [Job List].
91
Page 94

2. Basic Copying
2. Press [Job History].
A list of completed print jobs appears.
3. Select the job whose contents you want to check.
4. Press [Details], and then check the contents.
5. Press [Exit].
92
Page 95
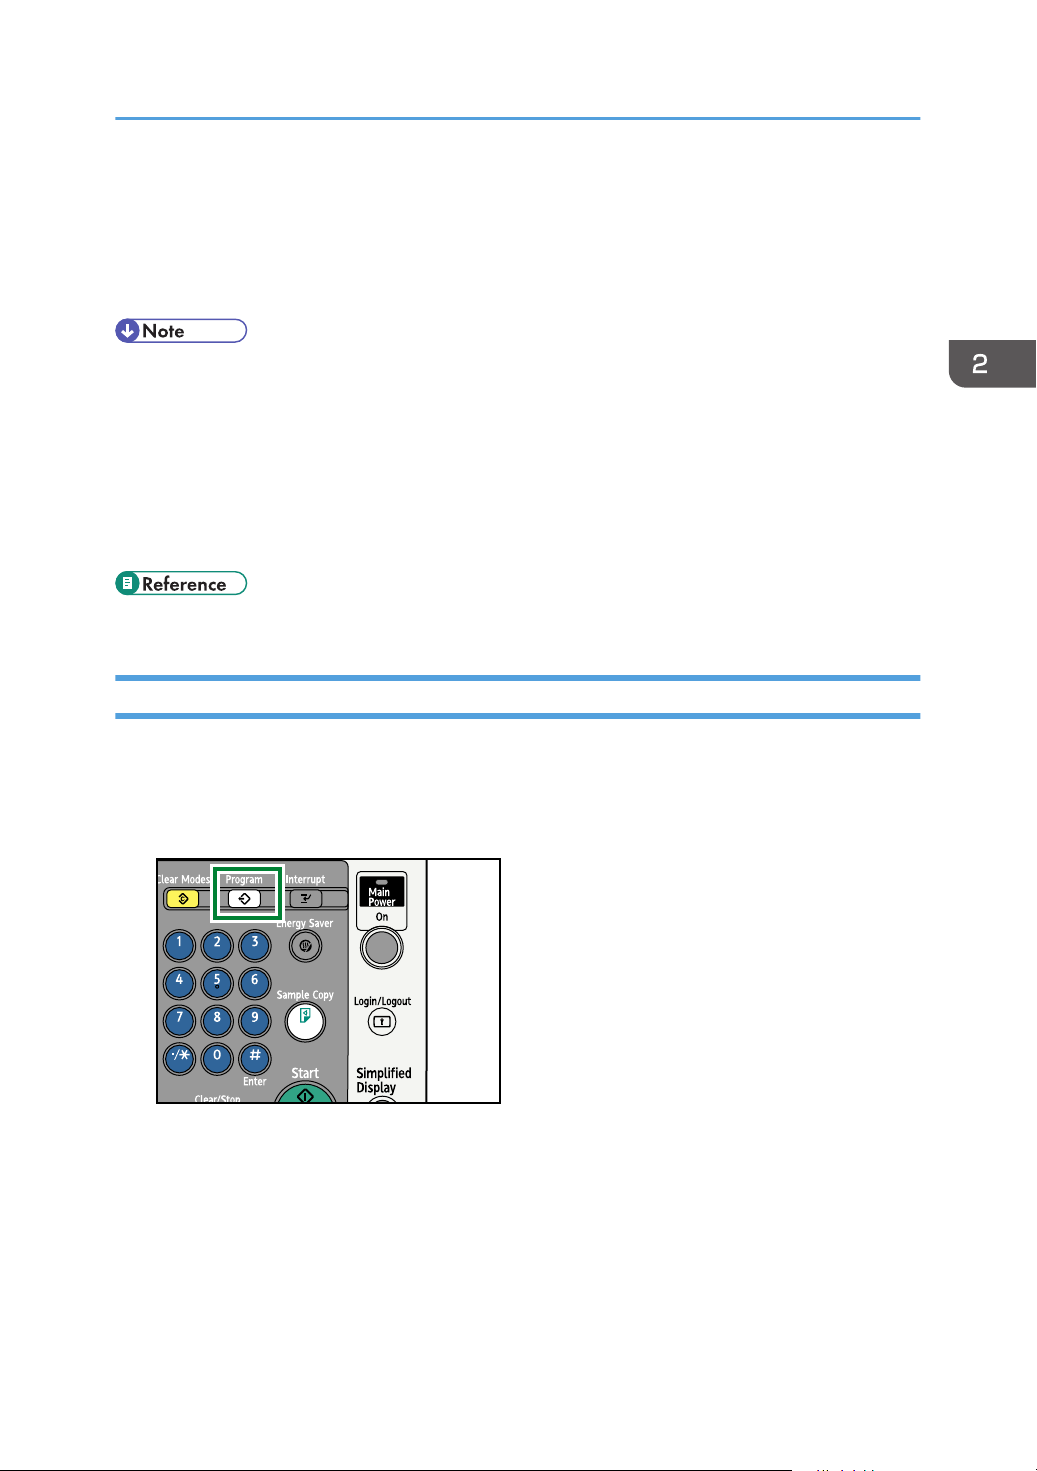
BKY047S
Registering Frequently Used Functions
Registering Frequently Used Functions
You can store frequently used copy job settings in the machine memory and recall them for future use.
You can store up to 10 programs.
• When a specified program is registered as the default, its values become the default settings, which
are displayed without pressing the [Program] key, when modes are cleared or reset, and after the
operation switch is turned on. See “Registering the Initial Display's Default Functions”.
• Stored paper settings are based on paper size. If multiple trays holding paper of the same size are
installed, the paper tray that is prioritized in the system settings will be selected first. See “System
Settings”, General Settings Guide.
• Programs are not deleted by turning the power off or by pressing the [Clear Modes] key.
• p.97 "Registering the Initial Display's Default Functions"
Registering Functions in a Program
You can register functions in a program.
1. Edit the copy settings so all functions you want to store in a program are selected.
2. Press the [Program] key.
93
Page 96
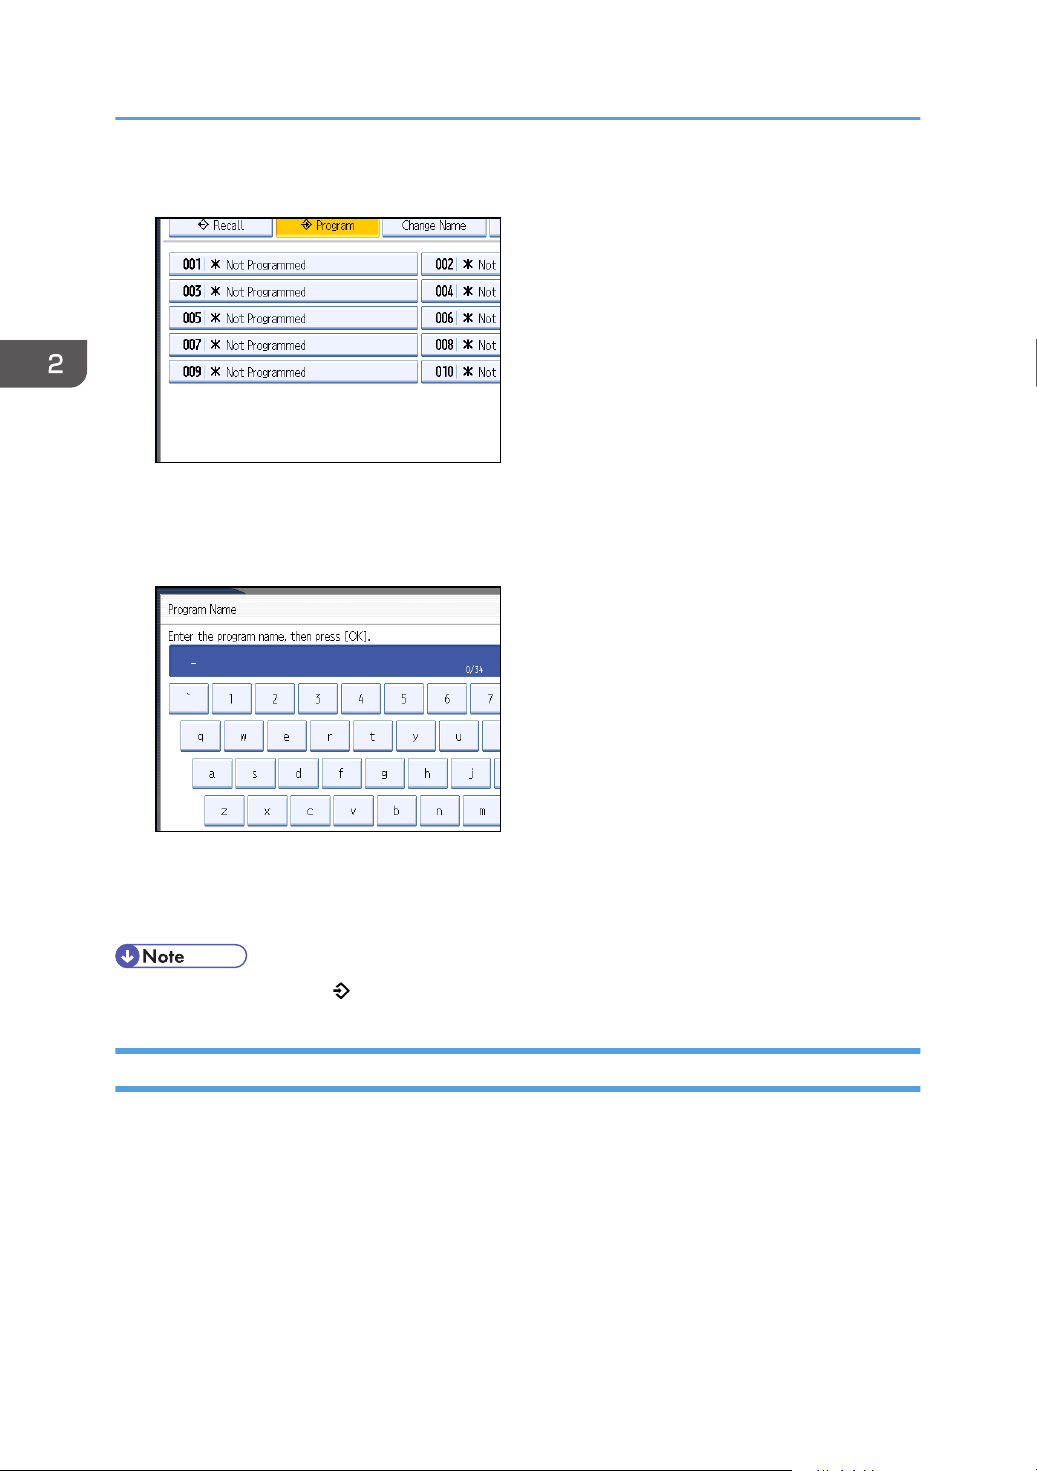
2. Basic Copying
3. Press [Program].
4. Press the program number you want to store.
5. Enter the program name with the letter keys on the display panel.
You can enter up to 34 characters.
6. Press [OK].
The screen returns to the program screen, showing the program number followed by the program
name. The screen returns to the initial copy display after a short time.
• Program numbers with against them already have settings made for them.
Changing a Stored Program
Changes program settings.
1. Check the program settings.
2. Specify the contents of a program.
3. Press the [Program] key.
4. Press [Program].
5. Press the program number you want to change.
94
Page 97
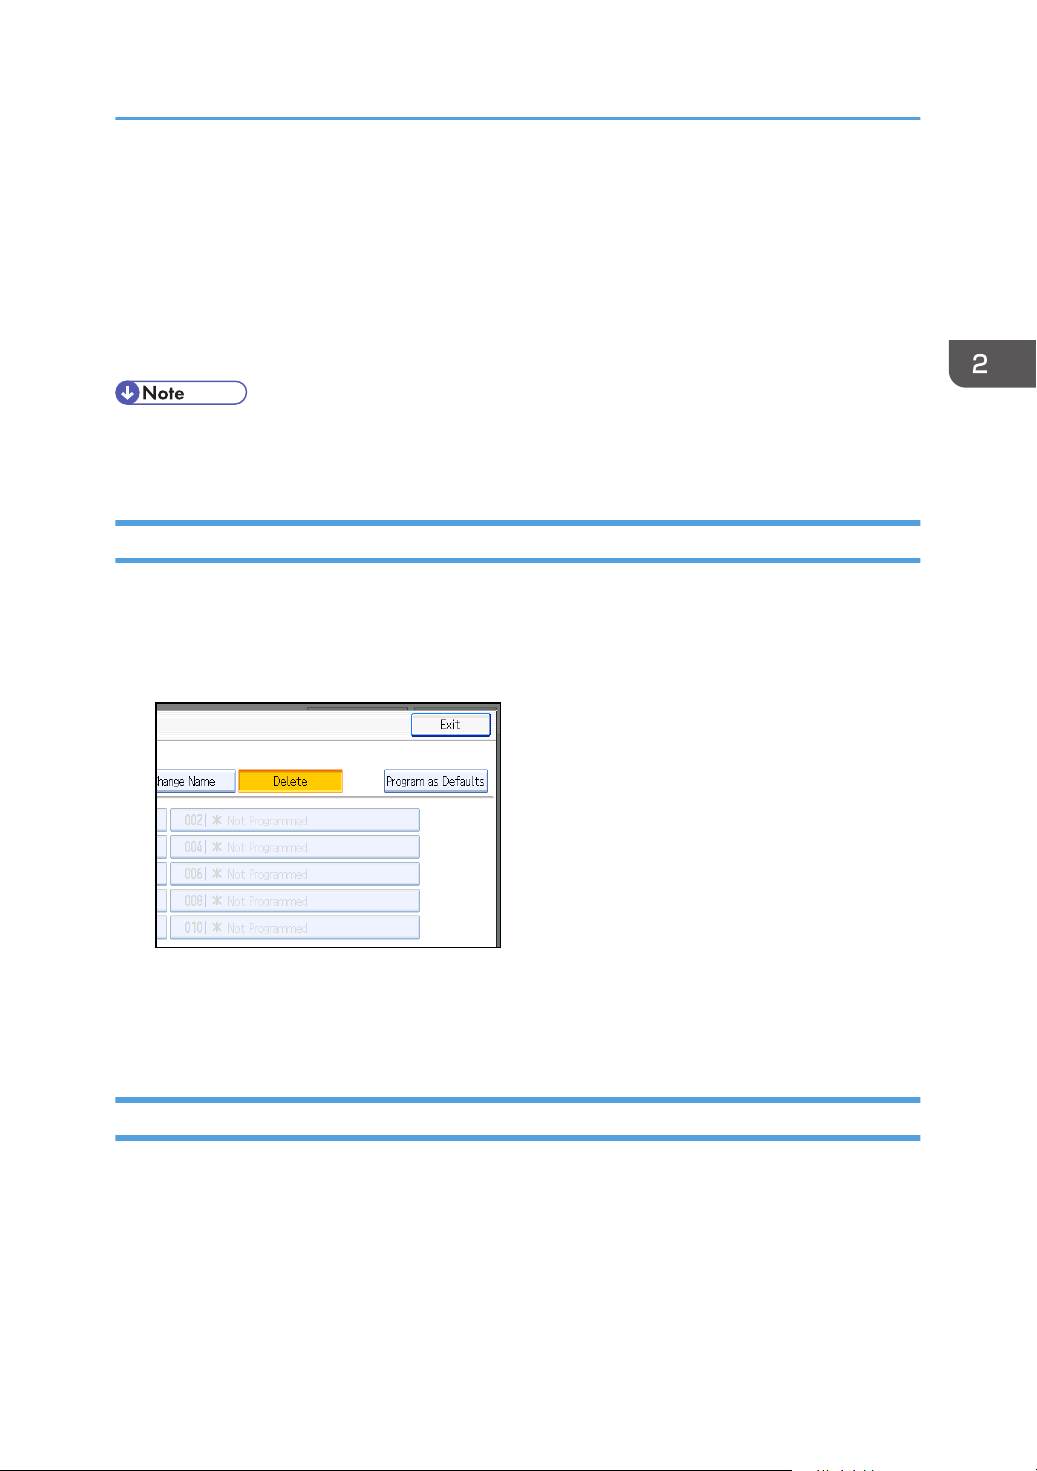
Registering Frequently Used Functions
6. Press [Yes].
7. Enter the program name.
You can enter up to 34 characters.
8. Press [OK].
The screen returns to the program screen, showing the program number followed by the program
name. The screen returns to the initial copy display after a short time.
• To check the contents of a program, recall the program.
• When it is overwritten, the previous program is deleted.
Deleting a Stored Program
Erases the contents of a program.
1. Press the [Program] key.
2. Press [Delete].
3. Press the program number you want to delete.
4. Press [Yes].
The program is deleted, and the display returns to the initial copy display.
Recalling a Stored Program
Recalls a stored program to make copies using the stored settings.
1. Press the [Program] key.
95
Page 98
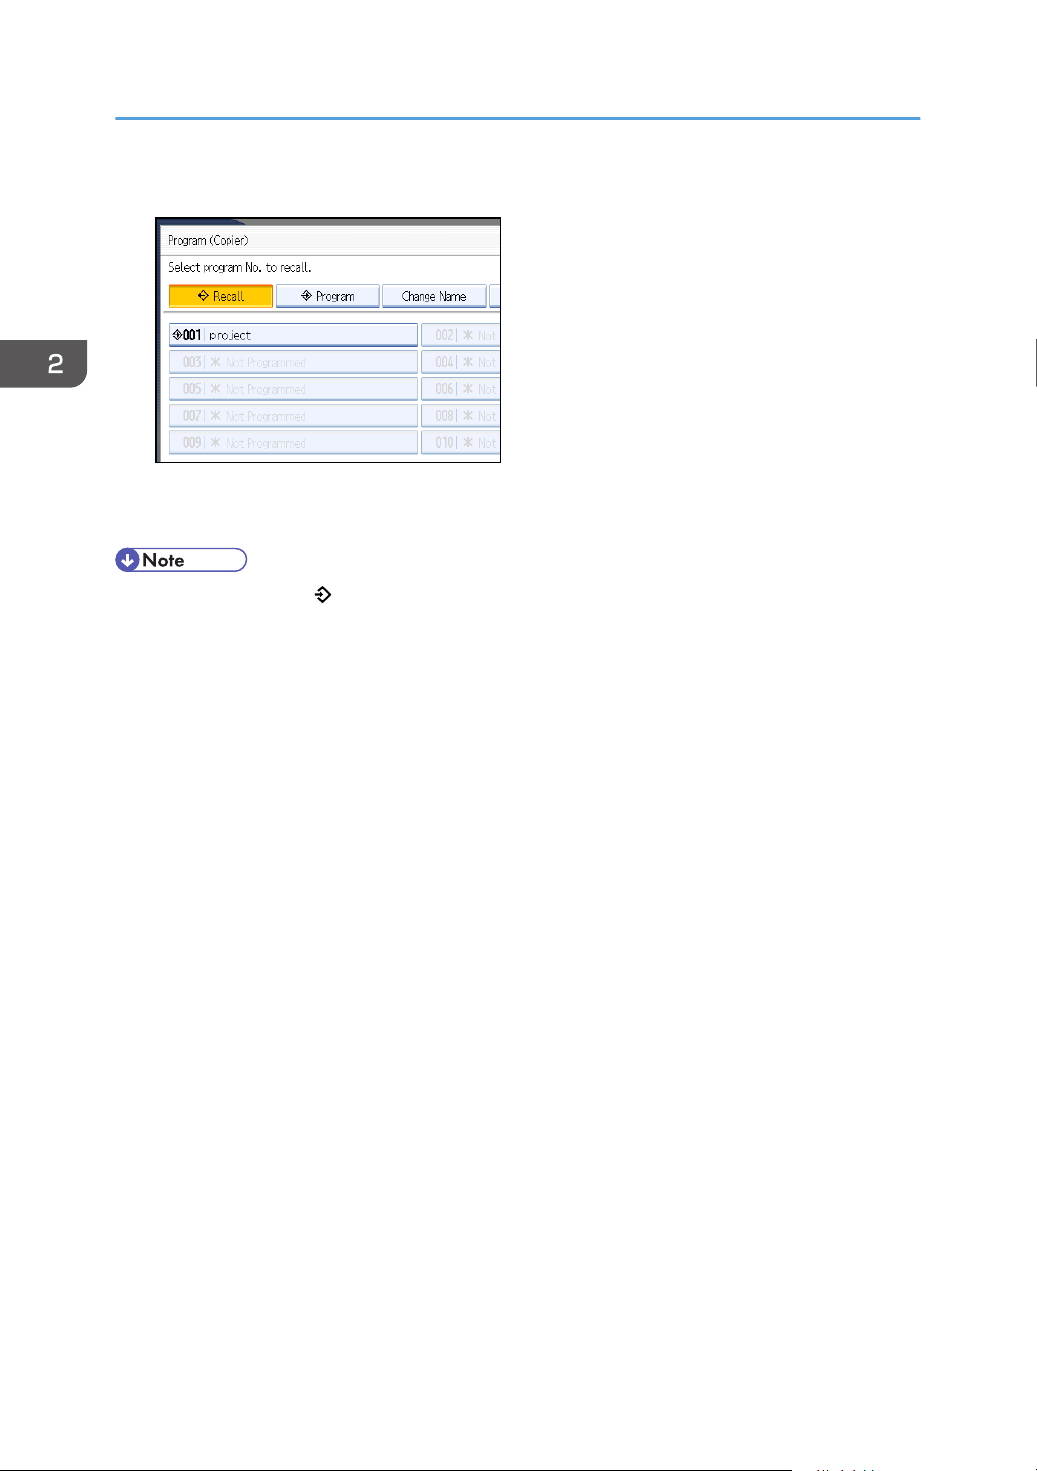
2. Basic Copying
2. Press [Recall].
3. Press the program number you want to recall.
The stored settings are displayed.
• Only programs with against them contain a program.
96
Page 99
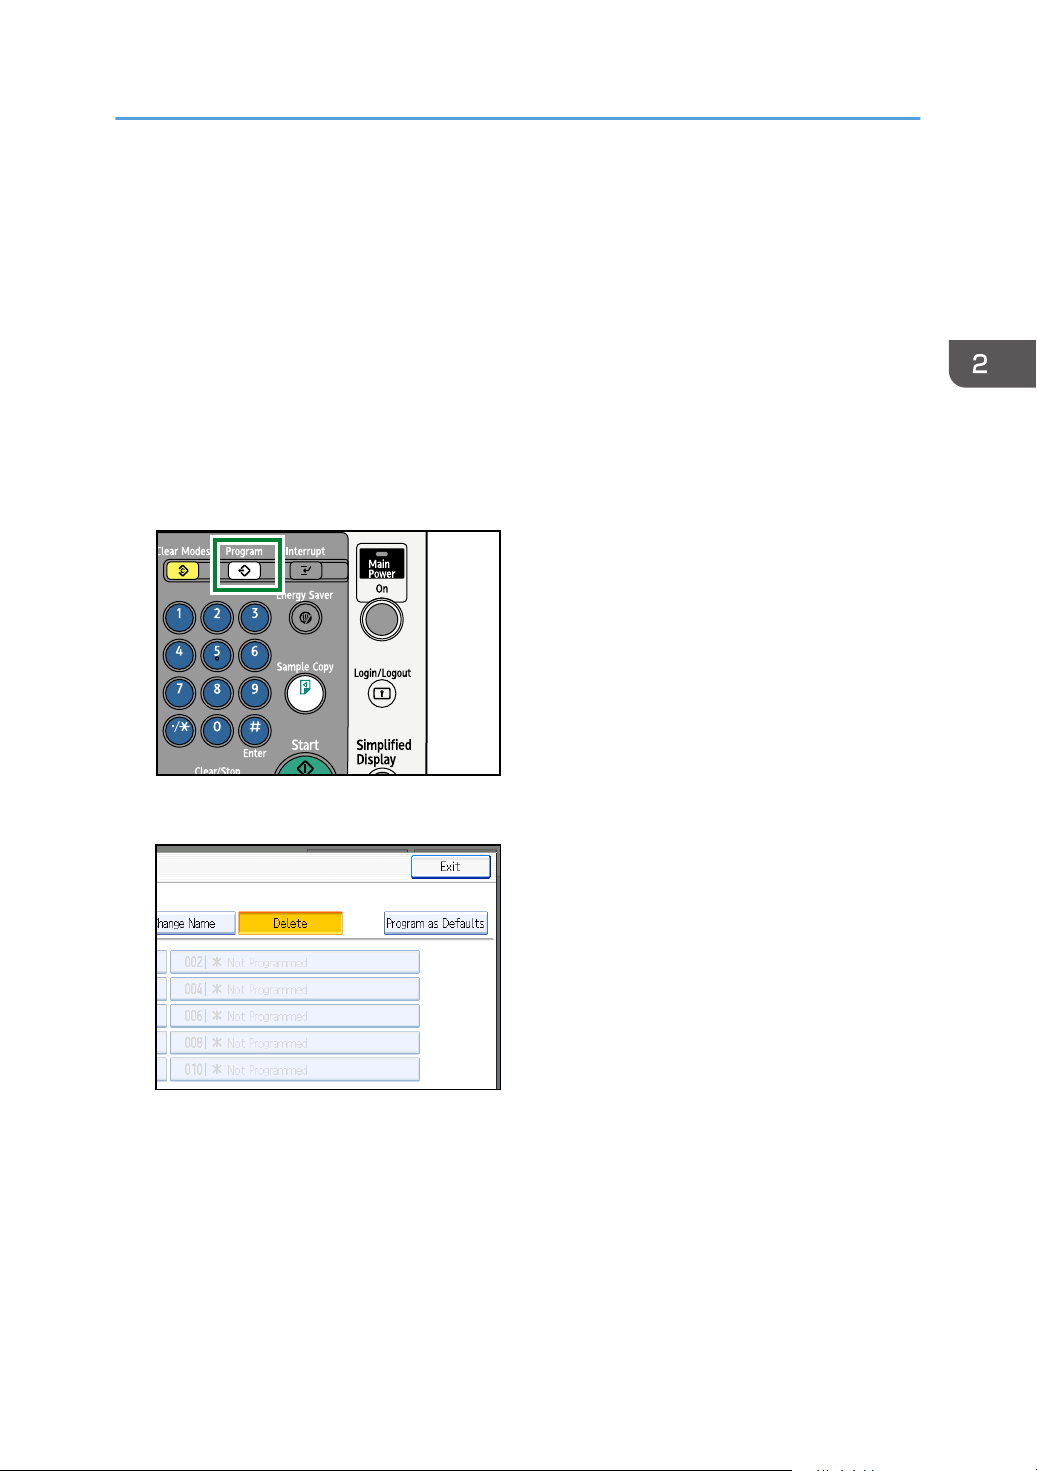
BKY047S
Registering the Initial Display's Default Functions
Registering the Initial Display's Default
Functions
This section describes how to program defaults for the initial display when modes are cleared or reset,
or immediately after the operation switch is turned on.
The default settings you can program are Paper Tray, Original Type, Density, Special Original, Original
Orientation, Edit / Stamp, Combine, Reduce / Enlarge, Finishing, Adjust Print Position, Copy Output
Location, Fold Type, paper cut method, and the number of copies.
1. Specify scan settings and any other settings you require on the initial display.
2. Press the [Program] key.
3. Press [Program as Defaults].
97
Page 100
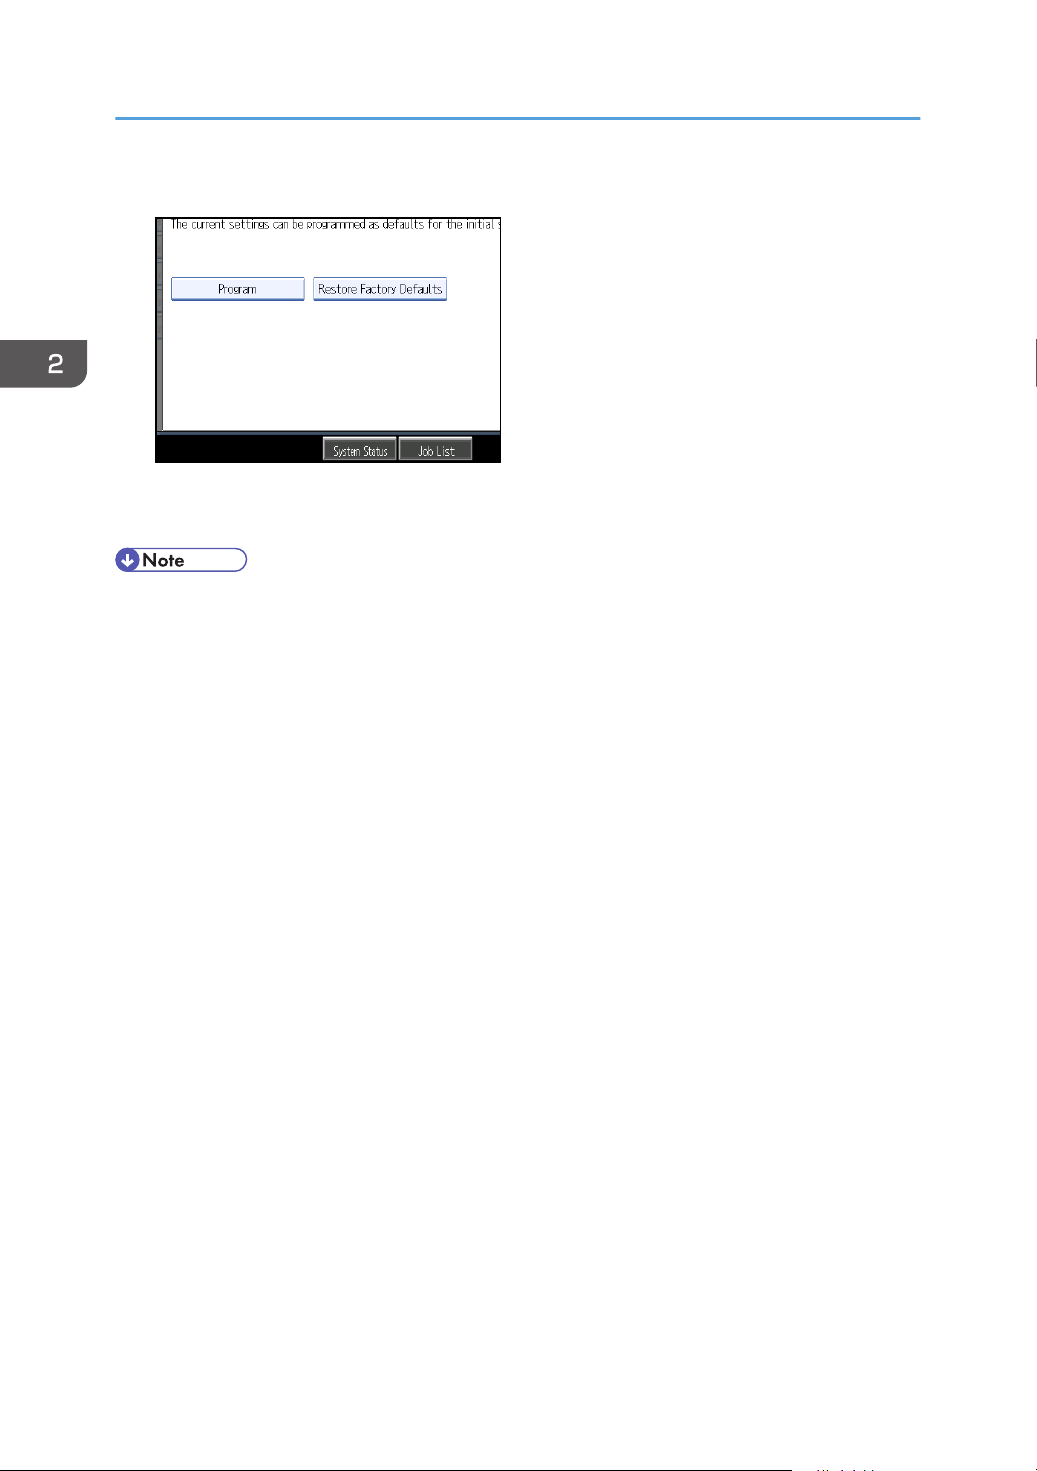
2. Basic Copying
4. Press [Program].
5. When a confirmation dialog appears, press [Yes].
The current settings are programmed as defaults. The screen returns to the initial display.
• To restore the factory default settings on the initial display, press [Restore Factory Defaults].
• The default settings can be programmed separately for the normal screen and simplified display
screens.
98
 Loading...