

Ricoh Nashuatec D440, Aficio 401, Savin 9940DPC, Infotec 5402MF, Lanier 5040MFD Operating Instructions Manual
...Page 1

WHERE IS IT &
WHAT IS IT
1
Page 2

2
Page 3
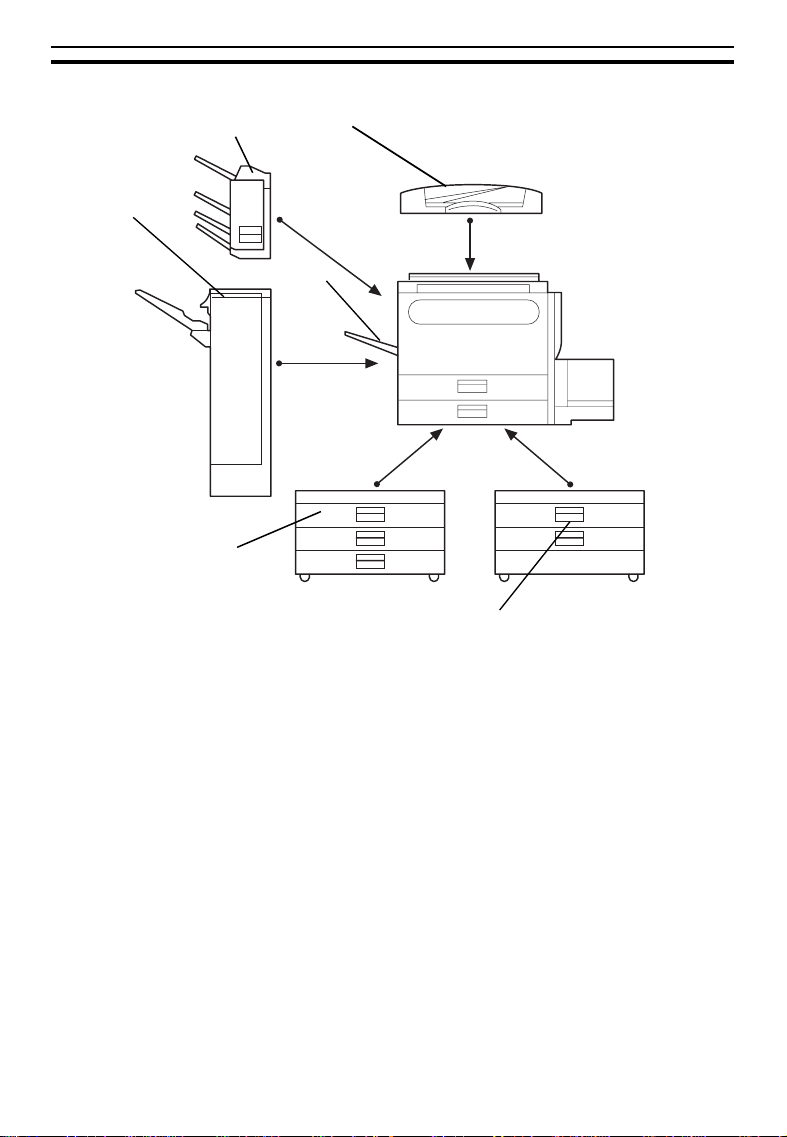
MAIN UNIT AND OPTIONS
MAIN UNIT AND OPTIONS
3
4
5
1. Document feeder
(Option)
2. Copy tray
(Option)
3. 3 - bin sorter
(Option)
4. Finisher
(Option)
5. 1500-sheet tray unit
(Option)
6. 1000-sheet tray unit
(Option)
1
2
6
Insert a stack of originals here. They will be fed
automatically.
Copied/printed papers are delivered here.
Sorts, stacks copied/printed papers.
Sorts, stacks, and staples copied/printed papers.
Holds 1500 sheets of paper.
Holds 1000 sheets of paper.
❐
Other mechanical options: plat en cover and ke y counter
3
Page 4
EXTERIOR AND INTERIOR PART NAMES
EXTERIOR AND INTERIOR PART NAMES
3
2
1
4
5
6
7
8
9
10
13
12
14
15
4
11
Page 5

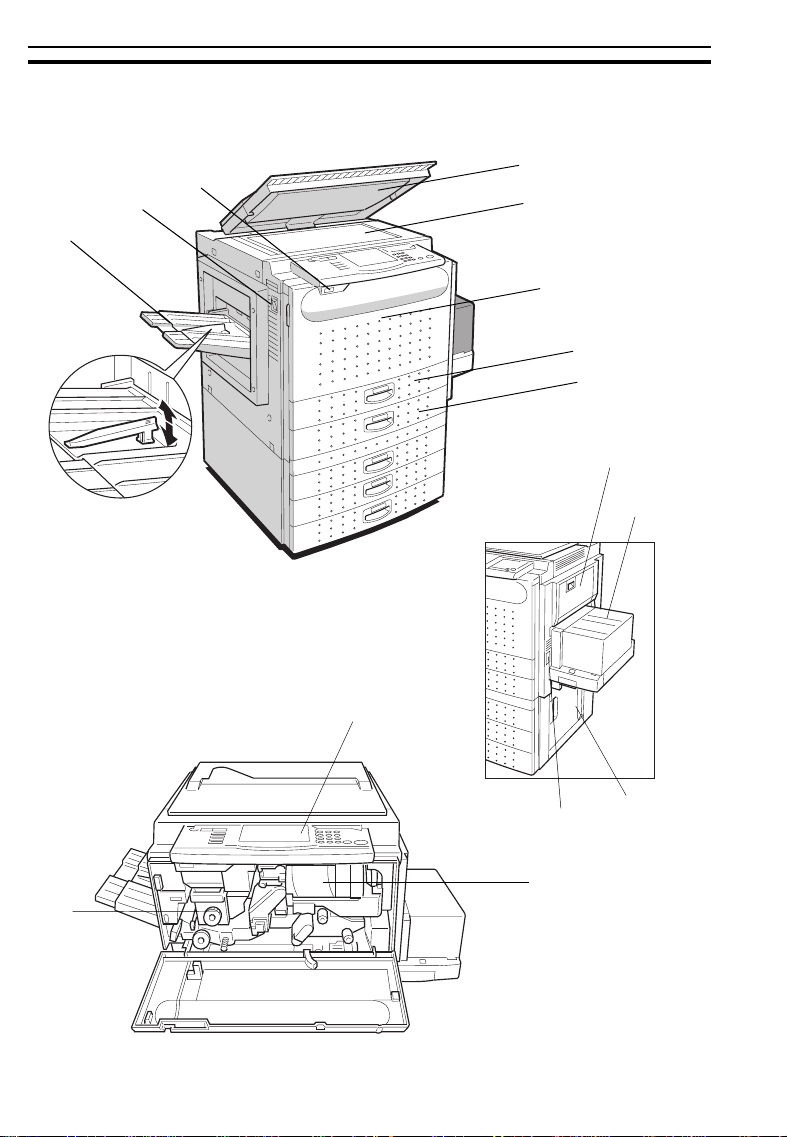
EXTERIOR AND INTERIOR PART NAMES
1. Copy tray (option)
2. Main switch
3. Auto response
(human) sensor
4. Platen cover (option)
5. Exposure glass*
6. Front cover
7. Unit for two-sided
copies/prints
(Duplex unit)
8. Paper tray
9. Bypass tray
10. Large capacity tray
Completed copies are delivered here. Regarding
the capacity of the tray.
Switches the machine between on and standby
conditions.
When someone comes close to the machine, it
will automatically switch from Low Power mode
to standby mode.
Lower this cover over originals for copying.
Position originals here face down for copying/
scanning.
*After turning off the main switch, the exposure glass might be hot
because of th e anticondensation fu nction. This is not a problem.
Open to access the inside of the machine.
Makes two-sided copies/prints.
Holds 500 sheets of copy paper.
Use to copy/print onto OHP sheets, adhesive la-
bels, translucent paper, post cards, and nonstandard size paper.
Holds 1,000 sheets of paper.
11. Right cover of
the optional tray unit
12. Key counter holder
13. Operation panel
14. Toner bottle
15. Fusing unit
Open to remove misfed paper.
Insert the optional key counter here.
Operator controls and touch panel are located
here.
Replace the toner bottle when " f Add Toner"
is displayed on the display.
Fuses the image to the paper. When accessing
the inside of the machine, use caution. This unit
may be very hot.
5
Page 6
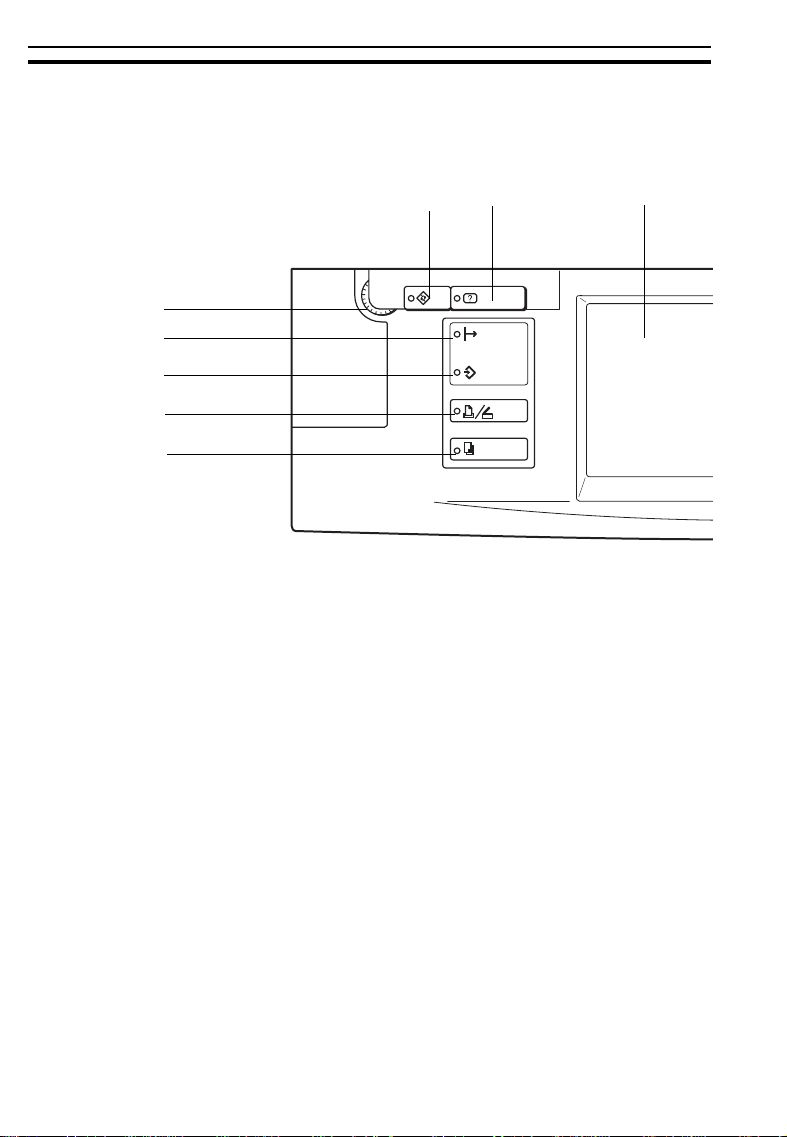
OPERATION PANEL
Keys
OPERATION PANEL
1
16
15
14
13
1. Contrast Dial
Changes the brightness of the
display.
2. User Tools key
Changes the basic settings and
copy features.
3. Guidance key
Shows guidance for functions.
6. Job Recall key
Use to recall your previous copy
settings.
7. Clear Modes/Low Power Mode
key
Press to clear the previously entered copy job settings. Also use
to switch to and from Low Power
mode.
2
3
4
4. Touch Panel Display
5. Program key
Press to select the program
mode.
6
8. Interrupt key
Press to make interrupt copies.
Page 7
5
6
123
456
7
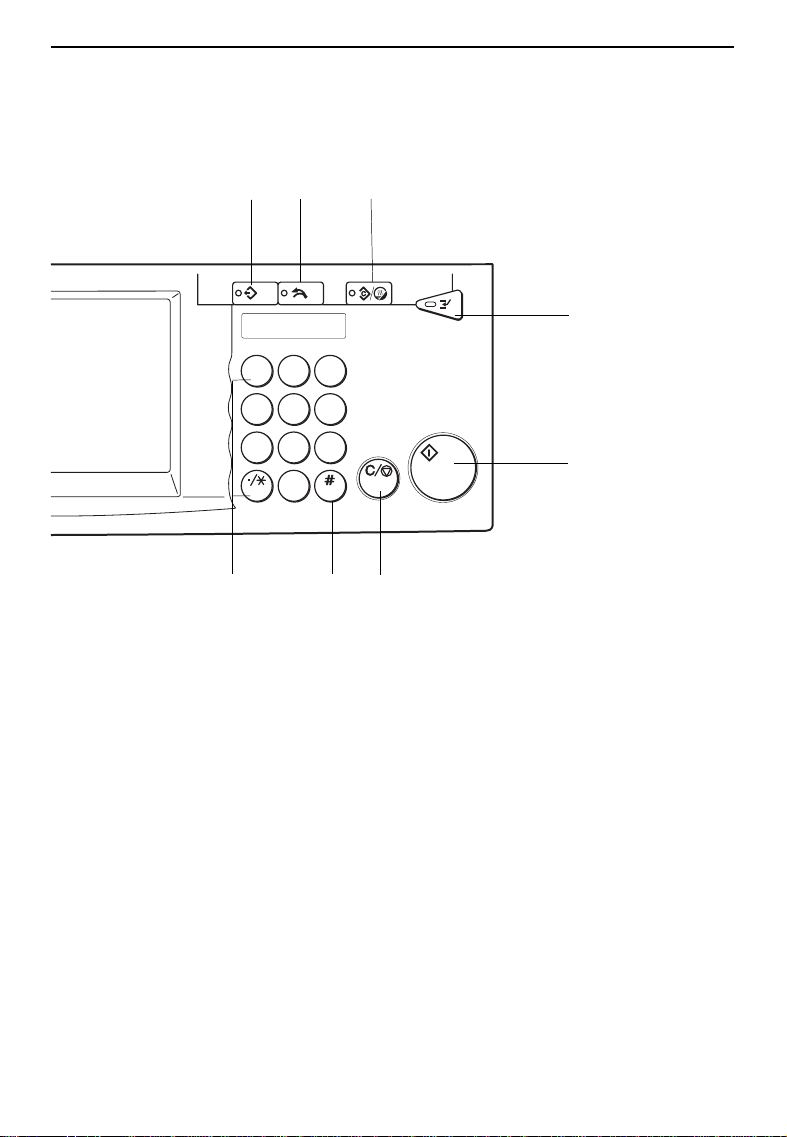
OPERATION PANEL
8
0
6
11
12
45
9. Start key
Press to start copying. Use to set
the Auto Start.
10. Clear/Stop key
While entering numbers, press to
cancel a number you have entered. While copying, press to
stop copying.
11. Enter key
Use to enter data in selected
modes.
12. Number keys
Use to enter the desired number of
copies and data for selected modes.
10
9
13. Copy key
Use to enter Copy mode from
Printer/Scanner mode.
14. Printer/Scanner key
Use to enter Printer/Scanner
mode from the copy mode.
15. Data in indicator
16. On line indicator
7
Page 8
OPERATION PANEL
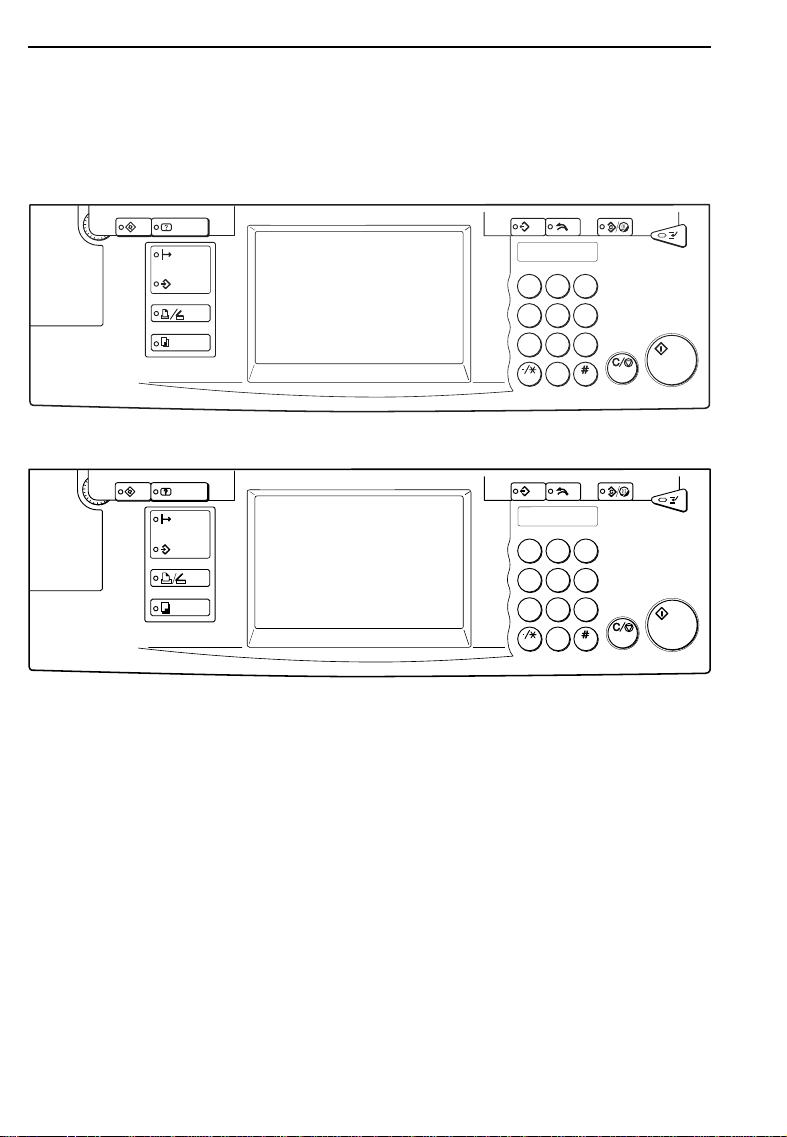
How To Use The Operation Panel
The type of operation panel is different depending on your location.
For U.S. model
123
456
6
45
0
For Europe model
123
456
6
45
0
The panel layout is grouped as follows:
❐
Touch Panel Display
Use to make selections and navigate menus. Also shows the machine status
and various messages. The status area is blank when in Printer mode and
off-line.
❐
Numeric Keypad
Use to enter numbe rs and cont rol how the ma chine func tions.
❐
Control Keys
Other keys used when printing and configuring the machine.
When you first turn on the machine, the Touch Panel Display shows the
Copy Menu. To access Printer mode, press the
[Printer/Scanner]
button on
the left side of the operation panel.
8
Page 9
OPERATION PANEL
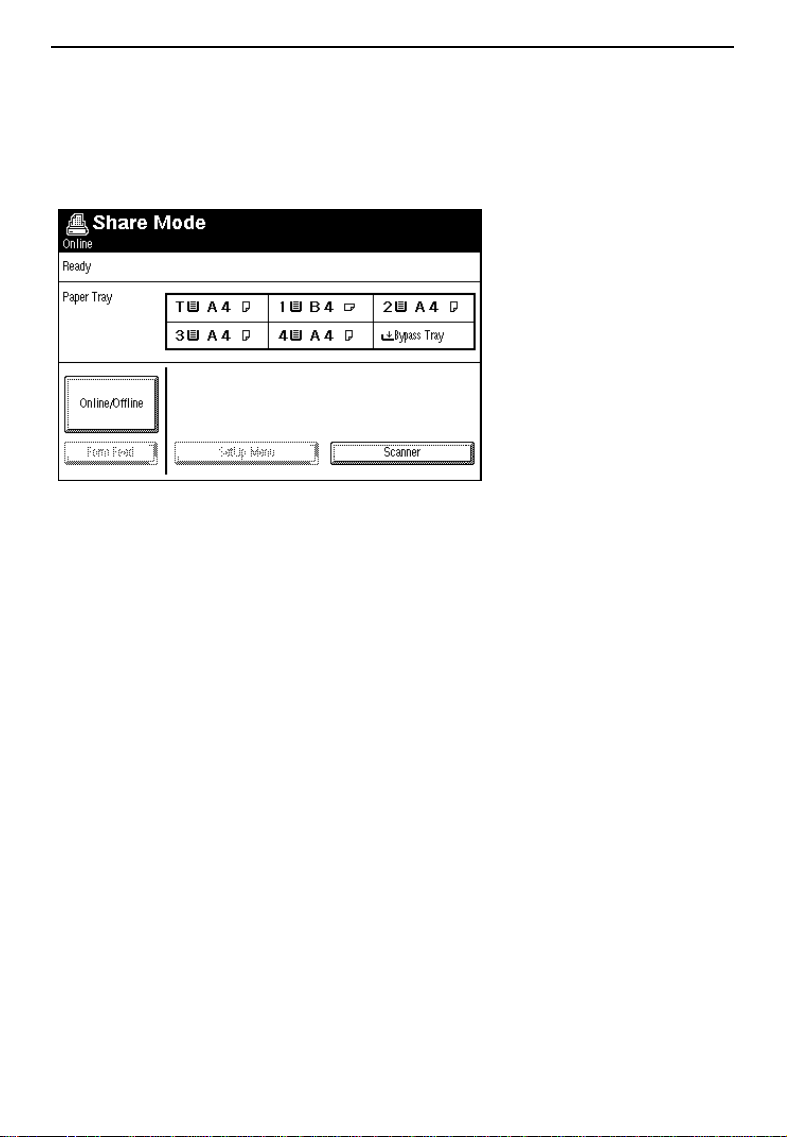
Printer Mode (Printer controller option must be installed)
Press the
The on-line status screen will appear as below.
In this screen shot, access priority is "share".
Printing/Scanner
key.
Scanner Mode (Scanner kit option must be installed)
Press the
Touch
Printer/Scanner
[Scanner]
.
key.
9
Page 10

OPERATION PANEL
10
Page 11

BASICS
11
Page 12
STARTING THE MACHINE
STARTING THE MACHINE
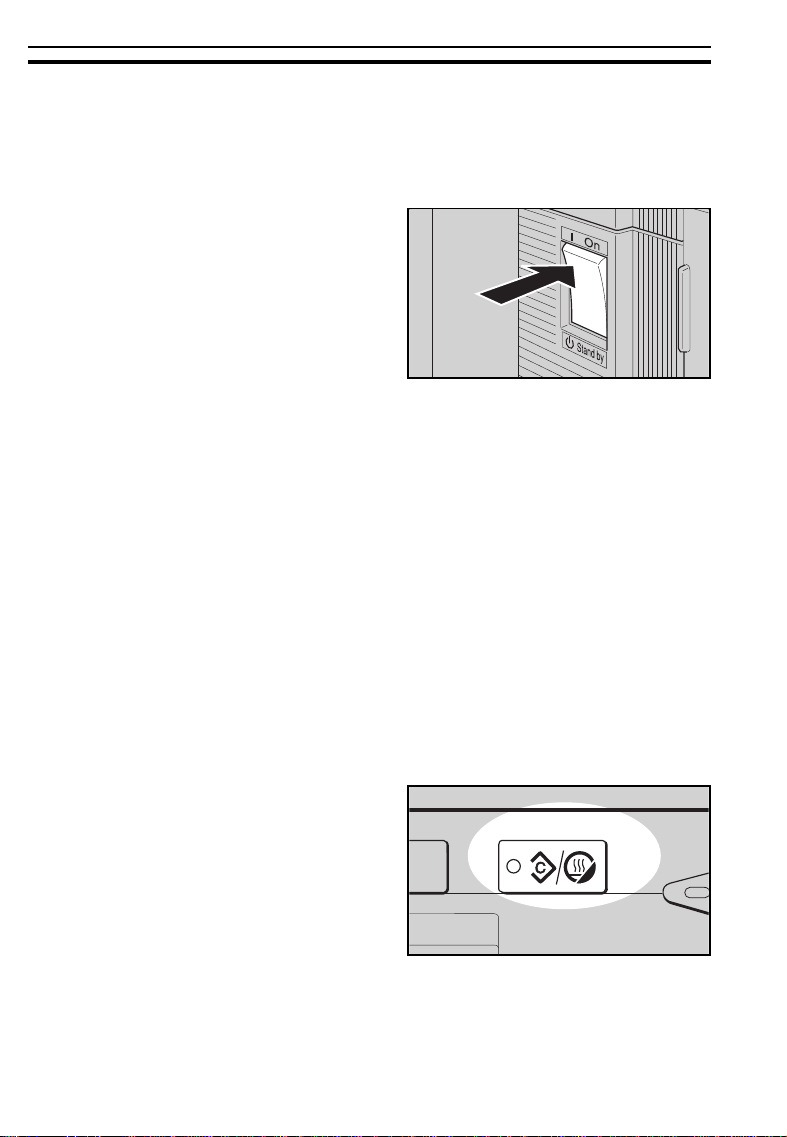
When The Main Switch Is In The Stand-by Position
Turn on the main switch.
1
Wait for the machine to warm up.
2
During the warm-up period (within
140 seconds), "
pears on the di splay .
After warm-up, "v Ready" ap-
3
pears on the di splay.
u
Please wait." ap-
When The Display Is Off And The Clear
Modes/Low Power Mode Key Is Lit
The machine is in Low Power mode.
Hold down the Clear Modes/Low
1
Power Mode key until the indicator is goes out. The machine will
return to the standby condition.
12
Page 13
The following actions will also wake up the machine:
❐
Operating the machine.
♦
Opening or closin g the option al platen cove r.
♦
Opening or closin g the option al documen t feeder.
♦
Setting origi nals in the op tional document fe eder.
♦
Opening or closin g the bypass tray.
♦
Pressing an y key.
♦
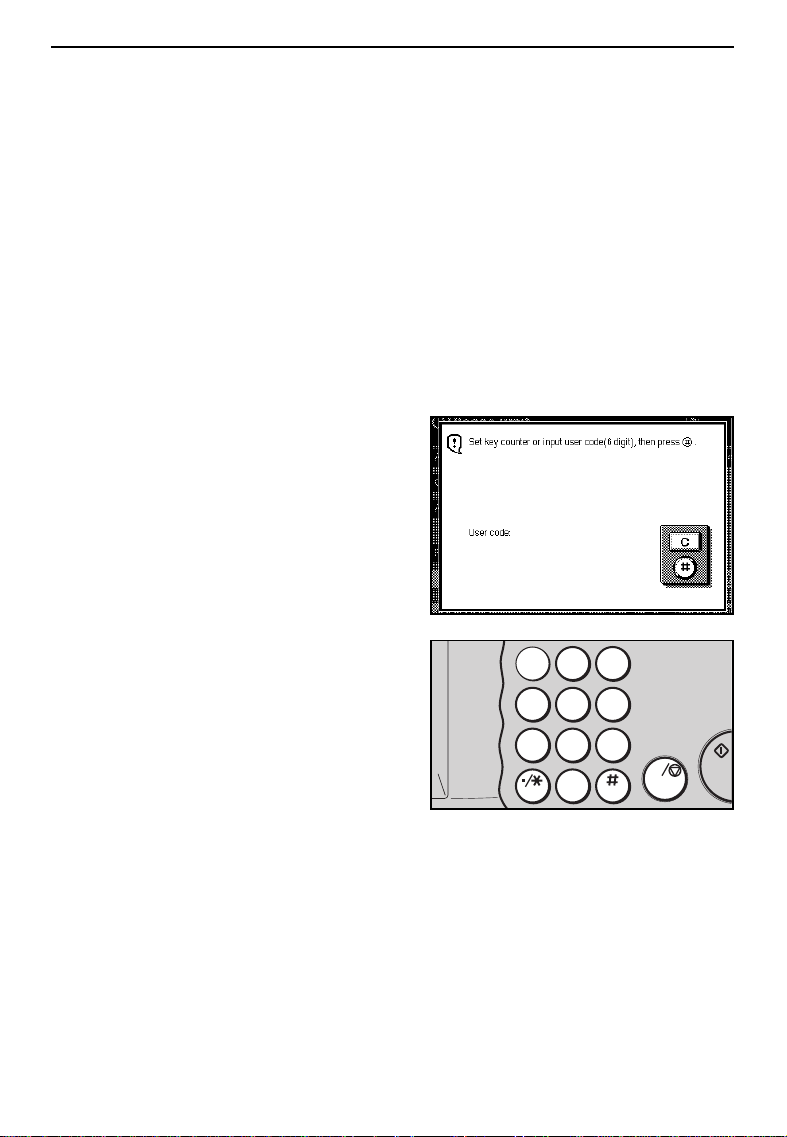
When Prompted For A User Code
The display instruct you to input
1
your user code.
STARTING THE MACHINE
Enter your user code (6 digits)
2
using the Number keys.
If you make a mistak e, touch the
❐
key or press the
enter the right number.
Clear/Stop
Touch the [#] key or press the
3
Enter key.
To prevent others from making copies
❐
with your user code, when you have
finished using the machine, hold down
the
Clear/Stop
Clear Modes/Low Power Mode
key and press the
[C]
key. and
key.
1 2 3
4 5 6
7 8 9
0
C
13
Page 14

SWITCHING BETWEEN THE COPIER, PRINTER AND SCANNER FUNCTIONS
SWITCHING BETWEEN THE COPIER, PRINTER
AND SCANNER FUNCTIONS
By default, the machine is in Share mode and set to Copier when you first
switch on.
To Use The Copier:
Press the Copy key
Depending on the machine configuration, it may not be possible to use this
function while another job is running.
To Use The Printer:
Press the Printer/Scanner key.
The display will change.
refer the screen on page 9.
☛
Depending on the machine configuration, it may not be possible to use this
function while another job is still running.
To Use The Scanner:
1. Press the Printer/Scanner key.
The machine will switch to Printer.
refer the figure on page 9.
☛
2. Touch the Scanner key.
The machine will switch to Scanner.
Depending on the machine configuration, it may not be possible to use this
function while another job is still running.
If the Scanner Only Mode is select ed, scanner function can be used at the
begining.
14
Page 15

SWITCHING BETWEEN THE COPIER, PRINTER AND SCANNER FUNCTIONS
How Are Multiple Scan, Print And Copy Jobs Handled?
Four modes are available that decide the priority the machine gives to
various jobs.
Share Mode
Share mode lets you copy, print and scan, and is the default mode when
you switch the machine on.
If there are no current print or scan jobs, the Copier screen is shown and
you can use all the normal Copier functions.
The screen will change to the Printer s creen if:
A print job is re ceived .
❐
You press the
❐
[Printer/Scanner]
button.
If you wish to switch back to the Copy screen, just press the [Copy] key. If
there are no current print jobs, the screen will change immediately. If the
machine is printing, however, the screen will change as soon as the current
print job has finished. Any other queued print jobs will be temporarily
suspended until you finish your copying.
Note that even if the Copier screen is shown, the machine will still receive
print jobs as long as the Online indicator is lit.
Printer Priority Mode
This is the same as Share mode, but you cannot use the [interrupt]
buttons.
Printer Only Mode Only printing is allowed. You cannot use the [Interrupt], [Copy] or [Scan-
ner] buttons. Scanner Only Mode
Only scanning is allowed and the machine is off-line for print jobs. You
cannot use the [Interrupt] or [Copy] keys.
15
Page 16

SWITCHING BETWEEN THE COPIER, PRINTER AND SCANNER FUNCTIONS
Changing To Another Mode
Make sure the machine is in Cop-
1
ier mode.
Press the Printer/Scanner key to
enter Printer mode.
Touch [On-line/Off-line].
2
16
Page 17

SWITCHING BETWEEN THE COPIER, PRINTER AND SCANNER FUNCTIONS
Touch [Setup Menu].
3
Touch [Configuration Menu].
4
Touch [Next].
5
Touch [Change ] in the mode op-
6
tions.
Touch either [Share], [Scanner
only], [Printer Priority] or
[Printer only].
Touch [Exit].
Touch [Preve. Menu] three
7
times.
Touch [On-line/Off-line] to return
8
to the printer on-line screen.
17
Page 18

INTERRUPTING THE CURRENT JOB
INTERRUPTING THE CURRENT JOB
This machine cannot perform two jobs at the same time. Multiple jobs are
carried out in the order that they were started.
You can interrupt a printing job to make copies.
Depending on the original configuration settings, you may not even be able
to interrupt the above cases.
After your interrupt operation has finished and the auto-clear time has
elapsed, the machine goes back tothe operation it was doing before you
interrupted it. For more about the configuration settings,
The following functions cannot be used during an interrupt operation:
Duplex mod e
❐
Sort, Rotate Sort
❐
Stack, Rotate Stack
❐
Stapling
❐
Adjust Image mode
❐
Stamp
❐
Combine
❐
Series Copies
❐
Interrupting A Print Job To Make Copies
Press the Interrupt key.
1
Make your copies as you would normally do.
2
18
Page 19

RECOMMENDED & NON-RECOMMENDED ORIGINALS
RECOMMENDED & NON-RECOMMENDED
ORIGINALS
Recommended Originals
For details of originals that the optional document feeder can handle, ☛ see
❐
page 66.
Non-recommended Originals For The Optional
Document Feeder
$
CAUTION:
The following types of originals are not recommended for use
with the document feeder. Place them directly on the exposure glass.
Originals thicke r than 128 g/m2, 34 lb.
❐
Originals thicke r than 105 g/m2, 28 lb. when using tw o-sided or iginals
❐
Originals thin ner than 40 g/m2, 11 lb. Bu t for origin als between 40 and 52 g/m
❐
(11 and 14 l b.), the do cument feeder must be set to Thin Paper mode. ☛ See
the "Copy R eferenc e".
Originals lar ger tha n A3, 1 1" x 17"
❐
Originals smalle r than A5, 5
❐
Paper with any king of coating (such as carbon) on the back
❐
Folded, curle d, cr eased, o r dam aged o riginal s
❐
Mailing labels , or perfor ated origin als
❐
OHP transpare ncies
❐
Translucent paper
❐
Pasted originals
❐
Damp originals
❐
Sticky originals
❐
Wavy origin als
❐
Originals th at are not ma de from paper
❐
Originals wr itten in penci l on b oth si des, or two-s ided c arbon origin als
❐
Thermal fax paper, CRO (camera ready original) or aluminum foil
❐
Originals with globs of ink from a ball-p oint pen
❐
1/2
" x 8
1/2
"
2
19
Page 20
SETTING ORIGINALS ON THE EXPOSURE GLASS
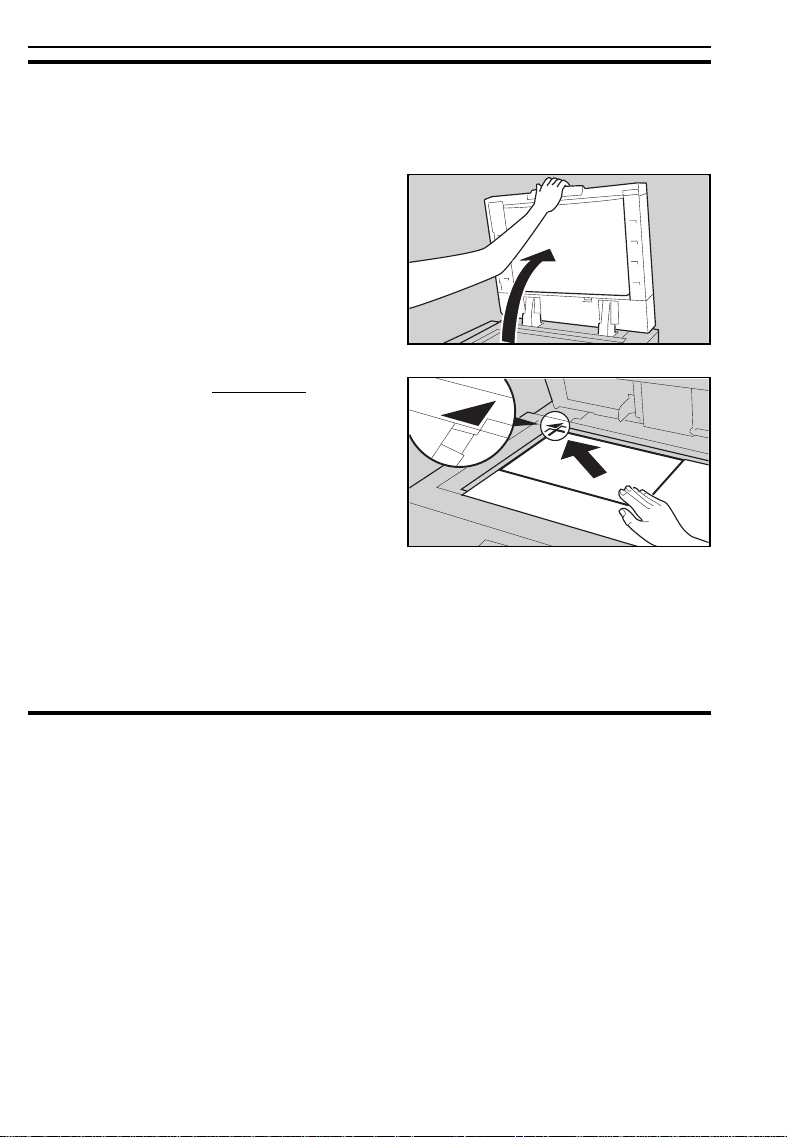
SETTING ORIGINALS ON THE EXPOSURE
Lift the optional platen cover or
1
the optional document feeder.
GLASS
Set the original
2
exposure glass. The original
should be aligned to the rear left
corner.
Lower the optional platen cover
3
or the optional document feeder.
face down
on the
SETTING A STACK OF ORIGINALS IN THE
OPTIONAL DOCUMENT FEEDER (ADF)
You can insert a stack of originals ( one-sided or two-sided) of the same size
into the document feeder. These originals are individually fed onto and
removed from the exposure glass.
Correct any curl, fold, or crease
1
in the originals before setting.
20
Page 21
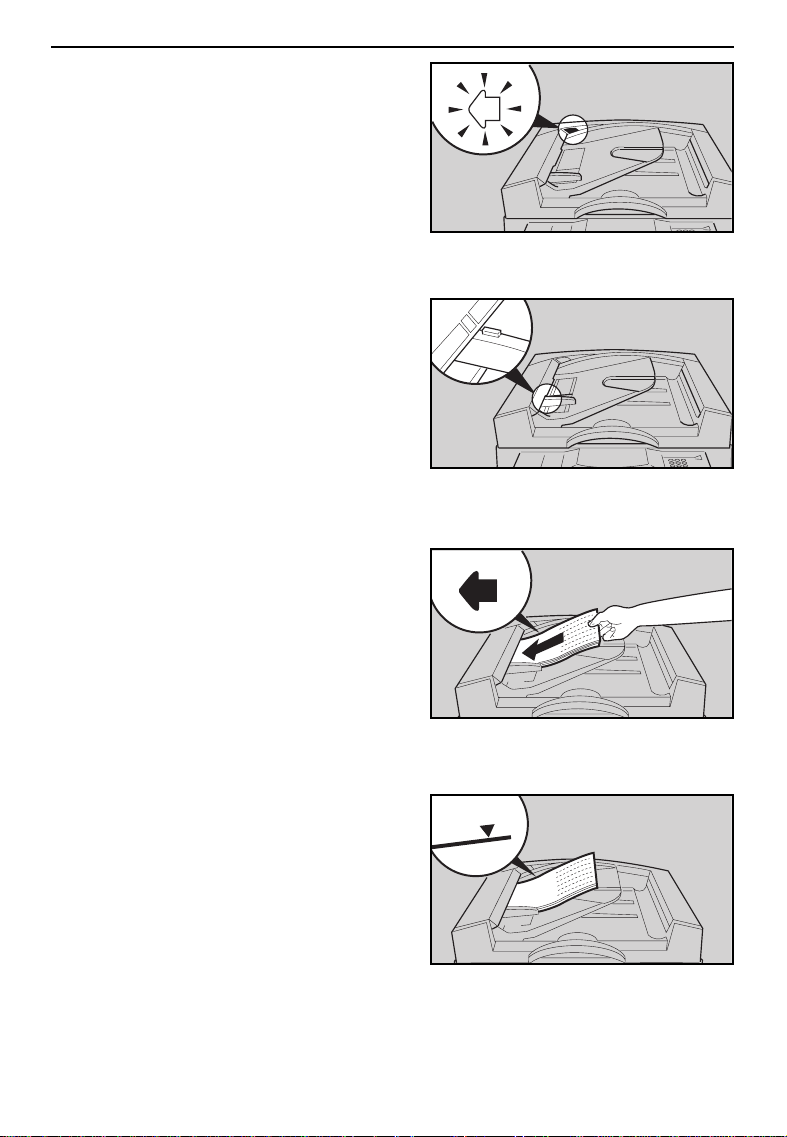
SETTING A STACK OF ORIGINALS IN THE OPTIONAL DOCUMENT FEEDER (ADF)
Confirm that the Insert Original
2
indicator is lit before setting the
originals.
Confirm that no previous originals
3
remain on the exposure glass.
Adjust the guide to the original
4
size.
Set the originals into the docu-
5
ment feeder until the Insert
Original indicator goes off.
When using the machine as a scan-
❐
ner, originals can be set either face
down and face up.
The guide must touch the front side
❐
of the origina ls.
Do not stack originals above the limit
❐
mark.
21
Page 22
SETTING ONE ORIGINAL AT A TIME IN THE OPTIONAL DOCUMENT FEEDER (SADF)
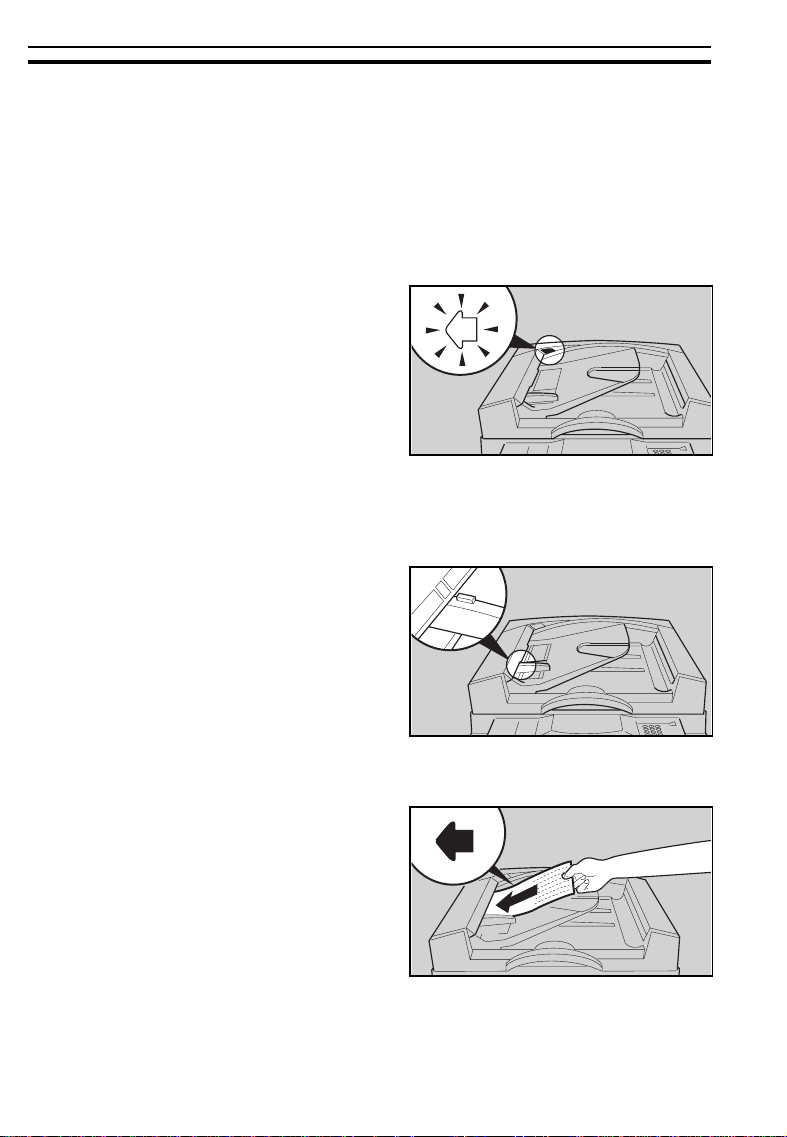
SETTING ONE ORIGINAL AT A TIME IN THE
OPTIONAL DOCUMENT FEEDER (SADF)
You can insert one original at a time into the document feeder. The original
is automatically fed onto and removed from the exposure glass.
SADF is not available, when using the machine as a scanner with an ISIS
❐
driver.
Correct any curl, fold, or crease
1
in the originals before setting.
Confirm that the Insert Original
2
indicator is lit before setting the
originals.
Confirm that no previous originals
3
remain on the exposure glass.
Adjust the guide to the original
4
size.
Set the original into the document
5
feeder until the Insert Original
indicator goes off.
If you are copying a stack of originals
❐
one sheet at a time and you want to
keep them in order, s tart with th e last
page of the origina ls.
The original guide must touch the
❐
front side of the original.
22
Page 23

SETTING ONE ORIGINAL AT A TIME IN THE OPTIONAL DOCUMENT FEEDER (SADF)
Press the Start key.
6
While the Auto Feed indicator is
7
lit after an original is fed, set the
next original. The original is automatically fed and copied.
If you have set more than two origi-
❐
nals, the
lit after the last original is fed. In this
case, press the
setting an original.
Auto Feed
indicator is not
key again after
Start
23
Page 24

SETTING ONE ORIGINAL AT A TIME IN THE OPTIONAL DOCUMENT FEEDER (SADF)
24
Page 25

WHAT TO DO IF
SOMETHING GOES
WRONG
25
Page 26

TROUBLESHOOTING
Machine’s Condition Action
Nothing happens when the main switch
is turned on.
The machine has automatically switches
itself off (Auto Off).
The Clear Modes/Low Power Mode
key is lit, and the display is off.
and messages are displayed.
Paper runs out. Load paper.
is displayed.
f
is displayed.
i
is displayed.
Y
is displayed.
Z
is displayed.
k
is displayed.
is displayed.
is displayed.
is displayed.
Check the power cord. Is it proper ly plugged into the
outlet?
Plug it in firmly.
➠
Turn on the main switch.
The copier is in Low Power mode.
Press the Clear Modes/Low Power Mode key.
➠
Follow the instructions on the display.
Add toner.
Add staples.
Remove misfed paper.
Close the indicated doors or covers.
Set the fusing unit correctly. For position of the fusing
unit,
Remove the jammed staples.
Turn the main switch off, wait a few seconds, and then
turn it on. If
representative.
Used toner bottle is full. Call your serv ice representative.
TROUBLESHOOTING
appears again, call your ser vice
26
Page 27

Machine’s Condition Action
Staples do not come out at all.
Misfeeds occur frequently.
TROUBLESHOOTING
After loading a new staple cartridge, staples mi ght not
be ejected the first few times you try to us e the stapler.
Try again.
➠
A few sheets might not be stapled. To correct thi s, try
turning over the paper stack in the tray unit. If there is
no improvement, change to paper with less curl.
There are jammed staples in the stapler.
Remove jammed staples.
➠
Is the right kind of paper in the paper tray?
Paper size and weight must be within the
➠
specification for this copier.
Is folded, wrinkled, damp, or curled paper in the paper
tray?
Always use dry, undamaged paper.
➠
Is the paper properly set in the paper tray?
Always load paper correctly.
➠
Are there any pieces of misfed paper or other foreign
objects in the machine?
Make sure that the paper path is completely clear of
➠
paper and other material after a misfeed.
Paper size setting is not correct.
Set the proper paper size with the User Tools.
➠
For details of printer and scanne r error messages, please refe r to the Pri nter or
❐
Scanner Reference.
If you cannot correct the problem by taking the above actions, please contact
❐
your serv ice r epresen tative .
27
Page 28

LOADING PAPER
LOADING PAPER
Regarding paper sizes that can be set, see the following pages:
❐
1st tray
optional tray unit
large capa city tr ay ☛ See page 51.
If you want to change the paper size, see the following pages:
❐
1st tray
optional tray unit
large capa city tr ay ☛ See page 51.
Non-recommended Paper
Folded, curl ed, creased , or damage d paper
❐
Torn paper
❐
Perforated paper
❐
Paper with conductive or low electrical resistance coating such as carbon or
❐
silver coating
Thermal paper, ar t paper
❐
Thin paper that ha s low stiffne ss
❐
☛
See page 38, 40, and 41.
☛
See page 43.
☛
See page 38, 40, and 41.
☛
See page 43.
Notes For Paper
Load paper with the copy side
❐
up
side
paper over i n the tray. If there is no improvement, change t o copy paper with
less curl.
Do not use paper that has been already copied/printed on.
❐
The followin g types of paper ca nnot be fed from the paper tray. Load them in
❐
the bypass t ray.
•
•
Correct curls in paper before loading.
❐
Fan paper to get air between the sheets before loading.
❐
28
in the large capacity tray. If copies are curled, try turning the copy
OHP transparenc ies • adhesive la bels • translucent paper
post card
down
in the 500-sheet trays, and with the copy
Page 29

Loading Paper In The Paper Tray
Pull out the paper tray until it
1
stops.
Load paper in the paper tray. Do
2
not stack paper above the limit
mark inside the paper tray.
LOADING PAPER
Push the tray in until it stops.
3
29
Page 30

LOADING PAPER
Loading Paper In The Large Capacity Tray
Down
If the
1
to lower the bottom plate. The
key will blink while the bottom
plate is moving down.
If the key is lit or blinking, proceed to
❐
step 2.
key is not lit, press it
After the
2
and lights, open the cover.
Load paper into the tray (not
3
more than 1,000 sheets). The paper stack must be flush with the
left side.
Close the cover.
Down
key stops blinking
4
30
Page 31

ADDING TONER
ADDING TONER
When "f
$
WARNING:
$
WARNING:
NOTE: When adding toner, do not turn off the main switch. If you do, your
NOTE: Before setting the new toner bottle, shake it well at least 5 or 6
NOTE: Do not remove the toner cap of the new toner bottle.
1
2
Add Toner
copy settings are cleared.
times.
Open the front cover of the machine.
You can find the sticker (with
at the top) explaining how to add
toner, inside the front cover as
shown in the illustration.
" is displayed on the display, it is time to supply toner .
Do not incinerate the used toner bottle. Toner bottle
might ignite when exposed to open flame.
Dispose of the used toner bottle according to your local
regulations.
f
Load the new toner bottle follow-
3
ing the instructions on the sticker.
31
Page 32

ADDING STAPLES
When "i
❐
1
2
3
❐
Add Staples
Do not remove the tape before setting the new staple refill in the cartridge. If you do, the staples fall into
pieces.
Open the front door of the finisher.
You can find a sticker (with i at
the top) explaining how to add a
staple cartridge, inside the front
door as shown in the illustration.
Add the new staple cartridge following the instructions on the
sticker.
After adding th e new staple, several pa ges will be printed witho ut staplin g.
" is displayed, add staples as follows:
Page 33

CLEARING MISFEEDS
CLEARING MISFEEDS
?I
?I
$
NOTE: When clearing misfeeds, make sure that all units and levers are
NOTE: Do not touch originals in the optional document feeder when a pa-
WARNING:
WARNING
CAUTION:
returned to their original positions and all cov ers are closed.
per misfeed occurs in the machine. If you do, the machine eill not
know which originals have been copied and which should be copied.
Since some parts of the machine are supplied with
high electrical voltage, touch only the parts specified in the instructions on the sticker inside the machine’s cover.
When removing misfed paper from sections B and
:
C, use caution. The fusing unit may be very hot.
See page 4 for the position of the fusing unit.
Do not leave any torn scraps within the machine.
Check The Display
The display shows the location of misfed paper. Remove them following instructions.
P is indicated only when your ma-
❐
chine is equipped with the optional
document feeder.
Right figure shows when your ma-
❐
chine is equipped with the optional
Finisher and Document Feeder.
33
Page 34

CLEARING MISFEEDS
Misfeeds In A, B, C, Y, Or Z Sections
Open the front cover of the ma-
1
chine.
You can find a sticker (with Y at
2
the top) explaining how to remove misfed paper, inside the
front cover as shown in the illustration.
Remove misfed paper following
3
the instructions on the sticker.
Misfeed In The Large Capacity Tray
Swing out the tray grasping the
1
tray handle, and remove any misfed paper.
Return the tray to its original po-
2
sition.
34
Page 35

Misfeeds In P Section
You can find a sticker, explaining
1
how to remove the misfed paper,
on the optional document feeder
as shown in the illustration.
Remove the misfed original refer-
2
ring to the sticker.
Misfeeds In R Section
When The Optional Finisher Is Installed
Open the front door of the op-
1
tional finisher.
You can find a sticker (with Y at
2
the top) explaining how to remove misfed paper, inside the
front door as shown in the illustration.
CLEARING MISFEEDS
P
Remove misfed paper following
3
the instructions on the sticker.
When The Optional 3-bin Sorter Is Installed
You can find a sticker, explaining
1
how to remove the misfed paper,
on the optional 3 bin sorter.
Remove the misfed paper refer-
2
ring to the sticker.
35
Page 36

REMOVING JAMMED STAPLES
REMOVING JAMMED STAPLES
When "
optional finisher. Follow these steps to solve the problem.
?I
After loading a new staple cartridge, staples might not be ejected the first few
❐
times you try to us e the stapler .
Open the front door of the op-
1
tional finisher.
You can find a sticker (with at
2
the top) explaining how to remove jammed staples, inside the
front door as shown in the illustration.
Remove jammed staples follow-
3
ing the instructions on the sticker.
Check Staple Unit
WARNING:
" is displayed, staples are jammed in the
Since some parts of the finisher are supplied with
high electrical voltage, touch only the parts specified in the instructions on the sticker inside the finisher’s cover.
36
Page 37

CHANGING SETTINGS
37
Page 38

CHANGING THE PAPER SIZE
CHANGING THE PAPER SIZE
Changing The Paper Size In The 1st Tray
Standard Size Paper
You can sele ct paper of the follow ing si zes:
❐
Metric version Inch version
;
A3
, B4 ;, A4 : ;, B5 : ;, A5
" x 8
;
" : is not available when using 3 bin sorter.
1/2
8
1/2
" x 11" :
*
: 5
1/2
Pull the paper tray out until it
1
stops.
:
11" x 17" ;, 8
5
" x 8
1/2
1/2
" x 14" ;, 8
:
*
"
, A3 ;, A4 : ;, A5
1/2
1/2
" x 11" : ;,
:
Remove the copy paper.
2
Remove the left guide as shown
3
in the illustration.
38
2
1
1
Page 39

Set the left guide to the paper
4
size you want to use as shown in
the illustration.
Load paper in the tray.
5
❐
Do not stack paper over the limit
mark.
While pressing the release lever
6
on the front guide, slide the front
and rear guides to the paper size
you want to use.
CHANGING THE PAPER SIZE
1
1
2
Select the paper size by adjusting
7
the paper size selector on the
back side of the tray.
Push the paper tray in until it
8
stops.
39
Page 40

CHANGING THE PAPER SIZE
F/F4 Size Paper (8" x 13", 8
Follow steps 1 to 6 on pages 38
1
and 39.
Select "F/F4" by adjusting the pa-
2
per size selector on the back side
of the tray.
Press the
3
Touch the
User Tools
[Basic Settings]
key.
key.
4
1/4
" x 13", or 8
1/2
" x 13)
Touch the
[Next]
key three times to reach the paper siz e setting menu.
5
In the "Tray 1 <F/F4> Paper Size Setting" menu, the present size
6
setting is displayed. Touch the
size by touching a key. Then, touch the
Press the
User Tools
key, then push the paper tray in until it stops.
[Change]
[Exit]
key. Select the new paper
key.
7
40
Page 41

Special Size Paper
You can select paper of the following sizes:
❐
Metric version Inch version
;
, 8
" x 14" ;, 5
11" x 17"
8" x 10"
*
: When using 3-bin sorter, 5
Follow steps 1 to 6 on pages 38
1
and 39.
Select * by adjusting the paper
2
size selector on the back side of
the tray.
1/2
;
1/2
" x 8
1/2
"
1/2
" x 8
:
CHANGING THE PAPER SIZE
11" x 15" ;, 10" x 14" ;, 8" x 10
*
,
8" x 10"
" : is not displayed.
1/2
;
, B4
;
1/2
" ;,
Press the
3
Touch the
4
User Tools
[Basic Settings]
key.
key.
41
Page 42

CHANGING THE PAPER SIZE
Touch the
[Next]
key three times to reach the paper size s etting menu.
5
In the "Tray 1 <*> Paper Size Setting" menu, the present size s etting is
6
displayed. Touch the
touching a key. Then, touch the
"*" (asterisk) is displayed on the key for paper sizes that cannot be detected in
❐
some modes (ex. Auto Paper Select).
Press the
User Tools
[Change]
key, then push the paper tray in until it stops.
key. Select the new paper size by
[Exit]
key.
7
42
Page 43

CHANGING THE PAPER SIZE
Changing The Paper Size In The Optional Tray Unit
(Trays 2, 3, and 4)
You can select paper of the following sizes:
❐
Metric version Inch version
;
, 8
;
A3
, B4 ;, A4 : ;, B5 :
11" x 17" ; , 8
8" x 10"
8
1
;
1/4
" x 13" ;
Follow steps 1 to 6 on pages 38
and 39.
" x 14" ;, 8
1/2
, 8" x 13" ;, 8
;
1/2
1/2
" x 13" ;,
" x 11" : ;,
11" x 17"
11" x 15"
8" x 10"
8" x 13"
8
1/4
;
;
;
" x 13" ;
" x 14" ;, 8
1/2
, 10" x 14" ;, 8" x 10
, A3 ;, B4 ;, A4 : ;,
, 8
" x 13" ;,
1/2
" x 11" : ;,
1/2
" ;,
1/2
Press the
User Tools
key.
2
Touch the
[Basic Settings]
key.
3
Touch the
[Next]
key three times to reach the paper size setting menu.
4
Find the paper tray (2, 3, or 4) and touch the
5
new paper size by touching a key. Then, touc h the
Press the
User Tools
key, then push the paper tray in until it stops.
6
[Change]
[Exit]
key. Select the
key.
43
Page 44

USER TOOLS
USER TOOLS
This section is for operators in charge of this machine. The User Tools allow
access to advanced settings.
User Tools Menu
Basic Settings
Menu
Auto Response (Human) Sensor
Operation panel beeper
Copy count display
Set date
Set time
Auto Reset
Low Pow er Timer
Auto Off Timer
Paper Type Display (for each tray)
Tray 1 <*> Paper Size Setting
Tray 1 <F/F4>Paper Size Setting
Paper Size Setting (for tray 2, 3, and 4 (option))
Paper Tray Priority
Original: <F/F4> Size Setting
ADF: Thin Paper Mode
Auto Tray Switching
Set User Code(s)
Output Trays
Function Timeout
44
Page 45

How To Change The Basic Settings
Confirm that the machine is in the
1
initial condition. If not, press the
Clear Modes/Low Power Mode
key.
USER TOOLS
Press the
User Tools
key.
2
Touch the
[Basic Settings]
key.
3
Select the desired settings following the ins truction on the display.
4
❐
[▼Next]
[▲Prev.]
[Exit]
[Cancel]
[Menu]
: Use to go to the next page.
: Use to go back to the previous page.
: Touch this key aft er enter ing the new d ata.
In the "User Tools Main Menu", touch to exit the User Tools condition.
: Touch to return to the previous menu without changing any data.
: Use to go back to the previous menu.
To return to the initial condition, press the
5
User Tools
key.
45
Page 46

USER TOOLS
Basic Settings
MENU DESCRIPTION
Auto Response
(Human) Sensor
Operation panel
beeper
Copy count display
Set date
Set time
Auto Reset
Low Power Timer
When the auto response sensor does not detect anyone
operating the machine for a while, it will switch to one of the
Reset modes (Auto Reset, Low Power mode, Auto Off, or
SADF Auto Reset). You change the delay before this cuts in.
❐
Default: Yes (On)
The noise made when you push a button can be tumed off.
❐
Default: On
The copy counter can be set to show the number of copies
made (count up) or the number of copies remaining to be made
(count down).
❐
Default: Up (count up)
Use to set the date and copier’s internal clock.
❐
Date Stamping uses this date.
❐
Remember to adjust the clock for Daylight Saving Time.
[▼ Next]
The machine returns to standby automatically a while after
every job. You can change the delay from 0 (no Auto Reset) to
180 seconds.
❐
Default: 30 seconds
[U.S. model]
The copier will automatically enter a Low Power condition after
the selected time after the last copying job has been completed.
This time can be set from 1 to 120 minutes in 1 minute steps.
❐
Default: 15 minutes
❐
The operator can activate the Low Power mode by pressing the
Clear Modes/Low Power Mode key for more than one second.
❐
Time required to return to a ready condition from the Low Power
mode is less than 30 seconds.
❐
In this mode, power consumption is reduced from l ess than 0.20 kW
(standby) to less than 0.11 kW
[Europian model]
The copier will automatically enter a Low Power mode while
after the last job has been completed. You can change the
delay from 0 (Low Power mode off) to 180 seconds.
❐
When "0" is set, the machine does not enter a Low Power mode.
46
Page 47

USER TOOLS
Auto Off Timer
Output Trays
Function Timeout
To conserve energy, this copier automatically tums off 60
minutes after the last copying job has been completed. This
time can be set from 10 to 120 minutes in 10 minutes steps.
❐
Default: 60 minutes
❐
To exit Auto Off mode, turm on the main switch. The main switch for
this copier has three positions, press it all the way, and hold for 1 2 seconds.
❐
In Auto Off mode, power consumption is reduced from less than
0.20kW (standby) to less than 0.04W.
❐
This function is available when using the machine as a copier.
Copy output tray and printer output tray can be select.
❐
This function is available when the 3-bin sorter is equipped.
0 to 180 seconds (step 10 seconds) can be selected.
❐
Default: 30 seconds
47
Page 48

USER TOOLS
(Basic Settings)
MENU DESCRIPTION
Paper Ty pe Displ ay
Tray 1 <*> Paper Si ze
Setting
Tray 1 <F/F4> Paper
Size Setting
Paper Size Se tting
,
Tray 2, 3
and 4
(option)
[▲ Prev.] [▼ Next]
When recycled paper or special paper is in the paper trays, you
can have the paper type shown on the display.
❐
Default: No display
❐
You cannot select both recycled paper and special paper in the
same tray.
[▲ Prev.] [▼ Next]
If you want to use a special paper size, you can select Tray 1
for this purpose.
❐
Default: Metric version: 11" x 17"
❐
For paper sizes that can be selected, ☛ see page 41.
❐
Make sure you select * by adjusting the paper size selector on the
back side of the tray.
❐
* (asterisk) is displayed on paper size keys that cannot be used by
Auto Paper Select.
Select if you want to use 8
Inch version: 10" x 14"
" x 13, 8" x 13", or 8
1/2
" x 13"
1/4
paper for the 1st tray.
❐
Default: 8
❐
For more details ☛ see page 40.
❐
Make sure you select F/F4 by adjusting the paper s ize selector on
the back side of the tray.
1/2
" x 13
Use to change the paper sizes in the optional tray unit.
❐
Default: Metric version: A4
❐
Make sure you change the paper size setting, when changing the
paper size in these trays otherwise a misfeed mi ght occur.
❐
Also be sure to select the paper size when install ing the optional
tray unit.
Inch version: 8
:
" x 11"
1/2
:
[▲ Prev.] [▼ Next]
48
Page 49

(Basic Settings)
MENU DESCRIPTION
Paper Tr ay Prior ity
Original: <F/F4> Size
Setting
ADF: Thin P aper Mode
Auto Tray Switching
USER TOOLS
[▲ Prev.] [▼ Next]
❐
You can choose the tray which will be active under the following
conditions:
♦
when the main switch is turned on.
♦
after Auto Reset or Low Power mode
♦
after pressing the Clear Modes/Low Power Mode key
(* If "Auto Tray Switch" is on, these are valid in printer mode.)
❐
Default: Tray T (1000-sheet large capacity tr ay)
❐
This function is available, when using the machine as a copier.
You can select one of the following original sizes to be detected
in the Auto Paper Select and Auto Reduce/Enlarge modes as F
size.
8
❐
1/2
Default: 8
" x 13, 8
" x 13"
1/2
1/4
" x 13", or 8" x 13"
Use when changing the type of originals to be fed into the
optional document feeder. Select when you use thin originals
(40 ~ 52 g/m
❐
Default: Normal (Not Thin)
2
or 11 ~ 14 lb).
If you load paper of the same size and in the same direction in
two or more trays, the copier automatically shifts to another tray
when the tray in use runs out of paper. You can cancel this
setting.
* If "Auto Tray Switch" is on, these are valia in printer mode.
❐
Default: Yes
❐
Trays for special paper and recycled paper can be used only when
the Special Paper Size setting is the same.
❐
This function is available, when using the machine as a copier.
49
Page 50

USER TOOLS
(Basic Settings)
MENU DESCRIPTION
Set User Code(s)
If User Codes are turned on, operators must input their user codes before using the machine. The machine keeps count of the number of copies made under each user code.
To switch on this mode, utilize the "Set User Code Mode" User Tool and then contact
your sales/service representative.
Check/Reset/Print
Copy Counter
User Code
Register/Change/Delete
Assign/Activate
Key Operator Code
Key Operator Code
Set User Code Mode
Use to check the number of copies made under each user
code, clear each code’s counter, clear all code’s counters and
print the counter data for all user codes.
Use to register, change, delete one user code, or delete all user
codes.
❐
Up to 20 user codes (6 digits) can be registered.
❐
When changing user codes, the number of copies made under the
old code is added to that made under the new user code.
❐
When deleting user codes, the number of copies made under the
deleted code is deleted.
❐
Registered codes will be sorted in numer ical order.
If you select
[Yes]
, only operators who know the key operator
code can access User Tools from User Code mode.
❐
Default: No
❐
If you select [Yes], you should register the key operator access
☛
Use the "Key Operator Code" menu.
code.
Use to register or change the key operator code.
Turn User Codes on or off.
❐
Default: No (not User Code mode)
❐
After select [Yes], please contact your sales/service representative
to set your machine to the User Code mode.
50
[▲ Prev.]
Page 51

SERVICE REPRESENTATIVE SETTINGS
SERVICE REPRESENTATIVE SETTINGS
Some features can be adjusted by your service representative to suit your
needs. This section gives a brief description of these features. For more
information, contact your service representative.
LCT Paper Size Change
The large capacity tray holds A4 : (for the metric version) or 8
(for the inch version) copy paper. If you need, A 4 : can be set for the inch
version, and 8
" x 11" : can be set for the metric version.
1/2
" x 11"
1/2
Auto Stamping (for metric version)
If your machine is the metric version, Auto Stamping cannot be used as a
default setting. You can cancel this setting and use this function.
A3, 11" x 17" Double Count
When you use A3, 11" x 17" paper, your service representative can set the
copier to count each A3, 11" x 17" as two copies.
Auto Image Density Level Selection
Auto Image Density level can be adjusted to lighter or darker.
APS A5/5
Your service representative can set the copier to detect the original s ize on
the exposure glass as A5
version) whenever the copier cannot detect it with Auto Paper Select.
1/2
" x 8
1/2
" Detection
;
(for metric version) or 5
1/2
" x 8
" ; (for inch
1/2
:
51
Page 52

SERVICE REPRESENTATIVE SETTINGS
52
Page 53

APPENDIX
53
Page 54

MAINTAINING YOUR MACHINE
MAINTAINING YOUR MACHINE
To maintain high copy quality, clean the following parts and units regularly
with a damp cloth and wipe them with a dry cloth.
Exposure glass Platen cover
Document Feeder (Option)
Feed-in unit Belt
54
Page 55

DO’S AND DON’TS
DO’S AND DON’TS
General Operations
❐
When using the bypass tray, paper should be set in the bypass tray l engthwise
;
).
(
❐
Do not plac e sheets of pa per o r orig inals on the c over of the large capaci ty tr ay.
❐
Do not move the machine when the main switch is turned on.
❐
Do not move t he mac hine a few mi nutes after the mai n swi tch is turned off.
When Adding Toner
❐
Do not incinerate toner or toner containers. Toner dust might ignite when exposed to open flame.
❐
Dispose of the us ed toner bottle acc ording to loc al re gulati ons.
❐
When adding toner, do not turn off the main switch. If you do, your settings are
cleared.
❐
Before setting the new toner, shake it well, at least 5 or 6 times.
❐
Do not remove th e inner cap of the new ton er bottle .
When Removing Misfed Paper
❐
Since some parts of the machine are supplied with high electrical voltage, touch
only the parts specified in the instructions on the sticker inside the machine’s
cover.
❐
When removing misfed paper from sections B and C, use cautions. The fusing
unit may be very hot.
❐
Do not leave any to rn scrapes within the m achine.
❐
When cleari ng misfeeds, do not turn off the main switch. If y ou do, your m achine
settings are cleared.
❐
After clear ing misfeeds, make sur e that all units and lev ers are returned to thei r
original positions and all covers are closed.
55
Page 56

DO’S AND DON’TS
Document Feeder (Option)
❐
While originals are fed from the original table to the exposure glass, do not pull
out the origina ls.
❐
Do not lift the do cument f eeder until t he las t ori ginal ha s been compl etely fed ou t.
❐
Do not press dow n or hold orig inals after insertin g them.
❐
Do not press any pa rts of the do cument f eeder s trongly .
Finisher (Option)
❐
Do not remove papers from the shi ft tray while copyin g/print ing.
56
Page 57

PAPER TIPS
PAPER TIPS
❐
If you get a lot of misfeeds, try turning ov er the paper stack in the 500- sheet or
large capa city tr ay. If there is no impro vement , chan ge to pa per wi th les s cur l.
❐
Load paper with the copy/print side
copy/print side up in the large capacity tray. If papers are curled, try turning the
copy/print paper over in the tray. If there is no improvement, change the
copy/print paper with less curl.
down
in the 500-sheet trays, and with the
SCANNABLE AREA
Leading and side edges of the original image are not copied/scanned.
a: 2
+
2
b: 2
c: 3
d: 2
2.5 mm
−
1.5 mm
±
1.5 mm
±
2 mm
±
2 mm
a
Paper feed direction
b
c
d
57
Page 58

WHERE TO PUT YOUR MACHINE
WHERE TO PUT YOUR MACHINE
Environment
The installation location should be carefully chosen because environmental
conditions greatly affect the performance of a machine.
Optimum environmental conditions
❐
Temperature : 10 - 30 oC
❐
Humidity: 15 - 90 %
❐
A strong and level ba se.
❐
To avoid pos sible built-up of ozone, make sure to locate this m achine in a large
well ventilated room whic h has an air tur nover of mor e than 30 m
❐
The machine must be level within 5 mm both front or rear and left to right.
Environments to avoid
❐
Locations e xposed to di rect su nlight or s trong l ight ( more t han 1, 500 lux) .
❐
Dusty areas.
❐
Areas with corrosive gasses.
❐
Places highe r than 2,000 m ab ove sea leve l.
❐
Places wh ere the machi ne mig ht be subjec ted to freque nt stro ng vib ratio n.
❐
Locations directly exposed to cool air from an air conditioner or heated air from a
heater. (Sudden temperature changes might cause condensation within the machine.)
3
/hr./person.
Power Connection
❐
Connect the m achine to a power source meetin g the specifications giv en on the
inside from c over of this manual .
❐
Do not set anything on the power cord.
❐
Voltage must not fluctuate more than 10 %.
❐
Avoid multiwi ring.
❐
Make sure that the wall outlet is near the machine and easily accessible.
❐
Make sure the pl ug is firml y inserte d in the outlet.
❐
Always turn the machine off when you ha ve finished using for the day, but leave
it plugged in.
58
Page 59

WHERE TO PUT YOUR MACHINE
Access To The Machine
Place the machine near a power source, providing clearance as shown.
More than 10 cm or 4.0"
More than 39 cm or 15.4"
With the optional finisher
More than 72 cm or 28.4"
More than 50 cm or 19.7"
More than 70 cm or 27.6"
More than 10 cm or 4.0"
More than 50 cm or 19.7"
More than 70 cm or 27.6"
59
Page 60

USE AND STORAGE OF SUPPLIES
USE AND STORAGE OF SUPPLIES
Paper
❐
Paper of the t ypes or in the conditions list ed below are not re commended for thi s
machine.
•
Folded, curled, creased, or damaged paper.
•
Torn paper
•
Damp paper
•
Perforated pa per
•
Paper with conductive or low electrical resistance such as carbon or silver coating.
•
Wavy paper
•
Thermal paper, art paper
•
Thin paper that has l ow st iffnes s
❐
Use the bypass tray to copy/print onto OHP transparencies, adhesive labels,
translucent paper, and post cards. Before making copies/prints onto them, read
the following :
•
Adhesive labe ls should be fed from the by pass tray one sheet at a tim e.
•
OHP transparenc ies should be fed from th e bypass tr ay. You can set ten
sheets at a time. However, if misfeed or multi-feed occurs, set one sheet at a time.
•
OHP transparencies should be fanned to get air between the sheets before loading.
•
Translucent paper should be fed from the bypass tray.
•
Translucent paper should be fanned to get air between the sheets and any curls
should be corrected before loading.
•
Post cards should be fed from the bypass tray.
•
It is recommended to feed one post card at a time.
•
Correct any curl in post cards before loading.
❐
For good copy/print quality, please use the type of OHP transparencies recommended by your sale s and service represent atives.
❐
When using the by pass tray , the large c apacity tra y cannot be us ed.
❐
Do not touch paper if your fingers are wet or oily; finger prints may appear on the
copy/print.
❐
Do not use paper that has been already copied/printed on.
❐
Do not set paper ov er the limi t mark inside the tray.
❐
To avoid probl ems caused by cu rly papres , try turning ov er the paper sta ck in the
500-sheet or large capacity tray. If there is no improvement, change to paper with
less curl.
❐
Load paper with the copy side
up
side
in the larg e capacity tr ay. If copies are curled, t ry turning the copy paper
over in the tray. If the re is n o impr oveme nt, ch ange the copy paper with l ess cu rl.
down
in the 500-sheet trays, and with the copy
60
Page 61

USE AND STORAGE OF SUPPLIES
Paper Storage
Paper should always be stored properly. Improperly stored paper might
result in poor image reproduction, creased copies, or paper misfeeds.
Generally, avoid curling and absorption of moisture.
❐
Avoid storing paper in humid areas. Under high temperature and high humidity, or
low temperatu re and low hum idity cond itions, st ore paper in a vinyl bag.
❐
Do not store paper where it will be exposed to heat.
❐
Store on a flat surface.
❐
Use older stock first.
❐
Do not lay heavy ob jects on paper .
❐
Keep open reams of paper in the package, and store as you would unopened
paper.
Toner Storage
❐
Store toner bot tles vertic ally in a co ol, dark plac e.
❐
Never store toner where it will be ex posed to hea t.
❐
Do not lay heavy ob jects on toner bottles.
61
Page 62

USE AND STORAGE OF SUPPLIES
62
Page 63

SPECIFICATIONS
63
Page 64

COPIER
COPIER
Configuration:
Process:
Memory capacity:
Scanning method:
Resolution:
Gray scale:
Originals:
Original thickness:
Original size:
Copying speed:
Warm-up time:
Desktop
Dry electrostatic transfer system
approximately 1.7GB hard disk
Flatbed solid state scanner
400 x 400 dpi
256 levels
Sheet, book
less than 30 mm, 1.18"
Maximum: A3, 11" x 17"
40 copies/minute
:
(A4
, 8
" x 11" :, in Full Size mode)
1/2
less than 140 seconds (20°C, 68°F)
* Refer the Copier Reference for details.
Resolution:
300, 400*, 600 dpi ( * 400dpi is available only
when using the Postscript.)
PRINTER
Speed:
Interface:
Options:
40 ppm (300dpi), 20ppm (600dpi)
Standard Centronics compatible
Standard RS232C
1000 sheet tray unit
1500 sheet tray unit
Finisher bin
3-bin sorter
Network Interface Card (Ether Net, Token Ring)
Postscript Kit
* Refer the Printer Reference for details.
64
Page 65

SCANNER
SCANNER
Resolution:
Grayscale:
Interface:
400 dpi (100 to 1600 dpi internal conversion)
256 levels
SCSI 2
* Refer the Scanner Reference for details.
Power consumption:
Copier only Full system*
Warm-up less than 0.88 kW less than 0.90 kW
Stand-by less than 0.20 kW less than 0.22 kW
Maximum less than 1.50 kW less than 1.50 kW
* Full system: copier with document feeder, finisher, and paper tray unit
Noise emission:
Sound pressure level
operator position)
(The measurements are made according to ISO 7779 at the
Dimensions :
Width Depth Height
with platen co ver, copy tray, and pa per tray
unit
with document feeder, finisher, and paper
tray unit
with document feeder, 3-bin sorter, and paper tray unit
1,150 mm
45.3"
1,551 mm
61.1"
1,300 mm
51.2"
655 mm
655 mm
655 mm
GENERAL
1,024 mm
25.8"
980+130mm
25.8"
1,110 mm
25.8"
40.4"
43.8"
43.8"
Weight:
with platen cover, copy tray, and 1500-sheet
paper tray unit
with docum ent feeder, finisher, an d 1500-she et
paper tray unit
with document feeder, 3-bin sorter, and 1500sheet paper tray unit
❐
Specifications are subject to change without notice.
137.5 kg
303.2 lb
178.5 kg
393.6 lb
161.0 kg
355.0 lb
65
Page 66

DOCUMENT FEEDER (OPTION)
DOCUMENT FEEDER (OPTION)
Original feed:
Automatic reverse document feed (ARDF)
two-sided originals mode
Automatic document feed (ADF)
one-sided originals mode
Semi-automatic document feed (SADF)
Single copies mode
Original size & weight:
Number of originals to be set:
Paper weight (g/m2)4047536481105128
Paper weight (lb) 11 12.5 14 17 22 28 34
Maximum number of
originals to be set
A3 lengthwise
lengthwise
A4
sideways
lengthwise
A5
sideways
B4 lengthwise
lengthwise
B5
sideways
lengthwise
B6
sideways
●
:ARDF (2 sided originals), ADF (1 sided originals), SADF, Single copies mode
50 50 50 50 50 30 25
✩✩❍❍❍❍✩
✩✩❍❍❍❍✩
✩✩●●●●★
✩✩❍❍❍❍✩
✩✩●●●●★
✩✩❍❍❍❍✩
✩✩❍❍❍❍✩
✩✩●●●●★
✩✩✩✩✩
✩✩★★★★★
❍: ARDF, ADF, SADF
★: ADF, SADF, Single copies mode
✩: ADF, SADF
Original set:
Copier: Face up, first sheet on top
Scanner: Face up/down
Original transport:
Power cons umpti on:
Power cons umpti on:
Weight:
Dimensions (W x D x H):
❐
Specificat ions a re subj ect to chang e witho ut not ice.
66
One flat belt
DC 24V ± 10 % (from copier)
45 W
Approximately 10.5 kg, 23.2 lb
610 x 507 x 130 mm, 24.1" x 20.0" x 5.2"
Page 67

FINISHER (OPTION)
FINISHER (OPTION)
Top
a= 6 ± 3 mm
b= 6 ± 3 mm
Staple replenishment:
Power source:
Power consumption:
Weight:
Dimensions (W x D x H):
Bottom
a= 6 ± 3 mm
b= 6 ± 3 mm
Cartridge exchange (5,000 pieces/cartridge)
DC 24V (from the main body)
48 W
35 kg, 77.2 lb
671 x 514 x 950 mm, 26.5" x 20.3" x 37.5"
2 Staples
a= 6 ± 3 mm
b= 132 ± 2 mm
c= 66 ± 3 mm
❐
Specifications are subject to change without notice.
67
Page 68

3-BIN SORTER
3-BIN SORTER
Paper capacity:
Power cons umpti on:
Power source:
Dimensions (W x D x H):
Weight:
❐
Specificat ions a re subj ect to chang e witho ut not ice.
1st bin: 500 sheets (A4, 80g/m2)
2nd bin: 250 sheets (A4, 80g/m
3rd bin: 250 sheets (A4, 80g/m
30 W
DC 24V, DC5V (from the main body)
468 x 483 x 490 mm,
18.5" x 19.1" x 19.4" (maximum)
13 kg
2
)
2
)
68
Page 69

1000-SHEET TRAY UNIT (OPTION)
1000-SHEET TRAY UNIT (OPTION)
Paper size:
Paper weight:
Paper capacity:
Power source:
Power consumption:
Weight:
Dimensions (W x D x H):
❐
Specifications are subject to change without notice.
☛
See page 43.
52 - 105 g/m2 (14 lb - 28 lb)
1,000 sheets
(500 sheets (80 g/m
DC 24V, 5V, AC 120V (from copier)
Average: less than 50 W (copying)
Maximum: less than 110.5 W (copying)
Approximately 36 kg, 79.4 lb
620 x 632 x 390 mm, 24.5" x 24.9" x 15.4"
1500-SHEET TRAY UNIT (OPTION)
Paper size:
Paper weight:
☛
See page 43.
52 - 105 g/m2 (14 lb - 28 lb)
2
) for each tray)
Paper capacity:
Power source:
Power consumption:
Weight:
Dimensions (W x D x H):
❐
Specifications are subject to change without notice.
1,500 sheets
(500 sheets (80 g/m
DC 24V, 5V, AC 120V (from copier)
Average: less than 50 W (copying)
Maximum: less than 110.5 W (copying)
Approximately 38 kg, 83.8 lb
620 x 632 x 390 mm, 24.5" x 24.9" x 15.4"
2
) for each tray)
69
Page 70

1500-SHEET TRAY UNIT (OPTION)
70
Page 71

INDEX
71
Page 72

INDEX
INDEX
!
1000-sheet tray unit .......... .......... 69
1500-sheet tray unit .......... .......... 69
3-BIN SORTER........................... 68
[Cancel] key. .......... ........ .......... .... 45
[Exit] key .. ........ ........ .......... ........ .. 45
[Menu] key ......... .............. ............ 45
[Next] key .... ........ ...... ...... ........ .... 45
[Prev.] key ...................................45
A
A3, 11" x 17" Double Count.. ...... 51
ADF ......... .......... ........ ........ ........ .. 20, 21
ADF: Thin Paper Mode ......... ...... 49
APS A5/5
Detection ................................... 51
Auto Image Density Level
Selection....................................51
Auto Reset......... ................ .......... 46
Auto Response (Human)
Sensor ....................................... 5, 46
Auto Stamping
(for metric ver sion) ............ ........ 51
Auto Tray Switching .............. ...... 49
1/2
" x 8
1/2
"
B
Basic Settings ........ ...... ........ ........ 46
ADF: Thin Paper Mode......... .. 49
Auto Off Timer ........................47
Auto Reset .............. ...... ........ .. 46
Auto Response (Human)
Sensor................................... 46
Auto Tray Switching.............. .. 49
Copy count display........ .......... 46
Function Timeout .............. ...... 47
Low Power Timer.................... 46
Operation panel beeper ...... .... 46
Original: F/F4 Size Setting ...... 49
Output Trays ...........................47
Paper Size SettingTray 2, 3,
and 4 (option) .......... ........ ........ 48
Paper Tray Priority............ ...... 49
Paper Type Display.......... ....... 48
Set date/Set time ........ ........ .... 46
Set User Code(s)........ ........ .... 50
Tray 1 <*> Paper Size Setting 48
72
Tray 1 <F/F4> Paper Size
Setting ................................... 48
bypass tray........ .......... ........ ........ 5
C
CAUTION ....................................iv
CHANGING PAPER SIZE........... 38 - 43
Clear Modes/Low Power
Mode key. .............. .............. ...... 6, 12
Clear/Stop key ............................. 7
Contrast Dial .. ........ ...... ........ ........ 6
copier..... ............ ............ .............. 64
Copy count display.... .......... ........ 46
copy paper, loading................... ..28 - 30
copy tray.... ........ ........ ........ .......... 3, 5
D
DO’S AND DON’TS..................... 55, 56
document feeder (option)........ .... 3, 56, 66
duplex unit..... ........ ........ ...... ........ 5
E
Enter key.....................................7
exposure glass .......... ........ ........ .. 5
F
finisher......... ............ ............ ........ 3, 56, 67
front cover.... ........ ...... ........ ........ .. 5
fusing unit.................................... 5
G
GENERAL ... ........ ...... ...... ...... ...... 65
H
How To Use The Operation
Panel.......................................... 8
I
installation environments............. 58, 59
Interrupt key.................................6
J
Job Recall key ... ................ .......... 6
Page 73

INDEX
K
Printer Mode................................ 9
Program key................................6
key counter holder...... ........ ...... ...5
Keys ...... ...... ........ ...... ...... ...... ...... .6
L
large capacity tray .............. ...... ...5
large capacity tray, loading
paper..........................................30
LCT Paper Size Change...... ....... 51
Low Power mode......... ........ ........ 12
Low Power Timer ......... ........ ...... .46
M
main switch.................................. 5, 12
MAIN UNIT AND OPTIONS ..... ...3
MAINTAINING YOUR
MACHINE..................................54
misfeeds ................... ................ ...33 - 35
N
Number keys .. ........ .......... .......... .7
O
operation panel ........... .............. ...6 - 10
keys............ ........ ........ ........ ..... 6
Operation panel beeper........ ....... 46
optional tray unit............. ........ .....43
Original: F/F4 Size Setting ... .......49
originals.......................................19
originals, setting .......... ........ ......... 20
P
paper............. .............. ................ .60
Paper Size Setting Tray 2, 3,
and 4 (option) ............................48
PAPER TIPS .. ...... ........ ...... ........ .57
paper tray ............... ............ ......... 5
Paper Tray Priority ............. ......... 49
paper tray unit ................ ............ .3
paper tray, loading paper....... .....29
Paper Type Display.... .......... ....... 48
paper, changing size in the
1st tray.......................................38
paper, loading ......... ............ ......... 28 - 30
platen cover............ ........ ...... ....... 5
PRINTER.... ...... ........ ...... ........ ..... 64
S
SADF...........................................22, 23
SAFETY INFORMATION ......... ...iv
SCANNABLE AREA ....................57
SCANNER ...................................65
Scanner Mode........ .......... ........ ...9
Set date/Set time .... .......... ........ ...46
Set User Code(s)...... .......... ......... 50
specifications
1000-sheet tray unit ......... ...... .69
1500-sheet tray unit ......... ...... .69
copier ...... ...... ........ ...... ...... ...... .64
document feeder .. .......... ........ .66
finisher.. ........ ........ ........ .......... .67
staples, adding ......... ............ .......32
staples, jammed ....... .......... ........ .3 6
STARTING THE MACHINE ........12, 13
SWITCHING BETWEEN
THE COPIER, PRINTER AND
SCANNER FUNCTIONS.......... .14 - 17
T
toner.... ........ ........ ........ ........ ........ .61
toner bottle .......... .......... ........ .......5
toner, adding... ............ ............ .....31
Touch Panel Display ........ ........ ...6
Tray 1 <*> Paper Size Setting ....48
Tray 1 <F/F4> Paper Size
Setting........................................48
TROUBLESHOOTING ..... ...... .....26, 27
jammed staples........ .......... .....36
misfeeds............... ................ ...33 - 35
U
User Code mode.......... .......... .....13
User Tools................................... 44 - 52
Basic Settings.......................... 46
User Tools key ............................ 6
W
WARNING ........ ........ ...... ...... ...... .iv
WHERE TO PUT YOUR
MACHINE..................................58, 59
73
 Loading...