

Page 1

Introduction
1
SLR Digital Camera
Operating Manual
Getting Started
Shooting
Playback
Sharing
Settings
Appendix
To ensure the best performance from your
camera, please read the Operating Manual
before using the camera.
2
3
4
5
6
7
Page 2

Checking the Contents of the Package
Hot shoe cover FK
(Installed on camera)
Battery charger
D-BC109
Start Guide
Lenses you can use
Lenses that can be used with this camera are DA, DA L, D FA and FA J lenses and lenses that have an 9 (Auto) position on the
aperture ring. To use any other lens or accessory, see p.113.
(Installed on camera)
AC plug cord Strap
Eyecup F
R
Body mount cover
(Installed on camera)
O-ST132
Rechargeable Lithium-ion
Battery D-LI109
Software (CD-ROM)
S-SW156
Page 3

Introducing the K-S2
1
Getting Started
Taking Pictures
Playback Functions
Sharing Images
Changing the Settings
Appendix
2
3
4
5
6
7
1
Page 4

How to Use This Manual
1
How to Use This Manual
Introducing the K-S2............................p.7
Gives you an overview of the K-S2.
Read this and get to know your K-S2!
Names and Functions of the Working Parts
.......................................................................p.7
How to Change Function Settings ............. p.18
Menu List ......................................................p.21
2
Getting Started........................................p.30
Explains how to get your K-S2 ready for shooting as
well as basic operations.
Attaching the Strap .....................................p.30
Attaching a Lens .........................................p.30
Using the Battery and Charger ..................p.31
Inserting a Memory Card ............................p.34
How to Open the Monitor ............................p.35
Initial Settings ..............................................p.36
2
Basic Shooting Operation ..........................p.39
Reviewing Images .......................................p.42
3
Taking Pictures.......................................p.44
Once you’ve confirmed that the camera works
properly, try out the camera and take lots of pictures!
Configuring the Capture Settings ..............p.44
Taking Still Pictures ....................................p.45
Recording Movies .......................................p.49
Setting the Exposure ..................................p.51
Using the Built-in Flash ..............................p.53
Setting the Focus Method .......................... p.54
Setting the Drive Mode ...............................p.59
Setting the White Balance .......................... p.68
Controlling the Image Finishing Tone .......p.71
Correcting Images .......................................p.74
Page 5

4
Playback Functions..............................p.77
Explains various operations for playing back and
editing images.
Playback Mode Palette Items .....................p.77
Changing the Playback Method ................. p.78
Connecting the Camera to a Computer ..... p.82
Editing and Processing Images .................p.83
5
Sharing Images.......................................p.89
Explains how to share images with other devices
using the built-in Wi-Fi function.
Enabling the Wi-Fi Function .......................p.89
Operating the Camera with a Communication
Device ...........................................................p.91
6
Changing the Settings ........................p.100
Explains how to change other settings.
7
Appendix....................................................p.110
Provides other resources to get the most from your
K-S2.
Restrictions on Each Capture Mode ..........p.110
Functions Available with Various Lenses
.......................................................................p.113
Functions when Using an External Flash
.......................................................................p.116
Using the GPS Unit .....................................p.117
Troubleshooting ..........................................p.118
Main Specifications .....................................p.123
Index .............................................................p.130
For Using Your Camera Safely ...................p.135
Care to be Taken During Handling ............ p.137
WARRANTY POLICY ...................................p.141
How to Use This Manual
Camera Settings ..........................................p.100
File Management Settings ..........................p.106
There is a possibility that the illustrations and the display screen
of the monitor in this manual are different from the actual ones.
3
Page 6

Contents
How to Use This Manual .........................2
Contents
Introducing the K-S2 ...............................7
Names and Functions of the Working Parts ......7
Operating Controls ......................................................... 8
Monitor ......................................................................... 10
Viewfinder .................................................................... 16
Electronic Level ........................................................... 17
How to Change Function Settings ....................18
Using the Direct Keys .................................................. 18
Using the Control Panel ............................................... 18
Using the Menus .......................................................... 19
Menu List .............................................................21
Rec. Mode Menus ........................................................ 21
Movie Menu ................................................................. 25
Playback Menu ............................................................ 25
Set-up Menus .............................................................. 26
Custom Setting Menus ................................................ 28
Getting Started ......................................30
Attaching the Strap ............................................30
Attaching a Lens .................................................30
Using the Battery and Charger ..........................31
Charging the Battery .................................................... 31
Inserting/Removing the Battery ................................... 32
Using the AC Adapter .................................................. 33
Inserting a Memory Card ...................................34
How to Open the Monitor ...................................35
4
Initial Settings .....................................................36
Turning the Camera On ............................................... 36
Setting the Display Language ...................................... 37
Setting the Date and Time ........................................... 37
Setting the LCD Display ............................................... 38
Formatting a Memory Card .......................................... 38
Basic Shooting Operation .................................39
Shooting with the Viewfinder ........................................ 39
Shooting While Viewing the Live View Image .............. 41
Reviewing Images ..............................................42
Taking Pictures .....................................44
Configuring the Capture Settings ..................... 44
Image Capture Settings ............................................... 44
Movie Capture Settings ................................................ 44
Taking Still Pictures ...........................................45
Scene Modes ............................................................... 45
Advanced HDR Mode .................................................. 46
Exposure Modes .......................................................... 47
EV Compensation ........................................................ 48
Recording Movies ...............................................49
Playing Back Movies .................................................... 51
Setting the Exposure ..........................................51
Sensitivity ..................................................................... 51
AE Metering ................................................................. 52
Using the Built-in Flash .....................................53
Setting the Focus Method .................................. 54
Setting the AF Mode when Shooting with the
Viewfinder .................................................................... 55
Page 7

Setting the AF Mode during Live View ......................... 57
AF Fine Adjustment ..................................................... 58
Setting the Drive Mode .......................................59
Continuous Shooting ................................................... 60
Self-timer ..................................................................... 60
Remote Control ............................................................ 61
Bracketing .................................................................... 62
Multi-exposure ............................................................. 63
Interval Shooting .......................................................... 64
Interval Composite ....................................................... 65
Interval Movie Record .................................................. 66
Star Stream .................................................................. 67
Setting the White Balance .................................68
Adjusting the White Balance Manually ........................ 70
Adjusting the White Balance with Color
Temperature ................................................................ 70
Controlling the Image Finishing Tone ..............71
Custom Image ............................................................. 71
Digital Filter .................................................................. 73
Correcting Images ..............................................74
Brightness Adjustment ................................................. 74
Lens Correction ........................................................... 75
Anti-Aliasing Filter Simulator ........................................ 76
Texture Enhancement ................................................. 76
Playback Functions ..............................77
Playback Mode Palette Items ............................ 77
Changing the Playback Method ........................78
Displaying Multiple Images .......................................... 78
Displaying Images by Folder ....................................... 79
Displaying Images by Shooting Date ........................... 79
Playing Back Images Continuously (Slideshow) .......... 80
Displaying Rotated Images .......................................... 80
Connecting the Camera to an AV Device .................... 81
Connecting the Camera to a Computer ............82
Editing and Processing Images ........................83
Changing the Image Size ............................................. 83
Correcting Color Moiré ................................................. 84
Processing Images with Digital Filters ......................... 84
Editing Movies .............................................................. 86
Developing RAW Images ............................................. 87
Sharing Images .....................................89
Enabling the Wi-Fi Function ..............................89
Setting from the Menus ................................................ 89
Pressing the Self-portrait Shutter Button ..................... 90
Touching a Communication Device ............................. 90
Operating the Camera with a Communication
Device ..................................................................91
Connecting the Camera and Communication Device ....91
Screens of “Image Sync” ............................................. 93
Shooting with a Communication Device ...................... 94
Viewing Images ............................................................ 95
Changing the Settings .................................................. 98
Changing the Settings ........................100
Camera Settings ...............................................100
Customizing the Button/E-dial Functions ................... 100
Saving Frequently Used Settings ............................... 103
Displaying the Local Date and Time of the Specified
City ............................................................................. 105
Selecting Settings to Save in the Camera ................. 105
File Management Settings ...............................106
Protecting Images from Deletion (Protect) ................. 106
Selecting the Folder/File Settings .............................. 106
Setting the Copyright Information .............................. 109
Contents
5
Page 8

Appendix ..............................................110
Restrictions on Each Capture Mode ............... 110
Restrictions on the Combinations of Special
Contents
6
Functions ................................................................... 112
Functions Available with Various Lenses ...... 113
Using the Aperture Ring ............................................ 115
Setting the Focal Length ............................................ 116
Functions when Using an External Flash ......116
Using the GPS Unit ...........................................117
Shooting Celestial Bodies (ASTROTRACER) ........... 118
Troubleshooting ...............................................118
Sensor Cleaning ........................................................ 120
Error Messages ......................................................... 121
Main Specifications ..........................................123
Operating Environment for USB Connection and
Provided Software ..................................................... 129
Index ..................................................................130
For Using Your Camera Safely ........................135
Care to be Taken During Handling .................. 137
WARRANTY POLICY ........................................141
Regarding copyrights
Images taken with this camera that are for anything other
than personal enjoyment cannot be used without permission
according to the rights as specified in the Copyright Act.
Please take care, as there are cases where limitations are
placed on taking pictures even for personal enjoyment during
demonstrations, performances or of items on display. Images
taken with the purpose of obtaining copyrights also cannot be
used outside the scope of use of the copyright as laid out in
the Copyright Act, and care should be taken here also.
To users of this camera
•
Do not use or store this camera in the vicinity of equipment
that generates strong electromagnetic radiation or magnetic
fields. Strong stati c charges or the magnetic fi elds produced
by equipment such as radio transmitters could interfere with
the monitor, damage the stored data, or affect the camera’s
internal circuitry and cause camera misoperation.
• The liquid crystal panel used for the monitor is
manufactured using extremely high precision technology.
Although the level of fu nctioning pixels is 99.99% or better,
you should be aware that 0.01% or fewer of the pixels may
not illuminate or may illuminate when they should not.
However, this has no effect on the recorded image.
• In this manual, the generic term “computer(s)” refers to
either a Windows PC or a Macintosh.
• In this manual, the term “battery(ies)” refers to any type of
batteries used for this camera and its accessories.
Regarding User Registration
In order to better serve you, we request that you complete
the user registration, which can be found on the CD-ROM
supplied with the camera or on our website.
Thank you for your cooperation.
http://www.ricoh-imaging.com/registration/
Page 9
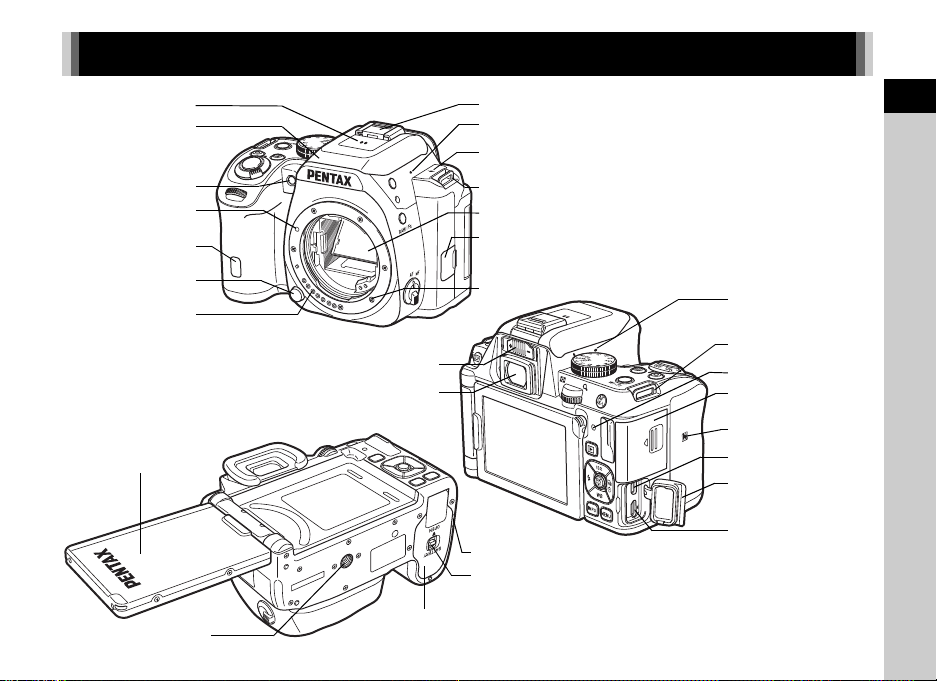
Names and Functions of the Working Parts
Remote control receiver
Lens unlock button
Lens information
contacts
Lens mount index
Speaker
AF assist light
Built-in flash
AF coupler
Mirror
Strap lug
Hot shoe
Microphone
Image plane indicator
Microphone terminal
Strap lug
Card access lamp
USB terminal (micro B)
Terminal cover
HDMI terminal (type D)
Microphone
NFC mark
Card slot for SD
Memory Cards
Diopter adjustment lever
Viewfinder
Vari-angle monitor
Connection cable cover
Battery cover unlock lever
Battery cover
Tripod socket
1
Introduction
7
Page 10

1
0
8
c
e
b
6
4
3
5
9
f
g
h
2
7
a
d
Operating Controls
1
Introduction
8
1 EV Compensation button (J)
Press to change the exposure compensation value. (p.48)
In playback mode, the last JPEG image taken can also be
saved in RAW format. (p.43)
2 Green button (M)
Resets the value being adjusted.
3 Shutter release button (0)
Press to capture images. (p.40)
In playback mode, press halfway to switch to capture mode.
4 Main switch
Turns the power on/off, or switches to C (movie) mode.
(p.36, p.49)
When the camera is turned on, it enters A (still picture)
mode and the indicator lamp lights green. When the switch
is turned to C, the camera enters C mode and the lamp
lights red.
5 Front e-dial (Q)
Changes the values for camera settings such as exposure.
(p.47)
You can change the menu category when a menu screen is
displayed. (p.19)
In playback mode, use this to select a different image.
6 Flash pop-up button (1)
Press to pop up the built-in flash. (p.53)
7 RAW/Fx button (P)
You can assign a function to this button. (p.100)
8 Focus mode switch
Changes the focus mode. (p.54)
9 Live View/Delete button (K/L)
Displays the Live View image. (p.41)
In playback mode, press to delete images. (p.43)
Page 11

0 Rear e-dial (R)
Changes the values for camera settings such as exposure.
(p.47)
You can change the menu tabs when a menu screen is
displayed. (p.19)
You can change the camera settings when the control panel
is displayed. (p.18)
In playback mode, use this to magnify an image or display
multiple images at the same time. (p.43, p.78)
a Four-way controller (ABCD)
Displays the Sensitivity, White Balance, Flash Mode or
Drive Mode setup menu. (p.18)
When a menu or the control panel is displayed, use this to
move the cursor or change the item to set.
Press B in single image display of the playback mode to
display the playback mode palette. (p.77)
b INFO button (G)
Changes the style of the display on the monitor. (p.10, p.14)
c Mode dial
Changes the capture mode. (p.39)
d
Self-portrait shutter button
When shooting with Live View, this button can be used as a
shutter release button and facilitates taking self-portraits by
holding the camera with the lens facing you. The indicator
lamp lights green or red when the button can be used as a
shutter release button. (p.41)
At all other times, this button is used to switch the Wi-Fi
function on or off. (p.90)
e AF/AE Lock button (f)
Available for adjusting focus, instead of pressing 0
halfway, and for l ocking the exposure value before sh ooting.
(p.54, p.101)
f Playback button (3)
Switches to playback mode. (p.42)
Press the button again to switch to capture mode.
g OK button (E)
When a menu or the control panel is displayed, press this
button to confirm the selected item.
Press this button when [AF Active Area] is set to E or 8,
or when [Contrast AF] is set to g or h to change the
focusing area. (p.56, p.57)
When the power is turned on, the indicator lamp lights blue.
The lamp turns off after a while.
h MENU button (F)
Displays a menu. Press this button while the menu is
displayed to return to the previous screen. (p.19)
1
Introduction
9
Page 12

About the indicator lamps
G
G
1/1/
25 0250
16 0 01600
FF
5.65.6
99 99999999
1/1/
25 0250
16 0 01600
FF
5.65.6
99 99999999
10: 2310:23
99 99999999
Status ScreenStatus ScreenStatus Screen
Custom ImageCustom ImageCustom Image
BrightBrightBright
02/ 02/201 502/02/2015
Standby mode
(Status screen)
Shooting Info Display
selection screen
Control panel
The main switch lamp, self-portrait shutter button lamp, and
E lamp turn off in the following situations.
1
• From the time when 0 is pressed halfway until the
Introduction
end of shooting
• While f is pressed
• During playback mode
• While a menu is displayed
• During Auto Power Off
You can set the lamp lighting settings in [Indicator Lamps] of
the D3 menu. (p.27)
About the four-way controller
In this manual, each button of the fourway controller is indicated as shown in
the illustration on the right.
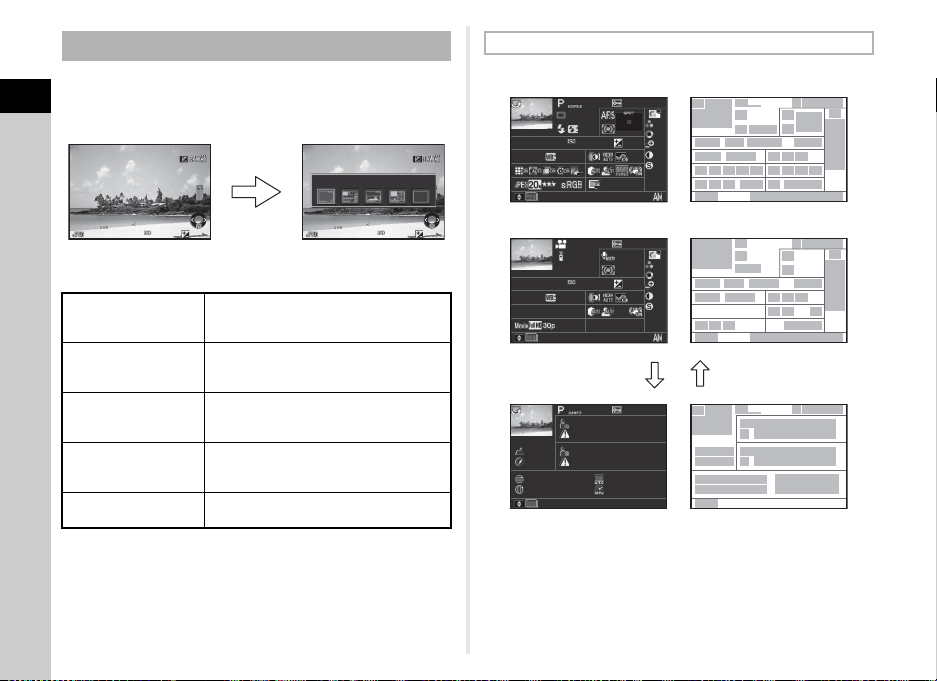
Monitor
Capture Mode
With this camera, you can take pictures while looking through
the viewfinder or while viewing the image on the monitor.
When using the viewfinder, you can take pictures while
checking the status scre en displayed on the monitor and looking
through the viewfinder. (p.39) When not using the viewfinder,
you can take pictures while viewing the Live View image
displayed on the monitor. (p.41)
The camera is in “standby mode” when it is ready to shoot, such
as when the status screen or Live View image is displayed.
Press G in standby mode to display the “control panel” and
change settings. (p.18) You can change the type of information
displayed in standby mode by pressing G while the control
panel is displayed. (p.13)
10
Page 13
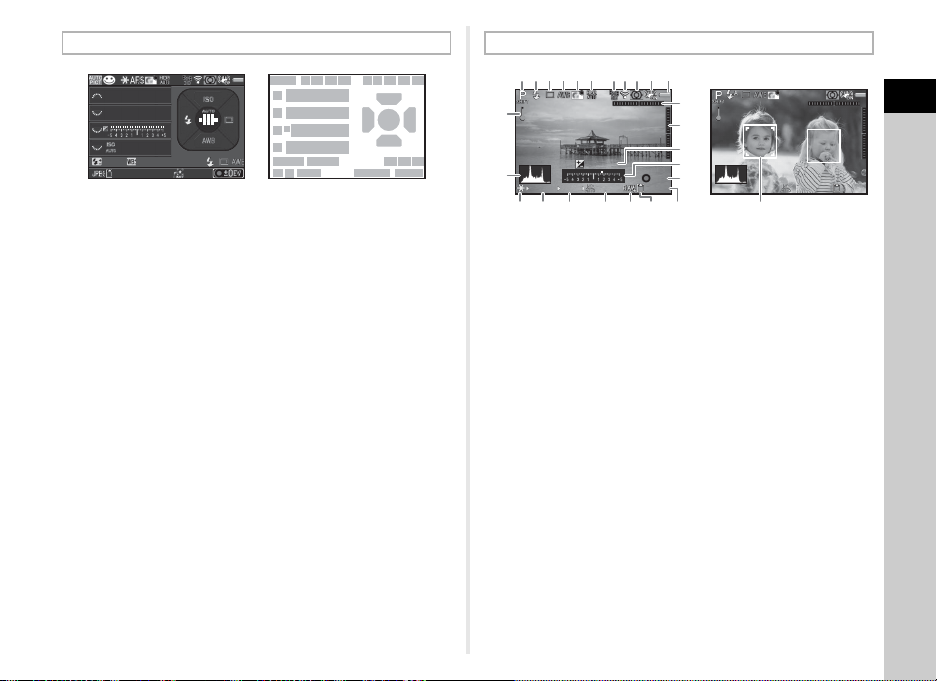
Status Screen
123
11
11
11
11
12
13
16
15
14
17 19 20
2726
17 1918
16
20
21 22
2523
24
45 678910
1/1/
25 0250
16 0 01600
FF
5.65.6
12 34512345 5´ 0 0˝5 ´00˝
+1 .0+1.0
G1 A1G1A1
+1. 7EV+1.7
EV
1/
200 01/2000
F2. 8F2.8
160 01600
9999999999
±0EV ±0EV
1/
200 01/2000
F2. 8F2.8
160 01600
9999999999
123456 91011
23
87
17
16
18
14
15
24 2519 20 21 22 26
12
13
1 Capture mode (p.45) 16 Sensitivity (p.51)
2 AE Lock (p.49) 17 Flash Mode (p.53)
3 Focus Method (p.54) 18 Focusing area (AF point)
4 Custom Image (p.71)
5 Digital Filter (p.73)/HDR
Capture (p.74)
6 GPS positioning status
(p.117)
7 Wireless LAN status
(p.89)
8 AE Metering (p.52) 23 File Format (p.44)
9 Shake Reduction/
Horizon Correction
(p.22)
10 Battery level
11 E-dial guide
12 Shutter speed
13 Aperture value
14 EV Compensation
(p.48)/Bracketing (p.62)
15 EV bar scale
(p.56)
19 Drive Mode (p.59)
20 White Balance (p.68)
21 Flash Exposure
Compensation (p.53)
22 White Balance fine-
tuning (p.69)
24 Memory card
25 Image storage capacity
26 Number of shots during
Multi-exposure, Interval
Shooting, or Interval
Composite/Maximum
tracking duration of
ASTROTRACER (p.118)
27 Operation guide
Live View
1 Capture mode (p.45) 15 Electronic Level (vertical
2 Flash Mode (p.53)
tilt) (p.17)
3 Drive Mode (p.59) 16 EV Compensation (p.48)
4 White Balance (p.68) 17 EV bar scale
5 Custom Image (p.71) 18 Operation guide, and
6 Digital Filter (p.73)/HDR
Capture (p.74)
7 GPS positioning status
(p.117)
8 Wireless LAN status
(p.89)
number of shots during
Multi-exposure, Interval
Shooting or Interval
Composite
19 AE Lock (p.49)
20 Shutter speed
9 AE Metering (p.52) 21 Aperture value
10 Shake Reduction/
Horizon Correction
(p.22)/Movie SR (p.25)
22 Sensitivity (p.51)
23 File Format (p.44)
24 Memory card
11 Battery level 25 Image storage capacity
12 Temperature warning 26 Face detection frame
13 Histogram
14 Electronic Level
(horizontal tilt) (p.17)
(when [Contrast AF] is
set to [Face Detection])
(p.57)
t Memo
•
In [Live View] of the A3 menu, you can change the settings of
the items displayed on the monitor during Live View. (p.22)
1
Introduction
11
Page 14
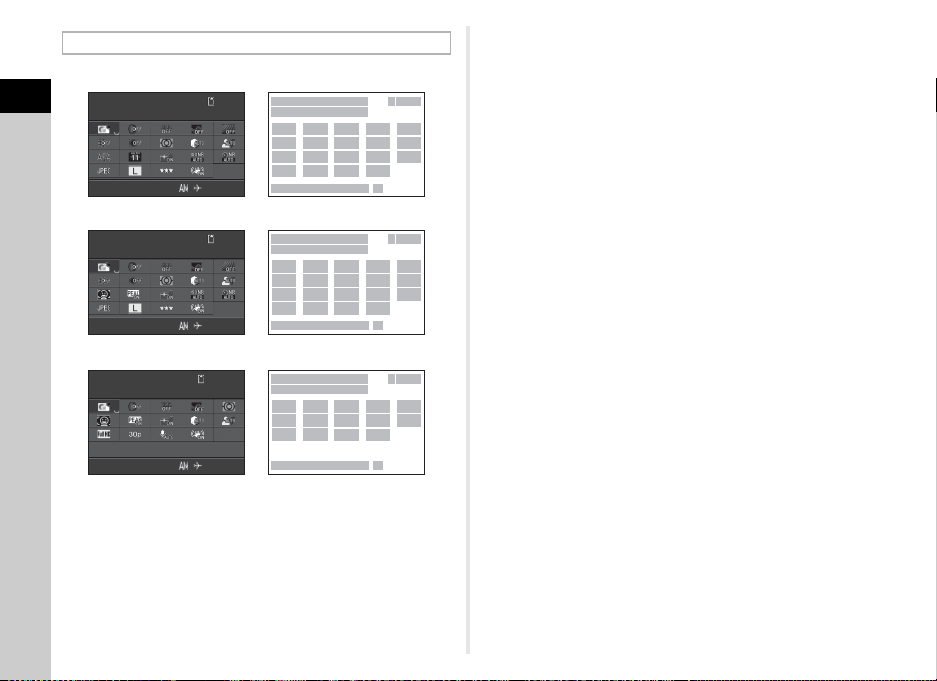
Control Panel
10: 2310:23
12 34512345
1
2
34
98
11
16
21
10
15
20
12
657
17
22
13
18
23
14
19
26 27
Custom ImageCustom ImageCustom Image
BrightBrightBright
02/ 02/201 502/02/2015
10: 2310:23
12 34512345
1
2
34
98
11
16
21
10
15
20
12
657
17
22
13
18
23
14
19
26 27
02/ 02/201 502/02/2015
Custom ImageCustom ImageCustom Image
BrightBrightBright
When shooting with Live View
1
2
34
128
16
24
15
21
17
657
13
25 23
14
26 27
10: 2310:23
1: 23' 4 5"1:23'45"
02/ 02/201 502/02/2015
Custom ImageCustom ImageCustom Image
BrightBrightBright
C mode
A mode
1
Introduction
1 Function name 7 HDR Capture (p.74)
2 Setting 8 Clarity Enhancement
3 Memory card
4 Number of recordable
12
still pictures/Movie
recordable time
5 Custom Image (p.71)/
Scene Mode (p.45)
6 Digital Filter (p.73) 12 AE Metering (p.52)
(p.76)
9 AA Filter Simulator (p.76)
10 Distortion Correction
(p.75)
11 Peripheral Illumination
Correction (p.75)
13 Highlight Correction
(p.74)
14 Shadow Correction
(p.74)
15 AF Mode (p.55)/Contrast
AF (p.57)
20 File Format (p.44)
21 JPEG Recorded Pixels
(p.44)/Movie Recorded
Pixels (p.44)
22 JPEG Quality (p.44)
23 Shake Reduction (p.22)/
Movie SR (p.25)16 AF Active Area (p.56)/
Focus Peaking (p.57)
24 Framerate (p.44)
17 AF Assist Light (p.55) 25 Recording Sound Level
18 High-ISO NR (p.52)
19 Slow Shutter Speed NR
(p.48)
(p.50)
26 Current date and time
27 Destination (p.105)
t Memo
• The items that can be selected vary depending on the current
camera setup.
• If no operations are made within 1 minute while the control
panel is displayed, the camera returns to standby mode.
Page 15
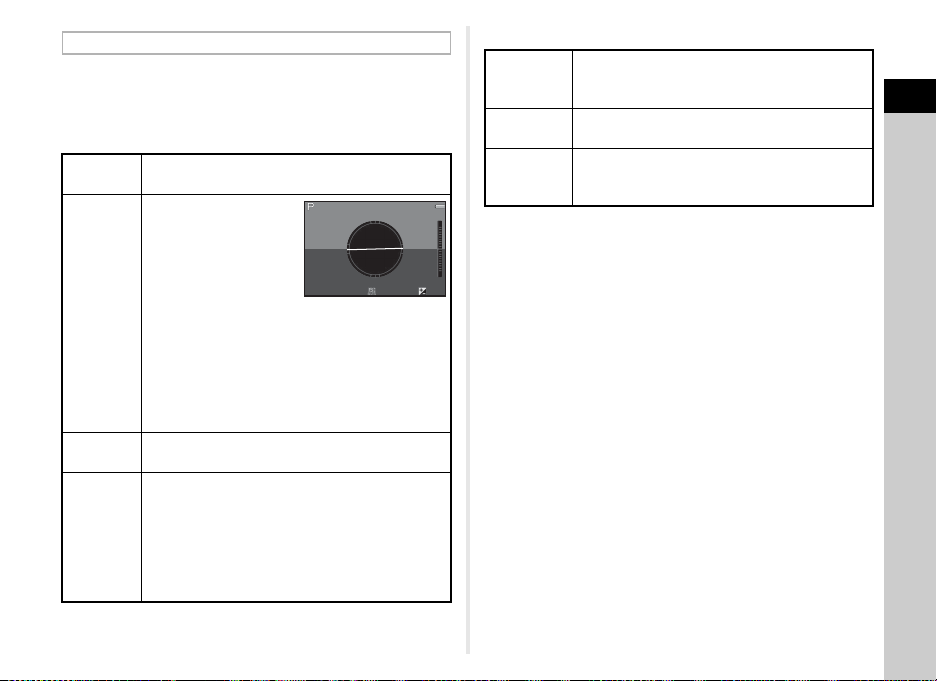
Shooting Info Display
1/
2501/250 F5.6F5.6 160 01600 0.00.0
Example:
Tilted 1.5° to the left
(yellow)
Vertically level (green)
You can change the type of information displayed in standby
mode by pressing G while the control panel is displayed.
Use CD to select the type and press E.
When shooting with the viewfinder
Status
Screen
Electronic
Level
Display
Off
Electronic
Compass
Displays the settings for shooting with the
viewfinder. (p.11)
Displays the camera
angle.
A scale indicating the
horizontal camera
angle appears at the
center of the screen,
and a scale indicating
the vertical camera
angle appears on the
right or left side. When
the angle exceeds the range that can be
displayed in the scale, the indicators on the scale
are displayed in red.
Nothing is displayed on the monitor.
The current latitude, longitude, altitude, direction,
Coordinated Universal Time (UTC), capture
mode, and exposure value are displayed. Turn
the camera off an d on again to return to the status
screen.
Available only when the optional GPS unit is
attached to the camera and is operating. (p.117)
When shooting with Live View
Standard
Information
Display
Electronic
Level
No
Information
Display
The Live View image and the settings for
shooting with Live View are displayed. (p.11)
The same electronic level as when shooting
with the viewfinder is displayed.
Certain icons, such as those for the capture
mode and drive mode, are not displayed.
t Memo
• The status screen is displayed when the camera is turned off
and on again. If [Shooting Info Display] is set to [On] in
[Memory] of the A4 menu, the screen selected on the
Shooting Info Display selection screen appears when the
camera is turned off and on again. (p.105)
1
Introduction
13
Page 16
Playback Mode
1/
200 01/2000 F2.8F2.8 200200 +0. 3+0.3
100 -0001100-0001
1/
200 01/2000 F2.8F2.8 200200 +0. 3+0.3
100 -0001100-0001
G
Standard Information DisplayStandard Information Display
Single image display
(Standard Information
Display)
Playback Info Display
selection screen
1
3
3
4
7
12
16
21 22 23
30
39
38
38
38
39
31 32 33 34 35
24 25 26 27 28 29
17 18 19 20
13 14 15
811
10
36
37
36
37
9
5
45
43
44
45
4547
48
49
50
46
4
41
11
3
6
40
13 14 1512
16 17 18 19
26 27 29
35423130
20
5
6
2
2
1
1
+1. 0+1.0
1/
200 01/2000 F2 .8F2.8
55. 0mm55.0mm
160 01600
500 0K5000K
100 -0001100-0001
+1. 5+1.5
±0±
0
±0±
0
±0±
0
±0±
0
±0±
0
10: 3010:30
10' 10"10'10"
G1A 1G1A1
100 -0001100-0001
0m0m
123 °123°
N
36° 45.410 'N
36°45.410'
10: 00:0010:00:00
ABCDEFGHIJKLMNOPABCDEFGHIJKLMNOP
QRSTUV
W
XYZ1 23 45 6QRSTUVWXYZ123456
ABCDEFGHIJKLMNOPABCDEFGHIJKLMNOP
QRSTUV
W
XYZ1 23 45 6QRSTUVWXYZ123456
W14 0°02.0 00'W140°02.000'
1/
1251/125 F8.0F8.0
55. 0mm55.0mm
160 01600
500 0K5000K
100 -0001100-0001
+1. 5+1.5
±0±
0
±0±
0
±0±
0
±0±
0
±0±
0
10: 3010:30
G1A 1G1A1
02/ 02/201 502/02/2015
02/ 02/201 502/02/2015
02/ 02/201 502/02/2015
Still pictures
Movies
Page 2
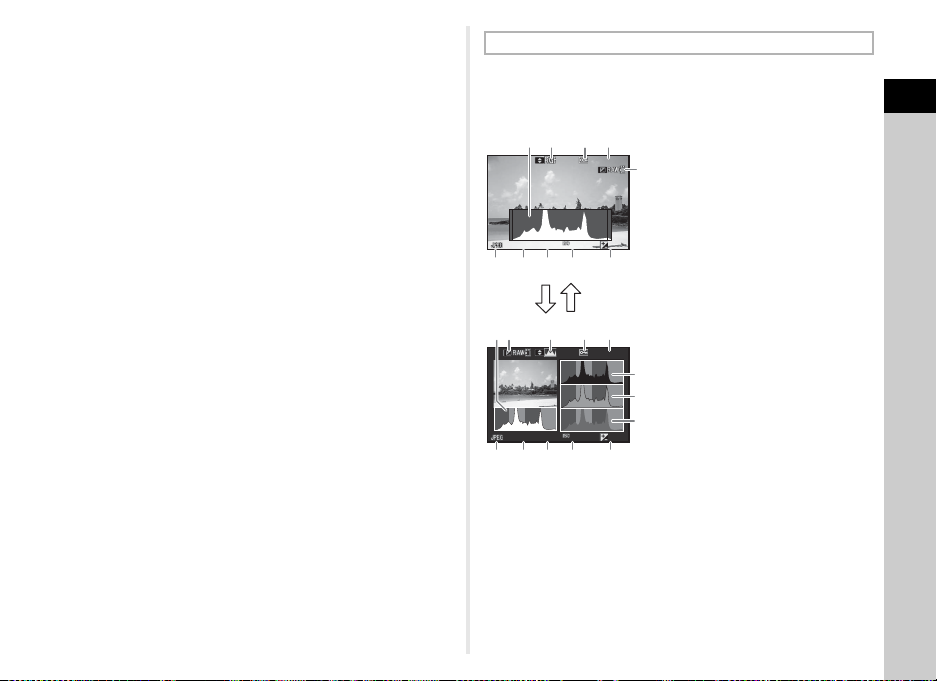
AB
The captured image and shooting information are displayed in
single image display of the playback mode.
1
Press G to change the type of information displayed in
Introduction
single image display. Use CD to select the type and press E.
Standard
14
Information Display
Detailed
Information Display
Histogram Display
RGB Histogram
Display
No Information
Display
t Memo
• The screen selected in the Playback Info Display selection
screen is displayed in playback mode when the camera is
turned off and on again. If [Playback Info Display] is set to
[Off] in [Memory] of the A4 menu, the [Standard Information
Display] always appears first when the camera is turned on.
(p.105)
Captured image, file format, exposure
parameters, and operation guide
indicators are displayed.
Detailed information on how and when
the image was taken is displayed.
(p.14)
Captured image and brightness
histogram are displayed. (p.15)
Not available during movie playback.
Captured image and RGB histogram
are displayed. (p.15)
Not available during movie playback.
Only the captured image is displayed.
Detailed Information Display
1 Captured image 6 Drive Mode (p.59)
2 Rotation information
(p.80)
7 Flash Mode (p.53)
8 Flash Exposure
Compensation (p.53)3 Capture mode (p.45)
4 Protect setting (p.106) 9 Focus Method (p.54)
5 Folder number-File
number (p.106)
10 Focusing area (AF point)
(p.56)
Page 17
11 AE Metering (p.52) 30 File Format (p.44)
100 -0001100-0001
1/
200 01/2000 F2.8F2.8 200200 +0. 3+0.3
100 -0001100-0001
1/
200 01/2000 F2.8F2.8 200200 +0. 3+0.3
134
5
2
11
12
13
6 7 8 9 10
34251
6 7 8 109
Brightness histogram
AB
RGB histogram
12 Shutter speed 31 JPEG Recorded Pixels
13 Aperture value
14 Sensitivity (p.51)
15 EV Compensation (p.48) 32 JPEG Quality (p.44)
16 White Balance (p.68) 33 Color Space (p.29)
17 White Balance fine-
tuning (p.69)
18 Digital Filter (p.73) 35 Lens focal length
19 HDR Capture (p.74) 36 Custom Image setting
20 Clarity Enhancement
(p.76) 37 Custom Image
21 Distortion Correction
(p.75) 38 Page guide
22 Peripheral Illumination
Correction (p.75)
Aberration Adjustment
(p.75)
24 Diffraction Correction
(p.75)
25 Color Fringe Correction
(p.87)
26 Highlight Correction
(p.74)
27 Shadow Correction
(p.74)
28 AA Filter Simulator (p.76) 50 Universal Coordinated
29 Shake Reduction/
Horizon Correction
(p.22)/Movie SR (p.25)
istogram Display
H
(p.44)/Movie Recorded
Pixels (p.44)
Use AB to switch between the brightness histogram and RGB
histogram.
1
Introduction
34 Color Moiré Correction
(p.84)
(p.71)
parameters
39 Shooting date and time
40 Length of time of the
recorded movie23 Lateral Chromatic
41 Recording Sound Level
42 Framerate (p.44)
43 Photographer (p.109)
44 Copyright Holder (p.109)
45 Information tampering
warning
46 Altitude (p.117)
47 Lens direction (p.117)
48 Latitude (p.117)
49 Longitude (p.117)
Time (p.117)
1 Histogram (Brightness)
2 Switch RGB histogram/
Brightness histogram
3 Protect setting
4 Folder number-File
number
5 Save RAW Data
6 File Format
7 Shutter speed
8 Aperture value
9 Sensitivity
10 EV Compensation
11 Histogram (R)
12 Histogram (G)
13 Histogram (B)
15
Page 18

Viewfinder
1
4
19
181716151413
61011
12
2
1
3
5 7 8 9
When shooting with the viewfinder, the following information
appears in the viewfinder.
1
Introduction
1 AF frame (p.40) 11 Sensitivity (p.51)/
2 Spot metering frame
(p.52)
3 AF point (p.56) 12 AE Lock (p.49)
4 Flash indicator (p.53) 13 Change AF Point (p.56)
5 Focus Method (p.54) 14 Multi-exposure (p.63)
6 Shutter speed 15 AE Metering (p.52)
7 Aperture value 16 Shake Reduction (p.22)
8 Focus indicator (p.40) 17 Flash Exposure
9 EV bar scale/Electronic
Level (p.17) 18 EV Compensation
10 ISO/ISO AUTO
Exposure compensation
value
Compensation (p.53)
(p.48)/Bracketing (p.62)
19 File Format (p.44)
t Memo
• The information is displayed in the viewfinder when 0
is pressed halfway, or during the meter operating time
(default setting: 10 sec.).
• The AF point in use for autofocus appears in red
(Superimpose AF Area) when 0 is pressed halfway.
You can set it to [Off] in [16 Superimpose AF Area] of the E3
menu.
• You can adjust the image
sharpness in the viewfinder using
the diopter adjustment lever. If it is
difficult to move the diopter
adjustment lever, lift up and
remove the eyecup. Adjust the
diopter setting until the AF frame in
the viewfinder looks sharp and clear.
16
Page 19

Electronic Level
When level (at 0°)
When tilted 5° to the left
When held vertically and tilted 3° to the right
You can check whether the camera is tilted by displaying the
electronic level. The electronic level for the horizontal camera
angle can be displayed in the EV bar scale in the viewfinder,
and the electronic levels for the vertical and horizontal camera
angles can be displayed on the Live View screen. (p.11)
Select whether to display the electronic level in [Electronic
Level] of the A3 menu. (p.22)
1
Introduction
17
Page 20
How to Change Function Settings
99 99 999999
10: 2310:23
99 99 999999
File FormatFile Format
CancelCancel OKOK
Fil
e FormatFile FormatFile Format
02/ 02 /20 1502/02/2015
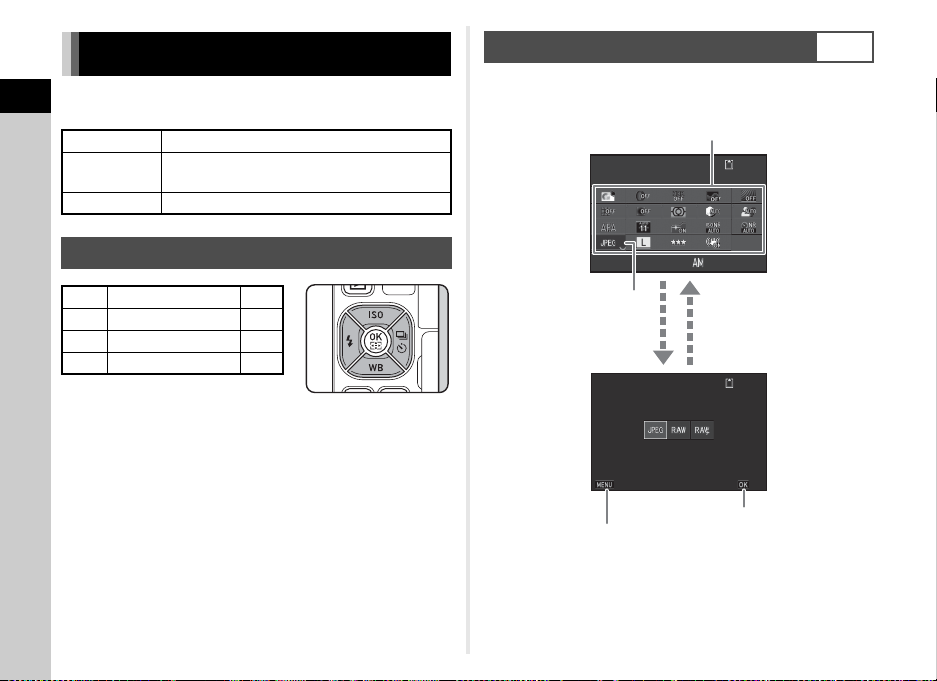
Use ABCD to select an item.
Use R to change
settings.
Press F to cancel
the setting operation.
Press E to confirm the
selected item and return to
the control panel.
Press E to make
detailed settings.
The camera functions and their settings can be selected and
1
changed by using the following ways.
Introduction
Direct keys Press ABCD in standby mode.
Control panel
Menus Press F.
Press G in standby mode.
(indicated with the v icon in this manual)
Using the Control Panel
You can set frequently used shooting functions. Press G in
standby mode.
G
Using the Direct Keys
A Sensitivity p.51
B White Balance p.68
C Flash Mode p.53
D Drive Mode p.59
18
Page 21
Using the Menus
1
2
GPSGPS
GPSGPS
2
1
PE FPEF
Custom ImageCustom Image
Image Capture SettingsImage Capture Settings
AF SettingsAF Settings
AE MeteringAE Metering
Digital FilterDigital Filter
HDR CaptureHDR Capture
ExitExit
Lens CorrectionLens Correction
Clarity EnhancementClarity Enhancement
D-Range SettingsD-Range Settings
High-ISO NRHigh-ISO NR
Slow Shutter Speed NRSlow Shutter Speed NR
Lens CorrectionLens Correction
Clarity EnhancementClarity Enhancement
D-Range SettingsD-Range Settings
High-ISO NRHigh-ISO NR
Slow Shutter Speed NRSlow Shutter Speed NR
ExitExit
CancelCancel OKOK
Custom ImageCustom Image
Image Capture SettingsImage Capture Settings
AF SettingsAF Settings
AE MeteringAE Metering
ExitExit
Digital FilterDigital Filter
HDR CaptureHDR Capture
File FormatFile Format
JPEG Recorded PixelsJPEG Recorded Pixels
Image Capture SettingsImage Capture Settings
JPEG QualityJPEG Quality
RAW File FormatRAW File Format
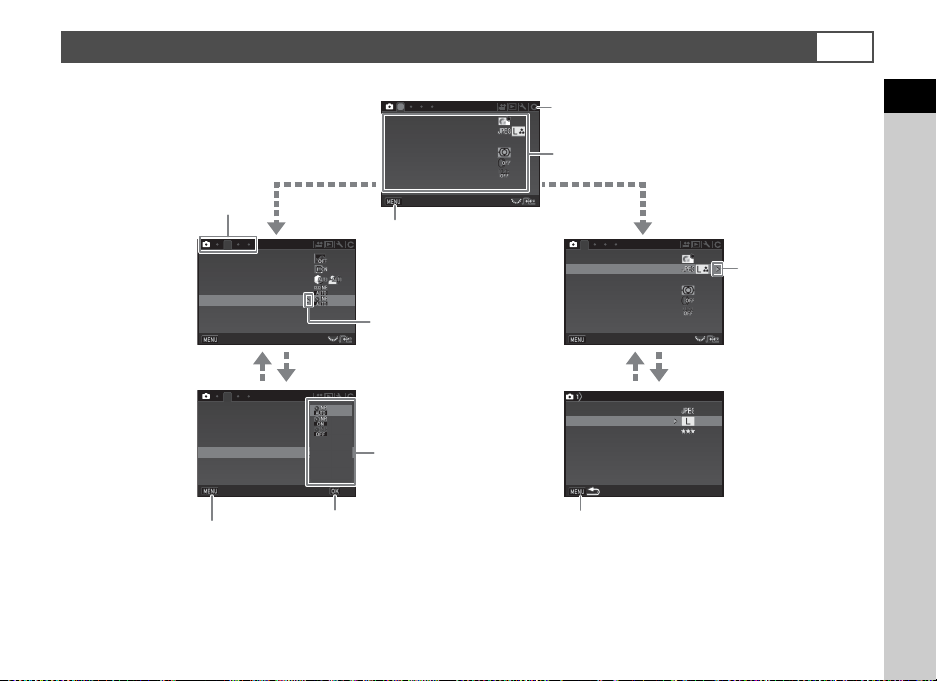
Use AB to select an item.
Press F to exit the
menu screen.
Menu tabs
Press D to display the
pop-up menu.
Press D to display
the submenu.
Press E to confirm the
selected item.
Press F to cancel the
pop-up menu.
Press F to return to the previous screen.
Use AB to select an item.
Use Q to change the menu category.
Use R to switch between menu tabs.
Most functions are set from the menus. The functions that can be set on the control panel can also be set from the menus.
F
1
Introduction
19
Page 22

t Memo
• For the Custom Setting menus (E1-5), you can show the setting screen of the next item in order of the menus on the monitor by
turning R while the submenu of the currently selected item is displayed.
• Press F to display the first tab of the proper menus for the camera settings at that time. To display the menu tab last selected
1
first, set in [25 Save Menu Location] of the E4 menu.
Introduction
• Settings are returned to their default values with [Reset] of the D3 menu. To reset all the settings in the Custom Setting menus to
the defaults, use [Reset Custom Functions] of the E5 menu. (Some settings do not apply.)
20
Page 23
Menu List
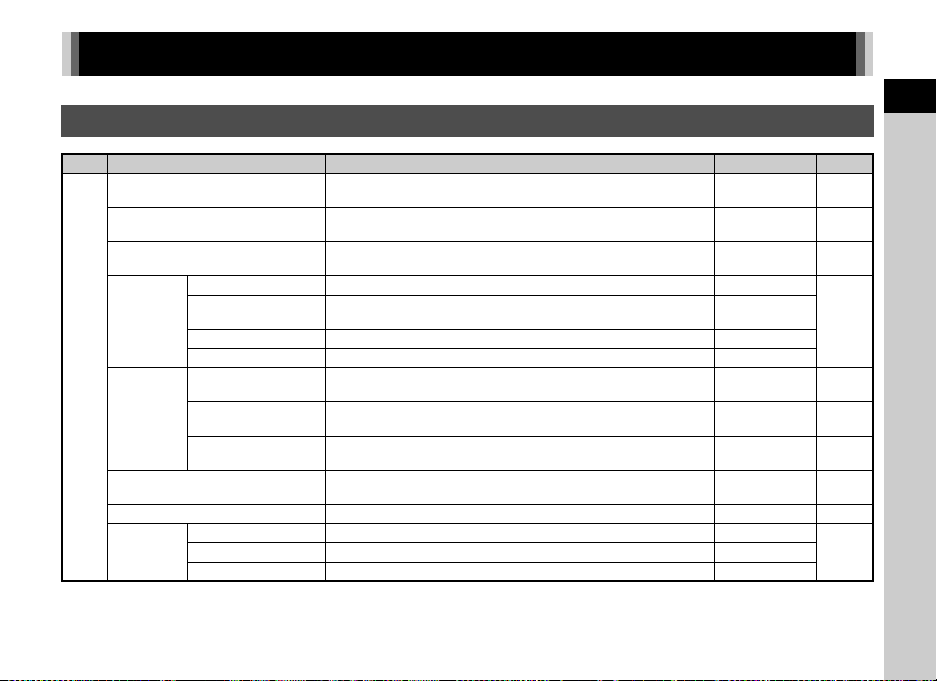
Rec. Mode Menus
1
Introduction
Menu Item Function Default Setting Page
Exposure Mode
Custom Image
Scene Mode
*3 *4
File Format
Image
Capture
Settings
JPEG Recorded
Pixels
JPEG Quality
*1
*2 *4
*4
Temporarily changes the exposure mode when the mode dial
is set to O or P.
Sets the image finishing tone such as color and contrast before
shooting an image.
Selects the scene mode that best suits the situation. (S
mode)
*4
Sets the file format of images. JPEG
Sets the recording size of JPEG images.
*4
Sets the quality of JPEG images.
G
p.104
Bright p.71
Portrait p.45
q
p.44
m
RAW File Format Sets the RAW file format. PEF
A1
AF
Settings
AE Metering
Digital Filter
HDR
Capture
AF Mode
*4
AF Active Area
AF Assist Light
*4
*4
HDR Capture
Auto Align Sets whether to automatically adjust the composition. On
Selects the autofocus method when shooting with the
viewfinder.
Selects the area to adjust the focus when shooting with the
*4
viewfinder.
Discharges the assist light when autofocusing in dark
*4
locations.
Selects the part of the sensor to use for measuring brightness
and determining exposure.
(11 AF Points)
Multi-segment p.52
Applies a digital filter effect when taking pictures. No Filter p.73
*4
Sets the type of high dynamic range shooting. Off
*4
Sets the amount to change the exposure. ±2EV
z p.55
Auto
p.56
On p.55
p.74Bracket Value
21
Page 24

Menu Item Function Default Setting Page
Clarity Enhancement
Distortion
1
Introduction
A2
Lens
Correction
D-Range
Settings
Correction
Peripheral Illumin.
Corr.
Lat-Chromatic-Ab
Adj
Diffraction
Correction
Highlight
Correction
Shadow
Correction
High-ISO NR
Slow Shutter Speed NR
*4
*4
*4
*4
*4
*4
Enhances the texture and surface details of the subject. Off p.76
Reduces distortions occurring due to lens properties. Off
Reduces peripheral light fall-off occurring due to lens
properties.
Reduces lateral chromatic aberrations occurring due to lens
properties.
Corrects blur caused by diffraction when using a small
aperture.
Expands the dynamic range and prevents overexposed areas
from occurring.
Expands the dynamic range and prevents underexposed
areas from occurring.
Sets the Noise Reduction setting when shooting with a high
ISO sensitivity.
Sets the Noise Reduction setting when shooting with a slow
*4
shutter speed.
GPS Sets the camera action when the optional GPS unit is used. – p.117
*4
Sets the autofocus mode for shooting with Live View. Face Detection p.57
Emphasizes the outline of the subject in focus and makes it
*4
easier to check the focus.
Live View
Contrast AF
Focus Peaking
Grid Display Displays the grid during Live View. Off
Highlight Alert Sets overexposed areas to blink red during Live View. Off
Displays the electronic level in the EV bar scale in the
viewfinder.
Displays the electron ic level in Standard Information Disp lay of
Live View.
A3
Electronic
Level
Viewfinder
Live View
Horizon Correction Corrects horizontal tilt when in A mode. Off –
Applies a low-pass filter effect using the Shake Reduction
mechanism.
Activates the Shake Reduction function. On –
Sets the focal length when using a lens of which focal length
information cannot be obtained.
22
AA Filter Simulator
Shake Reduction
Input Focal Length
*4
*4
Off
p.75
On
On
Auto
p.74
Auto
Auto p.52
Auto p.48
Off p.57
p.11Histogram Display Displays the histogram during Live View. Off
Off p.17
On p.11
Off p.76
35mm p.116
Page 25
Menu Item Function Default Setting Page
Instant
Review
A4
E-Dial
Programming
Display Time Sets the Instant Review display time. 1sec.
Zoom Review Displays the magnified image during Instant Review. On
Save RAW Data
Delete Deletes the displayed image during Instant Review. On
Histogram Display Displays the histogram during Instant Review. Off
Highlight Alert Sets overexposed areas to blink red during Instant Review. Off
G
H
I
J
K
L
M
m –, –, –
n
p I, J, G
o I, J, G
Rotation Direction Reverses the effect obtained when Q or R is turned. Rotate Right
Saves the RAW data during Instant Review.
Sets the Q / R / M operation for each exposure mode.
On
I
, J,
XG
–, ISO, –
I, –, –
–, J, –
I
, J, GLINE
I
, J, GLINE
–, J, –
–, J, GLINE
p.40
p.100
LINE
LINE
1
Introduction
23
Page 26

Menu Item Function Default Setting Page
RAW/Fx Button Sets the function for when P is pressed.
1
Introduction
Button
Customization
A4
Memory
Save USER Mode
*1 The function appears only when the mode dial is set to O or P.
*2 The function appears in modes other than S mode.
*3 The function appears in S mode.
*4 The function can also be set from the control panel.
AF/AE-L Button Sets the function for when f is pressed. Enable AF1
AF/AE-L Button
(Movie)
Self-portrait
Shutter Button
Sets the function for when f is pressed in C mode. Enable AF1
Sets whether to use the self-portrait shutter button as the
shutter release button when taking self-portraits.
Determines which settings to save when the power is turned
off.
You can save frequently used capture settings to O or P of
the mode dial.
One Push
File Format
On for settings
other than
Digital Filter,
HDR Capture,
Enhancement,
and Shooting
Info Display
p.100
On
Clarity
–p.103
p.105
24
Page 27
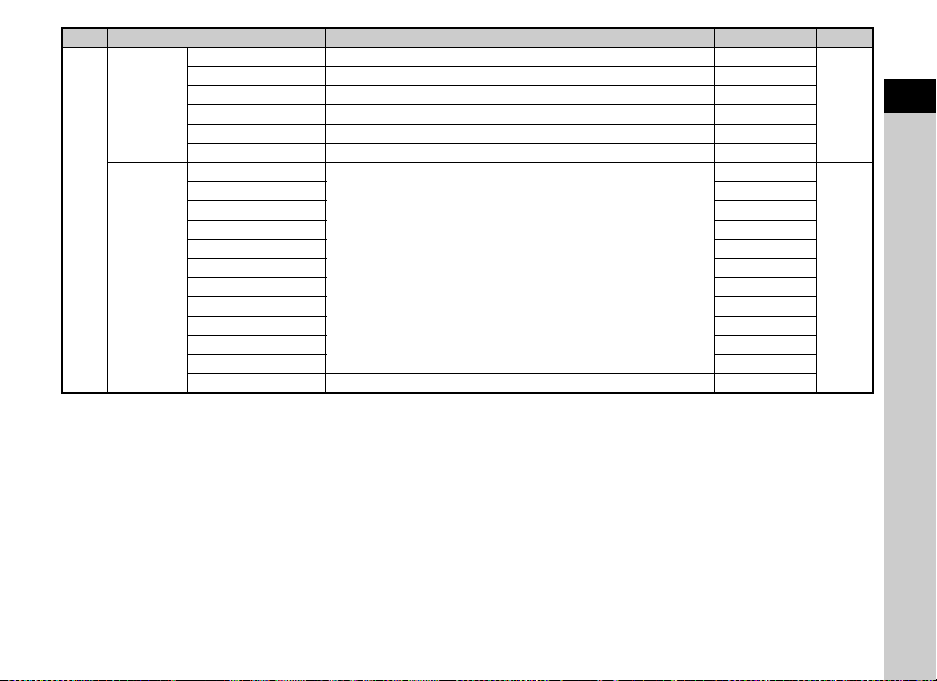
Movie Menu
Menu Item Function Default Setting Page
Movie Capture Settings
Recording Sound Level
Digital Filter
C1
HDR Capture
Clarity Enhancement
Movie SR
*1 The function can also be set from the control panel.
*1
*1
*1
*1
Sets the number of recorded pixels and the framerate of the
*1
movie.
*1
Sets the Recording Sound Level for recording. Auto p.50
Applies a digital filter effect when recording a movie. No Filter p.73
Sets the type of high dynamic range shooting. Off p.74
Enhances the texture and surface details of the subject. Off p.76
Activates the Shake Reduction function. On –
u/30p p.44
Playback Menu
Menu Item Function Default Setting Page
Slideshow
Quick Zoom Sets the initial magnification when magnifying images. Off –
B1
Highlight Alert
Auto Image Rotation
Protect All Images Protects all stored images at once. – –
Delete All Images Deletes all stored images at once. – –
Display Duration Sets an image display interval. 3sec.
Screen Effect Sets a transition effect when the next image is displayed. Off
Repeat Playback
Auto Movie
Playback
Starts the slideshow again from the beginning after the last
image is displayed.
Plays back movies during the slideshow. On
Sets overexposed areas to blink red in Standard Information
Display or Histogram Display in playback mode.
Rotates images which were captured with the camera held
vertically or of which the rotation information has been
changed.
Off
Off –
On p.80
p.80
1
Introduction
25
Page 28
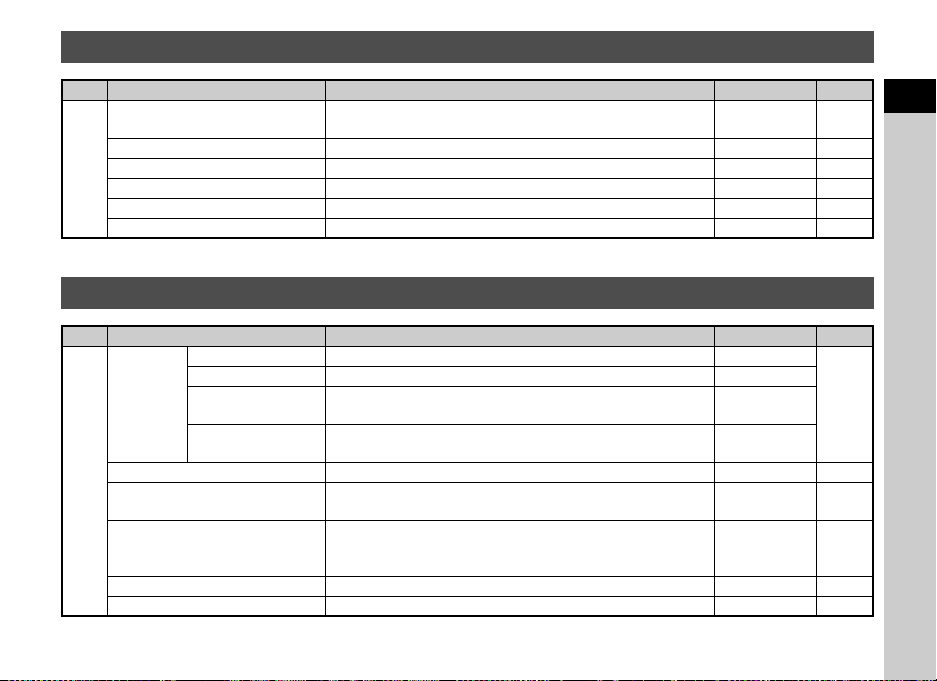
Set-up Menus
Menu Item Function Default Setting Page
1
Introduction
Language/W Changes the display language. English p.37
Date Adjustment Sets the date and time and the display format. 01/01/2015 p.37
World Time
Text Size Magnifies the text size when selecting a menu item. Std. p.37
D1
Sound Effects
LCD
Display
LCD Display Settings Adjusts the brightness, saturation and the color of the monitor. 0 –
USB Connection
HDMI Out
Folder Name Sets the folder name in which images are stored. Date p.106
Create New Folder Creates a new folder on the memory card. – p.107
D2
File Name Sets the file name assigned to an image. IMGP/_IMG p.108
File No.
Copyright Information
Guide Display
Display Color
Sequential
Numbering
Reset File Number
Switches between the date and time display of your hometown
city and that of a specified city.
Switches the operation sound on/off and changes the volume
for In-focus, AE-L, Self-timer, Remote Control, Change AF
Point, One Push File Format, Shake Reduction, and Wi-Fi
operations.
Displays the operation guides when the capture mode is
changed.
Sets the display color of the status screen, control panel and
menu cursor.
Sets the USB connection mode when connecting to a
computer.
Sets the output format when connecting to an AV device with
an HDMI input terminal.
Continues the sequential numbering for the file name when a
new folder is created.
Resets the file number setting and returns to 0001 each time a
new folder is created.
Sets the photographer and copyright information embedded in
the Exif data.
Hometown p.105
Volume 3/
All On
On p.39
1p.38
MSC p.82
Auto p.81
On
–
Off p.109
–
p.108
26
Page 29

Menu Item Function Default Setting Page
Flicker Reduction
Auto Power Off
Other Indicator
Lamps
Indicator
D3
Lamps
Wi-Fi Activates the built-in Wi-Fi function. Off p.89
Reset
Pixel Mapping Maps out and corrects any defective pixels on the sensor. – p.119
Dust Removal Cleans the sensor by shaking it. Off p.119
Sensor Cleaning
D4
Format Formats a memory card. – p.38
Firmware Info/Options
Certification Marks
Self-timer
Remote Control
Cuts down on the screen flicker by setting the power
frequency.
Sets the time until the camera turns off automatically if no
operations are made for a certain period of time.
Lights up the main switch lamp, self-portrait shutter button
lamp, and E lamp when the power is turned on.
Lights up the remote control receiver lamp during the
countdown for Self-timer shooting.
Lights up the remote control receiver lamp during the standby
and countdown for Remote Control shooting and after Remote
Control shooting.
Resets the settings of the direct keys and for the items of the
A menu, C menu, B menu, D menu, control panel, and
playback mode palette.
Locks the mirror in the up position for cleaning the sensor with
a blower.
Displays the camera’s firmware version. You can check the
current firmware version before running an update.
Displays the certification marks of conformance to wireless
technical standards.
50Hz –
1min. p.36
High
On
On
––
–p.120
––
–p.138
p.10
1
Introduction
27
Page 30

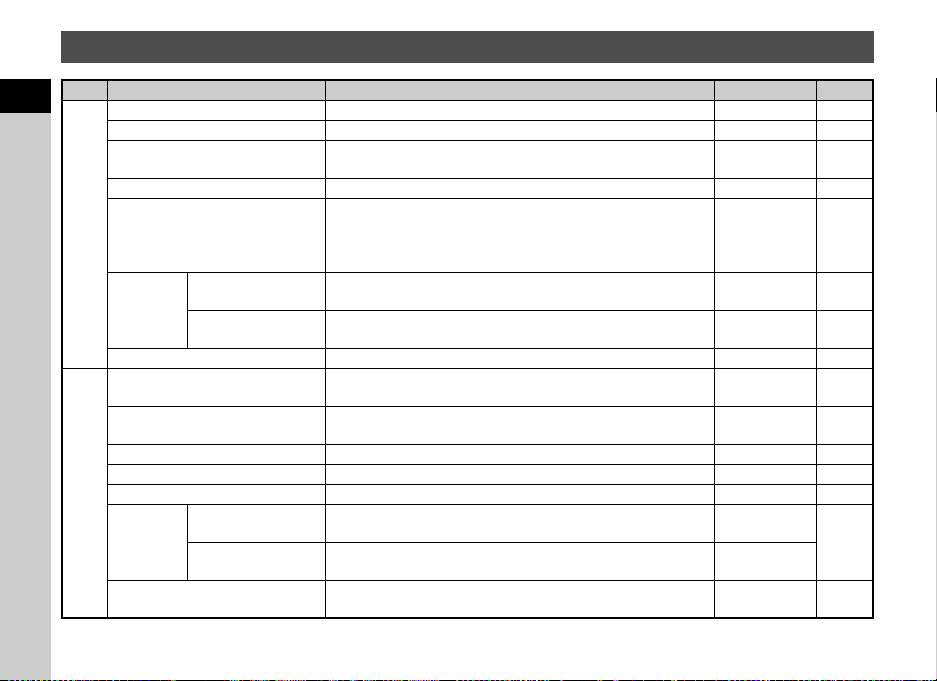
Custom Setting Menus
Menu Item Function Default Setting Page
1
Introduction
1 EV Steps Sets the adjustment steps for exposure. 1/3 EV Steps p.48
2 Sensitivity Steps Sets the adjustment steps for ISO sensitivity. 1 EV Step p.51
3 Meter Operating Time Sets the meter operating time. 10sec. –
4 AE-L with AF Locked
E1
5 Link AE and AF Point
6 Auto EV Compensation
7 Bulb (B) Mode Options Sets the camera operation when pressing 0 in M mode. Type1 –
8 Bracketing Order Sets the order for Bracketing shooting. 0 - + p.62
9 One-Push Bracketing Shoots all frames with one release when using Bracketing. Off p.62
10 Interval Shooting Options
11 AF in Interval Shooting
E2
12 WB Adjustable Range
13 WB When Using Flash Sets the white balance setting when using a flash.
14 AWB in Tungsten Light
Sets whether to lock the exposure value when the focus is
locked.
Sets whether to link the exposure and AF point in the focusing
area.
Automatically compensates the exposure when the correct
exposure cannot be achieved with the current settings.
Sets whether to start counting the time of interval from when
exposure starts or when exposure ends for Interval Shooting,
Interval Composite, and Interval Movie Record.
Sets whether to lock the focus position used when the first
picture is taken or perform autofocus for each exposure for
Interval Shooting and Interval Composite.
Sets whether to automatically fine-tune the white balance
when the light source is specified for the white balance setting.
Sets the tungsten light color tone when the white balance is set
to [Auto White Balance].
Interval p.65
Locks focus at
1st exposure
Auto White
Balance
Correction
Off –
Off p.52
Off –
p.65
Fixed p.69
p.69
Strong
p.69
28
Page 31

Menu Item Function Default Setting Page
15 Color Temperature Steps
16 Superimpose AF Area Displays the active AF point in red in the viewfinder. On p.16
17 AF.S Setting
18 1st Frame Action in AF.C
E3
19 Action in AF.C Continuous
20 Hold AF Status
21 AF with Remote Control
22 Release While Charging
23 Color Space Sets the color space to use. sRGB –
24 Save Rotation Info Saves rotation information when shooting. On p.80
25 Save Menu Location
E4
26 Catch-in Focus
27 AF Fine Adjustment
28 Using Aperture Ring
E5 Reset Custom Functions
Sets the adjustment steps for the Color Temperature option of
the white balance.
Sets the action priority for when the autofocus mode is set to
x and 0 is fully pressed.
Sets the action priority for the first frame when the autofocus
mode is set to y and 0 is fully pressed.
Sets the action priority during Continuous Shooting when the
autofocus mode is set to y.
Maintains the focus for a certain amount of time when the
subject happens to move out of the selected focusing area
after being focused.
Sets whether to use autofocus when shooting with a remote
control unit.
Sets whether to release the shutter while the built-in flash is
being charged.
Saves the last menu tab displayed on the monitor and displays
it again the next time F is pressed.
Enables Catch-in Focus shooting when a manual focus lens is
attached. The shutter is released automatically when the
subject comes into focus.
Allows you to precisely fine tune your lenses with the camera’s
autofocus system.
Enables the shutter to release when the lens aperture ring is
set to a position other than 9 (Auto).
Resets all the settings of the Custom Setting menus to the
defaults.
Kelvin p.70
Focus-priority p.55
Release-
priority
Focus-priority p.55
Off p.55
Off p.61
Off p.53
Reset Menu
Location
Off –
Off p.58
Disable p.115
––
p.55
p.20
1
Introduction
29
Page 32

Attaching the Strap Attaching a Lens
1 Pass the end of the strap
through the strap lug and
2
Getting Started
secure it on the inside of
the clasp.
2 Attach the other end in the same manner.
30
1 Make sure that the camera is turned off.
2 Remove the body mount
cover (1) and lens mount
cover (2).
After removing the cover, be sure
to put the lens down with the lens
mount side facing upward.
3 Align the lens mount
indexes (red dots: 3) on
the camera and the lens,
and secure by turning the
lens clockwise until it
clicks.
3
3
Page 33

To remove the lens
4
Battery charger Indicator lamp
AC plug cord
Attach the lens cap, and then turn
the lens counterclockwise while
pressing the lens unlock button
(4).
Using the Battery and Charger
Use the battery D-LI109 and battery charger D-BC109
exclusively developed for this camera.
u Caution
• When attaching or removing the lens, cho ose an environment
that is relatively free of dirt and dust.
• Keep the body mount cover attached on the camera when a
lens is not attached.
• Be sure to attach the lens mount cover and lens cap to the
lens after removing it from the camera.
• Do not insert your fingers inside the lens mount of the camera
or touch the mirror.
• The camera body and lens mount incorporate lens
information contacts. Dirt, dust, or corrosion may damage the
electrical system. Please contact your nearest service center
for professional cleaning.
• When a retractable lens is attached and is not extended, you
cannot take pictures and use some functions. If the lens is
retracted during shooting, the camera stops working. Refer to
“How to Use a Retractable Lens” (p.40) for details.
• We assume no responsibility nor liability for accidents,
damages and malfunctions resulting from the use of lenses
made by other manufacturers.
t Memo
• Refer to “Functions Available with Various Lenses” (p.113)
for details on the functions of each lens.
Charging the Battery
1 Connect the AC plug cord to the battery charger.
2 Plug the AC plug cord into the power outlet.
2
Getting Started
31
Page 34

3 Face the A mark on the
battery up, and insert it
into the battery charger.
Insert the battery into the battery
charger at an angle, and then fit
2
Getting Started
into place.
The indicator lamp is lit while
charging and turns off when the
battery is fully charged.
u Caution
• Do not use the battery charger D-BC109 to charge batteries
other than the battery D-LI109. Charging other batteries may
cause damage or heating.
• Replace the battery with a new one in the following cases:
• If the indicator lamp blinks or does not light after the battery
is inserted correctly
• If the battery starts to run down more quickly even after
being charged (the battery may have reached the end of its
service life)
t Memo
• The maximum charging time is approximately 240 minutes (it
depends on temperature and remaining battery power).
Charge in a location where the temperature is between 0°C
and 40°C (32°F and 104°F).
Inserting/Removing the Battery
u Caution
• Insert the battery correctly. If the battery is inserted
incorrectly, it may not be removed.
• Wipe the electrodes of the battery with a soft dry cloth before
inserting.
• Do not open the battery cover or remove the battery while the
power is on.
• Be careful as the camera or battery may become hot after the
camera has been used continuously for a long period of time.
• Remove the battery when you will not use the camera for a
long time. The battery may leak and damage the camera if left
installed during prolonged periods of non-use. If the removed
battery will not be used for six months or longer, charge the
battery for about 30 minutes before storing it. Be sure to
recharge the battery every six to twelve months.
• Store the battery in a location where the temperature will
remain at or below room temperature. Avoid locations with
high temperatures.
• The date and time may be reset if you leave the battery out of
the camera for long periods of time. If this happens, set the
current date and time again.
1 Open the battery cover.
Slide the battery cover unlock
lever (1) before opening the
cover.
1
32
Page 35

2 Face the A mark on the
2
battery towards the
outside of the camera, and
insert the battery until it
locks into place.
To remove the battery, push the
battery lock lever in the direction
of 2.
3 Close the battery cover.
t Memo
• The battery level may not be displayed properly if the camera
is used at low temperatures or when performing Continuous
Shooting for a long time.
• Battery performance temporarily decreases as the
temperature decreases. When using the camera in cold
climates, have extra batteries at hand and keep them warm in
your pocket. Battery performance will return to normal at
room temperature.
• Have extra batteries ready when traveling overseas, or taking
a lot of pictures.
Using the AC Adapter
We recommend the use of the optional AC adapter kit K-AC128
when using the monitor for a long time or when connecting the
camera to a computer or AV device.
1 Make sure that the camera is turned off.
2 Open the battery cover.
Remove the battery if it is inserted in the camera.
3 Pull out the connection
cable cover on the right
side of the battery
chamber.
4 Insert the DC coupler into
the battery chamber.
5 Close the battery cover.
Make sure that the connection
cable comes out from the
connection cable opening.
2
Getting Started
33
Page 36

2
Getting Started
6
Connect the DC coupler and the AC adapter.
Inserting a Memory Card
The following memory cards can be used with this camera.
• SD Memory Card
• SDHC Memory Card
• SDXC Memory Card
In this manual, these cards are referred to as memory cards.
1 Make sure that the camera is turned off.
2 Slide the memory card
cover in the direction of 1
and then rotate it to open
as shown by 2.
1
2
7 Connect the AC adapter to the AC plug cord, and
plug the cord into the power outlet.
u Caution
• Make sure that the camera is turned off before connecting or
disconnecting the AC adapter.
• Make sure that connections are secure between the
terminals. The memory card or data may be corrupted if the
connection to the power supply is lost while the card is being
accessed.
• After removing the DC coupler, return the connection cable
cover to its original position.
• Be sure to read the manual of the AC adapter kit before using
the AC adapter.
34
3 Insert the card all the way
into the memory card slot
with the memory card label
facing toward the side with
the monitor.
Push the memory card in once
and release to remove.
Page 37

4 Rotate the memory card
3
4
cover as shown by 3, and
slide it in the direction of
4.
How to Open the Monitor
The following procedure explains how to open the monitor with
the LCD screen facing inward.
u Caution
• Do not remove the memory card while the card access lamp
(orange) is lit.
• If the memory card cover is opened while the power is on, the
camera turns off. Do not open the cover while the camera is
in use.
• Use this camera to format (initialize) a memory card that is
unused or has been previously used on other devices. (p.38)
• Use a high-speed memory card when re cording movies. If the
write speed cannot keep up with the recording speed, the
writing may stop during recording.
1 Open the monitor 180°
horizontally while holding
the top and bottom of it.
2 Rotate the monitor 180°
forward.
The monitor can also be rotated
up to 90° backward.
3 Close the monitor on the
camera so that the LCD
screen can be seen.
2
Getting Started
35
Page 38

u Caution
• To close the monitor with the LCD screen facing inward,
rotate the monitor 180° backward in Step 2.
• When the monitor is closed with the LCD screen facing
inward, you cannot play back images and display the menus
unless the camera is connected to an AV device equipped
with an HDMI terminal.
2
• Do not hold the camera by the monitor or rotate the monitor
Getting Started
beyond its movable range.
• Do not carry the camera or put it in a bag with the monitor
open. You can carry the camera when the monitor is closed
regardless of the LCD screen direction.
t Memo
• The items displayed on the monitor rotate according to the
direction and angle of the monitor.
• You can take low-angle and high-angle pictures by adjusting
the angle of the monitor while it is open horizontally. Also, you
can take self-portraits by pointing the lens toward yourself
while checking the Live View image on the LCD screen of the
monitor facing you. (p.41)
Initial Settings
Turn the camera on and make the initial settings.
Turning the Camera On
1 Turn the main switch to
[ON].
The lamp lights up in green.
The first time the camera is
turned on after purchase, the
[Language/W] screen
appears.
t Memo
• The power automatically turns off when you do not perform
any operations within a set period of time. (Default setting:
1min.) You can change the setting in [Auto Power Off] of the
D3 menu. (p.27)
36
Page 39

Setting the Display Language
Text SizeText Size Std.Std.
New YorkNew York
EnglishEnglish
Initial SettingInitial Setting
Settings completeSettings complete
CancelCancel
HometownHometown
New YorkNew York
DSTDST
CancelCancel OKOK
Text Size
Std.
Large
New York
Initial Setting
Settings complete
Cancel
OK
Text Size
Std.
New York
English
Initial Setting
Settings complete
Cancel
OK
Time
Date
Date Format
00:00
mm/dd/yy
01/01/2015
Date Adjustment
Settings complete
Cancel
OK
1 Use ABCD to select the desired language and
press E.
The [Initial Setting] screen
appears in the selected
language.
Proceed to Step 6 if F
(Hometown) does not need to be
changed.
2 Press B to move the frame to F and press D.
The [F Hometown] screen appears.
3 Use CD to select a city.
Use R to change the region.
Refer to “List of World Time
Cities” (p.128) for cities that can
be selected as a hometown.
4 Press B to select [DST] (daylight saving time),
and use CD to select Y or Z.
5 Press E.
The camera returns to the [Initial Setting] screen.
6 Press B to select [Text Size] and press D.
New York
Text Size
Cancel
New York
Text Size
Cancel
Initial Setting
Settings complete
Initial Setting
Settings complete
Std.
Large
English
Std.
7 Use AB to select [Std.] or
[Large], and press E.
Selecting [Large] increases the
text size of the selected menu
items.
8 Press B to select [Settings
complete] and press E.
The [Date Adjustment] screen
appears.
Setting the Date and Time
1 Press D, and use AB to
select the date format.
Date Format
Date
Time
Settings complete
Cancel
Date Adjustment
mm/dd/yy
01/01/2015
00:00
2 Press D, and use AB to select [24h] or [12h].
3 Press E.
The frame returns to [Date Format].
4 Press B, and then press D.
The frame moves to the month if the date format is set to
[mm/dd/yy].
OK
2
Getting Started
OK
OK
37
Page 40

5 Use AB to set the month.
Time
Date
Date Format
00:00
mm/dd/yy
01/01/2015
Date Adjustment
Settings complete
Cancel
OK
Time
Date
Date Format
10:00
mm/dd/yy
02/02/2015
Date Adjustment
Settings complete
Cancel
OK
1/
125
F
5.6
1
Display Color
LCD Display
Cancel
OK
Format
Format
All data will be deleted
Cancel
OK
Set the day, year and time in the
same manner.
2
Getting Started
6 Press B to select [Settings
complete] and press E.
The [LCD Display] screen
appears.
Setting the LCD Display
1 Use CD to select a color.
Select the display color of the
status screen, control panel and
menu cursor from colors 1 to 12.
2 Press E.
The camera switches to capture mode and is ready to take
a picture.
t Memo
•
You can change the language, text size, date and time, and
LCD display settings from the
38
Date Format
Date
Time
Date Format
Date
Time
Display Color
D
1 menu. (p.26)
Date Adjustment
Settings complete
Cancel
Date Adjustment
Settings complete
Cancel
LCD Display
Cancel
1/
F
125
5.6
mm/dd/yy
01/01/2015
00:00
mm/dd/yy
02/02/2015
10:00
Formatting a Memory Card
D4
1 Press F.
The A1 menu appears.
OK
2 Use Q or R to display D4 menu.
3 Use AB to select [Format] and press D.
The [Format] screen appears.
4 Press A to select [Format]
OK
1
OK
and press E.
Formatting starts. When
formatting is completed, the D4
menu reappears.
5 Press F.
u Caution
• Do not remove the memory card while formatting, or the card
may be damaged.
• Formatting deletes all data, both protected and unprotected.
t Memo
• When a memory card is formatted, the volume label “K-S2” is
assigned to the card. When the camera is connected to a
computer, the memory card is recognized as a removable
disk with the name “K-S2”.
Format
All data will be deleted
Format
Cancel
OK
Page 41

Basic Shooting Operation
Dial indicator
1/
250
160 0
F
5.6
--
--
--
Auto Picture
Take pictures using the Auto Picture (R) mode in which the
camera automatically selects the optimal capture mode.
4 Turn the mode dial and
align the dial indicator to
R.
Shooting with the Viewfinder
1 Remove the front lens cap
by pushing the top and
bottom portions as
indicated in the
illustration.
When a retractable lens is
attached, extend the lens before
turning the camera on.
y How to Use a Retractable Lens (p.40)
2 Turn the camera on.
3 Set the focus mode switch
to v.
The selected capture mode is
displayed on the monitor (Guide
Display).
y Guide Display settings
(p.26)
5 Look through the
viewfinder to view the
subject.
When using a zoom lens, turn the
zoom ring to the right or left to
change the angle of view.
Auto Picture
1/
250
F
5.6
1600
--
2
Getting Started
--
--
39
Page 42

6 Position the subject inside
Focus indicator
1
2
3
the AF frame and press
0 halfway.
The focus indicator (P) appears
and you will hear a beep when
2
the subject comes into focus.
Getting Started
7 Press 0 fully.
The captured image is displayed on the monitor (Instant
Review).
Available operations during Instant Review
L
R
J
t Memo
• You can use the f button to focus on the subject. (p.54)
• You can select whether to make a beep sound and change
the sound volume in [Sound Effects] of the D1 menu. (p.26)
• You can set the operation and display settings for Instant
Review in [Instant Review] of the A4 menu. (p.23) When
[Display Time] is set to y, Instant Review is displayed until
the next operation.
40
Deletes the image.
Magnifies the image.
Saves the RAW data (only when a JPEG
image was taken and th e data remains in the
buffer).
How to Use a Retractable Lens
If the camera is turned on when a
retractable lens, such as smc
PENTAX-DA L 18-50mm F4-5.6
DC WR RE, is attached and is not
extended, an error message is
displayed on the monitor. Turn the
zoom ring in the direction of 2
while pressing the button on the ring (1) to extend the lens.
When retracting the lens, turn the zoom ring in the opposite
direction to 2 while pressing the button on the ring and align
the white dot to the position 3.
Page 43

Shooting While Viewing the Live View Image
1/
200 01/2000
F2. 8F2.8
160 01600
9999999999
AF frame
1 Press K in Step 5 of
“Shooting with the
Viewfinder” (p.39).
The Live View image is displayed
on the monitor.
Available operations
E
K
Magnifies the image.
Use R to change the magnification (up to
10×).
Use ABCD to change the area to display.
Press M to return the display area to the
center.
Press E to return to 1× image display.
Exits shooting with Live View.
2 Position the subject inside
the AF frame on the
monitor and press 0
halfway.
The AF frame turns green and
you will hear a beep when the
subject comes into focus.
Subsequent steps are the same as shooting with the
viewfinder.
Taking a Self-portrait
You can take self-portraits while checking the Live View image
by facing the lens and the LCD screen of the monitor toward
yourself.
1 In Step 2 of “Shooting
While Viewing the Live
View Image” (p.41), open
the monitor 180°
horizontally.
The self-portrait shutter button
lamp lights green.
2 Face both the lens and the
LCD screen of the monitor
toward yourself.
3 Check the Live View image
and press the self-portrait
shutter button.
After the picture is taken, Instant
Review is displayed until the next
operation.
The camera returns to standby
mode when the self-portrait shutter button is pressed again.
2
Getting Started
41
Page 44

u Caution
1/
200 0
F2. 8
200
0.0
100 -0001
• The self-portrait shutter button does not work with a halfway
press and needs to be fully pressed down. If the button is
pressed when the focus mode is set to v, a picture is taken
after autofocus is performed. Even if the subject is not in
focus, the shutter release has priority over focusing the
subject and a picture is taken.
2
• When the self-portrait shutter button can be used for
Getting Started
shooting, other button/dial operations are disabled.
• You cannot take pictures using the self-portrait shutter button
in the following situations.
• When the camera is connected to an AV device equipped
with an HDMI terminal
• When 0 is pressed for the first shutter release in a
mode requiring two shutter releases, such as in movie
recording mode or in bulb exposure mode. (The same
button must be used to start and stop shooting.)
• Images cannot be previewed.
• The image cannot be deleted or magnified during Instant
Review.
• Do not force the monitor over the maximum viewing angle.
• Keep the monitor closed when not using the camera.
t Memo
•
Shooting with the self-portrait shutter button is available only
when [Self-portrait Shutter Button] of [Button Customization]
in the
A
4 menu is set to [On] (default setting) and the monitor
is positioned at the correct angle. (p.100) When the selfportrait shutter button can be used for shooting, the indicator
lamp lights green or red and the main switch lamp turns off. At
all other times, the self-portrait shutter button functions as the
switch to turn the Wi-Fi function on or off. (p.90)
• Self-portraits can also be taken using a drive mode that
employs the self-timer or remote control. (p.59)
42
Reviewing Images
Review the captured image on the monitor.
1 Press 3.
The camera enters playback
mode and the most recently
captured image is displayed
(single image display).
1/
2000
F2.8
200
100-0001
0.0
Page 45

2 Review the captured image.
Available operations
C/Q to the left Displays the previous image.
D/Q to the right Displays the next image.
L Deletes the image.
R to the right Magnifies the image (up to 16×).
R to the left Switches to the thumbnail
J Saves the RAW data (only when
G
B
t Memo
• When Jv is displayed on the monitor, the JPEG image
that was just taken can also be saved in RAW format (Save
RAW Data).
Use ABCD to change the
area to display.
Press M to return the display
area to the center.
Press E to return to the entire
image display.
display (p.78).
a JPEG image was taken and
the data remains in the buffer).
Changes the type of information
displayed (p.14).
Displays the playback mode
palette (p.77).
2
Getting Started
43
Page 46

Configuring the Capture Settings
99 99999999
File FormatFile Format
CancelCancel OKOK
99 99999999
5472x36485472x3648
JPEG Recorded PixelsJPEG Recorded Pixels
CancelCancel OKOK
1: 23' 45"1:23'45"
1920x10801920x1080
Recorded PixelsRecorded Pixels
CancelCancel OKOK
1: 23' 45"1:23'45"
FramerateFramerate
CancelCancel OKOK
Image Capture Settings
Set the file format, recorded pixels, and quality level for still
pictures in the control panel or [Image Capture Settings] of the
A1 menu.
3
Shooting
File Format JPEG, RAW, RAW+
JPEG Recorded Pixels q, p, o, r
JPEG Quality m, l, k
RAW File Format PEF, DNG
t Memo
• When [File Format] is set to [RAW+], a JPEG image and a
RAW image with the same file number are saved at the same
time.
• [PEF] of [RAW File Format] is a PENTAX original RAW file
format.
v/A1
Movie Capture Settings
v/C1
Set the file format for movies in the control panel or [Movie
Capture Settings] of the C1 menu.
Recorded Pixels Framerate
u 30p, 25p, 24p
t
60p, 50p
u Caution
• When the drive mode is set to [Interval Movie Record] or [Star
Stream], you cannot set the number of recorded pixels and
the framerate. Shooting conditions for Interval Movie Record
and Star Stream can be changed from [Parameter Adj.] on
the Drive Mode screen.
44
Page 47

Taking Still Pictures
Portrait
For capturing portraits.
Reproduces a healthy
and bright skin tone
Cancel
OK
Select the capture mode that suits the subject and shooting
conditions.
The following capture modes are available on this camera.
Capture Mode Application Page
R
(Auto Picture
modes)
S
(Scene modes)
Y
(Advanced
HDR mode)
G/H/I/J/
K/L/M
(Exposure
modes)
u Caution
• The functions that can be set vary depending on the capture
mode. Refer to “Restrictions on Each Capture Mode” (p.110)
for details.
t Memo
• You can save frequently used capture modes and settings to
O and P so that you can repeatedly use the same modes
and settings. (p.103)
Automatically selects the optimal
capture mode from a (Standard),
b (Portrait), c (Landscape),
d (Macro), e (Moving Object),
f (Night Scene Portrait),
g (Sunset), h (Blue Sky) or
i (Forest).
Offers you various scene modes to
choose from.
Takes three consecutive images
using the Clarity Enhancement
feature to create a single
composite image with them.
Allows you to change the shutter
speed, aperture value, and
sensitivity.
p.39
p.45
p.46
p.47
Scene Modes
1 Set the mode dial to S.
The scene mode selection screen appears.
2 Select a scene mode.
Portrait
b
Landscape
c
Macro
d
Moving Object
e
Night Scene
f
Portrait
Sunset
g
Blue Sky
h
Forest
i
For capturing portraits.
Reproduces a heal thy and bright
skin tone.
For capturing landscape views.
Reproduces the vivid green of
trees.
For capturing tiny objects at
close focus range like flowers,
coins, jewelry, and more.
For capturing images of fast
moving subjects.
For capturing images of people
in low light conditions, such as
dusk or at night.
For capturing sunrises or
sunsets in beautiful, vivid color.
For capturing images of blue
sky. Produces a more
impressive deep blue.
Enhances colors of trees and
sunbeams through foliage and
produces a vivid color image.
Portrait
For capturing portraits.
Reproduces a healthy
and bright skin tone
Cancel
3
Shooting
OK
45
Page 48

Night Scene Used for shooting at night.
1/1/
250250
160 01600
FF
5.65.6
99 99999999
j
Night Scene HDR
k
Night Snap
l
Food
3
Shooting
m
Pet For capturing moving pets.
o
Kids
p
Surf & Snow
q
Backlight
s
Silhouette
Candlelight
t
Stage Lighting
u
Museum
v
Takes three consecutive ima ges
at three different e xposure levels
(-1, ±0, +1) to create a single
composite image from them.
For taking snapshots in poorly lit
places.
For capturing images of food.
Saturation will be rather high to
make food look appetizing.
For capturing moving kids.
Reproduces healthy and bright
skin tone.
For capturing images of dazzling
backgrounds, such as snowy
mountains.
Produces a silhouette image of
the subject in backlight
conditions.
For capturing scenes in
candlelight.
For capturing moving su bjects in
poorly lit places.
For capturing images in places
where a flash is prohibited.
3 Press E.
The camera is in standby mode.
Turn R to change the scene mode.
t Memo
• You can change the scene mode also from the control panel
46
or the A1 menu.
Advanced HDR Mode
1 Set the mode dial to Y.
2 Turn R to set the range
in which to change the
exposure.
Select from ±1, ±2, or ±3.
u Caution
• This mode cannot be used in combination with some other
functions. (p.110)
Page 49

Exposure Modes
1/1/
3030
100100
FF
4.54.5
99 99999999
1/
30
F4. 5
100
99999
x: Available #: Restricted ×: Not available
Change
Mode
G
Program Automatic
Exposure
H
Sensitivity Priority
Automatic Exposure
I
Shutter Priority
Automatic Exposure
J
Aperture Priority
Automatic Exposure
K
Shutter & Aperture
Priority Automatic
Exposure
L
Manual Exposure
M
Bulb Exposure
*1 You can set the value to be changed in [E-Dial Programming] of the
A4 menu. (p.100)
*2 [ISO AUTO] is not available.
*3 Fixed to [ISO AUTO].
Shutter
Speed
Change
Aperture
Value
*1
#
#
Change
Sensitivity
*1
××
x
×
xxx
xxx
×
×
xxx
xx
EV
Compen-
sation
xx
*2
x
xx
x
*3
x
*2
x
*2
×
1 Set the mode dial to the desired exposure mode.
Q or R appears on the
status screen for the value that
can be changed.
The value that can be changed is
underlined in the viewfinder.
During Live View, D appears for
the value that can be changed.
1/
F4.5
30
100
99999
2 Turn R.
The aperture value is changed in
J, K, L, or M mode.
The sensitivity is changed in H
mode.
3 Turn Q.
The shutter speed is changed in
I, K, or L mode.
3
Shooting
47
Page 50

t Memo
1/
250
160 0
F
5.6
99 999
•
The settings for exposure can be specified in increments of
1/3 EV steps. In [1 EV Steps] of the
change the adjustment steps to 1/2 EV steps.
• The correct exposure may not be obtained with the selected
shutter speed and aperture value when the sensitivity is set
to a certain sensitivity.
•In L mode, the difference from the correct exposure is
displayed on the EV bar scale while exposure is adjusted.
•In M mode, some functions are not available. (p.110)
3
• For each exposure mode, you can set the camera operation
Shooting
for when Q or R is turned or M is pressed. Set in [EDial Programming] of the A4 menu. (p.100)
• When shooting with a low shutter speed, you can reduce
image noise from the control panel or [Slow Shutter Speed
NR] of the A2 menu.
Applies Noise Reduction according to the shutter
Auto
speed, sensitivity, and internal temperature of the
camera.
Applies Noise Reduction when the shutter speed is
On
slower than 1 second.
Does not apply Noise Reduction at any shutter
Off
speed.
Checking the Depth of Field (Preview)
When [Optical Preview] or [Digital Preview] is assigned to
P in [RAW/Fx Button] of [Button Customization] in the
A4 menu, you can check the depth of field before taking
pictures. (p.100)
48
E
1 menu, you can
EV Compensation
The compensation value can be set between -5 and +5 EV (-2
and +2 EV in C mode).
1 Press J, and then turn
R.
e and the compensation value
are displayed on the status
screen, Live View screen, and in
the viewfinder during adjustment.
Available operations
Starts/ends adjusting the compensation value.
J
Resets the adjustment value to the default setting.
M
t Memo
• Bracketing shooting enables you to take pictures while
automatically changing exposure. (p.62)
1/
250
F
5.6
1600
99999
Page 51

Locking the Exposure
10'30"10'30"
Sound
Recordable Time
To lock the exposure before shooting, use the AE Lock
function. This function can be used by assigning [AE Lock]
to the f button. (p.100)
Recording Movies
1 Turn the main switch to
C.
The indicator lamp lights red and
the Live View image is displayed.
2 Set the mode dial to the desired capture mode.
The following settings are available depending on the
capture mode.
The camera operates in the selected
J/K/L
O/P
Other modes The camera operates in G mode.
exposure mode. (The aperture value can be
changed only before shooting. When set to
mode, the sensitivity can also be changed.)
The camera operates according to the
saved exposure mode.
3 Focus on the subject.
In v mode, press 0 halfway.
L
3
Shooting
49
Page 52

4 Press 0 fully.
Microphone terminal
Plug Stereo mini plug (ø3.5 mm)
Format Stereo electret condenser
Power
Plug-in Power Method (operating voltage of
2.0 V or lower)
Impedance 2.2 kΩ
Movie recording starts.
In the upper left area of the monitor, “REC” blinks and the
size of the recorded movie file is displayed.
5 Press 0 fully again.
Movie recording stops.
3
6 Return the main switch to the [ON] position to
Shooting
50
exit C mode.
The camera returns to shooting with the viewfinder in A
mode.
u Caution
• When recording a movie with sound, the camera operation
sounds are also recorded.
• When recording a movie with an image processing function
such as Digital Filter applied, the movie file may be saved with
some frames omitted.
• If the internal temperature of the camera becomes high
during recording, the recording may be terminated.
• When a retractable lens is attached, recording stops if the
lens is retracted during recording and an error message is
displayed.
• When the camera enters C mode, the Wi-Fi function is
disabled.
t Memo
• You can change the settings for recording a movie from the
control panel or the C1 menu. (p.25)
• The sound level for recording a movie can be set from the
control panel or [Recording Sound Level] of the C1 menu.
When [Manual] is selected, [Volume] can be set from 0 to 20.
• You can record a movie continuously up to 4 GB or 25
minutes. When the memory card is full, recording stops.
UsingaMicrophone
Youcanconnectacommercially
availablestereomicrophoneto
themicrophoneterminalonthe
camera.Usinganexternal
microphonecanalsohelpto
reducethepossibilityofrecording
cameraoperationsounds.
Thefollowingspecificationsarerecommendedforexternal
microphones.
Page 53

Playing Back Movies
10' 30"10'30"
100 -0001100-0001
320 0
100
100
-
Cancel
OK
1 Display the movie to play
back in single image
display of the playback
mode.
Setting the Exposure
Sensitivity
1 Press A in standby mode.
Available operations
A Plays back/pauses a movie.
D Forwards a frame (when
Press and hold D Fast-forwards playback.
C Reverses a frame (when
Press and hold C Fast-reverses playback.
B
R
J Saves the displayed frame as a
G Switches between [Standard
paused).
paused).
Stops playback.
Adjusts the volume (21 levels).
JPEG file (when paused).
Information Display] and [No
Information Display].
t Memo
• In [Movie Edit] of the playback mode palette, a movie file can
be divided into multiple segments or selected frames can be
deleted. (p.86)
2 Use AB to select an item.
Cancel
100
100
-
3200
Sets the range to be
adjusted automatically.
ISO
Both the upper limit
AUTO
and lower limit can be
changed.
Sets a fixed value from
ISO
ISO 100 to ISO 51200.
3 Use Q or R to change the value.
4 Press E.
The camera returns to standby mode.
t Memo
•In C mode, the sensitivity can be set from ISO 100 to ISO
3200.
• The adjustment steps for ISO sensitivity is 1 EV step. To
adjust the sensitivity in accordance with the EV step setting
for exposure, set from [2 Sensitivity Steps] of the E1 menu.
3
Shooting
OK
51
Page 54

Noise Reduction when Shooting with
High-ISO NRHigh-ISO NR
AutoAuto
CancelCancel OKOK
100
200
400
800
1600
3200
6400
ISO
ISO
ISO
ISO
ISO
ISO
ISO
High-ISO NR
Reset
AE MeteringAE Metering
Multi-segmentMulti-segment
CancelCancel OKOK
a High ISO Sensitivity
You can select the desired Noise
Reduction setting when shooting with
a high ISO sensitivity in the control
panel or [High-ISO NR] of the A2
menu.
3
Shooting
Auto
Low/
Medium/
High
Custom
Off
When [Custom] is selected, the noise
reduction level can be set according
to the ISO sensitivity value in the A2
menu.
52
Applies Noise Reduction at optimally calculated
levels throughout ISO range.
Applies Noise Reduction at constant chosen
level throughout ISO range.
Applies Noise Reduction at user-defined levels
for each ISO setting.
Does not apply Noise Reduction at any shutter
speed.
High-ISO NR
ISO
ISO
ISO
ISO
ISO
ISO
ISO
1600
3200
6400
100
200
400
800
Reset
v/A2
AE Metering
Choose the part of the sensor to use for measuring brightness
and determining exposure.
Set in the control panel or [AE
Metering] of the A1 menu.
Multi-
A
segment
Center-
B
weighted
1
C Spot
t Memo
• In [5 Link AE and AF Point] of the E1 menu, the metering
point and the AF point can be linked.
Meters the brightness in multiple different
zones of the sensor.
In backlit conditions, this mode automatically
adjusts exposure.
Meters the brightn ess with an emphasis on the
center of the sensor.
The sensitivity increases at the center and no
automatic adjustment is performed even in
backlit conditions.
Meters the brightness only within a limited
area at the center of the sensor.
Useful when the subject is small.
v/A1
Page 55

Using the Built-in Flash
0.0
EV
±0
EV
Auto Flash Discharge
Cancel
OK
1 Press C in standby mode.
2 Select a flash mode.
Auto Flash
A
Discharge
Auto Flash
+ Red-eye
B
Reduction
Flash On Discharges a flash for each picture.
C
Flash On
+ Red-eye
D
Reduction
Slow-speed
E
Sync
Slow-speed
Sync+Red-
F
eye
Trailing
H
Curtain
G
Sync
Manual
Flash
K
Discharge
Auto Flash Discharge
0.0
EV
±0
EV
Cancel
Automatically measures the ambient light and
determines whether to use the flash.
Discharges a pre-flash for red-eye reduction
before an automatic flash.
Discharges a pre-flash for red-eye reduction
before the main flash and discharges a flash
for each picture.
Sets to a slow shutter speed and discharges a
flash for each picture.
Use this, for example, when shooting a portrait
with the sunset in the background.
Discharges a pre-flash for red-eye reduction
before the main flash is discharged with Slowspeed Sync.
Discharges a flash immediately before closing
the shutter.
Sets to a slow shutter speed.
Captures moving objects as if they are leaving
a light trail behind them.
Sets the amount of flash discharge between
FULL and 1/128 power.
Available operations
R Compensates the flash exposure.
Selects the amount of flash discharge (when
[Manual Flash Discharge] is selected).
M Resets the compensation value to the
default setting.
3 Press E.
The camera returns to standby mode.
OK
4 Press 1.
The built-in flash is popped up.
t Memo
• The flash modes that can be selected vary depending on the
capture mode.
Capture Mode Selectable Flash Mode
R, S* A, B, C, D
G, H, J C, D, E, F, H, K
I, K, L, M C, D, G, K
The built-in flash cannot be used for some S modes and
for Y mode. (p.110)
• You cannot take pictures while the built-in flash is being
charged. If you want to take pictures while charging the flash,
set [22 Release While Charging] in the E4 menu.
• Depending on the lens being used, the use of the built-in flash
may be limited. (p.114)
3
Shooting
53
Page 56

• When the built-in flash is used in J mode, the shutter speed
automatically changes over a range from 1/180 seconds to a
slow shutter speed depending on the lens being used. The
shutter speed is locked at 1/180 seconds when a lens other
than a DA, DA L, D FA, FA J, FA or F lens is used.
• When the built-in flash is used in I, K or L mode, any
desired shutter speed of 1/180 seconds or slower can be set.
• The built-in flash is optimum for a subject at a distance from
approx. 0.7 m to 5 m. Vignetting may occur when used at a
distance closer than 0.7 m (this distance varies slightly
3
depending on the lens being used and the sensitivity setting).
Shooting
Sensitivity
ISO 100 Approx. 12 ISO 3200 Approx. 68
ISO 200 Approx. 17 ISO 6400 Approx. 96
ISO 400 Approx. 24 ISO 12800 Approx. 136
ISO 800 Approx. 34 ISO 25600 Approx. 192
ISO 1600 Approx. 48 ISO 51200 Approx. 272
• For details on the use of external flashes, refer to “Functions
when Using an External Flash” (p.116).
Guide
Number
Sensitivity
Guide
Number
Setting the Focus Method
Set the focus mode switch to v or
w.
The autofocus method for shooting with the viewfinder differs
from that for shooting with Live View.
TTL phase-matching autofocus:
Select from x, y, or z
mode which enables automatically
Shooting with the
viewfinder
Shooting with Live
View
t Memo
•
You can use the f button to
focus on the subject. The
button operation can be set in
[Button Customization] of the
menu. (p.100)
switching between x and y.
(p.55)
Set the focusing area in [AF Active Area].
(p.56)
Faster autofocus performance than the
contrast detection AF is possible.
Contrast detection AF:
Face Detection and Tracking are
available. (p.57)
f
A
4
54
Page 57

Setting the AF Mode when
AF ModeAF Mode
CancelCancel OKOK
Shooting with the Viewfinder
1 Press G in standby mode.
2 Select [AF Mode] and press E.
The [AF Mode] screen appears.
3 Select an autofocus mode
and press E.
z
Auto-select mode
x
Single mode
y
Continuous
mode
The control panel reappears.
v/A1
Switches automatically between
x and y modes according to
the subject.
When 0 is pressed halfway and
the subject comes into focus, the
focus is locked at that position.
The AF assist light turns on as
necessary.
The subject is kept in focus by
continuous adjustment while 0
is pressed halfway.
P appears in the viewfinder when
the subject comes into focus.
The shutter can be released even if
the subject is not in focus.
4 Press F.
The camera returns to standby mode.
t Memo
• The following settings for autofocus operation can be set in
the E3 menu.
17 AF.S Setting Focus-priority, Release-priority
18 1st Frame
Action in AF.C
19 Action in AF.C
Continuous
20 Hold AF Status Off, Low, Medium, High
In [20 Hold AF Status], you can set whether to immediately
reactivate autofocus or to maintain the focus for a certain
amount of time before reactivating autofocus when the
subject happens to move out of the selected focusing area
after being focused. The default setting is to immediately
reactivate autofocus when the subject moves out of focus.
•In S mode, [AF Mode] is fixed to x or y
depending on the selected scene mode. (p.110)
•In R mode, [AF Mode] is fixed to z.
Release-priority, Auto, Focus-priority
Focus-priority, Auto, FPS-priority
3
Shooting
55
Page 58

Selecting the Focusing Area (AF Point)
AF Active AreaAF Active Area
Auto (11 AF Points)Auto (11 AF Points)
CancelCancel OKOK
1/1/
250250
800800
FF
5.65.6
99 99999999
1 Press G in standby mode.
v/A1
4 Press F.
The camera returns to standby mode.
If you selected E or 8 in Step 3, proceed to Step 5.
2 Select [AF Active Area] and press E.
The [AF Active Area] screen appears.
3 Select the desired focus
3
Shooting
56
point selection mode and
press E.
Auto (11
6
AF Points)
Auto (5 AF
7
Points)
Select
E
Expanded
8
Area AF
Spot
D
The control panel reappears.
Out of the 11 AF points, the camera
automatically selects the optimum
focusing area.
Out of the 5 AF points, the camera
automatically selects the optimum
focusing area.
Sets the focusing area to the user
selected point from 11 points.
Sets the focusing area to the user
selected point from 11 points. When the
subject happens to move out of the
selected focusing area after being
focused, 8 peripheral points are used as
back-up points.
Not available in x mode.
Sets the focusing area to the center of the
11 points.
5 Select the desired AF
point.
Available operations
ABCD
E
Press and hold E Switches the function of the
t Memo
• When E or 8 is selected, the E lamp lights up.
• The AF point can also be changed from [AF Active Area] of
[AF Settings] in the A1 menu.
• You can also set the camera so that switching to the Change
AF Point mode by pressing and holding E can be operated
with P. (p.100)
Changes the AF point.
Returns the AF point to the
center.
arrow keys (ABCD) to the
Change AF Point mode or the
direct key operation.
Page 59

Setting the AF Mode during Live View
Contrast AFContrast AF
Face DetectionFace Detection
CancelCancel OKOK
OK
v/A3
5 Press and hold E.
1 Press G in standby mode in Live View.
2 Select [Contrast AF] and press E.
The [Contrast AF] screen appears.
3 Select an autofocus mode
and press E.
e
f Tracking
g
h
i
The control panel reappears.
4 Press F.
The camera returns to standby mode.
If you selected g or h in Step 3, proceed to Step 5.
Face
Detection
Multiple
AF Points
Select Sets the focusing area by the pixel.
Spot
Detects and tracks faces of people.
The main face detection frame for AF
and AE is displayed in yellow.
Tracks the subject in focus.
The shutter can be released even if the
subject is not in focus.
Sets the focusing area t o the desired area.
The sensor is divided into 35 areas (7
horizontal by 5 vertical), and you can
select a wider or narrower focusing area
by using 35, 25, 15, 9, or just 1 of those
35 areas available.
Sets the focusing area to a limited area
at the center.
6 Select the AF area.
Use the frame that appears on
the monitor to change the
position and size of the AF area.
Available operations
ABCD
R
M
Changes the position of the AF area.
Increases/reduces the size of the AF
area (when g is selected).
Returns the AF area to the center.
7 Press E.
The AF area is set.
u Caution
• When f is selected, the focus lock operation (composition
adjustment with the half press of 0) does not work.
t Memo
• When g or h is selected, the E lamp lights up.
• The setting can also be changed from [Contrast AF] of [Live
View] in the A3 menu.
• The autofocus mode is fixed to e in R mode and b,
f, and p of S mode.
• When [Focus Peaking] is set to [On] in the control panel or
[Live View] of the A3 menu, the outline of the subject in
focus is emphasized and makes it easier to check the focus.
This function works in both v and w modes.
OK
3
Shooting
57
Page 60

AF Fine Adjustment
±0
±0
3
27
AF Fine Adjustment
Apply One
Setting
Reset Individual Settings
Save
Cancel
You can precisely fine tune your lenses with the camera’s
autofocus system.
1 Select [27 AF Fine Adjustment] in E4 menu and
press D.
The [27 AF Fine Adjustment] screen appears.
3
2 Select [Apply All] or [Apply One] and press E.
Shooting
Apply All
Apply One
3 Select [Setting] and adjust
the value.
Available operations
D/R to the right Adjusts the focus to a closer
C/R to the left Adjusts the focus to a farther
M
4 Press E.
58
The adjustment value is saved.
Applies the same adjustment value to all
lenses.
Saves an adjustment value for the lens being
used. (Up to 20 values)
27
3
Setting
Reset Individual Settings
position.
position.
Resets the adjustment value to
the default setting.
Apply One
Cancel
AF Fine Adjustment
±0
E4
5 Press F twice.
The camera returns to standby mode.
±0
Save
Page 61

Setting the Drive Mode
Single Frame Shooting
Cancel
OK
You can choose from the following
drive modes.
Single Frame Shooting
(L)
Continuous Shooting
(Z/b)
Self-timer
(O/P/Y)
Remote Control
(Q/R/S)
Bracketing
(T/1/U)
Multi-exposure
(V/z/W/X)
Interval Shooting
(q/r/s)
Interval Composite
(t/u/v)
Interval Movie Record
(q/r/s)
Single Frame Shooting
Cancel
Normal capture mode
Continuously takes pictures while
0 is kept pressed. (p.60)
Releases the shutter about 12
seconds or 2 seconds after 0
is pressed. (p.60)
Enables shooting with remote
control. (p.61)
Takes three consecutive pictures at
different exposure levels. (p.62)
Creates a composite im age by taking
multiple pictures and merging them
into a single image. (p.63)
Automatically takes pictures at a set
interval from a set time. (p.64)
Takes pictures at a set interval from
a set time and merges them into a
single image. (p.65)
Takes pictures at a set interval from
a set time and saves the m as a single
movie file. (p.66)
Star Stream
(w/x/y)
Takes pictures at a set interval from
a set time and saves the m as a single
movie file using the Bright composite
mode of Interval Composite. (p.67)
u Caution
• There are restrictions on some drive modes when used in
some capture modes or in combination with some other
OK
functions. (p.110)
t Memo
•In C mode, Remote Control (Q only), Interval Movie Record,
and Star Stream can be selected.
• The Drive Mode setting is saved even after the power is
turned off. If [Drive Mode] is set to [Off] in [Memory] of t he A4
menu, the setting returns to [Single Frame Shooting] when
the power is turned off. (p.105)
• The Shake Reduction function is automatically turned off
when the drive mode that employs self-timer or remote
control is selected.
• When the drive mode that employs the self-timer or remote
control is selected, exposure may be affected by the light
entering through the viewfinder. In such a case, use the AE
Lock function. (p.49)
3
Shooting
59
Page 62

Continuous Shooting
Continuous Shooting (H)
Cancel
OK
Self-timer (12 sec.)
Cancel
OK
3
Self-timer + Continuous
Shooting Speed
Number of Shots
times
Cancel
OK
1 Press D in standby mode.
The Drive Mode screen appears.
2 Select Z and press B.
Continuous Shooting (H)
3
Shooting
Cancel
3 Use CD to select Z or b, and press E.
Z Continuously takes pictures at high speed.
b Continuously takes pictures at low speed.
The camera returns to standby mode.
t Memo
• When [AF Mode] is set to x, the focus position is locked
in the first frame.
Self-timer
1 Press D in standby mode.
The Drive Mode screen appears.
3 Use CD to select O, P, or Y.
O Releases the shutter after about 12 seconds.
P Releases the shutter after about 2 seconds.
Continuously takes pictures. (The shutter is
Y
released after about 12 seconds.)
Proceed to Step 7 when O or P is selected.
4 Press G.
OK
5 Use CD to set [Shooting
Speed] and [Number of
Shots].
6 Press E.
The screen of Step 2 reappears.
7 Press E.
The camera returns to standby mode.
8 Press 0 halfway, and then fully.
The shutter is released after about 12 seconds or 2
seconds.
Self-timer + Continuous
Shooting Speed
Number of Shots
Cancel
3
times
OK
2 Select O and press B.
60
Self-timer (12 sec.)
Cancel
OK
Page 63

Remote Control
Remote Control
Cancel
OK
Remote Continuous Shooting
Shooting Speed
Cancel
OK
8 Press 0 halfway.
1 Press D in standby mode.
The Drive Mode screen appears.
2 Select Q and press B.
3 Use CD to select Q, R, or S.
R Releases the shutter after about 3 seconds.
S Continuously takes pictures.
Proceed to Step 7 when Q or R is selected.
4 Press G.
5 Use CD to set [Shooting
Speed].
6 Press E.
The screen of Step 2 reappears.
7 Press E.
The camera returns to standby mode.
Remote Control
Cancel
Remote Continuous Shooting
Shooting Speed
Cancel
9 Point the remote control unit towards the remote
control receiver on the front of the camera, and
press the shutter release button on the remote
control unit.
t Memo
• The maximum operating distance of the remote control unit is
OK
OK
approx. 4 m from the front of the camera.
• To adjust focus with remote control, set in [21 AF with Remote
Control] of the E3 menu.
• When using the Remote Control Waterproof O-RC1, the
autofocus system can be operated with the q button on the
remote control unit. The r button cannot be used.
3
Shooting
61
Page 64

Bracketing
±0 .3EV
±0 .3EV
Bracketing
Cancel
OK
Bracketing
Self-timer
Cancel
OK
BracketingBracketing
Remote ControlRemote Control
CancelCancel OKOK
1 Press D in standby mode.
The Drive Mode screen appears.
2 Select T and press B.
3
Shooting
3
Use CD to select T, 1, or U.
1 Takes pictures with the self-timer.
U Takes pictures with remote control.
Proceed to Step 7 when T is selected.
4 Press G.
5 Use CD to select the
operation mode.
Cancel
Self-timer
Cancel
Bracketing
±0.3EV
Bracketing
±0.3EV
OK
OK
6 Press E.
The screen of Step 2 reappears.
7 Set the bracket value.
Available operations
R Changes the bracket value (up to ±3
JR Adjusts the exposure compensation
M Resets the compensation value to the
EV).
value.
default setting.
8 Press E.
The camera returns to standby mode.
9 Take three pictures.
After three pictures are taken, the camera returns to
standby mode in Step 8.
t Memo
• The bracket value can be set in increments of 1/3 EV steps or
1/2 EV steps according to the [1 EV Steps] setting of the E1
menu.
• The following settings for the Bracketing can be set in the E2
menu.
8 Bracketing Order
9 One-Push Bracketing
Changes the shooting order of
the three pictures.
Takes all three pictures with
one release of the shutter.
62
Page 65

Multi-exposure
00020002
Multi-exposureMulti-exposure
CancelCancel
Parameter Adj.Parameter Adj.
Composite ModeComposite Mode
Number of ShotsNumber of Shots
AverageAverage
OKOK
timestimes
00020002
Multi-exposureMulti-exposure
Composite ModeComposite Mode AverageAverage
Shooting SpeedShooting Speed
Number of ShotsNumber of Shots timestimes
CancelCancel OKOK
1 Press D in standby mode.
The Drive Mode screen appears.
2 Select V and press B.
3 Use CD to select V, z, W, or X.
z Continuously takes pictures.
W Takes pictures with the self-timer.
X Takes pictures with remote control.
Proceed to Step 7 if you do not need to change the shooting
conditions.
4 Press G.
5 Set the shooting
conditions.
Composite Mode
Number of Shots Select from 2 to 2000 times.
Shooting Speed/
Self-timer/
Remote Control
Select from [Average], [Additive], or
[Bright].
Select the operation mode.
6 Press E.
The screen of Step 2 reappears.
7 Press E.
The camera returns to standby mode.
8 Shoot.
Instant Review is displayed.
Available operations during Instant Review
L
F
After the specified number of shots are taken, the camera
returns to standby mode in Step 7.
t Memo
• Composite images are created as follows in each Composite
Mode.
Average
Additive
Bright
Discards pictures taken up to that point and
takes pictures again from the first picture.
Saves pictures taken up to that point and
displays the A menu.
Creates a composite image with the average
exposure.
Creates a composite image with the
cumulatively added exposure.
Creates a composite image replacing only the
portions that are brighter compared with the first
image.
3
Shooting
63
Page 66

Interval Shooting
00020002
00
:
00´02˝00
:
00´02˝
Interval ShootingInterval Shooting
CancelCancel
Parameter Adj.Parameter Adj.
IntervalInterval
Number of ShotsNumber of Shots
OKOK
timestimes
00
:
00´02˝00
:
00´02˝
00020002
10 :0 010:00
PMPM
Interval ShootingInterval Shooting
IntervalInterval
Set TimeSet Time
Start IntervalStart Interval
Start TimeStart Time
Number of ShotsNumber of Shots timestimes
CancelCancel OKOK
1 Press D in standby mode.
The Drive Mode screen appears.
2 Select q and press B.
3
Shooting
Interval Select from 2 seconds to 24 hours.
Standby Interval
Select from the minimum time or 1
second to 24 hours.
Number of Shots Select from 2 to 2000 times.
Start Interval
Start Time
Self-timer/
Remote Control
Select whether to take the first picture
now or at a set time.
Set the shooting start time when
[Start Interval] is set to [Set Time].
Select the operation mode.
3 Use CD to select q, r, or s.
r Takes pictures with the self-timer.
s Takes pictures with remote control.
Proceed to Step 7 if you do not need to change the shooting
conditions.
4 Press G.
5 Set the shooting
conditions.
64
6 Press E.
The screen of Step 2 reappears.
7 Press E.
The camera returns to standby mode.
8 Shoot.
When [Start Interval] is set to [Now], the first picture is
taken. When set to [Set Time], shooting starts at the set
time.
To cancel shooting, press F in standby mode.
After the specified number of shots are taken, the camera
returns to standby mode in Step 7.
Page 67

t Memo
00020002
00
:
00´02˝00
:
00´02˝
Interval CompositeInterval Composite
CancelCancel
Parameter Adj.Parameter Adj.
IntervalInterval
Number of ShotsNumber of Shots
OKOK
timestimes
00
:
00´02˝00
:
00´02˝
00020002
10 :0 010:00
PMPM
Interval CompositeInterval Composite
IntervalInterval
Set TimeSet Time
BrightBright
Start IntervalStart Interval
Start TimeStart Time
Composite ModeComposite Mode
Save ProcessSave Process
Number of ShotsNumber of Shots timestimes
CancelCancel OKOK
• A new folder is created when Interval Shooting is performed,
and the captured images are saved there. When shooting in
another drive mode after performing Interval Shooting,
another new folder is created.
• The shortest time that can be set f or [Interval] is 5 seconds for
[Digital Filter] and [Clarity Enhancement], and 10 seconds for
[HDR Capture] and Y mode.
• For Interval Shooting, Interval Composite, and Interval Movie
Record, the second and later exposures start at the interval
set in [Interval]. If the e xposure time is longer than the time set
in [Interval], some of the pictures that are supposed to be
taken at the set interval are not actually taken. For example,
if the time set in [Interval] is 2 seconds and the exposure time
is 3 seconds, the first exposure has not yet finished at the
time the second exposure is supposed to be started (2
seconds after shooting has started), and so the second
picture is not taken. As a result, Interval Shooting ends before
the specified number of shots are taken. In such cases, you
can set [Standby Interval] in [10 Interval Shooting Options] of
the E2 menu so that pictures are taken at the set interval
after each exposure ends. The screen displayed in Step 5
varies depending on the [10 Interval Shooting Options]
setting.
• For Interval Shooting and Interval Composite, the focus
position used when the first picture is taken is locked. When
performing autofocus for each exposure, set [11 AF in
Interval Shooting] to [Adjusts focus for each shot] in the E2
menu.
Interval Composite
Star and moon trails can be captured in one image.
1 Press D in standby mode.
The Drive Mode screen appears.
2 Select t and press B.
3
Shooting
3 Use CD to select t, u, or v.
u Takes pictures with the self-timer.
v Takes pictures with remote control.
Proceed to Step 7 if you do not need to change the shooting
conditions.
4 Press G.
5 Set the shooting
conditions.
65
Page 68

Interval Select from 2 seconds to 24 hours.
0008
00
:
00´02˝
Interval Movie Record
Cancel
Parameter Adj.
Interval
Number of Shots
OK
times
00
:
00´02˝00
:
00´02˝
00080008
––:––––:––
Interval Movie RecordInterval Movie Record
IntervalInterval
Recorded PixelsRecorded Pixels
NowNow
Start IntervalStart Interval
Start TimeStart Time
Number of ShotsNumber of Shots timestimes
CancelCancel OKOK
Standby Interval
Select from the minimum time or 1
second to 24 hours.
Number of Shots Select from 2 to 2000 times.
Start Interval
Start Time
3
Shooting
Composite Mode
Save Process
Self-timer/
Remote Control
Select whether to take the first picture
now or at a set time.
Set the shooting start time when
[Start Interval] is set to [Set Time].
Select from [Average], [Additive], or
[Bright].
Select Z to save images in the
middle of processing.
Select the operation mode.
6 Press E.
The screen of Step 2 reappears.
7 Press E.
The camera returns to standby mode.
8 Shoot.
When [Start Interval] is set to [Now], the first picture is taken.
When set to [Set Time], shooting starts at the set time.
To cancel shooting, press F in standby mode.
After the specified number of shots are taken, the camera
returns to standby mode in Step 7.
t Memo
• When [Save Process] is set to Z, a new folder is created and
the composite image is saved there. When shooting in
another drive mode after performing Interval Composite,
another new folder is created.
• Mount the camera on a tripod during shooting.
66
Interval Movie Record
In C mode, you can use [Interval Movie Record] to take still
pictures at a set interval from a set time and save them as a
single movie file (Motion JPEG, file extension: .AVI).
1 Turn the main switch to C and press D.
The Drive Mode screen appears.
2 Select q and press B.
Interval Movie Record
Interval
Number of Shots
Parameter Adj.
Cancel
00
0008
:
00´02˝
times
3 Use CD to select q, r, or s.
r Records a movie with the self-timer.
s Records a movie with remote control.
Proceed to Step 7 if you do not need to change the shooting
conditions.
4 Press G.
5 Set the shooting
conditions.
OK
Page 69

Recorded Pixels Select from z, u, or t.
0008
Star Stream
times
Cancel
OK
Standby Interval
Minimum
Number of Shots
Parameter Adj.
0008
––:––
Star Stream
Standby Interval
Minimum
Recorded Pixels
Now
Start Interval
Start Time
Fade-out
Number of Shots
times
Cancel
OK
Interval Select from 2 seconds to 24 hours.
Standby Interval
Select from the minimum time or 1
second to 24 hours.
Select from 8 to 2000 times. (When
Number of Shots
[Recorded Pixels] is set to z, select
from 8 to 500 times.)
Start Interval
Start Time
Self-timer/
Remote Control
Select whether to take the first picture
now or at a set time.
Set the shooting start time when
[Start Interval] is set to [Set Time].
Select the operation mode.
6 Press E.
The screen of Step 2 reappears.
7 Press E.
The camera returns to standby mode.
8 Shoot.
When [Start Interval] is set to [Now], the first picture is taken.
Instant Review is displayed, and then the monitor turns off.
To cancel shooting, press F in standby mode.
After the specified number of shots are taken, the camera
returns to standby mode in Step 7.
u Caution
• [Movie SR] is fixed to [Off].
• [Recording Sound Level] is fixed to [Mute].
t Memo
• The shortest time that can be set f or [Interval] is 5 seconds for
[Digital Filter] and [Clarity Enhancement], and 10 seconds for
[HDR Capture].
Star Stream
In C mode, you can use [Star Stream] to take still pictures at a
set interval from a set time and save them as a single movie file
(Motion JPEG, file extension: .AVI) using the Bright composite
mode of Interval Composite.
Star and moon trails can be captured as a movie file.
1 Turn the main switch to C and press D.
The Drive Mode screen appears.
2 Select w and press B.
Star Stream
Standby Interval
Number of Shots
Parameter Adj.
Cancel
Minimum
0008
times
OK
3 Use CD to select w, x, or y.
x Records a movie with the self-timer.
y Records a movie with remote control.
Proceed to Step 7 if you do not need to change the shooting
conditions.
4 Press G.
5 Set the shooting
conditions.
Star Stream
Recorded Pixels
Standby Interval
Number of Shots
Start Interval
Start Time
Fade-out
Cancel
Minimum
0008
times
Now
––:––
OK
3
Shooting
67
Page 70

Recorded Pixels Select from z, u, or t.
WB
±
Auto White Balance
Cancel
Check
OK
Standby Interval
Number of Shots
Start Interval
3
Shooting
Start Time
Fade-out
Self-timer/
Remote Control
Select from the minimum time or 1
second to 24 hours.
Select from 8 to 2000 times. (When
[Recorded Pixels] is set to z, select
from 8 to 500 times.)
Select whether to take the first picture
now or at a set time.
Set the shooting start time when
[Start Interval] is set to [Set Time].
Select the fade-out effect level of light
trails from Off, Low, Medium, or High.
Select the operation mode.
6 Press E.
The screen of Step 2 reappears.
7 Press E.
The camera returns to standby mode.
8 Shoot.
When [Start Interval] is set to [Now], the first picture is taken.
When set to [Set Time], shooting starts at the set time.
To cancel shooting, press F in standby mode.
After the specified number of shots are taken, the camera
returns to standby mode in Step 7.
u Caution
• [Movie SR] is fixed to [Off].
• [Recording Sound Level] is fixed to [Mute].
t Memo
• The camera operates in L mode regardless of the mode dial
setting.
• Mount the camera on a tripod during shooting.
68
Setting the White Balance
1 Press B in standby mode.
The White Balance setting screen appears.
2 Select the desired white
balance setting.
Auto White Balance
g
Multi Auto White Balance
u
Daylight
h
Shade
i
Cloudy
j
q Fluorescent - Daylight Color
r Fluorescent - Daylight White
k
s Fluorescent - Cool White
t Fluorescent - Warm White
Tungsten
l
Flash
m
Color Temperature Enhancement
n
Manual White Balance
o
Color Temperature
p
Auto White Balance
WB
±
Cancel
Check
OK
Page 71

Available operations when shooting with the
G3
A2
±0
Cancel
OK
Auto White Balance
viewfinder
R Selects the type of [Fluorescent].
P Uses Digital Preview to preview the
J
Proceed to Step 5 if you do not need to fine-tune the white
balance.
background image with the white balance
setting applied.
Saves the preview image (only when the
image can be saved).
3 Press G.
The fine-tuning screen appears.
G3
Cancel
Available operations
AB
CD
M
Adjust: Green-Magenta
Adjust: Blue-Amber
Resets the adjustment value to the default
setting.
4 Press E.
The screen of Step 2 reappears.
5 Press E.
The camera returns to standby mode.
Auto White Balance
A2
±0
u Caution
• The Digital Preview operation in Step 2 cannot be performed
when the drive mode is set to [Multi-exposure], [Interval
Shooting], or [Interval Composite].
t Memo
• When u is set, even if various light sources are present at
the shooting location, the camera automatically adjusts the
white balance according to the light source of each area. (u
is not available in C mode.)
• The following settings for the white balance can be set in the
E2-3 menus.
12 WB Adjustable Range
13 WB When Using Flash
OK
14 AWB in Tungsten Light
15 Color Temperature Steps Kelvin, Mired
Fixed, Auto Adjustment
Auto White Balance, Multi
Auto White Balance, F lash,
Unchanged
Strong Correction, Subtle
Correction
3
Shooting
69
Page 72

Adjusting the White Balance Manually
WB±WB
±
Manual White BalanceManual White Balance
CancelCancel CheckCheck
AdjustAdjust
OKOK
CancelCancel OKOK
±0
±0
±0
Cancel
OK
Color Temperature
You can measure the white balance at a selected location.
1 Select o in Step 2 of
“Setting the White
Balance” (p.68).
Adjusting the White Balance with Color Temperature
Specify the white balance with the color temperature.
1 Select p in Step 2 of “Setting the White
Balance” (p.68).
3
Shooting
2 Under the light you wish to measure the white
balance of, select a white area as the subject,
and press 0 fully.
The captured image is displayed.
3 Use ABCD to specify
the measuring area.
Press M to return the measuring
area to the center.
4 Press E.
The White Balance setting screen reappears.
[The operation could not be completed correctly] appears
when measuring is unsuccessful. Press E to remeasure
the white balance and return to Step 3.
t Memo
• You can copy the white balance settings of a captured image
and save them as manual white balance settings in [Save as
Manual WB] of the playback mode palette. (p.77)
70
2 Press G.
3 Adjust the color
temperature.
Set the color temperature value
within the range from 2500K to
10000K.
Available operations
Q
R
ABCD
Changes the color temperature in
increments of 100 Kelvin.
Changes the color temperature in
increments of 1000 Kelvin.
Fine-tunes the color temperature.
Color Temperature
±0
±0
Cancel
±0
4 Press E.
The White Balance setting screen reappears.
t Memo
• Select [Mired] in [15 Color Temperature Steps] of the E3
menu to set the color temperature in mired units. The color
temperature can be changed in 20 mired units with Q, and
100 mired units with R. However, figures are converted to
and displayed in Kelvin.
OK
Page 73

Controlling the Image Finishing
BrightBright
CancelCancel
Parameter Adj.Parameter Adj.
CheckCheck OKOK
SaturationSaturation
CancelCancel OKOKResetReset
Tone
When you want to take pictures with a slightly different style,
you can set the desired picture style before shooting.
Try out the various settings, and find your best picture style.
Custom Image
v/A1
1 Select [Custom Image] in the control panel, and
press E.
The Custom Image setting screen appears.
2 Select an image finishing
tone.
Bright
Natural
Portrait
Landscape
Vibrant
Radiant
Muted
Bleach Bypass
Reversal Film
Monochrome
Cross Processing
Available operations when shooting with the
viewfinder
P Uses Digital Preview to preview the
J
Proceed to Step 6 if you do not need to change the
parameters.
background image with the selected setting
applied.
Saves the preview image (only when the
image can be saved).
3 Press G.
The parameter setting screen appears.
4 Set the parameters.
Available operations
AB
CD
R
M
Selects a parameter.
Adjusts the value.
Switches between [Sharpness] and [Fine
Sharpness]. (Not available in C mode)
Resets the adjustment value to the default
setting.
3
Shooting
5 Press E.
The screen of Step 2 reappears.
71
Page 74

6 Press E.
100 -0001100-0001
Saves this image's CrossSaves this image's Cross
Processing settingsProcessing settings
Save as Favorite 1Save as Favorite 1
Save as Favorite 2Save as Favorite 2
Save as Favorite 3Save as Favorite 3
CancelCancel OKOK
The control panel reappears.
7 Press F.
The camera returns to standby mode.
u Caution
• This function is not available when in R or S mode.
• The Digital Preview operation in Step 2 cannot be performed
3
when the drive mode is set to [Multi-exposure], [Interval
Shooting
Shooting], or [Interval Composite].
Saving the Cross Processing Settings of a
Captured Image
The outcome of Cross Processing varies each time a picture is
taken. If you take a cross processed image that you like, you
can save the Cross Processing settings used in the image so
that you can repeatedly use the same settings.
1 Press B in single image display of playback
mode.
The playback mode palette appears.
2 Select j and press E.
The camera searches for cross processed images starting
from the most recent image taken.
[No cross processed image] appears if there are no cross
processed images.
72
3 Use Q to select a cross
processed image.
4 Select the “Favorite” number 1, 2 or 3 to save
the settings, and press E.
The settings of the selected image are saved as your
“Favorite” settings.
t Memo
• The saved Cross Processing settings can be loaded by
selecting [Cross Processing] in Step 2 of “Custom Image”
(p.71), and selecting one of the Favorite settings 1 to 3 for the
parameter.
Page 75

Digital Filter
Extract Color
Cancel
Parameter Adj.
Check
OK
Extracted Color 1Extracted Color 1
CancelCancel OKOKCheckCheck
v/A1/C1
1 Select [Digital Filter] in the control panel, and
press E.
The Digital Filter setting screen appears.
4 Set the parameters.
2 Select a filter.
Select [No Filter] to not shoot with
a digital filter.
Available operations when shooting with the
viewfinder
Proceed to Step 6 if you do not need to change the
parameters.
3 Press G.
The parameter setting screen appears.
Extract Color
Parameter Adj.
Cancel
Check
Extract Color
Replace Color
Toy Camera
Retro
High Contrast
P Uses Digital Preview to preview the
J
background image with the selected effect
applied.
Saves the preview image (only when the
image can be saved).
Shading
Invert Color
Unicolor Bold
Bold Monochrome
Available operations
Selects a parameter.
Adjusts the value.
OK
AB
CD
5 Press E.
The screen of Step 2 reappears.
6 Press E.
The control panel reappears.
7 Press F.
The camera returns to standby mode.
u Caution
• This function cannot be used in some capture modes or in
combination with some other functions. (p.110)
• The Digital Preview operation in Step 2 cannot be performed
when the drive mode is set to [Multi-exposure], [Interval
Shooting], or [Interval Composite].
• Depending on the filter used, it may take longer to save
images.
t Memo
• Images can also be processed with digital filters in playback
mode. (p.84)
3
Shooting
73
Page 76

Correcting Images
Highlight CorrectionHighlight Correction
AutoAuto
CancelCancel OKOK
Shadow Correction
Auto
Cancel
OK
HDR CaptureHDR Capture
AutoAuto
CancelCancel OKOK
Brightness Adjustment
Highlight Correction/Shadow Correction
3
Expands the dynamic range and enables a wider range of tones
Shooting
to be recorded by the CMOS sensor and reduces the
occurrence of overexposed/underexposed areas.
Set in the control panel or [D-Range Settings] of the A2 menu.
Shadow Correction
Auto
Cancel
u Caution
• When the sensitivity is set to less than ISO 200, [Highlight
Correction] cannot be set to [On].
t Memo
• [Highlight Correction] in C mode can be set to [Auto] or [Off].
74
v/A2
OK
HDR Capture
Takes three consecutive images at three different exposure
levels to create a single composite image with them.
v/A1/C1
1 Select [HDR Capture] in the control panel, and
press E.
The [HDR Capture] screen appears.
2 Use CD to select the type.
3 Press B, and use CD to set the range in which
to change the exposure.
4 Press E.
The control panel reappears.
5 Press F.
The camera returns to standby mode.
u Caution
• This function cannot be used in some capture modes or in
combination with some other functions. (p.110)
• [File Format] is fixed to [JPEG]. When [File Format] is set to
[RAW] or [RAW+], the setting is changed to [JPEG].
• For HDR Capture, multiple images are combined together to
create a single image, so it may take time to save the image.
•In C mode, this function is available only when the drive
mode is set to [Interval Movie Record].
Page 77

t Memo
Distortion Correction
Peripheral Illumin. Corr.
Lat-Chromatic-Ab Adj
Diffraction Correction
Lens Correction
•In Y mode or when k of S mode is selected,
specific HDR settings are used and HDR Capture cannot be
set.
• The Auto Align feature can be set if you access [HDR
Capture] from the A1 menu.
• When the drive mode is set to [Interval Shooting], [Auto Align]
is fixed to [Off].
Lens Correction
The following features can be set in
[Lens Correction] of the A2 menu.
v/A2
Lens Correction
Distortion Correction
Peripheral Illumin. Corr.
Lat-Chromatic-Ab Adj
Diffraction Correction
Distortion
Correction
Peripheral
Illumin. Corr.
Lat-ChromaticAb Adj
Diffraction
Correction
Reduces distortions occurring due to lens
properties.
Reduces peripheral light fall-off occurring
due to lens properties.
Reduces lateral chromatic aberrations
occurring due to lens properties.
Corrects blur caused by diffraction when
using a small aperture.
t Memo
• You can also set [Distortion Correction] and [Peripheral
Illumin. Corr.] from the control panel.
• Corrections can only be made when a compatible lens is
attached. (p.113) The features are disabled when using an
accessory such as a rear converter that is attached between
the camera and the lens.
• When [File Format] is set to [RAW] or [RAW+], correction
information is saved as a RAW file parameter and you can
select whether to apply the correction to the images when
developing them. For the RAW Development function, [Color
Fringe Correction] can also be set. (p.87)
3
Shooting
75
Page 78

Anti-Aliasing Filter Simulator
99 99999999
AA Filter SimulatorAA Filter Simulator
OffOff
CancelCancel OKOK
Clarity EnhancementClarity Enhancement
OffOff
CancelCancel OKOK
By shaking the Shake Reduction unit, a moiré reduction effect
simulating that of a low-pass filter can be achieved.
Set in the control panel or [AA Filter
Simulator] of the A3 menu.
v/A3
Texture Enhancement
Images with the texture and surface
details enhanced can be captured.
Set in the control panel or [Clarity
Enhancement] of the A2/C1 menu.
v/A2/C1
3
Shooting
Type1
Type2 Prioritizes moiré reduction.
Bracketing
u Caution
• This function cannot be used in some capture modes or in
combination with some other functions. (p.110)
• [Bracketing] cannot be used in the following situations.
• When e, o, or p of S mode is selected
•In M mode
• When the drive mode is set to other than [Single Frame
• When HDR Capture is set
• When the number of storable images is 2 or less
76
Takes pictures balancing the resolution and
moiré reduction.
Takes consecutive 3 images in order of [Off],
[Type1], and [Type2] (3 images are taken with
one press of 0).
Shooting], [Self-timer] (12 seconds, 2 seconds), or
[Remote Control] (now, after 3 seconds)
u Caution
• This function cannot be used in combination with some other
functions. (p.112)
•In C mode, this function is available only when the drive
mode is set to [Interval Movie Record].
Page 79

Playback Mode Palette Items
Image Rotation
Exit
Rotates captured images.
Useful for image playback on
TV and other display devices
OK
Playback functions can be set from
the playback mode palette as well as
the B1 menu (p.25).
Press B in single image display of
the playback mode to display the
playback mode palette.
Item Function Page
Image
a
Rotation
b Digital Filter
Color Moiré
c
Correction
d Resize
e Cropping
f Protect
h Slideshow
Save as Manual
i
WB
*1 *2
*1
Changes the rotation
*1
information of images.
Processes images with
*1
digital filters.
Reduces color moiré in
*1 *2
images.
Changes the number of
recorded pixels of the image.
Crops out only the desired
*1
area of an image.
Protects images from being
accidentally erased.
Plays back images one after
another.
Saves the white balance
settings of the captured
image as Manual White
Balance.
Image Rotation
Rotates captured images.
Useful for image playback on
TV and other display devices
Exit
p.80
p.84
p.84
p.83
p.83
p.106
p.80
p.70
Item Function Page
Saves the settings used for
j
Save Cross
Processing
an image captured in Cross
Processing mode of Custom
Image as your “Favorite”
settings.
OK
Development
RAW
k
l Movie Edit
*1 Not available when a movie is displayed.
*2 Not available when a RAW image is displayed.
*3 Available only when a RAW image is saved.
*4 Available only when a movie is displayed.
Develops RAW images into
JPEG images and saves
*3
them as new files.
Divides a movie or deletes
*4
unwanted segments.
p.72
p.87
p.86
4
Playback
77
Page 80

Changing the Playback Method
100 -0505
100 -0505
12 Thumbnail Display
100 -0505
001 /500
Displaying Multiple Images
You can display 6, 12, 20, 35 or 80 thumbnail images at the
same time.
Deleting Selected Images
1 Press L in Step 1 of “Displaying Multiple
Images” (p.78).
2 Select the images to
delete.
001/500
100-0505
1 Turn R to the left in
4
Playback
playback mode.
The multi-image display screen
appears.
Available operations
ABCD
Q
G
L
2 Press E.
The selected image appears in single image display.
78
Moves the selection frame.
Shows the next/previous page.
Shows the
display style
selection
screen.
Deletes the selected images.
12 Thumbnail Display
100-0505
100-0505
Available operations
ABCD
E
J
R Shows the selected image in single
In the upper left area of the monitor, the number of selected
images is displayed.
Moves the selection frame.
Confirms/cancels the selection of the
image to delete.
Selects the range of images to delete.
image display.
Use CD to select a different image.
3 Press L.
The delete confirmation screen appears.
4 Select [Delete] and press E.
t Memo
• You can select up to 500 images at a time.
• Protected images cannot be selected.
• You can delete the images selected individually along with
the images selected by specifying the range to delete.
Page 81

• Use the same steps to select multiple images for the following
100_ 0707100_0707
100100
101101
102102
103103
104104 105105 106106 107107
123123
100 -0505
2/5
12
201 5.2
201 5.3
THU
14
SAT
23
MON
27
FRI
1
SUN
12
THU
24
TUE
Shooting
date
Thumbnail
functions.
• RAW Development (p.87)
• Protect (p.106)
Displaying Images by Folder
1 Turn R to the left in Step
2 Press E.
Deleting a Folder
1 Select the folder to delete in Step 1 of
2 Select [Delete] and press E.
1 of “Displaying Multiple
Images” (p.78).
The folder display screen
appears.
Available operations
ABCD
L
Moves the selection frame.
Deletes the selected folder.
The images in the selected folder are displayed.
“Displaying Images by Folder” (p.79), and press
L.
The delete confirmation screen appears.
The selected folder and all the images in it are deleted.
When there are protected images in the folder, select
[Delete all] or [Leave all].
Displaying Images by Shooting Date
Images are grouped and displayed by shooting date.
1 Press G in Step 1 of “Displaying Multiple
Images” (p.78).
The display style selection screen appears.
2 Select [Calendar Filmstrip
Display].
2015.2
THU
SAT
MON
FRI
2015.3
SUN
THU
TUE
12
14
23
27
1
12
24
Available operations
AB
CD
Selects a shooting date.
Selects an image taken on the
selected shooting date.
R to the r ight Shows the selected image in single
image display.
L
Deletes the selected image.
100-0505
3 Press E.
The selected image appears in single image display.
4
Playback
2/5
79
Page 82

Playing Back Images Continuously
StartStart
CancelCancel OKOK
(Slideshow)
1 Select h in the playback mode palette.
Slideshow starts.
Displaying Rotated Images
When you take pictures with the camera held vertically, image
rotation information is saved when shooting. When [Auto Image
Rotation] in the B1 menu is set to [On], the image is
automatically rotated based on the rotation information during
playback (default setting).
The rotation information of an image can be changed by
following the procedure below.
4
Playback
Available operations
E
C
D
B
R
After all images are played back, the camera returns to
single image display.
t Memo
• You can change the [Display Duration], [Screen Effect],
[Repeat Playback], and [Auto Movie Playback] settings for
slideshow in [Slideshow] of the B1 menu. Slideshow can
also be started from the Slideshow setting screen.
Pauses/resumes playback.
Displays the previous image.
Displays the next image.
Stops playback.
Adjusts the volume of the movie.
80
1 Display the image to edit in single image
display.
2 Select a in the playback mode palette.
The selected image is rotated in 90° increments and the
four thumbnail images are displayed.
3 Use ABCD to select the
desired rotation direction
and press E.
The image rotation information is
saved.
u Caution
• When [24 Save Rotation Info] is set to [Off] in the E4 menu,
image rotation information is not saved when shooting.
• You cannot change the rotation information in the following
cases.
• Protected images
• Images without a rotation information tag
• Movie files cannot be rotated.
Page 83

Connecting the Camera to an AV Device
Connect to an AV device, such as a TV, equipped with an HDMI
terminal to display Live View images while shooting or to play
back images in playback mode.
Make sure to have a commercially available HDMI cable
equipped with an HDMI terminal (type D).
1 Turn the AV device and camera off.
2 Open the terminal cover of the camera, and
connect the cable to the HDMI terminal.
3 Connect the other end of the cable to the input
terminal on the AV device.
4 Turn the AV device and camera on.
The camera turns on in HDMI mode, and the camera
information is displayed on the screen of the connected AV
device.
u Caution
• While the camera is connected to an AV device, nothing is
displayed on the camera monitor regardless of the LCD
screen direction. Also, you cannot adjust the volume on the
camera. Adjust the volume on the AV device.
t Memo
• Check the operating manual of the AV device and select a
suitable input terminal for connecting the camera.
• By default, the maximum resolution supported by both the AV
device and camera is automatically selected. If it fails to play
back images properly, change the setting in [HDMI Out] of the
D2 menu.
• If you intend to use the camera continuously for a long period,
the use of the optional AC adapter kit is recommended.
4
Playback
81
Page 84

Connecting the Camera to a Computer
Connect the camera to a computer using a USB cable.
Make sure to have a commercially available USB cable
equipped with a micro B terminal.
1 Turn the computer on.
2 Turn the camera off.
4
Playback
3 Open the terminal cover of
the camera, and connect
the USB cable to the USB
terminal.
4 Connect the USB cable to the USB port of the
computer.
5 Turn the camera on.
The camera is recognized as a removable disk.
The E lamp of the camera blinks slowly.
6 Save the captured images to the computer.
7 Disconnect the camera from the computer.
u Caution
• The camera cannot be operated while it is connected to a
computer. To operate the camera, terminate the USB
connection on the computer, then turn off the camera and
remove the USB cable.
• If the “K-S2” dialog appears on the computer screen in Step
5, select [Open folder to view files] and click the OK button.
t Memo
• Refer to “Operating Environment for USB Connection and
Provided Software” (p.129) for system requirements to
connect the camera to a computer and to use the software.
• The USB connection mode when connecting the camera to a
computer can be set in [USB Connection] of the D2 menu.
Normally, you do not need to change the default setting
([MSC]).
• If you intend to use the camera continuously for a long period,
the use of the optional AC adapter kit is recommended.
82
Page 85

Editing and Processing Images
Cancel
OK
Changing the Image Size
u Caution
• Only JPEG images captured with this camera can be resized
or cropped.
• Images already resized or cropped to the minimum file size
cannot be processed.
Changing the Number of Recorded Pixels (Resize)
Changes the number of recorded pixels of the selected image,
and saves it as a new file.
1 Display the image to edit in single image
display.
2 Select d in the playback mode palette.
The screen to select the number of recorded pixels
appears.
3
Use CD to select the
number of recorded pixels
and press
You can select an image size
smaller than that of the original
image.
The save confirmation screen appears.
E
.
Cancel
4 Select [Save] and press E.
Cropping Out Part of the Image (Cropping)
Crops out only the desired area of the selected image and
saves it as a new file.
1 Display the image to edit in single image
display.
2 Select e in the playback mode palette.
The cropping frame to specify the size and position of the
area to crop appears on the screen.
3 Specify the size and
position of the area to crop
by using the cropping
frame.
Available operations
R
ABCD
G
M
Changes the size of the cropping frame.
Moves the cropping frame.
Changes the aspect ratio or Image
Rotation setting.
Rotates the cropping frame (only when
possible).
4 Press E.
OK
The save confirmation screen appears.
5 Select [Save] and press E.
4
Playback
83
Page 86

Correcting Color Moiré
CancelCancel OKOK
100 -0001100-0001
Base Parameter AdjBase Parameter Adj
StopStop
Parameter Adj.Parameter Adj.
OKOK
Reduces color moiré in images.
1 Display the image to edit in single image
display.
2 Select c in the playback mode palette.
If the image cannot be edited, [This image cannot be
processed] appears.
4
3 Use CD to select the
Playback
correction level and press
E.
The save confirmation screen
appears.
4 Select [Save] and press E.
u Caution
• The Color Moiré Correction function can be used only for the
JPEG images captured with this camera.
84
Processing Images with Digital Filters
1 Display the image to edit in single image
display.
2 Select b in the playback mode palette.
The screen to select a digital filter appears.
3 Select a filter.
Use Q to select a different
image.
Base Parameter Adj
Extract Color
Replace Color
Toy Camera
Retro
High Contrast
Shading
Invert Color
Unicolor Bold
Bold Monochrome
Tone Expansion
Proceed to Step 7 if you do not need to change the
parameters.
Sketch
Water Color
Pastel
Posterization
Miniature
Soft
Starburst
Fish-eye
Slim
Monochrome
4 Press G.
The parameter setting screen appears.
Page 87

5 Set the parameters.
BrightnessBrightness
CancelCancel OKOK
Applying the digital filterApplying the digital filter
Recreating filter effectsRecreating filter effects
Searching for original imageSearching for original image
OKOK
100 -0001
20
19
18
17
1616--
--
--
--
--
--
------
------
--
--
--
15
14
13
12
11
10
9
8
7
6
5
4
3
2
1
Reapplies following digital filter
effects from previous image
Details
OK
100 -0001
Performs digital filter
processing to this image
OK
Available operations
AB
CD
Selects a parameter.
Adjusts the value.
6 Press E.
The screen of Step 3 reappears.
7 Press E.
The save confirmation screen appears.
8 Select [Apply additional filter(s)] or [Save] and
press E.
Select [Apply additional filter(s)] when you want to apply
additional filters to the same image. The screen of Step 3
reappears.
u Caution
• Only JPEG and RAW images captured with this camera can
be edited with the digital filters.
t Memo
• Up to 20 filters, including the digital filter used during shooting
(p.73), can be applied to the same image.
Recreating Filter Effects
Retrieves the filter effects of the selected image and applies the
same filter effects to other images.
1 Display a filter-processed image in single image
display.
2 Select b in the playback mode palette.
3 Select [Recreating filter
effects] and press E.
The filter effects used for the
selected image appear.
4 To check the parameter
details, press G.
Press G again to return to the
previous screen.
Reapplies following digital filter
effects from previous image
5
1
6
2
7
3
8
4
100-0001
17
13
9
--
-18
14
10
11
--
12
Details
--
--
-19
15
--
--
-20
--
--
OK
5 Press E.
The image selection screen appears.
6
Use Q to select an image
for applying the same filter
E
effects, and press
You can only select an image
that has not been processed with
a filter.
The save confirmation screen appears.
.
Performs digital filter
processing to this image
100-0001
OK
4
Playback
85
Page 88

7 Select [Save] and press E.
00 '00 "00 '00"
10 '00 "10 '00"
StopStop OKOK
00 '05 "
10 '00 "
Select segments for deletion
t Memo
•
If [Searching for original image] is selected in Step 3, the
original image prior to digital filter application can be retrieved.
Editing Movies
1
Display the movie to edit in single image display.
2 Select l in the playback mode palette.
4
Playback
The movie editing screen appears.
3 Select the point where you
want to divide the movie.
The frame at the dividing point is
displayed at the top of the
screen.
Up to four points can be selected
to divide the original movie into five segments.
Available operations
A
D
Press and hold D
C
Press and hold C
R
G
86
Proceed to Step 7 if you do not want to delete any segment.
Plays back/pauses a movie.
Forwards a frame (when paused).
Fast-forwards playback.
Reverses a frame (when paused).
Fast-reverses playback.
Adjusts the volume.
Confirms/cancels a dividing point.
4 Press L.
The screen to select the segments to delete is displayed.
5 Use CD to move the
selection frame and press
E.
The segments to delete are
specified. (Multiple segments can
be deleted at once.)
Press E again to cancel the selection.
Select segments for deletion
6 Press F.
The screen of Step 3 reappears.
7 Press E.
The save confirmation screen appears.
8 Select [Save] and press E.
u Caution
• Select dividing points in chronological order from the
beginning of the movie. When canceling the selected dividing
points, cancel each of them in reverse order (from the end of
the movie to the beginning). In an order other than specified,
you can neither select dividing points nor cancel the
selections of the dividing points.
00' 05"
10' 00"
Page 89

Developing RAW Images
100 -0001100-0001001 /500001/500
Develop images as shotDevelop images as shot
Develop images withDevelop images with
modified settingsmodified settings
OKOK
100 -0001
Image Capture Settings
You can develop RAW images into JPEG images, and save
them as new files.
1 Select k in the playback mode palette.
The screen for selecting a RAW image processing option
appears.
2 Select the desired option and press E .
Select single
image
Select multiple
images
Select a folder
When [Select single image] is selected, proceed to Step 6.
The image/folder selection screen appears.
Develops an image.
Develops up to 500 images with the
same settings.
Develops up to 500 images in the
selected folder with the same settings.
3 Select the image(s) or a folder.
Refer to Step 2 of “Deleting Selected Images” (p.78) for how
to select the image(s).
4 Press G.
The screen for selecting the parameter setting method
appears.
5 Select the parameter
setting method and press
E.
Develop
images as shot
Develop
images with
modified
settings
Allows you to change Image Capture
Settings (JPEG Recorded Pixels and
JPEG Quality).
Allows you to change Image Capture
Settings (Aspect Ratio, JPEG Recorded
Pixels, JPEG Quality, Color Space),
Lens Correction (Distortion Correction,
Peripheral Illumin. Corr., Lat-ChromaticAb Adj, Diffraction Correction, Color
Fringe Correction), Digital Filter, White
Balance, Custom Image, Clarity
Enhancement, Sensitivity, High-ISO NR,
and Shadow Correction.
6 Set the parameters.
Image Capture Settings
4
Playback
100-0001
87
Page 90

Available operations
Selects a parameter.
Changes the value.
Selects a different image (when in single
image display).
4
Playback
AB
CD
Q
For Image Capture Settings and Lens Correction, press D
and use AB to select an item.
For Digital Filter, White Balance, and Custom Image, press
D to display the setting screen.
7 Press E.
The save confirmation screen appears.
8 Select [Save] and press E.
When [Select single image] is selected, select [Continue] or
[Exit], and press E.
u Caution
• Only RAW images captured with this camera can be
developed.
• The parameters [Digital Filter] and [Clarity Enhancement]
cannot be set at the same time.
t Memo
• When [Select multiple images] or [Select a folder] is selected
in Step 2, a folder with a new number is created, and the
JPEG images are stored in it.
• With the provided software “Digital Camera Utility 5”, you can
develop RAW files on a computer.
88
Page 91

Enabling the Wi-Fi Function
Wi-Fi
Action Mode
Communication Info
Reset Transfer Settings
Cancel
OK
This camera has a built-in Wi-Fi function. By directly connecting
to a communication device such as a smartphone or tablet via
wireless LAN, the camera can be operated from the
communication device and images can be shared with others
via social networks or e-mail.
The Wi-Fi function is disabled at the time of turning the camera
on. Enable the function using one of the following methods.
• Setting from the menus (p.89)
• Pressing the self-portrait shutter button (p.90)
• Touching a communication device (p.90)
t Memo
• When the Wi-Fi function is enabled, the k (white) icon
indicating the wireless LAN status is displayed on the status
screen and Live View screen. When l (gray) is displayed, a
connection with the access point was not made correctly.
• Even after the Wi-Fi function is enabled, it is disabled again
when the camera is turned off and on again. Also, when the
camera enters C mode, the Wi-Fi function is disabled.
• Auto Power Off is not available while a Wi-Fi connection is
established or images are being transferred. If Auto Power
Off is activated while a connection is not established or during
standby, the Wi-Fi function is disabled. The function is
enabled when the camera recovers from Auto Power Off.
• The Wi-Fi function is disabled during the USB connection.
u Caution
• Do not attempt to use the Wi-Fi function in a location where
the use of wireless LAN devices is restricted or prohibited,
such as on airplanes.
• When using the Wi-Fi function, please observe local laws and
regulations governing radio communication.
• If a memory card with a built-in wireless LAN function (such
as an Eye-Fi card or a Flucard) is used, radio wave
interference may occur. When this occurs, disable the Wi-Fi
function of the camera.
Setting from the Menus
D3
1 Select [Wi-Fi] in D3 menu and press D.
The [Wi-Fi] screen appears.
2 Set [Action Mode] to [ON].
Select [OFF] to disable the Wi-Fi
function.
Wi-Fi
Action Mode
Communication Info
Reset Transfer Settings
Cancel
OK
3 Press F twice.
t Memo
•
In Step 2, select [Communication Info] to check the SSID,
Password, and MAC A ddress of the wireless LAN. Or, select [Reset
Transfer Settings] to reset the settings to their default values.
5
Sharing
89
Page 92

Pressing the Self-portrait Shutter Button Touching a Communication Device
1 Press and hold the self-
portrait shutter button.
A beep sounds and [Wi-Fi
enabled] appears on the screen.
2 Release the self-portrait shutter button.
To disable the Wi-Fi function, press and hold the selfportrait shutter button again.
u Caution
5
• When the self-portrait shutter button lamp is lit green or red,
Sharing
it functions as the shutter release button. In such cases, use
another method to turn the Wi-Fi function on or off.
When this camera comes into contact with a communication
device equipped with the NFC function, the camera establishes
a Wi-Fi connection. (p.91)
1 Lightly touch the
communication device to
the NFC mark of the
camera.
A beep sounds and [Wi-Fi
enabled] appears on the screen.
u Caution
• To establish a Wi-Fi connection by touching a communication
device, the Wi-Fi function and the NFC reader/writer function
of the device must be enabled in advance. For details on how
to operate the communication device, refer to the operating
manual of the device.
t Memo
• When the dedicated application “Image Sync” is installed on
the communication device, the Wi-Fi function is enabled and
Image Sync is started at the same time by touch operation.
(p.94) When Image Sync is not installed, the download site for
the application is displayed on the communication device.
90
Page 93

Operating the Camera with a Communication Device
The following functions can be used by directly connecting the
camera to a communication device via Wi-Fi and using the
dedicated application “Image Sync”.
Displays the Live View image of the camera
Remote
Capture
Image View
Image Sync supports iOS and Android. Image Sync can be
downloaded from the App Store or Google Play Store. For
supported OS and other details, refer to the download site.
t Memo
• The Image Sync screenshots used in this manual are the
ones under development and may differ from the actual
display. The screen layout and elements may be also
changed due to causes such as the version upgrade of the
application.
• For details on how to operate the communication device,
refer to the operating manual of the device.
on the communication device, and then
enables controlling the exposure settings
and shooting by operating the
communication device.
Displays the images saved on the memory
card inserted in the camera on the
communication device and imports the
images to the communication device.
Connecting the Camera and Communication Device
Connect the camera and communication device via Wi-Fi, and
start Image Sync installed on the communication device.
When an NFC-compatible Device is Used
1 Set the wireless LAN (Wi-Fi) function and the
NFC reader/writer function to ON on the
communication device.
2 Lightly touch the
communication device to
the NFC mark of the
camera.
A Wi-Fi connection is established
between the camera and
communication device.
Image Sync is started, and the list of images appears.
5
Sharing
91
Page 94

When a Non-NFC-compatible Device is Used
1 Set the wireless LAN (Wi-Fi) function to ON on
the communication device.
2 Start Image Sync on the communication device.
The [Choose a Network] screen appears on the
communication device.
3 Tap [PENTAX_xxxxxx] in
the [Network List].
The [Enter Password] screen
appears.
5
Sharing
4 Enter the password, and
tap [Connect].
A Wi-Fi connection is established
between the camera and
communication device.
The list of images appears on the
Image Sync screen.
t Memo
• Refer to [Communication Info] in [Wi-Fi] of the D3 menu for
the default password. (p.89)
92
Page 95

When an iOS Device is Used
Application image list Camera image list
A mode
1 Set the wireless LAN (Wi-Fi) function to ON on
the communication device.
Tap [PENTAX_xxxxxx] in the list of detected Wi-Fi
networks.
2 Enter the password, and
tap [Join].
A Wi-Fi connection is established
between the camera and
communication device.
3 Start Image Sync on the communication device.
Image Sync is started, and the list of images appears.
Screens of “Image Sync”
Flick left or right on the screen to change screens.
t Memo
• You can also change screens by tapping the buttons
displayed at the bottom of each screen.
5
Sharing
93
Page 96

Shooting with a Communication Device
1
8
9
10
11
12
13
14
2
3
4
5
6
7
The Live View image of the camera and buttons for shooting are
displayed on the shooting screen of Image Sync.
5
Sharing
Shooting Images
1 Configure the basic settings on the camera.
2 Check the Live View image
on the shooting screen of
Image Sync.
1 Settings (p.98)
2 Capture mode
3 Live View
4 AF frame
5 White Balance, Shutter Speed, Aperture value, EV
94
Compensation, Sensitivity
6 Live View on/off
7 Operation modes
8 NFC connection screen
9 Battery level
10 Thumbnail of the last captured image
(When tapped, the camera image list is displayed.)
11 File Format, Image storage capacity
12 Drive Mode
13 Green button
14 Shutter button
3 Change the settings using
Image Sync as necessary.
Page 97

Tap an item and select a value
1
2
4
5
3
from the list.
t Memo
• Shooting can also be performed by tapping the Live View
image. Set in [Touch AF] on the [Settings] screen. (p.98)
Viewing Images
You can view the images saved either in the camera or in the
communication device.
4 When the focus mode is set to v, tap an area
where you want to perform autofocus in the Live
View image.
Autofocus is performed on the tapped area.
5
Sharing
5 Tap the shutter release button.
The captured image is displayed as a thumbnail.
u Caution
• Shooting with Image Sync is not available in the following
situations.
• When the drive mode is set to other than [Single Frame
Shooting]
•In C mode
• When the camera is connected to a device via USB or
HDMI terminal
• When using the ASTROTRACER function
• The captured images are saved to the memory card inserted
in the camera and to the communication device with Image
Sync. Shooting cannot be performed if there is not enough
available space on the memory card.
1 Multiple image selection button
2 Album selector button
(available for the application image list only)
3 Operation modes
4 Settings (p.98)
5 NFC connection screen
95
Page 98

Tap the image to display the fullscreen image and shooting
information.
Touch operations
Flick left/right Shows the previous/next image.
5
Pinch out/in Magnifies/Reduces the image.
Sharing
Selecting the Image Storage Location
When viewing images in application image list display, you can
select the image storage location (album) from [Application] or
[Gallery] (or [Camera Roll]).
1 Tap 4.
2 Select the album.
The images in the selected album
are displayed.
96
Page 99

Selecting Multiple Images
1 Tap 5.
2 Tap the images to select.
Blue check marks appear.
3 Touch and hold one of the selected images.
4 Select the desired action.
t Memo
• When you touch and hold the desired image shown in list
display or shooting information display, the same screen as
Step 4 appears and you can select the action to apply.
5
Sharing
97
Page 100

Changing the Settings
1 Tap 6.
The following settings are available.
Touch AF
Recorded
Pixels
General
Settings
Sets whether to perform only autofocus or
perform shooting after autofocus when touching
the Live View image.
Changes the number of recorded pixels and the
quality level.
Changes the communication settings and the
display language.
2 Tap [General Settings] if you change the
communication settings and the display
language.
5
Sharing
The [Settings] screen appears.
3 Tap the setting item to be
changed.
98
 Loading...