

Ricoh kc1fax NOTICE 1018ba

KirCAE-basic_FM.book Page i Tuesday, February 20, 2001 3:47 PM
NOTICE
R CAUTION:
Use of controls, adjustments or performance of procedures other than those
specified herein may result in hazardous radiation exposure.
Shielded interconnect cables must be employed with this equipment to ensure
compliance with the pertinent RF emission limits governing this device.
Direct (or indirect reflected) eye contact with the laser beam may cause serious eye damage.
Safety precautions and interlock mechanisms have been designed to prevent any possible laser
beam exposure to the operator.
Note
❒ Some illustrations may be slightly different from your machine.
❒ Certain options may not be available in some countries. For details, please
contact your local dealer.
NOTICE TO USERS (NEW ZEALAND)
The grant of a Telepermit for any item of terminal equipment indicates only that Telecom
has accepted that the item complies with minimum conditions for connection to its network. It indicates no endorsement of the product by Telecom, nor does it provide any
sort of warranty. Above all, it provides no assurance that any item will work correctly in
all respects with another item of Telepermitted equipment of a different make or model,
nor does it imply that any product is compatible with all of Telecom's network services.
This equipment is not capable, under all operating conditions, of correct operation at the higher speeds for which it is designed. Telecom will accept no responsibility should difficulties arise in such circumstances.
This equipment shall not be set up to make automatic calls to the Telecom "111"
Emergency Service.
If a charge for local calls is unacceptable, the "Dial" button should NOT be used
for local calls. Only the 7-digits of the local number should be dialed from your
telephone. DO NOT dial the area code digit or the "0" prefix.
This equipment may not provide for the effective hand-over of a call to another
device connected to the same line.
This device may be subject to ringing or bell tinkle when calls are made from another device on the same line. If this occurs, the problem should not be referred
to the Telecom Faults Service.
This equipment should not be used under any circumstances, which may constitute a nuisance to other Telecom customers. For example, repeated attempts to
make unsolicited sales offers to the same number or group of numbers, such as
when a block of numbers terminate on the same PABX.
The call log incorporated in this equipment does not record all answered calls.
The call log, therefore may not agree with the Telecom account which may include calls not shown on the log.
Not all telephone will respond to incoming ring when connected to the extension socket.
i
R
R
KirCAE-basic_FM.book Page ii Tuesday, February 20, 2001 3:47 PM
How to Read this Manual
Symbols
In this manual, the following symbols are used:
WARNING:
This symbol indicates a potentially hazardous situation that might result in
death or serious injury when you misuse the machine without following the instructions under this symbol. Be sure to read the instructions, all of which are described in the Safety Information section in the Copy Reference manual.
CAUTION:
This symbol indicates a potentially hazardous situation that might result in minor or moderate injury or property damage that does not involve personal injury
when you misuse the machine without following the instructions under this
symbol. Be sure to read the instructions, all of which are described in the Safety
Information section in the Copy Reference manual.
* The statements above are notes for your safety.
Important
If this instruction is not followed, paper might be misfed, originals might be
damaged, or data might be lost. Be sure to read this.
Preparation
This symbol indicates the prior knowledge or preparations required before operating.
Note
This symbol indicates precautions for operation, or actions to take after misoperation.
Limitation
This symbol indicates numerical limits, functions that cannot be used together,
or conditions in which a particular function cannot be used.
Reference
This symbol indicates a reference.
{}
Keys built into the machine's operation panel.
ii
KirCAE-basic_FM.book Page iii Tuesday, February 20, 2001 3:47 PM
TABLE OF CONTENTS
Manuals for This Machine......................................................................... 1
Basic Features (this manual) ........................................................................ 1
Advanced Features ...................................................................................... 1
1.Getting Started
Guide to Components ............................................................................... 3
Front View..................................................................................................... 3
Rear View...................................................................................................... 5
Operation Panel ......................................................................................... 6
Starting the Machine ................................................................................. 8
Turning On the Power ................................................................................... 8
Turning Off the Power ................................................................................... 9
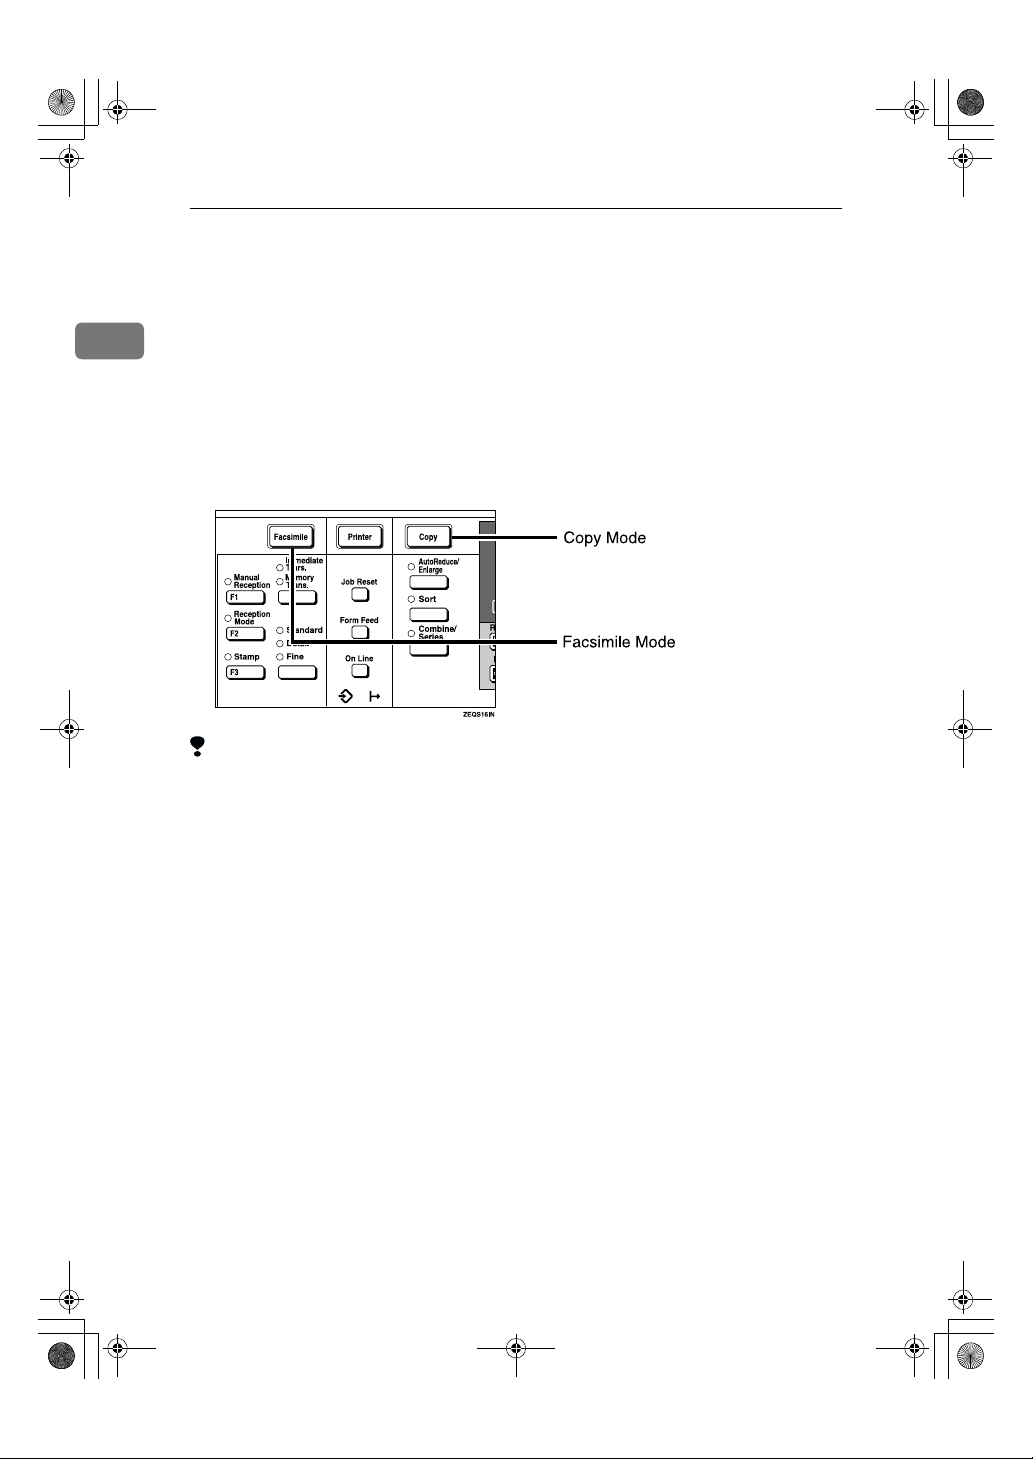
Switching Between Copy Mode and Facsimile Mode .......................... 10
Reading the Display ................................................................................ 11
Reading the Display and Using Keys.......................................................... 11
Standby Display .......................................................................................... 12
Communication Display .............................................................................. 12
Display Prompts.......................................................................................... 12
2.Faxing
Overview................................................................................................... 13
Changing Memory Transmission and Immediate Transmission ................. 13
Setting Originals...................................................................................... 14
Placing a Single Original on the Exposure Glass........................................ 15
Loading Originals in the Document Feeder................................................. 16
If the Machine Cannot Detect the Size of Your Original.............................. 17
Original Sizes Difficult to Detect.................................................................. 18
Memory Transmission ............................................................................ 19
Canceling a Memory Transmission ....................................................... 22
Canceling the Transmission Before the Original is Scanned ...................... 22
Canceling a Transmission While the Original is Being Scanned ................ 22
Canceling a Transmission While the Message is Being Sent ..................... 23
Immediate Transmission ........................................................................ 24
Canceling an Immediate Transmission................................................. 26
Canceling a Transmission Before You Have Pressed the Start Key .......... 26
Canceling a Transmission After You Have Pressed the Start Key ............. 26
Scan Settings........................................................................................... 27
Resolution ................................................................................................... 27
Original Type............................................................................................... 28
Image Density (Contrast) ............................................................................ 29
iii
KirCAE-basic_FM.book Page iv Tuesday, February 20, 2001 3:47 PM
Dialing....................................................................................................... 30
Number Keys .............................................................................................. 30
Quick Dials.................................................................................................. 32
Speed Dials................................................................................................. 33
Groups ........................................................................................................ 34
Reception ................................................................................................. 36
Selecting the Reception Mode .................................................................... 36
3.Setup
Own Name/Fax Header/Own Fax Number............................................. 37
Registering Own Name/Fax Header/Own Fax Number .............................. 38
Quick Dial ................................................................................................. 40
Registering Quick Dials............................................................................... 40
Quick Dial Key and Function Key Label (Dial label).................................... 42
Deleting Quick Dials.................................................................................... 45
Speed Dial................................................................................................ 46
Registering Speed Dial ............................................................................... 46
Deleting Speed Dial .................................................................................... 48
Groups...................................................................................................... 50
Registering Groups ..................................................................................... 50
Deleting Groups .......................................................................................... 52
Entering Text............................................................................................ 54
Available Characters................................................................................... 54
Keys ............................................................................................................ 54
How to Enter Text ....................................................................................... 55
4.Troubleshooting
Adjusting Volume .................................................................................... 57
Error Messages and Their Meanings..................................................... 59
When the {Facsimile} key is Lit in Red.................................................... 60
When the Receive File Indicator is Lit ................................................... 61
Solving Problems .................................................................................... 62
INDEX........................................................................................................ 63
iv
KirCAE-basic_FM.book Page 1 Tuesday, February 20, 2001 3:47 PM
Manuals for This Machine
Two Facsimile Reference manuals are provided, the Basic Features manual and
the Advanced Features manual. Please refer to the manual that suits your needs.
Basic Features (this manual)
The Basic Features manual explains the most frequently used fax functions and
operations.
Advanced Features
The Advanced Features manual describes more advanced functions, and also
explains settings for key operators.
❖❖❖❖ Chapter 1 Transmission Options
Explains about sending at a specific time without having to be by the machine
and also taking advantage of off-peak telephone line charges.
❖❖❖❖ Chapter 2 Job Information
Explains about erasing a fax message stored in memory and checking the contents of any files in memory.
❖❖❖❖ Chapter 3 Transmission Features
Explains about useful features for transmission. You can find out about dialing numbers easily.
❖❖❖❖ Chapter 4 Reception Features
Explains about reception features. You can find out about screening out message from anonymous senders.
❖❖❖❖ Chapter 5 Facsimile User Tools
Explains about programming frequently used functions for User Function
Key and setting the Date and Time.
❖❖❖❖ Chapter 6 Key Operator Settings
Explains about functions the key operator handles . You can find out about
setting up the phone line type, and how to change the user parameter settings.
❖❖❖❖ Chapter 7 Troubleshooting
Explains about things you should do when an Error Report is printed and
power is turned off.
❖❖❖❖ Chapter 8 Maintaining Your Machine
Explains about replacing the stamp cartridge.
❖❖❖❖ Chapter 9 Appendix
You can check the specifications for this machine.
1
KirCAE-basic_FM.book Page 2 Tuesday, February 20, 2001 3:47 PM
2
KirCAE-basic_FM.book Page 3 Tuesday, February 20, 2001 3:47 PM
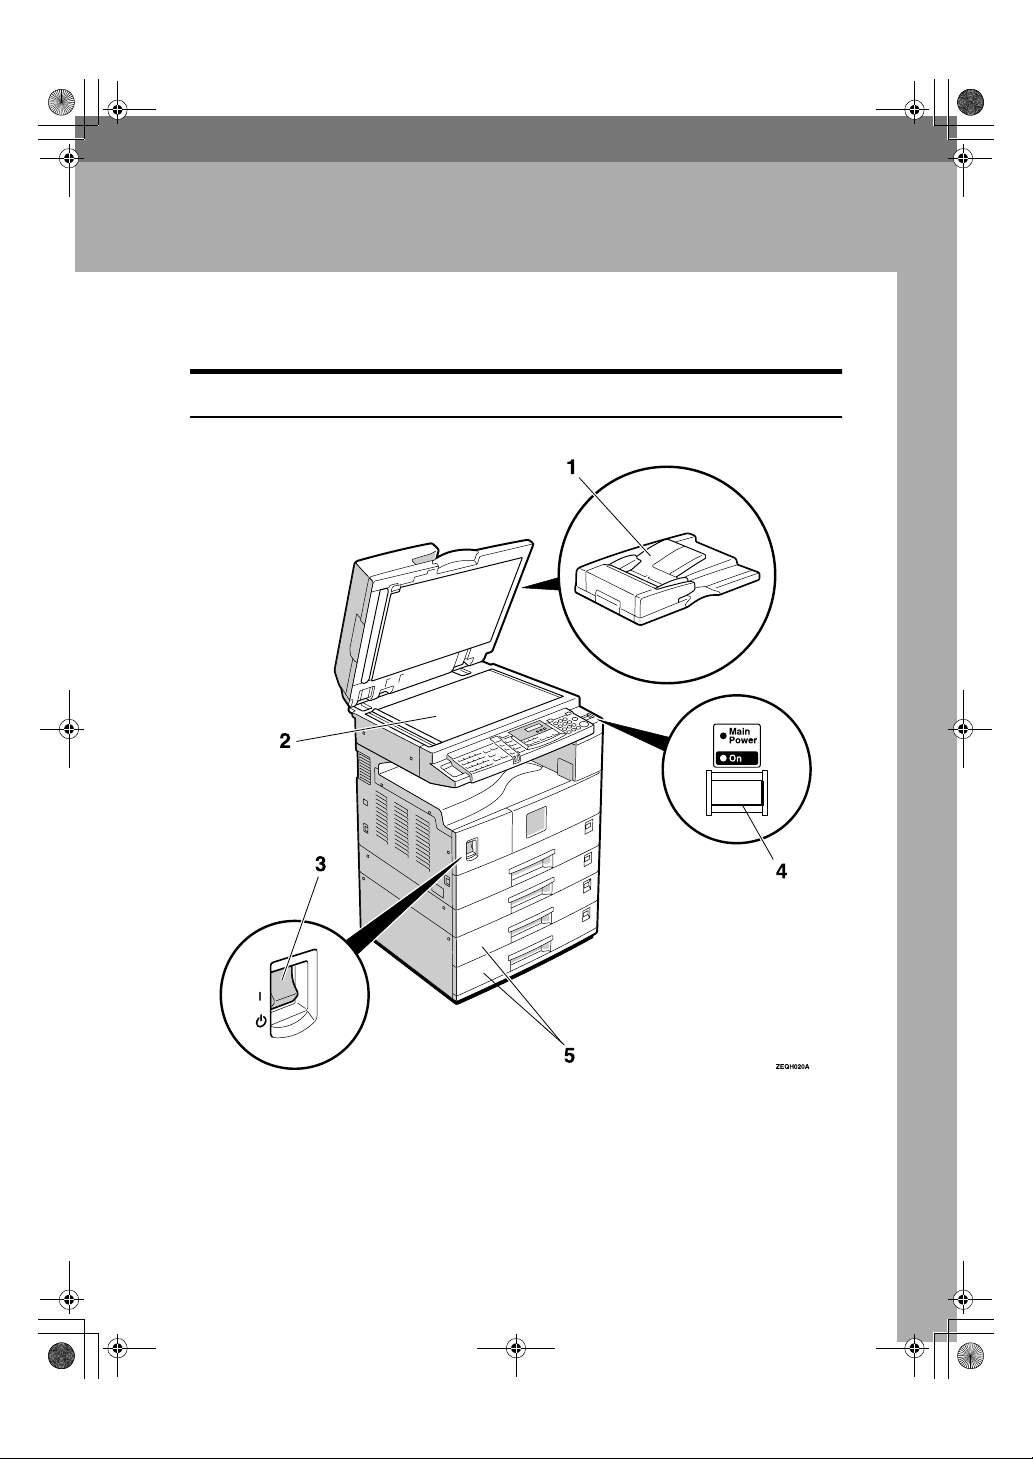
Guide to Components
Front View
1. Getting Started
1.
Document Feeder (ADF)/Platen
Cover (Option)
Holds a document stack of up to 30
sheets which are fed automatically one at
a time.Place documents face up here.
2.
Exposure Glass
Place the original face down on the upper
left corner of the exposure glass, aligning
the upper left corner with the reference
mark. Close the platen cover when you
set a document on the exposure glass.
3
KirCAE-basic_FM.book Page 4 Tuesday, February 20, 2001 3:47 PM
Getting Started
3.
Main Power Switch
If the machine dose not operate after
turning on the operation switch, check if
the main power switch is turned on. If it
1
is off, turn it on. However, if the machine
is installed with the fax option, do not
turn the main power switch off.
Note
❒ As the main power switch is normally
set by your service representative, do
not touch this switch.
❒ If the operation switch is on and there
is still no power, turn on the Main
Power switch.
❒ If you leave the Main Power switch
off for more than an hour, all files in
memory are lost.
4.
Operation Switch
Press this switch to turn the power on
(the On indicator lights up). To turn the
power off, press this switch again (the On
indicator goes off). See P.8 “Turning On
the Power”.
5.
Paper tray unit (Option)
For information about optional paper
tray unit, see the Copy Reference.
4
KirCAE-basic_FM.book Page 5 Tuesday, February 20, 2001 3:47 PM
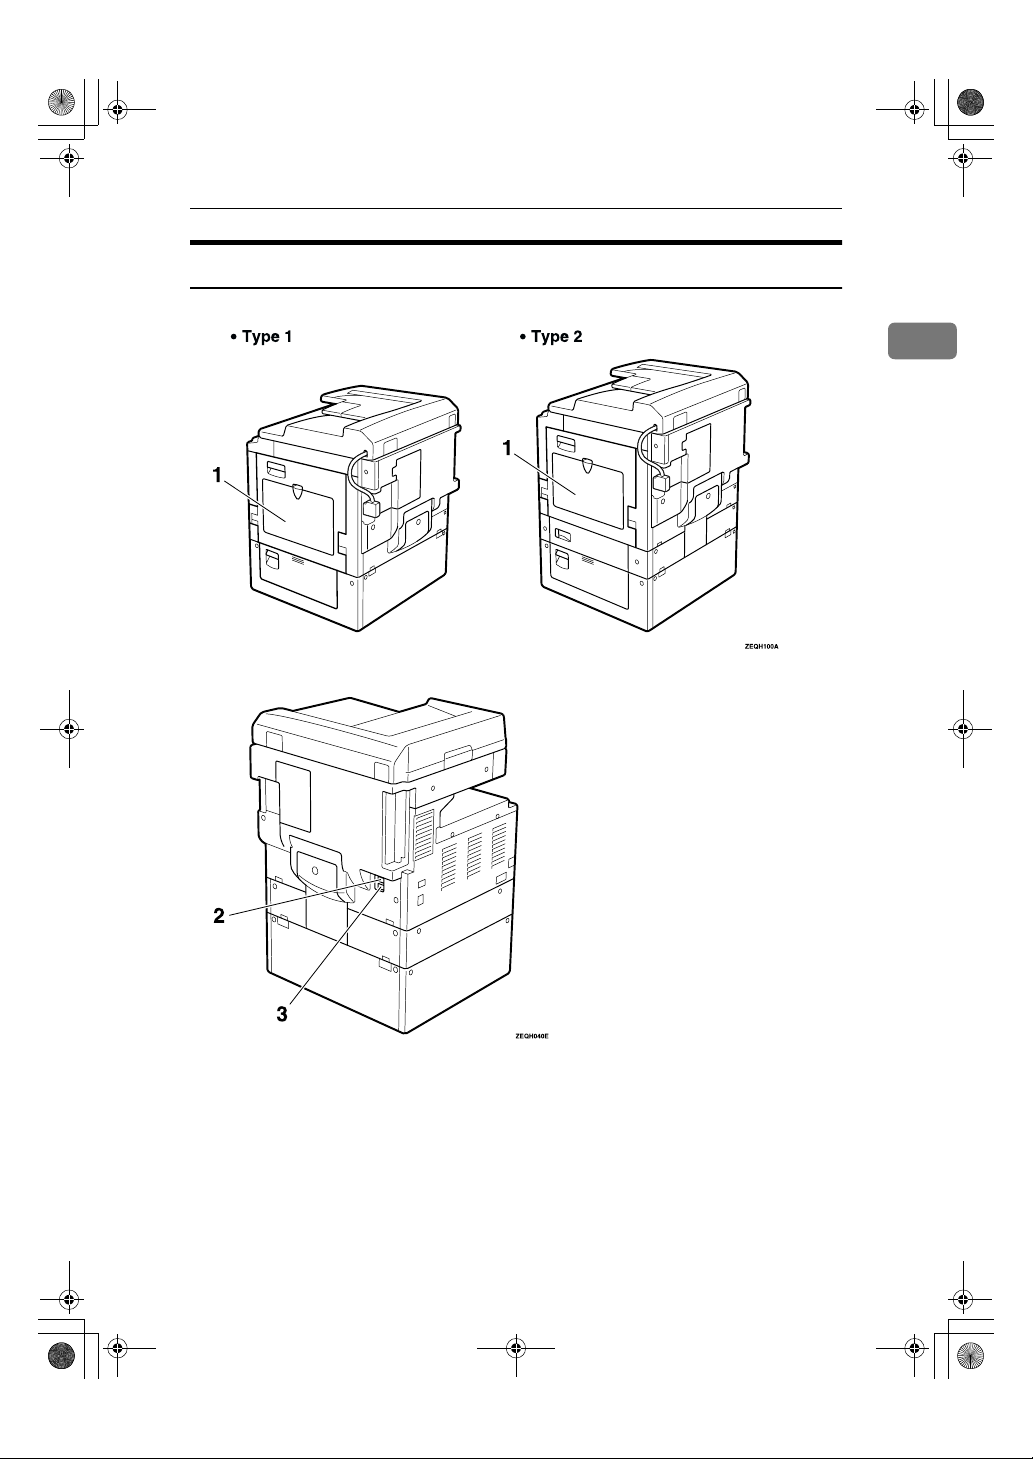
Rear View
Guide to Components
1
1.
Bypass Tray
Select this tray for non-standard size paper.
See Chapter 2 “Copying from the Bypass
Tray” in the Copy Reference.
2.
G3 Line Connector
3.
External Telephone Connector
5
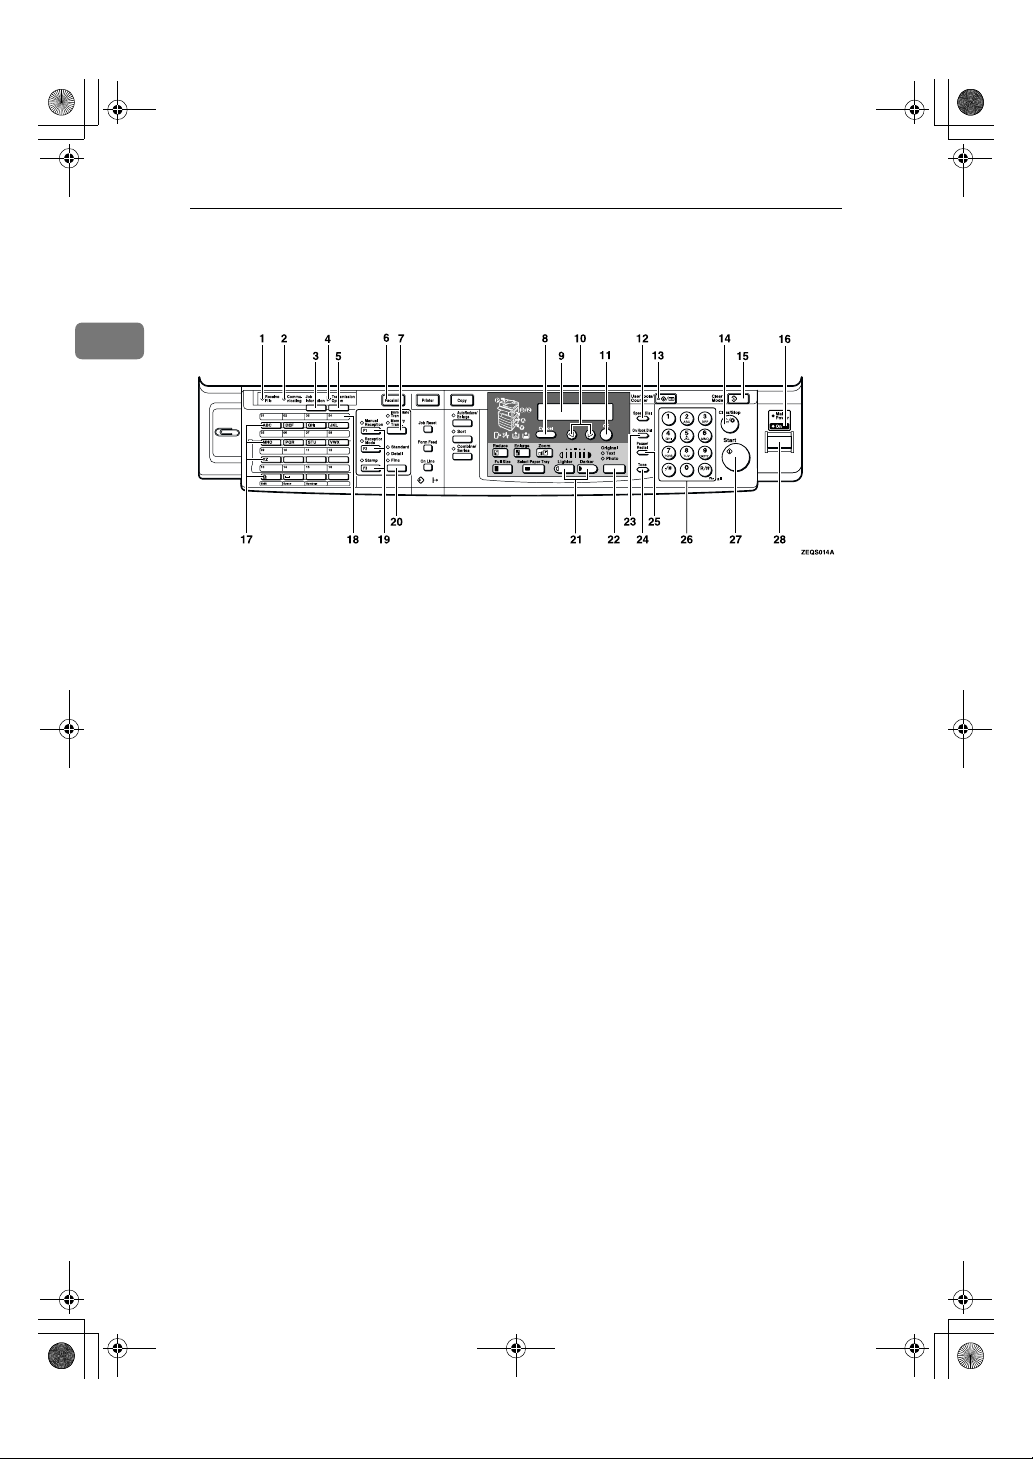
KirCAE-basic_FM.book Page 6 Tuesday, February 20, 2001 3:47 PM
Getting Started
Operation Panel
1
1.
Receive File Indicator
Lights to tell you a message has been received into memory.
2.
Communicating Indicator
Lights during transmission or reception.
3.
{{{{Job Information}}}} key
Press to search for information on a specific job.
4.
Transmission Option Indicator
5. {
{Transmission Option}}}} key
{{
Press to change the transmission option
settings. The indicator lights when option settings are changed.
6.
{{{{Facsimile}}}} key
Press to switch to Facsimile mode.
7.
{{{{Transmission Mode}}}} key
Press this key to toggle between Memory
Transmission (Memory Trans.) and Immediate Transmission (Immediate
Trans) modes.
8.
{{{{Cancel}}}} key
Press to cancel an operation or return to
the previous display.
9.
LCD display
This guides you through tasks and informs you of the machine status. A messages appears here.
6
10.
0000 1111 keys
Press to move the cursor or select functions.
11.
{{{{OK}}}} key
Press to answer "Yes" to a question displayed on the display.
12.
{{{{Speed Dial}}}} key
Press to select a Speed Dial.
13.
{{{{User Tools}}}} key
Press to enter User Tools mode. These
tools allow you to customize the default
settings.
14.
{{{{Clear/Stop}}}} key
Clear:
Deletes one character or digit.
Stop:
Interrupts the current operation (trans-
mission, scanning, copying or printing).
15.
{{{{Clear Modes}}}} key
16.
Main Power Indicator
17.
Quick Dial keys
Use to dial numbers at a single touch or
to enter letters and symbols. Also use for
the Group Dial feature.
18.
Quick Dial Flip Plate
Flip this plate down to access Quick Dial
keys 01 through 16, flip up to access keys
17 through 32.
KirCAE-basic_FM.book Page 7 Tuesday, February 20, 2001 3:47 PM
Operation Panel
19.
User Function keys
Each of these can be programmed for
rapid access to frequently used features.
❖❖❖❖ Features Programmed by Default
Key Function
F1 Manual Reception
F2 Reception Mode
F3 Stamp
20.
{{{{Resolution}}}} key
Press to switch between Standard, Detail
and Fine.
21. {
{Image Density}}}} keys (iiii and jjjj)
{{
Use to change the setting of image density.
22.
{{{{Original Type}}}} key
Press to select original type, Text or Photo. When the original type is selected, the
corresponding indicator lights.
23.
{{{{On Hook Dial}}}} key
Use to dial a number from the numeric
keypad without having to lift the handset.
24. {
{Tone}}}} key
{{
Press to send tonal signals down a pulse
dialing line.
25. {
{Pause/Redial}}}} key
{{
Pause:
Inserts a pause when you are dialing or
storing a fax number. A pause cannot be
inserted as the first digit.
Redial:
Press to redial one of the last ten num-
bers.
26.
Number keys
Use to dial fax numbers or enter the
number of copies.
27.
{{{{Start}}}} key
Press to start all tasks.
28.
Operation switch
Press this switch to turn the power on
(the On indicator goes on). To turn the
power off, press this switch again (the On
indicator goes off).
1
7
KirCAE-basic_FM.book Page 8 Tuesday, February 20, 2001 3:47 PM
Getting Started
Starting the Machine
To start the machine, turn on the op-
1
eration switch.
Note
❒ This machine automatically enters
Energy Saver mode or turns itself
off if you do not use the machine
for a while. See Chapter 2 “Settings
You Can Change with the User
Tools” in the System Settings.
----Power switches
This machine has two power switches: See P.3 “Guide to Components”.
❖❖❖❖ Operation switch
Turn on this switch to activate the
machine. When the machine has
warmed up, you can make copies
or send faxes.
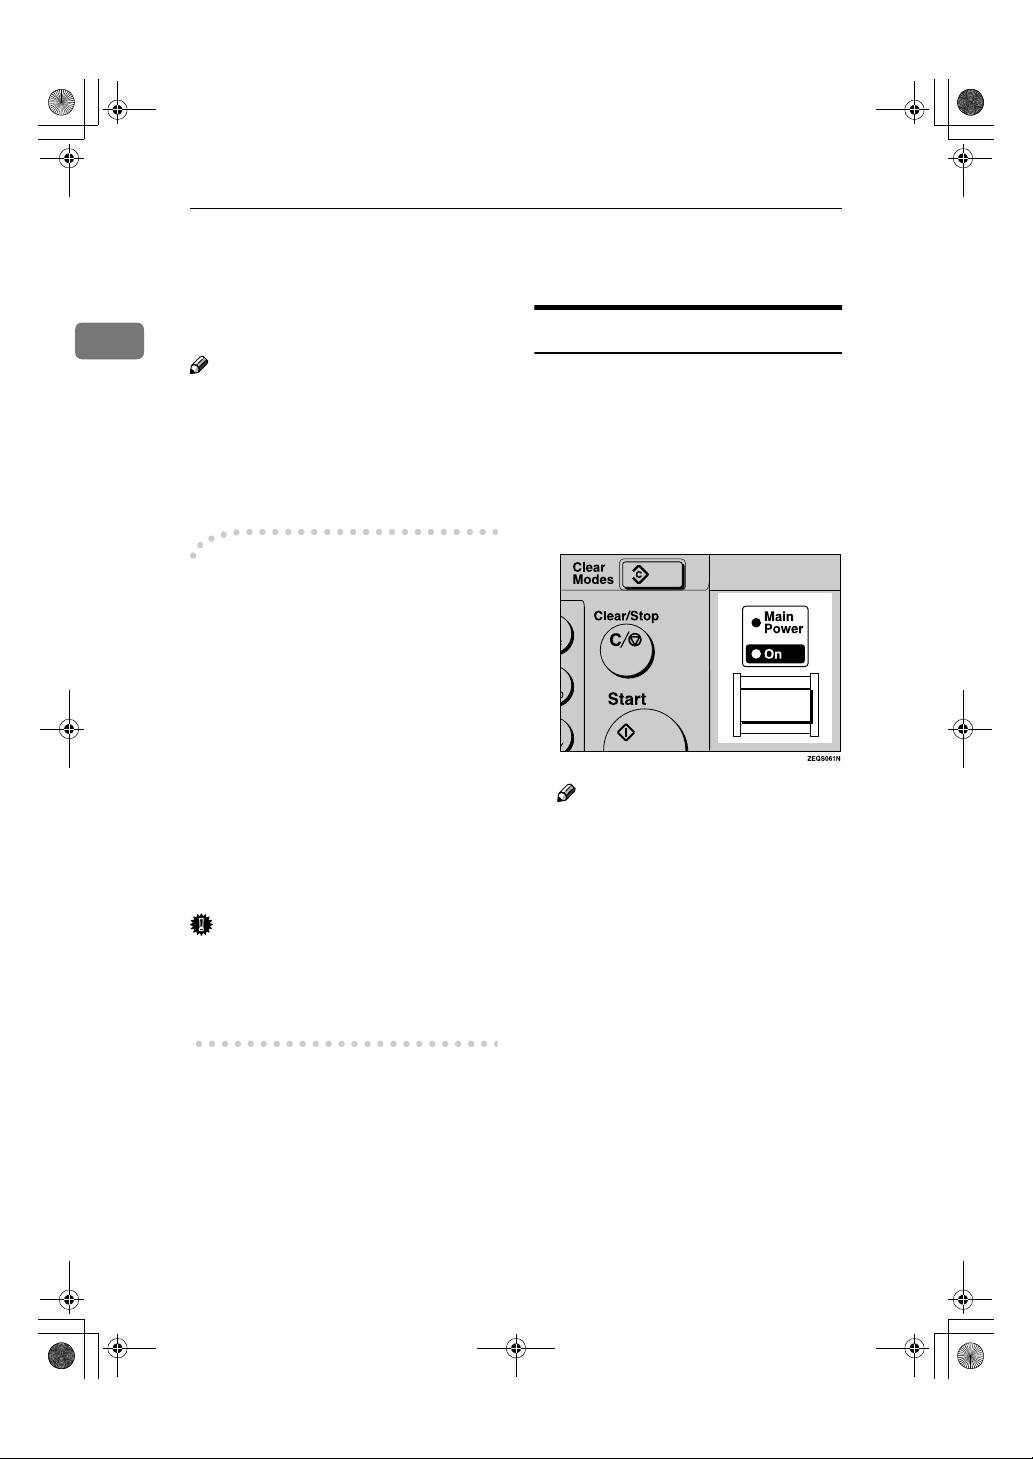
Turning On the Power
Confirm that the power cord is
A
plugged into the wall outlet firmly and the Main Power switch is
on.
Turn on the operation switch. The
B
On indicator should light.
The panel display will turn on.
❖❖❖❖ Main power switch
If the machine dose not operate after turning on the operation
switch, check if the main power
switch is turned on. If it is off, turn
it on.
Important
❒ If you leave the Main Power
switch off for more than one hour,
all fax files in memory are deleted.
See P.9 “Turning Off the Power”.
8
Note
❒ If nothing happens when you
turn on the operation switch,
make sure the Main Power
switch is turned on.
KirCAE-basic_FM.book Page 9 Tuesday, February 20, 2001 3:47 PM
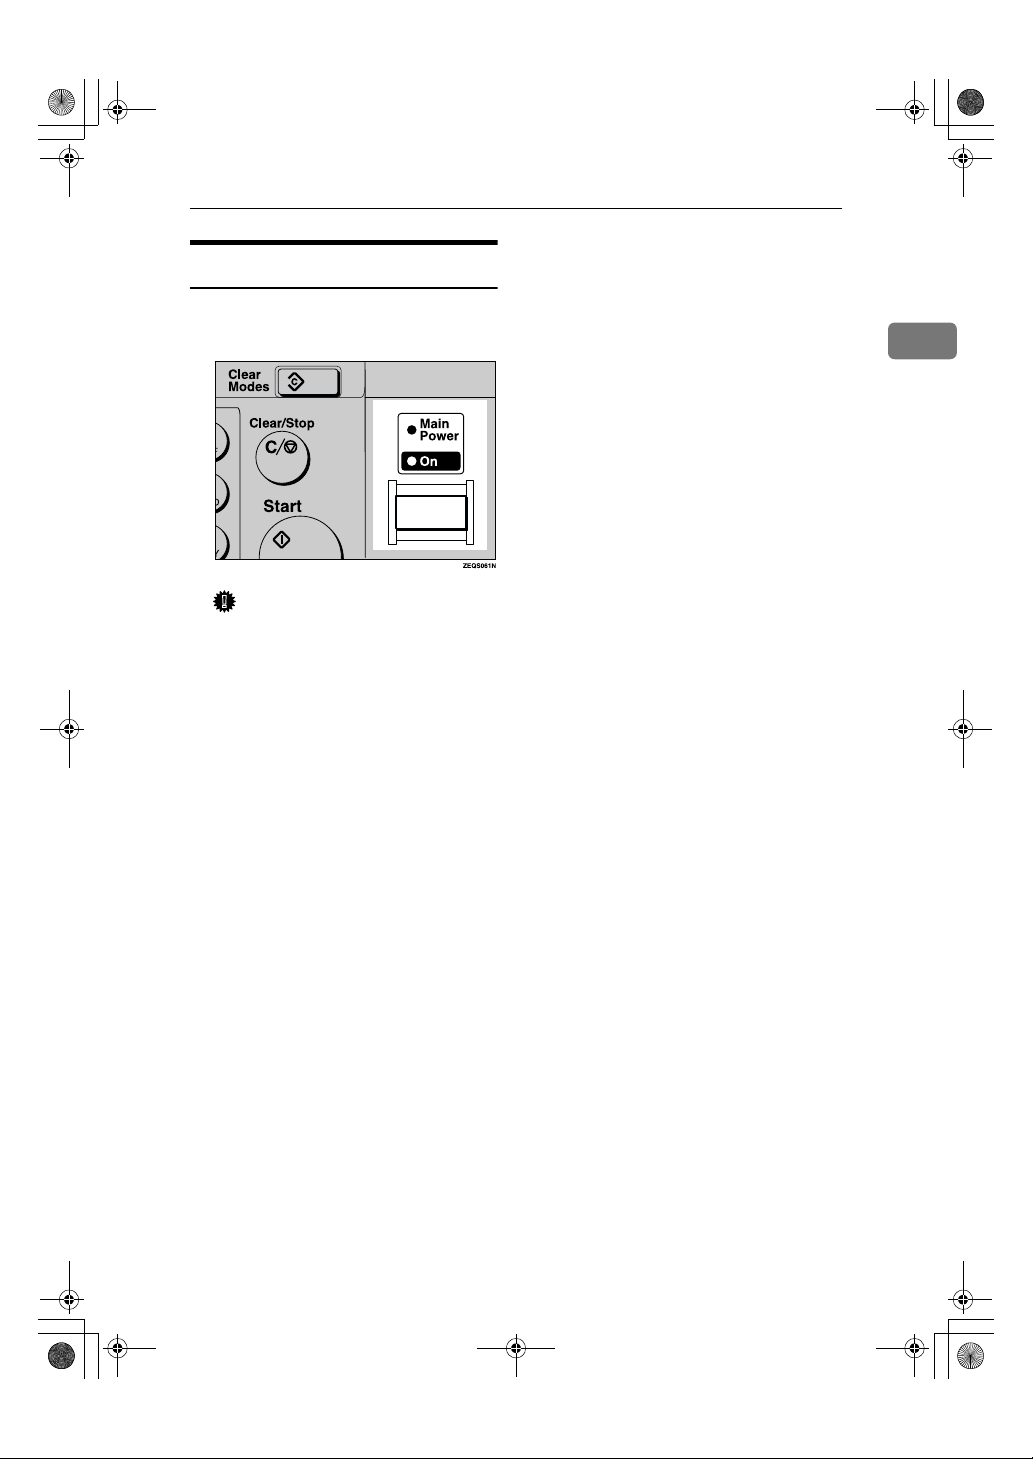
Turning Off the Power
Turn off the operation switch.
A
The On indicator will go out.
Important
❒ Before you unplug the power
cord, confirm that the display in
Facsimile mode indicates that
the remaining memory space is
100%.
❒ Fax files stored in memory will
be deleted an hour after you
turn the Main Power switch off
or you unplug the power cord.
Starting the Machine
1
9
KirCAE-basic_FM.book Page 10 Tuesday, February 20, 2001 3:47 PM
Getting Started
Switching Between Copy Mode and Facsimile Mode
1
This machine is both a fax and a copier. When you turn on the power switch, the
copier screen is shown and the machine is ready to make copies. When you wish
to use fax functions, press the {Facsimile} key.
You can set this machine to display facsimile mode immediately after the power
switch is turned on. See Chapter 2 “Setting You Can Change with the User
Tools” in the System Settings.
Limitation
❒ You cannot switch modes under the following circumstances:
• While scanning in a fax
• During Immediate Transmission
• While editing the System Settings
• While using On hook Dial
10
KirCAE-basic_FM.book Page 11 Tuesday, February 20, 2001 3:47 PM
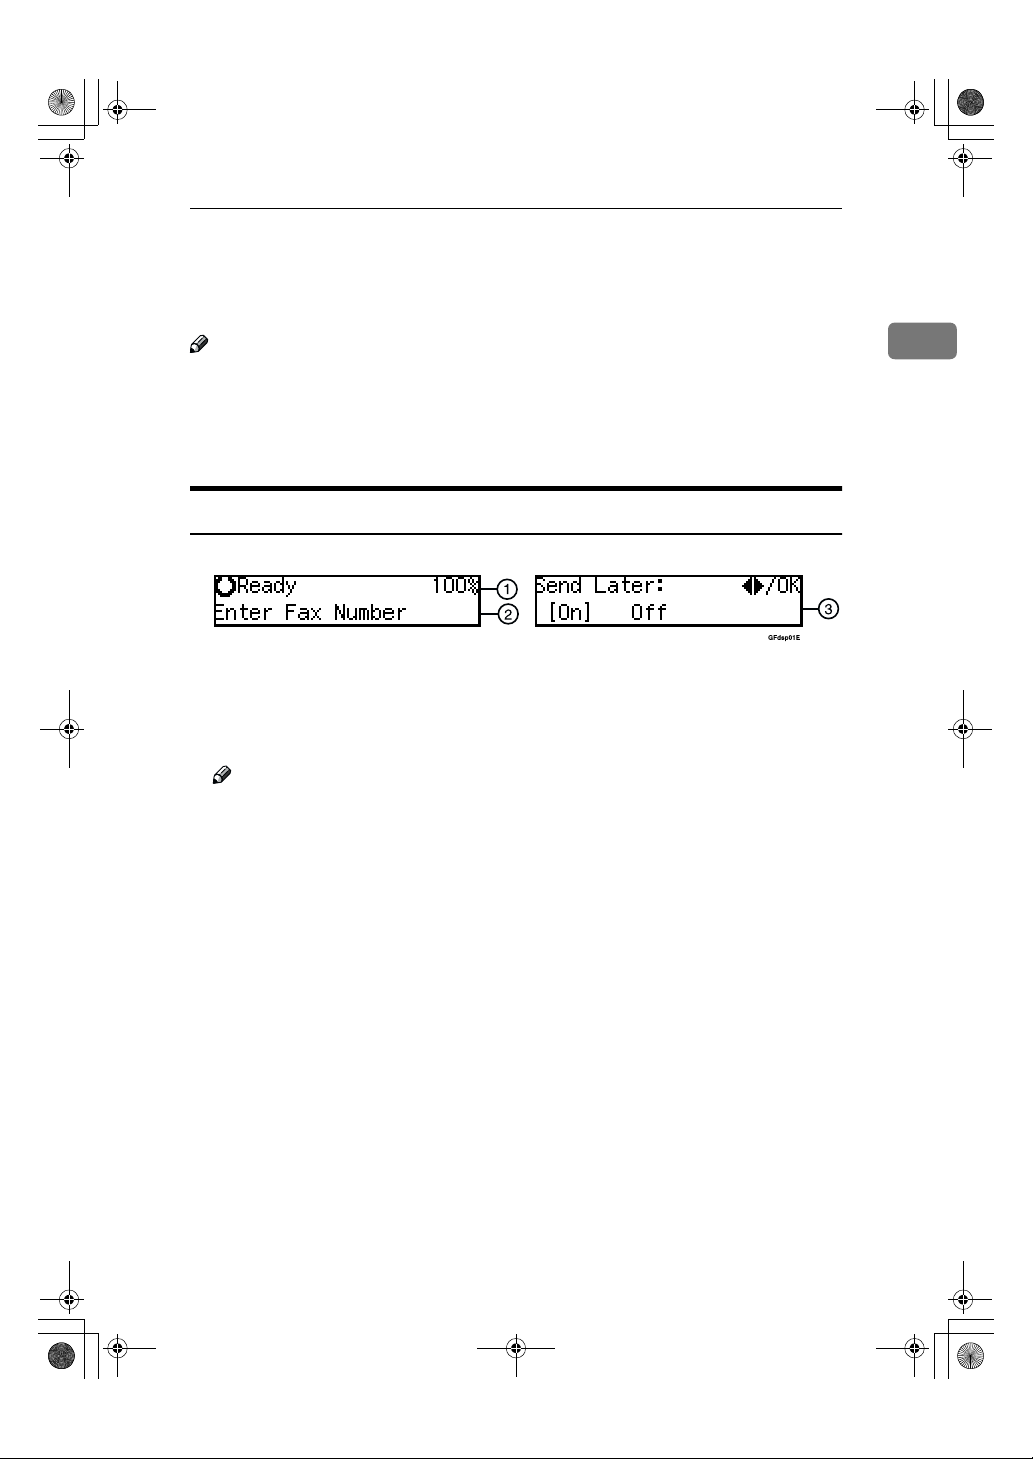
Reading the Display
The display tells you the machine status and guides you through operations.
Reading the Display
Note
❒ All procedures in this manual assume you are in Facsimile mode. By default,
when you turn the machine on it is in Copy mode. Press the {Facsimile} key
to change to Facsimile mode. You can have the machine start in Facsimile
mode. See Chapter 2 “Setting You Can Change with the User Tools” in the
System Settings.
Reading the Display and Using Keys
A Display for the machine status or currently selected function.
B Display for the messages.
Items which can be selected or specified.
C Display for items which can be selected.
Note
❒ Press 0 1 key to display another function on the LCD panel or move the
brackets to select another values.
❒ Press the {OK} key to set a selected function or entered value, and return
to the previous display.
❒ Press the {Cancel} key to cancel the selected function or entered value, and
return to the previous display.
❒ Press the {Clear Modes} key to cancel the settings and return to the initial
display.
1
11
KirCAE-basic_FM.book Page 12 Tuesday, February 20, 2001 3:47 PM
Getting Started
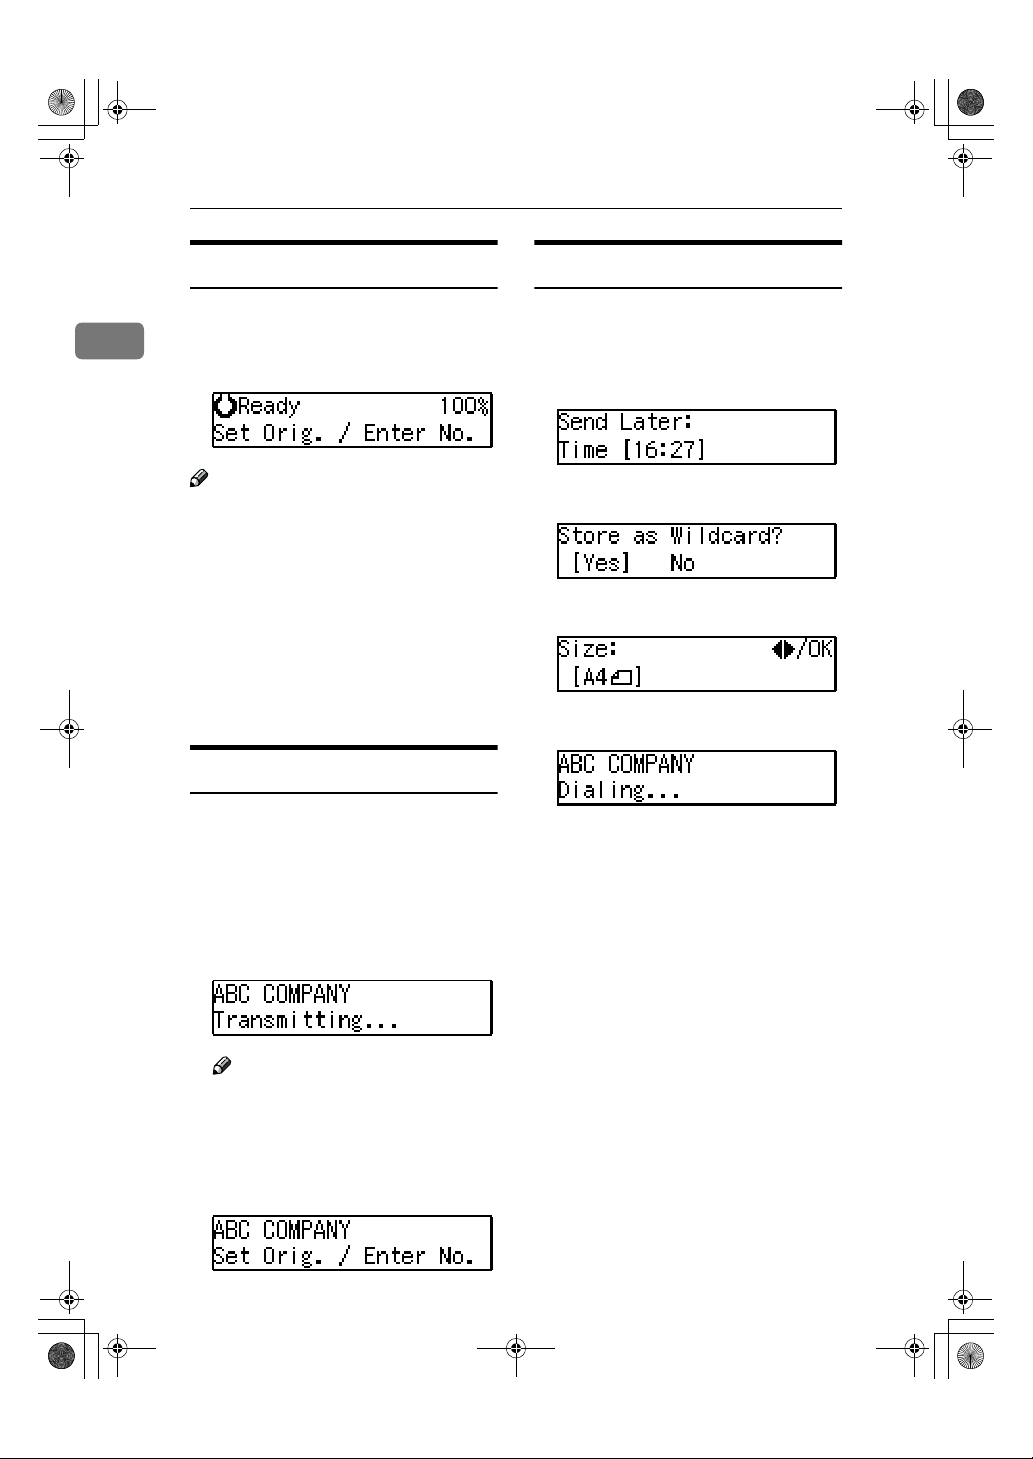
Standby Display
While the machine is in standby mode
1
(immediately after it is turned on or after the {Cancel} key is pressed), the following display is shown.
Display Prompts
Depending on the situation, the machine will show various prompts on
the display.
❖❖❖❖ Instructions and Requests
Note
❒ To return the machine to standby
mode, do one of the following:
• If you have set the original and
have not pressed the {Start} key,
remove the original.
• If you have not set an original,
press the {Cancel} key.
• If you are in User Tools mode,
press the {User Tools} key or the
{Cancel} key.
❖❖❖❖ Questions
❖❖❖❖ Selections
❖❖❖❖ Status
Communication Display
While the machine is communicating,
the status is displayed.
❖❖❖❖ Display during Memory Transmission
or Memory Reception:
The destination's name or fax
number appears on the top of the
LCD display.
Note
❒ Even when the machine is sending
or receiving a fax message from/
into memory, you can still scan the
next original into memory.
❖❖❖❖ Immediate Transmission:
12
KirCAE-basic_FM.book Page 13 Tuesday, February 20, 2001 3:47 PM
Overview
Changing Memory
Transmission and Immediate
Transmission
The basic procedure to send a fax
message is:
A Make sure the Facsimile indicator
is lit
B Set your original
C Dial the number
D Press the {Start} key
The rest of this section describes these
steps and the various features that are
available in more detail.
There are two ways to send a fax message:
• Memory Transmission
• Immediate Transmission
Check the indicators on the operation
panel to check which mode is currently active and press the {Transmission
Mode} key to toggle between them.
2. Faxing
13
KirCAE-basic_FM.book Page 14 Tuesday, February 20, 2001 3:47 PM
Faxing
Setting Originals
In this manual an original can mean a
single or multiple page document.
You can set your originals either in
the Document Feeder or on the expo-
2
sure glass. Some types of originals are
unsuitable for the Document Feeder
so they must be set on the exposure
glass.
Which way you place your original
depends on its size and whether you
are using the Document Feeder or the
exposure glass.
Limitation
❒ If you place A5 size documents on
the exposure glass, they will not be
detected.
Note
❒ When sending a fax, the image
output at the other end depends on
the size and direction of paper
used in the receiver's terminal. If
the receiver does not use paper of
the same size and direction as that
of the original, the fax image may
be output reduced, trimmed at the
both edges, or divided into two or
more sheets. When sending an important original, we recommend
that you ask the receiver about the
size and direction of the paper
used in their terminal.
❒ When sending an original of an ir-
regular (i.e. non-standard) size or
part of a large original, you can
specify the scan area precisely.
❒ You can scan non-standard size
documents as standard size documents with the Irregular Scan Area
feature. When you turn on this feature, the area scanned will be in the
specified range regardless of the
actual document size. A blank
margin will appear or the image
will be truncated at the receiving
end.
❒ Make sure that all ink, correcting
fluid etc., has completely dried before setting your original. If it is
still wet, the exposure glass will be
marked and those marks will appear on the received image.
❒ If you set an A4 size original in the
portrait direction, the machine rotates the image by 90 degrees before sending it. See Chapter 3
“Transmission with Image Rotation” in the Advanced Features
manual.
14
KirCAE-basic_FM.book Page 15 Tuesday, February 20, 2001 3:47 PM
Setting Originals
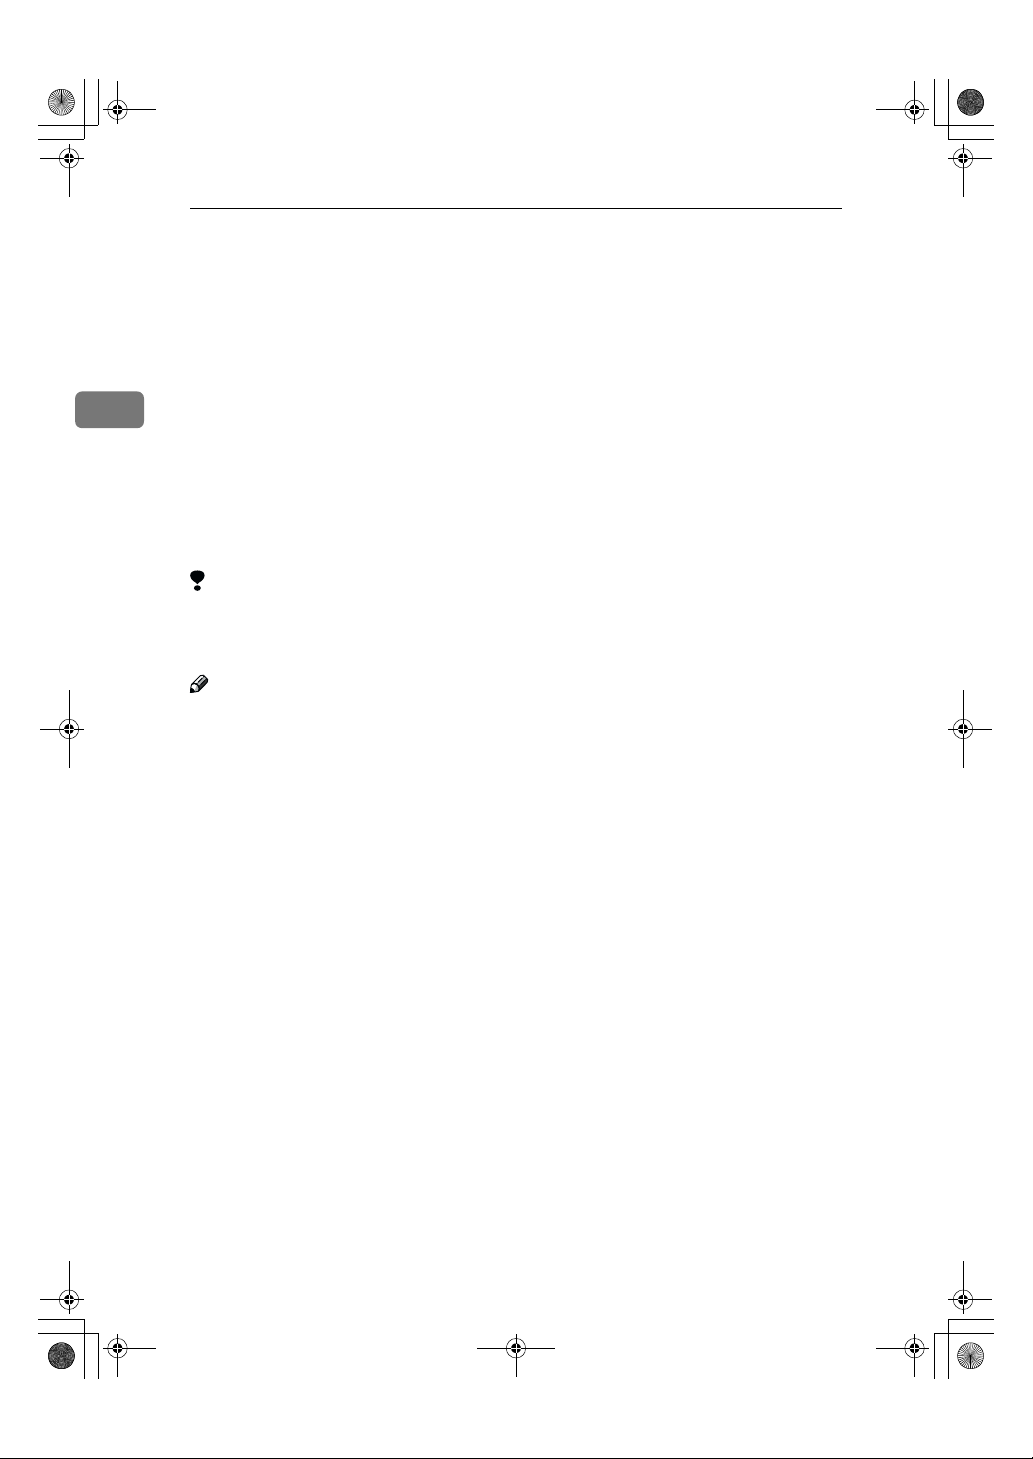
----How to set A4, B4, A3, and F
size originals
----How to set A4, A5 and B5 size
originals
Placing a Single Original on
the Exposure Glass
Set originals that cannot be placed in
the Document Feeder, such as a book,
on the exposure glass one page at a
time.
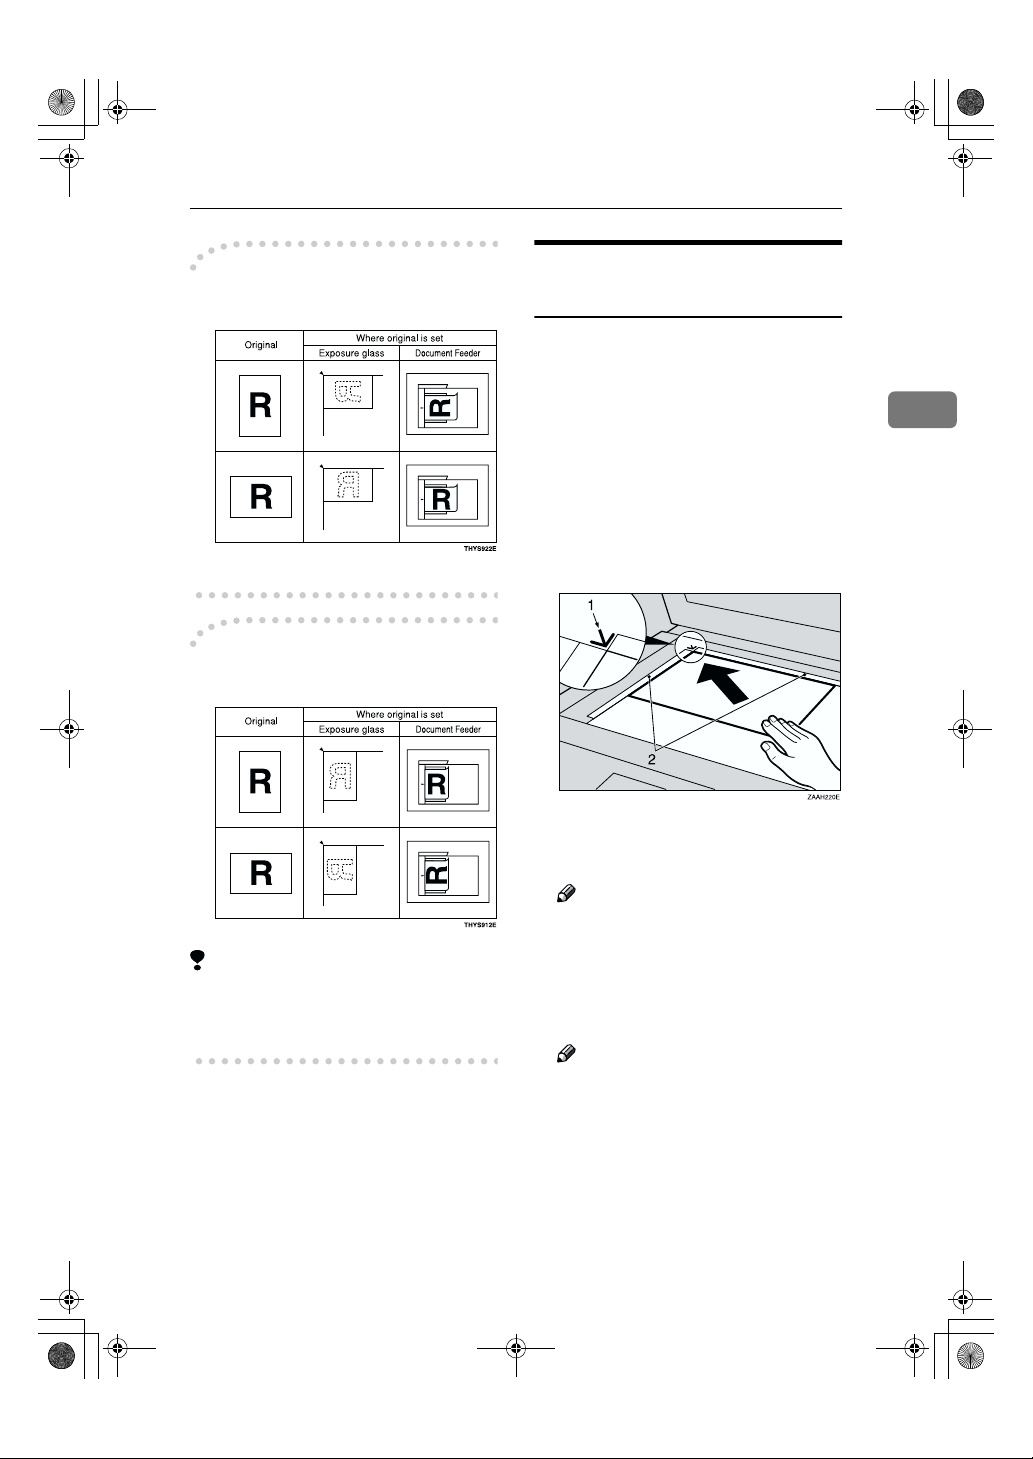
Lift the Document Feeder by at
A
least 30 degrees. Place the original
face down and align its upper left
corner with the reference mark at
the upper left corner of the exposure glass.
1.
Reference mark
2.
Scale
2
Limitation
❒ A5 size on the exposure glass is not
detected. Set A5 size documents in
the Document Feeder.
Note
❒ If you do not raise the Docu-
ment Feeder by at least 30 degrees, the original size will not
be detected properly.
Close the Document Feeder.
B
Note
❒ When sending a bound original,
the received image may contain
some black areas. To reduce this
effect, hold down the original to
prevent its bound part from rising.
15
KirCAE-basic_FM.book Page 16 Tuesday, February 20, 2001 3:47 PM
Faxing
Loading Originals in the
Document Feeder
Use the Document Feeder to scan in a
stack of originals in one operation.
Limitation
2
❒ The maximum document length is
432mm.
❒ Place all the originals to be sent in
a single stack.
❒ You cannot set originals in the
Document Feeder one page at a
time or in sheaves.
❒ Do not open the Document Feeder
while it is scanning the originals or
your document could be jammed.
Note
❒
When using Immediate Transmission mode, you cannot send originals
longer than 432mm. Use Memory
Transmission Mode instead.
❒ If an original jams, press the {Clear/
Stop} key then remove the original
carefully.
❒ If your original is bent or folded,
flatten it before you set it.
❒ Set thin originals on the exposure
glass.
Reference
For information about the sizes
and number of originals that can
be placed in the Document Feeder,
see Chapter 9 “Acceptable Types
of Originals” in the Advanced Features manual.
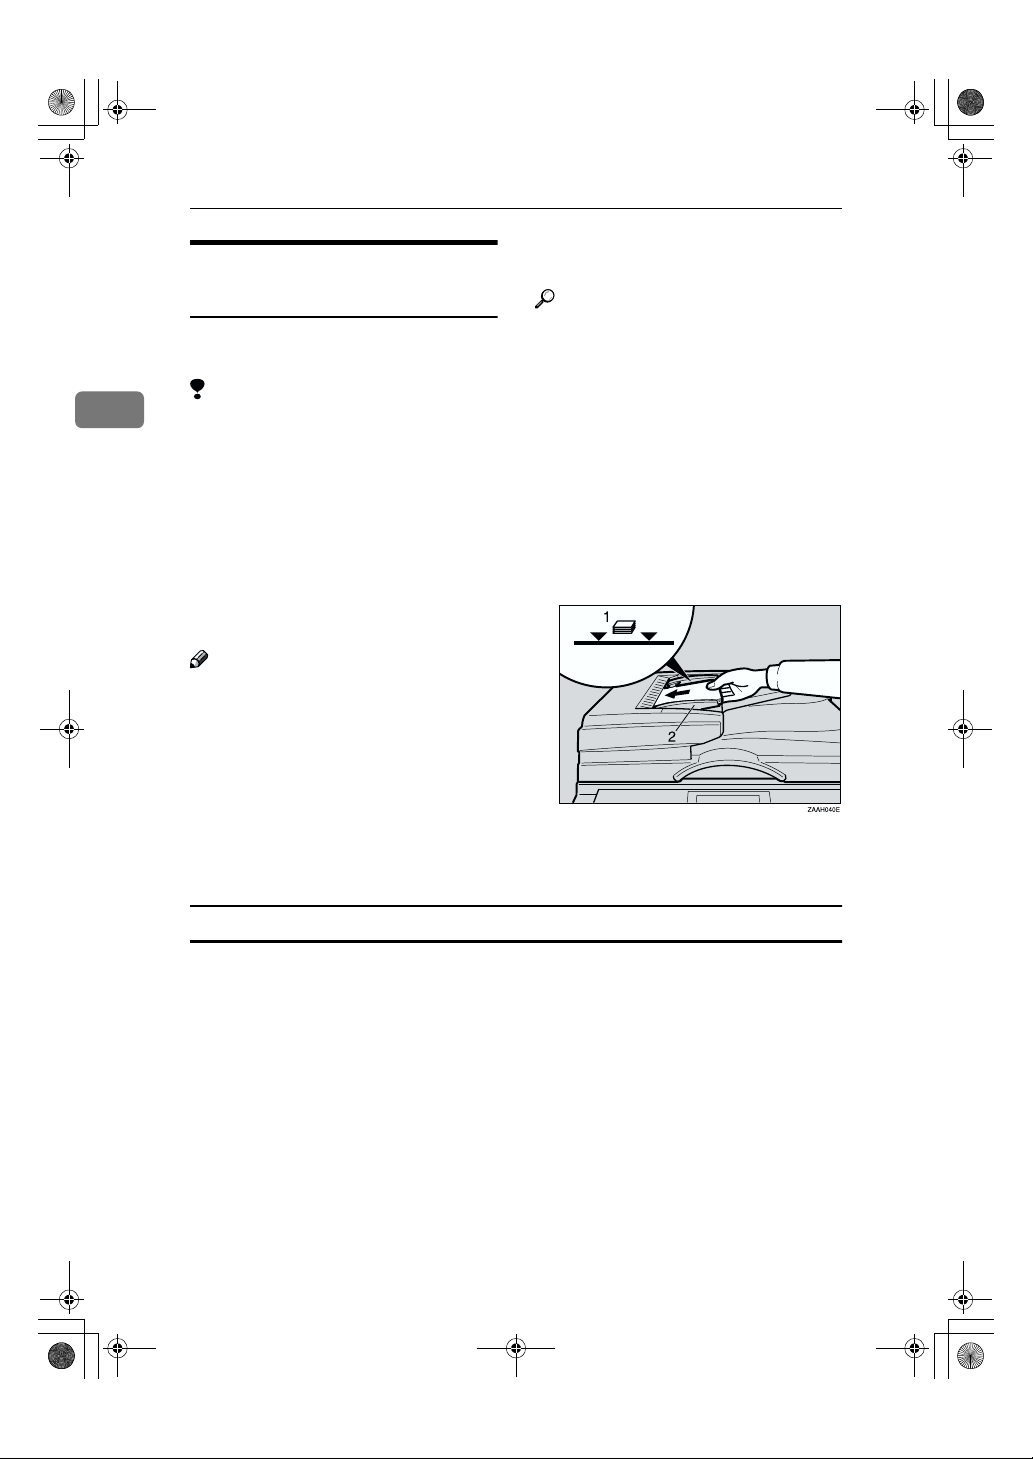
Adjust the document guide to
A
match the size of your originals.
Align the edges of your originals
and stack them in the Document
Feeder face up.
1.
Limit mark
2.
Document guide
Originals unsuitable for the Document Feeder
Do not set the following types of originals in the Document Feeder because they
may be damaged. Place them on the exposure glass instead.
• Originals of sizes other than those specified in the following table
• Originals containing staples or clips
• Perforated or torn originals
• Curled, folded, or creased originals
• Pasted originals
• Originals with any kind of coating, such as thermosensitive paper, art paper,
aluminum foil, carbon paper, or conductive paper
• Originals with index tabs, tags, or other projecting parts
• Sticky originals, such as translucent paper
16
KirCAE-basic_FM.book Page 17 Tuesday, February 20, 2001 3:47 PM
• Thin and soft originals
• Originals of inappropriate weight
• Originals in bound form, such as books
• Transparent originals, such as OHP transparencies or translucent paper
If the Machine Cannot Detect the Size of Your Original
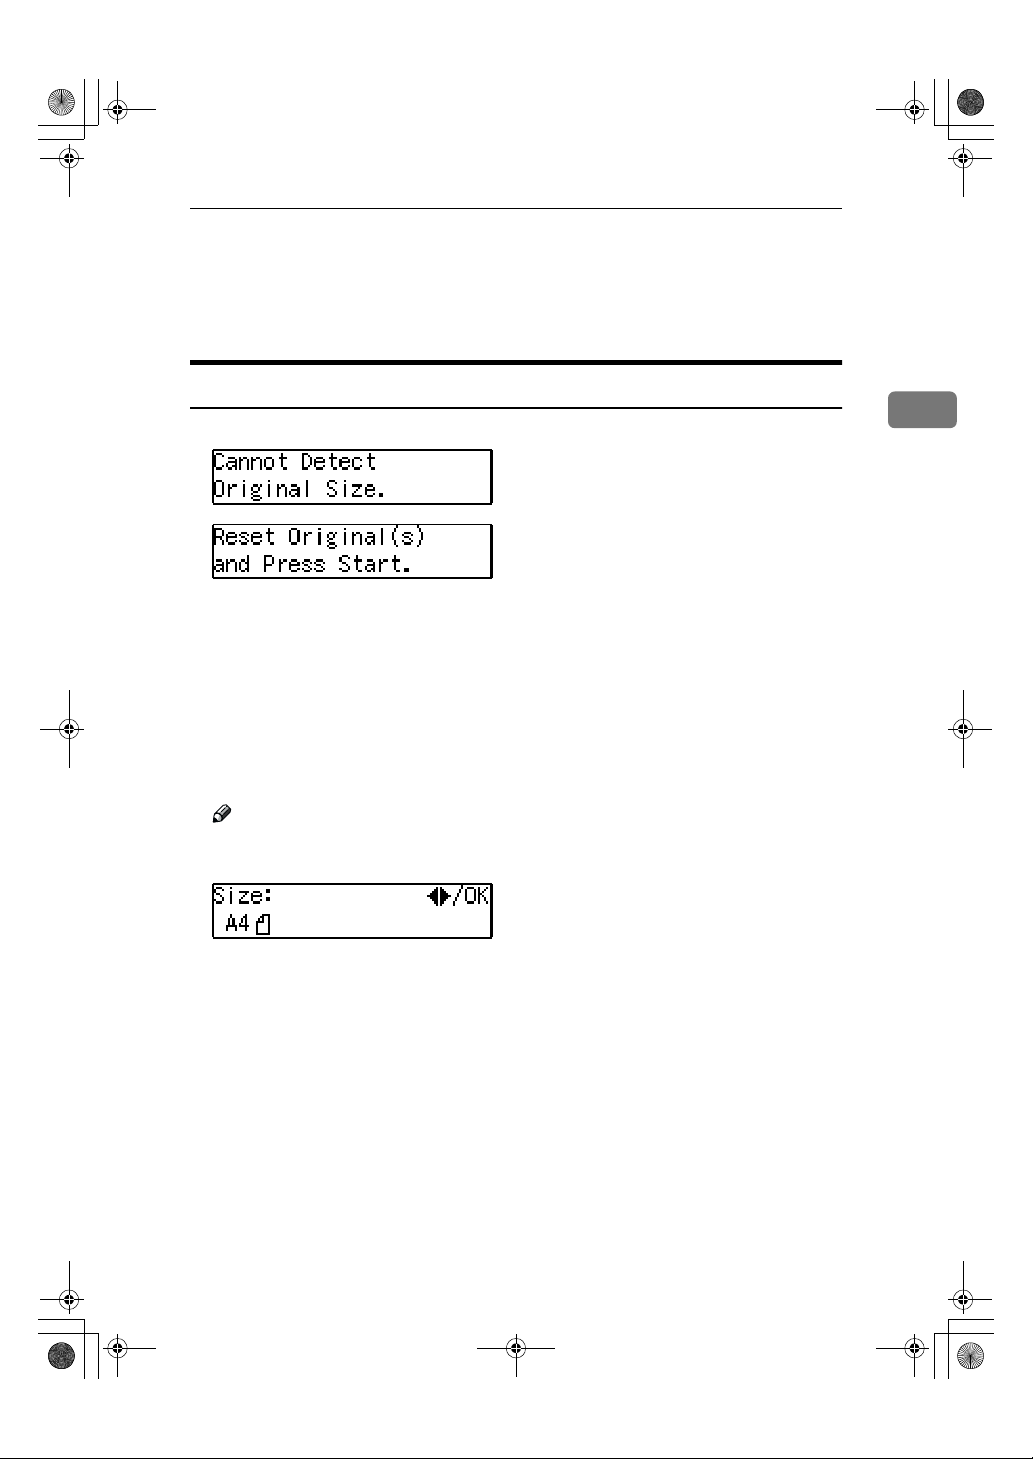
If the machine cannot detect the original size, the following display is shown:
If this happens, carry out the following steps.
Press the {{{{Cancel}}}} key.
A
Make sure that the original is set correctly.
B
Setting Originals
2
Remove the original and replace it on the exposure glass.
C
Press the {{{{OK}}}} key to scan the original again.
D
If the above display appears again, repeat steps A to D.
Note
❒ If the machine still cannot detect the original size, the following display is
shown. Press the {Transmission Option} key and select “4. Irreg. Scan Area".
17
 Loading...