

Page 1

KirCAE-advanced_FM.book Page i Thursday, March 8, 2001 2:04 PM
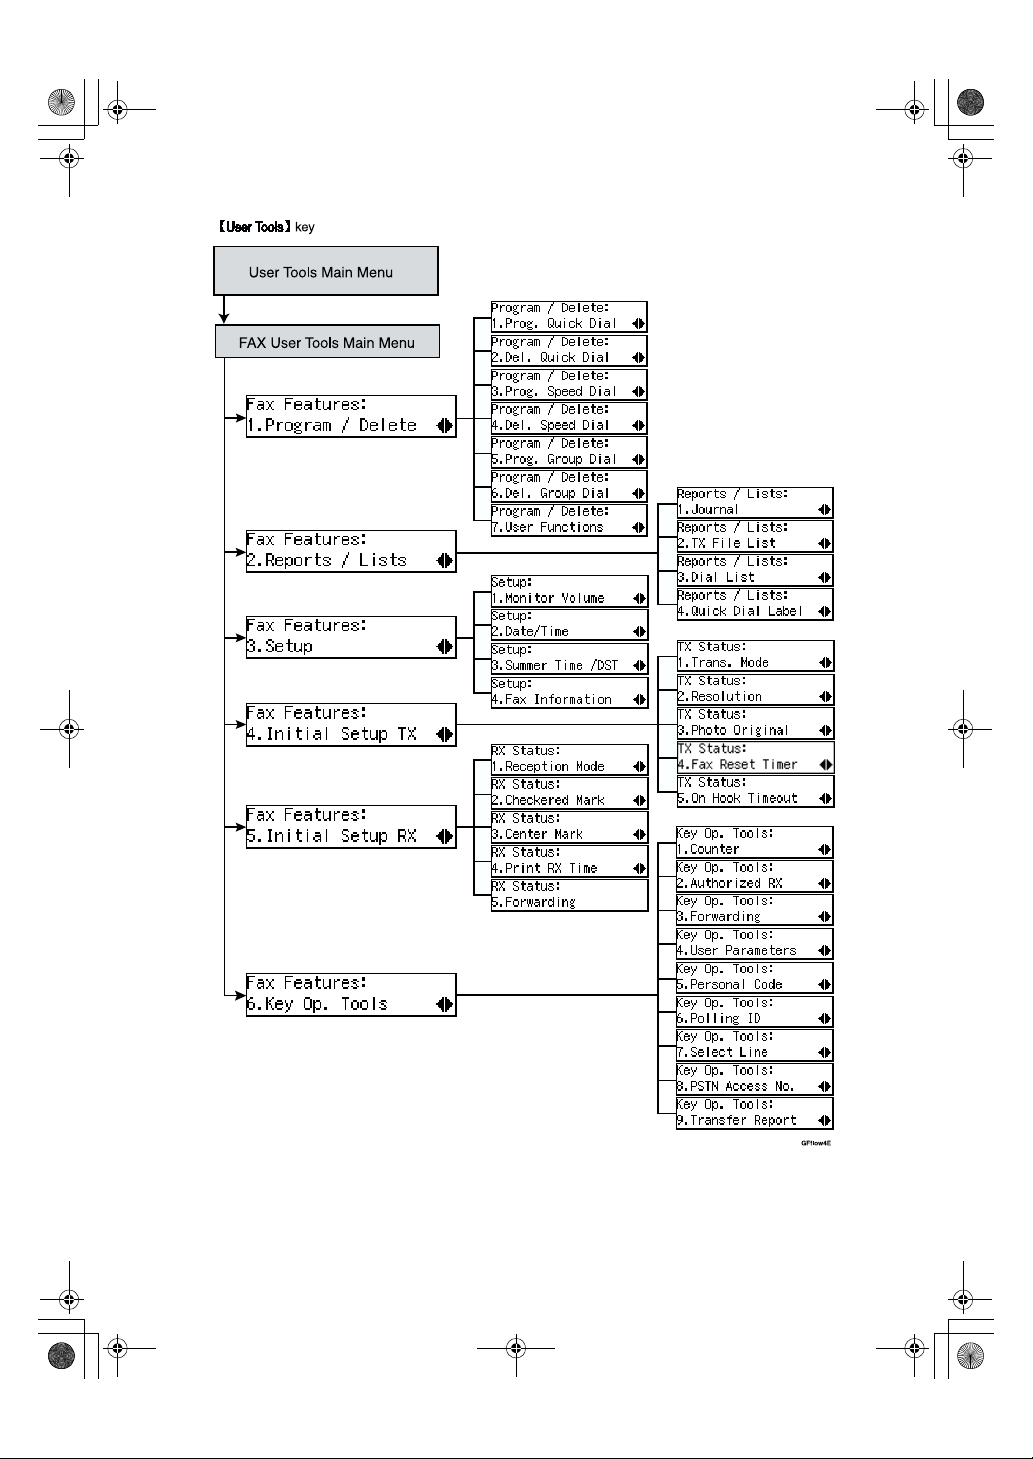
FUNCTION MAP
i
Page 2
KirCAE-advanced_FM.book Page ii Thursday, March 8, 2001 2:04 PM
ii
Page 3
R
R
KirCAE-advanced_FM.book Page iii Thursday, March 8, 2001 2:04 PM
How to Read this Manual
Symbols
In this manual, the following symbols are used:
WARNING:
This symbol indicates a potentially hazardous situation that might result in
death or serious injury when you misuse the machine without following the instructions under this symbol. Be sure to read the instructions, all of which are described in the Safety Information section in the Copy Reference manual.
CAUTION:
This symbol indicates a potentially hazardous situation that might result in minor or moderate injury or property damage that does not involve personal injury
when you misuse the machine without following the instructions under this
symbol. Be sure to read the instructions, all of which are described in the Safety
Information section in the Copy Reference manual.
* The statements above are notes for your safety.
Important
If this instruction is not followed, paper might be misfed, originals might be
damaged, or data might be lost. Be sure to read this.
Preparation
This symbol indicates the prior knowledge or preparations required before operating.
Note
This symbol indicates precautions for operation, or actions to take after misoperation.
Limitation
This symbol indicates numerical limits, functions that cannot be used together,
or conditions in which a particular function cannot be used.
Reference
This symbol indicates a reference.
{}
Keys built into the machine's operation panel.
iii
Page 4

KirCAE-advanced_FM.book Page iv Thursday, March 8, 2001 2:04 PM
TABLE OF CONTENTS
Manuals for This Machine......................................................................... 1
Advanced Features (this manual) ................................................................. 1
Basic Features .............................................................................................. 1
1.Transmission Options
Overview..................................................................................................... 3
Sending at a Specific Time (Send Later)................................................. 4
Personal Code Transmission................................................................... 6
Choosing the Area to be Scanned Yourself (Irregular Scan Area) ...... 7
Fax Header Print ........................................................................................ 8
Label Insertion ........................................................................................... 9
Auto Reduction........................................................................................ 10
Polling Reception .................................................................................... 11
File Reserve Report .................................................................................... 11
Communication Result Report .................................................................... 11
Transfer Request ..................................................................................... 12
Specifying an End Receiver........................................................................ 13
2.Job Information
Canceling Transmission or Reception.................................................. 15
Checking the Transmission Result (TX File Status) ............................ 17
Checking the Reception Result (RX File Status) .................................. 18
Printing a List of Files in Memory (Print TX File List) .......................... 19
Printing a Stored Message ..................................................................... 20
Printing the Journal................................................................................. 21
Displaying the Memory Status ............................................................... 22
iv
Page 5

KirCAE-adv anced_FM.b ook Page v Thur sday, March 8, 2001 2:04 P M
3.Transmission Features
Handy Dialing Functions ........................................................................ 23
Chain Dial.................................................................................................... 23
Telephone Directory.................................................................................... 23
Redial .......................................................................................................... 24
On Hook Dial ............................................................................................ 25
Manual Dial............................................................................................... 26
Transmission Features ........................................................................... 27
Stamp.......................................................................................................... 27
SEP Code ................................................................................................... 28
SUB Code ................................................................................................... 29
More Transmission Functions ............................................................... 31
Auto Fax Reception Power-up .................................................................... 31
Dual Access ................................................................................................ 31
Transmission with Image Rotation .............................................................. 31
Checking the Transmission Result.............................................................. 31
Sending a Fax Message Immediately ......................................................... 32
Automatic Redial......................................................................................... 32
Broadcasting Sequence .............................................................................. 32
Checking the Transmission Progress ......................................................... 32
If Memory Runs Out While Storing an Original ........................................... 32
Batch Transmission..................................................................................... 32
ECM (Error Correction Mode) ..................................................................... 33
Parallel Memory Transmission.................................................................... 33
Printed Report.......................................................................................... 34
File Reserve Report .................................................................................... 34
Communication Result Report .................................................................... 34
Communication Failure Report ................................................................... 34
Transmission Result Report (Immediate Transmission) ............................. 35
4.Reception Features
Reception ................................................................................................. 37
Immediate Reception .................................................................................. 37
Memory Reception...................................................................................... 37
Substitute Reception ................................................................................... 38
Screening Out Messages from Anonymous Senders ................................. 38
Printing Functions................................................................................... 40
Print Completion Beep ................................................................................ 40
Checkered Mark.......................................................................................... 40
Center Mark ................................................................................................ 40
Reception Time........................................................................................... 41
Image Rotation............................................................................................ 41
Page Separation and Length Reduction (Not Available in Some Countries)
Page Reduction........................................................................................... 42
TSI Print ...................................................................................................... 42
When There is No Paper of the Correct Size.............................................. 42
... 41
v
Page 6
KirCAE-adva nced_FM.bo ok Page vi Thur sday, March 8, 2001 2:04 PM
5.Facsimile User Tools
Accessing the User Tools....................................................................... 45
Exiting User Tool mode............................................................................... 46
Assigning User Function Keys .............................................................. 47
Storing/Editing the Contents of a User Function Key.................................. 47
Utilizing a User Function Key ...................................................................... 48
Functions You Can Store in User Function Keys........................................ 48
Printing Reports/Lists ............................................................................. 49
Setting the Date and Time ..................................................................... 51
Summer Time / Daylight Saving Time ................................................... 52
Changing the Initial Setup Transmission.............................................. 53
Changing the Initial Setup Reception.................................................... 55
6.Key Operator Settings
Changing Key Operator Settings ........................................................... 57
Counters...................................................................................................... 57
Authorized Reception.................................................................................. 58
Forwarding .................................................................................................. 63
User Parameters......................................................................................... 70
Personal Codes........................................................................................... 75
Polling ID..................................................................................................... 79
Select Line .................................................................................................. 80
PSTN Access Number ................................................................................ 81
Transfer Report........................................................................................... 82
RDS (Remote Diagnostic System) .............................................................. 82
7.Troubleshooting
When Toner Runs Out............................................................................. 83
When an Error Report is Printed............................................................ 84
When Power is Turned off or Fails ........................................................ 85
8.Maintaining Your Machine
Replacing the Stamp Cartridge.............................................................. 87
vi
Page 7

KirCAE-advanced_FM.book Page vii Thursday, March 8, 2001 2:04 PM
9.Appendix
Connecting the Machine to a Telephone Line and Telephone............ 89
Connecting the Telephone Line .................................................................. 89
Selecting the Line Type............................................................................... 90
Specifications .......................................................................................... 91
Acceptable Types of Originals .................................................................... 92
Function List............................................................................................ 94
Advanced Transmission Features............................................................... 94
Communication Information ........................................................................ 95
User Tools................................................................................................... 96
INDEX........................................................................................................ 99
vii
Page 8

KirCAE-advanced_FM.book Page viii Thursday, March 8, 2001 2:04 PM
viii
Page 9

KirCAE-adv anced_FM.b ook Page 1 Thur sday, March 8, 2001 2:04 P M
Manuals for This Machine
Two Facsimile Reference manuals are provided, the Basic Features manual and
the Advanced Features manual. Please refer to the manual that suits your needs.
Advanced Features (this manual)
The Advanced Features manual describes more advanced functions, and also
explains settings for key operators.
Basic Features
The Basic Features manual explains the most frequently used fax functions and
operations.
❖❖❖❖ Chapter 1 Getting Started
Describes part names of the machine and operation panel.
❖❖❖❖ Chapter 2 Faxing
Explains basic transmission. You can also find out about other types of transmissions.
❖❖❖❖ Chapter 3 Setup
Explains how to make initial settings, such as the Own Name and Own Fax
Number settings. Also explains the Quick Dial, Speed Dial and Group keys.
These functions allow you to store numbers and save time when dialing. This
chapter also explains how to enter letters and symbols.
❖❖❖❖ Chapter 4 Troubleshooting
Explains changing the volume of audible signals generated by the machine
and error messages. When the display or indicator lights show unusual information, check the list and take appropriate action.
1
Page 10

KirCAE-adv anced_FM.b ook Page 2 Thur sday, March 8, 2001 2:04 P M
2
Page 11

KirCAE-adv anced_FM.b ook Page 3 Thur sday, March 8, 2001 2:04 P M
1. Transmission Options
Overview
This feature describes various options that you can choose when sending a fax
message. The selections you make will only apply to the current fax message.
Note
❒ If you frequently use a certain configuration of options, you can change their
default settings (on or off) with the User Parameters. See P.70 “User Parame-
ters”.
3
Page 12

KirCAE-adv anced_FM.b ook Page 4 Thur sday, March 8, 2001 2:04 P M
Transmission Options
Sending at a Specific Time (Send Later)
Using this feature, you can instruct
1
the machine to delay transmission of
your fax message until a later time
which you specify. This allows you to
take advantage of off-peak telephone
charges without having to be by the
machine at the time.
Transmitter
Receiver
Send Later
at 21:00 (9:00PM)
ND1X01E4
Note
❒ You can not specify a time more
than 24 hours.
❒ This feature is only available with
Memory Transmission.
Make sure that the machine is in
A
Facsimile mode and the standby
display is shown.
Press the {{{{Transmission Option}}}} key.
C
Confirm that "1. Send Later" is
D
displayed.
Press the {{{{OK}}}} key.
E
Press 0000 or 1111 to select "On" or
F
"Off".
Press the {{{{OK}}}} key.
G
Enter the time that you want to
H
send the fax message.
Set your original and select any
B
scan settings you require.
Note
❒ When entering numbers small-
er than 10, add a leading zero.
❒ Enter the hour setting in 24-
hour format (0–23).
❒ If you make a mistake, press the
{Clear/Stop} key and try again.
❒ If the current time shown on the
display is not correct, change it.
4
See P.51 “Setting the Date and
Time”.
Page 13

KirCAE-adv anced_FM.b ook Page 5 Thur sday, March 8, 2001 2:04 P M
Press the {{{{OK}}}} key.
I
The specified time is set.
Specify the destination.
J
If you want to specify another destination, press the {OK} key and repeat step J.
Press the {{{{Start}}}} key.
K
Note
❒ You can cancel a message trans-
mission set up for Send Later.
See P.15 “Canceling Transmission
or Reception”.
Sending at a Specific Time (Send Later)
1
5
Page 14

KirCAE-adv anced_FM.b ook Page 6 Thur sday, March 8, 2001 2:04 P M
Transmission Options
Personal Code Transmission
Personal Codes allow you to keep
1
track of machine usage (for example,
for billing purposes). If everybody
uses a Personal Code when they use
the fax machine, the codes or the
names programmed for the codes will
be printed in the Journal and other reports. This will help you to check up
on who has been using the machine
and how often.
Preparation
Before using this feature you must
register personal codes. See P.75
“Registering Personal Codes”.
Limitation
❒ Personal codes may be any 8 digit
number except 00000000 (00000001
through 99999999). You can program up to 20 personal codes. See
P.75 “Personal Codes”.
Make sure that the machine is in
A
Facsimile mode and the standby
display is shown.
Set your original and select any
B
scan settings you require.
Press the {{{{Transmission Option}}}} key.
C
Press 0000 or 1111 until "2. Personal
D
Code" is displayed.
Press the {{{{OK}}}} key.
E
Press
F
❒ You can cancel this feature by
Press the {{{{OK}}}} key.
G
Enter a personal code (up to 8 dig-
H
its) with the number keys.
❒ If you make a mistake, press the
❒
Press the {{{{OK}}}} key.
I
The personal code is set.
or
to select "On" or "Off".
0000
1111
Note
selecting "Off".
Note
{Clear/Stop} key and try again.
Personal codes may be any string
of 8–digit numbers (0 to 9). You can
register up to 20 personal codes.
Specify the destination.
J
If you want to specify another destination, press the {OK} key and repeat step J.
Press the {{{{Start}}}} key.
K
Note
❒ You can cancel transmission of
a message set up for Personal
6
Code Transmission.
Page 15
KirCAE-adv anced_FM.b ook Page 7 Thur sday, March 8, 2001 2:04 P M
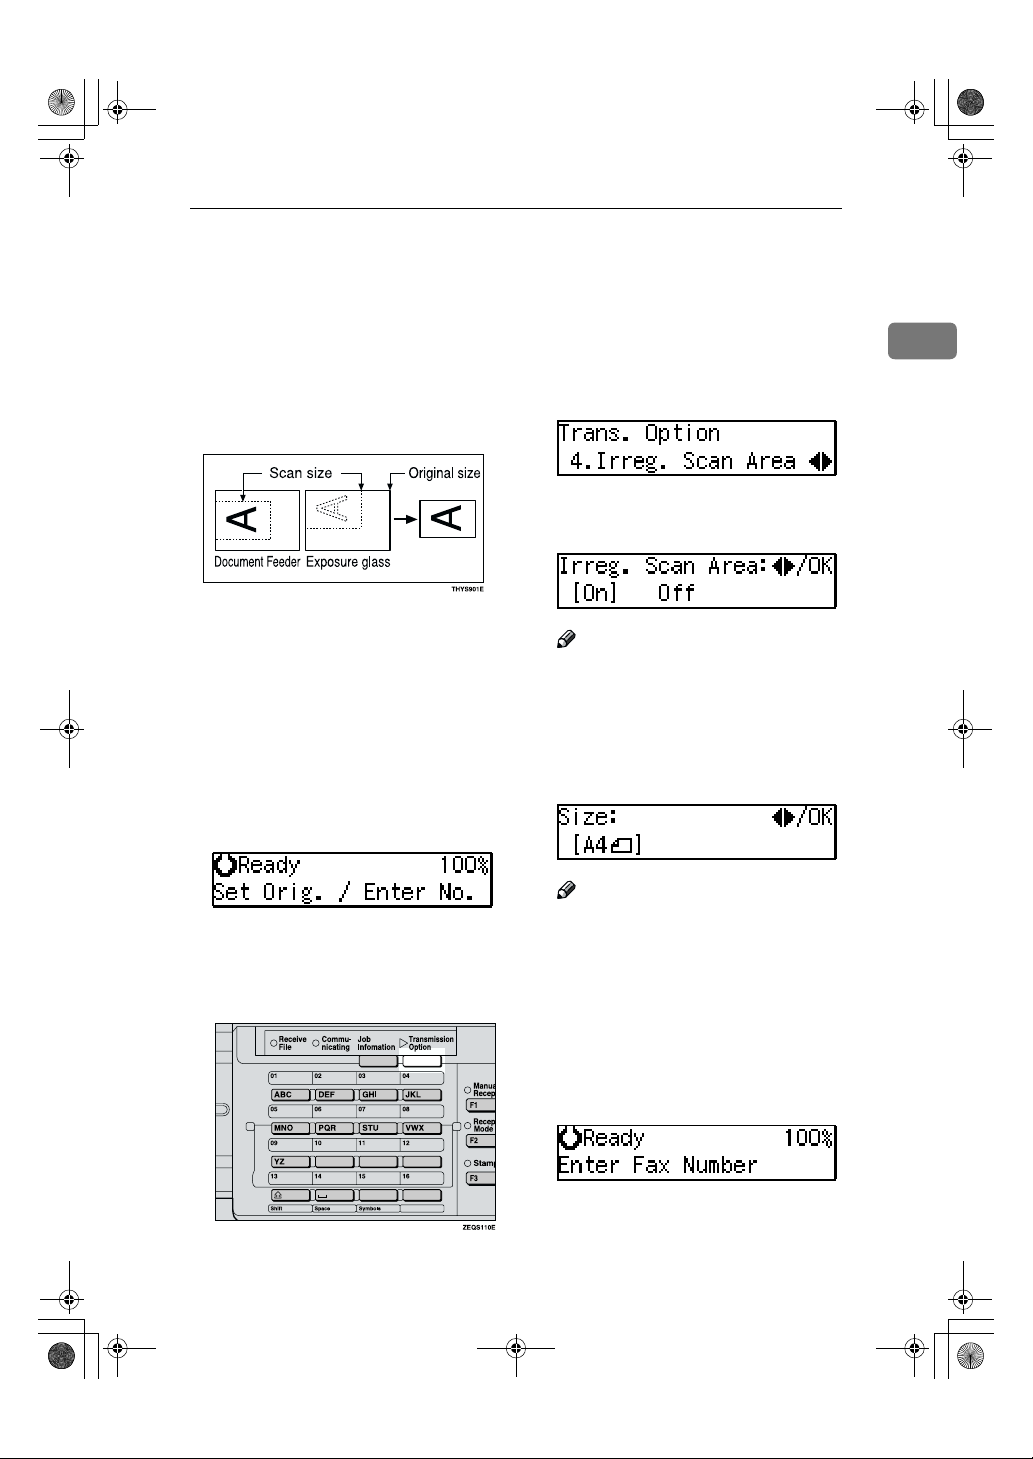
Choosing the Area to be Scanned Yourself (Irregular Scan Area)
Choosing the Area to be Scanned Yourself
(Irregular Scan Area)
Usually the machine automatically
detects the size of an original when it
is scanned. However, you may wish
to override this and choose the area to
be scanned yourself.
You can choose one of the standard
paper sizes (A4KL, A3L, B4L, 8
×11"KL, 8
Although you can specify a different scan
area for each page when using the exposure glass, only one size is allowed when
scanning from the Document Feeder.
Make sure that the machine is in
A
Facsimile mode and the standby
display is shown.
Set your original and select any
B
scan settings you require.
Press the {{{{Transmission Option}}}} key.
C
1
/2"×14"L, 11"×17"L, ) .
1
/
Press 0000 or 1111 until "4. Irreg. Scan
D
Area" is displayed and press the
{{{{OK}}}} key.
Press 0000 or 1111 to select "On" or
E
"Off".
2
Note
❒ You can cancel this feature by
selecting "Off".
Press the {{{{OK}}}} key.
F
Press 0000 or 1111 to select the paper
G
size.
Note
❒ To see which paper sizes have
already been programmed,
press 0 or 1.
Press the {{{{OK}}}} key.
H
Specify the destination.
I
If you want to specify another destination, press the {OK} key and repeat step I.
1
The Transmission Option menu
appears.
Press the {{{{Start}}}} key.
J
7
Page 16

KirCAE-adv anced_FM.b ook Page 8 Thur sday, March 8, 2001 2:04 P M
Transmission Options
Fax Header Print
By default, the machine adds your
1
Fax Header to each message you send
so it appears on the printed fax at the
other end. See Chapter 3 “Own
Name/Fax Header/Own Fax
Number” in the Basic Features manual.
Note
❒ You can switch this feature off
with the User Parameters. See P.70
“User Parameters” (Switch01, Bit5).
Make sure that the machine is in
A
Facsimile mode and the standby
display is shown.
Set your original and select any
B
scan settings you require.
Press the {{{{Transmission Option}}}}
C
key.
Press 0000 or 1111 to select "On" or
E
"Off".
Press the {{{{OK}}}} key.
F
Press the {{{{Transmission Option}}}}
G
key.
Specify the destination.
H
If you want to specify another destination, press the {OK} key and repeat step H.
Press the {{{{Start}}}} key.
I
The Transmission Option menu
appears.
Press 0000 or 1111 until "5. FaxHeader
D
Print" is displayed and press the
{{{{OK}}}} key.
8
Page 17

KirCAE-adv anced_FM.b ook Page 9 Thur sday, March 8, 2001 2:04 P M
Label Insertion
Label Insertion
With this feature you can have the receiver's name printed on the message
when it is received at the other end.
The name will be printed at the top of
the page and will be preceded by
"To".
Note
❒ If you select Label Insertion, the la-
bel might be printed over a portion
of the image when received at the
other end.
❒ Program the receiver's name and
number in a Quick Dial or Speed
Dial then Label Insertion turned on
with the User Parameters. See P.70
“User Parameters” (Switch01, Bit0).
Make sure that the machine is in
A
Facsimile mode and the standby
display is shown.
Set your original and select any
B
scan settings you require.
Press 0000 or 1111 until "6. Label Inser-
D
tion" is displayed and press the
{{{{OK}}}} key.
Press 0000 or 1111 to select "Pro-
E
grammed Value".
Press the {{{{OK}}}} key.
F
Specify the destination.
G
If you want to specify another destination, press the {OK} key and repeat step G.
Press the {{{{Start}}}} key.
H
1
Press the {{{{Transmission Option}}}} key.
C
The Transmission Option menu
appears.
9
Page 18

KirCAE-advanced_FM.book Page 10 Thursday, March 8, 2001 2:04 PM
Transmission Options
Auto Reduction
By default, if the receiver's paper is
1
smaller than the paper you are sending on, the message is automatically
reduced to fit onto the paper available
at the other end.
Transmitter
(This machine)
Receiver
Reduction
ND1X02E0
Important
❒ If you turn this feature off, the
scale of the original is maintained
and some parts of the image may
be deleted when printed at the other end.
ND1X02E1
Press the {{{{Transmission Option}}}} key.
C
The Transmission Option menu
appears.
Press 0000 or 1111 until "7. Auto Re-
D
duction" is displayed and press
the {{{{OK}}}} key.
Press 0000 or 1111 to select "On" or
E
"Off".
Note
❒ You can switch this feature on and
off with the User Parameters. The
default setting is on. See P.70 “User
Parameters” (Switch01, Bit2).
Make sure that the machine is in
A
Facsimile mode and the standby
display is shown.
Set your original and select any
B
scan settings you require.
10
Press the {{{{OK}}}} key.
F
Press the {{{{Transmission Option}}}} key.
G
Specify the destination.
H
If you want to specify another destination, press the {OK} key and repeat step H.
Press the {{{{Start}}}} key.
I
Page 19

KirCAE-advanced_FM.book Page 11 Thursday, March 8, 2001 2:04 PM
Polling Reception
Polling Reception
Use this function if you want to poll a
message from another terminal. You
can also poll documents from many
terminals with only one operation
(use Groups to fully exploit this feature).
Receiver
(This machine)
Limitation
❒ Polling Reception requires that the
other machine can perform Polling
Transmission.
Make sure that the machine is in
A
Facsimile mode and the standby
display is shown.
Press the {{{{Transmission Option}}}} key.
B
Transmission
Request
Sender
ND1X01E8
Press 0000 or 1111 until "8. Polling RX"
C
is displayed.
Press the {{{{OK}}}} key.
D
Press 0000 or 1111 to select "On" or
E
"Off".
Press the {{{{OK}}}} key.
F
Specify the other party's fax
G
number.
Press the {{{{Start}}}} key.
H
File Reserve Report
This report is printed after Polling Reception has been set up.
Note
❒ By default, this report is turned off.
Turn it on with the User Parameters. See P.70 “User Parameters”
(Switch03, Bit3).
1
Communication Result Report
This report is printed after a Polling Reception has been completed and shows
the result of the Polling Reception.
Note
❒ You can also check the result of a
Polling Reception with the Journal.
❒ By default, this report is turned on.
Turn it off with the User Parameters. See P.70 “User Parameters”
(Switch03, Bit4).
11
Page 20

KirCAE-advanced_FM.book Page 12 Thursday, March 8, 2001 2:04 PM
Transmission Options
Transfer Request
Transfer Request allows fax machines
1
that have this feature to automatically
distribute incoming messages onto
multiple fax destinations. This feature
helps you save costs when you send
❖❖❖❖ Transfer Station
The machine that forwards the incoming message to another destination, that is, the machine that
receives the Transfer Request.
the same message to more than one
place in a distant area, and saves time
since many messages can be sent in a
single operation.
The diagram below may make the
concept clearer.
The Transfer Stations you specify
must be machines of the same make
as this machine and have the Transfer
Station function.
Requesting
party
Transfer
Station
End Receiver
End Receiver
❖❖❖❖ End Receiver
The final destination of the mes-
sage, that is, the machine that the
Transfer Station sends to. End Re-
ceivers must be programmed into
Quick Dials, Speed Dials or
Groups in the Transfer Station.
Limitation
❒ You can specify only one Transfer
Stations in a Transfer Request.
❒ You can have up to 30 End Receiv-
ers per Transfer Station. If you
specify a Transfer Station Group,
the Group counts as a single re-
ceiver.
Transfer
Result Report
End Receiver
❒ The combined total of End Receiv-
ers and Transfer Stations you spec-
ify with the number keys cannot
ND1X01E9
Preparation
Before using this feature, you must
program the Polling ID. See P.79
“Polling ID”.
exceed 30.
Set your original and select any
A
scan settings you require.
Press the {{{{Transmission Option}}}} key.
B
Polling ID's of the requesting party
(this machine) and Transfer Stations must be identical.
Before using this feature, you must
program the Transfer Report. See
P.82 “Transfer Report”.
The following terminology is used in
this section.
❖❖❖❖ Requesting Party
The machine where the message
originates from, that is, the machine making a Transfer Request
(in this section, this machine).
12
Page 21

KirCAE-advanced_FM.book Page 13 Thursday, March 8, 2001 2:04 PM
Transfer Request
Press 0000 or 1111 until "9. Transf. Re-
C
quest" is displayed.
Press the {{{{OK}}}} key.
D
Press 0000 or 1111 to select "On" or
E
"Off".
Press the {{{{OK}}}} key.
F
Specify the Transfer Station.
G
If you make a mistake, press the
{Clear/Stop} key and try again.
Press the {{{{OK}}}} key.
H
Specify the End Receiver.
I
Note
❒ You cannot enter the numbers
of the End Receivers directly.
The numbers must be stored in
Quick Dials, Speed Dials or
Groups in the Transfer Station(s).
Press the {{{{OK}}}} key.
J
Press 0000 or 1111 to select "Yes" or
K
"No".
Press the {{{{OK}}}} key.
L
If you selected "Yes", go back to
step I.
Press the {{{{Start}}}} key.
M
Specifying an End Receiver
When you make a Transfer Request,
you must specify the final destinations (End Receivers) for your message.
You cannot enter the numbers of the
End Receivers directly. Instead, enter
a simple code that describes where
the numbers are stored in the Transfer Station (in Quick Dials, Speed Dials or Groups).
The numbers must first have been
stored in Quick Dials, Speed Dials or
Groups in the Transfer Station(s).
❖❖❖❖ Quick Dial
Enter
number (2 digits) of the Quick Dial
where the End Receiver is stored.
For example, to choose the number
stored in Quick Dial 01 in the
Transfer Station, enter: {q} {0}
{1}
❖❖❖❖ Speed Dial
Enter {q}, {p} followed by the
Speed Dial code (2 digits).
For example, to choose the number
stored in Speed Dial 12 in the
Transfer Station, enter: {q} {p}
{1} {2}
❖❖❖❖ Group Dial
Enter {q} , {p}, {p} followed
by the Group number (2 digits).
For example, to choose the number
stored in Group 04 in the Transfer
Station, enter: {q} {p} {p} {0}
{4}
followed by the
{q}
1
13
Page 22

KirCAE-advanced_FM.book Page 14 Thursday, March 8, 2001 2:04 PM
Transmission Options
1
14
Page 23

KirCAE-advanced_FM.book Page 15 Thursday, March 8, 2001 2:04 PM
2. Job Information
Canceling Transmission or Reception
Transmission files are originals that
have been stored in memory and are
awaiting transmission. The features
that produce transmission files are
Memory Transmission, Transfer Request, Polling Reception. For details
about these features, see Chapter 2
“Memory Transmission” in the Basic
Features manual,P.12 “Transfer Re-
quest”, and P.11 “Polling Reception”.
If you notice an error in the destination specified or the document content after scanning a document into
memory, you can cancel transmission
of that document. This is done by
searching for the document in the fax
machine's memory and deleting it.
Note
❒ You can cancel Memory Transmis-
sion even while files are being sent.
However, any pages that have already been sent cannot be canceled.
❒ To cancel transmission in progress,
press the {Clear/Stop} key.
❒ You can print out a File List to con-
firm the transmission files stored
in memory.
Press the {{{{Job Information}}}} key.
B
Confirm that "1. Cancel TX / RX" is
displayed.
Press the {{{{OK}}}} key.
C
Display the file you want to can-
D
cel.
To display the file, enter the file
number with the number keys, or
press 0 or 1 until the file number
is displayed.
Make sure that the machine is in
A
Facsimile mode and the standby
display is shown.
Note
❒ If you make a mistake, press the
{Cancel} key and try again.
❒ If you cannot find the file you
want to cancel, the document
has already been sent.
15
Page 24

KirCAE-advanced_FM.book Page 16 Thursday, March 8, 2001 2:04 PM
Job Information
Press the {{{{OK}}}} key.
E
Confirm that you have selected
F
the correct file, and press the {{{{OK}}}}
2
key.
"Trans. Cancelled File Deleted" is
displayed, and the machine returns to standby display.
16
Page 25

KirCAE-advanced_FM.book Page 17 Thursday, March 8, 2001 2:04 PM
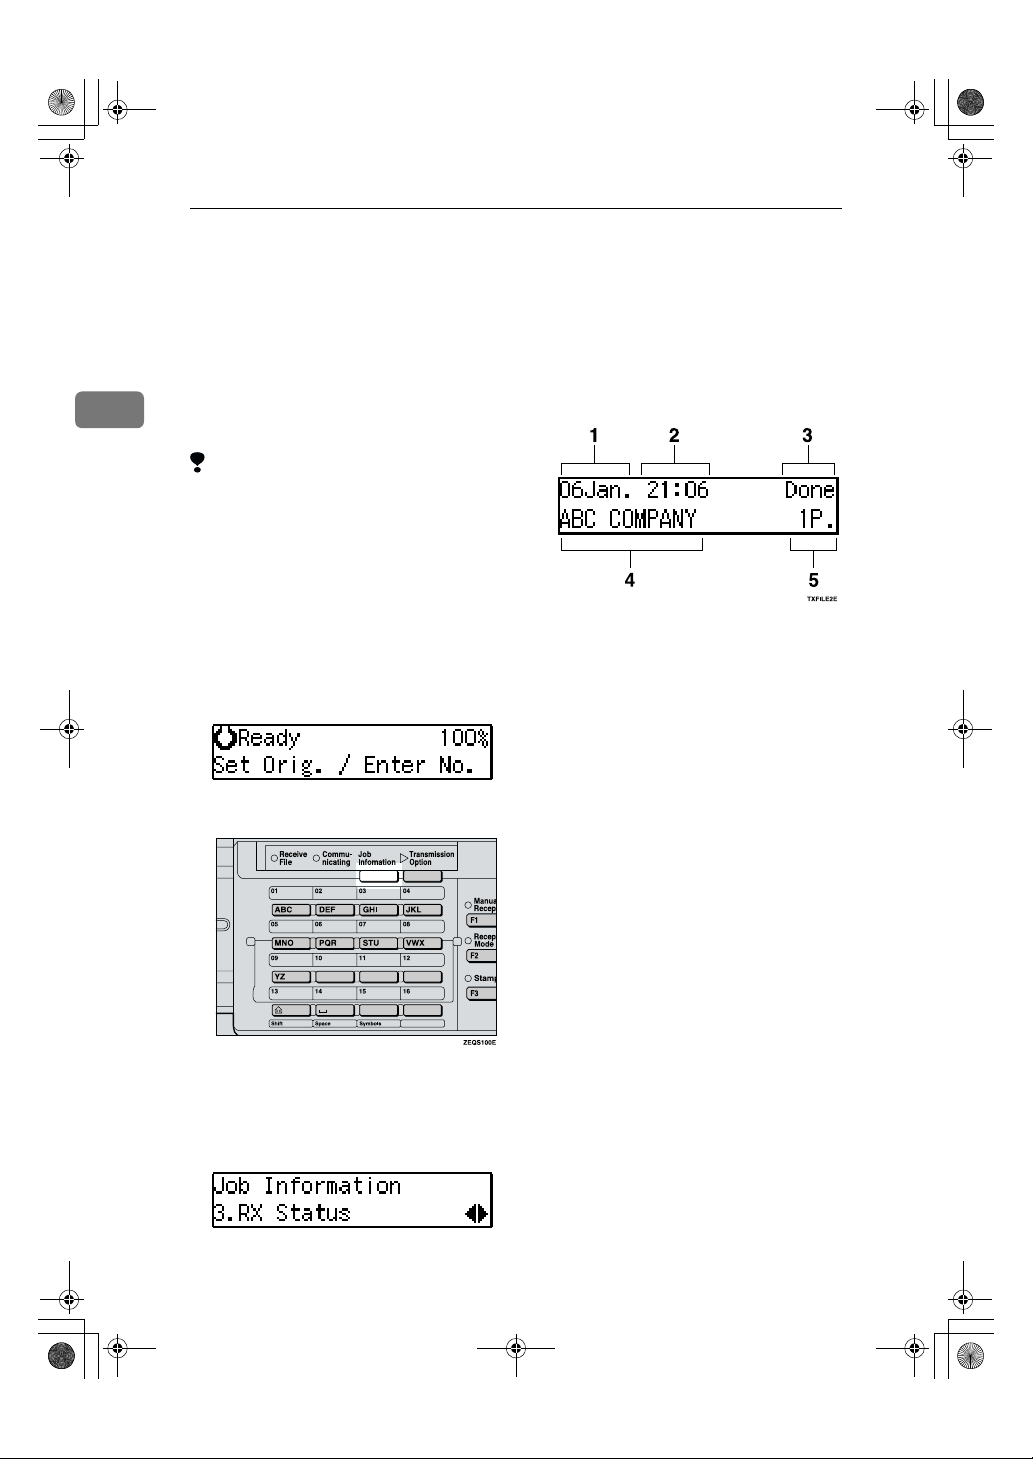
Checking the Transmission Result (TX File Status)
Checking the Transmission Result (TX File
Status)
This function let you check up on the
last 50 completed transmissions without having to print the Journal. You
can browse through the transmitted
messages on the display.
Limitation
❒ Only the last 50 communications
are displayed. Earlier transmissions are not available.
❒ If a transmission is completed
while you are using this function,
the result will not be shown until
you exit TX File Status and start it
again.
Make sure that the machine is in
A
Facsimile mode and the standby
display is shown.
Press the {{{{Job Information}}}} key.
B
Press 0000 or 1111 until "2. TX Status"
C
is displayed and press the {{{{OK}}}}
key.
Press 0000 or 1111 to scroll through the
D
messages.
1.
Date
2.
Time
3.
Transmission result
4.
Destination name
5.
Page
2
The Information menu is shown.
Press the {{{{OK}}}} key.
E
The machine returns to standby
display.
17
Page 26
KirCAE-advanced_FM.book Page 18 Thursday, March 8, 2001 2:04 PM
Job Information
Checking the Reception Result (RX File Status)
This function let you check up on the
last 50 messages received without
having to print the Journal. You can
2
browse through the received messages on the display.
Limitation
❒ Only the last 50 communications
are displayed. Earlier messages are
not available.
❒ If a message is received while you
are using this function, the result
will not be shown until you exit RX
File Status and start it again.
Make sure that the machine is in
A
Facsimile mode and the standby
display is shown.
Press the {{{{Job Information}}}} key.
B
Press 0000 or 1111 to scroll through the
D
messages.
1.
Date
2.
Time
3.
Reception Result
4.
Recipient
5.
Page
Press the {{{{OK}}}} key.
E
The machine returns to standby
display.
18
The Information menu is shown.
Press 0000 or 1111 until "3. RX Status"
C
is displayed and press the {{{{OK}}}}
key.
Page 27

KirCAE-advanced_FM.book Page 19 Thursday, March 8, 2001 2:04 PM
Printing a List of Files in Memory (Print TX File List)
Printing a List of Files in Memory (Print TX
File List)
Print this list if you wish to find out
which files are stored in memory and
what their file numbers are. Knowing
the file number can be useful (for example when erasing files).
Note
❒ The contents of an original stored
in memory can also be printed. See
P.20 “Printing a Stored Message”.
Make sure that the machine is in
A
Facsimile mode and the standby
display is shown.
2
Press the {{{{Job Information}}}} key.
B
Press 0000 or 1111 until "4. Print File
C
List" is displayed.
Press the {{{{OK}}}} key.
D
Press the {{{{Start}}}} key.
E
The File List is printed out and the
machine returns to standby display.
19
Page 28

KirCAE-advanced_FM.book Page 20 Thursday, March 8, 2001 2:04 PM
Job Information
Printing a Stored Message
If you wish to check the contents of a
fax that is stored in memory and has
not been sent yet, use this procedure
to print it out.
Make sure that the machine is in
2
A
Facsimile mode and the standby
display is shown.
Press the {{{{Job Information}}}} key.
B
The Information menu is shown.
Press 0000 or 1111 until "5. Print TX
C
File" is displayed and press the
{{{{OK}}}} key.
Press the {{{{OK}}}} key.
E
Press the {{{{Start}}}} key.
F
The document is printed and the
machine returns to standby dis-
play.
20
Display the file you want to print.
D
The registered name or fax number
appears on the lower line.
Note
❒ Enter the file number with the
number keys, or search using 0
or 1.
❒ If you make a mistake, press the
{Cancel} key and try again.
Page 29

KirCAE-advanced_FM.book Page 21 Thursday, March 8, 2001 2:04 PM
Printing the Journal
Printing the Journal
The Journal contains information
about the last 100 communications
made by your machine. When automatic communication report printing
is turned on, the Journal is printed automatically after every 50 communications (receptions + transmissions).
You can also print a copy of the Journal at any time by following the procedure below.
Note
❒ The sender's name column of the
Journal is useful when you need to
register a Specified Sender.
❒ If you do not want the Journal to be
printed automatically, you can
turn automatic printing off. See
P.70 “User Parameters” (switch 03,
bit 7).
Make sure that the machine is in
A
Facsimile mode and the standby
display is shown.
Press 0000 or 1111 until "6. Print Jour-
C
nal" is displayed.
Press the {{{{OK}}}} key.
D
Press the {{{{Start}}}} key.
E
The report is printed and the ma-
chine returns to standby display.
2
Press the {{{{Job Information}}}} key.
B
21
Page 30

KirCAE-advanced_FM.book Page 22 Thursday, March 8, 2001 2:04 PM
Job Information
Displaying the Memory Status
Use this function to display a summary of current memory usage. Items
shown are the percentage of free
memory space, the number of files to
2
be sent, and the number of received
messages to be printed.
Make sure that the machine is in
A
Facsimile mode and the standby
display is shown.
Press the {{{{Job Information}}}} key.
B
The Information menu is shown.
Press the {{{{OK}}}} key.
E
The number of files to be sent is
displayed.
Press the {{{{OK}}}} key.
F
The number of received files is dis-
played.
Note
❒ Memory can hold up to about
160 pages.
Press the {{{{OK}}}} key.
G
The machine returns to standby
display.
22
Press 0000 or 1111 until "7. Memory
C
Status" is displayed and press the
{{{{OK}}}} key.
The usage is displayed. When
D
you have finished, press the
{{{{OK}}}} key.
Page 31

KirCAE-advanced_FM.book Page 23 Thursday, March 8, 2001 2:04 PM
3. Transmission Features
Handy Dialing Functions
Chain Dial
This allows you to compose a telephone number from various parts,
some of which may be stored in
Quick Dials or Speed Dials and some
of which may be input using the
number keys.
Limitation
❒ Maximum length of telephone or
fax number: 254 digits
Note
❒ For Memory Transmission and Im-
mediate Transmission, insert a
pause between numbers. For On
Hook Dial and Manual Dial, no
pause is needed.
----(Example) 01133-1-555333
Assume that 01133 is stored in Quick
Dial 01 and that 1 is stored in Speed
Dial 01.
A Place the original and select any
scan settings you require.
B Press the Quick Dial key {01}.
C Press the {Pause/Redial} key.
D Press the {Speed Dial} key and {0}
and {1} using the number keys.
Press the {Pause/Redial} key.
E
F Enter {5}, {5}, {5}, {3}, {3} {3}
with the number keys.
G Press the {Start} key.
Telephone Directory
This feature lets you find a stored
Speed Dial quickly by just entering a
single letter, for example, the first letter of the name stored for that
number.
Preparation
To use the Telephone Directory
feature, you need to register a
search letter when you program
Speed Dials. See Chapter 3 “Speed
Dial” in the Basic features manual.
Limitation
❒ Speed Dial codes cannot be
searched for by symbol or number.
❒ Names enclosed within brackets
are not searched for.
Set your original and select any
A
scan settings you require.
Press the {{{{Speed Dial}}}} key.
B
23
Page 32

KirCAE-advanced_FM.book Page 24 Thursday, March 8, 2001 2:04 PM
Transmission Features
Enter the search letter by pressing
C
one of the Quick Dial keys (A to
Z).
3
Note
❒ The names or fax numbers reg-
istered in Speed Dials are
shown in numerical order on
the display.
Press 0000 or 1111 until the destina-
D
tion you are searching for is displayed and press the {{{{OK}}}} key.
Note
❒ If you make a mistake, press the
{Cancel} key to try again.
❒ If you wish to dial another des-
tination, press the {OK} key and
dial another fax number.
Press the {{{{Start}}}} key.
E
Redial
The machine memorizes the last 10
destinations that have been dialed. If
you wish to send a message to a destination which you faxed to recently,
the Redial feature saves you finding
and entering the number again.
Set your original and select any
A
scan settings you require.
Press the {{{{Pause/Redial}}}} key.
B
Press 0000 or 1111 until the destina-
C
tion you want to redial is dis-
played.
Press the {{{{OK}}}} key.
D
Press the {{{{Start}}}} key.
E
Limitation
❒ The following kinds of destina-
tions are not memorized.
• Quick Dials
• Speed Dials
• Group Dials
• Destinations dialed as End
Receivers for Transfer Request
• Any destinations if multiple
destinations were dialed
• Destinations dialed by Redial (regarded as already memorized)
24
Page 33

KirCAE-advanced_FM.book Page 25 Thursday, March 8, 2001 2:04 PM
On Hook Dial
On Hook Dial
This is just like using the external telephone, except you do not have to
pick up the external telephone before
dialing. Just press the {On Hook Dial}
key and dial the number. If you hear
a voice, you can pick up the external
telephone and speak with the other
party.
Reference
See Chapter 4 “Adjusting Volume”
in the Basic Features manual.
Set your original and select any
A
scan settings you require.
Reference
See Chapter 2 “Setting Originals” in the Basic Features manual.
See Chapter 2 “Scan Settings” in
the Basic Features manual.
Press the {{{{On Hook Dial}}}} key.
B
Dial.
C
The machine immediately dials the
destination. If you make a mistake,
press the {On Hook Dial} and return
to step B.
When the line is connected and
D
you hear a high-pitched tone,
press the {{{{Start}}}} key.
• If you hear a voice, pick up the
external telephone before you
press the {Start} key and notify
the destination that you want to
send a fax message (ask them to
switch to Facsimile mode).
• After transmission the machine
will return to standby mode.
3
You will hear a low tone from the
internal speaker. If you wish to
cancel this operation, press the {On
Hook Dial} key again.
25
Page 34

KirCAE-advanced_FM.book Page 26 Thursday, March 8, 2001 2:04 PM
Transmission Features
Manual Dial
The external telephone is required.
Pick up the handset of the external
telephone and dial. When the line is
connected and you hear a highpitched tone, press the {Start} key to
send your fax message. If, on the other hand, you hear a voice at the other
3
end, continue your conversation as
you would normally over the telephone.
Limitation
❒ The result of the transmission with
manual dial is not mentioned in
the Transmission Result Report
(Immediate Transmission).
Set your original and select any
A
scan settings you require.
Reference
See Chapter 2 “Setting Originals” in the Basic Features manual.
See Chapter 2 “Scan Settings” in
the Basic Features manual.
Pick up the external telephone.
B
You will hear a tone.
Replace the handset of the exter-
E
nal telephone.
After transmission the machine
will return to standby mode.
26
Dial.
C
If you make a mistake, replace the
external telephone and try again
from step B.
When the line is connected and
D
you hear a high-pitched tone,
press the {{{{Start}}}} key to send your
fax message.
Page 35

KirCAE-advanced_FM.book Page 27 Thursday, March 8, 2001 2:04 PM
Transmission Features
Transmission Features
Stamp
The optional Document Feeder is required.
When sending a fax message using
the Document Feeder (ADF), the machine can stamp a circle mark at the
bottom of the original. This stamp indicates that the original has been successfully stored in memory for
Memory Transmission, or that it has
been successfully sent for Immediate
Transmission.
Limitation
❒ Stamp only works when scanning
from the Document Feeder.
❒ You cannot turn the Stamp feature
on or off while a document is being
scanned.
❒ Do not open the Document Feeder
while scanning the document.
Document jam could occur.
Note
❒ When the stamp starts getting
lighter, replace the cartridge. See
P.87 “Replacing the Stamp Car-
tridge”.
❒ If a page was not stamped even
though the Stamp feature is turned
on, you need to re-send that page.
❒ By default, Stamp is turned off. If
you use this feature often, you can
adjust the User Parameters so that
the home setting is on. In this case,
Stamp can easily be turned off for
any single transmission by pressing the {F3} key. See P.70 “User Pa-
rameters” (Switch00, Bit0).
Press the {{{{F3}}}} key.
A
The Stamp indicator will light.
Pressing the {F3} key again will
turn it off.
3
27
Page 36

KirCAE-advanced_FM.book Page 28 Thursday, March 8, 2001 2:04 PM
Transmission Features
SEP Code
Normally you can only use Polling
Reception to receive faxes from machines that have the Polling Reception feature of the same make.
However, if the other machine of another make supports a polling reception, you can receive fax messages
from the other party using this meth-
3
od instead.
Preparation
You need to assign the Dial Option
feature to a User Function key beforehand. See P.47 “Assigning User
Function Keys”.
Note
❒ The ID can be up to 20 digits long
and consist of digits.
❒ Make sure the ID matches the oth-
er terminal of the fax you are receiving from.
❒ You can store IDs in Quick Dials,
Speed Dials, and Groups with
number keys.
❒ Messages you receive using this
feature are marked "SEP" on all reports.
Press the {{{{User Function}}}} key as-
B
signed with the Dial Option feature.
Press 0000 or 1111 until "2. SEP" is dis-
C
played and press the {{{{OK}}}} key.
Enter the SEP code with the
D
number Keys and press the {{{{OK}}}}
key.
When a password (PWD) is
necessary
28
Make sure that the machine is in
A
Facsimile mode and the standby
display is shown. Then enter the
fax number.
A Press the {{{{User Function}}}} key as-
signed with the Dial Option
feature.
B Press 0000 or 1111 until "4. PWD" is
displayed and press the {{{{OK}}}}
key.
C Enter the PWD code with the
number keys and press the
{{{{OK}}}} key.
Page 37

KirCAE-advanced_FM.book Page 29 Thursday, March 8, 2001 2:04 PM
Press the {{{{Transmission Option}}}}
E
key.
Press 0000 or 1111 until "8. Polling RX"
F
is displayed.
Press the {{{{OK}}}} key.
G
Press 0000 or 1111 to select "On" or
H
"Off".
Press the {{{{OK}}}} key.
I
Press the {{{{Start}}}} key.
J
Transmission Features
SUB Code
Transfer Request is only possible
with machines of the same make that
have the Transfer Request feature.
However, if you use the SUB/SID
function, you can send and receive
fax messages to and from other makers' machines that have the SUB/SID
feature.
Preparation
You need to assign the Dial Option
feature to a User Function key beforehand. See P.47 “Assigning User
Function Keys”.
Note
❒ The ID can be up to 20 digits long
and consist of spaces, {q} and
{p}.
❒ Make sure the ID matches the
specification of the fax you are
sending to.
❒ You can store IDs in Quick Dials,
Speed Dials, and Groups.
❒ Messages you send using this fea-
ture are marked "SUB" on all reports.
Set your original and make any
A
changes to the scan settings if necessary.
3
Dial the destination fax number
B
using the number keys.
29
Page 38

KirCAE-advanced_FM.book Page 30 Thursday, March 8, 2001 2:04 PM
Transmission Features
Press the {{{{User Function}}}} key as-
C
signed with the Dial Option feature.
3
Confirm that "1. SUB" is dis-
D
played and press the {{{{OK}}}} key.
Enter the SUB code with the
E
number keys and press the {{{{OK}}}}
key.
Press the {{{{Start}}}} key.
F
Note
❒ If you use Immediate Transmis-
sion and the destination fax machine does not support the Dial
Option feature, a message will
appear on the display to inform
you of this. In this case, press
the {OK} key to cancel the transmission.
30
When a password (SID) is
necessary
A Press the {{{{User Function}}}} key as-
signed with the Dial Option
feature.
B Press 0000 or 1111 until "3. SID" is
displayed and press the {{{{OK}}}}
key.
C Enter the SID code with the
number keys and press the
{{{{OK}}}} key.
Page 39

KirCAE-advanced_FM.book Page 31 Thursday, March 8, 2001 2:04 PM
More Transmission Functions
More Transmission Functions
Auto Fax Reception Power-up
This machine can be set to shut down
automatically if nobody has used it
for a while. In these situations, even
though the operation switch is off, the
machine can still receive incoming
messages as long as the Main Power
switch is on.
Important
❒ Reception is not possible if both
the operation switch and Main
Power switch are turned off.
Note
❒ By default, messages are printed as
soon as they are received (Immediate Reception). To change this, see
P.70 “User Parameters” (Switch14,
Bit0).
Dual Access
The machine can scan other messages
into memory even while sending a
fax message from memory, receiving
a message into memory , or automatically printing a report. Since the machine starts sending the second
message immediately after the current transmission terminates, the line
will be used efficiently.
Note that during Immediate Transmission or when in User Tools mode,
the machine cannot scan an original.
Transmission with Image
Rotation
For most purposes, set A4/LT originals in the landscape direction (L). If
you set an A4/LT original in the portrait direction (K), the image will be
sent rotated by 90°. Providing the receiver has A4/LT landscape paper
(L), the message will be printed the
same size as the original.
Limitation
❒ This feature is not available with
Immediate Transmission.
Checking the Transmission
Result
• Turn the Communication Result
Report on if you want a report to
be printed after every successful
transmission. See P.34 “Printed Re-
port”.
If you leave the Communication
Result Report off, the report will
not be printed after every transmission. However, should a transmission fail, a Communication
Failure Report will be printed instead.
• If you turn the Transmission Result Report (Immediate Transmission) off, the Error Report will be
printed when the communication
on fails.
• You can also check the transmission result by examining the Journal. See P.21 “Printing the Journal”.
You can either print or scroll
through the Journal on the display.
See P.17 “Checking the Transmission
Result (TX File Status)”.
3
31
Page 40

KirCAE-advanced_FM.book Page 32 Thursday, March 8, 2001 2:04 PM
Transmission Features
Sending a Fax Message
Immediately
To send a fax message immediately,
use Immediate Transmission. If you
have just set up an original for broadcasting, Immediate Transmission will
interrupt the current communication.
Your original will not be sent until pre-
3
viously queued files have been sent.
Automatic Redial
If a fax message could not be transmitted because the line was busy or an error occurred during transmission,
redialing is done 4 times at 5 minutes
intervals (these figures vary according
to which country you are in).
If redialing fails after four redials, the
machine cancels the transmission and
prints the Communication Result Report or Communication Failure Report.
If Memory Runs Out While
Storing an Original
If you run out of memory while storing an original (free space reaches
"Memory is Full. Storing
0%),
Stopped, Transmission Has Been
Cancelled."
Press the {OK} key to transmit the
stored pages only.
Note
❒ By default, successfully scanned
pages are sent. If you wish to
change this setting, please contact
your service representative.
is displayed.
Batch Transmission
Broadcasting Sequence
If you send a fax message by Memory
If you dial several destinations for the
same message (Broadcasting) the
messages are sent in the order in
which they were dialed. If the fax
message could not be transmitted, the
machine redials that destination after
the last destination specified for
Broadcasting. For example, if you
specify four destinations A through D
for broadcasting, and if the lines to
destinations A and C are busy, the
machine dials the destinations in the
following order: A, B, C, D, A, and C.
Transmission and there is another fax
message waiting in memory to be
sent to the same destination, that
message is sent along with your orig-
inal. Several fax messages can be sent
with a single call, thus eliminating the
need for several separate calls. This
helps save communication costs and
reduce transmission time.
Fax messages for which the transmis-
sion time has been set in advance are
sent by batch transmission when that
time is reached.
Checking the Transmission
Progress
To check which destinations the fax
message has been sent to so far, print
32
the TX file list.
Note
❒ By default Batch Transmission is
switched on. You can switch it on
or off with the User Parameters.
See P.70 “User Parameters”
(Switch14, Bit2).
Page 41

KirCAE-advanced_FM.book Page 33 Thursday, March 8, 2001 2:04 PM
ECM (Error Correction Mode)
This feature automatically sends data
that was not transmitted successfully
using a system that complies with international standards.
ECM requires that the destination
machine has the same feature.
Parallel Memory Transmission
This function dials while the original
is being scanned. Standard Memory
Transmission stores the original in
memory, then dials the destination.
Parallel Memory Transmission allows you to quickly determine
whether a connection was made. In
addition, this function scans the original faster than Immediate Transmission and is useful when you are in a
hurry and need to use the original for
another purpose.
More Transmission Functions
• When two or more destinations are
specified
• When the original is set on the exposure glass
Note
❒ If you press the {Clear/Stop} key,
the original jams, or memory becomes full during Parallel Memory
Transmission, the machine stops
transmitting and prints the Communication Result Report. The file
is erased.
❒ Total stored page numbers are not
printed in the Parallel Memory
Transmission. Only the page numbers are printed, such as P.1, P.2
not 1/2, 2/2.
❒ If you run out of memory, normal
Memory Transmission takes place.
3
Note
❒ By default this feature is turned on.
You can change this with the User
Parameters. See P.70 “User Parame-
ters” (Switch07, Bit2).
Limitation
❒ Standard Memory Transmission is
used instead of Parallel Memory
Transmission in the following cases.
• When the line is busy and could
not be connected to
• With Send Later
• With Transfer Request
• When you store an original for
Memory Transmission while another communication is in
progress
33
Page 42

KirCAE-advanced_FM.book Page 34 Thursday, March 8, 2001 2:04 PM
Transmission Features
Printed Report
File Reserve Report
This report is printed after an original
is stored in memory. It helps you review the contents and the destinations of stored originals. Even if the
machine is set up not to print this re-
3
port, it is still printed if an original
could not be stored.
❒ You can choose whether to include
part of the original image on the report (by default, part of the image
is printed). See P.70 “User Parame-
ters” (Switch04, Bit7).
❒ The "Page" column gives the total
number of pages. The "Not Sent"
column gives the number of pages
that could not be sent successfully.
Note
❒ You can turn this report on and off.
By default, it is not printed. See
P.70 “User Parameters” (Switch03,
Bit2).
❒ You can choose whether to include
part of the original image on the report (part of the image is printed
by default). See P.70 “User Parame-
ters” (Switch04, Bit7).
Communication Result Report
This report is printed when a Memory Transmission is completed so you
can check the result of the transmission. If two or more destinations are
specified, this report is printed after
the fax message has been sent to all
the destinations. If the machine is set
up not to print this report and the fax
message could not be successfully
transmitted, the Communication Failure Report is printed. See P.34 “Com-
munication Failure Report”.
Note
❒ By default, this function is turned
on. You can turn it off with the
User Parameters. See P.70 “User
Parameters” (Switch03, Bit0).
Communication Failure Report
This report is only printed if the Communication Result Report is turned
off and a message could not be successfully transmitted with Memory
Transmission. Use it to keep a record
of failed transmissions so you can
send them again.
Note
❒ You can choose whether to include
part of the original image on the report (by default, part of the image
is printed). See P.70 “User Parame-
ters” (Switch04, Bit7).
❒ The "Page" column gives the total
number of pages. The "Not Sent"
column gives the number of pages
that could not be sent successfully.
34
Page 43

KirCAE-advanced_FM.book Page 35 Thursday, March 8, 2001 2:04 PM
Transmission Result Report
(Immediate Transmission)
If you turn this report on, a report will
be printed after every Immediate
Transmission so you have a record of
whether the transmission was successful or not. If the machine is set up
not to print this report and the fax
message could not be successfully
transmitted, the Error report is printed instead.
Note
❒ You can switch this report on or off
using the User Parameters. See
P.70 “User Parameters” (Switch03,
Bit5).
❒ If the page was sent successfully,
the "Page" column gives the total
number of pages that were sent
successfully. The "Not Sent" column gives the number of pages
that could not be sent successfully.
Printed Report
3
35
Page 44

KirCAE-advanced_FM.book Page 36 Thursday, March 8, 2001 2:04 PM
Transmission Features
3
36
Page 45

KirCAE-advanced_FM.book Page 37 Thursday, March 8, 2001 2:04 PM
4. Reception Features
Reception
Immediate Reception
Each page of a received fax message is
printed as soon as it is received. This
method is used for standard fax messages.
Receiver (your machine)
Sender
ND1X00E2
----Display During Reception
The sender's name or fax number appears on the upper line.
----Reception Resolution
This machine supports Standard, De-
tail and Fine resolutions for recep-
tion. This may differ from the
sender's intention.
Reception will not take place if there
is not enough free memory left. If free
memory reaches 0% during Immediate Reception, any further reception
becomes impossible and the current
communication is terminated.
Memory Reception
The machine waits until all pages of
the message have been received into
memory before printing the message.
Receiver (your machine)
Sender
ND1X00E3
This method is used with Substitute
Reception. See P.38 “Substitute Recep-
tion”.
Important
❒ All the messages stored in memory
are deleted if the power is
switched off for more than one
hour.
❒ The machine may not be able to re-
ceive large numbers of messages
or messages with a high data content. In such cases, we recommend
you switch the above features off.
Limitation
❒ The machine may not be able to re-
ceive fax messages when the free
memory space is low.
Note
❒ If the memory free space reaches
0% during Memory Reception, the
machine can no longer receive the
current fax message and stops
communicating.
37
Page 46

KirCAE-advanced_FM.book Page 38 Thursday, March 8, 2001 2:04 PM
Reception Features
Substitute Reception
If any of the conditions listed below
are met, the machine automatically
switches to Memory Reception mode
and stores messages in memory instead of printing them. This reception
mode, in which a received fax message is stored in memory unprinted,
is called Substitute Reception. Messages received using Substitute Reception are automatically printed
when the condition which caused the
4
machine to use Substitute Reception
is rectified. Substitute Reception takes
place when:
• Paper runs out
• Toner runs out
• Paper is jammed
• A cover is open
• A fax is received during a copy or
print run
Limitation
❒ Reception may not take place if
there is not enough free memory
left.
Note
❒ The Receive File indicator lights to
let you know when message(s)
have been received using Substitute Reception.
❒ If free memory reaches 0% during
Substitute Reception, any further
reception becomes impossible and
the current communication is terminated.
Screening Out Messages from
Anonymous Senders
To help you screen out unwanted
messages that may fill up machine
memory, the machine can be programmed to only use Substitute Reception under the following
conditions.
Four settings are available:
• Enabled unconditionally (Free)
• Enabled for Own Name/Own Fax
Number is received
• Enabled for Polling ID match
• Disabled (Reception off)
Note
❒ The default setting is "When Own
Name or Own Fax Number is received", only storing messages
when the Own Name/Own Fax
Number is present. You can
change this with the User Parameters. See P.70 “User Parameters”
(Switch05, Bit2,1).
❒ Even if the sender does not have an
Own Name or Own Fax Number,
the machine will still receive messages using Substitute Reception
if:
• Paper becomes jammed while
the power switch is on
• For some reason printing is not
possible for example when copy
job is in progress
❒ The machine must be of the same
manufacturer and matches the
Polling ID.
38
Page 47

KirCAE-advanced_FM.book Page 39 Thursday, March 8, 2001 2:04 PM
----When Own Name or Own Fax
Number is Received
The machine switches to Substitute
Reception only when the sender has
programmed their Own Name or
Own Fax Number. If the power is
switched off for more than an hour,
all the messages received into memory are deleted. In that case, the Power
Failure Report or the Journal can be
used to identify which messages are
lost so you can ask the senders to
transmit them again.
Important
❒ If a sender has not programmed
their Own Name or Own Fax
Number, the machine may reject
an important fax message. We recommend that you ask important
senders to register an Own Name
or Own Fax Number in advance.
Reception
4
----Free
The machine switches to Substitute
Reception regardless of whether or
not the sender has programmed their
Own Name or Own Fax Number.
39
Page 48

KirCAE-advanced_FM.book Page 40 Thursday, March 8, 2001 2:04 PM
Reception Features
Printing Functions
Print Completion Beep
By default, the machine beeps to let
you know when a received message
has been printed.
Note
❒ You can alter the volume of the
beep or turn it off completely (set
the volume to the minimum level).
4
See Chapter 4 “Adjusting Volume”
in the Basic Features manual.
Center Mark
By default, marks are printed halfway
down the left side and at the top center of each page received. This makes
it easy for you to position a hole
puncher correctly when you file received messages.
Checkered Mark
By default, a checkered mark is printed on the first page of fax messages to
help you separate them.
ND1X00E5
Note
❒ You can turn this feature off with
the Initial Setup RX settings. See
P.55 “Changing the Initial Setup Re-
ception”.
Limitation
❒ The center mark may deviate a lit-
tle from the exact center of the
edge.
Note
❒ You can turn this feature off with
the Initial Setup RX. See P.55
“Changing the Initial Setup Reception”.
ND1X00E6
40
Page 49

KirCAE-advanced_FM.book Page 41 Thursday, March 8, 2001 2:04 PM
Printing Functions
Reception Time
You can have the date and time when
a message was received printed at the
bottom of the received image. This
feature is turned off by default—turn
it on with the Initial Setup RX settings. See P.55 “Changing the Initial
Setup Reception”.
Limitation
❒ When a received message is print-
ed on two or more sheets, the date
and time is printed on the last
page.
Note
❒ The date and time when the mes-
sage was printed can also be recorded on the message. If you need
this feature, please contact your
service representative.
Image Rotation
If you have installed paper in the cassette portrait K, incoming fax messages will be rotated automatically to
fit on the paper.
your machine
ND1X00E9
Page Separation and Length
Reduction (Not Available in
Some Countries)
When the size of a received message
is longer than the paper loaded in the
machine, each page of the message
can be split and printed on several
sheets, or reduced and printed on a
single sheet. For example, this feature
splits the message if the length exceeds 20mm or more, by reducing
within 20mm. When a message is
split, the split mark (*) is inserted at
the split position and about 10mm of
the split area is duplicated on the top
of the second sheet.
ABC
(Document)
ND1X01E1
Note
❒ Your service representative can
customize this feature with the following settings. Bracketed values
are defaults.
• Reduction (on)
• Print split mark (on)
• Overprinting (on)
• Overprinting length (10mm)
• Guideline for split (when mes-
sage is 20mm longer than paper)
4
41
Page 50

KirCAE-advanced_FM.book Page 42 Thursday, March 8, 2001 2:04 PM
Reception Features
Page Reduction
If you turn this feature on and you receive a message that is longer than the
paper in the cassette, usually the machine prints it on two pages. The machine reduces the width and length of
the received image so that it will fit on
one page. If A4L paper size is loaded
and a message of B4 L size is received, the machine will reduce the
message to a single A4L sheet.
TSI Print
Usually the sender's Fax Header is
printed on received messages. If the
sender has not programmed their Fax
Header, you will not be able to identify them. However, if you turn this
feature on, the sender's Name or Fax
Number is printed instead so you can
find out where the message came
from.
Note
❒ You can turn it on or off with the
4
your machine
User Parameters. See P.70 “User
Parameters” (Switch02, Bit3).
(B4 size)
Note
reduction
(A4 size)
ND1X01E3
❒ By default, this feature is turned
off. Switch it on with the User Parameters. See P.70 “User Parame-
ters” (Switch10, Bit3).
Reference
P.41 “Page Separation and Length Re-
duction (Not Available in Some Countries)”
When There is No Paper of the Correct Size
If there is no paper in your machine that matches the size of a received message,
the machine will choose a paper size based upon the paper you have available.
For example, if your machine has B4L and A3L installed and you receive a
A4L size message, check the A4 column of the table below. The paper size at
the top has the highest priority. In this case, since A3L is a higher priority than
B4L, the message is printed on A3L.
If only B5L is loaded and you receive an A3L message, the received message
is stored in memory and will not be printed.
42
Page 51

KirCAE-advanced_FM.book Page 43 Thursday, March 8, 2001 2:04 PM
❖❖❖❖ Priority Table
Printing Functions
4
Page Reduction Disabled
Reduction in Sub-scan Direction Enabled
Page Separation Threshold 20mm
Width or Length Priority Width
• KK and LL indicate that the message is split over two pages of paper with
the orientation and size shown.
43
Page 52

KirCAE-advanced_FM.book Page 44 Thursday, March 8, 2001 2:04 PM
Reception Features
Limitation
❒ The paper size used to print a received message may be different from the size
of the sent original.
Note
❒ Widths that this machine can receive are A4, B4, LT, LG, and A3. Any mes-
sages narrower than A4 or LT are sent as A4 or LT width with the length unchanged.
Reference
P.41 “Page Separation and Length Reduction (Not Available in Some Countries)”
P.42 “Page Reduction”
P.41 “Image Rotation”
4
”Just Size” Printing
If you turn this feature on and no paper tray is stocked with paper of a suitable
size to print a received document, a message will appear on the display prompting you to load paper of the required size. When you have loaded the new paper,
you can then print the message.
Two messages can appear:
• Paper Cassette
Note
❒ By default, this message is turned off. You can turn this message on with the
User Parameters. See P.70 “User Parameters” (Switch05, Bit5).
Out of paper display message
If the paper tray runs out of paper, you can have a message appear on the display asking you to add more paper.
Note
❒ By default, this message is turned off. You can turn it on with the User Param-
eters. See P.70 “User Parameters” (Switch05, Bit7).
44
Page 53

KirCAE-advanced_FM.book Page 45 Thursday, March 8, 2001 2:04 PM
5. Facsimile User Tools
Accessing the User Tools
The User Tools allow you to program
the machine with your identification,
store frequently used numbers and
settings, and customize the default
settings to match your needs.
So you can find the User Tool you
want quickly and easily, they are
grouped by function:
❖❖❖❖ Program/Delete
Use to program or delete: Quick
Dials, Groups, Speed Dials and
User Functions
❖❖❖❖ Reports/Lists
Use to print: the Journal, TX File
List, Group Dial list, Quick Dial
list, Speed Dial list and Quick Dial
label
❖❖❖❖ Setup
Use to configure: Monitor Volume,
Date/Time, Summer Time/DST
and Fax Information
❖❖❖❖ Initial Setup TX
Use to set defaults for: Transmission mode (Memory/Immediate),
scanning conditions (Resolution
and Original Type), Fax Reset Timer and On Hook Timeout.
Press the {{{{User Tools}}}} key.
A
Press 0000 or 1111 until "4. Fax Fea-
B
tures" is displayed.
Press the {{{{OK}}}} key.
C
Press 0000 or 1111 until the category
D
you require is displayed and
press the {{{{OK}}}} key.
❖❖❖❖ Initial Setup RX
Use to change settings for: Reception Mode, Checkered Mark, Center Mark, Print RX Time and
Forwarding
Press 0000 or 1111 until the User Tool
E
you require is displayed and
press the {{{{OK}}}} key.
45
Page 54

KirCAE-advanced_FM.book Page 46 Thursday, March 8, 2001 2:04 PM
Facsimile User Tools
Follow the instructions appearing
F
on the display.
For more details on each User
Tool, see the relevant pages of this
manual.
When you have made your chang-
G
es, press the {{{{OK}}}} key.
The machine automatically returns
to the User Tools main menu.
Exiting User Tool mode
Press the {{{{Cancel}}}} key on each
A
display until you reach the standby display.
5
46
Page 55

KirCAE-advanced_FM.book Page 47 Thursday, March 8, 2001 2:04 PM
Assigning User Function Keys
Assigning User Function Keys
You can program each of the User
Function keys ( {F1} - {F3} ) with a
function that you use frequently.
When you wish to use that function,
instead of having to search through
several menus to find it, just press the
appropriate User Function key. This
procedure can be used to edit, delete
or change the contents of the User
Function keys.
Note
❒ When the machine is shipped, the
following functions are stored in
the User Function keys by default.
Key Function
F1 Manual Reception
F2 Reception Mode
F3 Stamp
Storing/Editing the Contents
of a User Function Key
Press the {{{{User Tools}}}} key.
A
Press 0000 or 1111 until "4. Fax Fea-
B
tures" is displayed.
Press the {{{{OK}}}} key.
C
Confirm that "1. Program / De-
D
lete" is displayed and press the
{{{{OK}}}} key.
Press 0000 or 1111 until "7. User Func-
E
tions" is displayed and press the
{{{{OK}}}} key.
Press the User Function key ( {{{{F1}}}}
F
– {{{{F3}}}} ) you want to use.
5
Note
❒ If you make a mistake, press the
{Cancel} key and repeat from
step E.
47
Page 56

KirCAE-advanced_FM.book Page 48 Thursday, March 8, 2001 2:04 PM
Facsimile User Tools
Press 0000 or 1111 until the function
G
you want to register into the User
Function key and press the {{{{OK}}}}
key.
Note
❒ If you wish to store more func-
tions, repeat steps E to G for other keys.
❒ If you press the {Cancel} key,
the function is not stored and
the display shown in step E appears again.
Utilizing a User Function Key
Press the User Function Key
A
( {{{{F1}}}} – {{{{F3}}}} ) in which the function you want to use is stored.
The stored function's display is
shown.
❖❖❖❖ For example, "Print Journal"
5
Press the {{{{User Tools}}}} key.
H
Functions You Can Store in User Function Keys
Function Name Default Key
Manual Reception F1
Reception Mode F2
Stamp F3
TX Status
RX Status
Print Journal
Fax Header Print
TX Result Report
Forwarding
Group
Dial Option
48
Page 57

KirCAE-advanced_FM.book Page 49 Thursday, March 8, 2001 2:04 PM
Printing Reports/Lists
Printing Reports/Lists
This function allows you to print the
following reports and lists manually.
Select a report or list as needed.
• Journal
See P.21 “Printing the Journal”.
• TX File List
See P.19 “Printing a List of Files in
Memory (Print TX File List)”.
• Quick Dial list
See Chapter 3 “Quick Dial” in the
Basic Features manual.
• Speed Dial list
See Chapter 3 “Speed Dial” in the
Basic Features manual.
• Group Dial list
See Chapter 3 “Groups” in the Basic Features manual.
Press the {{{{User Tools}}}} key.
A
Press 0000 or 1111 until "2. Reports /
D
Lists" is displayed and press the
{{{{OK}}}} key.
Printing the Journal
A Confirm that "1. Journal" is dis-
played and press the {{{{OK}}}} key.
Note
❒ If you make a mistake, press
the {Cancel} key and try
again.
Printing a TX File List
A Press 0000 or 1111 until "2. TX File
List" is displayed and press the
{{{{OK}}}} key.
5
Press 0000 or 1111 until "4. Fax Fea-
B
tures" is displayed.
Press the {{{{OK}}}} key.
C
Note
❒ If you make a mistake, press
the {Cancel} key and try
again.
49
Page 58

KirCAE-advanced_FM.book Page 50 Thursday, March 8, 2001 2:04 PM
Facsimile User Tools
Printing the Quick Dial List
A Press 0000 or 1111 until "3. Dial
List" is displayed and press the
{{{{OK}}}} key.
B Confirm that "1. Quick Dial
List" is displayed and press the
{{{{OK}}}} key.
Note
5
❒ If you make a mistake, press
the {Cancel} key and try
again.
Printing the Speed Dial List
A Press 0000 or 1111 until "3. Dial
List" is displayed and press the
{{{{OK}}}} key.
Printing the Group Dial List
A Press 0000 or 1111 until "3. Dial
List" is displayed and press the
{{{{OK}}}} key.
B Press 0000 or 1111 until "3. Group
Dial List" is displayed and
press the {{{{OK}}}} key.
Note
❒ If you make a mistake, press
the {Cancel} key and try
again.
Printing the Quick Dial Label
A Press 0000 or 1111 until "4. Quick
Dial Label" is displayed and
press the {{{{OK}}}} key.
50
B Press 0000 or 1111 until "2. Speed
Dial List" is displayed and
press the {{{{OK}}}} key.
Note
❒ If you make a mistake, press
the {Cancel} key and try
again.
Note
❒ If you make a mistake, press
the {Cancel} key and try
again.
Press the {{{{Start}}}} key.
E
Press the {{{{User Tools}}}} key.
F
The machine returns to standby
display.
Page 59

KirCAE-advanced_FM.book Page 51 Thursday, March 8, 2001 2:04 PM
Setting the Date and Time
Setting the Date and Time
Use this function to set your machine's internal clock to the current
time and date.
If the current date and time are
wrong, use this procedure to correct
them.
Press the {{{{User Tools}}}} key.
A
Press 0000 or 1111 until "4. Fax Fea-
B
tures" is displayed.
Press the {{{{OK}}}} key.
G
Press a number key to enter the
H
year for the digit, or it the year is
correct press the {{{{OK}}}} key.
Press 0000 or 1111 key to select the cor-
I
rect month, and then press the
{{{{OK}}}} key.
Press the {{{{Clear/Stop}}}} key and use
J
the number keys to enter the correct number for the date (01 to 31).
Use the number keys to enter the
K
correct time.
5
Press the {{{{OK}}}} key.
C
Press 0000 or 1111 until "3. Setup" is
D
displayed.
Press the {{{{OK}}}} key.
E
Press 0000 or 1111 until "2. Date/Time"
F
is displayed.
Enter the current hour setting (0 to
23), and then press the 0 or 1 key.
Press the {Clear/Stop} key and use
the number keys to enter a 2–digit
number for the correct minute setting (00 to 59).
Press the {{{{OK}}}} key.
L
After "Function Accepted" flashes
briefly in the display, the next setting is displayed.
Press the {{{{User Tools}}}} key to re-
M
turn to standby display.
51
Page 60

KirCAE-advanced_FM.book Page 52 Thursday, March 8, 2001 2:04 PM
Facsimile User Tools
Summer Time / Daylight Saving Time
Whenever local custom requires advancing the clock or setting the clock
back, use this feature. You can easily
move the clock forwards when daylight saving time begins, and back
when it ends.
Note
❒ Before you set this function, make
sure that your machine's internal
clock is correct.
Press the {{{{User Tools}}}} key.
A
Press 0000 or 1111 until "3. Summer
F
Time /DST" is displayed.
Press the {{{{OK}}}} key.
G
Use 0000 or 1111 to select "On" or
H
"Off".
Select "On" to advance your machine's internal clock one hour,
and select "Off" to go back one
hour.
5
Press the {{{{OK}}}} key.
I
If you selected "On", "The Clock
Advanced By One Hour" is displayed in the display, and if you
selected "Off", "The Clock Put Back
By One Hour" is displayed.
Press the {{{{User Tools}}}} key to re-
J
Press 0000 or 1111 until "4. Fax Fea-
B
tures" is displayed.
turn to standby display.
52
Press the {{{{OK}}}} key.
C
Press 0000 or 1111 until "3. Setup" is
D
displayed.
Press the {{{{OK}}}} key.
E
Page 61

KirCAE-advanced_FM.book Page 53 Thursday, March 8, 2001 2:04 PM
Changing the Initial Setup Transmission
Changing the Initial Setup Transmission
When you turn on the machine or return to Copy mode, the machine returns to the home settings. You can
change these home settings so that
the machine starts with your most frequently used features selected.
This procedure can be used to change
the home settings for the following
functions.
• Transmission mode
See Chapter 2 “Faxing” in the Basic
Features manual.
• Resolution
See Chapter 2 “Resolution” in the
Basic Features manual.
• Photo Original
See Chapter 2 “Original Type” in
the Basic Features manual.
• Fax Reset Timer
See Chapter 1 “Starting the Machine” in the Basic Features manual.
• On Hook Timeout
See P.25 “On Hook Dial”.
Note
❒ You can also choose whether the
machine returns to the home settings after each communication.
See P.70 “User Parameters”
(Switch01, Bit7).
Press the {{{{User Tools}}}} key.
A
Press 0000 or 1111 until "4. Fax Fea-
B
tures" is displayed.
Press the {{{{OK}}}} key.
C
Press 0000 or 1111 until "4. Initial Set-
D
up TX" is displayed and press the
{{{{OK}}}} key.
The "Initial Setup TX" menu is
shown on the display.
5
Press 0000 or 1111 until the mode you
E
want to change is displayed and
press the {{{{OK}}}} key.
Note
❒ If you make a mistake, press the
{Clear/Stop} key and enter the
correct number.
53
Page 62

KirCAE-advanced_FM.book Page 54 Thursday, March 8, 2001 2:04 PM
Facsimile User Tools
Select the home setting with the
F
0000 or 1111 key then press the {{{{OK}}}}
key.
❖❖❖❖ Fax Reset Timer
❖❖❖❖ Transmission Mode
You can select the either way to
send a fax message (Memory
Transmission or Immediate Transmission).
❖❖❖❖ Resolution
This machine automatically enters
the Energy Saver mode if you do
5
not use the machine for a certain
period of time. You can select this
period from these options.
❖❖❖❖ On Hook Timeout
You can select the setting that
meets your needs based upon this
trade off between speed and image
clarity.
54
❖❖❖❖ Photo Original
You can select the setting that
meets your needs based upon the
appropriate Original Type to optimize image clarity.
This machine automatically cancel the
On Hook Dial mode if you do not dial
a number from the numeric keypad
for a certain period of time after press-
{
ing the
lect this period from these options.
❒
Press the {{{{User Tools}}}} key to re-
G
turn to standby display.
On Hook Dial
Note
If you want to change other home
settings, repeat steps E and F.
}
key. You can se-
Page 63

KirCAE-advanced_FM.book Page 55 Thursday, March 8, 2001 2:04 PM
Changing the Initial Setup Reception
Changing the Initial Setup Reception
The Initial Setup Reception function
allows you to change settings for the
following reception functions.
• Reception Mode
See Chapter 2 “Selecting the Reception Mode” in the Basic Features manual.
• Checkered Mark
See P.40 “Checkered Mark”.
• Center Mark
See P.40 “Center Mark”.
• Print RX Time
See P.41 “Reception Time”.
• Forwarding
See P.63 “Forwarding”.
Press the {{{{User Tools}}}} key.
A
Press 0000 or 1111until "5. Initial Set-
D
up RX" is displayed and press the
{{{{OK}}}} key.
The "Initial Setup RX" menu is
shown on the display.
Press 0000 or 1111 until the mode you
E
want to change is displayed and
press the {{{{OK}}}} key.
Note
❒ If you make a mistake, press the
{Clear/Stop} key and enter the
correct number.
Change the setting using the 0000 or
F
1111 key and press the {{{{OK}}}} key.
❖❖❖❖ Reception Mode
5
Press 0000 or 1111 until "4. Fax Fea-
B
tures" is displayed.
Press the {{{{OK}}}} key.
C
❖❖❖❖ Checkered Mark
❖❖❖❖ Center Mark
55
Page 64

KirCAE-advanced_FM.book Page 56 Thursday, March 8, 2001 2:04 PM
Facsimile User Tools
❖❖❖❖ Print RX Time
❖❖❖❖ Forwarding
Note
❒ If you wish to change other
functions, repeat steps E and F.
❒ Select on or off for Checkered
Mark, Center Mark, Print RX
Time and Forwarding.
5
Press the {{{{User Tools}}}} key to re-
G
turn to standby display.
56
Page 65

KirCAE-advanced_FM.book Page 57 Thursday, March 8, 2001 2:04 PM
6. Key Operator Settings
Changing Key Operator Settings
This chapter explains about functions
the key operator handles.
Counters
❖❖❖❖ Key Operator Code
When the Key Operator Code is
registered and turned on, user
have to enter registered the Key
Operator Code (maximum 8 digit)
to operate Key Operator Tools.
This prevents unauthorized people from changing registration.
Note
❒ You can change the Key Operator
Code between on and off with
"System Settings". See Chapter 2
“Settings You Can Change with
the User Tools” in the System Settings.
❒ When you register or change the
key operator access code, see
Chapter 2 “13.Key Op. Tools” in
the System Settings.
This function allows you to check the
total number of pages transmitted
and received on the display.
• Transmissions:
Total number of transmitted pages
• Receptions:
Total number of received pages
Press the {{{{User Tools}}}} key.
A
Press 0000 or 1111 until "4. Fax Fea-
B
tures" is displayed.
Press the {{{{OK}}}} key.
C
Press 0000 or 1111 until "6. Key Op.
D
Tools" is displayed.
57
Page 66

KirCAE-advanced_FM.book Page 58 Thursday, March 8, 2001 2:04 PM
Key Operator Settings
Press the {{{{OK}}}} key.
E
Note
❒ If the key operator code is regis-
tered and turned on, enter the
key operator code and press the
{OK} key.
Confirm that "1. Counter" is dis-
F
played.
Press the {{{{OK}}}} key.
G
The number of pages transmitted
is displayed. You can display the
number of pages received,
scanned, or printed by pressing 0
or 1.
6
Once you have confirmed the
H
number of pages, press the {{{{OK}}}}
key.
Press the {{{{Cancel}}}} key on each
I
display until you reach the standby display.
Authorized Reception
This feature helps you to reject junk
mail. It lets you specify which terminals you wish to receive fax messages
from; the others will be shut out. This
is useful if you are very annoyed with
someone.
You can register the following:
• 30 Specified Senders (up to 24
characters for each sender)
• Wild Card
Important
❒ We recommend that you print the
Sender/Authorized Reception list
and keep it when you register or
change a sender. See P.62 “Sender
(Authorized Reception) List”.
Limitation
❒ You cannot register a Specified
Sender who does not have an Own
Name or Own Fax Number.
❒ You can register up to 30 senders
for Forwarding and Authorized
Reception functions. You sometimes cannot register 30 senders
depending on the number of senders registered with other functions.
See P.63 “Forwarding”.
58
Note
❒ To find out a senders Own Name/
Own Fax Number, check the Journal.
❒ You can specify whether to only
receive messages from Specified
Senders, or to receive all messages
except those from Specified Senders. The default setting is "Receive
from Authorized Senders". See
P.70 “User Parameters” (Switch08,
Bit2).
Page 67

KirCAE-advanced_FM.book Page 59 Thursday, March 8, 2001 2:04 PM
Switching Authorized Reception On/Off
Press the {{{{User Tools}}}} key.
A
Press 0000 or 1111 until "4. Fax Fea-
B
tures" is displayed.
Press the {{{{OK}}}} key.
C
Press 0000 or 1111 until "6. Key Op.
D
Tools" is displayed.
Press the {{{{OK}}}} key.
E
Note
❒ If the key operator code is regis-
tered and turned on, enter the
key operator code and press the
{OK} key.
Press the {{{{OK}}}} key.
F
Changing Key Operator Settings
Press 0000 or 1111 until "2. Authorized
G
RX" is displayed.
Press the {{{{OK}}}} key.
H
Confirm that "1. On/Off" is displayed.
Press the {{{{OK}}}} key.
I
Press 0000 or 1111 to select "On" or
J
"Off".
Note
❒ You can cancel this feature by
selecting "Off".
Press the {{{{OK}}}} key.
K
Note
❒ If you have not programmed a
specified sender, the message
"Press OK to Program Sender
Name/Number" is displayed.
Press {OK} key, go to Step J in
"Programming specified senders". See P.60 “Programming
specified senders”.
Press the {{{{Cancel}}}} key on each
L
display until you reach the standby display.
6
59
Page 68

KirCAE-advanced_FM.book Page 60 Thursday, March 8, 2001 2:04 PM
Key Operator Settings
Programming specified senders
Press the {{{{User Tools}}}} key.
A
Press the {{{{OK}}}} key.
G
Press 0000 or 1111 until "2. Program
H
Sender" is displayed.
Press the {{{{OK}}}} key.
I
Enter the name for the Specified
J
User.
Enter the other party's name or fax
number.
Press 0000 or 1111 until "4. Fax Fea-
B
tures" is displayed.
6
Press the {{{{OK}}}} key.
C
Press 0000 or 1111 until "6. Key Op.
D
Tools" is displayed.
Press the {{{{OK}}}} key.
E
Note
❒ If the key operator code is regis-
tered and turned on, enter the
key operator code and press the
{OK} key.
Press 0000 or 1111 until "2. Authorized
F
RX" is displayed.
Reference
For details about how to enter
names, see Chapter 3 “Entering
Text” in the Basic Features manual.
Press the {{{{OK}}}} key.
K
If you want to specify a wildcard,
L
press the 0000 or 1111 key to select
"Yes", or select "No".
Reference
See Chapter 3 “Wild Cards” in
the Basic Features manual.
Press the {{{{OK}}}} key.
M
The Specified User is registered.
If you want to register another
Specified User, repeat from step I.
Press the {{{{Cancel}}}} key on each
N
display until you reach the standby display.
60
Page 69

KirCAE-advanced_FM.book Page 61 Thursday, March 8, 2001 2:04 PM
Deleting a Specified Sender (Authorized
Reception)
Press the {{{{User Tools}}}} key.
A
Press 0000 or 1111 until "4. Fax Fea-
B
tures" is displayed.
Changing Key Operator Settings
Press the {{{{OK}}}} key.
G
Press 0000 or 1111 until "3. Delete
H
Sender" is displayed.
Press the {{{{OK}}}} key.
I
Press the 0000 or 1111 key to select the
J
name of the Specified Sender that
you want to delete.
Press the {{{{OK}}}} key.
K
The Specified Sender is deleted.
If you want to delete more Specified Senders, repeat the above
steps from step I.
6
Press the {{{{OK}}}} key.
C
Press 0000 or 1111 until "6. Key Op.
D
Tools" is displayed.
Press the {{{{OK}}}} key.
E
Note
❒ If the key operator code is regis-
tered and turned on, enter the
key operator code and press the
{OK} key.
Press 0000 or 1111 until "2. Authorized
F
RX" is displayed.
Press the {{{{Cancel}}}} key on each
L
display until you reach the standby display.
61
Page 70

KirCAE-advanced_FM.book Page 62 Thursday, March 8, 2001 2:04 PM
Key Operator Settings
Sender (Authorized Reception) List
Print this list to find out which Specified Senders are currently programmed.
Press the {{{{User Tools}}}} key.
A
6
Press 0000 or 1111 until "4. Fax Fea-
B
tures" is displayed.
Press 0000 or 1111 until "2. Authorized
F
RX" is displayed.
Press the {{{{OK}}}} key.
G
Press 0000 or 1111 until "4. Print Send-
H
er List" is displayed.
Press the {{{{OK}}}} key.
I
Press the {{{{Start}}}} key.
J
The list is printed.
Press the {{{{Cancel}}}} key on each
K
display until you reach the standby display.
62
Press the {{{{OK}}}} key.
C
Press 0000 or 1111 until "6. Key Op.
D
Tools" is displayed.
Press the {{{{OK}}}} key.
E
Note
❒ If the key operator code is regis-
tered and turned on, enter the
key operator code and press the
{OK} key.
Page 71

KirCAE-advanced_FM.book Page 63 Thursday, March 8, 2001 2:04 PM
Changing Key Operator Settings
Forwarding
Using this feature, you can select
messages from Specified Senders to
be printed on your machine and then
sent on to another fax machine.
This is useful if, for example, you are
visiting another office and would like
a copy of your messages sent to that
office so you can read them.
In this section, the machines that messages are forwarded to are referred to
as Forwarding Stations. The locations
from which you would like messages
forwarded from are referred to as
Specified Senders.
You can register:
• 5 Forwarding Stations
• 30 Specified Senders (maximum 10
per Forwarding Station, up to 24
characters each)
• Wild Cards
Important
❒ We recommend that you print the
Forwarding/Sender list and keep
it when you register or change a receiver or sender.
Note
❒ Before using the Forwarding func-
tion, register Forwarding Stations
and turn Forwarding function on.
See P.55 “Changing the Initial Setup
Reception”.
❒ You can print a forwarding mark
on forward messages. See P.70
“User Parameters” (Switch02, Bit0).
❒ To register a sender, use an Own
Name or Own Fax Number.
❒ You can find out the Own Name or
Own Fax Number of a sender by
looking in the destination name
column of the Journal.
❒ You can specify whether or not to
print forwarded messages. This
feature is called "Local Printing".
The default setting is on. See P.70
“User Parameters” (Switch11, Bit6).
Registering Forwarding Stations
Press the {{{{User Tools}}}} key.
A
6
Limitation
❒ This feature only works if the in-
coming message is from another
party that has been programmed
as a Specified Sender.
❒ The Forwarding function does not
forward messages received with
Polling Reception mode.
❒ You cannot register a sender who
does not have an Own Name or
Own Fax Number.
❒ You can register up to 30 senders
for Forwarding and Authorized
Reception functions. You sometimes cannot register 30 senders
depending on the number of senders registered with other functions.
See P.58 “Authorized Reception”.
Press 0000 or 1111 until "4. Fax Fea-
B
tures" is displayed.
Press the {{{{OK}}}} key.
C
63
Page 72

KirCAE-advanced_FM.book Page 64 Thursday, March 8, 2001 2:04 PM
Key Operator Settings
Press 0000 or 1111 until "6. Key Op.
D
Tools" is displayed.
Press the {{{{OK}}}} key.
E
Note
❒ If the key operator code is regis-
tered and turned on, enter the
key operator code and press the
{OK} key.
Press 0000 or 1111 until "3. Forward-
F
ing" is displayed.
Press the {{{{OK}}}} key.
6
G
Press 0000 or 1111 until "1. Prog. Sta-
H
tion" is displayed
Press the {{{{OK}}}} key.
M
The Forwarding Station's fax
number is registered.
When specifying senders
A Press the {{{{OK}}}} key.
B Enter the other party's name.
Enter the other party's Own
Name or Own Fax Number.
C Press the {{{{OK}}}} key.
The name is registered.
D If you want to register the
Specified Sender as a Wildcard, press 0000 or 1111 to select
"Yes" or "No".
64
Press the {{{{OK}}}} key.
I
Press 0000 or 1111 to display the
J
number of the forwarding station
you want to register.
If a forwarding station is already
registered, the fax number for that
station is displayed.
Press the {{{{OK}}}} key.
K
Enter the other party's fax number
L
with the number keys.
E Press the {{{{OK}}}} key.
To register another Specified
Sender, repeat the above steps
from step A.
To register a different Forwarding Station, press the {Cancel}
key and repeat the above steps
from step I.
Limitation
❒
Names for Specified Senders
can be up to 24 characters long.
Note
❒ You can confirm the names
and fax numbers of Specified
Senders on the Journal.
❒ You can confirm registered
Specified Senders on the
Specified Sender list.
Page 73

KirCAE-advanced_FM.book Page 65 Thursday, March 8, 2001 2:04 PM
Changing Key Operator Settings
Press the {{{{Cancel}}}} key on each
N
display until you reach the standby display.
Editing a Forwarding Station
Press the {{{{User Tools}}}} key.
A
Press 0000 or 1111 until "4. Fax Fea-
B
tures" is displayed.
Press 0000 or 1111 until "3. Forward-
F
ing" is displayed.
Press the {{{{OK}}}} key.
G
Press 0000 or 1111 until "1. Prog. Sta-
H
tion" is displayed.
Press the {{{{OK}}}} key.
I
Press 0000 or 1111 to display the fax
J
number of the Forwarding Station you want to edit.
Press the {{{{OK}}}} key.
K
Press the {{{{Clear/Stop}}}} key and en-
L
ter the Forwarding Station's correct fax number.
6
Press the {{{{OK}}}} key.
C
Press 0000 or 1111 until "6. Key Op.
D
Tools" is displayed.
Press the {{{{OK}}}} key.
E
Note
❒ If the key operator code is regis-
tered and turned on, enter the
key operator code and press the
{OK} key.
Press the {{{{OK}}}} key.
M
The fax number is registered.
If you want to edit another Forwarding Station, press the {Cancel}
key and repeat the above steps
from step I.
Press the {{{{Cancel}}}} key on each
N
display until you reach the standby display.
65
Page 74

KirCAE-advanced_FM.book Page 66 Thursday, March 8, 2001 2:04 PM
Key Operator Settings
Deleting a Forwarding Station
Press the {{{{User Tools}}}} key.
A
Press 0000 or 1111 until "4. Fax Fea-
B
tures" is displayed.
6
Press the {{{{OK}}}} key.
G
Press 0000 or 1111 until "2. Delete Sta-
H
tion" is displayed.
Press the {{{{OK}}}} key.
I
Press 0000 or 1111 to display the fax
J
number of the Forwarding Station you want to delete.
Press the {{{{OK}}}} key.
K
The Forwarding Station is deleted.
If you want to delete another Forwarding Station, repeat the procedure from step I.
66
Press the {{{{OK}}}} key.
C
Press 0000 or 1111 until "6. Key Op.
D
Tools" is displayed.
Press the {{{{OK}}}} key.
E
Note
❒ If the key operator code is regis-
tered and turned on, enter the
key operator code and press the
{OK} key.
Press 0000 or 1111 until "3. Forward-
F
ing" is displayed.
Press the {{{{Cancel}}}} key on each
L
display until you reach the standby display.
Page 75

KirCAE-advanced_FM.book Page 67 Thursday, March 8, 2001 2:04 PM
Deleting a Specified Sender (Forwarding)
Press the {{{{User Tools}}}} key.
A
Press 0000 or 1111 until "4. Fax Fea-
B
tures" is displayed.
Changing Key Operator Settings
Press the {{{{OK}}}} key.
G
Press 0000 or 1111 until "1. Prog. Sta-
H
tion" is displayed.
Press the {{{{OK}}}} key.
I
Press 0000 or 1111 to display the fax
J
number of the Forwarding Station that contains the Specified
Sender you want to delete.
Press the {{{{OK}}}} key.
K
Press the {{{{OK}}}} key.
L
Press 0000 or 1111 until "2. Delete
M
Sender" is displayed.
6
Press the {{{{OK}}}} key.
C
Press 0000 or 1111 until "6. Key Op.
D
Tools" is displayed.
Press the {{{{OK}}}} key.
E
Note
❒ If the key operator code is regis-
tered and turned on, enter the
key operator code and press the
{OK} key.
Press 0000 or 1111 until "3. Forward-
F
ing" is displayed.
Press the {{{{OK}}}} key.
N
Use 0000 or 1111 to display the Speci-
O
fied Sender you want to delete.
Press the {{{{OK}}}} key.
P
The Specified Sender is deleted.
If you want to delete another Specified Sender, repeat the above
steps from step N.
Press the {{{{Cancel}}}} key on each
Q
display until you reach the standby display.
67
Page 76

KirCAE-advanced_FM.book Page 68 Thursday, March 8, 2001 2:04 PM
Key Operator Settings
Specified Sender/Forwarding Station list
Print this list to find out which Specified Senders are assigned to which
Forwarding Stations.
Press the {{{{User Tools}}}} key.
A
6
Press 0000 or 1111 until "4. Fax Fea-
B
tures" is displayed.
Press 0000 or 1111 until "3. Forward-
F
ing" is displayed.
Press the {{{{OK}}}} key.
G
Press 0000 or 1111 until "3. Print Send-
H
er List" is displayed.
Press the {{{{OK}}}} key.
I
Press the {{{{Start}}}} key.
J
The list is printed.
Press the {{{{Cancel}}}} key on each
K
display until you reach the standby display.
68
Press the {{{{OK}}}} key.
C
Press 0000 or 1111 until "6. Key Op.
D
Tools" is displayed.
Press the {{{{OK}}}} key.
E
Note
❒ If the key operator code is regis-
tered and turned on, enter the
key operator code and press the
{OK} key.
Page 77

KirCAE-advanced_FM.book Page 69 Thursday, March 8, 2001 2:04 PM
Sender Setting
For Forwarding, select the messages
to forward either from all senders,
from specified senders.
Press the {{{{User Tools}}}} key.
A
Press 0000 or 1111 until "4. Fax Fea-
B
tures" is displayed.
Changing Key Operator Settings
Press 0000 or 1111 until "3. Forward-
F
ing" is displayed.
Press the {{{{OK}}}} key.
G
Press 0000 or 1111 until "4. Sender Set-
H
ting" is displayed.
Press the {{{{OK}}}} key.
I
Press 0000 or 1111 and select "Selected
J
ON" or "All ON".
Messages are transferred only to
the specified party.
6
Press the {{{{OK}}}} key.
C
Press 0000 or 1111 until "6. Key Op.
D
Tools" is displayed.
Press the {{{{OK}}}} key.
E
Note
❒ If the key operator code is regis-
tered and turned on, enter the
key operator code and press the
{OK} key.
Messages are transferred to any
party.
Press the {{{{OK}}}} key.
K
Press the {{{{Cancel}}}} key on each dis-
L
play until you reach the standby
display.
69
Page 78

KirCAE-advanced_FM.book Page 70 Thursday, March 8, 2001 2:04 PM
Key Operator Settings
User Parameters
The User Parameters allow you to customize various settings to match your
needs.
To change the function settings, set the user parameter switches.
Preparation
Access to some User Parameter Settings requires installation of optional
equipment or that other settings be made beforehand.
----Switches and Bits
User Parameters are divided into Switches and each switch is divided into eight
bits. The right most bit is bit 0 and the left most is bit 7.
Bit
Number
Bit Value
76543210
↓↓↓↓↓↓↓↓
01000000
6
----User Parameter List
The User Parameter switches are outlined below.
Switch Bit Item 0 1
00 0 Stamp home position Off On
3, 2, 1 Image density adjustment level home position (the higher level,
the greater image density)
001: Level 1 (lightest),
010: Level 2, 011: Level 3, 100: Level 4, 101: Level 5
01 0 Label Insertion home posi-
tion
2 Auto Reduction home po-
sition
5 Fax Header Print home po-
sition
7 Return the machine to the
home settings after each
communication (Return to
default after transmission)
70
Off On
Off On
Off On
Off On
Page 79

KirCAE-advanced_FM.book Page 71 Thursday, March 8, 2001 2:04 PM
Switch Bit Item 0 1
02 0 Forwarding Mark Off On
3TSI Print Off On
03 0 Automatic printing of the
Communication Result Report (Memory TX)
2 Automatic printing of the
File Reserve Report (Memory TX)
3 Automatic printing of the
File Reserve Report (Polling RX)
4 Automatic printing of the
Communication Result Report (Polling RX)
5 Automatic printing of the
Transmission Result Report (Immediate TX)
7 Automatic printing of the
Journal
04 7 Include a portion of the im-
age on the Communication
Result Report, File Reserve
Report, Communication
Failure Report.
05 0 Receive Service Call (SC)
Condition (Substitute Reception during service call)
2, 1 Receive when the machine can not print (Substitute reception dur-
ing printer error)
00: Enabled unconditionally (Free),
01: Enabled for Own Name/Own Fax Number is received,
10: Enabled for Polling ID match,
11: Disabled (Reception off)
4 Restricted Access Off On
5 Just Size Printing Off On
7 Empty cassette alert (Paper
Empty Warning indication)
06 4 Selecting the Sheet to Print
the Quick Dial Label
07 2 Parallel Memory Trans-
mission
Changing Key Operator Settings
Off On
Off On
Off On
Off On
Off On
Off On
Off On
Possible (Substitute RX)
Off On
Paper label sheet Transparent label
Off On
Not possible (Reception off)
sheet
6
71
Page 80

KirCAE-advanced_FM.book Page 72 Thursday, March 8, 2001 2:04 PM
Key Operator Settings
Switch Bit Item 0 1
08 2 Authorized Reception type Only receive
10 3 Page Reduction when
11 6 Local Print when Forward-
14 0 Print documents received
6
15 2, 1, 0 Select paper feed tray to fix
17 2 Whether you need to press
printing
ing
with Auto Power-On Reception (Night Printing
mode)
1 Long Document Transmis-
sion (Well Log)
2 Batch Transmission Off On
3 Reset when function
changed
7System Parameter List TX Off On
001: First, 010: Second, 011 Third, 100: Four
5 Fixed Input tray On Off
the {OK} key after entering
a Quick Dial when broadcasting.
7 Receive messages by press-
ing the {Start} key when
originals are not set.
from specified
senders
Off On
Off On
Immediate printing (On)
Off On
Off On
Not Necessary Necessary
Off (The machine
does not receive
messages by
pressing the
{Start} key.)
Receive all messages except
those from specified senders
When turning on
the Operation
switch (Off)
On (The machine
receives messag-
es by pressin g the
{Start} key.)
72
Page 81

KirCAE-advanced_FM.book Page 73 Thursday, March 8, 2001 2:04 PM
Changing the User Parameters
• We recommend that you print the
User Parameter list and keep it
when you register or change a user
parameter. See P.74 “Printing the
User Parameter List”.
• Do not change any bit switches
other than those shown on the previous pages.
Press the {{{{User Tools}}}} key.
A
Press 0000 or 1111 until "4. Fax Fea-
B
tures" is displayed.
Changing Key Operator Settings
Press 0000 or 1111 until "4. User Pa-
F
rameters" is displayed.
Press the {{{{OK}}}} key.
G
Press the {{{{OK}}}} key.
H
For a list of the switches and settings, see P.70 “User Parameter
List”.
Use the User Parameters table to
look up the number of the switch
that you want to change, and then
press the 0 or 1 key to display
the number of the switch.
The switch bits are numbered 7~0.
To change a setting, press the corresponding number key to toggle
the setting between "0" and "1"
Key to
76543210
Press
SW 00:00000000
6
Press the {{{{OK}}}} key.
C
Press 0000 or 1111 until "6. Key Op.
D
Tools" is displayed.
Press the {{{{OK}}}} key.
E
Note
❒ If the key operator code is regis-
tered and turned on, enter the
key operator code and press the
{OK} key.
For example, if you want to change
the setting at bit 7, press the 7
number key to toggle the setting
between "1" and "0".
When you are finished making
I
adjustments, press the {{{{OK}}}} key.
Press the {{{{Cancel}}}} key on each dis-
J
play until you reach the standby
display.
73
Page 82

KirCAE-advanced_FM.book Page 74 Thursday, March 8, 2001 2:04 PM
Key Operator Settings
Printing the User Parameter List
Print this list to see the current User
Parameter settings.
Press the {{{{User Tools}}}} key.
A
6
Press 0000 or 1111 until "4. Fax Fea-
B
tures" is displayed.
Press 0000 or 1111 until "4. User Pa-
F
rameters" is displayed.
Press the {{{{OK}}}} key.
G
Press the 0000 or 1111 key until "2.
H
Print List" is displayed and press
the {{{{OK}}}} key.
Press the {{{{Start}}}} key to print the
I
list.
74
Press the {{{{OK}}}} key.
C
Press 0000 or 1111 until "6. Key Op.
D
Tools" is displayed.
Press the {{{{OK}}}} key.
E
Note
❒ If the key operator code is regis-
tered and turned on, enter the
key operator code and press the
{OK} key.
Note
❒ If you press {Cancel} before
printing starts, the printing
stops and the display shown in
step H appears again.
Press the {{{{Cancel}}}} key on each
J
display until you reach the standby display.
Page 83

KirCAE-advanced_FM.book Page 75 Thursday, March 8, 2001 2:04 PM
Personal Codes
This function allows you to keep
track of machine usage. When Personal Codes are programmed, users
have to enter their Personal Code before they send a fax.
Important
❒ We recommend that you print the
Personal Code List and keep it
when you register or change a Personal Code. See P.77 “Printing the
Personal Code List”.
Note
❒ To enter a Personal Code when
sending a fax, follow the steps
shown in "Personal Code Transmission". See P.6 “Personal Code
Transmission”.
Registering Personal Codes
Press the {{{{User Tools}}}} key.
A
Changing Key Operator Settings
Press 0000 or 1111 until "6. Key Op.
D
Tools" is displayed.
Press the {{{{OK}}}} key.
E
Note
❒ If the key operator code is regis-
tered and turned on, enter the
key operator code and press the
{OK} key.
Press 0000 or 1111 until "5. Personal
F
Code" is displayed.
Press the {{{{OK}}}} key.
G
Confirm that "1. Prog. Pers. Code"
H
is displayed and press the {{{{OK}}}}
key.
6
Press 0000 or 1111 until "4. Fax Fea-
B
tures" is displayed.
Press the {{{{OK}}}} key.
C
Enter the Personal Code (8-digits
I
or less) with the number keys.
Press the {{{{OK}}}} key.
J
Enter the user name.
K
Press the {{{{OK}}}} key.
L
Press the {{{{Cancel}}}} key on each
M
display until you reach the standby display.
75
Page 84

KirCAE-advanced_FM.book Page 76 Thursday, March 8, 2001 2:04 PM
Key Operator Settings
Editing a Personal Code
Press the {{{{User Tools}}}} key.
A
Press 0000 or 1111 until "4. Fax Fea-
B
tures" is displayed.
6
Press the {{{{OK}}}} key.
G
Confirm that "1. Prog. Pers. Code"
H
is displayed and press the {{{{OK}}}}
key.
Press 0000 or 1111 to display the Per-
I
sonal Code for the user name or
routing sub-address you want to
change.
Press the {{{{OK}}}} key.
J
Enter the user name.
K
76
Press the {{{{OK}}}} key.
C
Press 0000 or 1111 until "6. Key Op.
D
Tools" is displayed.
Press the {{{{OK}}}} key.
E
Note
❒ If the key operator code is regis-
tered and turned on, enter the
key operator code and press the
{OK} key.
Press 0000 or 1111 until "5. Personal
F
Code" is displayed.
Press the {{{{OK}}}} key.
L
Press the {{{{Cancel}}}} key on each
M
display until you reach the standby display.
Page 85

KirCAE-advanced_FM.book Page 77 Thursday, March 8, 2001 2:04 PM
Deleting a Personal Code
Press the {{{{User Tools}}}} key.
A
Press 0000 or 1111 until "4. Fax Fea-
B
tures" is displayed.
Changing Key Operator Settings
Press the {{{{OK}}}} key.
G
Press 0000 or 1111 until "2. Delete" is
H
displayed.
Press the {{{{OK}}}} key.
I
Press 0000 or 1111 to display the Per-
J
sonal Code you want to delete.
Press the {{{{OK}}}} key.
K
The Personal Code is deleted.
If you want to delete another Personal Code, repeat the above steps
from step I.
6
Press the {{{{OK}}}} key.
C
Press 0000 or 1111 until "6. Key Op.
D
Tools" is displayed.
Press the {{{{OK}}}} key.
E
Note
❒ If the key operator code is regis-
tered and turned on, enter the
key operator code and press the
{OK} key.
Press 0000 or 1111 until "5. Personal
F
Code" is displayed.
Press the {{{{Cancel}}}} key on each
L
display until you reach the standby display.
Printing the Personal Code List
Print this list to find out the registered
Personal Codes and their names.
Press the {{{{User Tools}}}} key.
A
77
Page 86

KirCAE-advanced_FM.book Page 78 Thursday, March 8, 2001 2:04 PM
Key Operator Settings
Press 0000 or 1111 until "4. Fax Fea-
B
tures" is displayed.
Press the {{{{OK}}}} key.
C
Press 0000 or 1111 until "6. Key Op.
D
Tools" is displayed.
Press the {{{{OK}}}} key.
E
Note
❒ If the key operator code is regis-
tered and turned on, enter the
key operator code and press the
6
{OK} key.
Press 0000 or 1111 until "5. Personal
F
Code" is displayed.
Press the {{{{OK}}}} key.
G
Press 0000 or 1111 until "3. Print List"
H
is displayed.
Restricted Access
Use this feature to restrict access to
the machine or monitor machine usage by user or department. When
turned on, users must enter a previously assigned code before they can
use the machine.
Preparation
In order to use this feature you
need to register Personal Codes beforehand. See P.75 “Registering Per-
sonal Codes”.
Note
❒ When the machine is shipped, this
feature is turned off by default.
Turn it on or off with the User Parameters. See P.70 “User Parame-
ters” (Switch 05, Bit 4).
❒ The machine returns to the state
where a Personal Code must be entered to use the machine in the following situations:
• The machine is not used for a
certain time
• A previously set document is
removed
• The current operation is completed
❒ When Restricted Access is turned
on, incoming faxes are received
and printed as normal.
78
Press the {{{{OK}}}} key.
I
Press the {{{{Start}}}} key.
J
The list is printed.
Press the {{{{Cancel}}}} key on each
K
display until you reach the standby display.
Check that the Restricted Access
A
display is shown.
Enter your personal code with the
B
number keys.
Press the {{{{OK}}}} key.
C
Page 87

KirCAE-advanced_FM.book Page 79 Thursday, March 8, 2001 2:04 PM
Changing Key Operator Settings
Note
❒ When Restricted Access is
turned on and you enter a personal code to use the machine,
Personal Code Transmission is
selected by default.
Polling ID
Use this procedure to register the
Polling ID code.
This ID is required for using the
Transfer Request (See P.12 “Transfer
Request” ).
Limitation
❒ When you use Transfer Request,
register the same ID code as that
registered on the sender's machine.
Note
❒ A Polling ID can be any combina-
tion of digits (0 - 9) and letters (A F) except for 0000 and FFFF.
Press the {{{{User Tools}}}} key.
A
Press 0000 or 1111 until "4. Fax Fea-
B
tures" is displayed.
Press the {{{{OK}}}} key.
C
Press 0000 or 1111 until "6. Key Op.
D
Tools" is displayed.
Press the {{{{OK}}}} key.
E
Note
❒ If the key operator code is regis-
tered and turned on, enter the
key operator code and press the
{OK} key.
Press 0000 or 1111 until "6. Polling ID"
F
is displayed.
6
Press the {{{{OK}}}} key.
G
Enter the Polling ID (4-digits)
H
with the number keys.
If you make a mistake, press the
{Clear/Stop} key and try again.
Press the {{{{OK}}}} key.
I
If you want to enter another item,
repeat the above steps from step G.
Press the {{{{Cancel}}}} key on each
J
display until you reach the standby display.
79
Page 88

KirCAE-advanced_FM.book Page 80 Thursday, March 8, 2001 2:04 PM
Key Operator Settings
Select Line
When your machine is connected
through a PABX, change the Select
Line setting to Extension. If it is connected directly to the telephone network, leave it set to Outside.
Note
❒ After you have registered an out-
side line access number, set the line
to "Extension" in "Select Line". By
default, this feature is set to "Outside".
Press the {{{{User Tools}}}} key.
A
6
Note
❒ If the key operator code is regis-
tered and turned on, enter the
key operator code and press the
{OK} key.
Press 0000 or 1111 until "7. Select Line"
F
is displayed.
Press the {{{{OK}}}} key.
G
Press 0000 or 1111 and select "Exten-
H
sion" or "Outside".
Press the {{{{OK}}}} key.
I
"Function Accepted" is displayed
on the screen.
Press the {{{{Cancel}}}} key on each
J
display until you reach the standby display.
80
Press 0000 or 1111 until "4. Fax Fea-
B
tures" is displayed.
Press the {{{{OK}}}} key.
C
Press 0000 or 1111 until "6. Key Op.
D
Tools" is displayed.
Press the {{{{OK}}}} key.
E
Page 89

KirCAE-advanced_FM.book Page 81 Thursday, March 8, 2001 2:04 PM
PSTN Access Number
Use this setting to save having to enter a pause after the outside line access number when dialing. When you
program an access number, a pause is
automatically added as soon as that
number is pressed. For example, if
you register "0" as the PSTN Access
Number, a pause will be inserted automatically after dialing "0".
Limitation
❒ Outside line access numbers can be
up to 2 digits long.
❒ This feature does not work when
using On Hook mode or when dialing from an external telephone.
Note
❒ After you have registered an out-
side line access number, set the line
to "Extension" in "Select Line". By
default, this feature is set to "Outside".
To register an outside line access
number perform the following procedure.
Press the {{{{User Tools}}}} key.
A
Changing Key Operator Settings
Press 0000 or 1111 until "4. Fax Fea-
B
tures" is displayed.
Press the {{{{OK}}}} key.
C
Press 0000 or 1111 until "6. Key Op.
D
Tools" is displayed.
Press the {{{{OK}}}} key.
E
Note
❒ If the key operator code is regis-
tered and turned on, enter the
key operator code and press the
{OK} key.
Press 0000 or 1111 until "8. PSTN Ac-
F
cess No." is displayed.
Press the {{{{OK}}}} key.
G
Enter the outside line access
H
number (2-digits) with the
number keys.
If you make a mistake, press the
{Clear/Stop} key and try again.
6
Press the {{{{OK}}}} key.
I
"Programmed" is displayed on the
screen.
Press the {{{{Cancel}}}} key on each
J
display until you reach the standby display.
81
Page 90

KirCAE-advanced_FM.book Page 82 Thursday, March 8, 2001 2:04 PM
Key Operator Settings
Transfer Report
For the requesting party to be able to
receive Transfer Result Reports from
the Transfer Station, the requesting
party must store the number of the
telephone line their machine is connected to in their own machine.
Be sure to insert a pause after the area
code.
For example, if your fax number is 1234-567-8900, store the following:
• 1-234-567-8900
Press the {{{{User Tools}}}} key.
A
6
Press the {{{{OK}}}} key.
E
Note
❒ If the key operator code is regis-
tered and turned on, enter the
key operator code and press the
{OK} key.
Press 0000 or 1111 until "9. Transfer
F
Report" is displayed.
Press the {{{{OK}}}} key.
G
Enter the fax number with the
H
number keys and {{{{Pause/Redial}}}}
key.
82
Press 0000 or 1111 until "4. Fax Fea-
B
tures" is displayed.
Press the {{{{OK}}}} key.
C
Press 0000 or 1111 until "6. Key Op.
D
Tools" is displayed.
Press the {{{{OK}}}} key.
I
Press the {{{{Cancel}}}} key on each dis-
J
play until you reach the standby
display.
RDS (Remote Diagnostic
System)
If your machine has a problem, a
service representative can perform
various diagnostic tasks over the telephone line from the service station to
try to find out what is wrong with
your machine. The service representative can also use RDS to change
some of your machine's settings if
you request it.
When the machine is shipped, this
feature is turned on.
Page 91

KirCAE-advanced_FM.book Page 83 Thursday, March 8, 2001 2:04 PM
7. Troubleshooting
When Toner Runs Out
When the machine has run out of toner the symbol appears on the display.
Note that even if there is no toner left
you can still send fax messages. However, it is advisable to replace the toner early to avoid poor printing
quality.
Limitation
❒ The File Reserve Report and is not
printed.
83
Page 92

KirCAE-advanced_FM.book Page 84 Thursday, March 8, 2001 2:04 PM
Troubleshooting
When an Error Report is Printed
An error report is printed when a message could not be successfully sent or received.
Possible causes include a problem with your machine or the receiver's noise on
the telephone line etc. If an error occurs during transmission, re-send the original. If an error occurs during reception, ask the sender to re-send the message.
Note
❒ If the error happens frequently, contact your service representative.
❒ The "Page" column gives the total number of pages. The "Page Not Sent" col-
umn gives the number of pages that were not sent or received successfully.
7
84
Page 93

KirCAE-advanced_FM.book Page 85 Thursday, March 8, 2001 2:04 PM
When Power is Turned off or Fails
When Power is Turned off or Fails
Even if the Main Power switch is turned off, the contents of the machine's memory (programmed numbers etc.) will not be lost. However, if power is lost for
about 1 hour through the Main Power switch being turned off, a power cut or
the power cable being removed, contents of the Fax memory will be lost. Lost
items will include any fax messages stored in memory using Memory Transmission or Reception.
If a file has been deleted from memory, a Power Failure Report is automatically
printed as soon as power is restored. This report can be used to identify lost files.
If an original stored for Memory Transmission was lost, re-send it. If a message
received by Memory Reception or Substitute Reception was lost, ask the sender
to re-send it.
Important
❒ Make sure that 100% is shown on the display before you unplug the machine.
If a lower value is shown, some data is currently stored in memory.
❒ Right after a power failure, the internal battery needs to be sufficiently re-
charged to guard against future data loss. Please keep the machine plugged
in and the Main Power switch on for about 24 hours after the power loss oc-
curs.
85
7
Page 94

KirCAE-advanced_FM.book Page 86 Thursday, March 8, 2001 2:04 PM
Troubleshooting
7
86
Page 95

KirCAE-advanced_FM.book Page 87 Thursday, March 8, 2001 2:04 PM
8. Maintaining Your Machine
Replacing the Stamp Cartridge
The optional Document Feeder is required.
When the stamp is getting to become
lighter, replace the cartridge.
Note
❒ Use the cartridge specified for this
machine.
Lift the Document Feeder and
A
open the stamp cover.
ZEQP080E
Pull out the cartridge.
B
Set a new cartridge.
C
Return the stamp cover to its orig-
D
inal position.
Close the Document Feeder.
E
ZEQP100E
ZEQP110E
ZEQP090E
Note
❒ Hold down the center part of
the cover to make sure that it is
closed completely.
87
Page 96

KirCAE-advanced_FM.book Page 88 Thursday, March 8, 2001 2:04 PM
Maintaining Your Machine
8
88
Page 97

KirCAE-advanced_FM.book Page 89 Thursday, March 8, 2001 2:04 PM
9. Appendix
Connecting the Machine to a Telephone Line and Telephone
Connecting the Telephone Line
To connect the machine to a telephone line, use a snap-in modular type connector.
Important
❒ Make sure the connector is the correct type before you start.
❖❖❖❖ Where to connect the machine
1.
G3
2.
External Telephone
❖❖❖❖ When using a modular type connector
1
2
ZEQH070E
89
Page 98

KirCAE-advanced_FM.book Page 90 Thursday, March 8, 2001 2:04 PM
Appendix
Selecting the Line Type
Select the line type to which the machine is connected. There are two types: tone
and pulse dial.
Select the Line Type using "Line Type" in "Key Operator Settings". The default
settings is "Tone".
Note
❒ This setting is not displayed in some areas.
9
90
Page 99

KirCAE-advanced_FM.book Page 91 Thursday, March 8, 2001 2:04 PM
Specifications
Standard G3
Resolution 8×3.85/mm•200×100dpi (Standard), 8×7.7/
mm•200×200dpi (Detail), 8×15.4/
mm•200×400dpi (Fine)
Transmission Time 3 seconds at 28,800bps, Standard resolution
Data Compression Method MH, MR, MMR
Maximum Original Size 297×1200mm
Maximum Scanning Size 297×432mm
Print Process Printing on standard paper using the laser
Transmission Speed 33,600/31,200/28,800/26,400/24,000/21,600/
19,200/16,800/14,400/12,000/9,600/7,200/4,800/
2,400bps (auto shift down system)
❖❖❖❖ Power Consumption
Standby mode 135W
Immediate Transmission 185W
Memory Transmission 140W
Memory Reception 125W
Printing 330W
Night Timer Off mode 25W
Specifications
91
9
Page 100

KirCAE-advanced_FM.book Page 92 Thursday, March 8, 2001 2:04 PM
Appendix
Acceptable Types of Originals
Make sure your originals are completely dry before setting them in the machine.
Originals containing wet ink or correcting fluid will mark the exposure glass and
resulting image will be affected.
Acceptable Original Sizes
Where Original is Set Acceptable Original Size Maximum
Exposure glass Maximum A3 (297×420mm),
Document Feeder
(ADF)
11"×17" (279×432mm)
Fax transmissio n: A5 LK to A3
L
(up to 1200mm long) 8
1
5
/2" L to 11"×17"(DLT)
1
L
/2"
Number of
Sheets
30 sheets
×
(80g/m
1----
2
, 20lb)
Paper Thickness
2
52-105g/m
(45-90kg, 14-28lb)
Paper Size and Scanned Area
❖❖❖❖ Exposure Glass
9
❖❖❖❖ Document Feeder
Note
❒ Maximum scanning area is 297 × 1,200 mm for 1-Sided original.
92
 Loading...