

Ricoh 3406WD, aficio MP W3601, GWD3006, LW426 Setting Manual

Operating Instructions
Network and System Settings
Reference
System Settings
1
Connecting the Machine
2
Using a Printer Server
3
Monitoring and Configuring the Machine
4
Registering Addresses and Users for Scanner Functions
5
Special Operations under Windows
6
Appendix
7
Read this manual carefully before you use this machine and keep it handy for future reference. For safe and correct use, be sure to read the Safety
Information in "About This Machine" before using the machine.


TABLE OF CONTENTS
Manuals for This Machine.................................................................................................................................9
Notice................................................................................................................................................................11
Important......................................................................................................................................................11
How to Read This Manual...............................................................................................................................12
Symbols........................................................................................................................................................12
Machine Types.............................................................................................................................................12
Names of Major Items.................................................................................................................................13
Notes............................................................................................................................................................13
About IP Address.........................................................................................................................................13
Laws and Regulations......................................................................................................................................14
Legal Prohibition..........................................................................................................................................14
Model-Specific Information.............................................................................................................................15
Display Panel....................................................................................................................................................16
Accessing User Tools.......................................................................................................................................17
Changing Default Settings...........................................................................................................................17
Quitting User Tools......................................................................................................................................18
1. System Settings
General Features..............................................................................................................................................19
Tray Paper Settings..........................................................................................................................................24
Timer Settings....................................................................................................................................................29
Interface Settings..............................................................................................................................................31
Network........................................................................................................................................................31
Wireless LAN...............................................................................................................................................35
Print List.........................................................................................................................................................37
File Transfer.......................................................................................................................................................39
Administrator Tools...........................................................................................................................................45
Programming the LDAP server.........................................................................................................................56
Programming the LDAP server....................................................................................................................56
Changing the LDAP server..........................................................................................................................60
Deleting the LDAP server.............................................................................................................................60
Programming the Realm...................................................................................................................................62
Programming the Realm..............................................................................................................................62
Changing the Realm....................................................................................................................................63
1

Deleting the Realm.......................................................................................................................................64
2. Connecting the Machine
Connecting to the Interface.............................................................................................................................65
Connecting to the Ethernet Interface..........................................................................................................66
Connecting to the Gigabit Ethernet Interface............................................................................................67
Connecting to the USB (Type B) Interface.................................................................................................69
Connecting a Device to the Machine’s USB Host Interface.....................................................................70
Connecting to the Wireless LAN Interface.................................................................................................70
Network Settings Required to Use the Printer................................................................................................73
Ethernet.........................................................................................................................................................73
Wireless LAN...............................................................................................................................................74
Network Settings Required to Use E-mail Function.......................................................................................76
Ethernet.........................................................................................................................................................76
Wireless LAN...............................................................................................................................................77
Network Settings Required to Use Scan to Folder Function.........................................................................80
Ethernet.........................................................................................................................................................80
Wireless LAN...............................................................................................................................................81
Network Settings Required to Use the Network Delivery Scanner..............................................................83
Ethernet.........................................................................................................................................................83
Wireless LAN...............................................................................................................................................84
Network Settings Required to Use Network TWAIN Scanner.....................................................................86
Ethernet.........................................................................................................................................................86
Wireless LAN...............................................................................................................................................87
Network Settings Required to Use Document Server....................................................................................89
Ethernet.........................................................................................................................................................89
Wireless LAN...............................................................................................................................................90
Using Utilities to Make Network Settings.......................................................................................................92
Interface Settings..........................................................................................................................................92
File Transfer..................................................................................................................................................97
3. Using a Printer Server
Preparing Printer Server...................................................................................................................................99
Using NetWare..............................................................................................................................................100
Setting Up as a Print Server (NetWare 3.x)............................................................................................100
2

Setting Up as a Print Server (NetWare 4.x, 5/5.1, 6/6.5).................................................................102
Using Pure IP in the NetWare 5/5.1 or 6/6.5 Environment................................................................103
Setting Up as a Remote Printer (NetWare 3.x).......................................................................................105
Setting Up as a Remote Printer (NetWare 4.x, 5/5.1, 6/6.5)............................................................107
4. Monitoring and Configuring the Machine
Using Web Image Monitor...........................................................................................................................111
Displaying Top Page.................................................................................................................................112
When User Authentication is Set..............................................................................................................114
About Menu and Mode............................................................................................................................114
Access in the Administrator Mode...........................................................................................................116
List of Setting Items.....................................................................................................................................116
Displaying Web Image Monitor Help.....................................................................................................123
When Using IPP with SmartDeviceMonitor for Client.................................................................................125
Machine Status Notification by E-Mail........................................................................................................126
Setting the Account for E-mail Notification.............................................................................................127
Mail Authentication...................................................................................................................................128
Auto E-mail Notification............................................................................................................................129
On-demand E-mail Notification...............................................................................................................130
Format of On-demand E-mail Messages................................................................................................131
Remote Maintenance Using telnet................................................................................................................132
Using telnet................................................................................................................................................132
access.........................................................................................................................................................133
authfree......................................................................................................................................................134
autonet........................................................................................................................................................134
bonjour.......................................................................................................................................................135
devicename...............................................................................................................................................137
dhcp............................................................................................................................................................137
dhcp6.........................................................................................................................................................138
diprint.........................................................................................................................................................139
dns..............................................................................................................................................................139
domainname..............................................................................................................................................141
etherauth....................................................................................................................................................142
etherconfig.................................................................................................................................................142
3

help.............................................................................................................................................................142
hostname....................................................................................................................................................143
ifconfig........................................................................................................................................................143
info..............................................................................................................................................................145
ipp...............................................................................................................................................................145
ipsec...........................................................................................................................................................146
ipv6.............................................................................................................................................................146
logout.........................................................................................................................................................146
lpr................................................................................................................................................................146
netware......................................................................................................................................................147
passwd.......................................................................................................................................................148
pathmtu.......................................................................................................................................................149
prnlog.........................................................................................................................................................149
route............................................................................................................................................................150
set................................................................................................................................................................151
show...........................................................................................................................................................154
slp...............................................................................................................................................................154
smb.............................................................................................................................................................154
snmp...........................................................................................................................................................155
sntp.............................................................................................................................................................159
spoolsw......................................................................................................................................................159
ssdp............................................................................................................................................................160
ssh...............................................................................................................................................................160
status...........................................................................................................................................................161
syslog..........................................................................................................................................................162
upnp...........................................................................................................................................................162
web.............................................................................................................................................................162
wiconfig......................................................................................................................................................163
wins.............................................................................................................................................................168
wsmfp.........................................................................................................................................................169
8021x........................................................................................................................................................170
SNMP.............................................................................................................................................................173
Getting Machine Information over the Network.........................................................................................174
4

Current Machine Status............................................................................................................................174
Printer configuration..................................................................................................................................176
Understanding the Displayed Information...................................................................................................179
Print Job Information..................................................................................................................................179
Print Log Information.................................................................................................................................179
Configuring the Network Interface Board...............................................................................................180
Message List...................................................................................................................................................186
System Log Information.............................................................................................................................186
5. Registering Addresses and Users for Scanner Functions
Address Book.................................................................................................................................................199
Managing names in the Address Book...................................................................................................202
Sending e-mail by Quick Dial..................................................................................................................202
Sending scanned files to a shared folder directly...................................................................................202
Preventing unauthorized user access to shared folders from the machine...........................................203
Managing users and machine usage......................................................................................................203
Registering Names.........................................................................................................................................204
Registering Names....................................................................................................................................204
Changing a Registered Name.................................................................................................................205
Deleting a Registered Name....................................................................................................................206
Authentication Information............................................................................................................................208
Registering a User Code...........................................................................................................................208
Changing a User Code.............................................................................................................................210
Deleting a User Code...............................................................................................................................211
Displaying the Counter for Each User......................................................................................................213
Printing the Counter for Each User...........................................................................................................213
Printing the Counter for All Users.............................................................................................................214
Clearing the Number of Prints..................................................................................................................215
E-mail Destination..........................................................................................................................................217
Registering an E-mail Destination.............................................................................................................217
Changing an E-mail Destination..............................................................................................................218
Deleting an E-mail Destination.................................................................................................................220
Registering Folders........................................................................................................................................221
Registering an SMB Folder.......................................................................................................................221
5

Changing an SMB Folder.........................................................................................................................225
Deleting an SMB Registered Folder.........................................................................................................226
Registering an FTP Folder.........................................................................................................................227
Changing an FTP Folder...........................................................................................................................230
Deleting an FTP Folder..............................................................................................................................231
Registering an NCP Folder.......................................................................................................................232
Changing an NCP Registered Folder......................................................................................................236
Deleting an NCP Folder............................................................................................................................237
Registering Names to a Group.....................................................................................................................239
Registering a Group..................................................................................................................................239
Registering Names to a Group................................................................................................................240
Adding a Group to Another Group.........................................................................................................242
Displaying Names Registered in a Group..............................................................................................243
Removing a Name from a Group............................................................................................................244
Deleting a Group Within Another Group................................................................................................245
Changing a Group Name........................................................................................................................246
Deleting a Group......................................................................................................................................247
Registering a Protection Code......................................................................................................................249
Registering a Protection Code to a Single User......................................................................................249
Registering a Protection Code to a Group User.....................................................................................250
Registering SMTP and LDAP Authentication................................................................................................252
SMTP Authentication.................................................................................................................................252
LDAP Authentication..................................................................................................................................253
6. Special Operations under Windows
Printing Files Directly from Windows............................................................................................................257
Setup...........................................................................................................................................................257
Using a Host Name Instead of an IPv4 Address....................................................................................257
Printing Commands...................................................................................................................................258
7. Appendix
When Using Windows Terminal Service/Citrix Presentation Server/Citrix XenApp..............................261
Operating Environment.............................................................................................................................261
Supported Printer Drivers..........................................................................................................................261
Limitations...................................................................................................................................................261
6

Using DHCP...................................................................................................................................................263
Using AutoNet...........................................................................................................................................263
Configuring the WINS Server......................................................................................................................264
Using Web Image Monitor......................................................................................................................264
Using telnet................................................................................................................................................265
Using the Dynamic DNS Function................................................................................................................266
Updating....................................................................................................................................................266
DNS servers targeted for operation........................................................................................................267
DHCPv4 servers targeted for operation..................................................................................................267
Setting the dynamic DNS function...........................................................................................................267
Precautions.....................................................................................................................................................269
Connecting a Dial-Up Router to a Network............................................................................................269
NetWare Printing......................................................................................................................................270
When the IEEE 802.11 Interface Unit is Installed.......................................................................................272
Configuring IEEE 802.1X..............................................................................................................................273
Installing a Site Certificate........................................................................................................................273
Installing Device Certificate......................................................................................................................273
Enabling SSL..............................................................................................................................................274
Setting Items of IEEE 802.1X for Ethernet................................................................................................275
Setting Items of IEEE 802.1X for Wireless LAN......................................................................................277
Specifications.................................................................................................................................................279
Copyrights......................................................................................................................................................281
expat...........................................................................................................................................................281
FreeBSD 4.6.2/netipx..............................................................................................................................281
Heimdal......................................................................................................................................................281
ILU...............................................................................................................................................................282
IPSTM print language emulations.............................................................................................................282
JPEG LIBRARY............................................................................................................................................282
LibTIFF.........................................................................................................................................................283
The m17n library.......................................................................................................................................283
MD4...........................................................................................................................................................284
MD5...........................................................................................................................................................284
nana...........................................................................................................................................................284
7

NetBSD......................................................................................................................................................285
Open LDAP................................................................................................................................................294
Open SSH..................................................................................................................................................295
Open SSL...................................................................................................................................................299
racoon........................................................................................................................................................301
RSA BSAFE®..............................................................................................................................................301
Sablotron (Version 0.82)..........................................................................................................................301
Samba........................................................................................................................................................302
SASL...........................................................................................................................................................307
SPX/IPX......................................................................................................................................................308
TrouSerS.....................................................................................................................................................308
WPA Supplicant........................................................................................................................................312
Trademarks.....................................................................................................................................................313
INDEX...........................................................................................................................................................315
8

Manuals for This Machine
Read this manual carefully before you use this machine.
Refer to the manuals that are relevant to what you want to do with the machine.
• Media differ according to manual.
• The printed and electronic versions of a manual have the same contents.
• Adobe Acrobat Reader/Adobe Reader must be installed in order to view the manuals as PDF files.
• A Web browser must be installed in order to view the html manuals.
About This Machine
Before using the machine, be sure to read the section of this manual entitled Safety Information.
This manual introduces the machine's various functions. It also explains the control panel, preparation
procedures for using the machine, how to enter text, how to install the CD-ROMs provided, and how
to replace paper, toner, and other consumables.
Troubleshooting
Provides a guide for resolving common usage-related problems.
Copy and Document Server Reference
Explains Copier and Document Server functions and operations. Also refer to this manual for
explanations on how to place originals.
Printer Reference
Explains Printer functions and operations.
Scanner Reference
Explains Scanner functions and operations.
Network and System Settings Reference
Explains how to connect the machine to a network, configure and operate the machine in a network
environment, and use the software provided. Also explains how to change User Tools settings and
how to register information in the Address Book.
Security Reference
This manual is for administrators of the machine. It explains security functions that you can use to
prevent unauthorized use of the machine, data tampering, or information leakage. For enhanced
security, we recommend that you first make the following settings:
• Install the Device Certificate.
• Enable SSL (Secure Sockets Layer) Encryption.
• Change the user name and password of the administrator using Web Image Monitor.
For details, see "Setting Up the Machine", Security Reference.
9

Be sure to read this manual when setting the enhanced security functions, or user and administrator
authentication.
VM Card Extended Feature Settings Device Reference
Explains how to set up the extended features settings with the machine.
VM Card Extended Feature Settings Web Reference
Explains how to set up the extended features settings using Web Image Monitor.
Other manuals
• UNIX Supplement
• Quick Reference Copy Guide
• Quick Reference Printer Guide
• Quick Reference Scanner Guide
• Manuals provided are specific to machine types.
• For "UNIX Supplement", please visit our Web site or consult an authorized dealer. This manual
includes descriptions of functions and settings that might not be available on this machine.
• The following software products are referred to using general names:
Product Name General name
ScanRouter EX Professional*1 and ScanRouter EX Enterprise*1 the ScanRouter delivery software
*1 Optional
10

Notice
Important
In no event will the company be liable for direct, indirect, special, incidental, or consequential damages
as a result of handling or operating the machine.
For good copy quality, the manufacturer recommends that you use genuine toner from the manufacturer.
The manufacturer shall not be responsible for any damage or expense that might result from the use of
parts other than genuine parts from the manufacturer with your office products.
11
How to Read This Manual
Symbols
This manual uses the following symbols:
Indicates points to pay attention to when using the machine, and explanations of likely causes of paper
misfeeds, damage to originals, or loss of data. Be sure to read these explanations.
Indicates supplementary explanations of the machine's functions , and instructions on resolving user errors.
This symbol is located at the end of sections. It indicates where you can find further relevant information.
[ ]
Indicates the names of keys on the machine's display or control panels.
(mainly Europe and Asia)
(mainly North America)
Differences in the functions of Region A and Region B models are indicated by two symbols. Read the
information indicated by the symbol that corresponds to the region of the model you are using. For details
about which symbol corresponds to the model you are using, see "Model-Specific Information".
Machine Types
This machine comes in several models which vary in copy/print speed.
(mainly Europe and Asia)
Type 1 Type 2
Copy/print speed
2 sheets/minute(A0(E) )
4 sheets/minute(A1(D) )
(mainly North America)
3 sheets/minute(A0(E) )
Copy/print speed
6 sheets/minute(A1(D) )
3 sheets/minute(A0(E) )
6 sheets/minute(A1(D) )
12

Names of Major Items
Major items of this machine are referred to as follows in this manual:
• Roll Feeder Type 3601A Paper roll tray 1
• Roll Feeder Type 3601B Paper roll tray 2
• Paper Cassette Type 240 Cut paper tray
• Table Type 240 Table
Notes
Contents of this manual are subject to change without prior notice.
Some illustrations in this manual might be slightly different from the machine.
Certain options might not be available in some countries. For details, please contact your local dealer.
Depending on which country you are in, certain units may be optional. For details, please contact your
local dealer.
About IP Address
In this manual, "IP address" covers both IPv4 and IPv6 environments. Read the instructions that are relevant
to the environment you are using.
13

Laws and Regulations
Legal Prohibition
Do not copy or print any item for which reproduction is prohibited by law.
Copying or printing the following items is generally prohibited by local law:
bank notes, revenue stamps, bonds, stock certificates, bank drafts, checks, passports, driver's licenses.
The preceding list is meant as a guide only and is not inclusive. We assume no responsibility for its
completeness or accuracy. If you have any questions concerning the legality of copying or printing certain
items, consult with your legal advisor.
14
Model-Specific Information
CBB013
This section explains how you can identify the region your machine belongs to.
There is a label on the rear of the machine, located in the position shown below. The label contains details
that identify the region your machine belongs to. Read the label.
The following information is region-specific. Read the information under the symbol that corresponds to the
region of your machine.
(mainly Europe and Asia)
If the label contains the following, your machine is a region A model:
• CODE XXXX -27
• 220-240V
(mainly North America)
If the label contains the following, your machine is a region B model:
• CODE XXXX -17
• 120V
• Dimensions in this manual are given in two units of measure: metric and inch. If your machine is a
Region A model, refer to the metric units. If your machine is a Region B model, refer to the inch units.
15
Display Panel
CBB004
The display panel shows machine status, error messages, and function menus.
The function items displayed serve as selector keys. You can select or specify an item by lightly pressing it.
When you select or specify an item on the display panel, it is highlighted like . Keys appearing
as cannot be used.
To display the following screen, press the [User Tools/Counter] key to display the User Tools menu, and
then press [System Settings].
Using the System Settings menu screen as an example, this section explains how to use the machine's
display panel.
1. The menu tabs for various settings appear. To display the setting you want to specify or change, press
the appropriate menu tab.
2. A list of settings appears. To specify or change a setting, press the appropriate key in the list.
3. Press this to quit the User Tools menu.
16
Accessing User Tools
CBB015
This section describes how to access User Tools menu.
User Tools allow you to change or set defaults.
• Operations for system settings differ from normal operations. Always quit User Tools when you have
finished.
• Any changes you make with User Tools remain in effect even if the main power switch or operation
switch is turned off, or the [Energy Saver] or [Clear Modes] key is pressed.
Changing Default Settings
This section describes how to change the settings of User Tools.
• If Administrator Authentication Management is specified, contact your administrator.
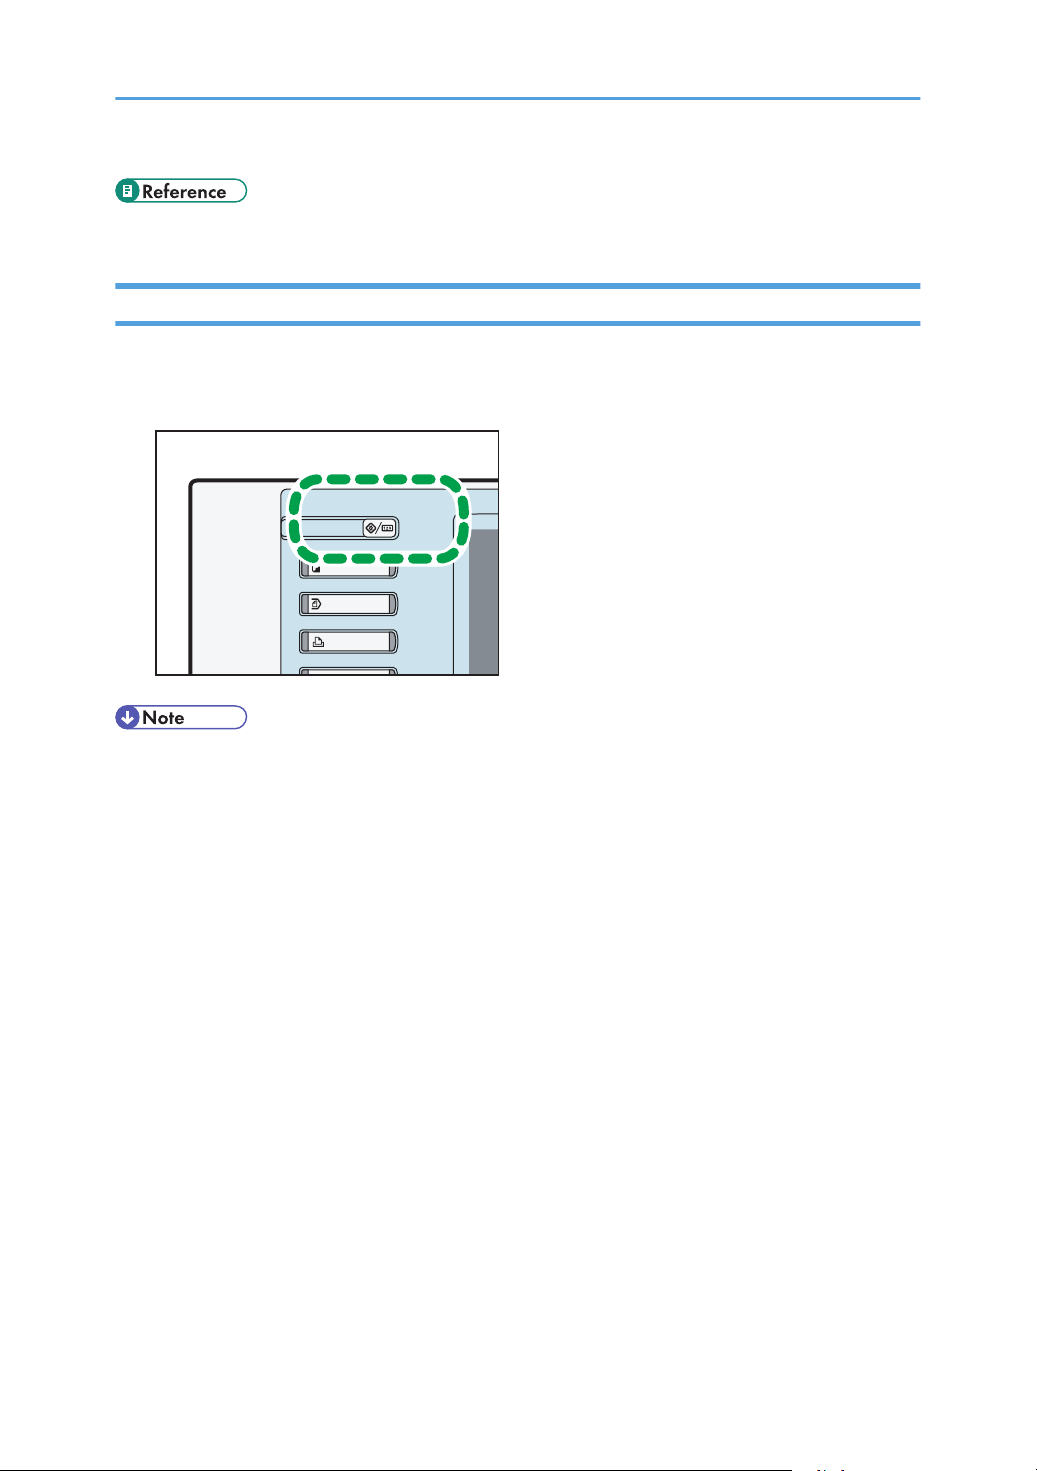
1. Press the [User Tools/Counter] key.
2. Press [System Settings].
3. Select the user tool you want to change.
4. Change settings by following instructions on the display, and then press [OK].
• To cancel changes made to settings and return to the initial display, press the [User Tools/Counter]
key.
• For details about specifying System Settings, see "System Settings".
• For details about changing the language, see "Changing the Display Language", About This Machine.
• For details about checking inquiry and counter, see "Remarks", About This Machine.
17
• p.19 "System Settings"
CBB015
Quitting User Tools
This section describes how to quit the settings of User Tools.
1. Press the [User Tools/Counter] key.
• You can also quit User Tools by pressing [Exit].
18

1. System Settings
1
This chapter describes user tools in the System Settings menu.
General Features
This section describes the user tools in the General Features menu under System Settings.
Program / Change / Delete User Text
You can register text phrases you often use when specifying settings, such as ".com" and "Regards".
You can register up to 40 entries.
• Program / Change
1. Press the [User Tools/Counter] key.
2. Press [System Settings].
3. Check that [General Features] is selected.
4. Press [Program / Change / Delete User Text].
5. Check that [Program / Change] is selected.
6. Select the user text you want to change.
To program new user text, press [*Not Programmed].
7. Enter the user text, and then press [OK].
Enter the user text using up to 80 characters.
8. Press [Exit].
9. Press the [User Tools/Counter] key.
• Delete
1. Press the [User Tools/Counter] key.
2. Press [System Settings].
3. Check that [General Features] is selected.
4. Press [Program / Change / Delete User Text].
5. Press [Delete].
6. Select the user text you want to delete.
7. Press [Yes].
8. Press [Exit].
9. Press the [User Tools/Counter] key.
Panel Key Sound
The beeper (key tone) sounds when a key is pressed.
19

1. System Settings
1
Default: [Medium]
Warm-up Beeper (copier/Document Server)
You can have the beeper sound when the machine becomes ready to copy after leaving Energy Saver
mode, or when the power is turned on.
Default: [On]
If the Panel Key Sound setting is [Off], the beeper does not sound, whatever the Warm-up Beeper
Notice setting.
Copy Count Display (copier/Document Server)
The copy counter can be set to show the number of copies made (count up) the number of copies yet
to be made (count down).
Default: [Up]
Function Priority
Specify the mode to be displayed immediately after the operation switch turned on, or when System
Reset mode is turned on.
Default: [Copier]
Print Priority
Print Priority is given to the mode selected.
Default: [Display Mode]
When [Interleave] is selected, the current print job will be interrupted after maximum of five sheets.
Function Reset Timer
You can set the length of time the machine waits before changing modes when using the multi-access
function.
This is useful if you are making many copies and have to change settings each copy. If you set a longer
reset period, you can prevent interruption from other functions.
Default: [Set Time], [3 second(s)]
When you select [Set Time], enter the time (3-30 seconds, in 1 second increments) using the number
keys.
The Function Reset Timer setting is ignored if [Interleave] or [Job Order] is set for Print Priority.
Output: Printer
Specify a tray to which documents are delivered.
Default: [Upper Paper Exit]
Key Repeat
You can enable or disable repetition of an operation if a key on the screen or control panel is pressed
continuously.
Default: [Normal]
20

CBB001
General Features
1
System Status/Job List Display Time
Specify how long to display the System Status and Job List display for.
Default: [On], [15 second(s)]
By selecting [On], you can specify a display time between 10 and 999 seconds.
Interleave Print
You can set the timing for changing modes when [Print Priority] has been set [Interleave].
Default: [10 sheet(s)]
You can set the number from 1 to 20 sheets using the number keys.
Feed Start Method
Specify whether feeding starts automatically or after pressing the [Start] Key.
Default: [Auto]
Original Feed Delay 2
Specify the duration of the pause immediately after originals are first fed into the machine. If originals
frequently feed in slanted, or you are using special originals, set the delay accordingly.
Default: [1 second(s)]
The time can be set from 1 to 5 seconds.
Original Feed Delay 1
Specify the duration of delay before an original is fed into the machine after being set. If originals
frequently feed in slanted, or you are using special originals, set the delay accordingly.
Default: [1 second(s)]
The time can be set from 0 to 5 seconds.
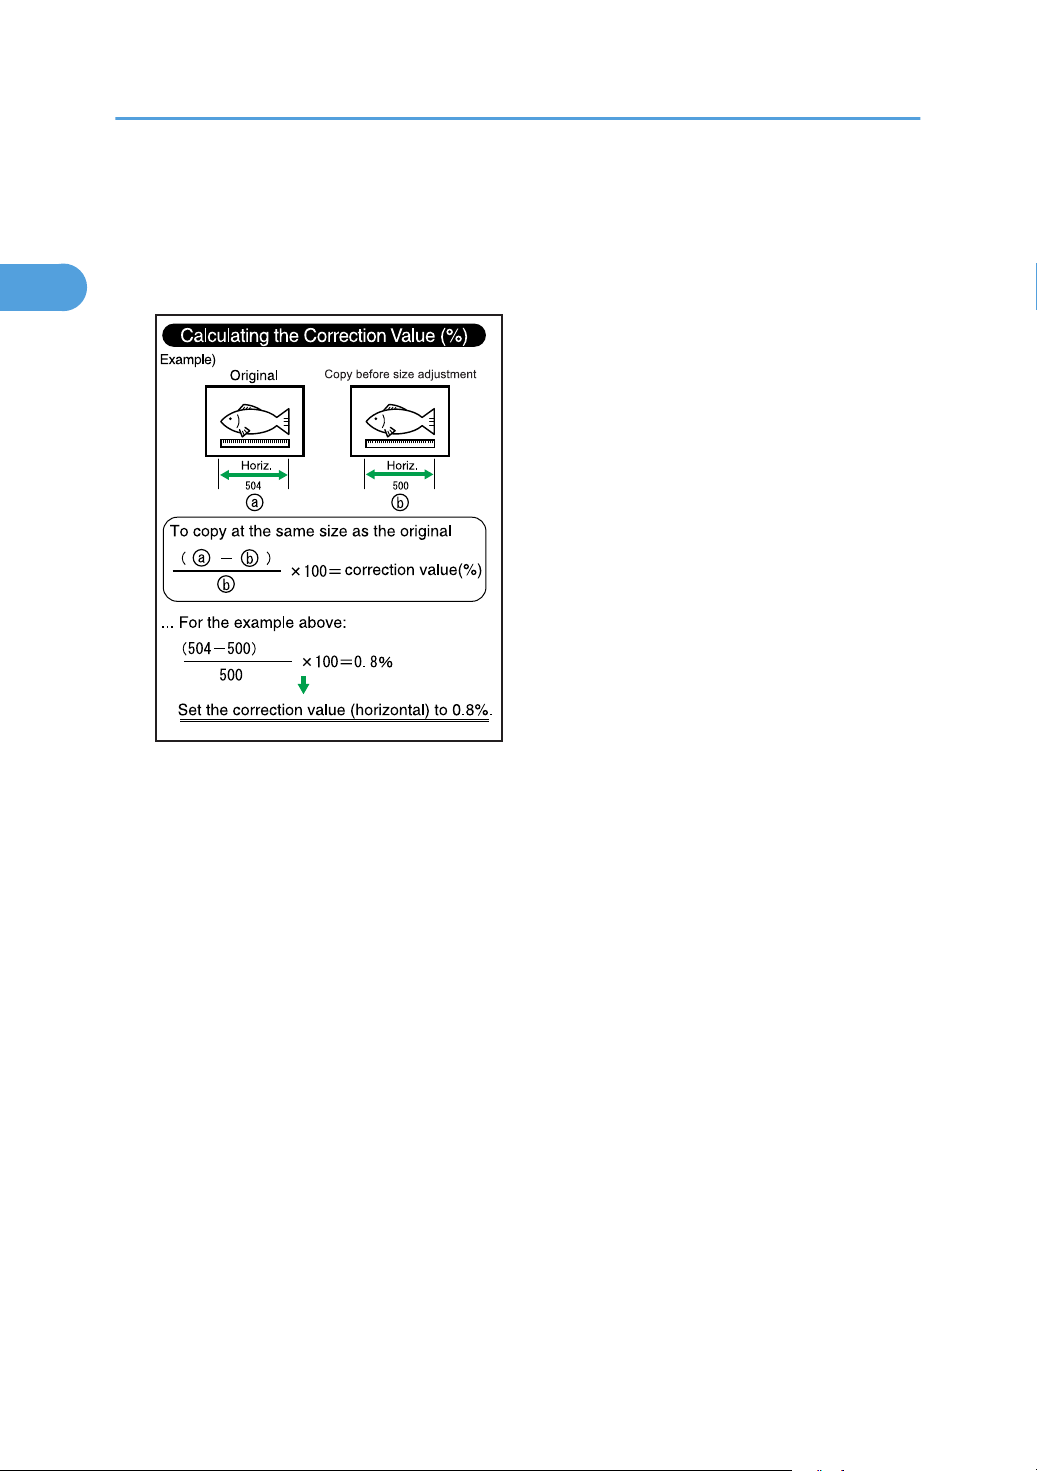
Fine Ratio Adjustment: Copier
Depending on paper type, environment, and humidity, copy paper can expand or shrink slightly. This
means that the size of the copy and the original do not match. if this happens, specify the vertical and
horizontal correction ratio. You can specify this setting for each paper type (plain, translucent, film
and recycled paper).
21
CBB002
1. System Settings
1
Default for Vertical: [0.0%] / Horizontal: [0.0%].
Specify the ratio between -1.0% and 1.0% (in 0.1% increments)
To set the Fine Ratio setting, measure the length of the original and the copy image to calculate the
ratio.
Fine Ratio Adjustment: Printer
Specify the fine ratio when the optional printer is installed. Depending on paper type, environment,
and humidity, copy paper can expand or shrink slightly. This means that the size of the copy and the
original do not match.
When the horizontal ratios are almost the same and there are differences between the vertical ratios,
you can specify the vertical correction ratio. You can make this setting for each paper type (plain,
translucent, film and recycled paper).
Default: [0.0%]
Specify the ratio between -1.0% and 1.0% (in 0.1% increments).
For details about how to set the fine ratio, see "Fine Ratio Adjustment: Copier".
Adjust Scan Position
You can adjust the position of the scan area.
Default: [0]
Specify the scan position between -10 and +10 (in 1 increments).
Preview Area Settings
Specify the default settings of preview area, area size, and orientation for previewing stored document
at the control panel.
22

General Features
1
This setting is effective when a preview of an enter image cannot be displayed due to document size.
Default for Area: [ ]
Default for Area Size: [Small]
Default for Landscape/Portrait: [ ]
Print Image Priority
You can prioritize either lines or gradation in printed images.
Default: [Thin Lines]
• For details on how to access System Settings, see "Accessing User Tools".
• p.17 "Accessing User Tools"
23

1. System Settings
1
Tray Paper Settings
This section describes the user tools in the Tray Paper Settings menu under System Settings.
• If the specified paper size differs from the actual size of the paper loaded in the paper tray, a misfeed
might occur because the correct paper size was not detected.
Paper Tray Priority: Copier (copier/Document Server)
Specify the tray to supply paper for output.
Default: [Tray 1]
When optional cut paper tray is installed, the default setting will be the cut paper tray.
When optional paper roll tray or optional cut paper tray is installed, [Tray 2] is displayed.
When optional two paper rolls tray and cut paper tray are installed, [Tray 3] is displayed.
Paper Tray Priority: Printer
Specify the tray to supply paper for output.
Default: [Tray 1]
When optional paper roll tray or optional cut paper tray is installed, [Tray 2] is displayed.
When optional two paper rolls tray and cut paper tray are installed, [Tray 3] is displayed.
Tray Paper Size: Tray 1
Select the size of the paper loaded in the paper tray.
• A Series:
A0 Width (841 mm), A1 Width (594 mm), A2 Width (420 mm), A3 Width (297 mm), A4 Width
(210 mm)
• JIS B Series:
B1 JIS Width (728 mm), B2 JIS Width (515 mm), B3 JIS Width (364 mm), B4 JIS Width (257
mm)
• Others:
880 mm, 800 mm, 707 mm, 680mm, 660 mm, 625mm, 620mm, 490mm, 440 mm
• Engineering:
34 inch, 22 inch, 17 inch, 11 inch, 81/2 inch
• Architecture:
36 inch / 914 mm, 24 inch, 18 inch, 12 inch, 9 inch
• Others:
30 inch
Default:
24

(mainly Europe and Asia)
1
[A0 Width (841 mm)]
(mainly North America)
[36 inch / 914 mm]
Tray Paper Size: Tray 2
Select the size of the paper loaded in the paper tray.
• When two paper rolls tray is installed
• A Series:
A0 Width (841 mm), A1 Width (594 mm), A2 Width (420 mm), A3 Width (297 mm), A4
Width (210 mm)
• JIS B Series:
B1 JIS Width (728 mm), B2 JIS Width (515 mm), B3 JIS Width (364 mm), B4 JIS Width
(257 mm)
• Others:
880 mm, 800 mm, 707 mm, 680mm, 660 mm, 625 mm, 620 mm, 490mm, 440 mm
Tray Paper Settings
• Engineering:
34 inch, 22 inch, 17 inch, 11 inch, 81/2 inch
• Architecture:
36 inch/914 mm, 24 inch, 18 inch, 12 inch, 9 inch
• Others:
30 inch
Default:
(mainly Europe and Asia)
[A0 Width (841 mm)]
(mainly North America)
[36 inch / 914 mm]
• When paper roll tray and cut paper tray are installed
A3 , A4 , B4 JIS , 12 × 18 , 11 × 17 , 81/2 × 14 , 81/2 × 13 , 81/2 × 11
Default:
(mainly Europe and Asia)
[A3 ]
(mainly North America)
[12 × 18 ]
25

1. System Settings
1
Tray Paper Size: Tray 3
Select the size of the paper loaded in the paper tray.
A3 , A4 , B4 JIS , 12 × 18 , 11 × 17 , 81/2 × 14 , 81/2 × 13 , 81/2 × 11
Default:
(mainly Europe and Asia)
[A3 ]
(mainly North America)
[12 × 18 ]
Printer Bypass Paper Size
Specify the size of the paper in the paper bypass when printing data from the computer.
A0 , B1 JIS , A1 , A1 , B2 JIS , B2 JIS , A2 , A2 , B3 JIS , B3 JIS , A3 , A3 , B4 JIS
, B4 JIS , A4
36 × 48 , 34 × 44 , 30 × 42 , 24 × 36 , 24 × 36 , 22 × 34 , 22 × 34 , 18 × 24 , 18 ×
24 , 17 × 22 , 17 × 22 , 12 × 18 , 12 × 18 , 11 × 17 , 11 × 17 , 9 × 12 , 81/2 × 14
, 81/2 × 11 , Custom Size
You can specify a custom size of between 257.0 - 2000.0 mm (10.12 - 78.74) vertically, and
between 210.0 - 914.4 mm (8.27 - 36.00) horizontally.
Paper Type: Bypass Tray
Sets the display so you can see what type of paper is loaded in the paper bypass.
• The paper types you can set for the paper bypass are as follows:
Do not Display, Recycled Paper, Translucent Paper, Film
Default: [Do not Display]
Paper Type: Tray 1-3
Sets the display so you can see what type of paper is loaded in each paper tray. The print function
uses this information to automatically select the paper tray.
• The paper types you can set for the paper bypass are as follows:
Do not Display, Recycled Paper, Translucent Paper, Film
Default for Paper Type: [Do not Display]
Default for Apply Auto Paper Select: [Yes]
A mark appears next to the paper tray if [No] is selected in "Apply Auto Paper Select".
When cut paper tray is installed, you cannot select [Translucent Paper] and [Film].
"Apply Auto Paper Select" can only be selected for the copier function if [Do not Display] and
[Recycled Paper] are selected. If [No] is selected, Auto Paper Select is not valid for the tray.
For details about the relations between possible paper sizes and thickness, see "Recommended Paper
Sizes and Types", About This Machine.
26

Paper Thickness: Paper Tray
1
Specify the thickness of paper loaded in the paper trays.
If the copy image blurs or the translucent paper loosens, changing the paper thickness level may
improve results.
Default for Plain Paper: [3]
Default for Recycled Paper: [3]
Default for Translucent Paper: [2]
Default for Film: [3]
Refer to the chart below when selecting the mode for the paper thickness.
Tray Paper Settings
Thickness
Paper type
1 2 3 4 5
110 g/m
2
90 g/m
2
70 g/m
2
60 g/m
2
51 g/m
2
Plain Paper
Recycled
Paper
Translucent
Paper
Film
(29.3 lb)
110 g/m
(29.3 lb)
70 - 90 g/m
(18.6 - 23.9
lb)
0.07 - 0.095
mm
(2.8 - 3.7 Mil)
2
2
(23.9 lb)
90 g/m
2
(23.9 lb)
70 - 80 g/m
(18.6 - 21.3
lb)
0.07 - 0.095
mm
(2.8 - 3.7 Mil)
(18.6 lb)
70 g/m
(18.6 lb)
2
70 - 80 g/m
(18.6 - 21.3
lb)
0.07 - 0.095
mm
(2.8 - 3.7 Mil)
(15.9 lb)
2
60 g/m
2
(15.9 lb)
2
51 - 70 g/m
(13.9 - 18.6
lb)
(13.9 lb)
51 g/m
(13.9 lb)
2
Hemmed
paper
2
0.07 - 0.095
mm
-
(2.8 - 3.7 Mil)
When Plain Paper is used for printing in a low-temperature environment (temperature 10 °C, humidity
15%), change the thickness level from 3 to 2.
If the paper becomes loose when [Translucent Paper] is selected with a thickness level of 2, change
the thickness level to 1.
These settings do not apply for hemmed paper.
Depending on paper type, operating conditions (low temperature and humidity), and paper feeding
settings (multiple copies on paper of 542 mm, 22 in width or less), toner fusing conditions vary. To
improve toner fusing, change the thickness level to 3 2 1.
When using thin, soft, or limp paper, toner fusing may appear wrinkled or the image may be blurred.
If this happens, change the thickness level to 3 4 5.
When level 1 or 2 are selected for translucent paper, and you change the paper type from plain or
film to translucent, it may take longer for the machine to get ready for copying (up to two minutes).
27
1. System Settings
1
When level 1 or 2 are selected for translucent paper, and you make copies on paper of size A1 or
above continuously, the interval between each copying may take longer. Even if you make copy on
one sheet only, it may takes 1 minute until the next copy job starts.
Paper Thickness: Paper Bypass
Specify the thickness of paper placed in the paper bypass.
If the copy image blurs or the translucent paper becomes loose, changing the paper thickness level
may improve the situation.
Default for Plain Paper: [3]
Default for Recycled Paper: [3]
Default for Translucent Paper: [2]
Default for Film: [3]
For information on the available settings, see the table titled "Paper Thickness: Paper Tray".
Paper Volume
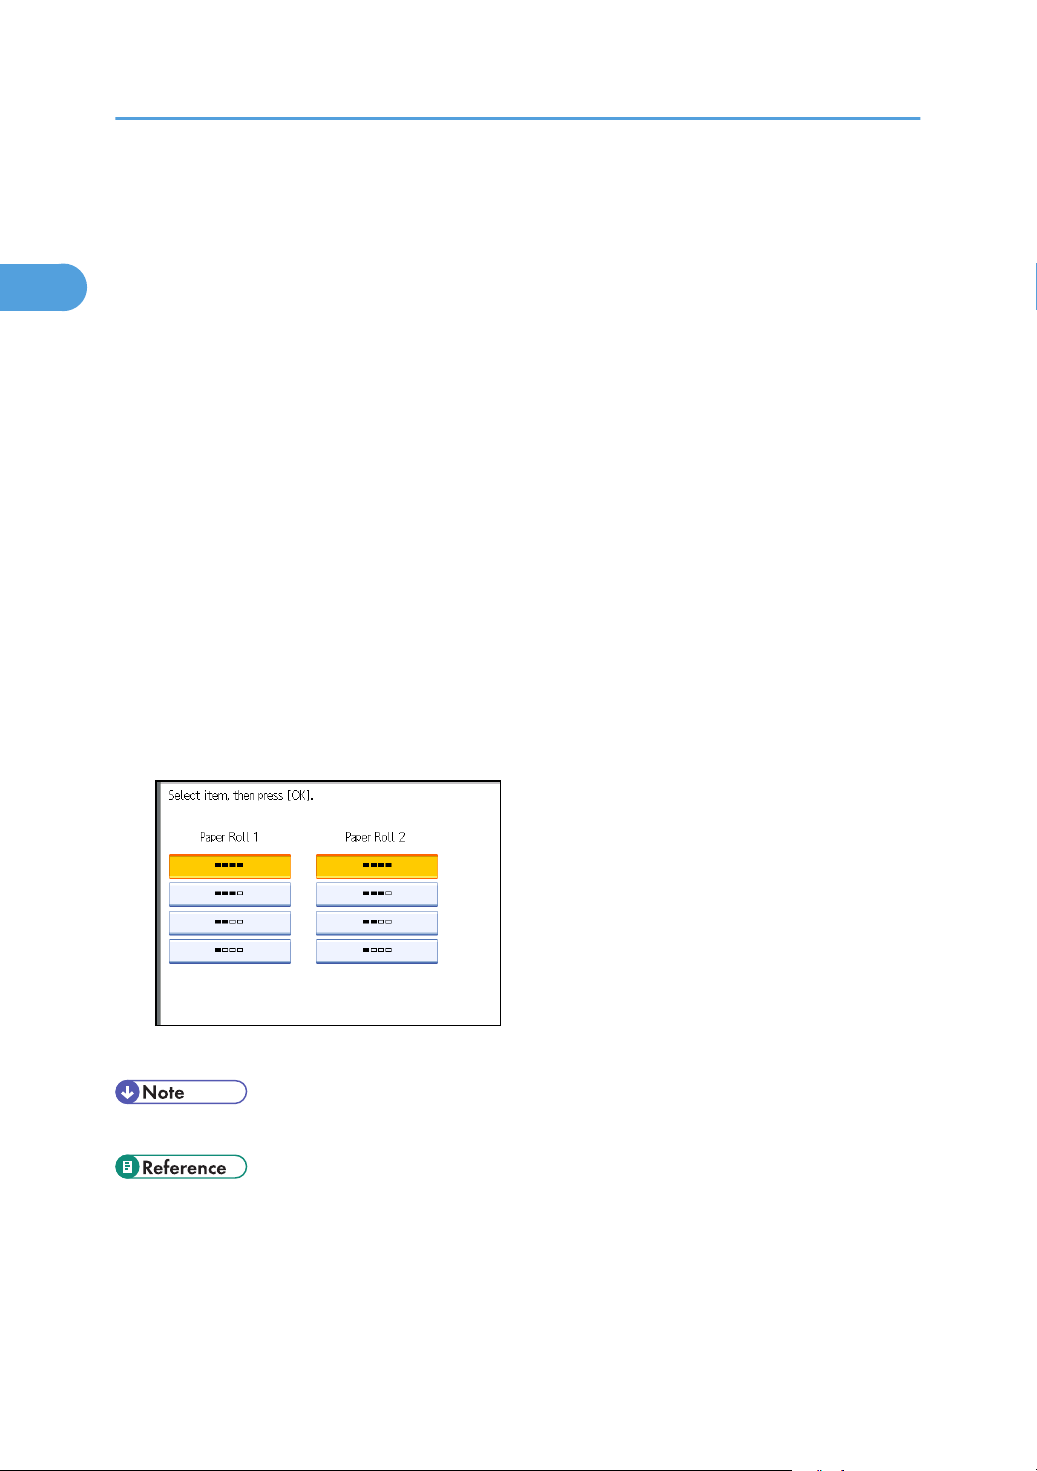
Specify the initial remaining volume of roll paper to be displayed for each paper tray.
The system monitors the amount of paper used, and automatically determines the remaining volume,
based on the specified initial remaining volume.
We recommend that you specify an appropriate remaining volume each time a paper tray is loaded.
Select "New (Full)" when a paper tray is loaded with a new 150 m roll of paper.
Default: [New (Full)]
• For details on how to access System Settings, see "Accessing User Tools".
• p.17 "Accessing User Tools"
28
 Loading...