

Page 1

Operating Manual
The serial number may be found on the bottom of the camera.
Before You Begin
Read this section before use.
It covers the names of the parts and how to prepare the camera for use.
First Steps
Read this section before using your camera for the first time.
It covers the basic operations for using your camera for the first time, including how to turn on the camera, take pictures, and play back images.
Advanced Operations
Read this section when you want to learn more about the different
camera functions.
It covers all shooting and playback functions and describes how to customize
the camera settings and use it with a computer.
Page 2

Checking the Contents of the Package
Before using your digital camera, confirm that the package contains the
items listed below.
GR II Hot shoe cover
(attached to camera)
g
USB cable
g
Hand strap
g
CD‑ROM
Power plug
g
Operating Manual (this manual)
Rechargeable
battery
(DB‑65)
USB power
adapter
(AC‑U1)
User Registration
Thank you for purchasing a RICOH IMAGING product.
In order to provide you with the best customer support and service experience for the product you have purchased, we ask you to complete the user
registration.
Visit the following Web site to complete the user registration.
http://www.ricoh-imaging.com/registration/
Registered users will be notified by e-mail about important customer support information, such as firmware version updates, etc.
Page 3

Introduction
This Operating Manual provides information on how to use the shooting and playback
functions of this camera and related precautions.
Thoroughly read this Operating Manual to make the best use of the functions available
with this camera. Be sure to keep this Operating Manual for future reference.
Safety precautions Read all safety precautions thoroughly to ensure safe use.
Test shots Take test shots to ensure that the camera is working properly be-
Copyright Reproduction or alteration of copyrighted documents, magazines,
Exemption from liability RICOH IMAGING COMPANY assumes no liability for failure to record
Radio interference Operating this camera in the vicinity of other electronic equipment
This publication may not be reproduced in whole or in part without RICOH IMAGING COMPANY’s express written
permission.
© RICOH IMAGING COMPANY, LTD. 2015
RICOH IMAGING COMPANY reserves the right to change the contents of this manual at any time without prior
notice.
Every effort has been made to ensure the accuracy of the information in this manual. Should you nevertheless
notice any errors or omissions, we would be grateful if you would notify us at the address listed on the back cover
of this manual.
fore taking photos on important occasions.
and other materials, other than for personal, home, or other similarly limited purposes, without the consent of the copyright holder,
is prohibited.
or display images as a result of product malfunction.
may adversely affect both the camera and the other device. Interference is particularly likely if the camera is used in close proximity
to a radio/TV receiver. In such case, take the following measures.
• Keep the camera as far away as possible from the radio/TV receiver.
• Reorient the antenna of the radio/TV receiver.
• Use a different wall outlet.
RICOH IMAGING COMPANY, LTD.
1
Page 4

About the Wireless LAN Function
• Do not use the camera in a place where electrical products, AV/OA devices, and so on generate magnetic fields
and electromagnetic waves.
• If the camera is affected by magnetic fields and electromagnetic waves, it may not be able to communicate.
• If the camera is used near a TV or a radio, poor reception or TV screen glitch may occur.
• If there are multiple wireless LAN access points near the camera and the same channel is used, search operation
may not be executed correctly.
• The security of your data stored, sent or received is your own responsibility.
In the frequency band used by the camera, along with industrial, scientific, and medical devices such as a microwave oven, premises radio stations (wireless stations requiring license) and specified low power radio stations
(wireless stations not requiring license) for mobile object identification used in factory production lines, etc., and
amateur radio stations (wireless stations requiring license) are operated.
1. Before using the camera, confirm that premises radio stations and specified low power radio stations for
mobile object identification and amateur radio stations are not operated in the vicinity.
2. I n the event that the camera causes harmful radio wave interference to premises radio stations for mobile
object identification, immediately change the frequency being used to avoid interference.
3. If you have other troubles such that the camera causes harmful radio wave interference to specified low
power radio stations for mobile object identification or to amateur radio stations, contact your nearest service
center.
This camera conforms to the technical standards under the Radio Law and Telecommunications Business Law and
the certification of conformance to technical standards can be displayed on the picture display.
Displaying the Certification Marks -----------------------------------------------------------------------------------------------------------------
The certification marks of conformance to wireless technical standards under the Radio Law and Telecommunications Business Law can be displayed
from [Certification Marks] of the [Setup] menu. Refer to “Setting from the Menus” (p.133) for how to use the menus.
Trademarks
• Microsoft, Windows, Windows 7®, and Windows 8® are registered trademarks of Microsoft Corporation in the
United States of America and other countries.
• Macintosh, Mac OS, and OS X are registered trademarks of Apple Inc. in the United States of America and other
countries.
• IOS is a trademark or registered trademark of Cisco in the U.S. and other countries and is used under license.
• Adobe, the Adobe logo, and Adobe Reader are trademarks or registered trademarks of Adobe Systems Incorporated in the United States of America and other countries.
• This product incorporates DNG technology with the permission of Adobe Systems Incorporated.
The DNG logo is a trademark or registered trademark of Adobe Systems Incorporated in the United States of
America and other countries.
• The SDXC logo is a trademark of SD-3C, LLC.
• HDMI, the HDMI logo, and High-Definition Multimedia Interface are trademarks or registered trademarks of HDMI
licensing, LLC in the United States and/or other countries.
• SILKYPIX is a registered trademark of Ichikawa Soft Laboratory.
• Google, Google Play, and Android are trademarks or registered trademarks of Google Inc.
• Wi-Fi is a registered trademark of Wi-Fi Alliance.
• The N-Mark is a trademark or registered trademark of NFC Forum, Inc. in the United States and in other countries.
• Facebook is a registered trademark of Facebook, Inc.
• Twitter is a registered trademark of Twitter, Inc.
• Tumblr is a registered trademark of Tumblr, Inc.
All other trade names mentioned in this manual are the property of their respective owners.
AVC Patent Portfolio License
This product is licensed under the AVC Patent Portfolio License for the personal use of a consumer or other uses in
which it does not receive remuneration to (i) encode video in compliance with the AVC standard (“AVC video”) and/
or (ii) decode AVC video that was encoded by a consumer engaged in a personal activity and/or was obtained from
a video provider licensed to provide AVC video.
No license is granted or shall be implied for any other use.
Additional information may be obtained from MPEG LA, L.L.C.
See http://www.mpegla.com.
2
Page 5

Announcement on the Use of BSD‑Licensed Software
This product includes software licensed under the BSD License. BSD license is a form of license which permits the
redistribution of the software provided that it is clearly stated that use is unwarranted, and a copyright notice and
a list of licensing conditions are provided. The following contents are displayed based on the abovementioned
licensing conditions and are not for the purpose of restricting your use of the product, etc.
Tera Term
Copyright (c) T.Teranishi.
Copyright (c) TeraTerm Project.
All rights reserved.
Redistribution and use in source and binary forms, with or without modification, are permitted provided that the
following conditions are met:
1. Redistributions of source code must retain the above copyright notice, this list of conditions and the following
disclaimer.
2. Redistributions in binary form must reproduce the above copyright notice, this list of conditions and the follow-
ing disclaimer in the documentation and/or other materials provided with the distribution.
3. The name of the author may not be used to endorse or promote products derived from this software without
specific prior written permission.
THIS SOFTWARE IS PROVIDED BY THE AUTHOR “AS IS” AND ANY EXPRESS OR IMPLIED WARRANTIES, INCLUDING,
BUT NOT LIMITED TO, THE IMPLIED WARRANTIES OF MERCHANTABILITY AND FITNESS FOR A PARTICULAR PURPOSE
ARE DISCLAIMED. IN NO EVENT SHALL THE AUTHOR BE LIABLE FOR ANY DIRECT, INDIREC T, INCIDENTAL, SPECIAL,
EXEMPLARY, OR CONSEQUENTIAL DAMAGES (INCLUDING, BUT NOT LIMITED TO, PROCUREMENT OF SUBSTITUTE
GOODS OR SERVICES; LOSS OF USE, DATA, OR PROFITS; OR BUSINESS INTERRUPTION) HOWEVER CAUSED AND
ON ANY THEORY OF LIABILITY, WHETHER IN CONTRACT, STRICT LIABILITY, OR TORT (INCLUDING NEGLIGENCE OR
OTHERWISE) ARISING IN ANY WAY OUT OF THE USE OF THIS SOFTWARE, EVEN IF ADVISED OF THE POSSIBILITY OF
SUCH DAMAGE.
3
Page 6
Safety Precautions
Warning Symbols
Various symbols are used throughout this Operating Manual and on the product to
prevent physical harm to you or other people and damage to property. The symbols
and their meanings are explained below.
Danger
Warning
Caution
Meaning of Symbols
Observe the following precautions to ensure safe use of this camera.
This symbol indicates matters that may lead to imminent risk of
death or serious injury if ignored or incorrectly handled.
This symbol indicates matters that may lead to death or serious injury
if ignored or incorrectly handled.
This symbol indicates matters that may lead to injury or physical
damage if ignored or incorrectly handled.
The symbol alerts you to actions that must be performed.
The symbol alerts you to prohibited actions.
symbol may be combined with other symbols to indicate that a spe-
The
cific action is prohibited.
n
Example:
: Do not touch : Do not disassemble
Danger
n
Do not attempt to disassemble, repair or alter the equipment yourself. The
high-voltage circuitry in the equipment poses significant electrical hazard.
n
Do not attempt to disassemble, alter or directly solder the battery.
n
Do not put the battery in a fire, attempt to heat it, use it in a high tem-
perature environment such as next to a fire or inside a car, or abandon it.
Do not put it into water or the sea or allow it to get wet.
n
Do not attempt to pierce, hit, compress, drop, or subject the battery to any
other severe impact or force.
n
Do not use a battery that is significantly damaged or deformed.
n
Do not connect the positive (+) and negative (-) poles of the battery with a
wire or other metallic item. Also, do not carry or store together with metal
objects such as ballpoint pens and necklaces.
4
Page 7

n
Do not charge the battery with a charger from another manufacturer. Also,
do not use the battery with any camera except the cameras compatible
with the DB-65.
n
Discontinue use immediately in the event of abnormalities such as smoke,
unusual odors, or excessive heat being emitted. Contact your nearest
dealer or service center for repair.
n
If the battery fluid leaks and gets into your eyes, immediately wash your
eyes thoroughly with tap water or other clean water without rubbing, and
seek medical attention immediately.
Warning
n
Turn off the power immediately in the event of abnormalities such as
smoke or unusual odors being emitted. Remove the battery as soon as
possible, being careful to avoid electric shocks or burns. If you are drawing
power from a household electrical outlet, be sure to unplug the power
plug from the outlet to avoid fire or electrical hazards. Contact the nearest
service center at your earliest convenience. Discontinue use of the equipment immediately if it is malfunctioning.
n
Turn off the power immediately if any metallic object, water, liquid or oth-
er foreign object gets into the camera. Remove the battery and memory
card as soon as possible, being careful to avoid electric shocks or burns.
If you are drawing power from a household electrical outlet, be sure to
unplug the power plug from the outlet to avoid fire or electrical hazards.
Contact the nearest service center at your earliest convenience. Discontinue use of the equipment immediately if it is malfunctioning.
n
Avoid any contact with the liquid crystal inside the picture display, should
the monitor be damaged.
below.
• SKIN: If any of the liquid crystal gets on your skin, wipe it off and rinse the
affected area thoroughly with water, then wash well with soap.
• EYES: If it gets in your eyes, wash your eyes with clean water for at least
15 minutes and seek medical advice immediately.
• INGESTION: If any of the liquid crystal is ingested, rinse the mouth out
thoroughly with water. Have the person drink a large amount of water and
induce vomiting. Seek medical assistance immediately.
n
Follow these precautions to prevent the battery from leaking, overheat-
ing, igniting or exploding.
• Do not use a battery other than those specifically recommended for the
equipment.
• Do not carry or store together with metal objects such as ballpoint pens,
necklaces, coins, hairpins, etc.
• Do not put the battery into a microwave or high pressure container.
• If leakage of battery fluid or a strange odor, color change, etc. is noticed
during use or during charging, remove the battery from the camera or battery charger immediately and keep it away from fire.
Follow the appropriate emergency measures
5
Page 8
n
Please observe the following in order to prevent fire, electrical shock or
cracking of the battery while charging.
• Use only the indicated power supply voltage. Also avoid the use of multisocket adapters and extension cords.
• Do not damage, bundle or alter power cords. Also, do not place heavy objects on, stretch or bend power cords.
• Do not connect or disconnect the power plug with wet hands. Always grip
the plug section when disconnecting a power plug.
• Do not cover the equipment while charging.
n
Keep the battery and memory card used in this equipment out of the
reach of children to prevent accidental ingestion. Consumption is harmful
to human beings. If swallowed, seek medical assistance immediately.
n
Keep the equipment out of the reach of children.
n
Do not touch the internal components of the equipment if they become
exposed as a result of being dropped or damaged. The high-voltage circuitry in the equipment could lead to an electric shock. Remove the battery as soon as possible, being careful to avoid electric shocks or burns.
Take the equipment to your nearest dealer or service center if it is damaged.
n
Do not use the equipment in wet areas as this could result in fire or electric
shock.
n
Do not use the equipment near flammable gases, gasoline, benzine, thin-
ner or similar substances to avoid the risk of explosion, fire or burns.
n
Do not use the equipment in locations where usage is restricted or prohib-
ited as this may lead to disasters or accidents.
n
Wipe off any dust that accumulates on the power plug as this may lead to
fire.
n
To avoid the risk of fire, electric shock or product malfunction, do not use
the battery charger with commercially available electronic transformers
when traveling abroad.
n
To avoid the risk of fire or electric shock, use only the indicated power sup-
ply voltage.
n
Do not damage, bundle or alter power cords. Also, to avoid damaging
power cords and the risk of fire or electric shock, do not place heavy objects on, stretch or bend power cords.
6
Page 9
n
Do not connect or disconnect the power plug with wet hands. Both opera-
tions pose the risk of electric shock.
n
Always grip the plug section when disconnecting a power plug. Do not
pull the power cord. This can damage the power cord and result in fire or
electric shock.
n
If any metallic object, water, liquid or other foreign object gets into the
camera, immediately remove the power plug from the outlet and contact
a service center for repair. Failure to observe these precautions could result in fire or electric shock.
n
If an abnormality such as an unusual sound or smoke is emitted from the
equipment, immediately remove the power plug from the outlet and contact your nearest dealer or service center for repair. Discontinue use of the
equipment immediately if it is malfunctioning.
n
Do not attempt to disassemble the equipment yourself. The high-voltage
circuitry in the equipment could lead to an electric shock.
n
Do not use in bathrooms or similar areas, as this can result in fire or electric
shock.
n
Do not touch the power plug during a lightning storm. This poses a risk of
electric shock.
n
Keep the battery out of the reach of children.
n
If the battery does not finish charging after the prescribed charging time,
discontinue charging.
n
Do not put the battery into a microwave or high pressure container.
n
If the batter y leaks or emits an unusual odor, immediately move it away
from any sources of fire.
Caution
n
Contact with fluid leaking from a battery can lead to burns. If part of your
body comes in contact with a damaged battery, rinse the area with water
immediately. (Do not use soap.)
If a battery starts to leak, remove it immediately from the equipment and
wipe the battery chamber thoroughly before replacing it with a new batter y.
n
Plug the power plug securely into the electrical outlets. Loose plug poses
a fire hazard.
n
Do not allow the camera to get wet. In addition, do not operate it with wet
hands. Both situations pose the risk of electric shock.
n
Do not fire the flash at drivers of vehicles, as this may cause the driver to
lose control and result in a traffic accident.
7
Page 10

Safety Precautions
for Accessories
n
Remove the power plug from the outlets before cleaning the equipment.
n
Remove the power plug from the outlets when not in use.
n
Do not cover equipment while charging, as this can result in fire.
n
Do not short the terminals or metal contacts on the power cords, as this
can result in fire.
n
Do not use the equipment in wet areas or areas subject to oil smoke as this
could result in fire or electric shock.
When using optional products, carefully read the instructions provided
with the product before using that product.
8
Page 11

Contents
Introduction ............................................................................................................................ 1
Contents ................................................................................................................................... 9
Before You Begin 13
Parts of the Camera ............................................................................................................14
Using the Dials and Lever ................................................................................................16
Picture Display .....................................................................................................................18
Getting Ready ......................................................................................................................23
First Steps 31
Basic Shooting .....................................................................................................................32
Shooting with Auto Settings ................................................................................32
Self-timer ......................................................................................................................34
Checking the Camera Level and Tilt ...................................................................36
Playing Back Images ..........................................................................................................38
Using the Menu ...................................................................................................................39
Advanced Operations 41
1
Various Shooting Functions 42
Shooting with a Set Exposure ........................................................................................42
Using Exposure Compensation............................................................................48
Setting the ISO Sensitivity ..................................................................................... 49
Dynamic Range Compensation ........................................................................... 51
Selecting a Metering Method ............................................................................... 52
Using the ND Filter ...................................................................................................53
Setting a Picture Format...................................................................................................54
Setting the Focus ................................................................................................................56
Selecting a Focusing Method ...............................................................................56
Shooting Close-ups (Macro Mode) ..................................................................... 59
Using the AF Button .................................................................................................60
Setting Focus Assist and AE/AF Target .............................................................. 63
Shooting with a Single Press of the Shutter Release Button
(Full Press Snap) ....................................................................................................66
9
Page 12

Setting the White Balance ...............................................................................................67
Setting the Color Temperature ............................................................................. 70
Setting the White Balance Manually ..................................................................70
Shooting Continuously .....................................................................................................71
Shooting Continuously ...........................................................................................72
Shooting Continuously with Different Settings (Auto Bracket) ...............73
Shooting While Merging Images Together
(Multiple Exposure Shooting) ..........................................................................74
Shooting Automatically at Set Intervals (Interval Shooting) .....................76
Recording Star Trails (Interval Composite) .......................................................77
Using the Flash ....................................................................................................................79
Setting the Flash Mode ...........................................................................................79
Adjusting the Intensity of the Flash ...................................................................81
Setting the Flash Intensity for Manual Flash ...................................................82
Setting the Timing for Firing the Flash .............................................................. 82
Taking Images with Unique Atmosphere ..................................................................83
Effect ..............................................................................................................................83
Image Settings ........................................................................................................... 88
Changing the Ambient Brightness .....................................................................89
Other Shooting Functions ...............................................................................................90
Adding the Date to Still Images ...........................................................................90
Recording Movies ...............................................................................................................91
Setting the Movie Format ......................................................................................91
Recording Movies .....................................................................................................92
Playing Back Movies .................................................................................................93
Clipping Movies .........................................................................................................94
2
Playback Functions 95
Displaying Images in Thumbnail View ........................................................................ 95
Displaying Images in a Slide Show ...............................................................................95
Displaying Images in Enlarged View ............................................................................96
Organizing Files ...................................................................................................................97
Deleting Files ..............................................................................................................97
Setting Protection .....................................................................................................99
Copying the Images and Movies in the Internal Memory
to a Memory Card ..............................................................................................101
10
Page 13

Correcting and Processing Images .............................................................................102
Reducing the Size of Images ...............................................................................102
Trimming Images ....................................................................................................102
Correcting Skewed Images ..................................................................................103
Correcting Brightness and Contrast (Level Compensation) ....................104
Correcting the White Balance .............................................................................106
Correcting Color Moire .........................................................................................107
Developing RAW Images ...............................................................................................108
Viewing Images with an AV Device ............................................................................110
Setting DPOF ......................................................................................................................112
Setting DPOF for Multiple Still Images ............................................................113
3
Changing Camera Settings 114
Customizing the Camera ...............................................................................................114
Registering Shooting Settings (My Settings) ................................................114
Shooting Images in My Settings Mode ...........................................................117
Editing “My Settings” ..............................................................................................118
Registering Functions to the ADJ. Lever .........................................................120
Registering Functions to the Fn1, Fn2, and Effect Buttons ......................122
Changing Other Settings ...............................................................................................124
Adjusting the Brightness of the Picture Display ..........................................124
Setting the Information Displayed in Shooting Mode ..............................125
Setting the Operation Sounds ...........................................................................126
Setting the File and Folder Names ....................................................................126
Setting the Copyright Notice ..............................................................................129
Checking the Firmware Version .........................................................................129
4
Making Use of Images 130
Using Images on a Computer .......................................................................................130
Saving Images to a Computer ............................................................................131
Operating the Camera with a Communication Device .......................................132
Enabling the Wi-Fi Function ................................................................................132
Operating the Camera with a Communication Device .............................136
Changing the Settings ..........................................................................................143
11
Page 14

5
Menus 145
[Shooting] Menu ...............................................................................................................145
[Playback] Menu ................................................................................................................149
[Key Custom Options] Menu ........................................................................................150
[Setup] Menu ......................................................................................................................152
6
Appendices 155
Trouble Shooting ..............................................................................................................155
Error Messages .........................................................................................................155
Camera Troubleshooting ......................................................................................156
Specifications .....................................................................................................................161
Storage Capacity .....................................................................................................164
Optional Accessories .......................................................................................................166
Conversion Lens, Hood, and Adapter ..............................................................166
External Flash ...........................................................................................................167
Using the Camera Abroad .............................................................................................170
Precautions for Use ..........................................................................................................171
Camera Care and Storage ..............................................................................................173
Warranty Policy ..................................................................................................................174
NOTICES ...............................................................................................................................175
Index ......................................................................................................................................178
12
Page 15

Before You Begin
This section covers the
names of the parts and
how to prepare the
camera for use.
Parts of the Camera ....................... 14
Using the Dials and Lever ............16
Picture Display ............................... 18
Getting Ready ................................ 23
Page 16
1
3
2
4
5 6 78
15
10
11
16
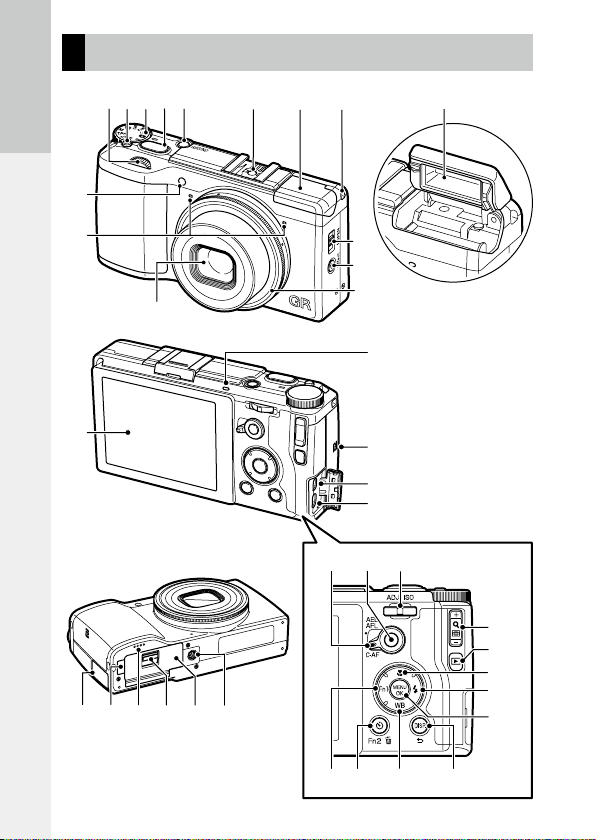
Parts of the Camera
Before You Begin
9
12
13
14
17
18
19
20
27
282429
14
22 23
262521
30
31
34
35
36
37
38
32 33
Page 17

1
Up-down dial ............................................17
2
Mode dial lock release button ...................16
3
Mode dial ..................................................16
4
Shutter release button ..............................32
5
POWER button ..........................................27
6
Hot shoe ..................................................167
7
Flash cover ................................................32
8
Strap eyelet
9
AF auxiliary light ...............................34, 152
10
Microphone
11
Lens
12
F (flash) OPEN switch ..............................32
13
w (Wi-Fi)/Effect button ........ 47, 122, 134
14
Ring cap ..................................................166
15
Flash .........................................................32
16
Picture display...........................................18
17
Autofocus/flash lamp ................................33
18
NFC mark ................................................134
19
USB/AV OUT terminal ................25, 110, 131
20
HDMI micro output terminal (Type D) .....110
21
Terminal cover ...........................25, 110, 131
22
DC power cable cover
23
Speaker
24
Release lever .............................................23
25
Battery/card cover .....................................23
26
Tripod screw hole
27
AF function switching lever .......................60
28
AF button ..................................................60
29
ADJ. lever ..........................................17, 120
30
Fn1 (function 1)/# button .....................122
31
t (self-timer)/Fn2 (function 2)/
D (delete) button ......................34, 97, 122
32
WB (white balance)/" button .................67
33
DISP./r button ........................ 21, 36, 125
34
X/Y (8/9) button ......................95, 96
35
6 (playback) button ..............................38
36
N (macro)/! button ..............................59
37
F (flash)/$ button..................................80
38
MENU/OK button.......................................39
Before You Begin
15
Page 18
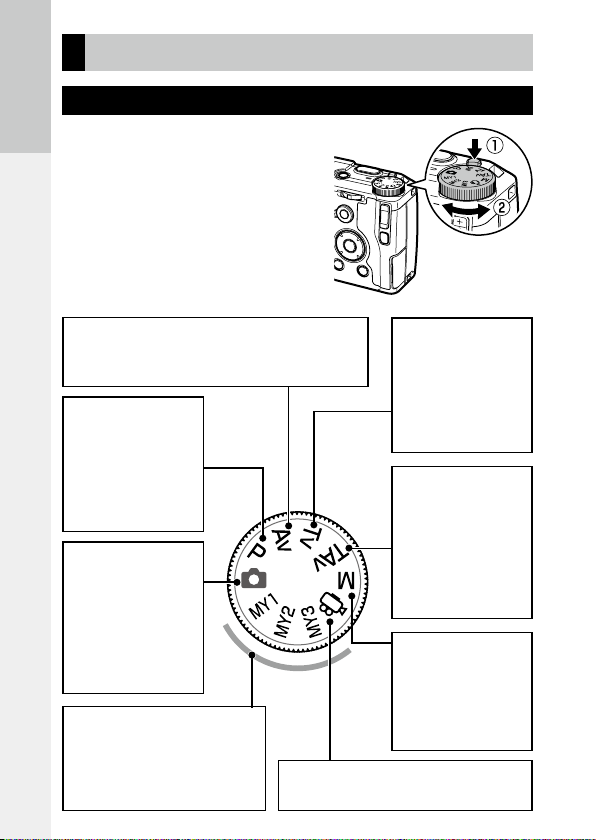
Using the Dials and Lever
Mode Dial
You can change the shooting mode with
the mode dial.
Before You Begin
While pressing the mode dial lock release
button (1), turn the mode dial (2).
Av: Aperture priority mode (p.42)
Allows you to manually set the aperture value. The
camera adjusts the shutter speed automatically.
P: Program shift
mode (p.42)
Allows you to
choose from
combinations of
aperture value and
shutter speed.
5: Auto shooting
mode (p.32)
Automatically
sets the optimal
aperture value
and shutter speed
depending on the
subject.
MY1/MY2/MY3: My Settings
mode (p.117)
Allows you to shoot with the
settings registered to [Reg. My
Settings].
16
Tv: Shutter priority mode (p.42)
Allows you to manually set the shutter
speed. The camera
adjusts the aperture
value automatically.
TAv: Shutter/
Aperture priority
mode (p.42)
Allows you to manually
set the shutter speed
and aperture value. The
camera adjusts the ISO
sensitivity automatically.
M: Manual exposure mode (p.42)
Allows you to
manually set the
aperture value and
shutter speed.
3: Movie mode (p.91)
Allows you to record movies.
Page 19
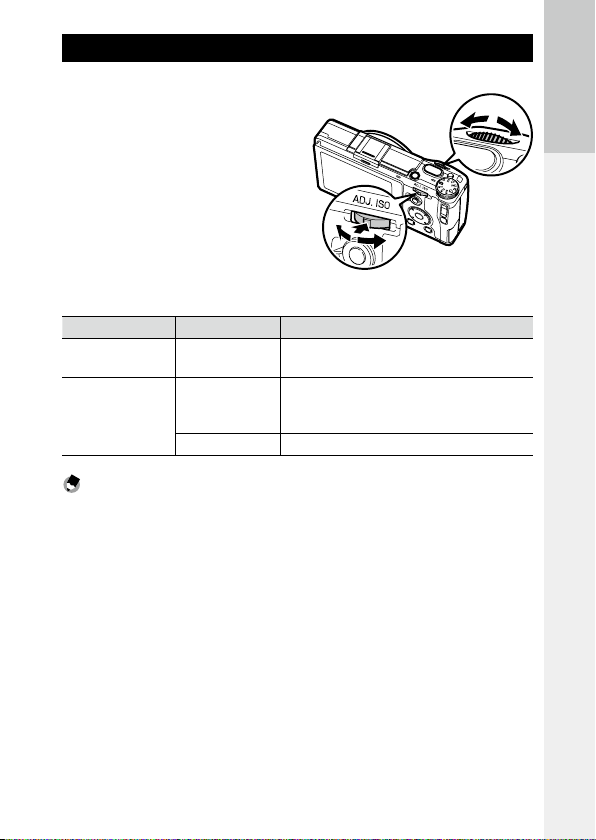
Up-down Dial and ADJ. Lever
Use the up-down dial and ADJ. lever in
place of the !"#$ buttons and to
set the exposure. (p.43)
ADJ. lever
Operation Description
Up-down dial Turn left or right
ADJ. lever
Press left or right
Push in the middle Calls assigned function. (p.121)
Used in place of the !" buttons.
Changes the aperture value and shutter speed.
Used in place of the #$ buttons.
Changes the aperture value, shutter speed, and ISO sensitivity.
Note -----------------------------------------------------------------------------------------------------------
• You can switch the functions of the up- down dial and ADJ. lever. (p.44)
Up-down dial
Before You Begin
17
Page 20
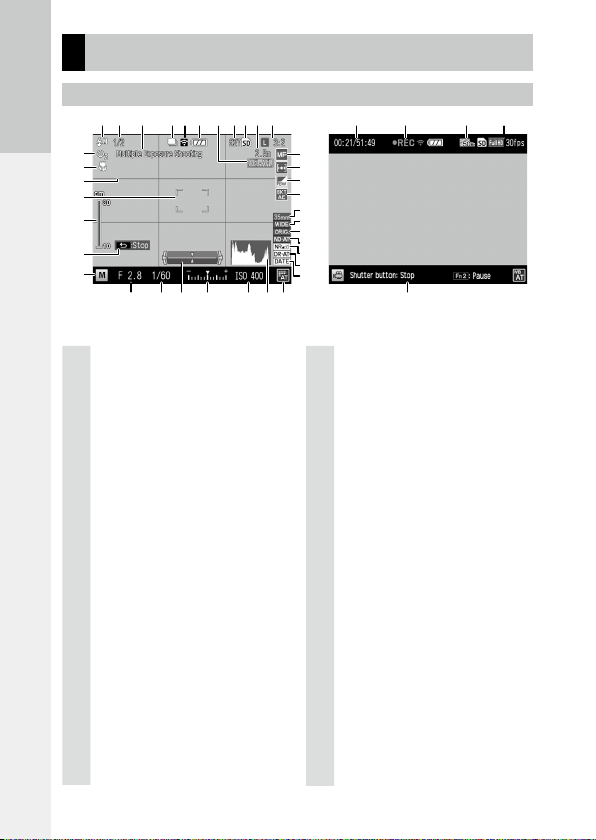
Picture Display
12
1
2 3 4 5 6 7 8 9 11 37 38 39 1110
30 31 32 33 34 35 36 17
13
14
15
16
17
18
Shooting Screen
Before You Begin
Still image mode Movie mode
1
Flash mode................................................79
2
Flash compensation/Manual flash amount
............................................................81, 82
3
Multiple exposure shooting/Interval shoot-
ing/Interval composite. .................74, 76, 77
4
Continuous mode ......................................72
5
Wi-Fi connection .......................................20
6
Battery level ..............................................20
7
Auto exposure lock/Autofocus lock............60
8
Number of storable images .....................164
9
Data storage location ................................24
10
Snap focus distance ...................................58
11
Format and size/Aspect ratio/Frame rate
............................................................54, 91
12
Self-timer ..................................................34
13
Macro mode ..............................................59
14
18
Grid guide .................................................21
15
Focus frame ...............................................33
16
Focus bar/Depth of field ............................58
17
Operation guide
18
Shooting mode .........................................42
19
Focus mode ...............................................56
19
20
21
22
23
24
25
26
27
28
29
20
Exposure metering ....................................52
21
Image setting/Effect .................................83
22
Auto bracket
23
24
25
26
27
28
29
30
31
32
33
..............................................73
Crop ..........................................................55
Conversion lens .......................................166
Ambient brightness [Original] ...................89
ND filter.....................................................53
Noise reduction .........................................50
Dynamic range compensation ...................51
Date imprint ..............................................90
Aperture value ..........................................43
Shutter speed ............................................43
Level indicator .....................................21, 36
Exposure indicator/Exposure compensation
............................................................43, 48
34
ISO sensitivity............................................49
35
Histogram .................................................21
36
White balance mode ..................................
37
Recording time/Remaining recording time
................................................................164
38
Recording indicator ...................................92
39
Reduce fluorescent flicker .........................91
67
Page 21
Note -----------------------------------------------------------------------------------------------------------
123567 8
109 11 1712 13 14 1615 16
4 8
• The maximum number that can be displayed for the number of storable images is “9999”.
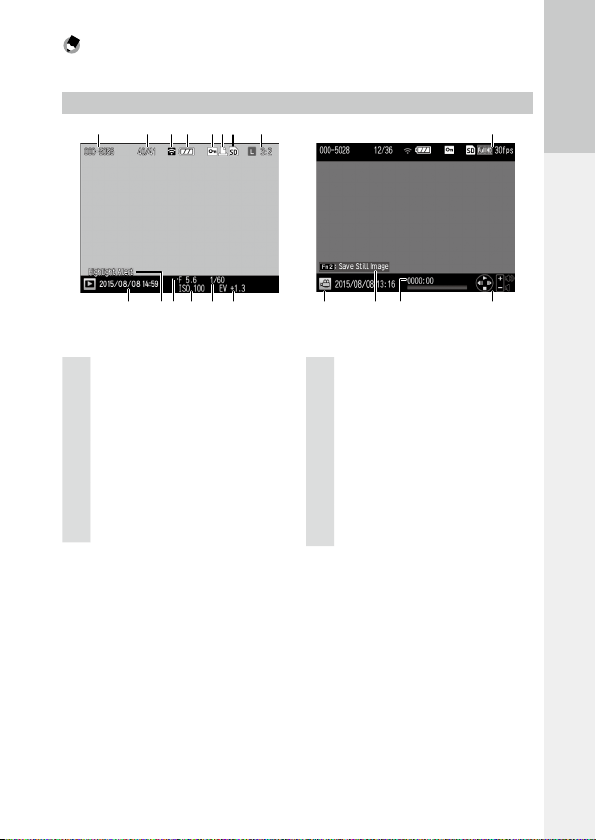
Playback Screen
Before You Begin
Still image mode
1
Folder number-File number ....................126
2
Current file/Total files
3
Wi-Fi connection .......................................20
4
Battery level ..............................................20
5
Protect ......................................................99
6
DPOF print indicator ................................112
7
Data source ...............................................24
8
Format and size/Aspect ratio/Frame rate
............................................................54, 91
Movie mode
9
Date of shooting
10
Highlight alert ..........................................22
11
Aperture value ..........................................43
12
ISO sensitivity............................................49
13
Shutter speed
14
15
16
17
............................................43
Exposure compensation ............................48
File type
Operation guide
Total time:Elapsed time.............................93
19
Page 22
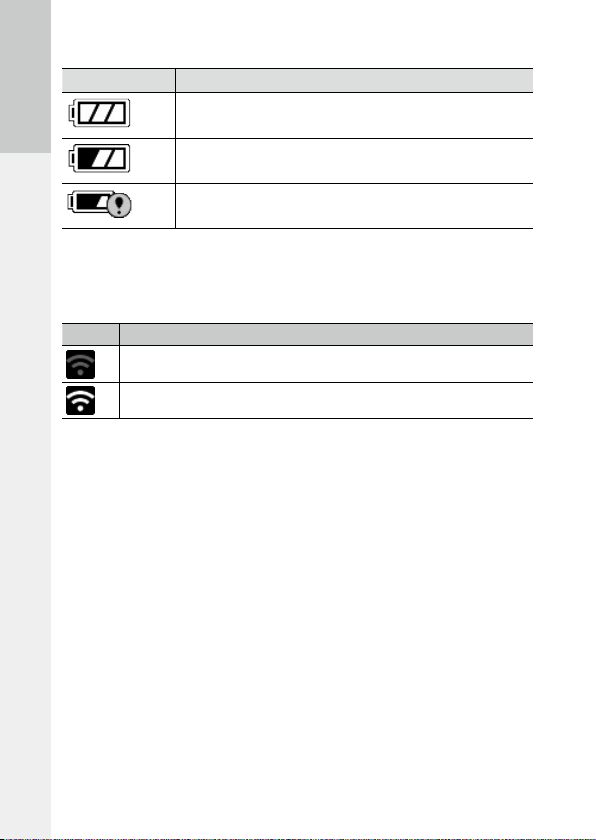
Battery Level Indicator
Icon Status
Battery is fully charged.
Before You Begin
Battery is partially charged. Recharging the battery is recommended.
Low battery. Recharge the battery.
Wi-Fi Connection
When using a Wi-Fi connection (p.132), the connection status is displayed
in the shooting and playback mode screens.
Icon Status
Not connected
Connected
20
Page 23

Changing the Screen Display
Shooting Mode
Select from the following displays in shooting mode.
Information display Grid guide
Level indicator
Information display
Histogram
Graphic display
Note -----------------------------------------------------------------------------------------------------------
• You can specify the information displayed each time the DISP. button is pressed in [DISP. Button Display Setting] of the [Setup] menu. (p.125)
• When [Information Display Mode] of the [Setup] menu is set to [On], information is displayed on the
picture display in the following cases even when the picture display is turned off. After the information is displayed and no operations are performed for several seconds, or when the shutter release
button is pressed halfway, the information display disappears.
• When the Fn1 button, N button, t button, or Effect button is pressed
• When the mode dial or up-down dial is turned
• When the ADJ. lever is pressed left or right
• When the FOPEN switch is pressed to raise the flash, or the flash cover is closed
Before You Begin
21
Page 24
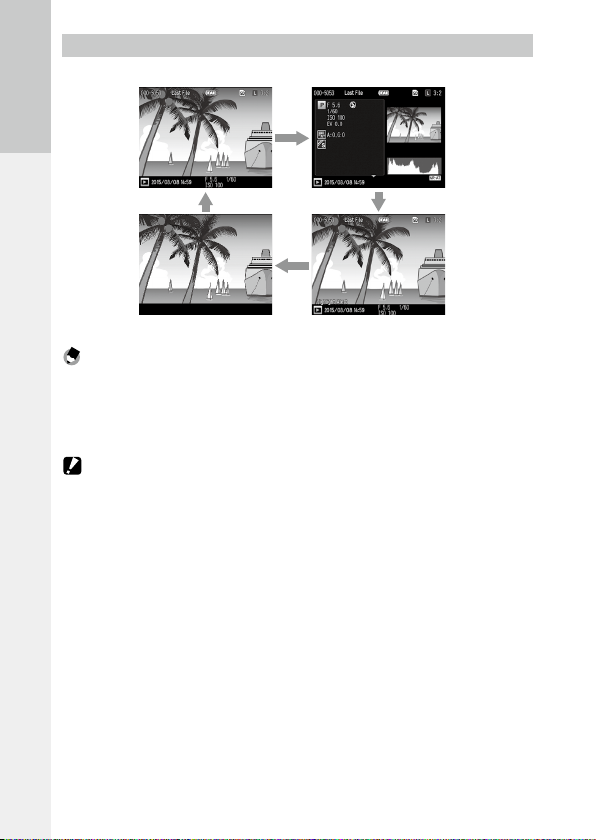
Playback Mode
Normal indicator display
Detailed information display
Before You Begin
No indicator display Highlight alert
Note -----------------------------------------------------------------------------------------------------------
• The pages of the detailed information display can be switched using the !" buttons.
• When [Highlight Alert] of the [Setup] menu is set to [On], the white saturation areas of the image
flash in black in the highlight alert. When this is set to [Off] (default setting), the highlight alert is not
shown.
Caution -------------------------------------------------------------------------------------------------------
• The detailed information display and highlight alert are not shown when recording movies.
• The highlight alert is not shown when connected with an HDMI cable.
22
Page 25
Getting Ready
2
Prepare the camera for use.
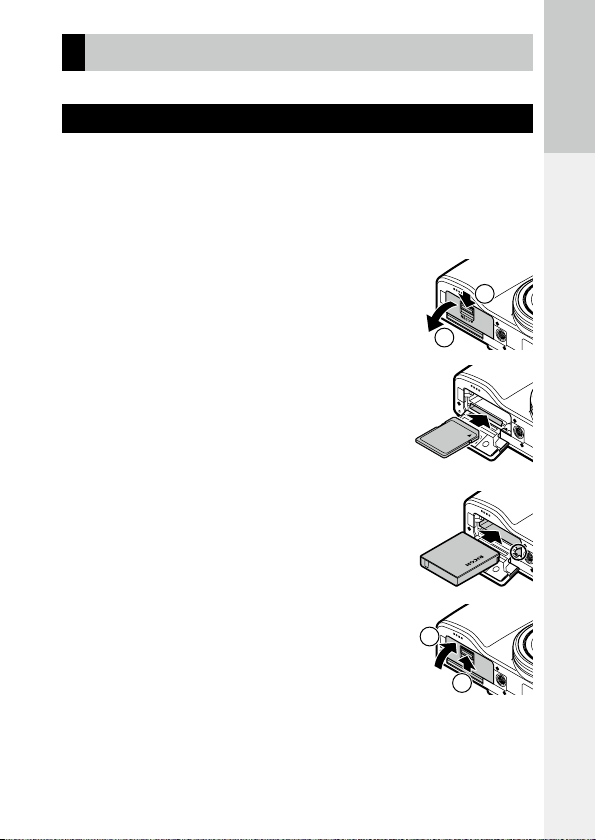
Inserting the Battery and a Memory Card
Be sure that the camera is off before inserting or removing the battery and
memory card.
SD memory cards, SDHC memory cards, and SDXC memory cards can be
used with this camera. “Memory card” refers to these memory cards in this
manual.
1 Slide the release lever on the bottom of the
camera toward OPEN to open the battery/
card cover.
1
2
2 Make sure that the memory card is facing
the right way and then push the card all
the way in until it clicks.
To remove it, press in the memory card and then release your hand.
3 Insert the battery.
Use the battery to press the latch and insert the battery all the way into the battery compartment.
To remove the battery, press and slide the latch.
4 Close the battery/card cover and slide the
release lever in the opposite direction of
OPEN to lock it in place.
1
Before You Begin
23
Page 26

Data Storage Location
Images taken and movies recorded with this camera are saved in the internal
memory or a memory card. When a memory card is not inserted in the camera, images and movies are saved in the internal memory.
Caution -------------------------------------------------------------------------------------------------------
Before You Begin
• Images and movies are not saved in the internal memory when a memory card is inserted, even if the
memory card is full.
• If the number of files stored in a memory card exceeds 10000, files with a small folder/file number
cannot be played back.
Note -----------------------------------------------------------------------------------------------------------
• You can copy all data stored in the internal memory to a memory card. (p.101)
• The storage capacity varies depending on the memory card. (p.164)
• When using a new memory card or a memory card used with another device, be sure to format the
memory card with this camera. Format memory cards in [Format [Card]] of the [Setup] menu.
24
Page 27
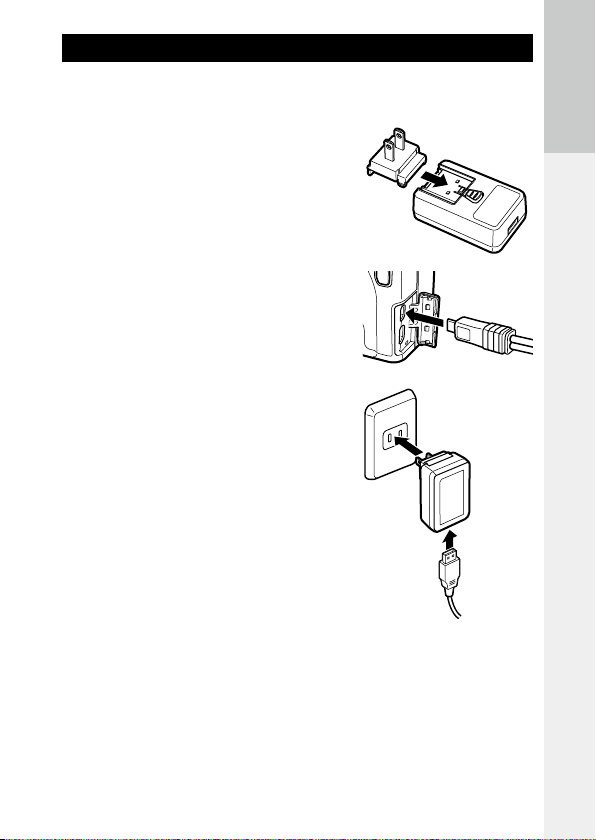
Charging the Battery
Charge the rechargeable battery (DB-65) using the included USB cable and
USB power adapter (AC-U1) with the included power plug before use.
1 Insert the power plug to the USB
power adapter.
Insert it until it clicks into place.
2 Open the terminal cover, and
connect the USB cable to the USB/
AV OUT terminal.
3 Connect the USB cable to the USB
power adapter.
4 Plug the USB power adapter into a
power outlet.
The autofocus/flash lamp turns on and charging starts.
Depending on the battery level, the charging time differs. An exhausted battery will be
fully recharged in about three hours (at 25°C
(77°F)).
When charging is complete, the autofocus/
flash lamp turns off. Unplug the USB power
adapter from the power outlet.
4
3
Before You Begin
25
Page 28

Storage Capacity --------------------------------------------------------------------------------------------
• Approximately 290 pictures can be taken when the battery is fully charged.
• This is based on tests conducted according to CIPA standards under the following conditions: At 23°C
(73°F) temperature; the picture display is on; a picture is taken every 30 seconds; the flash is fired
every two pictures; the camera is turned off and back on after 10 pictures are taken.
• The storage capacity is for reference. For long periods of use, it is recommended that you carr y spare
Before You Begin
batteries.
Caution -------------------------------------------------------------------------------------------------------
• Use only genuine rechargeable battery (DB-65).
• If the autofocus/flash lamp blinks during charging, the USB power adapter or battery has a problem.
Unplug the USB power adapter from the power outlet and remove the battery.
• The battery may become very hot immediately after operation. Turn the camera off and leave it to
cool down sufficiently before removing the battery.
Note -----------------------------------------------------------------------------------------------------------
• You can also charge the battery by connecting the camera to a computer using the USB cable. An
exhausted battery will be fully recharged in about 5 hours. (p.131)
• DB-65 can be recharged with the optional battery charger (BJ-6). (Recharging time: Approximately
2.5 hours)
26
Page 29
Turning the Camera On and Off
Press the POWER button to turn the camera on.
The POWER button lamp lights, and then the
autofocus/flash lamp blinks for several seconds.
When the POWER button is pressed again, the power turns off.
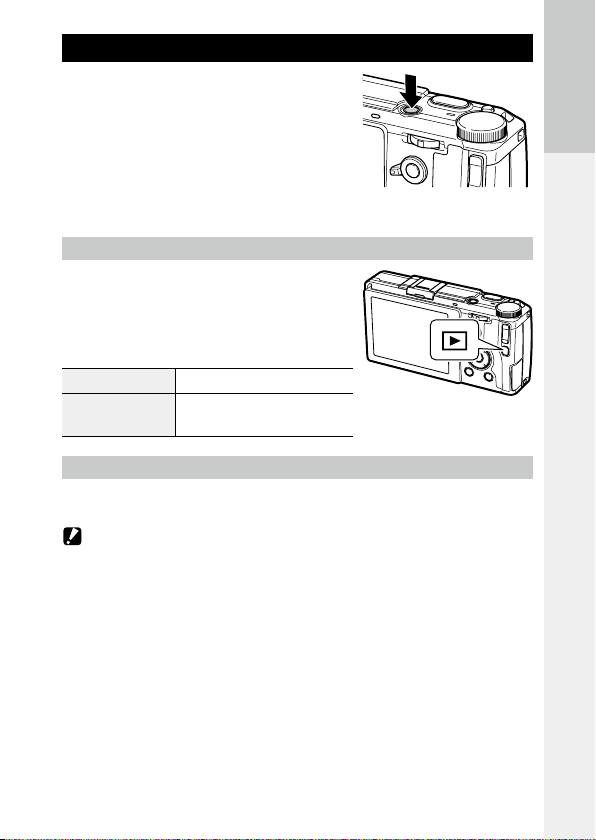
Turning the Camera On in Playback Mode
When the 6 button is pressed and held with
the camera turned off, the camera turns on in
playback mode.
When the camera is turned on in playback mode,
you can perform the following operations.
Press 6 button Turns off the power of the camera.
Press the shutter release
button halfway
Turning the Camera On with the Wi-Fi Function Enabled
When the 6 button is pressed and held with the camera turned off until a
beep sounds, the camera turns on with the Wi-Fi function enabled. (p.135)
Caution -------------------------------------------------------------------------------------------------------
• When the Wi-Fi function is enabled using the 6 button, the camera is not switched to shooting
mode even if the shutter release button is pressed. When performing shooting or other operations,
press the 6 button to turn the camera off and press the POWER button to turn the camera back on.
Switches the camera to shooting mode.
Before You Begin
27
Page 30

Note -----------------------------------------------------------------------------------------------------------
• To save the battery power, you can set the following functions in the [Setup] menu.
Operation When the setting is disabled
The camera will turn off automatically
if no operations are performed during
Before You Begin
Auto Power Off
Sleep Mode
LCD Auto Dim
• The POWER button lamp can be set to [On] or [Off] in [Power Button Lamp] of the [Setup] menu.
the set time. You can set this to [Off ]
or a certain number of minutes up to
30 minutes in increments of 1 minute.
To resume operation, turn the camera
on again.
The camera dims the display automatically if no operations are performed
during the set time. You can set this to
[Off] or a certain number of minutes
up to 30 minutes in increments of
1 minute.
To resume display brightness, operate
the camera.
The camera dims the display automatically if the camera is not moved
within five seconds. You can select
[On] or [Off].
• During movie recording
• During multiple exposure shooting, interval shooting, or interval
composite
• During movie playback or slide
show
• During processing
• While Wi-Fi connection is established
• While the camera is connected to
a computer
• During multiple exposure shooting, interval shooting, or interval
composite
• During playback
• While the camera is connected
with an AV or HDMI cable
• While the Wi-Fi function is enabled
28
Page 31

Setting the Date and Time
When the power is turned on for the first time, the [Date Settings] screen
appears.
1 Set the year, month, day, hour,
minute, and date format.
Press #$ to select an item, and press !" to
change the value.
To cancel the setting, press the r button.
2 Press the MENU/OK button.
A confirmation screen appears.
3 Press the MENU/OK button.
The date is set.
Note -----------------------------------------------------------------------------------------------------------
• If the battery is removed for about five days, the date and time settings will be lost. To retain the date
and time settings, insert a battery with sufficient power for at least two hours, and then remove the
battery.
• The set date and time can be changed in [Date Settings] of the [Setup] menu.
• The language displayed for the menus and messages can be changed in [Language/N] of the
[Setup] menu.
Before You Begin
29
Page 32

30
Page 33

First Steps
Read this section before
using your camera for
the first time.
Basic Shooting................................32
Playing Back Images ..................... 38
Using the Menu ..............................39
Page 34

Basic Shooting
Now you are ready.
Shooting with Auto Settings
First Steps
1 Turn the mode dial to 5.
Turn the mode dial while pressing the mode
dial lock release button.
2 To use the flash, slide the FOPEN
switch down.
The flash opens.
The autofocus/flash lamp blinks while the
flash charges. Once the flash is charged, the
lamp turns off and the camera is ready to
shoot.
The flash will not fire when the flash cover is closed.
3 Press the shutter release button
halfway.
Focus is adjusted, and exposure is set.
The distance is measured from up to nine
points and the green focus frame appears for
the area in focus.
4 Press the shutter release button fully.
The image you have just taken is displayed on the picture display and saved.
32
Page 35

Focus ----------------------------------------------------------------------------------------------------------
• The autofocus/flash lamp and the frame color show whether
the subject is in focus.
Focus status Frame color Autofocus/flash lamp
Before focusing White
Subject in focus Green Green (on)
Unable to focus Red (blinks) Green (blinks)
*1 The frame color is blue when a face is recognized in 5 mode or with [Effec t] set to [Portrait].
• The camera cannot focus or a subject may not be in focus even if the focus frame is displayed in green
in the following cases.
• Objects that lack contrast (the sky, a white wall, the hood of a car, etc.)
• Flat objects with only horizontal lines
• Fast-moving objects
• Objects that are poorly lit
• Objects with bright reflections or backlighting
• Flickering objects, such as fluorescent lights
• Point light sources (light bulbs, spotlights, or LEDs)
If the camera is unable to focus, lock focus on another object at the same distance from the camera as
your subject, then take the picture.
*1
Autofocus/flash lamp
Focus frame
Off
First Steps
33
Page 36

Note -----------------------------------------------------------------------------------------------------------
• In 5 mode, pictures are taken with the following settings.
• ISO Setting [Auto-Hi]
• Noise Reduction [Auto]
• Exposure Metering [Multi]
• Focus “Face recognition priority AF”
First Steps
• Auto Macro
• White Balance [Multi-P AUTO]
• Flash [Auto]
The settings cannot be changed for the above functions.
• Select [Off ], [0.5 seconds], [1 second], [2 seconds], [3 seconds], or [Hold] in [LCD Confirmation Time]
of the [Setup] menu to choose how long an image is displayed on the picture display after shooting.
When set to [Hold], the image remains displayed until the next time you press the shutter release
button halfway or turn the mode dial.
• Keeping the shutter release button pressed halfway after shooting holds the focus, aperture, shutter
speed, ISO, and white balance settings. The shooting conditions are not held in the following cases:
• Self-timer
• Interval Shooting
• Interval Composite
• 3 mode
Self-timer
The self-timer can be set to [Self-Timer 2 Sec] or [Custom Self-Timer]. The
[Self-Timer 2 Sec] setting is useful for preventing camera shake. With [Custom Self-Timer], you can set the number of pictures and the shooting interval.
1 Press the t button.
The self-timer setting screen appears.
2 Press the t button to select [Self-Timer 2 Sec] or [Custom Self-
Timer].
34
3 Shoot.
The AF auxiliary light lights when the selftimer starts.
Page 37

Note -----------------------------------------------------------------------------------------------------------
• The camera remains in self-timer mode even after shooting. To cancel the self-timer, change the selftimer setting to [Self-Timer Off] in Step 2.
• When the self-timer is set to [Self-Timer 2 Sec], the AF auxiliary light does not light.
• When [Custom Self-Timer] is set, set the following items in [Custom Self-Timer] of the [Shooting]
menu.
Number of pictures 1 to 10 (Default setting: 2)
Shooting interval 5 to 10 sec. (Default setting: 5 sec.)
When the number of pictures is two or more, the focus is fixed at the position of the first shot.
Caution -------------------------------------------------------------------------------------------------------
• The t button is used as the Fn2 button. The self-timer cannot be used when a function other than
the self-timer is registered with [Set Fn2 Button] of the [Key Custom Options] menu. (p.122)
• When [Continuous Mode] is set, the self-timer cannot be used.
• [Custom Self-Timer] cannot be selected in the following cases.
• When the focus is set to [Subj. Tracking]
• During Interval Shooting
• During Interval Composite
First Steps
35
Page 38

Checking the Camera Level and Tilt
This camera has a built-in level indicator that can be used to indicate the
level and tilt of the camera on the picture display. You can check for the horizontal level and tilt in the forward-backward direction.
The level is indicated by the tilt of the horizontal line, and the tilt in the for-
First Steps
ward-backward direction is indicated by the deviation of the horizontal line
from the reference line. When the indicator color is yellow, the camera is not
level or is tilted. When the indicator color is green, the camera is level or is
not tilted.
1 Press and hold the DISP. button.
The menu appears.
2 Press the !" buttons to select a
setting.
Off Displays no indicators.
Level + Tilt Displays the level and tilt indicators.
Level Displays only the level indicator.
(Default setting)
3 Press the MENU/OK button.
The indicator is displayed on the shooting screen.
36
Green
When level
Yellow
When tilted to the right
Page 39

Yellow
When tilted forward
When tilted too far or unable
to measure tilt
Note -----------------------------------------------------------------------------------------------------------
• The indicators are displayed only when [Level Indicator] is set to [On] in [DISP. Button Display Setting]
of the [Setup] menu. (p.125)
• The indicators can also be set in [Level Setting] of the [Setup] menu. You can use [Level (Tilt) Calibration] of the [Setup] menu to set the current camera tilt as the reference setting.
Caution -------------------------------------------------------------------------------------------------------
• The level indicator does not operate when the camera is upside down, movies are being recorded, or
during interval shooting.
• The level function becomes less accurate when the camera is moving or when shooting in an environment subject to movement, such as in a vehicle.
• Use this function as reference to see if images are level when shooting. The accurac y cannot be guaranteed when using the camera as a level.
Red
First Steps
37
Page 40

Playing Back Images
Images can be viewed on the picture display.
1 Press the 6 button.
First Steps
The camera switches to playback mode and
the last image you took is displayed.
2 View the images.
You can perform the following operations.
# button Displays the previous image.
Press and hold # button Fast-reverses playback.
$ button D isplays the next image.
Press and hold $ button Fast-forwards playback.
To switch the camera back to shooting mode, press the 6 button again or
press the shutter release button halfway.
Note -----------------------------------------------------------------------------------------------------------
• You can select the display order from [File Numbers] or [Sht. Date/Time] in [Playback Order Options]
of the [Setup] menu.
• Images are switched in the effect that the next image slides over the previous image from right to left.
To deactivate this effect, set [Playback Animation] of the [Setup] menu to [Off ].
Auto Rotate --------------------------------------------------------------------------------------------------
• When [Auto Rotate] of the [Setup] menu is set to [On], images are rotated automatically according to
the camera orientation.
• Images taken with [Auto Bracket] are rotated automatically according to the orientation of the first
image.
• Auto Rotate does not work in the following cases.
• When playing back movies
• In thumbnail view
• During [Slide Show] playback
• When playing back images on AV equipment
38
Page 41

Using the Menu
1 Press the MENU/OK button.
The menu appears.
The menu that is displayed first varies depending on the mode when the button is
pressed.
To change the menu, press the # button, use
the !" buttons to select a tab, and then
press the $ button.
2 Press the !" buttons to select an
item.
Pressing the X/Y button moves the cursor
to the head of the menu delimiter (horizontal
line).
3 Press the $ button.
The options are displayed.
4 Press the !" buttons to select an
option.
5 Press the MENU/OK button, or press the # button and then the
MENU/OK button.
The setting is set.
Note -----------------------------------------------------------------------------------------------------------
• For details of the menus, see “Menus”. (p.145)
First Steps
39
Page 42

40
Page 43

Advanced Operations
Read this section when
you want to learn more
about the different
camera functions.
1 Various Shooting Functions .... 42
2 Playback Functions ................... 95
3 Changing Camera Settings ...114
4 Making Use of Images ............ 130
5 Menus ........................................145
6 Appendices ..............................155
1
2
3
4
5
6
Page 44

1 Various Shooting Functions
Select a shooting mode to match the scene.
Mode Purpose Page
5 For easy shooting p.32
P/Av/Tv/TAv/M For shooting with a set aperture value and shutter speed p.42
1
3 For recording movies p.92
Various Shooting Functions
MY1/MY2/MY3 For shooting with your favorite settings p.117
Shooting with a Set Exposure
Set an aperture value or shutter speed when shooting. The following values
can be set.
Mode Aperture value Shutter speed ISO sensitivity
P
Program Shift
Av
Aperture Priority
Tv
Shutter Priority
TAv
Shutter/Aperture Priority
M
Manual Exposure
*1 Allows you to select the combination of aperture value and shutter speed.
*2 Only [Auto] and [Auto-Hi] are available.
*3 [Auto] and [Auto-Hi] are not available.
Yes: Can be set No: Automatically set by the camera
*1
Yes
No
Yes Yes
Yes Yes
*1 Yes
No Yes
Yes Yes
*2
Yes
*3
Yes
42
Page 45

1 Set the mode dial to P/Av/Tv/TAv/M.
The symbol for the selected shooting mode
and the set value are displayed on the shooting screen.
In M mode, the exposure indicator is displayed.
2 Turn the up-down dial or press the ADJ. lever left or right to
change a value.
The following values are changed.
Mode Up-down dial ADJ. lever
P Program Shift
Av Aper ture value
Tv Shutter speed
TAv/M
When the aperture value and shutter speed
are displayed in P mode (after the shutter
release button is pressed halfway or in other
situations), the Program Shift is available using the up-down dial.
When in M mode, the exposure is correct
when the indicator is in the center. When the
exposure value is in the range of -2EV to +2EV,
the indicator changes according to the exposure value. The indicator turns yellow when
the values are outside this range.
Aperture value Shutter speed
—
—
—
3 Shoot.
1
Various Shooting Functions
43
Page 46

Note -----------------------------------------------------------------------------------------------------------
• The functions for the up-down dial and ADJ. lever when in TAv and M modes can be switched in [M/
TAv Mode Dial Setting] of the [Key Custom Options] menu.
• You can set whether to automatically adjust the exposure when the correc t exposure cannot be obtained for the aperture value and shutter speed set in Av, Tv, and TAv modes in the [Shooting] menu.
Mode [Shooting] menu
1
Various Shooting Functions
Av Auto Aperture Shift
Tv Shutter Speed Auto Shift
TAv
Shutter/Aperture Auto Shift Off, Aprtr Priority, Shttr Priority
Off, On
Off, On
Caution -------------------------------------------------------------------------------------------------------
• When a slow shutter speed has been set, images are not displayed on the picture display during
shooting.
• When the picture display is set to off, the aperture value and shutter speed cannot be changed. If
[Information Display Mode] of the [Setup] menu is set to [On], these values can be changed.
Program Diagram ------------------------------------------------------------------------------------------
• You can select the program diagram for P and M modes in [P Mode Selection] of the [Shooting] menu.
Diagrams 1 and 2 show the program diagram for each setting.
• The program diagram is the guide for possible shift in a particular aperture value and shutter speed
combination and changes depending on the exposure value. (The example shows when the ISO sensitivity is [ISO 100].)
• When [One Press M Mode] of the [Key Custom Options] menu is set to [Program], the aperture value
and shutter speed are adjusted according to the program settings.
Setting
44
Page 47

Diagram 1: Normal
Lv
Lv
Lv
Lv
Lv
Lv
Lv
Lv7Lv8 Lv9Lv10Lv11Lv12Lv13Lv14Lv15Lv16Lv17Lv18Lv19Lv20
2481 1/2 1/4 1/8 1/15 1/30 1/60
1/125 1/250 1/500
1/1000 1/2000
1/4000
F5.6
F2.8
F1.4
Lv
Lv
Lv
Lv
Lv
Lv
Lv
Lv8Lv9 Lv10 Lv11 Lv12 Lv13 Lv14 Lv15 Lv16 Lv17 Lv18 Lv19 Lv20
2481 1/2 1/4 1/8 1/15 1/30 1/60
1/125 1/250 1/500
1/1000 1/2000
1/4000
F5.6
F2.8
F1.4
6
5
4
3
2
1
0
-1
0123456
-2-3
Diagram 2: Max Aperture Prior.
6
5
4
3
2
1
0
-1
0123456
-2-3
789
789
10 11
10 11
F16
8
F16
7
F11
6
F8
1
5
Various Shooting Functions
4
F4
F2.8
3
2
F2
1
0
F1
12
F16
8
F16
7
F11
6
F8
5
4
F4
F2.8
3
2
F2
1
0
F1
12
45
Page 48

Bulb/Time ----------------------------------------------------------------------------------------------------
• You can select between B (Bulb) and T (Time) for the shutter speed in M mode.
Shutter speed Operation
1
Various Shooting Functions
B The image continues to be exposed while the shutter release button is pressed.
T
In either mode, the camera automatically stops shooting once the limit has been reached.
ISO 100 to ISO 3200
ISO 3201 to ISO 25600 30 sec.
• Operation is also possible using the optional cable switch (CA-2).
• The following functions are not available.
• Self-timer
• Continuous Mode
• Auto Bracket
• Interval Shooting
• Interval Composite
• One Press M Mode
• When using B/T, and [Continuous Mode] is set in the [Shooting] menu, B/T is canceled, and the shutter speed for continuous shooting is set to 300 seconds. If [Continuous Mode] is set first, B/T cannot be
set.
The exposure ends when the shutter release button is released.
The exposure begins when the shutter release button is pressed.
The exposure ends when the shutter release button is pressed again.
ISO sensitivity
Shutter speed limit
300 sec.
46
Page 49

Slow Shutter Speed NR ------------------------------------------------------------------------------------
• Using a long shutter speed results in a noisy image. When [Slow Shutter Speed NR] of the [Shooting]
menu is set to [On], noise reduction processing is carried out depending on the combination of the ISO
sensitivity and shutter speed settings. However, it takes some time to save the processed image.
ISO sensitivity Shutter speed at the start of processing
ISO 3200 or less 8 seconds or more
ISO 3201 or more
4 seconds or more
Aperture Preview -------------------------------------------------------------------------------------------
• When [Effect Button Hold Setting] of the [Key Custom Options] menu is set to [Aperture Preview], the Aperture Preview is available using the w (Effect) button. If you press
and hold the w (Effect) button when the aperture value
is displayed on the shooting screen (such as when the shutter release button is pressed halfway), the aperture value
set when shooting operates, and you can check the depth
of field. When you release the w button, the Aperture
Preview mode is canceled.
• When [Effect Button Hold Setting] is set to [Wi-Fi] (default value), the w button works as the
switch to turn on/off the Wi-Fi function. In this case, the Aperture Preview is not available. (p.134)
• In the Aperture Preview mode, the shutter release button cannot be pressed fully, and the aperture
value cannot be changed.
• When using the flash, the actual aperture value may differ from the Aperture Preview.
• Because the Aperture Preview is used for checking the depth of field, it may not function properly
with AE.
• When [Auto Bracket] of the [Shooting] menu is set in Tv mode, the Aperture Preview is displayed
according to the set exposure compensation values.
• [AE-BKT 1/3EV] and [AE-BKT 1/2EV] of [Auto Bracket] settings in the [Shooting] menu are not reflected.
• This function is not available in 3 mode.
1
Various Shooting Functions
47
Page 50

Using Exposure Compensation
1 Set a value using the X/Y button.
Settings can be made in the range from
–4.0 EV to +4.0 EV (from –2.0 EV to +2.0 EV
in 3 mode).
1
Various Shooting Functions
You can also shoot while the [Exposure
Compensation] screen is displayed.
2 Press the MENU/OK button.
The shooting screen reappears, and the setting is displayed on the screen.
Note -----------------------------------------------------------------------------------------------------------
• The settings can also be made in [Exposure Compensation] of the [Shooting] menu.
• When [Shutter Button Confirmation] of the [Key Custom Options] menu is set to [On], the exposure
compensation setting can be set by pressing the shutter release button halfway.
• This function is not available in M mode. If the X/Y button is pressed, the exposure is automatically
adjusted to the correct exposure. You can select the priority of values in [One Press M Mode] of the
[Key Custom Options] menu.
Aprtr Priority
Shttr Priority
Program
Sets the aperture value to a fixed value and adjusts the shutter speed.
Sets the shutter speed to a fixed value and adjusts the aperture value.
Adjusts both the aperture value and shutter speed.
48
Page 51

Setting the ISO Sensitivity
Set the ISO sensitivity in [ISO Setting/NR] of the [Shooting] menu.
Auto In ISO 100 to ISO 800, the camera automatically adjusts sensitivity ac-
cording to brightness, the distance to the subject, macro settings, and
the format.
Auto-Hi (high sensitivity auto) The sensitivity can be set higher than in [Auto].
• You can set the upper/lower limit of the ISO sensitivity, the shutter
speed for switching the ISO sensitivity settings in [ISO Auto-High Settings] of the [Setup] menu.
ISO 100 to ISO 25600 Sensitivity is set to the selected ISO value.
Note -----------------------------------------------------------------------------------------------------------
• In [ISO Step Setting] of the [Setup] menu, ISO sensitivity setting steps can be selected. Depending on
the setting, the following ISO sensitivity can be selected.
ISO Step Setting Selectable ISO sensitivity
1EV ISO 100, ISO 200, ISO 400, ISO 800, ISO 1600, ISO 3200, ISO 6400, ISO
12800, ISO 25600
1/3EV ISO 100, ISO 125, ISO 160, ISO 200, ISO 250, ISO 320, ISO 400, ISO 500,
ISO 640, ISO 800, ISO 1000, ISO 1250, ISO 1600, ISO 2000, ISO 2500, ISO
3200, ISO 4000, ISO 5000, ISO 6400, ISO 8000, ISO 10000, ISO 12800, ISO
16000, ISO 20000, ISO 25600
When [1/3EV] is selec ted for the steps for ISO sensitivity, the setting steps for [Change Shutter Speed]
of [ISO Auto-High Settings] of the [Setup] menu also changes to 1/3EV steps.
• When [ISO Setting/NR] is set to [Auto] or [Auto-Hi], the ISO sensitivity is displayed on the screen when
the shutter release button is pressed halfway. The displayed ISO sensitivity may differ from the actual
setting when the flash is used.
• Images taken with a higher sensitivity may appear grainy.
• If the flash is used when [ISO Setting/NR] is set to [Auto], the ISO sensitivity is increased up to the
equivalent of ISO 1600.
• When [Dynamic Range Compensation] is set in the [Shooting] menu, the ISO sensitivity that can be
set is limited. (p.51)
• In the [Key Custom Options] menu, [ISO] can be registered to use to the ADJ. lever and the Fn1, Fn2,
and Effect buttons. (p.120, p.122)
[ISO] is registered to [ADJ. Lever Setting 1] as the default setting.
• If [ADJ. Direct ISO Control] of the [Key Custom Options] menu is set to [On], you can change the ISO
sensitivity simply by pressing the ADJ. lever left or right in P, Av, or Tv mode.
1
Various Shooting Functions
49
Page 52

Reducing Noise
You can reduce the amount of noise in still images.
1 In the [Shooting] menu, select [ISO Setting/NR], and then press
the $ button.
The [ISO Setting/Noise Reduction] screen appears.
2 Press the !" buttons to select [Noise Reduction], and then
1
Various Shooting Functions
press the $ button.
3 Press the !" buttons to select [Off ], [Auto], or [Manual].
When [Off] or [Auto] is selected, proceed to Step 5.
4 Press the !"#$ buttons to specify
the ISO sensitivity to apply to
[Strong], [Medium], and [Weak].
5 Press the MENU/OK button twice.
The symbol appears on the shooting screen.
Caution -------------------------------------------------------------------------------------------------------
• When noise reduction is set, it may take longer than normal to save images.
50
Page 53

Dynamic Range Compensation
With [Dynamic Range Compensation] of the [Shooting] menu, you can expand an image gradation to make the bright and dark portions of an image
clearly visible. You can select from [Off ], [Auto], [Weak], [Medium], and
[Strong].
When dynamic range compensation is set, a
symbol appears on the screen.
Caution -------------------------------------------------------------------------------------------------------
• When dynamic range compensation is set, available ISO sensitivity is limited.
Setting
Auto ISO 400 ISO 6400 ISO 320 ISO 8000
Weak ISO 200 ISO 12800 ISO 160 ISO 16000
Medium ISO 200 ISO 12800 ISO 200 ISO 12800
Strong ISO 400 ISO 6400 ISO 320 ISO 8000
• If dynamic range compensation is set, the [Auto-Hi] setting of the ISO sensitivity works as [Auto].
• When [ISO Setting] is set to [Auto], shooting may be performed with a lower ISO sensitivity than the
minimum sensitivity listed above depending on the shooting conditions.
• When [Dynamic Range Compensation] is set to [Strong], noise tends to occur more easily in images.
• [Dynamic Range Compensation] cannot be set in the following cases.
• Continuous Mode
• Multiple Exposure Shooting
• Interval Shooting
• Interval Composite
• When the shooting location is too bright or too dark, dynamic range compensation may not be effective.
Note -----------------------------------------------------------------------------------------------------------
• When using dynamic range compensation, it is recommended to set [Exposure Metering] of the
[Shooting] menu to [Multi]. (p.52)
• In the [Key Custom Options] menu, [Dyn Range Comp] can be registered to use to the ADJ. lever and
the Fn1, Fn2, and Effect buttons. (p.120, p.122)
ISO Step Setting [1EV] ISO Step Setting [1/3EV]
Min. Max. Min. Max.
1
Various Shooting Functions
51
Page 54

Selecting a Metering Method
Set the metering method in [Exposure Metering] of the [Shooting] menu.
Multi The camera meters exposure in 484 areas of the frame. (Default setting)
The entire image is metered, with emphasis on the center, to determine the exposure value.
Use this setting when the brightness of the center and surroundings are different.
Center
1
Various Shooting Functions
If [Center] or [Spot] is selected, the symbol appears on the shooting screen.
The center of the image is metered to determine the exposure value. Use this setting when
you want to use the brightness at the center. This is useful if there is a marked difference in
Spot
contrast or backlighting.
Note -----------------------------------------------------------------------------------------------------------
• Metering is fixed to [Multi] in the following cases.
• When the focus is set to [Subj. Tracking]
• In 3 mode
• When the target is moved in [FA/Move Target] of the [Shooting] menu, metering is fixed to [Spot].
• In the [Key Custom Options] menu, [Expo. Metering] can be registered to use to the ADJ. lever and
the Fn1, Fn2, and Effect buttons. (p.120, p.122)
[Expo. Metering] is registered to [ADJ. Lever Setting 5] as the default setting.
52
Page 55

Using the ND Filter
With [ND Filter] in the [Shooting] menu, you can set whether or not to always
use the camera’s internal ND filter.
The ND filter is not used.
Off
The ND filter is used when the exposure is outside the linked range. The ND filter is used if the
Auto
icon is displayed on the shooting screen when the shutter release button is pressed halfway.
The ND filter is not used in P and M modes.
The ND filter is always used. The icon is displayed on the shooting screen.
On
Note -----------------------------------------------------------------------------------------------------------
• If [ND Filter] is set to the Fn1, Fn2, and Effect buttons in the [Key Custom Options] menu, [Off], [Auto],
and [On] for the ND filter can be switched with button operation only. (p.122)
1
Various Shooting Functions
53
Page 56

Setting a Picture Format
With [Picture Format] of the [Shooting] menu, you can set the picture format,
size, and aspect ratio.
Format/Size o: Records a q sized RAW image (DNG format).
1
Various Shooting Functions
Aspect Ratio 3:2, 4:3, 1:1
p: Records a RAW image simultaneously with a q sized JPEG image.
q: 16M (3:2)
r: 10M (3:2)
s: 5M (3:2)
u: 1M (3:2)
Note -----------------------------------------------------------------------------------------------------------
• When the aspect ratio is set to [3:2] or [1:1], black band(s) appears at the lower side or right and left
sides of the picture display.
• In the [Key Custom Options] menu, [Picture Size] and [Aspect Ratio] can be registered to use to the
ADJ. lever and the Fn1, Fn2, and Effect buttons. (p.120, p.122)
[Picture Size] is registered to [ADJ. Lever Setting 2], and [Aspect Ratio] is registered to [ADJ. Lever
Setting 3] as the default setting.
If [JPEG>RAW] or [JPEG>RAW+] is set to the Fn1, Fn2, and Effect buttons, the image format can be
switched with button operation only.
Shooting RAW Images -------------------------------------------------------------------------------------
• RAW images can be processed in [RAW Development] of the [Playback] menu or using the included
software “Digital Camera Utility 5”. (p.108, p.130)
• The following functions are not reflected in RAW images. [Effect] and [Dynamic Range Compensation] can be reflected when a RAW image is converted to JPEG format in [RAW Development] of the
[Playback] menu.
• Effect
• Dynamic Range Compensation
• Date Imprint
When p is set, the functions mentioned above are reflected in JPEG images only.
54
Page 57

Crop -----------------------------------------------------------------------------------------------------------
• If [Crop] of the [Shooting] menu is set to [35 mm] or
[47mm], the 35 mm equivalent angle of view is changed
from default 28 mm to 35 mm or 47 mm, and the image
display is also changed.
• When [Crop] is set, available format and size are limited.
Crop Format/Size limitation
35 mm q cannot be used.
47 mm q and r cannot be used.
• If [28/35 mm] or [28/35/47 mm] is set to the Fn1, Fn2, and Effect buttons in the [Key Custom Options]
menu, the angles of view can be switched with button operation only. (p.122)
1
Various Shooting Functions
55
Page 58

Setting the Focus
Selecting a Focusing Method
Set the focusing method in [Focus] of the [Shooting] menu.
Measures the distances from 9 AF areas and focuses to the nearest AF area. This
prevents the center of the picture display from becoming out of focus and enables
you to shoot with a minimum number of out-of-focus pictures. (Default setting)
Tracks the subject and continually focuses.
When the shutter release button is pressed halfway, the subject inside the frame
in the center of the picture display is set as the target to be tracked, and a green
target symbol appears. When a tracking target cannot be found, the frame flashes
red.
Automatic tracking is canceled after shooting, or in the following cases.
• When the tracking target moves out of the frame
• When the shutter release button is released
• While the flash is charged
Focuses manually. (p.58)
Fixes the focus to the set distance. (p.58)
Fixes the focus distance at infinity. This is useful for shooting distant scenes.
1
Various Shooting Functions
Multi AF
Spot AF Focuses on the area in the center of the frame.
Pinpoint AF Focuses on a smaller area than [Spot AF].
Subj. Tracking
MF (Manual Focus)
Snap
∞ (Infinity)
56
Page 59

Note -----------------------------------------------------------------------------------------------------------
• The focus speed of the autofocus can be selected from [Normal] or [High Speed] in [AF Mode] of the
[Setup] menu. If [High Speed] is selected, the focus speed of the autofocus becomes fast. However,
the picture display turns off during autofocusing. [High Speed] is not available in the following cases.
• When the focus is set to [Subj. Tracking]
• During Continuous AF
• When the target is moved
• In the [Key Custom Options] menu, [Focus] can be registered to use to the ADJ. lever and the Fn1,
Fn2, and Effect buttons. (p.120, p.122)
[Focus] is registered to [ADJ. Lever Setting 4] as the default setting.
If the following functions are set to the Fn1, Fn2, and Effect buttons, the focus methods can be
switched with button operation only.
• MultiAF/SpotAF
• MultiAF/PinpointAF
• AF/MF
• AF/Snap
• AF/Subj.Trckng
Caution -------------------------------------------------------------------------------------------------------
• In [Subj. Tracking], the following functions are not available.
• Self-Timer [Custom Self-Timer]
• Interval Shooting
• Interval Composite
• FA/Move Target
1
Various Shooting Functions
57
Page 60

Focusing Manually (Manual Focus)
If the camera fails to focus automatically, you can focus manually.
The manual focus enables shooting at a fixed distance.
1 In [Focus] of the [Shooting] menu, select [MF].
The symbol and focus bar appear in the shooting screen.
1
Various Shooting Functions
In P, Av, TAv, and M modes, and when using Interval Composite, a depth of
field approximation appears.
2 Press the ! button.
$ appears on the focus bar.
3 Use the up-down dial to adjust the
focus.
Fixing the Focus to the Set Distance (Snap)
1 In the [Shooting] menu, select [Snap Focus Distance], and then
press the $ button.
2 Press the !" buttons to select a distance, and then press the #
button.
Distances can be selected from [1m], [1.5m], [2m], [2.5m], [5m], and [∞].
3 In [Focus] of the [Shooting] menu, select [Snap].
The camera focuses on the set distance.
To change the distance, turn the up-down dial while pressing the ! button.
Note -----------------------------------------------------------------------------------------------------------
• In the [Key Custom Options] menu, [SnapFocusDist.] can be registered to use to the ADJ. lever and the
Fn1, Fn2, and Effect buttons. (p.120, p.122)
58
Page 61

Shooting Close-ups (Macro Mode)
You can approach the subject up to 10 cm (shooting range: approx. 12 ×
8cm) away from the front edge of the lens to shoot.
1
Press the N (!) button in shooting
mode.
N appears on the shooting screen.
2 Shoot.
To cancel macro mode, press the N button
again.
Note -----------------------------------------------------------------------------------------------------------
• [Focus] operates as [Spot AF] or [Pinpoint AF].
Caution -------------------------------------------------------------------------------------------------------
• In 5 mode, Auto Macro is set, and the N button is deactivated.
• When [Focus] is set to [MF], macro mode is not available. Pressing the N (!) button enables focus
distance adjustment. (p.58)
1
Various Shooting Functions
59
Page 62

Using the AF Button
When the AF button is used, AE lock or AF lock is available in place of pressing the shutter release button halfway.
You can use the AF function switching lever to
switch the AF button function.
AF function switching lever
1
Various Shooting Functions
AF button
When the AF Function Switching Lever is Set to AEL/AFL
The AF button operation can be selected from [Off], [Multi AF], [Spot AF], or
[Pinpoint AF] in [AFL Focus Settings] of the [Key Custom Options] menu. (The
AF button operation is not available for pressing the shutter release button
halfway.) When [AFL Focus Settings] is set to [Off ], the AF operates following
the [AEL/AFL Setting] of the [Key Custom Options] menu.
AEL/AFL Setting Focus AF button lock operation
AFL Multi AF, Spot AF, Pinpoint AF Follows the setting in [Focus] of the [Shooting] menu to
Subj. Tracking, MF, Snap, ∞ Focuses using Spot AF and then locks the focus.
AEL·AFL Multi AF, Spot AF, Pinpoint AF Sets AE Lock and follows the setting in [Focus] of the
Subj. Tracking, MF, Snap, ∞
AEL Sets AE lock.
focus and then locks the focus.
[Shooting] menu to focus, and then locks the focus.
Sets AE Lock and focuses using Spot AF, and then locks
the focus.
60
Page 63

Note -----------------------------------------------------------------------------------------------------------
• In [AEL/AFL Lock keep Setting] of the [Key Custom Options] menu, you can set whether or not to
maintain the lock even when you release the AF button.
Off Locks the focus only while the button is pressed.
On Locks the focus when the button is pressed, and cancels the focus when the button
is pressed again.
• When the focus is locked with the AF button, the N button is deactivated.
• When functions such as the focus method switching function and [FA/Move Target] are registered to
the Fn1, Fn2, and Effect buttons in the [Key Custom Options] menu, the functions registered in the
buttons become invalid while the AF lock is set. If the button setting is changed while the AF lock is
set, the AF lock is canceled.
• When AF lock cannot be set, or when AF lock is canceled, the focus position moves to the position set
in [Focus].
• When the focus is locked with the AF button, the AE/AF lock position does not change even when the
shutter release button is pressed halfway.
1
Various Shooting Functions
61
Page 64

When the AF Function Switching Lever is Set to C-AF
While the AF button is pressed, “Continuous AF” which continuously focuses
on the subject will be active, regardless of the [Focus] setting.
Note -----------------------------------------------------------------------------------------------------------
• A green frame appears when the camera has finished focusing. The focus sound is not played.
• If the shutter release button is pressed fully while pressing the AF button, continuous shooting can be
1
Various Shooting Functions
performed following the [C-AF Continuous Setting] of the [Key Custom Options] menu. Continuous
shooting ends once the AF button is released.
Off Performs continuous shooting only when [Continuous Mode] is set in the
[Shooting] menu.
AF Priority Performs continuous shooting by focusing for each shot while the shutter
release button is pressed.
Shutter Priority Performs continuous shooting while the shutter release button is pressed.
The focus is fixed. (p.72)
• If the [Focus] is set to [MF], the focus can be locked when the AF button is released. It is easier to
operate when placing your index finger on the shutter release button, and using your thumb for the
AF button.
Caution -------------------------------------------------------------------------------------------------------
• “Continuous AF” is not available in the following cases.
• In self-timer mode
• In 3 mode
• During Multiple Exposure Shooting
• During Interval Shooting
• During Interval Composite
62
Page 65

Setting Focus Assist and AE/AF Target
Without moving the camera you can meter a specific spot on the subject
using buttons only, and activate the focus lock. This function is useful for
shooting on a tripod.
1 In the [Shooting] menu, select [FA /Move Target], and then press
the $ button.
The target setting screen appears.
2 Set the target position and size.
The following operations are available.
!"#$ buttons
Up-down dial Portion magnification: Changes the display area.
X/Y button
Moves the target.
Whole magnification: Changes the size of the focus assist area when the
magnification is the same ratio.
Changes the magnification factor.
1
Various Shooting Functions
63
Page 66

3 For detailed settings, press the Fn2
button.
1
Various Shooting Functions
The following settings are available.
Move Target Setting Specifies the target to move from [AE·AF], [AF], and [AE] (from [AE·MF],
Focus Assist Setting Intensifies the outlines and contrast inside the area, making it easier to
Magnification Setting Specifies the magnification area.
If you press the MENU/OK button, the screen in Step 2 reappears.
4 Press the MENU/OK button.
The shooting screen reappears.
[MF], and [AE] when [Focus] is set to [MF]).
adjust the focus.
[MODE 1] Emphasizes edges.
[MODE 2] Emphasizes outlines.
[MODE 3] Inverts black and white for MODE 1.
[MODE 4] Inverts black and white for MODE 2.
[Magnify portion]: Magnifies the target area and overlays the display
on the background. You can check the focus while looking at the overall
composition.
[Magnify whole]: The target area is magnified full-screen, and the target
can be moved while magnified. This function allows you to check the focus more closely than with [Magnify portion]. The magnification factor
can be changed with the X/Y button.
Target
64
Page 67

Caution -------------------------------------------------------------------------------------------------------
• [FA/Move Target] cannot be set in the following cases.
• In 5 and 3 modes
• When the focus is set to [Subj. Tracking]
• When [Magnification Setting] is set to [Magnify whole], [One Press M Mode] is not available.
Note -----------------------------------------------------------------------------------------------------------
• If [Focus] is changed to [Subj. Tracking], the target position is reset.
• In the [Key Custom Options] menu, [FA/Move Target] can be registered to use to the Fn1, Fn2, and
Effect buttons. (p.122)
[FA/Move Target] is registered to the Fn1 button as the default setting.
1
Various Shooting Functions
65
Page 68

Shooting with a Single Press of the Shutter Release Button (Full Press Snap)
While pressing the shutter release button halfway operates AF, pressing
the shutter release button fully quickly performs shooting at the set focal
distance. This function is called “Full Press Snap”. The camera focuses at the
distance set in [Snap Focus Distance] of the [Shooting] menu (p.58).
Set [Full Press Snap] of the [Shooting] menu.
1
Various Shooting Functions
Off Operates the same way as AF.
On Performs shooting by focusing at the distance set in [Snap Focus Distance] when the shutter
Auto-Hi ISO Performs shooting by focusing at the distance set in [Snap Focus Distance] with the ISO sensi-
release button is fully pressed.
tivity set to [Auto-Hi] when the shutter release button is fully pressed.
Caution -------------------------------------------------------------------------------------------------------
• “Full Press Snap” is not available in the following cases.
• In 5 and 3 modes
• In macro mode
• In self-timer mode
Note -----------------------------------------------------------------------------------------------------------
• “Full Press Snap” is available when [Focus] is set to [Multi AF], [Spot AF], [Pinpoint AF], or [Subj. Tracking].
• Even when [Full Press Snap] is set to [On], the camera focuses at the setting in [Focus] when the
shutter release button is pressed halfway.
66
Page 69

Setting the White Balance
Make adjustments to the white balance so that white subjects will appear
white under any kind of light.
If the white balance is not how you thought it would be when shooting
an object of a single color or when shooting under multiple light sources,
change the setting.
Adjusts the white balance automatically.
Auto
Automatically optimizes the white balance to match each of the separate areas
Multi-P AUTO
Outdoors
Shade
Cloudy
Incandescent 1
Incandescent 2
Daylight Fl.
Neutral White Fl.
Cool White Fl.
of light even when multiple light sources are mixed together, such as sunlight/
shade and flash. (Default setting)
Used when shooting in daylight under clear skies.
Used when shooting in shade.
Used when shooting in daylight under cloudy skies.
Used with incandescent lighting.
Takes an image a little redder than [Incandescent 1].
Used with daylight fluorescent lighting.
Used with neutral white fluorescent lighting.
Used with cool white fluorescent lighting.
1
Various Shooting Functions
67
Page 70

Used with warm white fluorescent lighting.
Warm White Fl.
Exaggerates the color of the light source to leave the color of the subject.
Use this setting when you want to emphasize the color used for most part of the
image.
Specifies the color temperature. (p.70)
Adjusts the white balance manually. (p.70)
1
Various Shooting Functions
CTE
CT (color temperature)
Manual
1 Press the WB (") button in shooting mode.
The [White Balance] screen appears.
2 Press the !" buttons to select the
setting.
If no compensation is required, proceed to
Step 6.
When [CT] or [Manual] is selected, see p.70.
3 Press the Fn2 button.
The [White Balance Compensation] screen appears.
4 Press the
point adjustments.
Press the r button to reset. If the r button is
pressed again, the compensation is canceled.
!"#$
5 Press the MENU/OK button.
The screen in Step 2 reappears.
68
buttons to make
Page 71

6 Press the MENU/OK button.
The shooting screen reappears and the symbol is displayed on the screen.
Note -----------------------------------------------------------------------------------------------------------
• The settings can also be made in [White Balance] of the [Shooting] menu.
• [Multi-P AUTO] works as [Auto] in the following cases.
• In 3 mode
• In Continuous Mode
• When [Auto Bracket] is set to [AE-BKT 1/3EV], [AE-BKT 1/2EV], or [DR-BKT]
Caution -------------------------------------------------------------------------------------------------------
• The white balance may not be adjusted correctly for a subject that is mostly dark.
• When using a flash, set the white balance to [Auto], [Multi-P AUTO], or [Manual]. The white balance
may not be adjusted correctly for other settings.
1
Various Shooting Functions
69
Page 72

Setting the Color Temperature
1 Select [CT ] in Step 2 on p.68, and then press the Fn2 button.
The [White Balance Detailed Settings [CT]] screen appears.
2 Press the !" buttons to set a value.
1
Various Shooting Functions
Values from 2500 K to 10000 K can be set.
If the Fn2 button is pressed, the white balance
compensation can be performed. If the Fn2
button is pressed again, the screen returns to
the color temperature settings.
3 Press the MENU/OK button.
The [White Balance] screen reappears.
4 Press the MENU/OK button.
The shooting screen reappears.
Setting the White Balance Manually
1 Select [Manual] in Step 2 on p.68.
2 Aim the camera at a white subject, such as a sheet of paper,
under the light for shooting.
3 Press the Fn2 button.
The white balance is measured.
If the Fn2 button is pressed while the flash is being fired, the white balance
for flash shooting can be measured.
4 Press the MENU/OK button.
The shooting screen reappears.
70
Page 73

Shooting Continuously
The continuous shooting functions are as follows.
Continuous Mode Continues to take pictures for as long as you hold down the shutter
release button.
Auto Bracket Takes three images with different exposure, white balance, effect,
dynamic range, or contrast settings.
Multiple Exposure Shooting Merges multiple images together. p.74
Interval Shooting Take pictures automatically at a fixed interval. p.76
Interval Composite Merges a series of continuous images in such a way that the bright
areas remain.
Caution -------------------------------------------------------------------------------------------------------
• Of the func tions described above, only [Auto Bracket] and [Interval Shooting] can be used in combination. The other functions cannot be set at the same time.
p.72
p.73
1
Various Shooting Functions
p.77
71
Page 74

Shooting Continuously
Set [Continuous Mode] of the [Shooting] menu to [Continuous] to perform
continuous shooting.
Pictures continue to be taken for as long as you hold down the shutter release button. The autofocus is fixed in the first frame.
When [Continuous] is set, the symbol appears
1
on the shooting screen.
Various Shooting Functions
Set [Continuous Mode] to [Off] to return to normal shooting.
Caution -------------------------------------------------------------------------------------------------------
• The flash cannot be used with this function.
• The self-timer cannot be used with this function.
• If the [Effect] of the [Shooting] menu is set to [Hi-Contrast B&W], [Miniaturize], [Clarity], or [Brilliance], continuous shooting is not available.
• If the [Picture Format] of the [Shooting] menu is set to o or p, the continuous shooting stops
when the camera memory capacity for processing reaches full.
Note -----------------------------------------------------------------------------------------------------------
• Continuous shooting can also be performed by holding the AF button down while fully pressing the
shutter release button (Continuous AF). See “When the AF Function Switching Lever is Set to C-AF”
(p.62) of “Using the AF Button”.
• The maximum number of pictures that can be taken continuously for one press of the shutter release
button is 999.
• In the [Key Custom Options] menu, [Cont. Mode] can be registered to use to the ADJ. lever and the
Fn1, Fn2, and Effect buttons. (p.120, p.122)
72
Page 75

Shooting Continuously with Different Settings (Auto Bracket)
In the [Auto Bracket] settings in the [Shooting] menu, three images will be
taken with differing values for exposure, white balance, etc.
Takes images at different exposures in 1/3-EV or 1/2-EV steps from -2.0 EV to
AE-BKT 1/3EV
AE-BKT 1/2EV
WB-BKT
WB-BKT Preset
Effect-BKT
DR-BKT
CONTRAST-BKT
Caution -------------------------------------------------------------------------------------------------------
• The flash cannot be used with this function.
• [AE-BKT 1/2EV] cannot be selected in Tv mode.
• When [Effect] of the [Shooting] menu is set to [Miniaturize], [Clarity], or [Brilliance], [AE-BKT 1/3EV],
[AE-BKT 1/2EV], and [DR-BKT] cannot be used.
• [Shift Crop] cannot be selected for [Effect-BKT].
Note -----------------------------------------------------------------------------------------------------------
• In the [Key Custom Options] menu, [Auto Bracket] can be registered to use to the ADJ. lever and the
Fn1, Fn2, and Effect buttons. (p.120, p.122)
+2.0EV.
Takes three images (an image with more reddish than the current white balance,
an image at the current white balance, and an image with more bluish than the
current white balance).
Takes three images with different white balance settings. The white balance for the
second and third images is selected, respectively.
Takes three images with different effect settings. The effect for the second and
third images is selected, respectively.
Takes images with the dynamic range compensation set to [Off ], [Weak], and
[Strong].
Takes images with different contrast settings.
1
Various Shooting Functions
73
Page 76

Shooting Continuously with Varied Exposure Values
1 In [Auto Bracket] of the [Shooting] menu, select [AE-BKT 1/3EV]
or [AE-BKT 1/2EV], and then press the $ button.
The [AE Bracketing Settings] screen appears.
2 Press the #$ buttons to select from
1
Various Shooting Functions
the first through third image, and
then press the !" buttons to set
the exposure value.
3 Press the MENU/OK button twice.
The shooting screen reappears.
Shooting While Merging Images Together (Multiple Exposure Shooting)
The camera takes images while merging them together. Up to five images
can be merged.
1 In the [Shooting] menu, select [Multiple Exposure Shooting],
and then press the $ button.
The [Multiple Exposure Shooting] screen appears.
2 Press the !" buttons to select
items, and then set the selected
item to [On] or [Off].
74
Page 77

Automatic Exposure
Save Each Image
Save in process
[Off]: Does not adjust the exposure value.
[On]: Merges images while adjusting the exposure value depending on the
number of images.
[Off]: Saves only the final merged image.
[On]: Saves each unmerged image.
[Off]: Saves only the final merged image.
[On]: Saves each merged image.
3 Press the MENU/OK button.
[Multiple Exposure Shooting] appears on the shooting screen.
4 Take the first image.
5 To take the next image, select [Next
shot >], and then press the MENU/
OK button.
To retake the image, select [Retake shot].
6 Take the next image.
Repeat Steps 5 and 6.
To return to the previous merged image, select [Retake shot]. To end multiple
exposure shooting, select [Complete].
When shooting ends after the fifth image is taken or when [Complete] is selected, the merged image is saved.
Note -----------------------------------------------------------------------------------------------------------
• If [Multi Exposure] is set to the Fn1, Fn2, and Effect buttons in the [Key Custom Options] menu, you
can start the multiple exposure shooting with button operation only. (p.122)
Caution -------------------------------------------------------------------------------------------------------
• The settings for the following functions cannot be changed during the multiple exposure shooting.
• Crop
• Effect/Image Settings
1
Various Shooting Functions
75
Page 78

Shooting Automatically at Set Intervals (Interval Shooting)
The camera takes pictures automatically at fixed intervals.
1 In the [Shooting] menu, select [Interval Shooting], and then
press the $ button.
1
Various Shooting Functions
The [Interval Shooting] screen appears.
2 Press the #$ buttons to select
minutes/seconds, and then press the
!" buttons to set the interval value.
You can select the shooting interval from
1 second, 2 seconds, or between 5 seconds
and 60 minutes (in 5-second increments).
3 Press the #$ buttons to select the number of pictures, and
then press the !" buttons to set the value.
Values from 1 to 99 or ∞ can be set.
4 Press the MENU/OK button.
[Interval Shooting] appears on the screen.
5 Press the shutter release button to take the picture.
A picture is taken every time the set interval elapses.
6 Press the MENU/OK button to end shooting.
Caution -------------------------------------------------------------------------------------------------------
• Depending on the shooting settings, the time until the next picture is taken may be longer than the
time set for interval shooting.
• When the shooting interval is set to 1 second or 2 seconds, the exposure for the first image may be
used for the second and later images.
• The interval shooting is canceled if the power is turned off.
Note -----------------------------------------------------------------------------------------------------------
• When [Focus] of the [Shooting] menu is set to [Subj. Tracking], the focus method becomes [Multi AF]
during the interval shooting.
• It is recommended to use the battery with sufficient power.
• It is recommended to use a memory card with sufficient free space or a high speed memory card.
76
Page 79

Recording Star Trails (Interval Composite)
A series of continuous images taken at set intervals is merged in such a way
that the bright areas remain. Use this function when you want to record the
trails of light formed by stars or the moon during nightscape shooting at a
fixed position.
1 Mount the camera on a tripod.
2 Set the mode dial to Av, Tv, TAv, or M, and then take a test shot.
Set the aperture value, shutter speed, focus, ISO sensitivity, and white balance, and then check the composition. This exposure is maintained in images
are merged.
3 In the [Shooting] menu, select [Interval Composite].
4 Press the !" buttons to select an
item, and then change its setting.
Interval Sets the shooting interval from the shortest value (Min.) up to 60 minutes.
Save Interval Composite
Img.
Sets how the images are saved.
[Off]: Saves only the merged image.
[Save Each Image]: Saves both the unmerged image and merged image in
JPEG format.
[Save in process]: Saves each image at the point it is merged in JPEG format.
5 Press the MENU/OK button.
[Interval Composite] appears on the shooting screen.
1
Various Shooting Functions
77
Page 80

6 Press the shutter release button fully.
The first image is taken, and additional images are taken continuously at the
set interval.
To check the images being merged, press the shutter release button halfway.
If the shutter release button is pressed fully, the images merged up to that
point are saved as they are, and the interval composite shooting starts with
a new image.
1
7 Press the MENU/OK button to end shooting.
Various Shooting Functions
The merged image is saved.
Caution -------------------------------------------------------------------------------------------------------
• The image at the time of pressing the MENU/OK button during shooting is not merged.
• The flash cannot be used with this function.
• The ISO sensitivity cannot be set to higher than ISO 1600.
• The shutter speed cannot be set to longer than 60 seconds.
• For the RAW images taken with Interval Composite when [Ambient Brightness] of the [Shooting]
menu is set to [Normal], [Original] cannot be selected for [Ambient Brightness] of [RAW Development] of the [Playback] menu.
• [Vignetting] set in [Effect] or [Image Settings] of the [Shooting] menu is invalid.
Note -----------------------------------------------------------------------------------------------------------
• The values of the following settings are fixed when the first image is taken.
• ISO sensitivity when set to [Auto] or [Auto-Hi]
• White balance value when set to [Auto]
• AF operation is only performed for the first image.
• When [Focus] of the [Shooting] menu is set to [Subj. Tracking], it works as [Multi AF] during the
interval composite shooting.
• The self-timer can only be used for the first image. [Custom Self-Timer] cannot be used.
• If shooting the light trails of stars, setting the [Focus] of the [Shooting] menu to [∞] and the [Interval] to [Min.] will yield clear images. Also, when taking test shots, check that the stars appear as
points of light. Those points of light will be recorded as light trails when merged.
• During shooting in a dark location, using the optional external viewfinder (GV-1/GV-2) is convenient.
78
Page 81

Using the Flash
Setting the Flash Mode
Automatically fires the flash when the subject is poorly lit or backlit. (Default set-
Auto
Flash On
Flash Synchro.
Manual Flash
Red-Eye Flash Auto
Red-Eye Flash On
Red-Eye Flash Synchro.
Wireless
ting)
Always fires the flash.
Fires the flash with the shutter speed slowed. Use when taking nightscape pictures
that include people. Use of a tripod is recommended to prevent blur.
Fires the flash with intensity set in [Manual Flash Amount] of the [Shooting] menu.
(p.82)
Reduces “red-eye” in portraits taken with the flash.
Forces the flash to fire while reducing the red-eye phenomenon.
Fires the flash with the shutter speed slowed while reducing the red-eye phenomenon.
Fires the PENTAX auto flash (AF540FGZ II, AF360FGZ II, AF540FGZ, or AF360FGZ)
placed separately from the camera. (p.168)
1 Slide the FOPEN switch downward.
The flash opens.
1
Various Shooting Functions
79
Page 82

2 Press the F ($) button.
The flash mode setting screen appears.
1
3 Press the #$ buttons to change the
Various Shooting Functions
flash mode.
The symbol appears on the shooting screen.
Note -----------------------------------------------------------------------------------------------------------
• If the ISO sensitivity is set to [Auto], the range the flash light will reach is approximately 20 cm to
3.0 m from the front edge of the lens.
• The flash fires a pre-flash to increase the AE accuracy. The pre-flash does not fire when set to [Manual
Flash].
• The flash intensity can be adjusted in [Flash Exposure Compensation] of the [Shooting] menu.
(p.81)
• For the external flash, see p.167.
Caution -------------------------------------------------------------------------------------------------------
• The flash mode cannot be changed when the flash cover is closed.
• The flash does not fire in the following cases.
• In Continuous Mode
• During Auto Bracket
• During Interval Composite
• In 3 mode
• Do not open the flash if using an external flash, conversion lens, or hood.
80
Page 83

Adjusting the Intensity of the Flash
The intensity of the flash can be adjusted.
1 In the [Shooting] menu, select [Flash Exposure Compensation],
and then press the $ button.
The [Flash Exposure Compensation] screen appears.
2 Press the X/Y button to set a value.
The intensity can be set in the range from
–2.0 EV to +2.0 EV in increments of 1/3EV.
3 Press the MENU/OK button.
The set value appears on the shooting screen.
Note -----------------------------------------------------------------------------------------------------------
• When the flash mode is set to [Manual Flash], the value set for [Flash Exposure Compensation] is
invalid.
• In the [Key Custom Options] menu, [Flash Comp.] can be registered to use to the ADJ. lever and the
Fn1, Fn2, and Effect buttons. (p.120, p.122)
1
Various Shooting Functions
81
Page 84

Setting the Flash Intensity for Manual Flash
The intensity of the internal flash can be set for when the flash mode is set
to [Manual Flash].
1 In the [Shooting] menu, select [Manual Flash Amount], and then
press the $ button.
1
2 Press the !" buttons to select a value.
Various Shooting Functions
You can select from the following fractions of the maximum flash intensity:
[Full], [1/1.4], [1/2], [1/2.8], [1/4], [1/5.6], [1/8], [1/11], [1/16], [1/22], [1/32], and
[1/64].
3 Press the MENU/OK button.
If the flash mode is set to [Manual Flash], the
set value appears on the shooting screen.
Note -----------------------------------------------------------------------------------------------------------
• In the [Key Custom Options] menu, [Flash Amount] can be registered to use to the ADJ. lever and the
Fn1, Fn2, and Effect buttons. (p.120, p.122)
Setting the Timing for Firing the Flash
You can set the timing at which the flash fires in [Flash Synchro Settings] of
the [Shooting] menu.
1st Curtain Fires the flash immediately after the exposure starts. (Default setting)
2nd Curtain Fires the flash just before the exposure ends. When shooting a subject in motion at a low shut-
ter speed, this makes it possible to naturally express the subject’s motion as a trail of light.
82
Page 85

Taking Images with Unique Atmosphere
Images with varied saturation and contrast can be taken.
Effect
The settings such as the hue can be changed to take distinctive images.
Takes a black and white image.
Black & White
B&W (TE)
Hi-Contrast B&W
Cross Process
Positive Film
Bleach Bypass
Retro
Miniaturize
Shift Crop
High Key
The [Contrast], [Sharpness], and [Vignetting] can be set.
Adds tint to black-and-white images.
The [Toning Effect], [Saturation], [Contrast], [Sharpness], and [Vignetting] can
be set.
Takes images with stronger contrast than [Black & White]. Makes it possible to
take images with a grainy feel, such as that created by using ultra-high-sensitivity film in a film camera or by push processing film at the development stage.
The [Contrast], [Sharpness], and [Vignetting] can be set.
Takes images with tones that differ from the actual colors.
The [Hue], [Saturation], [Contrast], [Sharpness], and [Vignetting] can be set.
Takes highly saturated images like those taken with positive film.
The [Saturation], [Contrast], [Sharpness], and [Vignetting] can be set.
Takes images with low saturation and high contrast.
The [Hue], [Saturation], [Contrast], [Sharpness], and [Vignetting] can be set.
Takes images that look like old photos.
The [Saturation], [Contrast], [Sharpness], and [Vignetting] can be set.
Takes images that make the landscape look as if it has been miniaturized.
The [Toning Effect], [Saturation], [Contrast], [Sharpness], and the position and
range of blurring in the image can be set. (p.87)
Cuts out the upper or lower area of the image with a ratio of width to length
of 1:1 when the camera is held vertically. You can select which area to cut out
with the Fn2 button.
Takes images with a bright atmosphere.
The [Saturation] can be set.
1
Various Shooting Functions
83
Page 86

Takes images finished like a painting with enhanced fine contrast.
HDR Tone
Clarity
1
Various Shooting Functions
Brilliance
Slight
Vibrant
Bright
Portrait
The [Toning Effect], [Saturation], and [Vignetting] can be set.
Takes images with enhanced subject texture and surface details.
The [Toning Effect], [Clarity], [Saturation], and [Vignetting] can be set.
Takes images with adjusted subject brilliance.
The [Brilliance], [Saturation], [Contrast], [Sharpness], and [Vignetting] can be
set.
Takes slightly colored images.
The [Saturation], [Contrast], [Sharpness], and [Vignetting] can be set.
Takes images with quaint and vibrant shades of color.
The [Saturation], [Contrast], [Sharpness], and [Vignetting] can be set.
Takes sharp images.
The [Saturation], [Contrast], [Sharpness], and [Vignetting] can be set.
Takes images with optimum color for human skin.
The [Saturation], [Contrast], [Sharpness], and [Vignetting] can be set.
The focus mode changes to “Face recognition priority AF”.
84
Page 87

1 In the [Shooting] menu, select [Effect], and then press the $
button.
2 Press the !" buttons to select the setting.
3 Press the Fn2 button.
4 Press the !" buttons to select the
item, and then press the #$
buttons to set the value.
5 Press the MENU/OK button twice.
The symbol appears on the shooting screen.
1
Various Shooting Functions
85
Page 88

Caution -------------------------------------------------------------------------------------------------------
• If [Effect] is set, the settings for [Image Settings] are invalid.
• [Vignetting] cannot be set in 3 mode.
• If [Interval Composite] is set in the [Shooting] menu, [Vignetting] is invalid.
• Settings made in [Effect] are not applied to RAW images.
• [Effect] cannot be used with the following functions.
Function Effect
1
Various Shooting Functions
5 mode Shift Crop
3 mode Hi-Contrast B&W, Miniaturize, Shift Crop, High Key, HDR Tone,
Multiple Exposure Shooting,
Interval Composite
• Depending on the effects that have been set, the following functions become invalid.
Effect Invalid function
Hi-Contrast B&W Continuous Mode
Hi-Contrast B&W, Cross Process,
Positive Film, Bleach Bypass,
Retro, Miniaturize
Miniaturize, HDR Tone, Clarity,
Brilliance
Shift Crop Focus ([Multi AF], [Spot AF], [Subj. Tracking]), Continuous AF,
• When [Vignetting] is set, the speed for [Continuous Mode] becomes slow.
Clarity, Brilliance
Miniaturize, HDR Tone, Clarity, Brilliance
Focus ([Subj. Tracking])
Continuous Mode, Auto Bracket ([AE-BKT 1/3EV], [AE-BKT
1/2EV], [DR-BKT])
Auto Bracket ([Effect-BKT])
Note -----------------------------------------------------------------------------------------------------------
• In the [Key Custom Options] menu, [Effect] can be registered to use to the ADJ. lever and the Fn1,
Fn2, and Effect buttons. (p.120, p.122)
[Effect] is registered to the Effect button as the default setting.
86
Page 89

Shooting with Miniaturize
Images that give the impression that they are close-ups of a miniature can
be taken. This mode is effective when shooting from a high vantage point
while looking down at a diagonal angle.
1 In [Effect] of the [Shooting] menu, select [Miniaturize].
To change settings such as [Toning Effect], press the Fn2 button.
2 Press the MENU/OK button.
The miniaturize shooting screen appears.
The areas outside of the unblurred (focus area) are shown in a semi-transparent gray.
3 Press the Fn2 button.
The screen for setting the position and range of blurring appears.
4 Press the !" buttons to move the
position of the focus area.
Change the vertical/horizontal orientation
of the focus area by pressing the Fn2 button
while this screen is displayed.
5 Press the #$ buttons to set the width of the focus area.
6 Press the MENU/OK button.
The shooting screen reappears.
Note -----------------------------------------------------------------------------------------------------------
• The amount of blurring in the image shown on the confirmation screen immediately after shooting
differs slightly from that of the actual image.
1
Various Shooting Functions
87
Page 90

Image Settings
Images can be taken with adjusted saturation, contrast, sharpness, and vignetting.
Increases the contrast, sharpness, and saturation beyond [Standard] for an image quality that feels solid.
Takes images with normal image quality.
The [Saturation], [Contrast], [Sharpness], and [Vignetting] can be set.
1
Various Shooting Functions
Vivid
Standard
Setting1/Setting2
1 In the [Shooting] menu, select [Image Settings], and then press
the $ button.
2 Press the !" buttons to select the setting.
When [Vivid] or [Standard] is selected, proceed to Step 6.
3 Press the Fn2 button.
4 Press the !" buttons to select the
item, and then press the #$
buttons to set the value.
5 Press the MENU/OK button.
The screen in Step 2 reappears.
6 Press the MENU/OK button.
The symbol appears on the shooting screen.
88
Page 91

Caution -------------------------------------------------------------------------------------------------------
• Settings made in [Image Settings] are not applied to RAW images.
• If [Interval Composite] is set in the [Shooting] menu, [Vignetting] is invalid.
Note -----------------------------------------------------------------------------------------------------------
• In the [Key Custom Options] menu, [Image Settings] can be registered to use to the ADJ. lever and the
Fn1, Fn2, and Effect buttons. (p.120, p.122)
Changing the Ambient Brightness
In [Ambient Brightness] of the [Shooting] menu,
[Original] or [Normal] can be selected. If [Ambient Brightness] is set to [Original], you can take
pictures with the ambient light quantities comparable to those of the GR film cameras.
The symbol appears on the shooting screen
when [Original] is selected.
Note -----------------------------------------------------------------------------------------------------------
• The RAW images can be developed with [Normal] or [Original] setting in [RAW Development] of the
[Playback] menu. The RAW images taken with Interval Composite when [Normal] is selected cannot
be developed with [Original] setting.
Caution -------------------------------------------------------------------------------------------------------
• The ambient brightness cannot be changed in 5 mode.
• When [Crop] is set in the [Shooting] menu, the [Ambient Brightness] setting may be ineffective.
1
Various Shooting Functions
89
Page 92

Other Shooting Functions
Adding the Date to Still Images
If [Date] or [Date and Time] is selected in [Date Imprint] of the [Shooting]
menu, either the date (Year/Month/Day) or the date and time (Year/Month/
Day Hour:Minute) is imprinted on the lower-right corner of still images.
1
The symbol appears on the shooting screen
Various Shooting Functions
when [Date Imprint] is on.
Caution -------------------------------------------------------------------------------------------------------
• [Date Imprint] is not available if the date and time have not been set. Set the date and time beforehand. (p.29)
• The date cannot be imprinted on RAW images or movies.
• The date imprinted in an image cannot be deleted.
90
Page 93

Recording Movies
Movies with sound can be recorded.
Movies are recorded as MOV files.
Setting the Movie Format
1 Turn the mode dial to 3.
The mode switches to 3 mode.
2 Press the MENU/OK button.
The [Shooting] menu of the 3 mode appears.
3 Select [Movie Format], and then press the $ button.
4 Press the !"#$ buttons to select
[Still Image Size] or [Frame Rate].
The following settings are available. The frame rates that can be selected depend on the [Still Image Size] setting.
Frame Rate (frames/second)
Still Image Size
w (1920 × 1080) No No Yes Ye s Yes
x (1280 × 720) Yes Yes Ye s Yes Ye s
n (640 × 480) No No Ye s Ye s Ye s
60 50 30 25 24
5 Press the MENU/OK button twice.
The shooting screen reappears.
Note -----------------------------------------------------------------------------------------------------------
• In the [Key Custom Options] menu, [Frame Rate] can be registered to use to the Fn1, Fn2, and Effect
buttons. (p.122)
• The screen may flicker if shooting under fluorescent lighting. The amount of flickering can be minimized by setting the power frequency for your region in [Reduce Fluorescent Flicker] of the [Shooting]
menu in 3 mode.
1
Various Shooting Functions
91
Page 94

Recording Movies
1 Turn the mode dial to 3.
2 Press the shutter release button.
Movie recording starts.
1
Various Shooting Functions
While recording, the “REC” indicator, recording time, and time remaining are displayed.
3 Press the shutter release button again.
Recording ends.
Caution -------------------------------------------------------------------------------------------------------
• If the camera is operated while shooting, the operation sounds are also recorded.
• The following functions are not available in 3 mode.
• Flash
• FA/Move Target
Note -----------------------------------------------------------------------------------------------------------
• If the Fn2 button is pressed while shooting, recording is paused. If the Fn2 button is pressed again,
recording resumes.
• Each movie can be a maximum of 25 minutes long or up to 4 GB in size.
• The maximum recording time per shooting depends on the capacity of the memory card. (p.164)
Shooting may end even before the maximum recording time is reached.
• The amount of time remaining is calculated based on the amount of memory available and may not
diminish at an even rate.
• Use a memory card of Speed Class 6 or higher for recording movies.
• Use the battery with sufficient power.
92
Page 95

Playing Back Movies
1 Press the 6 button.
The mode switches to playback mode.
2 Press the #$ buttons to select a
movie.
Movies are indicated by 3 icon.
The first frame of the movie is displayed as a
still image.
3 Press the ! button.
Playback starts.
The progress indicator and elapsed time are
displayed.
You can perform the following operations.
! button Pauses and resumes playback.
" button Stops playback.
X/Y button Adjusts the volume.
#$ buttons While playback is paused: Reverses and forwards a frame.
#$ buttons D uring playback: Fast-reverses and fast-forwards playback.
Fn2 button While playback is paused: Saves a still image in JPEG format.
1
Various Shooting Functions
Note -----------------------------------------------------------------------------------------------------------
• The speed for Fast Forward and Fast Rewind switches each time the button is pressed.
93
Page 96

Clipping Movies
The unnecessary parts at the beginning or end of a movie can be deleted,
and the movie can be saved as a new file.
1 Display the movie to be edited in playback mode, and then
press the MENU/OK button.
1
Various Shooting Functions
The [Playback] menu appears.
2 Select [Clip Movie File], and then press the $ button.
The [Clip Movie File] screen appears.
3 Press the ADJ. lever to select either
the beginning or the end of the
movie.
The point highlighted in yellow indicates
which has been selected.
If the Fn2 button is pressed while this screen
is shown, an explanation of the operations
appears. If the Fn2 button is pressed again,
the previous screen reappears.
4 Press the #$ buttons or the ADJ. lever left or right to move the
point to be deleted.
The yellow point moves. You can specify the point in increments of 1 second.
5 Press the MENU/OK button.
A new movie file is saved with the unnecessary parts deleted.
94
Page 97

2 Playback Functions
Displaying Images in Thumbnail View
Pressing the 8 (X)/9 (Y) button in playback mode displays multiple images in thumbnail view.
20-image view 81-image view
In thumbnail view, you can perform the following operations.
!"#$ buttons Selects an image.
ADJ. lever Displays the selected image in single image view.
DISP. button Changes between single image selection and page selec tion.
Displaying Images in a Slide Show
You can display taken images sequentially.
Select [Slide Show] in the [Playback] menu, and then press the $ button to
start a slide show.
If you want to stop the slide show in progress, press any button. The slide
show is displayed repeatedly until stopped.
Note -----------------------------------------------------------------------------------------------------------
• Each still image is displayed for three seconds.
• In the case of a movie, all of the frames of the movie are played back and then the next image is
displayed.
2
Playback Functions
95
Page 98

Displaying Images in Enlarged View
You can display still images enlarged.
In single image view, you can perform the following operations.
2
8 (X) button/
Playback Functions
Up-down dial to the right
9 (Y) button/
Up-down dial to the left
!"#$ buttons
Pushing down the ADJ. lever/
MENU/OK button (in enlarged
view)
Pressing the ADJ. lever left
or right
DISP. button In enlarged view: Turns the information display on/off.
Note -----------------------------------------------------------------------------------------------------------
• If you set [Target Zoom Play] of the [Setup] menu to [On], the image is enlarged centering on the
position to which the target shifted during shooting.
• The maximum magnification of enlarged view differs depending on the size of the image.
• Movies cannot be enlarged.
• The functions of the up-down dial and ADJ. lever during playback mode can be changed in [Playback
Mode Dial Options] of the [Key Custom Options] menu.
Setting1 (Default setting) Displays enlarged view. Displays next/previous enlarged
Setting2 Moves enlarged area up/down. Moves enlarged area left/right.
Enlarges the image.
In enlarged view: Reduces the image.
In enlarged view: Moves the enlarged area.
Enlarges the image to the magnification (4×, 8×, or 16×) set in [One Press
Zoom Ratio] of the [Setup] menu.
In enlarged view: Displays the previous or next image without changing the
magnification (returns to actual size in the case of a movie).
Up-down dial ADJ. lever
frame.
96
Page 99

Organizing Files
Deleting Files
Deleting One File
1 Display the image to delete in playback mode.
2 Press the D button.
3 Press the !" buttons to select
[Delete One].
You can change the image with the #$ buttons.
For images taken with p, [Delete
RAW+JPEG], [Delete JPEG Only], and [Delete
RAW Only] can be selected.
4 Press the MENU/OK button.
The image is deleted.
To delete another image, repeat Steps 3 and 4.
To end the process, select [Cancel].
Deleting All Files
1 Press the D button in playback mode.
2 Press the !" buttons to select [Delete All] and then press the
MENU/OK button.
The deletion confirmation screen appears.
2
Playback Functions
3 Press the $ button to select [Yes], and then press the MENU/OK
button.
Deleting Multiple Files Simultaneously
1 Press the D button in playback mode.
When in 20-image or 81-image view, proceed to Step 3.
97
Page 100

2 Select [Delete Multi], and then press the MENU/OK button.
3 Select [Sel. Indiv.] or [Sel. Range], and then press the MENU/OK
button.
4 Press the !"#$ buttons to select
images, and then press the MENU/OK
button.
The trash symbol is displayed in the bottom
left corner of the thumbnail.
2
Playback Functions
If [Sel. Range] is selected, select the image
that is the starting point of the range.
If the ADJ. lever is pressed, the selection screen in Step 3 reappears.
If [Sel. Indiv.] is selected, proceed to Step 6.
5 Press the !"#$ buttons to select
the image that is the ending point
of the range, and then press the
MENU/OK button.
Repeat Steps 4 and 5 to specify all of the
ranges.
6 Press the D button.
The deletion confirmation screen appears.
7 Press the $ button to select [Yes],
and then press the MENU/OK button.
A message appears to indicate processing
is being performed, and then the previous
screen reappears when deleting is complete.
Note -----------------------------------------------------------------------------------------------------------
• A folder cannot be deleted.
98
 Loading...