

Page 1

Camera User Guide
The product serial number may be found on the bottom
of the camera.
Before You Begin
Before using your camera, take a few moments to familiarize yourself with camera controls and displays (pages 1–8). Refer to this sec-
tion as you read through the rest of the manual.
Basic Photography and Playback
Read this section before using the camera for the first time. It covers the
steps involved in readying the camera for use, taking photographs,
and playing them back (pages 9–38).
Reference
Read this section for information on topics not covered in “Basic Photography
and Playback.” It covers advanced shooting and playback options and
describes how to print photographs, customize camera settings,
and copy pictures to a computer (pages 39–173).
The rechargeable battery needs to be charged before use. The
battery is not charged at the time of purchase.
Page 2
Package Contents
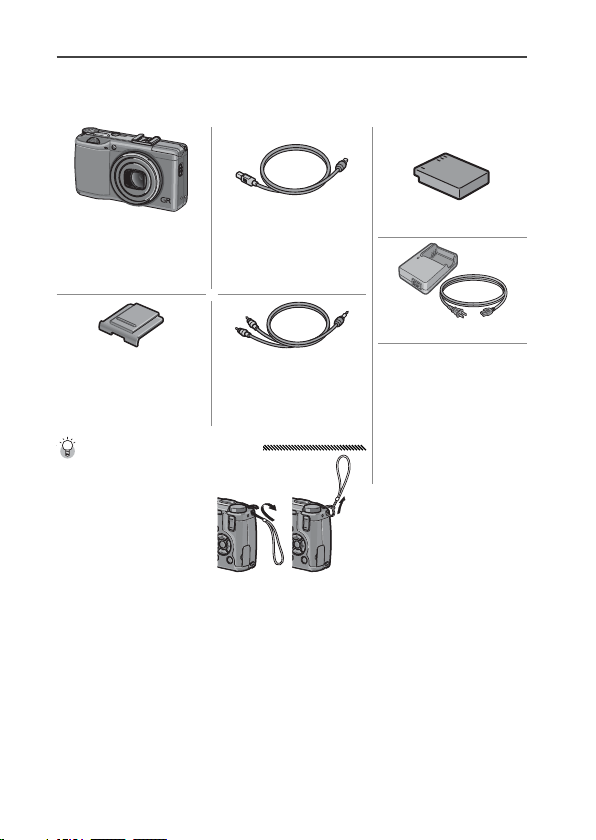
Package Contents
Before using your Ricoh digital camera, confirm that the
package contains the items listed below.
GR DIGITAL III
The serial number may
be found on the bottom of the camera.
Hot shoe cover
The cover comes
mounted on the camera
hot shoe.
Tip: Attaching the Hand Strap
Pass the small loop
through the strap
eyelet on the camera
body and pass the
large loop through
the small loop as
shown.
USB cable with mini-B
connector
Connect the camera to
a computer or printer.
A/V cable
Connect the camera to
a TV.
DB-65 rechargeable battery
BJ-6 battery charger
• CD: Contains software
and a Software User
Guide.
• Camera User Guide (this
manual)
• Safety Precautions
• Hand strap
ii
Page 3

Notices
Notices
Safety precautions
Test shots
Copyright
Exemption from liability
Warranty
Radio inter ference
•
Safety precautions: Read all safety precautions thoroughly to ensure safe
use.
Test shots: Take test shots to ensure that the camera is working properly
•
before taking photos on important occasions.
•
Copyright: Reproduction or alteration of copyrighted documents, magazines, and other materials, other than for personal, home, or other
similarly limited purposes, without the consent of the copyright holder, is prohibited.
•
Exemption from liability: Ricoh Co., Ltd. assumes no liability for failure to
record or display images as a result of product malfunction.
•
Warranty: This product is manufactured to local specifications and the
warranty is valid within the country of purchase. The manufacturer
assumes no responsibility for servicing the product in other countries
or bearing any expense thereby incurred.
•
Radio interference: Operating this product in the vicinity of other electronic equipment may adversely affect both the camera and the other
device. Interference is particularly likely if the camera is used in close
proximity to a radio or television. This can be resolved by moving the
camera as far as possible from the other device, reorienting the radio
or television antenna, or plugging the radio or television into a different outlet.
© 2009 RICOH CO., LTD. All rights reserved. This publication may not be
reproduced in whole or in part without Ricoh’s express written permission.
Ricoh reserves the right to change the contents of this document at any
time without prior notice.
Every effort has been made to ensure the accuracy of the information in
this document. Should you nevertheless notice any errors or omissions,
we would be grateful if you would notify us at the address listed on the
back cover of this booklet.
Microsoft, Windows, Windows Vista, and Internet Explorer are registered
trademarks of Microsoft Corporation in the United States of America and
other countries. Macintosh and Mac OS are registered trademarks of Apple
Inc. in the United States of America and other countries. Adobe, the Adobe
logo, and Adobe Reader are trademarks of Adobe Systems Incorporated.
All other trade names mentioned in this document are the property of
their respective owners.
iii
Page 4
Product Manuals
Product Manuals
Camera User Guide
(this booklet)
Software User Guide
(pdf file)
The following manuals are provided with the GR DIGITAL III:
Camera User Guide
The product serial number may be found on the bottom
of the camera.
Before You Begin
Before using your camera, take a few moments to familiarize yourself with camera controls and displays (pages 1–8). Refer to this sec-
tion as you read through the rest of the manual.
Basic Photography and Playback
Read this section before using the camera for the rst time. It covers the
steps involved in readying the camera for use, taking photographs,
and playing them back (pages 9–38).
Reference
Read this section for information on topics not covered in “Basic Photography
and Playback.” It covers advanced shooting and playback options and
describes how to print photographs, customize camera settings,
and copy pictures to a computer (pages 39–173).
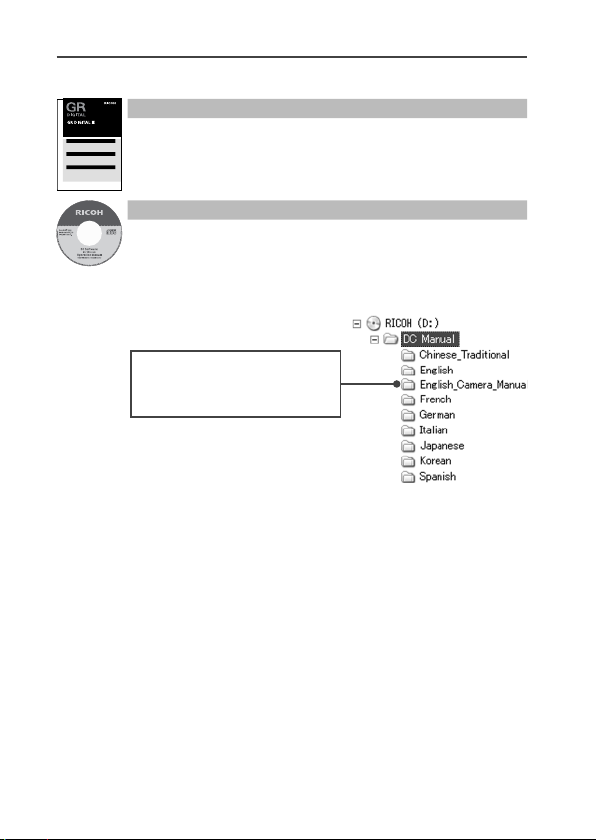
Camera User Guide
This guide describes how to use your camera and install the
supplied software. The English version of the manual is also
available in pdf format on the supplied CD.
(this booklet)
Software User Guide
(pdf file)
The Software User Guide describes how to copy pictures from
your camera to a computer for display and editing. It is available in several languages, each in its own folder in the “DC
Manual” folder on the supplied CD. For ease of reference, copy
the pdf file from the CD to your computer hard disk.
Note: This folder contains a pdf
copy of the English Camera User
Guide.
“Irodio Photo & Video Studio” image viewing and editing software
is also included with the camera. For information on using this
software, see the Help menu in Irodio Photo & Video Studio or
telephone one of the following customer support centers:
• North America (U. S. A.): +1–800–458–4029 (toll free)
• U. K., Germany, France, and Spain: +800–1532–4865 (toll free)
• Other European countries: +44–1489–564–764
• China: +86–21–5385–3786
• Other Asian countries: +63–2–438–0090
Business hours: 9:00 AM to 5:00 PM
iv
Page 5

Table of Contents
Table of Contents
Before You Begin
1
Basic Photography and Playback
9
Package Contents ......................................................................................................ii
Notices .............................................................................................................................iii
Product Manuals ........................................................................................................ iv
Before You Begin
Read this section before using your camera for the first time.
Introduction .................................................................................... 2
Parts of the Camera ..................................................................................................2
Basic Photography and Playback
Read this section before using your camera for the first time.
First Steps .......................................................................................10
Charging the Battery .............................................................................................10
Inserting the Battery .............................................................................................12
Inserting Memory Cards ..................................................................................... 13
Turning the Camera on and Off ..................................................................... 14
Basic Setup .................................................................................................................. 16
Taking Photographs .....................................................................17
Holding the Camera .............................................................................................. 17
Taking a Photograph ............................................................................................. 18
Digital Zoom ..............................................................................................................22
Close-ups (Macro Mode) ....................................................................................23
Flash Photography ................................................................................................. 24
The Self-Timer ............................................................................................................ 26
The Tilt Indicator ......................................................................................................27
Viewing and Deleting Photographs..........................................29
Viewing Photographs ...........................................................................................29
Deleting Photographs .......................................................................................... 33
O (DISP.) Button .........................................................................................36
The
1
9
v
Page 6

Reference 3
Reference 399
Read this section for more information on camera functions.
More on Photography .................................................................40
Mode P: Program Shift ......................................................................................... 40
Mode A: Aperture Priority ..................................................................................42
Mode S: Shutter Priority ...................................................................................... 43
Mode M: Manual Exposure ............................................................................... 44
4 Mode: Matching Settings to the Scene....................................46
“MY” Modes: Using Custom Settings ..........................................................53
The Shooting Menu ...............................................................................................54
Movies ............................................................................................87
3 Recording Movies ...........................................................................................87
3 Viewing Movies................................................................................................. 90
More on Playback .........................................................................91
The Playback Menu ................................................................................................91
Viewing Pictures on TV ..................................................................................... 104
Printing Photographs ................................................................106
Connecting the Camera .................................................................................. 106
Printing ....................................................................................................................... 108
The Setup Menu ..........................................................................112
Key Custom Settings/Setup Menu Options ........................................ 114
Copying Pictures to a Computer ..............................................136
Windows .................................................................................................................... 136
Macintosh ................................................................................................................. 148
Technical Notes ...........................................................................150
Troubleshooting ................................................................................................... 150
Specifications .......................................................................................................... 158
Optional Accessories .........................................................................................162
Using the Camera Abroad .............................................................................. 169
Precautions for Use ............................................................................................. 169
Camera Care and Storage ............................................................................... 171
Warranty and Servicing .................................................................................... 172
NOTICES .......................................................................................................173
Index .............................................................................................174
vi
Page 7

Before You Begin
Read this section before using your camera
for the first time.
Introduction .......................................................2
FIRST-TIME USER? READ THIS.
1
1
Page 8
Introduction
Parts of the Camera
1
2
3
4
5
6
7
8
9
10
11
12
13
This manual describes how to take pictures and play them
back. To ensure that you get the most from your camera,
read this manual thoroughly before use and keep it han-
FIRST-TIME USER? READ THIS.
dy when using the product.
Parts of the Camera
For more information, refer to the page number to the
right of each item.
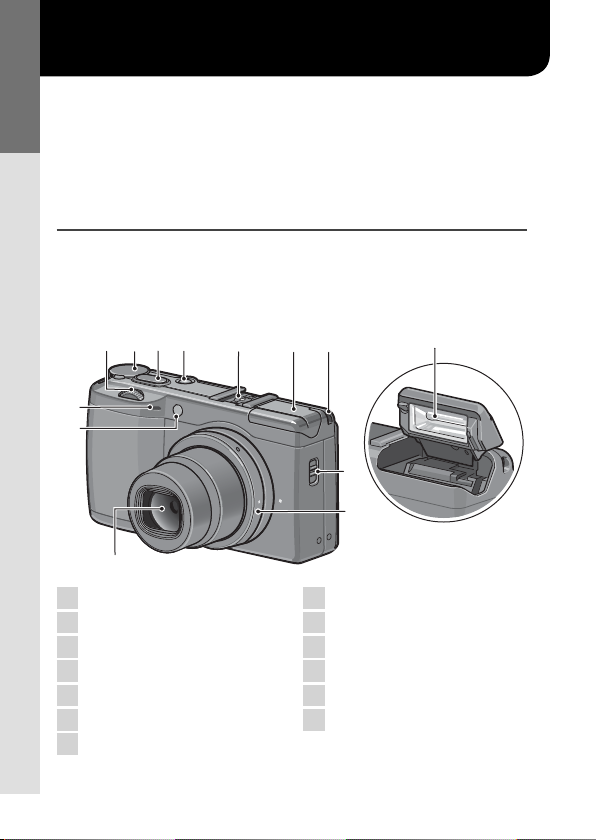
Front
1
234
10
11
12
1 Up -down dial ................................5
2 Mode dial ......................................4
3 Shutter-release button ....17, 18, 19
4 POWER button ................ 14, 15, 17
5 Hot shoe ................................ii, 164
6 Flash cover...................................24
7 Strap eyelet ...................................ii
5 67
8
9
8 Flash OPEN switch .......................24
9 Ring cap ....................................163
10 Microphone .................................87
11 AF auxiliary light .................26, 125
12 Lens .............................................17
13 Flash ............................................24
13
2
Page 9
Back
1
2
3
4
5
6
7
8
9
10
11
12
13
14
15
16
17
18
19
20
2
1
3
4
16 191817 20
15
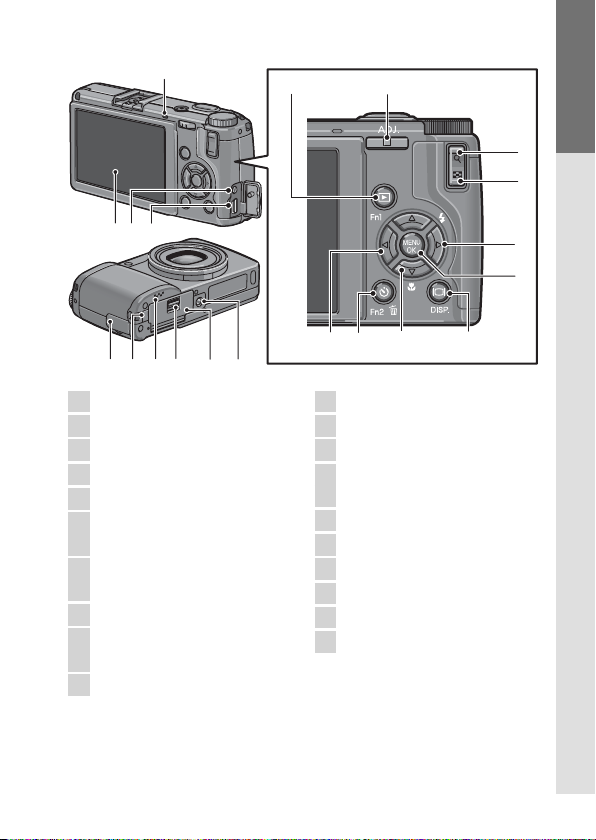
1 Picture display .......................... 6–8
2 Autofocus/flash lamp ...... 14, 18, 25
3 Connector for A/V cable .............104
4 Connector for USB cable ............107
5 ADJ. lever ................5, 78, 119–120
6 8 (enlarged view) button
................................ 22, 31, 32, 122
7 9 (thumbnail display) button
................................ 22, 31, 32, 122
8 $/F (flash) button ................ 5, 24
9 C/D button
................................ 47, 54, 91, 112
10 O (DISP.) button ....................36
13
12
11 "/N (macro) button.............5, 23
12 #/Fn1 (function 1) button ...5, 121
13 6 (playback) button ..... 15, 29, 91
14 t (self-timer)/Fn2 (function 2)/
15 Connector cover ................. 104, 107
16 DC power cable cover ................165
17 Speaker .................27, 90, 125–126
18 Release lever .................12, 13, 165
19 Battery/card cover ......... 12, 13, 165
20 Tripod screw hole ..................48, 61
5
11 10
14
D (delete) button...26, 33–35, 121
6
FIRST-TIME USER? READ THIS.
7
8
9
3
Page 10
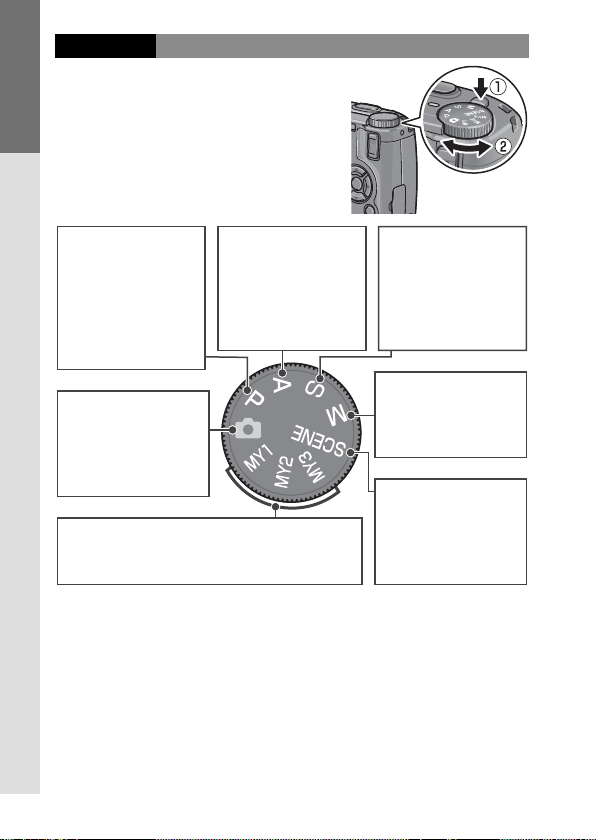
The Mode Dial
Before shooting, press the mode
dial lock release (q) and rotate
the mode dial to choose a shooting mode (w).
FIRST-TIME USER? READ THIS.
P (program shift): You
choose from combinations of shutter
speed and aperture that produce
the same exposure
(page 40).
5 (auto): The camera
sets shutter speed
and aperture for optimal exposure (page
17).
MY1, MY2, MY3 (“my settings”): Recall settings
saved using Reg. My Settings (pages 53,
114–116).
A (aperture priority): You
choose an aperture
and let the camera
adjust the shutter
speed for optimal exposure (page 42).
4
S (shutter priority): You
choose a shutter
speed and let the
camera adjust aperture for optimal exposure (page 43).
M (manual exposure):
You choose shutter
speed and aperture
(page 44).
4 (scene): Opti-
mize settings for the
current subject or
scene or shoot movies (pages 46–52).
Page 11
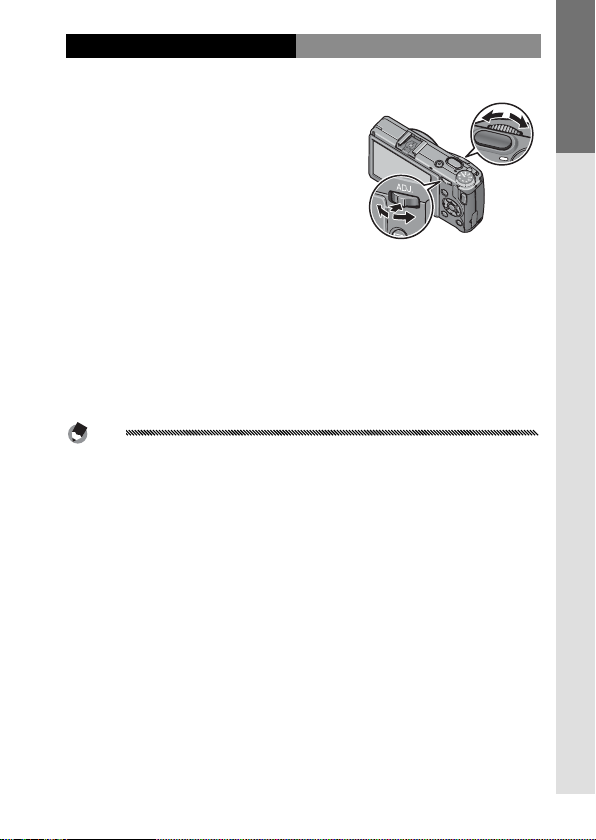
The Up-down Dial and ADJ. Lever
When viewing pictures or navigating the menus, you can use the
up-down dial in place of the
Up-down dial
!
and " buttons and the ADJ. lever
in place of the # and $ buttons.
The ADJ. lever and up-down dial
can also be used to select shutter
speed and aperture in P, A, S, and
ADJ. lever
M modes.
You can assign frequently-used shooting menu items to
the ADJ. lever for easy access. To display a shooting menu
item, center the ADJ. lever and press it in; you can then
use the lever and up-down dial to select an option as described on page 116.
Note
The M Mode Dial Options and Playback Mode Dial Options
items in the setup menu can be used to reverse the roles of the
up-down dial and ADJ. lever (page 123).
FIRST-TIME USER? READ THIS.
5
Page 12
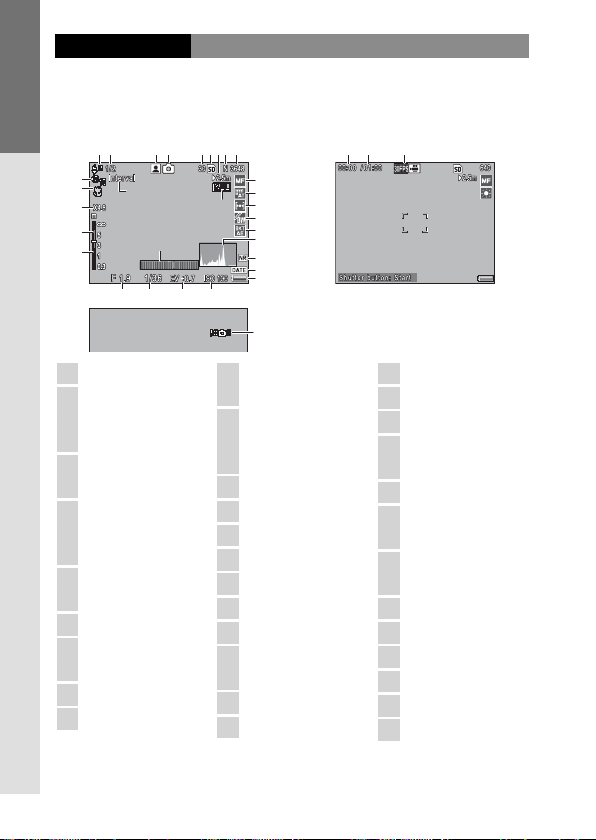
The Picture Display
30
25
1
2
3
4
5
6
7
8
9
10
11
12
13
14
15
16
17
18
19
20
21
22
23
24
25
26
27
28
29
30
31
32
33
34
The following indicators may be displayed during shooting and playback.
Shooting (still photography) Shooting (movie mode)
12
FIRST-TIME USER? READ THIS.
20
21
22
23
24
34567
25
25
30
30
89
10
11
191919
12
13
14
15
16
17
18
29282726
31
32 33
34
1 Flash mode ............ 24
2 Flash compensation/
manual flash level
.........................72, 73
3 Scene mode ........... 46
Continuous ...... 68–69
4 Shooting mode/
plus normal shooting
.....................4, 49, 50
5 Number of exposures
6 D estination ............ 13
7 Snap focus
remaining
*
.......... 161
distance ............59, 64
8 Picture quality ....... 57
9 Picture size ............ 57
10 Focus mode/full
press snap ........59, 64
11 White balance/
white balance
compensation ...79, 82
12 Metering ............... 65
13 Image setting ........ 66
14 Bracketing ............. 70
15 Histogram ........37, 38
16 Noise reduction ..... 74
17 Date imprint .......... 76
18 Battery level ............ 8
19 Autoexposure
lock ..................... 121
20 Self-timer .............. 26
21 Macro mode .......... 23
22 Zoom ..................... 22
23 Depth of field ........ 59
24 Focus bar ............... 59
25 Interval timer
shooting ................ 75
26 Aperture .....40, 42, 44
27 Shutter speed
...................40, 43, 44
28 Exposure
compensation ....... 77
29 ISO .........................84
30 Tilt indicator .......... 27
31 Blur warning ......... 27
32 Movie length ....... 161
33 Time available * .... 161
34 Frame rate ........87, 89
* Approximation only; actual capacity varies with shooting conditions and
make of memory card. Display shows “9999” when memory remains for
over 9,999 images.
6
Page 13
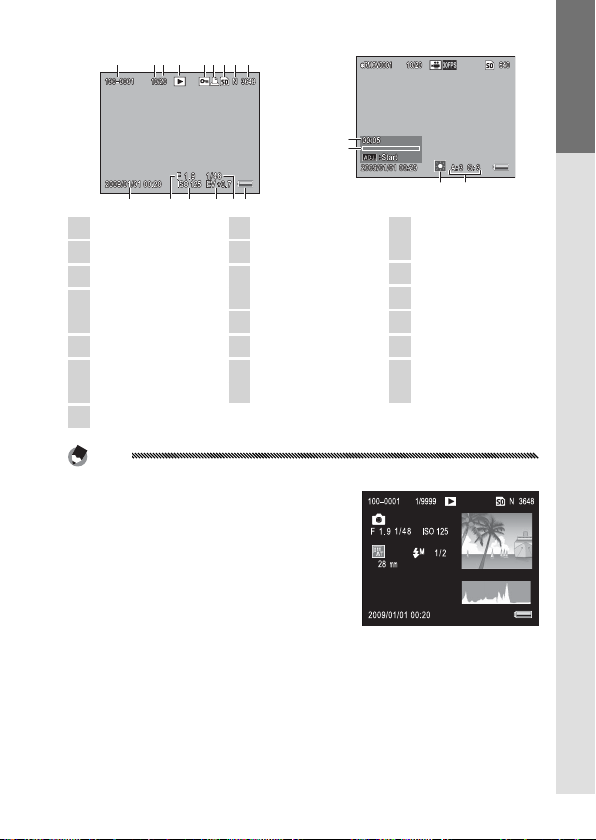
Playback (photographs) Playback (movies)
1
2
3
4
5
6
7
8
9
10
11
12
13
14
15
16
17
18
19
123456789
16
17
18 19
14 Shutter speed
...................40, 43, 44
15 Battery level ............ 8
16 Length/elapsed time
17 Progress indicator
18 White balance ....... 79
19 White balance
compensation .........82
1 File number
2 Current frame
3 Total frames
4 Playback mode
indicator
5 Protected image .... 92
6 DPOF print
indicator ................ 95
7 S ource ................... 13
1510 11 12 13 14
8 Picture quality ....... 57
9 Picture size ............ 57
10 Date of recording
.............................. 16
11 Aperture .....40, 42, 44
12 ISO .........................84
13 Exposure
compensation ....... 77
Notes
• The picture display may also display warnings and messages.
• Additional information can be viewed
by pressing the DISP. button (page 36).
FIRST-TIME USER? READ THIS.
7
Page 14

The Battery Level Indicator
Icon
Description
Icon
Battery level is shown by
the icon at the bottom
right corner of the picture
(green)
display.
FIRST-TIME USER? READ THIS.
Cautions
• The full battery indicator may
not appear or may appear
only briefly with NiMH batteries. Check the battery type
before use.
• may be displayed when the camera is powered by an AC
adapter. This is normal and does not indicate a malfunction.
(green)
(orange)
Description
Battery fully charged.
Battery partially discharged.
Low battery. Charge or
replace as soon as possible.
8
Page 15

Basic Photography and
Playback
Read this section before using your camera
for the first time.
First Steps .........................................................10
Taking Photographs........................................17
Viewing and Deleting Photographs ..............29
FIRST-TIME USER? READ THIS.
9
9
Page 16
First Steps
Charging the Battery
Prepare the camera for use.
Charging the Battery
FIRST-TIME USER? READ THIS.
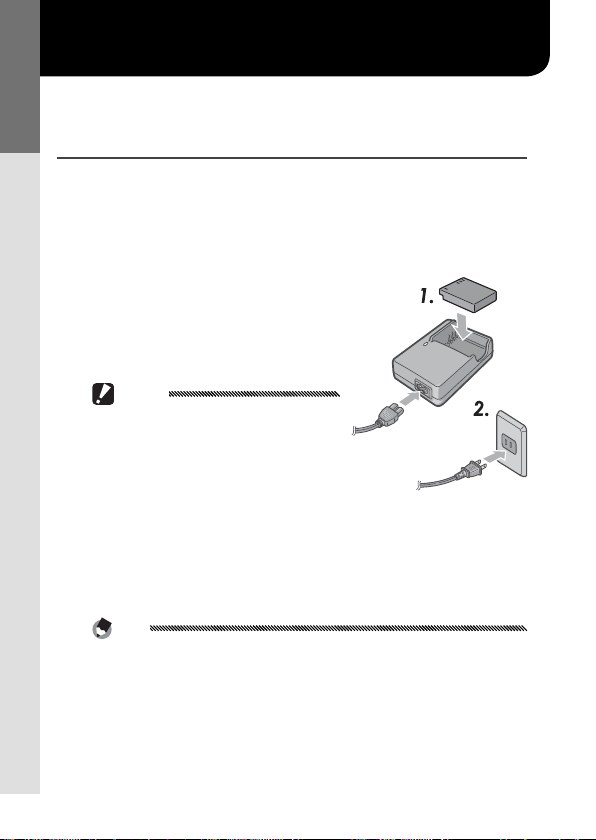
The rechargeable battery supplied with the camera is not
charged at shipment. Charge the battery in the supplied
BJ-6 battery charger before use.
Place the battery in the charger.
1
Place the battery label up
with the “+” and “–” labels oriented to match the labels on
the charger.
Caution
Be sure the battery is in the correct
orientation.
Plug the charger in.
2
The charger lamp will light
while the battery charges.
An exhausted battery will recharge in about two hours at
25 °C.
Note
If the charger lamp blinks, a battery or charger fault may have
occurred. Unplug the charger and remove the battery.
Remove the battery.
3
Charging is complete when the charger lamp turns
off. Unplug the charger and remove the battery.
10
Page 17
Compatible Batteries
The camera can be used with a DB-65 rechargeable Li-ion
battery (supplied; DB-60 rechargeable batteries can also
be used) or with a pair of AAA alkaline or rechargeable
nickel-metal hydride (NiMH) batteries.
Tip: Battery Capacity
Under normal conditions, about 370 shots can be taken with a fully-charged DB-65 battery. About 25 shots can be taken with a pair
of fresh AAA alkaline batteries manufactured by Panasonic. These
figures are based on tests conducted according to CIPA standards
under the following conditions: temperature 23 °C (73 °F); picture
display on; 10 shots taken with 30 seconds between shots and the
flash fired with every other shot; and the cycle repeated after the
camera has been turned off and then on again.
Cautions
• Rechargeable Li-ion batteries: Use only genuine DB-65 or DB-60 batteries. Do not use batteries not specifically designated by Ricoh
for use in this camera.
• Alkaline batteries: Battery life varies with make and storage conditions. Capacity drops at low temperatures.
• NiMH batteries: NiMH batteries are not charged at purchase and
gradually lose their charge over time. Charge before use. Note
that performance may be impaired immediately after purchase
or following an extended period of disuse, and that the batteries
may need to be used and recharged two or three times before
they will hold a charge.
• Manganese and Ni-Cd batteries can not be used.
• Batteries may be hot immediately after use. Before removing
batteries, turn the camera off and wait for them to cool down.
• Remove the battery if the camera will not be used for extended
periods.
FIRST-TIME USER? READ THIS.
11
Page 18
Inserting the Battery
Inserting the Battery
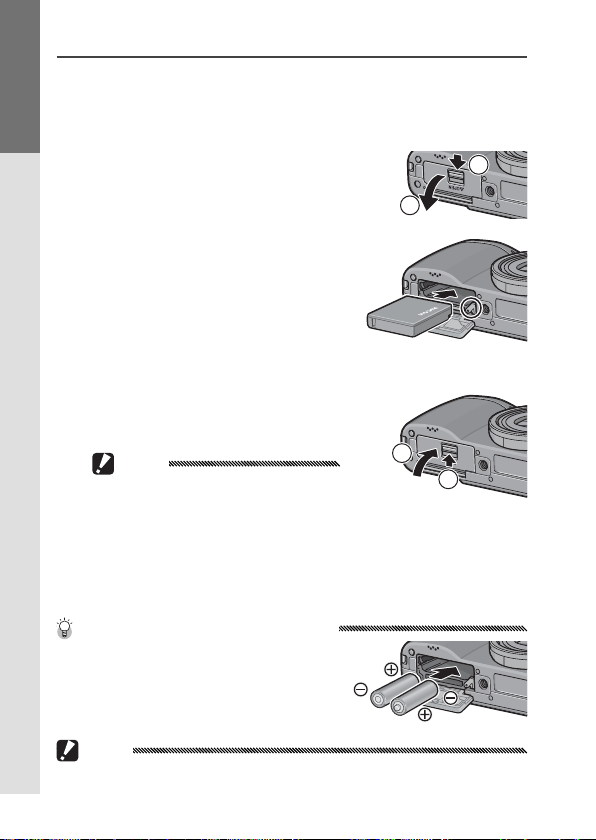
Be sure the camera is off before inserting or removing
batteries.
Open the battery/card cover.
1
FIRST-TIME USER? READ THIS.
Unlatch (q) and open (w)
the cover.
Insert the battery.
2
Using the battery to keep the
battery latch pressed to one
side, slide the battery in. The
latch will click into place when
the battery is fully inserted.
Close the battery/card cover.
3
Close (q) and latch (w) the
cover.
Caution
Be sure the cover is latched.
Removing the Battery
Unlatch and open the battery/card cover, then press and
release the latch and remove the battery by hand, being
careful not to drop it.
Tip: Inserting and Removing AAA Batteries
Insert in the orientation shown, press
the cover closed, and slide the release
lever to the closed position. To remove,
simply unlatch and open the cover.
Caution
If the camera will not be used for an extended period, remove the
batteries and store them in a cool dry place.
12
2
1
2
1
Page 19
Inserting Memory Cards
Inserting Memory Cards
Pictures can be stored in the camera’s 88 MB internal
memory, or optional SD and SDHC memory cards can
be used to store additional pictures. Internal memory is
used for recording and playback if no card is inserted; if a
card is inserted, the card will be used instead.
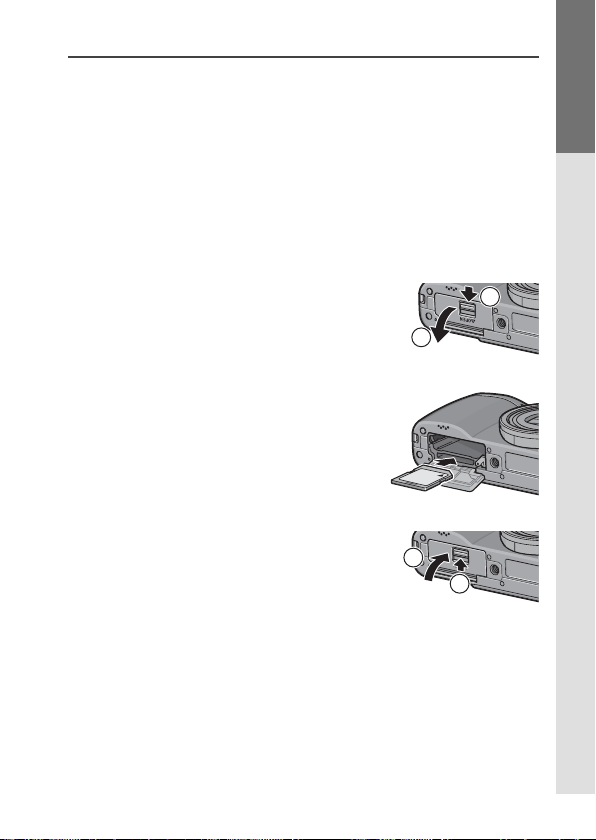
Before inserting or removing a memory card, be sure the
camera is off. To insert a memory card:
Open the battery/card cover.
1
Unlatch (q) and open (w)
the cover.
Insert the card.
2
Holding the memory card in
the orientation shown, slide it
in until it clicks into place.
Close the battery/card cover.
3
Close (q) and latch (w) the
cover.
Removing Memory Cards
Unlatch and open the battery/card cover and press the
memory card in to eject it. The card can then be removed
by hand.
2
1
1
2
FIRST-TIME USER? READ THIS.
13
Page 20
Cautions
Turning the Camera on and Off
• Pictures will not be recorded to internal memory when a memory card is inserted, even if the memory card is full.
• Keep the memory card contacts clean.
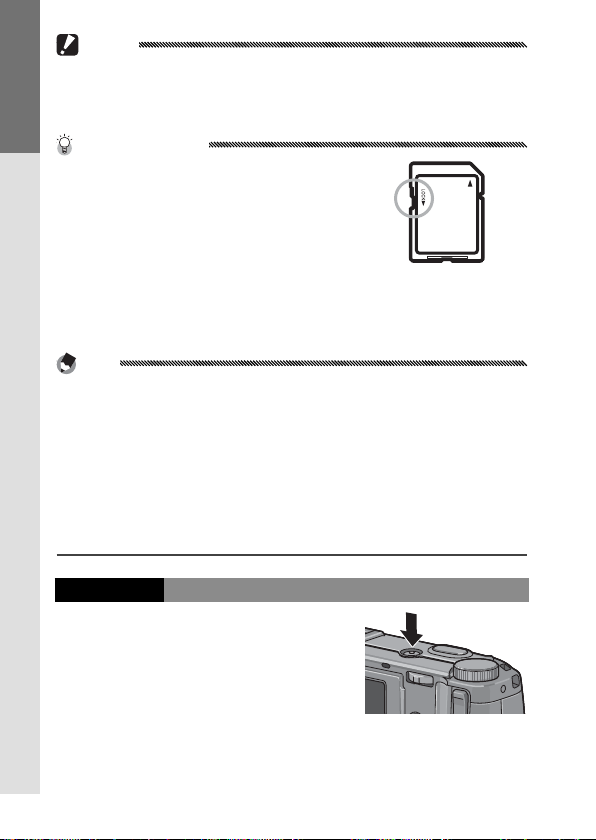
Tip: Write Protection
FIRST-TIME USER? READ THIS.
Memory cards can be protected by sliding the write-protection switch to “LOCK,”
keeping data from being written to or
deleted from the card and preventing
the card from being formatted.
Pictures can not be taken when the memory card is locked; lock
the card only to prevent accidental loss of data and be sure to unlock the card before shooting.
Notes
• Format memory cards before first use or after they have been
used in a computer or other device (page 124). Be sure to back
up any important data before formatting.
• See page 161 for information on memory card capacity.
• Pictures can be copied to memory cards from internal memory
(page 97).
Turning the Camera on and Off
Shooting Mode
Press the POWER button to turn the
camera on. The POWER button will
light and the camera will play the
start-up sound. The autofocus/
flash lamp blinks for several seconds while the camera starts up.
14
Page 21

To turn the camera off, press the
POWER button again. The number
of pictures taken so far that day
will be displayed before the camera turns off (zero is displayed if
the camera clock is not set; if you
turn the camera off after changing the clock, the camera
will display the number of pictures taken since the clock
was changed).
Cautions
• The camera may take slightly longer to start up if the flash is on.
• Changes to continuous (page 68), interval (page 75), and selftimer (page 26) settings are lost when the camera is turned off.
Turning the camera off restores settings for “MY” modes to the
values saved with Reg. My Settings. Other settings are unaffected.
Playback Mode
Press the 6 button for about a
second to turn the camera on
in playback mode. Press the
6
button again to exit to shooting
mode.
To turn the camera off, press the
POWER button.
Tip: Auto Power Off
The camera will turn off automatically to save power if no operations are performed for the time selected in the Auto Power Off
menu (see page 125).
FIRST-TIME USER? READ THIS.
15
Page 22
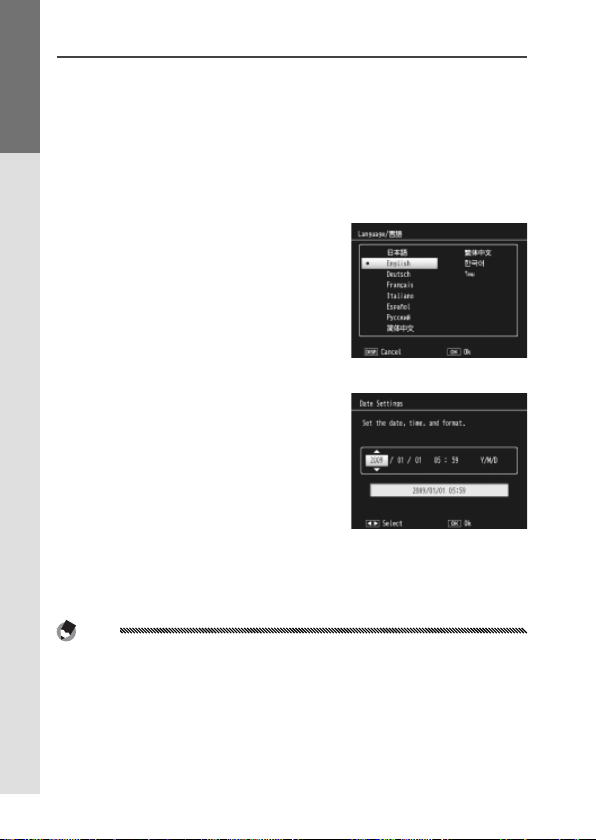
Basic Setup
Basic Setup
A language-selection dialog is displayed the first time the
camera is turned on. Follow the steps below to choose a
language and set the time and date. To exit before setup
is complete, press
FIRST-TIME USER? READ THIS.
be changed at any time in the setup menu (page 135).
Select a language.
1
Press !, ", #, or $ to highlight a language and press
C/D to select.
Set the clock.
2
Press # or $ to highlight
the year, month, day, hour,
minute, or date format and
press ! or " to change. After checking that the date is
correct, press
confirmation dialog will be
displayed; press C/D
again to set the clock.
Notes
• If you leave the battery in the camera for at least two hours, the
battery can be removed for about a week without resetting the
clock or language selection.
• The time and date of recording can be printed on photographs
(page 76).
DISP.; the language, time, and date can
C/D. A
Default date and time
16
Page 23
Taking Photographs
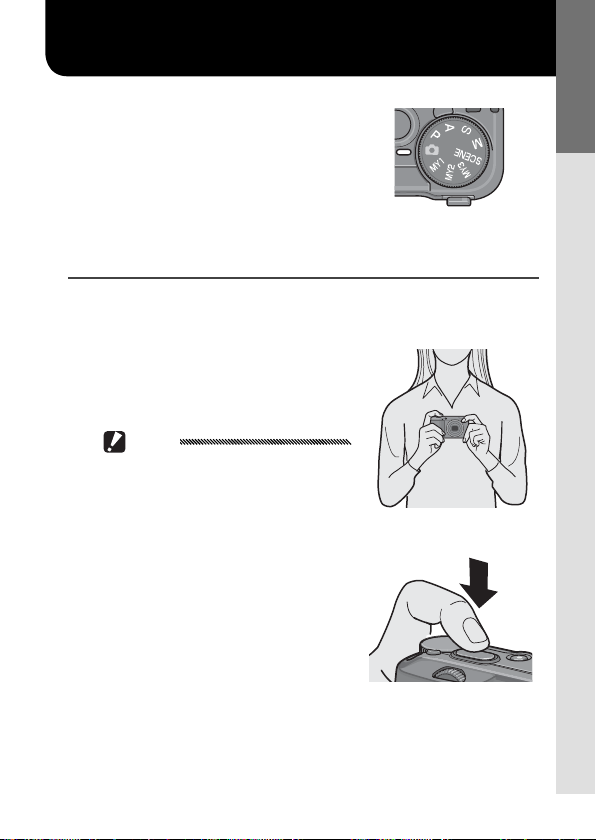
Holding the Camera
After setting up the camera as described in “First Steps” (pages 10–
16), you are ready to take your first
photos. Press the POWER button to
turn the camera on and rotate the
mode dial to
Holding the Camera
Hold the camera as shown below.
Hold the camera in both hands.
1
Hold the camera in both
hands with your elbows lightly pressed against your body.
Be sure your fingers or hair or the
camera strap do not obstruct the
lens or flash.
Get ready to shoot.
2
Put your finger on the shutter-release button.
5.
Caution
FIRST-TIME USER? READ THIS.
17
Page 24
Taking a Photograph
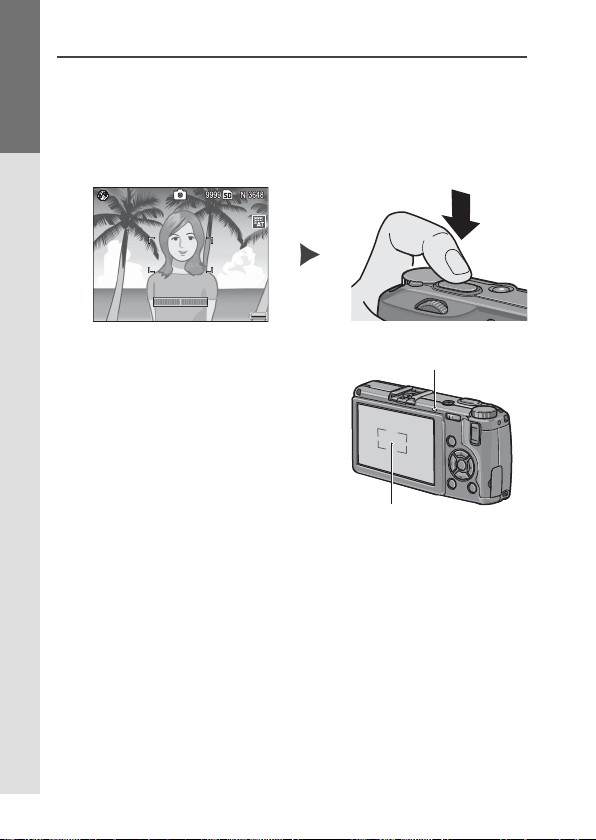
Taking a Photograph
Focus.
1
Frame your subject in the center of the picture display and press the shutter-release button halfway to
FIRST-TIME USER? READ THIS.
set focus and exposure.
If the camera is unable to focus, the
center focus frame blinks red
and the autofocus/flash lamp
blinks green.
If the camera is able to focus, the
focus frames (up to nine) that
contain objects that are in focus are shown in green.
Take the picture.
2
Gently press the shutter-release button the rest of
the way down to take the picture. The photograph
you have just taken will be displayed in the picture
display as it is recorded to the memory card or internal memory.
18
Autofocus/flash lamp
Focus frame
Page 25
Tip: The Shutter-Release Button
Focus status
Focus frame
Autofocus/flash lamp
The camera has a two-stage shutter-release button. To focus,
lightly press the shutter-release button until you feel resistance.
This is called “pressing the shutter-release button halfway.” Press
the shutter-release button the rest of the way down to shoot.
Tip: Focus
The autofocus/flash lamp and the focus frame show whether the
subject is in focus.
Focus status
Camera has not yet focused. White Off
Subject in focus. Green On (green)
Camera unable to focus. Blinks (red) Blinks (green)
Focus frame
Autofocus/flash lamp
The camera may be unable to focus on the following:
• Objects that lack contrast, such as the sky, a wall that is only one
color, or the hood of a car
• Flat objects containing only horizontal lines
• Fast-moving objects
• Objects that are poorly lit
• Objects with bright reflections or backlighting
• Flickering objects, such as fluorescent lights
• Point light sources, such as light bulbs, spotlights, or LEDs
Note that one or more focus frames may be displayed in green if
the camera is unable to focus with the above subjects; check focus
in the picture display before shooting. If the camera is unable to
focus, lock focus on another object at the same distance from the
camera as your subject, then recompose the photograph and take
the picture (page 21).
FIRST-TIME USER? READ THIS.
19
Page 26
Tip: Avoiding Blurred Pictures
To prevent blurring caused by the camera moving when the shutter is released (“camera shake”), press the shutter-release button
smoothly and gently. Blurring is particularly likely to occur if:
• The flash is off and lighting is poor, or
• The camera is zoomed in (page 22)
FIRST-TIME USER? READ THIS.
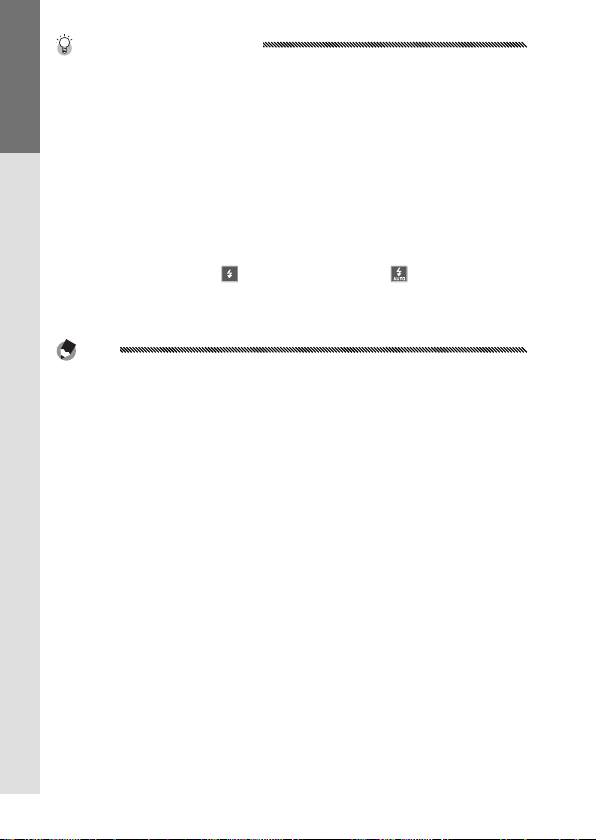
In situations in which photographs are especially prone to blurring caused by camera shake, a J icon will be displayed in the
picture display. Hold the camera steady and try focusing again, or
attempt one of the following remedies:
• Turning the flash on ( ) or using auto flash ( ; see page 24)
• Choosing a higher ISO (page 84)
• Using the self-timer (page 26)
Notes
• If the flash will fire when the picture is taken, a pre-flash will be
emitted to assist focus and exposure.
• You can choose how long pictures are displayed in the picture
display after shooting. If desired, photographs can be displayed
until the shutter-release button is pressed halfway (page 126).
5 mode, a built-in neutral density (ND) filter is used for be-
• In
tween f/8.0 and f/11. The smallest aperture available in
is f/11.
5 mode
20
Page 27
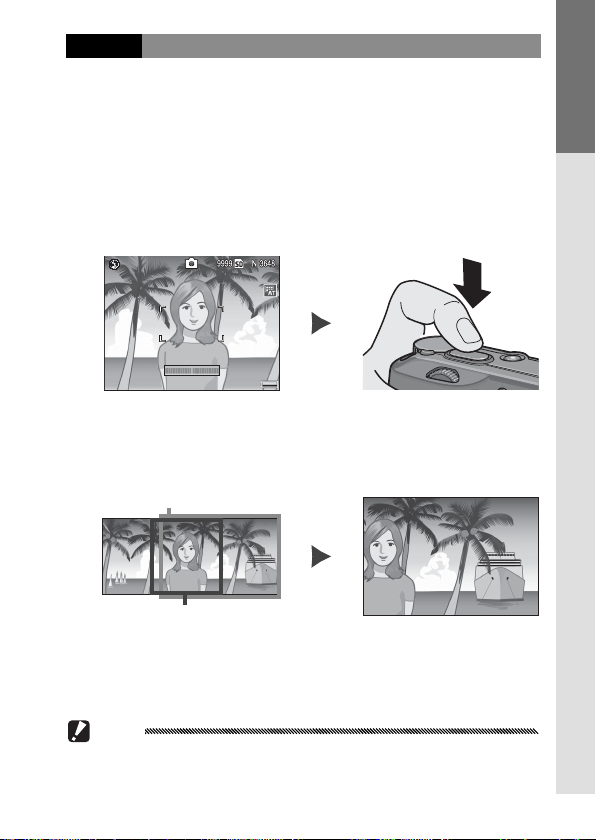
Focus Lock
Use focus lock to compose photographs in which the
subject is not in the center of the frame. Focus lock can
also be used if the camera is unable to focus (page 18).
Focus.
1
Position your subject in the center of the picture display and press the shutter-release button halfway to
focus.
Recompose the photograph.
2
Keeping the shutter-release button pressed halfway
to lock focus, recompose the photograph.
Final composition
Main subject
Take the picture.
3
Gently press the shutter-release button the rest of
the way down to take the picture.
Caution
If the distance between the camera and subject changes while
focus lock is in effect, focus again at the new distance.
FIRST-TIME USER? READ THIS.
21
Page 28
Digital Zoom
Digital Zoom
When Digital Zoom is selected for Zoom Button (page
122), the 8 button can be used to zoom in to a maximum
of 4.0 ×. Use the 9 button to zoom out.
FIRST-TIME USER? READ THIS.
Zoom
out
Assign digital zoom to the 8 and 9 buttons.
1
Select Digital Zoom for the Zoom Button option in
the setup menu (page 122).
Frame the picture using the 8 and 9 buttons.
2
The zoom ratio is shown in
the picture display.
Focus.
3
Press the shutter-release button halfway to focus.
Take the picture.
4
Gently press the shutter-release button the rest of
the way down to take the picture.
Notes
• If an option with a size of 3,648 × 2,736 is selected for Picture
Quality/Size, Auto Resize can be selected for Digital Zoom
Image (page 133).
• Digital zoom is not available when a RAW-quality option is selected for Picture Quality/Size (page 57) or the camera is in dynamic range double shot mode (page 48).
22
Zoom
in
Page 29
Close-ups (Macro Mode)
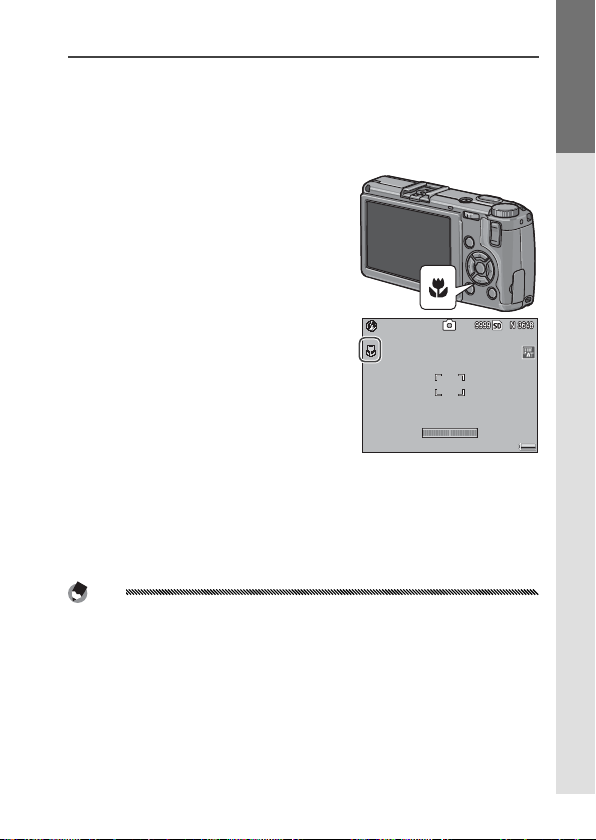
Close-ups (Macro Mode)
Use macro mode for close-ups of small objects as close as
1.0 cm (0.4 in.) to the lens (at this distance, the area photographed will be about 26 × 19 mm/1.0 × 0.7 in.).
Press the N button.
1
A
N icon will be briefly dis-
played in the center of the
picture display.
appear at the top of the display.
Focus.
2
Frame the subject in the picture display and press the
shutter-release button halfway to focus.
Take the picture.
3
Gently press the shutter-release button the rest of the
way down to take the picture.
To exit macro mode, press the N button again.
Note
If an option other than MF or Spot AF is selected for Focus when
the camera is in macro mode, the camera will focus using spot
autofocus (page 59).
N will then
FIRST-TIME USER? READ THIS.
23
Page 30
Flash Photography
Flash Photography
Mode
Description
The flash only fires when raised. Slide the F OPEN switch
to raise the flash and press the F button to choose from
the following flash modes:
FIRST-TIME USER? READ THIS.
Mode
Flash Off The flash is off and will not fire.
Auto The flash fires automatically when required.
Red-Eye
Flash
Flash On The flash fires with every shot.
Flash
Synchro.
Manual
Flash
Note
The flash has a range of approximately 20 cm to 3.0 m (8 in.–10 ft.),
measured from the front of the lens (auto ISO; see page 84).
Reduces “red-eye” in portraits taken with the flash.
Combines the flash with slow shutter speeds. Use when
taking portraits that include details of the background
indoors or at night. Use of a tripod is recommended to
prevent blur.
The flash fires with every shot; flash output is fixed at the
level selected for Manual Flash Amount (page 73).
Description
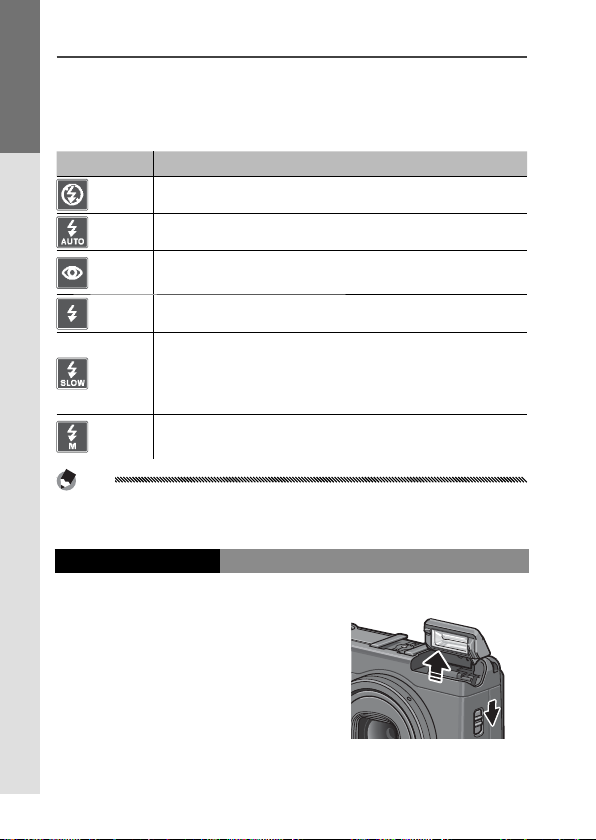
Using the Built-in Flash
Raise the flash.
1
Slide the flash OPEN switch as
shown.
24
Page 31

Select a flash mode.
2
Press the F button to select a
flash mode. The flash mode
icon is briefly displayed in the
center of the picture display
and then appears in the top
left corner of the display.
Note
The selected flash mode remains in effect until a new mode
is chosen.
The autofocus/flash lamp blinks while the flash
charges (if the camera is powered by AAA batteries,
the picture display will turn off until charging is complete). Photos can be taken when the lamp stops
blinking.
Focus and shoot.
3
If the flash is required, it will emit a pre-flash before
each shot to help with focus and exposure.
Notes
• To close the flash when it is not in use, gently press the center of
the flash cover down until it latches.
• The flash turns off automatically in dynamic range double shot,
movie, continuous, and bracketing modes.
• The built-in flash turns off automatically when an optional flash is
used (pages 167, 168).
Cautions
• Do not use the built-in flash with conversion lenses or lens
hoods.
• Do not use the flash unit in close proximity to your subject’s eyes.
Particular care should be observed when photographing infants.
Do not direct the flash at the operator of a motor vehicle.
FIRST-TIME USER? READ THIS.
25
Page 32

The Self-Timer
The Self-Timer
The camera offers a ten-second timer for self-portraits
and a two-second timer to prevent blur caused by camera
movement when the shutter-release button is pressed.
FIRST-TIME USER? READ THIS.
Note
By default, the self-timer is assigned to the
can also be assigned to the Fn1 button (the instructions that follow
assume it is assigned to the
used when assigned to a button (page 119).
Choose a self-timer mode.
1
Press the t button once to
select the ten-second timer
and again to select the twosecond timer. The current
selection is displayed in the
picture display. Pressing the
button a third time turns the timer off.
Note
The selected self-timer mode remains in effect until a new
mode is chosen.
Start the timer.
2
Press the shutter-release button to lock focus and
start the timer. If the ten-second timer is selected,
the AF auxiliary light will light.
t button). The self-timer can only be
t (Fn2) button, but it
26
Page 33

The Tilt Indicator
The Tilt Indicator
Option
Description
Use the tilt indicator to level the camera when photographing buildings or landscapes. It is particularly useful
for compositions in which the horizon is visible.
Display level setting options.
1
Press and hold the
O (DISP.)
button until level setting options are displayed.
Highlight an option.
2
Press ! or " to highlight an option:
FIRST-TIME USER? READ THIS.
Option
Off Tilt indicator not displayed.
Tilt is shown in the picture display. The indicator turns orange when the camera is tilted; the amount and direction
of rotation needed to bring it level is shown by the position
of the indicator in the display (the indicator turns red if the
Display
angle is too great to be shown). The indicator turns green
when the camera is level, either in the normal shooting
orientation or rotated 90 ° to shoot pictures in “tall” orientation. Tilt is not shown if the display is off, indicators are
hidden, or the framing grid is displayed (page 36).
Disp +
As above, except that a beep sounds periodically when the
Snd
camera is level.
A beep sounds periodically when the camera is level. The
Sound
tilt indicator is not displayed in the picture display.
Select the highlighted option.
3
Press C/D to select the highlighted option.
Description
27
Page 34

Understanding the Tilt Indicator
Green
FIRST-TIME USER? READ THIS.
Camera level Tilt camera left to level
Red
Unable to measure tilt; camera
rotated too far forward or back
Note
Tilt indicator settings can also be adjusted in the setup menu
(pages 113, 127).
Cautions
• The tilt indicator is not displayed when the camera is upside
down, movies are being recorded, or the interval timer is on.
• Muting the camera speaker (pages 125–126) also mutes the
beep that sounds to indicate that the camera is level.
• The tilt indicator is intended as a guide only and should not be
used as a spirit level or in other applications in which a high degree of precision is required. Accuracy drops when the camera
is in motion or you are shooting on a vehicle or other moving
platform.
Camera tilted 90 ° left
Orange
28
Page 35

Viewing and Deleting Photographs
Viewing Photographs
Pictures can be viewed in the picture display.
Viewing Photographs
Press the 6 button to display the
last photograph viewed.
Tip: If the Camera Is Off
If the camera is off, press the
for about a second to turn the camera
on and start playback.
Press $ to view photographs in the order recorded, # to
view in reverse order. Press " to skip ahead ten frames,
! to go back ten frames.
6 button
Back ten photos
FIRST-TIME USER? READ THIS.
Back one photo
# $
Ahead ten photos
!
"
Ahead one photo
Press the 6 button again to exit to shooting mode.
29
Page 36

Caution: RAW Images
The camera records JPEG copies of RAW images for display in the
picture display. When a RAW image is selected for playback, the
camera shows the JPEG copy and a RAW-mode indicator is displayed. If the JPEG copy has been deleted using a computer or
other device, the camera will display a small preview of the RAW
FIRST-TIME USER? READ THIS.
image, but you will not be able to view the image at larger magnifications. See pages 57, 58 for information on recording RAW
images.
Tip: Viewing Pictures in Shooting Mode
Photographs are displayed in the picture display immediately after shooting. You can choose how long pictures are displayed using the LCD Confirmation Time option in the setup menu (page
126).
Tip: Viewing the Pictures in Internal Memory
If a memory card is inserted, the pictures on the memory card will
be displayed; the pictures in internal memory can not be viewed
even if the memory card is empty. The pictures in internal memory will only be displayed if no card is inserted in the camera.
Tip: Auto Rotate
If On is selected for Auto Rotate in the setup menu, pictures will
automatically be displayed in the correct orientation in the picture
display (page 127).
30
Page 37

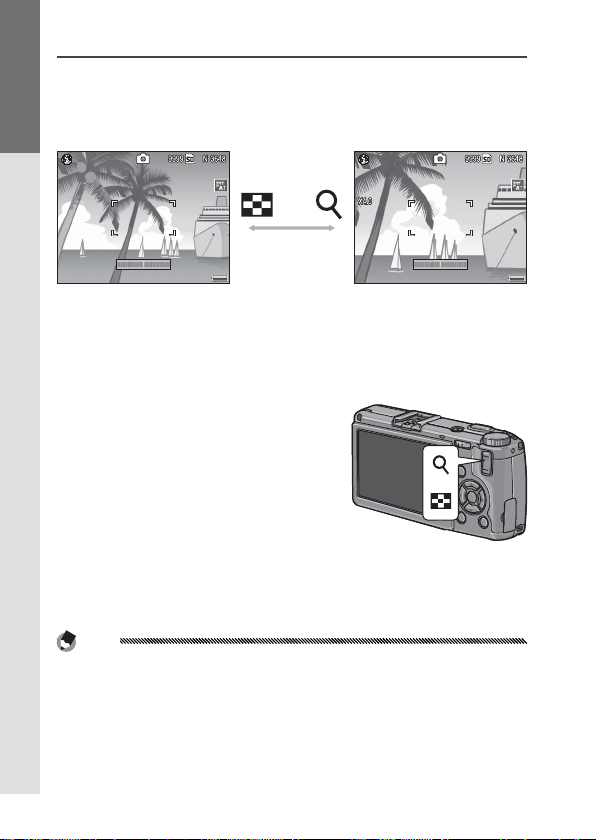
Viewing Multiple Photographs
Use the
9 and 8 buttons to
choose the number of photos displayed from one, 20, and 81. Multiframe views can be used to select
images for display or deletion.
Single frame 20 frames 81 frames
In multi-frame views, press !, ", #, and $ to highlight
photographs. In 20-frame view, press 8 or press the ADJ.
lever in to view the highlighted frame full frame. In 81frame view, press 8 to return to 20-frame view or press
the ADJ. lever in to display the highlighted photo full
frame.
FIRST-TIME USER? READ THIS.
31
Page 38

Playback Zoom
Use
To
Image size (pixels)
Maximum magnification
Press the 8 button or rotate the up-down dial to zoom
in on the photo currently displayed full frame. To zoom
in to the magnification selected with One Press Zoom
Ratio (page 126), press the ADJ. lever in.
FIRST-TIME USER? READ THIS.
The following operations can be performed:
Use
8
Zoom in.
Up-down
C/D
!"#$
ADJ. lever Press left or right to view other images at same zoom ratio.
Rotate right to zoom in, left to zoom out.
dial
Zoom in to magnification selected for One Press Zoom
Ratio. If picture is displayed at maximum magnification,
pressing
C/D cancels zoom.
View other areas of the image.
9
Cancel zoom.
To
Notes
• Maximum magnification varies with image size:
Image size (pixels)
2,048 × 1,536 or larger 16 ×
1,280 × 960 6.7 ×
640 × 480 3.4 ×
Maximum magnification
• Playback zoom is not available with movies or with photographs
taken at settings of S-Cont or M-Cont.
• If Setting2 is selected for Playback
Mode Dial Options in the setup
menu (page 123), the ADJ. lever and
up-down dial can be used to view
other areas of the image.
32
Page 39

Deleting Photographs
Deleting Photographs
Follow the steps below to delete unwanted photos.
Deleting Individual Photographs
Display a photograph you want to delete.
1
Display a photograph you want to delete in singleframe playback (page 29).
Press the D button.
2
The options shown at right
will be displayed (if the current image is not one you
wish to delete, press # or $
to display the desired photo).
Highlight Delete One.
3
Press ! or " to highlight Delete One.
Press C/D.
4
A message is displayed during deletion. The options
shown above will then be displayed; repeat Steps 2
and 3 to delete additional photographs, or highlight
Cancel and press
Deleting All Files
To delete all files, press the D button to display delete options as
described above and select Delete
All. A confirmation dialog will be
displayed; press # or $ to highlight Ye s and press C/D.
C/D to exit.
FIRST-TIME USER? READ THIS.
33
Page 40

Deleting Multiple Files
Follow the steps below to delete multiple selected files.
Press the D button.
1
In multi-frame playback, pro-
FIRST-TIME USER? READ THIS.
ceed to Step 2. In single-frame
playback, the options shown
at right will be displayed.
Highlight Delete Multi and
press C/D.
Select Sel. Indiv. or Sel. Range.
2
To select images one at a time,
highlight Sel. Indiv., press
C/D, and proceed to
Step 3. To select one or more
ranges consisting of two images and all photographs between them, highlight Sel. Range, press C/D,
and proceed to Step 3.1. To exit at any time without
deleting files, press DISP.
Select photographs.
3
Press !, ", #, or $ to highlight
photos and press C/D
to select. Selected pictures
are marked with D icons. To
deselect a photo, highlight it
and press C/D again.
34
Page 41

Tip: Selecting Ranges
To select one or more ranges consisting of two images and all
photographs between them, press the ADJ. lever in and follow
the steps below:
3.1 Press
3.2 Press !, ", #, or $ to high-
Repeat Steps 3.1–3.2 to select additional ranges, or press the
ADJ. lever in to return to Step 3 and select or deselect individual photographs.
Press D.
4
A confirmation dialog will be
!, ", #, or $ to high-
light the first image and press
C/D to select. The se-
lected image is marked with
a D icon. If you selected the
wrong image, press DISP. and
try again.
light the last image and press
C/D to select. The se-
lected image and other images
in the selected range will be
marked with D icons.
displayed.
Select Ye s .
5
Press # or $ to highlight Ye s
and press C/D.
FIRST-TIME USER? READ THIS.
35
Page 42

The
The
O
(DISP.) Button
O
(DISP.) Button
Use the O (DISP.) button to choose the information dis-
played in the picture display during shooting and playback.
FIRST-TIME USER? READ THIS.
Shooting Mode
Press the O (DISP.) button to cycle through the following
displays:
Indicators
displayed
Monitor
off
Tip: The Framing Grid
See page 128 for information on choosing a framing grid. The grid
lines do not appear in the final photograph.
Notes
• If Display or Display+Sound is selected for Level Setting, a tilt
indicator appears when indicators are displayed.
• When the picture display is off, pressing any of following turns
the picture display on: the ADJ. lever, the C/D, O (DISP.),
and 6 buttons, the 8 and 9 buttons (except when Off is selected for Zoom Button; page 122), and the ! and " buttons
(manual focus mode only).
Indicators +
histogram
Framing grid (no
indicators)
No
indicators
36
Page 43

Playback Mode
Press the O (DISP.) button to cycle through the following
displays:
Indicators
displayed
No
indicators
Tip: Highlights
The flashing portions of the highlights display mark “washed out”
areas in which details may have been lost to overexposure. Check
highlights after shooting in direct sunlight or in other conditions
in which parts of the image may be overexposed. If it seems important details may have been lost, choose a lower exposure compensation value and shoot again (page 77). Note that the display
is intended only as a guide and may not be entirely accurate.
Details +
histogram
Highlights
FIRST-TIME USER? READ THIS.
37
Page 44

Tip: The Histogram
The histogram is a graph showing the distribution of pixels of different brightness in the image. Brightness is plotted on the horizontal axis, with shadows at the left and highlights at the right.
The vertical axis gives the number of pixels. The histogram can be
used to assess exposure and check for loss of detail in highlights
FIRST-TIME USER? READ THIS.
and shadows without the brightness of your surroundings affecting your judgement. A histogram in which pixels are clustered on
the right indicates that the image may be overexposed, while a
histogram in which pixels are clustered on the left indicates that
the image may be underexposed.
Overexposed Underexposed
If the image appears to be incorrectly exposed, you may be able
to use exposure compensation to correct exposure in subsequent
photographs of the same subject (page 77; note that exposure
compensation may be insufficient to produce the correct exposure in some cases). The histogram can also be used as a guide
when adjusting contrast in photographs after shooting (pages
101, 102).
The histogram is intended as a guide only and may not be completely accurate, particularly in cases in which the flash is used or
ambient lighting is poor.
38
Page 45

Reference
Read this section for more information on
camera functions.
More on Photography ....................................40
Movies ..............................................................87
More on Playback ............................................91
Printing Photographs ...................................106
The Setup Menu ............................................112
Copying Pictures to a Computer ..................136
Technical Notes .............................................150
39
Page 46

More on Photography
Mode P: Program Shift
This section provides information on P, A, S, M, 4, and
“MY” modes and on using shooting menu options.
Mode P: Program Shift
When the mode dial is rotated
to P (program shift), you can use
the up-down dial to choose from
MORE ON PHOTOGRAPHY
several combinations of shutter
speed and aperture, all of which
produced the same exposure.
Choose mode P.
1
Rotate the mode dial to P. The
shooting mode is shown by
an icon in the display.
Measure exposure.
2
Press the shutter-release button halfway to measure exposure. The current shutter
speed and aperture appear in
the display.
Choose shutter speed and aperture.
3
Remove your finger from the
shutter-release button and
rotate the up-down dial to select a combination of shutter
speed and aperture.
40
Page 47

Note
Shutter speed and aperture can be adjusted for ten seconds
after you remove your finger from the shutter-release button.
Take the photograph.
4
Gently press the shutter-release button all the way
down to take the photograph.
Note: The Exposure Program
The exposure program (ISO 100, flash off) is shown below. The
shaded area gives the combinations of shutter speed and aperture
available at each exposure value (EV).
Aperture
Shutter speed (seconds)
MORE ON PHOTOGRAPHY
41
Page 48

Mode A: Aperture Priority
Mode A: Aperture Priority
In mode A (aperture priority),
you choose the aperture and the
camera selects the shutter speed.
Choose large apertures (low
f-numbers) to emphasize the main
subject by blurring background and foreground details.
Choose small apertures (high f-numbers) to bring both
the background and main subject into focus.
MORE ON PHOTOGRAPHY
Choose mode A.
1
Rotate the mode dial to A.
The current aperture is displayed in orange.
Choose an aperture.
2
Rotate the up-down dial to
choose an aperture. Your selection only takes effect when the photo is taken; the
effect can not be previewed in the picture display.
Press the shutter-release button halfway.
3
Press the shutter-release button halfway to set focus and
exposure. The shutter speed
selected by the camera will be
displayed in the picture display.
Take the photograph.
4
Gently press the shutter-release button the rest of
the way down to shoot.
Note
If auto aperture shift is on (page 85), the camera will adjust aperture for optimal exposure.
42
Page 49

Mode S: Shutter Priority
Mode S: Shutter Priority
In mode S (shutter priority), you
choose the shutter speed and
the camera selects the aperture. Choose fast shutter speeds
to “freeze” motion, slow shutter
speeds to suggest motion by blurring moving objects.
Choose mode S.
1
Rotate the mode dial to S. The
current shutter speed is displayed in orange.
Choose shutter speed.
2
Rotate the up-down dial to
choose a shutter speed.
Press the shutter-release button halfway.
3
Press the shutter-release button halfway to set focus and
exposure. The aperture selected by the camera will be
displayed in the picture display.
Take the photograph.
4
Gently press the shutter-release button the rest of
the way down to shoot.
Note
Maximum aperture (i.e., the lowest possible f-number) may not be
selected at slow shutter speeds, even when the subject is poorly
lit.
MORE ON PHOTOGRAPHY
43
Page 50

Mode M: Manual Exposure
Mode M: Manual Exposure
In mode M (manual exposure), you
use the up-down dial to choose
aperture and the ADJ. lever to select a shutter speed.
Choose mode M.
1
Rotate the mode dial to M. The
shooting mode, exposure in-
MORE ON PHOTOGRAPHY
dicator, and current aperture
and shutter speed appear in
the display.
Choose an aperture and shutter speed.
2
Rotate the up-down dial to
choose an aperture and press
the ADJ. lever left or right to
select a shutter speed (if desired, the roles of the two controls can be reversed;
see page 123). The effects can be previewed in the
picture display and are reflected in the exposure indicator (if the image would be under- or over-exposed
by more than 2 EV, the effects can not be previewed
and the indicator will turn orange).
+2 EV–2 EV +2 EV–2 EV
Focus.
3
Press the shutter-release button halfway to focus.
Take the photograph.
4
Gently press the shutter-release button the rest of
the way down to shoot.
44
Page 51

Notes
• If Auto or Auto-Hi is selected for ISO Setting (page 84), ISO will
be fixed at 100 while the camera is in manual exposure mode.
• Choose slower shutter speeds for longer exposure times. To reduce blur caused by camera shake, hold the camera steadily in
both hands or use a tripod. The picture display turns off while
the shutter is open. At speeds of 10 s or slower, the camera auto-
matically processes photographs to remove noise, increasing the
time needed to record images to about twice the shutter speed.
• Autoexposure (AE) lock is not available in manual exposure
mode. If AE Lock is selected for Set Fn1 Button or Set Fn2 But-
ton in the setup menu, pressing the affected button in manual
exposure mode will set shutter speed or aperture to a value
close to that needed for optimal exposure. Similarly, if Exposure
Comp. is selected for Zoom Button in the setup menu, pressing
the 8 and 9 buttons will not display exposure compensation
options in manual exposure mode, but will instead set shutter
speed or aperture to a value close to that needed for optimal exposure. This is useful when you want to use optimal exposure as
a starting point for modifying exposure. The One Press M Mode
option in the setup menu determines whether shutter speed or
aperture is altered to achieve optimal exposure.
MORE ON PHOTOGRAPHY
45
Page 52

4
4
Mode: Matching Settings to the Scene
Option
Description
Mode: Matching Settings to the Scene
Select 4 mode to shoot movies or to choose from one of the
following subject types. Camera
settings are automatically optimized for the selected subject
type.
Option
MORE ON PHOTOGRAPHY
Choose for natural contrast when photographing
Dynamic
Range
Skew Correct
Mode
Text Mode
Movie Shoot movies with sound (page 87).
subjects that are partly in the shade on a sunny day
and other high-contrast scenes (page 48). A tripod
is required; results are not guaranteed with subjects
that are in motion.
Reduce the effects of perspective when photographing rectangular objects, such as message boards or
business cards (page 51).
Make black-and-white photographs of text or drawings on notepaper or a white board (page 52).
To select a scene mode option:
Rotate the mode dial to 4.
1
The option currently selected
for 4 mode appears in
the display.
46
Description
Page 53

Press C/D.
2
A menu of scene mode options will be displayed.
Select an option.
3
Press ! or " to highlight an option and press
C/D to return to shooting mode with the se-
lected option shown at the top of the display.
Shoot.
4
• Dynamic range double shot: See page 48.
• Skew correct mode: See page 51.
• Text mode: See page 52.
• Movie mode: See page 87.
Tip: Using the Menus
To access the shooting and setup menus
in 4 mode, press the C/D
button to display the scene mode menu
and press
Press
menu tab (page 54), key custom settings tab (page 112), or setup menu tab
(page 112), and press $ to place the
cursor in the selected menu. See pages
55–56 for information on the shooting
menu options available in each mode.
# to highlight the mode tab.
! or " to highlight the shooting
q
w
e
r
Mode tab
q
Shooting menu tab
w
Key custom settings
e
tab
Setup menu tab
r
MORE ON PHOTOGRAPHY
47
Page 54

4 Mode: Dynamic Range Double Shot
Each time the shutter-release button is pressed, the camera takes
two shots at different exposures,
then combines the areas that are
correctly exposed to create a single composite image
with natural contrast, reducing loss of detail in highlights
and shadows. Use to photograph scenes that contain
both sunlight and shade or other high-contrast subjects.
MORE ON PHOTOGRAPHY
Cautions
• The flash turns off, digital zoom can not be used, and RAW options can not be selected for Picture Quality/Size (page 57).
• The desired effect may not be achieved if the scene is too bright
or too dark.
• Moving subjects may be blurred.
• Flicker from fluorescent lights may affect colors and brightness.
Tip: Dynamic Range
“Dynamic range” refers to the range of tones that can be expressed
by the camera, which is narrower than that visible to the naked eye.
In high-contrast scenes, this may result in loss of detail in highlights and shadows. Dynamic range double shot creates a smooth
transition from highlights to shadows for natural contrast.
Mount the camera on a tripod.
1
Note
Dynamic range double shot requires more time to create an
exposure than other modes, and an
show that photos may be blurred. Use a tripod. Note that
the camera may move when the shutter-release button is
pressed, even if mounted on a tripod. This can be prevented
by using the self-timer (page 26) or an optional CA-1 cable
switch wired remote shutter release.
J icon is displayed to
48
Page 55

Focus.
2
Press the shutter-release button halfway to set focus, exposure, and white balance.
Shoot.
3
Gently press the shutter-release button the rest of the
way down. The camera will
take two pictures and combine them to create a single
image with an enhanced dynamic range.
Shooting Menu Options
The following shooting menu options are available only
in dynamic range double shot mode:
• Dynamic Range Expansion: Choose amount by which dynamic range is enhanced.
• Plus Normal Shooting: Choose On to record two copies of
each photo, one with normal exposure and another
with enhanced dynamic range.
MORE ON PHOTOGRAPHY
Copy with enhanced
dynamic range
Unmodified copy
49
Page 56

Follow the steps below to adjust these options in dynamic range double shot mode.
Display the shooting menu.
1
Press C/D to display
the scene-mode menu. Press
# to highlight the mode
tab, press " to highlight the
shooting menu tab, and press
MORE ON PHOTOGRAPHY
$ to place the cursor in the
shooting menu.
Select a menu item.
2
Press ! or " to highlight
Dynamic Range Expansion
or Plus Normal Shooting and
$ to display options for
press
the highlighted item.
Select an option.
3
Tip: Plus Normal Shooting
When photographs taken with On
selected for Plus Normal Shooting
are displayed in the picture display after shooting, both the enhanced and
unmodified copies appear with histograms showing tone distribution. If
Hold is selected for LCD Confirmation
Time in the setup menu (page 126), the images will be displayed
until the shutter-release button is pressed halfway.
50
! or " to highlight an option and press
Press
C/D to select.
Page 57

4 Mode: Skew Correct
To take pictures in skew correct mode, frame the subject
so that it occupies as much of the frame as possible and
press the shutter-release button to take the photograph.
If the camera is able to detect an object that can be used
to correct perspective, a message will be displayed with
the object shown by an orange frame. The camera can
detect up to five objects; to select a different object, press
$, or press ! to record the photograph without correct-
ing perspective. If the camera is unable to detect a suitable subject, an error message will be displayed and the
photograph will be recorded without modification.
Caution: Skew Correct Mode
The camera records two images each time the shutter is released:
the unmodified photograph and a copy that has been processed
to correct perspective. No photograph will be taken if memory is
insufficient to record two images. The camera may be unable to
correct perspective if:
• The subject is out of focus.
• The four edges of the subject are not clearly visible.
• There is little contrast between the subject and the background.
• The background contains many fine details.
Tip: Skew Correction
The Skew Correction option in the playback menu can be used to
correct perspective in existing photographs (page 98).
MORE ON PHOTOGRAPHY
51
Page 58

4 Mode: Text
To take pictures in text mode:
Adjust contrast.
1
Press the ADJ. lever in to display the menu shown at right.
Press ! or " to highlight an
option and press the ADJ. lever
or
C/D to select the
MORE ON PHOTOGRAPHY
highlighted option and clear
the menu from the display.
Tip: Adjusting Contrast
Contrast can also be adjusted using the Density option in
the shooting menu (page 56).
Take the photograph.
2
Press the shutter-release button halfway to focus,
then gently press it the rest of the way down to take
the photograph.
52
Page 59

“MY” Modes: Using Custom Settings
“MY” Modes: Using Custom Settings
To take photos using settings
saved with the Reg. My Settings >
MY1 option in the setup menu key
custom settings tab (page 114),
rotate the mode dial to MY1. Select
MY2 to take photos using the settings saved with MY2,
MY3 to take photos using the settings saved with MY3.
Rotate the mode dial to MY1, MY2, or MY3.
1
The shooting mode saved using Reg. My Settings will be
displayed in the picture display.
Note
Menu settings can be freely adjusted in “MY” modes. The
settings saved with Reg. My Settings are restored when another mode is selected or the camera is turned off.
Tip: Choosing a Shooting Mode
To choose a shooting mode in “MY” mode without changing
other settings, use the Switch Shooting Mode option in the
shooting menu (page 86). Switch Shooting Mode is not
available in “MY” modes for which a scene mode is selected.
Take the photograph.
2
See the section on the selected shooting mode for
more information.
MORE ON PHOTOGRAPHY
53
Page 60

The Shooting Menu
The Shooting Menu
Use the !, ", #, $, and C/D buttons to navigate
the menus.
Display the shooting menu.
1
In modes other than 4,
pressing the C/D button in shooting mode displays
the shooting menu.
MORE ON PHOTOGRAPHY
Tip: 4 Mode
In 4 mode, pressing C/
D displays the mode menu;
press
# to highlight the mode tab,
" to display the shooting menu,
and $ to place the cursor in the
menu.
Select a menu item.
2
Press ! or " to highlight a
menu item and press $ to
display options for the highlighted item.
Select an option.
3
Press ! or " to highlight an option. Press C/
D to select and exit to shooting mode, or press #
to select and return to the shooting menu.
Scroll bar shows
position in menu
54
Page 61

The items available in the shooting menu vary with the
Option
Default
Page
Option
Default
Page
Option
Default
Page
Option
Default
Page
shooting mode.
5, P, A, S, M, MY1, MY2 and MY3 Modes
Option
Picture Quality/Size N3648 (10M) 57
Focus Multi AF 59
Snap Focus Distance 2.5 m 64
Full Press Snap On 64
Pre-AF Off 65
Exposure Metering Multi 65
Image Settings Standard 66
Continuous Mode Off 68
Auto Bracket Off 70
Flash Exposure
Compensation
Manual Flash Amount 1/2 73
Flash Synchro Settings 1st Cur tain 73
Noise Reduction Off 74
Default
0.0 72
Page
Option
Noise Reduction ISO Over ISO 401 74
Interval Shooting — 75
Date Imprint Off 76
Exposure Compensation 10.0 77
White Balance Multi-P AUTO 79
White Balance
Compensation
ISO Setting Auto 84
Restore Defaults
Auto Aperture Shift
Switch Shooting Mode
2
3
4
1 Not available in mode M.
5 mode only.
2
3 Mode A only.
4 Mode MY1, MY2 or MY3 only.
Default
Page
A: 0; G: 0 82
— 85
Off 85
— 86
4 Mode: Movie
Option
Movie Size 640 89
Frame Rate
Focus Multi AF 59
Snap Focus Distance 2.5 m 64
Default
30 Frame/Sec
Page
Option
Pre-AF Off 65
89
White Balance Auto 79
White Balance
Compensation
Default
Page
A: 0, G: 0 82
MORE ON PHOTOGRAPHY
55
Page 62

4 Mode: Dynamic Range Double Shot
Option
Default
Page
Option
Default
Page
Option
Default
Page
Option
Default
Page
Option
Default
Page
Option
Default
Page
Option
Picture Quality/Size N3648 (10M) 57
Focus Multi AF 59
Snap Focus Distance 2.5 m 64
Pre-AF Off 65
Exposure Metering Multi 65
Image Settings Standard 66
Dynamic Range
MORE ON PHOTOGRAPHY
Expansion
Plus Normal Shooting Off 49
Default
Weak 49
Page
4 Mode: Skew Correct
Option
Picture Quality/Size N1280 (1M) 57
Focus Multi AF 59
Snap Focus Distance 2.5 m 64
Full Press Snap On 64
Pre-AF Off 65
Exposure Metering Multi 65
Image Settings Standard 66
Default
Page
4 Mode: Text
Option
Density Normal
Size N3648 (10M) 57
Default
Page
46,
52
Option
Noise Reduction Off 74
Noise Reduction ISO Over ISO 401 74
Date Imprint Off 76
Exposure Compensation 0.0 77
White Balance Multi-P AUTO 79
White Balance
Compensation
ISO Setting Auto 84
Option
Flash Exposure
Compensation
Flash Synchro Settings 1st Cur tain 73
Date Imprint Off 76
Exposure Compensation 0.0 77
White Balance Multi-P AUTO 79
ISO Setting Auto 84
Option
Pre-AF Off 65
Date Imprint Off 76
Default
Page
A: 0; G: 0 82
Default
Page
0.0 72
Default
Page
56
Page 63

Picture Quality and Size
Option
Quality
Size
Description
Picture quality (RAW, fine, and normal) and size (dimensions in pixels) determine the number of photographs
that can be stored in internal memory or on a memory
card (page 13). The following options are available:
Option
RAW (10M)
RAW 3 : 2 (9M)
RAW 1 : 1 (7M)
F3648 (10M) Fine
N3648 (10M) Normal
F3 : 2 (9M)
N3 : 2 (9M)
F1 : 1 (7M)
N1 : 1 (7M)
Quality
1
1, 2
RAW
1, 2
2
Fine
2
Normal
2
Fine
2
Size
3,648 × 2,736
3,648 × 2,432
2,736 × 2,736
3,648 × 2,736
3,648 × 2,432
2,736 × 2,736
Description
Produces images adapted for
further processing or editing on
a computer.
3
Produces images that can be
printed at larger sizes or cropped
on a computer.
N3264 (8M) 3,264 × 2,448
N2592 (5M) 2,592 × 1,944
N2048 (3M) 2,048 × 1,536
Normal
N1280 (1M)
N640 (VGA)
4
4
1,280 × 960
640 × 480
Produces images suitable for
3
printing.
Allows more photos to be
stored.
Produces small images suited
to e-mail or the web and allows
more photos to be stored.
1 Not available in dynamic range double shot mode.
2 Edges of display blacked out to show crop in picture display.
3 One of two options available in text mode.
4 One of two options available in skew correct mode.
MORE ON PHOTOGRAPHY
57
Page 64

Tip: Picture Quality
The camera supports the following picture qualities:
• Normal: JPEG compression is used to reduce file size.
• Fine: Compression is reduced for improved quality. File size increases, reducing number of photos that can be recorded.
• RAW: Raw image data are saved in DNG format; JPEG copies are
also created. The camera displays only the JPEG copy; DNG files
can be viewed and edited on a computer using the supplied
Irodio Photo & Video Studio Software (Windows only) or commercially-available applications that support the DNG format.
MORE ON PHOTOGRAPHY
Unlike normal- and fine-quality images, RAW images are not compressed. This increases file size but avoids the loss of quality associated with JPEG compression. Note the following when shooting
RAW images:
• Some settings can not be used, as detailed in the section for the
affected setting. Image Settings and Date Imprint options apply only to JPEG copies and have no effect on the DNG images.
• The size and quality of the JPEG copies recorded with DNG images can be selected using the RAW/JPEG Setting option in the
setup menu (page 131).
• The number of RAW photographs that can be taken in a single
burst in continuous mode varies with the option selected for
Noise Reduction (page 74). Up to five photographs can be
taken when noise reduction is disabled; when noise reduction is
enabled, this number drops to four.
58
Page 65

Focu s
Option
Description
Choose how the camera focuses. By default, the camera
uses autofocus; other options are listed below.
Option
Multi AF
Spot AF Focus on the subject in the center of the frame.
MF
(manual focus)
Snap
∞ (infinity)
The camera selects the focus area with the closest
subject, preventing out-of-focus shots by keeping
the camera from focusing on the background.
Focus manually (page 60).
Focus is fixed at distance selected with Snap Focus
Distance (page 64) for quick shutter response.
Fix the focus distance at infinity when photographing distant scenes.
Description
In the case of MF, Snap, and ∞, the
current selection is shown by an
icon in the picture display.
Tip: Depth of Field
Depth of field is the distance in front of and behind the focus point
that appears to be in focus. Small apertures (high f-numbers) increase depth of field, bringing more of the scene into focus; large
apertures (low f-numbers) decrease depth of field, emphasizing
the main subject by blurring the foreground and background. At
settings of MF, Snap, and ∞, the focus
bar shows depth of field in shooting
modes M, A, and P (in mode P, depth of
field is only shown when the shutterrelease button is pressed halfway and
aperture values are displayed).
Note
The Fn buttons can be used to switch back and forth between autofocus and manual or snap focus (page 121).
Focus bar
Focus bar
(distances are
(distances are
approximate)
approximate)
Depth of field
Depth of field
(green)
(green)
MORE ON PHOTOGRAPHY
59
Page 66

Focus: MF (Manual Focus)
Manual focus can be used to lock focus over a series of
photographs or to focus when the camera is unable to
focus using autofocus.
Note
Manual focus is not available in text mode (page 46).
Select MF (manual focus).
1
Select MF in the Focus menu.
MORE ON PHOTOGRAPHY
The focus mode and focus bar
(page 59) are displayed in the
picture display.
Choose the focus distance.
2
Press ! to increase the focus distance, " to decrease.
To zoom in on the subject in
the center of the picture display and check focus, press
and hold the C/D
button. Press and hold the
button again to return to the
normal shooting display.
Take the picture.
3
See the section on the selected shooting mode for
more information.
60
Page 67

Choosing the Focus and Metering Target
Option
Description
Target selection can be used to set focus and exposure
for off-center subjects without moving the camera, making it easier to use a tripod.
Activate target selection.
1
Press the ADJ. lever in and then
press the lever left or right to
highlight P. Press
! or " to
highlight one of the following
options and press C/D
to select.
MORE ON PHOTOGRAPHY
Option
Spot metering and spot autofocus; choose the focus and
AE/AF
exposure target.
Spot autofocus; choose the focus target. Exposure is me-
AF
tered using the option selected for Exposure metering
(page 65).
Spot metering; choose the metering target. Focus is set
AE
using the option selected for Focus (page 59).
Off Target selection off.
Position the target.
2
Using the !, ", #, and $ buttons, position the cross hairs
over your subject and press
C/D (to return to the
target selection menu, press
DISP.).
Description
61
Page 68

Take the picture.
3
Press the shutter-release button halfway to set focus
and/or exposure for the selected subject and then
gently press the shutter-release button the rest of
the way down to take the picture.
Notes
• Target selection is not available in manual focus mode (page
60).
• The selected target remains in effect until a new target is select-
MORE ON PHOTOGRAPHY
ed. Note that target will be reset if you choose a new option in
the target-selection menu or select manual focus.
• When the mode dial is rotated to
macro mode can be selected by pressing the ADJ. lever in, selecting
U, and then using the !, ", #, and $ buttons to position
the cross-hairs as described on page 63.
• The Fn buttons can be used for focus target selection in macro
mode (see below). Note that if the Fn buttons have been used to
select the focus target, the ADJ. lever can not be used for target
selection until the target is reset.
4, the focus target for
62
Page 69

Macro Target Selection
If Macro Target is assigned to the Fn1
or Fn2 button (pages 121–122), you can
select macro mode by pressing the
chosen button in shooting mode. The
cross-hairs shown at right will be displayed; use the
!, ", #, and $ buttons
to position the cross-hairs over your
subject and press
C/D (to exit without moving the target,
press DISP.). Press the shutter-release button halfway to focus on
the selected target and then gently press the shutter-release button the rest of the way down to take the picture.
Note that if the ADJ. lever has been used to select the focus target,
the Fn buttons can not be used for target selection until the target
is reset. Target selection can be reset by pressing the N button.
MORE ON PHOTOGRAPHY
63
Page 70

Snap Focus Distance
Option
Description
Select the distance at which the camera focuses when
Snap is selected for Focus (page 59) or Full Press Snap
is on (see below). Choose from 1 m (3.3 ft.), 2.5 m (8.2 ft.),
5 m (16.4 ft.), and ∞ (infinity).
Note
When Snap is selected for Focus or Full Press Snap is on, the
snap focus distance can also be selected by pressing
ing the up-down dial.
MORE ON PHOTOGRAPHY
! and rotat-
Full Press Snap
Take photographs without pausing to focus the camera
when Multi AF or Spot AF is selected for Focus (page
59).
Option
Off The camera focuses normally.
If the shutter-release is pressed all the way down in one motion, the camera will take a picture at the focus distance se-
On
lected for Snap Focus Distance. Choose when quick shutter
response is required.
On
(Auto-Hi ISO)
As for On, except that ISO sensitivity is automatically set to
Auto-Hi (page 84).
Description
Tip: Autofocus
The camera will focus normally if you pause with the shutter-release button pressed halfway.
Cautions
• Full press snap is not available in macro mode or when MF, Snap,
or ∞ is selected for Focus.
• Care is required to avoid blur caused by camera movement.
64
Page 71

Pre-AF
Option
Description
If On is selected when Multi AF or Spot AF is selected for
Focus (page 59), the camera will continue to focus even
when the shutter-release button is not pressed halfway
(the focus range, however, is narrower than for normal focus). This may decrease the time needed to focus when a
picture is taken, potentially improving shutter response.
Cautions
• Pre-AF is not available when MF, Snap, or ∞ is selected for Focus.
• Using pre-AF increases the drain on the battery.
Exposure Metering
Choose how the camera measures exposure.
MORE ON PHOTOGRAPHY
Option
Multi The camera meters exposure in 256 areas of the frame.
The camera meters the entire frame but assigns the great-
Center
est weight to the center. Use when the subject in the center of the frame is brighter or darker than the background.
The camera meters only the subject in the center of the
Spot
frame, ensuring that it is correctly exposed even when it is
markedly brighter or darker than the background.
Description
Settings of Center and Spot are
shown by an icon in the picture
display.
65
Page 72

Image Settings
Option
Description
Control contrast, sharpness, and vividness (color depth)
or take monochrome photographs.
Option
Vivid
Standard Normal contrast, sharpness, and vividness.
Black & White
MORE ON PHOTOGRAPHY
B&W (TE)
(toning effect)
Setting 1
Setting 2
Note
Contrast has no effect in dynamic range double shot mode.
Take strong, vivid photos with heightened contrast
and sharpness and maximum vividness.
Take photos in black and white. Contrast and
sharpness can be adjusted manually.
Create monochrome photos with a sepia, red,
green, blue, or purple tint. Vividness, contrast, and
sharpness can be adjusted manually.
Make individual adjustments to vividness, contrast,
sharpness, colors and hue to create custom settings that can be recalled as desired.
Description
At settings other than Standard,
the current selection is shown by
an icon in the picture display.
To make individual adjustments to the settings for Black
& White, B&W (TE), Setting 1, or Setting 2, highlight the
desired option and press $.
Adjust custom color reproduction settings.
1
• Black & White: Press ! and "
to highlight an option and
press # and $ to change.
66
Page 73

• B&W (TE): Adjust vividness,
contrast, and sharpness as
described above. To choose
a tint, highlight Toning Ef-
fect and press $. Press !
and " to highlight an option and press # to select.
• Setting1/Setting2: Adjust vividness, contrast, and sharpness as described above.
To adjust individual colors,
highlight Colors and press
$. Press ! and " to high-
light an option and press
# and $ to change. Press
C/D to exit when
settings are complete.
Press C/D.
2
Press C/D to return to the Image Settings
menu when settings are complete.
Exit to shooting mode.
3
Press C/D to exit to shooting mode, or press
# and then press C/D.
MORE ON PHOTOGRAPHY
The option currently selected
for Image Settings will be displayed in the picture display.
67
Page 74
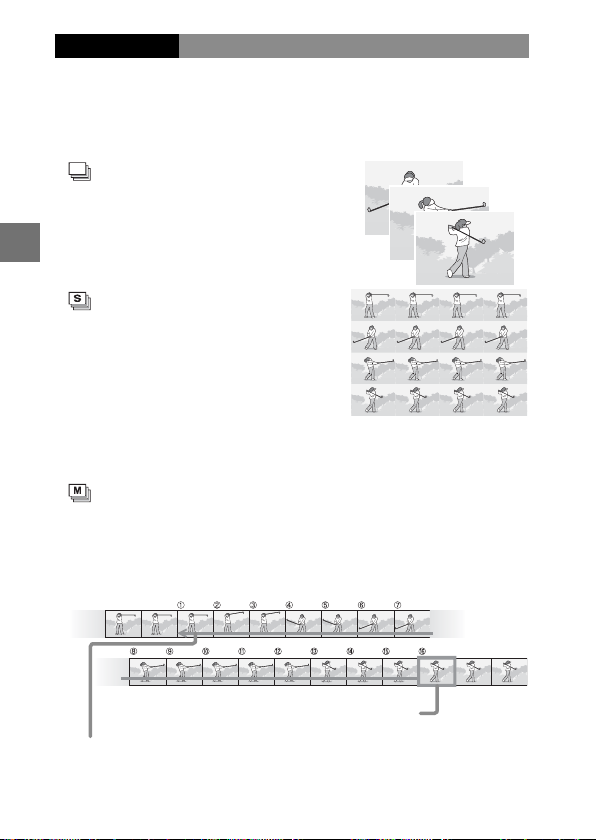
Continuous Mode
Shoot photographs one at a time or in continuous sequence. The following options are available:
• Off: One photo is taken each time the shutter-release
button is pressed.
•
Continuous: The camera records
photographs one after the other
while the shutter-release button
is pressed.
MORE ON PHOTOGRAPHY
• S-Cont (stream continuous): While
the shutter-release button is
pressed, the camera shoots up to
16 frames at about 7.5 frames per
second and joins them to form a
single image 3,648 × 2,736 pixels
in size. About 2 s are required to
shoot the entire sequence.
• M-Cont (memory-reversal continuous): The camera shoots
while the shutter-release button is pressed, but only the
last 16 frames (about the last two seconds of shooting)
are recorded, creating a single image 3,648 × 2,736 pixels in size.
When you remove your finger
from the shutter release button…
…the camera records the frames taken
in the last two seconds (frames q to !6).
68
Page 75

At settings other than Off, the current selection is shown by an icon
in the picture display.
Caution
Digital zoom is available at settings of S-Cont and M-Cont even if
Auto Resize is selected for Digital Zoom Image.
Notes
• At settings other than Off, the flash turns off automatically, focus
and exposure are fixed with the first shot in each series, and Auto
white balance is used in place of Multi-P AUTO (page 79).
• ISO settings of ISO 100 or ISO 64 will be set to Auto while S-
Cont or M-Cont are in effect.
Tip: Viewing S-Cont and M-Cont Images with Playback Zoom
Zoom can be used to view the individual frames of S-Cont and M-Cont
images during playback. Pressing the
8 button while an image taken with
either of these options is displayed in
single-frame playback displays the first
frame in the sequence; use the
$ buttons to display other frames. Your current position in the
sequence is shown by strip at the bottom of the display (the DISP.
button can be used to hide the strip; see page 36). Press
D to exit.
# and
C/
MORE ON PHOTOGRAPHY
69
Page 76

Auto Bracket
Option
Description
Vary exposure, white balance, or color to record two or
three images “bracketing” current settings.
Option
Each time the shutter-release button is pressed, the camera takes
three photos: one underexposed
by 0.3 EV, a second at current exposure settings, and a third over-
ON ±0.3
exposed by 0.3 EV. Choose when
MORE ON PHOTOGRAPHY
you find it difficult to judge the
correct exposure.
As above, except that the camera varies exposure by 0.5 EV with
each shot instead of 0.3 EV.
ON ±0.5
The camera records three copies
of each photo: one with a “warm,”
reddish cast, a second at the white
balance currently selected in the
shooting menu (page 79), and a
WB-BKT
third with a “cool,” blueish cast.
Choose when you find it difficult to
select the correct white balance.
Record photos in both black-and-white and color or in blackand-white, color, and tinted monochrome (page 71).
CL-BKT
Description
Display after shooting
Display after shooting
The current selection is shown by
an icon in the picture display.
Notes
• Bracketing is not available when an option other than Off is se-
lected for Continuous. White balance bracketing is not available
when shooting monochrome photographs.
•
White balance bracketing and color bracketing are not available when
a RAW-quality option is selected for Picture Quality/Size (page 57).
• The flash turns off automatically when bracketing is in effect.
• Auto white balance is used in place of Multi-P AUTO when ex-
posure bracketing is in effect.
70
Page 77

CL-BKT: Color Bracketing
The number and type of photographs recorded when CLBKT is selected for Auto Bracket depends on the option
chosen for CL-BKT Black & White (TE) in the setup menu
(page 131):
• Off: The camera records two cop-
ies of each photograph, one in
black and white and a second in
color.
• On: The camera records three
copies of each photograph, one
in black and white, a second in
color, and a third using the tint
selected for B&W (TE) in the Im-
age Settings menu (pages 66–
67).
Tip: Contrast, Sharpness, and Color Depth
The contrast, sharpness, and vividness of the images in the bracketing sequence are determined by the options selected in the Im-
age Settings menu (pages 66–67). The black-and-white copy is
recorded at the settings most recently selected for Black & White,
the tinted monochrome copy at the settings most recently selected for B&W (TE), and the color copy at the setting currently selected for Image Settings (if Black & White or B&W (TE) is selected,
the color copy will be recorded at a setting of Standard).
B&W (TE) copy
MORE ON PHOTOGRAPHY
71
Page 78

Flash Exposure Compensation
Adjust flash level by –2.0 to +2.0
in steps of / EV Selecting Flash
Exposure Compensation in the
shooting menu displays the slider
shown at right; press ! or " to
choose a flash exposure compensation value and press
Flash exposure compensation is
MORE ON PHOTOGRAPHY
C/D.
displayed in the picture display
except when the flash is off.
Note
See page 24 for information on using the flash.
Caution
Flash exposure compensation may have no effect outside the
range of the flash (page 24).
72
Page 79

Manual Flash Amount
Choose amount of light produced by the flash in manual
flash mode (page 24). Flash output is expressed as a fraction of full power (all values are approximate):
FULL / / / / / / / / / / /
Flash level is displayed in the
picture display in manual flash
mode.
Note
Flash exposure compensation is not available in manual flash
mode.
Cautions
• In manual mode, flash level is not automatically adjusted accord-
ing to lighting conditions.
• Do not direct the flash at a person operating a motor vehicle or
use the flash close to the subject’s eyes. Particular care should be
observed when photographing infants.
Flash Synchro Settings
Choose how the flash synchronizes with the shutter.
• 1st Curtain: The flash fires at the beginning of the expo-
sure. Recommended in most situations.
• 2nd Curtain: The flash fires at the end of the exposure.
This option produces trails of light behind moving light
sources.
MORE ON PHOTOGRAPHY
73
Page 80

Noise Reduction
Choose Weak or Strong to reduce “noise” (random variations in brightness and color) in photographs taken at
high ISO sensitivities. The minimum ISO sensitivity at
which noise reduction applies can be selected using
Noise Reduction ISO (see below).
is displayed when noise reduc-
tion is on.
MORE ON PHOTOGRAPHY
Notes
• When a RAW-quality option is selected for Picture Quality/Size,
noise reduction applies only to the JPEG copy, not to the DNG
file.
• The time needed to record photographs varies with the option
selected for Noise Reduction.
Noise Reduction ISO
Select the minimum ISO sensitivity at which noise reduction applies when Weak or Strong is selected for Noise
Reduction. Choose from All (noise reduction applies at
all ISO sensitivities), Over ISO 201, Over ISO 401, Over
ISO 801, and ISO 1600.
74
Page 81

Interval Shooting
To take photos automatically at intervals of from five seconds to one hour, select Interval Shooting in the shooting menu and follow the steps below:
Choose an interval.
1
Press
# and $ to highlight
hours, minutes, or seconds
and press ! and " to change.
Press
C/D to return to
shooting mode.
Interval will be displayed in
the picture display.
Start shooting.
2
Press the shutter-release button. Photographs will
be taken automatically at the selected interval.
End shooting.
3
Press C/D to end shooting when all the desired photographs have been taken.
Cautions
• The interval timer is not available in 4 mode.
• The interval resets to zero when the camera is turned off.
• If the time needed to record photographs is longer than the se-
lected interval, the next photograph will not be taken until recording is complete.
MORE ON PHOTOGRAPHY
75
Page 82

Notes
• Use a fully-charged battery or optional AC adapter and be sure
that sufficient space remains in internal memory or on the memory card. Interval timer photography ends automatically when
the number of exposures remaining reaches zero.
• Photographs can be taken at any time by pressing the shutter-
release button.
• If Continuous or M-Cont is selected for Continuous Mode,
continuous shooting turns off automatically.
Date Imprint
MORE ON PHOTOGRAPHY
Imprint the date (YY/MM/DD) or date and time (YY/MM/
DD hh:mm) on photographs as they are taken.
An indicator is displayed in the
bottom right corner of the picture
display when date imprint is on.
Notes
• Date imprint is not available when the clock is not set. Set the
clock (page 16) before using date imprint.
• The date can not be imprinted on movies.
• When a RAW-quality option is selected for Picture Quality/Size,
the date is imprinted only on the JPEG copy, not the DNG file.
• The date is permanently imprinted on the image and can not be
removed.
76
Page 83

Exposure Compensation
The camera automatically adjusts exposure for the subject in the center of the frame, producing optimal exposure even when the subject is backlit. Exposure compensation may however be required in situations such as the
following:
• Very bright backlighting: Subjects that are very strongly
backlit may be underexposed. Try increasing exposure
compensation.
• The frame is dominated by very bright objects: The subject may
be underexposed. Try increasing exposure compensation.
• The frame is mostly dark (for example, a spotlit subject on a
darkened stage): The subject may be overexposed. Try
reducing exposure compensation.
Exposure compensation can be adjusted from the shooting menu or using the ADJ. lever.
The Shooting Menu
Selecting Exposure Compensation in the shooting menu dis
plays the slider shown at right;
press
! or " to choose an ex-
posure compensation value and
press C/D.
MORE ON PHOTOGRAPHY
77
Page 84

The ADJ. Lever
If exposure compensation is assigned to the ADJ. lever
(page 119), exposure compensation can be adjusted as
described below.
Display the exposure compensation slider.
1
With the camera in shooting
mode, press the ADJ. lever in
and press
MORE ON PHOTOGRAPHY
ADJ. lever left or right until the
exposure compensation slider
is displayed.
Adjust exposure compensation.
2
Press ! or " to choose an exposure compensation
value. Press the shutter-release button to take a picture or press the ADJ. lever or C/D to return to
shooting mode.
At settings other than 0.0, exposure compensation is displayed in
the picture display.
Caution
Exposure compensation is not available in mode M.
# or $ or press the
78
Page 85

White Balance
Option
Description
At the default setting of Multi-P AUTO, the camera au-
tomatically adjusts white balance so that a white subject will appear white regardless of the color of the light
source. It may however be necessary to match white balance to the light source under mixed lighting or when
photographing a subject that is a solid color.
Option
Auto The camera adjusts white balance automatically.
Multi-P AUTO
Outdoors Use when shooting in daylight under clear skies.
Cloudy Use when shooting in daylight under cloudy skies.
Incandescent
Lamp
Fluorescent
Lamp
Manual
Settings
Detail Make fine adjustments to white balance (page 81).
The camera adjusts white balance to account for differences in lighting in separate areas of the frame (in
continuous mode, this option is equivalent to Auto).
Use with incandescent lighting.
Use with fluorescent lighting.
Measure white balance manually (page 80).
Description
At settings other than Auto, the
current selection is shown by an
icon in the picture display.
Cautions
• Auto white balance may not produce the desired results with
scenes lacking white objects. This can be corrected by adding a
white object to the scene before shooting.
• Options other than Auto may not produce the desired results
when the flash is used. Select Auto when using the flash.
MORE ON PHOTOGRAPHY
79
Page 86

White balance can be selected in the shooting menu
(page 79) or assigned to the ADJ. lever (page 119) and adjusted as described below:
Display white balance options.
1
With the camera in shooting mode, press the ADJ. le-
ver in and press # or $ or press the ADJ. lever left or
right until white balance options are displayed.
Select a white balance option.
2
MORE ON PHOTOGRAPHY
Press ! or " to select an option. Press the shutterrelease button to take a picture or press the ADJ. lever
or C/D to return to shooting mode.
Manual: Measuring White Balance
To measure a value for white balance:
Select Manual Settings.
1
Highlight Manual Settings
in the white balance menu.
Measure white balance.
2
Frame a blank piece of paper
or other white object so that
it fills the frame and press the
DISP. button. Repeat Steps 1–2 until the desired effect
is achieved.
Press C/D.
3
Press C/D to return to shooting mode.
Note
Selecting an option other than Manual Settings resets manual
white balance.
80
Page 87

Detail: Making Fine Adjustments to White Balance
To make fine adjustments to white balance:
Select Detail.
1
Highlight Detail in the
white balance menu and
press the DISP. button.
Choose a setting.
2
Press ! or " to choose a
white balance. Press C/
D when settings are com-
plete.
Return to shooting mode.
3
Press C/D to return to shooting mode.
Note
Selecting an option other than Detail resets detail white balance.
MORE ON PHOTOGRAPHY
81
Page 88

White Balance Compensation
Compensate for color casts by modifying white balance
on the green-magenta or blue-amber axis. The modifications apply to the option currently selected for white balance and to all options selected while the modifications
are in effect.
Selecting White Balance Com-
pensation in the shooting menu
(page 54) displays the controls
MORE ON PHOTOGRAPHY
shown at right. Choose white balance compensation using the
", #, or $ buttons, or press the
DISP. button to reset white balance
!,
Amount
Green
compensation to a neutral value.
C/D to save changes
Press
and exit, or press the DISP. but-
ton twice to cancel.
Blue
Amber
Magenta
White balance compensation is
shown in the picture display.
82
Page 89

Notes
• White balance compensation can be
assigned to the ADJ. lever (page 119).
To reset, highlight Reset and press
C/D.
• White balance compensation can also
be assigned to the Fn buttons (pages
121–122).
• When the mode dial is rotated to
4, white balance com-
pensation is only available in movie and dynamic range double
shot modes.
• The White Balance Compensation option in the playback
menu (page 103) does not use the same values as the shooting
menu option.
MORE ON PHOTOGRAPHY
83
Page 90

ISO Setting
Adjust the camera’s sensitivity to light. Higher values
can be used for faster shutter speeds when the subject is
poorly lit, preventing blur.
• Auto: The camera automatically adjusts sensitivity according to brightness, the distance to the subject, and
the options selected for macro mode and picture quality and size.
• Auto-Hi (high sensitivity auto): As above, except that the cam-
MORE ON PHOTOGRAPHY
era selects higher sensitivities when the subject is poorly lit. The maximum sensitivity can be selected in the
setup menu (page 125).
• ISO 64–ISO 1600: Sensitivity is set to the selected value.
The current sensitivity is shown
in the picture display (if Auto or
Auto-Hi is selected, the sensitivity selected by the camera is shown when the shutter-release button is pressed halfway).
Sensitivity can be selected in the shooting menu (page
54) or assigned to the ADJ. lever (page 119) and adjusted
as described below:
Display ISO sensitivity options.
1
With the camera in shooting mode, press the ADJ. le-
ver in and press # or $ or press the ADJ. lever left or
right until ISO sensitivity options are displayed.
Select an ISO sensitivity option.
2
Press ! or " to select an option. Press the shutterrelease button to take a picture or press the ADJ. lever
or C/D to return to shooting mode.
84
Page 91

Notes
Picture
size
ISO sensitivity
Picture
size
ISO sensitivity
Default
Min.
Max.
Default
Min.
Max.
• “Noise” (random variations in brightness and color) may appear
in photographs taken at high sensitivities.
• The sensitivity displayed in the picture display in Auto and Auto-
Hi modes may differ from the actual value. If the flash is used,
a sensitivity of Auto is equivalent to ISO 125, regardless of the
value displayed in the picture display. The range of sensitivities
available in Auto mode when the flash is off is shown below:
ISO sensitivity
Picture
size
640
2048 176 3648
Default
100 64
Min.
Picture
Max.
283 2592
size
Default
100 64 1541280 238 3264
ISO sensitivity
Min.
Max.
Restore Defaults
To restore default shooting menu settings (pages 55–56),
rotate the mode dial to 5 and select Restore Defaults
in the shooting menu. A confirmation dialog will be displayed; highlight Ye s and press C/D to restore default values and exit to shooting mode.
Auto Aperture Shift
When On is selected, the camera will automatically adjust
aperture to prevent overexposure in mode A.
Note
Auto aperture shift is available only in mode A.
MORE ON PHOTOGRAPHY
85
Page 92

Switch Shooting Mode
When the mode dial is rotated to a
“MY” mode (page 53), you can use
this option to switch between 5,
P, A, S, and M modes without rotating the mode dial to a new setting. This option is only available
in “MY” modes and is not displayed if the shooting mode
currently selected for Reg. My Settings is a scene mode.
MORE ON PHOTOGRAPHY
86
Page 93

Movies
3
Recording Movies
This section describes how to record and view movies.
3
Recording Movies
Shoot movies with sound. Movies are stored as AVI files.
Rotate the mode dial to 4.
1
The option currently selected
for 4 mode appears in
the display.
Press C/D.
2
A menu of scene mode options will be displayed.
Select 3.
3
Press ! or " to highlight 3
(movie) and press C/D
to exit to movie mode.
Shoot.
4
Press the shutter-release button to begin recording;
press again to end. Recording ends automatically
when memory is full.
MOVIES
87
Page 94

Cautions
• Sounds made by the camera may be recorded with the movie.
• Movies may be up to 90 minutes in length or 4 GB in size. De-
pending on the type of memory card used, shooting may end
before this length is reached. The maximum total length of all
movie files that can be stored in internal memory or on a memory card varies with the options selected for Movie Size and
Frame Rate (page 89).
Notes
• The flash can not be used.
• The camera focuses when the shutter-release button is pressed
to begin recording.
• The amount of time remaining is calculated based on the amount
MOVIES
of memory available and may not diminish at an even rate.
• Shooting menu options differ from those available in other
modes (page 55).
• Charge the battery before shooting or use an optional AC
adapter. For long recordings, choose memory cards with high
write speeds and check the amount of memory available before
shooting.
88
Page 95

Choosing the Frame Size and Frame Rate
Movies consist of a series of images (frames) that are
played at high speed to create the illusion of motion. To
choose a frame size (the size of each frame in pixels) or
frame rate (the rate at which the frames are recorded), select 3 mode and follow the steps below:
Display the shooting menu.
1
Press C/D to display the scene menu. Press
# to highlight the mode tab, press " to highlight
the shooting menu tab, and press $ to place the cursor in the shooting menu.
Select Movie Size or Frame Rate.
2
Highlight Movie Size or Frame Rate and press $ to
display options for the selected item.
Highlight an option.
3
• Movie Size: Choose 640
(640 × 480 pixels) or 320
(320 × 240 pixels).
• Frame Rate: Choose 30 Frames/
Sec (30 fps) or 15 Frames/Sec
(15 fps).
Exit to shooting mode.
4
Press C/D. The selected option will be displayed in the picture display.
MOVIES
89
Page 96

3
3
Viewing Movies
ToToPress
Description
Viewing Movies
Follow the steps below to view movies.
Press 6.
1
Press the 6 button to display pictures in the picture
display.
Display the movie.
2
Use the !, ", #, and $
buttons (page 29) to scroll
through pictures until the
first frame of the movie is dis-
MOVIES
played. Movies are indicated
by a
3 icon.
Start playback.
3
Press the ADJ. lever in to start playback. Progress is
shown in the playback display. The following operations can be performed:
Press
Hold 8 to fast forward, 9 to rewind. If movie
Advance/
rewind
Pause/
resume
Adjust
volume
is paused, movie will advance or rewind one
8/9
frame; keep button pressed for slow advance or
rewind.
Press the ADJ. lever in to pause; press again to
ADJ.
resume.
!/" Press ! to increase volume, " to decrease.
Description
90
Page 97

More on Playback
The Playback Menu
Option
Page
Option
Page
This section details the options in the playback menu and
describes how to view pictures on a TV.
The Playback Menu
To use the playback menu, press the 6 button to start
playback and follow the steps below.
Display the playback menu.
1
Press the C/D button to display the playback
menu.
Select a menu item.
2
Press ! or " to scroll through the menu and press $
to display options for the highlighted item.
The playback menu contains the following options:
Option
Slide Show 92
Protect 92
DPOF 95
Resize 97
Page
Copy to Card from Internal Memory 97
Skew Correction 98
Level Compensation 100
White Balance Compensation 103
Option
Page
MORE ON PLAYBACK
Note
The setup menu can be accessed from the playback menu (page
112).
91
Page 98

Slide Show
Selecting this option starts an automated slide show. Pictures are displayed at three second intervals in the order
recorded. When a movie is displayed, movie playback
begins automatically; the slide show resumes when playback is complete.
The slide show repeats until stopped; press any button to
end the slide show.
Protect
Protect pictures from accidental
deletion. Protected files are indicated by the icon shown at right.
Caution
Formatting erases all files, including protected files.
MORE ON PLAYBACK
Protecting Individual Pictures
To protect or remove protection
from individual files, play the picture back and select Protect in the
playback menu to display the options shown at right (if the desired
image is not displayed, press
$ to view other pictures). High-
# or
light 1 File and press C/D.
92
Page 99

Changing the Protect Status of Multiple Files
Follow the steps below to change the protect status of
multiple selected files.
Select Protect in the playback menu.
1
In multi-frame playback,
proceed to Step 2. In singleframe playback, the options
shown at right will be displayed. Highlight Sel Mult
and press C/D.
Select Sel. Indiv. or Sel. Range.
2
Select Protect in the playback
menu to display the options
shown at right. To select images one at a time, highlight
Sel. Indiv., press C/D,
and proceed to Step 3. To select one or more ranges consisting of two images and
all photographs between them, highlight Sel. Range,
C/D, and proceed to Step 3.1.
press
Select photographs.
3
Press !, ", #, or $ to highlight photos and press
C/D to select. Pro-
tected pictures are marked
with icons. To remove protection from a photo, highlight it
and press C/D again.
MORE ON PLAYBACK
93
Page 100

Tip: Selecting Ranges
To select one or more ranges consisting of two images and all
photographs between them, press the ADJ. lever in and follow
the steps below:
MORE ON PLAYBACK
3.1 Press
3.2 Press !, ", #, or $ to high-
Repeat Steps 3.1–3.2 to select additional ranges, or press the
ADJ. lever in to select or deselect individual photographs as
described in Step 3.
Press the Fn2 button.
4
A message will be displayed while the camera pro-
!, ", #, or $ to high-
light the first image and press
C/D to select. The se-
lected image is marked with an
icon. If you selected the wrong
image, press DISP. and try again.
light the last image and press
C/D to select. The se-
lected image and other images
in the selected range will be
marked with icons.
tects the selected files. The camera will then return
to normal playback.
Protecting or Removing Protection from All Files
To protect all files, select Protect,
highlight Select All and press
C/D. To remove protec-
tion from all files, highlight Cancel
All and press C/D.
94
 Loading...