

Page 1

Finisher (FS-108R)
User’s Guide
© 2007 Ricoh Corporation
5 Dedrick Place
West Caldwell, NJ 07006
January 2007
N905437B
Page 2

© 2007 Ricoh Corporation. All rights reserved.
No part of this document may be reproduced without the expressed permission of Ricoh
Corporation.
The material in this document is for informational purposes and is subject to change
without notice. Ricoh Corporation assumes no responsibility for errors or omissions in
this document. No liability is assumed for any damages resulting from the use of the
information it contains.
TRADEMARK
Adobe and Postscript are registered trademarks of Adobe Systems Incorporated. PCL
is the trademark of Hewlett Packard. Ethernet is a trademark of Xerox Corporation.
Windows XP is a trademark of Microsoft Corporation. Digital Document Publisher and
DDP and its associated logo mark are the trademarks of Ricoh Corporation. Ricoh and
the Ricoh trademark are registered trademarks of Ricoh, Ltd. All rights reserved.
All other terms and product names may be trademarks or reg istered trade marks of the ir
respective owners and are hereby acknowledged.
NOTICE TO USER
In an effort to meet the demands of a rapidly changing technology, the manufacturer is
continually developing new features and functions to meet changing printing or printer
needs. Please be sure to consult all manual updates or addenda when using this
product’s documentation.
This document contains TrueType fonts from Monotype Imaging Inc. Reproduction of
these fonts is prohibited.
The software embedded in this product is based in part on the work of Independent
JPEG Group.
The software embedded in this product uses software by CMU. Copyright 1988, 1989
by Carnegie Mellon University. All rights reserved.
Permission to use, copy, modify, distribute and sell this software and its documentation
for any purpose and without fee is hereby granted, provided that the avove copyright
notice appears in all copies and that both the copyright notice and permission notice
appear in supporting documentation, and the name of CMU not be used in advertising
or publicity pertaining to distribution of the software without specific written prior
permission.
The software embedded in this product uses the software by Sam Leffler and Silicon
Graphics.
Copyright (c) 1988-1997 Sam Leffler
Copyright (c) 1991-1997 Silicon Graphics, Inc
Permission to use, copy, modify, distribute and sell this software and its documentation
for any purpose and without fee is hereby granted, provided that the above copyright
notice appear in all copies of the software and related documentation, and (ii) the names
of Sam Leffler and Silicon Graphics may not be used in advertising or publicity pertaining
to distribution of the software without specific, written prior permission of Sam Leffler and
Silicon Graphics.
Page 3

Revisions
Revision Page No. (Contents) Date
A Original Release April 2006
B Generic Version; Add rev history page, copyright page updated January 2007
i
Page 4

Contents
Chapter 1. Introduction . . . . . . . . . . . . . . . . . . . . . . . . . . . . . . . . . . . . . . . . . . . . .1-1
1.1. Finisher Configuration . . . . . . . . . . . . . . . . . . . . . . . . . . . . . . . . . . . . . . . . . . . 1-1
1.1.1. External View of the Finisher . . . . . . . . . . . . . . . . . . . . . . . . . . . . . . . . . . 1-1
1.1.2. Opening the Finisher Front Cover . . . . . . . . . . . . . . . . . . . . . . . . . . . . . . 1-2
1.1.3. Internal View of the Finisher. . . . . . . . . . . . . . . . . . . . . . . . . . . . . . . . . . . 1-3
Chapter 2. General Information. . . . . . . . . . . . . . . . . . . . . . . . . . . . . . . . . . . . . . .2-1
2.1. Powering on the Finisher. . . . . . . . . . . . . . . . . . . . . . . . . . . . . . . . . . . . . . . . . 2-1
Chapter 3. Replacing Consumables . . . . . . . . . . . . . . . . . . . . . . . . . . . . . . . . . . .3-1
3.1. When to Replace Consumables . . . . . . . . . . . . . . . . . . . . . . . . . . . . . . . . . . . 3-1
3.2. Replacing the Staple Cartridge . . . . . . . . . . . . . . . . . . . . . . . . . . . . . . . . . . . . 3-2
Chapter 4. Troubleshooting. . . . . . . . . . . . . . . . . . . . . . . . . . . . . . . . . . . . . . . . . .4-1
4.1. Clearing Paper Jams. . . . . . . . . . . . . . . . . . . . . . . . . . . . . . . . . . . . . . . . . . . . 4-1
4.2. Clearing Wedged Staples . . . . . . . . . . . . . . . . . . . . . . . . . . . . . . . . . . . . . . . . 4-2
Chapter 5. Others . . . . . . . . . . . . . . . . . . . . . . . . . . . . . . . . . . . . . . . . . . . . . . . . . .5-1
5.1. Extend the Tray . . . . . . . . . . . . . . . . . . . . . . . . . . . . . . . . . . . . . . . . . . . . . . . . 5-1
5.2. Cancel of Staple Job . . . . . . . . . . . . . . . . . . . . . . . . . . . . . . . . . . . . . . . . . . . . 5-1
i
Page 5
Chapter 1. Introduction
1.1. Finisher Configuration
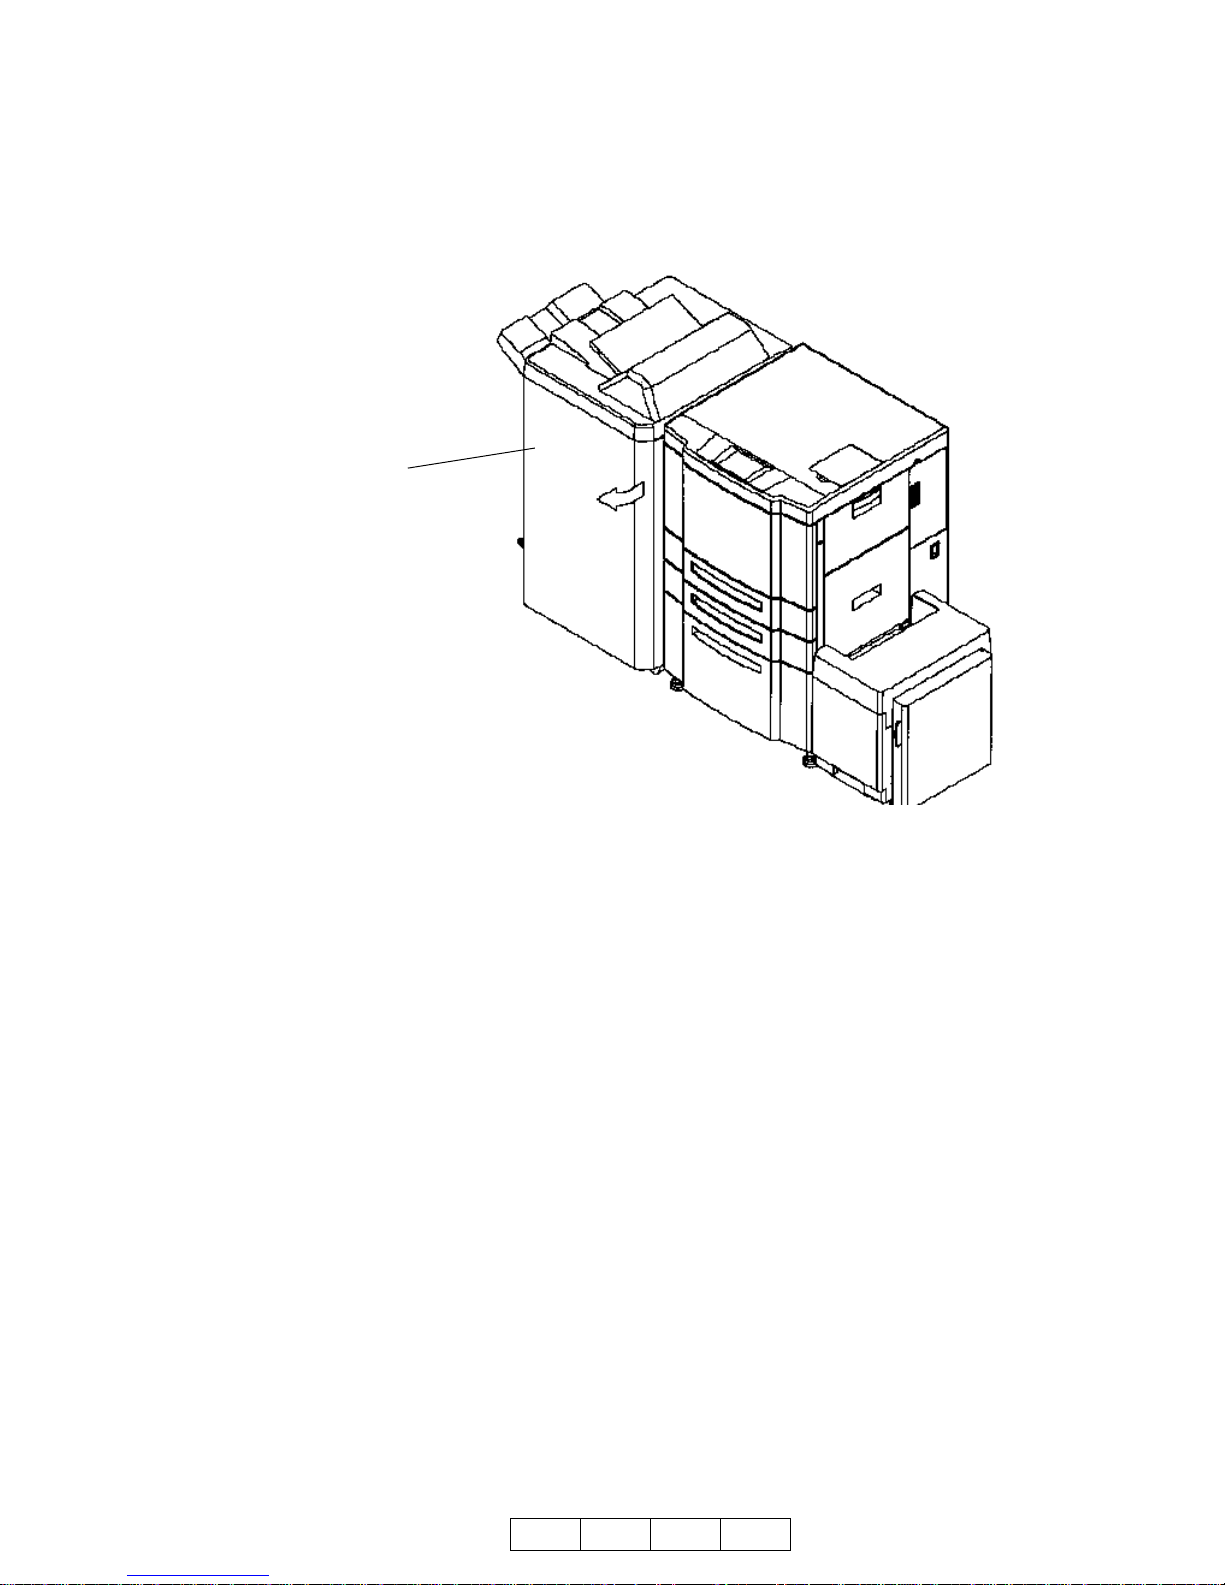
1.1.1. External Vie w of the Finisher
The figure below shows an external view of the finisher and descriptions of the main
parts.
Fi
fffff ff
Finisher
Finisher
kk llll
F
Fi
2. Main Tray
1. Finisher Front Cover Open to change the staple cartridge or clear paper jams.
2. Main Tray It receives printed paper.
3. Sub Tray It receives printed paper.
3. Sub Tray
1. Finisher
Front Cover
O G V 1 0 0
1-1
Page 6
1.1.2. Opening the Finisher Front Cover
Open the finisher front cover according to the following figure.
Finisher
Fi
Finisher Front Cover
1-2
O G V 1 0 0
Page 7

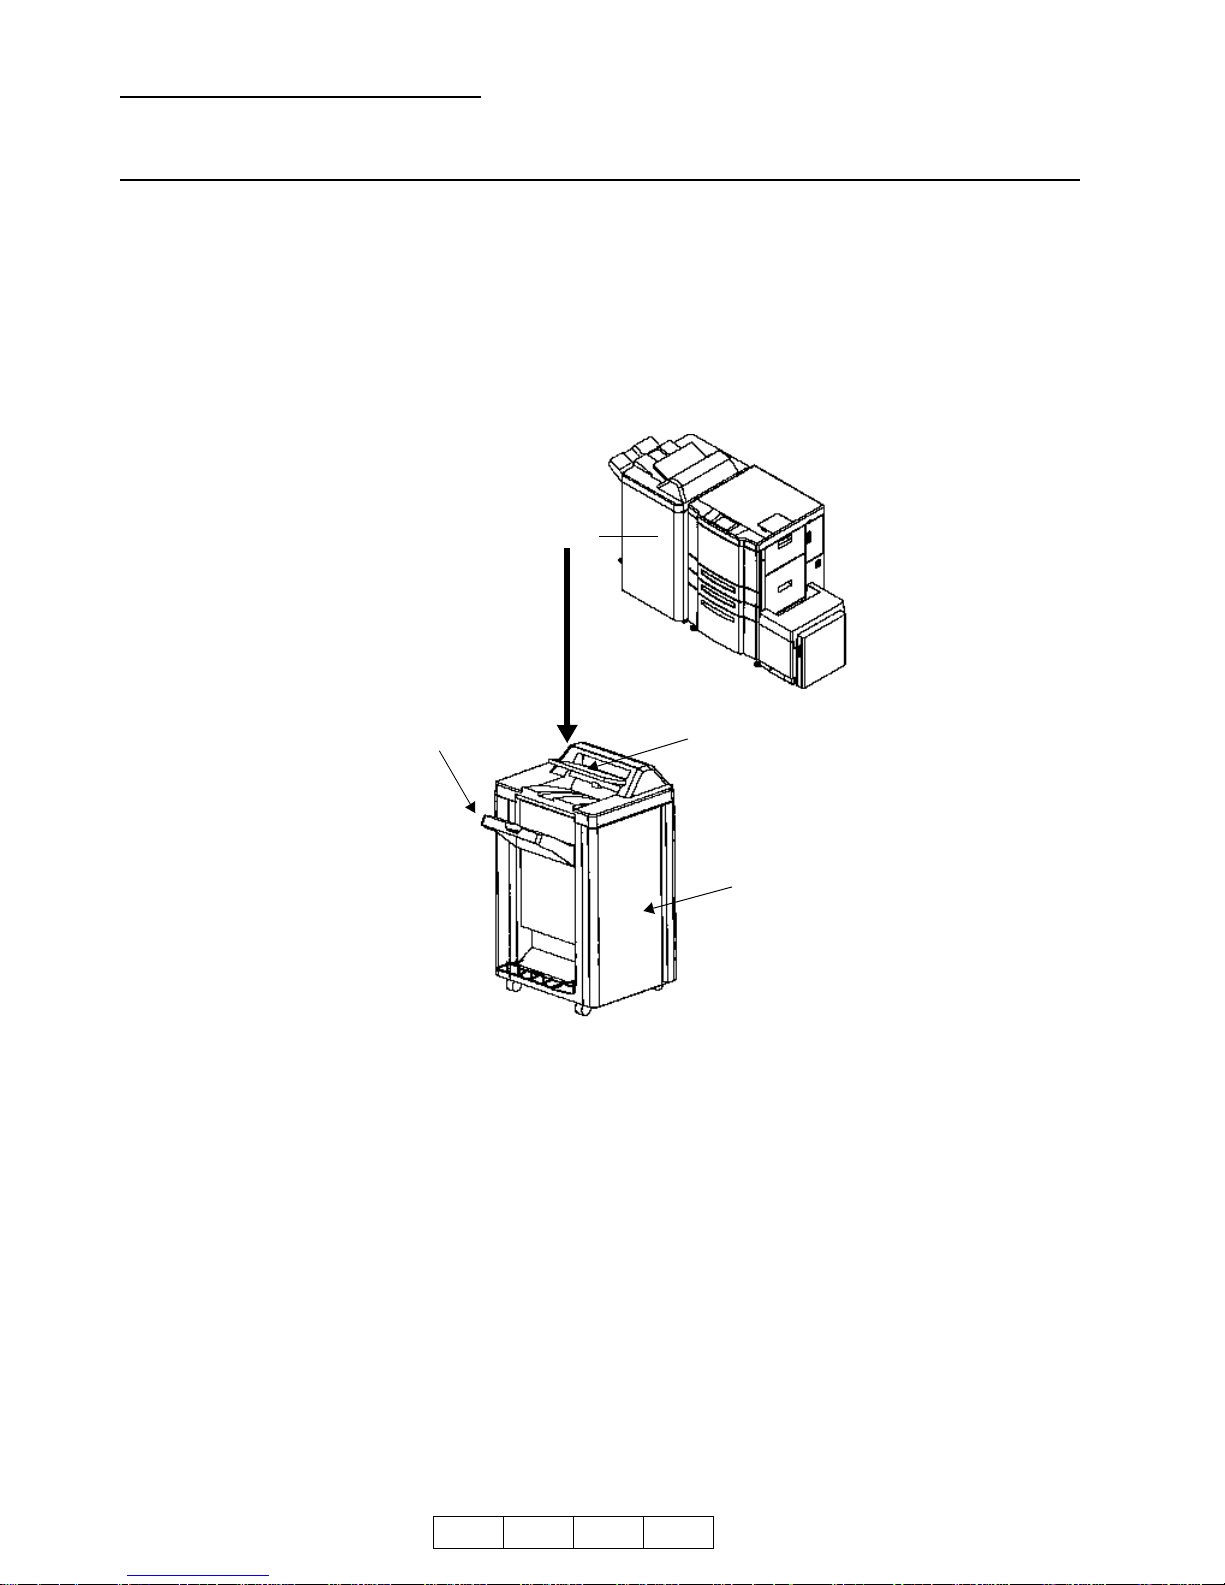
1.1.3. Internal Vie w of the Finisher
The following figure shows an internal view of the finisher with the front cover open.
Sub Tray
Main Tray
1. Stacker Unit
2. Stapler Unit
(2) Staple R
Staple Cartridge
O G V 1 0 0
(1) Staple F
Operator’s
Side
1-3
Page 8

1. Stacker Unit Clear stacked paper when the Operator’s Panel of the
printer indicates.
2. Stapler Unit
(1) Staple F Replace the staple cartridge in the Staple F on the opera-
tor’s side.
(2) Staple R Replace the staple cartridge in the Staple R on the oppo-
site side of the operator’s.
1-4
O G V 1 0 0
Page 9

Chapter 2. General Information
2.1. Powering on the Finisher
If your Finisher is connected to a DDP 70/92, turn the finisher on and off using the
switch on the printer. The mark on the switch represents the binary characters “O” for
off and “I” for on.
F
Fini sher
Finisher
If your Finisher is connected to a DDP 184, turn the finisher on and off using the Main
Power Switch. The mark on the switch represents the binary characters “O” for off and
“I” for on.
F
Finis
Fini shFi niFIer
Power Switch Power Swit chPPPoPOPower
Power
Power Switch
Finisher
Main Power Switch
When the printer is powered on, the printer and the finisher go through a power-up
sequence that takes approximately 5 minutes. During the power-up sequence, the
printer will run a series of internal tests.
CAUTION:
Wait at least 5 seconds to power on the printer after powering off.
When the printer cannot be powered on, PO WER OFF the printe r and wait at least
30 seconds. Then power on the printer again.
WARNING:
In the event of an emergency, POWER OFF the printer by turning the Power
Switch to’O’ side. The printer can be always powered off by turning the Power
Switch to ’O’ side.
O G V 1 0 0
2-1
Page 10

2-2
O G V 1 0 0
Page 11

Chapter 3. Replacing Consumables
3.1. When to Replace Consumables
The Operator’s Panel on the printer displays a message informing you when a supply
needs to be replaced. However, the following item will help you anticipate when to
replace consumables.
Consumable Replace every...
Staple 5,000 times
Note:
• Waste materials should be disposed of or incinerated under conditions
which meet all federal, state and local environmental regulations. Since
regulations may vary from one region to another, check with the agency
that governs waste disposal in your area for proper procedures.
• Confirm that staples comply with the specifications of the finisher.
O G V 1 0 0
3-1
Page 12

3.2. Replacing the Staple Cartridge
Replace the staple cartridge when LOW STAPLE (R) or LOW STAPLE (F) is displayed
on the Operator’s Panel.
1. Open the finisher front cover.
2. Pull out the stacke r unit by holding the stacker unit
handle.
3. Pull up the cartridge
housing, then remove it
while sliding it along the
stapler rail.
4. Remove the empty cartridge from the cartridge housing.
3-2
O G V 1 0 0
Page 13

5. Insert the new
cartridge into the
housing.
Note:
Do not remove the
remaining staples inside
the housing; otherwise,
the first sheet output
after the replenishment
will not be stapled.
6. Insert the cartridge
housing while sliding it
along the stapler rail,
then push in and d own to
secure it in place.
7. Return the stacker unit to its original pos ition.
8. Close the Finisher door.
O G V 1 0 0
3-3
Page 14

3-4
O G V 1 0 0
Page 15

Chapter 4. Troubleshooting
4.1. Clearing Paper Jams
The finisher stops when a misfeed occurs and PAPER JAM is displayed on the Oper-
ator’s Panel of the printer.
Follow the steps below to clear paper from the finisher.
Move the blue tab and remove paper.
Turn the blue knob, move the blue tab, then remove paper.
Move the blue tab and remove paper.
Remove the paper of a delivery tray.
Pull out the stacker unit, then remove paper.
O G V 1 0 0
4-1
Page 16

4.2. Clearing Wedged Staples
Follow the steps below to clear wedged staples.
Pull out the stacker unit by holding the stacker unit handle.
Pull up the cartridge housing, then
remove it while sliding it along the
stapler rail.
Pull the lever of cartridge, then open the cover.
Remove the wedged staples.
4-2
O G V 1 0 0
Page 17

Return the Cover of cartridge to its original position.
Insert the Cartridge housing while it
along the stapler rail , then p ush in and
down to secure it in place.
Return the stacker Unit to its original position.
After removing the wedged staples, staples do not come out from the stapler for several times, then execute the TEST
PRINT of staple mode till staple appears on the paper.
O G V 1 0 0
4-3
Page 18

4-4
O G V 1 0 0
Page 19

Chapter 5. Others
5.1. Extend the Tray
Main Tray
Sub Tray
Extend the Main Tray and the Sub Tray,
when the length of the printed paper is 9
inches or more.
5.2. Cancel of Staple Job
When the staple job is canceled, the paper of this job is delivered to the Main Tray
without staple.
O G V 1 0 0
5-1
Page 20

5-2
O G V 1 0 0
 Loading...