

Ricoh FF-9, FF-9s Owner's Manual

Ricoh FF-9/FF-9s
www.PayPal.me/butkus
This camera manual library is for reference and historical purposes, all rights reserved.
This page is copyright by , M. Butkus, NJ.
This page may not be sold or distributed without the expressed permission of the producer
I have no connection with Chinon Co., Japan
On-line camera manual library
This is the full text and images from the manual. This may take 3 full minutes for all images to appear.
If they do not all appear. Try clicking the browser "refresh" or "reload button" or right click on the image, choose "view image" then go back. It should now appear.
To print, try printing only 3 or 4 pages at a time.
Back to main on-line manual page
If you find this manual useful, how about a donation of $3 to:
M. Butkus, 29 Lake Ave., High Bridge, NJ 08829-1701
and send your e-mail address so I can thank you.
Most other places would charge you $7.50 for a electronic copy
or $18.00 for a hard to read Xerox copy.
This will allow me to continue to buy new manuals and pay their shipping costs.
It'll make you feel better, won't it?
If you use Pay Pal, use the link below. Use the above address for a check, M.O. or cash.
Ricoh FF-9s and Ricoh FF-9 are identical camera manuals. The only difference is the location of the lens opening
switch and the body look. The text in the manual is word for word except the 9s contains the statement that "the
battery should be replaced if older then 5 years" and a different shot of the front in the illustrated instructions that I
have included.
CONTENTS
Locating the controls..........................
Using the strap....................................
Inserting the battery............................
Opening the lens shield......................
Checking the battery...........................
Loading the film...................................
Setting the film speed.........................
Holding your camera...........................
Viewfinder ............................................
Auto-focus shooting............................
Pre-focus shooting..............................
Rewinding the film (Auto reverse).......
Flash photography...............................
Using the self timer.............................
The feature mode................................
Using the panorama mode..................
Using the nigh! photography mode....
Using the TV mode..............................
Using the continuous shooting mode
Using the interval mode......................
Using the ME mode.............................
Remote control socket........................
Proper care of your camera.................
Specifications................................ ......
We are most gratified that you have selected a RICOH camera. Before using your camera, please be sure to read these
instruction carefully.
LOCATING THE CONTROLS
1. Shutter Release Button
2. Remote Control Socket
3. Mode Button
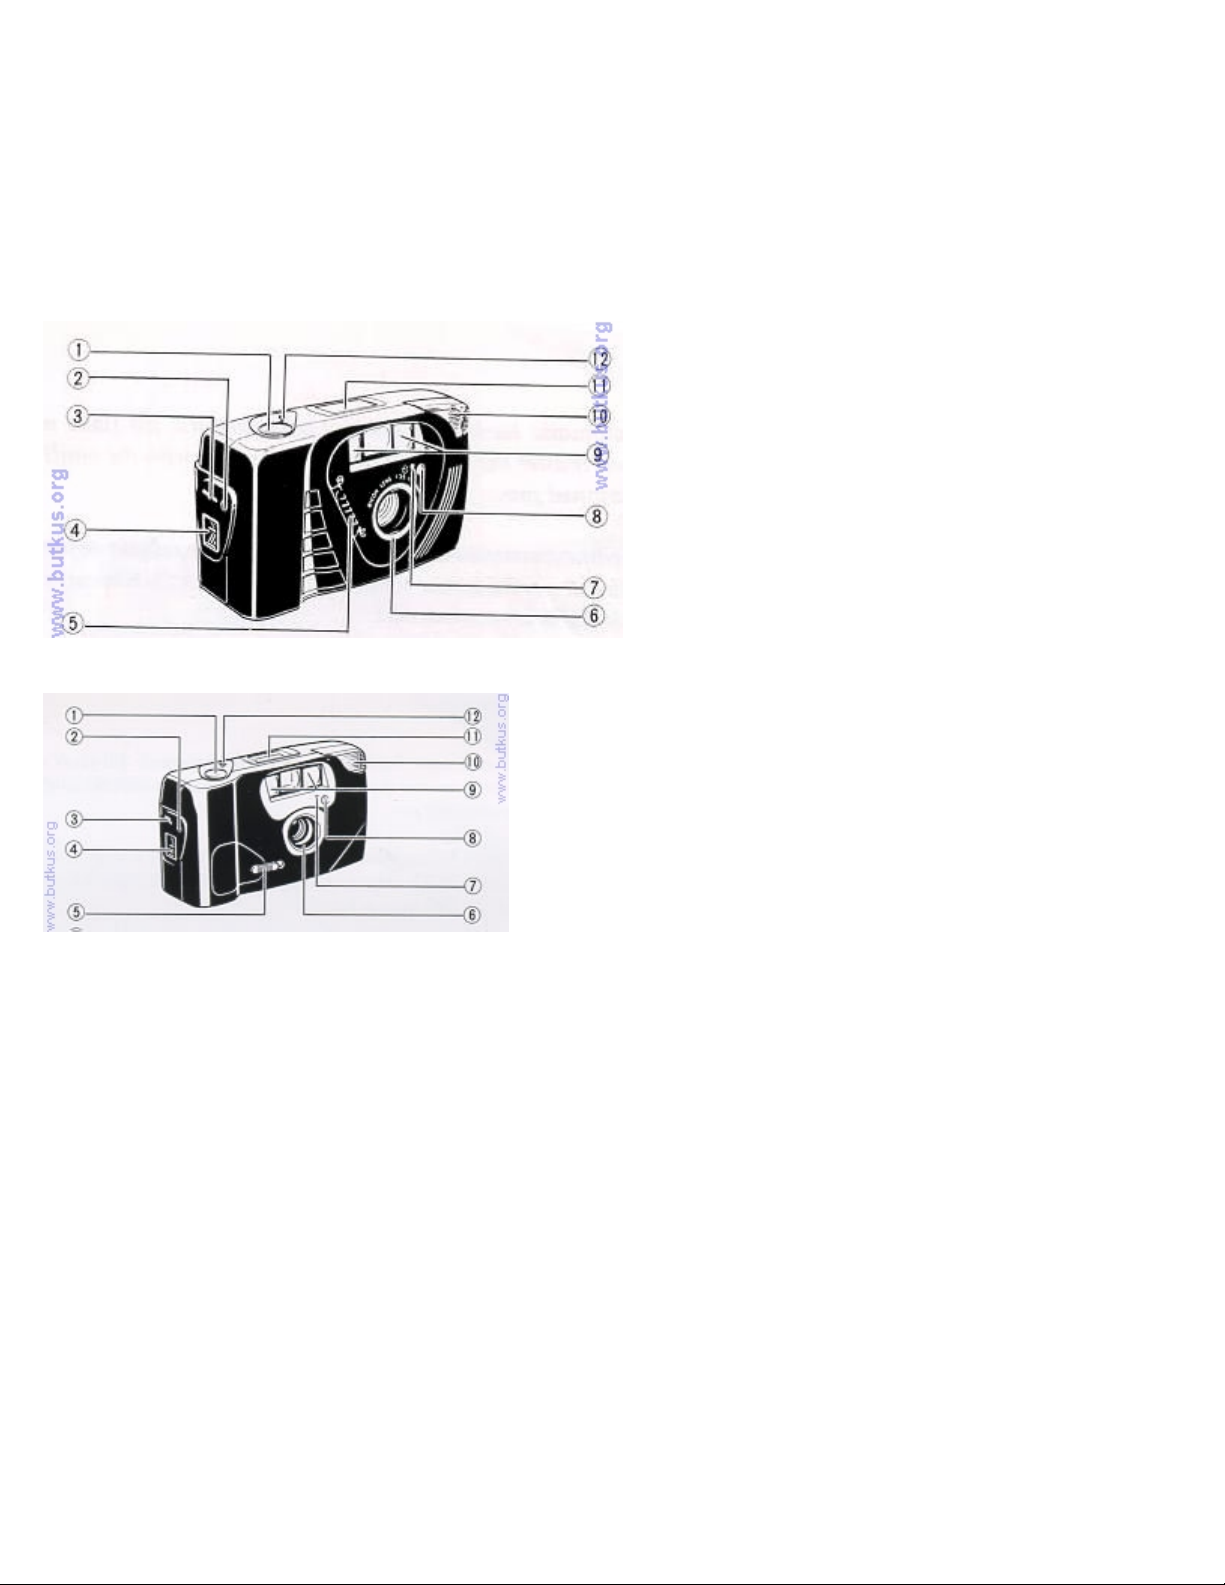
4. Strap Holder
5. Lens Shield Switch
6. Lens Shield
7. Self -timer LED4www.butkus.org
FF-9 shown below
FF9s shown below
8. Photocell
9. Distance Measuring Windows
10. Built-in Flash Unit
11. LCD Panel
12. Self-timer Button
13. Viewfinder
14. AF Monitor
15. Flash Ready Lamp
16. Film Take-up Spool4www.butkus.org
17. Back Cover Latch
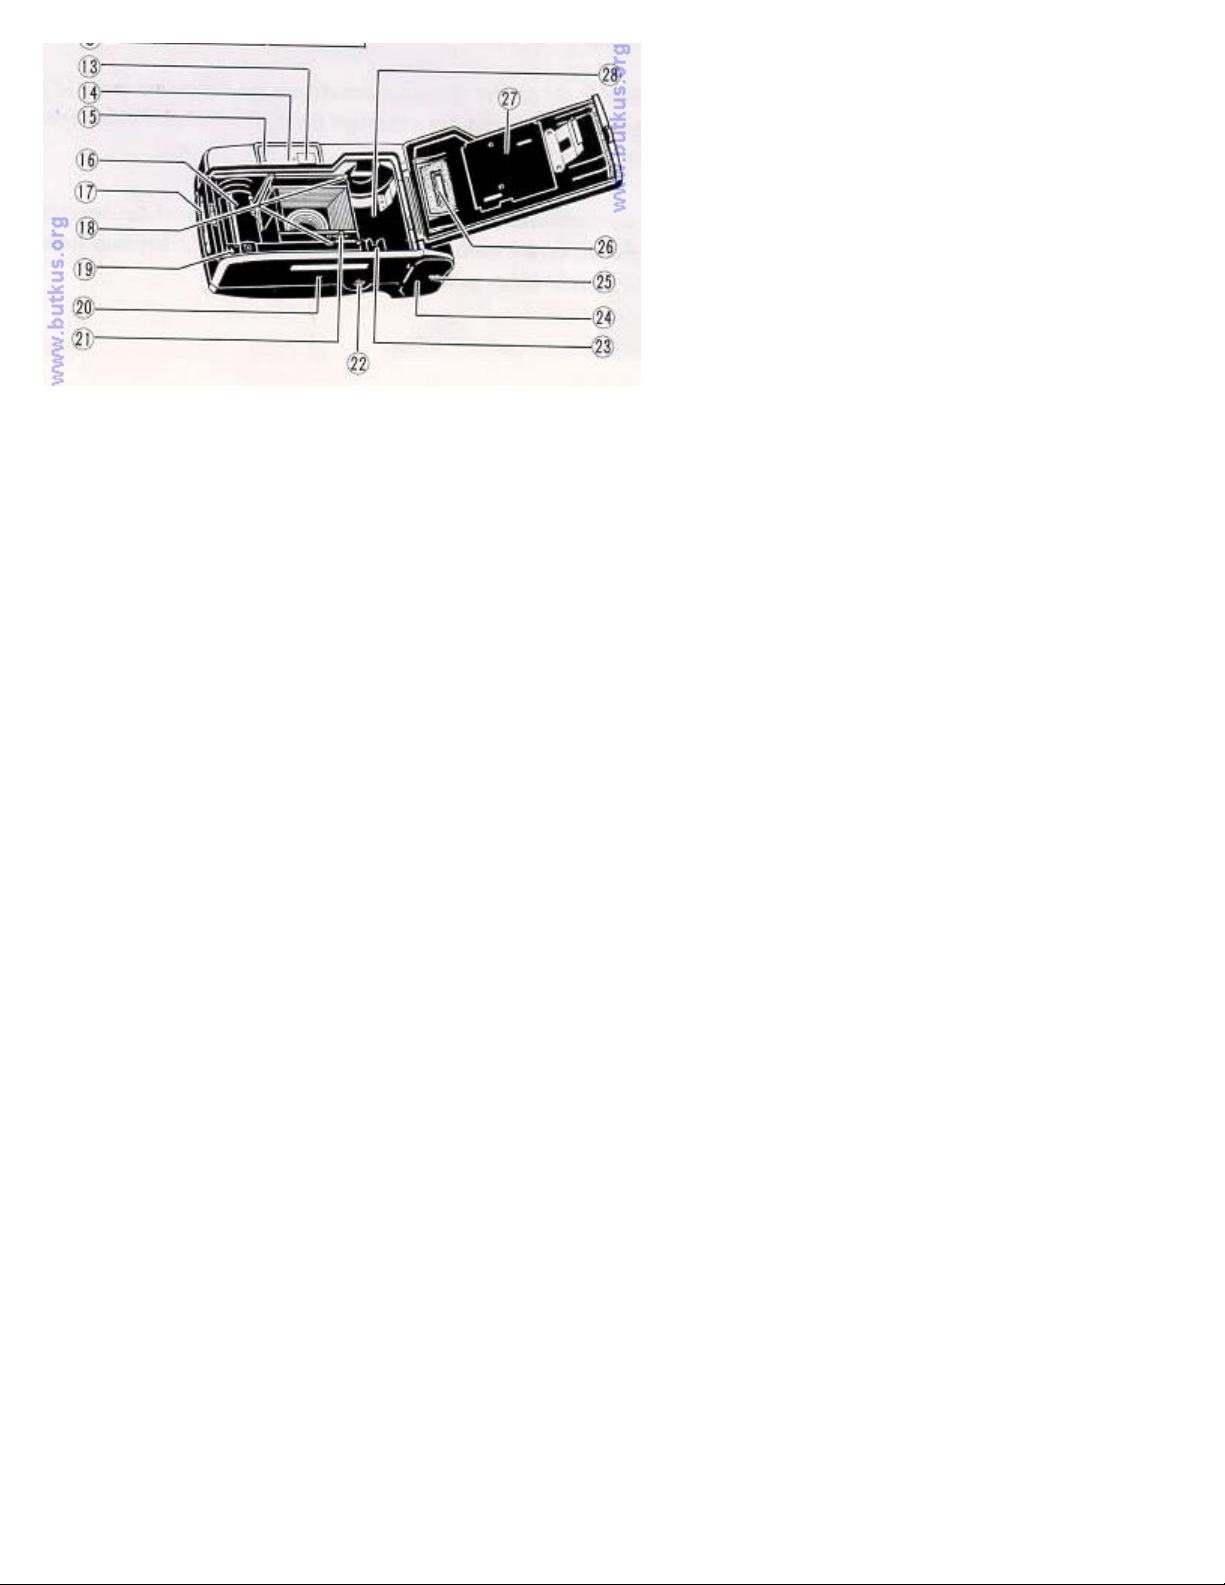
18. Film Guides
19. Mark of the Film Leader Position
20. Manual Film Rewind Button
21. Sprocket
22. Tripod Socket
23. Film Rewind Shaft
24. Battery Compartment Cover
25. Battery Compartment Cover Latch
26. Film Loaded Window
27. Back Cover
28. Film Chamber
USING THE STRAP
Attaching the Strap
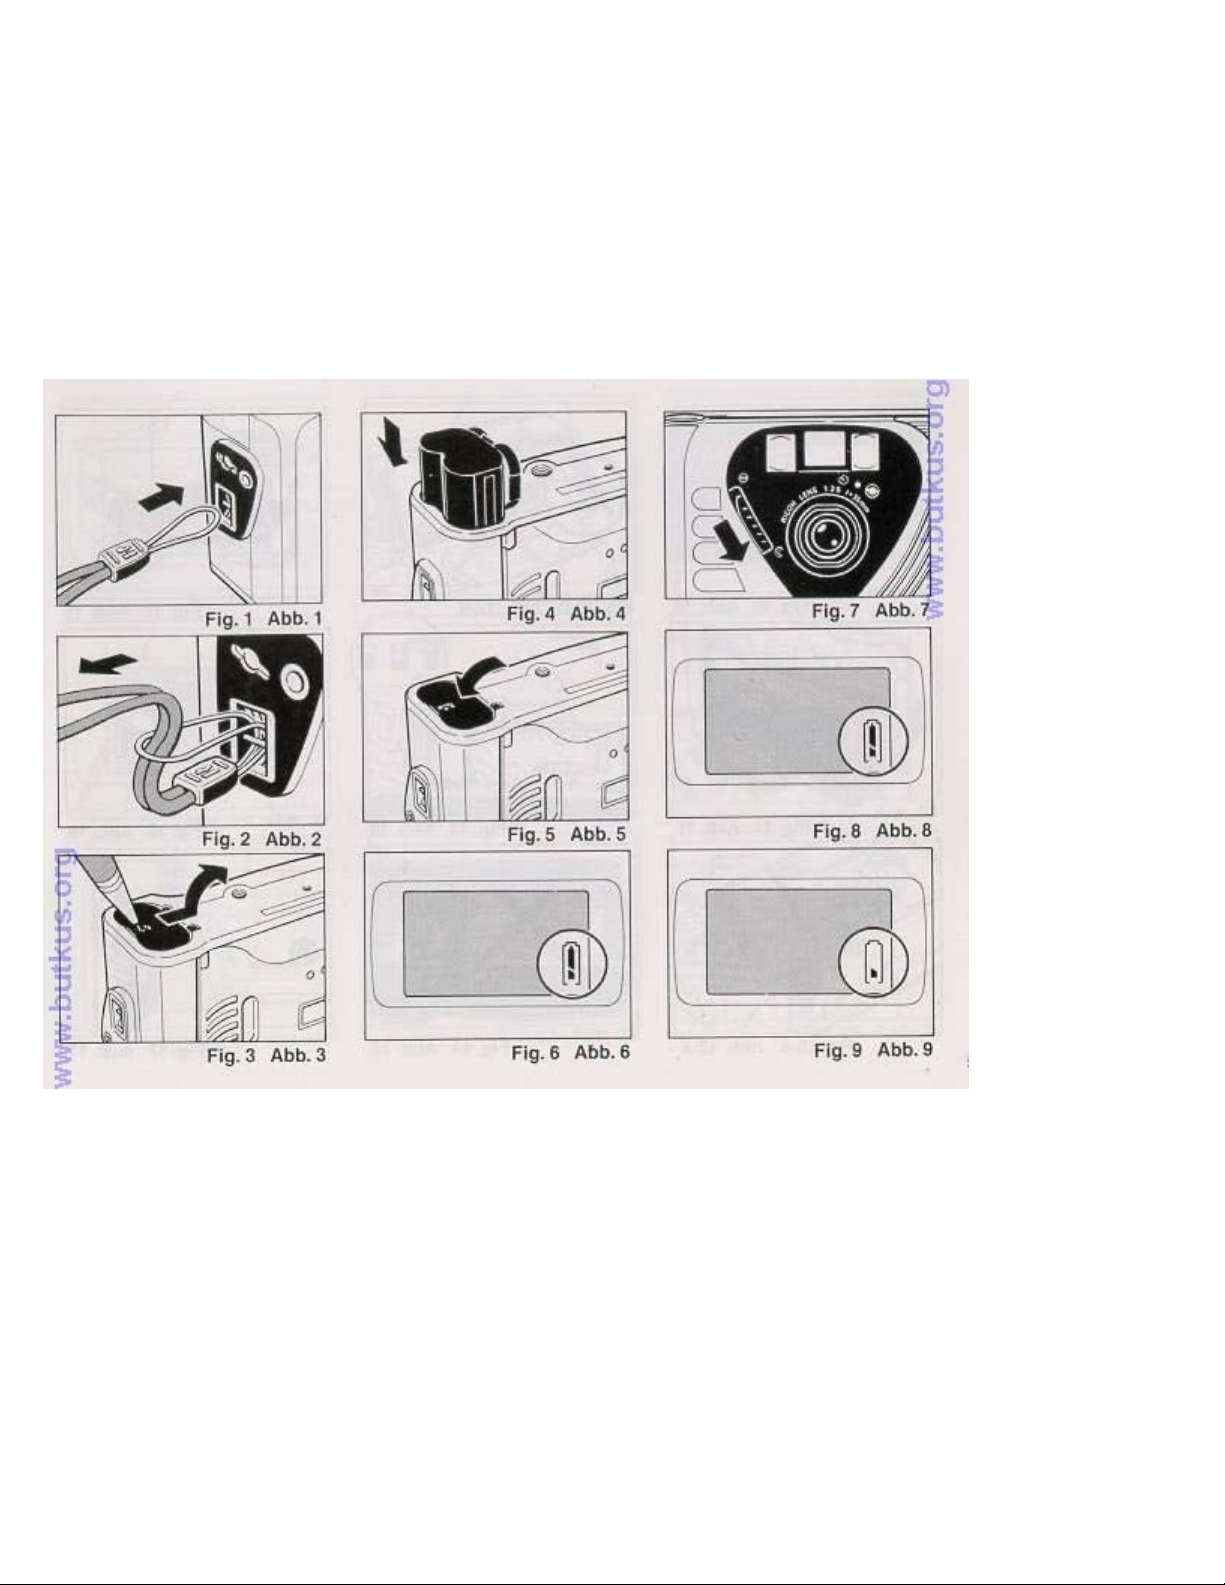
1. Insert the loop at the end of the Strap under the Strap Holder. (Fig. 1)
2. Insert the other end of the Strap through the loop and tie the Strap onto the Strap Holder (Fig. 2)4www.butkus.org
INSERTING THE BATTERY
The camera will not operate unless the battery is installed. It is important to make sure that the battery is installed
correctly.
1. Push the Battery Compartment Cover Latch by a pen etc. in the direction of the arrow and pull open the cover.
(Fig. 3)
2. Insert the 6 volt lithium battery, checking that+ and - on the battery are lined up correctly according to the polarity
diagram inside the battery compartment. (Fig. 4)
3. Close the Battery Compartment Cover by pushing it in the direction of the arrow. (Fig. 5)
* When the battery is inserted correctly, the Battery Condition Mark Am: appears on the LCD Control Panel when the
Lens Shield is opened. (Fig. 6)
* When replacing the battery, do so as quickly as possible, and avoid having film inside the camera
* Do not remove the battery from the camera unless it is to replaced with a new one.
Battery for use
Lithium battery (6 V) Panasonic BR-P2DP

OPENING THE LENS SHIELD
1. Open the Lens Shield by sliding the Lens Shield Switch toward the mark of "C" (opening). (Fig. 7)4www.butkus.org
FF-9s shown below
* You can only fire the camera when the Lens Shield is completely open.
* To avoid tripping the shutter inadvertently and wasting battery power, always keep the Lens Shield closed when
you are not taking pictures.
* When the Lens Shield is closed, the Battery Condition Mark will disappear to conserve the battery power.
* Opening the lens shield while pressing the shutter release will release the shutter.
CHECKING THE BATTERY
1. The symbol is displayed on the LCD Panel when the battery power is sufficient. (Fig. 8)
2. When the battery is nearly exhausted, the symbol will appear. (Fig. 9)
If there is film in your camera, finish the roll as soon as possible and obtain a new battery
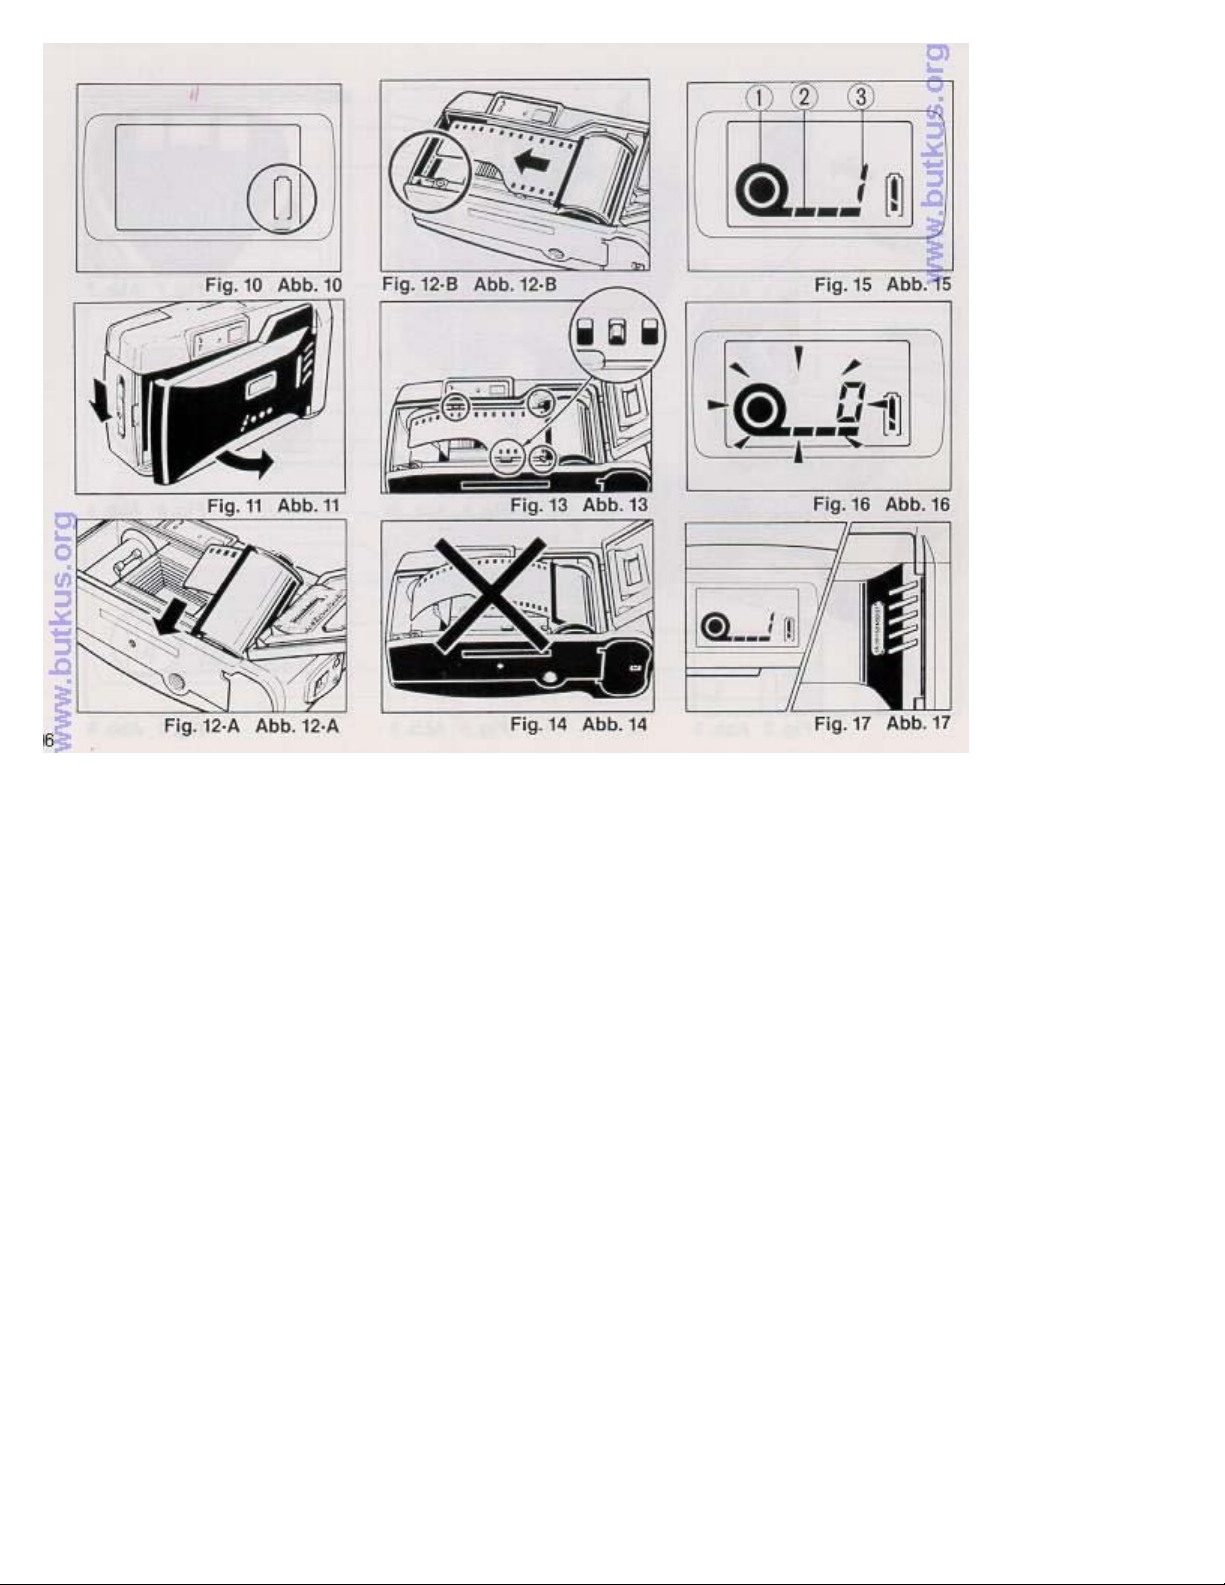
3. When the battery is completely exhausted the symbol will be displayed. (Fig. 10)
Replace with a new battery.
* Cold temperatures will reduce battery efficiency. In freezing weather, the ** symbol may turn off and only the ** or
** symbol may show in the LCD panel. When the camera returns to normal temperature, the Battery "All Right" **
symbol should reappear. If you are taking pictures in cold weather, keep the camera warm and take it out only when
you need it.
* When the
* If the battery voltage is insufficient, the shutter may not release or the film may not advance completely In the
following cases, replace the battery:
symbol is shown in the LCD Panel, don't use the flash.
1 ) When the battery mark displays only the outside of the frame ( C ).
2) When the shutter does not release.
3) When it takes 10 or more seconds for the Flash Ready Lamp to light.
4) When film advance and rewind cannot be done
5) When the self-timer does not function.
LOADING THE FILM
Always avoid direct sunlight when loading the film.
1. Push the Back Cover Latch downwards to open. (Fig. 11)
2. Load the film cassette into the Film Chamber and pull out enough film leader to extend over the mark of the film
leader position (A). (Fig. 12.A, 12.B)
3. Please make sure that the film is within the Film Guides (Fig. 13), and that the film is not slack.
(Fig. 14)
4. Press the Back Cover shut so that the Back Cover Latch returns to its original position. The film is automatically
advanced until number Hi" appears in the LCD Panel. As soon as you close the Back Cover, the LCD Panel will show
the following signs. (Fig. 15)
(1) Film Cassette loaded Symbol
(2) Film Advance Symbols (these symbols will flash in sequence toward the right to tell you the film is winding.)
(3) Exposure Counter
4. If the film has not advanced correctly and is not taken up onto the Film Take-up Spool, the Film Cassette Loaded
Symbol, the Film Advance Symbol and Exposure Counter will blink for about 30 sec. (after 30 sec., they appear
without blinking but start to blink when the Shutter Release Button is pressed and the shutter can not be released).
 Loading...