


Before You Use This Machine
Before y ou send or receive fax messa ges,
take about 30 minutes to set up y our mac hine.
Set up your machine using the following procedures.
First,
check the supplies.
w
Operating Instructions
w
Before You Use This Machine
(this manual)
w
Paper size decals
w
Key layout sheet *1
w
Harness set *2
w
Handset bracket assembly
(bracket and four screws)
w
Bland plaque
w
Bland plaque Installation
Instructions
Type 2 (Color NIC FAX Unit standard) only:
w
CD-ROM
(LAN-Fax driver & Operating Instructions)
w
End-User License Agreements
w
NIC FAX UNIT CD-ROM Operating
Instractions
w
Fernite core
*1:Attach this if you want to use the ABC
layout.
*2:Used by your service representative to
install the second optional paper tray unit.
Keep going...
ZHMX040E
R
ZHMX030E
WARNING:
• Disconnect the power (by pulling the plug, not the
cable) if the power cable or plug becomes frayed or
otherwise damaged.
• To avoid electric shock or laser radiation exposure,
do not remove any covers or scre ws other than those
specified in this manual.
• Turn off the po wer and disconnect the po wer (by pulling the plug, not the cable) if any of the following occurs:
• You spill something into the machine.
• You suspect that your machine needs service or re-
pair.
• The external housing of your machine has been dam-
aged.
• Disposal can be done by our authorized dealer.
R
CAUTION:
• Protect the machine from damp and wet weather , such
as rain and snow.
• Do not allow paper clips, staples, or other small metallic objects to fall inside the machine.
1
• For environmental reasons, do not dispose of the machine or supply waste at household waste collection
points. Disposal can take place at an authorized dealer .
• The inside of the machine could be very hot. Do not
touch the parts labelled “hot surface”. Otherwise injury might occur.
• Our products are engineered to high standards of quality and functionality, and we recommend that you use
only the supplies available at an authorized dealer.
Preparing the Toner Cartridg e
1
Note
• The protective sheet on the ADF (Auto Document
Feeder) refers to this section as “Preparing the Toner
Cassette”.
R
WARNING:
• Do not burn spilled or used toner. Toner dust might
ignite when exposed to an open flame.
• Dispose of used toner cartridges in accordance with
local regulations.
R
CAUTION:
• Keep toner (used or unused) and toner cartridges out
of the reach of children.
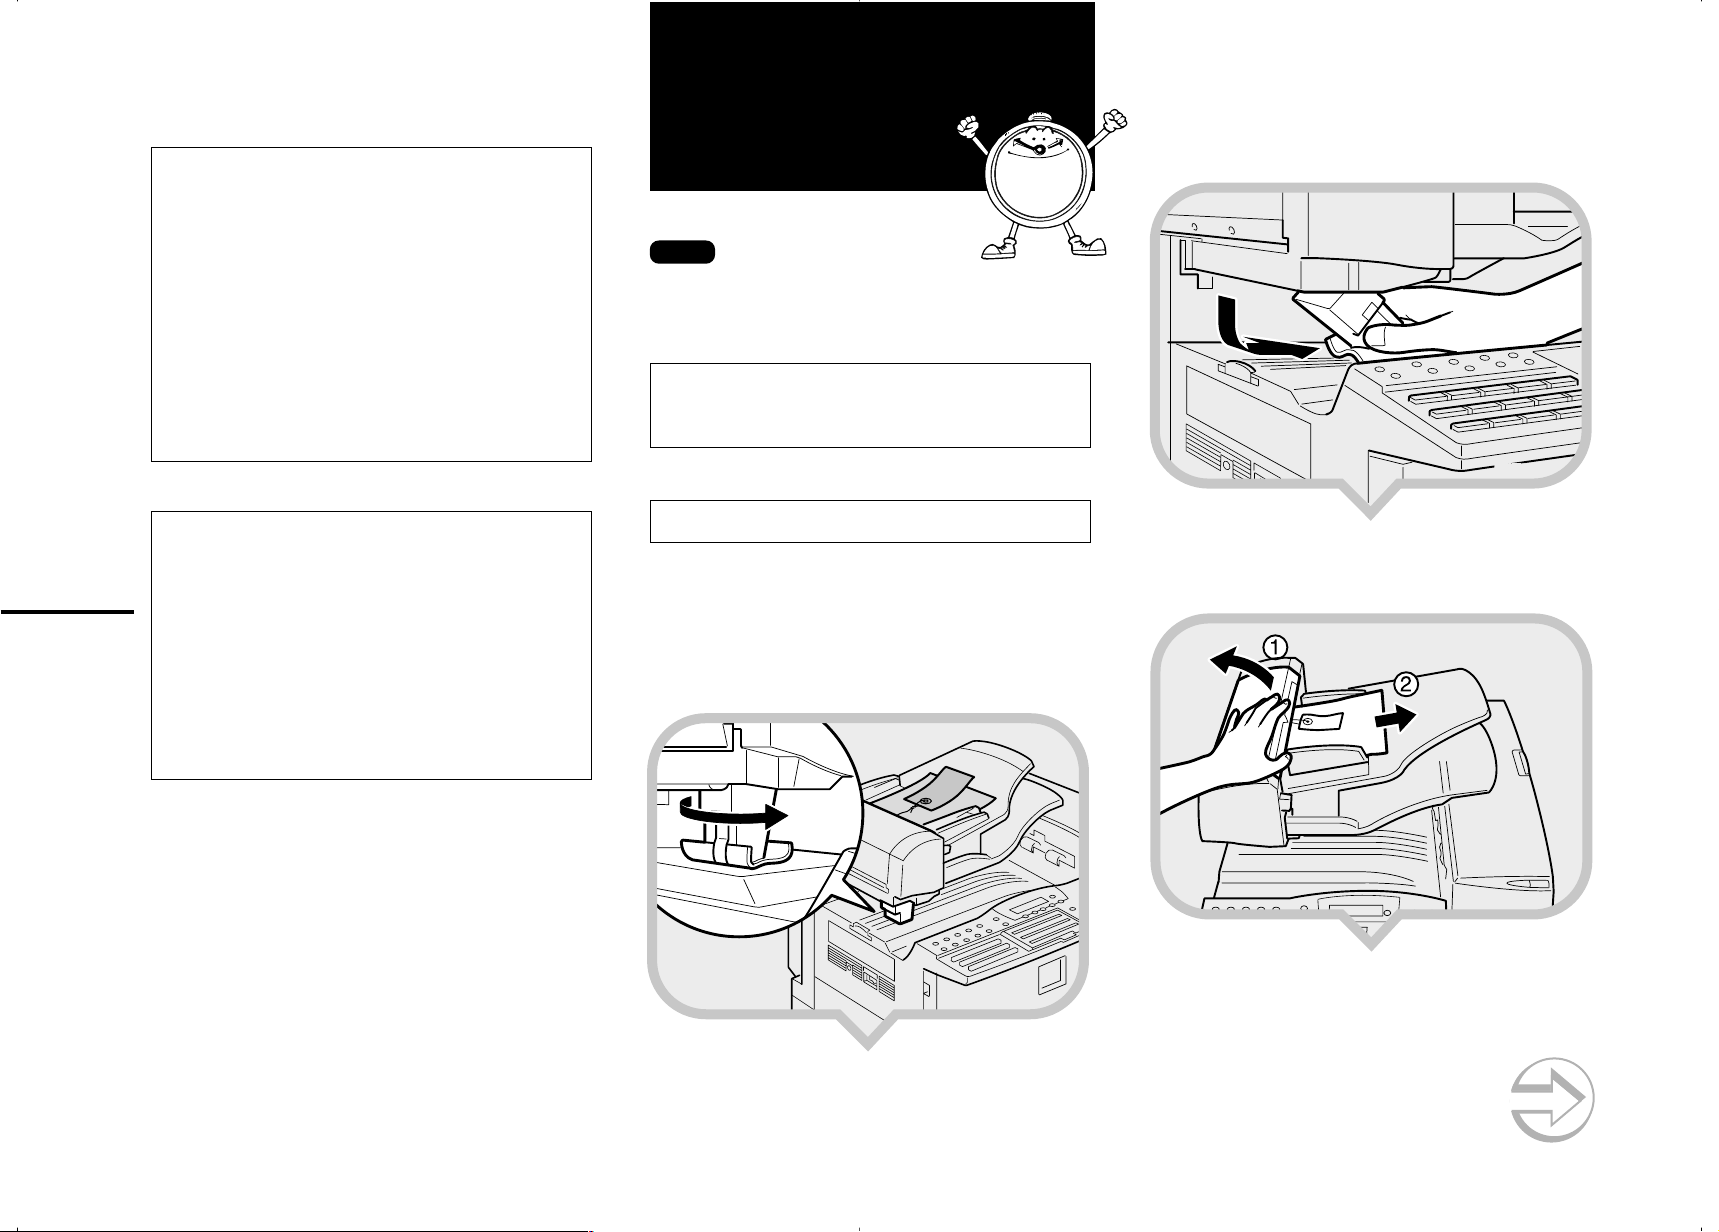
1.Remove the plastic wrapping from the
machine, and then remove all shipping
tape.
2.Turn the foam block 90° counterclock-wise.
3.Pull the fixing material to the right to
remove.
4.Open the Auto Document Feeder (ADF) and
take out the protective sheet.
ZHMX020E
Continued on next page
ZFWT020E
5.
ZHMX200E
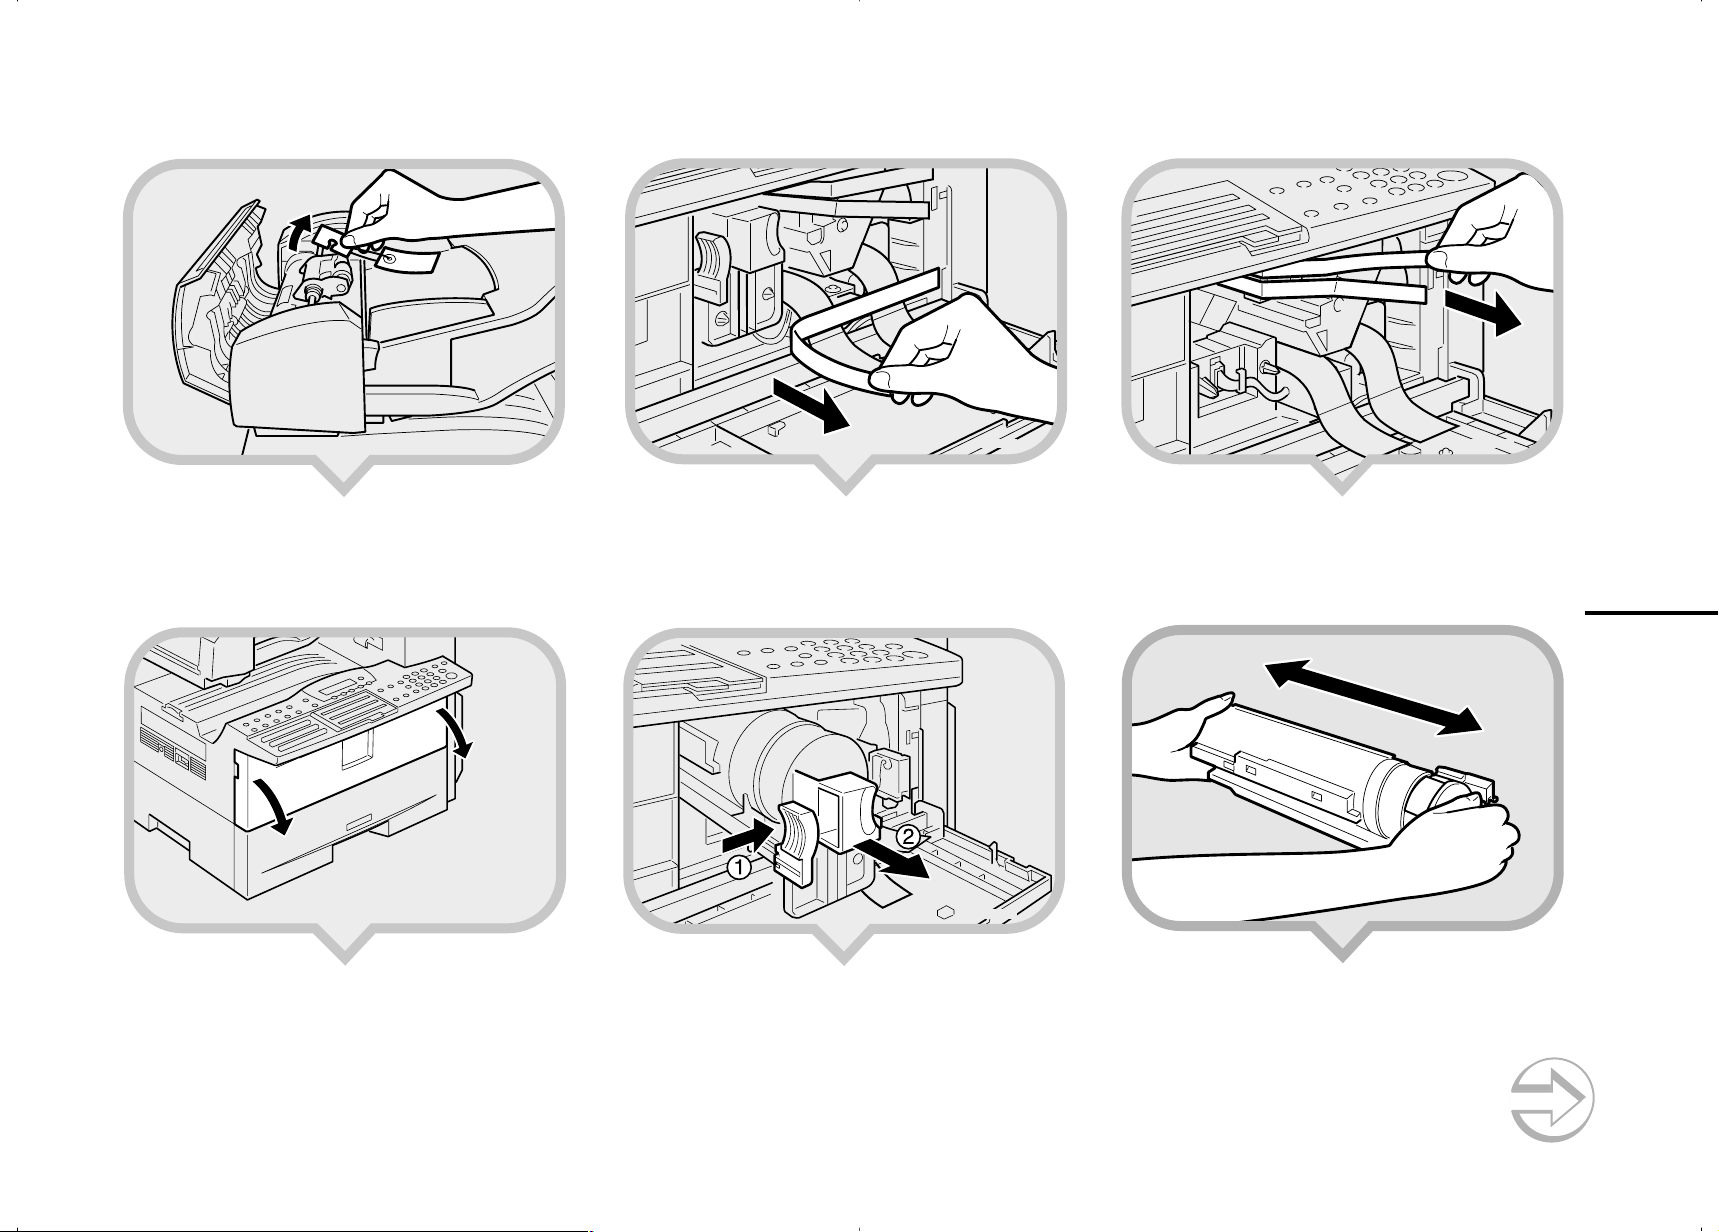
Remove the protective material from the axis.
8.Remove the shipping tape.
10
.Remove the shipping tapes.
ZHMX050E
6.Close the ADF and make sure it locks
securely into place.
7.Open the front cover.
ZHMH310E
ZHMX190E
9.Push the lever (햲) and pull out the toner
cartridge holding 햲 and 햳.
ZHMT030E
11
.Hold the cartridge horizontally and shake it
gently from side to side a few times.
2
Continued on next page

12
ZHMH320E
.Remove the tape from the toner cartridge.
14
.Pull the two red tags to remove the plastic
strips.
15
. Close the front cover.
13
.Re-position the toner cartridge.
Push the toner cartridge in until it locks
securely into place.
3
ZFWT030E
ZHMX080E
Important
• T o av oid spilling toner , leave the toner car tridge installed while moving or transporting the unit.
ZHMX090E
ZHMT040E
Keep going...

ZHMY050E
ZHMY020E
Preparing the Main Paper Tray
1.Pull the paper tray out of the
main unit.
2
3.Push the metal base plate firmly down until
it locks into place.
ZHMY030E
5.Push the paper tray firmly until it locks into
place.
2.If necessary, adjust the paper size.
As default, the paper size in the tray is set
as 81/2” x 11”.
Reference
TTo change the paper size in the paper tray, see
Chapter 9 “Changing the Paper Size in the Main
Paper Tray”, Advanced Features.
ZHMY010E
4. Load the paper into the paper tray.
ZHMY040E
6.Stick the appropriate tray-number decal
and paper size decal onto the places
indicated in the illustration.
7.If you changed the paper size of the paper
tray, set the paper size with the User Tools.
Reference
TChapter 6 “Tray Paper Size”, Advanced Features
4
Installing the Optional
ZFWP020E
햲 Turn off the power switch of the machine.
Paper T ray Unit
햳 Unplug the power cord of the machine
from the outlet.
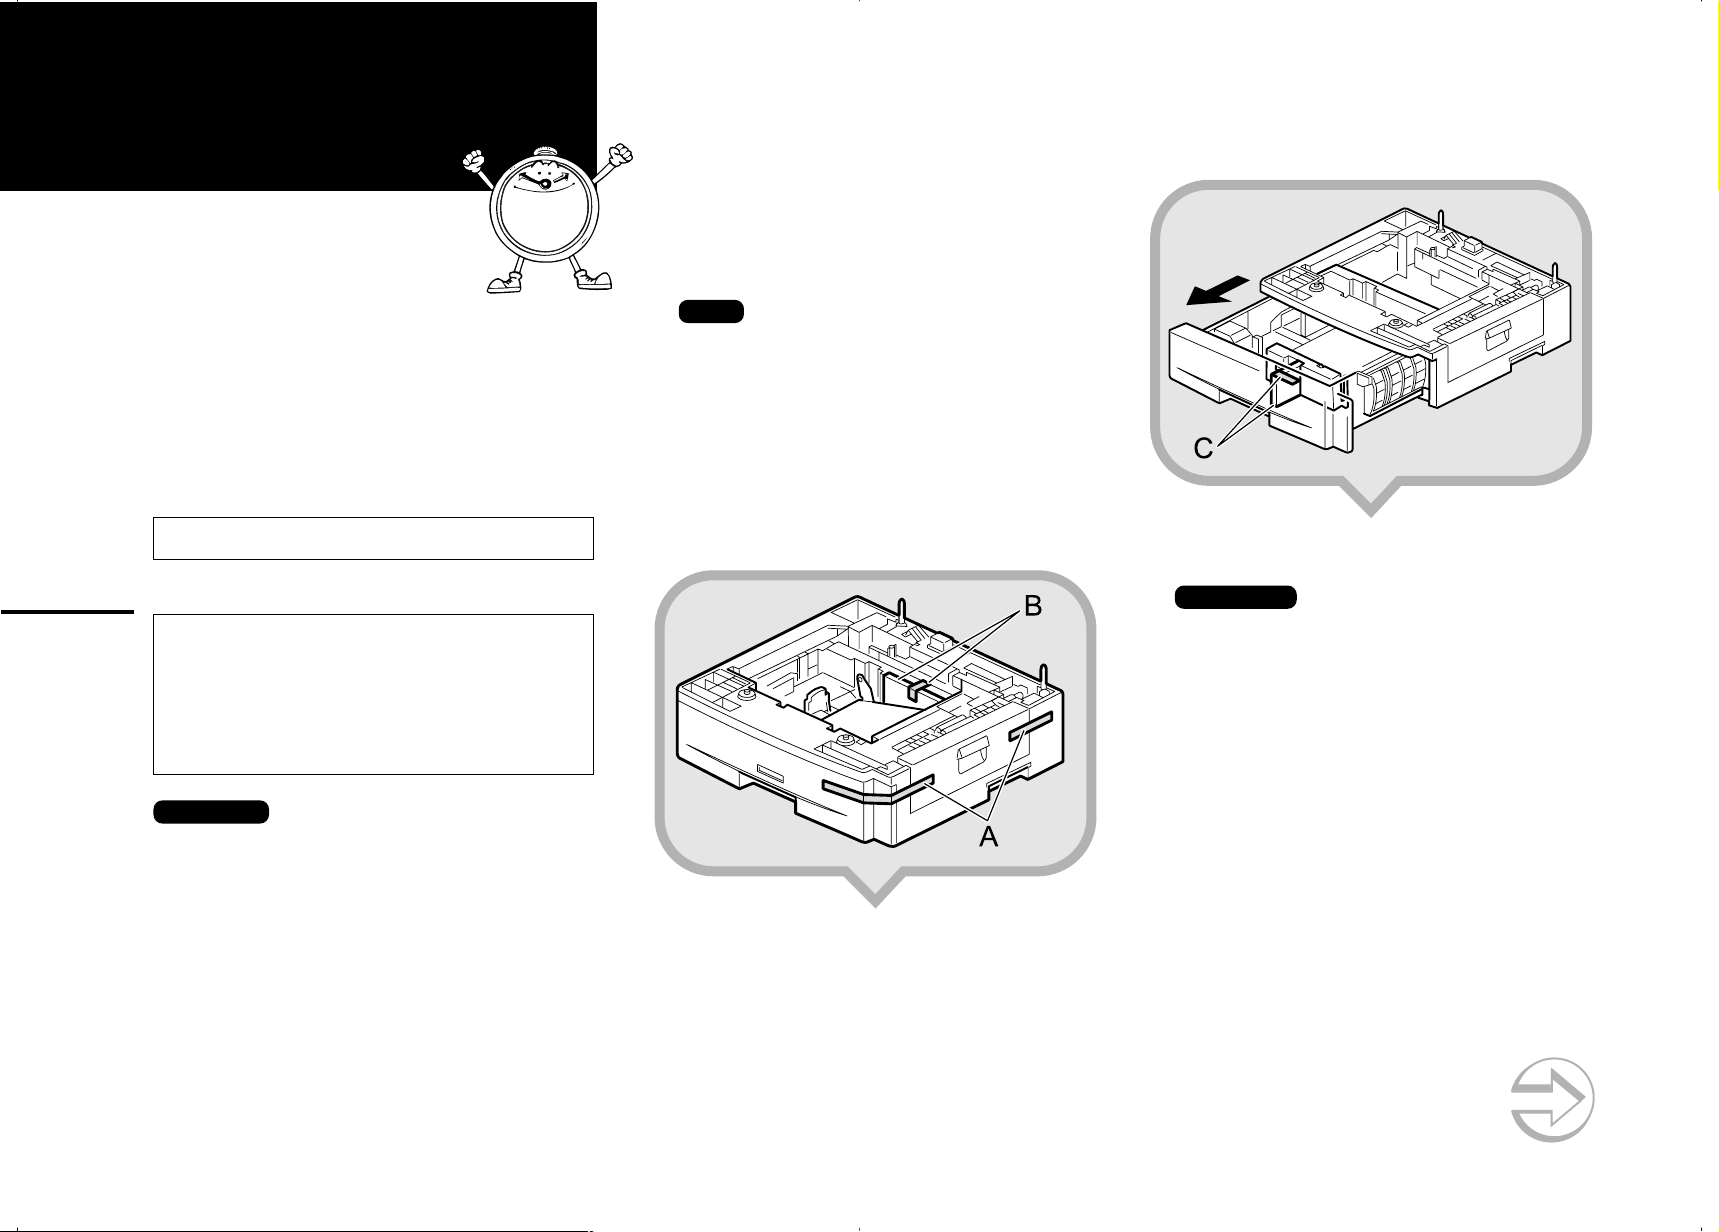
2.Pull the paper tray out of the unit, and then
remove the tape and cardboard at [C].
These instructions are for installing the first optional paper
tray unit for Type 2 (Color NIC FAX Unit standard).
If your machine is Type 1 (Color NIC FAX Unit optional),
it is already installed.
If you install the optional paper tray unit f or T ype 2 later,
read the following WARNING, CAUTION and “Important”, and then perform 햲 to 햴.
R
WARNING:
• Connect the power cord directly into a wall outlet and
never use an extension cord.
R
CAUTION:
5
• Unplug the power cord from the wall outlet before you
move the machine.
While moving the machine, take care that the power
cord is not damaged under the machine.Unplug the
power cord from the wall outlet before you move the
machine.
• When y ou disconnect the power cord fr om the wall outlet, always pull the plug (not the cord).
Important
• There is a risit of electric shock if you plug or
unplug the power cord with wet hands.
• Check the machine’ s nameplate to confirm the
model code.
• Make sure that 100% is shown on the display
before you turn the power switch off or unplug
the power cord. Fax files stored in memory
will be deleted 12 hours after you turn the
power switch off or unplug the power cord.
• Do not pull two paper trays out at the same
time. Having two paper tra ys filled with paper
in a fully extended position could cause the
machine to fall over.
3
햴 Unplug the telephone line from the
machine.
Note
• After installation, plug the power cord of the
machine back into the outlet, turn the power switch
on, and then connect the telephone line to the
machine.
• You can install the first optional paper tray unit
yourself. If you want to install the second optional
paper tray unit, please contact your service
representative.
1.Remove the tape at [A], and then remove
the tape and cardboard at [B].
ZFWP010E
3.If necessary, adjust the paper size of the
paper tray.
Reference
TFor information about changing paper size, see
Chapter 9 “Changing the Paper Size in the Optional
Paper Tray Unit”, Advanced Features.
4.Push the paper tray in until it stops.
Continued on next page

5.There are two pins on the top of the paper
tray unit that point straight up. On the
bottom of the machine there are two holes.
Align the holes over the pins and lower the
machine gently onto the paper tray unit.
Note
• Two people are better for lifting the machine.
• Be careful not to trap your fingers.
6.Stick the appropriate tray-number decal
and paper-size decal onto the places
indicated in the illustration.
ZHMP020E
7.If you changed the paper size of the paper
tray, set the paper size with the User Tools.
Reference
TFor information about setting paper size, see Chap-
ter 6 “Tray Paper Size”, Advanced Features.
6
ZHMP010E
Important
When lifting the machine, use the inset grips
on both sides. The machine could be
damaged or cause injury if dropped.
After Setting the Paper Tray Unit
Reference
TFor information about loading paper, see Chapter 9
“Loading Paper in the Optional Paper T ray Unit”, Ad-
vanced Features.
Keep going...
ZHMP060E
ZHMP030E
Installing the
Optional 40MB
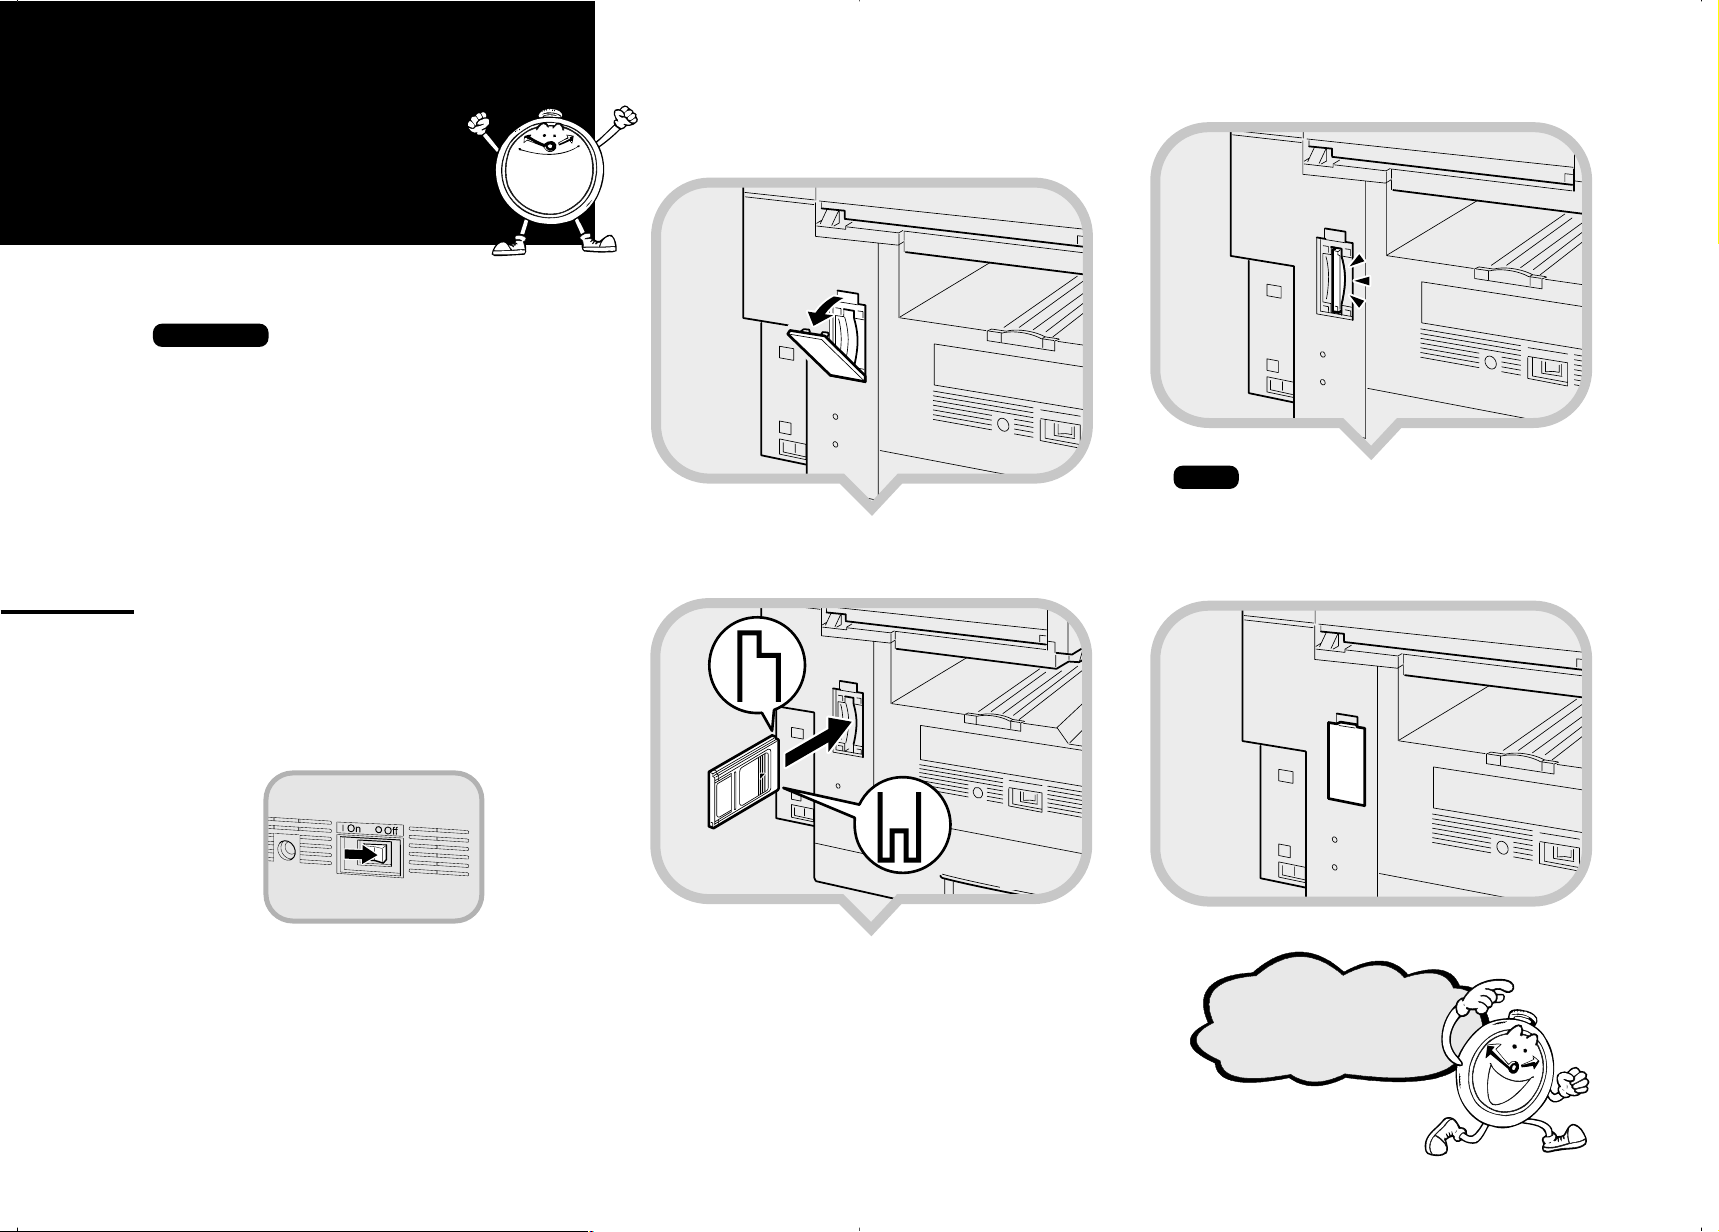
1.Open the memory card cover on the left
side of the machine.
Memory Card
If you install the optional 40MB memory card later, read
the following “Important”, and then perform 햲.
Important
• Turn the power switch off before installing
cards, otherwise they could be damaged.
• Fax files stored in memory will not be deleted
while the optional 40MB memory card is
installed.
• When you install the optional 40MB memory
card, make sure that 100% is shown on the
display, and then turn off the power switch.
• If you want to use the machine without the
optional 40MB memory card installed, contact
your service representative. If you turn the
7
power on after removing the optional 40MB
memory card, a high-pitched alarm sounds
and the machine will not start up. If the alarm
sounds when you turn the power on after
installing the optional 40MB memory card, see
Chapter4 "Solving Problems", Basic Features.
햲 Turn off the power switch.
4
ZHMP040E
2.Insert the optional 40MB memory card
carefully into the slot.
Note
• Insert the optional 40MB memory card firmly,
otherwise the machine may not work properly.
3.Close the memory card cover.
ZHMP050E
ZFWH350E
Keep going...
ZHMP020N
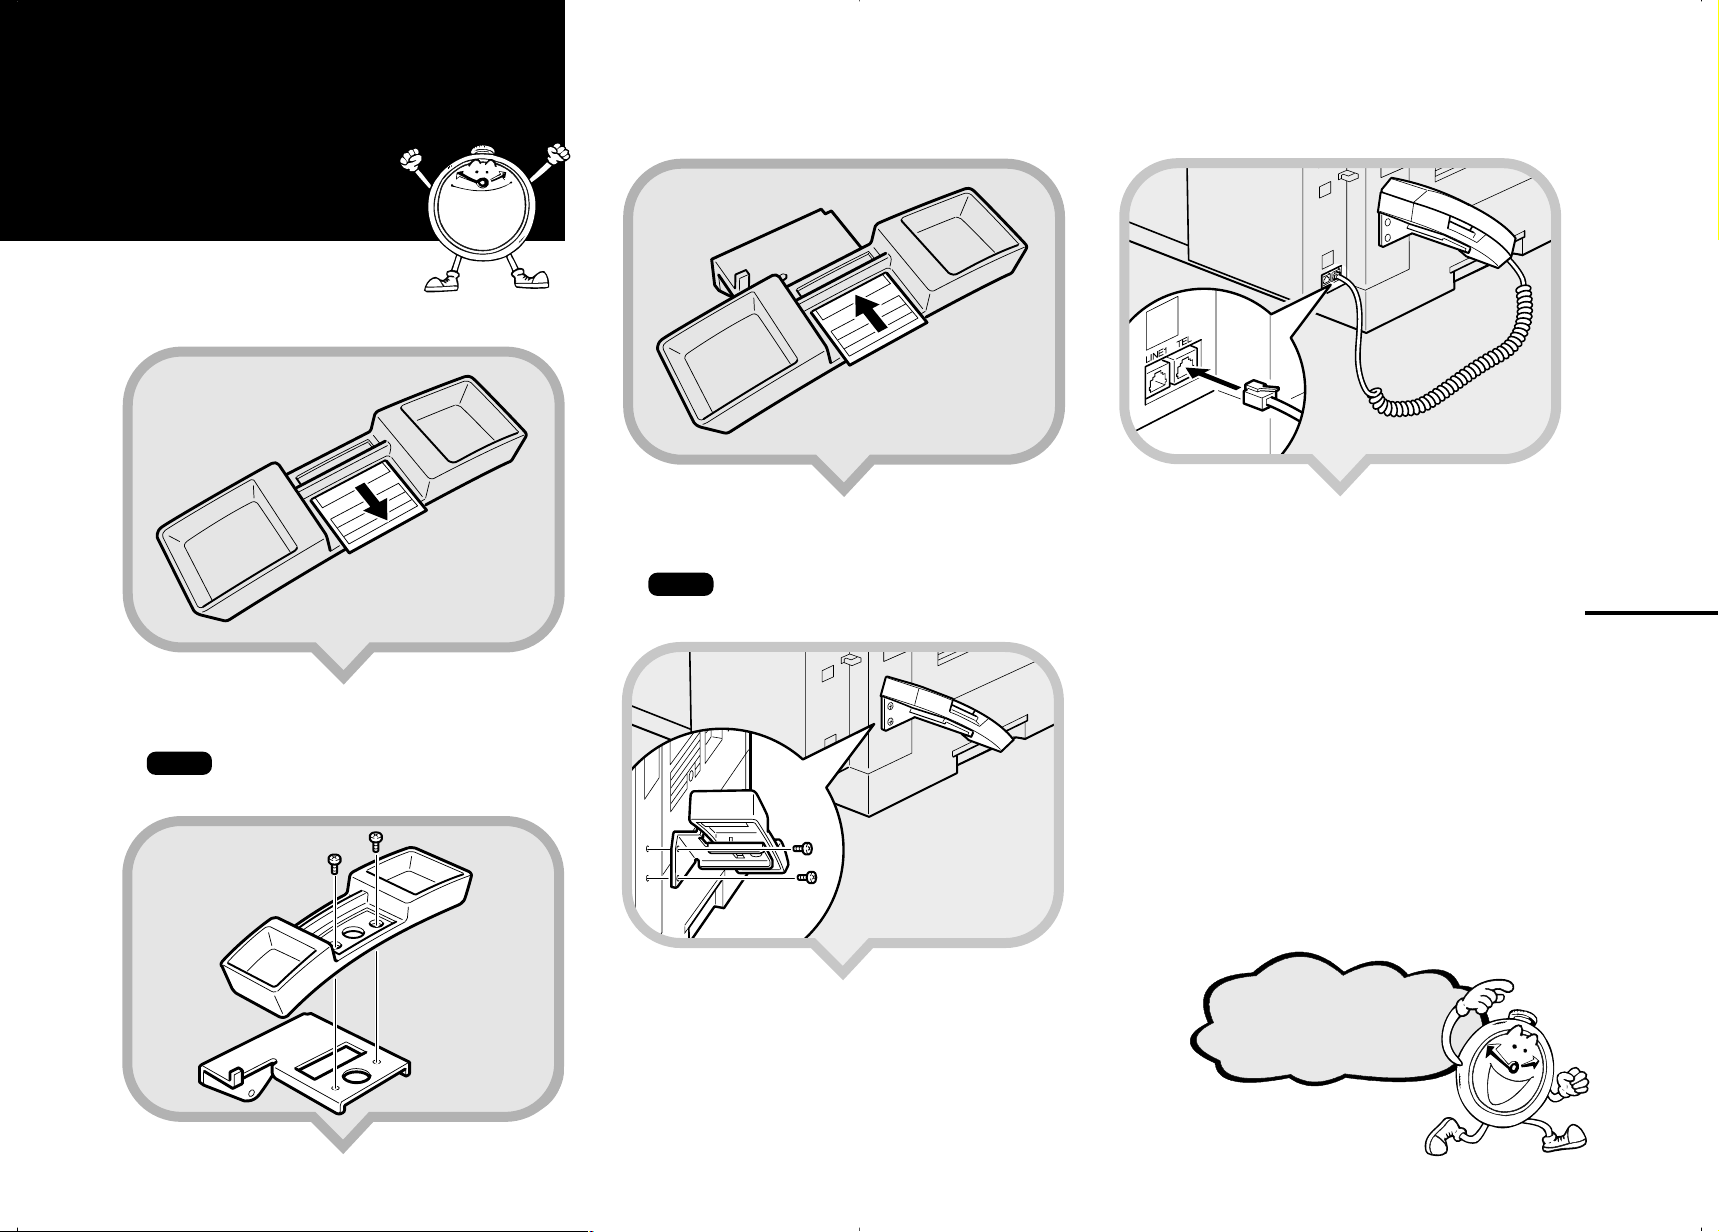
Installing the
Optional
Handset
5
1.Remove the information card from the
holder.
ZFWP100E
3.Replace the information card.
ZFWP120E
4.Attach the bracket to the machine with the
two screws provided.
Note
• You can use a coin-like object to fix the screw.
5.Insert the handset jack into the “TEL” soc ket.
8
2.Attach the holder to the bracket with the
two screws provided.
Note
• You can use a coin-like object to fix the screw.
Continued on next page
ZFWP110E
ZHMP010N
Keep going...

Connecting the
Initial Settings &
Power and
Switching On
R
WARNING:
• Connect the power cord directly into a wall outlet.
Never use an extension cord.
1.Plug the cable into the outlet.
Important
• Power requirements : 120 V, 60 Hz
• Insert the power plug securely into the outlet.
• Make sure the outlet is near the machine
and readily accessible.
• Do not connect other equipment to the
same outlet.
2.Turn the power switch on.
9
6
Adjustments
7
The following display appears after the power
is turned on for the first time. Do not turn off
the power until you have completed the
following procedures.
Before using the machine, please make the following settings:
• Date & Time
• Line Type
• Own Name, Fax Header, Fax Number
Important
If you make a mistake, press the Cancel key,
and then the OK key to register again.
Note
When entering characters, use the following
keys.
Entering letters
(A-Z, a-z)
Entering a space
Entering symbols
Switching between
uppercase and
lowercase
Entering digits
Deleting characters
Moving the cursor
The following illustration is for Type2.
A - Z keys
(Quick Dial keys )
Space key
(Quick Dial keys 29, 59, or 89)
Symbols key
(Quick Dial keys 30, 60, or 90)
ABC/abc key
(Quick Dial keys 21, 51, or 81)
Number keys
Clear/Stop key
keys
ZFWH110E
Note
• If "Call Service" appears on the display after the
power switch is turned on, turn the power switch
off, and check whether the tape has been removed
from the toner cartridge and PCU.
See "1. Preparing the Toner Cartridge".
1.Press
the OK key.
2.Press the OK key.
The following display appears.
ZHMS080N
EN USA H556-8780
3.Press the OK key.
The following display appears.
14.
Press the OK key .
“Programmed” will flash on the display.
One of the following is displayed.
21.
Press the OK key.
The Own Name programmed in step 16
appears.
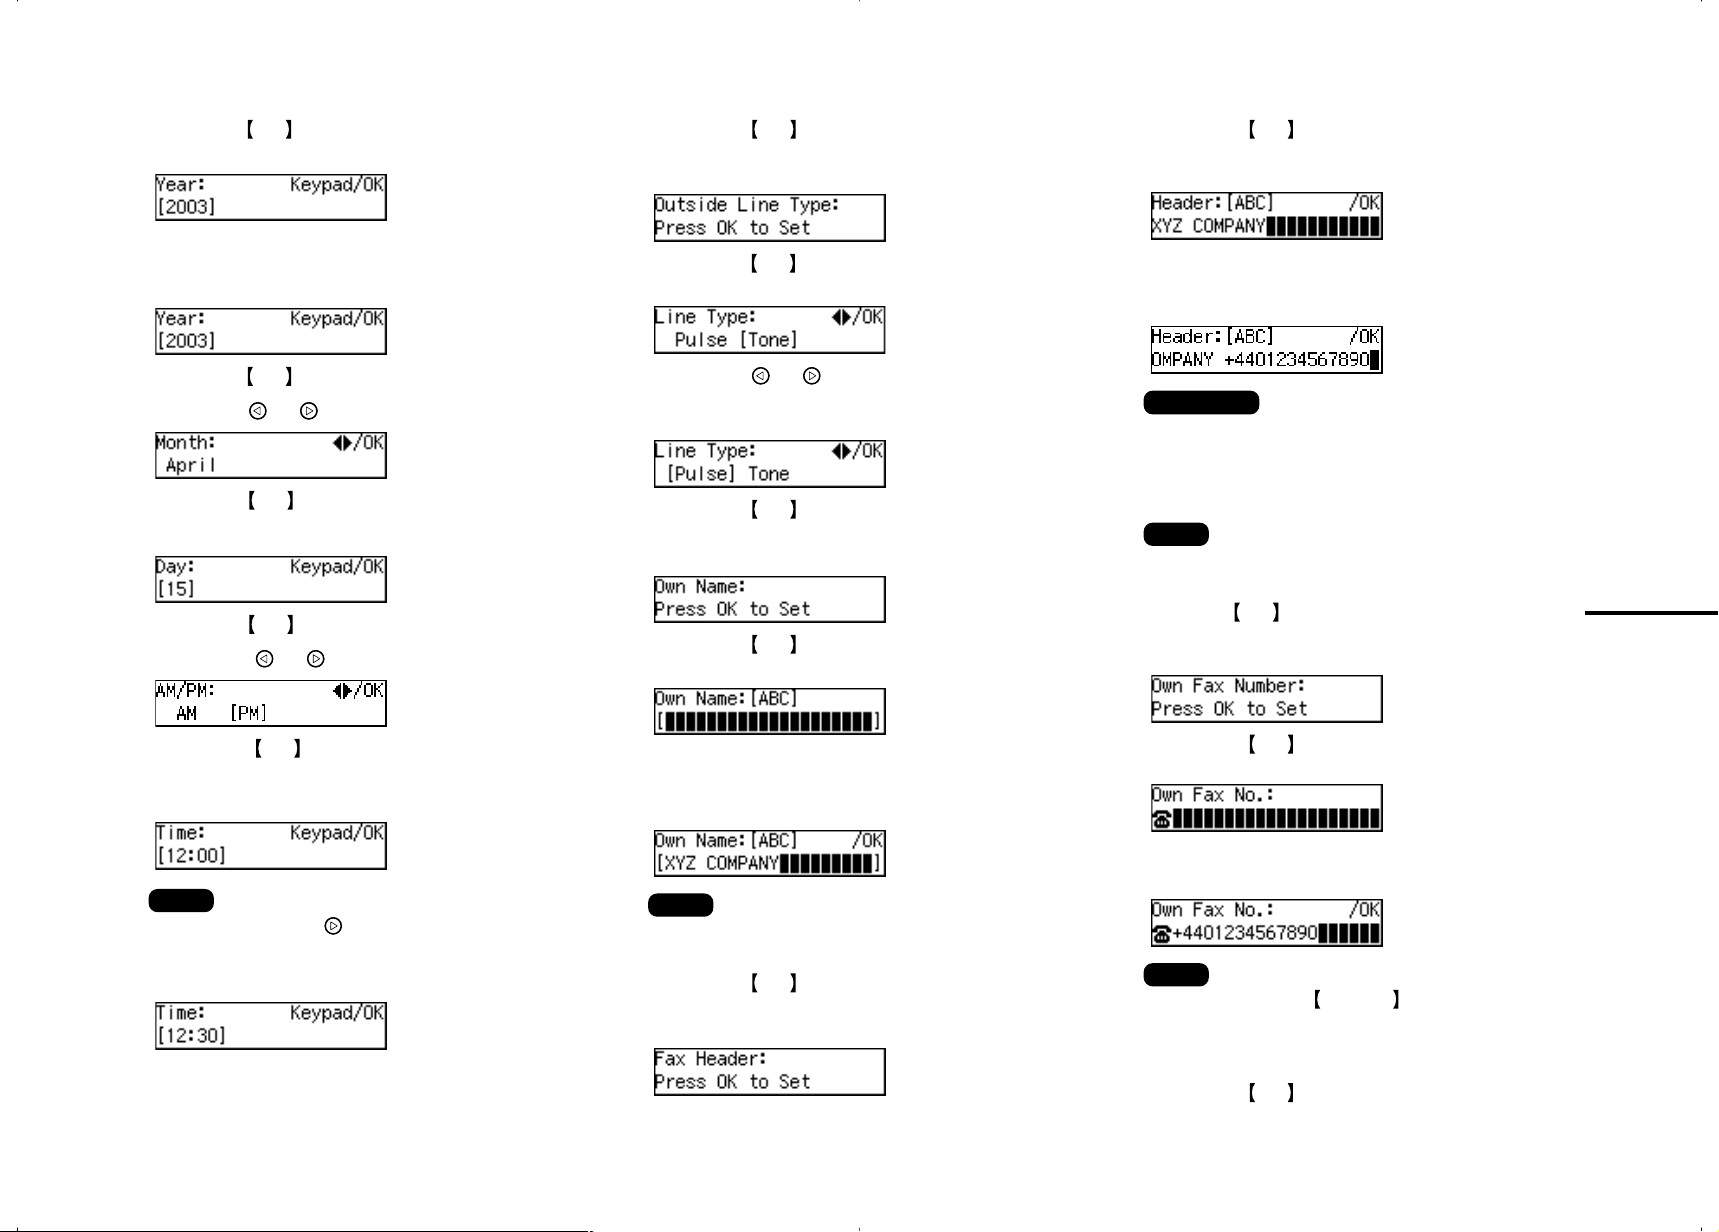
4.Make sure the current year setting is
correct. If it is not, enter the year with the
number keys.
5.Press the OK key.
6. Press the or key to select the month.
7. Press the OK key.
8. Enter the date with the number keys (1 to 31) .
9. Press the OK key.
10
. Press the or key to select AM or PM.
11
. Press the OK key.
12
. Enter the current hour setting (1 to 12)
with the number keys.
15.
Press the OK key .
The following display appears.
16.
Press the or key to set your
machine to work on a tone dial line or a
pulse dial line.
17.
Press the OK key .
“Programmed” will flash on the display.
The following display appears.
18.
Press the OK key .
The following display appears.
19.
Enter your office, company, personal
name, or any other appr opriate
identification.
22.
After Own Name, enter your fax number so the
Own Name and fax number are printed in the
Fax Header when you fax documents.
Important
In the USA, this must contain the telephone
number of the line your machine is connected
to. It will be printed on the header of e very page
you send. Required in the USA.
Note
If you want to program the second Fax Header too, see
Chapter 3 "Own Name/Fax Header", Basic Features.
23.
Press the
“Programmed” will flash on the display.
The following display appears.
24.
Press the OK key.
The following display appears.
OK
key .
10
Note
• T o set 1 to 9, press the key after entering 1 to 9.
13
. Enter the current minute setting (00 to 59)
with the number keys.
Note
• The [ABC/abc] key does not work when entering “Own
Name”. Only uppercase is available for “Own Name”.
20.
Press the OK key .
“Programmed” will flash on the display.
The following display appears.
25.
Enter your fax number, including the
country and area code (but no pauses).
Note
• Enter “+” with the Symbols key.
• The fax number you set here will not be printed in
the Fax Header . It will appear in reports, and on the
receivers' display, etc.
26.
Press the OK key.
“Intial Setup Completed” will flash on the display.
After Initial Settings
• You can check and adjust these settings using function
keys.
TDate & Time : See Chapter 6, "Date/Time", Ad-
vanced Features.
TLine Type : See Chapter 7, "G3 Analog Line -
Line T ype", Advanced Features.
TOwn Name, Fax Header, F ax Number : See Chap-
ter 3, "Own Name/Fax Header" and "Own Fax
Number", Basic Features.
Reference
See Chapter 10, “Installation, Moving and Disposing of
the Machine”, Advanced Features for further informa-
tion about installation.
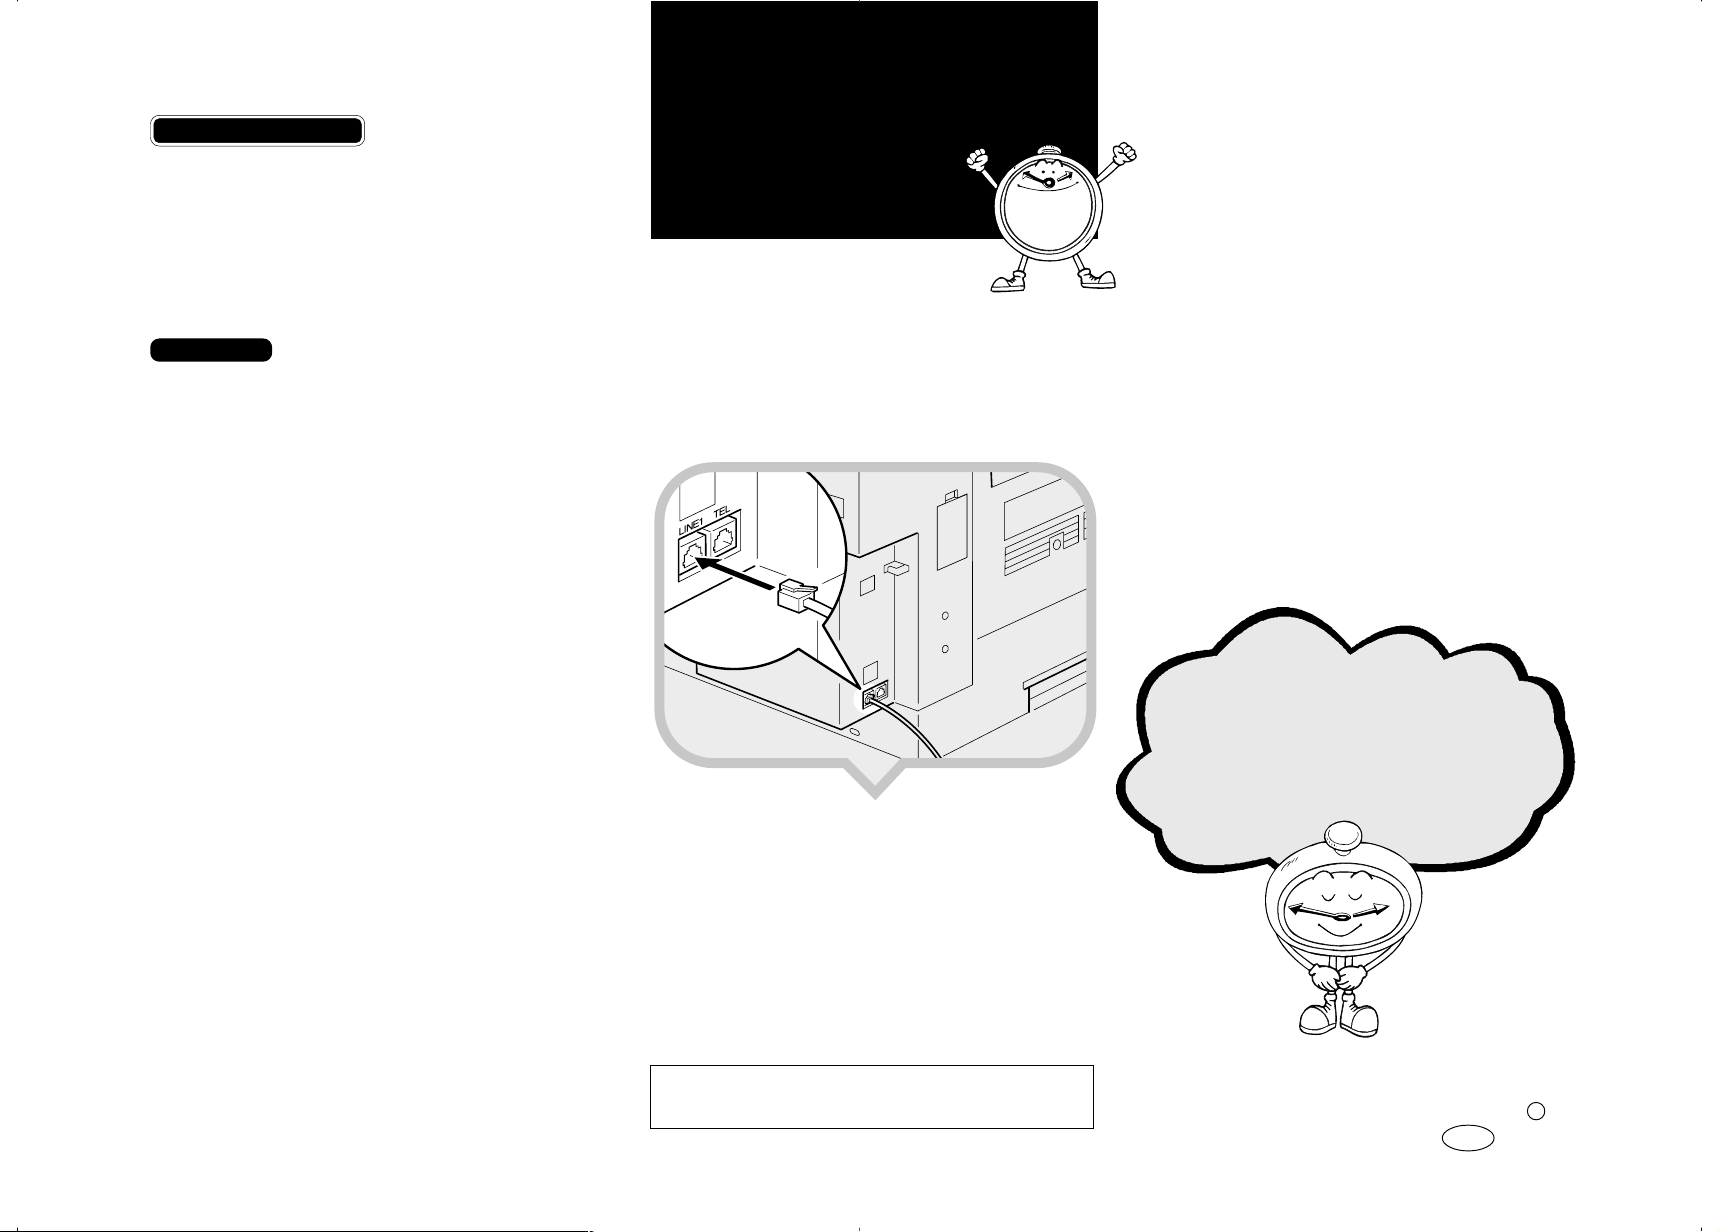
Connecting the Telephone Line
8
There are similar sockets located on the left side
of the machine:
TEL: For the external telephone
LINE1: Telephone line connection
1.Insert the telephone line cable into the
socket labeled “Line1”.
ZHMH330E
2.
Connect the other end to your telephone line
socket.
Important
Please keep this manual and any leftover
parts in a safe place.
Finished!
Printed in China
Copyright c 2002
EN USA H556-8780

English
Replacing the ADF Maintenance Kit
Deutsch
Austausch des
ADF-Wartungskits
Français
Remplacer le Kit d’Entretien
du chargeur ADF
Español
Reemplazo del kit de
mantenimiento del ADF
Italiano
Sostituzione del kit di
manutenzione ADF
1
2
3
4
Perform the following procedures with the
power switch on.
Open the ADF cover.
1
Push in the feed unit as shown (햲), then
2
pull it out (햳).
Open the cover gently.
3
While pushing down the white case, pull
4
up the green tab to remove the separation
roller.
Führen Sie bei eingeschaltetem Netzschalter
folgendes aus:
Öffnen Sie die ADF-Abdeckung.
1
Schieben Sie die Einzugseinheit ein, siehe
2
(햲), öffnen Sie die ADF-Abdeckung und
entfernen Sie die Einzugseinheit wie in Bild
(햳) dargestellt.
Öffnen Sie vorsichtig die Abdeckung der
3
Trennrolle.
Ziehen Sie, während Sie das weiße Gehäuse
4
nach unten drücken, gleichzeitig die grüne
Haltezunge nach oben, um die Trennrolle zu
entfernen.
Les procédures suivantes doivent êttre effectuées
lorsque l’appareil est sous tension.
Ouvrez le couvercle du chargeur ADF.
1
Poussez l’unité d’alimentation comme illustré
2
au point (햲) puis retirez la (햳).
Ouvrez le couvercle doucement.
3
Tout en poussant le boîtier blanc vers le bas,
4
tirez la patte verte vers le haut pour retirer le
rouleau de séparation.
Con el interruptor de alimentación de la máquina activado,
efectúe el procedimiento que se describe a continuación.
Abra la cubierta del ADF.
1
Empuje la unidad de alimentación como in-
2
dica (햲), y luego tire de ella hacia fuera (햳).
Abra la cubierta cuidadosamente.
3
Mientras empuja hacia abajo la caja blanca,
4
tire hacia arriba la lengüeta verde para retirar
el rodillo de separación.
Eseguite le seguenti operazioni con la macchina
accesa.
1
2
3
4
Aprite il coperchio ADF.
Inserite l’alimentatore come illustrato (햲),
quindi estraetelo (햳).
Aprite delicatamente il coperchio.
Tenendo premuto l’involucro bianco, sollevate
la linguetta verde per rimuovere il rullo di
separazione.
5
6
7
8
Set the new separation roller as shown.
5
Make sure that the green tab fits firmly into
the white case (see the enlargement).
Note
❐ Do not touch the rubber part of the new separa-
tion roller.
Close the cover.
6
Set the new feed unit as shown. Make sure
7
that the axis of the feed unit fits into the
transparent pipe (see the enlargement).
Close the ADF cover until it clicks.
8
If you replace the ADF Maintenance Kit
9
when “Change ADF Maintenance Kit” message is not displayed, reset the ADF counter.
(See “Resetting the ADF Counter” in the Advanced Features manual.)
Setzen Sie die neue Trennrolle wie gezeigt
5
ein. Vergewissern Sie sich, dass die grüne
Haltezunge fest im weißen Gehäuse
eingesetzt ist (siehe Vergrößerung).
Hinweis
❐ Berühren Sie nicht den Gummiring der neuen
Trennrolle.
Schließen Sie die Abdeckung.
6
Setzen Sie die neue Einzugseinheit wie
7
gezeigt ein. Vergewissern Sie sich, dass die
Achse der Einzugseinheit in die transparente
Hülle eingesetzt ist (siehe Vergrößerung).
Schließen Sie die ADF-Abdeckung bis zum
8
Anschlag.
Wenn Sie den ADF-Wartungskit austauschen,
9
obwohl die Meldung “ADF-Wartungssatz austauschen” nicht angezeigt wird, stellen Sie
den ADF-Zähler auf Null. (Siehe “Den ADFZähler rücksetzen” im Handbuch Erweiterte
Funktionen.)
Placez le nouveau rouleau de séparation
5
comme le montre l’illustration. Assurez-vous
que la patte verte soit bien enfoncée dans le
boîtier blanc (voir l’agrandissement).
Remarque
❐ Ne pas toucher la partie en caoutchouc du
nouveau rouleau de séparation.
Fermez le couvercle.
6
Placez la nouvelle unité d’alimentation
7
comme indiqué. Assurez-vous que l’axe de
l’unité d’alimentation s’insère bien dans le
tube transparent (voir l’agrandissement).
Fermez le couvercle du chargeur ADF
8
jusqu’au déclic.
Si vous remplacez le Kit d’Entretien du chargeur ADF
9
alors que le message “Changer le Kit d’Entretien du
chargeur ADF” n’est pas affiché, veuillez remettre à
zéro le compteur du chargeur ADF. (Voir la section
“Remettre à zéro le compteur du chargeur ADF“ dans
le manuel des Fonctions avancées.)
Instale el nuevo rodillo de separación como
5
se muestra en el dibujo. Asegúrese de que la
lengüeta verde encaje firmemente en la caja
blanca (vea la ampliación del dibujo).
Nota
❐ No toque la parte de goma del nuevo rodillo de
separación.
Cierre la cubierta.
6
Instale la nueva unidad de alimentación como
7
se muestra en el dibujo. Asegúrese de que el
eje de la unidad de alimentación quede
debidamente introducido en el tubo
transparente (vea la ampliación del dibujo).
Cierre la cubierta del ADF hasta oir un “clic”.
8
Si reemplaza el kit de mantenimiento del ADF
9
antes de que la máquina haya mostrado el
mensaje “Cambiar kit de mantenimiento del ADF”,
ponga el contador del ADF a cero. (Consulte la
sección “Poner el contador del ADF a cero” en el
manual “Características avanzadas”.)
Inserite il nuovo rullo di separazione come
5
illustrato. Accertatevi che la linguetta verde
sia saldamente inserita nell’involucro bianco
(vedere l’ingrandimento).
Nota
❐ Non toccate la parte in gomma del nuovo rullo di
separazione.
Chiudete il coperchio.
6
Inserite il nuovo alimentatore come illustrato.
7
Accertatevi che l’asse dell’alimentatore sia
inserito nel tubo trasparente (vedere
l’ingrandimento).
Chiudete il coperchio ADF finché non scatta
8
in posizione con un clic.
Qualora il kit di manutenzione ADF sia stato
9
sostituito quando il messaggio “Sostituire kit
di manutenzione ADF” non è visualizzato,
azzerate il contatore ADF. (Vedere
“Azzeramento del contatore ADF” nel
manuale Funzioni avanzate.)

Svenska
Byta ut ADF-underhållningssatsen
Norsk
Bytte ADF Vedlikeholdssett
Português
Substituição do Kit de
Manutenção ADF
Nederlands
Vervangen van het onderhoudssetje
voor de documentinvoer
1
2
3
4
Utför följande procedurer med strömmen
avslagen.
Öppna locket till ADF.
1
Tryck in matningsenheten som visas (햲) och
2
dra sedan ut den (햳).
Öppna locket försiktigt.
3
Tryck ned den vita lådan och dra samtidigt
4
upp den gröna fliken för att ta bort
separationsrullen.
Følg fremgangsmåten nedenfor med
strømbryteren på.
Åpne ADF-dekslet.
1
Skyv mateenheten inn som vist (햲), og trekk
2
den deretter ut (햳).
Åpne dekslet forsiktig.
3
Trekk den grønne hempen opp, samtidig som
4
du skyver den hvite beholderen nedover, for
å ta ut separasjonsrullen.
Execute os seguintes procedimentos com o
interruptor de corrente desligado.
Abra a tampa ADF.
1
Empurre para dentro a unidade de
2
alimentação como indicado (햲), e depois
puxe-a para fora (햳).
Abra a cuidadosamente a tampa.
3
Enquanto empurra para baixo o invólucro
4
branco, puxe para cima a patilha verde para
remover o rolo de separação.
Voer onderstaande procedure uit terwijl de
netspanning is ingeschakeld.
Open de klep van de documentinvoer.
1
Druk de invoereenheid in zoals afgebeeld
2
(햲), en trek hem er uit (햳).
Open de klep voorzichtig.
3
Druk het witte omhulsel omlaag en trek het
4
groene lipje omhoog om de separatorrol te
verwijderen.
5
6
7
8
Placera den nya separationsrullen som visas.
5
Kontrollera att den gröna fliken passar säkert
in i den vita lådan (se förstoringen).
OBS!
❐ Rör inte vid gummidelen på den nya
separationsrullen.
Stäng locket.
6
Placera matningsenheten som visas.
7
Kontrollera att matningsenhetens axel passar
i det transparenta röret (se förstoringen).
Stäng ADF-locket tills det klickar till.
8
Om “Byte av ADF-underhållningsutrustning”
9
inte visas på displayen när du byter ut ADFunderhållningssatsen, måste du nollställa
ADF-räknaren. (se “Nollställa ADF-räknaren”
i Handboken Avancerade funktioner.)
Plasser den nye separasjonsrullen som vist.
5
Pass på at den grønne hempen passer godt
inn i den hvite beholderen (se forstørrelsen).
Merk
❐
Ikke rør gummidelen på den nye separasjonsrullen.
Lukke dekslet.
6
Plasser den nye mateenheten som vist. Pass
7
på at mateenhetens akse passer inn i det
gjennomsiktige røret (se forstørrelsen).
Lukk ADF-dekslet til det klikker på plass.
8
Hvis du bytter ADF vedlikeholdssett uten at
9
meldingen “Bytt ADF vedlikeholdssett” vises,
må du nullstille ADF-telleren. (Se “Nullstille
ADF-telleren” i håndboken med avanserte
funksjoner.)
Instale o rolo de separação novo conforme
5
indicado. Certifique-se que a etiqueta verde
encaixa perfeitamente no invólucro branco
(veja a ampliação).
Nota
❐ Não toque na parte de borracha do novo rolo de
separação.
Feche a tampa.
6
Instale a nova unidade de alimentação como
7
indicado. Certifique-se que o eixo da unidade
de alimentação encaixa no tubo transparente
(veja a ampliação).
Feche a tampa do ADF até esta fazer um
8
clique.
Se substituir o Kit de Manutenção ADF quando
9
a mensagem “Mude o Kit de Manutenção ADF”
não for visualizada, reinicie o contador ADF.
(Consulte “Reinício do Contador ADF” no
Manual de Funções Avançadas.)
Plaats de nieuwe separatorrol zoals afgebeeld.
5
Let erop, dat u het groene lipje goed in het
witte omhulsel plaatst (zie uitvergroting).
Opmerking
❐ Raak het rubber van de nieuwe separatorrol niet
aan.
Sluit de klep.
6
Plaats de nieuwe invoereenheid zoals
7
afgebeeld. Let erop, dat u de as van de
invoereenheid goed in de transparante pijp
plaatst (zie uitvergroting).
Sluit de klep van de documentinvoer tot de
8
klep vastklikt.
Wanneer u het onderhoudssetje voor de document-
9
invoer vervangt terwijl de “Documentinvoer
onderhoudsset vervangen” melding niet wordt getoond, moet de documentinvoerteller op nul worden
gezet. (Zie “Nulstellen van de documentinvoerteller”
van de Geavanceerde functies handleiding.)
Printed in China
H555-1390

Facsimile
Operating Instructions
Basic Features
Getting Started
Faxing
Programming
Troubleshooting

Introduction
This manual describes detailed instructions on the operation and notes about the use of this machine.
To get maximum versatility from this machine all operators are requested to read this manual carefully
and follow the instructions. Please keep this manual in a handy place near the machine.
Notes:
Some illustrations in this manual might be slightly different from the machine.
Certain options might not be available in some countries. For details, please contact your local dealer.
Caution: Use of controls or adjustment or performance of procedures other than those specified in this
manual might result in hazardous radiation exposure. This product (see specification in the Operating
Instructions) is considered a class 1 laser device. Safety precautions and interlock mechanisms have
been designed to prevent any possible laser beam exposure to the operator. The following marking is
attached on the back of the product.
Machine Types
The model names of the machine do not appear in the following pages. Check the type of your machine
before reading this manual.
• Type1: F104
• Type2: F104L
Notes:
Two kinds of size notation are employed in this manual. With this machine refer to the metric version.
For good copy quality, Rex-Rotary recommends that you use genuine Rex-Rotary toner.
Rex-Rotary shall not be responsible for any damage or expense that might result from the use of parts
other than genuine Rex-Rotary parts in your Rex-Rotary office product.
Important
Contents of this manual are subject to change without prior notice. In no event will the company be liable for direct, indirect, special, incidental, or consequential damages as a result of handling or operating the machine.
Power Source:
220–240V, 50/60Hz
Please be sure to connect the power cord to a power source as above. For details about the power
source, see Chapter 10, “Connecting the Power and Switching On” in the Advanced Features manual.
Trademarks
®
and Acrobat® are registered trademarks of Adobe Systems Incorporated.
Adobe
®
Microsoft
United States and/or other countries.
Other product names used herein are for identification purposes only and might be trademarks of their
respective companies. We disclaim any and all rights in those marks.
, Windows® and Windows NT® are registered trademarks of Microsoft Corporation in the
Note
The proper names of the Windows operating systems are as follows:
•Microsoft
•Microsoft
•Microsoft® Windows® Millennium Edition (Windows Me)
•Microsoft
®
Windows® 95 operating system
®
Windows® 98 operating system
®
Windows® 2000 Professional
•Microsoft® Windows® XP Professional
•Microsoft® Windows® XP Home Edition
•Microsoft
®
Windows® 2000 Server
•Microsoft® Windows NT® Server operating system Version 4.0
•Microsoft® Windows NT® Workstation operating system Version 4.0
For safe and correct use of this machine, please be sure to read the Safety Information before you use it.

Introduction
This manual describes detailed instructions on the operation and notes about the use of this machine.
To get maximum versatility from this machine all operators are requested to read this manual carefully
and follow the instructions. Please keep this manual in a handy place near the machine.
Notes:
Some illustrations in this manual might be slightly different from the machine.
Certain options might not be available in some countries. For details, please contact your local dealer.
Caution: Use of controls or adjustment or performance of procedures other than those specified in this
manual might result in hazardous radiation exposure. This product (see specification in the Operating
Instructions) is considered a class 1 laser device. Safety precautions and interlock mechanisms have
been designed to prevent any possible laser beam exposure to the operator. The following marking is
attached on the back of the product.
Machine Types
The model names of the machine do not appear in the following pages. Check the type of your machine
before reading this manual.
• Type1: F104
• Type2: F104L
Notes:
Two kinds of size notation are employed in this manual. With this machine refer to the metric version.
For good copy quality, Gestetner recommends that you use genuine Gestetner toner.
Gestetner shall not be responsible for any damage or expense that might result from the use of parts
other than genuine Gestetner parts in your Gestetner office product.
Important
Contents of this manual are subject to change without prior notice. In no event will the company be liable for direct, indirect, special, incidental, or consequential damages as a result of handling or operating the machine.
Power Source:
220–240V, 50/60Hz
Please be sure to connect the power cord to a power source as above. For details about the power
source, see Chapter 10, “Connecting the Power and Switching On” in the Advanced Features manual.
Trademarks
®
and Acrobat® are registered trademarks of Adobe Systems Incorporated.
Adobe
®
Microsoft
United States and/or other countries.
Other product names used herein are for identification purposes only and might be trademarks of their
respective companies. We disclaim any and all rights in those marks.
, Windows® and Windows NT® are registered trademarks of Microsoft Corporation in the
Note
The proper names of the Windows operating systems are as follows:
• Microsoft
• Microsoft
• Microsoft® Windows® Millennium Edition (Windows Me)
• Microsoft
®
Windows® 95 operating system
®
Windows® 98 operating system
®
Windows® 2000 Professional
• Microsoft® Windows® XP Professional
• Microsoft® Windows® XP Home Edition
• Microsoft
®
Windows® 2000 Server
• Microsoft® Windows NT® Server operating system Version 4.0
• Microsoft® Windows NT® Workstation operating system Version 4.0
For safe and correct use of this machine, please be sure to read the Safety Information before you use it.

Introduction
This manual describes detailed instructions on the operation and notes about the use of this machine.
To get maximum versatility from this machine all operators are requested to read this manual carefully
and follow the instructions. Please keep this manual in a handy place near the machine.
Notes:
Some illustrations in this manual might be slightly different from the machine.
Certain options might not be available in some countries. For details, please contact your local dealer.
Caution: Use of controls or adjustment or performance of procedures other than those specified in this
manual might result in hazardous radiation exposure. This product (see specification in the Operating
Instructions) is considered a class 1 laser device. Safety precautions and interlock mechanisms have
been designed to prevent any possible laser beam exposure to the operator. The following marking is
attached on the back of the product.
Machine Types
The model names of the machine do not appear in the following pages. Check the type of your machine
before reading this manual.
• Type1: F104
• Type2: F104L
Notes:
Two kinds of size notation are employed in this manual. With this machine refer to the metric version.
For good copy quality, Nashuatec recommends that you use genuine Nashuatec toner.
Nashuatec shall not be responsible for any damage or expense that might result from the use of parts
other than genuine Nashuatec parts in your Nashuatec office product.
Important
Contents of this manual are subject to change without prior notice. In no event will the company be liable for direct, indirect, special, incidental, or consequential damages as a result of handling or operating the machine.
Power Source:
220–240V, 50/60Hz
Please be sure to connect the power cord to a power source as above. For details about the power
source, see Chapter 10, “Connecting the Power and Switching On” in the Advanced Features manual.
Trademarks
®
and Acrobat® are registered trademarks of Adobe Systems Incorporated.
Adobe
®
Microsoft
United States and/or other countries.
Other product names used herein are for identification purposes only and might be trademarks of their
respective companies. We disclaim any and all rights in those marks.
, Windows® and Windows NT® are registered trademarks of Microsoft Corporation in the
Note
The proper names of the Windows operating systems are as follows:
• Microsoft
• Microsoft
• Microsoft® Windows® Millennium Edition (Windows Me)
• Microsoft
®
Windows® 95 operating system
®
Windows® 98 operating system
®
Windows® 2000 Professional
• Microsoft® Windows® XP Professional
• Microsoft® Windows® XP Home Edition
• Microsoft
®
Windows® 2000 Server
• Microsoft® Windows NT® Server operating system Version 4.0
• Microsoft® Windows NT® Workstation operating system Version 4.0
For safe and correct use of this machine, please be sure to read the Safety Information before you use it.

Declaration of Conformity
Notice to Users in EEA Countries
This product complies with the essential requirements and provisions of Directive 1999/5/EC of the European Parliament and of the Council of 9 March 1999 on radio equipment and telecommunications
terminal equipment and the mutual recognition of their conformity.
Notice to Users Accessing Analog PSTN in EEA Countries
This product is designed to be able to access analog PSTN in all EEA countries. Local PSTN compatibility is dependent on software switch settings. Please contact your service representative if relocating
this product to another country. In the event of problems, please contact your service representative
in the first instance.
The CE Declaration of Conformity is available on the Internet at URL: http://www.ricoh.co.jp/fax/ce_doc/.
In accordance with IEC 60417, this machine uses the following symbols for the main power switch:
aaaa means POWER ON.
bbbb means POWER OFF.
Copyright © 2002

Introduction
This manual describes detailed instructions on the operation and notes about the use of this machine.
To get maximum versatility from this machine all operators are requested to read this manual carefully
and follow the instructions. Please keep this manual in a handy place near the machine.
Notes:
Some illustrations in this manual might be slightly different from the machine.
Certain options might not be available in some countries. For details, please contact your local dealer.
Caution: Use of controls or adjustment or performance of procedures other than those specified in this
manual might result in hazardous radiation exposure. This product (see specification in the Operating
Instructions) is considered a class 1 laser device. Safety precautions and interlock mechanisms have
been designed to prevent any possible laser beam exposure to the operator. The following marking is
attached on the back of the product.
Machine Types
The model names of the machine do not appear in the following pages. Check the type of your machine
before reading this manual.
• Type1: IF2150
• Type2: IF2200
Notes:
Two kinds of size notation are employed in this manual. With this machine refer to the metric version.
For good copy quality,Infotec recommends that you use genuine Infotec toner.
Infotec shall not be responsible for any damage or expense that might result from the use of parts other
than genuine Infotec parts in your Infotec office product.
Important
Contents of this manual are subject to change without prior notice. In no event will the company be liable for direct, indirect, special, incidental, or consequential damages as a result of handling or operating the machine.
Power Source:
220–240V, 50/60Hz
Please be sure to connect the power cord to a power source as above. For details about the power
source, see Chapter 10, “Connecting the Power and Switching On” in the Advanced Features manual.
Trademarks
®
Adobe
and Acrobat® are registered trademarks of Adobe Systems Incorporated.
®
Microsoft
United States and/or other countries.
Other product names used herein are for identification purposes only and might be trademarks of their
respective companies. We disclaim any and all rights in those marks.
, Windows® and Windows NT® are registered trademarks of Microsoft Corporation in the
Note
The proper names of the Windows operating systems are as follows:
• Microsoft
• Microsoft
• Microsoft
• Microsoft
• Microsoft
• Microsoft
• Microsoft
• Microsoft
• Microsoft
This information is based on our present state of knowledge and is intended to provide general notes
on our products and their uses.
It should not therefore be construed as guaranteeing specific properties of the products described or
their suitability for particular applications.
Any existing industrial property rights must be observed. The quality of our products is guaranteed under our General Conditions of Sale.
®
Windows® 95 operating system
®
Windows® 98 operating system
®
Windows® Millennium Edition (Windows Me)
®
Windows® 2000 Professional
®
Windows® XP Professional
®
Windows® XP Home Edition
®
Windows® 2000 Server
®
Windows NT® Server operating system Version 4.0
®
Windows NT® Workstation operating system Version 4.0
For safe and correct use of this machine, please be sure to read the Safety Information before you use it.

Declaration of Conformity
Notice to Users in EEA Countries
This product complies with the essential requirements and provisions of Directive 1999/5/EC of the European Parliament and of the Council of 9 March 1999 on radio equipment and telecommunications
terminal equipment and the mutual recognition of their conformity.
Notice to Users Accessing Analog PSTN in EEA Countries
This product is designed to be able to access analog PSTN in all EEA countries. Local PSTN compatibility is dependent on software switch settings. Please contact your service representative if relocating
this product to another country. In the event of problems, please contact your service representative
in the first instance.
The CE Declaration of Conformity is available by accessing the URL:
http://www2.danka.de/jboard/produkte/indext_3_1.htmlo
and selecting the product applicable.
In accordance with IEC 60417, this machine uses the following symbols for the main power switch:
aaaa means POWER ON.
bbbb means POWER OFF.
Copyright © 2002

TABLE OF CONTENTS
What Do You Want to Do with This Machine? ....................................................1
Notice......................................................................................................................3
Safety Information......................................................................................................3
Safety During Operation..........................................................................................3
Important Safety Instructions...............................................................................5
Grounding ..................................................................................................................5
Position of the RRRRCAUTION Label ........................................................................6
ENERGY STAR Program.......................................................................................7
Energy Saver Modes..................................................................................................8
Remarks................................................................................................................10
How to Read This Manual ................................................................................... 12
Paper Mark...............................................................................................................13
Manuals for This Machine...................................................................................14
Basic Features (this manual) ...................................................................................14
Advanced Features (on CD-ROM)...........................................................................14
Before You Use This Machine .................................................................................14
NIC FAX Unit Manual (on CD-ROM)........................................................................ 14
NIC FAX Unit CD-ROM Manual ...............................................................................15
1. Getting Started
Machine Types .....................................................................................................17
Guide to Components .........................................................................................18
Front View ................................................................................................................18
Side View .................................................................................................................19
Control Panel........................................................................................................21
Reading the Display.................................................................................................23
Reading the Display and Using Keys .................................................................... 23
Standby Display..................................................................................................... 24
Communication Display.........................................................................................25
Display Prompts ....................................................................................................25
Energy Saver Mode Display..................................................................................26
Restricted Access Display.....................................................................................26
Turning On or Off the Power...............................................................................28
Turning On the Power..............................................................................................28
Turning Off the Power..............................................................................................28
i

2. Faxing
Transmission Modes........................................................................................... 29
Switching between Memory Transmission and Immediate Transmission................29
Placing Originals..................................................................................................31
Placing Originals in the ADF ....................................................................................32
Originals Unsuitable for the Auto Document Feeder (ADF) .....................................33
Memory Transmission.........................................................................................34
Canceling a Memory Transmission.................................................................... 36
Before Pressing the Start Key..................................................................................36
While Scanning the Original.....................................................................................36
When an Original Is Jammed...................................................................................36
During Transmission ................................................................................................36
While Awaiting Transmission ...................................................................................37
Immediate Transmission.....................................................................................39
If the Connection Could Not Be Made......................................................................40
Canceling an Immediate Transmission .............................................................41
Before Pressing the Start Key..................................................................................41
After Pressing the Start Key.....................................................................................41
When an Original Is Jammed...................................................................................41
Scan Settings .......................................................................................................42
Resolution ................................................................................................................42
Original Type............................................................................................................44
Changing Scan Settings...........................................................................................44
Dialing................................................................................................................... 45
Entering Numbers Directly .......................................................................................45
Pause ....................................................................................................................46
Tone ......................................................................................................................46
Using Quick Dials..................................................................................................... 47
Using Speed Dials.................................................................................................... 48
Using Group Dials....................................................................................................49
When specifying a group with a Quick Dial ...........................................................50
When specifying a group with the Group Key ....................................................... 50
Reception Modes.................................................................................................52
Selecting the Reception Mode ................................................................................. 52
Receiving Messages in Manual Receive .................................................................53
ii

3. Programming
Own Name/Fax Header/Own Fax Number .........................................................55
Own Name / Fax Header .........................................................................................56
Programming.........................................................................................................56
Editing.................................................................................................................... 57
Deleting .................................................................................................................58
Own Fax Number ..................................................................................................... 59
Programming.........................................................................................................59
Editing.................................................................................................................... 60
Deleting .................................................................................................................61
Quick Dial .............................................................................................................62
Programming............................................................................................................63
Editing ..................................................................................................................... 65
Deleting ................................................................................................................... 66
Quick Dial Key Label (Dial Label) ............................................................................67
Label paper............................................................................................................69
Speed Dial.............................................................................................................71
Programming ...........................................................................................................72
Editing ......................................................................................................................74
Deleting ................................................................................................................... 75
Groups .................................................................................................................. 77
Programming ...........................................................................................................77
Editing ......................................................................................................................81
Deleting ....................................................................................................................83
To delete a destination from a group..................................................................... 83
To delete an entire group ......................................................................................84
Entering Characters.............................................................................................86
Available Characters ................................................................................................86
Keys .........................................................................................................................86
How to Enter Characters..........................................................................................87
4. Troubleshooting
Loading Paper in the Main Paper Tray...............................................................89
Replacing the Toner Cartridge ...........................................................................90
Toner Cartridge Storage......................................................................................92
Adjusting Volume ................................................................................................93
Clearing Original Jams........................................................................................95
Clearing a Copy, Fax, or Print Jam ....................................................................96
Error Messages.................................................................................................... 98
Indicators............................................................................................................100
Solving Problems...............................................................................................101
When Things Don't Go as Expected ................................................................ 103
Printing the Help List.........................................................................................104
INDEX....................................................................................................... 105
iii

iv

What Do You Want to Do with This Machine?
This is a summary of this machine's features including which pages to consult
for detailed information.
I want ... Reference
to specify several destinations with a single
key
to print Quick Dial key labels that can be attached to the control panel so that I can find
quickly the Quick Dial with the destination I
want to specify programmed in
to check whether a fax transmission was successful or not
to find a stored Speed Dial quickly p.46 “Telephone Directory”,
to send a fax at a specific time p.5 “Sending at a Specific Time (Send Later)”,
to cut down on my telephone bill p.142 “Economy Transmission”,
to cut down on my paper consumption p.82 “Two in One”,
to prevent many sheets of paper from being
printed out if fax messages are received during
the night or on holidays
to block out unwanted messages p.123 “Authorized Reception”,
to send a message on a two-sided original p.56 “Duplex Original Settings”,
to send a fax message which has the large
number of pages in one transmission
to have multiple copies of incoming messages p.81 “Multi-copy Reception”,
to retry a failed transmission p.31 “Retrying a Failed Transmission”,
to change destination(s) or alter the transmission time for a file queued for transmission
to find frequently used functions by just pressing a single key instead of searching through
several menus
to prevent my message being picked up casually by anyone at the other end
p.49 “Using Group Dials” and p.77 “Groups”
p.67 “Quick Dial Key Label (Dial Label)”
p.35 “Checking the Transmission Result (TX
Status)”,
tures
Advanced Features
Features
vanced Features
“Two-sided Reception”,
p.143 “Energy Save Timer”,
tures
Features
p.57 “Batch Original Documents Transmission”,
tures
vanced Features
p.27 “Changing Transmission Files”,
vanced Features
p.105 “User Function Keys”,
tures
p.7 “Sending Confidential Messages”,
vanced Features
Advanced Features
Advanced Features
Advanced Fea-
and p.20 “Transfer Request”,
Advanced Features
Advanced Features
Advanced Features
Advanced Fea-
Advanced Features
Advanced Fea-
Advanced Fea-
and p.169 “Personal Boxes”,
Advanced
Ad-
and p.81
Advanced
Ad-
Ad-
Ad-
1

I want ... Reference
to prevent a received message being picked up
casually by other people
to have backups automatically made of faxes I
send
to have backups automatically made of incoming faxes
to restrict access to the machine to specified users
to monitor machine usage by user or department
to receive messages while I am away on a trip p.136 “Forwarding”, Advanced Features
to program in memory a document I often use p.101 “Auto Documents”, Advanced Features
to perform multiple keypad operations with a
single key
p.38 “Printing a Confidential Message”, Ad-
vanced Features and p.43 “Printing Personal
Box Messages”, Advanced Features
p.140 “Backup File Transmission Settings”,
Advanced Features
p.136 “Forwarding”, Advanced Features and
p.169 “Personal Boxes”, Advanced Features
p.27 “Restricted Access”
p.27 “Restricted Access” and p.9 “User Code
Transmission”, Advanced Features
p.99 “Programs”, Advanced Features
2

Notice
R
R
R CAUTION:
Use of controls, adjustments, or performance of procedures other than those
specified herein may result in hazardous radiation exposure.
Direct (or indirect reflected) eye contact with the laser beam may cause serious eye damage.
Safety precautions and interlock mechanisms have been designed to prevent any possible laser
beam exposure to the operator.
Safety Information
When using this machine, the following safety precautions should always be followed.
Safety During Operation
In this manual, the following important symbols are used:
WARNING:
CAUTION:
Indicates a potentially hazardous situation which, if instructions
are not followed, could result in death or serious injury.
Indicates a potentially hazardous situation which, if instructions are not
followed, may result in minor or moderate injury or damage to property.
3

R WARNING:
• Connect the power cord directly into a wall outlet and never use an
extension cord.
• Disconnect the power plug (by pulling the plug, not the cable) if the
power cable or plug becomes frayed or otherwise damaged.
• To avoid hazardous electric shock or laser radiation exposure, do
not remove any covers or screws other than those specified in this
manual.
• Turn off the power and disconnect the power plug (by pulling the
plug, not the cable) if any of the following occurs:
•
You spill something into the machine.
• You suspect that your machine needs service or repair.
• The external housing of your machine has been damaged.
• Do not incinerate spilled toner or used toner. Toner dust might ig-
nite when exposed to an open flame.
•
Disposal can take place at an authorized dealer.
• Dispose of used toner cartridges in accordance with the local regulations.
• Make sure that the wall outlet is near the machine and easily accessible.
R CAUTION:
• Protect the machine from dampness or wet weather, such as rain and
snow.
• Unplug the power cord from the wall outlet before you move the ma-
chine. While moving the machine, you should take care that the power
cord will not be damaged under the machine.
• When you disconnect the power plug from the wall outlet, always pull the
plug (not the cable).
• Do not allow paper clips, staples, or other small metallic objects to fall
inside the machine.
• Keep toner (used or unused) and toner cartridges out of reach of chil-
dren.
• For environmental reasons, do not dispose of the machine or expended
supply waste at household waste collection points. Disposal can take
place at an authorized dealer.
• The inside of the machine could be very hot. Do not touch the parts with
a label indicating “hot surface”. Otherwise an injury might occur.
4

Important Safety Instructions
Grounding
In order to prevent potentially hazardous electrical shock, provide means of
connecting to the protective grounding conductor in the building, wiring those
grounding conductors of power cable and 3 pins plug.
5
 Loading...