

Page 1
FAX2900L/2900Li
Operator's Manual
TSTH120E
Read this manual carefully before you use this product and keep it handy for future
reference.
For safety, please follow the instructions in this manual.
Page 2

RICOH COMPANY, LTD.
15-5, 1 chome, Minami-Aoyama, Minato-ku, Tokyo
Telephone: Tokyo 3479-3111
Ricoh shall not be responsible for any damage or expense that may result from the use of parts other than
recommended parts.
For good copy quality, Ricoh recommends that you
use genuine Ricoh toner.
TONER CASSETTES
RICOH FAX TONER CASSET TE TY PE 1430 BLAC K
mended for the best performance.
is recom-
FAX 2900L/2900Li Operator’s Manual
Overseas Affiliates
U.S.A.
RICOH CORPORATION
5 Dedrick Place
West Caldwell, New Jersey 07006
Phone: +1-973-882-2000
The Netherlands
RICOH EUROPE B.V.
Groenelaan 3, 1186 AA, Amstelveen
Phone: +31-(0)20-5474111
United Kingdom
RICOH UK LTD.
Ricoh House,
1 Plane Tree Crescent, Feltham,
Middlesex, TW13 7HG
Phone: +44-(0)181-261-4000
Germany
RICOH DEUTSCHLAND GmbH
Mergenthalerallee 38-40,
65760 Eschborn
Phone: +49-(0)6196-9060
France
RICOH FRANCE S.A.
383, Avenue du Général de Gaulle
BP 307-92143 Clamart Cedex
Phone: +33-(0)1-40-94-38-38
Spain
RICOH ESPAÑA S.A.
Avda. Litoral Mar, 12-14,
08005 Barcelona
Phone: +34-(0)93-295-7600
Italy
RICOH ITALIA SpA
Via della Metallurgia 12,
37139 Verona
Phone: +39-(0)45-8181500
Hong Kong
RICOH HONG KONG LTD.
23/F., China Overseas Building,
139, Hennessy Road,
Wan Chai, Hong Kong
Phone: +852-2862-2888
Singapore
RICOH ASIA PACIFIC PTE.LTD.
260 Orchard Road,
#15-01/02 The Heeren,
Singapore 238855
Phone: +65-830-5888
Printed in The Netherlands
EE GB H547-8601
Page 3

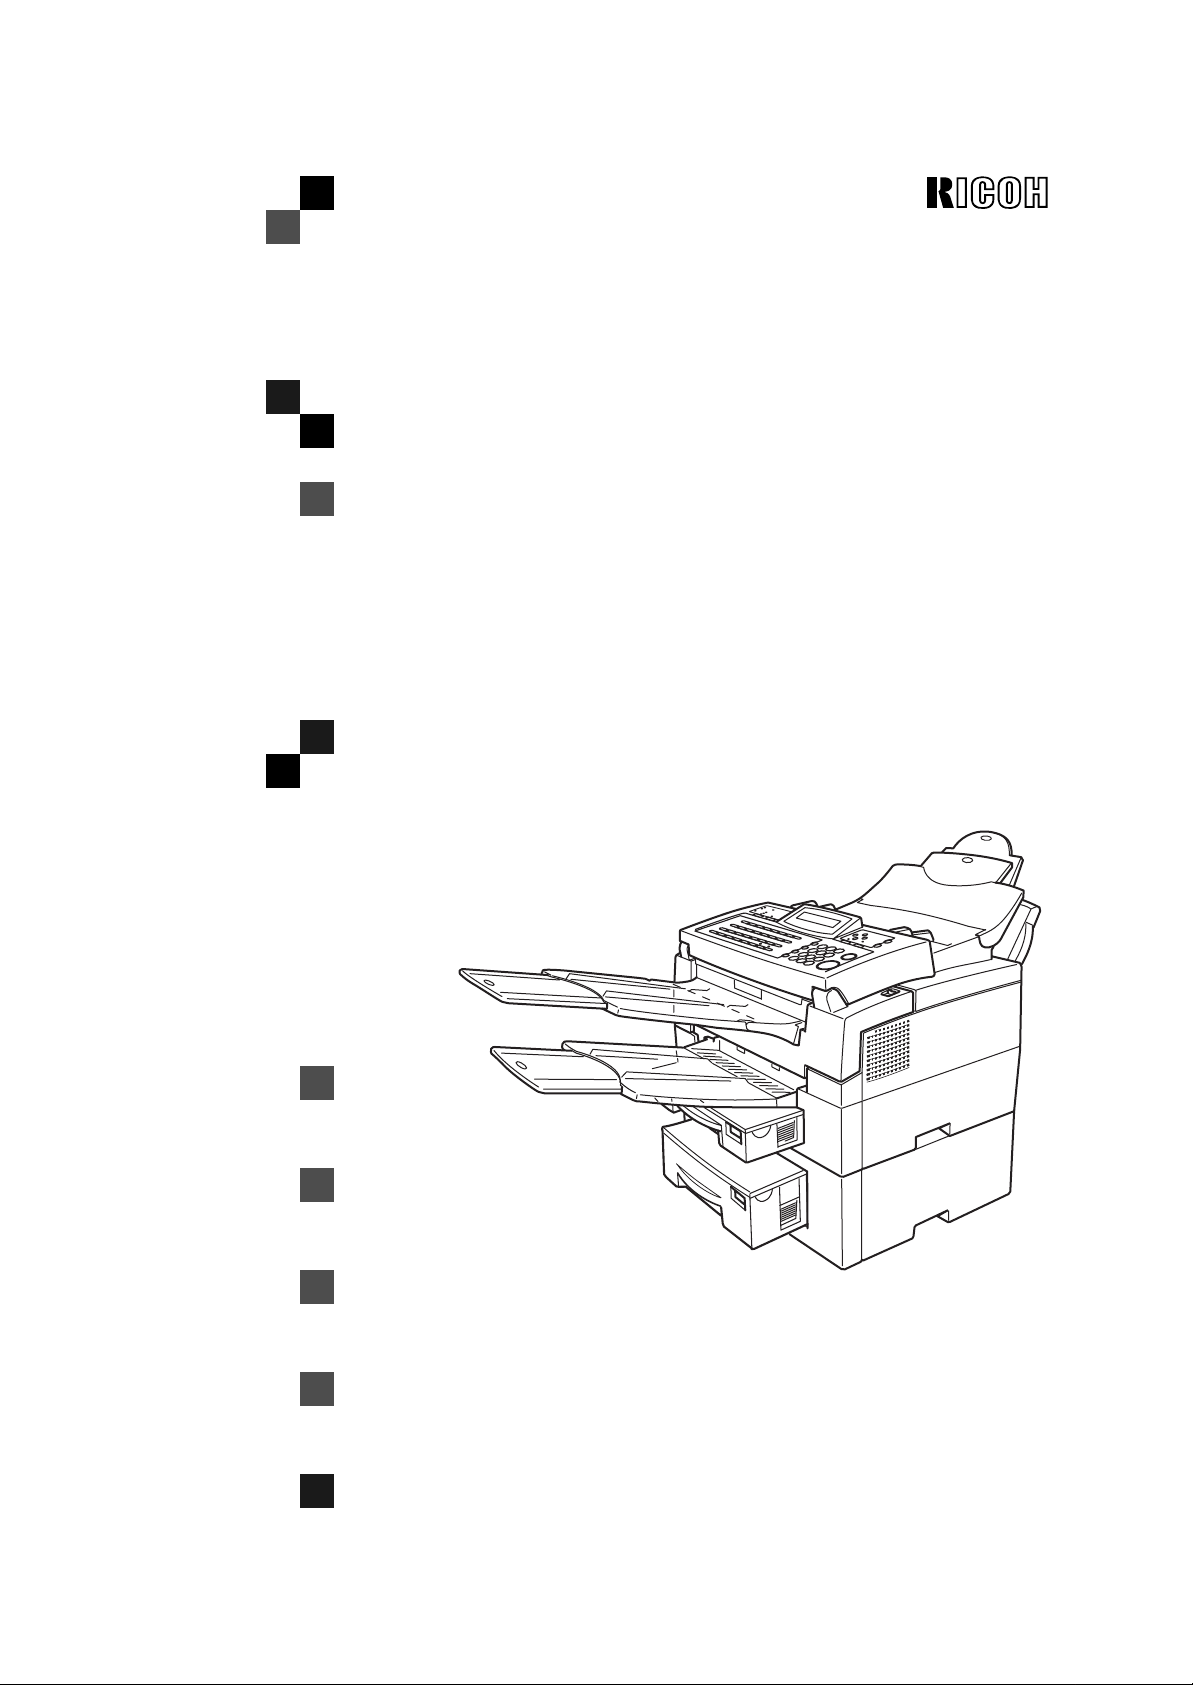
Optional Equipment
❖
PAPER FEED UNIT TYPE 180 (Second Cassette)
A second paper feed unit can be added to the base machine.
❖
BYPASS FEEDER TYPE 180(Multi -purpose Feeder)
A third paper feed unit can be added to the base machine.
❖
FAX EXPANSION CARD TYPE 10
A 1-Mbyte memory card can be added.
❖
FAX EXPANSION CARD TYPE 20
A 2-Mbyte memory card can be added.
❖
FAX EXPANSION CARD TYPE 40
A 4-Mbyte memory card can be added.
❖
PC-FAX EXPANDER TYPE 190
This allows you to us e the ma chine as a modem for an IBM PC/AT or compatible personal computer.
(Type 1 only)
❖
ISDN INTERFACE UNIT TYPE 190
This allows you to send and receive using the ISDN (Integrated Service Digital Network).
(Type 1 only)
The interface complies with the requirements of the Commission Decision 98/515/EC.
98/515/EC:★ Commission Deci sion of 1 7 June 19 98 on a c ommon te chnical regulatio n for the p anEuropean integrated service digital network (ISDN) basic access (Amendment1).
Note
❒
The model names of the machines do not appear in the following pages. Check the type of your
machine before reading this manual.
• Type 1: FAX2900L
• Type 2: FAX2900Li
Page 4

Declaration of Conformity
“The Product complies with the requirements of the EMC Directive 89/336/EEC and the Low Voltage
Directive 73/23/EEC.”
Page 5

Optional Equipment
❖
PAPER FEED UNIT TYPE 180 (Second Cassette)
A second paper feed unit can be added to the base machine.
❖
BYPASS FEEDER TYPE 180(Multi -purpose Feeder)
A third paper feed unit can be added to the base machine.
❖
FAX EXPANSION CARD TYPE 10
A 1-Mbyte memory card can be added.
❖
FAX EXPANSION CARD TYPE 20
A 2-Mbyte memory card can be added.
❖
FAX EXPANSION CARD TYPE 40
A 4–Mbyte memory card can be added.
❖
PC-FAX EXPANDER TYPE 190
This allows you to us e the ma chine as a modem for an IBM PC/AT or compatible personal computer.
(Type 1 only)
❖
ISDN INTERFACE UNIT TYPE 190
This allows you to send and receive us ing the ISDN (Inte grated Service D igital Network) .
(Type 1 only)
The interface complies with the requirements of the Commission Decision 98/515/EC.
98/515/EC:★Commission Decision of 17 Jun e 1998 o n a com mon tec hnica l regul ation fo r the panEuropean integrated service digital network (ISDN) basic access (Amendment1).
Note
❒
The model names of the machines do not appear in the following pages. Check the type of your
machine before reading this manual.
• Type 1: iNFOTEC3684
• Type 2: iNFOTEC3684 ISDN
This information is based on our present state of knowledge and is intended to provide general notes
on our products and their uses.
It should not therefore be construed as guaranteeing specific properties of the products described or
their suitability for particular applications.
Any existing indus t rial p rope rty rights must be ob served. The quali ty of our products is guara nte ed under our General Conditions of Sale.
Page 6
Notice
R
CAUTION:
Use of controls, adjustments or performance of procedures other than those
specified herein may result in hazardous radiation exposure.
Shielded interconnect cables must be employed with this equipment to ensure
compliance with the pertinent RF emission limits governing this device.
Although this equipment can use either loop disconnect or DTMF signalling,
only the performance of the DTMF signalling is subject to regulatory requirements for correct operation. It is therefore strongly recommended that the equipment is set to use DTMF signalling for access to public or private emergency
services. DTMF signalling also provides faster call set up.
Direct (or indirect reflected eye contact with the laser beam may cause serious eye
damage. Safety precautions and interlock mechanisms have been designed to prevent
any possible laser beam exposure to the operator.
Note
❒
Some illustrations may be slightly different from your machine.
❒
Certain options may not be available in some countries. For details, please
contact your local dealer.
In accordance with IEC 60417, this machine uses the following symbols for the
main power switch:
•a means POWER ON.
•b means POWER OFF.
Warning:
Changes or modifications not expressly approved by the party responsible for
compliance could void the user's authority to operate the equipment.
Examples Of Indications
Symbols R mean a situation that requires you take care.
Symbols v mean “Hot surface”.
Symbols n mean “Do not touch”.
i
Page 7

ENERGY STAR Program
As an ENERGY STAR Partner, we have determined that this machine model
meets the ENERGY STAR Guidelines for energy efficiency
The ENERGY STAR Guidelines intend to establish an international energy-saving system for developing and introducing energy-efficient office equipment to
deal with environmental issues, such as global warming. This product was designed to reduce the environmental impact associated with fax equipment by
means of energy-saving features, such as Energy Saving Standby mode.
This fax automatically lowers its power consumption 5 minute after the last operation has been completed by default. To exit low power mode, press the
}
ergy Saver
key. The fax starts printing in about 40 seconds in the Energy Saving
Standby mode or in about 30 seconds in the Fax Standby Mode. Please see the
applicable page for details.
{
En-
Specification
❖
Type 1
Energy Saving Standby Mode Fax Standby Mode
Power consump-
tion
Default Time 5 minutes Default Time 5 minutes
Print Start Time Within about 40
❖
Type 2 machines, or Type 1 machines with the ISDN UNIT Type 190 installed
Energy Saving Standby Mode Fax Standby Mode
Power consump-
tion
Default Time 5 minutes Default Time 5 minutes
Print Start Time Within about 40
2W Power consump-
tion
Print Start Time Within about 30
seconds
2.5W Power consumption
Print Start Time Within about 30
seconds
30W
seconds
30W
seconds
Recycled paper
Please contact your sales or service representative for recommended recycled
paper types that may be used in this machine.
ii
Page 8

TABLE OF CONTENTS
1.Safety
Important Safety Instructions................................................................... 1
When to Call Your Service Representative............................................. 3
Power And Grounding .............................................................................. 4
Power Supply................................................................................................ 4
Grounding ..................................................................................................... 4
Other Important Informations................................................................... 5
General ........................... .............................................................................. 5
Cold Weather Power-up................................................................................ 5
Thunderstorms..................... ......................................................................... 5
Operating Precautions .................................................................................. 5
Copy Paper................................................................................................... 5
Symbols & Conventions Used in This Manual.............................................. 6
2.Useful Functions
Help List ..................................................................................................... 7
Blank Sheet Detect.................................................................................... 7
Quick Label................................................................................................ 8
3.Machine Layout
Part Names....................................... ..... ..... ............................ .... ..... ..... ...... 9
Operation Panel....................................................................................... 11
4.Faxing
Recommended Types of Document...................................................... 15
Correct Size for the Document Delivery Tray.............................................. 15
Page Condition............................................................................................ 16
Memory Transmission And Immediate Transmission......................... 17
Memory Transmission (Memory Indicator Lit)............................................. 17
Immediate Transmission........... .................................................................. 20
Dialing with the Telephone Directory .......................................................... 21
Receiving Telephone Calls & Fax Messages (Faxes/Phone Calls)..... 22
Switching Between Fax and Telephone Mode............................................ 22
Receiving the Fax Message in the Telephone Mode.................................. 22
Printing Received Messages That Have Been Stored
(Substitute Reception)........................................................................... 23
Faxing a Page with Very Fine Detail...................................................... 24
Resolution & Shading.................................................................................. 24
iii
Page 9

Optional Features for Transmission...................................................... 25
Sending at a Specific Time (Send Later) .................................................... 25
Printing the Page Number (Page Count) .................................................... 25
Sending Your Identification at the Top of Your Message (TTI)................... 26
Sending by a Specific Time (Transmission Deadline)................................. 26
Personal Codes......................... .................................................................. 27
Using the Stamp...................................................................................... 28
Changing the Stamp Home Position Setting ............................................... 28
Redialing .................................................................................................. 29
Automatic Redialing.................................................................................... 29
Using the AI Redial key............................................................................... 29
Storing & Editing Fax Numbers (Functions 31 & 32)........................... 30
Storing, Editing & Erasing Quick Dial Numbers (Function 31).................... 30
Storing, Editing & Erasing Speed Dial Numbers (Function 32)................... 31
Storing & Editing a Group of Fax Numbers (Function 33)................... 33
Erasing Groups........................................................................................... 34
Programming the Group Key ...................................................................... 34
Dial Options ................................. .... ..... ..... ............................ .... ..... ..... .... 36
Programming the Dial Option Key............................................................... 36
Using the Dial Options ................................................................................ 36
Chain Dialing............................................................................................ 38
Erasing a Stored Message before It Is Sent (Functions 21 & 22)........ 39
Printing a Stored Message (Function 51).............................................. 40
Locking Incoming Messages (Memory Lock)....................................... 41
Storing a Memory Lock ID........................................................................... 41
Editing the Memory Lock ID....................................................................... 42
Switching Memory Lock on/off.................................................................... 42
Programming Special Terminals for Lock in Memory ................................. 43
Selecting which Messages to Lock in memory ........................................... 43
Printing a Memory-locked Message (Function 55)...................................... 43
Sending a Fax Using the External Telephone....................................... 44
Answering the Telephone....................................................................... 45
If the Telephone Rings Continuously ............................................ ............. 45
Phoning and Faxing on the Same Call.................................................. 46
To Talk before Sending a Fax..................................................................... 46
5.5Other Features
Verifying Communications, Errors, Counters, Etc............................... 47
Automatically Printed Reports..................................................................... 47
Report Formats........................................................................................... 48
Counters (function 94)................................................................................. 49
Programming Keystrokes....................................................................... 50
Storing a Keystroke Program...................................................................... 50
iv
Page 10

Labeling a Program................................ ..................................... ................ 51
Using a Program......................................................................................... 51
Erasing a Program / Changing the Program Label ..................................... 52
Storing an Often Used Document (Auto Document)............................ 53
Storing an Auto Document (Function 35).................................................... 53
Using an Auto Document............................................................................ 54
Printing the Contents of an Auto Document (Function 53).......................... 54
Erasing an Auto Document......................................................................... 55
Batch Transmission................................................................................ 56
Changing the Batch Transmission on/off.................................................... 56
Closed Network (Transmission)............................................................. 57
Sending Confidential Messages (Function 12)..................................... 58
Confidential ID Override Option.................................................................. 59
Transfer Request (Function 13)............................................................. 60
Storing Your Machine's Own Telephone Number....................................... 60
Storing the ID Code..................................................................................... 61
Programming the ID Code .......................................................................... 61
Editing the ID Code..................................................................................... 62
Making a Transfer Request......................................................................... 62
Combining Transfer Request with Broadcasting......................................... 64
Multi-step Transfer............................ .......................................................... 65
Programming the Personal Codes (Function 72)................................. 66
Storing a Personal Code............................................................................. 66
Editing or Erasing a Personal Code............................................................ 67
Tonal Signals........................................................................................... 69
Using the Tone Key..................................................................................... 69
Rejecting Messages from Senders Who Don't Identify Themselves
.... 70
Receiving Confidential Messages.......................................................... 71
Storing a Confidential ID............................................................................. 71
Editing the Confidential ID........................................................................... 72
Printing a Confidential Fax Message (Function 54).................................... 72
Confidential File Report............................................................................... 73
Closed Network (Reception)................................................................... 74
Rejecting or Accepting Messages from Specified Senders
(Authorized Reception).......................................................................... 75
About Authorized Reception ....................................................................... 75
Entering a List of Senders to Treat Differently (Function 81)...................... 75
Switching Authorized Reception on / off (Function 62) ............................... 75
Cassette Selection................................................................................... 76
About Cassette Selection............................................................................ 76
Entering a List of Senders to Treat Differently (Function 81)...................... 76
Selecting the Messages to Be Printed from the Main Cassette.................. 76
Selecting the Cassette (Function 62).......................................................... 76
Multi-sort Document Reception............................................................. 78
v
Page 11

About Multi-sort Reception.......................................................................... 78
Switching Multi-sort Document on/off (Function 62) ................................... 78
Setting the Number of Copies (Function 83) ............................................... 79
Programming the Special Terminals to Make Multi-sort-copies.................. 79
Choosing How to Treat the Special Terminals . ........................................... 80
Programming a List of Senders to Treat Differently (Function 81)..... 81
Programming the List of Senders (Special Senders).................................. 81
Editing the RTI/CSI for the Special Terminals............................................. 82
Erasing the Special Terminal...................................................................... 84
Forwarding .............................................................................................. 85
Programming the Forwarding Feature (Function 82).................................. 85
Editing the Forwarding Feature................................................................... 87
Switching Forwarding on / off (Function 62)................................................ 88
Selecting Which Messages to Forward.................................................... ... 89
Switching Local Printing on / off.................................................................. 89
Enabling and Disabling the Forwarding Mark ............................................. 89
Wild Cards................................................................................................ 90
Receiving Options................................................................................... 91
Reverse Order Printing ............................................................................... 91
Printing a Center Mark................................................................................ 91
Checkered Mark........................... ............................................................... 91
Reducing the Page Length ......................................................................... 91
Reception Time............... ............................................................................ 92
Two In One (Into 1)..................................................................................... 92
Reports You Can Printout Yourself....................................................... 93
Journal (Function 41).................................................................................. 93
File List (Function 42).................................................................................. 93
Telephone Number List (Function 43)......................................... ................ 93
Quick Label (Function 44)........................................................................... 93
Program List (Function 45).......................................................................... 93
Energy Saving.......................................................................................... 94
Introduction ................................................................................................. 94
Entering Energy Saving mode .................................................................... 96
Exiting Energy Saving mode....................................................................... 96
Selecting the Energy Saving mode type..................................................... 96
Reception in Energy Saving mode.............................................................. 96
Saving Energy with the Power Saving Timer........................................ 98
Setting the Power Saving time (Function 71).............................................. 98
Switching the Power Saving Timer on / off (Function 62) .......................... 99
Copying.................................................................................................. 100
Calling to Request a Message (Polling) .............................................. 101
Picking up Messages Stored Elsewhere (Polling Reception) ................... 101
Operating Procedure................................................................................. 101
Entering a Personal Code......................................................................... 101
Stored ID Override Option......................................................................... 102
Leaving a Document to Be Picked up by Others (Polling Transmission
vi
).... 103
Page 12

Free Polling (Function 15) ......................................................................... 103
Secured Polling (Function 14)................................................................... 104
Stored ID Override.................................................................................... 104
Options for Polling Transmission .............................................................. 105
Canceling a Polling Transmission (Function 23)....................................... 106
Printing a Polling Transmission File (Function 52).................................... 106
User Function Keys (Function 36)....................................................... 108
Programming a User Function Code......................................................... 108
Using a Function Program ........................................................................ 109
Editing a Function Program....................................................................... 109
Deleting a Function Program .................................................................... 109
Dual Access........................................................................................... 110
6.Maintaining Your Machine
Loading Paper in the Main Cassette.................................................... 111
Loading Paper in the Second Cassette............................................... 114
Loading Paper in the Optional Multi-purpose Feeder........................ 117
Replacing the Toner Cassette and Cleaning Pad............................... 118
Toner Cassette....................................................................................... 122
Replacing the Stamp............................................................................. 123
Cleaning the Rollers and Scanner....................................................... 124
Changing the Paper Size in the Main Cassette................................... 125
How to change to the legal size................................................................ 130
Changing the Paper Size in the Second Cassette.............................. 131
How to change to the legal size................................................................ 135
Changing the Paper Size in the Optional Multi-purpose Feeder....... 136
Changing the Paper Size Settings....................................................... 138
7.Troubleshooting
If an Indicator Lights up on the Operation Panel ............................... 139
Clearing a Document Jam.................................................................... 140
Clearing a Copy, Fax, or Print Jam...................................................... 142
Clear a Jam inside the Machine ................................................................ 142
Clear a Jam in the Cassette Entrance ...................................................... 144
Clear a Jam in the Optional Second Cassette.......................................... 145
Clear a Jam in the Upper Rear Unit.......................................................... 146
Clear a Jam in the Lower Rear Unit.......................................................... 147
If Messages You Receive Don't Fit on Your Paper............................. 149
Breaking Down Large Format Messages.................................................. 149
Communication Problems.................................................................... 150
Adjusting the Printing Margins (Function 95)..................................... 151
vii
Page 13

Operating Difficulties............................................................................ 152
Displayed Error Messages.................................................................... 157
Calling the Service Station................................................................... 159
Sending a Service Report ................. .................. ...................................... 159
8.Technical Reference
Access Code for Functions 61 to 95.................................................... 161
User Parameters.................................................................................... 162
User Parameter Hints................................................................................ 169
Adjusting the Volume of Various Features (Function 92) ................. 170
Selecting the Display's Language (Function 93)................................ 171
Entering Characters............................. ..... .... ........................................ 172
Entering Symbols...................................................................................... 172
Document & Paper Specifications....................................................... 173
Documents (Using the Auto Document Feeder)....................................... 173
Document Feeder Requirements.............................................................. 173
Paper Requirements................................................................................. 173
Capabilities ............................................................................................ 174
Stored Numbers (Long Term) ..................... ..................................... ......... 174
Stored Destinations................................................................................... 174
File Storage............................................................................................... 174
Specifications........................................................................................ 175
Base Machine ........................................................................................... 175
Optional Lower Paper Cassette................................................................ 175
Multi-purpose Feeder................................................................................ 176
9.ISDN
Introduction............................................................................................ 177
Setting up the Group 4 Interface.......................................................... 178
Subaddress Key.......................................... ................................... ........... 178
Own ISDN-G4 Number ..................... .................. ...................................... 178
Programming the IG3 CSI ......................................................................... 178
Programming the Terminal ID................................................................... 178
Programming the G4 Subscriber 1............................................................ 179
Programming the G4 Subscriber 2............................................................ 179
Programming the G4 Subaddress............................................................. 180
Programming the IG3 Subscriber 1........................................................... 180
Programming the IG3 Subscriber 2........................................................... 180
Programming the IG3 Subaddress............................................................ 181
Operation................................................................................................ 182
Dialing and Storing Telephone Numbers .................... ..................... ......... 182
Transmission Procedure........................................................................... 182
Storing a Telephone Number.................................................................... 183
viii
Page 14

Automatic Fallback from Group 4 Mode to Group 3 Mode........................ 184
Terminal ID................................................................................................ 185
Explanation of the Items in the Group 4 Identifier..................................... 186
Switching the Command Information Line On/Off..................................... 187
Troubleshooting.................................................................................... 188
Call Progress Signals (CPS)..................................................................... 188
10.Installation
Before Installation................................................................................. 189
Machine Environment........................................................................... 190
Location..................................................................................................... 190
Installing the Toner Cassette .............................................................. 191
Installing the Main Paper Cassette...................................................... 194
Installing the Optional Second Cassette............................................. 196
Attaching the Trays and Document Table........................................... 198
Ventilation Grill Direction........................................................................... 199
Installing the Optional Multi-purpose Feeder..................................... 200
Installing the Optional Memory Card................................................... 202
Connecting the External Telephone.................................................... 203
Connecting the Machine....................................................................... 204
Connecting up to the Telephone Line................................................. 205
Connecting the Power and Switching on............................................ 206
Initial Settings & Adjustments.............................................................. 207
Initial Settings (Function 61)...................................................................... 208
Setting the Access Number....................................................................... 210
Setting the Phone Line (Function 62)........................................................ 211
Setting the Date & Time (Function 91)...................................................... 211
Summer Time / Daylight Saving Time (Function 62) ................................ 212
11.Function List
Function List.......................................................................................... 213
12.Laser Label
Position of the Laser Label................................................................... 217
13.BABT Notice
BABT Notice........................................................................................... 221
INDEX...................................................................................................... 224
ix
Page 15

x
Page 16

Important Safety Instructions
1. Safety
All Safety messages in the main text
of this manual are labeled WARNING or CAUTION. These mean the
following:
WARNING: Important information
to alert you to a situation that might
cause serious injury and damage to
your property if instructions are not
followed properly.
CAUTION: Important information
that tells how to prevent damage to
your equipment or how to avoid a situation that might cause minor injury.
In addition to the warnings and cautions included in the text of this manual, please read and observe the
following safety instructions.
A
Read all of these instructions.
B
Save these instructions for later
use.
C
Follow all warnings and cautions
marked on the product.
D
Unplug this product from the wall
outlet before cleaning. Do not use
liquid cleaners or aerosol cleaners.
Use a damp cloth for cleaning.
E
Do not use this product near water,
for example, near bath tub, wash
bowl, kitchen sink or laundry tub,
in a wet basement or near a swimming pool.
F
Avoid using a telephone (other
than a cordless type) during an
electrical storm. There may be a remote risk of electric shock from
lightning.
G
Do not use a telephone in the vicinity of a gas leak to report the leak.
H
Do not place this product on an unstable cart, stand, or table. The
product may fall, causing serious
damage to the product or injuring
the user.
I
Slots and opening in the cabinet
and the back or bottom are provided for ventilation; to ensure reliable operation of the product and to
protect it from overheating, these
openings must not be blocked or
covered. The openings should never be blocked by placing the product on a bed, sofa, rug, or other
similar surface. This product
should not be placed in a built-in
installation unless proper ventilation is provided.
J
This product should be operated
from the type of power source indicated on the marking label. Using a different power source may
result in injury or accident. If you
are not sure of the type of power
available, consult an authorized
sales person or your local power
company.
K
This product is equipped with a 3wire grounding type plug, a plug
having a third (grounding) pin.
This plug will only fit into a
grounding-type power outlet. This
is a safety feature. If you are unable
to insert the plug into the outlet,
contact your electrician to replace
your obsolete outlet. Do not defeat
the purpose of the grounding type
plug. (This does not apply in countries in which the 2-wire, nongrounded type of plug is used.)
1
Page 17

Safety
1
L
Do not allow anything to rest on
the power cord. Do not locate this
product where persons will walk
on the cord.
M
If an extension cord is used with
this product, make sure that the total of the ampere ratings on the
products plugged into the extension cord does not exceed the extension cord ampere rating. Also,
make sure that the total of all products plugged into the wall outlet
does not exceed 15 amperes.
N
Never push objects of any kind
into this product through cabinet
slots as they may touch dangerous
voltage points or short out parts
that could result in a risk of fire or
electric shock. Never spill liquid of
any kind on the product.
O
Do not attempt to service this
product yourself, as opening or removing covers may expose you to
dangerous voltage points or other
risks.
Refer all servicing to qualified
service personnel.
P
Do not take apart or attempt any
modifications to this machine.
There is a risk of fire, electric
shock, explosion or loss of sight.
Q
Do not incinerate used toner or
toner containers. Toner dust might
ignite when exposed to open
flame. Dispose of the used toner
containers according to local regulations for plastics.
R
Unplug this product from the wall
outlet and refer servicing to qualified service personnel under the
following conditions:
• When the power cord or plug is
damaged or frayed.
• If liquid has been spilled into
the product.
• If the product has been exposed
to rain or water.
• If the product does not operate
normally when the operating
instructions are followed. Adjust only those controls that are
covered by the operating instructions since improper adjustment of other controls may
result in damage and will often
required extensive work by a
qualified technician to restore
the product to normal operation.
• If the product has been dropped
or the cabinet has been damaged.
• If the product exhibits a distinct
change in performance, indicating a need for service.
2
Page 18

When to Call Your Service Representative
When to Call Your Service Representative
WARNING: Do not attempt any
maintenance or troubleshooting other
than that mentioned in this manual.
This machine contains a laser beam
generator and direct exposure to laser
beams can cause permanent eye damage.
Unplug this product from the wall
outlet and refer servicing to qualified
service personnel under the following conditions:
A
When the power cord or plug is
damaged or frayed.
B
If liquid has been spilled into the
product.
C
If the product has been exposed to
rain or water.
D
If the product does not operate
normally when the operator's
manual are followed. Adjust only
those controls that are covered by
the operator's manual since improper adjustment of other controls may result in damage and
will often require extensive work
by a qualified technician to restore
the product to normal operation.
E
If the product has been dropped or
the cabinet has been damaged.
F
If the product exhibits a distinct
change in performance, indicating
a need for service.
G
If smoke is coming out, there is a
strange smell or anything looks
unusual.
H
Do not use reuse stapled paper. Do
not use aluminum foil, carboncontaining paper or other conductive paper. Otherwise, a fire might
occur.
I
After you move the machine, fix it
with the caster fixture. Otherwise
the machine might move or come
down to cause a personal injury.
J
When removing misfed paper, do
not touch the fusing section because could be very hot.
1
3
Page 19

Safety
Power And Grounding
1
Power Supply
A
Power requirements: 220-240V,
50/60 Hz
B
Insert the power plug securely into
the wall socket.
C
Make sure that the wall outlet is
near the machine and readily accessible.
D
Do not connect other equipment to
the same socket.
E
Do not step on or set anything on
the power cord.
F
Do not connect other equipment to
the same extension cord.
G
Be sure that the power cord is not
in a position where it would trip
someone.
H
The wall outlet must be easily accessible.
I
Do not damage, break or make any
modifications to the power cord.
Do not place heavy objects on it,
pull it hard or bend it more than
necessary. These actions could
cause and electric shock or fire.
J
Do not plug or unplug the power
cord with wet hands or an electric
shock might occur.
K
When you move the machine, unplug the power cord from the wall
outlet to avoid fire or electric
shock.
L
When you pull out the plug from
the socket, grip the plug to avoid
damaging the cord and causing
fire or electric shock.
Grounding
Ground the machine and the lightning protection circuit in accordance
with regulations. Do not ground to
gas or water pipes, or to a telephone
ground plug. Proper grounding is to
the ground terminal of the power outlet. Be sure that the ground terminal
of the power outlet is properly
grounded.
The lightning protection circuit for
the machine requires the machine to
be properly grounded. If proper
grounding is provided, about 90 % of
lightning damage can be prevented.
For safety, be sure to connect the machine to a three-prong grounded outlet.
4
Page 20

Other Important Informations
Other Important Informations
General
A
Since some parts of the machine
are supplied with high voltage,
make sure that you do not attempt
any repairs or attempt to access
any part of the machine except
those described in this manual.
B
Do not make modifications or replacements other than those mentioned in this manual.
C
When not using the machine for a
long period, disconnect the power
cord.
D
Keep the machine away from humidity and dust. A fire or an electric shock might occur.
E
Do not reuse stapled paper. Do not
use aluminum foil, carbon-containing paper or other conductive
paper. Otherwise, a fire might occur.
F
This machine has been tested for
safety using this supplier's parts
and consumable. We recommend
you only use these specified supplies.
G
Ventilate the room around every
half an hour during a long copy
run or while printing a long mes-
sage.
Ozone
The machine generates ozone during
operation. Normally, the ozone level
is safe for operators. However, during a long copy run or while printing
a long message, ozone odor may appear; in such a case, ventilate the
room.
Cold Weather Power-up
Avoid raising the room temperature
abruptly when it is below 14°C, or
condensation may form inside the
machine.
A
Raise the room temperature to
20°C at less than 10°C per hour.
B
Wait for 30 to 60 minutes.
C
Turn the power on.
D
Do not use the machine near a humidifier.
Thunderstorms
With proper grounding, about 90 %
of lightning damage can be prevented. However, if possible, during severe electric storms turn the power
switch off and disconnect the power
cord and telephone line cord.
Operating Precaut ions
• While the machine is in operation,
do not turn off the main switch or
unplug the power cord.
• Keep corrosive liquids, such as acid, off the machine.
• Do not allow paper clips, staples,
or other small metallic objects to
fall inside the machine.
• The fusing unit may be very hot.
Be careful when handling it.
Copy Paper
• 60 to 90g/m2. copy paper is recommended.
1
5
Page 21

1
Safety
• Do not use damp paper, or copies
will be defective.
• Do not touch copy paper if your
fingers are wet or oily; fingerprints
may appear on the copy.
• Keep paper in a vinyl bag if it will
not be used for a long time.
• Store in a cool dry place.
• Store flat. Do not stand upright.
• The following materials cannot be
used in the paper cassettes: Post
cards, Tracing paper, OHP sheets,
Adhesive labels
• Do not overload the paper trays.
• If Multi-sheet Feeding occurs or
dog-eared copies are made when
using recycled paper in the paper
tray, fan the recycled paper and
load it in the paper tray again.
A
This is a step in a procedure.
THIS CORRESPONDS TO
THE LCD DISPLAY.
Symbols & Conventions Used in This Manual
❖
Documents:
A document is anything you put
on the feed table of your machine
whether you are faxing it or copying it.
❖
Prints:
A print is anything that comes out
of the machine: a fax message you
received or a copy you made.
❖
Procedures:
Procedures are described step by
step. Perform them in order. When
you see a display, it always shows
what comes after performing the
step it accompanies. Other illustrations accompanying steps help
you find the right key or handle, or
show you how to perform the step.
6
Page 22

Help List
2. Useful Functions
Use the
This list explains the following procedures:
• Immediate Transmission
• Memory Transmission
• Erasing a stored message before it is sent.
• Storing & editing Quick Dial numbers.
• Printing a list of the Quick Dial numbers
• Storing & editing Speed Dial numbers.
• Printing a list of the Speed Dial numbers
• Printing the Journal
{
No/Help
}
key to print the Help List.
Blank Sheet Detect
This feature is designed to help you avoid making mistakes while scanning in
documents.
If you try and scan in an almost completely blank document, an alarm sounds to
warn you. Make sure the document is not blank and is set the correct way up.
• Transmission is not cancelled even if the machine detects the document as
blank.
• With Immediate Transmission, the alarm sounds immediately.
• With Memory Transmission, the alarm sounds as soon as the document has
{
been scanned. If you press the
is shown, the "Cancel Transmission" display appears.
• As the alarm sounds, the
• You can turn Blank Original Detect on or off with the User Parameters (function 63 ⇒ P.162
by default.
• This feature is not supported in Copy mode.
“User Parameters”
BLANK DOCUMENT
}
key while the
Stop
message appears.
). When shipped, this feature is turned on
BLANK DOCUME NT
message
7
Page 23

2
Useful Functions
Quick Label
Use this function to print a sheet showing the contents of each Quick Dial and
User Function key. The size of the sheet matches the dimensions of the keys.
The following items are printed depending on what is stored in each key:
• Fax number label
• Group Dial label
• Program label
• User Function key
• Auto Document label
8
Page 24
Part Names
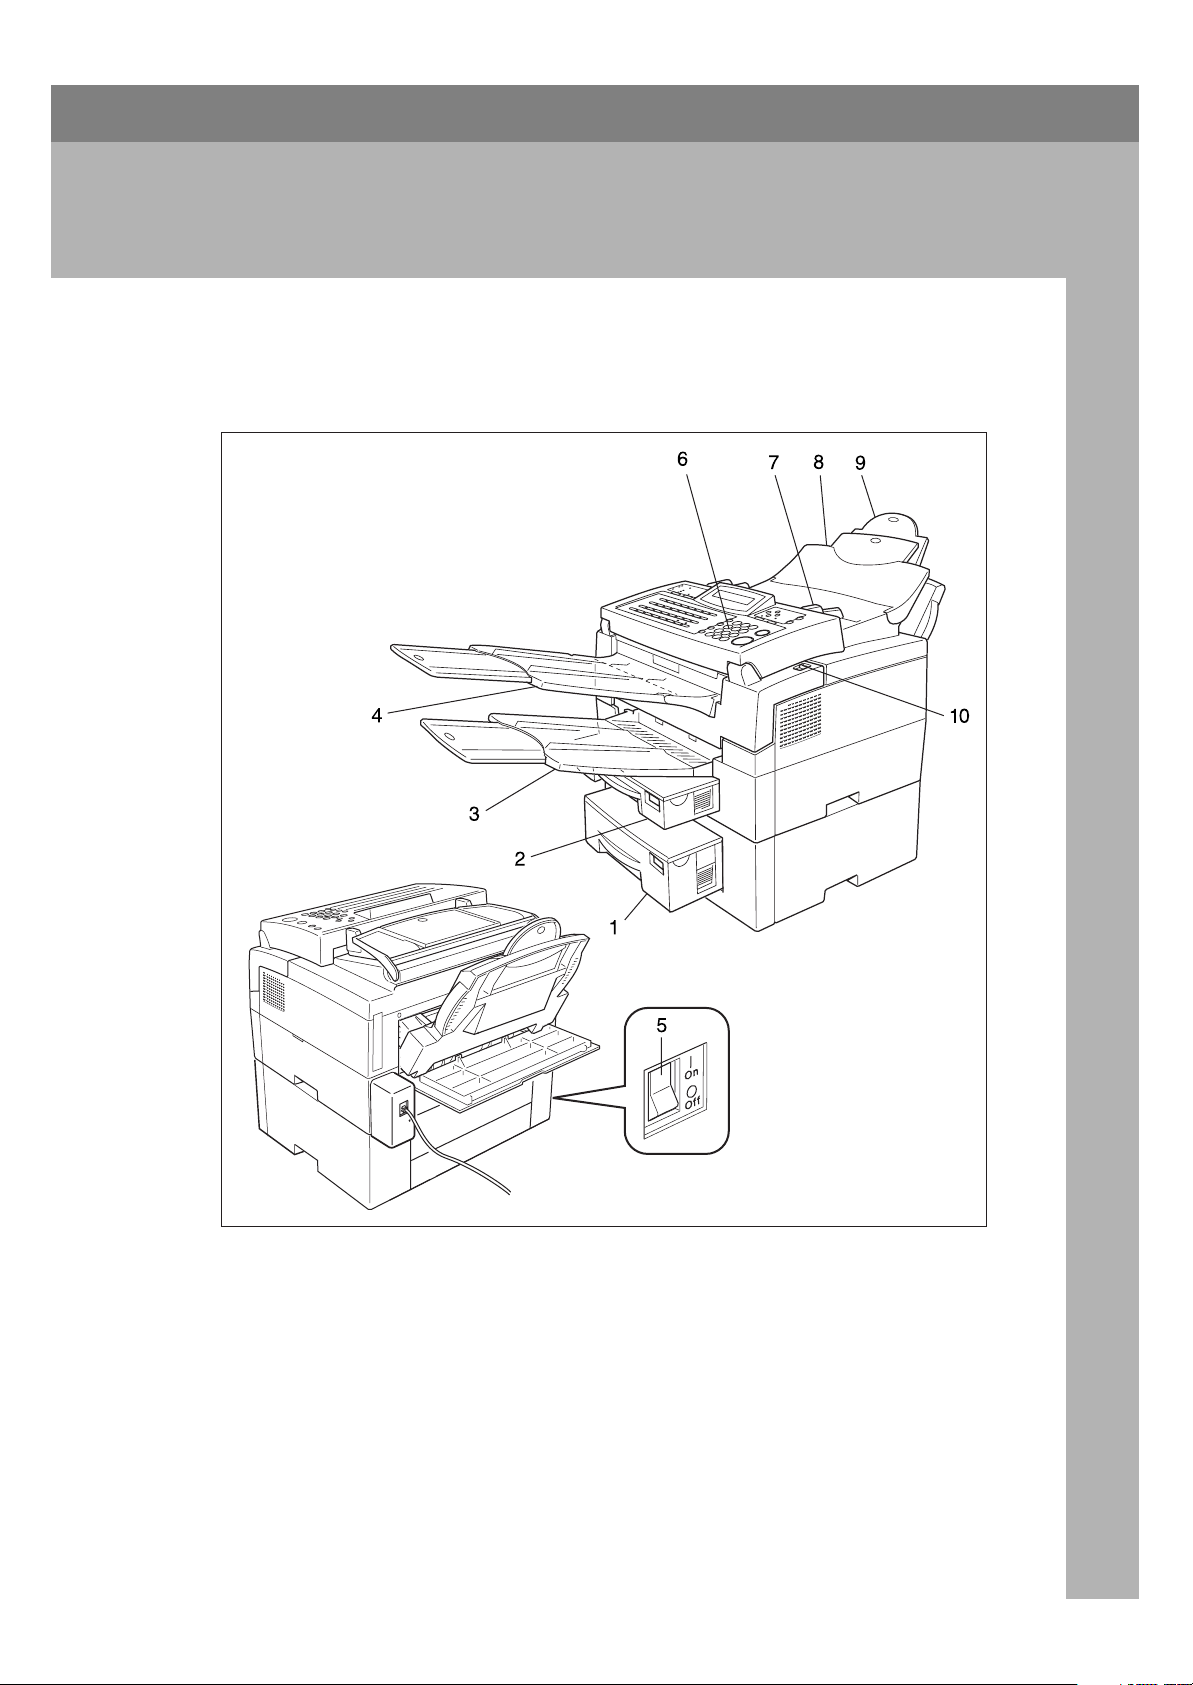
3. Machine Layout
1. Second Paper Cassette
The optional Second paper cassette holds
more paper.
2. Main Paper Cassette
The main paper cassette holds copy paper.
TSMH030E
3. Print Delivery Tray
Copies, incoming faxes, and prints are
delivered here.
4. Document Delivery Tray
Scanned documents are stacked on the
document delivery tray.
9
Page 25

3
Machine Layout
5. Main Switch
The main switch turns your machine on
and off.
6. Operation Panel
Key panel for operating the machine.
7. Document Guide
Match the document guide to the size of
your original documents.
8. Document Table
Document table holds up to 30 sheets
which are fed one at a time. Place your
original documents here.
9. Multi-purpose Feeder (Bypass
Feeder Type 180) (Option)
Expands paper delivery capability to
handle A4, Legal and F4 sizes.
10. Cover Release Button
Pull this catch to release the top cover.
10
Page 26

Operation Panel
❖
Type 1
F1
Journal
F2
Operation Panel
3
Stamp
TSMS011N
❖
Type 2
1. Add Paper indicator
Lights when a cassette is empty.
2. Add Toner indicator
Blinks when toner is about to run out
and lights continuously when toner
has run out.
F1 F2
Journal
Stamp
3. Check Display indicator
The
Check Display
tell you to read the display.
4. Receive File indicator
The
Receive File
when an incoming message was re-
TSMS021N
Indicator lights to
indicator lights
11
Page 27

Machine Layout
3
ceived into memory. Blinks when confidential reception file or memory lock
file is stored in the memory. (see P.139
“If an Indicator Lights up on the Operation Panel”
5.
{
Resolution
The resolution/Halftone is indicated
by these three indicators and can be
changed by the resolution/Halftone.
When the Indicator is not lit, Standard
is selected.
).
key.
}
6. Memory key/ indicator
When the
then memory transmission is in effect,
if it is off, immediate transmission is in
effect. Switch between the two with
{
Memory
the
7.
{G4}
Press to select G4 mode. When this indicator is not lit, G3 is mode. The display backlight enhances readability.
Memory
}
key.
Selector Key/Indicator
indicator is on,
W
scroll left/
size selection screen for each cassette
will appear.
V
scroll right/
the options.
{
Paper Size
{
Option
}
The paper
}
Press to access
12. Manual Receive indicator.
Lights when the reception mode is
Telephone.
13.
{
Clear Modes
Clear Modes: Press to clear any selected settings and return the condition it
was in just after being switched on.
Energy Saver: Hold a few seconds this
to start or end the energy saver mode.
14.
{
Press this to copy the document now
in the feeder.
15.
{
Press this to select the reception mode
(Tel or Fax).
key
}
Copy
Reception Mode
/
}
{
Energy Sa ver
key
}
key
}
8. Control panel Display
The Liquid Crystal Display guides
you through tasks and informs you of
the state of the machine. Messages appear here. The display consists of two
20-character lines.
9.
{
Speed Dial/Tel Directory
{
Press the
using Speed Dialor the Telephone Directory Feature.
10.
{
Pause/Al Redial
The
pause when you are dialing or storing
a fax number. Or, press the key to redial the last number dialed. (The redial feature doesn't work once you've
started dialing a new number.)
Speed Dial/Tel Directory
key
}
{
Pause/Al Redial
key
}
}
key inserts a
11. Arrow keys
T {
U {
Print help list
Yes
No
}
accept
}
reject/
{
}
Help
(Type 1 only)
}
key
key
}
key
}
key
}
{
Function
{
Stop
{
Start
}
key and enter a
and the
}
key to stop a trans-
}
key to start all tasks.
16.
{
Function
Press the
two digit code to access functions 11
to 55. (For functions 61 to 95, enter 6,
the access code on see P.161
Code for Functions 61 to 95”
function number.)
17.
{
Stop
Press the
mission or a document scanning, to
stop a reception or to stop a long copy
run. The machine will finish printing
out the sheet being printed and then
stop.
18.
{
Start
Press the
19. Ten key pad
Use the ten key pad (sometimes called
the ten keys) to dial fax numbers, to
enter the numbers of copies, etc.
20.
{
On Hook Dial
Press the
phone call from the keypad without
{
key (Type 1 only)
}
On Hook Dial
}
key to dial a
“Access
12
Page 28

having to lift the phone or handset off
the hook (phone or handset option
needed).
Operation Panel
21.
{
Clear
Press the
character or digit entered, or use the
left and right arrow keys to move the
cursor and then press Clear to erase
whatever is at the cursor.
22.
{
Quick Dial
key
}
{
Clear
}
}
key to erase the last
keys/
{
User Function
keys.
There are 30 Quick Dial keys. Use
them to store individual fax numbers
(see P.30
bers (Functions 31 & 32)”
groups (see P.33
Group of Fax Numbers (Function 33)”
). You can also use these keys to enter
characters (see P.172
ters”
Quick Dial 29 as the Dial Option key
(see P.36
Key”
as a Group key (see P.34
ming the Group Key”
You can store one special function in
each of the User Function Keys (F1,
F2). There are 9 special functions see
P.108
36)”
“Storing & Editing Fax Num-
) or
“Storing & Editing a
“Entering Charac-
). In addition you can register
“Programming the Dial Option
.) You can also use Quick Dial 30
“Program-
.)
“User Function Keys (Function
}
3
23.
{
Use to print the Help list.
24.
{
Use to enter a subaddress.
key (Type 2 only)
}
Help
key (Type 2 only)
Subaddress
}
13
Page 29

3
Machine Layout
14
Page 30
4. Faxing
Recommended Types of Document
Before you send your document, make sure that it meets the following requirements.
Important
❒
Documents that do not meet these requirements can cause your machine to
jam or may cause some components of the machine to become damaged or
dirty.
❖
Scanning area
7mm
Maximum size
218mm
Scanning direction
4mm
7mm
5mm
GFSIZE0E
Minimum size
148mm
105mm
600mm
Scanning direction
The part shaded will not be scanned, because it is outside the maximum scanning width range.
Correct Size for the Document Delivery Tray
• Thickness 0.05 to 0.2 mm (50 ∼ 90 g/m2)
• Length and Width: See the above diagram.
If the page is too short, put it inside a document carrier or enlarge it with a
copier.
If the page is too long, divide it into two or more sheets.
• Clearly Written
Small faint characters may not be transmitted clearly.
• Uniform Page Size
Do not use different sizes of document in the same transmission.
15
Page 31

4
Faxing
Page Condition
Do not place damaged pages in the automatic document feeder.
• If your pages are curled or dog eared, flatten them.
• If your pages are stuck together, shuffle the stack.
• If your pages are folded, torn, or patched together, make copies.
• If your pages have binding files, trim the edges or make copies.
Important
❒
Do not place originals that contain the following materials in the document
feeder ;
• Crayon
• Paint
• Charcoal, soft pencil
• Glue
• Thermal paper
• Clips
• OHP Sheets, vinyl-coat paper
• Waxed paper
• Carbon paper
• Silicone oil
Note
❒
Copies made with a copier that uses silicone oil may cause a misfeed. To
avoid this, do not scan such copies until five or ten minutes after copying.
16
Page 32

Memory Transmission And Immediate Transmission
Memory Transmission And Immediate
Transmission
G4 user please seeP.182 “Transmission Procedure”.
There are two ways to send a fax message.
• Immediate Transmission
• Memory Transmission
Memory Transmission (Memory Indicator Lit)
Memory Transmission is convenient
because:
• Fax messages can be scanned
much more quickly (you can take
your document away from the fax
machine without waiting too
long).
• While your fax message is being
sent, another user can operate the
machine (people will not have to
wait by the fax machine too long).
• You can send the same message to
more than one place with the same
operation.
• There are two kinds of Memory
Transmission: Parallel and Normal. Parallel Memory Transmission is the default.
READY 100% 10:00
SET DOC. OR DIAL NO.
Note
❒
If the display is blank, press the
Energy Saver key to exit Energy
Saving mode.
B Fan your document stack (at most
2
30 pages: 80 g/m
pages are loose, then square it.
Note
❒
All pages in your document
must be one-sided and be of the
same size.
to make sure all
4
Note
❒
If your document gets stuck while
it is being processed, press the
{
}
key, and turn to P.140
Stop
“Clearing a Document Jam”
structions on how to safely remove
the original.
for in-
A Make sure that the machine is in
standby mode for faxing.
The display should look like this:
17
Page 33

Faxing
07
06
GFDIAL1N
4
C Insert the document face - down
into the feeder until the machine
beeps. Then adjust the guides to
match the width of the document.
TSTH110N
Note
❒
You can dial before you set the
document. Place the document
after you dial the number and
go to step G.
❒
Please set your document
straight in the feeder. If you set
more than 15 sheets, make sure
the ends of your document are
not skewed.
D The display will look like this:
TRANSMIT OPTIONi
DIAL FAX NUMBER
TRANSMIT Y/START
5551234kkkkkkkkkkkkk
Ten Key Pad Quick Dial
1 2 3
4 5 6
7 9
*
GFDIAL0N
Speed Dial Group
Example:
Example: Speed Dial 10
Speed Dial
0
1
GFDIAL2N
*1
In this example Group Dial is programmed in Quick Dial 08.
*2
In this example Quick Dial key 30
is programmed as the Group key,
and Group dial number 1 is programmed.
Method
Dial key 08.
Method
Dial key 30 and 1
on the ten key pad.
Note
❒
If you want to erase a digit of
the phone number, press the
{
}
key. If you want to erase
Clear
the entire number, press the
{
}
key.
No
❒
The maximum destinations you
can dial using the ten key pad is
68. However, this limitation is
also subject to memory capacity.
Reference
Programming Quick Dial: see
P.30
“Storing & Editing Fax
Numbers (Functions 31 & 32)”
*1
Quick
*2
Quick
.
E If the memory indicator is not lit,
press the
{
Memory
key.
}
Programming Speed Dial: see
P.30
Numbers (Functions 31 & 32)”
“Storing & Editing Fax
.
F Dial the number in one of the fol-
lowing ways.
18
Page 34

Programming Group Dial: see
“Storing & Editing a Group
P.33
of Fax Numbers (Function 33)”
Programming Group key: see
“Programming the Group
P.34
Key”
.
G Press the
other number.
key to enter an-
}
{
Yes
TRANSMIT DIAL/START
DIAL NEXT FAX NUMBER
Note
❒
Repeat steps F and G until all
destinations are entered.
❒
If you have only one destina-
}
key.
}
{
tion, press the
❒
The machine stores your message and dials the first number
(or, if you selected Send Later, it
will return to standby mode and
the fax message will be sent at
the time that you selected).
Reference
Send Later: see P.25
at a Specific Time (Send Later)”
.
H Press the
The machine will dial the destination's number.
{
Start
Start
key.
“Sending
5551234
SET DOC. OR DIAL NO.
.
Memory Transmission And Immediate Transmission
❒
If the other party's fax machine
answers, both machines will
connect and yours will send the
message. A name or a label will
appear on the upper line.
❒
If your line goes through a local
switchboard (a PBX) remember
to dial the exit code. Press the
{
the code. If the number includes
a country code, press the
{
code, then dial the rest of the
number.
Pause
Pause
}
key immediately after
}
key after the country
If you like to cancel the
transmission
A Press the
communication.
{
key during
}
Stop
5551234
STOP & CLR FILE? Y/N
B Then press the
cancel the transmission.
Parallel Memory Transmission
With this feature the machine can call
destinations while scanning documents. Compared with normal Memory Transmission where the machine
calls once all the documents have
been stored, it is quick to verify
whether a connection has been made
or not.
{
Yes
key to
}
4
Note
❒
If the other party's line is busy,
your machine will dial again.
(See P.29
“Redialing”
.)
READY 98% 10:04
SET DOC. OR DIAL NO.
Additionally, as scanning finishes
more quickly than Immediate Transmission, it is useful if you want to
take the document back to your desk
immediately. However, if the connection cannot be made (for example if
the line is busy), normal Memory
Transmission takes place.
19
Page 35

Faxing
4
After a Parallel Memory Transmission fails, a communication result report or a communication failure
report is printed.
Important
❒
The file is erased if any of the following happen during transmission:
• The Stop key is pressed.
• There is not enough memory
available.
• A document becomes jammed.
Limitation
❒
If the amount of available memory
is less than 50 %, you cannot use
Parallel Memory Transmission.
Note
❒
Normal Memory Transmission
still takes place when using the following:
• Send Later
• Specify Multiple Destinations
• Transfer Request
• Transmission Deadline
❒
When using Parallel Memory
Transmission, page numbers are
not printed at the other end. If you
want page numbers printed, use
Printing the Page Number of the
optional feature for transmission.
(See P.25
(Page Count)”
“Printing the Page Number
.)
Immediate Transmission
Immediate Transmission is convenient when:
• You wish to send a message immediately.
• You wish to quickly check whether
you have successful connected
with the other party's fax machine.
• Your machine's memory is getting
full.
The machine dials immediately after
}
you press the
specified later time, if you used a
time-delay feature like Send Later).
The message is scanned and transmitted page by page without being
stored in memory.
{
key (or at the
Start
A Make sure that the machine is in
standby mode.
The display should look like this:
READY 100% 10:00
SET DOC. OR DIAL NO.
Note
❒
The memory indicator should
go out. If the memory indicator
is lit, press the
{
Memory
}
key.
B Place the entire document face
down into the feeder.
TRANSMIT OPTIONi
DIAL FAX NUMBER
Note
❒
No more than 30 pages.
❒
You can dial before you set the
document. Place the document
after you dial the number and
go to step D.
C Dial.
TRANSMIT Y/START
5551234
20
D Press the
{
Start
key.
}
Page 36

Memory Transmission And Immediate Transmission
5551234
DIALING
The machine dials and connect to
the other party. The number that
you dialed and the other party's
RTI or CSI is displayed.
Reference
RTI, CSI: see P.207
tings & Adjustments”
“Initial Set-
.
Dialing with the Telephone Directory
This function is only available on Type 1
machines.
This can be done for any number that
you have stored as a Speed Dial code
with a label programmed for it.
Example : you wish to dial “ XYZ CO.
NEWYORK “.
TEL DIR. Y/hi
b01 XA COMPANY
E If the label you want does not ap-
pear, scroll through the labels using with W and V until you find it.
TEL DIR. Y/hi
b12 XYZ CO.NEW YORK
F Press
number you want.
key to dial the
}
{
Yes
G Either :
• Dial more numbers.
{
• Press
Start
}
key.
4
A Make sure that the machine is in
standby mode.
READY 100% 10:00
SET DOC. OR DIAL NO.
B Carefully place your fax message
into the auto document feeder.
TRANSMIT OPTIONi
DIAL FAX NUMBER
C Press the
key.
{
Speed Dial/Tel Directory
SPEED DIAL 0-9
PUSH NUM OR ABC
D Press the first letter of the name.
}
21
Page 37

Faxing
Receiving Telephone Calls & Fax Messages (Faxes/Phone Calls)
This future is only available on Type 1 machine.
4
The machine can treat incoming fax
messages and telephone calls in two
ways.
❖
Fax mode
Use this mode if you have a dedicated fax line. The machine assumes all calls are fax messages. It
will ring once to alert you to an incoming call and then start receiving.
❖
Telephone mode
Use this mode if your line is shared
by a fax machine and a telephone
but you wish to answer all calls
yourself and decide whether they
are fax messages or telephone
calls. You must manually hit the
Start key to receive a fax.
The machine will ring continuously until you answer the call, so you
have to be near the machine at all
times.
The Manual Receive indicator is lit
when the machine is in this mode.
B Press the
mode you require.
and V key to select the
W
RECEIVE MODE Y/hi
FAX iTEL
C Press the
{
Yes
key.
}
READY 100% 10:00
SET DOC. OR DIAL NO.
Receiving the Fax Message in the Telephone Mode
This mode is active when the Manual
Receive indicator is lit. You have to
answer the call yourself and decide
whether it is a fax or a telephone call.
The procedure for answering a call is
as follows:
A Pick up the handset of the option-
al handset or the external telephone.
Switching Between Fax and Telephone Mode
The Manual Receive indicator is lit
when the machine is in Telephone
mode. To switch to a different mode,
follow the steps below.
A Press the
RECEIVE MODE Y/hi
iFAX TEL
22
{
Reception Mode
key.
}
B Listen to the other end.
If you hear a voice
A Continue your conversation as
you would normally.
If you hear a fax tone
A Remove any documents from
the feeder, press the
then replace the handset.
The machine will start receiving.
{
Start
key
}
Page 38

Printing Received Messages That Have Been Stored (Substitute Reception)
Printing Received Messages That Have
Been Stored (Substitute Reception)
If the Receive File indicator is lit, a
message was stored in memory using
substitute reception. This could be because the machine ran out of paper or
toner, or because the Power Saver has
turned off the print engine.
Check the following items and solve
the problems, and the machine goes
back to the working condition.
• While the Power Saver (see P.98
“Saving Energy with the Power Saving Timer”
er off, press Energy Saver Key for
the machine go back to the working condition.
•When
display, your fax machine is out of
paper. Add paper (see P.111
ing Paper in the Main Cassette”
•When
display, your fax machine is out of
toner. Change the toner cassette
(see P.118
sette and Cleaning Pad”
) has turned off the heat-
ADD PAPER
ADD TONER
“Replacing the Toner Cas-
appears in the
appears in the
).
“Load-
).
light. The message will be printed
as soon as copying is done.
❒
To turn substitute reception off or
back on, set bit 0 of user parameter
switch 05. See P.162
ters”
.
“User Parame-
4
• Otherwise, there might be a paper
jam (see P.142
Fax, or Print Jam”
er.
As soon as the machine is back in
working condition, messages stored
in memory will be printed. The Receive File indicator will turn off and
the messages will be erased from
memory.
Note
❒
If a message comes in while you
are copying, the fax machine will
store the message in memory and
the Receive File indicator will
“Clearing a Copy,
) or an open cov-
23
Page 39

Faxing
Faxing a Page with Very Fine Detail
4
So that text, diagrams and images
stand out clearly in your document,
the machine automatically detects the
image density (contrast) and makes a
compensation.
However, if you need to send a document which requires optimum clarity, select the resolution setting
appropriate to your needs.
You can select different settings for
each page of your message. Simply
change the settings for page 2 while
page 1 is being scanned.
Resolution & Shading
The resolution button gives you control over document quality. The indicators above the button show the
current setting. Choose a setting that
matches your document.
Note
❒
Faxing at a higher resolution requires more time. Frequent use of
high resolution could cause an increase in your phone bill, especially for long distance transmissions.
❖
Standard:
Standard quality. Use for most
printed or typewritten documents.
This is selected when the other resolution indicators are not lit.
❖
Detail:
High quality. Use for documents
with small print or fine details.
❖
Fine:
Very high quality. Use this for high
quality reproduction.
❖
Halftone:
Use this for optimum quality if
your document contains photographs/diagrams with complex
shading patterns or gray tones. If
you choose this setting, resolution
will automatically be Detail.
24
Page 40

Optional Features for Transmission
Optional Features for Transmission
❒
If you enter the wrong time,
}
Sending at a Specific Time (Send Later)
press the
again.
{
No
key and enter
This feature is called Send Later.
Using this feature, you can delay
transmission of your fax message until a specified time. This allows you to
take advantage of off-peak telephone
line charges without having to be by
the machine at the time.
Note
❒
If the machine memory is full, your
document will remain in the document feeder. As a result, anybody
removing the document will cancel the transmission.
A Set your document, dial the desti-
nation fax number and press
key. Do not press the
{
Yes
key.
B Press
}
V
twice.
{
Start
SET OPTION Y/i
SEND LATER?
Note
❒
V
is also the
C Press the
{
Yes
{
Option
key.
}
}
key.
D Enter a sending time that falls
within the following 24 hours.
SET OPTION KPAD/Y
TIME 23:30 10:00
Note
❒
For example: To send at 23:30,
{
press
the key pad.
} {3} {3}
2
and
{0}
from
E Press the
Note
❒
Use function 21 to erase a stored
fax message before it is sent (see
“Erasing a Stored Message
P.39
before It Is Sent (Functions 21 &
22)”
).
{
Yes
key.
}
Printing the Page Number
(Page Count)
This feature is called Page Count.
When your fax message is printed at
the other end, page numbers will be
printed on the top of each page. Using
the Page Count feature, you can select
}
the batch-numbering page numbers.
If you use Page Count, page numbers
will be printed in batch-numbering
format (for example, p1/3, p2/3, and
p3/3 for a three-page message). This
makes it easy for the other party to
see how many pages you sent, and if
any are missing. However, you have
to input the number of pages at the
ten key pad before sending.
If you do not use Page Count, page
numbers will be printed only as a sequence (for example, p1, p2, p3). This
makes it difficult for the other party
to tell at a glance whether any pages
are missing (for example, due to a
double feed in your machine's document feeder).
4
25
Page 41

Faxing
4
Limitation
❒
This feature is available at Immediate Transmission and Parallel
Memory Transmission.
Note
❒
If you do not select Immediate
Transmission, Page Count is automatically switched on, and the
pages are counted automatically.
❒
If the numbering with page count
appears strange, check that the
page count value matches the
number of pages in your document.
A Press
play appears.
until the following dis-
V
SET OPTION Y/i
SET PAGES?
top of the image will be overprinted if
there is no margin at the top of the
transmitted page.
In some cases, you may wish the other party to receive an unmarked copy
of your original. In this case, you can
switch TTI off.
A Press
play appears.
until the following dis-
V
SET OPTION Y/i
TTI ON/OFF?
B Press the
{
Yes
key.
}
SET OPTION Y/hi
TTI iON OFF
C Press
setting is correct.
or V until the displayed
W
B Press the
{
Yes
key.
}
SET OPTION KPAD
PAGES:kk
C Enter
key pad.
{
and
}
1
using the ten
{0}
SET OPTION Y/N
PAGE:10
Note
❒
Example: 10 pages
D Press the
{
Yes
key.
}
Sending Your Identi fi cation at
the Top of Your Message (TTI)
Normally, the TTI programmed in
your machine is printed at the top of
each of the pages you transmit when
they are received at the other end. The
SET OPTION Y/hi
TTI ON iOFF
D Press the
have finished.
key when you
}
{
Yes
Sending by a Specific Time
(Transmission Deadli ne)
This feature is called Transmission
Deadline (TRD). If your message has
to be sent to the other end before a
certain time, use the Transmission
Deadline option and input this deadline.
If the line is busy, the machine will redial at set intervals either until the
message gets through or until the
deadline passes. Before the deadline
passes, there is no limit to the number
of times that the machine can redial.
After the deadline passes, the machine will print a report which indi-
26
Page 42

Optional Features for Transmission
cates whether or not your message
was sent within the deadline. Then
the message will be erased from
memory.
Note
❒
This feature is only available with
Memory Transmission.
A Press
play appears.
until the following dis-
V
SET OPTION Y/i
SET TRD?
B Press the
{
Yes
key.
}
SET OPTION KPAD/Y
TIME 00:00 10:00
C Example: If the deadline is 12:50
pm, press
{
} {2} {5} {0}
1
SET OPTION Y/N
TIME 12:50 10:00
Note
❒
The TRD time cannot be more
than 24 hours into the future.
.
• They allow personalization of documents and printed reports. For
example, if you use Label Insertion
and store your name with your
Personal Code, the receiver of your
fax message will see your name at
the top of the printout. This eliminates the need for a cover page.
If you input your Personal Code, your
name will appear on the JOURNAL
and Transmission Result Report.
Reference
See P.66
Codes (Function 72)”
See P.93
Label Insertion: See P.172
ing Characters”
A Press
play appears.
“Programming the Personal
.
“Journal (Function 41)”
“Enter-
.
until the following dis-
V
.
SET OPTION Y/i
SET PERSONAL CODE?
B Press the
{
Yes
key.
}
SET OPTION KPAD
PERSONAL CODE:kkkk
4
D Press the
{
Yes
key.
}
Personal Codes
Personal Codes do the following.
• They allow you to keep track of
machine usage. If everybody uses
a Personal Code when they use the
fax machine, the codes, or the
names programmed into the
codes, will be printed on the report
that is called the Journal. This will
help you to check on who has been
using the machine, and how often.
C Enter the personal code.
Note
❒
Example:
SET OPTION Y/N
PERSONAL CODE:7362
D Press the
{
} {3} {6} {2}
7
key.
}
{
Yes
27
Page 43

Faxing
Using the Stamp
4
When the
machine stamps a small mark on the
bottom of each page. During Memory
Transmission, the stamp indicates
that the page was successfully stored.
For Immediate Transmission, it
shows that the page was sent successfully.
Before you can use the Stamp, you
need to program the Stamp function
in a User Function key (F1 or F2) (See
P.108
36)”
.) Then whenever you wish to use
the Stamp feature, just press the User
Function key you programmed it in.
Note that you must switch the stamp
on before you press the
the machine will not stamp the first
page.
Note
❒
F2 key: default is stamp
Stamp
“User Function Keys (Function
indicator is lit, the
{
}
key, or
Start
Changing the Stamp Home
Position Setting
You can change the Stamp default
setting. To change this setting, adjust
bit 0 of switch 0 with the user parameters:
• bit 0 = 0: Verification stamp off
• bit 0 = 1: Verification stamp on
(See P.162
28
“User Parameters”
.)
Page 44

Redialing
Redialing
If a message was not transmitted successfully, that does not mean that you
have to enter the telephone number
again. In many cases, the machine
will redial the destination automatically. Or, with the AI Redial key, you
can redial with just a few keystrokes.
Automati c Redialing
The machine will automatically redial
the other party if any of the following
conditions occurred.
• The other party was busy
• There was no reply from the other
party
• The message was rejected by the
machine at the other end because
of excessive errors (in this case, redialing will only take place if
Memory Transmission was used).
Note
❒
The number of redials and redialing interval varies according to
your locale.
❒
The number of redials and the redial interval may be adjusted by a
service technician.
❒
During redialing, the number being dialed is displayed as shown
below.
redial one of these numbers, just
press the
quired telephone number or name is
displayed, then press the
This feature has the following uses.
• If the machine is waiting to redial
the other party, you do not have to
wait for the redialing interval to
expire. Press the
til the required telephone number
or name is displayed, then press
the
• If you wish to send another message to the same address that you
sent one to recently, you don't
have to dial the full number again
if it is still in the Redial memory.
Place the message in the feeder,
then press the
A Press the
til the required number appears
in the display, then press the
{
Yes
{
Al Redial
{
}
key.
Start
{
key twice.
}
}
key until the re-
{
{
Al Redial
{
}
key.
Start
Pause/Al Redial
}
Start
}
key un-
key un-
}
key.
REDIAL Y/hi
a01 XYZ CO. NEW YORK
B Carefully place your fax message
into the Document Guide feeder.
TRANSMIT DIAL/START
DIAL NEXT FAX NUMBER
4
2125551234
DIALING
Using the AI Redial key
The machine can remember the last
10 numbers dialled on the numeric
keypad, and one previously dialled
Quick Dial/Speed Dial. If you have to
If you dial another party
A Select another number. (Broad-
casting)
If you dial no more party
A Press the
transmission.
{
key to start the
}
Start
29
Page 45

Faxing
Storing & Editing Fax Numbers (Functions 31 & 32)
4
Type 2 users, or Type 1
see P.183 “Storing a Telephone Number”.
You can store numbers that you often
use in the machine's memory. A
stored number will remain in memory even if the power is cut.
You can store numbers in two ways.
❖
Quick Dials
The number is assigned to its own
key. To dial that number, just press
the key. You can store up to 30
numbers in this way.
❖
Speed Dials
The number is given a two-digit
code. To dial the number, press the
{
Speed Dial
code. There are 100 Speed Dial
codes available numbered 00 to 99.
}
key and enter the
ISDN INTERFACE UNIT TYPE 190
Storing, Editing & Erasing Quick Dial Numbers (Function 31)
This procedure describes how to store
and edit fax numbers in Quick Dial
keys.
option installed please
a01 PROGRAM? Y/hi
• Press the V key until the Quick
Dial you want appears on the display.
Note
❒
To print a list of all Quick Dials
and their contents, press
{
}
Yes
C Press the
then the
{
Yes
key.
}
{
Start
}
key.
a01 KPAD/N
kkkkkkkkkkkkkkkkkkkk
D Do one of the following:
•Enter the fax number you wish to
store in this Quick Dial using the
ten key pad. Then press the
key.
a01 KPAD/Y/N
212551234kkkkkkkkkkk
{
Yes
W
}
A Press
{
Yes
{
Function
key.
}
} {3} {1}
ak QUICK/hi
PRINT LISTh/SEARCHi
B Select a Quick Dial in any one of
the following ways:
•Press a Quick Dial key (e.g. press
Quick Dial 01).
30
then the
•To clear the number, press
}
{
then go to step J.
Yes
E Do one of the following:
•If you wish to enter or edit a label
for this Quick Dial, press the
key.
a01 Y/N
PROGRAM LABEL?
{
{
No
Yes
}
,
}
Page 46

•If you do not wish to give this
{
number a label, press
to step H.
No
}
then go
Storing & Editing Fax Numbers (Functions 31 & 32)
Storing, Editing & Erasing Speed
Dial Numbers (Function 32)
F Enter or edit the label using the
Quick Dial keys and the ten key
pad. See P.172
ters”
a01 ABC Y/N
NEW YORK OFFICEkkkkk
G Press
{
Yes
a01 Y/hi
LABEL SET ON iOFF
H Press
the label for this Quick Dial will
be printed on top of messages that
you send to this destination.
I Press
or V a to select whether
W
{
Yes
ak QUICK/hi
PRINT LISTh/SEARCHi
Note
❒
To print a Quick Dial List,
please the W key to select
then press the
❒
To print a Quick Dial label,
choose
key.
“Entering Charac-
key.
}
key.
}
{
Start
LABEL
then press
}
key.
LIST
{
Start
This procedure describes how to store
and edit fax numbers in Speed Dials.
A Press the
the
{
}
Yes
{
Function
key.
} {3} {2}
bkk KPAD/hi
PRINT LISTh/SEARCHi
B Select a Speed Dial in any one of
the following ways:
•Enter the Speed Dial code one the
ten key pad. (e.g. 01)
b01 PROGRAM? Y/hi
•Press the V key until the Speed
Dials you want appears on the display.
Note
❒
To print a list of all Speed Dials
and their contents, press W keys
{
Start
}
keys.
,
}
and then
C Press
{
Yes
key.
}
b01 KPAD/N
kkkkkkkkkkkkkkkkkkkk
and
4
J You now have two choices:
•To store, edit or delete another
Quick Dial, go to step B.
•To finish, press
{
Function
}
key.
D Do one of the following:
•Enter the fax number you wish to
store in this Speed Dial using the
ten key pad. Then press
b01 KPAD/Y/N
212551234kkkkkkkkkkk
•To clear the number, press
{
}
then go to step J.
Yes
{
Yes
}
key.
{
No
}
,
31
Page 47

4
Faxing
E Do one of the following:
•If you wish to enter or edit a label
for this Speed Dial, press
key.
{
Yes
b01 Y/N
PROGRAM LABEL?
•If you do not wish to give this
}
{
number a label, press
to step H.
No
then go
F Enter or edit the label using the
Quick Dial keys.
b01 ABC Y/N
NEW YORK OFFICEkkkkk
}
G Press
{
Yes
key.
}
a01 Y/hi
LABEL SET ON iOFF
Press a W or V to select whether
the label for this Speed Dial will be
printed on top of messages that
you send to this destination.
H Press
{
Yes
key.
}
bkk KPAD/hi
PRINT LISTh/SEARCHi
Note
❒
To Print a Speed Dial List, press
the W key and then the
key.
I You now have two choices:
•To store, edit or delete another
Speed Dial, go to step B.
{
Start
}
32
•To finish, press
{
Function
}
key.
Page 48

Storing & Editing a Group of Fax Numbers (Function 33)
Storing & Editing a Group of Fax Numbers
(Function 33)
❖
Groups
If you regularly broadcast messages to the same set of destinations,
you can combine these numbers
into a group. Then just select the
group and each number will be dialled in sequence automatically.
You can program up to 7 groups
with 140 numbers each.
This section describes how to program or edit a Group. You can also
get a printout of numbers that are already stored. In this example we will
program Group 1 into Quick Dial key
01.
You can store up to seven groups
numbered 1 to 7.
You can program up to 140 numbers
in a Group.
D To program or edit a Quick Dial
key for this group, press the
key.
Note
❒
If you do not program or edit,
press the
step F.
{No}
key and go to
{
Yes
E Press the Quick Dial key you
wish to use for this group,
for example, then press the
key.
Note
❒
If you want to free up the old
Quick Dial key, press the
}
{
key, then the
Yes
key.
GROUP 1 Y/N
PROGRAM LABEL?
{
{
01
Yes
{
No
}
}
}
}
4
A Press the
the
{
Yes
}
{
Function
key.
} {3} {3}
and
GROUP k 1-7/hi
PRINT LISTh/SEARCHi
B Enter the number of the group
you want to program or edit.
Note
❒
e.g. Group 1: Press
❒
To print a list, press W then the
{
}
key.
Start
C Press the
{
Yes
key.
}
GROUP 1 Y/N
PROGRAM QUICK?
{
}
.
1
❒
If a message like
flashes up, the key is already in
use. Press a different key.
USED AS..
F If you wish to give this group a
name, press the
GROUP 1 ABC
kkkkkkkkkkkkkkkkkkkk
Note
❒
If not, press the
to step H.
{
Yes
{
}
No
key.
}
key and go
G Enter or edit the name then press
{
Yes
key.
}
the
How to enter characters, see P.172
“Entering Characters”
33
Page 49

Faxing
4
GROUP 1 KPAD/N
kkkkkkkkkkkkkkkkkkkk
H Enter a fax number.
Note
❒
Enter one in one of these ways.
• Press a Quick Dial key.
• Press the Speed Dial key followed by two digits.
• Enter a number on the ten key
pad.
I Press the
Note
❒
ALREADY PROG RAMMED
If
flashes up on the display, either
press the
number and choose another
number, or press the
to clear.
{
Yes
key.
}
{
}
key to keep the
No
briefly
{
Yes
}
key
B Enter the group number using the
ten key pad, then press the
key.
GROUP 1 Y/N
PROGRAM QUICK?
C Press the
{
No
key.
}
GROUP QUICK/N
PROGRAM LABEL?
D Press the
{
No
key.
}
GROUP 1 Y/N
CLEAR?
E Press the
{
Yes
key.
}
GROUP 1 Y/N
CLEARED
{
Yes
}
J Press the
ing numbers in this group.
Note
❒
To enter another number, go
back to step H.
K Press the
Note
❒
To work on another group, go
to step B.
key to finish enter-
}
{
No
key.
{
Function
}
Erasing Groups
These steps describe how to erase single numbers from a group.
A Press the
the
{
}
Yes
{
Function
key.
} {3} {3}
GROUP k 1-7/hi
PRINT LISTh/SEARCHi
and
F Press the
Note
❒
To delete another number, go to
step B.
{
Function
key.
}
Programming the Group Key
You can program the 7 groups. However, if there is no room in Quick Dial
keys, this group key is helpful. You
have to Quick Dial 30 or one of User
Function keys (F1 or F2) as the group
key. How to transmit using the group
key, see P.17
(Memory Indicator Lit)”
Reference
For how to program User Function
keys, see P.108
(Function 36)”
“Memory Transmission
.
“User Function Keys
.
34
Page 50

Storing & Editing a Group of Fax Numbers (Function 33)
A Press the
the
{
}
Yes
{
Function
key.
} {3} {1}
ak QUICK/hi
PRINT LISTh/SEARCHi
B Press the Quick Dial
{
30
a30 PROGRAM? hi
C Press the
{
Yes
key.
}
a30 PROGRAM? Y/N
PROGRAM GROUP KEY?
D Press the
{
Yes
key.
}
ak QUICK/hi
PRINT LISTh/SEARCHi
and
.
}
4
E Press the
{
Function
key.
}
35
Page 51

Faxing
Dial Options
4
The Dial Options provide access to
various F-code features which are designed to allow confidential transmission and polling reception between
different makers' fax machines. Use
them if the other party's fax machine
is of a different make and supports
the F-code features. Before you can
use the Dial Options, you need to program Quick Dial key 29 as the Dial
Option key if you have not done so already (see below for details).
Programming the Dial Optio n Key
This procedure describes how to set
up Quick Dial key 29 as the Dial Option key.
A Press
{
Yes
{
Function
key.
}
} {3} {1}
then the
E Press the
{
Function
key.
}
Using the Dial Options
Available Dial options are as follows:
• SUB, SID, SEP, PWD
• SUBADDRESS (Type 1 users require the
UNIT TYPE 190
ture)
To use the Dial Options, do the following after you have dialed the destination fax number and before you
press the
{
ISDN INTERFACE
option for this fea-
}
key.
Start
A Press the Dial Option key (Quick
Dial 29).
Y/N/hi
SUB
ak QUICK/hi
PRINT LISTh/SEARCHi
B Press Quick Dial key
{
29
a29 PROGRAM? Y/hi
C Press the
{
Yes
key.
}
a29 Y/N
PROG. DIAL OPTION?
D Press the
{
Yes
key.
}
ak QUICK/hi
PRINT LISTh/SEARCHi
B Press the
the Dial Option you require, then
press the
.
}
Y/N/hi
and V keys to select
W
key.
}
{
Yes
SUB
Y/N/hi
SEP
Y/N/hi
SID
Y/N/hi
PWD
Y/N/hi
SUBADDRESS
36
Page 52

C Enter the code on the ten key pad
then press the
SUB KPAD/Y/N
1234kkkkkkkkkkkkkkkk
{
Yes
key.
}
D To specify another Dial Option,
repeat steps B, C .
TRANSMIT Y/START
55551234
Dial Options
E Press the
{
Start
key.
}
4
37
Page 53

4
Faxing
Chain Dialing
This feature allows you to compose a
telephone number from various
parts, some of which may be stored as
Quick Dial Keys or Speed Dial Codes,
and some of which may be input at
the ten key pad.
You can program commonly used
area or country codes into Speed Dial
Codes or Quick Dial Keys.
Example: 01133-1-5553333 (From the
United States to Paris).
Assume that the following Quick Dial
and Speed Dial numbers have already been programmed.
• Quick Dial 01 = 01133 (Overseas to
France)
• Quick Dial 02 = 1 (Paris)
• Speed Dial 10 = 555
The machine ask you to operate.
❖
On Hook Dial or Handset Mode:
{
❖
Press
}
key,
al
}
{
.
3
Other:
Press
{
the
Pause
{
} {0}
1
} {02}
01
{1} {0}
{
}
01
, then
and the
then
{
the
}
Pause
{
key,
Speed Dial
{3} {3} {3} {3}
{
Speed Di-
{3} {3} {3}
}
key,
}
{02}
keys,
.
38
Page 54

Erasing a Stored Message before It Is Sent (Functions 21 & 22)
Erasing a Stored Message before It Is Sent
(Functions 21 & 22)
Every time you store a fax message in
your machine's memory, a new file is
created. A file is also created for storing instructions to pick up a fax message left elsewhere (polling, see P.101
“Calling to Request a Message (Polling)”
). Each file is given a number.
This number appears on the File Reserve Report, Journal and Transmission Result Report. To see which files
are currently in memory, you may
print a file list.
A Either :
To erase a fax message stored in
memory
A To erase a fax message stored
in memory; press the
} {2} {1}
tion
and the
{
Yes
{
Func-
key.
}
Note
❒
Press W to obtain a list of all the
files and their number. If you already know the number of the
file to erase, enter it directly
from the ten key pad.
C Press the
{
Yes
key.
}
FILE NO.027 Y/N
CLEAR?
D Press the
the file.
E Press the
Note
❒
To erase another file, go to step
B
.
key again to erase
}
{
Yes
key.
{
Function
}
4
FILE NO.kkk KPAD/hi
PRINT LISTh/SEARCHi
To erase instructions to pick up a
message (polling)
A Press the
and the
B Press
sages.
You'll see the display. A number or
a label will appear on the lower
line.
to scroll through the mes-
V
{
Yes
{
Function
key.
}
} {2} {2}
FILE NO.027 Y/hi
5551234
39
Page 55

Faxing
Printing a Stored Message (Function 51)
If you need to see the contents of any
files, use this feature.
4
A Press the
the
{
Yes
}
{
Function
key.
} {5} {1}
FILE NO.kkk KPAD/hi
PRINT LISTh/SEARCHi
B Press
sages.
You'll see the display. A number or
a label will appear on the upper
line.
to scroll through the mes-
V
FILE NO.115 Y/hi
5551234
Note
❒
Press W to obtain a list of all the
files and their number. If you already know the number of the
file to print, enter it directly
from the ten key pad and skip to
step D.
and
C Press the
D Press the
40
key.
}
{
Yes
A number or a label will appear on
the upper line.
FILE NO.115 START/N
6661234
key to print the
}
{
Start
message.
Page 56

Locking Incoming Messages (Memory Lock)
Locking Incoming Messages (Memory
Lock)
If Memory Lock is switched on, the
machine will not print any incoming
fax messages. They will be kept in
memory until you enter the Memory
Lock ID that you previously stored in
the machine. Messages received by
Confidential Reception will not be
printed when you input the Memory
Lock ID.
Preparation
To use Memory Lock, you must
first:
• Store a Memory Lock ID (Function 61).
• Switch Memory Lock on (Function 62).
To make Memory Lock more versatile you may choose to receive messages from select locations into
memory or exclude certain select locations from coming into memory.
You may:
• Specify the senders whose messages you want to be lock in memory
(Special Terminals). Do this by
programming the RTI's or CSI's of
these senders (Function 81).
Storing a Memory Lock ID
This can be any four-digit code (using
digits 0 to 9), except 0000.
A Press the
enter the access code
. Then press
{
}
2
{
Yes
key.
}
{
Function
{6} {1}
} {6}
{
then the
} {2} {2}
2
and the
Y/NEXTi
SET G3 OWN NUMBER
B Press
shown.
until the screen is as
V
Y/NEXTi
SET MEMORY LOCK ID
C Press the
{
Yes
key.
}
LOCK ID KPAD
kkkk
D Input the Memory Lock ID that
you will be using.
4
• Select the messages to store in
memory
a) Only messages from Special Terminals.
b) All messages except those from
specified Terminals.
(User Parameters, switch 09, bit 0
and 1; see P.162
Reference
Receiving Confidential Messages:
see P.71
Messages”
.
“User Parameters”
“Receiving Confidential
.)
E Press the
F Press the
LOCK ID Y/N
6754
Note
❒
Example:
the ten key pad.
ID.
{
} {7} {5} {4}
6
key to store the
}
{
Yes
{
Function
key.
}
from
41
Page 57

Faxing
Editing the Memory Lock ID
A Press the
the access code
Then press
key.
{
Function
{
} {1}
6
{
Y/NEXTi
SET G3 OWN NUMBER
B Press
shown.
until the screen is as
V
then enter
} {6}
} {2} {2} {2}
2
and the
{
Yes
After you switch Memory Lock on,
MEMORY LOCK
display when the machine is in
standby mode.
.
}
Note
❒
If you switch Memory Lock on,
Forwarding will be automatically
disabled.
❒
If you wish, you can prevent unidentified senders from sending
you messages while Memory Lock
is on. See P.71
tial Messages”
will appear on the
“Receiving Confiden-
.
4
Y/NEXTi
SET MEMORY LOCK ID
C Press the
{
Yes
key.
}
LOCK ID CHANGE? Y/N
5477
D Press the
{
Yes
key.
}
LOCK ID Y/N
5477
E Press the
new number.
key and input a
}
{
No
LOCK ID Y/N
5478
F Press the
{
Yes
key.
}
A Press the
ter the access code
Then press
key.
{
Function
{
} {2}
6
. Then en-
} {6}
} {2} {2} {2}
{
2
and the
{
Yes
Y/NEXTi
SELECT LINE
B Scroll through the features with
until the screen is as shown.
V
Y/NEXTi
MEMORY LOCK ON/OFF
C Press the
{
Yes
key.
}
MEMORY LOCK Y/hi
ON iOFF
D Change the on/off setting by
pressing W or V.
.
}
G Press the
{
Function
key.
}
Switching Memory Lock on/off
Preparation
Before you can use Memory Lock,
you have to switch it on using
Function 62.
42
MEMORY LOCK Y/hi
iON OFF
E Press the
F Press the
key.
}
{
Yes
{
Function
key to finish.
}
Page 58

Locking Incoming Messages (Memory Lock)
Programming Special Terminals for Lock in Memory
If you like to receive information
from only select locations into Memory lock, you can program the RTI
codes or CSI codes of those locations.
A terminal sending an incoming messages always identifies itself to your
terminal. The identification consists
of an RTI or a CSI. When you specify
the senders for Memory lock, you
must program a list of these codes.
Program the list using Function 81
called “Special Terminals” (see P.81
“Programming a List of Senders to Treat
Differently (Function 81)”
).
Selecting which Messages to Lock in memory
Note
❒
If the
blinking, an incoming fax message
has been stored in the memory using the Memory Lock feature or
Confidential Reception feature.
Reference
To print the message using the
Confidential Reception. (seeP.71
“Receiving Confidential Messages”
A Press the
the
Receive File
{
Function
key.
{
}
Yes
indicator is
} {5} {5}
LOCK ID KPAD
kkkk
B Input the Memory Lock ID.
LOCK ID START/N
kkkk
and
4
You have to select either to:
• Only Lock messages from Special
Terminals.
• Lock all messages except those
from Special Terminals.
To change this setting, adjust bit 1 of
switch 9 with the User Parameters:
• Bit 1 = 0: Lock incoming messages
in memory from special terminal
• Bit 1 = 1: All incoming messages
except those from specified terminal
(See P.162
“User Parameters”
.)
Printing a Memory-locked Message (Function 55)
If the
ing, a message has been stored using
Memory Lock. Print it using the following procedure.
Receive File
indicator is blink-
Note
❒
Example:
the ten key pad.
C Press the
{
} {6} {3} {3}
4
key.
}
{
Start
from
43
Page 59

Faxing
Sending a Fax Using the External Telephone
You can send a fax message using the
handset. (External telephone is required.)
A Set the document then pick up the
handset.
B Dial the other party.
4
If you hear a voice
A Speak to the other party.
If you hear a high-pitched tone
instead of a voice
A Press the
{
Start
key.
}
C When you are ready to send your
fax message, ask the other party to
press the
{
Start
key.
}
D When you hear a high-pitched
tone, press the
{
Start
key.
}
E Replace the handset.
44
Page 60

Answering the Telephone
This feature is available when you
connect the external telephone.
Note
❒
If the telephone rings just once, a
fax is coming in. Do not pick up the
handset.
If the Telephone Rings
Continuously
A Pick up the handset and speak to
the other party.
If you hear a high-pitched tone
Answering the Telephone
4
A A fax is coming in. Press the
key then hang up.
}
{
Start
If the caller wants to send you a
fax
A Press the
speaking. Then hang up.
Note
❒
If nothing happens after you
press the
phone may not be properly
connected.
{
{
}
Start
}
key the tele-
Start
key after
45
Page 61

4
Faxing
Phoning and Faxing on the Same Call
This feature is available when you
connect the external telephone.
To Talk before Sending a Fax
A Pick up the handset.
B Dial.
Note
❒
Do not press the
C If you hear a voice speak as a nor-
mal telephone conversation.
If you hear a high-pitched tone
instead of a voice
{
Start
}
key.
A Place your fax message in the
feeder, then press the
key.
{
Start
D When you are ready to send your
fax message, place your message
in the feeder, then ask the other
party to press the
{
Start
key.
}
E When you hear a high-pitched
tone, press the
{
Start
key.
}
F Replace the handset.
}
46
Page 62

5. Other Features
Verifying Communications, Errors, Counters, Etc.
You can obtain reports from your machine either by having your machine
print them out automatically, or by
printing them out yourself.
Automatically Printed Reports
Unless otherwise indicated, the automatic printing of these reports can be
turned on or off by changing the bit of
the user parameters (see P.162
Parameters”
❖
Journal (Switch 03, bit 7)
This report gives details on each
communication made by your terminal. It is automatically output
after 50 transmissions and receptions.
❖
File Reserve Report (Switch 03, bit 2)
If you switch this report on, it is
printed immediately after you
store a document in memory for
Memory Transmission. It gives the
file number, the time that it was
stored, and the destinations (including any Group numbers that
were selected).
❖
Power Failure Report (Stays on)
This report is printed if the machine's power was off for long
enough to erase files from the
memory. The report gives details
of the files that were lost. With this
information, you may store messages for transmission again, and
contact the senders of any received
messages that were lost.
).
“User
Note
❒
Phone numbers stored in
Quick/Speed/Groups are not
lost.
❖
Communication Result Report (Memory Transmission) (Switch 03, bit 0)
This report is printed out after
memory transmission showing
whether it was successful or not. If
you have switched this report off, a
Communication Failure Report
will be printed only when a communication fails.
❖
Transmission Result Report (Switch
03, bit 5)
This report is printed out after immediate transmission showing
whether it was successful or not.
❖
Communication Result Report (Polling result report) (Switch 03, bit 4)
This report is printed after your
machine polls a message from another machine.
❖
Communication Failure Report (ON if
Communication Result Report is OFF)
This report is printed if a memory
transmission failure occurred, after a job is completed. It is only
printed if the Communication Result Report is switched off, and
event of a communication failure.
❖
Error Report (Turned on/off by a Service Technician)
This report is printed after each
unsuccessful communication. The
47
Page 63

Other Features
5
communication failure report is
printed after a job has been completed. And at the end, it prints a
communication failure or transmission result report. Check it, and
retransmit any pages that were not
sent. If a particular problem continues or gets worse, keep the error
reports for the service technician.
❖
Polling Result Report (Switch 03, Bit
4)
This report is printed after your
machine polls a message from another machine.
❖
Polling Reserve Rep ort (Switch 03, Bit
3)
If you switch this report on, it is
printed automatically after you
program the machine for polling
reception (immediate or send later). It gives the file number, time of
polling, and destinations (including any Group numbers that you
selected).
❖
Polling Clear Report (Switch 03, Bit 6)
This report is printed after a polling file has been erased from memory.
❖
Printing Part of the Image on the Report (Switch 04, bit 7)
For reference purposes, the machine prints the first few inches of
the fax message on the following
reports.
• Communication Result
• File Reserve
• Communication Failure Report
Report Formats
* * * COMMUNICATION RESULT REPORT (NOV.24.1999 9:19) * * *
FILE MODE OPTION ADDRESS (GROUP) RESULT PAG
<TRANSMISSION>
DATE TIME ADDRESS MODE TIME PAGE RESULT PERSNAL NAME FILE
<RECEPTION>
DATE TIME ADDRESS MODE TIME PAGE RESULT PERSONAL NAME FILE
TTI XYZ COMPANY
E
* * * JOURNAL(NOV.24.1999 11:10) * * *
TTI XYZ COMPANY
GFLIST0E
48
Page 64

Verifying Communications, Errors, Counters, Etc.
❖
The Mode Column
See the bottom of the Journal for a full listing of symbols on the Journal. On
other reports a code is given, informing the type of communication. These
codes are explained below.
❖
The Result Column
OK: Successful communication
E: An error occurred
❖
The Footnote on the Journal
Transmission counter: Total number of transmitted pages
Reception counter: Total number of received pages
Counters (functi on 94)
These counters will help you if you
wish to keep a regular check on how
many pages your machine has sent,
received, and copied. The machine
has the following counters:
❖
TX Counter:
The number of pages that your machine has sent (transmitted)
❖
RX Counter:
The number of pages that your machine has received
❖
Scan Counter:
The number of pages that your machine has scanned (including copies)
❖
Print Counter:
The number of pages that your machine has printed (including copies, reports and lists.)
B Press the
SCAN and PRINT counter.
key to check the
}
{
Yes
SCAN : 003287
PRINT : 002703
C When you have finished, press
the
{
Function
key.
}
5
A Press the
the access code
Then press
key.
{
Function
{
{
} {4}
9
then enter
} {6}
} {2} {2} {2}
2
and the
TX :003256
RX :002648
{
Yes
.
}
49
Page 65

Other Features
Programming Keystrokes
5
If you regularly transmit to a particular destination or set of destinations
using the same features, you can save
a lot of repetitive the ten key pad operation by storing the features and
destinations in a Keystroke Program.
Keystroke Programs are stored as
Quick Dial Keys.
• If you store a Keystroke Program
into a Quick Dial Key, that Quick
Dial Key cannot be used for any
other purpose.
• Be sure to store your Keystroke
Program in a vacant Quick Dial
Key.
Example: Let us say that you normally send a daily report to locations A,
B, and C at 11 pm (using Sending at a
Specific Time). Store these instructions as a Keystroke Program. Then
every day, you will only have to place
the report in the document feeder,
then press that key to set up the transmission.
Reference
Sending at a Specific Time: see P.25
“Sending at a Specific Time (Send
Later)”
.
Storing a Keystroke Progr am
TRANSMIT OPTIONi
DIAL FAX NUMBER
Note
❒
Skip step B if you are making a
Polling Reception program.
C Select all required features and
telephone numbers as you would
normally do.
Note
❒
Resolution, and halftone cannot
be stored in a keystroke program.
D Press the
wish to store the program in.
{
Quick Dial
PROGRAM Y/N
PROGRAM?
Note
❒
Example: 01 of the Quick Dial
❒
Make sure that this key is vacant.
E Press the
{
Yes
key.
}
QUICK 01 TO PROGRAM
NO KEY TO CLEAR
key that you
}
A Make sure that the machine is in
standby mode.
READY 100% 10:00
SET DOC. OR DIAL NO.
B Place a sheet of paper in the feed-
er.
50
F Press the Quick Dial key where
this program is being stored. In
this example, press the Quick
Dial
The procedure that you just stored
will now begin.
.
{
}
01
Page 66

Programming Keystrokes
If you do not wish to use the
procedure now
A Press the
ately.
{
key immedi-
}
Stop
Labeling a Program
If you store a label for your keystroke
programs, the label will appear on the
display when you use the program.
A Press the
the
{
Yes
}
{
Function
key.
} {3} {4}
ak QUICK/hi
PRINT LISTh/SEARCHi
Note
❒
If you press W and the
key, a Program List will be
printed.
and
{
Start
Reference
How to enter the label; see P.172
“Entering Characters”
E Press the
{
Yes
key.
}
ak QUICK/hi
PRINT LISTh/SEARCHi
To label another pro gr a m
A Go to step B.
To return to standby
A Press the
{
Function
}
Using a Program
}
Before using a program, make sure
that the machine is in standby mode.
.
key.
5
B Press the Quick Dial key that
holds the program that you wish
to label and press the
{
Yes
key.
}
a 01 Y/N
PROGRAM LABEL?
Note
❒
Example:
Key and the
C Press the
label for this program.
{
}
of the Quick Dial
01
{
}
key.
Yes
key to program a
}
{
Yes
a 01 ABC
kkkkkkkkkkkkkkkkkkkk
D Input your label, using the Quick
Dial keys.
a 01 ABC Y/N
DAILY REPORTkkkkkkkk
Transmission program
A Place your document in the feed-
er.
TRANSMIT OPTIONi
DIAL FAX NUMBER
B Press the programmed
key.
}
al
Note
❒
The program begins at once.
Free polling reception program
A Press the programmed
key.
}
al
2125551234
SET DOC. OR DIAL NO.
{
Quick Di-
{
Quick Di-
51
Page 67

Other Features
5
Note
❒
The program begins at once.
Reference
Picking Up Messages Stored
Elsewhere (Polling Reception ) :
see P.101
Message (Polling)”
“Calling to Request a
.
Erasing a Program / Changi ng
the Program Label
When you wish to delete a keystroke
program, do the following.
A Press the
the
{
}
Yes
{
Function
key.
} {3} {4}
ak QUICK/hi
PRINT LISTh/SEARCHi
and
To edit the program name
A Press the
B Edit the program name.
C Press the
{
{
Yes
Yes
key.
}
key.
}
D Either ;
ak QUICK/hi
PRINT LISTh/SEARCHi
To edit or erase another program
A Go to step B.
To return to standby
A Press the
{
Function
key.
}
B Press the Quick Dial key that
holds the program that you wish
to erase, or scroll the Quick Dial
using W and V.
a08 CHANGE? Y/hi
USED AS PROGRAM
Note
❒
Example:
Key.
C Press the
a08 Y/N
PROGRAM LABEL?
To erase this program
A Press the
B press the
{
{
Yes
{
{
}
of the Quick Dial
08
key.
}
key.
}
No
key.
}
Yes
52
Page 68

Storing an Often Used Document (Auto Document)
Storing an Often Used Document (Auto
Document)
If you often find that you have to send
a particular page to people (for example, a map, a standard attachment, or
a set of instructions), store that page
in the memory as an Auto Document,
using a Quick Dial Key. This feature
is called Auto Document.
When you need to send that page to
somebody, press the Quick Dial Key
that you stored it in, place any other
pages that you wish to send into the
{
feeder, dial, and press the
At the other end, the Auto Document
will be printed first. You can also program a destination for each Auto
Document into the same Quick Dial
Key.
Note
❒
The Auto Document is transmitted
as is; you cannot write anything on
it like you can with a cover sheet. If
you wish the machine to place
your name on your transmitted
documents, try using the Label Insertion feature (see P.26
Your Identification at the Top of Your
Message (TTI)”
).
}
key.
Start
“Sending
Quick Dial key the Auto Document will be attached to that transmission.
a08 PROGRAM? Y/hi
USED AS DIAL
A Take the document that you want
to be an Auto Document and
place it into the feeder.
TRANSMIT OPTIONi
DIAL FAX NUMBER
B Press the
the
{
}
Yes
{
Function
key.
} {3} {5}
and
ak QUICK/hi
PRINT LISTh/SEARCHi
C Press the Quick Dial Key that you
wish to store the Auto Document
in.
a08 PROGRAM? Y/hi
5
Storing an Auto Document
(Function 35)
Note
❒
You can program a Quick Dial
number and an Auto Document in
the same Quick Dial key. If you
program the key as a Quick Dial
before programming the Auto
Document, the display below will
appear in step C. If you press the
{
}
key, whenever you press the
Yes
Note
❒
Example: Quick Dial Key
D Press the
{
Yes
key.
}
a08 Y/N
PROG. AUTO DOCUMENT?
E Press the
The document is scanned.
{
Yes
key.
}
{
}
.
08
53
Page 69

Other Features
5
To label this document
A Press the
If no
A Press the
step H.
key.
}
{
Yes
key and go to
}
{
No
F Input a label using the Quick Dial
key.
a08 ABC Y/N
OFFICE LOCATION MAP
G Press the
{
Yes
key.
}
ak QUICK/hi
PRINT LISTh/SEARCHi
H Either:
If you wish to attach a fax
message to your Auto Document
A Place the fax face down into
the feeder.
TRANSMIT OPTIONi
DIAL FAX NUMBER
B Press the Quick Dial Key that
contains the Auto Document that
you need.
TRANSMIT OPTIONi
OFFICE LOCATION MAP
Note
❒
Example:
Key.
{
}
of the Quick Dial
08
C Dial the destination(s), and press
the
{
Yes
key.
}
To program anoth er auto
document
A Place the document that you
want to be an Auto Document
and go to step C.
To finish
A The
{
Function
key.
}
Using an Auto Document
A Make sure that the machine is in
standby mode.
READY 98% 10:00
SET DOC. OR DIAL NO.
TRANSMIT DIAL/START
DIAL NEXT FAX NUMBER
Note
❒
If you send the message to more
than one location, and you enter
the Quick Dial key which contain the Auto Document, it will
be attached to all destinations.
❒
To dial another number, repeat
this step.
D Press the
{
Start
key.
}
Printing the Cont ents of an
Auto Document (Function 53 )
If you need to remind yourself of
what one of your stored Auto Documents looks like, do the following
procedure.
54
Page 70

Storing an Often Used Document (Auto Document)
A Press the
the
{
}
Yes
{
Function
key.
} {5} {3}
and
ak QUICK/hi
PRINT LISTh/SEARCHi
B Press the Quick Dial Key that
holds the Auto Document that
you wish to see.
a08 START/N
OFFICE LOCATION MAP
Note
❒
Example:
Key and the
C Press the
Erasing an Auto Document
If you wish to delete an Auto Document, do the following.
{
Start
{
}
of the Quick Dial
08
{
}
key.
Yes
key.
}
a08 Y/N
PROGRAM LABEL?
D Press the
{
No
key.
}
a08 Y/N
AUTO DOC. CLEAR?
E Press the
Auto Document.
key to erase the
}
{
Yes
ak QUICK/hi
PRINT LISTh/SEARCHi
To erase another Auto Docu ment
A Go to step B.
To return to standby mode
A Press the
{
Function
key.
}
5
A Press the
the
{
Yes
}
{
Function
key.
} {3} {5}
and
ak QUICK/hi
PRINT LISTh/SEARCHi
B Press the Quick Dial Key that
contains the Auto Document that
you wish to erase.
a08 CHANGE? Y/hi
USED AS AUTO DOC.
Note
❒
Example:
Key.
C Press the
{
{
Yes
}
of the Quick Dial
08
key.
}
55
Page 71

Other Features
Batch Transmission
5
This feature will save communication
costs if you often send more than one
message to the same location.
If various people in your office send
messages to the Tokyo branch office,
sending all these messages on separate calls can be expensive. It is cheaper to send them all together on the
same call. You can further cut costs by
sending out batches during off-peak
hours. To do so, simply create Keystroke Programs that use Send Later
to send to those common destinations.
Instruct people in your office to store
all faxes for the Tokyo branch in the
memory, using Send Later. The selected time of transmission must be
the same for each message that you
wish to include in the batch. Then,
when that time comes, the messages
will all be sent out on the same call, or
‘batched’.
Reference
Sending at a Specific Time: see P.25
“Sending at a Specific Time (Send
Later)”
.
Changing the Batch
Transmission on/off
To turn Batch Transmission on or off,
adjust bit 4 of switch 6 in the User Parameters. (See P.162
ters”
).
“User Parame-
You can set up more than one batch.
In an example, you could set up a
batch for Tokyo at, say, 1 am, a batch
for Hong Kong at 2 am, a batch for
London at 3 am, and so on.
Also, when you send a fax message, if
there is a message in the memory
waiting for transmission to the same
telephone number, it will be sent out
with your message. This will only
happen if the message already in the
memory is waiting for retransmission
(for example, because the line was
busy on the first attempt).
Note
❒
You can have up to 50 fax messages in the same batch.
56
Page 72

Closed Network (Transmission)
This feature helps to stop you from
accidentally sending a fax message to
a terminal that is outside your fax network.
The ID Codes of the communicating
machines are checked. If they are not
the same, the communication is
stopped.
If you are interested in this feature,
change the user parameter Switch 06
bit 2 to 1. (Function 63)
Note
❒
This feature may not be reliable if
you are communicating with a terminal produced by a different
manufacturer.
Closed Network (Transmission)
5
Reference
ID Code: see P.61
Code”
.
Closed Network (Reception): see
“Closed Network (Reception)”
P.74
“Storing the ID
.
57
Page 73

Other Features
Sending Confidential Messages (Function 12)
5
This feature is called Confidential
Transmission. Use this feature if you
do not want your message to be
picked up casually by anybody at the
other end. The message will be stored
in the memory at the other end. It will
not be printed until an ID known as
the Confidential ID is entered.
There are two types of Confidential
Transmission.
❖
Normal Confidential Transmission
The other party can print the message by entering the ID that was
previously stored using the Confidential ID feature.
❖
Confidential ID Override
If you wish to send a confidential
message to a particular person at
the other end, you can specify the
Confidential ID that person has to
enter to see that message. Anybody entering the machine's Confidential ID will not be able to see
the message. Before you send the
message, don't forget to tell the intended receiver what code must be
entered to print the message.
Note
❒
The receiving machine's Confidential ID is not changed by this
process.
❒
If the intended receiver has a
Personal Code with a Confidential ID stored with it, you can
override the receiving machine's ID with that Confidential ID. Then:
• The receiver can print the
message by inputting the
Confidential ID that is stored
with that person's Personal
Code.
• The intended receiver will
also be informed personally
by a Confidential File Report;
this report will have the
name of the receiver on it, if
the name was stored with the
Personal Code.
To set up a confidential transmission,
do the following.
Limitation
❒
The machine at the other end must
have memory space available and
it must have the Confidential Reception feature.
❒
This is a proprietary feature, and
as such it only functions with machines produced by the same manufacturer that have this feature.
Note
❒
Before sending a confidential message, it is recommended that you
call the receiver and advise them
that you are sending a fax message
in this manner.
Reference
Confidential ID: see P.71
Confidential ID”
Personal Codes: see P.66
Personal Code”
Confidential File Report: see P.73
“Confidential File Report”
Journal: see P.93
41)”
Receiving confidential Messages:
see P.71
Messages”
“Journal (Function
“Receiving Confidential
“Storing a
“Storing a
58
Page 74

Sending Confidential Messages (Function 12)
A Place your document in the feed-
er.
TRANSMIT OPTIONi
DIAL FAX NUMBER
key.
}
and
B Press the
the
{
Yes
}
{
Function
key.
} {1} {2}
CONFID’L TRANS OPTi
DIAL FAX NUMBER
C Dial then press the
{
Yes
CONFID’L TRANS Y/STA
2125551234kkkkkkkkkk
CONFID’L TRANS D/STA
DIAL NEXT FAX NUMBER
Note
❒
To dial another number, repeat
this step.
C Enter the Confidential ID that
you wish to use for this message.
SET OPTION Y/N
ID:2567
Note
❒
Example:
ten key pad and press the
key.
D Dial and press the
{
} {5} {6} {7}
2
{
Start
key.
}
of the
{
Yes
}
5
D Press the
{
Start
key.
}
Confidential ID Override
Option
This procedure will override the Confidential ID stored in the other party's
machine. The override is only effective for this one transmission.
OPTION
If
A Press
SET OPTION Y/i
SET CONFIDENTIAL ID?
B Press the
SET OPTION KPAD
ID:kkkk
V is displayed:
until the display appears.
V
key.
}
{
Yes
59
Page 75

Other Features
Transfer Request (Function 13)
5
Transfer Request helps you save costs
when you send the same message to
more than one place in a distant area.
You send your message once, to a machine referred to as a Transfer Station.
In turn, this machine sends on the
message to local machines (referred
to as End Receivers). After the Transfer Station has broadcasted the message to all End Receivers in the
sequence, it sends your machine a
Transfer Result Report to tell you if
these were any problems with the
communication.
Preparation
Before you can start to set up transfer request, there are some items
that you have to program in your
machine. These are as follows.
• Your Fax Machine's Own Telephone Number
• The ID Code
Limitation
❒
This feature can only be used if the
Transfer Station was made by the
same maker as your machine.
❒
The Transfer Station must have
memory space available, and must
be able to act as a Transfer Station
(some machines cannot do this, or
can but the capability has been
switched off).
❒
The ID Code of your machine must
be the same as the ID Code of the
Transfer Station.
numbers that are stored as Quick
Dials, Speed Dials or Groups in the
Transfer Station. Always keep a
copy of the Transfer Station's Telephone Lists (Quick Dial, Speed Dial, and Group Lists) near the
machine if you plan to use Transfer
Request.
Reference
Quick Dial and Speed Dial: see
“Storing & Editing Fax Num-
P.30
bers (Functions 31 & 32)”
Groups: see P.33
a Group of Fax Numbers (Function
33)”
ID Code: see P.61
Code”
“Storing & Editing
“Storing the ID
Storing Your Machine's Own Telephone Number
Store your fax terminal's telephone
number using this feature. If you do
not do this, you will not be able to use
the Transfer Request feature.
Note
❒
If your fax machine's telephone
number changes, do not forget to
change the stored telephone
number data.
A Press the
the access code
Then press
key.
{
Function
{
{
} {1}
6
then enter
} {6}
} {2} {2} {2}
2
and the
{
Yes
.
}
60
Note
❒
You cannot specify the End Receivers as full numbers on your ten
key pad, and you cannot use your
own stored Speed Dials, Quick Dials, and Groups. You must use the
Y/NEXTi
SET G3 OWN NUMBER
B Input your fax terminal's tele-
phone number.
Page 76

G3 OWN NO. KPAD/Y/N
0111212-5551234kkkkk
Transfer Request (Function 13)
❒
Features using ID Codes can only
be used between terminals made
by the same maker.
Note
❒
The format of the number must
be as follows: International Dial
Prefix, Your Country Code,
Your Area Code, then you must
add a Pause, followed by your
telephone number.
❒
Check the International Dialing
Prefix and the Country Code
with your local telecommunications operator. The example
shown is for the United States;
the codes to add are 011 and 1.
❒
Use the Pause key to add a
pause.
C Press the
keys.
{
Yes
and
}
{
Function
Storing the ID Code
In addition to the networking features described in this section, ID
Codes are used with the following
communication features. The same
code must be used by all members of
your fax network and all people you
wish to communicate with using
these features.
• Calling to Request a Message (Polling): see P.101
Message (Polling)”
• Closed Network: see P.74
Network (Reception)”
Limitation
❒
Before programming the ID Code,
confer with other users in your fax
network to agree on an ID Code.
This is because communications
using ID Codes will fail if the codes
are not the same.
“Calling to Request a
.
“Closed
.
Note
❒
The ID Code can be any four-digit
code (using digits 0 to 9 and letters
A to F), except 0000 and FFFF.
Programming the ID Code
To store an ID Code, do the following.
A Press the
the access code
Then press
key.
{
Function
{
} {1}
6
} {6}
} {2} {2} {2}
{
2
and the
Y/NEXTi
}
SET G3 OWN NUMBER
B Press
until the display appears.
V
Y/NEXTi
SET POLLING ID
C Press the
{
Yes
key.
}
POLLING ID KPAD
kkkk
D Input the ID Code that you will
be using.
POLLING ID Y/N
4363
Note
❒
Example:
❒
Do not use 0000 or FFFF.
E Press the
keys.
{
} {3} {6} {3}
4
and
}
{
Yes
then enter
{
Yes
{
Function
.
}
5
}
61
Page 77

Other Features
5
Editing the ID Code
If you want to change the ID code, do
the following.
A Press the
the access code
Then press
key.
{
Function
{
} {1}
6
{
Y/NEXTi
SET G3 OWN NUMBER
B Press
appears.
until the opposite display
V
Y/NEXTi
SET POLLING ID
C Press the
{
Yes
key.
}
POLL. ID CHANGE? Y/N
1234
then enter
} {6}
} {2} {2} {2}
2
and the
{
Yes
Making a Transfer Request
After you stored your Machine's Own
Telephone Number and ID code you
can do the transfer request as in the
following procedure.
.
}
Note
❒
You may use some transmission
options, such as Sending at a Specific Time. See P.25
Specific Time (Send Later)”
“Sending at a
A Make sure that the machine is in
standby mode.
READY 100% 10:00
SET DOC. OR DIAL NO.
B Place your document in the feed-
er.
TRANSMIT OPTIONi
DIAL FAX NUMBER
.
D Press the
{
Yes
and
}
{No}
POLLING ID KPAD
kkkk
E Input a new ID.
POLLING ID Y/N
5433
Note
❒
Example:
F Press the
keys.
{
} {4} {3} {3}
5
and
}
{
Yes
{
keys.
Function
C Press the
the
{
}
Yes
{
Function
key.
} {1} {3}
TRANSFER OPTIONi
DIAL FAX NUMBER
D Input the telephone number of
the transfer broadcasting station,
then press the
TRANSFER */KPAD
DESTINATION #kk
}
Limitation
❒
This machine must be of the
same manufacturer as yours,
and it must be able to act as a
Transfer Station.
{
Yes
key.
}
and
62
Page 78

E Input the destinations for this
transfer broadcaster.
TRANSFER Y/N
DESTINATION #*10
Note
❒
Example: Speed Dial Code 10
❒
You must use Quick Dials,
Speed Dials, or Groups that are
stored in the transfer broadcaster. There is a shorthand notation for this purpose. See the
following examples:
Yes
{
01
{
10
}
• Quick Dial Key 01:
{
}
Yes
• Speed Dial Code 10: *
{
}
Yes
{
• Group 01: * *
❒
You can select one Transfer Station, and up to 30 End Receivers
for this Transfer Station.
0 1
} {
Transfer Request (Function 13)
}
}
5
F Press the
G Press the
transfer request.
{
{
Yes
Start
key.
}
key to start the
}
TRANSFER */KPAD
DESTINATION #kk
To enter more destinations for
this transfer broadcaster
A Go to step E.
63
Page 79

5
Other Features
Combining Transfer Request with Broadcasting
If you wish to complex set up fax message distribution networks, you can make
a Transfer Request using more than one Transfer Station. When you do this, you
can send the same message to up to 30 Transfer Stations, and each Transfer Station can pass the message on to 30 End Receivers.
Assume that your machine is in San Francisco and you wish to send the same
message to various locations in the U.S.A. Of course, doing a simple broadcast,
sending to each terminal directly from your machine, would get the job done,
but you would not be taking advantage of the cost-cutting features of the machine.
However, If you incorporate Transfer Request, as shown below, your machine
would only make 4 calls, instead of the 10 that would be necessary if Transfer
Request was not used. This saves costs.
• Your machine can play any part in a Transfer Request network of this type,
provided that you have programmed all the required features as explained
earlier in this station.
• The ID codes of the requester (San Francisco) and the Transfer Stations
(NewYork and Houston) must be the same. The requester must have its own
fax number programmed.
• The model used by the requester (San Francisco) must be able to make Transfer Requests through more than one Transfer Station.
• Report indicating success of failure will be returned to San Francisco from terminals fin Houston and NewYork.
64
Page 80

Transfer Request (Function 13)
Multi-st ep Transfer
The principles of the Two-step Transfer feature can be used to build up a multistep facsimile network. This will using either analog (Group3) or digital
(Group4) lines. An example follows.
5
To set up this network, the following programming must be done.
• Terminal C must contain two preprogrammed groups. Group 1 must contain
terminal I and J, Group 2 must contain terminals E, F, G, and H. In Group 1,
terminal D must be specified as the Group Transfer Station.
• Terminal B must contain a preprogrammed group (Group 1). This group
must contain two numbers, #**01, and #**02. These specify transfer using
groups 1 and 2 that are stored in the Group Transfer Station. In Group 1, C
must be specified as the Group Transfer Station.
• The ID codes of terminal A, B, C, and D must be the same.
To start the operation, terminal A does a transfer request using terminal B as the
broadcasters stored in Group 1 at terminal B.
65
Page 81

Other Features
Programming the Personal Codes (Function 72)
5
The main advantage of Personal
Codes is that they allow you to track
machine usage You can still use Personal Codes to personalize your fax
messages, by using the Label Insertion feature.
Each user can be given a Personal
Code. While programming, you can
store the following items with each
Personal Code:
❖
A name:
This will be printed on reports,
such as the JOURNAL, to identify
the users of the machine.
❖
A Confidential ID:
This must be different for each Personal Code, and different from
your machine's Confidential ID. If
somebody sends you a confidential message, they can override
your machine's Confidential ID
with the Confidential ID stored
with your Personal Code, if you inform them of this ID. If so, the machine will print a Confidential File
Report that will inform you when
the message has arrived. Then, you
must input this Confidential ID to
print the message.
Note
❒
The Personal Code is a four digit
code. It can have any value from
0001 to 9999.
❒
You cannot register more than 30
Personal Codes with Names and
Confidential IDs in this machine.
Journal: see P.93
41)”
.
Confidential File Report: see P.73
“Confidential File Report”
Confidential ID: see P.71
Confidential ID”
Receiving Confidential Messages:
see P.71
Messages”
.
“Journal (Function
.
“Storing a
.
“Receiving Confidential
Storing a Personal Code
A Press the
the access code
Then press
key.
{
Function
{
} {2}
7
{
SETTING? Y/hi
PRINT LISTh/SEARCHi
Note
❒
If you press W and the
key, a Personal Code List will be
printed.
B Press the
{
Yes
key.
}
PERS. CODE KPAD/hi
kkkk
then enter
} {6}
} {2} {2} {2}
2
and the
{
{
Start
Yes
C Input a Personal Code that you
want to store in your machine for
later use.
PERSONAL CODE Y/N
5477
.
}
}
66
Reference
Using Personal Codes: see P.27
“Personal Codes”
.
Page 82

Programming the Personal Codes (Function 72)
Note
❒
Example:
the ten key pad.
If you input the wrong code
A Press the
again.
D Press the
code.
{
} {4} {7} {7}
5
key and input
}
{
No
key to store the
}
{
Yes
PERSONAL CODE Y/N
PROGRAM LABEL?
To store the label for this
personal code
A Press the
Step E.
key and go to
}
{
Yes
from
F Press the
name.
key to store the
}
{
Yes
PERSONAL CODE Y/N
SET CONFIDENTIAL ID
If you want to program the
Confidential ID for this user
A Press the
B Input a Confidential ID for the
personal code used by this user.
C Press the
To enter another code
A Go to step C.
G Press the
{
Function
{
{
Yes
Yes
key.
}
key.
}
key to finish.
}
5
If you do not program for this
personal code
A Press the
step G.
key and go to
}
{
No
E Input a name for this Personal
Code using the Quick Dial keys
or the ten key pad.
PERSONAL ABC Y/N
JOHNSONkkkkkkkkkkkkk
Note
❒
Example: JOHNSON
Reference
How to enter the label; see P.172
“Entering Characters”
If you do not wish to store an ID
A Press the
step G .
{
No
}
.
key and go to
Editing or Erasing a Personal
Code
A Press the
the access code
Then press
key.
{
Function
} {2}
{
7
{
SETTING? Y/hi
PRINT LISTh/SEARCHi
B Scroll the personal code using
PERSONAL CHANGE? Y/N
5474
C Press the
PERSONAL CODE Y/N
5474
{
Yes
key.
}
then enter
} {6}
} {2} {2} {2}
2
and the
{
Yes
V
.
}
.
67
Page 83

Other Features
5
To erase this Personal Code
A Press the
B Press the
back to step B to edit another
personal code. To finish, press
the
{
Function
{
No
{
key.
}
key and go
}
Yes
key.
}
To edit the contents of this code
A Press the
step D.
key and go to
}
{
Yes
PERSONAL CODE Y/N
PROGRAM LABEL?
D Edit the label.
To edit the label
A Press the
step E .
key and go to
}
{
Yes
When the ID is correct
A Press the
{
Yes
key twice.
}
To enter or edit another code
A Press the
to step B .
F Press the
{
Function
key and go back
}
{
No
key.
}
PERSONAL CODE Y/N
PROGRAM LABEL?
If you don't edit the label
A Press the
to step B to edit another personal code. To finish, press the
{
Function
key and go back
}
{
No
key.
}
E Edit the name stored with this
code. When the name is correct,
press the
PERSONAL CODE Y/N
SET CONFIDENTIAL ID?
To edit the Conf idential ID stored
with this code
A Press the
then input the ID.
{
Yes
{
}
Yes
key.
}
and
{No}
key
68
Page 84

Tonal Signals
This function is only available on Type 1 machine.
{
On this model the
key pad is used as the Tone key.
Some organizations offer you a special service by telephone, which you
can access by transmitting Touch tone
or DTMF tones. If your phone service
provides only pulse dialing, or if you
are calling over a digital network, the
ability to generate Tonal Signals will
allow you to access these services.
First, dial the other party. When you
are through to the other end, press the
Tone key and enter the code number
that is needed to access the required
feature at the other terminal. You do
not need to press the Tone key if your
machine is set up for dialing in Tone
Dial (DTMF) mode.
}
key on the ten
*
E Input the digits that you need to
Tonal Signals
use the remote facility. After you
have finished your business with
the remote facility, hang up.
Note
❒
Do not press the
{
Start
}
key.
5
Using the Tone Key
A Make sure that the machine is in
standby mode, and that there is
no document in the feeder.
B Pick up the telephone handset, or
press the
{
On Hook Dial
key.
}
C Dial the remote facility. Do not
press the
Note
❒
If your telephone line type is
DTMF (Tone Dial), go to step E.
{
Start
key.
}
D After your line is connected to the
remote facility, if your telephone
line type is Pulse Dial, press the
key on the ten key pad.
{
}
*
A dot appears in the display.
69
Page 85

5
Other Features
Rejecting Messages from Senders Who Don't Identify Themselves
Your fax machine can reject incoming
messages lacking an identifier signal.
Follow the user parameter procedure
on to enter these settings.
Switch 05, bit 1
• 0: Accept such messages
• 1: Reject such messages
Reference
User Parameter: see P.162
Parameters”
“User
70
Page 86

Receiving Confidential Messages
Receiving Confidential Messages
This feature is called Confidential Reception.
If the other party sent you a message
using Confidential Transmission, the
message is stored in the memory, and
not printed. The “Receive File” indicator on the operation panel blinks to
inform you when a confidential message has come in. Also, if you have
switched Confidential File Report on,
the machine will print a report whenever a confidential message comes in.
Preparation
For this feature to work properly,
you must have stored a Confidential ID in advance.
There is no need to do anything immediately. When you want to print
the message, input the Confidential
ID.
Note
❒
If the machine's Confidential ID
does not have any effect, contact
the sender and check whether they
used Confidential ID Override to
override your ID. Print the Journal
to find out who the sender is, if
necessary.
❒
If you have forgotten the machine's Confidential ID, print a
User Parameter List, or call a service technician for assistance.
❒
You can also receive confidential
message using 4–digit SUB codes.
Confidential ID Override: see P.59
“Confidential ID Override Option”
Sending Confidential Messages:
see P.58
sages (Function 12)”
Journal: see P.93
41)”
“Sending Confidential Mes-
.
“Journal (Function
.
.
Storing a Confidential ID
This can be any four-digit code (using
digits 0 to 9). It must be used to print
any confidential messages that your
machine has received.
Important
❒
If you do not store a Confidential
ID, you will not be able to receive
confidential messages.
A Press the
the access code
Then press
key.
{
Function
{
} {1}
6
{
Y/NEXTi
SET G3 OWN NUMBER
B Press
shown.
until the screen is as
V
Y/NEXTi
SET CONFIDENTIAL ID
C Press the
{
Yes
key.
}
then enter
} {6}
} {2} {2} {2}
2
and the
{
Yes
5
.
}
Reference
User Parameter List: see P.163
of all relevant user parameters”
Confidential File Report: see P.73
“Confidential File Report”
“List
.
.
CONFID’L ID KPAD
kkkk
71
Page 87

Other Features
5
D Input the Confidential ID that
you will be using.
CONFID’L ID Y/N
6754
Note
❒
Example:
the ten key pad.
E Press the
F Press the
Editing the Confidential I D
A Press the
access code
press
B Press
shown.
{
Y/NEXTi
SET G3 OWN NUMBER
V
{
} {7} {5} {4}
6
key.
}
{
Yes
key.
{
Function
{
Function
{
} {1}
6
until the screen is as
}
} {6}
} {2} {2} {2}
2
and the
{
from
then enter
. Then
key.
}
Yes
F Press the
{
Yes
key.
}
CONFID’L ID Y/N
8352
G Press the
{
Function
key.
}
Printing a Confid ential Fax
Message (Function 54)
If the Receive File indicator is blinking, do the following to print the message.
Note
❒
If the
blinking, an incoming fax message
has been stored in the memory using the Memory Lock feature or
Confidential Reception feature.
Reference
To print the message which is
Memory Locked, see P.43
a Memory-locked Message (Function
55)”
Receive File
.
indicator is
“Printing
C Press the
D Press the
E Press the
72
Y/NEXTi
SET CONFIDENTIAL ID
key.
}
{
Yes
CONF. ID CHANGE? Y/N
6754
key.
}
{
Yes
CONFID’L ID Y/N
6754
key and input a
}
{
No
new confidential ID code.
Note
❒
Example:
{
} {3} {5} {2}
8
.
A Press the
the
{
}
Yes
{
Function
key.
} {5} {4}
CONFID’L ID KPAD
kkkk
B Input the ID.
CONFID’L ID START/N
kkkk
Note
❒
Example:
the ten key pad.
❒
If you cannot output a confidential file with this ID, you have
input the wrong ID or the send-
{
} {7} {5} {4}
6
and
from
Page 88

er may have over-ridden your
ID. Contact your sender.
Receiving Confidential Messages
C Press the
{
Start
key.
}
Confidential File Report
This report informs you when a confidential message has been received.
You can store a separate Confidential
ID with each of the Personal Codes. If
the sender of the message uses Confidential ID Override, the sender can
specify one of these IDs. If so, the
Confidential File Report will contain
the name stored with that Personal
Code, drawing the attention of the intended receiver of the confidential
message.
You can switch this report on or off,
see P.162
In a new machine, it is switched on at
the factory.
Note
❒
If you wish, you can prevent unidentified senders from sending
you Confidential Messages. See
P.71
es”
“User Parameters”
“Receiving Confidential Messag-
.
.
5
Reference
Personal Codes: see P.27
Codes”
.
“Personal
73
Page 89

5
Other Features
Closed Network (Reception)
This feature may help you to prevent
reception of excessive junk fax mail.
The ID Codes of the communicating
machines are checked. If they are not
the same, the communication is
stopped.
Note
❒
This feature may not be reliable if
you are communicating with a terminal produced by a different
manufacturer.
❒
If you are interested in this feature,
contact your service representative.
Reference
ID Codes: see P.61
the ID Code”
“Programming
74
Page 90

Rejecting or Accepting Messages from Specified Senders (Authorized Reception)
Rejecting or Accepting Messages from
Specified Senders (Authorized Reception)
This feature is called Authorized Reception. It helps you reject junk fax
mail.
It lets you specify which terminals
you wish to receive fax messages
from; all others will be shut out.
About Authorized Rece ption
A
You must specify a list of senders
(function 81). See P.81
ming a List of Senders to Treat Differently (Function 81)”
B
You must turn Authorized Reception on (function 62).
C
You must set your machine to accept or reject messages from senders in that list (function 63). (user
parameters, switch 08, bit 2 and 3;
see P.162
“User Parameters”
“Program-
.
).
Entering a List of Senders to Treat Differently (Function 81)
How to enter a list of senders to treat
differently, see P.81
List of Senders to Treat Differently
(Function 81)”
“Programming a
Switching Authorized Reception on / off (Function 62)
Before you use Authorized Reception, you have to switch the feature
on.
A Press the
the access code
Then press
key.
{
Function
{
{
} {2}
6
then enter
} {6}
} {2} {2} {2}
2
and the
{
Yes
5
.
}
If you accept them, the general public
will not have access to your fax machine. You accept messages only from
a group of people you know.
If you reject them, everyone will be
able to send you messages except the
people in the list. This is useful to reject the junk fax mail.
You can store up to 30 identifications
with this feature. You can program
part of an identification and accept
(or reject) messages from all senders
whose identification contains that
part. See P.90
“Wild Cards”
.
Y/NEXTi
SELECT LINE
B Press
shown.
until the screen is as
V
Y/NEXTi
AUTHORIZED ON/OFF
C Press the
{
Yes
key.
}
AUTHORIZED Y/hi
ON iOFF
D Press
off setting.
E Press the
keys.
or V to change the on or
W
and
{
Yes
}
{
Function
}
75
Page 91

Other Features
Cassette Selection
5
About Cassette Selecti on
This feature is only available if your
machine has an optional lower cassette, you can direct fax messages
from certain senders to be printed
from the main cassette.
Note
❒
Example: Put yellow paper in the
main cassette. Then, messages
from head office can be printed out
on yellow paper; this will make it
easy for you to see when a message
from head office has arrived.
A
You must specify a list of senders (function 81). See P.81
gramming a List of Senders to
Treat Differently (Function 81)”
B
You must turn Cassette Selection (function 62). See P.76
lecting the Cassette (Function
62)”
.
C
Select the messages to be printed from the main cassette.
a) All messages from specified
senders
b) All messages except those
from specified senders. (user
parameters, switch 08, bit 4 and
5; see P.162
“User Parameters”
“Pro-
.
“Se-
) .
Entering a List of Senders to
Selecting the Messages to Be Printed from t he Main Cassette
You can select the messages to be
printed from the main cassette (see
P.162
following settings.
❖
❖
“User Parameters”
Switch 08, bit 4
You have to set it “1”
Switch 08, bit 5
• 0: Print messages from the special terminals from the main
cassette.
• 1: Print messages except from
the special terminal from the
main cassette.
) to enter the
Selecting the Casse tte
(Function 62)
Before you use Cassette Selection,
you have to switch the feature on.
If you remove the lower cassette, the
cassette selection mode is automatically turned off.
A Press the
the access code
Then press
key.
{
Function
{
{
} {2}
6
then enter
} {6}
} {2} {2} {2}
2
and the
{
Yes
.
}
Treat Differently (Function 81)
How to enter a list of senders to treat
differently, see P.81
List of Senders to Treat Differently
(Function 81)”
76
.
“Programming a
Y/NEXTi
SELECT LINE
B Press
shown.
until the screen is as
V
Y/NEXTi
CASSETTE ON/OFF
Page 92

Cassette Selection
C Press the
{
Yes
key.
}
CASSETTE SELECT Y/hi
ON iOFF
D Press
off setting.
E Press the
key.
or V to change the on or
W
and
{
Yes
}
{
Function
}
5
77
Page 93

Other Features
Multi-sort Document Reception
parameters, switch 08, bit 0 and
About Multi-sort Recepti on
1; see P.162
“User Parameters”
).
5
Using this feature, more than one
copy of each incoming fax message
can be printed. You may also choose
to have more than one copy from only
select senders. This feature eliminates
the extra steps needed to have someone make photocopies.
Note
❒
For example: If you switch this feature on overnight, you will not
have to make distribution copies of
the messages that came in during
the night. However, the paper in
the cassette will be used up much
faster.
A
You must turn Multi-sort Reception (Function 62).
B
Set the number of copies (Function 83). See P.79
Number of Copies (Function 83)”
C
Switch Reverse Order Printing
on. See P.91
Printing”
If you wish to specify the senders whose messages are multi
sorted.
D
Specify the senders whose messages you want to make Multisort. Do this by programming
the RTI or CSI of these senders.
See P.81
Senders to Treat Differently (Function 81)”
.
“Programming a List of
“Setting the
“Reverse Order
Reference
Reverse Order Printing: see P.91
“Reverse Order Printing”
Copying an Original: see P.100
“Copying”
.
Switching Multi-sort
Document on/off (F unction 62)
Preparation
Before you can make multiple copies, you have to switch it on using
Function 62.
A Press the
.
B Press
C Press the
{
Function
the access code
Then press
key.
{
Y/NEXTi
SELECT LINE
until the screen is as
V
shown.
Y/NEXTi
# OF COPIES ON/OFF
{
Yes
# OF COPIES Y/hi
iON OFF
} {2}
6
key.
}
} {6}
{
} {2} {2} {2}
2
and the
.
then enter
{
Yes
.
}
78
E
Select the messages to Multisort copied
a) All messages from Special
Terminals.
b) All messages except those
from Special Terminals. (user
D Change the on/off setting by
pressing W or V.
# OF COPIES Y/hi
ON iOFF
Page 94

Multi-sort Document Reception
E Press the
F Press the
key.
}
{
Yes
{
Function
key to finish.
}
Setting the Number of Copies (Function 83)
A Press the
access code
press
{
8
} {3}
{
Function
{
} {2} {2} {2}
2
and the
NO. OF COPIES KPAD/Y
1 SETS
} {6}
{
then enter
. Then
key.
}
Yes
B Input the number of copies that
you need, then press the
key.
Copies of incoming faxes will be
collated.
{
Yes
}
5
NO. OF COPIES KPAD/Y
3 SETS
Note
❒
Maximum number of copies: 9.
❒
To use Multi-sort Document Reception, you must switch Reverse Order Printing on. See
“Reverse Order Printing”
P.91
for how to do this.
C Press the
{
Function
key.
}
Programming the Special
Terminals to Make Multi-sortcopies
To program the list of senders, see
“Entering a List of Senders to Treat
P.75
Differently (Function 81)”
.
79
Page 95

Other Features
Choosing How to Treat the Special Terminals
You have to select one of the following two things. To change this selecting, adjust bit 1 of switch 8 with the User Parameters:
• Bit 1 = 0 : Make multiple copies of messages from Special Terminals.
• Bit 1 = 1 : Make multiple copies of all messages except those from Special Terminals.
5
List of Special Terminals (Function 81)
Empty On Either All messages are
Empty/Not empty Off Either No messages are
Not empty On Listed Only messages
Not empty On non-Listed All messages are
Multi-sort on/off
(Function 62)
Switch 08 Digit 1
(Function 63)
Result
Multi-sorted.
Multi-sorted.
from special terminals are Multi-sorted.
Multi-sorted except
those from Special
Terminals.
80
Page 96

Programming a List of Senders to Treat Differently (Function 81)
Programming a List of Senders to Treat
Differently (Function 81)
You can enter a list of up to 30 identifications (RTI, CSI and Wild Cards)
for senders you wish to treat differently. For instance, for each identification in the list, you have the
following options.
• Authorized Reception: You can accept their calls and reject all others
(or vice-versa) with the Authorized Reception setting (See P.75
“Rejecting or Accepting Messages
from Specified Senders (Authorized
Reception)”
• Specified Cassette Selection: You
can choose to print their messages
from the specified cassette.
• Multi-sort Reception: You can
choose to make multiple copies of
setting (See P.79
Number of Copies (Function 83)”
• Memory Lock: You can choose to
lock their message in memory
).
“Setting the
).
RTI/CSI ABC hi
kkkkkkkkkkkkkkkkkkkk
C Enter RTI or CSI using the Quick
Dial key and the ten key pad.
RTI/CSI ABC Y/N
XYZ COMPANYkkkkkkkkk
Note
❒
Example: XYZ COMPANY
Reference
How to enter the characters, see
“Entering Characters”
P.172
D Press the
{
Yes
key.
}
.
RTI/CSI Y/N
STORE AS WILD CARD?
E Either:
5
Programming the List of Senders (Special Senders)
A Press the
access code
press
{
8
} {1}
{
Function
} {2} {2} {2}
{
2
and the
SETTING? Y/hi
PRINT LISTh/SEARCHi
Note
❒
At this time, you can print a
Programmed Special Senders
List by pressing W and the
{
}
key.
Start
B Press the
{
Yes
key.
}
} {6}
{
then enter
. Then
key.
}
Yes
Store this RTI as a wild card
A The
Otherwise
A The
{
{
Yes
No
}
key.
}
key.
F Select whether you set this RTI/
CSI as the special Senders for authorized reception using V or W.
(if yes: ON, if no: OFF)
SET AUTHORIZED Y/hi
iON OFF
81
Page 97

Other Features
5
G Press the
{
Yes
key.
}
SET # OF COPIES Y/hi
ON iOFF
H Select whether you set this RTI/
CSI as the special terminal for
Multi copy using V or W. (if yes:
ON, if no: OFF)
SET # OF COPIES Y/hi
iON OFF
I Press the
{
Yes
key.
}
SET MEM. LOCK Y/hi
ON iOFF
J Select whether you set this RTI/
CSI as the special terminal for
specified Memory Lock using
or W. (if yes: ON, if no: OFF)
SET MEM. LOCK Y/hi
iON OFF
K Press the
{
Yes
key.
}
SET CASSE SLCT Y/hi
ON iOFF
V
N Either:
To program another special
terminal
A Go to step C.
To finish
A The
Hints for programming the
-
special senders
You must specify the sender's identification code (see P.207
tings & Adjustments”
a little different from their phone
number.
To get the other party's identification,
call and ask for their CSI or RTI code.
Explain that you need the number
programmed into their fax machine
for identification purposes. Or, attempt a communication with their fax
machine and print out a Journal report (function 41, see P.93
(Function 41)”
tion under the RTI or CSI heading of
the report.
{
Function
). Read the identifica-
key.
}
“Initial Set-
) which could be
“Journal
L Select whether you set this RTI/
CSI as the special terminal for
specified Cassette Selection using
or W. (if yes: ON, if no: OFF)
V
SET CASSE SLCT Y/hi
iON OFF
M Press the
RTI/CSI ABC hi
kkkkkkkkkkkkkkkkkkkk
82
{
Yes
key.
}
Editing the RTI/CSI for the Special Terminals
A Press the
the access code
Then press
key.
{
Function
} {1}
{
8
{
SETTING? Y/hi
PRINT LISTh/SEARCHi
then enter
} {6}
} {2} {2} {2}
2
and the
{
Yes
.
}
Page 98

Programming a List of Senders to Treat Differently (Function 81)
B Press
When RTI/CSI you want to
change appears, press the
key.
to scroll through the list.
V
{
Yes
RTI/CSI CHANGE? Y/hi
XYZ COMPANY
C Edit the RTI or CSI and press the
key.
{
}
Yes
RTI/CSI ABC Y/N
XYZ COMPANY
D Either:
RTI/CSI Y/N
STORE AS WILD CARD?
Store this RTI as a wild card
SET # OF COPIES Y/hi
iON OFF
}
H Press the
{
Yes
key.
}
SET MEM. LOCK Y/hi
ON iOFF
I Select whether you set this RTI/
CSI as the special terminal for
Memory Lock using V or W. (if
yes: ON, if no: OFF)
SET MEM. LOCK Y/hi
iON OFF
J Press the
SET CASSE SLCT Y/hi
ON iOFF
{
Yes
key.
}
5
A The
Otherwise
A The
{
{
Yes
No
}
key.
}
key.
E Select whether you set this RTI/
CSI as the special terminal for
Authorized reception using V or
. (if yes: ON, if no: OFF)
W
SET AUTHORIZED Y/hi
iON OFF
F Press the
{
Yes
key.
}
SET # OF COPIES Y/hi
ON iOFF
G Select whether you set this RTI/
CSI as the special terminal for
Multi copy using V or W. (if yes:
ON, if no: OFF)
K Select whether you set this RTI/
CSI as the special terminal for
specified Cassette Selection using
or W. (if yes: ON, if no: OFF)
V
SET CASSE SLCT Y/hi
iON OFF
L Press the
{
Yes
key.
}
RTI/CSI ABC hi
kkkkkkkkkkkkkkkkkkkk
M Either:
To edit another special terminal
A Go to step B.
To finish
A The
{
Function
key.
}
83
Page 99

Other Features
Erasing the Special Terminal
5
A Press the
the access code
Then press
key.
{
Function
{
{
} {1}
8
then enter
} {6}
} {2} {2} {2}
2
and the
SETTING? Y/hi
PRINT LISTh/SEARCHi
B Press
the RTI/CSI you want to change
appears, press the
scroll the RTI/CSI. And
V
key.
}
{
Yes
RTI/CSI CHANGE? Y/hi
XYZ COMPANY
C Press the
D Press the
and
}
{
No
{
Function
}
{
Yes
key.
key.
}
{
Yes
.
}
84
Page 100

Forwarding
Forwarding
Using this feature, you can send fax
messages coming in from certain locations on to another fax machine.
The terminals that receive your forwarded messages are called “forwarding terminals”.
If other fax machines in your organization have this feature, you can use
Forwarding to set up distribution
chains for incoming fax messages.
To set up Forwarding, program your
machine as follows:
• Program the phone numbers of the
Forwarding Terminals that you
will pass on messages to, together
with the list of specified senders
for each number (Function 82).
• Specify the senders whose messages you want to forward (Ask the
sending party what their RTI/CSI
is. Or make a communication with
that terminal, print a Journal and
read off the RTI/CSI).
If the other party is using a machine made by another maker,
they may not be familiar with the
terms RTI or CSI. Explain that you
are interested in the telephone
number that they stored in the machine for identification purposes
(Function 82).
• Switch the Forwarding on (Function 62).
• Select the messages to forward
(Function 63).
• All messages from specified
senders.
messages that it forwards (Function 63).
• Select whether or not your machine transmits a forwarding mark
to be printed at the other end on
the top of each page of the printout
(Function 63).
Limitation
❒
If the RTI/CSI of the machine
sending you a fax is not the same
as any of those that you have programmed into this feature, the
message will not be forwarded.
Reference
RTI and CSI: see P.207
tings & Adjustments”
Journal: see P.93
41)”
.
Wild Cards: see P.90
“Journal (Function
“Initial Set-
.
“Wild Cards”
.
Programming the Forwarding Feature (Function 82)
This section shows you how to set up
your machine to forward incoming
fax messages to another location or
locations.
A Press the
the access code
Then press
key.
{
Function
} {2}
{
8
{
SETTING? Y/hi
PRINT LISTh/SEARCHi
then enter
} {6}
} {2} {2} {2}
2
and the
{
Yes
5
.
}
• All messages except those from
specified senders.
• Decide whether you want your
machine to automatically print
To print a list
A Press W.
85
 Loading...