

Page 1
Getting Started
1
Preparing to Print
2
Operating Instructions
Printer Reference
Setting Up the Printer Driver and Canceling a Print Job
3
Various Types of Printing
4
Troubleshooting
5
Using the Control Panel
6
Appendix
7
Read this manual carefully before you use this machine and keep it handy for future reference. For safe and correct use, be sure to read the
Safety Information before using the machine.
Page 2

Introduction
This manual contains detailed instructions and notes on the operation and use of this machine. For your
safety and benefit, read this manual carefully before using the machine. Keep this manual in a handy
place for quick reference.
Important
Contents of this manual are subject to change without prior notice. In no event will the company be liable for direct, indirect, special, incidental, or consequential damages as a result of handling or operating the machine.
Caution:
Use of controls or adjustments or performance of procedures other than those specified in this manual
might result in hazardous radiation exposure.
Two kinds of size notation are employed in this manual.
Trademarks
Microsoft
®
, Windows® and Windows NT® are registered trademarks of Microsoft Corporation in the
United States and/or other countries.
Adobe®, PostScript®, Acrobat® and PageMaker® are registered trademarks of Adobe Systems Incorporated.
AppleTalk, Apple, Macintosh and Mac OS are registered trademarks of Apple Computer, Incorporated.
IPS-PRINT™ Printer Language Emulation Copyright
©
2000, Oak Technology, Inc., All Rights Re-
served.
Other product names used herein are for identification purposes only and might be trademarks of their
respective companies. We disclaim any and all rights to those marks.
The proper names of the Windows operating systems are as follows:
• The product name of Windows
®
95 is Microsoft® Windows® 95
• The product name of Windows® 98 is Microsoft® Windows® 98
• The product name of Windows
• The product name of Windows
Microsoft
®
Windows® 2000 Server
®
Me is Microsoft® Windows® Millennium Edition (Windows Me)
®
2000 are as follows:
Microsoft® Windows® 2000 Professional
• The product name of Windows
Microsoft
Microsoft
• The product names of Windows Server
Microsoft
Microsoft
Microsoft
• The product name of Windows® NT are as follows:
Microsoft
®
Windows® XP Professional
®
Windows® XP Home Edition
®
Windows Server® 2003 Standard Edition
®
Windows Server® 2003 Enterprise Edition
®
Windows Server® 2003 Web Edition
®
Windows NT® Server 4.0
®
XP are as follows:
®
2003 are as follows:
Microsoft® Windows NT® Workstation 4.0
Notes:
Some illustrations in this manual might be slightly different from the machine.
Certain options might not be available in some countries. For details, please contact your local dealer.
Page 3

Manuals for This Machine
The following manuals describe the operational procedures of this machine. For
particular functions, see the relevant parts of the manual.
Note
❒ Adobe Acrobat Reader/Adobe Reader is necessary to view the manuals as a
PDF file.
❒ To view HTML manuals, a Web browser must be installed.
❖ Safety Information (paper)
Describes information about the safety precautions.
❖ Easy Operation Guide (paper/PDF file - CD-ROM
*1
)
Describes information about the control panel and basic operations.
❖ Operating Instructions (PDF file - CD-ROM
*1
)
Describes operations, functions, User Tools (initial setting, mode setting, etc.)
and troubleshooting.
❖ Network Guide (PDF file - CD-ROM
*1
)
Describes procedures for configuring the machine and computers in a network environment.
❖ Printer Reference (this manual)
Describes system settings and operations for the machine's printer function.
❖ Preparations for Use as a Printer (paper/PDF file - CD-ROM
*1
)
Describes procedures for connecting the Ethernet and USB cables to the machine.
❖ Manuals for DeskTopBinder Lite
DeskTopBinder Lite is a utility included on the CD-ROM labeled “Document
Management Utility”.
• DeskTopBinder Lite Setup Guide (HTML - CD-ROM
*2
)
Describes the installation of, and the operating environment for DeskTopBinder Lite in detail. This guide can be displayed from the [Setup] dialog
box when DeskTopBinder Lite is installed.
• DeskTopBinder Lite Introduction Guide (HTML - CD-ROM
*2
)
Describes operations of DeskTopBinder Lite and provides an overview of
its functions. This guide is added to the [Start] menu when DeskTopBinder
Lite is installed.
❖ Other manuals
• PostScript3 (PDF file - CD-ROM
*1
Provided on the CD-ROM labeled “Operating Instructions”
*2
Provided on the CD-ROM labeled “Document Management Utility”
*1
)
i
Page 4

TABLE OF CONTENTS
Manuals for This Machine ......................................................................................i
How to Read This Manual .....................................................................................1
1. Getting Started
Control Panel..........................................................................................................3
Display Panel .............................................................................................................5
Printer Settings...........................................................................................................6
2. Preparing to Print
Connecting the Machine .....................................................................................12
Requirements...........................................................................................................13
Using the Parallel interface Cable............................................................................13
Using IEEE 802.11b (Wireless LAN)........................................................................14
User Tools Menu (System Settings)...................................................................17
Interface Settings .....................................................................................................17
Network Configuration..............................................................................................18
Settings You Can Change with User Tools ..............................................................20
Installing the Software.........................................................................................24
Auto Run ..................................................................................................................24
Quick Install..............................................................................................................25
Installing RPCS Printer Driver..................................................................................27
Setting Up Options - RPCS......................................................................................32
Installing the PostScript3 printer driver ....................................................................33
Mac OS - Installing the PostScript3 printer driver and Utilities.................................40
Mac OS X - Installing the PostScript3 printer driver.................................................42
Installing the Printer Driver Using USB ....................................................................44
Installing DeskTopBinder Lite- SmartDeviceMonitor for Client ................................45
Installing SmartDeviceMonitor for Admin .................................................................46
Using Adobe PageMaker Version 6.0, 6.5, or 7.0.................................................... 47
Software and Utilities Included on the CD-ROM............................................... 48
Printer Drivers ..........................................................................................................48
Software and Utilities ...............................................................................................49
3. Setting Up the Printer Driver and Canceling a Print Job
Accessing Printer Properties..............................................................................51
Windows 95/98/Me - Accessing Printer Properties ..................................................51
Windows 2000/XP and Windows Server 2003 - Accessing Printer Properties ........ 52
Windows NT 4.0 - Accessing Printer Properties ......................................................54
Macintosh - Setting Up for Printing ..........................................................................56
Canceling a Print Job ..........................................................................................57
Canceling from a computer ......................................................................................57
Canceling on the control panel.................................................................................58
ii
Page 5

4. Various Types of Printing
Windows 95/98/Me - Various Types of Printing ................................................59
Duplex Printing.........................................................................................................59
Storing the Print File.................................................................................................60
Printing on custom sized paper ................................................................................61
Printing on paper with an undetectable size ............................................................62
When envelopes cannot be fed................................................................................63
Windows 2000/XP and Windows Server 2003 - Various Types of Printing ....65
Duplex Printing.........................................................................................................65
Storing the Print File.................................................................................................66
Printing on custom sized paper ................................................................................67
Printing on paper with an undetectable size ............................................................68
When envelopes cannot be fed................................................................................69
Windows NT 4.0 - Various Types of Printing.....................................................71
Duplex Printing.........................................................................................................71
Storing the Print File.................................................................................................72
Printing on custom sized paper ................................................................................73
Printing on paper with an undetectable size ............................................................74
When envelopes cannot be fed................................................................................75
5. Troubleshooting
Error & Status Messages on the Display Panel ................................................77
Printer does not Print ..........................................................................................79
Other Printing Problems .....................................................................................82
6. Using the Control Panel
Online Print Features Menu ................................................................................89
Adjusting Online Print Features .........................................................................91
Online Print Features Settings ...........................................................................92
General Features .....................................................................................................92
List / Test Print .........................................................................................................93
Host Interface...........................................................................................................95
PS Menu ..................................................................................................................96
Administrator Tools ..................................................................................................96
7. Appendix
Printing a PDF File Directly.................................................................................97
Printing Method ........................................................................................................97
Specifications.......................................................................................................99
Options...................................................................................................................100
INDEX....................................................................................................... 102
iii
Page 6

iv
Page 7

How to Read This Manual
Symbols
The following set of symbols is used in this manual.
Important
If this instruction is not followed, paper might be misfed, originals might be
damaged, or data might be lost. Be sure to read this.
Preparation
This symbol indicates information or preparations required prior to operating.
Note
This symbol indicates precautions for operation, or actions to take after abnormal operation.
Limitation
This symbol indicates numerical limits, functions that cannot be used together,
or conditions in which a particular function cannot be used.
Reference
This symbol indicates a reference.
[]
Keys that appear on the machine's display panel.
[]
Keys and buttons that appear on the computer's display.
{}
Keys built into the machine's control panel.
{}
Keys on the computer's keyboard
1
Page 8

2
Page 9

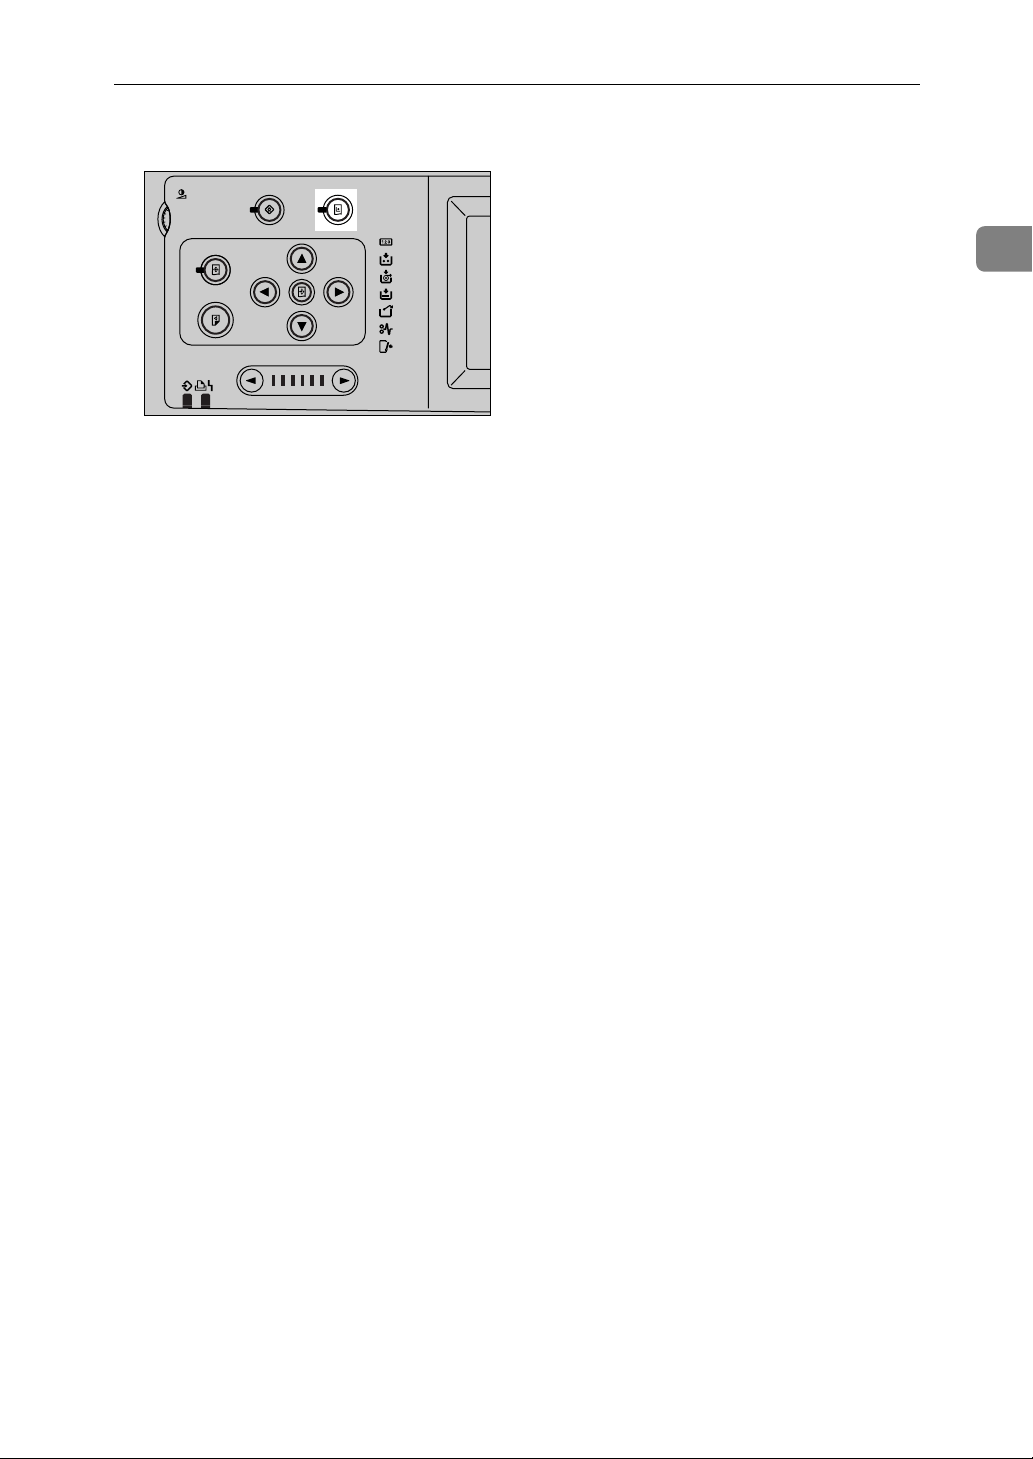
Control Panel
1. Getting Started
AVA001S
1. Screen contrast knob
Adjusts the brightness of the display panel.
2. {Image Position} key
Adjusts the position of printed images.
3. {User Tools} key
Press to change the default settings to
meet your requirements.
4. Position Setting keys
Adjusts the position of printed images.
5. {Printer Settings} key
Press to change the default settings of online printing.
6. Indicators
7. {Check Modes} key
Press this key to check settings.
8. {Program} key
Press to register frequently used settings,
or to recall registered settings.
9. {Clear Modes} key
Press to clear previously entered copy job
settings.
10. {Hold Data-in} key
Press to reject the online print temporarily.
11. {Master Making} mode select key
Press to select the master making mode.
12. {Auto Cycle} key
Press to make masters and prints in a single operation.
13. {Print} mode select key
Press to select the print mode.
14. Main power indicator
The main power indicator lights up when
the main power switch is turned on.
15. {Proof} key
Press to make a proof print.
Same as 22.
16. Data In indicator (Green)
• On: Master Making in progress
• Blinking: Data being received
• Off: Master Making and printing are
completed.
17. Error indicator (Red)
• On: An error has occurred. Master
Making and printing stops.
• Off: Normal status
18. Speed setting keys
Press to adjust the printing speed.
3
Page 10

1
Getting Started
19. {Initial position} key
Press to reset to the default image position.
20. Number keys
Press to enter the desired number of
prints and data for selected modes.
21. {Clear/Stop} key
•Clear
Press to delete a number entered.
•Stop
Press to stop a job in progress.
22. {Proof} key
Press to make a proof print.
Note
❒ Same as 15.
23. {Start} key
Press to start making masters or printing.
24. Operation switch
Press this switch again to return to the
ready state.
4
Page 11
Control Panel
Display Panel
The display panel shows machine status, error messages and function menus.
The function items displayed serve as selector keys. You can select or specify an
item by lightly pressing the key.
When you select or specify an item on the display panel, it is highlighted like
. Keys appearing as cannot be used.
Important
❒ A force or impact of more than 30 N (about 3 kgf) will damage the display
panel.
By default the screen is displayed when you the power is on.
Common Key Operations
The display panel shows the printer status, error message, and function menu.
1
1. Machine status or messages
Displays current machine condition.
2. Number of prints made.
3. [End Printing] key
Press to cancel the current master making
or printing. See p.7 “Selecting the Cycle
Setting Mode”
AVA005S
4. [Job Reset] key
Press to cancel the current job.
See p.57 “Canceling a Print Job”
5
Page 12
1
Getting Started
❖ Key list
[OK] Acknowledges a selected function or entered values, and then returns
to the previous display
[Cancel] Deletes a selected function or entered values, and then returns to the
previous display
[UPrev.], [TNext] Moves to the previous page or the next page when all functions cannot
be displayed on one page.
[OK] [Yes] Closes displayed messages.
[Clear] Clears entered values and does not change the settings.
[Exit] Returns to the previous display.
Printer Settings
It is possible to change the paper size and cycle setting mode on the Printer Settings menu.
Selecting the Online Print Paper Size
This machine automatically detects the paper size, however, there are cases
where the machine cannot detect the size of the paper. In these cases, follow the
procedure below and manually make the desired settings.
A Press the {Printer Settings}key on the printer.
AVA003S
B Press [Tray Paper Size: Paper Feed Tray].
C Select the paper size, and then press [OK].
Important
❒ Select a size that is bigger than the contents to be printed. If the contents
are bigger than the paper size, it will cause the roller to get dirty.
D Press [Exit].
6
Page 13
Control Panel
Selecting the Cycle Setting Mode
You can select an operation mode for master making and printing online.
A Auto Cycle
AJK172S
Master making and printing are completed continuously.
If printing is suspended using the {Clear/Stop} on the control panel, it stops in
the print mode.
In this case, it is not possible to switch to the master making mode unless
printing is completed.
To resume master making from the next page, press the [End Printing] on the
display and terminate the printing operation.
B Original Page Cycle
1
AJK175S
Operations stop briefly after both master making and printing of each page
are performed.
After printing, if further data remains waiting for master making, the printer
switches back to master making mode. Press the {Start} key when the printer
has stopped to resume master making from the next page. If no further data
remains, the printer will end the operation.
Note
❒ If further data remains waiting for master making, the printer switches to
master making mode after making each print. However, if you need additional printing of the preceding original, switch the machine to print mode,
and then press the {Start} key.
7
Page 14

1
Getting Started
C Master Cycle
AJK174S
There is a belief pause between completion of the master and beginning the
print.
The machine briefly stops after master making, but does not pause between
printing and master making of the following page. When master making is
concluded, the machine pauses again before switching to print mode.
Press the {Start} on the control panel to begin printing.
Note
❒ Since it switches to the print mode when master making concludes, to pro-
ceed to the master making of the next page without printing the master
making page, press the [End Printing] on the display and conclude the print
mode.
D Master/Print Cycle
AJK173S
Operation stops briefly after each master making and print.
After printing, if further data remains waiting for master making, the printer
will switch back to the master making mode.
Press the {Start} on the control panel to start printing. It switches to the master
making mode with printing in the concluded state.
Press the {Start} key when the printer has stopped to resume master making
from the next page. If no further data remains, the printer will end the operation.
Note
❒ If further data remains waiting for master making, the printer will switch
to the master making mode at the end of the print. However, if you need
additional printing still need to execute additional print after the end of the
preceding print, switch the machine to the print mode, and then press the
8
{Start} key.
Page 15
A Press the {Printer Settings} key.
AVA003S
B Press the [Cycle Setting] .
C Select the Cycle Setting Mode, and then press [OK].
D Press the [Exit].
Control Panel
1
9
Page 16

1
Getting Started
10
Page 17
2. Preparing to Print
This section gives instructions for connecting the printer and computer, configuring the printer, and installing software.
❖ When operating the printer with a USB or a parallel connection
• Connect the printer and computer using a USB or a parallel connection.
Reference
For details about connection using the USB, see Preparations for Use as a
Printer.
For details about connection using the parallel cable, see p.12 “Connecting the Machine”.
• Install a printer driver from the CD-ROM labeled "Printer Drivers and Util-
ities".
Reference
For details, see p.24 “Installing the Software”.
❖ When operating the printer under a network environment
• Configure the network using the machine's control panel.
Reference
For details, see p.17 “User Tools Menu (System Settings)”.
For details about connection using Ethernet, see Preparations for Use as a
Printer.
For information about connection using wireless LAN, see p.12 “Connecting the Machine”.
• Install a printer driver and other utilities from the CD-ROM labeled "Print-
er Drivers and Utilities".
Reference
For details, see p.24 “Installing the Software”.
Note
❒ “Network environment” describes a situation where the printer is connected
to a computer via wireless LAN.
❒ The IEEE 1284 parallel board for parallel connection and the IEEE 802.11b in-
terface unit for wireless LAN connection cannot be used at the same time.
❒ Wireless LAN and parallel connection are optional functions.
11
Page 18
2
Preparing to Print
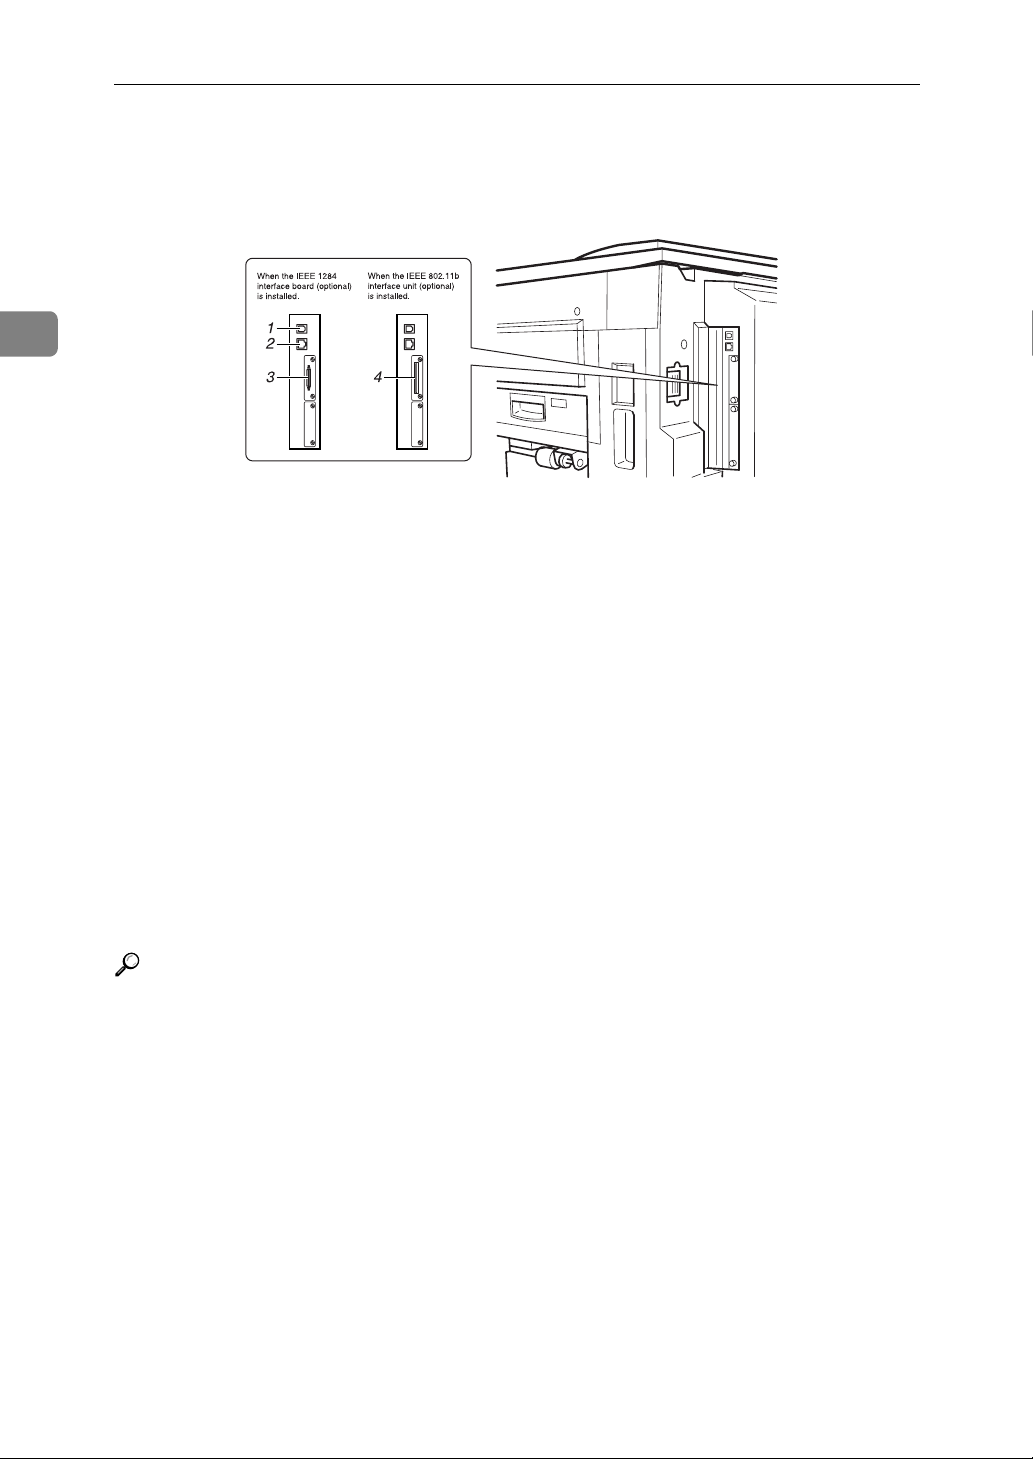
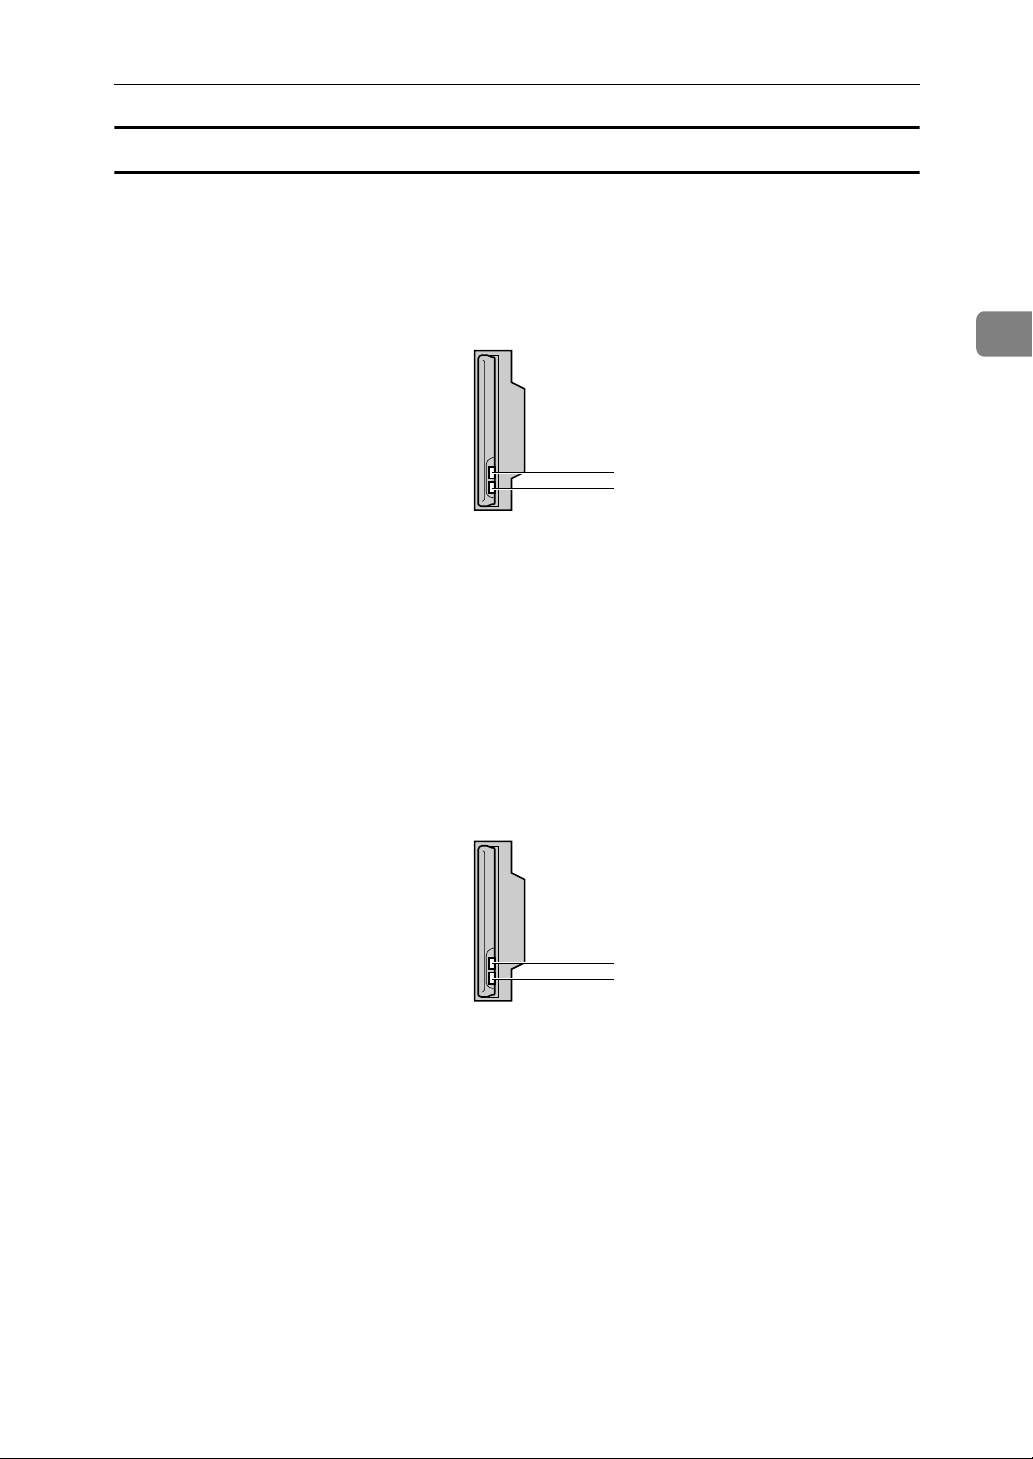
Connecting the Machine
AJK204S
1. USB interface port
Use a USB interface cable to connect the
printer to the host computer.
2. Ethernet interface port
Use a network interface cable to connect
the printer to a network.
3. Parallel interface port
Connector for the parallel interface cable
used when connecting to a computer.
4. IEEE 802.11b (wireless LAN) in-
terface port
Use to install the IEEE 802.11b interface
unit for wireless LAN connection to the
network.
Reference
For details about connection using
USB and Ethernet, see Preparations
for Use as a Printer.
12
Page 19
Connecting the Machine
Requirements
Before using this printer, make sure all environmental and electrical requirements are met. Connect the printer to the host computer using the parallel interface port, network interface unit, or both.
Make sure all interface cables, connectors, and electrical outlets necessary to attach the printer to the host computer or network are at hand.
Important
❒ The interface cable is not supplied. It is your responsibility to prepare the in-
terface cable appropriate for the computer that you are using.
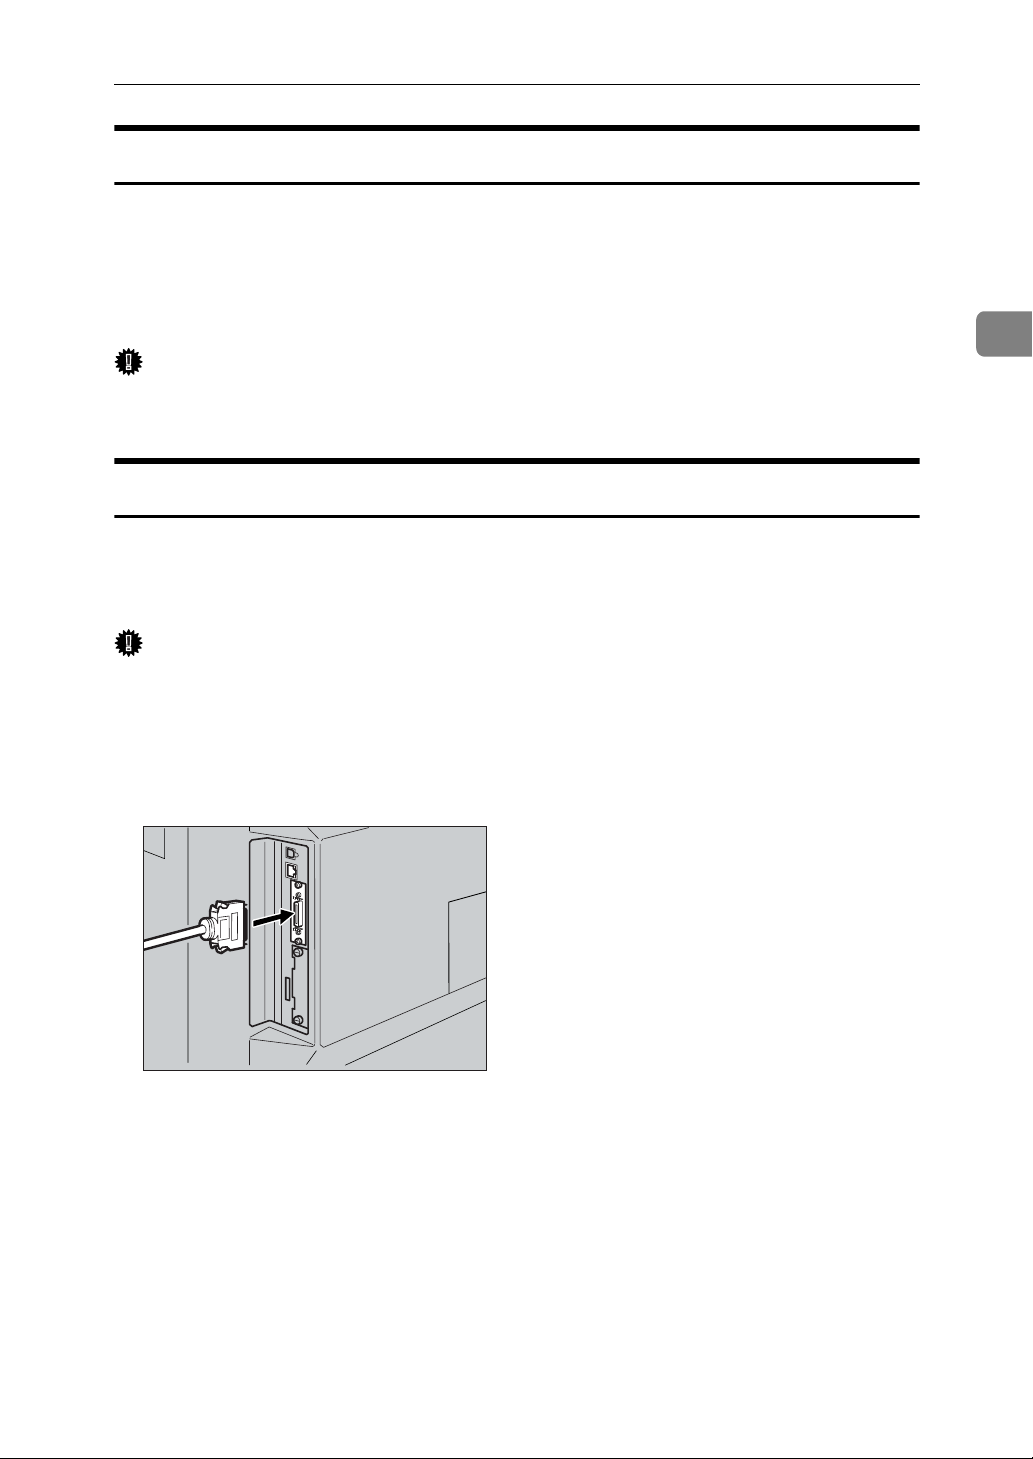
Using the Parallel interface Cable
Connect the printer to the host computer using a parallel interface cable compliant with IEEE 1284 (available separately).
Follow these steps to connect the printer to the host computer.
Important
❒ Before connecting an interface cable between the printer and a computer,
make sure that the printer is not operating, and then turn off the main power
switches of the printer and the computer.
2
A Attach the parallel interface cable to the parallel interface connector of the
printer, and then secure the parallel interface cable.
ACV014S
B Attach the other end of the parallel interface cable to the port of the compu-
ter. Secure the interface cable.
13
Page 20
2
Preparing to Print
Using IEEE 802.11b (Wireless LAN)
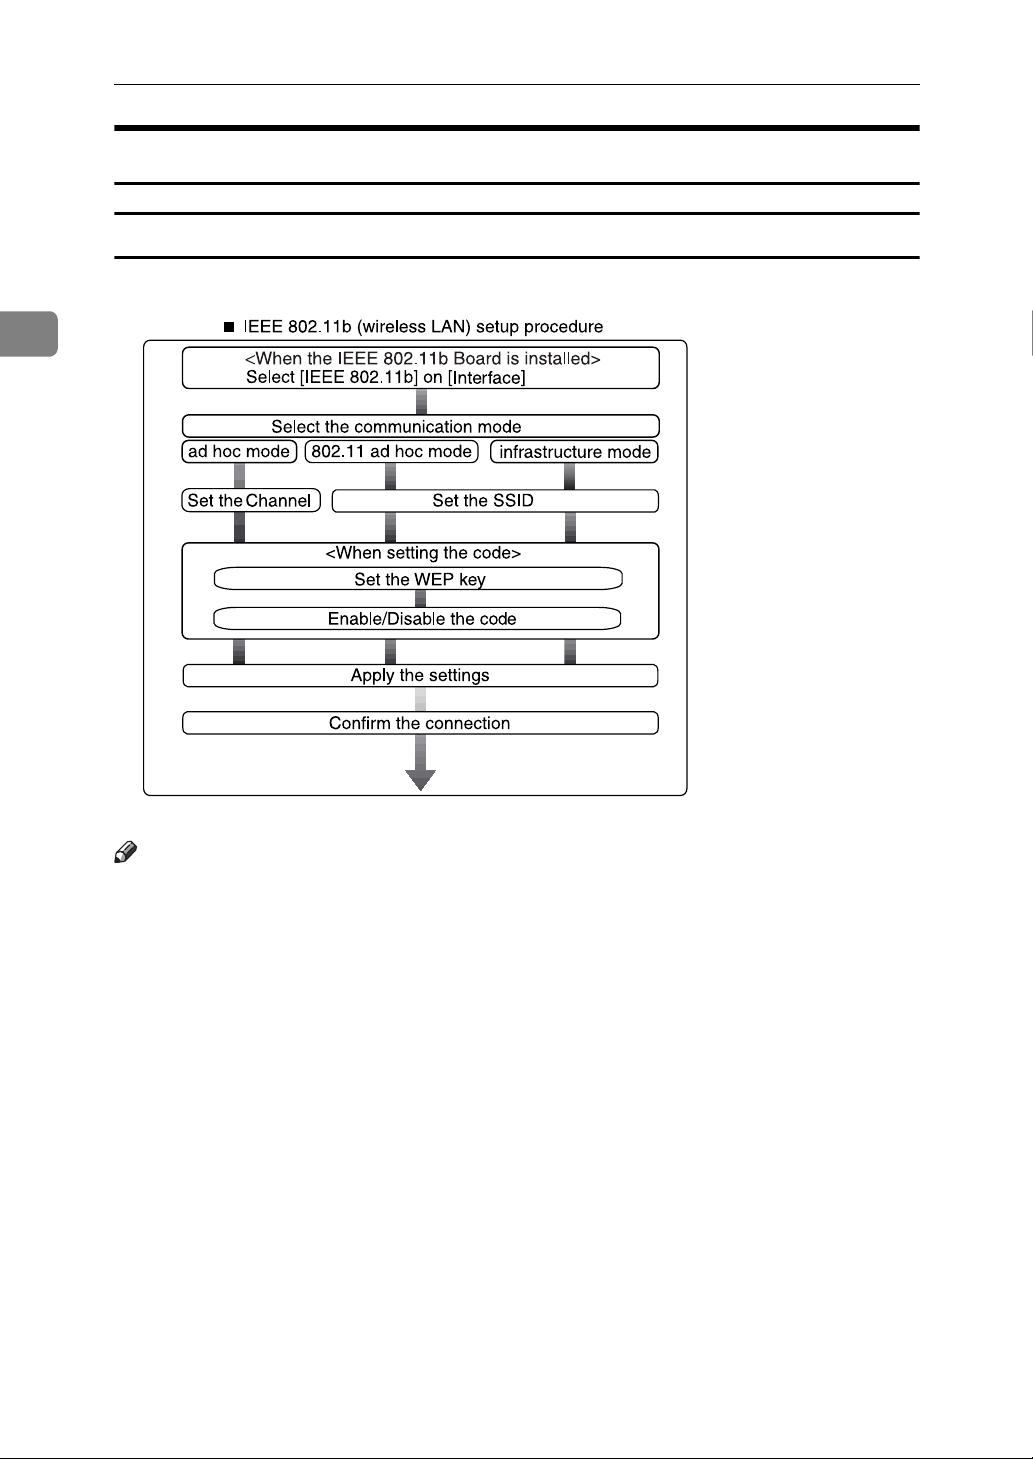
Setting IEEE 802.11b (Wireless LAN)
ACV010S
Note
❒ Select [802.11 Ad hoc] as the communication mode when connecting Windows
XP as a wireless LAN client using Windows XP standard driver or utilities, or
when not using the infrastructure mode.
14
Page 21
Confirming the Connection
A Make sure the LED of the IEEE 802.11b card is lit.
❖ When using in infrastructure mode
1
2
Connecting the Machine
2
ZGDH600J
1. If [LAN Type] on the [Interface Set-
tings]/[Network] screen is not set to
[IEEE 802.11b], this LED does not
light, even if the main power is on.
2. If the printer is connected proper-
ly to the network, the LED will be
green in infrastructure mode. If the
LED is blinking, the printer is
searching for devices.
❖ When using in ad hoc mode/802.11 ad hoc mode
1. If the IEEE 802.11b card is work-
ing, the LED is orange.
2. If the printer is connected proper-
ly to the network, the LED is green
in ad hoc mode or 802.11 ad hoc
mode. If the LED is blinking, the
printer is searching for devices. The
LED will light after a few seconds.
1
2
ZGDH600J
15
Page 22
Preparing to Print
B Print the configuration page to verify settings.
Reference
For details, see p.93 “Printing the configuration page”.
Checking the machine's radio wave status
2
When using the machine's infrastructure mode, you can check its radio wave
status on the control panel.
Note
❒ To check the radio wave status, press [IEEE 802.11b] under [LAN Type] on the
[Network] screen.
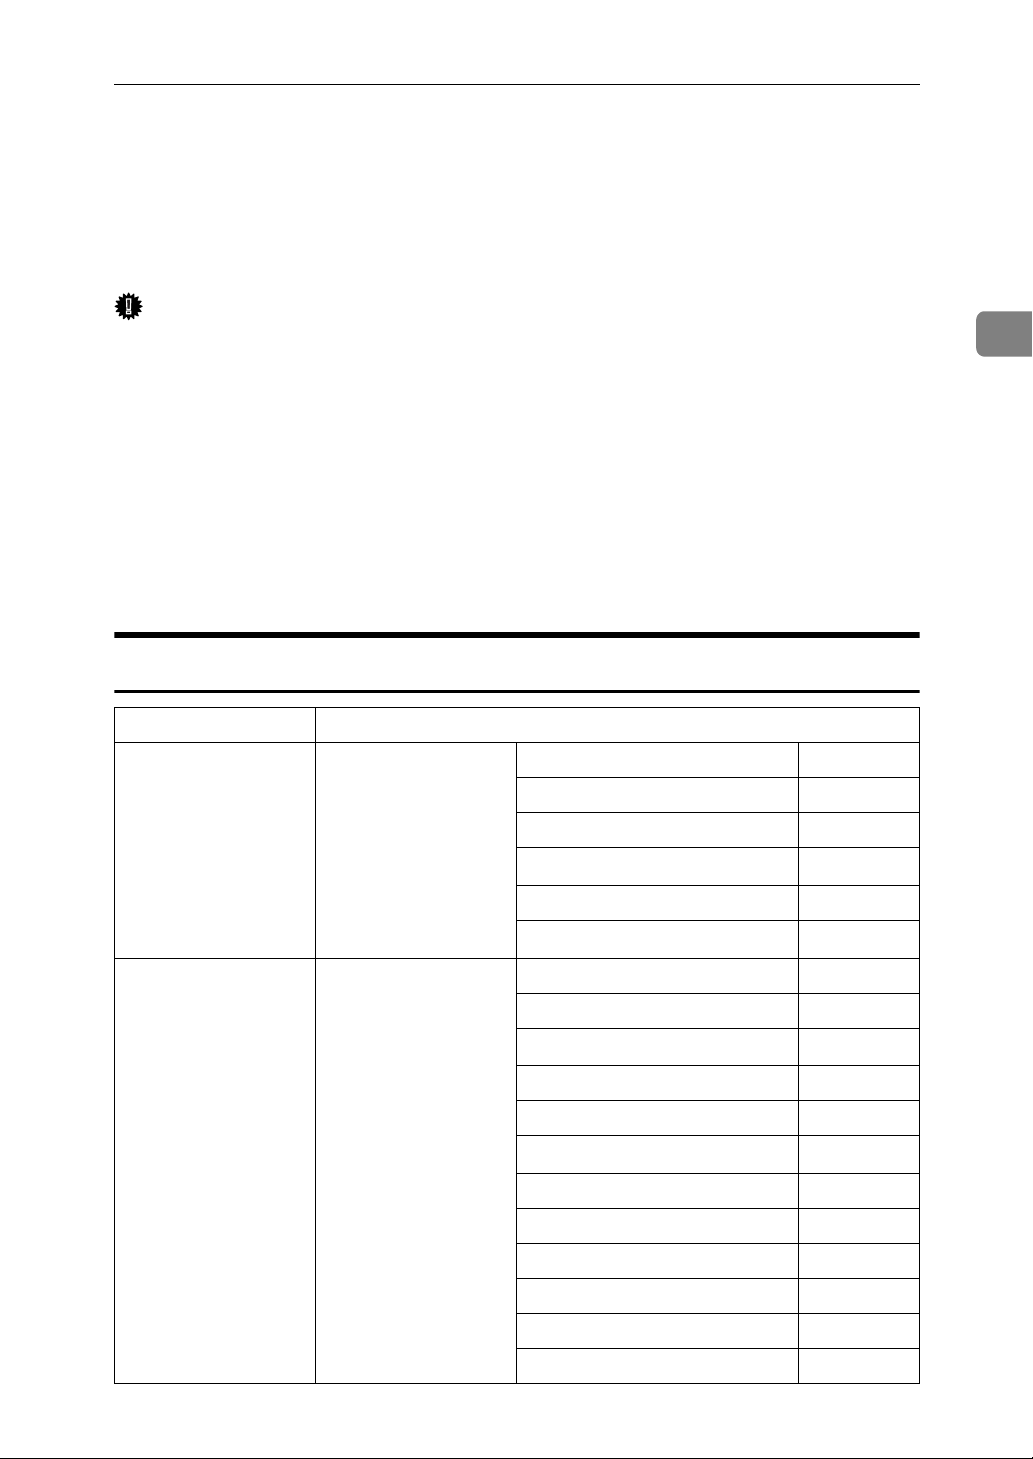
A Press the {User Tools} key.
AVA002S
B Press [System Settings].
C Press [Interface Settings].
D Press [IEEE 802.11b].
E Press [Wireless LAN Signal].
The machine's radio wave status appears.
F After checking radio wave status, press [Exit].
G Press the {User Tools} key to return to the User Tools menu.
16
Page 23
User Tools Menu (System Settings)
User Tools Menu (System Settings)
This section describes the network settings you can change with User Tools (System Settings). Make settings according to functions you want to use and the interface to be connected.
Important
❒ These settings should be made by the systems administrator, or after consult-
ing with the systems administrator.
❖ Viewing the Information Displayed in the List
$ These items must be set to use the function. Be sure to set them before attempting to use the corresponding function.
For details about settings, see p.20 “Settings You Can Change with User
Tools”
❍ These items must be set if required.
For details about settings, see "Settings You Can Change with User Tools",
Network Guide.
2
Interface Settings
Interface Settings
Ethernet Interface Set-
tings/Network
See p.20 “Interface
Settings/Network”.
IEEE 802.11b (wireless LAN)
Interface Settings/Network
See p.20 “Interface
Settings/Network”.
Interface Settings/IEEE 802.11b
See p.22 “Interface
Settings/IEEE
802.11b”.
IP Address $
Gateway Address ❍
NW Frame Type ❍
Effective Protocol
Ethernet Speed ❍
LAN Type
IP Address $
Gateway Address ❍
Effective Protocol
NW Frame Type ❍
*2
Ethernet Speed ❍
LAN Type
Communication Mode $
SSID Setting ❍
*1
*2
*1
*2
$
$
$
$
Channel ❍
WEP (Encryption) Setting ❍
Wireless LAN Signal ❍
Transmission Speed ❍
17
Page 24
2
Preparing to Print
*1
Check [Active] is selected for TCP/IP.
*2
Appears when the IEEE 802.11b interface unit is installed.
If Ethernet and IEEE 802.11b (wireless LAN) are both connected to the printer, the
selected interface has priority.
Network Configuration
Any change you make with User Tools remains in effect even if the main power
switch or operation switch is turned off, or if the {Clear Modes} key is pressed.
Configuring the network using the control panel
Note
❒ Operations for System Settings are different from normal operations. After
using User Tools, press the {User Tools} key to exit.
❒ If the key operator code has been set, the key operator code entry screen ap-
pears. Enter the code, and then press the [OK] key. For details about the key
operator code, see Operating Instructions.
A Press the {User Tools} key.
AVA002S
B Press [System Settings].
C Press [Interface Settings].
D Select the setting you want to change, and then press [OK].
E Change the setting, and then press [OK].
Note
❒ To cancel changes made to settings and return to the System Settings
menu, press [Cancel].
F Press [Exit].
G Press the {User Tools} key.
Note
18
❒ You can also exit by pressing [Exit] on the User Tools main menu.
Page 25
User Tools Menu (System Settings)
Configuring the network using other utilities
In addition to the control panel, Web Image Monitor and SmartDeviceMonitor
for Admin can also be used for configuring the network. The following table
shows available settings:
Note
❒❍ Indicates printer settings can be changed.
❒ - Indicates the setting cannot be changed from that device.
2
Web Im-
Name on the control panel
Interface Network DHCP ❍❍❍
IP Address ❍❍❍
Subnet Mask ❍❍❍
Gateway Address ❍❍❍
NW
Frame
Type
Active
Protocol
Ethernet Speed - - -
Auto ❍ - ❍
EthernetII ❍ - ❍
Ethernet802.2 ❍ - ❍
Ethernet802.3 ❍ - ❍
EthernetSNAP ❍ - ❍
TCP/IP -
NetWare ❍
SMB ❍❍❍
AppleTalk ❍❍❍
age Mon-
itor
SmartDe-
viceMon-
itor for
Admin
*1
❍
*2
❍
telnet
❍
❍
LAN
Type
IEEE
802.11b
*1
You can make the TCP/IP settings if SmartDeviceMonitor for Admin is communicating with the printer using IPX/SPX.
*2
You can make the IPX/SPX settings if SmartDeviceMonitor for Admin is communi-
Comm. Mode ❍ - ❍
Channel ❍ - ❍
Trans. Speed - - ❍
SSID ❍ - ❍
WEP Encryption ❍ - ❍
WEP Key ❍ - ❍
Ethernet ❍ - ❍
IEEE 802.11b ❍ - ❍
cating with the printer using TCP/IP.
19
Page 26

2
Preparing to Print
Settings You Can Change with User Tools
Interface Settings/Network
❖ IP Address
Before using this machine in the network environment, you must configure
the IP address and subnet mask.
•Auto-Obtain (DHCP)
•Specify
When you select [Specify], enter the [IP Address]and [Sub-net Mask] as
“xxx.xxx.xxx.xxx”(“x” indicates a number).
• IP Address: 011.022.033.044
• Sub-net Mask: 000.000.000.000
Note
❒ Default: Auto-Obtain (DHCP)
❒ When you select [Specify], be sure not to set the same [IP Address] as that of
another machines on the network.
❒ The physical address (MAC address) also appears.
❖ Gateway Address
A gateway is a connection or interchange point between two networks. Configure the gateway address for the router or host computer used as a gateway.
• Gateway Address:000.000.000.000
Note
❒ Default: 000.000.000.000
❖ Effective Protocol
Select the protocol to use in the network.
• TCP/IP:Effective/Invalid
• NetWare:Effective/Invalid
• SMB:Effective/Invalid
• AppleTalk:Effective/Invalid
Note
❒ Default: TCP/IP: Effective, NetWare: Effective, SMB: Effective, AppleTalk: Effec-
tive
20
Page 27

❖ NW Frame Type
Select the frame type when you use NetWare.
•Auto Select
•Ethernet II
• Ethernet 802.2
• Ethernet 802.3
User Tools Menu (System Settings)
• Ethernet SNAP
Note
❒ Default: Auto Select
❖ Ethernet Speed
Set the access speed for networks.
Select a speed that matches your network environment. [Auto Select] should
usually be selected.
•Auto Select
• 100Mbps Fixed
• 10Mbps Fixed
Note
❒ Default: Auto Select
❖ LAN Type
When you have installed the optional IEEE 802.11b interface unit, select interface, IEEE 802.11b (wireless LAN) or Ethernet.
•Ethernet
• IEEE 802.11b
2
Note
❒ Default: Ethernet
❒ Appears when the optional IEEE 802.11b interface unit is installed.
❒ If Ethernet and IEEE 802.11b (wireless LAN) are both connected to the ma-
chine, the selected interface takes precedence.
21
Page 28

2
Preparing to Print
Interface Settings/IEEE 802.11b
Preparation
You must install the IEEE 802.11b interface unit into the printer.
Note
❒ Be sure to make all settings.
❖ Communication Mode
Specifies the communication mode of the wireless LAN.
• 802.11 Ad hoc
•Ad hoc
• Infrastructure
Note
❒ Default: 802.11 Ad hoc
❖ SSID Setting
Specifies SSID to distinguish the access point in infrastructure mode or 802.11
ad hoc mode.
Limitation
❒ The characters that can be used are ASCII 0x20-0x7e (32 bytes).
Note
❒ Default: blank (ASSID)
❒ If blank is specified in 802.11b ad hoc mode or ad hoc mode, “ASSID” ap-
pears.
❖ Channel
Specifies a channel when you select 802.11b ad hoc mode or ad hoc mode.
Note
❒ Default: 11
❒ The following channels are available:
• Metric version: 1-13
• Inch version: 1-11
22
Page 29

User Tools Menu (System Settings)
❖ WEP (Encryption) Setting
Specifies the encryption of the IEEE 802.11b (wireless LAN). If this is set to
[Active], you must enter the WEP key.
• VWEP
•Active
•Inactive
• VEncryption
10 alphanumeric characters must be entered for 64 bit, 26 characters for 128
bit.
Note
❒ Default: Inactive
❖ Wireless LAN Signal
Shows the radio wave conditions of the access point connected in infrastructure mode.
Note
❒ Radio wave status is displayed when you press [Wireless LAN Signal].
2
❖ Transmission Speed
Specifies the communication speed of the IEEE 802.11b (wireless LAN).
•Auto
• 11Mbps Fixed
• 5.5Mbps Fixed
•2Mbps Fixed
•1Mbps Fixed
Note
❒ Default: Auto
❖ Return to Defaults
You can return the IEEE 802.11b (wireless LAN) settings to their defaults.
•No
•Yes
23
Page 30

2
Preparing to Print
Installing the Software
This manual assumes you are familiar with general Windows procedures and
practices. If you are not, see the operating instructions that come with Windows
for details.
The procedure for installing the printer driver depends on the connection with
the computer. With a parallel or Ethernet connection, Quick Install is also available. With a wireless LAN connection, check the printer and computer are communicating properly and then install the printer driver by following the
procedure used for an Ethernet connection.
• For details about the parallel/network connection, see p.25 “Quick Install” or
p.27 “Installing RPCS Printer Driver”.
• For details about the USB connection, see p.44 “Installing the Printer Driver
Using USB”.
Auto Run
Inserting the CD-ROM into the CD-ROM drive starts the installer automatically.
The installer helps you install the printer drivers and software easily.
Note
❒ If “plug and play” starts, click [Cancel] in [New Hardware Found], [Device Drive]
or [Found New Hardware Wizard] dialog box, and then insert the CD-ROM. The
[New Hardware Found], [Device Driver Wizard] or [Found New Hardware Wizard] dialog box appears depending on the system version of the Windows
95/98/Me/2000/XP, Windows Server 2003, or Windows NT 4.0.
❒ Auto Run might not work automatically with certain operating system set-
tings. If this happens, launch "Setup.exe", located on the CD-ROM root directory.
❒ If you want to cancel Auto Run, hold down the {SHIFT} key (if your operating
system is Windows 2000/XP or Windows Server 2003, hold down the left
{SHIFT} key) while inserting the CD-ROM. Keep the {SHIFT} key held down
until the computer has finished accessing the CD-ROM.
Limitation
❒ If your operating system is Windows 2000/XP, Windows Server 2003, or
Windows NT 4.0, installing software using Auto Run requires Administrator
permission. When you install software using Auto Run, log on using an account that has Administrators permission.
24
Page 31

Installing the Software
The following table shows the printer drivers and software that can be installed
using Auto Run:
Auto Run
Quick Install Add Printer and
Network connection
with TCP/IP
RPCS Printer Driver ❍❍❍
PostScript3 Printer
Driver
SmartDeviceMonitor
for Admin
SmartDeviceMonitor
for Client
*1
Available operating systems are: Windows 95/98/Me/2000/XP, Windows Server
2003, and Windows NT 4.0. Auto Run is unavailable with Macintosh.
❍❍
Parallel connection
*1
Utility Wizard
❍
❍
Quick Install
Auto Run will start the installer automatically when you insert the CD-ROM
into the CD-ROM drive. By selecting Quick Install, you can easily install the
RPCS printer driver. SmartDeviceMonitor for Client can also be installed provided the printer and computer are connected via the network.
2
Preparation
Before starting installation, close all documents and applications.
Limitation
❒ The following conditions are required:
• Windows 95/98/Me/2000/XP, Windows Server 2003, or Windows NT 4.0
For network connections:
• The printer must be connected to the network using an Ethernet cable.
• TCP/IP protocol must be configured.
• The IP address must be assigned to both printer and computer.
• The IEEE 802.11b interface unit is installed and the connection is properly
made.
For parallel connections:
• The printer must be connected to the computer using a parallel cable.
• Bidirectional transmission must be enabled.
25
Page 32

2
Preparing to Print
Important
❒ If your system is Windows NT 4.0, we recommend that you upgrade the Win-
dows NT 4.0 operating system to Service Pack 4 or later before installing the
RPCS printer driver. Contact your Windows retailer for details about latest
versions.
Note
❒ When the printer is connected to the computer using the USB interface, Quick
Install cannot be used. See p.44 “Installing the Printer Driver Using USB”.
A Quit all applications running.
B Insert the CD-ROM into the CD-ROM drive.
Auto Run will start the installer.
C Select a language for the interface, and then click [OK].
The following languages are available: Deutsch (German), English (English),
Espanol (Spanish), Francais (French), Italiano (Italian), Nederlands (Dutch),
Russian (Russian)
The default interface language is English.
D Click [Quick Install].
The software license agreement appears in the [License Agreement] dialog box.
E After reading through the agreement, click [I accept the agreement.] to agree,
and then click [Next].
F Click the printer model you are using when the [Select Printer] dialog box ap-
pears.
Note
❒ For TCP/IP network connection, select the printer whose IP address is dis-
played in the [Connect To] column.
❒ For parallel connection, select the printer whose printer port is displayed
in the [Connect To] column.
G Click [Install].
26
Page 33

Installing the Software
H Follow the instructions on the screen.
A message prompting you to restart your computer may appear. To complete
installation, restart your computer.
Important
❒ If the printer has options installed, you should make settings for them us-
ing the printer driver. See p.32 “Setting Up Options - RPCS”.
Note
❒ If you want to change the printer name, follow the procedure below:
• Windows 95/98/Me/2000, and Windows NT 4.0
On the [Start] menu, point to [Settings], and then click [Printers]. The
[Printers] window appears. Right-click the printer icon, and then click
[Rename].
• Windows XP Professional and Windows Server 2003
On the [Start] menu, click [Printers and Faxes]. The [Printers and Faxes]
window appears. Right-click the printer icon, and then click [Rename].
• Windows XP Home Edition
On the [Start] menu, click[Control Panel]. Click [Printers and Other Hard-
ware], and then click [Printers and Faxes]. The [Printers and Faxes] window
appears. Right-click the printer icon, and then click [Rename].
Installing RPCS Printer Driver
This section gives basic instructions for installing the RPCS printer driver without using Quick Install. Follow the procedures below, as appropriate.
Reference
See p.25 “Quick Install” to install the RPCS printer driver using Quick Install.
2
Limitation
❒ If your operating system is Windows 2000/XP, Windows Server 2003, or
Windows NT 4.0, installing a printer driver using Auto Run requires Administrator permission. When you install a printer driver using Auto Run, log on
using an account that has Administrator permission.
❒ SmartDeviceMonitor for Client, included on the CD-ROM, must be installed.
Important
❒ If your operating system is Windows NT 4.0, we recommend that you up-
grade the Windows NT 4.0 operating system to Service Pack 4 or later before
installing the printer drivers. Contact your Windows retailer for details about
latest versions.
27
Page 34

2
Preparing to Print
Note
❒ If you want to share the printer on a Windows 2000/XP, Windows Server
2003, or Windows NT 4.0 platform, use the [Sharing] tab in the [Printer Proper-
ties] dialog box to specify the additional driver (alternate driver). For details,
see the operating instructions that come with Windows 2000/XP, Windows
Server 2003, or Windows NT 4.0.
❒ When prompted for the additional driver (alternate driver) location, select the
following folders on the CD-ROM:
• Windows 95/98/Me
RPCS: \DRIVERS\RPCS\WIN9X_ME\(Language)\DISK1\
• Windows 2000/XP and Windows Server 2003
RPCS: \DRIVERS\RPCS\WIN2K_XP\(Language)\DISK1\
• Windows NT 4.0
RPCS: \DRIVERS\RPCS\ NT4\(Language)\DISK1\
A Quit all applications running.
B Insert the CD-ROM into the CD-ROM drive.
Auto Run will start the installer.
C Select a language for the interface, and then click [OK].
The following languages are available: Deutsch (German), English (English),
Espanol (Spanish), Francais (French), Italiano (Italian), Nederlands (Dutch),
Russian (Russian)
The default interface language is English.
D Click [RPCS Printer Driver].
The software license agreement appears in the [License Agreement] dialog box.
E After reading through the agreement, click [I accept the agreement.] to agree,
and then click [Next].
F Select the printer drivers you want to install when the [Select Program] dia-
log box appears, and then click [Next].
G Select the model of the printer you are using.
To change the printer name, change it in the [Change settings for 'Printer Name']
box.
H Double-click the printer name to display the printer settings.
28
Page 35

I Add the new port from SmartDeviceMonitor.
Selecting the port type
A Click [Port:], and then click [Add].
B Click [SmartDeviceMonitor], and then click [OK].
C Select the printer you want to use.
❖ TCP/IP
A Click [TCP/IP], and then click [&Search].
Available machines will be listed.
B Select the printer you want to use, and then click [OK].
Note
❒ Machines that respond to an IP broadcast from the computer will be
displayed. To print to a printer not listed here, click [Specify Address -
TCP/IP], and then enter the IP address or host name.
❒ Part of the printer's IP address is used for the port name. Under Win-
dows 95/98/Me, avoid using an address that is partially similar to
one already in use. For example , if “192.168.0.2” is already used,
“192.168.0.2xx” cannot be used. Similarly, if “192.168.0.20” is already
used, “192.168.0.2” cannot be used.
Installing the Software
2
❖ NetBEUI
A Click [NetBEUI], and then click [&Search].
A list of machines that can be used with NetBEUI appears.
B Select the printer you want to use, and then click [OK].
Note
❒ NetBEUI cannot be used under Windows XP or Windows Server 2003.
❒ Machines that respond to a broadcast from the computer will be dis-
played. To print to a printer not listed here, click [Specify Address -
TCP/IP], and then enter the NetBEUI address. Confirm the NetBEUI
address on the network is on the configuration page. The NetBEUI
address appears as “\\RNPxxxx\xxx” on the configuration page.
Enter the machine's network path name in the form of "%%Computer name\Share name". Do not enter "\\" but "%%" as head characters.
❒ You cannot print to machines beyond routers.
29
Page 36

2
Preparing to Print
❖ IPP
A Click [IPP].
The [IPP Setting] dialog box appears.
B To specify the IP address of the printer, enter "http://machine's-ip-
address/printer" or "ipp://machine's-ip-address/printer" in the
[Printer URL] box.
(Example: IP address is 192.168.15.16)
http://192.168.15.16/printer
ipp://192.168.15.16/printer
C If necessary, enter the names to distinguish the printer in the [IPP Port
Name] box. Enter a different name to those of any existing port name.
If you do not do this, the address entered in the [Printer URL] box will
be set as the IPP port name.
D If a proxy server and IPP user name are used, click [&Detailed Settings],
and then configure the necessary settings.
Note
❒ For details, see SmartDeviceMonitor for Client Help.
E Click [OK].
J Make sure the location for the selected printer appears after [Port:].
K Configure the user code and default printer as necessary.
❖ User Code
User codes are eight digit codes that allow you to keep track of printing done
under each code. To use this feature, the network administrator should assign
user codes and inform users of them before they install the printer driver.
Use the following procedures to enter a user code for registration:
• For the PostScript3 printer driver, enter the user code on the [Job Log]
tab in the printer properties dialog box.
• For the RPCS printer driver, click the [Printer Configuration...] button on the
[Print Settings] tab in the [Printer Properties] dialog box. Click the [User Code...]
button. A dialog box appears. Enter the user code in the dialog box.
Note
❒ When using the RPCS printer driver on Windows 95/98/Me, the user code
cannot be changed once it is entered. To change an entered user code, uninstall the printer driver, reinstall it, and then enter a new user code.
Reference
For details, see Operating Instructions.
❖ Default Printer
Select the [Default Printer] check box to set the printer as the default printer.
L Click [Continue] to start printer driver installation.
M Follow the instructions on the screen.
30
Page 37

Installing the Software
Changing port settings
Follow these steps to change SmartDeviceMonitor for Client settings, such as the
proxy server settings or IPP URL.
Note
❒ There are no port settings for NetBEUI.
A In the [Printers] window, click the icon of the printer you want to use. On
the [File] menu, click [Properties].
Note
❒ Under Windows XP and Windows Server 2003, click the icon of the printer
you want to use in the [Printers and Faxes] window.
B Click the [Details] tab, and then click [Port Settings].
The [Port Settings] dialog box appears.
Note
❒ Under Windows 2000/XP, Windows Server 2003, and Windows NT 4.0,
click the [Ports] tab, and then click [Configure Port...]. The [Port Configuration:]
dialog box appears.
• For TCP/IP, you can configure Timeout Settings.
Note
❒ If you cannot select the items on the [Recovery/Parallel Printing] tab, follow
the procedure below.
A Click [Cancel] to close the [Port Settings] dialog box.
B Start SmartDeviceMonitor for Client, and then right-click the Smart-
DeviceMonitor for Client icon on the taskbar.
C Click [Extended Features Settings], and then select the [&Set Recov-
ery/Parallel Printing for each port] check box.
D Click [OK] to close the [Extended Features Settings] dialog box.
2
• For IPP, you can configure IPP User Settings, Proxy Settings and Timeout
Settings.
Note
❒ For details, see SmartDeviceMonitor for Client Help.
31
Page 38

2
Preparing to Print
Setting Up Options - RPCS
If the printer has options installed, you should set the options using the printer
driver.
Limitation
❒ Under Windows 2000/XP and Windows Server 2003, changing printer set-
tings requires Manage Printers permission. Members of the Administrators
and Power Users groups have Manage Printers permission by default. When
you set up options, log on using an account that has Manage Printers permission.
❒ Under Windows NT 4.0, changing printer settings requires Full Control per-
mission. Members of the Administrators, Server Operators, Print Operators,
and Power Users groups have Full Control permission by default. When you
set up options, log on using an account that has Full Control permission.
When setting up options, you should access the [Printer Properties] dialog box
from Windows. You cannot set up options by accessing the [Printer Properties] dialog box from an application.
RPCS printer driver
A On the [Start] menu, point to [Settings], and then click [Printers].
The [Printers] window appears.
Note
❒ Under Windows XP Professional or Windows Server 2003, click the [Print-
ers and Faxes] window on the [Start] menu.
❒ Under Windows XP Home Edition, access the [Printers and Faxes] window
by clicking the[Start] button on the taskbar, click [Control Panel], click [Print-
ers and Other Hardware], and then click [Printers and Faxes].
B Click the icon of the printer you want to use.
C On the [File] menu, click [Properties].
The printer properties dialog box appears.
Note
❒ If the following message appears “Configure installed accessories in the
[Accessories] tab of [Printer Configuration...], which will open next.”, click
[OK], and then proceed to step
.
E
D Click the [Change Accessories...] tab.
Note
❒ Under Windows 95/98/Me, click [Printer Configuration...] on the [Print Set-
tings] tab, and then click [Change Accessories...].
E Select the options installed in the [Select printer options:] list.
32
Page 39

Installing the Software
F Click [OK].
G Click [OK], and then close the [Printer Properties] dialog box.
Installing the PostScript3 printer driver
This section gives basic instructions for installing the PostScript3 printer driver.
Actual procedures may differ depending on the operating system. Follow the
procedures below, as appropriate.
Reference
To use the PostScript3 printer driver, the PostScript3 board must be installed
on the printer. For details, see PostScript3.
Windows 95/98/Me - Installing the PostScript3 printer driver
A Close all running applications.
B Insert the CD-ROM into the CD-ROM drive.
Auto Run will start the installer.
2
C Select a language for the interface, and then click [OK].
The following languages are available: Deutsch (German), English (English),
Espanol (Spanish), Francais (French), Italiano (Italian), Nederlands (Dutch),
Russian (Russian)
The default interface language is English.
Note
❒ The printer driver with the selected language will be installed.
❒ When Russian is selected, an English version is installed.
D Click [PostScript 3 Printer Driver].
Add Printer Wizard starts.
E Click [Next].
F Click [Local Printer], and then click [Next].
A dialog box for selecting the printer appears.
G Select the model of the printer you are using, and then click [Next].
H In the [Available ports:] box, click [Printer Port], and then click [Next].
I Change the name of the printer if you want to, and then click [Next].
Note
❒ Click [Yes] if you want to set the printer as the default printer.
33
Page 40

Preparing to Print
J Follow the instructions on the screen.
Windows 95/98/Me - Setting up options
If the printer has options installed, you should make settings for them using the
printer driver.
2
A On the [Start] menu, point to [Settings], and then click [Printers].
The [Printers] window appears.
B Click the icon of the printer you want to use.
C On the [File] menu, click [Properties].
The printer properties dialog box appears.
D Click the [Device Options] tab.
E Select the options you have installed in the [Installable options] area.
F Click [OK].
Windows 2000/XP and Windows Server 2003 - Installing the PostScript3 printer driver
Limitation
❒ Installing a printer driver requires Administrator permission. When you in-
stall a printer driver, log on using an account that has Administrator permission.
Note
❒ If you want to share the printer on a Windows 2000/XP or Windows Server
2003 platform, use the [Sharing] tab in the [Printer Properties] dialog box to spec-
ify the additional driver (alternate driver). For details, see the operating instructions that come with Windows 2000/XP and Windows Server 2003.
❒ When prompted for the additional driver (alternate driver) location, select the
following folders on the CD-ROM:
• Windows 95/98/Me: \DRIVERS\PS\WIN9X_ME\(Language)\DISK1\
• Windows NT 4.0: \DRIVERS\PS\NT4\(Language)\DISK1\
A Close all running applications.
B Insert the CD-ROM into the CD-ROM drive.
Auto Run will start the installer.
34
Page 41

Installing the Software
C Select a language for the interface, and then click [OK].
The following languages are available: Deutsch (German), English (English),
Espanol (Spanish), Francais (French), Italiano (Italian), Nederlands (Dutch),
Russian (Russian)
The default interface language is English.
Note
❒ The printer driver with the selected language will be installed.
❒ When Russian is selected, an English version is installed.
D Click [PostScript 3 Printer Driver].
Add Printer Wizard starts.
E Click [Next].
F Click [Local Printer], and then click [Next].
Note
❒ Under Windows XP or Windows Server 2003, click [Local printer attached to
this computer], and then click [Next].
2
A dialog box for selecting the printer port appears.
G Select the check box of the port you want to use, and then click [Next].
A dialog box for selecting the printer appears.
H Select the model of the printer you are using, and then click [Next].
I Change the name of the printer if you want to, and then click [Next].
Note
❒ Click [Yes] if you want to set the printer as the default printer.
J Select whether or not you want to share the printer, and then click [Next].
Reference
See Network Guide for information about setting up and using the printer
in a network environment.
K Follow the instructions on the screen.
35
Page 42

2
Preparing to Print
Windows 2000/XP and Windows Server 2003 - Setting up options
If the printer has options installed, you should make settings for them using the
printer driver.
Limitation
❒ Changing the printer settings requires Manage Printers permission. Members
of the Administrators and Power Users groups have Manage Printers permission by default. When you set up options, log on using an account that has
Manage Printers permission.
A On the [Start] menu, point to [Settings], and then click [Printers].
The [Printers] window appears.
Note
❒ Under Windows XP Professional or Windows Server 2003, click the [Print-
ers and Faxes] window on the [Start] menu.
❒ Under Windows XP Home Edition, access the [Printers and Faxes] window
by clicking the [Start] button on the taskbar, click [Control Panel], [Printers
and Other Hardware], and then click [Printers and Faxes].
B Click the icon of the printer you want to use.
C On the [File] menu, click [Properties].
The printer properties dialog box appears.
D Click the [Device Settings] tab.
E Select the options you have installed under [Installable Options].
F Click [OK].
Windows NT 4.0 - Installing the PostScript3 printer driver
Limitation
❒ Installing a printer driver requires Administrator permission. When you in-
stall a printer driver, log on using an account that has Administrator permission.
Important
❒ The CD-ROM containing Windows NT Server operating system version 4.0,
or the Windows NT Workstation operating system is required to install the
printer driver.
❒ We recommend that you upgrade Windows NT 4.0 operating system to Serv-
ice Pack 6 or later before installing the printer driver. Contact your Windows
retailer for details about latest versions.
36
Page 43

Installing the Software
Note
❒ If you want to share the printer on a Windows NT 4.0 platform, use the [Shar-
ing] tab in the [Printer Properties] dialog box to specify the additional driver (al-
ternate driver). For details, see the operating instructions that come with
Windows NT 4.0.
❒ When prompted for the additional driver (alternate driver) location, select the
following folders on the CD-ROM:
• Windows 95/98/Me: \DRIVERS\PS\WIN9X_ME\(Language)\DISK1\
A Close all running applications.
B Insert the CD-ROM into the CD-ROM drive.
Auto Run will start the installer.
C Select a language for the interface, and then click [OK].
The following languages are available: Deutsch (German), English (English),
Espanol (Spanish), Francais (French), Italiano (Italian), Nederlands (Dutch),
Russian (Russian)
The default interface language is English.
2
Note
❒ The printer driver with the selected language will be installed.
❒ When Russian is selected, an English version is installed.
D Click [PostScript 3 Printer Driver].
Add Printer Wizard starts.
E Confirm that the [My Computer] option is selected, and then click [Next].
A dialog box for selecting the printer port appears.
F Select the check box of the port you want to use, and then click [Next].
A dialog box for selecting the printer appears.
G Select the model of the printer you are using, and then click [Next].
H Change the name of the printer if you want to, and then click [Next].
Note
❒ Click [Yes] if you want to set the printer as the default printer.
I Select whether or not you want to share the printer, and then click [Next].
Reference
See Network Guide for information about setting up and using the printer
in a network environment.
J Follow the instructions on the screen.
37
Page 44

2
Preparing to Print
Windows NT 4.0 - Setting up options
If the printer has options installed, you should make settings for them using the
printer driver.
Limitation
❒ Changing printer settings requires Manage Printers permission. Members of
the Administrators and Power Users groups have Manage Printers permission by default. When you set up options, log on using an account that has
Manage Printers permission.
A On the [Start] menu, point to [Settings], and then click [Printers].
The [Printers] window appears.
B Click the icon of the printer you want to use.
C On the [File] menu, click [Properties].
The [Printer Properties] dialog box appears.
D Click the [Device Settings] tab.
E Select the options you have installed under [Installable Options].
F Click [OK].
-Bidirectional transmission
When bidirectional transmission is enabled, information such as paper size and
feed orientation is automatically sent to the computer. You can also check printer status from your computer.
• Bidirectional transmission is supported under Windows 95/98/Me/2000/XP,
Windows Server 2003, and Windows NT 4.0.
• When bidirectional transmission is running, printer status and information
can be viewed by opening the printer driver screen.
To support bidirectional transmission, the following conditions are required:
❖ When connecting with USB 2.0
• The port on the USB 2.0 interface and the USB port on the computer are
connected using a USB interface cable (Windows 2000/XP, Windows Server 2003).
Note
❒ Under Windows 2000/XP or Windows Server 2003, [Enable bidirectional
support] must be selected, and [Enable printer pooling] must not be selected
on the [Ports] tab in RPCS printer driver.
38
Page 45

Installing the Software
❖ When connecting with the network
• The printer must be set to bidirectional transmission.
• SmartDeviceMonitor for Client included on the CD-ROM must be in-
stalled.
One of the following conditions must also be satisfied as well as the two requirements mentioned above:
• The port for SmartDeviceMonitor and TCP/IP must be used.
• The standard TCP/IP port is used without changing the port name (Win-
dows 2000/XP, Windows Server 2003).
• The IP address specified in the Microsoft TCP/IP Print is used (Windows
NT 4.0).
• The IP address is included in port name, if using IPP protocol.
Note
❒ Under Windows 95/98/Me, [Enable bi-directional support for this printer] must
be selected in [Spool Settings] on the [Details] tab in RPCS printer driver.
❒ Under Windows 2000/XP, Windows Server 2003, or Windows NT 4.0, [En-
able bidirectional support] must be selected, and [Enable printer pooling] must
not be selected on the [Ports] tab in RPCS printer driver.
2
❖ When connecting with a parallel cable
• The computer must support bidirectional transmission.
• The printer must be set to bidirectional transmission.
• The printer parallel port and computer parallel port are connected using a
parallel interface cable that supports bidirectional transmission.
Note
❒ Under Windows 95/98/Me, [Enable bi-directional support for this printer] must
be selected in [Spool Settings] on the [Details] tab in RPCS printer driver.
❒ Under Windows 2000/XP, Windows Server 2003, or Windows NT 4.0, [En-
able bidirectional support] must be selected, and [Enable printer pooling] must
not be selected on the [Ports] tab in RPCS printer driver.
39
Page 46

2
Preparing to Print
Mac OS - Installing the PostScript3 printer driver and Utilities
It is necessary to install a printer driver and a PPD file to print from a Macintosh.
Follow this procedure to install a printer driver and a PPD file on Macintosh running OS 8.6 or later versions up to 9.2, and Mac OS X Classic mode.
Note
❒ For installation under Mac OS X (v10.1.x), see p.42 “Mac OS X - Installing the
PostScript3 printer driver”.
A Insert the CD-ROM into the CD-ROM drive.
B Double-click the CD-ROM icon.
C Double-click the [Mac OS] folder.
D Double-click the [PS Driver] folder.
E Double-click the folder of the language you use.
F Open [Disk 1], and then double-click the installer icon.
The PostScript3 printer driver installer window appears.
G Follow the instructions on the screen.
H Double-click [Extensions] in [System Folder].
I Double-click [Printer Descriptions].
J Double-click the CD-ROM icon on the desktop.
K Double-click the [Printer Descriptions] folder in the [Mac OS] folder.
L Double-click [Disk 1] in the folder of the language you use.
M Drag the PPD file into [Printer Descriptions] in [Extensions] in [System Folder].
N Restart the Macintosh.
40
Page 47

Installing the Software
Setting up the PPD file
Preparation
Make sure that the printer is connected to an AppleTalk network before performing the following procedure:
A On the Apple menu, click [Chooser].
B Click the [Adobe PS] icon.
C In the [Select a PostScript Printer:] list, click the name of the printer you want
to use.
D Click [Setup].
E Click [Select PPD...].
F Click the printer description file you want to use, and then click [Select].
G Click [OK].
The PPD file is set up, and the [Adobe PS] icon appears at the left of the printer
name in the list. Next, follow the procedure on p.41 “Setting up options” to
make the option settings, or close the [Chooser] dialog box.
2
Setting up options
A On the Apple menu, click [Chooser].
B Click the [Adobe PS] icon.
C In the [Select a PostScript Printer:] list, click the name of the printer you want
to use, and then click [Setup...].
D Click [Configure].
A list of options appears.
E Select the option you want to set up, and then select the appropriate setting
for it.
Note
❒ If the option you want to set up is not displayed, the PPD file might not be
set up correctly. Check the name of the PPD file shown in the dialog box.
F Click [OK].
The list of options closes.
G Click [OK].
H Close the [Chooser] dialog box.
41
Page 48

Preparing to Print
Mac OS X - Installing the PostScript3 printer driver
It is necessary to install a PPD file to print from a Macintosh. Follow the procedures to install a PPD file on Macintosh running Mac OS X.
Printer driver is included in Mac OS. When printing under Mac OS X v10.1.x, use
the printer driver included in Mac OS.
2
Preparation
You need an administrator name and a password (phrase). For details, consult your administrator.
A Insert the CD-ROM into the CD-ROM drive.
B Double-click the CD-ROM icon.
C Double-click the [Mac OS X] folder.
D Double-click the [Mac OSX PPD Installer] folder, and then double-click the in-
staller icon.
E Follow the instructions on screen.
Setting up the PPD file
A Run [Print Center].
B Click [Add].
Note
❒ Select [AppleTalk] in the first pop-up menu.
❒ If the zone has been set, select the zone in the second pop-up menu.
C Select the PPD file for the model you are using from the [Printer Model:] pop-
up menu.
D Click [Add].
42
Page 49

Installing the Software
Selecting PPD files when using USB
It is necessary to select a PPD file in order to be able to use printers with USB connection. Make the setting as described below.
A Run [Print Center].
B Click [Add Printer].
C Select [USB] in the first pop-up menu.
D Select a printer and select the printer brand name of the printer in use from
the [Printer Model:] pop-up menu.
Note
❒ If using MAC OS X 10.1.x, a list of printer models is displayed on the [Print-
er Model:] pop-up menu. Select the printer model in use and proceed to step
.
F
E Select the connected printer model from the list of printers and Click [Add].
2
F Close the Printer List and close [Print Center].
Setting up options
Limitation
❒ You can make settings for all printer features, even if the necessary option is
not installed due to Mac OS X Native mode limitations. Check which options
are installed in the printer before you print.
43
Page 50

2
Preparing to Print
Installing the Printer Driver Using USB
This section gives basic instructions for installing printer drivers using USB. The
printer drivers can be installed from the CD-ROM that comes with this printer.
Preparation
Make sure that all other applications are closed and the computer is not printing before installation.
Windows 2000/XP and Windows Server 2003 - Installing the printer driver using USB
Limitation
❒ Installing a printer driver requires the Administrators permission. When you
install a printer driver, log on using an account that has Administrator permission.
When the USB interface cable is used for the first time, the [Found New Hardware
Wizard] dialog box appears.
If the printer driver is already installed, the “plug and play” is displayed, and
the printer with its port directed to the USB interface cable is added to the [Print-
*1
ers]
folder.
Note
❒ Under Windows XP, even if the printer driver has already been installed,
[Found New Hardware Wizard] may start when connecting the printer and the
computer with the USB interface cable for the first time. If this happens, install the printer driver by following the procedure below:
A Install the printer driver by referring to the instructions for installation.
Note
❒ Each printer driver is stored in the following folders on the CD-ROM:
• RPCS: \DRIVERS\RPCS\WIN2K_XP\(Language)\DISK1
• PostScript 3: \DRIVERS\PS\WIN2K_XP\(Language)\DISK1
When installation is complete, the printer with its port directed to “USB00n”
appears in the [Printers]
*1
Under Windows XP, the folder is [Printers and Faxes].
*1
folder. (“n” is the number of printers connected.)
44
Page 51

Installing the Software
Macintosh - Creating a desktop printer icon
When you connect the printer and your computer using USB 2.0, create a Desktop Printer icon.
Limitation
❒ Under Mac OS X Native mode, printing is disabled when connected to the
printer using USB.
A Double-click [Desktop Printer Utility] in the [AdobePS Components] folder.
B Select [AdobePS] in [With:] and [Printer (USB)] in [Create Desktop], and then
click [OK].
C Click [Change] in [USB Printer Selection].
D Select the model of the printer you are using in [Select a USB Printer:], and
then click [OK].
2
E Click [Auto Setup] in [PostScript
TM
Printer Description (PPD) File].
F Click [Create].
G Enter the printer name, and then click [Save].
The printer icon appears on the desktop.
H Close the Desktop Printer Utility.
Installing DeskTopBinder Lite- SmartDeviceMonitor for Client
Limitation
❒ If your operating system is Windows 2000/XP, Windows Server 2003, or
Windows NT 4.0, installation using Auto Run requires Administrator permission. To install a printer driver using Auto Run, you must log on using an
account that has Administrator permission.
A Close all running applications.
B Insert the CD-ROM into the CD-ROM drive.
Auto Run will start the installer.
C Select a language for the interface, and then click [OK].
The default interface language is English.
D Click [DeskTopBinder - SmartDeviceMonitor for Client].
E A massage telling you to close all other applications appears.
Confirm that all applications are closed, and then click [Next].
45
Page 52

Preparing to Print
F The software license agreement appears in the [License Agreement] dialog
box. After reading through its contents, click [Yes]
G Click [Full install] or [Custom Install].
[Full install] installs all required applications.
[Custom Install] installs selected applications.
2
H Follow the instructions on the display, and then click [Next].
Installing SmartDeviceMonitor for Admin
Limitation
❒ If your operating system is Windows 2000/XP, Windows Server 2003, or
Windows NT 4.0, installation using Auto Run requires Administrator permission. To install a printer driver using Auto Run, log on using an account
that has Administrator permission.
A Close all running applications.
B Insert the CD-ROM into the CD-ROM drive.
Auto Run will start the installer.
C Select a language for the interface, and then click [OK].
The default interface language is English.
D Click [SmartDeviceMonitor for Admin].
E A message telling you to close all other applications appears.
Confirm that all applications are closed, and then click [Next].
F The software license agreement appears in the [License Agreement] dialog
box. After reading through its contents, click [Yes]
G Follow the instructions on the display and click [Next].
46
Page 53

Installing the Software
Using Adobe PageMaker Version 6.0, 6.5, or 7.0
If you use the printer under Windows 95/98/Me/2000/XP, Windows Server
2003, or Windows NT 4.0 with Adobe PageMaker, you need to copy the PPD file
to the PageMaker folder.
The PPD file is the file with the extension “.ppd” in the folder “DRIVERS\PS\WIN9X_ME\(Language)\DISK1\” on the CD-ROM.
The [WIN9X_ME] folder, inside the [PS] folder, is for Windows 95/98/Me. Use the
folder at a level appropriate for the operating system you are currently using.
The third folder, “(Language)” may be renamed with an appropriate language
name.
Copy the file with extension “.ppd” to the PageMaker folder.
• For PageMaker 6.0 default installation
The directory is “C:\PM6\RSRC\PPD4”.
• For PageMaker 6.5 default installation
The directory is “C:\PM65\RSRC\USENGLISH\PPD4”.
“USENGLISH” may vary depending on your language selection.
• For PageMaker 7.0 default installation
The directory is “C:\PM7\RSRC\USENGLISH\PPD4”.
“USENGLISH” may vary depending on your language selection.
2
Note
❒ When using PageMaker, optional features that can be selected by the printer
driver will not be active. The following procedure describes how to activate
the optional printer features.
A On the [File] menu, click [Print].
The [Print Document] dialog box appears.
B Make the necessary settings in the [Features] box.
47
Page 54

Preparing to Print
Software and Utilities Included on the CD-ROM
The CD-ROM labeled “Printer Drivers and Utilities” is mainly used for printer
functions. In this manual, “CD-ROM” refers to the “Printer Drivers and Utilities” CD-ROM, unless specified otherwise.
2
Printer Drivers
Printing requires installation of a printer driver for your operating system. The
following drivers are included on the CD-ROM labeled “Printer Drivers and
Utilities” that comes with the printer option of this printer.
Printer Language RPCS PostScript3
Windows 95
Windows 98
Windows Me
Windows 2000
Windows XP
Windows Server 2003
Windows NT 4.0
Mac OS
Mac OS X
*1
Microsoft Windows 95 operating system
*2
Microsoft Windows 98 operating system
*3
Microsoft Windows Millennium Edition
*4
Microsoft Windows 2000 Server
Microsoft Windows 2000 Professional
*5
Microsoft Windows XP Professional
Microsoft Windows XP Home Edition
*6
Microsoft Windows Server 2003 Standard Edition
*1
*2
*3
*4
*5
*6
*8
*9
*10
√
√
√
√
√
*7
√
*11
√
Microsoft Windows Server 2003 Enterprise Edition
Microsoft Windows Server 2003 Web Edition
*7
Cluster and Terminal Service are not supported.
*8
Microsoft Windows NT Server operating system version 4.0, Microsoft Windows NT
Workstation operating system version 4.0 in a computer using x86 processors.
*9
Versions 8.6 to 9.2 of the Mac OS (Mac OS X Classic mode is supported.)
*10
Mac OS X 10.1 or later (Native mode)
*11
Requires Service Pack 4 or later.
*12
Requires Service Pack 6 or later.
*13
The Adobe PostScript3 printer drivers and PostScript Printer Description (PPD) files
are included on the CD-ROM labeled “Printer Drivers and Utilities”.
*14
The PostScript Printer Description (PPD) files are included on the CD-ROM labeled
“Printer Drivers and Utilities”.
*15
The Adobe PostScript Printer Description (PPD) installer is included on the CDROM labeled “Printer Drivers and Utilities”.
√
√
√
√
√
√
*12 *13
√
√
√
*13
*13
*13
*14
*14
*7 *14
*13
*15
48
Page 55

Software and Utilities Included on the CD-ROM
❖ RPCS printer driver
The RPCS printer drivers are included on the CD-ROM labeled "Printer Drivers and Utilities" This printer driver allows the computer to communicate
with the printer via a printer language. The preset type user interface is provided in addition to the usual one.
See p.27 “Installing RPCS Printer Driver” .
❖ Adobe PostScript3 printer drivers and PPD files
The Adobe PostScript3 printer driver and the PPD files are included on the
CD-ROM labeled "Printer Drivers and Utilities" This printer driver allows the
computer to communicate with the printer via a printer language. The PPD
files allow the printer driver to enable printer specific functions.
See p.33 “Installing the PostScript3 printer driver” .
Software and Utilities
❖ SmartDeviceMonitor for Admin
This utility is for the system administrator to manage network printers.
Reference
For details, see SmartDeviceMonitor for Admin online Help.
2
❖ SmartDeviceMonitor for Client
This utility is for users to manage their own print status on the network.
Reference
For details, see SmartDeviceMonitor for Client online Help.
❖ Printer Utility for Mac
This utility allows users to download and manage a variety of fonts as well as
manage printers.
Reference
For details, see PostScript3 which is provided as a PDF file on the CD-ROM
labeled “Operating Instructions”.
Important
❒ Software and utilities must be uninstalled before installing newer versions of
Windows. Reinstall software and utilities after upgrading Windows.
49
Page 56

2
Preparing to Print
50
Page 57

3. Setting Up the Printer Driver
and Canceling a Print Job
Accessing Printer Properties
Windows 95/98/Me - Accessing Printer Properties
Changing default settings
A On the [Start] menu, point to [Settings], and then click [Printers].
The [Printers] window appears.
B Click the icon of the printer whose default you want to change.
C On the [File] menu, click [Properties].
The [Printer Properties] dialog box appears.
D Make the settings you require, and then click [OK].
Note
❒ With some applications, printer driver settings are not used, and the appli-
cation's own settings are applied.
Making settings from an application
To make settings for a specific application, open the printer properties dialog
box from that application. The following example describes how to make settings in WordPad for Windows 95/98/Me.
Note
❒ Actual procedures for opening the [Printer Properties] dialog box may vary de-
pending on the application. For details, see operating instructions for the application you are using.
❒ Any setting you make in the following procedure is valid for the current ap-
plication only:
A On the [File] menu, click [Print].
The [Print] dialog box appears.
B In the [Name] list, select the printer you want to use, and then click [Proper-
ties...].
The [Printer Properties] dialog box appears.
C Make the settings you require, and then click [OK].
D Click [OK] to start printing.
51
Page 58

3
Setting Up the Printer Driver and Canceling a Print Job
Windows 2000/XP and Windows Server 2003 - Accessing Printer Properties
Changing default settings - Printer properties
Limitation
❒ Changing printer settings requires Manage Printers permission. Members of
Administrators and Power Users groups have Manage Printers permission
by default. When you set up options, log on using an account that has Manage
Printers permission.
A On the [Start] menu, point to [Settings], and then click [Printers].
The [Printers] window appears.
Note
❒ Under Windows XP Professional and Windows Server 2003, open the
[Printers and Faxes] window on the [Start] menu.
❒ Under Windows XP Home Edition, open the [Printers and Faxes] window
by clicking [Control Panel] from the [Start] button on the taskbar, click [Print-
ers and Other Hardware], and then click [Printers and Faxes].
B Click the icon of the printer whose default you want to change.
C On the [File] menu, click [Properties].
The [Printer Properties] dialog box appears.
D Make the settings you require, and then click [OK].
Note
❒ Normally you do not have to change the “Form to Tray Assignment” set-
tings on the [Device Settings] tab in the PostScript3 printer driver.
❒ Settings you make here are used as default for all applications.
52
Page 59

Accessing Printer Properties
Changing default settings - Printing preferences properties
Limitation
❒ Changing printer settings requires Manage Printers permission. Members of
the Administrators and Power Users groups have Manage Printers permission by default. When you set up options, log on using an account that has
Manage Printers permission.
A On the [Start] menu, point to [Settings], and then click [Printers].
The [Printers] window appears.
Note
❒ Under Windows XP Professional and Windows Server 2003, open the
[Printers and Faxes] window on the [Start] menu.
❒ Under Windows XP Home Edition, open the [Printers and Faxes] window
by clicking [Control Panel] from the [Start] button on the taskbar, click [Print-
ers and Other Hardware], and then click [Printers and Faxes].
B Click the icon of the printer whose default you want to change.
3
C On the [File] menu, click [Printing Preferences...].
The [Printing Preferences] dialog box appears.
D Make the settings you require, and then click [OK].
Note
❒ Settings you make here are used as default for all applications.
Making settings from an application
To make settings for a specific application, open the [Print] dialog box from that
application. The following example describes how to make settings in WordPad
for Windows 2000/XP and Windows Server 2003.
Note
❒ Actual procedures for opening the [Print] dialog box vary depending on the
application. For details, see the operating instructions that come with the application you are using.
❒ Any setting you make in the following procedure is valid for the current ap-
plication only.
A On the [File] menu, click [Print...].
The [Print] dialog box appears.
53
Page 60

3
Setting Up the Printer Driver and Canceling a Print Job
B In the [Select Printer] list, select the printer you want to use, and then click
the tab for which you want to change print settings.
Note
❒ Under Windows XP and Windows Server 2003, click [Preferences] to open
the [Printing Preferences] dialog box.
C Make the settings you require.
D Click [Print] to start printing.
Under Windows XP and Windows Server 2003, click [OK], and then click
[Print] to start printing.
Windows NT 4.0 - Accessing Printer Properties
Changing default settings - Printer properties
Limitation
❒ Changing printer settings requires Full Control access permission. Members
of Administrators, Server Operators, Print Operators, and Power Users
groups have Full Control permission by default. When you change printer
settings, you must log on using an account that has Full Control permission.
A On the [Start] menu, point to [Settings], and then click [Printers].
The [Printers] window appears.
B Click the icon of the printer whose default you want to change.
C On the [File] menu, click [Properties].
The [Printer Properties] dialog box appears.
D Make the settings you require, and then click [OK].
Note
❒ Normally you do not have to change the “Form to Tray Assignment” set-
tings on the [Device Settings] tab in the PostScript3 printer driver.
❒ Settings you make here are used as default for all applications.
54
Page 61

Accessing Printer Properties
Changing the default settings - Default document properties
Limitation
❒ Changing printer settings requires Full Control access permission. Members
of the Administrators, Server Operators, Print Operators, and Power Users
groups have Full Control permission by default. When you set up options, log
on using an account that has Full Control permission.
A On the [Start] menu, point to [Settings], and then click [Printers].
The [Printers] window appears.
B Click the icon of the printer whose default you want to change.
C On the [File] menu, click [Document Defaults...].
The [Default] dialog box appears.
D Make the settings you require, and then click [OK].
Note
❒ Settings you make here are used as default for all applications.
3
Making settings from an application
To make settings for a specific application, open the [Printer Properties] dialog box
from that application. The following example describes how to make settings in
WordPad for Windows NT 4.0.
Note
❒ Actual procedures for opening the [Printer Properties] dialog box vary depend-
ing on the application. For details, see the operating instructions that come
with the application you are using.
❒ Any setting you make in the following procedure is valid for the current ap-
plication only.
A On the [File] menu, click [Print].
The [Print] dialog box appears.
B In the [Name] list, select the printer you want to use, and then click [Proper-
ties].
The [Printer Properties] dialog box appears.
C Make the settings you require, and then click [OK].
D Click [OK] to start printing.
55
Page 62

Setting Up the Printer Driver and Canceling a Print Job
Macintosh - Setting Up for Printing
Making paper settings from an application
A Open the file you want to print.
B On the [File] menu, click [Page Setup...].
The [AdobePS Page Setup] dialog box appears.
3
C Make sure the printer you want to use is shown in the [Printer:] box.
Note
❒ Under Mac OS X, this is called [Format for:].
❒ If the printer is not shown in the [Printer:] box, use the pop-up menu to dis-
play a list of available machines.
Reference
The actual appearance of Page Setup depends on the application you are
using. See the operating instructions that come with the Macintosh for details.
D In the [Paper:] box, select the paper size.
Note
❒ Under Mac OS X, this is called [Paper Size:].
E Make the settings you require, and then click [OK].
Setting up for printing from an application
A Open the file you want to print.
B On the [File] menu, click [Print:].
The [Printer Features] dialog box appears.
C Make sure the printer is selected in the [Printer:] box.
D Make the settings you require, and then click [Print] to start printing.
56
Page 63

Canceling a Print Job
Canceling a Print Job
Canceling from a computer
Windows
A Double-click the printer icon on the Windows taskbar.
A window appears, showing all the print jobs that are currently queuing to
be printed. Check the current status of the job you want to cancel.
B Select the name of the job you want to cancel.
C On the [Document] menu, click [Cancel Printing].
Note
❒ You can also open the print job queue window by double-clicking the
printer icon in the [Printer] window.
3
Macintosh
A Double-click the printer icon on the desktop.
A window appears, showing all the print jobs that are currently queuing to
be printed. Check the current status of the job you want to cancel.
Note
❒ Under Mac OS Χ, start Print Center.
B Select the name of the job you want to cancel.
C Click the pause icon, and then click the trash icon.
Note
❒ Under Mac OS Χ, Click [Hold], and then click [Delete].
57
Page 64

Setting Up the Printer Driver and Canceling a Print Job
Canceling on the control panel
Canceling before the printer starts Master Making
The print jobs of all pages can be canceled before the printer starts Master Making.
A Press [Job Reset] on the machine's display panel.
3
Canceling after the printer has started Master Making
In order to cancel the print job after Master Making has started, press “Job Reset”
or “End Printing” on the display panel.
❖ Pressing “Job Reset” while Master Making is in progress
If “Job Reset” is pressed while Master Making is processing a particular page,
the print job will be cancelled beginning from the next page.
Note
❒ If the Master Making is processing the last page of a print job, the print job
cannot be canceled
❖ Pressing “Job Reset” while printing
If “Job Reset” is pressed when a particular page is being printed, the job will
be canceled beginning from the next page.
Note
❒ If the last page is being printed, the next print job will be canceled. If there
are no print jobs in queue, the “Job Reset” button will not function.
❖ Pressing “End Printing” while printing queue is on pause
When a print job is paused, the next master making cannot begin until printing is completed. If there are any pages remaining when printing is paused,
press the “End Printing” to cancel the remaining pages and master making
for the next print job can begin.
58
Page 65

4. Various Types of Printing
Windows 95/98/Me - Various Types of Printing
This section introduces several printing examples from Windows 95/98 and Me.
Reference
For details, see the operating instructions that come with the respective application.
Duplex Printing
Prints on both sides of the sheet.
Limitation
❒ Duplex printing is possible on the following paper sizes only: A4K, B5 JISK
and 8
1
/2" × 11"K.
A Display the data to be printed.
B On the [File] menu, click [Print...].
The [Print] dialog box appears.
C From [Name:], select the printer.
D Click [Properties].
The [Properties] dialog box appears.
E In the [Custom Setting name:] menu on the [Print Settings] tab, select the [Du-
plex].
F On the [Print Settings] tab, click [Add/Change Custom Settings...].
The [Add/Change Custom Settings...] dialog box appears.
G Click [Duplex/Booklet], and then select the opening side.
H Click [Save].
The screen returns to the [Properties] dialog box.
I Click [OK].
The screen returns to the [Print] dialog box.
J Click [OK].
59
Page 66

4
Various Types of Printing
Storing the Print File
Use this function to store a file in the machine, and then print it from the computer or the machine's control panel later.
Limitation
❒ If data from PostScript3 printer driver is stored in the machine using [Store
File], when printing from the machine, it is possible that the data will not print
in the intended direction. For details, see PostScript3.
A Display the data to be printed.
B On the [File] menu, click [Print...].
The [Print] dialog box appears.
C From [Name:], select the printer.
D Click [Properties].
The [Properties] dialog box appears.
E In the [Job type:] menu on the [Print Settings] tab, select [Store File].
F If you want to set [User name:], [File name:]and [Password:], click [Details...].
The [Details...] dialog box appears.
G Set [User name:], [File name:], and [Password:].
H Click [OK].
The screen returns to the [Properties] dialog box.
I Click [OK].
The screen returns to the [Print] dialog box.
J Click [OK].
60
Page 67

Printing on custom sized paper
Printing on custom sized paper
Important
❒ Be sure to load paper in the paper feed tray.
A Display the data to be printed.
B On the [File] menu, click [Print...].
The [Print] dialog box appears.
C From [Name:], select the printer.
Windows 95/98/Me - Various Types of Printing
D Click [Properties].
The [Properties] dialog box appears.
E In the [Original size:] menu on the [Print Settings] tab, click [Custom paper size...].
The [Custom Paper Sizes] dialog box appears.
F Enter the paper size in [Short edge:] and [Long edge:].
Note
❒ Specify [Measurement Unit...] if required.
G Select [Place as portrait] or [Place as landscape] according to the paper orienta-
tion.
H Click [OK].
The screen returns to the [Properties] dialog box.
I Click [OK].
The screen returns to the [Print] dialog box.
J Click [OK].
4
61
Page 68

Various Types of Printing
Printing on paper with an undetectable size
This machine automatically detects the paper size, however, there are cases
where the machine cannot detect the size of the paper. In these cases, follow the
procedure below and manually make the desired settings.
Important
❒ Be sure to load paper in the paper feed tray.
Note
❒ If you make these settings frequently, it is convenient to define a default size
by selecting [Tray Paper Size: Paper Feed Tray] in Online Print menu on the control panel.
4
A Press the {Printer Settings}key on the printer.
AVA003S
B Press [Tray Paper Size: Paper Feed Tray].
C Select the paper size, and then press [OK].
Important
❒ Select a size that is bigger than the contents to be printed. If the contents
are bigger than the paper size, it will cause the roller to get dirty.
D Select the paper size on the computer's printer driver.
Important
❒ Select the same paper size selected in the [Tray Paper Size: Paper Feed Tray]
setting on the machine.
E Print from the computer.
62
Page 69

Windows 95/98/Me - Various Types of Printing
When envelopes cannot be fed
Envelopes cannot be fed in well because the seal may get caught. In that case,
you can rotate and print the image by 180 degrees using the rotate function in
the printer driver.
The following chart shows how the image is rotated.
Paper Feed Di-
rection
Short Edge
Feed
Long Edge Feed
Original Image Rotate: Off Rotate: 180°
Portrait
4
Landscape
Portrait
Landscape
63
Page 70

Various Types of Printing
A Rotate the envelopes 180 degrees and place them in the paper feed tray.
GRENVE1E
4
*Paper feed direction
B On the printer driver’s [Misc.] tab, select [Rotate by 180 degrees].
C Click [OK].
The screen returns to the [Print] dialog box.
D Click [OK] to start printing.
64
Page 71

Windows 2000/XP and Windows Server 2003 - Various Types of Printing
Windows 2000/XP and Windows Server 2003 Various Types of Printing
This section introduces several printing examples from Windows 2000/XP and
Windows Server 2003.
Reference
For Details, see the operating instructions that come with your respective application.
Duplex Printing
Prints on both sides of the sheet.
Limitation
❒ Duplex Printing is possible on the following paper sizes only: A4K, B5 JISK
and 8
1
/2" × 11"K.
A Display the data to be printed.
B On the [File] menu, click [Print...].
The [Print] dialog box appears.
C From [Select Printer], select the printer.
D Click [Preferences].
The [Printing Preferences] dialog box appears.
E In the [Custom Setting name:] menu on the [Print Settings] tab, select the [Du-
plex].
F On the [Print Settings] tab, click [Add/Change Custom Settings...].
The [Add/Change Custom Settings...] dialog box appears.
G Click [Duplex/Booklet] and select the open side.
4
H Click [Save].
The screen returns to the [Printing Preferences] dialog box.
I Click [OK].
The screen returns to the [Print] dialog box.
J Click [Print].
65
Page 72

4
Various Types of Printing
Storing the Print File
Use this function to store a file in the machine, and then print it from the computer or the machine's control panel later.
Limitation
❒ If data from PostScript3 printer driver is stored in the machine using [Store
File], when printing from the machine, it is possible that the data will not print
in the intended direction. For details, see PostScript3.
A Display the data to be printed.
B On the [File] menu, click [Print...].
The [Print] dialog box appears.
C From [Select Printer], select the printer.
D Click [Preferences].
The [Printing Preferences] dialog box appears.
E In the [Job type:] menu on the [Print Settings] tab, select [Store File].
F If you want to set [User name:], [File name:] and [Password:], click [Details...].
The [Details...] dialog box appears.
G Set [User name:], [File name:], and [Password:].
H Click [OK].
The screen returns to the [Printing Preferences] dialog box.
I Click [OK].
The screen returns to the [Print] dialog box.
J Click [Print].
66
Page 73

Windows 2000/XP and Windows Server 2003 - Various Types of Printing
Printing on custom sized paper
It is possible to make settings for custom sized paper.
Important
❒ Be sure to load paper in the paper feed tray.
A Display the data to be printed.
B On the [File] menu, click [Print...].
The [Print] dialog box appears.
C From [Select Printer], select the printer.
D Click [Properties].
The [Properties] dialog box appears.
E In the [Original size:] menu on the [Print Settings] tab, click [Custom paper size...].
The [Custom Paper Sizes] dialog box appears.
F Enter the paper size in [Short edge:] and [Long edge:].
Note
❒ Specify [Measurement Unit...] if required.
G Select [Place as portrait] or [Place as landscape] according to the paper orienta-
tion.
H Click [OK].
The screen returns to the [Properties] dialog box appears.
I Click [OK].
The screen returns to the [Print] dialog box.
J Click [Print].
4
67
Page 74

Various Types of Printing
Printing on paper with an undetectable size
This machine automatically detects the paper size, however, there are cases
where the machine cannot detect the size of the paper. In these cases, follow the
procedure below and manually make the desired settings.
Important
❒ Be sure to load paper in the paper feed tray.
Note
❒ If you make these settings frequently, it is convenient to define a default size
by selecting [Tray Paper Size: Paper Feed Tray] in the Online Print menu on the
control panel.
4
A Press the {Printer Settings}key on the printer.
AVA003S
B Press [Tray Paper Size: Paper Feed Tray].
C Select the paper size, and then press [OK].
Important
❒ Select a size that is bigger than the contents to be printed. If the contents
are bigger than the paper size, it will cause the roller to get dirty.
D Select the paper size on the computer's printer driver.
Important
❒ Select the same paper size selected in the [Tray Paper Size: Paper Feed Tray]
setting on the machine.
E Print from the computer.
68
Page 75

Windows 2000/XP and Windows Server 2003 - Various Types of Printing
When envelopes cannot be fed
Envelopes cannot be fed in well because the seal may get caught. In that case,
you can rotate and print the image by 180 degrees using the rotate function in
the printer driver. The following chart shows how the image is rotated.
Paper Feed Di-
rection
Short Edge
Feed
Long Edge Feed
Original Image Rotate: Off Rotate: 180°
Portrait
4
Landscape
Portrait
Landscape
69
Page 76

Various Types of Printing
A Rotate the envelopes 180 degrees and place them in the paper feed tray.
GRENVE1E
4
*Paper feed direction
B On the printer driver’s [Misc.] tab, select [Rotate by 180 degrees].
C Click [OK].
The screen returns to the [Print] dialog box.
D Click [Print] to start printing.
70
Page 77

Windows NT 4.0 - Various Types of Printing
Windows NT 4.0 - Various Types of Printing
This section introduces several printing examples from Windows NT 4.0.
Reference
For details, see the operating instructions that come with your respective application regarding details on settings.
Duplex Printing
Prints on both sides of the sheet.
Limitation
❒ Duplex Printing is possible on the following paper sizes only: A4K, B5 JISK
A Display the data to be printed.
B On the [File] menu, click [Print...].
1
and 8
The [Print] dialog box appears.
/2" × 11"K.
4
C From [Name:], select the printer.
D Click [Properties].
The [Properties] dialog box appears.
E In the [Custom Setting name:] menu.
F On the [Print Settings] tab, click [Add/Change Custom Settings...].
The [Add/Change Custom Settings...] dialog box appears.
G Click [Duplex/Booklet] and select the opening side.
H Click [Save].
The screen returns to the [Properties] dialog box.
I Click [OK].
The screen returns to the [Print] dialog box.
J Click [OK].
71
Page 78

4
Various Types of Printing
Storing the Print File
Use this function to store a file in the machine, and then print it from the computer or the machine's control panel later.
Limitation
❒ If data from PostScript3 printer driver is stored in the machine using [Store
File], when printing from the machine, it is possible that the data will not print
in the intended direction. For details, see PostScript3.
A Display the data to be printed.
B On the [File] menu, click [Print...].
The [Print] dialog box appears.
C From [Name:], select the printer.
D Click [Properties].
The [Properties] dialog box appears.
E In the [Job type:] menu on the [Print Settings] tab, select [Store File].
F If you want to set [User name:], [File name:],and [Password:], click [Details...].
The [Details...] dialog box appears.
G Set [User name:], [File name:], and [Password:].
H Click [OK].
The screen returns to the [Properties] dialog box.
I Click [OK].
The screen returns to the [Print] dialog box.
J Click [OK].
72
Page 79

Windows NT 4.0 - Various Types of Printing
Printing on custom sized paper
It is possible to make settings for custom sized paper.
Important
❒ Be sure to load paper in the paper feed tray.
A Display the data to be printed.
B On the [File] menu, click [Print...].
The [Print] dialog box appears.
C From [Name:], select the printer.
D Click [Properties].
The [Properties] dialog box appears.
E In the [Original size:] menu on the [Print Settings] tab, click [Custom paper size...].
The [Custom Paper Sizes] dialog box appears.
F Enter the paper size in [Long edge:] and [Short edge:].
Note
❒ Specify [Measurement Unit...] if required.
G Select [Place as portrait] or [Place as landscape] according to the paper orienta-
tion.
H Click [OK].
The screen returns to the [Properties] dialog box.
I Click [OK].
The screen returns to the [Print] dialog box.
J Click [OK].
4
73
Page 80

Various Types of Printing
Printing on paper with an undetectable size
This machine automatically detects the paper size, however, there are cases
where the machine cannot detect the size of the paper. In these cases, follow the
procedure below and manually make the desired settings.
Important
❒ Be sure to load paper in the paper feed tray.
Note
❒ If you make these settings frequently, it is convenient to define a default size
by selecting [Tray Paper Size: Paper Feed Tray] in the Online Print menu on the
control panel.
4
A Press the {Printer Settings}key on the printer.
AVA003S
B Press [Tray Paper Size: Paper Feed Tray].
C Select the paper size, and then press [OK].
Important
❒ Select a size that is bigger than the contents to be printed. If the contents
are bigger than the paper size, it will cause the roller to get dirty.
D Select the paper size on the computer's printer driver.
Important
❒ Select the same paper size selected in the [Tray Paper Size: Paper Feed Tray]
setting on the machine.
E Print from the computer.
74
Page 81

Windows NT 4.0 - Various Types of Printing
When envelopes cannot be fed
Envelopes cannot be fed in well because the seal may get caught. In that case,
you can rotate and print the image by 180 degrees using the rotate function in
the printer driver.
The following chart shows how the image is rotated.
Paper Feed Di-
rection
Short Edge
Feed
Long Edge Feed
Original Image Rotate: Off Rotate: 180°
Portrait
4
Landscape
Portrait
Landscape
75
Page 82

Various Types of Printing
A Rotate the envelopes 180 degrees and place them in the paper feed tray.
GRENVE1E
4
*Paper feed direction
B Click [Add/Change Custom Settings...] on the printer driver’s [Print Settings] tab.
C On the printer driver’s [Misc.] tab, select [Rotate by 180 degrees].
D Click [OK].
The screen returns to the [Print] dialog box.
E Click [OK] to start printing.
76
Page 83

5. Troubleshooting
Error & Status Messages on the Display Panel
Messages/Second messages Descriptions and Solutions
Ethernet board Error. An error has occurred in the Ethernet module.
Turn off the main power switch, and back on again. If the message appears again, contact your sales or service representative.
Wireless card error. IEEE 802.11b card was not inserted when the printer was turned
on, or it was pulled out after the printer turned on.
Turn off the printer and check the IEEE 802.11b card is inserted
correctly. Then, turn the printer on again. If the message appears again, contact your sales or service representative.
Wireless board error. An error has occurred in the IEEE 802.11b module.
Turn off the main power switch, and back on again. If the message appears again, contact your sales or service representative.
Master Processing... The master is being made.
Memory switch error. An error has occurred in the memory unit.
Turn off the main power switch, and back on again. If the message appears again, contact your sales or service representative.
Optional RAM error. An error has occurred in the SDRAM module.
Turn off the main power switch, and back on again. If the message appears again, contact your sales or service representative.
Printing... Data is being printed.
Wait until the job is finished.
Parallel I/F board error. An error has occurred in the parallel I/F board.
Turn off the main power switch, and back on again. If the message appears again, contact your sales or service representative.
DIMM value error. An error has occurred in the PostScript3 bored.
Turn off the main power switch, and back on again. If the message appears again, contact your sales or service representative.
HDD board error. An error has occurred in the HDD board.
Turn off the main power switch, and back on again. If the message appears again, contact your sales or service representative.
Print is not finished. Printing is not finished.
Printing has been interrupted. Perform one of the following
procedures:
•Press the {Start} key, and printing will restart. Before the
print amount display reaches 0, press the {Start} key to print.
•Press [End Printing] , and printing will stop. The interrupted
prints will not be performed.
Ready<Online> Master Making or print data is on the spool. This is not an error.
Press the {Start} key to begin master making or printing.
77
Page 84

5
Troubleshooting
Messages/Second messages Descriptions and Solutions
Ready The Master Making or print data is not in the spool.
This is not an error. The message will change when printing
starts from the computer.
Resetting Job... The data spooled is dumped.
Wait until the job is finished.
Open the Paper Feed Tray. The paper feed tray is not set correctly.
Set the paper feed tray correctly.
USB interface error. An error has occurred in the USB interface.
Turn off the main power switch, and back on again. If the message appears again, contact your sales or service representative.
Waiting... Waiting for data from the computer.
Wait until the job is finished.
78
Page 85

Printer does not Print
Possible Cause Solutions
Is the power on? Turn on the printer.
Printer does not Print
Does the Start key stay
red?
Are there any error messages on the display panel?
Is the interface cable properly connected?
Are you using the correct
interface cable?
Did you connect the interface cable after turning on
the main switch?
Is the specified paper set? Set the specified paper in the paper feed tray.
Does the Error indicator
stay red?
Is the Data In indicator
blinking or lit?
Can you make a proof
print?
If so, check the error message or warning status on the display and
take the required action.
Check the error message, and take the required action.
Connect the interface cable properly.
If there are any connectors or screws, make sure that they are fastened securely.
Be sure to use the correct one. If the cable is damaged or worn, replace it with a new one.
Be sure to connect the interface cable before turning on the main
switch.
Check the error message, and take the required action.
If it is not, the data does not reach the printer. Check the printer
cable connection. Also confirm that the printer port settings are
correct.
If you cannot print a system configuration list or a PS Font List
from the printer, the printer might be out of order. Contact your
sales or service representative.
5
Is “Waiting” displayed? Perform one of the following procedures:
• Wait until the job is finished.
• Cancel by pressing [Job Reset].
Is the signal status satisfactory when using IEEE
802.11b interface unit in infrastructure mode?
To check signal status, press the {UserTools} key, and then select
[System Settings]. On the [Interface Settings], select [IEEE 802.11b],
and then select [Wireless LAN Signal] . If signal quality is poor, remove objects that might cause interference.
Note
❒ You can check signal status only when using IEEE 802.11b in-
terface unit in infrastructure mode.
When using IEEE 802.11b
interface unit, is the SSID
correctly set?
When using IEEE 802.11b
interface unit, is the access
point correctly set?
Check using the machine's control panel that the SSID is correctly
set.
see “User Tools Menu (System Settings)”, Network Guide.
Check access point settings when in infrastructure mode. Depending on the access point, client access may be limited by MAC address.
Also, check that there are no problems in transmission between access point and wired clients, and between access point and wireless clients.
79
Page 86

Troubleshooting
Possible Cause Solutions
5
When using IEEE 802.11b
interface unit, is the LED
on the wireless LAN card
blinking or lit?
Is the IEEE 802.11b interface being used in ad hoc
mode?
Confirm that the orange LED is lit and the green LED is lit or blinking during transmission.
Turn the main power off and back on. See “Turning On the Power”, General Settings Guide.
Otherwise, configure [Network] in [Interface Settings] in [System Set-
tings]. See “Setting Up the Machine on a Network”, Network Guide.
If you cannot solve the problem by taking the preceding actions, contact your
sales or service representative.
Note
❒ If the Data In indicator is not blinking or lit, you can check the computer port
settings using the following procedure.
❖ If the printer is connected to the computer using the interface cable
❒ Check that the printer port setting is correct. For USB, specify USB00(n)
as the printer port setting ( “n” is the number of printers on the network).
❒ For a parallel port connection, port LPT1 or LPT2 should be set.
• Windows 95/98/Me
A Click the [Start] button, point to [Settings], and then click [Printers].
B Click the icon of the printer. On the [File] menu, click [Properties].
80
C Click the [Details] tab.
D In the [Print to the following port:] list, confirm the correct port is selected.
• Windows 2000
A Click the [Start] button, point to [Settings], and then click [Printers].
B Click the icon of the printer. On the [File] menu, click [Properties].
C Click the [Ports] tab.
D In the [Print to the following port(s)] list, confirm the correct port is selected.
• Windows XP Professional and Windows Server 2003
A Click the [Start] button, and then click [Printers and Faxes].
B Click the icon of the printer. On the [File] menu, click [Properties].
C Click the [Ports] tab.
D In the [Print to the following port(s)] list, confirm the correct port is se-
lected.
• Windows XP Home Edition
A Click the [Start] button, click [Control Panel], click [Printers and Other
Hardware], and then click [Printers and Faxes].
B Click the icon of the printer. On the [File] menu, click [Properties].
C Click the [Ports] tab.
D In the [Print to the following port(s)] list, confirm the correct port is selected.
Page 87

Printer does not Print
• Windows NT 4.0
A Click the [Start] button, point to [Settings], and then click [Printers].
B Click the icon of the printer. On the [File] menu, click [Properties].
C Click the [Ports] tab.
D In the [Print to the following port(s)] list, confirm the correct port is selected.
❖ Network Connection
❒ Contact your network administrator.
5
81
Page 88

Troubleshooting
Other Printing Problems
Status Possible Causes, Descriptions, and Solutions
5
Multiple pages are fed through
the printer at once.
Cannot print in duplex mode You cannot use thick paper with duplex printing.
Printing of Duplex data has
been canceled.
A blank page is automatically
printed.
The image is printed on the reverse side of the paper.
Paper misfeeds occur frequently.
The display panel error message stays on after removing
the misfed paper.
Remove all paper from the paper feed tray and fan it gently
to get air between the sheets. Then, load it back into the paper
feed tray.
Specify one of the following duplex-compatible paper size:
A4K, B5 JISK and 8
If different paper sizes are mixed in the data, select A4K, B5
JISK and 8
Postscript3 printer driver, originals with different sizes cannot be printed in Duplex mode.
Depending on the application, when printing a document
from Postscript3 printer driver with an odd number of pages
in duplex mode, a blank page might be added automatically.
To avoid this, set [Blank Page Print] to disable in the PS Menu
on the control panel.
Load paper with the other side facing up.
Use the recommended paper. Avoid using curled, folded,
wrinkled, perforated or glossy paper.
Open the front cover of the printer and then close it.
1
/2" × 11"K from [Fit to paper size]. If using
1
/2" × 11"K.
82
A print instruction was issued
from the computer, but printing
did not start.
Photo images are coarse. Some applications reduce print resolution.
Images are cut off or excess is
printed.
Page layout is not as expected. Print areas differ depending on the printer used. Information
User code management may have been set. Ask the administrator about valid user codes. To print, the user code must be
entered from the printer driver.
You may be using paper smaller than the size selected in the
application. Use the same size paper as that selected in the
application. If you cannot load paper of the correct size, use
the reduction function to reduce the image, and then print.
See the printer driver Help.
that fits on a single page on one printer may not fit on a single
page of another printer.
Adjust the [Printable area:] setting on the [Printer Configura-
tion...] tab in the RPCS printer driver.
See the printer driver Help.
Page 89

Other Printing Problems
Status Possible Causes, Descriptions, and Solutions
It takes a long time to complete
a print job.
Photographs and other data intensive pages take a long time
for the printer to process, simply wait when printing such data.
Changing the following settings with the printer driver may
help speed up printing:
•RPCS
Click [Change User Settings...] on the [Print Quality] tab in the
[Printer Properties] dialog box, and then select the [Fast] value for [Image processing priority:] on the [Image Adjustments]
tab in the [Change User Settings...] dialog box.
Note
❒ Under Windows 2000/XP and Windows Server 2003,
click [Change User Settings...] on the [Print Quality] tab in
the [Printing Preferences] dialog box, and then select the
[Fast] value for [Image processing priority:] on the [Image
Adjustments] tab in the [Change User Settings...] dialog
box.
❒ Under Windows NT 4.0, click [Change User Settings...]
on the [Print Quality] tab in the [Document Defaults] dialog box, and then select the [Fast] value for [Image
processing priority:]on the [Image Adjustments] tab in the
[Change User Settings...] dialog box.
•PostScript3
Select [PostScript (optimize for speed)]for [PostScript output
format:] on the [PostScript] tab in the [Printer Properties] dia-
log box.
5
It takes too much time to
resume printing.
Note
❒ Under Windows 2000/XP and Windows Server 2003,
click [Advanced...] on the [Paper/Quality] tab in the [Print-
ing Preferences] dialog box, and then select [PostScript
output options : optimize for speed] for [PostScript Options]
in the [Advanced...] dialog box.
❒ Under Windows NT 4.0, click [Advanced...] in the [Doc-
ument Defaults] dialog box, and then select [PostScript
output options : optimize for speed] for [PostScript Options]
in the [Advanced...] dialog box.
See the printer driver Help.
The data is so large or complex that it takes time to process. If
the Data In indicator is blinking, data is being processed.
Simply wait until printing resumes.
The data is so large or complex that it takes time to process. If
the Data In indicator is blinking, data is being processed.
Simply wait until printing resumes.
The printer was in Energy Saver mode. It usually takes time
for the machine to return to ready mode. Simply wait until
printing resumes. See Operating Instructions.
83
Page 90

Troubleshooting
Status Possible Causes, Descriptions, and Solutions
5
Images are printed in the
wrong orientation.
<Only when using PostScript3
printer driver under Windows>
The data which uses proportional fonts cannot be printed
exactly as viewed on the screen.
<Only when using PostScript3
printer driver under Windows>
Combine printing cannot be
done as specified.
<Only when using PostScript3
printer driver under Windows>
Auto Magnification cannot be
done as specified.
The feed orientation you selected and the feed orientation selected in the printer driver's option setup might not be the
same. Set the machine's feed orientation and the printer driver's feed orientation accordingly.
See the printer driver Help.
• Under Windows 95/98/Me
Select [Substitute printer fonts for True Type Fonts when appli-
cable] in the [Fonts] tab.
• Under Windows 2000/XP and Windows Server 2003
Click [Advanced...] on the [Paper/Quality] tab or on the [Lay-
out] tab to display the [Advanced Options] dialog box. Select
[Download as softfont] in [TrueType Font:] under [Graphic].
• Under Windows NT 4.0
Click the [Advanced] tab on the [Properties] dialog box. Select [Download as softfont] in [TrueType Font] under [Graph-
ics] .
Make sure that the same orientation is set, as well as the same
paper size set in the application.
• Under Windows 95/98/Me, check the [Paper] tab.
• Under Windows 2000/XP and Windows Server 2003,
check the [Layout] tab.
• Under Windows NT 4.0, check the [Page Setup] tab.
If a different size has been set, select the correct paper size
and orientation.
<Only when using PostScript3
printer driver under Windows>
Printing cannot be done even if
the data is being received in a
network environment.
<Mac OS only>
The printer is not displayed in
the Chooser.
<Mac OS Χ only>
The printer is not displayed in
the Printer list.
<Macintosh only>
It takes a long time for the [Print]
dialog box to be displayed.
• Windows 95/98/Me
Click [Advanced...] on the [PostScript] tab to display the [Ad-
vanced PostScript Options] dialog box. Make sure to clear
both the [Send CTRL+D after job] check box and the [Send
CTRL+D before job] check box.
• Windows 2000/XP and Windows Server 2003
Make sure to select [No] in both [Send CTRL+D Before Each
Job:] and [Send CTRL+D After Each Job:] in the [Device Settings] tab.
• Windows NT 4.0
Make sure to select [No] in both [Send CTRL+D Before Each
Job] and [Send CTRL+D After Each Job] in the [Device Settings] tab.
Make sure that the printer and the Macintosh are connected
in the Apple talk environment.
Depending on the processing speed of the Macintosh system,
the dialog box display may take time.
84
Page 91

Other Printing Problems
Status Possible Causes, Descriptions, and Solutions
<Macintosh only>
It takes a long time to print from
the Macintosh G3 or G4 via a
hub.
The same page is being master
made many times.
Fine dot patterns are not printed • RPCS
Solid lines are printed as
broken lines.
When the printer is connected to a Macintosh computer
equipped with the G3 or G4 processor via a hub, it may take
a long time to transfer data on a 100BASE-TX from the Macintosh to the printer.
Make sure to clear the [Collate] check box in the [Print] dialog
box of the application.
< Windows 2000/XP and Windows Server 2003 only >
Even if the check mark is cleared in the [Collated] check box,
master making may be done every time a page is going to be
printed. In this case, make sure to clear the [collated] check
box displayed when selecting [Copy Count] in [Advanced] dialog box of the printer driver.
Change the [Dithering:] setting under the [Image Adjust-
ments] tab in the [Change User Settings] dialog box under
the [Print Quality] tab in the [Printer Properties] dialog box.
•PostScript3
Change the [Dithering:] setting in the [Advanced] dialog box
under the printer driver's [Print Quality] tab.
In the RPCS printer driver [Change User Settings] dialog box,
change the [Dithering:] setting on the [Image Adjustments] tab.
For details, see the printer driver Help.
5
Two or more sheets are fed
together.
The set option cannot be
selected in the print menu.
In the RPCS printer driver [Change User Settings] dialog box,
change the [Dithering:] setting on the [Image Adjustments] tab.
For details, see the printer driver Help.
The option may not be set correctly.
• Windows95/98/Me
Set the option correctly in the [Device Options] tab.
• Windows 2000/XP and Windows Server 2003
Set the option correctly in the [Device Settings] tab.
• Windows NT 4.0
Set the option correctly in the [Device Settings] tab.
•Mac OS
Set the option configuration correctly in [Chooser] in the
Apple menu.
85
Page 92

Troubleshooting
Status Possible Causes, Descriptions, and Solutions
5
PDF Direct Print is not executed
(PDF file is not printed).
As a result of printing using
PDF Direct Print, characters are
missing or misshapen.
The paper size appears on the
control panel and printing is
not performed with PDF Direct
Print.
Set the value in [RAM Disk] on the [PS Menu] to 2 MB or more.
Reference
For details about RAM Disk, see p.96 “PS Menu”.
When printing a PDF with a password set, set the password
of the PDF file using the [Change PDF Password] menu in [Gen-
eral Features] or Web Image Monitor.
Reference
For details about [Change PDF Password], see p.92 “General
Features”.
For details about Web Image Monitor, see Help.
PDF files not allowed to be printed by the PDF file security
setting cannot be printed.
Before printing, embed the font in the PDF file to be printed.
When using PDF Direct Print, printing will be performed
only when paper of the size set within the PDF file is loaded.
When a message indicating a paper size appears, either load
paper of the indicated size in the paper tray or perform Form
Feed.
If [Tray Paper Size: Paper Feed Tray] in the online print feature
menu is set to [Auto Detect], printing proceeds even if the size
of the paper loaded in the paper feed tray differs from the
page size of the PDF file.
86
The printing data is left in the
machine's input buffer.
Do not use NetWare to configure form feed. Form feed is controlled by the printer driver on Windows. If NetWare form
feed is configured, the printer may not print properly.
Follow the procedure below to disable form feed according to
the operating system used:
• Under Windows 95/98/Me, clear the [Form feed] check
box on the [Printer Settings] tab in the printer properties dialog box.
• Under Windows 2000/XP, Windows Server 2003, or Windows NT 4.0, clear the [Form feed] check box on the [Net-
Ware Settings] tab in the printer properties dialog box.
Page 93

Other Printing Problems
Note
❒ A PostScript error could mean that the PostScript data is erroneous or that
there is a lack of memory. Some PostScript errors can be avoided if the memory is expanded. If you still cannot print as expected, consult your sales or
service representative. For information on your nearest sales or service representative, consult the store where you purchased this printer.
❒ The following is the memory assigned for PostScript.
General memory 128 MB (64 + 64 MB,
Factory settings)
Assigned memory 15.0 MB 27.0 MB 47.0 MB
192 MB
(64 + 128 MB)
320 MB
(64 + 256 MB )
5
87
Page 94

5
Troubleshooting
88
Page 95

6. Using the Control Panel
Though the factory default settings of the printer are suitable for most printing
jobs, “Online Print Features” menu gives you access to a number of settings that
control basic printer operations. The Online Print Features settings you make are
retained even when the printer is turned off.
Reference
For details about settings other than the Online Print Features, see the Operating Instructions.
Online Print Features Menu
The following items are listed in the “Online Parameters” menu.
• General Features
• List / Test Print
•Host Interface
•PS Menu
• Administrator Tools
89
Page 96

Using the Control Panel
Functions in the following table can be selected:
Menu Function menu
General Features Hold Data-in
Tray Paper Size: Paper Feed Tray
Custom Paper Size: Paper Feed Tray
Print Size Priority
Cycle Setting
Memory Over Flow
Spool Printing
Change PDF Password
Print Error Report
List / Test Print Configuration Page
PDF Configuration / Font Page
PS Configuration / Font Page
Host Interface I/O Buffer
6
I/O Timeout
PS Menu
Administrator Tools Return to Defaults
*1
Appears when the PostScript3 board is installed.
*1
Data Format
RAM Disk
Blank Page Print
90
Page 97

Adjusting Online Print Features
Adjusting Online Print Features
A Press the {User Tools} key.
AVA002S
B Press [Online Print Features].
C Select the item you want to change, and then press [OK].
D Make any setting you require, and then press [OK].
Note
❒ To change the value entered, press the {Clear/Stop} key before pressing the
[OK] key. Then enter the new value.
❒ Press [Cancel] to return to the previous menu without changing any data.
E Press the {User Tools} key to return to the standby display.
Note
❒ The settings are not canceled even if the main switch is turned off or the
{Clear Modes} key is pressed.
❒ You can also return to the standby display by pressing the [Exit] key.
6
91
Page 98

Using the Control Panel
Online Print Features Settings
General Features
❖ Hold Data- in
You can select online print mode and choose whether the machine accepts or
rejects online print data from the computer.
Note
❒ Default: Off
❒ Set the mode “On” to reject the online print.
❒ Set the mode “Off” to accept the online print.
❖ Tray Paper Size: Paper Feed Tray
You can select the size of the paper loaded in the paper feed tray.
Note
❒ Default: Auto Detect
6
❒ The machine cannot detect the following paper sizes automatically. When
printing on the following sizes, select the desired paper size on “Tray Paper Size: Paper Feed Tray” menu before printing.
•A5K, HLTK, 8KL, 16KLK
❖ Custom Paper Size: Paper Feed Tray
You can specify the custom paper size of the paper loaded in the paper feed tray.
Note
❒ Default: 210mm x 297mm
❖ Print Size Priority
You can choose to specify the paper size on the printer driver or the control panel.
Note
❒ Default: Machine Size
❖ Cycle Setting
You can select the Cycle Setting mode.
Note
❒ Default: Auto Cycle
❖ Memory Overflow
You can specify whether or not to print an error report when a memory overflow occurs.
92
Note
❒ Default: Do not Print
Page 99

Online Print Features Settings
❖ Spool Printing
You can select the Spool printing mode.
Note
❒ Default: Off
❖ Change PDF Password
Set the password for the PDF file executing PDF Direct Print.
Note
❒ Default: Not Set
❖ Print Error Report
You can specify whether or not to print an error report when a RPCS error or
PostScript error occurs.
Note
❒ Default: Off
List / Test Print
❖ Configuration page
You can print the system controller data.
❖ PDF Configuration Page
You can print the controller’s PDF font list.
❖ PS Configuration Page
You can print the controller’s PostScript font list.
Printing the configuration page
A Press the {User Tools} key.
6
B Press [Online Print Features].
C Select [List / Test Print] .
AVA002S
93
Page 100

6
Using the Control Panel
D Press the type of configuration page you want.
Confirmation massage appears.
E Press[Yes].
The configuration page is printed.
Interpreting the configuration page
System Reference
❖ Printer ID
Displays the serial number assigned to the board by its manufacturer.
❖ Firmware Version
•System Version
Displays the version number of the system firmware.
•Engine
Displays the version number of the engine.
•Panel Version
Displays the version number of the panel.
❖ Controller Option
This item(s) appears when the controller option(s) is installed.
❖ HDD
Displays the capacity of the HDD.
❖ Printer Language
Displays the version number of the Printer Description Language.
❖ Options
Displays the optional trays installed.
Paper Input
Displays the settings made under the Print Size menu.
System
Displays the settings made under the System menu.
PS Menu
Displays the settings made under PS Menu.
94
 Loading...