

Ricoh DX 3243, DX 3443 Operating Instructions Manual

DX 3243 / DX 3443
Before Using the Machine
1
Basics
2
Printing Functions
3
Operating Instructions
Troubleshooting
4
User Tools
5
Remarks
6
Specifications
7
Read this manual carefully before you use this machine and keep it handy for future reference. For safe and correct use, be sure to read “Safety
Information” before using the machine.

Introduction
This manual contains detailed instructions and notes on the operation and use of this machine. For your
safety and benefit, read this manual carefully before using the machine. Keep this manual in a handy
place for quick reference.
Important
Contents of this manual are subject to change without prior notice. In no event will the company be liable for direct, indirect, special, incidental, or consequential damages as a result of handling or operating the machine.
Do not copy or print any item for which reproduction is prohibited by law.
Copying or printing the following items is generally prohibited by local law:
bank notes, revenue stamps, bonds, stock certificates, bank drafts, checks, passports, driver's licenses.
The preceding list is meant as a guide only and is not inclusive. We assume no responsibility for its
completeness or accuracy. If you have any questions concerning the legality of copying or printing certain items, consult with your legal advisor.
Notes:
Some illustrations in this manual might be slightly different from the machine.
Certain options might not be available in some countries. For details, please contact your local dealer.
The model names of the machines do not appear in the following pages. Check the type of your machine before reading this manual.
• LG drum: Not Available
• A4 drum: Type 1
• B4 drum: Type 2
Two kinds of size notation are employed in this manual. With this machine refer to the metric version.
The supplier shall not be responsible for any damage or expense that might result from the use of parts
other than genuine parts from the supplier with your office products.
Power Source
220 – 240V, 50/60Hz, 0.7A or more
Please be sure to connect the power cord to a power source as above. For details about power source,
see p.123 “Power Connection”.

TABLE OF CONTENTS
Manuals for This Machine .....................................................................................1
What You Can Do with this Machine....................................................................2
How to Read this Manual ......................................................................................4
Safety Information .................................................................................................5
Safety During Operation.............................................................................................5
User Information on Electrical & Electronic Equipment .................................... 7
Users in the EU, Switzerland and Norway .................................................................7
All Other Users...........................................................................................................7
Note for the Battery and/or Accumulator Symbol (For EU countries only)......8
ENERGY STAR Program .......................................................................................9
Positions of RWARNING and RCAUTION Labels ........................................... 10
Guide To Components ........................................................................................11
Options .................................................................................................................13
Option List ................................................................................................................13
Guide to Major Options ............................................................................................13
Control Panel........................................................................................................14
Panel Display ...........................................................................................................16
1. Before Using the Machine
Originals ...............................................................................................................19
Recommended Sizes and Weights of Originals.......................................................19
Print Paper............................................................................................................21
Non-recommended Paper........................................................................................22
Storing Paper ...........................................................................................................23
Printing Size .........................................................................................................24
2. Basics
Printing Preparations ..........................................................................................25
Using the Paper Feed Tray and Delivery Tray .........................................................25
After Printing ........................................................................................................28
Folding the Paper Feed Tray and Delivery Tray ......................................................28
Placing Originals..................................................................................................30
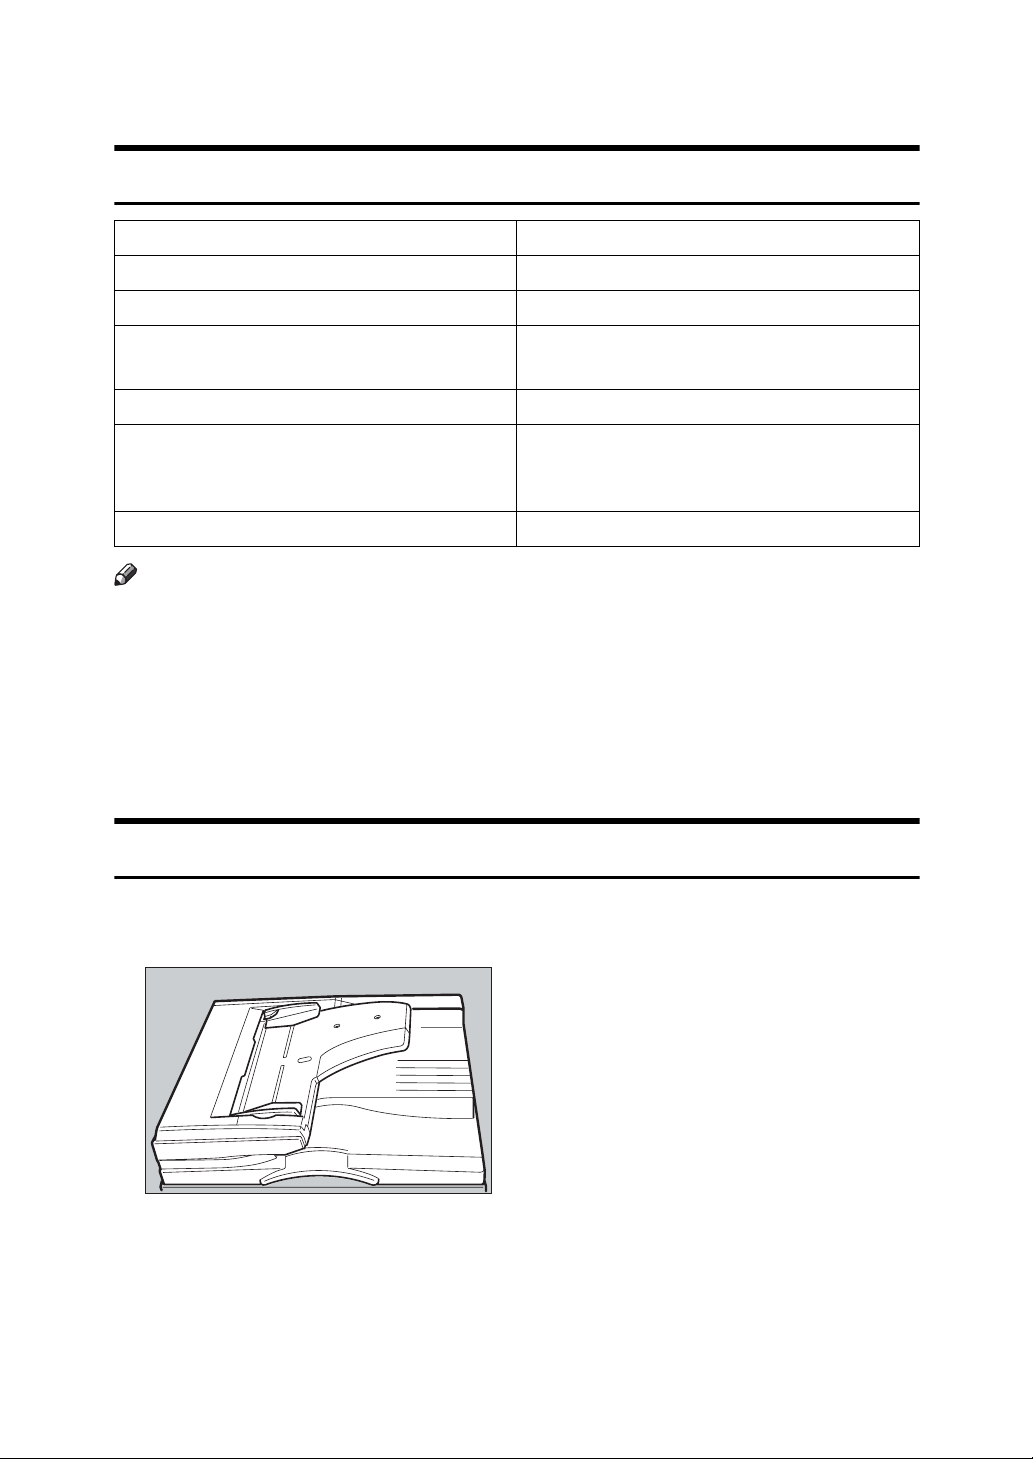
Placing Originals on the Exposure Glass.................................................................30
Placing Originals in the Auto Document Feeder ......................................................30
Basic Procedure...................................................................................................32
Energy Saver Mode .................................................................................................34
Auto Reset ...............................................................................................................34
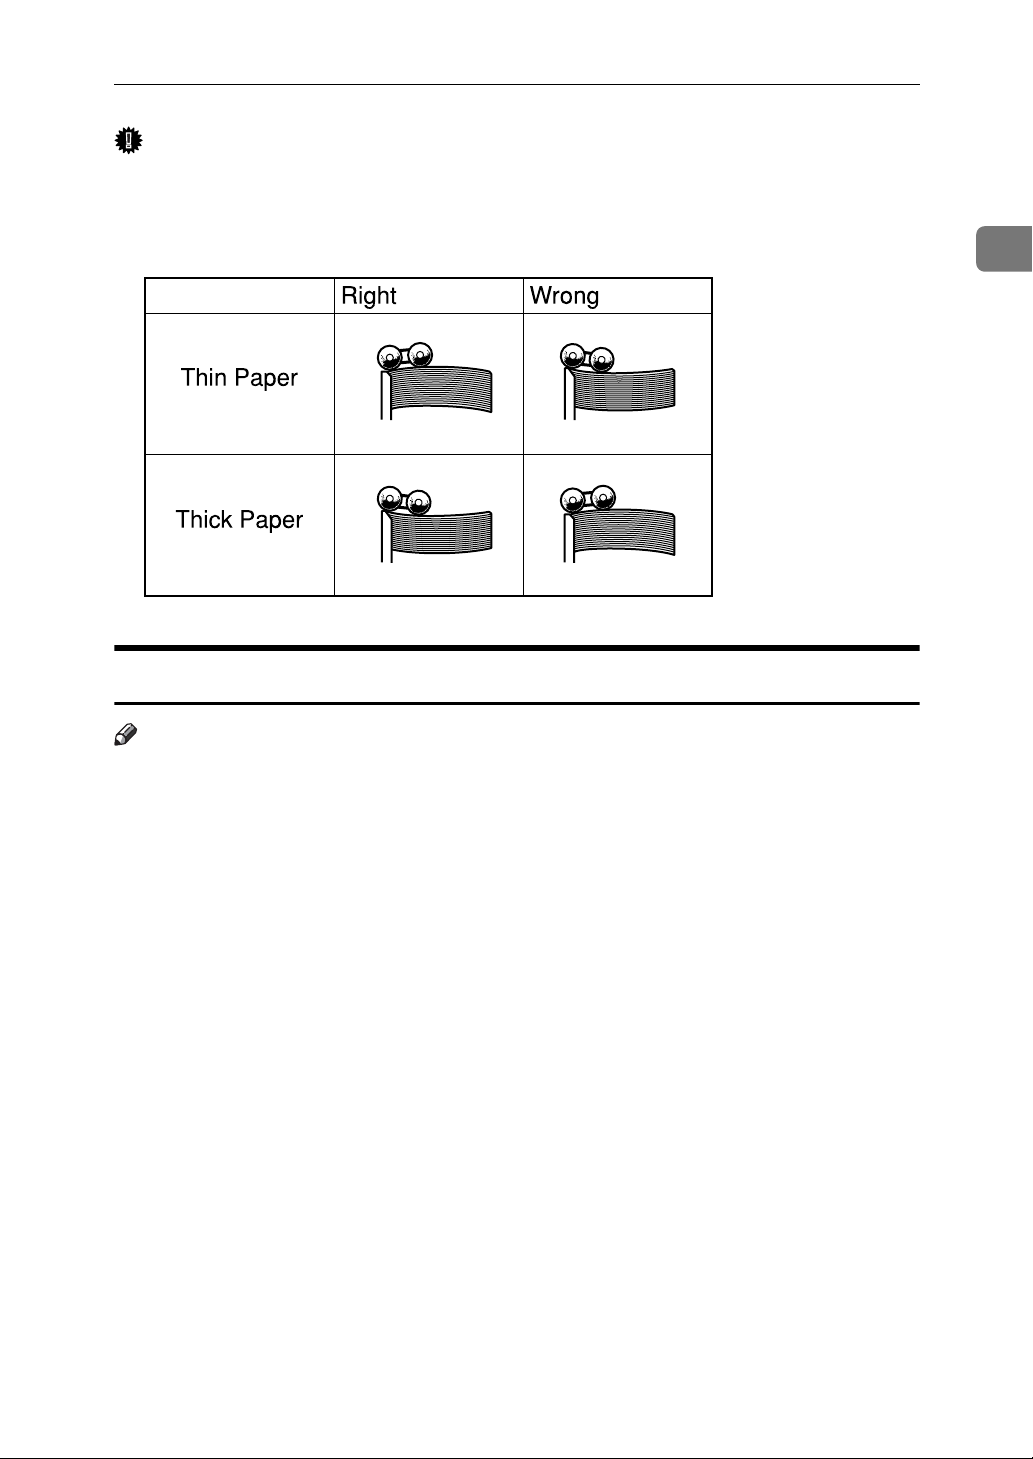
Printing on Thick or Thin Paper .........................................................................35
Feed Roller Pressure Lever Position .......................................................................35
Separation Pressure Lever Position.........................................................................37
Auto Cycle ............................................................................................................38
Original Type............................................................................................................39
Sample Print and Adjustment.............................................................................40
Adjusting the Print Image Position ...........................................................................40
Changing the Printing Speed..............................................................................43
i

3. Printing Functions
Printing Functions ...............................................................................................45
Master Making Density.............................................................................................45
Fine Mode ................................................................................................................46
Preset Reduce/Enlarge ............................................................................................46
Erase Border ............................................................................................................48
Economy Mode ........................................................................................................49
Memory/Class ..........................................................................................................49
Class Mode (print per class) ....................................................................................51
Memory Mode (print per original) .............................................................................52
Recall Program ........................................................................................................54
Class/Year................................................................................................................58
Combine...................................................................................................................60
Repeat......................................................................................................................62
Skip Feed / A3 Paper Feed......................................................................................63
Security Mode ..........................................................................................................65
Online Printing..........................................................................................................65
Hold Data-in .............................................................................................................66
Program ................................................................................................................67
Registering Print Settings.........................................................................................67
Recalling a Program.................................................................................................68
Make Colour Prints ..............................................................................................69
Changing the Colour Drum Unit ...............................................................................69
Making Colour Prints................................................................................................70
Printing in Two Colours ............................................................................................71
Combination Chart...............................................................................................72
4. Troubleshooting
If Your Machine Does Not Operate as You Want ..............................................73
Printing Problems................................................................................................74
Printing Problems When Using Combine Mode.......................................................74
Loading Paper into the Paper Feed Tray........................................................... 75
Replenishing Paper..................................................................................................75
Changing the Paper Size .........................................................................................76
When the Add Ink Indicator (j) Lights .............................................................77
Master Roll Replacement ....................................................................................81
Placing a New Roll of Tape in the Tape Dispenser (Optional).........................83
x Clearing Misfeeds ...........................................................................................84
“x + P” Original Misfeeds Occur in the Auto Document Feeder .............................84
“x + A” Paper Misfeeds in the Paper Feed Section................................................87
“x + B” Paper Wrapped Around the Drum..............................................................87
“x + C” Paper Misfeeds in the Paper Exit Section..................................................89
“x + D” Master Misfeeds in the Master Feed Section.............................................92
“x + A + B” Paper Misfeeds in the Paper Feed Section .........................................93
“x + B + E” Master Misfeeds in the Master Eject Section.......................................95
When the Open Cover/Unit Indicator (M) Lights and a Message is Displayed
Front cover is Open..................................................................................................98
Cover of Optional Auto Document Feeder is Open..................................................98
Master Eject Unit is Open ........................................................................................98
....98
ii

When the Master End Indicator (C) Lights and a Message is Displayed ......99
Master Feeding Cover is Open ................................................................................99
Master Tray is Not Set Properly ...............................................................................99
When the Master Eject Indicator (k) Lights ...................................................100
When Other Indicators Light.............................................................................101
Poor Printing ......................................................................................................102
Dirt on the Back Side of Paper...............................................................................102
Dirt on the Front Side of Paper (Black Line/Stain) .................................................105
Blank Prints or Incomplete Prints ...........................................................................106
5. User Tools
Accessing the User Tools.................................................................................109
Quitting User Tools ................................................................................................109
User Tools Menu ................................................................................................110
1 Counter ...............................................................................................................110
2 System ................................................................................................................110
3 Set Operation Mode ............................................................................................111
4 Initial Settings......................................................................................................112
5 Mode Settings .....................................................................................................113
6 Administrator Tools .............................................................................................114
7 Online Settings....................................................................................................115
User Code ...........................................................................................................117
Entering the User Code to Use the Machine..........................................................117
Clearing the Counter ..............................................................................................118
6. Remarks
Operation Notes .................................................................................................119
General Cautions ...................................................................................................119
Print Paper .............................................................................................................121
Originals .................................................................................................................121
Where to Put Your Machine .............................................................................. 122
Environmental Conditions ......................................................................................122
Power Connection..................................................................................................123
Access to Machine .................................................................................................123
Maintaining the Machine ...................................................................................124
Main Frame ............................................................................................................124
Optional Document Feeder ....................................................................................125
7. Specifications
Main Frame .........................................................................................................127
Auto Document Feeder (ADF)...........................................................................131
Consumables .....................................................................................................132
INDEX....................................................................................................... 133
iii

iv

Manuals for This Machine
The following manuals describe the operational procedures of this machine. For
particular functions, see the relevant parts of the manual.
Note
❒ Manuals provided are specific to machine type.
❒ Adobe Acrobat Reader/Adobe Reader is necessary to view the manuals as a
PDF file.
❖ Safety Information (paper)
Describes information about the safety precautions.
❖ Easy Operation Guide (paper/PDF file - CD-ROM
Describes information about the control panel and basic operations.
❖ Operating Instructions (this manual) (PDF file - CD-ROM
Describes operations, functions, User Tools (initial setting, mode setting, etc.)
and troubleshooting.
*1
Provided on the CD-ROM labeled "Operating Instructions"
*1
)
*1
)
1
What You Can Do with this Machine
Below is a quick summary of this machine's features and where to look in
this manual for more information
❖ Basic Procedure
See p.32 “Basic Procedure”.
❖ Printing on Thick or Thin Paper
See p.35 “Printing on Thick or Thin
Paper”.
❖ Selecting Original Type
See p.39 “Original Type”.
❖ Adjusting the Print Image Position
See p.40 “Adjusting the Print Image Position”.
❖ Adjusting the Print Image Density
See p.45 “Master Making Density”.
❖ Changing the Print Speed
See p.43 “Changing the Printing
Speed”.
❖ Fine Mode
See p.46 “Fine Mode”.
❖ Reducing and Enlarging Using Preset
Ratios
See p.46 “Preset Reduce/Enlarge”.
❖ Saving Ink (Economy Mode)
See p.49 “Economy Mode”.
❖ Printing per Class (Class Mode)
See p.51 “Class Mode (print per
class)”.
R
R R
R
R R R
GRCLAS0E
❖ Printing per Original (Memory Mode)
See p.52 “Memory Mode (print per
original)”.
A
A
B
B
C
D
❖ Combining Originals onto One Print
See p.60 “Combine”.
C D
GRCLAS1E
❖ Erasing Edge Margins
See p.48 “Erase Border”.
2
GRRATI0E
ACY068S
BA AB
ZCTX040E

❖ Repeating Original onto One Print
See p.62 “Repeat”.
❖ Skip Feed/A3 Paper Feed Printing
See p.63 “Skip Feed / A3 Paper
Feed”.
❖ Printing Secret Documents (Security
Mode)
See p.65 “Security Mode”.
❖ Making Colour Prints
See p.69 “Make Colour Prints”.
❖ Printing in Two Colours
See p.71 “Printing in Two Colours”.
3

How to Read this Manual
R
R
Symbols
This manual uses the following symbols:
WARNING:
Indicates important safety notes.
Ignoring these notes could result in serious injury or death. Be sure to read these
notes. They can be found in the "Safety Information" section of About This Machine.
CAUTION:
Indicates important safety notes.
Ignoring these notes could result in moderate or minor injury, or damage to the
machine or to property. Be sure to read these notes. They can be found in the
"Safety Information" section of About This Machine.
Important
Indicates points to pay attention to when using the machine, and explanations
of likely causes of paper misfeeds, damage to originals, or loss of data. Be sure
to read these explanations.
Note
Indicates supplementary explanations of the machine’s functions, and instructions on resolving user errors.
Reference
This symbol is located at the end of sections. It indicates where you can find further relevant information.
[]
Indicates the names of keys that appear on the machine’s display panel.
{}
Indicates the names of keys on the machine’s control panel.
4

Safety Information
R
R
When using this machine, the following safety precautions should always be followed.
Safety During Operation
In this manual, the following important symbols are used:
WARNING:
CAUTION:
Indicates a potentially hazardous situation which, if instructions
are not followed, could result in death or serious injury.
Indicates a potentially hazardous situation which, if instructions are not
followed, may result in minor or moderate injury or damage to property.
R WARNING:
• Do not damage, break or make any modifications to the power cord.
Do not place heavy objects on it. Do not pull it hard nor bend it more
than necessary. These actions could cause an electric shock or fire.
• Disconnect the power plug (by pulling the plug, not the cable) if the
power cable or plug becomes frayed or otherwise damaged.
• To avoid hazardous electric shock, do not remove any covers or
screws other than those specified in this manual.
• Turn off the power and disconnect the power plug (by pulling the plug,
not the cable) if any of the following occurs:
• You spill something into the machine.
• You suspect that your machine needs service or repair.
• The external housing of your machine has been damaged.
• Keep the machine away from flammable liquids, gases, and aerosols.
A fire or an electric shock might occur.
• Connect the power cord directly into a wall outlet and never use an extension cord.
• Only connect the machine to the power source described in this manual.
• Disposal can take place at our authorized dealer or at appropriate collection sites.
5

R CAUTION:
• After you move the machine, use the caster fixture to fix it in place. Otherwise the machine might move or come down to cause an injury.
• If you use the machine in a confined space, make sure there is a continuous
air turnover.
• Keep the machine away from humidity and dust. Otherwise a fire or an electric shock might occur.
• Protect the machine from dampness or wet weather, such as rain and snow.
• Do not place the machine on an unstable or tilted surface. If it topples over,
an injury might occur.
• Unplug the power cord from the wall outlet before you move the machine.
While moving the machine, you should take care that the power cord will not
be damaged under the machine.
• When you disconnect the power plug from the wall outlet, always pull the
plug (not the cable).
• Do not allow paper clips, staples, or other small metallic objects to fall inside
the machine.
• For environmental reasons, do not dispose of the machine or expended
supply waste at household waste collection points. Disposal can take place
at an authorized dealer.
• When disposing of a used ink container, reattach the cap to prevent ink from
splattering.
• Be careful not to get ink on your clothes when replacing an ink container. Ink
stains on clothes are hard to remove.
• Be careful not to cut yourself on any sharp edges when you reach inside the
machine to remove misfed sheets of paper or masters.
• If ink comes into contact with your eyes, rinse immediately in running water.
For other symptoms, consult a doctor.
• Keep the ink or ink container out of reach of children.
• If ink is ingested, induce vomiting by drinking a strong saline solution. Con-
sult a doctor immediately.
• If your skin comes into contact with ink, wash the affected area thoroughly
with soap and water.
• While printing, do not touch the belt at the end of the paper delivery tray.
Otherwise, an injury might occur.
• Our products are engineered to meet the high standards of quality and functionality, and we recommend that you only use the expendable supplies
available at an authorized dealer.
6

User Information on Electrical & Electronic Equipment
Users in the EU, Switzerland and Norway
Our Products contain high quality components and are designed to facilitate recycling.
Our products or product packaging are marked with the symbol below.
The symbol indicates that the product must not be treated as municipal waste.
It must be disposed of separately via the appropriate return and collection systems available. By following these instructions you ensure that this product is
treated correctly and help to reduce potential impacts on the environment and
human health, which could otherwise result from inappropriate handling. Recycling of products helps to conserve natural resources and protect the environment.
For more detailed information on collection and recycling systems for this product, please contact the shop where you purchased it, your local dealer or
sales/service representatives.
All Other Users
If you wish to discard this product, please contact your local authorities, the
shop where you bought this product, your local dealer or sales/service representatives.
7

Note for the Battery and/or Accumulator Symbol (For EU countries only)
In accordance with the Battery Directive 2006/66/EC Article 20 Information for
end-users Annex II, the above symbol is printed on batteries and accumulators.
This symbol means that in the European Union, used batteries and accumulators
should be disposed of separately from your household waste.
In the EU, there are separate collection systems for not only used electrical and
electronic products but also batteries and accumulators.
Please dispose of them correctly at your local community waste collection/recycling centre.
8

ENERGY STAR Program
❖ ENERGY STAR® Program Requirements for Imaging Equipment
This company is a participant in the ENERGY STAR®
Program.
This machine is compliant with the regulations specified by the ENERGY STAR
®
The ENERGY STAR
servation by promoting energy efficient computers and other office equipment.
The program backs the development and dissemination of products that feature energy saving
functions.
It is an open program in which manufacturers participate voluntarily.
Targeted products are computers, monitors, printers, facsimiles, copiers, scanners, and digital
duplicator. Energy Star standards and logos are internationally uniform.
Program Requirements for Imaging Equipment encourage energy con-
®
Program.
9
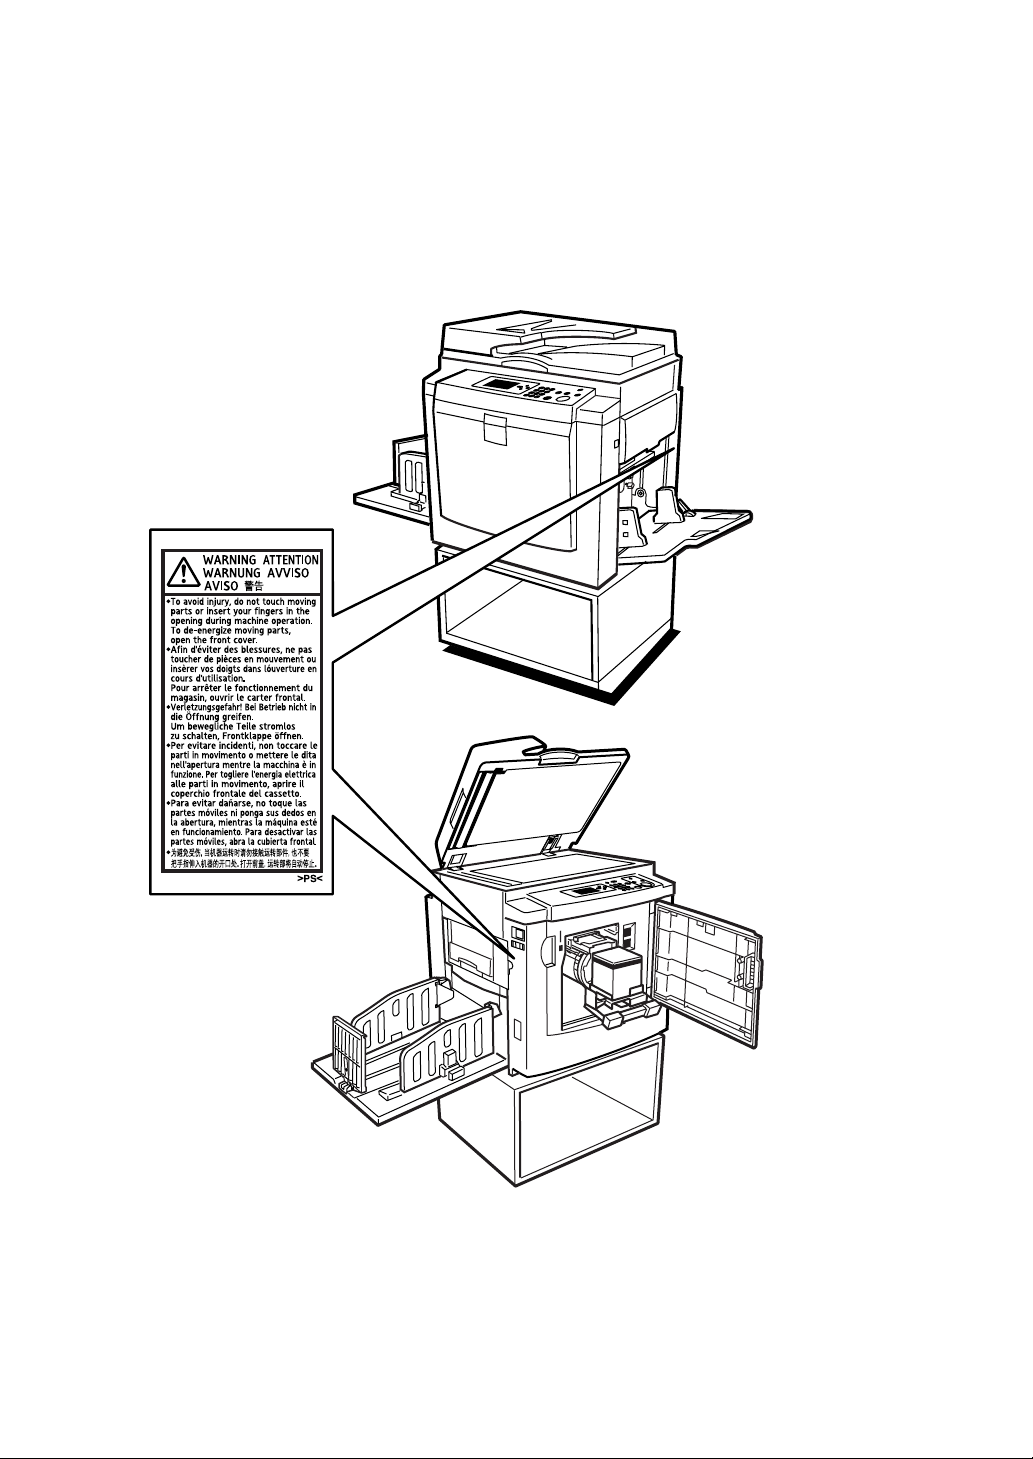
Positions of RWARNING and RCAUTION
Labels
This machine has labels for RWARNING and RCAUTION at the positions
shown below. For safety, please follow the instructions and handle the machine
as indicated.
10
ANT150S
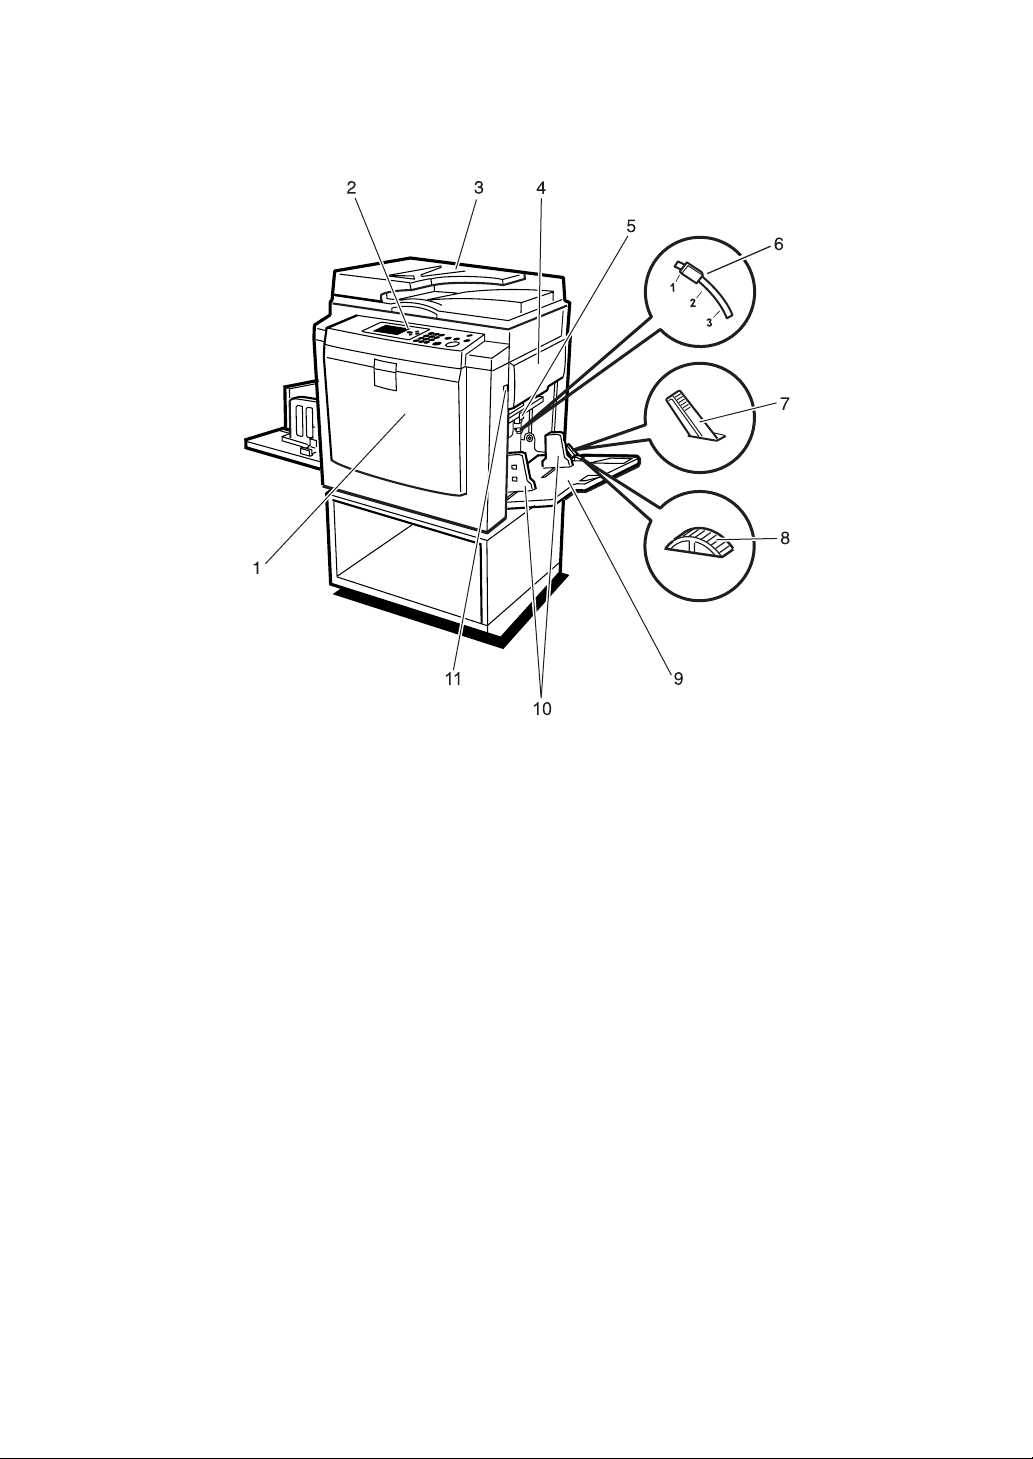
Guide To Components
1. Front cover
Open for access to the inside of the machine.
2. Control panel
Operator controls and indicators are located here. See p.14 “Control Panel”.
3. Exposure glass cover (optional) or
Auto Document Feeder (optional)
Lower this cover over an original on the
exposure glass. If you have the ADF, load
a stack of originals here. They will be fed
automatically, one by one.
(The illustration shows the ADF.)
4. Master tray
Open this tray when installing the master.
5. Feed roller pressure lever
Use to adjust the contact pressure of the
paper feed roller according to paper
thickness.
ANT046S
7. Paper feed side plate lock lever
Use to lock or unlock the paper feed side
plates.
8. Side tray fine adjusting dial
Use to shift the paper feed tray sideways.
9. Paper feed tray
Set paper on this tray for printing.
10. Paper feed side plates
Use to prevent paper skew.
11. Paper feed tray down key
Press to lower the paper feed tray.
6. Separation pressure lever
Use to prevent double feed.
11
ANT043S
1. Exposure glass
Use to set the original.
2. Master eject unit
Open to remove the misfed master.
3. Master eject box
Used masters are stored here.
4. Paper delivery side plates
Use to align the prints on the paper delivery tray.
5. Paper delivery end plate
Use to align the leading edge of prints.
6. Paper delivery tray
Completed prints are delivered here.
7. Main switch
Use to turn the power on or off.
8. Drum unit
The master is wrapped around this unit.
9. Drum unit lock lever
Lift to unlock and pull out the drum unit.
10. Ink holder
Set the ink cartridge in this holder.
12
Options
Option List
Options Model Name
Auto Document Feeder (ADF) DF Type 20
Exposure Glass Cover Platen Cover Type 1018
Drum unit Color Drum Type 20 A4
Color Drum Type 20 B4
Tape Dispenser Priport Tape Maker Type 20
Printer Controller Printer Unit VC-20 (Non Network Connecta-
ble)
Printer Unit Type 4545 (Network Connectable)
Key Counter –
Note
❒ Printer Unit VC-20 and Printer Unit Type 4545 cannot be used at the same
time.
❒ Even if both units are connected, by default only Printer Unit Type 4545 can
be used.
❒ Printer Unit VC-20 is not available on the network. If Printer Unit VC-20 is
connected to your printer server via USB, it cannot be used as a network
printer.
Guide to Major Options
❖ Auto Document Feeder (ADF)
Load a stack of originals here. They will be fed automatically, one by one.
ANT071S
13
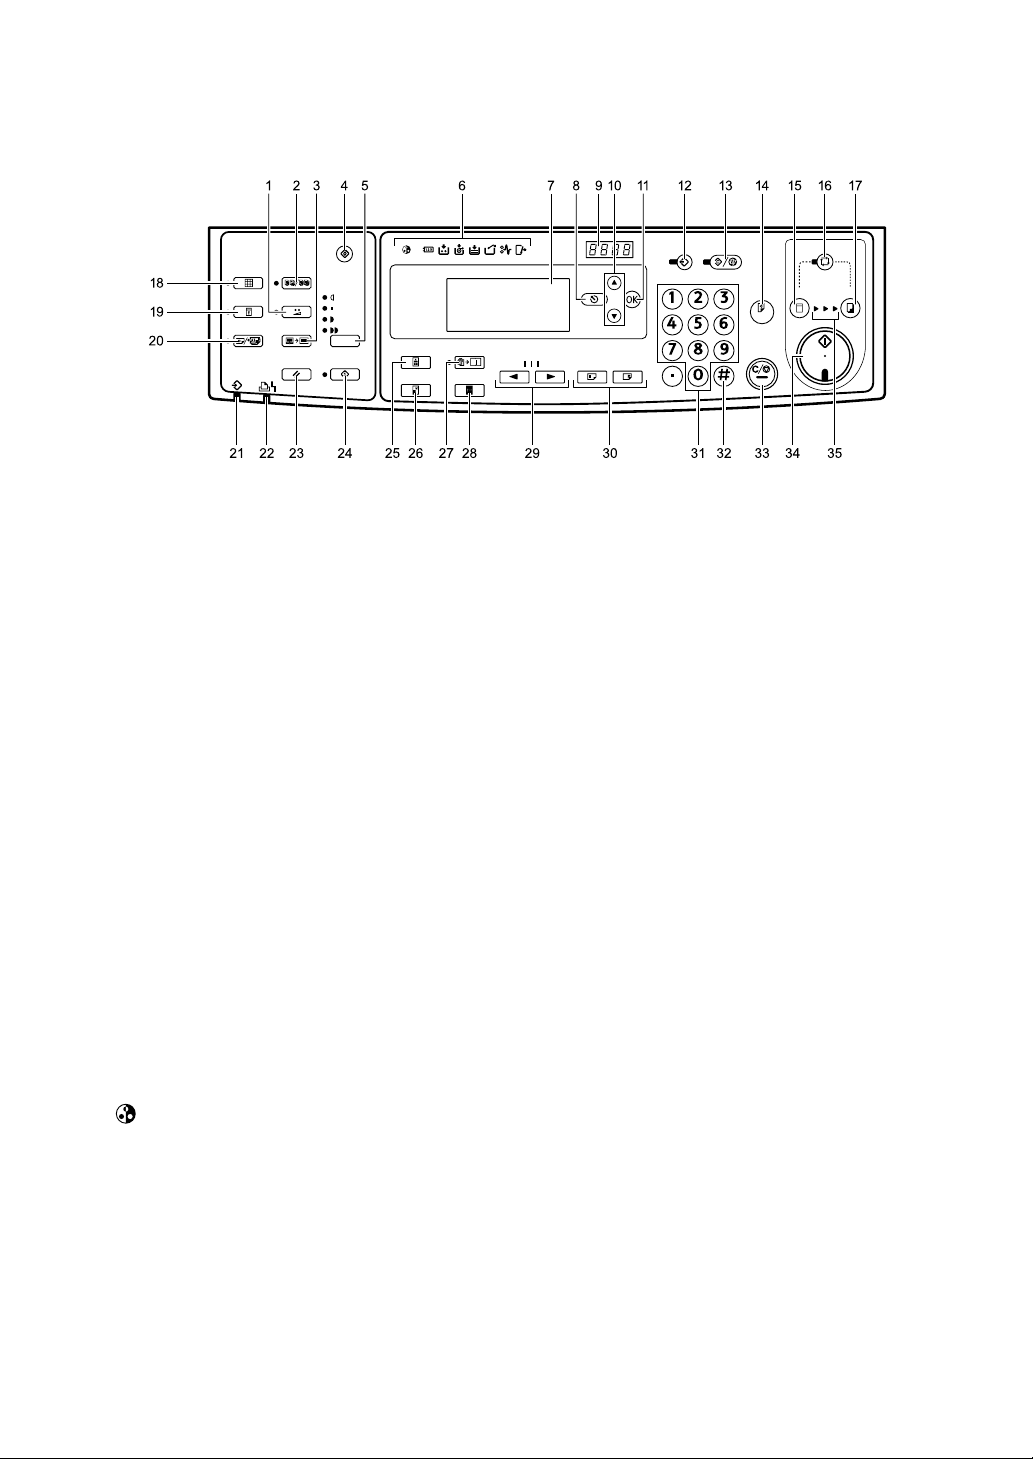
Control Panel
BFU002S
1. {Economy} key
Press to save ink. See p.49 “Economy
Mode”.
2. {Memory/Class} key
Press to select Memory or Class mode.
See p.51 “Class Mode (print per class)” or
p.52 “Memory Mode (print per original)”.
3. {Erase Border} key
Press to select erase margins on the
prints. See p.48 “Erase Border”.
4. {User Tools} key
Press to change the default settings to
suit your requirements. See p.109 “User
Tools”.
5. {Master Making Density} key
Press to make prints darker or lighter. See
p.45 “Master Making Density”.
6. Indicators
Show errors and machine status.
:Colour Drum indicator
u: Key Counter indicator
See p.101 “When Other Indicators Light”.
j: Add Ink indicator
See p.77 “When the Add Ink Indicator
(j) Lights”.
C: Master End indicator
See p.99 “When the Master End Indicator
(C) Lights and a Message is Displayed”.
B: Load Paper indicator
See p.75 “Loading Paper into the Paper
Feed Tray”.
k: Master Eject indicator
See p.100 “When the Master Eject Indica-
tor (k) Lights”.
x: Misfeed indicator
See p.84 “x Clearing Misfeeds”.
M: Open Cover/Unit indicator
See p.98 “When the Open Cover/Unit In-
dicator (M) Lights and a Message is Displayed”.
7. Panel Display
The panel display shows the machine status, error messages, and function menus.
8. {Escape} key
Press to cancel a selection or an entry,
and to return to the previous display.
9. Counter
Shows the number of prints entered.
While printing, it shows the remainder
that is to be printed.
10. {U}{T} keys
Press to select an item on the panel display.
11. {OK} key
Press to confirm a selection or an entry.
12. {Program} key
Press to input or recall user programs.
See p.67 “Program”.
14

13. {Clear Modes/Energy Saver} key
• Clear Modes
Press to clear the previously entered
job settings.
• Energy Saver
Press to switch to and from Energy
Saver Mode p.34 “Energy Saver
Mode”.
14. {Proof} key
Press to make proof prints.
15. {Master Making} mode select key
Press to select the master making mode.
16. {Auto Cycle} key
Press to make masters and prints in a single operation. See p.32 “Basic Procedure”
17. {Print} mode select key
Press to select the print mode.
18. {Fine} key
Press to select the fine image. See p.46
“Fine Mode”.
19. {Security} key
Press to make prints of secret documents.
See p.65 “Security Mode”.
20. {Skip Feed/A3 Paper Feed} key
Press to select skip feed or A3 Paper Feed
printing. See p.63 “Skip Feed / A3 Paper
Feed”.
21. Data In indicator (Green)
• On: Data waiting for Master Making
and printing is in the machine.
• Blinking: Data is being received, or
Master Making or printing is in
progress.
• Off: Master Making and printing are
completed.
22. Error indicator (Red)
• On: An error has occurred. Master
Making and printing stops.
• Off: Normal status
25. {Original Type} key
Press to select Text, Photo, Text/Photo,
Pale, or Pencil mode. See p.39 “Original
Type”.
26. {Reduce/Enlarge} key
Press to reduce or enlarge the image by
preset ratios. Seep.46 “Preset Reduce/Enlarge”.
27. {Combine/Repeat} key
Press to combine two originals onto one
print. See p.60 “Combine”.
Press to repeat the image of an original
on one print. See p.62 “Repeat”.
28. {Full Size} key
Press to make full size prints.
29. {W} and {V} keys (Speed keys)
Press to adjust the printing speed. See
p.43 “Changing the Printing Speed”.
30. {Image Position} key
Press to shift the image forwards or backwards. See p.40 “Adjusting the Print Image Position”.
31. Number keys
Press to enter the desired number of
prints and data for selected modes.
32. {q} key
Press to enter data in selected modes.
33. {Clear/Stop} key
Press to cancel a number you have entered or to stop printing.
34. {Start} key
Press to start making masters or printing.
35. Processing indicators
Shows the process of making master to
printing.
23. {Job Reset} key
Press to cancel the data from an optional
printer controller.
24. {Hold Data-in} key
Press to reject the online print temporarily.
15
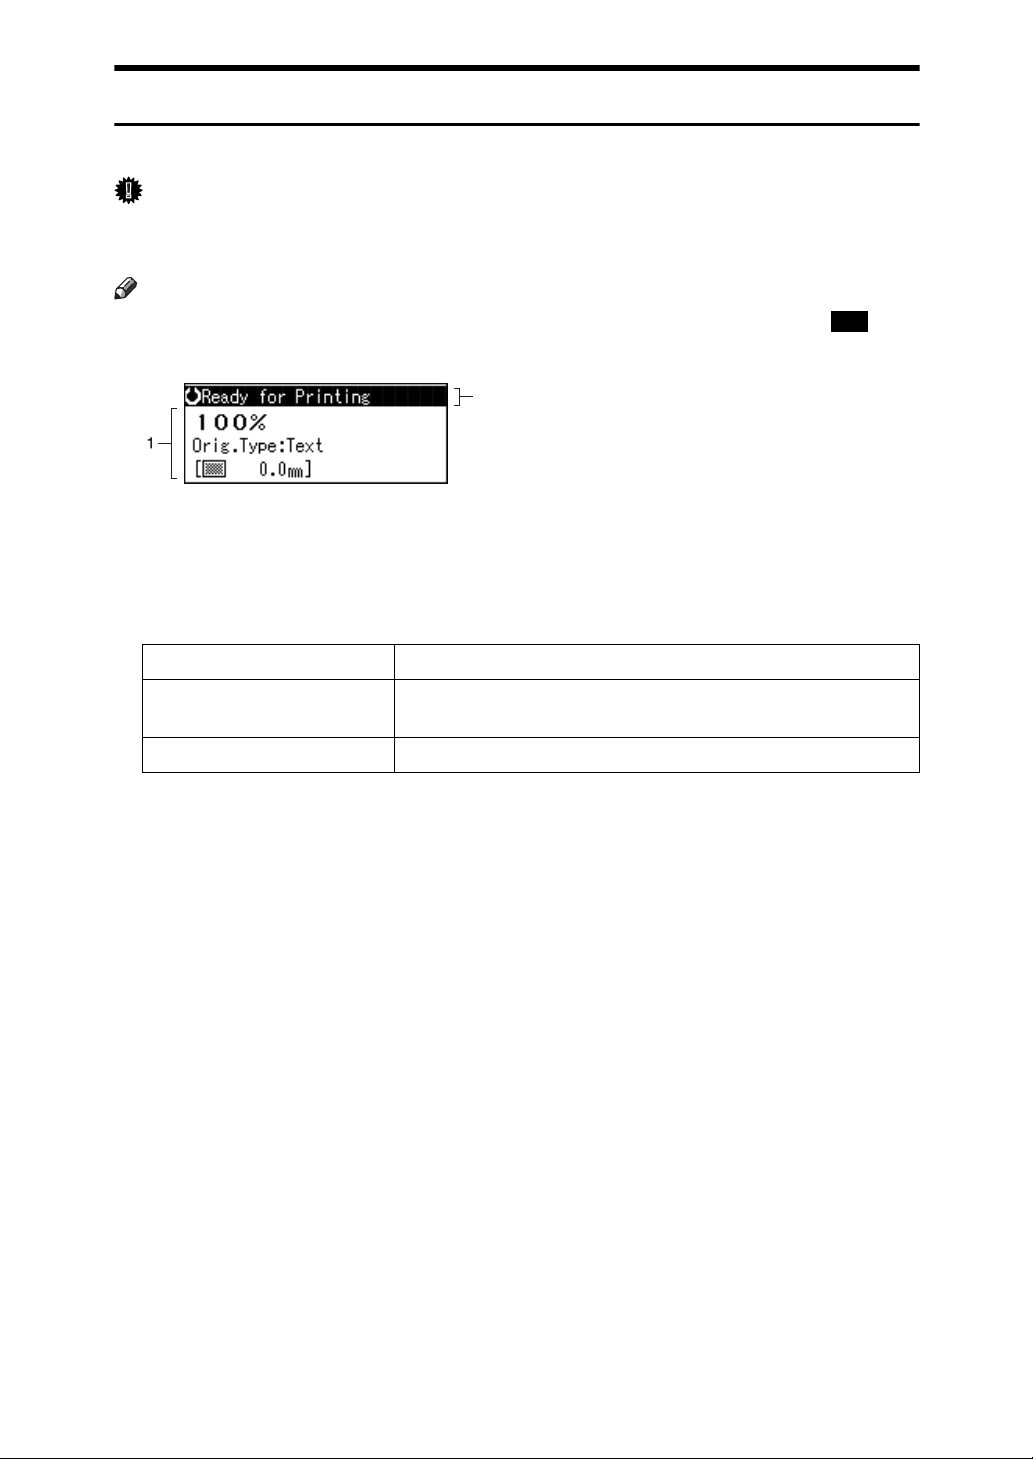
Panel Display
The panel display shows the machine status, error messages, and function menus.
Important
❒ Do not subject the panel display to strong impact or a force equivalent to 30N
or more, otherwise it could be damaged.
Note
❒ When you select an item on the panel display, it is highlighted (e.g. ).
2
ANT100S
1. Menu for the function selected
2. Machine status or messages
❖ Common keys
{OK} key Press to confirm a selection or an entry.
100
{Escape} key Press to cancel a selection or entry, and to return to the previ-
ous display.
{U}{T} keys Press to select items on the panel display.
16
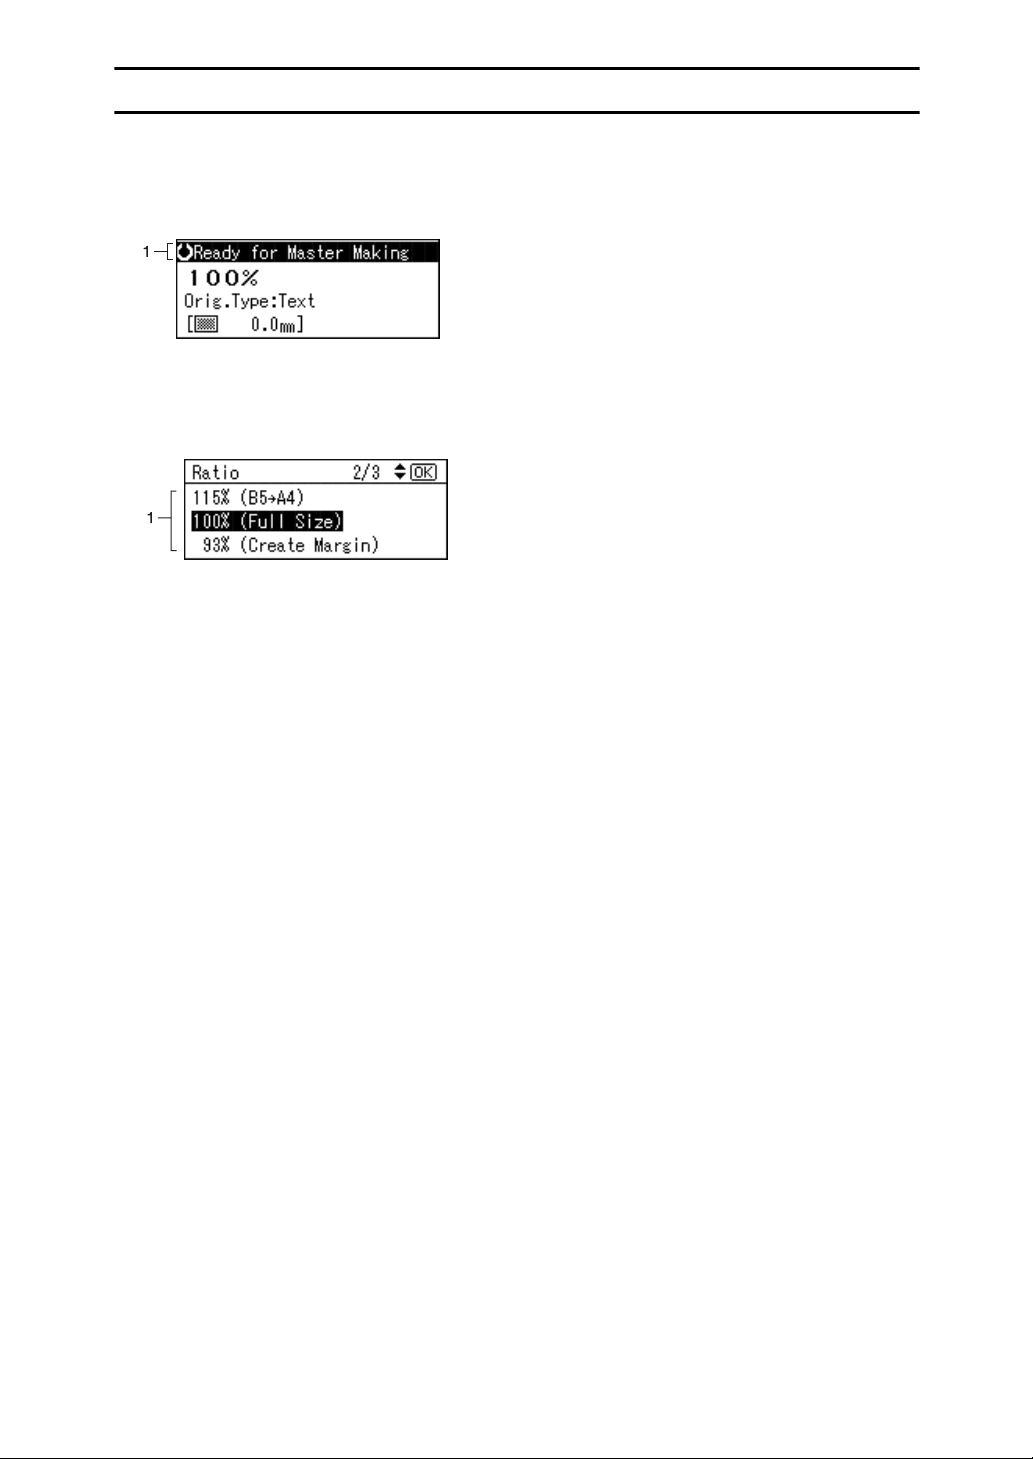
Panel Display Layout
The basic elements of the panel display are explained below. Understanding
their meaning helps you use this machine's features quickly and easily.
❖ Sample display when selecting the {Reduce/Enlarge} key
ANT101S
1. Machine status or messages
When the {Reduce/Enlarge} key is pressed, the following display is shown.
ANT102S
Functions and settings available:
• Press the {U}{T} keys to select an item.
• Press the {OK} key to confirm your settings.
• Press the {Escape} key to return to the previous display.
17

18
1. Before Using the Machine
Originals
Recommended Sizes and Weights of Originals
❖ Metric version
Where original is
placed Original size Original weight
Exposure glass
ADF Maximum: 297 mm × 432 mm
*1
When using an A3 size original, be sure to check the printed paper size and print size,
and use the Reduce or Combine functions.
Up to A3
Minimum: 105 mm × 128 mm
*1
❖ Inch version
--
52–128 g/m
2
Where original is
placed Original size Original weight
Exposure glass
ADF Maximum: 11.7" × 17.0"
*1
When using an 11" × 17" size original, be sure to check the printed paper size and
print size, and use the Reduce or Combine functions.
Up to 11" × 17" L
Minimum: 4.1 " × 5.0 "
*1
--
14–28 lb.
Note
❒ The maximum number of originals that can be placed in the ADF is about 30
(80 g/m
2
, 20 lb).
❒ If you do not lift the exposure glass cover more than 30° when you place an-
other original, the machine might not detect the next original correctly.
19

1
Before Using the Machine
Non compatible originals for the Auto Document Feeder (ADF)
Placing the following types of originals in the ADF can cause paper misfeeds or
result in damage to the originals. Place these originals on the exposure glass instead.
• Originals other than those specified on p.19 “Recommended Sizes and
Weights of Originals”.
• Perforated or torn originals
• Curled, folded, or creased originals
• Pasted originals
• Originals with any kind of coating, such as thermal fax paper, art paper, aluminum foil, carbon paper, or conductive paper.
• Originals with indexes, tags, other projecting parts
• Stapled or clipped original
• Sticky originals such as translucent paper
• Thin originals that have low stiffness
• Thick originals such as postcards
• Bound originals such as books
• Transparent originals such as OHP transparencies or translucent paper
20

Print Paper
The following limitations apply:
Print Paper
Paper Size Paper
Metric Inch
Paper feed tray
*1
For details about how to print on A3L, see p.64 “A3 Paper Feed”
*1
A3L
B5 JIS LK, A5 L, B6 JIS L,
A6 L
Others (Vertical: 90 - 268 mm,
Horizontal: 148 - 388 mm)
, B4 JIS L, A4 L,
81/2" × 14" L, 81/2" × 11" L,
1
5
/2" × 81/2" LK, 8" × 13" L
Others (Vertical: 3.6" - 10.5",
Horizontal: 5.9" - 15.2")
Weight
47.1 - 209.3
2
,
g/m
12.5 - 55.6 lb
Note
❒ Paper with a thickness of 47.1 - 209.3 g/m2 can be used. However, when using
a thickness less than 52.5 g/m
2
or greater than 81.6 g/m2, it is advised to select
printing speed to setting 1.
❒ About 1,000 sheets of paper with a 64 g/m
2
thickness is the standard amount
that can be set in the paper feed tray. This amount changes depending on the
paper thickness. In general, set paper at a height less than 105 mm.
❒ When using paper that easily curls or waves in humidity, if there is high hu-
midity (more than 80%), set less than 500 sheets in the paper feed tray.
❒ Paper with a length of 90 - 297 mm and width of 140 - 420 mm can be set in
the paper feed tray. However, when using a paper size that exceeds 275 mm
length and 395 mm width, specify A3 Paper Feed. Specifying this function
sets the printing speed to 80 cpm and the print position to -20 mm (Type 1: A4
drum) / -10 mm (Type 2: B4 drum).
1
❒ Do not use curled or waved paper. Use paper with less than 5 mm curl and 3
mm wave.
❒ When paper feed problems arise, try using a slower print speed.
21

1
Before Using the Machine
Non-recommended Paper
The following types of paper are not recommended for this machine:
• Roughly cut paper
• Paper of different thickness and types in the same stack
2
• Envelopes heavier than 85 g/m
• Folded, curled, creased, or damaged paper
• Damp paper
• Torn paper
• Slippery paper
• Rough paper
• Paper with any kind of coating (such as carbon)
• Short grain paper
• Thin paper that has low stiffness
• Paper that is prone to generate a lot of paper dust
• Grained paper loaded with the direction of the grain perpendicular to the
feed direction
• Certain types of long thin envelopes.
E.g. international mail envelopes
, 22 lb.
ZFXX040E
• The following types of envelopes
Note
❒ Do not use inkjet paper. It does not absorb ink well, print will smudge if
rubbed, and the back of paper may be dirtied.
❒ If you print on rough grained paper, the print image might be blurred.
22
Print Paper
Important
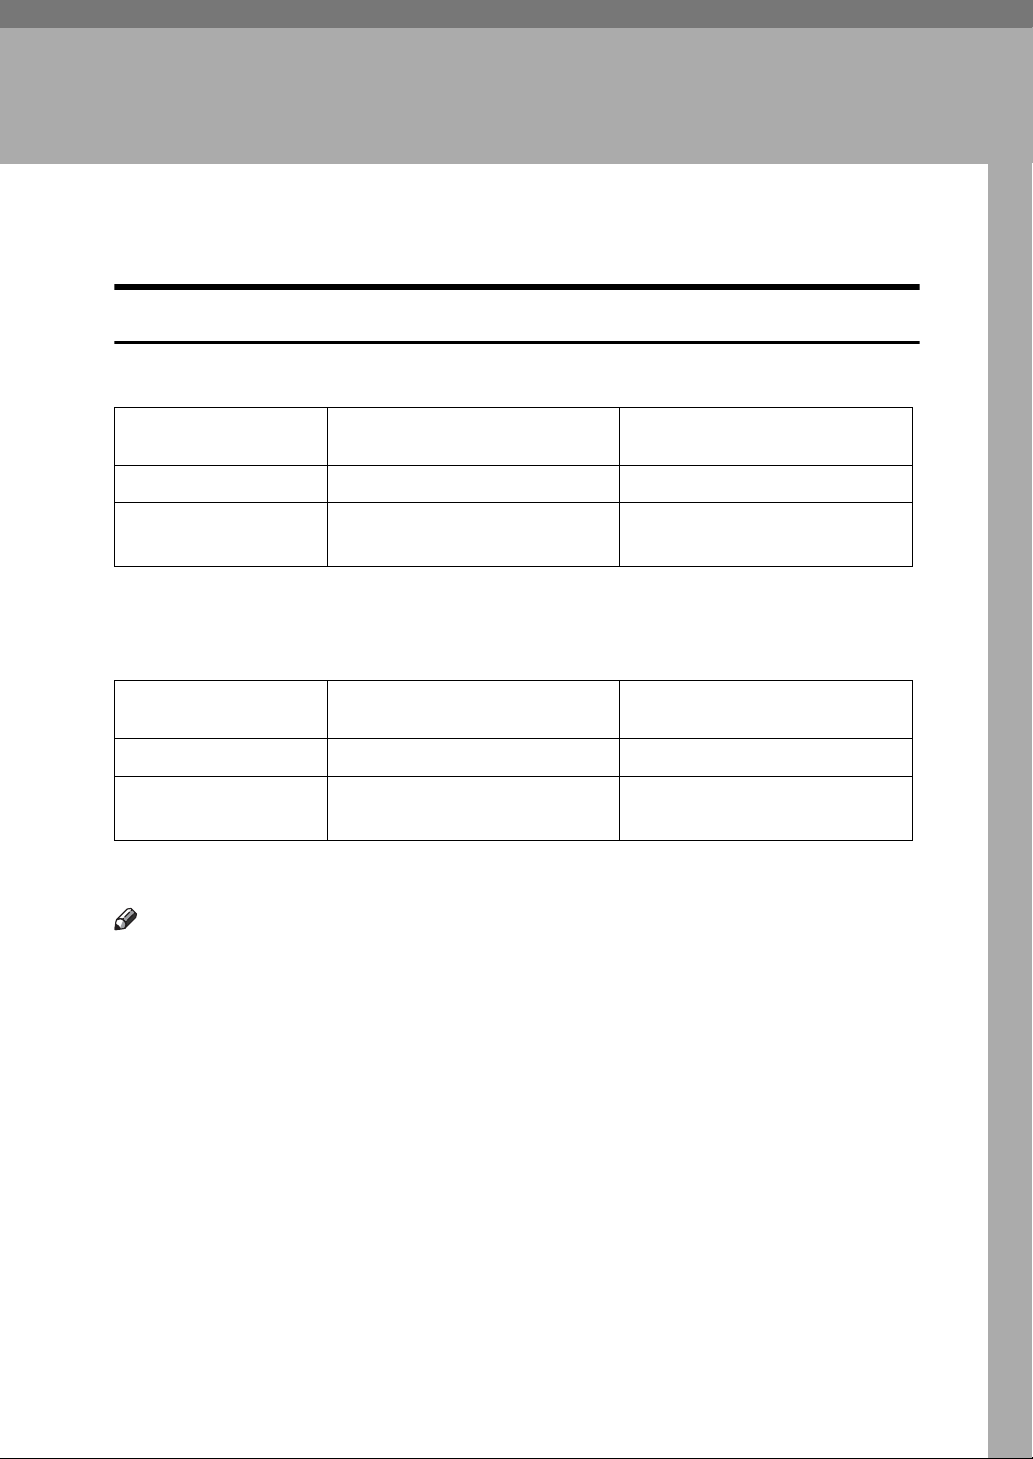
❒ Correct curls in the paper before placing it in the machine. When you cannot
correct the paper curl, stack the paper with the curl face down or face up as
shown in the illustration. If the paper is curled, it might wrap around the
drum or stains might appear.
TPEY990E
1
Storing Paper
Note
❒ When storing paper, the following precautions should always be taken:
• Do not store paper where it will be exposed to direct sunlight.
• Avoid storing paper in humid (greater than 70%) areas.
• Store on a flat surface.
❒ Keep open reams of paper in the package and store as you would unopened
paper.
23
1
Before Using the Machine
Printing Size
Maximum print size
• Type 1 (A4 drum) model:
210 × 288 mm, 8.3" × 11.3"
• Type 2 (B4 drum) model:
250 × 355 mm, 9.8" × 14.0"
At low temperatures, the maximum print size may be somewhat smaller.
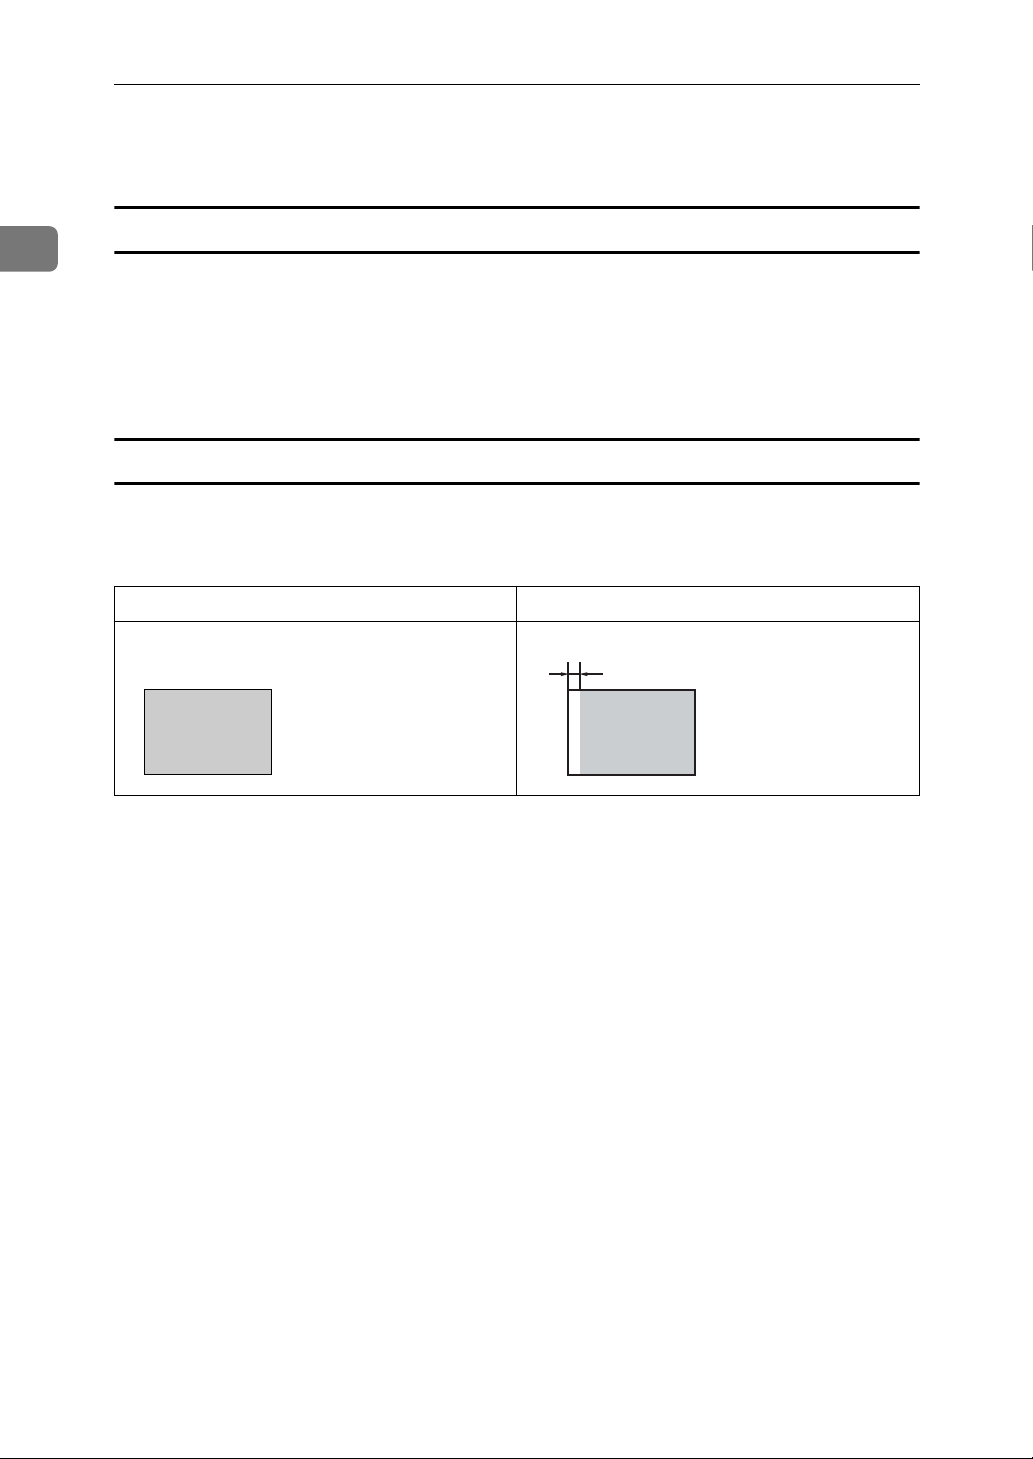
Range that cannot be printed
The first 5 mm, 0.2" of the leading edge cannot be printed. When using the optional Auto Document Feeder, the first 5 mm, 0.2", of the leading edge as well as
the last 2 mm, 0.08", of the trailing edge cannot be printed.
Original Print
a: 5 mm, 0.2"
a
24
 Loading...