

Page 1
Operating Instructions
***
h001
if***
Scanner Reference
Network Scanner
Preparations for Use as a Network Scanner
ZHS
E.t
Setting Originals
Sending Scan Files by E-mail
Using the Network Delivery Scanner Function
Using the Network TWAIN Scanner Function
Appendix
For safe and correct use of this machine, please be sure to read the Safety Information in the
"Copy Reference" before you use it.
Page 2

Operating Instructions Scanner Reference
GB GB B683-8710
Page 3

Introduction
This manual describes detailed instructions on the operation and notes about the use of this machine.
To get maximum versatility from this machine all operators are requested to read this manual carefully
and follow the instructions. Please keep this manual in a handy place near the machine.
Warning:
Use of controls or adjustment or performance of procedures other than those specified i n this man ual
might result in hazardous radiation exposure.
Two kinds of size notation are employed in this manual. With this machine refer to the metric version.
Page 4

In accordance with IEC 60417, this machine uses the following symbols for the main power switch:
010
a means POWER ON.
c means STAND BY.
M
.eps
Declaration of Conformity
“The Product complies with the requirements of the EMC Dire ctive 89/336/EEC and its amending di-
rectives and the Low Voltage Directive 73/23/EEC and its amending directives.”
Trademarks
®
Adobe
Pentium
Microsoft
, PostScript®, and Acrobat® are trademarks of Adobe Systems Incorporated.
®
is a registered trademark of Intel Corporation.
®
, Windows®, and Windows NT® are registered trademarks of Microsoft Corpora-
tion.
Other product names used herein are for identification purposes only and might be trade-
marks of their respective companies. We disclaim any and all rights in those marks.
• The product name of Windows
®
95 is Microsoft® Windows® 95.
• The product name of Windows® 98 is Microsoft® Windows® 98.
• The product name of Windows
• The product names of Windows
Microsoft
®
Windows® 2000 Professional
®
Me is Microsoft® Windows® Millennium Edition (Windows Me).
®
2000 are as follows:
Microsoft® Windows® 2000 Server
Microsoft® Windows® 2000 Advanced Server
• The product names of Windows® XP are as follows:
Microsoft® Windows® XP Home Edition
Microsoft® Windows® XP Professional
• The product names of Windows ServerTM 2003 are as follows:
Microsoft® Windows ServerTM 2003 Standard Edition
Microsoft® Windows ServerTM 2003 Enterprise Edition
Microsoft
• The product names of Windows NT
Microsoft® Windows NT® Workstation 4.0
Microsoft
®
Windows ServerTM 2003 Web Edition
®
4.0 are as follows:
®
Windows NT® Server 4.0
Copyright © 2003
Page 5

Manuals for This Machine
The following manuals describe the operational procedures of this machine. For
particular functions, see the relevant parts of the manual.
Note
The manuals provided are specific to machine type.
Adobe Acrobat Reader is necessary to view the manuals as a PDF file.
Three CD-ROMs are provided:
• CD-ROM 1 "Operating Instructions for Printer/Scanner"
• CD-ROM 2 "Scanner Driver & Document Management Utilities"
• CD-ROM 3 "Operating Instructions for General Settings and Facsimile "
General Settings Guide (PDF file - CD-ROM3)
Provides an overview of the machine and describes System Settings (paper
trays, Key Operator Tools, etc.), and troubleshooting.
Refer to this manual for Address Book procedures such as registering fax
numbers, e-mail addresses, and user codes.
Network Guide (PDF file - CD-ROM1)
Describes procedures for configuring the machine and computers in a network environment.
Copy Reference
Describes operations, functions, and troubleshooting for the machine's copier function.
Facsimile Reference <Basic Features>
Describes operations, functions, and troubleshooting for the machine's facsimile function.
Facsimile Reference <Advanced Features> (PDF file - CD-ROM3)
Describes advanced functions and settings for key operators.
Printer Reference 1
Describes system settings and operations for the machine's printer function.
Printer Reference 2 (PDF file - CD-ROM1)
Describes operations, functions, and troubleshooting for the machine's printer function.
Scanner Reference (this manual) (PDF file - CD-ROM1)
Describes operations, functions, and troubleshooting for the machine's scanner function.
i
Page 6

Manuals for DeskTopBinder V2 Lite
DeskTopBinder V2 Lite is a utility included on the CD-ROM labeled "Scanner
Driver & Document Management Utilities".
• DeskTopBinder V2 Lite Setup Guide (PDF file - CD-ROM2)
Describes the installation of DeskTopBinder V2 Lite, and the operating environment for DeskTopBinder V2 Lite in detail. This guide can be dis-
played from the [Setup] dialog box when DeskTopBinder V2 Lite is
installed.
• DeskTopBinder V2 Introduction Guide (PDF file - CD-ROM2)
Describes operations with DeskTopBinder V2 Lite and provides an over-
view of its functions. This guide is added to the [Start] menu when Desk-
TopBinder V2 Lite is installed.
•Auto Document Link Guide (PDF file - CD-ROM2)
Describes operations and functions of Auto Document Link installed with
DeskTopBinder V2 Lite. This guide is added to the [Start] menu when
DeskTopBinder V2 Lite is installed.
Manuals for ScanRouter V2 Lite
ScanRouter V2 Lite is a utility included on the CD-ROM labeled "Scanner
Driver & Document Management Utilities".
• ScanRouter V2 Lite Setup Guide (PDF file - CD-ROM2)
Describes the installation of ScanRouter V2 Lite, settings, and the operating environment for ScanRouter V2 Lite in detail. This guide can be dis-
played from the [Setup] dialog box when ScanRouter V2 Lite is installed.
• ScanRouter V2 Lite Management Guide (PDF file - CD-ROM2)
Describes delivery server management and operations, and provides an
overview of ScanRouter V2 Lite functions. This guide is added to the [Start]
menu when ScanRouter V2 Lite is installed.
Other manuals
• PostScript3 Supplement (PDF file - CD-ROM1)
• UNIX Supplement (available from an authorized dealer, or as a PDF file on
ii
our Web site)
Page 7

TABLE OF CONTENTS
Manuals for This Machine......................................................................................i
How to Read This Manual .....................................................................................1
Symbols .....................................................................................................................1
Names of Major Components and Software..............................................................1
1. Network Scanner
Outline.....................................................................................................................3
E-mail.........................................................................................................................3
Network Delivery Scanner..........................................................................................4
Network TWAIN Scanner...........................................................................................5
Control Panel.......................................................................................................... 6
Reading the Display and Using Keys.........................................................................7
2. Preparations for Use as a Network Scanner
Initial Scanner Setup .............................................................................................9
Scanner Features.......................................................................................................9
Scan Settings...........................................................................................................12
Destination List Settings........................................................................................... 13
Send Settings...........................................................................................................14
Installing Software...............................................................................................16
Auto Run Program .................................. .................................. .. .............................16
Software for Using a Network TWAIN Scanner .......................................................18
Software for Using the Network Delivery Scanner Function ....................................19
DeskTopBinder V2 Lite............................................................................................19
Software Supplied on CD-ROM.......................................... .....................................20
3. Setting Originals
Placing Originals..................................................................................................25
Placing on the Exposure Glass................................................................................26
Placing in the Auto Document Feeder .....................................................................27
Original Orientation.............................................................................................29
For E-mail and a Network Delivery Scanner............................................................29
For a Network TWAIN Scanner................................................................................29
Scanning Originals in Several Times using the Exposure Glass....................30
4. Sending Scan Files by E-mail
Preparation for Sending by E-mail.....................................................................31
E-mail Screen...........................................................................................................32
Sending Scan Files by E-mail.............................................................................33
Procedure for Sending by E-mail.............................................................................33
Checking the Status of E-mail............................................................................45
iii
Page 8

5. Using the Network Delivery Scanner Function
Preparation for Delivering...................................................................................47
Network Delivery Scanner Screen ...........................................................................48
Delivering Scan Files...........................................................................................50
Delivery Procedure...................................................................................................50
Checking the Status of Delivery.........................................................................60
6. Using the Network TWAIN Scanner Function
Preparation for Using the Network TWAIN Scanner.........................................61
Network TWAIN Scanner Screen.............................................................................61
Scanning Originals..............................................................................................62
Functions of the TWAIN Driver ........................................ ... .................................... .64
7. Appendix
Relationship between Resolution and File Size................................................65
When using the Auto Document Feeder..................................................................65
When using the exposure glass cover .....................................................................65
Max. Number of Addresses Which Can Be Specified ......................................66
Troubleshooting...................................................................................................67
When Scanning Is Not Performed as Expected.......................................................67
When the Delivery Function Does Not Work............................................................ 67
When an Error Message Appears on the Control Panel................................. .........68
When an Error Message Appears on the Client Computer...................................... 70
Specifications.......................................................................................................72
INDEX.........................................................................................................73
iv
Page 9

How to Read This Manual
Symbols
In this manual, the following symbols are used:
Important
If this instruction is not followed, paper might be misfed, originals might be
damaged, or files might be lost. Be sure to read this.
Preparation
This symbol indicates the prior knowledge or preparations required before operating.
Note
This symbol indicates precautions for operation or actions to take after misoperation.
Limitation
This symbol indicates numerical limits, functions that cannot be used together,
or conditions in which a particular function cannot be used.
Reference
This symbol indicates a reference.
[]
Keys that appear on the machine's display panel.
[]
Keys and buttons that appear on the computer's display.
{}
Keys built into the machine's control panel.
{}
Keys on the computer's keyboard.
Names of Major Components and Software
Major components of this machine are referred to as follows in this manual:
• Auto Document Feeder → ADF
The following software products are referred to using a general name:
• DeskTopBinder V2 Lite and DeskTopBinder V2 Professional (optional) →
DeskTopBinder V2 Lite/Professional
• ScanRouter V2 Lite and ScanRouter V2 Professional (optional) → ScanRouter
V2 Lite/Professional
1
Page 10

2
Page 11
1. Network Scanner
001
Outline
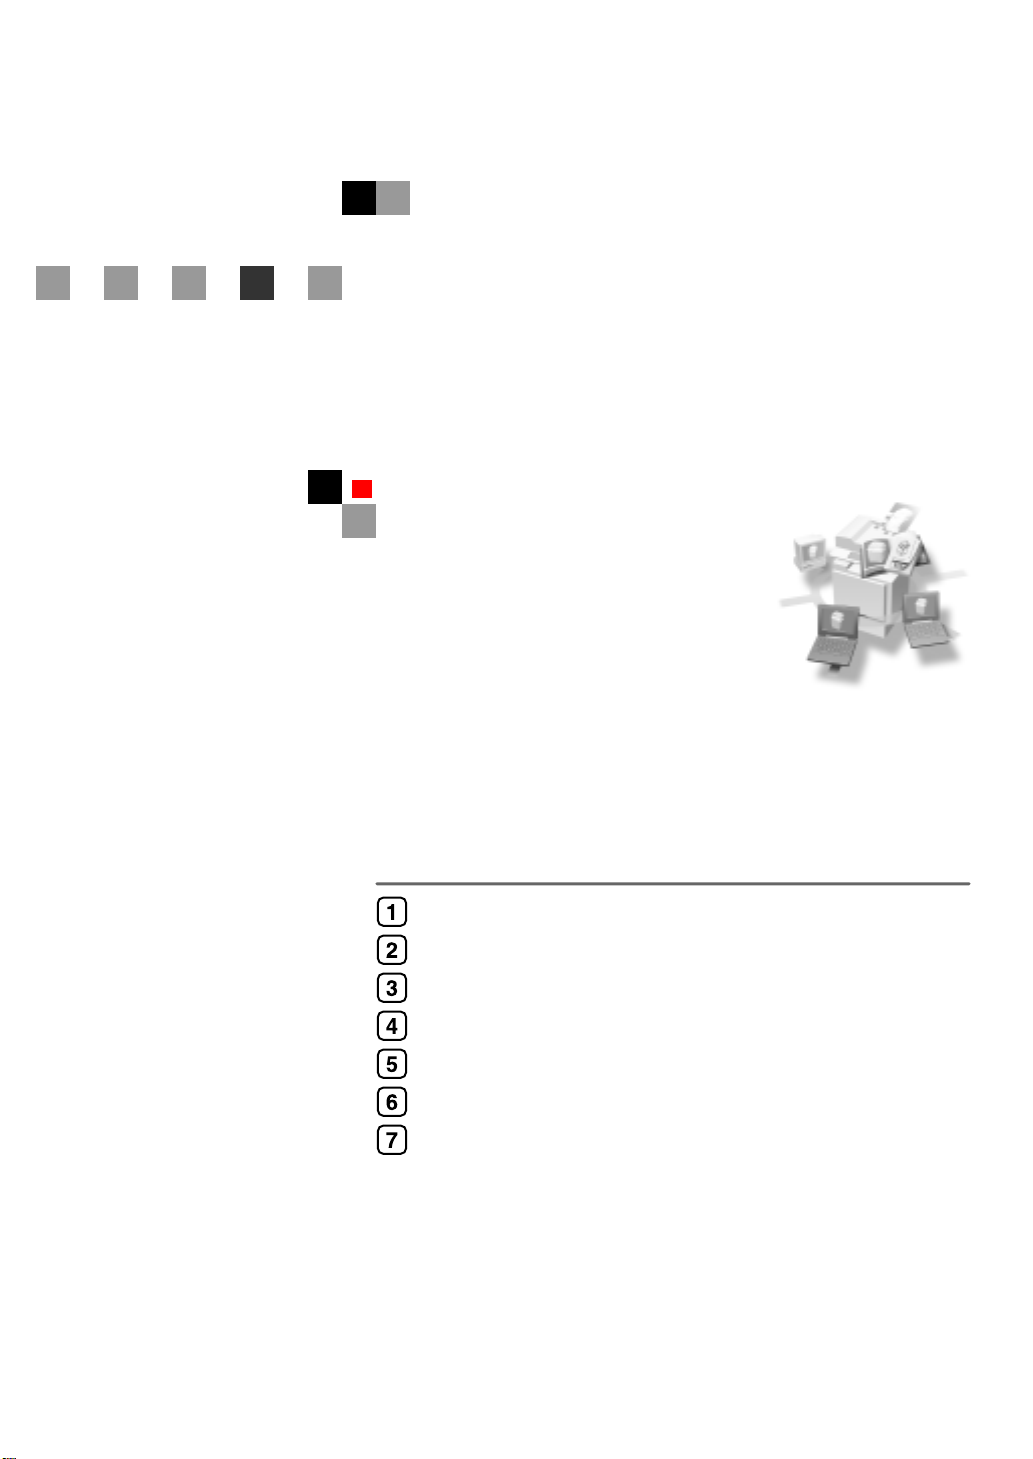
The machine can be used as a network scanner.
As a network scanner, the machine can send scan files by e-mail, operate as a network delivery scanner, and operate as a network TWAIN scanner.
Scan files that are attached to an e-mail can be sent using the e-mail system
through a LAN or the Internet.
Reference
p.31 “Sending Scan Files by E-mail”
ABF
S.eps
1. This machine
Scan files that are attached to an e-mail can be sent to an e-mail server.
2. E-mail server
An e-mail server is the SMTP server used
for an e-mail system. It transfers a received e-mail to a specified destination
through a LAN or the Internet.
ABF001S
3. Client computer
An e-mail with scan files attached is received from the e-mail server using email software.
Check the contents of the file with an application appropriate for the file type.
3
Page 12
1
002
Network Scanner
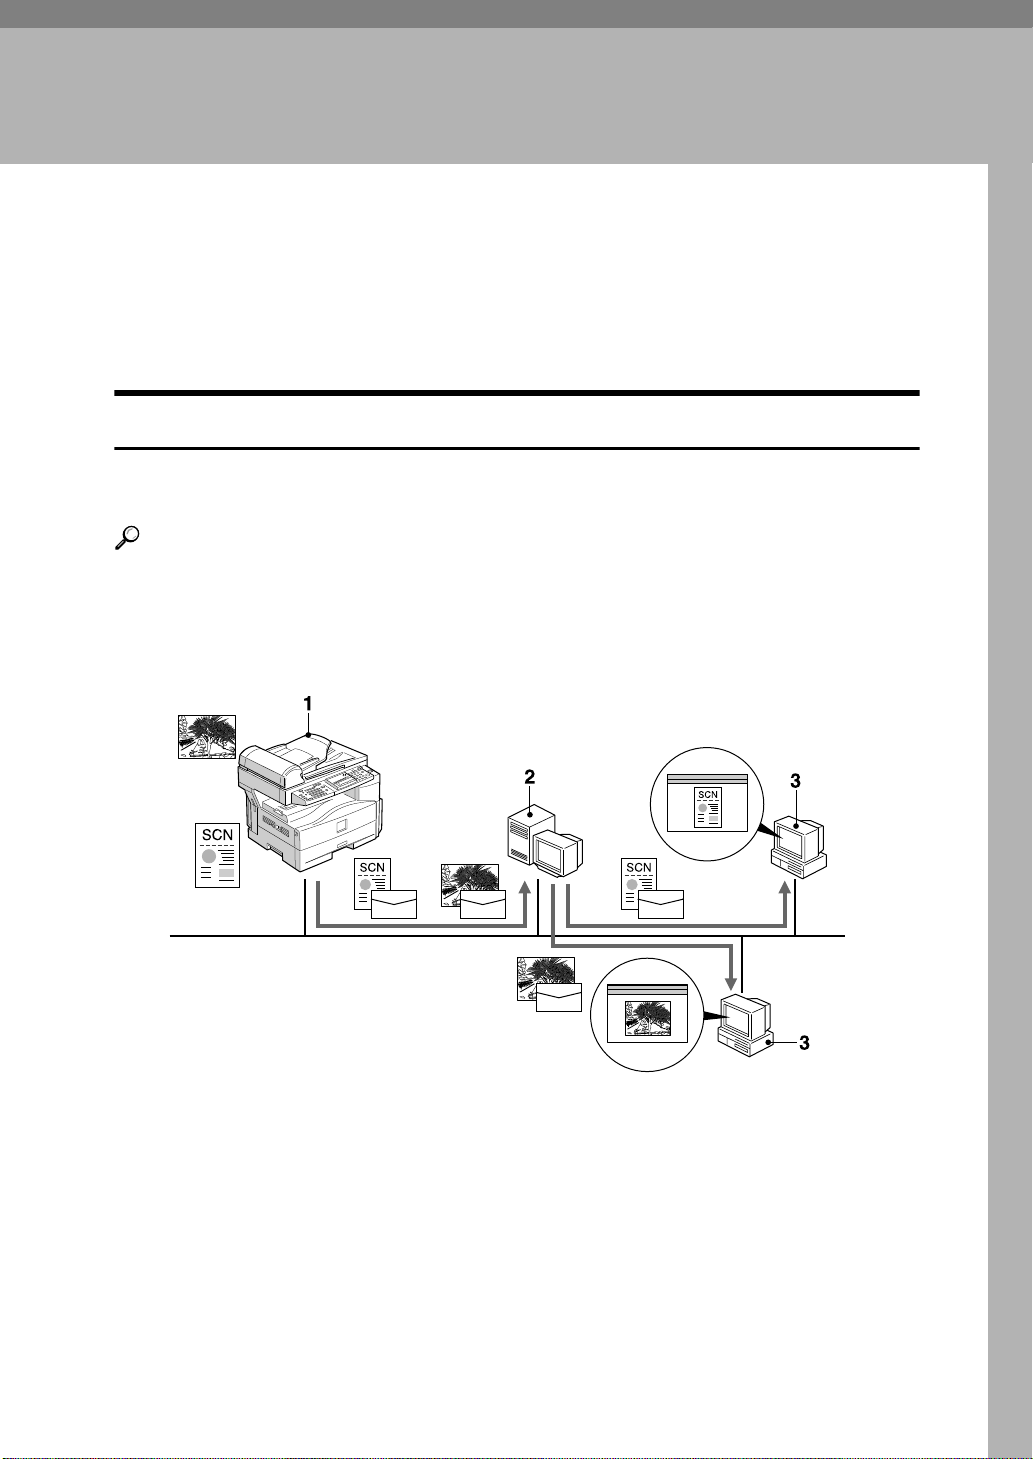
Network Delivery Scanner
The machine is used as a delivery scanner with ScanRouter V2 Lite/Professional. Scan files are stored in the delivery server and delivered to the folders of client computers on the same network.
Reference
p.47 “Using the Network Delivery Scanner Function”
Note
When the optional ScanRouter V2 Professional is used, the machine can also
deliver scan files using e-mail, and the files can be viewed from a client computer using a Web browser.
ABF
S.eps
1. This machine
Scan files are sent to the delivery server.
2. Delivery server
ScanRouter V2 Lite/Professional is installed in this computer which is used as
a delivery server.
A received file is delivered to the in-tray
of the specified destination (A in the figure). According to the settings of the intray, the file is stored in the in-tray or in a
Windows folder (B in the figure).
Reference
For more information about ScanRouter V2 Lite, DeskTopBinder V2 Lite, or
Auto Document Link, see p.i “Manuals for This Machine”.
4
ABF002S
3. Client computer
The contents of stored files can be checked in the following ways:
• View the file in the in-tray using DeskTopBinder V2 Lite to check the contents. (C in the figure)
•
Use Auto Document Link to receive the
file stored in the in-tray, and check the
contents with an application appropriate for the file type. (
•
Access the Windows folder where the
file is stored via the network, and check
the contents with an application appropriate for the file type. (
D
in the figure)
E
in the figure)
Page 13
Outline
003
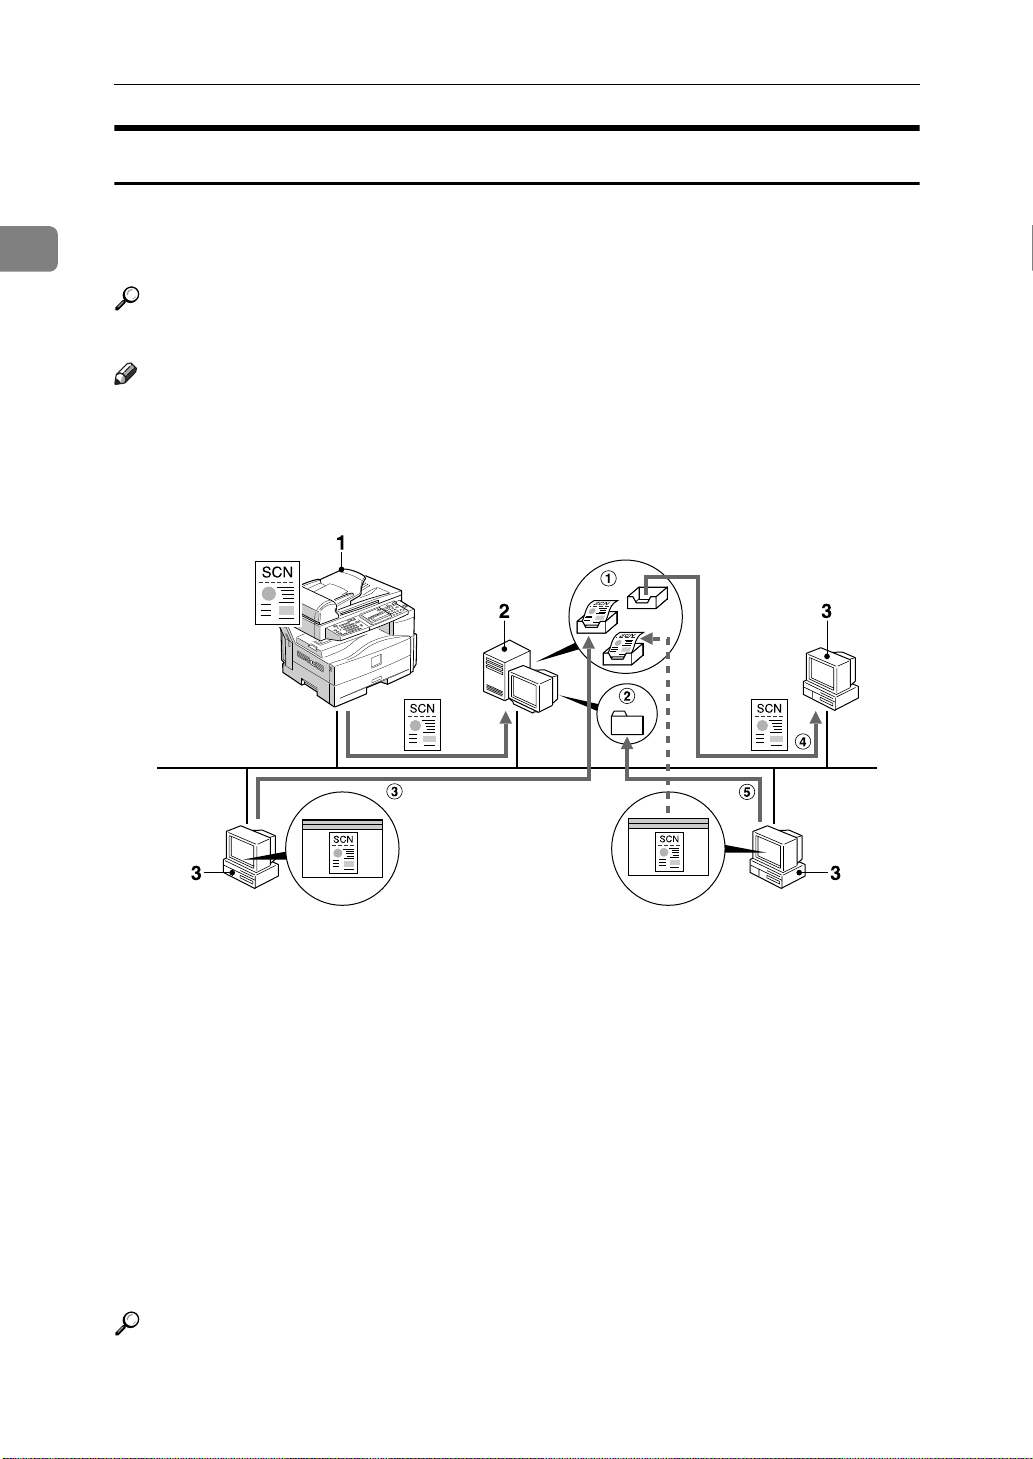
Network TWAIN Scanner
The scanning function of this machine can be used from a client computer via a
network (Ethernet, IEEE 1394 (IP over 1394) [optional], or IEEE 802.11b (Wireless LAN) [optional]).
Reference
p.61 “Using the Network TWAIN Scanner Function”
ABF
S.eps
1
1. This machine
The scanning function of the machine can
be used from a client computer via a network.
ABF003S
2. Client computer
Originals are scanned using the TWAIN
driver for the machine from an application.
5
Page 14
Network Scanner
004
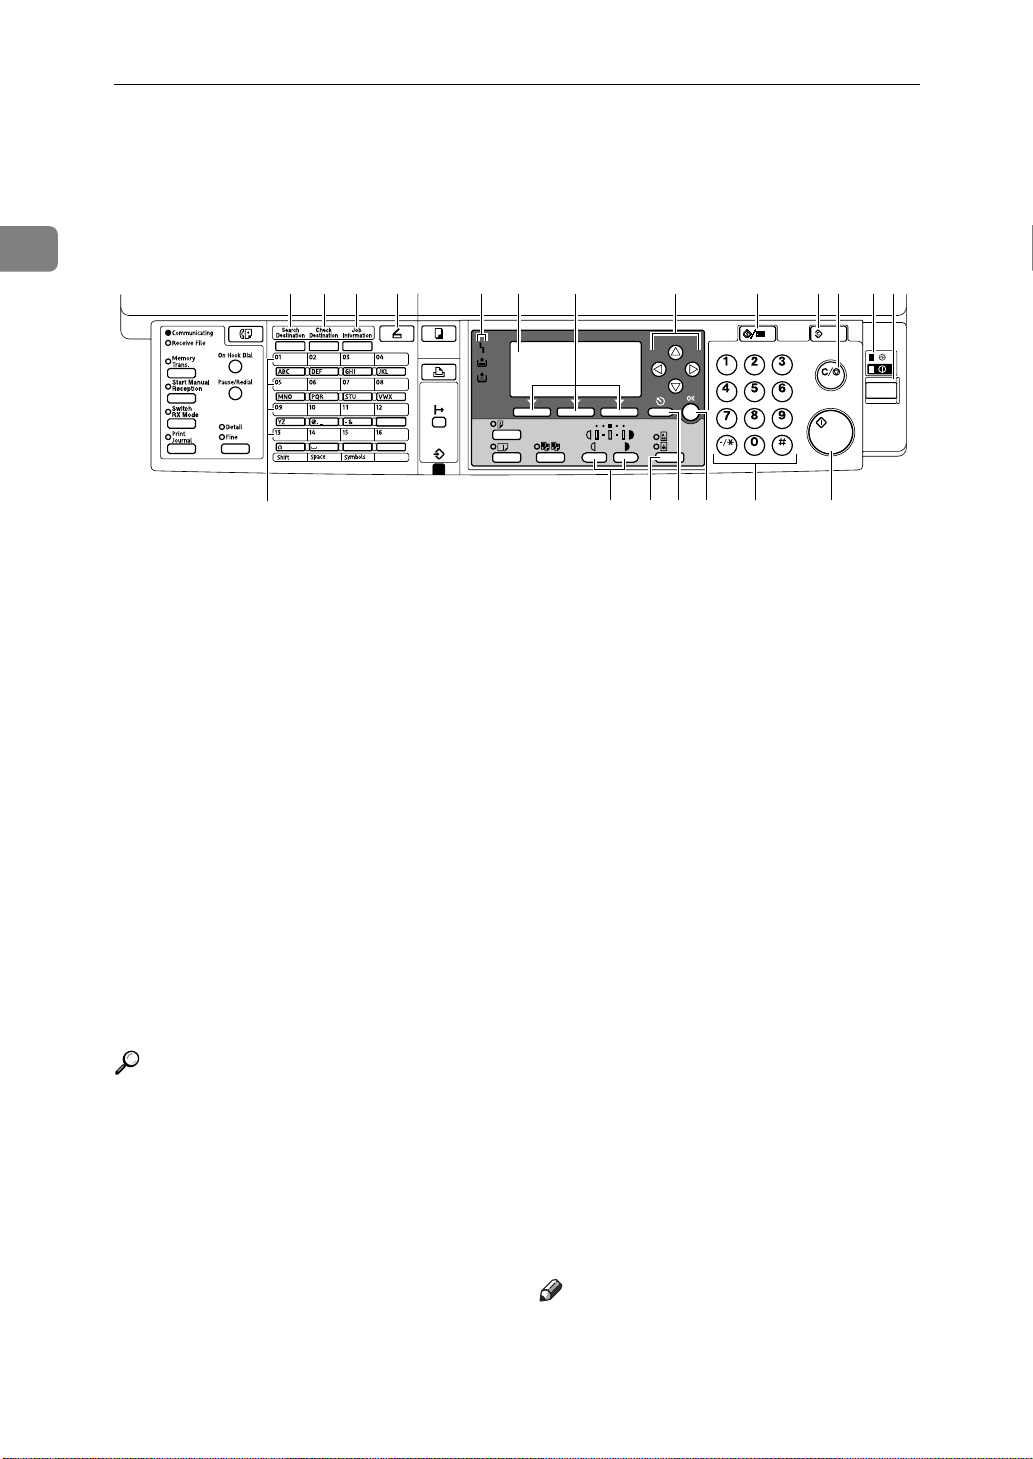
Control Panel
This illustration shows the control panel when options are installed.
1
ABF
S.eps
123 4 56 7 8 9 101112
14
1. {Search Destination} key
Press to search for the destination from the Destination List.
2. {Check Destination} key
Press to check the destinations currently selected.
3. {Job Information} key
Press to check the status of sent and delivered e-mail.
13
15 16 17 18 19 20
ABF004S
8. Scroll keys
Press to select an item.
{U}: scroll upward
{T}: scroll downward
{V}: scroll right
{W}: scroll left
9. {User Tools/Counter} key
Press to change default or operation parameters according to requirement.
4. {Scanner} key
Press to activate the scanner function.
5. Indicators
Display errors and machine status. h: Error indicator
B: Load Paper indicator
D: Add Toner indicator
Reference
For more information, see Copy Reference.
6. Display
Displays operation status and messages.
7. Selection keys
Correspond to items on the display. Press to select the corresponding item.
6
10. {Clear Modes} key
Press to clear the current settings.
11. {Clear/Stop} key
Clear: clears an entered numeric value.
Stop: stops scanning.
12. Main power indicator and On
indicator
The main power indicator lights when
the main power switch is turned on. The
On indicator lights when the operation
switch is on.
13. Operation switch
Press to turn the power on. The On indicator lights. To turn the power off, press
again.
Note
This key is inactivate during scanning
or while setting scanner defaults.
Page 15
Control Panel
4
005
14. Quick Dial keys
Press to select the registered destination with a single touch, or to enter letters and symbols.
Reference
For more information, see General Settings Guide.
Note
You can register up to 16 destinations
using the Quick Dial keys.
15. {Lighter} and {Darker} keys
Press to change the image density setting.
Select the image density in three increments, Lighter to Darker.
16. {Original Type} key
Press to select the original type registered
with [Type 1(Text):] or [Type 2(Photo):].
When the original type is selected, the
corresponding indicator lights.
17. {Cancel} key
Press to cancel an operation or return to the previous display.
18. {OK} key
Press to set a selected item or an entered numeric value.
19. Number keys
Press to enter numeric values.
20. {Start} key
Press to start scanning or sending.
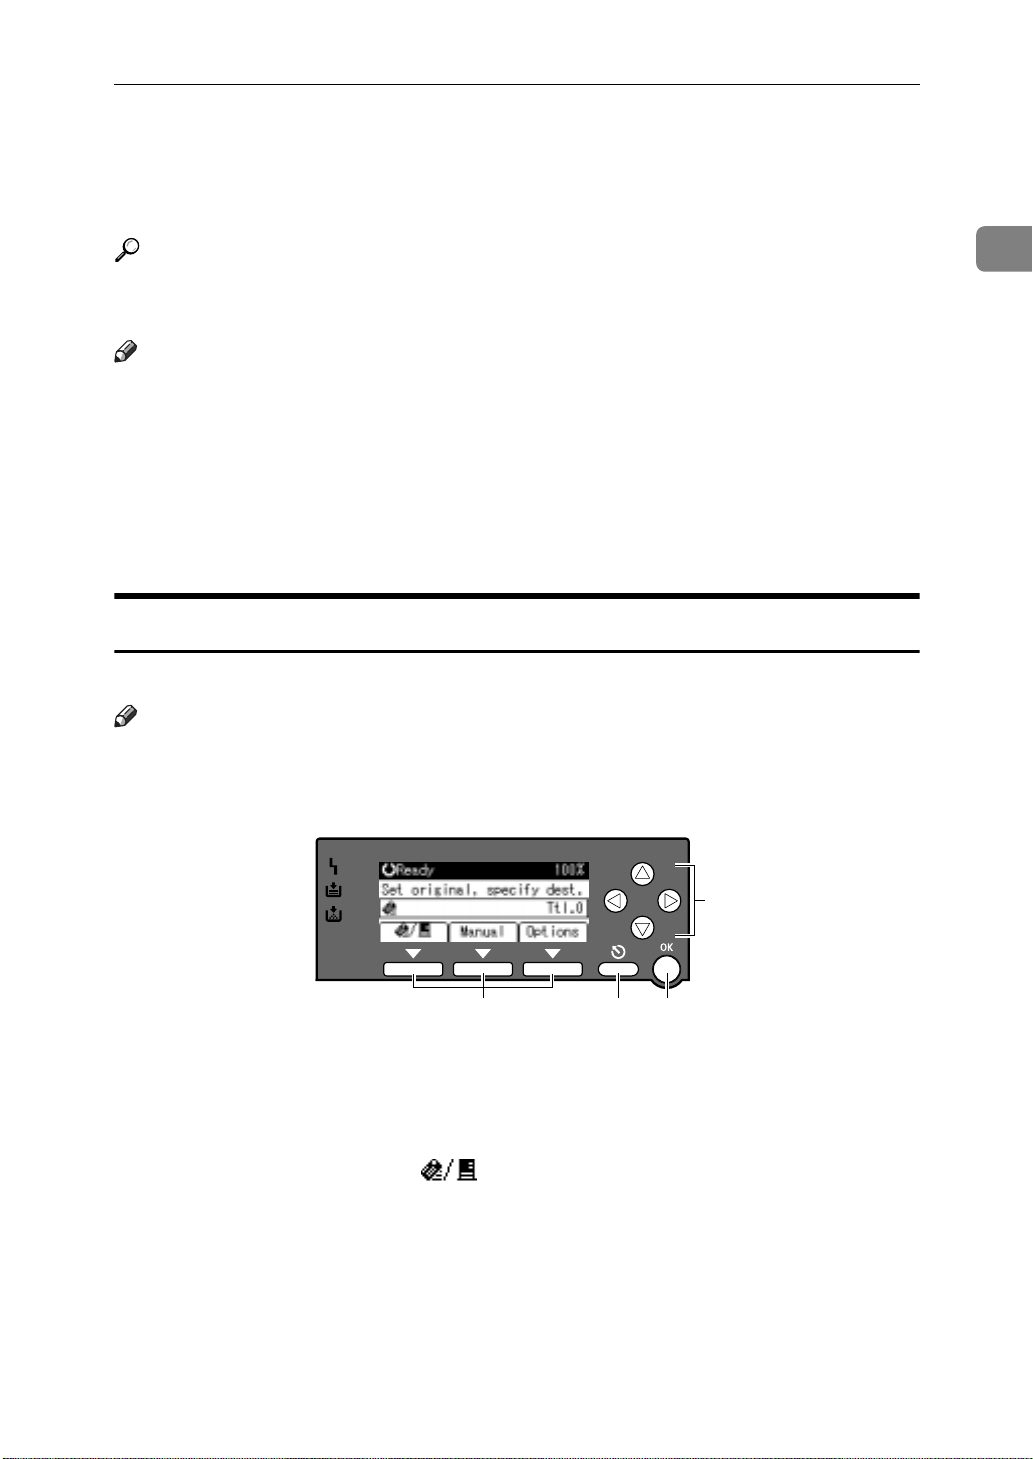
Reading the Display and Using Keys
This section explains how to read the display and use the selection key.
1
Note
The copy screen is set as the default screen when the machine is turned on.
You can change the settings in [System Settings]. See General Settings Guide.
ABF
S.eps
1 2 3
1. Selection keys
Correspond to items at the bottom line on the display.
Example: The E-mail screen
• When the instruction “press []”
is given in this manual, press the left
selection key.
• When the instruction “press [Manual]”
is given in this manual, press the centre selection key.
• When the instruction “press [Options]”
is given in this manual, press the right
selection key.
2. {Cancel} key
Press to cancel an operation or return to the previous display.
3. {OK} key
Press to set a selected item or an entered numeric value.
4. Scroll keys
Press to move the cursor in each direction, step by step.
When the {U}, {T}, {V}, or {W} key appears in this manual, press the scroll key of the same direction.
ABF005S
7
Page 16

1
Network Scanner
8
Page 17

2. Preparations for Use as a
Network Scanner
To use the machine as a network scanner, you must make settings required for
use as a scanner as well as basic settings for use in a network.
Reference
First, see General Settings Guide for details about how to make basic settings, and then make scanner settings.
For more information about settings for sending by e-mail, see Network Guide.
Initial Scanner Setup
This section explains all required settings and procedures for using the machine
as a network scanner.
Scanner Features
The settings for using the network scanner functions of the machine are listed
below. Make the necessary settings.
Note
Make settings for the items marked with if necessary.
Scan Settings
For explanations of settings, see p.12 “Scan Settings”.
Settings Default E-mail
Scan Settings
Default Scan Settings
Orig. Orientation Priority
Original Type Setting
Resolution
Scan Size
200dpi
A4 S
Original Type
1 (Text)
Original Type
2 (Photo)
Text
(Print)
Photo
Destination List Settings
For explanations of settings, see p.13 “Destination List Settings”.
Settings Default E-mail
Delivery
Delivery
TWAIN
TWAIN
Destination List
Settings
Destination List Priority
Update Server Dest. List
Delivery Server
—
9
Page 18
Preparations for Use as a Network Scanner
006
***
001.tif***
***
002.tif***
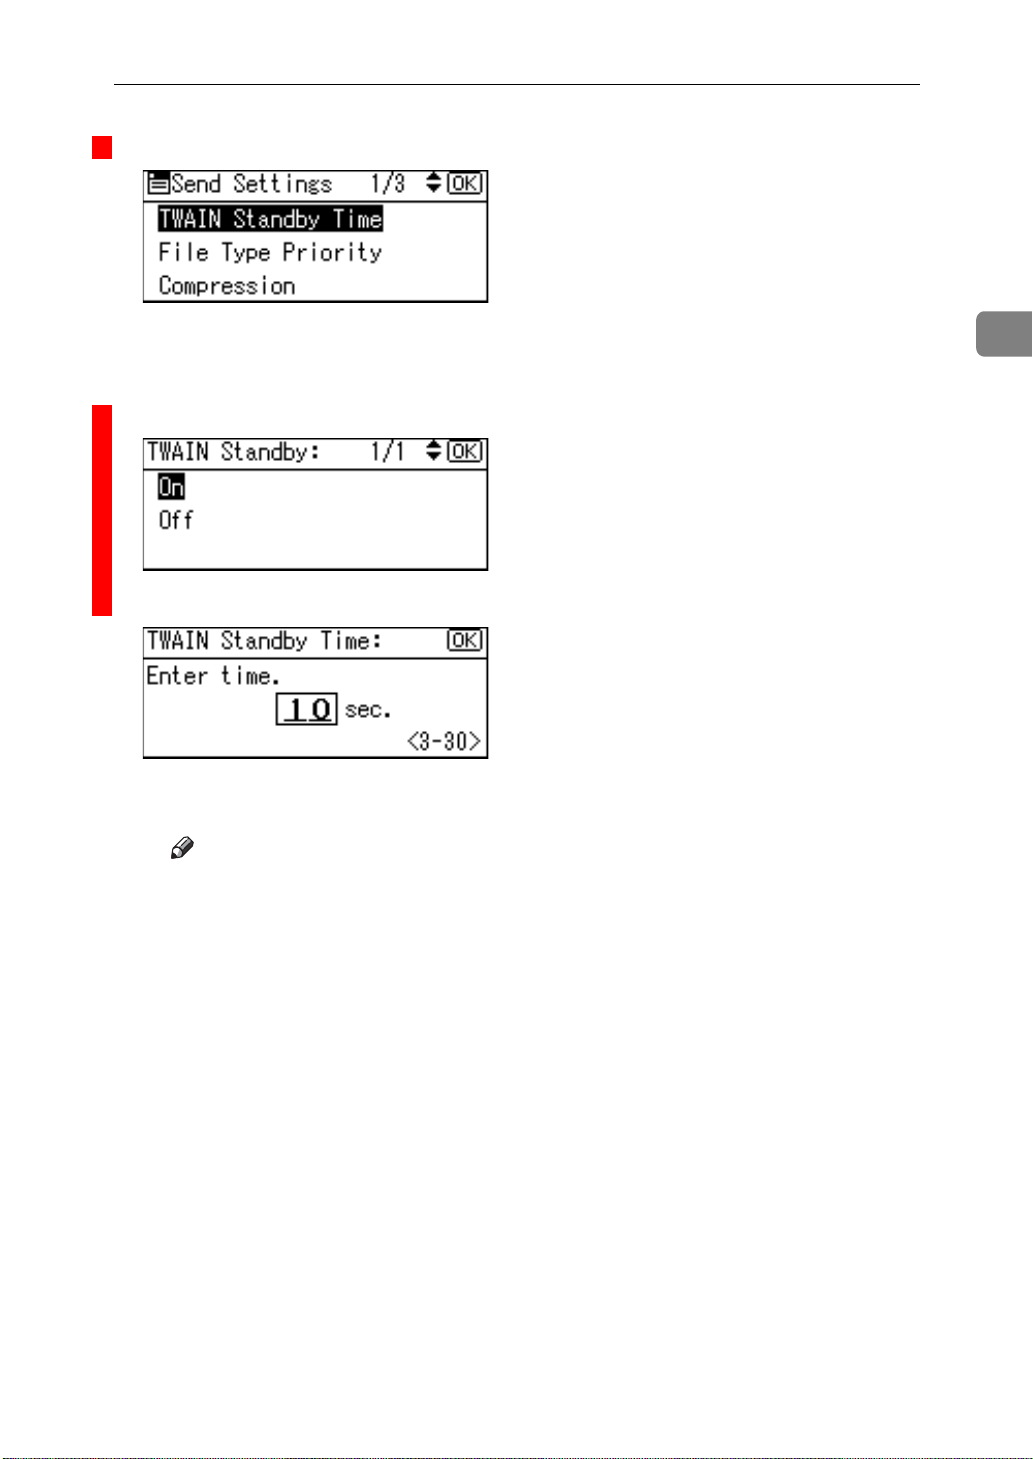
Send Settings
For explanations of settings, see p.14 “Send Settings”.
2
Settings Default E-mail
Send Settings
TWAIN Standby Time
File Type Priority Multi-page:TIFF
Compression On
Print&Del. Scanner Journal
Max. E-mail Size 2048 KB
Divide & Send E-mail On (per max. size)
E-mail Informatn. Language
Sender's Name Default
Setting procedure
A Press the {User Tools/Counter} key.
ABF
S.eps
Delivery
10 sec.
On
British English
None
TWAIN
10
ABF006S
B Select [Scanner Features] using {U} or {T}, and then press the {OK} key.
SCN-
C Select a menu using {U} or {T}, and then press the {OK} key.
SCN-
Page 19
Initial Scanner Setup
***
003.tif***
***
004.tif***
***
005.tif***
D Select a setting using {U} or {T}, and then press the {OK} key.
SCN-
Example: TWAIN Standby Time setting
E Change the settings.
• Select an item using {U} or {T}, and then press the {OK} key.
SCN-
• Enter numbers using the number keys, and then press the {OK} key.
SCN-
Programmed” message appears, and then the Send Settings screen re-
The “
turns.
Note
To cancel changing a setting, press the {Cancel} key. The setting returns
to the previous condition.
2
F Press the {Cancel} key.
The Scanner Features screen reappears.
G Repeat steps
to F to make other settings.
C
H Press the {Cancel} key.
The main menu appears.
11
Page 20

2
Preparations for Use as a Network Scanner
Scan Settings
This section explains how to set the defaults for scan settings.
The scan settings consist of the following. For the list about settings and
defaults, see p.9 “Scanner Features”.
Default Scan Settings
Resolution and scan size can be set.
•Resolution
Select the resolution from 100dpi,
200dpi, 300dpi, 400dpi, or 600dpi.
•Scan Size
Select the size of the original to be
scanned.
When the size is specified, scanning is performed for that size, regardless of the actual size of the
original. The following sizes can be
selected:
A4S, A5RS, B5JISS (Japanese
Industrial Standard), 8
1
/
× 13S, 8
8
2
1
8
/2RS, Custom Size
Note
1
/
2
When the ADF is not installed,
1
8
/
× 14S and 8
2
unavailable and not displayed
on the screen.
When [Custom Size] is selected,
the dimensions of the scan area
(width and height) can be specified.
When selecting [Custom Size] for
[Scan Size], see p.13 “Selecting a
custom size”.
1
/
× 14S,
2
× 11S, 5
1
/
× 13S are
2
1
/
×
2
Orig. Orientation Priority
Select the default for original
placement orientation. When originals are always positioned the
same way, select that orientation
as the default to make operation
easier.
Reference
p.29 “Original Orientation”
Original Type Setting
Select the original type registered
in [Original Type 1 (Text)] or [Original
Type 2 (Photo)]. The original type
that can be registered is as follows:
•Text (Print)
For standard originals containing mainly text (for print)
•Text (OCR)
For standard originals containing mainly text (for OCR)
•Text/Photo
For originals containing a mixture of text and photographs
•Photo
For originals containing photographs and other pictures
Note
You can register “Text
(Print)” or ”Text (OCR)” in
[Original Type 2 (Photo)], or
“Text/Photo” or ”Photo” in
[Original Type 1 (Text)].
Printer printing is best
scanned with Text (Print).
Text (OCR) is suitable for
higher OCR accuracy.
12
Page 21
Initial Scanner Setup
***
006.tif***
***
007.tif***
***
008.tif***
Selecting a custom size
When selecting [Custom Size] as the
scan size, follow the procedure below.
A Select [Custom Size] on the Scan
Size screen using the scroll keys,
and then press the {OK} key.
SCN-
B Enter the width of the original us-
ing the number keys.
Enter the value in Horiz., and then
press the {OK} or {#} key.
SCN-
When using the exposure glass
cover
•Original Size
Horiz.: 139 - 297 mm (5.5" -
11.6")
Vert.: 139 - 216 mm (4.2" -
8.5")
The “
pears, and then the Scan Size
screen returns.
Programmed” message ap-
D Press the {User Tools/Counter} key.
Destination List Settings
This section explains how to set the
defaults for the destination list displayed.
The destination list settings consist of
the following. For the list about settings and defaults, see p.9 “Scanner
Features”.
2
C Enter the height of the original
using the number keys.
Enter the value in Vert., and then
press the {OK} or {#} key.
SCN-
The range of possible dimensions for original sizes is as follows:
When using the Auto Document
Feeder
•Original Size
Horiz.: 139 - 356 mm (5.5" -
14.0")
Vert.: 139 - 216 mm (4.2" -
8.5")
Destination List Priority
Select a destination list to be displayed when the machine is in the
initial state. You can select either
[E-mail] or [Delivery Server].
Update Server Dest. List
To update the Delivery Server Des-
tination List, press [Update Server
Dest. List].
Ordinarily, the Delivery Server
Destination List is automatically
updated. This function allows updating at any time.
13
Page 22

2
Preparations for Use as a Network Scanner
Send Settings
This section explains how to set the
defaults for sending settings and how
the machine switches to the network
TWAIN scanner function.
The send settings consist of the following. For the list about settings and
defaults, see p.9 “Scanner Features”.
TWAIN Standby Time
When the machine is being used to
send e-mail or functioning as a network delivery scanner, a scanning
request to the machine as a
TWAIN scanner will switch the
machine to the network TWAIN
scanner function. This setting determines the delay until the machine switches to the network
TWAIN scanner function.
• When [Off] is selected, the ma-
chine will switch to the network
TWAIN scanner function at
once.
• When [On] is selected, you can
enter the delay time with the
number keys (3 - 30 seconds).
The machine will switch to the
network TWAIN scanner function when the time set here
passes after the last key operation.
File Type Priority
Select whether to send the file of
scanned originals using a single
page or multiple pages.
When sending using multiple pages, select either TIFF or PDF.
Compression
This setting determines whether a scan file is to be compressed.
Note
The actual time required for file
transfer will vary depending on
the file size and network load.
Compression reduces the time
required for transferring the
scan file.
Print&Del. Scanner Journal
Select whether to print the Scanner
Journal automatically when the
number of delivered e-mails reaches 50.
Important
When the main power switch is
turned off, all records are deleted.
Note
When [On] is selected, all
records are deleted after print-
ing. When [Off] is selected,
records that exceed the limit are
automatically deleted from the
oldest records.
Max. E-mail Size
Select whether the size of an e-mail with a scan file attached is limited or not.
When [On] is selected, enter the
size limit (64 - 7168 KB) with the
number keys.
Note
When the SMTP limits the size,
match that setting.
14
Page 23

Initial Scanner Setup
Divide & Send E-mail
This function is effective only
when [On] is selected for [Max. E-
mail Size].
When an e-mail with an attached file exceeds the size specified in
[Max. E-mail Size], select whether or
not to divide the file and send using more than one e-mail. Select ei-
ther [On (per page)], [On (per max.
size)], or [Off]. When [On (per max.
size)] is selected, enter the maxi-
mum number of divisions (2-130)
with the number keys.
Note
When [Multi-page:TIFF] or [Multi-
page:PDF] is selected for [File
Type Priority], an attached scan
file will not be divided even if
[On (per page)] is selected.
When [On (per max. size)] is se-
lected, some received files may
not be able to be restored, depending on the type of e-mail
software.
When [Off] is selected, the e-
mail is not sent if its size exceeds
the limit, and an error message
appears. The scan file is discarded.
Set the maximum e-mail size
within the capacity of the SMTP
server.
E-mail Informatn. Language
Select a language for E-mail Information Language for message,
date, key operator's e-mail address
to be sent.
Select one of the following 20 languages: British English, American
English, German, French, Italian,
Spanish, Dutch, Portuguese, Polish,
Czech, Swedish, Finnish, Hungarian, Norwegian, Danish, Japanese,
Simplified Chinese, Traditional
Chinese, Russian, and Hangul.
Note
“E-mail Information Language”
is as follows (Example: When
[British English] is selected):
“This E-mail was sent from ”,
“Scan Date”, and “Queries to:”.
These messages cannot be
changed.
Sender's Name Default
Select whether to register an administrator as a sender or to specify a sender each time e-mail is sent.
If the key operator code has been
set, enter the code with the number
keys, and then press the {OK} key.
•Select [None] to specify the send-
er each time.
•Select [Key Op's E-mail Address] to
specify an administrator as the
sender.
Important
It is recommended that a send-
er's password be set to prevent
the sender's name from being
misused.
When [On] is selected for [Key
Operator Code] in [Key Operator
Tools] of [System Settings] and
[On: Partial] is set for the range,
enter the key operator code
when [Sender's Name Default] in
[Send Settings] of [Scanner Features] is selected. For more infor-
mation about System Settings,
see General Settings Guide.
2
15
Page 24

2
Preparations for Use as a Network Scanner
Installing Software
The machine comes with three CD-ROMs containing various software.
The CD-ROM labeled “Scanner Driver & Document Management Utilities” contains the necessary software to use the machine as a network scanner. The CDROM labeled “Printer Driver & Utilities” contains the necessary software to use
the machine as a printer.
This section explains the software to use the machine as a network scanner.
Auto Run Program
When the CD-ROM is inserted into a client computer in Windows
95/98/Me/2000/XP, or Windows NT 4.0, the installer starts automatically (Auto Run) to install the TWAIN driver and various software.
Note
Auto Run might not automatically work with certain operating system set-
tings. In this case, launch “Set up.exe” located in the CD-ROM root directory.
If you want to install the software without using Auto Run, hold down the
{Shift} key while inserting the CD-ROM. Keep the {Shift} key held down until
the client computer has finished accessing the CD-ROM.
If [Cancel] is pressed during installation, the installation will be stopped and
all the remaining software will not be installed. If [Cancel] has been pressed,
reinstall the remaining software after restarting the client computer.
Limitation
For installation in Windows 2000/XP, or Windows NT 4.0, log in as a member
of the administrators group.
16
Page 25
The installing sequence using Auto Run is as follows.
070
ZHSY
E.eps
Installation Sequence
Insert the
CD-ROM.
TWAIN Driver Ver.3
TWAIN
The installer
starts up.
Driver
ScanRouter V2 Lite
Installing Software
2
Select
the software.
The
installation
complete
message is
displayed.
Restart
your PC.
ScanRouter
V2 Lite
Install all at once, or select and install individually.
DeskTopBinder V2 Lite
DeskTopBinder
V2 Lite
Acrobat Reader
Acrobat
Reader
ScanRouter V2
Administration
Utility
ZHSY070E
For information about the software that can be installed by Auto Run, see p.20
“Software Supplied on CD-ROM”.
17
Page 26

2
Preparations for Use as a Network Scanner
Software for Using a Network TWAIN Scanner
To use the machine as a network TWAIN scanner, it is essential to install the TWAIN driver.
If you do not have applications that work with TWAIN, it is necessary to also
install DeskTopBinder V2 Lite. For information about the installation of DeskTopBinder V2 Lite, see p.19 “DeskTopBinder V2 Lite”.
Preparation
Before installation, check the operating environment for the TWAIN driver.
See p.20 “TWAIN Driver”.
Using Windows 95/98/Me/2000/XP or Windows NT 4.0
Install the TWAIN driver using Auto Run.
A Start Windows, and then insert
the supplied CD-ROM labeled
“Scanner Driver & Document
Management Utilities” into the
CD-ROM drive of the client computer.
The CD-ROM Launcher screen appears.
Reference
If the installer does not start automatically, see p.16 “Auto Run
Program”.
B Click [TWAIN Driver].
The Software Setup screen appears.
C The installer of the TWAIN driv-
er starts. Follow the instructions
on the screen.
Note
When the installation is com-
plete, a message to prompt you
to restart the client computer
may appear. In this case, restart
the client computer.
After the installation is com-
plete, the TWAIN driver can be
displayed from the Start → Pro-
gram menu. Help can also be
displayed from here.
Be sure to read “Readme.txt”
before use.
18
Page 27

Installing Software
Software for Using the Network Delivery Scanner Function
To use the machine as a network delivery scanner, it is essential to install ScanRouter V2 Lite on the delivery server. To check an in-tray or retrieve files, it is
necessary to install DeskTopBinder V2 Lite on the client computer.
Use Auto Run for installation.
Preparation
Before installation, check the system requirements for the software. See p.20
“Software Supplied on CD-ROM”.
A Start Windows, and then insert the supplied CD-ROM labeled “Scanner
Driver & Document Management Utilities” into the CD-ROM drive of the
client computer.
The CD-ROM Launcher screen appears.
B Click the key of the software to be installed.
•Click [ScanRouter V2 Lite], and then the ScanRouter V2 Lite Setup screen ap-
pears.
•Click [DeskTopBinder V2 Lite], and then the DeskTopBinder V2 Lite Setup
screen appears.
C Click [ScanRouter V2 Lite] or [DeskTopBinder V2 Lite]. The installer of the soft-
ware starts. Follow the instructions on the screen.
Reference
For information about the subsequent installation procedure, see
that can be displayed from the Setup screen of the respective software.
Guide
Setup
2
DeskTopBinder V2 Lite
Use Auto Run for installation.
Preparation
Before installation, check the system requirements for DeskTopBinder V2
Lite. See p.21 “DeskTopBinder V2 Lite”.
A Start Windows, and then insert the supplied CD-ROM labeled “Scanner
Driver & Document Management Utilities” into the CD-ROM drive of the
client computer.
The CD-ROM Launcher screen appears.
B Click [DeskTopBinder V2 Lite].
The DeskTopBinder V2 Lite Setup screen appears.
C Click [DeskTopBinder V2 Lite]. The installer of the DeskTopBinder V2 Lite
starts. Follow the instructions on the screen.
19
Page 28

Preparations for Use as a Network Scanner
Reference
For information about the subsequent installation procedure, see
Guide
that can be displayed from the Setup screen of DeskTopBinder V2 Lite.
Software Supplied on CD-ROM
Setup
2
List of files
CD-ROM
Drive
Wizard for the TWAIN driver and utilities
Drivers Twain TWAIN driver for Windows
95/98/Me/2000/XP, Windows NT 4.0
Utility RouterV2 ScanRouter V2 Lite , ScanRouter V2 Ad-
ministration Utility
DeskV2 DeskTopBinder V2 Lite
Acroread Acrobat Reader
TWAIN Driver
This driver is required to scan an original on the machine.
To use the machine as a network TWAIN scanner, this driver must be installed.
File storage folder
The files are stored in the following folder on the CD-ROM provided with this machine:
\DRIVERS\TWAIN
System requirements
20
Limitation
Under Windows NT with RISC-based processors (MIPS R series, Alpha
AXP, or PowerPC), this driver is not available.
•Hardware
PC/AT compatible
•CPU
Pentium or faster (Pentium 150 MHz or faster recommended)
• Operating system
Microsoft Windows 95 (OSR 2 or later)
Microsoft Windows 98
Microsoft Windows Millennium Edition
Microsoft Windows 2000 Professional
Microsoft Windows 2000 Server
Microsoft Windows XP Home Edition
Microsoft Windows XP Professional
Microsoft Windows NT Workstation 4.0 (Service Pack 5 or later)
Microsoft Windows NT Server 4.0 (Service Pack 5 or later)
Page 29

Installing Software
•Memory
Operating system minimum operation memory + 8 MB (64 MB or more
recommended)
• Hard disk space
100 MB or more
• Display resolution
800 × 600 pixels, 256 colours or higher
• Network protocol
TCP/IP
DeskTopBinder V2 Lite
DeskTopBinder V2 Lite is to be installed on the client computers for integration
and management of various kinds of files such as scan files, files created with applications, and existing files. This software allows you to use various functions
for scan files stored in the Document Server, e.g., viewing stored files. Also, with
ScanRouter V2 Lite, you can view the files stored in in-trays of the delivery server or use other functions for stored files.
Reference
See DeskTopBinder V2 Lite Help or the manuals for DeskTopBinder V2 Lite.
2
File storage folder
The files are stored in the following folder on the CD-ROM provided with this machine:
\UTILITY\DESKV2
System requirements
•Hardware
PC/AT compatible
•CPU
Pentium 133 MHz or faster (Pentium II 266 MHz or faster recommended)
• Operating system
Microsoft Windows 95 (OSR 2 or later)
Microsoft Windows 98
Microsoft Windows Millennium Edition
Microsoft Windows 2000 Professional (Service Pack 1 or later)
Microsoft Windows 2000 Server (Service Pack 1 or later)
Microsoft Windows XP Home Edition
Microsoft Windows XP Professional
Microsoft Windows Server 2003 Standard Edition
Microsoft Windows Server 2003 Enterprise Edition
Microsoft Windows Server 2003 Web Edition
Microsoft Windows NT Workstation 4.0 (Service Pack 5 or later)
Microsoft Windows NT Server 4.0 (Service Pack 5 or later)
•Memory
48 MB or more (128 MB or more recommended)
21
Page 30

Preparations for Use as a Network Scanner
• Hard disk space
50 MB or more (200 MB or more recommended)
• Display resolution
800 × 600 pixels, 64K colours or higher
• Network protocol
TCP/IP
2
Software installed with DeskTopBinder V2 Lite
•Auto Document Link
Auto Document Link on the client computer monitors in-trays of the delivery server. In addition, the files delivered to in-trays can be retrieved or notification of the arrival of a file can be received at the client computer with
this software.
• Function Palette
Function Palette allows you to use functions such as the network TWAIN
scanner, printing, printing preview, sending files by e-mail, or sending faxes without starting DeskTopBinder V2 Lite. You must make settings in ad-
vance in the [Extended Features...] to use Function Palette. See the
DeskTopBinder V2/Lt manuals for more information.
• Extended Features Wizard
You can make settings equivalent to the settings made with [Extended Fea- tures...] of the [Tools] menu with Extended Features Wizard. See the Desk-
TopBinder V2/Lt manuals for more information.
ScanRouter V2 Lite
ScanRouter V2 Lite is to be installed on the delivery server. Scan files can be sorted in the delivery server, stored in specified in-trays, or saved in folders of client
computers on the same network.
Reference
See ScanRouter V2 Lite Help or the manuals for ScanRouter V2 Lite.
File storage folder
The files are stored in the following folder on the CD-ROM provided with this machine:
\UTILITY\ROUTERV2
System requirements
Limitation
When installing the software in Windows NT Server or Windows 2000
Server, a stand-alone server must be used. Do not use the primary domain
controller or backup domain controller.
If you install this software in an operating system, such as Windows NT
Workstation and Windows 2000 Professional, in which a client server is
not permitted to be used in a network, you may violate the license agree-
22
ment of Microsoft Corporation.
Page 31

Installing Software
•Hardware
PC/AT compatible
•CPU
Pentium 200 MHz or faster (Pentium II 350 MHz or faster recommended)
• Operating system
Microsoft Windows 95 (OSR 2 or later)
Microsoft Windows 98
Microsoft Windows Millennium Edition
Microsoft Windows 2000 Professional (Service Pack 1 or later)
Microsoft Windows 2000 Server (Service Pack 1 or later)
Microsoft Windows XP Home Edition
Microsoft Windows XP Professional
Microsoft Windows NT Workstation 4.0 (Service Pack 5 or later)
Microsoft Windows NT Server 4.0 (Service Pack 5 or later)
•Memory
64 MB or more (128 MB or more recommended)
• Hard disk space
Minimum free space required for installing: 200 MB
Note
In addition to the space required for installation, the hard disk should
have at least 500 MB of free space for files.
2
• Network protocol
TCP/IP
Software installed with ScanRouter V2 Lite
• ScanRouter V2 Administration Utility
ScanRouter V2 Administration Utility manages the delivery system run by
ScanRouter V2 Lite.
You can register destination and sender information for the scan files in the
delivery server. In addition, you can perform maintenance for free disk
space monitoring, error log recording, and other features of the delivery
server.
Note
ScanRouter V2 Administration Utility can be installed not only on the
delivery server but also on client computers. To install it, click [Scan-
Router V2 Administration Utility] on the ScanRouter V2 Lite Setup screen.
23
Page 32

2
Preparations for Use as a Network Scanner
24
Page 33

3. Setting Originals
This chapter explains the procedure for placing originals on the exposure glass
and in the Auto Document Feeder (ADF), and setting the original scan area and
orientation according to the placement method.
To correctly display the top/bottom orientation of the scanned original on a client computer, the placement of the original and the settings made on the control
panel and scanner driver must match.
Placing Originals
There are two orientations for placing the original. See the table below.
Note
Normally, an original is or , but in the table below, a square original is
used to make original orientation easy to understand. If the actual shape of
the original is different, the combination of original orientation and the orientation specified on the control panel or scanner driver does not change.
For information about the scan size that can be specified, see p.12 “Default
Scan Settings” and p.13 “Selecting a custom size”.
Specifying original orientation and setting originals
Org.eps
An original to be scanned
Exposure glass ADF
Decide the placement method.
Place the original.
(There are two original orientations.)
Place the
original so
that the top
edge touches
the top left of
the exposure glass.
GLSyoko.eps GLState.eps ADFyoko.eps ADFtate.eps
Place the original so that the top edge touches the rear of the exposure glass.
Place the top edge of the original first.
Place the original so that the top edge touches the back of the ADF.
25
Page 34

3
***TWdrhz2.t
***TWd
i
***TWdrhza2
***TWd
t
R
007
Setting Originals
When scanning using
Specify the
orientation.
The original displayed on a computer
the e-mail function or
the delivery scanner
function
(Specified on the control panel screen)
When scanning using the TWAIN scanner function
(Specified in the Scanner Control dialog
box)
Placing on the Exposure Glass
Originals which do not fit into the
ADF, such as sheets with glued-on
parts, books, etc., can be placed directly on the exposure glass for scanning.
rvt2.t
OrgPC.eps
.
rvta2.
When placing the original so that
the top edge touches the rear of
the exposure glass
ABF
S.eps
26
Note
For information about the origi-
nals which can be placed on the exposure glass, see Copy Reference.
A Lift the exposure glass cover or
the ADF.
B Place the original on the exposure
glass with the side to be scanned
facing down. Align the original
with the back left corner mark.
There are two original orientations.
ABF007S
1. Positioning mark
Page 35

When placing the original so that
R
008
009
the top edge touches the top left of
the exposure glass
When using the machine as a
network TWAIN scanner, this
orientation is the standard setting for the TWAIN driver. Normally, use this orientation for
placing originals.
ABF
S.eps
1. Positioning mark
ABF008S
Placing Originals
Placing in the Auto Document Feeder
The ADF allows you to place multiple originals at one time.
Originals that can and cannot be
placed in the ADF
For information about the originals that can and cannot be placed
in the ADF, see Copy Reference.
Attempting to use unsuitable originals in the ADF can lead to a misfeed and damage to the originals.
Place such originals directly on the
exposure glass.
Important
For information about placing
originals in the ADF, see Copy
Reference.
3
C Lower the exposure glass cover or
the ADF.
D Select the original orientation ac-
cording to the orientation of the
placed original.
Reference
p.25 “Specifying original orientation and setting originals”
Proceed to p.29 “Original Orientation”.
A Adjust the original guide to
match the size of the originals.
B Place the originals with the side
to be scanned facing up.
There are two orientations.
When placing the originals so that
the top edges touch the back of the
ADF
ABF
S.eps
ABF009S
27
Page 36

3
010
Setting Originals
When placing the top edges of the
originals first
When using the machine as a
network TWAIN scanner, this
orientation is the standard setting for the TWAIN driver. Normally, use this orientation for
placing originals.
ABF
S.eps
Note
Originals are scanned in the in-
serted order, starting with the
topmost page.
ABF010S
C Select the original orientation ac-
cording to the orientation of the
placed originals.
Reference
p.25 “Specifying original orientation and setting originals”
Proceed to p.29 “Original Orientation”.
28
Page 37

Original Orientation
***
009.tif***
***
010.tif***
***
011.tif***
Original Orientation
To correctly display the top/bottom
orientation of a scanned original on a
client computer, original orientation
must be set when placing the original.
When using the e-mail function or the
network delivery scanner function,
settings are made on the control panel
of the machine. When using the machine as a network TWAIN scanner,
settings are made with the TWAIN
driver.
Note
When an original is smaller than
the specified size, a blank space appears in the resulting image.
For E-mail and a Network Delivery Scanner
A To make settings for original ori-
entation, press [Options].
SCN-
C Select the icon for the same orien-
tation as the actual orientation of
the original, [] or [], and
then press the {OK} key.
SCN-
The “
Accepted” message appears,
and then the Send Option screen
returns.
For a Network TWAIN Scanner
A Open the scanner properties dia-
log box.
Reference
p.62 “Scanning Originals”
B Select the position from the [Docu-
ment] list in the [Document] area.
3
Note
The default can be changed us-
ing [Orig. Orientation Priority] in
the initial scan settings. See p.12
“Orig. Orientation Priority”.
B Select [Original Orientation] using
{U} or {T}, and then press the
{OK} key.
SCN-
C Select [ / ] or [ / ] in
the [Orientation:] list.
Reference
p.25 “Specifying original orientation and setting originals”
29
Page 38

Setting Originals
009.tif
***
012.tif***
***
013.tif***
Scanning Originals in Several Times using the Exposure Glass
3
A Place the originals.
Reference
p.25 “Placing Originals”
Note
Originals are scanned in order.
Place them from the first page.
B Make settings for scanning area
and original orientation.
Reference
p.29 “Original Orientation”
SCN-
C Make settings for sending by e-
mail or delivering.
F After all originals are scanned,
press the {#} key.
Sending will start.
SCN-
Reference
p.33 “Procedure for Sending by E-mail”
p.50 “Delivery Procedure”
D Press the {Start} key.
SCN-
E When there are additional origi-
nals to scan, place them and press
the {Start} key.
30
Repeat this step until all originals are scanned.
Page 39

4. Sending Scan Files by Email
Scan files can be sent from this machine to a specified destination using e-mail.
This chapter explains the preparation for sending scan files by e-mail, various
display screens, procedures for sending, and how to check the sending result
when this function is used.
Preparation for Sending by E-mail
To send by e-mail system, the preparation described below is required.
Note
Set up an e-mail server on the network in advance. For information about set-
ting up an e-mail server, see the instruction manuals of the e-mail server to be
used and the software to be installed.
1
Connect to Network
2
Make System Settings
3
Make Scanner
Settings
Connect the machine to the network with an Ethernet cable or
IEEE 1394 (optional) cable, or use Wireless LAN (optional).
See Network Guide.
Make the network settings, settings for sending e-mail such as
for the SMTP server and TCP/IP, and the destination (sender)
settings in System Settings.
See Network Guide and General Settings Guide.
Make settings for sending e-mail such as the file type priority and sender's default.
See p.14 “Send Settings”.
31
Page 40

Sending Scan Files by E-mail
011
012
E-mail Screen
These screens are shown when using the machine for e-mail .
Main display
ABF
S.eps
1
2
4
32
345
When a destination is selected
ABF
S.eps
675
1. E-mail icon ( )
Indicates that the E-mail screen is displayed.
2. Destination field
Displays the selected destination. If
multiple destinations are selected, the
destinations are displayed in the order they were selected by pressing
{U} or {T}.
Note
Press the {Check Destination} key to
check the selected destination.
3. [] E-mail/Network Delivery
Scanner
Press to switch between the e-mail function and the network delivery scanner function.
ABF011S
ABF012S
4. [Manual]
When specifying a destination that is
not registered, press [Manual], and
then enter the e-mail address of the
destination using the Quick Dial keys.
5. [Options]
Press to make the scan settings such as
resolution or scan size, the sender, the
subject of the e-mail to be sent, and the
file type of the scan file attached to the
e-mail if necessary.
6. [Add Dest]
When selecting multiple destinations
after a manual entry of an e-mail ad-
dress, press [Add Dest], and then enter
the e-mail address of the destination.
7. [EditDest]
When changing an e-mail address that
has been entered, press [EditDest], and
then enter the new e-mail address.
Page 41

Sending Scan Files by E-mail
013
***
014.tif***
010.tif
Sending Scan Files by E-mail
Procedure for Sending by Email
Scan files are sent after specifying scan settings and destinations.
A Press the {Scanner} key.
ABF
S.eps
ABF013S
B If the user codes are set, enter a
user code using the number keys,
and then press the {#} key.
The initial scanner screen appears.
D Make sure that no previous set-
tings remain.
Note
If a previous setting remains,
press the {Clear Modes} key.
E Place the original, and then make
the scan settings and settings for
orientation if necessary.
Reference
p.12 “Scan Settings”
p.25 “Setting Originals”
Making the settings
A Press [Options].
B Select items such as [Resolu-
tion], [Original Orientation], and
[Scan Size] using {U} or {T},
and then change their settings.
SCN-
4
Reference
For information about user codes, see General Settings Guide.
C If the Network Delivery Scanner
screen appears, press [] to
switch to the E-mail screen.
SCN-
The E-mail screen appears.
Scan settings can be made in the
same way as default scan settings. See p.12 “Scan Settings”.
C Press the {Cancel} key.
The E-mail screen appears.
F Specify the destination
To specify a destination, you can
select it using the Quick Dial key,
search for and select it from the
Destination List, select it by specifying a registration number, or enter the e-mail address directly.
33
Page 42

Sending Scan Files by E-mail
014
012.tif
015
***
015.tif***
***
016.tif***
4
Using a Quick Dial key to select a destination
A Press the Quick Dial key in
which the destination is registered.
ABF
S.eps
ABF014S
Reference
For more information about
how to register the destination, see General Settings
Guide.
B To select more destinations, re-
peat step A .
SCN-
Searching to select a destination by name
A Press the {Search Destination}
key.
ABF
S.eps
ABF015S
B Select [Search by Name] using
{U} or {T}, and then press the
{OK} key.
SCN-
C Enter the beginning of the des-
tination name, and then press
the {OK} key twice.
SCN-
34
Note
To deselect a destination,
press {U} or {T} to display
the destination in the Destination field, and then press
the {Clear/Stop} key.
Note
Enter the first character or
characters of the destination
name.
It is necessary to differentiate
between uppercase and lowercase.
Reference
For information about how to enter characters, see Gener- al Settings Guide.
Page 43

Sending Scan Files by E-mail
***
017.tif***
015
015.tif
***
018.tif***
015
015.tif
D Select the destination using
{U} or {T}, and then press the
{OK} key.
SCN-
E To select more destinations, re-
peat steps A to D.
Note
To deselect a destination,
press {U} or {T} to display
the destination in the Destination field, and then press
the {Clear/Stop} key.
Selecting a destination from Destination List
C Select the destination using
{U} or {T}, and then press the
{OK} key.
SCN-
D To select more destinations, re-
peat steps A to C.
Note
To deselect a destination,
press {U} or {T} to display
the destination in the Destination field, and then press
the {Clear/Stop} key.
Searching to select a destination by registration number
4
A Press the {Search Destination}
key.
ABF
S.eps
ABF015S
B Select [Display Destination List]
using {U} or {T}, and then
press the {OK} key.
SCN-
A Press the {Search Destination}
key.
ABF
S.eps
ABF015S
B Select [Search by Registration No.]
using {U} or {T}, and then
press the {OK} key.
SCN-
35
Page 44

Sending Scan Files by E-mail
***
019.tif***
***
020.tif***
015
015.tif
***
021.tif***
017.tif
4
C Enter a 3-digit registration
number that has been assigned
to a destination using the
number keys, and then press
the {OK} key.
SCN-
D Press the {OK} key.
SCN-
E To select more destinations, re-
peat steps A to D.
Note
To deselect a destination,
press {U} or {T} to display
the destination in the Destination field, and then press
the {Clear/Stop} key.
Searching to select a destination by e-mail address
B Select [Search by E-mail Address]
using {U} or {T}, and then
press the {OK} key.
SCN-
C Enter the beginning of the e-
mail address, and then press
the {OK} key twice.
SCN-
Note
Enter the first character or
characters of the destination
name.
It is necessary to differentiate
between uppercase and lowercase.
Reference
For information about how to enter characters, see Gener- al Settings Guide.
36
A Press the {Search Destination}
key.
ABF
S.eps
ABF015S
D Select the destination using
{U} or {T}, and then press the
{OK} key.
SCN-
E To select more destinations, re-
peat steps A to D.
Note
To deselect a destination,
press {U} or {T} to display
the destination in the Destination field, and then press
the {Clear/Stop} key.
Page 45

Sending Scan Files by E-mail
***
022.tif***
***
023.tif***
010.tif
***
024.tif***
Manual entry of an e-mail address
A Press [Manual].
B Enter the e-mail address.
SCN-
Note
It is possible to use letters,
numbers, and periods. The
symbols ()\,;:” cannot be
used.
Reference
For information about how to enter characters, see Gener- al Settings Guide.
C Press the {OK} key.
Checking selected destinations
A Check the selected destina-
tions in the Destination field.
Note
When multiple destinations
are selected, the selected destinations are displayed in the
order they were selected by
pressing {U} or {T}.
Press the {Check Destination}
key to check the selected destination.
SCN-
G Select the file type if necessary.
A Press [Options].
4
Note
To change an e-mail address
that has been entered, press
[EditDest]. The E-mail Ad-
dress screen appears. Enter
the new e-mail address, and
then press the {OK} key.
If the entered destination is
longer than the Destination
field, the address will be
omitted and […] is displayed
instead.
D To enter more destinations,
press [Add Dest], and then repeat steps A to C.
Note
To deselect a destination,
press {U} or {T} to display
the destination in the Destination field, and then press
the {Clear/Stop} key.
B Select [File Type] using {U} or
{T}, and then press the {OK}
key.
SCN-
C Select the file type of the file to
be attached to the e-mail using
{U} or {T}, and then press the
{OK} key.
SCN-
The “
Accepted” message ap-
pears, and then the Send Options screen returns.
D Press the {Cancel} key.
37
Page 46

Sending Scan Files by E-mail
010.tif
014
***
025.tif***
4
H Specify the e-mail sender.
To specify a sender, you can select
it using the Quick Dial key, search
for and select it from the Destination List, or select it by specifying a
registration number.
A Press [Options].
B Select [Sender's Name] using
{U} or {T}, and then press the
{OK} key.
SCN-
Note
Step
Op's E-mail Address] is speci-
fied for [Sender's Name Default]
in [Send Settings] of [Scanner
Features].
When a sender is selected,
the sender name is automatically placed in the From field
of the e-mail so that the sender can be identified by the recipient.
To prevent misuse of a send-
er name, we recommend you
set a sender's password for
that sender name.
Be sure to select or enter a
sender name. Otherwise the
key operator's e-mail address
is used as the sender name.
See General Settings Guide.
can be omitted if [Key
H
Using a Quick Dial key to select a sender
A Press the Quick Dial key in
which the sender is registered.
ABF
S.eps
ABF014S
Reference
For more information about
how to register the destination, see General Settings
Guide.
Note
When a sender's password is
set, a screen for entering the
sender's password appears.
Enter the sender's password
using the number keys, and
then press the {OK} or {#}
key. If the password entered
is correct, the sender name is
displayed.
B Press the {OK} key.
SCN-
38
The “
Accepted” message ap-
pears, and then the Return Receipt screen returns.
Page 47

Sending Scan Files by E-mail
***
026.tif***
015
***
027.tif***
***
028.tif***
017.tif
C For receiving a return receipt
confirmation, select [On] using
{U} or {T}, and then press the
{OK} key.
SCN-
The “
Accepted” message ap-
pears, and then the Send Options screen returns.
Note
When [On] is selected, an e-
mail notifying that the e-mail
has been read by the recipient is sent to the sender selected here. However, if the
mailing software used by the
recipient does not support
MDN (Message Disposition
Notification), the e-mail may
not be sent.
Searching to select a sender by name
A Press the {Search Destination}
key.
ABF
S.eps
B Select [Search by Name] using
{U} or {T}, and then press the
{OK} key.
SCN-
C Enter the beginning of the
sender name, and then press
the {OK} key twice.
SCN-
4
Note
Enter the first character or
characters of the sender
name.
It is necessary to differentiate
between uppercase and lowercase.
Reference
For information about how to enter characters, see Gener- al Settings Guide.
D Select the sender using {U} or
{T}, and then press the {OK}
key.
SCN-
ABF015S
39
Page 48

Sending Scan Files by E-mail
***
029.tif***
026.tif
015
027.tif
***
030.tif***
4
Note
When a sender's password is
set, a screen for entering the
sender's password appears.
Enter the sender's password
using the number keys, and
then press the {OK} or {#}
key. If the password entered
is correct, the sender name is
displayed.
E Press the {OK} key.
SCN-
The “
Accepted” message ap-
pears, and then the Return Receipt screen returns.
F For receiving a return receipt
confirmation, select [On] using
{U} or {T}, and then press the
{OK} key.
SCN-
Selecting a sender from Destination List
A Press the {Search Destination}
key.
ABF
S.eps
ABF015S
B Select [Display Destination List]
using {U} or {T}, and then
press the {OK} key.
SCN-
40
The “
Accepted” message ap-
pears, and then the Send Options screen returns.
Note
When [On] is selected, an e-
mail notifying that the e-mail
has been read by the recipient is sent to the sender selected here. However, if the
mailing software used by the
recipient does not support
MDN (Message Disposition
Notification), the e-mail may
not be sent.
C Select the sender using {U} or
{T}, and then press the {OK}
key.
SCN-
Note
When a sender's password is
set, a screen for entering the
sender's password appears.
Enter the sender's password
using the number keys, and
then press the {OK} or {#}
key. If the password entered
is correct, the sender name is
displayed.
Page 49

D Press the {OK} key.
***
031.tif***
026.tif
015
027.tif
***
032.tif***
SCN-
Sending Scan Files by E-mail
Searching to select a sender using a registration number
A Press the {Search Destination}
key.
ABF
S.eps
The “
Accepted” message ap-
pears, and then the Return Receipt screen returns.
E For receiving a return receipt
confirmation, select [On] using
{U} or {T}, and then press the
{OK} key.
SCN-
The “
Accepted” message ap-
pears, and then the Send Options screen returns.
Note
When [On] is selected, an e-
mail notifying that the e-mail
has been read by the recipient is sent to the sender selected here. However, if the
mailing software used by the
recipient does not support
MDN (Message Disposition
Notification), the e-mail may
not be sent.
ABF015S
B Select [Search by Registration No.]
using {U} or {T}, and then
press the {OK} key.
SCN-
C Enter a 3-digit registration
number that has been assigned
to a sender using the number
keys, and then press the {OK}
key twice.
SCN-
4
Note
When a sender's password is
set, a screen for entering the
sender's password appears.
Enter the sender's password
using the number keys, and
then press the {OK} or {#}
key. If the password entered
is correct, the sender name is
displayed.
41
Page 50

Sending Scan Files by E-mail
031.tif
026.tif
015
027.tif
021.tif
D Press the {OK} key.
SCN-
Searching to select a sender by e-mail address
A Press the {Search Destination}
key.
ABF
S.eps
4
The “
Accepted” message ap-
pears, and then the Return Receipt screen returns.
E For receiving a return receipt
conformation, select [On] using
{U} or {T}, and then press the
{OK} key.
SCN-
The “
Accepted” message ap-
pears, and then the Send Options screen returns.
Note
When [On] is selected, an e-
mail notifying that the e-mail
has been read by the recipient is sent to the sender selected here. However, if the
mailing software used by the
recipient does not support
MDN (Message Disposition
Notification), the e-mail may
not be sent.
F Press the {Cancel} key.
ABF015S
B Select [Search by E-mail Address]
using {U} or {T}, and then
press the {OK} key.
SCN-
C Enter the beginning of the
sender's e-mail address, and
then press the {OK} key twice.
SCN-
42
Note
Enter the first character or
characters of the sender
name.
It is necessary to differentiate
between uppercase and lowercase.
Reference
For information about how to enter characters, see Gener- al Settings Guide.
Page 51

Sending Scan Files by E-mail
017.tif
029.tif
026.tif
010.tif
D Select the sender using {U} or
{T}, and then press the {OK}
key.
SCN-
Note
When a sender's password is
set, a screen for entering the
sender's password appears.
Enter the sender's password
using the number keys, and
then press the {OK} or {#}
key. If the password entered
is correct, the sender name is
displayed.
E Press the {OK} key.
SCN-
Note
When [On] is selected, an e-
mail notifying that the e-mail
has been read by the recipient is sent to the sender selected here. However, if the
mailing software used by the
recipient does not support
MDN (Message Disposition
Notification), the e-mail may
not be sent.
I Specify a subject if necessary.
A Press [Options].
B Select [Attach Subject] using {U}
or {T}, and then press the {OK}
key.
SCN-
4
The “
Accepted” message ap-
pears, and then the Return Receipt screen returns.
F For receiving a return receipt
confirmation, select [On] using
{U} or {T}, and then press the
{OK} key.
SCN-
The “
Accepted” message ap-
pears, and then the Send Options screen returns.
Note
When a subject is set, it is
added to the scan file. The
subject appears automatically in the Subject field of the email.
To specify a subject, you can
select it from the list, enter it
directly, or combine selecting
and entering it.
A subject to select from the
list must be registered in
[System Settings] in advance.
See Network Guide.
A subject can be entered us-
ing up to 64 characters.
43
Page 52

Sending Scan Files by E-mail
***
033.tif***
***
034.tif***
***
035.tif***
033.tif
***
036.tif***
***
037.tif***
***
038.tif***
4
Manual entry of a subject
A Select [Manual Input] using {U}
or {T}, and then press the {OK}
key.
SCN-
B Enter a subject, and then press
the {OK} key.
SCN-
The “
Accepted” message ap-
pears, and then the Send Options screen returns.
B Select a subject using {U} or
{T}, and then press the {OK}
key.
SCN-
The “
Accepted” message ap-
pears, and then the Send Options screen returns.
J Press the {Cancel} key.
The initial scanner screen appears.
K Press the {Start} key.
Note
The original is scanned and the
“
Scanning...” message ap-
pears.
SCN-
Note
When the subject to be en-
tered exceeds 64 characters,
“U” appears.
SCN-
Selecting a subject from the list
A Select [Select Programmed Sub-
ject] using {U} or {T}, and then
press the {OK} key.
SCN-
• To interrupt scanning, press
the {Clear/Stop} key.
The scan file is sent and the
“
Sending...” message ap-
pears.
SCN-
• While sending a scan file, you cannot do any other job.
• If sending fails, start the procedure again from the beginning.
44
Page 53

Checking the Status of E-mail
016
***
039.tif***
Checking the Status of E-mail
The status of the last 50 sendings can
be checked. For every new sending
record after 50, the oldest record is
deleted.
Important
When the main power switch is
turned off, all records are deleted.
Note
When [Print&Del. Scanner Journal] is
set to [On], the whole scanner jour-
nal is printed when the number of
records reaches 50.
Items that can be checked
• Date/Time
The date and time the e-mail
was sent or the date “Error”
was confirmed is displayed.
•Page
The number of pages of a
scan file is displayed.
•Status
One of the following is displayed: “
• Destination
The function that was used
(e-mail or delivery function)
is displayed with an icon.
When multiple destinations
were selected, the first selected destination is displayed.
Done” or “Error”.
A Press the {Job Information} key.
ABF
S.eps
ABF016S
B Check the displayed records.
SCN-
C If you want to print the scanner
journal, press [Print], and then
press the {Start} key.
Note
The whole scanner journal is
printed.
D Press the {Cancel} key.
The display returns to the E-mail screen.
4
45
Page 54

4
Sending Scan Files by E-mail
46
Page 55

5. Using the Network Delivery
Scanner Function
Scan files can be sent to a specified destination using the network delivery scanner function. This chapter explains the preparation sequence, various display
screens, delivery procedures, and how to check the delivery result when this
function is used.
Important
A delivery server in which ScanRouter V2 Lite/Professional is installed is
necessary to use the network delivery scanner function. Information about
delivery destinations and senders must be registered first into the delivery
server. Also, configure connected devices in [Set I/O Device] of ScanRouter V2
Administration Utility. For more information, see ScanRouter V2 Administration Utility Help.
Preparation for Delivering
To use the machine as a network delivery scanner, the preparation described below is required.
1
Connect to Network
2
Make System Settings
3
Make Scanner
Settings
4
Install Delivery
Software
Connect the machine to the network with an Ethernet cable,
IEEE 1394 (optional) cable, or use Wireless LAN (optional).
See Network Guide.
Check the network settings in System Settings, and change if required.
See Network Guide.
Make settings for the network delivery scanner function, such as Destination List Settings.
See p.9 “Initial Scanner Setup”.
Install the software required for using the network delivery
scanner functions, such as ScanRouter V2 Lite, on the delivery
server. After installing the software, make the required settings
for server maintenance and delivery service.
See p.22 “ScanRouter V2 Lite”.
47
Page 56

Using the Network Delivery Scanner Function
017
018
5
5
Set Destination Information, Sender
Information, and connected devices
6
Install Client Computer
Software
Use ScanRouter V2 Administration Utility to add destinations, senders, and connected devices.
On the client computers, install the application required for
viewing or retrieving files by connecting to the delivery server,
such as DeskTopBinder V2 Lite.
See p.21 “DeskTopBinder V2 Lite”.
Network Delivery Scanner Screen
These screens are shown when using the machine as a network delivery scanner.
Main display
ABF
S.eps
2
1
345
When a destination is selected
ABF
S.eps
67
1. Network Delivery Scanner icon
()
Indicates that the Network Delivery Scanner screen is displayed.
ABF017S
5
ABF018S
2. Destination field
Displays the selected destination. If
multiple destinations are selected, the
destinations are displayed in the order they were selected by pressing
{U} or {T}.
48
Page 57

Note
Press the {Check Destination} key to
check the selected destination.
Group destinations are denoted by
this symbol ( ).
3. [] E-mail/Network Delivery
Scanner
Press to switch between the network
delivery scanner function and the email function.
4. [Manual]
When specifying a destination that is
not registered, press [Manual], and
then enter the e-mail address of the
destination using the Quick Dial keys.
5. [Options]
Press to make the scan settings such as
resolution or scan size, the sender,
and the subject of the e-mail to be sent.
Preparation for Delivering
5
6. [Add Dest]
When selecting multiple destinations
after a manual entry of a e-mail ad-
dress, press [Add Dest], and then enter
the e-mail address of the destination.
7. [EditDest]
When changing the e-mail address
that has been entered, press [EditDest],
and then re-enter the e-mail address.
49
Page 58

Using the Network Delivery Scanner Function
013
009.tif
010.tif
Delivering Scan Files
5
Delivery Procedure
Scan files are delivered after scan settings and destinations are specified. If
necessary, you can select a sender and
a subject.
A Press the {Scanner} key.
ABF
S.eps
ABF013S
B If the user codes are set, enter a
user code using the number keys,
and then press the {#} key.
The initial scanner screen appears.
D Make sure that no previous set-
tings remain.
Note
If a previous setting remains,
press the {Clear Modes} key.
E Place the original in the machine,
and then make the scan settings
and settings for orientation if necessary.
Reference
p.12 “Scan Settings”
p.25 “Setting Originals”
Making the settings
A Press [Options].
B Select items such as [Resolu-
tion], [Original Orientation], and
[Scan Size] using {U} or {T},
and then change their settings.
SCN-
50
Reference
For information about user codes, see General Settings Guide.
C If the E-mail screen appears, press
[] to switch to the Network
Delivery Scanner screen.
SCN-
The Network Delivery Scanner screen appears.
Scan settings can be made in the
same way as default scan settings. See p.12 “Scan Settings”.
C Press the {Cancel} key.
The Network Delivery Scanner screen appears.
F Specify the destination.
To specify a destination, you can
select it using the Quick Dial key,
search for and select it from the
Destination List, select it by specifying a registration number, or enter the e-mail address directly.
Page 59

Delivering Scan Files
014
***
040.tif***
015
015.tif
016.tif
Note
When using ScanRouter V2
Lite/Professional, the Destination List is updated automatically.
Using a Quick Dial key to select a destination
A Press the Quick Dial key in
which the destination is registered.
ABF
S.eps
Searching to select a destination by name
A Press the {Search Destination}
key.
ABF
S.eps
ABF015S
B Select [Search by Name] using
{U} or {T}, and then press the
{OK} key.
SCN-
5
ABF014S
Reference
For more information about
how to register the destination, see General Settings
Guide.
B To select more destinations, re-
peat step A .
SCN-
Note
To deselect a destination,
press {U} or {T} to display
the Destination in the destination field, and then press
the {Clear/Stop} key.
C Enter the beginning of the des-
tination name, and then press
the {OK} key twice.
SCN-
Note
Enter the first character or
characters of the destination
name.
It is necessary to differentiate
between uppercase and lowercase.
51
Page 60

Using the Network Delivery Scanner Function
***
041.tif***
015
015.tif
***
042.tif***
015
5
Reference
For information about how to enter characters, see Gener- al Settings Guide.
D Select the destination using
{U} or {T}, and then press the
{OK} key.
SCN-
E To select more destinations, re-
peat steps A toD.
Note
To deselect a destination,
press {U} or {T} to display
the destination in the Destination field, and then press
the {Clear/Stop} key.
When selecting a destination from Destination List
A Press the {Search Destination}
key.
ABF
S.eps
B Select [Display Destination List]
using {U} or {T}, and then
press the {OK} key.
SCN-
C Select the destination using
{U} or {T}, and then press the
{OK} key.
SCN-
D To select more destinations, re-
peat steps A to C.
Note
To deselect a destination,
press {U} or {T} to display
the destination in the Destination field, and then press
the {Clear/Stop} key.
Searching to select a destination by registration number
52
ABF015S
A Press the {Search Destination}
key.
ABF
S.eps
ABF015S
Page 61

Delivering Scan Files
015.tif
019.tif
***
043.tif***
015
015.tif
***
044.tif***
B Select [Search by Registration No.]
using {U} or {T}, and then
press the {OK} key.
SCN-
C Enter a 3-digit registration
number that has been assigned
to a destination using the
number keys, and then press
the {OK} key.
SCN-
D Press the {OK} key.
SCN-
Searching to select a destination by comment
A Press the {Search Destination}
key.
ABF
S.eps
ABF015S
B Select [Search by Comment] us-
ing {U} or {T}, and then press
the {OK} key.
SCN-
5
E To select more destinations, re-
peat steps A to D.
Note
To deselect a destination,
press {U} or {T} to display
the destination in the Destination field, and then press
the {Clear/Stop} key.
C Enter the beginning of the
comment, and then press the
{OK} key twice.
SCN-
Note
Enter the first character or
characters of the comment.
It is necessary to differentiate
between uppercase and lowercase.
Reference
For information about how to enter characters, see Gener- al Settings Guide.
53
Page 62

Using the Network Delivery Scanner Function
***
045.tif***
022.tif
***
046.tif***
5
D Select the destination using
{U} or {T}, and then press the
{OK} key.
SCN-
E To select more destinations, re-
peat steps A to D.
Note
To deselect a destination,
press {U} or {T} to display
the destination in the Destination field, and then press
the {Clear/Stop} key.
Manual entry of a destination
Note
When using ScanRouter V2 Pro-
fessional, it is possible to enter
the e-mail address of the destination directly. However, settings for sending e-mail must be
made in advance.
A Press [Manual].
B Enter the e-mail address.
SCN-
C Press the {OK} key.
Note
To change an e-mail address
that has been entered, press
[EditDest]. The display re-
turns to the E-mail Address
screen. Make any changes,
and then press the {OK} key.
If the entered destination is
longer than the Destination
field, the address will be
omitted and […] is displayed
instead.
D To enter more destinations,
press [Add Dest], and then repeat steps A to C.
Note
To deselect a destination,
press {U} or {T} to display
the destination in the Destination field, and then press
the {Clear/Stop} key.
Checking selected destinations
A Use the Destination field to
check which destinations are
selected.
Note
When multiple destinations
are selected, the selected destinations are displayed in the
order they were selected by
pressing {U} or {T}.
54
Note
It is possible to use letters,
numbers, and periods. The
symbols ()\,;:” cannot be
used.
Reference
For information about how to enter characters, see Gener- al Settings Guide.
Press the {Check Destination}
key to check the details of the
selected destination.
SCN-
Page 63

Delivering Scan Files
010.tif
014
***
047.tif***
026.tif
G Specify the sender (scan file de-
liver source) if necessary.
To specify a sender, you can search
for and select it from the Destination List, or select it by specifying a
registration number.
A Press [Options].
B Select [Sender's Name] using
{U} or {T}, and then press the
{OK} key.
SCN-
Note
When a sender is selected,
the sender name is automatically placed in the From field
of the e-mail so that the sender can be identified by the recipient.
Reference
For more information about
how to register the destination, see General Settings
Guide.
B Press the {OK} key.
SCN-
The “
Accepted” message ap-
pears, and then the Return Receipt screen returns.
C For receiving a return receipt
confirmation, select [On] using
{U} or {T}, and then press the
{OK} key.
SCN-
5
Using a Quick Dial key to select a sender
A Press the Quick Dial key in
which the sender is registered.
ABF
S.eps
ABF014S
The “
Accepted” message ap-
pears, and then the Send Options screen returns.
Note
When [On] is selected, an e-
mail notifying that the e-mail
has been read by the recipient is sent to the sender selected here. However, if the
mailing software used by the
recipient does not support
MDN (Message Disposition
Notification), the e-mail may
not be sent.
55
Page 64

5
027.tif
028.tif
***
048.tif***
***
049.tif***
026.tif
Using the Network Delivery Scanner Function
Searching to select a sender by name
A Press the {Search Destination}
key.
B Select [Search by Name] using
{U} or {T}, and then press the
{OK} key.
SCN-
C Enter the beginning of the
sender name, and then press
the {OK} key twice.
SCN-
E Press the {OK} key.
SCN-
The “
Accepted” message ap-
pears, and then the Return Receipt screen returns.
F For receiving a return receipt
conformation, select [On] using
{U} or {T}, and then press the
{OK} key.
SCN-
Note
Enter the first character or
characters of the sender
name.
It is necessary to differentiate
between uppercase and lowercase.
Reference
For information about how to enter characters, see Gener- al Settings Guide.
D Select the sender using {U} or
{T}, and then press the {OK}
key.
SCN-
The “
Accepted” message ap-
pears, and then the Send Options screen returns.
Note
When [On] is selected, an e-
mail notifying that the e-mail
has been read by the recipient is sent to the sender selected here. However, if the
mailing software used by the
recipient does not support
MDN (Message Disposition
Notification), the e-mail may
not be sent.
56
Page 65

Delivering Scan Files
015
027.tif
***
050.tif***
***
051.tif***
026.tif
015
When selecting a sender from Destination List
A Press the {Search Destination}
key.
ABF
S.eps
ABF015S
B Select [Display Destination List]
using {U} or {T}, and then
press the {OK} key.
SCN-
E For receiving a return receipt
conformation, select [On] using
{U} or {T}, and then press the
{OK} key.
SCN-
The “
Accepted” message ap-
pears, and then the Send Options screen returns.
Note
When [On] is selected, an e-
mail notifying that the e-mail
has been read by the recipient is sent to the sender selected here. However, if the
mailing software used by the
recipient does not support
MDN (Message Disposition
Notification), the e-mail may
not be sent.
5
C Select the sender using {U} or
{T}, and then press the {OK}
key.
SCN-
D Press the {OK} key.
SCN-
The “
Accepted” message ap-
pears, and then the Return Receipt screen returns.
Searching to select a sender by registration number
A Press the {Search Destination}
key.
ABF
S.eps
ABF015S
57
Page 66

Using the Network Delivery Scanner Function
027.tif
032.tif
***
052.tif***
026.tif
010.tif
5
B Select [Search by Registration No.]
using {U} or {T}, and then
press the {OK} key.
SCN-
C Enter a 3-digit registration
number that has been assigned
to a sender using the number
keys, and then press the {OK}
key twice.
SCN-
D Press the {OK} key.
SCN-
Note
When [On] is selected, an e-
mail notifying that the e-mail
has been read by the recipient is sent to the sender selected here. However, if the
mailing software used by the
recipient does not support
MDN (Message Disposition
Notification), the e-mail may
not be sent.
H Specify a subject if necessary.
A Press [Options].
B Select [Attach Subject] using {U}
or {T}, and then press the {OK}
key.
SCN-
The “
Accepted” message ap-
pears, and then the Return Receipt screen returns.
E For receiving a return receipt
conformation, select [On] using
{U} or {T}, and then press the
{OK} key.
SCN-
The “
Accepted” message ap-
pears, and then the Send Options screen returns.
Note
When a subject has been set,
this information is added to
the scan file.
When ScanRouter V2 Profes-
sional is used to send files using e-mail, the subject is
automatically placed in the
Subject field of the e-mail.
To specify a subject, you can
select it from the list, enter it
directly, or combine selecting
and entering it.
A subject to select from the
list must be registered in
[System Settings] in advance.
See Network Guide.
A subject can be entered us-
ing up to 64 characters.
58
Page 67

Delivering Scan Files
033.tif
034.tif
035.tif
033.tif
036.tif
***
053.tif***
038.tif
Manual entry of a subject
A Select [Manual Input] using {U}
or {T}, and then press the {OK}
key.
SCN-
B Enter a subject, and then press
the {OK} key.
The “
Accepted” message ap-
pears, and then the Send Options screen returns.
SCN-
B Select a subject using {U} or
{T}, and then press the {OK}
key.
SCN-
The “
Accepted” message ap-
pears, and then the Send Options screen returns.
I Press the {Cancel} key.
The initial scanner screen appears.
J Press the {Start} key.
Note
The originals is scanned and the
“
Scanning...” message ap-
pears.
SCN-
5
Note
When the subject to be en-
tered exceeds 64 characters,
“U” appears.
SCN-
When selecting a subject from the list
A Select [Select Programmed Sub-
ject] using {U} or {T}, and then
press the {OK} key.
SCN-
• To interrupt scanning, press
the {Clear/Stop} key.
The scan file is sent and the
“
Sending...” message ap-
pears.
SCN-
• While sending a scan file, you cannot do any other job.
• If sending fails, start the all
procedure again from the beginning.
59
Page 68

Using the Network Delivery Scanner Function
016
***
054.tif***
Checking the Status of Delivery
5
The status of the last 50 deliveries can
be checked. For every new delivery
record after 50, the oldest record is
deleted.
Important
When the main power switch is
turned off, all records are deleted.
Note
When [Print&Del. Scanner Journal] is
set to [On], the whole journal is
printed when the number of
records reaches 50.
Items that can be checked
•Date/Time
The date and time the delivery
was requested or the date “Error” was confirmed is displayed.
•Page
The number of pages of a scan
file is displayed.
• Status
One of the following is displayed: “
•Destination
The function that was used (email, or delivery function) is
displayed with an icon.
When multiple destinations
were selected, the first selected
destination is displayed.
Done” or “Error”.
A Press the {Job Information} key.
ABF
S.eps
ABF016S
B Check the displayed records.
SCN-
C If you want to print the scanner
journal, press [Print], and then
press the {Start} key.
Note
The whole scanner journal is
printed.
D Press the {Cancel} key.
The display returns to the E-mail screen.
60
Page 69

6. Using the Network TWAIN
Scanner Function
This chapter describes the operations for scanning originals with the network
TWAIN scanner using DeskTopBinder V2 Lite. In addition, the preparation for
using the network TWAIN scanner and some functions of the TWAIN driver are
introduced.
Preparation for Using the Network TWAIN Scanner
To use the machine as a network TWAIN scanner, the preparation described below is required.
1
Connect to Network
2
Make System Settings
3
Install Software
Connect the machine to the network with an Ethernet cable,
IEEE 1394 (optional) cable, or use Wireless LAN (optional).
See Network Guide.
Check the network settings in System Settings, and change if required.
See Network Guide.
On the client computers, install the software required for using
the network TWAIN scanner functions, such as a TWAIN driver
and DeskTopBinder V2 Lite.
See p.18 “Software for Using a Network TWAIN Scanner”.
Network TWAIN Scanner Screen
When using the machine as a network TWAIN scanner, it is not necessary to press the {Scanner} key on the control panel. When the TWAIN driver becomes active on a client computer, the display automatically switches to the network TWAIN scanner screen.
Press [Exit] to use functions other than the network TWAIN scanner function.
61
Page 70

Using the Network TWAIN Scanner Function
Scanning Originals
6
This section explains how to scan originals using the network TWAIN scanner function.
A Start DeskTopBinder V2 Lite, and
then select the scanner driver.
A On the [Start] menu, point to
[Program], point to [DeskTop-
Binder V2], and then click [Desk-
TopBinder V2].
B Click [Scanner Settings] on the
[Tools] menu.
If the scanner is already selected, no scanner settings are necessary. Check the settings in the
[File format for scanned image(s)]
area, and then proceed to step
E.
C Click [Select Scanner Driver...].
D Select the name of the machine
you want to use in the list, and
then click [Select...].
E Click [OK].
B Place the original in the scanner.
Reference
p.25 “Setting Originals”
C Make the scan settings.
A On the [File] menu, point to
[Add Document], and then click
[Scan].
The TWAIN driver starts.
After a short while, the dialog
box of the TWAIN driver that
operates the scanner appears.
This dialog box is called the
Scanner Properties dialog box.
Note
The name of the scanner cur-
rently being used is shown
on the title bar of the dialog
box. When multiple machines are connected, make
sure that the indicated machine is the machine you
want to use. If it is different,
click [Select Scanner] to select
the scanner again.
If the machine you want to
use is not displayed in the
list, make sure that the IP address is configured and that
the machine is correctly connected to the network. If the
machine is still not displayed
in the list after confirming
the above, consult with your
network administrator.
B Depending on the type of orig-
inal or the objective for scanning, click the appropriate
button in [Mode].
• [Standard] is suitable for scan-
ning standard originals that
are comprised of mainly text.
• [Photo] is suitable for scan-
ning originals that include
photos, shaded illustrations,
etc.
• [OCR] is suitable for conver-
sion processing with an OCR
(Optical Character Reading)
application after scanning
the original.
• [Filing] is suitable for use with
filing applications, etc.
62
Page 71

Scanning Originals
Note
For advanced settings, click
[Detail] to display the Detail
window. For information
about the Detail window, see
TWAIN driver Help.
C According to the settings of
[Document] and [Orientation:],
change the other setting of the
[Document] group.
Reference
p.29 “For a Network TWAIN Scanner”
For information about mak-
ing settings for the [Docu-
ment] group, see TWAIN
driver Help.
When you want to configure the scanning area
When you do not configure the
scanning area, the area scanned is
the size specified in the [Size:] box.
A Click [Preview].
The original that was placed is
scanned and the [Preview] dialog
box appears. The scanning area
in the preview is displayed
within the broken lines.
Note
When you change the scan
settings after previewing the
original, scan that original
again.
B Configure the scanning area by
dragging a border or a corner.
When reconfiguring the area, click and drag one corner of the area towards or away from its opposite corner.
Note
Depending on the scanning
resolution, the area to be
scanned may be subject to restrictions.
C Click [Close].
Note
When an original placed in
the ADF is previewed, place
that original again.
D Click [Scan].
When there are additional originals to scan, place the original, and
then click [Continue]. When there
are no more originals, click [Com-
plete].
E Save the scan file in DeskTop-
Binder V2 Lite.
A On the [File] menu, click [Exit].
B Enter the file name, and then
click [OK].
The scan file is stored in DeskTopBinder V2 Lite, and DeskTopBinder Viewer closes.
-Editing and printing scan files
With DeskTopBinder V2 Lite, it is
possible to edit and print scan files.
For more information about how to
edit and print, see DeskTopBinder V2
Lite Help.
6
63
Page 72

Using the Network TWAIN Scanner Function
Functions of the TWAIN Driver
The following is an introduction to the various functions of the TWAIN driver:
Automatic Tilt Correction
This function automatically corrects character strings that were
scanned slanted.
Printing to the Image
This function allows you to imprint dates, page numbers, or your
favorite characters on a scan file.
You can also change the fonts of
the imprints as well as change the
ascending order of images to a descending order.
6
Scanning Mode Registration
This function allows you to register other scanning configurations
that are often used as scanning
modes besides the already pre-installed ones. After registration,
you can quickly scan with these
scanning configurations.
Reference
For more information about
these functions or other func-
tions, see TWAIN driver Help.
64
Page 73

7. Appendix
Relationship between Resolution and File Size
Resolution and scan area are inversely related. The higher the resolution is set,
the smaller the area that can be scanned. Conversely, the larger the scan area, the
lower the resolution that can be set.
The relationship between the scanning resolution and the file size is shown below. If the file size is too large, the message “Exceeded max.data capacity. Check
the scanning resolution.” appears on the control panel of the machine. Specify
the scan size and resolution again.
Limitation
Depending on the image compression level, the maximum image size will be
limited.
When using the Auto Document Feeder
All combinations up to 216 × 356 mm/8.5 × 14.0 inches (A4, 8
600 dpi are possible.
1
/
× 14 inches) and
2
When using the exposure glass cover
All combinations up to 216 × 297 mm/8.5 × 11.6 inches (A4, 8
600 dpi are possible.
Reference
To specify the scanning area or resolution when using the machine as a network TWAIN scanner, see TWAIN driver Help.
Note
If the originals cannot be scanned when using the TWAIN driver, select [No
compression] in Select Device Data Compression.
1
/
× 11 inches) and
2
65
Page 74

Appendix
Max. Number of Addresses Which Can Be Specified
E-mail Delivery Server
7
The number of addresses which can be specified at a time when sending
The number of addresses which can be registered in the list 150
The max. number of files which can be scanned
The max. number of pages which can be scanned
The max. number of pages which can be scanned as a single file
*1
Up to 50 addresses can be entered directly. All remaining addresses have to be specified using the registered ones.
*2
The maximum number of addresses which can be specified varies depending on the
100
*1
See the manuals for ScanRouter V2 Lite/Professional.
1
100
100
100
*2
software you use, ScanRouter V2 Lite or ScanRouter V2 Professional. For more information, see the manuals for ScanRouter V2 Lite/Professional.
Note
Sometimes the machine cannot scan files to the maximum number depending
on the type of originals.
When the power switch is turned off, all records are deleted.
66
Page 75

Troubleshooting
Troubleshooting
This section contains advice on what to do if you have problems scanning an
original, or if the network delivery scanner or e-mail function does not work.
Various messages that may appear on the control panel or client computer are
listed, along with causes and solutions.
When Scanning Is Not Performed as Expected
Problems Causes and solutions
No image results from scanning.
The image is distorted or out of position.
The scanned image is dirty. The exposure glass or the exposure glass cover is dirty. Clean
The scanned image is upside down.
The original was placed with the front and back reversed.
When the original is placed directly on the exposure glass, the
side to be scanned must face down. When the original is fed via
the ADF, the side to be scanned must face up. See p.25 “Setting
Originals”.
• The original was moved during scanning. Do not move the original during scanning.
• The original was not pressed flat against the exposure glass.
Make sure that the original is pressed flat against the exposure glass.
these parts. See General Settings Guide.
The original was placed upside down. Place the original in the
correct orientation. See p.25 “Setting Originals”.
When the Delivery Function Does Not Work
Problems Causes and solutions
The delivery scanner function screen is not displayed.
• If the network TWAIN scanner screen appears when the ma-
chine is switched to scanner mode, press [Exit] to switch to
the network delivery scanner screen.
• If the display does not switch from network TWAIN scanner
to network delivery scanner, the delivery scanner settings
are not correct. See p.9 “Scanner Features”, and then make
the appropriate settings.
7
67
Page 76

Appendix
When an Error Message Appears on the Control Panel
Note
If an error message that is not included in this section appears, turn off the
main power switch of the machine, and then turn it on again. If the message
still appears, note the content of the message and the error number (if listed
in the table), and contact your service representative. For information about
how to turn off the main power switch, see General Settings Guide.
Message Causes and solutions
7
Cannot enter manually more than nnn destinations.
Note
“nnn” in the message represents a changeable
number.
Cannot specify more than 100 destinations.
Exceeded max. data capacity. Check resolution and Start.
Exceeded max. data capacity. Check the
resolution and
reset nnn original(s)
Note
This message appears when using the ADF.
“nnn” in the message represents a changeable
number.
When there are nnn or more destinations for a delivery or an e-mail, split
the destinations into two or more
groups.
When there are 100 or more destinations for a delivery or an e-mail, split
the destinations into two or more
groups.
Specify the scan size and resolution
again. Note that it may not be possible to scan very large originals at a
high resolution. See p.65 “Relationship between Resolution and File
Size”.
Specify the scan size and resolution
again. Note that it may not be possible to scan very large originals at a
high resolution. See p.65 “Relationship between Resolution and File
Size”.
68
Exceeded max. E-mail size. Sending Email has been cancelled.
Exceeded max. page capacity. Do you
want to send the scanned data? Scanned
data will be cleared when selecting
[No].
• Increase the size of [Max. E-mail Size].
•Set [Divide & Send E-mail] to [On (per page)] or [On (per max. size)].
Because the number of pages has
reached the maximum number that
can be sent, the data up to this point
is sent. Scan the remaining pages after transmission.
Page 77

Message Causes and solutions
Troubleshooting
Exceeded max.memory capa. Scanning will be cancelled. Scanned data will be cleared.
Exceeded max. memory capacity. Do you
want to send the scanned data? Scanned
data will be cleared when selecting
[No].
No valid dest. lists. Check the settings or the server status.
Original is being scanned by another function.
Sending has failed. Press Job Information key to check the status.
Because of insufficient memory
space, the first page could not be
scanned. Try one of the following
measures:
• Wait for a while, and then retry the scan operation.
• Reduce the scan area or scanning resolution.
Because there is not enough free
memory space in the machine for delivery or e-mail, only some of the
pages could be scanned. Specify
whether or not to deliver the data.
Check that the delivery server is on
and the authentic settings for the delivery server are correct.
The machine is using another function such as copying. Retry scanning
after the operation with the other
function is completed.
While a file was being sent, a network error occurred and the file
could not be sent correctly. Try the
operation once more.
If the message is still shown, the network may be crowded. Consult the
network administrator.
Use the Job Information screen to
check for the file where the problem
occurred. See p.45 “Checking the
Status of E-mail” or p.60 “Checking
the Status of Delivery”.
If there is not enough free hard disk
space in the destination server, free
the necessary hard disk space.
7
Destination list has been updated. Selected destinations/sender will be
cleared.
E-mail address entered is incorrect. Please re-enter.
Specified group contains some invalid dest. Do you want to select only valid
dest.?
A specified destination or sender's
name was cleared when the destination list in the delivery server was
updated. Specify the destination or
sender's name again.
Make sure the e-mail address is correct, and then enter it again.
The group contains members whose
e-mail addresses are not registered.
Please check the e-mail addresses of
the group and make selections again.
69
Page 78

Appendix
Message Causes and solutions
Updating destination list. Reselect
destination(s) or sender's name later.
Updating destination list has failed. Try again?
If a destination or a sender's name
was already selected, re-select it after
this message disappears.
Check whether the server is connected.
When an Error Message Appears on the Client Computer
This section describes the main possible causes and actions for error messages
displayed on the client computer when the TWAIN driver is used.
Note
If an error message that is not contained in this section appears, turn off the
main power switch of the machine, and then turn it on again. If the message
is still shown after scanning is performed again, note the content of the message and the error number (if listed in the table), and contact your service representative. For information about how to turn off the main power switch, see
General Settings Guide.
Message Causes and solutions
[Cannot add any more scanning mode.] The maximum number of modes that can
be stored is 99. Delete unneeded modes.
7
[Cannot connect to the scanner. Check the network Access Mask settings in User Tools.]
[Cannot find the scanner. Check if the scanner main power is on.]
[Cannot specify any more scanning area.] The maximum number of scanning areas
[Clear Misfeed(s) in ADF.] Remove the jammed originals. When origi-
[Communication error has occurred on the network.] Check whether the client computer can use
[Error has occurred in the scanner.] Check whether the scanning settings made
The access mask is set. Consult the network or scanner administrator.
• Check whether the main power switch of the machine is turned off.
• Check whether the machine is connected to the network correctly.
• Deselect the personal firewall function of the client computers.
that can be stored is 99. Delete unneeded
scanning areas.
nals are misfed, place them again. Check
whether the originals are suitable to be
scanned by the machine.
the TCP/IP protocol.
with the application exceed the setting
range of the machine.
70
Page 79

Message Causes and solutions
Troubleshooting
[Error has occurred in the scanner driver.] •
[Fatal error has occurred in the scanner.] An unrecoverable error has occurred in the
[Insufficient memory. Close all other applications, then restart scanning.]
[Insufficient memory. Reduce the scanning area.] • Reset the scan size.
Check whether the network cable is connected correctly to the client computer.
• Check whether the Ethernet board of
the client computer is recognized correctly by Windows.
• Check whether the client computer can use the TCP/IP protocol.
machine. Call your service representative.
Close all the unnecessary applications running on the client computer.
• Lower the resolution.
• Set with no compression. See p.14
“Send Settings”.
Note
When a paper misfeed occurs in the ma-
chine during printing, scanning cannot
be performed. In this case, after the misfed paper has been removed, proceed
with scanning.
[Invalid Winsock version. Please use version 1.1 or higher.]
Reinstall the operating system of the computer or copy Winsock from the operating
system CD-ROM.
7
[No response from the scanner.] • Check whether the machine is connect-
ed to the network correctly.
• The network is crowded. Wait for a while, and then try to reconnect.
[No User Code is registered. Consult your system administrator.]
[Please call your service representative.] An unrecoverable error has occurred in the
[Scanner is in use for other function. Please wait.] A function of the machine other than the
[Scanner is not available. Check the scanner connec-
tion status.]
[
Scanner is not ready. Check the scanner and the options.]Check whether the ADF cover is closed.
[The name is already in use. Check the registered names.]
Acc es s i s r est ri ct ed wi th u se r co de s. Co nsu lt the system administrator of the machine.
machine. Call your service representative.
scanner function is being used such as the
copier function. Wait for a while and reconnect.
• Check whether the main power switch of the machine is turned off.
• Check whether the machine is connected to the network correctly.
• Deselect the personal firewall function of the client computers.
You tried to register a name that is already in use. Use another name.
71
Page 80

Appendix
Specifications
Scan method Flatbed scanning
Scan speed
Maximum power consumption Less than 900 W
Image sensor type CCD Image Sensor
Scan types Sheet, book
Interface Ethernet interface (10BASE-T or 100BASE-TX), IEEE 1394
Maximum scan size 216 × 356 mm/8.5 × 14.0 inches (A4, 8
Resolution 600 dpi
*1
• E-mail/Network Delivery Scanner
Approx. 22 pages/minute [Scan size: A4S, Original
type: Text(Print), Resolution: 200dpi, Compression: On
(MH), Document feeder: ADF, ITU-T No.1 Chart]
• TWAIN Scanner
Approx. 18 pages/minute [Scan size: A4S, Colours/Gradations: Binary, Resolution: 200dpi, Select device data compression (Binary/Halftone): Data
compression (MMR), Document feeder: ADF, ITU-T
No.1 Chart]
(IP over 1394) [optional], and IEEE 802.11b (Wireless LAN)
[optional]
1
/
× 14 inches)
2
7
Variable range of scan resolution • E-mail/Network Delivery Scanner
Setting range: 100 dpi, 200 dpi, 300 dpi, 400 dpi, and 600 dpi
• TWAIN Scanner
Setting range: 100 dpi - 600 dpi
File formats that can be sent by email
Compression method Binary: TIFF (MH, MR, MMR)
Protocol Network: TCP/IP
*1
Scanning speeds vary according to machine operating conditions, computer (speci-
TIFF, PDF
Sending e-mail: SMTP
fication, network traffic, and software, etc.), and original types.
72
Page 81

INDEX
A
Auto Document Link, 22
Automatic Tilt Correction
Auto Run program
, 64
, 16
C
Checking the status of delivery, 60
Checking the status of e-mail
Compression
Control panel
Custom Size
, 14
, 6
, 13
, 45
D
Default Scan Settings, 12
Delivering scan files
Delivery procedure
Checking selected destinations
Manual entry of a destination
Manual entry of a subject
Searching to select a destination
by comment
Searching to select a destination
by name
Searching to select a destination
by registration number
Searching to select a sender by name
Searching to select a sender by
registration number
Using a Quick Dial key to select a
destination
Using a Quick Dial key to select a
sender
, 55
When selecting a destination from
Destination List
When selecting a sender from
Destination List
When selecting a subject from the list
DeskTopBinder V2 Lite
Destination List Priority
Destination List Settings
Divide & Send E-mail
, 50
, 50
, 59
, 53
, 51
, 52
, 57
, 51
, 52
, 57
, 19, 21, 61
, 13
, 9, 13
, 15
, 54
, 54
, 56
,
59
E
E-mail, 31
E-mail Informatn. Language
E-mail screen
Error Message
Client Computer
Control Panel
Extended Features Wizard
, 32
, 70
, 68
, 15
, 22
F
File Type Priority, 14
Function Palette
Functions of the TWAIN Driver
, 22
, 64
I
Initial scanner setup, 9
Installing software
, 16
M
Max. E-mail Size, 14
Max. number of addresses which can be
specified and files which can be stored
Mode
, 62
N
Network delivery scanner, 47
Network delivery scanner screen
Network TWAIN scanner
, 61
, 48
O
Original orientation, 29
e-mail and a network delivery scanner
network TWAIN scanner
Original Type Setting
Orig. Orientation Priority
Outline
, 3
E-mail
, 3
Network delivery scanner
Network TWAIN scanner
, 29
, 12
, 12
, 4
, 5
,
,
66
29
73
Page 82

P
S
Placing originals, 25
Auto Document Feeder (ADF)
exposure glass
Preparation for delivering
Preparation for sending by e-mail
Preview
Print&Del. Scanner Journal
Printing to the image
Procedure for sending by e-mail
, 63
Checking selected destinations
Manual entry of an e-mail address
Manual entry of a subject
Searching to select a destination
by e-mail address
Searching to select a destination
by name
Searching to select a destination
by registration number
Searching to select a sender by e-mail
address
Searching to select a sender by name
Searching to select a sender using a
registration number
Selecting a destination from Destination
, 35
List
Selecting a sender from Destination List
Selecting a subject from the list
Using a Quick Dial key to select a
destination
Using a Quick Dial key to select a
sender
, 26
, 47
, 64
, 36
, 34
, 42
, 41
, 34
, 38
, 27
, 31
, 14
, 33
, 37
, 44
, 35
, 44
R
Reading the display and using keys, 7
Relationship between resolution and
file size
Resolution
, 65
, 12
, 37
, 39
,
40
Save, 63
Scanner Features
Setting procedure
Scanning mode registration
Scanning originals
Scanning originals in several times using
the exposure glass
ScanRouter V2 Lite
Scan Settings
Scan Size
Selecting a custom size
Sender's Name Default
Sending scan files by e-mail
Send Settings
Setting originals
SMTP server
Software for using the network delivery
scanner function
Software supplied on CD-ROM
Specifications
, 12
, 9
, 10
, 64
, 62
, 30
, 22
, 9, 12
, 13
, 15
, 33
, 10, 14
, 25
, 3
, 19
, 20
, 72
T
Troubleshooting, 67
When an error message appears on the
client computer
When an error message appears on the
control panel
When scanning is not performed as
expected
When the delivery function does not
, 67
work
TWAIN Driver
TWAIN Standby Time
, 70
, 68
, 67
, 20
, 14
U
Update Server Dest. List, 13
74 GB GB B683-8710
 Loading...