

Ricoh AFICIO 1106EX, AFICIO 1356EX, PRO 906EX User Manual
Operating Instructions
Troubleshooting
When the Machine Does Not Operate As wanted
1
Troubleshooting When Using the Copy Function
2
Troubleshooting When Using the Printer Function
3
Troubleshooting When Using the Scanner Function
4
Adding paper, Toner and Staples
5
Clearing Misfeeds
6
Remarks
7
Read this manual carefully before you use this machine and keep it handy for future reference. For safe and correct use, be sure to read the
Safety Information in "About This Machine" before using the machine.

Introduction
This manual contains detailed instructions and notes on the operation and use of this machine. For your
safety and benefit, read this manual carefully before using the machine. Keep this manual in a handy
place for quick reference.
Do not copy or print any item for which reproduction is prohibited by law.
Copying or printing the following items is generally prohibited by local law:
bank notes, revenue stamps, bonds, stock certificates, bank drafts, checks, passports, driver's licenses.
The preceding list is meant as a guide only and is not inclusive. We assume no responsibility for its
completeness or accuracy. If you have any questions concerning the legality of copying or printing certain items, consult with your legal advisor.
Important
Contents of this manual are subject to change without prior notice. In no event will the company be liable for direct, indirect, special, incidental, or consequential damages as a result of handling or operating the machine.
Notes:
Some illustrations in this manual might be slightly different from the machine.
Depending on which country you are in, certain units may be optional. For details, please contact your
local dealer.
Two kinds of size notation are employed in this manual. With this machine refer to the inch version.
For good copy quality, the supplier recommends that you use genuine toner from the supplier.
The supplier shall not be responsible for any damage or expense that might result from the use of parts
other than genuine parts from the supplier with your office products.
Power Source
208-240 V, 50/60 Hz, 20 A or more.
Please be sure to connect the power cord to a power source as shown above. For details about power
source, see p.112 “Power Connection”.
Trademarks
®
Microsoft
, Windows® and Windows NT® are registered trademarks of Microsoft Corporation in the
United States and/or other countries.
TrueType is registered trademarks of Apple Computer, Inc.
®
PostScript
and Acrobat® are registered trademarks of Adobe Systems, Incorporated.
PCL is a registered trademark of Hewlett-Packard Company.
Bluetooth is a Trademark of the Bluetooth SIG, Inc. (Special Interest Group) and licensed to Ricoh
Company Limited.
Other product names used herein are for identification purposes only and might be trademarks of their
respective companies. We disclaim any and all rights to those marks.
The proper names of the Windows operating systems are as follows:
®
• The product name of Windows
• The product name of Windows
• The product name of Windows
• The product names of Windows
Microsoft
Microsoft
Microsoft
• The product names of Windows
Microsoft
Microsoft
• The product names of Windows Server
Microsoft
Microsoft
Microsoft
• The product names of Windows NT
Microsoft
Microsoft
®
Windows® 2000 Advanced Server
®
Windows® 2000 Server
®
Windows® 2000 Professional
®
Windows® XP Professional
®
Windows® XP Home Edition
®
Windows ServerTM 2003 Standard Edition
®
Windows ServerTM 2003 Enterprise Edition
®
Windows ServerTM 2003 Web Edition
®
Windows NT® Server 4.0
®
Windows NT® Workstation 4.0
95 is Microsoft® Windows 95.
®
98 is Microsoft® Windows 98.
®
Me is Microsoft® Windows Millennium Edition (Windows Me).
®
2000 are as follows:
®
XP are as follows:
TM
2003 are as follows:
®
4.0 are as follows:

Manuals for This Machine
Refer to the manuals that are relevant to what you want to do with the machine.
❖ About This Machine
Be sure to read the Safety Information in this manual before using the machine.
This manual provides an introduction to the functions of the machine. It also
explains the control panel, preparation procedures for using the machine,
how to enter text, and how to install the CD-ROMs provided.
❖ General Settings Guide
Explains User Tools settings, and Address Book procedures such as registering e-mail addresses, and user codes. Also refer to this manual for explanations on how to connect the machine.
❖ Trouble Shooting
Provides a guide to solving common problems, and explains how to replace
paper, toner, staples, and other consumables.
❖ Security Reference
This manual is for administrators of the machine. It explains security functions that the administrators can use to protect data from being tampered, or
prevent the machine from unauthorized use.
Also refer to this manual for the procedures for registering administrators, as
well as setting user and administrator authentication.
❖ Copy/ Document Server Reference
Explains Copier and Document Server functions and operations. Also refer to
this manual for explanations on how to place originals.
❖ Printer Reference
Explains Printer functions and operations.
❖ Scanner Reference
Explains Scanner functions and operations.
❖ Network Guide
Explains how to configure and operate the machine in a network environment, and use the software provided.
This manual covers all models, and includes descriptions of functions and
settings that might not be available on this machine. Images, illustrations, and
information about operating systems that are supported might also differ
slightly from those of this machine.
i

❖ Other manuals
•Information
• PostScript3 Supplement
•UNIX Supplement
• Manuals for DeskTopBinder Lite
Note
❒ Manuals provided are specific to machine types.
❒ Adobe Acrobat Reader/Adobe Reader must be installed in order to view the
manuals as PDF files.
❒ For “UNIX Supplement”, please visit our Web site or consult an authorized
dealer.
❒ “PostScript3 Supplement” and “UNIX Supplement” include descriptions of
functions and settings that might not be available on this machine.
ii

TABLE OF CONTENTS
Manuals for This Machine ......................................................................................i
How to Read This Manual ..................................................................................... 1
Symbols .....................................................................................................................1
Names of Major Options ............................................................................................2
1. When the Machine Does Not Operate As wanted
Indicators................................................................................................................3
Panel Tone..............................................................................................................4
Checking Machine Status and Settings...............................................................5
When an Indicator to the Left of a Function Key is Lit....................................... 8
When You Have Problems Operating the Machine.............................................9
When a Job is Not Performed.............................................................................14
2. Troubleshooting When Using the Copy Function
When a Message Appears...................................................................................19
Display During Connect Copy ............................................................................24
If Connect Copy is Cancelled ............................................................................. 25
If You Cannot Exit from Connect Copy..............................................................26
When You Cannot Make Clear Copies ............................................................... 27
When You Cannot Make Copies As Wanted ..................................................... 29
When Memory is Full ...............................................................................................33
3. Troubleshooting When Using the Printer Function
When a Message Appears during Installation of the Printer Driver................35
Windows 95/98/Me...................................................................................................35
Windows 2000..........................................................................................................36
Windows XP, Windows Server 2003........................................................................36
Windows NT 4.0.......................................................................................................37
If USB Connection Fails ......................................................................................38
When a Message Appears...................................................................................39
Status Messages......................................................................................................39
Alert Messages ........................................................................................................40
Checking the Error Log ............................................................................................41
When You Cannot Print.......................................................................................42
Other Printing Problems ..................................................................................... 45
4. Troubleshooting When Using the Scanner Function
When Scanning is Not Done as Expected ......................................................... 51
When You Cannot Send Scanned Files.............................................................52
When Stored Files Cannot be Accessed .................................................................52
When You Cannot Browse the Network to Send a Scan file ...................................52
When the TWAIN Driver Cannot be Started ............................................................52
When Stored Files Cannot be Edited.......................................................................53
When the Network Delivery Function Cannot be Used ............................................53
Operations are not possible when messages appear ..............................................53
iii

When a Message is Displayed............................................................................54
When a Message is Displayed on the Control Panel...............................................54
When a Message is Displayed on the Client Computer...........................................61
5. Adding paper, Toner and Staples
Loading paper ......................................................................................................65
Loading paper into Tray 1 (Tandem Tray) ...............................................................65
Loading Paper into the A3/11” × 17” Tray Unit......................................................... 67
Loading Paper into Tray 2 and 3..............................................................................68
Loading Paper into the Large Capacity Tray (LCT) .................................................69
Loading Paper into the Wide Large Capacity Tray (Wide LCT) ...............................70
Loading Paper into the Multi Bypass Tray (Tray 7).................................................. 71
Loading Paper in the Interposer...............................................................................72
Changing the Paper Size.....................................................................................75
Changing the Paper Size in Tray 2 and 3 ................................................................76
Changing the Paper Size in the Large Capacity Tray (Tray 4 and 5) ......................78
Changing the Paper Size in the Wide Large Capacity Tray .....................................81
Changing to a Size that is Not Automatically Detected............................................84
Pausing Copy When Using Finisher ..................................................................86
Adding Toner........................................................................................................87
Inserting Toner ......................................................................................................... 89
Used Toner ..............................................................................................................89
Adding Staples.....................................................................................................90
Finisher ....................................................................................................................90
Booklet Finisher (Saddle Stitch)...............................................................................91
6. Clearing Misfeeds
Removing Jammed Paper ...................................................................................93
Locating Jammed Paper ..........................................................................................94
Removing Jammed Paper........................................................................................96
When Z-folded paper is not properly aligned .........................................................105
Removing Jammed Staples ..............................................................................106
Finisher ..................................................................................................................106
Booklet Finisher (Saddle Stitch).............................................................................107
Removing Punch and Staple Waste.................................................................108
Finisher ..................................................................................................................108
7. Remarks
Where to Put Your Machine ..............................................................................109
Machine Environment ............................................................................................ 109
Moving.................................................................................................................... 111
Power Connection..................................................................................................112
Access to the Machine...........................................................................................113
Maintaining Your Machine ................................................................................ 114
Cleaning the Exposure Glass.................................................................................114
Cleaning the Auto Document Feeder.....................................................................114
Earth Leakage Circuit Breaker..........................................................................115
INDEX....................................................................................................... 117
iv
How to Read This Manual
Symbols
This manual uses the following symbols:
Indicates important safety notes.
Ignoring these notes could result in serious injury or death. Be sure to read these
notes. They can be found in the “Safety Information” section of About This Machine.
Indicates important safety notes.
Ignoring these notes could result in moderate or minor injury, or damage to the
machine or to property. Be sure to read these notes. They can be found in the
“Safety Information” section of About This Machine.
Indicates points to pay attention to when using the machine, and explanations
of likely causes of paper misfeeds, damage to originals, or loss of data. Be sure
to read these explanations.
Indicates supplementary explanations of the machine’s functions, and instructions on resolving user errors.
This symbol is located at the end of sections. It indicates where you can find further relevant information.
[ ]
Indicates the names of keys that appear on the machine’s display panel.
{ }
Indicates the names of keys on the machine’s control panel.
1

Names of Major Options
Major options of this machine are referred to as follows in this manual:
• Auto Document Feeder → ADF
• Finisher SR5000 → Finisher
• Booklet Finisher BK5000 → Booklet Finisher
2
1. When the Machine Does Not Operate As wanted
This chapter explains basic troubleshooting procedures that are applicable to all
functions of this machine.
Indicators
This section explains Indicators displayed when the machine requires the user
to remove misfed paper, add paper, or other perform other procedures.
x: Misfeed indicator Appears when a misfeed occurs.
See p.93 “Removing Jammed Paper”.
B: Add Paper indicator Appears when paper-out condition occurs.
See p.65 “Loading paper”.
D: Add Toner indicator Appears when toner runs out.
See p.87 “Adding Toner”.
d: Add Staple indicator Appears when staples run out.
See p.90 “Adding Staples”.
y: Empty Hole Punch Receptacle
indicator
0: Empty Waste Staple Receptacle
indicator
L: Service Call indicator Appears when the machine is mulfuncitoning, or needs
M: Open Cover indicator Appears when the front cover, etc, is open.
Appears when the hole punch receptacle is full.
See p.108 “Removing Punch and Staple Waste”
Appears when the waste staple receptacle is full.
See p.108 “Removing Punch and Staple Waste”
repairing.
3
1
When the Machine Does Not Operate As wanted
Panel Tone
The following table explains the meaning of the various beep patterns that the machine produces to alert users about left originals and other machine conditions.
Beep pattern Meaning Cause
Two long beeps. Machine has warmed up. After cooling or being switched on, the
machine has fully warmed up and is
ready for use.
Single short beep. Panel/screen input ac-
cepted.
Single long beep. Job completed. A Copier/Document Server Features
Four long beeps. Soft alert. The screen changes back to the initial
Four long beeps repeated
five times.
Five short beeps repeated
five time.
Soft alert. An original has been left on the expo-
Strong alert. The machine requires user attention
A control panel or screen key was
pressed. Single short beeps are produced only when valid keys are
pressed.
job has finished.
screen after the machine shifts to energy-saving mode, or the setting was
reset at the simplified display.
sure glass, paper is empty, or the punch
waste box is full.
because paper have jammed, the toner
needs replenishing, or other troubles
have occurred.
Note
❒ Users cannot mute the machine's beep alerts. When the machine beeps to alert
users of a paper jam or toner request, if the machine's covers are opened and
closed repeatedly within a short space of time, the beep alert might continue,
even after normal status has resumed.
Reference
For details about enabling or disabling beep alerts, see “The System Settings”,
General Settings Guide.
4

Checking Machine Status and Settings
Checking Machine Status and Settings
You can check the machine's system status.
❖ Maintenance Info
You can check the following items under [Maintenance Info]:
• [Remaining Toner]
Displays the amount of remaining toner.
• [No Staples]
Displays where the staple is empty.
• [Punch Receptacle Full]
Displays whether the hole punch receptacle is full.
• [Waste Staple Receptcl Full]
Displays whether the waste staple receptacle is full.
• [Paper Tray]
Displays the paper type and size loaded in the paper tray.
• [Output Tray Full]
Displays whether the output tray is overloaded.
• [Original Misfeed]
Displays state of and solutions for original misfeeds.
• [Paper Misfeed]
Displays state of and solutions for paper jams.
• [Cover Open]
Indicates whether front cover, duplex unit, etc, is open.
1
❖ Data Storage
You can check the following items under [Data Storage]:
• [HDD Remaining Memory]
Displays the amount of available hard disk drive memory.
• [HDD File(s)]
Displays the total number of jobs stored in the hard disk drive.
• [Print Job(s)]
Displays the number of jobs for Hold print/Saved print/Locked
print/Sample print.
• [Memory Erase Status]
Displays the state of the memory data.
5

1
When the Machine Does Not Operate As wanted
❖ Machine Address Info
You can check the following items under [Machine Address Info]:
• [Machine IPv4 Address]
Displays the machine's IPv4 address.
• [Machine IPv6 Address]
Displays the machine's IPv6 address.
❖ Inquiry
You can check the following items under [Inquiry]:
• [Machine Repairs]
Displays the machine number and contact number that are required for
service.
• [Sales Representative]
Displays the sales representative's telephone number.
• [Supply Order]
Displays the contact number for placing supply orders.
• [Supply Details]
Displays the name of toner, staples, etc, used on the machine.
A On the control panel, press [System Status] on the control panel.
B Press each tab and check the contents.
6
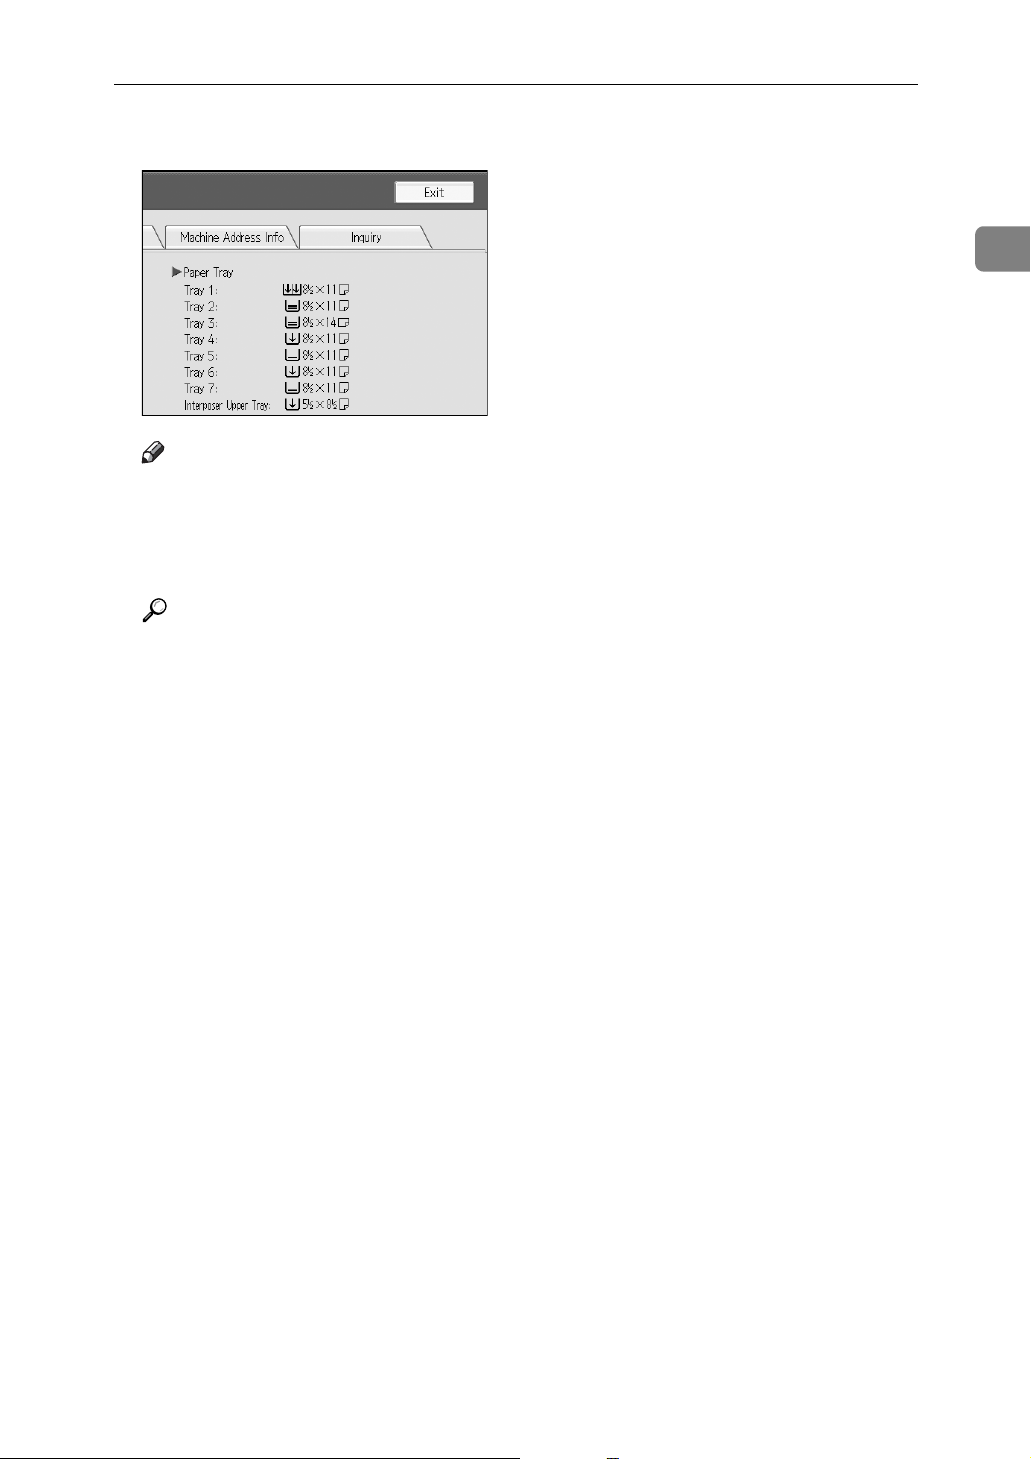
Checking Machine Status and Settings
C After checking the information, press [Exit]. The previous screen returns.
Note
❒ [Output Tray Full], [Original Misfeed], [Paper Misfeed], and [Cover Open] appear
only when these errors occur.
❒ For details about how to locate and remove misfeeds, see “Checking
Jammed Paper” or “Removing Jammed Paper”.
Reference
p.94 “Locating Jammed Paper”.
1
p.93 “Removing Jammed Paper”.
7
When the Machine Does Not Operate As wanted
When an Indicator to the Left of a Function Key is Lit
1
When an indicator to the left of a function key lights up, press the corresponding
function key. Then, follow the instructions displayed on the control panel.
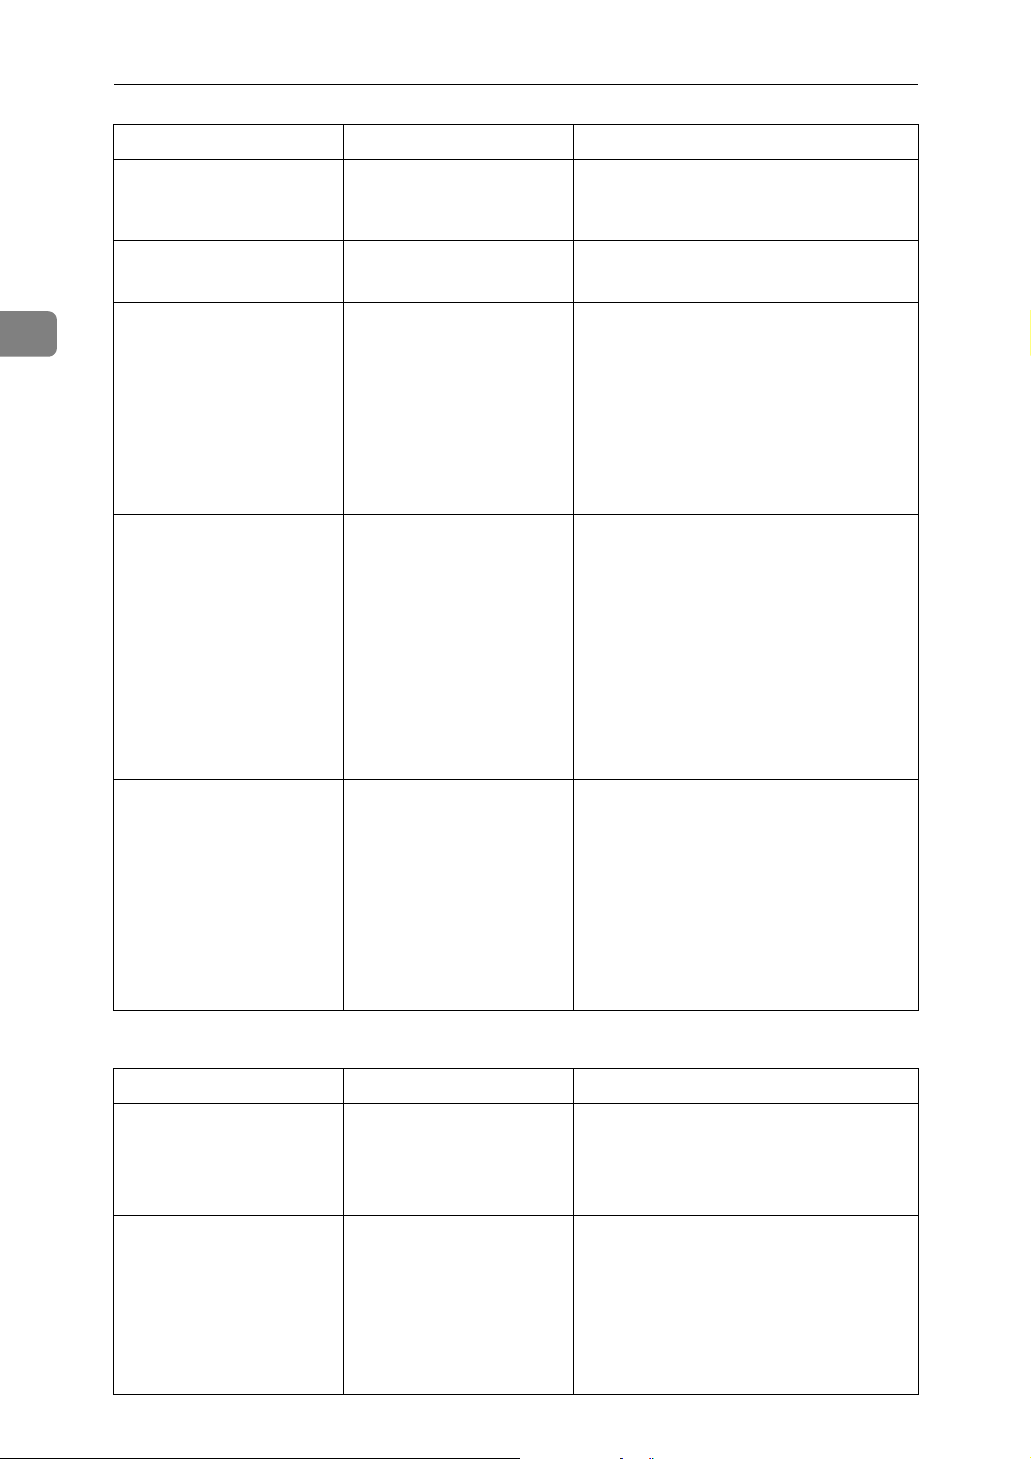
Problem Cause Solution
Documents and reports
do not print out.
Documents and reports
do not print out.
An error has occurred. The function whose indi-
The machine is unable to
connect to the network.
The paper output tray is
full.
There is no copy paper
left.
cator is lit is defective.
A network error has occurred.
Remove the paper from the tray.
Add more paper. See p.65 “Loading paper”.
Record the code number shown in the
display and contact your service representative. See “When a Message displayed” of each chapter.
You can use other functions normally.
• Check the displayed message and
take an appropriate action. See
“When a Message displayed” of
each chapter.
• Check that the machine is correctly
connected to the network, and that
the machine is correctly set. See
“Network Settings”, General Settings Guide.
• Contact the administrator.
• When the function key is still lit,
even if you take the measures
above, contact your service representative.
Note
❒ If an error occurs in the function you are using, check the message that ap-
pears on the control panel, and then refer to “When a Message is Displayed”
for the relevant function.
Reference
p.19 “Troubleshooting When Using the Copy Function”.
p.35 “Troubleshooting When Using the Printer Function”.
p.51 “Troubleshooting When Using the Scanner Function”.
8
When You Have Problems Operating the Machine
When You Have Problems Operating the
Machine
The following chart gives explanations of common problems and messages.
If other messages appear, follow the instructions displayed.
Important
❒ Check the contact address and Serial No. of Machine shown in the call service
message, and then contact your service representative.
Problem Cause Solution
Although the copier
screen appears when the
machine is turned on using the main power
switch, it cannot be
switched to another
screen by pressing the
{Printer} or {Scanner} key.
The machine has just
been turned on and the
User Tools screen is displayed, but the User
Tools menu has items
missing.
The main power indicator continues blinking
and does not turn off
when pressed.
Functions other than the
copier function are not
yet ready.
Functions other than the
copier function are not
yet ready. Time required
varies by function. Functions appear in the User
Tools menu when they
become ready for use.
This occurs in the following cases:
• ADF is open.
• The machine is communicating with external equipment.
• The hard disk is active.
Wait a little longer.
Wait a little longer.
Close ADF, and check if the machine is
communicating with a computer.
1
The display is off. The machine is in Energy
Saver mode.
The display is off. The operation switch is
turned off.
Nothing happens when
the operation switch is
turned on.
Please wait.” ap-
“
pears.
Please wait.” ap-
“
pears.
The main power switch is
turned off.
This message appears
when you turn on the operation switch.
This message appears
when you change the toner bottle.
Press the {Energy Saver} key to cancel
Energy Saver Mode. mode.
Turn on the operation switch.
Turn on the main power switch.
Wait for the machine to get ready.
Wait for the machine to get ready.
9

When the Machine Does Not Operate As wanted
Problem Cause Solution
1
“Memory is full.
Do you want to
store scanned
file?
“
appears.
The user code entry
screen is displayed.
The Authentication
screen appears.
“
” appears.
Self checking...”
You do not have
the privileges to
use this function.
” is displayed.
The scanned originals exceed the number of
sheets/pages that can be
stored in the hard disk.
The machine is performing image adjustment operations.
Users are restricted by
user management.
Basic Authentication,
Windows Authentication, LDAP Authentication or Integration Server
Authentication is set.
The use of the function is
restricted to authenticated users only.
•Press [Store File] to store pages that
have been scanned. Delete unnecessary files with [Delete File].
•Press [No] if you are not storing pag-
es that have been scanned. Delete
unnecessary files with [Delete File].
The machine may perform periodic
maintenance during operations. The
frequency and duration of maintenance
depends on the humidity, temperature,
and printing factors such as number of
prints, paper size, and paper type. Wait
for the machine to get ready.
Enter the user code (up to eight digits),
and then press [OK].
Enter your login user name and user
password. See “When the Authentication Screen is Displayed”, About This
Machine.
Contact the administrator.
You do not have
“
the privileges to
use this function.
continues to be displayed
even though you have
entered a valid user code.
An error message remains, even if misfed paper is removed.
Original images are
printed on the reverse
side of the paper.
This user code is not allowed to use the function
selected.
”
• When a misfeed message appears, it remains until you open
and close the cover as
required.
• Paper is still jammed
in the tray.
You may have loaded the
paper incorrectly.
Press the {Energy Saver} key. Confirm
that the display goes off, and then press
{
Energy Saver} key again. The display
the
will return to the user code entry display. When printing under the copier or
{
printer function, press the
key only after printing has finished.
Clear misfed paper, and then open and
close the front cover. see p.93 “Clearing
Misfeeds”.
Load paper correctly. Place paper in the
paper tray with the print side up. Load
paper into the bypass tray with the
print side down. See p.74 “OrientationFixed Paper or Two-Sided Paper”.
Energy Saver}
10

When You Have Problems Operating the Machine
Problem Cause Solution
Misfeeds occur frequently.
Misfeeds occur frequently. The tray's end fence may
Misfeeds occur frequently. Paper of undetectable
Misfeeds occur frequently. There is a foreign object
Misfeeds occur frequently. The staple cartridge is not
The tray's side fences
may not be locked.
not be set properly.
size has been loaded.
on the finisher tray.
set correctly.
• Remove the paper. See p.93 “Removing Jammed Paper”.
• Check the side fences are locked.
See p.75 “Changing the Paper Size”.
• Remove the paper. See p.93 “Removing Jammed Paper”.
• Check the end fence is set properly.
See p.75 “Changing the Paper Size”.
• Remove the paper. See p.93 “Removing Jammed Paper”.
• When loading the paper of undetectable size, specify the paper size
in “Tray Paper Size”. See “Paper
Size: Tray 1-7”, General Settings
Guide and “Copy Paper”, About
This Machine.
• Remove the paper. See p.93 “Removing Jammed Paper”.
• Do not place anything on the finisher tray. It may cause a paper jam.
The Booklet Finisher requires the saddle stitch stapler cartridge also. See p.90
“Adding Staples”.
1
Cannot print in duplex
mode.
Cannot print in duplex
mode.
Authentication failed. The entered login user
Authentication failed. The machine cannot per-
The selected file(s) contained file(s) without access privileges. Only
file(s) with access privileges will be deleted.
[1 Sided Copy] is selected
for Paper Type: Tray 1-7.
You cannot select duplex
printing if the paper type
is set to [OHP], [Tab Stock],
[Translucent] or [Label Pa-
per].
name or login password
is not correct.
form authentication.
You have tried to delete
files without the authority to do so.
Select [2 Sided Copy] for Paper Type:
Tray 1-7 See “Paper Size: Tray 1-7”,
General Settings Guide.
Select a paper type that allows duplex
printing. See “Paper Size: Tray 1-7”,
General Settings Guide.
Inquire the user administrator for the
correct login user name and login password.
Contact the administrator.
Files can be deleted by the person who
created the file. To delete a file which
you are not authorized to delete, contact the person who created the file.
11

When the Machine Does Not Operate As wanted
❖ Document Server
Problem Cause Solution
1
“
Exceeded max.
number of pages
per file. Do you
want to store the
scanned pages as
1 file?
You forgot your password.
You cannot find out what
is stored in a file.
” appears.
The number of scanned
pages exceeds the capacity per file of the Document Server.
You cannot access a protected file without entering the password.
You may not be able to
ascertain the contents of a
file simply from the file
name.
To store scanned pages as a file, press
[Store File]. Scanned data is stored as a
file in the Document Server. If you do
not want to store scanned pages, press
[No]. Scanned data is deleted.
Contact the administrator.
To delete the files stored in the document server, select [Delete All Files in Doc-
ument Server]. As this will permanently
delete every single file, make sure the
document server does not contain any
files you want to keep. See “Delete All
Files in Document Server”, General Settings Guide.
You can switch the Select File screen between [List] and [Thumbnail] display to
check the contents of the file. In list display, the file name, date and time of
storage, and user name are shown. In
thumbnail display, an image of the
stored file appears. You can enlarge the
image by pressing [Preview]. Use the Select File screen to check information
other than the file name. See “Checking
the Details of a Stored Document”,
Copy/Document Server Reference.
12
Memory frequently becomes full.
The document server
memory is full.
Delete unnecessary files. On the file selection display, select unnecessary files,
and then press [Delete File]. If this does
not increase available memory, do the
following.
• Switch to the scanner screen, and
then delete unnecessary files stored
under the scanner function.
• Switch to the printer screen, and
then delete unnecessary files stored
under Sample Print, Locked Print,
Hold Print, or Stored Print.
When You Have Problems Operating the Machine
Problem Cause Solution
You want to check print
quality before making a
large print run.
Original is being
“
scanned by another
function. Please
wait.
” appears.
You can print a single
copy without specifying
the setting again.
Copier or Scanner function is in use.
Check print quality by printing out
only the first set using the {Sample
Copy} key.
To cancel a job in progress, first press
[Exit], and then press the {Copy} key or
{Scanner} key. Next, press the {Stop}
key. When the message “
The Stop
key was pressed. Stop copy-
” press [Stop].
ing?
Cannot display
“
preview of this
page.
you can not check the
thumb nail image.
” appears, and
The image data may have
been corrupted.
Pressing [Exit] displays the preview
screen without a thumbnail.
Note
❒ If you cannot make copies as you want because of paper type, paper size, or
paper capacity problems, use recommended paper. See “Copy Paper”, About
This Machine.
❒ Using curled paper often causes misfeeds, soiled paper edges, or slipped po-
sitions while performing staple or stack printing. When using curled paper,
take the stiffness out of the paper with your hands to straighten out the curl,
or load the paper up side down. Also, to prevent paper from curling, lay paper on a flat surface, and do not lean it against the wall.
1
13

1
When the Machine Does Not Operate As wanted
When a Job is Not Performed
If you cannot execute a function, it may be that the machine is being held up by
another function.
If you cannot execute a function, terminate any other functions currently active,
and then try executing the function again. In certain cases, you can carry out another job (copier, document server, printer, scanner) without canceling the current job being performed. Performing multiple functions simultaneously like
this is called “Multi-accessing”.
Combination Chart
❖ Function Compatibility
The chart shows Function Compatibility when print priority is set to “Interleave”. See “Print Priority”, General Settings Guide.
: Simultaneous operations are possible.
: Operation is enabled when the relevant function key is pressed and re-
mote switching (of the scanner/external extension) is done.
: Operation is enabled when the {Interrupt} key is pressed to interrupt the
preceding operation.
→ : Operation is performed automatically once the preceding operation ends.
× : The operation must be started once the preceding operation ends. (Simul-
taneous operations are not possible.)
14
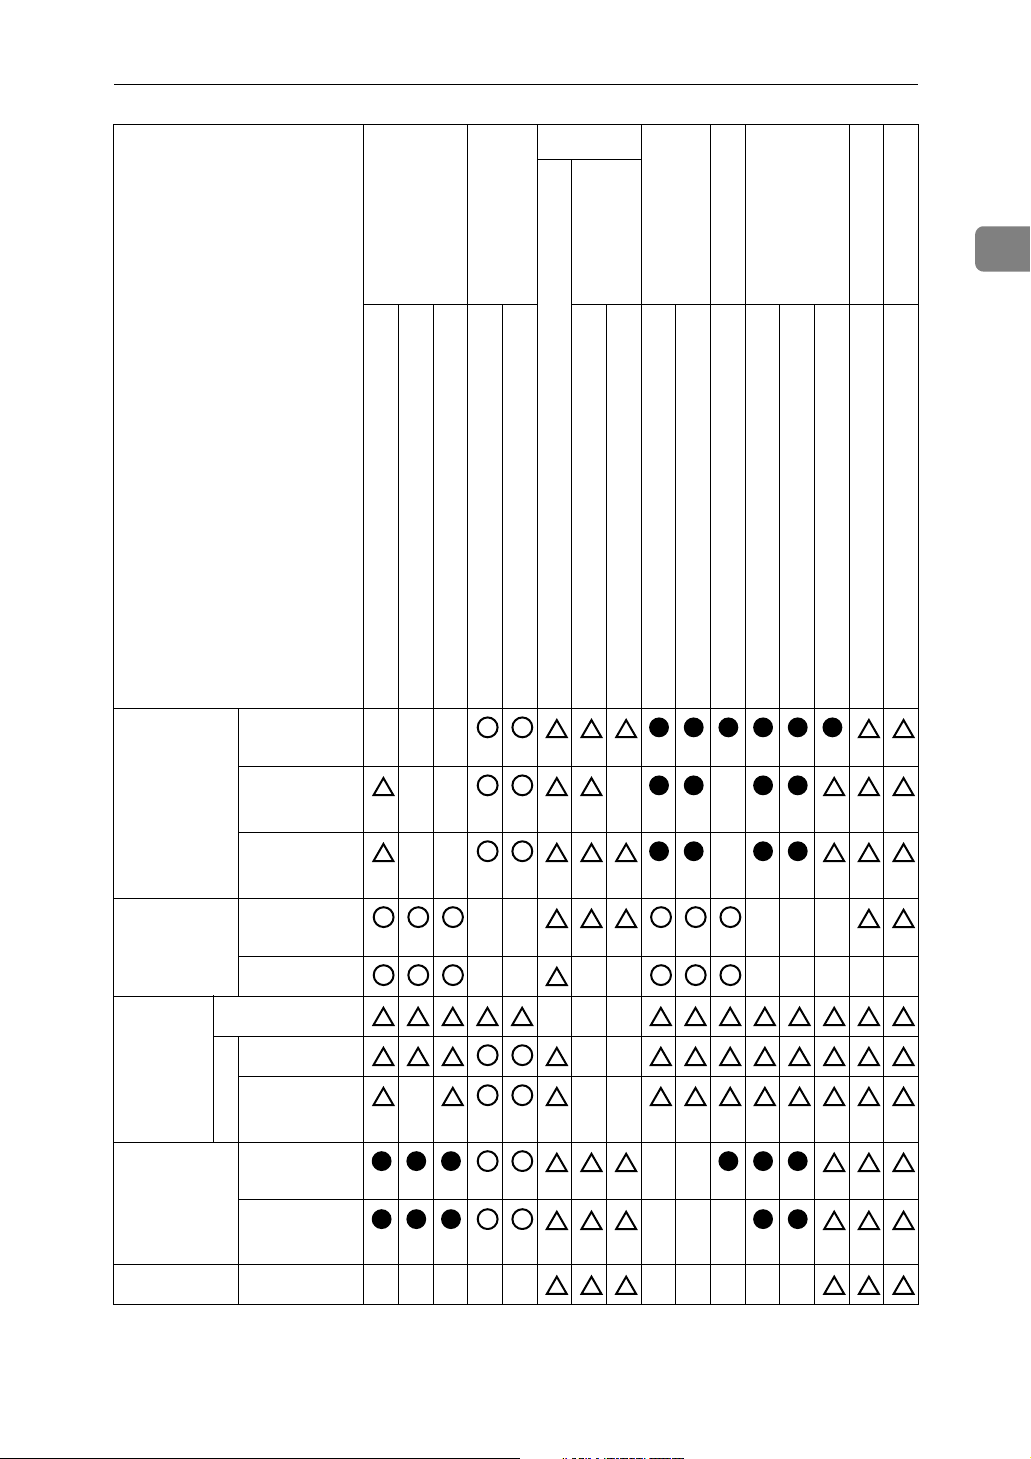
When a Job is Not Performed
Mode after you select Copy
Mode before you select
Copy Operations
for Copying
Operations for Copying
Stapling
Sort
×××
Printer
Interrupt Copying
Operations for Copying
Copying
1
Stapling
Scanner
Operations for Scanning
Print
Data Reception
Printing
Scanning
TWAIN
Document Server
Scanning
Operations for Document Server
Scanning a Document to Store in Document Server
Printing from Document Server
DeskTopBinder
Printing from Document Server
Web Document Server
Printing
→
Interrupt
Copying
Stapling
Sort
Operations
for Copying
→
*1
→
*1
→
*1
*1
*1
*1
*4
×× ×××
→
×
*2
*2
×
*2
*2
Copying ×× →→ ×××→→
Printer Data Reception →→→
Printing →→
Stapling →
Print
Scanner Operations
*4
→→
××
for scanning
Scanning
*2 *2
×××
*2
TWAIN Scanning ЧЧЧЧЧ ЧЧЧЧЧ
*3
*3 *3 *3
*3
15
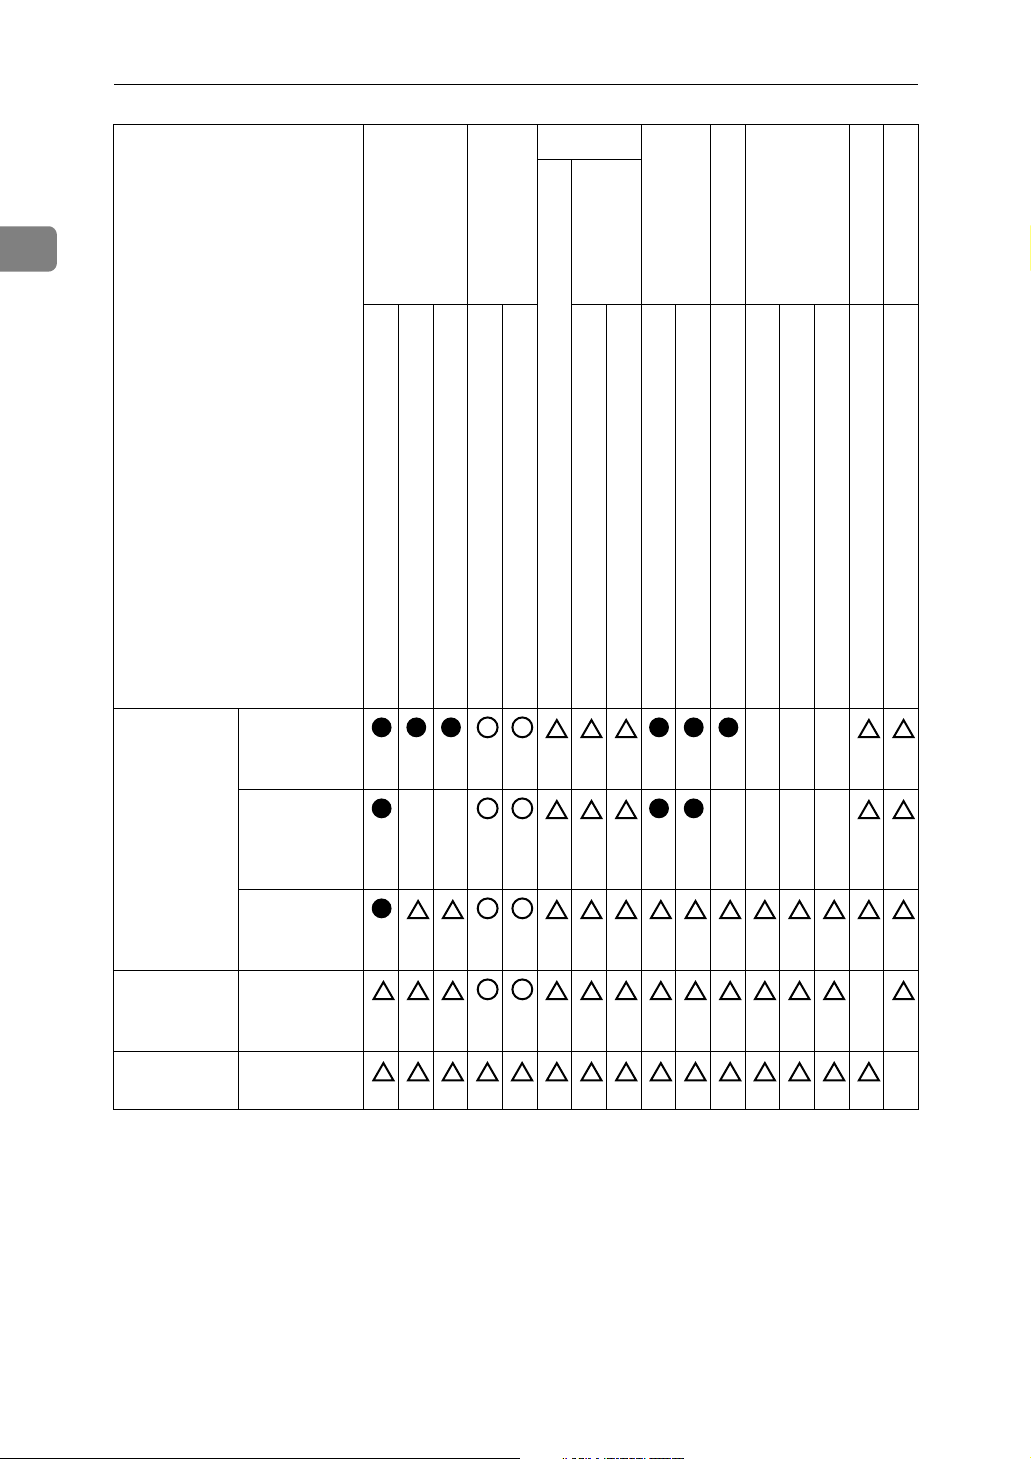
When the Machine Does Not Operate As wanted
1
Mode after you select Copy
Mode before you select
Document
Server
Operations
for Document Server
Operations for Copying
Stapling
Sort
Printer
Interrupt Copying
Operations for Copying
Copying
Stapling
Scanner
Operations for Scanning
Print
Data Reception
Printing
Scanning
TWAIN
Document Server
Scanning
Operations for Document Server
×××
Scanning a Document to Store in Document Server
Printing from Document Server
DeskTopBinder
Printing from Document Server
Web Document Server
Printing
Scanning a
Document to
Store in Document Server
Printing
from Document Server
DeskTopBinder
Web Document Server
*1
Simultaneous operations are only possible after the preceding job documents are all
scanned and [New Job] key appears.
*2
You can scan a document after the preceding job documents are all scanned.
*3
During stapling, printing automatically starts after the current job.
*4
Stapling is not available.
*5
Simultaneous operation become possible after you press [New Job] key.
Printing
from Document Server
Printing ×
××
××××
*2
*5 *5 *5
×
16

When a Job is Not Performed
Note
❒ Stapling cannot be used at the same time for multiple functions.
❒ If the machine is capable of executing multiple functions simultaneously,
specify which function should have priority in “Print Priority”. This setting is
factory-preset to “Display Mode”. For setting of Printing Priority Function,
see “Print Priority”, General Settings Guide.
❒ When Finisher or Booklet Finisher is installed on the machine, you can specify
the output tray where documents are delivered. See “Output tray settings”,
General Settings Guide.
❒ Operation speed might be reduced if you scan originals while a print job is in
progress.
1
17

1
When the Machine Does Not Operate As wanted
18
2. Troubleshooting When Using the Copy Function
This chapter explains likely causes of and possible solutions for copier function
problems.
When a Message Appears
This section explains the machine's main messages. If other messages appear,
follow the instructions they contain.
Important
❒ For messages that are not listed here, see p.9 “When You Have Problems Op-
erating the Machine”.
Message Cause Solution
Cannot detect
original size.
Cannot detect
original size.
Cannot detect
original size.
Check original
orientation.
Check paper size.
Rotate Sort is
not available
with this paper
size.
Rotate Sort is
not available
with this paper
size.
Improper original is
placed.
Improper original is
placed.
Original is not placed. Place your originals.
Original is not placed in a
proper orientation.
Improper paper size is
set.
A size of paper for which
Rotate Sort is not available is selected.
A size of paper for which
Rotate Sort is not available is selected.
Select paper manually, not in Auto Paper Select mode, and do not use Auto
Reduce/Enlarge function. See “Sizes
difficult to detect”, Copy/Document
Server Reference.
Place the original on the exposure glass.
See “Placing Originals on the Exposure
Glass” and “Sizes difficult to detect”,
Copy/Document Server Reference.
Change the orientation of the original.
If you press the {Start} key, copy will
start onto the selected paper.
Select the proper paper size. See “Sort”,
Copy/Document Server Reference.
Select the proper paper size. See “Sort”,
Copy/Document Server Reference.
19

Troubleshooting When Using the Copy Function
Message Cause Solution
2
Cannot punch this
paper size.
The Punch function cannot be used with paper
size selected.
The following paper sizes are available
for Punch mode:
•2 holes:
A3L, B4L, A4KL, B5KL,
A5KL, B6L, A6L, 12”×18”L,
1
11”×17”L, Legal(8
1
ter(8
/2”×11”)KL, Half Letter
1
/2”×81/2”)KL, Executive
(5
1
/4”×101/2”)KL, F/GL
(7
(8”×13”)L, Foolscap (8
1
Folio (8
/4”×13”)L, 11”×15”L,
/2”×14”)L, Let-
1
/2”×13”)L,
11”×14”L, 10”×15”L, 10”×14”L,
1
/4”×14”L, 8”×10”L, 8KL,
8
16KKL. Select one of these sizes.
•3 holes:
A3L, B4L, A4K, B5K, 12”×18”L,
11”×17”L, Letter(8
1
ecutive (7
/4”×101/2”)K,
1
/2”×11”)K, Ex-
11”×15”L, 11”×14”L, 8KL,
16KK. Select one of these sizes.
•4 holes:
Metric version:
A3L, B4L, A4K, B5K, 12”×18”L,
1
11”×17”L, Letter(8
1
ecutive (7
/4”×101/2”)K,
/2”×11”)K, Ex-
11”×15”L, 11”×14”L, 10”×15”L,
10”×14”L, 8KL, 16KK. Select one
of these sizes.
Narrow 2 × 2 version:
A3L, B4L, A4KL, B5KL,
A5KL, B6L, 12”×18”L,
1
11”×17”L, Legal(8
1
/2”×11”)KL, Half Letter
ter(8
1
/2”×81/2”)KL, Executive
(5
1
/4”×101/2”)KL, F/GL
(7
(8”×13”)L, Foolscap (8
Folio (8
1
/4”×13”)L, 11”×15”L,
/2”×14”)L, Let-
1
/2”×13”)L,
11”×14”L, 10”×15”L, 10”×14”L,
8KL, 16KKL. Select one of these
sizes.
20
Stapling capacity
exceeded.
Cannot staple paper of this size.
The number of sheets per
set is over the staple capacity.
The Staple function cannot be used with paper
size selected.
Check the stapler capacity. See “Supplementary Informations”, Copy/Document Server Reference.
Select a paper size that can be used in
Staple mode. See “Supplementary Informations”, Copy/Document Server
Reference.
When a Message Appears
Message Cause Solution
Duplex is not
available with
this paper size.
Maximum number of
sets is nn.
(A figure is placed at n.)
File being stored
exceeded max.
number of pages
per file. Copying
will be stopped.
Magazine or Booklet mode is not
available due to
mixed image mode.
A paper size not available
in Duplex mode has been
selected.
The number of copies exceeds the maximum copy
quantity.
The scanned originals
have too many pages to
store as one document.
You selected the Magazine or Booklet function
for originals scanned using different functions,
such as copy and printer.
The following paper sizes are available
for Duplex mode: A3L, B4L, A4KL,
B5KL, A5KL, B6L, A6L,
12”×18”L, 11”×17”L, Legal
1
/2”×11”)L, Letter (81/2”×11”)KL,
(8
Half Letter (5
tive (7
(8”×13”)L, Foolscap (8”×13”)L, Folio
1
/4”×13”)L, 11”×15”L, 11”×14”L,
(8
10”×14”L, 8
8KL, 16KKL. Select one of these sizes.
You can change the maximum copy
quantity. See “Max. Number of Sets”,
General Settings Guide.
Press [Exit], and then store again with
an appropriate number of pages.
Make sure originals for the Magazine
or Booklet function are scanned using
the same function.
1
1
/2”×81/2”)KL, Execu-
/4”×101/2”)KL, F/GL
1
/4”×14”L, 8”×10”L,
2
Orig. is being
scanned by another
function. Please
wait.
You do not have
the privileges to
use this function.
You do not have
the privileges to
use this function.
Document Server or
Scanner function is in
use.
This user code is not allowed to use the function
selected.
This user code is not allowed to use the function
selected.
To cancel the job in process, press [Exit],
and then press the {Document Server} or
{Scanner} key. Next, press the {Stop}
key. When the message “
The Clear
/ Stop key was pressed. Are
you sure you want to stop
scanning?
Contact the administrator.
If the message continues to be displayed and you cannot switch the
screen, press the {Energy Saver} key.
Confirm that the display goes off, and
then press the {Energy Saver} key again.
The display will return to the user code
entry display. When printing under the
copier or printer function, press the
{Energy Saver} key only after printing
has finished.
” appears, press [Cancel].
21
Troubleshooting When Using the Copy Function
Message Cause Solution
2
Authentication
has failed.
Authentication
has failed.
The selected
file(s) contained
file(s) without
access privileges. Only file(s)
with access privileges will be
deleted.
Please wait.
The entered login user
name or login password
is not correct.
The machine cannot perform authentication.
You have tried to delete
files without the authority to do so.
The destination list is being
updated from the network
using SmartDeviceMonitor for Admin. Depending
on the number of destinations to be updated, there
may be some delay before
you can resume operation.
Operations are not possible while this message is
displayed.
Inquire the user administrator for the
correct login user name and login password.
Contact the administrator.
Files can be deleted by the person who
created the file. To delete a file which
you are not authorized to delete, contact the person who created the file.
Wait until the message disappears. Do
not switch off the power while this
message is displayed.
It will be necessary to start
over and reload
the tab stock to
the trays.
❖ Connect Copy
Message Cause Solution
Cannot connect to
the sub-machine.
Check the status of
the sub-machine.
Cannot print from
the sub-machine.
Check the status of
the sub-machine.
A misfeed occurred when
unneeded tab stock was
ejected.
•The L indicator is lit.
• The hard disk of the
sub-machine is malfunctioning.
A paper misfeed has occurred on the sub-machine, or toner or other
supplies need to be replenished.
Remove the jammed sheet.
If cycle printing is specified for tab
stock sheets, both needed and unneeded tab stock is ejected when copying restarts. Reload the tab stock trays before
the new print cycle begins.
After resetting the tab stock pages,
press [Exit]. To resume printing, press
the {Start} key.
Press [Exit] on the main machine and
follow the instructions on the display.
Follow the instructions displayed. For
details, see p.87 “Adding Toner”, p.93
“Removing Jammed Paper”, p.106 “Removing Jammed Staples”.
If the sub-machine's display indicates
that a cover is open, follow the instructions displayed.
22
When a Message Appears
Message Cause Solution
Cannot print from
the sub-machine.
Check the status of
the sub-machine.
Sub-machine is in
Interrupt mode.
Sub-machine does
not have the same
paper setting(s).
The Cover Sheet
setting(s) of the
sub-machine is
different from
the main machine.
The Slip Sheet
setting(s) of the
sub-machine is
different from
the main machine.
The Designation
Sheet setting(s)
of sub-machine is
different from
main machine.
The sub-machine's User
Tools menu is open.
The sub-machine is in Interrupt mode.
Paper type or tray settings on the two machines do not match.
Cover settings on the two
machines do not match.
Slip Sheet settings on the
two machines do not
match.
Designation Sheet settings on the two machines do not match.
Press the {User Tools} key to close the
User Tools menu.
Press the {Interrupt} key on the sub-machine to cancel Interrupt mode.
Make the same settings on both machines.
Make the same settings on both machines.
Make the same settings on both machines.
Make the same settings on both machines.
2
Sub-machine paper
settings must be
the same to use
Paper tray settings on the
two machines do not
match.
Make the same settings on both machines.
this tray.
No stamp data in
the sub-machine.
Cannot print from
the sub-machine.
Sub-machine will
be disconnected.
Z-fold is available only when
Stamp data on the submachine has been deleted.
The sub-machine has
stopped due to power
failure or communication
error.
Sort has not been selected
with Z-fold.
Reprogram the stamp on the sub-machine.
Continue copying using the main machine.
Select the Sort function.
Sort mode is selected in Connect
Copy.
Reference
p.9 “When You Have Problems Operating the Machine”
23

Troubleshooting When Using the Copy Function
Display During Connect Copy
This section explains about the display during Connect Copy.
Problem Cause Solution
2
[Connect Copy] is not displayed.
[Connect Copy] is not displayed.
[Connect Copy] is not displayed.
[Connect Copy] is not displayed.
[Connect Copy] is not displayed.
[Connect Copy] is not displayed.
[Connect Copy] appears
faded.
The sub-machine's main
power is off.
Functions that cannot be
used with Connect Copy
are selected on the main
machine (such as storing
or copying the first page
of a document in the Document Server).
The main machine is in
Interrupt mode.
The [Connect Copy Key Dis-
play] setting is off.
The cable connecting the
two machines is damaged.
The L is lit. Follow the instructions displayed.
Functions that cannot be
used with Connect Copy
have been set.
Turn on the sub-machine's main power.
Cancel the functions selected on the
main machine.
Press the {Interrupt} key on the sub-machine to cancel Interrupt mode.
Select [Display] for the [Connect Copy Key
Display] setting.
Contact your service representative.
Press the {Clear Modes} key to clear the
settings.
24
 Loading...