

Ricoh AFICIO 1100, AFICIO MP 9000, AFICIO MP 1100, AFICIO 1350, AFICIO 9000 User Manual
...
Placing Originals
1
Copying
2
Operating Instructions
Copy/Document Server
Reference
Connect Copy
3
Document Server
4
Appendix
5
Read this manual carefully before you use this machine and keep it handy for future reference. For safe and correct use, be sure to read the
Safety Information in "About This Machine" before using the machine.

Introduction
This manual contains detailed instructions and notes on the operation and use of this machine. For your
safety and benefit, read this manual carefully before using the machine. Keep this manual in a handy
place for quick reference.
Important
Contents of this manual are subject to change without prior notice. In no event will the company be liable for direct, indirect, special, incidental, or consequential damages as a result of handling or operating the machine.
Notes:
Some illustrations in this manual might be slightly different from the machine.
Certain options might not be available in some countries. For details, please contact your local dealer.
Caution:
Use of controls or adjustments or performance of procedures other than those specified in this manual
might result in hazardous radiation exposure.
Notes:
The model names of the machines do not appear in the following pages. Check the type of your machine before reading this manual. (For details, see “Machine Types”, About This Machine.)
• Type 1: 8090/DSm790/LD190/Aficio MP 9000
• Type 2: 8110/DSm7110/LD1110/Aficio MP 1100
• Type 3: 8135/DSm7135/LD1135/Aficio MP 1350
Certain types might not be available in some countries. For details, please contact your local dealer.
Two kinds of size notation are employed in this manual. With this machine refer to the inch version.
For good copy quality, the supplier recommends that you use genuine toner from the supplier.
The supplier shall not be responsible for any damage or expense that might result from the use of parts
other than genuine parts from the supplier with your office products.
Power Source
208 - 240V, 50/60Hz, 20A
Please be sure to connect the power cord to a power source as above. For details about power source,
see “Power Connection”, Troubleshooting.
Power Supply
The socket-outlet shall be installed near the product and shall be easily accessible.

Manuals for This Machine
Refer to the manuals that are relevant to what you want to do with the machine.
❖ About This Machine
Be sure to read the Safety Information in this manual before using the machine.
This manual provides an introduction to the functions of the machine. It also
explains the control panel, preparation procedures for using the machine,
how to enter text, and how to install the CD-ROMs provided.
❖ General Settings Guide
Explains User Tools settings, and Address Book procedures such as registering, e-mail addresses, and user codes. Also refer to this manual for explanations on how to connect the machine.
❖ Troubleshooting
Provides a guide to solving common problems, and explains how to replace
paper, toner, staples, and other consumables.
❖ Security Reference
This manual is for administrators of the machine. It explains security functions that the administrators can use to protect data from being tampered, or
prevent the machine from unauthorized use. Also refer to this manual for the
procedures for registering administrators, as well as setting user and administrator authentication.
❖ Copy/ Document Server Reference
Explains Copier and Document Server functions and operations. Also refer to
this manual for explanations on how to place originals.
❖ Printer Reference
Explains Printer functions and operations.
❖ Scanner Reference
Explains Scanner functions and operations.
❖ Network Guide
Explains how to configure and operate the machine in a network environment, and use the software provided.
This manual covers all models, and includes descriptions of functions and
settings that might not be available on this machine. Images, illustrations, and
information about operating systems that are supported might also differ
slightly from those of this machine.
i

❖ Other manuals
• PostScript3 Supplement
•UNIX Supplement
• Manuals for DeskTopBinder Lite
• DeskTopBinder Lite Setup Guide
• DeskTopBinder Introduction Guide
•Auto Document Link Guide
Note
❒ Manuals provided are specific to machine types.
❒ Adobe Acrobat Reader/Adobe Reader must be installed in order to view the
manuals as PDF files.
❒ For “UNIX Supplement”, please visit our Web site or consult an authorized
dealer.
❒ “PostScript3 Supplement” and “UNIX Supplement” include descriptions of
functions and settings that might not be available on this machine.
ii

What You Can Do with This Machine
Functions differ depending on machine type and options.
Reference
p.3 “Functions Requiring Optional Configurations”
Types of Duplex Copies
❖ 1-sided 2 Pages → 2-sided 1 Page
See p.76 “Duplex”.
❖ 2-sided 1 Page → 2-sided 1 Page
See p.76 “Duplex”.
❖ 1-sided 4 Pages → 2-sided 1 Page
See p.83 “Two-Sided Combine”.
GCBOOK0E
iii
❖ 1-sided 8 Pages → 2-sided 1 Page
See p.83 “Two-Sided Combine”.
ANP020S
A Front
B Back
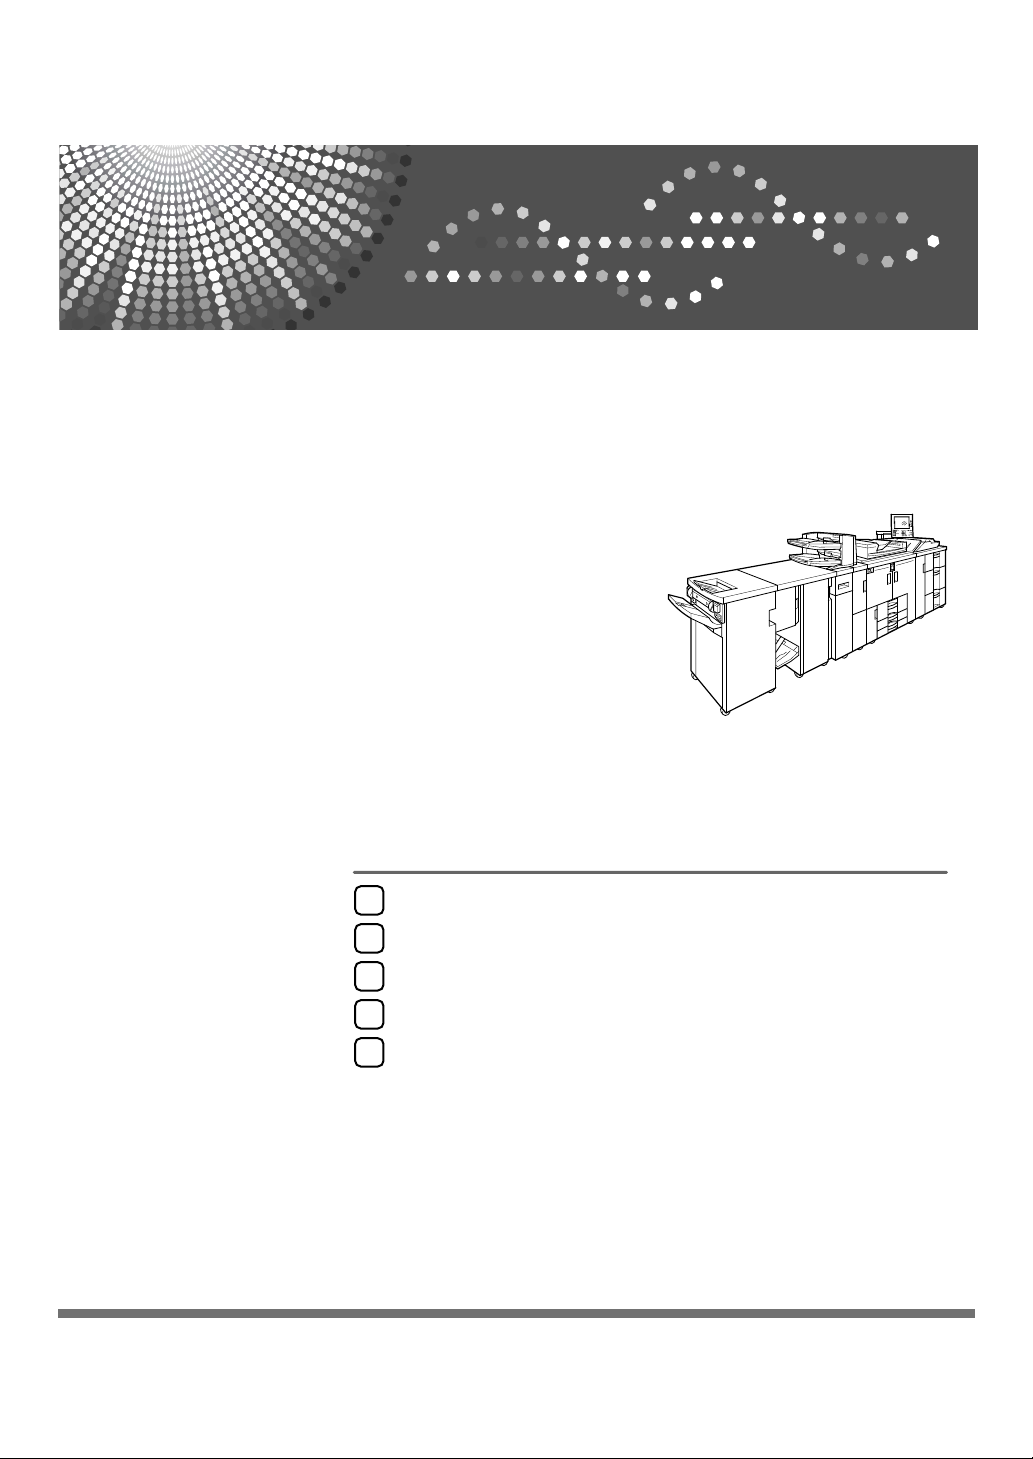
❖ 1-sided 16 Pages → 2-sided 1 Page
See p.83 “Two-Sided Combine”.
GCSHVY5E
A Front
B Back
❖ 2-sided 2 Pages → 2-sided 1 Page
See p.83 “Two-Sided Combine”.
GCSHVY1E
iv

❖ 2-sided 4 Pages → 2-sided 1 Page
See p.83 “Two-Sided Combine”.
GCSHVY2E
A Front
B Back
❖ 2-sided 8 Pages → 2-sided 1 Page
See p.83 “Two-Sided Combine”.
GCSHVY6E
A Front
B Back
❖ Bound Originals → 2-sided Pages
See p.88 “Booklet/Magazine”.
v

❖ Front/Back Bound → Originals 2-sided Pages
See p.88 “Booklet/Magazine”.
❖ Mix 1 & 2 Sided
See p.94 “Mix 1 & 2 Sided”.
Copying Book Originals
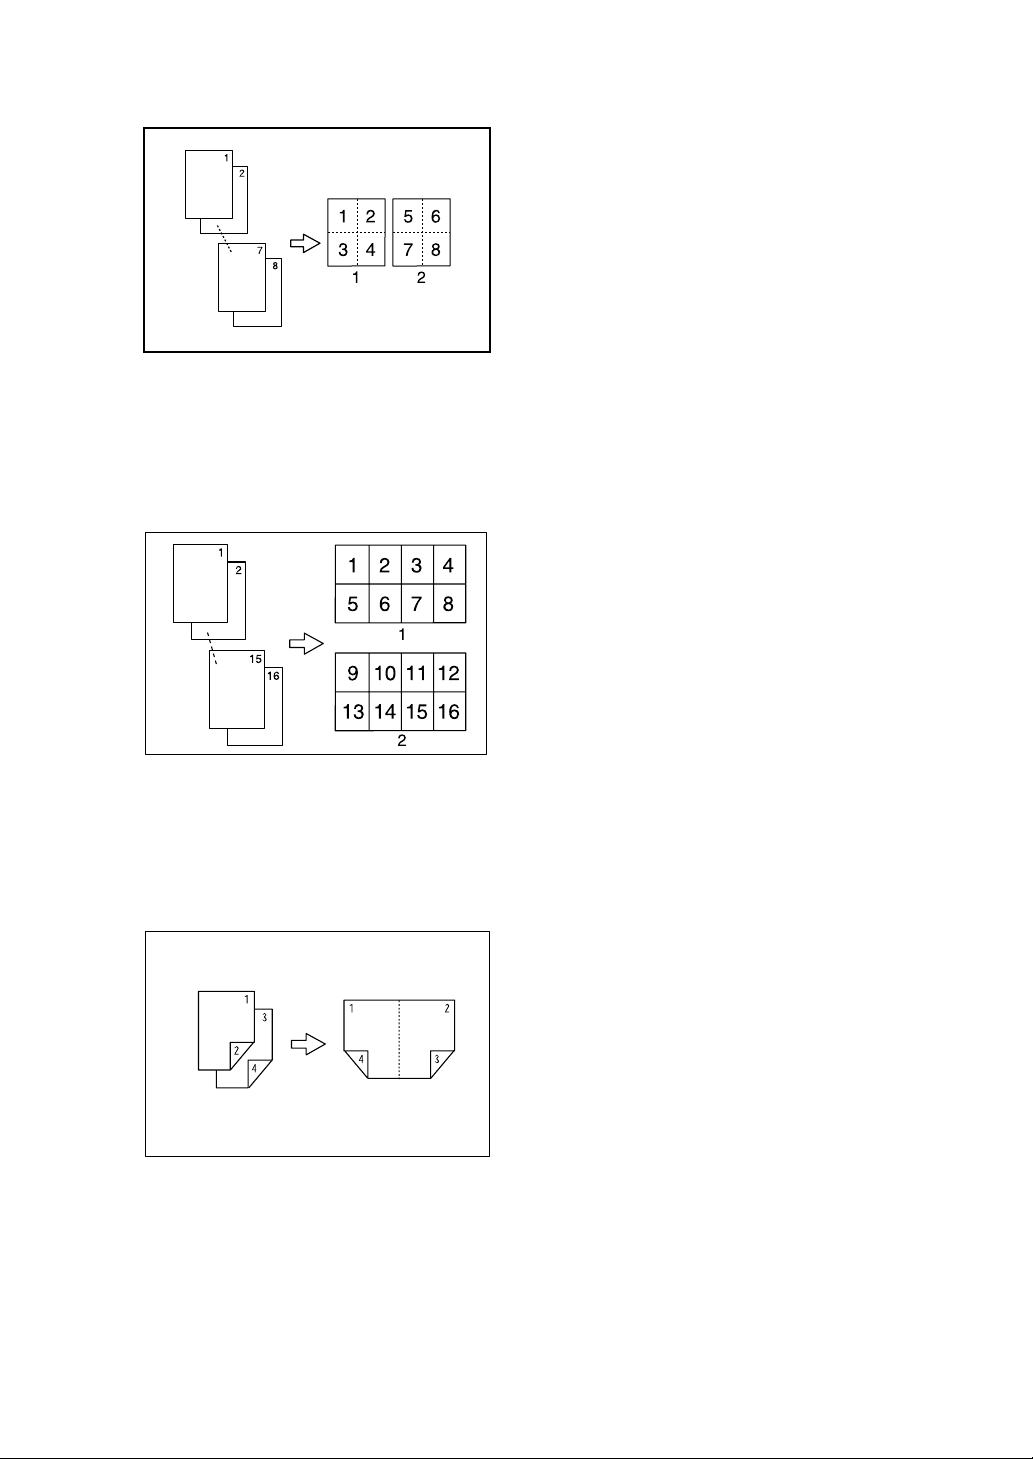
❖ 1-sided 4 Pages → Booklet
See p.88 “Booklet/Magazine”.
•Open to left
GCKONZ0J
GCBOOK0E
vi
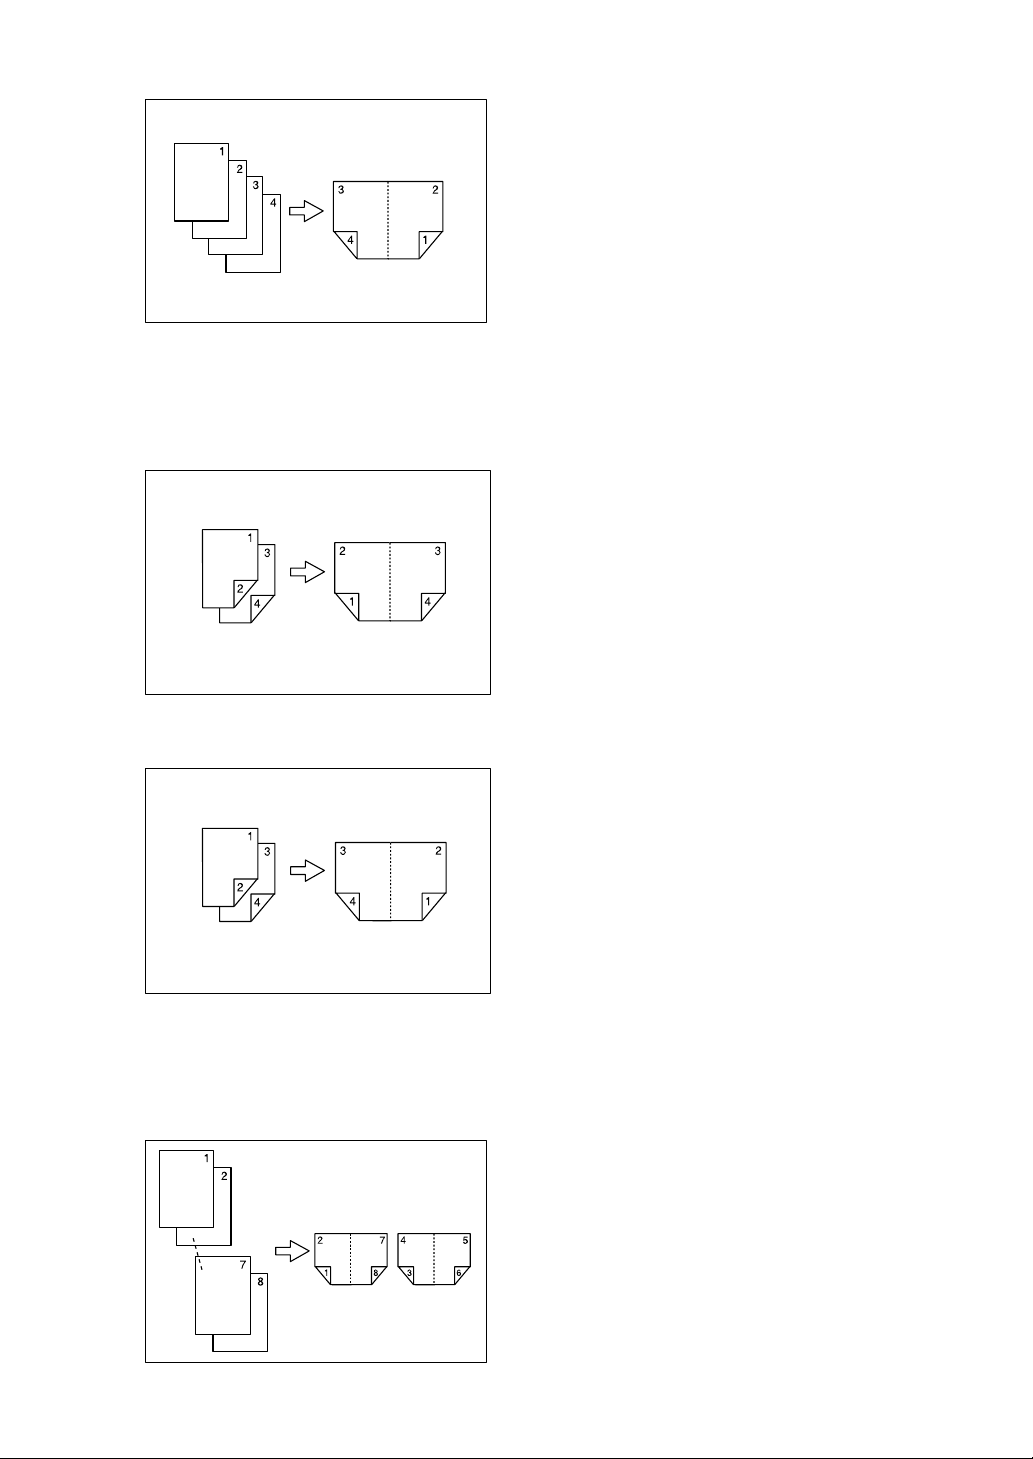
•Open to right
❖ 2-sided 2 Pages → Booklet
See p.88 “Booklet/Magazine”.
•Open to left
GCBOOK1E
•Open to right
❖ 1-sided → Magazine
See p.88 “Booklet/Magazine”.
•Open to left
GCAH010E
GCAH020E
GCBOOK3E
vii
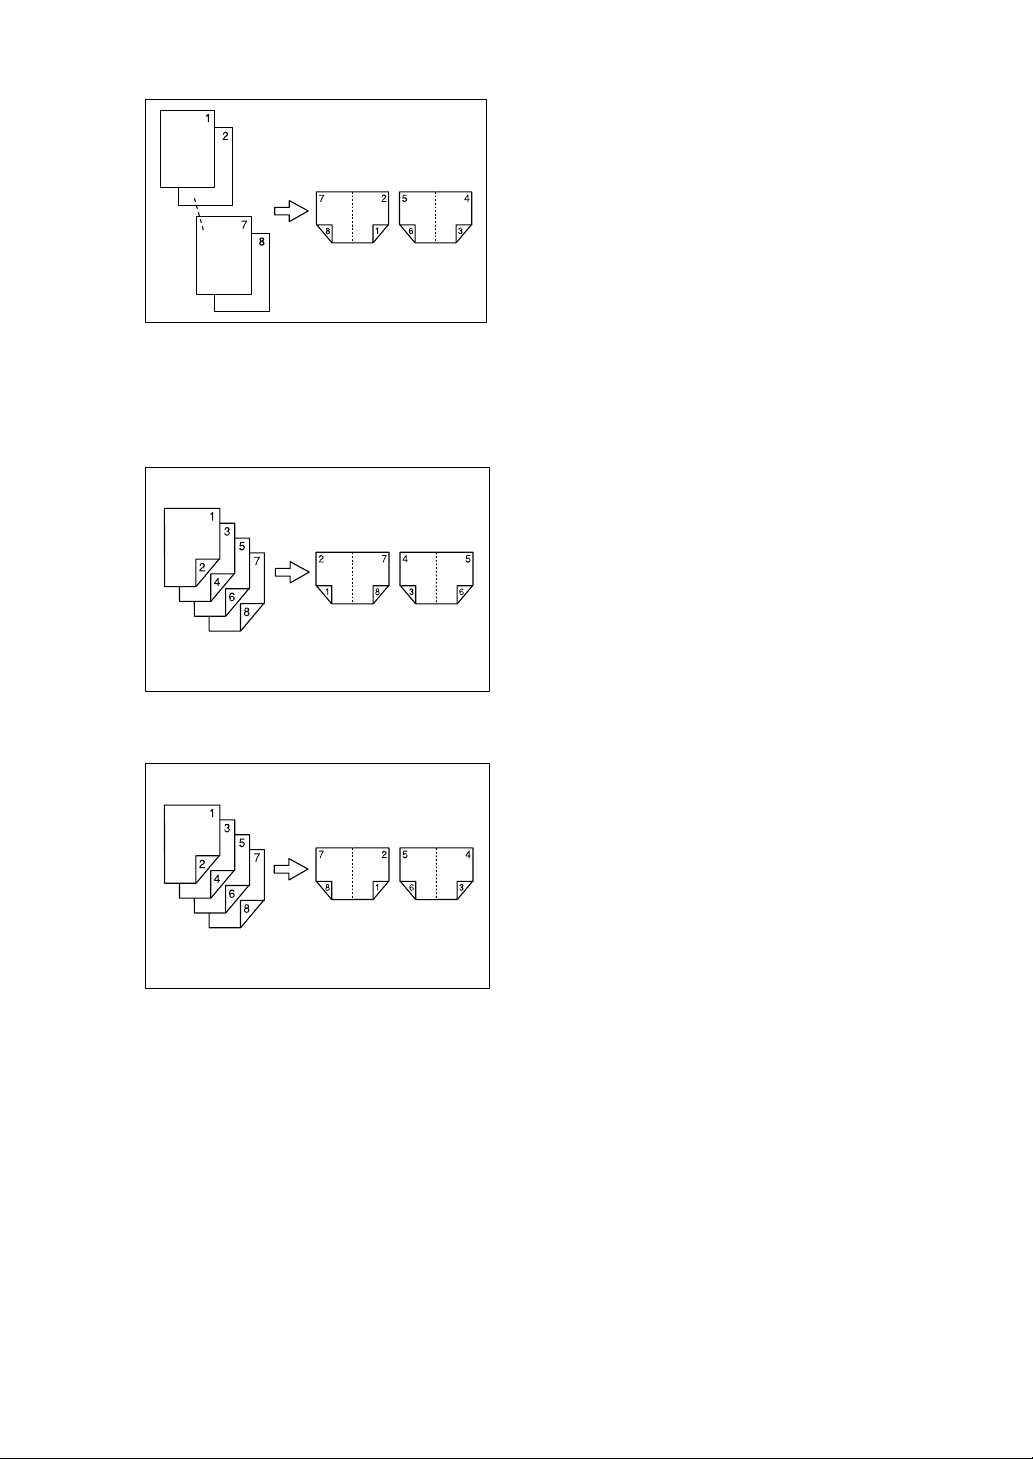
•Open to right
❖ 2-sided → Magazine
See p.88 “Booklet/Magazine”.
•Open to left
GCBOOK4E
•Open to right
GCAH030E
GCAH040E
viii
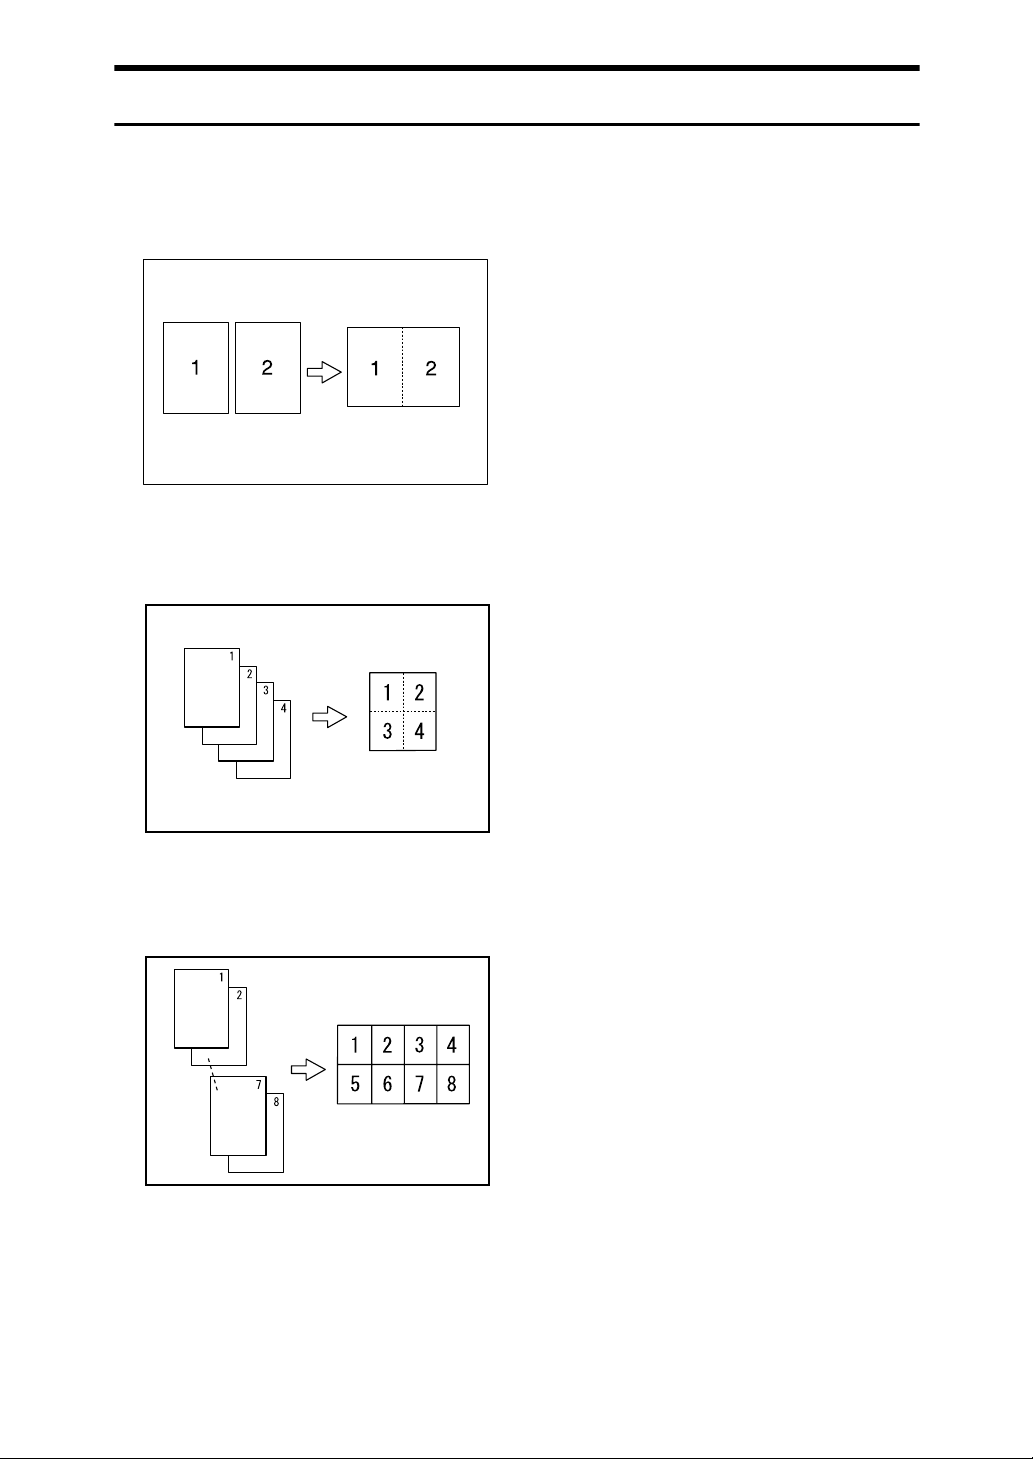
Combining Multiple Pages onto a Single Page
See p.80 “One-Sided Combine”.
❖ 1-sided 2 Pages → 1-sided 1 Page
GCSHVY7E
❖ 1-sided 4 Pages → 1-sided 1 Page
GCSHVY8J
❖ 1-sided 8 Pages → 1-sided 1 Page
GCSHVY3J
ix
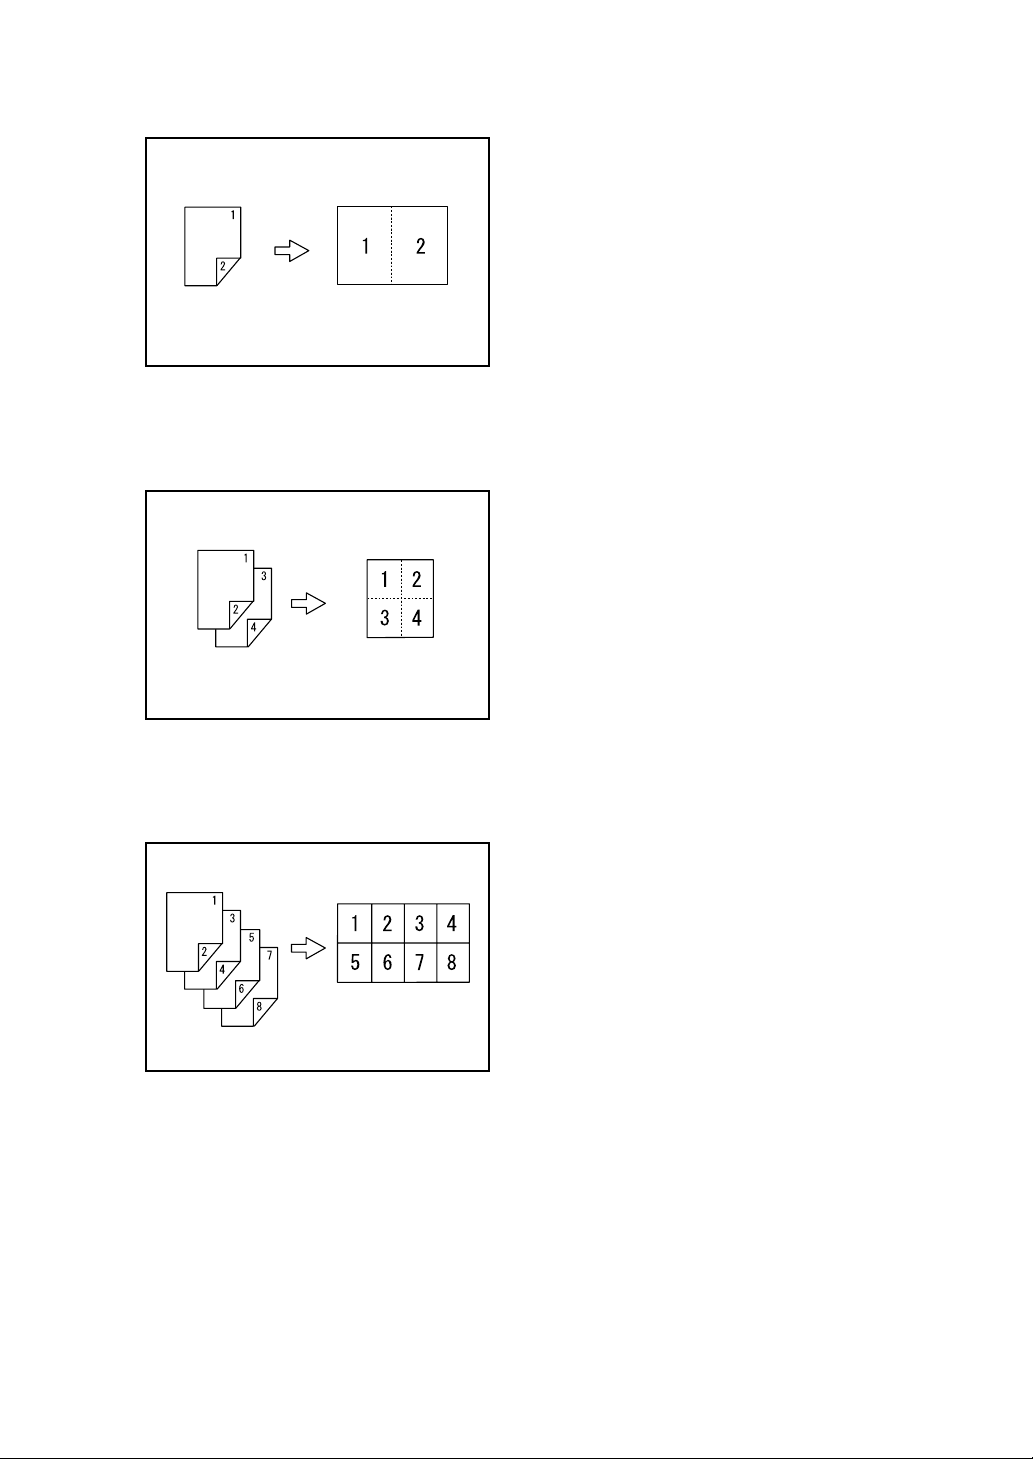
❖ 2-sided 1 Page → 1-sided 1 Page
GCSHVYOJ
❖ 2-sided 2 Pages → 1-sided 1 Page
GCSHVYBJ
❖ 2-sided 4 Pages → 1-sided 1 Page
GCSHVY4J
x
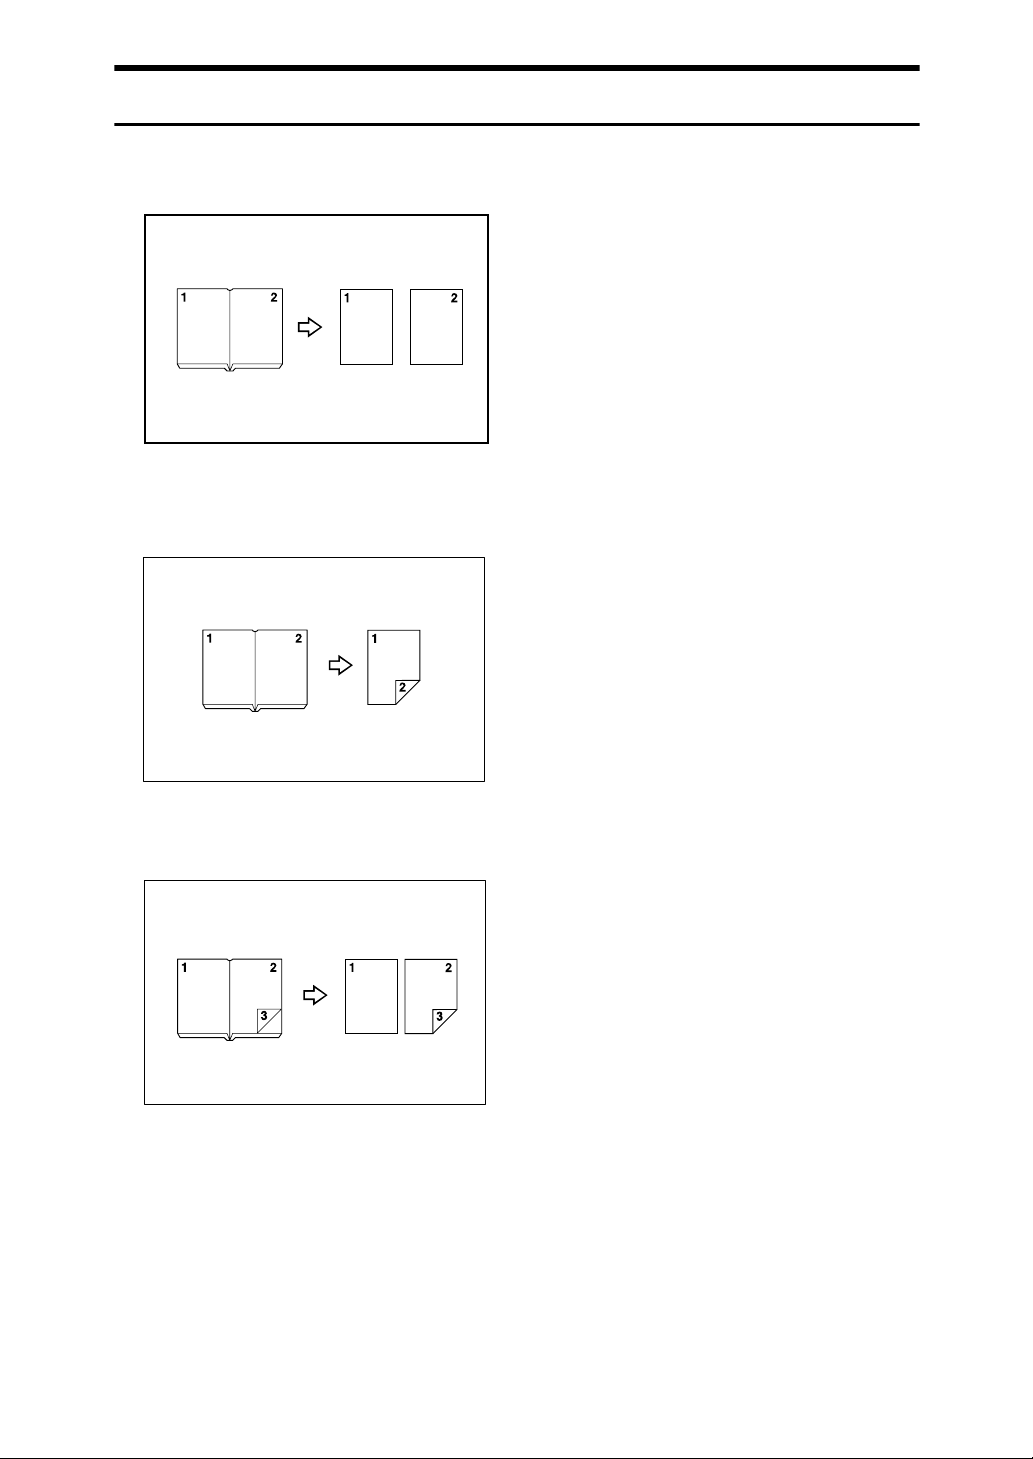
Copying Originals Such as Books
❖ Bound Originals → 1-sided Pages
See p.86 “Series Copies”.
CP2B0100
❖ Bound Originals → 2-sided Pages
See p.88 “Booklet/Magazine”.
❖ Front/Back Bound Originals → 2-sided Pages
See p.88 “Booklet/Magazine”.
xi

Copying 2-Sided Pages onto 1-Sided Pages
See p.86 “Series Copies”.
❖ 2-sided 1 Page → 1-sided 2 Pages
CP2B0200
xii

TABLE OF CONTENTS
Manuals for This Machine ......................................................................................i
What You Can Do with This Machine..................................................................iii
Types of Duplex Copies ............................................................................................ iii
Copying Book Originals............................................................................................. vi
Combining Multiple Pages onto a Single Page ......................................................... ix
Copying Originals Such as Books............................................................................. xi
Copying 2-Sided Pages onto 1-Sided Pages........................................................... xii
Notice ...................................................................................................................... 1
How to Read This Manual ..................................................................................... 2
Symbols ..................................................................................................................... 2
Functions Requiring Optional Configurations....................................................3
Display Panel..........................................................................................................4
Simplified Display.......................................................................................................5
User Tools Menu (Copier / Document Server Features) ....................................6
1. Placing Originals
Originals ............................................................................................................... 11
Sizes and Weights of Recommended Originals.......................................................11
Originals not recommended for the Auto Document Feeder (ADF) ......................12
Sizes Detectable by the Auto Paper Select .............................................................13
Sizes difficult to detect...........................................................................................14
Missing Image Area .................................................................................................15
Placing Originals..................................................................................................16
Original Orientation ..................................................................................................16
Reverse Orientation .................................................................................................18
Placing Originals on the Exposure Glass.................................................................19
Placing Originals in the Auto Document Feeder ......................................................20
Batch mode ..............................................................................................................21
SADF mode..............................................................................................................22
Mixed size mode ......................................................................................................23
Thin Mode ................................................................................................................24
Original size .............................................................................................................25
Regular sizes......................................................................................................... 25
Custom sizes......................................................................................................... 26
2. Copying
Basic Procedure...................................................................................................29
Interrupt Copy ..........................................................................................................30
Left Original Beeper ................................................................................................. 31
Copying onto Tab Stock...........................................................................................31
Surplus tab stock auto eject .................................................................................. 33
When copying onto OHP Transparencies................................................................34
Auto Start .................................................................................................................34
xiii

Job Preset ................................................................................................................35
Job Preset display .................................................................................................35
To check job contents............................................................................................36
To change job contents after checking..................................................................36
To delete a job after checking its contents ............................................................ 37
Deleting a job......................................................................................................... 37
Job List .................................................................................................................38
Job List screen .........................................................................................................38
Checking jobs in the print queue.............................................................................. 39
Changing the order of jobs.......................................................................................40
Holding print jobs .....................................................................................................41
Deleting jobs ............................................................................................................41
Checking Job History ............................................................................................... 42
Copying from the Multi Bypass Tray ................................................................. 43
Setting the tab stock in the multi bypass tray (Tray 7) .............................................45
When copying onto Regular Size Paper ..................................................................46
When copying onto Custom Size Paper ..................................................................47
When copying onto Special Paper ...........................................................................48
Copier Functions ................................................................................................. 49
Adjusting Copy Image Density .................................................................................49
Auto image density................................................................................................49
Manual image density............................................................................................50
Combined auto and manual image density ...........................................................50
Selecting the Original Type Setting..........................................................................51
Selecting Copy Paper .............................................................................................. 52
Auto Paper Select..................................................................................................53
Manual Paper Select .............................................................................................53
Preset Reduce/Enlarge ............................................................................................54
Create Margin function ..........................................................................................56
Zoom ........................................................................................................................56
To select the ratio with [o] and [n]..................................................................... 57
To enter the ratio with the number keys ................................................................57
Auto Reduce/Enlarge ...............................................................................................58
Size Magnification ....................................................................................................59
Directional Magnification (%) ...................................................................................60
To enter the ratio with the number keys ................................................................61
To specify a ratio with [o] and [n] ......................................................................61
Directional Size Magnification (inch) ........................................................................62
Sort...........................................................................................................................64
Sample copy.......................................................................................................... 65
Changing the Number of Sets ...............................................................................66
When memory is full..............................................................................................66
Shift tray off in sort/stack .......................................................................................67
Separation ............................................................................................................. 67
Stack ........................................................................................................................68
Staple .......................................................................................................................69
Punch .......................................................................................................................72
3 Edges Full Bleed ...................................................................................................74
Z-fold ........................................................................................................................75
Using the Z-fold Support Tray ...............................................................................75
Z-fold positions and Z-folding Copies ....................................................................76
Duplex ......................................................................................................................76
Originals and copy orientation ............................................................................... 79
xiv

One-Sided Combine.................................................................................................80
Two-Sided Combine.................................................................................................83
Series Copies...........................................................................................................86
Booklet/Magazine.....................................................................................................88
Creep Adjustment ....................................................................................................93
Mix 1 & 2 Sided ........................................................................................................94
Scanning Position ....................................................................................................95
Margin Adjustment ...................................................................................................97
Erase........................................................................................................................98
Border Erase (same width)..................................................................................100
Border Erase (different width)..............................................................................101
Center/Border Erase (same width)...................................................................... 102
Center/Border Erase (different width)..................................................................103
Inside Erase.........................................................................................................104
Outside Erase......................................................................................................105
Background Numbering .........................................................................................106
Preset Stamp .........................................................................................................107
Changing the stamp position, size and density ................................................... 109
User Stamp ............................................................................................................110
Changing the user stamp position.......................................................................112
To program the user stamp .................................................................................113
To delete the user stamp.....................................................................................115
Date Stamp ............................................................................................................116
To change the format of date ..............................................................................118
To change the date stamp position .....................................................................119
Page Numbering ....................................................................................................119
Changing the stamp position...............................................................................122
Specifying the first printing page and start number
(“P1,P2...”, “-1-,-2-...”, “P.1,P.2...”, “1,2...”)........................................................122
Specifying the first printing page and start number (“1/5,2/5…”) .........................123
Specifying the first printing page and start number (“1-1,1-2…”) ........................124
Stamp Text.............................................................................................................125
Changing the stamp position...............................................................................126
Image Repeat.........................................................................................................127
Double Copies........................................................................................................128
Centering................................................................................................................130
Positive/Negative ................................................................................................... 131
Covers....................................................................................................................132
Designate ...............................................................................................................134
Chapters.................................................................................................................135
Designation Sheet Copy ........................................................................................136
Blank Slip Sheets ...................................................................................................138
Slip Sheets .............................................................................................................139
Copy Face Up ........................................................................................................141
Storing Originals in the Document Server ......................................................142
Programs ............................................................................................................144
Storing a Program ..................................................................................................144
Changing a Stored Program ..................................................................................145
Deleting a Program ................................................................................................146
Recalling a Program...............................................................................................146
Programming Defaults in Initial Display .................................................................147
xv

3. Connect Copy
What is Connect Copy?.....................................................................................149
How It Works..........................................................................................................150
Machine Types and Options................................................................................150
Interrupt Copy......................................................................................................150
Before You Start..................................................................................................151
Connect Copy Display Panel ............................................................................152
Display panel of the sub-machine ..........................................................................154
Using Connect Copy..........................................................................................155
Order of Copy Output.............................................................................................158
Auto Reset when using Connect Copy................................................................159
Auto Off ...............................................................................................................159
Exiting Connect Copy............................................................................................. 159
Copying Stored Documents Using Connect Print ..................................................160
Using Job Preset in Connect Copy..................................................................162
Connect Copy Job Flow ....................................................................................164
When One of the Two Machines is Idle .................................................................164
Using the idle machine as the main machine (Connect Copy)............................165
Using the machine currently copying as the main machine (Connect Copy: Job Preset)
When Both Machines are in Use............................................................................166
When both machines are copying the same number of originals
(Connect Copy: Job Preset).............................................................................. 167
When one machines is copying a larger number of originals (Connect Copy: Job Preset)
....166
...168
4. Document Server
Relationship between Document Server and Other Functions .....................169
Document Server Display ......................................................................................170
Simplified Display...................................................................................................171
Preview Display......................................................................................................172
Using the Document Server..............................................................................174
Storing Data ...........................................................................................................174
To register or change a user name
(When using a user name registered to the Address Book)..............................176
To register or change a user name
(When using a user name not registered to the Address Book)........................177
To register or change a user name
(When no name is registered to the Address Book)..........................................178
To change a file name.........................................................................................178
To set or change a Password.............................................................................. 179
Changing User Name, File Name or Password of a Stored Document .................180
Checking the Details of a Stored Document ..........................................................181
Searching for a Stored Document..........................................................................182
To search by file name ........................................................................................182
To search by user name...................................................................................... 183
Printing a Stored Document ...................................................................................184
When Interrupting Printing...................................................................................185
Changing Number of Print Copies while Printing is in Progress..........................186
Sample Print........................................................................................................186
Printing the First Page.........................................................................................187
Printing a Specified Page ....................................................................................188
Printing a Specified Range..................................................................................188
xvi

Edit File ..................................................................................................................189
Combining Files...................................................................................................189
Inserting Documents............................................................................................190
Deleting Pages ....................................................................................................190
Copying Documents ............................................................................................191
Print Backup ........................................................................................................192
Deleting a Document.............................................................................................. 192
Displaying a Document in Document Server with Web Image Monitor..................193
Downloading Stored Documents............................................................................194
5. Appendix
Function Compatibility ......................................................................................195
Supplementary Information ..............................................................................197
INDEX....................................................................................................... 208
xvii

xviii

Notice
Do not copy or print any item for which reproduction is prohibited by law.
Copying or printing the following items is generally prohibited by local law:
bank notes, revenue stamps, bonds, stock certificates, bank drafts, checks, passports, driver's licenses.
The preceding list is meant as a guide only and is not inclusive. We assume no
responsibility for its completeness or accuracy. If you have any questions concerning the legality of copying or printing certain items, consult with your legal
advisor.
Some illustrations in this manual might be slightly different from the machine.
1

How to Read This Manual
Note
❒ For proper use of this product, be sure to read About This Machine first.
❒ Supplementary information about the copier mode is described in “Supple-
mentary Information”.
Reference
p.197 “Supplementary Information”
Symbols
This manual uses the following symbols:
Indicates important safety notes.
Ignoring these notes could result in serious injury or death. Be sure to read these notes.
They can be found in the “Safety Information” section of About This Machine.
Indicates important safety notes.
Ignoring these notes could result in moderate or minor injury, or damage to the
machine or to property. Be sure to read these notes. They can be found in the
“Safety Information” section of About This Machine.
Indicates points to pay attention to when using the machine, and explanations
of likely causes of paper misfeeds, damage to originals, or loss of data. Be sure
to read these explanations.
Indicates supplementary explanations of the machine's functions, and instructions on resolving user errors.
This symbol is located at the end of sections. It indicates where you can find further relevant information.
[ ]
Indicates the names of keys that appear on the machine's display panel.
{ }
Indicates the names of keys on the machine's control panel.
2

Functions Requiring Optional Configurations
Certain functions require special machine configuration and extra options as follows.
Shift Sort: Finisher SR5000 and Booklet Finisher BK5000
Stack: Finisher SR5000 and Booklet Finisher BK5000
Staple: Finisher SR5000 and Booklet Finisher BK5000
Staple (Center): Finisher SR5000 and Booklet Finisher BK5000
Punch: Finisher SR5000 with punch unit
Z-fold: Finisher SR5000 and Z-folding Unit
Connect Copy: Copy Connector
Multi bypass tray: Multi bypass tray (Tray 7)
Note
❒ The punch function is not available for Type 3.
3
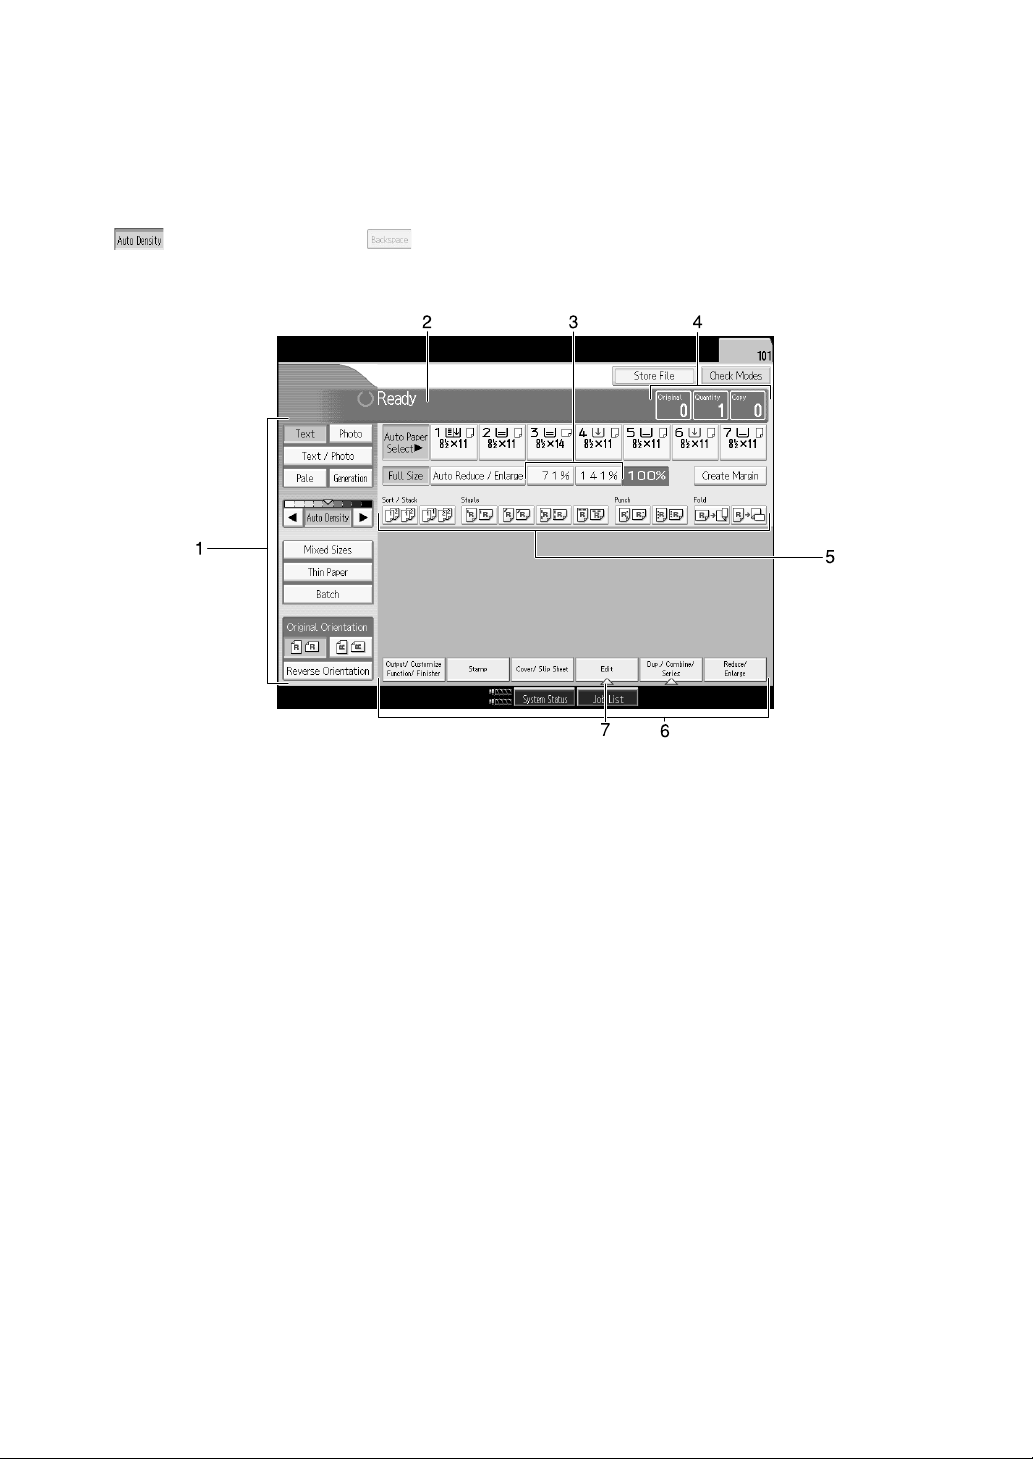
Display Panel
The function items displayed serve as selector keys. You can select or specify an
item by lightly pressing them.
When you select or specify an item on the display panel, it is highlighted like
. Keys appearing as cannot be used.
❖ Initial copy display
1. Original function, Image Density
and Special Original function.
2. Operational status and messages.
3. You can register up to two frequently
used reduce/enlarge ratios other than
the fixed reduce/enlarge ratios. See
“Reproduction Ratio”, General Settings Guide.
4. Numbers of originals scanned into
memory, copies set, and copies made.
APG060S
5. Sort, Stack, Staple functions.
6. Displays available functions. Press
a function name to display its menu.
For example, press [Reduce/ Enlarge]
to switch the Reduce/Enlarge menu.
7. A clip mark indicates the current-
ly selected function.
4
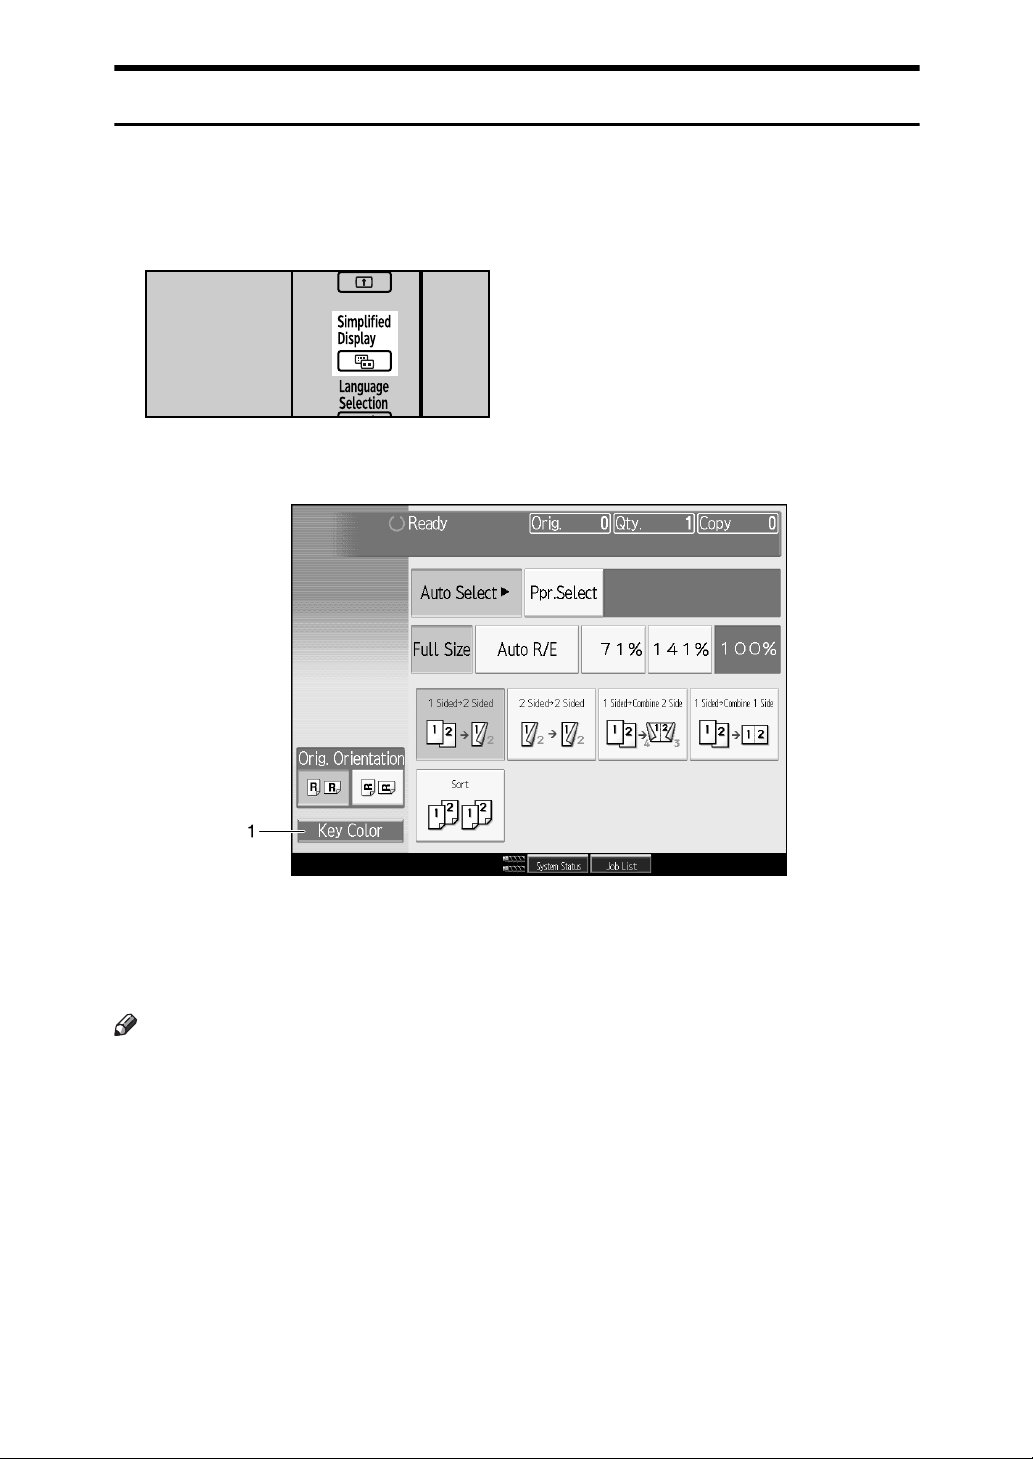
Simplified Display
This section explains how to switch to the simplified display.
When you press the {Simplified Display} key, the screen changes from the initial
display to the simplified display.
Letters and keys are displayed at a larger size, making operations easier.
APG044S
❖ Example of a simplified display
APG061S
1. [Key Color]
Press to change the key color and increase
the brightness of the display panel.
Note
❒ To return to the initial display, press the {Simplified Display} key again.
❒ Certain keys do not appear on the simplified display.
5

User Tools Menu (Copier / Document Server Features)
This section describes items that can be specified on the copier initial screen.
Copier initial screen can be displayed by pressing the {User Tools} key. For more
information about how to set up these items, see General Settings Guide.
❖ General Features
Item Description
Auto Image Density Priority
Original Orientation in
Duplex Mode
Copy Orientation in Duplex Mode
Reserve Job Mode You can set whether to reset the mode to the initial state or return
Reservation Screen Autooff Timer
Max. Copy Quantity The maximum copy quantity can be set between 1 and 9999. The
Manual Original Counter
Reset
Auto Tray Switching When the paper runs out during copying, it can be automatically
You can set whether Auto Image Density is “On” or “Off” when
the machine is turned on, reset, or modes are cleared.
You can set the original orientation when making two-sided copies.
You can set the copy orientation when making two-sided copies.
to the mode in use before the reserved operation was started when
you return to the initial screen after reserved copying finishes.
You can set the time required until the display is switched to the
reserved first job display after reservation is set. If you select
“Switch”, use the numbers key to enter the time (10-99 seconds).
The default setting is 15 seconds.
default setting is 9999 sheets.
You can set whether to enable the document counter reset key.
fed from a substitute paper feed tray, irrespective of the orientation of paper in that tray – provided it is the same size as that set
in the other paper feed tray during automatic paper selection. This
function is called “Auto Tray Switching”. You can set whether to
perform the Auto Tray Switching.
Text You can adjust the edge level of the finished image. The outline of
a character becomes soft when you select “Soft”. The outline of a
character can be sharply copied when you select “Sharp”.
Text / Photo You can select which has priority, photographs or characters,
when an original contains both. If you select “Normal”, character
and photo quality is balanced in the copy.
Photo You can adjust the quality of finished images according to the type
of photo original. “Printed photo” is set for magazine and catalog
photo originals. You can smooth photos by selecting “Printed
photo”. “Glossy Photo” is set for the silver-salt photos printed
from photo film. If you select “Normal”, you can finish characters
that exist together in a photo block.
Pale You can adjust the image quality of a pale original so the copy is
at normal density.
Generation Copy You can adjust the image quality to prevent characters in the copy
becoming too thick.
6

Item Description
Dark Background You can set whether “Deep document” can be selected as an orig-
inal type.
Panel Features Default You can set which items will appear as the function buttons on the
basic display.
Image Adjustment Priority You can set the items, to be preferentially displayed, to the func-
tion buttons on the basic display.
Paper Display You can choose to have the available paper trays and sizes shown
on the initial display.
Original Type Display You can have the original types shown on the initial display.
Special Original Display
Special Original Display
Defaults
Tone: Original Remains You can set whether to use a buzzer to alert you when you forget
Job End Call You can set whether to generate a buzzer sound (“pi”) when a
Connect Copy Key Display You can set whether to display [Connect Copy]. If you select “Off”,
Switch Original Counter
Display
Customize Function: Copi-erA maximum of four often-used functions can be registered to the
Customize Function: Document Server Storage
You can set whether to show the original types on the initial display.
You can set up to three items for displaying on the initial display
from five items.
to remove an original.
copy is completed. If “Panel key soun d” whe n performing system
settings is set to “On”, the buzzer sounds four times if copying is
interrupted because the paper has run out or become jammed.
This notifies you that the copy job could not be completed.
the key does not appear and a master unit cannot be obtained.
You can set whether to count the two-sided documents by number
of sheets or pages.
function keys.
A maximum of four often-used functions can be registered to the
function keys. Registered functions can also be changed.
❖ Reproduction Ratio
Item Description
Shortcut R / E You can register up to two frequently used Reduce/Enlarge ratios
other than the fixed Reduce/Enlarge ratio and have them shown
on the initial display. You can also change registered Reduce/ Enlarge ratios.
R / E Ratio You can specify the enlargement and reduction ratios that appear
if [Reduce/ Enlarge] is pressed on the copier screen.
R / E Ratio Priority You can set the ratio with priority when [Reduce/ Enlarge] is
pressed.
Ratio for Create Margin You can set a Reduce/Enlarge ratio when registering Create Mar-
gin in a shortcut key. Enter a ratio using number keys (in the range
of 90 to 99%). The ratio is set to 93% by default.
7

❖ Edit
Item Description
Front Margin: Left / Right You can specify left and right margins on the front side of copies
in Margin Adjustment mode.
Back Margin: Left / Right You can specify left and right margins on the back side of copies
in Margin Adjustment mode.
Front Margin: Top / Bottom
Back Margin: Top / Bottom
1 Sided→2 Sided Auto
Margin: TtoT
1 Sided→2 Sided Auto
Margin: TtoB
Creep Setting for Magazine
Erase Border Width You can specify the width for erasing border in the range of “2 to
Erase Original Shadow in
Combine
Erase Center Width You can specify the width of the erased center margins with this
Front Cover Copy in Combine
Copy Order in Combine You can set the copy order in Combine mode.
You can specify top and bottom margins on the front side of copies in Margin Adjustment mode.
You can specify top and bottom margins on the back side of copies
in Margin Adjustment mode.
In 1 sided to 2 sided Duplex mode, you can specify the margins on
the back side. The margin is set to the same value of “Back Margin:
Left / Right”.
In 1 sided to 2 sided Duplex mode, you can specify the margins on
the back side. The value set for “Back Margin: Top / Bottom” is
used.
You can specify the creep binding margin width.
99 mm” (in units of 1 mm).
In Combine mode, you can specify whether to erase a 3 mm, 0.1"
boundary margin around all four edges of each original.
function.
You can make a combined copy on the front cover sheet when you
select Front Cover mode.
Orientation: Booklet, Magazine
Copy on Designating Page
in Combine
Image Repeat Separation
Line
Double Copies Separation
Line
Separation Line in Combine
Copy Back Cover When copying the back cover, you can specify whether to have the
Double Copies Position You can select the copy position of bottom or left page according
You can select the orientation of copies to open when using Booklet or Magazine mode.
You can specify whether to make a combined copy on the inserted
slip sheets in Desig./Chapter mode.
You can select a separation line from: None, Solid, Broken A, Broken B, or Crop Marks.
You can select a separation line using the Double Copies function
from: None, Solid, Broken A, Broken B, or Crop Marks.
You can select a separation line using the Combine function from:
None, Solid, Broken A, Broken B, or Crop Marks.
back cover outside (outside page) or inside (inside page).
to top or right page as the original image position.
8

❖ Stamp
Item Description
Background Numbering
Size You can set the size of the numbers.
Density You can set the density of the numbers.
Preset Stamp
Stamp Language You can select the language of the message printed in Stamp
mode.
Stamp Priority You can select the stamp type given priority when [Preset Stamp]
is pressed.
Stamp Format You can specify how each of stamp is printed.
User Stamp
Program / Delete Stamp
Stamp Format: 1-5
Date Stamp
Format You can select the date format for Date Stamp mode.
Font You can select the Date Stamp font.
Size You can set the Date Stamp size.
Superimpose You can have the Date Stamp printed in white when it overlaps
Stamp Setting You can specify how Date Stamp is printed.
Page Numbering
Stamp Format You can select the page number format given priority when [Page
Font You can select the font in Page Numbering mode.
Size You can set the size of the stamp printed in Page Numbering
Duplex Back Page Stamping Position
Page Numbering in Combine
You can register, change, or delete these designs as user stamps. You
can register up to five custom stamps with your favorite designs.
You can specify how each of registered User Stamps 1 to 5 is printed.
black parts of the image.
Numbering] is pressed.
mode.
You can set the position of the duplex back page number printed
in Duplex mode.
You can set page numbering when using the Combine function
and the Page Numbering function together.
Stamp Position on Designating Page
Stamp Position You can specify how each of stamp is printed.
Superimpose You can have page numbers printed in white when they overlap
Page Numbering Initial
Letter
Stamp Text
Font You can select the font in Stamp Text mode.
You can select to print the page number onto slip sheets when using the Designate function set to [Copy] and the Page Numbering
function together.
black parts of the image.
Switch the page print language.
9

Item Description
Size You can set the size of the stamp printed in Stamp Text mode.
Superimpose You can have the Stamp Text printed in white when it overlaps
black parts of the image.
Stamp Setting You can specify how Stamp Text is printed.
❖ Input / Output
Item Description
SADF Auto Reset In SADF mode, an original must be set within a specified time af-
ter the previous original has been fed. You can adjust this time
from 3 to 99 seconds in increments of 1 second. The timing is set
to “5 second(s)” by default.
Copy Eject Face Method in
Glass Mode
Memory Full Auto Scan
Restart
Sort / Stack Shift Tray Setting
Insert Separation Sheet You can specify the number of copy pages for inserting the Sepa-
Staple Position Specify which Top 2 staples or Bottom shown on the initial display
Punch Type Specify which punch type (2 holes or 3 holes) has priority to be
Finisher: Staple Position Specify the stapling position. The optional Finisher SR5000 is re-
Finisher: Punch Type Specify the punch type. The optional Finisher SR5000 and Multi-
Simplified Screen: Finishing Types
You can specify the way in which copies are delivered when copying an original placed on the exposure glass.
When memory becomes full while scanning originals, the machine can make copies of scanned originals first, and then automatically proceed scanning remaining originals.
You can specify whether to shift the Shift Tray in sort mode or
stack mode.
ration Sheet from 1 to 999 pages in increments of 1 page.
with priority. The optional Finisher SR5000 is required to use this
function.
shown on the initial display. The optional Finisher SR5000 and
Multi-hole Punch Unit are required to use this function.
quired to use this function.
hole Punch Unit are required to use this function.
You can select which key is displayed with higher priority for
“Finishing Types” on the Simplified Screen.
❖ Administrator Tools
Item Description
Menu Protect Using Menu Protect, you can limit the settings available to users
10
other than the administrator.
 Loading...