

Page 1

AstraLink
User’s Guide
68808
1
Page 2

Copyright © 2000 Ishida Co. Ltd., Japan
Copyright © 2000 Interface Translation Ltd., New Zealand
No part of this manual may be reproduced or transmitted in any form or by any means, electronic or mechanical,
without permission in writing from Ishida Co. Ltd.
Microsoft Windows is a registered trademark of Microsoft Corporation.
Page 3
Revision History
Date Program
Version
4th July 2003 1.24 1 Added a system requirements section
21 Dec. 2005 1.25 37 Added Trans. Fat to USA nutrition
Page Description
Page 4

Contents
1. Introduction.......................................................................................................................................... 1
System Requirements............................................................. ..........................................................1
How to Use This Manual.................................................................................................................1
2. Getting Started......................................................................................................................................2
Before You Start............................................................................................. .................................2
Starting AstraLink for the First Time...............................................................................................2
Troubleshooting.......................................................................................................................5
Starting AstraLink (second and subsequent times)..........................................................................7
Finding a PLU.......................... .......................................................................... .....................8
If you know the PLU number .........................................................................................8
If you know some or all of the PLU name......................................................................8
If you do not know the PLU number or name ................................................................8
Adding a New PLU............................................ .....................................................................9
Editing and Deleting PLUs......................................................................................................9
To edit the selected PLU.................................................................................................9
To delete the selected PLU................................................... ..........................................9
Changing PLU Prices............................................................................................................10
Using the Price Change Dialog...................................................................... ...............10
Using the PLU Edit Dialog....................................................................................................11
Entering the PLU description........................................................................................12
Entering the PLU settings..................................... ................................................. .......12
Changing the PLU number............................................................................................12
Saving your changes.....................................................................................................12
Changing the displayed PLU ........................................................................................13
Adding a new PLU................................................................................. .......................13
Closing the PLU Edit window...................................................................................... 13
Extra Messages......................................................................................................................13
Storage Instructions (Sweden Only)......................................................................................14
Nutrition (USA Only)............................................................................................................15
Keyboard...............................................................................................................................17
1. Upper Keys ...............................................................................................................18
2. Lower Keys...............................................................................................................18
3. Keysheet....................................................................................................................18
Using the keyboard window .........................................................................................18
Scale Communications..........................................................................................................19
PLU List and Extra Message List Reports............................................................................21
PLU Production Report.........................................................................................................21
Other Features................................................................................................................................22
3. Communicating with the Scale................................................................... ........................................23
3.1 Receiving Data From the Scale................................................................................................23
3.2 Sending Data to the Scale........................................................................................................25
4. The Astra Database............................................................................................................................27
Selecting the Database...........................................................................................................27
Automatic Databa se Backup................................................................ ......................... .........27
5. Editing PLUs...................................................................................................................................... 28
5.1 Using the PLU Search Window...............................................................................................28
Finding a PLU.......................... .......................................................................... ...................28
If you know the PLU number .......................................................................................2 8
If you know some or all of the PLU name....................................................................28
If you do not know the PLU number or name ..............................................................29
Adding a New PLU............................................ ...................................................................29
Editing or Deleting a PLU.....................................................................................................29
Deleting a Range of PLUs......................................... ........................ ......................... ...........30
Cutting and Pasting PLUs......................................................................................................30
Quick Price Changes.............................................................................................................30
5.2 Using the PLU Edit Dialog......................................................................................................32
Page 5

6. Extra Messages and Storage Instructions...........................................................................................35
Creating and Editing Extra M essages....................................................................................35
Assigning an Extra Message to a PLU............................................................................. .....37
Deleting an Extra Message.......................................................... ......................... .................37
7. Nutrition (USA)...................... ............................................................................................................38
Creating and Editing Nutrition Information..........................................................................38
Assigning Nutrition Information to a PLU......................................................................... ...38
Deleting Nutrition Records....................................................................................................39
8. Nutrition and Ingredients (NZ)...........................................................................................................40
Creating and Editing Nutrition Information..........................................................................40
Creating and Editing Ingredients Information.......................................................................41
Deleting Nutrition Data.................... .....................................................................................41
Deleting Ingredient Data........................................... ........................ ......................... ...........41
9. Keyboard........................................ ......................... ......................... ......................... ......................... 42
9.1 Defining the Upper and Lower Key Meanings........................................................................42
9.2 Printing Keysheet Templates...................................................................................................46
10. Store Name and Address................................... ...............................................................................48
11. PLU and Extra Message List Reports ..............................................................................................49
12. Production Totals Report..................................................................................................................51
13. Price Importing........................... ......................... ......................... ......................... ...........................53
Page 6

1. Introduction
AstraLink is a software utility that provides all the features you need to setup and maintain the
data on your Ishida Astra scale.
AstraLink includes the following features.
• Visual interface for creating and editing scales data.
PLUs
Extra messages
Keyboard presets
Store name and address
• Scales data can be sent to and read from the scales via the serial port on your PC.
• Quick price change feature
• Search function for quickly locating the desired PLU
• Print scale keyboard templates
• PLU, extra message, and production to tals reports
System Requirements
AstraLink requires a Windows 98 or higher perso na l comp uter with a free serial port.
The software can also be used on Windows 95 in most cases.
Operation on Windows XP has been verified for AstraLink version 1.24.
How to Use This Manual
If you are a new user wishing to familiarize
yourself with the software.
If you wish to learn how to use a specific
feature.
If you require information about the operation
of a particular menu or other command.
Ö See Chapter 2 Getting Started
Ö Lookup the feature in the Contents and find
the relevant chapter.
Ö Refer to On-Line Help (click Index in the
Help menu.)
1
Page 7
2. Getting St arted
This section gives a quick tutorial on how to use AstraLink and introduces the main concepts
you will need to edit and manage scales data.
Before You Start
When you run AstraLink for the first time, the soft ware steps you th rough a series of operations
to setup your copy of AstraLin k. This includes reading the i nitial scale da ta from th e Astra itself.
Accordingly, you must have the Astra and data cable available before yo u can run AstraLink
Starting AstraLink for the First Time
Installing AstraLink adds an "AstraLink" icon to the <Pr ograms> sub-menu of your Windows
<Start> menu.
To run AstraLink from Windows, click on <St art> → <Programs> → <AstraLink> →
<AstraLink>.
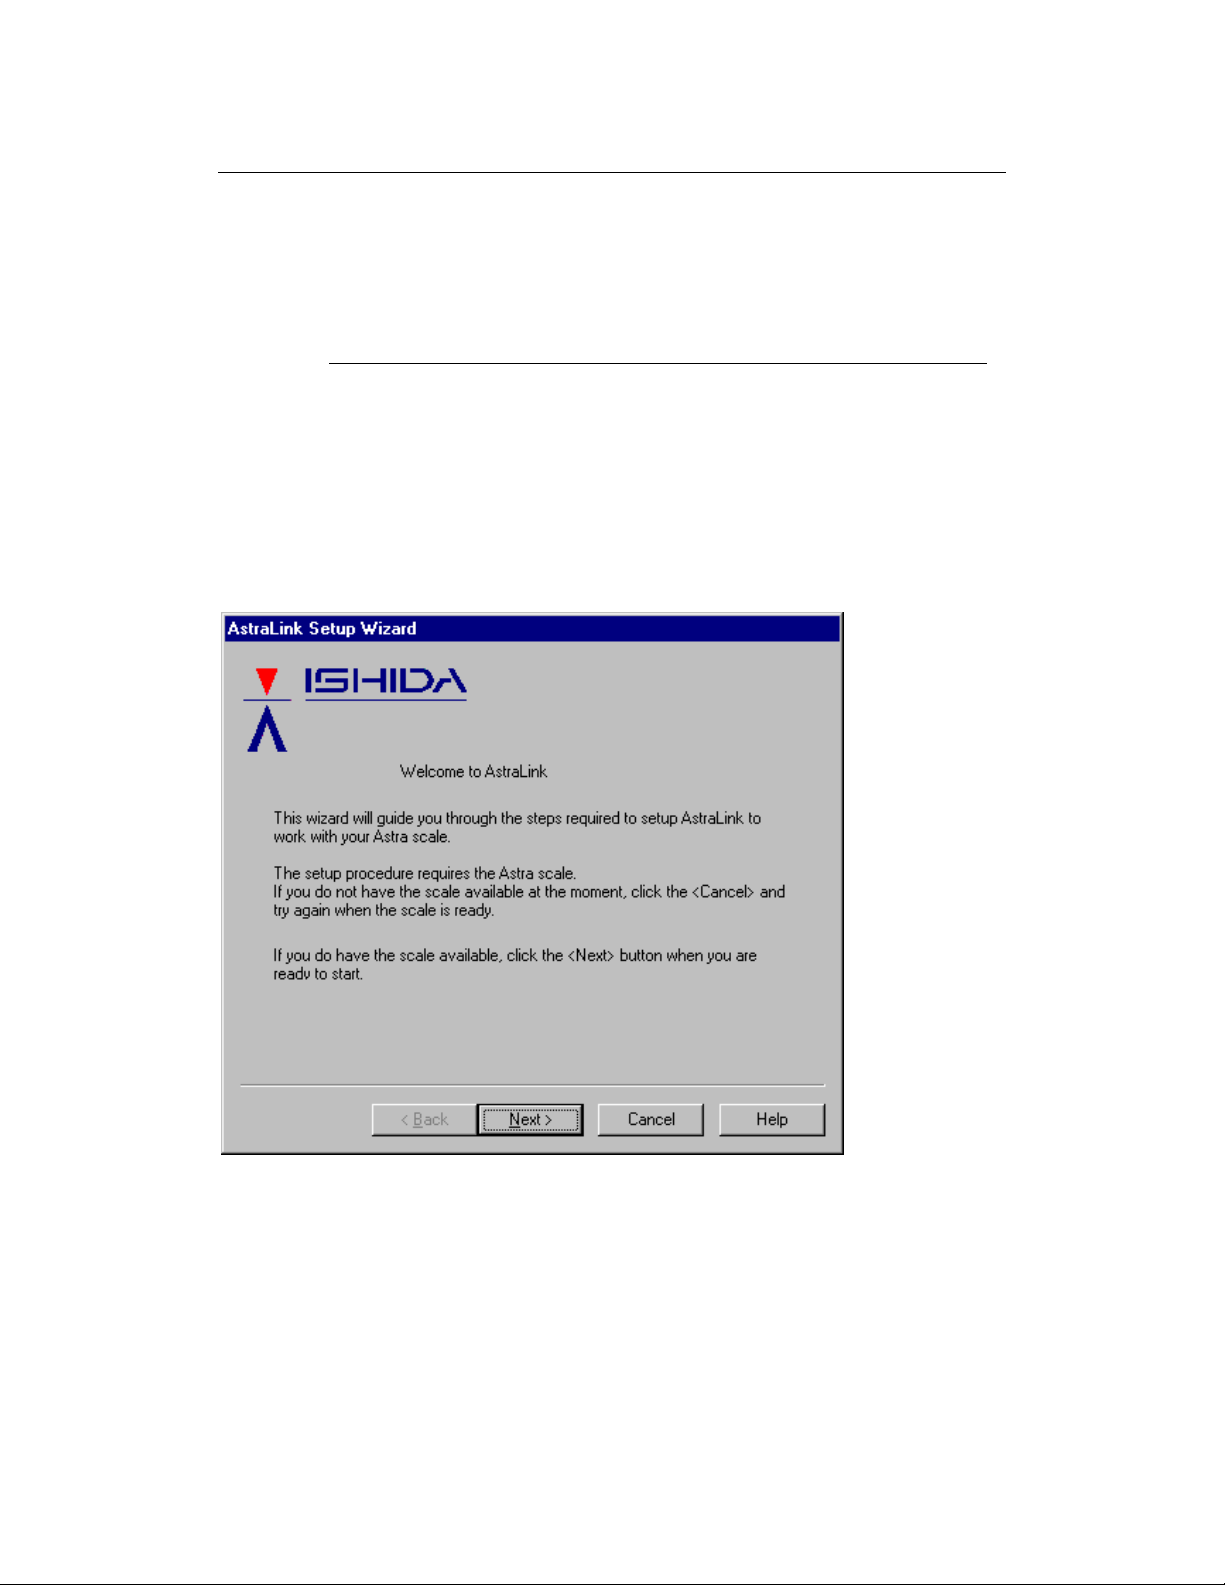
When you run AstraLink for the first time, the AstraLink Setup Wizard appears as shown below
to step you through the process of setting up your copy of AstraLink.
.
Click the Next button to move to the next step in the setup process.
NOTE: If you do not have a scale available, it is possible to bypass the AstraLink Setup Wizard
by unzipping the file BYPA SS.ZIP included i n the installatio n before running AstraLink.
This will open a sample database instead.
However, it is important that y o u read the data from your scale before cre ating your
database. See Chapter 3 Communicating with the Scale for details.
2
Page 8
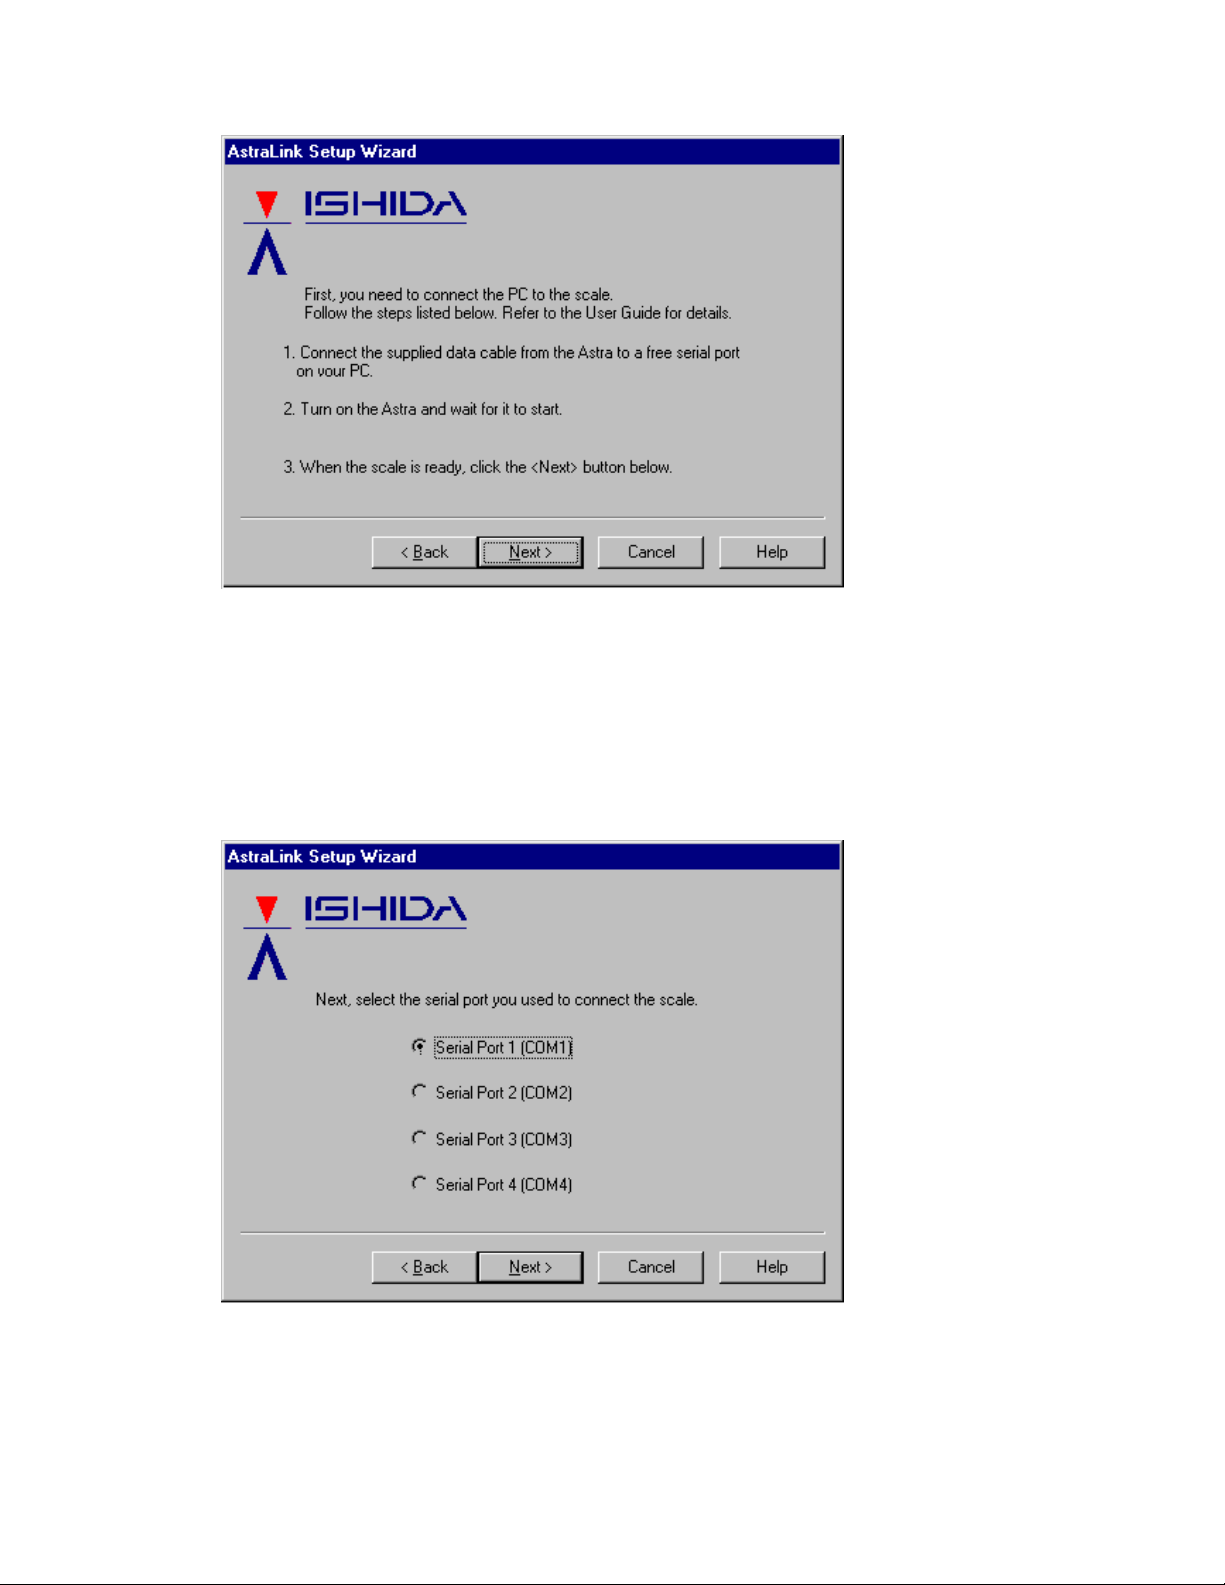
If you have not already connected the Astra to your PC using the cable provided, now is the
time to do so.
Plug one end of the cable into the 9-pin socket on the left side of the Astra, and plug the other
end into an unused serial port socket on you r PC. If the PC port is labeled, make a note of the
port number.
Next, turn on the Astra and allow it to start.
Leave the Astra in this st ate , go b ack to you r PC, and click th e Next button to move to the next
step.
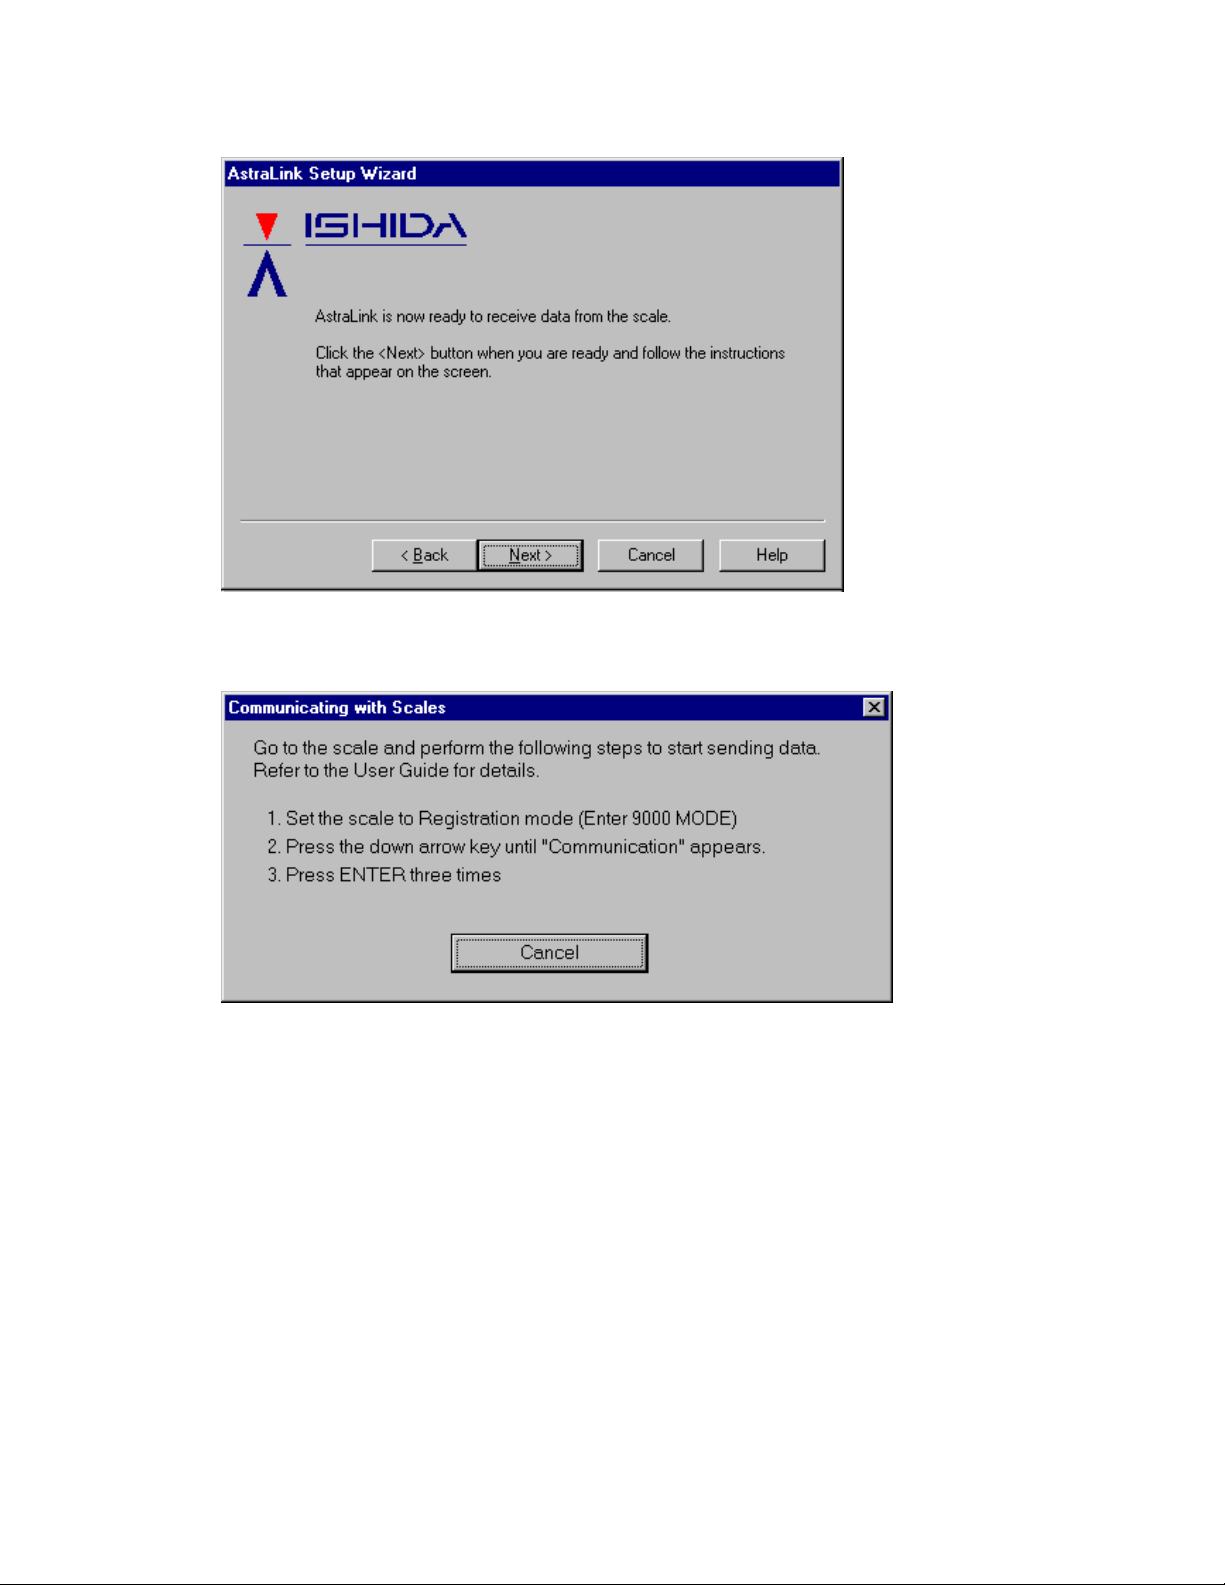
In this step, you specify which serial port you used to connect the Astra to the PC.
If you are unsure, leave the de fault setting. If communications do es n ot work you can return to
this step and try another serial port.
Click the button indicating t he correct serial port , then click th e Next button to move to the next
step.
3
Page 9
The AstraLink software is now ready to receive the initial data from the scale.
Click the Next button to start the transf er . This opens the dialog shown below.
Follow the instructions in the dialog to st ar t the data transfer. The scale operation is described
in detail below. The "Troubleshooting" section below describes what to do if you have
problems.
1 Remove any keysheet from the A st ra keyboard to expose the programming keyboard.
2
Enter 9000 using the numeric keys on the right, then press the MODE key. The scale
display shows "registration" indicating registration mode.
3 Next, press the down arrow key a number of times until "communication" appears.
4
Press the ENTER key once to display "Upload", again to display "All Data", then a third
time to start sending data.
If the data transfer is successf ul, the scale will display briefly "Uploa ding", then "Upload
OK", then "All Data".
If communications fails, see "Troubleshooting" below.
5 Go back to the PC. If the data transfer is successful, a message will be displayed on the
screen to indicate this. Click the OK button. Nex t, a dial og op ens for you to specify the
file name for the scale database. You can specify any valid file name (your store name,
for example).
4
Page 10

Troubleshooting
The following are possible causes if you cannot commu nicate with the scale.
• Check that the cable is securely plugged in at both ends.
• Incorrect serial port. Unfortunately, not all PC manufacturers bother to label the serial port
connectors on the back of the PC. Y ou ma y ne ed t o exp erime nt by set ti ng dif f erent seri al
ports in AstraLink until you find th e on e you used to plug in the cable to the Astr a.
In this case, click the Back button to return to the serial port selection window and set a
different serial port. Keep trying until it works or you run out of ports to try.
• Serial port in use by other application. If AstraLink displays the following me ssage, the
serial port may be being used by an other program.
"Cannot open comms link. Close any other programs that may be using the same
COM port."
You may also get this message i f you select a serial port that is no t availa ble on yo ur PC.
Either close the other program, or try using a different serial port.
• If the above steps do not resolve the problem, you may need to contact your support
agent for either the Astra or yo ur PC.
5
Page 11
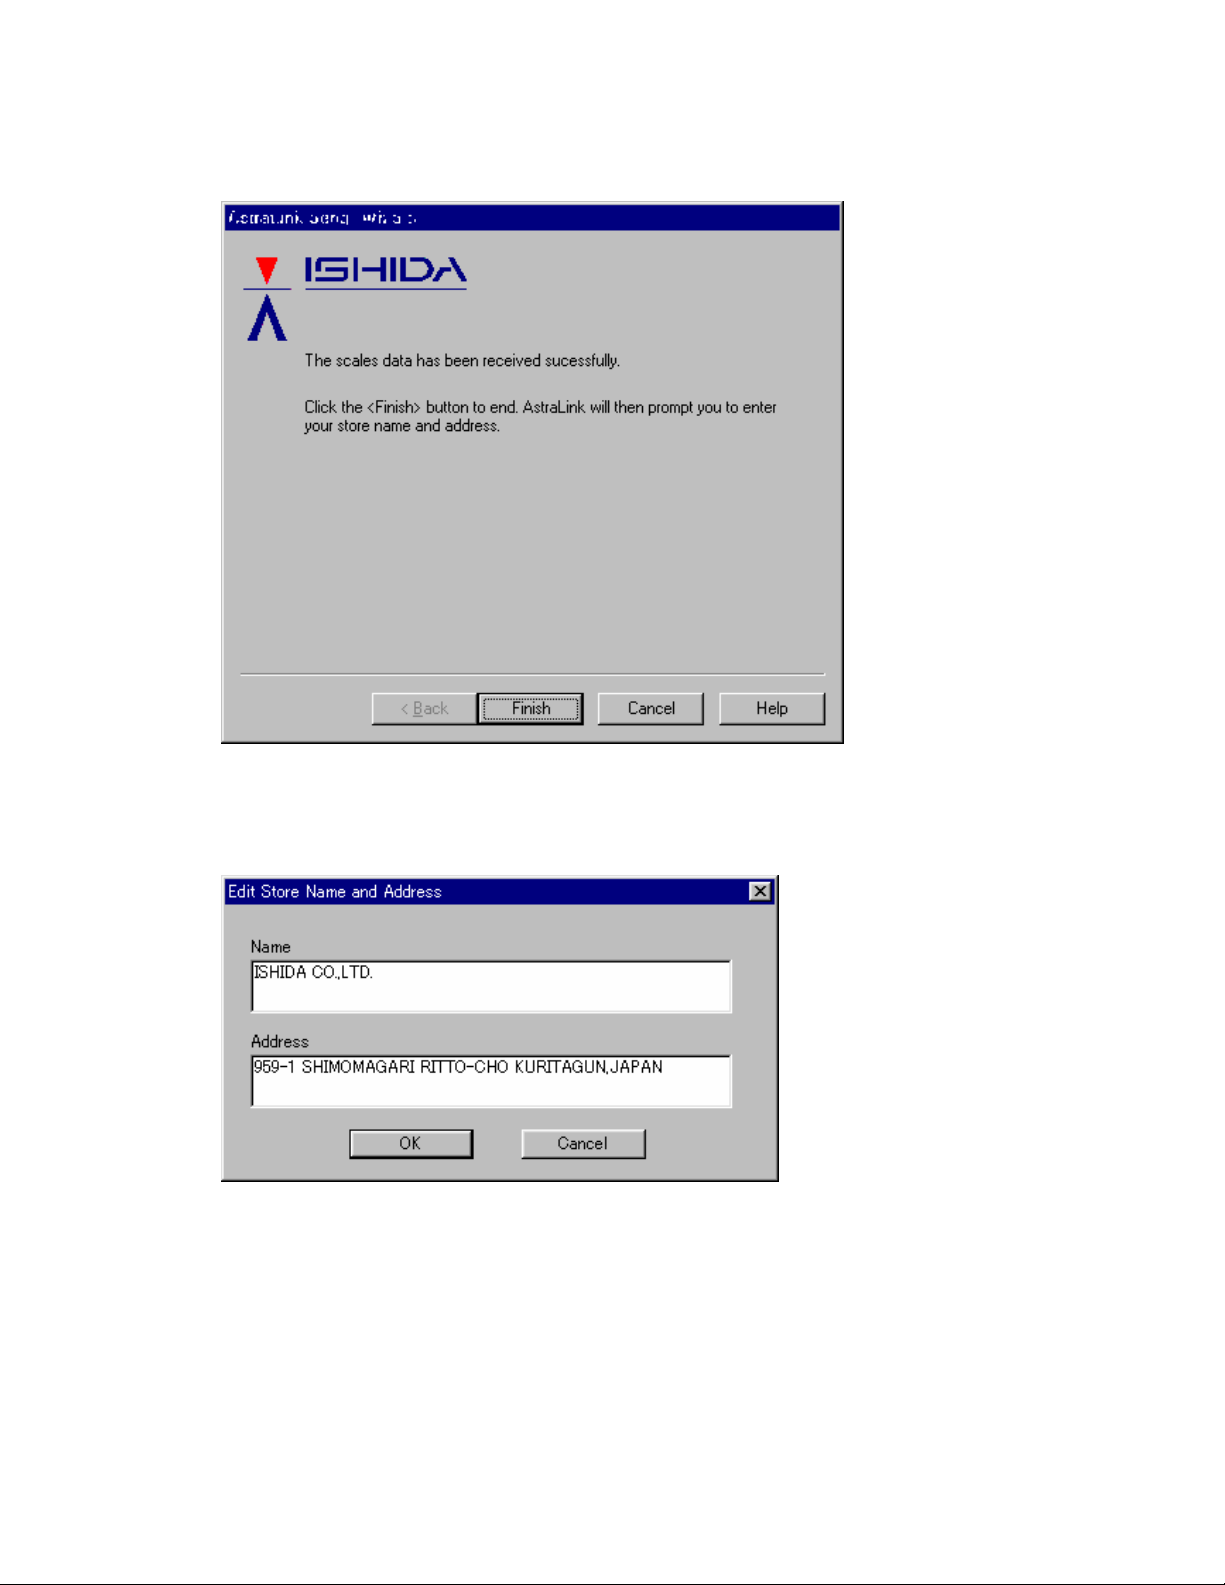
The following window appears if the data is successfu lly re ceived from the scale.
Click the Finish button to end the AstraLink Setup Wizard.
Next AstraLink opens the dialog shown below for you to enter your store name and address.
This is the store name and address used by the scale to print at the bottom of labels.
Enter your store details then click OK.
This completes the initial setup for your store. We recommended that you now take a few
minutes to work through the tutorial below for a quick introduction to using AstraLink.
6
Page 12
Starting AstraLink (second and subsequent times)
y
g
When you start AstraLink, the prog ra m automatically loads the database tha t was open when
you last exited.
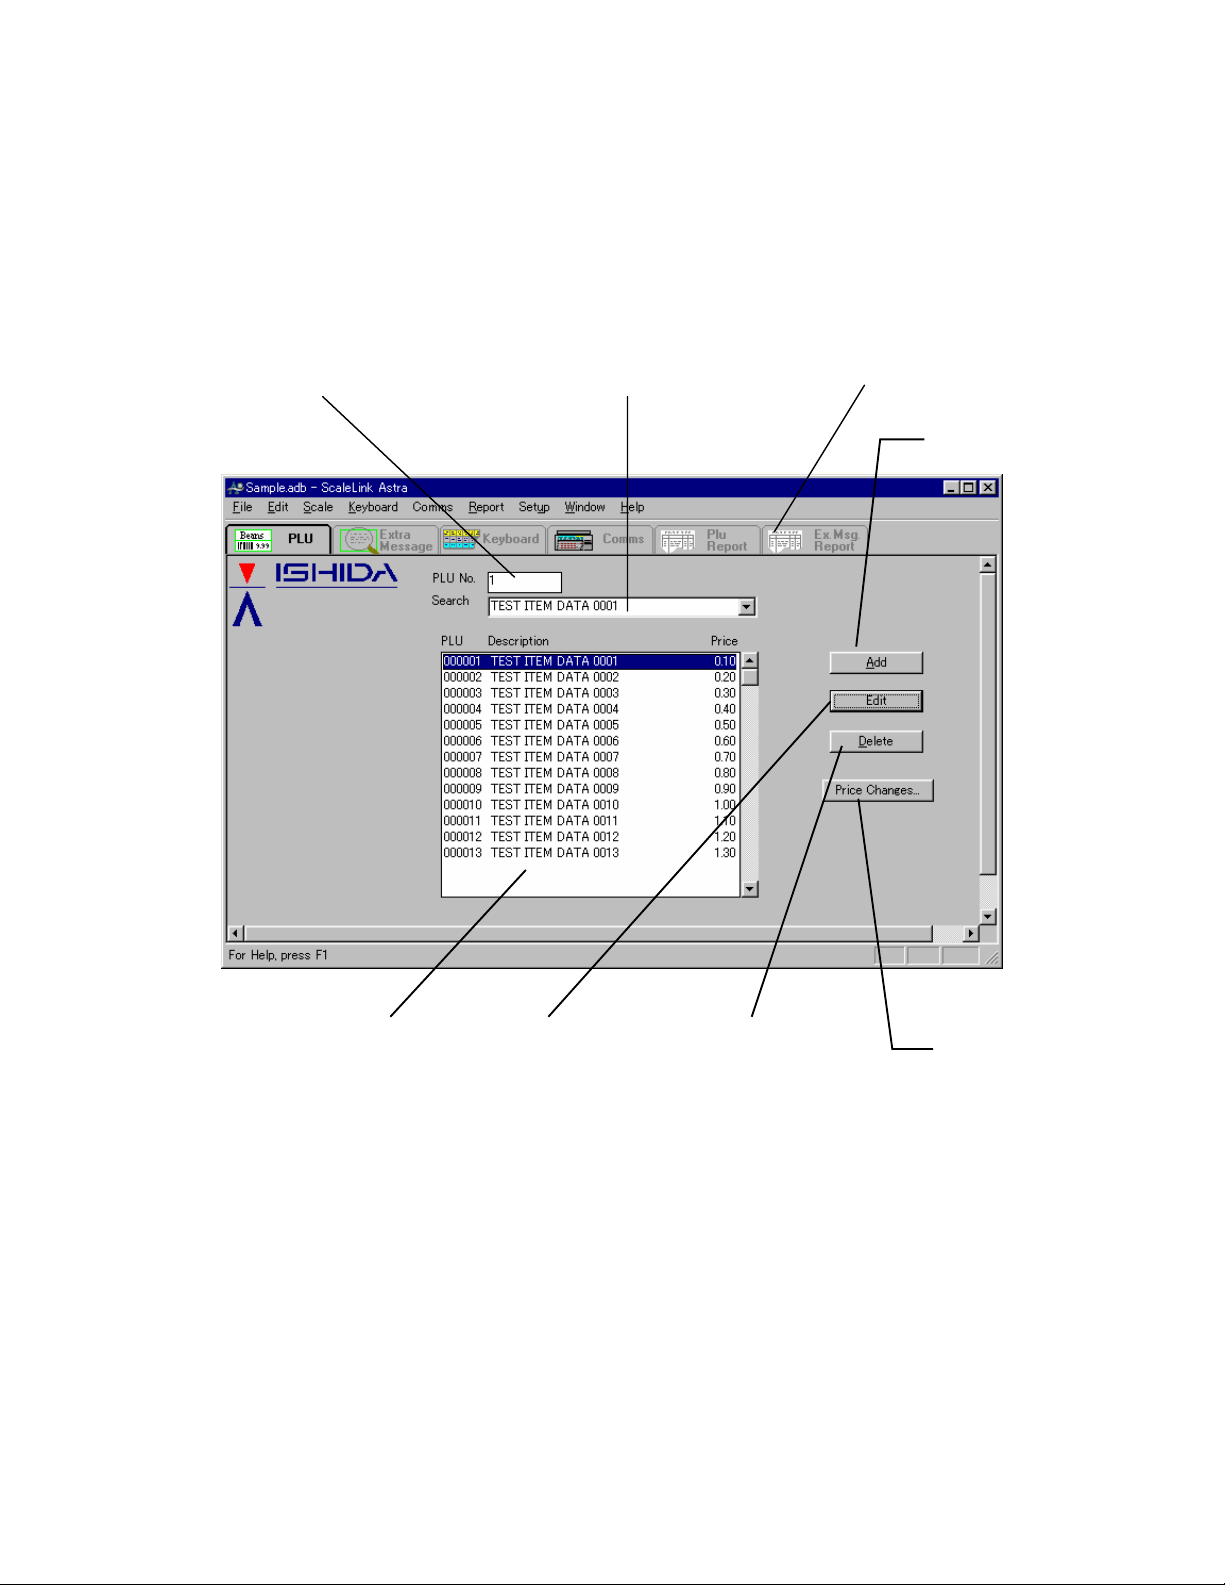
The figure below shows the initial screen (called the PLU Search window).
Click here to list all PLUs.
Use the ↑, ↓, PgUp and PgDn
ke
s to scroll the PLU list
Click here to enter a search string.
The list only displays PLUs that
match the search strin
.
Tab bar. Click here to
change the displayed
window.
Add a new PLU
PLU list. Double
click on a PLU to
edit.
The initial screen opens with the cursor in the PLU No. field of the PLU Search window. The
PLU Search window provides a n umber of methods for you to find the PLU you are looking for
and to edit or delete the selected PLU. You can also add new PLUs from this window.
Open PLU Edit
window to edit
currently selected
PLU
Delete currently
selected PLU
Open PLU price
change dialog
7
Page 13

Finding a PLU
If you know the PLU number
Enter the PLU number in the PLU No. field. The sp ecified PLU appears selected in the PLU list.
If you know some or all of the PLU name
The PLU name is the first line of t he P LU de script ion th at appe ars on th e labe l. E nter th e init ial
characters of the PLU name in the Search field. The PLU list displays only those PLUs with
names that start with the entered t ex t. For example, entering “BE EF” di sp lays all PLU names
starting with the word “beef”. (The search is not case-sensitive: entering “beef” is the same as
entering “BEEF”.)
You can also use the wildcard characters (‘*’ and ‘?’) to spe cif y a more detailed search
condition. For example, entering “*BEEF” displays all PLU names containing the word “beef”.
NOTE: The search re-executes automatically each time you type a character. The response
may be a bit slow on older computers. In this case, allow a few seconds for the list to
update.
If you do not know the PLU number or name
When the cursor is in the Search field, the PLU list only displays those PLUs that match the
search condition. Move the cursor back to the PLU No. field (e. g. click on t he field ) to clear the
search results and display all PLUs in the P LU list.
Next, use the scroll bar, the up and down arrow keys, or the PageUp and PageDown keys to
scroll the PLU list until you find the P LU y o u are looking for.
See Chapter 6 Creating and Editing PLUs for a full explanation of the PLU Search window.
8
Page 14
Adding a New PLU
Click the Add button in the PLU Search window. This opens a dialog for you to enter then PLU
number. The number defaults to the next unused PLU number. If you wish to use a different
number, enter an unused number, then press Return or click OK to open the PLU Edit dialog.
If you entered the number of an existing PLU, the data for that PLU is displayed. Otherwise, a
new PLU is created and the initial values of the fields in the lower half of the dialog are set to
their default values.
The cursor is initially positioned in the PLU description field. Enter the PLU description. Next,
use the mouse or TAB key to move the cursor to the price field and enter the PLU price.
Similarly, enter any other values you wish to change
Finally, click the OK button. This saves the PLU in the database and ret ur ns y ou to the PLU
Search window. Use the procedure described in Finding a PLU above to check that the PLU
has been added.
Editing and Deleting PLUs
When you have found the new PLU, click on the P LU name in the list to select it. The selected
PLU appears highlighted.
To edit the selected PLU
Click the Edit button. A PLU Edit dialog opens displaying the data for that PLU.
The operation of the PLU Edit dialog is described in more detail below. For now, click the
Cancel button at the top right of the window. This returns you to the PLU Search window.
To delete the selected PLU
Click the Delete button. A dialog opens asking whether or not to delete the PLU. Click No if you
don’t want to delete the PLU. If you click Yes, the PLU is deleted from the database.
9
Page 15
You can also delete a range of PLUs by selecting Delete Range from the Edit menu. For
example, you can use this function to de lete the sample PLUs loaded from the Astra at initial
setup.
Changing PLU Prices
Click the Price Changes button in the PLU Search window to open a dialog for changing PLU
prices (or select Price Changes in the Scales menu).
The purpose of this feature is to allow you to rapidly change the prices of a numb er o f PLUs
without having to edit each PLU in the PLU Edit dialog.
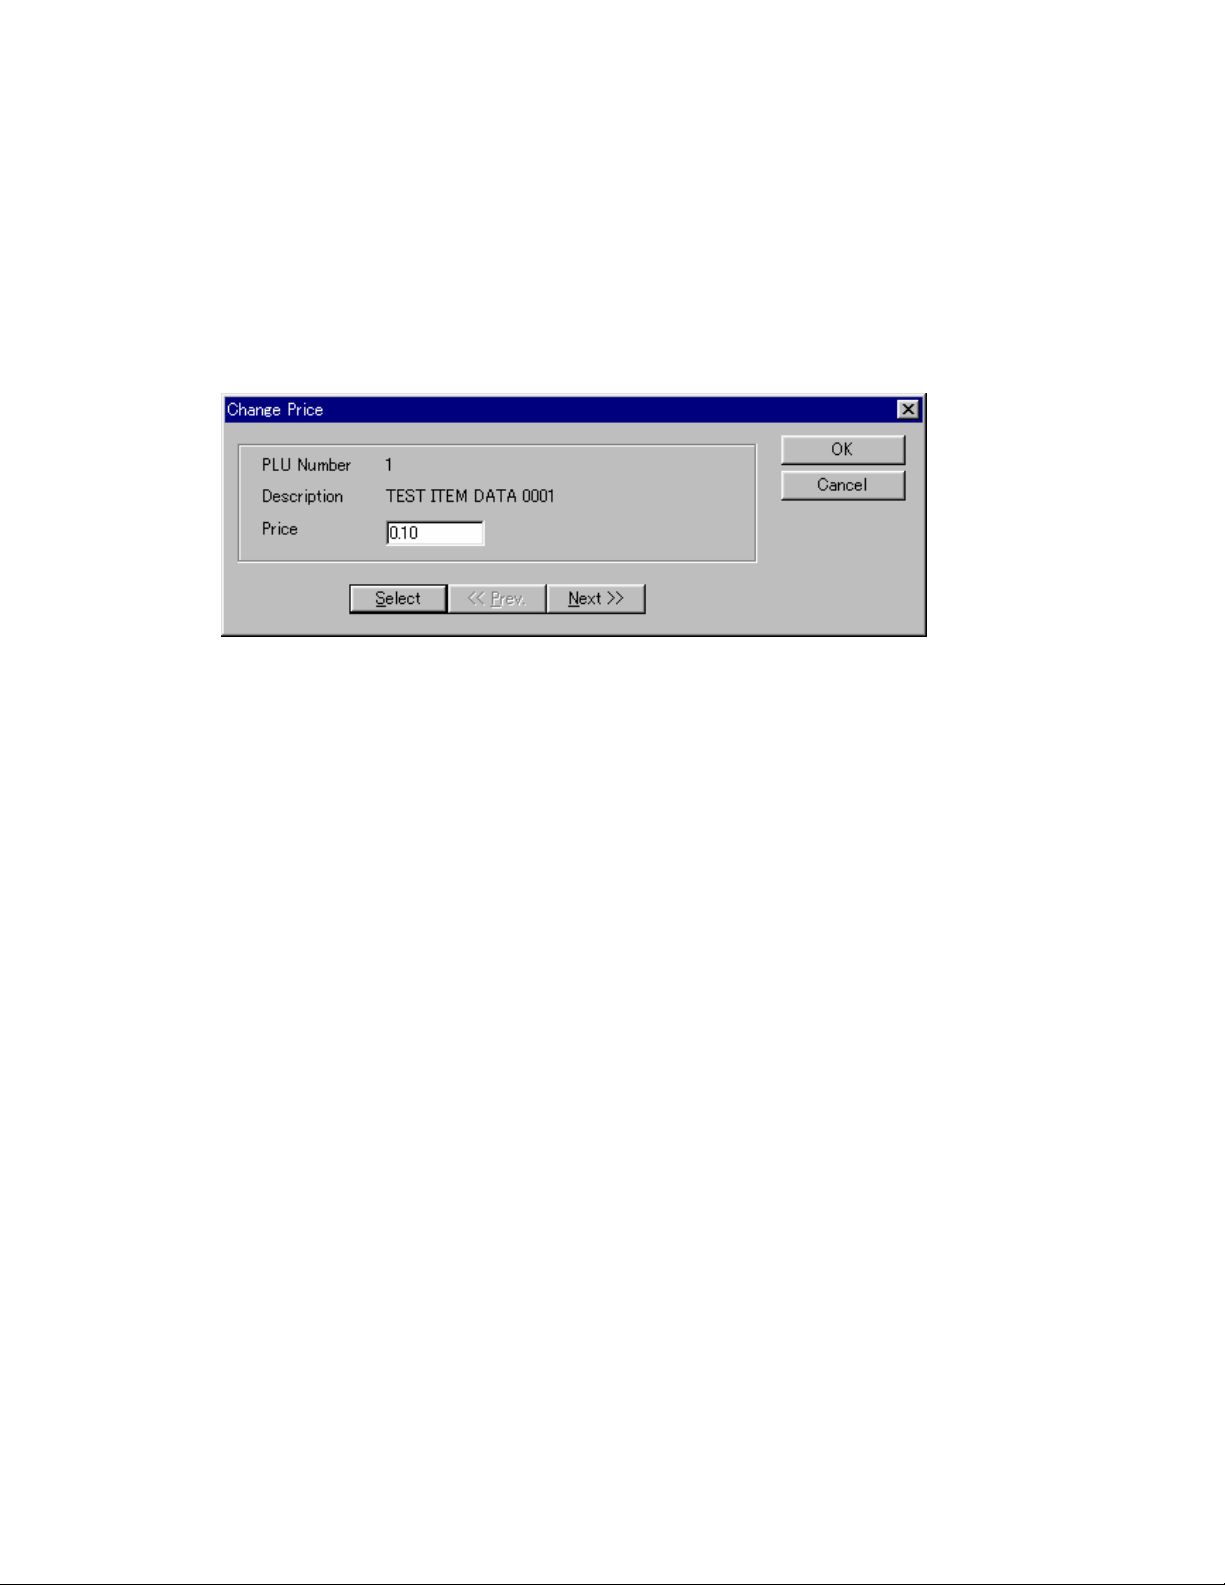
Using the Price Change Dialog
Enter the new price and press Enter. This saves the sp ecif ied price in the database. A PLU
Search dialog opens (defaulted to the next sequential PLU number) for you to specify the next
PLU number.
The Next and Prev buttons jump to the next or previous PLU respectively. The Select button
opens a PLU Search dialog for you to select another PLU.
10
Page 16
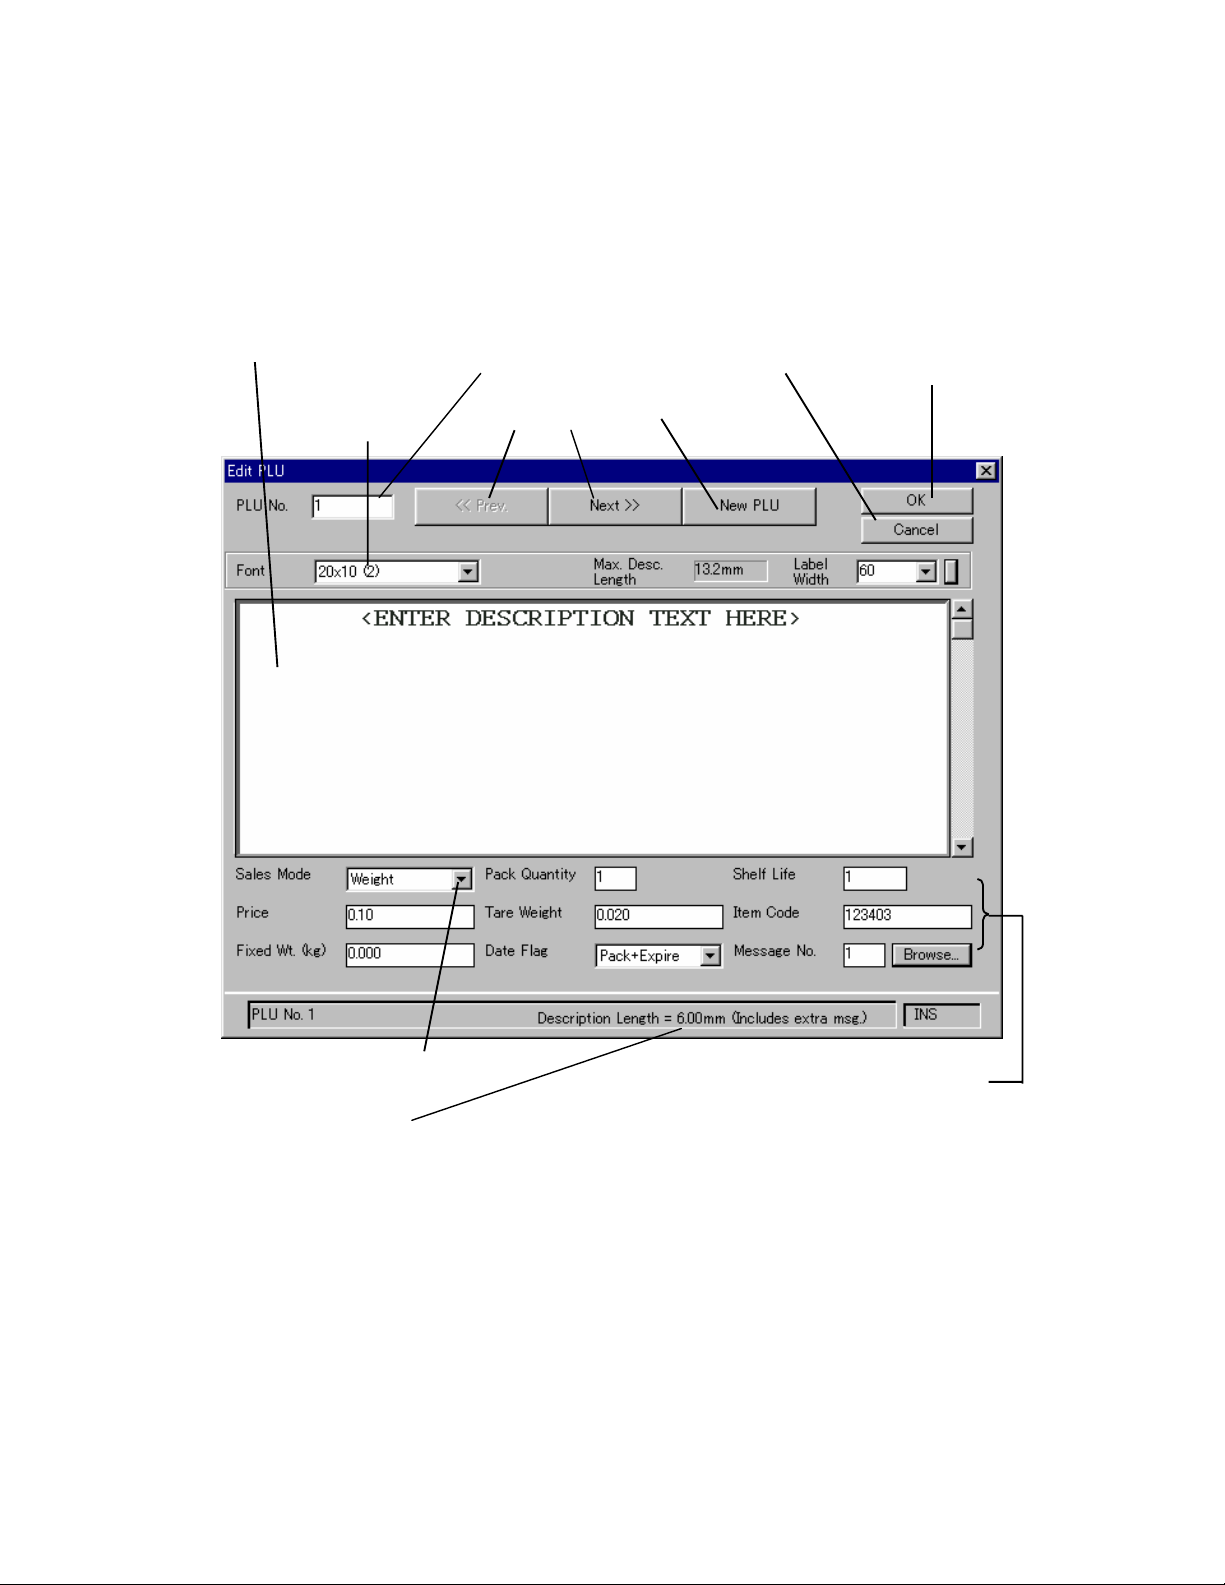
Using the PLU Edit Dialog
g
p
The following are some quick tips to get you started using the PLU Edit dialog. See Chapter 5
Editing PLUs for a full explanation.
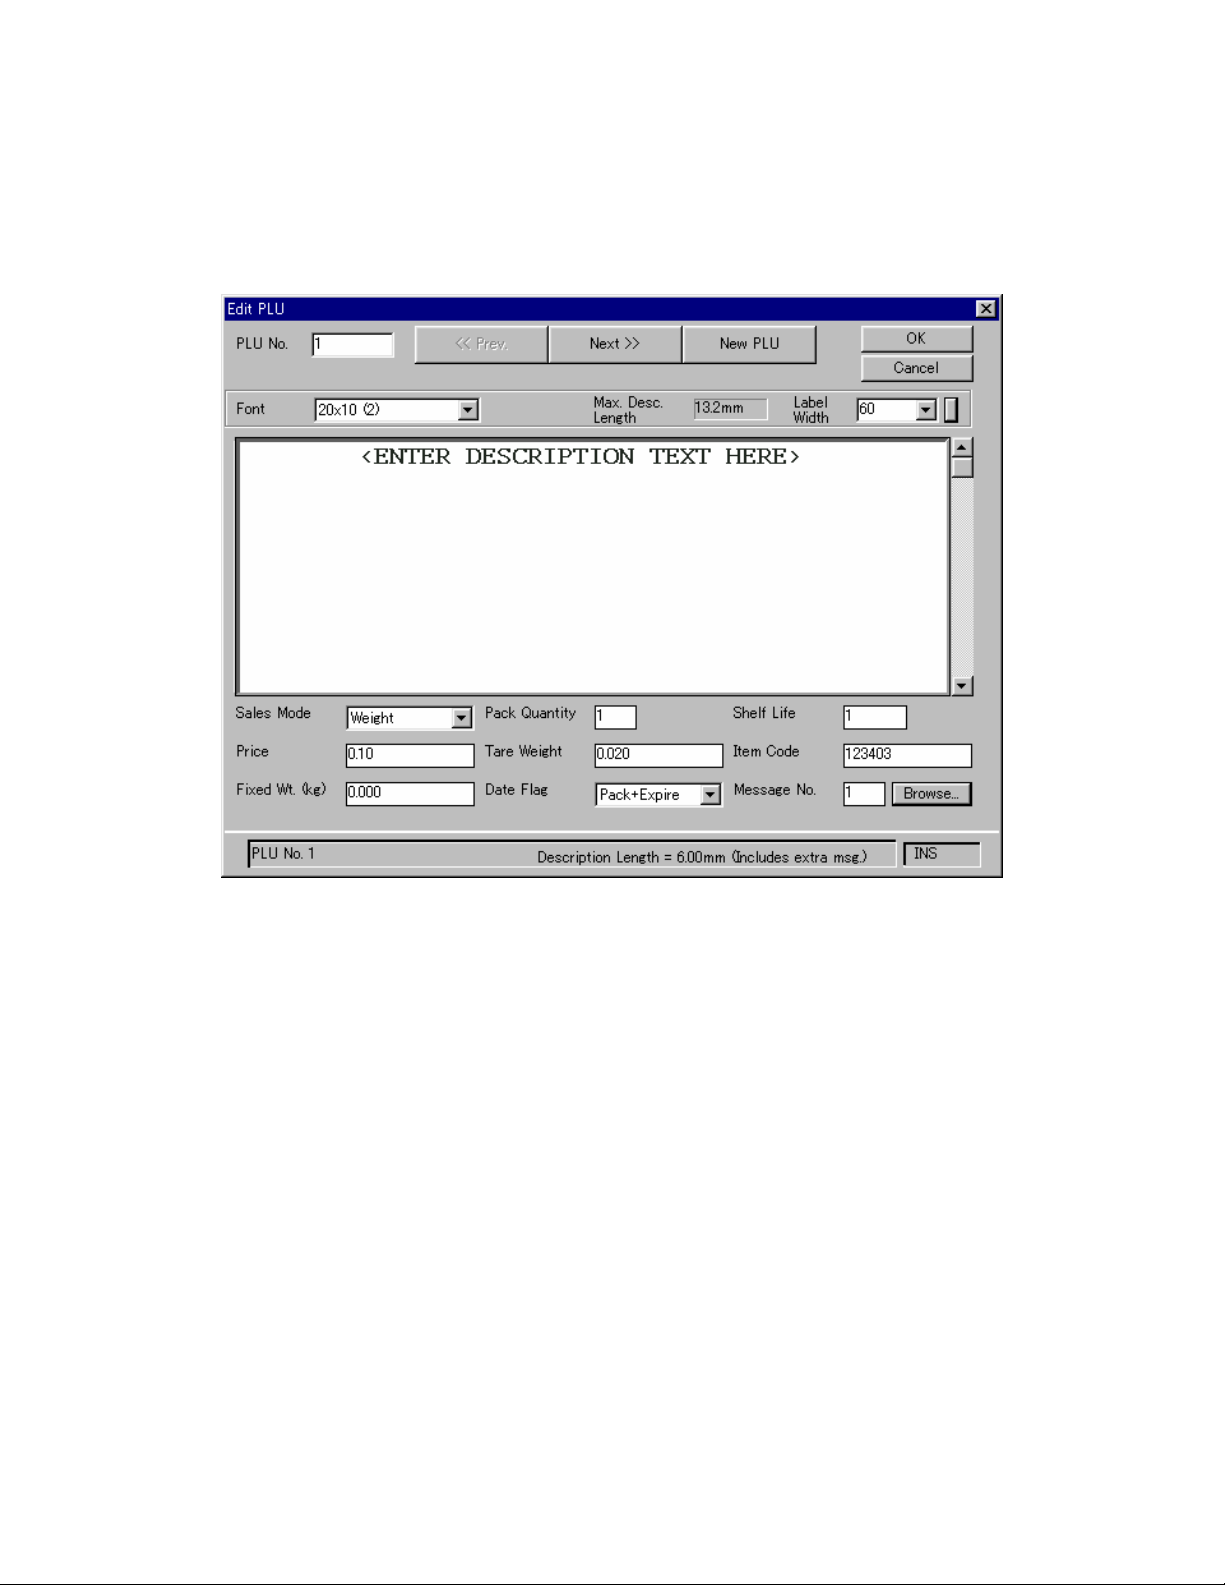
The appearance of the PLU Edi t window depends on how your system is conf igured. The figure
below shows an example.
PLU description
Font settings for
description text
Enter a new value to
save to a different PLU
Display next or
revious PLU
Close without
saving
Add a new PLU
Save PLU and close
dialog.
Click button to display list of
options
Length of current description text,
including any extra message
PLU settings. Use TAB key or mouse to select a
field, then enter value or select from list.
Clicking the Browse button for the Message No.
opens a dialog for you to select from a list of the
available messa
es.
11
Page 17

Entering the PLU description
The large field in the middle of the PLU Edit dialog contains the PLU description. Click on the
field to set the input focus and use the mouse or arrow keys to move the cursor. Use the
operations described below to enter or modify the description text.
Operation Explanation
Insert text
Position the cursor at the desired location and enter text from the keyboard.
The font and label width determine how many characters are displayed per
line. Press the INS key to switch between insert and overwrite mode.
Select text
Drag with the mouse or hold down the shift key and use the left or right arrow
key to move the cursor over the desired text. The selected text appears
highlighted.
Change line
font
A different font can be set for ea ch lin e. Position the cursor in the line and
select the desired font from the Font field. You can also press Ctrl+F to step
through the available fonts.
Change label
width
Set the Label Width field to the actual label width to be used for this PLU.
This updates the description field to only display as many characters as will fit
on the label.
(The Label Width field is used for display only and ha s no effect on the
scales.)
Cut, Copy or
Paste
Use the Edit menu or the standard Windows keystroke s to cut, copy or paste
description text.
Entering the PLU settings
The lower half of the window displays the va rio us PLU settings. Which fields are displaye d
depends on how your system is configured.
Use the mouse or TAB key to move to a field, then enter or select the desired value. An error
message appears if you try to move to another field when the value of this field is outside the
allowed range.
NOTE: You can only enter digits. None of the PLU fields accept letters or punctuation symbols.
Changing the PLU number
The PLU number field is at the top le ft of the Edit dialog . You can cha nge the va lue to sav e the
displayed data with a differen t PLU numb er. In th is case, a warning message app ears if a PLU
with the specified number already exists. Saving the PLU data to a new PLU number does not
delete the old PLU number and leaves t h e da ta for the old PLU unchanged.
Saving your changes
Click the OK button. This saves the PLU in the database .
12
Page 18
Changing the displayed PLU
Click the Next>> or <<Prev buttons to display the data for th e next or pre vious PLU number . (A
warning message appears if you have not saved your changes to the current PLU.)
Adding a new PLU
To add a new PLU, click the New PLU button. This opens a PLU Search dialog to specify the
number of the new PLU. En ter t he new PLU nu mber the n press Retu rn. This reset s all fiel ds in
the Edit dialog to their default v a lue s. Th e new PLU is not saved until you click the OK button.
Closing the PLU Edit window
Click the OK to save your changes and close the PLU Edit dialog, or Cancel button to close the
dialog without saving.
Extra Messages
Extra messages are a way of defining add itional text, such as ingredient lists, to appear on
labels. You use the extra message function to create and edit the extra messages, then use the
PLU Edit dialog (described above) to assign extra messages to PLUs.
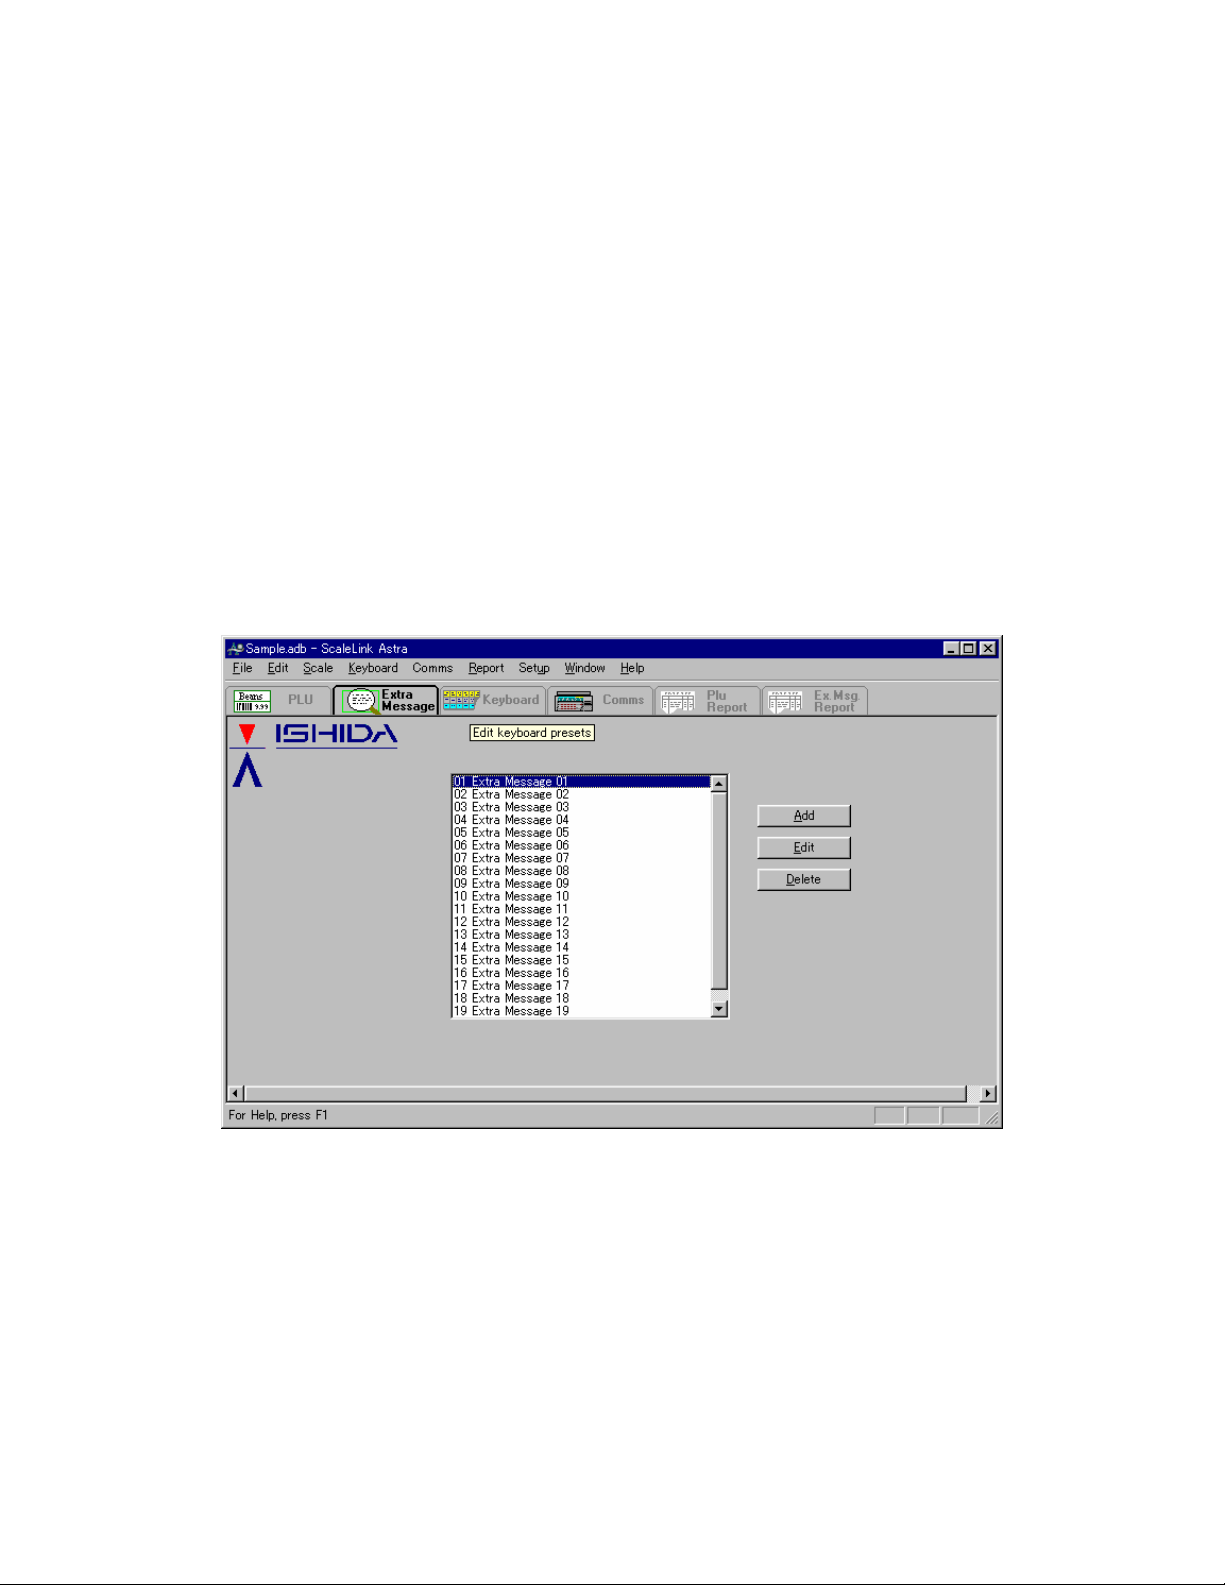
To display the extra message screen, click th e extra messages tab at the top of the AstraLink
window (below the menu bar). The figure below shows an example.
Click the Add button to create a new message, or click on an existing message to select, then
click the Edit button to edit the message (or simply double-click on a message). In either case,
a dialog opens to edit the message text , as shown below.
13
Page 19

Enter the message text in the same way as you entered the PLU description text in the PLU
Edit dialog.
After you have entered the message text, enter a name, then click OK to save the message.
The name is used to identify the message inside AstraLink (when assigning the message to a
PLU, for example) and is not sent to t he scale.
Storage Instructions (Sweden Only)
Storage instructions are only applicabl e t o th e Sweden version of the Astra. The operation is
identical to extra messages, as described ab ove.
14
Page 20

Nutrition (USA Only)
This feature is only available on USA-version scales.
The nutrition feature defines the information to be printed in the nutrition panel on PLU labels
To display the nutrition screen, click the nutrition tab at the top of t he AstraLink window (below
the menu bar). The figure below shows an example.
Click the Add button to create a new nutrition record, or click on an existing record to select,
then click the Edit button to edit the nutrition infor mation (or simply doub le-click on a record). In
either case, a dialog opens to edit the nu tr ition information, as shown below.
15
Page 21

Enter the nutrition information in the dialog, then click OK to save the message.
The nutrition Name is used to identify the nutrit ion record inside AstraLi nk (when assign ing the
nutrition information to a PLU, for example) and is not sent to the scal e.
To copy nutrition data to a different nutrition number, enter the new number in the Nutrition No.
field. A warning message appears if nutrition data is already assigned to the new number.
16
Page 22

Keyboard
The keys on the Astra keyboard can be assig ned t o part icul ar PLUs, tare weight s, and va rious
other functions. The scale keyboard has a shift key, so you can define two mean ing s for each
key. These are called the upper (standard) and lower (shift key pressed) keys respectively.
To display the keyboard screen, click th e key board tab at the top of the AstraLink window
(below the menu bar). The figure below shows an examp le.
The keyboard screen can be used to edit three different types of data. Use the Display buttons
on the bottom left of the windo w to switch between the three options.
17
Page 23

1. Upper Keys
This displays the meaning assigned to each upper key. Meanings can only be assigned to the
keys on the left side of the keyboard . Th e rig hthand side keys appear gray.
To edit the settings for a key, click on t he key t o hi ghlight it then click th e Edit button on the left
of the window (or simply double click on the key). This displays the dialog shown below.
The upper key meaning is set at the top left of the dialog. The Key Type selects the key
meaning and Data specifies the value associated with the key. (In this case, the key is
assigned to PLU number 10.) The funct ions of the other parts of the dialog are explained below.
Set the Key Type and Data, then click OK to exit.
2. Lower Keys
This displays the meaning assigned to each lower key. The "lower key" means the key meaning
when the key is pressed on the scale at the same time as the Shift key.
To display the lower preset key meanings, click on th e Lower button on the bottom left of the
window.
The operation for setting lower key meanings is the same as for the upper keys.
3. Keysheet
In addition to defining the preset key meanings, you can also use AstraLink to prin t the
keysheet template.
To display the keysheet template, click on the Keysheet button on the bottom left of the
window.
To edit the settings for a key, click on t he key t o hi ghlight it then click th e Edit button on the left
of the window (or simply double click on the key). This displays the dialog shown above.
The keysheet printing settings are on the right side of the dialog.
Use the dialog to set the text, font, color and other settings for the key, then click OK to exit. The
operation is described in detail in Chapter 7 Keyboard.
Using the keyboard window
The explanation above briefly describes the three types of key data you ca n set usin g this
window. After you have finished setting the keys, clic k the Save button at the top left of the
window to save your changes in the database.
To print the keysheet, click the Print button at the top left of the window. A Print Preview
command is also available in the File menu.
18
Page 24

For a full explanation of how to use the keyboard function, see Chapte r 8 Keyboard.
Scale Communications
After you have set the PLUs and othe r scale data, use the scale communications functio n to
send the data to the scale.
To display the scale communications screen, click the Comms tab at the top of the AstraLink
window (below the menu bar). The figure below shows an example.
The procedure for sending data to the scales is as follows:
1.
Click the Send All Data button in the scale communications screen. This displays the
following dialog asking whether to append the data being sent to the existing scale data
or whether to overwrite the ex isting scale data. Sele ct the desired option, then click OK.
19
Page 25

NOTE: The operation of the Astra scale may vary some wha t from that described below,
depending on which Astra model you are using. If in doubt, consult the Astra Operation
Manual.
2. Next, the following dialo g appears with instru ctions on how to setup the scale to receive
data.
Check that the cable connecting the PC to the scale is plugged in correctly.
Also, remove any keysheet from the Astra keyboard to expose the programming
keyboard.
Turn on the Astra and set to REGISTRATION mode (on the Astra keyboard, enter
9000, then press the MODE key).
3. Press the down arrow on the Astra keyboard until "Communication" appears, then
press ENTER, followed by the down arrow. The scale should display "receive data".
4.
Press ENTER again. The scale displays "receiving" indicating that it is now ready to
receive data.
5.
Go back to the PC and click the OK button in the abov e dialog t o start send ing. The PC
starts sending data to the sca le.
If the data transfer is successful, the scale will display briefly "data received OK", then
"PLU".
If communications are not successful, see the "Troubleshooting" section in Starting
AstraLink for the First Time ab ove.
See Chapter 3 Com municating with the Scal e for full details on how to transfer data to and from
the scale.
20
Page 26

PLU List and Extra Message List Reports
AstraLink can print reports listing all registered PLUs and all registered extra messages.
To display the report screen, click the Report tab at the top of the Astra Link window (below th e
menu bar). The figure below shows an example for the PLU report.
The tool bar at the top left has commands fo r spe cifying the range of PLUs to display (the
Select buttons), paging through the repo rt (<Prev Page and Next Page> buttons), and printing
or exporting. Exporting outp ut s the report data to a text file in a forma t su itable for reading into
software packages such as Microsoft Excel.
You can also select whether to display the entire description for each PLU or the first line only.
The operation for the Extra Message Report is the same.
PLU Production Report
Sales (production) totals for each PLU can b e accumulated on the Astra and received by
AstraLink to generate a production report.
The operation is similar to the PLU and Extra Message list reports described above.
21
Page 27

Other Features
The above sections have given you a quick introduction to the main AstraLink operations. The
following lists additional features of AstraLink and where to look in the manual for an
explanation.
Feature Description Manual Chapter
Store Name and
Address
Change
Database
Set the store name and address to
print on labels
Selects which database to edit Ö See Chapter 4 The PLU
Ö See Chapter 9 Store Name and
Address
Database
22
Page 28

3. Communicating with the Scale
AstraLink communicates with the scale using one of the PC's serial ports.
To display the scale communications screen, click the Comms tab at the top of the AstraLink
window (below the menu bar). The figure below shows an example.
3.1 Receiving Data From the Scale
The procedure is as follows.
1.
NOTE: The operation of the Astra scale may vary some wha t from that described below,
2. AstraLink is now ready to receive data from the scale. Ho wever, to start the tr ansfer you
3.
4. Next, press the down arrow key a number of times until "communication" appears.
Click the Receive from Scale button. This displays the dialog show belo w.
deepening on which Astra model you are using. If in doubt, consult the Astra Operation
Manual.
need to perform the following operations on the scale.
Remove any keysheet from the A st ra keyboard to expose the programming keyboard.
On the Astra, enter 9000 using the numeric keys on the ri gh t, then press the MODE
key. The scale display shows "registration" ind i cat i n g re gistration mode.
23
Page 29

5.
Press the ENTER key once to display "Send Data", again to display "All Data", t he n a
third time to start sending data.
Alternatively, when "All Data" is displayed, press the down arrow to select the type of
data to send, then press ENTER to start sending data.
If the data transfer is successful, the scale will display briefly "Sending ", then "Data
Sent OK", then "All Data".
If communications fails, see "Troubleshooting" in Chapter 2 Getting Started .
6. Go back to the PC. If the data transfer is successful, the foll owing dialog appears
asking you what to do with the receive d data.
The right side of the dialog contains a summary of the received data.
Notes
1. In addition to the data you can edit in AstraLink (PLUs, etc.), the scale also sends label
format and configuration data. If you sav e the receiv ed data in a data base, this inf ormation
is also saved. This means that the AstraLink database provides a full backup for the scale.
However, care is required as, if you make any changes to the scale configuration at the
scale itself, these will be overwritten the next time you send data to the scale.
2. In the USA and Mexico Astra models, the configuration data includes the label format setup
data and label format number. Wh en send ing data from the scales, these are not included
in the “ALL DATA” menu command. Instead send this data separately using the “LABEL
DATA” and LABEL DATA 2” commands in th e Astra menu.
The left side of the dialog provides you with a options for what to do with the received data.
Do not load received data
This simply discards the data without saving.
Load into new database
This creates a new database. You will be prompted to specify the file name.
Load into current database (default)
In this case, you ne ed to specify wh at to do if the same PLU or messag e number, etc. is presen t
in both the current databa se and the rece ived scale dat a. The default is t o update the databa se
with the data from the scale.
Note: Some data is used in AstraLink only and is not sent to the scales. Accordingly , when
you receive data back from the scale, the received data does not include this internal
information. AstraLink fills in this missing information by setting default values. In other
words, if you send data to the scale then read it back, this information will be lost.
This includes label width information and the "Name" for extra messages.
24
Page 30

3.2 Sending Data to the Scale
As you can see in the scale communica tions window, y ou can either send all data o r a selected
type of data only.
The procedure is as follows.
1. Click the button corresponding to the type of data you wish to send. This displays a
dialog asking whether to append the data being sent to the existing scale data or
whether to overwrite the existing scale data. Select the desired option, then click OK.
2. Next, the following dialo g appears with instru ctions on how to setup the scale to receive
data.
Check that the cable connecting the PC to the scale is plugged in correctly.
Also, remove any keysheet from the Astra keyboard to expose the programming
keyboard.
Turn on the Astra and set to REGISTRATION mode (on the Astra keyboard, enter
9000, then press the MODE key).
3. Press the down arrow on the Astra keyboard until "communication" appear s, then
press ENTER, followed by the down arrow. The scale should display "Receive Data".
4.
5.
Press ENTER again. The scale displays "Receiving" indicating that it is now ready to
receive data.
Go back to the PC and click the OK button in the above dialog to start sending. A
message appears when sending completes.
If communications fails, see "Troubleshooting" in Chapter 2 Getting Started .
25
Page 31

26 27
Page 32

4. The Astra Database
AstraLink stores the scale data in a database. Whenever you change the scale data, whether
by receiving data from the scale or using the AstraLink screens, AstraLink updates this
database with the new data.
Selecting the Database
When you start AstraLink, the prog ra m automatically loads the database tha t was open when
you last exited.
As most stores will keep all data in a si ngle datab ase, no furt her action is requ ired and you can
start editing scale data immediately.
However, in special cases such as when using the Astra for different purposes, you may use
AstraLink to edit multiple databases. If you need to change the database, click Change
Database in the File menu to open a dialog for sele cting the new database file. Selecting a
database file closes the current database and op ens the new databa se. You can only have one
database open at a time.
Automatic Database Backup
AstraLink can automatically create a backu p of the current database each time the p rog ra m
starts. The backup database file is created in th e BACKUP sub-directory of the directory
containing the database file. The dat e o f the backup is appended to the file name. Astra Lin k
maintains three or four backups ranging ap proximately one month.
To restore a backed up database file, use Change Database in the File menu to open the
database file, then use Save As to save under a new name.
The automatic backup function can be set on or off from the Options dialog. Select Options
from the Setup menu.
Page 33

5. Editing PLUs
This section describes how to manage PLU data.
5.1 Using the PLU Search Window
The PLU search window opens automatically when you start AstraLink. Use the PLU Search
window for the following operations.
• Finding a PLU
• Adding a new PLU
• Editing or deleting a PLU
• Deleting a range of PLUs
• Cutting and pasting PLUs
• Quick price changes
Finding a PLU
If you know the PLU number
Enter the PLU number in the PLU No. field. The sp ecified PLU appears selected in the PLU list.
If you know some or all of the PLU name
The PLU name is the first line of t he P LU de script ion th at appe ars on th e labe l. Ente r the in itial
characters of the PLU name in the Search field. The PLU list displays only those PLUs with
names that start with the entered text. For example, enteri ng “BEEF” displays all PLU names
starting with the word “beef”. (The search is not case-sensitive: entering “beef” is the same as
entering “BEEF”.)
You can also use the wildcard characters (‘*’ and ‘?’) to spe cif y a more detailed search
condition. For example, entering “*BEEF” displays all PLU names containing the word “beef”.
28
Page 34

NOTE: The search re-executes automatically each time you type a character. The response
may be a bit slow on older computers. In this case, allow a few seconds for the list to
update.
If you do not know the PLU number or name
When the cursor is in the Search field, the PLU list only displays those PLUs that match the
search condition. Click the PLU No. field to clea r the search resul ts and display all PLUs in the
PLU list.
Next, use the scroll bar, the up and down arrow keys, or the PageUp and PageDo wn key s t o
scroll the PLU list until you find the P LU y o u are looking for.
Adding a New PLU
1.
2.
3.
Click the Add button or select Add from the PLU menu. This opens a PLU Selection
dialog for you to specify the PLU number. The next free PLU number appears as the
default. Enter the PLU number then click OK.
Next, the PLU Edit dialog opens displaying the data for the new PLU.
The fields in the lower half of the window are set to their default values.
The specified PLU number is set in the PLU numb er field, but you can change the
number if desired. (A warning message appears if you try to save the PLU with the
same number as an existing PLU.)
The operation of the PLU Edit window is described in 5.2 Using the PLU Edit Dialog.
Enter the PLU description and other data , then click the OK button. This saves the PLU
in the database.
Click the Close button to close the window and return to the PLU Search window. Use
the procedure described in Finding a PLU above to check that the PLU has been
added.
Editing or Deleting a PLU
1.
2.
3.
Use the procedure described in Finding a PLU above to find the PLU to edit or delete.
Click on the PLU in the list to select.
To edit the PLU: click the Edit button, select Edit PLU from the PLU menu, or
double-click on the PLU in the list.
This opens a PLU Edit window displayin g t he data for the selected PLU.
The operation of the PLU Edit window is described in 5.2 Using the PLU Edit Dialog.
To delete the PLU: click the Delete button.
A dialog opens asking you to confirm whether to delete the PLU. Take care as there is
no means of undeleting a deleted PLU .
Click Yes to delete the PLU from the dat abase.
29
Page 35

Deleting a Range of PLUs
1.
2.
3.
Select Delete Range from the PLU menu. This opens a dialog for you to specify the
range of PLUs to delete.
Enter the start and end PLU numbers or use the Select buttons to open a PLU selection
dialog. The PLU selection dialog operates in the same way as the PLU Search window
(see Finding a PLU above).
Click OK to delete the PLUs from the database.
Cutting and Pasting PLUs
You can use the Edit menu or the standard Windows keystroke s to cut, copy and paste PLUs in
the PLU list field of the PLU Search windo w.
When pasting a PLU, a dialog appears asking how to paste the PLU into the database
(overwrite existing PLU or assign a new PL U number).
Quick Price Changes
This feature is provided to allow you to upda te prices quickly without editing the entire PL U.
1.
To change prices, click the Price Changes button or select Price Chang es from the
Scales menu.
This opens the price change dialog shown be lo w.
30
Page 36

2. Enter the new price and press Enter. This saves the specified price and opens a PLU
search dialog for you to select the next PLU number.
This feature is useful if you have a list of PLU price changes to make that are not in
sequential order.
The intention is to allow you to change a large number of prices with the minimum
number of keystrokes.
3.
4.
If necessary, use the mouse to click the <<Prev, Next>>, or Select button to find the
desired PLU number.
Clicking the Select button opens a PLU selection dialog. The PLU selection dialog
operates in the same way as the PLU Search window (see Finding a PLU above).
When finished, click the OK button (to save the currently displayed price change) or
Cancel button (to close the dialog without saving).
31
Page 37

5.2 Using the PLU Edit Dialog
This section describes how to use the PLU Edit di alo g.
The contents of the PLU Edit window depends on ho w your system is configured. See 5.1 for
an example.
The main elements of the PLU Edit window are as follows:
Control Element Explanation
PLU description
field and associated
controls
PLU data fields
OK button
Cancel button
<<Prev and Next>>
buttons
Located in the upper half of the dialo g. The PLU description f ield consists
of the controls for sett ing the font and label widt h, and an ed it area (with a
scroll bar) for editing the description text.
How to use this field is explained below (see Editing the PLU description).
Located in the lower half of the dialog. These fields are used to set the
various parameters, such as the price, th at determine how the PLU is
printed on the scales.
Use the mouse or TAB key to move the cursor to the desired field and
enter a value or select an option from the list. A message appears if you
enter a value outside the allowed range.
Located at the top left of the di alog. Click to save any changes you have
made and close the dialog.
Located at the top left of the dialog. Click to close the dialog without
saving.
Located at the top of the dialog. Click to display the next or previous PLU
number. A warning message appear s if the current PLU has any unsaved
changes.
32
Page 38

Control Element Explanation
New PLU button
PLU No. field
Extra Message and
Nutrition "Browse"
buttons
Click to create a new PLU. A PLU search dialog opens for you to specify
the new PLU number.
Located on the left of the dialog. Enter a new PLU number if you wish to
save the displayed data as a new PLU. A warning message appears
when you save the PLU if a PLU with that nu mber a lre ady exist s. Sav ing
the PLU data to a new PLU number does not delete the old PLU number
and leaves the data for the old PLU unchanged.
Located next to the extra message and/or nutrition field.
This opens a dialog displaying a list of the ava ila ble extra messages or
nutrition information. Select from the list and click OK to set. You can also
use the Edit button in the selection dialog to edit the selected extra
message or nutrition data.
33
Page 39

Editing the PLU description
The PLU description field consists of controls for setting the font and label width, and an edit
area (with a scroll bar) for editing the de scrip tion text.
Click on the edit area to select the fiel d an d u se the mouse or arrow keys to move the cursor
within the field. The following operations are available in the PLU descript ion field.
Operation Explanation
Insert text
Select text
Change line
font
Change label
width
Description
Text Length
Cut, Copy or
Paste
Position the cursor at the desired location and enter text from the keyboard.
The font and label width determine how many characte rs are displayed per
line. Press the INS key to switch between insert and overwrite mode.
Drag with the mouse or hold down the shift key and use the arrow keys to
move the cursor over the desired text. The selected text appears highlighted.
A different font can be set for ea ch lin e. Position the cursor in the line and
select the desired font from the Font field.
Alternatively, press Ctrl+F t o step through the available font s.
Set the Label Width field to the actual label width to be used for this PLU.
This updates the description field to only display as many characters as will fit
on the label.
NOTE: This setting is only used within AstraLink. It has no effect on the actual
label width on the scale.
The maximum description text length i s disp lay e d next to the Label Width
field. The length of the currently entered description te xt and any selected
extra message is displayed on the status line at the bottom of the dialog.
A warning message appears when you try to save the P LU if the description
length is too long. Description lengths that are too long do not print correctly
on the Astra.
NOTE: The maximum description length is set by Label Sizes in the Setup
menu.
Use the standard Windows keystrokes (listed below) to cut, copy or paste
description text.
Keystroke Operation
Ctrl+X or Shift+Del Cut
Ctrl+C or Ctrl+INS Copy
Ctrl+V or Shift+INS Paste
34
Page 40

6. Extra Messages and Storage Instructions
This chapter describes how to create and edit ex tra messages.
Extra messages are a way of defining add itional text, such as ingredient lists, to appear on
labels. You use the extra message function to create and edit the extra messages, then use the
PLU Edit dialog (described above) to assign extra messages to PLUs.
NOTE: Storage instructions are only applicable to the Sweden version of the Astra. The
operation is identical to extra messages, as described below.
Creating and Editing Extra Messages
1. To display the extra message screen , click the extra messages tab at the to p of the
AstraLink window (below the menu bar) . The figure below shows an example.
2.
Click the Add button to create a new message, or click on an existing message to
select, then click the Edit button to edit the message (or si mply double-click on a
message).
A dialog opens to edit the message.
35
Page 41

3. Enter the message name. The name entered here appears in the extra message
screen (step 2 above).
4. Enter the message text. The operation of the message text field is described below.
5.
6.
Optionally, you can change the me ssage nu mber in the Msg No. field to save the
displayed message with a different number. A warning message appears when you
click the OK button if a message with that number already exists.
When you have finished, click OK to save the message.
This returns you to the extra message screen.
36
Page 42

Editing the message text
The message text field con sists of controls f or setti ng the fo nt and label width, and an edit are a
(with a scroll bar) for editing the message text .
Click on the edit area to select the fiel d an d u se the mouse or arrow keys to move the cursor
within the field. The following operations are available in the PLU descript ion field.
Operation Explanation
Insert text
Select text
Change line
font
Change label
width
Cut, Copy or
Paste
Position the cursor at the desired location and enter text from the keyboard.
The font and label width determine how many characters are displayed per
line. Press the INS key to switch between insert and overwrite mode.
Drag with the mouse or hold down the shift key and use the left or right arrow
key to move the cursor over the desired text. The selected text appears
highlighted.
A different font can be set for ea ch lin e. Position the cursor in the line and
select the desired font from the Font field.
Alternatively, press Ctrl+F t o step through the available font s.
Set the Label Width field to the actual label width to be used. This upda tes
the message field to only display as many cha ra cte rs as will fit on the label.
NOTE: This setting is only used within AstraLink. It has no effect on the actual
label width on the scales.
Use the standard Windows keystrokes (listed below) to cut, copy or paste
message text.
Keystroke Operation
Ctrl+X or Shift+Del Cut
Ctrl+C or Ctrl+INS Copy
Ctrl+V or Shift+INS Paste
Assigning an Extra Message to a PLU
The Message No. field i n the PLU Edit dialo g assigns the extra messa ge for that PLU. Use th e
Browse button on the right of the field to display a dia log listing the available extra messages.
Set Message No. to zero to not assign any extra message to the PLU.
Deleting an Extra Message
1. To display the extra message screen , cl ick th e extra messages tab at the top of the
AstraLink window (below the menu ba r) .
2.
3.
Click on a message to select it then click the Delete button. A warning message
appears asking you to confirm deletion.
Alternatively, you can select Del et e Ra nge from the Edit menu to delete a range of
messages. This opens a dialog for you to select the ra nge of messages to delete.
37
Page 43

7. Nutrition (USA)
This feature is only available on some USA-version scales.
The nutrition feature defines the information to be printed in the nutrition panel on PLU labels
Creating and Editing Nutrition Information
1. To display the nutrition screen, click the nutrition tab at the top of the AstraLink window
(below the menu bar).
2.
Click the Add button to create a new nutrition record, or click on an existing nutrition
record to select, then click the Edit button to edit the nutrition information (or simply
double-click on a nutrition re cord).
The dialog shown below opens to edit th e nu trition information.
3. Enter the nutrition information name. The name entered here appears in the nutrition
screen (step 2 above).
4. Enter the nutrition information in each field of the dialog.
5.
6.
Optionally, you can change the nu trition number in the Nutrition No. field to save the
displayed nutrition record with a different number. A warning message appears when
you click the OK button if a nutrition record with that number already exists.
When you have finished, click OK to save the nutrition information.
This returns you to the nutrition screen.
Assigning Nutrition Information to a PLU
The Nutrition field in the PLU Edit dialog assigns the nutrition information for that PLU. Use the
Browse button on the right of the field to display a dia log listing the available nutrition
information.
Set the Nutrition field to zero to not assign any nutrition information to the PLU.
38
Page 44

Deleting Nutrition Records
1. To display the nutrition screen, click the nutrition tab at the top of the AstraLink window
(below the menu bar).
2.
3.
Click on a nutrition record to select it then click the Delete button. A warning message
appears asking you to confirm deletion.
Alternatively, you can select Del et e Ra nge from the Edit menu to delete a range of
nutrition records. This opens a dialog for you to select the range of nutrit ion records to
delete.
39
Page 45

8. Nutrition and Ingredients (NZ)
This feature is only available on some New Zealand-version scales.
The nutrition feature defines the information to be printed in the nutrition panel on PLU labels
Creating and Editing Nutrition Information
1. To display the nutrition screen, select the PL U in the PLU window and click the
Nutrition button
2. Enter the nutrition data in the fields. If you wish you can copy the nutrition data from
another PLU by clicking the Copy From button and selecting the PLU from the list.
3.
When you have finished, click OK to save the nutrition information.
This returns you to the PLU screen.
40
Page 46

Creating and Editing Ingredients Information
1. To display the ingredients screen, select the PLU in the PLU window and click the
Ingredients button.
2. The operation of the ingredients screen is the same as for extra messages. Enter the
ingredients text and click the OK button to save.
Deleting Nutrition Data
1.
Select the PLU in the PLU window and select Delete Nutrition from the Edit menu.
This deletes the nutrition data for t he sele cte d P LU.
Deleting Ingredient Data
1.
Deleting a PLU also deletes the associated nu tr ition and ingredients data.
Select the PLU in the PLU window and select Delete Ingredients from the Edit menu.
This deletes the ingredints data for the selected PLU.
41
Page 47

9. Keyboard
Keyboard presets allow you to define the meaning of keys on the scale keyboard. The Astra
keyboard has a shift key, so you can defin e two meanings for each key. Meanings that can be
assigned to keys include PLU numbers, extra message s, and tare weights.
The keyboard screen can be used to edit three different types of data. Use the Display buttons
on the bottom left of the windo w to switch between the three options.
9.1 Defining the Upper and Lower Key Meanings
The scale keyboard has a shift key, so you can define two meanings for each key. These are
called the upper (standard) and lower (shift key pressed) keys respectively.
However, meanings can only be assigned to the keys on the left side of the keyboard. The
righthand side keys appear gray as in the example below.
1. To display the keyboard screen, click the keyboard tab at the top of the AstraLink
window (below the menu bar).
2.
In the Display buttons on the bo ttom left of the screen, select Upper.
The figure below shows an example.
3.
4.
Edit the key definitions as describe d be low. Click the Upper and Lower buttons in the
Display area at the bottom left of the wi nd ow to switch the display between the uppe r
and lower keys.
When you have finished, click the Save button to save your changes.
42
Page 48

Editing the keyboard presets
The following operations are available:
Operation Explanation
Edit key
Double-click on a key, or click on a key to select then click the Edit Key
button.
This opens the dialog shown below for specifyi n g t he key meaning.
The upper key meaning is set at the top left of the dialog and the lower key
meaning at the bottom left. The Key Type selects the key meaning and Data
specifies the value associated wit h th e ke y. (In this case, the key is assigned
to PLU number 10.)
For some key types, you can use the Select button to open a dialog listing the
available values.
Setting data is not applicable for some key types. In this case, the Data field
becomes disabled.
The functions of the other parts of the dialog are explained later.
Set the Key Type and Data, then click OK to exit.
Set Default
Delete key
Display
Zoom
This sets the default settings for keysheet template printing. The default
settings are used for keys for which no keysheet template print settings have
been entered (or which have been deleted by Delete Key.)
This can be used to set a standard background colo r and default font, for
example.
Click on a key then click the Delete button to delete the definition for that key.
These three buttons switch between displaying the upper keys, lower keys,
and keysheet template (described below).
Sets the display magnification. You can set a custom zoom ratio by selecting
Zoom → Custom from the Keyboard menu.
43
Page 49

Save
Saves your changes to the database .
44
Page 50

Operation Explanation
Clear Changes
Cut, Copy and
Paste
Drag & Drop
Selecting Clear Changes from the Keyboard menu resets the keyboard data
to the state when last saved.
You can cut, copy and paste key de f i nitions using the standard Windows
keystrokes (listed below) or using the Edit menu.
Keystroke Operation
Ctrl+X or Shift+Del Cut
Ctrl+C or Ctrl+INS Copy
Ctrl+V or Shift+INS Paste
Click on a key to select, then hold down the left mouse button to drag the key
definition to another key location.
If you hold down the Ctrl key when you release the mouse button this copies
the key definition instead of just moving it.
45
Page 51

9.2 Printing Keysheet Templates
In addition to defining the preset key meanings, you can also use AstraLink to prin t the
keysheet template.
The procedure is as follows.
1. To display the keyboard screen, click the keyboard tab at the top of the AstraLink
window (below the menu bar).
2.
In the Display buttons on the bo ttom left of the screen, select Keysheet.
The figure below shows an example.
3. Set the print format for each key as described belo w.
The operation of the window is the same as for setting the upper and lower keys
(described above).
4.
5.
Note: Some Windows printer drivers do not print rotat ed text correctly (the keysheet text must
When you have finished, click the Save button to save your changes.
To print the keysheet, click the print button or select Print from the File menu.
be rotated if printing in portrait mode).
If the keysheet does not print correctly on your printer, select Options in the Setup
menu and change the "Bypass bug in printer driver" setting. Alternatively, use Print
Setup in the File menu to set the printer to landscape mode.
46
Page 52

Editing the keysheet print settings
Double-click on a key, or click on a key to select then click the Edit Key button. This opens the
dialog shown below for specifying the key p rin t format.
The keysheet template print settings are on the right side of the dialog.
The following operations are available:
Operation Explanation
Key text
(upper and
lower)
Justification
Font and Color
Enter the text to print in t he key. I f you wi sh to print text f or both the up per and
lower key meanings, set the Split key text button ON.
The entered text appears in the Preview box on the bottom right.
Select whether you wish the text to be left-justified, centered, or right-justified.
Click on the Font and Color buttons to set the t ext font and background
colors respectively.
Draw split
line?
Double key
This draws a horizontal line through the middle of the key to separate the
upper and lower key meanings.
Setting this button ON defines a double size key, such as the PRINT and PLU
keys on the right side of the Astra keyboard .
This links the selected key to the key on the ri gh t o r to th e ke y b elo w.
Copy → The Copy → buttons in th e upper and lower Key Preset areas (left side of the
dialog) copy the key meaning (PLU name, etc.) to the key text field.
47
Page 53

10. Store Name and Address
This defines the store name and address printed on PLU labels.
1.
2. This opens a store name and address edit dialog. Enter the information f or your store
Click Store Name and Address in the Scales menu.
then click the OK button to sav e y our changes.
48
Page 54

11. PLU and Extra Message List Reports
The PLU and Extra Message list reports generate reports listing the registered PLUs and extra
messages respectively.
The PLU report lists the PLU number, PLU descrip t i on , and a number of additional PLU fiel ds
such as the price. Which additional PLU f i elds are printed is determined by the wi dth of the
printer page. (The line length adjusts automatically based on the size of the printer pape r. )
Accordingly, if you wi sh to include more fields in t he report, it i s recommended that you set your
printer to landscape mode.
To set landscape mode, select Print Setup in the File menu to open a printer setup dialog.
The extra message report lists the extra message text for each message.
The operation is the same for both report windows. The following explains for the case of the
PLU report.
1.
2.
If necessary, click Print Setup in the File menu to check the printer settings.
To display the report screen, click the Report tab at the top of the AstraLink window
(below the menu bar). The figure be low sh ows an example.
3.
4.
Use the Select buttons to specify the range of PLUs to print.
Click the Print button to start printing or the Export button to output t he report data t o
a file.
49
Page 55

Report Window Operations
The following operations are avai lab l e u sing the tool bar at the top of the PLU an d Extra
Message report windows.
Operation Explanation
Specify range
of PLUs to
print
View report
on-screen
Preview
printing
Start printing Click the Print button or click Print in the File menu.
Export to text
file
Full desc/
1st line only
Use the Select buttons to specify the start and end PLU or message
numbers for the report.
Use the <<Prev Page and Next Page>> buttons to step through the report
pages on-screen.
If necessary, use the scroll bars to scroll sections of the report page into
view.
Click Print Preview in the File menu.
Click the Export button to open a File Save As dialog to specify the file in
which to save. Click OK to output the report contents to the text file. Each
line of the report is output with the fields separated by commas. This is
called comma-separated-value (CSV) format.
This format is suitable for reading into other soft ware packages such as
Microsoft Excel.
Click these buttons to switch between di spla y i ng the full PLU description
text or the first line only.
50
Page 56

12. Production Totals Report
Sales (production) totals for each PLU can b e accumulated on the Astra and received by
AstraLink to generate a production report.
The production totals include the quantity, total weight and total value of each PLU. Additional
PLU fields such as the price can also be included i n the re port. Wh ich additi onal PLU fiel ds are
printed is specified in the AstraLink setu p. Contact your dealer for details.
Cumulative Totals Report
The Greek version of the Astra also supports a cumulative totals report. In this case, the scale
maintains cumulative production totals for each PLU number, which are typically never cleared.
Accordingly, specifying a date range is not applicable for the cumulative totals report.
Other than this, the operation of t he cumula tiv e totals repo rt in Ast raLink is the same as for the
PLU production report described below.
The operation of the report window is as follo ws.
1.
To display the report screen, click the Plu Prod. tab at the top of the AstraLink
window (below the menu bar). The figu re belo w sho ws an example.
3.
4.
5.
Use the Select buttons to specify the range of PLUs to print.
Use the Date Range button to specify the date range for the report.
Note that the dates represent the date that the totals data was received from the
Astra. This may not be the same as the date of the actual sales on the Astra.
Click the Print button to start printing or the Export button to output t he report data t o
a file.
51
Page 57

Report Window Operations
The following operations are available using the tool bar at the top of the PLU Production report
window.
Operation Explanation
Specify range
of PLUs to
print
Specify date
range for
report
View report
on-screen
Preview
printing
Start printing Click the Print button or click Print in the File menu.
Export to text
file
Use the Select buttons to specify the start and end PLU or message
numbers for the report.
Use the Date Range button to specify t he start an d end dat es for th e report.
Note that the dates represent the date that the totals data was received from
the Astra. This may not be the same as the date of the actual sales on the
Astra.
Use the <<Prev Page and Next Page>> buttons to step through the report
pages on-screen.
If necessary, use the scroll bars to scroll sections of the report page into
view.
Click Print Preview in the File menu.
Click the Export button to open a File Save As dialog to specify the file in
which to save. Click OK to output the report contents to the text file. Each
line of the report is output with the fields separated by commas. This is
called comma-separated-value (CSV) format.
This format is suitable for reading into other soft ware packages such as
Microsoft Excel.
52
Page 58

13. Price Importing
Price changes can be imported from a text file.
The text file format must consists of a PLU number and price value separated by a comma on
each line, as shown in the example below. The decimal point in the price is optional.
Text import format
1001,1.23
1002,3.45
1003,5.67
This imports price changess for PLUs 1001, 1002, and 1003. The prices are set to $1.23, $3.45,
and $5.67 respectively.
The PLUs must already exist in the AstraLink database.
The operation of the price import function is as follows:
1.
2.
3. AstraLink imports the price chan ge s fro m t he file and updates the database. A
Select Import Prices from the File menu. A File Open dialog appears.
Select the file to import, then click Open.
message appears when the import has finished indicating how many prices were
imported and whether any l ines had errors.
An error means either the text format was invalid or the specified PLU number does
not exist in the AstraLink database.
53
 Loading...