

Page 1

IB Series
Precision Balance
Operation Manual
42193
Page 2

Contents
About This Manual ...................................................................................................................................1
1.0 Introduction ..................................................................................................................................1
1.1 Operating Modes . . . . . . . . . . . . . . . . . . . . . . . . . . . . . . . . . . . . . . . . . . . . . . . . . . . . . . . . . . . . . .1
1.2 Unpacking and Inspection . . . . . . . . . . . . . . . . . . . . . . . . . . . . . . . . . . . . . . . . . . . . . . . . . . . . . . . .1
1.3 Unlocking . . . . . . . . . . . . . . . . . . . . . . . . . . . . . . . . . . . . . . . . . . . . . . . . . . . . . . . . . . . . . . . . . . . .2
1.4 Repacking . . . . . . . . . . . . . . . . . . . . . . . . . . . . . . . . . . . . . . . . . . . . . . . . . . . . . . . . . . . . . . . . . . . .2
1.5 Site Location and Precautions . . . . . . . . . . . . . . . . . . . . . . . . . . . . . . . . . . . . . . . . . . . . . . . . . . . . .2
1.6 Weighing Pan Attachment . . . . . . . . . . . . . . . . . . . . . . . . . . . . . . . . . . . . . . . . . . . . . . . . . . . . . . . .2
1.7 Leveling the Scale . . . . . . . . . . . . . . . . . . . . . . . . . . . . . . . . . . . . . . . . . . . . . . . . . . . . . . . . . . . . . .3
1.8 Main Components . . . . . . . . . . . . . . . . . . . . . . . . . . . . . . . . . . . . . . . . . . . . . . . . . . . . . . . . . . . . . .3
1.9 Front Panel Keypad . . . . . . . . . . . . . . . . . . . . . . . . . . . . . . . . . . . . . . . . . . . . . . . . . . . . . . . . . . . . .4
1.10 Start-up Self Test . . . . . . . . . . . . . . . . . . . . . . . . . . . . . . . . . . . . . . . . . . . . . . . . . . . . . . . . . . . . . .5
2.0 Calibration ....................................................................................................................................6
3.0 Measuring Weight ........................................................................................................................7
4.0 Count Weighing ............................................................................................................................8
4.1 Count Mode Setting Procedure . . . . . . . . . . . . . . . . . . . . . . . . . . . . . . . . . . . . . . . . . . . . . . . . . . . .8
4.2 Self Counting System . . . . . . . . . . . . . . . . . . . . . . . . . . . . . . . . . . . . . . . . . . . . . . . . . . . . . . . . . . .9
5.0 Calculation Factor Mode ............................................................................................................11
5.1 Method of Operation . . . . . . . . . . . . . . . . . . . . . . . . . . . . . . . . . . . . . . . . . . . . . . . . . . . . . . . . . . .11
6.0 Percentage Mode .......................................................................................................................13
6.1 Setting Actual Weight . . . . . . . . . . . . . . . . . . . . . . . . . . . . . . . . . . . . . . . . . . . . . . . . . . . . . . . . . .13
6.2 Setting Numerical Value . . . . . . . . . . . . . . . . . . . . . . . . . . . . . . . . . . . . . . . . . . . . . . . . . . . . . . . . .14
7.0 Functions ....................................................................................................................................15
7.1 Selecting Functions . . . . . . . . . . . . . . . . . . . . . . . . . . . . . . . . . . . . . . . . . . . . . . . . . . . . . . . . . . . .15
7.2 Function List . . . . . . . . . . . . . . . . . . . . . . . . . . . . . . . . . . . . . . . . . . . . . . . . . . . . . . . . . . . . . . . . .17
7.2.1 Comparator Function Data . . . . . . . . . . . . . . . . . . . . . . . . . . . . . . . . . . . . . . . . . . . . . . . . . . . . . . . . . .20
7.2.2 Interface Data . . . . . . . . . . . . . . . . . . . . . . . . . . . . . . . . . . . . . . . . . . . . . . . . . . . . . . . . . . . . . . . . . . . 21
7.2.3 Measurement Conditions and Results . . . . . . . . . . . . . . . . . . . . . . . . . . . . . . . . . . . . . . . . . . . . . . . . .21
8.0 Comparator Function .................................................................................................................22
8.1 Upper and Lower Limit Setting Procedure . . . . . . . . . . . . . . . . . . . . . . . . . . . . . . . . . . . . . . . . . . .22
8.2 Setting Confirmation and Input Procedure . . . . . . . . . . . . . . . . . . . . . . . . . . . . . . . . . . . . . . . . . . .23
8.3 Upper/Lower Limit Input . . . . . . . . . . . . . . . . . . . . . . . . . . . . . . . . . . . . . . . . . . . . . . . . . . . . . . . .24
8.3.1 Actual Weight Input . . . . . . . . . . . . . . . . . . . . . . . . . . . . . . . . . . . . . . . . . . . . . . . . . . . . . . . . . . . . . . .24
8.3.2 Numeric Input Procedure . . . . . . . . . . . . . . . . . . . . . . . . . . . . . . . . . . . . . . . . . . . . . . . . . . . . . . . . . . . 25
9.0 Accumulation Function ..............................................................................................................27
9.1 Operation . . . . . . . . . . . . . . . . . . . . . . . . . . . . . . . . . . . . . . . . . . . . . . . . . . . . . . . . . . . . . . . . . . .27
10.0 Specifications ............................................................................................................................28
10.1 Specifications . . . . . . . . . . . . . . . . . . . . . . . . . . . . . . . . . . . . . . . . . . . . . . . . . . . . . . . . . . . . . . . . 28
10.1.1 Common Specifications . . . . . . . . . . . . . . . . . . . . . . . . . . . . . . . . . . . . . . . . . . . . . . . . . . . . . . . . . . . . 28
10.1.2 Model Specific Data . . . . . . . . . . . . . . . . . . . . . . . . . . . . . . . . . . . . . . . . . . . . . . . . . . . . . . . . . . . . . . .28
10.2 Options and Standard Attachments . . . . . . . . . . . . . . . . . . . . . . . . . . . . . . . . . . . . . . . . . . . . . . .29
10.3 Model Capacity/Readability Tables . . . . . . . . . . . . . . . . . . . . . . . . . . . . . . . . . . . . . . . . . . . . . . . . 29
11.0 Troubleshooting .........................................................................................................................31
IB Series Limited Warranty ....................................................................................................................32
Copyright © 2001 Rice Lake Weighing Systems. All rights reserved. Printed in the United States of America.
Specifications subject to change without notice.
Version 2.1, November 2001
Page 3

About This Manual
This manual is intended for use by service technicians
responsible for installing and servicing the IB Series
electronic tuning fork scale.
Configuration and calibration of the scale can be
accomplished using the IB Series front panel keys.
1.0 Introduction
The IB Series is an advanced precision weighing
instrument utilizing a high-precision electronic tuning
fork sensor which provides stable measurement over
years of usage. It provides ultra-fast response time and
greatly improved resistance to external vibrations.
Features include:
•Measures weight in thirteen units (mg, g, kg,
ct, oz, lb, ozt, dwt, gr, HK tael, SIN tael, TW
tael and mommes)
•Switchable for straightweighing, piece count,
or over/under checkweighing mode
•Built-in automatic zero tracking
•Die-cast aluminum housing, making it
resistant to chemicals and electromagnetic
interference
•Counting mode, checkweighing mode,
calculation factor mode, and percentage mode
capabilities
• Large .5 " (12.5mm) liquid crystal display
(LCD)
•Optional glass breeze shield available for all
round pan models
•Available in 115 VAC adapter. 230 VAC
adapter (optional)
1.1 Operating Modes
The IB Series has four weighing modes:
Normal (weighing) mode
Normal mode is the “production” mode of the
scale. The IB Series displays gross or net weights
as required, using the LCD annunciators
described in Table 1-1 on page 4 to indicate scale
status and the type of weight value displayed.
A checkweighing function can be used with the
normal weighing mode. It is convenient for
classifying weighing items according to whether
they fall within a pre-determined weight range.
The limit setting procedure is described in Section
4.1 on page 7.
Authorized distributors and their employees
can view or download this manual from the
Rice Lake Weighing Systems distributor site
at
www.rlws.com
Counting mode
The IB Series is capable of parts counting.
Sampling is done by placing the sample on the
scale and designating the number of pieces in the
sample. Four preset sample quanitities are
available.
Entering the counting mode is done through the
front panel keypad, and is explained in detail in
Section 4.0 on page 8.
Calculation Factor mode
In calculation factor mode, the desired index is
memorized, the index for the weight of the item
placed on the scale is calculated and the
calculated value is displayed. This is a convenient
function that allows conversion into various units,
and is explained in detail in Section 5.0 on
page 11.
Percentage mode
In percentage mode, the weight of the sample
selected as the reference is memorized as 100%.
The ratio between the item being measured and
the reference is displayed as a percentage. The
percentage mode is explained in detail in
Section 6.0 on page 13.
.
1.2 Unpacking and Inspection
Each component of the IB Series system is packed in a
specially designed carton. Remove each component
from its carton, separate the component from its
polystyrene shell assembly, and set the assembly
aside. Inspect the carton interior and inner panels to be
sure that all accessories have been removed. Items
included in this carton include:
• IB Series precision balance scale
•Weighing pan and pan base
•AC adaptor
•Operation manual
•Dust cover
Be sure to replace all packing materials within the
carton set. Store the carton set in a secure area so it is
available whenever shipment of the scale is required.
Introduction 1
Page 4

2
SLEEP
T
LOW-BATT
RICE LAKE
IB
P
F
S
LEEP
T
L
O
W
-B
A
TT
RICE LAKE
IB
P
F
Immediately after unpacking, a visual inspection of
the instrument should be conducted. Keep the scale in
an upright position. The shipper and Rice Lake
Weighing Systems should be notified immediately if
any damage occurred during transportation.
Instructions for assessment of damage and further
procedures will then be determined.
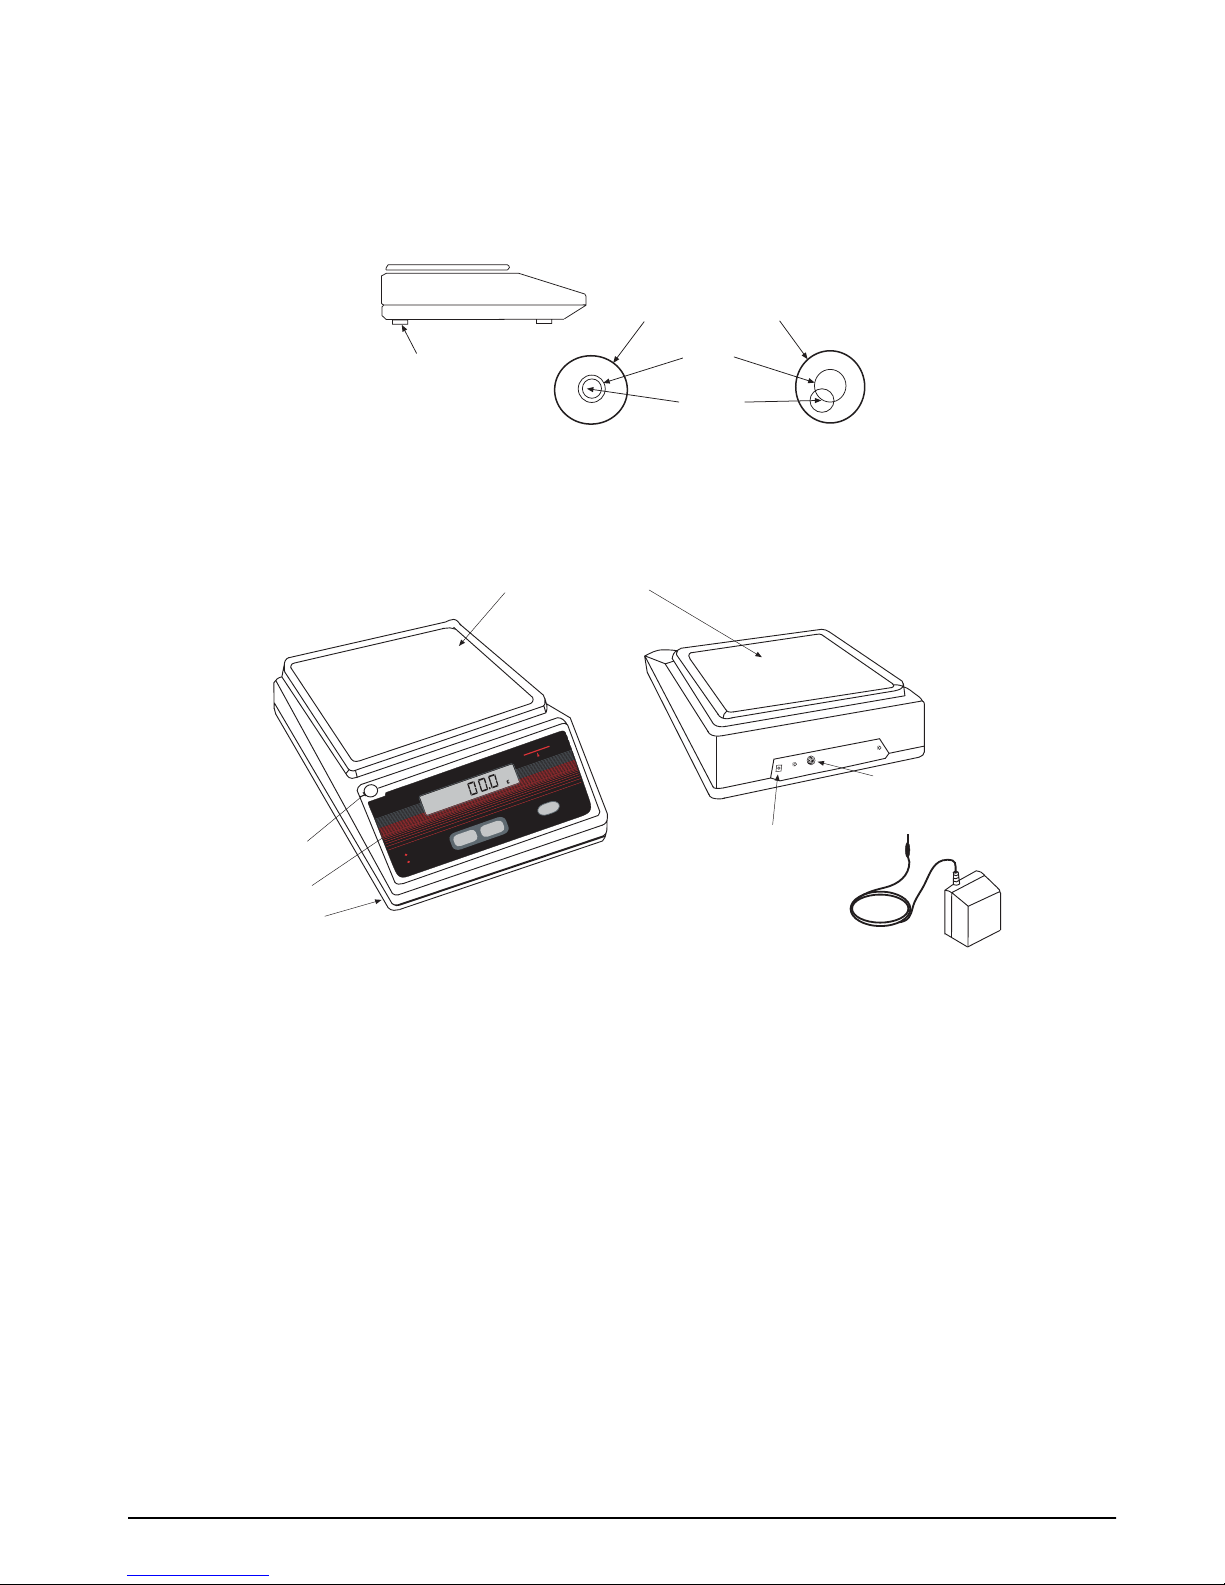
1.3 Unlocking
Locate a black rubber cap at the top of the scale.
Remove the cap to find a lock lever in it. Turn the
lever to the center of the scale to unlock.
Note: Before relocation or transportation, turn the lever to
the edge of the scale for locking mechanism.
Pan base
fitting screw
For installation
For transportation
Figure 1-1. Unlocking Scale
The IB Series is a precision instrument and requires
careful handling. Certain precautions must be taken to
ensure weighing accuracy.
•Weighing accuracy may be affected by
installation or extended usage. To ensure
accurate measurement, perform calibration
(as described in Section 2.0).
•Always remove objects from the weigh pan
gently. Shock, especially applied to the sides
of the scale, may result in loss of accuracy.
• If the capacity of the scale is exceeded, an
error message is displayed. Do not
[o-Err]
leave an over-capacity load on the pan.
1.6 Weighing Pan Attachment
Use the following steps to properly attach the IB
Series weigh pan.
1. Attach the pan base onto the center of the
main base.
2. Fix the position of the pan base by tightening
the attachment screw (as shown in Fig 1-1)
using a screwdriver or coin.
Attachment
Screw
1.4 Repacking
If the IB Series counting scale must be returned for
modification or repair, be sure that it is properly
packed with the original packing material and original
carton assembly if possible. Any damage caused by
improper packaging will not be covered by the
warranty.
1.5 Site Location and Precautions
Try to select a good, clean environment for installing
the scale. The following environmental factors may
cause the scale to give inaccurate measurements:
• Installation on a weak surface that may flex
when objects are put on it or put on the scale.
•Greatly varying temperature and humidity.
•Vibration or an unstable surface for
installation of the scale.
•Air flow from heaters or air conditioning
units.
•Corrosive gases or large amounts of dust.
•Direct, intense sunlight.
Figure 1-2. Weighing Pan Attachment
3. Place the weighing pan on the pan base.
(weighing pan comes in both retangular and
round types).
IB Series Operation Manual
Figure 1-3. Weighing Pan
Page 5
S
L
E
E
P
T
L
O
W
-
B
A
T
T
RICE LAKE
IB
P
F
1.7 Leveling the Scale
The scale must be level for proper operation. Use the four level adjusters located at the four corners of the scales
main unit to adjust the horizontal position of the scale until the bubble of the level indicator lies within the red
circle. Ensure that the scale sits solidly and does not wobble due to uneven adjustment.
LEVEL INDICATOR
ADJUSTERS
1.8 Main Components
The main parts of the IB Series balance are:
Level Indicator
Display
Level Adjusters
BLUE
CIRCLE
BUBBLE
Figure 1-4. Bubble Adjustment
Weighing Pan
Adaptor
Connector
Output Connectors
for Optional Equipment
AC Adaptor
Figure 1-5. Main Component Parts of the IB Series
Introduction 3
Page 6

4
1.9 Front Panel Keypad
Table 1-1 on page 4 shows the IB Series LED annunciators, keypad, and normal mode key functions.
SLEEP
LOW-BATT
P
Figure 1-6. Front Panel Keypad
F
RICE LAKE
T
IB
The LCD annunciators shown on the IB Series front panel describe the indicator functions assigned in setup
mode. In setup and calibration mode, the keys are used to navigate through menus, select digits within numeric
values, and increment/decrement values. The key symbols shown in the LCD display describe the functions
assigned in setup mode.
Indicator Symbols Meaning
g Unit display for weighing mode
PCS Unit display for counting mode
% Unit display for percentage scale
# Unit display for index scale
∑
M Indicates value setting in progress for limit or sampling functions.
"
Display during total mode (displayed in conjunction with each scale mode’s unit
display).
Scale stability display (scale is unstable when not displayed).
Display indicates automatic memory update in index mode (simplified SCS method).
Indicates the measurement range and remaining weight. In Comparator Mode, the bar
graph performs judgments.
Table 1-1. LCD Annunciator Functions
IB Series Operation Manual
Page 7
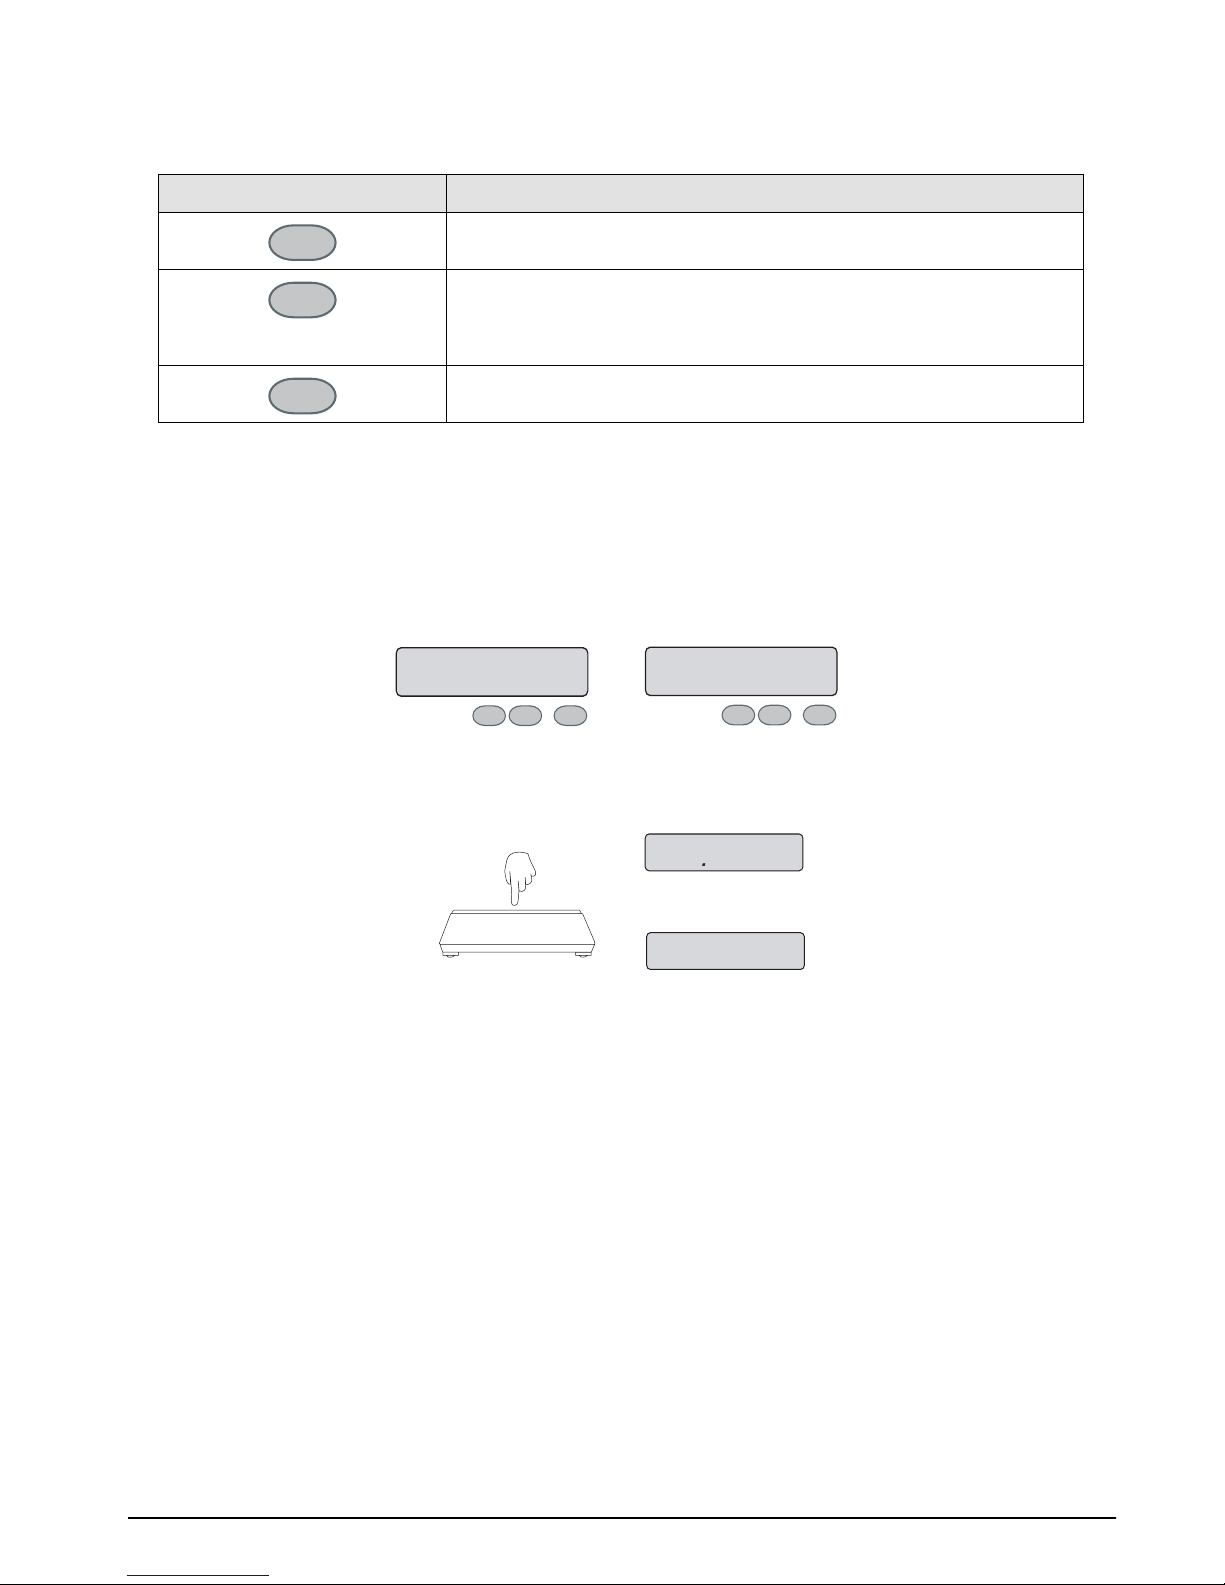
The front panel operation key symbols describe the functions assigned to the scale.
Operation Key
P
F
T
Sets limit function or cancels functions
• Sets and memorizes data in the count mode and when the limit function is
operating.
• Calls up and selects functions and items.
• Selects row during numerical setting (limit function).
• Selects operation zero and tare subtraction.
• Selects input numeral during numerical setting (limit function).
Table 1-2. Front Panel Key Functions
Function
1.10 Start-up Self Test
A self test must be performed prior to using the scale. To perform a self test, do the following:
1. Connect the AC power adapter to the IB Series scale and insert into a 115V service outlet.
2. Press the
characters are lit. After a few moments, the display reads
ON/OFF
key. All segments and characters light for a self test. Confirm that all segments and
[0.00g]
:
Display Character Check
M
▲▲
–
0.0.0.0
▼
▲
Figure 1-7. Display Character Check
Pcs
➩
Kg.
T
FP
0.00
T
FP
g
3. Verify that the display changes by touching the pan slightly. It should return immediately to
release. A flashing
[g]
annunciator means that the scale has not yet stabilized.
123.4
g
➩
g
0.0
Figure 1-8. Verifying Scale Weight
[0.00g]
upon
Introduction 5
Page 8
6
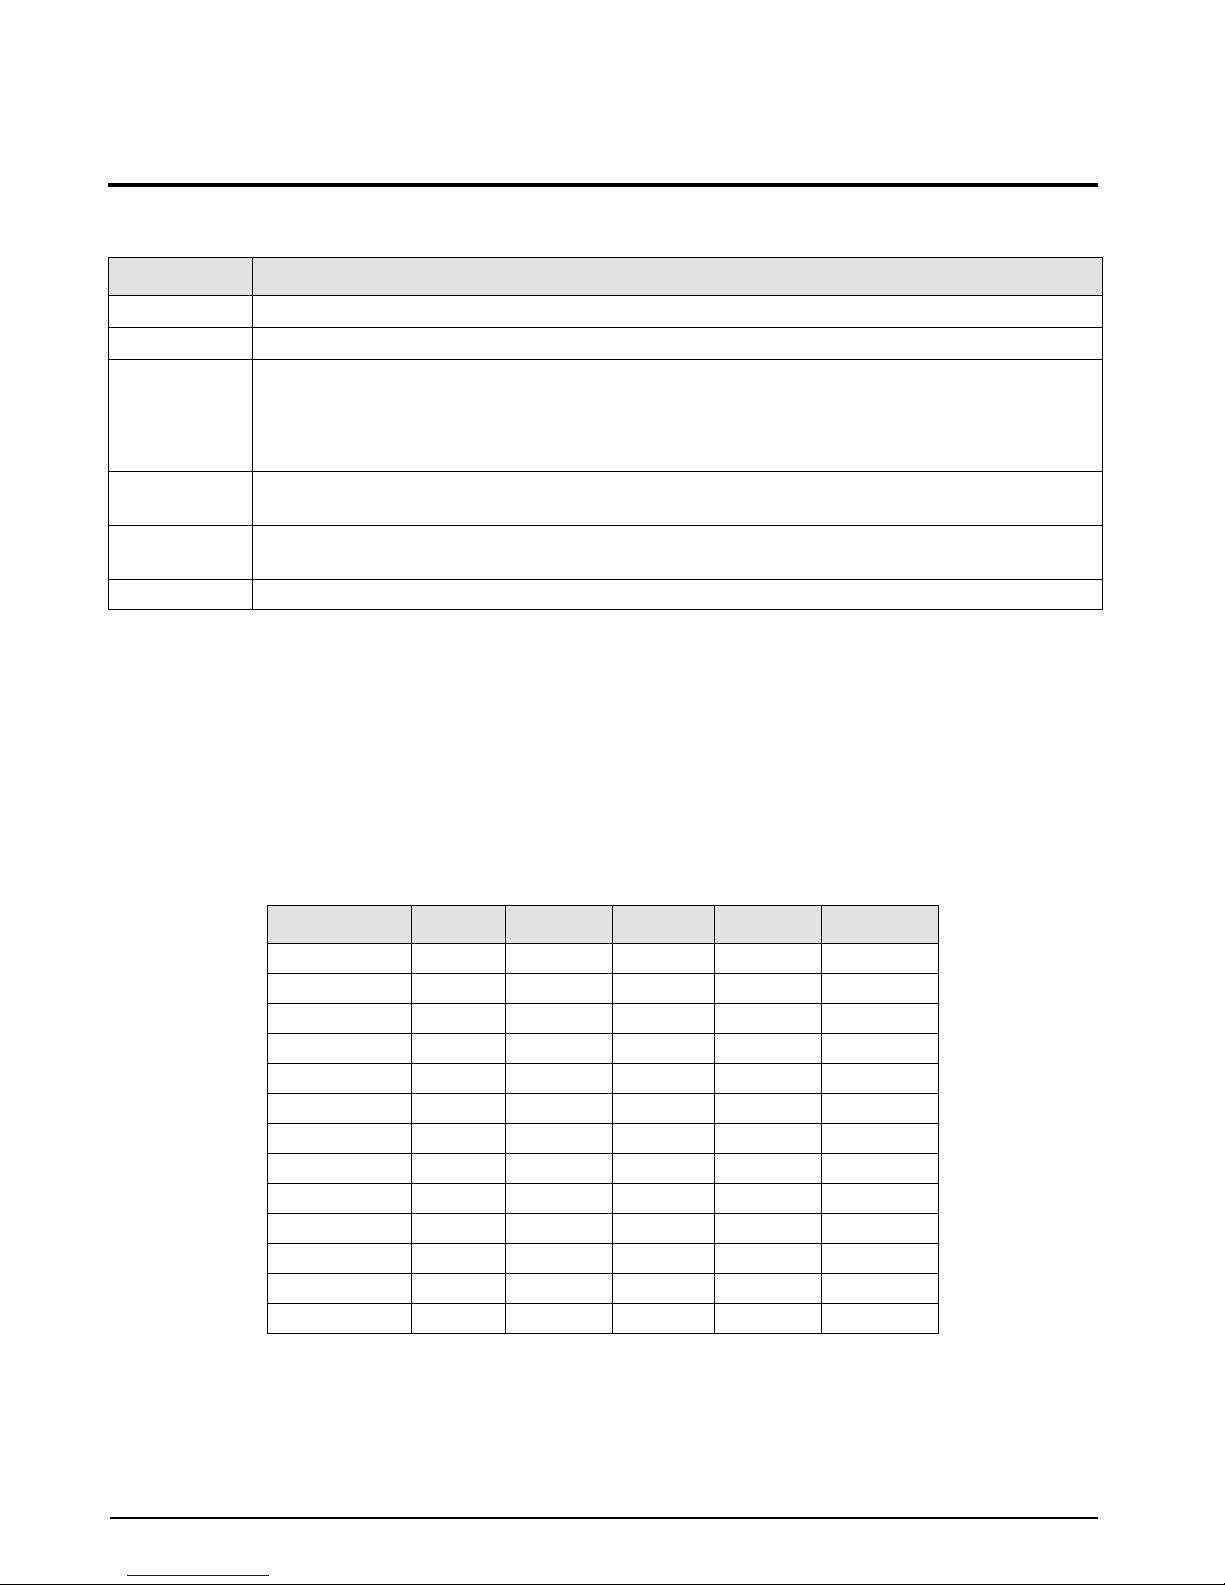
2.0 Calibration
This section describes procedures for calibrating the IB Series scale. Follow the steps in Table 2-1 to calibrate the
IB Series scale.
.
Step
1
2
3
4
5
6 When calibration is complete, the scale automatically returns to the weighing mode.
Hold down the
Hold down the
The display will show
contents of the parameters are the same as at function
Note: Unit will not appear in setting at
advance to on 0. In this case, use a reference weight of the weight unit selected in function
appears. The scale will automatically be set to the zero point. Verify that nothing is placed on the
[on 0]
weighing pan.
After the IB performs the zero adjustment,
calibration weight on the center weigh pan (see Table 2-2 below for designated calibration weights).
F
key until
key, then press the
T
[Func]
Select weight unit from parameters “1” to “d”, by pressing the
[unit].
[CAL]
➙
key, then release both keys.
F
[on FS]
Action
appear in sequence, then release the key.
[71 uA]
. After setting the parameter , pr ess the
[1 SEt 1]
and
[73 ub 0]
automatically appears. Gently place the designated
at the same time. The display will
key. The
T
F
key.
[71 uA]
Table 2-1. Calibration Steps for the IB Series Scale
Notes:
• Press the P key to cancel calibration procedures and return to the weight display.
appears on the display, the weight exceeds the scale capacity.
[o-Err]
• If
• Standard calibration weight is 1/2 capacity. However, when possible, calibrate using a full capacity weight. See
Table 2-2 below for the unit system capacities.
[1-Err]
• If
• If
(1%) is exceeded.
appears on the display, the calibration weight is less than 50% of the standard.
[2-Err]
appears on the display, an object other than the calibration weight is on the pan, or the display tolerance
Unit No. (mark)
1 (mg) 100,000 2,000,000 5,000,000 10,000,000 15,000,000
2 (g) 1000 2000 5000 10,000 1,500
3 (kg) 1 2 5 10 15
4 (ct) 5,000 10,000 25,000 50,000 75,000
5 (oz) 35 70 170 350 520
6 (lb) 2.2 4.4 11 22 33
7 (ozt) 32 64 160 320 480
8 (dwt) 640 1200 32000 6400 9600
9 (gr) 15,000 30,000 77,000 150,000 230,000
A (tl) 26 53 130 260 400
b (tl) 26 52 130 260 390
c (tl) 26 53 130 260 400
d (mom) 260 530 1,300 2,600 4,000
IB-1000 IB-2000 IB-5000 IB-10K IB-15K
Table 2-2. Unit System Capacities
IB Series Operation Manual
Page 9
3.0 Measuring Weight
0.0
g
Tare Subtraction
1234.5
g
Net Weighing
0.0
g
Zero Point Setting
678.9
g
Additional Weighing
This section describes procedures for tare subtraction and weighing on the IB Series scale. Follow the steps
below for tare subtracting and weighing on the IB Series scale.
1. Place a container on the weigh pan, press the
T
key. The zero
display appears.
2. Place the product in the container. The net weight is displayed.
3. If you wish to remove the product or to return
the display to zero, press the
4. Without removing the product, press the
T
key.
T
key.
T
FP
P
Zero Point Setting
P
F
0.0
F
T
g
T
5. Add the next product quantity. Only the additional amount is
displayed.
Notes:
• Tare subtraction procedure is the same for weighing or count modes.
• When tare weighing is performed, product weighing range is reduced by the amount of the tare weight.
weighing range = capacity - tare weight
• A flashing
If weighing is performed in an unstabilized condition, accurate weigh results will not be returned.
[0-ERR] appears if the load exceeds roughly 101% of the scale capacity. The net weighing range will be reduced by
•
the tare container from the capacity of the scale.
[g] indicator means the scale has not stabilized; when the indicator remains lit, the scale has stabilized.
P
Measuring Weight
T
F
T
FP
7
Page 10
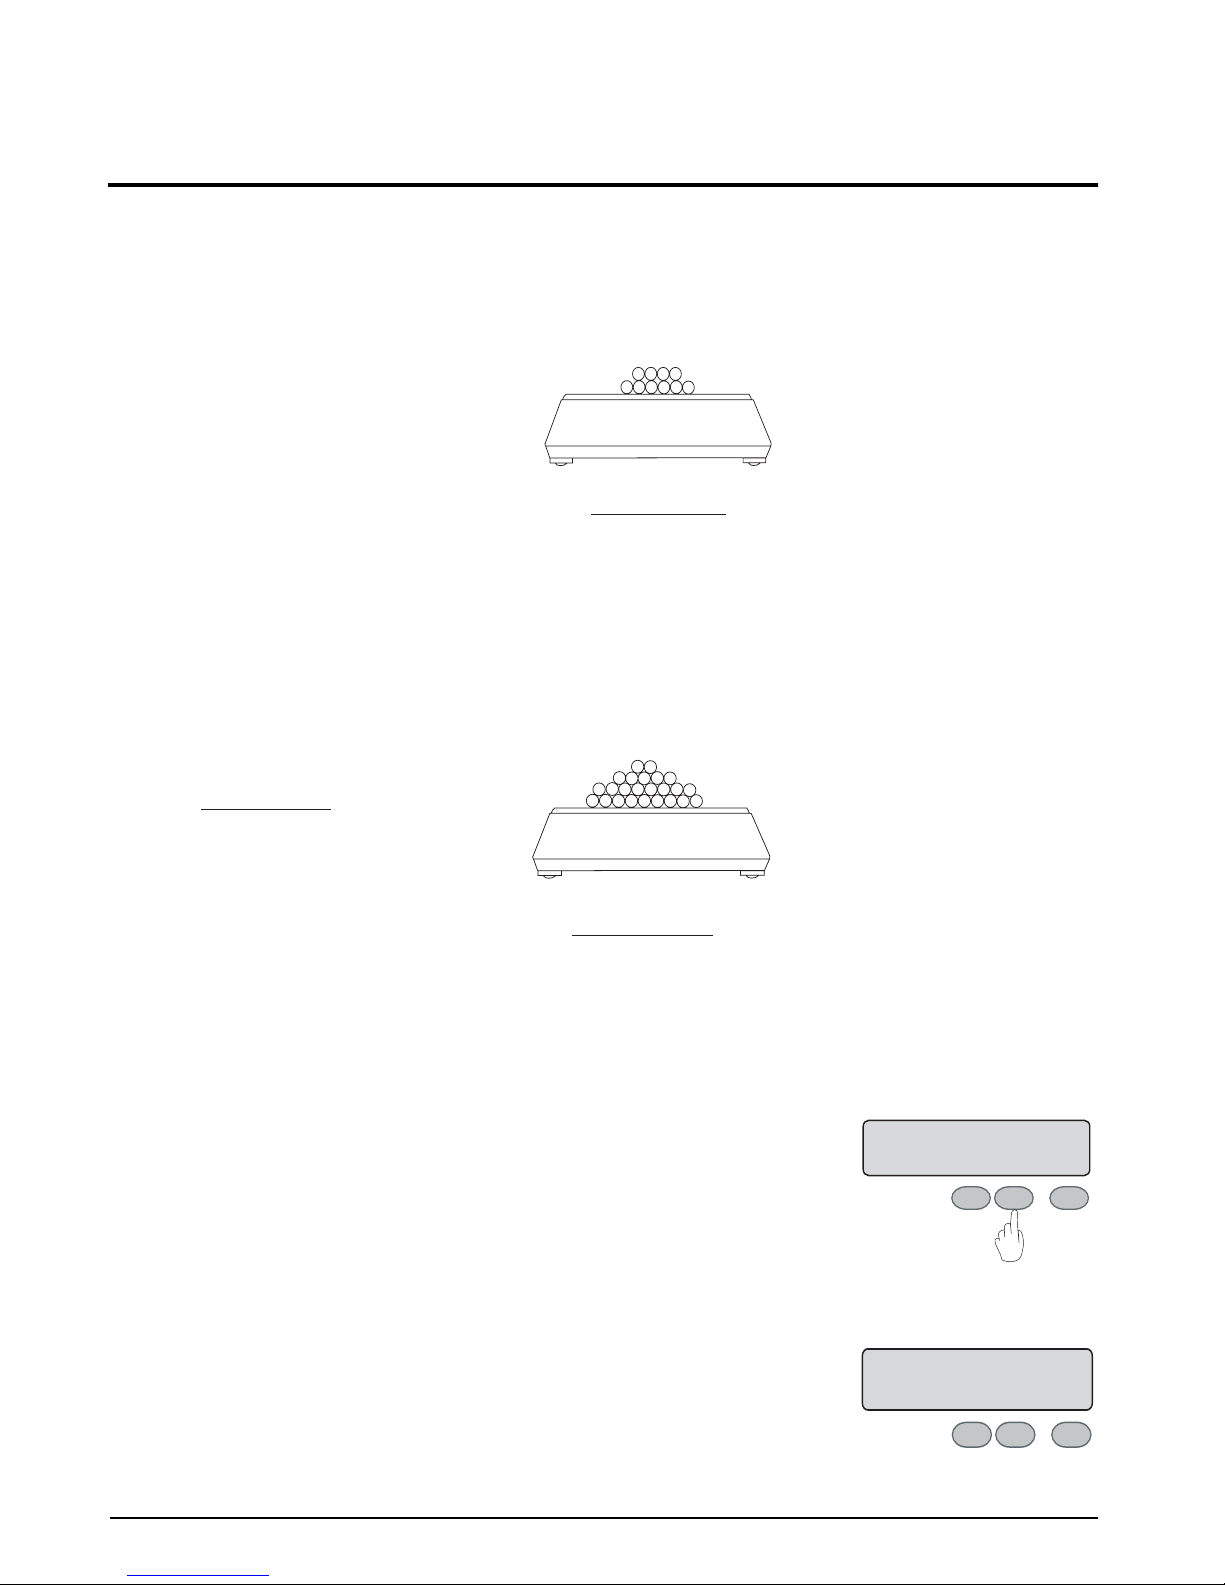
4.0 Count Weighing
Count weighing is used to determine piece count rather than weight. In order for the scale to perform this
function it must know the average piece weight. By loading a specified number of pieces on the pan and entering
that count, the scale calculates and stores in memory the piece weight for that product. This process is referred to
as “sampling. ” F or e xample, ten pieces are placed on the scale. When “10” is entered, the unit piece weight is set.
Sampling
Average Unit Weight = Piece Weight
Total Wt. 10 g
Piece Count 10
Next, the product to be weighed is placed on the scale. The scale calculates the piece count by dividing the total
weight by the piece weight.
= Piece Weight = 1g
10 pieces are placed
on the scale
Total Weight = 10g
Calculating Piece Count
Total Weight
Piece Weight
= Piece Count
Total Wt. 250 g
Piece Weight 1 g
= Piece Count = 250pcs
A load of product is
placed on the scale
Total Weight = 250g
4.1 Count Mode Setting Procedure
1. Hold down the F key for about four seconds. Release
when the [Func] display appears.
2. The first item of the function display appears: mode
type.
8 IB Series Operation Manual
Function Access
FUNC
F
P
Mode Type
T
1.SET 1
T
FP
Page 11

3. If the weighing mode display appears, press the T
0
Exit Mode Settings
pcs.
0.0
pcs
Zero Scale
U. SET
Sample Quantity Setting
key to enter the count mode.
Weighing Mode
Count Mode
4. To exit the function setting display and enter the
count mode press the
P key.
1.SET 1
T
FP
➩
1.SET 2
T
FP
T
FP
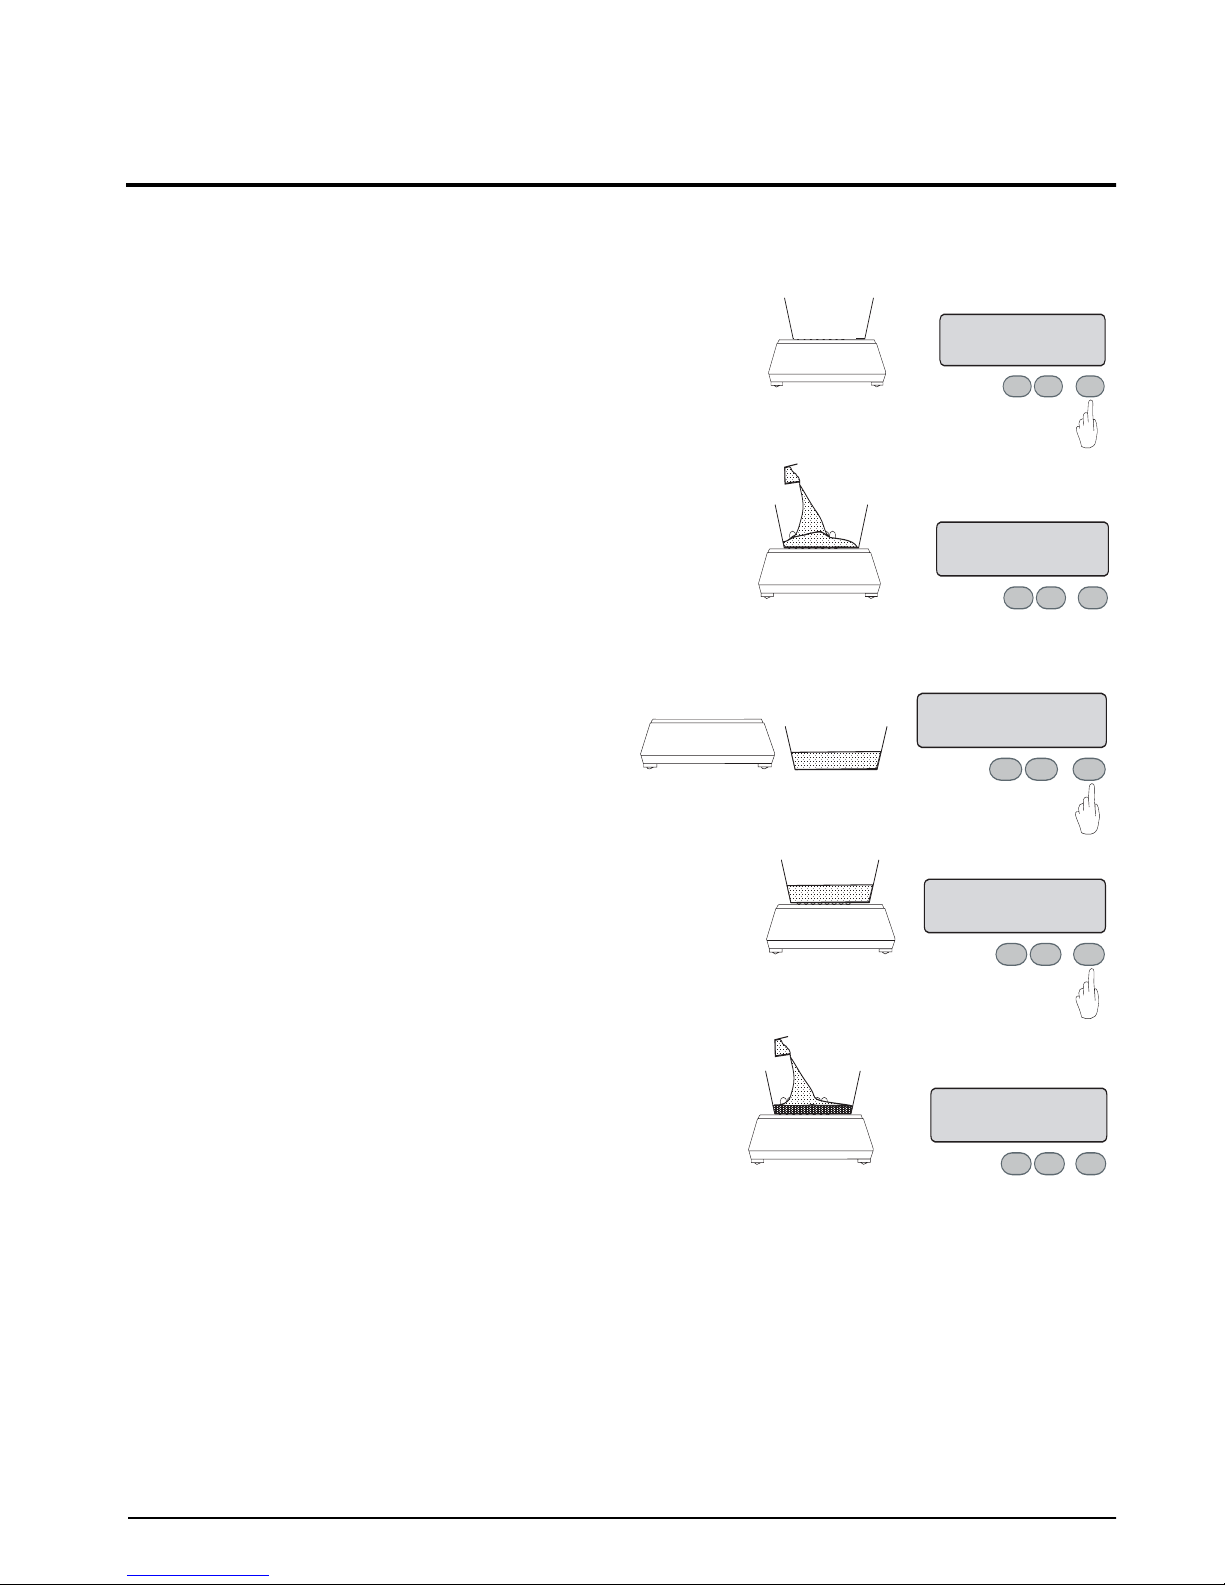
4.2 Self Counting System
Self Counting System (SCS) allows the user to start with any sample quantity selected. The concept of SCS
keeps the user within built-in parameters. If the user adds more than three times the pieces previously on the
scale, a message will display indicating pieces must be removed to get back within the built-in parameters. If the
user stays within the parameters, the count display continues to flash, advising that SCS is active.
1. Place the tare vessel on the weighing pan and then
press the
display does not indicate zero.
T key. Also perform this operation if the
2. Continuously press the
is displayed.
3. The display flashes, indicating that a value must be
entered. Set the desired quantity of the sample by
pressing the
incremented by one according to the pattern
indicated below each time the T key is
pressed
T key. The displayed quantity will be
5
F key until [U SEt] message
10
30
100
FP
TFP
Set Sample Quantity
ON 10
pcs.
TFP
T
Count Weighing 9
Page 12

4. Place the selected number of items in the tare vessel
and then press the F key. The display will
temporarily go blank and a tone will be emitted,
indicating the quantity has been memorized. The
[" ] flashes, indicating that memory is being
updated.
5. If additional items are placed in the tare vessel
(maximum of three times the displayed quantity),
the new quantity will be memorized. A tone will
then be emitted indicating the new quantity has been
memorized.
6. Place additional items in the tare vessel. Memory is
updated automatically.
Sample Quantity Memorized
10
pcs.
P
T
F
Automatic Memory Update
30
pcs.
T
FP
Automatic Memory Update
85
pcs.
T
FP
7. When satisfied that enough sample quantity has
been placed on the scale to achieve a good average
piece weight, press the
F key to save it to memory.
The display stops flashing and the average piece
weight remains in memory until it is changed by
starting a new SCS process, beginning at step one
above.
NOTE: Once the F key has been pressed to memorize the
average piece weight, repeated pressing of the
F key allows display of the current weight and count.
End Sample Memorization
85
pcs.
T
FP
10 IB Series Operation Manual
Page 13

5.0 Calculation Factor Mode
In calculation factor mode, the desired index is memorized, the index for the weight of the item placed on the
scale is calculated and the calculated value is displayed. This allows conversion into various units.
5.1 Method of Operation
1. Hold down the F key until [C Set] appears. The [M]
symbol and the display begins flashing. If a
reference value has already been set, that value
displays.
2. Press the
and the bar graph underneath flashes. The desired
value can now be set.
3. If the
will be incremented according to the pattern below.
Press the T key repeatedly until the desired value is
displayed.
0
T key until the [0] displays to the right side
T key is pressed again, the displayed value
Minus mark
_
1
2
3
~
9
Decimal point
.
C. SET
T
FP
➩
➩
Input Setting Value
Select Setting Value
Setting Index Value
0.00
#
0.0
T
FP
#
1.0
T
FP
4. Press the F key to set the value pre viously set in step
three and shift its display to the left side. Set the
next digit by repeating steps three and four. Repeat
this process until the desired value has been
completely entered.
5. After the reference value has been completely set,
press the
the reference value setting has been completed and
the scale returns to calculation factor mode.
P key. A long tone emits, indicating that
Setting Second Digit
10
FP
End Reference Value
123
FP
Calculation Factor Mode 11
#
T
#
T
Page 14

6. When an item is placed on the scale, the index of its
weight is calculated and the calculated value
displays. This display is equal to the index (1.23)
times the weight of the item (100 g).
Measurement of Index
123.00
FP
#
T
12 IB Series Operation Manual
Page 15

6.0 Percentage Mode
0 %
Zero Scale
The weight of the sample selected as the reference is memorized as 100%. The ratio between the item being
measured and the reference is displayed as a percentage.
6.1 Setting Actual Weight
1. Press the T key to zero the scale. This operation is
also performed if the tare vessel is used.
T
FP
2. Continuously press the
The [M] symbol and the display flash. If a reference
value has been previously set, that value displays.
3. Next, place the reference sample on the weighing
pan (tare vessel) and press the
temporarily goes blank and a long tone emits. The
reference value is memorized and the scale returns
to measurement mode.
4. Place the item to be measured on the weighing pan
(tare vessel) and the ratio to the reference value is
F key until [P SEt] displays.
F key. The display
P. SET
P
F
➩
➩
T
Reference Value Memorized
Setting Index Value
0.00 %
100.00 %
T
FP
Ratio to Reference Value
displayed in percent (%).
130.00 %
T
FP
Note: The percentage resolution will automatically RANGE, depending on the percent of scale capacity used for the
reference weight.
IB 1000 IB 2000 IB 5000 IB 10K IB 15K % Scale capacity Display resolution
Less than .5g 1g 2.5g 5g 7.5g .05% L-ERR
Less than 5g 10g 25g 50g 75g .5% 1%
Less than 50g 10g 250g 500g 750g 5% 0.1%
Less than 500g 1000g 2500g 5000g 7500g 50% 0.01%
More than 500g 1000g 2500g 5000g 7500g Over 50% 0.01%
Example: IB 1000
Reference Weight: 487g
In the IB 1000 column from the table above, 487g is more than 50g, but less than 500g. The display resolution
will be in increments of 0.01%.
Table 6-1. Break Points for the IB Series Scale.
Percentage Mode 13
Page 16

6.2 Setting Numerical Value
1. Press the F key until the [P SEt] message is
displayed. The [M] symbol and the setting value
flashes on the display. If the reference value has
been previously set, that value is dislayed.
2. Press the
and the bar graph underneath flashes. The desired
value can now be set.
3. If the
incremented according to the pattern below. Press
the T key repeatedly until the desired value is
displayed.
0
T key until the [0] displays to the right side
T key is pressed again, the displayed value is
Minus mark
_
1
2
3
~
9
Decimal point
.
P. SET
FP
➩
➩
T
Setting Index Value
0.00 %
Start Numeric Input
0.0 %
FP
T
Select Setting Value
3.0 %
T
FP
4. Press the F key to set the value pre viously set in step
three and shift its display to the left side. Set the
next digit by repeating steps three and four. Repeat
this process until the desired value has been
completely entered.
5. After the reference value has been completely set,
press the
the reference value setting has been completed and
the scale returns to calculation factor mode.
Note: The percentage display will automatically set in the range of 1 to 0.001% as with memorization of an actual
reference weight.
P key. A long tone emits, indicating that
Setting Second Digit
30 %
T
FP
End Reference Value
321 %
TFP
14 IB Series Operation Manual
Page 17

7.0 Functions
The following sections describe the functionality of the IB Series scale.
7.1 Selecting Functions
1. Hold down the F key for about four seconds.
Release when the [Func] display appears.
2. The first item of the function display appears: mode
type.
Each time the
F key is pressed, the function item displays appear in sequence.
Mode Type
1.SET 1
P
F
➩
T
Simple Weighing Function
2.SEL 1
Function Access
FUNC
T
FP
Mode Type
1.SET 1
T
FP
Comparator Contents
➩
P
T
F
21.CO.2
FP
T
Response Speed
5 R.E. 3
P
F
➩
Weighing Unit
7. UN.
P
F
➩
Auto Power OFF
Auto Zero
➩➩
4 A.P. 1
T
T
P
T
F
3. A.O 1
P
F
Functions 15
T
Page 18

3. To alter the setting, press the T key with the
desired function display showing. (See Table 7-1
on page 17).
5. RE. 1
T
FP
➩
➩
5. RE. 5
T
FP
4. After confirming the change, press the
function setting is complete and the display returns
to the operational mode.
P key. The
5. RE. 1
T
FP
➩
➩
0.0
g
T
FP
16 IB Series Operation Manual
Page 19

7.2 Function List
Display Function Description
1.SEt *
2.SEL *
3. A0
*
4. AS
*
5.rE
1 Mode Type Weighing Mode (weighing only)
2 Counting Mode + weighing
3 Percentage Mode + weighing
4Weight conversion + weighing
1 Additional Functions Simple Weighing Function Only when setting value
2 Accumulation Function On
3 Comparator Function On
4 Accumulation Function +
Comparator Function
0 Auto Zero No adjustment of zero point
1 Automatic adjustment of zero point
0 Auto Power Off With Battery
1 Auto shut off after three
0 Response
Speed
1Average
2
*
3
Fast
Slow
Option
When minute amounts of liquids or powders are to be measured.
Display
Update
Continuous ON
minutes of non-usage
Short
[34] is selected. Proceed
to type 21 function.
Ambient
Environment
Good
6. S.d
*
8. i.F *
4
5
1 Stabilization
Judgement
2
3
4
0 Ouput Control Output is not effective
1 Constant serial output (old format, 6-digit)
2 Constant serial output (old format, 7-digit)
Judgement
Accuracy
Flexible
Severe
Long
Stabilization
Time
Table 7-1. Function List
Poor
Short
Long
Functions 17
Page 20

Display Function Description
71 uA
72 dA
1Weighing
Unit
2g
3kg
4ct
5oz
6lb
7 ozt
8 dwt
9gr
A tl (Hong Kong)
B tl (Singapore, Malaysia)
C tl (Taiwan)
D mon
1 Least
Readability
2
3
4
5
Group “A” mg
Fine Ex. IB-2000 0.001g
0.02g
0.05g
0.1g
0.2g
Coarse
Table 7-1. Function List (Continued)
18 IB Series Operation Manual
Page 21

Display Function Description
73 uA
74 dA
0Weighing
Unit
1mg
2g
3kg
4ct
5oz
6lb
7 ozt
8 dwt
9gr
A tl (Hong Kong)
B tl (Singapore, Malaysia)
C tl (Taiwan)
D mon
1 Least
Readability
2
3
4
5
Group “B” No unit displayed
Fine Ex. IB-2000 0.001g
0.02g
0.05g
0.1g
0.2g
Coarse
Table 7-1. Function List (Continued)
* = indicates default setting at time of factory shipment.
Notes:
• If activate comparator function is selected, the comparator function data shown in Figure 7.2.1 will supersede the
auto zero display.
• If activate interface function is selected, the interface function data shown on page 21 will supersede the Auto Zero
display. If this display is shown, the display will return to the normal operational mode.
• The auto power off function is available only when the battery option is used.
Functions 19
Page 22

7.2.1 Comparator Function Data
Display Contents Description
21.Co *
22.Li *
23.Pn
24.Bu *
1 Judgment Condition Judgment even when scale unstable
2 Judgment only when scale is stable
0 Judgment Range No judgment around zero point
1Total range includes zero point
1 Number of Setting Points Setting point no. 1 The message “25 LG 2” is
2 Setting point no. 2
3 Setting point no. 3
4 Setting point no. 4
0 Buzzer Operation
(*1: Option)
1 Active Under The buzzer position is
2 Active Accept
3 Active Over
4 Active Under & Accept
5 Active Accept & Over
6 Active Under & Over
Off (buzzer suppressed)
["] mark ON when buzzer deactivated
displayed only during
setting of two points, it is
not valid when setting 1,
3 or 4 points.
shown by the
flashing next to UNDER/
ACCEPT/OVER. This
facilitates monitoring
judgment results.
["] mark
25.LG *
1 Judgment Display Ranking Display
2Two-point bar graph (effective only when 2 points set)
Table 7-2. Comparator Function Data
*1: Buzzer sounds only when buzzer is attached. Option relay output is also common when buzzer output.
20 IB Series Operation Manual
Page 23

7.2.2 Interface Data
Display Item Status
81 oc *
82 bL. *
Note:
• * denotes default setting at time of factory shipment.
• Weight units other than “g”, “kg” and “lb” are indicated by a
attached over this mark.
0 Output Control Output disabled
1 Normal operation, continuous output
2 Continued output when stable (stop if unstable)
3
4 Automatic output X 1 after load stabilized
5 Stable = output X 1; unstable = no output
6 Stable = output X 1; unstable = continue output
7
1 Baud Rate 1200 BPS
2 2400 BPS
3 4800 BPS
Press the
Press the
P key X 1 to ouput (manual) printer X 1
P key once to output X 1
Table 7-3. Interface Data
[# ] mark. A decal with the unit printed on it can be
7.2.3 Measurement Conditions and Results
Integration Time Stabilization Speed Results
Conditions
Good
↓
Normal
↓
Worse
Measurement
Precise
↓
Normal
↓
Coarse
Table 7-4. Measurement Conditions and Results
SrE 1
↓
SrE 3
↓
SrE4
SrE 4
↓
SrE 3
↓
SrE1
65d 4
↓
65d 3
↓
65d 1
65d 4
↓
65d 3
↓
65d 1
Accurate
↓
Less Accurate
Slow
↓
Quick
Functions 21
Page 24

8.0 Comparator Function
The comparator function is convenient for classifying weighing items according to pre-determined weight
ranges. The upper and lower limits of this range are stored in the scale’s memory, and when an item is placed on
the weighing pan it is judged as either acceptable or unacceptable. This function can only be used in weighing
mode.
8.1 Upper and Lower Limit Setting Procedure
To set the upper and lower limits, follow this procedure while referring to Section 8.3 on page 24.
1. Hold down the
[Func] display appears.
2. The first item of the function display appears: mode type.
3. If the count mode display appears, press the T
key to enter the weighing mode.
4. Press the
appears.
F key for about four seconds. Release when the
F key. The limit function display
Count Mode
1.SET 2
T
FP
Function Access
FUNC
1.SET 1
➩
T
FP
Mode Type
T
FP
Weighing Mode
1.SET 1
FP
Limit Function
T
5. Press the
appears.
22 IB Series Operation Manual
T key. The function on display
2.SEL 1
FP
Function OFF Function ON
2.SEL 1
T
FP
➩
2.SEL 2
T
T
FP
Page 25

6. Press the F key. The first limit function
display appears. Press the F key repeatedly
to call up the limit function displays in
sequence.
LIMIT
FUNCTION
DISPLAYS:
Limit Function Data
21.CO.2
T
FP
➩
7. To change the setting parameters, press the
T key with the desired limit function
display showing.
8. After each parameter is set, press the
to return to weighing mode.
P key
Buzzer ON
23.BU.0
T
FP
All Status Judgement
21,CO. 1
T
FP
End Setting
21,CO. 2
T
FP
➩
➩
➩
22.LI.1
Judgement When Stable
21.CO. 2
➩
P
Weighing Mode
00.0
➩
FP
F
FP
Range
T
T
T
Notes:
• To confirm function setting status, press the
display function settings in sequence.
• To end setting sequence at any time, press the P key to return to weighing mode.
F key with the function item display showing (in step two above)
8.2 Setting Confirmation and Input Procedure
1. Hold the P key down for two to three
seconds. Release when the display shows
L.SEt (lower limit set). The ["] indicator
next to UNDER flashes and the lower limit
value is displayed.
Setting Start
L. SET
FP
T
➩
Lower Limit Value
123.4
g
T
FP
Comparator Function 23
Page 26

2. Press the P key to display H.SEt (high [upper]
limit set). The
["] indicator next to OVER
flashes and the lower limit value is displayed.
Setting Start
H. SET
FP
Upper Limit Value
➩
567.8
T
g
T
FP
3. Press the
return to weighing mode.
Note: If the L.SEt display does not appear, the scale is not in function setting mode, or the count mode is in effect (pcs
displayed as unit indicator).
P key to end setting sequence and
End Setting
g.
0.0
T
FP
8.3 Upper/Lower Limit Input
There are two methods of entering upper and lower limit values. Both methods can be used interchangeably.
1. Actual weight input procedure: samples of upper and lower limit weight are placed on the weighing pan.
2. Numeric input procedure: the
limits into the scale’s memory.
The judgement results are shown by the position of the lit
H (high) Measured weight is over the upper limit ...... upper limit weight
C (good) Measured weight is within acceptable range....... upper limit weight lower limit
L (low) Measured weight is under the lower limit ....... lower limit weight
F and P keys are used with numeric key entry to record upper and lower
["] indicator next to OVER/ACCEPT or UNDER.
Note: In the case where lower limit upper limit, the flashing ["] appears next to all OVER/ACCEPT/UNDER indicators
to alert operator to error data.
8.3.1 Actual Weight Input
1. Hold the P key down for two to three seconds.
Release when the display shows L.SEt (lower
limit set). The indicator next to UNDER will
flash.
24 IB Series Operation Manual
Setting Start
L. SET
FP
Flashing Numerals
➩
0.0
g
T
T
FP
Page 27

2. Place a sample of the actual lower limit weight
on the weigh pan and press the F key. The
display goes blank for a moment while the
lower limit value is memorized.
Place Low Sample
Memorize Upper Limit
123.4
FP
g
T
3. Press the
P key to change to the upper limit
setting display. The indicator next to OVER
flashes.
4. Place a sample of the actual upper limit weight
on the weigh pan and press the
F key. The
display is blank for a moment while the upper
limit value is memorized.
5. Press the
P key to end the setting sequence and
return to the weighing mode.
Upper Limit Setting
H. SET
T
FP
Place High Sample
➩
Flashing Numerals
0.0
g
T
FP
Memorize Upper Limit
567.8
End Setting
0.0
P
F
FP
g
T
g.
T
Notes:
• The actual weight setting can be revised as many times as needed by repeating steps two and four.
• When using the
the QB-12K. Also, the next highest place M flashing indicates a (+ -) symbol should be selected.
• A flashing triangle
may be caused by mis-entry or lower limit upper limit setting value. Check the relevant settings if this occurs.
8.3.2 Numeric Input Procedure
F key to advance the digit during numeric setting, the highest place (10.000) can only be entered to
["] appearing next to all OVER/ ACCEPT/ UNDER indicators alerts operators to error data. It
1. Hold the P key down for two to three seconds.
Release when the display shows L.SEt (lower
limit set). The indicator next to UNDER
flashes.
Setting Start
L. SET
FP
Flashing Numerals
➩
0.0
g
T
T
Comparator Function 25
FP
Page 28

2. Press the T key to commence value setting.
All digits are displayed and only the lowest
digit flashes to indicate that input can be
made to that position.
Start Numeric Input
0000.0
g
3. Press the
Each time the key is pressed, a new numeral is
advanced.
0
4. If the
flashes, and the input position shifts
accordingly . Enter numeral as in the third step
above.
T key again to select a numeral.
.......
1
2
F key is pressed, the next digit position
3
4
Move Input Digit
0000.4
g
T
FP
➩
FP
0000.4
Numeral Input
0003.4
T
Enter Digit
g
T
FP
g
T
FP
5. Continue entering the required numerals as
above. When all numerals have been entered,
press the
memory.
P key to record lower limit value in
Lower Limit Setting
123.4
F
P
g
T
26 IB Series Operation Manual
Page 29

9.0 Accumulation Function
100
pcs.
Accumulation
The accumulation function of the IB Series offers summing-up and display of measured data repeatedly. Useful
in mixing or filling applications.
9.1 Operation
1. Load an object on the scale. When the display
shows , press the
display value. The total value and ∑ is displayed
for a moment.
2. Unload the object and allow the balance to
stabilize and re-zero. Display will show .
Once stabilized, load next object and press
the
P key to accumulate the value as in step
1 above.
P key to accumulate the
T
FP
Accumulation
250
pcs.
T
FP
3. Press the
F key to display the total amount.
To clear the accumulated total to zero, press the T
key.
Notes:
• Pressing the
• Accumulation is not effective if weighing in Mode “B” in simple weighing mode.
• To avoid duplication without unloading first object, press the
Display will show
• In counting mode, renewal of unit weight will automatically clear the total.
S key before stabilization may cause inaccurate accumulation reading.
T key after step 1 above to continue the accumulation.
[0], and next object can then be added on top of previous object remaining on scale. Useful for mixing.
Total Amount
550
pcs.
FP
T
Accumulation Function 27
Page 30

10.0 Specifications
This section contains charts for specifications and model data for the IB Series scale.
10.1 Specifications
Refer to the tables below for common specifications and model specific data.
10.1.1 Common Specifications
Item Specification
Measurement method Tuning fork type
Tare subtraction Full capacity, one-touch adjustment (measurable range = capacity - tare weight)
Zero adjustment
Display Maximum 6 column liquid crystal display
Weight correction Semi-automatic span adjustment
Over-scale display
Ambient temperature/humidity
Power Specialized AC adapter (AC 110V DC9V, 400 mA)
Auto zero (can be set to
OFF)
[0-Err] message. (If weight = capacity + 9 digits)
ο
C, 80% relative humidity or less
0~40
Table 10-1. Common Specifications
10.1.2 Model Specific Data
Model Capacity Minimum Graduations Resolution Pan Dimensions
IB-1000 1000g 0.005g 1/200,000 170mm
IB-2000 2000g 0.01g 1/200,000
IB-5000 5000g 0.01g 1/500,000 220mm X 180mm
IB-10K 10kg 0.05g 1/20,000
IB-15K 15Kg 0.1g 1/150,000
* In counting mode, the minimum unit is equal to the minimum graduation value.
28 IB Series Operation Manual
Table 10-2. Model Specific Data
Page 31

10.2 Options and Standard Attachments
Options
• IJ output: for connecting peripherals (printer, comparator, etc.)
•Buzzer output: judgment result alert buzzer function + IJ output.
• Limit output: judgment result alert buzzer connection output + specialized printer output.
•RS-232C output: for two-way communication with peripheral or external units.
•Battery drive: 48-hour charge (when not using output) for use where no service outlet is available.
Standard Attachments
•AC Adaptor
•Dust cover
10.3 Model Capacity/Readability Tables
IB-1000 IB-2000
Set C Unit Mark Capacity Readability
1mgmg1,000,000 10
2g g 1,000 0.01
3kgkg1.0 0.00001
4ctct5,000 0.05
5oz
6lb
7 ozt
8 dwt
9gr
A HK tael
B SIN tael
C TW tael
D mom
#
#
#
#
#
#
#
#
#
35 0.0005
2.2 0.00002
32 0.0005
640 .01
15,000 0.2
26 0.0002
26 0.0002
26 0.0002
260 0.002
Set C Unit Mark Capacity Readability
1mgmg2,000,000 10
2g g 2,000 0.01
3kgkg2 0.00001
4ctct10,000 0.05
5oz
6lb
7 ozt
8 dwt
9gr
A HK tael
B SIN tael
C TW tael
D mom
#
#
#
#
#
#
#
#
#
70 0.0005
4.4 0.00002
64 0.0005
1,200 0.005
30,000 0.2
53 0.0002
52 0.0002
53 0.0002
530 0.002
Specifications 29
Page 32

IB-5000 IB-10K
Set C Unit Mark Capacity Readability
1mgmg5,000,000 100
2g g 5,000 .01
3kgkg5 .0001
4ctct25,000 .5
5oz
6lb
7 ozt
8 dwt
9gr
A HK tael
B SIN tael
C TW tael
D mom
#
#
#
#
#
#
#
#
#
170 0.002
11 0.0002
160 0.002
3,200 0.05
77,000 2
130 .002
130 .002
130 .002
1,300 0.02
Set C Unit Mark Capacity Readability
1mgmg10,000,000 50
2g g 10,000 .05
3kgkg10 0.00005
4ctct50,000 0.2
5oz
6lb
7 ozt
8 dwt
9gr
A HK tael
B SIN tael
C TW tael
D mom
#
#
#
#
#
#
#
#
#
350 0.002
22 0.0001
320 0.002
6,400 0.05
150.000 1
260 0.001
260 0.001
260 0.001
2,600 0.01
IB-15K
Set C Unit Mark Capacity Readability
1mgmg15,000,000 100
2g g 15,000 0.1
3kgkg15 0.0001
4ctct75,000 0.5
5oz
6lb
7 ozt
8 dwt
9gr
A HK tael
B SIN tael
C TW tael
#
#
#
#
#
#
#
#
520 0.005
33 0.0002
480 0.005
9600 0.05
230,000 2
400 0.002
390 0.002
400 0.002
30 IB Series Operation Manual
D mom
#
4,000 0.02
Page 33

11.0 Troubleshooting
The following section contains a troubleshooting chart for the IB Series scale. Refer to this chart to locate causes
and countermeasures to various conditions.
Condition Cause Countermeasure
Limit function data
cannot be set
• Scale is not set to Limit Function mode
• Upper and lower limits have not been
set, or lower limit upper limit setting
has been entered
[#] mark will flash at OVER/ACCEPT/
UNDER positions.
Display will not
stabilize
Displayed value is in
error. Weight value
deviating
Linearity
error
Display is blank • Adapter is not connected
Scale will not weigh
up to rated capacity
•Wind or vibration is affecting scale • Set up scale elsewhere
• Scale is set on unstable surface • Set scale level
• Extended usage or moving scale has
affected span value
• Mis-performed tare subtraction • Reset tare subtraction
• Scale is not set level • Set scale level
• Extended usage or moving scale has
affected span value
• Mechanical adjustment has changed
due to some modification in scale
characteristics, etc
• Battery needs recharging
• Auto Power
•Tare + sample weight exceeds capacity
•(Weight range = maximum capacity tare weight)
OFF is activated
• Check that limit function settings are
correct: See page 27
• Perform span adjustment
• Perform span adjustment
• Consult your local Rice Lake Weighing
Systems Service distributor
• Recharge battery
•Press the
• Recheck tare weight
ON/OFF
The LOW-BATT lamp
is lit
The SLEEP lamp is lit • If the battery option is employed, the
b - ERR
0 - ERR
U - ERR
• If the battery option is employed, the
voltage of the internal batteries has
dropped
displayed value has not been used for
more than three minutes
• Electronic malfunction due to static
electricity electromagnetic interference
• Capacity is exceeded
•Tare is overweight
(Weighing value = sample weight + tare weight)
• Something contacting and holding up pan or pan base
• Recharge batteries or connect the AC
adapter
•Press a key or weigh an item
• Consult your local Rice Lake Weighing
Systems distributor
Table 11-1. Troubleshooting Chart
Troubleshooting 31
Page 34

IB Series Limited Warranty
Rice Lake Weighing Systems (RLWS) warrants that all RLWS equipment and systems manufactured and sold by
RLWS and properly installed by an authorized RLWS Distributor or Original Equipment Manufacturer (OEM)
will operate per written specifications as confirmed by the Distributor/OEM and accepted by rlws. All systems
and components are warranted against defects in materials and workmanship for five years.
RLWS warrants that the equipment sold hereunder will conform to the current written specifications authorized
by RLWS. RLWS warrants the equipment against faulty workmanship and defective materials. If any equipment
fails to conform to these warranties, RLWS will, at its option, repair or replace such goods returned within the
warranty period subject to the following conditions:
•Upon discovery by Buyer of such nonconformity, RLWS will be given prompt written notice with a
detailed explanation of the alleged deficiencies.
• Individual electronic components returned to RLWS for warranty purposes must be packaged to
prevent electrostatic discharge (ESD) damage in shipment. Packaging requirements are listed in a
publication, Protecting Your Components From Static Damage in Shipment, available from RLWS
Equipment Return Department.
• Examination of such equipment by RLWS confirms that the nonconformity actually exists, and was
not caused by accident, misuse, neglect, alteration, improper installation, improper repair or
improper testing; RLWS shall be the sole judge of all alleged non-conformities.
• Such equipment has not been modified, altered, or changed by any person other than RLWS or its
duly authorized repair agents.
•RLWS will have a reasonable time to repair or replace the defectiv e equipment. Buyer is responsible
for shipping charges both ways.
• In no event will RLWS be responsible for travel time or on-location repairs, including assembly or
disassembly of equipment, nor will RLWS be liable for the cost of any repairs made by others.
THESE WARRANTIES EXCLUDE ALL OTHER WARRANTIES, EXPRESSED OR IMPLIED,
INCLUDING WITHOUT LIMITATION WARRANTIES OF MERCHANTABILITY OR FITNESS FOR
A PARTICULAR PURPOSE. NEITHER RLWS NOR DISTRIBUTOR WILL, IN ANY EVENT, BE
LIABLE FOR INCIDENTAL OR CONSEQUENTIAL DAMAGES.
RLWS AND BUYER AGREE THAT RLWS’ SOLE AND EXCLUSIVE LIABILITY HEREUNDER IS
LIMITED TO REPAIR OR REPLACEMENT OF SUCH GOODS. IN ACCEPTING THIS WARRANTY,
THE BUYER W AIVES ANY AND ALL OTHER CLAIMS TO W ARRANTY .
SHOULD THE SELLER BE OTHER THAN RLWS, THE BUYER AGREES TO LOOK ONLY TO THE
SELLER FOR WARRANTY CLAIMS.
NO TERMS, CONDITIONS, UNDERSTANDING, OR AGREEMENTS PURPORTING TO MODIFY
THE TERMS OF THIS WARRANTY SHALL HAVE ANY LEGAL EFFECT UNLESS MADE IN
WRITING AND SIGNED BY A CORPORATE OFFICER OF RLWS AND THE BUYER.
© 2001 Rice Lake Weighing Systems, Inc. Rice Lake, WI USA. All Rights Reserved.
RICE LAKE WEIGHING SYSTEMS • 230 WEST COLEMAN STREET • RICE LAKE, WISCONSIN 54868 • USA
 Loading...