

Page 1

920i Based Truck In/Out System
Software Application
Version 1.01
Operator’s Manual
78855 Rev A
Page 2

Page 3

Contents
Technical training seminars are available through Rice Lake Weighing Systems.
Course descriptions and dates can be viewed at www.ricelake.com/training
or obtained by calling 715-234-9171 and asking for the training department.
1.0 Introduction and System Overview.............................................................................................. 1
2.0 Supervisor Mode.......................................................................................................................... 2
2.1 Customer . . . . . . . . . . . . . . . . . . . . . . . . . . . . . . . . . . . . . . . . . . . . . . . . . . . . . . . . . . . . . . . . . . . . . 3
2.2 Product . . . . . . . . . . . . . . . . . . . . . . . . . . . . . . . . . . . . . . . . . . . . . . . . . . . . . . . . . . . . . . . . . . . . . . 4
2.3 Truck . . . . . . . . . . . . . . . . . . . . . . . . . . . . . . . . . . . . . . . . . . . . . . . . . . . . . . . . . . . . . . . . . . . . . . . . 5
2.4 Project . . . . . . . . . . . . . . . . . . . . . . . . . . . . . . . . . . . . . . . . . . . . . . . . . . . . . . . . . . . . . . . . . . . . . . . 5
2.5 Report Menu . . . . . . . . . . . . . . . . . . . . . . . . . . . . . . . . . . . . . . . . . . . . . . . . . . . . . . . . . . . . . . . . . . 6
2.5.1 Print Sample. . . . . . . . . . . . . . . . . . . . . . . . . . . . . . . . . . . . . . . . . . . . . . . . . . . . . . . . . . . . . . . . . . . . . 7
2.5.2 Set EOL Delay . . . . . . . . . . . . . . . . . . . . . . . . . . . . . . . . . . . . . . . . . . . . . . . . . . . . . . . . . . . . . . . . . . . 7
2.5.3 Report Printer Port . . . . . . . . . . . . . . . . . . . . . . . . . . . . . . . . . . . . . . . . . . . . . . . . . . . . . . . . . . . . . . . . 7
2.5.4 Printer Ticket Formats. . . . . . . . . . . . . . . . . . . . . . . . . . . . . . . . . . . . . . . . . . . . . . . . . . . . . . . . . . . . . . 7
2.5.5 View Data Fields . . . . . . . . . . . . . . . . . . . . . . . . . . . . . . . . . . . . . . . . . . . . . . . . . . . . . . . . . . . . . . . . . . 7
2.5.6 Format Ticket . . . . . . . . . . . . . . . . . . . . . . . . . . . . . . . . . . . . . . . . . . . . . . . . . . . . . . . . . . . . . . . . . . . . 8
2.5.7 Clear Format. . . . . . . . . . . . . . . . . . . . . . . . . . . . . . . . . . . . . . . . . . . . . . . . . . . . . . . . . . . . . . . . . . . . . 9
2.6 Transactions . . . . . . . . . . . . . . . . . . . . . . . . . . . . . . . . . . . . . . . . . . . . . . . . . . . . . . . . . . . . . . . . . . 9
2.7 Password . . . . . . . . . . . . . . . . . . . . . . . . . . . . . . . . . . . . . . . . . . . . . . . . . . . . . . . . . . . . . . . . . . . . 10
2.8 System . . . . . . . . . . . . . . . . . . . . . . . . . . . . . . . . . . . . . . . . . . . . . . . . . . . . . . . . . . . . . . . . . . . . . . 10
2.9 Set Date Time . . . . . . . . . . . . . . . . . . . . . . . . . . . . . . . . . . . . . . . . . . . . . . . . . . . . . . . . . . . . . . . . 11
2.10 Diagnostics. . . . . . . . . . . . . . . . . . . . . . . . . . . . . . . . . . . . . . . . . . . . . . . . . . . . . . . . . . . . . . . . . . 12
3.0 Scale Select............................................................................................................................... 13
4.0 Weighing.................................................................................................................................... 14
4.1 Weigh In . . . . . . . . . . . . . . . . . . . . . . . . . . . . . . . . . . . . . . . . . . . . . . . . . . . . . . . . . . . . . . . . . . . . . 14
4.1.1 Customer Selection - Optional . . . . . . . . . . . . . . . . . . . . . . . . . . . . . . . . . . . . . . . . . . . . . . . . . . . . . . 15
4.1.2 Product Selection - Optional. . . . . . . . . . . . . . . . . . . . . . . . . . . . . . . . . . . . . . . . . . . . . . . . . . . . . . . . 15
4.1.3 Project Selection. . . . . . . . . . . . . . . . . . . . . . . . . . . . . . . . . . . . . . . . . . . . . . . . . . . . . . . . . . . . . . . . . 16
4.1.4 Weigh In Canceled . . . . . . . . . . . . . . . . . . . . . . . . . . . . . . . . . . . . . . . . . . . . . . . . . . . . . . . . . . . . . . . 16
4.2 Weigh Out . . . . . . . . . . . . . . . . . . . . . . . . . . . . . . . . . . . . . . . . . . . . . . . . . . . . . . . . . . . . . . . . . . . 17
4.2.1 Truck Number or Transaction Lookup. . . . . . . . . . . . . . . . . . . . . . . . . . . . . . . . . . . . . . . . . . . . . . . . . 17
4.3 Weigh . . . . . . . . . . . . . . . . . . . . . . . . . . . . . . . . . . . . . . . . . . . . . . . . . . . . . . . . . . . . . . . . . . . . . . . 18
4.3.1 Customer Selection - Optional . . . . . . . . . . . . . . . . . . . . . . . . . . . . . . . . . . . . . . . . . . . . . . . . . . . . . . 19
4.3.2 Product Selection - Optional. . . . . . . . . . . . . . . . . . . . . . . . . . . . . . . . . . . . . . . . . . . . . . . . . . . . . . . . 19
4.3.3 Project Selection - Optional. . . . . . . . . . . . . . . . . . . . . . . . . . . . . . . . . . . . . . . . . . . . . . . . . . . . . . . . . 20
5.0 Appendix .................................................................................................................................... 21
5.1 Serial Port Usage. . . . . . . . . . . . . . . . . . . . . . . . . . . . . . . . . . . . . . . . . . . . . . . . . . . . . . . . . . . . . . 22
5.1.1 Required 920i Hardware. . . . . . . . . . . . . . . . . . . . . . . . . . . . . . . . . . . . . . . . . . . . . . . . . . . . . . . . . . . 23
5.2 Default Ticket Format . . . . . . . . . . . . . . . . . . . . . . . . . . . . . . . . . . . . . . . . . . . . . . . . . . . . . . . . . . 23
EPD Software License Agreement......................................................................................................... 24
© Rice Lake Weighing Systems. All rights reserved. Printed in the United States of America.
Rice Lake Weighing Systems is an ISO 9001 registered company.
Specifications subject to change without notice.
Version 1.01 May 2, 2014 3:00 pm
Contents i
Page 4

ii 920i Based Truck In/Out Weigh Program
Rice Lake continually offers web-based video training on a growing selection
of product-related topics at no cost. Visit www.ricelake.com/webinars.
Page 5
1.0 Introduction and System Overview
Weigh
Weigh Out
10/22/07
08:05AM
SCALE #1
-888.8888
Mode
Units
Supervisor
Mode
Select
=>
Scale
#1
Truck
Ta re
Gross
Customer
Product
Project
Net
Weigh In
Scale
Select
This manual provides information on using a truck in/out weighing program (PN 77297) for manual truck
transactions using Rice Lake Weighing System’s 920i digital weight indicator. Stored IDs let you keep a database of
truck IDs, customer product and project information, and weigh-in weights in the indicator’s memory and are
accessed by simply scrolling through the
automatically store up to 100 truck ID’s and tare weig hts, 9 50 customers, 1000 products, an d 1000 projects.
While this manual gives basic information about this program, it only addresses those settings that are important to the
operation of the truck in/out program. For further information on the installation, configuration, and operation of the
920i, consult the 920i Installation Manual, PN 67887.
To install the truck in/out program onto your 920i programmable indicator, it must be in configuration mode before
.cod file can be sent. You can send the .cod file directly from iRev by using the Download Configuration... selection
the
Communications menu and specifying that you want to send the .cod file.
on the
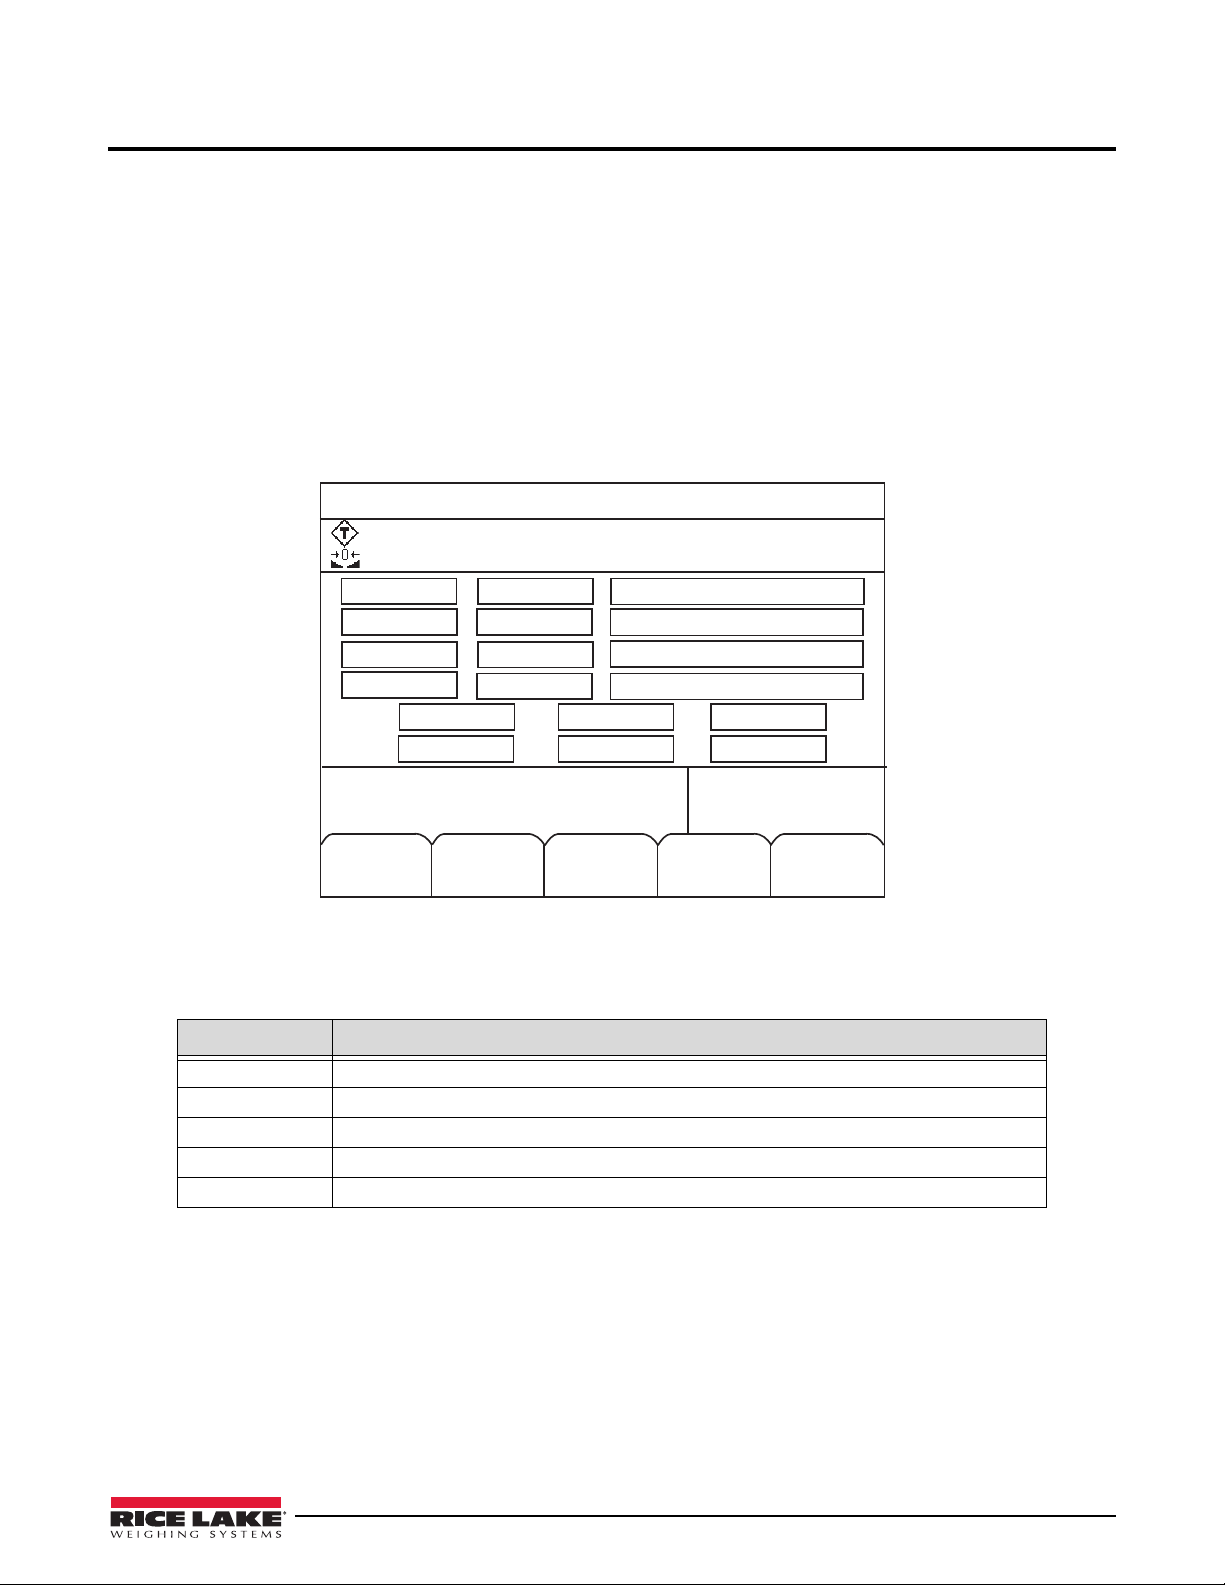
The following main menu screen is shown.
Supervisor main menu using the down arrow on the 920i. The 920i can
The main screen consists of general information that will be added as information is accessed from the database.
Weigh Select this softkey to do a single weighment
Weigh In Allows truck ID entry; generates weigh-in ticket
Weigh Out Allows truck ID entry; generates weigh-out ticket
Scale Select For multi-scale applications, provides a prompt to enter the scale number to be displayed
Supervisor Mode Allows information to be added to the database
All of the softkeys access additional function parameters and are explained in further detail in the following sections.
Figure 1-1. Main Screen
Softkey Description
Table 1-1. Softkey Descriptions
Introduction and System Overview 1
Page 6
2.0 Supervisor Mode
Exit to
Weigh
Set Date/
Time
10/22/07
08:05AM
SCALE #1
Clear
1
2
3
4
Product
Customer
8
7
6
5
Edit
Edit
Edit
Edit
Go to
Edit
Change
Truck
Project
Report Name
Transactions
Password
System
Diagnostics
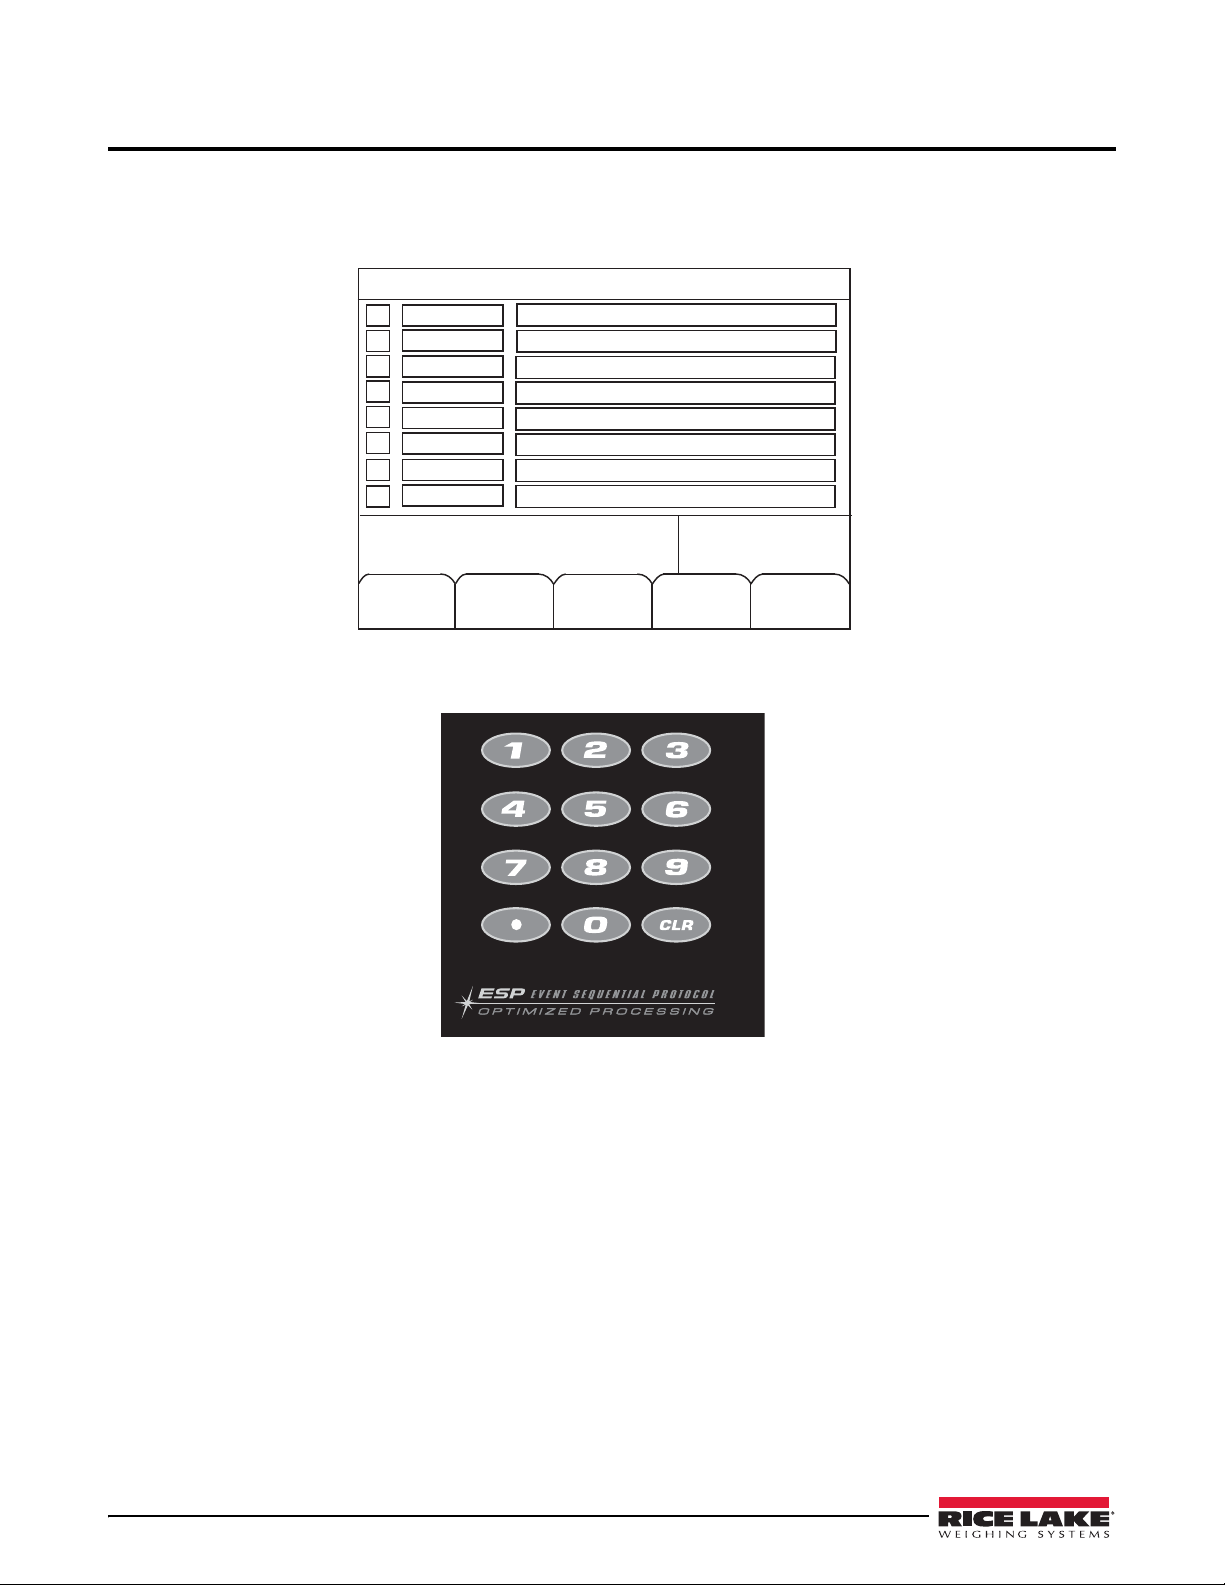
Within the supervisors screen you are able to enter/edit customers, products, trucks, projects, and access report
functions.
1. Press the
shown in Figure 2-1.
2. Using the numeric keypad on the 920i or the front panel keypad, select the desired field.
Supervisor Mode softkey from the main menu screen to access the supervisor menu main screen,
Figure 2-1. Supervisor Menu Main Screen
Figure 2-2. 920i Numeric Keypad
2 920i Based Truck In/Out Weigh Program
Page 7
2.1 Customer
Exit to
Weigh
06/08/13
08:05AM
SCALE #1
Phone
1
2
3
4
7
6
5
ID
Name
Address 1
Address 2
Address 3
Accum
Enter Selection Number
Menu/
Cancel
Customer
Home
Cancel
10/22/13
08:05AM
SCALE #1
End
Customer
Enter ID
A B C D E F G H I J K L M N O P Q R S T U V W X Y Z
a b c d e f g h i j k l m n o p q r s t u v w x y z
! # $ & ? ( ) < > + * % = / \ “ . , : ; ‘ | ~[ ] { }
1
4
3
2
5
6
ID
Name
Address 1
Address 2
Address 3
Phone
Note
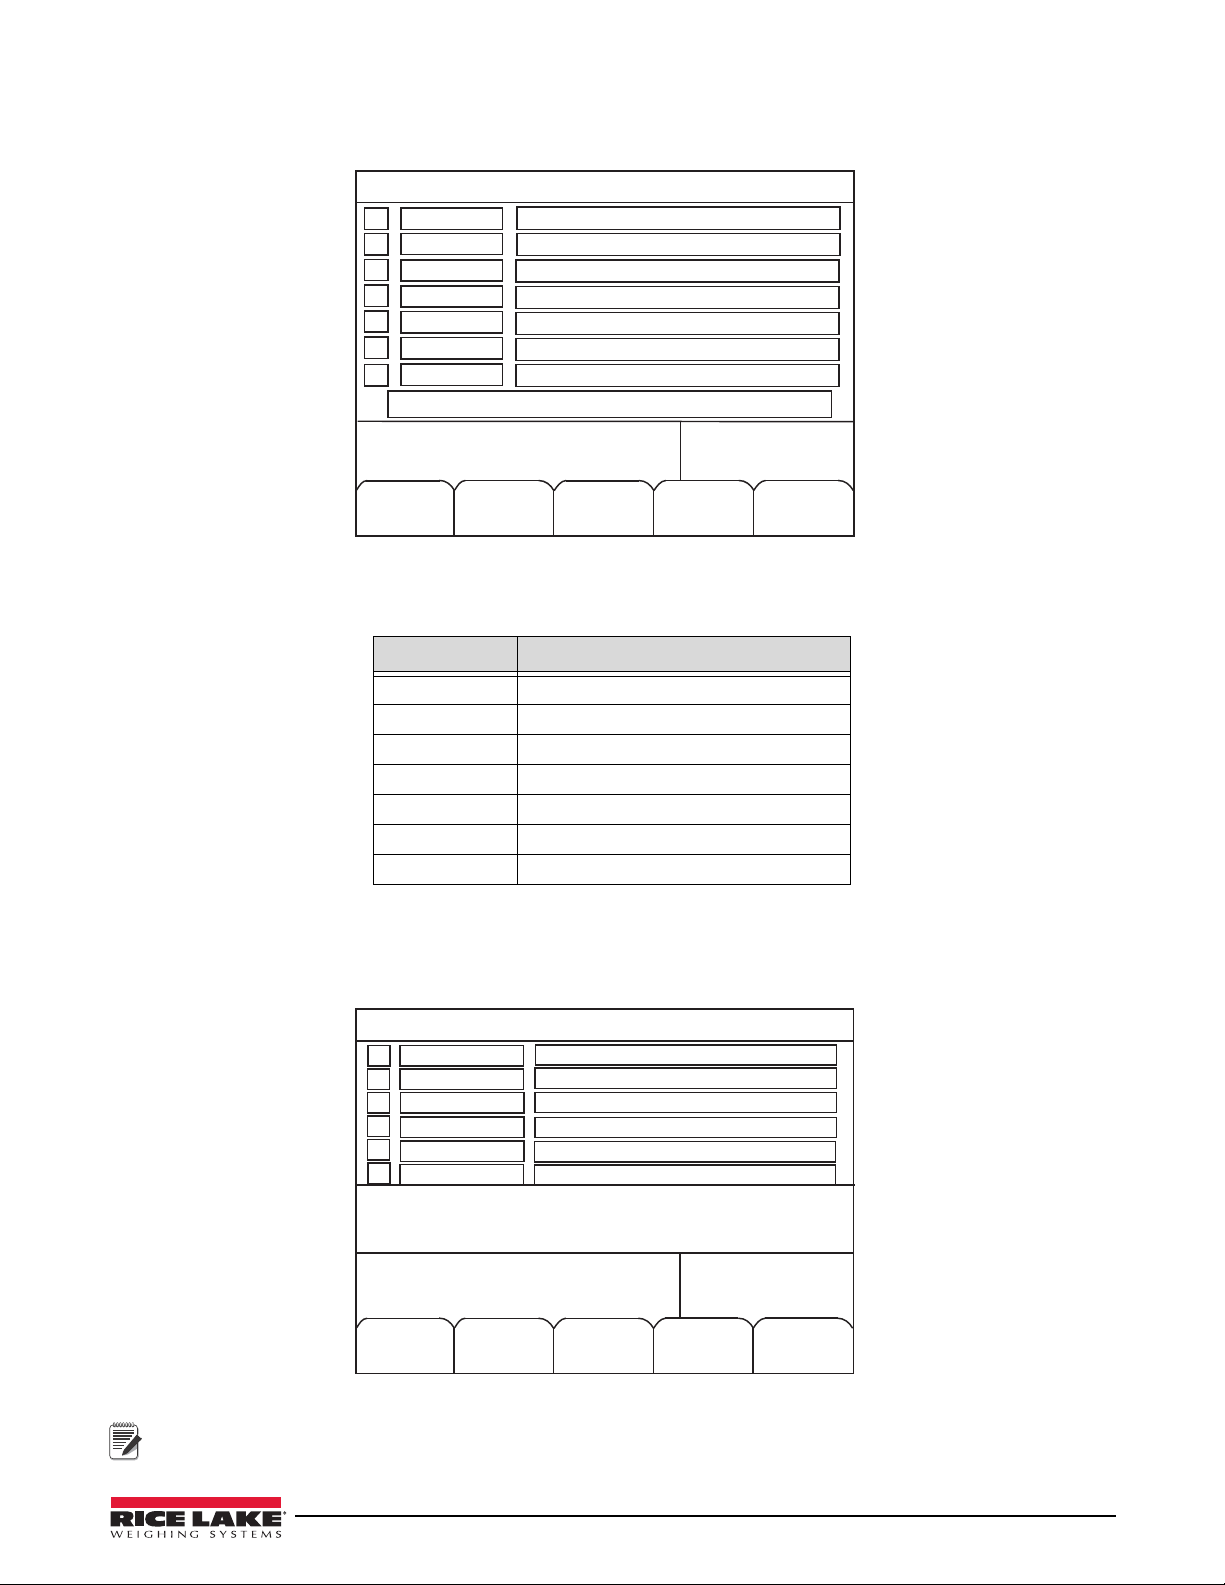
1. Select 1 - Customer, to access the customer entry screen, shown in Figure 2-3.
Figure 2-3. Customer Entry Screen
2. Enter the field number to be edited using the numeric keypad. The following table lists the amount of
characters allowed for each field.
Field Characters Allowed
ID 16 character alphanumeric
Name 20 character alphanumeric
Address 1 20 character alphanumeric
Address 2 20 character alphanumeric
Address 3 20 character alphanumeric
Phone 20 character alphanumeric
Accum Can’t edit, view only
Table 2-1. Customer Entry Character Parameters
3. Enter customer information using the
menu.
4. Move the cursor back down to the
When entering the customer ID, if it is not currently found in the program, the on-screen prompt tells you that it’s
not found, but adding that entered customer ID number. Press the Save softkey to save the new customer ID.
up/down, right/left navigation keys, to scroll through the alpha-numeric
Enter line and press enter to save.
Figure 2-4. Customer Entry ID Screen
Supervisor Mode 3
Page 8

You can use the up/down arrows on the navigation pad on the 920i to scroll through and view customer
Note
Exit to
Weigh
10/22/07
08:05AM
SCALE #1
1
2
3
4
7
6
5
ID
Name
Rate
Accum
Total
Enter Selection Number
Menu/
Cancel
Products
information already entered into the database.
5. Enter other customer parameters, using the same steps.
6. When complete, press the
Exit to Weigh softkey to access the weigh screen or the Menu/Cancel softkey to go to
the Supervisor main menu.
2.2 Product
1. Select 2 - Product, from the Supervisor’s main menu to access the product parameter screens.
Figure 2-5. Product Entry Screen
2. Enter the field number to be edited on the numeric keypad. The following table lists the amount of characters
allowed for each field.
Field Characters Allowed
ID 16 character alphanumeric
Name 20 character alphanumeric
Rate Numeric
Accum Can’t edit/view only
Total Can’t edit/view only
Table 2-2. Product Entry Character Parameters
3. Use the
up/down navigation keys, to scroll through the alpha-numeric menu to edit or enter the product
information.
4. Press
enter to save the values. Additional entries can be made by using the navigation keys to add additional
products.
5. When complete, use the
Menu/Cancel softkey to go to the Supervisor Main Menu screen.
4 920i Based Truck In/Out Weigh Program
Page 9

2.3 Truck
Exit to
Weigh
10/22/07
08:05AM
SCALE #1
1
2
3
4
7
6
5
ID
Ta re
Descrip
Accum
Enter Selection Number
Menu/
Cancel
Trucks
Exit to
Weigh
10/22/07
08:05AM
SCALE #1
1
2
3
4
7
6
5
ID
Name
Descrip 1
Descrip 2
Enter Selection Number
Menu/
Cancel
Projects
Accum
1. Select 3 - Truck , from the Supervisor’s main menu to access the truck parameter screen.
Figure 2-6. Truck Entry Screen
2. Enter the field number to be edited on the numeric keypad. The following table lists the amount of characters
allowed for each field.
Field Characters Allowed
ID 16 character alphanumeric
Tare Numeric (keyed or from scale)
Descrip 20 character alphanumeric
Accum Can’t edit/view only
Table 2-3. Truck Entry Character Parameters
3. Using the
4. Press
up/down navigation keys, to scroll through the alpha-numeric to edit or enter the truck information.
Save softkey to save the values. Additional entries can be made by using the navigation keys to add
additional truck numbers.
5. To store a tare value taken from the scale, press the
2 key after selecting an ID and press enter with nothing
entered. This stores the the current weight on the scale as the tare.
6. When complete, use the
Menu/Cancel softkey to go to the Supervisor Main Menu screen.
2.4 Project
1. Select 4 - Project from the Supervisor’s main menu to access the project parameters screen.
Figure 2-7. Project Entry Screen
Supervisor Mode 5
Page 10

2. Enter the field number to be edited on the numeric keypad. The following table lists the amount of characters
Clear
Format
Format
Ticket
10/22/07
08:05AM
SCALE #1
Edit Header 2
1
2
3
4
Product Report
Customer Repor t
8
7
6
5
Print
Print
Print
Print
Edit Header 1
Print
Edit Header 3
Transaction Report
Truck Repor t
Project Report
Reports
View Data
Fields
More=>
Menu
Set EOL Report
Delay
Printer Port Tckt Format
10/22/07
08:05AM
SCALE #1
Edit Header 2
1
2
3
4
Product Report
Customer Report
8
7
6
5
Print
Print
Print
Print
Edit Header 1
Print
Edit Header 3
Transaction Report
Truck Report
Pr
oject Repor
t
Reports
Print
Sample
<=More
Print
allowed for each field.
Field Characters Allowed
ID 20 character alphanumeric
Name 20 character alphanumeric
Descrip 1 20 character alphanumeric
Descrip 2 20 character alphanumeric
Accum Can’t edit/view only
Table 2-4. Project Entry Character Parameters
3. Use the Up/down navigation keys to scroll through the alphanumeric keys to edit or enter the project
information.
4. Press
5. When complete, use the
Save softkey to save.
Menu/Cancel softkey to go to the Supervisor Main Menu screen.
2.5 Report Menu
1. Select 5 - Report Menu from the Supervisor’s main menu to access the reporting parameter screens.
Figure 2-8. Report Entry Screen
Figure 2-9. Report Entry Screen (more)
2. There are several types of reports that can be generated through this screen which include customer reports,
product reports, transaction reports, truck reports, and project reports. To access a particular report, select the
number using the numeric keypad on the 920i. The report will be printed on the attached printer.
6 920i Based Truck In/Out Weigh Program
Page 11

2.5.1 Print Sample
Exit to
Weigh
10/22/07
08:05AM
SCALE #1
1
2
3
4
7
6
5
Print
Print
Print
Enter Selection Number
Menu/
Cancel
Weigh Sample
Weigh In Sample
Weigh Out Sample
Item Data Field
1Truck ID
2Product ID
3Customer ID
4 Time and Date
5Gross
6Tare
7Net
8Value
9 Transaction #
10 Truck Description
11 Product Name
12 Customer Name
13 Header 1
14 Header 2
15 Header 3
16 Customer Address 1
17 Customer Address 2
18 Customer Address 3
19 Customer Phone
20 Customer Accum
21 Product Rate
22 Product Accum
Item Data Field
23 Product Total
24 Truck Accum
25 Net in Tons
26 Project ID
27 Project Name
28 Project Description 1
29 Project Description 2
30 Project Accum
/Transmit Text
C Transmit Character -
decimal value
Item Data Field
1. Select the Print Sample softkey to access the print selections.
Figure 2-10. Print Sample Selections Screen
2.5.2 Set EOL Delay
Enter the delay between printed lines if the printer buffer is getting overloaded.
The default setting is 2 and time is entered in milliseconds.
2.5.3 Report Printer Port
Enter the port that the reports (including customer, product, project, truck, transaction, and ticket format reports) will
print.
The default setting is port 3, although ports 1-4 can be used.
2.5.4 Printer Ticket Formats
This prints the contents of the weigh ticket, weigh in ticket, and the weigh out ticket for ticket formatting to see what
has been currently entered and it will be printed on the report printer.
2.5.5 View Data Fields
Select the View Data Fields softkey to view a list of available ticket fields. Table 2-5 lists the available ticket fields.
Table 2-5. Available Ticket Fields
Supervisor Mode 7
Page 12

2.5.6 Format Ticket
Exit to
Weigh
10/22/07
08:05AM
SCALE #1
1
2
3
4
7
6
5
Format
Format
Format
Enter Selection Number
Menu/
Cancel
Weigh Ticket
Weigh In Ticket
Weigh Out Ticket
Choose Type to Format
Home
Cancel
10/22/07
08:05AM
SCALE #1
End
Weigh Ticket Format
Enter Row
Press Cancel to End
Note
1. Format a ticket by selecting the Format Ticket softkey screen as shown in Figure 2-8 and select the print
format to be edited. The following screen is displayed.
Figure 2-11. Format Ticket Select
2. Choose the type of ticket format type by using the numeric keypad to select 1, 2, or 3. Figure 2-12 illustrates an
example of the weigh ticket format screen.
3. Enter information and press enter to save your entry.
This can also be done through the Database Editor. To view the database rows/columns for the sample ticket
shown below, see Appendix 7.2.
8 920i Based Truck In/Out Weigh Program
Figure 2-12. Format Ticket Screen
Table 1-1. Data Fields Parameters
Page 13

Figure 2-13. Weigh Ticket Example
10/22/07
08:05AM
SCALE #1
Clear Transactions
No
Are You Sure?
Yes
2.5.7 Clear Format
1. Select the Clear Format (Figure 2-8) softkey to clear the ticket format.
2.6 Transactions
1. Select 6 - Tr an sa ct io ns from the Supervisor’s main menu to delete all stored transactions. The following
screen is displayed.
Figure 2-14. Transaction Menu Screen.
2. If you wish to clear all transactions from the database, press the Yes softkey. After pressing Yes or No to clear
the transaction database, it will prompt asking if the user wants to clear all of the accumulated totals.
Supervisor Mode 9
Page 14

Figure 2-15. Clear Accumulated Totals Screen
10/22/07
08:05AM
SCALE #1
Clear All Accum Totals?
No
Are You Sure?
Yes
Exit to
Weigh
10/22/07
08:05AM
SCALE #1
1
2
3
4
7
6
5
Store Tr
ansaction Recor
ds
Allow Transient Customers
Print on Weigh In
Transaction Number
Menu
Use Stored Tar e
Weigh Out By
Yes
Yes
0
Yes
Yes
Truck ID
Yes
0
9
8
Tare Key Enabled to Modify Truck Tares
Yes
Yes
Project Auto Prompt in Weighs
Yes
Customer Auto Prompt in Weighs
Product Auto Prompt in Weighs
Edit
Labels
3. Press Yes to clear all of the customer, truck, product, and project accu mulations.
2.7 Password
1. Select 7 - Password from the Supervisor’s main menu to access the password parameter screen.
2. Follow the on-screen prompt to either keep the password or change the password.
3. Press
enter to save the entry .
2.8 System
1. Select 8 - System from the Supervisor’s main menu to access the system parameters. The following screen is
displayed.
2. Select the parameter to access using the numeric keypad. The following describes the system parameters.
10 920i Based Truck In/Out Weigh Program
Store Transaction Records
Yes – transaction database is updated after every transaction.
No – nothing is updated.
Allow Transient Customers
Yes – updates the database when a new customer is added on the fly.
No – does not save this data and the only way to add to the database is through the Supervisor softkey.
Figure 2-16. System Parameters
Page 15

Print on Weigh In
Selects whether or not a ticket will be printed after a truck is weighed in.
Transaction Number
Displays the current transaction number and also allows the number to be reset. The next transaction number
will be 1 higher than the value shown.
Use Stored Tare
Yes – uses the stored tare in the vehicle database.
Weigh Out By
When you press the Weigh Out button, the Weigh Out By prompt looks up the first weight reading that was
taken depending on if it was set up for a truck ID or a tran ID. This parameter toggles between Truck ID and
Tran ID, the default is T ruck ID.
Tare Key Enabled
Yes – allows the tare key to be pressed in between transactions and will prompt for a truck ID, either new or
currently stored. After entering an ID, the 920i will take the weight on the scale and store it as the tare for that
truck ID, as a quick way to edit tares.
No – function is disabled.
Customer Auto Prompt on Weighs
Yes – at weigh or weigh in after prompting for a truck ID the system will prompt for a Customer ID, Product
ID, and Project ID.
No – system will prompt for Truck ID only and o ther ID can be selected separately.
Product Auto Prompt on Weighs
Yes – at weigh or weigh in after prompting for a truck ID, the system will prompt for a product ID.
No – system will prompt for Truck ID only and y ou can select other IDs separately.
Project Auto Prompt on Weighs
Yes – at weigh or weigh in after prompting for a truck ID, the system will prompt for a project ID.
No – system will prompt for Truck ID only and y ou can select other IDs separately.
Edit Labels Softkey
Press this key and follow the prompts to change the labels for the actual words, Customer, Project, Product,
Truck in the screens and displayed messages throughout the s yst em.
and
The defaults are Customer, Project, Product, and T ruck.
3. When complete, use the
Menu softkey to exit out of the system menu screen.
2.9 Set Date Time
1. Press the Set Date Time softkey to access the time and date.
2. Use the on-screen prompts to enter the month, day, year, and time.
Supervisor Mode 11
Page 16

2.10 Diagnostics
Note
10/22/07
08:05AM
SCALE #1
Diagnostics
NAME
DEADLOAD
0.1871
1.1509
0.7567
0.3791
0.0931
0.7079
CURRENT
0.2159
0.0547
0.7301
0.3583
0.1565
0.6655
A2-Load Cell 2
A3-Load Cell 3
A4-Load Cell 4
A5-Load Cell 5
A6-Load Cell 6
A7-Load Cell 7
System 1
44 weighments over 1000 grads
17.24608
Cell OK
Previous Done
Cell
Emulation
Next
Figure 2-17 shows an example of a 920i display of iQube diagnostic information. Information shown includes the
following:
• Cell name
• Cell deadload value (mV )
• Current individual cell and total values (mV)
• Number of weighments
• Cell status for highlighted cell. Use the indicator navigation keys to select cells.
Displayed deadload and current values are raw millivolt values. All diagnostic measurements use corrected mV
values:
corrected_value = current_value – deadload_value
Figure 2-17. 920i Diagnostic Display
The 920i diagnostic display can be shown by pressing the Diagnostic softkey (if configured).
In setup mode, diagnostic information can be shown by going to the VERS menu, pressing the
then the
Access through the VERS menu also displays softkeys for
Emulation
Next softkey.
Clear Diagnostics and, if cell emulation is enabled, Cell
. If cell emulation is set to AUTO2 or MANUAL2, a Snapshot softkey is also shown.
Contact softkey,
12 920i Based Truck In/Out Weigh Program
Page 17

3.0 Scale Select
Home
Cancel
10/22/07
08:05AM
SCALE #1
-888.8888
Mode
Units
End
Scale Select
Scale Number
Scale
#1
Truck
Customer
Product
If more than one scale is connected to the 920i, the Scale Select softkey allows the user to select which scale to use.
Figure 3-1. Scale Selection Screen
1. Use the numeric keypad to select the scale number.
2. Press the
3. To end out of the scale selection screen, press the
enter key to save the scale number .
Cancel softkey .
Scale Select 13
Page 18

4.0 Weighing
Home
Product
10/22/07
08:05AM
SCALE #1
-888.8888
Mode
Units
End
Scale
#1
Truck
Ta re
Gross
Customer
Product
Net
Customer
Project
Project
Select
Enter Truck ID
Note
Note
Cancel
Customer
10/22/07
08:05AM
SCALE #1
-888.8888
Mode
Units
Complete
Scale
#1
Truck
Ta re
Gross
Customer
Product
Net
Project
Product
Project
4.1 Weigh In
The general weigh-in procedure is as follows:
1. The truck moves onto the scale for weigh-in.
2. Press the
Weigh In softkey. The following screen is displayed.
Figure 4-1. Weigh In Screen
3. Enter the truck ID by using the numeric keys on the 920i. Press enter to save the ID number .
4. Enter the Customer ID, Product ID, and Project ID as the series of prompts come up.
5. After valid truck IDs are entered the following screen is displayed.
If the truck ID has already been entered and a weigh in has already been complete, the following error message
appears on the user screen:
“Error, Truck is Weighed In.”
Press enter without keying in an ID for any of the above as it is not necessary to enter those. If Auto-prompt is
set to No in the Supervisor System menu this will not prompt through all IDs and the user will have to press
individual softkeys to select customer, project, product IDs separately.
Figure 4-2. Truck ID Data
14 920i Based Truck In/Out Weigh Program
Page 19

4.1.1 Customer Selection - Optional
Home
Cancel
10/22/07
08:05AM
SCALE #1
-888.8888
Mode
Units
End
Scale
#1
Truck
Ta re
Gross
Customer
Product
Net
Project
Customer
Enter Customer
Home
Cancel
10/22/07
08:05AM
SCALE #1
-888.8888
Mode
Units
End
Scale
#1
Truck
Ta re
Gross
Customer
Product
Net
Project
Product
Enter Prod ID
1. Enter the customer selection by using the up/down, right/left navigation keys, to scroll through the numeric
menu.
2. Press
enter to save the customer selection or press enter without typing anything into the Enter Customer field.
Figure 4-3. Customer Selection Screen
4.1.2 Product Selection - Optional
1. Enter the product selection by using the up/down, right/left navigation keys, to scroll through the
alpha-numeric menu.
2. Press
enter to save the product selection or press enter without typing anything into the Enter Prod ID field.
Figure 4-4. Product Selection Screen
Weighing 15
Page 20

4.1.3 Project Selection
Home
Cancel
10/22/07
08:05AM
SCALE #1
-888.8888
Mode
Units
End
Scale
#1
Truck
Ta re
Gross
Customer
Product
Net
Project
Product
Enter Prod ID
Weigh
Weigh Out
10/22/07
08:05AM
SCALE #1
-888.8888
Mode
Units
Supervisor
Mode
Scale
#1
Truck
Ta re
Gross
Customer
Product
Net
Weigh In
Scale
Select
Complete
Project
1. Enter the project selection by using the up/down, right/left navigation keys, to scroll through the
alpha-numeric menu.
2. Press
3. Once the customer and product and project are entered and saved, press the Complete softkey to complete the
enter to save the project selection or press enter without typing anything into the Enter Project field.
Figure 4-5. Project Selection Screen
weigh in. The following screen is shown and the indicator generates a weigh-in ticket.
4.1.4 Weigh In Canceled
If you want to quit the weigh in, use the Cancel softkey (shown in Figure 4-5) to cancel the weigh in process.
16 920i Based Truck In/Out Weigh Program
Figure 4-6. Weigh In Complete Screen
Page 21

4.2 Weigh Out
Home
Cancel
10/22/07
08:05AM
SCALE #1
-888.8888
Mode
Units
End
Scale
#1
Truck
Ta re
Gross
Customer
Product
Net
Truck Lookup
Enter Number
Project
Cancel
Customer
10/22/07
08:05AM
SCALE #1
-888.8888
Mode
Units
Complete
Scale
#1
Truck
Ta re
Gross
Customer
Product
Net
Project
Product
Project
The general weigh-out procedure is as follows:
4.2.1 Truck Number or Transaction Lookup
1. Enter the truck number or the transaction lookup number (depending on what you have set up in the
Supervisor menu system parameter) by using the up/down, right/left navigation keys, to scroll through the
alpha-numeric menu.
Figure 4-7. Weigh Out Truck Number
2. Press enter to save the truck number.
3. Once the customer and product are entered and saved, press the Complete softkey to complete the weigh in.
The truck ID (temporarily stored), is then deleted from the truck database.
Figure 4-8. Truck Info Screen
Weighing 17
Page 22

4.3 Weigh
Home
Cancel
10/22/07
08:05AM
SCALE #1
-888.8888
Mode
Units
End
Select
Enter Truck ID
Scale
#1
Truck
Customer
Product
Project
Gross Tare
Net
Note
Cancel
Customer
10/22/07
08:05AM
SCALE #1
-888.8888
Mode
Units
Complete
Scale
#1
Truck
Ta re
Gross
Customer
Product
Net
Project
Product
Project
1. To perform a single weighment, select the Weigh softkey. The truck ID entry screen is displayed.
Figure 4-9. Truck ID Entry Screen
2. Use the up/down, right/left navigation keys, to scroll through the alpha-numeric menu to enter the truck ID
(shown in Figure 4-9).
3. Move the cursor back down to the Truck ID entry and press
entered, it will prompt for a tare (Figure 6-7).
4. Enter the Customer ID, Product ID, and Project ID as the series of prompts come up.
Press enter without keying in an ID for any of the above as it is not necessary to enter those. If Auto-prompt is
set to No in the Supervisor System menu this will not prompt through all IDs and the user will have to press
individual softkeys to select customer, project, product IDs separately.
5. The following screen is now displayed.You can select customer or product from the menu softkeys if they have
not been entered.
enter to save the truck ID. If no tare has been
18 920i Based Truck In/Out Weigh Program
Figure 4-10. Customer Selection
Page 23

4.3.1 Customer Selection - Optional
Home
Cancel
10/22/07
08:05AM
SCALE #1
-888.8888
Mode
Units
End
Scale
#1
Truck
Ta re
Gross
Customer
Product
Net
Project
Customer
Enter Customer
Home
Cancel
10/22/07
08:05AM
SCALE #1
-888.8888
Mode
Units
End
Scale
#1
Truck
Ta re
Gross
Customer
Product
Net
Project
Product
Enter Prod ID
1. Enter the customer selection by using the up/down right/left navigation keys to scroll through the numeric
menu.
2. Press
enter to save the customer selection.
Figure 4-11. Customer Selection Screen
4.3.2 Product Selection - Optional
1. Enter the product selection by using the up/down, right/left navigation keys, to scroll through the
alpha-numeric menu.
2. Press
enter to save the product selection.
Figure 4-12. Product Selection Screen
Weighing 19
Page 24

4.3.3 Project Selection - Optional
Home
Cancel
10/22/07
08:05AM
SCALE #1
-888.8888
Mode
Units
End
Scale
#1
Truck
Ta re
Gross
Customer
Product
Net
Project
Project
Enter Project
Weigh
Weigh Out
10/22/07
08:05AM
SCALE #1
-888.8888
Mode
Units
Supervisor
Mode
Scale
#1
Truck
Ta re
Gross
Customer
Product
Net
Weigh In
Scale
Select
Complete
Project
1. Enter the product selection by using the up/down, right/left navigation keys, to scroll through the
alpha-numeric menu.
2. Press the
3. Once the truck is weighed the following screen is displayed. Now the truck can exit the scale.
Complete softkey, to finish the weighment.
Figure 4-13. Project Selection Screen
20 920i Based Truck In/Out Weigh Program
Figure 4-14. Weigh Selection Complete
Page 25

5.0 Appendix
Control ASCII Dec. Hex ASCII Dec. Hex ASCII Dec. Hex ASCII Dec Hex
Ctrl-@ NUL 00 00 space 32 20 @ 64 40 ` 96 60
Ctrl-A SOH 01 01 ! 33 21 A 65 41 a 97 61
Ctrl-B STX 02 02 “ 34 22 B 66 42 b 98 62
Ctrl-C ETX 03 03 # 35 23 C 67 43 c 99 63
Ctrl-D EOT 04 04 $ 36 24 D 68 44 d 100 64
Ctrl-E ENQ 05 05 % 37 25 E 69 45 e 101 65
Ctrl-F ACK 06 06 & 38 26 F 70 46 f 102 66
Ctrl-G BEL 07 07 ’ 39 27 G 71 47 g 103 67
Ctrl-H BS 08 08 ( 40 28 H 72 48 h 104 68
Ctrl-I HT 09 09 ) 41 29 I 73 49 i 105 69
Ctrl-J LF 10 0A * 42 2A J 74 4A j 106 6A
Ctrl-K VT 11 0B + 43 2B K 75 4B k 107 6B
Ctrl-L FF 12 0C , 44 2C L 76 4C l 108 6C
Ctrl-M CR 13 0D - 45 2D M 77 4D m 109 6D
Ctrl-N SO 14 0E . 46 2E N 78 4E n 110 6E
Ctrl-O SI 15 0F / 47 2F O 79 4F o 111 6F
Ctrl-P DLE 16 10 0 48 30 P 80 50 p 112 70
Ctrl-Q DC1 17 11 1 49 31 Q 81 51 q 113 71
Ctrl-R DC2 18 12 2 50 32 R 82 52 r 114 72
Ctrl-S DC3 19 13 3 51 33 S 83 53 s 115 73
Ctrl-T DC4 20 14 4 52 34 T 84 54 t 116 74
Ctrl-U NAK 21 15 5 53 35 U 85 55 u 117 75
Ctrl-V SYN 22 16 6 54 36 V 86 56 v 118 76
Ctrl-W ETB 23 17 7 55 37 W 87 57 w 119 77
Ctrl-X CAN 24 18 8 56 38 X 88 58 x 120 78
Ctrl-Y EM 25 19 9 57 39 Y 89 59 y 121 79
Ctrl-Z SUB 26 1A : 58 3A Z 90 5A z 122 7A
Ctrl-[ ESC 27 1B ; 59 3B [ 91 5B { 123 7B
Ctrl-\ FS 28 1C < 60 3C \ 92 5C | 124 7C
Ctrl-] GS 29 1D = 61 3D ] 93 5D } 125 7D
Ctrl-^ RS 30 1E > 62 3E ^ 94 5E ~ 126 7E
Ctrl-_ US 31 1F ? 63 3F _ 95 5F DEL 127 7F
Figure 5-1. ASCII Character Chart (Part 1)
Appendix 21
Page 26

ASCII Dec Hex ASCII Dec Hex ASCII Dec Hex ASCII Dec Hex
Ç 128 80 á 160 A0 192 C0 a 224 E0
ü 129 81 í 161 A1 193 C1 b 225 E1
é 130 82 ó 162 A2 194 C2 G 226 E2
â 131 83 ú 163 A3 195 C3 p 227 E3
ä 132 84 ñ 164 A4 196 C4 S 228 E4
à 133 85 Ñ 165 A5 197 C5 s 229 E5
å 134 86 ª 166 A6 198 C6 m 230 E6
ç 135 87 º 167 A7 199 C7 t 231 E7
ê 136 88 ¿ 168 A8 200 C8 F 232 E8
ë 137 89 169 A9 201 C9 Q 233 E9
è 138 8A ¬ 170 AA 202 CA W 234 EA
ï 139 8B 1/2 171 AB 203 CB d 235 EB
î 140 8C 1/4 172 AC 204 CC • 236 EC
ì 141 8D ¡ 173 AD 205 CD f 237 ED
Ä 142 8E « 174 AE 206 CE Œ 238 EE
Å 143 8F » 175 AF 207 CF « 239 EF
É 144 90 176 B0 208 D0 ½ 240 F0
æ 145 91 177 B1 209 D1 ± 241 F1
Æ 146 92 178 B2 210 D2 Š 242 F2
ô 147 93 179 B3 211 D3 £ 243 F3
ö 148 94 180 B4 212 D4 Û 244 F4
ò 149 95 181 B5 213 D5 € 245 F5
û 150 96 182 B6 214 D6 ³ 246 F6
ù 151 97 183 B7 215 D7 ª 247 F7
ÿ 152 98 184 B8 216 D8 × 248 F8
Ö 153 99 185 B9 217 D9 ² 249 F9
Ü 154 9A 186 BA 218 DA 250 FA
¢ 155 9B 187 BB 219 DB 251 FB
£ 156 9C 188 BC 220 DC 252 FC
¥ 157 9D 189 BD 221 DD
Pts 158 9E 190 BE 222 DE 254 FE
ƒ 159 9F 191 BF 223 DF 255 FF
2
253 FD
Figure 5-2. ASCII Character Chart (Part 2)
5.1 Serial Port Usage
The following table lists the serial ports for the 920i and their uses with the truck in/out program.
920i Serial Port Description
1 Unused by program
2 Unused by program
3Printer output
4 Unused by program
Table 5-1. Serial Port Descriptions
22 920i Based Truck In/Out Weigh Program
Page 27

5.1.1 Required 920i Hardware
Slot # Description
Slot 1 Single channel A/D card
Slot 2 1 MB memory card
Table 5-2. Required Hardware
5.2 Default Ticket Format
An example of the default ticket format shown on page 10 is shown below using the formatted database
rows/columns.
Row Column Te xt
1113
2114
3115
5 1 /Transaction Number
5209
614
71/Truck
7101
71210
81/Customer
8103
81212
91/Product
9102
91211
10 1 /Product Rate: $
10 18 21
11 18 /Gross:
11 24 5
12 18 /Tare:
12 24 6
13 18 /Net:
13 24 7
14 18 /Price: $
14 24 8
Table 5-3. Default Ticket Format
To put an ASCII character into the Ticket Format you would put the decimal value of the character preceded by the
letter C. So to put 3 line feeds and 1 carriage return character at the end of this ticket, you would add the row in the
database below. You could sepeate this out into four different database rows or put it all together like the example
shown below .
Row Column Te xt
15 1 C10C10C10C13
Appendix 23
Page 28

EPD Software License Agreement
Please Read Carefully. This is a legal Agreement between you (either an individual or an entity) and Rice Lake Weighing
Systems. If you do not agree to the terms of this Agreement, promptly return the disks and the accompanying items (including
written materials and binders or other containers) to the place you obtained them for a full refund. “Software” refers to any
programs or program components, disk, or EPROM based.
Rice Lake Weighing Systems SOFTWARE LICENSE
1. GRANT OF LICENSE. Rice Lake Weighing Systems grants to you the right to use one copy of the Ri ce
Lake Weighing systems software program identified above in the following manner. You may use one copy
of the SOFTWARE on any single computer connected to a single terminal (i.e. single CPU).
2. COPYRIGHT. The SOFTWARE is owned by Rice Lake We ighing Systems or its su ppliers and is protected by
United States copyright laws and international treaty provisions. Therefore, you must treat the SOFTWARE
like any other copyrighted material (e.g. a book or musical recording) except that you may either (a) make one
copy of the SOFTWARE solely for backup or archival purposes, or (b) transfer the SOFTWARE to a single
hard disk provided you keep the original solely for backup or archival purposes.
3. OTHER RESTRICTIONS. You may not rent or lease the SOFTWARE, but you may transfer the SOFTW ARE
and accompanying written materials on a permanent basis provided you retain no copies and the recipient
agrees to the terms of this Agreement. You may not reverse engineer, decompile, or disassemble the
SOFTWARE. Software and hardware systems may be transferred with written permission to RLWS. The
warranty becomes void. If the SOFTWARE is an update or has been updated, any transfer must include the
most recent update and all prior versions. The source code of the SOFTWARE is confidential information
owned by Rice Lake Weighing Systems. You may not disclose it to any third party, make derivative works
based upon it, or use it for any purpose except the specific uses expressly permitted in the user documentation
which accompanies the SOFTWARE.
LIMITED WARRANTY
Rice Lake Weighing Systems warrants that (a) the SOFTWARE will perform substantially in accordance with the accompanying
written materials for a period of ninety (90) days from the date of receipt; and (b) any hardware accompanying the SOFTWARE
will be free from defects in materials and workmanship under normal use and service for a period of one (1) year from the date of
receipt. Any implied warranties on the SOFTWARE and hardware are limited to ninety (90) days and one (1) year, respectively.
Some states/countries do not allow limitations on d uration o f im plied warrant y, so the above limitation may not apply to you.
CUSTOMER REMEDIES. Rice Lake Weighing Systems and its suppliers entire liability and your exclusive remedy shall be, at
Rice Lake Weighing Systems option, either (a) return of the price paid or (b) repair or replacement of the SOFTWARE or
hardware that does not meet Rice Lake Weighing Systems Limited Warranty and which is returned to Rice Lake Weighing
Systems with a copy of your receipt. This Limited Warranty is void if failure of the SOFTWARE or hardware ha s resulted from
accident, abuse, or misapplication. Any replacement SOFTWARE will be warranted for the remainder of the original warranty
period or thirty (30) days, whichever is longer.
NO OTHER W ARRANTIES. Rice Lake Weighing Systems and its suppliers disclaim all other warranties, either expr ess or
implied, including, but not limited to implied warranties of merchantability and fitness for a particular purpose, with
regard to the SOFTWARE, the accompanying written materials, and any accompanying hardware. This limited warranty
gives you specific legal rights. You may have others which vary from state/country to state/country.
NO LIABILITY FOR CONSEQUENTIAL DAMAG ES. In no event shall Rice Lake Weighing Systems or its suppliers be
liable for any damages whatsoever (including without limitation, damages for loss of business profits, business
interruption, loss of business information, or any other pecuniary loss) arising out of the use of or inability to use this Rice
Lake Weighing Systems product, even if Rice Lake Weighing Systems has been advised of the possibility of such damages.
Because some states/countries do not allow the exclusion or limitation of liability for consequential or incidental damages,
the above limitation may not apply to you.
© Rice Lake Weighing Systems, Inc., Rice Lake, WI USA. All Rights Reserved.
Rice Lake Weighing Systems • 230 West Coleman S treet • Rice Lake, Wisconsin 54868
24 920i Based Truck In/Out Weigh Program
Page 29

Page 30

230 W. Coleman St. • Rice Lake, WI 54868 • USA
U.S. 800-472-6703 • Canada/Mexico 800-321-6703 • International 715-234-9171 • Europe +31 (0) 88 2349171
www.ricelake.com www.ricelake.mx www.ricelake.eu www.ricelake.co.in m.ricelake.com
© Rice Lake Weighing Systems 05/2014 PN 78855 Rev A
 Loading...