

Page 1

of
Re:ception plasma 42 HD
Plasma TV
M642 HD
Dominating Entertainment.
Revox of Switzerland.
Page 2

DEUTSCH
Dieses Symbol bedeutet eine mögliche Gefahr für Ihr Leben und Ihre Gesundheit, wenn bes timmten Handlungsaufforderungen nicht nachgekommen wird,
bzw. wenn entsprechende Vorsichtsmaßnahmen nicht getroffen werden.
ENGLISH
This symbol refers to a hazard or unsafe practice, which can result in severe personal injury or death.
DEUTSCH
Dieses Symbol warnt Sie vor Fehlverhalten, welches Sach- und Umweltschäden zur Folge hat.
ENGLISH
This symbol refers to a hazard or unsafe practice, which can result in a personal i njury or property damage.
DEUTSCH
Dieses S ymbol gibt Informationen über die Handhabung des Produkts oder den jeweiligen Teil der Bedienungsanleitung, auf den bes onders aufmerksam gemacht werden soll.
ENGLISH
This sy m bol provides information about handling of the product or about the relevant part of the operating instructions to which particular attention should be
paid.
E 2005, All rights reserved.
Trademarks:
MS-DOS® and Windows® are registered trademarks of Microsoft®.
Other trademarks are the property of their respective owners.
The information in this document is subject to change without notice.
[2950-4042-C288 Rev.00]
Page 3

Inhaltsverzeichnis
DEUTSCH
Sicherheitshinweise 2............................
Wichtige Grundregeln zum Gebrauch 2...........
Entsorgung 3..................................
Reinigung 3...................................
Reinigung des Plasma-TV’s 3.................
Reinigung des Gehäuses 3...................
Konformität 4..................................
Bei Störungen 4................................
Batterien 4....................................
Übersicht 5......................................
Lieferumfang 5................................
Anschlüsse 6..................................
Bedientasten und Funktionen der Fernbedienung 7.
Bedientasten am Gerät (Ortsbedienung) 7.........
Erste Inbetriebnahme 8...........................
Auspacken, Blickrichtung, Aufstellungsort und
Installation 8...................................
Auspacken 8...............................
Blickrichtung 8..............................
Aufstellungsort 8............................
Aufstellen 9................................
Wandmontage 9............................
Alltägliche Bedienung 16..........................
Einschalten 16...............................
Ausschalten 16..............................
Umschalten 16..............................
Ton einstellen 16................................
Lautstärke einstellen 16.......................
Soundeinstellung 16..........................
Ton abschalten 17............................
Bild einstellen 17................................
Kontrast 17..................................
Helligkeit 17.................................
Bildschärfe 17...............................
Farbe 17....................................
DNC 17.....................................
Photo CD 17................................
Anti-Flicker 18...............................
Film Mode (nur für AV-Quellen) 18..............
Bildformat 18................................
Fernsehbetrieb 19...............................
Videotext 19.................................
PC Betrieb 19..................................
Betrieb mit zusätzlichen Geräten 19................
Videorecorder 19.............................
DVD-Player 19..............................
Anschließen und Einschalten 10..................
Anschliessen 10.............................
Vorbereitung 11..............................
Einschalten 11...............................
OSD-Menü Bedienung 11........................
Einstellungen vornehmen 11...................
Änderungen speichern 11.....................
Grundeinstellungen OSD -Menü
(On Screen Display) 12..........................
OSD Sprache ändern 12......................
Ändern der OSD -Menü Eigenschaften 12........
Zurücksetzen auf die Werkseinstellungen 12.....
Einstellungen bei erster Inbetriebnahme 12.........
TV Betrieb 12................................
PC Betrieb 14...............................
Auto Abgleich Funktion 15.....................
Benutzerformate einstellen 15.................
Sonderfunktionen 20............................
Manuelle Programmsuche 20..................
Standbild 20.................................
Farbtemperatur 20...........................
Bild-in-Bild 20................................
Multi-PIP Funktion 21.........................
Automatisches abschalten 22..................
Zweikanalton umschalten 22...................
Dekoderbetrieb 22...........................
Unterstützung des HDTV Standards 22..........
Progressive Scan 22.........................
HDCP Kompatibilität 22.......................
Bildschirmschoner 23.........................
Menü “Info” 23...............................
Fehlerbehebung 24................................
Technische Daten 25..............................
1DEUTSCH
Page 4

Sicherheitshinweise
Sicherheitshinweise
Bevor Sie den Plasma-TV in Betrieb setzen, lesen Sie bitte das vorliegende Bedienhandbuch sorgfältig durch.
Der Plasma-TV ist ausschließlich für den Empfang und die Wiedergabe von Bild- und Tonsignalen bestimmt.
Beachten Sie die nachfolgenden Sicherheitshinweise, damit bei bestimmungsgemäßem Gebrauch keine Gefahr für Ihre Gesundheit entsteht.
Fehler bei der Aufstellung und beim Anschluss können das Gerät oder damit verbundene Geräte beschädigen. Beachten Sie
die Warnungen und Hinweise auf dem Gerät und in den Bedienhandbüchern.
Dieser Plasma-TV ist nur für den Gebrauch in Wohn- und Büroräumen ausgelegt.
Schützen Sie den Plasma-TV vor Feuchtigkeit. Hierzu zählen dauerhaft hohe Luftfeuchtigkeit, die Nähe zu Wasser, Tropf-und
Spritzwasser sowie Regen. BetreibenSie den Plasma-TV nicht in Räumen hoher Staubbelastung.Stellen Sie keine mit Wasser
gefülltenGefäße, wie z.B. Vasen auf das Gerät. Bitte beachten Sie bei Anschluss einer Außenantenne, dass an der Kabelzuführung kein Wasser eindringen kann.
Auf keinen Fall dürfen irgendwelche Gegenstände durch die Belüftungsöffnungen in das Geräteinnere gelangen. Das führt zu
Kurzschlüssen und damit möglicherweise zu einem Brand. Sollte doch einmal etwas in das Geräteinnere gelangt sein, sofort
am Netzschalterdas Gerät ausschalten und den Netzstecker aus der Steckdose ziehen. Versuchen Sie nicht selbst das Gerät
zu öffnen, sondern wenden Sie sich an die Hotline oder einen qualifizierten Servicetechniker.
Schützen Sie den Plasma-TV vor Hitze, Hitzestau und direkter Sonneneinstrahlung. Meiden Sie die Nähe zu Feuer,Heizungen
und Öfen. Verhängen Sie das Gerät nicht mit Gardinen.
Zur Vermeidung von Störungen und Überhitzungdürfendie Belüftungsöffnungen nicht abgedeckt oder blockiertwerden. Sorgen
Sie bei der Aufstellung für ausreichend Abstand zu anderen Geräten,zu Möbeln, zu Wändenund zur Decke, so dass eineLuftzirkulation möglich ist.
Wenn der Plasma-TVschnell aus einer kalten Umgebung in eine warme Umgebung gebracht wird,kann sich an der Oberfläche
und im Inneren des Gerätes Feuchtigkeitniederschlagen. Sollte dieser Umstand eingetreten sein, schalten Sie das Gerät nicht
ein, sondern warten bis die Feuchtigkeit verdunstet ist. Ein Gebrauch des Geräte mit Feuchtigkeitsniederschlag kann zu Funktionsstörungen führen.
Die verwendete Spannungsversorgung muss den Angaben auf dem Typenschild entsprechen.
Benutzen Sie nur das mitgelieferte Netzkabel.
Der Plasma-TV ist nur vollständig vom Stromnetz getrennt, wenn der Netzschalter ausgeschaltet und das Netzkabel am Gerät
oder der Steckdose herausgezogen ist.
SchließenSie den Plasma -TV nur an eine NETZ -SteckdosemitSchutzleiter-Anschlussan. Achten Sie darauf, dass Netzstecker
und Steckdose jederzeit erreichbar sind.
Abweichende Bedingungen können zu elektrischer Gefährdung, Brand oder Ausfall des Gerätes führen.
Entfernen Sie keinesfalls den Netzstecker durch Ziehen am Netzkabel aus der Steckdose. Vermeiden Sie die Verlegung des
Netzkabels in der Nähe von heißen Objekten.
Ziehen Sie bei Gewitter oder bei längerer Abwesenheit den Netz- und Antennenstecker ab.
Durch Überspannungen bei Blitzeinschlag kann das Gerät, die Antennenanlage als auch das Stromnetz beschädigt werden.
Schalten Sie den Plasma-TV und die Signalquelle immer aus, bevor Sie eine Verbindung zwischen beiden Geräten herstellen.
Der Plasma-TV ist mit einer Filter-Vorsatzscheibe aus Glas ausgestattet. Wird das Gerät übermäßiger Belastung ausgesetzt,
z.B. durch Schock, Vibration, Biegung und Hitzeschock, kann die Glasfläche brechen. Setzen Sie die Glasfläche keinem Druck
oder Schlag aus. Sollte das Glas gesprungen sein, ziehen Sie sofort den Netzstecker aus der Steckdose. Fassen die Scherben
nicht mit den bloßen Händen an - Verletzungsgefahr durch scharfkantige Glasscherben.
Wichtige Grundregeln zum Gebrauch
Der von Ihnen erworbene Plasma-TV genügt den höchsten Qualitätsanforderungen in diesem Segment und wurde bezüglich
Pixelfehlern überprüft. Trotz höchster Sorgfalt bei der Fertigung der Geräte istaus technologischen Gründen nichtzu 100% auszuschliessen, dass einige Bildpunkte Defekte aufweisen.
Wir bitten um Ihr Verständnis,dass derartige Effekte, solange sie in der durch die Norm spezifizierten Grenzen liegen, nicht als
Gerätedefekt im Sinne der Gewährleistung betrachtet werden können.
Wie bei allen Plasma-TV’s auf Phosphorbasis, verringert s ich die Leuchtdichte allmählich mit zunehmender Nutzungsdauer.
UnterbestimmtenBetriebsbedingungenneigen alle Plasma-TV’s auf Phosphorbasiszu Einbrennungen. Solche Betriebsbedingungen können sein:
D lang andauernde Anzeige eines Standbildes
D lange Wiedergabe von Videotext
D ständige Anzeige eines gleichen Hintergrundes (z.B. bei Videospielen)
D Verwendung eines nicht bildschirmfüllenden Formats (z.B. 4:3) über einen längeren Zeitraum.
2 DEUTSCH
Page 5

Sicherheitshinweise
Einmal entstandene Einbrennungen können in der Regel nicht rückgängig gemacht werden.
Zur Vermeidung bzw. Reduzierung von Einbrennungen beachten Sie bitte die folgenden Hinweise und Empfehlungen:
D während der ersten 100 Betriebsstunden sollten vorwiegend Bewegtbilder bzw. häufig wechselnde Standbilder bild-
schirmfüllend angezeigt werden
D nutzen Sie Ihren Plasma-TV in einem bildschirmfüllenden Format (16:9)
D bei der Nutzung als PC -Bildschirm, immer den Bildschirmschoner aktivieren
D soweit wie möglich Bewegtbilder anzeigen
D schalten Sie den Plasma-TV immer aus, wenn er nicht benutzt wird
D verringern Sie soweit wie möglich Kontrast und Helligkeit
D möglichst Bilder mit vielen Farben und Farbabstufungen anzeigen.
Ungünstige Bedingungen können zu einem Brummen Ihres Plasma-TV’s führen. Das Brummen kommt im allgemeinen aus der
Netzspannungsversorgung und kann durch die Verbindung von unterschiedlichen Schutzleitern entstehen. Abhilfe können Sie
hier schaffen, in dem Sie einen sogenannten Mantelstromfilterzwischen die ankommende Antennenleitung und den Antenneneingang am Plasma-TV schalten. Die Mantelstromfilter werden in Formeines kleinen Zwischensteckers im Fachhandel angeboten.
Technisch bedingt kann es auch im Gerät selbst zu einer Geräuschentwicklung kommen. Diese darf jedoch den in der Gerätespezifikation angegebenen Wert nicht überschreiten.
Wenn Ihr Plasma-TV mit einer Aussenantenne verbunden ist,muß diese zum Schutz gegen Stromschläge und statische Aufladungen geerdet sein. Die Erdung muß den geltenden Vorschriften entsprechen.
Aus ergonomischen Gründen empfehlen wir,dieVerwendung von roten und blauen Schriften oder Symbolen auf dunklen Hintergründen zu vermeiden. Eine derartige Darstellung verursacht wegen des geringen Kontrastes eine schlechte Lesbarkeit und
ermüdet frühzeitigdie Augen. VerwendenSie daher bitte möglichst kontrastreiche Darstellungen, z.B. schwarze Schrift auf weißem Hintergrund.
DEUTSCH
Um Augenschmerzen zu vermeiden und den optimalen Betrachtungsabstand zu erhalten, sollte die Entfernung zum Gerätdas
fünf- bis sechsfache der Bildschirmdiagonale betragen. In ihrem Fernsehzimmer sollte es so hell sein, dass man auch lesen
könnte. Bei zuviel Helligkeit verlieren sich die Kontraste. Zu wenig Licht strapaziert die Augen durch den Hell-Dunkel-Wechsel
auf dem Bildschirm.
Beachten Sie beim Anschluss externer Lautsprecher die technischen Daten des Lautsprecherausgangs. Bei unzureichender
Dimensionierung der Lautsprecher können Lautsprecher und/oder der eingebaute Verstärker zerstört werden.
Entsorgung
Mischen Sie dieses Gerät, wenn Sie es entsorgen wollen, nicht mit gewöhnlichen Haushaltsabfällen. Es gibt ein getrenntes Sammelsystem für gebrauchte elektronische Produkte, über das die richtige Behandlung, Rückgewinnung
und Wiederverwertung gemäß der bestehenden Gesetzgebung gewährleistet wird.
Dieses Gerät und seine Verpackung wurden weitestgehend aus Materialien hergestellt, die umweltschonend entsorgt und einem fachgerechten Recycling zugeführt werden können.
Nach seinem Gebrauch wird das Gerät zurückgenommen,um es einer Wiederverwendung bzw.wertstofflichen Verwertung zuzuführen, soweit es in einem Zustand zurückgegeben wird, der dem bestimmungsgemäßen Gebrauch entspricht.
Nicht verwertbare Geräteteile werden sachgemäß entsorgt.
Wenn Sie Fragen zur Entsorgung haben, wenden Sie sich bitte an Ihre Verkaufsstelle oder an unseren Service.
Reinigung
Bevor Sie mit der Reinigung beginnen, schalten Sie das Gerät aus und ziehen den Netzstecker aus der Steckdose.
Reinigung des Plasma-TV’s
Für die Reinigung des Plasma-TV’s verwenden Sie ein Glasreinigungsprodukt in Verbindung mit einem weichen Tuch. Benutzen Sie keine Scheuermittel!
Reinigung des Gehäuses
Benutzen Sie für die Reinigung des Gehäuses keine chemischen Lösung- und Reinigungsmittel, da sonst die Oberfläche des
Gerätes beschädigt werden könnte.
Wenn Sie dieGehäuseoberfläche mit einem nassen Tuch reinigen, können Wassertropfenin das Gerät gelangen, was zu Funk tionsstörungen führt.
Zum Reinigen der Belüftungsöffnungen benutzen Sie einen Staubsauger mit weichem Bürstenaufsatz.
3DEUTSCH
Page 6
Sicherheitshinweise
Konformität
Der vorliegende Bildschirm ist ein Plasma-TV Gerät und entspricht den folgenden Richtlinien und Normen der
Europäischen Union:
D 89/336/ECCE vom 3. Mai 1989 mit anschließenden Modifikationen (Direktive 92/31/ECCE vom April 1992 und Direktive
93/68/ECCE vom 22. Juli 1993)
D 73/23/ECCE vom 19. Februar 1973 mit anschließenden Modifikationen (Direktive 93/68/ECCE vom 22. Juli 1993)
D EN55013, EN55020, EN61000-3-2/-3 (Elektromagnetische Verträglichkeit)
D EN60065 (Sicherheitsanforderungen).
Die Übereinstimmung mit den Anforderungen wird durch die, auf dem Produkt angebrachte,
Der Hersteller kann nicht für den Betrieb außerhalb der Betriebsbedingungen, wie in dieser Bedienungsanleitungbeschrieben,
haftbar gemacht werden. Zudem erlöschen hierdurch Ihre Produkthaftungs- und Gewährleistungsansprüche.
Kennzeichnung zertifiziert.
Bei Störungen
Ziehen Sie den Netzstecker aus der Steckdose, wenn das Gerät beschädigt ist.
Sofort den Netzstecker aus der Steckdose ziehen, wenn Rauch, unangenehmer Geruch oder ungewöhnliche Geräusche aus
dem Gerät kommen. Verfahren Sie ebenfalls in dieser Weise,wenn das Gerät nach dem Einschalten oder während des Betriebes kein Bild mehr darstellen kann. Versuchen Sie nicht den Plasma-TV in diesem Zustand weiter zu betreiben.
ÖffnenSie auf keinen Fall das Gerät selbst.In diesem Gerät befinden sich keine Teile, die von Ihnen gewartet oder ausgewechselt werden können. Wenden Sie sich an unsere Service-Hotline oder eine andere Fachwerkstatt.
Batterien
Beachten Sie beim Einlegen der Batterien, dass die Polarität (+ / -) mit der Markierung an der Fernbedienung übereinstimmt.
Batterien dürfen nicht im Hausmüll entsorgt werden. Die verbrauchten Batterien müssen Sie an einer kommunalen Sammelstelle abgeben oder in die dafür ausgewiesenen Behältern im Handel einwerfen.
Die Batterien nicht übermäßigerWärme aussetzen, nicht ins Feuer werfen,nicht wiederaufladen,nicht versuchen zu öffnen;sie
könnten auslaufen oder explodieren.
Bitte nehmen Sie Batterien aus der Fernbedienung, wenn das Gerät über längere Zeit nicht benutzt wird.
4 DEUTSCH
Page 7
Übersicht
Übersicht
Der Plasma-TV bietetvielfältige AnschlussmöglichkeitenfürPersonalComputer,DVD-Player,Videorecorder, Videokamera,etc.
Egal ob Fernseh-, Video- oder PC-Bilder, alle werden gestochen scharfund verzerrungsfrei auf der völlig planen Bildschirmoberfläche dargestellt. Dabei zeichnen sich die Bilder durch eine hervorragende Helligkeit und außergewöhnliche Brillanz aus. Weitere wichtige Merkmale sind die große Bildschirmdiagonale bei einem Seitenverhältnis von 16:9 und die sehr geringe Bautiefe.
Für den Fernsehbetrieb ist der Anschluss an eine terrestrische Antenne, SAT-Empfangsanlage oder Kabelfernsehanlage notwendig.
Die Bedienung erfolgt interaktivüber die mitgelieferte Fernbedienungund das On-Screen-Menü(OSD).Dort können umfangreiche Einstellungen an der Bildqualität vorgenommen werden.
Ein lüfterloses Kühlsystem ermöglichtden Betriebdes Plasma-TV’s ohne störende Nebengeräusche. Leise wie ein herkömmliches Fernsehgerät ist der Plasma-TV hervorragend geeignet für Wohn- und Konferenzräume.
Ausstattung
D Hochwertiges Aluminium-Gehäuse
D Lüfterloses Design
D HD ready
D HDCP kompatibel
D 16:9 Format
D Bildschirmfüllende Darstellung im 16:9 und 4:3 Format
D Sichtwinkel horizontal/vertikal 160 Grad
D Digitaler Kammfilter
D Kompatibel mit PAL, SECAM und NTSC
D Kompatibel mit VGA, SVGA, WXGA , XGA , UXGA
D TOP / FLOF Videotext
D Automatische Programmidentifizierung und Sendersortierung
D Sleep Timer
D Bildschirmschoner
D 2 x EURO SCART (SCART1 mit RGB)
D 1 x Y/C (S-Video)
D 1 x YUV / FBAS
D 1 x DVI (I) (Analog und Digital)
DEUTSCH
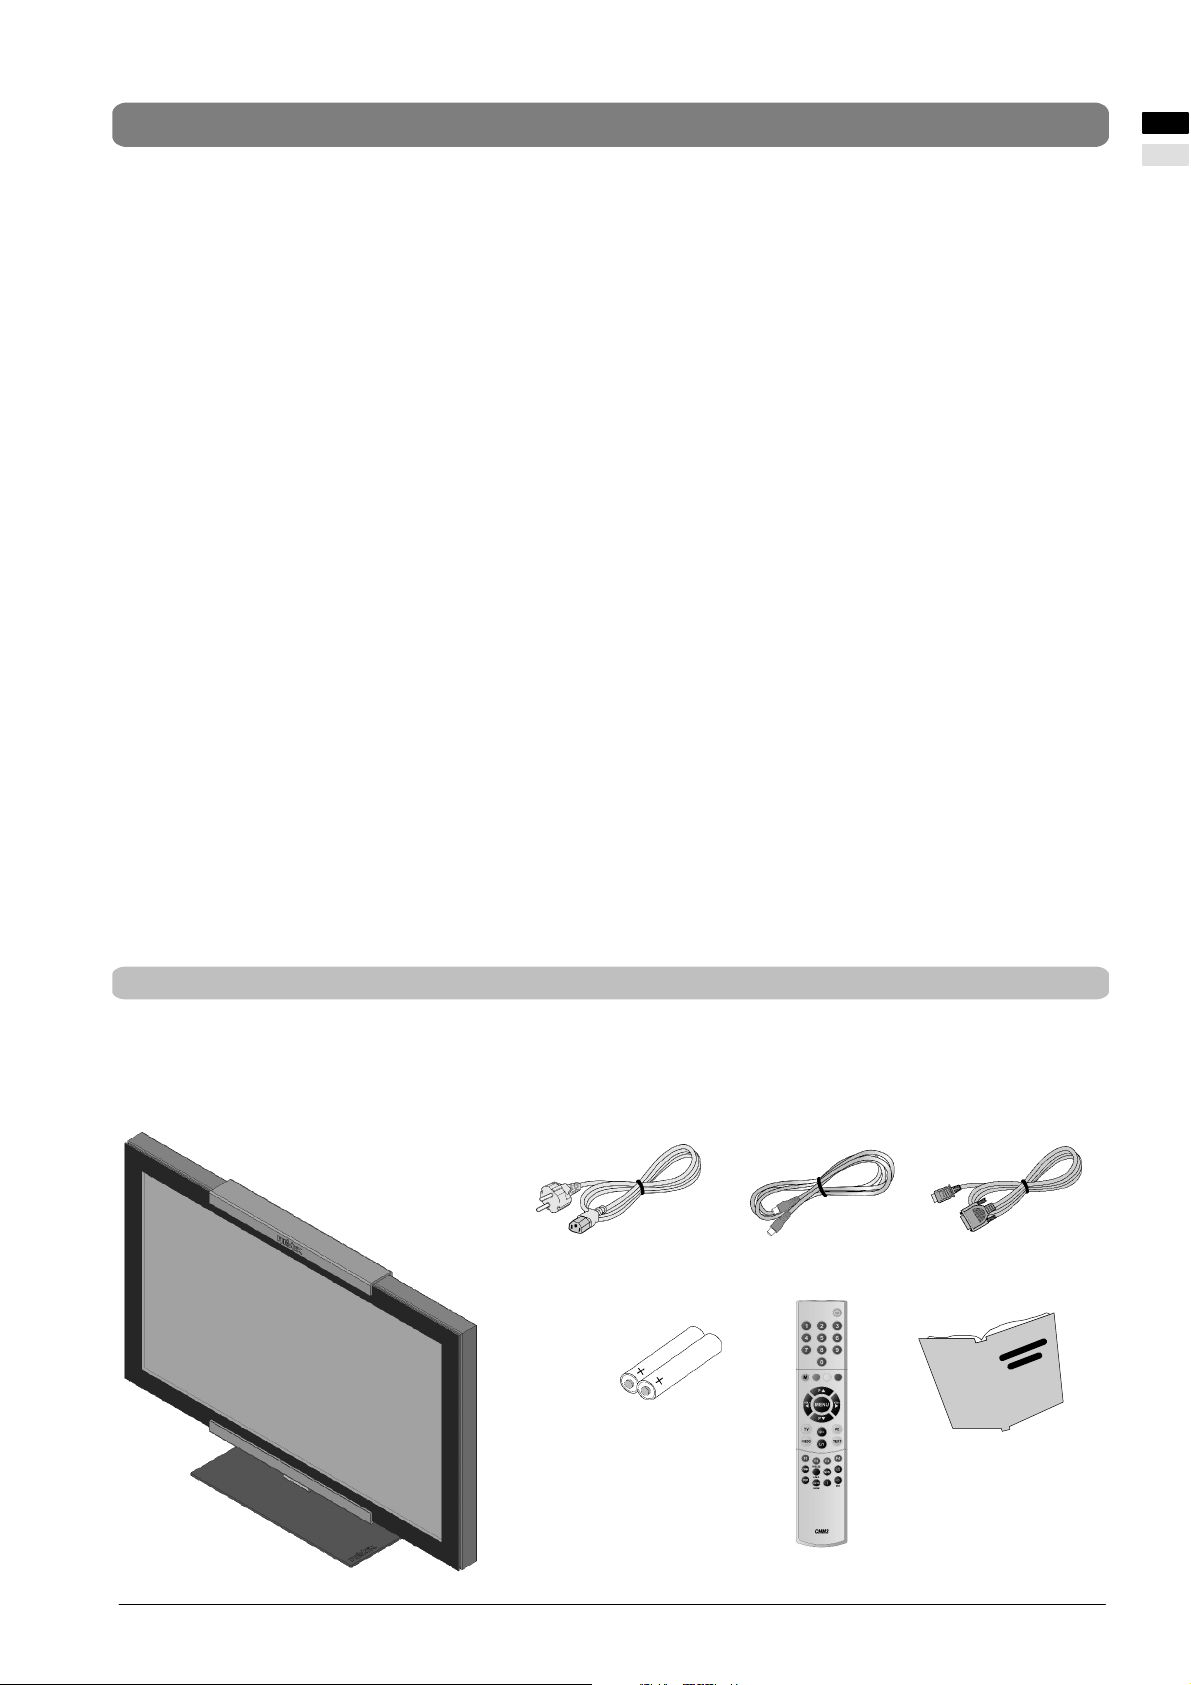
Lieferumfang
Bitte überprüfen Sie den Plasma-TV nach dem Auspacken auf mögliche Transportschäden und Vollständigkeit der Lieferung.
Der Lieferantkann Ihre Ansprüche bei Transportschädennur dann gewähren, wenn Sie ihmdiesevorder erstenInbetriebnahme
mitteilen.FehlteinTeil des Lieferumfangs,wendenSie sich bittean die Service-Hotline.Bewahren Sie bitte die Original-Verpakkung für einen eventuellen Transport des Monitors auf.
Plasma-TV
Netzkabel für Europa
(außer UK und Irland)
Batterien AAA
Antennenkabel Kabel HDMI auf DVI
Bedienhandbuch
Fernbedienung
5DEUTSCH
Page 8

Übersicht
Anschlüsse
9
1
16 13 11 5 6 715 14 11 10
2 3 4 8
18
16
1 LINE OUT L/R 10 SCART 1
z.B. Anschluss Audioverstärker oder DVD-Receiver z.B. Anschluss Satellitenreceiver
2 RF IN (Patch Cord) 11 S-VIDEO (Y/C)
Verbindungskabel z.B. Anschluss Camcorder mit S -Video Buchse
3 RF OUT (Patch Cord) 12 RS-232
Verbindungskabel Serielle Schnittstelle für Servicezwecke
Revox Interface M200
4 ANTENNA 13 PC DVI-I
Anschluss TV Antennen-Signal Anschluss PC
(terrestrische Antenne oder Kabelanschluss) (RGB bei analogen Signalen, DVI bei digitalen Signalen)
Wenn Ihr PC über einen analogen VGA Ausgang verfügt,
benutzen Sie zum Anschluss Ihres PC’s an den
Bildschirm ein Anschlusskabel DVI-I auf 15 Pin HD-Sub.
Anschluss Revox DVS-Modul über Adapterkabel
5 YUV / V 14 LINE IN S-VIDEO
Audio-Eingang für S-Video
6 YUV / U 15 LINE IN PC (L/R)
z.B. Audio-Eingang PC mit Line-Out-Buchse
7 YUV / Y (CVBS) 16 LINE IN YUV (CVBS)
Anschluss für DVD -Player mit YUV -Ausgang Audio-Eingang für YUV (CVBS)
8 SCART 2 17 Netzeingangsbuchse
z.B. Anschluss Videorecorder oder Dekoder Anschluss für das mitgelieferte Netzkabel
9 SPEAKERS OUT 18 Netzschalter
Anschluss Lautsprecher Links (+ / -) Ein / Aus
Anschluss Lautsprecher Rechts (+ / -)
6 DEUTSCH
Page 9
Übersicht
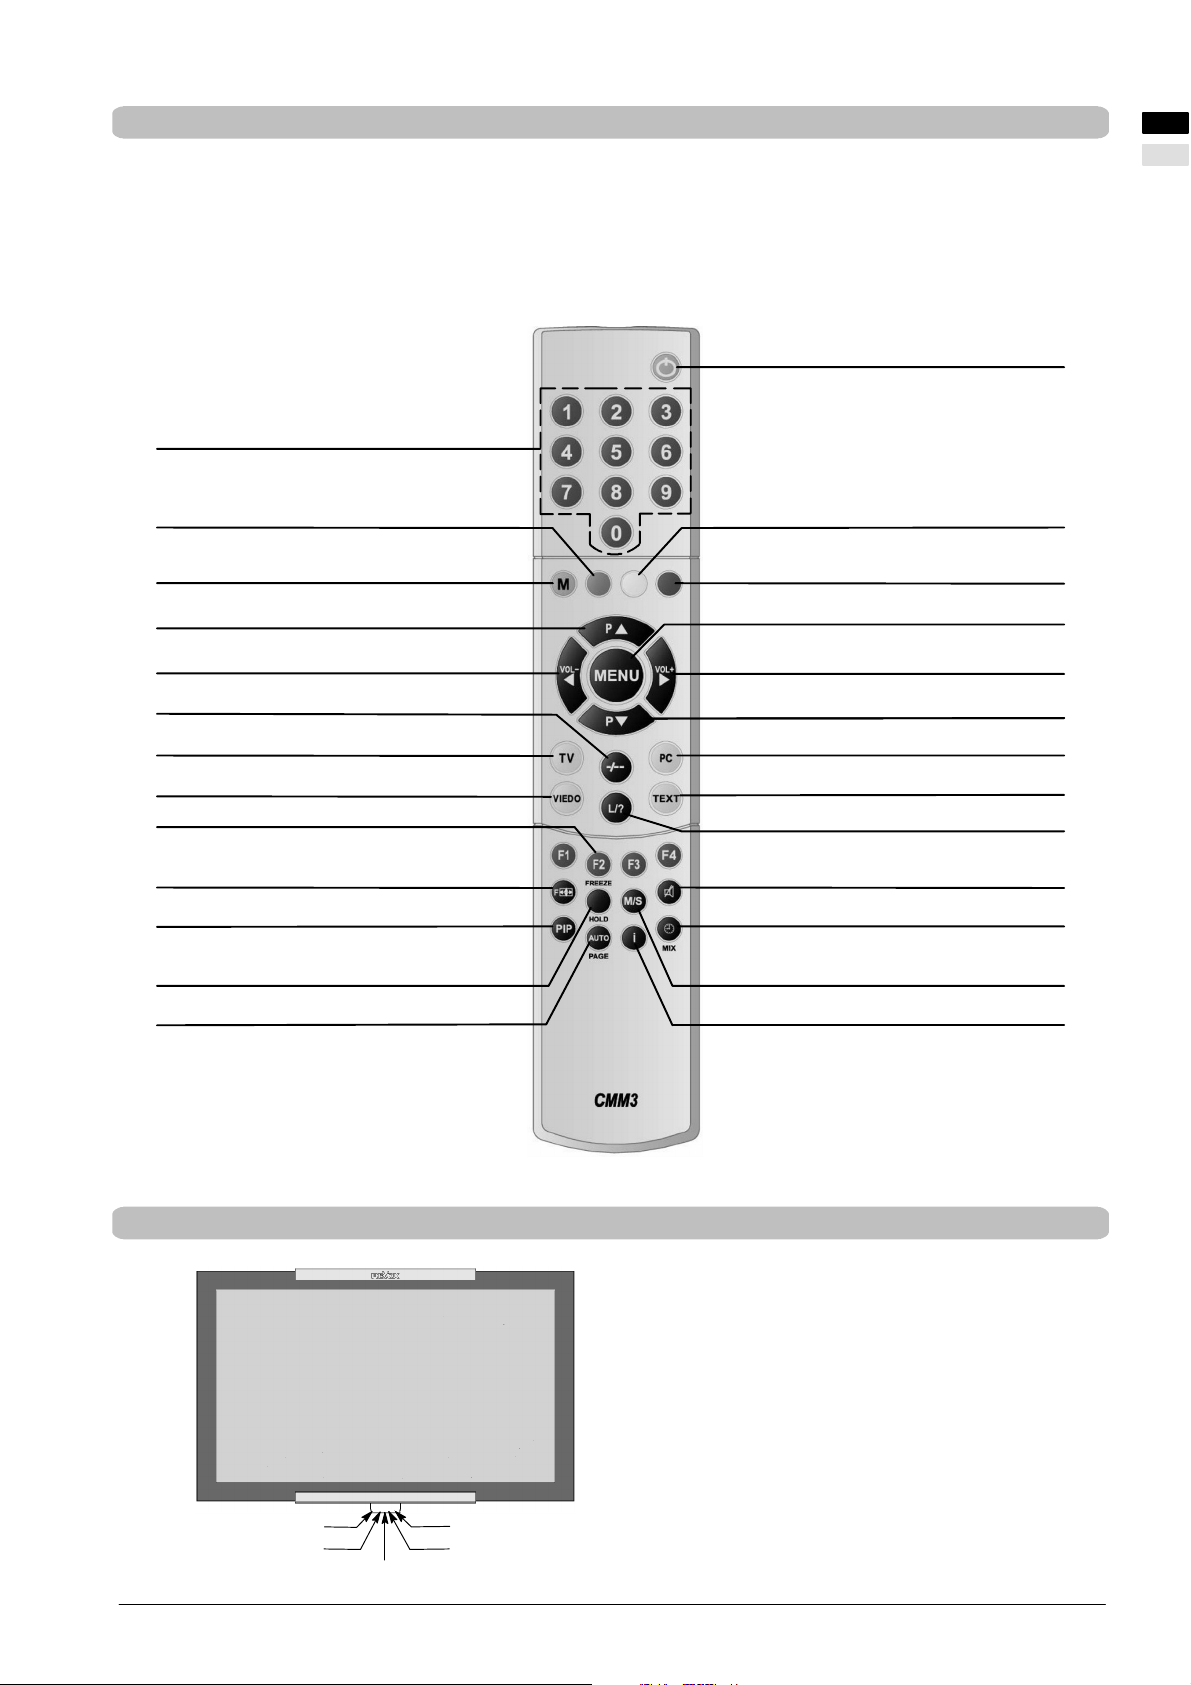
Bedientasten und Funktionen der Fernbedienung
Um den Plasma-TV mit der Fernbedienung steuern zu können, muss der Netzstecker eingesteckt und der Netzschalter einge schaltet sein.
Die Infrarot-Fernbedienung funktioniert nur, wenn sich kein Hindernis zwischen der Bedienung und dem Infrarot-Sensor an der
Vorderseite (unten) des Bildschirms befindet. Die Reichweite der Fernbedienung beträgt ca. 6m.
Wenn die Batterien schwächer werden, reduziert sich die Reichweite der Fernbedienung. Wechseln Sie in diesem Fall bitte die
Batterien. Es dürfen nur 2 Batterien vom Typ LR03 AAA 1,5 V verwendet werden.
Stand-By Taste
Zifferntasten 0 - 9
Kanalauswahl
DEUTSCH
Taste grün, Videotext
Taste M (Memo), rot
Taste Programmwahl aufwärts /
OSD-Menü Richtungstaste aufwärts
Taste zum Verringern der Lautstärke /
Taste zur OSD-Bedienung
Taste zum Wechseln zwischen ein- und
mehrstelliger Programmnummer
Taste für Direktwahl TV Betrieb
Taste für Direktwahl Video Betrieb
Bild-in-Bild,
vertauschen von Hauptbild und eingeblendetem Bild
Auswahltaste Bildformat
PIP Taste (Bild-in-Bild Modus)
Multi-PIP Funktion
FREEZE Taste, Standbild
AUTO Zoom
bzw. PAGE Taste im Videotext Betrieb
Taste gelb, Videotext
Taste blau, Videotext /
Multi-PIP Funktion
Menu Taste
Taste zum Vergrößern der Lautstärke /
Taste zur OSD-Bedienung
Taste Programmwahl abwärts /
OSD-Menü Richtungstaste abwärts
Taste Direktwahl PC Betrieb
Taste Direktwahl Videotext
Taste für Funktion Programmliste im TV Betrieb
bzw. Funktionen im Videotext Betrieb
Taste für Tonabschaltung
Taste für Uhrzeit-Anzeige
M/S Taste,
Wahl des Tonmodus
Info Taste,
Senderinformationen
Bedientasten am Gerät (Ortsbedienung)
Taste Vol – E I N / M E N U - Ta s t e
Taste Vol +
Taste P B
Taste P Y
Die Funktionen der Tasten am Gerät entsprechen
denen auf der Fernbedienung!
7DEUTSCH
Page 10
Erste Inbetriebnahme
Erste Inbetriebnahme
Schalten Sie alle beteiligten Geräte einschließlich des Plasma-TV’s aus, bevor Sie irgendeine Verbindung
herstellen.
Auspacken, Blickrichtung, Aufstellungsort und Installation
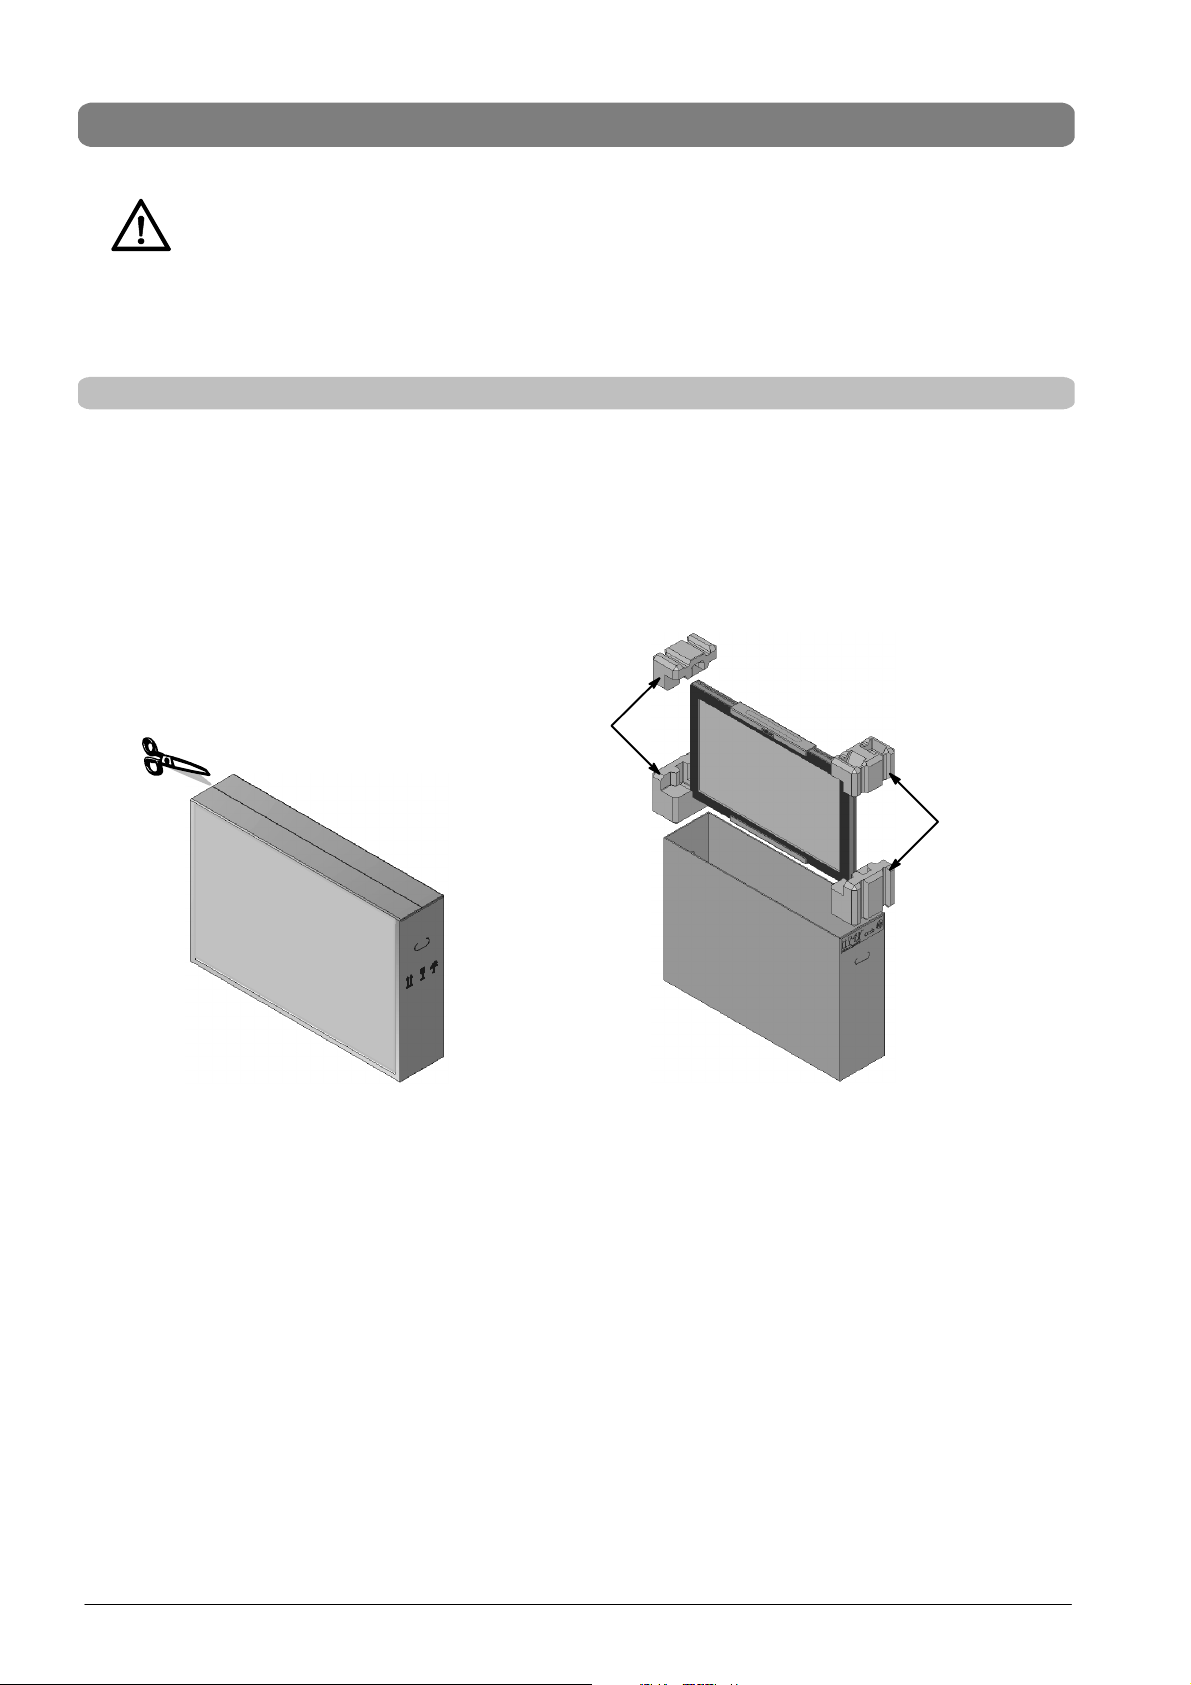
Auspacken
. Stellen Sie den Karton senkrecht mit der Unterseite auf einen festen Untergrund. Die Oberseite erkennen Sie an der
Richtung der Pfeilspitzen auf der Längsseite des Kartons.
. Lösen Sie das Verpackungsband an der Öffnungskante und klappen Sie die Deckel des Kartons nach außen.
. Entfernen Sie die beiden oberen Styropor-Verpackungsecken und nehmen Sie den Zubehörkarton aus der Verpackung.
Dieser befindet sich seitlich an der Vorderseite des Bildschirms.
Styroporecke
Styroporecke
Blickrichtung
D Trotz des großen Blickwinkels bietet der Plasma-TV die beste Performance bei direkter senkrechter Blickrichtung. Rich-
ten Sie den Plasma-TV auf die am häufigsten verwendete Blickrichtung aus.
Aufstellungsort
D Lichtreflexion
Vermeiden Sie die Aufstellung gegenüber von Fenstern oder anderen Lichtquellen.
D Zugang zum Netzeingang
Netzeingang und Netzschalter sollten jederzeit leicht erreichbar sein.
D Luftzufuhr
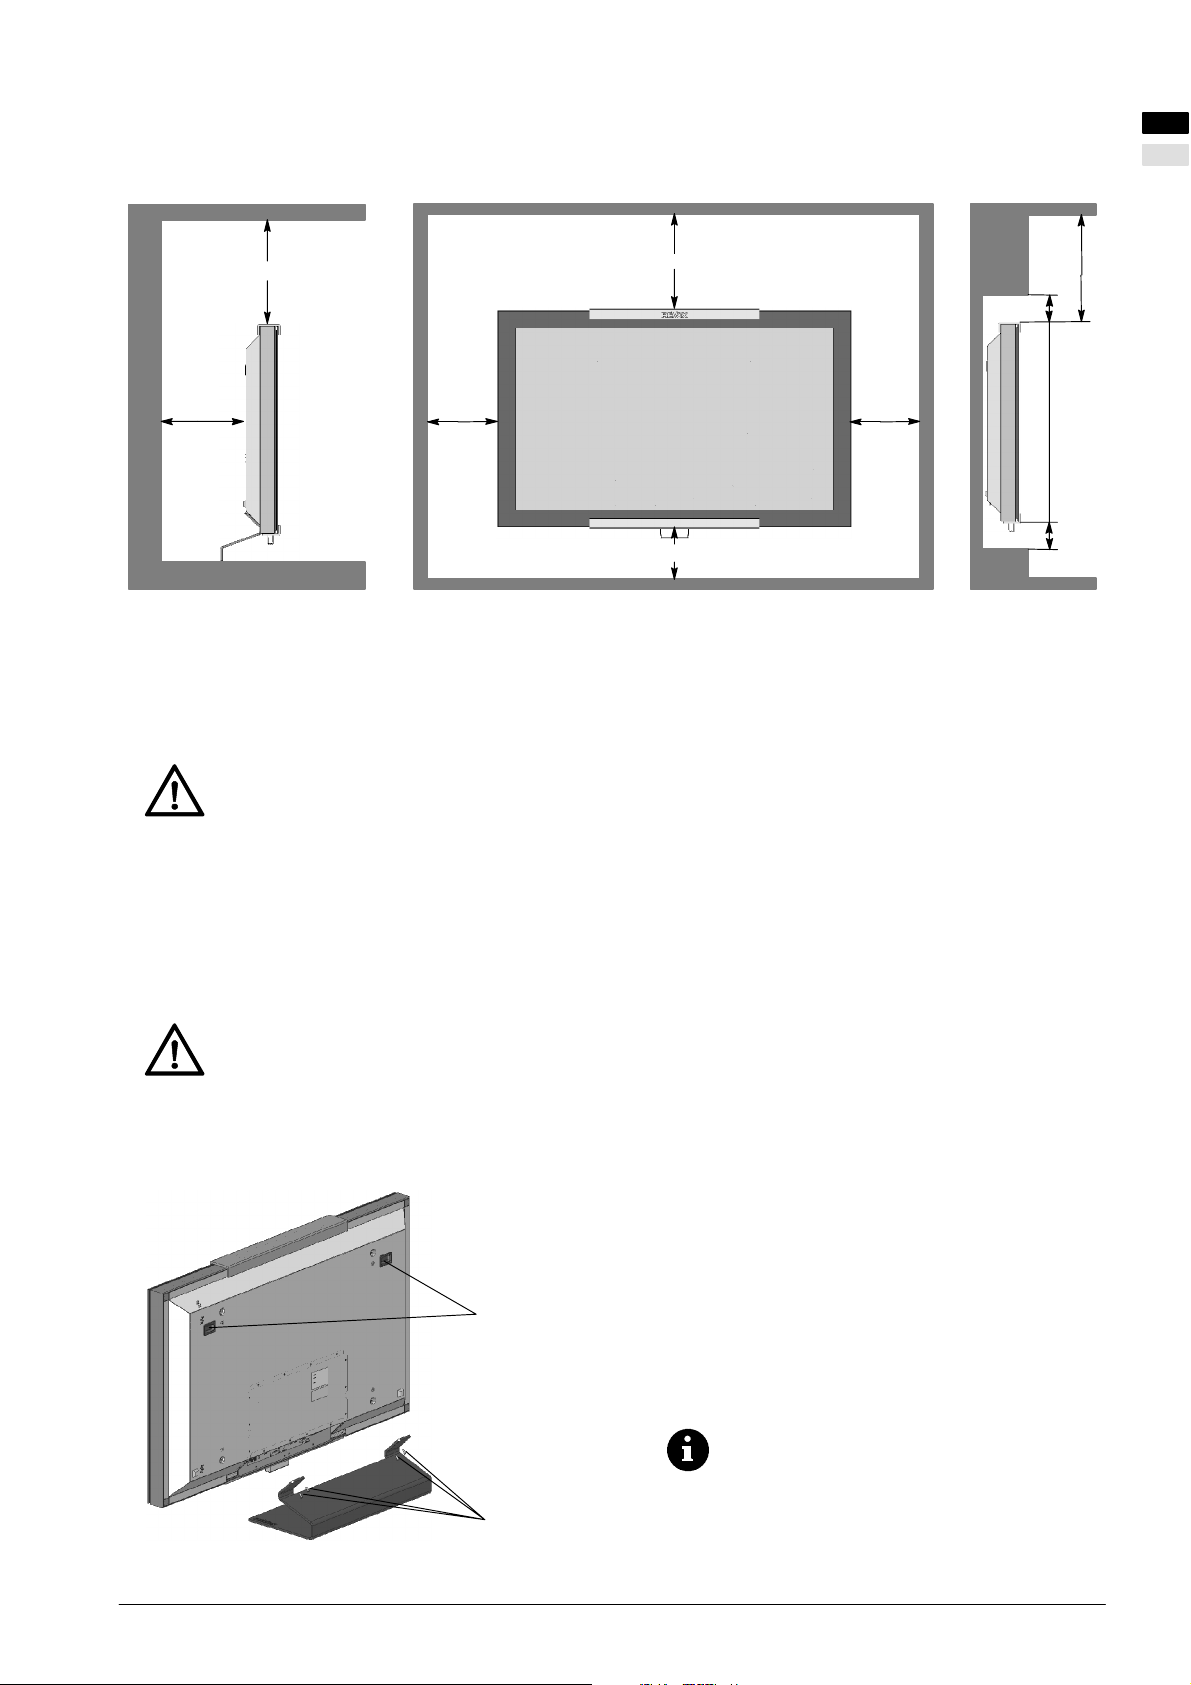
Lassen Sie mindestens 10 cm seitlich und nach hinten Abstand zu Möbeln. Nach oben sollte der Abstand mindestens
30 cm zu Möbeln oder zur Decke betragen.
Bei der Wandmontage muss der Abstand nach oben zu Möbeln oder zur Decke mindestens 80 cm betragen. Seitlich und
nach unten sollten Sie einen Mindestabstand von 10 cm einhalten.
D Umgebungstemperatur
Für sicheren und zuverlässigen Betrieb muss die Umgebungstemperatur zwischen 5°C und 35°C liegen.
8 DEUTSCH
Page 11
Tischaufstellung Wandmontage
Erste Inbetriebnahme
DEUTSCH
10 cm
Freiraum
Aufstellen
30 cm Freiraum
10 cm
Freiraum
80 cm Freiraum
10 cm Freiraum
10 cm
Freiraum
D Entnehmen Sie den Plasma-TV nur mit zwei Personen aus der Verpackung und heben Sie den Plas-
ma-TV niemals alleine hoch. Der Versuch den Plasma-TV alleine zu heben gefährdet Ihre Gesundheit.
D Stellen Sie den Plasma-TV auf eine standfeste und waagerechte Unterlage. Der Untergrund muss fest
und statisch tragfähig sein.
D Vergewissern Sie sich vor der Montage, dass der Plasma-TV ausgeschaltet ist, sowie das Netzkabel
und die Signalkabel ausgesteckt sind.
80 cm Freiraum
10 cm Freiraum
Wandmontage
Optional: Revox Tischfuss
D Der Plasma-TV darf nur an senkrechten Wänden montiert werden.
D Prüfen Sie vor der Montage, ob die Tragfähigkeit der Wand für das 3 fache Gewicht des Plasma-TV’s
(Gewicht siehe Seite 25 “Technische Daten”) geeignet ist. Ziehen Sie im Zweifelsfall einen qualifizierten Installateur zu Rate.
D Vergewissern Sie sich vor der Montage, dass der Plasma-TV ausgeschaltet ist, sowie das Netzkabel
und die Signalkabel ausgesteckt sind.
D Für die Montage sind zwei Personen notwendig.
. Drehen Sie den Plasma-TV mit der Frontseite(Bildschirm)
nach unten und legen Sie ihn auf eine völlig flache und sichere Grundlage.
. Optional ist ein Revox Tischfuss erhältlich.
Öffnungen für
Befestigungshaken
. Montieren Sie 2 Befestigungshaken (Dübel und Be-
festigungshaken gehören nicht zum Lieferumfang)
waagerecht und im entsprechendem Abstand (Abstand
siehe Bohrschablone im Zubehör) an der Wand.
Das Befestigungsmaterial muss für das 3 fache
Gewicht des Plasma-TV’s ausgelegt sein. Wenden Sie sich, falls es nötig ist, an einen qualifizierten Installateur.
Befestigungsschrauben des
Tischfusses
. Positionieren Sie den Plasma-TV so, dass die Be-
festigungshaken in die dafür auf der Geräterückseite vorgesehenen Öffnungen eingeführt werden können.
9DEUTSCH
Page 12
Erste Inbetriebnahme
Anschließen und Einschalten
Anschliessen
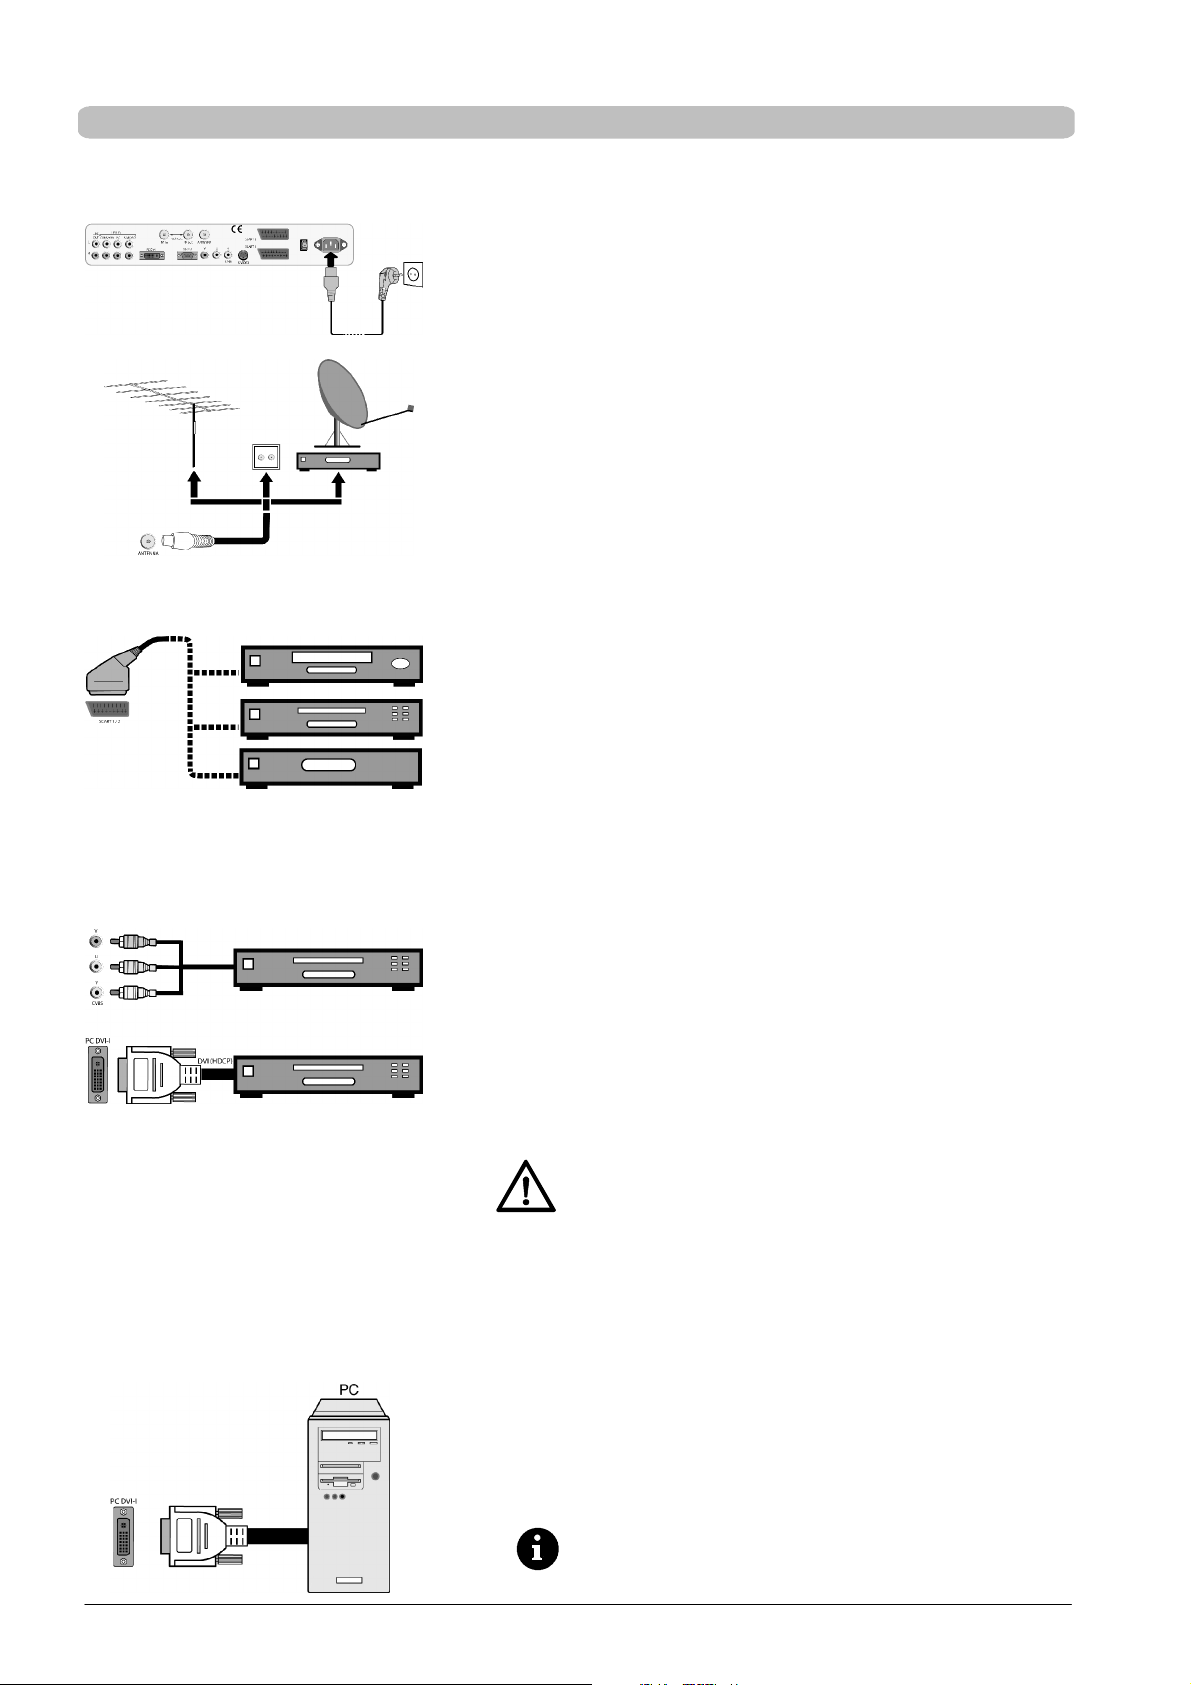
(Übersicht Anschlüsse siehe Abb. Seite 6)
. Stecken Sie das Netzkabel in die Netzeingangsbuchse am Plasma-TV
und den Netzstecker in eine Steckdose.
Kabelanschluss / Terrestrische Antenne
Wenn Sie einen Kabelanschluss oder eine terrestrische Antenne anschließen möchten, verwenden Sie hierfür die Buchse “ANTENNA”.
Satelliten-Receiver
Wenn Sie Ihr Fernsehprogramm über einen Satelliten empfangen, schließen Sie Ihren Receiver mit einem SCART-Kabel an die Buchse SCART 1
oder SCART 2 an.
SCART 1 verfügt zusätzlich über einen Anschluss für RGB Quellen wie
z.B. DVD-Player.
Für den Anschluss eines Dekoders kann nur SCART 2 verwendet werden.
Anmerkung: Wenn Sie den Dekoder und das Gerät mithilfe eines Scartkabels verbinden, positionieren Sie auf <AUS> die Funktion <TV SCART>
im Menü <EINGÄNGE / PIP -> QUELLE: SCART2 -> EINSTELLUNGEN>.
DVD-Player
Für den Anschluss eines DVD-Players oder einer anderen Bildquelle mit
YUV-Ausgang verwenden Sie bitte den YUV-Eingang des Plasma-TV’s.
Verfügt Ihr DVD -Player über einen DVI-I-Ausgang, können Sie den
DVI-I-Eingang und den Audio-Eingang LINE IN PC am Plasma-TV benutzen.
Beim Anschluss eines DVD-Players an den DVI-I-Eingang
des Plasma-TV’s muss folgendes beachtet werden:
D Bevor Sie die Verbindung zwischen DVD-Player und Plas-
ma-TV mittels der Kabel herstellen, müssen Sie den Netzstecker vom DVD -Player aus der Steckdose ziehen.
D Sind die Kabel am DVD-Player und am Plasma -TV einge -
steckt, kann der Netzstecker vom DVD-Player wieder mit
dem Netz verbunden werden.
Beachten Sie diese Vorgehensweise nicht, kann das zur
Beschädigung des DVD-Players oder des Plasma-TV’s
führen!
Hinweis : Besitzt Ihr DVD-Player eine HDMI-Schnittstelle, benutzen Sie
zum Anschluss das beigelegte Adapterkabel “HDMI auf DVI”.
PC
Für den Anschluss Ihres PC’s an den Plasma-TV verwenden Sie die PC
DVI-I Buchse. Verfügt Ihr PC über einen analogen VGA-Ausgang, benutzen
Sie zum Anschluss ein Adapterkabel DVI-I auf 15 Pin HD-Sub.
Bei älteren PC-Grafikkarten kann es vorkommen, dass der Pin
9 verschlossen ist. Sollte dies der Fall sein, wenden Sie sich
bitte an die Service-Hotline.
10 DEUTSCH
Page 13
Erste Inbetriebnahme
Vorbereitung
. Öffnen Sie den Batteriefachdeckel auf der Rückseite der Fernbedienung und legen Sie die beiden mitgelieferten Batterien
(TypLR03 Mikro AAA) ein. Beachten Sie die Polaritätsangaben auf dem Batteriefachboden. Schließen Sie das Batteriefach
wieder.
Einschalten
. SchaltenSie den Netzschalter an derRückseitedes Plasma-TV’s auf Position “I”.Der Plasma-TV ist nun im Stand-ByBetrieb
und kann mit der Fernbedienung eingeschaltet werden.
Kabelanschluss / Terrestrische Antenne
. Schalten Sie den Plasma-TV mit der Taste [TV] auf Ihrer
Fernbedienung ein.
Satelliten-Receiver
. Schalten Sie Ihren Satelliten Receiver ein und schalten Sie
den Plasma-TV mit der Taste[VIDEO] auf IhrerFernbedienung ein. Bitte beachten Sie, je nachdem an welcher
SCART-Buchse Ihr Receiver angeschlossen ist, müssen
SiedieTaste[VIDEO] gegebenenfalls mehrfach drücken.
PC
. Schalten Sie den Plasma-TV mit der Taste [PC] auf Ihrer
Fernbedienung ein und wählen Sie den entsprechenden
Signaleingang <PC(RGB)> oder <PC(DVI)> . Hierzu rufen
Sie über die Taste [MENU] der Fernbedienung das OSDMenü Ihres Plasma-TV’s auf und wählen im Untermenü
<EINGÄNGE> Ihr Eingangssignal aus.
DEUTSCH
OSD-Menü Bedienung
Einstellungen vornehmen
Ihr Plasma-TV läßt sich mit Hilfe der einfachen OSD-Menüsteuerung einstellen und bedienen. Hierzu stehen Ihnen 6 Tastenauf
Ihrer Fernbedienung zur Verfügung:
P
Y Taste
Aufwärtsbewegung im OSD-Menü. Das angewählte Menü
oder die angewählte Funktion wird schwarz hinterlegt.
A Taste
Verlassen der ausgewählten Funktion.
Zum Verlassen eines Untermenüs wählen Sie den Menüpunkt
<
← > aus und drücken dann die Taste [ A ].
Ändern der Einstellung im angewählten Menüpunkt.
M Ta s te
Speichert vorgenommene Änderungen ab.
MENU Ta s te
OSD-Hauptmenü einblenden. Das Hauptmenü erscheint am
oberen linken Bildschirmrand. OSD-Menü ausblenden.
" Ta s te
Öffnet das nächste Untermenü.
Aktiviert den angewählten Menüpunkt bzw. die angewählte
Funktion. Der angewählte Menüpunkt wird schwarz hinterlegt.
Ändern der Einstellung im angewählten Menüpunkt.
P
B Taste
Abwärtsbewegung im OSD-Menü. Das angewählte Menü
oder die angewählte Funktion wird schwarz hinterlegt.
Änderungen speichern
Die von Ihnen vorgenommenen Änderungen werden durch Drücken der Taste [M] auf Ihrer Fernbedienung (siehe Abb. oben)
oder durch das Verlassen des OSD-Menüs abgespeichert.
11DEUTSCH
Page 14

Erste Inbetriebnahme
Grundeinstellungen OSD-Menü (On Screen Display)
OSD Sprache ändern
Ihr Plasma-TV verfügt über ein 10 sprachiges OSD -Menü (deutsch, englisch, französisch,italienisch, niederländisch, spanisch,
norwegisch, schwedisch, dänisch und finnisch).
Eingänge / PIP >
Bild >
Anzeige >
Ton >
Einstellung >
Info >
Info Signalquelle: EIN
Sprache: Deutsch
OSD Einstellungen >
ECO Modus/Stand--By >
Aufruf Werkseinstellungen >
Abschaltzeit: AUS
←
Ändern der OSD-Menü Eigenschaften
. Um die voreingestellte Sprache zu ändern, rufen Sie im
Hauptmenü den Menüpunkt <EINSTELLUNG> auf. Aktivieren Sie im Untermenü den Menüpunkt <SPRACHE>
und wählen Sie die gewünschte Sprache aus.
Info Signalquelle: EIN
Sprache: Deutsch
OSD Einstellungen >
ECO Modus/Stand--By >
Aufruf Werkseinstellungen >
Abschaltzeit: AUS
←
Wartezeit: 5 s
Transparent: AUS
←
. Um die Darstellung bzw. die Einblendezeit (Zeit nach der
letzten Betätigung bis zur Ausblendung) des OSD-Menüs
zu verändern, wählen Sie im Hauptmenü den Menüpunkt
<EINSTELLUNG>.
Im Untermenü <OSD -EINSTELLUNGEN> steht Ihnen ein
weiteres Untermenü mit den Menüpunkten <WARTEZEIT> (Auswahlmöglichkeiten: 5, 10 und 15 Sekunden)
und <TRANSPARENT> (Auswahlmöglichkeiten: Ein oder
Aus) zur Verfügung.
Zurücksetzen auf die Werkseinstellungen
Sie haben die Möglichkeit alle im OSD-Menü vorgenommenen Änderungen wieder auf die ursprüngliche Werkseinstellung zurückzusetzen.
Info Signalquelle: EIN
Sprache: Deutsch
OSD Einstellungen >
ECO Modus/Stand--By >
Aufruf Werkseinstellungen >
Abschaltzeit: AUS
←
Ja, alle Einstellungen löschen "
←
. Hierzu wählen Sie im Hauptmenü den Menüpunkt <EIN-
STELLUNG> und aktivieren im Untermenü den Menüpunkt <AUFRUF WERKSEINSTELLUNGEN>.
Einstellungen bei erster Inbetriebnahme
TV Betrieb
D Automatischer Sendersuchlauf
Wenn Sie Ihre Programme ausschließlich über Satellit empfangen, müssen Sie den automatischen Sendersuchlauf nicht
durchführen.
Um den automatischen Sendersuchlauf zu starten gehen Sie wie folgt vor:
. Schalten Sie den Plasma-TV über die [TV]-Taste Ihrer Fernbedienung ein.
. Rufen Sie das OSD-Menü über die [MENU]-Taste Ihrer Fernbedienung auf und wählen Sie den Menüpunkt
<EINGÄNGE / PIP>. Es öffnet sich ein Untermenü.
. Wählen Sie im Untermenü den Menüpunkt <EINSTELLUNGEN>. Das Untermenü <AUTOM. SUCHE> wird geöffnet.
12 DEUTSCH
Page 15
Erste Inbetriebnahme
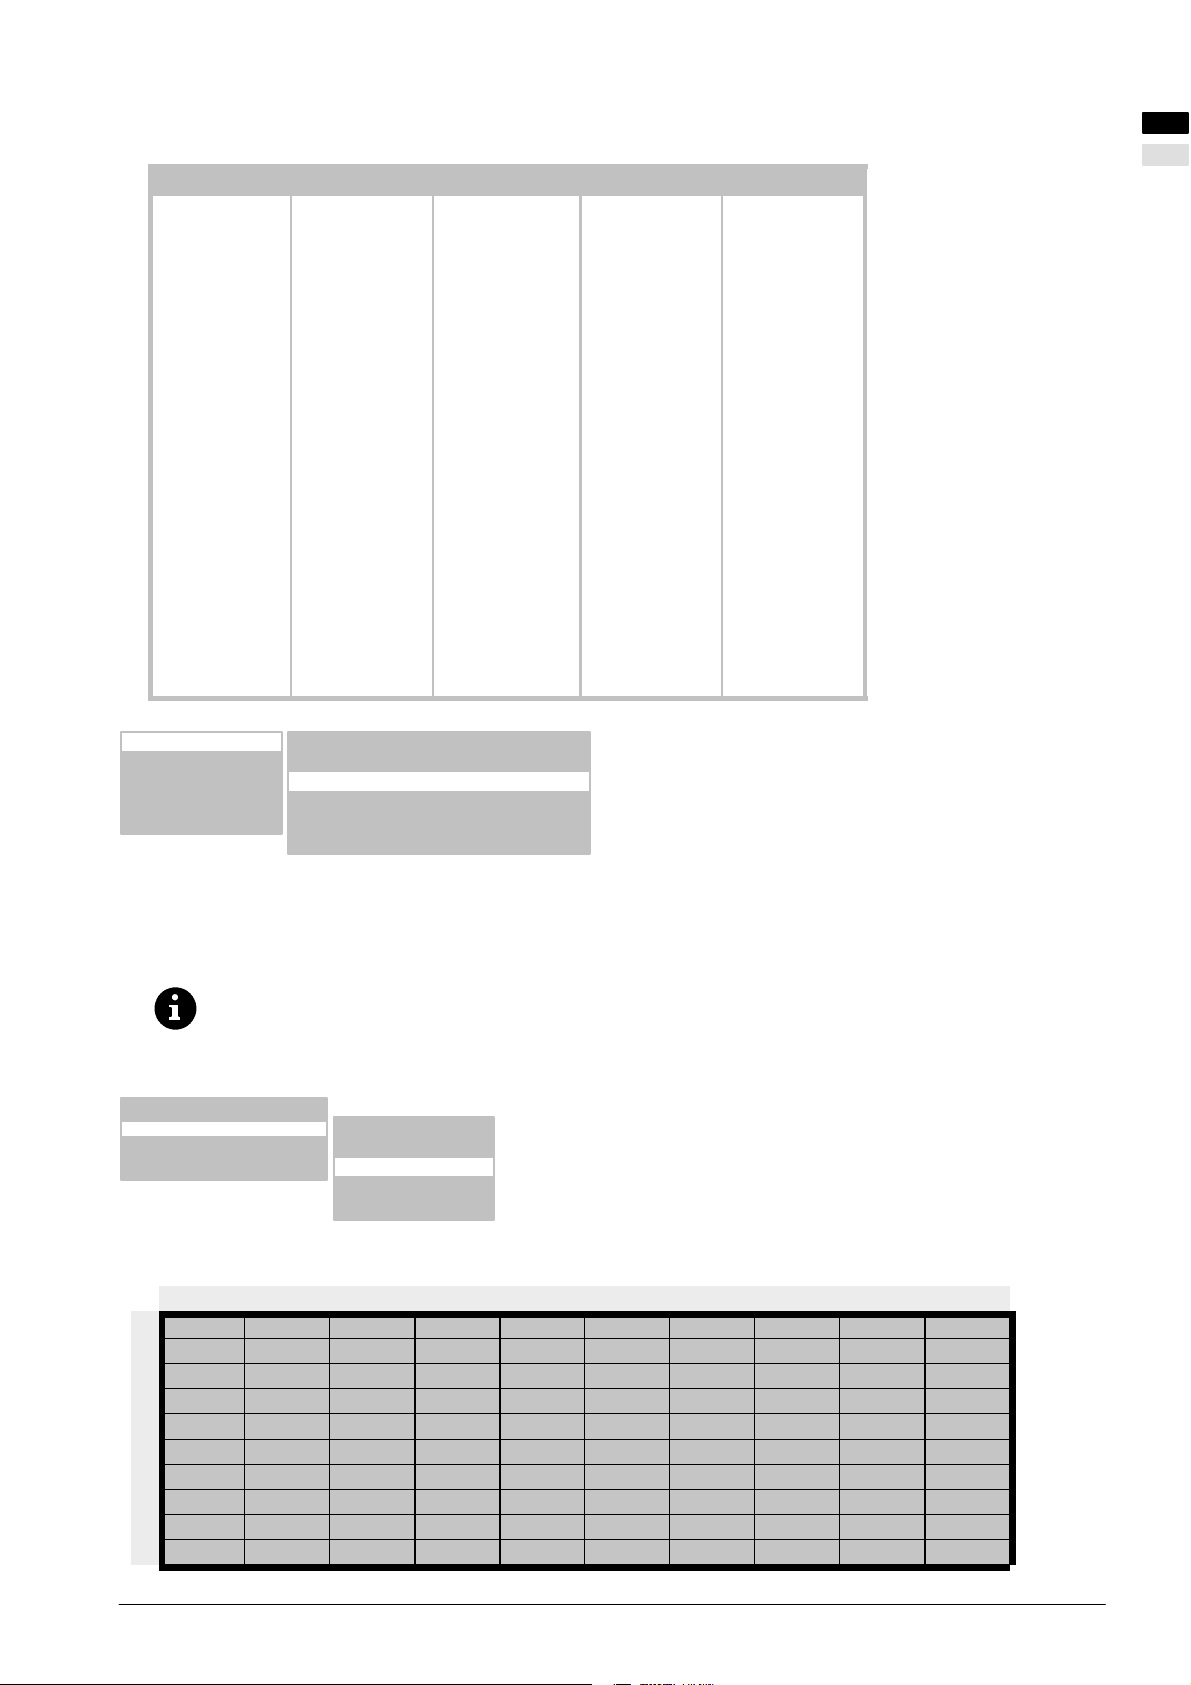
. Im Menüpunkt <TV STANDARDS> können Sie den für Ihr Land unterstützen TV Standard eingeben - siehe Tabelle
unten.
PAL BG PAL I PAL DK SECAM L SECAM DK
Austria UK Czech Republic France Bulgaria
Belgium Ireland Hungary Luxembourg Russia
Denmark Poland Ukraine
Finland Slovakia
Germany
Greece
Italy
Luxembourg
Netherlands
Norway
Rumania
Portugal
Slovenia
Spain
Sweden
Switzerland
Turkey
DEUTSCH
Autom. Suche >
Manuelle Suche >
Sortieren >
Löschen >
← Land: Deutschland
TV Standard: Auto
Suchart: Alle Programme
Suche starten "
Startpunkt Programm: 01
←
Wählen Sie im Menüpunkt <EINGÄNGE / PIP ⇒
EINSTELLUNGEN ⇒ AUTOM. SUCHE ⇒ TV STANDARD> die Einstellung “Auto” aus, so werden automatisch alle TV-Standards nach Sendern durchsucht.
Bitte beachten Sie, dass diegefundenen Sender nach
der Einstellung im Menüpunkt <LAND> vorsortiert
werden. Stellen Sie vor dem Startdes Sendersuchlaufes Ihr Land ein.
. Wählen Sie jetzt den Menüpunkt <AUTOM. SU-
CHE> und aktivieren Sie den Untermenüpunkt
<SUCHE STARTEN>.
Der automatische Sendersuchlauf startet.
Durch das Drücken der [M]-Taste können Sie die Suche abbrechen.
D TV Sender sortieren
Quelle: TUNER
Einstellungen >
Bild in Bild : AUS
←
Autom. Suche >
Manuelle Suche >
Sortieren >
Löschen >
←
. Wählen Sie den Menüpunkt <EINGÄNGE / PIP
⇒ EINSTELLUNGEN ⇒ SORTIEREN> aus.
Die folgende Tabelle öffnet sich.
1 2 3 4 5 6 7 8 9 10
0 ARD ZDF SW3 VOX NBC N--TV VIVA2 KABEL HR RTL2
1 BR PHOEN KIKA CNN SAT1 RTL DSF EUROS VIVA 3--SAT
2 WDR PRO7 -- -- -- -- -- -- -- -- -- -- -- -- -- -- -- -- -- -- -- -- -- -- -- -- -- -- -- -- -- -- -- -- -- -- -- -- -- -- -- --
3 -- -- -- -- -- -- -- -- -- -- -- -- -- -- -- -- -- -- -- -- -- -- -- -- -- -- -- -- -- -- -- -- -- -- -- -- -- -- -- -- -- -- -- -- -- -- -- -- -- --
4 -- -- -- -- -- -- -- -- -- -- -- -- -- -- -- -- -- -- -- -- -- -- -- -- -- -- -- -- -- -- -- -- -- -- -- -- -- -- -- -- -- -- -- -- -- -- -- -- -- --
5 -- -- -- -- -- -- -- -- -- -- -- -- -- -- -- -- -- -- -- -- -- -- -- -- -- -- -- -- -- -- -- -- -- -- -- -- -- -- -- -- -- -- -- -- -- -- -- -- -- --
6 -- -- -- -- -- -- -- -- -- -- -- -- -- -- -- -- -- -- -- -- -- -- -- -- -- -- -- -- -- -- -- -- -- -- -- -- -- -- -- -- -- -- -- -- -- -- -- -- -- --
7 -- -- -- -- -- -- -- -- -- -- -- -- -- -- -- -- -- -- -- -- -- -- -- -- -- -- -- -- -- -- -- -- -- -- -- -- -- -- -- -- -- -- -- -- -- -- -- -- -- --
8 -- -- -- -- -- -- -- -- -- -- -- -- -- -- -- -- -- -- -- -- -- -- -- -- -- -- -- -- -- -- -- -- -- -- -- -- -- -- -- -- -- -- -- -- -- -- -- -- -- --
9 -- -- -- -- -- -- -- -- -- -- -- -- -- -- -- -- -- -- -- -- -- -- -- -- -- -- -- -- -- -- -- -- -- -- -- -- -- -- -- -- -- -- -- -- -- /
13DEUTSCH
Page 16
Erste Inbetriebnahme
: Programm markieren.. Aktuell = 1 -- ARD [MENU]: Beenden
: Leeren Programmplatz einfügen
: Ausgewähltes Programm auf aktuelle Position umsetzen
Mit den farbigen Tasten auf Ihrer Fernbedienung können Sie jetzt die TV-Sender sortieren.
D Einen Sender löschen
Rufen Sie mit der Taste[MENU]das Hauptmenü auf.Wählen Sie denMenüpunkt <EINGÄNGE/ PIP>,und dann <EINSTELLUNGEN>, und dann <LÖSCHEN> aus. Die folgende Tabelle öffnet sich.
1 2 3 4 5 6 7 8 9 10
0 ARD ZDF SW3 VOX NBC N--TV VIVA2 KABEL HR RTL2
1 BR PHOEN KIKA CNN SAT1 RTL DSF EUROS VIVA 3--SAT
2 WDR PRO7 -- -- -- -- -- -- -- -- -- -- -- -- -- -- -- -- -- -- -- -- -- -- -- -- -- -- -- -- -- -- -- -- -- -- -- -- -- -- -- --
3 -- -- -- -- -- -- -- -- -- -- -- -- -- -- -- -- -- -- -- -- -- -- -- -- -- -- -- -- -- -- -- -- -- -- -- -- -- -- -- -- -- -- -- -- -- -- -- -- -- --
4 -- -- -- -- -- -- -- -- -- -- -- -- -- -- -- -- -- -- -- -- -- -- -- -- -- -- -- -- -- -- -- -- -- -- -- -- -- -- -- -- -- -- -- -- -- -- -- -- -- --
5 -- -- -- -- -- -- -- -- -- -- -- -- -- -- -- -- -- -- -- -- -- -- -- -- -- -- -- -- -- -- -- -- -- -- -- -- -- -- -- -- -- -- -- -- -- -- -- -- -- --
6 -- -- -- -- -- -- -- -- -- -- -- -- -- -- -- -- -- -- -- -- -- -- -- -- -- -- -- -- -- -- -- -- -- -- -- -- -- -- -- -- -- -- -- -- -- -- -- -- -- --
7 -- -- -- -- -- -- -- -- -- -- -- -- -- -- -- -- -- -- -- -- -- -- -- -- -- -- -- -- -- -- -- -- -- -- -- -- -- -- -- -- -- -- -- -- -- -- -- -- -- --
8 -- -- -- -- -- -- -- -- -- -- -- -- -- -- -- -- -- -- -- -- -- -- -- -- -- -- -- -- -- -- -- -- -- -- -- -- -- -- -- -- -- -- -- -- -- -- -- -- -- --
9 -- -- -- -- -- -- -- -- -- -- -- -- -- -- -- -- -- -- -- -- -- -- -- -- -- -- -- -- -- -- -- -- -- -- -- -- -- -- -- -- -- -- -- -- -- /
: Aktuelles Programm löschen [MENU]: Löschen beenden
: Auswahl, Löschen Startpunkt Bereich. Aktuell = 1 -- ARD
: Auswahl, Löschen Endpunkt Bereich. Aktuell = 1 -- ARD
: Bestätigung Löschen gesamter Bereich
Mit den farbigen Tasten auf Ihrer Fernbedienung können Sie jetzt die TV-Sender löschen.
D Ändern der Programmnamen
Wenn der Plasma-TV den Sendernamen aus dem Fernsehsignal erkennen kann, wird der erkannte Name in der eingestellten
Programmnummerabgespeichert.Bei nicht erkennen des Programmnamens, erscheint im Namen die Programmnummer(z.B.
PR02).
Gehen Sie wie folgt vor, um den Programmnamen zu
ändern:
Autom. Suche >
Manuelle Suche >
Sortieren >
Löschen >
←
Programm: 02
TV Standard: Auto
Typ: Kanal
Kanaleingabe: 12
Frequenz: 062.25 MHz
Name: HR
Option: Normal
←
. Wählen Sie den Menüpunkt <EINGÄNGE / PIP ⇒
EINSTELLUNGEN ⇒ MANUELLE SUCHE ⇒
NAME> aus.
. Drücken Sie jetzt die [
"] Taste, um die erste Zei-
chenposition anzuwählen.
. Mit den Tasten [
B ] und [ Y ] können Sie durch
den Zeichensatz blättern, bis das gewünschte Zeichen auf der angewählten Zeichenposition erscheint.
. Verwenden Sie die [
" ] Taste zur Auswahl der
nächsten Zeichenposition.
Wiederholen Sie die 3 letzten Schritte solange bis Sie den Namen eingegeben haben.
Es sind max. 5 Zeichen möglich.
PC Betrieb
Eingänge / PIP >
Bild >
Anzeige >
Ton >
Einstellung >
Info >
14 DEUTSCH
Quelle: PC (RGB)
Einstellungen >
Bild in Bild: AUS
←
. Schalten Sie den Plasma-TV über die [PC]-Taste
Ihrer Fernbedienung ein.
. Rufen Sie das OSD-Menü über die [MENU]-Taste
Ihrer Fernbedienung auf. Der Menüpunkt <EINGÄNGE / PIP> ist schwarz hinterlegt.
. Wählen Sie im Untermenü <QUELLE> den ent-
sprechenden Signaleingang aus (PC (RGB) oder
PC (DVI)).
Page 17
Erste Inbetriebnahme
Auto Abgleich Funktion
Der Plasma-TV führt immer bei der erstmaligen Verwendung eines analogen Video-Formates (RGB) automatisch die
Auto-Abgleich Funktion aus. Während dieser Zeit bewegt sich die Darstellung leicht hin und her, um die optimale Position und
Wiedergabe zu erreichen.
Die H/V (horizontale/vertikale) Position und die Bildgröße müssen bei einigen ungünstigen PC-Formaten manuell
eingestellt werden. Die Auto-Abgleich Funktion hängt sehr stark von der Bilddarstellung ab. Gut geeignet ist die
Darstellung eines bildschirmfüllenden Weißbildes.
DEUTSCH
Quelle: PC (RGB)
Einstellungen >
Bild in Bild: AUS
←
H Freq.: 60.0 kHz
VFreq.: 75.0 Hz
Pixel Takt: 78.75 MHz
H/VPol: +/-Benutzerformate >
Auto. Abgleich "
VPos:
V Grösse:
H Grösse:
HPos:
Phase:
←
. Wenn Sie den Auto-Abgleich manuell aktivieren
möchten, wählen Sie den Menüpunkt <EINGÄNGE / PIP ⇒ EINSTELLUNGEN ⇒ AUTO. ABGLEICH> aus.
Benutzerformate einstellen
Sie haben die Möglichkeit häufig benutzte Formate als Benutzerformate abzuspeichern. Der Plasma-TV erkennt die abgespeicherten Formate und stellt sie ohne Ausführung der Auto-Abgleich Funktion sofort korrekt dar.
H Freq.: 60.0 kHz
V Freq.: 75.0 Hz
Pixel Takt: 78.75 MHz
H/VPol: +/-Benutzerformate >
Auto. Abgleich "
VPos:
V Grösse:
H Grösse:
HPos:
Phase:
←
Position: 1
Aufruf "
Speichern "
Alle löschen "
←
. Wählen Sie im Hauptmenü den Menüpunkt <EIN-
GÄNGE / PIP> und rufen Sie das Untermenü
<EINSTELLUNGEN> auf. Es öffnet sich ein weiteres Untermenü.
. Aktivieren Sie den Menüpunkt <BENUTZERFOR -
MATE>.
. Jetzt können Sie das momentan eingestellte Be-
nutzerformat beispielsweise unter Position 1
(8 Positionen sind möglich) mit dem Menüpunkt
<SPEICHERN> ablegen.
Mit dem Menüpunkt <AUFRUF> können Sie ein gespeichertes Benutzerformat aufrufen und mit
<ALLE LÖSCHEN> alle gespeicherten Benutzerformate löschen.
15DEUTSCH
Page 18

Alltägliche Bedienung
Alltägliche Bedienung
Einschalten
. Stellen Sie zum Einschalten des Plasma-TV’s den Netzschalter in Position “I”.
Die STAND-BY-LED am Infrarotsensor leuchtet rot.
. Drücken Sie jetzt eine der Zifferntasten oder [TV]/[VIDEO]/[PC] auf der Fernbedienung, um den Plasma-TV in Betrieb zu
setzen.
Die BETRIEBS-LED am Infrarotsensor leuchtet blau.
Der Plasma-TV muss “hochgefahren” werden. Dies ist vergleichbar mit einem PC und dauert einige Sekunden.
Ausschalten
. Drücken Sie die Stand-By-Taste auf der Fernbe-
dienung, der Plasma-TV schaltet wieder in den
Stand-By-Taste
. Um den Plasma-TV wieder komplett auszuschalten, stellen Sie den Netzschalter in Position “0”.
Liegt kein Signal am Plasma-TV an, wird dieser automatisch in den Stand-By-Betrieb geschaltet.
. Zum Wiedereinschalten drücken Sie eine der Zifferntasten auf der Fernbedienung.
Stand-By-Betrieb.
Die Stand-By-LED am Infrarotsensor leuchtet rot.
Umschalten
Wenn Sie von einem TV-Sender zum anderen umschalten, sehen Sie zunächst ein Standbild vom 1. Sender und anschließend
das laufende Bild vom anderen Sender.
Ton einstellen
Lautstärke einstellen
Lautstärke:
Eingänge / PIP >
Bild >
Anzeige >
Ton >
Einstellung >
Info >
Lautstärke:
Balance:
Equalizer: Benutzer
Option: Stereo
Lautstärke Audio Ausgang:
Max.Einschalt--Lautstärke:
Lautstärkeregelung: EIN
Benutzer EQ Einstellungen >
←
Soundeinstellung
Lautstärke:
Balance:
Equalizer: Benutzer
Option: Stereo
Lautstärke Audio Ausgang:
Max.Einschalt--Lautstärke:
Lautstärkeregelung: EIN
Benutzer EQ Einstellungen >
←
Klangmuster:
Benutzer
Flat
Pop
Classic
Vocal
Rock
Jazz
. Betätigen Sie die Taste [
auf der Fernbedienung, um die gewünschte Lautstärkeeinzustellen.Die aktuelle Lautstärkeeinstellung erscheint auf dem Bildschirm.
. Wählen Sie den Menüpunkt
<TON ⇒ LAUTSTÄRKE> aus.
Menüpunkte:
Lautstärke = aktuell eingestellte Lautstärke
Max.Einschalt-Lautstärke = Voreinstellung für die
Lautstärke beim Einschalten
Unter dem Menüpunkt <EQUALIZER> können Sie
vordefinierte Klangmuster einstellen.
A Vol - ] oder [ " Vol + ]
16 DEUTSCH
Page 19

Alltägliche Bedienung
Lautstärke:
Balance:
Equalizer: Benutzer
Option: Stereo
Lautstärke Audio Ausgang:
Max.Einschalt--Lautstärke:
Lautstärkeregelung: EIN
Benutzer EQ Einstellungen >
←
Ton abschalten
TV -- 2 -- ZDF
STUMM
TV -- 2 -- ZDF
STEREO
Bild einstellen
<120Hz:
500 Hz:
1.5 kHz:
5kHz:
>10kHz
←
. Wählen Sie den Menüpunkt <BENUTZER EQ
EINSTELLUNGEN>, um Ihr individuelles Klangmuster zu erstellen.
Der Menüpunkt <BENUTZER EQ EINSTELLUNGEN> wird nur eingeblendet, wenn im Menüpunkt
<EQUALIZER> “Benutzer” eingestellt ist.
. Drücken Sie die Taste [ ] auf der Fernbedienung.
Der Ton wird abgeschaltet und am Bildschirm erscheint für ca. 5 Sekunden das Info-Fenster siehe Abb. links..
. Der Ton wird wieder eingeschaltet, wenn Sie die
Taste [
], [ A Vol - ] oder [ " Vol + ] auf der Fernbedienung drücken. Am Bildschirm erscheint für
ca. 5 Sekunden das Info-Fenster- siehe Abb.links.
DEUTSCH
Beim ersten Einschalten des Plasma-TV’s werden für Kontrast, Helligkeit, Bildschärfe und Farbe Grundwerte eingestellt. Wie
nachfolgend beschrieben können Sie diese Werte, je nach persönlichem Geschmack und Standort des Plasma-TV’s bzw. dem
damit verbundenen Lichteinfall, individuell verändern.
Kontrast
. Drücken Sie Taste [ "] , der Kontrast wird
stärker.
Eingänge / PIP >
Bild >
Anzeige >
Ton >
Einstellung >
Info >
Kontrast: 64
Helligkeit: 64
Bildschärfe:
Farbe: 15
DNC: 5
Photo CD: Aus
Anti--Flicker: Aus
Film Mode: Aus
←
. Drücken Sie Taste [
geringer.
Helligkeit
. Drücken Sie Taste [ " ] , das Bild wird
heller.
. Drücken Sie Taste [
Bildschärfe
A ] , der Kontrast wird
A ], das Bild wird dunkler.
. Drücken Sie Taste [ " ] , das Bild wird schärfer.
. Drücken Sie Taste [
A ] , das Bild wird weicher.
Farbe
. Drücken Sie Taste [ " ] , die Farbsättigung wird
erhöht.
. Drücken Sie Taste [
verringert.
A ] , die Farbsättigung wird
Die dunkel markiertenMenüpunkte stehen nicht in den Einstellungen <EINGÄNGE / PIP ⇒ QUELLE> “PC(RGB)”
und “PC(DVI)” zur Verfügung!
DNC
Der Menüpunkt <DNC> ist das “Dynamic Noise Control”.
Schwache TV-Signale oder schlechte Videosignale können störendes Bildrauschen erzeugen. DNC passt die Wirkung derdigitalen Rauschunterdrückung dynamisch dem Bildinhalt an.
Photo CD
Der Menüpunkt <PHOTO CD> ist speziell für die Wiedergabe von Standbildern z.B. von Photo-CD oder Picture-CD.
. Stellen Sie den Menüpunkt <PHOTO CD> auf “Ein”, die Standbilder werden automatisch in der besten Qualität
dargestellt.
17DEUTSCH
Page 20

Alltägliche Bedienung
Anti-Flicker
Die Funktion <ANTI-FLICKER>schaltet bei Wiedergabe von Videosignalenzwischen einem synchronenund ruckelfreien 50Hz
Betrieb und einem flickerfreien 60Hz Betrieb um. “AUS” ist gleich 50Hz Betrieb und “EIN” ist gleich 60Hz Betrieb.
Film Mode (nur für AV-Quellen)
Diese Funktion erkennt, wenn es sich bei dem ausgestrahlten Programm um einen Film handelt und optimiert die Bildqualität.
Standardmäßig ist die Funktion deaktiviert. Um die Funktion zu aktivieren, stellen Sie im Menüpunkt <BILD ⇒ FILM MODE>
“Auto” ein.
Bildformat
D Auto Zoom
Diese Funktion wertet das aktuelle Bildformat aus und schaltet automatisch zwischen “Vollbild“ und “4:3 Letterbox auf 16:9“
um.
Unter dem Menüpunkt <ANZEIGE ⇒ FORMAT> können Sie die nachfolgend beschrieben Bildformate einstellen. Die Formatauswahl ist nur möglich, wenn im Menüpunkt <AUTO ZOOM> “Aus” eingestellt ist.
D Panorama
Diese Formateinstellung skaliert das Eingangssignal automatisch in horizontaler und vertikaler Richtung bildschirmfüllend,
aber nicht linear. Das heißt, dass die Bildinhalte in der Bildschirmmitte original dargestellt werden und zum Rand hin eine
stärkere Skalierung stattfindet.
D Normal (4:3)
Diese Formateinstellungstelltein PAL 4:3 Bildim korrekten Seitenverhältnis dar. Am linken und rechtenBildrandsind dunkle
Streifen sichtbar.
D Vollbild
In dieser Formateinstellung wird das Bild in horizontalerundvertikaler Richtung so angepasst,dass immereinebildschirmfüllende Darstellung sichtbar ist.
D Benutzerzoom
Wählen Sie Benutzerzoom aus, so wird der Menüpunkt <BENUTZERZOOM> im Menü eingeblendet.
In diesem Menüpunkt können Sie ein individuelles Bildformat im Bereich von 40% bis 160 % der ursprünglichen Bildgröße
darstellen. Die Einstellung erfolgt in Sprüngen von 6 %.
D 4:3 Letterbox auf 16:9 - zentriertes Bild im 16:9 Letterbox-Format
D 16:9 - Bild im 16:9 Letterbox-Format mit Untertiteln
D 14:9 - zentriertes Bild im 14:9 Letterbox-Format
D 14:9 Top - Bild im 14:9 Letterbox-Format mit Untertiteln
Zum Umschalten der Formate können Sie auch wiederholt die Taste [F
Eingänge / PIP >
Bild >
Anzeige >
Ton >
Einstellung >
Info >
Auto Zoom: Aus
Format: Benutzerzoom
Benutzerzoom:
Farbtemperatur: Benutzer
Kontrast: Normal
Standbild "
Benutzer Farbtemperatur >
Bildschirmschoner >
←
Dieser Menüpunkt wir nur eingeblendet, wenn im Menüpunkt
<FORMAT> “Benutzerzoom”
eingestellt ist.
] drücken.
Benutzerzoom
Vollbild
Normal (4:3)
14:9
14:9 Top
4:3 Letterbox auf 16:9
16:9 Top
Panorama
Diese Menüpunkte stehen nur in der Einstellung
<EINGÄNGE / PIP ⇒ QUELLE> “PC (RGB) oder
Form.Fuellend
1:1
PC(RGB)” zur Verfügung!
D Taste [AUTO] auf der Fernbedienung
Drücken Sie die [AUTO]-Taste zum Einschalten der Funktion “Auto Zoom”.
RufenSiemitderTaste [MENU]dasHauptmenüauf. Wählen Sie denMenüpunkt<ANZEIGE>,und dann<AUTO ZOOM>. Drükken Sie auf die Taste [
Um in ein anderes Format umzuschalten, drücken Sie [F
18 DEUTSCH
"], um <AUTO ZOOM> auszuschalten.
]Taste.
Page 21

Alltägliche Bedienung
Fernsehbetrieb
Der Plasma-TV befindet sich im Stand-By Betrieb.
. Zum Einschalten drücken Sie eine der Zifferntasten [0...9] oder die [TV]-Taste auf der Fernbedienung.
Danach erscheint der zuletzt angewählte Fernsehsender (Programmnummer) auf dem Bildschirm.
TV -- 2 -- ZDF
STEREO
Steht der Menüpunkt <EINSTELLUNG ⇒ INFO
SIGNALQUELLE> auf “Ein”,wird das Info-Fenster
zur Signalquelle für ca. 5 Sekunden eingeblendet
- siehe Abb. links.
DEUTSCH
. Drücken Sie die Taste[ P
Sie mit den Zifferntasten auf der Fernbedienung jede Programmnummer direkt an.
Y ]bzw.[PB ], um die Programmnummer jeweils um 1 zu erhöhen bzw. zu verringern oder wählen
Videotext
Ihr Plasma-TV kann TOP/FLOF Videotextinformationen empfangen und darstellen.
. Wählen Sie einen Fernsehsender mit Videotext.
. Drücken Sie Taste [TEXT] auf der Fernbedienung, um den Videotext anzuzeigen. Zur direkten Anwahl von Videotextseiten
benutzen Sie die Zifferntasten.
Die rote, grüne, gelbe und blaue Taste auf der Fernbedienung haben je nach Videotextart unterschiedliche Funktionen, die im
unteren Bereich des Videotextes angezeigt werden.
PC Betrieb
. Schalten Sie Plasma -TV und PC AUS.
. Verbinden Sie Ihren PC und den Plasma-TV mit dem beiliegenden Videokabel (DVI-Stecker an Plasma-TV und HD-Sub-
Stecker an PC).
. Schalten Sie Plasma-TV und PC wieder EIN.
PC (RGB)
1024 x 768
Im Menüpunkt <EINGÄNGE / PIP ⇒ QUELLE> muss
PC (RGB) eingestellt sein. Beim Einschalten erkennt
der Plasma-TV das am PC eingestellte Bildformat automatisch. Diese Information wird in einem Info-Fenster angezeigt - siehe Abb. links.
Betrieb mit zusätzlichen Geräten
Videorecorder
. Schalten Sie Plasma-TV und Videorecorder AUS.
Es gibt 3 Anschlussmöglichkeiten für Ihren Videorecorder an den Plasma-TV :
D über die Antennenleitung, lesen Sie dazu die Bedienungsanleitung vom Videorecorder
D mit einem Scartkabel entweder an SCART1 oder SCART2
D wenn Ihr Videorecorder einen S -Video Ausgang besitzt, verbinden Sie diesen mit dem Y/C Eingang.
. Schalten Sie Plasma-TV und Videorecorder wieder EIN.
. Zum Umschalten auf den angeschossenen Eingang (z.B. SCART1) drücken Sie wiederholt die [VIDEO]Taste.
DVD-Player
Betrieb mit Revox M51 und DVS-Modul: siehe Bedienungsanleitung DVS-Modul
. Schalten Sie Plasma-TV und DVD-Player AUS.
. Verbinden Sie Ihren DVD-Player mit SCART1, YC Eingang oder dem YUV Eingang, wenn dieser über einen S-Video Aus-
gang verfügt.
. Schalten Sie Plasma-TV und DVD-Player wieder EIN.
. Zum Umschalten auf den angeschossenen Eingang drücken Sie wiederholt die [VIDEO]Taste.
19DEUTSCH
Page 22

Alltägliche Bedienung
Sonderfunktionen
Manuelle Programmsuche
Autom. Suche >
Manuelle Suche >
Sortieren >
Löschen >
←
Im Menüpunkt <OPTION> kann “Decoder A” oder “Decoder B” nur ausgewählt werden, wenn an SCART 2 ein De koder angeschlossen ist. Die Einstellung “Normal” ist der Betrieb ohne Decoder.
Programm: 02
TV Standard: Auto
Typ: Kanal
Kanaleingabe: 12
Frequenz: 062.25 MHz
Name: HR
Option: Normal
←
. Unter Menüpunkt <EINGÄNGE / PIP ⇒ EIN-
STELLUNGEN ⇒ MANUELLE SUCHE ⇒ PROGRAMM> geben Sie eine Programmnummer ein,
die noch nicht in Benutzung ist.
. Im Menüpunkt <FREQUENZ> müssen Sie direkt
die Frequenz des Fernsehsenders mittels der Zifferntasten auf der Fernbedienung eingeben, den
Sie suchen.
. Ist das Bild nicht optimal, erhöhen bzw. verringern
Sie die eingegebene Frequenz in kleinen Schritten.
. Strahlt der Fernsehsender keinen Namen aus,
können Sie diesen unter dem Menüpunkt
<NAME> eingeben (siehe “Ändern derProgrammnamen”).
Standbild
Eingänge / PIP >
Bild >
Anzeige >
Ton >
Einstellung >
Info >
Auto Zoom: Aus
Format: Benutzerzoom
Farbtemperatur: Benutzer
Kontrast: Normal
Standbild "
Benutzer Farbtemperatur >
Bildschirmschoner >
←
Ein Standbild können Sie mit der [FREEZE] Taste oder
unter dem Menüpunkt <STANDBILD> erzeugen.
Farbtemperatur
Auto Zoom: Aus
Format: Benutzerzoom
Benutzerzoom:
Farbtemperatur: Benutzer
Kontrast: Normal
Standbild "
Benutzer Farbtemperatur >
Bildschirmschoner >
←
Rot: 128
Grün 128
Blau: 110
←
Die Farbtemperatur können Sie unter den 3 vordefinierten Einstellungen “Warm”, “Normal” oder “Kalt”
auswählen. Stellen Sie den Wert “Benutzer” ein, können Sie im Menüpunkt <BENUTZER FARBTEMPERATUR> einen Wert selbst festlegen.
Ein niedriger Wert der Farbtemperatur erhöht den
Rotanteil im Bild und läßt es “wärmer” erscheinen. Mit
steigender Farbtemperatur erhöht sich der blaue
Lichtanteil, das Bild wirkt “kälter”.
Bild-in-Bild
Die Funktion BILD-IN-BILD bietet die Möglichkeit zwei Bildsignale gleichzeitig zu betrachten.
D Sie können Sie in das laufende Fernsehprogramm ein externes Videosignal z.B. vom Videorecorder einblenden.
D Sie können gleichzeitig zu PC-Signalen ein Videosignal z.B. vom DVD-Player darstellen.
. Drücken Sie die [PIP] Taste, das Bild von dem in Menüpunkt <EINGÄNGE / PIP ⇒ PIP QUELLE> eingestellten Eingang
(z.B. Tuner), wird in das aktuelle Bild eingeblendet.
Sollte an diesem Eingang kein Signal anstehen, so bleibt das eingeblendete Fenster dunkel.
Ist als PIP-Quelle “Tuner” eingestellt,können Sie mit den Zifferntasten den Fernsehkanal im Hauptbild umschalten. Für die Umschaltung des Fernsehkanals im PIP-Fenster, benutzen Sie die Taste [P
Y] oder [PB].
Die Position und Grösse des Fensters können eingestellt werden.
. Stellen Sie im Menüpunkt <PIP GRÖSSE> - die Fenstergrösse, in <PIP HORIZ.POS.> - die horizontale Fensterposition und
in <PIP VERT.POS.> - die vertikale Fensterposition ein.
Die Änderungen an Grösse und Position werden sofort sichtbar.
. Mit dem Menüpunkt <PIP TAUSCHEN (F2)> oder der Taste [F2] können Sie “Hauptbild” und “Bild in Bild” tauschen.
. Wählen Sie Menüpunkt <EINGÄNGE / PIP ⇒ BILD IN BILD>, um den PIP-Modus einzustellen.
20 DEUTSCH
Page 23

Alltägliche Bedienung
. Zur Umschaltung des PIP-Modus können Sie auch die [PIP] Taste auf der Fernbedienung benutzen.
EINSTELLUNG - PIP
Eingänge / PIP >
Bild >
Anzeige >
Ton >
Einstellung >
Info >
EINSTELLUNG - SPLIT
Quelle: TUNER
Einstellungen >
Bild in Bild: PIP
PIP Quelle: SCART1
PIP Grösse:
PIP Horiz.Pos.:
PIP Vert. Pos.:
PIP Tauschen (F2) "
←
SCREEN
SCART1
Hauptbild
SCART2
CVBS
TUNER
YC
YUV
Diese Menüpunkte sind nicht bei den Einstellungen
<EINGÄNGE / PIP ⇒ QUELLE> “PC (RGB)” /
“PC (DVI)” verfügbar.
DEUTSCH
Bild in Bild
Eingänge / PIP >
Bild >
Anzeige >
Ton >
Einstellung >
Info >
Quelle: TUNER
Einstellungen >
Bild in Bild: Split Screen
PIP Quelle: SCART1
PIP Tauschen (F2) "
←
Multi-PIP Funktion
Eingänge / PIP >
Bild >
Anzeige >
Ton >
Einstellung >
Info >
1
16
15
14
13
Quelle: TUNER
Bild in Bild: Multi--PIP
←
2
HAUPTBILD
12
VOL-
YY
Multi-PIP
Split Screen PIP Aus
3
P
YY
B
P
45
Y
VOL+
Y
B
6
7
8
91011
Hauptbild Bild in Bild
Die Multi-PIP Funktion gestattet die gleichzeitige Darstellung von 16 Fernsehkanälen. Davon 15 als Standbild (Snapshot) und ein sich aktualisierendes Bild, der
aktuelle Fernsehkanal wird als Live-Bild (Hauptbild)
dargestellt.
Zum Start der Multi-PIP Funktion können Sie im OSDMenü <EINGÄNGE / PIP ⇒ BILDIN BILD> “Multi-PIP”
auswählen oder die [PIP] Taste auf der Fernbedienung mehrmals drücken.
Nach dem Start der Multi-PIP Funktion wird der aktuell
eingestellte Fernsehkanal als aktives Hauptbild übernommen (blau umrandet) und anschließend werden
von den ersten 16 gespeicherten Fernsehkanälen
Snapshots erzeugt. Über die Zifferntasten [1]bis[6]
können die Multi-PIP Programmgruppen: [1]=Programmplatz 1 bis 16; [2] = Programmplatz 17 bis 32;
. . . angewählt werden. Mit der Taste [0] springen Sie
wieder auf die Prgrammplätze 1 bis 16 zurück.
Das grau umrandete Bild markiert den momentanausgewählten inaktiven Fernsehkanal (Snapshot oder
Hauptbild). Die Snapshots werden von oben links be ginnend im Uhrzeigersinn angezeigt. Jede Sekunde
wird ein Snapshot aktualisiert, so dass sich jeder
Snapshot alle 16 Sekunden einmal aktualisiert.
Bei aktivem Hauptbild können Sie mit den Programmtasten auf der Fernbedienung [
Y] und [B] den Fern-
sehkanal im Hauptbild umschalten.
Zum Wechseln des aktiven Bildes vom Hauptbild auf
die Multi-PIP Snapshots und umgekehrt, drücken Sie
die blaue Taste auf der Fernbedienung.
Bei aktiven Multi-PIP Snapshots können Sie mit den
Taste n [
A] und ["] Ihren gewünschten Fernsehkanal
in den Snapshots anwählen. Zur Übernahme ins das
aktive Hauptbild müssen Sie wieder auf die blaue Ta ste drücken.
Um den Fernsehkanal für einen aktiven Snapshot
(blau umrandet) zu ändern, drücken Sie die Taste [
oder [
B].
Y]
Alle Änderungen an den Snapshots werden sofort gespeichert.
21DEUTSCH
Page 24

Alltägliche Bedienung
Automatisches abschalten
Info Signalquelle: Ein
Sprache: Deutsch
OSD Einstellungen: >
ECO Modus/Stand--By: >
Aufruf Werkseinstellungen >
Abschaltzeit: Aus
←
Zweikanalton umschalten
Zweikanalton ist die Bezeichnung für Filme, bei denen der Zuschauer die Möglichkeit hat, zwischen der Synchronfassung und
der Originalsprache zu wechseln.
Werden Sendungen mit Zweikanalton ausgestrahlt, ist zuerst der Kanal “A” aktiv.
. Drücken Sie die Taste [M/S], um auf Kanal “B” umzuschalten.
Dekoderbetrieb
Im Menüpunkt <EINGÄNGE / PIP ⇒ EINSTELLUNGEN ⇒ MANUELLE SUCHE ⇒ OPTION> können Sie für jeden Programmplatz den Dekoderbetrieb auswählen.
Sie können den Plasma-TV s o einstellen, dass er
nach einer bestimmtenZeit automatisch in den StandBy Betrieb schaltet.
. Wählen Sie im Menüpunkt <EINSTELLUNG ⇒
ABSCHALTZEIT> eine der vorgegebenen Zeiten
30, 60 oder 90 Minuten aus.
Nach Ablauf dieser Zeit wird der Plasma -TV automatisch in den Stand-By Betrieb geschaltet.
Unterstützung des HDTV Standards
(High Definition Television)
Für Komponenten (Receiver;Settopboxen),dieAusgangssignalegemäßHDTV Standardliefern, stehen die Eingänge ”PC(DVI)
und PC(RGB)” zur Verfügung.
Die folgenden HDTV Formate 480 i, 480 p, 576 p, 720 p und 1080 i können dargestellt werden.
Der Eingang ”YUV” ist nicht für HDTV vorgesehen. Bei inkompatiblem Eingangssignal können Verzerrungen des
Bildes auftreten.
Progressive Scan
(Eingangssignal am YUV Eingang)
Eingänge / PIP >
Bild >
Anzeige >
Ton >
Einstellung >
Info >
Quelle: YUV
Einstellungen >
←
YUV progress.: Aus
←Bild im Bild: Aus
Moderne Komponenten (DVD Spieler; Settopboxen)
verfügen über die Möglichkeit so genannte ”Progressive Scan Signale” zu generieren. Über den YUV Eingang können diese Signale verarbeitet werden.
Über den Menüpunkt <EINGÄNGE / PIP ⇒ EINSTELLUNGEN ⇒ YUV PROGRESS.> auf EIN, können Sie
die Unterstützung aktivieren.
Die Komponente muss den Standard EIA-770.2 unterstützen.
Standard TV-Auflösung (480 bzw. 576 Zeilen; HDTV Auflösungen siehe HDTV)
HDCP Kompatibilität
(High Bandwidth Content Protection)
Eingänge / PIP >
Bild >
Anzeige >
Ton >
Einstellung >
Info >
Wenn Sie eine Komponente (DVD-Player) benutzen, die nicht exakt dem HDCP Standard entspricht, entstehen
möglicherweise Bildfehler. Tritt dieser Fehler auf, schalten Sie die angeschlossene Komponente AUS und wieder
EIN.
Quelle: PC (DVI)
Einstellungen >
Bild im Bild: Aus
←
HFreq: 60.0kHz
V Freq : 75.0 Hz
Pixeltakt : 78.75 MHz
H/V Pol : + / --
Overscan: Aus
DVI-Mode: HDCP
←
Der Kopierschutz für die digitale Videoschnittstelle
DVI (HDCP) ist bei der Anwahl des Eingangs
”PC(DVI)” und der Einstellung im Menüpunkt <DVIMODE> auf “HDCP” aktiv. Dies stellt sicher, das Geräte mit HDCP Unterstüzung (DVD Player) fehlerfrei
arbeiten.
Werden Komponenten ohne HDCP Unterstützung an
den Eingang ”PC(DVI)” angeschlossen, müssen Sie
den Menüpunkt <DVI-MODE> auf “PC” einstellen.
22 DEUTSCH
Page 25

Bildschirmschoner
Auto Zoom: Aus
Format: Benutzerzoom
Farbtemperatur: Benutzer
Kontrast: Normal
Standbild "
Benutzer Farbtemperatur >
Bildschirmschoner > Wei ß: "
←
Invertiert: "
←
Menü “Info”
Eingänge / PIP >
Bild >
Anzeige >
Ton >
Einstellung >
Info >
Aktuelle Temperatur: 21.5
Hardware Version: Rev02
Softwareversion: 42S1V03h1gT
←
Alltägliche Bedienung
. Wählen Sie den Menüpunkt <ANZEIGE ⇒ BILD-
SCHIRMSCHONER>, um die Option zu aktivieren.
Option “Weiß”: für die Aufhebung von jüngeren und
wenig ausgeprägten “Einbrennungen” auf dem Bildschirm.
Option “Invertiert”: für die Regenierung des Bildschirmes im Fall von starken “Einbrennungen”.
. Zum Abbrechen des Vorganges drücken Sie die
[MENU]Taste.
Rufen Sie das Hauptmenü auf, indem Sie die Ta ste
[MENU] drücken, und wählen Sie Info.
Der Bildschirm zeigt die interne Temperatur und tech nische Informationen des Gerätes an. Der Inhalt dieser Anzeige kann nicht geändert werden.
DEUTSCH
23DEUTSCH
Page 26

Fehlerbehebung
Fehlerbehebung
Die nachstehende Tabelle zeigt herkömmliche Probleme und die entsprechenden Lösungen. Informieren Sie sich zuerst anhand dieser Tabelle, bevor Sie unseren Kundendienstvertreter kontaktieren.
Sollten die angegebenen Hinweise zur Fehlerbehebung nicht zum Erfolg führen, schalten Sie das Gerät am Netzschalter AUS und ziehen Sie den Netzstecker aus der Steckdose.
Versuchen Sie niemals das Gerät selbst zu reparieren und entfernen Sie keinesfalls die hintere Abdek kung am Gerät.
FEHLER MÖGLICHE URSACHE MÖGLICHE BEHEBUNG
Kein Bild und kein Ton,
obwohl der Netzstecker
eingesteckt und Gerät
eingeschaltet ist.
Bildschirm dunkel. D Kontrasteinstellung zu gering.
Schwache oder
übermäßige Farben.
Das Bild ist abgeschnitten
bzw. das Bild ist nicht
zentriert.
Das Bild ist zu gross bzw.
zu klein.
Die Fernbedienung
funktioniert nicht.
Das dargestellte Bild ist zu
dunkel.
Bild wird angezeigt, aber
kein Ton vorhanden.
Einzelne Buchstaben
werden nicht dargestellt
(PC-Modus).
Horizontale Streifen bei
TV- oder Video-Signalen.
Um alle Einstellungen wieder in den Grundzustand zu versetzen, benutzen Sie den Menüpunkt
Temperaturwarnung
D Netzschalter in Position “0” (AUS).
D Netzstecker von Gerät nicht in Steck-
dose eingesteckt.
D Defektes Netzkabel .
D Kein Eingangssignal, falscher Eingang
ausgewählt.
D Farbe nicht richtig eingestellt.
D Anschlusskabel nicht richtig ange-
schlossen.
D Bildlage nicht richtig eingestellt. D Korrigieren Sie die Bildlage.
D Bildformat falsch eingestellt. D Drücken Sie wiederholt die Taste F ,
D Die Batterien sind leer.
D Zwischen der Fernbedienung und
dem Sensor befindet sich ein Hindernis.
D Die Fernbedienung befindet sich
außerhalb ihres Betriebsbereiches.
D Die Bildqualität ist nicht richtig einge-
stellt.
D Tonabschaltung ist eingeschaltet.
D Lautstärke auf Minimum eingestellt.
D Lautsprecher nicht richtig angeschlos-
sen.
D Signalquelle vor dem Bildschirm auf-
gestellt.
D Schirmung der Videokabel ist nicht
ausreichend.
<EINSTELLUNG ⇒ AUFRUFEN WERKSEINSTELLUNGEN>!
Wenn der Bildschirm nicht mit ausreichender Belüftung betrieben wird, kann die Innentemperatur übermäßig ansteigen. Steigt die Umgebungs- oder Innentemperatur weiter
über einen bestimmten Wert an, erscheint zuerst das links stehende Warnfenster auf dem
Bildschirm. In der Folge kann der Bilschirm automatisch in den Stand-By-Betrieb schalten.
Sorgen Sie für ausreichende Belüftung!
D Netzschalter in Position “I” stellen.
D Stecken Sie den Stecker vom Netzka-
bel in die Steckdose.
D Service-Hotline anrufen.
D Helligkeit und/oder Kontrast richtig ein -
stellen (siehe Menüpunkt <BILD>).
D Anschlusskabel kontrollieren; richtigen
Eingang der Quelle zuordnen.
D Stellen Sie Farbe unter Menüpunkt
<BILD> ein.
D Kabel korrekt anschließen.
Benutzen Sie die Auto Abgleich
Funktion.
bis das Bild bildschirmfüllend
angezeigt wird.
D Legen Sie neue Batterien ein.
D Entfernen Sie das Hindernis zwischen
Fernbedienung und Sensor.
D Betreiben Sie die Fernsteuerung im
angegebenen Bereich.
D Korrigieren Sie Bildhelligkeit und Kon-
trast unter Menüpunkt <BILD>.
D Drücken Sie die Taste auf der Fern-
bedienung.
D Erhöhen Sie die Lautstärke.
D Schließen Sie die Lautsprecher richtig
an.
D Stellen Sie die Phasenlage unter Me-
nüpunkt <EINGÄNGE/PIP ⇒ EIN STELLUNGEN ⇒PHASE> ein.
D Überprüfen Sie die Einstellung der
Bildbreite.
D Führen Sie <EINGÄNGE/PIP ⇒EIN-
STELLUNGEN ⇒ AUTO ABGLEICH>
aus.
D Platzieren Sie die Signalquellen grund-
sätzlich seitlich oder hinter dem Bildschirm.
D Verwenden Sie nur hochwertige
Signalkabel mit hoher Schirmdämpfung.
24 DEUTSCH
Page 27

Technische Daten
Technische Daten
BILDSCHIRM
Größe / diagonal: 107 cm (42”), 16:9 Format
Darstellbare Bildgröße: 933 mm (horizontal) x 532 mm (vertikal)
Auflösung: 1024 x 768 Bildpunkte
Betrachtungswinkel: 160° typisch
VIDEO STANDARDS
Video: PAL / SECAM / NTSC
TV Tuner: PAL (BG,I,DK,M,L)/ SECAM (L/L’), 47 - 861 MHz (VHF , UHF, Hyperband)
PALplus, Cinescope: Automatische Formaterkennung (Bildschirmfüllend)
Formate: 4:3, 16:9 (Top), 14:9 (Top), Panorama, Bildschirmfüllend, Benutzerzoom
FREQUENZBEREICH PC
Horizontalfrequenz: 30 - 80 kHz
Vertikalfrequenz: 50 - 90 Hz
Clockfrequenz: max. 140 MHz
Auflösungen:
Empfohlene Auflösung:
Formate: 1:1, Bildschirmfüllend, Formatfüllend, Zoom, Benutzerzoom (40%-160%)
EINGÄNGE / ANSCHLÜSSE / SYNCHRONISATION
PC / Video-Eingang: RGB analog und automatische Sync-Erkennung
Video-Anschlüsse TV Tuner: IEC, 75 Ohm Eingangswiderstand
PC Anschluss analog/digital: DVI-I
Audio-Anschlüsse Lautsprecherausgang
Synchronisation: Sync auf grün, Composite Sync mit automatischer Erkennung,
Bedienelemente: Netzschalter, IR-Fernbedienung (OSD-Menü 10 Sprachen), Ortsbedienung
BETRIEBSBEDINGUNGEN
Temperatur: +5°C bis +35°C (Betrieb), -20 °C bis +60 °C (Lagerung)
Luftfeuchtigkeit: 20% bis 85% (nicht kondensierend) @ 35°C
Höhe: max. 2.000 m (7.000 ft)
DATEN NETZANSCHLUSS
Spannungsversorgung: 115 - 230 V ~
Netzfrequenz: 50 / 60 Hz
Leistungsaufnahme: 300 W typisch, 5 W im Stand-By Mode
ABMESSUNGEN UND GEWICHT
Gerät ohne Standfuss H x B x T: (657 mm x 1041 mm x 104 mm) ± 2 mm
Gerät mit Standfuss H x B x T: (730 mm x 1041 mm x 240 mm) ± 2 mm
Gewicht Gerät : 37,3 kg ± 10%
Gewicht Fuss : 9,9 kg ± 10%
Gewicht gesamt : 47,2 kg ± 10%
(40%-160%)
DOS: 640 x 480 @ 60 Hz, 720 x 400 @ 70 Hz,
VGA: 640 x 480, SVGA: 800 x 600; WVGA: 848 x 480 50 Hz - 90 Hz
XGA: 1024 x 768 50 Hz - 9 0 Hz
WXGA: 1280 x 768 @ 60 Hz
SXGA: 1280 x 1024 50 Hz - 7 5 Hz
UXGA: 1600 x 1200 50 Hz - 60 Hz
1024 x 768 @ 60 Hz
SCART1: RGB, FBAS Eingang, FBAS Ausgang
SCART2: FBAS Eingang, FBAS Ausgang
FBAS: 1 x RCA Cinch
Y/C: MiniDIN (HOSIDEN)
YUV (FBAS): 3 x RCA Cinch
SPEAKERS OUT: 2 x 7 W Sinus @ 8 Ω
Stereo-Eingang: 3 x 2 Cinch L/R 1Vrms (YUV (FBAS), YC, PC),
2 x SCART 1 Vrms
Stereo-Ausgang: 2 x Cinch (LINE OUT L/R)
Seperate H- und V-Sync
DEUTSCH
25DEUTSCH
Page 28

Page 29

Table of Contents
Safety instructions 2.............................
ENGLISH
Changing channel 16.........................
Important basic principles for use 2...............
Waste disposal 3...............................
Cleaning 3....................................
Cleaning the plasma TV 3....................
Cleaning the casing 3........................
Conformity 4..................................
In the event of any faults 4.......................
Batteries 4....................................
Overview 5......................................
Scope of supply 5..............................
Connection sockets 6...........................
Control buttons and functions of the remote control 7
Control buttons on the display unit (Local operator
control) 7.....................................
Getting started 8.................................
Unpacking, viewing, locating and installing 8.......
Unpacking 8................................
Viewing position 8...........................
Location 8.................................
Installation 9................................
Wall mounting 9............................
Regulating the sound 16.........................
Regulating the volume 16.....................
Sound setting 16.............................
Sound mute 17..............................
Adjusting the picture 17..........................
Contrast 17.................................
Brightness 17................................
Sharpness 17...............................
Color 17....................................
DNC 17.....................................
Photo CD 17................................
Film Mode (AV sources only) 17................
Picture format 18.............................
Television mode 19..............................
Telet e x t 1 9..................................
PC Mode 19....................................
Operation with additional devices 19...............
Video recorder 19............................
DVD player 19...............................
Connecting and switching on the display 10.........
Connecting the display 10.....................
Preparations 11..............................
Switching on the display 11....................
Using the OSD menu 11.........................
Configuring settings 11.......................
Saving changes 11...........................
Basic OSD menu settings 12......................
Changing the OSD language 12................
Changing the OSD menu properties 12..........
Restoring default settings 12...................
Settings for getting started 12.....................
TV mode 12.................................
Selecting PC mode 14........................
Auto setup function 15........................
Setting user formats 15.......................
General operation 16..............................
To switch the display on 16....................
To switch the display off 16....................
Special functions 20.............................
Manual channel search 20....................
Still picture 20...............................
Color temperature 20.........................
PIP Mode 20................................
Multi-PIP function 21..........................
Automatic switch-off 22.......................
Switching over to dual sound 22................
Decoder mode 22............................
Support of the HDTV standard 22..............
Progressive scan 22..........................
HDCP compatibility 22........................
Screen saver 23.............................
Menu “Info” 23...............................
Troubleshooting 24................................
Technicalspecifiications 25........................
1ENGLISH
Page 30

Safety instructions
Safety instructions
Before you put this plasma TV into operation please read through this user manual carefully.
This plasma TV is intended exclusively for the reception and reproduction of video and audio signals.
Take heed of the safety directions so that when used in compliance with the intended use there is no danger to your health.
Installation and connection errors can damage the unit or any devices connected to it. Take heed of the warnings and directions
on the unit and in the operating manuals.
This plasma TV is designed only for use in residential rooms and offices.
Protect the plasma TV against moisture. This includes continuous high levels of air humidity, proximity to water, dripping water,
spray water and rain. Do not operate this plasma TV in rooms with a high dust incidence. Do not put any vessels that are filled
with water, e.g. vases, on the unit. If you connect an external aerial, please ensure thatno water can penetrate the cable infeed.
Under no circumstances may any objects be allowed to enter the unit through the ventilation apertures. This would cause short
circuits and could therefore cause a fire. Should anything get into the unit at any time, immediately turn off the unit via the mains
power switch and disconnect the mains plug from the plug receptacle. Do not try to open the unit yourself. Instead, contact the
hotline or a qualified service engineer.
Protect the plasma TV against heat, heat accumulation and direct sunlight. Avoid proximity to fire, heaters and ovens. Do not
drape curtains over the unit.
The ventilation apertures may not be covered or blocked in order to avoid faults and overheating. During installation maintain
a sufficient distance from other any equipment, furniture, walls and ceiling so that air circulation is possible.
If the plasma TV is moved quickly from cold surroundings to warm surroundings, moisture can collect on the surface and inside
the unit. Should this situation occur, do not switch on the unit, but wait until the moisture has evaporated. If the unit is used with
such a collection of moisture, malfunctions may occur.
The voltage supply used must correspond with the specifications on the type plate.
Use only the mains cable supplied.
This plasma TV is completely disconnected from the electrical mains only when the mains switch is switched offand the mains
cable is pulled out of the unit or the plug is pulled out of the plug receptacle.
Connect this plasma TV only to a MAINS plug receptacle with an earth conductor connection. Ensure that the mains plug and
plug receptacle are accessible at all times.
Differing conditions can cause an electrical hazard, fire or failure of the unit.
Never remove the plug from the receptacle by pulling it out of the plug receptacle by the mains cable. Avoid laying the mains cable
in the vicinity of hot objects.
Disconnect the mains plug and aerial plug if there is a thunderstorm or if you are going to be absent for a long period of time.
The power supply system can get damaged through an overload caused by lightning striking the antenna system.
Always turn off the plasma TV and the signal source before you connect the two devices.
The plasma unit is equipped with a supplementary filter panel made of glass. If the unit is exposed to an excessive load, e.g.
due to shock, vibration, bending or heat shock, the glass surface can break. Do not subject the glass surface to any pressure
or knocks. Should the glass be broken, immediately unplug the mains plug from the plug receptacle.Do not touch the fragments
with your bare hands. There is a danger of injury from sharp-edged glass fragments.
Important basic principles for use
The plasma TV that you have purchased meets the highest quality requirements in this product segment and has been checked
forpixeldefects.Despitetaking the greatest care duringproductionoftheseunits,for technologicalreasons itcannot be excluded
absolutely that there are some pixels with defects.
We request y our understanding for the fact that such defects, provided that they are within the limits specified by the standard,
cannot be considered to be as an appliance defect in the terms of the warranty.
The luminance diminishes gradually with increasing usage time, as is the case with all plasma TV’s on a phosphorus basis.
Under certain operating conditions all plasma TV’s on a phosphorus basis have a tendency to incur screen burns. The following
are examples of such operating conditions:
D long, continuous display of a still image
D continuous reproduction of teletext
D constant display of the same background (e.g. with video games)
D use of a format that does not fill the display screen (e.g. 4:3) over a long period of time.
2 ENGLISH
Page 31

Safety instructions
As a rule once screen burns have occurred they cannot be reversed.
To avoid or reduce screen burns please take heed of the following directions and recommendations:
D during the first 100 operating hours mainly moving images or frequently changing still images should be displayed as a
full screen
D use your plasma TV on a screen-filling format (16:9)
D always activate the screen saver when using it as a PC display
D display moving images as far as possible
D always switch off the plasma TV when it is not being used
D reduce as much as possible the contrast and brightness
D wherever possible display images with lots of colours and colour shades.
Unfavourable conditions can cause your plasma TV to hum. The humming generally comes from the mains voltage supply and
can occur through the connection of different earth conductors. You can provide a remedy by putting a so-called sheath current
filter between the incoming aerial lead and the aerial input socket on the plasma TV. Sheath current filters are available in the
retail trade in the form of a small inline plug.
For technicalreasons the unit can generatenoise inside itself. However, this must not exceed the value specifiedin the appliance
specification.
If your plasma TV is connected to an external aerial, the latter must be earthed as protection against electric shocks and static
charging. The earthing must comply with the valid regulations.
For ergonomic reasons we recommend that you avoid the use of red or blue fonts or symbols on dark backgrounds. On account
of the poor contrast such a display causes poor legibility and causes early eye fatigue. Therefore please use displays that are
rich in contrast, e.g. black font on a white background.
ENGLISH
To avoid aching eyes and obtain an optimizedviewing distance,the distance from the unit should be five to six times the display’s
diagonaldimension.Inyour televisionroom it should be so light that you could also read. The contrast is lostwith too much brightness. Too little light strains the eyes due to the alternation between light and dark on the display.
When connecting externalloudspeakers take heed of the technical specifications of the loudspeaker output. If the loudspeakers
are insufficiently dimensioned, the loudspeakers and/or integrated amplifiers can be ruined.
Waste disp o sal
If you want to dispose this unit, do not mix it with general household waste. There is a separate collection system for
used electronic products in accordance with legislation that requires proper treatment, recovery and recycling.
This unit and its packaging have been produced largely from materials that can be disposed of in an environmentally friendly
manner and that can be properly recycled.
After use the unit will be taken back for reuse or recycling, provided that it is handed back in a condition that corresponds to its
use having been in compliance with the intended use.
Any non -recyclable parts of the unit will be disposed of in the proper manner.
If you have any questions about disposal, please contact the place where you purchased the unit or our service department.
Cleaning
Before you start any cleaning, turn off the unit and unplug the mains plug from the plug receptacle.
Cleaning the plasma TV
Use a glass cleaning product with a soft cloth for cleaning the plasma TV. Do not use any abrasives!
Cleaning the casing
Do not use any chemical solvents or cleaning agentsforcleaning the casing, otherwise the surface of the unit could be damaged.
If you clean the surface of the casing with a wet cloth, drops of water can get into the unit, which will cause malfunctions.
Use a vacuum cleaner with a soft brush attachment for c leaning the ventilation apertures.
3ENGLISH
Page 32

Safety instructions
Conformity
This unit is a plasma TV and complies with the following directives and standards of the European Union:
D 89/336/ECCE of 03 May 1989 with subsequent modifications (directive 92/31/ECCE of April 1992 and directive 93/68/ECCE
of 22 July 1993)
D 73/23/ECCE of 19 February 1973 with subsequent modifications (directive 93/68/ECCE of 22 July 1993)
D EN55013, EN55020, EN61000-3-2/-3 (ElectroMagnetic Compatibility)
D EN60065 (Safety Requirements).
Conformity with the requirements is certified by the designation on
The manufacturer cannot be held liable for operationoutsideof the operating conditions as described in these operating instructions. Your product liability and warranty claims shall also lapse due by this.
the product.
In the event of any fau lts
Unplug the mains plug from the plug receptacle, if the unit is damaged.
Pullthe mains plug outof the plug receptacle, if the unit gives offany smoke, an unpleasant odourorany unusual noises. Proceed
in the same way if the unit is no longer able to display a picture after it has been switched on or during operation. Do not attempt
to continue operating the plasma TV in this condition.
Under no circumstancesshould you open the unit yourself.Inside the display there are no parts that can be serviced or replaced
by you. Contact our service hotline or another suitable technical workshop.
Batteries
When inserting the batteries ensure that the polarity (+/-) agrees with the markings on the remote control.
Batteries may not be disposed of in the domestic waste. The used batteries must be disposed of at a municipal collection centre or thrown into the containers provided for this purpose in the retail trade.
Do not expose the batteries to excessive heat, do not throw them into a fire, do not recharge them and do not attempt to open
them; they could leak or even explode.
Please remove the batteries from the remote control, if the unit is not to be used for a long period of time.
4 ENGLISH
Page 33

Overview
Overview
The plasma TV offers a broad range of connection options for PCs, DVD players, video recorders, video cameras, etc.
No matter whether displayed on television, video or PC, all images are presented with a very sharp outline and distortion-free
on an absolutely flat display surface. They have an excellent degree of brightness and exceptional brilliance. Other important
features include the display’s large diagonal dimensions with a length ratio of 16:9 and a very slim overall depth.
To be able to watch your TV, connect the unit to a terrestrial aerial, SAT receiver or cable TV box.
The TV is operated interactively via the remote control provided and the on-screen menu (OSD). A wide range of picture quality
settings can be adjusted using these.
A new type of cooling system means that the plasma display can operate without any disturbing fan noise. Being as quiet as
a conventional television set, the plasma display is ideal for use in living rooms, as well as conference rooms.
EQUIPMENT
D High-quality aluminium frame
D Fanless design
D HD ready
D Compatible with HDCP
D 16:9 format
D Full screen in 16:9 and 4:3 format
D Viewing angle horizontal/vertical 160 degrees
D Digital comb filter
D Compatible with PAL, SECAM and NTSC
D Compatible with VGA, SVGA, WXGA and XGA
D TOP / FLOF Videotext
D Automatic channel identification and channel sorting
D Sleep Timer
D Screen saver
D 2xEUROSCARTs(SCART1withRGB)
D 1 x Y/C (S-video)
D 1 x YUV / CVBS
D 1 x DVI (I) (analogue and digital)
ENGLISH
Scope of supply
Afterunpacking, please check the plasma display for possible transportation damage and ensure that the delivery is complete.
The supplier can only accept claims for transportation damage if you advise them of this before starting to use the unit. If any
partof the delivery is missing,please contact our service hotline. Please keep the originalpackingin the event you have to return
the display unit.
Plasma TV
Mains cable for Europe
(except U.K. and Ireland)
AAA batteries
Antenna cable HDMI to DVI cable
Operating manual
Remote control
5ENGLISH
Page 34

Overview
Connection sockets
9
1
2 3 4 8
18
16 13 11 5 6 715 14 11 10
1 LINE OUT L/R 10 SCART 1
e.g. audio amplifier or DVD receiver socket e.g. satellite receiver socket
2 RF IN (Patch Cord) 11 S-VIDEO (Y/C)
Connecting cable e.g. camcorder socket with S-video jack
3 RF OUT (Patch Cord) 12 RS-232
connecting cable Serial interface for service purposes
Revox interface M200
4 ANTENNA 13 PC DVI-I
Socket for TV aerial signal PC socket
(terrestrial aerial or cable connection) (RGB for analogue signals, DVI for digital signals)
If your PC has an analogue VGA output, to connect
our PC to the display use a DVI-I connection cable
provided via a 15-pin HD-Sub.
Connection Revox DVS module over adaptor cable
16
5 YUV / V 14 LINE IN S-VIDEO
Audio input for S-video
6 YUV / U 15 LINE IN PC (L/R)
e.g. audio input PC with line-out jack
7 YUV / Y (CVBS) 16 LINE IN YUV (CVBS)
Socket for DVD player with YUV output Audio input for YUV (CVBS)
8 SCART 2 17 Mains input socket
e.g. video recorder or decoder socket Connection for the mains cable supplied
9 SPEAKERS OUT 18 Mains switch
Connection loudspeaker left (+ / -) on / off
Connection loudspeaker right (+ / -)
6 ENGLISH
Page 35

Overview
Control buttons and functions of the remote control
To be able to control the plasma display with the remote control, the mains plug must be plugged in and the mains switch must
be turned on.
The infrared remote control only functions if there are no obstructions between the control and the infrared sensor on the front
(bottom) of the display. The remote control has a range of approx. 6 m.
When the batteries start running down the remote control’s range is reduced. If this happens, please change the batteries. You
must only use 2 LR03 AAA 1.5 V batteries.
Stand-by button
Programme buttons 0 - 9
Channel selection
ENGLISH
Button green, teletext
Button M (memory), red
Button for program selection up /
OSD menu direction button up
Button for reducing the volume /
Button for OSD operating
Button for switching between single and
multi-digit channel numbers
Button for direct selection of TV mode
Button for direct selection of video mode
PIP mode
To swap the main picture with the PIP picture
Selection button for picture format
PIP button (Picture-in-Picture mode)
Multi-PIP function
FREEZE button, Still picture
AUTO Zoom /
PAGE button in teletext mode
Button yellow, teletext
Button blue, teletext /
Multi-PIP function
Menu button (open / close the OSD menu)
Button for increasing the volume /
Button for OSD operating
Button for program selection down /
OSD menu direction button down
Button for direct selection PC mode
Button for direct selection of teletext
Button for function programme list in TV mode /
Functions in teletext mode
Mute button
Button for time display
M/S button, Sound mode
Info button
Control buttons on the display unit (Local operator control)
The functions of the buttons on the unit match those
on the remote control.
Vol – button ON / MENU button
Vol + button
Button PB
Button PY
7ENGLISH
Page 36

Getting started
Getting started
Before you make any connections, switch off all the appliances involved, including the plasma display.
Unpacking, viewing, locating and installing
Unpacking
. Place the box uprightwith its underside on a solid base. The direction of the arrowheads on the long side of the box indicates
the top of the box.
. Remove the packaging tape from the opening edge and open the box’s flap outwards.
. Remove the two top polystyrene packing corners and take the accessories box out of the packing.This is locatedon theside
at the rear of the display.
Polystyrene corner
Polystyrene
corner
Viewing position
D Although the plasma TV has a large display angle, its best performance is achieved when viewed directly from a central
front position. Align the display with the most frequent viewing position.
Location
D Light reflection
Avoid positioning the display opposite windows or other light sources.
D Access to the mains input
The mains input and mains switch should be easily accessible at all times.
D Air supply
Leave a space at the side and to the rear of at least 10 cm from any furniture. The space above the unit should be at
least 30 cm from any furniture or the ceiling.
With the wall mounting the space must above at least 80 cm to any furniture or to the ceiling. Laterally and down you
should keep to a least space of 10 cm.
D Ambient temperature
To ensure safe, reliable operation the ambient temperature must be between 5 °C and 35 °C.
8 ENGLISH
Page 37

Table installation Wall mounting
Getting started
ENGLISH
10 cm
Space
Installation
30 cm Space
10 cm
Space
80 cm Space
10 cm Space
10 cm
Space
D Two persons are required to remove the plasma display from the packing. Never lift the display alone.
Any attempt to lift the display alone will pose a risk to your health.
D Place the display on a stable, horizontal base. The base must be solid and capable of bearing the load.
D Before installing it, make sure that the display is switched off and that the mains cable and signal cable
are unplugged.
80 cm Space
10 cm Space
Wall mounting
D The plasma display screen may be mounted on vertical walls only.
D Before mounting it check whether the loadbearing capacity of the wall is suitable for 3-times the weight
of the plasma display screen (for the weight see page 25 ”Technical Specifications”). If in doubt, seek
the advice of a qualified installer.
D Before installing it, make sure that the display is switched off and that the mains cable and signal cable
are unplugged.
D Two people are required to mount the display screen on the wall.
. Turn the plasma display screen so that the front side
(screen) is pointing downwards and place it on a completely flat and firm surface.
. A Revox table foot is optional available.
Holes for
rackets
. Fit the 2 fastening hooks (rawl plugs and fastening hooks
are not included in theitemssupplied)horizontallyandwith
the appropriate distance between them (for this distance
see drilling template in the accessories pack) to the wall.
The fastening material must be designed for 3 -times the weight of the plasma display screen. If
necessary, please c onsult a qualified installer.
. Position the plasma display screen so that the fastening
Screws from
the table foot
hooks can be introduced into the openings providedfor this
purpose on the rear side of the appliance.
Optional: Revox table foot
9ENGLISH
Page 38

Getting started
Connecting and switching on the display
Connecting the display
(for an overview of the connection sockets see the illustration on page 6)
. Plug the mains power cord intothe mains input jack on the plasma TVand
the mains plug into a plug receptacle.
Cable connection / terrestrial aerial
If you would like to connect a cable, a terrestrial aerial or a satellite receiver, use the ANTENNA socket for this purpose.
Video recorder / DVD player / satellite receiver
If you receive your TV channels via satellite, connect your receiver by
means of a SCART cable to the SCART 1 or SCART 2 socket.
In addition, SCART 1 has a connection socket for RGB sources,
e.g. a DVD player.
Only a SCART 2 can be used for c onnecting a decoder.
DVD player
For connection of a DVD player or another video source to a YUV -output
please use the display’s YUV-input.
If your DVD player has a DVI-I output port, you can use the DVI-I input
port and the audio input port LINE IN PC on the display screen.
f a DVD player is connected to the DVI-I input port of the display screen, the following must be ensured:
D Beforeyou make a connection between the DVD playerand
the display screen using the cables, you must disconnect
the mains plug of the DVD player from the plug socket.
D Once the cables are plugged in on the DVD player and on
the display screen, the mains plug of the DVD player can be
reconnected to the mains.
If you do not comply with this procedure, damage can be
caused to the DVD player or to the display screen!
Notice : If your DVD player has a HDMI interface, you use to the connec-
tion the supplied adapter cable ”HDMI on DVI”.
PC
Use the PC DVI-Isocket to connect your PC to the display. If your PC has an
analogue VGA output port, use the DVI-I connecting cable supplied on a 15
Pin HD-Sub to connect it.
On older PC graphic cards it is possible that pin 9 is barred.
Should this be the case, please contact the service hotline.
10 ENGLISH
Page 39

Getting started
Preparations
. Open the battery compartment on the rear side of the remote control and insert the two batteries provided (type LR03
micro AAA). Make sure that the polarity is the same as shown on the bottom of the battery compartment.
Switching on the display
. Turn the mains switch on the rear side of the display to position ”I”.The display is now in standby mode and can be switched
on using of the remote control.
Cable connection / terrestrial aerial
. Switch on the display by pressing the [TV] button on your
remote control.
Satellite receiver
. Switch on your satellite receiver and switch on the display
via the [VIDEO] button on your remote control.Pleasenote
that you may have to press the button [VIDEO] several times depending on which SCART socket your receiver is
connected to.
PC
. Switch on the display by pressing the [PC] button on your
remote control and select the appropriate signal input (
PC(RGB) or PC(DVI) ). To do so, access your display’s
OSD menu via the remote control [MENU] button and select your input signal from <INPUTS / PIP> submenu.
ENGLISH
Using the OSD menu
Configuring settings
Your display can be configured and operated using the simple OSD menu. 6 buttons are available on the remote control for this
purpose:
P
Y button
Press this button to move upwards in the OSD menu. The selected menu or selected function appears against a black
background.
A button
Quits the selected function.
To quit a submenu, selectthe option < ← > and press the [
Change the setting for the selected option.
M button
Saves any changes that have been made.
MENU button
Displays the OSD main menu. The main menu appears in the
top left of the screen. It also closes the OSD menu.
" button
Opens the next submenu.
Activates the selected option or the selected function. The selected option is displayed against a black background.
Changes the setting under the s elected option.
A ].
P
B button
Press this button to move downwards in the OSD menu.
The selected menu or selected function is displayed against a
black background.
Saving changes
The changes you have made are saved by pressing the [M] button on your remotecontrol (see illustration on the previous page)
or by quitting the OSD menu.
11ENGLISH
Page 40

Getting started
Basic OSD menu settings
Changing the OSD language
Your display has a 10-language OSD menu (English, French, German, Italian, Dutch, Spanish, Norwegian, Swedish,
Danish and Finnish).
Inputs / PIP >
Picture >
Display >
Sound >
Set Up >
Info >
Display Source Info: On
Language: English
OSD Set Up >
Pwr Down/Stand--By >
Reset to factory Defaults >
Sleep Timer: Off
←
Changing the OSD menu properties
Display Source Info: On
Language: English
OSD Set Up >
Pwr Down/Stand--By >
Reset to factory Defaults >
Sleep Timer: Off
←
Time Out: 5 s
Transparency: Off
←
. To change the preset language, select the option <SET
UP> from the main menu. In the submenu choose
<LANGUAGE> and select the desired language.
. To change the display or display time of the OSD menu
(time after the last key or mouse movement before the display closes), select the option <SET UP> from the main
menu.
IInthe submenu <OSD SET UP> anothersubmenu is avai lable with the options <TIME OUT> (possible selections: 5,
10 and 15 seconds) and <TRANSPARENCY> (possible
selections: On and Off).
Restoring default settings
You have the option of restoring all the changes made in the OSD menu back to the original default settings.
Display Source Info: Off
Language: English
OSD Set Up >
Pwr Down/Stand--By >
Reset to factory Defaults >
Sleep Timer: Off
←
Yes, delete my settings "
←
. To do so, select the option <SET UP> from the main menu
and choose the option <RESET TO FACTORY DEFAULTS> from the submenu.
Settings for getting started
TV mode
D Automatic channel search
If you receive your channels via satellite only, you do not have to perform the automatic channel search.
To start the automatic channel search, proceed as follows:
. Switch on the display via the [TV] button on your remote control.
. Press the [MENU] button on your remote control to display the OSD menu and select the option
<INPUTS / PIP>. A submenu opens.
. In the s ubmenu select the option <MAIN INPUT SETTINGS>. The submenu <AUTO SEARCH> is opened.
12 ENGLISH
Page 41

Getting started
. Under the option <TV STANDARD> you can enter the TV standard supported for your country - see table below.
PAL BG PAL I PAL DK SECAM L SECAM DK
Austria UK Czech Republic France Bulgaria
Belgium Ireland Hungary Luxembourg Russia
Denmark Poland Ukraine
Finland Slovakia
Germany
Greece
Italy
Luxembourg
Netherlands
Norway
Rumania
Portugal
Slovenia
Spain
Sweden
Switzerland
Turkey
ENGLISH
Autom. Suche >
Manuelle Suche >
Sortieren >
Löschen >
← Land: Deutschland
TV Standard: PAL BG
Suchart: Alle Programme
Suche starten "
Startpunkt Programm: 01
←
Under the option <TV STANDARD> select the setting
”Auto”. In this way, all TV standards are searched for
channels.
Please ensure that the channels found are pre-sorted
according to the setting under the menu option
<COUNTRY>. Before starting, set the channel search
for your country.
. Now select the option <AUTO SEARCH> and
choose the option <START SEARCH> from the
submenu.
The automatic channel search starts.
You can cancel the search by pressing the [MENU] button.
D Sorting TV channels
Main input: TUNER
Main input settings >
PIP Mode : AUS
←
Auto Search >
Manual Search >
Sort >
Delete >
←
. Select the option <INPUTS / PIP ⇒ MAIN INPUT
SETTINGS ⇒ SORT>.
The following table appears.
1 2 3 4 5 6 7 8 9 10
0 ARD ZDF SW3 VOX NBC N--TV VIVA2 KABEL HR RTL2
1 BR PHOEN KIKA CNN SAT1 RTL DSF EUROS VIVA 3-- SAT
2 WDR PRO7 -- -- -- -- -- -- -- -- -- -- -- -- -- -- -- -- -- -- -- -- -- -- -- -- -- -- -- -- -- -- -- -- -- -- -- -- -- -- -- --
3 -- -- -- -- -- -- -- -- -- -- -- -- -- -- -- -- -- -- -- -- -- -- -- -- -- -- -- -- -- -- -- -- -- -- -- -- -- -- -- -- -- -- -- -- -- -- -- -- -- --
4 -- -- -- -- -- -- -- -- -- -- -- -- -- -- -- -- -- -- -- -- -- -- -- -- -- -- -- -- -- -- -- -- -- -- -- -- -- -- -- -- -- -- -- -- -- -- -- -- -- --
5 -- -- -- -- -- -- -- -- -- -- -- -- -- -- -- -- -- -- -- -- -- -- -- -- -- -- -- -- -- -- -- -- -- -- -- -- -- -- -- -- -- -- -- -- -- -- -- -- -- --
6 -- -- -- -- -- -- -- -- -- -- -- -- -- -- -- -- -- -- -- -- -- -- -- -- -- -- -- -- -- -- -- -- -- -- -- -- -- -- -- -- -- -- -- -- -- -- -- -- -- --
7 -- -- -- -- -- -- -- -- -- -- -- -- -- -- -- -- -- -- -- -- -- -- -- -- -- -- -- -- -- -- -- -- -- -- -- -- -- -- -- -- -- -- -- -- -- -- -- -- -- --
8 -- -- -- -- -- -- -- -- -- -- -- -- -- -- -- -- -- -- -- -- -- -- -- -- -- -- -- -- -- -- -- -- -- -- -- -- -- -- -- -- -- -- -- -- -- -- -- -- -- --
9 -- -- -- -- -- -- -- -- -- -- -- -- -- -- -- -- -- -- -- -- -- -- -- -- -- -- -- -- -- -- -- -- -- -- -- -- -- -- -- -- -- -- -- -- -- /
13ENGLISH
Page 42

Getting started
: Select a programme.. Current = 1 - ARD [MENU]: Stop sorting
: Insert an empty programme at current position
: Swap selected programme with current position
You c an now sort the TV channels using the coloured buttons on your remote control.
D Delete a TV channel
Display the main menu by pressing the [MENU] button. Select the option [INPUTS / PIP], then [MAIN INPUT SETTINGS] and
then [DELETE]. The table opposite appears.
1 2 3 4 5 6 7 8 9 10
0 ARD ZDF SW3 VOX NBC N--TV VIVA2 KABEL HR RTL2
1 BR PHOEN KIKA CNN SAT1 RTL DSF EUROS VIVA 3-- SAT
2 WDR PRO7 -- -- -- -- -- -- -- -- -- -- -- -- -- -- -- -- -- -- -- -- -- -- -- -- -- -- -- -- -- -- -- -- -- -- -- -- -- -- -- --
3 -- -- -- -- -- -- -- -- -- -- -- -- -- -- -- -- -- -- -- -- -- -- -- -- -- -- -- -- -- -- -- -- -- -- -- -- -- -- -- -- -- -- -- -- -- -- -- -- -- --
4 -- -- -- -- -- -- -- -- -- -- -- -- -- -- -- -- -- -- -- -- -- -- -- -- -- -- -- -- -- -- -- -- -- -- -- -- -- -- -- -- -- -- -- -- -- -- -- -- -- --
5 -- -- -- -- -- -- -- -- -- -- -- -- -- -- -- -- -- -- -- -- -- -- -- -- -- -- -- -- -- -- -- -- -- -- -- -- -- -- -- -- -- -- -- -- -- -- -- -- -- --
6 -- -- -- -- -- -- -- -- -- -- -- -- -- -- -- -- -- -- -- -- -- -- -- -- -- -- -- -- -- -- -- -- -- -- -- -- -- -- -- -- -- -- -- -- -- -- -- -- -- --
7 -- -- -- -- -- -- -- -- -- -- -- -- -- -- -- -- -- -- -- -- -- -- -- -- -- -- -- -- -- -- -- -- -- -- -- -- -- -- -- -- -- -- -- -- -- -- -- -- -- --
8 -- -- -- -- -- -- -- -- -- -- -- -- -- -- -- -- -- -- -- -- -- -- -- -- -- -- -- -- -- -- -- -- -- -- -- -- -- -- -- -- -- -- -- -- -- -- -- -- -- --
9 -- -- -- -- -- -- -- -- -- -- -- -- -- -- -- -- -- -- -- -- -- -- -- -- -- -- -- -- -- -- -- -- -- -- -- -- -- -- -- -- -- -- -- -- -- /
: Delete current programme [MENU]: Stop deleting
: Select delete range start point. Current = 1 -- ARD
: Select delete range end point. Current = 1 -- ARD
: Confirm delete from start point to end point
You can now delete TV channels using the coloured buttons on the remote control.
D Changing the channel name
If the display can detect the channel name from the TV signal, the detected name is stored under the set channel number. If the
channel name is not detected, the channel number appears in the name (e.g. PR02).
Proceed as follows to change the channel name:
Auto Search >
Manual Search >
Sort >
Delete >
←
Programme: 02
TV Standard: Auto
Type: Channel
Channel Entry: 12
Frequency: 062.25 MHz
Name: HR
Option: Normal
←
. Select the option <INPUTS / PIP ⇒ MAIN INPUT
SETTINGS ⇒ MANUAL SEARCH ⇒ NAME>.
. Now press the [
" ] button to select the firstcharac-
ter position.
. Using the [
B ] and [ Y ] buttons you can scroll
through the character set until the desired character appears in the selected character position.
. Use the [
" ] button to select the next character po-
sition.
Repeat the previous 3 steps until you have entered the name. A maximum of 5 characters is possible.
Selecting PC mode
Inputs / PIP >
Picture >
Display >
Sound >
Set Up >
Info >
14 ENGLISH
Main input: PC (RGB)
Main input settings >
PIP Mode: Off
←
. Switch on the display via the [PC] button on your
remote control.
. Press the [MENU] button on y our remote control to
display the OSD menu. The option <INPUTS /
PIP> appears against a black background.
. Select the relevant signal input (PC (RGB) or PC
(DVI)) from the submenu <MAIN INPUT>.
Page 43

Getting started
Auto setup function
The display always automatically runs the auto s etup function when an analogue video format (RGB) is used for the first time.
During this period the display moves slightly back and forth to reach the optimal position and picture.
The H/V (horizontal/vertical) position and the picture size have to be set manually for several incompatible PC formats. The auto setup function is highly dependent on the picture display.
A full-screen white picture is ideal.
ENGLISH
Main input: PC (RGB)
Main input settings >
PIP Mode: Off
←
H Freq.: 60.0 kHz
VFreq.: 75.0 Hz
Pixel Clk: 78.75 MHz
H/VPol: +/-User timings >
Auto Setup "
VPos:
V Size:
H Size:
HPos:
Phase
←
. If you would like to activate auto setup manually,
select the option <INPUTS / PIP ⇒ MAIN INPUT
SETTINGS ⇒ AUTO SETUP>.
Setting user formats
You have the option of storingfrequently used formats as user formats. The display unit detects these stored formats and immediately displays them correctly without running the auto-adjust function.
H Freq.: 60.0 kHz
V Freq.: 75.0 Hz
Pixel Clk: 78.75 MHz
H/VPol: +/-User timings >
Auto Setup "
VPos:
V Size:
H Size:
HPos:
Phase
←
Position: 1
Recall "
Save "
Delete All "
←
. Select the option <INPUTS / PIP> from the main
menu and choose the submenu <MAIN INPUT
SETTINGS>. Another submenu opens.
. Select the option <USER TIMINGS>.
. You can now save the user format that is set at the
moment, for example, in position 1 (8 positions are
possible) by selecting the option <SAVE>.
Under the option <RECALL> you can retrieve a stored user format and with <DELETE ALL> you can delete all stored user formats.
15ENGLISH
Page 44

General operation
General operation
To switch the display on
. To switch the display on, set the mains switch to position ”I”.
The standby LED on the infrared sensor lights up red.
. Now press one of the numeric buttons or [TV] / [VIDEO] / [PC] button on the remote control to switch the display on.
The OPERATING LED on the infrared sensor lights up blue.
The display must be ”powered up”. This is comparable to the process with a PC and takes several seconds.
To switch the display off
. Press the standby button on the remote control.
The display switches back to standby mode.
Standby button
. To switch the display off again completely, set the mains switch to position ”0”.
If no signal is pending on screen, it automatically goes into standby mode.
. To switch on again, press one of the numeric buttons on the remote control.
The standby LED on the infrared sensor lights up
red.
Changing channel
When you change from one TV channel to another, firstof all you see a still picture of the 1st channel and then a moving picture
of the other channel.
Regulating the sound
Regulating the volume
Vo l u m e :
Inputs / PIP >
Picture >
Display >
Sound >
Set Up >
Info >
Vo lume:
Balance:
Equalizer: User
Option: Stereo
Volume Line Out:
Max Startup Volume:
AV C: O ff
User Equalizer >
←
Sound setting
Vo lume:
Balance:
Equalizer: User
Option: Stereo
Volume Line Out:
Max Startup Volume:
AV C: EI N
User Equalizer >
←
Acoustic pattern:
Rock
Jazz
User
Flat
Pop
Classic
Vocal
. You press the button [
remote control,to set the desired volume. The current volume control appears on the screen.
. Select the option <SOUND ⇒ VOLUME>.
Menu items:
Volume = The current volume
Max Startup Volume = Presetting for the volume when
the display is switched on
Under the option <EQUALIZER> you can set the predefined acoustic pattern.
A Vol - ] or [ " Vol + ] on the
16 ENGLISH
Page 45

General operation
Vo lume:
Balance:
Equalizer: User
Option: Stereo
Volume Line Out:
Max Startup Volume:
AV C: O ff
User Equalizer >
←
Sound mute
TV -- 2 -- ZDF
MUTE
TV -- 2 -- ZDF
MUTE
Adjusting the picture
<120Hz:
500 Hz:
1.5 kHz:
5kHz:
>10kHz
←
. Select the option <USER EQUALIZER> to create
your individual acoustic pattern.
The option <USER EQUALIZER> is displayed only if
”User” is set under <EQUALIZER>.
. Press the [ ] button on the remote control. The
sound is switched offand the following infowindow
appears on the display for approx. 5 seconds - see
the drawing at left side.
. The sound is switched on again, if you press the
button [
], [ A Vol - ] or [ " Vol + ] on the remote
control. The following info window appears on the
display for approx. 5 seconds - see the drawing at
left side.
ENGLISHENGLISH
When the display is switched on for the first time basic values are set for contrast, brightness, picture sharpness and colour.You
can adjust these settings separately as described below, according to your personal taste and the location of the display or the
light incidence associated with it.
Contrast
. Press the [ "] button to increase the contrast.
Inputs / PIP >
Picture >
Display >
Sound >
Set Up >
Info >
Contrast: 64
Brightness: 64
Sharpness:
Color: 15
DNC: 5
Photo CD: Off
←
. Press the [
Brightness
. Press the [ " ] button to make the picture brighter.
. Press the [
Sharpness
. Press the [ " ] button to make the picture sharper.
. Press the [
A ] button to decrease the contrast.
A ] button to make the picture darker.
A ] button to make the picture softer.
Color
. Press the [ " ] button to increase the colour satu-
ration.
The dark marked menu options are not
”PC(DVI)“!
. Press the [
ration.
available for the settings <INPUTS / PIP ⇒ MAIN INPUT> ”PC(RGB)” and
A ] button to decrease the colour satu-
DNC
The option <DNC> stands for ”Dynamic Noise Control”.
Weak TV signals or poor video signals can generate irritating picture noise. DNC dynamically adapts the effect of digital noise
suppression to the picture’s content.
Photo CD
The option <PHOTO CD> is specifically for reproducing still pictures, e.g. photo CDs or picture CDs.
. Set the option <PHOTO CD> to ”On” and still pictures will be displayed automatically with optimum quality.
Film Mode (AV sources only)
this function detects that the programme being broadcast is a film and enhances picture quality. It is disabled by default. Select
the option “Auto” to enable it.
17ENGLISH
Page 46

General operation
Picture format
D Auto Zoom
This function evaluates the current picture format and switches automatically between ”FULL SCREEN” and
”4:3 LETTERBOX TO 16:9”.
Under the option <DISPLAY ⇒ ZOOM>, you can set the preset picture formats. Manual format selection is possible only if ”Off”
is set under the option <AUTO ZOOM>.
D Panorama
This format setting automatically scales the input signal, horizontally and vertically, so that the picture fills the entire screen,
but not linearly, i.e. the picture’s content in the centre of the screen is displayed like the original and towards the edges more
intense scaling takes place.
D Normal (4:3)
This format setting displays a PAL 4:3 picture with the correct side ratio. Dark stripes are visible on the left and right-hand
edges of the picture.
D Full screen
In this format setting the picture is adjusted horizontally and vertically so that a full screen is always displayed.
D User zoom
If you select User zoom, the option <USER ZOOM> is displayed in the menu.
With this option you can display an individual picture format ranging from 40 to 160% of the original picture size.
The value is set in increments of 6 %.
D 4:3 Letterbox to 16:9 - centred picture in 16:9 letterbox format
D 16:9 Top - picture in 16:9 letterbox format with subtitles
D 14:9 - centred image in 14:9 letterbox format
D 14:9 Top - picture in 14:9 letterbox format with subtitles
To toggle between the formats, press the [F
Input / PIP >
Picture >
Display >
Sound >
Set Up >
Info >
Auto Zoom: Off
Zoom: Userzoom
User Zoom:
Color Temperature: USER
Picture Contrast: Ideal
Freeze Picture "
User Color Temp >
←
] button repeatedly.
This option is displayed only if
”Userzoom” is set under
<ZOOM>.
These options are available only with the
setting <INPUTS / PIP ⇒ MAIN INPUT>
Userzoom
Full screen
Normal (4:3)
14:9
14:9 Top
4:3 Letterbox to 16:9
16:9 Top
Panorama
Fill AR
1:1
”PC (RGB) / PC(RGB)” !
D Button [AUTO] on the remote control
To switch the function “Auto Zoom” on, by pressing the [AUTO] button.
Display the main menu by pressing the [MENU] button. Select the menu option[DISPLAY] and then [AUTO ZOOM]. To switch
the function “Auto Zoom” off, by pressing the [
To change the formats by pressing the [F
"] button.
] button.
18 ENGLISH
Page 47

General operation
Television mode
The display is in standby mode.
. To switch on, press one of the numeric buttons [0...9] or the [TV] button on the remote control.
Then the television channel last selected (programme number) appears on screen.
If the option <SET UP ' DISPLAY SOURCE INFO> is set to ”On”, the following info window for s ignal source is displayed for
approx. 5 seconds
TV -- 2 -- ZDF
STEREO
If the option <SET UP ⇒ DISPLAY SOURCE
INFO> is set to ”On”, the following info window for
signal source is displayed for approx. 5 seconds see the drawing at the left side.
ENGLISH
. Press the [ P
directly using the numeric buttons on the remote control.
Y ]or[ PB ] button to increaseor reduce the channel numberin single incrementsor enter each channel number
Teletext
Your display c an receive and display TOP/FLOF Teletext information.
. Select a television channel with Teletext.
. Press the [TEXT] button on the remote controlto display Teletextoruse the numeric buttons to directly select Teletext pages.
The red, green, yellow and blue buttons on the remote control have different functions depending on the type of Teletext. They
are displayed at the bottom of the Teletext screen.
PC Mode
. Switch off the display and the PC.
. Connect your PC and the display using the enclosed video cable (DVI plug on the display and HD-sub connectoron the PC).
. Switch ON the display and PC again.
PC (RGB)
1024 x 768
PC (RGB) must be set in under the option <INPUTS /
PIP SOURCE>. When switched on, the display
automatically detects the pictureformat set on the PC.
This information is displayed in an info window - see
the drawing at the left side.
Operation with additional devices
Video recorder
. Switch OFF the display and video recorder.
There are 3 options for connecting your video recorder to the display:
D via the aerial lead; read the operating instructions for your video recorder on this subject
D using a SCART cable connected either to SCART1 or SCART2
D if your video recorder has an S-video output, connect this to the Y/C input.
. Switch the display and video recorder back ON.
. o switch over to the connected input (e.g. SCART1) press the [VIDEO] button repeatedly.
DVD player
Operation with Revox M51 and DVS module: see the operating manual DVS module
. Switch OFF the display and DVD player.
. Connect your DVD player via SCART1, YC input or YUV input, if it has an S-video output.
. Switch the display and DVD player back ON.
. To switch over to the connected input, press the [VIDEO] button repeatedly.
19ENGLISH
Page 48

General operation
Special functions
Manual channel search
Auto Search >
Manual Search >
Sort >
Delete >
←
Under <OPTION> ”Decoder A” or ”Decoder B” can be selected only if a decoder is connected to SCART 2.
The setting is ”Normal” when there is no decoder.
Still picture
Inputs / PIP >
Picture >
Display >
Sound >
Set Up >
Info >
Programmme: 02
TV Standard: Auto
Type: Channel
Channel Entry: 12
Frequency: 062.25 MHz
Name: HR
Option: Normal
←
Auto Zoom: Off
Zoom: Userzoom
Color Temperature:
USER
Picture Contrast: Ideal
Freeze Picture "
User Color Temp >
←
. Under the option <PROGRAMME> enter a chan-
nel number that is not yet being used.
. Under the option <FREQUENCY> you must enter
directly the frequency of the TV channel you are
searching for using the numeric buttons on the remote control.
. If the picture is not perfect, increase or reduce the
frequency entered in small increments.
. If the TV channel does not display a name, you can
enter it under the option <NAME>
(see ”Changing the channel name”).
You can generate a s till picture withthe [FREEZE] button or via the option <FREEZE PICTURE>.
Color temperature
Auto Zoom: Off
Zoom: Userzoom
User Zoom:
Color Temperature: USER
Picture Contrast: Ideal
Freeze Picture "
User Color Temp >
←
Red: 128
Green 128
Blue: 110
←
You can select the colour temperature from 3 predefined settings or define a value yourself via the option
<USER COLOR TEMP>.
A lower colour temperature value increases the proportion of red in the picture and gives it a ”warmer” ap pearance.
The proportion of blue light increases with an increasing colour temperature, the picture has a ”colder” effect.
PIP Mode
The PIP Mode offers the possibility of viewing two image signals at the same time.
D You c an fade an external video signal, e.g. from the video recorder, into the current TV programme.
D You c an display a video signal, e.g. from a DVD player, at the same time as PC signals.
. Press the [PIP] button and the picture from the input set under the option <INPUTS / PIP ⇒ SECONDARY INPUT> (e.g. tu-
ner) is displayed on the current screen.
If no signal is pending at this input port, the superimposed window remains dark.
The position and size of the window can be set.
. Under the option <PIP SIZE> - set the window size, under <PIP HORIZ.POS.> set the horizontal window position and under
<PIP VERT.POS.> the vertical window position.
Any change in size and position becomes visible immediately.
. You can toggle between ”main screen” and ”Picture In Picture” by selecting the option <QUICK SWAP (F2)> or pressing
the [F2] button.
. Select the option <INPUTS / PIP ⇒ PIP MODE> to set the PIP mode.
20 ENGLISH
Page 49

. To change PIP mode you can also use the [PIP] button on the remote control.
SETTING - PIP
Inputs / PIP >
Picture >
Display >
Sound >
Set Up >
Info >
Main input: TUNER
Main input settings >
PIP Mode: PIP
Secondary input: SCART1
PIP Size:
PIP Horiz.Pos.:
PIP Vert. Pos.:
Quick swap (F2) "
←
SCART1
SCART2
CVBS
TUNER
YC
YUV
These options are not available for the settings <INPUTS / PIP ⇒ MAIN INPUT> ”PC (RGB)”
SETTING - SPLIT
SCREEN
or ”PC (DVI)”.
Main
picture
General operation
ENGLISH
PIP
Inputs / PIP >
Picture >
Display >
Sound >
Set Up >
Info >
Multi-PIP function
Inputs / PIP >
Picture >
Display >
Sound >
Set Up >
Info >
1
16
15
14
13
Main input: TUNER
PIP Mode: Multi--PIP
←
2
MAIN PICTURE
12
Main input: TUNER
Main input settings >
PIP Mode: Split Screen
Secondary input: SCART1
Quick swap (F2) "
←
Multi-PIP
Split Screen PIP Off
3
45
6
7
8
91011
Main picture PIP
The multi-PIP function allows the simultaneous display of 16 television channels, 15 of which are in the
form of a still picture (snapshot) and a continually updated picture, the current television channel being
shown as a live picture (the main picture).
To start the multi-PIP function you can select via the
OSD menu <INPUTS / PIP ⇒ PIP Mode> “Multi-PIP”
or press the [PIP] button on the remote controlseveral
times.
Afterstarting the multi-PIP functionthe currentlytelevision channel setting is adopted as the active main picture (with a blue border) and then snapshotsare generated of the first 16 s tored television channels. The
multi-PIP groups of programmes are selected via the
numeric buttons [1]to[6]: [1] = programme location 1
to 16; [2]=programmelocation17to32;....
The picture with the grey border marks the momentarily selected inactive television channel (snapshot or
main picture). The snapshots are displayed clockwise
starting from the top left. A snapshot is updated every
second so that each snapshot is updated once every
16 seconds.
When the main picture is active you can switch over
the television channel that appears in the main picture
by means ofthe programme buttons [
Y] and [B]onthe
remote control.
P
YY
VOL-
YY
B
B
P
Y
VOL+
Y
To change the active picture from the main picture to
multi-PIP snapshots and vice versa, press the blue
button on the remote control.
When multi-PIP snapshots is active you can selected
your desired television channel in the snapshots by
pressing buttons [
A] and ["]. To adopt this channel in
theactivemainpictureyoumustpresstheblue button
again.
To change the television channel for an active snapshot (blue border), press the button [
Y]or[B].
Once you have selected the programme group 1 to 16,
all changes to the snapshot settings are stored as fa-
vourites. You can set the favourites with the button
[0].
21ENGLISH
Page 50

General operation
Automatic switch-off
Display Source Info: On
Language: Deutsch
OSD Set Up: >
Pwr Down/Stand--By: >
Reset to factory Defaults >
Sleep Timer: Off
←
Switching over to dual sound
Dual channel sound is intended for films where the viewer has the option to switch between the dubbed version and the original
language.
If channels are transmitted with dual channel sound, channel ”A” is active first of all.
. Press the button [M/S] to switch over to channel ”B”.
Decoder mode
Under the option <INPUTS / PIP ⇒ MAIN INPUT SETTINGS ⇒ MANUAL SEARCH ⇒ OPTION> you can select the decoder
mode for each channel location.
You can set the display so that it switches off automatically after a certain amount of time.
. Under the option <SLEEP TIMER> select one of
the preset times 30 , 60 or 90 minutes.
When this period of time has elapsed the display switches off automatically.
Support of the HDTV standard
(High Definition Television)
The input ports ”PC(DVI)and PC(RGB)”are available for components (receiver; s et-top boxes) that supply output signals incompliance with HDTV standard.
The HDTV formats can be displayed: 480 i, 480 p, 576 p, 720 p and 1080 i.
The input port ”YUV” is not envisaged for HDTV. Picture distortions can occur, if the input signal is incompatible.
Progressive scan
(Input signal at the YUV input port)
Inputs / PIP >
Picture >
Display >
Sound >
Set Up >
Info >
Main input: TUNER
Main input settings >
←
YUV progress.: Off
←PIP Mode: Off
Modern c omponents (DVD players; set-top boxes)
have the facility to generate so-called ”progressive
scan signals”. These signals can be processed via the
YUV input port. You c an activate the support via the
menu option <INPUTS / PIP ⇒ SETTINGS ⇒ YUV
PROGRESS.> ON.
The component must support the standard EIA-770.2.
Standard TV resolution (480 or 576 lines; for HDTV resolutions see HDTV)
HDCP compatibility
(High Bandwidth Content Protection)
Inputs / PIP >
Picture >
Display >
Sound >
Set Up >
Info >
Main input: PC (DVI)
Main input settings >
PIP Mode: Off
←
HFreq: 60.0kHz
V Freq : 75.0 Hz
Pixel Clk : 78.75 MHz
H/V Pol : + / --
Overscan: Off
DVI-Mode: HDCP
←
Copying protection for the digital video interface DVI
(HDCP) is active when the input port ”PC(DVI)” is selected and menu option <DVI-MODE> is set to
”HDCP”. If components without HDCP support are
connected to the input port”PC(DVI)”,you must s et the
menu option < DVI-MODE> to ”PC”.
If you are using a component (DVD player)that is not exactly compliant with theHDCP standard, picture errors may
occur. If any errors occur, switch the connected component OFF and back ON again.
22 ENGLISH
Page 51

Screen saver
Auto Zoom: Off
Zoom: Userzoom
Color Temperature: USER
Picture Contrast: Ideal
Freeze Picture "
User Color Temp >
Screen saver > White: "
←
Inverted: "
←
Menu “Info”
Inputs / PIP >
Picture >
Display >
Sound >
Set up >
Info >
Cuurent temperature: 21.5
Hardware version: Rev02
Software version: 42S1V03h1gT
←
General operation
. Select the menu option <DISPLAY ⇒ SCREEN
SAVER>, to activate the option.
Option “White”: to cancel out more recent and less
distinctive burn spots on the display screen.
Option “Inverted”: to regenerate the display screen
if there are any intense burn spots.
. To abort the procedure press the [MENU]key.
Call the main menue, by pressing the button [MENU],
and select you [INFO].
The screen indicates the internal temperature and the
technical information of the display. The contents of
this menu items cannot be changed.
ENGLISH
23ENGLISH
Page 52

Troubleshooting
Troubleshooting
The following table lists possible problems and methods for remedy.Please refer to this table prior to contactinga service representative.
f the troubleshooting information provided does not result in the fault being successfully resolved,
switch OFF the unit via the mains switch and remove the mains plug from the socket.
Never attempt to repair the unit y ourself and under no circumstances should you remove the
rear cover from the unit.
FAULTS POSSIBLE CAUSES POSSIBLE SOLUTION
No picture and no sound,
although the mains plug is
inserted and the unit is
switched on.
Screen is dark. D Contrast setting too low.
Weak or excessive
colours.
The picture is cut off or off
centre.
The picture is too large or
too small.
The remote control is not
working.
The displayed picture is
too dark.
The picture is displayed,
but there is no sound.
Individual letters are not
displayed (PC mode).
Horizontal stripes with TV
or video signals.
D Mainsswitchinposition”0”(OFF).
D Display’s mains plug is not inserted in
the socket.
D Defective mains cable.
D No input signal, wrong input selected.
D Colour not set correctly.
D Connection cable not correctly
inserted.
D Picture position not set correctly. D Correct the picture position.
D Picture format set wrongly.
D The batteries are flat.
D There is an obstruction between the
remote control and the sensor.
D The remote control is located
outside of its operating range.
D The picture quality is not set correctly D Correct the picture brightness and contrast
D Sound mute is switched on.
D Volume set to minimum.
D Loudspeakers not connected correctly.
D Signal source has been set up before
the display.
D Video cable screening is inadequate.
To restore all settings to their original status, select the option
<SET UP ⇒ RESET TO FACTORY DEFAULTS>!
D Set mains switch to position ”I”.
D Insert the mains cable plug into the socket.
D Call the service hotline.
D Adjust the brightness and/or contrast
correctly (see <PICTURE> menu).
D Check the connection cable; assign correct
input to source.
D Adjust the colour using the <PICTURE> me-
nu.
D Connect the cable correctly.
Use the auto setup function.
D Press F button repeatedly until the picture
is displayed as full screen.
D Insert new batteries.
D Remove the obstruction between the remote
control and the sensor.
D Use the remote control within the specified
range.
under the menu option <PICTURE>.
D Press the button on the remote control.
D Increase the volume.
D Connect the loudspeakers correctly.
D Set the phase position via the option
<INPUTS / PIP ⇒ MAIN INPUT SETTINGS ⇒ PHASE>.
D Check the picture width setting.
D Run <INPUTS / PIP ⇒ MAIN INPUT SET -
TINGS ⇒ AUTO SETUP>.
D Always place the signal sources at the side of
or behind the display.
D Use only a high-grade signal cable with a
high screening attenuation.
Temperature warning
24 ENGLISH
If the display is operated without sufficient ventilation, the internal temperature can rise
excessively. If the ambient or internal temperature rises above a certain value, first of all,
the warning window on the left-hand side of the display will appear.
As a result, the display may automatically switch to standby mode.
Make sure sufficient ventilation is provided!
Page 53

Technicalspecifiications
Technicalspecifiications
DISPLAY
Size / diagonal: 107 cm (42”), 16:9 format
Display area: 933 mm (horizontal) x 532 mm (vertical)
Resolution: 1024 x 768 pixels
Viewing angle: 160° typical
VIDEO STANDARDS
Video: PAL / SECAM / NTSC
TV tuner: PAL (BG,I,DK,M,L)/ SECAM (L/L’), 47 - 861 MHz (VHF, UHF , Hyperband)
PALplus, Cinescope: Automatic format detection (full screen)
Formats: 4:3, 16:9 (Top), 14:9 (Top), panorama, full screen, user zoom (40%-160%)
PC FREQUENCY RANGE
Horizontal frequency: 30 - 80 kHz
Vertical frequency: 50 - 90 Hz
Clockf requency: max. 140 MHz
Resolutions:
Recommended resolution:
Formats: 1:1, full screen, full format, zoom, user zoom (40%-160%)
INPUTS / CONNECTIONS / SYNCHRONIZATION
PC / Video input port: RGB analogue and automatic sync detection
Video connections TV tuner: IEC, 75 ohms input resistance
PC analogue/digital connection: DVI-I
Audio sockets Loudspeaker output
Synchronization: Sync on green, composite sync with automatic detection, Separate H and V sync
Operator control elements: Mains switch, IR remote control (OSD menu 10 languages), local operator control
OPERATING CONDITIONS
Temperature: +5 °C to +35 °C (in operation), -20 °C to +60 °C (storage)
Air humidity: 20 % to 85 % (non-condensating) @ 35 °C
Elevation: max. 2.000 m (7.000 ft)
DATA MAIN CONNECTIONS
Voltage supply:: 115 - 230 V ~
Mains frequency: 50 / 60 Hz
Power consumption: 300 W typical, 5 W in stand-by mode
DIMENSIONS AND WEIGHT
Display screen without table foot
H x W x D: (657 mm x 1041 mm x 104 mm) ± 2 mm
Display screen with table foot
H x W x D: (730 mm x 1041 mm x 240 mm) ± 2 mm
Weight plasma TV: 37.3 kg ± 10%
Weight table foot: 9.9 kg ± 10%
Weight total: 47.2 kg ± 10%
DOS: 640 x 480 @ 60 Hz, 720 x 400 @ 70 Hz,
VGA: 640 x 480, SVGA: 800 x 600; WVGA: 848 x 480 50 Hz - 90 Hz
XGA: 1024 x 768 50 Hz - 9 0 Hz
WXGA: 1280 x 768 @ 60 Hz
SXGA: 1280 x 1024 50 Hz - 7 5 Hz
UXGA: 1600 x 1200 50 - 60 Hz
1024 x 768 @ 60 Hz
SCART1: RGB, CVBS input, CVBS output
SCART2: CVBS input, CVBS output
CVBS: RCA cinch
Y/C: MiniDIN (HOSIDEN)
YUV (CVBS): 3 x RCA cinch
SPEAKERS OUT: 2 x 7 W sinusoidal @ 8 Ω
Stereo input: 3 x 2 RCA cinch L/R 1Vrms (YUV (CVBS), YC,
PC),
2 x SCART 1 Vrms
Stereo output: 2 x RCA cinch (LINE OUT L/R)
ENGLISH
25ENGLISH
Page 54

GERMANY
Revox GmbH, Am Krebsgraben 15, D-78048 VS-Villingen
Telefon +49 7721 8704 0, Fax +49 7721 8704 29
info@revox.de, www.revox.de
SCHWEIZ
Revox Schweiz AG, Althardstrasse 146, CH-8105 Regensdorf
Telefon +41 44 871 66 11, Fax +41 44 871 66 19
info@revox.ch, www.revox.ch
Zentralservice
Revox GmbH, Am Krebsgraben 15, D-78048 VS-Villingen
Telefon +49 7721 8704 43, Fax +49 7721 8704 49
info@revox.de
Copyright by REVOX GmbH, Germany.
 Loading...