

Page 1
Audio
Multiroom
Server
User Guide
1
Page 2
Warning: To avoid overheating do not position the Audio Multiroom
Server near heat sources, and ensure that the ventilation holes are
not blocked.
Warning: Do not remove the cover of the Audio Multiroom Server
due to the risk of electric shock. There are no user-serviceable parts
inside, and opening the case will invalidate your warranty.
Caution: This product contains a lithium battery. Danger of explosion
if battery is incorrectly replaced. Replace only with the same or
equivalent type recommended by REVOX. Dispose of batteries
according to the manufacturer’s instructions.
Disclaimer: This equipment must not be used for unauthorised
duplication of CDs or any other works protected by copyright. No
license to infringe copyright is granted by the sale of this equipment.
This guide was designed and produced by
Human-Computer Interface Ltd, www.interface.co.uk
Radio interference
FCC Warning: This equipment generates and can radiate radio
frequency energy and if not installed and used correctly in
accordance with our instructions may cause interference to radio
communications or radio and television reception. It has been typetested and complies with the limits set out in Subpart J, Part 15 of
FCC rules for a Class B computing device. These limits are intended
to provide reasonable protection against such interference in home
installations.
EU: This product has been designed and type-tested to comply with
the limits set out in EN55022:1998 CLASS B, EN55024:1998, FCC
RULES PART 15 SUBPART B CLASS B, EMC-AS/NZS3548:1995
(AMD 1+2), CLASS B.
REVOX GmbH
Am Krebsgraben 15
78048 VS-Villingen
Germany
Tel : +49 7721 8704-0
Fax : +49 7721 8704-29
Web : www.revox.de
E-mail : info@revox.de
2
Page 3
Contents
Audio Multiroom Server User Guide 1
Welcome to the Audio Multiroom Server 4
Requirements 5
Specifications 5
XiVA™ – new media brought to life 6
Using your Audio Multiroom Server 7
Audio Multiroom Server remote control 7
Front panel controls 8
Rear panel connections 8
Front panel display 9
Using your Audio Multiroom Server’s action keys 9
Using your Audio Multiroom Server’s menus 10
Recording music 11
Recording from a CD 11
Making a custom recording 13
Getting automatic track listings 15
Playing music 16
Playing music 16
Pausing and stopping 18
Skipping and seeking 18
Random and repeat playback 19
Choosing how to browse your library 19
Selecting items directly using the remote control 22
Selecting an album by number 22
Organising your music collection 23
Using playlists 23
Changing a playlist 25
Entering and editing names 25
Deleting albums, tracks, or playlists 27
Advanced Settings 28
Settings menu 28
Internet Account 28
Recording Quality 29
System Information 29
System Settings 29
Using the Audio Multiroom Server in a
Multiroom System 30
Setting the output controlled by the front panel 30
Communication Settings 31
Stand-alone installation of the
Audio Multiroom Server 31
Multiroom Installation Examples 32
REVOX RC28 Control 33
Other Multiroom control systems 34
Getting help 35
Index 36
Copyright and acknowledgements 40
3
Page 4
Welcome to
the Audio
Multiroom
Server
…the revolutionary way of filling your home with music.
Your Audio Multiroom Server stores and catalogues
your entire music collection, allowing you to select and
play any album or track at the press of a button. You can
listen to different pieces of music in several rooms at
the same time, controlling your Audio Multiroom
Server from each room via the remote control or a
multiroom controller. Your Audio Multiroom Server also
lets you organise your music collection, create
selections for different occasions, and use the Internet
to gather CD track listings automatically.
The heart of a multiroom system
Your Audio Multiroom Server can supply music to
multiple rooms simultaneously with complete
independent control from each room without affecting
the music supplied to other rooms. Your Audio Multiroom
Server can be controlled via a simple infra-red interface.
Alternatively, infrared control is also possible using a
special REVOX Palm™ based remote control. An RS232
control port is also available for use with multiroom
control systems.
Incredible capacity, with room for expansion
Your Audio Multiroom Server is a multi-output hard disk
based audio system which can store thousands of hours
of compressed audio, depending on the size of internal
hard disk fitted. As larger disk drives become available
your Audio Multiroom Server can be upgraded to virtually
any conceivable capacity.
Internet access for track listings
Your Audio Multiroom Server records the CDs from your
music collection at faster than real time. It then
automatically connects to a dedicated Internet CD
database via the built-in modem or Ethernet connection.
This database provides album and track details for a wide
range of CDs. This information can be downloaded and
stored with each CD you record, allowing you to select
any item in your music collection by album name, artist
4
Page 5

name, track name, or genre, giving you total flexibility in
the way you access and control your music collection.
Create your own playlists
Your Audio Multiroom Server allows you to compile
personal playlists and then automatically play tracks from
the playlist you have selected. Playlists let you customise
your Audio Multiroom Server for each member of your
family, or for matching the music to the occasion or
mood.
Instant access, irrespective of your music collection
Whether you select a track by title, album, artist, or
genre, your Audio Multiroom Server locates it instantly
and plays it at the press of a key. All this is achieved with
an extremely simple and intuitive user interface,
operated using a few keys on the front panel or remote
control.
Requirements
Your Audio Multiroom Server can be used in conjunction
with any music system that provides a line-level phono
stereo input. Your Audio Multiroom Server can optionally
be supplied with a digital output, so it can be used with a
sound system that provides a digital coaxial (electrical)
input.
Specifications
Front Panel
• Slot-loading CD drive
• Standby, play, pause, stop, record, skip track,
up/down, 4 function keys, eject
• Alphanumeric 4 x 20 backlit LCD display
• Metal enclosure
Rear Panel
• RS232 Serial Port, 9-pin D-connector (male)
• Ethernet RJ45 connection (10 BaseT/100BaseT)
• IEC mains power connector
• 56kb/s internal modem
• 2 x USB connections
• P/S2 connection
Formats supported
• Uncompressed audio: 44.1kHz, 16-bit stereo
• Compressed audio: MP3 (MPEG1 Layer 3)
• Upgradeable compression formats
• Up to 24-bit, 96kHz record/playback capability
Content loading and recording
• Whole CD recording (Red Book and Blue Book)
• Selected CD track recording
• Faster than real-time recording
• Automatic CD track listing using Internet CD
database
5
Page 6

Multiroom controller compatibility
The Audio Multiroom Server is fully compatible with
most leading multiroom controllers. Contact REVOX for
further details.
Key Functions
• Play, pause, stop, skip between tracks
• Play by artist, album, genre, track, or playlist
• Random and repeat playback
• User programmable playlists
• Browse music database by artist, album, track title,
playlist, or genre
• Add/edit album, track, and playlist title
General specifications
• W x D X H: 430mm x 374mm x 166mm
(16.9” x 14.7” x 6.5”)
• Maximum operating temperature 35˚C
• 100-127V; 6A; 60Hz / 200-240V; 3.5A; 50Hz
• Approval to FCC, CSA, BABT, and CE
XiVA™ – new media brought to life
XiVA™ is a highly portable software framework that
powers next-generation media appliances. XiVA blends
hard disk technology, advanced software design, and
embedded Internet technology to provide amazing
features. Audio, video, text, graphics, and all forms of
streaming new media are all brought to life through a
wealth of interactive user interface options. Powerful
personalised software accesses on-line content like
never before. The next generation media appliance is
powered by XiVA.
6
Page 7
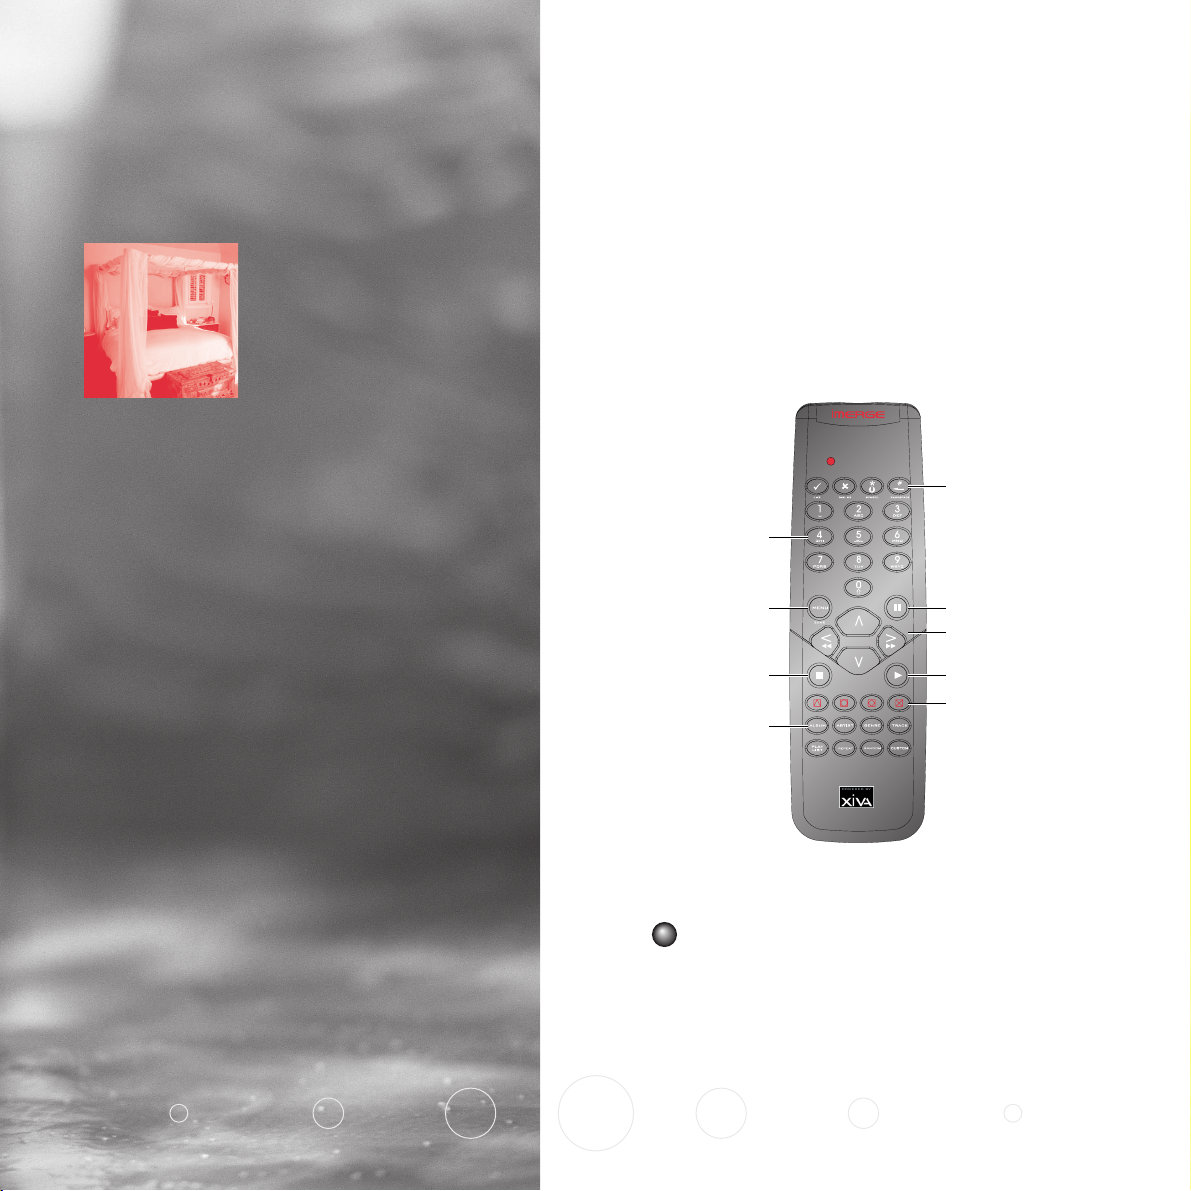
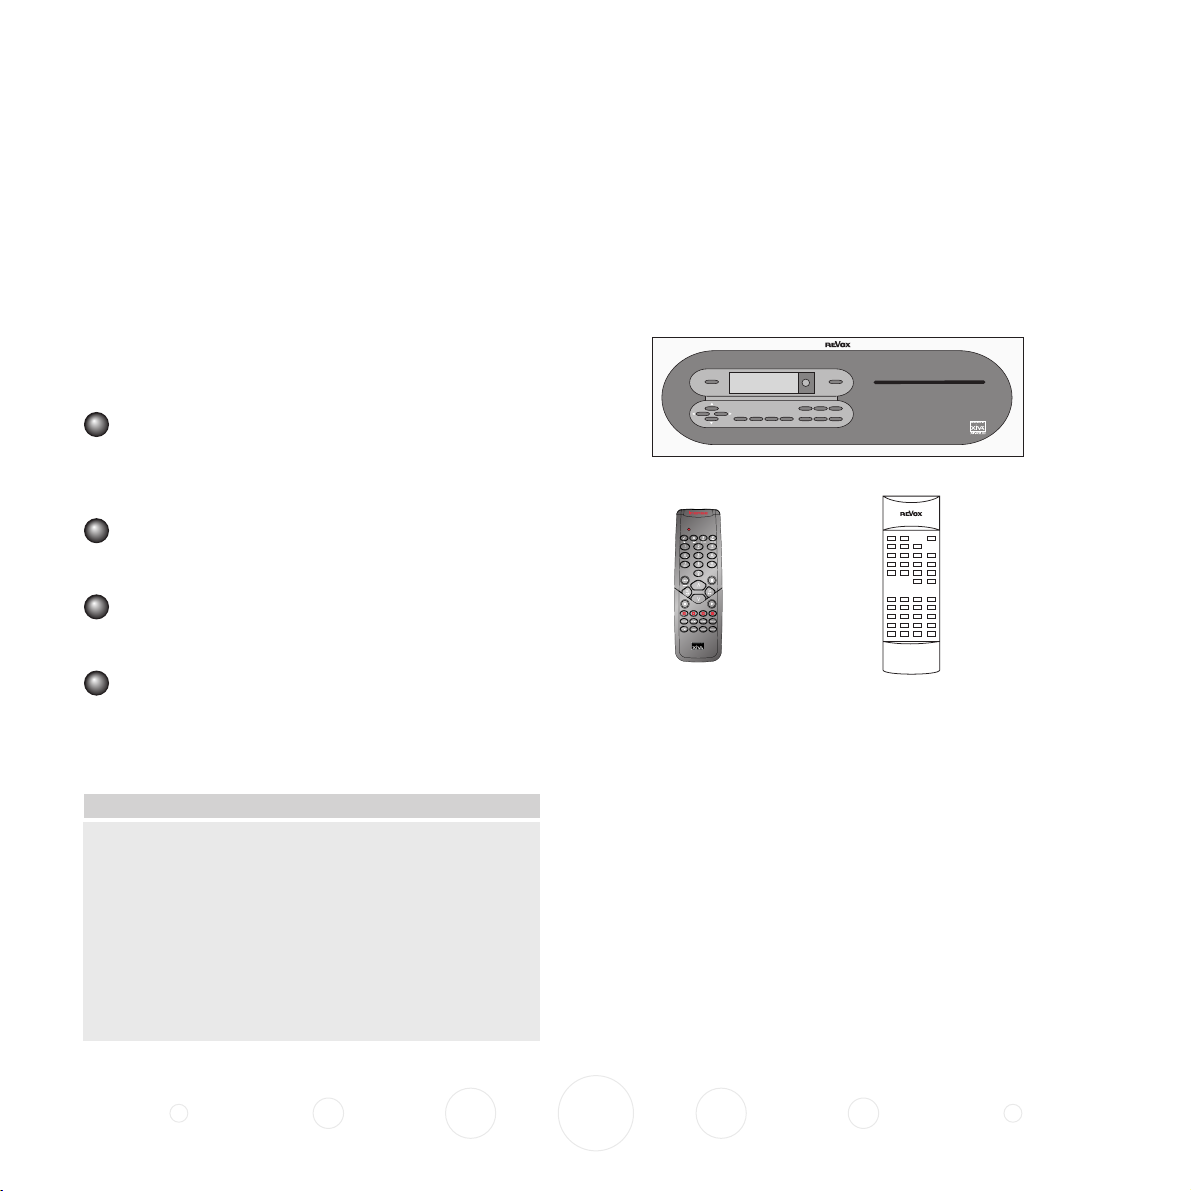
Audio Multiroom Server remote control
The following diagram explains the function of the keys
on your Audio Multiroom Server remote control:
Using your
Audio
Multiroom
Server
This chapter gives a general introduction to using your
Audio Multiroom Server, with an explanation of the
functions of each of the front panel controls, and the
information displayed on the front panel display. It also
explains how to use your Audio Multiroom Server
remote control.
Alphanumeric keys
For selecting by name or
number, or entering titles
MENU
Displays the main menu
Stop key
Category keys
Specify how you
search or browse
for music
Insert the four AAA batteries provided into the back
of the remote control.
SYMBOL and BACKSPACE
For entering titles
Pause key
Navigation keys
For browsing menus
Play key
Action keys
These four keys
correspond to the
different actions shown
on the front panel display
7
Page 8
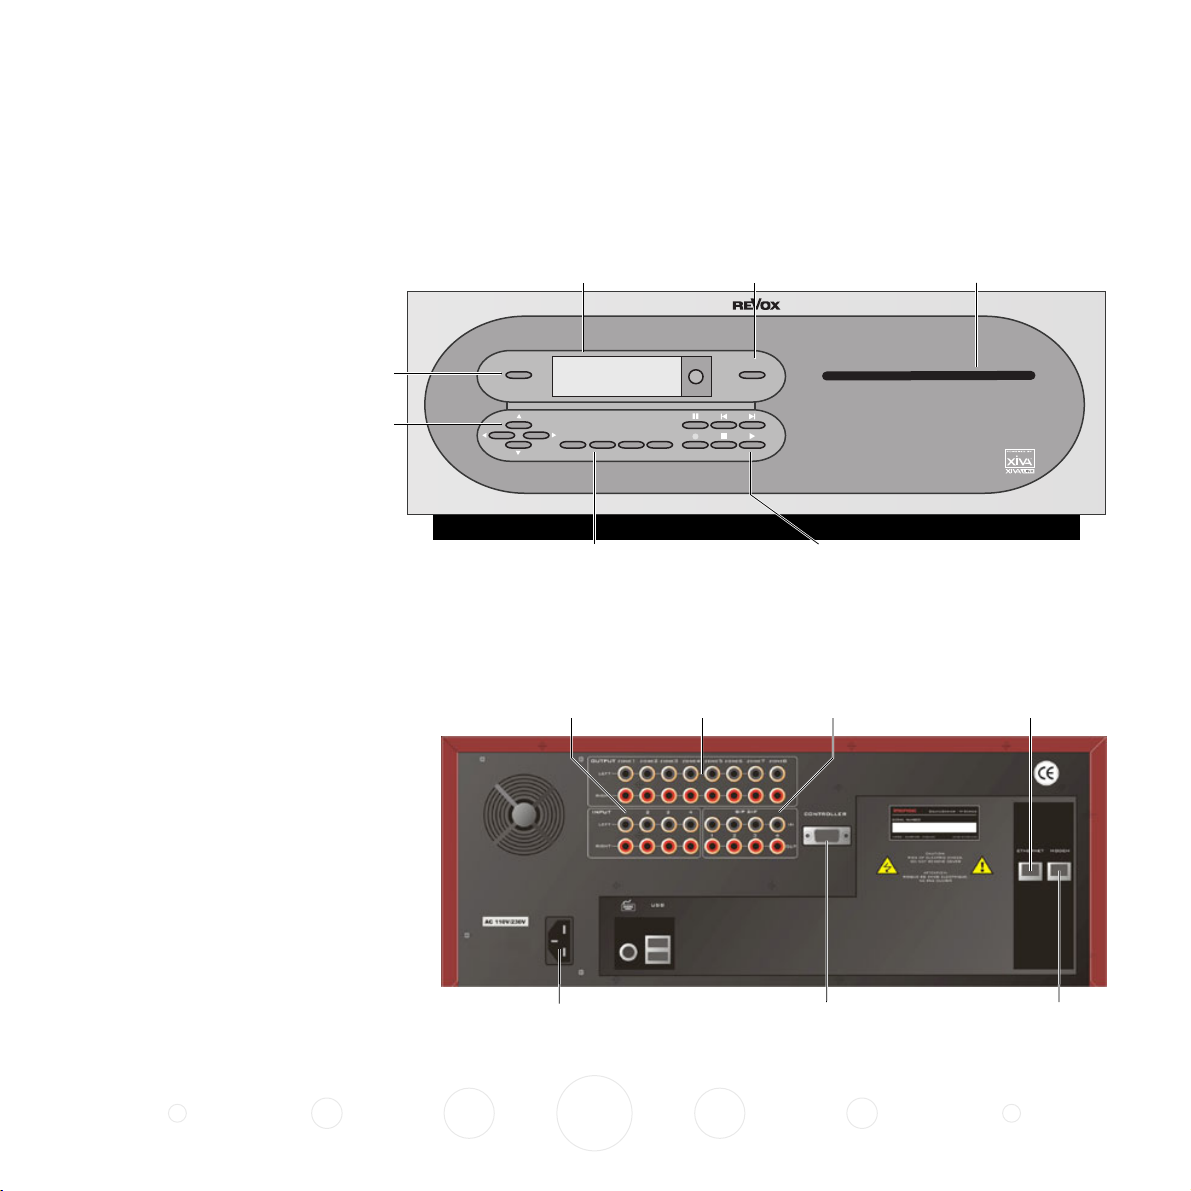
Front panel controls
The following
diagram explains
the function of
your Audio
Multiroom
Server’s front
panel controls:
Switches on or off
Navigation keys
For browsing menus
STANDBY
Display
Displays Information
Main Menu
Standby Eject
>Play Music
Select
EJECT
Ejects the CD
CD slot loader
Allows you to insert a CD
Rear panel connections
The following diagram explains the
function of the Audio Multiroom
Server’s rear panel connections:
Note that these may vary depending on
the configuration of your version of
Audio Multiroom Server.
These four keys correspond to the different
actions shown on the front panel display.
Action keys
Input
Audio
line input
Power input
Connects to
mains power
Outputs
Audio output
for each zone
8
Playback controls
Control playback in the main room
Digital connections
Digital inputs
and outputs
RS232 port
Connects to a multiroom
controller or infra-red eye
Ethernet
Connects to an
Ethernet network
Modem
Connects to a
telephone line
Page 9
Front panel display
Select Album
◊ ’Delerium
√ Santessa
Back Info Open Play
07
The following diagram shows the key features of a
typical Audio Multiroom Server front panel display:
21
Select Album 07
3
◊ ’Delerium
√ Santessa
4
Back Info Open Play
5
1. Indicates the title of the current screen.
2. Title of the current selection.
3. Indicates that you can use the a or v keys to
browse up and down the current menu list.
4. Indicates that you can press the } key to look
inside the currently selected item, such as to show
the tracks in an album, or the albums by an artist or
in a genre.
Using your Audio Multiroom Server’s
action keys
Your Audio Multiroom Server’s functions are accessed
using the four action keys below the display on the front
panel. These keys are also provided on your Audio
Multiroom Server remote control.
The function of these keys changes depending on which
menu you are currently viewing. The available actions are
as shown on the bottom line of the front panel display.
For example, in the following menu the functions Back,
Info, Open, and Play are available from the
corresponding keys:
5. Action keys available from the current menu for
selection or navigation.
9
Page 10
Using your Audio Multiroom Server’s
menus
To display the Main Menu
Press the MENU button on your Audio Multiroom
Server remote control.
You may wish to exit from the current menu first by
pressing the action key labelled Back or Cancel.
The Main Menu will be displayed on the front panel
display:
Main Menu
◊ ’Play Music
√
Select
The options are as follows:
Option Description
Play Music Allows you to select the music you want to play
by album, artist, genre, or playlist.
Record Music Allows you to record music from a CD and add
it to the library.
Edit Music Library Allows you to edit album, artist, and playlist
information, or delete albums, tracks, or
playlists.
Select Output Shows which output of the Audio Multiroom
Server you are currently controlling and allows
you to change it.
Settings Allows you to configure your Audio Multiroom
Server settings, including default record quality.
Connect Now Allows you to go on-line to download the CD
information for all the CDs you have recorded.
To select an option from the main menu
Press the a or v key on the front panel or Audio
Multiroom Server remote control to step between
the Main Menu options.
The current option is shown highlighted.
Press the } key or the Select action key to select
the current option.
More information about each of these functions is given
in the following chapters.
10
Page 11
Recording from a CD
Insert a CD gently into the CD slot on the front
panel, and push it until it slides into the slot.
The following prompt is displayed:
Record CD Now?
Recording
music
Your Audio Multiroom Server allows you to record
music from CDs and add it to your music library. It also
has a built-in modem which allows it to connect to the
Internet via a standard telephone line. If you provide
this connection your Audio Multiroom Server
automatically checks the Internet CD database when
you record a CD, and downloads the album title, track
titles, artist name, and genre for the CD. If you do not
provide an Internet connection you can label the CDs
you record manually.
Cancel Continue
Press the Continue action key to proceed.
Alternatively, if the CD is already in the drive:
Press the • REC key on the front panel.
The following display then allows you to choose whether
to do an auto (one-touch) recording of the entire CD at a
preset quality, or a custom recording which allows you to
select the tracks you want to record and the recording
quality:
Do auto or
custom record?
Cancel Custom Auto
To make an auto (one-touch) recording
Press the Auto action key.
11
Page 12
An Auto recording will automatically look up the track
and artist information on an Internet CD database, and
then record all the tracks on the album.
As your Audio Multiroom Server connects to the Internet
to retrieve the CD text you will see the following display:
Accessing
Gracenote CDDB
for CD information
Cancel Hide
You can cancel the recording at any time by pressing the
Stop action key.
Listening to music while recording a CD
You can play music from your music library while you are
recording a CD. Press the > key on the front panel or
Audio Multiroom Server remote control to return to
displaying information about the track you are playing.
An additional indicator shows that you are making a
recording:
The following screen confirms when the CD text has
been found:
CD text search done
1 CDs found
0 CDs failed
OK
Press the OK action key to continue.
The following display shows the approximate progress of
the recording:
Recording •
CD: Album 35
Remaining: 11 mins
Stop Menu
Playing • ˘
Bohemian Rhapsody
[1] 00:43
Browse Disp Menu
To see information on the progress of your recording.
Press the • REC key on the front panel, or select
Record Music from the main menu, to return to
the Recording display.
The following display confirms when the recording is
finished:
Rec Finished
CD: Album 35
13 tracks recorded
OK
12
Page 13
Making a custom recording
The Custom recording option lets you choose which
tracks to record, the sound quality, and allows you to
enter album information.
To make a custom recording
Choose Custom from the Do auto or custom
record? screen.
When you have specified which tracks you want to
record:
Press the Cont action key.
Sound quality
The Sound Quality menu then allows you to specify the
recording quality:
A series of front panel displays lets you specify each of
the record options.
Tr a c ks
The following display allows you to specify which tracks
you want to record:
Select CD Tracks
◊¿1. Track 1
√
Back ¿ None Cont
Initially all tracks are selected, as indicated by a ¿ in
front of the track number.
Press the ✓ action key to unselect or select the
currently displayed track.
Press the a or v keys to step between tracks.
Press the None/All action key to unselect or select
all the tracks respectively.
Select Rec Quality
◊ High (MP3 160K)
√ 154 hours free
Back Continue
Use the a or v keys to choose between
Maximum (Uncompressed) (CD quality) or one of
the MP3 compression options.
Note: The higher quality options use more space on your
Audio Multiroom Server hard disk, so you will not be
able to record as many CDs.
In each case the display shows the total remaining
recording time available at the specified recording
quality.
Press the Continue action key.
13
Page 14

Album Name, Artist Name, Genre, and Tracks
The following menu then allows you to choose how to
enter the CD information:
Enter CD Information
◊ Automatically now
√
Back Record
Press the a or v keys to select between
Automatically now, Manually now, or Enter
later.
Press the Record action key to choose the option
you have selected.
Edit the name using the alphanumeric keys on your
Audio Multiroom Server remote control, or press
the Grid action key and select letters using the
cursor keys.
For more information about entering and editing names
Entering and editing names
see
After entering the album name and artist name, you will
be prompted to select a genre:
Select CD Genre
◊ Unknown
√
Back Continue
, page 25.
If you select Enter later you can download the CD
information for all the CDs you have recorded by
choosing Connect Now from the Main Menu at a later
time.
If you selected Manually now a series of menus
prompts you to enter the album name, artist name, and
track titles:
Enter Album Name
Album 35
Back aA Grid Cont
Select a genre using the a and v keys.
Press the Continue action key.
You will finally be prompted to enter the track titles.
Edit each track title in the usual way, and press the
Cont action key.
Press the Record action key to start recording.
14
Page 15

Getting automatic track listings
If you have set up your Audio Multiroom Server with an
Internet connection it can automatically connect to the
Internet CD database and download the title of the
album, the name of the artist, a list of the track titles,
and a genre for the album.
CD text support
If the CD supports CD-text the album will be identified
by the text on the CD itself.
If you do not have an Internet connection, or the CD is
not listed in the database, it will be given names such as
Album 35, Artist 21, and Track 1, Track 2, etc. and it will
be classified in genre Unclassifiable. If you wish you
can then manually title the album, artist, and tracks from
your Audio Multiroom Server menus; for more
information see
Entering and editing names
, page 25.
15
Page 16

Playing
music
This chapter explains how to play music from the
collection stored on your Audio Multiroom Server. It
also explains how to search for a track in a number of
alternative ways.
Playing music
Display the Main Menu by pressing the MENU key
on your Audio Multiroom Server remote control.
If necessary press the a or v keys to highlight
Play Music:
Main Menu
◊ ’Play Music
√
Select
Press the } key, or the Select action key.
The Play Music Menu will be displayed. This lets you
choose how you want to browse your music collection:
Play Music Menu
◊ ’Albums
√
Back Select
You can browse items by album, artist, genre, or playlist.
16
Press the a and v keys to step between categories.
Press the } key, or the Select action key, to display
the contents of the selected category.
Alternatively, you can display the contents of a category
directly from the Main Menu, or any of the Play Music
menus, by pressing the ALBUM, ARTIST, GENRE, or
Page 17

PLAYLIST key on your Audio Multiroom Server remote
control.
While tracks are playing the front panel display shows
information about the current track:
For example, if you select Albums the display will show
the first album:
Select Album 024
◊ ’Abbey Road
√ The Beatles
Back Info Open Play
Albums are displayed in alphabetical order.
For more information about browsing your music
collection see
19.
To play a whole album
Press the a and v keys to step between albums.
Press the > key, or the Play action key, to play the
currently selected album.
To play an individual track
Press the } key, or the Open action key to open
the currently selected album and display the tracks
it contains.
Press the a and v keys to step between tracks.
Press the > key, or the Play action key, to play the
currently selected track.
Choosing how to browse your library
, page
Playing ˘
Sometimes
[2] 00:35
Browse Disp Menu
To change the displayed information
You can choose what information is displayed on the
front panel display.
Press the Disp action key to step between the
following four options:
Track name, track number, and elapsed time for the
current track:
Playing ˘
Sometimes
[2] 00:35
Browse Disp Menu
Track name, track number, and time remaining for the
current track:
Playing ˘
Sometimes
[2] -05:15
Browse Disp Menu
17
Page 18

Album name and track name:
Playing ˘
Delerium
Sometimes
Browse Disp Menu
Artist name and track name:
To s top play
Press the * key on the front panel or your Audio
Multiroom Server remote control.
Skipping and seeking
While the Playing menu is displayed you can skip
between tracks in the current album, or seek backwards
or forwards within a track.
Playing ˘
Santessa
Sometimes
Browse Disp Menu
Pausing and stopping
To pause play
Press the = key on the front panel or your Audio
Multiroom Server remote control.
The front panel display shows:
Play paused Æ
Sometimes
[2] 00:11
Browse Disp Menu
To resume play
Press the = key again or the > key on the front
panel or your Audio Multiroom Server remote
control.
To skip to the next or previous track
Press the { or } key on the front panel or your
Audio Multiroom Server remote control.
The front panel display shows the number of each track
as you skip between them.
To seek within a track
Hold down the { or } key on the front panel or
your Audio Multiroom Server remote control.
The front panel displays Seeking, and play resumes
from the new position when you release the key.
18
Page 19

Random and repeat playback
Your Audio Multiroom Server lets you play albums,
artists, genres, or tracks within an album, in random
order to add variety to your music. You can also play a
selection repeatedly.
To randomise the current selection
Press the RANDOM key on your Audio Multiroom
Server remote control.
Choosing how to browse your library
You can browse items by album, artist, genre, or playlist.
When you are browsing by category you can display the
entire contents of that category.
To browse through the library by album
Either:
Press the ALBUM key on your Audio Multiroom
Server remote control.
The front panel display shows a random symbol:
Playing ¢ ˘
Sometimes
[2] 00:14
Browse Disp Menu
To repeat the current selection
Press the REPEAT key on your Audio Multiroom
Server remote control.
The front panel display shows a repeat symbol:
Playing ™˘
Sometimes
[2] 00:15
Browse Disp Menu
To cancel the random or repeat play
Press the RANDOM or REPEAT key again.
Or:
Select Albums from the Play Music Menu.
The front panel display shows the first album:
Select Album 05
◊ ’Delerium
√ Santessa
Back Info Open Play
Press the a or v keys to step between albums.
Press the > key, or the Play action key, to play the
currently selected album.
19
Page 20

To display the tracks in an album
Press the } key to open the album and display the
tracks it contains:
Select Track
◊ 1. Phased
√
Back Info Play
The front panel display shows the first artist:
Select Artist
◊ ’Macy Gray
√
Back Open Play
Artists are displayed in alphabetical order.
Press the a or v keys to step between tracks, or
press a key on the alphanumeric keypad to jump to
that track number.
Press the > key, or the Play action key, to play the
currently selected track.
Press the { key to return to browsing by album.
To browse through the library by artist
Either:
Press the ARTIST key on your Audio Multiroom
Server remote control.
Or:
Select Artists from the Play Music Menu.
Press the a or v keys to step between artists, or
press the appropriate letter on your remote control
to jump directly to that position in the list.
Press the > key, or the Play action key, to play all
the albums by the currently selected artist.
Alternatively, to find a particular album:
Press the } key to display the first album by the
currently selected artist, and browse through their
albums.
Press the } key again if you want to view the
tracks within any album.
20
Page 21

To browse through the library by genre
Either:
Press the GENRE key on your Audio Multiroom
Server remote control.
Or:
Select Genres from the Play Music Menu.
The front panel display shows the first genre:
To browse through your playlists
Playlists allow you to create your own selections of
tracks and save them with a name of your choice, such
as Party Music. For more information about creating a
playlist see
To create a new playlist
, page 23.
Either:
Press the PLAYLIST key on your Audio Multiroom
Server remote control.
Select Genre
◊ ’Blues
√
Back Open Play
Press the a or v keys to step between genres.
Albums are classified into a series of genres, such as
blues, classical, folk, jazz, and rock.
Press the > key, or the Play action key, to play all
the albums in the currently selected genre.
Press the } key to display the first album in the
currently selected genre, and browse through the
albums.
Press the } key again to view the tracks within any
album.
21
Or:
Select Playlists from the Play Music Menu.
The front panel display shows the first playlist:
Select Playlist
◊ ’Party Music
√
Back New Open Play
If you have not yet created any playlists the list will be
empty; see
information about creating a playlist.
To create a new playlist
Press the a or v keys to step between playlists.
Press the > key, or the Play action key, to play the
currently selected playlist.
Press the } key to display the tracks within any
playlist.
, page 23, for
Page 22

Selecting items directly using the
remote control
You can select an album, artist, genre, or playlist directly
by name, or a track by number, from any of the Play
Music menus, using the alphanumeric keypad on your
Audio Multiroom Server remote control.
To select an album, artist, genre, or playlist by name
Display the Play Music Menu for the type of item
you want to find.
Press the key on the alphanumeric keypad
corresponding to the first letter of the item you
want to select.
For example, to find the artist
ARTIST key to display the Select Artist menu, then
press the 7 key four times because S is the fourth letter
on the 7 key.
Santessa
press the
Selecting an album by number
Each album you have recorded in your Audio Multiroom
Server music library is allocated a sequence number,
from zero upwards. The album number is displayed in
the top right corner of the Select Album menu. If you
know the number of the album you want to listen to you
can select it directly by number using the number keys
on your Audio Multiroom Server remote control.
To select an album by number
Display the Albums menu.
Press the 0 key on your Audio Multiroom Server
remote control, followed by the number of the
album.
For example, to select album 27 press ALBUM, 0, 2, 7.
The front panel display shows:
If there are several items beginning with the letter you
specified press the v key to step through until you find
the one you are looking for.
To select a track by number
Display the list of tracks in the album or playlist.
Press the key on the alphanumeric keypad
corresponding to the track number you want to
select.
Select Item Number:
027_
Cancel Grid OK
Press the OK action key to select the album you
have specified.
22
Page 23

Organising
Using playlists
Your Audio Multiroom Server allows you to create your
own selections of tracks, called playlists, and identify
them with a name of your choice. For example, you
could select your favourite party tracks from a number of
different albums and include them in a playlist called
Party Music. You can then play your selection simply by
choosing the appropriate playlist from the Select Playlist
menu just as you would an album.
your music
collection
This chapter describes the features built into your
Audio Multiroom Server to help you organise the
music in your music library, including information about
creating playlists of your favourite tracks, deleting
albums or tracks you no longer want to store, and
naming albums, tracks, and artists.
To create a new playlist
Press the a or v key to display the Edit Music
Library option on the Main Menu.
Press the Select action key to display the Edit
Music Menu:
Edit Music Menu
◊ ’Albums
√
Back Select
Press the v key to highlight Playlists and press
the Select action key to select it.
23
Page 24

The existing playlists will be displayed:
Edit Playlist
◊ No Playlists! Us…
√
Back New
Initially there are no playlists and you are prompted to
create one.
Press the New action key to create a new playlist.
The following menu then allows you to enter a name for
the playlist:
To select items for a playlist
You will then be prompted to select the items that you
want to include in the playlist:
Playlist Contents
◊ (press Add… …
√
Back Add…
Press the Add… action key.
The Add Music Menu then lets you browse through the
music library to select the first item you want to add to
the playlist.
Enter Playlist Name:
Cancel aA Grid OK
Enter a name for the playlist using the
alphanumeric keys on your Audio Multiroom Server
remote control, or press the Grid action key, and
select letters using the cursor keys.
For more information about entering names see
and editing names
Press the OK action key to confirm the name you
have entered.
, page 25.
Entering
24
You can add whole albums, complete genres, all the
albums by a selected artist, another playlist, or individual
tracks. For more information refer to
page 16.
When you have located the album, genre, artist, playlist,
or track you want to add:
Press the Add… action key to add it to the playlist:
Track added
to playlist
OK
Playing music
,
Page 25

Press the OK action key to continue.
When you have finished compiling the playlist:
Press the Back action key until the Playlist
Contents menu is displayed.
The tracks you have added will be shown in the playlist:
Playlist Contents
◊ 1. The Time is Now
√
Back Add… Edit
Note: If you do not add any tracks to your playlist it will
be ignored.
Changing a playlist
You can change a playlist at any stage by adding items,
deleting tracks, or changing the position of the tracks in
the playlist.
To add items to a playlist
Select the playlist you want to change from the
Playlists menu and press }, or the Open action
key, to select it.
Press the Add… action key to add new tracks, and
locate the item you want to add by browsing
through the music library.
To remove a track from a playlist, or change the
position of a track in a playlist
Open the playlist as previously described.
Press the a or v keys to highlight the track you
want to change.
Press the Edit action key to display the Edit
Playlist Track menu:
Edit Playlist Track
◊ Remove Track
√
Back Select
Select Remove Tr a c k to remove the track from the
playlist, or Move Track, to change its position by
moving it to a new position in the list with the a or
v keys.
Entering and editing names
Your Audio Multiroom Server labels the albums, artists,
tracks, and playlists in your music library with names
which identify the track you are listening to, and these
help you locate items when you are browsing through
the library.
If you have an Internet connection, your Audio Multiroom
Server reads the labels automatically from the Internet
CD database. Alternatively you can enter the names
25
Page 26
manually, using the front panel or your Audio Multiroom
Server remote control. You can also edit the names at
any stage to suit your own preferences.
To select what you want to edit
Select Edit Music Library from the Main Menu.
Select Edit Title, Edit Artist, Edit Genre, or Edit
Tr a c ks and press the Edit action key.
To edit a name
Edit Album name:
hatever
The Edit Music Menu lets you choose whether to edit
albums or playlists:
Edit Music Menu
◊ ’Albums
√
Back Select
Select Albums to edit an album title, artist, genre,
track, or Playlists to edit a playlist.
To edit album information
Select Albums from the Edit Music Menu.
Select the album you want to edit and press the
Edit action key.
The following menu lets you choose which information
to edit:
Select Item to Edit
◊ Edit Title
√
Back Edit
Cancel aA Grid OK
Press the } or { keys to select a character
position.
Use the alphanumeric keypad on your Audio
Multiroom Server remote control to enter a letter.
For example, to enter S press the 7 key four times,
because S is the fourth letter on the 7 key.
Press the BACKSPACE key on your Audio
Multiroom Server remote control to delete letters.
Press the aA action key to switch between upper-
case and lower-case letters.
26
Page 27
To select letters from a grid
Alternatively, the Grid option provides a convenient way
of entering text from the front panel:
Deleting albums, tracks, or playlists
You can delete albums, tracks or playlists you no longer
want from your Audio Multiroom Server library.
Press the Grid action key to display the grid:
hatever
˘
<->a b c d e f g h
√ i j k l m n o p q
aA Sel OK
Use the cursor keys to move around the grid.
Use the action keys as follows:
KeyAction
aA Switches between upper and lower case.
Sel Selects a letter.
OK Exits from the grid.
Finally, when you have finished entering the name:
Press the OK action key to confirm the name you
have entered.
Select the album, track, or playlist you want to
delete:
Edit Track
◊ 4. The Outsider
√
Back Delete Edit
Press the Delete action key to delete it.
The following warning is displayed:
Delete Track?
The Outsider
Cancel Delete
If you are sure you want to delete the item press
the Delete action key.
Note: If you delete tracks from an album the Internet CD
database information is retained, so you can re-record
the tracks at a later date without needing to do another
CD lookup.
27
Page 28

Settings menu
To display the Settings Menu
Press the a or v key to highlight the Settings
option on the Main Menu.
Press the Select action key to display the Settings
Menu:
Advanced
Settings
This chapter describes the advanced settings that you
can access from your Audio Multiroom Server’s
Settings Menu. These settings are set up for you by
your installer, and you should not normally need to
alter them unless you want to change the configuration
of your Audio Multiroom Server.
Settings Menu
◊ ’Internet Account
√
Back Select
The following sections describe each of the options on
the Settings Menu.
Internet Account
Displays your Internet account details and allows you to
edit them:
Internet Account
◊ ’Username
√ (********)
Back Edit
Username allows you to change (but not view) the user
name.
Password allows you to change (but not view) the
password.
28
Page 29
Dialup number allows you to edit the Internet account
telephone number.
Recording Quality
Allows you to specify the recording quality used when
you record music using the Auto record option:
Select Rec Quality
◊ High (MP3 160K)
√ 153 hours free
Cancel Select
System Settings
Provides a series of menus to allow you to change your
Audio Multiroom Server’s configuration:
System Settings
◊ ’Network mode
√ (Ethernet)
Back Edit
The following table summarises the settings available on
each of the System Settings menus:
For each quality setting the screen shows the number of
hours of recording time available at that setting.
System Information
Shows the serial number, production date, and software
version number of your Audio Multiroom Server. You may
need to quote these if you contact REVOX for technical
support.
Menu Settings
Network Mode Specifies whether your Audio Multiroom
Server connects to the Internet via Ethernet,
or using the built-in modem.
Modem Settings Allows you to configure the number of
retries, the Assigned IP Address and the
Server IP Address used when connecting by
modem.
Ethernet Settings Allows you to specify the following settings
used when connecting via Ethernet: Mode,
IP Address, IP Mask, Gateway, IP DNS1, IP
DNS2, Assigned IP Address, and Assigned IP
Mask.
Controller Settings Specifies the controller port configuration
(XiVALink, REVOXLink or Infra-red), the
XiVALink settings, REVOXLink settings and
the infra-red settings.
Remote Select this option if instructed to set up your
Diagnostics modem to receive incoming calls from
REVOX technical support.
29
Page 30
Using the
The instructions in this chapter explain how to operate
your Audio Multiroom Server from a remote room with
no visible feedback. A number of possible configurations
are shown to illustrate how the Audio Multiroom Server
can be integrated into a REVOX multiroom audio system.
Setting the output controlled by the
front panel
You can select which output is controlled by the front
panel as follows:
Audio
Multiroom
Server in a
Multiroom
System
Your Audio Multiroom Server can provide music to
several rooms simultaneously, and allows you to select
tracks by album, artist, genre or playlist in each room
independently, using your Audio Multiroom Server
remote control.
Press the a or v keys to display the Select
Output option on the Main Menu.
Press the Select action key to display the Select
Output menu:
Select Output
◊ ’Output 1
√
Back Select
Press the a or v to display the correct output.
Press the Select key to select it.
30
Page 31
Communication Settings
Your Audio Multiroom Server has a number of
configuration options which allow you to change how the
system operates in a multiroom environment. These
settings can be accessed as follows:
From the Main Menu use the a or v keys to
display the Settings option. Press the Select
action key.
Stand-alone installation of the Audio
Multiroom Server
Main Menu
Standby
>Play Music
Select
=[]
•
M57 - AUDIO MULTIROOM SERVER
Eject
*>
Use the a or v keys to display the System
Settings option. Press the Select action key.
Press the a or v keys to display the Controller
Settings option. Press the Select action key.
Press the a or v keys to display REVOXLink
Settings option. Press the Select action key.
The options available are as follows:
Option Function
AUX Mode Enables/disables control of the Audio
Multiroom Server o/p 4 via the AUX device
through the V219 amplifier.
Exception Amp Enables/disables control of the Audio
Multiroom AUX Mode Server o/p4 via the AUX
device through the Exception amplifier.
Forward RC5 Enables/disables control of the Audio
commands Multiroom Server via front panel using REVOX
RC28 remote control.
tuner
power
CD
tape
phono
TV
spkr
aux
local
A
B
RC28 remoteAudio
bass treb
-
-
+
+
+
bal
-20dB
flat
-
vol
Multiroom
Server
remote
+
play
stop
<
>
pause
shuffle
<<
>>
prog
1
2
3
display
4
5
6
7
8
9
0
When the Audio Multiroom Server is installed in a stand-
alone configuration the Audio Multiroom Server remote
control can be used to navigate the menu system as
normal. If you have other REVOX AV equipment in the
room and wish to use the RC28 remote to control the
Audio Multiroom Server you must first enable the
Forward RC5 commands option in the REVOXLink
settings (shown above). The Audio Multiroom Server
controls are found on the AUX setting of the RC28
remote control.
31
Page 32

Multiroom Installation Examples
The diagrams below show how the Audio Multiroom
Server can be installed as part of a multiroom audio
system alongside a REVOX Exception E450 amplifier and
the V219 room amplifier. Depending on the number of
rooms you have available the installation can be
configured in two different ways:
Audio Multiroom Server installation example 1
o/p 1
Main Menu
Standby Eject
>Play Music
Select
M57 - AUDIO MULTIROOM SERVER
o/p 2
o/p 3
o/p 4
• Audio Multiroom Server installed in main room
alongside REVOX Exception E450 amplifier. Up to 3
remote rooms using REVOX V219 room amplifier.
• Audio Multiroom Server installed to supply up to 4
rooms with audio using REVOX V219 room
amplifier. Exception E450 amplifier is used for other
AV equipment.
communications cable
tuner
power
CD
tape
phono
TV
spkr
aux
local
A
B
-
-
bass treb
+
+
+
bal
-20dB
REVOX RC28 remote
flat
-
vol
+
play
stop
<
>
pause
shuffle
<<
>>
prog
1
2
3
display
4
5
6
7
8
9
0
In this configuration output 4 of the Audio Multiroom
Server is connected to AUX1 of the E450 Exception
amplifier. REVOXLink settings should be set as follows:
• AUX mode should be enabled.
• Exception amplifier AUX mode should be set to
enabled.
• All other REVOXLink options should be disabled.
Commands received at the Exception amplifier will
control output 4 of the Audio Multiroom Server.
Note that this configuration creates a “party” mode in
which all sources can listen to and control output 4 of
the Audio Multiroom Server.
32
Page 33

Audio Multiroom Server installation example 2
o/p 1
Main Menu
Standby Eject
>Play Music
Select
M57 - AUDIO MULTIROOM SERVER
o/p 2
o/p 3
o/p 4
REVOX RC28 Control
communications cable
power
tuner
CD
tape
phono
TV
spkr
aux
local
A
B
-
-
bass treb
+
+
+
-20dB
flat
REVOX RC28 remote
bal
-
vol
+
play
stop
<
>
pause
shuffle
<<
>>
prog
1
2
3
display
4
5
6
7
8
9
0
In this configuration the E450 Exception amplifier is only
used as a controller for the Audio Multiroom Server.
Audio cannot be monitored through the E450. All
REVOXLink settings should be set to disabled.
tuner
CD
tape
phono
aux
local
bass treb
-
+
-20dB
flat
power
TV
spkr
A
B
-
+
-
+
bal
-
vol
+
Skip track backwards
play
pause
stop
<
shuffle
<<
1
2
3
4
5
7
8
display
6
9
>
>>
prog
0
Skip track forwards
Album down
Album up
Album number
You can select an album by number using the REVOX
RC28 remote control as follows:
Ensure that you are controlling the device
appropriate to Audio Multiroom Server control.
33
Press the prog key to enter album selection mode.
Page 34

Press the album number (this number is displayed
in the top right corner of the Select Album menu).
Press the play key to begin playback.
Album Up and Album Down keys select the
subsequent and previous albums respectively.
Other Multiroom control systems
The REVOX Audio Multiroom Server can be controlled by
a number of other leading Multiroom controllers via the
XiVA-link RS232 protocol. Latest compatibility
information is available from www.revox.de.
34
Page 35

Getting help
This chapter gives information about getting help with
your Audio Multiroom Server from your dealer, or from
REVOX.
Getting help
Your Audio Multiroom Server has been designed to
provide years of trouble-free operation. If, however, you
need technical assistance above and beyond what is
covered in this user guide, we have established the
following methods for continued support.
Your dealer
Your local dealer has the best understanding of your
particular system, product and needs and should
therefore be your first point of contact. Specific
guarantee and warranty coverage details may also be
obtained form your dealer.
REVOX Web site
The REVOX Web Site contains comprehensive technical
information on your Audio Multiroom Server as well as
product updates. The Web site also has the most up-to-
date information on how to contact REVOX directly:
www.revox.de
35
REVOX customer support
Tel: +49 (0) 7721 8704-44
Fax: +49 (0) 7721 8704-29
E-mail: support@revox.de
Page 36

Index
Index
ARTIST key 16
auto (one-touch) recording 11
BACKSPACE key 26
browsing
by album 19
by artist 20
by genre 21
by playlist 21
action keys 9
aA 26
Add 24
Back 25
Complete 27
Create 24
Delete 27
Display 17
Grid 24
New 24
OK 22, 25
Open 17, 25
Play 17
Select 10, 16, 23
Add Music Menu 24
album information, editing 26
ALBUM key 16
capacity 4
CD text support 15
communication settings 30
Connect option 10
Custom recording option 13
deleting
albums 27
playlists 27
tracks 27
display 9
Edit Library Menu 23
Edit Music Library option 10, 23
Edit playlist track menu 25
editing names 25
formats supported 5
36
Page 37

front panel
controls 8
display 8
random 19
repeat 19
PLAYLIST key 17
GENRE key 16
genres 21
Internet Account details 28
Main Menu 10, 16
MENU key 16
menus, using 10
multiroom installation 32
multiroom system 4
controller compatibility 6
names, editing 26
pause 18
Play Music menu 16
Play Music option 10
playing 16
a whole album 17
pause 18
resuming 18
stopping 18
Playing menu 18
playing music 16
playlists 5, 23
adding items 25
changing 25
changing item positions 25
creating 23
deleting 27
editing 26
removing items 25
selecting items 24
RANDOM key 19
REC key 11
Record Music option 10, 12
recording 11
auto (one-touch) 11
custom 13
monitoring progress 12
while listening to music 12
recording quality 29
remote control 7
REPEAT key 19
requirements 5
37
Page 38

resuming play 18
Revox RC28 Control 33
seeking tracks 18
seeking within a track 18
selecting items
by name 22
by number 22
from a menu 19
Settings Menu 28
Settings option 10, 28
Show Info Page option 10
skipping tracks 18
Sound Quality menu 13
specifications 5
stand-alone installation 31
stopping play 18
System Information 29
System Settings 29
menus 29
track listings 4, 14
Automatically enter now option 14
CD text 15
Enter information later option 14
38
Page 39

39
Page 40

Copyright and acknowledgements
Copyright© 2002 Imerge Ltd. All rights reserved.
The Audio Multiroom Server software and this documentation are
copyright materials. No part of the Audio Multiroom Server software
or this documentation may be reproduced, transmitted, transcribed,
stored in a retrieval system, or translated into any language, or
computer language, in any form or by any means without the prior
written permission of Imerge Ltd.
XiVA is a registered trademark of Imerge Ltd. All other product
names are trademarks or registered trademarks of their respective
owners.
The Internet CD database referred to in this user guide is the
Gracenote CDDB® Music Recognition Service. Gracenote is the
industry standard in music recognition technology and related
content delivery. For more information go to www.gracenote.com.
Gracenote is CDDB, Inc. d/b/a “Gracenote.” CD-related data from
Gracenote CDDB®, copyright 1999, 2000, 2001, 2002 Gracenote.
Gracenote CDDB Client Software, copyright 1999, 2000, 2001, 2002
CDDB, Inc. U.S. Patents Numbers #5,987,525; #6,061,680;
#6,154,773, and other patents issued or pending.
CDDB is a registered trademark of Gracenote. The Gracenote logo
and the Gracenote CDDB logo are trademarks of Gracenote. Music
Recognition Service and MRS are service marks of Gracenote.
MPEG Layer-3 audio coding technology licensed from Fraunhofer IIS
and THOMSON multimedia.
The information in this guide is believed to be correct as of the date
of publication. However, our policy is one of continuous
development and so the information in this guide is subject to
change without notice, and does not represent a commitment on
the part of Imerge Ltd or REVOX AG.
40
 Loading...