

Page 1
of
Re:control
M208
System Remote
Control
Dominating Entertainment.
Revox of Switzerland.
Version 1
Page 2

M208 Re:control
A General
Remote control
MMC card
M208 Link
Synchronisation
Operation
M208 Base settings
B TUNER
Synchronising tuner stations
Operation
C DVD
D TV
E SERVER
Synchronising the music server
Operation
Music selection
Repeat
Shuffle
M37 - Original
F SAT
G VIDEO
H AUDIO
I LIGHT
J SOUND
K Appendix
Troubleshooting
Technical data
Guarantee, Disposal, Scope of delivery
A 2
A 4
A 5
A 6
A 7
A 8
A 8 - 12
B 1
B 1
B 2
C 1-2
D 1-2
E 1
E 2
E 3-5
E 6
E 6
E 7-8
F 1-4
G 1-2
H 1-2
I 1
J 1-2
K 1
K 1
K 2
K 2
A-2
Page 3

M208 Re:control
A General
The M208 System Remote
Control was developed based on
the knowledge gained through our
many years of experience and on
the requests and requirements of
our customers.
All current Revox products can be
operated with the M208, both in
the main room and in the
additional rooms of a Multiroom
system. As the commands are
identical for each room, you can
take your remote control with you
from the living room to the kitchen
and continue as normal.
But it’s not just this ability to use
the remote control in many
different locations that makes the
M208 an exceptional product.
Many hidden solution details, such
as the motion detector that
switches the M208 on
automatically when it is picked up
and moved, make using it a joy.
Chapter structure
The M208 Operation manual is
designed in a modular way in the
same as the M51. New functions
can be added to the M208 through
the software update option.
The new functions are described
in the following chapters, which
are delivered to accompany each
relevant software update from
Revox. Simply replace the cover
page containing the chapter
overview and the relevant chapter
in the manual. In this way, your
manual is always up to date. You
will find a version index number at
the bottom righthand corner of the
cover page.
A-3
Page 4

M208 Re:control
Batteries
Because the M208 uses the latest
processor technology with very
low current requirements, you will
not have to change the batteries
very often. In the following
chapters, you will find out how
your settings affect the current
consumption and therefore the
working life of the batteries.
Open the battery compartment
cover on the underside of the
remote control, to insert new
batteries. Insert the four batteries
as shown on the bottom of the
battery compartment.
You should only use Alkaline LR
03/AAA batteries, also known as
Micro and they must be inserted
with correct polarity.
Revox does not recommend the
use of rechargeable batteries.
Because of the low voltage of 1.2V
as compared to 1.5V, as well as
the high levels of self-discharge by
rechargeables (particularly with
NIMH models), the battery
warning display appears
frequently and without justification.
Advice on the disposal of
batteries
Used batteries should be disposed
of at recognised battery collection
points or through the shop where
you bought them.
Care
The remote control should be
cleaned using just a damp, soft
and clean cloth without any
cleaning agents.
If any liquid should get into the
remote control, the unit should be
returned to Revox. The Revox
Service Department cleans the
M208 and if necessary, will
replace the keypad mat. Never
open the remote control yourself
as you could damage sensitive
components through a discharge
of static electricity and nullify any
guarantee rights.
A-4
Page 5
M208 Re:control
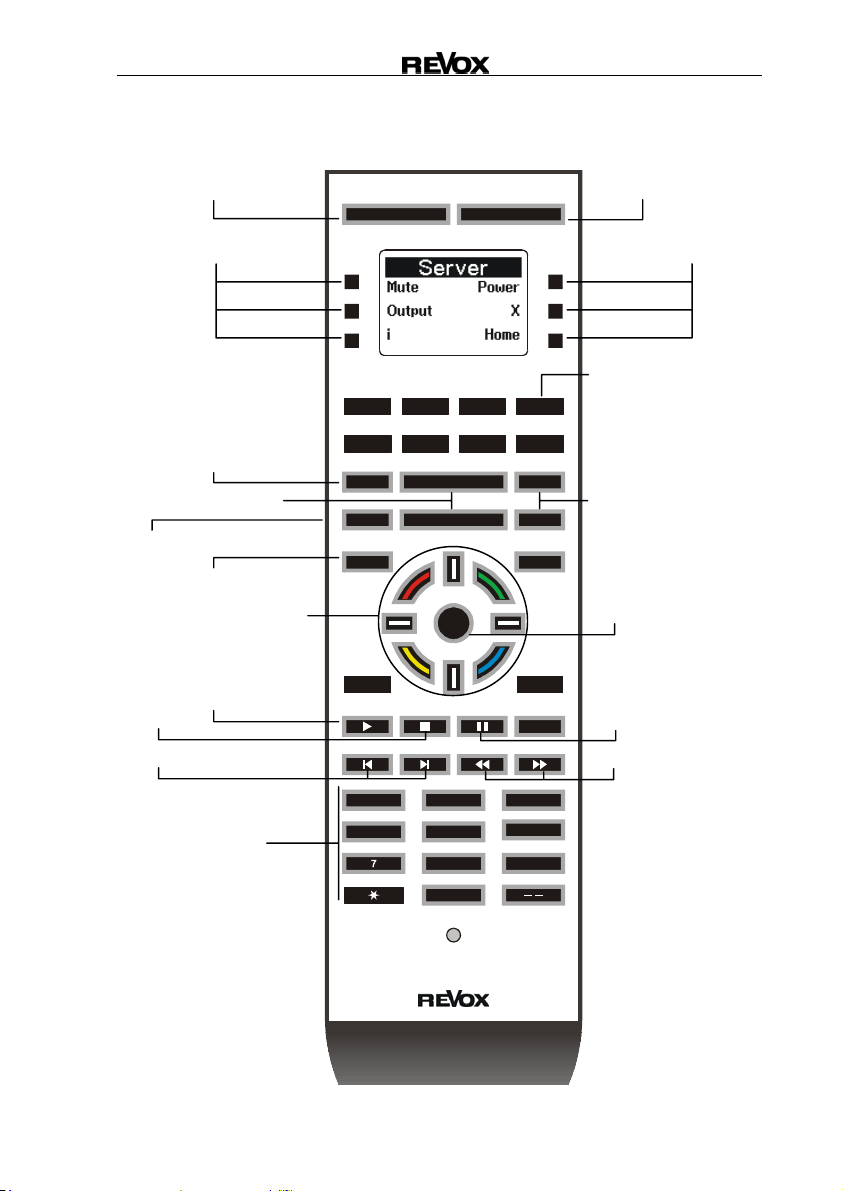
V
V
A
OL +
OL -
OK
Switch device off
OFF
Individual softkeys
TV
UDIO
SERVER
LIGHT
CH +
CH -
Light control
Channel / Station
up/down
MORE
Call further display
pages
Confirm / Execute
ENTEREXIT
REC
2
5
8
0
3
6
9
Select menu access
Record
Pause/ Still
Search forward / back
2-digit channel
Light sensor
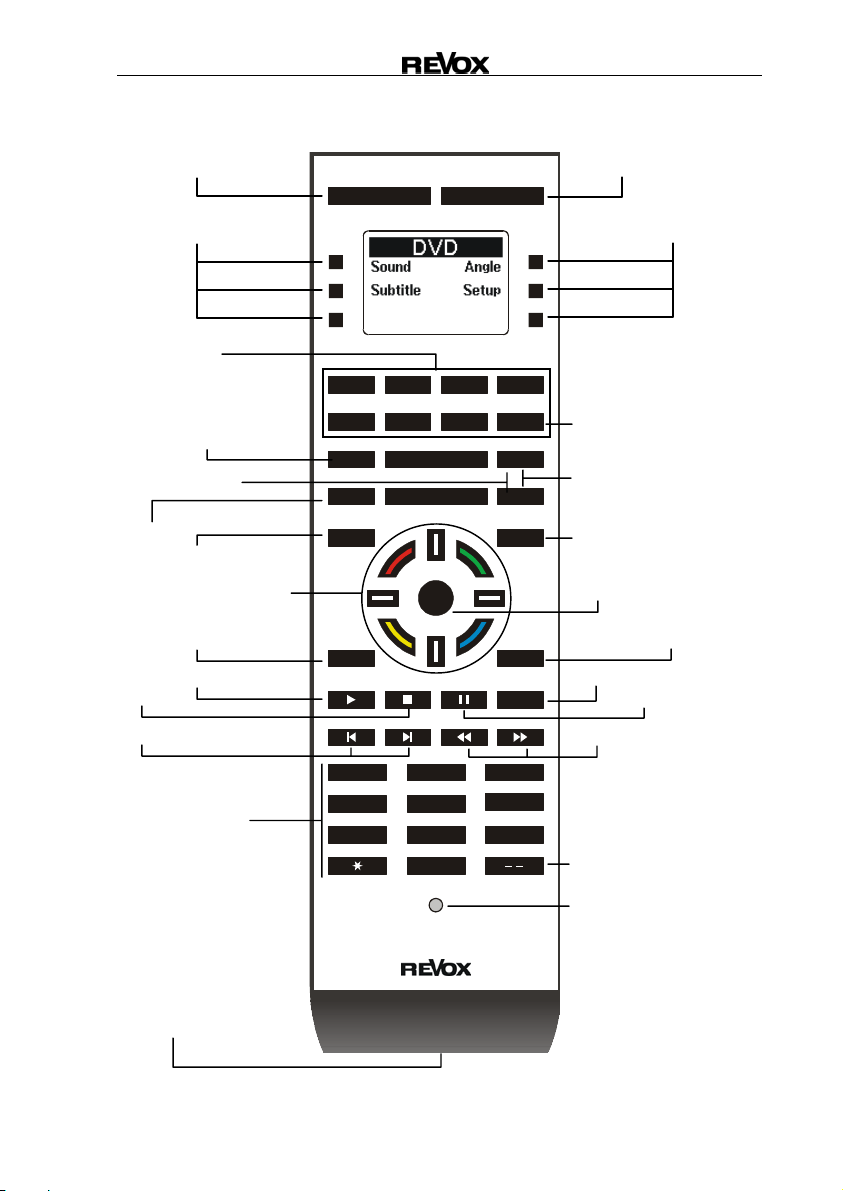
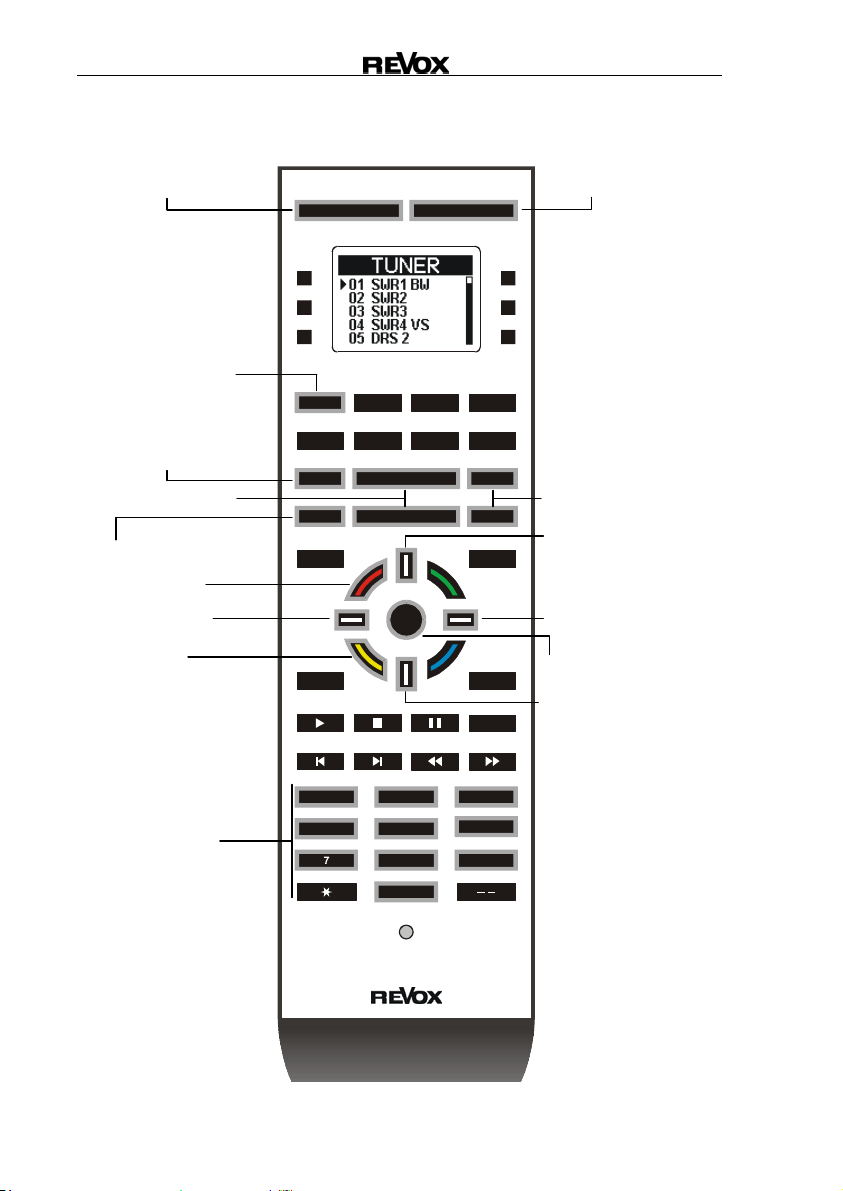
Remote control
A..
Base settings
Individual softkeys
Device selection
buttons
Sound settings
Volume control
Mute
Call menu
Menu navigation
Exit menu
Play
Stop
Skip next / back
Number pad for direct
access
Cover for USB /
M-Link socket and
MMC Memory card
TUNER
SAT
SOUND
MUTE
MENU
1
4
7
SETUP
DVD
VIDEO
A-5
Page 6
M208 Re:control
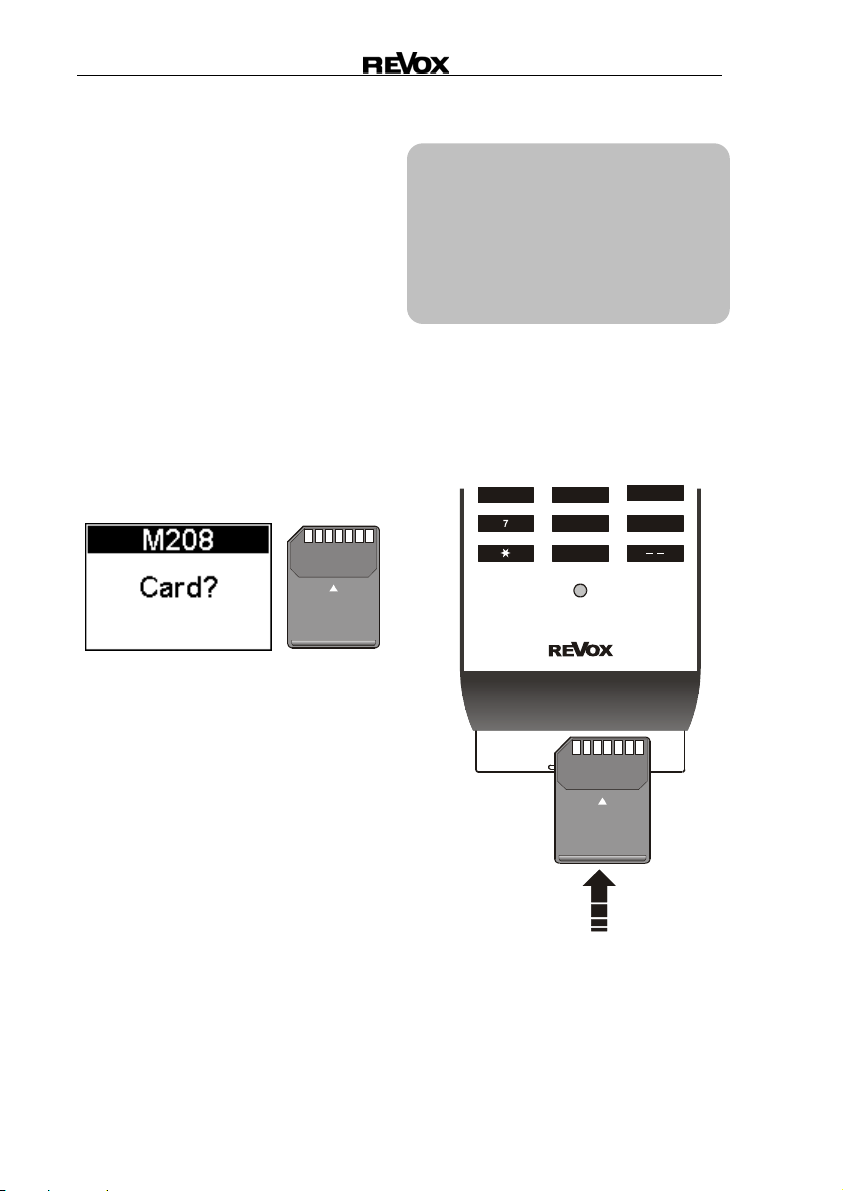
MMC card
There is a hinged cover on the
lower front end of the M208.
Opening this cover gives you
access to the MMC memory card
and the link connection.
MMC memory card
All device data is stored on the
MMC card by the M208. For this
reason, the M208 only operates
when the MMC card is inserted. If
there is no MMC card in the M208
or if the card is incorrectly inserted,
the following message appears on
the display:
MMC Card
Check the MMC card. If the
message continues to appear
even through the MMC card is
correctly inserted and locked in
position, it is possible that the
software is not installed or is
incorrectly installed on the card.
In this case, you should carry out
an update with the M208
Manager PC program.
L
MMC Multi Media Card
The MMC card has a Revox file system and
cannot be read by the Windows
system.
®
operating
Advice on MMC card
You should use exclusively MMC
cards from Revox. There is no
guarantee that the unit will function
correctly if you use cards from
other manufacturers. Use of such
cards also nullifies your guarantee
rights.
Inserting the MMC card
Insert the MMC card into the card
compartment as shown below.
The gold contacts should be at the
top with the angled corner to the
left.
554
0
6
98
MMC Card
Press the card gently into the
compartment to release it, if you
want to remove it. The compartment has an eject mechanism that
then pushes the card out.
A-6
Page 7
M208 Re:control
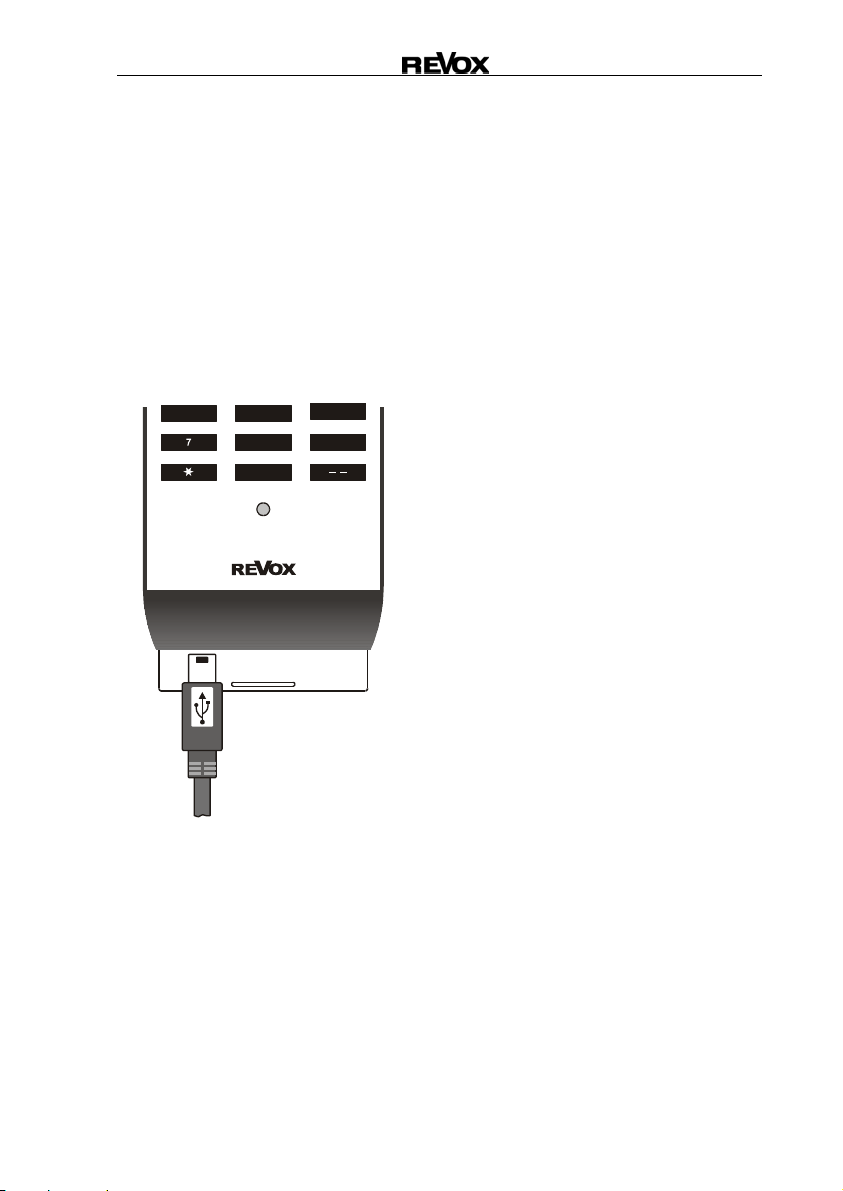
M208 Link
The unit can exchange data with
different devices using the M208
Link.
Access to the M208 Link is
underneath the hinged cover on
the lower front end of the M208, in
the form of a USB mini socket.
The required USB cable is
supplied with the M208.
554
0
6
98
The M208 Link fulfils the following
functions:
Synchronisation with the M51
M51 Tuner stations, as well as
Revox server data are accepted
by the M208 and stored on the
MMC card. You will find further
information about the
synchronisation process and/or
the connection diagram in the
following chapter, Synchronisation
and in the description of the
corresponding devices.
Configuring the M208
New device controls can be added
to the M208 and/ or existing
configurations can be modified
with the M208 Manager PC
program. You will find the M208
Manager on the Revox homepage
www.revox.de
Firmware update
As well as loading software for
device control using the M208
Link, you can also load new
firmware for the integrated
microprocessor. This is also done
through the M208 Manager.
A-7
Page 8
M208 Re:control
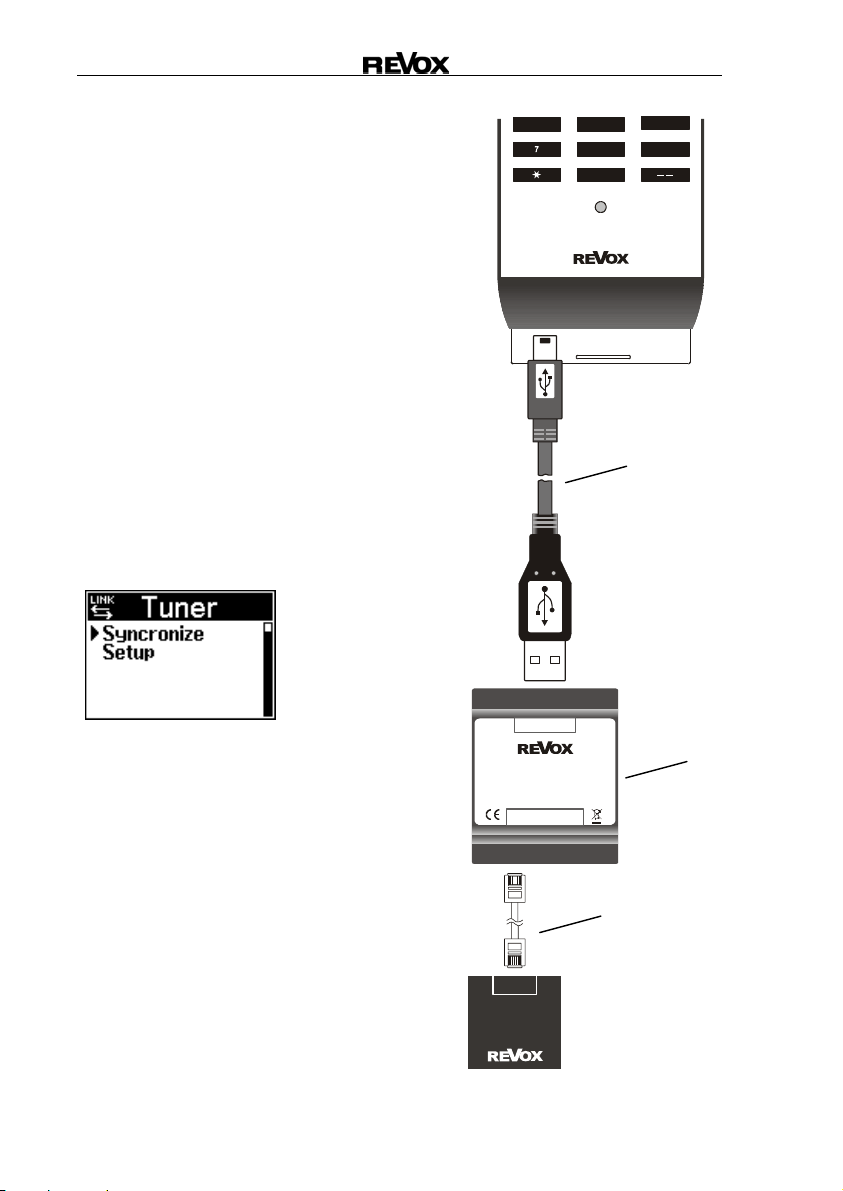
Synchronisation
The M208 Remote control offers
the option of data exchange with
the M51. Here, all relevant
information is transferred to the
remote control, e.g. the M51
Tuner stations or from the Revox
music server.
Connect the M208 with the
supplied USB cable to the M208
Link interface, as shown in the
figure on the right. The Link
interface for its part is connected
to the M51 through a cable to the
M Link. Once the connection is
established, select the source that
is to be synchronised at the M208
and press the SETUP button.
554
0
6
98
USB cable
Switch on the M51 and confirm
the Synchronize setting with
the OK button. Data exchange
now starts and you are kept
informed of the progress.
* Only possible in connection with the
Re:source SAT Module from Revox
and the 5000 PVR Series Topfield
receivers with hard disk (HDD).
A-8
M208-Link
1.552.200.00
Serialnumber
Re:connect M208 Link
Made in Germany by
REVOX GmbH, D-78048 VS-Villingen
IN OUT
M-Link
M-Link
Re:system M51
M208
Link Interface
M-Link cable
Page 9
M208 Re:control
Operation
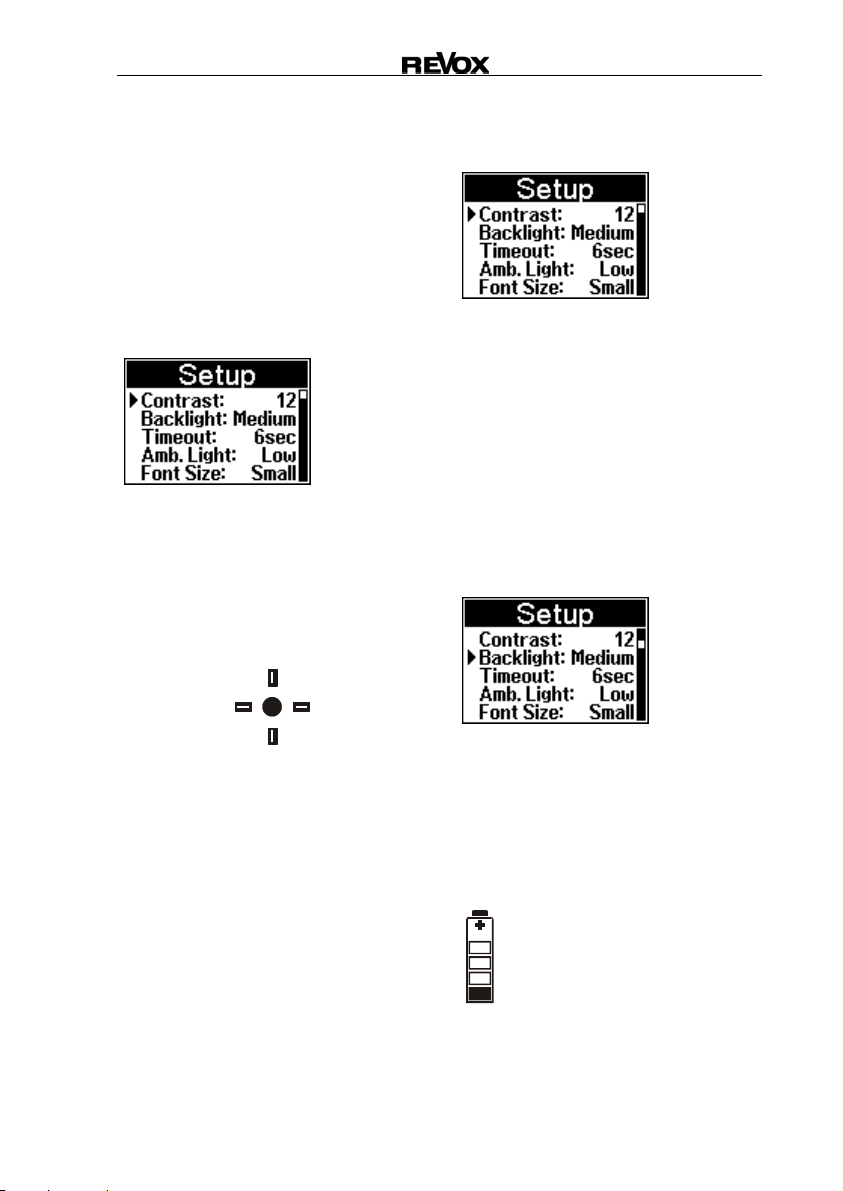
Basic settings
The Setup menu where you can
make the basic settings appears
automatically after you insert the
batteries. In normal operation, you
get to the Setup Menu with the
Setup button.
The most important settings are
made in this menu. Each setting is
saved without needing to confirm
it, until such time as you make a
modification. All settings in the
Setup Menu are made using the
Navigation Compass.
Contrast
[Contrast]
The display contrast is already at
the optimum setting when the unit
leaves the factory. However,
depending on the read angle, a
different contrast value can give
you a better result. The contrast
value range goes from 1 (weak
contrast) to 24 (strong contrast).
Background lighting
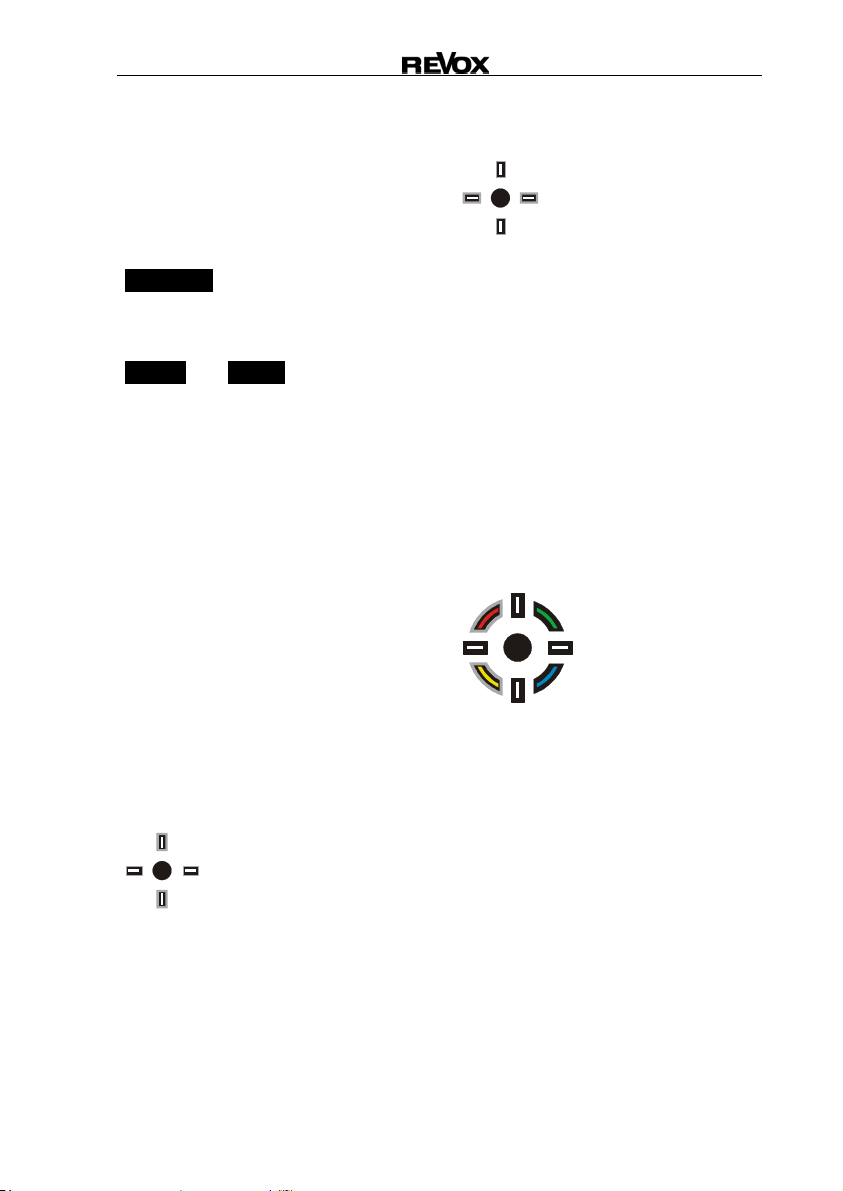
[Backlight]
OK
Using the vertical pair of buttons
(North/South) you select the
menu. With the horizontal buttons
(West/East) and the OK button,
you change the corresponding
menu setting. The small
arrowhead on lefthand side of the
display, indicates the current
menu. Additionally, the position
bar on the righthand side of the
display gives you information
about the location within the Setup
Menu.
The brightness of the blue
backlighting can be set in three
levels from Low (dark), through
Medium to High (bright). The
backlighting is switched off
completely with the Off option.
The brighter the
backlighting, the shorter the
working life of the batteries.
A-9
Page 10
M208 Re:control
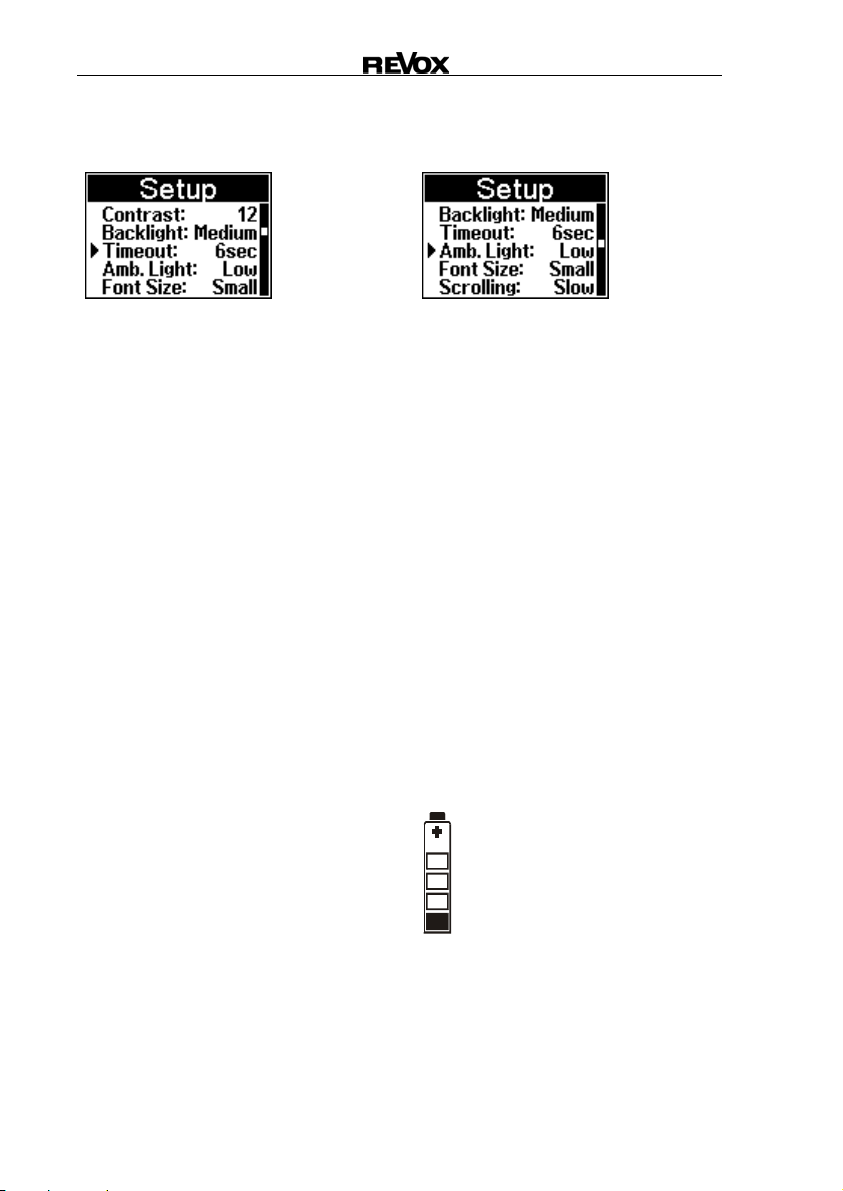
Automatic switch-off
[Timeout]
Ambient light
[Amb. Light]
The M208 has an automatic
switch-off feature that extends the
working life of the batteries. The
M208 is switched on using an
integrated movement sensor,
which recognises each movement
of the remote control and returns it
to the operating mode that was
active before the automatic switchoff. In a very quiet room, the
mechanics of the sensor are
audible, but this does not indicate
a fault.
Through the Timeout Menu, you
define the length of time from the
last time a button was pressed or
the last time the unit was moved,
until the automatic switch-off. This
timeout can be set to one of three
values, 3, 6 or 10 seconds.
L
The Timeout Menu does not
define the timeout for the
backlighting. This is fixed and
cannot be changed.
The brightness sensor is located
at the lower end of the remote
control, below the 0 button.
Using the Amb. Light function,
you can define at which ambient
brightness level the blue
backlighting should be switched
on. As well as the three brightness
levels, the sensor can be
deactivated through the Off
setting. With the Off setting, the
backlighting is switched on each
time a button is pressed whatever
the level of ambient brightness.
OFF: deactivated
Low: dark
Medium: semi-dark
High: bright
The brighter the ambient
brightness setting, the
shorter the working life of the
batteries. The setting Off
results in the shortest
working life.
A-10
Page 11

M208 Re:control
Font size
[Font Size]
Scrolling
[Scrolling]
The M208 gives you the option to
modify the font size for the
TUNER and the SERVER.
The two displays below show the
SERVER Menu in small and
large font sizes.:
Setting: Small
Setting: Large
The font size setting has no
effect on any other devices. They
are displayed in a small font size.
The Scrolling function is
activated automatically by the
M208 in the case of texts that
exceed a certain length and
therefore cannot be displayed
completely. In this case, the texts
are shown in sections, starting
from the beginning of the text
element.
Using the Scrolling function, you
can define the speed at which
such texts are scrolled.
The two options are slow and
fast.
A-11
Page 12
M208 Re:control
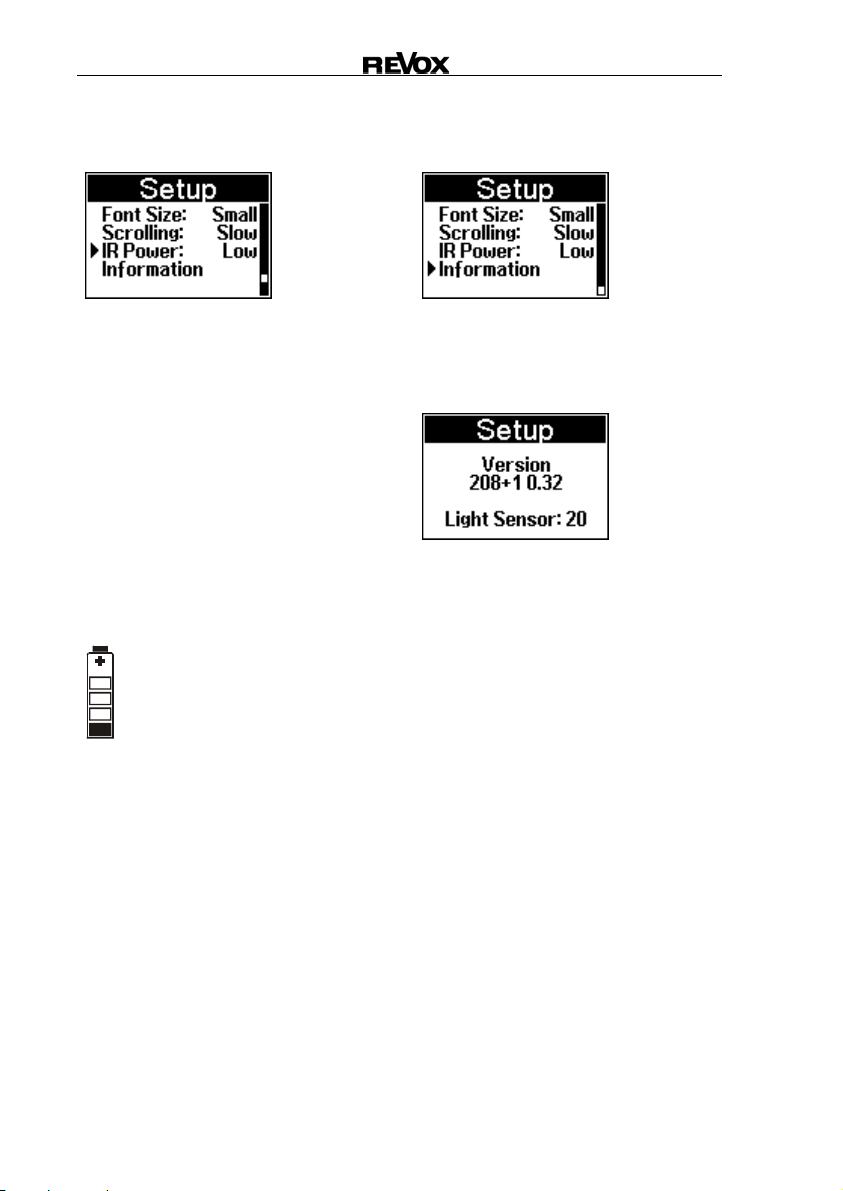
Infrared power
[IR-Power]
Information
[Information]
The M208 can send the IR
commands with two different
power levels. This offers you
particular advantages if you
frequently want to control devices
over longer distances or if you
have a device that doesn’t react
very sensitively to IR commands.
If you select the Low IR Power
setting, the MR208 sends at low
power level. At the High setting,
a higher power level is used.
The High setting causes a
greater drain on the batteries
and therefore reduces the
working life.
Using the Information menupoint, you can display the current
version number of the M208.
Additionally, this menu also
displays the brightness values as
calculated by the brightness
sensor in the lower part of the
remote control. This value can be
between 0 and 255. 0 indicates
complete darkness; 255 is the
brightest value.
A-12
Page 13
M208 Re:control
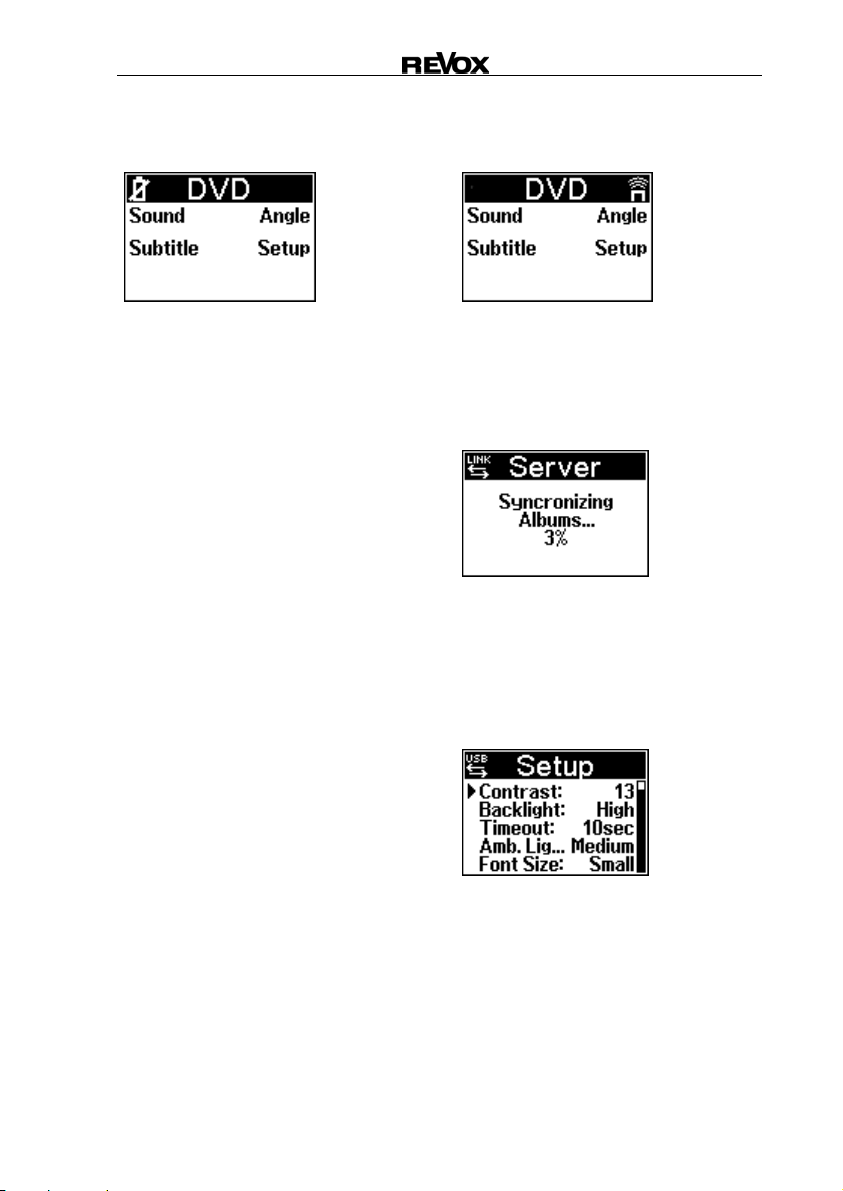
Battery display
Status display
IR send
The battery state display appears
in the top left display field, to
indicate that the batteries are
getting weak. You can continue to
use the remote control but you
should replace the batteries with
new ones at the next opportunity.
You should only use Alkaline LR
03/AAA batteries, also known as
Micro and they must be inserted
with correct polarity.
L
Revox does not recommend the
use of rechargeable batteries.
Because of the low voltage of 1.2V
as compared to 1.5V, as well as
the high levels of self-discharge by
rechargeables (particularly with
NIMH models), the battery
warning display appears
frequently and without justification.
The IR symbol appears in the
upper display fields each time the
M208 sends an infrared
command.
Link
If you connect the M208 to the
M51 using the M208 Link interface
to synchronise the Server
database for example, the Link
symbol appears.
USB
The USB symbol appears as soon
as the M208 is connected with a
PC USB port over a USB cable.
This connection is only needed for
data transfer with the M208
Manager PC program.
A-13
Page 14

Page 15

M208 Re:control
B TUNER
Synchronising tuner stations
The following display appears the
first time the Tuner is started on
the remote control:
This indicates that the Tuner
stations are not yet synchronised.
It is possible to operate the remote
control using the CH +/- and/or the
numeric keypad. Tuner operation
is however much more comfortable if the M51 Tuner stations
have been synchronised with the
M208.
To do this, you should connect the
M208 to the M208 Link interface
with the USB cable supplied. The
Link interface for its part is
connected to the M51 through a
cable to the M Link.
see Synchronisation plan
in Chapter A-8.
Once the connection is established, switch on the M51 and
select the TUNER at the M208
and press the SETUP button.
Confirm the Synchronize
setting with the OK button.
Important advice
Neither the M51 nor the M208 can
be operated while the
synchronisation is running.
Synchronisation now starts and
takes a few seconds. When the
synchronisation is complete, the
following display appears:
The next time you call the Tuner,
all tuner stations stored in the M51
appear on the display. The display
order is determined by the order
they were stored in the M51.
L
If you modify the tuner stations in
the M51 by adding, deleting,
renaming or moving entries, you
should carry out another
synchronisation with the M208.
Otherwise, you will call wrong
tuner stations.
B-1
Page 16
M208 Re:control
V
V
Operation
Base settings
Switch Tuner on
Sound settings
Volume control
Mute
Jump to start
Previous page
Jump to end
Number pad for direct
access
SETUP OFF
TUNER
SOUND
MENU MORE
DVD TV SERVER
IDEOAUDIO LIGHT
SAT
EXIT
11
OL +
OK
554
0
CH +
CH -VOL -MUTE-
ENTER
REC
32
6
98
Switch device off
Station up/ down
Channel above
Next page
Confirm / Select
Channel below
B-2
Page 17
M208 Re:control
Operation
Operation of the Tuner is very
simple. You switch on the Tuner at
the M51 or in another room, if you
have installed the Revox
Multiroom System, using the
ATUNERA button. The last
selected station is automatically
selected. You can scroll up and
down the list of stations with the
ACH+A and ACH-A buttons or you
can enter the station memory
number directly through the
numeric keypad. The M208 display
is not updated. It continues to
show the station that was selected
last through the navigations
compass.
Working with the navigation
compass gives the highest levels
of user comfort. You simply select
the desired station using the
navigation compass and confirm
your choice with the OK button.
The are several navigation options
to help you find the desired station
in the shortest time:
Single jump
Using the vertical (North/South)
buttons, you can select the station
above or below your current
position in the list.
OK
Page jump
OK
With the two horizontal
(West/East) buttons, you can jump
to the next or previous page within
the station list.
If you have selected the small font
size, a positional jump covers 5
stations. If you have selected the
large font size, the jump only
covers 3 stations.
Start / End jump
OK
Using the red button you can jump
to the first station in the list, Station
1. The yellow button takes you to
the last station in the list.
You confirm your station selection
with the OK button. The M51 and
the wall display in the Additional
rooms of a Multiroom System,
now also show the station that you
have selected with your remote
control.
B-3
Page 18

Page 19

M208 Re:control
V
V
C DVD
Base settings
Change soundtrack
Subtitles
Switch CD/DVD on
Sound settings
Volume control
Mute
Call the menu
Menu navigation
Exit menu
Play
Stop
Skip next / back
Number pad for direct
access
SETUP OFF
TUNER
SOUND
MENU MORE
SAT
EXIT
DVD TV SERVER
IDEOAUDIO LIGHT
OL +
OK
11
554
0
CH +
CH -VOL -MUTE-
ENTER
REC
Switch device off
Change angle
Call setup
Chapter / Title up/down
Confirm / Execute
Pause/ Still
32
6
98
Search forward / back
C-1
Page 20
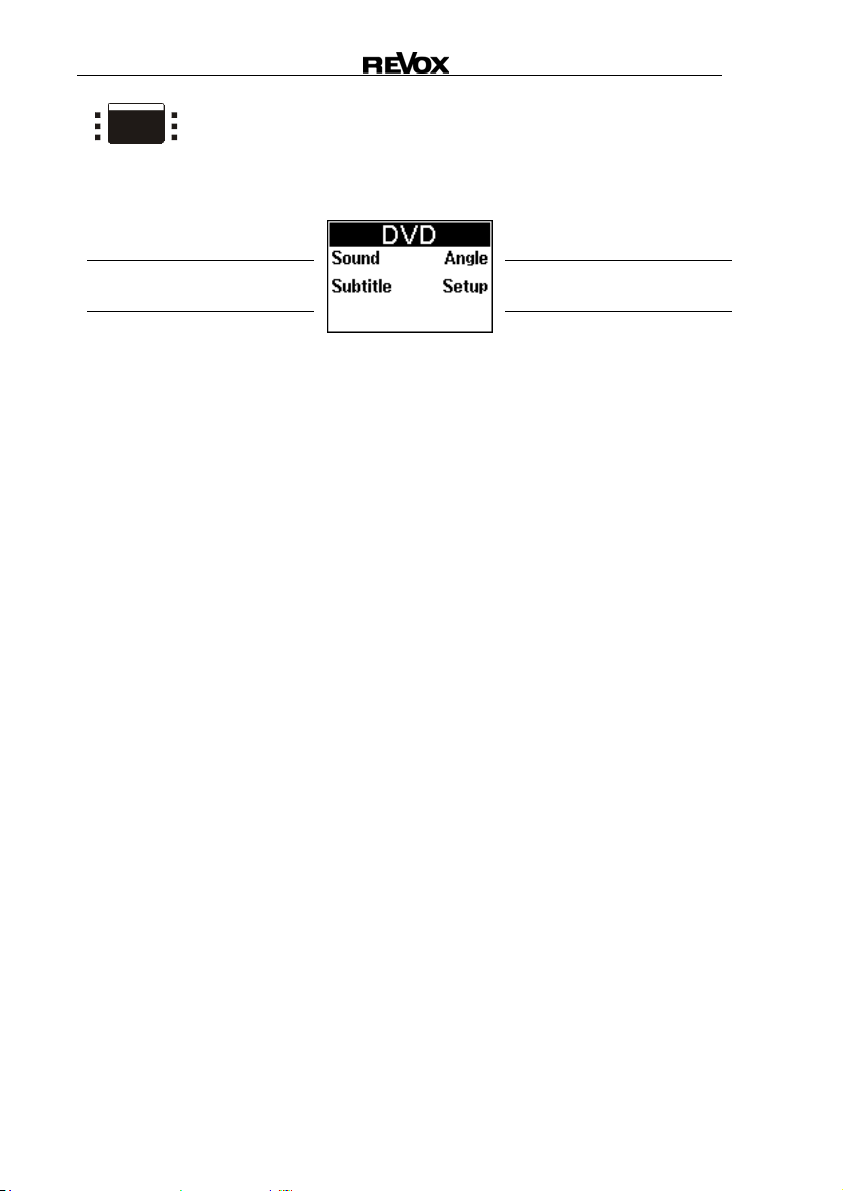
M208 Re:control
M208
Softkeys
Re:source M51 DVD
Page 1
Change soundtrack
Select/ modify subtitles Call DVD Setup Menu
Change viewing angle
C-2
Page 21

M208 Re:control
V
V
D TV
Base settings
Individual softkeys
Sound settings
Volume control
Mute
Call the menu
Menu navigation
Number pad for direct
access
SETUP OFF
TUNER
SOUND
MENU MORE
DVD TV SERVER
SAT
IDEOAUDIO LIGHT
EXIT
11
OL +
OK
CH +
CH -VOL -MUTE-
ENTER
REC
32
554
0
6
98
Switch device off
Individual softkeys
Switch TV on
Channel up / down
Call further display
pages
Confirm / Execute
2-digit channel
D-1
Page 22

M208 Re:control
M208
Softkeys
Re:ception plasma 42 HD
Page 1
Switch off Plasma
Select PC/DVI input Select video source
Videotext on/off
Switch on with TV
MORE
Select format
Page 2
Function button 1
Function button 3 Function button 4
Programme list/ Videotext
Function button 2
MORE
Change soundtrack
Page 3
Freeze frame
Auto zoom Channel information
Picture-In-Picture function
Time
MORE
D-2
Page 23

M208 Re:control
V
V
E SERVER
Operation through the M51
Base settings
Sound settings
Volume control
Mute
Menu navigation
Play
Stop
Skip next / back
Number pad for direct
access
SETUP OFF
TUNER
SOUND
MENU MORE
DVD TV SERVER
IDEO AUDIO LIGHT
SAT
EXIT
11
OL +
OK
CH +
CH -VOL -MUTE-
ENTER
REC
32
554
0
6
98
Switch device off
Switch Server on
Confirrm / Execute
Pause
E-1
Page 24

M208 Re:control
Server
Synchronising the Revox Server
The M208 can store all the
relevant data, such as the name of
the album or the artist from the
music server, which gives you the
option to operate your music
server from every room in your
house or apartment. An IR
receiver, such as the Re:connect
M204 is enough for this.
A synchronisation is carried out in
order to execute a data exchange
between the music server and the
M208. To do this, you should
connect the M208 to the M208
Link interface with the USB cable
supplied. The Link interface for its
part is connected to the M51
through a cable to the M Link. See
Chapter A-8, Synchronisation.
Once the connection is established,
select SERVER at the M208 and
press the SETUP button. Confirm
the Synchronize setting with
the OK button.
Important advice
Neither the M51 nor the M208 can
be operated while the
synchronisation is running.
Data exchange now starts and
depending on the number of
albums stored, can last anything
from a few seconds to 10 minutes.
During this process, all album,
artist, genre and playlist data is
transferred in sequence. The
progress of each sequential
transfer is shown on the M208 as
a percentage value:
When the synchronisation is
complete, the following display
appears:
L
You should carry out a
synchronisation whenever you
have added a new album to the
server or if you have edited a
name.
E-2
Page 25

M208 Re:control
Operation
Using the M208, you can operate
your music server in the same way
that you are used to do with the
M51, or with the Revox Multiroom
System wall display.
Four options are available to you
as selection criteria:
Album…
Artist…
Genre…
Playlist…
Album…
Select the Album… option with
the navigation compass and
confirm your selection with the OK
button.
All albums on the music server are
now listed in alphabetical order.
You can now use the vertical
navigation buttons to select the
desired album and confirm your
choice with OK.
An IR command is sent as soon
as you confirm your selection. The
remote control must be directed at
the IR receiver during this time.
If you have stored a large number
of albums, searching for a
particular album can be made
significantly easier using the
innovative navigation compass.
The following options are on offer:
Jump to start
Previous
page
Jump to end
OK
Jump
ABC -
Next
page
Jump
ABC +
E-3
Page 26

M208 Re:control
Artist…
Select the Artist… option with the
navigation compass and confirm
your selection with the OK button.
All artists, groups, solo singers,
etc. on the music server are now
listed in alphabetical order.
You can now use the vertical
navigation buttons to select the
desired artist and confirm your
selection with the OK button.
An infrared command is sent as
soon as you confirm your selection.
The remote control must be
directed at the IR receiver during
this time.
If you have stored a large
number of artists, searching can
be made significantly easier
using the navigation compass.
The following options are on offer:
Jump to start
Previous
page
Jump to end
OK
Jump
ABC -
Next
page
Jump
ABC +
E-4
Page 27

M208 Re:control
Genre…
Select the Genre… option with the
navigation compass and confirm
your selection with the OK button.
Playlist…
Select the Playlist… option with
the navigation compass and
confirm your selection with the OK
button.
All genre classifications on the
music server are now listed in
alphabetical order:
Select the desired Genre with the
navigation compass and confirm
your selection with the OK button.
All albums on the music server
that match the selected genre
are now listed in alphabetical
order. Selected the desired album
as described above and confirm
your choice with the OK button.
If you have stored a large
number of albums, searching for
a particular album can be made
significantly easier using the
innovative navigation compass.
A list of all the playlists you have
created now appears. Select the
desired playlist with the navigation
compass and confirm your
selection with the OK button.
L
A playlist contains tracks or
complete albums that have been
put together by the user himself.
The order of the tracks is also
defined by the user and is not
displayed in alphabetic order, as is
otherwise the case. These lists of
tracks are either created at a PC
using the XIVA Producer program
or direct at the music server.
E-5
Page 28

M208 Re:control
Repeat
Using the Repeat On/ Repeat Off
selections, you can decide
whether the album you are
listening to should be repeated or
not. The default setting is without
repetition.
Using the remote control, you can
now trigger the repetition of the
album by selecting Repeat On and
pressing OK or you can cancel the
repetition setting through Repeat
Off. The Repeat Off command
also has to be confirmed with the
OK button.
The current mode selection is
shown in the M51 display on the
second page of the Server Menu.
Shuffle
Using the Shuffle ON/ Shuffle Off
selection, you can select whether
the tracks on an album will be
played in a random or in the
defined order. The default setting
is that the tracks are played in the
defined order.
Select Shuffle On and confirm
this with the OK button for a
random play order.
To end the random play order,
select Shuffle Off and confirm this
with the OK button as well.
The current mode selection is
shown in the M51 display on the
second page of the Server Menu.
M51 Server Menu
M51 Server Menu
E-6
Page 29
M208 Re:control
V
V
Server
Original M37 Remote control
Base settings
Individual softkeys
Sound settings
Volume control
Mute
Call menu
Menu navigation
Play
Stop
Skip next / back
Number pad for direct
access
SETUP OFF
TUNER
SOUND
MENU MORE
DVD TV SERVER
SAT
IDEO AUDIO LIGHT
EXIT
11
OL +
OK
CH +
CH -VOL -MUTE-
ENTER
REC
554
0
Switch device off
Individual softkeys
Switch M51 Server on
Track up / down
Confirm / Execute
Pause
Search forward / back
32
6
98
E-7
Page 30

M208 Re:control
M208
Softkeys
Original M37 Remote control
Page 1
Server on/off
Mute
Select audio output
Information /Edit text
Cancel
MORE
Page 2
Select album
Select genre Select playlist
Once only repeat
L
Playlist: A compilation of different albums and artists
Select artist
MORE
Back to Main Menu
Permanent repeat
E-8
Page 31

M208 Re:control
V
V
F SAT
Operation through the M51
Base settings
TV operation
SAT operation on
Sound settings
Volume control
Mute
Channel up / down
Number pad for direct
access
SETUP OFF
TUNER
SOUND
MENU MORE
DVD TV SERVER
IDEO AUDIO LIGHT
SAT
EXIT
11
OL +
OK
554
0
CH +
CH -VOL -MUTE-
ENTER
REC
32
6
98
Switch device off
Radio operation
Channel up / down
F-1
Page 32

M208 Re:control
F-2
Page 33

M208 Re:control
V
V
SAT
Original Topfield Remote control
Type : 5000-PVR series
Base settings
Individual softkeys
Switch M51-SAT on
Sound settings
Volume control
Mute
Call menu
Menu navigation
Exit menu
Play
Stop
Skip forward / back
Number pad for direct
access
SETUP OFF
TUNER
SOUND
MENU MORE
DVD TV SERVER
SAT
IDEO AUDIO LIGHT
EXIT
11
OL +
OK
CH +
CH -VOL -MUTE -
ENTER
REC
32
554
0
6
98
Switch device off
Individual softkeys
Channel up / down
Call further display
pages
Confirm / Execute
Slow motion
Record
Pause
Search forward / back
F-3
Page 34
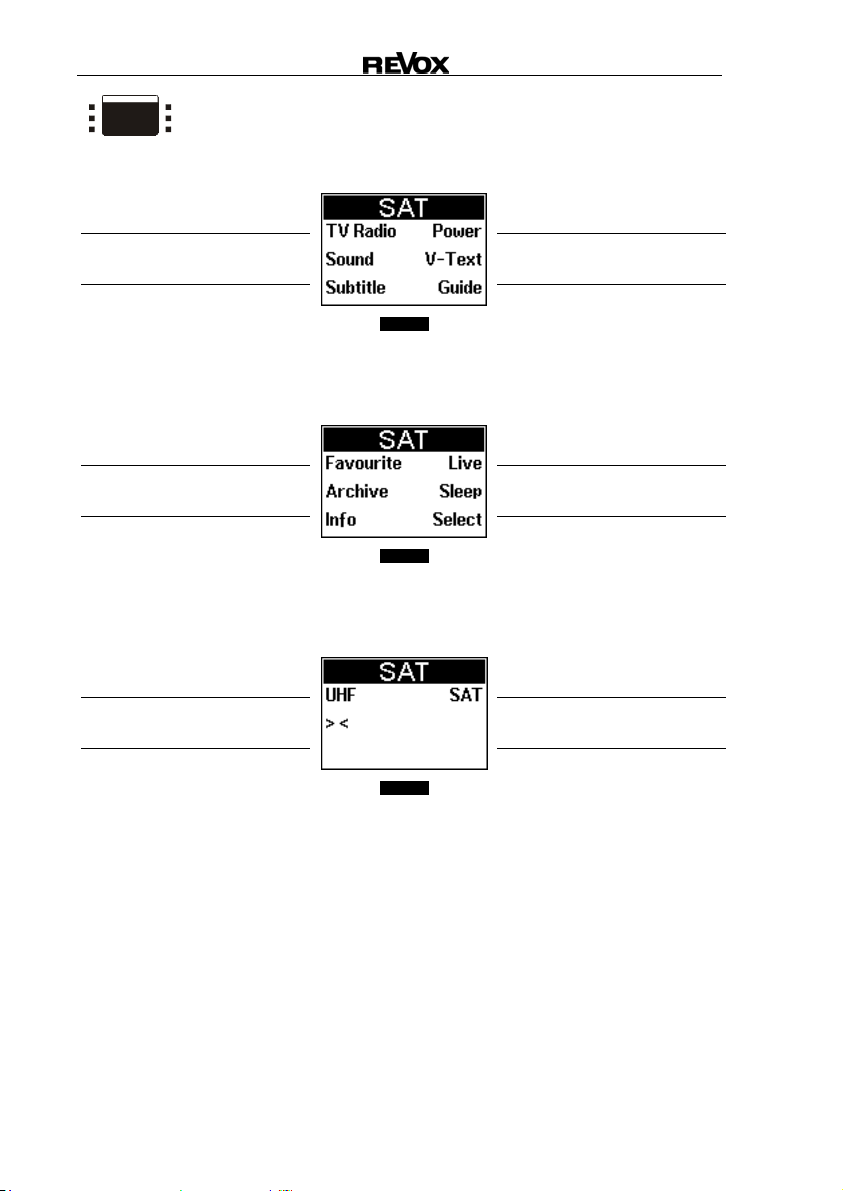
M208 Re:control
M208
Softkeys
Topfield 5000-PVR Series
Page 1
Switch between TV / Radio
Sound operating mode
Subtitles
Switch on receiver
Select videotext
MORE
EPG
Page 2
Show favourites list
Show film archive Sleep function
Programme information
Live transmission
MORE
e.g. Menu selection
Page 3
UHF Modulator setting
List for PIP sub-picture
L
EPG: Electronic Programme Guide – Online programm listings
PIP: Picture-in-picture function
SAT List / Sub-main picture
MORE
F-4
Page 35

M208 Re:control
V
V
G VIDEO
You can access the selection
menu that offers you 4 video
sources through the AVIDEOA
SETUP OF F
button.
You can select one of the M51
sources through the softkeys and
following that, you can use the
button with the grey border.
In this way, all commands are
sent to the source address.
Example:
Selected source: Video 1
All commands, such as Play or
OK will be sent to the source
address Video 1.
TUNER
SOUND
MENU MOR E
DVD TV SERVER
IDEOAUDIO LIGHT
SAT
OL +
CH +
CH -VOL -MU TE-
L
When selecting the source, you
should be aware that the
address that is selected, is the
one that was assigned to the
corresponding source button
through the M51 Remote Menu.
EXIT
11
OK
ENTER
REC
32
554
0
6
98
G-1
Page 36

M208 Re:control
G-2
Page 37

M208 Re:control
V
V
H AUDIO
You can access the selection
menu that offers you 6 audio
sources through the AAUDIOA
button.
You can select one of the M51
sources through the softkeys and
following that, you can use the
button with the grey border.
In this way, all commands are
sent to the source address.
Example:
Selected source: Aux 1
All commands, such as Play or
OK will be sent to the source
address Aux 1.
L
When selecting the source, you
should be aware that the
address that is selected, is the
one that was assigned to the
corresponding source button
through the M51 Remote Menu.
SETUP OFF
TUNER
SOUND
MENU MORE
DVD TV SERVER
SAT
IDEOAUDIO LIGHT
EXIT
OL +
OK
CH +
CH -VO L -MUTE-
ENTER
REC
11
554
0
32
6
98
H-1
Page 38

M208 Re:control
M208
Softkeys
AUDIO
Page 1
Analogue source Aux 1
Analogue source Aux 3 Analogue source Rec-In
Local source - MR
Analogue source Aux 2
MORE
Analogue source TV
H-2
Page 39

M208 Re:control
I LIGHT
I-1
Page 40

M208 Re:control
I-2
Page 41
M208 Re:control
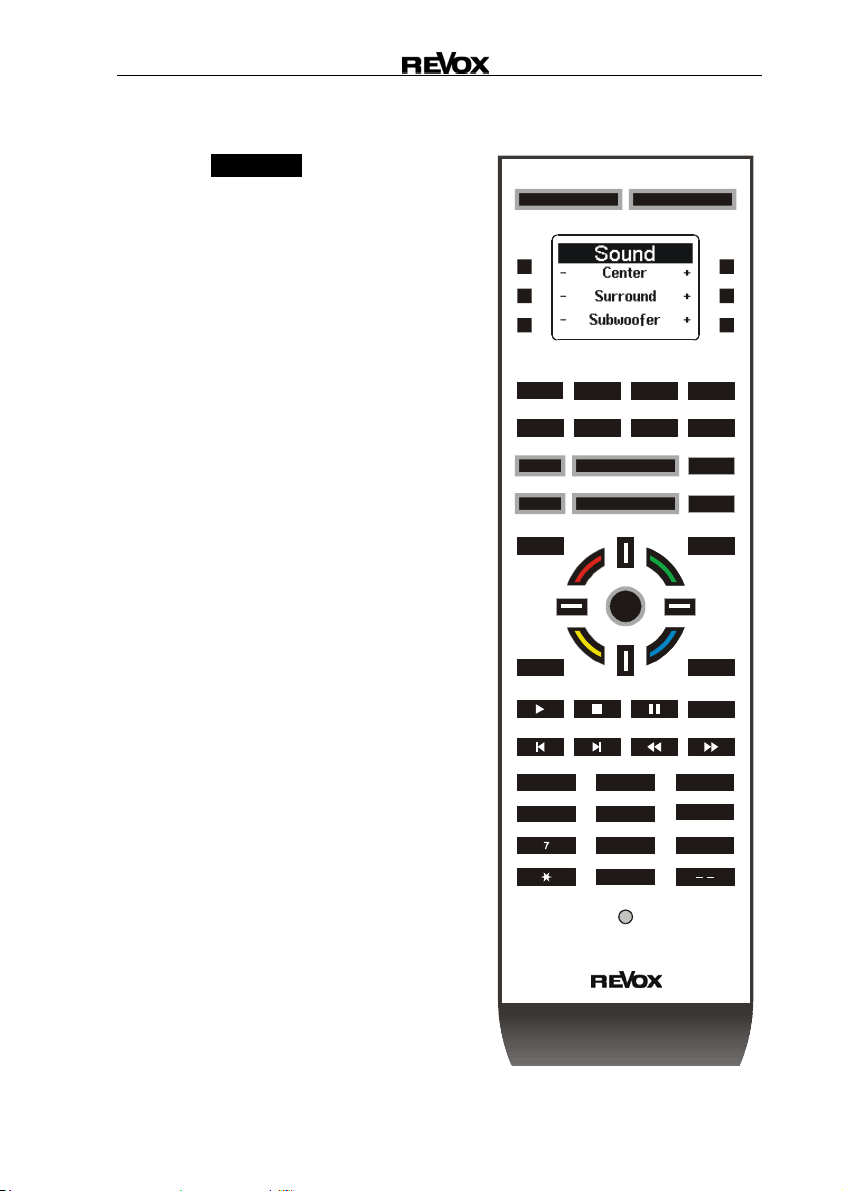
V
V
J Sound
Using the ASOUNDA button, you
can make the sound settings for
the M51 as well as for the
Multiroom amplifier.
The buttons with the grey border
are active while defining the sound
settings through the softkeys. All
other buttons have no functions.
You will find an overview of the
softkeys on the next page.
Note:
The M51 softkeys (Page 1 of the
softkeys) and those of the
Multiroom amplifier (Page 2 of the
softkeys) send the same infrared
codes and can have an influence
on each other.
L
MR: Multiroom
SETUP OFF
TUNER
SOUND
MENU MORE
DVD TV SERVER
SAT
IDEOAUDIO LIGHT
EXIT
OL +
OK
CH +
CH -VO L -MUTE-
ENTER
REC
11
554
0
32
6
98
J-1
Page 42

M208 Re:control
M208
Softkeys
M51 Sound settings
Sound
Page 1
Center Speaker volume
Rear Speaker volume Rear Speaker volume
Subwoofer volume
Center Speaker volume
MORE
Subwoofer volume
Multiroom amplifier sound settings
Page 2
MR amplifier “Balance”
MR amplifier “Treble” MR amplifier “Treble”
MR amplifier “Bass”
MR amplifier “Balance”
MORE
MR amplifier “Bass”
M51 + MR amplifier sound settings
Page 3
Toggle M51 room sound
mode
L
MR: Multiroom
MORE
J-2
Restore MR amplifier base
settings
Page 43
M208 Re:control
K Appendix
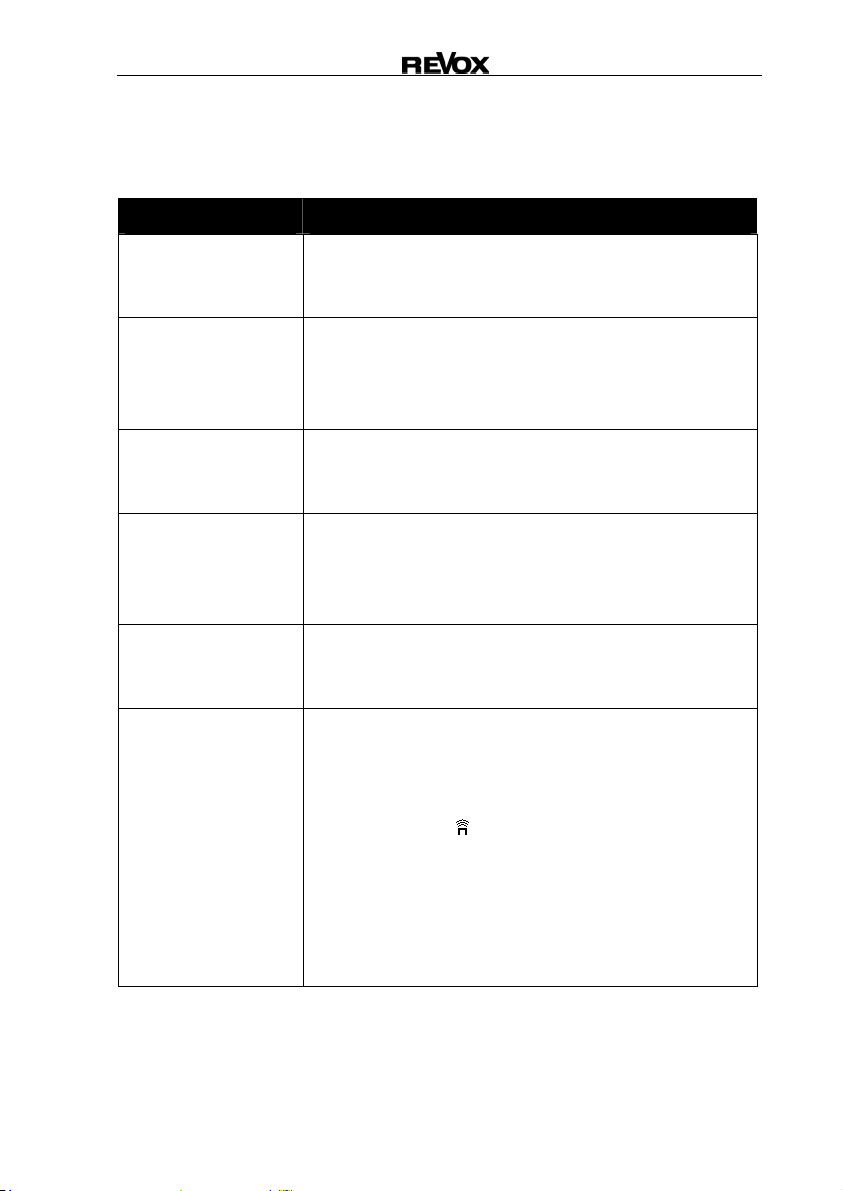
Troubleshooting
Problem Possible remedy
No LCD display when
unit is touched
Backlighting remains
dark
Display shows Card?
when a button is
pressed
Synchronisation with
the M51 cannot be
carried out
A mechanical noise can
be heard from the M208
The device to be
controlled does not
respond to the infrared
command
Check the batteries and replace if necessary
Check that the batteries are in the right way round
Activate the movement sensor through the Setup Menu
Activate backlighting in the Setup Menu
Backlight
Is the brightness sensor covered?
Is the ambient light too bright? Setup Amb. Light
MMC memory card is not installed correctly or it is missing.
See Chapter MMC Card. You are not using an original
MMC card from Revox.
The connection through the M208 Link interface is faulty.
See Chapter Synchronisation.
The M51 does not have the software that is needed to carry
out a synchronisation. See Technical Data.
There are two gold bearings in the M208’s movement
sensor that move against each other. This can be heard in a
very quiet environment and does not signify a fault.
With some M208 sources, not all buttons send infrared
codes. Please check in the Operating manual of the
corresponding device(s) to see whether the buttons send
infrared codes (grey border). Additionally, the display
shows the symbol
sent.
The device cannot receive the infrared code because it is
too far away or because the transfer angle is too large. Try
again while standing nearer to the device and/ or hold the
remote control directly in front of the device.
top right, if an infrared code is being
K-1
Page 44

M208 Re:control
Technical Data
Power supply: 4 Alkaline batteries
Battery type: AAA / MICRO/ LR03 1.5 V – non-rechargeable
Weight: 260 g (including batteries)
Dimensions: 62 x 217 x 25 mm (W x H x D)
Display: 80 x 120 pixel matrix LCD
LCD lighting Blue LED backlighting (adjustable)
System requirements: Tuner module software: > Version 1.20 (FMT-1)
Server module software: > Version 0.81 (M57-2) MK2
> Version 1.11 (M57-1) MK1
Software M51 MK2 > Version 0.72 (M51+2)
Software M51 MK1 > Version 1.10 (M51-1) Supply
Software Display MK1 > Version 1.20 (DPL-1)
Disposal of your old device
Your product has been manufactured from high-quality materials and
components that can be recycled. If this symbol of a crossed-out, wheeled
rubbish container is on the product, this means that it is covered by the EU
Directive 2002/96/EG.
Please find the location of your nearest recycling point for electrical and electronic
devices. Please follow local regulations and do not dispose of the device with your
domestic refuse. The correct disposal of your old device helps to avoid negative
impacts on the environment and on personal health.
Guarantee
The guarantee period is 24 months. Your dealer should be your first contact if you need
service. If he can't give you the help you need, send the remote control carriage free and
without any accessories to your national Sales Office.
Please supply a complete description of the fault together with your address.
Scope of delivery
M208 Remote control
M208 Link Interface
USB cable
M Link cable
4 x AAA Batteries
Operating manual
(only M series)
(only M series)
K-2
 Loading...