

Page 1
WI-FI INTERNET RADIO
www.revo.co.uk
NorwayItalianoDeutschFrançaisEnglish
mode d’emploi
Bedienungsanleitung
Mode demploi
Bruksanvisning
Operating Guide
INTERNET RADIO ADAPTOR
MONDO Wi-Fi Manual.qxd 10/12/07 12:01 Page 1
Page 2

Contents
Welcome to Mondo Wi-Fi 3
Benefits of Internet Radio 3
Mondo Wi-Fi Overview 3
Warranty 3
Warranty Registration 3
Before Getting Started 3
Wi-Fi Internet Requirements 3
Connecting Mondo 3
Controls and Connections 4
Remote Control 4
Powering Mondo 4
Reciva Radio Portal 4
Connecting To Your Network 5
Choosing a Station 6
Station Updates 6
On-Demand Broadcasts 7
General Operation 7
Resetting Mondo 7
Alarm + Clock Functions 8
Setting Mondo’s Clock 8
Setting An Alarm 8
Configure Menu 9
Network Configuration 9
Version + Firmware Updates 9
Languages 9
Factory Reset 9
Register 9
Clock 9
Sleep Mode 9
Backlight 9
Wi-Fi Strength 9
Media Player Operation 10
Windows + Apple Mac Set-Up 10
Accessing Shared Music 10
General Media Player Operation 10
Windows PC UPnP Set-Up 11
Troubleshooting 12
Spare and Accessories 12
Copyright and
Acknowledgements
Copyright © 2007 Revo Technologies Ltd.
All rights reserved.
Revo Technologies Ltd
The Inox Building
Caldwellside
Lanark
Scotland
United Kingdom
ML11 7SR
Tel. 01555 66 61 61
Int. Tel. +44 1555 66 61 61
Fax. 01555 66 33 44
Int. Fax. +44 1555 66 33 44
Email. enquiries@revo.co.uk
Website: www.revo.co.uk
The information in this guide is believed to
be correct at the time of publication.
However, our policy is one of continuous
development and so the information is
subject to change without notice.
Revo, Mondo and M-Port are trademarks or
registered trademarks of Revo Technologies
Limited.
iPod
® is a registered trademark of Apple
Computer, Inc.
Safety Warnings
Do not operate this radio near water.
Avoid small objects and liquids from getting
into this product.
Do not remove screws or casing parts.
Use only the power supply unit supplied.
EEC: This product has been designed and
type-tested to comply with EU requirements
and carries a CE mark.
Technical Support
Should you encounter any difficulties with
the operation of your Revo Mondo Wi-Fi, or
should you suspect that it may be faulty in
some way, please call our technical support
department on the number below:
01555 66 61 61
Alternatively, email support@revo.co.uk or
visit the troubleshooting section of our
website at: www.revo.co.uk/support
Preface
2
English
MONDO Wi-Fi Manual.qxd 10/12/07 12:01 Page 2
Page 3
3
Benefits of Internet Radio
Access to 7,000+ internet radio stations
Search by genre or country
Access ‘Listen Again’ services
Station list updates automatically
No subscription charges
Mondo Wi-Fi Overview
The Mondo Wi-Fi Internet Radio Adaptor is
capable of accessing thousands of internet
radio stations from all over the world, giving
the user an unprecedented choice of radio
content.
Mondo Wi-Fi connects to any sound system
that has RCA inputs, be it a hi-fi system or
boombox type product. It then links to any
broadband Wi-Fi connection to stream both
live and “Listen Again" internet radio
broadcasts.
Mondo has the added benefit of providing
full electronic alarm clock functionality.
Warranty
Revo Technologies Ltd warrants to the
purchaser that this product will be free
from parts and manufacturing defects in
the course of normal use for a period of
one year from the date of purchase.
This warranty does not apply in cases of
accidental damage, where the case has
been removed, wear and tear, negligence,
modification or inappropriate use.
Should you encounter problems with this
product, please contact your supplier or
alternatively see page 2 of this guide for
technical support contact details.
Warranty Registration
It is a warranty condition that you register
your purchase by either completing the
warranty card enclosed with your radio or
alternatively registering online at
www.revo.co.uk/register
Wi-Fi Internet Requirements
In order to use your Mondo Wi-Fi internet
radio adaptor you will require a wireless
(Wi-Fi) broadband Internet connection.
If your wireless network is configured to use
Wired Equivalent Privacy (WEP) or Wi-Fi
Protected Access (WPA) data encryption,
you need to know the WEP or WPA code
(Web Key) in order allow Mondo Wi-Fi to
communicate with the network.
Mondo Wi-Fi should be able to operate
anywhere within 35 metres of the wireless
base station – depending on the operating
environment and the specification of your
wireless base station.
Please ensure that your wireless network is
powered-up and connected to your
broadband Internet connection.
Thank you for buying our Mondo Wi-Fi internet radio, we feel sure that it will
provide you with years of enjoyment and reliable service.
This guide has been designed to quickly get you up-and-running and listening
to internet radio, offer guidance on the more complex features of this
product and provide information on safety, warranty and registration.
Welcome to Mondo Wi-Fi
Before Getting Started
English
Connecting Mondo
Mondo can be connected to any audio
system that has stereo RCA connectors.
Using the connection leads supplied, simply
connect to the corresponding red and black
RCA connectors on Mondo’s rear panel.
MONDO Wi-Fi Manual.qxd 10/12/07 12:01 Page 3
Page 4
4
Controls and Connectors
Your Mondo Wi-Fi internet radio adaptor can be powered from the mains using the power
adaptor supplied.
To power from the mains, insert the power adaptor plug into the DC power socket on the
rear of Mondo Wi-Fi. Pressing the button will switch Mondo Wi-Fi on.
Only use the power adaptor supplied. Replacements can be purchased from our website
www.revo.co.uk, or alternatively call us on 01555 66 61 61.
The station list used by Mondo Wi-Fi’ is
compiled and managed by Reciva Limited,
they also provide the internet radio
technology used in Mondo Wi-Fi.
Mondo Wi-Fi users are able to access
additional internet radio services by visiting
the Reciva Radio Portal at - www.reciva.com
and registering their radio.
Reciva Radio Portal
Powering Mondo Wi-Fi
English
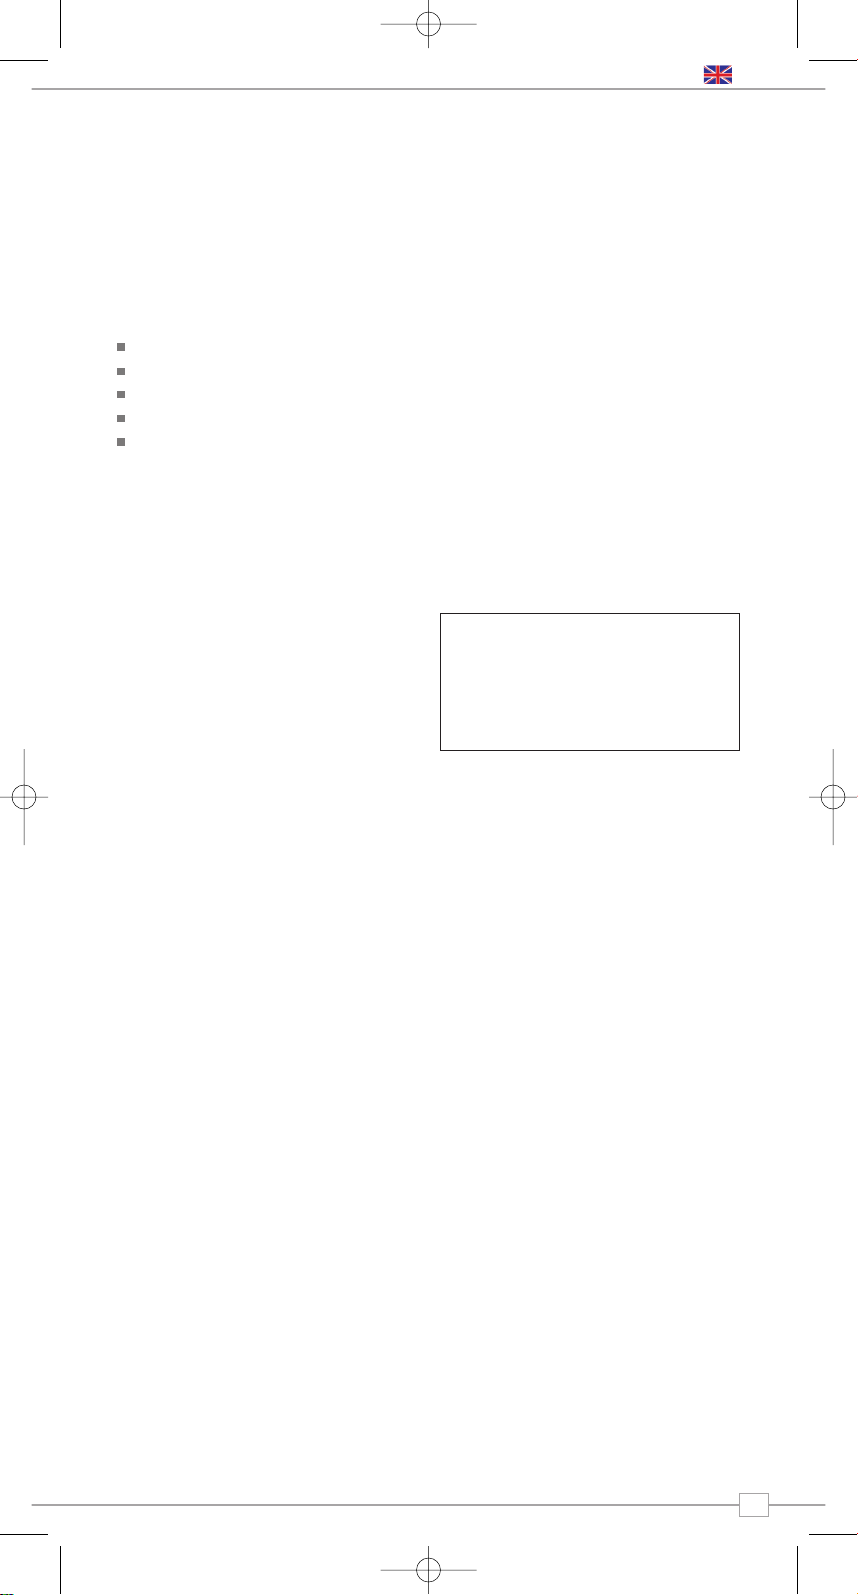
1. Power
2. Back
3. Scroll Left
4. Scroll Right
5. Select
1. Wi-Fi Antenna
2. Stereo RCA Line-Out
3. DC Power Socket
4. Headphone Socket
1.
2. 3.
2.
1.
3. 4.
4. 5.
A
A
back select
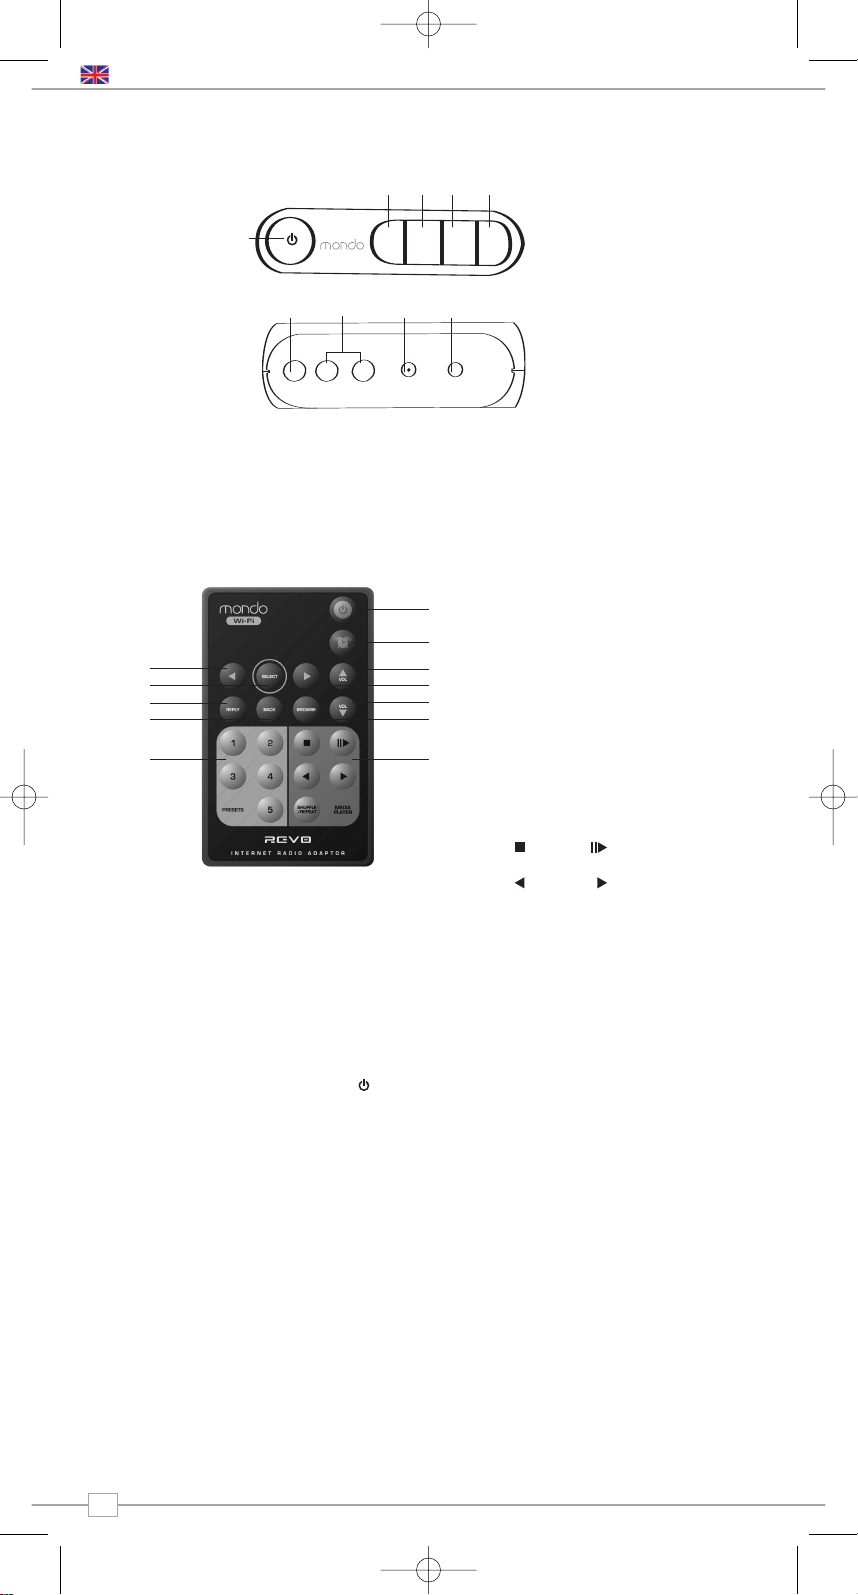
1. Scroll Left
2. Select
3. Reply
4. Back
5. Presets
6. Media Player
7. Browse
8. Volume Down
9. Scroll Right
10. Volume Up
11. Alarm 0n/Off
12. Standby
1.
3.
4.
5. 6.
8.
10.
11.
12.
7.
9.
2.
Media Player
Stop
Skip Back Skip Forward
Play / Pause
Remote Control
MONDO Wi-Fi Manual.qxd 10/12/07 12:01 Page 4
Page 5
5
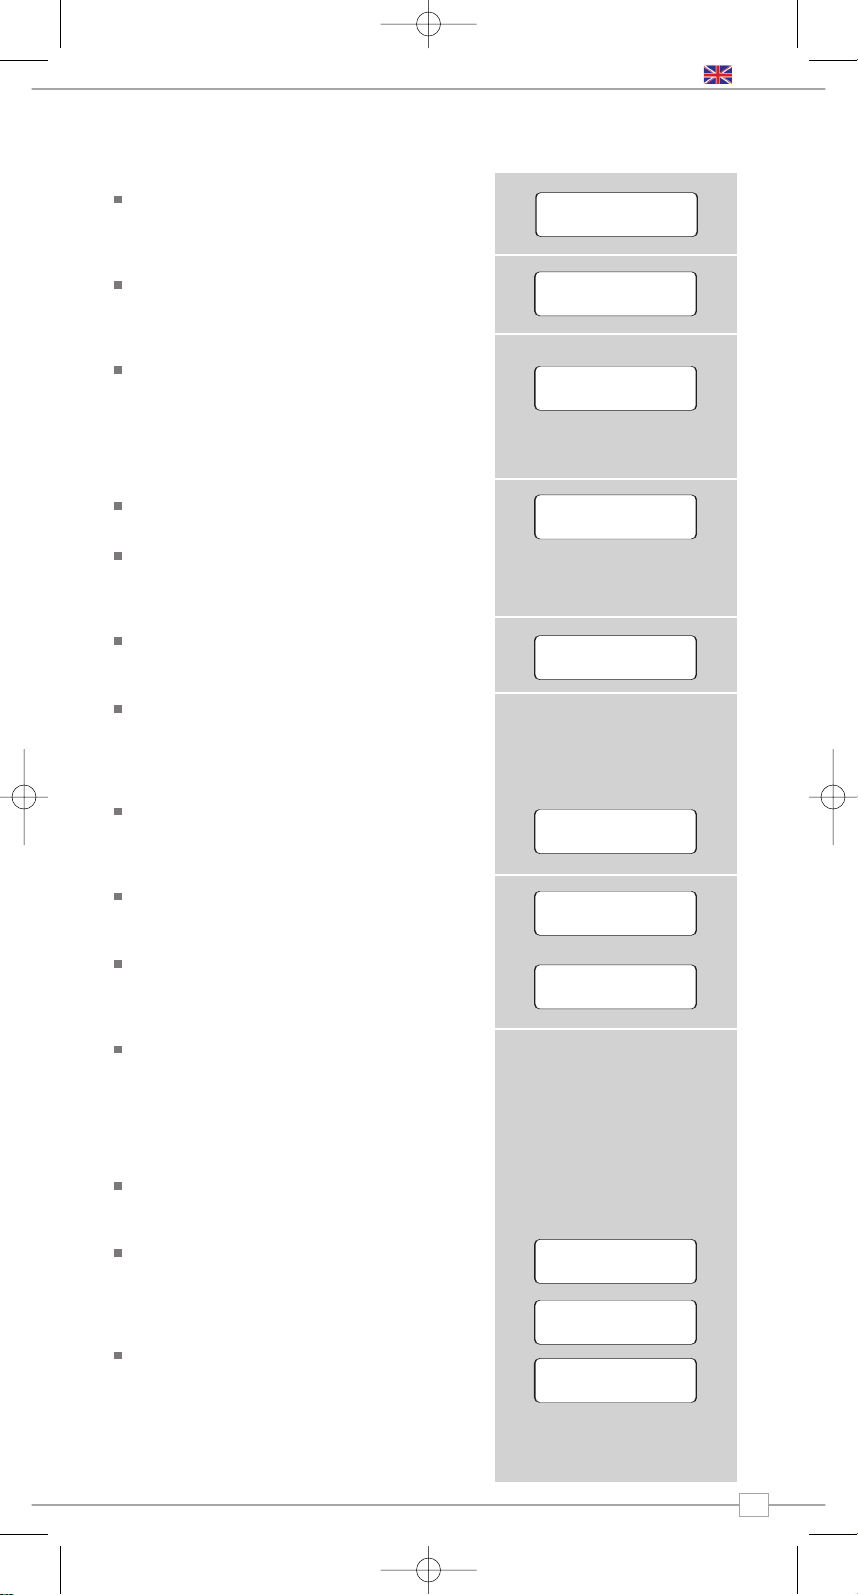
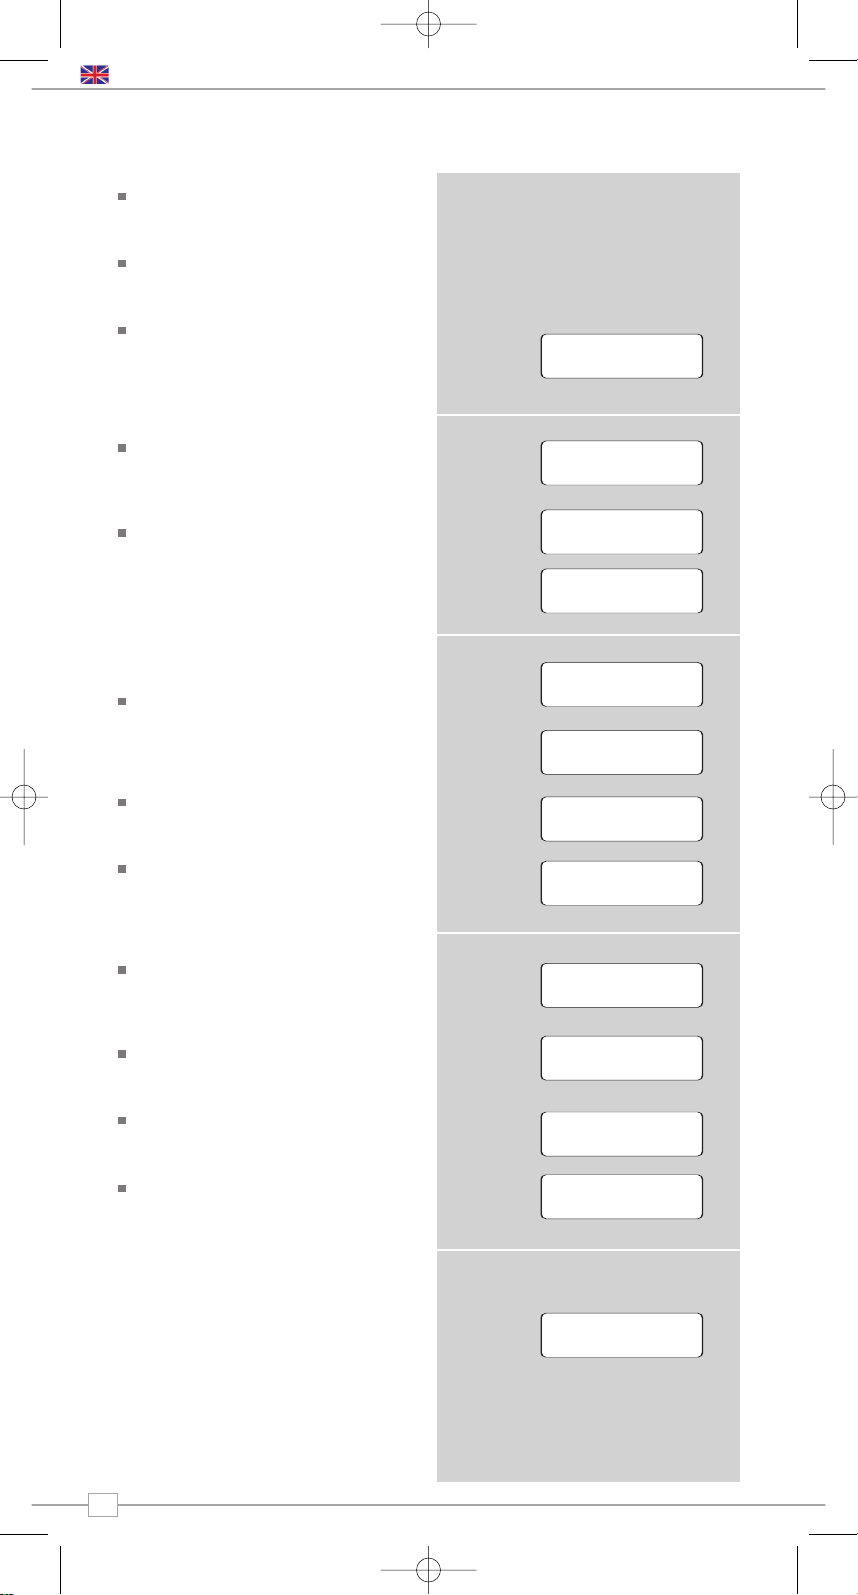
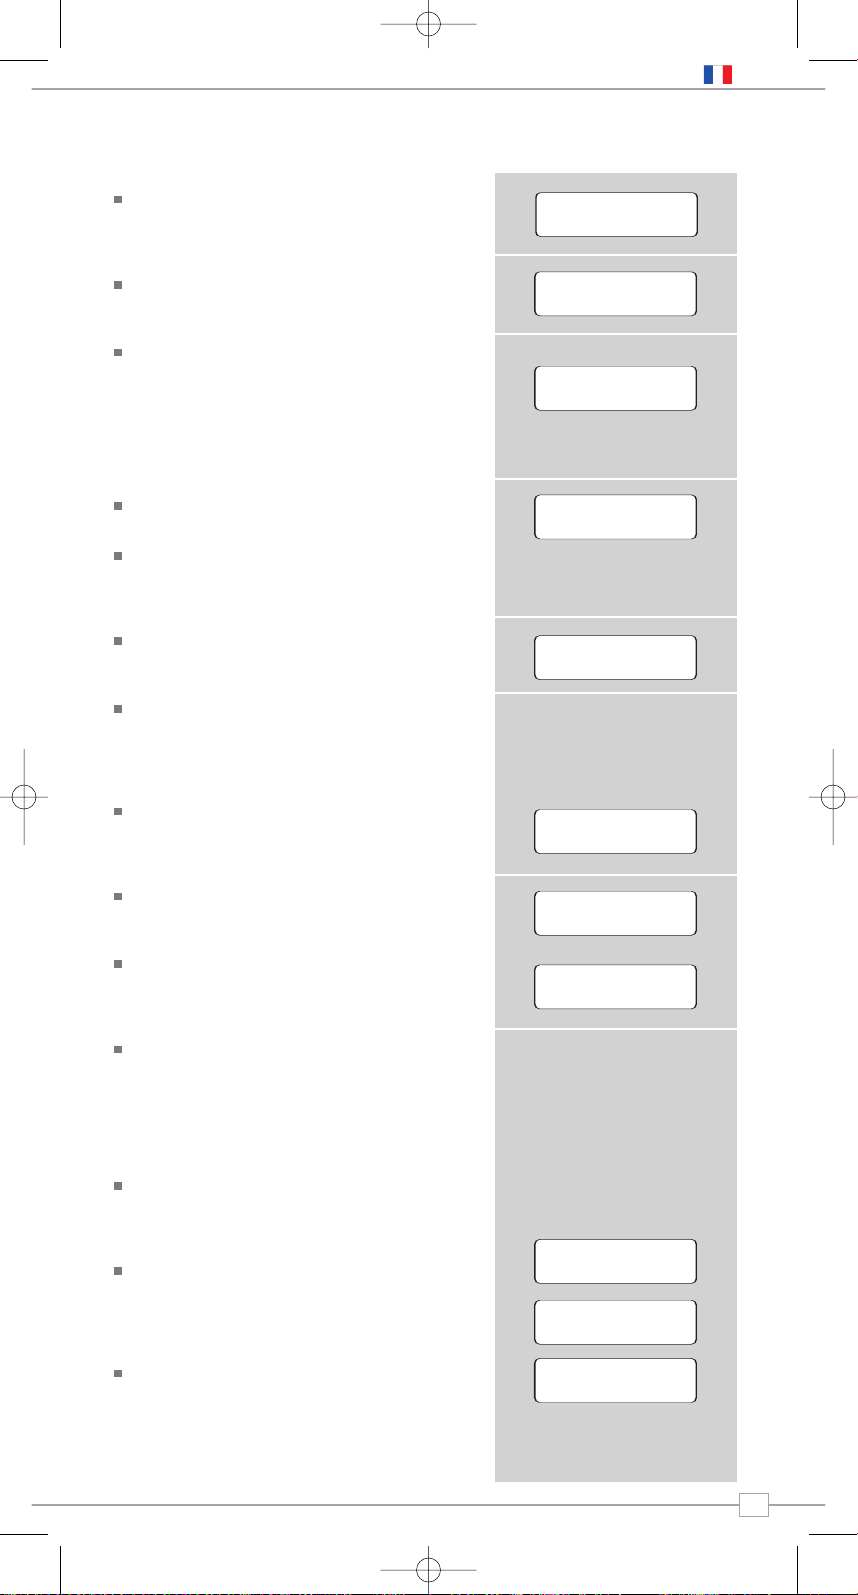
Press the ON/OFF button to power-up
Mondo Wi-Fi. Mondo’s LCD screen will
display a welcome message.
After a few seconds this message will
change to ‘Initialising Network’
You will then be given the option to scan
for available networks. Press the
SELECT
button to action this request.
NOTE: If you make a mistake at any point,
press
BACK to return to previous screen.
If Mondo can’t find a wireless network it
will display the following message.
If this happens please check that your
wireless router is switched on, refer to
the manufacturer if problem persists.
If Mondo does find your wireless network,
it will display the network name, for
example:
In some cases Mondo Wi-Fi may find
more than one network. Use the
<>
buttons to see the names of each one –
and press the
SELECT button when the
name of your own network is displayed.
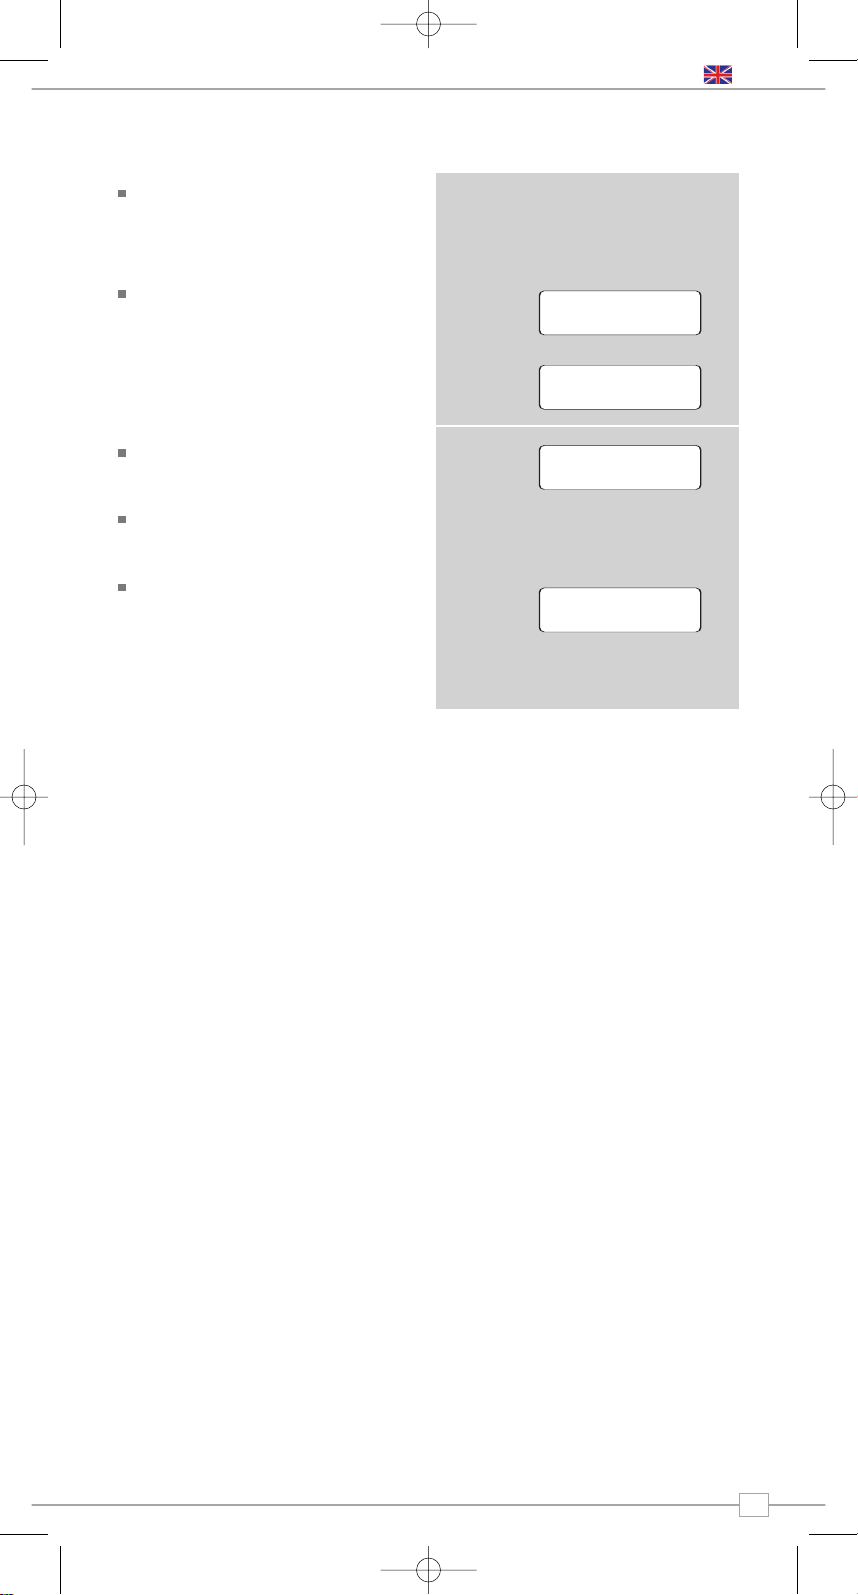
If your network is not configured to
request a password (WEP/WPA), Mondo
will connect to the network and display:
If a WEP/WPA key (password) is
required, Mondo will display the following:
After a few seconds, Mondo will ask you
to input the WEP/WPA code and will
display the password entry screen:
Use the
<>buttons to cycle back and
forward through the alpha-numeric
character list. Press the
SELECT button
to select a character.
Please note, WEP/WPA pass codes are
case-sensitive.
If you make a mistake while entering your
password, press the
BACK button to
delete a character.
After selecting the final character of your
password, scroll to the word ‘END’ and
press the
SELECT button to enter your
code. Mondo Wi-Fi should now
successfully connect to your network.
Mondo Wi-Fi will automatically remember
the WEP/WPA code for your network,
and other networks you have used
previously. You will not need to re-enter
these codes in the future.
Connecting To Your Network
87.50MHz
Clock not set...
English
Revo Mondo
Wi-Fi
Initialising
Network
Revo Pico Wi-Fi
Internet Radio
< Scan for
network >
Connecting to
Network
Initialising
Network
Revo Pico Wi-Fi
Internet Radio
< Scan for
network >
Connecting to
Network
Initialising
Network
Revo Pico Wi-Fi
Internet Radio
No Wireless
Networks Found
< Scan for
network >
My Home Network
Connecting to
Network
Initialising
Network
Revo Pico Wi-Fi
Internet Radio
No Wireless
Networks Found
< Scan for
network >
My Home Network
Network Ok
Connecting to
Network
Initialising
Network
Revo Pico Wi-Fi
Internet Radio
No Wireless
Networks Found
< Scan for
network >
My Home Network
Network Ok
Connecting to
Network
Initialising
Network
Revo Pico Wi-Fi
Internet Radio
No Wireless
Networks Found
Connecting to
Network
Initialising
Network
Revo Pico Wi-Fi
Internet Radio
< Scan for
network >
My Home Network
Network Ok
Enter WEP key
<END<> 0 1234>
<END<> 0 1234>
Using saved key
Connecting to
Network
Initialising
Network
Revo Pico Wi-Fi
Internet Radio
No Wireless
Networks Found
< Scan for
network >
My Home Network
Network Ok
Enter WEP key
Connecting to
Network
Initialising
Network
Revo Pico Wi-Fi
Internet Radio
No Wireless
Networks Found
< Scan for
network >
My Home Network
Network Ok
Enter WEP key
<END<> 0 1234>
Connecting to
Network
Initialising
Network
Revo Pico Wi-Fi
Internet Radio
No Wireless
Networks Found
MONDO Wi-Fi Manual.qxd 10/12/07 12:01 Page 5
Page 6
When Mondo Wi-Fi has connected to your
wireless network, you are now ready to
select a station.
Please Note: You can move back to the
previous screen at any time by pressing
the
BACK button.
Mondo Wi-Fi has three main menu
headings Stations, Configure and Media
Player.To select a radio station, use the
<>buttons until the word STATIONS
appears, then press the
SELECT button.
You now have the option of selecting a
station by
location (country) or by genre.
Use the <>buttons to pick your search
method, then press
SELECT.
Choosing
location will give you an
alphabetical list of countries broadcasting
internet radio. Use the <>buttons to
scroll through the country list. Press
SELECT to select your desired location.
For example:
You will then be given the choice of listing
all station types in this country, or listing
them by genre eg. Pop, Dance... etc.
Use the
<>keys and press SELECT to
make your selection, Mondo Wi-Fi will now
download the station list for your choice.
You can now scroll through the station list
and make your selection by pressing the
SELECT button.
Choosing
Genre will give you an
alphabetical list of station types. Use the
<>keys to view these.
Press the
SELECT button to choose your
desired genre.
You will now be given the choice of viewing
all stations in this genre, or further
sorting them by location (country)
Now select your chosen station from the
alphabetical list.
Station Updates
Occasionally, Mondo Wi-Fi will tell you that it
is receiving an updated station list. It does
this automatically and periodically, ensuring
that Mondo Wi-Fi always has the latest
station directory on-board.
Choosing a Station
87.50MHz
Clock not set...
6
OR
OR
English
<Stations >
<Location >
6537 Stations
<Stations >
<Genre >
6537 Stations
<Location >
6537 Stations
<Stations >
<Albania >
16 Stations
<Genre >
6537 Stations
<Location >
6537 Stations
<Stations >
<Albania >
16 Stations
<Genre >
6537 Stations
<Location >
6537 Stations
<Stations >
<[All Station] >
323 Stations
<Albania >
16 Stations
< Dance >
323 Stations
<Genre >
6537 Stations
<Location >
6537 Stations
<Stations >
<[All Station] >
323 Stations
<Albania >
16 Stations
Loading 323
Stations
< Dance >
323 Stations
<Genre >
6537 Stations
<Location >
6537 Stations
<Stations >
<[All Station] >
323 Stations
<Albania >
16 Stations
Loading 323
Stations
<Cool FM >
96 kbps WMA
< Dance >
323 Stations
<Genre >
6537 Stations
<Location >
6537 Stations
<Stations >
<[All Station] >
323 Stations
<Albania >
16 Stations
Loading 323
Stations
<Cool FM >
96 kbps WMA
< Genre >
6537 Stations
< Dance >
323 Stations
<Genre >
6537 Stations
<Location >
6537 Stations
<Stations >
<[All Station] >
323 Stations
<Albania >
16 Stations
Loading 323
Stations
<Cool FM >
96 kbps WMA
< Genre >
6537 Stations
< Dance >
323 Stations
< Dance >
323 Stations
<Genre >
6537 Stations
<Location >
6537 Stations
<Stations >
<[All Station] >
323 Stations
<Albania >
16 Stations
Loading 323
Stations
<Cool FM >
96 kbps WMA
< Genre >
6537 Stations
< Dance >
323 Stations
< Dance >
323 Stations
<[All Station] >
323 Stations
<Genre >
6537 Stations
<Location >
6537 Stations
<Stations >
<[All Station] >
323 Stations
<Albania >
16 Stations
Loading 323
Stations
Loading 323
Stations
<Cool FM >
96 kbps WMA
<Cool FM>
96 kbps WMA
Station Update
from Reciva
< Genre >
6537 Stations
< Dance >
323 Stations
< Dance >
323 Stations
<[All Station] >
323 Stations
<Genre >
6537 Stations
<Location >
6537 Stations
<Stations >
<[All Station] >
323 Stations
OR
MONDO Wi-Fi Manual.qxd 10/12/07 12:01 Page 6
Page 7
General Operation
7
Changing Volume
To change Mondo Wi-Fi’s volume, press the
VOLUME UP and DOWN buttons on
Mondo’s remote control, the volume level
will be displayed on Mondo’s LCD screen.
Mondo Wi-Fi will remember its previous
volume level after shutdown and power-up.
Internet Radio Presets
Mondo Wi-Fi can store five presets on its
remote control. To store the current
station, press and hold one of the preset
keys for a period of two seconds. To select
a stored station, simply press the
corresponding preset key.
Returning To Main Menu
You may return to Mondo’s top-line main
menu at anytime by pressing the
BACK
button and working back through previous
menus.
LCD Backlight
Under standard factory settings, Mondo will
dim its LCD backlight after approximately
30 seconds. Pressing any button on Mondo
or the remote control will temporarily return
the LCD brightness to full. To change these
factory settings see the ‘Backlight’
instructions on page 9 .
Requesting a Station
If you want to listen to a radio station that
is not listed in Mondo’s station list, you can
visit the Reciva website at
http://www.reciva.com/ and make a
request to add the station to the list.
OR
On-Demand Broadcasts
Some radio stations provide a number of
additional ways to listen to content; for
example being able to listen to radio
shows that have already been broadcast,
know as On-Demand or ‘Listen-Again’.
To choose between a ‘Live’ broadcast or
an On-Demand one, simply use the
<>
buttons to select your option and press
SELECT to choose.
If you select On-Demand, you will be
presented with a list of shows that are
available to ‘Listen Again’.
Use the
<>buttons until your choice is
displayed on the LCD, then press the
SELECT button to confirm.
Some stations may allow you to fastforward through an On-Demand
broadcast. Do so by pressing
BROWSE
on the remote control and using the <>
buttons to forward and rewind through
the broadcast. Press
SELECT to play
from your selected point.
Resetting Mondo Wi-Fi
In the unlikely even that Mondo Wi-Fi should
‘crash’, ‘freeze’ or stop responding to key
presses, it is possible to perform a reset
and bring it ‘back to life’.
A ‘Factory Reset’ can be activated from
Mondo’s ‘Configure’ menu. Performing a
factory reset will completely reset Mondo’s
memory, clearing all WEP/WPA codes and
user settings. This will effectively return
Mondo to its default factory settings.
English
< Live (Real
Audio) >
< On Demand >
< Live (Real
Audio) >
< On Demand >
< Chart Show >
< Live (Real
Audio) >
< On Demand >
< Chart Show >
Start Time
<00:03:03 >
< Live (Real
Audio) >
OR
MONDO Wi-Fi Manual.qxd 10/12/07 12:01 Page 7
Page 8
8
English
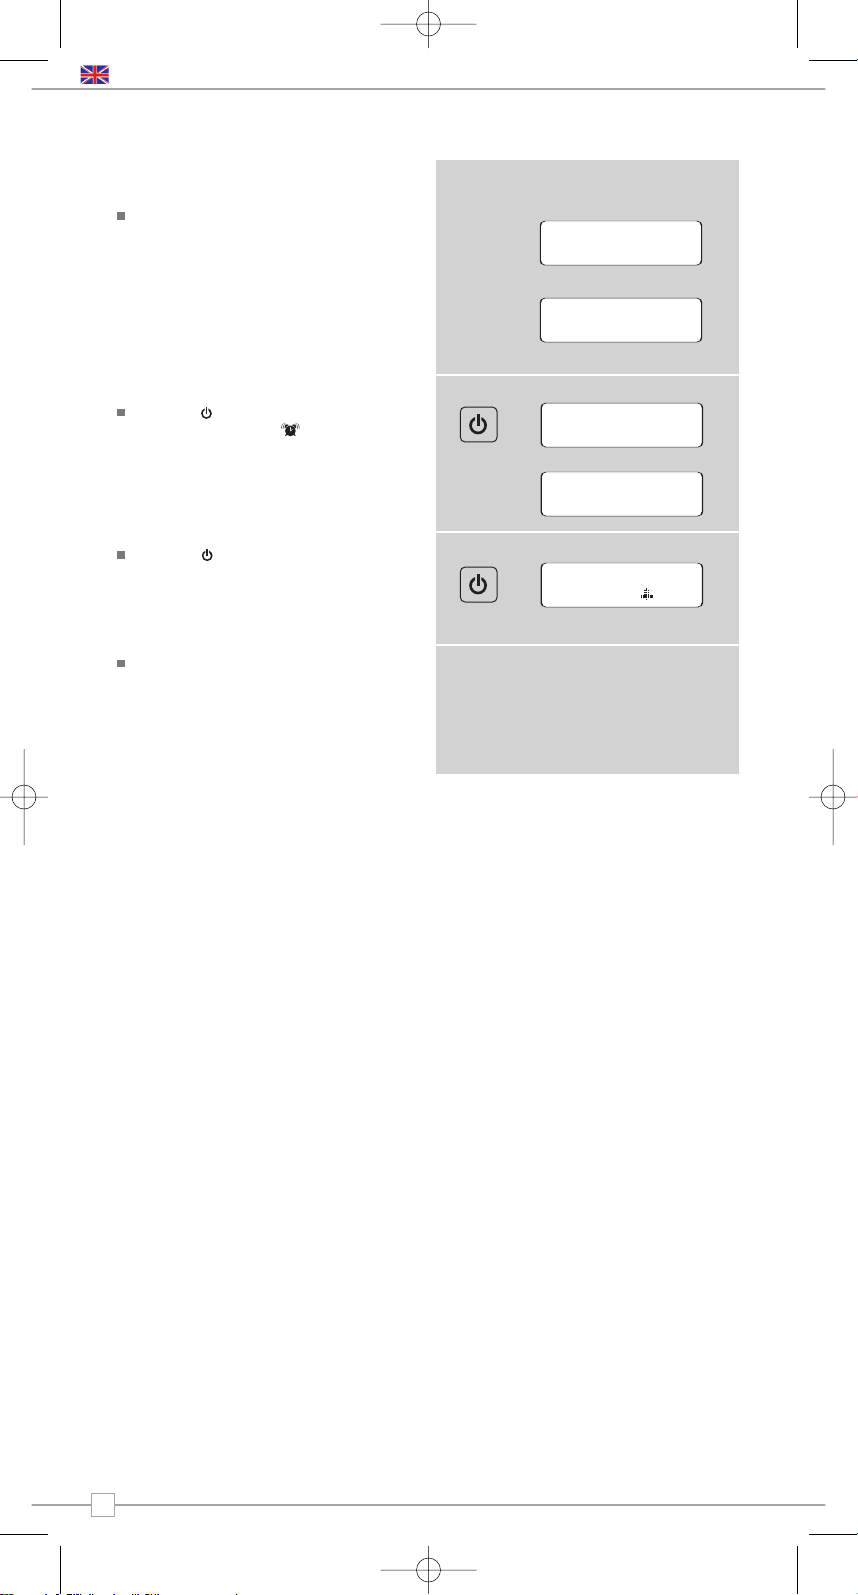
Setting An Alarm
Press the button to switch on your
radio, then press the button on the
Mondo Wi-Fi remote control. Use the <>
keys to change the hour, then press
SELECT to set. Mondo Wi-Fi will now ask
you to set the minutes in the same way,
press
SELECT to set the alarm time.
Press the button to put Mondo into
standby mode. Mondo will now display the
current time on the top row of its display,
with the alarm time shown in brackets on
the second line of the display.
Mondo Wi-Fi wake you up to an audible
tone, to stop the alarm simly press any
button on Mondo or its remote control.
When the alarm has been deactivated,
Mondo will switch to the radio station that
was playing before Mondo went into
standby mode.
Alarm + Clock Functions
Setting Mondo’s Clock
Turn Mondo Wi-Fi on and from the
Configure menu locate the Clock option.
Press SELECT and Mondo will give you
two options; ‘Set Clock’ or ‘Set Alarm’.
Choose ‘Set Clock’ and press
SELECT,
now use the <>keys to change the hour,
then press
SELECT to set. Mondo Wi-Fi
will now ask you to set the minutes in the
same way, press
SELECT to set the time.
<Alarm1 >
<Set alarm >
<Set clock >
Set alarm
Set minutes
<08:05 >
Set Alarm
00:00
Set Clock
08:10
¯ Clock ˘
Alarm Set:
07:10
Set Alarm
00:00
Set Clock
08:10
¯ Clock ˘
22:35
(07:10 )
Alarm Set:
07:10
Set Alarm
00:00
Set Clock
08:10
¯ Clock ˘
¯ Clock ˘
Set Clock
08:10
¯ Clock ˘
MONDO Wi-Fi Manual.qxd 10/12/07 12:01 Page 8
Page 9
9
English
Network Configuration
Enables you to scan again for connection to
another wireless network, or to manually
configure the network parameters. You can
also choose to enable the ‘Low Signal
Warning’ prompt when your wireless
network signal is low.
Version
This will display such information as your
device s serial number and
hardware/software version numbers.
This information may be requested when
dealing with technical support issues.
Update Firmware
Use this to check whether there are any
firmware updates available for your Mondo
Wi-Fi radio adaptor. Mondo will check, and
prompt you if there is. You can then make
the decision whether to start a firmware
download or not. A firmware update can
take several minutes, do not switch Mondo
Wi-Fi off until this procedure has been
completed. Doing so my cause permanent
damage.
Language
This allows you to change Mondo’s display
language. Languages supported include
English, French, German, Italian,
Norwegian, Danish, Dutch, Portuguese,
Spanish, Swedish and Finnish.
Factory Reset
See page 7 for details.
Register
This will display a key code that can be used
to register your radio on the Reciva
customer portal: http://www.reciva.com/
Clock
Set Mondo Wi-Fi’s on-board clock via this
menu. It is also possible to access the
alarm clock features of Mondo Wi-Fi
through this menu, as an alternative to
using the remote control.
Sleep Mode
Select Sleep Mode from the congigure
menua to programme Mondo to turn itself
off after a pre-defined period of time. Sleep
Mode operates in 15 minute incraments,
from 15 minutes to 90 minutes. Simply use
the
<>keys to define the sleep period and
press
SELECT. Mondo Wi-Fi will now
automatically put itself into standby mode
after the time has elapsed.
Backlight
It is possible to change the brightness of
Mondo Wi-Fi’s LCD screen via the Configure
menu. There are three brightness settings
as follows:
Normal: This setting defines Mondo’s
normal LCD brightness level. Use the <>
keys to select the required brightness level
and press SELECT to set.
Auto-Bright: When switched on, pressing
any button on Mondo or its remote control
will activate ‘Auto-Bright’ mode for a period
of 30 seconds. The actual brightness level
for ‘Auto-Bright’ is defined by this setting.
Standby: This sets the LCD brighness level
for when Mondo Wi-Fi is in ‘Standby’ mode.
Use the
<>keys to select the required
brightness level and press
SELECT to set.
Wi-Fi Strength
This will display the strength of your Wi-Fi
signal and will range between 0% - 100%.
The further Mondo Wi-Fi is away from your
Wi-Fi base-station, the weaker the signal
strength will be.
Configure Menu
MONDO Wi-Fi Manual.qxd 10/12/07 12:01 Page 9
Page 10
10
English
Mondo Wi-Fi’s media player functionality
allows you to play audio files (AAC, AIFF, AU,
MP3, RM, WAV and WMA) and playlists
(M3U) stored on a networked PC or Apple
Mac. The media player functions have been
tested and certified to operate with
Windows 2000, Windows XP, Windows
Vista and Mac OSX 10.2 or a later version.
Windows PC Set-Up
Ensure that your PC is available on the
network, then using Windows Explorer,
locate the folder where your audio files are
stored...then
Right click on the folder.
Select ‘Properties’
Click on ‘Sharing’
Select “Share this folder on the network’
and ‘Allow network users to change my
files’. Please note, do not try to make your
‘My Documents’ or any of its sub-folders
(e.g. ‘My Music’) shareable.
Apple Mac Set-Up
Setup Windows File Sharing on the MAC:
From the ‘Dock’, click ‘System Preferences’.
From the ‘System Preferences’ window
(under the ‘Internet & Network’ section)
click ‘Sharing’.
From the ‘Sharing’ window, do the following:
Under the ‘Services’ section, enable
‘Personal File Sharing’ and ‘Windows
Sharing’. Also, click ‘Start’ for each of these
services.
Under the ‘Firewall’ section, keep firewall off.
Under the ‘Internet’ section, keep ‘Internet
Sharing’ off.
Setup an Account:
From the ‘System Preferences’ window,
under the ‘System’ section, click ‘Accounts’.
Select an account and remember its ‘Short
Name’ and password. This information will
be used by Mondo Wi-Fi when connecting to
your Mac.
Directory Setup:
From the ‘Dock’, click ‘Finder’. From the
‘Finder’ window, click ‘Applications >
Utilities’. Holding Ctrl click on ‘Directory
Access’ then select ‘Get Info’ and ensure
that read / write enabled. Next double click
on ‘Directory Access’ and enable the
following:
AppleTalk LDAPv3
SLP SMB/CIFS
Also, for the ‘SMB/CIFS’ item, click
‘Configure’ and select an appropriate
workgroup.
Copy and paste the audio files to
‘Documents’ in the ‘Finder’ window. Ensure
that your Mac is successfully connected to
the wireless network. Note, you may need
to wait for few minutes for the changes to
take effect.
You should now be able to access the audio
files on your Mac by selecting ‘Media Player
> Windows Shares’ on Mondo Wi-Fi, then
selecting your Mac from the list of devices.
On selecting your Mac, if no shared folders
are found, press the
SELECT button and
select user - at this point you can enter in
the ‘Short Name’ and password for your
Mac account.
Accessing ‘Shared’ Music
When Mondo has connected to your
wireless network, press the BACK button
until ‘Stations’ is displayed. Use the <>
keys to find the ‘Media Player’ menu onscreen, then press the SELECT button.
Using the <>keys, find and select
“Windows Shares’, then ‘Scan for PCs’.
Mondo will now display ‘Finding PCs’. When
the scan is complete, use the
<>keys to
find your PC and select, Mondo will now
search for shared folders. Using the
<>
keys to highlight the correct folder and
press SELECT.
Mondo will display ‘File Scan...’ as it scans
through all the files on your Mac or PC.
PLEASE NOTE If you have a large number
of files, this operation could take several
minutes.
When Mondo has finished scanning, it will
display ‘By Album’. You can now browse
through the scanned media files, which will
be organised ‘By Album’, ‘By Artist’, and
‘Playlist’ - if available.
IMPORTANT The first time Mondo Wi-Fi
completes a file scan, a file called
“reciva_media_cache” is written to the folder
where the audio files are stored. This will
speed-up subsequent file scans.
Listening To A Single Track
Scroll until ‘By Artist’ is on-screen then
press SELECT. Now use the <>keys to
scroll until your artist choice is displayed,
then press
SELECT. Now scroll until your
desired album is displayed, and select it.
The prompt ‘Add To Queue’ will appear at
this point. Scroll until your chosen track
name is on-screen and press
SELECT. Your
choice will now start to play.
Listening To A Complete Album
Using the <>keys, locate and select
‘By Artist’, then select your choice of artist.
Now use the
<>keys to scroll until your
album choice is displayed, then press
SELECT. The prompt ‘Add To Queue’ will
appear at this point, press SELECT and
your chosen album will start to play.
Queuing Tracks For Playback
Highlight your chosen track then press
SELECT. ‘Track Added To Queue’ will now
be displayed.
Queuing Albums For Playback
Highlight your chosen album then press
SELECT. Scroll to ’Add To Queue’ then
SELECT. ‘Tracks Added To Queue’ will now
be displayed.
Media Player Operation
✓
✓✓
✓
MONDO Wi-Fi Manual.qxd 10/12/07 12:01 Page 10
Page 11
11
Controlling Playback
Use the STOP button on Mondo’s
remote control to stop playback.
Use the
PLAY/PAUSE button to start
a track, pause a track, or restart a paused
track.
Use
SKIP TO PREVIOUS TRACK to
start playback of the previous track in the
queue.
Use the
SKIP TO NEXT TRACK to
start playback of the next track in the
queue.
Browsing A Queue
Press the BROWSE button - the currently
playing track name will be displayed. Use
the <>keys to see the tracks that are
queued for playback. To jump ahead and
play a track from the queue, use the
<>
keys and SELECT.
Removing Tracks From A Queue
Press the BROWSE button - the currently
playing track name will be displayed.
Use the <>keys to scroll to the track
that you would like to remove from the
queue. Press and hold the
STOP key for 2
seconds. Mondo will display ‘Delete Track?’.
Use the <>keys to to highlight either
‘Yes’ or ‘No’. Press
SELECT to make your
selection. ‘Removed From Queue’ will be
displayed if you decided to delete a track.
To clear the entire contents of a queue,
select ‘Clear Queue’ from the the main
Media Player menu.
Playing Tracks Randomly
Select and add the individual tracks to the
queue as described previously.
Return to the main top-line Media Player
menu and select ‘Playback Mode’.
Use the
<>keys to display ‘Shuffle’, then
select
SELECT.
Confirm that ‘Shuffle’ mode should be
enabled, by selecting YES or NO.
Repeating Tracks In A Queue
Select the individual tracks as previously
described.
Return to the main top-line Media Player
menu and select ‘Playback Mode’.
Scroll to display ‘Repeat’, then press
SELECT button.
Confirm that ‘Repeat’ mode should be
enabled, by selecting YES or NO.
Windows PC UPnP Set-Up
If your PC is running Microsoft Windows XP
or Vista, then you can use Window Media
Player 11 (WMP 11) to act as your UPnP
(Universal Plug and Play) media server 1.0.
WMP 11 can be downloaded from
Microsoft’s website and installed by following
the instructions detailed in its installation
wizard.
Once installed, Windows Media Player 11
will create a library from all the media files
available to it on your PC. To add new media
files to the library, select ‘File > Add to
Library… > Advanced Options’, click ‘Add’
and choose the files you wish to add and
click ‘OK’.
You will now need to connect Mondo Wi-Fi
to Windows Media Player 11 and configure
it to allow the radio to access your media
library. In order to this, you will need to do
the following:
Keep pressing
BACK to get to Mondo’s
top-line menu and then scroll to ‘Media
Player’ and press SELECT.
Now use the
<>keys to scroll to ‘UPNP
Servers’ and press
SELECT. Mondo will
scan for all available UPnP servers. Note, it
may take a few seconds for Mondo to
complete its scan and before the scan has
been completed. Mondo will display
‘[Empty]’. Mondo will continue to display
‘[Empty]’ if no UPnP servers are found.
If “No PC Found” is displayed on Mondo’s
display, click the library tab in Windows
Media Player and select media sharing, now
select share my media and then click ‘OK’.
At this point you can scan for UPnP
servers on Mondo Wi-Fi again, Mondo will
now be listed as a unknown device in the
media sharing window click the ‘Allow’
button and then click ‘OK’. Mondo Wi-Fi
should now be accessing your Windows
Media Player Library.
PLEASE NOTE that only WMA files in
Windows Media Player are accessible using
UPnP.
Playing Music Using UPnP
When the UPnP server is configured to
share media files with Mondo Wi-Fi, you can
begin playing music as follows:
Press the
BACK button until ‘Stations’ is
displayed, then scroll to ‘Media Player’
option, now press the SELECT button.
Use the <>keys to highlight ‘UPNP
Servers’ and press
SELECT. Mondo will
scan for all available UPnP servers. Please
note, it may take a few seconds for Mondo
to complete its scan. Before the scan has
been completed, Mondo will display ‘[Empty]’
and continue to do so if no UPnP servers
can be found.
After a successful scan, select your UPnP
server using the
<>keys (if there is more
than one UPnP server), and then pressing
the
SELECT button.
Mondo will now list the media categories
available from the UPnP server, e.g. ‘Music’,
‘Playlists’ etc. Use the
<>keys to choose
which category you wish to browse, then
press
SELECT. Use the <>keys to
highlight a sub category and press
SELECT.
Scroll to highlight the media files that you
wish to play, then press
SELECT. Mondo
will display ‘[Add to Queue]’, press SELECT
again and Mondo will add the tracks to its
queue and begin playing them automatically.
added to the radio’s queue.
English
MONDO Wi-Fi Manual.qxd 10/12/07 12:01 Page 11
Page 12
Browsing A Queue
Press the BROWSE button - the currently
playing track name will be displayed. Use
the <>keys to scroll through the tracks
that are queued for playback. If you want to
jump to a particular place in the queue,
press the
SELECT button when the
required track is displayed. It is important to
note here that media files scanned from the
radio’s ‘Windows Shares’ function can also
be added to the radio’s queue.
Full instructions on queue management,
controlling music playback etc. under UPnP
can be found on page 11.
If you are experiencing any problems with
your Mondo Wi-Fi internet radio adaptor,
please read the following ‘troubleshooting’
guide. Alternatively can can visit the HELP
section of the Reciva website
(www.reciva.com) the support section of the
Revo website (www.revo.co.uk) or call our
technical support staff on 01555 66 61 61.
If you have trouble connecting Mondo Wi-Fi
to your wireless network, these steps may
help to resolve the problem:
1. Confirm that a Wi-Fi connected PC can
access the Internet (i.e. can browse the
web) using the same network.
2. Check that a DHCP server is available, or
that you have configured a static IP address
on the radio. You can configure a static IP
address on the radio using the menu item
‘Configure -> Network Config -> Edit Config’,
and then select ‘No’ for ‘Auto (DHCP)’.
3. Check that your network’s firewall is not
blocking any outgoing ports. As a
minimum, Mondo Wi-Fi needs access to
UDP and TCP ports 80, 554, 1755, 5000
and 7070.
4. Check your access point does not
restrict connections to particular MAC
addresses. You can view the radio’s MAC
address using the menu item ‘Configure ->
Network Config -> View Config -> MAC
address’.
5. If you have an encrypted network, check
that you have entered the correct key or
pass phrase into the radio. Remember that
text-format keys are case sensitive. If, when
attempting to connect to an encrypted
network, your radio displays: ‘Wireless
error’ followed by a 5-digit number, then
please ensure that you enter the correct
pass phrase for the network. If the problem
persists, then you may need to consult your
network configuration.
If Mondo Wi-Fi can connect to the network
successfully, but is unable to play particular
stations, it may be due to one of the
following causes:
1. The station is not broadcasting at this
time of the day (remember it may be
located in a different time zone).
2. The station has reached the maximum
allowed number of simultaneous listeners.
3. The station is not broadcasting anymore.
4. The link on the radio is out of date.
5. The Internet connection between the
server (often located in a different country)
and you is slow. Try using a PC to play back
the stream via the broadcaster’s web site.
If you can play back the station with a PC,
but not via Mondo Wi-Fi - use the form at
http://www.reciva.com/ to notify Reciva of
the problem - they can change the station
data that is used by the radio.
Troubleshooting
12
Accessories and Spares
Remote Control:
Replacement Mondo remote control.
Mains Power Supply Unit:
Replacement power supply for Mondo.
Stereo RCA Leads:
Replacement leads to connect Mondo to a hi-fi system or similar.
The following optional accessories and spare parts are available for Mondo.
Please contact your local retailer or alternatively call us on 01555 666 161.
Accessories and spare parts can also be purchased online at www.revo.co.uk
English
MONDO Wi-Fi Manual.qxd 10/12/07 12:01 Page 12
Page 13
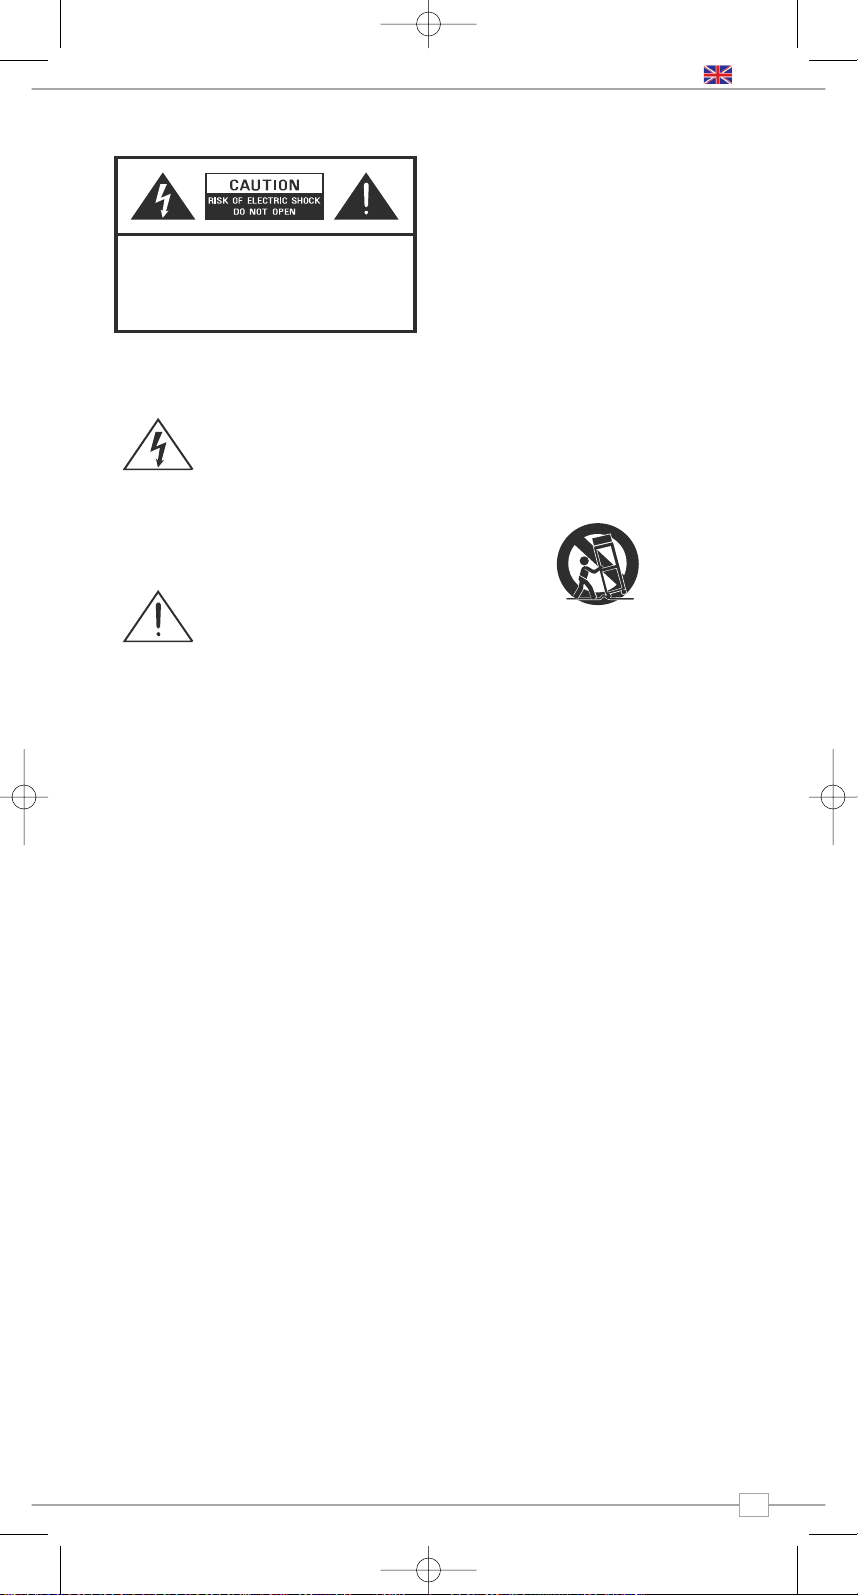
Safety Information
The lightning flash with
arrowhead symbol within an
equilateral triangle is intended
to alert the user to the
presence of uninsulated
"dangerous voltage" within the
product's enclosure that may
be of sufficient magnitude to
constitute a risk of electric
shock to persons.
The exclamation point within an
equilateral triangle is intended
to alert the user to the
presence of important
operating and maintenance
(servicing) instructions in the
literature accompanying the
appliance.
WARNING: TO REDUCE THE RISK OF FIRE
OR ELECTRIC SHOCK, DO NOT EXPOSE
THIS APPLIANCE TO RAIN OR MOISTURE.
IMPORTANT SAFETY INSTRUCTIONS
To reduce the risk of electrical shock, fire,
etc:
1. Read these instructions.
2. Keep these Instructions.
3. Heed all Warnings.
4. Follow all instructions.
5. Do not use this apparatus near water.
6. Clean only with dry cloth. For stubborn
stains, use a soft cloth dampened with a
weak solution of mild detergent and
water. Dry the apparatus immediately
afterwards with a clean cloth. Do not use
abrasive clothes, thinners, alcohol, or
other chemical solvents, because they
may damage the finish or remove the
panel lettering.
7. Do not block any ventilation openings. The
ventilation shall not be impeded by
covering the ventilation openings with
items, such as newspapers, table clothes,
curtains, etc.
8. Do not install near any heat source such
as radiators, heat registers, stoves, or
other apparatus (including amplifiers) that
produce heat.
9. Do not defeat the safety purpose of the
polarized or grounding - type plug. A
polarized plug has two blades with one
wider than the other. A grounding type
plug has two blades and a third grounding
prong. The wide blade or the third prong
are provided for your safety. If the
provided plug does not fit into your outlet,
consult an electrician for replacement of
the obsolete outlet.
10. Protect the power cord from being
walked on or pinched particularly at
plugs, convenience receptacles, and the
point where they exit from the apparatus.
If the power cord is damaged, it must be
repaired by a qualified repairer.
11. Only use attachments/accessories
specified by the manufacturer.
12. Use only with the cart, stand, tripod,
bracket or table specified by the
manufacturer, or sold with the apparatus.
When a cart is used, use caution when
moving the cart/apparatus combination
to avoid injury from tip-over.
13. Unplug this apparatus during lightning
storms or when unused for long periods
of time.
14. Refer all servicing to qualified service
personnel. Servicing is required when the
apparatus has been damaged in any way,
such as power-supply cord or plug is
damaged, liquid has been spilled or
objects have fallen into the apparatus, the
apparatus has been exposed to rain or
moisture, does not operate normally, or
has been dropped.
15. The apparatus shall not be exposed to
dripping or splashing and no objects filled
with liquids, such as vases, shall be
placed on the apparatus.
16. The mains plug or an appliance coupler is
used as the disconnect device, the
disconnect device shall remain readily
operable.
17. Please read Rating Labels at the bottom
of the Sender and Receiver for power
input and other safety information.
FCC
This device complies with Part 15 of the FCC
Rules Operation that is subject to following
two conditions:
(1) This device may not cause harmful
interference and,
(2) This device must accept any
interference received, including
interference that may cause undesired
operation.
WARNING: Changes or modifications to this
unit not expressly approved by the party
responsible for compliance could void the
user authority to operate the equipment.
PORTABLE CART WARNING
CAUTION:
TO REDUCE THE RISK OF ELECTRIC SHOCK:
DO NOT REMOVE SCREWS, COVERS OR THE CABINENT.
NO USER SERVICING PARTS INSIDE.
REFER SERVICING TO QUALIFIED SERVICE PERSONNEL.
13
English
MONDO Wi-Fi Manual.qxd 10/12/07 12:01 Page 13
Page 14

Notes
MONDO Wi-Fi Manual.qxd 10/12/07 12:01 Page 14
Page 15
WI-FI INTERNET RADIO
INTERNET RADIO ADAPTOR
Français
Guide de Fonctionnement
MONDO Wi-Fi Manual.qxd 10/12/07 12:01 Page 15
Page 16
Table des matières
Bienvenu chez Mondo Wi-Fi 3
Les avantages de la radio internet 3
Vue d’ensemble Mondo Wi-Fi 3
Garantie 3
Inscription pour la garantie 3
Avant de commencer 3
Exigences Wi-Fi Internet 3
Connecter Mondo 3
Contrôles et connexion 4
Télécommande 4
Mise en marche de Mondo 4
Reciva Radio Portal 4
Connexion au réseau 5
Choisir une station 6
Mise à jour des stations 6
Programme sur demande 7
Fonctionnement général 7
Reprogrammation de Mondo 7
Fonctions réveil et horloge 8
Programmer l’horloge de Mondo 8
Programmer le réveil 8
Configurer le Menu 9
Configurer le réseau 9
Version+mises à jour du micrologiciel 9
Langages 9
Remise à zéro 9
Enregistrement 9
Horloge 9
Mode de veille 9
Lumière de fond 9
Force Wi-Fi 9
Fonctionnement du Media Player 10
Installation Windows + Apple Mac 10
Accès à la musique partagée 10
Fonctionnement du Media Player 10
Installation de Windows PC UPnP 11
Dépannage 12
Pièces de rechange, Accessoires 12
Droits d’auteur et
Remerciements
Droits d'auteur© 2007 Revo Technologies
Ltd. Tous droits réservés.
Revo Technologies Ltd
The Inox Building
Caldwellside
Lanark
Scotland
United Kingdom
ML11 7SR
Tel. 01555 66 61 61
Int. Tel. +44 1555 66 61 61
Fax. 01555 66 33 44
Int. Fax. +44 1555 66 33 44
Email. enquiries@revo.co.uk
Website: www.revo.co.uk
Les informations contenues dans ce guide
sont réputées exactes au moment de leur
publication. Cependant, nous observons une
politique de développement continu et ces
informations sont donc sujettes à
changement sans avertissement préalable.
Revo®, Mondo™ et M-Port™ sont des
marques déposées ou enregistrées de Revo
Technologies Limited.
iPod® est une marque enregistrée de Apple
Computer, Inc.
Avertissements
Ne faites pas fonctionner cette radio près
de l’eau.
Evitez que de petits objets et des liquides
entrent dans ce produit.
N’ôtez pas les vis ou des parties du boîtier.
Utilisez uniquement le bloc d’alimentation qui
est fourni.
CEE: Ce produit a été conçu et testé de
manière à être conforme aux exigences EU
et porte la marque CE.
Support Technique
En cas de difficultés pour faire fonctionner
votre radio, ou si vous soupçonnez quelque
défaut, veuillez s'il vous plaît appeler notre
département de support technique au
numéro ci-dessous:
01555 66 61 61
Vous pouvez aussi nous écrire un email à:
support@revo.co.uk ou visiter la section
dépannage sur notre site Web:
www.revo.co.uk/support
Préface
2
Français
MONDO Wi-Fi Manual.qxd 10/12/07 12:01 Page 16
Page 17
Avantages de la radio Internet
Accès à + de 7 000 stations Internet
Recherche par genre or par pays
Accès aux services de réécoute
Mise à jour automatique de la liste des stations
Pas de frais d’inscription
Mondo Wi-Fi Overview
L’adaptateur Internet Wi-Fi Mondo peut
accéder des miliers de stations radio
internet du monde entier, offrant à
l’utilisateur un choix sans précédent de
contenu radio.
Mondo Wi-Fi se connecte à tout système de
son ayant des entrées RCA, que ce soit un
système hi-fi ou un transistor. Il se relie
ensuite à toute connection Wi-Fi à large
bande pour diffuser les programmes radio
en direct et en réécoute.
Mondo possède en outre toutes les
fonctions de réveil.
Garantie
Revo Technologies Ltd garantit à l’acheteur
que ce produit ne présentera de défauts de
fabrication ou sur ses pièces lors de son
utilisation normale durant une période de un
an à partir de la date d’achat.
Cette garantie ne s’applique pas en cas de
dommages accidentels, dus à l’usure ou la
négligence, à des modifications ou à l’utilisation
inappropriée ou si le boîtier a été ôté.
Si ce produit présente un problème, veuillez
s’il vous plaît contacter votre revendeur ou
voir les coordonnées du support technique à
la page 2 de ce guide.
Enregistrement de la garantie
Une condition de la garantie est
d’enregistrer votre achat soit en remplissant
la carte de garantie inclue avec votre radio,
soit en l’inscrivant en ligne sur
www.revo.co.uk/register.
Wi-Fi Internet Requirements
Vous aurez besoin d’une connection Internet
Wi-Fi (sans fil) à large bande passante afin
de pouvoir utiliser votre radio Mondo
Internet Wi-Fi.
Si votre réseau sans fil est configuré de
manière à utiliser l’encodage de données
WEP (Wireless Equivalent Privacy) ou WPA
(Wi-Fi Protected Access), vous aurez besoin
de connaître le code WEP ou WPA (code
Web) de manière à permettre à votre
Mondo Wi-Fi de communiquer avec le
réseau.
Mondo Wi-Fi devrait pouvoir fonctionner
dans un rayon de 35 mètres à partir de la
station de base (selon l’environnement et les
spécifications de votre station de base sans
fil).
Veuillez vous assurer que votre réseau sans
fil est bien allumé et connecté à votre
connection Internet à large bande passante.
Merci d’avoir acheté notre Adaptateur digital de radio DAB Mondo, nous sommes
certains que vous en retirerez des années de plaisir et de service fiable.
Ce guide a été conçu pour que vous soyez rapidement prêt à utiliser et
écouter la radio Internet, pour vous offrir des conseils sur les fonctions plus
complexes de ce produit et vous fournir des informations sur la sécurité, la
garantie et l’enregistrement.
Bienvenue à Mondo Wi-Fi
Avant de commencer
Connecting Mondo
Mondo peut être connecté à tout système
audio possédant des entrées stéréo RCA.
À l’aide des câbles fournis, connectez-le
simplement aux entrées correspondantes
rouges et noires se trouvant à l’arrière de
Mondo.
3
Français
MONDO Wi-Fi Manual.qxd 10/12/07 12:01 Page 17
Page 18

Controls and Connectors
Votre radio internet Mondo Wi-Fi fonctionne sur le secteur au moyen de l’adaptateur de
courant fourni.
A cet effet, insérez la fiche de l’adaptateur dans la prise DC située à l’arrière de
Mondo Wi-Fi. Appuyez sur le bouton pour allumer Mondo Wi-Fi.
Utilisez uniquement l’adaptateur du bloc-secteur fourni pour nos appareils. Des pièces de
rechange sont disponibles: veuillez visiter notre site Web
www.revo.co.uk ou nous appeler au
01555 66 61 61.
La liste de stations utilisée par Mondo Wi-Fi
est compilée et gérée par Reciva Limited,
qui fournit également la technologie de radio
Internet utilisée pour Mondo Wi-Fi.
Les utilisateurs de Mondo Wi-Fi ont accès
à d’autres services de radio Internet en
visitant le portail radio Reciva:
www.reciva.com et en y inscrivant leur
radio.
Portail Radio Reciva
Alimentation de Mondo Wi-Fi
1. Power (mise en/hors circuit)
2. Retour
3. Défilement vers la gauche
4. Défilement vers la droite
5. Choisir
1. Wi-Fi Antenne
2. Sortie stéréo RCA
3. Prise DC
4. Prise pour écouteurs
1. Défilement vers la gauche
2. Choisir
3. Réponse
4. Retour
5. Programmes
6. Lecteur multimédia
7. Naviguer
8. Diminuer le volume
9. Scroll Right
10. Augmenter le volume
11. Réveil allumé/éteint
12. Attente
1.
3.
4.
5. 6.
8.
10.
11.
12.
7.
9.
2.
Contrôles du lecteur multimédia
Stop
Saut arrière Saut avant
Jouer / Arrêt
Remote Control
4
Français
2.1.
3. 4.
1.
2. 3. 4. 5.
A
A
back select
MONDO Wi-Fi Manual.qxd 10/12/07 12:01 Page 18
Page 19
Appuyez sur ON/OFF pour allumer Mondo
Wi-Fi. L’écran LCD de Mondo affichera un
message de bienvenue.
Après quelques secondes, ce message
deviendra ‘Initialising Network’
Vous aurez ensuite la possibilité de
rechercher les réseaux disponibles.
Appuyez sur le bouton
SELECT
afin d’actionner cette fonction.
REMARQUE: Si vous faites une erreur, vous
pouvez appuyer sur
BACK à tout moment
afin de revenir à l’écran précédent.
Si Mondo ne peut pas trouver de réseau
sans fil il affichera le message suivant.
Dans ce cas, veuillez vérifier que votre
routeur sans fil est bien allumé, et adressezvous au fabriquant si le problème persiste.
Si Mondo trouve votre réseau sans fil, il
affichera le nom du réseau,
comme par exemple:
Il se peut que Mondo Wi-Fi trouve plus
d’un réseau. Utilisez les boutons
<>afin
de voir leurs noms, et appuyez sur le
bouton
SELECT lorsque le nom de votre
réseau apparaît.
Si votre réseau n’est pas configuré de
manière à demander un mot de passe
(WEP/WPA),Mondo se connectera
au réseau et affichera:
Si un mot de passe WEP/WPA est exigé,
Mondo affichera ce message:
Après quelques secondes, Mondo vou
demandera d’introduire le code
WEP/WPA et affichera l’écran d’entrée
du mot de passe de la manière suivante:
Utilisez les boutons
< et > afin d’avancer
ou de reculer dans la liste de caractères
alpha-numériques. Appuyez sur le bouton
SELECT pour choisir un caractère
Veuillez remarquer que les codes
WEP/WPA respectent la casse.
Si vous faites une erreur lors de
l’introduction de votre mot de passe,
appuyez sur le bouton
BACK afin d’effacer
un caractère.
Après avoir choisi le dernier caractère de
votre mot de passe, faites défiler jusqu’au
mot ‘END’ et appuyez sur le bouton
SELECT
pour entrer votre code. Mondo Wi-Fi devrait
alors se connecter à votre réseau.
Mondo Wi-Fi se souviendra automatiquement
du code WEP/WPA de votre réseau ainsi
que d’autres réseaux que vous avez utilisés
auparavant. Il ne vous sera plus nécessaire
d’introduire ces codes dans le futur.
Connection au réseau
87.50MHz FM
94.50MHz FM
Clock not set...
Revo Mondo
Wi-Fi
Initialising
Network
Revo Pico Wi-Fi
Internet Radio
< Scan for
network >
Connecting to
Network
Initialising
Network
Revo Pico Wi-Fi
Internet Radio
< Scan for
network >
Connecting to
Network
Initialising
Network
Revo Pico Wi-Fi
Internet Radio
No Wireless
Networks Found
< Scan for
network >
My Home Network
Connecting to
Network
Initialising
Network
Revo Pico Wi-Fi
Internet Radio
No Wireless
Networks Found
< Scan for
network >
My Home Network
Network Ok
Connecting to
Network
Initialising
Network
Revo Pico Wi-Fi
Internet Radio
No Wireless
Networks Found
< Scan for
network >
My Home Network
Network Ok
Connecting to
Network
Initialising
Network
Revo Pico Wi-Fi
Internet Radio
No Wireless
Networks Found
Connecting to
Network
Initialising
Network
Revo Pico Wi-Fi
Internet Radio
< Scan for
network >
My Home Network
Network Ok
Enter WEP key
<END<> 0 1234>
<END<> 0 1234>
Using saved key
Connecting to
Network
Initialising
Network
Revo Pico Wi-Fi
Internet Radio
No Wireless
Networks Found
< Scan for
network >
My Home Network
Network Ok
Enter WEP key
Connecting to
Network
Initialising
Network
Revo Pico Wi-Fi
Internet Radio
No Wireless
Networks Found
< Scan for
network >
My Home Network
Network Ok
Enter WEP key
<END<> 0 1234>
Connecting to
Network
Initialising
Network
Revo Pico Wi-Fi
Internet Radio
No Wireless
Networks Found
5
Français
MONDO Wi-Fi Manual.qxd 10/12/07 12:01 Page 19
Page 20
Une fois que Mondo Wi-Fi est connecté à
votre réseau sans fil, vous êtes prêt à
choisir une station.
Remarque: Vous pouvez retourner à
l’écran précédent à tout moment en
appuyant sur le bouton
BACK.
Mondo Wi-Fi dispose de trois titres de
menus principaux: Stations, Configure et
Media Player. Afin de choisir une station,
utilisez les boutons < et > jusqu’à ce que
le mot STATIONS apparaisse, appuyez
ensuite sur le bouton
SELECT.
Vous avez maintenant la possibilité de
choisir une station par sa situation (pays)
ou par genre. Utilisez les boutons < et >
afin de choisir votre méthode de recherche,
et ensuite appuyez sur
SELECT.
Le fait de choisir une situation vous
donnera une liste de pays diffusant de la
radio Internet. Utilisez les boutons
< et >
pour faire défiler la liste des pays.
Appuyez sur SELECT pour choisir la
situation désirée. Par exemple:
Vous aurez alors le choix de voir la liste de
tous les genres de stations dans ce pays,
ou de voir la liste des stations selon leur
genre (par ex. Pop, Dance, etc.).
Utilisez les boutons
< et >
et appuyez sur
SELECT pour faire votre choix. Mondo
Wi-Fi va alors télécharger la liste de
stations suivant votre choix.
Vous pouvez maintenant faire défiler la
liste de stations et effectuer votre choix
en appuyant sur le bouton
SELECT.
Le fait de choisir
Genre vous donnera une
liste alphabétique des genres de stations.
Utilisez les boutons
< et >
afin de les voir.
Appuyez sur le bouton
SELECT pour
choisir le genre désiré.
Vous avez alors le choix de voir toutes les
stations diffusant ce genre, ou de les
classifier aussi par situation (pays).
Choisissez maintenant la station désirée
se trouvant dans la liste alphabétique.
Mise à jour des stations
Occasionnellement, Mondo Wi-Fi vous
annoncera qu’il reçoit une liste de stations
mise à jour. Cela se passe automatiquement
et périodiquement, de manière à assurer
que Mondo Wi-Fi dispose toujours la
dernière liste de stations en date.
Choisir une station
87.50MHz FM
94.50MHz FM
Clock not set...
OR
OR
<Stations >
<Location >
6537 Stations
<Stations >
<Genre >
6537 Stations
<Location >
6537 Stations
<Stations >
<Albania >
16 Stations
<Genre >
6537 Stations
<Location >
6537 Stations
<Stations >
<Albania >
16 Stations
<Genre >
6537 Stations
<Location >
6537 Stations
<Stations >
<[All Station] >
323 Stations
<Albania >
16 Stations
< Dance >
323 Stations
<Genre >
6537 Stations
<Location >
6537 Stations
<Stations >
<[All Station] >
323 Stations
<Albania >
16 Stations
Loading 323
Stations
< Dance >
323 Stations
<Genre >
6537 Stations
<Location >
6537 Stations
<Stations >
<[All Station] >
323 Stations
<Albania >
16 Stations
Loading 323
Stations
<Cool FM >
96 kbps WMA
< Dance >
323 Stations
<Genre >
6537 Stations
<Location >
6537 Stations
<Stations >
<[All Station] >
323 Stations
<Albania >
16 Stations
Loading 323
Stations
<Cool FM >
96 kbps WMA
< Genre >
6537 Stations
< Dance >
323 Stations
<Genre >
6537 Stations
<Location >
6537 Stations
<Stations >
<[All Station] >
323 Stations
<Albania >
16 Stations
Loading 323
Stations
<Cool FM >
96 kbps WMA
< Genre >
6537 Stations
< Dance >
323 Stations
< Dance >
323 Stations
<Genre >
6537 Stations
<Location >
6537 Stations
<Stations >
<[All Station] >
323 Stations
<Albania >
16 Stations
Loading 323
Stations
<Cool FM >
96 kbps WMA
< Genre >
6537 Stations
< Dance >
323 Stations
< Dance >
323 Stations
<[All Station] >
323 Stations
<Genre >
6537 Stations
<Location >
6537 Stations
<Stations >
<[All Station] >
323 Stations
<Albania >
16 Stations
Loading 323
Stations
Loading 323
Stations
<Cool FM >
96 kbps WMA
<Cool FM>
96 kbps WMA
Station Update
from Reciva
< Genre >
6537 Stations
< Dance >
323 Stations
< Dance >
323 Stations
<[All Station] >
323 Stations
<Genre >
6537 Stations
<Location >
6537 Stations
<Stations >
<[All Station] >
323 Stations
OR
6
Français
MONDO Wi-Fi Manual.qxd 10/12/07 12:01 Page 20
Page 21

Fonctionnement général
Changer le volume
Afin de changer le volume de Mondo Wi-Fi,
appuyez sur les boutons VOLUME UP et
DOWN; le niveau numérique du volume
s’affichera sur l’écran LCD de Mondo.
Mondo Wi-Fi se souviendra de son niveau
de volume précédent après avoir été éteint
et rallumé.
Programmation de stations Internet
Mondo Wi-Fi peut garder 5 stations en
mémoire, au moyen de la télécommande.
Afin de garder la station actuelle en
mémoire, appuyez et gardez la pression sur
une des touches de programme.
Retour au menu principal
Vous pouvez revenir au menu principal
à tout moment en appuyant sur le bouton
BACK et en repassant par les menus
précédents.
Lumière de fond LCD
Lorsqu’il est réglé selon les configurations
standard, Mondo va faire décroître la
lumière LCD de fond après environ 30
secondes. Le fait d’appuyer sur n’importe
quel bouton de Mondo ou de la
télécommande va restaurer l’intensité
lumineuse originale du LCD. Pour changer
cette configuration standard, vueillez lire les
instructions concernant la lumière de fond,
page 9.
Demander une station
Si vous voulez écouter une station radio qui
ne se trouve pas sur la liste de Mondo,
vous pouvez visiter le site Web de Reciva à
http://www.reciva.com/ et demander que
cette station soit ajoutée à la liste.
OR
Diffusion sur demande
Certaines radios fournissent d’autres
manières d’écouter leurs émissions; elles
offrent par exemple la possibilité d’écouter des
émissions qui ont déjà été diffusées, système
appelé la diffusion sur demande, ou ’réécoute’
Pour choisir une diffusion en direct ou sur
demande, utilisez simplement les boutons
< et >
pour choisir votre option, et
appuyez sur
SELECT pour choisir.
Si vous choisissez “sur demande”, vous
verrez une liste d’émissions qui peuvent
être réécoutées.
Utilisez les boutons
< et >
jusqu’à ce que
votre choix soit affiché sur l’écran LCD, et
ensuite appuyez sur le bouton
SELECT
afin de confirmer.
Il se peut que certaines stations vous
permettent d’avancer rapidement dans une
émission sur demande. Vous pouvez, dans ce
cas, appuyer sur
BROWSE et utiliser les
boutons
< et > afin d’avancer rapidement et
retourner en arrière dans l’émission. Appuyez
sur
SELECT pour commencer à écouter à
partir du moment que vous avez choisi.
Réinitialisation de Mondo
Dans l’éventualité peu probable où Mondo
Wi-Fi se fige, se bloque, ou ne répond pas à
la pression exercée sur les boutons, il est
possibile de le réinitialiser et de le
‘réanimer’.
Il est possibile de remettre les paramètres
sur leurs réglages initiaux à partir du menu
‘Configure’ de Mondo. Le fait de remettre
les paramètres sur leurs réglages initiaux
va remettre la mémoire de Mondo à zéro,
effaçant tous les codes WEP/WPA ainsi
que les réglages effectués par l’utilisateur.
Ceci remettra donc Mondo sur ses réglages
initiaux (par défaut).
< Live (Real
Audio) >
< On Demand >
< Live (Real
Audio) >
< On Demand >
< Chart Show >
< Live (Real
Audio) >
< On Demand >
< Chart Show >
Start Time
<00:03:03 >
< Live (Real
Audio) >
OR
7
Français
MONDO Wi-Fi Manual.qxd 10/12/07 12:01 Page 21
Page 22

Régler le réveil
Appuyez sur pour allumer votre radio, appuyez
ensuite sur de la télécommandede Mondo
Wi-Fi. Utilisez les touches < et > pour changer
l’heure et appuyez sur
SELECT pour confirmer.
Mondo Wi-Fi vous demandera alors de choisir les
minutes de la même manière, appuyez sur
SELECT pour confirmer l’heure de réveil.
Appuyez pour mettre Mondo en mode
d’attente. Mondo affichera l’heure actuelle
sur la ligne supérieure de son écran,
l’heure de réveil étant entre parenthèses
sur la seconde ligne.
Mondo Wi-Fi vous réveillera à l’aide de sa
sonnerie. Pour éteindre le réveil poussez
simplement sur n’importe quel bouton de
Mondo ou de la télécommande. Lorsque
le réveil est désactivé, Mondo va revenir à
la sation radio qui était sélectionnée avant
que Mondo soit en mode d’attente.
Fonctions réveil et horlog
e
Réglage de l’horloge de Mondo
Allumez Mondo Wi-Fi, et dans le menu de
configuration, cherchez l’option Horloge.
Appuyez sur
SELECT et Mondo vous donnera
deux options: ‘Set Clock’ ou ‘Set Alarm’.
Choisissez ‘Set Clock’, appuyez sur
SELECT,
utilisez les boutons
< et > pour changer l’heure
et appuyez sur
SELECT pour confirmer. Mondo
Wi-Fi vous demandera alors de choisir les
minutes de la même manière, appuyez sur
SELECT pour confirmer l’heure
<Alarm1 >
<Set alarm >
<Set clock >
Set alarm
Set minutes
<08:05 >
Set Alarm
00:00
Set Clock
08:10
¯ Clock ˘
Alarm Set:
07:10
Set Alarm
00:00
Set Clock
08:10
¯ Clock ˘
22:35
(07:10 )
Alarm Set:
07:10
Set Alarm
00:00
Set Clock
08:10
¯ Clock ˘
¯ Clock ˘
Set Clock
08:10
¯ Clock ˘
8
Français
MONDO Wi-Fi Manual.qxd 10/12/07 12:01 Page 22
Page 23

Configuration du réseau
Vous permet de rechercher à nouveau la
connection à un autre réseau sans fil, ou de
configurer manuellement les paramètres du
réseau. Vous pouvez également choisir d’activer
l’avertissement de “signal faible” lorsque le
signal de votre réseau sans fil est faible
Version
Affiche des informations telles que le
numéro de série de votre appareil et les
numéros de version de votre matériel et
logiciel. Ces informations peuvent vous être
demandées lors de problèmes techniques.
Mise à jour du micrologiciel
Utilisez ceci afin de vérifier si des mises à
jour sont disponibles pour votre micrologiciel
de radio Mondo Wi-Fi. Mondo vérifiera, et
vous avisera s’il y en a. Vous pouvez alors
prendre la décision de démarrer le
téléchargement du micrologiciel ou non. La
mise à jour d’un micrologiciel peut prendre
plusieurs minutes, n’éteignez pas Mondo
Wi-Fi jusqu’à ce que cette procédure ait été
terminée, car cela pourrait causer des
dommages permanents à votre appareil
Langue
Vous premet de changer la langue
d’affichage de Mondo. Les langues
disponibles sont l’anglais, le français,
l’allemand, l’italien, le norvégien, le danois,
le néerlandais, le portugais, l’espagnol, le
suédois et le finnois.
Remise à zéro des paramètres
Voyez page 7 pour les détails.
Enregistrement
Affiche un code qui peut être utilisé pour
enregistrer votre radio sur le portail
consommateurs de Reciva:
http://www.reciva.com/
Horloge
Mettez l’horloge de Mondo Wi-Fi à l’heure
via ce menu. Il est aussi possible d’accéder
aux commandes du réveil de Mondo Wi-Fi
via ce menu, comme alternative à la
télécommande.
Mode de veille
Choisissez le mode de veille dasn le menu
de configuration afin de programmer Mondo
pour qu’il s’éteigne lui-même après un
temps prédeterminé. Le mode de veille
fonctionne par incréments de 15 minutes,
de 15 minutes à 90 minutes. Utilisez
simplement les touches
< et > pour définir
le temps de veille et appuyez sur
SELECT.
Mondo Wi-Fi se mettra automatiquement en
mode de veille après que ce temps soit
passé.
Lumière de fond
Il est possible de changer la luminosité de
l’écran LCD de Mondo via le menu de
configuration. Il y a trois niveaux de
luminosité:
Normal: Ce réglage correspond au niveau
normal de luminosité de l’écran LCD de
Mondo. Utilisez les touches < et > pour
choisir le niveau requis de luminosité et
appuyez sur
SELECT pour régler.
Auto-luminosité: Appuyez sur n’importe
quel bouton de Mondo ou de la
télécommande quand il est allumé pour
activer le mode “auto-luminosité” durant 30
secondes. La luminosité actuelle de l’“autoluminosité” est définie par ce réglage.
Attente: Règle la luminosité LCD lorsque
Mondo Wi-Fi est en mode d’attente. Utilisez
les touches < et > pour choisir le niveau
requis de luminosité et appuyez sur SELECT
pour régler.
Force Wi-Fi
Affiche la force de votre signal Wi-FI et
variera de 0 % à 100 %. Plus Mondo est
loin de votre station de base Wi-Fi, plus le
signal sera faible.
Menu de configuration
9
Français
MONDO Wi-Fi Manual.qxd 10/12/07 12:01 Page 23
Page 24

La fonction de lecteur multimédia de Mondo Wi-Fi
vous permet de jouer des fichiers audio (AAC, AIFF,
AU, MP3, RM, WAV et WMA) et des listes d’écoute
(M3U) se trouvant en mémoire sur un PC ou Apple
Mac sur réseau. Les fonctions du lecteur multimédia
ont été testées et certifiées pour pouvoir fonctionner
sur Windows 2000, Windows XP, Windows Vista et
Mac OSX 10.2 ou les versions plus récentes.
Installation sur PC Windows
Assurez-vous que votre PC se trouve sur le
réseau, et grâce à Windows Explorer, localisez le
dossier dans lequel se trouvent vos fichiers
audio…faites ensuite les manoeuvres suivantes:
Clic droit sur le dossier.
Choisissez ‘Properties’ (propriétés)
Clic sur ‘Sharing’ (partager)
Choisissez “Share this folder on the network’
(partager ces dossier sur le réseau) et ‘Allow
network users to change my files’ (permettre aux
usagers du réseau de changer mes dossiers).
Veuillez ne pas essayer de partager vos dossiers
“My documents” (mes documents) ou ses sousdossiers (p.ex. “My Music” (ma musique).
Installation sur Apple Mac
Installation du partage dossiers Windows sur Mac:
A partir de la station d’accueil, cliquez sur
‘Préférences système’. De la fenêtre
‘Préférencs système’ se trouvant sous la
section ‘Internet et Réseau’, cliquez ‘Partage’.
Depuis la fenêtre ‘Partage’, faites ceci:
Dans la section ‘Services’, activez
‘partage des dossiers personnels et
‘Partage de fenêtres’. Cliquez aussi sur
‘Start’ pour chacun de ces services.
Désactivez la section ‘Pare-feu’.
Dans la section ‘Internet’, désactivez
‘partage de l’Internet’.
Ouvrez un compte:
Depuis la fenêtre ‘Préférences système’,
dans la section ‘Système’, cliquez sur
‘Comptes’. Choisissez un compte et
souvenez-vous de son nom ‘nom
d’utilisateur’ et de son mot de passe. Cette
information sera utilisée par Mondo Wi-Fi
lorsqu’il se connectera à votre Mac.
Création du répertoire:
Depuis la ‘Station d’accueil’, cliquez sur
‘Finder’. Depuis la fenêtre
‘Finder’, cliquez ‘Applications > Utilities’. Tout
en appuyant sur Ctrl, cliquez sur ‘Accès
répertoire et choisissez ‘Obtenir Info’ et
assurez-vous
que lire / écrire soit activé. Double-cliquez
ensuite sur on ‘Accès répertoire’ et activez
les fonctions suivantes:
AppleTalk LDAPv3
SLP SMB/CIFS
Pour ‘SMB/CIFS’, cliquez sur
‘Configurer’ et choisissez un groupe de
travail approprié.
Copiez-collez les fichiers audio dans ‘Documents’
dans la fenêtre ‘Finder’. Assurez-vous que votre
Mac est bien connecté au réseau sans fil.
Notez que vous pourriez avoir besoin d’attendre
quelques minutes pour que les changements
soient effectifs.
Vous devriez pouvoir, à présent, accéder aux
fichiers audio de votre Mac en choisissant
‘Lecteur multimédia > Partages fenêtres’ sur
Mondo, et en choisissant ensuite votre Mac sur la
liste des appareils. Si, en sélectionnant votre Mac,
vous ne trouvez pas de fichiers partagés, apuyez
sur
SELECT et choisissez “utilisateur” – à ce
moment vous pouvez entrer le “nom d’utilisateur”
et le mot de passe de votre compte Mac.
Accès à la musique “partagée”
Quand Mondo se sera connecté à votre
réseau sans fil, appuyez sur
BACK jusqu’à
ce que ‘Stations’ soit affiché. Utilisez
< et >
pour trouver le menu ‘lecteur multimédia’
sur l’écran, et appuyez sur
SELECT.
En utilisant
< et >, trouvez et choisissez
“partages fenêtres’, puis ‘Rechercher PC’.
Mondo affichera ‘Recherche de PC’. Quand
la recherche est terminée, utilisez
< et >
pour trouver votre PC et le choisir. Mondo
va chercher des fichiers partagés. En
utilisant
< et >, surlignez le fichier correct
et appuyez sur
SELECT.
Mondo va afficher ‘Recherche de dossiers...’ durant
sa recherche dans les dossiers de votre Mac ou PC.
REMARQUEZ Si vous avez un grand
nombre de dossiers, cette opération
pourrait prendre plusieurs minutes.
Quand la recherche de Mondo est finie, il va
afficher ‘Par album’. Vous pouvez alors
naviguer dans les dossiers média, qui
seront organisés ‘Par album’, ‘Par artiste’,
et ‘Liste d’écoute’ s’il y a lieu.
IMPORTANT La première fois que Mondo
Wi-Fi effectue une recherche de dossiers,
un dossier nommé “reciva_media_cache”
s’inscrira dans le dossier audio. Ceci
accélèrera la recherche future de dossiers.
Écouter une seule chanson
Faites défiler jusqu’à voir ‘Par artiste’ et
appuyez sur
SELECT. Utilisez ensuite < et >
pour arriver à votre artiste choisi et appuyez
sur
SELECT. Faites ensuite défiler jusqu’à votre
album désiré et sélectionnez-le. L’indication
‘Ajouter à la queue’ va alors apparaître. Faites
défiler jusqu’à votre piste choisie et appuyez sur
SELECT. Ce choix va alors être joué.
Écouter un album complet
Utilisez < et >, pour trouver et choisir
‘Par artiste, et sélectionnez votre artiste.
Utilisez ensuite
< et >, pour trouver votre
choix d’album, et appuyez ensuite sur
SELECT. L’indication ‘Ajouter à la queue’ va
alors apparaître, appuyez sur
SELECT et
l’album choisi commencera à être joué.
Mettre les chansons en attente
pour être jouées
Mettez en évidence la chanson choisie et
appuyez sur
SELECT. ‘Piste ajoutée à la
queue’ va être affiché.
Mettre les albums en attente pour
être joués
Mettez en évidence l’album choisi et
appuyez sur
SELECT. Faites défiler jusqu’à
’Ajouter à la queue’ et appuyez sur
SELECT.
‘Pistes ajoutées à la queue’ va alors être
affiché.
Mode d’emploi du lecteur multimédia
✓
✓✓
✓
10
Français
MONDO Wi-Fi Manual.qxd 10/12/07 12:01 Page 24
Page 25

Contrôler le playback
Utilisez STOP sur la télécommande
pour arrêter le playback.
Utilisez
PLAY/PAUSE sur la
télécommande pour démarrer, mettre en
pause ou re-démarrer la chanson.
Utilisez
RETOUR pour faire démarrer le
playback à partir de la chanson
précédente dans la liste d’attente.
Utilisez
EN AVANT pour démarrer le
playback à partir de la chanson suivante
dans la liste d’attente
Parcourir une liste d’attente
Appuyez sur BROWSE – la chanson jouée
actuellement s’affichera. Utilisez
<
et >pour
voir les chansons qui sont dans la liste d’attente
pour le playback. Pour aller en avant et lire une
chanson dans la liste d’attente,utilisez
<
et >et
appuyez sur
SELECT.
Enlever une chanson de la liste
Appuyez sur BROWSE – le nom de la
chanson courante sera affiché.
Utilisez < et > pour trouver la chanson que vous
voulez éliminer de la liste. Appuyez et
maintenez enfoncée la touche
STOP pendant 2
secondes. Mondo affichera ‘Effacer la chanson?’.
Utilisez < et > pour surligner ‘Oui’ or ‘Non’.
Apuyez sur
SELECT. ‘Effacé de la liste’
s’affichera si vous décidez d’éliminer la
chanson.
Pour éliminer le contenu d’une liste ,
sélectionnez ‘Eliminer la liste’ à partir du
menu principal du lecteur multimédia.
Ecouter des chansons en séquence aléatoire
Sélectionnez et ajoutez individuellement les
chansons à la liste comme décrit
précédemment.
Retournez au menu principal du lecteur
multimédia et sélectionnez le ‘Mode
Playback’
Utilisez < et > pour afficher ‘Navette’,
ensuite appuyez sur
SELECT.
Confirmez que le mode ‘Shuffle’ doit être
activé, en sélectionnant OUI ou NON.
Répéter les chansons dans la liste
Sélectionnez individuellement les chansons
comme décrit précédemment.
Retournez au menu principal du lecteur
multimédia et sélectionnez le ‘Mode
Playback’.
Faites défiler pour afficher ‘Répéter’,
appuyez ensuite sur
SELECT.
Confirmez que le mode‘Répéter’ doit être
activé en sélectionnant OUI ou NON.
InstallationWindows PC UPnP
Si votre PC fonctionne avec Microsoft
Windows XP ou Vista, alors vous pouvez
utiliser Window Media Player 11 (WMP 11)
pour fonctionner comme votreUPnP
(Universal Plug and Play) media server 1.0.
WMP 11 peut être téléchargé à partir du
site internet de Microsoft et installé en
suivant les instructions indiquées dans le
fichier d’installation de Wizard.
Une fois installé, Windows Media Player 11
créera une librairie à partir de tous les fichiers
média disponibles sur votre PC. Pour ajouter de
nouveaux fichiers média à la librairie, sélectionnez
‘Fichier > Ajouter à librairie… > Options avancées’,
cliquez sur ‘Ajouer’ et choisissez les fichiers que
vous désirez ajouter et cliquez sur ‘OK’.
YVous aurez besoin maintenant de
connecter Mondo Wi-Fi à Windows Media
Player 11 et de le configurer pour
permettre à la radio d’avoir accès à votre
librairie média. Pour pouvoir faire cela, vous
devez d’abord faire ce qui suit :
Maintenez enfoncée la touche BACK pour
aller sur le menu principal de Mondo et
ensuite faites défiler et appuyez sur
SELECT.
Utilisez ensuite <
et
> pour arriver à ‘UPNP
Servers’ et appuyez sur
SELECT. Mondo va
rechercher tous les serveurs UPnP disponibles.
Remarque: cela peut prendre quelques minutes
jusqu’à ce que Mondo termine sa recherche et
pendant ce temps, Mondo affichera ‘[Vide]’. ondo
continuera à afficher ‘[Vide]’ si aucun serveur
UPnP n’a été trouvé.
Si “Aucun PC trouvé” s’affiche sur Mondo
Wi-Fi, cliquez sur la bibliothèque dans Windows
Media Player et sélectionnez ‘partager média’,
maintenant sélectionnez ‘partager mon média’ et
ensuite cliquez sur ‘OK’.
A ce point, vous pouvez lancer à nouveau un
balayage à la recherche de serveurs UPnP sur
Mondo Wi-Fi, Mondo sera affiché comme dispositif
inconnu dans la fenêtre de partage média, cliquez
sur la touche ‘Autoriser’ et ensuite cliquez sur ‘OK’.
Mondo Wi-Fi devrait maintenant avoir accès à votre
bibliothèque de Windows Media Player.
REMARQUE seuls les fichiers WMA de Windows
Media Player sont accessibles en utilisant UPnP.
Ecouter de la musique en utilisant UPnP
Quand le server UPnP a été configuré
pour partager les fichiers médias avec
Mondo Wi-Fi, vous pouvez commencer à
écouter la musique comme suit :
Appuyez sur BACK jusqu’à ce que ‘Stations’
s’affiche, défilez ensuite j’usqu’à l’option
‘Media Player’, et appuyez sur
SELECT.
Utilisez < et > pour mettre en évidence
‘Serveurs UPNP’ et appuyez sur
SELECT.
Mondo va rechercher tous les serveurs
UPnP disponibles. Remarque: cela peut
prendre quelques minutes jusqu’à ce que
Mondo termine sa recherche et pendant ce
temps, Mondo affichera ‘[Vide]’. Mondo
continuera à afficher ‘[Vide]’ si aucun
serveur UPnP n’a été trouvé.
Après une recherche réussie, sélectionnez
vorte serveur UpnP en utilisant
< et >
(s’il y a plus d’un serveur UPnP), en en
appuyant sur
SELECT.
Mondo va alors mettre sous forme de
liste les catégories médias disponibles à
partir du serveur UPnP, P.ex. ‘Musique’,
‘Listes d’écoute’ etc. Utilisez
< et > pour
choisir la catégorie que vous désirez voir, ,
et appuyez alors sur
SELECT. Utilisez
< et > pour mettre une sous-catégorie en
évidence et appuyez sur
SELECT. Faites
défiler pour mettre en évidence les fichiers
média que vous désirez écouter, et appuyez
sur
SELECT. Mondo affichera ‘[Ajouter à la
la liste]’, appuyez de nouveau sur
SELECT
et Mondo ajoutera les chansons à la liste
d’attente et commencera à les lire
automatiquement.
11
Français
MONDO Wi-Fi Manual.qxd 10/12/07 12:01 Page 25
Page 26

Parcourir une liste
Appuyez sur BROWSE – la chanson jouée
actuellement s’affichera. Utilisez
< et >
pour
voir les chansons qui sont dans la liste
d’attente pour le playback. Pour aller en avant
et lire une chanson dans la liste d’attente,
utilisez,
< et >
et appuyez sur SELECT. Il est
important de remarquer ici que
es fichiers média pris à partir de la fonction
radio ‘Partage Windows’ peuvent auusi être
ajoutés à la liste d’attente de la radio.
Les instructions complètes au sujet du
traitement de la liste, du contrôle de la
musique, du playback etc. avec UPnP, sont
disponibles à la page 11.
Si vous avez des problèmes avec votre
radio Internet Mondo Wi-Fi, veuillez lire ce
guide sur le dépannage. Vous pouvez
également visiter la section AIDE du site
Internet Reciva (www.reciva.com), la section
support du site Internet Revo
(www.revo.co.uk), ou appeler notre support
technique au 01555 66 61 61.
Si vous éprouvez des difficultés à connecter Mondo
Wi-Fi au réseau sans fil, ces étapes pourraient
vous être utiles pour résoudre le problème:
1. Assurez-vous qu’un système Wi-Fi soit
connecté à votre PC, qu’il puisse avoir
accès à internet (et qu’il puisse balayer le
Web) en utilisant le même réseau.
2. Contrôlez qu’un serveur DHCP soit
disponible, ou que vous ayez configuré
une adresse IP statique sur la radio. Vous
pouvez configurer une adresse IP statique
sur la radio en utilisant le menu Configurer > Config. réseau -> Editer Config’, et ensuite
sélectionnez ‘Non’ pour ‘Auto (DHCP).
3. Contrôlez que votre pare-feu de réseau
ne bloque pas les ports de sortie. Mondo
Wi-Fi a besoin, au minimum, d’avoir accès
aux ports UDP et TCP ports 80, 554,
1755, 5000 et7070.
4. Contrôlez que le point d’accès ne freine
pas les connections à certaines adresses
MAC. Vous pouvez voir l’adresse MAC de la
radio en utilisant le menu ‘Configurer ->
Config. réseau -> Voir Config -> adresse
MAC’.
5. Si vous avez un réseau crypté, contrôlez
que vous avez bien entré la clé ou le mot de
passe corrects dans la radio. Souvenez-vous
que les clés en format de texte sont
sensibles à la casse. Si, quand vous essayez
de vous connecter à un réseau crypté,
votre radio affiche: ‘Erreur réseau sans fil’
suivit d’un numéro à 5 chiffres, assurezvous d’avoir entré le mot de passe correct
pour le réseau. Si le problème persiste,
vous avez sans doute besoin de consulter la
configuration de votre réseau..
Si Mondo Wi-Fi peut se connecter au
réseau avec succès, mais est incapable de
lire certaines stations, cela est peut-être dû
aux raisons suivantes :
1. La station n’est pas en train de
transmettre à ce moment-là (rappelez-vous
qu’elle pourrait être située dans un fuseau
horaire différent).
2. La station a atteint le nombre d’auditeurs
simultanés maximum.
3. La station ne transmet plus.
4. Le lien à cette radio a expiré.
5. La connexion Internet entre le serveur
(souvent situé dans un autre pays) et vous
est lente. Essayez d’utiliser un PC pour
reproduire le flux à travers le site Internet
du radiodiffuseur. Si vous pouvez reproduire
la station avec un PC, mais pas avec Mondo
Wi-Fi, utilisez le formulaire que vous
trouverez sur http://www.reciva.com/ afin
d’expliquer le problème à Reciva: ils peuvent
changer les données de la station qui sont
utilisées par votre radio.
Dépannage
Accessoires et pièces de rechange
Télécommande:
Télécommande de rechange pour Mondo.
Bloc d’alimentation secteur:
Bloc d’alimentation de rechange pour Mondo.
Câbles stéréo RCA:
Câbles de rechange pour connecter Mondo à un système hi-fi ou similaire.
Les accessoires et pièces de rechange suivants sont disponibles pour Mondo.
Veuillez prendre contact avec votre revendeur le plus proche ou appelez-nous au
01555 666 161. Les accessoires et les pièces de rechange peuvent également
achetés en ligne à: www.revo.co.uk
12
Français
MONDO Wi-Fi Manual.qxd 10/12/07 12:01 Page 26
Page 27

WI-FI INTERNET RADIO
INTERNET RADIO ADAPTOR
Deutsch
Bedienungsanleitung
MONDO Wi-Fi Manual.qxd 10/12/07 12:01 Page 27
Page 28

Innhalt
MONDO WiFi sagt Hallo ! 3
Nutzen des Internet Radios 3
MONDO WiFi allgemein 3
Garantie 3
Garantie Registrierung 3
Vor dem Einschalten 3
WiFi Internet Voraussetzungen 3
Mondo anschliessen 3
Tasten und Verbindungen 4
Die Fernbedienung 4
Mondo anschalten 4
Das RECIVA Radio Portal 4
Verbindung mit dem Netzwerk 5
Senderauswahl 6
Aktualisieren der Senderliste 6
Sendungen abrufen - “on demand” 7
Generelle Bedienung 7
Mondo Reset 7
Alarm - und Uhrfunktionen 8
Mondo’s Uhr einstellen 8
Einen Alarm einstellen 8
Konfigurationsmenü 9
Netzwerk Einstellungen 9
Version + Firmware Updates 9
Sprachen 9
Fabrikeinstellungen wiederherstellen – Reset
9
Registrierung 9
Uhr 9
Schlafmodus 9
Hintergrundbeleuchtung 9
WiFi Signalstärke 9
Media Player Bedienung 10
Windows + Apple Mac Set – Up 10
Musikdateien gemeinsam nutzen 10
Generelle Media Player Bedienung 10
Windows PC UpnP Set – Up 11
Fehlersuche 12
Ersatzteile und Zubehör 12
Warenzeichen und Urheberrecht
sind Eigentum von
2007 Revo Technologies Ltd. Alle Rechte
sind vorbehalten für
Revo Technologies Ltd
The Inox Building
Caldwellside
Lanark
Scotland
United Kingdom
ML11 7SR
Tel. 01555 66 61 61
Int. Tel. +44 1555 66 61 61
Fax. 01555 66 33 44
Int. Fax. +44 1555 66 33 44
Email. enquiries@revo.co.uk
Website: www.revo.co.uk
Die Informationen in dieser Anleitung
basieren auf dem technischen Stand zum
Zeitpunkt der Drucklegung. Durch die
Fortentwicklung des Produktes kann es zu
technischen Veränderungen kommen.
REVO, MONDO und M-PORT sind
Warenzeichen von Revo Technologies Ltd.
iPod
® ist ein registriertes Warenzeichen
der Apple Computer. Inc.
Sicherheitshinweise
Benutzen Sie das Radio nicht in unmittelbarer
Nähe zum oder im Wasser.
Vermeiden Sie das Einbringen kleiner Körper
oder von Flüssigkeiten in das Gerät.
Entfernen Sie bitte keine Schrauben oder
Gehäuseteile. Benutzen Sie bitte nur das
mitgelieferte Netzteil.
CE-Hinweis: MONDO entspricht den
europäischen CE Vorschriften.
Technische Hilfe:
Sollten bei der Benutzung Ihres Mondo WiFi
Adapters Schwierigkeiten auftreten, und Sie
Hilfe benötigen, so rufen Sie bitte Revo
unter
0044-1555 666 161 an oder
schreiben Sie ein Email an
support@revo.co.uk bzw. besuchen Sie die
Seite für technische Hilfe unter
www.revo.co.uk/support.
Alternativ wird Ihnen sicher auch Ihr Händler
zur Verfügung stehen.
Vorwort
2
Deutsch
MONDO Wi-Fi Manual.qxd 10/12/07 12:01 Page 28
Page 29

Leistungen Ihres Internet Radios
Zugriff auf mehr als 7.000 Radiostationen
Suche nach Land oder Genre
Zugriff auf Podcasts und “on Demand”
Automatisches Update der Stationsliste
Keine zusätzlichen Gebühren
Mondo WiFi im Überblick
Ihr Internetradio verbindet Sie mit
tausenden von Radiostationen rund um die
Welt.
Mondo WiFi können Sie an jedes Hifi System
mit RCA Cinch Eingängen anschliessen, sei
es Ihre HiFi Anlage oder ein portables
Gerät. Nach dem Anschluss ermöglicht er
Ihnen über Ihre WiFi / W-LAN Verbindung
sowohl “Life Radio” zu streamen als auch
„on demand / Wiederholungen“ Internet
Radiosendungen zu hören.
Mondo ist zusätzlich mit einer WeckAlarmuhr ausgestattet.
Garantie
Revo Technologies Ltd. garantiert dem
Käufer die einwandfreie Funktion und
Beschaffenheit des Gerätes für eine Frist
von 2 Jahren ab Kaufdatum.
Der Garantieanspruch erlischt bei
unsachgemäßer Behandlung sowie bei nicht
autorisierten Fremdeingriffen.
Sollten Sie Probleme mit Ihrem MONDO
WiFi haben, so kontaktieren Sie bitte Ihren
Händler oder beachten Sie die
Kundendiensthinweise auf Seite 2 dieser
Anleitung.
Garantie Registrierung
Bedingung für eine Garantieleistung ist die
Registrierung Ihres Kaufes auf der REVO
Internetseite. Sie können auch die
beigefügte Garantiekarte nutzen.
Wi-Fi Internet Requirements
Um Mondo WiFi in Betrieb zu nehmen,
benötigen Sie Zugang zu einem drahtlosen
W-LAN / WiFi Breitbandzugang / DSL
Anschluss.
Wenn das zur Verfügung stehende W-LAN
/ WiFi Netz die Verschlüsselung nach WEP
( Wired Equivalent Privacy ) oder WPA (
WiFi Protected Acess ) nutzt, müssen Sie
die entsprechende Zugangskennung
eingeben. Erst danach kann Sie Mondo WiFi
mit dem Internet verbinden.
Sofern Ihr W-LAN / WiFi Router auf
unverschlüsselten Zugang eingestellt ist,
benötigen Sie keinen Zugangscode.
Mondo WiFi arbeitet normalerweise in
einem Radius von 35 Metern um den
Access Point . Die Reichweite ist sehr stark
von den örtlichen Bedingungen abhängig.
So können Mauern, je nach Stärke, oder
Betondecken sowie Türzargen aus Metall
die Reichweite teilweise drastisch
reduzieren.
Sie können in solch einem Fall durch die
Installation eines Reichweitenexpanders
einen eventuellen Mangel an Reichweite in
Ihrem W-LAN Netzwerk beseitigen.
Bitte vergewissern Sie sich vor dem
Einschalten, dass Ihr W-LAN / WiFi Router
eingeschaltet ist und der DSL Zugang aktiv ist.
Danke, dass Sie sich für das REVO Internet Radio Adapter MONDO WiFi
entschieden haben. Wir sind sicher, dass es Sie, durch seine technische Qualität
bedingt, auf Jahre Vergnügen bereiten wird.
Diese Anleitung wird Ihnen zunächst einen schnellen Überblick geben, sodass Sie
schnell einschalten und Ihr Webradio geniessen können. Weiter zeigt sie Ihnen die
mehr komplexen Eigenschaften dieses Produktes und gibt Ihnen Informationen zu
den Themen Sicherheit, Garantie und Registrierung.
Mondo WiFi sagt Hallo !
Hinweise vor dem Einschalten
Mondo Anschliessen
MONDO kann an jedes Audio System
angeschlossen werden, das über RCA Cinch
Eingänge verfügt.
Nutzen Sie dazu das mitgelieferte Cinch
Anschlusskabel und verbinden Sie dies
jeweils mit den farblich übereinstimmenden
Ausgängen auf MONDO`s Rückseite, bzw.
Eingängen am Audio System.
3
Deutsch
MONDO Wi-Fi Manual.qxd 10/12/07 12:01 Page 29
Page 30

Tasten und Anschlüsse
Ihr MONDO WiFi Internet Radio Adapter wird mit Netzspannung durch das mitgelieferte
Netzteil versorgt.
Stecken Sie das Netzteilkabel auf der Rückseite des Gerätes in die Netzbuchse.
Drücken Sie den Knopf und Mondo WiFi schaltet ein.
Nutzen Sie nur das mitgelieferte Netzteil. Ersatz ist verfügbar, rufen Sie uns unter
044-1555 66 6161 für Einzelheiten an, oder besuchen Sie unsere Internetseite
www.revo.co.uk
Die vom MONDO WiFi genutzte
Stationsliste wird von RECIVA kompiliert, die
auch die von REVO genutzte Internet Radio
Technik entwickelt haben.
Als MONDO WiFi Nutzer erhalten Sie nach
der Registrierung auf dem RECIVA Radio
Portal unter www.reciva.com Zugang zu
zusätzlichen Radiodiensten.
Reciva Internet Radio Portal
Mondo Wi-Fi Einschalten
1. EIN / AUS
2. BACH / Schritt zurück Taste
3. BLÄTTERN nach links
4. BLÄTTERN nach rechts
5.SELECT / Auswahl Taste
1. Wi-Fi Antenne
2. Stereo RCA Line-Out
3. Netzteilanschlussbuchse
4. Kopfhöreranschlussbuchse
1. Blättern nach links
2. SELECT/Auswahl
3. Antworttaste
4. BACH/Schritt zurück Taste
5. Stationstasten
6. MEDIA Player Bedienfeld
7. BROWSER Taste
8. Leiser
9. Blättern nach rechts
10. Lauter
11. Alarm Ein/Aus
12. Bereitschaft
1.
3.
4.
5. 6.
8.
10.
11.
12.
7.
9.
2.
Media Player Funktionstasten
Stop
Schritt zurück Schritt vorwärts
Wiedergabe/Pause
Fernbedienung
4
Deutsch
2.1.
3. 4.
1.
2. 3. 4. 5.
A
A
back select
MONDO Wi-Fi Manual.qxd 10/12/07 12:01 Page 30
Page 31

Drücken Sie die Einschalttaste. Mondo’s
LCD Anzeige meldet Betriebsbereitschaft.
Nach einigen Sekunden erfolgt die
Meldung “Initialising Network”
Es wird Ihnen nun die Option angeboten
nach vorhandenen Netzwerken zu suchen.
Drücken Sie die
SELECT Taste um den
Vorgang auszulösen.
ACHTUNG: Sollten Sie an irgendeinem
Punkt einen Fehler machen, drücken Sie
bitte die BACK Taste und es erscheint der
vorhergehende Menüpunkt.
Insofern Mondo keine drahtlosen Netzwerke
findet, zeigt er diese Meldung an.
Wird diese Meldung angezeigt, überprüfen
Sie bitte, ob Ihr Router angeschaltet ist.
Sofern dies der Fall ist, kontaktieren Sie
Ihren Händler oder die Hotline.
Wenn Mondo Ihr Netzwerk findet, wird er
den Namen des Netzwerkes im Display
anzeigen, zum Beispiel:
Es kann passieren, dass Mondo Wi-Fi
mehrere Netzwerke findet. Bitte nutzen
Sie die
<> um die Namen jedes
Netzwerkes zu sehen, und drücken Sie die
SELECT Taste dann, wenn der Name
Ihres Netzwerkes sichtbar ist.
Sofern Ihr Netzwerk nicht eingestellt ist ein
Passwort/Zugangscode abzufragen
(WEP/WPA ) wird Mondo Wi-Fi sich mit
dem Netzwerk verbinden und anzeigen:
Sofern ein WEP/WPA Code oder Passwort
verlangt wird, erscheint diese Anzeige:
Nach ein paar Sekunden wird MONDO
WiFi Sie bitten das Passwort oder den
Code einzugeben und folgenden
Bildschirmeintrag anzeigen:
Benutzen Sie die Tasten,
<>um
Buchstaben oder Zeichen auszuwählen.
Bestätigen Sie Ihre Auswahl, indem Sie die
SELECT drücken.
Bitte beachten Sie, dass WEP/WPA
Codes bzw. Passwörter je nach
Falls Sie bei der Eingabe einen Fehler
machen, drücken Sie bitte die
BACK
Taste, um einen Schritt zurück zu machen
und das falsche Zeichen zu löschen.
Nach der Eingabe des letzten Zeichens
Ihres Codes oder Passwortes blättern Sie
bitte auf END, und drücken Sie den
SELECT Knopf, um Ihren Code zu
bestätigen. Mondo WiFi sollte Sie nun
erfolgreich mit Ihrem Netzwerk verbinden.
Mondo Wifi wird sich automatisch an den
WEP/WPA Code für Ihr Netzwerk, oder
andere bereits genutzte Netzwerke,
erinnern. Sie müssen diese Codes nicht
erneut eingeben.
Verbindung mit dem Netzwerk
87.50MHz FM
94.50MHz FM
Clock not set...
Revo Mondo
Wi-Fi
Initialising
Network
Revo Pico Wi-Fi
Internet Radio
< Scan for
network >
Connecting to
Network
Initialising
Network
Revo Pico Wi-Fi
Internet Radio
< Scan for
network >
Connecting to
Network
Initialising
Network
Revo Pico Wi-Fi
Internet Radio
No Wireless
Networks Found
< Scan for
network >
My Home Network
Connecting to
Network
Initialising
Network
Revo Pico Wi-Fi
Internet Radio
No Wireless
Networks Found
< Scan for
network >
My Home Network
Network Ok
Connecting to
Network
Initialising
Network
Revo Pico Wi-Fi
Internet Radio
No Wireless
Networks Found
< Scan for
network >
My Home Network
Network Ok
Connecting to
Network
Initialising
Network
Revo Pico Wi-Fi
Internet Radio
No Wireless
Networks Found
Connecting to
Network
Initialising
Network
Revo Pico Wi-Fi
Internet Radio
< Scan for
network >
My Home Network
Network Ok
Enter WEP key
<END<> 0 1234>
<END<> 0 1234>
Using saved key
Connecting to
Network
Initialising
Network
Revo Pico Wi-Fi
Internet Radio
No Wireless
Networks Found
< Scan for
network >
My Home Network
Network Ok
Enter WEP key
Connecting to
Network
Initialising
Network
Revo Pico Wi-Fi
Internet Radio
No Wireless
Networks Found
< Scan for
network >
My Home Network
Network Ok
Enter WEP key
<END<> 0 1234>
Connecting to
Network
Initialising
Network
Revo Pico Wi-Fi
Internet Radio
No Wireless
Networks Found
5
Deutsch
MONDO Wi-Fi Manual.qxd 10/12/07 12:01 Page 31
Page 32

Falls Mondo Wi-Fi Sie mit Ihrem Netzwerk
verbunden hat, können Sie jetzt die Station
auswählen.
Achtung: Sie können jederzeit zurück zum
vorherigen Menüpunkt, indem Sie die BACK
Taste drücken.
Mondo Wi-Fi bietet drei Hauptmenüpunkte an:
Stations, Konfiguration und Medienwiederabe (
Media Player ). Um eine Radiostation auszuwählen,
drücken Sie die Tasten, bis
Stations erscheint
und drücken Sie dann auf den
SELECT Knopf.
Mondo Wi-Fi lädt nun die aktuelle Stationsliste.
Danach werden Ihnen 2 Optionen angeboten. Sie
können einen Sender entweder nach
Standort
oder Genre auswählen. Drücken Sie die Tasten,
und wählen Sie durch Druck auf die
SELECT
Taste die von Ihnen gewählte Suchmethode aus.
Die Auswahl
Standort gibt eine alphabetische
Liste aller Länder aus, in denen Internet
Radiosender aktiv sind. Sie können die
Länderliste durch Druck auf die Tasten aufrufen.
Drücken Sie die
SELECT Taste <>um das
ausgewählte Land zu bestätigen. Zum Beispiel:
Es wird Ihnen nunmehr entweder die Auswahl
einer Radiostation aus der kompletten Liste
angeboten oder Sie können die Radiosender
nach Genre listen lassen, also nach Pop, Dance
usw.
Nutzen Sie nun die
<>Tasten und drücken Sie
die
SELECT Taste um Ihre Auswahl einzugeben.
Mondo Wi-Fi beginnt dann, die ausgewählte Liste
herunterzuladen.
Sie können jetzt durch die Senderliste blättern
und Ihre Auswahl durch Drücken der
SELECT
Taste eingeben.
Die Auswahl
Genre gibt eine alphabetische Liste
aller Stationen aus. Benutzen Sie die Tasten
<>
um in der Liste zu blättern.
Drücken Sie auf
SELECT um Ihr gewähltes
Genre zu bestätigen.
Es wird nunmehr eine Auswahl aller Sender des
gewählten Genres angezeigt, oder entsprechend
vorher eine Liste nach Ländern.
Wählen Sie nun die ausgesuchte Station aus der
alphabetischen Liste durch Druck auf die
SELECT Taste.
Neueste Senderliste
Gelegentlich zeigt Ihnen MONDO WiFi an, dass er
die Senderliste aktualisiert. Er macht dies
automatisch und periodisch , damit Sie sicher sind,
stets über die allerneueste Liste zu verfügen.
Einen Sender Auswählen
87.50MHz FM
94.50MHz FM
Clock not set...
OR
OR
<Stations >
<Location >
6537 Stations
<Stations >
<Genre >
6537 Stations
<Location >
6537 Stations
<Stations >
<Albania >
16 Stations
<Genre >
6537 Stations
<Location >
6537 Stations
<Stations >
<Albania >
16 Stations
<Genre >
6537 Stations
<Location >
6537 Stations
<Stations >
<[All Station] >
323 Stations
<Albania >
16 Stations
< Dance >
323 Stations
<Genre >
6537 Stations
<Location >
6537 Stations
<Stations >
<[All Station] >
323 Stations
<Albania >
16 Stations
Loading 323
Stations
< Dance >
323 Stations
<Genre >
6537 Stations
<Location >
6537 Stations
<Stations >
<[All Station] >
323 Stations
<Albania >
16 Stations
Loading 323
Stations
<Cool FM >
96 kbps WMA
< Dance >
323 Stations
<Genre >
6537 Stations
<Location >
6537 Stations
<Stations >
<[All Station] >
323 Stations
<Albania >
16 Stations
Loading 323
Stations
<Cool FM >
96 kbps WMA
< Genre >
6537 Stations
< Dance >
323 Stations
<Genre >
6537 Stations
<Location >
6537 Stations
<Stations >
<[All Station] >
323 Stations
<Albania >
16 Stations
Loading 323
Stations
<Cool FM >
96 kbps WMA
< Genre >
6537 Stations
< Dance >
323 Stations
< Dance >
323 Stations
<Genre >
6537 Stations
<Location >
6537 Stations
<Stations >
<[All Station] >
323 Stations
<Albania >
16 Stations
Loading 323
Stations
<Cool FM >
96 kbps WMA
< Genre >
6537 Stations
< Dance >
323 Stations
< Dance >
323 Stations
<[All Station] >
323 Stations
<Genre >
6537 Stations
<Location >
6537 Stations
<Stations >
<[All Station] >
323 Stations
<Albania >
16 Stations
Loading 323
Stations
Loading 323
Stations
<Cool FM >
96 kbps WMA
<Cool FM>
96 kbps WMA
Station Update
from Reciva
< Genre >
6537 Stations
< Dance >
323 Stations
< Dance >
323 Stations
<[All Station] >
323 Stations
<Genre >
6537 Stations
<Location >
6537 Stations
<Stations >
<[All Station] >
323 Stations
OR
6
Deutsch
MONDO Wi-Fi Manual.qxd 10/12/07 12:01 Page 32
Page 33

Allgemeine Bedienung
Lautstarke Einstellen
um die Lautstärke einzustellen, drücken Sie
bitte die VOLUME UP oder DOWN Taste
auf Mondo’s Fernbedienung, um die
Lautstärke zu erhöhen, oder um die
Lautstärke zu verringern. Das
Lautstärkeniveau wird auf dem LCD Display
angezeigt. Mondo Wi-Fi erinnert sich beim
nächsten Einschalten automatisch an die
eingestellte Lautstärke.
Internet Radio Stationstasten
Mondo WiFi kann fünf Sender über die
Fernbedienung abspeichern. Um die gerade
gehörte Station abzuspeichern, drücken und
halten Sie eine der Stationstasten für
mindestens 2 Sekunden. Um eine
abgespeicherte Station aufzurufen, drücken
Sie kurz auf die entsprechende
Stationstaste.
Rückkehr zum Hauptmenü
Sie können jederzeit zum Hauptmenü
zurückkehren, indem Sie mit der BACK
Taste im Menü schrittweise zurückgehen.
LCD Hintergrundbeleuchtung
Nach ca. 30 fabrikseitig voreingestellten
Sekunden wird Mondo WiFi die
Hintergrundbeleuchtung der LCD Anzeige
vermindern. Jeder Druck auf einen
Bedienknopf am Gerät oder auf der
Fernbedienung bewirkt automatisch eine
volle Beleuchtung des Display. Um diese
Werte einzustellen, verfahren Sie bitte wie
auf Seite 9 unter “Hintergrundbeleuchtung”
beschrieben.
Aufnahme eines Senders in die Senderliste
Für den Fall, dass ein Sender nicht in der
von MONDO WiFi heruntergeladenen
Stationsliste genannt ist, besuchen Sie bitte
die RECIVA Webseite unter
http://www.reciva.com/ und tragen Sie
dort den Auftrag ein, die Station zu listen.
OR
Rundfunk “auf Abruf” und “podcasts”
Einige Radiosender ( z.B. BBC ) bieten
unterschiedliche Methoden an, einem
Inhalt zuzuhören. So können Sie z.B.
Radiosendungen hören, die bereits
gesendet wurden, bekannt als
“On-Demand“ oder “Wiederholung“
Um zwischen “Live“ Übertragungen oder
“on Demand“ Sendungen auszuwählen,
drücken Sie eine der
<>Tasten und
wählen Sie durch Druck auf die
SELECT
Taste aus.
Sofern Sie “on Demand” auswählen,
erhalten Sie eine Liste der abrufbaren
Sendungen, aus der Sie wählen können.
Drücken Sie eine der
<>Tasten bis Ihr
ausgewähltes Programm im LCD
erscheint und bestätigen Sie durch Druck
auf die
SELECT Taste Ihre Auswahl.
Einige Stationen erlauben ein Vorspulen
des “on Demand” Programms. Dazu
drücken Sie den
BROWSE Knopf und
danach eine der <> Tasten.
Wiederherstellung der Werkseinstellungen von Mondo Wi-Fi
Für den unerwarteten Fall, dass MONDO
WiFi “abstürzt”, “einfriert” oder auf
Tastenbefehle nicht mehr reagiert, können
Sie das Gerät durch einen RESET wieder in
einen normalen, fabrikfrischen Zustand
versetzen.
Der “FACTORY Reset” kann über den
Menüpunkt “Configure” aufgerufen werden
und leert den kompletten Speicher , löscht
also auch die WEP / WPA und Nutzer
Einträge und versetzt MONDO WiFi in den
Auslieferungszustand. WEP / WPA und
Nutzereinträge müssen nach dem RESET
neu eingegeben werden.
< Live (Real
Audio) >
< On Demand >
< Live (Real
Audio) >
< On Demand >
< Chart Show >
< Live (Real
Audio) >
< On Demand >
< Chart Show >
Start Time
<00:03:03 >
< Live (Real
Audio) >
OR
7
Deutsch
MONDO Wi-Fi Manual.qxd 10/12/07 12:01 Page 33
Page 34

Einen Alarm Einstellen
Drücken Sie den Knopf um Ihr Radio
einzuschalten., danach drücken Sie bitte
die Taste auf der Mondo Wi-Fi
Fernbedienung. Nutzen Sie bitte die
<>
Tasten um die Stunde einzustellen und
drücken Sie zur Bestätigung
SELECT.
Mondo Wi-Fi wird Sie nun auffordern, die
Minuten in der gleichen Weise
einzustellen. Drücken Sie SELECT um die
Alarmzeit abzuspeichern.
Drücken Sie den Knopf um Mondo in
den Bereitschaftsmodus zu schalten.
Mondo wird nun in der obersten Zeile des
Displays die aktuelle Zeit anzeigen. Die
Alarmzeit wird in der zweiten Linie in
Klammern angezeigt.
Mondo Wi-Fi weckt Sie mit einem
hörbaren Alarmton. Um den Alarm zu
stoppen, drücken Sie einfach irgendeinen
Knopf am Gerät oder auf der
Fernbedienung. Nach Beendigung des
Alarmsignals schaltet Mondo automatisch
in das zuletzt gespielte Radioprogramm.
Alarm + Uhr Funktionen
Mondo’s Uhr einstellen
Schalten Sie Mondo ein, gehen Sie in das
Konfigurationsmenü und wählen Sie den Menüpunkt
“CLOCK”. Drücken Sie SELECT und es werden Ihnen
zwei Optionen angeboten: “Set Clock” (Uhr einstellen)
oder “Set Alarm” (Alarm einstellen) Drücken Sie
SELECT zur Auswahl. Drücken Sie nun eine der
Tasten um die Stunde zu wechseln, drücken Sie danach
SELECT. Mondo Wi-Fi wird Sie nun auffordern, die
Minuten in der gleichen Weise einzustellen.
<Alarm1 >
<Set alarm >
<Set clock >
Set alarm
Set minutes
<08:05 >
Set Alarm
00:00
Set Clock
08:10
¯ Clock ˘
Alarm Set:
07:10
Set Alarm
00:00
Set Clock
08:10
¯ Clock ˘
22:35
(07:10 )
Alarm Set:
07:10
Set Alarm
00:00
Set Clock
08:10
¯ Clock ˘
¯ Clock ˘
Set Clock
08:10
¯ Clock ˘
8
Deutsch
MONDO Wi-Fi Manual.qxd 10/12/07 12:01 Page 34
Page 35

Netzwerk Konfiguration
Ermöglicht Ihnen, sich erneut mit einem
anderen Netzwerk zu verbinden, oder die
Netzwerkparameter manuell einzustellen.
Sie können hier auch die “LOW SIGNAL
WARNING” einstellen, die anzeigt, wenn das
lokale Netzwerk nicht ausreichend
signalstark empfangen wird.
Version
Hier wird Ihnen die Seriennummer
angezeigt, sowie die Hardware - und
Software Versionsnummer. Diese
Informationen werden unter Umständen
benötigt, um Ihnen bei technischen
Problemen zu helfen.
Firmware Update
Hier können Sie prüfen, ob eine neue
Firmware Version für Ihren Mondo Wi-Fi
Adapter verfügbar ist. Mondo prüft und
zeigt die Verfügbarkeit an. Sie können nun
entscheiden einen Firmwaredownload
durchzuführen oder nicht Ein Update kann
mehrere Minuten in Anspruch nehmen.
Sofern Sie ein Update durchführen, schalten
Sie das Gerät niemals vor Ende des Updates
aus. Ein Ausschalten während des Vorgangs
kann unter Umständen zu einer dauerhaften
Funktionsstörung führen.
Language
Hier können Sie die Displaysprache
einstellen. Es stehen Englisch, Französisch,
Deutsch, Italienisch, Norwegisch, Dänisch,
Holländisch, Portugiesisch, Spanisch,
Schwedisch und Finnisch zur Auswahl.
Factory Reset
Lesen Sie bitte die Bedienungshinweise auf
Seite 7
Register
Hier wird ein Funktionscode angezeigt, den
Sie bitte zur Registrierung Ihres Gerätes auf
der Kundenseite von Reciva eintragen, die
Sie unter http://www.reciva.com/ finden.
UHR einstellen
Sie können Mondo Wi-fi`s Uhr über diesen
Menüpunkt einstellen. Es ist ebenso
möglich, die Alarmfunktion, alternativ zur
Fernbedienung, über diesen Menüpunkt
einzustellen.
Schlafmodus
Wählen Sie “Sleep Mode” im
Konfigurationsmenü um die
Selbstabschaltung von Mondo zu aktivieren.
Mondo schaltet sich dann nach einem
vordefinierten Zeitraum aus. Der
Schlafmodus arbeitet in 15 Minuten
Sprüngen von 15 bis 90 Minuten. Nutzen
Sie einfach die Tasten um die Schlafperiode
einzustellen und drücken Sie dann
SELECT.
Mondo Wi-Fi fällt nach Ablauf des
vordefinierten Zeitraumes automatisch in
den Bereitschaftsmodus.
Hintergrundbeleuchtung
Es ist möglich, die Hintergrundhelligkeit im
Konfigurationsmenü in drei Stufen
einzustellen. Es werden Ihnen drei
Einstellungen angeboten:
Diese Einstellung definiert Mondo’s normale
LCD Helligkeit. Mit den
<>Tasten stellen
Sie die Helligkeit ein und bestätigen mit der
SELECT Taste.
Automatische Hintergrundbeleuchtung:
Sofern eingestellt, aktiviert jeder Druck auf
irgendeine Taste von Mondo Wi-Fi oder der
Fernbedienung die automatische
Hintergrundbeleuchtung für 30 Sekunden.
Die aktuelle Helligkeit kann auch für AUTO
BRIGHT eingestellt werden:
Standby / Betriebsbereitschaft:
Hier wird die LCD Hintergrundhelligkeit für
den STANDBY Betrieb justiert.
Nutzen Sie die <>Tasten um die benötigte
Helligkeit einzustellen und speichern Sie
durch Druck auf die
SELECT Taste.
Wi-Fi Signalstärke
Hier wird die Signalstärke Ihres WiFi/
W-LAN Signales zwischen 0% und 100%
angezeigt. Je weiter Mondo von der
Signalquelle entfernt ist, um so schwächer
wird das Signal empfangen.
Konfigurations Menü
9
Deutsch
MONDO Wi-Fi Manual.qxd 10/12/07 12:01 Page 35
Page 36

Die Media Player Funktion von MONDO WiFi
erlaubt die Wiedergabe von
AAC,AIFF,AU,MP3,RM,WAV und WMA Audio
Dateien sowie von M3U Wiedergabelisten, die sich
auf Ihrem Netzwerk PC oder Mac befinden. Die
Media Player Funktionen sind mit einwandfreier
Funktion getestet unter Windows 2000. Windows
XP, Windows Vista und Mac OSX 10.2 und spätere
Versionen.
Windows PC Einstellungen
Prüfen Sie mit dem Windows Explorer, ob Ihr PC
im Netzwerk angemeldet bzw. sichtbar ist und
stellen Sie fest, wo Ihre abzuspielende Audio
Dateien abgespeichert sind.
Sofern Sie das Laufwerk mit den Audiodateien nicht
generell freigegeben haben, selektieren Sie den
entsprechenden Ordner mit einem rechten
Mausklick.
Wählen Sie EIGENSCHAFTEN
Klicken Sie auf FREIGABE
Setzen Sie das Flag / den Haken bei “Diesen
Ordner im Netzwerk freigeben”
und ebenso bei “Netzwerkbenutzer dürfen Dateien
verändern”
Wichtig: bitte versuchen Sie nicht, Ordner und
Dateien unter “eigene Dateien“ freizugeben.
Apple Mac Set-Up
Konfiguration der Freigabe-Funktion von
Windows D unter Mac OS (MacBetriebssystem)
Klicken Sie im Dock auf “Systemeinstellungen”.
Klicken Sie unter Systemeinstellungen/Internet und
Netzwerk auf “Freigabe”.
Im Fenster “Freigabe“ führen Sie folgende Vorgänge
aus:
Aktivieren Sie unter dem Index “Services” die Option
“Freigabe eigener Dateien” und “Windows-Freigabe”.
Dazu klicken Sie das entsprechende Kästchen an
oder klicken Sie für jeden Dienst auf “Starten”.
Unter der Rubrik “Firewall” deaktivieren Sie die
Firewall.
Unter der Rubrik “Internet” deaktivieren Sie
“Internet-Freigabe”.
Konfiguration der Konten
Klicken Sie auf “Account” im Abschnitt “System” des
Fensters “Systemeinstellungen”. Wählen Sie ein
Account und speichern Sie “Namenskürzel” und
“Passwort”. Beide sind für den Anschluss an den
Mac erforderlich.
Konfiguration des Verzeichnisses
Klicken Sie im Dock auf “Finder”. Klicken Sie im
Finder auf “Anwendungen” und anschließend auf
“Utilities”. Wählen Sie das “Verzeichnisformat”,
klicken Sie auf “Datei” und anschließend auf “Read
Information” und prüfen Sie, ob die Option
Wiedergabe/Schreiben aktiviert ist. Doppelklicken
Sie auf “Verzeichnisformat” und aktivieren Sie
folgende Elemente:
AppleTalk LDAPv3
SLP SMB/CIFS
Für “SMB/CIFS” klicken Sie auf “Konfiguration” und
wählen Sie die entsprechende Arbeitsgruppe.
Mit Kopieren/Einfügen die MP3-Dateien in das
Verzeichnis “Documents“ im Finder-Fenster
einfügen.
Aktivieren Sie die Funktion AirPort (kabellose
Freigabe)
Gedulden sie sich einige Minuten.
Wählen Sie im Menü “MediaPlayer” -> “Windows
Shares“ (Windows Freigabe), geben Sie ein
Pseudonym und Account-Daten Ihres MAC-Account
sein. Anschließend kann sich Ihr Mondo Wi-Fi in
das Mac-Netzwerk einloggen.
Sie sollten nun in der Lage sein, auf die Audio
Dateien Ihres Mac zuzugreifen, indem Sie am
Mondo “Media Player > Windows Shares” aufrufen
und dann Ihren Mac aus der Liste der
Netzteilnehmer auswählen. Bei der Auswahl Ihres
Mac drücken Sie, falls keine gemeinsamen Ordner
gefunden wurden, den
SELECT Knopf und wählen
Sie dann den User – an diesem Punkt wird der
“Short name” und das Passwort für Ihr Mac Konto
eingegeben.
Zugriff auf “gemeinsame” Dateien
Wenn Mondo Wi-fi Sie mit dem W-LAN Netz
verbunden hat, drücken Sie die BACK Taste so oft,
bis in der Anzeige “STATIONS” erscheint. Nutzen Sie
die
<>Tasten
um das “MEDIA PLAYER” Menü aufzurufen bzw. in
der Anzeige zu finden, dann drücken Sie die
SELECT Taste.
Nutzen Sie die
<>Tasten, um den Menüpunkt
“Windows Shares“ aufzurufen, danach “Scan for
PCs”. Wenn der Suchvorgang abgeschlossen ist,
nutzen Sie die
<> Tasten um Ihren PC zu finden
und auszusuchen. Mondo Wi-Fi sucht nun nach
freigegebenen Ordnern. Mit den
<>Tasten suchen
Sie den richtigen Ordner aus und drücken dann die
SELECT Taste.
Im Mondo Display wird nun “File Scan” erscheinen,
während er alle Ordner Ihres PC oder Mac
durchsucht.
Bitte beachten: Im Fall einer grossen Anzahl von
Ordnern kann der Suchvorgang einige Minuten
andauern.
Nachdem Mondo den Suchvorgang abgeschlossen
hat, wird er die Ordner “By Album” anzeigen. Sie
können nun durch die gefundenen Alben blättern,
die dann, sofern gekennzeichnet, unter “By Album”,
“By Artist” oder “Playlist” angezeigt werden.
WICHTIG: Beim ersten Suchlauf legt MONDO WiFi
eine Datei “reciva_media_cache” auf dem Laufwerk
mit den Audio Dateien ab. Diese Datei sollte nicht
gelöscht werden, da Sie die zukünftigen Suchläufe
beschleunigt.
Einen einzelnen Song hören
Blättern Sie, bis in der Anzeige “By Artist” erscheint
und drücken Sie dann den
SELECT Knopf. Nutzen
Sie nun die
<> Tasten um zum ausgewählten
Künstler zu blättern, drücken Sie dann zur Auswahl
die
SELECT Taste. Blättern Sie dann weiter, bis das
gesuchte Album erscheint und wählen Sie es aus.
In der Anzeige erscheint nun “Add to Queue”.
Blättern Sie weiter, bis der auszuwählende Titel
erscheint und drücken Sie den
SELECT Knopf. Der
ausgewählte Song wird nun wiedergegeben.
Ein komplettes Album hören
Nutzen Sie die <> Tasten und wählen Sie “By
Artist” dann bestätigen Sie mit
SELECT ihre
Auswahl. Blättern Sie nun mit den
<>Tasten bis
das Album angezeigt wird und bestätigen Sie mit
SELECT. Der Befehl “Add to Queue” wird nun
angezeigt. Nach Druck auf die
SELECT Taste wird
das Album wiedergegeben.
Aufreihen von Songs zur Wiedergabe
Unterlegen Sie den ausgewählten Song und drücken
Sie dann
SELECT. Es wird nunmehr “Track Added
To Queue” angezeigt.
Aufreihen von Alben zur Wiedergabe
Unterlegen Sie das ausgewählte Album und drücken
Sie
SELECT. Blättern Sie bis der Befehl “Add To
Queue” erscheint und drücken Sie dann
SELECT.
Es wird nun “Tracks Added To Queue” angezeigt.
Media Player Bedienung
✓
✓✓
✓
10
Deutsch
MONDO Wi-Fi Manual.qxd 10/12/07 12:01 Page 36
Page 37

Wiedergabe Funktionen
Benutzen Sie den STOP Knopf am Mondo oder
an der Fernbedienung, um die Wiedergabe zu
stoppen.
Benutzen Sie die
PLAY/PAUSE Taste, um
die Wiedergabe zu starten oder zu stoppen bzw. zu
unterbrechen.
Nutzen Sie die
SKIP TO PREVIOUS TRACK
Taste, um die Wiedergabe des vorhergehenden
Bandes in der Schlange zu starten.
Nutzen Sie die
SKIP TO NEXT TRACK
Taste um die Wiedergabe des nächsten Bandes in
der Schlange zu starten.
Eine Schlange (Queue) durchblättern
Drücken Sie den BROWSE Knopf – der Titel des
gerade gespielten Stückes erscheint in der Anzeige.
Benutzen Sie die
<>Tasten um die Titel zu
sichten, die zur Wiedergabe aufgereiht sind. Um
einen Titel der Reihe zu spielen, springen Sie mit
den
<> Tasten bis der Titel unterlegt ist, und
drücken dann die
SELECT Taste.
Einzelne Bänder aus der
Wiedergabeschlange entfernen
Drücken Sie die BROWSE Taste – in der Anzeige
erscheint der Name des gespielten Titels.
Benutzen Sie die
<>Tasten um zu dem Titel zu
blättern, den Sie aus der Schlange entfernen
möchten. Drücken und halten Sie die
STOP Taste
für mindestens 2 Sekunden. Mondo fragt nun im
Display “Delete Track” (band löschen) ?
Use the
<>keys to to highlight either ‘Yes’ or
‘No’. Press
SELECT to make your selection.
‘Removed From Queue’ will be displayed if you
decided to delete a track.
Nutzen sie die
<>Tasten, um entweder “YES”
oder “NO” zu unterlegen. Drücken Sie
SELECT um
Ihre Auswahl festzulegen. Nach der Bestätigung der
Befehlszeile erscheint nunmehr: “removed from
Queue” ( aus der Schlange entfernt )
Um den Inhalt des Queues / der
Wiedergabeschlange korrekt abzubilden, wählen Sie
“Clear Queue” aus dem Media Player Menü.
Zufallswiedergabe
Wählen Sie die einzelnen Titel wie vorbeschrieben
aus.
Kehren Sie zur Hauptbefehlszeile im Media Player
Menü zurück und wählen Sie “Playback Mode” aus.
Navigieren Sie mit den
<>Tasten bis “Shuffle”
erscheint, dann drücken Sie
SELECT.
Unterlegen/bestätigen Sie bei der Aktivierung
von “Shuffle” “YES” oder “NO” durch Druck auf die
SELECT Taste.
Wiederholung von Bändern aus einer
Schlange
Wählen Sie die individuellen Bänder aus wie
vorgehend beschrieben.
Kehren Sie zum Media Player Hauptmenü zurück
und wählen Sie “PLAYBACK MODE” aus.
Blättern Sie bis “Repeat” erscheint, drücken Sie
dann den
SELECT Knopf.
Unterlegen / bestätigen Sie bei der Aktivierung
von “Repeat” “YES“ oder “NO” durch Druck auf die
SELECT Taste.
Windows PC UPnP Einstellungen
Sofern Ihr PC mit dem Betriebssystem Microsoft
Windows XP oder Vista ausgestattet ist, können Sie
den Windows Media Player 11 ( WMP 11) als
Ihren UpnP ( Universal Plug and Play ) Media Server
1.0 einrichten.
WMP 11 kann von der Microsoft Internetseite
heruntergeladen werden. Folgen Sie dann den
Anweisungen des Installation Wizard.
Nach der Installation legt WMP 11 eine Verzeichnis
aller Mediadateien an, die auf bzw. an Ihrem PC
verfügbar sind. Um neue Mediadateien zur
Bibliothek hinzuzufügen, wählen Sie bitte die “File>
Add to Library”> Advanced Options, klicken Sie auf
“Add” und wählen Sie die Dateien aus, die Sie
hinzufügen möchten und klicken Sie danach auf
“OK”.
Sie müssen nun Mondo Wi-Fi mit dem WMP 11
verbinden. Vorher konfigurieren Sie ihren WMP 11
so, dass Mondo Wi-Fi der Zugriff auf die
Medienbibliothek erlaubt wird. Zur Einrichtung gehen
Sie bitte wie folgt vor:
Drücken Sie die
BACK Taste so oft, bis Sie in
Mondo’s Hauptmenü sind. Blättern Sie dann auf
“MEDIA PLAYER” and drücken Sie die
SELECT
Taste.
Now use the
<>keys to scroll to ‘UPNP Servers’
and press
SELECT. Mondo will scan for all available
UPnP servers. Note, it may take a few seconds for
Mondo to complete its scan and before the scan
has been completed. Mondo will display ‘[Empty]’.
Mondo will continue to display ‘[Empty]’ if no UPnP
servers are found.
Benutzen Sie nun die
<>Tasten um zu “UpnP
Servers“ zu blättern und drücken Sie dann SELECT.
Mondo Wi-Fi sucht nun automatisch nach allen
verfügbaren UpnP Servern. Bitte beachten Sie, dass
Mondo für die komplette Suche einige Sekunden
benötigt bevor er den kompletten Inhalt anzeigen
kann. Für den Fall, dass Mondo kontinuierlich
“Empty” anzeigt, wurde kein UpnP Server gefunden.
Wenn “No PC Found” angezeigt wird, klicken Sie
bitte auf den “library”
Tabulator im Windows Media Player und wählen Sie
“media sharing”. Wählen Sie “share my media”
durch Klick auf OK aus.
An diesem Punkt können Sie mit Mondo Wi-Fi
nochmals/wiederholt nach UpnP Servern suchen.
Mondo Wi-Fi wird nun als “unknown device” im
Media Sharing Fenster angezeigt. Klicken Sie auf
den “allow” Button und klicken Sie dann auf “OK“
Mondo Wi-Fi sollte nun Zugriff auf Ihre Windows
Media Player Bibliotheken haben.
Bitte Beachten Sie, dass über den WMP 11 nur
WMA Dateien angesprochen werden können. UPnP.
Playing Music Using UPnP
Sofern der UpnP Server so eingestellt ist, dass
MONDO WiFi Zugriff auf Ihre Mediadateien hat,
können Sie die Mediadateien wie folgt wiedergeben:
Drücken Sie den BACK Knopf so oft, bis “Stations”
angezeigt wird. Dann blättern Sie zur “Media Player”
Einstellung und drücken dann
SELECT.
Benutzen Sie die <>Tasten um zum Menüpunkt
“UpnP Servers” zu blättern und bestätigen Sie durch
Druck auf
SELECT. Mondo Wi-Fi sucht nun nach
verfügbaren UpnP Servern. Bitte beachten Sie, dass
der komplette Suchvorgang, abhängig von der
Anzahl der Mediadateien, einige Minuten dauern
kann. Vor Ende des Suchvorgangs zeigt Mondo WiFi die Meldung “Empty” im Display. Diese Meldung
wird fortgesetzt angezeigt, falls kein UpnP Server
gefunden wird.
Nach einem erfolgreichen Suchvorgang,
hinterlegen Sie bitte Ihren UpnP Server, indem Sie
mit den blättern ( sofern mehr als ein einzelner
UpnP Server gefunden wurde ), und bestätigen Sie
bitte durch Druck auf die
SELECT Taste.
Mondo Wi-Fi wird nun die gefundenen
Dateikategorien des UpnP Servers listen z.B. “Music”,
“Playlists” usw. Mit den
<> Tasten können Sie eine
Kategorie auswählen. Sobald diese hinterlegt ist,
bestätigen Sie durch Druck auf
SELECT. Nutzen Sie
wiederum die
<> Tasten um ein Unterverzeichnis
oder eine einzelne Datei zu hinterlegen (auszuwählen),
dann bestätigen Sie die zu spielende Datei durch
Druck auf
SELECT. Mondo Wi-fi zeigt nun “Add to
Queue” an. Durch Druck auf
SELECT fügt Mondo die
Bänder der Warteschlange zu und wird diese
automatisch abspielen.
11
Deutsch
MONDO Wi-Fi Manual.qxd 10/12/07 12:01 Page 37
Page 38

Eine Warteschlange durchblättern
Drücken Sie auf den BROWSE Knopf um
den Dateinamen der gerade gespielten
Datei abzulesen. Nutzen Sie die Tasten um
zwischen den einzelnen Dateien der
Wiedergabeschlange zu blättern. Um einen
speziellen Titel der Wiedergabeschlange
abzuspielen, drücken Sie bitte den
SELECT
Knopf, sobald der Titel hinterlegt ist. Es ist
ein wichtiger Hinweis, dass Mediadateien
aus der “Windows Shares” Funktion ebenso
der Warte/Wiedergabeschlange
hinzugefügt werden können.
Alle Hinweise zur Handhabung des Media
Players und zur Handhabung der
Wiedergabe / Warteschlange unter UpnP
finden Sie auf Seite 11.
Sofern im Betrieb des Mondo Wi-Fi
Probleme auftreten sollten, lesen Sie bitte
diese Anleitung zur Fehlersuche. Alternativ
können Sie auch die HILFE/HELP Seite auf
der Reciva Internetseite ( www.reciva.com )
besuchen, oder die Supportsektion auf der
REVO Internetseite (www.revo.co.uk ).
Natürlich können Sie auch unseren Support
unter 0044-1555 66 6161 anrufen.
Sofern Sie Probleme haben, Mondo Wi-fi in
Ihrem W-LAN / WiFi Netzwerk anzumelden,
können Ihnen folgende Schritte helfen:
1. Vergewissern Sie sich, dass ein am
gleichen Netzwerk angeschlossener PC
Zugang zum Internet hat und aktuelle Seiten
aufgerufen werden können.
2. Prüfen Sie bitte ob ein DHCP Server
verfügbar ist, oder dass Sie eine statische
IP Adresse im Radio konfiguriert haben.
Sie können eine statische IP Adresse im
Radio konfigurieren, indem Sie den
Menüpunkt Konfiguration /
Netzwerkeinstellung / Konfiguration wählen. Unter der Einstellung Automatisch
DHCP wählen Sie bitte NEIN aus.
3. Prüfen Sie, ob Ihre Firewall nicht folgende
ausgehenden Ports blockiert. Mondo Wi-Fi
benötigt die UDP und TCP Ports
80,554,1755,5000 und 7070.
4. Prüfen Sie bitte, ob in Ihrem Router MAC
Adressen ausgeschlossen oder aktiviert
sind. Gegebenenfalls müssen Sie die Mac
Adresse Ihres MONDO WiFi dort eintragen
bzw. freigeben. Sie finden die Mac Adresse
Ihres MONDO WiFi im Menü unter
KONFIGURATION/Netzwerkeinstellungen/Ko
nfiguration anzeigen/MAC- Adresse
5. Sofern Sie MONDO WiFi über ein
verschlüsseltes Netzwerk betreiben, prüfen
Sie bitte, ob Sie den korrekten Zugangscode
(WEP / WPA key) eingegeben haben.
Wenn, nachdem Sie Mondo Wi-Fi
eingeschaltet haben und nach der
Netzwerksuche die Anzeige „WIRELESS
ERROR“ erscheint, gefolgt von einer
5stelligen Zahl, dann überprüfen Sie bitte,
ob Sie den korrekten Code eingegeben
haben. Sofern das Problem nicht behoben
werden kann, überprüfen Sie bitte die
Netzwerkkonfiguration.
Falls Sie Mondo Wi-Fi erfolgreich mit dem
Netzwerk verbunden hat, aber bestimmte
Stationen nicht wiedergegeben werden
können, dann kann dies an einem der
folgenden Gründe liegen:
1. Der Sender liegt eventuell in einer
anderen Zeitzone und sendet zu dieser
Tageszeit nicht !
2. Der Sender hat die maximale Zahl der
gleichzeitigen Zuhörer erreicht.
3. Der Sender hat den Betrieb evtl.
eingestellt ?
4. Der Link dieser Station ist evtl. nicht
mehr aktuell.
5.Die Internet Verbindung mit der
ausgewählten Station ist möglicherweise zu
langsam, da Sie evtl. in einem entfernten
Land liegt. Versuchen Sie in diesem Falle,
den Radiosender über einen PC aufzurufen.
Sofern Sie die Station über Ihren PC
einwandfrei hören können, nicht aber über
Mondo Wi-Fi, besuchen Sie bitte die RECIVA
Internetseite www.reciva.com und füllen Sie
bitte das entsprechende Formular aus.
RECIVA kann die Stationsdaten
entsprechend korrigieren.
Fehlersuche
Zubehör und Ersatzteile
Fernbedienung:
Mondo Wi-Fi Ersatz Fernbedienung
Netzteil
Mondo Wi-Fi Ersatz Netzteil 220 V
Stereo RCA Cinch Kabel:
Ersatzkabel RCA Cinch zum Anschluss an Hifi System oder ähnliches.
The following optional accessories and spare parts are available for Mondo.
Please contact your local retailer or alternatively call us on 01555 666 161.
Accessories and spare parts can also be purchased online at www.revo.co.uk
12
Deutsch
MONDO Wi-Fi Manual.qxd 10/12/07 12:01 Page 38
Page 39

WI-FI INTERNET RADIO
INTERNET RADIO ADAPTOR
Italiano
Guida Operativa
MONDO Wi-Fi Manual.qxd 10/12/07 12:01 Page 39
Page 40

Contenuti
Introduzione a Mondo Wi-Fi 3
Vantaggi della Internet Radio 3
Panoramica su Mondo Wi-Fi 3
Garanzia 3
Attivazione della Garanzia 3
Operazioni preliminari 3
Requisiti Internet Wi-Fi 3
Come collegare Mondo 3
Comandi e Connessioni 4
Tecomando 4
Alimentare Mondo 4
Portale Radio Reciva 4
Collegamento alla vostra rete 5
Scegliere una Stazione 6
Aggiornamento Stazioni 6
Programmazioni On-Demand 7
Funzionamento generale 7
Ripristinare Mondo 7
Funzioni Sveglia + Orologio 8
Impostazione Orologio Mondo 8
Impostazione Sveglia 8
Menu di Configurazione 9
Configurazione di Rete 9
Aggiornamento Versione + Firmware 9
Lingue 9
Ripristino impostazioni di fabbrica 9
Registrazione 9
Orologio 9
Sleep Mode 9
Luce dello schermo 9
Potenza segnale Wi-Fi 9
Modalità Media Player 10
Set-up Windows + Apple Mac 10
Accesso alla Musica Condivisa 10
Funzionamento Media Player 10
Set-up UpnP PC Windows 11
Risoluzione dei problemi 12
Accessori e parti di ricambio 12
Copyright e
Riconoscimenti
Copyright © 2007 Revo Technologies Ltd.
Tutti i diritti riservati.
Revo Technologies Ltd
The Inox Building
Caldwellside
Lanark
Scotland
United Kingdom
ML11 7SR
Tel. 01555 66 61 61
Int. Tel. +44 1555 66 61 61
Fax. 01555 66 33 44
Int. Fax. +44 1555 66 33 44
Email. enquiries@revo.co.uk
Website: www.revo.co.uk
Le informazioni contenute in questa guida
sono da considerarsi esatte al momento
della sua pubblicazione. Poichè perseguiamo
una politica di continuo sviluppo le
informazioni sono soggette a cambiamento
senza preavviso.
Revo, Mondo e M-Port sono marchi o marchi
registrati della Revo Technologies Ltd.
iPod® è un marchio registrato della Apple
Computer, Inc.
Informazioni di Sicurezza
Non utilizzate questa radio in vicinanza di
acqua.
Evitate che piccoli oggetti o liquidi entrino in
questo prodotto.
Non rimuovete le viti e non aprite gli
alloggiamenti. Utilizzate solo l’alimentatore di
corrente fornito.
CEE: Questo prodotto è stato progettato e
testato uniformemete ai requisiti EU e porta
il marchio CE.
Assistenza Tecnica
Nel caso di difficoltà nell’utilizzo del vostro
Revo BLIK Wi-Fi, o se credete che esso
presenti dei difetti, per favore contattate la
nostra assistenza tecnica al seguente
numero:
0044 1555 66 61 61
In alternativa potete scrivere una mail
all’indirizzo support@revo.co.uk o visitare la
sezione Risoluzione Problemi del nostro sito
all’indirizzo web:
www.revo.co.uk/support
Prefazione
2
Italiano
MONDO Wi-Fi Manual.qxd 10/12/07 12:01 Page 40
Page 41

Vantaggi della Internet Radio
Accesso a + di 7.000 stazioni radio internet
Ricerca per genere o Paese
Accesso ai servizi ‘Listen Again’
Lista stazioni aggiornata automaticamente
Nessun costo di abbonamento
Panoramica su Mondo Wi-Fi
L’adattatore Radio Internet Mondo Wi-Fi può
accedere a migliaia di stazioni radio di
tutto il mondo offrendo agli utenti una
scelta senza precedenti.
Mondo Wi-Fi può essere collegato a
qualsiasi sistema audio dotato di
connessioni RCA, un sistema hi-fi o un
prodotto tipo Boombox. Si collega a
qualsiasi connessione Wi-Fi a banda larga
trasmettendo sia in diretta sia con la
funzione “Listen Again".
Mondo inoltre è dotato di orologio e sveglia
eletronica.
Garanzia
Revo Technologies Ltd garantisce
all’acquirente che questo prodotto non
presenterà difetti nei componenti nè di
fabbricazione durante il normale utilizzo per
un periodo di un anno dalla data dell’acquisto.
Questa garanzia decade nel caso di danno
accidentale, di asportazione
dell’alloggiamento, di logoramento,
negligenza, modifiche o uso inappropriato.
In caso di problemi siete pregati di
contattare il vostro fornitore o in alternativa
consultate pag. 2 di questa guida per i
dettagli sull’assistenza tecnica.
Attivazione della Garanzia
Per attivare la garanzia è necessario
registrare il vostro acquisto compilando la
cartolina di garanzia allegata alla vostra
radio o in alternativa registrandovi online al
seguente indirizzo:
www.revo.co.uk/register
Requisiti Internet Wi-Fi
Per poter utilizzare il vostro adattatore radio
internet Mondo Wi-Fi avete bisogno di una
connessione internet senza fili (Wi-Fi) a
banda larga.
Se la vostra rete è configurata con i
protocolli Wired Equivalent Privacy (WEP)
o Wi-Fi Protected Access (WPA), avrete
bisogno del codice WEP o WPA (Web Key)
per permettere a Mondo Wi-Fi di
comunicare con la rete. Mondo Wi-Fi
dovrebbe essere in grado di operare
ovunque nel raggio di 35 metri dalla base
della stazione senza fili – a seconda delle
condizioni ambientali e delle specifiche della
vostra stazione wireless.
Verificate che la vostra rete wireless sia
accesa e collegata alla connessione Internet
a banda larga.
Grazie per aver scelto la nostra radio internet Mondo, siamo certi che vi
regalerà anni di intrattenimento ed un servizio sempre affidabile.
Questa guida vi permetterà di accedere velocemente all’utilizzo e all’ascolto
della Internet Radio, i llustrando le caratteristiche più complesse di questo
prodotto e fornendo informazioni sulla sicurezza, la garanzia e la
registrazione del prodotto stesso.
Introduzione a Mondo Wi-Fi
Operazioni Preliminari
Come collegare Mondo
Mondo può essere collegato a qualsiasi
sistema audio dotato di connessioni RCA
stereo.
Utilizzando i cavi di connessione forniti,
collegate semplicemente i relativi connettori
RCA rosso e nero al pannello posteriore di
Mondo.
3
Italiano
MONDO Wi-Fi Manual.qxd 10/12/07 12:01 Page 41
Page 42

Comandi e Connessioni
IIl vostro adattatore radio internet Mondo Wi-Fi può essere alimentato dalla rete elettrica
usando l’adattatore fornito.
Nel caso di collegamento alla rete elettrica, inserite lo spinotto dell’adattatore nella presa
DC sul retro di Mondo Wi-Fi. Premendo il tasto Mondo Wi-Fi si accenderà.
Utilizzate solo l’adattatore fornito. I pezzi di ricambio possono essere acquistati sul nostro
sito internet
www.revo.co.uk, oppure chiamandoci al numero 01555 66 61 61.
La lista di stazioni usata da Mondo Wi-Fi è
compilata e gestita da Reciva Limited, che
fornisce anche la tecnologia radio utilizzata
da Mondo Wi-Fi.
Gli utenti di Mondo Wi-Fi possono usufruire
di ulteriori servizi di radio internet
collegandosi al Portale Radio Reciva
all’indirizzo www.reciva.com e registrando la
propria radio.
Portale Radio Reciva
Alimentazione di Mondo Wi-Fi
1. Accensione
2. Indietro
2. Sinistra
3. Destra
5. Selezione
1. Wi-Fi Antenna
2. Uscita Stereo RCA
3. Ingresso DC Power
4. Ingresso cuffie
1. Scorri a sinistra
2. Seleziona
3. Riproduci
4. Indietro
5. Preselezioni
6. Media Player
7. Sfoglia
8. Volume Giù
9. Scorri a destra
10. Volume su
11. Sveglia 0n/Off
12. Standby
1.
3.
4.
5. 6.
8.
10.
11.
12.
7.
9.
2.
Media Player
Stop
Indietro Avanti
Play / Pause
Telecomando
4
Italiano
2.1.
3. 4.
1.
2. 3. 4. 5.
A
A
back select
MONDO Wi-Fi Manual.qxd 10/12/07 12:01 Page 42
Page 43

Premete il tasto ON/OFF per accendere
Mondo Wi-Fi. Sullo schermo LCD di Mondo
apparirà un messaggio di benvenuto.
Dopo qualche secondo il messaggio cambierà
in ‘Initialising Network’ (Inizializzazione Rete)
Adesso porete cercare le reti disponibili.
Premete il tasto
SELECT (SELEZIONA) per
attivare questa opzione.
NOTA: Se commettete un errore in
qualsiasi momento, premete
BACK per
ritornare alla schermata precedente.
Se Mondo non riuscirà a trovare nessuna
rete wireless, apparirà il seguente
messaggio.
In tal caso controllate che il vostro router
wireless sia acceso e fate riferimento al
vostro fornitore se il problema persiste.
Se Mondo trova una rete wireless
apparirà il nome della rete, per esempio:
In alcuni casi Mondo Wi-Fi potrebbe
trovare più di una rete. Usate i tasti
<>
per visualizzarne i nomi – e premete il
tasto
SELECT quando apparirà il nome
della vostra rete.
Se la vostra rete non è configurata per
richiedere una password (WEP/WPA),
Mondo si collegherà alla rete e apparirà:
Se invece è richiesta una chiave
WEP/WPA (password), Mondo mostrerà
il seguente messaggio:
Dopo pochi secondi, Mondo vi chiederà di
inserire il codice WEP/WPA e mostrerà
la schermata di immissione chiave:
Usate i tasti
<> per muovervi avanti o
indietro all’interno della lista di caratteri
alfanumerici. Premete il tasto
SELECT per
selezionare un carattere.
Attenzione: i codici WEP/WPA fanno
distinzione tra maiuscole e minuscole.
Se fate un errore durante l’immissione
della password, premete il tasto
BACK
per cancellare un carattere.
Dopo aver selezionato l’ultimo carattere
della vostra chiave, scorrete fino alla
parola ‘END’ e premete il tasto
SELECT
per immettere il vostro codice. Adesso
Mondo Wi-Fi dovrebbe riuscire a
connettersi alla rete.
Mondo Wi-Fi ricorderà automaticamente
il codice WEP/WPA della vostra rete,
e quello delle altre reti precedentemente
utilizzate. Non dovrete immettere di nuovo
questi codici per le prossime connessioni.
Collegamento alla vostra rete
87.50MHz FM
94.50MHz FM
Clock not set...
Revo Mondo
Wi-Fi
Initialising
Network
Revo Pico Wi-Fi
Internet Radio
< Scan for
network >
Connecting to
Network
Initialising
Network
Revo Pico Wi-Fi
Internet Radio
< Scan for
network >
Connecting to
Network
Initialising
Network
Revo Pico Wi-Fi
Internet Radio
No Wireless
Networks Found
< Scan for
network >
My Home Network
Connecting to
Network
Initialising
Network
Revo Pico Wi-Fi
Internet Radio
No Wireless
Networks Found
< Scan for
network >
My Home Network
Network Ok
Connecting to
Network
Initialising
Network
Revo Pico Wi-Fi
Internet Radio
No Wireless
Networks Found
< Scan for
network >
My Home Network
Network Ok
Connecting to
Network
Initialising
Network
Revo Pico Wi-Fi
Internet Radio
No Wireless
Networks Found
Connecting to
Network
Initialising
Network
Revo Pico Wi-Fi
Internet Radio
< Scan for
network >
My Home Network
Network Ok
Enter WEP key
<END<> 0 1234>
<END<> 0 1234>
Using saved key
Connecting to
Network
Initialising
Network
Revo Pico Wi-Fi
Internet Radio
No Wireless
Networks Found
< Scan for
network >
My Home Network
Network Ok
Enter WEP key
Connecting to
Network
Initialising
Network
Revo Pico Wi-Fi
Internet Radio
No Wireless
Networks Found
< Scan for
network >
My Home Network
Network Ok
Enter WEP key
<END<> 0 1234>
Connecting to
Network
Initialising
Network
Revo Pico Wi-Fi
Internet Radio
No Wireless
Networks Found
5
Italiano
MONDO Wi-Fi Manual.qxd 10/12/07 12:01 Page 43
Page 44

Quando Mondo Wi-Fi sarà connesso alla
vostra rete wireless, potrete scegliere una
stazione.
Nota: Potete tornare alla schermata
precedente in qualunque momento
premendo il tasto
BACK.
Mondo Wi-Fi ha tre menu principali:
Stations, Configure and Media Player
(Stazioni, Configurazione e Media Player).
Per selezionare una stazione radio usate i
tasti
<> finchè non apparirà la parola
STATIONS, quindi premete il tasto
SELECT.
Ora vi sarà data la possibilità di scegliere
una stazione per location (nazione) o per
genre (genere). Usate i tasti <>per
selezionare il metodo di ricerca da voi
scelto, quindi premete il tasto
SELECT.
Scegliendo location comparirà una lista
alfabetica di nazioni che offrono una
programmazione radio via internet. Usate
i tasti <>per scorrere la lista delle
nazioni. Premete
SELECT per selezionare
la nazione da voi scelta. Per esempio:
A questo punto potrete visualizzare
l’elenco di tutte le radio di questo paese o
l’elenco delle radio per genere, per es.
Pop, Dance... ecc.
Usate i tasti
<> e premete SELECT per
rendere effettiva la vostra scelta, adesso
Mondo Wi-Fi scaricherà la lista di stazioni
secondo la vostra scelta.
Ora potete scorrere la lista di stazioni e
selezionarne una premendo il tasto
SELECT.
Scegliendo
Genre apparirà una lista
alfabetica di tipi di stazione. Usate i tasti
<>per visualizzarli.
Premete il tasto
SELECT per scegliere il
genere da voi desiderato.
Ora potete visualizzare tutte le stazioni di
questo genere che potrete selezionare
anche per nazione.
Adesso selezionate la stazione scelta dalla
lista alfabetica.
Aggiornamento Stazioni
Di quando in quando, Mondo Wi-Fi vi
comunicherà che sta ricevendo una lista
aggiornata di stazioni radio. Lo farà
automaticamente e periodicamente, in modo
che possiate avere sempre a disposizione
una lista di stazioni radio aggiornata.
Scegliere una Stazione
87.50MHz FM
94.50MHz FM
Clock not set...
OR
OR
<Stations >
<Location >
6537 Stations
<Stations >
<Genre >
6537 Stations
<Location >
6537 Stations
<Stations >
<Albania >
16 Stations
<Genre >
6537 Stations
<Location >
6537 Stations
<Stations >
<Albania >
16 Stations
<Genre >
6537 Stations
<Location >
6537 Stations
<Stations >
<[All Station] >
323 Stations
<Albania >
16 Stations
< Dance >
323 Stations
<Genre >
6537 Stations
<Location >
6537 Stations
<Stations >
<[All Station] >
323 Stations
<Albania >
16 Stations
Loading 323
Stations
< Dance >
323 Stations
<Genre >
6537 Stations
<Location >
6537 Stations
<Stations >
<[All Station] >
323 Stations
<Albania >
16 Stations
Loading 323
Stations
<Cool FM >
96 kbps WMA
< Dance >
323 Stations
<Genre >
6537 Stations
<Location >
6537 Stations
<Stations >
<[All Station] >
323 Stations
<Albania >
16 Stations
Loading 323
Stations
<Cool FM >
96 kbps WMA
< Genre >
6537 Stations
< Dance >
323 Stations
<Genre >
6537 Stations
<Location >
6537 Stations
<Stations >
<[All Station] >
323 Stations
<Albania >
16 Stations
Loading 323
Stations
<Cool FM >
96 kbps WMA
< Genre >
6537 Stations
< Dance >
323 Stations
< Dance >
323 Stations
<Genre >
6537 Stations
<Location >
6537 Stations
<Stations >
<[All Station] >
323 Stations
<Albania >
16 Stations
Loading 323
Stations
<Cool FM >
96 kbps WMA
< Genre >
6537 Stations
< Dance >
323 Stations
< Dance >
323 Stations
<[All Station] >
323 Stations
<Genre >
6537 Stations
<Location >
6537 Stations
<Stations >
<[All Station] >
323 Stations
<Albania >
16 Stations
Loading 323
Stations
Loading 323
Stations
<Cool FM >
96 kbps WMA
<Cool FM>
96 kbps WMA
Station Update
from Reciva
< Genre >
6537 Stations
< Dance >
323 Stations
< Dance >
323 Stations
<[All Station] >
323 Stations
<Genre >
6537 Stations
<Location >
6537 Stations
<Stations >
<[All Station] >
323 Stations
OR
6
Italiano
MONDO Wi-Fi Manual.qxd 10/12/07 12:01 Page 44
Page 45

Funzionamento Generale
Regolazione Volume
Per regolare il volume di Mondo Wi-Fi
premere il tasto Volume Su o il tasto
Volume Giù sul telecomando; sullo schermo
LCD di Mondo apparirà il livello del volume.
Dopo lo spegnimento Mondo Wi-Fi terrà in
memoria l’ultimo livello di volume selezionato.
Preselezione delle Radio su Internet
Sul telecomando di Mondo Wi-Fi si possono
memorizzare fino a cinque preselezioni. Per
memorizzare la stazione in onda premere e
tenere premuto uno dei tasti di preselezione
per circa due secondi. Per selezionare una
stazione memorizzata basterà premere il
tasto corrispondente.
Ritorno al Menu principale
Potete tornare al menu principale di
Mondo in qualunque momento premendo il
tasto
BACK ed interagendo con i menu
precedenti.
Luce dello schermo LCD
Secondo le impostazioni di fabbrica standard,
la luce dello schermo LCD di Mondo diminuirà
progressivamente dopo circa 30 secondi.
Spingendo qualsiasi tasto sull’apparecchio o sul
telecomando si ritornerà temporaneamente
alla piena luminosità dello schermo LCD. Per
modificare queste impostazioni di fabbrica
vedere le istruzioni sulla ‘Luce di fondo’ a
pagina 9.
Richiedere una Stazione
Se volete ascoltare una stazione radio che
non è presente nella lista delle stazioni di
Mondo, potete visitare il sito web di Reciva
all’indirizzo http://www.reciva.com/ e
richiedere di aggiungere la stazione alla
lista.
OR
Programmazioni On-Demand
Alcune stazioni radio forniscono una serie
di metodi addizionali di ascolto dei
contenuti; per esempio offrono la
possibilità di ascoltare trasmissioni che
sono state già mandate in onda, tramite il
servizio chiamato On-Demand (su
richiesta) o ‘Listen-Again’ (riascolto).
Per scegliere tra una trasmissione “dal
vivo” o una “On-Demand” usarte
semplicemente i tasti
<> per selezionare
la vostra opzione e premete
SELECT per
effettuare la vostra scelta.
Se selezionate “On-Demand”, comparirà
una lista delle trasmissioni disponibili al
riascolto.
Usate i tasti
<> finchè sullo schermo
LCD non apparirà la vostra scelta, quindi
premere il tasto
SELECT per confermare.
Alcune stazioni permettono di andare
avanti velocemente all’interno di una
trasmissione “On-Demand”. Potete farlo
premendo
BROWSE (SFOGLIA) ed
utilizzando i tasti <>per portare la
trasmissione avanti o indietro. Premere
SELECT per avviare dal punto selezionato.
Ripristinare Mondo Wi-Fi
Nell’improbabile eventualità che Mondo Wi-Fi
si ‘blocchi’ o si ‘arresti’ e smetta di
rispondere ai comandi, è possibile effettuare
un ripristino in modo da ‘riportarlo in vita‘.
Un ‘Ripristino delle impostazioni di fabbrica’
può essere attivato dal menu ‘Configure’
(Configurazione) di Mondo.
Questo ripristino reimposterà
completamente la memoria di Mondo,
cancellando tutti i codici WEP/ WPA e le
impostazioni dell’utente, riportando Mondo
alle originarie impostazioni di fabbrica.
< Live (Real
Audio) >
< On Demand >
< Live (Real
Audio) >
< On Demand >
< Chart Show >
< Live (Real
Audio) >
< On Demand >
< Chart Show >
Start Time
<00:03:03 >
< Live (Real
Audio) >
OR
7
Italiano
MONDO Wi-Fi Manual.qxd 10/12/07 12:01 Page 45
Page 46

Impostazione Sveglia
Premete per accedere la radio, e poi
premete il tasto sul telecomando di
Mondo Wi-Fi. Usate i tasti <> per
cambiare l’ora, e premete
SELECT per
impostarla. Allo stesso modo Mondo Wi-Fi
vi chiederà adesso di impostare i minuti.
Premete
SELECT per impostare la
sveglia.
Premete per mettere Mondo in
standby. Sul display in alto apparirà l’ora
attuale, e appena sotto tra parentesi
apparitìrà l’ora impostata per la sveglia.
Mondo Wi-Fi ti sveglierà con un trillo
sonoro; per spegnere la sveglia premere
semplicemente uno dei tasti
dell’apparecchio o del telecomando.
Quando la sveglia verrà disattivata, Mondo
si accenderà sulla stazione radio che si
stava ascoltando prima che si attivasse la
modalità standby.
Funzioni Sveglia +Orologio
Impostazione Orologio
Accendete Mondo Wi-Fi e dal menù di
configurazione andate all’opzione Orologio.
Premendo
SELECT Mondo vi darà due
opzioni; ‘Imposta Orologio’ o ‘Imposta
Sveglia’. Scegliete ‘Imposta Orologio’ e
premete
SELECT, quindi usate i tasti <>
per cambiare l’ora, e premete SELECT per
impostarla. Allo stesso modo Mondo Wi-Fi
vi chiederà adesso di impostare i minuti.
Premete
SELECT per impostare l’orario.
<Alarm1 >
<Set alarm >
<Set clock >
Set alarm
Set minutes
<08:05 >
Set Alarm
00:00
Set Clock
08:10
¯ Clock ˘
Alarm Set:
07:10
Set Alarm
00:00
Set Clock
08:10
¯ Clock ˘
22:35
(07:10 )
Alarm Set:
07:10
Set Alarm
00:00
Set Clock
08:10
¯ Clock ˘
¯ Clock ˘
Set Clock
08:10
¯ Clock ˘
8
Italiano
MONDO Wi-Fi Manual.qxd 10/12/07 12:01 Page 46
Page 47

Configurazione di rete
Permette di ritentare la connessione ad
un’altra rete wireless, o di configurare
manualmente i parametri di rete. Potete
anche scegliere di attivare la segnalazione di
‘Low Signal Warning’ (attenzione segnale
debole) quando il segnale della vostra rete
wireless è debole.
Versione
Mostra informazioni relative al numero
seriale del vostro dispositivo e la versione
dell’hardware e del software. Queste
informazioni vi potranno essere richieste in
caso contattiate la nostra assistenza
tecnica.
Aggiornamento del Firmware
Usatelo per controllare se sono disponibili
aggiornamenti per il vostro adattatore radio
Mondo Wi-Fi. Mondo controllerà e ve li
segnalerà. Sarete voi a decidere se
effettuare o meno il download del firmware.
L’aggiornamento del firmware può durare
diversi minuti. Non spegnete Mondo Wi-Fi
prima del termine della procedura. Un
eventuale spegnimento potrebbe causare
danni permanenti.
Lingua
Permette di cambiare la lingua del display.
Le lingue supportate sono inglese, francese,
tedesco, italiano, norvegese, danese,
olandese, portoghese, spagnolo, svedese e
finlandese.
Ripristino configurazioni di
fabbrica
Vedere pag. 7 per i dettagli.
Registrazione
Mostra un codice che può essere utilizzato
per registrare la vostra radio al portale
clienti di Reciva: http://www.reciva.com/
Orologio
Attraverso il menu di configurazione si
possono impostare anche l’orologio e la
sveglia di Mondo Wi-Fi, in alternativa all’uso
del telecomando.
Funzione Sleep
Selezionate la funzione Sleep dal menu di
configurazione per programmare lo
spegnimento di Mondo dopo un periodo di
tempo predefinito. La funzione Sleep si può
impostare da 15 a 90 minuti con
incrementi di 15 minuti. Usate
semplicemente i tasti
<> per stabilire il
periodo di spegnimento e premete
SELECT.
Mondo Wi-Fi andrà automaticamente in
standby quando il tempo sarà scaduto.
Luce Schermo LCD
Attraverso il menu di configurazione è
possibile anche cambiare la luminosità dello
schermo LCD di Mondo Wi-Fi. Ci sono tre
diverse impostazioni per la luminosità:
Normale: Questa impostazione definisce il
livello normale di luminosità dello schermo
LCD di Mondo. Usate i tasti
<>per
selezionare il livello di luminosità desiderato
e premete
SELECT per impostarlo.
Auto-Bright: Quando si accende o quando
si preme qualsiasi tasto del telecomando si
attiva l’‘Auto-Bright’ per un tempo di 30
secondi. Con questa impostazione si
definisce l’attuale livello di luminosità per
l’‘Auto-Bright’.
Standby: In questo modo si imposta il livello
di luminosità dello schermo LCD per
quando Mondo Wi-Fi è in modalità ‘Standby’.
Usate i tasti
<> per selezionare il livello di
luminosità desiderato e spingete
SELECT
per impostarlo.
Potenza segnale Wi-Fi
Mostra la potenza del vostro segnale Wi-Fi
con un range tra 0 % e 100 %. Tanto più
Mondo sarà lontano dalla sua stazione base
Wi-Fi tanto più sarà debole il suo segnale.
Menu di Configurazione
9
Italiano
MONDO Wi-Fi Manual.qxd 10/12/07 12:01 Page 47
Page 48

La funzione Media Player di Mondo
Wi-Fi permette di riprodurre file audio (AAC,
AIFF, AU, MP3, RM, WAV e WMA) e playlist
(M3U) memorizzate in un PC o in un Apple
Mac collegati alla rete. Le funzioni del media
player sono state testate e certificate per
funzionare con Windows 2000, Windows XP,
Windows Vista and Mac OSX 10.2 o versioni
successive.
Set-Up PC Windows
Controllate che il vostro PC sia collegato
alla rete. Usando Windows Explorer,
individuate la cartella nella quale sono
memorizzati i file audio… poi
Cliccate col tasto destro sulla cartella
Selezionate ‘Proprietà’
Cliccate su ‘Condivisione’
Selezionate “Condividi questa cartella in rete’
e ‘Consenti agli utenti in rete di modificare i
miei file’. Attenzione: non cercate di mettere
in condivisione la cartella “Documenti” o le
sue sottocartelle (per es. ‘My Music’).
Set-up Apple Mac
Setup Windows File Sharing on the MAC:
Dal ‘Dock’, cliccate ‘Preferenze di Sistema’.
Dalla finestra di ‘Preferenze di Sistema’ (nella
sezione ‘Internet & Network’) cliccate
‘Condivisione’.
Dalla finestra ‘Condivisione’:
Nella sezione ‘Servizi’, attivate
‘Condivisione File Personali’ e
‘Condivisioni Windows’. Cliccate su ‘Start’
per ognuno di questi servizi.
Nella sezione ‘Firewall’ disattivate il firewall.
Nella sezione ‘Internet’ mantenete
disattivato ‘Condivisione Internet’.
Creazione di un Account:
Dalla finestra ‘Preferenze di Sistema’, nella
sezione ‘Sistema’, cliccate ‘Accounts’.
Selezionate un account e ricordate il “Nome
abbreviato” e la password. Questa
informazione sarà usata da Mondo Wi-Fi
quando si collegherà al vostro Mac.
Set-up della Directory:
Dal ‘Dock’, cliccate ‘Finder’. Dalla finestra del
‘Finder’, cliccate ‘Applicazioni > Utilities’.
Tenendo premuto Ctrl cliccate su ‘Accesso
Directory ’ e poi selezionate ‘Info’ e verificate
che leggi / scrivi sia attivato. Poi fate doppio
click su ‘Accesso Directory’ e atttivate i
seguenti:
AppleTalk LDAPv3
SLP SMB/CIFS
Anche per ‘SMB/CIFS’ dovete cliccare
‘Configura’ e selezionare un gruppo di lavoro
appropriato.
Copiate e incollate i file audio in ‘Documenti’
nella finestra ‘Finder’. Verificate che il vostro
Mac sia collegato alla rete wireless. Tenete
presente che potrebbe essere necessario
attendere qualche minuto prima che i
cambiamenti siano effettivi.
Ora dovreste essere in grado di accedere ai
file audio del vostro Mac selezionando ‘Media
Player > Condivisioni Windows’ su Mondo
Wi-Fi, e poi selezionando il vostro Mac nella
lista dei dispositivi. Se selezionando il vostro
Mac non trovate le cartelle condivise,
premete il tasto
SELECT e selezionate utente
– a questo punto inserite il “Nome abbreviato”
e la password del vostro account Mac.
Accesso alla Musica ‘Condivisa’
Quando Mondo si sarà connesso alla rete
wireless, premete il tasto BACK finché
compare la scritta ‘Stazioni’. Usate i tasti <>
finchè sullo schermo non apparirà il menu
‘Media Player’, quindi premete il tasto
SELECT.
Usando i tasti
<>, trovate e selezionate
“Windows Shares (Condivisioni Windows)’, e
poi ‘Scan for PCs’ (Cerca PC). ora mostrerà
sullo schermo ‘Finding PCs’ (cercando PC).
Quando la ricerca sarà completata, usate i
tasti <> per trovare il vostro PC e
selezionatelo. Mondo ora cercherà le cartelle
condivise. Usate i tasti <> per evidenziare
la cartella corretta, quindi premete SELECT.
Mondo mostrerà a schermo ‘File Scan...’
(cerca file) mentre cerca tra tutti i file del
vostro Mac o del vostro PC.
ATTENZIONE Se avete molti file questa
operazione potrebbe durare anche qualche
minuto.
Al termine della ricerca Mondo mostrerà la
scritta ‘By Album’ (Per Album). Ora potete
cercare tra i file multimediali trovati, che
saranno organizzati ‘Per Album’, ‘Per Artista’,
o come ‘Playlist’ – se disponibile.
IMPORTANTE Quando Mondo Wi-Fi
completa per la prima volta la ricerca di un
file compare la scritta “reciva_media_cache”
sulla cartella nella quale sono conservati i file
audio. Ciò renderà più veloci le successive
ricerche.
Ascoltare un Singolo Brano
Scrorrete finchè sullo schermo non apparirà
la scritta ‘By Artist’ (Per Artista) quindi
premete SELECT. Ora usate i tasti <>per
scorrere finchè non trovate l’artista scelto,
quindi premete SELECT. Scorrete quindi
finchè non trovate l’album desiderato e
selezionatelo. A questo punto apparirà la
voce ‘Add To Queue’ (Aggiungi alla coda).
Scorrete finchè non apparirà sullo schermo il
brano scelto e premete SELECT. Inizierà
adesso la riproduzione del brano scelto.
Ascoltare un Album Intero
Usando i tasti <>, cercate e selezionate la
voce ‘By Artist’ (Per Artista), quindi
selezionate il nome dell’artista scelto. Usate
ancora i tasti <>finchè non apparirà
l’album da voi scelto, quindi premete
SELECT. A questo punto apparirà la voce
‘Add To Queue’ (Aggiungi alla coda). Scorrete
finchè non apparirà sullo schermo l’album
scelto e premete SELECT. Inizierà adesso la
riproduzione dell’album scelto.
Mettere in coda Brani per la riproduzione
Evidenziate il brano prescelto e premete
SELECT. Comparirà la scritta ‘Track Added
To Queue’ (brano aggiunto alla coda).
Mettere in coda Album per la riproduzione
Evidenziate l’Album prescelto e premete
SELECT. Scorrete finché non comparirà la
scritta ‘Add To Queue‘ (Aggiungi alla Coda) e
selezionate. Apparirà la scritta ‘Track Added
To Queue’ (Brano aggiunto alla Coda).
Modalità Media Player
✓
✓✓
✓
10
Italiano
MONDO Wi-Fi Manual.qxd 10/12/07 12:01 Page 48
Page 49

Comandi Riproduzione
Usate il tasto STOP del telecomando di
Mondo per fermare la riproduzione.
Usate il tasto
PLAY/PAUSE per
riprodurre un brano, metterlo in pausa o far
ripartire un brano in pausa.
Usate
SKIP TO PREVIOUS TRACK per
avviare la riproduzione del brano precedente in
coda.
Usate
SKIP TO NEXT TRACK per avviare
la riproduzione del brano successivo in coda.
Sfogliare i brani in coda
Premendo il tasto BROWSE (Sfoglia) verrà
visualizzato il titolo del brano attualmente in
riproduzione. Usate i tasti
<> per vedere i
brani nella coda di riproduzione. Per andare
avanti e riprodurre un brano della coda usate i
tasti
<>e poi SELECT.
Rimuovere Brani dalla Coda
Premendo il tasto BROWSE (Sfoglia) verrà
visualizzato il titolo del brano attualmente in
riproduzione.
Usate i tasti
<>per trovare il brano che
volete eliminare dalla coda. Premete e tenete
premuto il tasto
STOP per 2 secondi. Sullo
schermo apparirà ‘Delete Track?’ (Cancellare
Brano?).
Usate i tasti
<>per evidenziare ‘Si’ o ‘No’.
Premete
SELECT per rendere effettiva la vostra
scelta. Se avete scelto di cancellare il brano
sullo schermo apparcirà ‘Removed From Queue’
(Rimosso dalla Coda).
Per cancellare l’intero contenuto di una coda
selezionate ‘Clear Queue’ (Cancellare Coda) dal
menu principale di Media Player.
Riproduzione Casuale dei Brani
Selezionate e aggiungete i singoli brani alla
coda come descritto in precedenza.
Ritornate al menu principale di Media Player e
selezionate ‘Playback Mode’ (Modo
Riproduzione).
Usate i tasti
<> fino al comando ‘Shuffle’
(casuale), poi selezionate premendo il tasto
SELECT.
Confermate l’attivazione del modo ‘Shuffle’
selezionando SI o NO.
Ripetere brani di una Coda
Selezionate i singoli brani come descritto in
precedenza.
Ritornate al menu principale di Media Player e
selezionate ‘Playback Mode’ (Modo
Riproduzione).
Scorrete fino a visualizzare ‘Repeat’ (Ripeti),
quindi premete il tasto
SELECT.
Confermate l’attivazione o meno del modo
‘Repeat’ selezionando SI o NO.
Set-Up UPnP PC Windows
Se il vostro PC ha come sistema operativo
Microsoft Windows XP o Vista potete utilizzare
Windows Media Player 11 (WMP 11) come
UPnP (Universal Plug and Play) media server
1.0.
WMP 11 può essere scaricato dal sito
Microsoft e installato seguendo le istruzioni che
trovate nel suo wizard di installazione.
Una volta installato, Windows Media Player
11 creerà un catalogo multimediale con tutti i
file multimediali presenti nel vostro PC. Per
aggiungere nuovi file al catalogo selezionate ‘File
> Add to Library… > Advanced Options’ (File >
Aggiungi al Catalogo Multimediale > Opzioni
avanzate), cliccate ‘Add’ (Aggiungi), scegliete i
file che desiderate aggiungere e cliccate ‘OK’.
Ora dovete collegare Mondo Wi-Fi a Windows
Media Player 11 e configurarlo in modo da
permettere alla radio di accedere al catalogo
multimediale. Per fare ciò dovete:
Tenere premuto il tasto
BACK per arrivare al
menu principale di Mondo, poi scorrere fino a
‘Media Player’ e premere il tasto
SELECT.
Ora usate i tasti
<> to per cercare la voce
‘UPNP Servers’ quindi premete
SELECT. Mondo
cercherà tutti i server UPnP disponibili. Nota:
può impiegare qualche secondo per completare
la ricerca; nel frattempo lo schermo mostrerà
la scritta ‘[Empty]’ (vuoto). Mondo continuerà a
mostrare la scritta ‘[Empty]’ se non trova alcun
server UPnP.
Se compare la scritta “No PC Found” (nessun
PC trovato), cliccate sulla voce Catalogo
Multimediale di Windows Media Player e
selezionate Condivisione File multimediali, quindi
selezionate Condividi i miei file multimediali e poi
‘OK’.
A questo punto potete nuovamente cercare i
server UPnP su Mondo Wi-Fi; ora Mondo
comparirà come dispositivo sconosciuto. Nella
finestra di condivisione ciccate su ‘Allow’
(consenti) e poi su ‘OK’. Mondo Wi-Fi ora
dovrebbe accedere al vostro Catalogo
Multimediale di Windows Media Player.
NOTA: in Windows Media Player solo i file
WMA sono accessibili tramite UPnP.
Riprodurre Musica Usando UPnP
Una volta che il server UPnP è configurato
per condividere i file con Mondo Wi-Fi, per
ascoltare la musica dovete fare in questo modo:
Premete il tasto
BACK finchè non apparirà
sullo schermo la voce ‘Stazioni’, quindi scorrete
fino all’opzione ‘Media Player’ e premete il tasto
SELECT.
Usate i tasti
<> fino ad evidenziare ‘UPNP
Servers’ e premete
SELECT. Mondo cercherà
tutti i server disponibili. Nota: Mondo
impiegherà qualche secondo per completare la
ricerca; nel frattempo lo schermo mostrerà la
scritta ‘[Empty]’ (vuoto) e continuerà a mostrarla
se non troverà alcun server UPnP.
Se la ricerca è andata a buon fine selezionate
il vostro server UPnP usando i tasti
<>(se è
stato trovato più di un server UPnP) quindi
premete il tasto
SELECT.
Mondo ora mostrerà la lista delle categorie
multimediali disponibili sul server UPnP, per es.
‘Musica’, ‘Playlists’ ecc. Usate i tasti
<> per
scegliere la categoria che volete sfogliare, quindi
premete
SELECT. Usate i tasti <> per
evidenziare le sotto categorie e premete
SELECT.
Scorrete per evidenziare il file multimediale
che desiderate riprodurre, quindi premete
SELECT. Sul display apparirà ‘[Add to Queue]’
(Aggiungi alla Coda), premete nuovamente
SELECT e Mondo aggiungerà i brani alla sua
coda e li metterà automaticamente in
esecuzione.
11
Italiano
MONDO Wi-Fi Manual.qxd 10/12/07 12:01 Page 49
Page 50

Sfogliare una coda
Premendo il tasto BROWSE (sfoglia) –
apparirà il brano attualmente in
riproduzione. Usate i tasti <>per vedere i
brani nella coda di riproduzione. Se volete
saltare in un punto specifico della coda
premete il tasto SELECT quando viene
visualizzato il brano desiderato. È importante
anche i file multimediali della funzione
‘Windows Shares’ possono essere aggiunti
alla coda della radio.
Potete trovare istruzioni complete sulla
gestione della coda, sul controllo della
riproduzione di musica ecc. sotto UPnP a
pag.11.
Nel caso di problemi nell’utilizzo del vostro
adattatore radio internet Mondo Wi-Fi,
leggete attentamente le istruzioni che
seguono relative alla ‘risoluzione dei
problemi’.
In alternativa potete visitare la sezione HELP
del sito web Reciva (www.reciva.com), la
sezione assistenza del sito web Revo
(www.revo.co.uk) o chiamare la nostra
assistenza tecnica allo 01555 66 61 61.
Se avete problemi nel connettere Mondo
Wi-Fi alla vostra rete wireless, queste
indicazioni potrebbero esservi utili per
risolvere il problema:
1. Assicuratevi che un PC connesso tramite
Wi-Fi riesce a collegarsi ad Internet (per
es. navigando nel web) usando la stessa
rete.
2. Verificate la disponibilità di un server
DHCP o che abbiate configurato un IP
statico sulla radio. Potete configurare un IP
statico sulla radio usando la voce del menu
‘Configure -> Network Config -> Edit Config’,
e poi selezionando ‘No’ ad ‘Auto (DHCP)’.
3. Verificate che il firewall della vostra rete
non stia bloccando le porte in uscita.
Mondo Wi-Fi ha bisogno di accedere almeno
alle porte UDP e TCP 80, 554, 1755,
5000 e 7070.
4. Verificate che il vostro access point non
impedisca i collegamenti di alcuni specifici
indirizzi MAC. Potete controllare l’indirizzo
MAC della radio usando la voce del menu
‘Configure -> Network Config -> View Config > MAC address’.
5. Se la vostra rete è criptata, controllate di
aver inserito il codice o la password
corretta nella radio. Ricordatevi che i codici
in formato testo sono case sensitive (fanno
distinzione tra minuscole e maiuscole). Se
mentre cercate di collegarvi a una rete
criptata la radio mostra il messaggio:
‘Wirelesserror’ seguito da un numero di 5
cifre, controllate di aver inserito la giusta
password per la rete. Se il problema
persiste analizzate la configurazione della
vostra rete.
Se Mondo Wi-Fi si connette alla rete ma
non è in grado di riprodurre alcune
particolari stazioni le cause probabili
possono essere:
1. La stazione non è in onda in quel
particolare momento della giornata
(ricordate che può essere localizzata su un
fuso orario diverso).
2. La stazione ha raggiunto il numero
massimo consentito di utenti collegati
simultaneamente.
3. La stazione non trasmette più.
4. Il link alla radio è cambiato.
5. Provate a collegarvi con un PC per
ascoltare la stazione radio tramite il suo sito
web. Se potete ascoltare la stazione tramite
il PC ma non tramite Mondo Wi-Fi - usate il
modulo presente sul sito
http://www.reciva.com/ per comunicare il
problema a Reciva – loro potranno cambiare
i dati della stazione utilizzati dalla radio.
Risoluzione dei problemi
Accessori e parti di ricambio
Telecomando:
Sostituzione del telecomando di Mondo.
Trasformatore:
Sostituzione del trasformatore di Mondo
Cavi Stereo RCA:
Cavi sostitutivi per collegare Mondo a un sistema hi-fi o simili.
Sono disponibili per Mondo i seguenti accessori opzionali e parti di ricambio.
Contattate il vostro rivenditore o chiamate il numero 01555 666 161. Gli accessori e
le parti di ricambio possono essere acquistati anche on line all’indirizzo www.revo.co.uk
12
Italiano
MONDO Wi-Fi Manual.qxd 10/12/07 12:01 Page 50
Page 51

WI-FI INTERNET RADIO
INTERNET RADIO ADAPTOR
Norsk
Bruksanvisning
MONDO Wi-Fi Manual.qxd 10/12/07 12:01 Page 51
Page 52

Contents
Velkommen til Mondo Wi-Fi 3
Fordeler ved internettradio 3
Mondo oversikt og nøkkelfunksjoner 3
Garanti 3
Garantiregistrering 3
Før du starter 3
WiFi internett krav 3
Å koble til Mondo WiFi 4
Fjernkontroll 4
Strøm til Mondo 4
Recivas radio portal 4
Å koble til ditt nettverk 5
Å velge en stasjon 6
Oppdatering av stasjoner 6
OnDemand / Podcasts 7
Generelt bruk 7
Nullstilling av Mondo WiFi 7
Alarm og klokkefunksjon 8
Å stille Mondos klokke 8
Innstilling av alarmer 8
Konfigurasjonsmeny 9
Nettverkskonfigurasjon 9
Versjon + SW oppdatering 9
Språk 9
Fabrikksnullstilling 9
Registrer 9
Klokke 9
Innsovningsfunksjon 9
Bakgrunnsbelysning i display 9
WiFi signalindikator 9
Bruk av Media Player 10
Windows + Apple Mac oppsett 10
Tilgang til delt musikk 10
Generell bruk av Media Player 10
Windows PC UPnP oppsett 11
Mulige problem + løsninger 12
Ekstradeler og tilbehør 12
Rettigheter og tilkjennegivelser
Copyright 2007 Revo Technologies Ltd.
Alle rettigheter reservert.
Revo Technologies Ltd
The Inox Building
Caldwellside
Lanark
Scotland
United Kingdom
ML11 7SR
Tel. 01555 66 61 61
Int. Tel. +44 1555 66 61 61
Fax. 01555 66 33 44
Int. Fax. +44 1555 66 33 44
Email. enquiries@revo.co.uk
Website: www.revo.co.uk
Informasjonen i denne bruksanvisningen er
kontrollert og funnet korrekt på det
tidspunkt den ble trykket og publisert
sammen med tilhørende produkt. Vår
politikk er imidlertid å stadig videreutvikle
våre produkter og informasjonen kan være
gjenstand for endringer uten forutgående
varsel.
Revo, Mondo og M-Port er varemerker eller
registrerte varemerker som tilhører Revo
Technologies Ltd.
iPod‚ er et registrert varemerke som
tilhører Apple Computer, Inc.
Sikkerhetsadvarsler
Bruk ikke denne radioen i nærheten av
vann. Unngå at små objekter eller vann
kommer inn i dette produktet. Skru ikke ut
skruer eller deler fra radioen. Bruk kun
strømforsyningen som leveres sammen med
radioen.
EEC: Dette produktet er designet og testet
for å godkjenne EUs krav og er CE merket.
Teknisk Support
Dersom du skulle erfare tekniske problemer
eller mistenker at ditt REVO produkt har en
feil, kan du ta kontakt med oss på
hcag@hcag.no (Norge) eller telefon
0044 01555 666 161 (UK).
Du kan også sende en epost til
support@revo.co.uk eller besøke nettsidene
våre på www.revodab.no (Norge) eller
www.revo.co.uk/support (UK)
Innledende informasjon
2
Norsk
MONDO Wi-Fi Manual.qxd 10/12/07 12:01 Page 52
Page 53

Fordeler ved internett radio
Tilgang til over 7000 internettradiostasjoner
Søk etter sjanger eller nasjonalitet
Tilgang til ”hør igjen” tjenester (podcast)
Stasjonsliste som oppdateres automatisk
Ingen abonnementskostnader
Mondo Wi-Fi oversikt og nøkkelfunksjoner
Mondo Wi-Fi er en internettradio som gir
deg tilgang til tusenvis av radiostasjoner
over hele verden, rett inn på det
stereoanlegget du har fra før.
Mondo Wi-Fi kan kobles til hvilket som helst
lydsystem med RCA innganger, uavhengig av
om det er et HiFi produkt eller en
”boombox”. Når radioen slås på, kobler den
seg opp mot tilgjengelig WiFi nettverk
(trådløst internett) og kan motta både
direkte radiosendinger og ”podcasts”.
Mondo Wi-Fi har også full klokkeradio alarmfunksjonalitet.
Garanti
Revo Technologies Ltd garanterer kjøperen
at dette produktet er fritt for dele- eller
monteringsfeil og at det vil fungerer ved
normal bruk, i ett år fra kjøpsdato.
Garantien gjelder ikke dersom produktet blir
utsatt for uhell, hvis radioen har blitt åpnet,
unormal bruk, deler er slitt ut eller revet av,
produktet er brukt uforsiktig, produktet eller
deler har blitt modifisert eller feilen har
oppstått som en normal følge av brukerens
oppførsel med produktet.
Skulle du oppleve problemer med produktet,
vennligst kontakt den du kjøpte det av eller
se side 2 i denne bruksanvisningen for våre
teknisk support kontaktdetaljer.
Garantiregistrering
Produsenten forutsetter at du registrerer
ditt produkt enten ved å fylle ut det vedlagte
garantikortet eller alternativt registrerer
online på
www.revo.co.uk/register. For
produkter solgt i Norge, med gyldig
kvittering, gjelder norsk lovgivning.
For å kunne bruke din Mondo Wi-Fi
internettradio må du ha et trådløst (Wi-Fi)
bredbånds internett nettverk.
Dersom ditt trådløse nettverk er konfigurert
til å bruke ”Wired Equivalent Privacy” (WEP)
eller ”Wi-Fi Protected Access” (WPA) data
kryptering, må du ha kjennskap til WEP eller
WPA koden (Web Key) for å kunne la
Mondo Wi-Fi kommunisere med nettverket.
Mondo Wi-Fi vil kunne fungere hvor som
helst innenfor 35 meters avstand fra din
trådløse basestasjon. Dette påvirkes dog av
både miljøet nettverket brukes i og din
basestasjons tekniske spesifikasjoner.
Vennligst forsikre deg om at ditt trådløse
nettverk er installert, slått på og koblet til
ditt bredbånd.
Takk for at du valgte vår Mondo Wi-Fi internettradio. Vi føler oss sikre på at
den vil forsyne deg med mange gode radioopplevelser.
Denne bruksanvisningen er laget for raskt å kunne hjelpe deg til å komme i
gang med å høre internettradio, gi innMondok i mer komplekse funksjoner og
gi informasjon om sikkerhet, garanti og registrering.
Velkommen til Mondo Wi-Fi
Før du starter
Koble til Mondo WiFi
Mondo WiFi kan kobles til ethvert lydanlegg
med stereo RCA innganger. Bruk kabelen
som følger med radioen og koble til den
røde RCA kontakten i den røde RCA
utgangen på forsterkeren din. Koble den
andre til i den andre utgangen på
forsterkeren din (oftest hvit eller sort).
3
Norsk
MONDO Wi-Fi Manual.qxd 10/12/07 12:01 Page 53
Page 54

Knapper og tilkoblinger
Din Mondo Wi-Fi radio kan drives på 220v ved å bruke den medfølgende strømadapter.
For å bruke 220v må du plugge i strømadapteren i kontakten på baksiden av Mondo Wi-Fi.
Ved å trykke på vil du slå Mondo Wi-Fi på.
Bruk kun strømadapteren som følger med. Erstatningsadapter kan kjøpes hos våre
forhandlere eller på www.revo.co.uk eller ved å ringe +44 01555 666 161
Stasjonslisten som brukes av Mondo Wi-Fi
er samlet og administreres av Reciva
Limited. De produserer også internettradio
teknologien som brukes i Mondo Wi-Fi.
Mondo Wi-Fi brukere kan få tilgang til
ytterligere internettradio service ved å
besøke Recivas Radio Portal på –
www.reciva.com - og registrere sitt Mondo
Wi-Fi kjøp.
Reciva Radio Portal
Strøm til Mondo Wi-Fi
1. På / Av
2. Bla gjennom (mot venstre)
3. Bla til venstre
4. Bla til høyre
5. Tilbake
1. Wi-Fi Antenne
1. Stereo RCA linjeutgang
2. Strømtilførsel
3. 3.5mm hodetelefon tilkobling
1. Bla til venstre
2. Velg
3. Svar
4. Tilbake
5. Fem hurtigtaster
6. Media Player
7. Bla gjennom
8. Volum ned
9. Bla til høyre
10. Volum opp
11. Alarm På / Av
12. Standby
1.
3.
4.
5. 6.
8.
10.
11.
12.
7.
9.
2.
Media Player
Stop
Skip Back Skip Forward
Play / Pause
Fjernkontroll
4
Norsk
2.1.
3. 4.
1.
2. 3. 4. 5.
A
A
back select
MONDO Wi-Fi Manual.qxd 10/12/07 12:01 Page 54
Page 55

Trykk på ON/OFF knappen for å slå på
Mondo Wi-Fi. Mondos LCD display vil vise
en velkomstmelding.
Etter noen sekunder vil meldingen endres
til “Initialising Network”
Du vil da få muligheten til å lete etter
tilgjengelige nettverk. Trykk på
SELECT for
å sette i gang dette søket.
MERK: Dersom du gjør noe feil, kan du
når som helst trykke BACK-knappen for å
komme tilbake til forrige nivå.
Dersom Mondo ikke kan finne et trådløst
nettverk, vil den gi følgende beskjed i
displayet:
Dersom dette skjer, vennligst kontroller at
din trådløse router er slått på. Henvend
deg til routerens produsent dersom
problemet vedvarer.
Dersom Mondo finner et nettverk, vil du
se nettverkets navn i displayet. For
eksempel:
Noen ganger kan Mondo Wi-Fi finne flere
enn ett nettverk. Bruk
< eller > knappen
for å bla deg gjennom listen av nettverk, og
trykk på
SELECT når navnet på det
nettverket du vil koble deg til kommer frem.
Dersom ditt nettverk ikke er konfigurert til
å kreve et passord (WEP/WPA) vil Mondo
automatisk koble seg til og vise:
Dersom en WEP/WPA kode er påkrevet,
vil Mondo gi følgende beskjed:
Etter noen sekunder vil Mondo be deg om
å taste inn WEP/WPA koden din, og
skjermbildet for inntasting kommer frem:
Bruk
< og > knappene for å bla deg
fremover og bakover i den alfanummeriske
tegn- og symbollisten. Trykk på
SELECT
for å velge en bokstav/et tegn.
Legg merke til at WEP/WPA koder skiller
mellom store og små bokstaver.
Dersom du gjør en feil under innleggingen
av koden, trykker du
BACK knappen for å
slette et tegn.
Etter at du har valgt det siste tegnet i ditt
passord, bla deg gjennom til ordet ’END’
og trykk på
SELECT for å registrere ditt
passord i Mondo Wi-Fi. Har du tastet rett,
vil radioen nå koble seg til ditt nettverk.
Mondo Wi-Fi vill automatisk huske ditt
WEP/WPA passord, og også passordene
til andre nettverk du har vært koblet til i
det siste. Du vil ikke trenge å taste inn
passordet igjen.
Å koble til ditt nettverk
87.50MHz FM
94.50MHz FM
Clock not set...
Revo Mondo
Wi-Fi
Initialising
Network
Revo Pico Wi-Fi
Internet Radio
< Scan for
network >
Connecting to
Network
Initialising
Network
Revo Pico Wi-Fi
Internet Radio
< Scan for
network >
Connecting to
Network
Initialising
Network
Revo Pico Wi-Fi
Internet Radio
No Wireless
Networks Found
< Scan for
network >
My Home Network
Connecting to
Network
Initialising
Network
Revo Pico Wi-Fi
Internet Radio
No Wireless
Networks Found
< Scan for
network >
My Home Network
Network Ok
Connecting to
Network
Initialising
Network
Revo Pico Wi-Fi
Internet Radio
No Wireless
Networks Found
< Scan for
network >
My Home Network
Network Ok
Connecting to
Network
Initialising
Network
Revo Pico Wi-Fi
Internet Radio
No Wireless
Networks Found
Connecting to
Network
Initialising
Network
Revo Pico Wi-Fi
Internet Radio
< Scan for
network >
My Home Network
Network Ok
Enter WEP key
<END<> 0 1234>
<END<> 0 1234>
Using saved key
Connecting to
Network
Initialising
Network
Revo Pico Wi-Fi
Internet Radio
No Wireless
Networks Found
< Scan for
network >
My Home Network
Network Ok
Enter WEP key
Connecting to
Network
Initialising
Network
Revo Pico Wi-Fi
Internet Radio
No Wireless
Networks Found
< Scan for
network >
My Home Network
Network Ok
Enter WEP key
<END<> 0 1234>
Connecting to
Network
Initialising
Network
Revo Pico Wi-Fi
Internet Radio
No Wireless
Networks Found
5
Norsk
MONDO Wi-Fi Manual.qxd 10/12/07 12:02 Page 55
Page 56

Når MONDO Wi-Fi har koblet seg til ditt
nettverk, er du klar til å velge en stasjon.
Vennligst merk: Du kan gå tilbake til
forrige nivå når som helst, ved å trykke på
BACK knappen.
Mondo Wi-Fi har tre hovedmeny overskrifter.
Stations, Configure og Media Player. For
å velge en radiostasjon må trykke på < og >
knappene til ordet STATIONs kommer opp i
displayet. Deretter trykker du på SELECT.
Du vil nå få valget mellom å velge/søke
etter en stasjon etter
location (land) eller
genre (sjanger). Bruk < og > knappene
og trykk
SELECT når du skal velge din
foretrukne søkemetode.
Dersom du velger
location vil du få opp
en alfabetisk sortert liste over alle landene
som sender en eller flere radiostasjoner
på internett. Bruk < og > knappene
forover eller bakover for å bla deg
gjennom listen. Trykk på
SELECT når du
vil velge det landet som står i displayet.
For eksempel:
Så vil du få velge om du vil lytte til alle
landets typer internettradiostasjoner, eller
om du vil liste dem opp etter sjanger, for
eksempel Pop, Dance… etc.
Bruk
< og > knappene og trykk på
SELECT når du vil gjøre ditt valg. Mondo
Wi-Fi laster nå ned stasjonslisten etter ditt
ønske.
Når listen er lastet ned kan du igjen bla
deg gjennom med
< og > knappene. Også
her gjør du ditt valg ved å trykke på
SELECT.
Velger du Genre vil du få en alfabetisk liste
over stasjonstyper. Bruk < og > knappene
for å bla gjennom alle stasjonstyper.
Trykk på SELECT for å velge den
sjangeren du ønsker.
Deretter får du valget om du vil se alle
stasjonene i denne sjangeren, eller om du
vil sortere dem etter land.
Velg til slutt den kanalen du vil høre på med
< og > og bekreft ved å trykke på SELECT.
Oppdatering av stasjonslisten
Fra tid til annen vil MONDO Wi-Fi fortelle deg
at den mottar en oppdatert stasjonsliste.
Dette skjer automatisk og etter en viss
periode, jevnlig, slik at MONDO Wi-Fi alltid
har den siste og oppdaterte stasjonslisten i
minnet.
Å velge en stasjon
87.50MHz FM
94.50MHz FM
Clock not set...
OR
OR
<Stations >
<Location >
6537 Stations
<Stations >
<Genre >
6537 Stations
<Location >
6537 Stations
<Stations >
<Albania >
16 Stations
<Genre >
6537 Stations
<Location >
6537 Stations
<Stations >
<Albania >
16 Stations
<Genre >
6537 Stations
<Location >
6537 Stations
<Stations >
<[All Station] >
323 Stations
<Albania >
16 Stations
< Dance >
323 Stations
<Genre >
6537 Stations
<Location >
6537 Stations
<Stations >
<[All Station] >
323 Stations
<Albania >
16 Stations
Loading 323
Stations
< Dance >
323 Stations
<Genre >
6537 Stations
<Location >
6537 Stations
<Stations >
<[All Station] >
323 Stations
<Albania >
16 Stations
Loading 323
Stations
<Cool FM >
96 kbps WMA
< Dance >
323 Stations
<Genre >
6537 Stations
<Location >
6537 Stations
<Stations >
<[All Station] >
323 Stations
<Albania >
16 Stations
Loading 323
Stations
<Cool FM >
96 kbps WMA
< Genre >
6537 Stations
< Dance >
323 Stations
<Genre >
6537 Stations
<Location >
6537 Stations
<Stations >
<[All Station] >
323 Stations
<Albania >
16 Stations
Loading 323
Stations
<Cool FM >
96 kbps WMA
< Genre >
6537 Stations
< Dance >
323 Stations
< Dance >
323 Stations
<Genre >
6537 Stations
<Location >
6537 Stations
<Stations >
<[All Station] >
323 Stations
<Albania >
16 Stations
Loading 323
Stations
<Cool FM >
96 kbps WMA
< Genre >
6537 Stations
< Dance >
323 Stations
< Dance >
323 Stations
<[All Station] >
323 Stations
<Genre >
6537 Stations
<Location >
6537 Stations
<Stations >
<[All Station] >
323 Stations
<Albania >
16 Stations
Loading 323
Stations
Loading 323
Stations
<Cool FM >
96 kbps WMA
<Cool FM>
96 kbps WMA
Station Update
from Reciva
< Genre >
6537 Stations
< Dance >
323 Stations
< Dance >
323 Stations
<[All Station] >
323 Stations
<Genre >
6537 Stations
<Location >
6537 Stations
<Stations >
<[All Station] >
323 Stations
OR
6
Norsk
MONDO Wi-Fi Manual.qxd 10/12/07 12:02 Page 56
Page 57

Generelt bruk
Endre volum
For å skru lyden opp eller ned, trykker du på
VOLUM opp eller ned på fjernkontrollen. Du
vil se volumindikator i displayet. Mondo Wi-Fi
husker lydnivået den stod på da den ble
slått av.
Internett radio hurtigtaster
Mondo Wi-Fi kan lagre fem radiokanaler på
hurtigtaster ved å bruke hurtigtastene på
fjernkontrollen. For å lagre stasjonen du
hører på, trykker og holder du nede en
hurtigtast til displayet sier at kanalen er
lagret. For å høre kanalen senere, trykker
du på tasten der den ligger lagret.
Gå tilbake til hovedmeny
Du kan når som helst gå tilbake til Mondo
Wi-Fis hovedmeny ved å trykke BACK
knappen gjentatte ganger. Da blar du deg
tilbake gjennom menynivåene i den
rekkefølge du tidligere har gått inn i dem i.
Bakgrunnsbelysning
Med innstillingen fra fabrikken vil
Mondo
Wi-Fi
dimme displaylyset sitt etter 30 sekunder. Ved
å taste en tast på
Mondo
eller fjernkontrollen,
vil lyset øke til full styrke igjen. For å endre
denne innstillingen, må du lese
”Bakgrunnsbelysning”-informasjonen på side 9.
Forespør en stasjon
Dersom du ønsker å høre en
internettstasjon som enda ikke er listet i
Mondo Wi-Fis stasjonsliste, kan du gå inn
på internett på adressen
http://www.reciva.com og legge inn en
forespørsel om å legge stasjonen til
stasjonslisten.
OR
On Demand kringkasting (Podcast)
Noen radiostasjoner tilbyr alternative
metoder for å lytte til deres innhold.
Eksempelvis gi deg muligheten til å høre
på radioprogrammer som allerede har
vært sendt. Dette kjenner vi som ”On
Demand kringkasting” eller ”Podcast”.
For å velge mellom en ”live” sending eller
en Podcast, bruk
< og > knappene og
trykk
SELECT for å velge.
Dersom du velger ”On Demand”/Podcast,
vil du bli presentert for en liste med
sendinger som er tilgjengelige for slik lytting.
Bruk < og > knappene til ditt valg vises i
displayet og trykk på
SELECT for å velge det.
Noen stasjoner tillater deg å spole raskt
gjennom slike ”On Demand”/Podcast
sendinger. Det gjør du i så fall ved å
trykke på
BROWSE knappen og bruke
< og > knappene for å gå fremover eller
bakover i sendingen. Trykk på
SELECT for
å stoppe spolingen og avspille i rett
hastighet.
Nullstille Mondo WiFi
Dersom Mondo Wifi mot all formodning
skulle ’kræsje’, ’fryse’ eller på annen måte
slutte å respondere, er det mulig å
gjennomføre en nullstilling av radioen for å
bringe den ”tilbake til livet”.
En fullstendig tilbakestilling til originalt
fabrikksoppsett kan du gjennomføre ved å
gå til radioens ’Configure’ meny.
(Konfigurasjonsmenyen). Ved å gjennomføre
en fullstendig nullstilling, vil Mondo Wi-Fis
minne bli fullstendig slettet. WEP/WPA
koder og andre innstillinger forsvinner.
Mondo Wi-Fi er tilbake der den var da den
forlot fabrikken.
< Live (Real
Audio) >
< On Demand >
< Live (Real
Audio) >
< On Demand >
< Chart Show >
< Live (Real
Audio) >
< On Demand >
< Chart Show >
Start Time
<00:03:03 >
< Live (Real
Audio) >
OR
7
Norsk
MONDO Wi-Fi Manual.qxd 10/12/07 12:02 Page 57
Page 58

Å stille en alarm
Trykk på knappen for å slå på radioen,
trykk deretter på knappen på
fjernkontrollen. Bruk < og > knappene for
å stille timen. Trykk
SELECT. Gjør på
samme måte med minuttene. Når du har
stilt inn, bekrefter du med SELECT.
Trykk på knappen for å sette Mondo
Wi-Fi i Stand-by modus. Mondo viser nå
klokketiden i øverste linje og
alarmtidspunktet som er innstilt på linjen
under.
MONDO Wi-Fi vekker deg med en pipelyd.
For å stanse denne trykker du på en
hvilken som helst knapp på Mondo eller
fjernkontrollen. Når alarmen er stanset, vil
Mondo WiFi slå seg på den radiostasjonen
som du lyttet til forrige gang Mondo sto
på.
Alarm og klokkefunksjon
Å stille Mondo’s klokke
Slå på Mondo og finn Configurasjonsmenyen.
Velg ”Clock” alternativet ved å bla med
< eller > knappene. Trykk SELECT og
Mondo vil gi deg to valg. “Set Clock” (still
klokken) eller “Set Alarm” (still alarmen). Velg
“Set Clock” og trykk på
SELECT og bruk
< og > knappene for å endre time, trykk så
SELECT for å bekrefte. Mondo ber deg nå
om å stille minuttene på samme måte.
<Alarm1 >
<Set alarm >
<Set clock >
Set alarm
Set minutes
<08:05 >
Set Alarm
00:00
Set Clock
08:10
¯ Clock ˘
Alarm Set:
07:10
Set Alarm
00:00
Set Clock
08:10
¯ Clock ˘
22:35
(07:10 )
Alarm Set:
07:10
Set Alarm
00:00
Set Clock
08:10
¯ Clock ˘
¯ Clock ˘
Set Clock
08:10
¯ Clock ˘
8
Norsk
MONDO Wi-Fi Manual.qxd 10/12/07 12:02 Page 58
Page 59

Nettverkskonfigurasjon
Gir deg muligheten til å lete etter andre
nettverk du kan koble deg til, eller til
manuelt å konfigurere
nettverksparametrene. Du kan også velge å
slå på ’Low Signal Warning’, en melding
som kommer når ditt trådløse
nettverkssignal er lavt.
Versjon
Her vises informasjon som enhetens
serienummer og hardware og software
versjons nummer. Slik informasjon kan være
aktuell ved kontakt med supportavdelingen
vår.
Oppdatere sw
Bruk dette menyvalget for å sjekke om det
finnes nye software versjoner til din Mondo
Wi-Fi radio. Mondo sjekker og gir beskjed
hvis det finnes. Du kan deretter bestemme
om du ønsker å starte en nedlasting av ny
software eller ikke. En oppdatering av
software kan ta flere minutter. Ikke slå av
Mondo Wi-Fi før denne prosessen er
fullført. Slår du av, kan du i verste fall
forårsake varige skader på radioen.
Språk
Her kan du endre Mondos menyspråk.
Språk som støttes er Engelsk, Fransk, Tysk,
Italiensk, Norsk, Dansk, Nederlandsk,
Portugisisk, Spansk, Svensk og Finsk.
Fabrikksoppsett
Se side 7 for detaljer
Registrer
Her finner du en kode som kan brukes for å
registrere din Mondo Wi-Fi i Recivas
kundeportal på nett:
http://www.reciva.com
Clock
Still Mondos innebygde klokke via denne
menyen. Det er også mulig å komme til
Mondos alarmfunksjoner gjennom denne
menyen, som et alternativ til å bruke
knappen på fjernkontrollen.
Innsovningsfunksjon
Velg Innsovningsfunksjonen/Sleep Mode fra
konfigurasjonsmenyen for å programmere
Mondo til å slå seg selv av etter en
forhåndsdefinert tidsperiode.
Innsovningsfunksjonen, som vi kaller den,
fungerer med intervaller på 15 minutter, fra
15 til 90. Bruk
< og > knappene til å
bestemme perioden du vil at radioen skal
spille før den slår seg av, og trykk på
SELECT for å bekrefte ditt valg. Mondo vil
nå slå seg selv av etter at tiden du valgte
har gått.
Bakgrunnsbelysning
Det er mulig å justere lysstyrken på Mondo
WiFis LCD display via konfigurasjonsmenyen.
Det er tre lysstyrke innstillinger:
Normal: Denne innstillingen gir Mondos
normale lysstyrke. Bruk < og > knappene
for å velge ønsket lysstyrke og trykk
SELECT for å bekrefte.
Auto-Bright: Når Mondo Wi-Fi star på og
du trykker hvilken som helst knapp på
fjernkontrollen eller hovedenheten, vil
displaylyset tennes og stå på i 30 sekunder.
Lysstyrket for ”auto-bright” innstillingen
velges her.
Standby: Her stiller du lysstyrken for
Mondo Wi-Fi når den står i ”Stand By”
modus. Bruk < og > knappene for å velge
ønsket lysstyrke og trykk
SELECT for å
bekrefte.
WiFi signalstyrke
Her vil du se signalstyrket på ditt WiFi
signal, angitt på skalaen 0% til 100%. Jo
lenger unna WiFi basestasjonen du befinner
deg med din Mondo WiFi, jo svakere vil
signalet bli.
Konfigurasjonsmeny
9
Norsk
MONDO Wi-Fi Manual.qxd 10/12/07 12:02 Page 59
Page 60

Mondo Wi-Fis Media Player funksjon gir deg
mulighet til å spille lydfiler (AAC, AIFF, AU,
MP3, RM, WAV og WMA) og spillelister
(M3U) som er lagret i en PC eller Apple Mac
som befinner seg på nettverket. Media Player
funksjonen er testet og er sertifisert for bruk
med Windows 2000, Windows XP, Windows
Vista og Mac OSX 10.2 eller senere versjoner.
Windows PC oppsett
Sjekk at PCen er tilgjengelig på nettverket.
Deretter bruker du Windows Explorer for å
finne folderen der lydfilene er lagret. Så:
Høyreklikk på folderen
Velg ’Properties’/’Egenskaper’
Klikk på ’Share’/’Dele’
Velg ’Share this folder on the network’/’Del
denne mappen på nettverket’
og
’Allow network users to change my
files’/’Tillatt netverksbrukere å endre mine
filer’
Vennligst merk: ikke gjør din “Mine
dokumenter” eller noen av den mappens
undermapper delbar. (f.eks ”Min musikk”)
(Her kan menyspråket og beskjedene variere
noe, da denne teksten er direkte oversatt
fra engelsk. Enkelte valg kan ha annen tekst,
men samme betydning.)
Apple Mac oppsett
Sett opp Windows fildeling på MAC:
Fra ’Dock’, klikk ’System
Preferences’/’System Innstillinger’. Fra
’System Preferences’ vinduet (under
’Internet & Network’ seksjonen) klikker du
’Sharing’/’Deling’.
Fra ’Sharing’ vinduet, gjør du følgende:
Under ’Services’ seksjonen; skru på
’Personal File Sharing’ og ’Windows
Sharing’. Klikk også ’Start’ for hver av disse
tjenestene.
Under ’Firewall’ seksjonen, hold
firewall/brannmur AV.
Under ’Internet’ seksjonen, hold ’Internet
sharing’ AV.
Oppsett av konto:
Fra ’System Preferences’ vinduet, under
’System’ seksjonen, klikker du ’accounts’.
Velg deg en konto og husk dennes ’short
name’ og passord. Denne informasjonen
trenger du i din Mondo Wi-Fi når den skal
kobles til din Mac.
Oppsett av katalog
Fra ’Dock’, klikk på ’Finder’. Fra ’Finder’
vinduet, klikk ’Applications > Utilities’. Hold
inne CTRL og klikk på ’Directory Access’ og
velg der ’Get info’ og forsikre deg om at
read/write er slått på (enabled). Så
dobbeltklikker du på ’Directory Access’ og
slår på følgende:
AppleTalk LDAPv3
SLP SMB/CIFS
Husk også for ‘SMB / CIFS’ enheter, klikk
‘Configure’ og velg en passende arbeidsgruppe /
workgroup.
Kopier og lim inn lydfilene dine til ’Documents’ i
’Finder’ vinduet. Sjekk at din MAC er tilkoblet og
fungerer på det trådløse nettverket. Legg merke
til at du muligens må vente noen minutter for at
disse endringene skal begynne å virke.
Du skal nå kunne få tilgang til lydfilene på din
MAC ved å velge ’Media Player > Windows
Shares’ på din Mondo Wi-Fi, og der velge din
MAC fra listen med enheter. Dersom du ikke
finner noen delte mapper (shared folders) kan
du trykke på
SELECT og velge bruker. Nå vil
du kunne skrive inn ’short name’ og passordet
til din MAC konto.
Få tilgang til delt musikk
Når Mondo er koblet til ditt trådløse nettverk,
kan du trykke på
BACK knappen helt til
’Stations’ står i displayet. Trykk på
< eller >
knappene til ’MediaPlayer’ står i displayet, og
trykk på
SELECT for å velge denne.
Bruk
<
og >knappene og velg ’Windows
Shared’, vri og velg deretter ’Scan for PCs’.
Mondo viser nå ’Finding PCs’ i displayet. Når
søket er ferdig, bruk < og > knappene og velg
din PC ved å trykke på
SELECT. Mondo Wi-Fi
vil nå lete etter delte mapper. Bruk
<
og
>
knappene og marker den korrekte mappen.
Velg denne ved å trykke på
SELECT.
Mondo Wi-Fi vil vise ’File Scan…’ mens den
skanner gjennom alle filene på din MAC eller PC.
Merk; dersom du har et stort antall filer vil
denne operasjonen kunne ta flere minutter.
Når Mondo er ferdig med å søke, vil den vise
’By album’ i displayet. Du kan nå bla deg
gjennom mediafilene. Disse er organisert ’By
Album’, ’By artist’ og ’By Playlist’ – hvis
tilgjengelig.
VIKTIG: Første gangen Mondo Wi-Fi
gjennomfører et søk etter filer på denne måten,
vil den lagre en fil ved navn ’reciva_media_cache’
i mappen der filene er lagret. Dette vil øke
hastigheten på fremtidige søk.
Å høre på et enkelt spor
Trykk på <eller >knappen til ’By artist’ står
på displayet og trykk på
SELECT for å velge.
Bruk
<
eller >til den artisten du ønsker står i
displayet, og trykk på
SELECT for å velge. Bla
og velg deretter ønsket album på samme
måten. ’Add to queue’ vil stå i displayet. Bruk
<
eller >til det lydsporet du vil høre kommer
frem. Trykk på
SELECT og sangen starter.
Å høre på et helt album
Bruk <og >knappene og velg ’By artist’. Velg
deretter din artist. Bla og velg album med
<
og >og SELECT. ’Add to queue’ kommer opp
og du trykker for å velge. Albumet begynner å
spille.
Enkeltspor i kø for avspilling
Marker din ønskede lydfil og trykk på
SELECT for å velge. ’Track added to queue’
vill komme opp i displayet.
Album i kø for avspilling
Marker ditt ønskede album og trykk på
SELECT for å velge. Bruk <eller >til ’Add
to queue’ står i displayet og velg ved å
trykke på
SELECT. ’Tracks added to queue’
står i displayet.
Bruk av Media Player
✓
✓✓
✓
10
Norsk
MONDO Wi-Fi Manual.qxd 10/12/07 12:02 Page 60
Page 61

Kontrollere avspilling
Bruk STOP knappen på din Mondo Wi-Fi
fjernkontroll for å stoppe avspillingen.
Bruk
PLAY/PAUSE knappen på
fjernkontrollen for å starte en avspilling, pause
en avspilling eller starte en avspilling igjen etter
pause.
Bruk
SKIP TO PREVIOUS TRACK for å
starte avspilling av den forrige lydfilen i køen.
Bruk
SKIP TO NEXT TRACK for å starte
avspilling av den neste lydfilen i køen.
Bla gjennom en liste med filer
Trykk på BROWSE knappen og navnet på
filen som spilles nå vises i displayet. Bruk
< og > knappene for å se navnene på filene
som ligger i listen. For å hoppe fremover i
listen og starte avspilling av et annet spor, bla
til du markerer sporet og velg det ved å trykke
på
SELECT. Avspilling av dette sporet starter.
Fjerne filer fra en liste
Trykk på BROWSE knappen og navnet på
filen som spilles vises i displayet. Bruk < eller >
knappen til du markerer filen du vil fjerne fra
listen. Trykk og hold
STOP knappen på
fjernkontrollen i 2 sekunder. Mondo spør
’Delete Track?’.
Bruk < eller > for å markere enten ’Yes’ eller
’No’. Trykk på
SELECT for å foreta ditt
valg.’Removed from queue’ vil stå i displayet
dersom du velger å slette sporet fra listen.
For å fjerne hele innholdet i en liste, velg
’Clear Queue’ fra Media Player hovedmenyen.
Spille av lydfiler i tilfeldig rekkefølge
Velg og legg til individuelle lydfiler til listen
som beskrevet tidligere.
Gå tilbake til toppen av Media Player
hovedmenyen og velg ’Playback Mode’.
Bruk
< eller > knappen og velg ’shuffle’. Trykk
Select.
Bekreft at du ønsker ’shuffle’ modus ved å
velge ’yes’ og trykke på
SELECT.
Gjenta lydfiler i en liste
Velg og legg til individuelle lydfiler til listen
som beskrevet tidligere.
Gå tilbake til toppen av Media Player
hovedmenyen og velg ’Playback Mode’.
Bruk
< eller > knappen og velg ’repeat’.
Bekreft ved å trykke på
SELECT.
Bekreft at du ønsker ’repeat’ modus ved å
velge ’yes’ og trykke på
SELECT.
Windows PC UPnp oppsett
Hvis din PC kjører med Microsoft Windows
XP eller Vista, kan du bruke Windows Media
Player 11 (WMP 11) til å fungere som din
UPnP (Universal Plug and Play) media server
1.0.
WMP 11 kan du laste ned fra Microsofts
nettsted og den installeres ved å følge
rettledningen og installasjonsguiden som følger
med.
Når WMP 11 er installert vil programmet
lage et bibliotek med alle filene som er
tilgjengelige på din PC. For å legge til nye
filer, velger du File > Add to Library…>Advance
Options, klikk ’add’, velg filene du ønsker å legge
til og klikk ’OK’.
Nå må du koble Mondo Wi-Fi til Windows
Media Player 11 og konfigurer slik at du får
tilgang til filene dine. Dette gjør du på følgende
måte:
Trykk
BACK til du kommer til toppen på
Mondos meny og trykk < eller > knappen til du
ser ’Media Player’ i displayet. Velg denne ved å
trykke på
SELECT.
Nå bruker du < eller > knappen til du får
’UPNP Servers’ i displayet. Velg dette ved å
trykke på
SELECT. Mondo søker nå etter alle
tilgjengelige UPnP servere. Merk: Det kan ta
noen sekunder å fullføre dette søket. I
mellomtiden vil Mondo si ’Empty’ i displayet.
Dersom Mondo ikke finner noen UPnP servere,
vil det fortsatt stå ’Empty’ i displayet når søket
er over.
Dersom ’No PC found’ står i displayet, må du
klikke på ’library’ fanen i WMP og velge ’media
sharing’. Velg ’share my media’ / ’del mine filer’
der og klikk OK.
Nå kan du søke etter UPnP servere på
Mondo igjen. Mondo Wi-Fi blir nå listet opp
som ’unknown device’ / ’ukjent enhet’ i
fildelingsvinduet i WMP. Klikk ’allow’ / ’tillat’
knappen og så OK. Mondo Wi-Fi burde nå få
tilgang til ditt Windows Media Player bibliotek.
Vennligst merk at kun VMA filer i WMP er
tilgjengelige ved bruk av UPnP.
Spille musikk med UPnP
Når UPnP serveren er konfigurert til å dele
media filer med Mondo Wi-Fi, kan du begynne å
spille musikk:
Trykk på
BACK knappen helt til ’Stations’ står
i displayet. Bruk < eller > knappen helt til
’Media Player’ står i displayet og trykk deretter
på
SELECT for å velge.
Bla med < eller > knappen og marker ’UPnP
servers’ og trykk på
SELECT for å velge.
Mondo søker nå etter alle tilgjengelige UPnP
servere. Merk: Det kan ta noen sekunder å
fullføre dette søket. I mellomtiden vil Mondo si
’Empty’ i displayet. Dersom Mondo ikke finner
noen UPnP servere, vil det fortsatt stå ’Empty’ i
displayet når søket er over.
After a successful scan, select your UPnP
server using the
<>keys (if there is more
than one UPnP server), and then pressing the
SELECT button.
Etter et vellykket søk, velg din UPnP server
(hvis det står flere der) ved å bla med < eller >
knappen og markere denne og trykke på
SELECT for å velge.
Mondo lister nå opp de tilgjengelige media
kategoriene fra UPnP serveren. Eksempelvis
”Musikk”, ”Spillelister” etc. Bruk
< eller >
knappen for å velge en kategori du vil bla deg
gjennom. Velg kategorien ved å trykke på
SELECT. Bla med < eller > for å markere en
underkategori og trykk på
SELECT for å velge.
Bruk < eller > knappen for å velge
mediafilen/ene du ønsker å spille, trykk så på
SELECT for å velge. I displayet vil det stå ’Add
to Cue’. Trykk på SELECT igjen og Mondo
legger sporene til i køen og begynner å spille
dem automatisk.
11
Norsk
MONDO Wi-Fi Manual.qxd 10/12/07 12:02 Page 61
Page 62

Å bla gjennom en kø
Trykk på BROWSE knappen, filnavet på
filen som spilles kommer opp. Bruk <eller
>
for å bla gjennom filene som ligger i kø for å
bli spilt. Dersom du vil hoppe til et bestemt
sted i køen, trykker du på SELECT når den
fila du ønsker står i displayet. Det er viktig å
merke seg at media filene som er funnet i
radioens ’Windows Shares’-funksjon også
kan legges til i radioens avspillingskø.
Mer informasjon om administrasjo av
avspillingskøen etc. finner du under UPnP
informasjonen på side 11.
Dersom du erfarer problemer med din
Mondo Wi-Fi internettradio bør du lese
denne oversikten over mulige problem +
løsninger. Du kan også besøke HELP
seksjonen på Recivas hjemmeside
(http://www.reciva.com) eller support
seksjonen til Revo på www.revo.co.uk.
Har du problemer med å koble din Revo
Mondo Wi-Fi internettradio til ditt trådløse
nettverk, kan følgende tips hjelpe:
1. Forsikre deg om at PC som er tilkoblet
det samme Wi-Fi nettet kan surfe på nett.
2. Sjekk at en DHCP server er tilgjengelig
eller at du har fått konfigurert en statisk IP
adresse på radioen. Du kan selv gjøre dette
ved å benytte menyen ’Configure -> Network
Config -> Edit Config’ og så ’No’ for ’ Auto
(DHCP)’.
3. Sjekk at ditt nettverks
FireWall/Brannmur ikke stenger for noen
utgående porter. Som et minimum trenger
Mondo Wi-Fi tilgang til UDP og TCP portene
80, 554, 1755, 5000 og 7070.
Sjekk at ditt aksess punkt ikke er sperret for
enkelte MAC adresser. Du kan se radioens
MAC adresser under menyen ’Configure ->
Network Config - > View Config -> MAC
addresses’
5. Dersom du har et kryptert/beskyttet
nettverk, sjekk at du har lagt inn den rettet
nettverksnøkkelen i radioen. Husk at tekstformatsnøkler er sensitive for små og store
bokstaver. Dersom radioen sier ’Wireless
Error’ etterfulgt av en tallkode på 5 tall når
du skal koble til et kryptert nettverk, må du
sjekke at du har lagt inn den nøyaktige
nøkkelen. Dersom problemet fortsetter, må
du konsultere nettverkskonfigurasjonen din.
Dersom Mondo Wi-Fi kan koble til nettverket
ditt, men ikke kan spille alle stasjoner som
burde være tilgjengelige, kan en av følgende
feil ha oppstått:
1. Stasjonen sender ikke nå. Husk at det er
radiostasjoner fra mange tidssoner og ikke
alle sender hele døgnet.
2. Radiostasjonen har oppnådd det
maksimale antall tillatte samtidige lyttere og
kan ikke gi deg tilgang nå.
3. Radiostasjonen er nedlagt.
4. Linken til radiostasjonens nettradio er
skiftet ut og ikke oppdatert i databasen.
5. Kommunikasjonshastigheten mellom
serveren (svært ofte lokalisert i et annet
land) og deg er lav. Prøv å logge deg på en
PC for å høre stasjonen der. Dersom du kan
spille av radiostasjonens lydstrømmer via
stasjonens webside, på Pcen, men ikke på
Mondo, gå til www.reciva.com og gjør dem
oppmerksom på problemet. De kan endre
på stasjonsdataene og rette problemet.
Mulige problem + løsninger
Tilbehør og Ekstradeler
Fjernkontroll:
Erstatningsfjernkontroll for Mondo WiFi
Strømadapter:
Erstatningsstrømadapter for Mondo WiFi
Stereo RCA kabler:
Erstatningskabler for å koble Mondo WiFi til et stereoanlegg.
Følgende tilbehør og ekstradeler er tilgjengelige for Mondo WiFi. Vennligst kontakt
din REVO forhandler eller kontakt REVO International på 0044 1555 666 161.
Du kan også bestille tilbehør og ekstradeler på nettet . www.revo.co.uk
12
Norsk
MONDO Wi-Fi Manual.qxd 10/12/07 12:02 Page 62
Page 63

Notes / Remarques / Notizen / Note / Notater
MONDO Wi-Fi Manual.qxd 10/12/07 12:02 Page 63
Page 64

Revo Technologies Ltd The Inox Building Caldwellside Lanark Scotland United Kingdom ML11 7SR
Telephone Support 01555 666 161
Online Support www.revo.co.uk/support support@revo.co.uk
MONDO Wi-Fi Manual.qxd 10/12/07 12:02 Page 64
 Loading...