

Page 1

DELUXE TABLE RADIO
With docking for iPod and iPhone
DAB | DAB+ | FM | Internet Radio | Audio Streaming
Version 2.0
Owner’s Manual
Bedienungsanleitung
Manuel de l’utilisateur
Manuale dell’utente
Page 2
TECHNICAL SUPPORT
WARRANTY
Should you encounter problems using this product, please refer to the
troubleshooting section on page 39 of this owner’s guide.
Alternatively, call Revo technical support on :
UK 01555 666161
From outside the UK + 44 1555 666161
Alternatively, e-mail [email protected] or visit the troubleshooting
section of our website at: www.revo.co.uk/support
ENVIRONMENTAL INFO
PRODUCT DISPOSAL INSTRUCTIONS (WEEE DIRECTIVE)
The symbol shown here and on the product means that it is classed
as Electrical or Electronic Equipment and should not be disposed with
other household or commercial waste at the end of its working life.
The Waste of Electrical and Electronic Equipment (WEEE) Directive
(2002/96/EC) has been put in place to recycle products using best
available recovery and recycling techniques to minimise the impact
on the environment, treat any hazardous substances and avoid the
increasing landfi ll.
For more information please contact your local authority or the retailer
where the product was purchased.
RoHS COMPLIANT & CE MARK
This product has been designed to comply with international
directives on the Restriction of Hazardous Substances (RoHS) and has
been designed and type-tested to comply with EU
requirements and carries a CE mark.
SAFETY WARNINGS
• Do not operate this radio near water
• Do not remove screws or casing parts
• Use only the power supply unit supplied
• Avoid small objects and liquids from entering the product
ISO 7000-0434
Revo Technologies Ltd warrants to the end user that this product will
be free from defects in materials and workmanship in the course of
normal use for a period of one year from the date of purchase.
This guarantee covers breakdowns due to manufacturing faults and
does not apply in cases such as accidental damage, general wear
and tear, user negligence, modifi cation or repair not authorised by
Revo Technologies Ltd.
To register your purchase please visit www.revo.co.uk/register
COPYRIGHTS AND
ACKNOWLEDGEMENTS
Copyright 2011 Revo technologies Ltd. All rights reserved.
No part of this publication may be copied, distributed, transmitted
or transcribed in any form or by any means, electronic, mechanical,
magnetic, manual or otherwise, without the permission of Revo
Technologies Limited.
REVO and HERITAGE are trademarks or registered trademarks of
Revo Technologies Ltd. iPod and iPhone are trademarks of Apple
Inc., registered in the U.S. and other countries.
Revo Technologies Ltd
The Inox Building, Caldwellside, Lanark,
Scotland, United Kingdom, ML11 7SR
Tel: 01555 66 61 61 Int. Tel: +44 1555 66 61 61
Fax: 01555 66 33 44 Int. Fax: +44 1555 66 33 44
Email: [email protected] Website: www.revo.co.uk
DISCLAIMER
Revo Technologies Limited makes no representation or
warranties with respect to the content of this publication, and
specifi cally disclaims any implied warranties of merchantability or
fi tness for any particular purpose. Further, Revo Technologies Limited
reserves the right to make changes to this publication from time to
time, without notifi cation to any person or organisation.
02
Page 3

CONTENTS
02 Technical Support
02 Environmental Info
02 Warranty
02 Copyrights and Acknowledgements
02 Disclaimer
03 Welcome / Overview / Unpacking
04 Anatomy
05 Remote Control
06 Power Supply
06 Set-Up
07 Controlling Heritage / Menu Structure
08 - 09 DAB Mode
10 - 11 DAB Mode Menu Options
12 FM Mode
13 FM Mode / AUX-IN Mode
14 - 16 iPod Mode
17 - 22 Internet Radio Mode
23 Internet Radio Portal
24 - 25 Setting Up A Music Server
26 - 28 Music Player Mode
29 - 31 Last.fm Mode
32 - 33 Alarm Clock
34 - 38 System Settings
39 - 40 Troubleshooting
41 Error Messages
WELCOME
Thank you for purchasing our Heritage radio, we are sure that it will
provide you with many years of enjoyment and reliable service.
This guide has been designed to quickly get you up-and-running
with your radio, offer guidance on the more complex features of
this product and provide information on safety, warranty details and
troubleshooting.
HERITAGE OVERVIEW
Heritage is a contemporary reinterpretation of classic European
table radio designs from the 60’s. A multi-format digital radio that
provides coverage of DAB, DAB+, FM and Wi-Fi internet radio –
as well as wireless audio streaming and iPod/iPhone docking
functionality.
Heritage is crafted using the fi nest quality materials and components.
Its cabinet is constructed using a combination of aluminium and
furniture-grade American walnut. Audio performance is delivered by
a custom-designed 3” neodymium speaker driver, driven by a superb
7W amplifi er. Lastly, Heritage benefi ts from a large, graphical OLED
display and intuitive control system.
UNPACKING HERITAGE
Carefully remove Heritage from its packaging before removing the
other items from the box.
The box should contain the following:
• Heritage radio
• Remote control
• iPod/iPhone dock adaptor kit
• Power adaptor with multi - country adaptors (UK, Euro, USA)
• Owner’s Manual
Should any item be missing or damaged, please contact your point
of purchase or call Revo directly on +44 (0) 1555 66 61 61
NOTE
: Heritage’s packaging should be retained for possible future
use, it is the safest way to transport Heritage should it be necessary.
03
Page 4
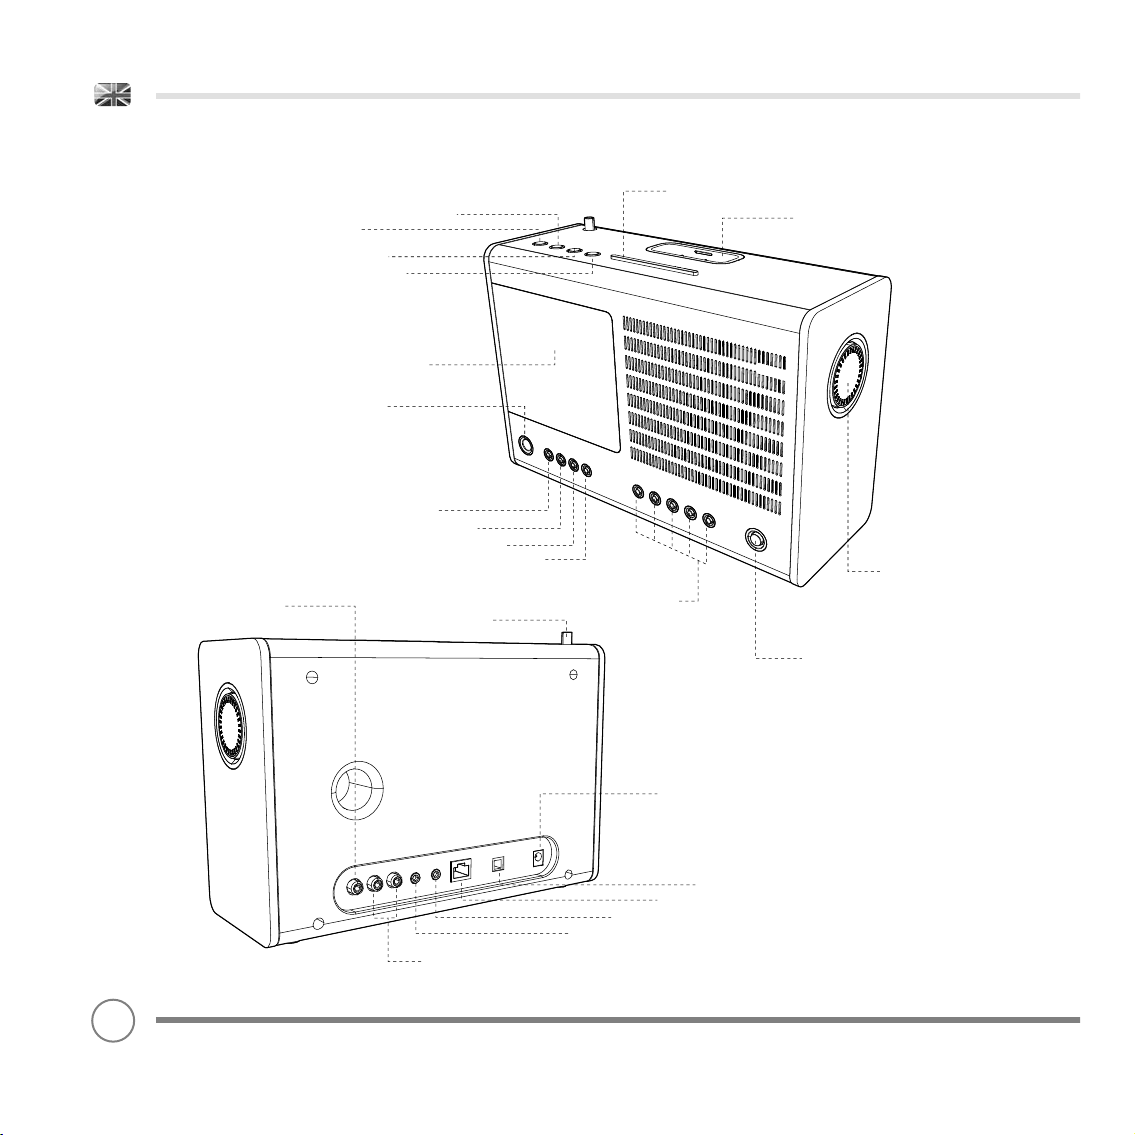
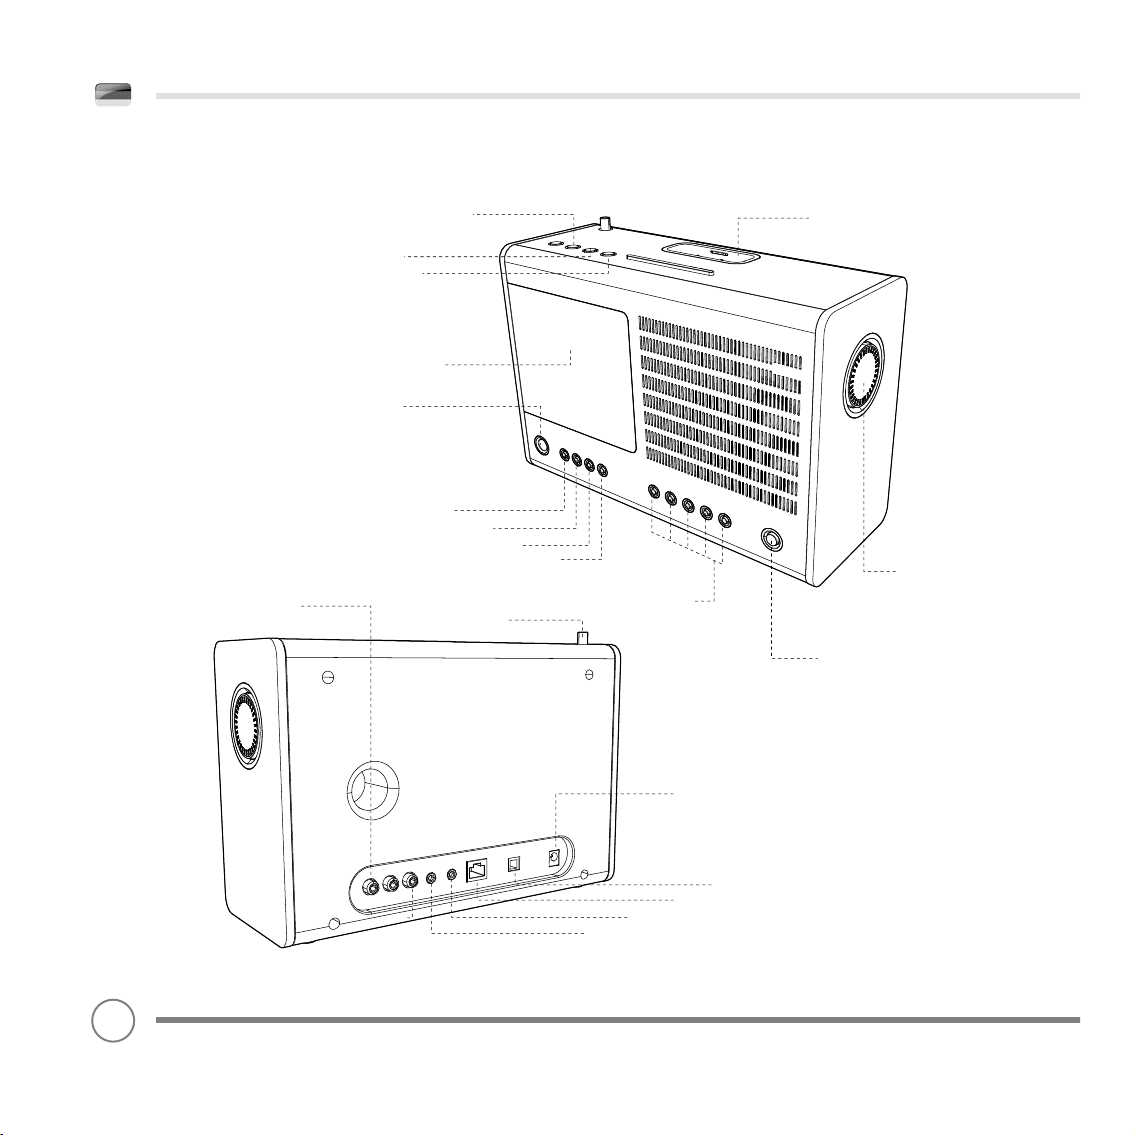
ANATOMY OF HERITAGE
Skip Back
Skip Forward
Cursor Control
iPod Video Out
Play/Pause
Feedback
OLED
Mode
Menu
Telescopic Antenna
Info
Alarm
Snooze/Sleep Bar
iPod/iPhone Dock
Volume Dial
Station Presets 1 - 5
Power/Standby
04
Stereo RCA Connectors
DC Power Socket
Wired LAN
Aux-In
3.5 Headphone Connector
Digital Optical Out
Page 5
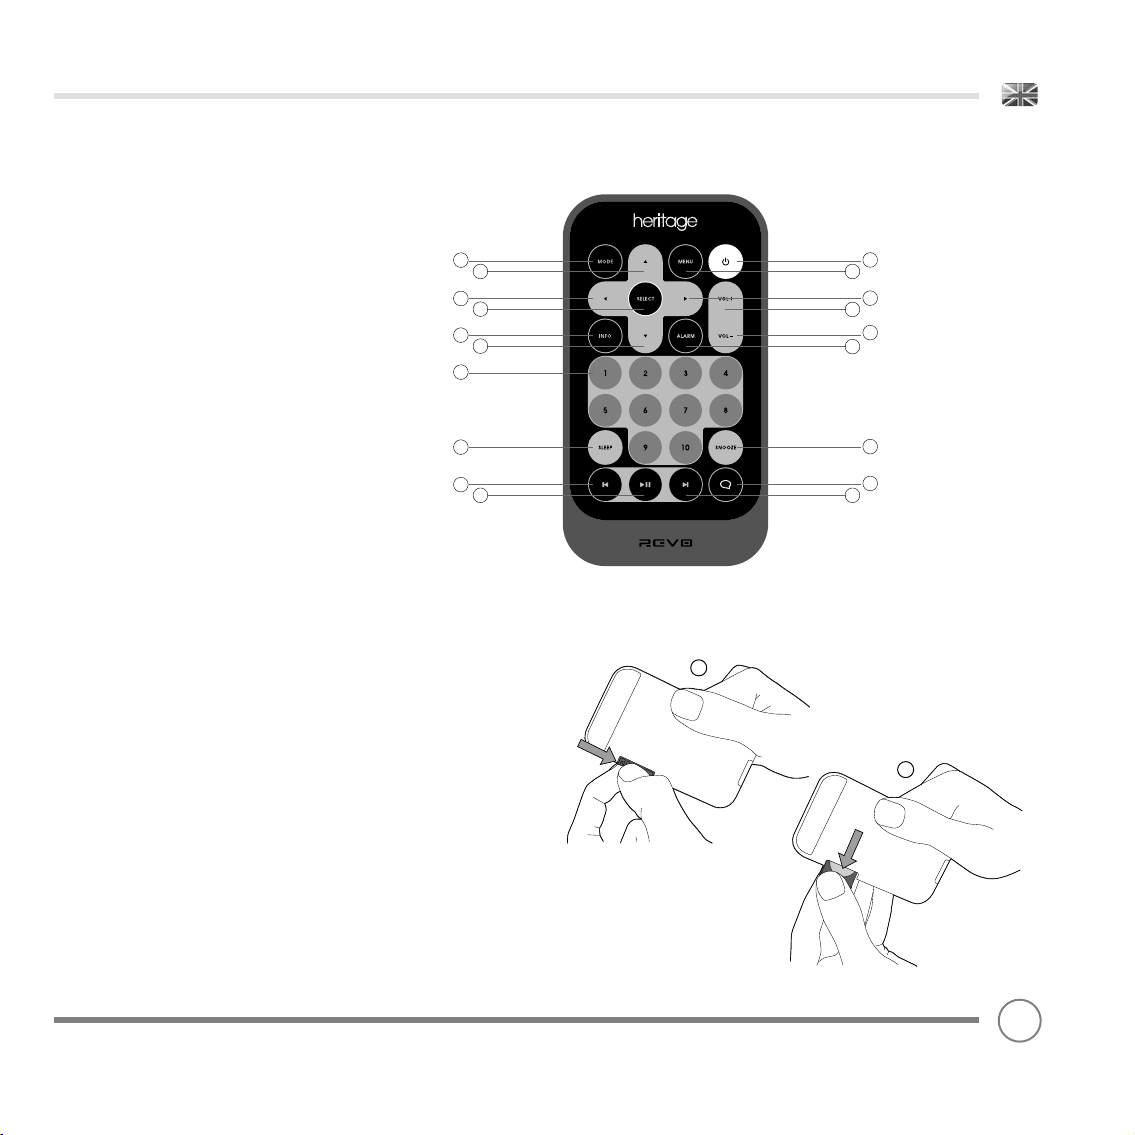
REMOTE CONTROL
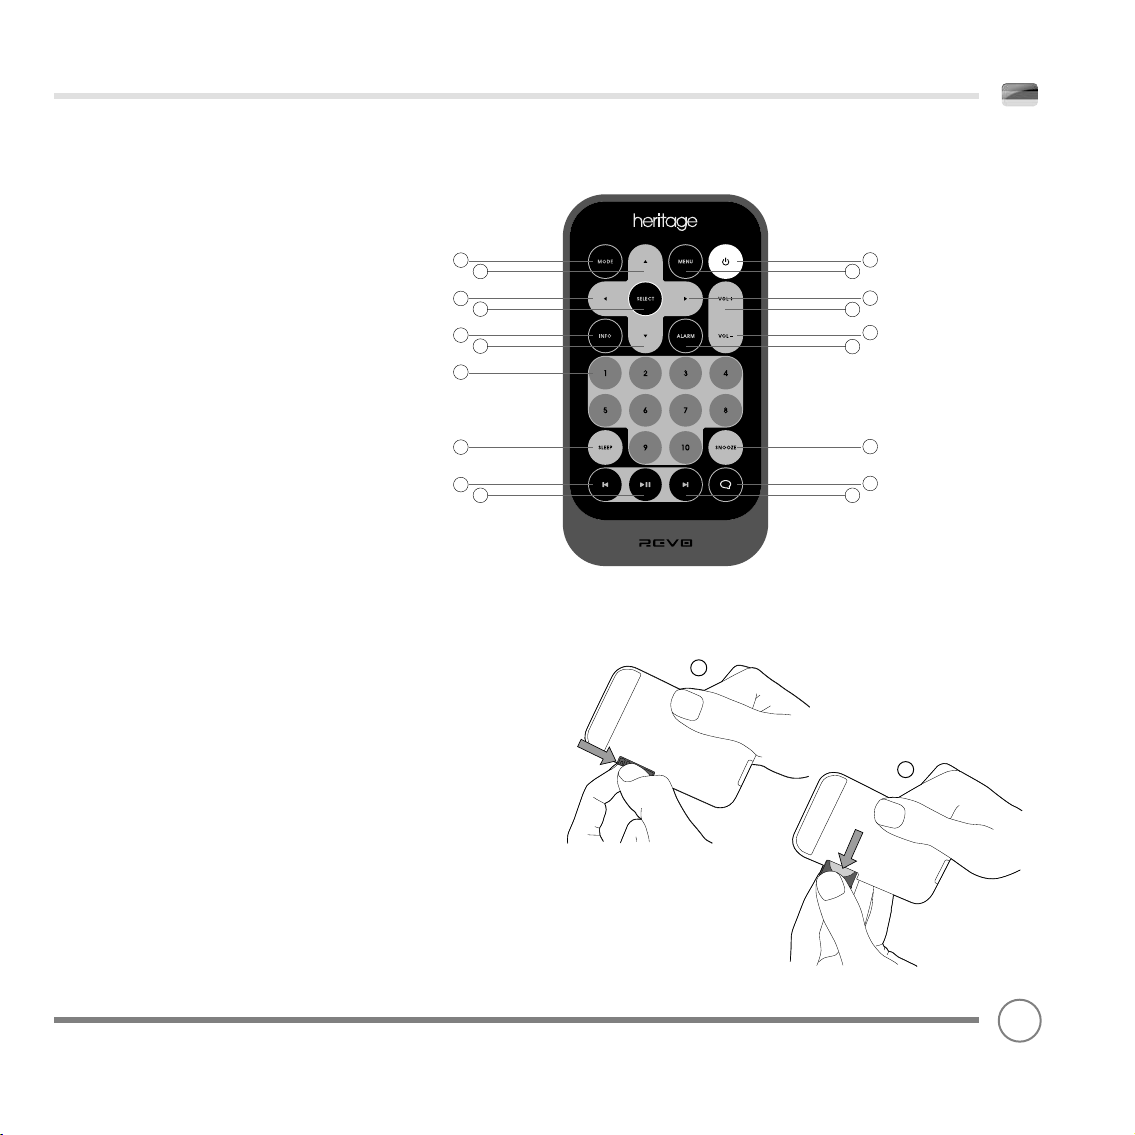
01 - Mode
02 - Scroll up
03 - Menu
04 - Power
05 - Back
06 - Select
07 - Forward
08 - Volume increase
09 - Info
10 - Scroll Down
11 - Alarm
12 - Volume Decrease
13 - Presets 1- 10
14 - Sleep
15 - Snooze
16 - Skip Back (Fast Rewind)
17 - Play/Pause
18 - Skip Forward (Fast Forward)
19 - Feedback (Love/Ban)
BATTERY REPLACEMENT
1
2
5
6
9
10
13
14
16
17
3
4
7
8
12
11
15
19
18
1
The Heritage remote control is powered by a single 3V lithium
battery. Depending on usage, the battery should happily run for
between 1 and 2 years.
Replace the battery when button presses seem sluggish, or when the
operating range appears to have reduced signifi cantly.
Replace the old battery with a new CR2025 lithium cell.
2
05
Page 6
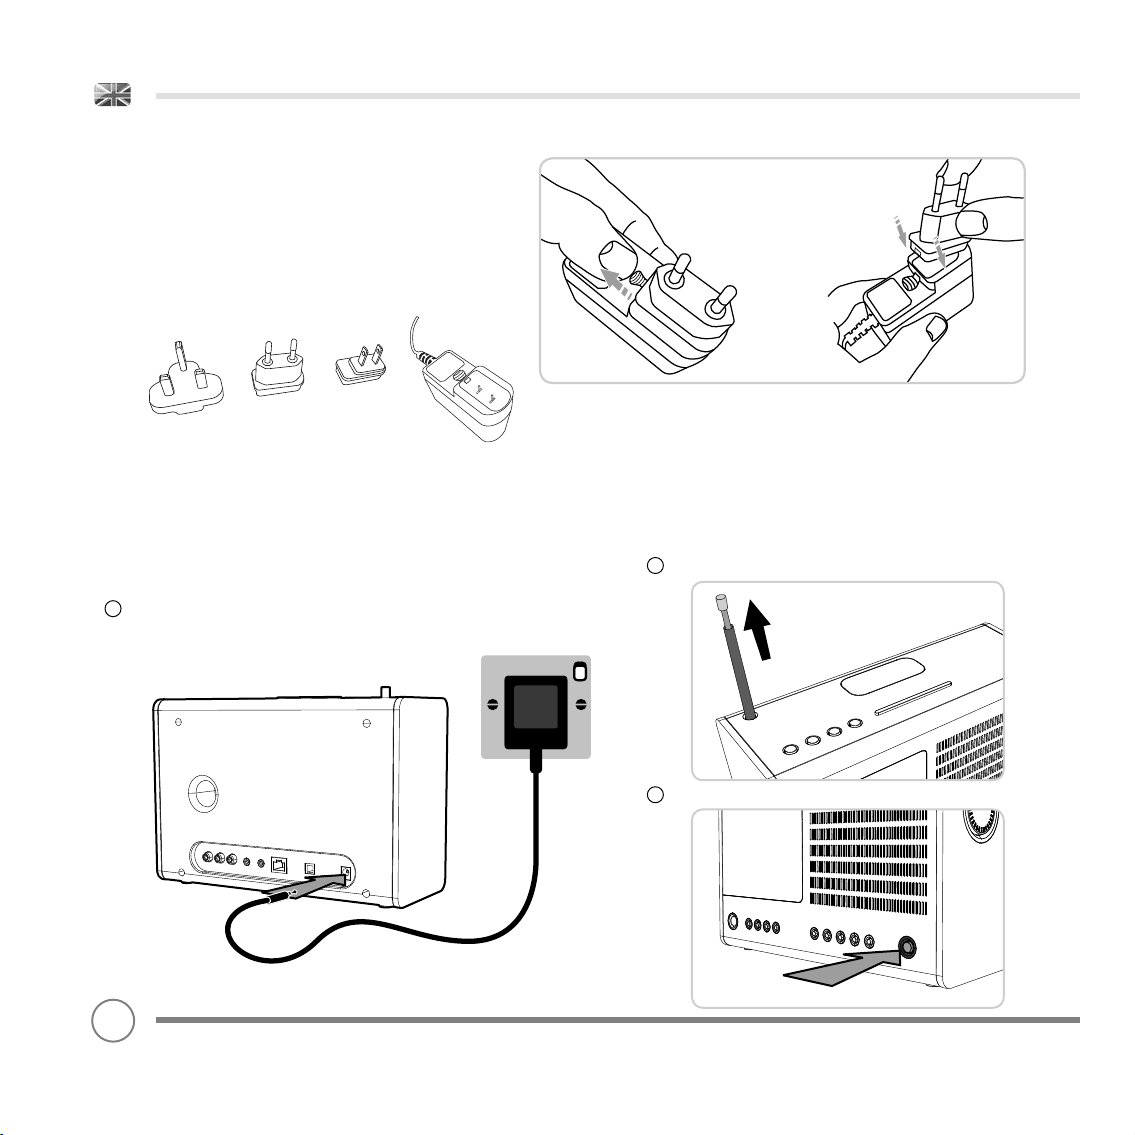
POWER SUPPLY (PSU)
PUSH
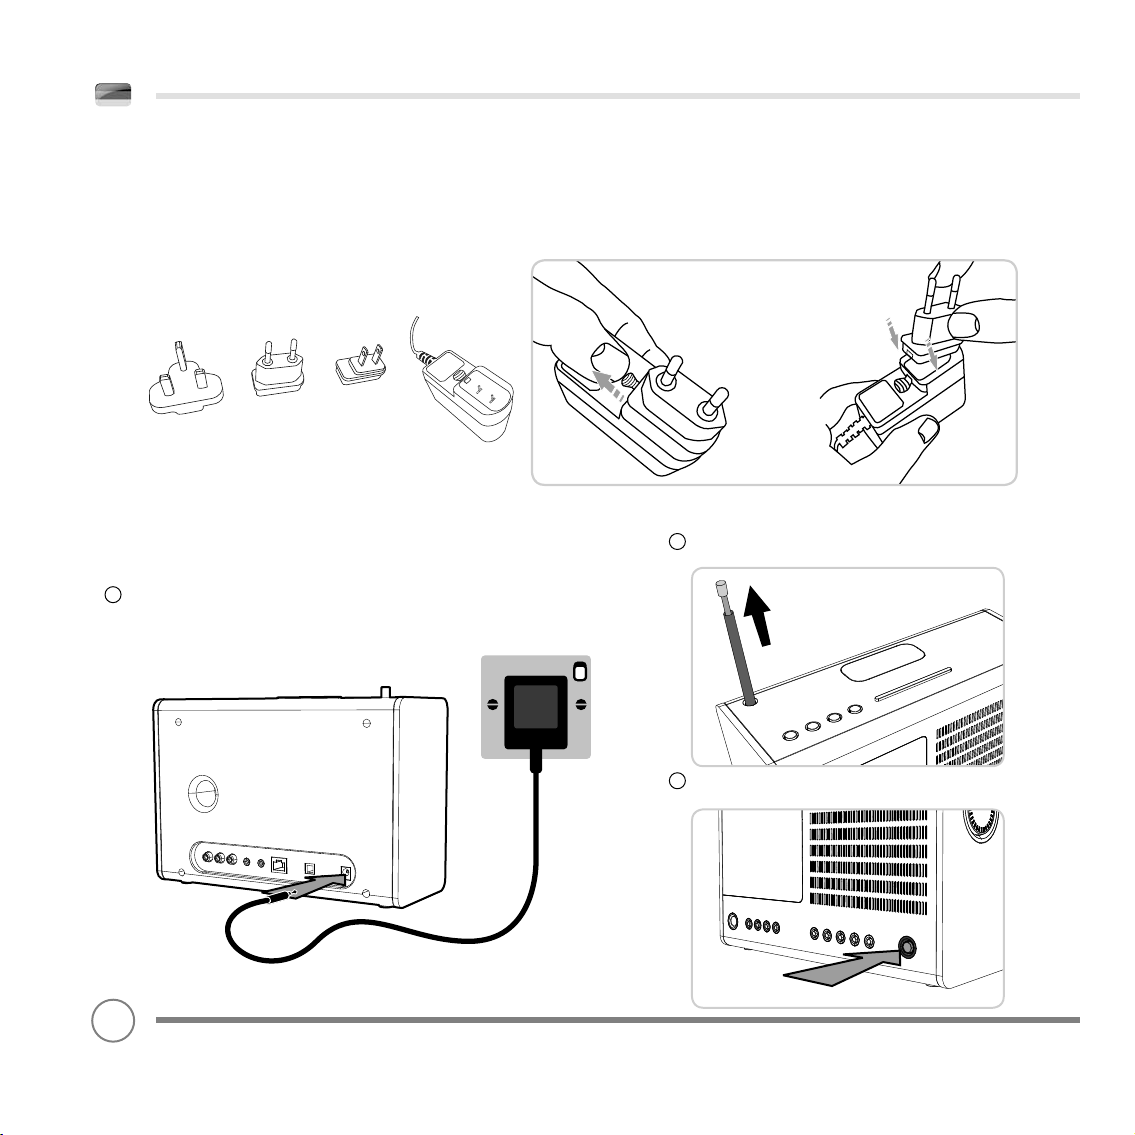
Your Heritage radio is supplied with a multi-region power supply,
meaning that it can be operated in a number of countries around
the world.
Simply choose the correct adaptor for your country from the
selection supplied, then follow the instructions below.
UK EURO U.S.A
SET-UP
Using the PSU supplied, connect one end to the DC power socket found on the
1
rear of Heritage, then plug the opposite end into the mains socket on the wall.
2
Fully extend the antenna for DAB or FM operation
06
3
Press the POWER button once to start the initialisation process.
Page 7
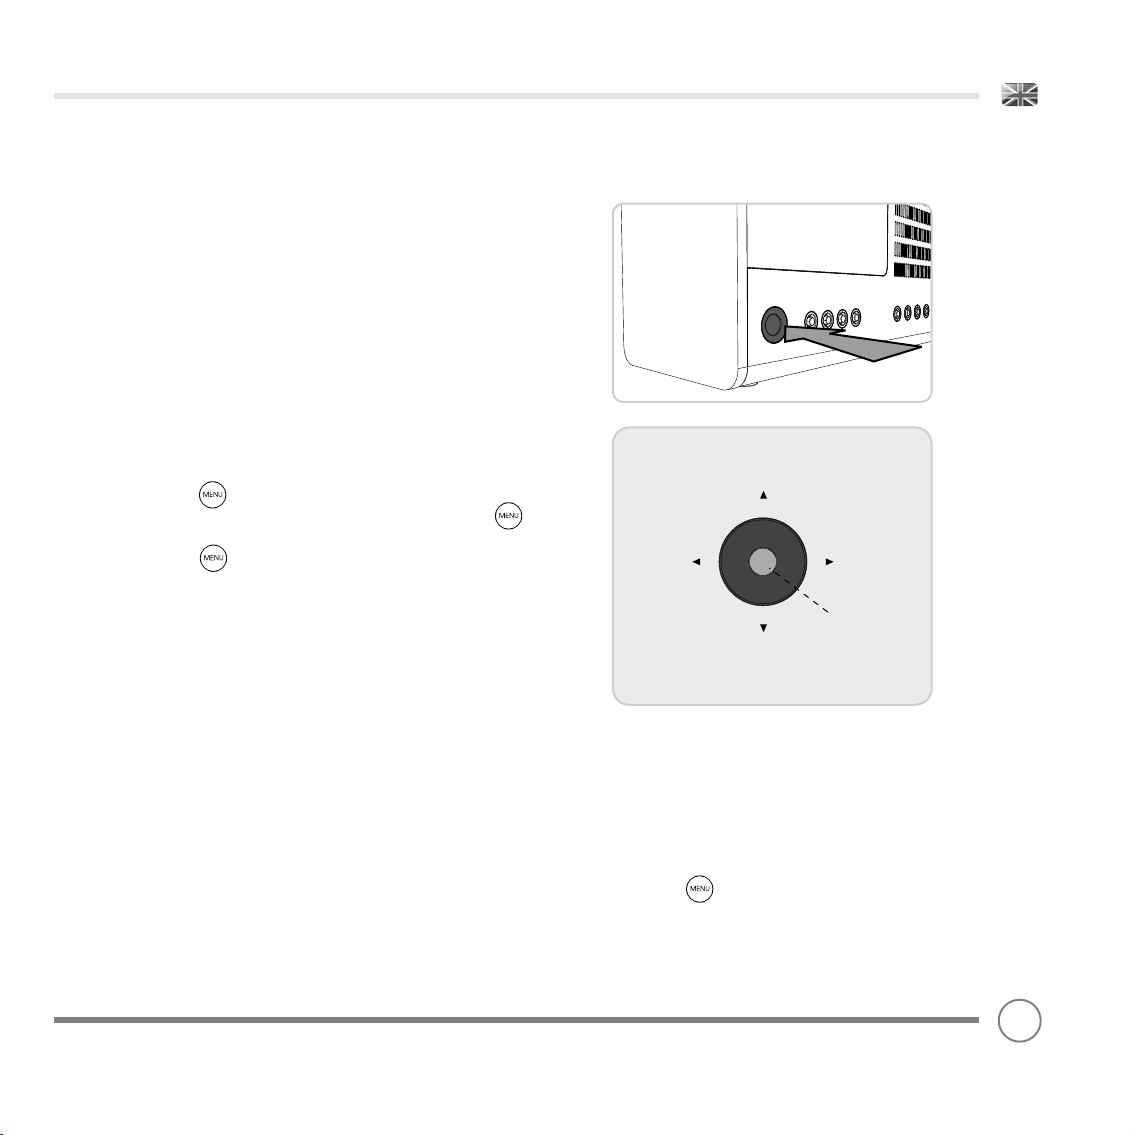
CONTROLLING HERITAGE
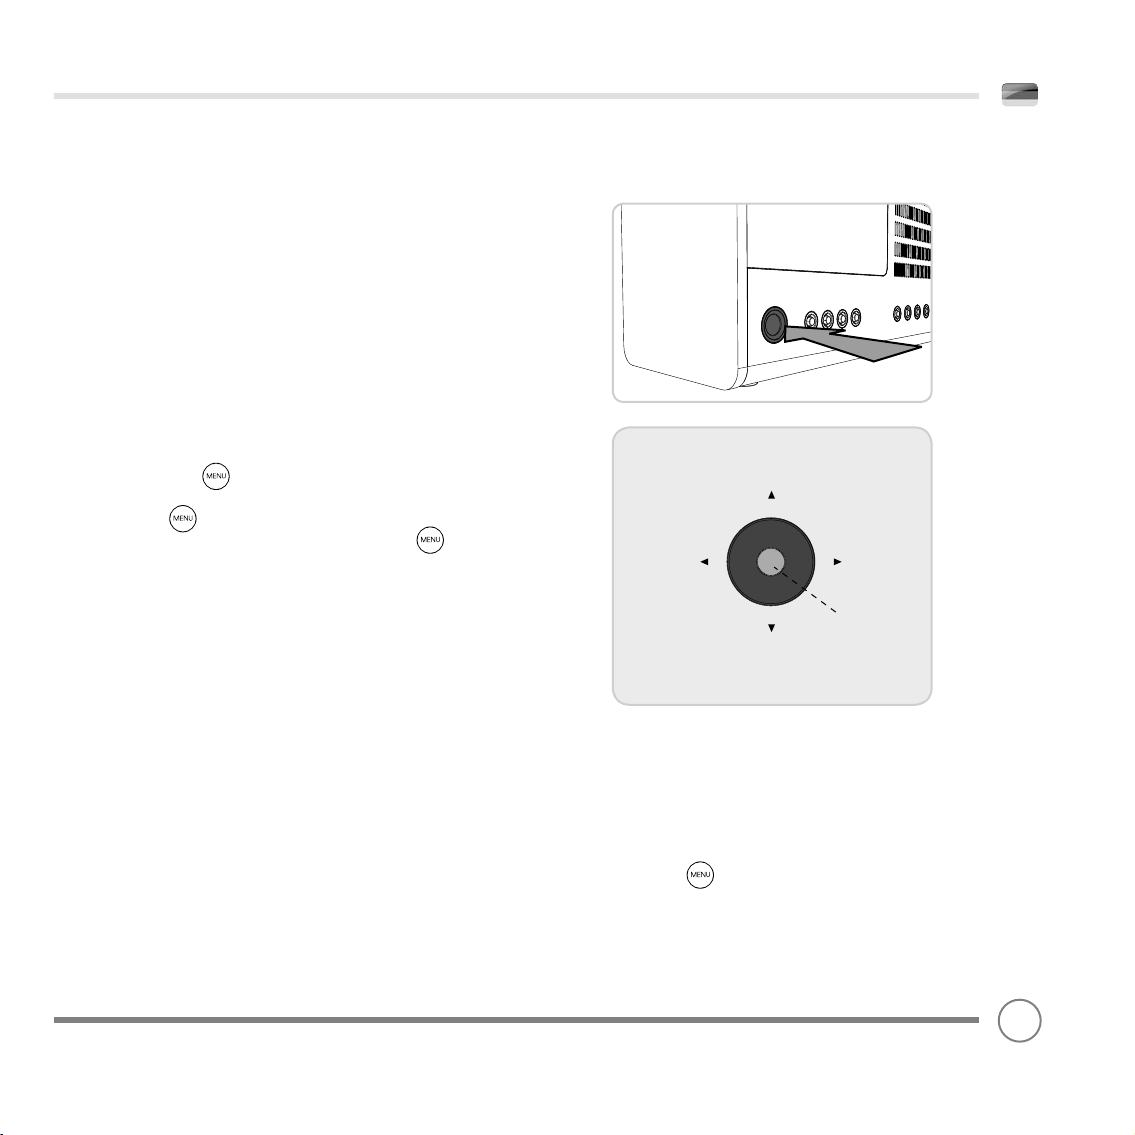
‘UP’
‘DOWN’
‘LEFT’
(BACK)
SELECT
‘RIGHT’
(FORWARD)
‘PRESS’
(TO SELECT)
CURSOR
In order for you to get the most from your radio, it is important for you
to understand how its control and menu system operates.
CURSOR CONTROL
Your radio uses a cursor based control system for ease of use.
The cursor control has fi ve functions as follows:
UP Scrolls Up
DOWN Scrolls Down
LEFT Scrolls Left and moves back through menus
RIGHT Scrolls Right and moves forward through menus
PRESS Selects current option
MENU BUTTON
Pressing the button will take you to the Mode Menu for the
particular mode of operation you are in. For example, pressing
when in DAB Mode will take you to the DAB MODE MENU.
Pressing the button for a second time will return you to the
‘playing screen’ that you just left.
MODE BUTTON
Pressing the MODE button will sequentially cycle through each of
Heritage’s modes of operation. It is also possible to move between
modes of operation via the MAIN MENU (see below).
MENU STRUCTURE EXPLAINED
MAIN MENU
The MAIN MENU provides access to the following modes and
sub-menus:
• Internet radio • iPod
• Music player • Auxiliary Input
• Last.fm • Alarms
• DAB radio • System settings
• FM radio
MODE MENUS
The Mode Menus are so called because they show the functions
available within the currently selected mode.
Pressing the button at any time will take you to the Mode
Menu for the mode of operation your radio is currently in.
Each of the Mode Menus also includes a listing for MAIN MENU,
allowing you to return to the top level MAIN MENU.
07
Page 8

DAB RADIO MODE
GETTING READY FOR DAB OPERATION
Please ensure that the radio’s antenna is extended before operation
in DAB Mode.
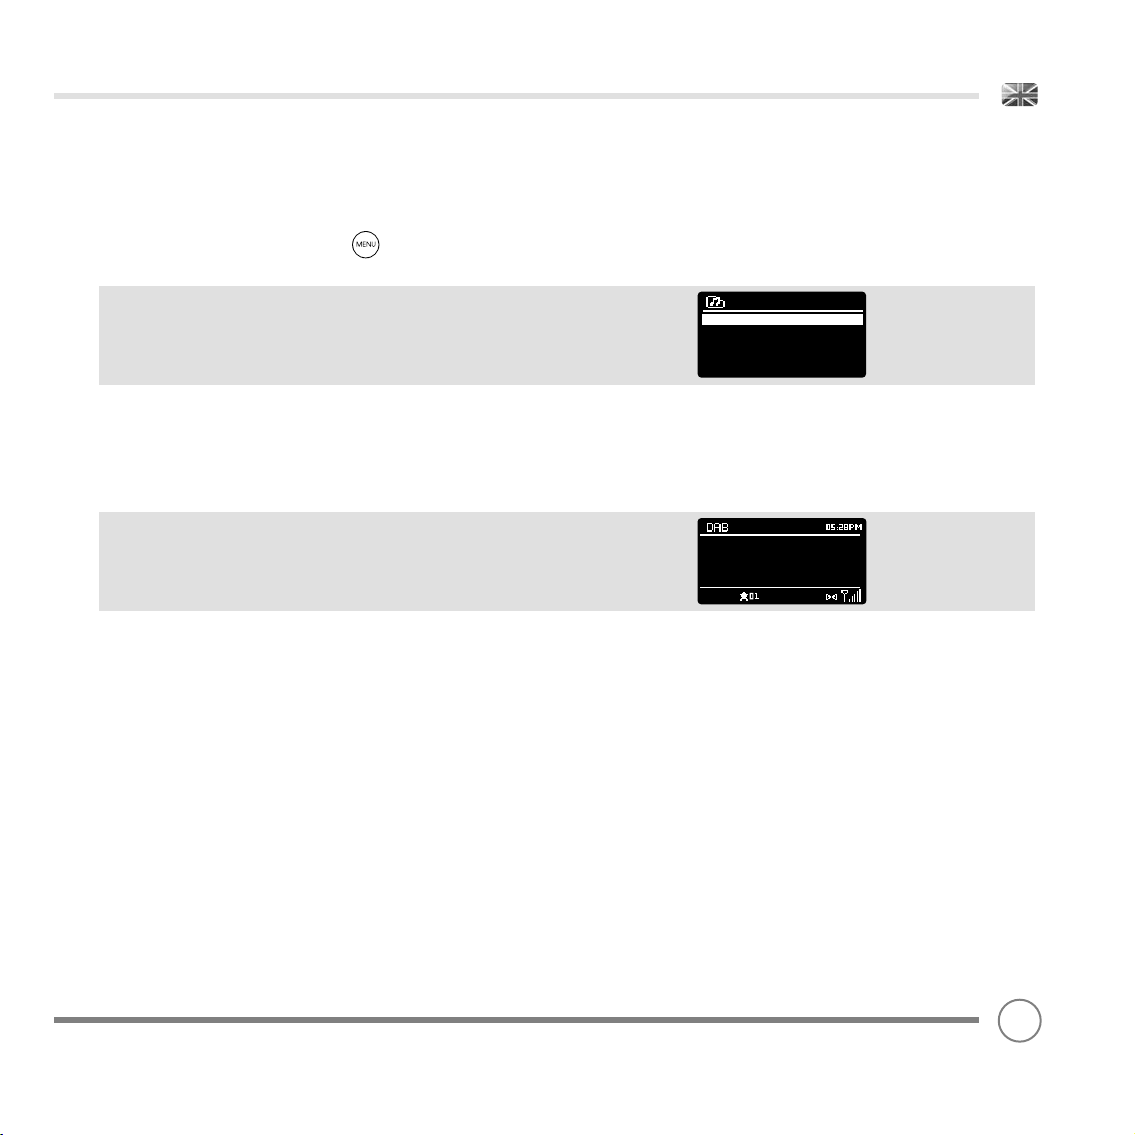
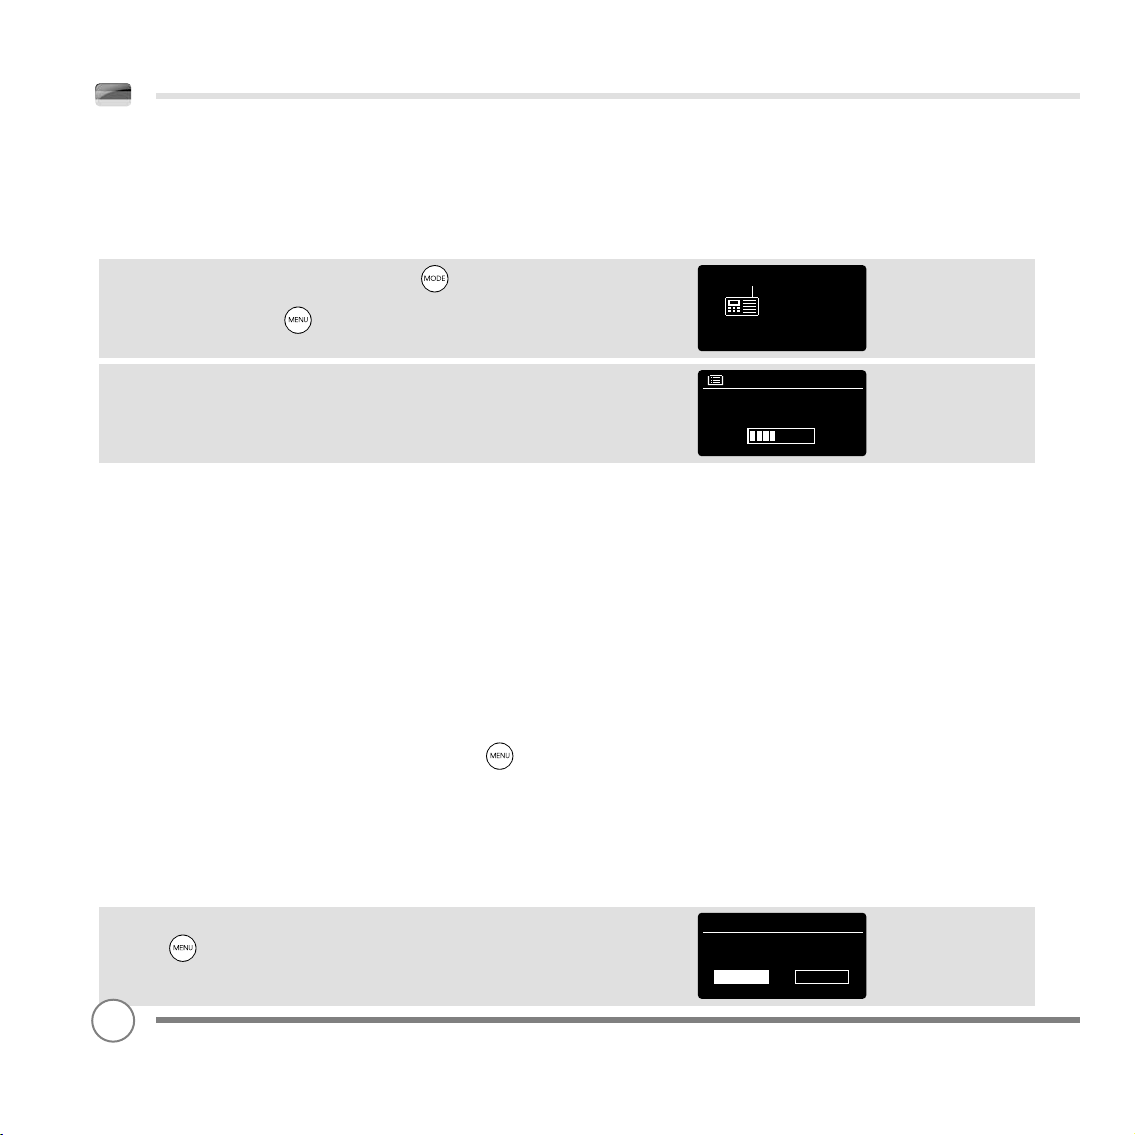
To enter DAB MODE, press the button until the DAB MODE intro
screen is displayed, alternatively press then select MAIN MENU,
then DAB from menu option list.
On power-up, Heritage will automatically perform a full scan to see
what stations are being broadcast in your area, before storing them
alphabetically in the radio’s memory.
It may be necessary to perform a manual scan from time to time, in
order to update your radio’s station list. This may be required for any
one of the following reasons:
1. Station availability can change from time to time as new stations
appear, or existing stations cease broadcasting.
2. If reception was poor during the initial automatic scan, for
example the radio’s antenna was not completely extended,
it may be that the station list is incomplete or even empty.
3. If you have poor reception on some of the stations (resulting in
broken or poor quality audio), you may wish to list only stations that
have a strong signal strength.
To start a manual scan, press the button then select FULL SCAN
from the menu list.
To scan for only stations that have a strong signal strength, press
then select LOCAL SCAN from the menu list.
Scanning
Stations : 21
Scanning
DAB
radio
When the scan is complete, your radio will list all available stations.
To remove stations that are listed but unavailable, press then
choose PRUNE INVALID. When asked whether you wish to “remove all
invalid stations”, select YES.
08
Prune Invalid
This removes all invalid
stations, continue?
YES NO
Page 9
DAB RADIO MODE
SELECTING A STATION
To access your radio’s station list, press UP, DOWN or LEFT on the cursor
control at any time, alternatively press then select STATION LIST.
Scroll through the available stations using UP and DOWN on the
cursor control then either press the select button to select your station
choice, or tap RIGHT.
FAVOURITE STATION PRESETS
Heritage allows you to store your favourite stations as presets, either
via its 5 front panel mounted ‘hot-keys’, or 10 preset buttons located
on the Heritage remote control.
To store the station you are currently listening to as a preset, simply
press and hold a preset button until “Preset Stored” is display on your
radio’s screen. The preset number that has been assigned to the
station will be displayed at the bottom of the screen.
If you want to change a particular preset in the future, repeat the
process and the previously stored preset will be automatically
overwritten.
Station list
Absolute
Amazing
BBC 1Xtr
BBC 6Mus
BBC Gael
BBC Radio 6Music
u to vote for a track that
missed out on the 6:00 AM
Music playlist
09
Page 10
DAB MODE MENU OPTIONS
STATION INFO
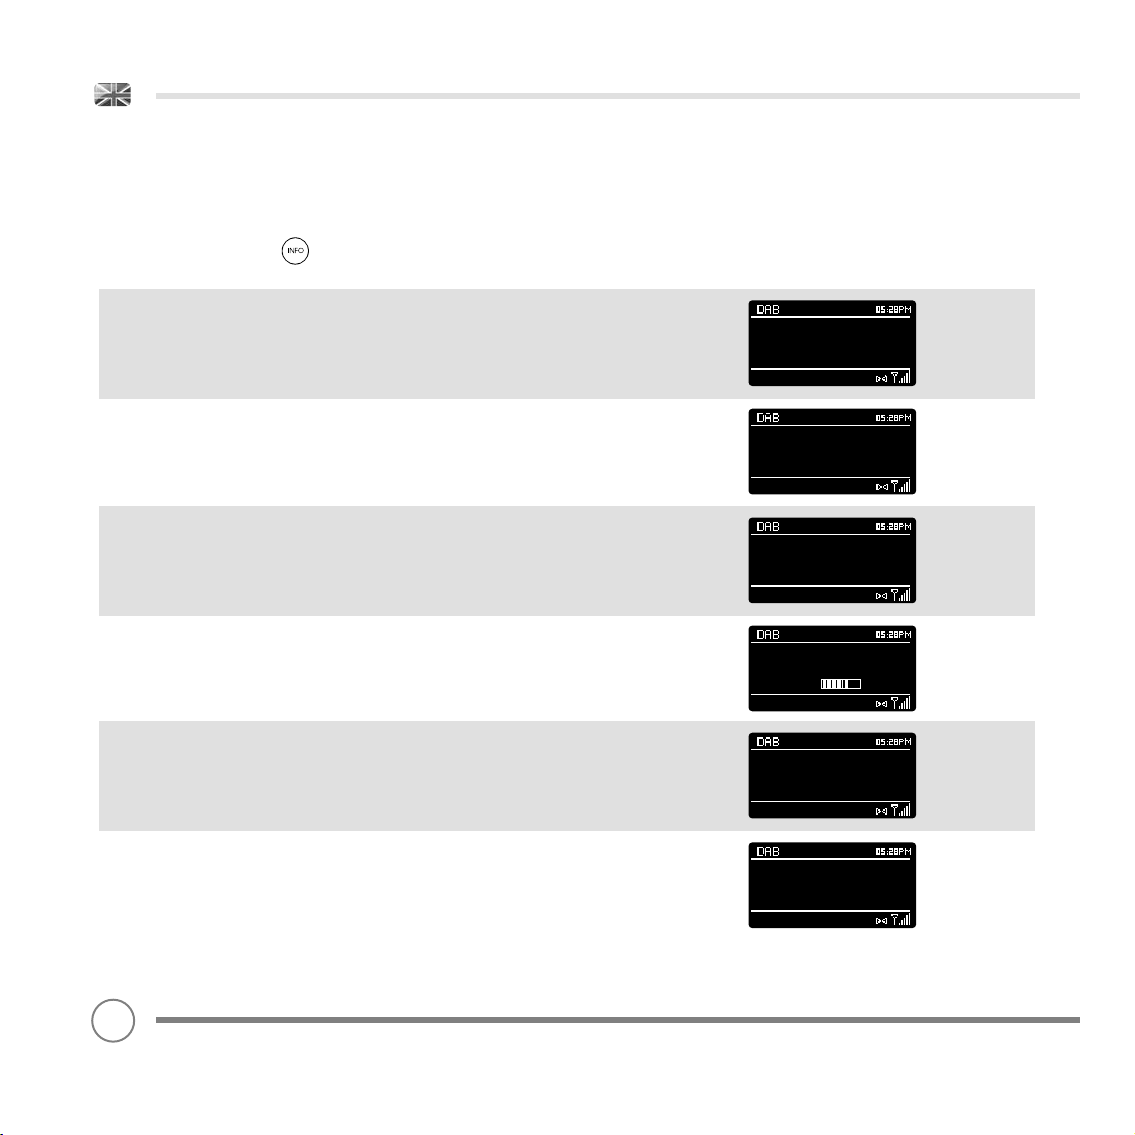
In DAB MODE, Heritage is capable of displaying various pieces of information on
its screen. By pressing the button, you can sequentially cycle through the
following types of information.
STANDARD DAB SCREEN Shows scrolling text info from broadcaster
PROGRAMME TYPE For example News, Rock Music, Classical etc.
MULTIPLEX AND FREQUENCY Multiplex owner and station frequency
SIGNAL STRENGTH Station’s current signal strength
BBC Radio 6Music
Now Playing : Glasvegas
Go Square Go!
BBC Radio 6Music
Rock Music
BBC Radio 6Music
BBC National DAB
Freq: 225.648 MHz
BBC Radio 6Music
Signal Level : 90
Strength
BIT RATE AND CODEC Audio format, sample rate, mono or stereo
DATE Today’s date
10
BBC Radio 6Music
Bit rate: 128 kbps
Codec : MP2
Channels : Joint Stereo
BBC Radio 6Music
Today’s Date :
22/12/09
Page 11
DAB MODE MENU OPTIONS
DYNAMIC RANGE COMPRESSION (DRC)
If you are listening to music with a high dynamic range in a noisy
environment (for example, classical music while cooking), you may
wish to compress the audio’s dynamic range. This has the effect of
making quiet sounds louder, and loud sounds quieter.
To change the DRC setting, press then choose the DRC option,
before selecting OFF, LOW or HIGH.
STATION ORDER
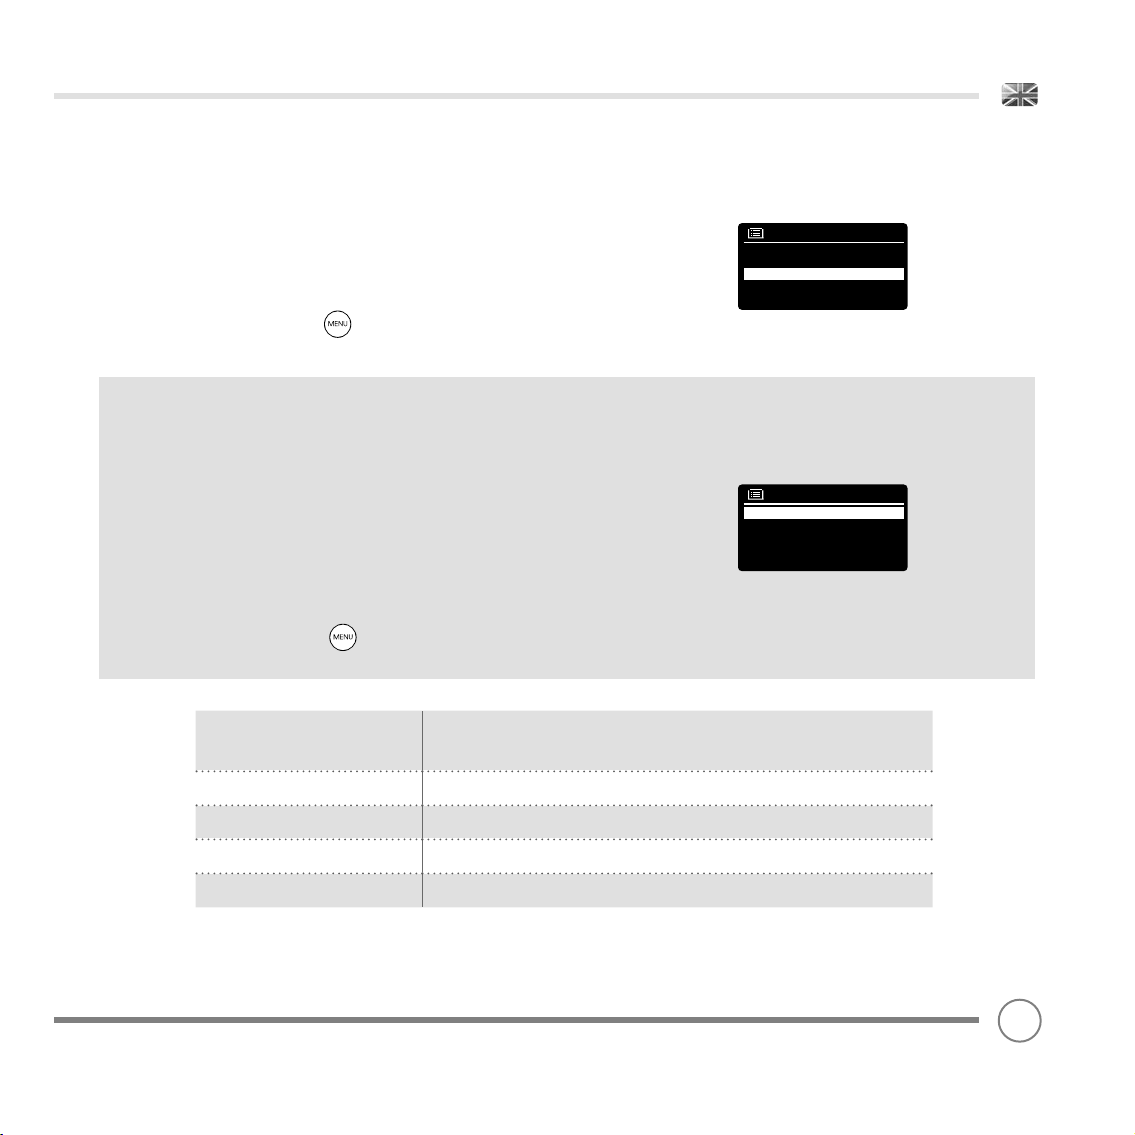
It is possible to choose the order of the DAB station list to be either
ALPHANUMERIC, ENSEMBLE or VALID.
DRC
DRC Low
DRC High
DRC Off #
As the name implies, ALPHANUMERIC lists stations in alphanumeric
order.
ENSEMBLE lists groups of stations that are broadcast together on the
same ensemble, for example BBC or Central Scotland Local.
VALID lists valid stations fi rst, alphanumerical, then off-air stations.
To change the station order, press then select STATION ORDER,
before choosing either ALPHANUMERIC, ENSEMBLE or VALID.
STATION ORDER DESCRIPTION
ALPHANUMERIC Display all stations in alphanumeric order.
ENSEMBLE List active stations [ones that are currently broadcasting] before inactive ones.
VALID Remove inactive stations from the station list.
Station order
Alphanumeric #
Ensemble
Valid
11
Page 12
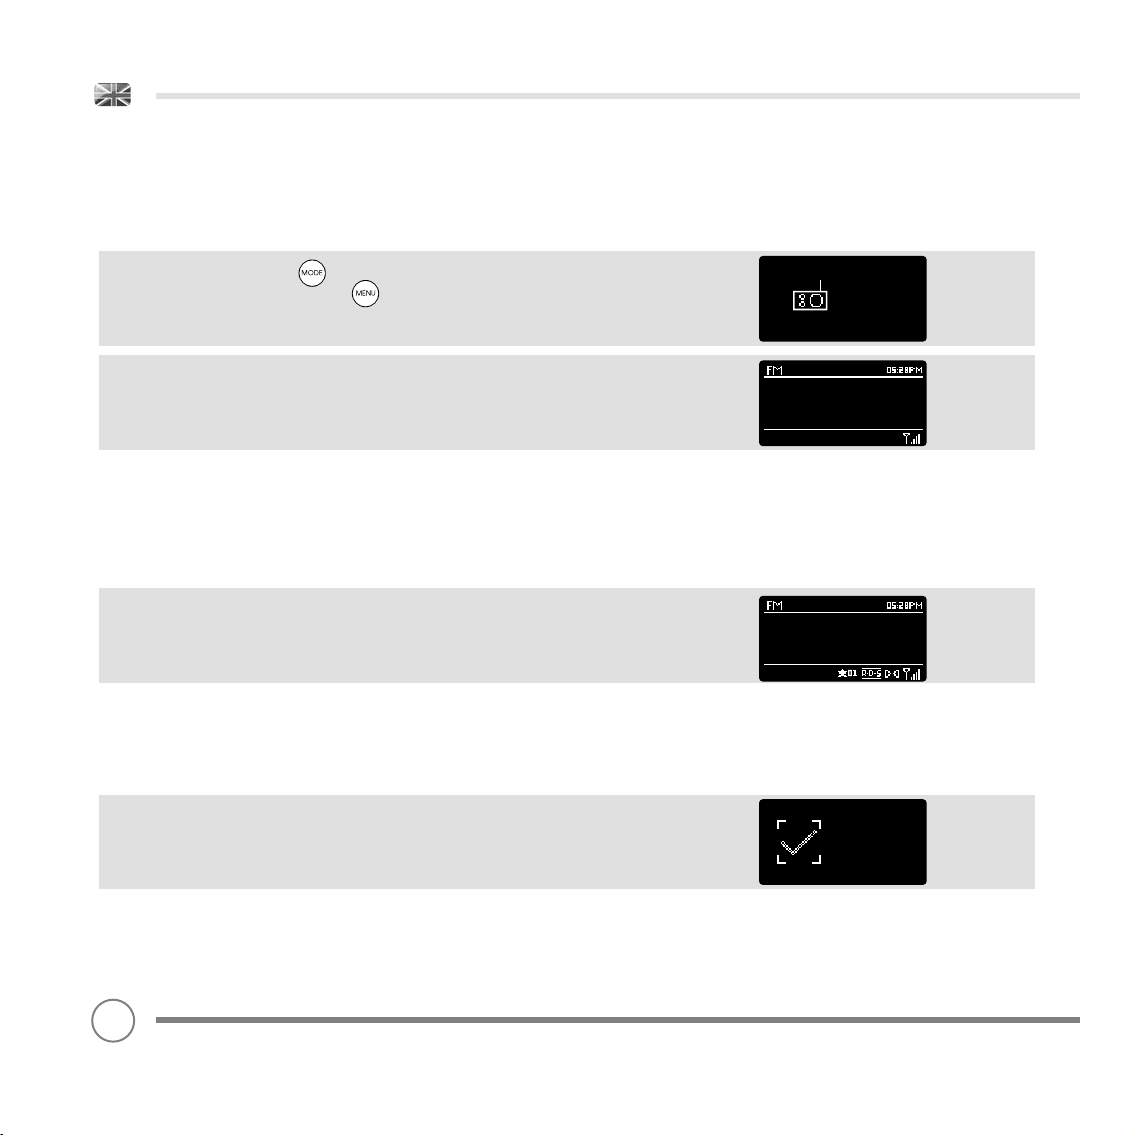
FM RADIO MODE
FM OPERATION
Please ensure that the radio’s antenna is extended before operation
in FM MODE.
To enter FM MODE, press the button until the FM MODE intro
screen is displayed, alternatively press then select MAIN MENU,
then FM from menu option list.
If this is the fi rst time that Heritage has been used in FM MODE,
scanning will start at the beginning of the frequency range otherwise Heritage will default to the station you were listening to last.
Pressing the select button will start the radio scanning for the next
available station. Heritage will automatically stop scanning when a
station is found.
To fi ne tune, use UP or DOWN on the cursor control to
incrementally change the frequency.
When on an FM station that has a strong signal and is broadcasting
RDS information, Heritage will display the station name and other
pieces of text information on-screen.
FAVOURITE STATION PRESETS
Heritage allows you to store your favourite stations as presets, either
via its 5 front panel mounted ‘hot-keys’, or 10 preset buttons located
on the Heritage remote control.
To store the station you are currently listening to as a preset, simply
press and hold a preset button until “Preset Stored” is display on your
radio’s screen. The preset number that has been assigned to the
station will be displayed at the bottom of the screen.
87.50 MHz
BBC R3
Composer of the Week
Coming next - Proms
Chamber Music 2009
Preset stored
FM
radio
If you want to change a particular preset in the future, repeat
the process and the previously stored preset will be automatically
overwritten.
12
Page 13
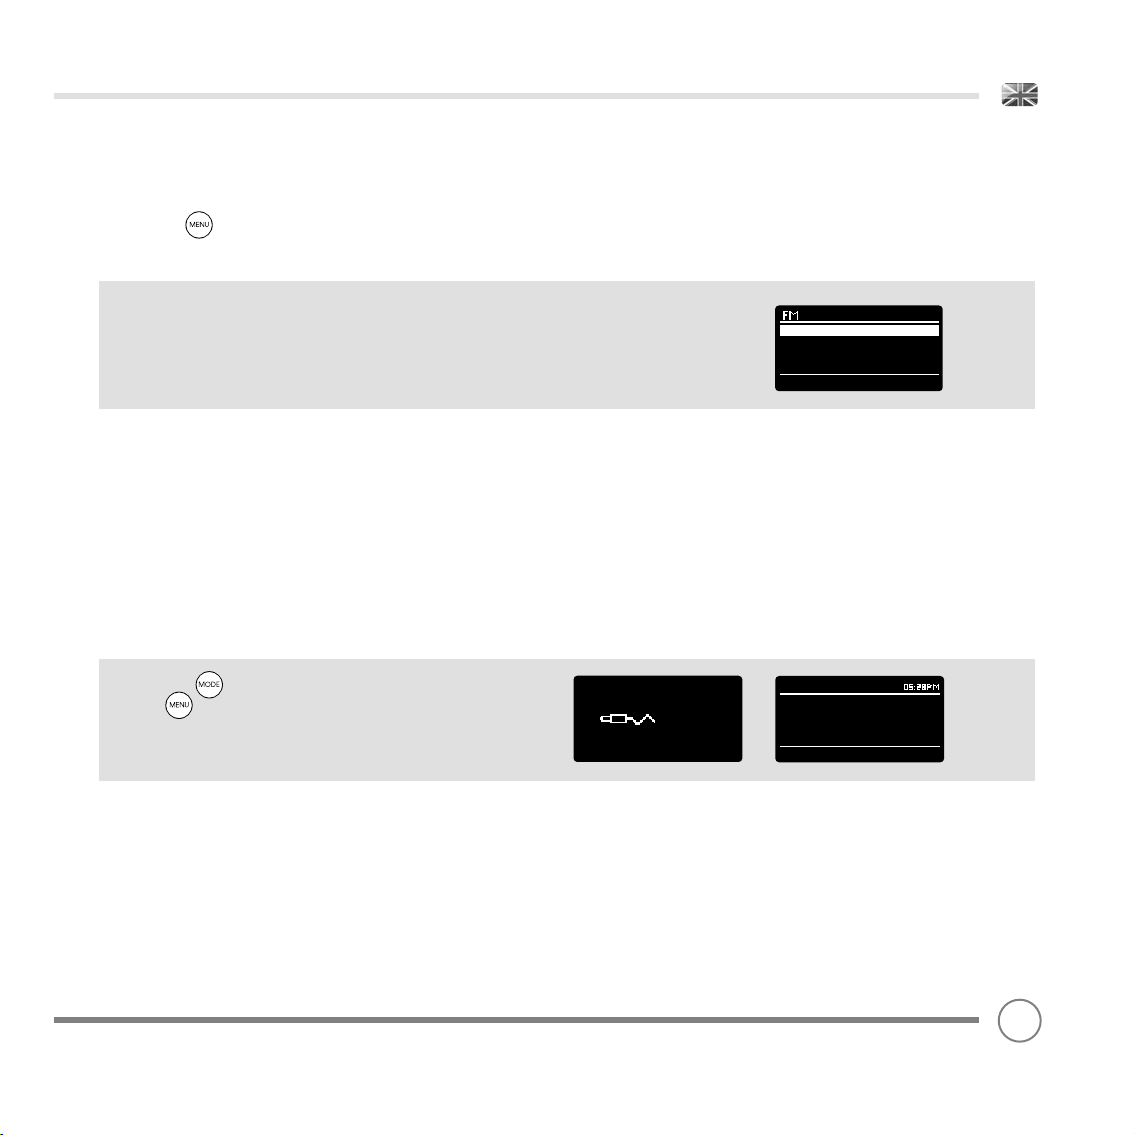
FM RADIO MODE
FM SETTINGS
Press the button to access the FM MODE MENU. From here
you can set some FM preferences such as SCAN SETTING and AUDIO
SETTING.
SCAN SETTING allows you to decide whether the radio should stop
scanning only when it fi nds a station with a strong signal.
AUDIO SETTING gives you the option of listening to a station in mono,
should the signal strength not be suffi ciently strong to allow stereo
reception.
AUX IN MODE
AUX IN MODE allows you to play audio from an external source (such
as an MP3 player) through your radio.
To do so, connect your external audio source to the 3.5mm AUX IN
connector on the rear of Heritage.
Turn the volume down low on both Heritage and, if adjustable, the
external device.
Scan setting
Audio setting
Main menu >
Now press until the AUX IN screen is displayed, alternatively
press then select MAIN MENU, then choose AUX IN.
Adjust the volume of Heritage and, if necessary, the external audio
device as required.
Aux in
Auxiliary Input
Audio in
Today’s Date :
15/10/09
13
Page 14
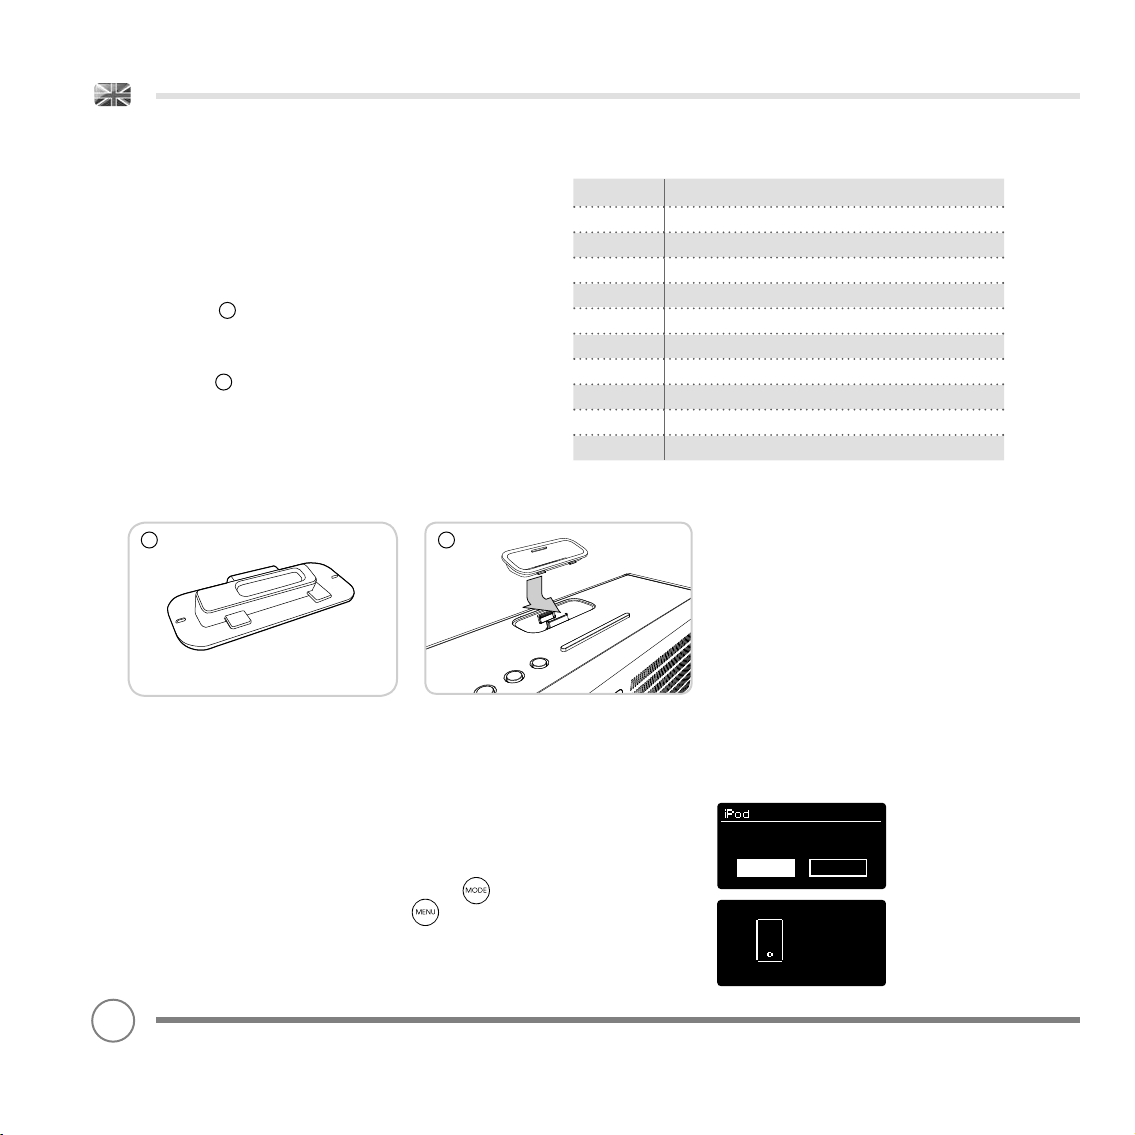
iPod MODE
19
FITTING A DOCK ADAPTOR
Heritage is supplied with a selection of dock adaptors to fi t most
iPod/iPhone models.
Select the adaptor that is compatible with your iPod/iPhone using the
compatibility table on the right - each one is numbered
(see illustration below).
To fi t the adaptor, remove the dock dust cover before inserting the
adaptor into the recess that surrounds the dock connector
(see illustration ). If a dock adaptor for your specifi c iPod/iPhone
model is not one of the adaptors included with your radio, please use
the adaptor supplied by Apple as part of your iPod/iPhone kit.
1
1
2
2
Adaptor No. iPod Model
9 iPod classic 80GB
10 iPod classic 120GB
12 iPhone
13 iPod nano (3rd generation)
15 iPhone 3G
16 iPod touch (2nd and 3rd generation)
17 iPod nano (4th generation)
18 iPod nano (5th generation)
19 iPhone 4
20 iPod touch (4th generation)
ENTERING iPod MODE
Connect your iPod/iPhone to the dock connector. Heritage will
automatically ask if you would like to switch to iPod mode.
Select YES or NO using the cursor control.
If an iPod/iPhone is already connected to Heritage, press until
the iPod MODE intro screen is displayed, or press then select
MAIN MENU, then iPod.
iPod attached -
switch to iPod mode?
YES NO
iPod
14
Page 15
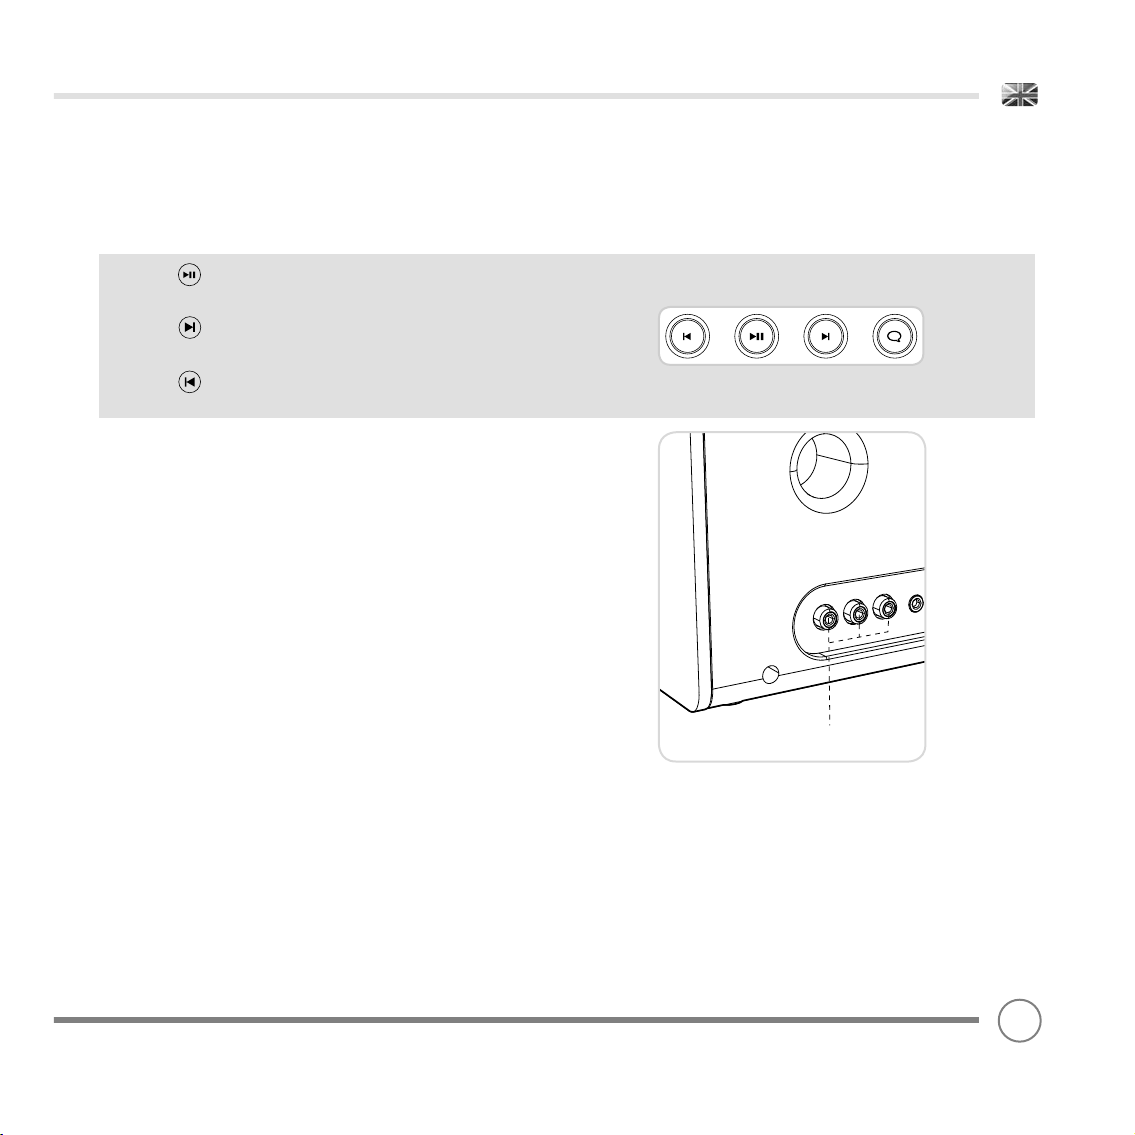
iPod MODE
Composite Video-Out
CONTROL AND PLAYBACK
Basic track control functions can be carried out by using the media
controls located on the top face of Heritage.
Pressing will start the currently selected track. Pressing it when a
track is playing will PAUSE the current track.
Pressing will advance to the next track. Pressing and holding will
fast-forward.
Pressing will skip-back to the previous track. Pressing and holding
will fast-rewind.
Alternatively, your iPod/iPhone can be operated using the Heritage
remote control, which offers advanced control of menus etc.
Lastly, it is possible to control the iPod/iPhone by using the controls on
the iPod/iPhone itself.
VIDEO
Heritage is equipped with a set of composite video-out connectors,
making it possible to view iPod/iPhone movies, slideshows etc. on your
television - all directly from your radio.
To use this functionality, go to SETTINGS on your iPod/iPhone, select
VIDEO, then switch TV OUT to ON. Now set the TV SIGNAL to either PAL
or NTSC, depending on the broadcast system that your TV uses.
Should you need to buy a composite video cable, they can be
purchased directly from the Apple Store.
15
Page 16
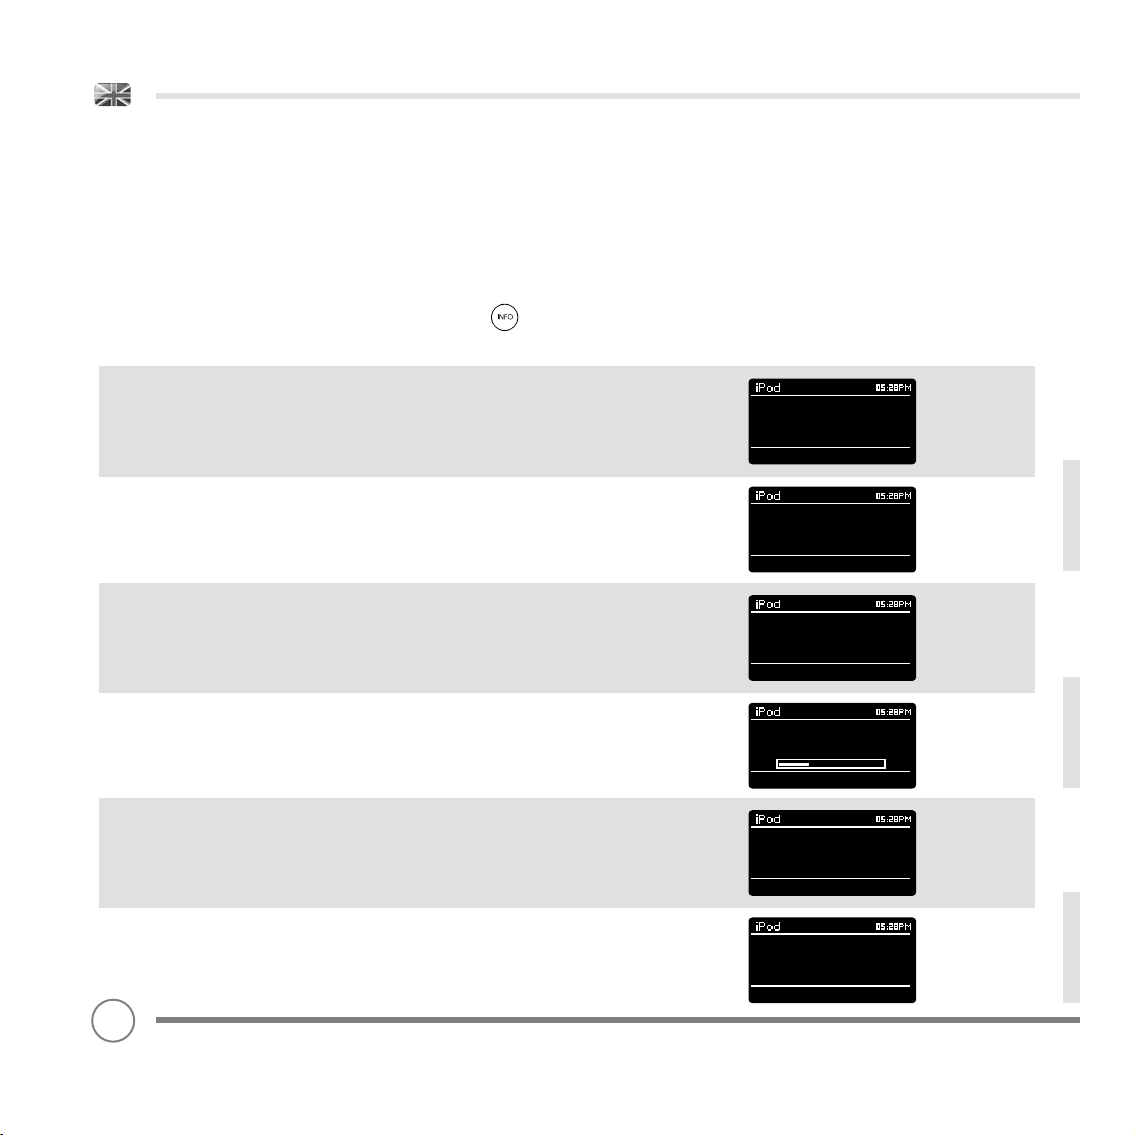
iPod MODE
NOW PLAYING INFO
When an iPod/iPhone has been docked and the authentication process has
been completed, your radio will display the artist and track information for the
current track (if this information is stored on your iPod/iPhone).
Heritage is capable of displaying various pieces of information about the current
track and the iPod/iPhone that is connected. By pressing the button, it is
possible to sequentially cycle through the following types of information.
STANDARD SCREEN Shows track name and artist
iPod/iPhone TYPE Shows model of iPod/iPhone currently connected
AUTHENTICATION STATUS Whether authentication was successful or not
TRACK TIME Shows track length and current position in track
ALBUM TITLE Displays album title if available
DATE Today’s date
As you Are
Travis
As you Are
iPod touch
As you Are
iPod touch
Authentication:
Success
As you Are
3:54 4:14
As you Are
The Man Who
As you Are
Today’s Date:
14/10/09
16
Page 17
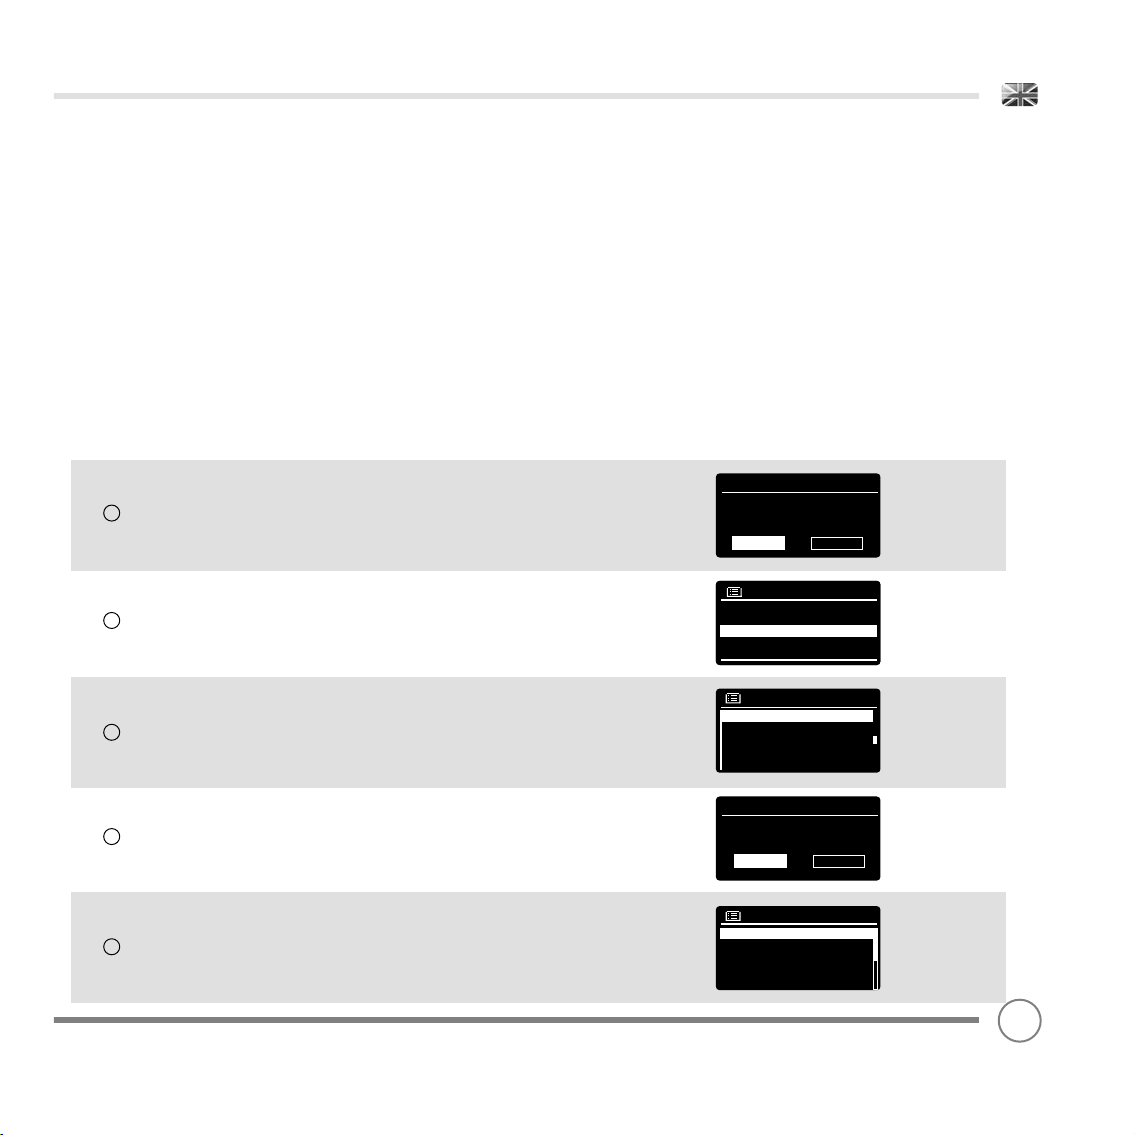
INTERNET SETUP
USING THE INTERNET RADIO SETUP WIZARD
The fi rst time you use Heritage in INTERNET RADIO MODE, you will be
asked whether you would like to run the SETUP WIZARD. The ‘WIZARD’
will run through a series of questions, and is the simplest way to get
internet radio up and running on your device.
You can run the SETUP WIZARD again at any time, it can be found
under the NETWORK heading, in the SYSTEM SETTINGS MENU.
To set up your radio for online operation using the INTERNET WIZARD,
follow these steps:
Press the select button to select YES, and start the SETUP WIZARD
procedure.
1
Choose and select your preferred hour format (12 or 24 hour).
2
Choose and select UPDATE FROM NETWORK.
Scroll and select your local timezone from the menu.
3
Date/Time
12/24 hour format
12 24
Auto update
Update from DAB
Update from FM
Update from Network *
No update
Set Timezone
UTC + 00 : 00 : Dublin , London#
UTC + 00 : 30 :
UTC + 01 : 00 : Madrid , Ar
UTC + 01 : 30 :
UTC + 02 : 00 : Athens , Ci
*
4
Choose and select your preferred daylight savings status.
Scroll and select your Wlan region.
5
Daylight savings
Daylight savings
YES NO
Wlan region
Most of Europe
USA
Canada
Spain
France
17
Page 18
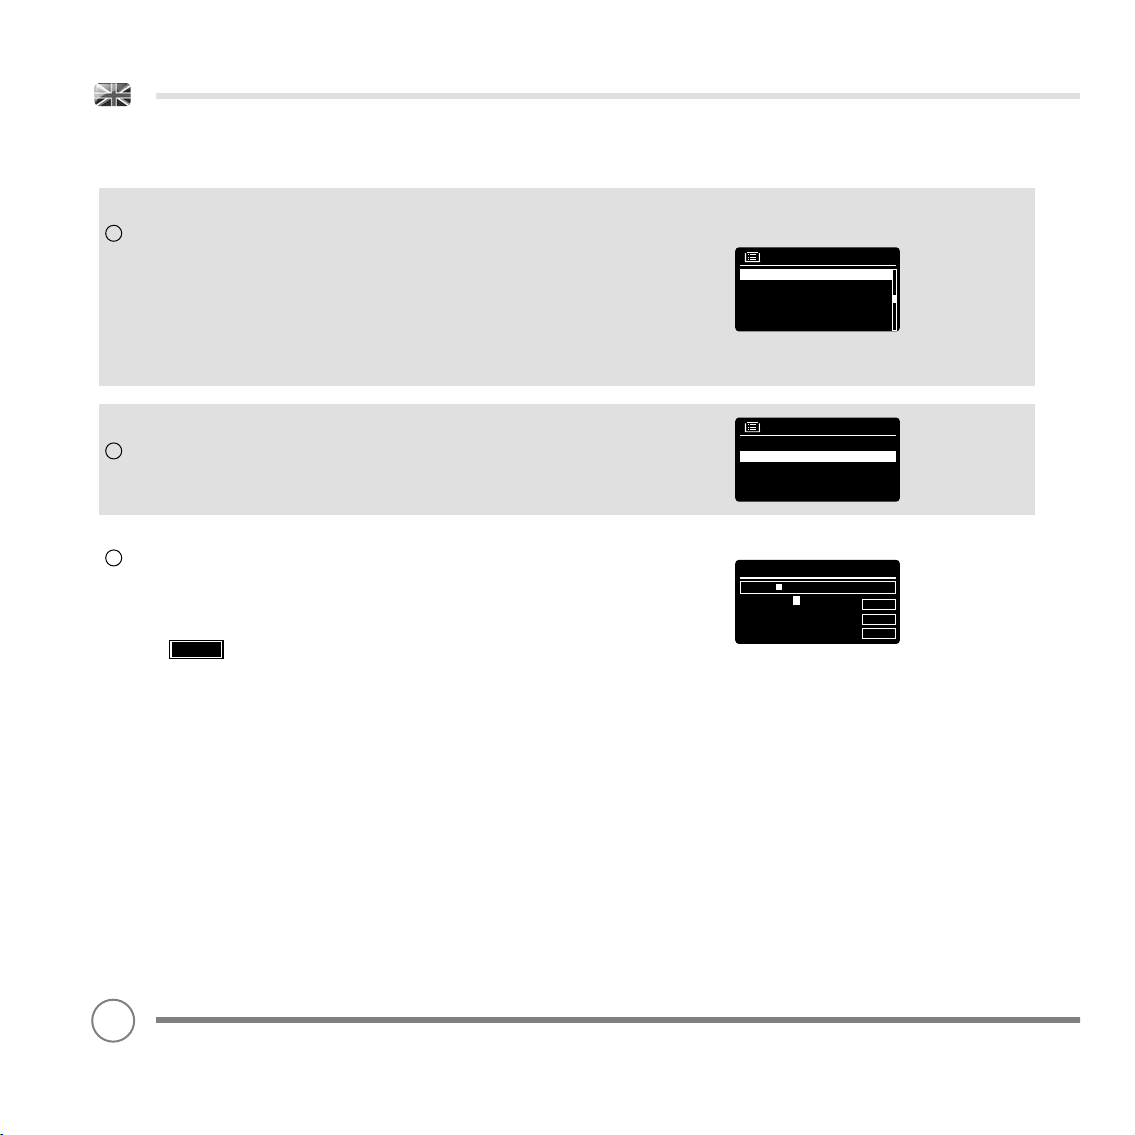
INTERNET SETUP
6
Scroll and select your NETWORK. In some cases your radio may fi nd
more than one. Simply choose the one you want to use.
WIRED CONNECTIONS
If you would like to use your radio over a wired connection, rather
than a wireless one, simply choose the WIRED option from the SSID list.
If your wireless network is not password protected, Heritage will
7
automatically connect, and the following screen will be displayed:
8
If you do use password protection, enter your network password using the cursor control to scroll over and select the correct
alphanumeric characters. When you have correctly entered your
password, select OK.
Select (back space) if you have entered an incorrect
BKSP
character.
Heritage will save the password into its memory. There will be no
need to re-enter the password again.
SSID
Homehub
FAMILY net
[Rescan]
[Wired]
[Manual config]
Internet Radio
Last Listened
Station List >
Main Menu >
Key:
xxxxx
0 1 2 3 4 5 6 7 8 9 . , a b
c d e f g h i j k l m n o p q
r s t u v w x y z A B C D E
F G H I J K L M N O P Q
BKSP
OK
CANCEL
18
Page 19
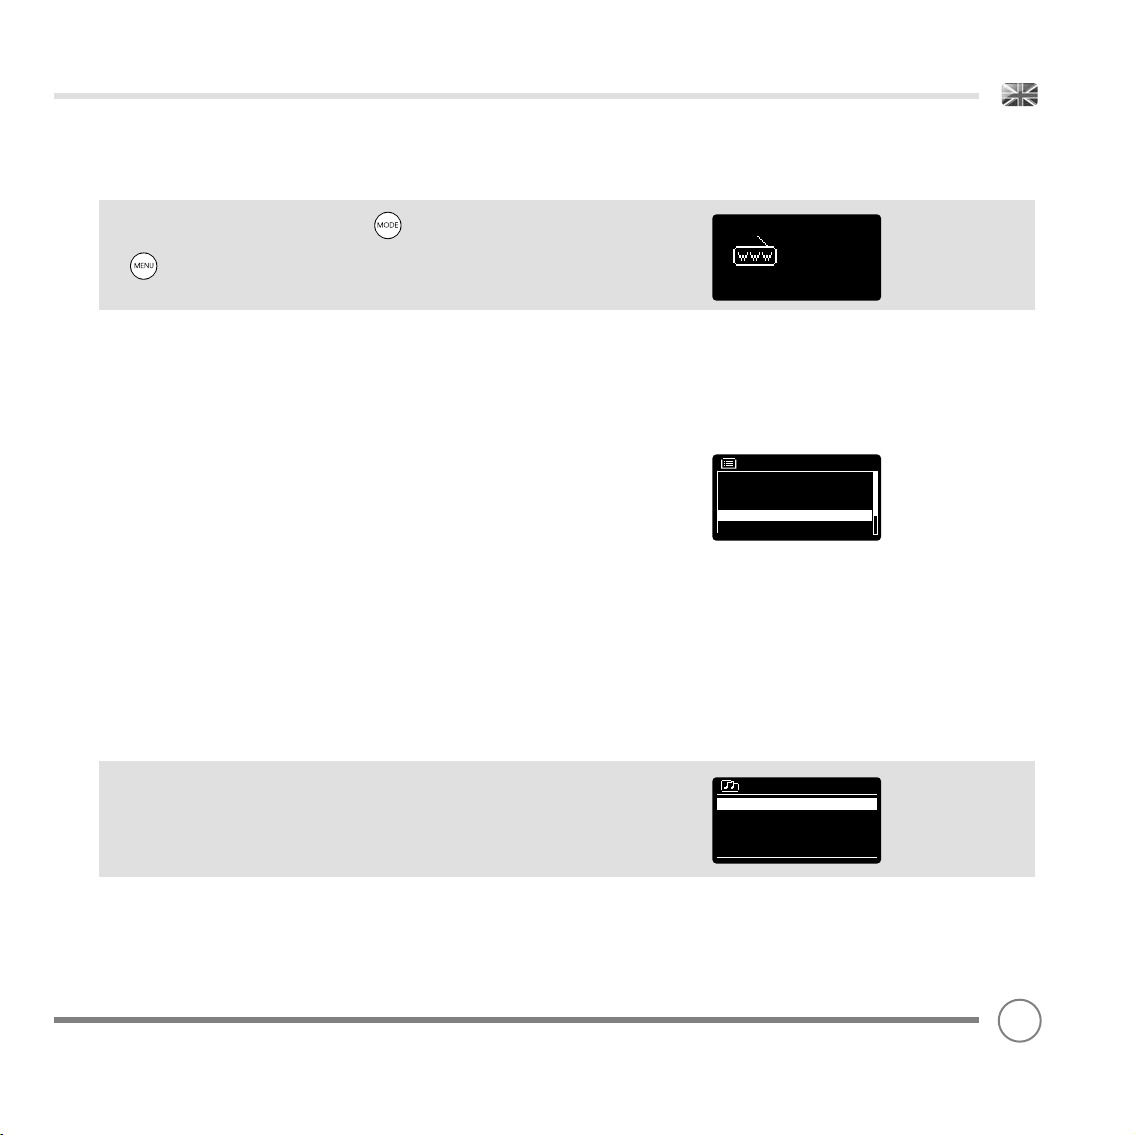
INTERNET RADIO MODE
GETTING STARTED
To enter INTERNET RADIO MODE, press the button until the
INTERNET RADIO MODE intro screen is displayed, alternatively press
then select MAIN MENU, then INTERNET RADIO from the menu
option list.
The INTERNET RADIO MENU comprises of the following options:
My Favourites: Used to navigate to your favourite stations. These can
be set up by visiting the Frontier Silicon Radio Portal (using your PC or
Mac). See page 23 for further information.
Internet
radio
Local: A comprehensive list of all the stations being broadcast from
within your own geographical area (or country).
BBC: Used as a shortcut to all BBC stations broadcast worldwide.
Stations: Find stations using a number of search criteria such as:
location, genre, most popular etc.
Podcasts: Find Podcasts or ‘Listen-Again’ broadcasts by location,
genre or search by name.
My Added Stations: Shows stations that you have personally added
to your radio’s station list via the Frontier Silicon Radio Portal.
See page 23 for full details.
Help: Find your radio’s ACCESS CODE here. Required to access the
Frontier Silicon Radio Portal. See page 23.
CHOOSING A STATION
To choose a station, select STATION LIST from the INTERNET RADIO
MENU, then select STATIONS using the cursor control.
You now have the option to choose or fi nd a station using the
following search criteria:
LOCATION (country of origin) GENRE
SEARCH STATIONS (by name) POPULAR STATIONS
NEW STATIONS
Internet radio
My Favourites >
Local United Kingdom >
BBC >
Stations >
Podcasts >
Stations
Location >
Genre >
Search Stations
Popular Stations >
New Stations >
19
Page 20
INTERNET RADIO MODE
CHOOSING A STATION (Continued)
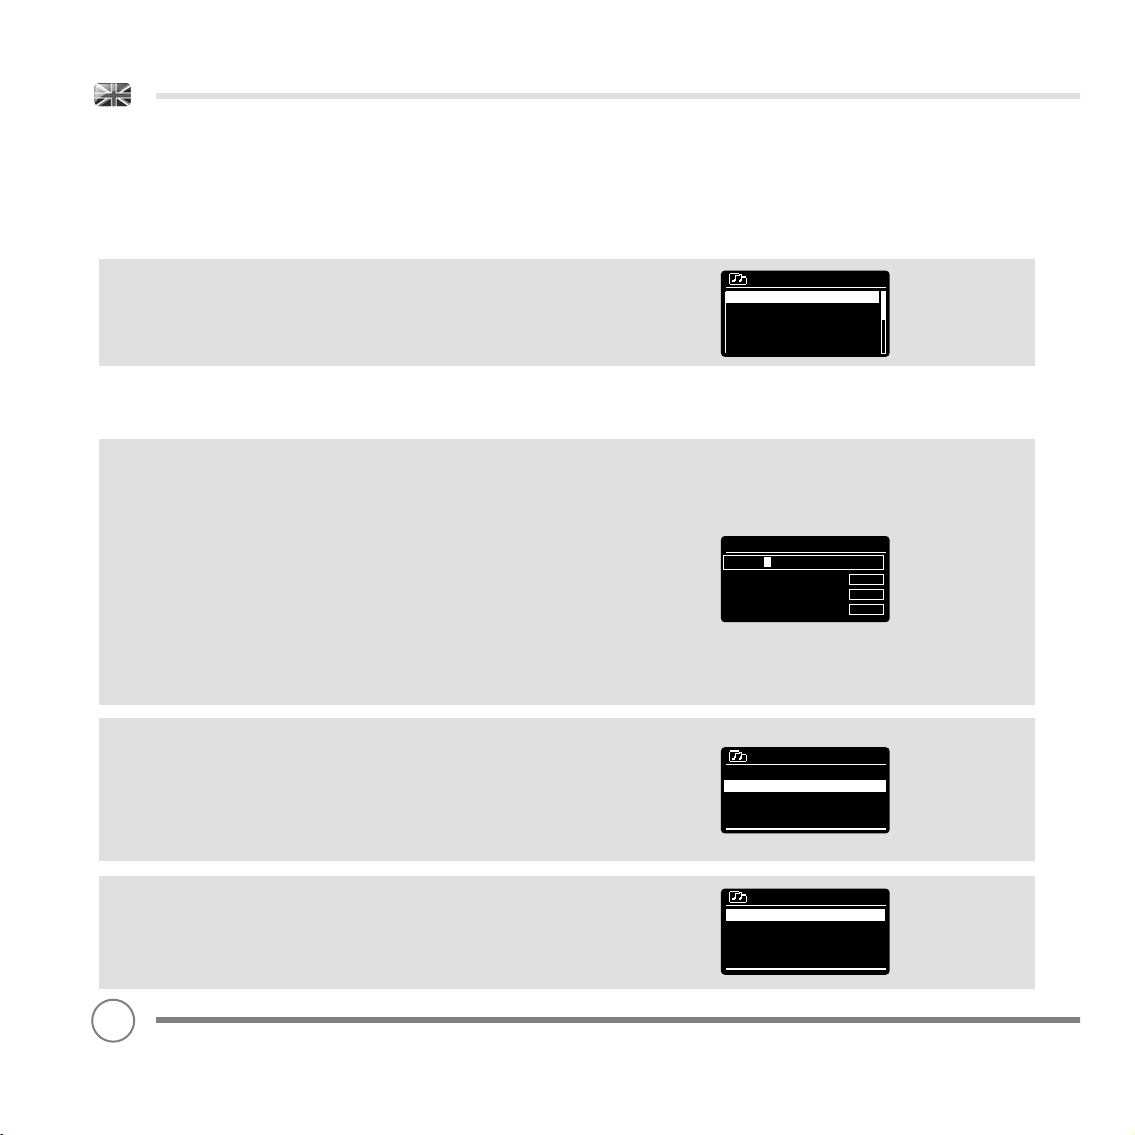
Using the cursor control, scroll through the options and press select
to choose your search criteria.
For example, choosing LOCATION will give you an alphabetical list of
continents/regions, and then a list of countries. Use the cursor control
to scroll through the list and press select to choose the continent,
then country. You will then be given the option of choosing
ALL STATIONS or a GENRE, to further refi ne your search.
After selecting your search criteria, you will be presented with a list of
stations. Simply select a station from the list to begin listening.
SEARCH
You can search for an internet radio station by name (if you know it),
or by using a keyword from within its title.
To SEARCH for a station, select SEARCH STATIONS from the STATIONS
MENU, then enter a keyword using the keyboard input screen (similar
to the keyboard screen you used for password input).
If your station is found, simply select to listen.
If you searched for a keyword, Heritage will list all the stations found
that contain that particular keyword. Scroll through the list and
select your station.
CHOOSING A PODCAST
Podcasts (also referred to as ‘Listen Again’) are searched and
selected in the same way as a regular station.
Select PODCAST from the INTERNET RADIO MENU, then search by
location, genre or a combination of both.
Location
Africa >
Asia >
Caribbean >
Central America >
Europe >
Stations
ROCKF
0123456789 ABCD
EFGHIJKLMNOPQRS
TUVWXYZ
BBC Radio 1
BBC Radio 1
Podcasts >
BKSP
CANCEL
OK
The main difference when searching for a Podcast, is that when
you have selected a station, you will then be presented with a list of
Shows (or Podcasts) available from that station.
Simply select your choice from the list.
20
Podcasts
Adam and Joe
BBC Introducing
Bruce Dickinson
Chris Hawkins
Clare McDonnell
Page 21
INTERNET RADIO MODE
MY FAVOURITES
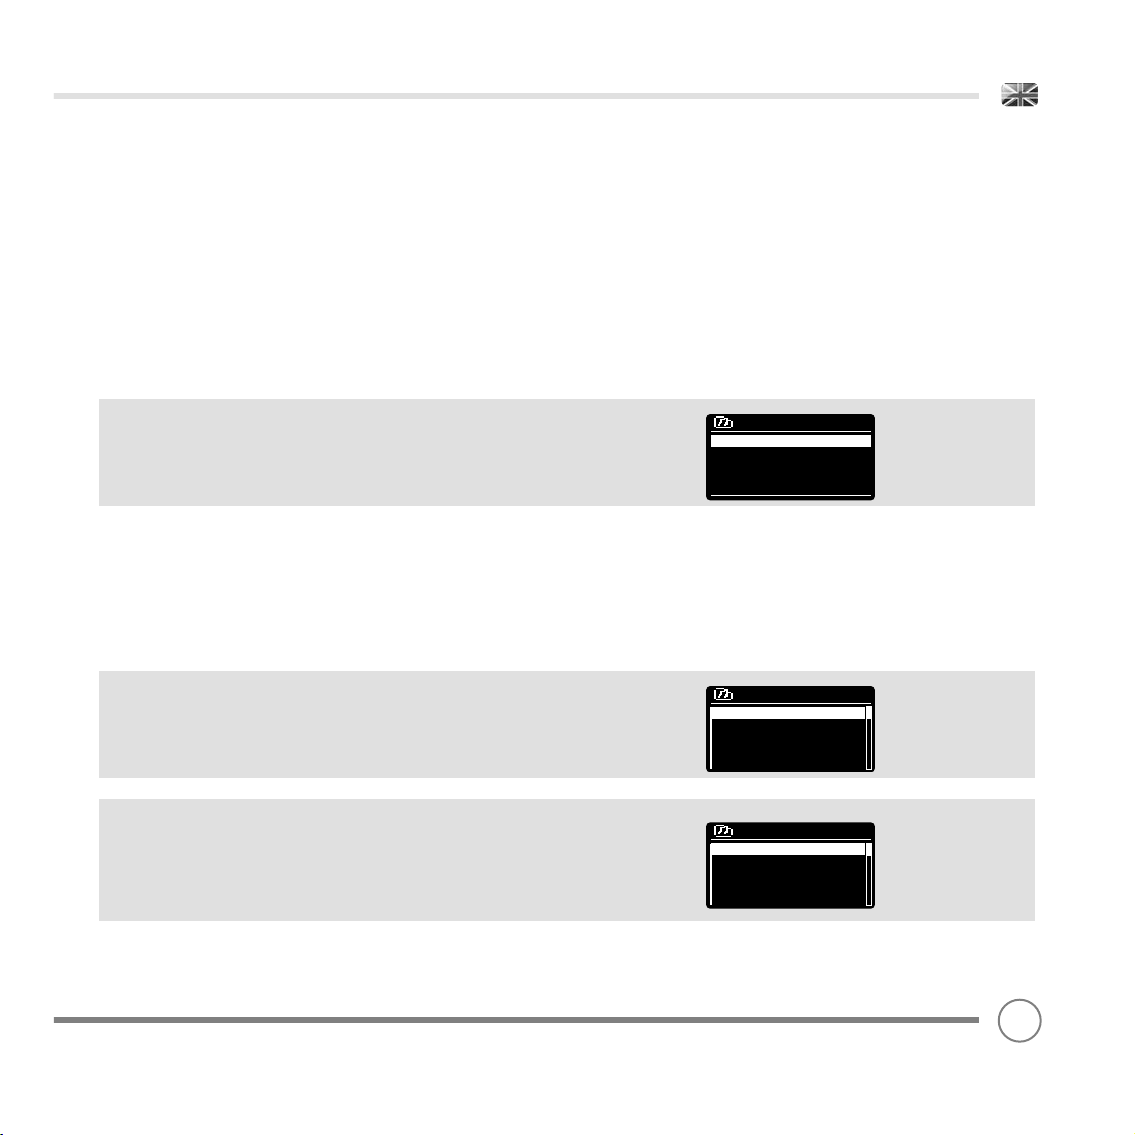
It is possible to compile a list (or lists) of your favourite stations,
allowing quick and easy access to a number of stations from different
countries and genres.
To do this you must fi rst register your radio with the Frontier Silicon
Radio Portal. See the INTE
To store a station as a favourite, press and hold the select button until
FAVOURITE ADDED appears on the screen. The chosen station will
now appear in the default favourites stations list.
RNET RADIO PORTAL section on page 23.
To access the MY FAVOURITES list, select STATION LIST, then MY
FAVOURITES, followed by STATIONS. You can now scroll through and
select any station in the list.
MY ADDED STATIONS
If you have added any of your own stations to the internet radio
station list (via the Frontier Silicon Radio Portal, see page 23), they will
be listed here. The MY ADDED STATIONS option can be found under
the STATION LIST MENU, in INTERNET RADIO MODE.
BBC
The BBC option is a shortcut to the entire BBC station list.
Simply select this option from the STATION LIST MENU, then scroll
through and select a station in the normal way.
LAST LISTENED
When you enter INTERNET RADIO MODE, the last-listened station is
automatically selected. To select another station that you’ve listened
to recently, select LAST LISTENED. A full list will be displayed (the most
recent being at the top).
Your Rock Favourites
Kerrang! >
North Sea Classic rock >
Rock FM >
Takeover Radio >
The Arrow >
BBC
BBC Radio 1 >
BBC Radio 1Xtra >
BBC Radio 2 >
BBC Radio 3 >
BBC Radio 3 >
Last Listened
Clyde 1 >
West FM >
BBC Radio6 >
BBC Radio 1 >
Chill >
21
Page 22
INTERNET RADIO MODE
HELP
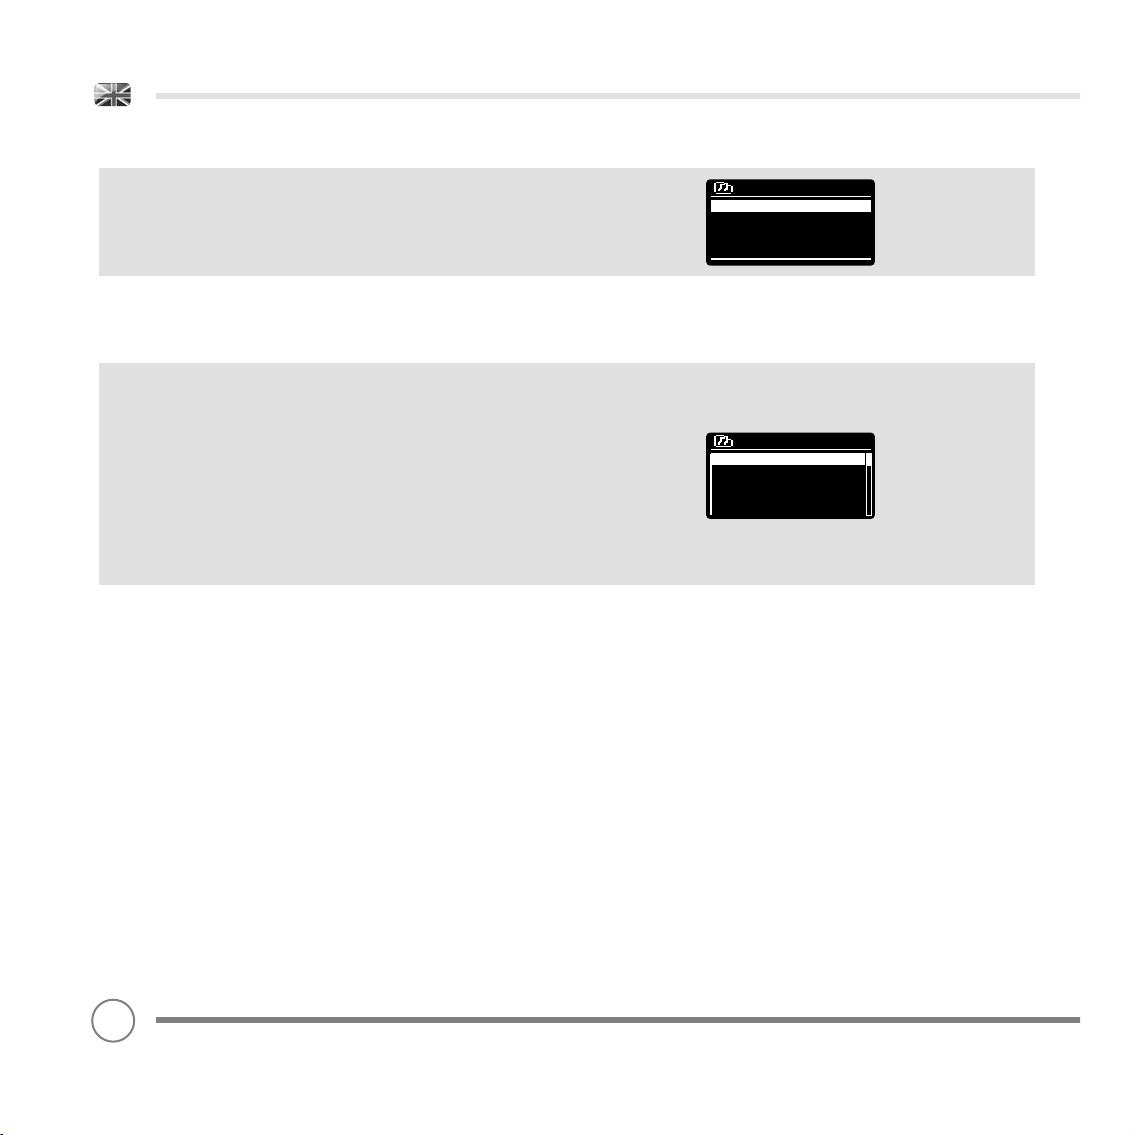
The HELP option can be found in the STATIONS LIST MENU. Under HELP,
you will fi nd the ACCESS CODE that you require to register your radio
on the Frontier Silicon Radio Portal (see page 23 for full instructions).
A helpful FAQ audio track can also be found under the HELP
heading.
LOCAL
The LOCAL station list can be found under the STATION LIST MENU and
will differ depending on which country you are currently located in.
For example, if you are based in the UK, this selection will display
stations originating from the UNITED KINGDOM. Likewise, if you are
using your radio in Germany, this selection will display only stations
that are being broadcast from Germany.
Select this option to navigate either all of the available local stations,
or alternatively you can search the list by genre.
Get access code
Access code
HEBZM0Z
Local United Kingdom
All Stations >
Highlighted Stations >
Alternative >
Ambient >
Big Band >
22
Page 23
INTERNET RADIO PORTAL
ACCESSING ADDITIONAL FEATURES
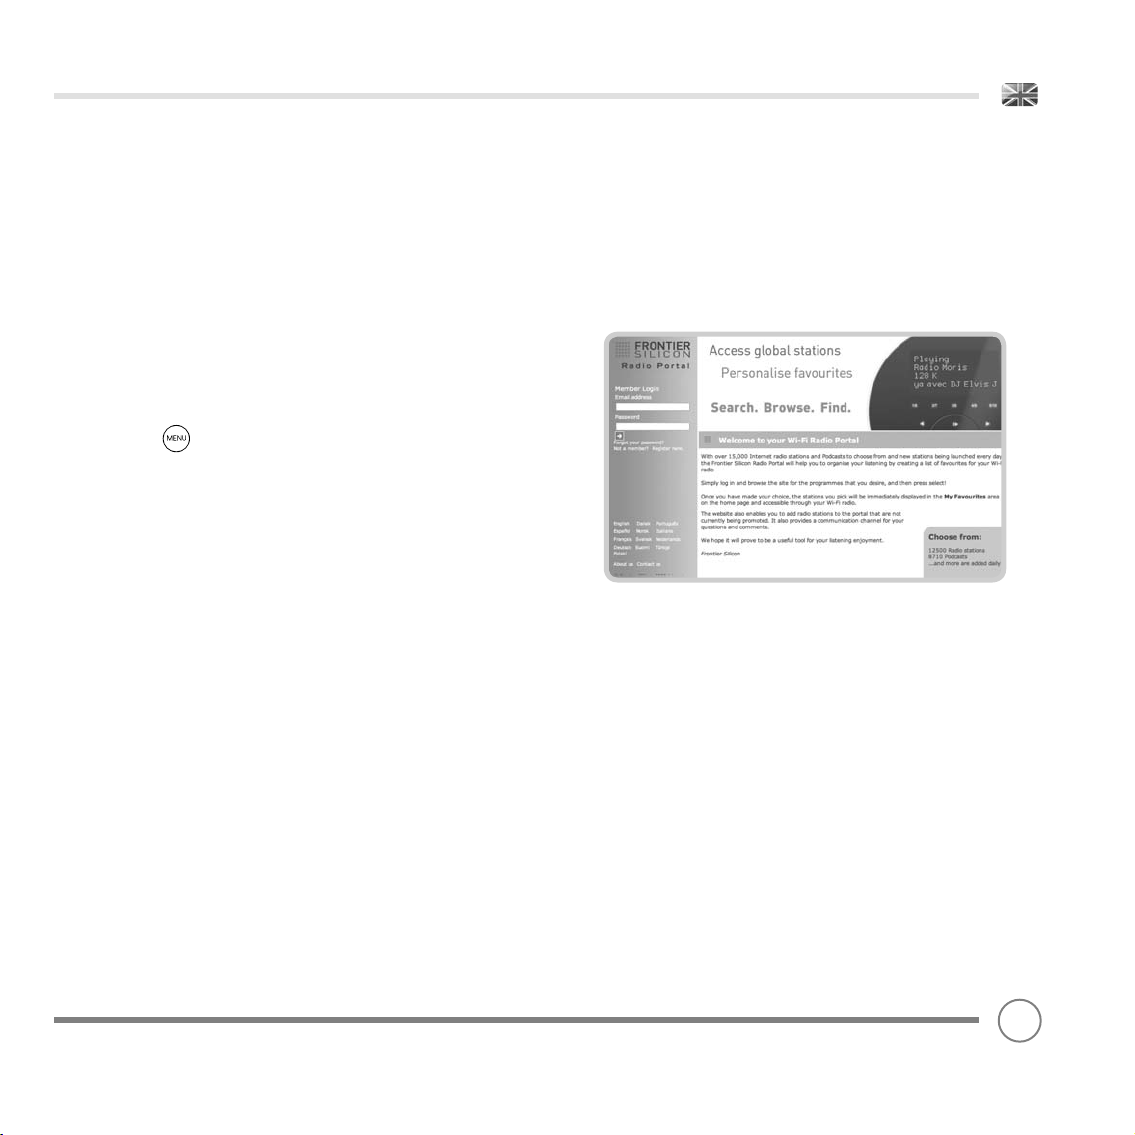
Some of Heritage’s more advanced internet radio features can only
be accessed by visiting the Frontier Silicon Radio Portal.
In order to access these features you must fi rst register your radio.
REGISTERING YOUR RADIO
In order to register your radio, you will need your radio’s unique
access code.
To fi nd the access code, fi rstly enter INTERNET RADIO MODE, then
press . Select STATION LIST, then HELP. Now select GET ACCESS
CODE.
Write down the access code.
Now, using your PC or Mac, visit the portal website at -
www.wifiradio-frontier.com
Click on the REGISTER HERE link (located on the left hand panel) to
begin the registration process.
If you already have an account and wish to add an additional
radio, log in to your account and select MY PREFERENCES, then ADD
ANOTHER Wi-Fi RADIO.
When you have registered your radio with the portal, you can
immediately take advantage of various additional features and
services that it provides.
23
Page 24
SETTING UP A MUSIC SERVER
In order for Heritage to be able to play music fi les from a connected
computer, the computer must fi rst be set up for media sharing.
UPnP media sharing allows devices like Heritage to play music from
a shared media library, navigating through tag menus such as Artist,
Album or Genre.
If you are running a PC with Windows Media Player 11 or later (WMP),
or an Apple Mac with OS X 10 or later and a UPnP application
installed, you can connect Heritage and stream audio.
NOTE: iTunes does not currently operate as a UPnP media server, but
there are a number of third party software add-ons available that will
allow you to access your iTunes library.
SHARING MEDIA WITH WINDOWS MEDIA PLAYER
The most common UPnP server is Windows Media Player (version11
or later) although other UPnP platforms and servers may be used.
To set up WMP for media sharing, performs the following steps:
Ensure that your PC and radio are connected to the same network.
Heritage will be recognised as ‘Heritage’ by your PC.
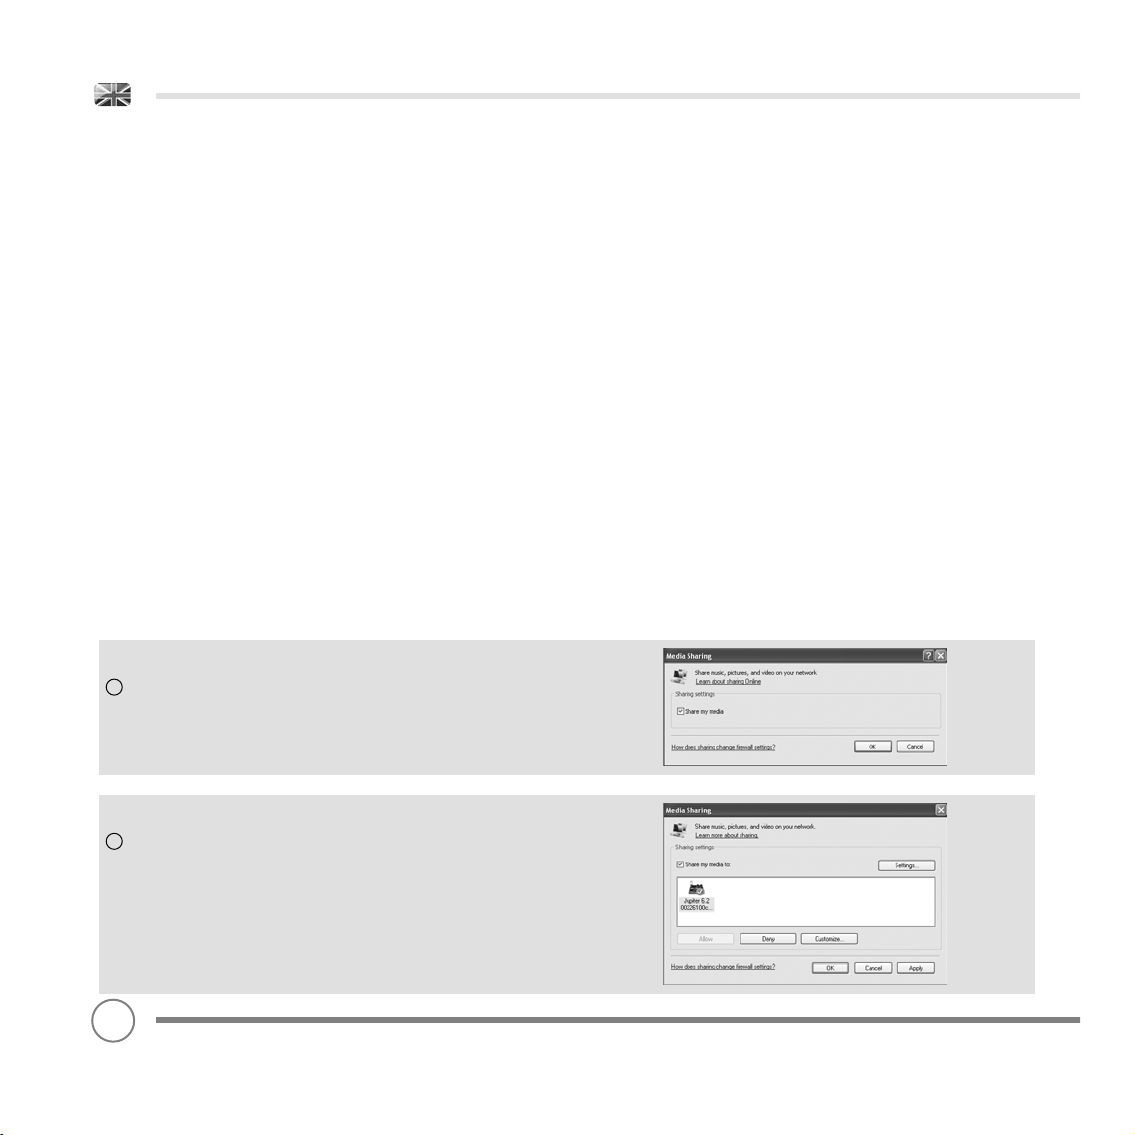
1
In WMP, add to the media library the audio fi les and folders you want
to share with Heritage (LIBRARY > ADD TO LIBRARY . . . .).
2
Make sure that the radio has access to the shared media by
selecting it and clicking ALLOW. You can also set a name for the
shared media settings.
The PC is now ready to stream music to your radio. The WMP UPnP
service runs in the background; there is no need to start WMP
explicitly.
24
Page 25
SETTING UP A MUSIC SERVER
SHARING MEDIA WITH A MAC
In order to connect Heritage to your Apple Mac, a third party UPnP
server application is required. There are a number of applications
available to download from the Internet.
One such application is EyeConnect. This is an easy to install media
sharing application that enables Heritage to stream audio.
EyeConnect can be downloaded from:
http://www.elgato.com
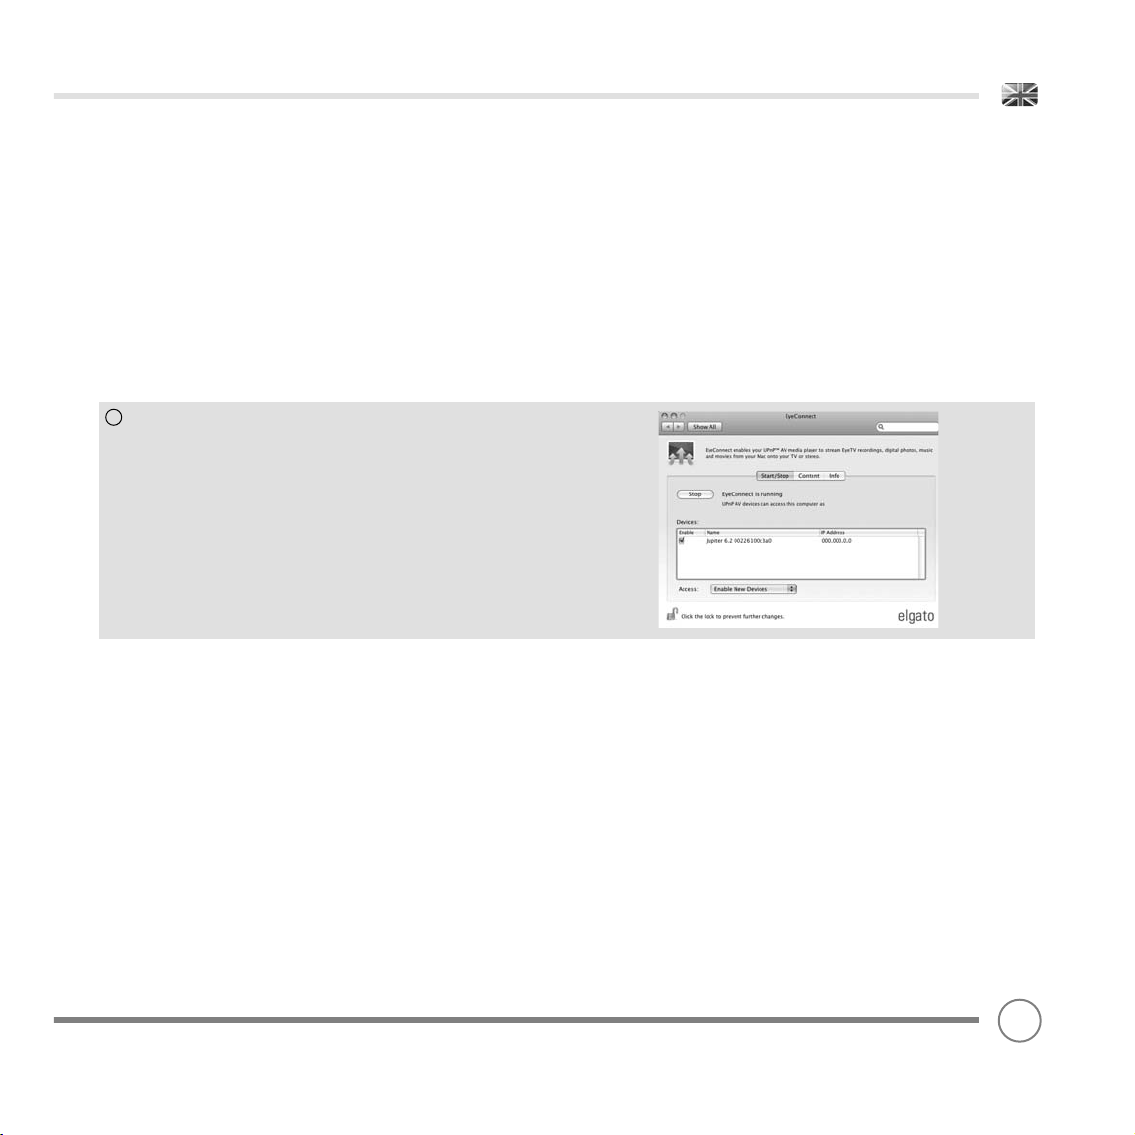
3
Once installed, EyeConnect can be found on the System Preference
panel. When connecting Heritage, make sure EyeConnect is shown
as running on its setup screen.
Heritage will appear as ‘Jupiter 6.2’ in the EyeConnect list of devices.
The ENABLE box must be checked and the ACCESS selection set to
ENABLE NEW DEVICES.
Your Mac is now ready to stream music to your radio. EyeConnect
will normally run automatically after boot up.
25
Page 26
MUSIC PLAYER MODE
PLAYING AUDIO TRACKS IN THE MUSIC PLAYER
MUSIC PLAYER MODE allows you to play audio fi les such as MP3s,
AACs, WMAs or FLACs directly from a computer or music server on
your local network.
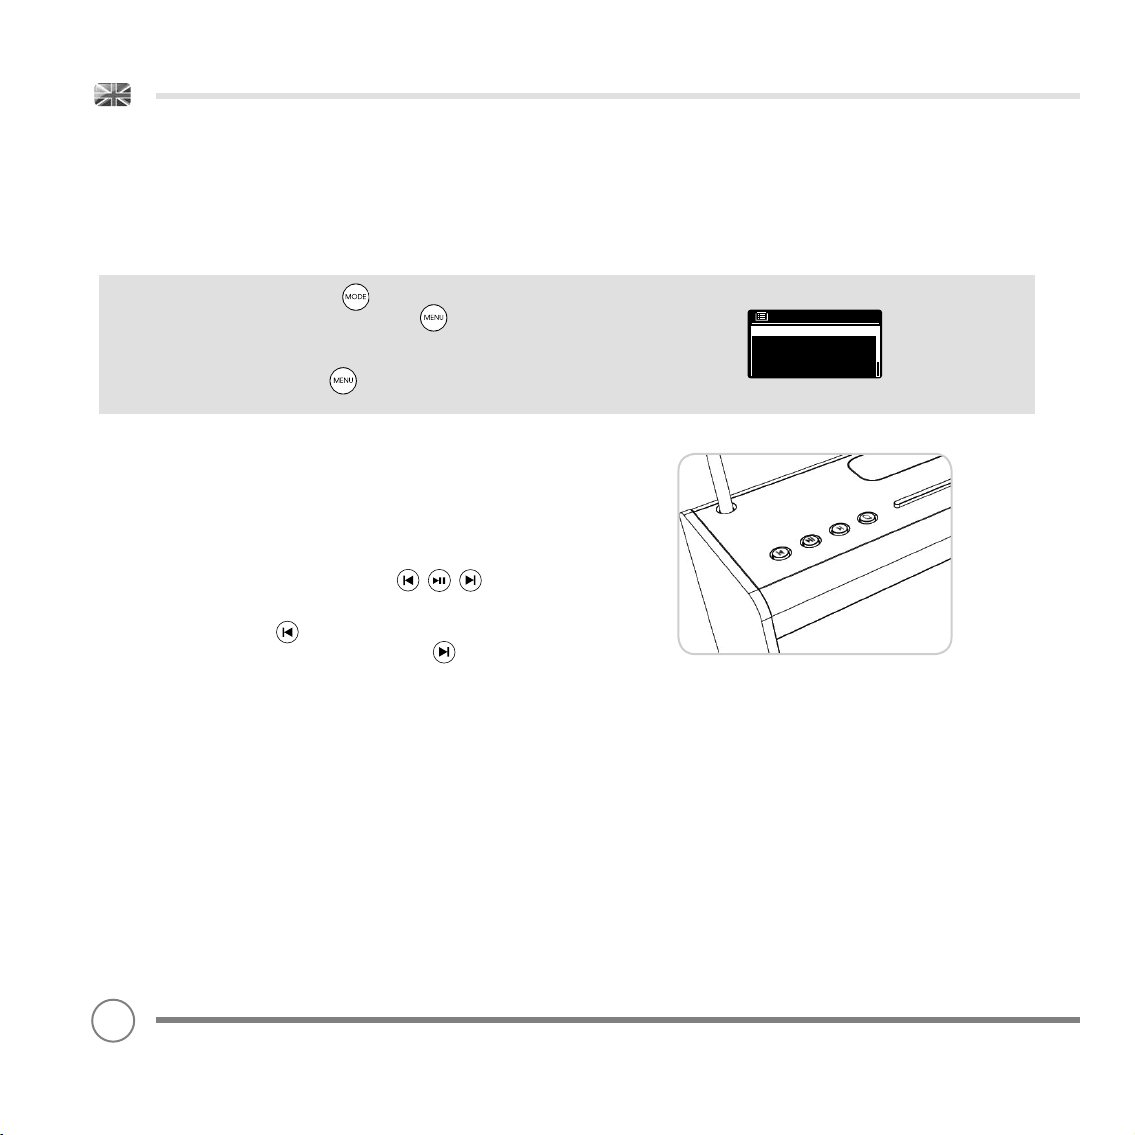
To enter MUSIC PLAYER MODE, press until the MUSIC PLAYER
MODE intro screen is displayed, alternatively press then select
MAIN MENU, then MUSIC PLAYER from the menu option list.
Once in music player mode, press , then select either SHARED
MEDIA.
You can navigate your way through the list using the cursor control,
using UP and DOWN to scroll through the list, and either Push (SELECT)
or RIGHT to advance through folders. When you reach your desired
track, a short press of the select button will start the track playing, a
long press will add the track to the playlist (see PLAYLISTS on page 28
for more information).
Audio tracks can also be controlled using the buttons
mounted on your radio’s top panel.
Pressing and holding the button will fast-rewind the track your
are currently playing, while doing the same with the button will
fast-forward.
Music player
Shared media >
My playlist >
Repeat play: Off
Shuffle play: Off
26
Page 27
MUSIC PLAYER MODE
SHARED MEDIA (From a UPnP Media Server)
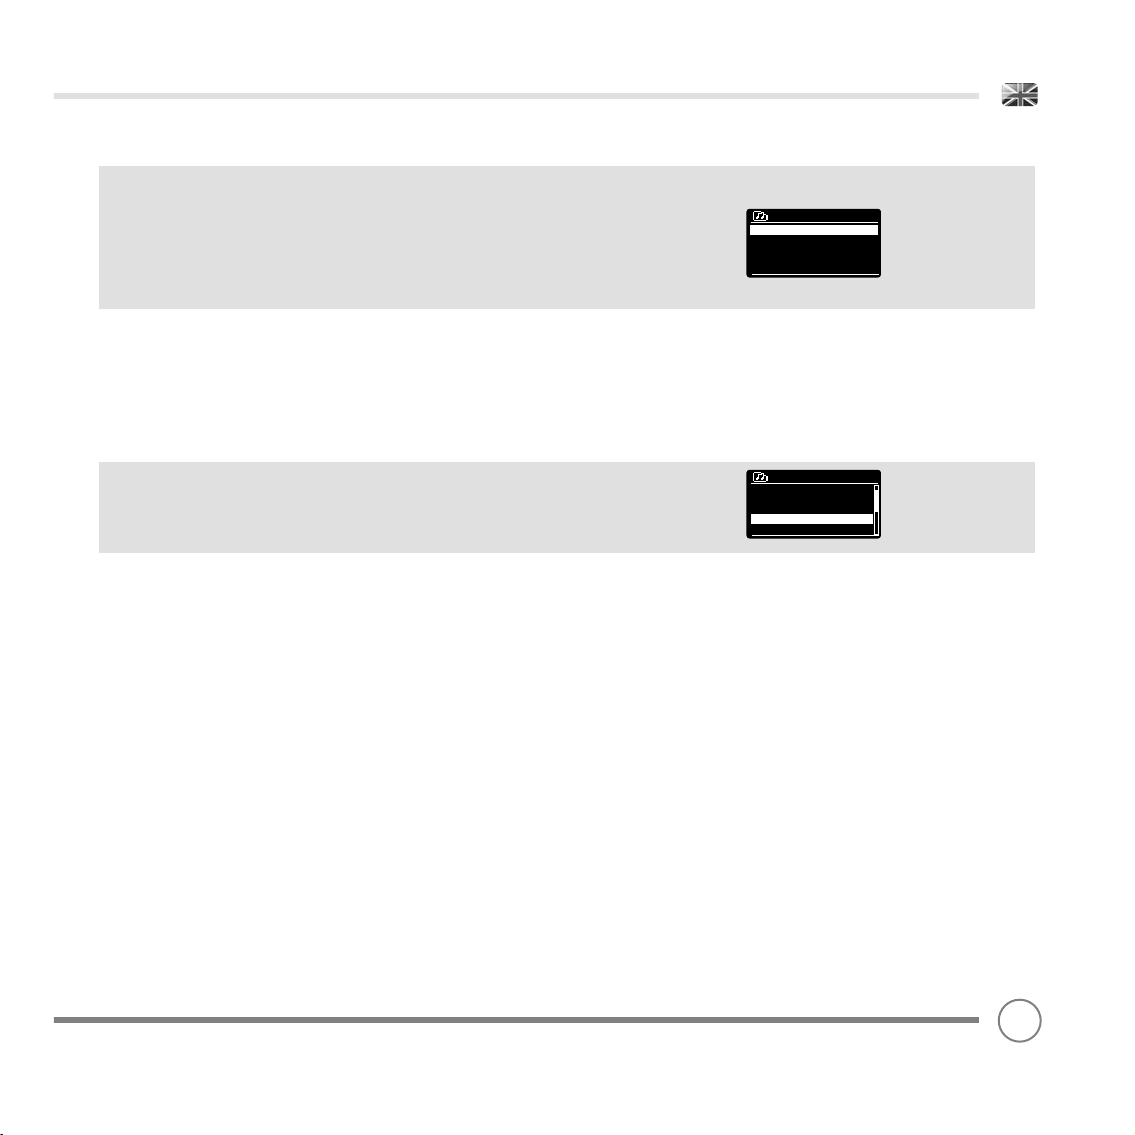
In MUSIC PLAYER MODE select SHARED MEDIA. If you have set up
shared media (as described on page 24), you should see an entry,
for the server you set up, example “SB-Laptop: Audio”. If you have
more than one computer sharing media, the alternatives are listed.
Select the shared media you want to play.
From this point on, the menus are generated from the shared media
server (typically Windows Media Player). The fi rst menu shows a
list of media types, for example music, video, pictures and playlists.
Heritage can only play music and playlists.
There is also a search function, which fi nds tracks in a similar way to
Internet radio search, as described on page 20.
SB-laptop: Audio
Music >
Video >
Pictures >
Playlists >
<Search>
For music there are numerous ways of selecting tracks, including:
Genre | Artist | Album | Composer | Rating
Once you have found a track you want to play, press the select button to select. A short press plays the track immediately, while a long
press will add the track to the PLAYLIST.
Note
: Tracks played in UPnP mode are SROBBLED to Last.fm, if
SCROBBLING is turned on in the Last.fm menu. For more information
about SCROBBING, see page 29.
Music
Music >
All Artists >
Contributing Artists >
Album Artists >
Composers >
27
Page 28

MUSIC PLAYER MODE
PLAYLISTS
Heritage is capable of holding a queue of up to 500 tracks in its
playlist. Playlist tracks can be mixed from multiple UPnP servers and
USB devices. To manage the playlist, select MY PLAYLIST from the
MUSIC PLAYER MENU.
To view the contents of the playlist, scroll through it using the cursor
control. To play the playlist from a certain track, give the select
button a short press. To delete a track from the playlist, give the
select button a long press, then confi rm YES to erase.
If you select a track/album/folder for instant playback, without using
the playlist feature, the playlist will be preserved and will continue to
be stored by your radio until you choose to delete it.
REPEAT/SHUFFLE
You can choose to repeat tracks or play them in random order by
selecting REPEAT PLAY or SHUFFLE PLAY from the MUSIC PLAYER MENU.
NOW PLAYING INFORMATION
While a track is playing, Heritage will display the track and artist
name (UPnP). There is also a progress bar with displays elapsed and
total track time.
To view further track information, press .
Each time you press , another piece of information is displayed
as follows:
UPnP: Track name/artist, progress bar/track times, album, codec/
sampling rate, playback buffer and today’s date.
My playlist
Human >
Just My Imagination.wma
Back At One
Can’t Fight This Feelng. . . . . .
Three birds.mp3
Music player
Human.mp3
1:01 3:08
Music player
Letter To Me
Album:
5th Gear
28
Page 29
LAST.FM MODE
In addition to its terrestrial and internet radio capabilities, Heritage
is also capable of providing access to online music service Last.fm.
Simply choose an artist or genre and let Last.fm build the perfect
playlist from its library of 5 million tracks – unique to you, and fresh
every time.
If you already subscribe to the service, you can use your existing
Last.fm profi le on Heritage, alternatively visit www.last.fm, complete
a profi le, then subscribe.
If you have a Trial Subscription Voucher, visit www.last.fm/voucher
and follow the on-screen prompts.
ADDING A USER ACCOUNT
To enter LAST.FM MODE, press until the LAST.FM MODE intro
screen is displayed, alternatively press then select MAIN MENU,
then LAST.FM from the menu list.
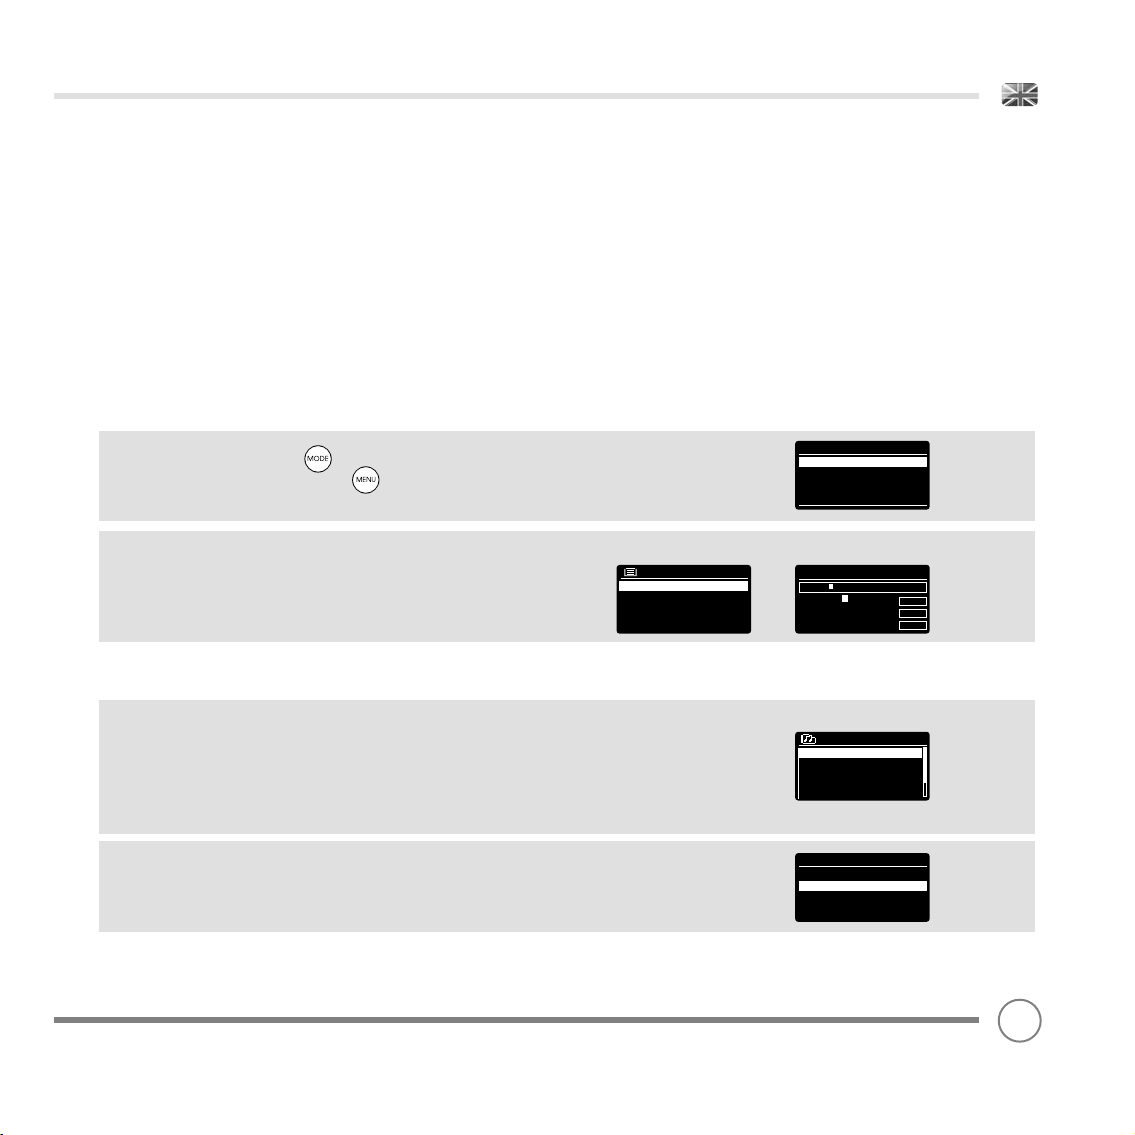
To add an account, select LAST.FM SETUP from the menu, then select
USER ACCOUNTS.
Now select ADD NEW ACCOUNT and enter your LAST.FM user name
and password using the on-screen keyboard.
SCROBBLING AND LOVE/BAN TRACKS
To get the most from LAST.FM, you can SCROBBLE all the tracks that
you’ve listened to, in both UPnP and LAST.FM modes (and even those
from an iPod or computer media server with the correct software
plug-ins). This sends track names to LAST.FM, adding them to your
library, and helps the service tailor recommendations (and neighbours) to your musical tastes. You can playback your LAST.FM library
by selecting the YOUR LIBRARY station in the LAST.FM MENU.
Last.fm
Station list >
last.fm setup >
System settings >
Main menu >
User Accounts
<Add new account>
Search:
Rolling
0 1 2 3 4 5 6 7 8 9 . , a b
c d e f g h i j k l m n o p q
r s t u v w x y z A B C D E
F G H I J K L M N O P Q
Last.fm
Your library
Your Recommendations
Your neighbourhood
Artist radio
Tag radio
BKSP
OK
CANCEL
To turn SCROBBLING ON or OFF, select LAST.FM SETUP, then
SCROBBLING, now select ON or OFF.
Note
: if you intend to let other people use Heritage in LAST.FM MODE,
you may want to turn SCROBBLING OFF. Alternatively, you could
switch to another account.
Last.fm setup
User Accounts >
Scrobbling: on
29
Page 30
LAST.FM MODE
While listening to LAST.FM you can choose to LOVE or BAN tracks
(which SCROBBLES them even if SCROBBLING is set to OFF). Telling
LAST.FM that you LOVE a track will add that particular track to your
YOUR LOVED TRACKS list, allowing playback at a future time.
BANNING a track will mean it will never be played again.
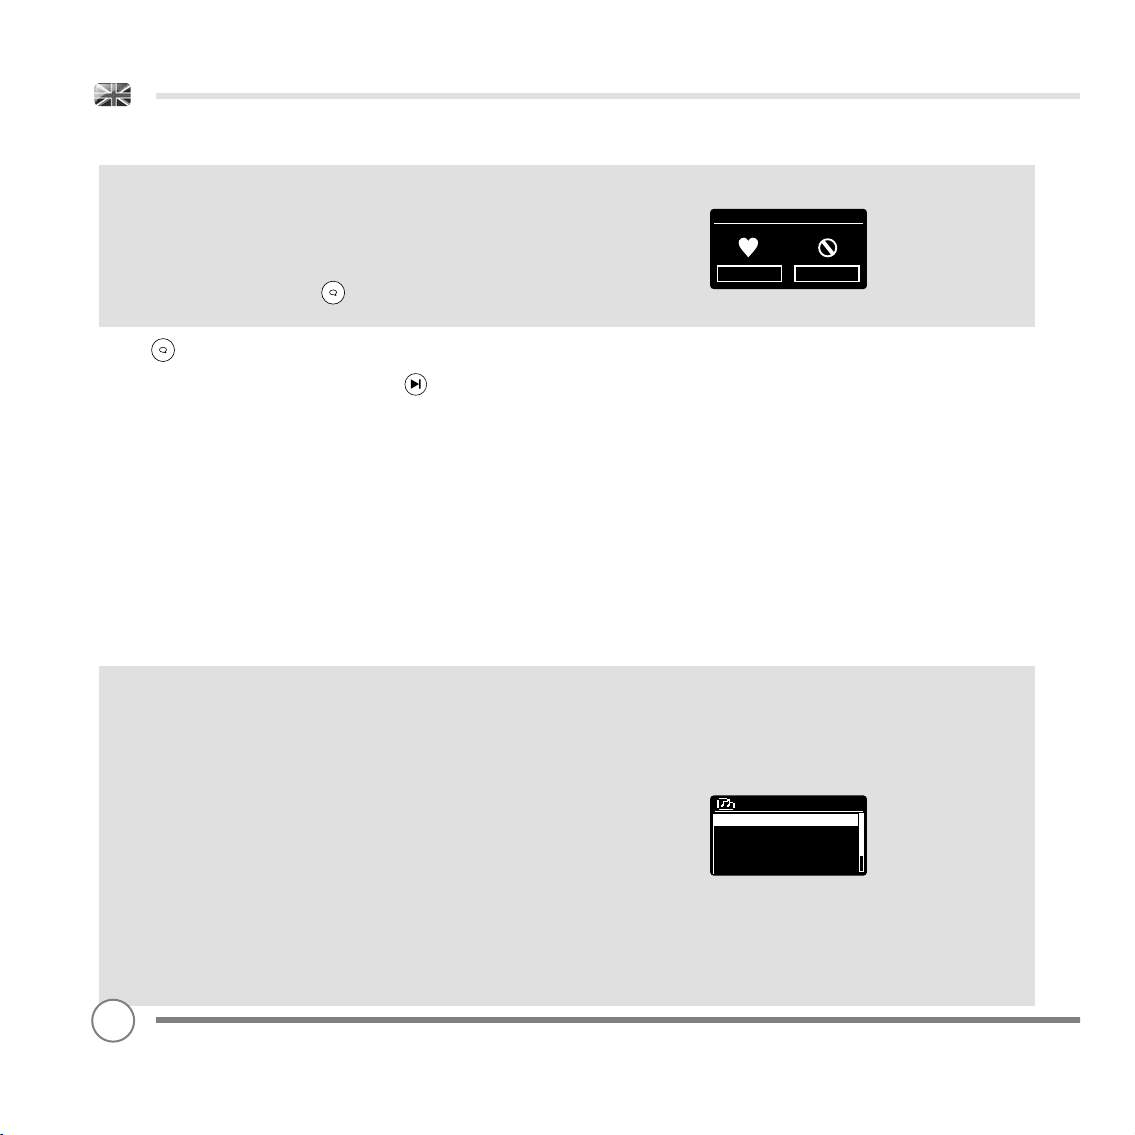
To LOVE or BAN a track press the button and use the cursor to
select either LOVE or BAN.
The button can be found on the top face of your radio,
or alternatively on the remote control. When listening to LAST.FM
you can choose to SKIP a track by pressing the button. It is
not possible to PAUSE a track in LAST.FM.
Note
: You can edit your library and track ratings by visiting
the LAST.FM website.
PLAYING MUSIC
There are several types of streams, or ‘radio stations’ available in LAST.
FM. To choose one, select STATION LIST from the LAST.FM MODE menu.
If you are new to LAST.FM, we recommend that you perhaps start off
with ARTIST or TAG RADIO, to allow you to be fully comfortable with
the basic features of the service.
The following options are available:
YOUR LIBRARY
Plays all the tracks SCROBBLED to your profi le, or tracks by artists
you’ve added to your library. Can be edited on the LAST.FM website.
Last.fm
Love Ban
YOUR RECOMMENDATIONS
Plays tracks recommended to you based on your music profi le and
that of other listeners with similar tastes.
YOUR LOVED TRACKS
Plays tracks you have rated as LOVED.
YOUR NEIGHBOURHOOD
Plays tracks from the libraries of people on LAST.FM with similar music
tastes to yours.
30
Last.fm
Your library
Your Recommendations
Your neighbourhood
Artist radio
Tag radio
Page 31
LAST.FM MODE
PLAYING MUSIC (continued)
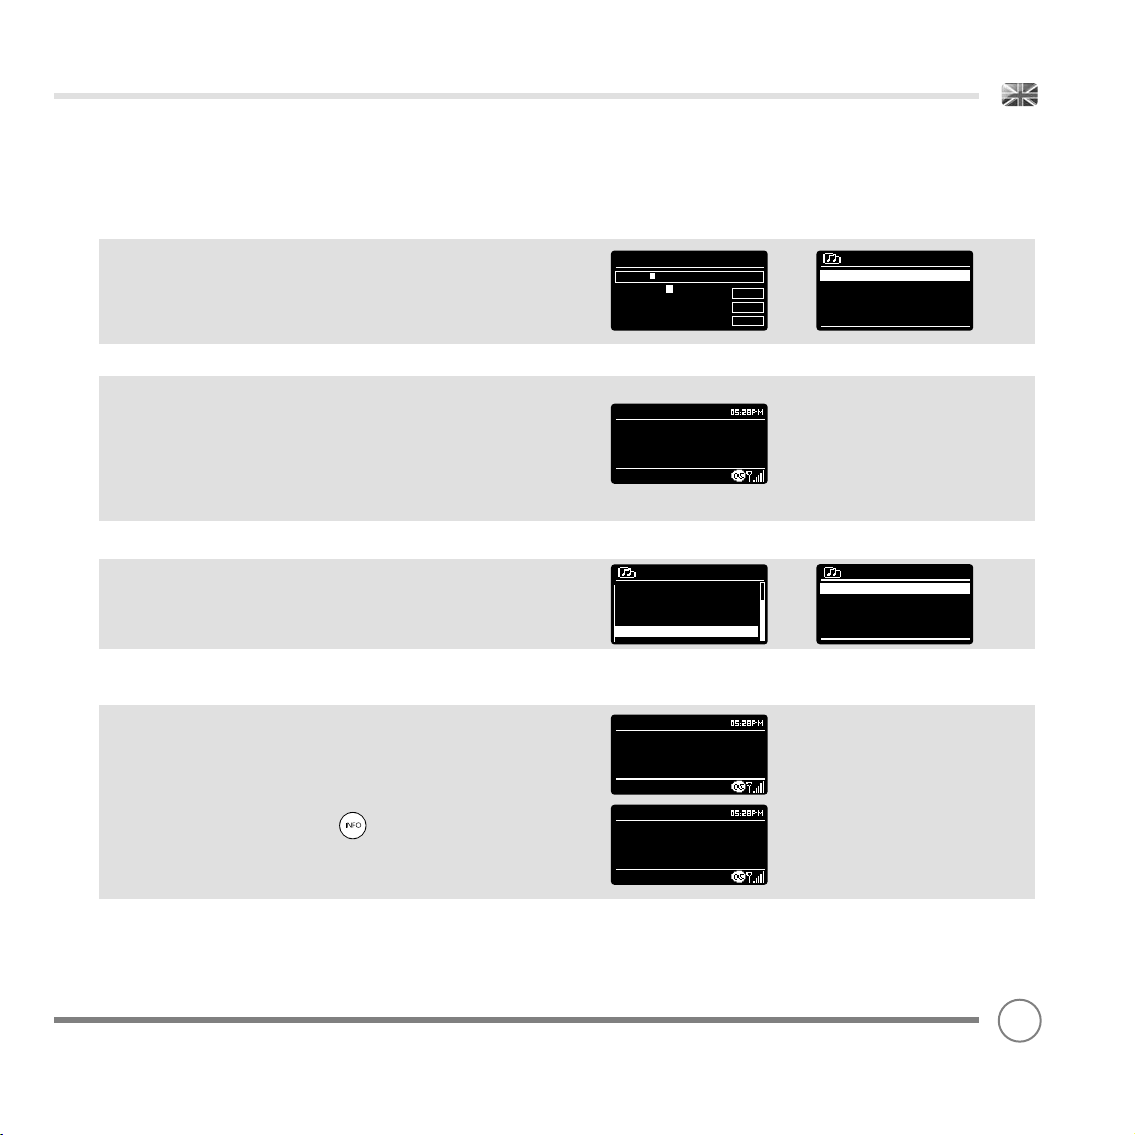
ARTIST RADIO
Plays a selection of tracks by a certain artist, together with tracks by
artists that have a similar musical style. Pick an artist by entering their
name or part of their name (you don’t have to enter the full name,
so for example to fi nd ROLLING STONES you can just enter ROLLING),
then pick the artist from the list of search results and select OK.
TAG RADIO
Plays a selection of tracks tagged with certain keywords. Pick a
tag word/genre by entering a word or phrase (its advisable to be
as specifi c as possible, for example BOLLYWOOD rather than BOLLY,
because tags are user-generated, so there tends to be many
spurious tags connected to only a few tracks, which may then give
an insuffi cient content error). Pick a tag from the list of search results
and select OK.
HISTORY
Lists the tracks you have listened to recently, with the most recent
track listed fi rst. It is not possible to select a track from this list and
listen to it again on demand.
ON-SCREEN INFORMATION
While LAST.FM is playing, the screen will display the track name and
progress bar, with fi gures for elapsed and total track time. A LAST.FM
icon is shown at the bottom of the screen to signify that you are in
LAST.FM MODE.
During track playback, pressing the button will allow you to
cycle though other pieces of information such as artist, album, track
name, radio name, codec/samplying rate, playback buffer and
today’s date.
Search:
Rolling
0 1 2 3 4 5 6 7 8 9 . , a b
c d e f g h i j k l m n o p q
r s t u v w x y z A B C D E
F G H I J K L M N O P Q
Last.fm
This Hard Land
Album:
Greatest Hits
Last.fm
Your Loved Tracks
Your Neighbourhood
Artist Radio
Tag Radio
History >
Last.fm
This Hard Land
Artist:
Bruce Springstein
Last.fm
This Hard Land
Album:
Greatest Hits
CANCEL
BKSP
OK
Artist radio
The Rolling Stones
Rolling Stones
Rolling Baba and the
Rolling Stones and Dave Matt
History
Rapture by DatA from
Visions by Cut Copy from. . . .
We Are The People by E . . . . .
She’s got me dancing by. . . . .
Meddle by Little Boots f. . . . .
31
Page 32
ALARM CLOCK
SETTING AN ALARM
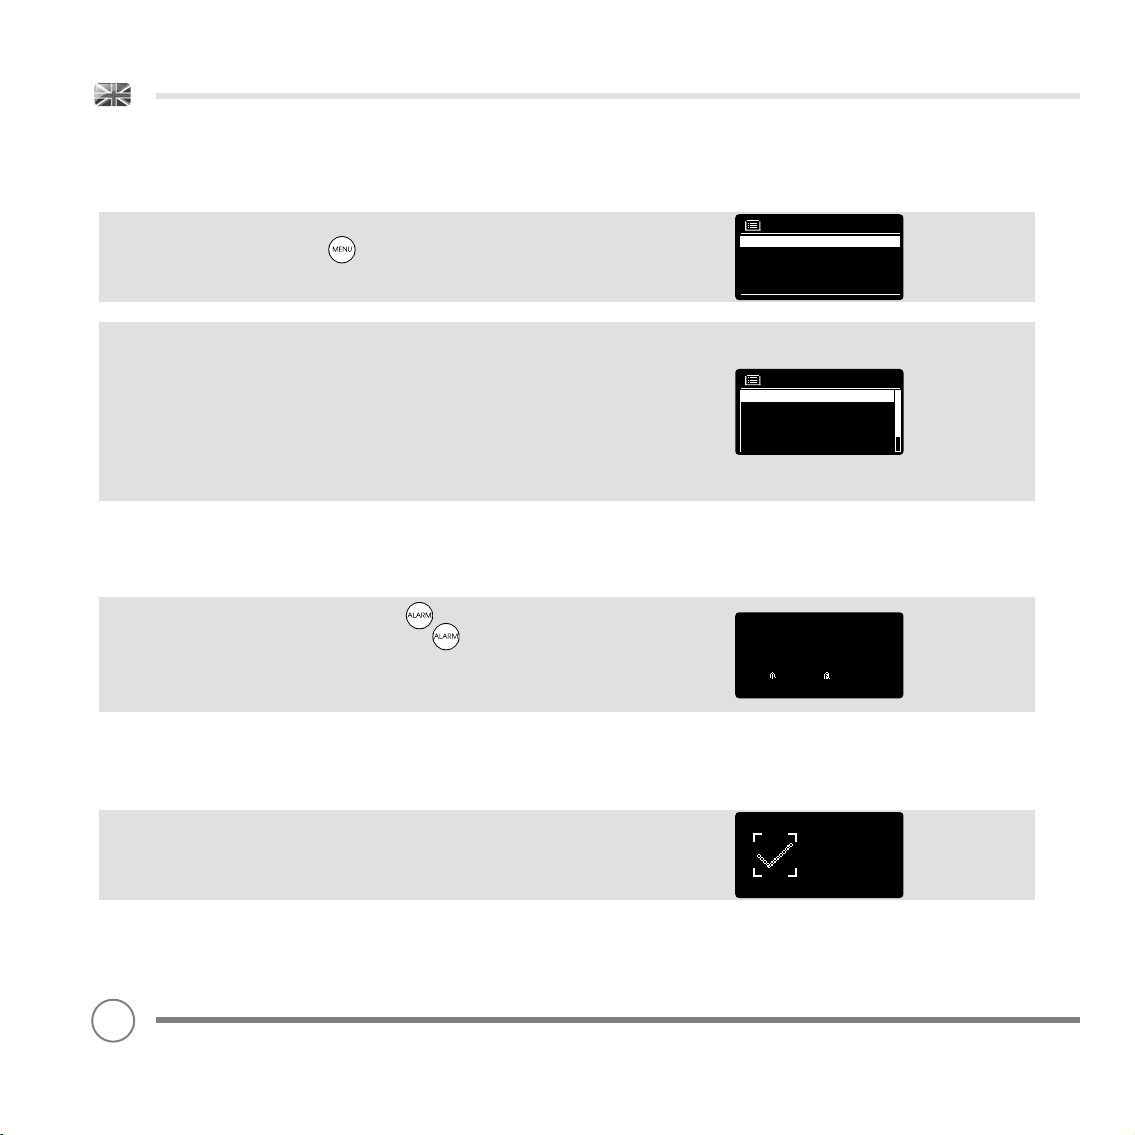
Heritage is able to store two individual alarm settings. To set or
change an alarm, either press the button, or select MENU,
then MAIN MENU, then ALARM. Select which of the ALARM SETTINGS
(Alarm 1 or Alarm 2) you would like to modify or enable.
Using the cursor control, scroll through the options below, setting your
preferences.
• Enable: on/off
• Frequency: Daily, Once, Weekends or Weekdays.
• Time
• Mode: Buzzer, Internet Radio, DAB, FM or iPod or Last.fm
• Preset: Last listened or favourite station preset 1-10
• Volume: 0 - 20
When your preferences have been set, remember to select SAVE.
Heritage shows any active alarms by displaying an icon at the
bottom of its screen.
When in STANDBY MODE, by simply pressing the button, you can
turn any alarms held in memory ON or OFF. Pressing will cycle
through ALARM 1 and ALARM 2 settings, enabling, and disabling
them. If the ALARM icons are displayed, the alarm is enabled.
If no alarm icon is shown, the alarms are switched off.
STOPPING AN ALARM
When an alarm is sounding, pressing any one of Heritage’s
buttons will STOP the alarm.
Alarms
Alarm 1: Off [06:55AM]
Alarm 2: Off [07:50AM]
Alarm 1
Enable : Daily
Time : 7:30AM
Mode : internet radio
Preset : last listened
Volume : 6
12/10/2009
14:30
06:55AM 07:50AM
When the alarm has been cancelled, an ALARM OFF message will be
displayed on Heritage’s screen.
32
Alarm off
Page 33
ALARM CLOCK
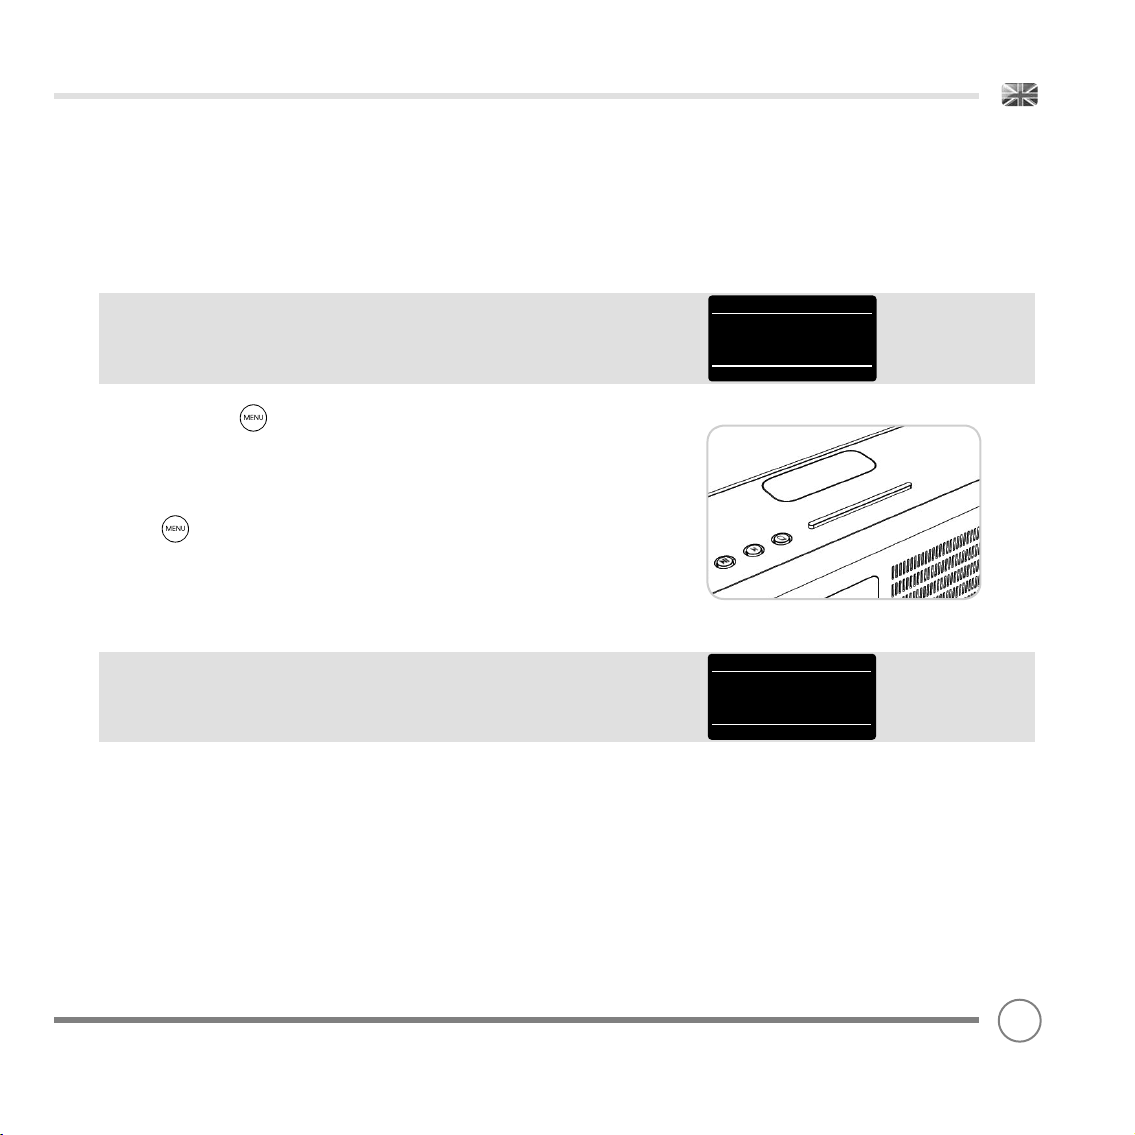
SLEEP MODE
By using the SLEEP function, you can set Heritage to automatically
switch itself into STANDBY mode. The SLEEP mode can be engaged in
one of two ways:
The quickest method is via the SNOOZE BAR. Simply tap the SNOOZE
BAR to cycle through a range of pre-set SLEEP durations, from SLEEP
OFF, through 15, 30, 45 and 60 minutes.
Alternatively, press then select MAIN MENU, then SLEEP. You can
now set the SLEEP timer to any one of the following pre-sets.
When you have selected a sleep duration, Heritage will return to the
MAIN MENU.
Press to return to the NOW PLAYING screen.
SNOOZE FUNCTION
Heritage includes a SNOOZE feature and incorporates a dedicated
SNOOZE BAR, found on the top face of the radio. SNOOZE allows you
to temporarily silence the alarm for a period of up to 30 minutes.
The SNOOZE duration can only be set when your radio is actually in
the process of alarming. At this point, simply tap the SNOOZE BAR to
cycle through a range of pre-set SNOOZE durations, either 5, 10, 15 or
30 minutes.
When SNOOZE is activated, Heritage will return to standby for the set
period with the icon of the SNOOZED alarm shown on-screen.
Set sleep time
15 MINS
Set snooze
5 MINS
33
Page 34

SYSTEM SETTINGS
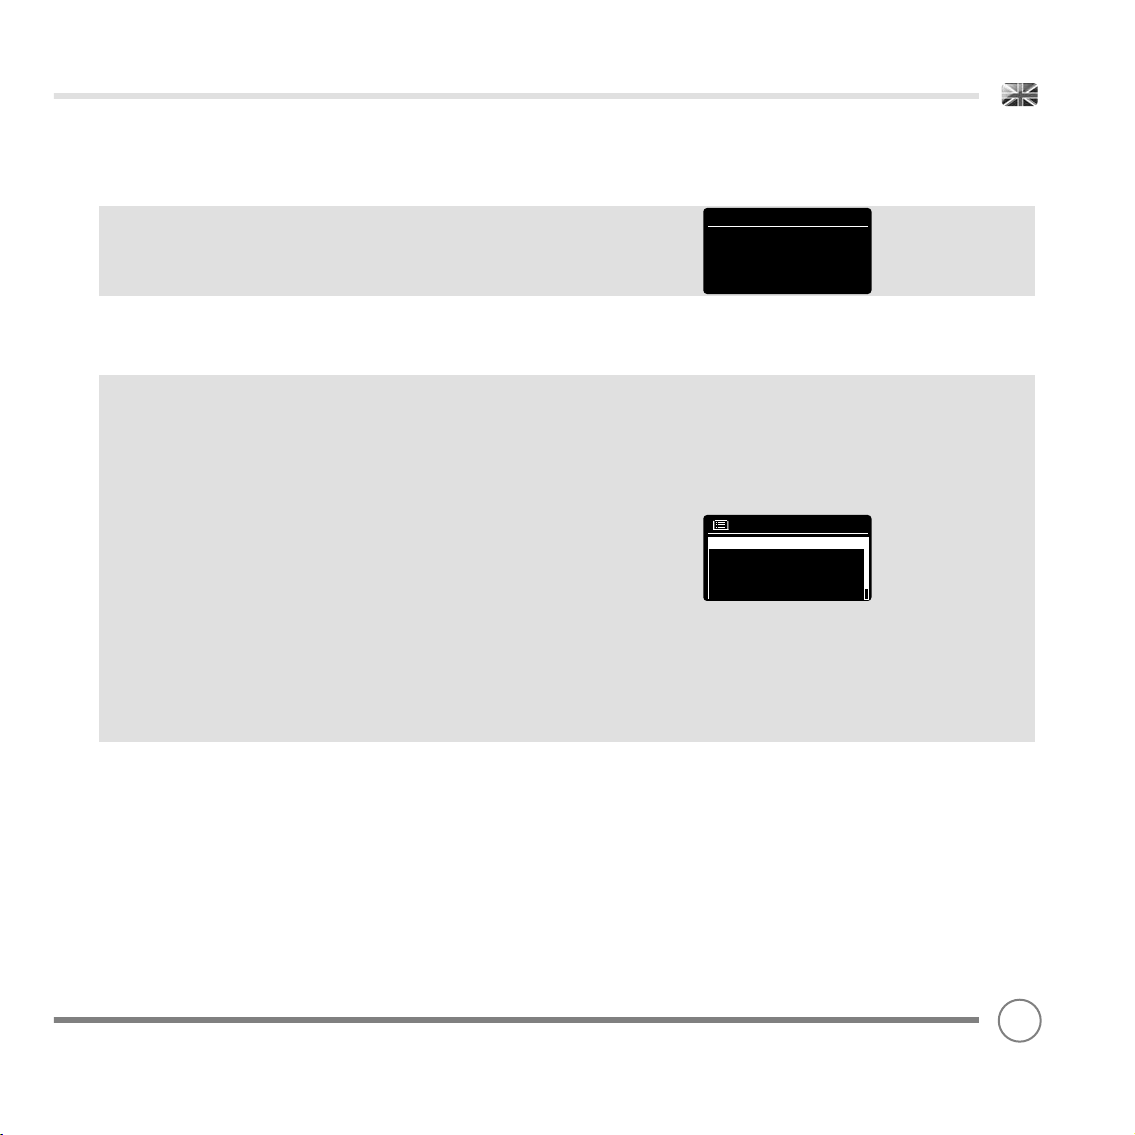
EQUALISER
Heritage provides the user with a signifi cant degree of control over its
standard (factory default) audio settings. This includes control over
BASS and TREBLE, LOUDNESS and the ability to use one of a number of
preset EQ settings. It is also possible to create your own personalised
EQ setting - known as “My EQ”.
To adjust the audio settings , press then select MAIN MENU,
followed by SYSTEM SETTINGS. Now select EQUALISER from the menu.
Heritage will display a list of nine EQ options as follows:
Normal, Flat, Jazz, Rock, Movie, Classic, Pop, News and My EQ.
Simply select your preference from the list by highlighting your option
and pressing the select button. Heritage will now store this setting in
its memory. For reference, the current EQ setting is highlighted by an
asterisk (*) in the EQ list.
Equaliser
Classic
Pop
News
My EQ
My EQ profile setup >
To confi gure your own personal EQ setting, select MY EQ PROFILE
SETUP from the EQUALISER menu. Now adjust the BASS and TREBLE
levels, decide whether you would like the LOUDNESS function OFF or
ON - before selecting SAVE. Your personalised EQ setting can now be
selected by choosing MY EQ from the EQUALISER menu.
34
My EQ profile
Bass : 0
Treble : 0
Loudness : Off
Bass
Bass
0
dB
Page 35
SYSTEM SETTINGS
NETWORK
The NETWORK MENU can be found under SYSTEM SETTINGS in the
MAIN MENU and includes an entry for the INTERNET WIZARD, which
will assist you in setting up your radio’s internet connection.
For the more experienced user, a variety of manual settings can also
be accessed from here, as follows:
INTERNET WIZARD :
Simplifi es the setup of your radio’s internet connection by taking you
through step-by-step instructions.
PBC WLAN SETUP :
Used to pair your radio with a router that uses WPS security.
VIEW SETTINGS :
View the MAC address, Wlan region, etc.
WLAN REGION :
Where you are using your radio - Europe, USA etc.
MANUAL SETTINGS :
Detailed control of Wired and Wireless connections.
NETWORK PROFILE :
Shows the names of the last four wireless networks Heritage has been
connected to.
NOTE: Heritage remembers the last four wireless networks it has
connected to, and automatically tries to connect to whichever
one of them it can fi nd. It’s possible however to delete unwanted
networks, simply select SYSTEM SETTINGS, then NETWORK, then
NETWORK PROFILE. Now select the network profi le you’d like to
delete by selecting and confi rming delete YES.
Internet Setup
Network Wizard
scanning/
Internet Setup
Internet Wizard
PBC Wlan setup
View settings
Wlan region >
Manual settings
35
Page 36

SYSTEM SETTINGS
TIME / DATE
Found in the SYSTEM SETTINGS menu, this menu offers you the option
of changing a number of time/date related settings. The TIME/DATE
menu has three listings as follows:
SET TIME / DATE : Allows you to manually set the time/date.
AUTO UPDATE : Choose from three different automatic setting options.
SET FORMAT : Choose whether you would like to use 12hr or 24hr
formats.
Update from DAB :
Automatically takes time/date from DAB signal. Heritage needs to
have been operated in DAB MODE (and have received a signal)
before this information can be extracted.
Update from FM :
Sets time/date from FM broadcast. Like DAB, Heritage needs to have
been operated in FM MODE, and have received RDS information
before time/date information can be extracted.
Update from Network :
Takes time/date from your internet connection.
BRIGHTNESS
Heritage allows a degree of control over the brightness of its OLED
display, meaning that both its STANDBY and POWER ON brightness
levels can be independently set to either HIGH, MEDIUM or LOW
brightness levels.
To change the brightness settings, press then select MAIN
MENU, followed by SYSTEM SETTINGS. Now select BRIGHTNESS from the
menu list. You will now be able to modify the default brightness level
settings for the two modes of operation - STANDBY and POWER ON.
Select the mode you’d like to change from these two options, then
choose your desired brightness level. Your chosen settings will be
held in memory indefi nitely, but can be changed at any time.
Time/Date
Set Time/Date
Auto update >
Set format
Set timezone >
Daylight savings
Auto update
Update from DAB
Update from Network *
No update
Brightness
Power-On Level *
Standby Level
36
Page 37
SYSTEM SETTINGS
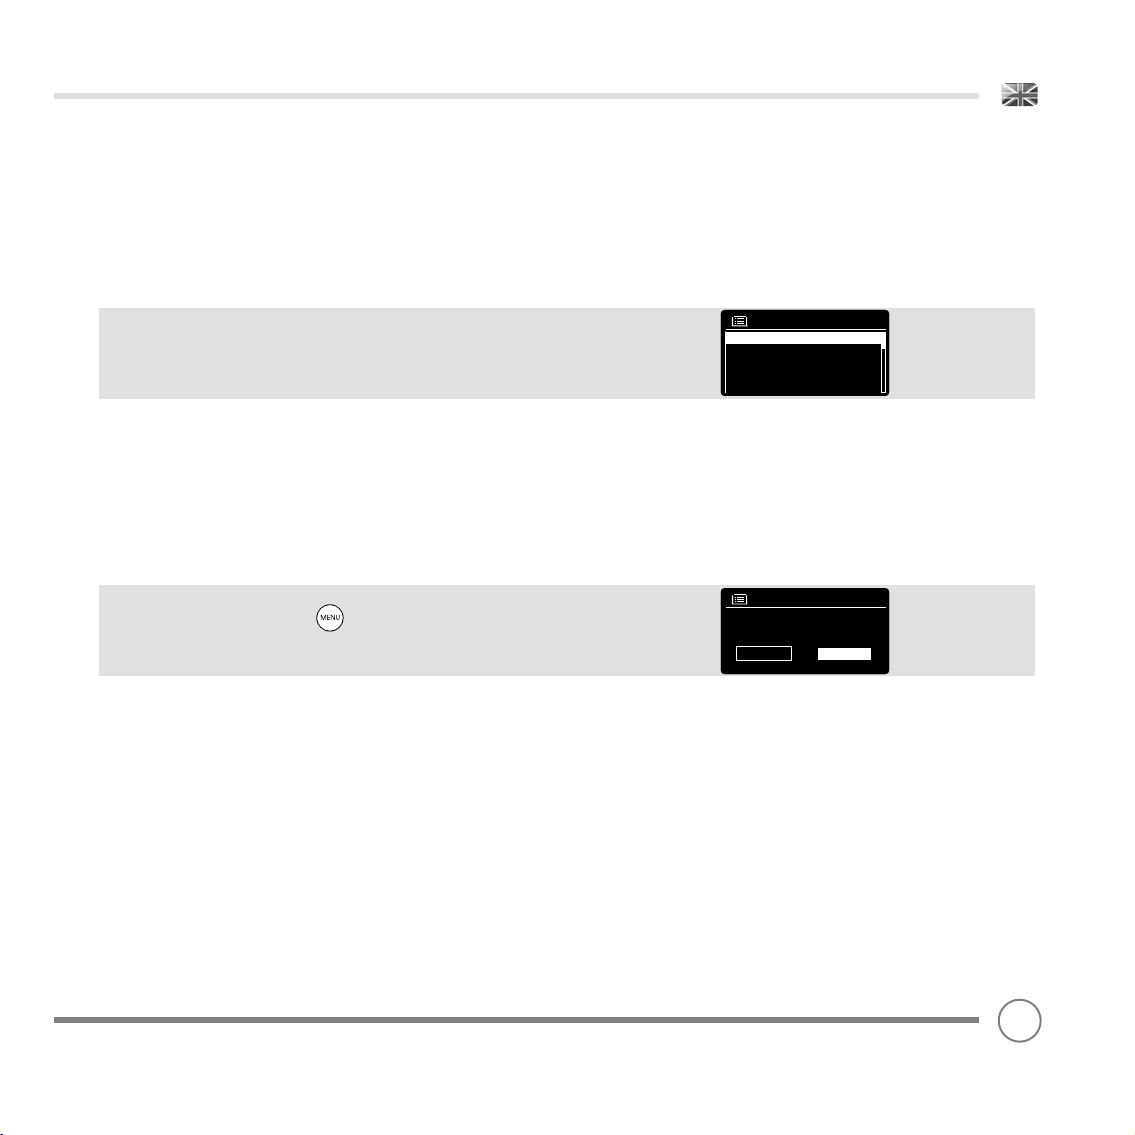
LANGUAGE
The default language on your radio is English, though 12 other
languages are supported as follows:
Danish Dutch Finnish French German Italian
Norwegian Polish Portuguese Spanish Swedish Turkish
To change the current language setting, select SYSTEM SETTINGS from
the MAIN MENU, then LANGUAGE, then select your choice.
FACTORY RESET
By selecting FACTORY RESET from the SYSTEM SETTINGS menu, you can
reset Heritage to its default factory values, erasing any personal
settings that may have been confi gured (time/date, network
confi guration and presets will be erased). However, Heritage’s
current software version is maintained, as is its registration with the
internet radio portal. Internet radio favourites are therefore retained,
unless you re-register your radio with another account on the portal.
Language
English *
Danish
German
Italian
Norweigian
To perform a factory reset, press then select MAIN MENU,
followed by SYSTEM SETTINGS, then FACTORY RESET. Now answer YES.
SOFTWARE UPDATES
From time to time we will make software updates available for your
radio. These are necessary for general maintenance reasons, as well
as for adding additional functionality to your radio. Software updates
are carried out ‘over-the-air’, via your broadband connection.
Heritage will to check for software updates each time it is switched
on, and if an update is available, will ask you to confi rm that you’d
like to go ahead and commence the download.
Please note that after a software upgrade, all user settings are
maintained.
Factory Reset
Proceed?
YES NO
37
Page 38
SYSTEM SETTINGS
SOFTWARE UPDATES (Continued)
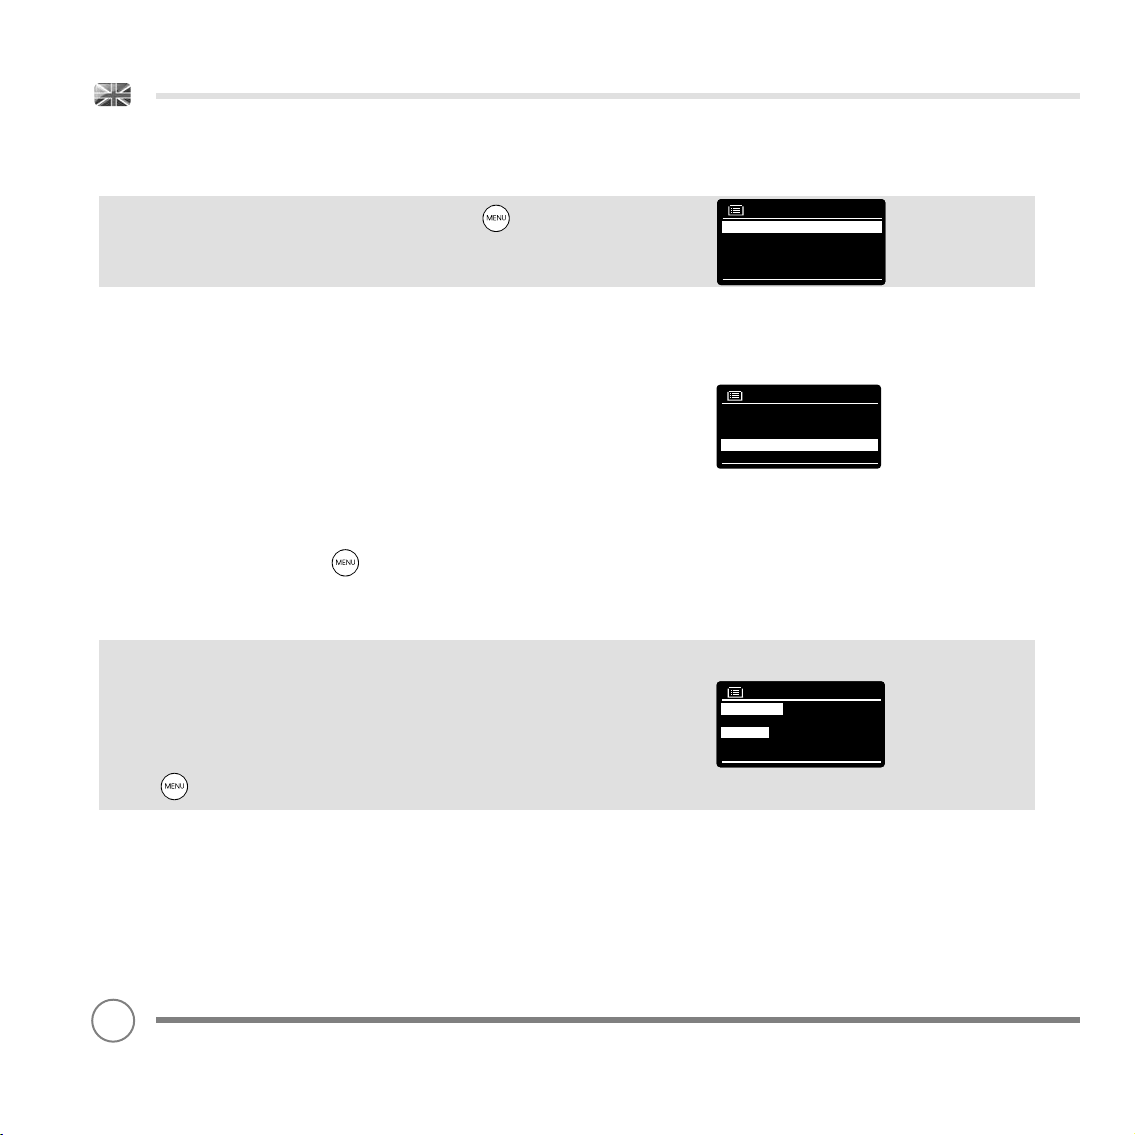
If you’d prefer to manually check for software updates, press
then select MAIN MENU. Now choose SYSTEM SETTINGS, then
SOFTWARE UPDATES. Select AUTO-CHECK SETTING then choose NO
when prompted.
To manually check for updates, select CHECK NOW from the
SOFTWARE UPDATES menu.
CAUTION
: Before commencing a software upgrade, ensure that
Heritage is plugged into a stable mains power connection.
Disconnecting power during a software update may permanently
damage your radio.
SETUP WIZARD
The SETUP WIZARD simplifi es the set-up of both time/date and internet
settings, by running through a series of questions.
To access the SETUP WIZARD, press then select MAIN MENU,
followed by SYSTEM SETTINGS. Now select SETUP WIZARD from the
menu list.
INFO
Software update
Auto-Check setting *
Check now
System settings
Language
Factory reset
Software Update
Setup Wizard >
Info
When dealing with a technical support issue, you may be asked for
the SOFTWARE VERSION or RADIO ID number. Both these pieces of
information can be found under the INFO heading, in the SYSTEM
SETTINGS menu.
Press then select MAIN MENU, followed by SETTINGS, then INFO.
38
Info
SW version:
domino_V2.0.16.25756-5
Radio ID:
00226100C3D6
Page 39
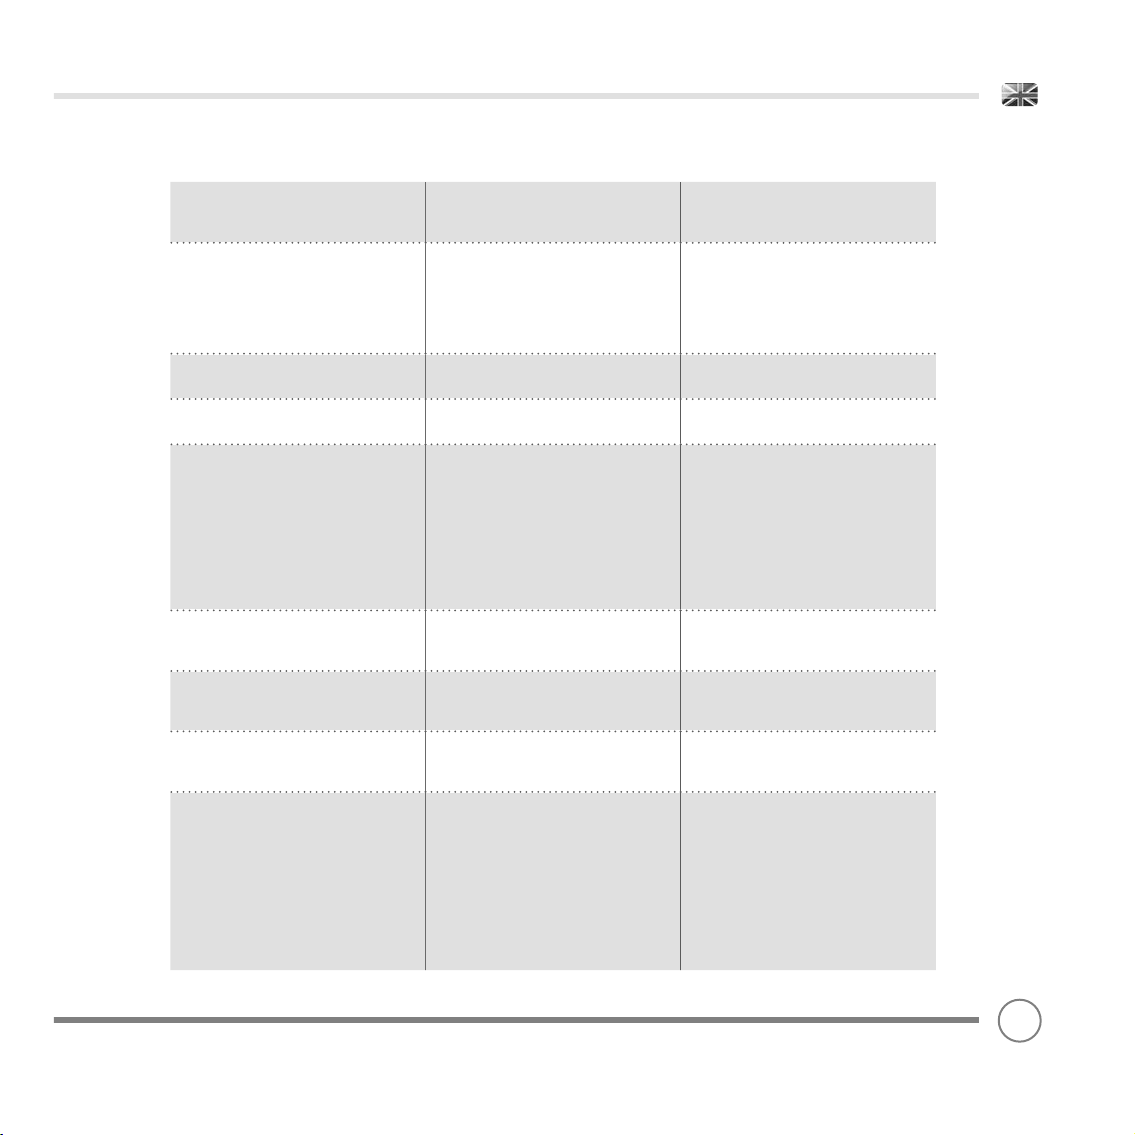
TROUBLESHOOTING
PROBLEM CAUSE SOLUTIONS
FM: HISS
DAB: Burbling/Intermittent
Cut-Out
DAB: ‘No stations available’ Low signal strength. As above, then rescan stations.
Cannot connect to network Network down. Check that network is working
Low signal strength. Check/move antenna.
Router restricts access to listed
MAC addresses.
Insuffi cient Wi-Fi signal strength. Check distance to router.
Unknown encryption method. Change encryption method on
Unusual network confi guration. Setup network manually through
Firewall preventing access. Check the following ports are open
Move radio to another location.
Rescan local (high-strength)
stations only.
For DAB, check local coverage at
www.ukdigitalradio.com/coverage
between computer and the router.
Obtain the Heritage MAC address
from MENU > SYSTEM SETTINGS >
NETWORK > VIEW SETTINGS and
add to router list
NOTE: Heritage has separate MAC addresses for
wired and wireless networks; only the current network adaptor method address is displayed, but
the other address can be obtained by changing
the fi rst pair of digits between ‘00’ (wireless) and
‘02’ (wired)
See if a computer can connect to
the network in this location.
router. Heritage supports WEP, WPA
and WPA2.
MENU > SYSTEM SETTINGS >
NETWORK > MANUAL SETTINGS
on the router:
UDP and TCP ports 80 and 123
DNS port 53
Windows shares: ports 135 - 139
and 445
Windows media player: varies Non-Microsoft fi rewalls may require
confi guration for UPnP.
39
Page 40

TROUBLESHOOTING
PROBLEM CAUSE SOLUTIONS
Cannot connect to Internet Internet connection down Check that the Internet is working
Firewall preventing access Check the following ports are
Cannot play particular Internet
radio station
Cannot play Last.fm ‘Unauthorized’ message Account details wrong.
Last.fm: Insuffi cient content to play There are not enough tracks
Station not broadcasting
Overloaded or insuffi cient
bandwidth.
Station broadcasting using
unknown codec.
Link out of date.
available and licensed to play for
the particular artist or tag radio
station you have.
for a computer connected to the
same network.
open:
UDP and TCP ports 80 and 123
DNS port 53.
Some Internet radio stations may
require additional ports to be
opened.
Try other stations.
Try listening on computer via
Internet radio portal website.
Try later.
Account details not entered.
Region not supported.
(Last.fm is currently restricted to
particular regions e.g. US/UK)
due to licensing issues.
Select a different radio station.
40
Page 41
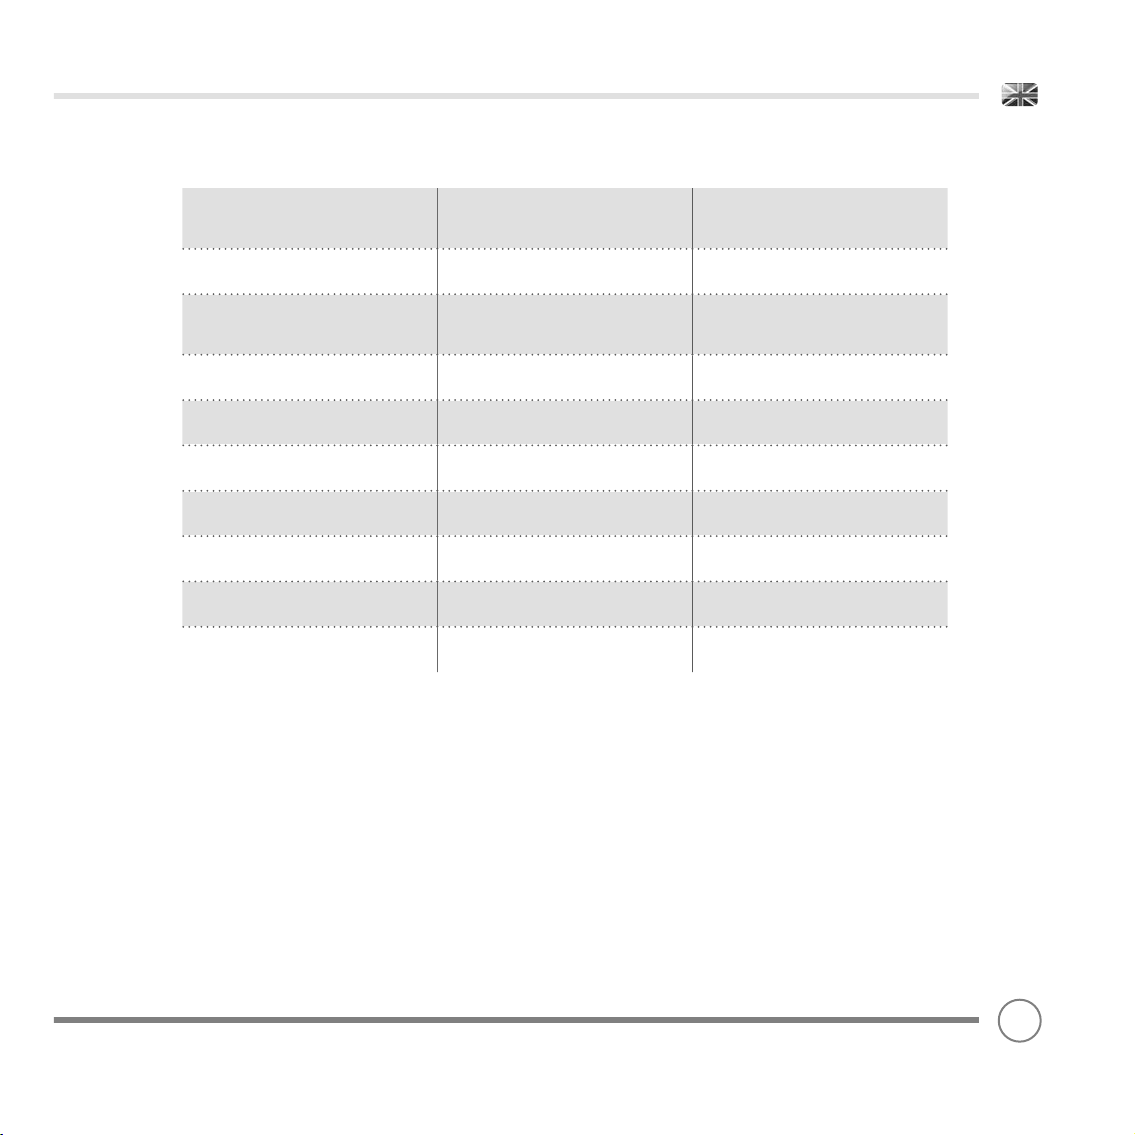
ERROR MESSAGES
MESSAGE DESCRIPTION EXAMPLE
Failed to connect Correct key entered, but router
rejects request.
Format error Cannot recognise fi le format -
independent of network.
Network error Problem past router - incorrect
data being received from network.
Network timeout Problem past router - no response
being received from network.
No UPnP media found No UPnP servers found.
Service not available (DAB) No DAB reception.
Unauthorised Access not grated by UPnP server. Allow access for Heritage in UPnP
Update failed Software upgrade failed.
Network not ready problem with connection to router. Router switched off.
MAC fi ltering enabled on router.
Received .wma, but found that the
stream wasn’t WMA when trying to
decode.
Data obtained from server is
unreadable.
Streaming IR station and suddenly
station becomes unavailable.
server settings.
41
Page 42

NOTES
42
Page 43

43
Page 44
TECHNICAL SUPPORT
TEL - + 44 (0) 1555 666161
E-MAIL - [email protected]
WEB - www.revo.co.uk/support
“Made for iPod”, and “Made for iPhone”, means that an electronic accessory has been designed to connect specifi cally
to iPod or iPhone, respectively, and has been certifi ed by the developer to meet Apple performance standards.
Page 45

DELUXE TISCHRADIO
geeignet zum Andocken von iPod und iPhonedock
DAB | DAB+ | FM | Internet Radio | Audio Streaming
Version 2.0
Bedienungsanleitung
Page 46
TECHNISCHE HILFE
Sollten Sie bei der Nutzung dieses Produktes Probleme haben,
lesen Sie bitte das Kapitel “Problemlösungen” auf Seite 39 dieser
Bedienungsanleitung. Wahlweise können Sie auch Revos technischen
Hilfsdienst anrufen:
Vereinigtes Königreich 01555 666161
Außerhalb des Vereinigten Königreiches + 44 1555 666161
Alternativ senden Sie eine Email an [email protected] oder besuchen
Sie die Sektion „Problemlösungen auf unserer webseite
www.revo.co.uk/support.
GARANTIE
Revo Technologies Ltd garantiert dem Benutzer, dass dieses
Produkt nei normalem Gebrauch für die Dauer von einem
Jahr beginnend mit dem Kaufdatum frei von Material- und
Herstellungschäden sein wird. Diese Garantie deckt Betriebsausfälle
welche auf Herstellungsfehlern basieren und ist nicht anwendbar
in Fällen von versehentlich zugefügtem Schaden, normalen
Abnutzungserscheinungen und nicht durch Revo Technologies Ltd
autorisierten Veränderungen oder Reparaturen.
Um Ihren Kauf zu registrieren besuchen Sie bitte die folgende
webseite: www.revo.co.uk/register
UMWELTINFORMATIONEN
INFORMATIONEN ZUR ENTSORGUNG (WEEE RICHTLINIE)
Das hier und auf dem Produkt dargestellte Symbol bedeutet, dass
dieses Heritage in die Gruppe elektrischer oder elektronischer Produkte
gehört und nicht mit normalem Hausmüll oder gewerblichem Abfall
entsorgt werden darf.
Die Richtlinie 2002/96/EG über Elektro- und Elektronikaltgeräte wurde
entwickelt, um entsprechende Produkte mit den besten zur Verfügung
stehenden Wiederherstellungs- und Recyclingmethoden zu behandeln
und somit den Einfl uss auf die Umwelt zu verringern. Sie regelt weiterhin
die Behandlung gefährlicher Substanzen und meidet die wachsende
Deponiemüllnutzung.
Für weitere Informationen kontaktieren Sie bitte Ihre Kommune oder
den Verkäufer bei welchem Sie das Produkt erstanden haben.
RoHS KONFORM & CE KENNZEICHNUNG
Dieses Produkt wurde entsprechend internationaler Richtlinien zur
Begrenzung gefährlicher Substanzen (RoHs) und europäischen
Anforderungen entwickelt und gestest und trägt die CE Kennzeichnung.
SICHERHEITSHINWEISE
• Benutzen Sie dieses Radio nicht in der Nähe von Wasser.
• Entfernen Sie keine Schrauben oder Gehäuseteile.
• Nutzen Sie nur das beigefügte Netzanschlussgerät.
• Verhindern Sie, das kleine Objekte oder Flüssigkeiten in das Gerät
gelangen.
ISO 7000-0434
URHEBERRECHT UN
DANKSAGUNGEN
Copyright 2011 Revo Technologies Ltd. Alle Rechte vorbehalten.
Es ist nicht erlaubt, Teile dieser Veröffentlichung ohne vorherige
Erlaubnis durch Revo Technologies Limited in jedweder Form
oder durch jedwede Mittel, seien diese elektronisch, mechanisch,
magnetisch, manuell oder noch andere, zu kopieren, zu verteilen, zu
vermitteln oder umzuschreiben.
REVO und HERITAGE sind Handelsmarken oder eingetragene
Warenzeichen von
Revo Technologies Ltd. iPod ist eine Handelsmarke der Apple Inc.,
registriert in den U.S.A. und anderen Ländern.
Revo Technologies Ltd
The Inox Building, Caldwellside, Lanark,
Scotland, United Kingdom, ML11 7SR
Tel: 01555 66 61 61 Int. Tel: +44 1555 66 61 61
Fax: 01555 66 33 44 Int. Fax: +44 1555 66 33 44
Email: [email protected] Webseite: www.revo.co.uk
HAFTUNGSAUSSCHLUSS
Revo Technologies Limited gibt keine Garantie und ist nicht
repräsentativ haftbar für die Inhalte dieser Veröffentlichung und
lehnt jedwede implizierte Mängelgewährleistung klar ab. Revo
Technologies Limited behält sich weiterhin das Recht vor, von Zeit zu
Zeit und ohne Personen oder Organisationen informieren zu müssen,
Änderungen an dieser Veröffentlichung vorzunehmen.
46
Page 47

INHALT
46 Technische Hilfe
46 Umweltinformationen
46 Garantie
46 Urheberrecht und Danksagungen
46 Haftungsausschluss
47 Willkommen / Übersicht / Auspacken
48 Anatomie
49 Fernbedienung
50 Stromzufuhr
50 Aufbau
51 Heritage Bedienung / Menüstruktur
52 - 53 DAB Modus
54 - 55 DAB Modus Menüoptionen
56 FM Modus
57 FM Modus / AUX-IN Modus
58 - 60 iPod Modus
61- 66 Internetradiomodus
67 Internetradioportal
68 - 69 Einstellen eines Musikservers
70 - 72 Abspielmodus
73 - 75 Last.fm Modus
76 - 77 Wecker
78 - 82 Systemeinstellungen
83 - 84 Problemlösungen
85 Fehlermeldungen
86 Notizen
WILLKOMMEN
Wir danken Ihnen, dass Sie sich zum Kauf dieses Heritage Radios
entschieden haben und wir sind sicher, dass es Ihnen viele
Jahre lang Freude und verlässliche Dienste geben wird. Diese
Bedienungsanleitung wurde entwickelt, um Ihnen eine schnelle
Inbetriebnahme Ihres Radios zu ermöglichen und Sie mit den
komplexeren Eigenschaften dieses Produktes vertraut zu machen.
Weiterhin bietet sie Ihnen Information zu Sicherheitsfragen,
Garantiedetails und Problemlösungen
HERITAGE ÜBERSICHT
Heritage ist die moderne Neuinterpretation des klassischen,
europäischen Tischradios aus den 60er Jahren. Ein Multi-FormatDigitalradio, das Radiostandards wie DAB, DAB+, UKW und Wi-FiInternetradio unterstützt, aber auch kabelloses Streaming Audio bietet
und als iPod- und iPhone-Dockingstation eingesetzt werden kann.
Heritage wurde aus hochwertigsten Materialien und Bauelementen
gefertigt. Sein Gehäuse ist eine Kombination aus Aluminium und
hochwertigem amerikanischem Walnussholz. Die Audioleistung wird
von einem anwendungsspezifi schen 3”-Neodym-Lautsprechertreiber
geliefert, der durch einen 7W-Verstärker angetrieben wird. Schließlich
profi tiert Heritage von einem großen, grafi schen OLED-Display und
einem intuitiven Steuersystem.
DAS AUSPACKEN VON
HERITAGE
Entnehmen Sie Heritage vorsichtig aus der Verpackung bevor Sie alle
weiteren Artikel aus der Box nehmen.
Die Verpackung sollte folgendes enthalten:
• Heritage Radio
• Fernbedienung
• Adapter Set zum Andocken Ihres iPod/iPhone
• Multinetzadapter zur Nutzung in verschiedenen
Ländern (UK, Euro, USA)
• Bedienungsanleitung
Sollte irgendein Artikelfehler oder beschädigt sein, wenden Sie sich bitte
an Ihren Verkäufer oder rufen Sie Revo direkt an +44 (0) 1555 66 61 61
HINWEIS:
Die Verpackung Ihres Heritage sollte für zukünftige Nutzung
zurückgelegt werden. Sie ist der sicherste Weg, das Produkt bei Bedarf
zu transportieren.
47
Page 48
HERITAGE ANATOMIE
Zurück
Cursorsteuerung
iPod Videoausgang
Abspielen/
Vorwärts
Feedback
Bildschirm
Modus
Pause
Menü
Antenne
Info
Alarm
Voreingestellte Sender 1 - 5
Snooze/Schlafleis te
iPod/iPhone Dock
Lautstärke
An/Aus/Standby
48
Stereo RCA Anschlüsse
DC Stromanschluss
LAN Anschluss
Aux-In
3.5 Kopfhöreranschluss
Digitalausgang (optisch)
Page 49
FERNBEDIENUNG
01 - Modus
02 - Hochrollen
03 - Menü
04 - An/Aus
05 - Zurück
06 - Auswahl
07 - Vorwärts
08 - Lautstärke steigern
09 - Info
10 - Herunterrollen
11 - Alarm
12 - Lautstärke verringern
13 - Voreingestellte Sender 1- 10
14 - Schlaf
15 - Snooze
16 - Zurückspulen
17 - Abspielen/Pause
18 - Vorspulen
19 - Feedback (Love/Ban)
BATTERIEWECHSEL
1
2
5
6
9
10
13
14
16
17
3
4
7
8
12
11
15
19
18
1
Die Heritage Fernbedienung wird durch eine einzelne 3V Lithium
batterie betrieben. Abhängig vom Gebrauch hält die Batterie gut
1-2 Jahre.
Wechseln Sie die Batterie wenn das Aufforderungen durch Drücken
der Knöpfe schleppend ausgeführt werden oder wenn der
Betriebsbereich bedeutend geschrumpft zu sein scheint.
Tauschen Sie die Batterie mit einer neuen CR2025 Lithiumbatterie aus.
2
49
Page 50
STROMZUFUHR (PSU)
PUSH
Ihr Heritage Radio ist mit einem Mehrregionenadapter ausgestattet.
Es kann somit in verschiedenen Ländern in der ganzen Welt problemlos genutzt werden.
Wählen Sie einfach den korrekten Adapter für Ihr Land und folgen Sie
den unten angezeigten Anweisungen.
UK EURO U.S.A
AUFBAU
Nutzen Sie den beigefügten Netzadapter und verbinden Sie das eine Ende mit dem
1
DC Stromanschluss auf der hinteren Seite von Heritage und das andere mit einer
normalen Wandsteckdose.
2
Ziehen Sie die Antenne für DAB und FM
Betrieb voll aus.
50
3
Drücken Sie den Knopf An/Aus einmal, um den
Initialisierungsprozess zu starten.
Page 51
BEDIENEN IHRES HERITAGE RADIOS
‘ HOCH’
‘RUNTER’
‘LINKS’
(ZURÜCK)
‘RECHTS’
(VORWÄRTS)
SELECT
‘DRÜCKEN’
(ZUR AUSWAHL)
JOYSTICK
Zur optimalen Nutzung Ihres Radios ist es wichtig, dass Sie verstehen,
wie sein Steuer- und Menüsystem arbeitet.
CURSORKONTROLLE
Zur einfachen Handhabung verwendet Ihr Radio ein Steuersystem, das mit
einem Cursor arbeitet. Die Cursorsteuerung hat die folgenden fünf Funktionen:
HOCH Rollt Hoch
RUNTER Rollt Herunter
LINKS Rollt nach links und geht in Menüs zurück
RECHTS Rollt nach rechts und geht in Menüs vorwärts
DRÜCKEN Wählt gegenwärtige Option
DIE MENÜTASTE
Drücken der Menütaste ruft das Modusmenü für den
Operationsmodus auf, in welchem Sie sich gerade befi nden. Drücken
Sie die Menütaste zum Beispiel im DAB Modus, wird das DAB
Modusmenü aufgerufen. Ein zweites drücken der Menütaste
bringt Sie zurück zum vorherigen ‚Abspielbildschirm‘.
DIE MODUSTASTE
Drücken der MODUS Taste ruft einen sequenziellen Ablauf durch
alle Heritage Operationsmodi auf. Es ist auch möglich, mit Hilfe des
HAUPTMENÜS (siehe unten) durch die Operationsmodi zu wechseln.
DIE MENÜSTRUKTUR ERKLÄRT
HAUPTMENÜ
Dies ist das prinzipielle (auf höchster Ebene) Heritage Menü, es
ermöglicht Ihnen das Betreten verschiedener Operationsmodi, das
Ändern von Einstellungen und das Ansehen von Informationen wie
die ID Nummer und die Softwareversion Ihres Radios.
Das Hauptmenü ermöglicht Zugang zu den folgenden Modi und
Untermenüs:
• Internetradio • iPod
• Musik abspielen • Kopfhöhrereingang
• Last.fm • Alarm und Weckfunktionen
• DAB Radio • Systemeinstellungen
• FM Radio
MODUSMENÜS
Die Modusmenüs erhalten Ihren Namen von der Tatsache, dass Sie
die zugänglichen Funktionen in einem gegenwärtig ausgewählten
Modus anzeigen.
Drücken der Menütaste wird Ihnen zu jeder Zeit in das Modus-
menü desjenigen Modus aufrufen, welchen Ihr Radio gegenwärtig
nutzt.
Jedes Modusmenü beinhaltet auch den Listenpunkt HAUPTMENÜ,
mit welchem Sie in dieses zurückkehren.
51
Page 52
DAB RADIOMODUS
DAB BEDIENUNG VORBEREITEN
Bitte stellen Sie sicher, dass die Radioantenne ausgezogen ist, bevor
Sie die Benutzung im DAB Modus beginnen.
Um den DAB MODUS zu betreten, drücken Sie die Modustaste
bis der Einführungsbildschirm des DAB MODUS angezeigt wird. Alternativ können Sie auch die Menütaste drücken, das HAUPTMENÜ
betreten und in diesem DAB aus der Optionsliste wählen.
Beim Einschalten führt Heritage automatisch einen Vollscan der
verfügbaren Sender durch und speichert diese dann in alfabetischer
Reihenfolge.
Es kann nötig sein, von Zeit zu Zeit eine manuelle Suchabfrage durchzuführen, um die Senderliste Ihres Radios aktuell zu halten. Dies kann
in den folgenden Situationen möglich sein:
1. Die Verfügbarkeit eines Senders kann sich ändern, da neue Sender
entstehen oder existierende Sender abgeschafft werden.
2. Ist während des anfänglichen automatischen Vollscans der
Empfang schlecht, weil z.B. die Radioantenne nicht komplett
ausgezogen war, kann die Senderliste inkomplett oder sogar leer sein.
3. Sollte bestimmte Sender eine schlechte Empfangsqualität aufweisen (beschädigte oder schlechter Audioqualität), wollen Sie vielleicht
nur Sender speichern, welche ein starkes Empfangssignal haben..
Um eine manuelle Suchabfrage zu beginnen, drücken Sie die
Menütaste und wählen Sie VOLLSCAN aus der Menüliste.
Um nur nach Sendern zu suchen , welche eine starkes Empfangssignal aufweisen, drücken Sie LOKALE SUCHABFRAGE in der Menüliste.
Scanning
Stations : 21
Scanning
DAB
radio
Ist die Suchabfrage vollständig durchgeführt, listet Ihr Radio alle
verfügbaren Sender auf.
Um aufgelistete aber nicht verfügbare Sender zu löschen, drücken
Sie die Menütaste. Dann wählen Sie UNGÜLTIGE AUSSCHNEIDEN
und beantworten Sie „Wollen Sie alle ungültigen Sender löschen“
mit Ja.
52
Prune Invalid
This removes all invalid
stations, continue?
YES NO
Page 53

DAB RADIOMODUS
SENDERAUSWAHL
Um zu Ihrer Radiosenderliste zu gelangen, können Sie jederzeit
UP, DOWN oder LEFT auf der Cursorsteuerung drücken. Alternativ
drücken Sie und wählen dann STATION LIST aus.
Scrollen Sie durch die verfügbaren Sender, indem Sie UP und DOWN
auf der Cursorsteuerung drücken. Dann drücken Sie entweder die
Auswahltaste oder RIGHT, um Ihre Senderauswahl zu treffen.
VOREINSTELLEN BEVORZUGTER SENDER
Heritage gibt Ihnen die Möglichkeit, Ihre Lieblingssender voreinzustellen. Dies ist entweder über die 5 Schnelltasten auf der Vorderseite
des Gerätes möglich, oder Sie benutzen die 10 Schnelltasten auf der
Heritage Fernbedienung.
Um den Sender, welchen Sie gegenwärtig anhören als vorreingestellt
zu speicher, drücken und halten Sie einfach eine der Schnelltasten
bis „Voreinstellung gespeichert“ auf dem Bildschirm angezeigt wird.
Die dem voreingestellten Sender zugeordnete Nummer wird auf dem
unteren Rand des Bildschirms angezeigt.
Sollten Sie zu einem späteren Zeitpunkt einen bestimmten voreingestellten Sender ändern wollen, wiederholen Sie einfach den oben
erläuterten Ablauf und der vorher eingestellte Sender wird automatisch gelöscht.
Station list
Absolute
Amazing
BBC 1Xtr
BBC 6Mus
BBC Gael
BBC Radio 6Music
u to vote for a track that
missed out on the 6:00 AM
Music playlist
53
Page 54
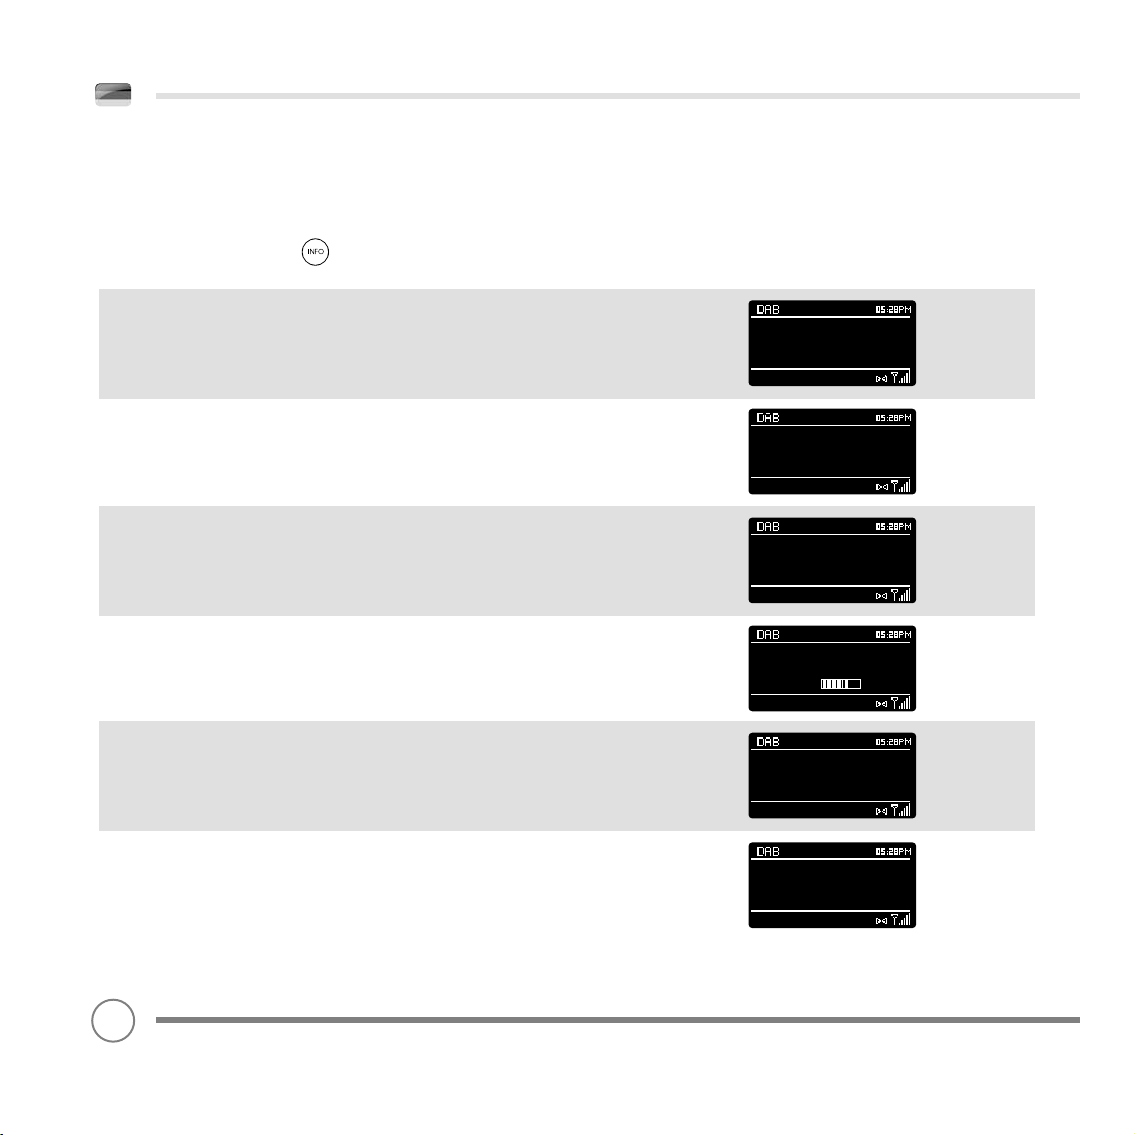
DAB MODUS MENÜOPTIONEN
SENDERINFORMATIONEN
Im DAB MODUS kann Heritage verschiedene Informationen auf seinem Bildschirm
anzeigen. Durch drücken der Infotaste können Sie in Reihenfolge durch die
folgenden Informationen wechseln:
STANDARD DAB ANZEIGE Zeigt Rolltextinformationen der Sendeanstalt
PROGRAMMTYP Zum Beispiel News, Rock Music, Klassisch etc.
MULTIPLEX UND FREQUENZ Multiplex Besitzer und Sendefrequenz
SIGNALSTÄRKE Gegenwärtige Signalstärke
BBC Radio 6Music
Now Playing : Glasvegas
Go Square Go!
BBC Radio 6Music
Rock Music
BBC Radio 6Music
BBC National DAB
Freq: 225.648 MHz
BBC Radio 6Music
Signal Level : 90
Strength
BITRATE UND CODEC Audioformat, Abtastrate, Mono oder Stereo
DATUM Heutiges Datum
54
BBC Radio 6Music
Bit rate: 128 kbps
Codec : MP2
Channels : Joint Stereo
BBC Radio 6Music
Today’s Date :
22/12/09
Page 55
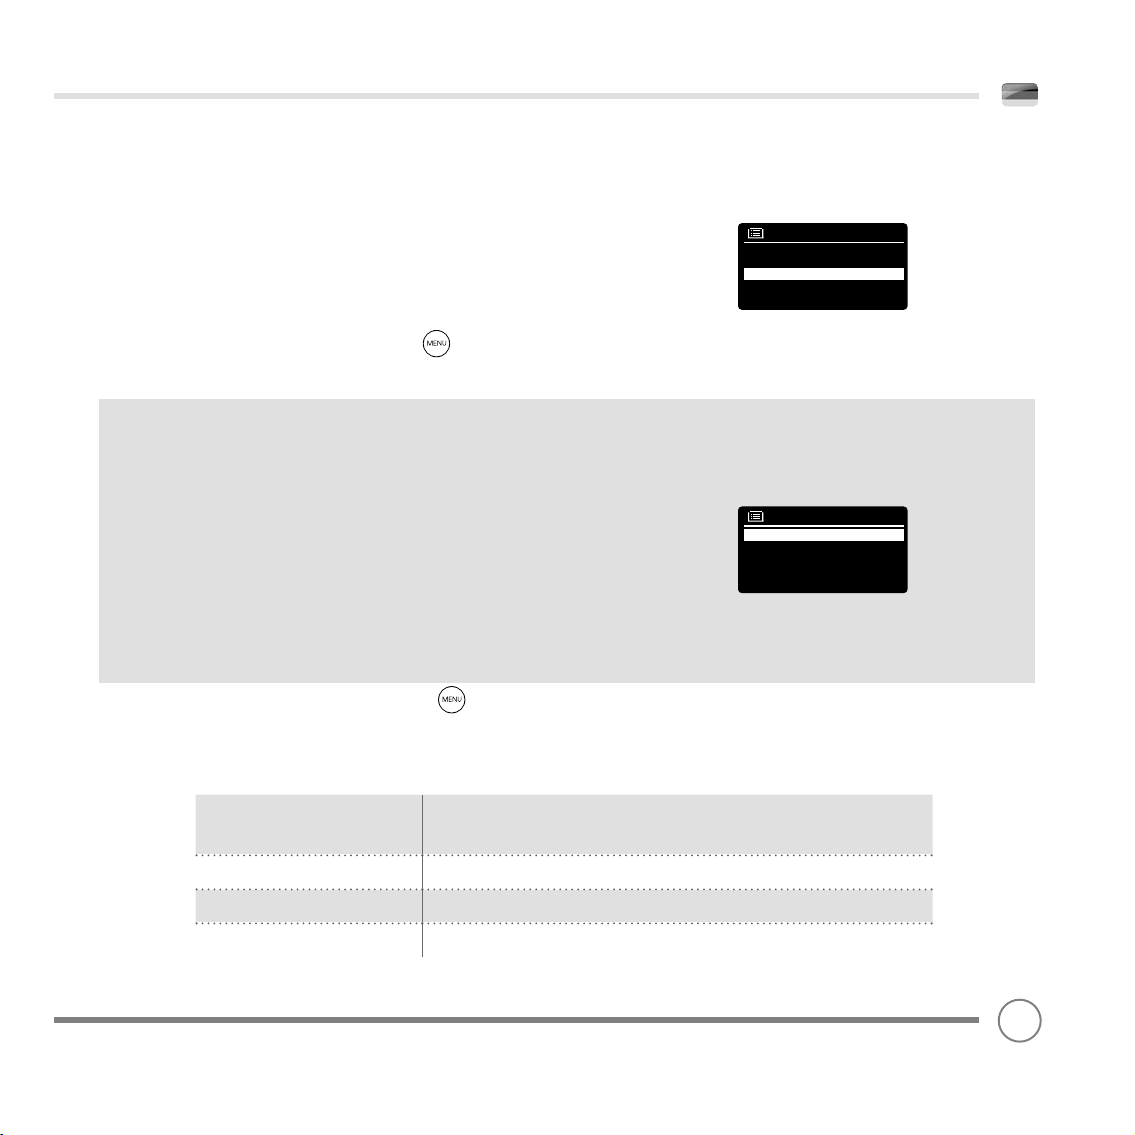
DAB MODUS MENÜOPTIONEN
Kompression des Lautstärkeumfangs (Dynamic Range Controll)
Wenn Sie Musik mit einem hohen Lautstärkeumfang in einer geräuschvollen Umgebung hören (z.B. klassische Musik beim Kochen),
kann es sein dass Sie wünschen, den Lautstärkeumfang der Musik zu
komprimieren. Dies hat den Effekt, dass leise Töne lauter
wiedergegeben werden und laute Töne leiser klingen.
Um die DRC Einstellung zu ändern, drücken Sie die Menütaste
und wählen Sie dann die DRC Option in welcher Sie AUS, NIEDRIG
oder HOCH wählen.
SENDERREIHENFOLGE
Es ist möglich die Reihenfolge, in welcher die DAB Sender angezeigt
werden, entsprechend den folgenden Kriterien zu wählen:
ALPHANUMERISCH, ENSEMBLE oder VERFÜGBAR.
Wie der Name andeutet, listet ALPHANUMERISCH die Sender in
alphanumerischer Reihenfolge auf.
ENSEMBLE listet Sendergruppen auf, welche zusammen von derselben Funkanstalt gesendet werden (z.B. BBC, Central Scotland
Local).
VERFÜGBAR zeigt erst alle verfügbaren in alphanumerischer
Reihenfolge an und listet dann alle nicht verfügbaren Sender auf.
Um die Senderreihenfolge zu ändern, drücken Sie die Menütaste
und wählen Sie dann SENDERREIHENFOLGE. Dort wählen Sie nun
zwischen ALPHANUMERISCH; ENSEMBLE oder VERFÜGBAR.
DRC
DRC Low
DRC High
DRC Off #
Station order
Alphanumeric #
Ensemble
Valid
SENDERREIHENFOLGE BESCHREIBUNG
ALPHANUMERISCH Zeigt alle Sender in alphanumerischer Reihenfolge an.
ENSEMBLE Zeigt verfügbar Sender [welche gegenwärtig senden] vor nicht verfügbaren.
VERFÜGBAR Entfernt inaktive Sender aus der Senderliste.
55
Page 56
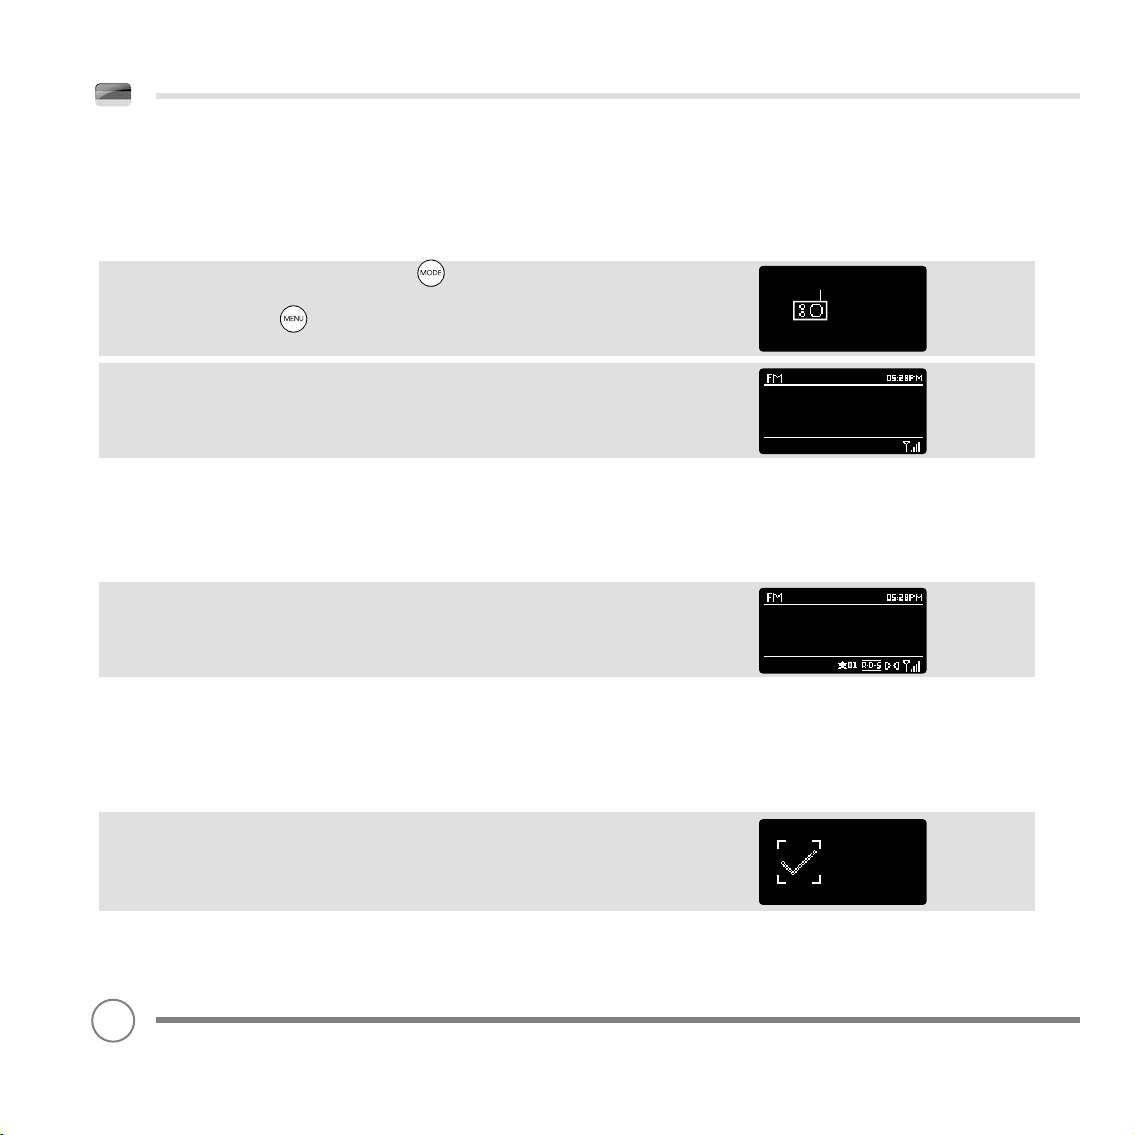
FM RADIOMODUS
FM BEDIENUNG
Bitte stellen Sie sicher, dass die Radioantenne ausgezogen ist, bevor
Sie die Nutzung im FM MODUS beginnen.
Um den DAB MODUS zu betreten, drücken Sie die Modustaste
bis der Einführungsbildschirm des FM MODUS angezeigt wird. Alternativ können Sie auch die Menütaste drücken, das HAUPTMENÜ
betreten und in diesem FM aus der Optionsliste wählen.
FM
radio
Wenn Sie Heritage das erste Mal im FM MODUS benutzen, beginnt
ein Vollscan ab der ersten Frequenzspanne. Ansonsten stellt Heritage
automatisch den Sender ein, welchen Sie zuletzt gehört haben.
Durch Drücken der Auswahltaste startet das Radio den Suchlauf
nach dem nächsten verfügbaren Sender. Heritage unterbricht den
Suchlauf automatisch, wenn ein Sender gefunden wurde.
Zur Feineinstellung verwenden Sie UP oder DOWN auf der Cursorsteuerung, um die Frequenz stufenweise zu ändern.
Wird ein FM Sender wiedergegeben, der ein starkes Sendesignal aufweist und welcher RDS Informationen sendet, zeigt Heritage auf dem
Bildschirm den Sendernamen und andere Textinformationen an.
VOREINSTELLEN BEVORZUGTER SENDER
Heritage gibt Ihnen die Möglichkeit, Ihre Lieblingssender voreinzustellen. Dies ist enweder über die 5 Schnelltasten auf der Vorderseite
des Gerätes möglich, oder Sie benutzen die 10 Schnelltasten auf der
Heritage Fernbedienung.
Um den Sender, welchen Sie gegenwärtig anhören als voreingestellt
zu speichern, drücken und halten Sie einfach eine der Schnelltasten
bis „Voreinstellung gespeichert“ auf dem Bildschirm angezeigt wird.
Die dem voreingestellten Sender zugeordnete Nummer wird auf dem
unteren Rand des Bildschirms angezeigt.
Sollten Sie zu einem späteren Zeitpunkt einen bestimmten voreingestellten Sender ändern wollen, wiederholen Sie einfach den oben
erläuterten Ablauf und der vorher eingestellte Sender wird automatisch gelöscht.
87.50 MHz
BBC R3
Composer of the Week
Coming next - Proms
Chamber Music 2009
Preset stored
56
Page 57
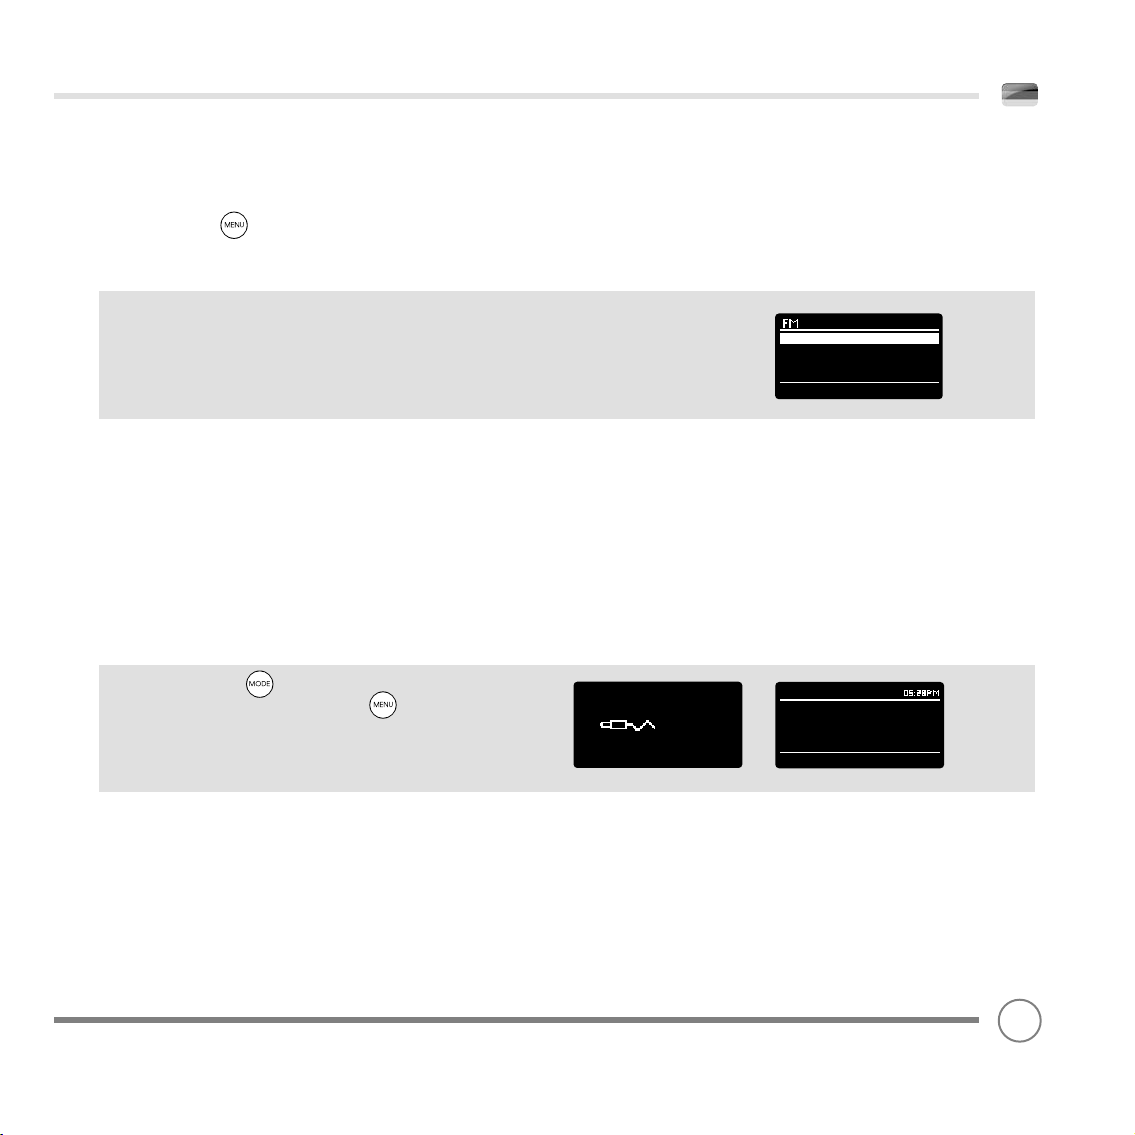
FM RADIOMODUS
FM EINSTELLUNGEN
Drücken Sie die Menütaste, um das FM MODUSMENÜ zu
betreten. Hier können Sie FM Optionen wie SCANEINSTELLUNG und
AUDIOEINSTELLUNG bestimmen.
SCANEINSTELLUNG erlaubt es Ihnen zu entscheiden, ob das Radio
nur dann eine Suchabfrage beenden soll, wenn es einen Sender mit
starkem Signal gefunden hat.
AUDIOEINSTELLUNG gibt Ihnen die Möglichkeit, einen Sender in Mono
anzuhören, sollte die Sendestärke nicht groß genug sein, um einen
Stereoempfang zu ermöglichen.
AUX-IN MODUS
Der AUX-IN MODUS erlaubt Ihnen die Audiowiedergabe von einer
externen Quelle (z.B. MP3 Player) über Ihr Radio.
Um dies zu tun, verbinden Sie die externe Audioquelle mit dem
3.5mm Aux-In Eingang auf der Rückseite Ihres Heritage
Stellen Sie die Lautstärke an Heritage und, wenn möglich, dem
externen Gerät leise.
Scan setting
Audio setting
Main menu >
Drücken Sie nun die Modustaste, bis der Aux-In Bildschirm
angezeigt wird. Alternativ können Sie die Menütaste drücken,
Hauptmenü auswählen und in diesem dann AUX-In wählen.
Passen Sie die Lautstärke von Heritage und, wenn nötig, die des
externen Gerätes entsprechend an.
Aux in
Auxiliary Input
Audio in
Today’s Date :
15/10/09
57
Page 58
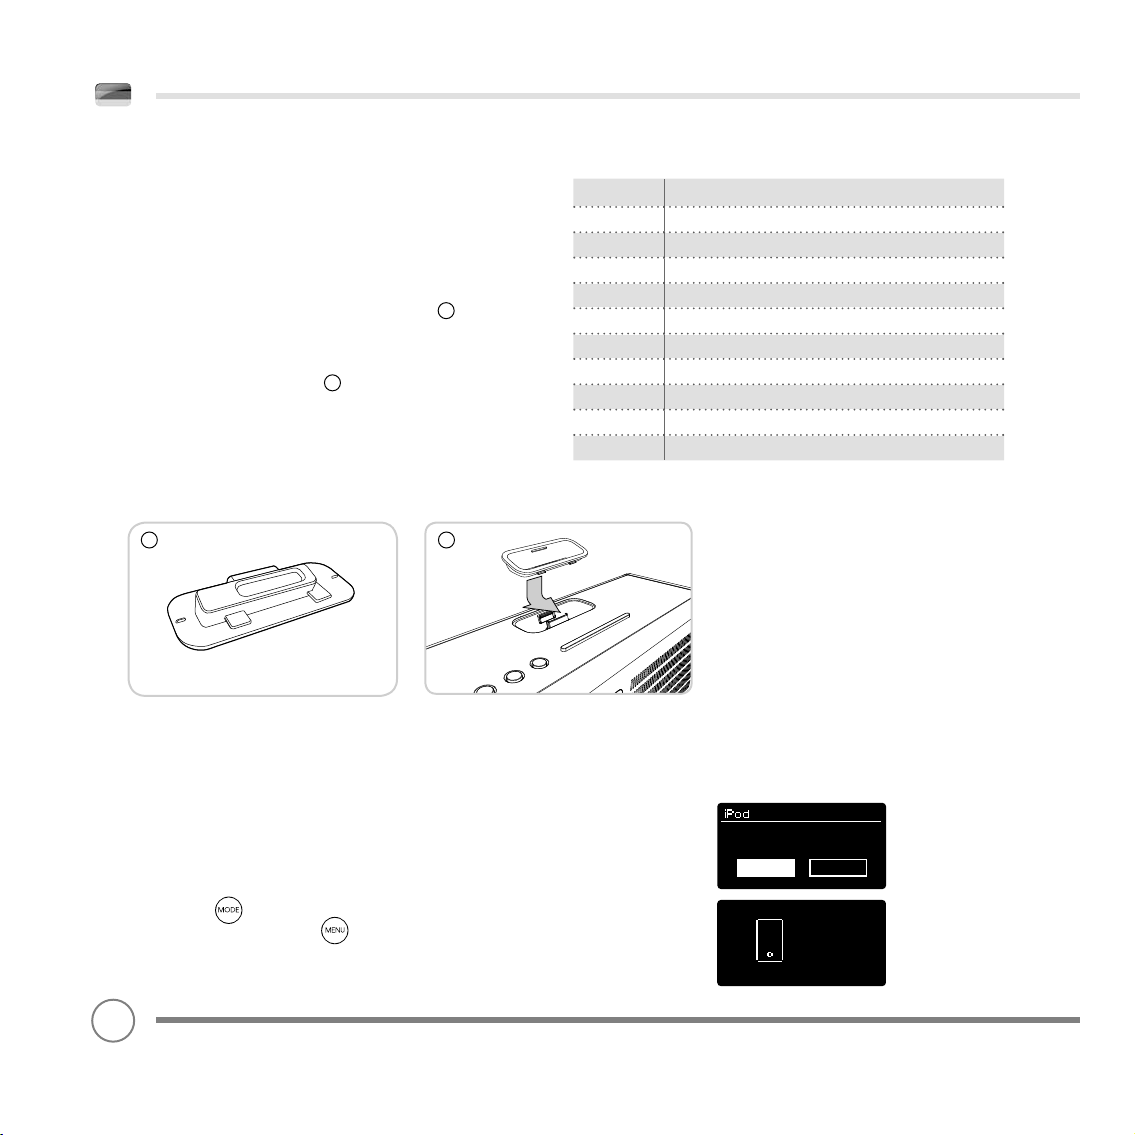
iPod MODUS
19
ANBRINGEN EINES DOCKADAPTERS
Mit dem Heritage wird eine Auswahl an Dock-Adaptern, die für die
meisten iPod-/iPhone-Modelle passen, mitgeliefert.
Wählen Sie den Adapter aus, der mit Ihrem iPod/iPhone kompatibel
ist. Nutzen Sie hierfür die Kompatibilitätstabelle auf der rechten
Seite – jeder Adapter ist nummeriert (Siehe Abbildung unten).
Um den Adapter einzupassen, entfernen Sie die Dock-Staubabdeckung,
bevor Sie den Adapter in die Aussparung, die die Dock-Anschlussstelle
umgibt, einsetzen (siehe Abbildung ). Sollte sich der Dock-Adapter
für Ihr spezielles iPod-/iPhone-Modell nicht unter den Adaptern, die mit
Ihrem Radio mitgeliefert wurden, befi nden, verwenden Sie bitte den
Adapter, der zum Apple-Zubehörset Ihres iPod/iPhone gehört.
1
DEN iPod MODUS BETRETEN
2
1
2
Adaptor No. iPod Model
9 iPod classic 80GB
10 iPod classic 120GB
12 iPhone
13 iPod nano (3rd generation)
15 iPhone 3G
16 iPod touch (2nd and 3rd generation)
17 iPod nano (4th generation)
18 iPod nano (5th generation)
19 iPhone 4
20 iPod touch (4th generation)
Schließen Sie Ihren iPod / Ihr iPhone an die Dock-Anschlussstelle an.
Ihr Heritage-Radio wird Sie automatisch fragen, ob Sie auf den iPodModus umschalten wollen. Unter Zuhilfenahme der Cursorsteuerung
wählen Sie bitte YES oder NO aus.
Wenn ein iPod/iPhone bereits an Ihr Heritage-Radio angeschlossen
ist, drücken Sie bis der iPod MODE auf dem Intro-Bildschirm
angezeigt wird, oder drücken Sie und wählen Sie MAIN MENU
und anschließend iPod aus.
iPod attached -
switch to iPod mode?
YES NO
iPod
58
Page 59
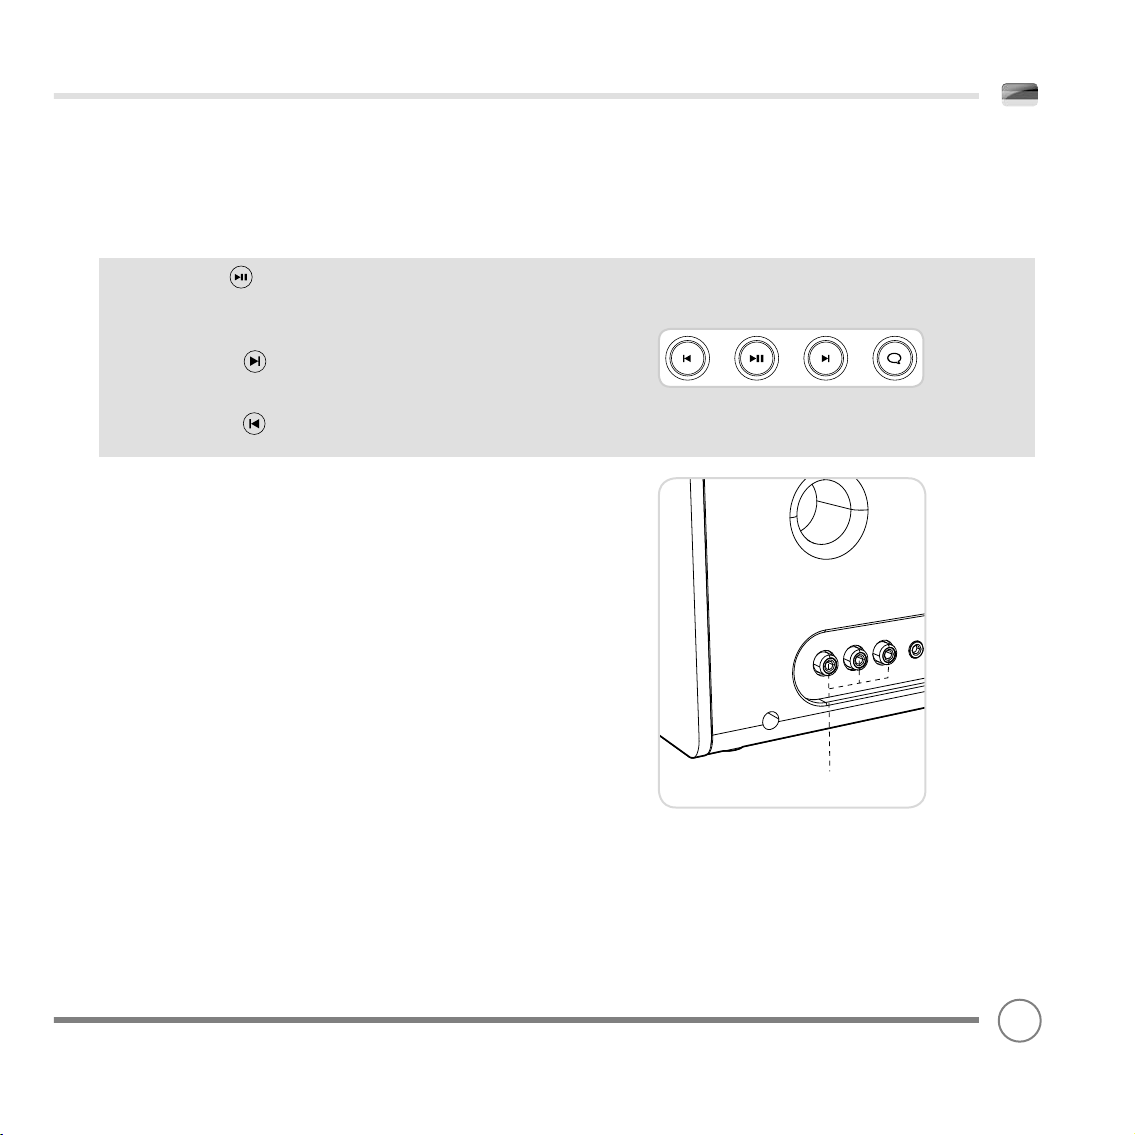
iPod MODUS
Gemischter Videoausgang
KONTROLLE UND WIEDERGABE
Die grundlegenden Kontrollfunktionen können mit den Kontrolltasten
auf der Oberseite Ihres Heritage durchgeführt werden.
Das Drücken von startet den gegenwärtig ausgewählten Titel.
Drücken Sie diese Taste während ein Titel abgespielt wird, halten Sie
diesen an.
Durch Drücken von springen Sie zum nächsten Titel. Durch
Drücken und Halten dieser Taste, spulen Sie schnell vor.
Durch Drücken von springen Sie zum vorherigen Titel. Durch
Drücken und Halten dieser Taste, spulen Sie schnell zurück.
Alternativ können Sie Ihren iPod / Ihr iPhone unter Zuhilfenahme der
Heritage-Fernbedienung, die eine erweiterte Steuerung des Menüs
usw. bietet, bedienen.
Schließlich ist es möglich, den iPod / das iPhone mit Hilfe der Bedienelemente auf dem iPod/iPhone zu bedienen.
VIDEO
Heritage ist mit einem Satz Composite Video-Ausgangssteckern ausgestattet, durch die es möglich ist, iPod/iPhone Filme, Diashows usw.
auf Ihrem Fernseher anzusehen, alles direkt von Ihrem Radio aus.
Um diese Funktionalität zu nutzen, gehen Sie zu SETTINGS auf Ihrem
iPod/iPhone, wählen Sie dann VIDEO und schalten Sie anschließend
von TV OUT auf ON um. Stellen das TV SIGNAL nun entweder auf
PAL oder NTSC ein. Dies hängt davon ab, welche Fernsehnorm Ihr
Fernsehgerät verwendet.
Sollte der Kauf eines Composite Video-Kabels notwendig werden,
können Sie dieses direkt beim Apple Store erwerben.
59
Page 60

iPod MODUS
ABSPIELINFORMATION
Wird ein iPod mit dem Radio verbunden und der Erkennungssprozess ist abgeschlossen, zeigt Ihr Radiobildschirm den Künstlernamen und die Titelinformationen für den
wiedergegebenen Titel an (gesetzt dem Fall, diese Informationen sind auf Ihrem iPod
gespeichert).
Heritage ist es möglich, verschiedene Informationen über den gegenwärtig wiedergegebenen Titel und den verbundenen iPod anzuzeigen. Durch Drücken der
Infotaste ist es möglich, in Reihenfolge durch die folgenden Informationen zu wechseln
STANDARBILDSCHIRM Zeigt Titelname und Künstler
VERBUNDENER iPod TYP Zeigt das Model des verbundenen iPods
ERKENNUNGSSTATUS Zeigt an, ob die Erkennung erfolgreich war.
TITELLÄNGE Zeigt die Titellänge und den gegenwärtigen Abspielstatus
ALBUMTITEL Gibt den Albumtitel wieder (wenn verfügbar)
DATUM Heutiges Datum
As you Are
Travis
As you Are
iPod touch
As you Are
iPod touch
Authentication:
Success
As you Are
3:54 4:14
As you Are
The Man Who
As you Are
Today’s Date:
14/10/09
60
Page 61
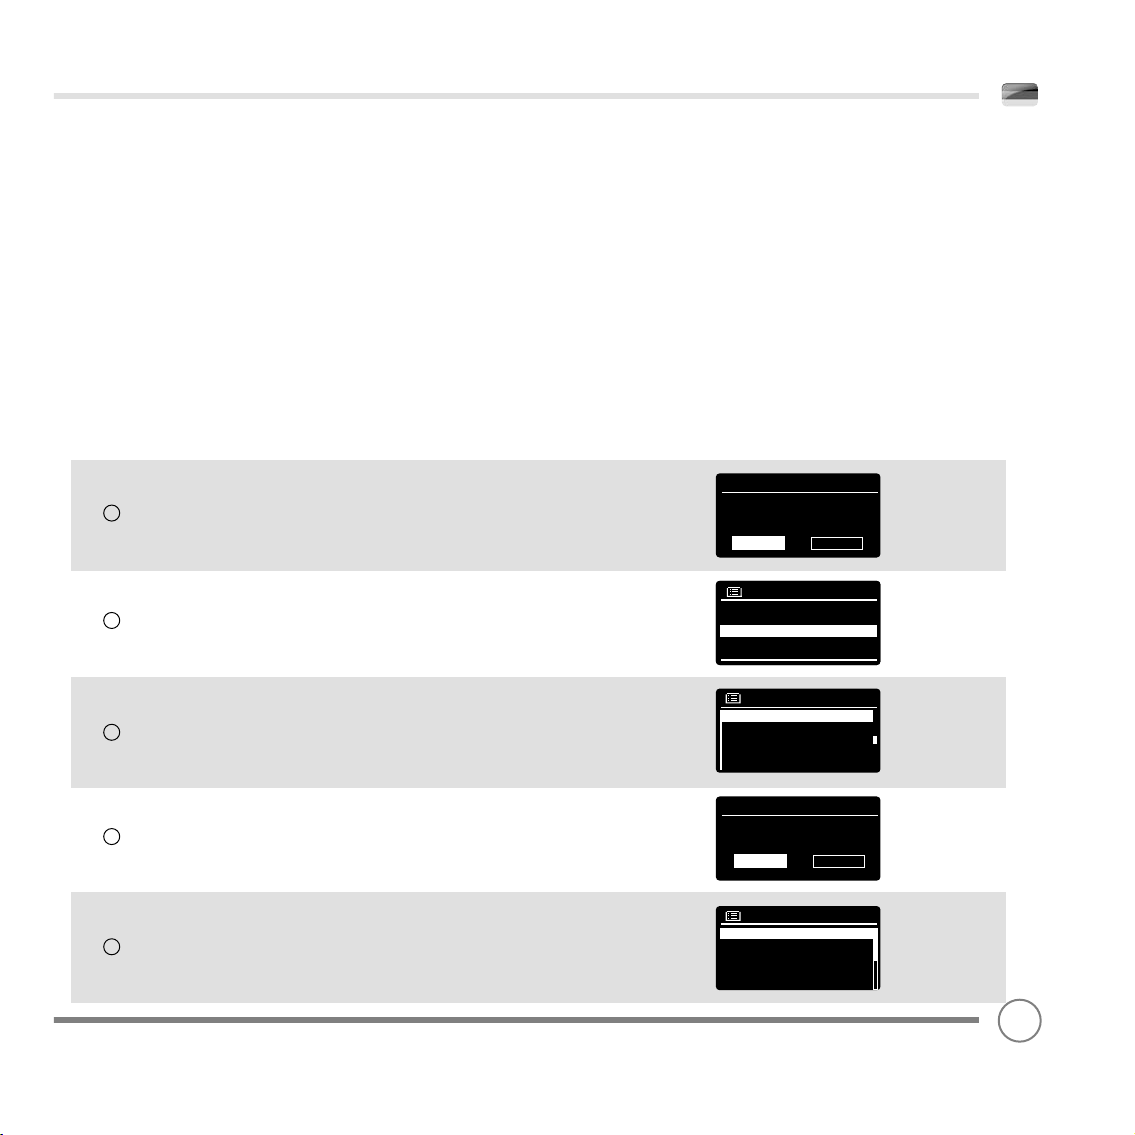
INTERNETEINSTELLUNGEN
VERWENDEN DES INTERNETRADIO-INSTALlATIONSASSISTENTEN
Wenn Sie zum ersten Mal Ihr Heritage-Radio im INTERNET RADIO MODE
verwenden wollen, werden Sie gefragt, ob Sie den SETUP WIZARD
(Installationsassistenten) starten wollen. Der ‘WIZARD’ wird Sie durch
eine Reihe von Fragen leiten. Dies ist der einfachste Weg, Zugang zum
Internetradio zu bekommen und es auf Ihrem Gerät laufen zu lassen.
Sie können den SETUP WIZARD jederzeit erneut starten. Sie können
ihn unter der Überschrift NETWORK im SYSTEM SETTINGS MENU fi nden.
Um Ihr Radio mit Hilfe des INTERNET WIZARD für den Online-Betrieb
einzurichten, müssen Sie die folgenden Schritte durchführen:
Drücken Sie die Auswahltaste, um YES auszuwählen und den SETUP
WIZARD Vorgang zu starten
1
Wählen und bestätigen Sie Ihr bevorzugtes Stundenformat (12 oder 24).
2
Wählen und bestätigen UPDATE AUS DEM NETZWERK.
Scrollen Sie im Menü durch die Zeitzonen und bestätigen Sie Ihre lokale Zeitzone.
3
Date/Time
12/24 hour format
12 24
Auto update
Update from DAB
Update from FM
Update from Network *
No update
Set Timezone
UTC + 00 : 00 : Dublin , London#
UTC + 00 : 30 :
UTC + 01 : 00 : Madrid , Ar
UTC + 01 : 30 :
UTC + 02 : 00 : Athens , Ci
*
4
Wählen und bestätigen Ihren bevorzugten Zeitumstellungsstatus.
Scrollen Sie durch die Regionen und wählen Sie Ihre Wlan-Region
5
Daylight savings
Daylight savings
YES NO
Wlan region
Most of Europe
USA
Canada
Spain
France
61
Page 62
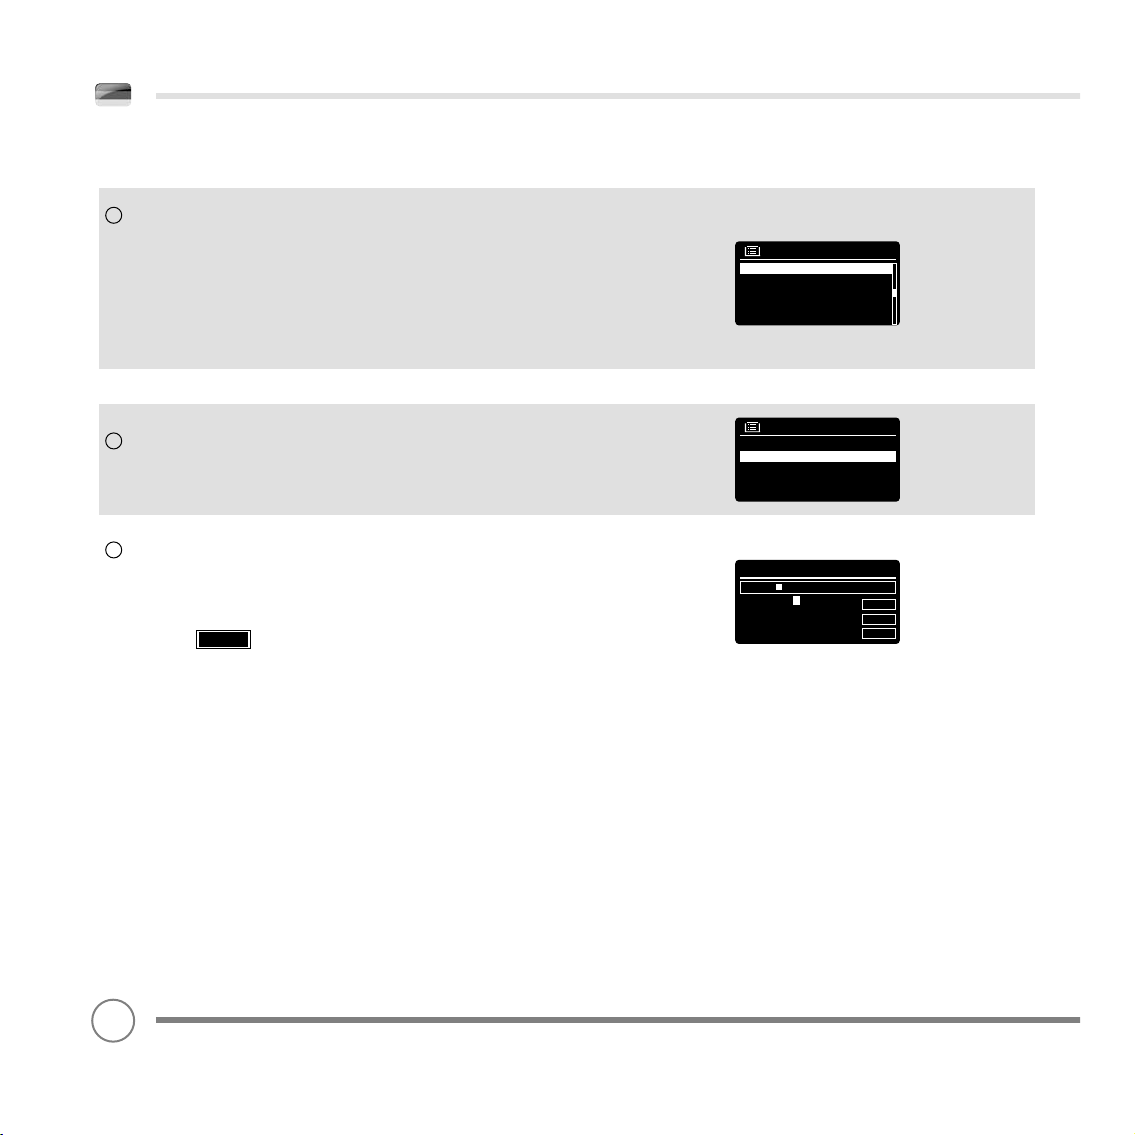
INTERNETEINSTELLUNGEN
Scrollen Sie durch die Möglichkeiten und wählen Sie Ihr NETZWERK. In
6
einigen Fällen kann es sein, dass Ihr Radio nicht mehr als ein Netzwerk
fi ndet. Wählen Sie einfach das Netzwerk, welches Sie bevorzugen.
KABELVERBINDUNGEN
Sollten Sie Ihr Radio über eine Kabelverbindung nutzen wollen,
wählen Sie einfach KABEL aus der SSID Liste.
SSID
Homehub
FAMILY net
[Rescan]
[Wired]
[Manual config]
Ist Ihr kabelloses Netzwerk nicht mit einem Passwort geschützt, wird
7
Heritage sich automatisch mit diesem verbinden und den folgenden
Bildschirm anzeigen:
Wenn Sie einen Passwort-Schutz verwenden, geben Sie Ihr Netzwerk-
8
Passwort ein, indem Sie mit der Cursorsteuerung durch die alphanummerischen Zeichen scrollen und diese auswählen. Wenn Sie Ihr
Passwort korrekt eingegeben haben, drücken Sie OK.
Wählen Sie (Zurück), sollten Sie ein inkorrektes Zeichen
BKSP
eingegeben haben.
Heritage wird das Passwort speichern. Es wird nicht nötig sein, das
Passwort erneut einzugeben.
Internet Radio
Last Listened
Station List >
Main Menu >
Key:
xxxxx
0 1 2 3 4 5 6 7 8 9 . , a b
c d e f g h i j k l m n o p q
r s t u v w x y z A B C D E
F G H I J K L M N O P Q
BKSP
OK
CANCEL
62
Page 63
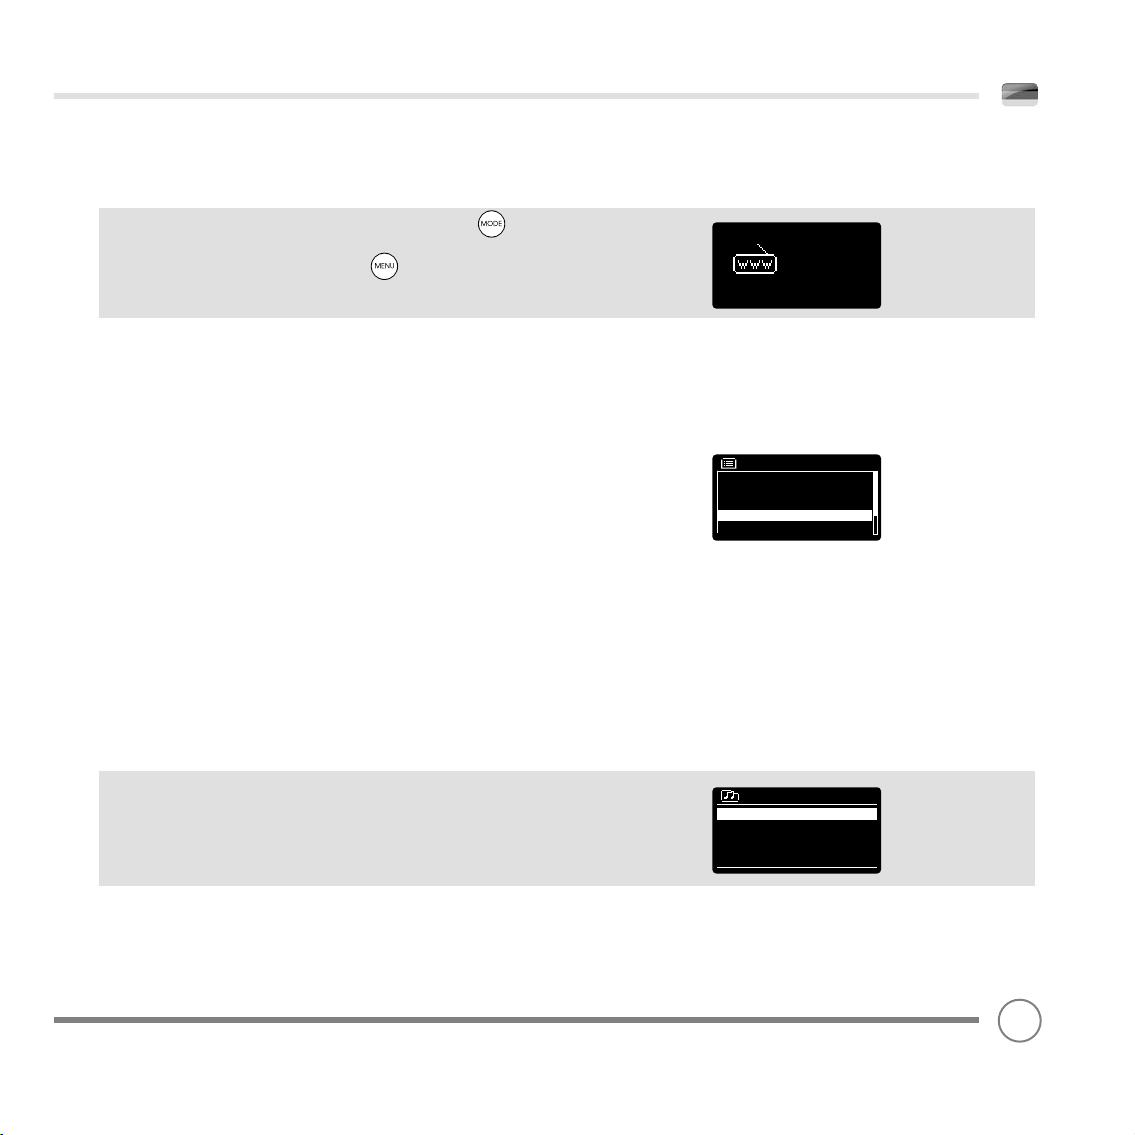
INTERNETRADIOMODUS
VORBEREITUNG
Um den INTERNETRADIOMODUS zu betreten, drücken Sie die
Modustaste bis INTERNETRADIOMODUS auf dem Bildschirm
angezeigt wird. Alternativ drücken Sie die Menütaste, wählen
Sie HAUPTMENÜ und wählen Sie dann INTERNETRADIO aus der Liste
der Menüoptionen.
Das INTERNETRADIOMENÜ beinhaltet die folgenden Optionen:
Meine Favoriten: Ermöglicht es Ihnen, durch Ihre Lieblingssender zu
navigieren. Diese können durch einen Besuch des Frontier Silicon
Radioportals (mit Hilfe Ihres PCs oder Macs) eingestellt werden.
Vergleichen Sie Seite 23 für weitere Informationen.
Lokal: Eine verständliche Liste aller in Ihrem Gebiet (oder Land)
gesendeten Sender.
BBC: Eine Abkürzung für alle weltweit gesendeten BBC Sender.
Sender: Finden Sie Sender mit Hilfe einer Reihe von Suchkriterien wie
z.B.: Lage, Genre, Beliebtheitsgrad etc.
Podcasts: Finden Sie Podcasts oder Sendungen zum ‘Erneut Anhören’
über Lage, Genre oder namentliche Suche.
Meine gespeicherten Sender: Zeigt Sender die Sie persönlich mit
Hilfe des Frontier Silicon Radioportals zur Senderliste Ihres Radios
hinzugefügt haben. Vergleichen Sie S. 23 für Details.
Internet
radio
Internet radio
My Favourites >
Local United Kingdom >
BBC >
Stations >
Podcasts >
Hilfe: Hier fi nden Sie den ZUGANGSCODE Ihres Radios. Dieser ist nötig,
um das Frontier Silicon Radioportal zu betreten. Vgl. S. 23.
EINENSENDER AUSWÄHLEN
To choose a station, select STATION LIST from the INTERNET RADIO
MENU, then select STATIONS using the cursor control.
Sie haben nun die Möglichkeit, einen Sender mit Hilfe der folgenden
Suchkriterien zu wählen oder zu fi nden:
LAGE (Ursprungsland) GENRE
SENDERSUCHE (nach Name) BELIEBTE SENDER NEUE SENDER
Stations
Location >
Genre >
Search Stations
Popular Stations >
New Stations >
63
Page 64
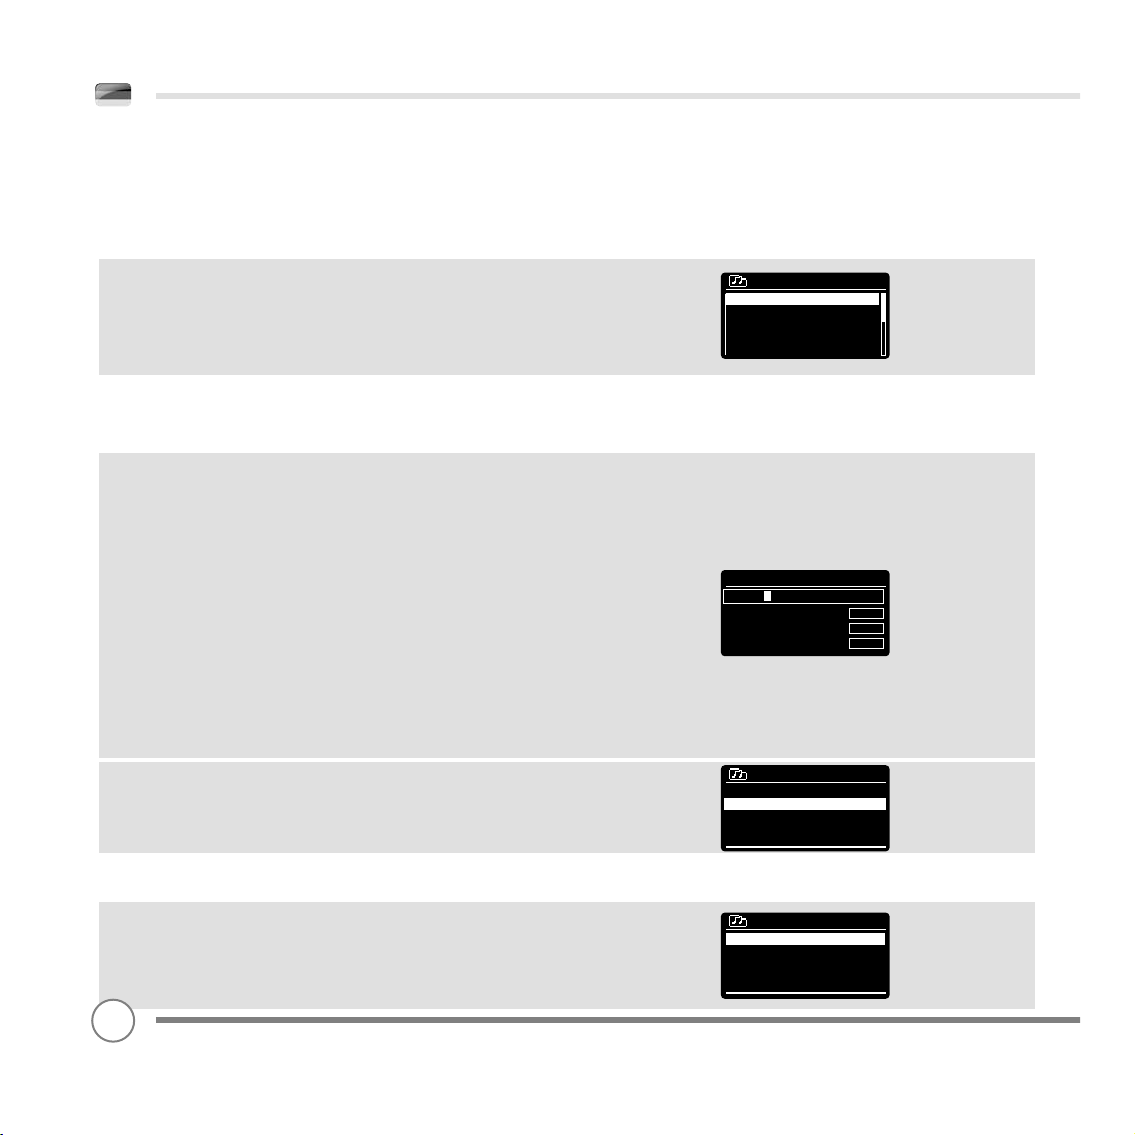
INTERNETRADIOMODUS
EINEN SENDER AUSWÄHLEN (Fortsetzung)
Mit Hilfe des cursor, scrollen Sie nun durch die Optionen. Drücken Sie
den cursor um Ihr gewünschtes Suchkriterium auszuwählen.
Wenn Sie beispielsweise LOCATION auswählen, erscheint eine
alphabetische Liste der Kontinente/Regionen und dann eine Liste
der Länder. Verwenden Sie die Cursorsteuerung, um durch die Liste
zu scrollen und drücken Sie “select”, um den Kontinent und dann das
Land auszuwählen. Ihnen wird daraufhin die Möglichkeit gegeben, ALL
STATIONS oder ein GENRE zu wählen, um die Suche weiter zu verfeinern.
Nachdem Sie die besten Suchkriterien ausgewählt haben, wird
Ihnen eine Senderliste angezeigt. Um einen dieser Sender anzuhören,
wählen Sie diesen einfach von Liste.
SUCHE
Sie können einen Internetradiosender nach dem Namen (wenn Sie
diesen kennen) oder durch die Nutzung bestimmter Schlüsselwörter
des Titels suchen.
Location
Africa >
Asia >
Caribbean >
Central America >
Europe >
Um einen Sender zu SUCHEN, wählen Sie SENDER SUCHEN aus dem
SENDERMENÜ und geben Sie dann ein Schlüsselwort über den
Eingabebildschirm ein (ähnlich der Passworteingabe).
Wird der Sender gefunden, wählen Sie diesen zum Anhören einfach
aus.
Haben Sie mit Hilfe eines Schlüsselwortes eine Suchabfrage gestartet,
listet Heritage alle Sender auf, die dieses bestimmte Wort enthalten.
Scrollen Sie durch die Liste und t Sie einen Sender.
EINEN PODCAST AUSWÄHLEN
Podcasts (auch ‘Erneut Anhören’ genannt) werden nach denselben
Kriterien gesucht und ausgewählt, wie normale Sender.
Wählen Sie PODCAST aus dem INTERNETRADIOMENÜ und suchen Sie
nach Lage, Genre oder einer Kombination aus beidem.
Der Hauptunterschied bei der Suche nach einem Podcast ist, dass
Ihnen nach der Wahl eines Senders eine Liste mit verfügbaren
Sendungen (Podcasts) angezeigt wird.
Wählen Sie einfach die gewünschte Sendung aus der Liste.
64
Stations
ROCKF
0123456789 ABCD
EFGHIJKLMNOPQRS
TUVWXYZ
BBC Radio 1
BBC Radio 1
Podcasts >
Podcasts
Adam and Joe
BBC Introducing
Bruce Dickinson
Chris Hawkins
Clare McDonnell
BKSP
CANCEL
OK
Page 65
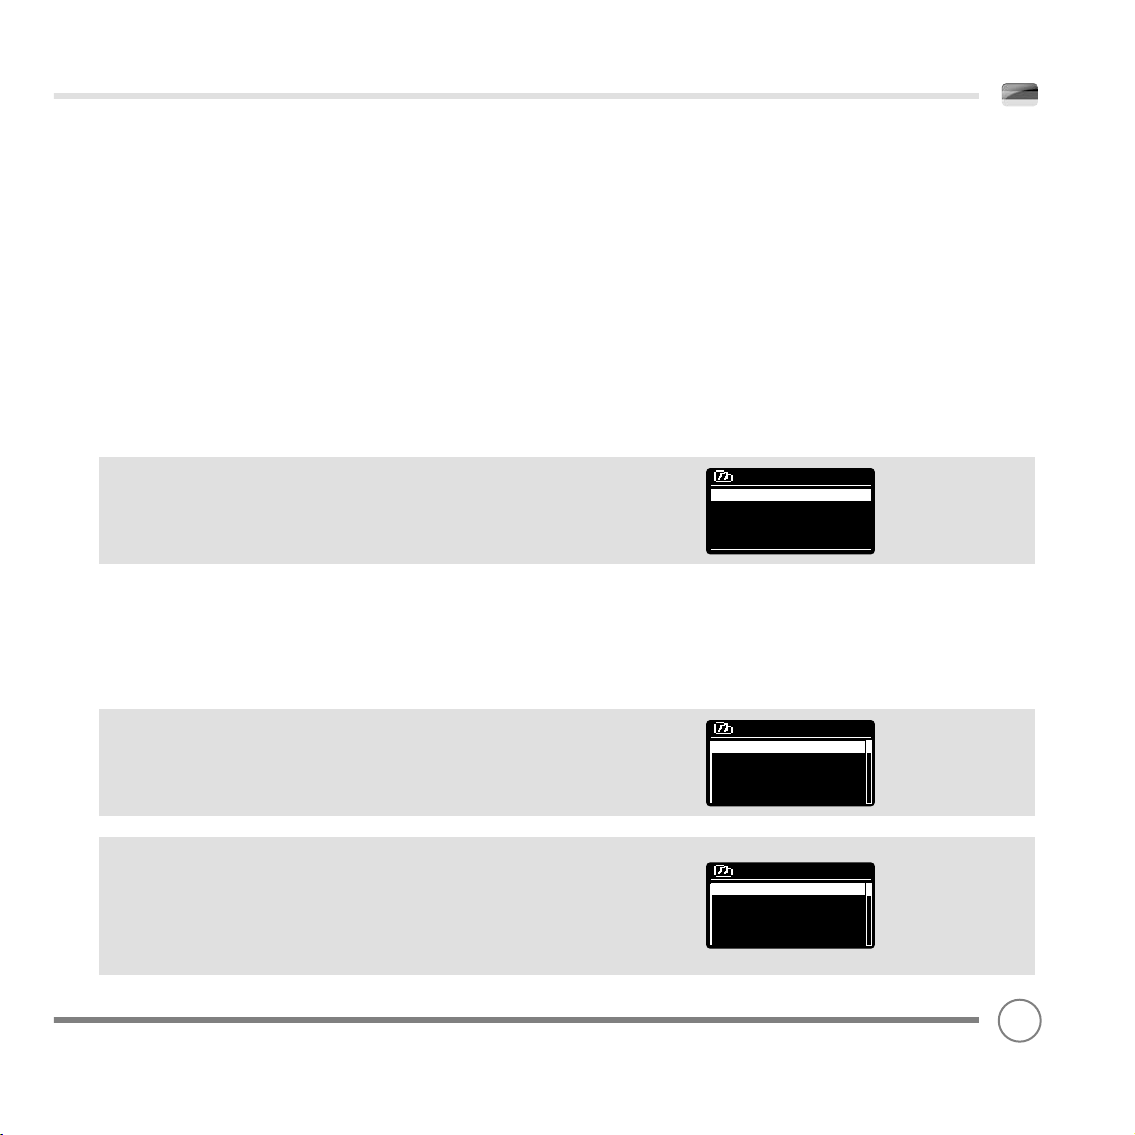
INTERNETRADIOMODUS
MEINE FAVORITEN
Es ist möglich, eine oder mehrere Listen mit Ihren Lieblingssendern
anzulegen und Ihnen somit einen schnellen und einfachen Zugang
zu einer bestimmten Anzahl von Sendern aus verschiedenen Ländern
und Genres zu beschaffen.
Für diese Option müssen Sie zuerst Ihr Radio im Frontier Silicon
Radioportal registrieren. Vergleichen Sie hierzu die Sektion
INTERNETRADIOPORTAL auf Seite 23.
Um einen Sender als Ihren Lieblingssender abzuspeichern, drücken
und halten Sie die Auswahltaste bis FAVOURITE ADDED auf dem
Bildschirm erscheint. Der ausgewählte Sender erscheint nun in der
Standardsenderliste Ihrer Lieblingssender.
Um die Liste unter MEINE FAVORITEN zu betreten, wählen Sie
SENDERLISTE, MEINE FAVORITEN und zuletzt SENDER. Sie können nun
durch die Liste scrollen und einen Sender aus dieser wählen.
MEINE GESPEICHERTEN SENDER
Wenn Sie der Internetradiosenderliste selbst Sender über das Frontier
Silicon Radioportal (vgl. S. 23) hinzugefügt haben, werden diese hier
aufgelistet. Die Option MEINE GESPEICHERTEN SENDER kann unter
dem Menü SENDERLISTE im INTERNETRADIOMODUS gefunden werden.
BBC
Die Option BBC ist eine Abkürzung zur kompletten BBC Senderliste.
Wählen Sie einfach diese Option aus dem Menü SENDERLISTE,
scrollen Sie durch die Sender und treffen Sie Ihre Auswahl.
ZULETZT GEHÖRT
Wenn Sie den INTERNETRADIOMODUS betreten, wird automatisch der
zuletzt gehörte Sender wiedergegeben. Um einen anderen kürzlich
gehörten Sender auszuwählen, wählen Sie ZULETZT GEHÖRT. Eine
volle Liste wird angezeigt, bei der die zuletzt gehörten Sender zuerst
angezeigt werden.
Your Rock Favourites
Kerrang! >
North Sea Classic rock >
Rock FM >
Takeover Radio >
The Arrow >
BBC
BBC Radio 1 >
BBC Radio 1Xtra >
BBC Radio 2 >
BBC Radio 3 >
BBC Radio 3 >
Last Listened
Clyde 1 >
West FM >
BBC Radio6 >
BBC Radio 1 >
Chill >
65
Page 66
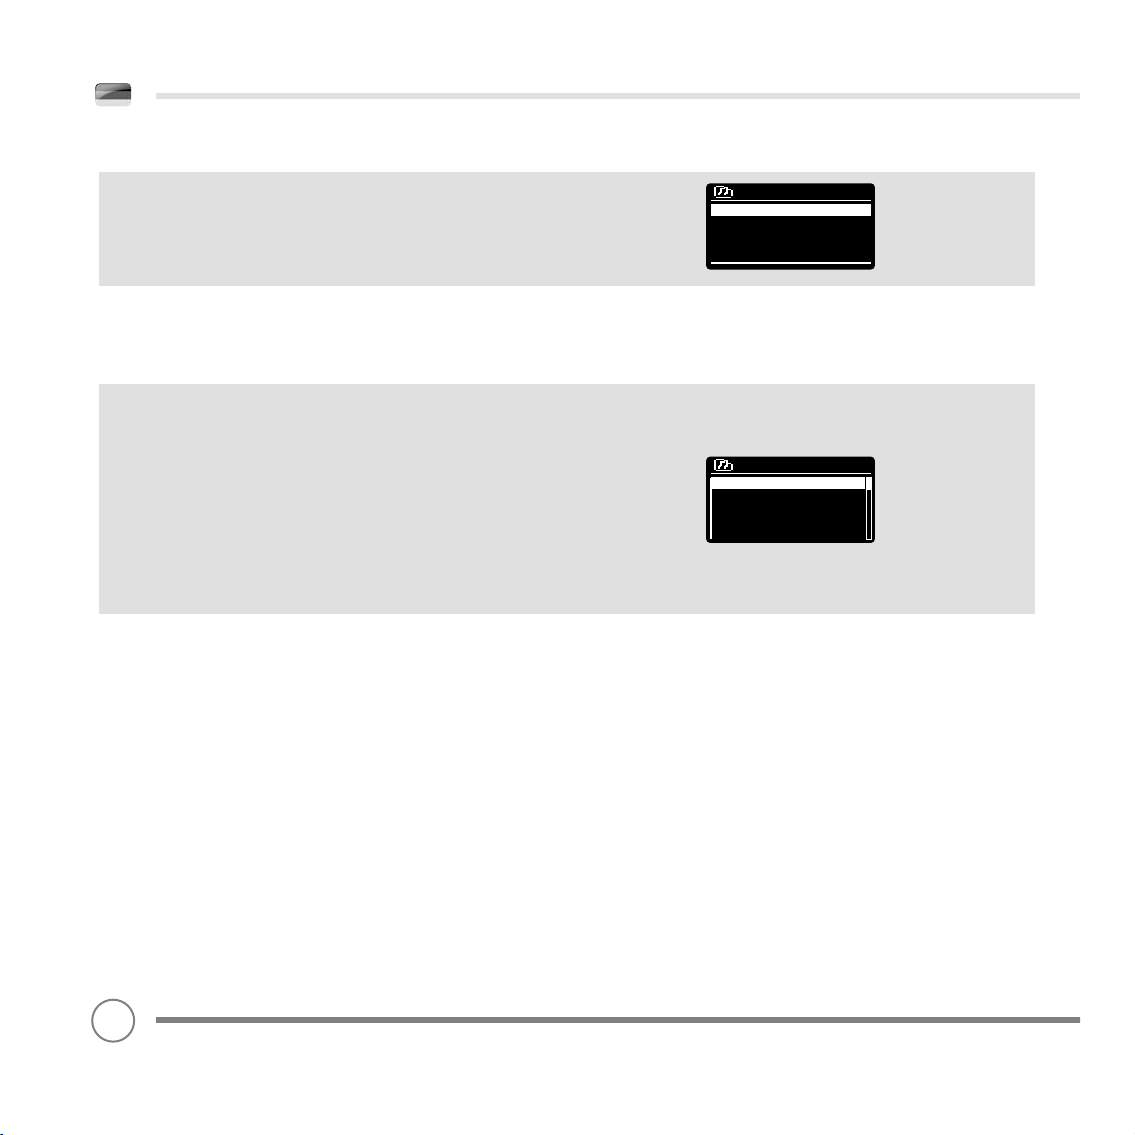
INTERNETRADIOMODUS
HILFE
Die Option HILFE kann im Menü SENDERLISTE gefunden werden. Unter
HILFE fi nden Sie den ZUGANGSCODE, welchen Sie zur Registrierung
Ihres Radios im Frontier Silicon Radioportal benötigen (vgl. S. 23 für
eine komplette Anleitung).
Unter HILFE fi nden Sie außerdem einen hilfreichen Audiotitel zu häufi g
gestellten Fragen.
LOKAL
Die LOKALE Senderliste kann unter dem Menü SENDERLISTE gefunden
werden und ist abhängig von dem Land, in welchem Sie sich gerade
befi nden. Beispiel: Befi nden Sie sich im Vereinigten Königreich, wird
eine Auswahl Sender aus diesem Gebiet angezeigt. Befi nden Sie sich
in Deutschland, werden nur Sender angezeigt, die in Deutschland
gesendet werden.
Wählen Sie diese Option entweder um durch alle lokalen Sender
zu navigieren oder suchen Sie alternative nach einem bestimmten
Genre.
Get access code
Access code
HEBZM0Z
Local United Kingdom
All Stations >
Highlighted Stations >
Alternative >
Ambient >
Big Band >
66
Page 67
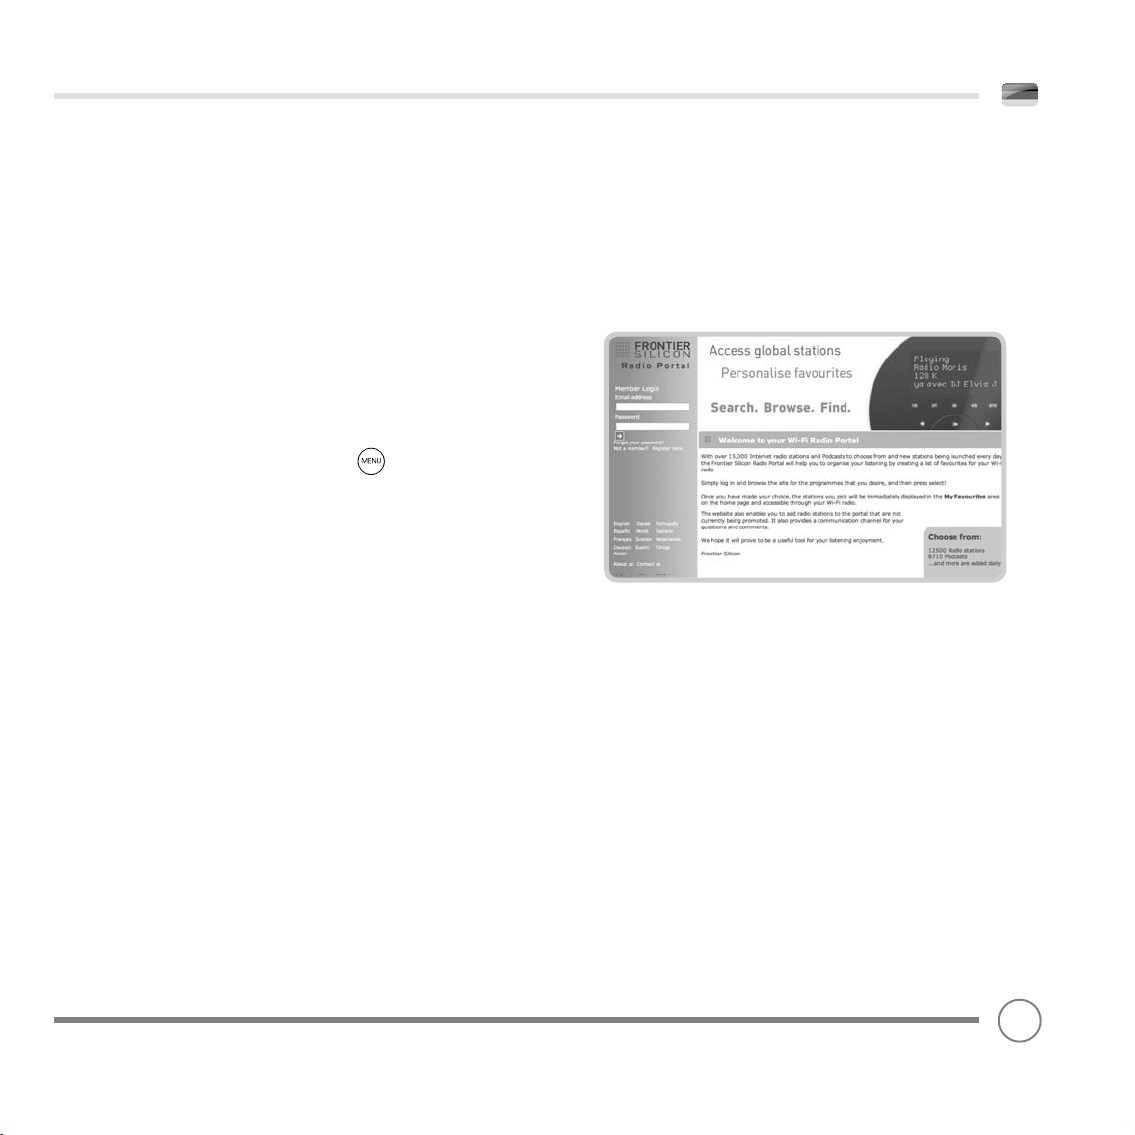
INTERNETRADIOPORTAL
ZUGRIFF AUF ZUSÄTZLICHE FEATURES
Einige von Heritages erweiterten Internetradioeigenschaften können
nur durch einen Besuch des Frontier Silicon Radioportals genutzt
werden.
Um diese Feature zu benutzen, müssen Sie Ihr Radio erst registrieren.
REGISTRIERUNG IHRES RADIOS
Um Ihr Radio zu registrieren, benötigen Sie den spezifi schen Zugangscode Ihres Radios.
Um diesen Zugangscode zu fi nden, betreten Sie zuerst den INTERNETRADIOMODUS. Drücken Sie nun die Menütaste, wählen
Sie SENDERLISTE und dann HILFE. Wählen Sie nun ZUGANGSCODE
ERHALTEN.
Notieren Sie sich den Zugangscode.
Mit Hilfe Ihres PCs oder Macs besuchen Sie nun die Webseite des
Portals - www.wifi radio-frontier.com
Klicken Sie auf den Link HIER REGISTRIEREN (auf der linken Seite) und
beginnen Sie den Registrierungsprozess.
Wenn Sie schon ein Mitgliedskonto haben und ein neues Radio
hinzufügen möchten, loggen Sie sich ein und wählen Sie MEINE
PRÄFERENZEN. Wählen Sie nun EIN WEITERES WI-FI RADIO HINZUFÜGEN.
Wenn Sie Ihr Radio im Portal registriert haben, können Sie sofort dessen verschiedene Feature und Leistungen in Anspruch nehmen.
67
Page 68
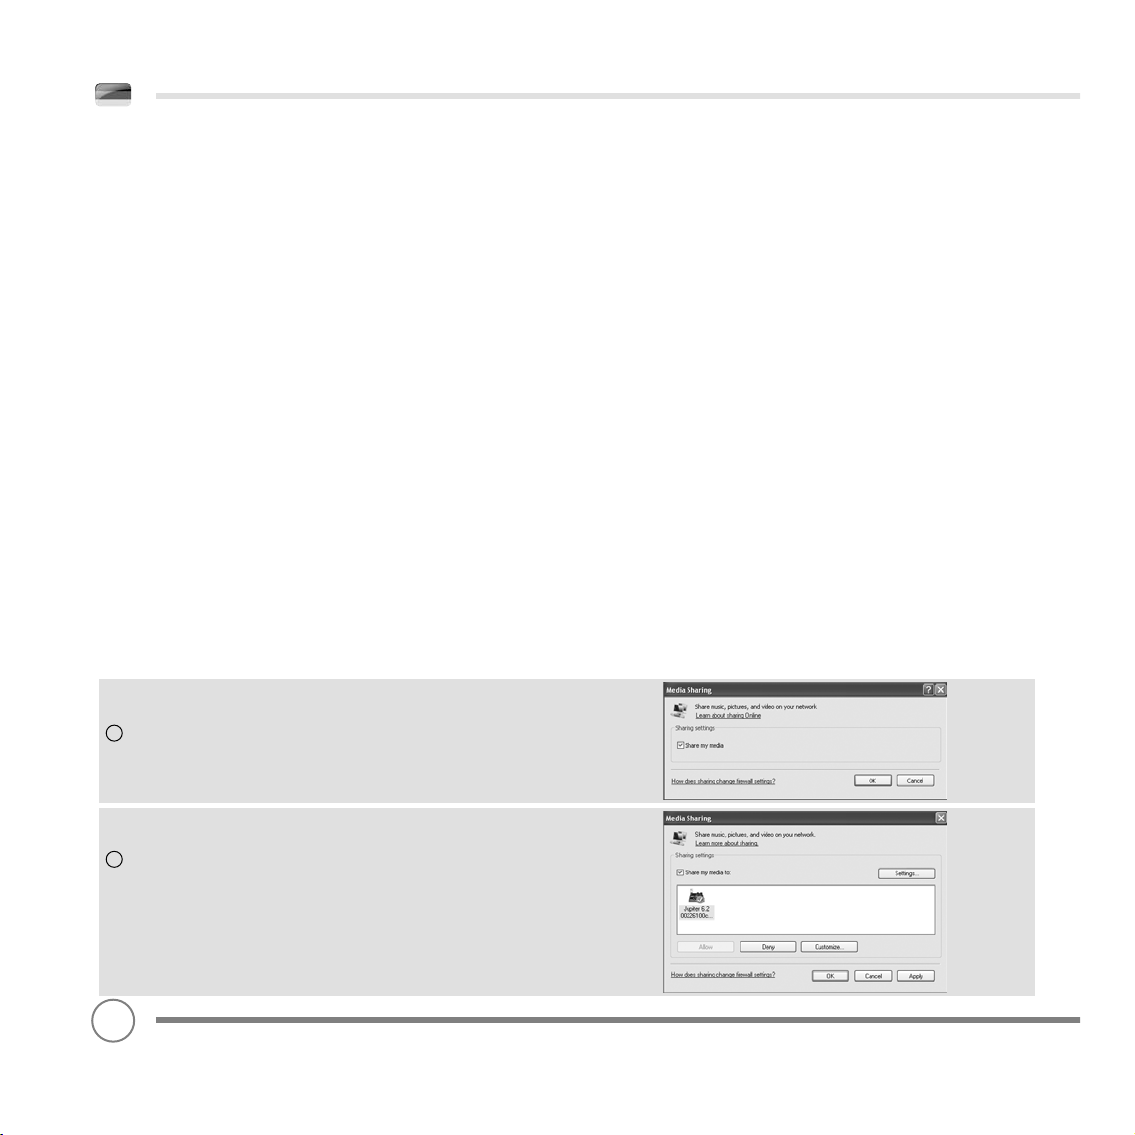
EINEN MUSIKSERVER EINRICHTEN
Damit Heritage in der Lage ist Musikdateien von einem Computer
abzuspielen, muss zuerst der Computer für die geteilte Nutzung von
Mediadateien vorbereitet warden.
UPnP Media Sharing macht es Geräten wie Heritage möglich, Musik
aus einer gemeinsam genutzten Mediabibliothek abzuspielen und
durch Untermenüs wie Künstler, Album oder Genre zu navigieren.
Wenn Sie eine UPnP Applikation installiert haben und einen PC mit
Windows Media Player 11 oder älter (WMP) oder einen Apple Mac
mit OS X 10 oder älter benutzen, können Sie Heritage mit diesem
Verbinden und Audio im Streaming abspielen.
HINWEIS:
iTunes arbeitet gegenwärtig noch nicht als UPnP Mediaserver aber es existieren eine Anzahl von Add-on Softwares von
Drittanbietern, welche es Ihnen ermöglichen, Ihre iTune Bibliothek zu
benutzen.
MEDIADATEIEN MIT WINDOWS MEDIAPLAYER TEILEN
Der am meisten genutzte UPnP Server ist Windows Media Player
(Version 11 oder älter), auch wenn andere UPnP Plattformen genutzt
werden können.
Um WMP für das Teilen von Mediadateien vorzubereiten, führen Sie
die folgenden Schritte durch:
Vergewissern Sie sich, dass Ihr PC und das Radio mit demselben
Netzwerk verbunden sind. Heritage wird von Ihrem PC als ‘Heritage’
erkannt,
1
Im WMP, fügen Sie der Mediabibliothek die Audiodateien und Ordner
zu, welche Sie mit Heritage teilen wollen.
(BILBLIOTHEK > HINZUFÜGEN. . . .).
2
Stellen Sie sicher, dass das Radio Zugang zu den geteilten Mediadateien hat, indem Sie diese
auswählen und ERLAUBEN klicken. Sie können die geteilten Mediaeinstellungen auch benennen. t
Der PC ist jetzt bereit, Musik zu Ihrem Radio zu leiten. Der WMP UPnP
Service läuft im Hintergrund, es ist nicht nötig, WMP extra zu starten.
68
Page 69

EINEN MUSIKSERVER EINRICHTEN
MEDIADATEIEN MIT EINEM MAC TEILEN
Um Ihren Heritage mit Ihrem Apple Mac zu verbinden, benötigen Sie
eine UPnP Serverapplikation eines Drittanbieters. Es ist möglich, eine
Anzahl von Applikationen direkt aus dem Internet herunter zu laden.
Eine dieser Applikationen ist EyeConnect. Es handelt sich um eine
einfach zu intasllierende Applikation zum Media Sharing welche es
Heritage ermöglicht, Audiodateien im Streaming abzuspielen. EveConnect kann auf folgender Webseite heruntergeladen werden:
http://www.elgato.com
Wenn Sie EyeConnect installiert haben, fi nden Sie das Progamm
3
unter den Präferenzen des Systemanzeigefelds wieder. Wenn Sie
Heritage mit dem Mac verbinden, stellen Sie sicher, das EyeConnect
mit der Setupanzeige läuft.
Heritage wird als ‘Heritage’ in der Geräteliste von EyeConnect
aufgelistet. Die ENABLE Box muss ausgewählt sein und die Auswahl für
den Zugang (ACCESS) muss als ENABLE NEW DEVICES eingestellt sein.
Ihr Mac ist jetzt bereit, um Musik zu Ihrem Radio zu leiten. EyeConnect
wird automatisch normal weiterlaufen.
69
Page 70
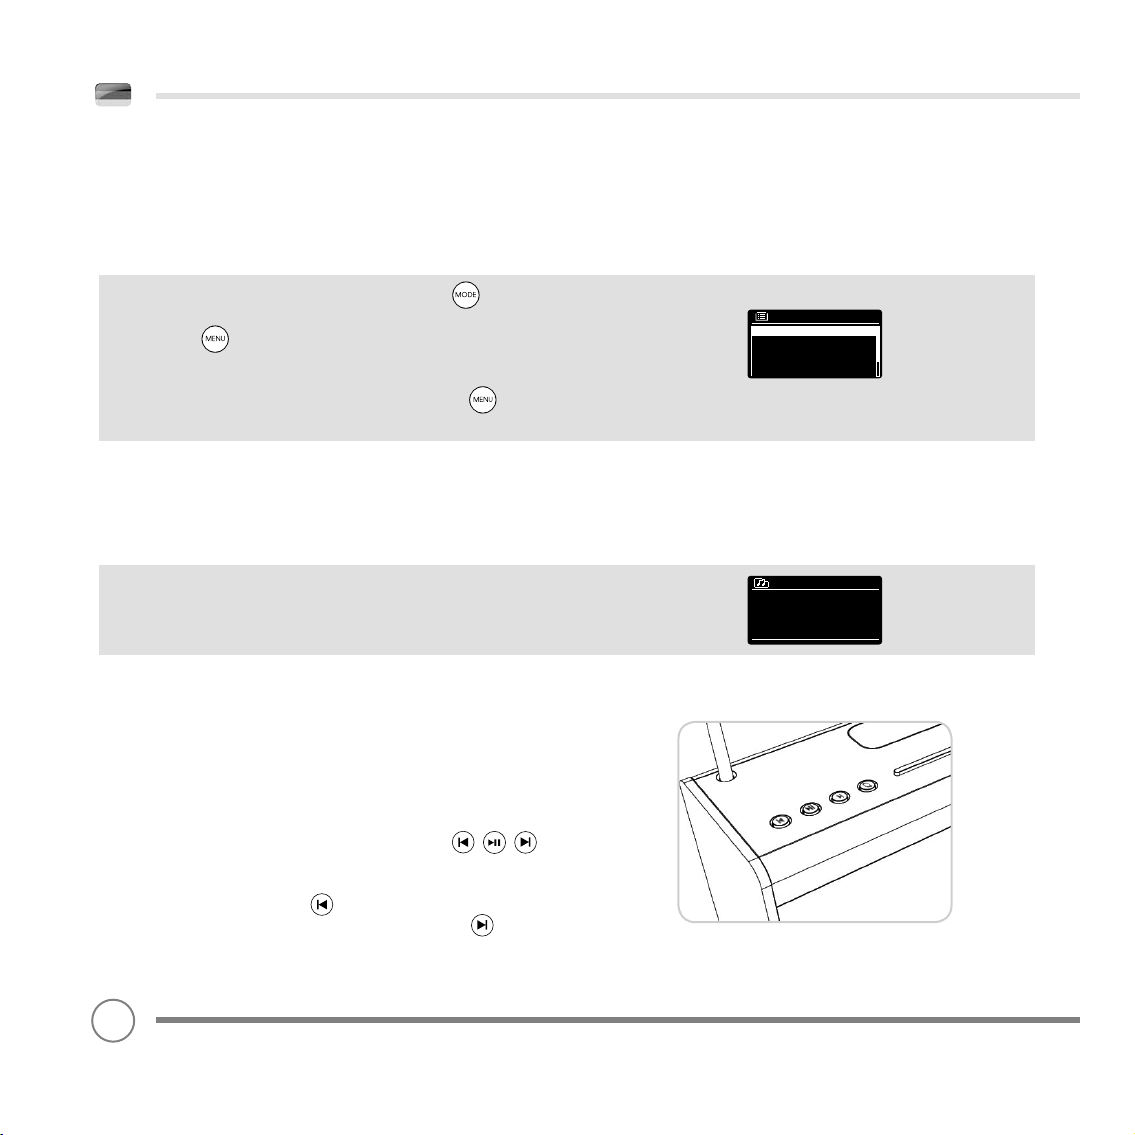
MUSIKABSPIELMODUS
ABSPIELEN VON AUDIOTITELN MIT DEM MUSIKPLAYER
Der MUSIC PLAYER MODE ermöglicht das Abspielen von Audiodateien
wie MP3-, AAC-, WMA- oder FLAC-Dateien direkt von einem Computer
oder einem Musikserver in Ihrem lokalen Netzwerk aus.
Um zum MUSIC PLAYER MODE zu gelangen, drücken Sie bis auf
Ihrem Intro-Bildschirm MUSIC PLAYER MODE angezeigt wird, alternativ
drücken Sie , dann wählen Sie MAIN MENU und anschließend
MUSIC PLAYER aus der Optionsliste des Menüs aus.
Wenn Sie sich im Musikplayer-Modus befi nden, drücken Sie ,
dann wählen Sie SHARED MEDIA aus.
MUSIK VON EINEM USB SPEICHER ABSPIELEN
Verbinden Sie zuerst den USB Speicher über den entsprechenden
Anschluss auf der Rückseite Ihres Radios mit dem Gerät.
Music player
Shared media >
My playlist >
Repeat play: Off
Shuffle play: Off
Die Auswahl von USB WIEDERGABE aus dem Menü MUSIK ABSPIELEN
wird den Inhalt des externen Speichers in Form einer Dateiliste
anzeigen.
Mit Hilfe der Cursorsteuerung können Sie sich durch die Liste bewegen.
Um durch die Liste zu scrollen, müssen Sie die Tasten UP und DOWN
verwenden. Um durch die Ordner zu blättern, drücken Sie entweder
(SELECT) oder RIGHT. Wenn Sie den gewünschten Titel erreicht haben,
wird durch ein kurzes Drücken der Auswahltaste der Titel abgespielt.
Durch langes Drücken wird der Titel zur Wiedergabeliste hinzugefügt
(siehe PLAYLISTS auf Seite 28 für weitere Informationen).
Audiotitel können auch gesteuer t werden, indem Sie die
-Tasten, die auf der Oberseite des Radios angebracht sind, verwenden.
Durch Drücken und Halten der -Taste wird der Titel, der gerade
gespielt wird, schnell zurückgespult. Wenn Sie hingegen die
-Taste drücken und halten, wird der Titel schnell vorwärts gespult.
70
Friendly Fires
-01-Jump.MP3
-02-Paris.MP3
Page 71
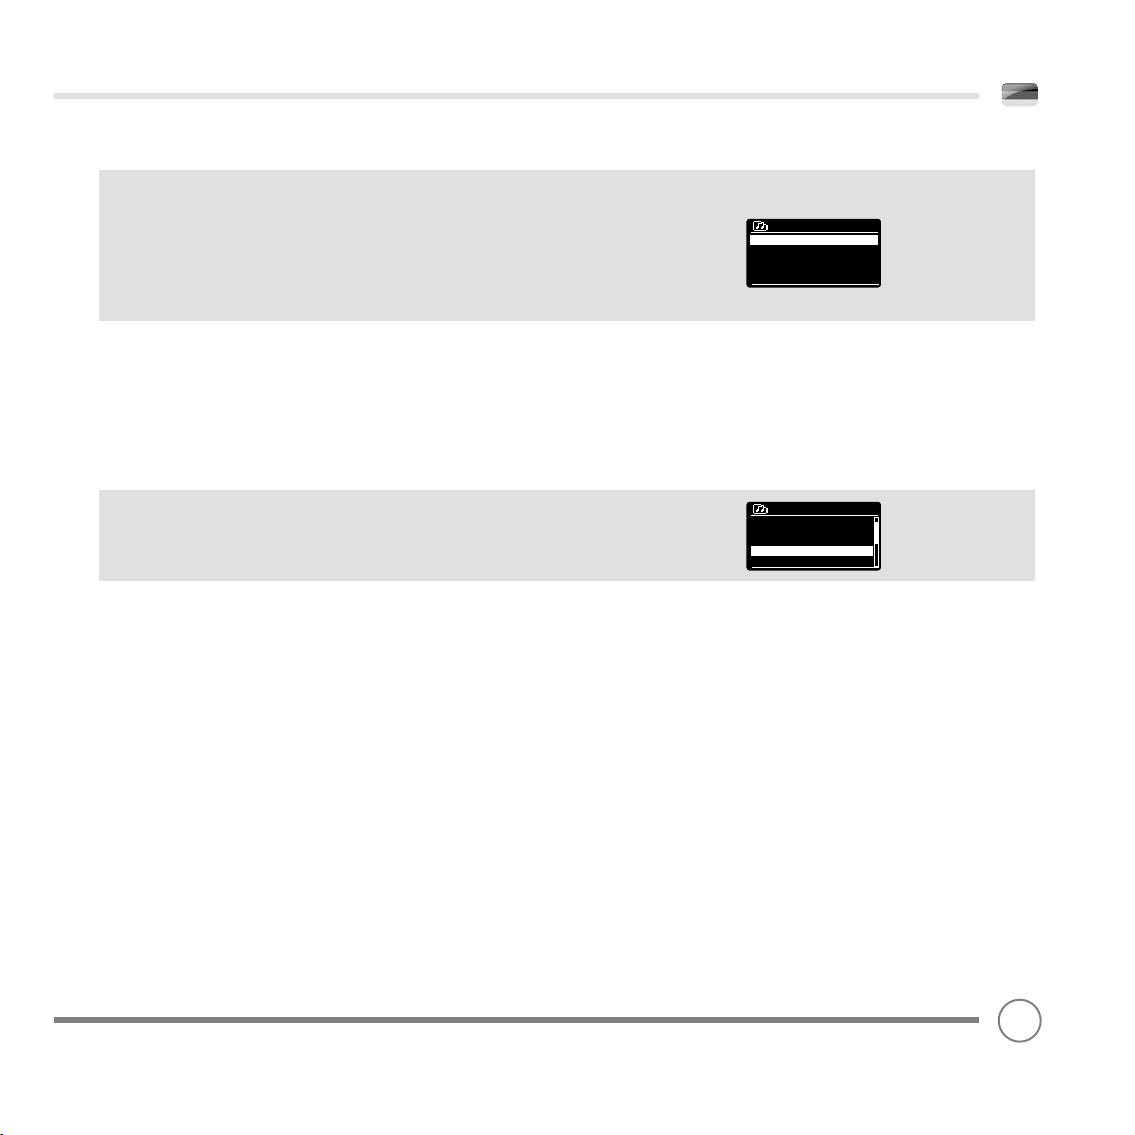
MUSIKABSPIELMODUS
SHARED MEDIA (VON EINEM UPnP MEDIASERVER)
Im MUSIKABSPIELMODUS wählen Sie SHARED MEDIA. Wenn Sie geteilte
Mediadateien vorbereitet haben (vgl. S. 24), sollte für den erstellen
Server ein Eintrag sichtbar sein (z.B. „SB-Laptop: Audio). Haben Sie
geteilte Mediadateien von mehr als einem Computer zur Verfügung,
sind die Alternativen aufgelistet. Wählen Sie die Mediadateien,
welche Sie abzuspielen wünschen.
Von diesem Moment an werden Menüs vom geteilten Mediaserver
erstellt (normalerweise Windows Media Player). Das erste Menü zeigt
eine Liste mit Mediatypen, z.B. Musik, Video, Bilder oder Abspiellisten.
Heritage kann nur Musik oder Abspiellisten wiedergeben.
Eine Suchfunktion ermöglicht es Ihnen außerdem, Titel zu fi nden.
Die Funktion ist ähnlich der Internetradiosuche, welche auf S. 20
beschrieben ist.
Es gibt mehrere Möglichkeiten, Musiktitel auszuwählen, zum Beispiel:
Genre | Künstler | Album | Komponist | Rating
Wenn Sie den Titel, den Sie abspielen wollen, gefunden haben,
drücken Sie die Auswahltaste, um diesen auszuwählen. Durch kurzes
Drücken wird der Titel sofort abgespielt, während der Titel durch
langes Drücken der PLAYLIST hinzugefügt wird.
HINWEIS:
Titel die im UPnP Modus abgespielt werden, werden zu
Last.fm geleitet (gescrobbelt), wenn diese Funktion im Last.fm Menü
eingestellt ist. Für weitere Informationen vergleichen Sie S. 29.
SB-laptop: Audio
Music >
Video >
Pictures >
Playlists >
<Search>
Music
Music >
All Artists >
Contributing Artists >
Album Artists >
Composers >
71
Page 72

MUSIKABSPIELMODUS
ABSPIELLISTEN
Heritage ist in der Lage, eine Abfolge von bis zu 500 Titeln in seinen
Wiedergabelisten zu speichern. Die Titel in der Wiedergabeliste
können von mehreren UPnP Servern und USB-Geräten gemischt
werden. Um die Wiedergabeliste zu verwalten, wählen Sie MY
PLAYLIST im MUSIC PLAYER MENU aus.
Um die Inhalte der Wiedergabeliste anzusehen, scrollen Sie
durch diese unter Zuhilfenahme der Cursorsteuerung. Um die
Wiedergabeliste von einem bestimmten Titel an zu spielen, drücken
Sie die Auswahltaste kurz. Um einen Titel aus der Wiedergabeliste zu
entfernen, drücken Sie die Auswahltaste lang und bestätigen dann
zum Löschen mit YES.
Wenn Sie einen Titel / ein Album / einen Folder sofort abspielen
wollen, ohne die Wiedergabeliste-Funktion zu verwenden, bleibt
die Wiedergabeliste erhalten und wird weiterhin von Ihrem Radio
gespeichert, bis Sie sie löschen wollen.
WIEDERHOLEN/ZUFÄLLIGE WIEDERGABE
Sie haben die Möglichkeit, Titel wiederholt oder zufällig abzuspielen,
indem Sie REPEAT PLAY oder SHUFFLE PLAY im MENU MUSIC PLAYER
auswählen.
ABSPIELINFORMATIONEN
My playlist
Human >
Just My Imagination.wma
Back At One
Can’t Fight This Feelng. . . . . .
Three birds.mp3
Während ein Titel abgespielt wird, zeigt Heritage den Titel und
den Namen des Interpreten (UPnP) an. Es gibt auch einen
Fortschrittsbalken, der die vergangene Spielzeit und die Gesamtspiel
des Titels anzeigt.
Um weitere Informationen zum Titel anzuzeigen, drücken Sie .
Jedes Mal, wenn Sie drücken, wird eine weitere Information wie
folgt angezeigt:
UPnP: Name des Titels / Interpret, Fortschrittsbalken /Titelspielzeiten,
Album, Codec/Abtastrate, Wiedergabepuffer und Tagesdatum.
72
Music player
Human.mp3
1:01 3:08
Music player
Letter To Me
Album:
5th Gear
Page 73
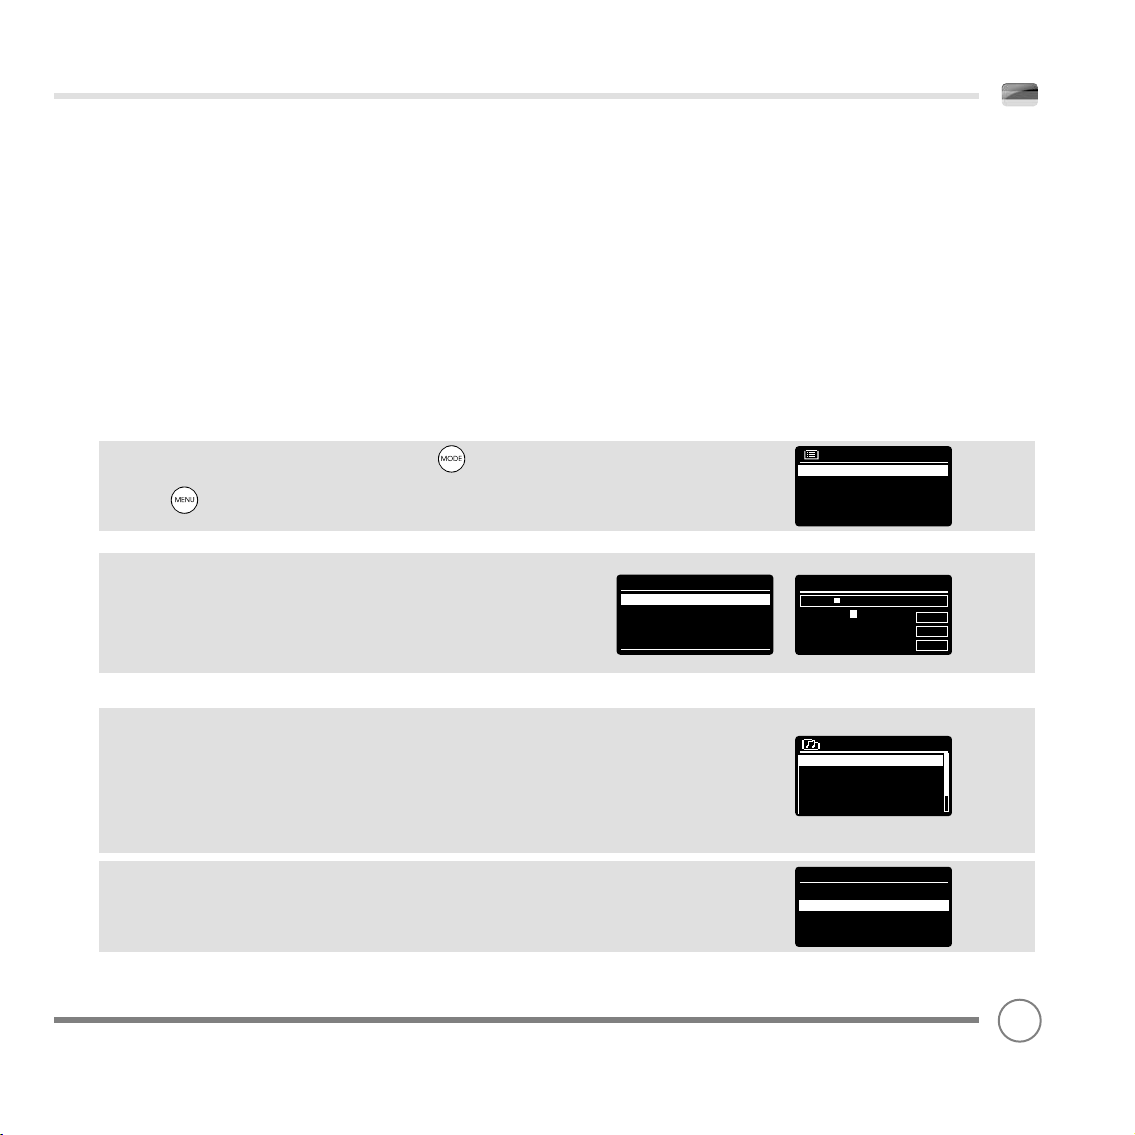
LAST.FM MODUS
Zusätzlich zu seinen Radio und Internetradio Features, ist Heritage
auch in der Lage, Zugang zum online Musikservice Last.fm zu bieten.
Wählen Sie einfach einen Künstler oder ein Genre und lassen Sie Last.
fm eine Abspielliste aus seinen über 5 Millionen gespeicherten Titeln
erstellen – für Sie jedes Mal einzigartig und frisch.
Wenn Sie diesen Service schon nutzen, können Sie Ihr existierendes
Last.fm Profi l auf Heritage anwenden. Ansonsten besuchen Sie www.
last.fm, erstellen Sie ein Profi l und melden Sie sich an.
Sollten Sie im Besitz eines Probevouchers sein, besuchen Sie www.last.
fm/voucher und folgen Sie den Bildschirmanweisungen.
EIN BENUTZERKONTO HINZUFÜGEN
Um den LAST.FM MODUS zu betreten, drücken Sie die Modu-
staste bis Last.fm auf dem Bildschirm erscheint. Alternative drücken
Sie die Menütaste, wählen Sie HAUPTMENÜ und dann LAST.FM
aus der Liste der Menüoptionen.
Um ein Konto hinzuzufügen, wählen Sie LAST.FM SETUP aus dem Menü
und wählen Sie dann BENUTZERKONTEN.
Wählen Sie nun NEUES KONTO HINZUFÜGEN und geben Sie Ihren LAST.
FM Benutzernamen und das Passwort mit Hilfe der Bildschirmtastatur
ein.
SCROBBELN UND LOVE/BAN VON TITELN
Um LAST.FM bestmöglich zu nutzen, können Sie alle Titel welche Sie im
UPnP und im Last.fm Modus gehört haben SCROBBELN (dies ist sogar
mit Titeln von einem iPod oder Computermediaserver mit der korrekten Software). Dieser Vorgang sendet Titelnamen zu LAST.FM und
fügt diese automatisch Ihrer Bibliothek zu, um zu helfen, maßgeschneiderte Vorschläge für Ihren Musikgeschmack zu entwerfen. Sie können Ihre Last.fm Bibliothek wiedergeben, indem Sie IHRE BIBLIOTHEK
im LAST.FM MENÜ auswählen.
Um SCROBBELN AN oder AUS zu schalten, wählen Sie LAST.FM SETUP,
gefolgt von SCROBBELN und dann AN oder AUS.
Hinweis:
Sollten andere Personen Ihr Heritage im LAST.FM MODUS
benutzen, sollten Sie SCROBBELN ausschalten. Sonst könnten Sie zu
einem anderen Benutzerkonto wechseln.
User Accounts
<Add new account>
Last.fm
Station list >
last.fm setup >
System settings >
Main menu >
Search:
Rolling
0 1 2 3 4 5 6 7 8 9 . , a b
c d e f g h i j k l m n o p q
r s t u v w x y z A B C D E
F G H I J K L M N O P Q
Last.fm
Your library
Your Recommendations
Your neighbourhood
Artist radio
Tag radio
Last.fm setup
User Accounts >
Scrobbling: on
BKSP
OK
CANCEL
73
Page 74
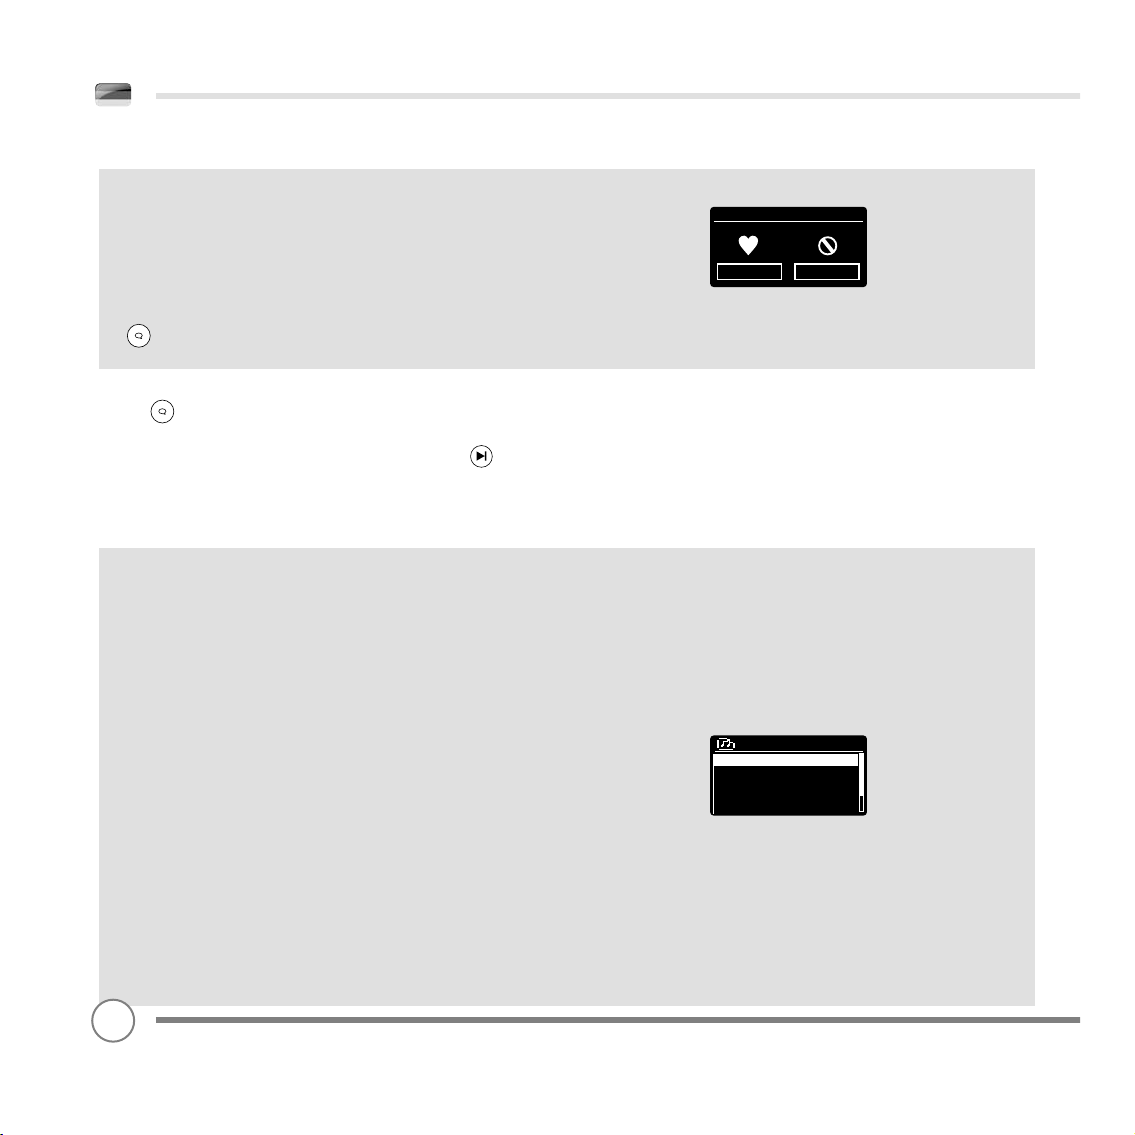
LAST.FM MODUS
Während Sie LAST.FM anhören, könne Sie entscheiden, Titel zu
bevorzugen (LOVE) oder zu entfernen (BAN). Solche Titel werden
gescrobbelt, auch wenn SCROBBELN auf AUS gestellt ist. Die
Auswahl LOVE für einen Titel lässt Last.fm diesen bestimmten Titel auf
IHRE LIEBLINGSTITELLISTE setzen. Diese können Sie in Zukunft wieder
abspielen. BAN bedeutet, dass ein Titel nicht wieder gespielt wird.
Um LOVE oder BAN für einen Titel einzustellen, drücken Sie die Taste
und nutzen Sie dann den cursor um LOVE oder BAN
auszuwählen.
Die Taste befi ndet sich auf der oberen Seite Ihres Radios der
alternativ können auf der Fernbedienung. Während Sie LAST.FM
anhören, können Sie Titel überspringen, indem Sie die Taste
drücken. Es ist nicht möglich Titel in LAST.FM anzuhalten.
Hinweis: Sie können Ihre Bibliothek und das Rating für Ihre Titel auf der
LAST.FM Webseite ändern.
MUSIK WIEDERGEBEN
Im LAST.FM MODUS sind verschiedene Streamings oder ‘Radiosender’
verfügbar. Um einen auszuwählen, wählen Sie SENDERLISTE im LAST.
FM MODUS Menü. Wenn Sie neu bei LAST.FM sind, raten wir Ihnen, mit
ARTIST oder TAG RADIO zu beginnen, welche Ihnen eine komfortable
Nutzung der Grundeigenschaften und Leistungen erlauben.
Es gibt die folgenden Optionen:
IHRE BIBLIOTHEK
Spielt alle zu Ihrem Profi l gescrobbelten Titel oder Titel von Künstlern
die Sie Ihrer Bibliothek hinzugefügt haben. Kann über die LAST.FM
Webseite bearbeitet werden.
IHRE VORSCHLÄGE
Last.fm
Love Ban
Last.fm
Your library
Your Recommendations
Your neighbourhood
Artist radio
Tag radio
Spiel Titel welche Ihnen aufgrund Ihres Musikprofi ls und das anderer
Hörer mit ähnlichem Geschmack vorgeschlagen werden.
IHRE LIEBLINGSTITEL
Spielt Titel mit dem Rating LOVED.
IHRE NACHBARSCHAFT
Spielt Titel aus Bibliotheken anderer Personen mit ähnlichem
Musikgeschmack.
74
Page 75
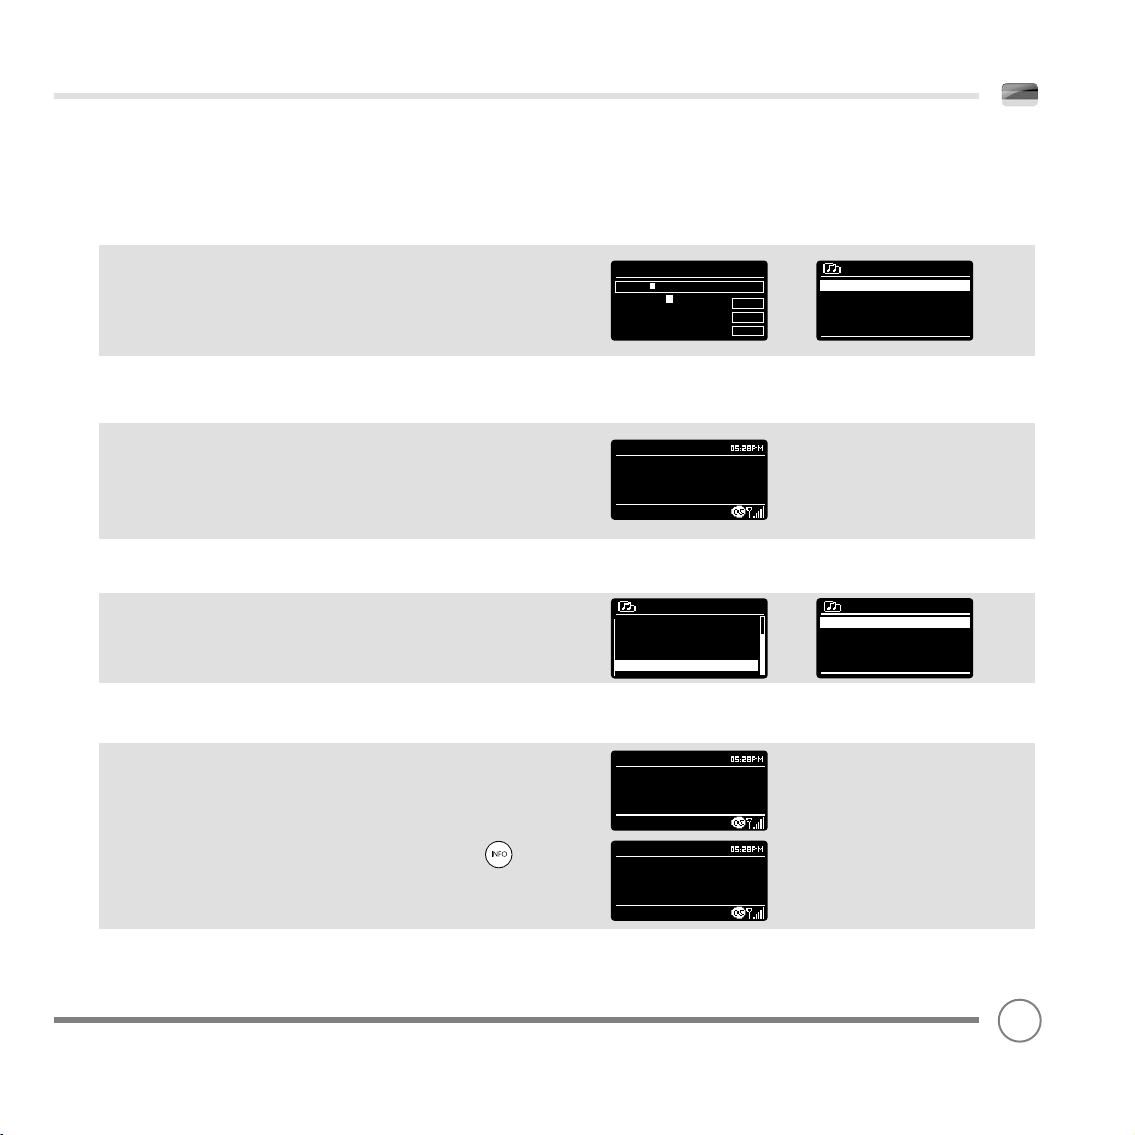
LAST.FM MODUS
MUSIK WIEDERGEBEN (fortgesetzt)
ARTIST RADIO
Gibt eine Auswahl an Titeln eines bestimmten Künstlers wieder,
zusammen mit Titeln von Künstlern mit ähnlichem Stil. Wählen Sie
einen Künstler durch Eingabe des Namens oder Teile des Names (die
Eingabe des vollen Namens ist nicht notwendig, ROLLING STONES
kann als STONES eingegeben werden). Wählen Sie nun den Künstler
aus der Ergebnisliste und wählen Sie OK:
TAG RADIO
Gibt eine Auswahl von Titeln wieder, die durch ein bestimmtes
Schlüsselwort verbunden sind. Wählen Sie ein Wort oder Genre indem
Sie ein Wort oder einen Satz eingeben. Es ist ratsam, so genau wie
möglich zu sein, also besser BOLLYWOOD als BOLLY einzugeben, da
Tags von Benutzern erstellt werden und daher sehr vielfältig sind.
Wählen Sie einen Tag aus der Ergebnisliste und wählen Sie dann OK
GESCHICHTE
Listet Titel auf, die Sie vor kurzem gehört haben, die letzten Titel zuerst.
Es ist nicht möglich, Titel aus dieser Liste zu wählen und nach Bedarf
erneut anzuhören.
BILDSCHIRMINFORMATIONEN
Während LAST.FM spielt, werden auf dem Bildschirm der Titelname
und ein Abspielbalken mit Anzeigen zur abgelaufenen Zeit und zur
totalen Titeldauer angezeigt. Eine LAST.FM Ikone wird am unteren
Bildschirmrand angezeigt um den LAST.FM MODUS anzuzeigen.
Search:
Rolling
0 1 2 3 4 5 6 7 8 9 . , a b
c d e f g h i j k l m n o p q
r s t u v w x y z A B C D E
F G H I J K L M N O P Q
Last.fm
This Hard Land
Album:
Greatest Hits
Last.fm
Your Loved Tracks
Your Neighbourhood
Artist Radio
Tag Radio
History >
Last.fm
This Hard Land
Artist:
Bruce Springstein
CANCEL
BKSP
OK
Artist radio
The Rolling Stones
Rolling Stones
Rolling Baba and the
Rolling Stones and Dave Matt
History
Rapture by DatA from
Visions by Cut Copy from. . . .
We Are The People by E . . . . .
She’s got me dancing by. . . . .
Meddle by Little Boots f. . . . .
Während der Titelwiedergabe, können Sie durch Drücken der
Infotaste durch weitere Informationen wechseln, wie z.B. Künstler,
Album, Titelname, Radioname, Codec/Abtastrate, Wiedergabebuffer
und Heutiges Datum.
Last.fm
This Hard Land
Album:
Greatest Hits
75
Page 76
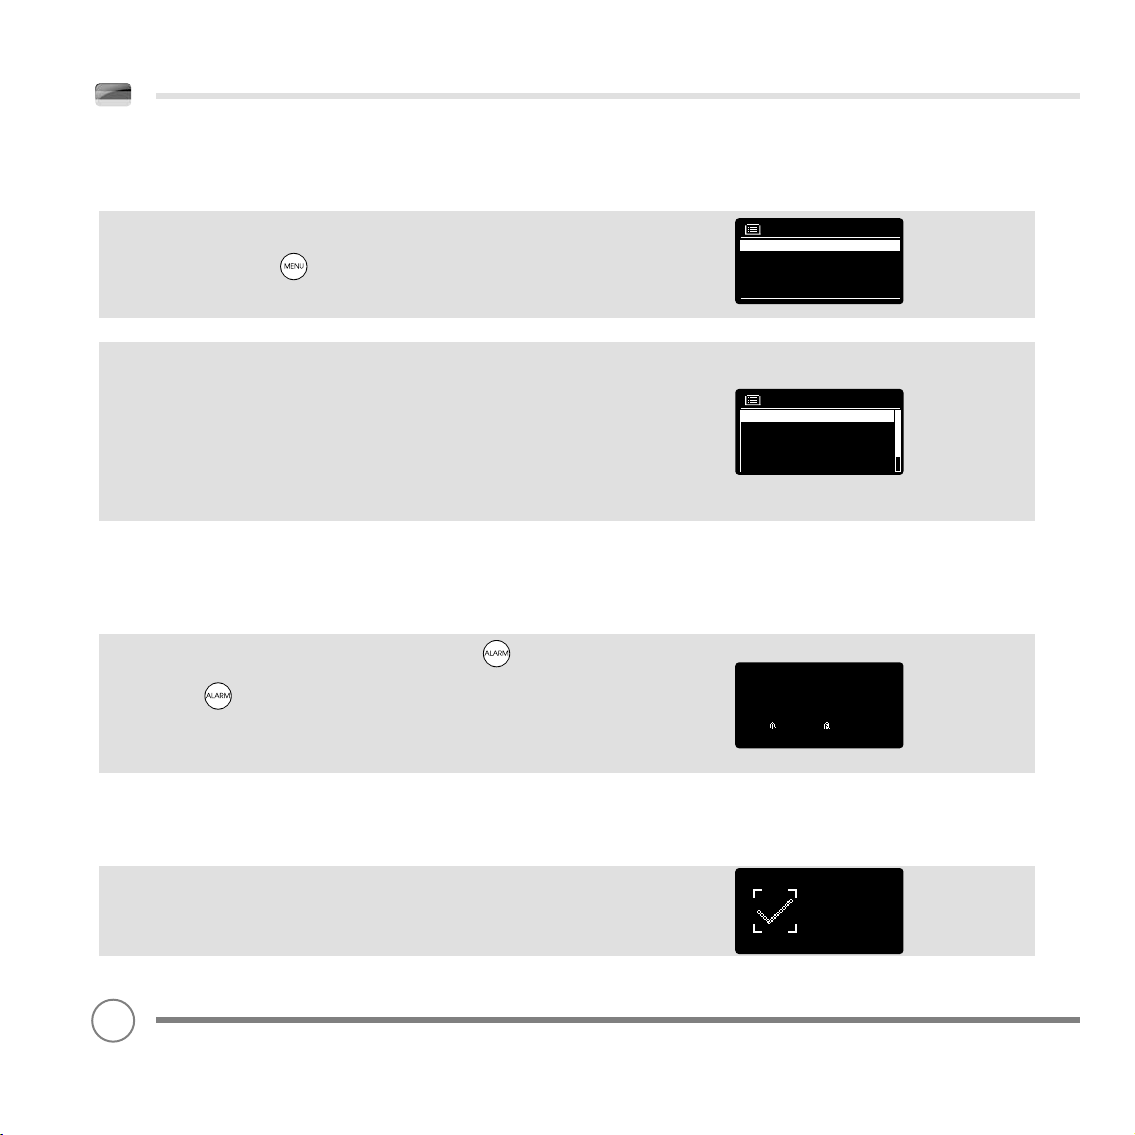
WECKER
EINEN ALARM EINSTELLEN
Heritage gibt Ihnen die Möglichkeit, zwei verschiedene
Alarmeinstellungen zu speichern. Um einen Alarm einzustellen oder
zu verändern, drücken Sie entweder die Menütaste oder
wählen Sie MENÜ, HAUPTMENÜ und dann ALARM. Wählen Sie die
Alarmeinstellung, welche Sie bearbeiten möchten (Alarm 1 Alarm 2).
Unter Zuhilfenahme der Cursorsteuerung können Sie durch die
untenstehenden Optionen scrollen und Ihre Favoriten festlegen.
• Alarm: an/aus
• Frequenz: Täglich, Einmal, Wochentags oder Wochenende
• Zeit
• Modus: Buzzer, Internetradio, DAB, FM oder iPod oder Last.fm
• Voreinstellungen: zuletzt gehört oder Voreingestellte Sender 1-10
• Laustärke: 0 - 20
Sind Ihre Vorlieben eingestellt, erinnern Sie sich SPEICHERN
auszuwählen.
Heritage zeigt einen aktiven Alarm durch Anzeige einer Alarmikone
am unteren Bildschirmrand.
Im STANDBYMODUS können Sie durch einfaches Drücken der
Alarmtaste einen gespeicherten Alarm AN- oder AUSCHALTEN.
Drücken der Alarmtaste wechselt zwischen Alarm 1 und Alarm
2 Einstellungen, welche an- und abgeschaltet werden. Werden
die Alarmikonen angezeigt, ist ein Alarm angeschaltet. Wird keine
Alarmikone angezeigt, sind die Alarme abgeschaltet.
EINEN ALARM ANHALTEN
Alarms
Alarm 1: Off [06:55AM]
Alarm 2: Off [07:50AM]
Alarm 1
Enable : Daily
Time : 7:30AM
Mode : internet radio
Preset : last listened
Volume : 6
12/10/2009
14:30
06:55AM 07:50AM
Wenn ein Alarm erklingt, kann dieser durch Drücken einer beliebigen
Taste Ihres Heritage GESTOPPT werden.
Wurde ein Alarm angehalten, wird eine ALARM AUS Nachricht auf
dem Bildschirm Ihres Heritage angezeigt.
76
Alarm off
Page 77
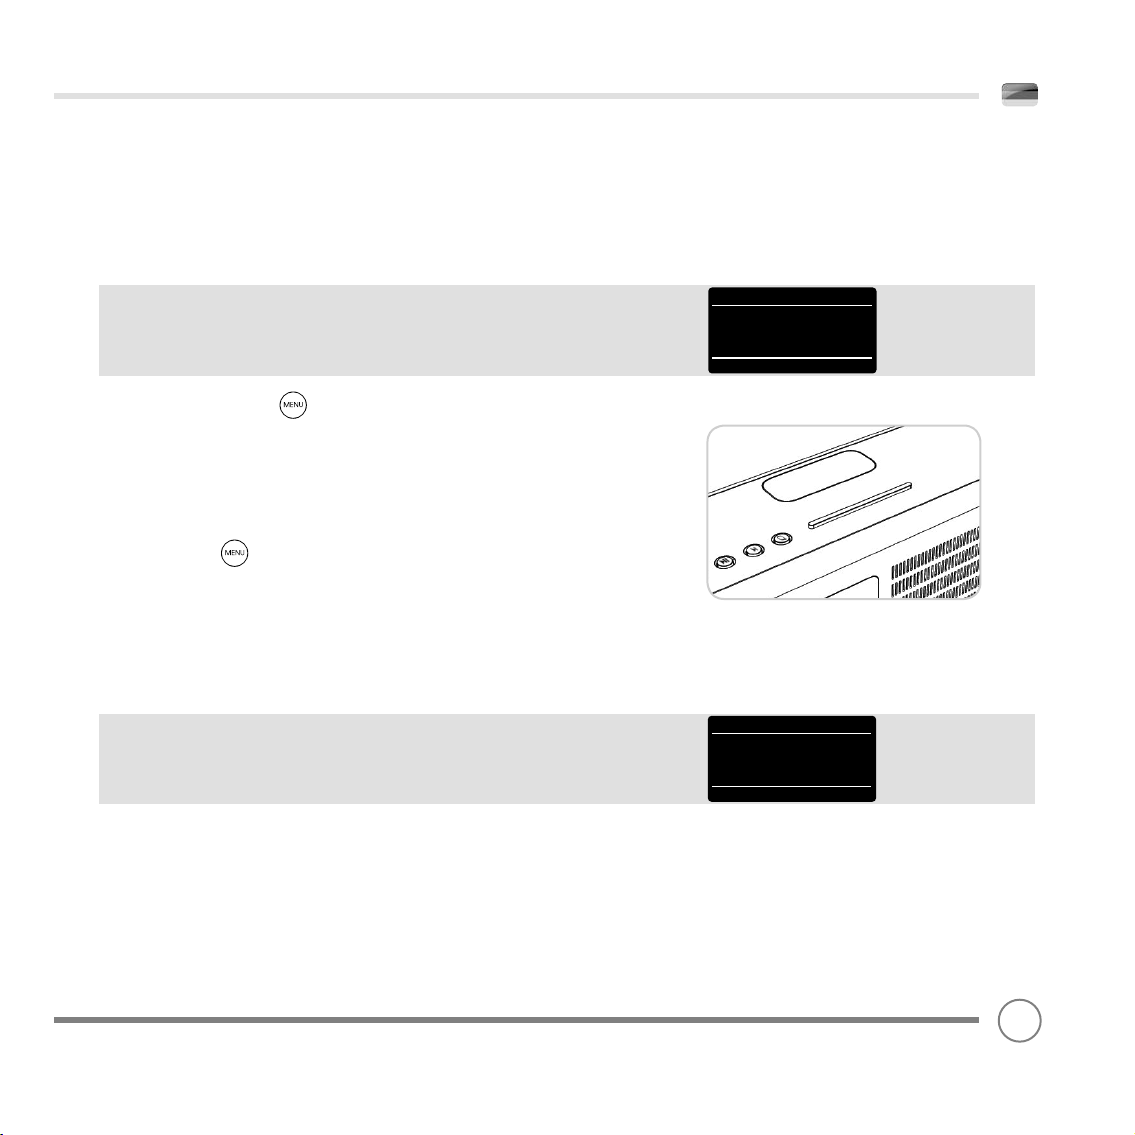
WECKER
SCHALFMODUS
Durch Nutzen der Schlaffunktion können Sie Heritage so einstellen,
dass das Gerät sich automatisch in den STANDBY MODUS setzt. Der
Schlafmodus kann auf zwei verschiedene Arten eingestellt werden:
Die schnellste Methode ist die SNOOZELEISTE. Tippen Sie diese einfach
an, um durch die Spanne der voreingestellten SCHLAFZEITEN zu
wechseln, von SCHLAF AUS zu 15, 30, 45 und 60 Minuten.
Alternativ, drücken Sie die Menütaste, wählen Sie HAUPTMENÜ
und dann SCHLAF. Sie können den SCHLAFTIMER nun entsprechend
der gewünschten Voreinstellung einstellen.
Wenn Sie die Schlafzeit ausgewählt haben, wird Heritage in das
HAUPTMENÜ zurückkehren.
Drücken Sie die Menütaste, um zur WIEDERGABEANZEIGE
zurückzukehren.
SNOOZEFUNKTION
Heritage beinhaltet ein SNOOZEFEATURE mit entsprechender SNOOZELEISTE auf der oberen Seite des Radios. SNOOZE erlaubt es Ihnen,
einen Alarm temporär und für einen Zeitraum von bis zu 30 Minuten
abzuschalten.
Die SNOOZEDAUER kann nur genutzt werden, wenn Ihre Radio
einen Alarm wiedergibt. Zu diesem Zeitpunkt tippen Sie einfach
auf die SNOOZELEISTE, um durch eine Spanne von voreingestellten
SNOOZEZEITEN zu wechseln (5, 10, 15 oder 30 Minuten).
Ist SNOOZE aktiviert, wird Heritage für die eingestellte SNOOZEDAUER
in Standby zurückkehren. Eine SNOOZE-Ikone wird auf dem Bildschirm
angezeigt.
Set sleep time
15 MINS
Set snooze
5 MINS
77
Page 78
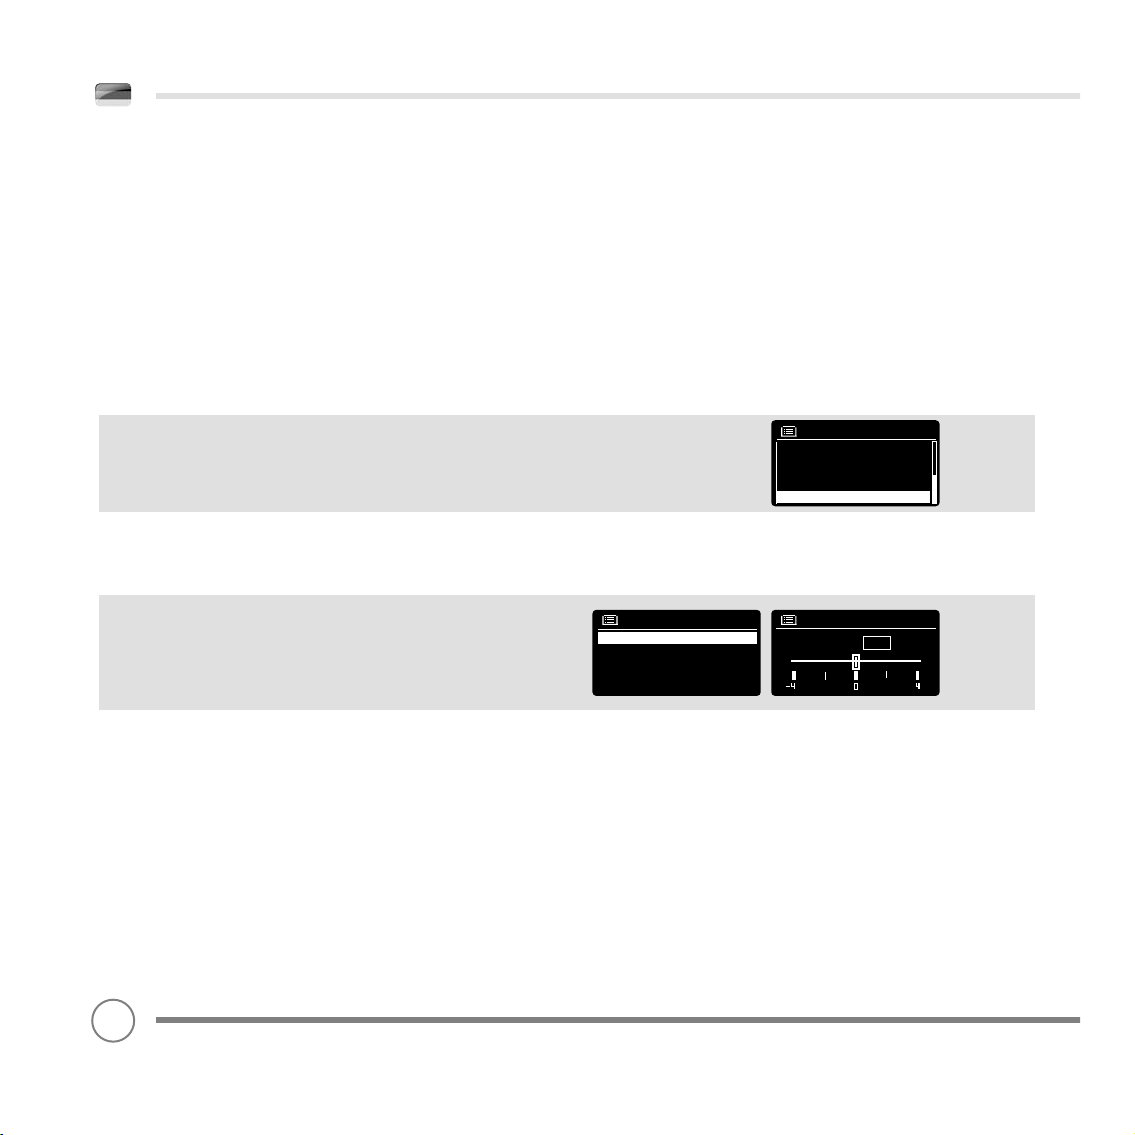
SYSTEMEINSTELLUNGEN
EQUALIZER
Heritage bietet dem Nutzer ein großes Maß an Kontrolle über seine
Standardaudioeinstellungen (Fabrikeinstellungen). Dies beinhaltet
Kontrolle über BASS, TREBLE und LAUTSTÄRKE und die Fähigkeit,
eine gewisse Anzahl voreingestellter EQ-Einstellungen zu nutzen.
Es ist weiterhin möglich, Ihre eigenen, maßgeschneiderten EQEinstellungen zu erstellen – “Mein EQ“ genannt.
Wählen Sie Ihren Favoriten ganz einfach aus der Liste aus, indem Sie Ihre
Auswahl markieren und die Auswahltaste drücken. Heritage wird nun
Ihre Einstellungen in seinem Speicher abspeichern. Als Referenz wird die
aktuelle EQ-Einstellung durch ein Sternchen (*) in der EQ-Liste markiert.
Heritage wird eine Liste von neun EQ Optionen anzeigen: Normal,
Flat, Jazz, Rock, Movie, Klassik, Pop, News und Mein EQ.
Wählen Sie Ihren Favoriten ganz einfach aus der Liste aus, indem Sie Ihre
Auswahl markieren und die Auswahltaste drücken. Heritage wird nun
Ihre Einstellungen in seinem Speicher abspeichern. Als Referenz wird die
aktuelle EQ-Einstellung durch ein Sternchen (*) in der EQ-Liste markiert.
Equaliser
Classic
Pop
News
My EQ
My EQ profile setup >
Um Ihre persönliche EQ-Einstellung zu konfi gurieren, wählen Sie
MEIN EQ PROFILEINSTELLUNGSSETUP im EQUALIZER Menü. Passen Sie
nun die BASS und TREBLE Einstellungen an und entscheiden Sie, ob
die Funktion LAUTSTÄRKE An oder AUS sein soll. Speichern Sie Ihre
Einstellungen mit SPEICHERN. Ihre persönlichen EQ-Einstellungen
können nun unter MEIN EQ im EQUALIZER Menü aufgerufen werden.
78
My EQ profile
Bass : 0
Treble : 0
Loudness : Off
Bass
Bass
0
dB
Page 79
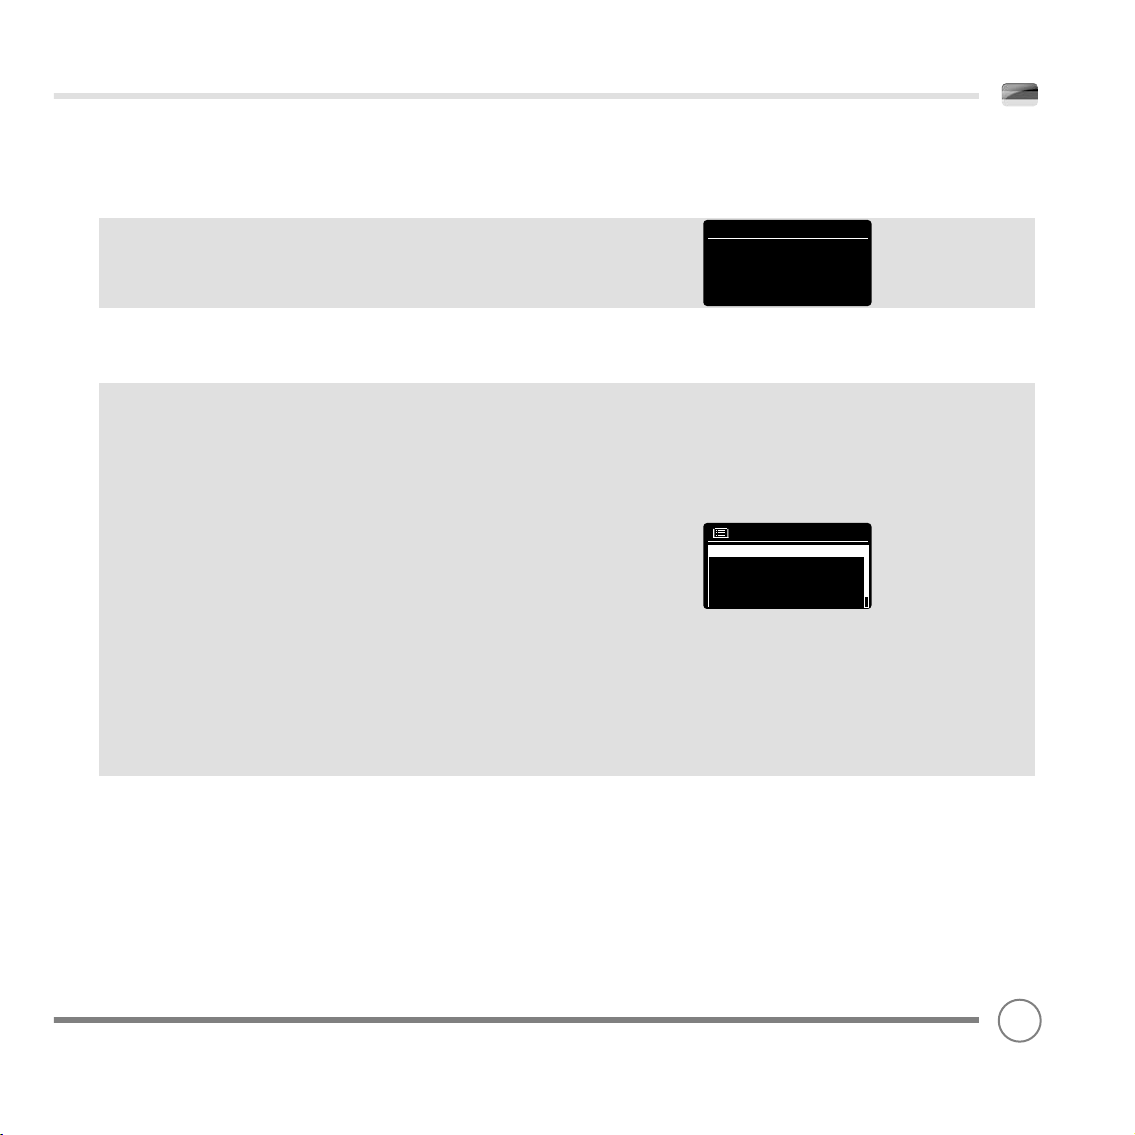
SYSTEMEINSTELLUNGEN
NETZWERK
Das NETZWERKMENÜ kann unter SYSTEMEINSTELLUNGEN im HAUPTMENÜ gefunden werden und beinhaltet einen INTERNET WIZARD,
welcher Ihnen beim Einstellen der Internetverbindung Ihres Radios
hilft.
Für erfahrene Nutzer ist es auch möglich, eine Reihe manuell einstellbarer Einstellungsmenüs von hier zu betreten:
INTERNET WIZARD :
Vereinfacht die Einstellung der Internetverbindung Ihres Radios mit
Hilfe von Schritt-für-Schritt Instruktionen
PBC WLAN EINSTELLUNG :
Wird genutzt, um Ihr Radio mit einem WPS Security Router zu verbinden.
ANZEIGEEINSTELLUNGEN:
Lassen Sie die MAC Adresse, Wlan-Region etc. anzeigen.
WLAN-REGION :
Wo Sie Ihr Radio nutzen - Europa, USA etc.
MANUELLE EINSTELLUNGEN:
Detailierte Kontrolle über Kabelverbindungen und kabellose Verbindungen.
NETZWERKPROFIL:
Zeigt die Namen der letzten vier kabellosen Netzwerke an, mit denen
Heritage verbunden war
HINWEIS:
Heritage speichert die letzten vier Netzwerke, mit denen
das Gerät verbunden war und versucht automatisch, sich mit diesen
zu verbinden. Es ist möglich, nicht gewollte Netzwerke zu löschen.
Wählen Sie einfach SYSTEMEINSTELLUNGEN, NETZWERK und NETZWERKPROFIL. Wählen Sie nun das Netzwerkprofi l, welches Sie löschen
möchten. Wählen sie Löschen und bestätigen Sie mit JA.
Internet Setup
Network Wizard
scanning/
Internet Setup
Internet Wizard
PBC Wlan setup
View settings
Wlan region >
Manual settings
79
Page 80
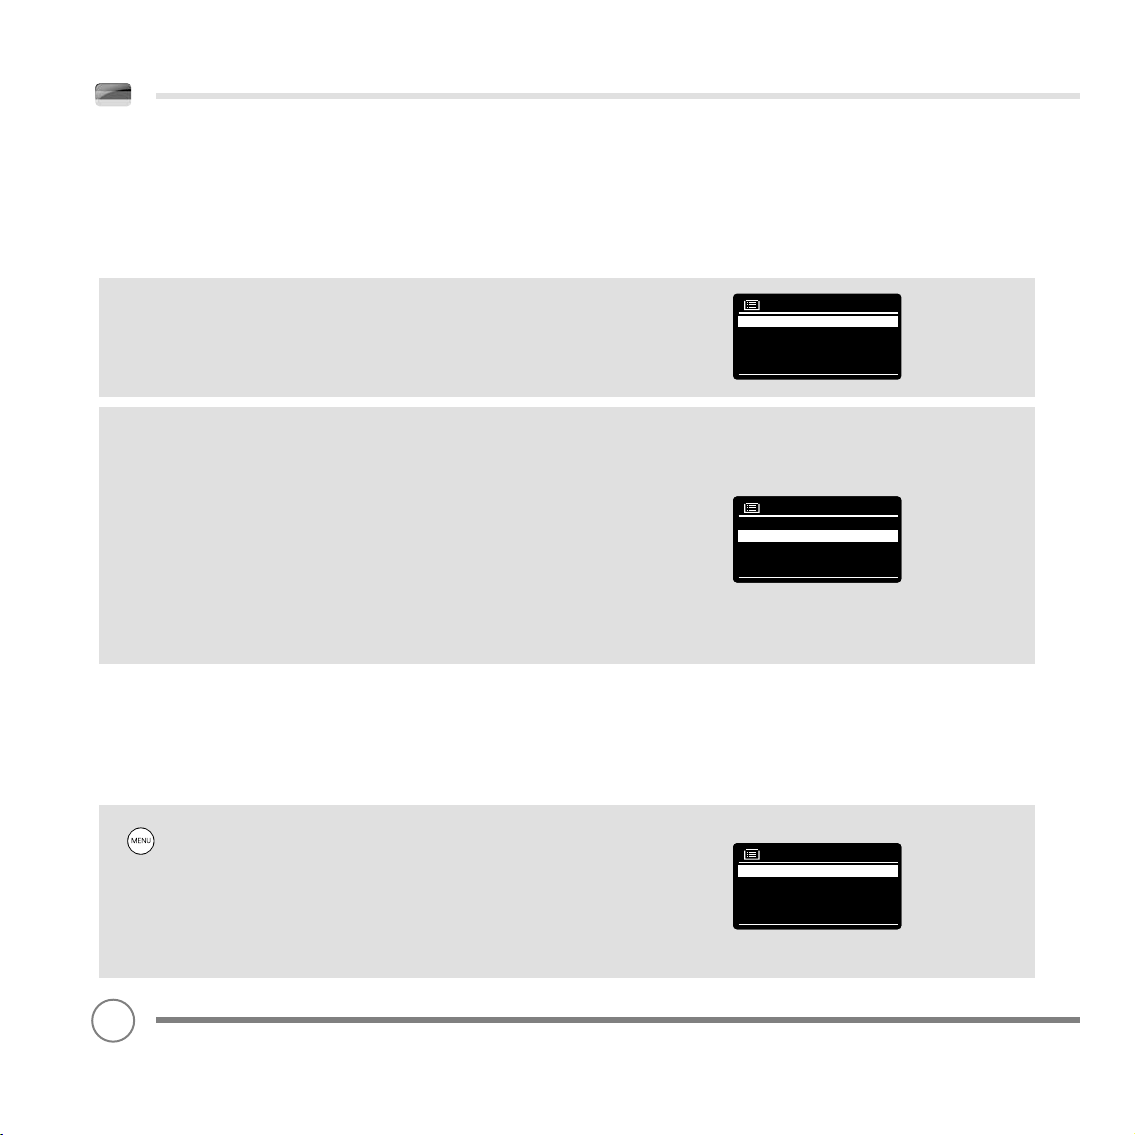
SYSTEMEINSTELLUNGEN
UHRZEIT / DATUM
Dieses im SYSTEMEINSTELLUNGSMENÜ befi ndliche Untermenü
ermöglicht Ihnen eine Anzahl an Einstellungen zu Uhrzeit und Datum.
Das Menü UHRZEIT/DATUM beinhaltet die drei folgenden Optionen:
UHRZEIT / DATUM EINSTELLEN: Erlaubt das manuelle Einstellen von
Uhrzeit und Datum.
AUTO UPDATE : Wählen Sie aus drei verschiedenen automatischen
Einstellungsoptionen.
FORMAT EINSTELLEN: Wählen Sie zwischen dem 12 oder 24 Stunden
Format.
DAB Update:
Übernimmt automatisch Uhrzeit und Datum aus dem DAB Signal.
Heritage muss im DAB MODUS aktiv gewesen sein (und muss ein
Signal empfangen haben), um diese Informationen zu erhalten.
FM Update:
Übernimmt Uhrzeit und Datum aus dem FM Signal. Wie bei DAB, muss
Heritage im FM MODUS aktiv gewesen sein und RDS Informationen
empfangen haben, bevor diese Informationen erhalten werden
können.
Netzwerkupdate:
Übernimmt Uhrzeit und Datum aus der gegenwärtigen
Internetverbindung.
HELLIGKEIT
Heritage ermöglicht ein gutes Maß an Kontrolle über die
Helligkeit seines OLED Bildschirms. Das Helligkeitslevel kann für den
Betriebsmodus und den Standby Modus unterschiedlich eingestellt
werden. Helligkeitslevel sind HOCH, MEDIUM oder NIEDRIG.
Um die Helligkeitseinstellungen zu verändern, drücken Sie die
Menütaste,, wählen sie HAUPTMENÜ und dann
SYSTEMEINSTELLUNGEN: Wählen Sie nun HELLIGKEIT aus der Menüliste.
Es ist Ihnen jetzt möglich, das voreingestellte Helligkeitslevel für die
beiden Operationsmodi, Standby und Betriebsmodus, einzustellen.
Wählen Sie den gewünschten Modus und das gewünschte
Helligkeitslevel. Die gewählten Einstellungen werden gespeichert,
können aber jederzeit geändert werden.
Time/Date
Set Time/Date
Auto update >
Set format
Set timezone >
Daylight savings
Auto update
Update from DAB
Update from Network *
No update
Brightness
Power-On Level *
Standby Level
80
Page 81
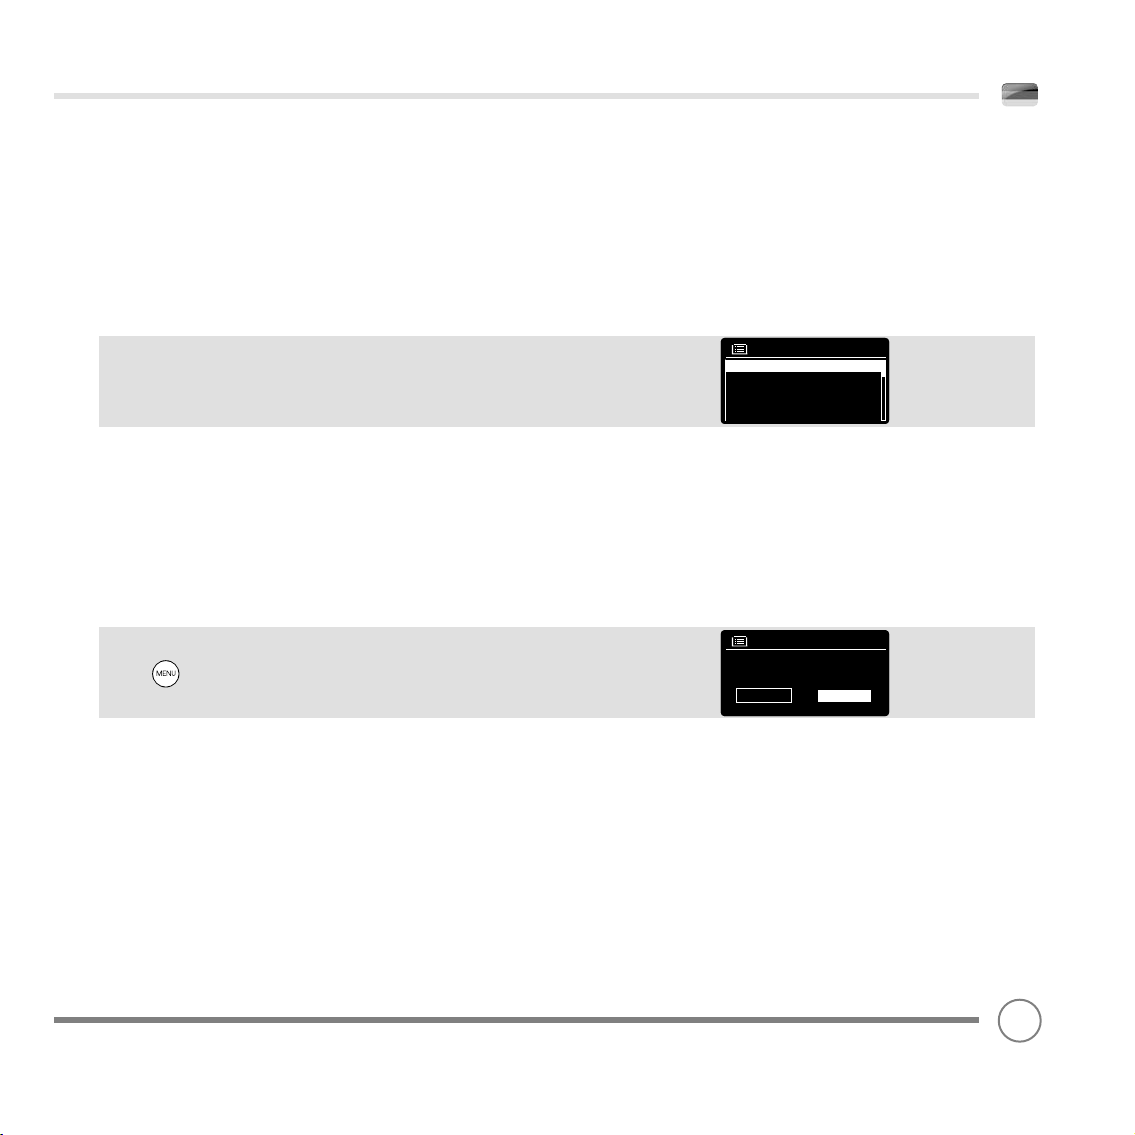
SYSTEMEINSTELLUNGEN
SPRACHE
Die voreingestellte Sprache auf Ihrem Radio ist Englisch. Es werden
weitere 12 Sprachen unterstützt:
Dänisch Holländisch Finnisch
Französisch Deutsch Italienisch
Norwegisch Polnisch Portugiesisch
Spanisch Schwedisch Türkisch
Um die gegenwärtige Sprache zu wechseln, wählen Sie SYSTEMEINSTELLUNGEN aus dem HAUPTMENÜ und dort SPRACHE. Tätigen Sie nun
Ihre Wahl.
RESET DER BETRIEBLICHEN VOREINSTELLUNGEN
Durch Auswahl von FACTORY RESET aus dem Menü SYSTEMEINSTELLUNGEN; können Sie die betrieblichen Voreinstellungen Ihres Heritage
wieder aufrufen. Alle persönlichen Einstellungen wie Uhrzeit/Datum,
Netzwerkkonfi guration und voreingestellte Sender werden gelöscht.
Die gegenwärtig genutzte Softwareversion Ihres Heritage wird
beibehalten, sowie die Registrierung im Internetradioportal. Das heißt,
dass auch Internetradiofavoriten beibehalten werden, solange Sie Ihr
Radio nicht mit einem anderen Benutzerkonto im Portal anmelden.
Um die betrieblichen Voreinstellungen wieder aufzurufen, drücken Sie
die Menütaste und wählen Sie HAUPTMENÜ, SYSTEMEINSTELLUNGEN und dann FACTORY RESET. Antworten Sie mit JA.
Language
English *
Danish
German
Italian
Norweigian
Factory Reset
Proceed?
YES NO
SOFTWAREUPDATES
Von Zeit zu Zeit werden für Ihr Radio Softwareupdates zur Verfügung
gestellt. Diese sind nötig für regelmäßige Wartung und um Ihr Radio
mit zusätzlicher Funktionalität auszustatten. Softwareupdates werden
über Sendeverbindungen durchgeführt.
Heritage wird bei jedem Anschalten nach Softwareupdates suchen.
Ist ein Update zugänglich, werden Sie gefragt, den Download zu
bestätigen.
Bitte beachten Sie, dass nach einem Softwareupdate alle Benutzereinstellungen beibehalten werden.
81
Page 82
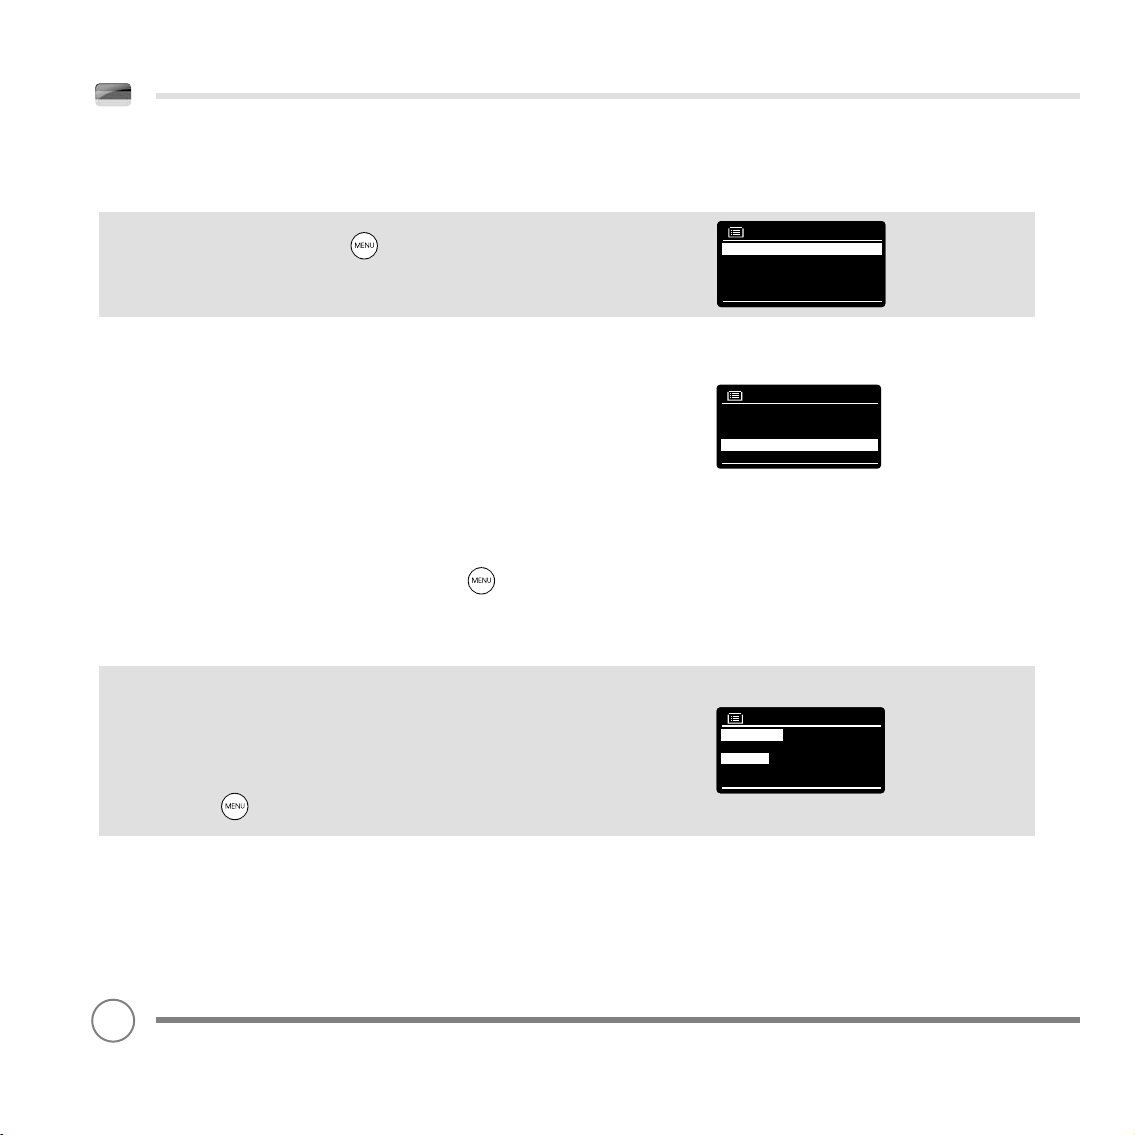
SYSTEMEINSTELLUNGEN
SOFTWAREUPDATES (fortgesetzt)
Sollten Sie es bevorzugen, manuell die Möglichkeit für Softwareupdates zu kontrollieren, drücken Sie die Menütaste und wählen
Sie HAUPTMENÜ. Wählen Sie nun SYSTEMEINSTELLUNGEN und dann
SOFTWAREUPDATES. Wählen Sie AUTO-CHECK EINSTELLUNG und
beantworten Sie mit NEIN.
Um manuell nach Softwareupdates zu suchen, wählen Sie JETZT
SUCHEN aus dem Menü SOFTWAREUPDATES.
Software update
Auto-Check setting *
Check now
ACHTUNG: Vor dem Starten eines Softwareupdates, stellen Sie
sicher, dass Heritage mit dem Hauptstromnetz verbunden ist. Eine
Stromunterbrechung während eines Updates kann Ihrem Radio
bleibende Schäden zufügen.
EINSTELLUNGSWIZARD
Der EINSTELLUNGSWIZARD vereinfacht das Einstellen von Uhrzeit/
Datum und Internet mit Hilfe einer Reihe von Fragen.
Um dem EINSTELLUNGSWIZARD aufzurufen, drücken Sie die
Menütaste und wählen Sie HAUPTMENÜ. Wählen Sie nun SYSTEMEINSTELLUNGEN gefolgt von EINSTELLUNGSWIZARD.
INFO
Bei technischen Hilfeanfragen, kann es sein, dass Sie nach der SOFTWAREVERSION oder der ID NUMMER Ihres Radios gefragt werden.
Beide Informationen können im Untermenü INFO des Menüs SYSTEMEINSTELLUNGEN gefunden werden.
Drücken Sie die Menütaste und wählen Sie HAUPTMENÜ. Wählen
Sie nun SYSTEMEINSTELLUNGEN gefolgt von INFO.
System settings
Language
Factory reset
Software Update
Setup Wizard >
Info
Info
SW version:
domino_V2.0.16.25756-5
Radio ID:
00226100C3D6
82
Page 83

PROBLEMLÖSUNGEN
PROBLEM URSACHE LÖSUNGEN
FM: Zischt.
DAB: Unklar/Setzt aus
Ausgeschnitten
DAB: ‘Keine Sender verfügbar’ Schwache Signalstärke. Wie oben, versuchen Sie dann eine erneute
Kann Netzwerk nicht kontaktieren. Netzwerk operiert nicht. Kontrollieren Sie, dass das Netzwerk zwis-
Schwache Signalstärke. Kontrollieren/Bewegen Sie die Antenne.
Router begrenzt Zugang auf
eingetragene MAC Adressen.
Wi-Fi Signalstärke zu schwach. Kontrollieren Sie die Distanz zum Router.
Unbekannte Kodierungsmethode. Ändern Sie die Kodierungsmethode des
Ungewöhnliche Netzwerkkonfi guration.
Firewall verhindert Zugang. Kontrollieren Sie, dass die folgenden Ports
Wechseln Sie den Standort.
Lokale Suchabfrage (nur starke Sender).
Für DAB, kontrollieren Sie lokale
Verfügbarkeit unter
www.ukdigitalradio.com/coverage
Suchabfrage.
chen Computer und Router funktioniert.
Entnehmen Sie die Heritage MAC Adresse
aus MENÜ > SYSTEMEINSTELLUNGEN > NETZWERK > ANZEIGEEINSTELLUNGEN und fügen
Sie diese der Routerliste hinzu.
HINWEIS:
Heritage hat separate MAC Adressen für kabellose
und verkabelte Netzwerke. Nur die gegenwärtige Netzwerkadaptermethode wird angezeigt. Die andere Adresse kann
durch Ändern der ersten zwei Nummern von ’00’ (kabellos)
zu ‘02’ (verkabelt) erstellt werden.
Versuchen Sie, ob ein Computer an
derselben Stelle mit dem Netzwerk
verbunden werden kann.
Routers. Heritage unterstützt WEP, WPA und
WPA2.
Stellen Sie das Netzwerk manuell über
MENÜ > SYSTEMEINSTELLUNGEM > NETZWERK
> MANUELLE EINSTELLUNGEN ein.
des Routers offen sind:
UDP und TCP Ports 80 und 123
DNS Port 53
Windows shares: Ports 135 - 139
und 445
Windows Media Player: verschieden Nicht-Microsoft Firewall kann Konfi guration
für UPnP verlangen.
83
Page 84
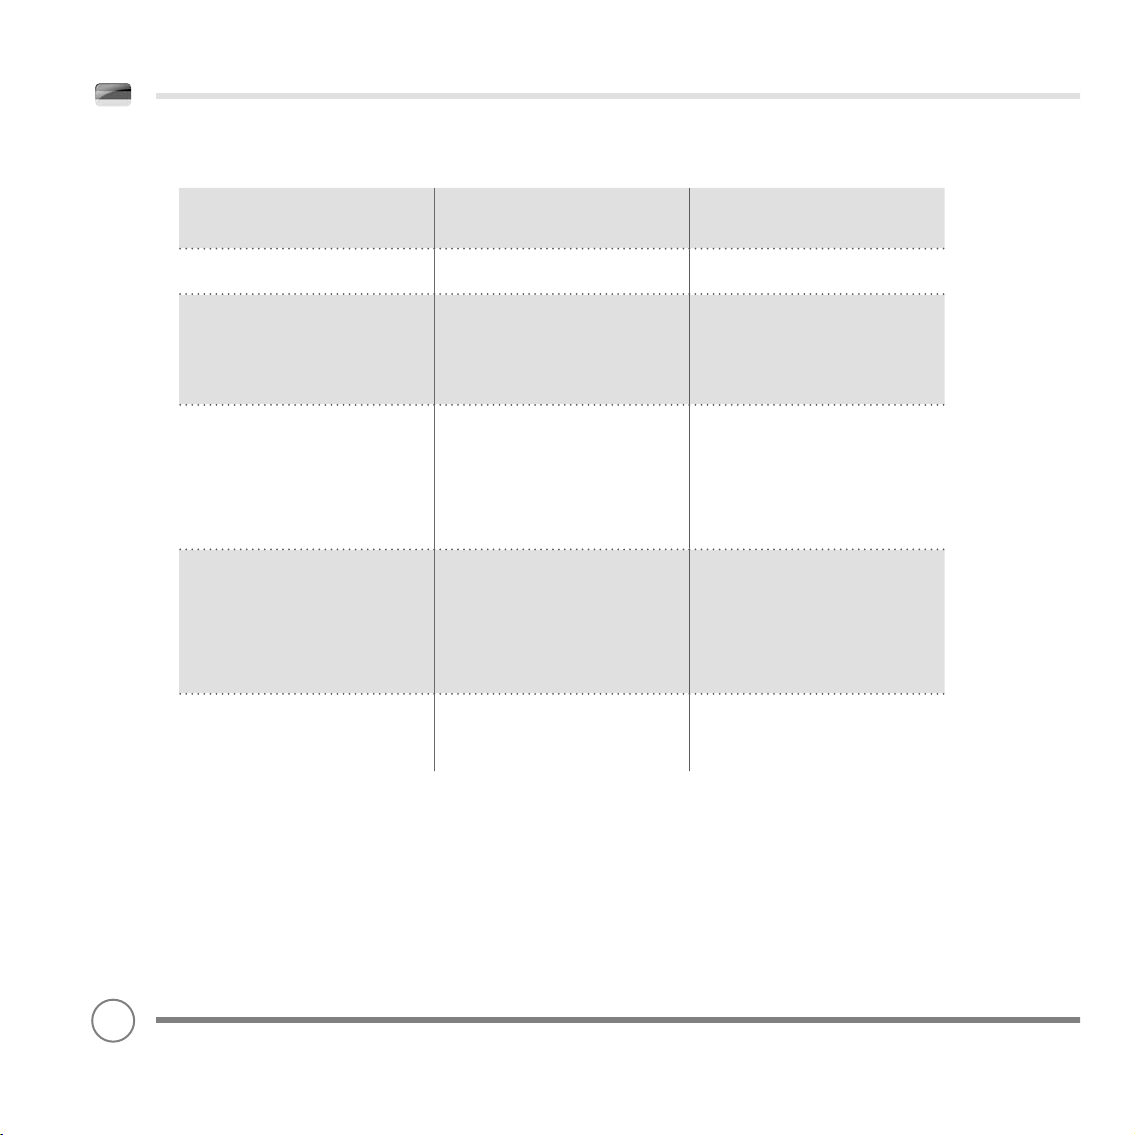
PROBLEMLÖSUNGEN
PROBLEM URSACHE LÖSUNGEN
Kann nicht mit Internet verbinden. Internetverbindung nicht operativ. Kontrollieren Sie, die Funktionalität
Firewall verhindert Zugang. Kontrollieren Sie, dass die folgen-
Ein bestimmter Internetradiosender
kann nicht abgespielt werden.
Cannot play Last.fm ‘Unauthorized’ message Falsche Kontodetails. Kontodetails
Last.fm: Inhalt reicht nicht zur
Wiedergabe
Sender sendet nicht.
Überladene oder ungenügende
Bandbreite.
Sender sendet mit unbekanntem
Codec.
Link veraltet.
Für Ihre bestimmten Künstler- oder
Tag-Radiosender sind nicht genug
Titel verfügbar und lizensiert.
des Internets mit einem Computer.
den Ports offen sind:
UDP und TCP Ports 80 und 123
DNS Port 53.
Einige Internetradiosender können
weitere Ports verlangen.
Versuchen Sie einen anderen
Sender.
Versuchen Sie, den Sender am
Computer über die Internetradioportalseite zu hören.
Versuchen Sie es zu einem späteren Zeitpunkt noch einmal.
nicht eingegeben. Region nicht
unterstützt.
(Last.fm sind wegen Lizenzaspekten gegenwärtig auf bestimmte
Regionen in den USA/UK beschränkt.)
Wählen Sie einen anderen Sender.
84
Page 85
FEHLERMELDUNGEN
NACHRICHT BESCHREIBUNG BEISPIEL
Verbindung nicht erfolgreich. Schlüssel korrekt eingegeben aber
Router weist die Anfrage ab.
Formatfehler Kann das Dateiformat nicht erken-
nen – unabhängiges Netzwerk.
Netzwerkfehler Problem nach Router – inkorrekte
Daten werden vom Netzwerk
übertragen.
Netzwerk Timeout Problem nach Router – keine Ant-
wort vom Netzwerk.
Keine UPnP Mediadatei gefunden Kein UPnP Server gefunden.
Service nicht verfügbar (DAB) Kein DAB Empfang.
Nicht autorisiert. Zugang von UPnP Server nicht
gestattet.
Update fehlgeschlagen Softwareupgrade fehlgeschlagen.
Netzwerk nicht bereit Problem mit der Routerverbindung. Router abgeschaltet.
MAC Filter auf Router aktiv.
.wma erhalten aber beim Dekodieren erkannt, dass der Stream nicht
WMA ist.
Die vom Server empfangenen
Daten sind nicht lesbar.
Normales Senderstreaming bevor
der Sender plötzlich nicht mehr
verfügbar ist.
Erlauben Sie Heritage Zugang zu
den Servereinstellungen
85
Page 86

NOTIZEN
86
Page 87

87
Page 88

Page 89

RADIO DA TAVOLO DELUXE
Con docking station per iPod e iPhone
DAB | DAB+ | FM | Internet Radio | Audio Streaming
Version 2.0
Manuel de l’utilisateur
Page 90
SUPPORTO TECNICO
GARANZIA
Per ogni problema riscontrato nell’utilizzo di questo prodotto vi preghiamo di consultare l’apposita sezione alla pagina 39 di questo manuale.
In alternative è possibile contattare direttamente il servizio di assistenza
tecnica Revo:
UK 01555 666161
Fuori da UK + 44 1555 666161
E’ anche a disposizione un’email, [email protected] ed un sito
internet con una sezione appositamente dedicata ai possibili problemi:
www.revo.co.uk/support
INFORMAZIONI AMBIENTALI
ISTRUZIONI SULLO SMALTIMENTO DEL PRODOTTO (DIRETTIVA WEEE)
Il simbolo riportato su questo prodotto, come da esempio, signifi ca che
è classifi cato come Materiale Elettrico o Elettronico e pertanto non
smaltibile nei rifi uti generici domestici o commerciali alla fi ne del suo
ciclo vitale.
La Direttiva sullo Smaltimento di Materiale Elettrico ed Elettronico
(WEEE) (2002/96/EC) è stata creata per riciclare I prodotti grazie a
tecniche che minimizzino l’impatto dei materiali e delle sostanze pericolose sull’ambiente e per evitare l’aumento di aree sempre più vaste
di stoccaggio irrecuperabile.
Per ottenere maggiori informazioni a riguardo vi preghiamo di contattare le autorità locali o il rivenditore di questo prodotto.
CERTIFICAZIONE RoHS & MARCHIO CE
Questo prodotto è stato progettato e sviluppato nel pieno rispetto
delle regolamentazioni internazionali in tema di Restrizioni sulle Sostanze
Pericolose (RoHS). Inoltre il prodotto è stato sottoposto a test e controlli
sia durante le fasi di progettazione che di produzione, come richiesto
dall’UE, e per questo riporta il marchio CE.
INFORMATIVA SUI RISCHI
• Non utilizzare la radio vicino all’acqua
• Non rimuovere viti o parti
• Utilizzare solo gli alimentatori forniti
• Evitare che possano penetrare piccoli oggetti o liquidi all’interno del
prodotto
ISO 7000-0434
Revo Technologies Ltd garantisce all’utilizzatore fi nale che questo
prodotto è privo di difetti in materiali e nella fattura se utilizzato in
modo idoneo ed è pertanto garantito per la durata di un anno dalla
data d’acquisto.
La garanzia copre i soli difetti di produzione e non può essere
considerate valida in caso di danno accidentale, usura o rotture,
negligenza dell’utilizzatore, modifi che o riparazioni non autorizzate
da Revo Technologies Ltd.
Per registrare l’acquisto: www.revo.co.uk/register
COPYRIGHT E
RICONOSCIMENTI
Copyright 2011 Revo technologies Ltd. Tutti i diritti riservati.
E’ vietata la copia, la distribuzione la trasmissione o la trascrizione in
qualunque forma e con qualunque mezzo di questo documento
senza il permesso di Revo Technologies Limited.
REVO e HERITAGE sono marchi o marchi registrati di Revo
Technologies Ltd. iPod è un marchio Apple Inc., registrato negli U.S.
ed in altri Paesi.
Revo Technologies Ltd
The Inox Building, Caldwellside, Lanark,
Scotland, United Kingdom, ML11 7SR
Tel: 01555 66 61 61 Int. Tel: +44 1555 66 61 61
Fax: 01555 66 33 44 Int. Fax: +44 1555 66 33 44
Email: [email protected] Website: www.revo.co.uk
DISCLAIMER
Revo Technologies Limited non ha rappresentazioni o garanzie nel
rispetto del contenuto di questa pubblicazione, e nello specifi co
disconosce ogni implicita garanzia di vendita o d’uso ad ogni fi ne.
Inoltre, Revo Technologies Limited si riserva il diritto di effettuare
cambiamenti a questa pubblicazione qualora fosse necessario,
senza obbligo di notifi ca a nessuna associazione o organizzazione.
90
Page 91

CONTENUTI
90 Supporto Tecnico
90 Informazioni Ambientali
90 Garanzia
90 Copyright e Riconoscimenti
90 Disclaimer
91 Benvenuti /Il Marchio / Estrazione dall’Imballo
92 Anatomia
93 Telecomando
94 Alimentazione
94 Set-Up
95 Controllo Heritage / Struttura Menu
96 - 97 Modalità DAB
98 - 99 Opzioni MENU MODALITA’DAB
100 Modalità FM
101 Modalità FM / Modalità AUX-IN
101 - 104 Modalità iPod
105 - 110 Modalità Radio Internet
111 Portale Radio Internet
112 -113 Impostare un Server Musicale
114 - 116 Modalità Music Player
117 - 119 Modalità Last.fm
120 - 121 Sveglia
122 - 126 Impostazioni di Sistema
127 - 128 Risoluzione Problemi
129 Messaggi d’Errore
130 Note
BENVENUTI
Grazie per aver acquistato la nostra radio Heritage, siamo sicuri
che vi regalerà molti anni di divertimento e di affi dabilità. Questa
guida è stata creata per garantire un’installazione rapida e sicura
della vostra nuova radio, offrendovi ogni tipo di informazione utile e
di guida anche sugli aspetti più complessi, nonché note essenziali
sulla vostra sicurezza, note a riguardo della garanzia e risoluzione dei
problemi.
IL MARCHIO HERITAGE
Heritage è una reinterpretazione contemporanea della classica
radio europea da tavolo stile anni 60. Una radio digitale multi formato
con funzioni DAB, DAB+, FM e Wi-Fi internet radio, come anche
wireless audio streaming e funzioni docking iPod/iPhone.
Heritage è fabbricato utilizzando materiali e componenti delle
migliori qualità. Case in alluminio e vero noce americano. Prestazioni
audio assicurate da driver altoparlante al neodimio da 3”
personalizzato, e da un eccellente amplifi catore hi-fi da 7W. Infi ne,
Heritage dispone di un ampio display grafi co OLED e di un sistema di
comando intuitivo.
ESTRAZIONE DELL’IMBALLO
DI HERITAGE
Rimuovere cautamente Heritage dalla sua confezione estraendo gli
altri oggetti dalla scatola.
All’interno della confezione troverete:
• Radio Heritage
• Telecomando
• Kit d’adattamento dock station per iPod/iPhone
• Alimentatore con adattatori multi-paese (UK, Euro, USA)
• Manuale d’Uso
Qualora mancassero delle componenti o se le trovaste danneggiate,
contattare immediatamente il proprio rivenditore o chiamare Revo
al numero +44 (0) 1555 66 61 61
NOTE:
L’imballo Heritage dovrebbe essere conservato per un
eventuale futuro utilizzo poiché è il modo più sicuro di trasportare
Heritage e pertanto necessario.
91
Page 92
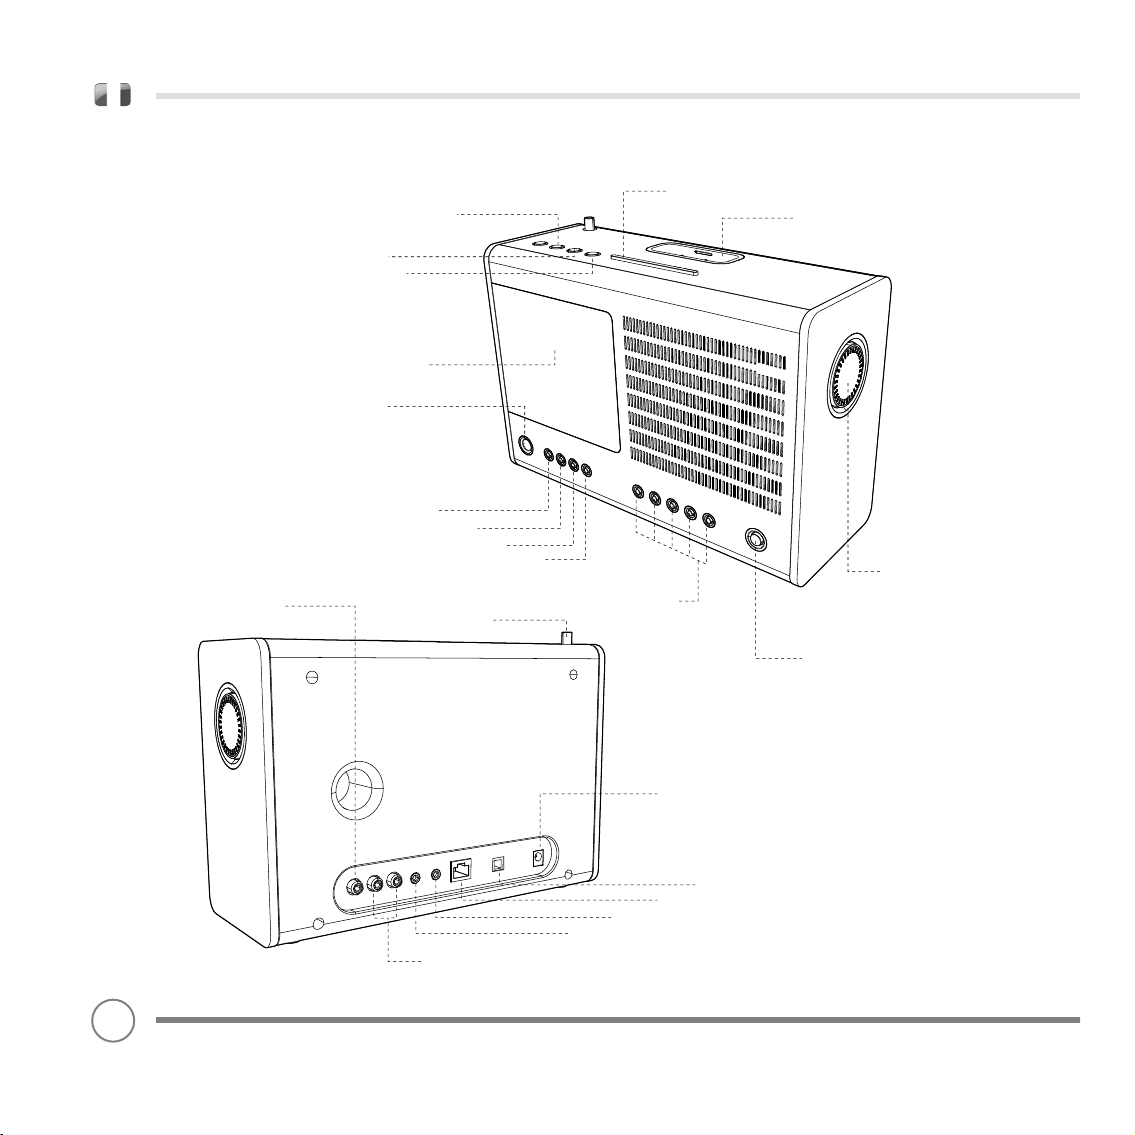
ANATOMY OF HERITAGE
Indietro
Controllo di cursore
iPod Video Out
Play/Pause
Avanti
Feedback
OLED
Mode
Menu
Telescopic Antenna
Info
Svegli
Snooze/Sleep Bar
iPod/iPhone Dock
Volume Dial
Station Presets 1 - 5
Accendi/Standby
92
Connettore Stereo RCA
Cavo di Corrente
Cavo LAN
Aux-In
3.5 Connectore Cuffie
Digital Optical Out
Page 93
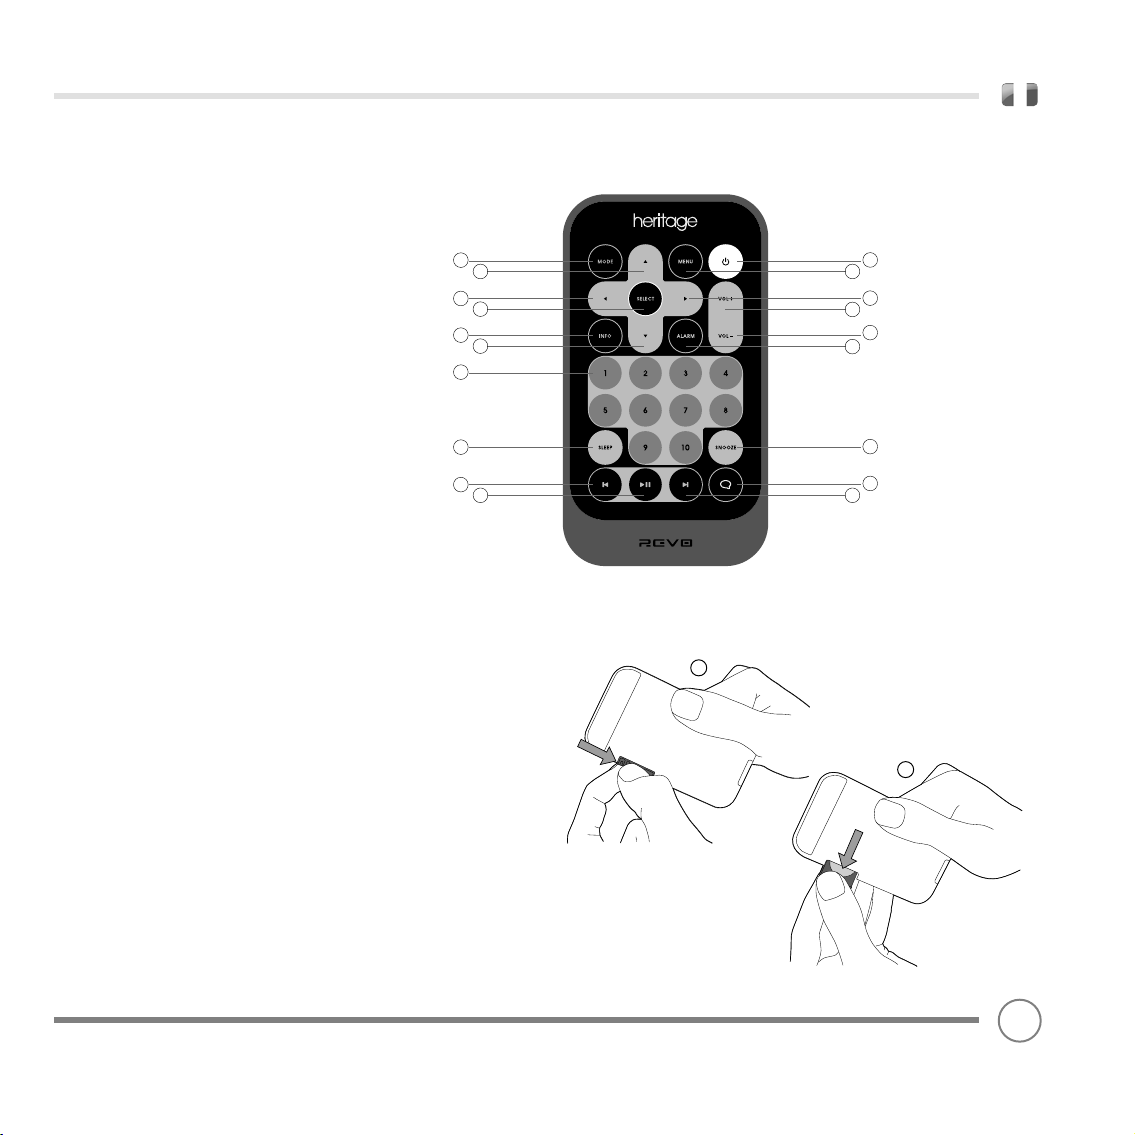
TELECOMANDO
01 - Mode
02 - Visualizza Sopra
03 - Menu
04 - Accendi
05 - Indietro
06 - Seleziona
07 - Avanti Veloce
08 - Aumento Volume
09 - Info
10 - Visualizza Giù
11 - Sveglia
12 - Diminuisci Volume
13 - Pre-Sintonizzate 1- 10
14 - Sleep
15 - Snooze
16 - Skip Back (Indietro Veloce)
17 - Play/Pausa
18 - Skip Forward (Avanti Veloce)
19 - Feedback (Love/Ban)
SOSTOTUZIONE BATTERIA
1
2
5
6
9
10
13
14
16
17
3
4
7
8
12
11
15
19
18
1
Il telecomando Heritage è alimentato da una singola batteria al litio
da 3V. A seconda di quanto utilizzata, la batteria dovrebbe durare
senza problemi da 1 a 2 anni.
Sostituire la batteria quando si evidenzia un rallentamento nella
percezione dei comandi o quando le funzionalità risultano
signifi cativamente ridotte.
Sostituire la vecchia batteria con una nuova cellula al litio CR2025.
2
93
Page 94
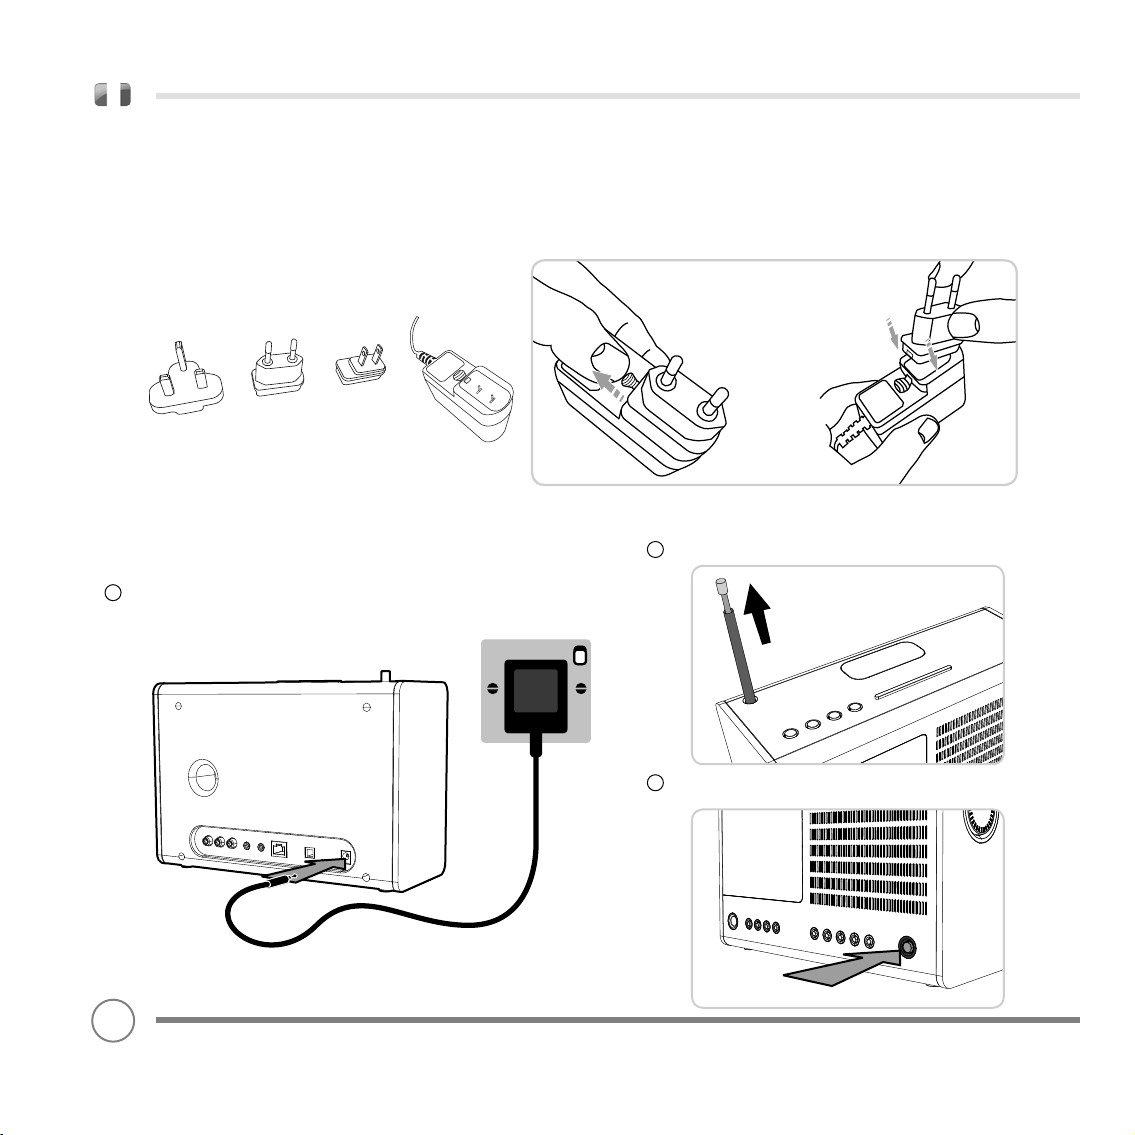
ALIMENTATORE (PSU)
PUSH
La vostra radio Heritage è fornita di adattatori multi-paese, il che
signifi ca che possono operare in molti dei paesi del mondo.
Scegliete l’adattatore corrispondente al vostro paese tra le
alternative fornite e seguite le istruzioni illustrate qui in basso.
UK EURO U.S.A
SET-UP
Utilizzando la PSU fornita, connettere un’estremità all’ingresso di corrente posizion-
1
ato sul retro di Heritage, a questo punto inserite l’altra estremità alla presa sul muro.
2
Estrarre completamente l’antenna per DAB o FM
94
3
Premere il tasto ACCENDI una sola volta per iniziare il
processo di inizializzazione.
Page 95
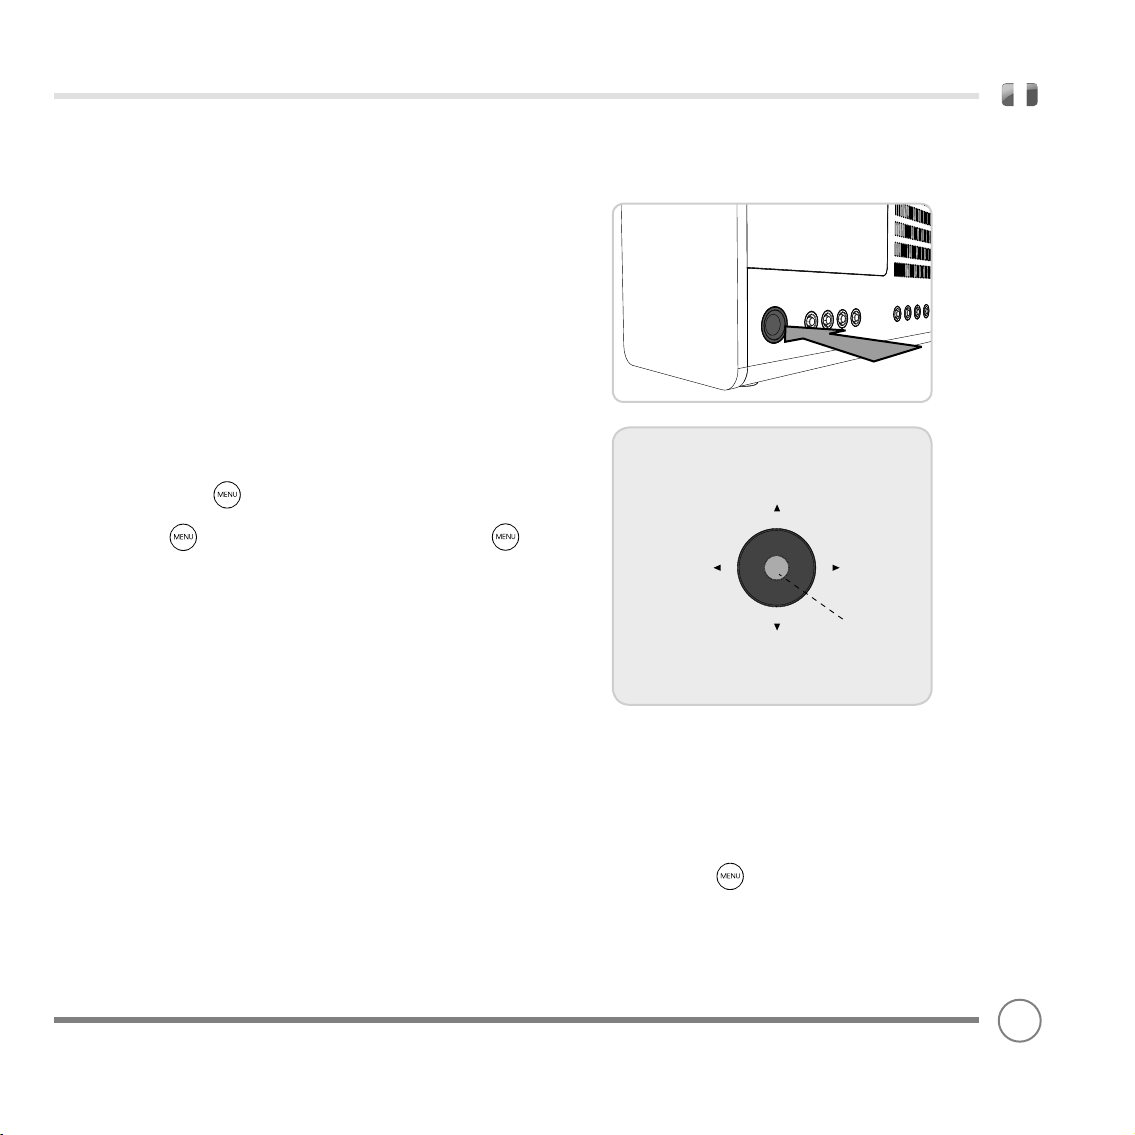
CONTROLLO HERITAGE
‘SU’
‘GIÙ’
‘SINISTRO’
(PARTE POSTERIORE)
‘DESTRA’
(DI ANDATA)
‘STAMPA’
(PER PER SELEZIONARE)
SELECT
LEVA DI COMANDO
Per ottenere il massimo dalla vostra radio, è importante capire il
funzionamento del suo sistema di comando e del menu.
COMANDO CURSOR
La vostra radio utilizza un sistema di comando basato sul cursore per
semplicità di utilizzo. Il comando del cursore ha cinque funzioni:
UP Scorre verso l’Alto
DOWN Scorre verso il Basso
LEFT Scorre verso Sinistra va indietro tra I Menu
RIGHT Scorre a Destra e va Avanti tra Menu
PRESS Seleziona l’opzione
TASTO MENU
Grazie al tasto potrete entrare nel Mode Menu della funzionalità in cui vi trovate. Ad esempio, premendo il tasto nella modalità
DAB, vi riporterà nel DAB MODE MENU. Tenendo premuto
per un secondo, rientrerete nella schermata “play” iniziale.
TASTO MODE
Premendo il tasto MODE si visualizzeranno tutte le modalità operative
di Heritage. E’ anche possibile muoversi tra le diverse modalità attraverso il MENUPRINCIPALE (vedi sotto).
FUNZIONAMENTO MENU
MENU PRINCIPALE
E’ il menu più importante di Heritage e permette di entrare nelle
diverse modalità operative, di cambiare le impostazioni e di visualizzare le informazioni come ad esempio l’ID del software della radio.
Il MENU PRINCIPALE offre accesso alle seguenti modalità e
sotto-menus:
• Radio Internet • iPod
• Lettore Musicale • Ingresso Ausiliario
• Last.fm • Sveglia
• Radio DAB • Impostazioni di sistema
• Radio FM
MENU MODALITA’
I Menu Modalità si chiamano così perché illustrano le funzioni
disponibili nella modalità corrente.
Premendo il tasto vi riporterà in qualunque momento nel
Menu Modalità della modalità in cui vi trovate in quel momento.
Ognuna dei Menu Modalità include anche la voce MENU
PRINCIPALE, così che possiate ritornare al livello superiore del MENU.
95
Page 96
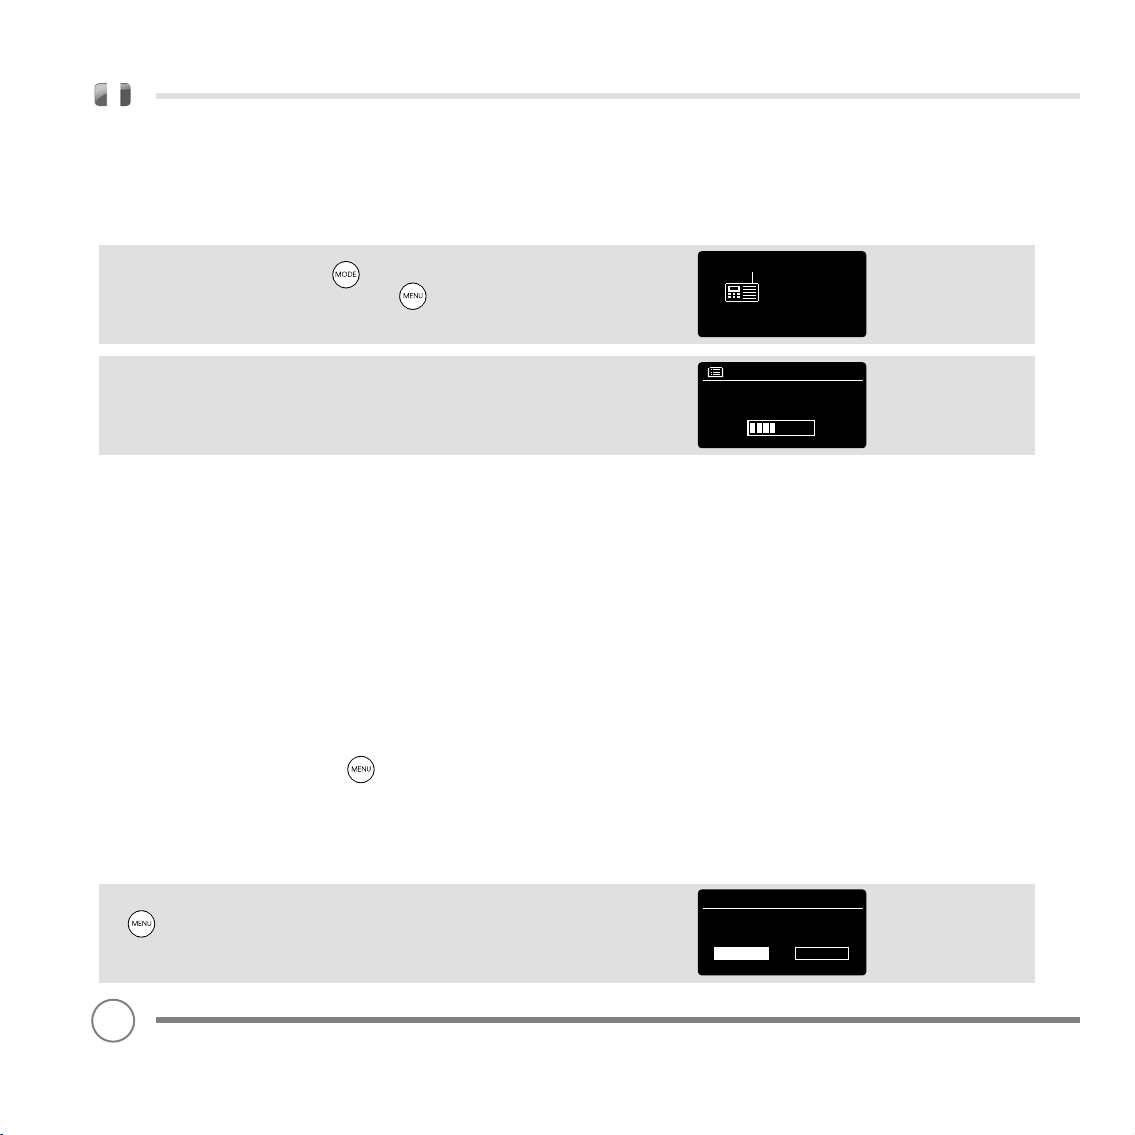
MODALITA’ DAB RADIO
PREPARARSI PER L’OPERAZIONE DAB
Prima di avviare la Modalità DAB, estendere completamente
l’antenna.
Per entrare in DAB MODE, premere il tasto MODE fi nché non si
visualizza la voce DAB MODE oppure premere e poi selezionare
MENU PRINCIPALE, poi DAB dalle opzioni menu.
Al momento dell’accensione, Heritage farà automaticamente una
scansione delle stazioni disponibili nella zona e poi le memorizzerà in
ordine alfabetico.
Potrebbe essere necessario operare una scansione manuale di tanto
in tanto per aggiornare la lista delle stazioni radio. Questo potrebbe
essere necessario per le seguenti motivazioni:
1. La disponibilità delle stazioni può cambiare quando compaiono
nuove stazioni oppure qualora emittenti esistenti cessassero la
programmazione.
2. Se la ricezione è scarsa durante lo scanning automatico, ad esempio se l’antenna della radio non è stata estratta del tutto potrebbe
verifi carsi che la lista delle stazioni sia incomplete o vuota.
3. Se alcune stazioni non hanno una buona ricezione (audio spezzato
o di scarsa qualità), così da selezionare solamente quelle con un
buon segnale.
Per una scansione manuale, premere il tasto e in seguito
selezionare SCAN COMPLETO dalla lista menu.
Per scansionare solo le stazioni con il segnale chiaro, premere e poi
selezionare SCAN LOCALE dalla lista menu. Una volta completato la
scansione, la radio elencherà tutte le stazioni disponibili.
Scanning
Stations : 21
Scanning
DAB
radio
Per rimuovere stazioni presenti nella lista ma non valide, premere e
poi scegliere ABOLISCI NON VALIDE Quando sullo schermo
comparirà la domanda “rimuovere tutte le stazioni non valide?”,
selezionare Sì.
96
Prune Invalid
This removes all invalid
stations, continue?
YES NO
Page 97
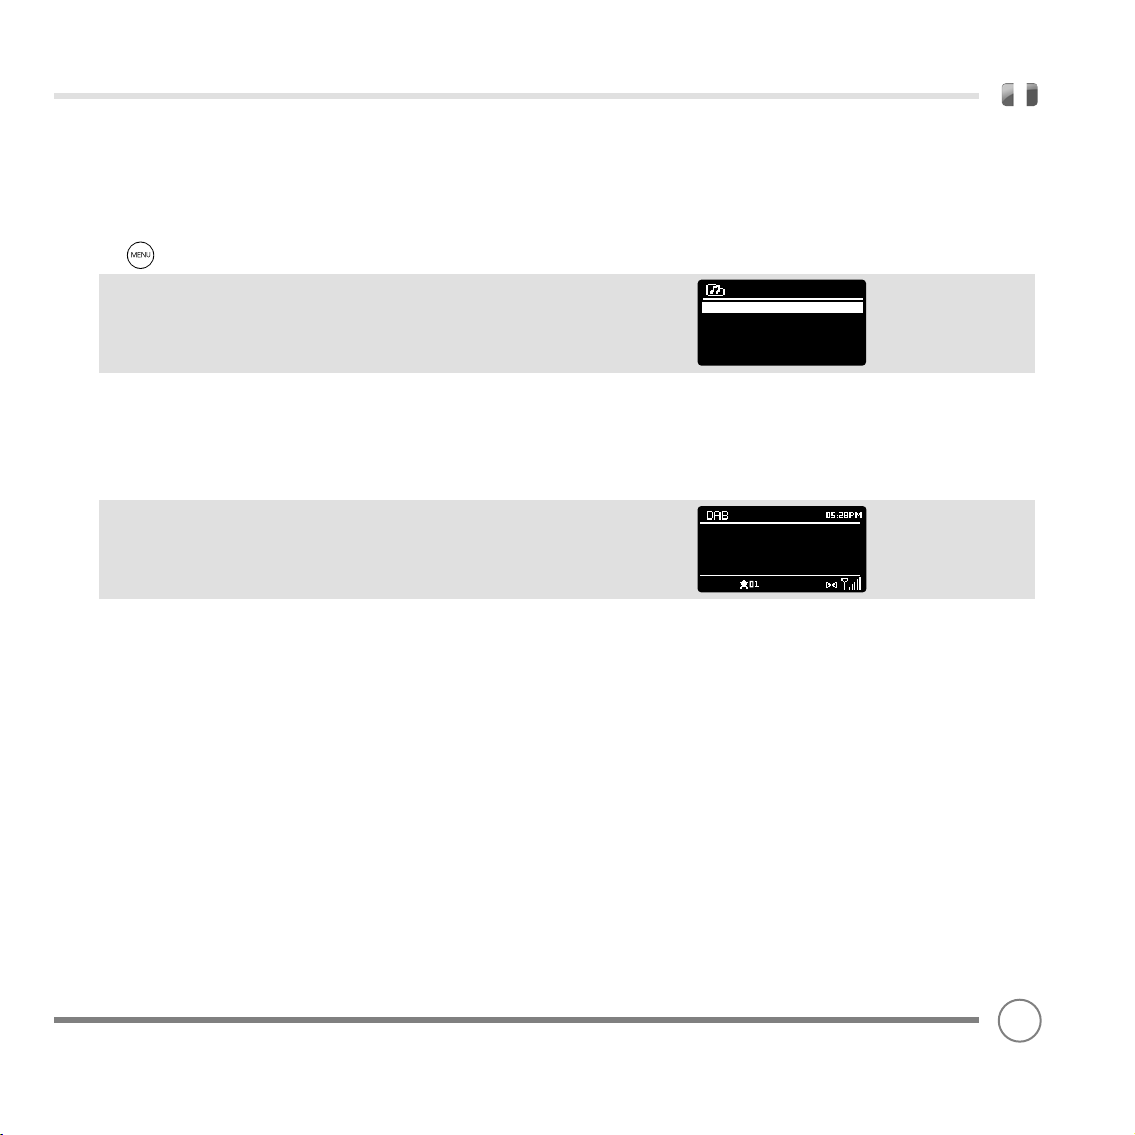
MODALITA’ RADIO DAB
SELEZIONARE UNA STAZIONE
Per accedere all’elenco delle stazioni radio, premere UP, DOWN o
LEFT sul comando del cursore quando lo desiderate, oppure premere
poi selezionare STATION LIST.
Scorrere l’elenco delle stazioni disponibili con i comandi UP e DOWN
del cursore poi premere il tasto selezione per selezionare la stazione
desiderata, o premere RIGHT.
PRESELEZIONE STAZIONI PREFERITE
Heritage vi permette di conservare le vostra stazioni favorite come
preselezioni accedendovi sia dai suoi 5 tasti montati sul frontalino
che dai 10 tasti disposti sul telecomando.
Per salvare la stazione in ascolto in quel preciso momento, premere
e tenere premuto il tasto corrispondente fi nché non si visualizzerà la
scritta “Preselezione Memorizzata”. Il numero di stazione assegnato
alla nuova memorizzazione sarà visibile in fondo allo schermo.
Se in futuro si desiderasse cambiare una particolare preselezione,
ripetere il processo e sopra descritto e la selezione precedente sarà
sovrascritta con la nuova scelta.
Station list
Absolute
Amazing
BBC 1Xtr
BBC 6Mus
BBC Gael
BBC Radio 6Music
u to vote for a track that
missed out on the 6:00 AM
Music playlist
97
Page 98
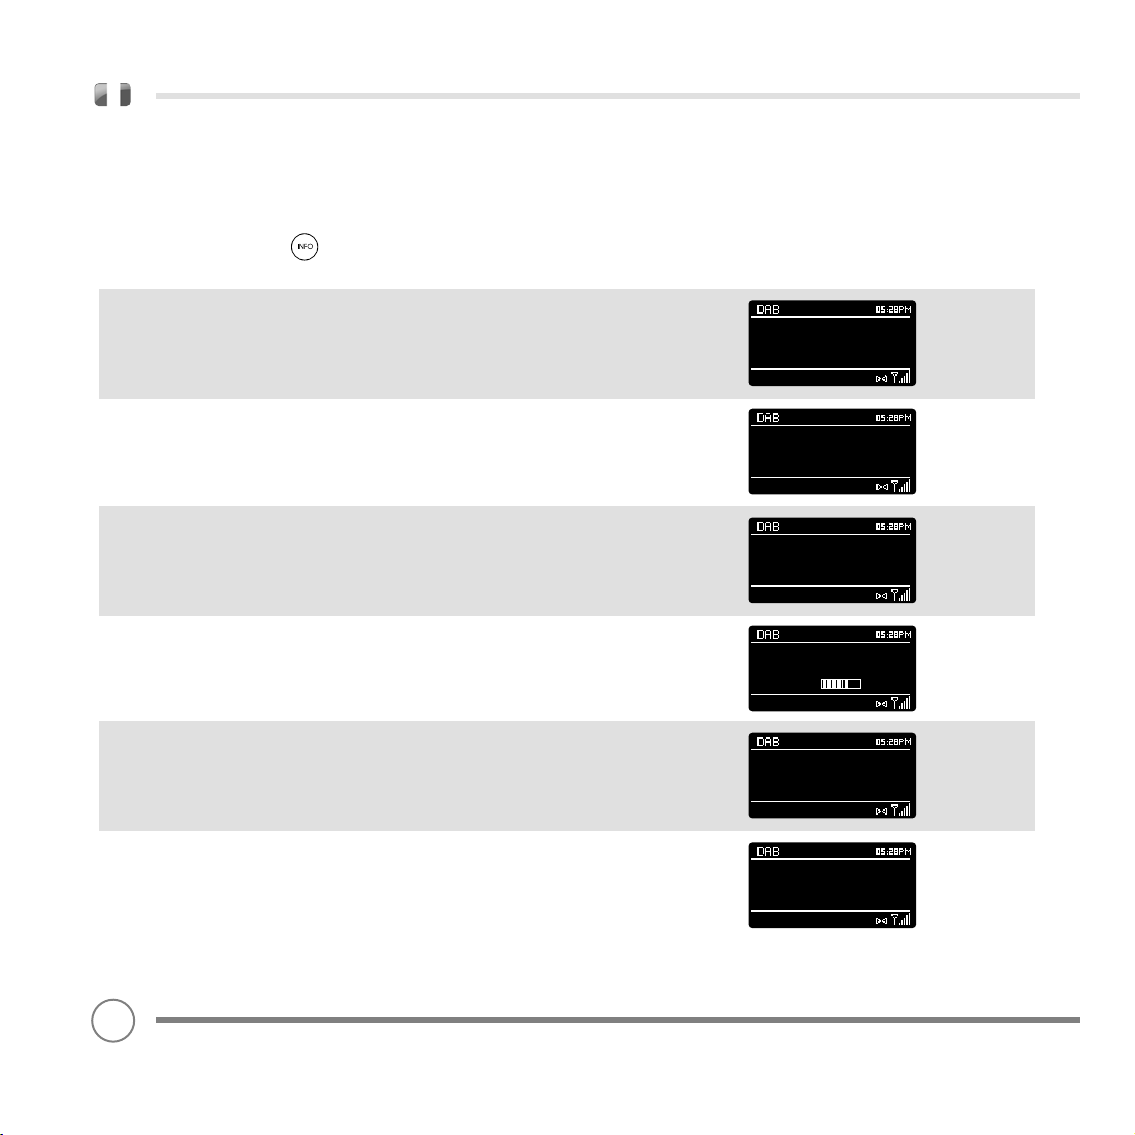
OPZIONI MENU MODALITA’ DAB
INFORMAZIONI STAZIONE
In DAB MODE, Heritage è in grado di visualizzare diversi tipi di informazioni sullo
schermo. Premendo il tasto è possibile ottenere le seguenti informazioni.
SCHERMO DAB STANDARD Scorre le informazioni standard dell’emittente.
TIPO PROGRAMMA Ad esempio, News, Rock Music, Classica ecc.
MULTIPLEX E FREQUENZA Proprietario Multiplex e frequenza stazione.
POTENZA SEGNALE La Potenza del segnale in quel momento.
BBC Radio 6Music
Now Playing : Glasvegas
Go Square Go!
BBC Radio 6Music
Rock Music
BBC Radio 6Music
BBC National DAB
Freq: 225.648 MHz
BBC Radio 6Music
Signal Level : 90
Strength
BIT RATE E CODEC Formato audio, velocità media, mono o stereo
DATA Data odierna.
98
BBC Radio 6Music
Bit rate: 128 kbps
Codec : MP2
Channels : Joint Stereo
BBC Radio 6Music
Today’s Date :
22/12/09
Page 99

DYNAMIC RANGE COMPRESSION (DRC)
Se state ascoltando della musica ad alto contenuto dinamico in un
ambiente rumoroso (ad esempio, musica classica mentre cucinate),
con questa opzione potrete comprimere la dinamica dell’audio
aumentando così i suoni più bassi e riducendo i suoni più alti per un
effetto più omogeneo.
Per cambiare le impostazioni DRC, premere e poi scegliere
l’opzione DRC, prima di selezionare SPENTO, BASSO o ALTO.
ORDINE STAZIONE
E’ possibile impostare l’ordine della lista di stazioni DAB come
ALFANUMERICO, ENSEMBLE o VALIDE.
Come suggerisce la denominazione, l’ ALFANUMERICO elenca le
stazioni in ordine numerico.
ENSEMBLE elenca gruppi di stazioni che sono trasmesse insieme nello
stesso insieme, ad esempio BBC o Central Scotland Local.
VALIDE visualizza per prime le stazioni valide, poi le alfanumeriche e
infi ne quelle non ricevibili.
Per cambiare l’ordine delle stazioni, premere e poi
selezionare ORDINE STAZIONI, prima di scegliere tra ALFANUMERICO,
ENSEMBLE o VALIDE.
DRC
DRC Low
DRC High
DRC Off #
Station order
Alphanumeric #
Ensemble
Valid
ORDINE STAZIONE DESCRIZIONE
ALFANUMERICO Visualizza tutte le stazioni in ordine alfanumerico.
ENSEMBLE Elenca le stazioni attive [quelle che trasmettono segnale] prima di quelle inattive.
VALIDE Rimuove le stazioni inattive dalla lista stazioni.
99
Page 100

MODALITA’ RADIO FM
OPERAZIONE FM
Assicurarsi che l’antenna della radio sia completamente estesa
prima diavviare la MODALITA’ FM.
Per entrare in MODALITA’ MODE, premere il tasto fi no
all’apparire della scritta MODALITA’ FM sullo schermo, oppure
Premere e poi selezionare MAIN MENU, poi FM dalla lista delle
opzioni.
FM
radio
Se questa è la prima volta che si utilizza Heritage in MODALITA’
FM, effettuare una scansione a partire dalla prima frequenza
disponibile – altrimenti Heritage si sintonizzerà automaticamente
sull’ultima stazione ascoltata in precedenza.
Premendo il tasto selezione, partirà la scansione automatica fi no alla
prima stazione disponibile. Non appena la stazione viene trovata, la
ricerca si interrompe.
Per migliorare manualmente la sintonizzazione, utilizzare i comandi UP
o DOWN del cursore.
Quando ci si trova su una frequenza FM con un segnale molto forte e
con la stazione che sta trasmettendo informazioni RDS, Heritage
visualizzerà il nome della stazione insieme ad alter informazioni utili sul
display.
PRESELEZIONI RADIO PREFERITE
Heritage permette di memorizzare le proprie stazioni preferite come
preselezioni, sia utilizzando i suoi 5 comodi pulsanti disposti sul
pannello frontale che i 10 tasti del telecomando.
Per memorizzare la stazione in ascolto, tenere semplicemente
premuto un pulsante di preselezione fi no alla comparsa della scritta
“Preselezione Memorizzata” sul display della radio. Il numero di
preselezione assegnato alla stazione sarà visibile sul fondo dello
schermo.
Se si desidera cambiare una particolare preselezione, ripetere il
processo sopra descritto e la nuova frequenza salvata sostituirà
automaticamente la precedente.
87.50 MHz
BBC R3
Composer of the Week
Coming next - Proms
Chamber Music 2009
Preset stored
100
 Loading...