


H5i
Table of contents
 Loading...
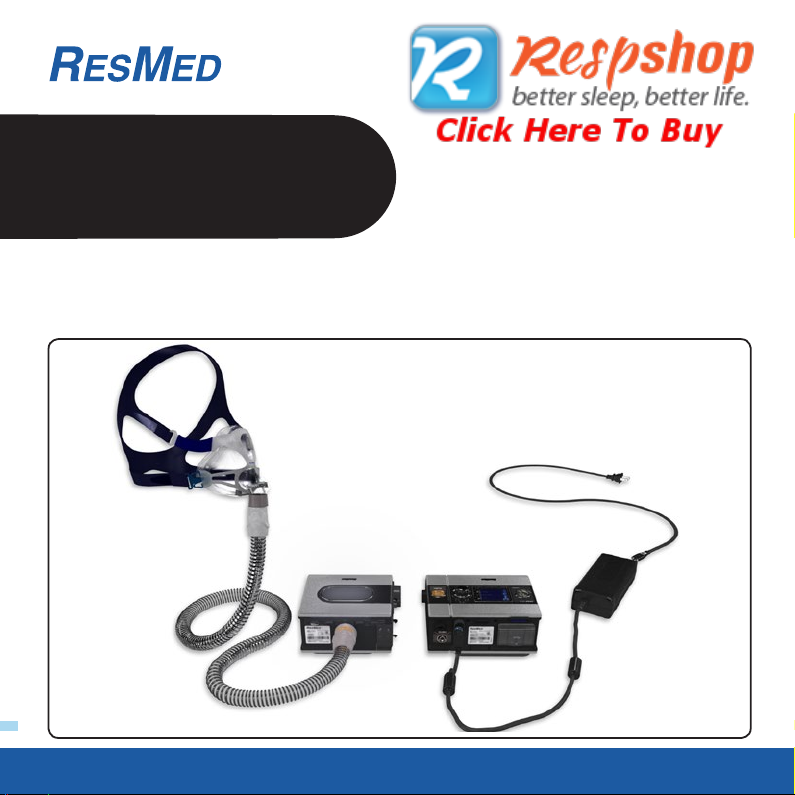
A
3
1
2
4
5
6
H5i™ for S9 VPAP Tx
HEATED HUMIDIFIER
User Guide
English • Español • Português • Deutsch • Français
1 2 3 54
English
WARNINGS
Read the entire manual before using the device.
•
• Use the device only as directed by your physician or healthcare provider.
• Use the device only for the intended use as described in this manual. Advice contained in this
manual should not supersede instructions given by the prescribing physician.
•
If you notice any unexplained changes in the performance of the device, if it is making unusual or harsh
sounds, if the device or the power supply are dropped or mishandled, if water is spilled into the
enclosure, or if the enclosure is broken, discontinue use and contact your ResMed Service Center.
•
Beware of electrocution. Do not immerse the device, humidifier, power supply or power cord in water.
In the event of a spill, disconnect the device from the power supply and let the parts dry. Always unplug
the device before cleaning and make sure that all parts are dry before plugging in the device.
• Explosion hazard – do not use in the vicinity of flammable anesthetics.
• Make sure the power cord and plug are in good condition and the equipment is not damaged.
• Keep the power cord away from hot surfaces.
• Do not operate the H5i if it is not working properly or if any part of the device or H5i has been
dropped or damaged.
• Do not leave long lengths of air tubing around the top of your bed. It could twist around your head or
neck while you are sleeping.
•
Only ResMed air tubing and accessories should be used with the device. A different type of air tubing or
accessory may alter the pressure you actually receive, reducing the effectiveness of the treatment.
• Only use the ResMed 90W power supply units.
CAUTIONS
•
Do not open the device enclosure. There are no user serviceable parts inside. Repairs and servicing
should only be performed by an authorised ResMed service agent.
• Do not use bleach, chlorine, alcohol, or aromatic-based solutions, moisturising or antibacterial soaps
or scented oils to clean the device, humidifier or air tubing. These solutions may cause damage and
reduce the life of these products.
• The H5i should only be used with tubing or accessories recommended by ResMed. Connection of
other delivery tubes or accessories could result in injury, or damage to the device.
• Do not open the H5i enclosure. There are no user serviceable parts inside. Repairs and servicing
should only be performed by an authorised ResMed service agent.
• Do not overfill the water tub as water may enter the device and air tubing.
English
1

• Do not use any additives (eg, scented oils and perfumes). These may reduce the humidification
output of the H5i and/or cause deterioration of the water tub materials.
• Take care when handling the H5i as the water/water tub may be hot. Allow 10 minutes for the
heater plate and any excess water to cool.
• The H5i should only be connected or disconnected when the water tub is empty.
• Make sure that the water tub is empty before transporting the H5i.
• Do not operate the H5i on an aircraft as water may enter the device and air tubing during
turbulence.
• Always place the H5i on a level surface below the level of the user to prevent the mask and tubing
from filling with water.
• If liquids are inadvertently spilled into or on the H5i, unplug the device from the power outlet.
Disconnect the H5i from the device and allow it to drain and dry before re-using.
H5i indications for use
The H5i is indicated for the humidification of the air delivered from a CPAP or bilevel device. The H5i is
for use only as recommended by a physician. The H5i is intended for single patient re-use in the home
environment and re-use in a hospital/institutional environment.
Contraindications
The H5i is contraindicated for use with patients whose upper (supraglottic) airway has been bypassed.
Please refer to the S9 VPAP Tx Clinical Guide for contraindications associated with CPAP or bilevel
therapy.
Setup
Refer to illustration A.
1. Align your H5i with your S9 and push them together until they click into place.
2. Connect the DC plug of the power supply unit to the rear of the S9.
3. Connect the power cord to the power supply unit.
4. Plug the other end of the power cord into the power outlet.
5. Connect one end of the air tubing firmly onto the air outlet.
6. Connect the assembled mask system to the free end of the air tubing.
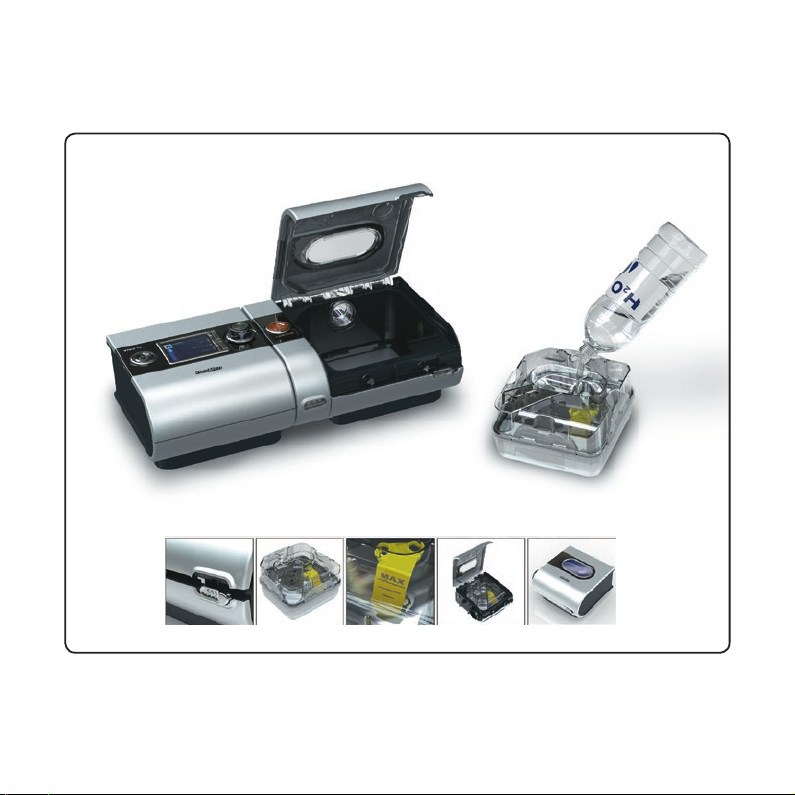
Filling the water tub
Refer to illustration B.
1. Slide the latch and lift open the flip lid.
2. Remove the water tub.
3. Fill the water tub (through the centre hole) with distilled or deionized water up to the maximum
2

water level mark (380 ml).
4. Return the water tub to the H5i.
5. Close the flip lid ensuring that it clicks into place.
Control panel
Refer to illustration C.
The control panel of your S9 devices includes the following items:
1. Start/Stop button: Starts or stops treatment
2. Home menu
3. LCD screen
4. Info menu: Allows you to view your sleep statistics
5. Setup menu: Allows you to make changes to settings
6. Push dial: Turning the dial allows you to scroll through the menu and change settings. Pushing the
dial allows you to enter into a menu and confirm your choice.
Adjusting humidity level
Refer to illustration D.
Ranging from OFF to 6, you can adjust the humidity level at any time to find the setting that is most
comfortable for you. To adjust your level of humidity:
1. From your HOME screen, turn (Push Dial) until the HUMIDITY LEVEL screen is displayed in blue.
2. Press . The selection is highlighted in orange.
3. Turn until the humidity level that you require is displayed.
4. Press to confirm your choice.
Warming the H5i
The warm-up feature is used to pre-heat the water before starting treatment.
To start warming:
1. Navigate to the humidity level icon.
2. Push and hold for three seconds. The Warming Up status bar is displayed. You can stop warmup at any time by pressing for at least three seconds. You can start treatment at any time by
pressing (Start/Stop).
Note: In order to assist the heater plate in cooling, your S9 device will continue to blow air for up to an
hour after treatment has stopped. However, you can unplug the device from the power outlet at any
time and allow the heater plate to cool without air flow.
English
3

Getting started
1. Make sure your S9 and H5i are connected and the water tub is filled to the maximum water level
mark.
2. Adjust the humidification level if required.
3. Fit your mask as described in your mask user guide.
4. To start therapy press .
5. Lie down and arrange the air tubing so that it is free to move if you turn in your sleep.
6. To stop treatment at any time or press .
Note: Once therapy has started a treatment screen is displayed.
Disassembling the H5i
Refer to illustration E.
1. Slide the latch.
2. Lift open the flip lid.
3. Remove the water tub.
4. Discard any excess water from the water tub.
5. Unclip all four side latches.
6. Pull apart the tub lid, plate and base.
Reprocessing the H5i and air tubing between patients
The H5i and air tubing should be reprocessed when used between patients. Cleaning and disinfection
instructions are available from the ResMed website, www.resmed.com under Products and Service &
Support. If you do not have internet access, please contact your ResMed representative.
Reassembling the H5i
1. Place the plate back onto the base ensuring that the maximum water level mark faces up.
2. Place the tub lid back onto the plate/base ensuring that the centre holes are aligned.
3. Clip all four side latches.
4. Fill the water tub and return the water tub to the H5i.
5. Close the flip lid ensuring that it clicks into place.
4

Troubleshooting
If there is a problem, try the following suggestions. If the problem cannot be solved, contact your
equipment supplier or ResMed. Do not attempt to open these devices.
Problem/Possible cause Solution
No display
Power is not connected. Ensure the power cable is connected and the power outlet
The DC plug is partially inserted into the
back of the device.
The S9 and H5i are not connected
correctly.
Insufficient air delivered from the device
The S9 is not working correctly. See the Troubleshooting section of the S9 VPAP Tx Clinical
Air tubing is not connected properly. Check air tubing.
Air tubing is blocked, pinched or
punctured.
The H5i flip lid is not latched correctly. Close the flip lid ensuring that it clicks into place.
The H5i flip lid seal is not fitted
correctly.
Incorrect air tubing selected. If you are using the SlimLine or Standard air tubing ensure
Displays error message: Heated tube fault, replace tube
Device has been left in a hot
environment.
There is a fault in your ClimateLine or
ClimateLine
MAX
air tubing.
Displays error message: Humidifier fault, replace humidifier
There is a fault in your H5i heated
humidifier.
(if available) is on.
Fully insert the DC plug.
Ensure that the S9 and H5i are securely attached.
Guide.
Unblock or free the air tubing. Check the air tubing for
punctures.
Make sure the flip lid seal is facing the right way up and
fitted securely.
that you have the correct air tubing selected via the menu.
Allow to cool before re-use. Disconnect the power cord
and then reconnect it to restart the device.
Discontinue using your ClimateLine or ClimateLine
MAX
tubing and contact your service provider. Use Standard or
SlimLine tubing in the interim.
Discontinue using your H5i and contact your service
provider.
air
English
5

Problem/Possible cause Solution
Device has been left in a hot
environment.
Refilling the humidifier with cold water
Allow to cool before re-use. Disconnect the power cord
and then reconnect it to restart the device.
Allow the humidifier to cool before re-filling.
while humidifier is still hot after therapy.
Filling the humidifier with ice cold water
Use room temperature water.
on a warm day or with hot water.
Displays error message: Tube blocked, please check your tube
Air tubing is blocked. Check your air tubing and remove any blockages.
Displays error message: High leak, please check system setup and all connections
There is excessive leak. Adjust position of mask and headgear.
Air tubing is not connected properly. Connect firmly at both
ends.
The H5i flip lid is not latched correctly. Close the flip lid ensuring that it clicks into place.
Displays error message: Please close H5i flip lid, attach tube and press any key
H5i flip lid is not closed. Close the flip lid ensuring that it clicks into place.
Air tubing is not connected properly. Connect firmly at both ends.
Water splashing on your face from the H5i
The water tub is overfilled. Check that the water level is below the maximum water
level mark.
Condensation is forming in the air tube
and mask.
Turn the H5i or relative humidity setting down via the
menu.
Leaking water tub
The water tub may be damaged or
Contact your service provider for a replacement.
cracked.
The cleanable water tub is not
assembled correctly.
Check for damage and reassemble the cleanable water tub
correctly.
Air feels too warm/cold in the mask
The temperature of the ClimateLine or
ClimateLine
MAX
air tubing is set too
Turn up/down the heated tubing temperature via the menu.
high/low.
6

Technical specifications
Maximum heater plate temperature 65°C
Temperature cut-out 74°C
Maximum gas temperature 41°C
Nominal dimensions (L x W x H) Docking station and water tub: 153 mm x 145 mm x 86 mm
Weight (Standard water tub) Docking station and unfilled water tub 0.69 kg
Weight (Cleanable water tub) Docking station and unfilled water tub 0.79 kg
Water capacity To maximum fill line 380 mL
Docking station Flame retardant engineering thermoplastic, aluminium
Cleanable water tub Injection molded plastic, stainless steel and silicone seal
Standard water tub Injection molded plastic, aluminium and thermoplastic
Operating temperature +5ºC to +35ºC
Operating humidity 10–95% non-condensing
Storage and transport temperature -20ºC to +60ºC
Storage and transport humidity 10–95% non-condensing
ClimateLine air tubing Flexible plastic and electrical components, 2 m, 15 mm
ClimateLine
MAX
air tubing Flexible plastic and electrical components, 1.9 m, 19 mm
Heated tubing temperature cut-out 41°C
IEC 60601-1 classification Class II (double insulation), Type BF
Electromagnetic compatibility Please refer to the S9 VPAP Tx Clinical Guide for details
Notes:
• The manufacturer reserves the right to change these specifications without notice.
• The temperature and relative humidity settings displayed for ClimateLine or ClimateLine
measured values.
•
Check with your service provider before using the SlimLine air tubing with devices other than the S9
or H5i.
elastomer
inner diameter
inner diameter
MAX
are not
English
7

Humidifier performance
IP21
93 C
The following settings have been tested at 22°C ambient temperature:
CPAP mask
pressure, cm H2O
RH output % Nominal system output AHa, BTPS
Setting 3 Setting 6 Setting 3 Setting 6
4901001018
10 95 100 11.5 21
20 95 100 11 18
25 100 100 12 13.5
a. AH – Absolute Humidity in mg/L.
b. BTPS – Body Temperature Pressure Saturated.
b
Symbols
The following symbols may appear on your H5i, ClimateLine or packaging.
Caution; Follow instructions for use; Protection against insertion of fingers and against
vertically dripping water; Not drip proof; Manufacturer; European RoHS; Batch
code; Catalogue number; Serial number; Not for use on more than one patient;
European Authorised Representative; Keep dry; Maximum water level;
Disinfectable up to 93°C; China pollution control logo 1; China pollution control logo 2;
Lock/unlock; Remove tub to fill; Prescription only (In the US, Federal
law restricts these devices to sale by or on the order of a physician.).
Environmental information
WEEE 2002/96/EC is a European Directive that requires the proper disposal of electrical and electronic
equipment. These devices should be disposed of separately, not as unsorted municipal waste. To
dispose of your device, you should use appropriate collection, reuse and recycling systems available in
your region. The use of these collection, reuse and recycling systems is designed to reduce pressure
on natural resources and prevent hazardous substances from damaging the environment.
If you need information on these disposal systems, please contact your local waste administration. The
crossed-bin symbol invites you to use these disposal systems. If you require information on collection
8

and disposal of your ResMed device please contact your ResMed office, local distributor or go to
www.resmed.com/environment.
Servicing
The H5i device is intended to provide safe and reliable operation when operated in accordance with the
instructions provided by ResMed. ResMed recommends that the H5i be inspected and serviced by an
authorised ResMed Service Centre if there is any sign of wear or concern with device function.
Otherwise, service and inspection of the devices generally should not be required during the five year
design life of the device.
Limited warranty
ResMed Ltd (hereafter ’ResMed’) warrants that your ResMed product shall be free from defects in
material and workmanship from the date of purchase for the period specified below.
Product
• Mask systems (including mask frame, cushion, headgear and tubing) –
excluding single-use devices
• Accessories – excluding single-use devices
• Flex-type finger pulse sensors
• Humidifier water tubs
• Batteries for use in ResMed internal and external battery systems 6 months
• Clip-type finger pulse sensors
• CPAP and bilevel device data modules
• Oximeters and CPAP and bilevel device oximeter adapters
• Humidifiers and humidifier cleanable water tubs
• Titration control devices
•CPAP, bilevel and ventilation devices (including external power supply units)
• Battery accessories
• Portable diagnostic/screening devices
This warranty is only available to the initial consumer. It is not transferable.
If the product fails under conditions of normal use, ResMed will repair or replace, at its option, the
defective product or any of its components.
This limited warranty does not cover: a) any damage caused as a result of improper use, abuse,
modification or alteration of the product; b) repairs carried out by any service organisation that has not
been expressly authorised by ResMed to perform such repairs; c) any damage or contamination due to
Warr anty
period
90 days
1 year
2 years
English
9

cigarette, pipe, cigar or other smoke; and d) any damage caused by water being spilled on or into an
electronic device.
Warranty is void on product sold, or resold, outside the region of original purchase.
Warranty claims on defective product must be made by the initial consumer at the point of purchase.
This warranty replaces all other expressed or implied warranties, including any implied warranty of
merchantability or fitness for a particular purpose. Some regions or states do not allow limitations on
how long an implied warranty lasts, so the above limitation may not apply to you.
ResMed shall not be responsible for any incidental or consequential damages claimed to have resulted
from the sale, installation or use of any ResMed product. Some regions or states do not allow the
exclusion or limitation of incidental or consequential damages, so the above limitation may not apply
to you.
This warranty gives you specific legal rights, and you may also have other rights which vary from region
to region. For further information on your warranty rights, contact your local ResMed dealer or ResMed
office.
Español
ADVERTENCIAS
Lea el presente manual en su totalidad antes de usar el equipo.
•
• Solo use el equipo de acuerdo con las instrucciones proporcionadas por el médico o proveedor de
servicios sanitarios.
• Utilice el equipo únicamente para el uso que se indica en el presente manual. Las recomendaciones
que figuran en el presente manual no deben sustituir las instrucciones brindadas por el médico
tratante.
•
Si advierte que el desempeño del equipo se modifica sin causa aparente, si este hace ruidos inusuales
o discordantes, si el equipo o la fuente de alimentación se caen o se tratan sin cuidado, si ingresa agua
a la carcasa del equipo, o si esta se rompe, deje de utilizar el equipo y comuníquese con el centro de
servicio técnico de ResMed.
•
Peligro de electrocución. No sumerja el equipo, el humidificador, la fuente de alimentación ni el cable de
alimentación en agua. Si se llegara a derramar líquido, desconecte el equipo de la fuente de
alimentación y deje que las piezas se sequen. Siempre desenchufe el equipo antes de limpiarlo, y
asegúrese de que todas las piezas estén secas antes de enchufarlo.
• Peligro de explosión: no utilizar cerca de anestésicos inflamables.
• Asegúrese de que el cable de alimentación y el enchufe estén en buenas condiciones y que el
equipo no esté dañado.
• Mantenga el cable de alimentación lejos de superficies calientes.
10

• No utilice el H5i si no funciona adecuadamente o si alguna pieza del equipo o del H5i se ha caído o
está dañada.
• No deje largos tramos del tubo de aire alrededor de la cabecera de la cama. Podría enrollársele
alrededor de la cabeza o el cuello mientras duerme.
•
Solo deben usarse tubos de aire y accesorios ResMed con el equipo. Un tubo de aire o accesorio de
otro tipo puede modificar la presión que usted efectivamente recibe, y ello reduciría la eficacia del
tratamiento.
• Utilice únicamente fuentes de alimentación de 90 W de ResMed.
PRECAUCIONES
•
No abra la carcasa del equipo. No hay piezas dentro que el usuario pueda reparar. Las reparaciones
y el mantenimiento deben ser efectuados únicamente por un agente de servicio técnico autorizado
de ResMed.
• No utilice lejía, cloro, alcohol o soluciones aromáticas, jabones hidratantes o antibacterianos ni
aceites perfumados para limpiar el equipo, el humidificador o el tubo de aire. Estas soluciones
podrían causar daños y reducir la vida útil de los productos.
• El H5i solo debe utilizarse con tubos o accesorios recomendados por ResMed. Conectarlo a otros
accesorios o tubos de suministro podría provocar una lesión o dañar el equipo.
• No abra la carcasa del H5i. No hay piezas dentro que el usuario pueda reparar. Las reparaciones y el
mantenimiento deben ser efectuados únicamente por un agente de servicio técnico autorizado
de ResMed.
• No sobrepase el nivel máximo de llenado de la cubeta ya que el agua podría ingresar al equipo y al
tubo de aire.
• No use aditivos (p. ej. aceites aromáticos y perfumes). Estos podrían reducir la humidificación
suministrada por el H5i o deteriorar los materiales de la cubeta de agua.
• Tenga cuidado al manipular el H5i, dado que el agua o la cubeta pueden estar calientes. Espere
10 minutos para que se enfríen la placa de calefacción y el agua que haya quedado.
• El H5i solo debe conectarse o desconectarse cuando la cubeta de agua esté vacía.
• Asegúrese de que la cubeta de agua esté vacía antes de transportar el H5i.
• No utilice el H5i en un avión ya que el agua podría entrar al equipo o al tubo de aire durante una
turbulencia.
• Siempre coloque el H5i en una superficie que se encuentre más abajo que el usuario para evitar
que la mascarilla y el tubo se llenen de agua.
• En caso de que inadvertidamente se derramen líquidos sobre el H5i o hacia su interior, desenchufe
el equipo del tomacorriente. Desconecte el H5i del equipo y deje que se vacíe y se seque antes de
volver a utilizarlo.
Español
11

Indicaciones de uso del H5i
El H5i está indicado para humidificar el aire suministrado por un equipo CPAP o binivel. El H5i solo debe
ser utilizado por recomendación médica. El H5i está diseñado para ser utilizado en repetidas ocasiones
por un único paciente en el domicilio y para ser utilizado en repetidas ocasiones en hospitales o
instituciones.
Contraindicaciones
El H5i está contraindicado en pacientes que no respiran por las vías respiratorias superiores
(supraglóticas). Consulte el manual clínico del S9 VPAP Tx para conocer las contraindicaciones asociadas
con el tratamiento CPAP o binivel.
Instalación
Consulte la figura A.
1. Alinee el H5i con el equipo S9 y empújelos uno contra otro hasta que encajen.
2. Conecte el enchufe de CC de la fuente de alimentación en la parte posterior del equipo S9.
3. Conecte el cable de alimentación a la fuente.
4. Conecte el otro extremo del cable de alimentación a un tomacorriente.
5. Conecte firmemente un extremo del tubo de aire a la salida de aire del equipo.
6. Conecte el sistema de mascarilla ya montado al extremo libre del tubo de aire.
Cómo llenar la cubeta de agua
Consulte la figura B.
1. Deslice la traba y abra la tapa a presión.
2. Retire la cubeta de agua.
3. Llene la cubeta (a través del orificio que hay en el centro) con agua destilada o desionizada, hasta
que alcance la marca de nivel máximo (380 ml).
4. Vuelva a colocar la cubeta en el H5i.
5. Cierre la tapa, asegurándose de que encaje en su lugar.
Panel de control
Consulte la figura C.
El panel de control de los equipos S9 incluye los siguientes elementos:
1. Botón de inicio/detención: inicia o detiene el tratamiento
2. Menú de inicio
3. Visor
12

4. Menú informativo: permite ver las estadísticas del sueño
5. Menú de configuración: permite modificar la configuración
6. Botón de selección: girar este botón permite desplazarse a través del menú y modificar la
configuración. Oprimirlo permite ingresar a un menú y confirmar la selección.
Cómo ajustar el nivel de humedad
Consulte la figura D.
Usted puede ajustar el nivel de humedad en cualquier momento dentro de la gama de valores que va
desde APAG hasta 6, para hallar el valor que le resulte más cómodo. Para ajustar el nivel de humedad:
1. Desde la pantalla INICIO, gire (botón de selección) hasta que la pantalla NIVEL HUMEDAD
aparezca de color azul.
2. Oprima . La selección aparece marcada en naranja.
3. Gire hasta que aparezca el nivel de humedad deseado.
4. Oprima para confirmar la selección.
Cómo calentar el H5i
La función de calentamiento se utiliza para precalentar el agua antes de iniciar el tratamiento.
Para comenzar el calentamiento:
1. Desplácese hasta el ícono del nivel de humedad.
2. Mantenga oprimido durante tres segundos. Aparecerá la barra de estado Calentando. Puede
detener el calentamiento en cualquier momento oprimiendo durante al menos tres segundos.
Puede iniciar el tratamiento en cualquier momento oprimiendo (inicio/detención).
Nota: Para contribuir al enfriamiento de la placa de calefacción, el equipo S9 continuará generando un
flujo de aire durante un período de hasta una hora luego de detener el tratamiento. Sin embargo, usted
puede en cualquier momento desenchufar el equipo del tomacorriente y dejar que la placa de
calefacción se enfríe sin flujo de aire.
Cómo comenzar
1. Asegúrese de que el S9 y el H5i estén conectados y que la cubeta contenga agua hasta la marca de
nivel máximo.
2. Si lo desea, ajuste el nivel de humidificación.
3. Colóquese la mascarilla según se indica en el manual del usuario de esta.
4. Para iniciar el tratamiento, oprima .
Español
13

5. Recuéstese y acomode el tubo de aire de forma que este pueda moverse libremente si usted se da
vuelta mientras duerme.
6. Para detener el tratamiento en cualquier momento, pulse .
Nota: Una vez iniciado el tratamiento, aparece una pantalla de tratamiento.
Desmontaje del H5i
Consulte la figura E.
1. Deslice la traba.
2. Abra la tapa a presión.
3. Retire la cubeta de agua.
4. Tire cualquier resto de agua que haya en la cubeta.
5. Desabroche las cuatro trabas laterales.
6. Separe la tapa, la placa y la base de la cubeta.
Reprocesamiento del H5i y del tubo de aire entre un paciente y otro
El H5i y el tubo de aire deben reprocesarse cuando pasen de un paciente a otro. Puede obtener
instrucciones de limpieza y desinfección en el sitio web de ResMed, www.resmed.com, bajo
Productos y Servicio y asistencia. Si no tiene acceso a Internet, comuníquese con el representante
de ResMed.
Montaje del H5i
1. Vuelva a colocar la placa sobre la base, asegurándose de que la marca de nivel máximo de agua
quede mirando hacia arriba.
2. Vuelva a colocar la tapa de la cubeta sobre la placa/base, asegurándose de que los orificios
centrales queden alineados.
3. Abroche las cuatro trabas laterales.
4. Llene la cubeta de agua y vuelva a colocarla en el H5i.
5. Cierre la tapa, asegurándose de que encaje en su lugar.
14

Solución de problemas
Si surge algún problema, intente poner en práctica las sugerencias que figuran a continuación. Si el
problema no se resuelve, póngase en contacto con el proveedor del equipo o con ResMed. No intente
abrir estos equipos.
Problema/Causa posible Solución
Pantalla en blanco
La alimentación no está conectada. Verifique que el cable de alimentación esté conectado y
El enchufe de CC está insertado
parcialmente en la parte posterior del
equipo.
El S9 y el H5i no están conectados
correctamente.
El equipo no proporciona suficiente aire
El S9 no está funcionando
correctamente.
El tubo de aire no está debidamente
conectado.
El tubo de aire está obstruido, apretado
o perforado.
La tapa del H5i no está correctamente
cerrada.
La junta de la tapa del H5i no está
correctamente colocada.
Selección incorrecta del tubo de aire. Si está utilizando los tubos de aire SlimLine o Estándar,
Aparece un mensaje de error: Tubo caliente averiado, reemplácelo
Se ha dejado el equipo en un ambiente
con temperatura elevada.
que el tomacorriente (en caso de haberlo) esté encendido.
Inserte el enchufe de CC completamente.
Asegúrese de que el S9 y el H5i estén firmemente
conectados.
Consulte la sección Solución de problemas del manual
clínico del S9 VPAP Tx.
Revise el tubo de aire.
Desobstruya o despeje el tubo de aire. Verifique que el
tubo de aire no esté perforado.
Cierre la tapa, asegurándose de que encaje en su lugar.
Asegúrese de que la junta de la tapa no esté colocada al
revés y que esté colocada firmemente.
asegúrese de que en el menú haya seleccionado el tipo de
tubo de aire correcto.
Deje que se enfríe antes de volver a usarlo. Desconecte el
cable de alimentación y después vuelva a conectarlo para
poner nuevamente en marcha el equipo.
Español
15

Problema/Causa posible Solución
Hay una falla en el tubo de aire
ClimateLine o ClimateLine
MAX
.
Deje de usar el tubo de aire ClimateLine o ClimateLine
y comuníquese con el proveedor de servicio. Mientras
MAX
tanto, utilice un tubo Estándar o SlimLine.
Aparece un mensaje de error: Humidificador averiado, reemplácelo
Hay una falla en el humidificador
térmico H5i.
Se ha dejado el equipo en un ambiente
con temperatura elevada.
Deje de usar el H5i y comuníquese con el proveedor de
servicio.
Deje que se enfríe antes de volver a usarlo. Desconecte el
cable de alimentación y después vuelva a conectarlo para
poner nuevamente en marcha el equipo.
Se ha vuelto a llenar el humidificador
con agua fría cuando este aún estaba
Deje que el humidificador se enfríe antes de volverlo a
llenar.
caliente luego del tratamiento.
Se ha llenado el humidificador con agua
Use agua a temperatura ambiente.
helada en un día cálido o con agua
caliente.
Aparece un mensaje de error: Tubo bloqueado, verifíquelo
El tubo de aire está obstruido. Revise el tubo de aire y desobstrúyalo.
Aparece un mensaje de error: Fuga elevada, verifique instalación del sistema y todas las
conexiones
Hay una fuga excesiva. Ajuste la posición de la mascarilla y del arnés.
El tubo de aire no está debidamente conectado. Conéctelo
firmemente en ambos extremos.
La tapa del H5i no está correctamente
Cierre la tapa, asegurándose de que encaje en su lugar.
cerrada.
Aparece un mensaje de error: Cierre la tapa del H5i, conecte el tubo y oprima cualquier tecla
La tapa del H5i no está cerrada. Cierre la tapa, asegurándose de que encaje en su lugar.
El tubo de aire no está debidamente
Conéctelo firmemente en ambos extremos.
conectado.
El agua del H5i le salpica la cara
Se ha sobrepasado el nivel de agua
recomendado en la cubeta de agua.
Verifique que el nivel de agua esté por debajo de la marca
de nivel máximo.
16
Loading...