

Page 1

DA-590
INK JET PRINTER
OPERATION MANUAL
Part # M-3021
Revision Date: 2/97
Page 2

RENA Systems, Inc.
136 Green Tree Rd Ste 140
PO Box 1069
Oaks, PA 19456-1069
Telephone: 610/650-9170
Fax: 610/650-9171
E-Mail: [email protected]
Web Site: http://www.renausa.com
Every effort has been made to assure the accuracy of this manual.
RENA Systems shall not be held liable for any errors contained herein or
for any consequential or incidental damages incurred as a result of acting
on information contained in this manual.
Technical specifications may change due to design advances.
The data stated are nominal values only.
Page 3

Important Notes on Safety
PLEASE READ THESE INSTRUCTIONS CAREFULLY
KEEP THEM WITHIN EASY REACH FOR LATER USE
All direction and warning labels on the printer must be observed.
Setting up the
printer
Electrical
safety
• When setting up the printer, make sure that it is positioned securely and is
level. If it is allowed to tilt, roll away or drop, injuries may result.
• The printer must be protected from moisture.
• When connecting the printer to the power supply, observe the rated
values for the power connection on the name plate.
• Check the voltage setting at the printer’s power input module.
• For reasons of electrical safety, the power connection socket must be
equipped with a grounded conductor contact.
• The printer has a double-pole fuse protection! In the event of fuse failure,
electrical parts in the printer may still be live.
• Run the power supply cable so that no-one can trip over it. Also make
sure that nothing is placed on the cable.
• If the printer remains unused over a long period of time, disconnect it from
the power supply. This ensures that no damage will be caused by voltage
surges.
• Never open the printer. For reasons of electrical safety, it may be opened
only by authorized service personnel.
Operational
safety
Print head
caution
Cleaning the
printer
• Never touch the internal parts of the printer while it is running !
• To avoid damaging the printer, use only parts that have been approved by
• Remove the print head whenever the printer is not in use. Some print
• Before cleaning, the printer must always be disconnected from the power
• Cleaning is best done with a cloth dampened with water. RENA Care
the manufacturer.
heads may leak when not used for some time and damage the main PC
board.
supply.
should be used to clean the rollers.
Page 4

Let your
RENA service
technician
check the
printer!
IN THE FOLLOWING CASES, DISCONNECT THE PRINTER FROM
THE POWER SUPPLY !
• The power cable or power socket are damaged.
• Liquid has penetrated the printer.
• The printer was exposed to moisture.
• If the printer does not function as described in the operating instructions,
or there is no improvement with the aid of these instructions.
• The printer was dropped and/or the housing is damaged.
• If the printer shows clear signs of a defect.
Parts • If a repair is required, use only genuine RENA parts.
Consult your RENA service provider with questions relating to service and repair. This will ensure
that your printer will operate properly at all times.
Page 5
CONTENTS
Page
Important information on safety
Power connection N.1
Voltage selection N.1
Changing fuses N.2
1. Introduction
What can the the DA 590 printer do? 1.1
The parts of the DA 590 printer 1.2
Technical data 1.3
2. Operating the printer
Connecting the printer 2.1
Interface cable 2.1
Power cable 2.1
Turning the printer on 2.2
What does the display show ? 2.3
What do the keys mean ? 2.4
When are the keys active ? 2.5
On-line mode 2.5
Off-line mode 2.5
3. Setting up to print
Printing Gap 3.1
Setting the material thickness 3.1
Setting up the paper feed 3.2
\text\da590\contents I.1 DA590 Instruction Manual
Page 6
Defining the print position 3.4
Rotating the address block 3.4
Setting the left margin 3.5
Setting the top margin 3.5
Setting the side guides 3.5
Setting the horizontal elevation guide 3.6
Setting the vertical elevation guide 3.7
Aligning the exit rollers 3.8
Feeding without printing 3.8
4. Printing
The Print Head 4.1
Which print heads to use 4.1
When must the print head be replaced ? 4.1
Changing the print head and resetting the ink status counter 4.2
Cleaning the print head nozzles 4.2
Counting addresses 4.3
Counting printed addresses 4.3
Counting test addresses 4.3
5. Printer functions
Programming mode 5.1
What is programming mode for ? 5.1
Getting into programming mode 5.1
What does the display show in programming mode 5.2
How the keys function in programming mode 5.2
\text\da590\contents I.2 DA590 Instruction Manual
Page 7

Menu overview 5.3
An explanation of the menu fields 5.4
A programming example 5.12
Initializing the printer 5.12
6. Interface
Centronics parallel interface 6.1
Pin assignment 6.2
Signal description 6.3
Circuit extract 6.3
7. Fonts
Terminology 7.1
Type Face 7.1
Serif and Sans Serif font types 7.1
Spacing 7.2
Fixed spacing 7.2
Proportional spacing 7.2
Pitch 7.2
Point size 7.3
Char. Height 7.3
Char. Width 7.3
Char. Spacing 7.4
Quality 7.4
\text\da590\contents I.3 DA590 Instruction Manual
Page 8
NLQ 7.4
LQ 7.4
Character set 7.5
7-bit character set 7.5
8-bit character set 7.5
8. Error messages and solutions
Note on maintenance 8.2
9. Appendix
Character sets 9.1
7-bit character sets 9.1
8-bit character sets 9.12
Software considerations 9.19
DOS 9.19
Form Feeds 9.19
Windows 9.20
HP Deskjet 500 driver 9.21
Automatic barcode feature 9.23
DA-590 control commands 9.24
\text\da590\contents I.4 DA590 Instruction Manual
Page 9

Introduction
What can the DA-590 printer do?
The DA-590 is an inkjet cartridge printer that gives a true 300 dpi (dots per inch)
print-out. The DA-590 prints on envelopes, catalogues , brochures, self-mailers,
magazines and cards. It will print on any media that will accept ink from a
cartridge. The DA-590 can print on a single thickness of 20lb. paper up to media
5/32” (more than 1/8”) thick.
Introduction
The DA-590 has three internal fonts, Cour12 (Courier 12 Pt. 10 cpi), Helv14 (Helvetica 12 Pt.
Proportional) and TmsRm12 (Times Roman 12 Pt. Proportional). Printing is accomplished with
a standard, replaceable, inkjet cartridge print head.
\text\da590\introduction 1.1 DA590 Instruction Manual
Page 10
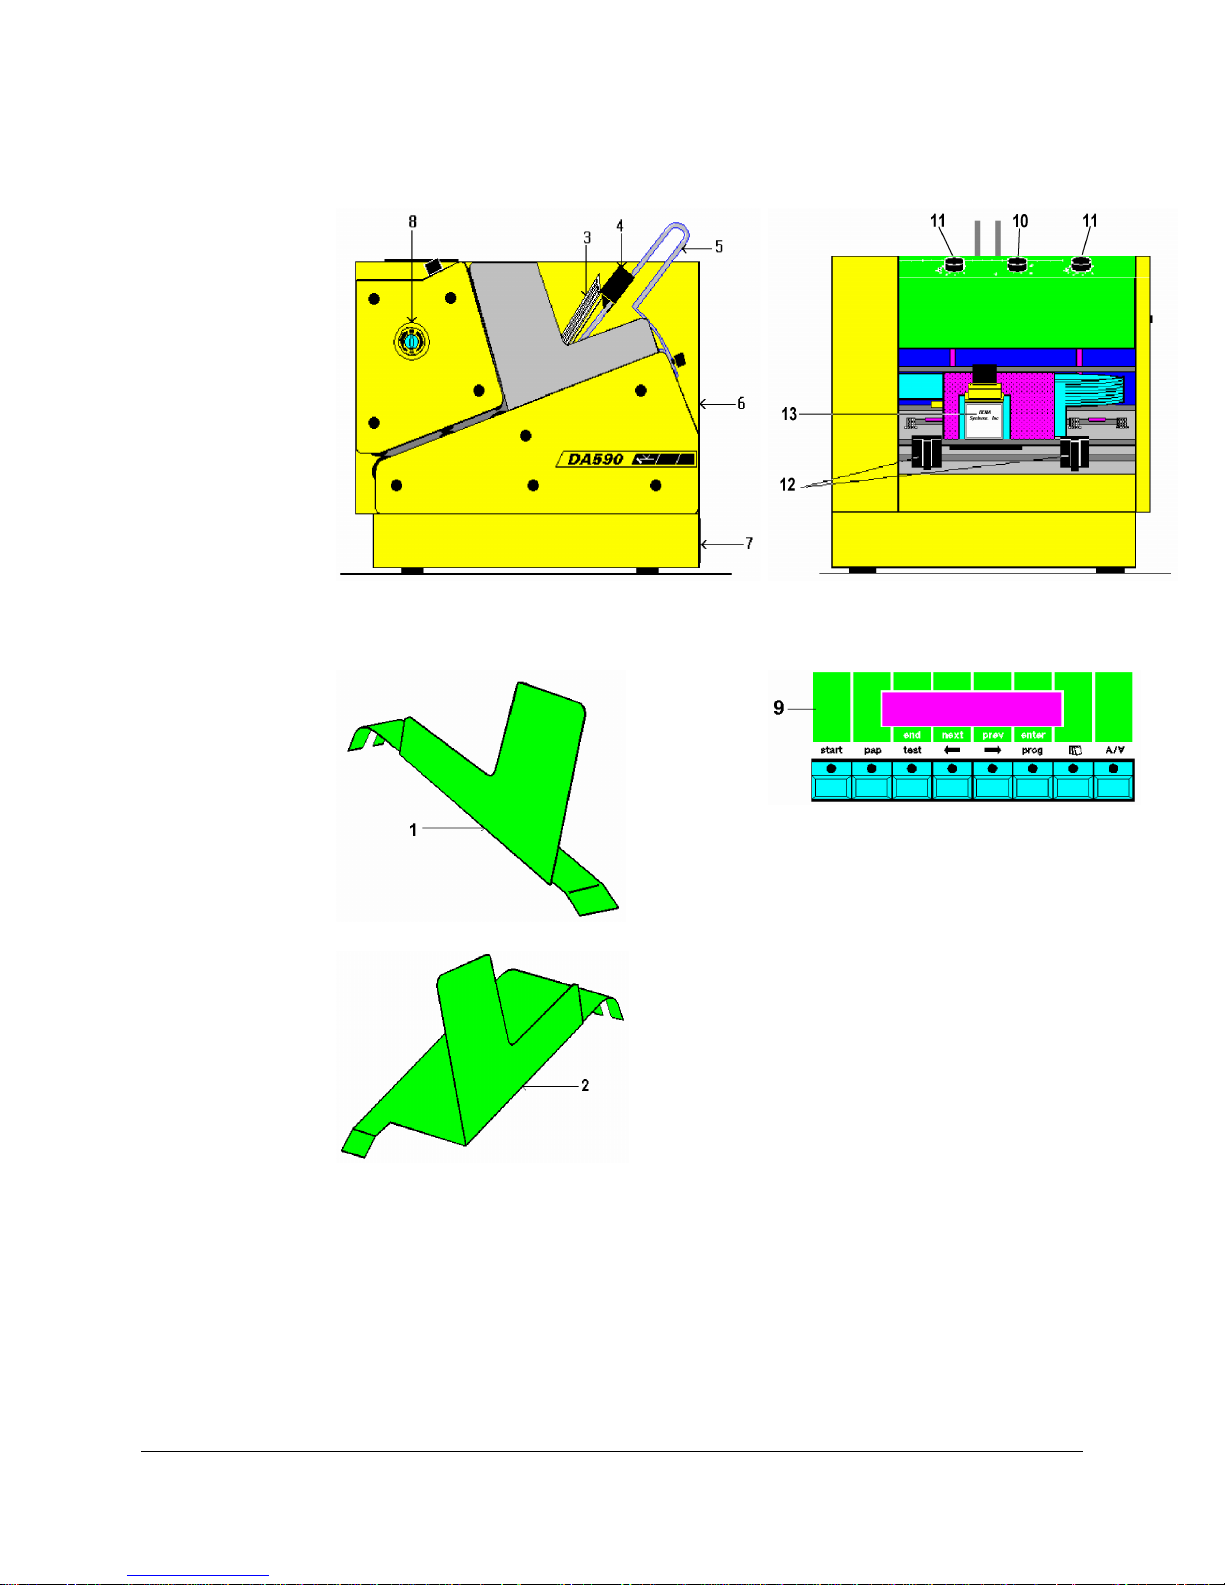
The parts of the DA-590 printer:
Introduction
1. Inner side guide (326.0.101)
2. Outer side guide (326.0.100)
3. Material to be printed
4. Guide block
5. Elevation guide
6. Power input and power switch
7. Parallel interface (36-pin)
8. Paper thickness setting
9. Controls (see next page)
10. Lock for separators
11. Fine adjustment for separators
12. Exit rollers
13. Inkjet print head
\text\da590\introduction 1.2 DA590 Instruction Manual
Page 11

Uni-directional
Technical Data
Dimensions
L x W x H (mm)
(inches - approx.)
Media size
Length (mm)
(inches - approx.)
Width (mm)
(inches - approx.)
Introduction
372 x 347 330
(14.6 x 13.7 x 13)
75 - 500
(3 - 19.7)
70 - 435
(2.8 - 17.1)
Media thickness (mm)
(inches - approx.)
Thickness difference (mm)
(inches - approx.)
(from one side to the other)
4
(.16)
maximum 1
(.04)
Media types Envelopes. self-mailers, documents,
single sheets, booklets, catalogues,
cards.
Media quality Inkjet suitable, no plastic foil or high
gloss paper
Throughput
3 lines with 20 chars per line
Print heads
Life
Life
Life
2,500 #10 envelopes/hr. LQ
3,500 #10 envelopes/hr. NLQ
RENA Klick Kit
LQ 1.1 million characters
NLQ 2.2 million characters
RENA Remanufactured Cartridge
LQ 1 million characters
NLQ 2 million characters
HP 51626A Inkjet Cartridge
LQ 1 million characters
NLQ 2 million characters
\text\da590\introduction 1.3 DA590 Instruction Manual
Resolution 300 dpi
Printing mode Bi -directional
Page 12

Technical Data (continued)
Introduction
Automatic changeover
\text\da590\introduction 1.4 DA590 Instruction Manual
Page 13

Introduction
Printing speed 115 chars/sec
Pitch Cour12: 10 cpi
Helv14: proportional font
TmsRmn12: proportional font
Print width 6.5” 65 chars/line at 10 cpi
Print quality LQ 300 dpi
NLQ 150 dpi
Special functions Postnet ZIP+4 Barcode
Postnet Delivery Point Barcode
bpo4, British postal barcode
kix, Dutch postal barcode
2/5I, 2 of 5 Interleave barcode
ean, European UPC barcode
Set-up memory
Test address loadable
user definable
Ink consumption display
Last 10 addresses can be reprinted
Receive buffer 6 Kbytes
Battery buffer Printer set-up is retained after
switching off
Interface Parallel
(36 pin Centronics compatible)
Character sets 17 national character sets
PC8 IBM character set
Power connection 100 V, 120 V, 220 V, 240 V
(switchable)
50 - 60 Hz
Drive motors (2)
Stepper motor for paper transport.
DC motor with encoder for moving
print head.
\text\da590\introduction 1.5 DA590 Instruction Manual
Page 14

Technical Data (continued)
Introduction
Fuses
Power input
Printer electronics
220,240V: 2 x 1.6A (slow)
100,120V: 2 x 2.5A (slow)
2 x 3.15A (slow)
(110, 220V)
Noise < 55 dB at 1 m (39”) distance
(ISO 9296)
Certification GS for 3 years (European)
\text\da590\introduction 1.6 DA590 Instruction Manual
Page 15
2. Operating the printer
Connecting the printer
Interface cable
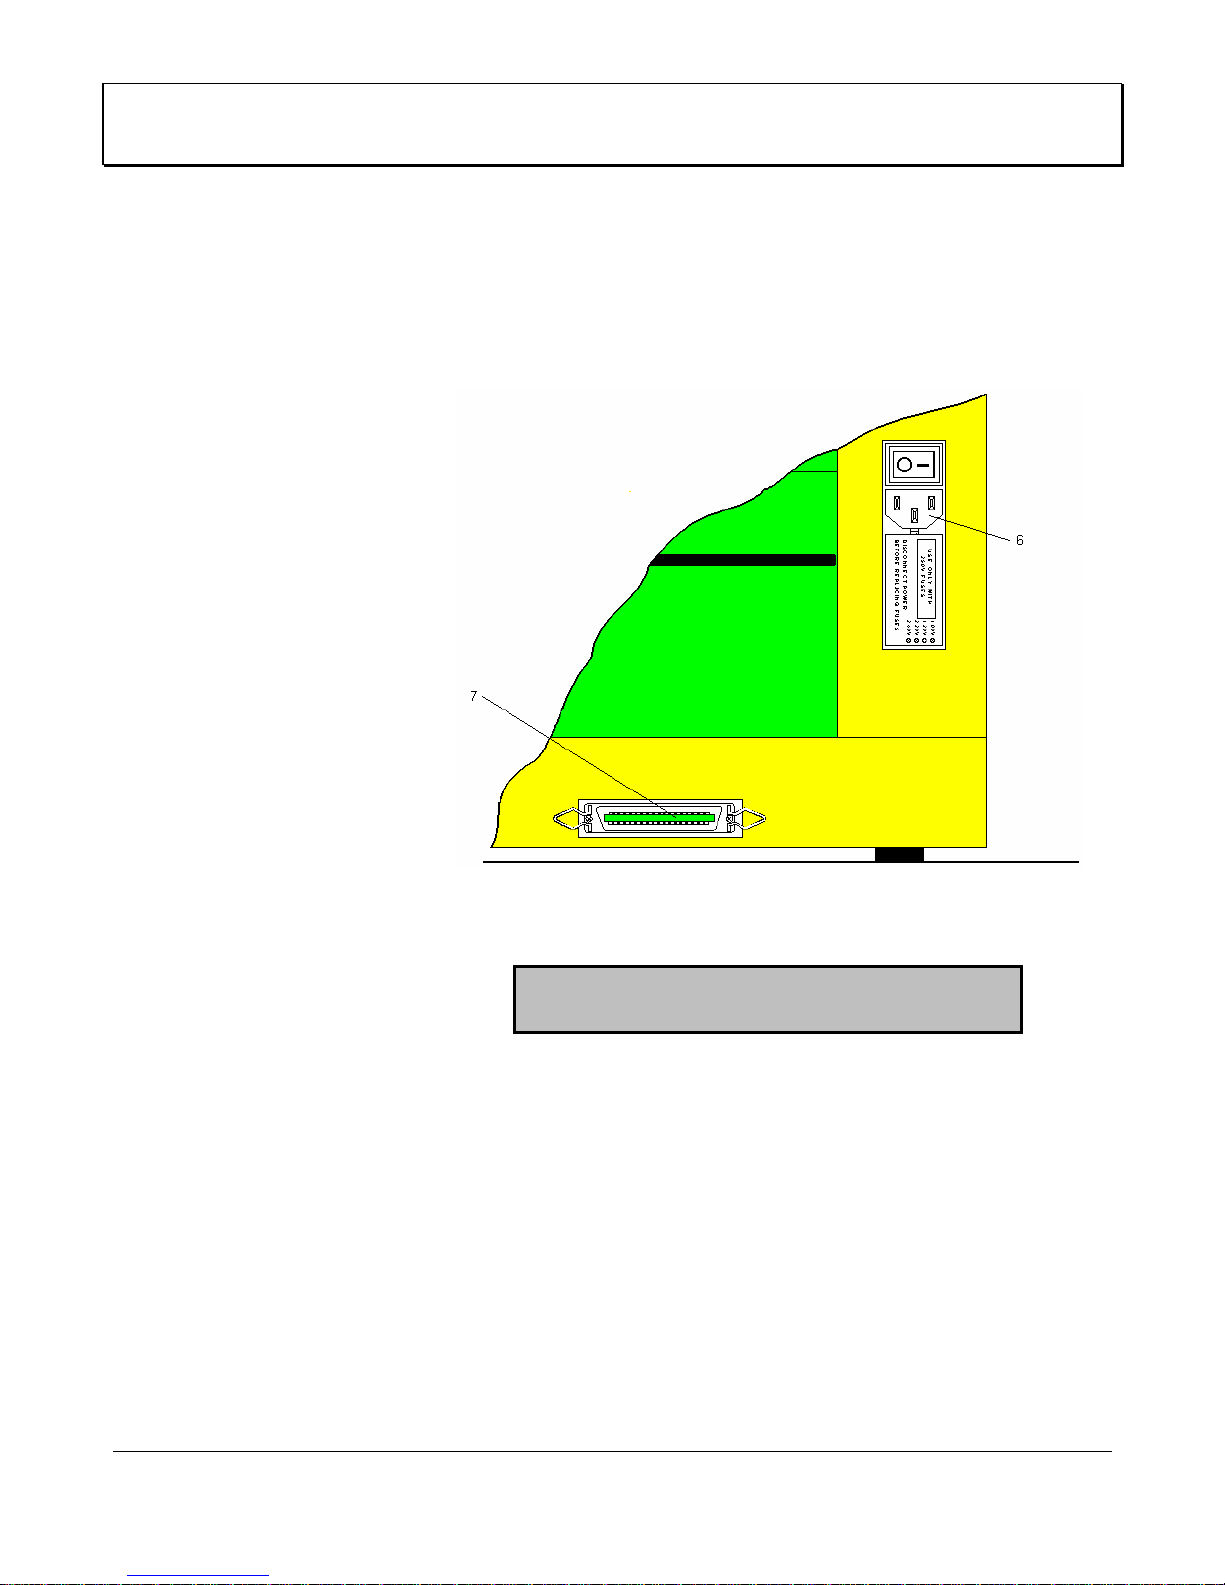
Plug a parallel printer cable from your computer into jack (7) and
secure it.
Power cable
The DA-590 is a class 1 safety device
Use grounded circuits only!
Plug the power cable into (6).
Κ | The parallel interface cable should not be longer than 6’.
\text\da590\operation 2.1 DA590 Instruction Manual
CAUTION !
Page 16
Operating the printer
Turning the printer on
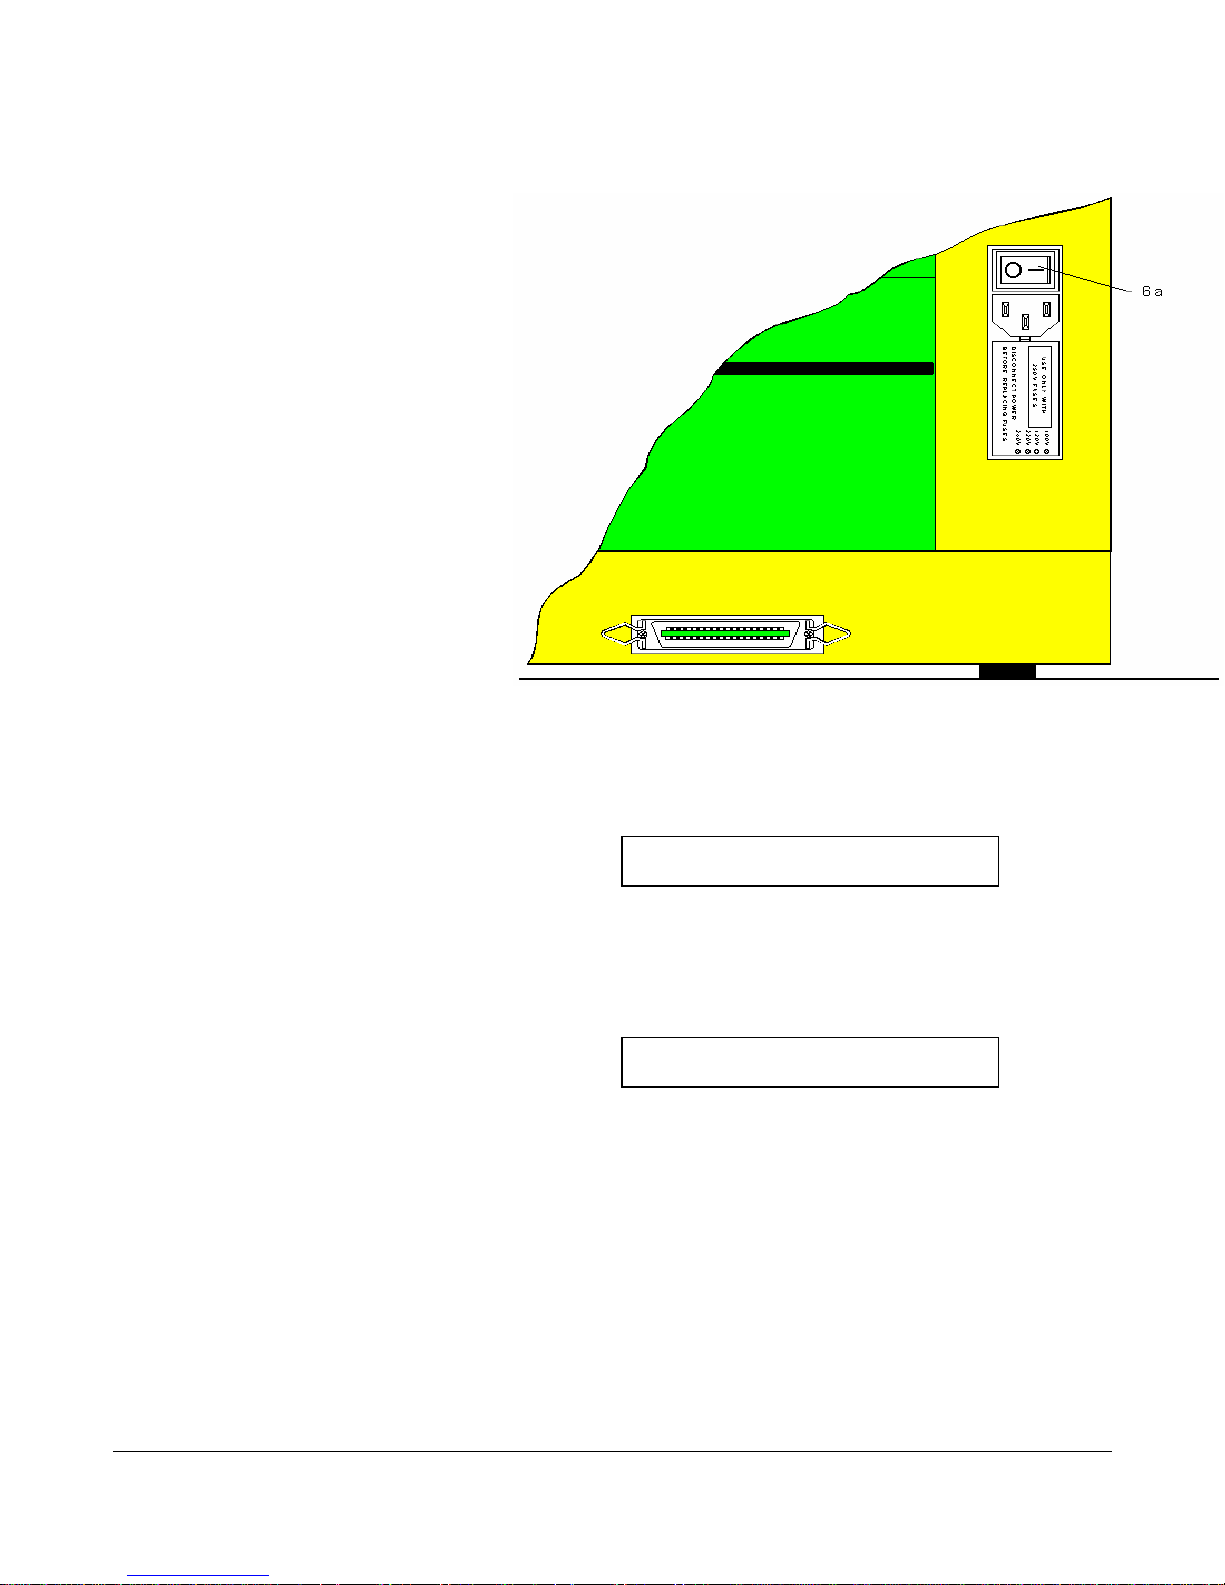
Switch the printer on with the power switch (6a). 1=ON, 0 = OFF
The following display appears briefly, to indicate printer initialization.
DA 590 Inkjet
Initialization
The printer is now in off-line mode, with this display:
100% Cour12 000000
Off LQ Set1U Nor
These displays are described on the following page.
\text\da590\operation 2.2 DA590 Instruction Manual
Page 17

Operating the printer
What does the display show ?
What do the keys mean ?
\text\da590\operation 2.3 DA590 Instruction Manual
Page 18

Operating the printer
The four keys in the middle have a dual meaning depending on the
operating mode (on-line or off-line)!
“start” key The “start” key is used to toggle between on-line and off-line mode.
“pap” key The “pap” key feeds in or ejects media.
“test” key The “test” key feeds in one document, prints a test address on it and
ejects it.
“prog” key The “prog” key puts the printer into programming mode.
“ï” key
The left “ï” arrow key adjusts the print start position toward the
trailing edge of the media.
\text\da590\operation 2.4 DA590 Instruction Manual
Page 19
Operating the printer
“ð” key
The right “ð” arrow key adjusts the print start position toward the
leading edge of the media.
“ ” key
Press this key (backspace) once for each address to be reprinted
(maximum 10).
“ ” key
“start”+ “pap” keys Pressing these two keys at the same time resets the address
Pressing this key will rotate the printing direction by 180°.
counter to “0”.
“test” + “pap” keys Pressing these two keys at the same time resets the test address
counter to “0”
When are the keys active?
When the printer is first turned on, it is in off-line mode. Except for the “start” key, the keys
are active only in off-line mode.
On-line mode Press the “start” key. You are now in on-line mode.
The following display appears.
100% Cour12 000000
On LQ Set1U Nor
In this mode the printer is ready to print.
Repeatedly pressing the “start” key toggles the printer between
on-line and off-line mode.
Off-line mode In off-line mode, the following display appears and programming
mode can be entered by pressing the “prog” key.
\text\da590\operation 2.5 DA590 Instruction Manual
100% Cour12 000000
Off LQ Set1U Nor
Page 20

3. Setting up to print
Printing Gap
For postcards and thin documents you can work with the smallest space between
the print head and the material (the printing gap).
If the print head smudges the print, or if the material is particularly thick (such as a
booklet), the gap between the print head and the material should be increased.
Setting the material
thickness
- Turn the knob (8) to the most open setting (see arrow).
- Place one thickness of the material (3) under the exit rollers (b).
- Turn the knob (8) to the right or left until both exit rollers contact the
material. Then turn the knob (8) two to three clicks further in the
same direction to insure proper transport pressure.
\text\da590\printing 3.1 DA590 Instruction Manual
Page 21
printing
Setting up the paper feed
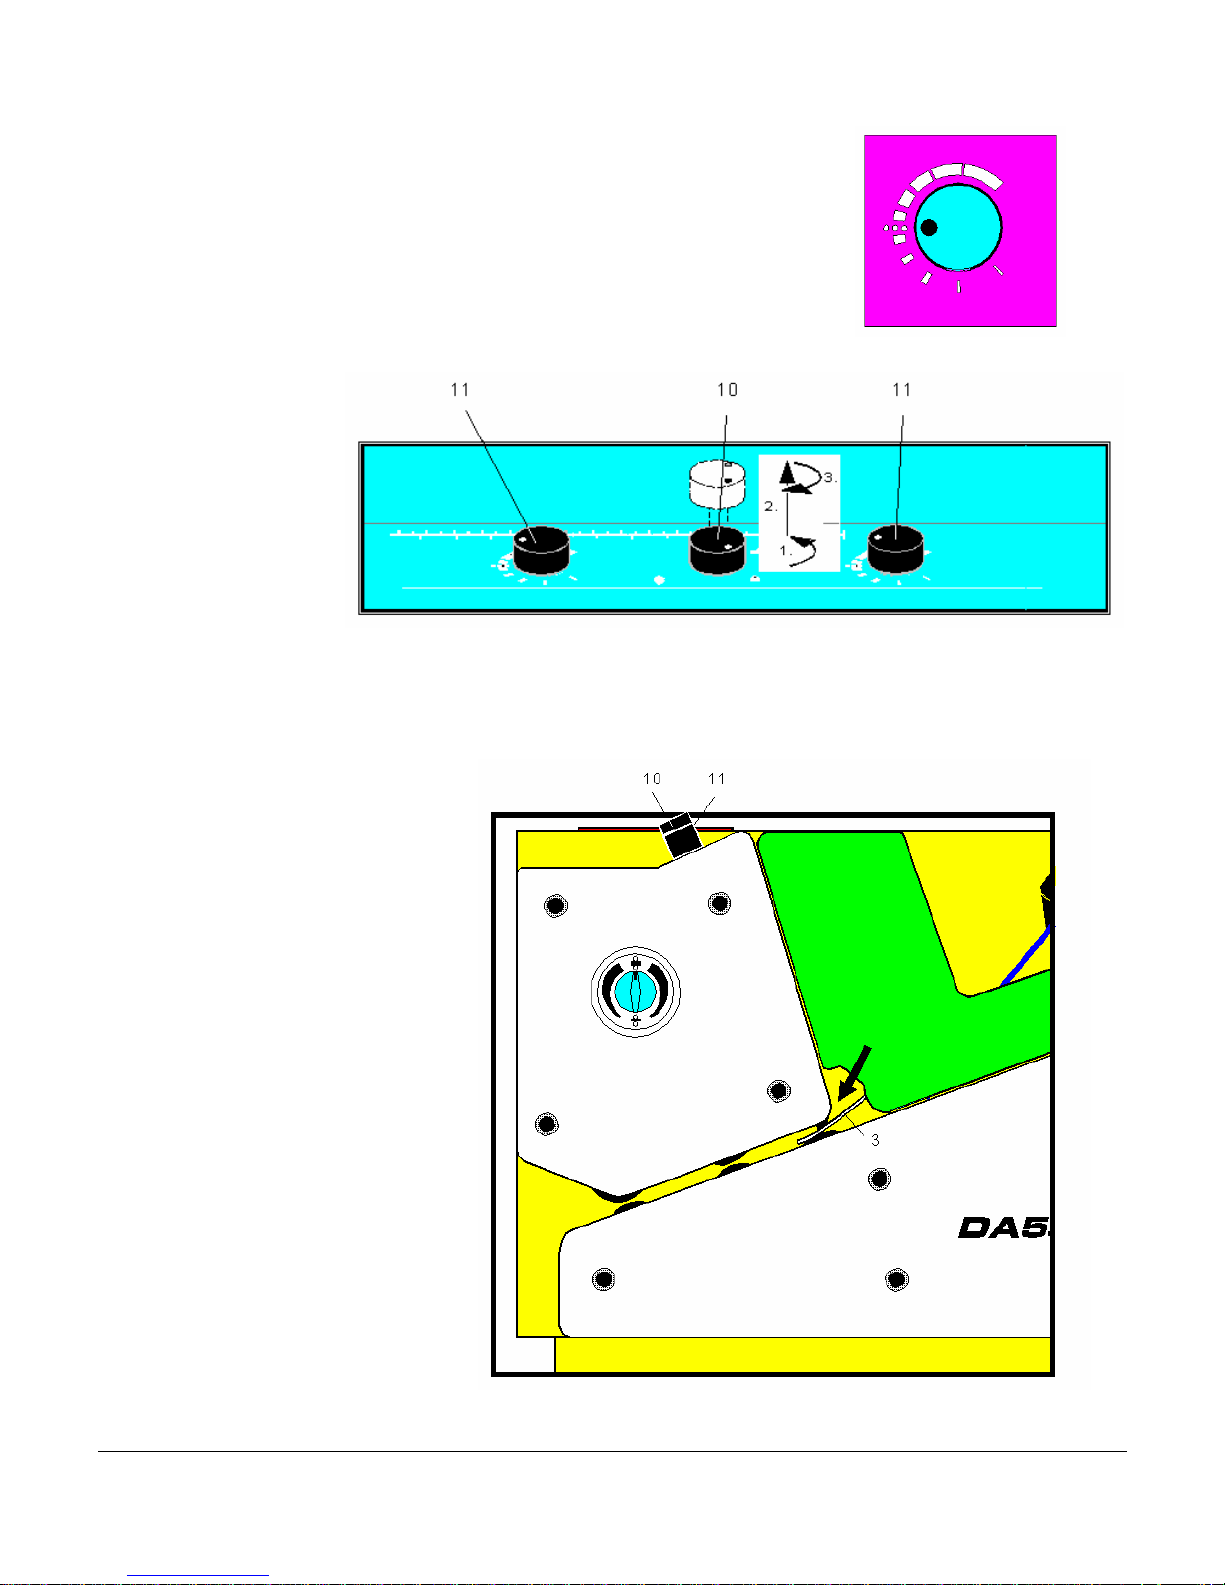
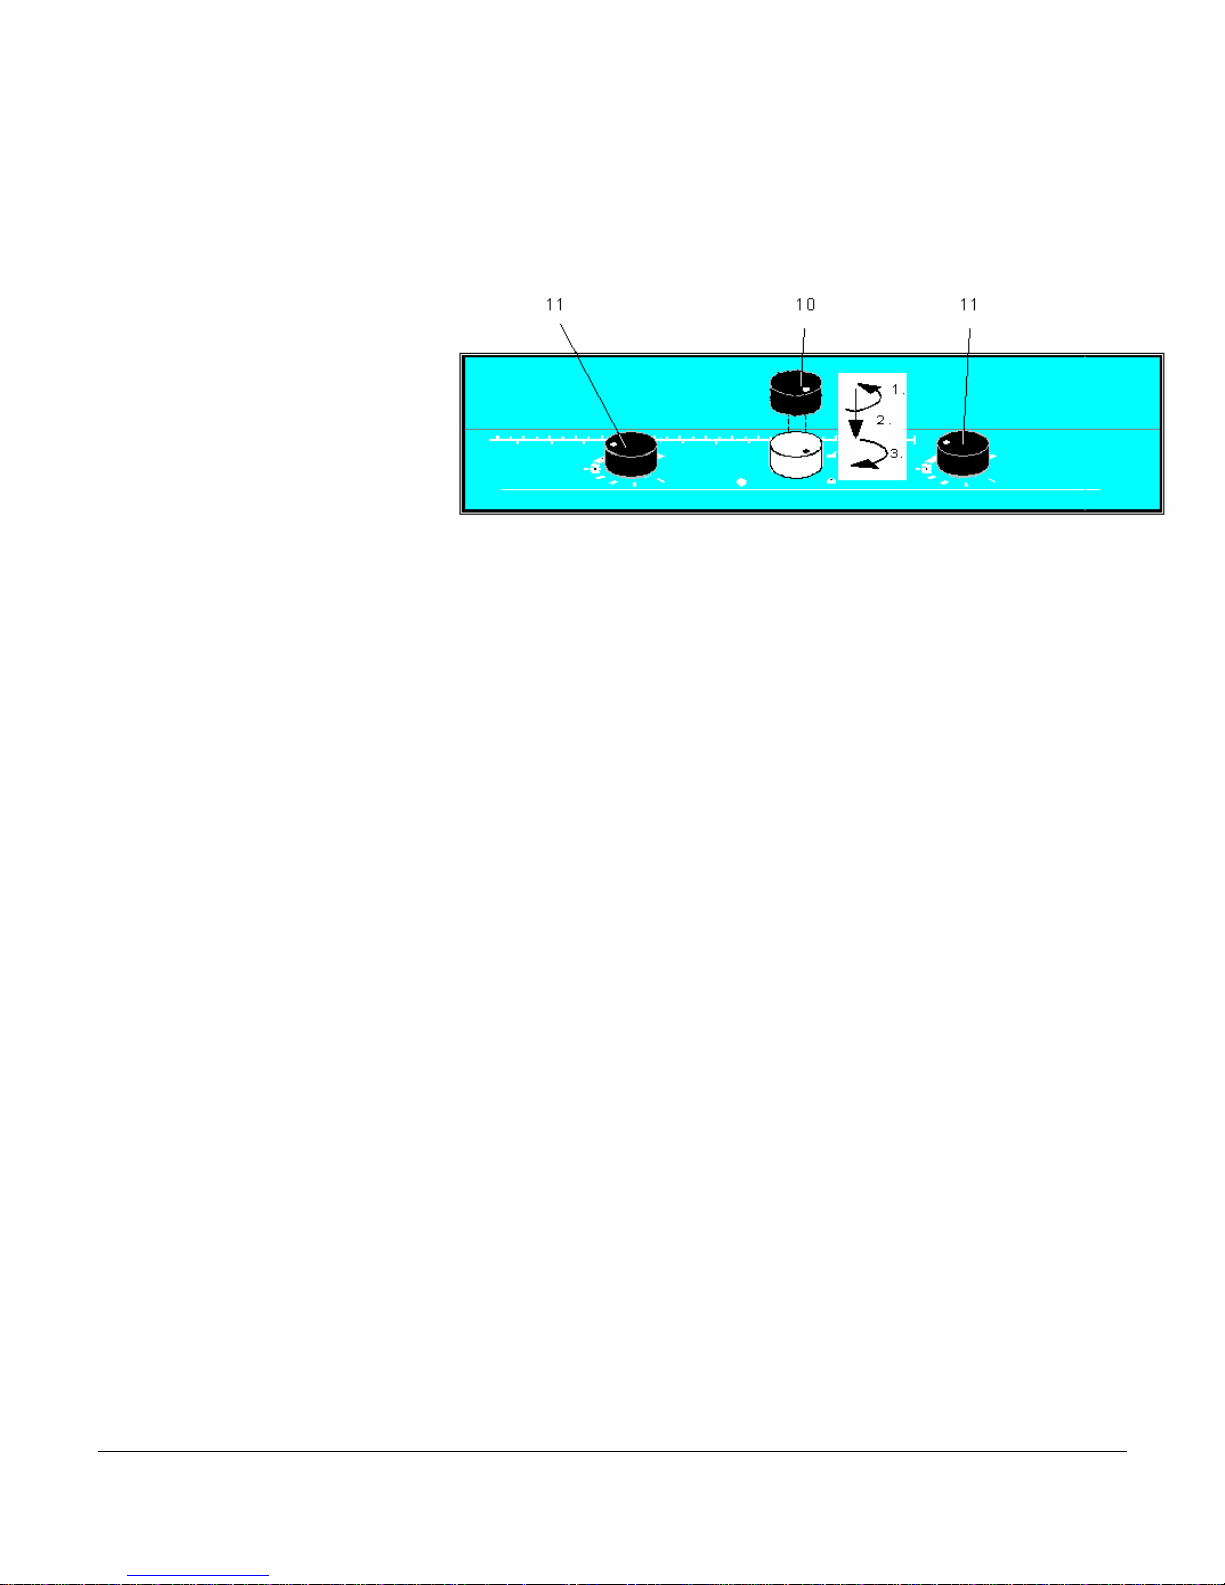
- Turn each of the two outside knurled
screws (11) about half a turn away
from the stop, towards the middleposition (see figure on right).
- Unlock the center knurled screw
(10), lift it up and lock it again in its
raised position (see arrow).
- Place the thickest part of one piece of the material (3) between the
separators and the input feed roller (see arrow below).
\text\da590\printing 3.2 DA590 Instruction Manual
Page 22
printing
- Unlock the center knurled screw (10), and let the separators drop
down onto the material. When the center knurled screw (10) is locked
again, the separators are set.
- If the material is skewing when it is fed in, you can make fine
adjustments by turning either of the two outside knurled screws (11)
without unlocking the center knurled screw (10).
\text\da590\printing 3.3 DA590 Instruction Manual
Page 23

printing
Defining the print position
Before beginning to print, you must decide where you want to print
on the material. The printing area is indicated by arrows on the
decal on the housing above the print head. The printing area is 6.5”
(165 mm ) from the inside, where the print head housing meets the
body of the printer, out to where the operator stands.
Rotating the address block The optimal printing direction depends on the size of the piece and
where you want to print on it.
The address block, with its left margin, may be rotated by 180°.
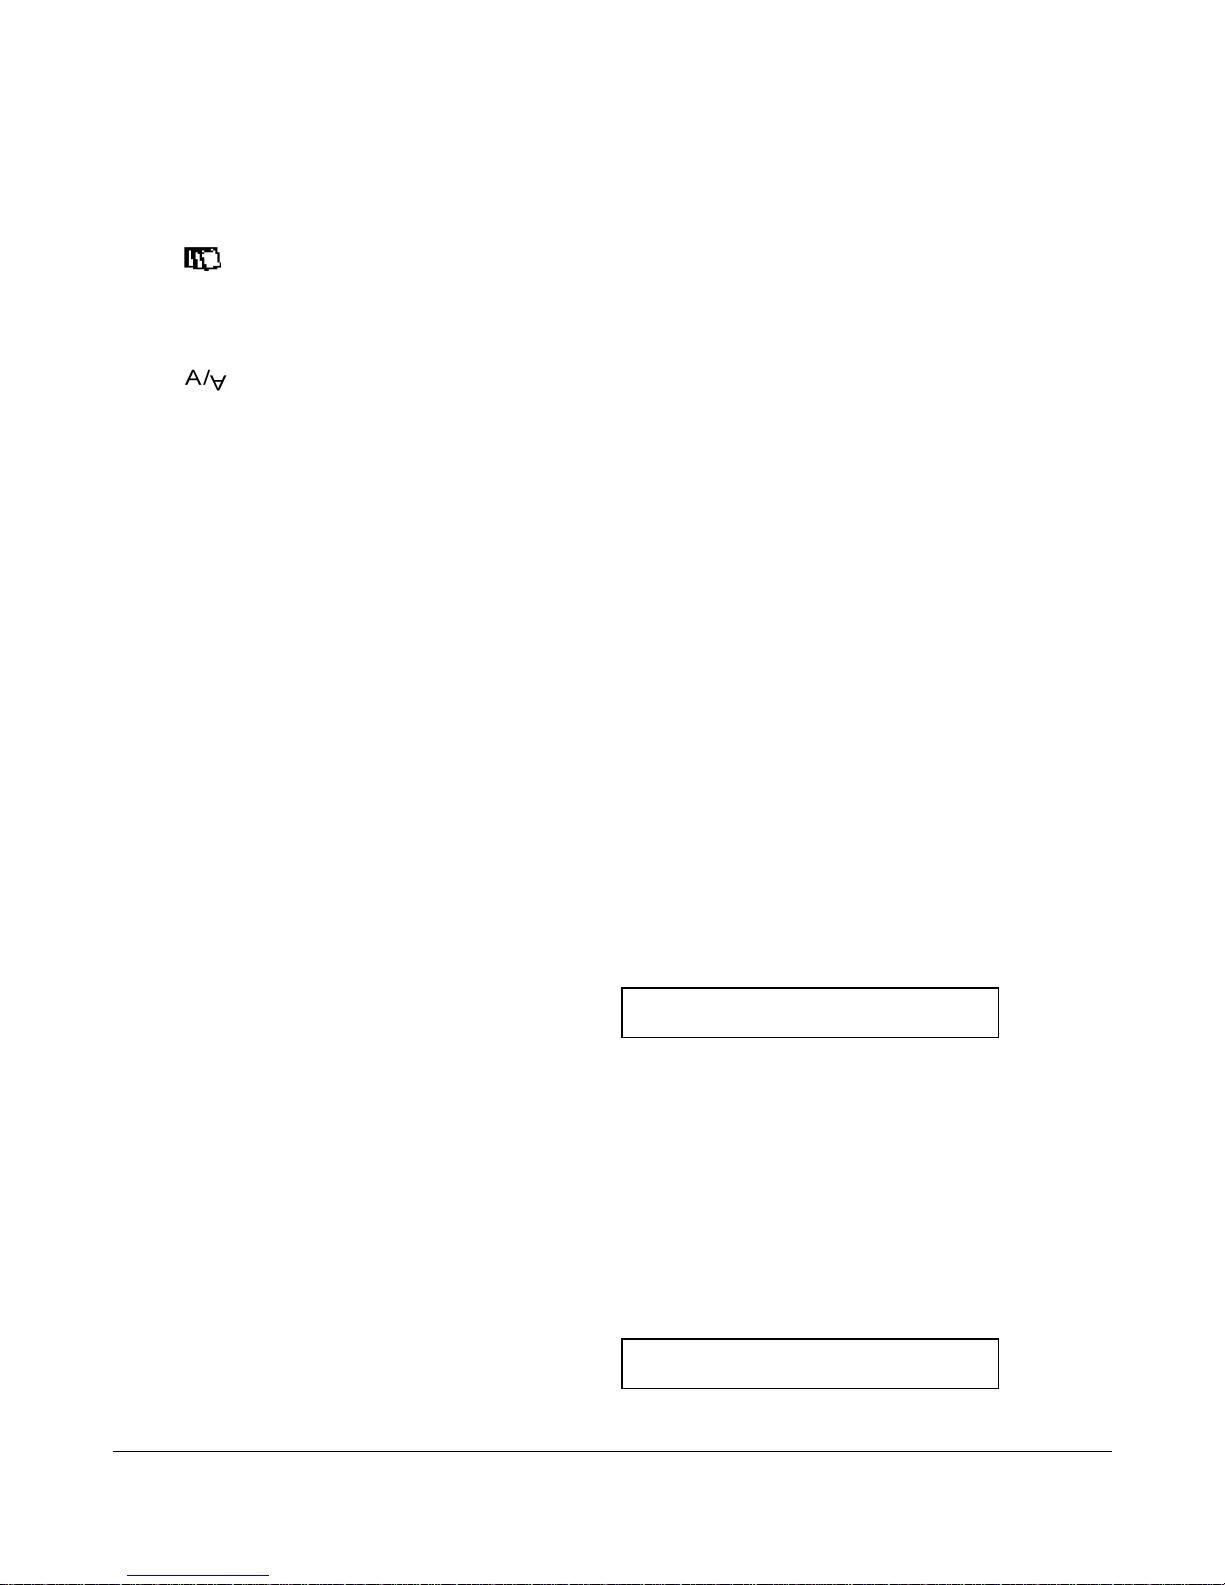
“A/∀” key = “Nor”
“A/∀” key = “Rev”
\text\da590\printing 3.4 DA590 Instruction Manual
Page 24
printing
Setting the left margin
Setting the top margin
The left margin is the distance between the edge of the printer’s
print area and the first printed character. (See the decal on top of
the print head housing.)
The default setting for the left margin is 0 mm.
Use programming mode to set the left margin 0-150 mm (0-5.9 in.). See
Sect. 5 in the “Left Margin” menu).
The top margin is the distance between the leading edge of the
material and the first printed line.
The default value for the top margin is 0 mm.
Use programming mode to set the top margin from 0-400 mm. (0-15.6
in.). See Sect. 5 in the "Top Margin" menu).
With the printer in off-line mode, the top margin can be adjusted, line by
line, by pressing the left or right arrow keys:
“ï” key = increases the top margin, one line at a time.
“ð” key = decreases the top margin, one line at a time.
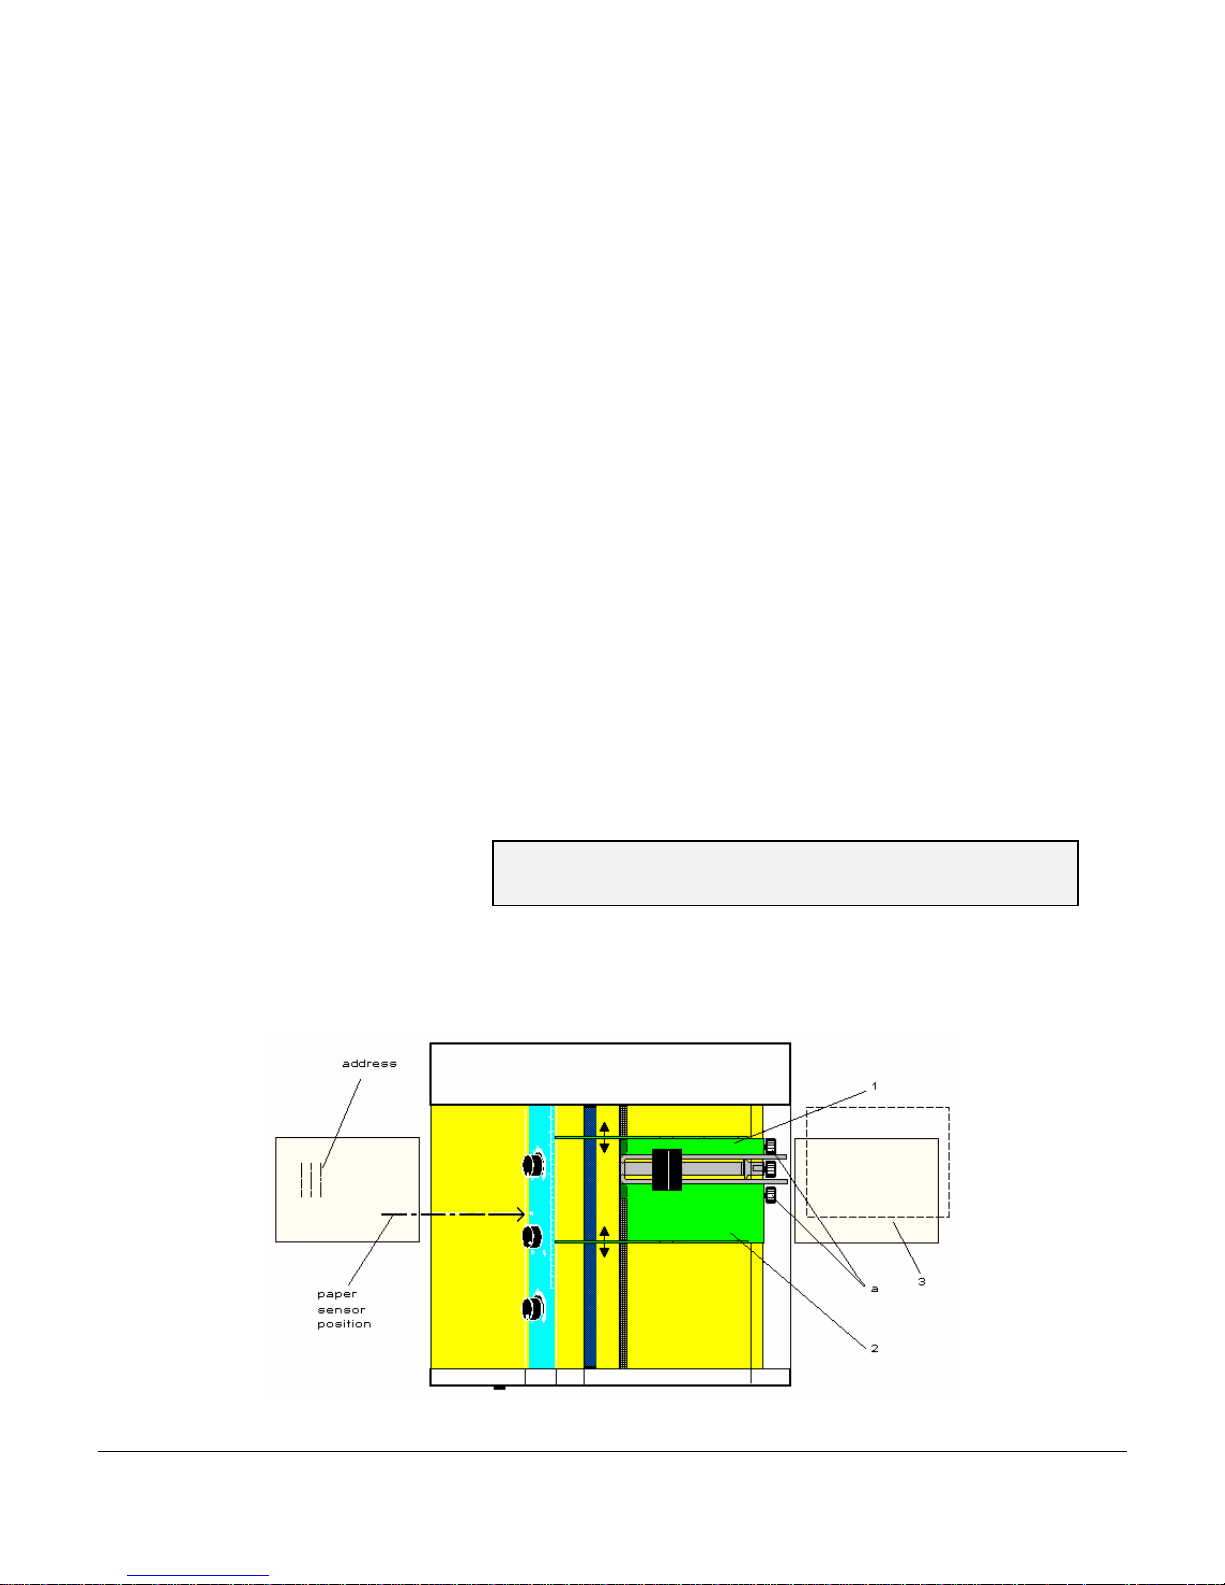
Setting the side guides
Loosen the knurled screws (a), and adjust the side guides (1 and 2)
to the width of the material (3).
CAUTION !
The material must pass over the paper sensor.
The edge of the material should project laterally at least 5mm (.18 in.)
over the paper sensor.
\text\da590\printing 3.5 DA590 Instruction Manual
Page 25
printing
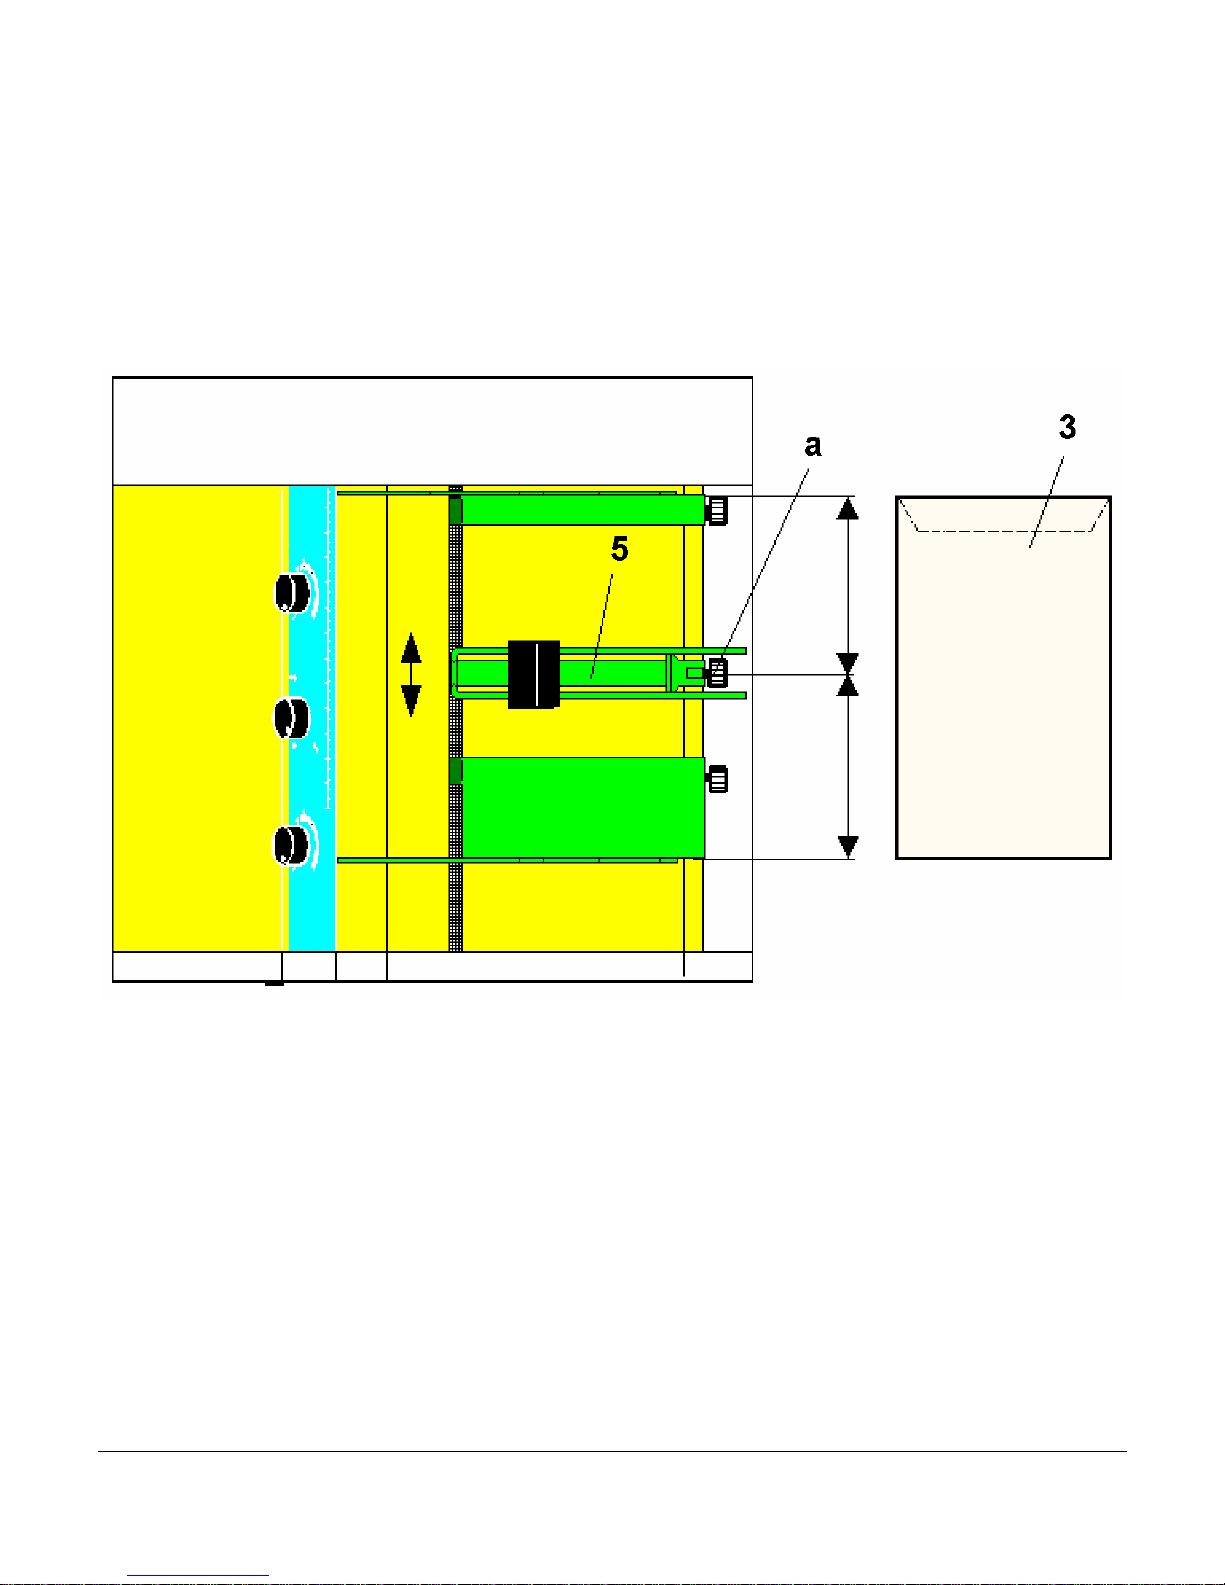
Setting the horizontal
elevation guide
adjustment
Loosen the knurled screw (a) and align the elevation guide (5)
more or less in the middle of the material (3) being used.
\text\da590\printing 3.6 DA590 Instruction Manual
Page 26

printing
Setting the vertical
elevation guide
adjustment
- Place two pieces of the material (3) on the elevation guide so
that they rest against the separators (b) and the guide block (4).
- Slide the guide block so that the bottom of the block just barely
touches the top edge of the top piece of material.
- Fan the material so that the bottom piece sticks out more than the top
piece.
- Adjusting the elevation guide angle:
The optimum angle of the elevation guide depends on the length of the
material.
shorter length = steeper angle
longer length = flatter angle
- Secure the elevation guide in-place with the knurled screw (a).
\text\da590\printing 3.7 DA590 Instruction Manual
Page 27

printing
Aligning the exit
rollers
Align the two exit rollers (12) so that the material is gripped evenly.
The printed area must not pass under the exit rollers.
Feeding without
printing
Check the set-up by running several pieces through without printing.
Press the “pap” key: a single piece should be fed in.
Press the “pap” key again and a single piece should be ejected and
the next single piece should be fed in.
Κ
Never touch the internal parts of the printer while it is running !
\text\da590\printing 3.8 DA590 Instruction Manual
Page 28
4. Printing
Print head
Printing
Printing is performed with a standard commercial inkjet cartridge
print head. When the ink is used up, the print head is replaced.
Which print heads to use
When must the print head be
replaced ?
RENA Klick Kit inkjet cartridge system
RENA Remanufactured inkjet cartridge
Hewlett Packard 51626A inkjet cartridge
When 0% appears in the top left of the display.
0% Cour12 00000
Off LQ Set1U Nor
this warning appears
NO INK !!
CHANGE PRINT HEAD
Details of how to replace the print head and to reset the ink status counter are given on the
following page.
Κ The ink status counter accurate only when the print head replacement
instructions, on the next page, are followed.
\text\da590\printing 4.1 DA590 Instruction Manual
and printing is interrupted.
Page 29
Printing
Changing the
- Press the “start” key to go into off-line mode.
- Press the “prog” key.
print head and
resetting the ink
status counter
- Press the “prev” key to get to the “HEAD RESET” menu.
- Press the “enter” key twice:
The print head will move away from the “park” position.
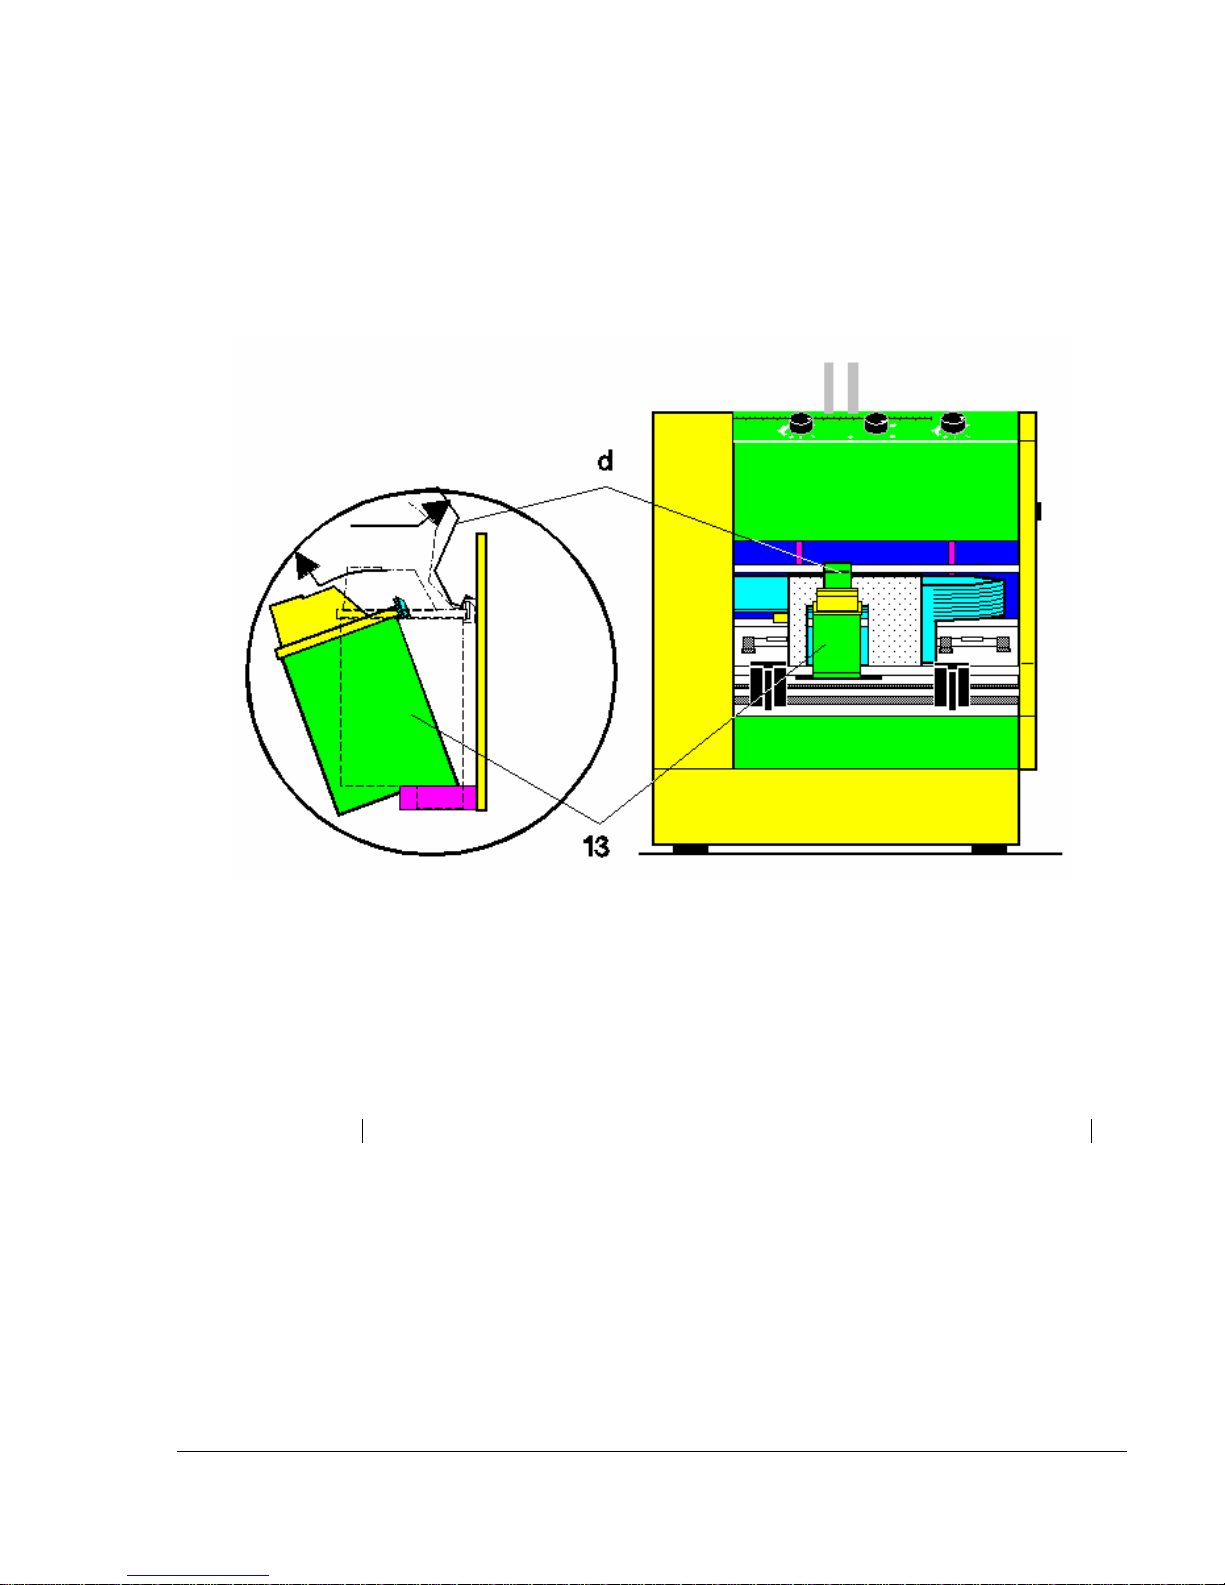
Press the leaf spring (d) in the direction of the arrow to eject the
print head (13).
-Remove the print head by tilting it out towards the exit side of the printer.
-Follow the instructions supplied with the new print head.
-When inserting the new print head, make sure that it locks audibly into place.
-Press the “end” key to return to off-line mode. The display is reset to 100%.
-Press the “start” key to return to on-line mode.
Κ The ink status display applies only to the HP 51626A or its equivalent!
\text\da590\printing 4.2 DA590 Instruction Manual
Page 30
Printing
Cleaning the print
head nozzles
The print head nozzles are cleaned automatically
- before each test print.
- after switching from off-line to on-line.
- after approximately every 100 printed addresses.
- when no data is received after end of printing.
The print head nozzles should be cleaned manually if it has
not been used for several days.
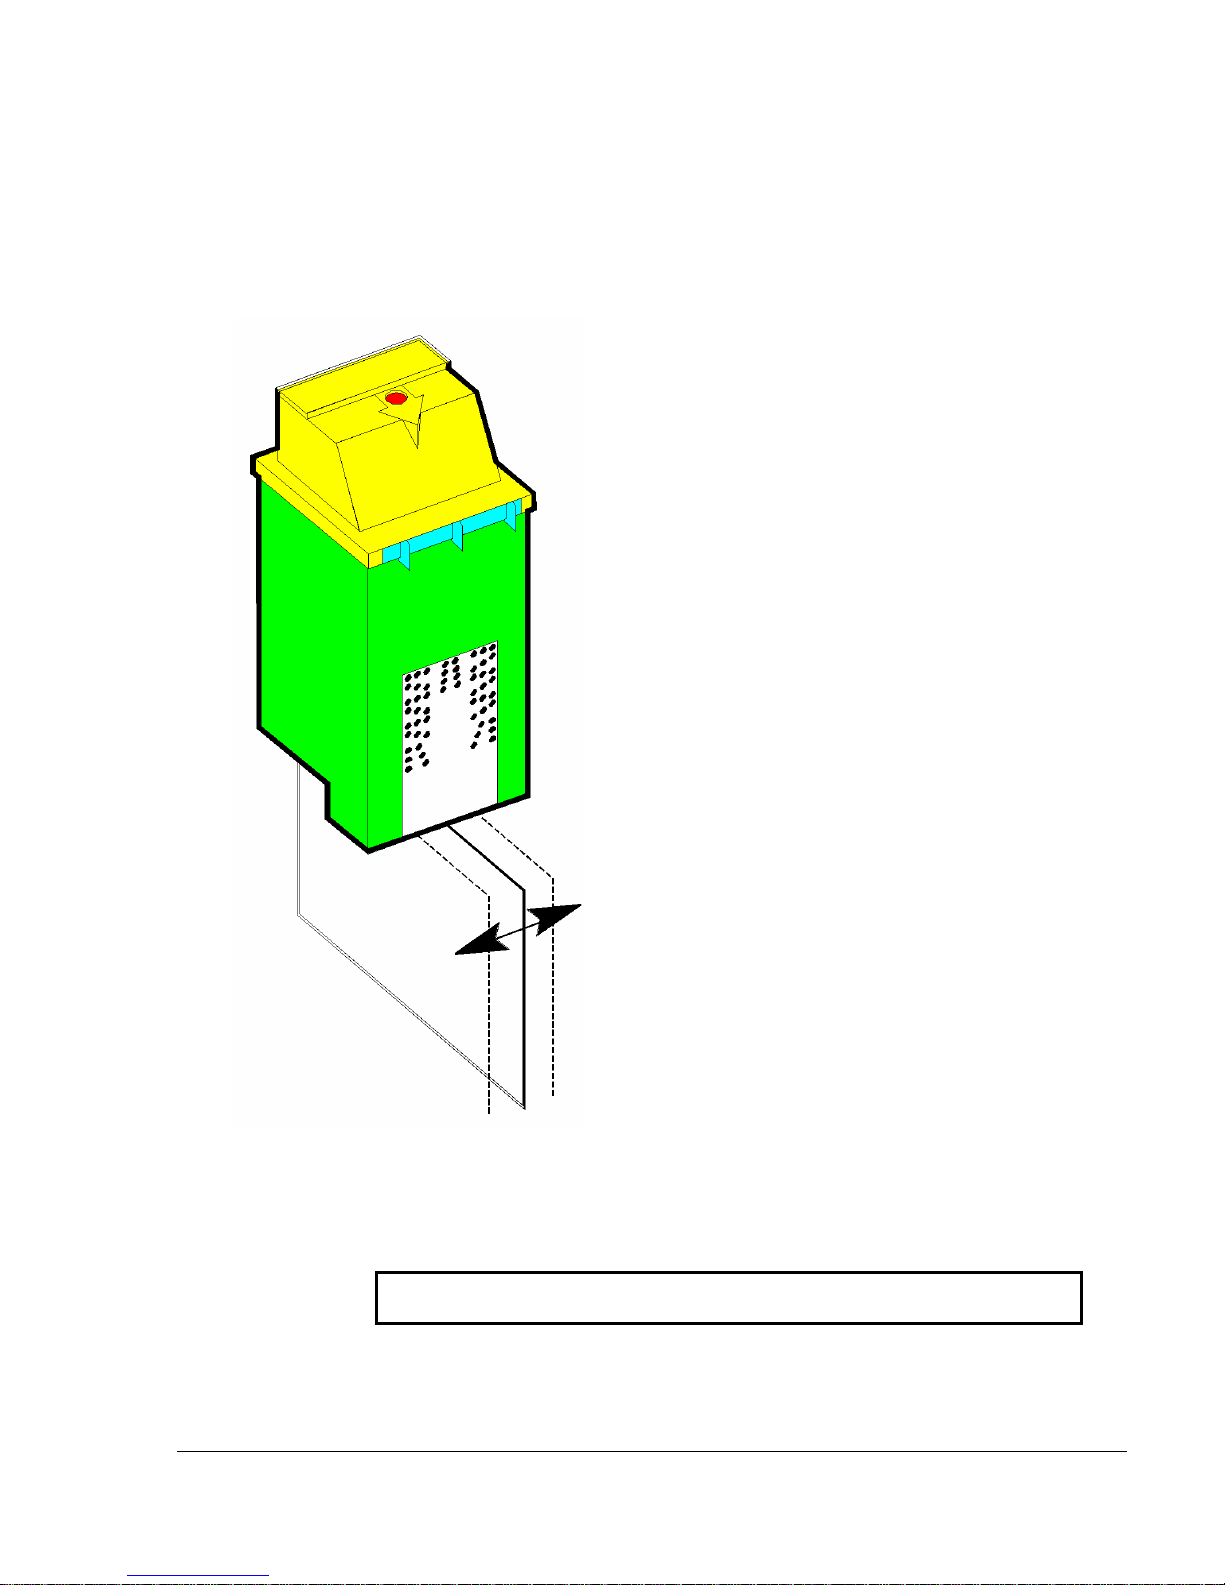
- To do so, remove the print head from the printer (see
diagram above).
- Slide a piece of paper across the print head nozzles back
and forth several times. Or, use a damp cloth.
Κ-When the printer is not being used, the print head
must be removed and stored properly. This will
avoid nozzle clogging and the possibility of ink
leaking out and damaging the printer.
Print test
Κ
\text\da590\printing 4.3 DA590 Instruction Manual
Never touch the internal parts of the printer while it is running !
Press the “test” key. The bottom sheet is fed in and printed with a
test address. The sheet is then ejected and the next sheet is fed in.
Page 31

Printing
Counting addresses
Every printout is counted after the material has been ejected. The number can be
seen in the upper right of the display. The printer performs two different and
independent types of address counting.
Counting printed addresses
Counting test addresses
This count occurs after each address is printed.
The count is maintained while the printer is in on-line mode.
The number remains visible in the display until you go off-line
and press the “test” key. Then the number represents the
number of test addresses printed. Only when you change
back to on-line mode does the address count number
appear in the display again. When you return to on-line
printing, the address count is continued.
By simultaneously pressing the “start” and “pap” keys, the
counter can be reset to “0” without losing addresses in the
buffer.
A test address count is the number of test prints performed by
the printer.
This count is maintained when pressing the “test” key with
the printer in off-line mode.
If you switch over to on-line mode by pressing the “start”
key, the count disappears from the display, but is stored in
memory.
If you again press the “start” key to return to off-line mode
and perform additional test prints, the stored counter value
again appears in the display and the counting is continued. If
the “test” key is held down until the word “Test” appears
on the display, test addresses will be continuously printed
until the “start” key is pressed and the word “off” appears
on the display.
Κ Both address counters are reset when the printer is switched off !
\text\da590\printing 4.4 DA590 Instruction Manual
By simultaneously pressing the “test” and “pap” keys, you
can reset the test address counter to “0” without losing
addresses in the buffer.
Page 32

5. Printer functions
Programming mode
The printer is delivered with factory default menu settings. To change the
print quality, for example, you must go into programming mode.
What is programming
mode for ?
The “menu overview” section lists the menu fields and their options.
Κ The printer set-up can be changed by using the RENASET program, by
sending escape sequences from software , or in programming mode.
Getting to
programming mode
Programming mode is used for the manual setting of specific parameters via
the control panel.
- Change over to off-line mode by pressing the “start” key.
- Then press the “prog” key.
- The following display appears briefly:.
DA 590 Inkjet
Programming mode
-The printer is in programming mode when the following display appears:
\text\da590\printer functions 5.1 DA590 Instruction Manual
(Menu field) blinking (Option field)
Page 33
Printer functions
What does the display show
in programming mode?
How the keys function in
programming mode.
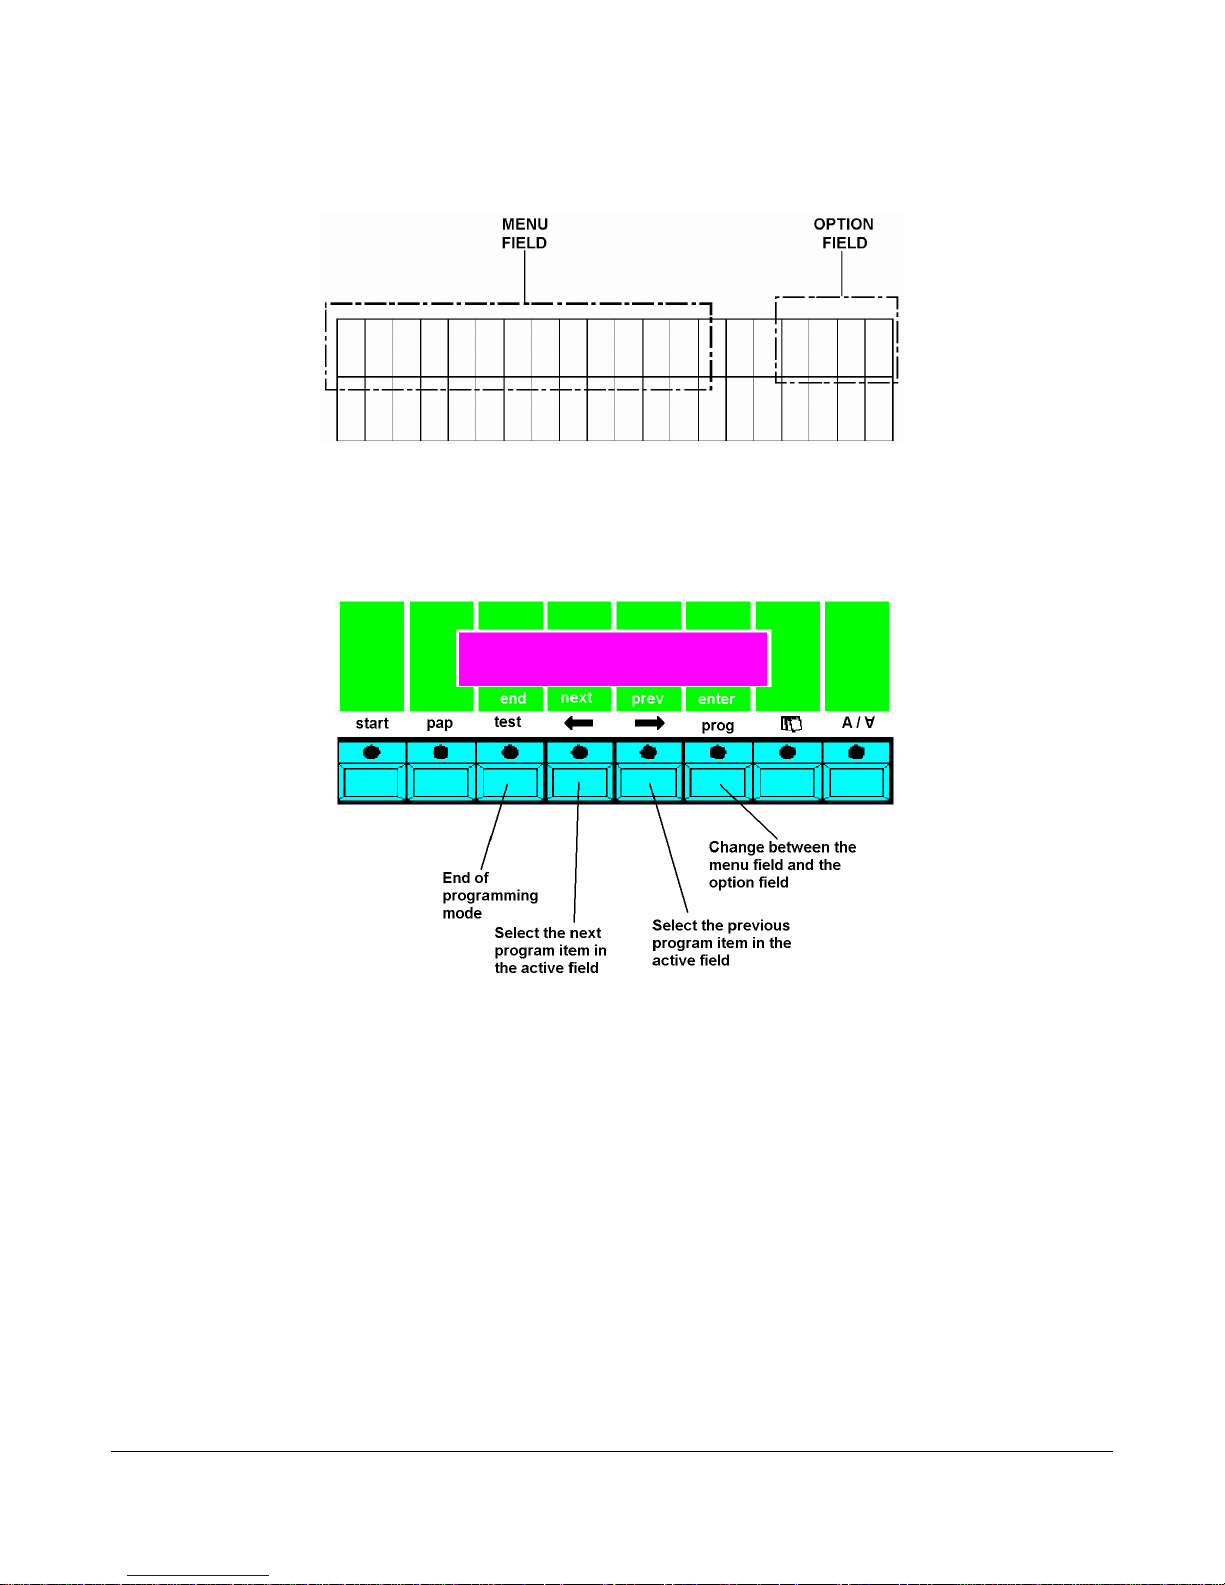
“enter” key Use “enter” to toggle between displaying the menu field and
In programming mode, the top line of key descriptions are
active (end, next, prev, enter).
the option field. The currently active field blinks. The last
setting is always saved.
“next” key Use “next” to move to the next active field choice.
“prev” key Use “prev” to move to the previous active field choice.
\text\da590\printer functions 5.2 DA590 Inst ruction Manual
Page 34

Printer functions
“end” key Use “end” to leave programming mode and return to normal
mode.
\text\da590\printer functions 5.3 DA590 Inst ruction Manual
Page 35
Printer functions
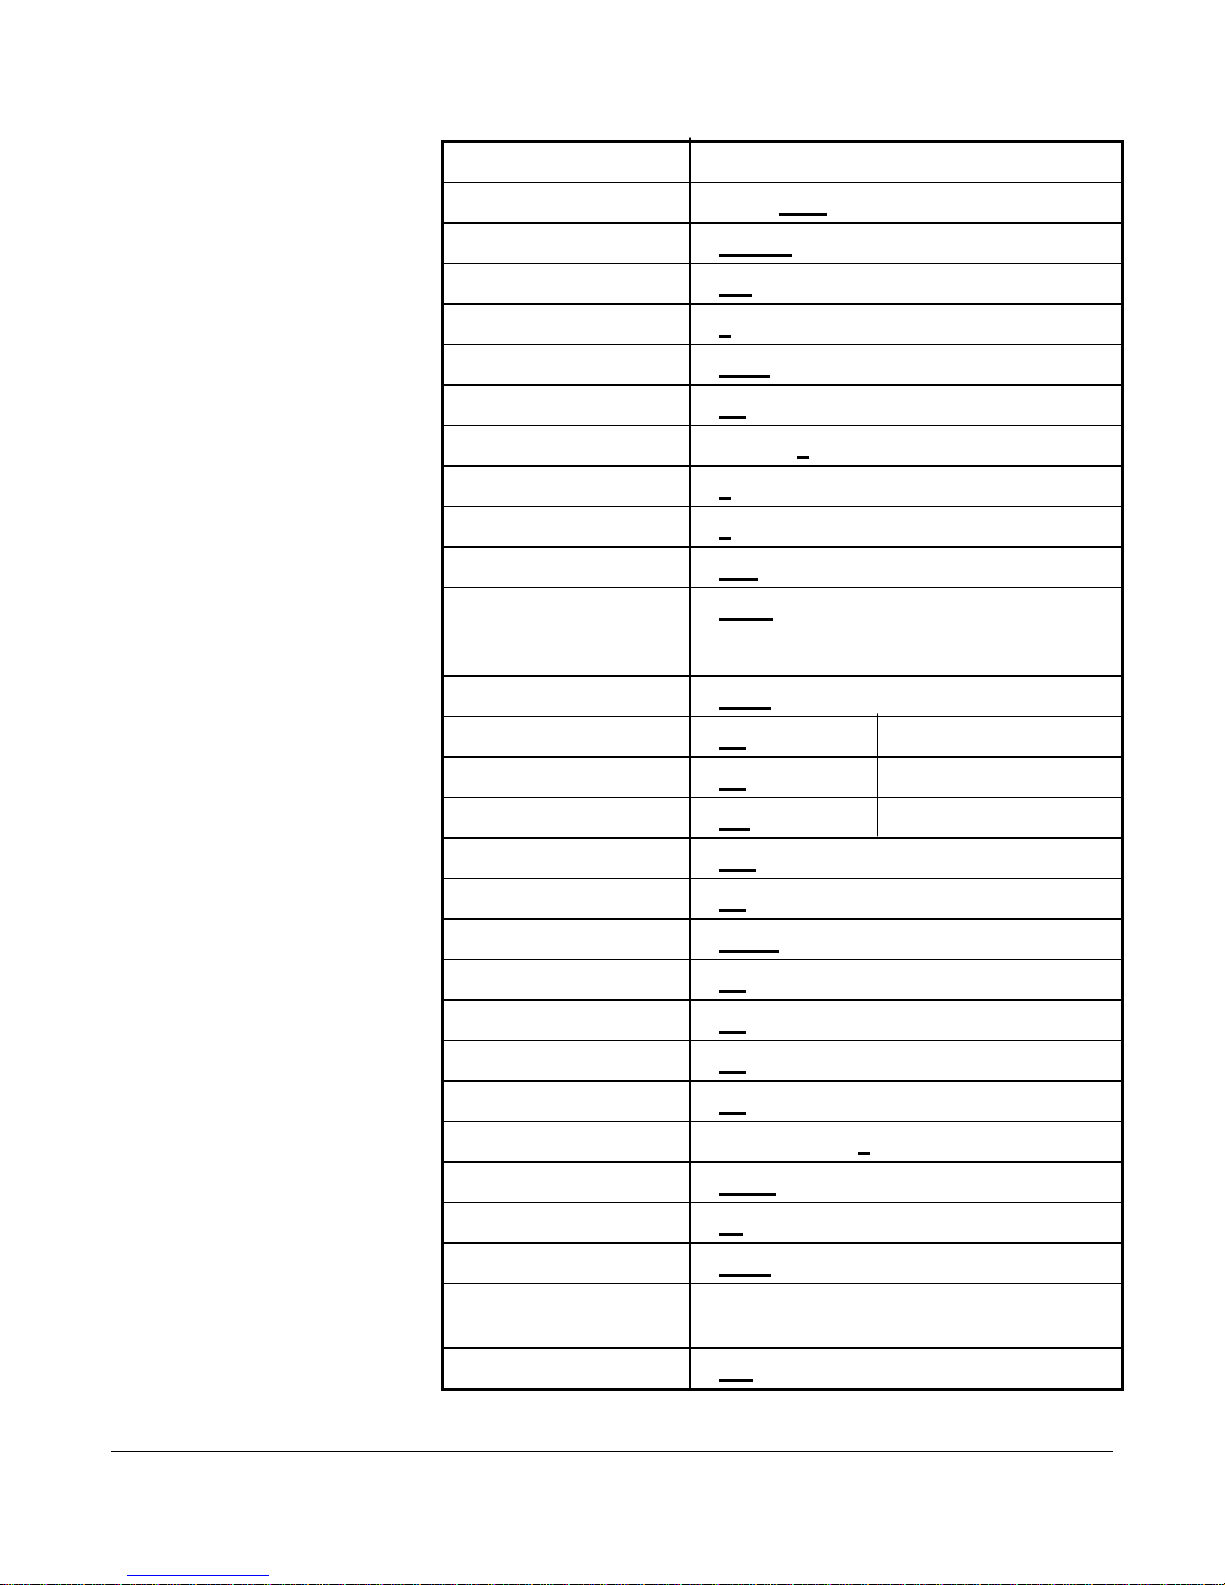
Menu overview - the underlined values are the factory default settings:
Menu Option
SETTING No 0 No 1 ... No 9
FONT Cour12 Helv14 TmsRm12
PRINT QUALITY LQ NLQ
CHAR. SPACING 0 1 2 ... 29 30
CHAR. HEIGHT norm doub trip
CHAR. WIDTH off doub trip
LINE SPACING 1 2 ... 6 ... 10 (lines per inch)
LEFT MARG. [mm] 0 150
TOP MARGIN [mm] 0 400
ORIENTATION Nor Rev
CHARACTER SET PC8 Rom8 P850 ECMA P8DN ICEL
P852 P860 USA7 UK7 Fra7 Ger7 Ita7
Spa7 Den7 Nor7 Swe7 SwN7 Por7
BIT8 SET TO BIT8 FIX0 FIX1
BARCODE SELECT zip bpo4, kix, 2/5i, ean,
ZIP SEARCH off zip dpbc
ZIP POSITION top bot conv
PRINT MODE aut. uni bid.
EJECT DELAY off 0.1 - 9.9 (sec)
PAPER SPEED 100% 90% 80% 30%
AUTO LF off on
HEX TO ASCII off on
LINE MODE (lines) off 1 99
DELIMITER < > off on
CARRIAGE CORR. -5 -4 -3 -2 -1 0 +1 +2 +3 +4 +5
EMULATION PCL3 D300 D306 U332
SETTING LOCKED no yes
SERVICE Prom Adrc Head Char HexD SetD
\text\da590\printer functions 5.4 DA590 Inst ruction Manual
HARDWARE TEST To be used by qualified RENA service
representatives only
HEAD RESET yes no
Page 36

Printer functions
An explanation of the menu fields
SETTING Selection of a user-defined set-up.
You may create various set-ups yourself and store these as a “setting”.
Nine of the ten setting options, “No 1” - “No 9” are available for user
defined set-ups. The first option, “No 0”, is reserved for factory default
settings.
If you select setting “No 0”, programming mode is terminated
immediately after pressing the “enter” key. You cannot make any
changes to setting “No 0”.
To make changes to a set-up, you must first select any one of the
remaining nine options (“No 1” to “No 9”) or use the default “No 1”.
By ending programming mode, the changes that were made are
automatically stored in the selected setting “No #".
The settings remain stored when the printer is switched off.
In the “service” option “SetD”, you can print out the active
settings (see “service” description).
A default reset may be accomplished by holding down the
“prog” key while turning on the printer.
FONT Selection of the font (see section “Fonts”). Three fonts, Cour12,
Helv14 and TmsRm12 are resident in the printer.
PRINT QUALITY Selection between two print qualities: NLQ and LQ
NLQ: Near Letter Quality = 150 dots printed per inch
LQ: Letter Quality = 300 dots printed per inch
CHAR.
The space between characters can be adjusted from 0 to 30 dots.
SPACING
CHAR. HEIGHT Characters may be printed normal, double and triple high.
CHAR. WIDTH Characters may be printed normal, double or triple wide.
LINE SPACING Line spacing may be from 1 to 10 lines per inch.
\text\da590\printer functions 5.5 DA590 Inst ruction Manual
Page 37

Printer functions
BARCODE
LEFT MARG. This allows you to define the spacing between the edge of the print
area and the first printed character. The range is 0-150 mm.
By pressing and holding down the “prev” or the “next” key, the margin
change is performed in cm-steps (1 cm = 10 mm), instead
of in mm-steps.
TOP MARGIN This allows you to define the spacing between the leading edge of the
material and the first printed line. The range is 0-400 mm.
By pressing and holding down the “prev” or the “next” key, the margin
change is performed in cm-steps (1 cm = 10 mm), instead
of in mm-steps.
ORIENTATION Rotating the address block by 180°.
In “Nor”, the first line is printed first.
In “Rev”, the last line is printed first.
CHARACTER
SET
National character sets with their own special characters in each
language (see character sets in the Appendix).
BIT8 SET TO This menu allows you to define how the DA-590 is to execute bit 8.
This menu prompt is active only for 7-bit character sets.
The following variants are possible:
BIT8: the higher-value bit (bit 8) of the received character is taken over
in unchanged form.
FIX0: the higher-value bit (bit 8) of the received character is always
deleted.
FIX1: the higher-value bit (bit 8) of the received character is always set
to "1".
\text\da590\printer functions 5.6 DA590 Inst ruction Manual
Use this menu to change between the USPS ZIP barcode, bpo4
Page 38

Printer functions
SELECT British postal barcode, kix Dutch postal barcode, 2/5I 2 of 5
interleave industrial barcode or ean industrial barcode.
ZIP SEARCH If the “enter” key is pressed while “ZIP” is flashing the following
option is offered:
“ZIP SEARCH : off”
You may choose between the options “off”, “zip” and “dpbc”.
In the setting “zip” the nine (or five) digits of the ZIP code from
the last line of the address are recognized and the corresponding postnet
barcode (with check sum) is printed.
The numbers of the ZIP code must be sent in the last line of the address.
The ZIP code may not have more than nine digits, but
must have at least five. As the number sequence search starts from the
end of the address, the last nine digits of a sequence are converted. The
separating hyphen between the fifth and sixth digits is ignored.
With the “dpbc’ setting, the program searches for the delivery
point number in the delivery address line and adds it to the ZIP+4
barcode. The delivery address line must be sent to the printer
immediately above the last (City/State/Zip) address line. The delivery
address must conform to USPS regulations. A “0” is inserted
automatically if the delivery address contains a single digit delivery
number.
ZIP POSITION After you make your choice in the “ZIP SEARCH” menu, the
following display appears:
“ZIP POSITION : top"
The barcode can be positioned “top”, "bot" or "conv".
This determines the position of the barcode in relation to the address
block.
top: the barcode is printed above the first address line.
bottom: the barcode line is printed below the last address line.
conventional: the position of the barcode line is the conventional
lower right.
In the “conv” option, the following settings are pre-set :
LEFT MARG.: 37 mm
TOP MARGIN: 48 mm
The barcode is indented by 30 mm and printed in the eleventh
line, i.e. the spacing between the first line of the address and the barcode
is 10 line feeds (at 6 lpi).
\text\da590\printer functions 5.7 DA590 Inst ruction Manual
Page 39

Printer functions
The values for LEFT MARGIN and TOP MARGIN can be
changed to your requirements to match the position of the address on the
envelope.
Κ When selectiong conv (convntional lower right) for
automatic barcode placement, always use a USPS
template to check for the proper positioning of the
barcode.
PRINT MODE You may choose between three print modes:
bidirectional: Prints from left to right, then from right to left
unidirectional: Prints from left to right (except for Hex-Dump
and HEAD test)
automatic: Prints from left to right, then from right to left
for text and uni-directionally for graphics.
EJECT DELAY 0 - 9.9 seconds
Paper ejection can be delayed so that the ink can dry.
(0.1 up to 9.9 secs. in .1 second increments.)
PAPER SPEED The maximum paper throughput speed can be reduced from 100%
to 30%. This may be required for particularly delicate or heavy
papers.
AUTO LF Automatic line feed on/off
With this function activated, a line feed (LF) is performed every
time a carriage ruturn (CR) is received from software.
\text\da590\printer functions 5.8 DA590 Inst ruction Manual
Page 40

Printer functions
HEX TO ASCII HEX TO ASCII conversion off/on
If conversion is switched on, the printer interprets the
per-cent symbol “%” as a non-printable control character.
The two characters following the “%” symbol are interpreted
as Hexadecimal values and combined into a single character.
Example: %0C = 0C = Form Feed
LINE MODE Line mode off / 1 - 99 lines
This creates a form feed after a specific number of line feeds.
If the “prev” or “next” key is pressed and held down, the change
takes place in 10 line steps, otherwise in 1 line steps.
DELIMITER <>
With Delimiter “on”, surrounding an address with these two symbols
“<“ (less than) at the beginning of the address and “>“ (greater than)
after the ZIP code, will force a form feed.
CARRIAGE
CORR.
This allows for aligning multiple lines when creating graphics with bidirectional printing.
Select one of the following eleven values :
+5, +4, +3, +2, +1, 0, -1, -2, -3, -4, -5
Κ This feature is only recognized when selecting “bid” in the Print Mode
menu. It allows you to set your printer so that you can print graphics
"bi -directionally" with the same quality as "uni-directionally", but with
a greater throughput than when using uni. or aut. !
\text\da590\printer functions 5.9 DA590 Inst ruction Manual
Page 41

Printer functions
EMULATION The DA-590 printer can be operated with software programs that were
created for other RENA printers. To do so, the relevant printer must be
selected in the menu option "Emulation".
Κ Not all control instructions of the other printers are
recognized, such as graphics instructions !
SETTING
LOCKED
You may “lock” each setting individually. This means that the
corresponding set-up cannot be changed via software escape
sequences.
If you select the “yes” option, your setting is locked.
The status of the active setting is shown on the display.
The display text “Set1U” means that Setting “No 1” was selected, but is
Unlocked.
The display text “Set1L” means that Setting “No 1” was selected, but is
Locked.
SERVICE
Prom Displays the internal software version (EPROM numbers)
Adrc Displays the number of printed addresses from initial operation of the
The counter can be only be reset by service personnel.
\text\da590\printer functions 5.10 DA590 Inst ruction Manual
printer.
Page 42

Printer functions
Κ For the following service points, letter size paper must be
loaded for under the print head for printing!
Head Test print in which the print head nozzles are individually fired.
Char Printout of the currently selected character set.
HexD Hex -Dump causes all received characters to be printed from the
receive buffer in hexadecimal.
Κ The Hex-Dump prints out only in Cour12 !
Pressing the “prog”, “end” or “start” keys terminate Hex-Dump.
CAUTION !
Hex -Dump may also be switched on directly by keeping
the “start” key depressed when the printer is switched
on.
Do not stop Hex-Dump by switching off the printer, as this
may lead to changed settings !
SetD The active settings are printed out.
See the following page for an example of a SetD print out.
Head Test print in which the nozzles are individually fired.
\text\da590\printer functions 5.11 DA590 Inst ruction Manual
Page 43

Printer functions
The following is an example of a SetD print out:
DA590 SETTINGS
SETTING No 3
FONT Cour12
PRINT QUALITY LQ
CHAR. SPACING 0
CHAR. HEIGHT norm
CHAR. WIDTH off
LINE SPACING 6
LEFT MARG. [mm] 33
TOP MARGIN [mm] 50
ORIENTATION Nor
CHARACTER SET PC8
BIT8 SET TO Bit8
BARCODE SELECT zip
ZIP SEARCH dpbc
ZIP POSITION top
PRINT MODE aut.
EJECT DELAY off
PAPER SPEED 100%
AUTO LF off
HEX TO ASCII off
LINE MODE off
DELIMITER < > off
CARRIAGE CORR. 0
EMULATION PCL3
SETTING LOCKED no
HARDWARE
TEST
HEAD RESET Resets the display of the ink status after a new print head is installed.
\text\da590\printer functions 5.12 DA590 Inst ruction Manual
ADDRCOUNTER 1581
PROM #2480 #2473
Testing various hardware components
Page 44

Printer functions
A programming example
Programming mode - Press the “prog” key.
Activate required
menu field
Changing from menu
field to option field
Activate required
option field
End programming
mode
You want to change the set up from 6 lines per inch to 8 lines
per inch.
- Switch the printer on.
- Use the “prev” or the “next” key to move to the “LINE
SPACING” menu choice. “LINE SPACING” is blinking.
- Press the “enter” key. The option field on the right with a
“6” is blinking.
- Use the “next” key to change the blinking “6” to “8”.
- Press the “end” key. The changed value is now stored in
the settings under the selected "Setting No" and the printer
is in off-line mode again.
Initializing the printer
without loss of setting
set-up
with loss of setting setup
To reset to the factory default settings, select option “No 0” in
the “SETTING” menu field in programming mode. You can
end programming mode by pressing the “enter” key. The
“Set 0U” message appears in the display. The other settings
remain stored under their respective setting numbers.
To return all the changed values and settings to factory default
settings, switch the printer off and ....
- Keep the “prog” key pressed while switching the printer
on again.
The following
display appears
DA 590 Inkjet
Default Reset
The printer now has the default settings and all set-ups are as set
at the factory. The display shows “Set 1U”.
\text\da590\printer functions 5.13 DA590 Inst ruction Manual
Page 45
6. Interface
The DA-590 printer is equipped with a standard data communication interface. The
interface connection socket is Centronics parallel. It allows the printer to be connected
to a terminal or a computer.
Centronics parallel interface
This interface is most frequently used for connecting to a personal
computer. This interface usually requires no special instructions or
configurations for the printer or computer. The Centronics parallel
interface cable allows fast data transmission.
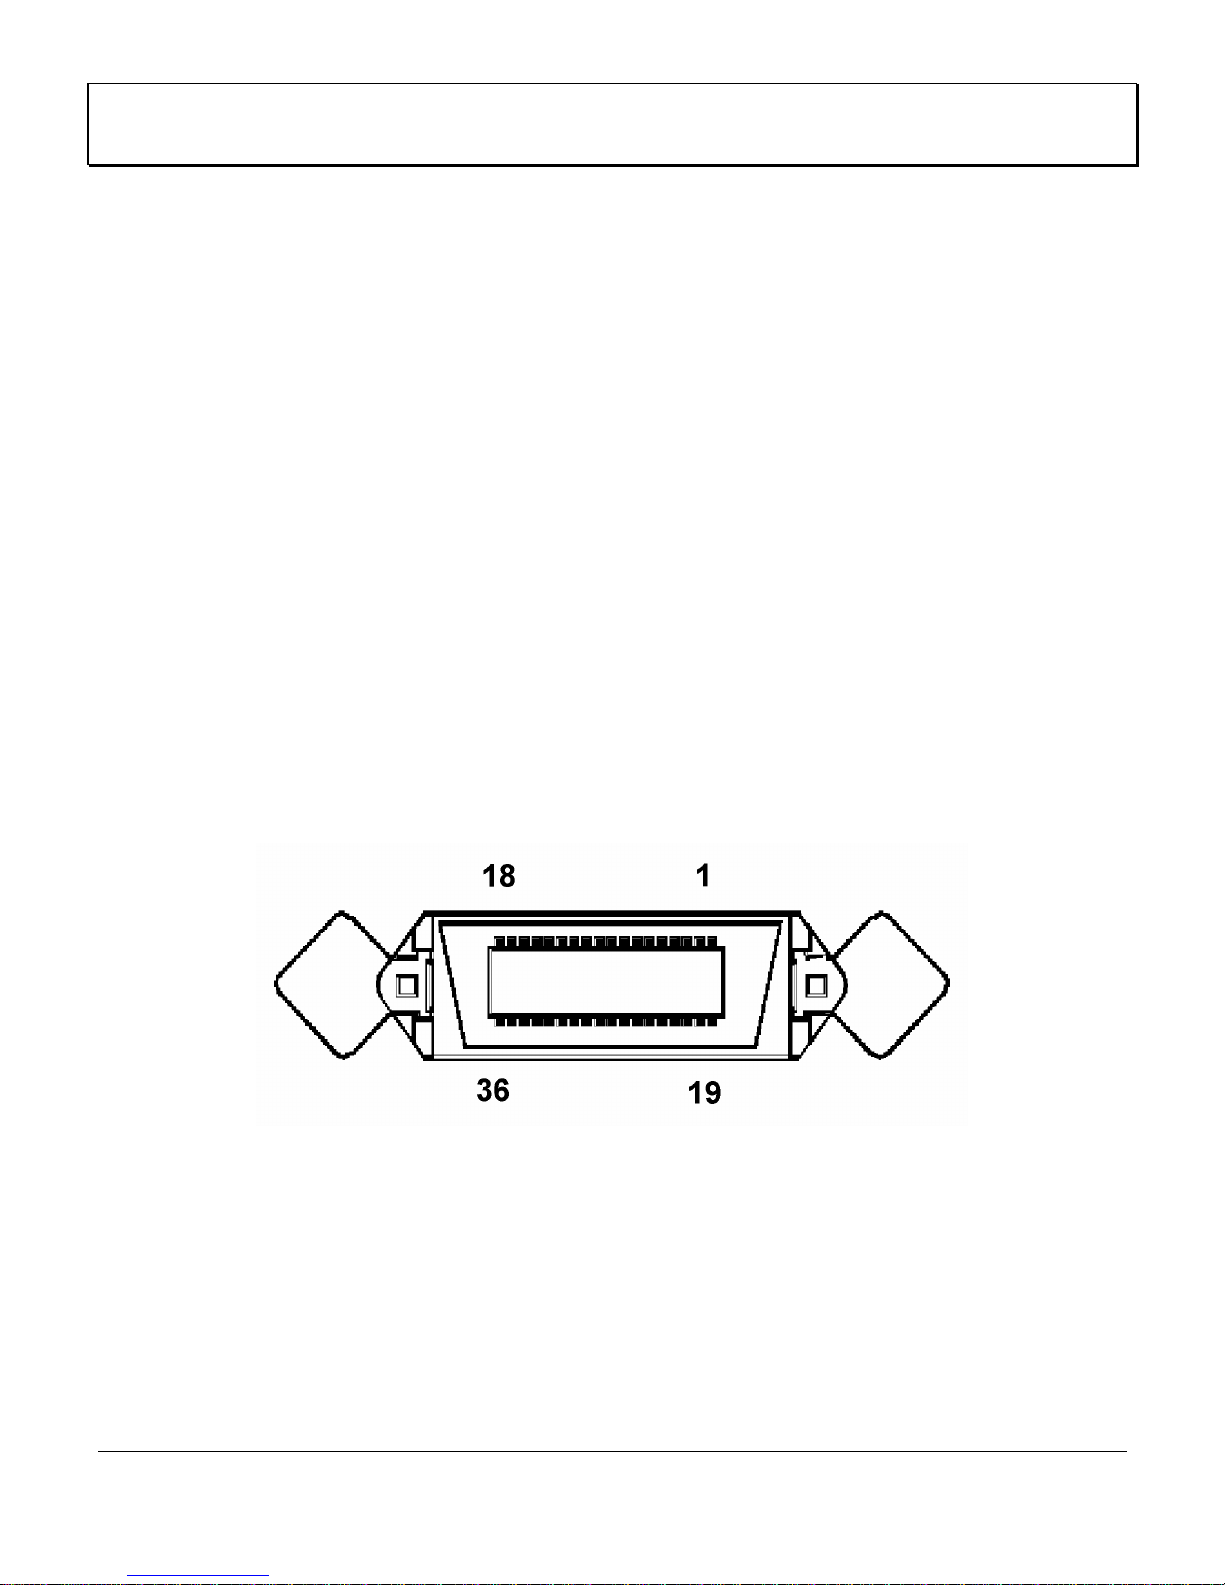
The parallel interface connector has a standard 36-pin Amphenol
jack with two metal clips.
Connecting socket Connector type: Socket strip Amphenol
Design: 57 - 40360
Cable length max. 6 feet with
Amphenol plug strip 57 - 30360
\text\da590\Interface 6.1 DA590 Instruction Manual
The pin assignment is found on the next page.
Page 46

Interfaces
Pin assignment
PIN assignment of the 36-pin connector
PIN Signal
_______
1 STROBE
2 DATA 1
3 DATA 2
4 DATA 3
5 DATA 4
6 DATA 5
7 DATA 6
8 DATA 7
9 DATA 8
______________
10 ACKNOWLEDGE
11 BUSY
12 PE
13 SELECT
14 ---
15 ---
16 GND
17 Chassis-GND
18 + 5V
PIN Signal
19 GND
20 GND
21 GND
22 GND
23 GND
24 GND
25 GND
26 GND
27 GND
28 GND
29 GND
30 GND
____
31 INIT
_____
32 ERROR
33 GND
34 -- 35 -- 36 ---
\text\da590\Interface 6.2 DA590 Instruction Manual
The signal description is shown on the next page.
Page 47

Interfaces
Signal description
PIN associated Signal Signal- Meaning
GND In./Out.
1 19 STROBE E This pulse (0.5ms)
shows that data bits
are valid
2-9 20-27 DATA 1-8 E Data bits D0-D7
_____________
10 28 ACKNOWLEDGE A Printer report:
data is processed
(ready to receive)
11 29 BUSY A Printer report:
received data
will be processed
12 30 PE (Paper empty) A Printer reports to
computer: no
paper
13 -- SELECT A Signal is always high
14 -- Free Free
15 -- Free Free
16 -- GND GND
17 -- Chassis-GND Chassis-GND
18 -- + 5V + 5V
19-30 -- GND GND
____
31 -- INIT E Unassigned
_______
32 -- ERROR A Signal is always high
33 -- GND GND
34-36 -- Free Free
\text\da590\Interface 6.3 DA590 Instruction Manual
Page 48

Interfaces
Circuit extract
\text\da590\Interface 6.4 DA590 Instruction Manual
Page 49

7. Fonts
Terminology
A font is a collection of characters and symbols with the same type face and
spacing, the same height, line thickness and characteristics (Italic, Bold etc.).
Type Face
Serif and sans serif
font types
A Type Face is a set of characters and symbols of a specific
design.
Cour Helv TmsRm
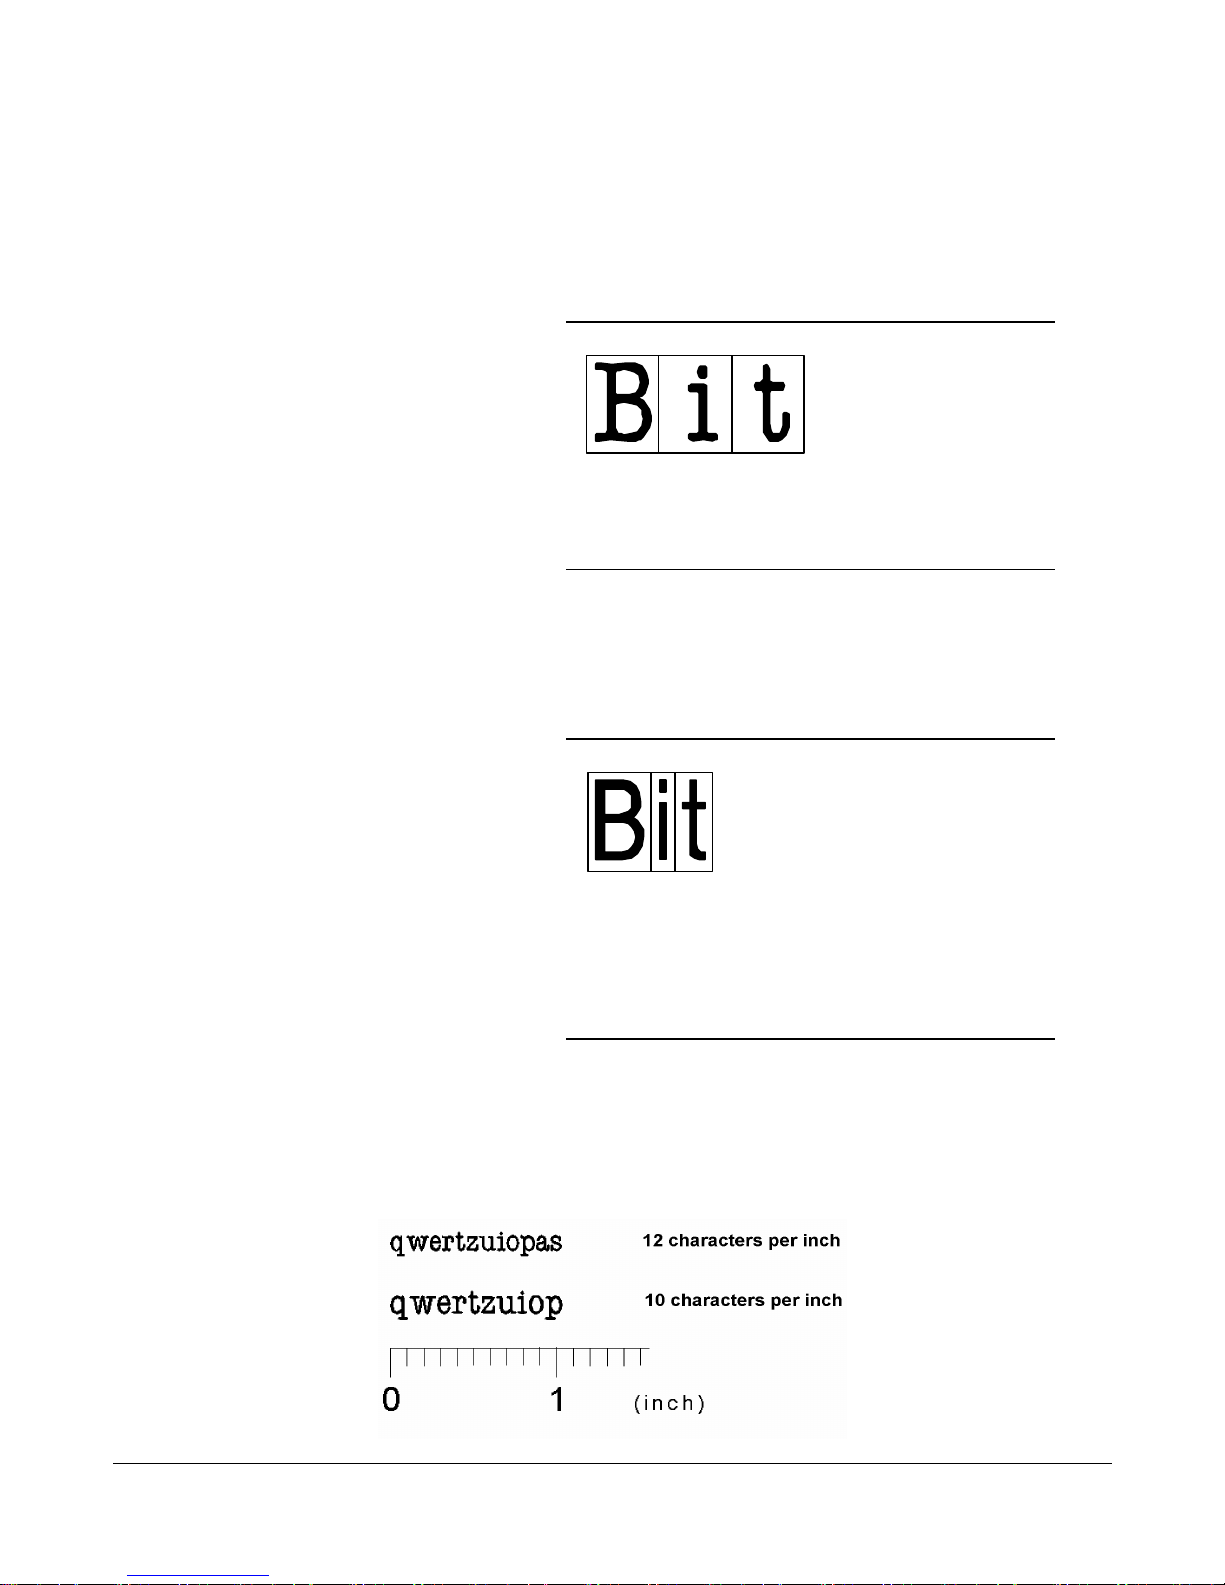
Serifs are small cross-lines above or below characters (known
as "feet" in the Antiqua fonts). Cour (Courier) and TmsRm
(Times Roman) are Serif fonts. Fonts without serifs are known
as Sans Serif. Helv (Helvetica) is a Sans Serif font. The
diagram below shows the difference between a Serif and a
Sans Serif font.
\text\DA590\fonts 7.1 DA590 Instruction Manual
Page 50
Fonts
Spacing
Spacing refers to the relative position of the characters of a
font. Character spacing may be either fixed or proportional.
Fixed spacing With fixed character spacing, each character of a font assumes
the same width and has the same spacing as the adjacent
characters.
fixed spacing
of each character
Proportional spacing With proportional character spacing, the spacing depends on
the width of a character.
proportional spacing
of each character
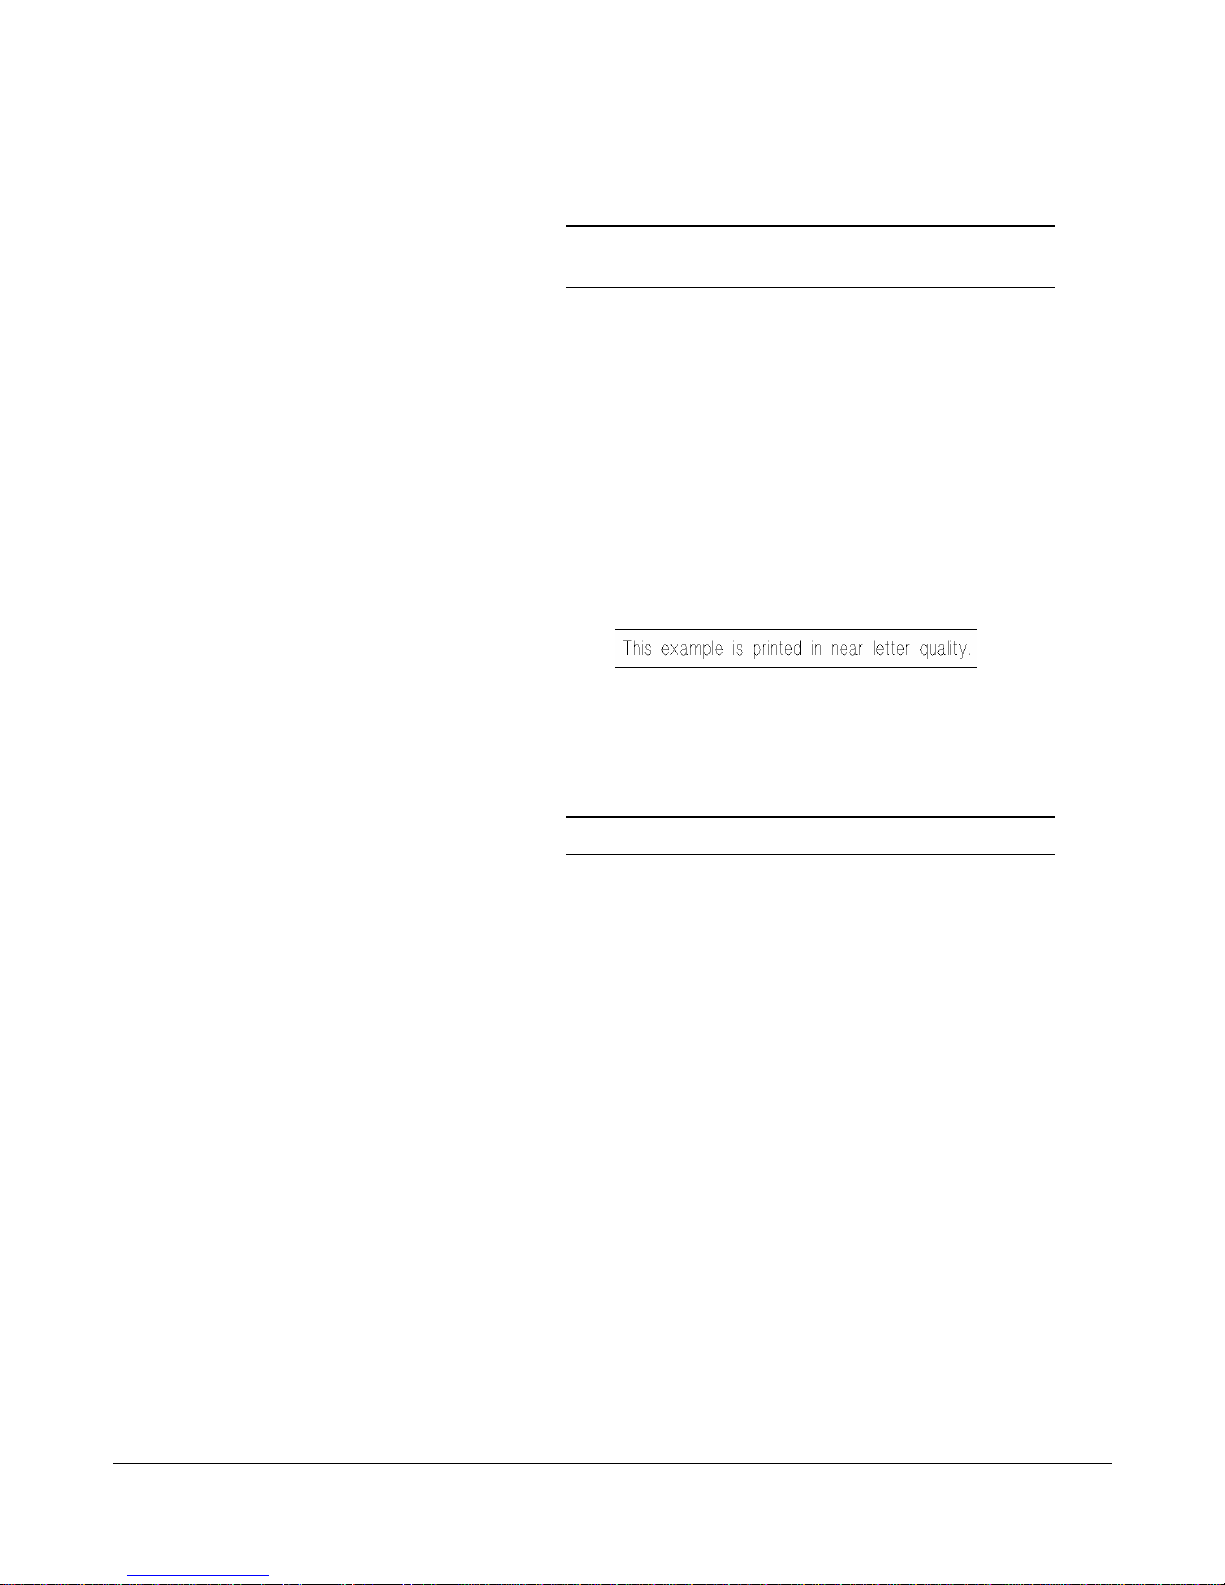
Pitch Pitch is the number of printed characters within a linear inch.
A font with a pitch of 10, prints ten characters per horizontal
inch. This is also known as cpi or characters per inch. Pitch is
only relates to fonts with fixed spacing.
\text\DA590\fonts 7.2 DA590 Instruction Manual
Page 51

Fonts
Point size refers to the height of a font from the bottom of the
Point size
lowest descending character (i.e. j or y) to the top of the
highest character (i.e. F or T). Point size is measured in pica
points. One point corresponds to approximately 1/72 of an
inch. A 12 point font is 1/6” high.
CHAR. HEIGHT
You can print (e.g. for large envelopes)a font two or three
times normal height while maintaining the character width and
spacing.
CHAR. WIDTH
You can print a font two or three times normal width while
maintaining the proportional character height and spacing. You
may combine CHAR. HEIGHT and CHAR. WIDTH
\text\DA590\fonts 7.3 DA590 Instruction Manual
Page 52
Fonts
CHAR. SPACING
To bring single words out more clearly, you can expand the
spacing between letters and words without changing the
character size itself.
The word E x a m p l e is printed adding character
spacing.
Quality
Quality refers to the number of dots printed per inch.
Letter Quality prints 300 dots per inch. Near Letter Quality
prints 150 dots per inch.
Near Letter (NLQ) Near Letter Quality is used for faster printing with lower ink
consumption. (2-2.2 million characters per inkjet cartridge)
Letter (LQ) Letter Quality is used to obtain an enhanced appearance. (1-
1.1 million characters per inkjet cartridge)
This example is printed in Letter Quality.
\text\DA590\fonts 7.4 DA590 Instruction Manual
Page 53

Character set
A character set consists of characters and symbols that contain all elements of a
language (country-specific characters), including punctuation marks and numerals.
Fonts
7-bit character set
The 7-bit character sets correspond to the definitions of the
“International Standards Organization” (ISO) and the
“American Standard Code for Information Interchange”
(ASCII). 7-bit character sets contain 128 characters. An
example of a 7-bit character set is shown below.
8-bit character set
The 8-bit character set contains 256 characters. It includes
many national characters. The most commonly used 8-bit
character set is shown below.
\text\DA590\fonts 7.5 DA590 Instruction Manual
Page 54

8. Error messages and solutions
Error message Cause Solution
Setting locked !!
No addresses !!
Too many characters !!
NO PAPER !!
PAPER JAM !!
REMOVE PAPER
Configuration is blocked. Select the option “Setting
locked:” “no” in programming
mode
No addresses stored, hence
address cannot be repeated.
Address contains too many
characters, therefore it cannot
be repeated.
Out of paper. Insert more forms (see Sec. 3).
Paper jam. Remove jammed paper, set up
Transmit data to printer.
Restrict the address size to 1.5
Kbytes.
paper feed again (see Sec. 3).
POSITION ERROR !!
CHECK TOP MARGIN
ADDRESS TOO LONG
CHECK TOP MARGIN
NO INK !!
The first print line is outside
the paper format.
Address too long for the
paper or no form feed
detected
Print-head is empty. Replace the print-head (see Sec.
CHANGE PRINTHEAD
PRINTHEAD ERROR !
VERIFY HEAD MOVEMENT
\text\da590\errormes 8.1 DA590 Instruction Manual
Error in print-head transport Switch printer off.
Reduce the “TOP MARGIN”
setting with the “ð” key or in
programming mode. (see
Sec. 5).
Reduce the “TOP MARGIN”
setting with the “ð” key or
make sure that the software is
sending a form feed. (see
Sec. 5).
4) or use reset if the print head
still has ink in it.
Check whether the head slide
has jammed.
Check the print-head fuses
(SI2)
Page 55

Error messages and solutions
use the printer.
Error message Cause Solution
NO FORMFEED RECEIVED
ERROR LCA !!
CALL SERVICE
CHECKSUM ERROR !!
MAKE DEFAULT RESET
CHECKSUM ERROR !!
MAKE COUNTER RESET
TEST MACRO TOO LONG
No form feed character (0C
hex) was received after an
address was sent.
Error in loading the LCA
module.
Error in buffered RAM Switch the printer off.
Error in the buffered RAM for
ink status counter.
User-defined test address is
too long.
Check the program setup in
your software.
Call for service !
Perform a default reset. (see
Sec. 5).
With this error message you
may continue to
Reset the ink status counter
with the "HEAD RESET" menu
in programming mode.
(see Sec. 5).
Limit the size of the test
address to 3 Kbytes.
If you are working in block
rotation (= “Rev” in the
display), the test address may
not exceed 8 lines.
BUFFER OVERFLOW !!
PROM ERROR !!
VERIFY U9
PROM ERROR !!
VERIFY U43
Note on maintenance:
\text\da590\errormes 8.2 DA590 Instruction Manual
Error in data transfer Check the connection of the
interface cable.
Incorrect or missing Eprom
U9.
Incorrect or missing Eprom
U43.
Check the corresponding
Eprom U9.
Check the corresponding
Eprom U43.
Make sure that the feed rollers are always kept clean.
Page 56

Appendix
Software Considerations
Here are a few of the basics regarding printing to the RENA DA-590 inkjet printer.
• The DA-590 is an ASCII printer. This means that it expects to receive ASCII text
information from a program.
• If fonts are sent to the DA-590 using the appropriate printer driver, the printer will print the
font as a graphic. Graphic information is very voluminous and takes a very long time to
download to the printer. The through-put of the printer will be reduced enormously.
• Sending a margin with the data will add the margin to that programmed in the printer menu.
• The DA-590 will only print in portrait orientation. The printing may be inverted 180°.
• Landscape printing can only be accomplished by sending graphic information to the printer.
DOS:
For DOS programs try to select printer drivers such as DOS/TEXT, Void/Null Codes,
STANDARD Printer, TTY, Universal printer, Plain Vanilla, ASCII or anything else that seems
not to be for any particular printer. Do not use a printer driver such as Epson FX or IBM
Proprinter or HP Laserjet. These drivers will generally confuse the DA-590 printer.
The best format to use is a simple Letter, Document or Report. You may set up your page
layout to be any size page that will hold an address. Always zero out all of your margins. Any
margins that you send from your program will be added on to the margins set up in the printer.
Do not try to send an envelope format except from specialized mailing software programs.
Envelope formats from Windows and DOS programs generally expect you to be printing
using a laser or DeskJet printer and send out data in a landscape format that the DA-590
cannot understand.
Form Feeds:
The DA-590 needs to know where the end of an address is so that it can eject the piece and
feed in the next piece. There are several ways that a form feed may be achieved. First we will
discuss DOS programs and later, Windows® programs.
Most DOS programs (with the exception of specialized mailing programs such as Mail Manager
2000, ArcList and ProSort for DOS), do not send out a form feed that a RENA printer will
understand. Generally speaking, for DOS progr ams, you will have to create a form feed using
one of the methods described on the following page.
\text\da590\appendix 9.19 DA590 Instruction
Manual
Page 57

Appendix
One method of creating a form feed after each address is to turn on a feature called Line
Mode. Line Mode will automatically force a form feed after a specific number of lines that you
set up in the menu of the printer. For instance, if every address in a list has four lines, you would
program in four lines in the Line Mode selection of the DA-590 menu and the printer would
form feed after printing four lines.
A second method is to send the following three characters %0C (the per cent symbol
followed by a zero and a capital or uppercase letter C) either before or after each address.
When using this method, the menu choice HEX TO ASCII must be turned ON in the printer.
There should be no other instances of the % symbol in the list. Occasionally the % symbol is
used to indicate c/o for in-care-of. These other % symbols must be removed from the
database. With the HEX TO ASCII feature turned on in the printer, the % symbol is
interpreted as a trigger symbol and the two characters following the symbol are interpreted as
hexadecimal characters. 0C hexadecimal is a form feed.
A third method is placing the < (less than) symbol before the first character of an address and
the > (greater than) symbol after the last character in the address. For this method to work the
Delimiter < > menu selection must be turned ON in the DA-590.
If you have to select a one up label format in a program, rather than a plain document, you can
use any of the above methods.
Windows®:
Windows programs work a bit differently. The basic informa tion outlined above still applies.
Generic/Text Only is the driver of choice in Windows. The Windows95 Generic/Text Only
driver has bugs in it. We recommend that the Windows 3.x Generic/Text Only driver,
TTY.DRV , be copied over the Windows95 Generic/Text Only driver of the same name. If
the Generic/Text Only driver has been loaded, it can be found in the \WINDOWS\SYSTEM
subdirectory. If it has not been loaded you will have to load it from your original Windows
diskettes before copying it.
In most Windows. programs, a page break creates an acceptable form feed for the DA-590
printer. All that is usually necessary is to have one address per page. Be careful not to send an
additional form feed from the your program.
If necessary, the HP DeskJet 500 driver may be used with the DA-590. A few Windows.
programs will not work with the Generic/Text Driver, such as Microsoft Access and ACT!
for Windows. In these cases you will have to use the HP DeskJet 500 driver. Once again
we are finding that the Windows95 HP DeskJet 500 driver has bugs in it. The same
procedure as used for the Generic/Text Only driver will work here as well.
Page 58

Appendix
\text\da590\appendix 9.20 DA590 Instruction
Manual
The HP DeskJet 500 driver is called HPDSKJET.DRV. For details, re-read the process for
copying the Generic/Text Only driver above.
All HP printer drivers reset a printer to factory defaults before formatting and sending
information to the printer. We suggest that you send your top and left margins from your
software, when using the HP DeskJet 500 driver.
Using the Windows 3.1® HP DeskJet 500 Driver
To set up the HP DeskJet Printer Driver in Windows® 3.1 to use with the RENA DA-590 and
print text instead of graphics, do the following:
Follow the Windows® instructions for adding a printer driver using the Control Panel in the
Main window.
After the installation, the HP DeskJet 500 on LPT1: or whichever port you set it for, will
appear in the Installed Printers window.
Then Click on the Setup button.
In the Cartridges (max: 2) window click on E: Tms Rmn 12 point and
T: Helv 8,10,12 & 14 pt.
Both E and T should be highlighted.
Click on the OK button.
Click on the Close button.
Close the Control Panel window.
Close the Main window.
Open your application.
When selecting the HP DeskJet 500 as the default printer in your application program, be sure
to select one of the internal fonts of the DA-590 as the default font. These fonts will be
available in the listing of fonts available in Windows®. These are not True Type fonts. They
will have a computer/printer icon next to the name of the font instead of the letters TT. The
Page 59

Appendix
fonts are called Courier 10 pitch (use 12 pt. only), Helv (use 14 pt. only), Tms Rmn (use 12 pt.
only). You may not use any other point size or other features such as Bold, Italic or Underline.
\text\da590\appendix 9.21 DA590 Instruction
Manual
Using the Windows®95 HP DeskJet 500 Driver
To set up the HP DeskJet Printer Driver in Windows®95 to use with the RENA DA-590 and
print text instead of graphics, do the following:
Follow the Windows®95 instructions for adding a printer driver using the either the Control
Panel or Printers in Settings on the Start Menu.
After the installation, the HP DeskJet 500 on LPT1: or whichever port you set it for, will
appear in the Printers window.
Double click on the HP DeskJet 500 printer.
An HP DeskJet 500 window will pop up.
Click on Printer.
Click on Properties.
Click the Fonts tab.
In the Cartridges (max: 2) window click on E: Tms Rmn 12 point and
T: Helv 8,10,12 & 14 pt.
The two font cartridges will be highlighted.
Click the Apply button.
Click the OK button.
Close the HP DeskJet window.
Close the Printers window.
Obtain a copy of the HPDSKJET.DRV file from Windows®3.1.
This file appears only after the HP DeskJet 500 driver has been installed in Windows®.
It is found in the \Windows\System subdirectory.
Page 60

Appendix
You can use either the File Manager or a DOS Copy command to copy the file to a diskette.
Place the diskette into the floppy drive of your Windows®95 computer.
\text\da590\appendix 9.22 DA590 Instruction
Manual
Page 61

Software
Use either Windows Explorer or the DOS Copy command to copy this file over the
HPDSKJET.DRV file in the \Windows\System subdirectory.
Open your application.
When selecting the HP DeskJet 500 as the default printer in your application program be sure
to select one of the internal fonts of the DA-590 as the default font. These fonts will be
available in the listing of fonts available in Windows®. These are not True Type fonts. They
will have a computer/printer icon next to the name of the font instead of the letters TT. The
fonts are called Courier 10 pitch (use 12 pt. only), Helv (use 14 pt. only), Tms Rmn (use 12 pt.
only). You may not use any other point size or other features such as Bold, Italic or Underline.
NOTES ON THE AUTOMAT IC BARCODING FEATURE
When using the automatic barcoding feature in DA-590 printer, be aware of the following
requirements. The information to be printed must have the City State Zip+4 on the bottom (last
line) and the delivery address has to be on the line immediately above that. This is the only
USPS approved address layout. Using any other format will not create a correct delivery point
or zip code barcode.
If you choose, via the DA-590 programming menu, to print the barcode on top of the address,
the barcode will be printed above the top line of whatever information that you are sending.
This means that if you are simultaneously sending any information, such as a return address or
other text to be printed anywhere above the first line of the delivery address information, the
barcode will appear above that line. It will be the top line printed.
You can get around this limitation in two ways. First, the DA-590 printer can print a barcode
when the zip code information is sent surrounded by a %10. The HEX TO ASCII feature
must be turned on in the menu and automatic barcoding must be turned off. For example:
%10 ZIPCODE DELIVERY POINT CODE %10 or %1019406-246790%10 or
%1019406246790%10. The hyphen is not required. If you only send the zip code you will
only get a zip code barcode and not the delivery point barcode. The printer figures out the
check digit automatically. The printer is creating the barcode out of the numbers being sent to it,
it is not reading the address at all. The %10###########%10 can be set up anywhere in the
form being sent to the printer.
The second method requires the software being used to send the appropriate barcode. Mail
Manager 2000, Bulk Mailer+ and Jet Direct are mailing programs that have CASS certified
barcodes built-in for the DA-590 printer. When using the barcode from a software program,
automatic barcoding must be turned OFF in the DA-590.
\text\da590\appendix 9.23 DA590 Instruction
Manual
Page 62
DA-590 CONTROL COMMANDS
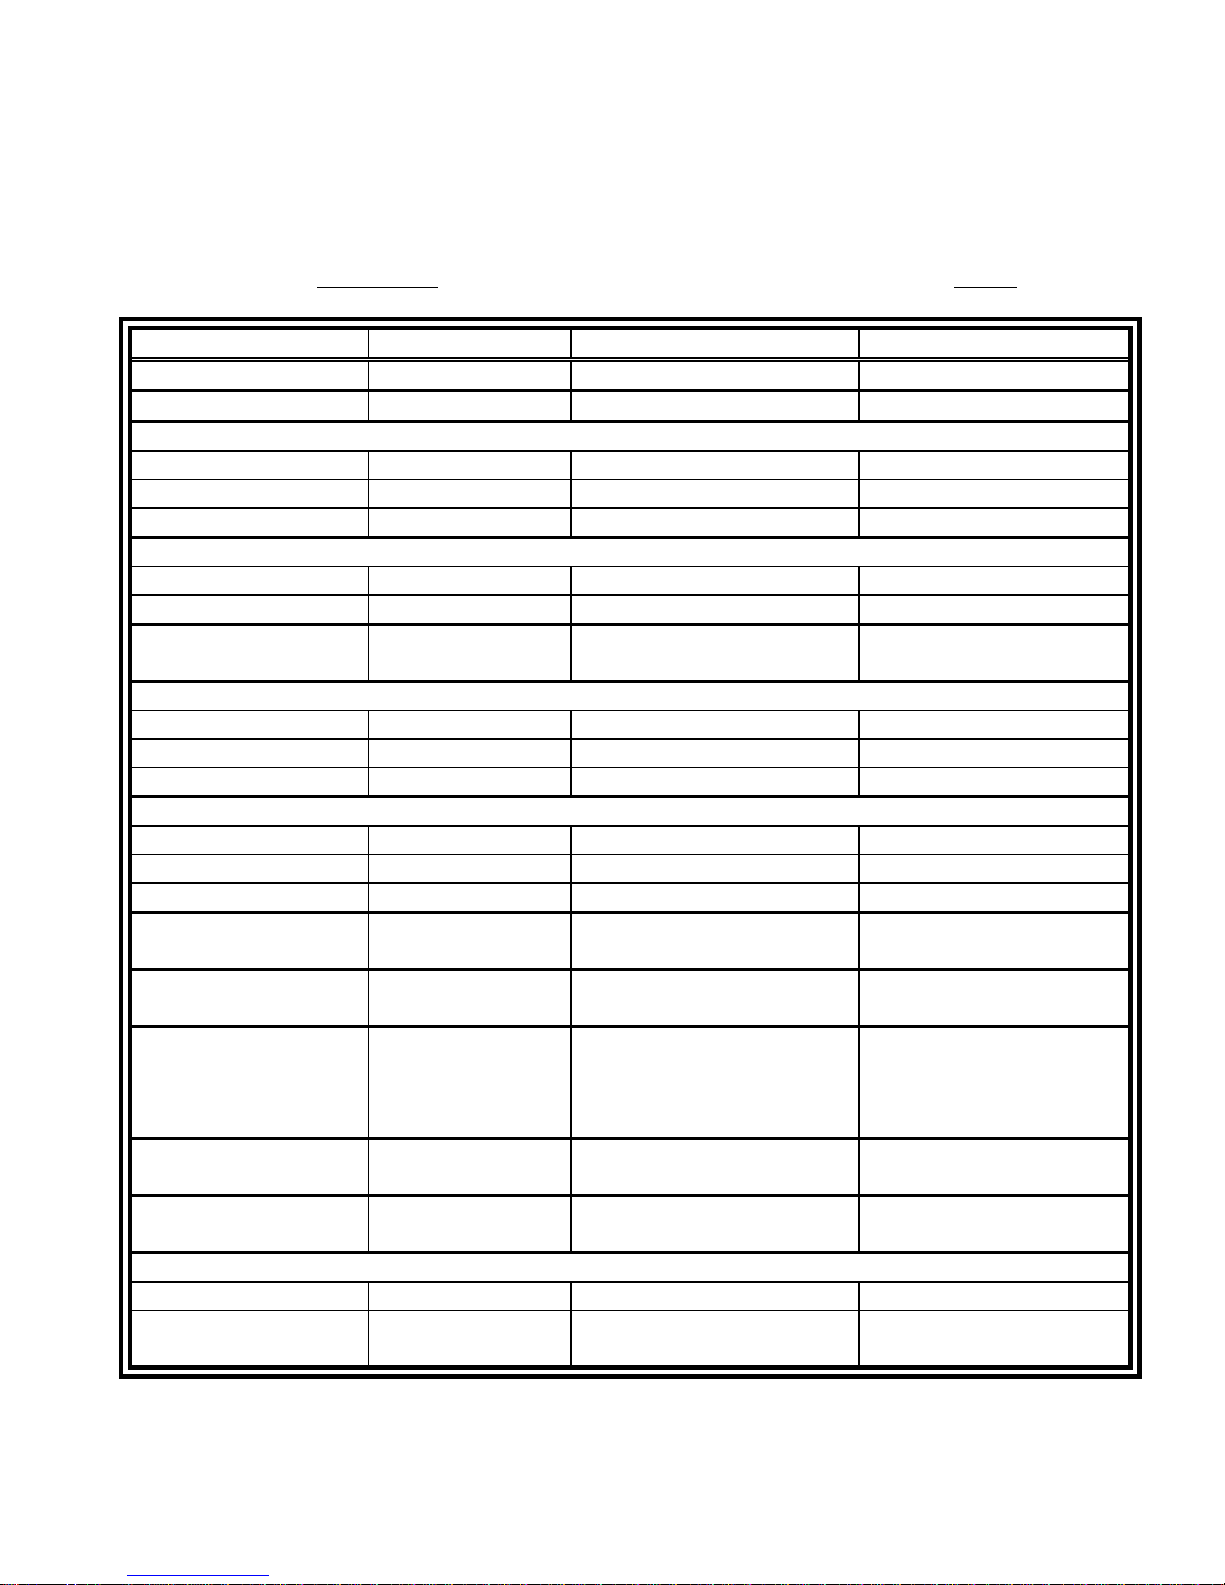
Note: There should be NO SPACES between characters sent. The spacing below is for clarity ONLY!
ASCII Decimal Hexadecimal
Printer Initialization
Setting: # = 0-9:
Font:
Courier Esc ( s 3 T 27 40 115 51 84 1B 28 73 33 54
Helvetica Esc ( s 4 T 27 40 115 52 84 1B 28 73 34 54
Times Roman Esc ( s 5 T 27 40 115 53 84 1B 28 73 35 54
Print Quality:
NLQ Esc ( s 1 Q 27 40 115 49 81 1B 28 73 31 51
Char. Spacing:
# = 1-30
Char. Height:
Single Height Esc ( s 12 V 27 40 115 49 50 86 1B 28 73 31 32 56
Double Height Esc ( s 24 V 27 40 115 50 52 86 1B 28 73 32 34 56
Triple Height Esc ( s 36 V 27 40 115 51 54 86 1B 28 73 33 36 56
Char. Width:
Single Width Esc ! $ 0 F 27 33 36 48 70 1B 21 24 30 46
Double Width Esc ! $ 1 F 27 33 36 49 70 1B 21 24 31 46
Triple Width Esc ! $ 2 F 27 33 36 50 70 1B 21 24 32 46
Line Spacing:
# = 1-10 lpi
Left Margin [mm]:
# = 1-150mm
Left Margin in
[Columns]:
# = columns
(2.5 mm per column)
Top Margin in Lines:
# = lines
Top Margin [mm]:
# = 0-288mm
Orientation:
Nor (normal) Esc & l 0 O 27 38 47 48 79 1B 26 2F 30 4F
Rev (reverse) Esc & l 2 O
Esc E 27 69 1B 45
Esc ! $ # S 27 33 36 # 83 1B 21 24 # 53
LQ Esc ( s 2 Q 27 40 115 50 81 1B 28 73 32 51
Esc ! $ # C 27 33 36 # 67 1B 21 24 # 43
Esc & l # D
27 38 108 # 68 1B 26 6C # 44
(lower case “L”)
Esc ! $ # M 27 33 36 # 77 1B 21 24 # 4D
Esc & a # L
27 38 97 # 76 1B 26 61 # 4C
Esc & l # E
27 38 108 # 69 1B 26 6C # 45
(lower case “L”)
Esc ! $ # T 27 33 36 # 84 1B 21 24 # 54
27 38 47 49 79 1B 26 2F 31 4F
(lower case “L”)
Appendix
Page 63

DA-590 CONTROL COMMANDS
Note: There should be NO SPACES between characters sent. The spacing below is for clarity ONLY!
Appendix
ASCII Decimal Hexadecimal
Bit 8 Set To:
unchanged (Bit8) Esc ! $ 0 B 27 33 36 48 66 1B 21 24 30 42
set to 0 (Fix0) Esc ! $ 1 B 27 33 36 49 66 1B 21 24 31 42
set to 1 (Fix1) Esc ! $ 2 B 27 33 36 50 66 1B 21 24 32 42
Eject Delay:
Esc ! $ # D 27 33 36 # 68 1B 21 24 # 44
# = 0 - 99
1 = .1 sec., 99 = 9.9 sec.
Paper Speed: 0 - 7
100% Esc ! $ 0 V 27 33 36 48 86 1B 21 24 30 56
90% Esc ! $ 1 V 27 33 36 49 86 1B 21 24 31 56
30% Esc ! $ 7 V 27 33 36 55 86 1B 21 24 37 56
Hex to ASCII:
Off Esc ! $ 0 H 27 33 36 48 72 1B 21 24 30 48
On Esc ! $ 1 H 27 33 36 49 72 1B 21 24 31 48
Delimiter < >:
Off Esc ! $ 0 A 27 33 36 48 65 1B 21 24 30 41
On Esc ! $ 1 A 27 33 36 49 65 1B 21 24 31 41
Carriage Corr: 0 - 10
Esc ! $ 0 O 27 33 36 48 79 1B 21 24 30 4F
-5
Esc ! $ 1 O 27 33 26 49 79 1B 21 24 31 4F
-4
0 Esc ! $ 5 O 27 33 26 53 79 1B 21 24 35 4F
Esc ! $ 10 O 27 33 36 49 48 79 1B 21 24 31 30 4F
+5
Emulation: 0-3
PCL3 Esc ! $ 0 E 27 33 36 48 69 1B 21 24 30 45
DA300 Esc ! $ 1 E 27 33 36 49 69 1B 21 24 31 45
DA 306/307 Esc ! $ 2 E 27 33 36 50 69 1B 21 24 32 45
UP332 Esc ! $ 3 E 27 33 36 51 69 1B 21 24 32 45
Defining Custom Test Macro
Start Macro Control: Esc & f 0 X 27 38 102 48 88 1B 26 66 48 58
Define Macro ID:
Esc & f 0 Y 27 38 102 48 89 1B 26 66 30 59
& Send Test Address
End Macro Control: Esc & f 1 X 27 38 102 49 88 1B 26 66 31 58
Reset to Rena Test
Esc & f 0 y 8 X 27 38 102 48 121 56 88 1B 26 66 30 79 38 58
Macro
Page 64

DA-590 CONTROL COMMANDS
99
99
1000
Note: There should be NO SPACES between characters sent. The spacing below is for clarity ONLY!
Barcoding Codes
ASCII Decimal Hexadecimal
Type of Bar-code:
Zip (Postnet) Esc ( 15 Y 27 40 49 53 89 1B 28 31 35 59
2 of 5 (Opt. Font Card) Esc ( 4 Y 27 40 52 89 1B 28 34 59
Bar-code Search: Zip (Postnet) Only
Off Esc ! $ 0 Z 27 33 36 48 90 1B 21 24 30 5A
Zip+4 Esc ! $ 1 Z 27 33 36 49 90 1B 21 24 31 5A
Delivery Point BC Esc ! $ 2 Z 27 33 36 50 90 1B 21 24 32 5A
Bar-code Position: Zip (Postnet) Only
Top Esc ! $ 0 P 27 33 36 48 80 1B 21 24 30 50
Bottom Esc ! $ 1 P 27 33 36 49 80 1B 21 24 31 50
Conventional Esc ! $ 2 P 27 33 36 50 80 1B 21 24 32 50
Bar-code Size: 2 of 5 Only
Thin Bar # = 1-
Fat Bar # = 1-
Bar Height # = 1-
50 = 1 Line = 12 points
Esc ! $ # W 27 33 36 # 87 1B 21 24 # 57
Esc ! $ # X 27 33 36 # 88 1B 21 24 # 58
Esc ! $ # Y 27 33 36 # 89 1B 21 24 # 59
Appendix
Page 65
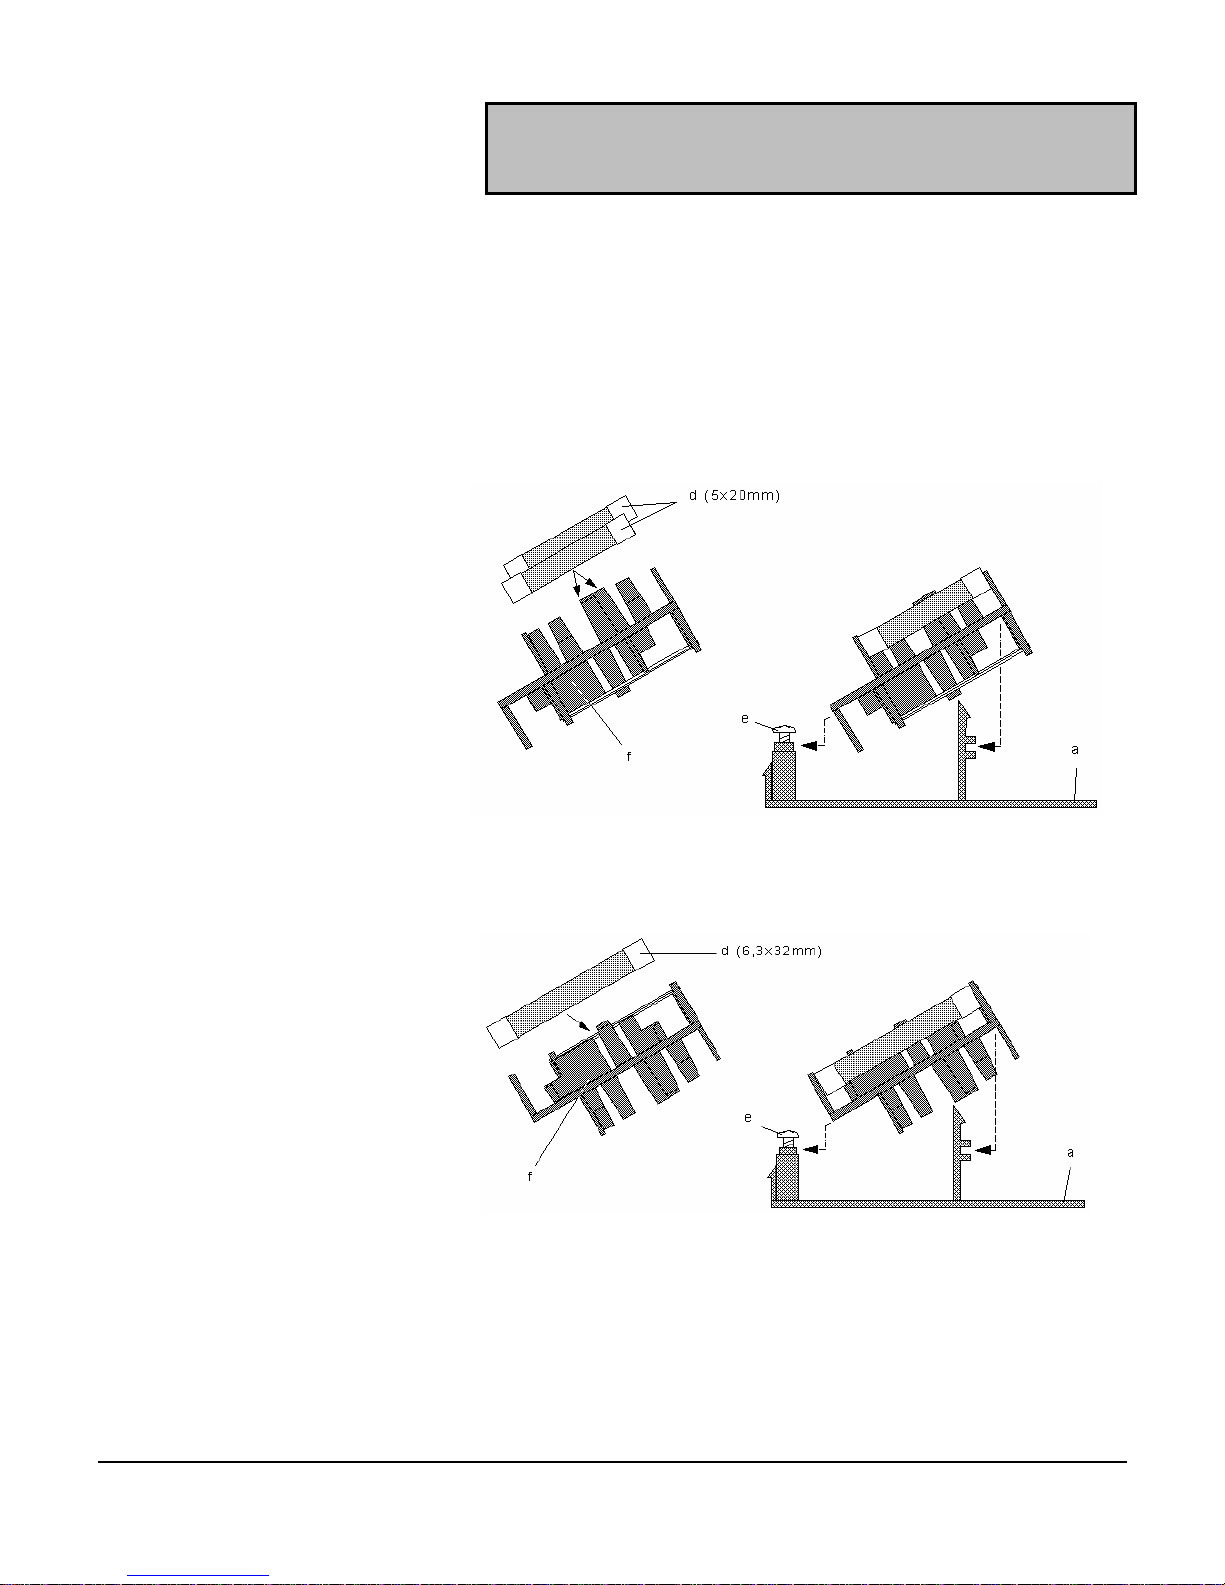
Power connection
WARNING !
After changing the voltage, the fuses must also be changed ! (Fuse values
can be read off the letterplate.)
Changing fuses
- Open the (housing) lid as described on the preceding page.
- Screw the recessed head screw (e) out, by one turn.
- First push the fuse mount (f) out horizontally and then lift it out.
European fuses [2 fuses (d)]
US fuse [1 fuse (d)]
\text\da590\power N.2 Power input module
- For a US fuse turn the fuse mount (f) upside down.
- Place the fuse mount (f) with the fuse(s) (d) onto the lid as shown in the
diagram.
- Secure the recessed head screw (e) and replace the entire block in the
housing.
- The fuse(s) is active.
Page 66
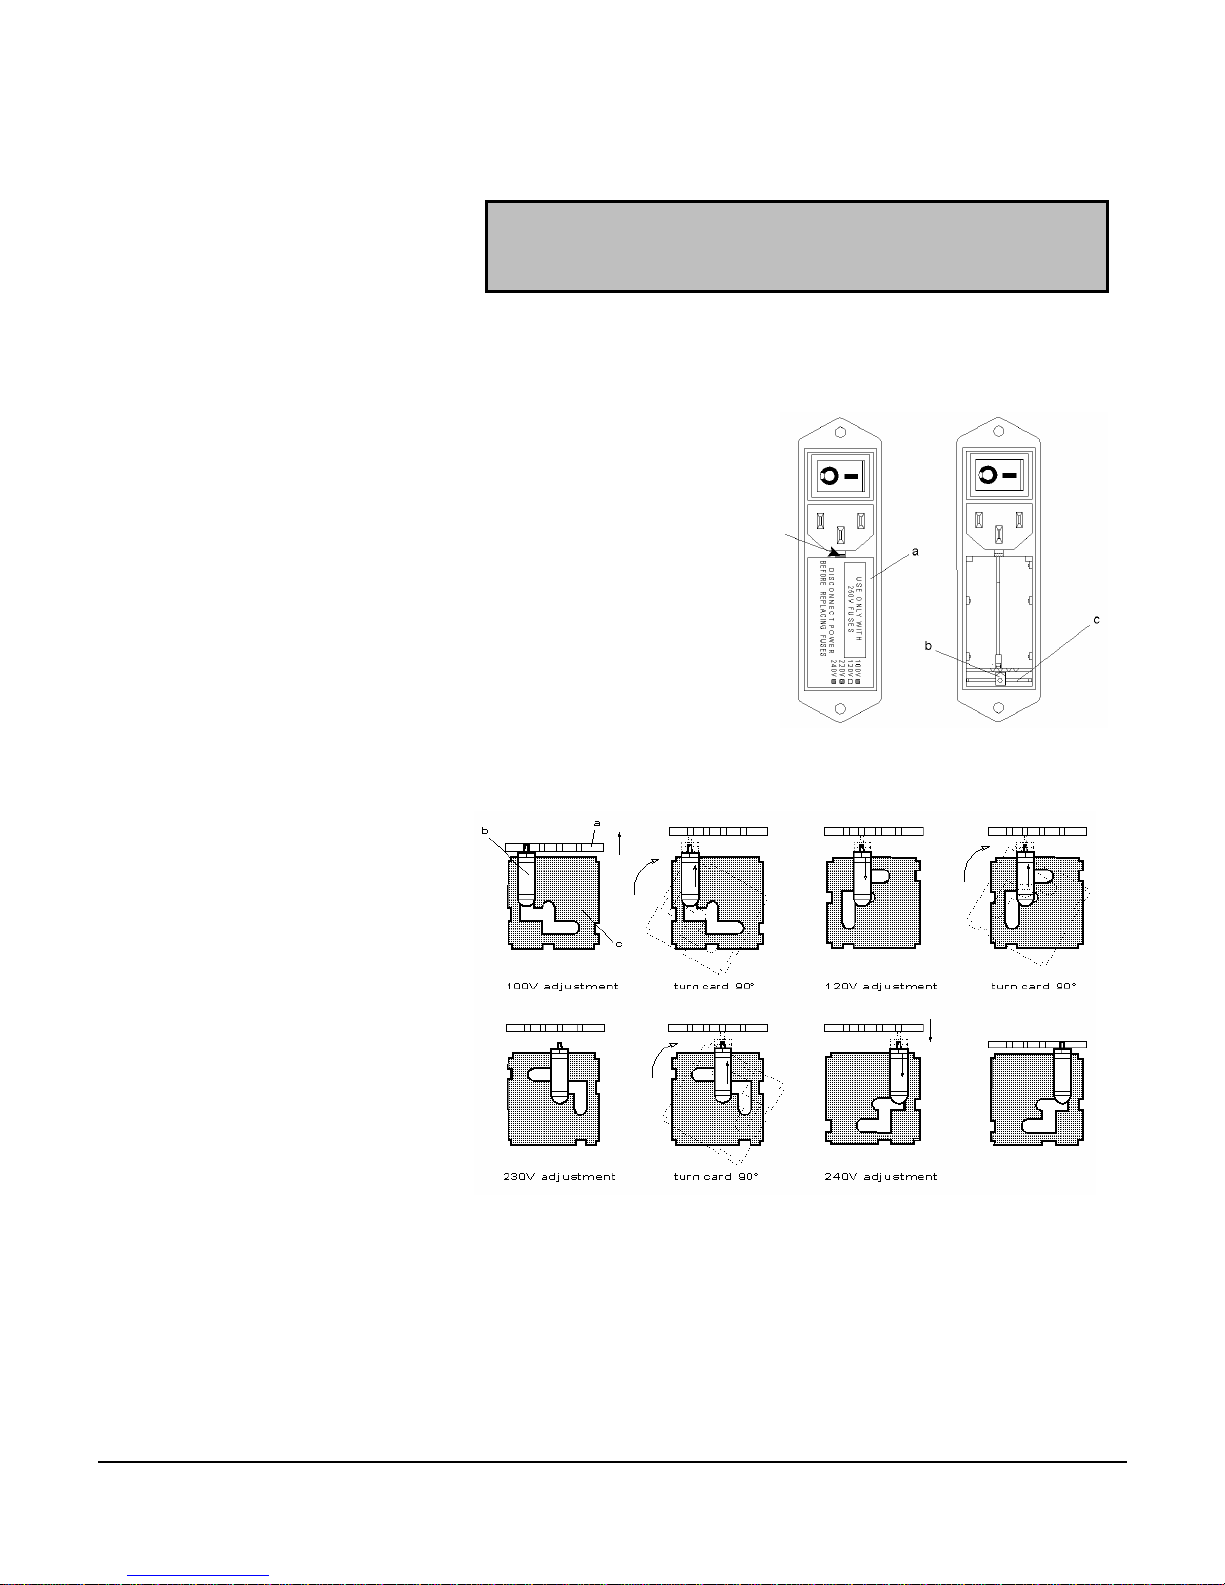
Power connection
Power connection
CAUTION !
Before plugging the power cable into the back of the printer check for the
correct voltage setting on the power input module.
If the setting is correct, go on to the sub-section on the “power cable”.
Voltage selection
- Remove the power cable!
- Open the (housing) lid (a)
at the slit (see arrow) with a
small screwdriver or similar
tool and place the fuse
mount carefully to one
side.
- Pull the voltage selection
card (c) straight out of the
housing via the indicator
pin (b).
- Turn the voltage selection card until the desired voltage can be read at the
bottom edge.
\text\da590\power N.1 Power input module
- The indicator pin must be placed in the relevant space in the card and must
point upwards.
- Insert the voltage selection card with the printed side toward the IEC plug
into the housing and align the indicator pin with the housing marking.
- Replace the (housing) lid and check that the indicator pin is placed in the
opening with the desired voltage specification.
 Loading...