

Page 1
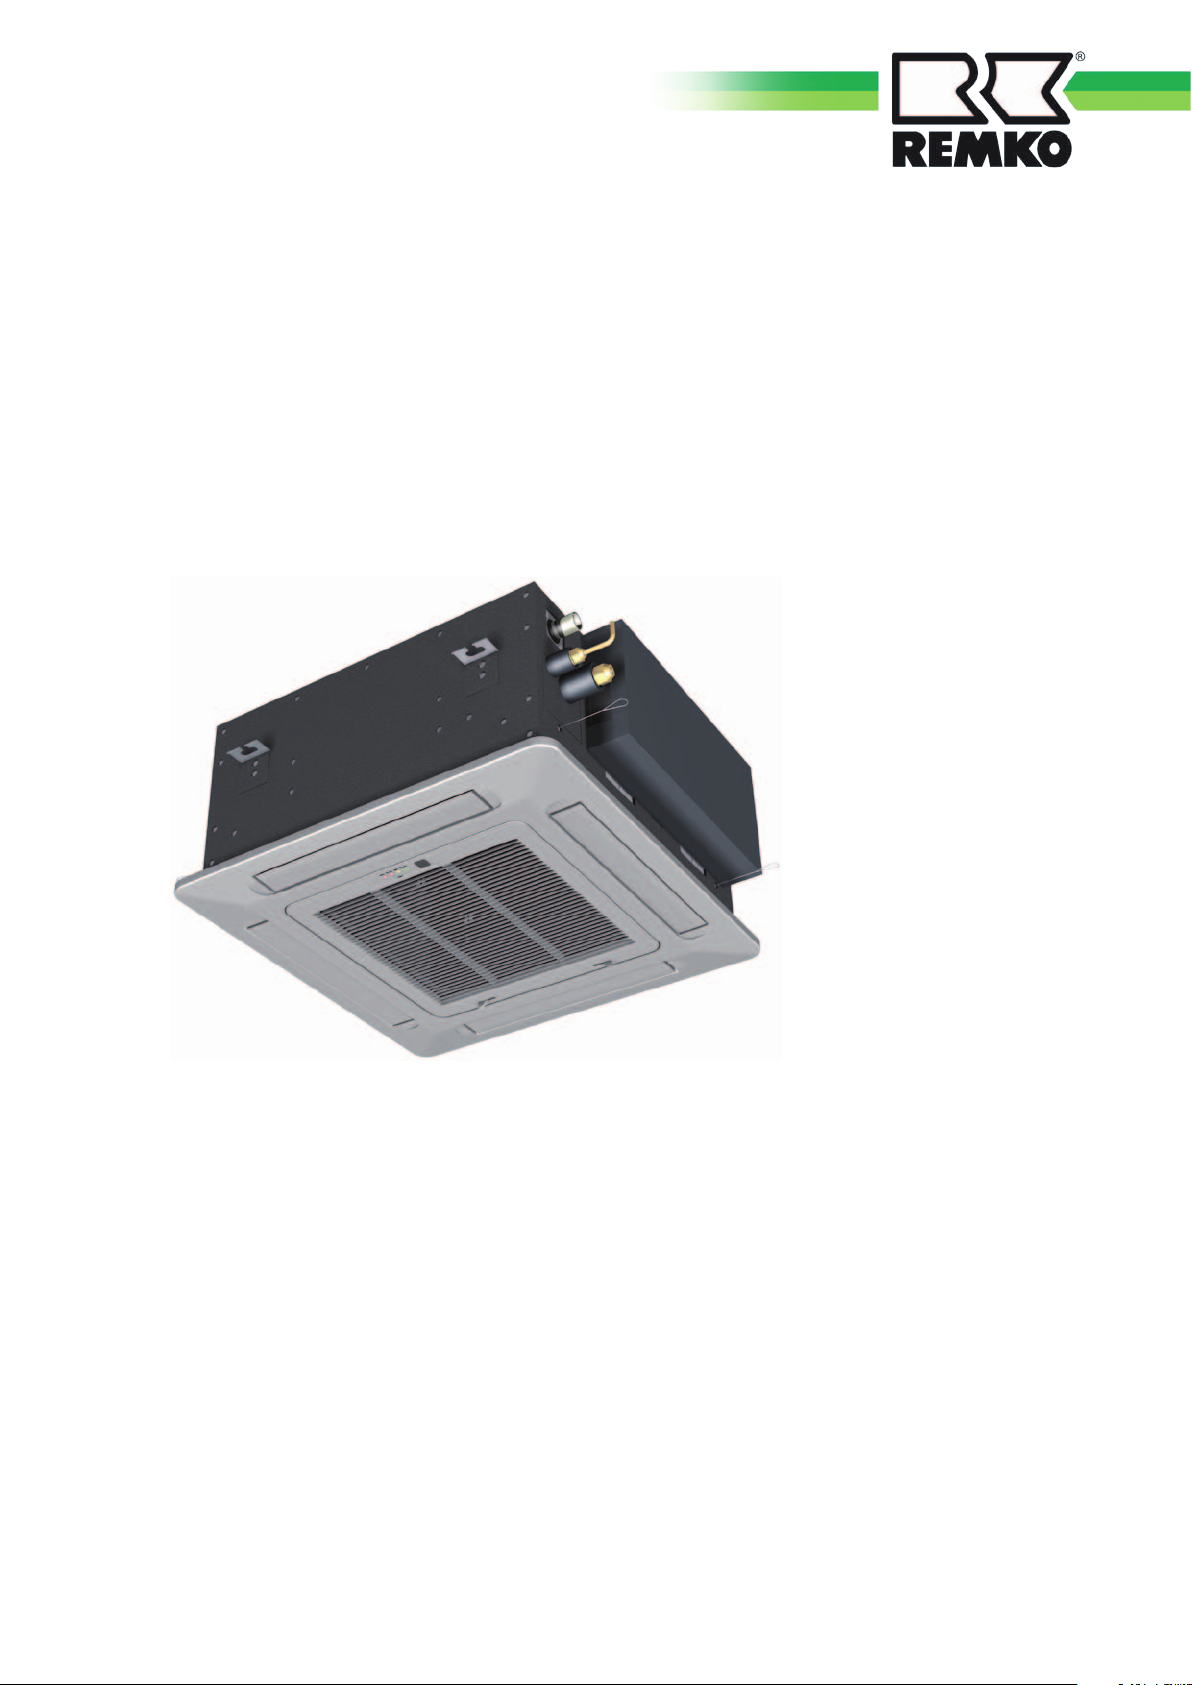
REMKO MXD
MXD 200, MXD 260, MXD 350, MXD 520
Ceiling cassette
Operation · Technology · Spare parts
Issue GB – W06
Page 2

Page 3
Contents
Safety notes
Environmental protection and recycling
Warranty
Intended use
Transport and packaging
Equipment description
Combinations
Operation
shut-down
Care and maintenance
Troubleshooting and customer service
Installation instructions for qualified personnel
Installation
4
4
4
5
5
5
6-7
8-14
15
15-16
17-18
19
19-20
Condensate drain
Electrical connection
Electrical connection diagram and choice of unit
Electrical circuit diagram
Commissioning
Unit dimensions
Exploded view
Spare parts list
Technical data
EC-Declaration of Conformity
Read these operating instructions carefully
before commissioning / using the device!
20-21
21
22
22
23
23
25
25
26
27
Made by REMKO
These instructions are an integral part of the system and must always
be kept near or on the device.
This operating manual is a translation of the German original, Version W-06
Subject to modifications; no liability accepted for errors or misprints!
3
Page 4
REMKO MXD
Safety notes
Carefully read the operating instructions before commissioning the
equipment for service. It provides
useful tips and information as
well as hazard warnings to prevent
injury or material damage . Failure to follow the directions in this
manual can result in endangerment
to persons, the environment and
the equipment itself and will void
any claims for liability.
■ Keep this manual and the refrig-
erant data sheet near the unit.
■ The unit should be set up and in-
stalled only by qualified personnel.
■ The set-up, connection, and op-
eration of the unit and its components must be in accordance
with the operating conditions
stipulated in this manual and
comply with all applicable local
regulations.
■ Mobile units must be set up
securely on suitable surfaces and
in an upright position. Stationary units must be permanently
installed for operation.
■ Modification of equipment and
components supplied by REMKO
is not permitted and can cause
malfunctions.
■ Equipment and components
may not be operated in areas
where there is an increased risk of
damage. Observe the minimum
clearances.
■ The electrical supply is to be
adapted to the requirements of
the equipment.
■ The operational safety of equip-
ment and components is only
assured if they are fully assembled and used as intended.
Safety devices may not be modified or bypassed.
■ Do not operate equipment or
components with obvious defects or signs of damage.
■ All housing parts and openings
in the device, e.g. air inlets and
outlets, must be free of foreign
objects, fluids, or gases.
■ The equipment and components
must be kept an adequate distance from flammable, explosive,
combustible, abrasive and dirty
areas or atmospheres.
■ Touching some parts of the
equipment can result in burns or
other injury.
■ Installation, repair and mainte-
nance work may be carried out
only by authorised specialists.
Visual inspections and cleaning
can be performed by the operator as long as power is disconnected from the equipment.
■ To preclude any danger from
the equipment, take appropriate hazard-prevention measures
when performing installation,
repair or maintenance work or
cleaning the equipment.
■ The equipment or components
are not to be exposed to any mechanical stresses, extreme levels
of humidity or direct sunlight.
Environmental
protection
and recycling
Disposal of packaging
All products are packed for transport in environmentally friendly
materials. Make a valuable contribution to reducing waste and sustaining raw materials. Only dispose of
packaging at approved collection
points.
Disposal of equipment
and components
Only recyclable materials are used
in the manufacture of the devices
and components.
Help protect the environment by
ensuring that the devices or components (for example batteries) are
not disposed in household waste,
but only in accordance with local
regulations and in an environmentally safe manner, e.g. using certified firms and recycling specialists
or at collection points.
Warranty
Prerequisites for possible warranty
claims are that the ordering party or
their representative has completely
filled out the "warranty registration
card" and commissioning report
included with the unit at the time
when the equipment was purchased and first put into operation
and returned it to:
REMKO GmbH & Co. KG and placing the unit in service.
The warranty conditions are listed
in the "General terms and conditions". Furthermore, only the parties to a contract can strike special
agreements beyond these conditions. For this reason please contact
your contractual partner in the first
instance.
4
Page 5
Intended use
Equipment description
Depending on the model, the
equipment and the additional
fittings with which it is equipped
is only intended to be used as an
air-conditioner for the purpose of
cooling or heating the air in an
enclosed room.
Different or additional use shall not
be classed as intended use. The
manufacturer/supplier assumes no
liability for damages arising from an
unintended use of the equipment.
The user bears the sole risk in such
cases.
Using the equipment as intended
also includes working in accordance with the operating manual
and installation instructions and
complying with the maintenance
requirements.
Transport and
Packaging
The equipment is shipped in sturdy
transport packaging. Immediately
check the equipment on delivery
and make note of any damage or
missing parts on the delivery note
and inform the forwarding agent
and your contractual partner.
Warranty claims at a later date will
not be accepted.
The indoor unit on the split-design
combined room air conditioning
units serves to extract heat from
the indoor room being cooled. The
outdoor unit then expels this heat
to the outside.
If combined heating/cooling units
are operated as heaters, the heat
absorbed by the outdoor unit can
be discharged by the indoor unit
into the room being heated.
The unit is designed for installation
high up on indoor walls. Operation takes place using an infrared
remote control.
The indoor unit consists of a fin
vaporiser, vaporiser fan, controller
and condensation pan. The indoor
unit can be combined with REMKO outdoor units of series MVT
600/900/950/1050 DC with sufficient cooling output. The outdoor
component is controlled via the
controller of the indoor unit.
Condensation pumps
are available as an accessory.
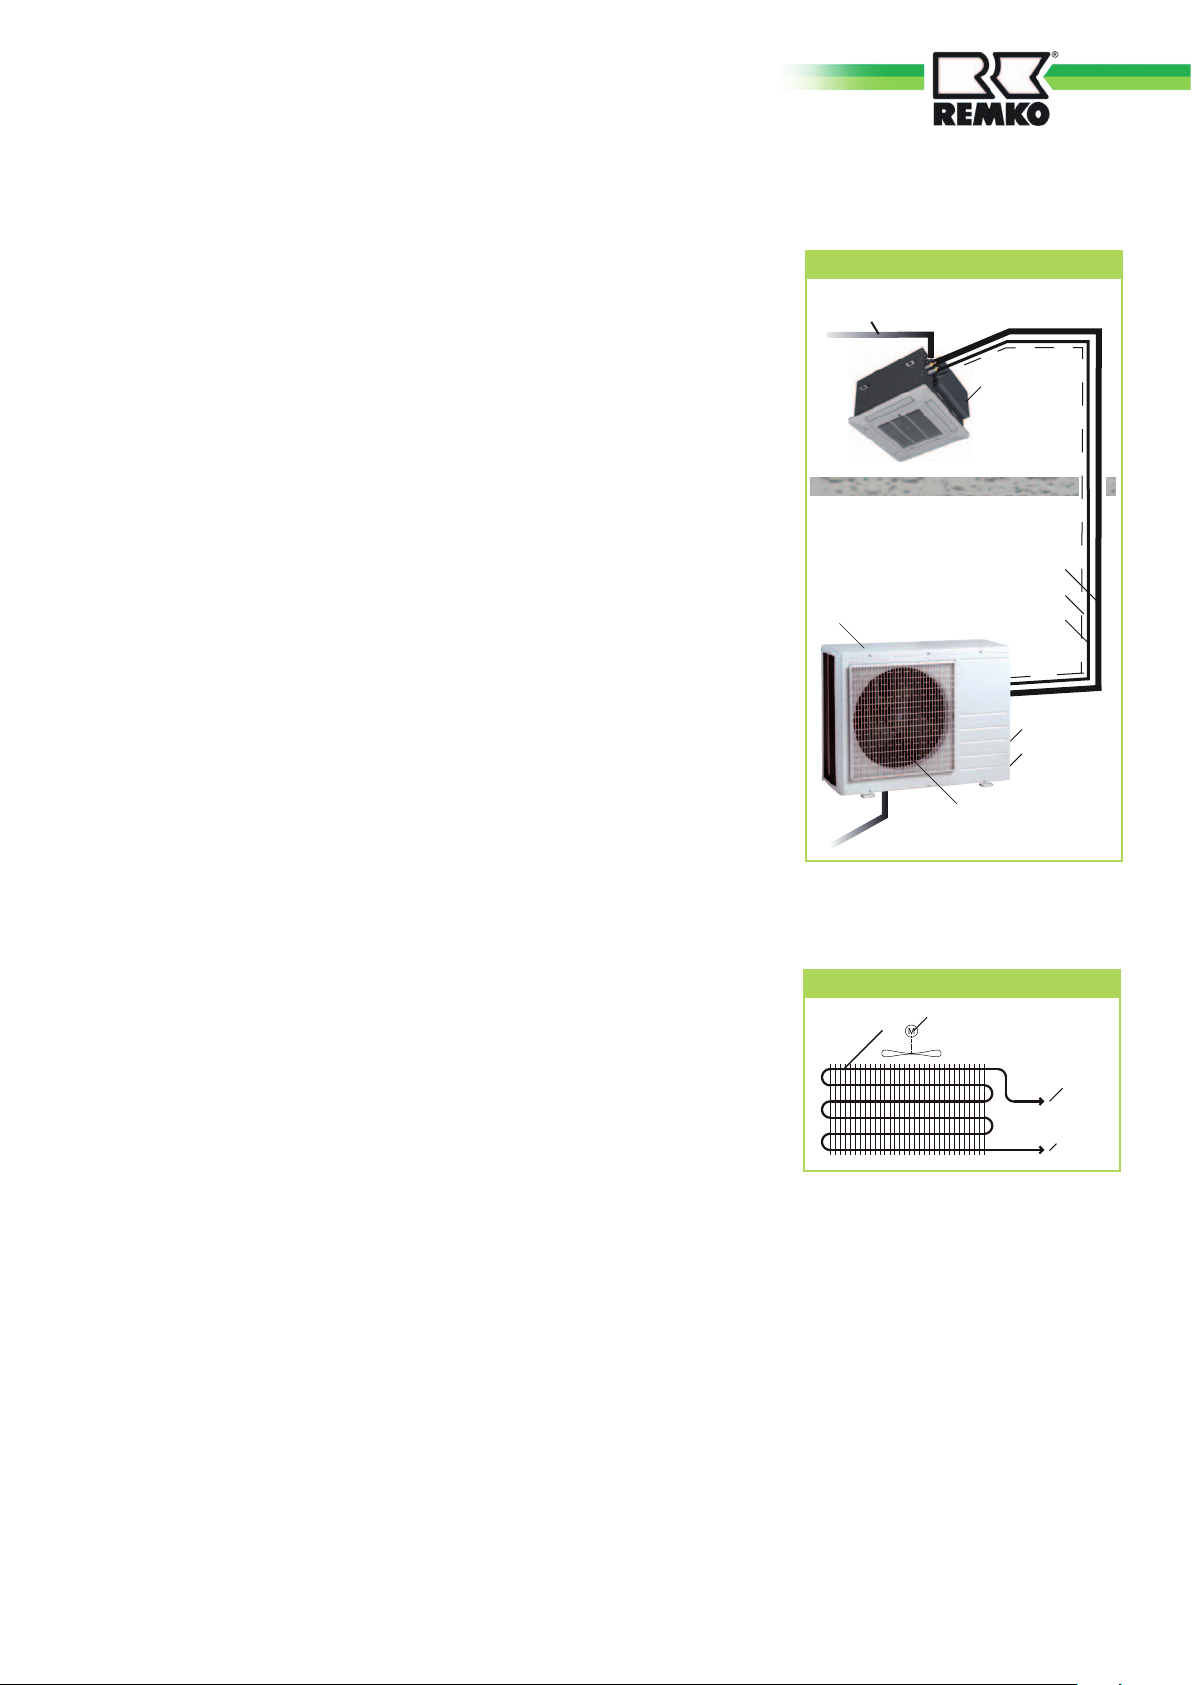
System layout
Indoor area
Condensation line
Indoor unit
Outdoor area
Suction line
Outdoor
component
Condensation line
Control cable
Injection line
Mains cable
Stop valve
Condenser fan
Refrigerant pipes are used to connect the indoor unit to the outdoor
unit.
Schematic of refrigerant circuit
Vaporiser Vaporiser fan
Connection
to suction
pipe
Connection to
injection line
5
Page 6
REMKO MXD
Combinations
Interior units
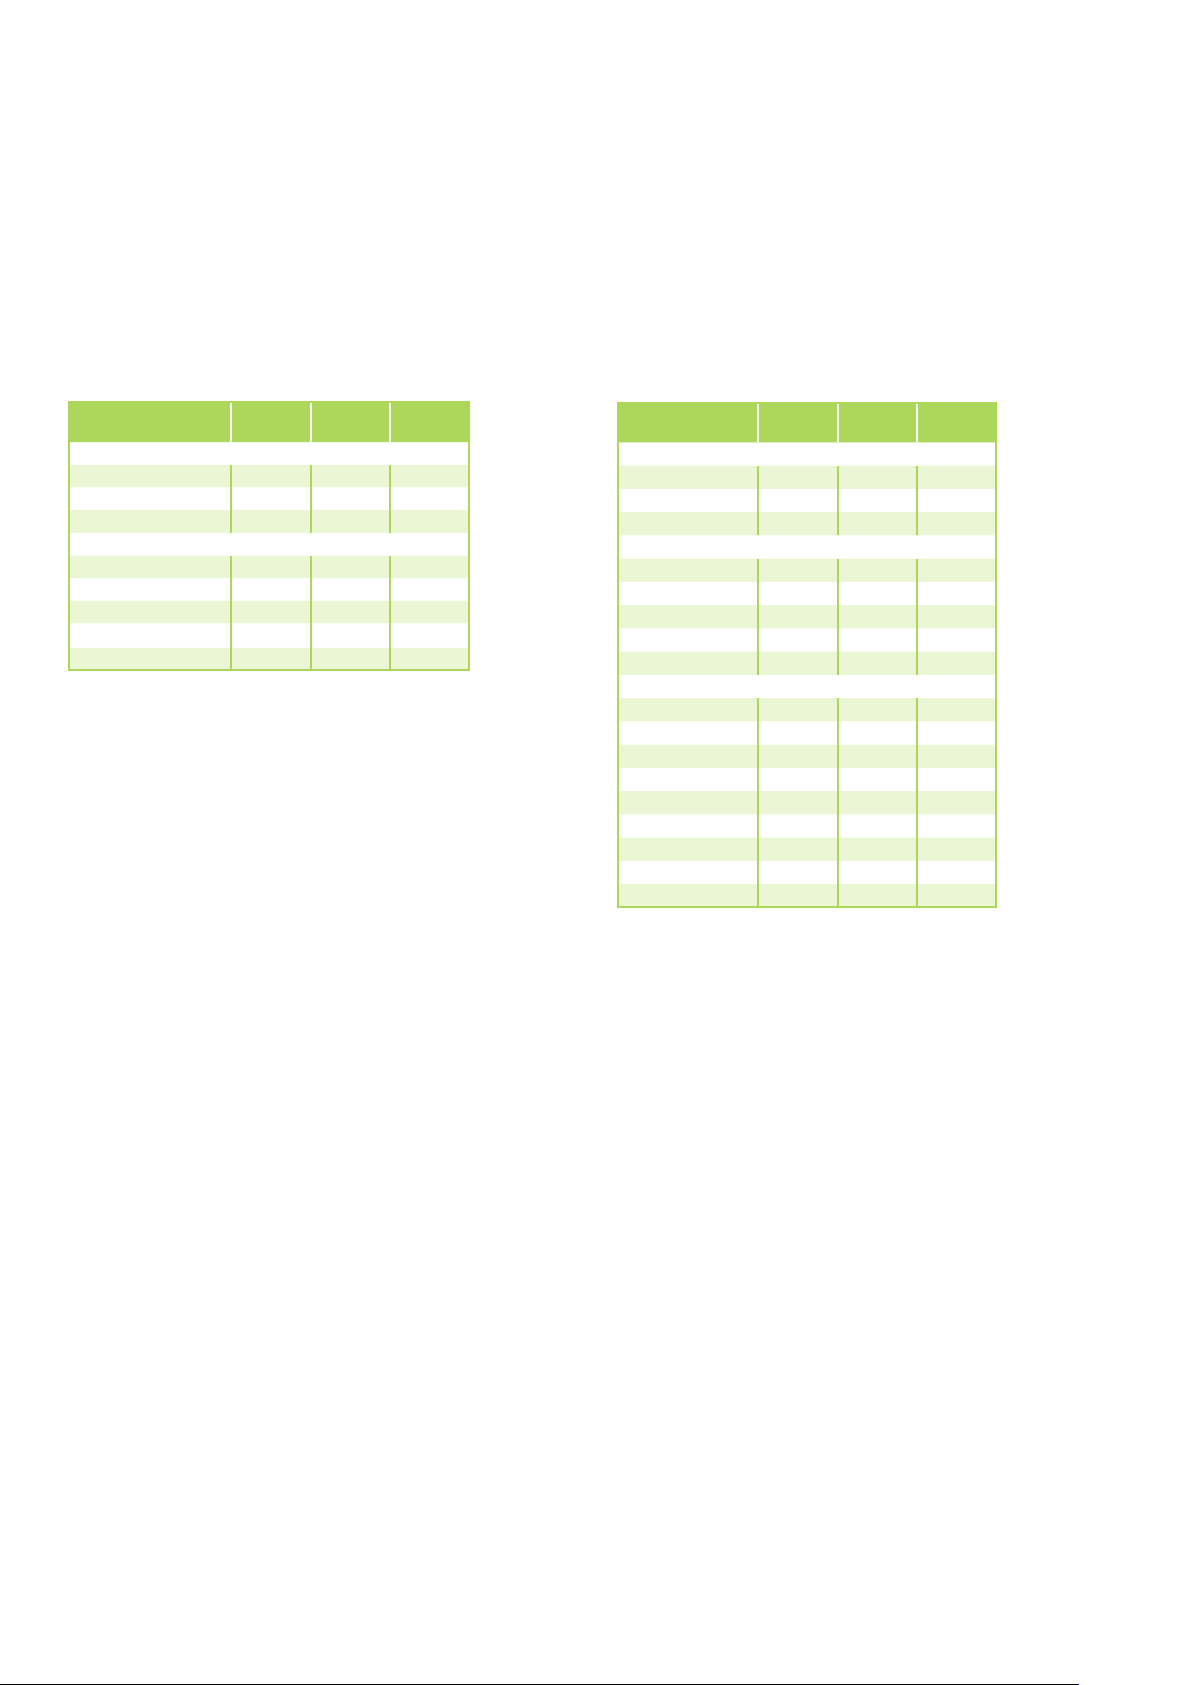
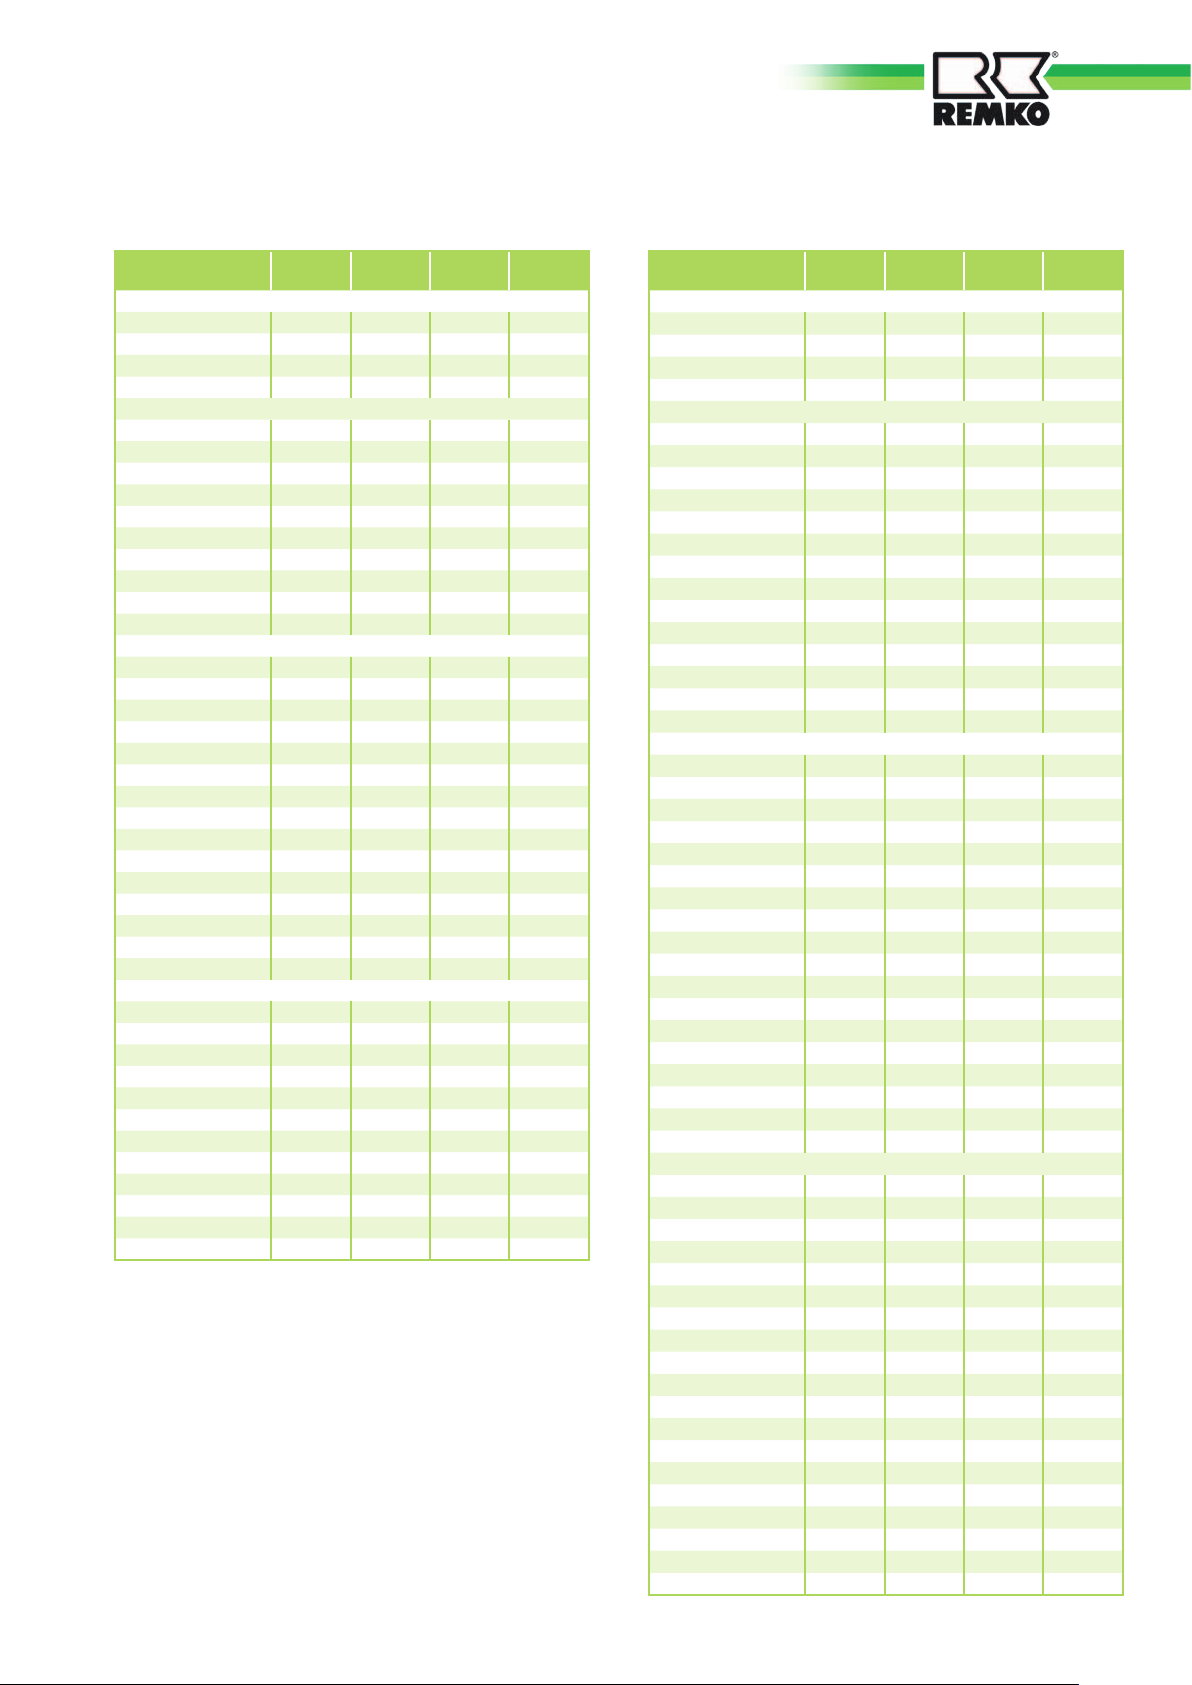
Indoor units MXD 200-520 can be combined with MVT series outdoor units.
The following combinations are possible.
Outdoor unit MVT 600 DC
MXD
200
One indoor unit
Combination 1
Combination 2
Combination 3
Two indoor units
Combination 4
Combination 5
Combination 6
Combination 7
Combination 8
•
• •
• •
• •
MXD
260
•
• •
• •
MXD
350
•
Outdoor unit MVT 900 DC
MXD
200
One indoor unit
Combination 1
Combination 2
Combination 3
Two indoor units
Combination 4
Combination 5
Combination 6
Combination 8
Combination 9
Three indoor units
Combination 13
Combination 14
Combination 15
Combination 16
Combination 17
Combination 18
Combination 19
Combination 20
Combination 21
•
• •
• •
• •
• • •
• • •
• • •
• • •
• • •
• • •
MXD
260
•
• •
• • •
• • •
• •
MXD
350
•
• •
6
Page 7
Outdoor unit MVT 950 DC Outdoor unit MVT 1050 DC
One indoor unit
Combination 1
Combination 2
Combination 3
Combination 4
Two indoor units
Combination 5
Combination 6
Combination 7
Combination 8
Combination 9
Combination 10
Combination 11
Combination 12
Combination 13
Combination 14
Three indoor units
Combination 15
Combination 16
Combination 17
Combination 18
Combination 19
Combination 20
Combination 21
Combination 22
Combination 23
Combination 24
Combination 25
Combination 26
Combination 27
Combination 28
Combination 29
Four indoor units
Combination 31
Combination 32
Combination 33
Combination 34
Combination 35
Combination 36
Combination 37
Combination 38
Combination 39
Combination 40
Combination 41
Combination 42
MXD
200
MXD
260
MXD
350
•
•
•
• •
• •
• •
• •
• •
• •
• •
• •
• •
• • •
• • •
• • •
• • •
• • •
• • •
• • •
• • •
• • •
• • •
• • •
• • •
• • •
• • •
• • •
• • • •
• • • •
• • • •
• • • •
• • • •
• • • •
• • • •
• • • •
• • • •
• • • •
• • • •
• • • •
MXD
520
•
• •
One indoor unit
Combination 1
Combination 2
Combination 3
Combination 4
Two indoor units
Combination 5
Combination 6
Combination 7
Combination 8
Combination 9
Combination 10
Combination 11
Combination 12
Combination 13
Combination 14
Combination 15
Combination 16
Combination 17
Combination 18
Three indoor units
Combination 19
Combination 20
Combination 21
Combination 22
Combination 23
Combination 24
Combination 25
Combination 26
Combination 27
Combination 28
Combination 29
Combination 30
Combination 31
Combination 32
Combination 33
Combination 34
Combination 35
Combination 36
Four indoor units
Combination 37
Combination 38
Combination 39
Combination 40
Combination 41
Combination 42
Combination 43
Combination 44
Combination 45
Combination 46
Combination 47
Combination 48
Combination 49
Combination 50
Combination 51
Combination 52
Combination 53
Combination 54
Combination 55
MXD
200
MXD
260
MXD
350
•
•
•
• •
• •
• •
• •
• •
• •
• •
• •
• •
• •
• •
• •
• • •
• • •
• • •
• • •
• • •
• • •
• • •
• • •
• • •
• • •
• • •
• • •
• • •
• • •
• • •
• • •
• • •
• • •
• • • •
• • • •
• • • •
• • • •
• • • •
• • • •
• • • •
• • • •
• • • •
• • • •
• • • •
• • • •
• • • •
• • • •
• • • •
• • • •
• • • •
• • • •
• • • •
MXD
520
•
• •
• •
7
Page 8
REMKO MXD
Operation
The indoor unit is easily operated using the standard infrared remote control. The indoor unit beeps to acknowledge the correct transmission of data. If it is not possible to program the indoor unit using the remote control,
it can also be manually operated.
Manual operation
The indoor units can be started
manually.
Press the RESET button on the receiver unit of the cover to activate
automatic mode. In manual mode,
the following settings apply:
Cooling mode: 24 °C,
Fan speed AUTO
Heating mode: 26 °C,
Fan speed AUTO
Pressing any button on the infrared remote control interrupts
manual mode.
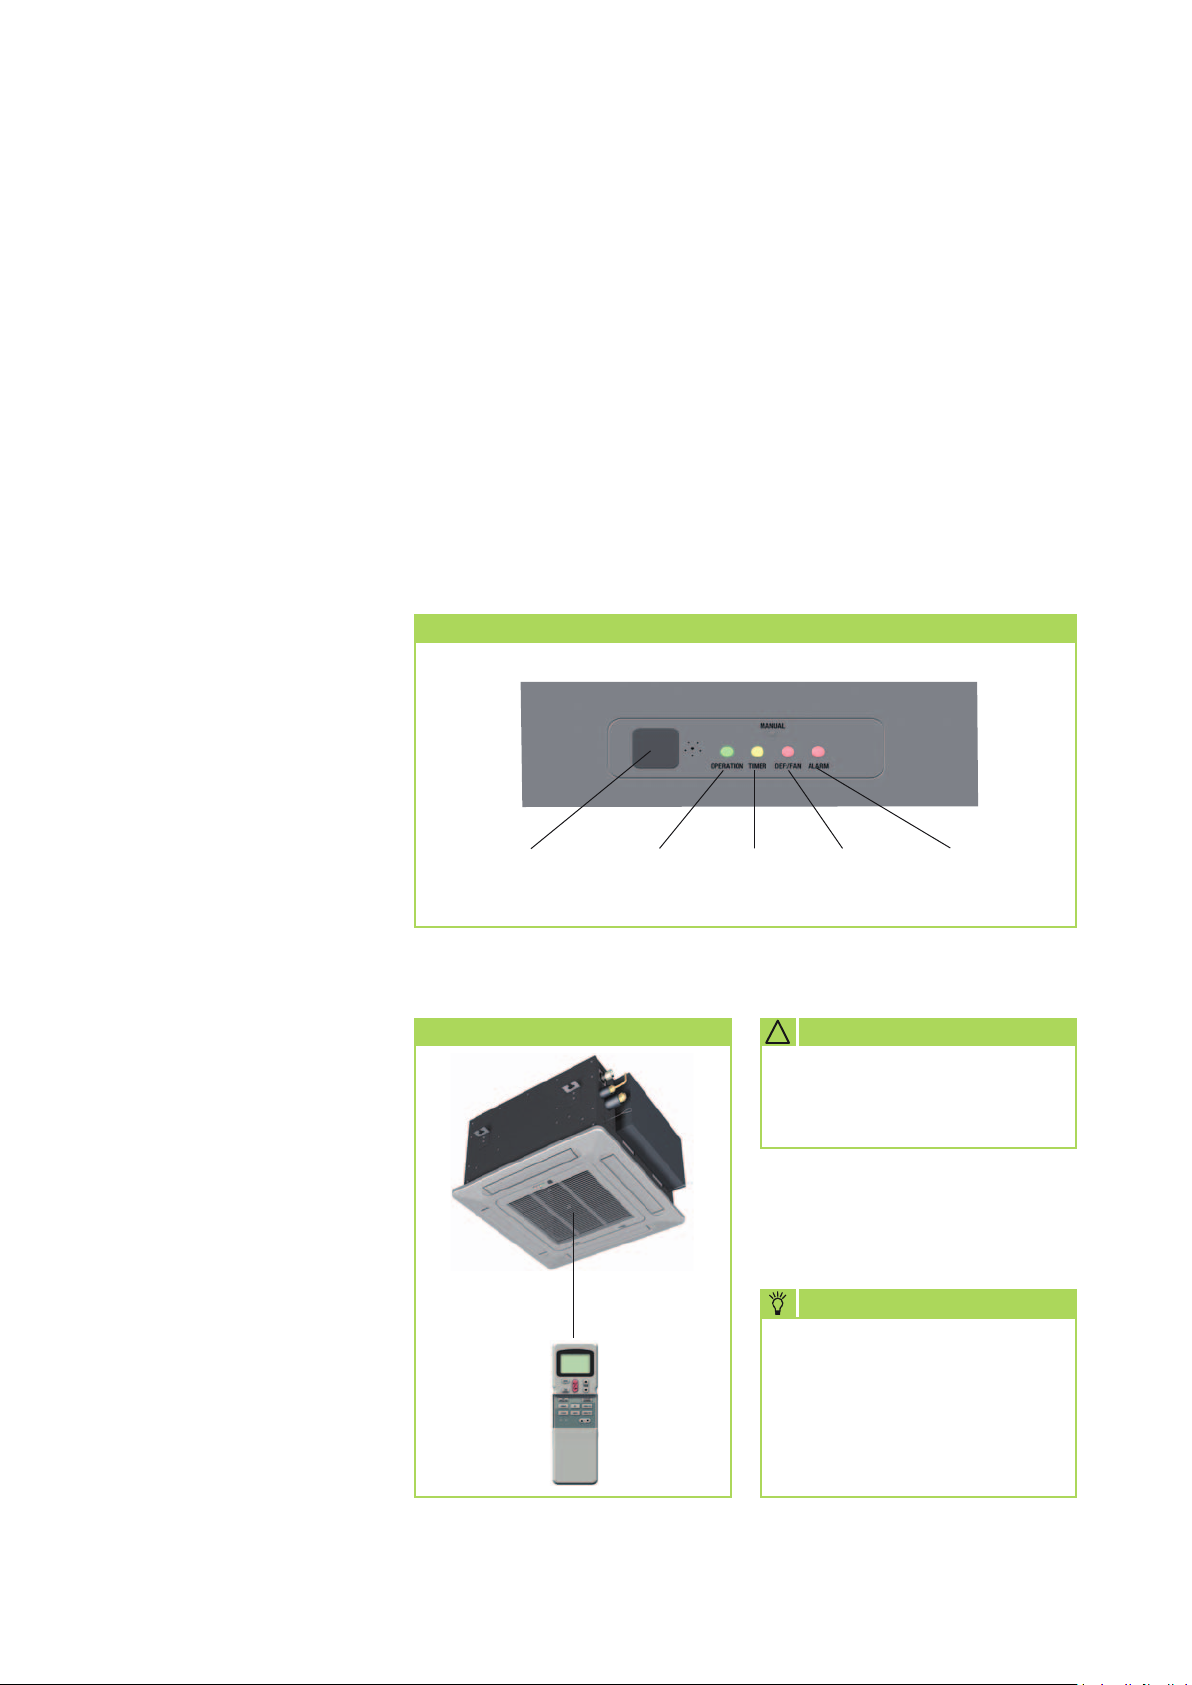
Display on the indoor unit
The lit LED indicators show the settings.
LED H red = high fan speed
LED M yellow = medium fan speed
LED L green = low fan speed
Display on the indoor unit
Unit for receiving signals
from the remote control
Operation
indicator
Timer
indicator
Fan
Defrost
Alarm indicator
infrared remote control
The infrared remote control sends
the programmed settings over a distance of up to 6 m from the receiver
of the indoor unit. Data will only be
received correctly if the remote control is pointed at the receiver and no
objects obstruct the transmission
path.
First insert the batteries supplied on
delivery
(2 x type AAA) into the remote control. To do so, pull off the flap of the
battery compartment and insert the
batteries according to their polarity
(see markings).
Maximum distance
max. 6 m
! CAUTION
Faults are indicated in code
(see chapter Troubleshooting
and Customer service).
NOTE
Immediately replace flat batteries with a new set, otherwise
there is a risk of leakage. It is
recommended that the batteries
be removed if the equipment is
shut down for long periods.
8
Page 9
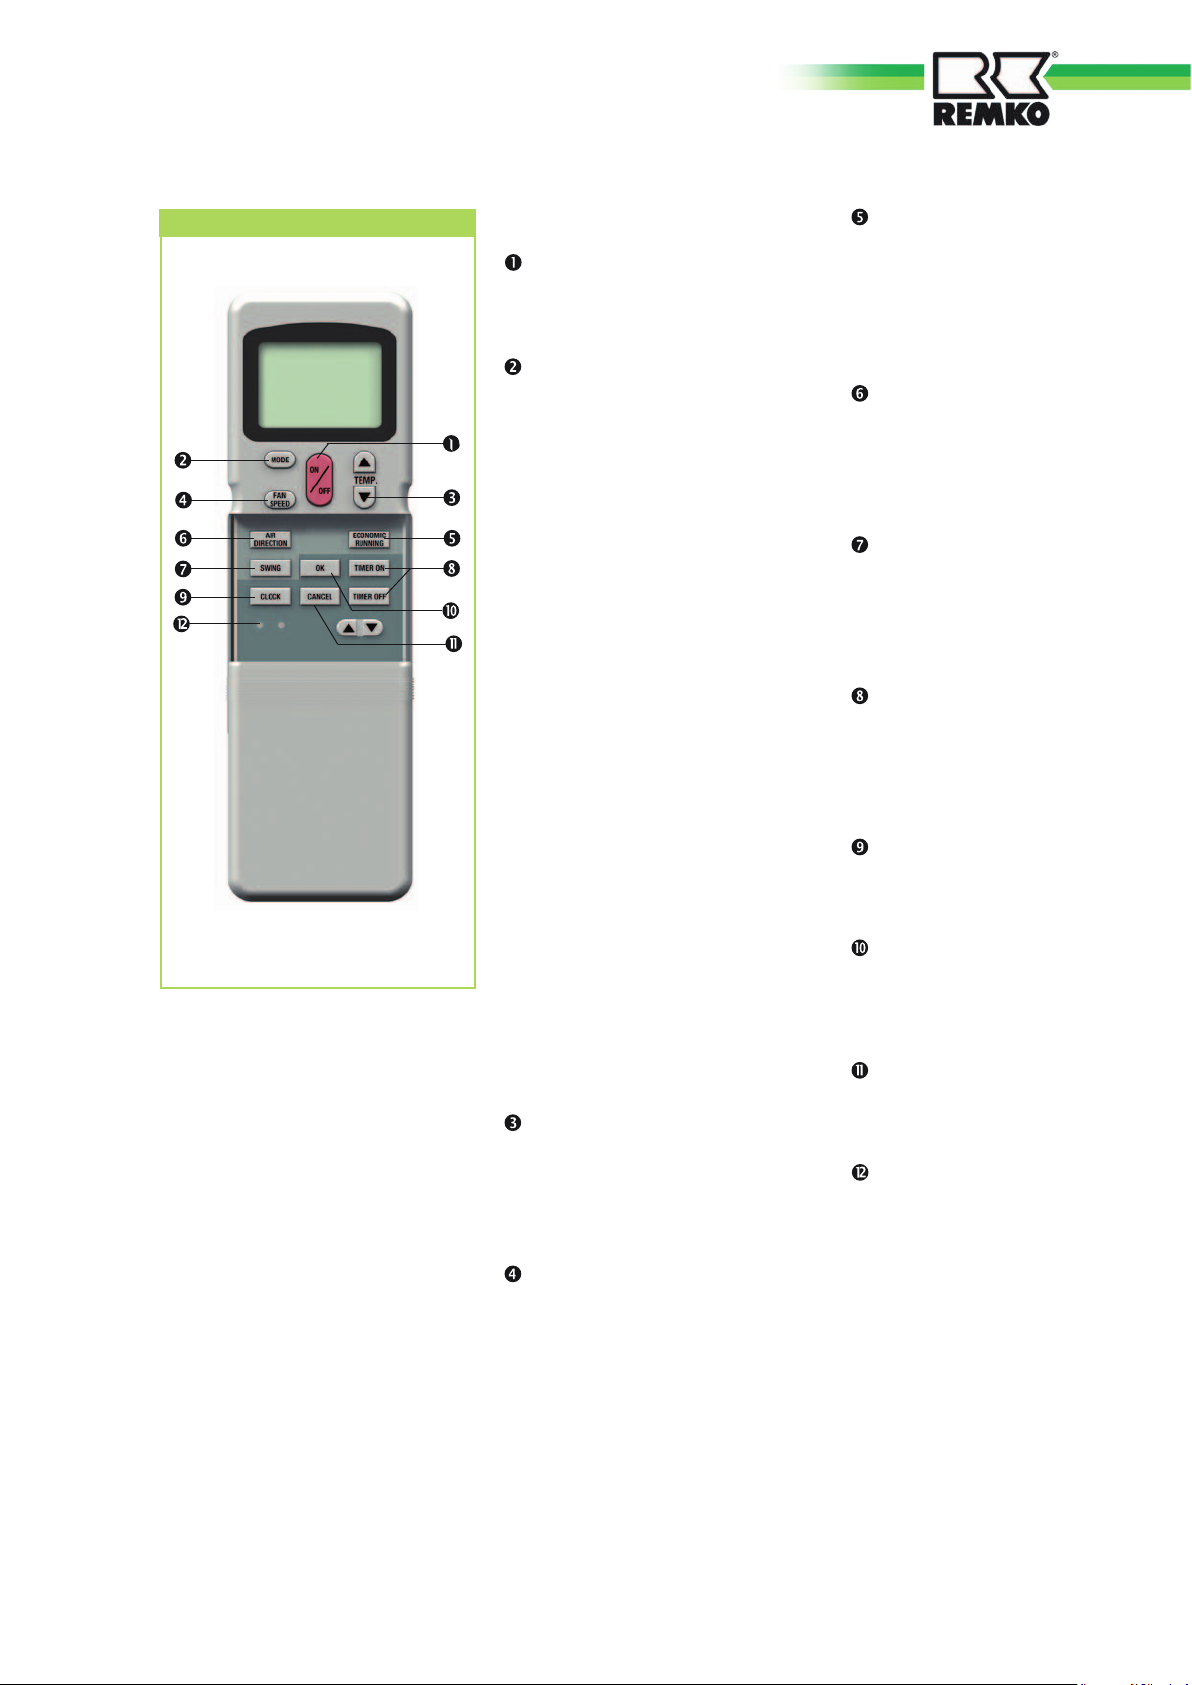
Buttons on the remote control
Buttons on the remote control
"ON/OFF" button
Press this button
to start the unit.
"MODE" button
Use this button to
select the operating mode.
The indoor unit has 5 modes:
1. Automatic mode
In this mode, the unit works in
cooling or in heating mode.
2. Cooling mode
In this mode, the warm room
air is cooled to the
desired temperature.
3. Dehumidification mode
In this mode the room is mainly
dehumidified and the temperature setting is maintained.
4. Heating mode
In this mode, the warm air in the
room is heated up to the desired
temperature.
5. Circulation mode
In this mode, the air in the room
is recirculated.
Temperature selection is not
possible.
"Temp ▲ ▼ " button
This button is used to
select the desired temperature
between 17 - 30°C.
"FAN SPEED" button
Press this button to set the
desired fan speed. 4 settings
are available: automatic, high,
medium and low fan speed.
"ECONOMIC RUNNING" button
Pressing this button will auto-
matically increase or decrease
the target temperature by 1 °C
within an hour in cooling and
heating mode respectively.
"AIR DIRECTION" button
With this button, the desired fin
position can be set. There are 5
positions and an oscillating function available.
"SWING" button
This button directly activates the
oscillating function of the fins
for better air distribution in the
room.
"TIMER ON/OFF" button
This button serves to program
the automatic activation time
for the device within the next
24 hours.
"CLOCK" button
This button opens the time pro-
gram.
"OK" button
This button transfers the pro-
grammed data to the indoor
unit.
"CANCEL" button
This button stops the timer pro-
gram once set.
"LOCK / RESET" button
(recessed buttons)
The left LOCK button prevents
subsequent operation, the right
RESET button resets the display.
9
Page 10
REMKO MXD
Button functions
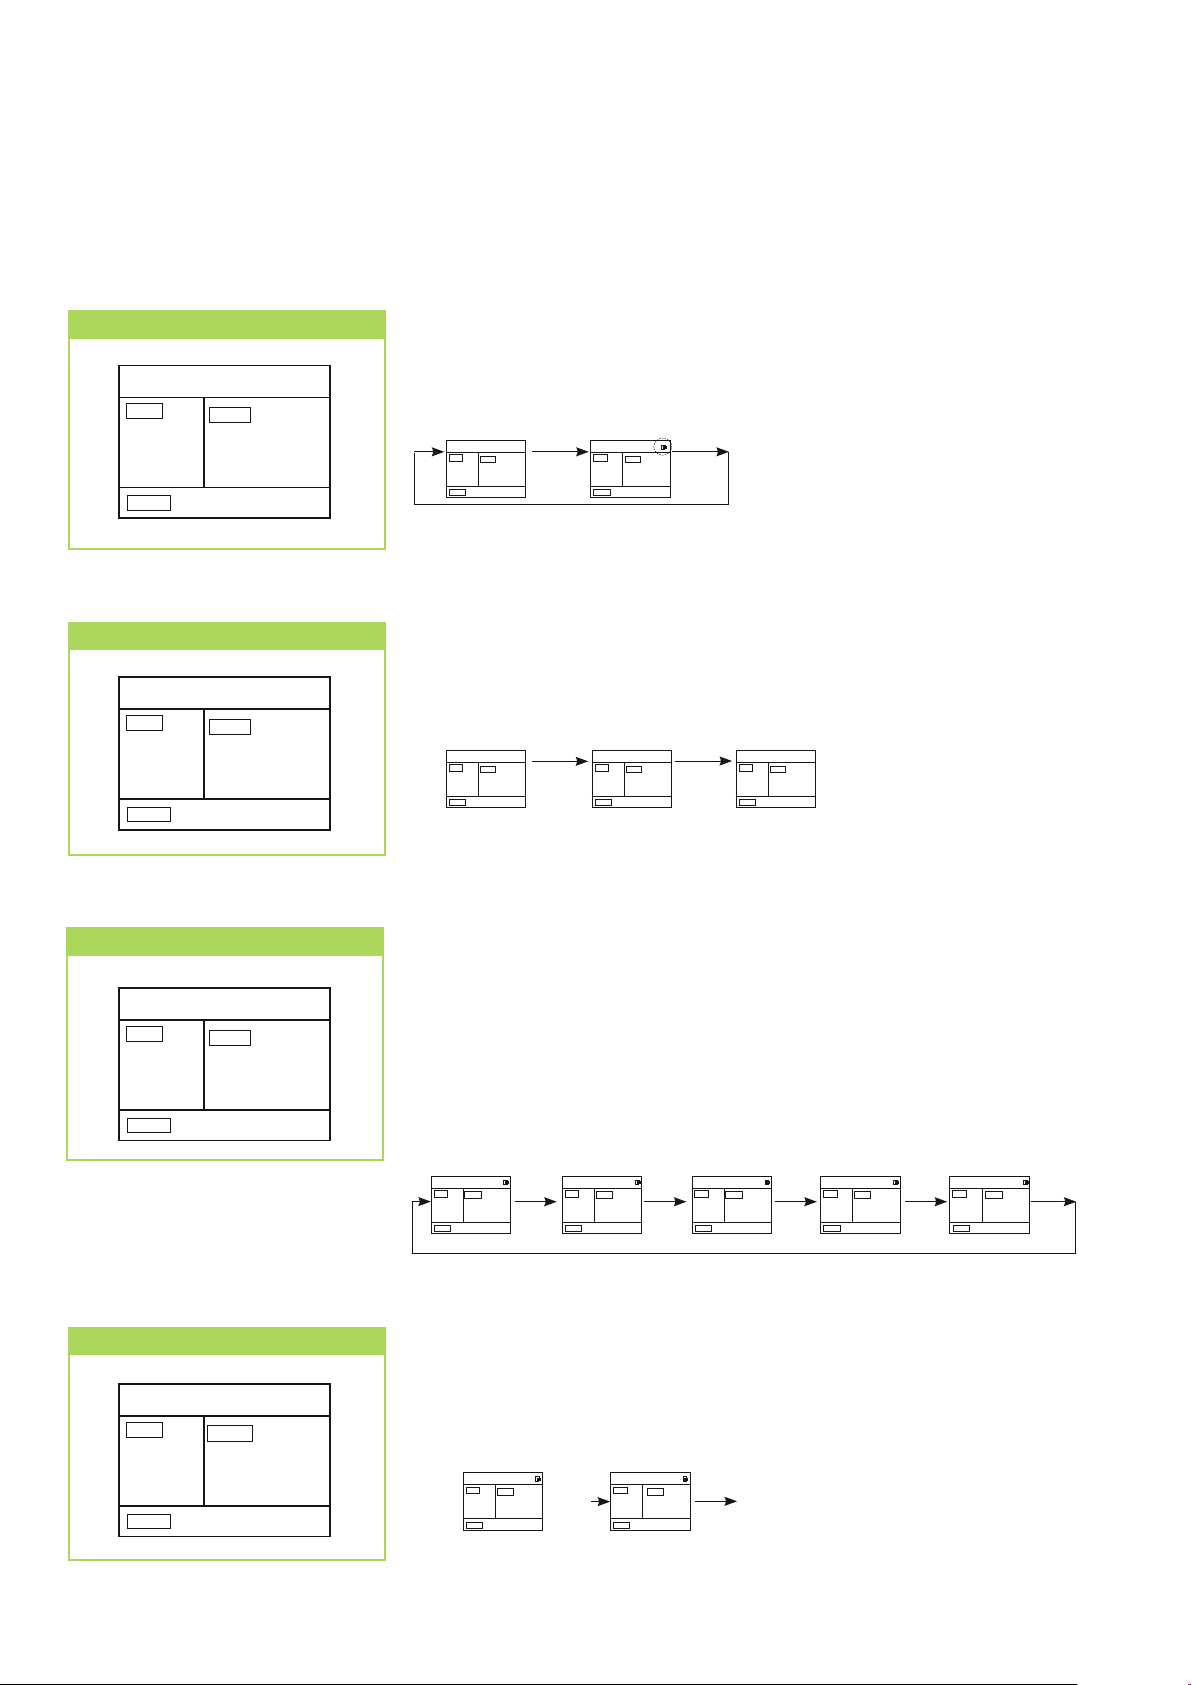
A symbol is shown on the display to indicate that the settings are being transferred.
ON/OFF Button
COOL
TEMP
20
C
°
SPEED
pq
Buttons
COOL
TEMP
20
C
°
SPEED
CLOCK
LOW
CLOCK
LOW
10:49
10:49
Your air-conditioner is activated and deactivated by pressing the ON /
OFF button. The programmed settings and adjustment values from before the unit was turned off will appear on the display.
The
COOL
TEMP
20
SPEED
p/q
C
°
ON/OFF ON/OFF
CLOCK
10:49
LOW
buttons can be used to reduce and increase the desired nominal
COOL
TEMP
CLOCK
10:49
20
C
°
SPEED
LOW
temperature.
10:49
p
COOL
TEMP
CLOCK
2i
C
°
SPEED
LOW
COOL
TEMP
CLOCK
20
C
°
SPEED
LOW
10:49
q
COOL
TEMP
CLOCK
10:49
20
C
°
SPEED
LOW
MODE Button
COOL
TEMP
20
SPEED
CLOCK
C
°
LOW
AUTOMATIC MODE
AUTO
TEMP
20
SPEED
CLOCK
C
°
AUTO
10:49
10:49
Use the MODE button to select between the individual operating modes. 5
modes are available:
1. Automatic automatic selection of cooling or heating mode
2. Cooling predominantly summer operating mode
3. Dehumidifying summer or winter operating mode
4. Heating predominantly winter operating mode
5. Air circulation only for circulation of air
Automatic Cooling
AUTO
TEMP
2i
°
SPEED
MODE
CLOCK
10:49
C
LOW
COOL
TEMP
CLOCK
2i
C
°
SPEED
LOW
Dehumidifying
MODE MODE MODE MODE
10:49
DRY
TEMP
CLOCK
10:49
2i
C
°
SPEED
LOW
Heating
TEMP
2i
C
°
SPEED
HEAT
CLOCK
10:49
LOW
Air circulation
TEMP
2i
FAN
CLOCK
10:49
C
°
SPEED
LOW
In automatic mode, the control system autonomously selects between
heating, cooling and air circulation modes. The nominal temperature can be
preselected and is then applied in automatic mode. The fan speed is automatically adapted to the given circumstances.
The nominal temperature is
below the room temperature
The nominal temperature is
above the room temperature
AUTO AUTO
TEMP TEMP
CLOCK CLOCK
2i
C
°
SPEED SPEED
AUTO AUTO
▲
10:49 10:49
OR
▼
COOLING
or
23
C
°
HEATING
or
AIR CIRCULATION
10
Page 11
Cooling MODE
COOL
TEMP
20
°
SPEED
C
CLOCK
LOW
10:49
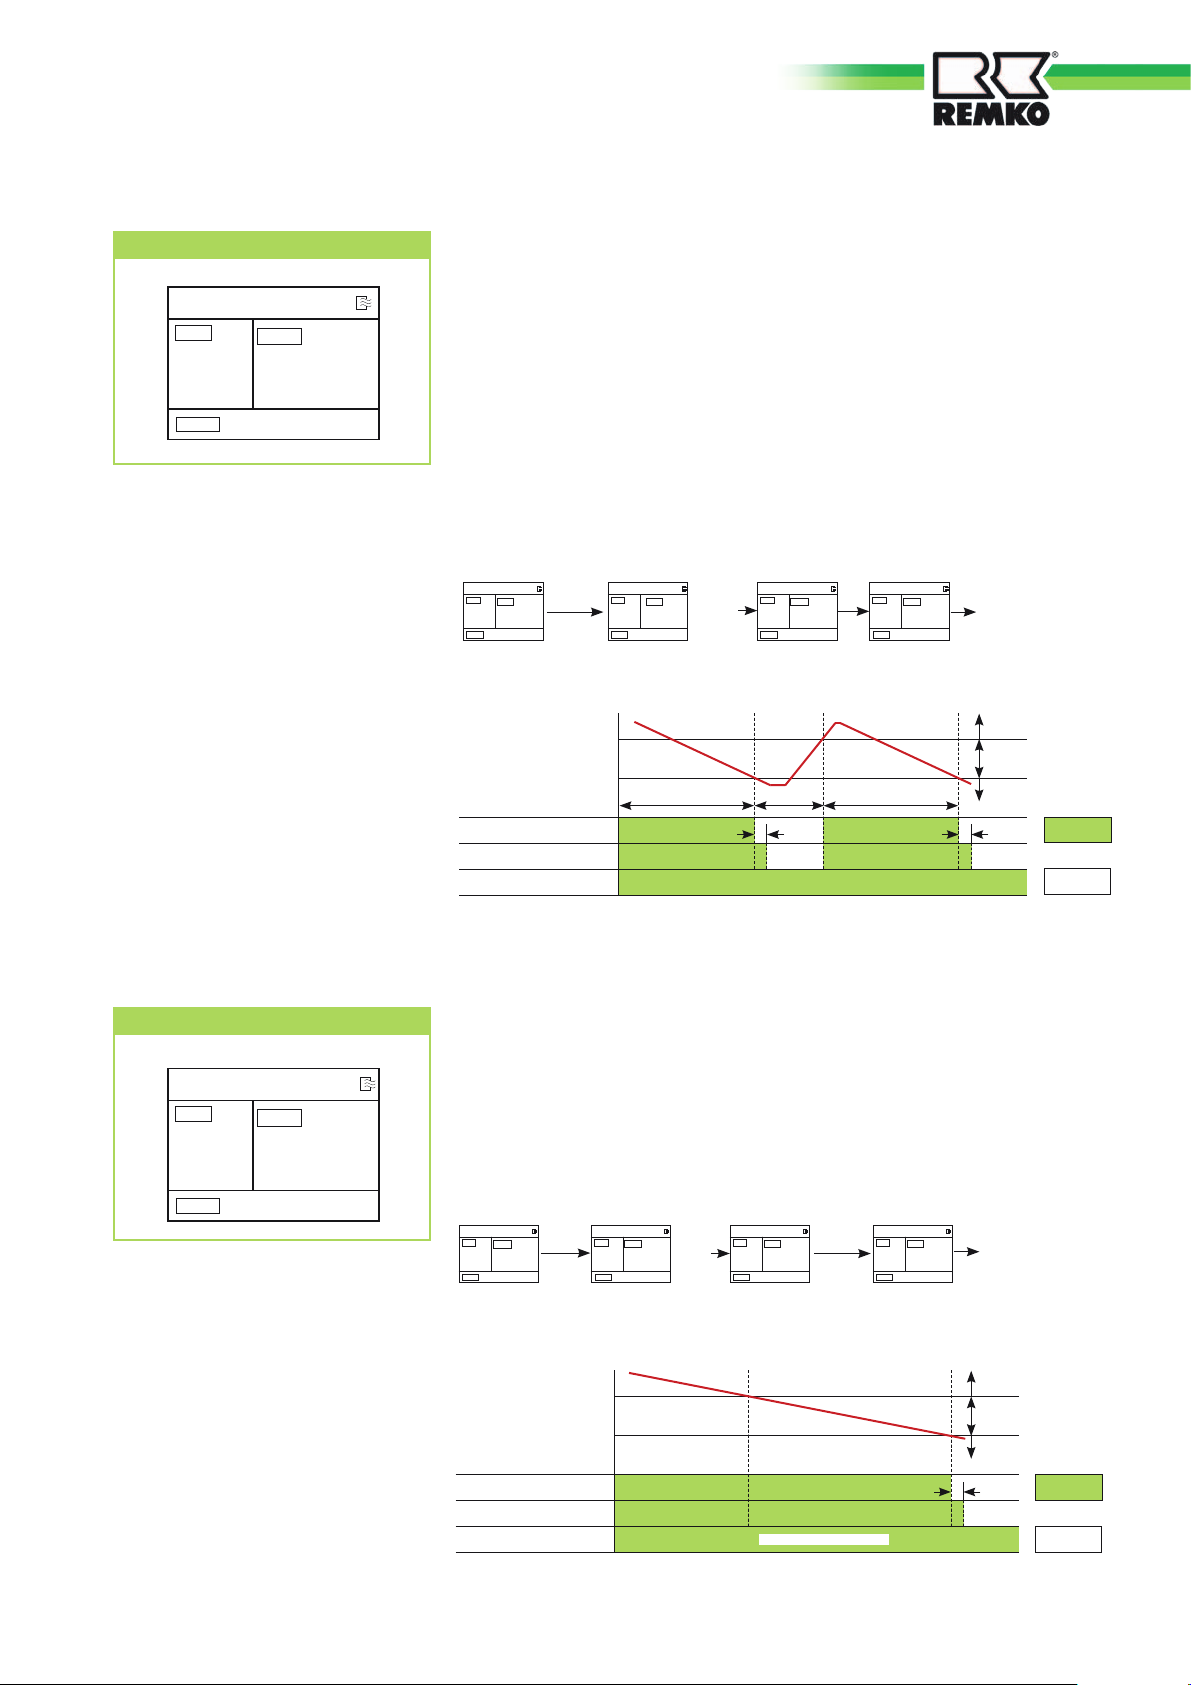
In cooling mode, the air in the room is cooled down to the set nominal
temperature. The desired room temperature is set with the ▲/▼buttons in
1 °C increments. If the room temperature is 1 °C above the selected nominal
temperature, the indoor unit starts to cool the air in the room. The inverter
controller checks the difference between the adjusted nominal temperature
and the actual room temperature. If there is a large difference, the cooling
output is very high. If the difference is smaller, a lower cooling output is
produced. This serves to maintain extremely even air discharge temperature
and room temperature.
If the adjusted room temperature is lower than approx. 2 °C, then the control system turns the cooling function off. To protect the compressor, the
controller only turns the cooling on again after a waiting period of 3 minutes.
DEHUMIDIFYING MODE
DRY
TEMP
20
CLOCK
C
°
10:49
AUTO
TEMP
CLOCK
10:49
2i
C
°
SPEED
MODE
LOW
COOL
TEMP
2i
C
°
SPEED
LOW
▲
and
TEMP
2i
CLOCK
10:49
▼
FAN
CLOCK
10:49
C
°
SPEED
LOW
22
FAN
TEMP
CLOCK
C
°
SPEED
LOW
10:49
COOLING
MODE
Functional diagram
Nominal temperature
Nominal temperature -2°C
OU compressor operation
OU fan operation
IU fan operation
Actual temperature
> 6 mins
> 6 mins> 3 mins
30 secs 30 secs
Start cooling mode
Cooling mode
Stop cooling mode
Operation
Stop
In dehumidifying mode, the room temperature is set to 24 °C. Due to the
low temperature of the refrigerant, the dew point of the air on the vaporiser
is lower. The excess moisture in the air is condensed by the vaporiser, the
room is dehumidified. The fan speed should be set to automatic in order to
achieve a maximum level of dehumidification. The fan speed is automatically adapted to the given circumstances.
SPEED
AUTO
COOL
TEMP
CLOCK
10:49
2i
C
°
SPEED
LOW
MODE
TEMP
2i
C
°
SPEED
AUTO
Functional diagram
Nominal temperature
Nominal temperature -2°C
OU compressor operation
OU fan operation
IU fan operation
DRY
▲
▼
TEMP
24
SPEED
CLOCK
10:49
AND
Actual temperature
DRY
CLOCK
ON/OFF
10:49
C
°
AUTO
Low fan speed
DRY
TEMP
CLOCK
24
C
°
SPEED
AUTO
DE-
10:49
HUMIDIFYING
MODE
Start
Dehumidifying mode
Dehumidifying mode
Stop
Dehumidifying mode
30 secs
Operation
Stop
11
Page 12
REMKO MXD
HEATING MODE
HEAT
TEMP
20
SPEED
CLOCK
C
°
LOW
10:49
! CAUTION
Heating mode has priority!
If an indoor unit switches over
to heating mode, then cooling
is switched off for the other
indoor devices in cooling mode.
Cooling is not possible during
heating mode.
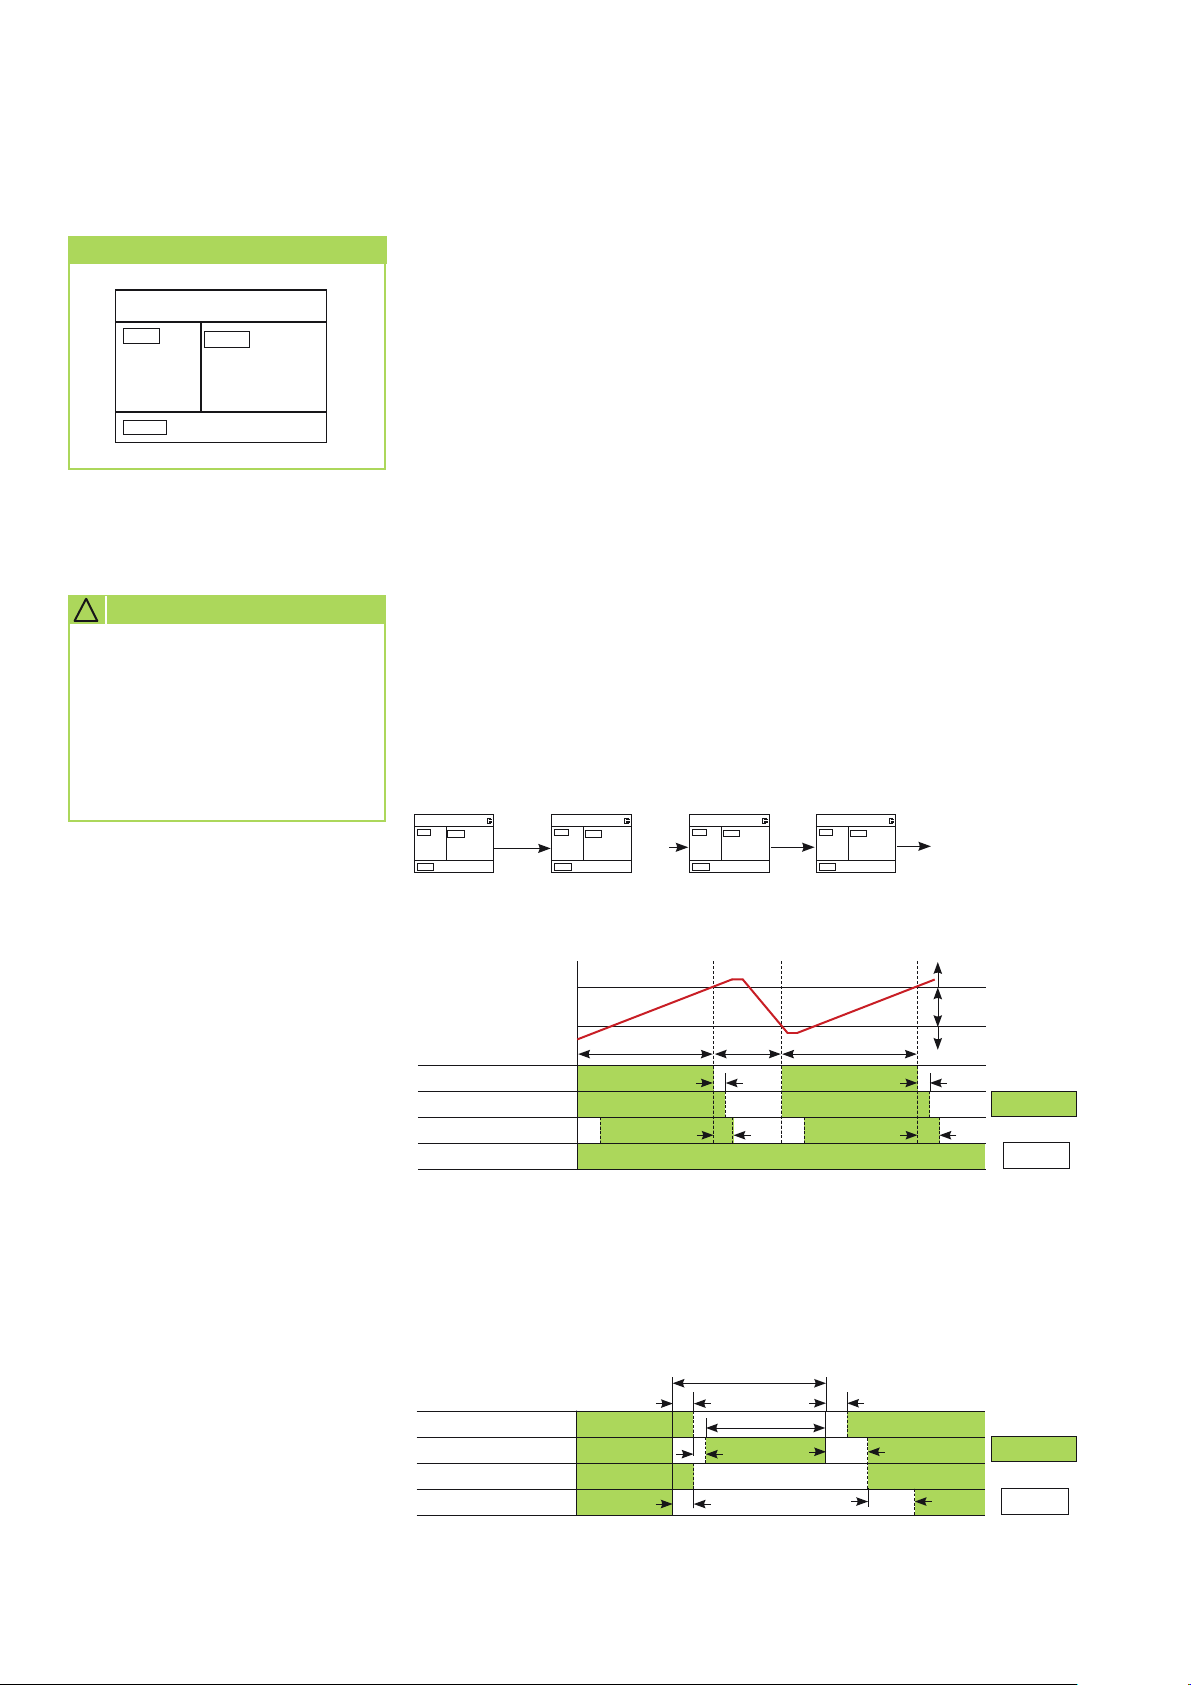
In heating mode, you can heat the room in spring or autumn. The desired
room temperature is set with the ▲/▼ buttons in 1 °C increments. If the
room temperature is 1 °C below the selected target temperature, the indoor
unit starts to heat the air in the room. The inverter controller checks the
difference between the adjusted nominal temperature and the actual room
temperature.
If there is a large difference, a higher cooling output is produced.
If there is a small difference, a lower cooling output is produced.
This serves to maintain the air discharge temperature and the room temperature.
If the adjusted room temperature is still exceeded by approx. 2 °C, then
the control system turns the heating function off. To protect the compressor, the controller only turns the heater on again after a waiting period of 3
minutes.
In heating mode, the indoor unit fan motor is switched on after a delay, in
order to prevent the discharge of cold air.
The fins on the outdoor unit could ice up at low outdoor temperatures.
Regular reversal of the cooling circuit results in a defrosting action.
The display shows "H1" during the defrosting period.
Heating mode operational sequence
DRY
TEMP
CLOCK
10:49
2i
°
SPEED
AUTO
MODE
C
HEAT
TEMP
CLOCK
▲
10:49
2i
C
°
SPEED
AND
LOW
▼
HEAT
TEMP
CLOCK
10:49
23
°
SPEED
FAN
C
LOW
HEAT
TEMP
CLOCK
10:49
23
C
°
SPEED
MED
HEATINGMODE
Functional diagram
Nominal temperature +5 °C
Nominal temperature +2 °C
OU compressor operation
OU fan operation
IU fan operation
Reverse flow valve
Actual temperature
> 6 mins
> 6 mins> 3 mins
30 secs 30 secs
30 secs 30 secs
Stop heating mode
Heating mode
Start heating mode
Operation
During the defrosting cycle, the indoor unit vaporiser fan and the outdoor
unit condenser fan are switched off.
After the cycle is concluded, the fans are switched to their
previous settings.
Reverse flow valve
OU compressor operation
OU fan operation
IU fan operation
Defrost period
30 secs
< 7 mins
15 secs
30 secs
60 secs
30 secs
Operation
3 mins
Stop
Stop
12
Page 13
AIR CIRCULATION MODE
TEMP
20
SPEED
CLOCK
C
°
LOW
FAN
10:49
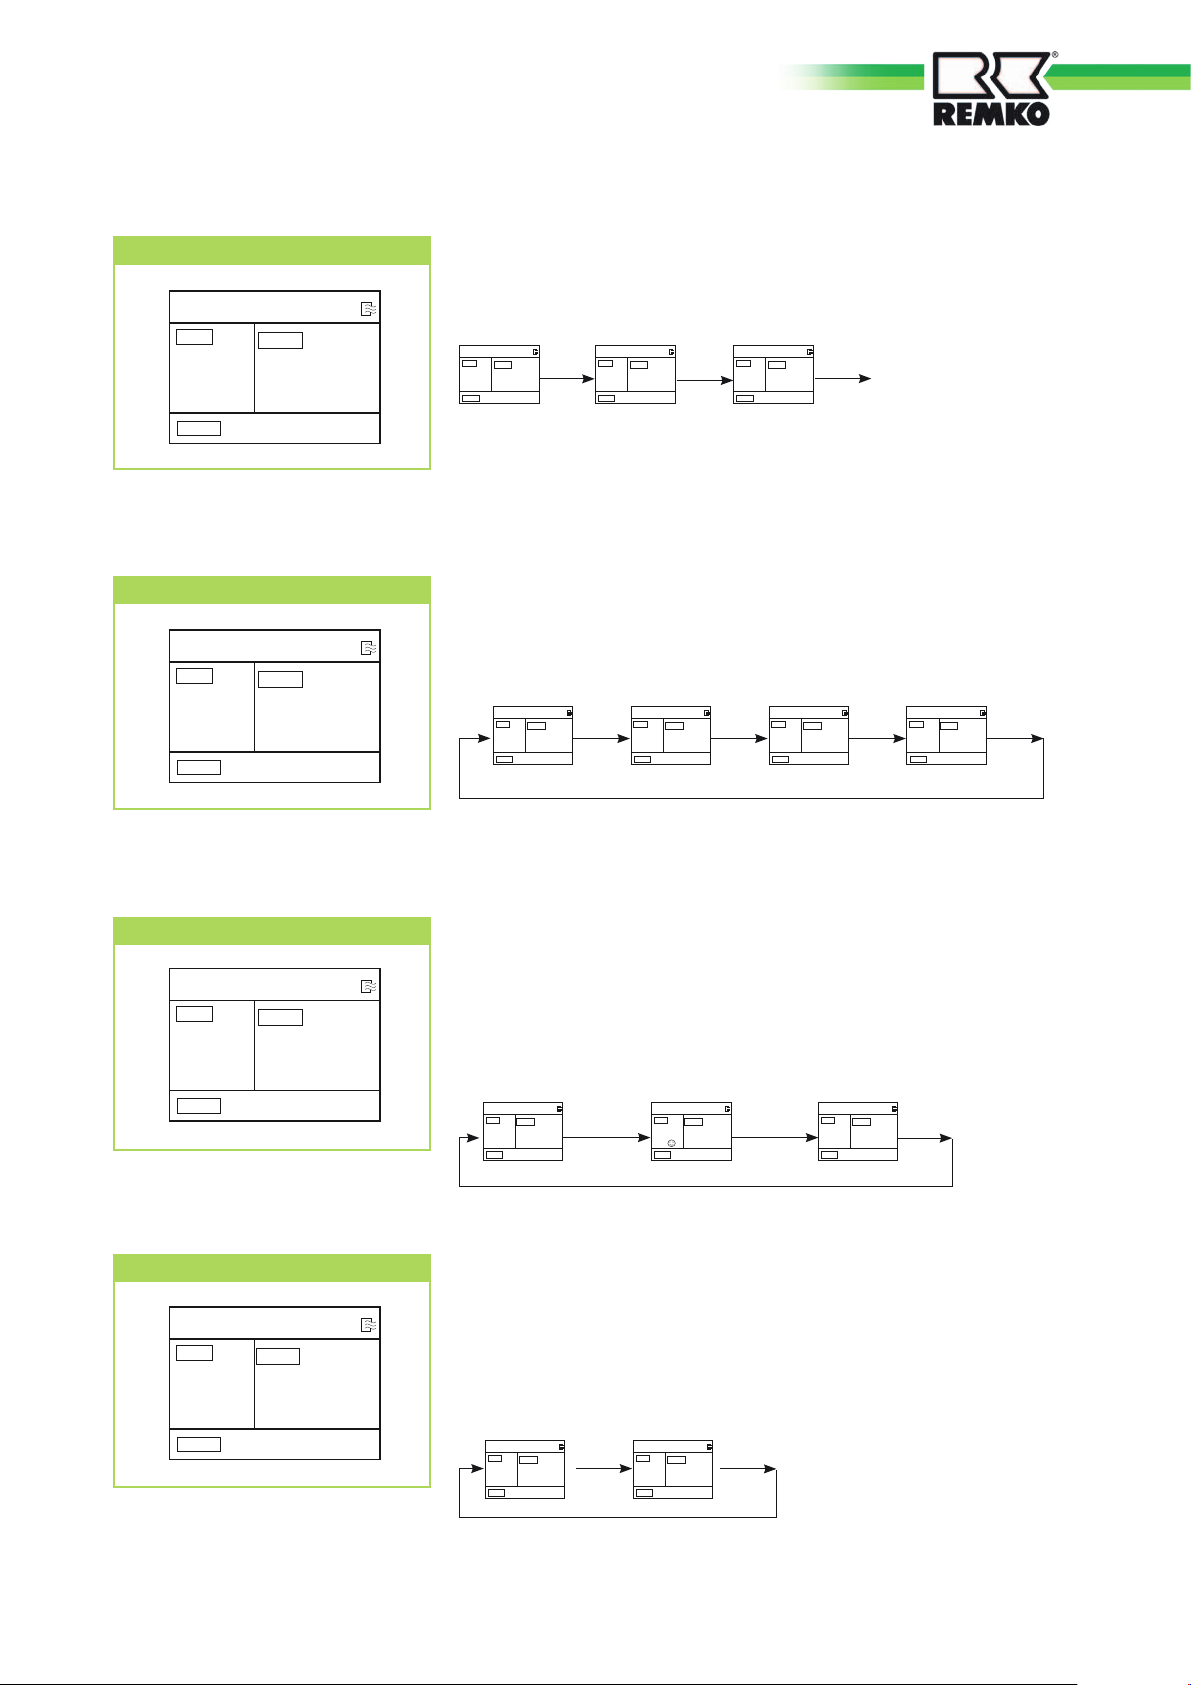
In air circulation mode, the air in the room is only circulated.
The room temperature cannot be changed in this mode.
Cooling or heating mode is not activated.
HEAT
TEMP
CLOCK
10:49
2i
C
°
SPEED
LOW
MODE
TEMP
2i
C
°
SPEED
FAN
FAN
CLOCK
10:49
SPEED
2i
LOW
FAN
TEMP
CLOCK
10:49
C
°
SPEED
MED
AIR CIRCULATION
FAN SPEED Button
FAN
TEMP
20
SPEED
CLOCK
C
°
LOW
10:49
ECONOMIC RUNNING button
FAN
TEMP
20
SPEED
CLOCK
C
°
LOW
10:49
The fan speed can be adjusted with this button. A selection can be made
between low, medium, high and automatic fan speed.
TEMP
CLOCK
10:49
2i
C
°
SPEED
AUTO
SPEED
TEMP
2i
C
°
SPEED
LOW
FAN
HEAT
FAN
HEAT
CLOCK
10:49
SPEED
TEMP
2i
C
°
SPEED
FAN
HEAT
CLOCK
10:49
MED
SPEED
TEMP
CLOCK
2i
C
°
SPEED
FAN
HEAT
10:49
SPEED
HIGH
This button activates a programme, which causes the nominal temperature in cooling mode to increase after one hour by 1°C and after two
hours by 2 °C. In heating mode, the target temperature is decreased by 1
°C after one hour by 2 °C after 2 hours.
The display indicator on the indoor unit goes out.
The TURBO function is used to activate the maximum fan speed.
TEMP
CLOCK
10:49
2i
C
°
SPEED
AUTO
RUNNING
TEMP
2i
°
SPEED
AUTO
ECONOMIC
HEAT
C
CLOCK
ECONOMIC
HEAT
10:49
RUNNING
HEAT
C
°
AUTO
CLOCK
10:49
Deactivated
TEMP
2i
SPEED
SWING and AIR DIRECTION Buttons
FAN
TEMP
20
SPEED
CLOCK
C
°
LOW
10:49
The oscillating function of the air discharge fins can be adjusted with this
button. The air distribution in the room is improved by the swing function.
In order to adjust the aim of the air discharge fins to a particular direction,
the AIR DIRECTION button must be pressed briefly. In order to activate the
automatic swing function, the AIR DIRECTION button must be pressed for
longer than 2 seconds.
Deactivated
HEAT
▲ ▲
TEMP
2i
C
°
SPEED
AUTO
SWING
CLOCK
10:49
HEAT
TEMP
CLOCK
SWING
10:49
2i
C
°
SPEED
AUTO
13
Page 14
REMKO MXD
TIMER button TIMER ON / OFF
FAN
TEMP
20
SPEED
C
°
CLOCK
TIMER ON
TIMER OFF
LOW
10:49
18:45
22:30
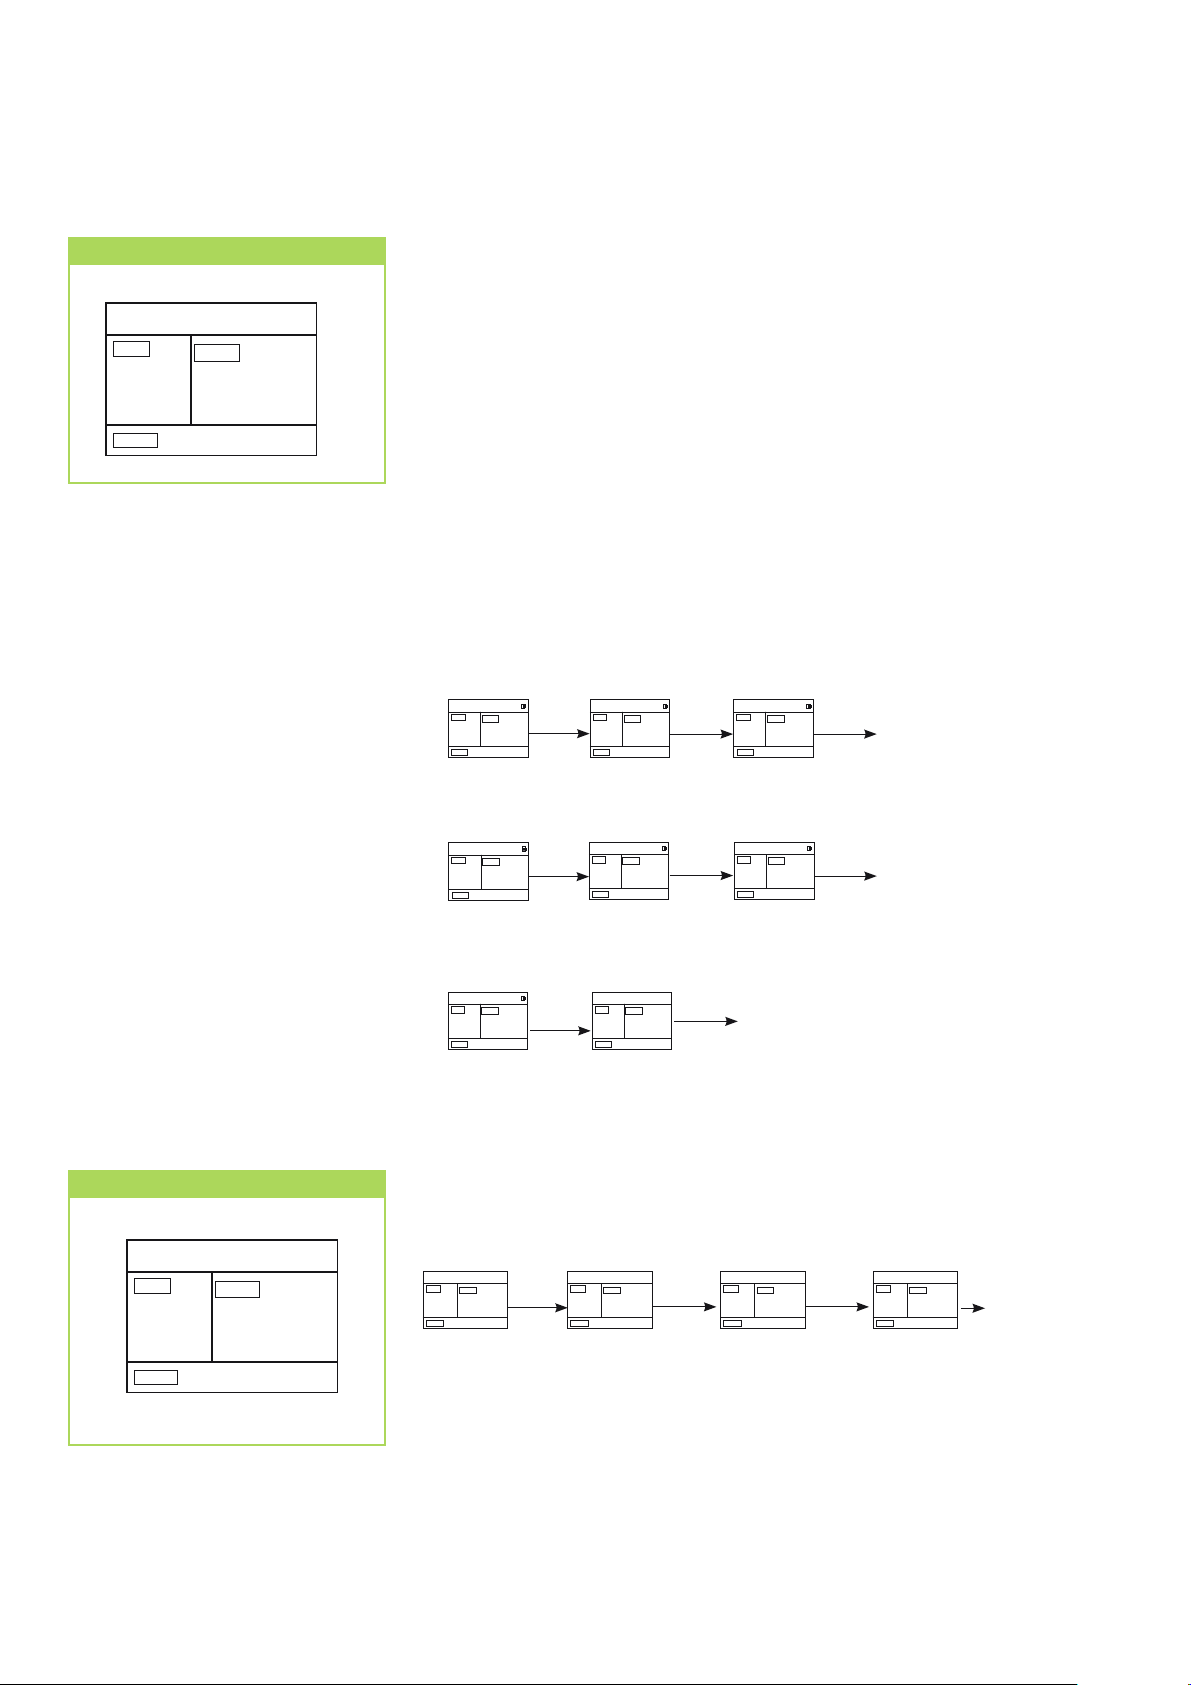
The activation and switch-off time can be programmed with this button.
The timer is activated/deactivated by means of pressing the timer on and
the timer off button. The timer symbol ON TIMER or OFF TIMER appears. The
desired turn on or turn off time is set by pressing the TIME ADJUST button.
Pressing a TIME ADJUST arrow button adjusts the time in 10 min. intervals.
Pressing both TIME ADJUST arrow buttons enables the time to be set more
quickly.
When the programmed time has been reached, the device is automatically
turned on or off. If the indoor unit is automatically switched on, then the
mode, temperature and fan speed for the last setting is reactivated.
Pressing the OK button serves to store the selected TIMER setting.
The on and off time can be deleted before the timer elapses by pressing the
CANCEL button. The timer display on the indoor unit goes out.
TIMER ON button - activation delay
HEAT
TEMP
2i
°
SPEED
TIMER
CLOCK
10:49
C
ON
LOW
HEAT
CLOCK
TIMER ON
LOW
10:49
18:45
TIMER
ADJUST
TEMP
2i
C
°
SPEED
HEAT
TEMP
CLOCK
10:49
06:30
2i
TIMER ON
C
°
SPEED
LOW
Activation delay
TIMER OFF button - switch-off delay
HEAT
CLOCK
TIMER ON
LOW
10:49
06:30
TIMER
OFF
TEMP
2i
C
°
SPEED
HEAT
TEMP
2i
C
°
SPEED
TIMER
CLOCK
10:49
ADJUST
06:30 06:30
TIMER ON TIMER ON
12:30 17:30
TIMER OFF TIMER OFF
LOW
HEAT
TEMP
CLOCK
10:49
2i
C
°
SPEED
LOW
Switch-off delay
CLOCK button
TEMP
20
SPEED
°
CLOCK
TIMER ON
C
TIMER OFF
LOW
FAN
10:49
18:45
22:30
CANCEL - delete timer program
HEAT
TEMP
CLOCK
10:49
CANCEL
06:30
2i
TIMER ON
C
°
17:30
TIMER OFF
SPEED
LOW
HEAT
TEMP
CLOCK
10:49
2i
C
°
SPEED
LOW
Timer deleted
The current time can be adjusted with this button. If the clock button is
pressed for longer than 3 secs, the time can be set with the TIME ADJUST
button. Store
HEAT
TEMP
CLOCK
i0:49
2i
C
°
SPEED
CLOCK
LOW
HEAT
TEMP
2i
C
°
SPEED
TIMER
CLOCK
i0:49
ADJUST
LOW
HEAT
TEMP
CLOCK
i5:50
2i
C
°
SPEED
LOW
OK
HEAT
TEMP
CLOCK
i5:50
2i
C
°
SPEED
LOW
Time stored
14
Page 15
Shut-down
Temporary shut-down
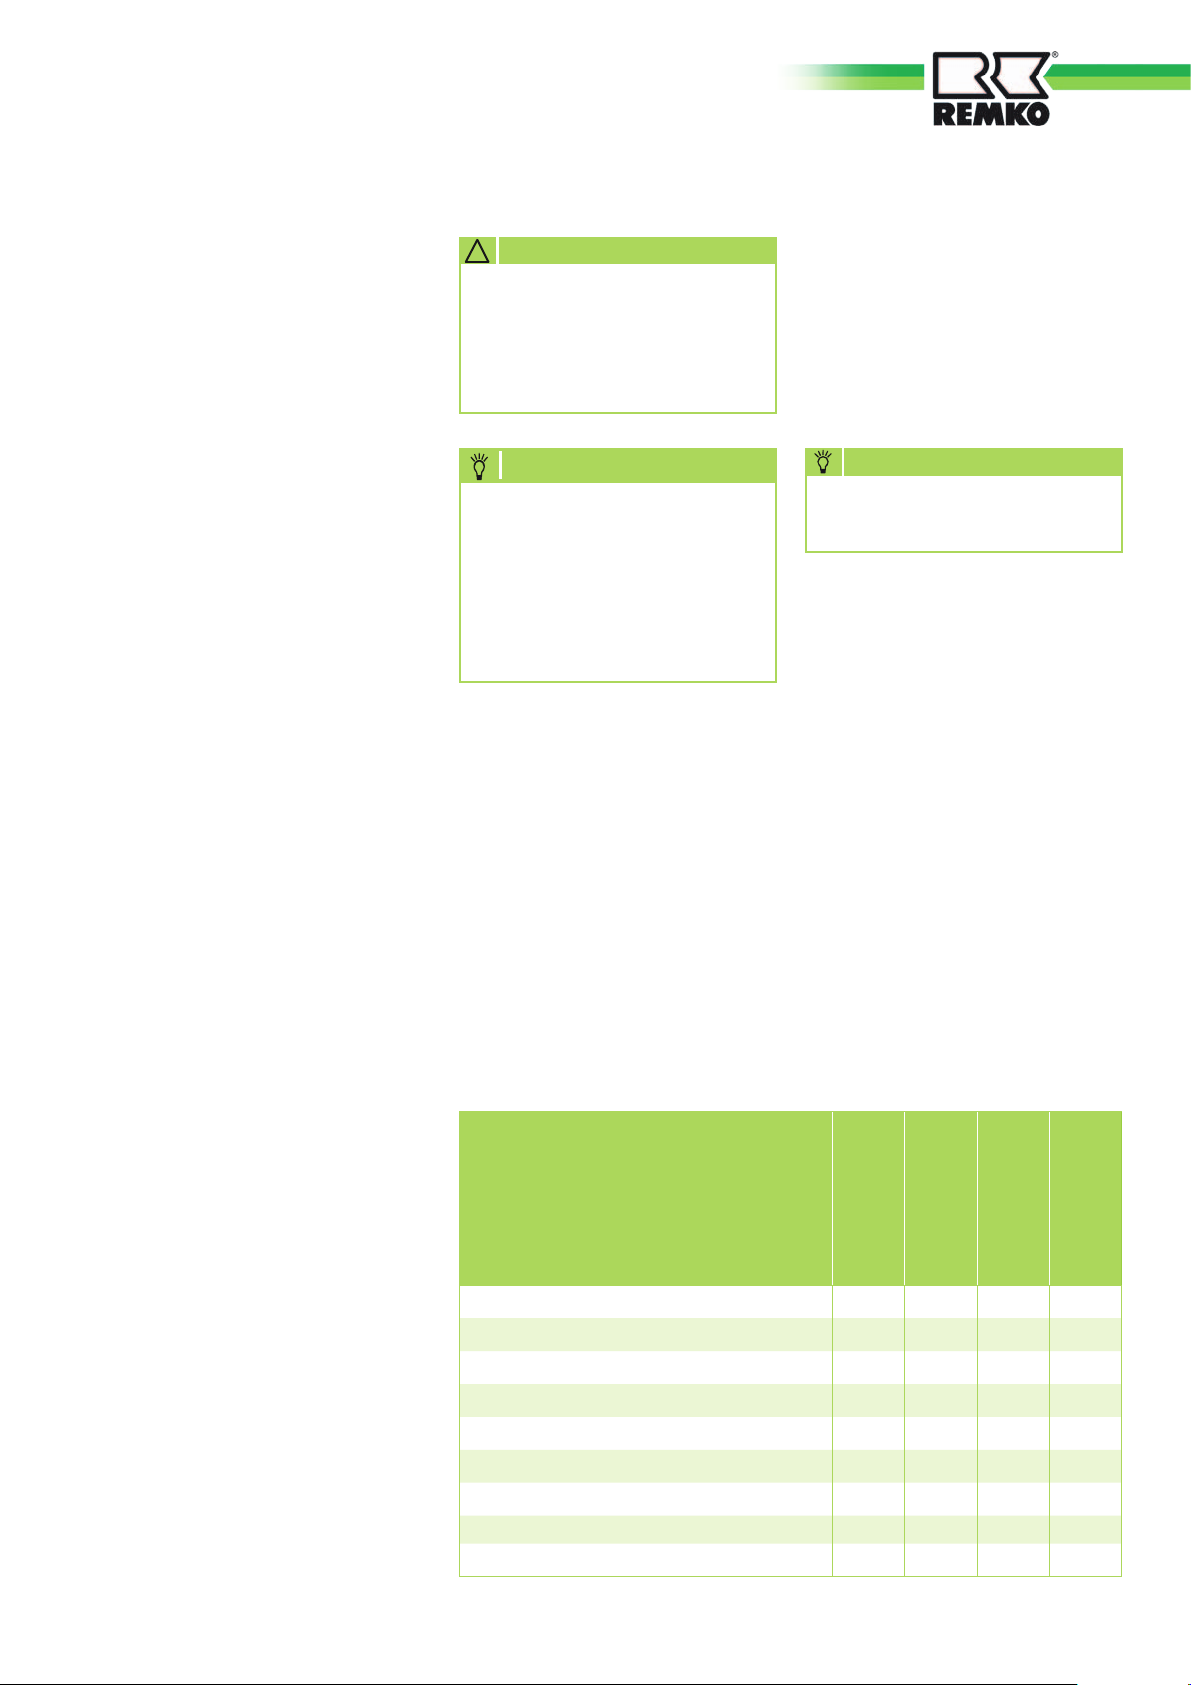
1. Allow the indoor unit to run for
2 to 3 hours in air circulation
mode or in cooling mode at the
maximum temperature setting
in order to remove any residual
moisture from the unit.
2. Shut down the system using
the remote control.
3. Switch off the voltage supply to
the unit.
4. Check the unit for visible signs
of damage and clean it as
described in the chapter "Care
and maintenance".
Permanent shut-down
Ensure that equipment and components are disposed of
in accordance with the applicable
regulations, e.g. through authorised disposal and recycling specialists or at collection points.
REMKO GmbH & Co. KG or your
contractual partner will be pleased
to provide a list of certified firms
near you.
Care and maintenance
! CAUTION
Prior to performing any work,
ensure the equipment is isolated from the voltage supply
and secured to prevent accidental switch-on!
NOTE
Statutory regulations require
an annual leak test for the
refrigerant circuit in relation
to the refrigerant medium fill
level. Inspection and documentation is to be carried out
by specialist technicians.
Care
■
Ensure the unit is protected
against dirt, mould and other
deposits.
■
Clean the unit using a damp
cloth. Do not use any caustic,
abrasive or solvent-based cleaning products. Do not use a jet of
water.
■
Clean the fins on the unit prior to
long shutdown periods.
Type of task
Checks/Maintenance/Inspections
Maintenance
■ We recommend a maintenance
contract with annual maintenance interval with an appropriate specialist company.
TIP
This ensures the operational
reliability of your system!
Cleaning the cover
of the indoor unit
1. Disconnect the supply voltage
to the equipment.
2. Open and fold down the air
inlet guard on the cover. The
filter is held in place by the flaps
screwed in at the side of the
guard (Page 16, Fig. 1).
3. Clean the guard and cover using
a soft, damp cloth.
4. Switch the supply voltage back
on.
Regular care and observation
of some basic points will ensure
trouble-free operation and a long
service life.
General
Measure voltage and current
Check function of compressor/fans
Dirt on condenser/vaporiser
Check refrigerant fill quantity
Check condensation drain
Test insulation
Check moving parts
Sealing test for refrigerant circuit
1) See note
Commissioning
Monthly
Half-yearly
• •
• •
• •
• •
• •
• •
• •
• •
• •
Yearly
1)
15
Page 16
REMKO MXD
Air filter for indoor unit
Clean the air filter at intervals of
no more than two weeks. Reduce
this interval if the air is especially
dirty.
Cleaning the filter
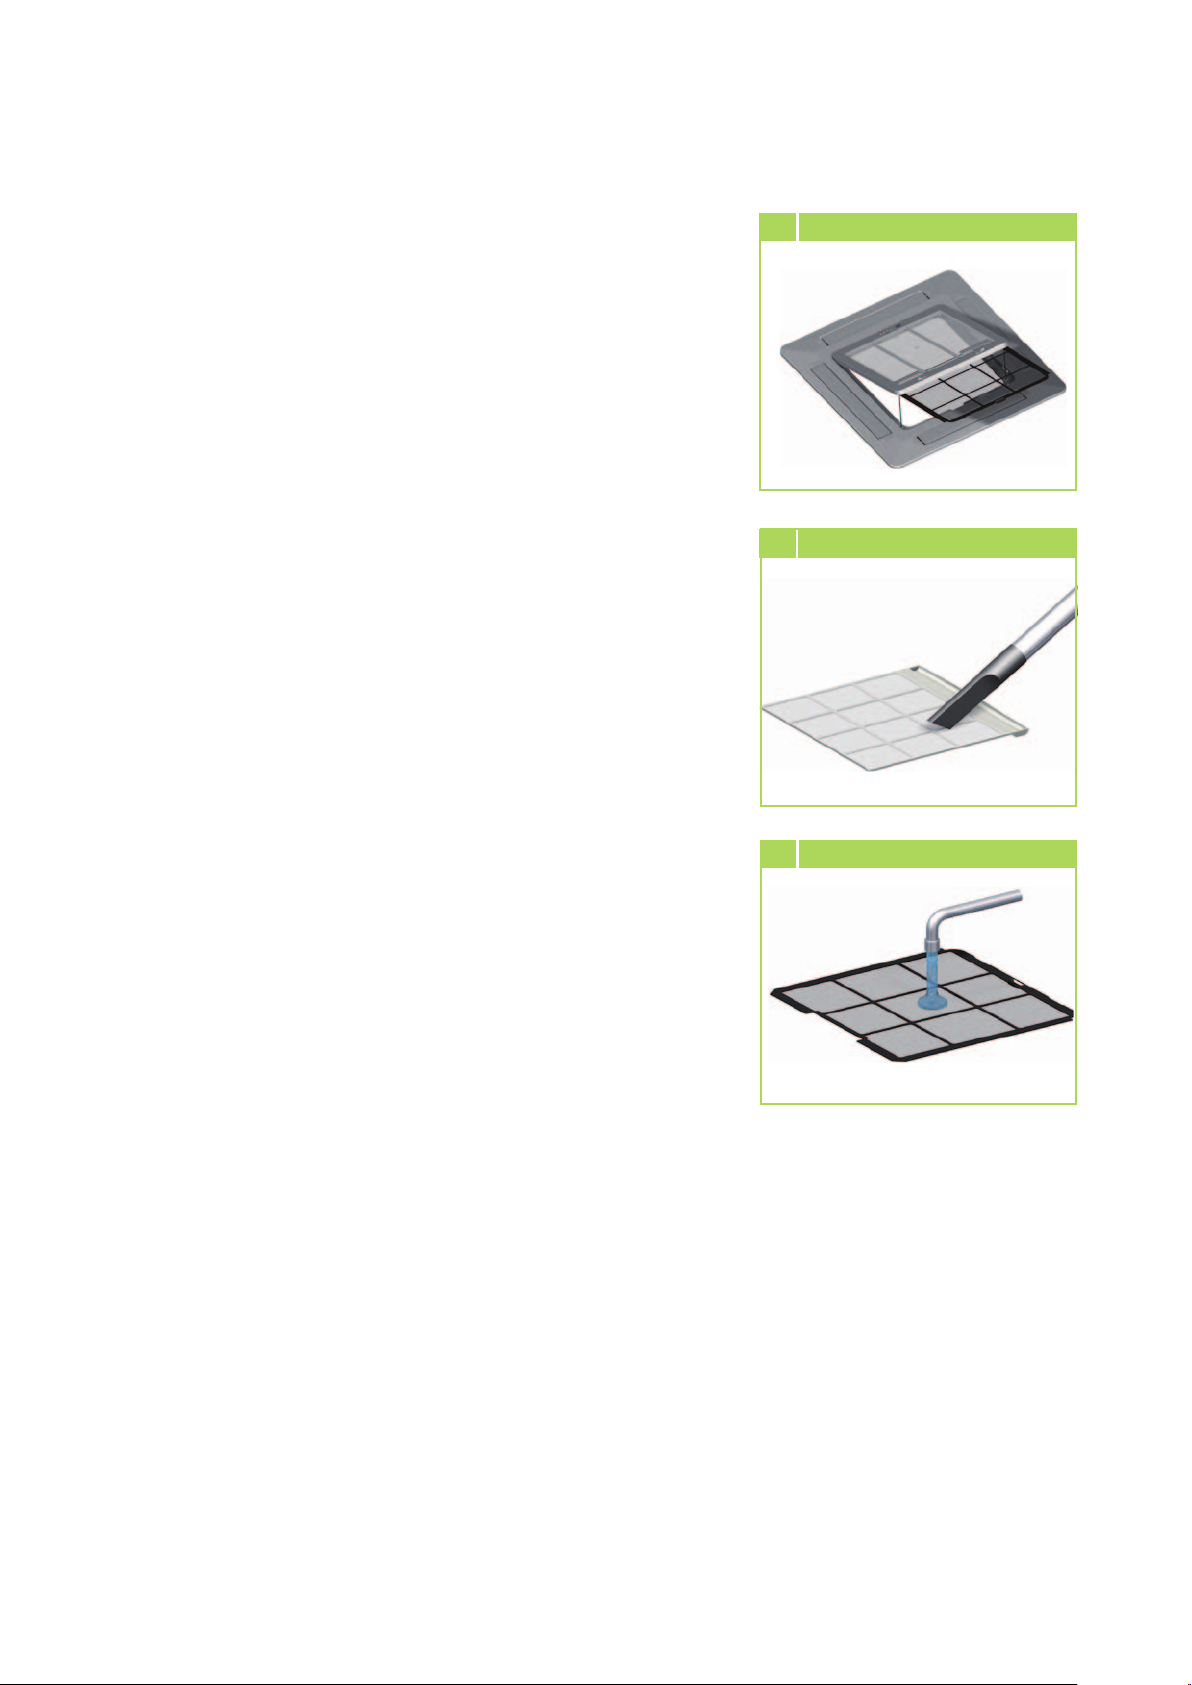
1. Disconnect the supply voltage
to the equipment.
2. Open and fold down the air
inlet guard on the cover. The
filter is held in place by the flaps
screwed in at the side of the
guard (Fig. 1).
3. Tilt the filter to lift it out (Fig. 1).
4. Clean the filter using a normal
vacuum cleaner (Fig. 2).
To do so, turn the dirty side
upward.
Cleaning the
condensation pump
The indoor unit includes a built-in
condensation pump, for pumping the condensation to a drain at
a higher level.
The pump is more or less maintenance free. The condensation pipes
should be checked for dirt at regular
intervals. Clean them as required.
If an external pump is also used,
observe the maintenance and care
instructions given in the separate
operating manual.
1 Pull out the filter
2 Cleaning using a vacuum cleaner
3
Cleaning with lukewarm water
5. Dirt can also be removed by
carefully cleaning with lukewarm
water and mild cleaning agents.
To do so, turn the dirty side
downward (Fig. 3).
6. When using water, allow the
filter dry out properly in air
before replacing it in the unit.
7. Carefully insert the filter. Make
sure it is seated correctly.
8. Close the cover as described
above but in reverse order.
9. Switch the supply voltage back
on.
10.
Switch the unit on again.
16
Page 17
Troubleshooting and customer service
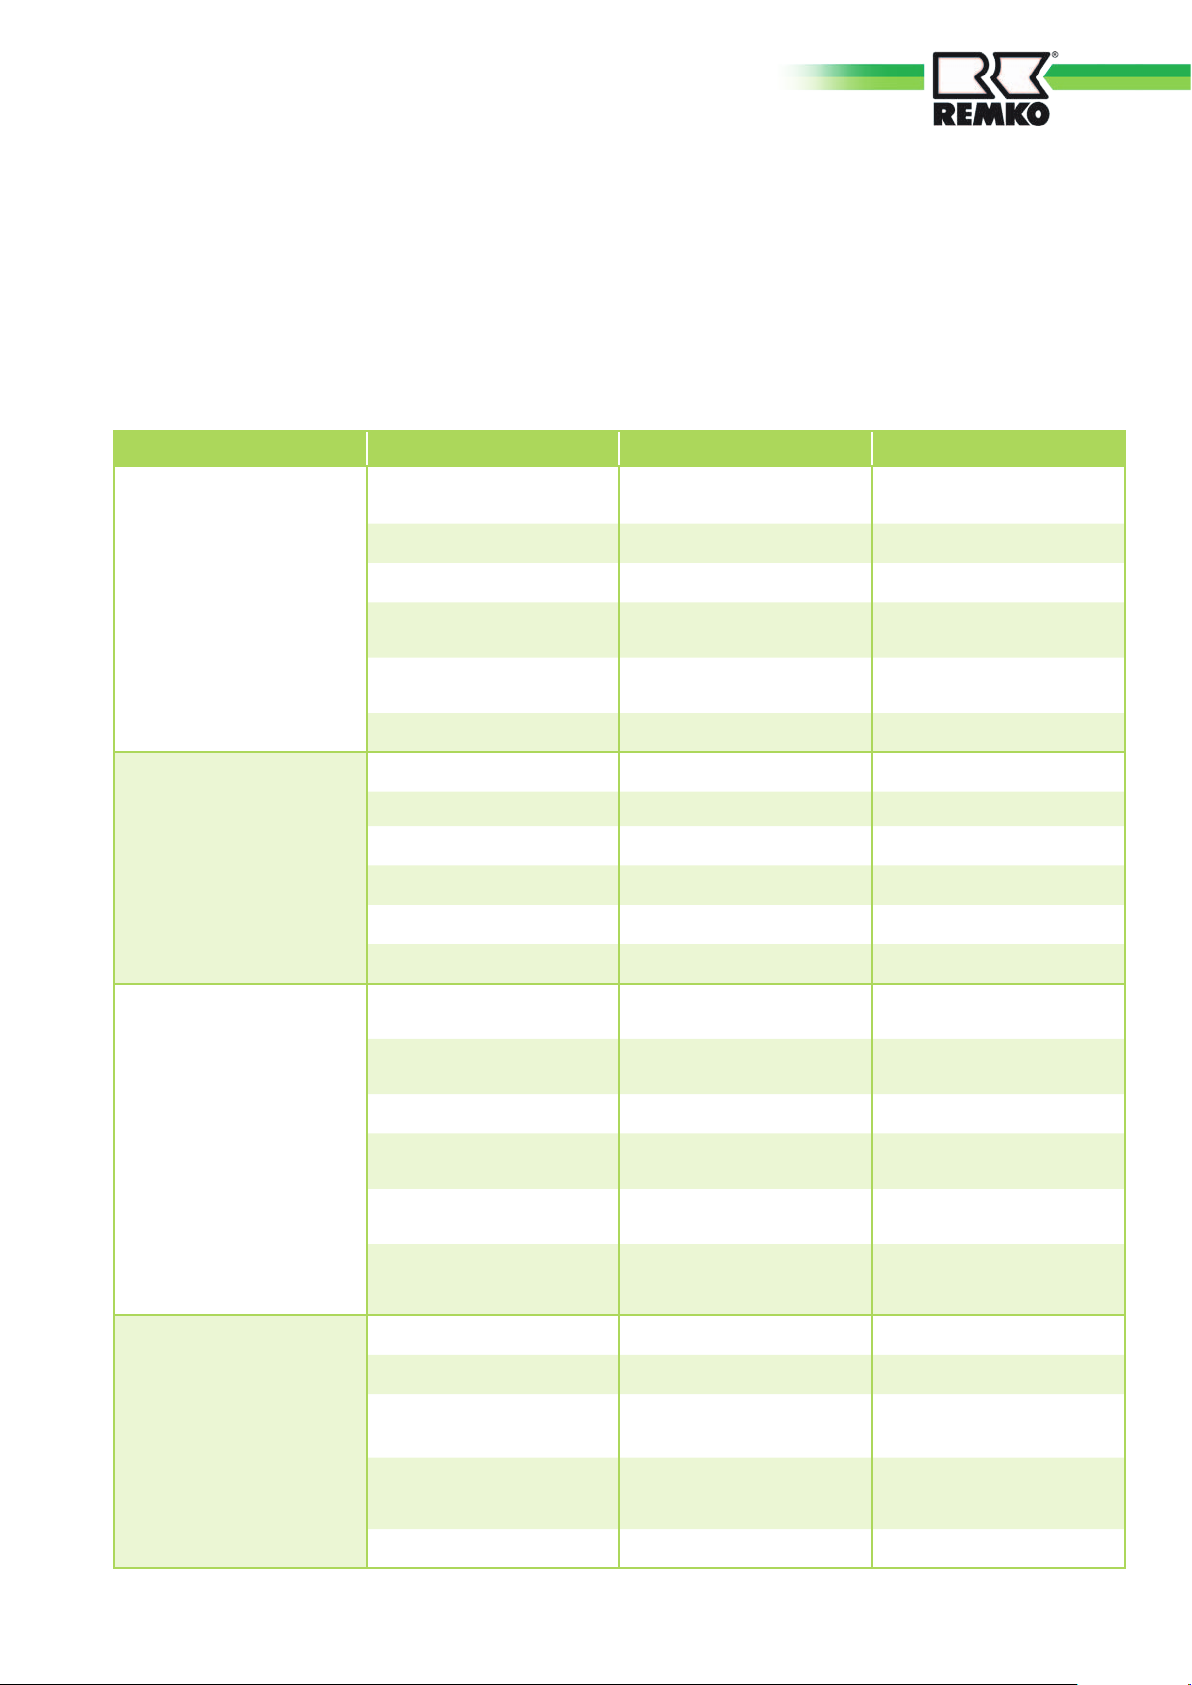
The equipment and components are manufactured using state-of-the-art production methods and tested several times to verify their correct function. If malfunctions should occur, please check the functions as detailed in
the list below. For installations with an indoor unit and outdoor unit, refer to the chapter "Troubleshooting and
customer service" in both manuals. Please inform your dealer if the unit is still not working correctly after all the
functional checks have been performed!
Malfunctions
Fault Possible cause Checks Remedy
The unit does not start
or switches itself off
off.
The unit does not respond
to the remote control
Power outage, undervoltage, defective mains fuse / main switch in off
position
Damaged mains cable
Wait time after switching on is too
short
Temperature outside operating
range.
Electrical surges caused by thunderstorms
Fault in external condensation
pump
Transmission distance too far /
receiver affected by interference
Defective remote control
Receiver or transmitter unit exposed to excessive solar radiation
Electromagnetic fields are interfering with transmission
Button in remote control jammed /
two buttons pressed at same time
Batteries in remote control are flat
Filter is unclean / air inlet / outlet
blocked by foreign objects
Are all other electrical installations
functioning correctly?
Are all other electrical installations
functioning correctly?
Have approx. 5 minutes
elapsed since the restart?
Are the fans in the indoor unit
and outdoor component working
correctly?
Have there been lightning strikes in
the area recently?
Did the pump shut down due to
a fault?
Does the indoor unit beep when
pressing a button?
Is the unit running in manual mode?
Does it function correctly in the
shade?
Does it function when switching off
possible sources of interference?
Does the “Send” symbol appear
on the display?
Have new batteries been inserted?
Is the display incomplete?
Have the filters been cleaned? Clean the filters
Check voltage if necessary wait
until turned on again.
Repair by a specialist
Schedule longer waiting periods
Take into account the temperature
range for the indoor unit and outdoor component
Switch off the mains breaker and
switch it back on. Have it checked
by a specialist
Check and if necessary clean the
pump
Reduce the distance to less than 6
m or change position
Replace the remote control
Place the receiver & transmitter unit
in the shade
Signal is not transmitted when
interference sources are operational
Release the button / press only one
button
Insert new batteries
The unit is running with
reduced or without
cooling / heating output
Condensation discharge
on unit
Windows and doors open. Heating/
cooling loads increased
Neither cooling nor heating mode
has been set
Fins on outdoor component
blocked by foreign objects
Leaking refrigerant circuit
Outdoor component iced up
Drainage pipe on collection container clogged / damaged
Faulty external condensation pump
or float
Condensation has not drained away
and has collected in the condensation line
Condensation does not drain off
Float is stuck or jammed due to
excessive dirt.
Have there been any structural /
usage-related changes?
Does the cooling symbol appear on
the display?
Is the fan on the outdoor component running? Are the fins
unobstructed?
Are there signs of frost on the fins
of the indoor unit?
Check outdoor component.
Has the cassette sensor on the
outdoor component been correctly
positioned?
Can the condensation drain off
without any obstruction?
Is the collection tray full of water
and the pump not running?
Is there a steady fall on the condensation pipe? Check there is no
blockage in the pipe.
Are the condensation lines unblocked and laid on a slope? Are the
condensation pump and float switch
functioning correctly?
Are the LEDs on the receiver unit of
the indoor unit flashing?
Close windows and doors / install
additional units
Correct the settings for the unit
Check the fan or winter controller,
reduce the air resistance
Repair by specialist
De-ice and fit the sensor at the
point where the most ice forms
Clean the drainage pipe and collection container
Call out a specialist to replace the
pump
Ensure there is a fall when laying
the condensation pipe and clean
the pipe.
The condensation line must have
a fall. If necessary, clean the pipe.
A faulty condensation pump and
float switch should be replaced.
Should be cleaned by specialist firm
17
Page 18
REMKO MXD
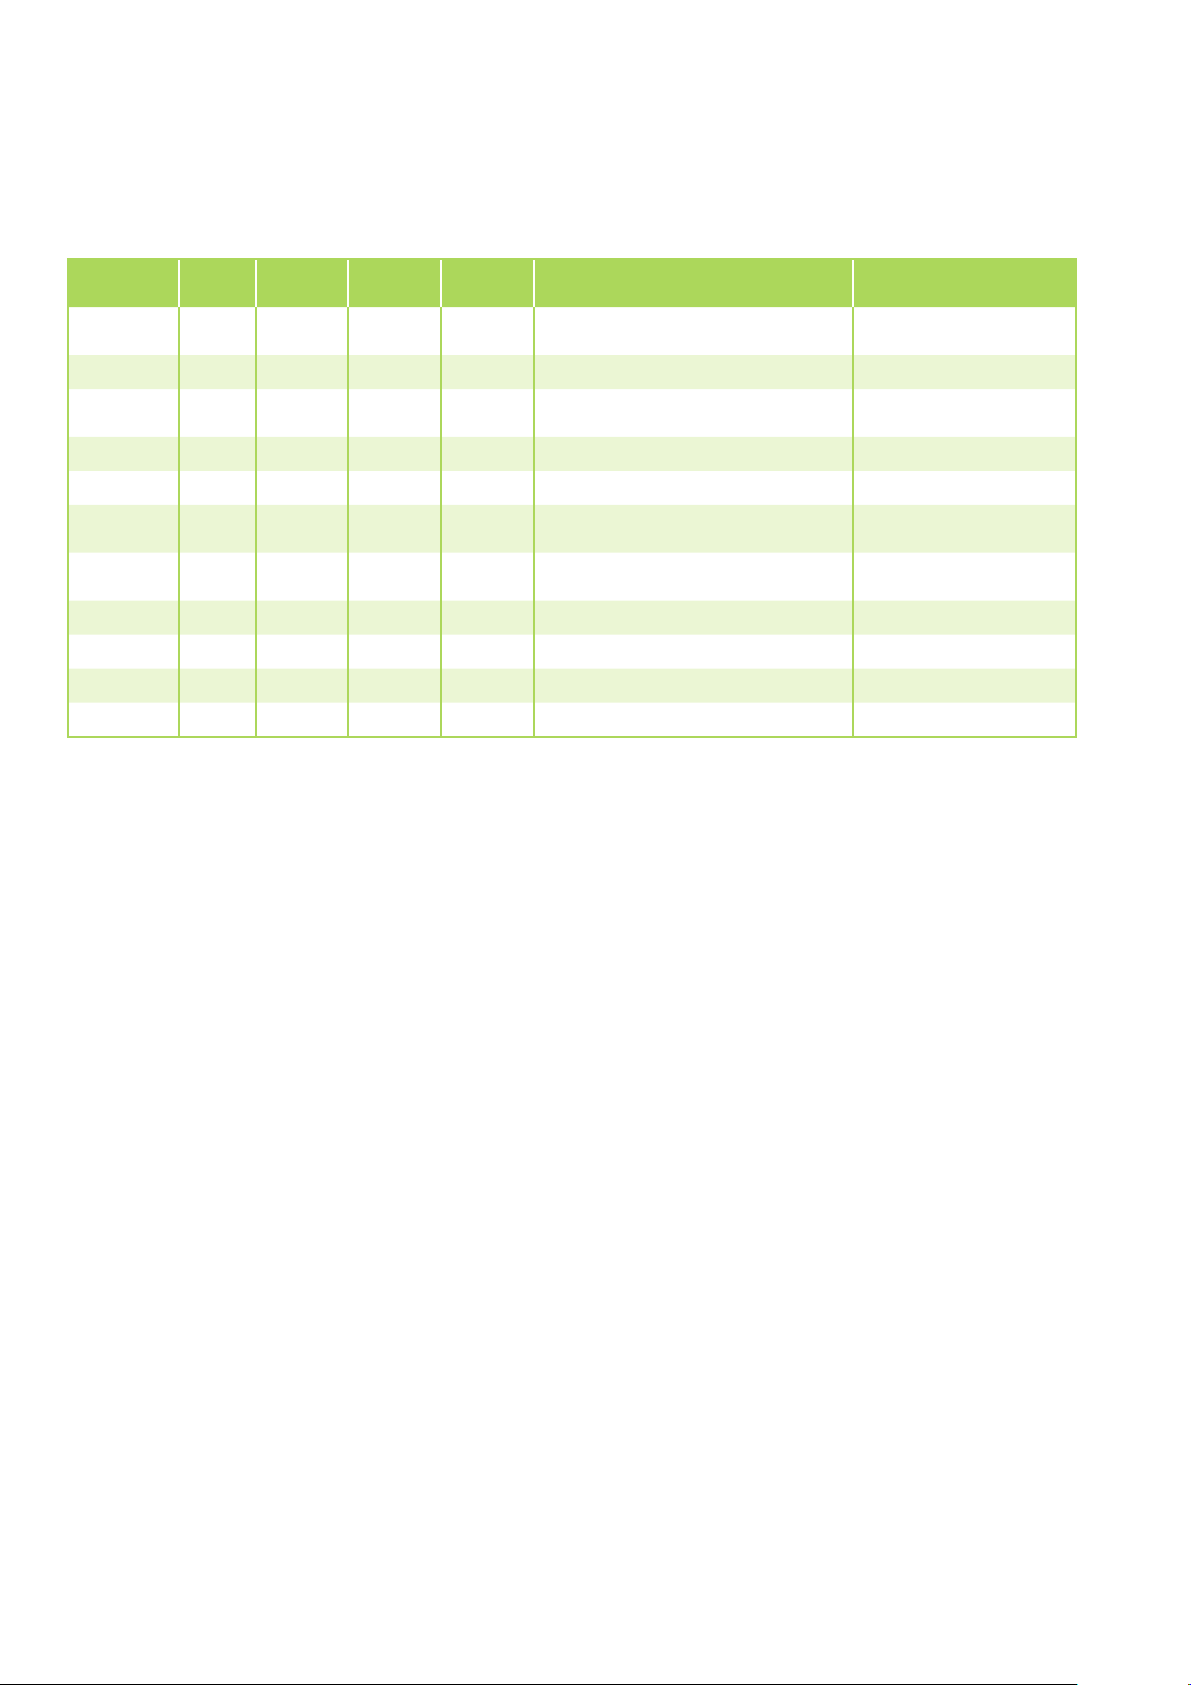
Fault indication by flashing code
LED
Operation
flashes - Sensor air circulation faulty / tripped
flashes flashes E0 EEPROM error Check EEPROM
flashes On - Inverter module shutdown
flashes On E4 Outdoor temp sensor on OU tripped
flashes On On E5 Surge voltage on outdoor unit Check power supply
flashes On P0 Excess temperature in compressor Allow compressor to cool
flashes On On - Mode conflict Switch system off
flashes flashes flashes P3 OU power consumption too high Check power consumption
LED
Timer
flashes E7
LED
Defrost
flashes - Sensor on vaporiser faulty / tripped Check resistance
LED
Alarm
flashes -
OU dis-
play
Cause Required action
Communication error between PCBs
OU & IU
Condensation pump float switch faulty/
tripped
Check resistance
Check electrical connection
leads
Contact specialist dealer
Check resistance and temperature on sensor
18
Page 19
Installation instructions for qualified personnel
Important notes prior to
installation
For installation of the entire system, observe the operating instructions of the indoor unit and the
outdoor unit.
■
Transport the unit in its original
packaging as close as possible
to the installation location.
This avoids transportation damage.
■
Check the contents of the
packaging for completeness
and check the unit for visible
transport damage.
Immediately notify any deficiencies to the contractual
partner and forwarding agent.
■
Lift the unit at the corners and
not by the refrigerant or condensation connections.
■
The refrigerant pipes (injection and suction pipe), valves
and connections to make them
tight against vapour diffusion.
If necessary, also insulate the
condensation line.
■
Select an installation location
which allows air to freely flow
through the inlet and outlet (see
section "Minimum clearances")
■
Do not install the unit in the
immediate vicinity of devices
with intensive thermal radiation. Installation near sources of
thermal radiation reduces the
output of the unit.
■
Install the refrigerant pipes from
the indoor unit to the outdoor
unit.
■
Seal off open refrigerant lines
with suitable caps or adhesive
strips to avoid the infiltration
of moisture and never kink or
compress the refrigerant pipes.
■
Only use the union nuts for the
refrigerant pipes included in
the delivery, and remove them
shortly before connecting the
refrigerant pipes.
.
■
Establish all electrical connections in accordance with the relevant DIN and VDE standards.
■
Always ensure electrical cables
are properly connected to the
terminals, otherwise there is
a risk of fire.
■
Service openings should be provided in the suspended ceiling
to allow maintenance access to
the control box.
Installation material
The indoor unit is fastened using
a wall brace and 4 bolts (provided
by the customer).
In order to complete the installation, use the supplied installation
material. Appropriate dowels, trapezoidal sheet metal supports, steel
profiles, fixing clips for refrigerant
and condensation pipes (as well as
laying ducts) and connection fittings for condensation pipes must
also be provided.
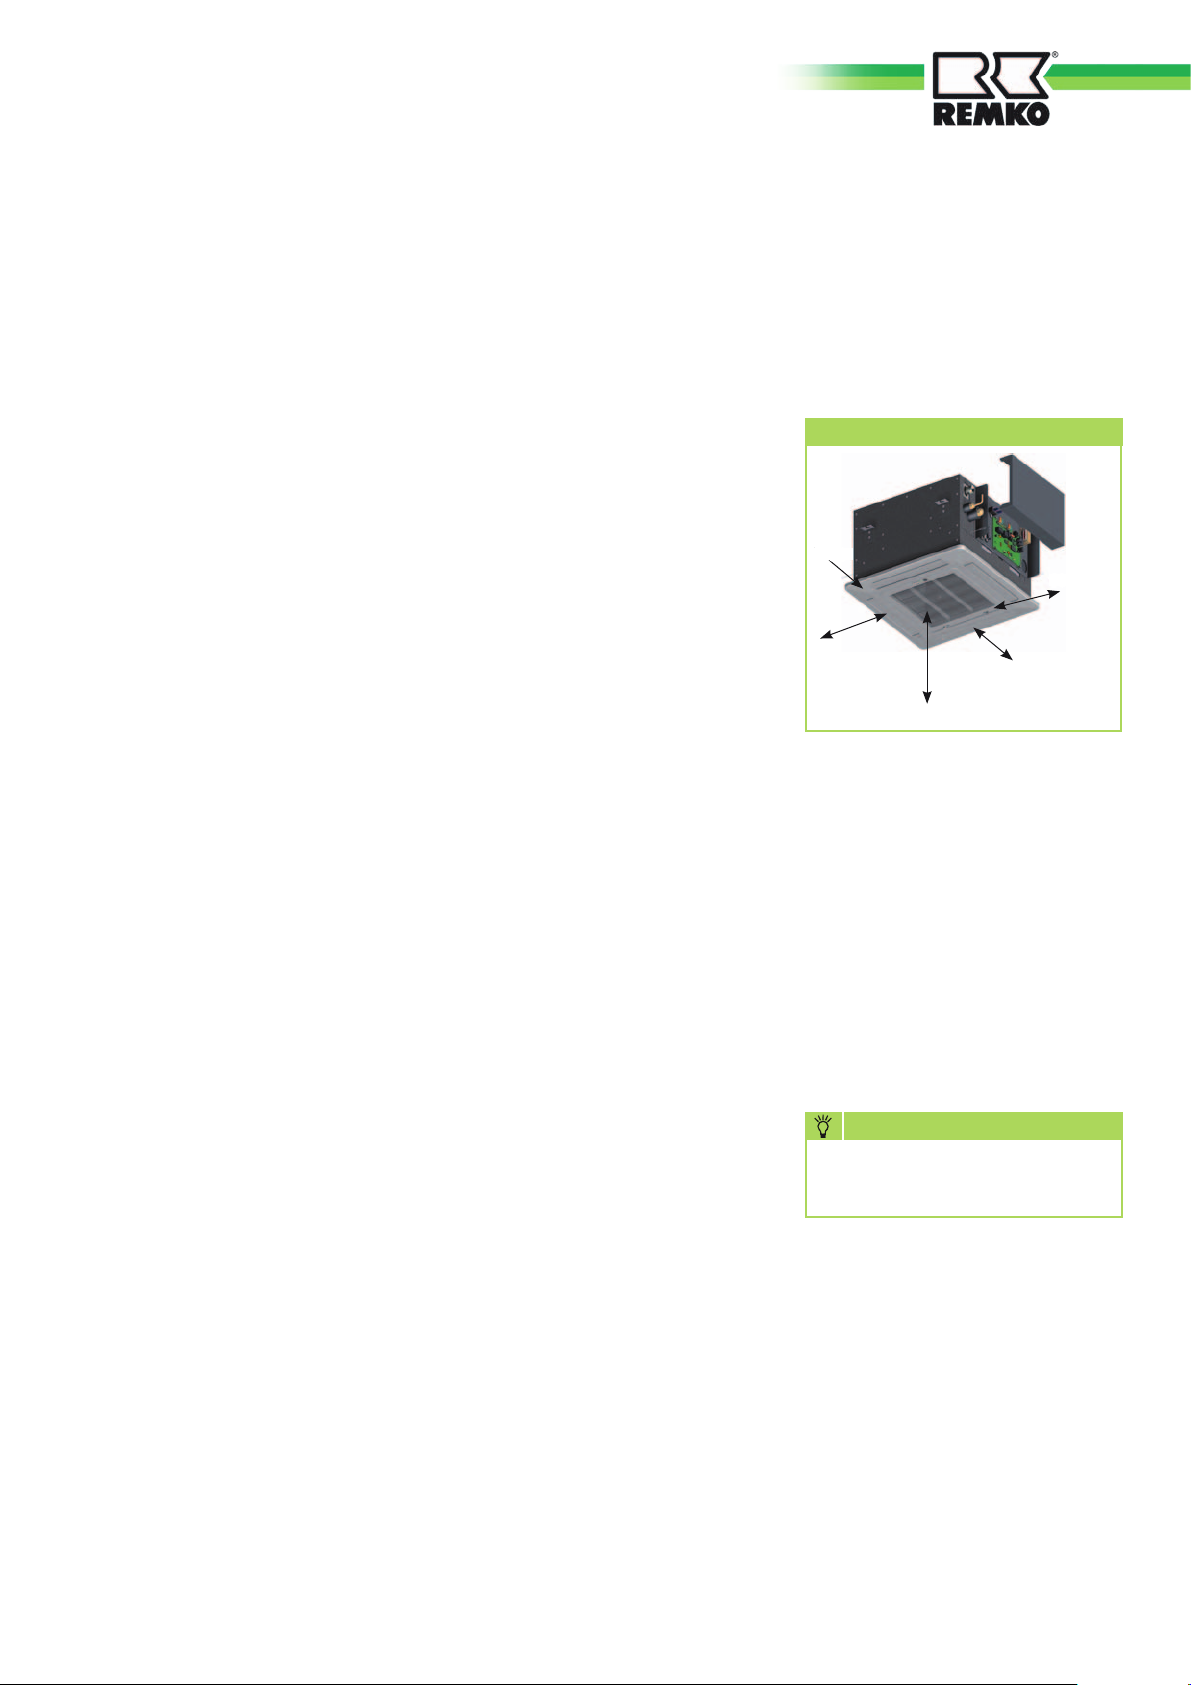
Minimum clearances
Observe the minimum clearances to
allow access for maintenance,
repair work and for
optimum air distribution.
Minimum clearances
1000
1000
1000
All dimensions are given in mm
1000
Selection of the installation
location
The indoor unit is designed for
horizontal mounting in suspended
ceilings with Euroraster dimensions. It can also be installed in
other types of suspended ceilings
with different dimensions.
Take into account the installation
height of the equipment.
Installation
NOTE
Installation may only be performed by authorised specialists.
Unit installation
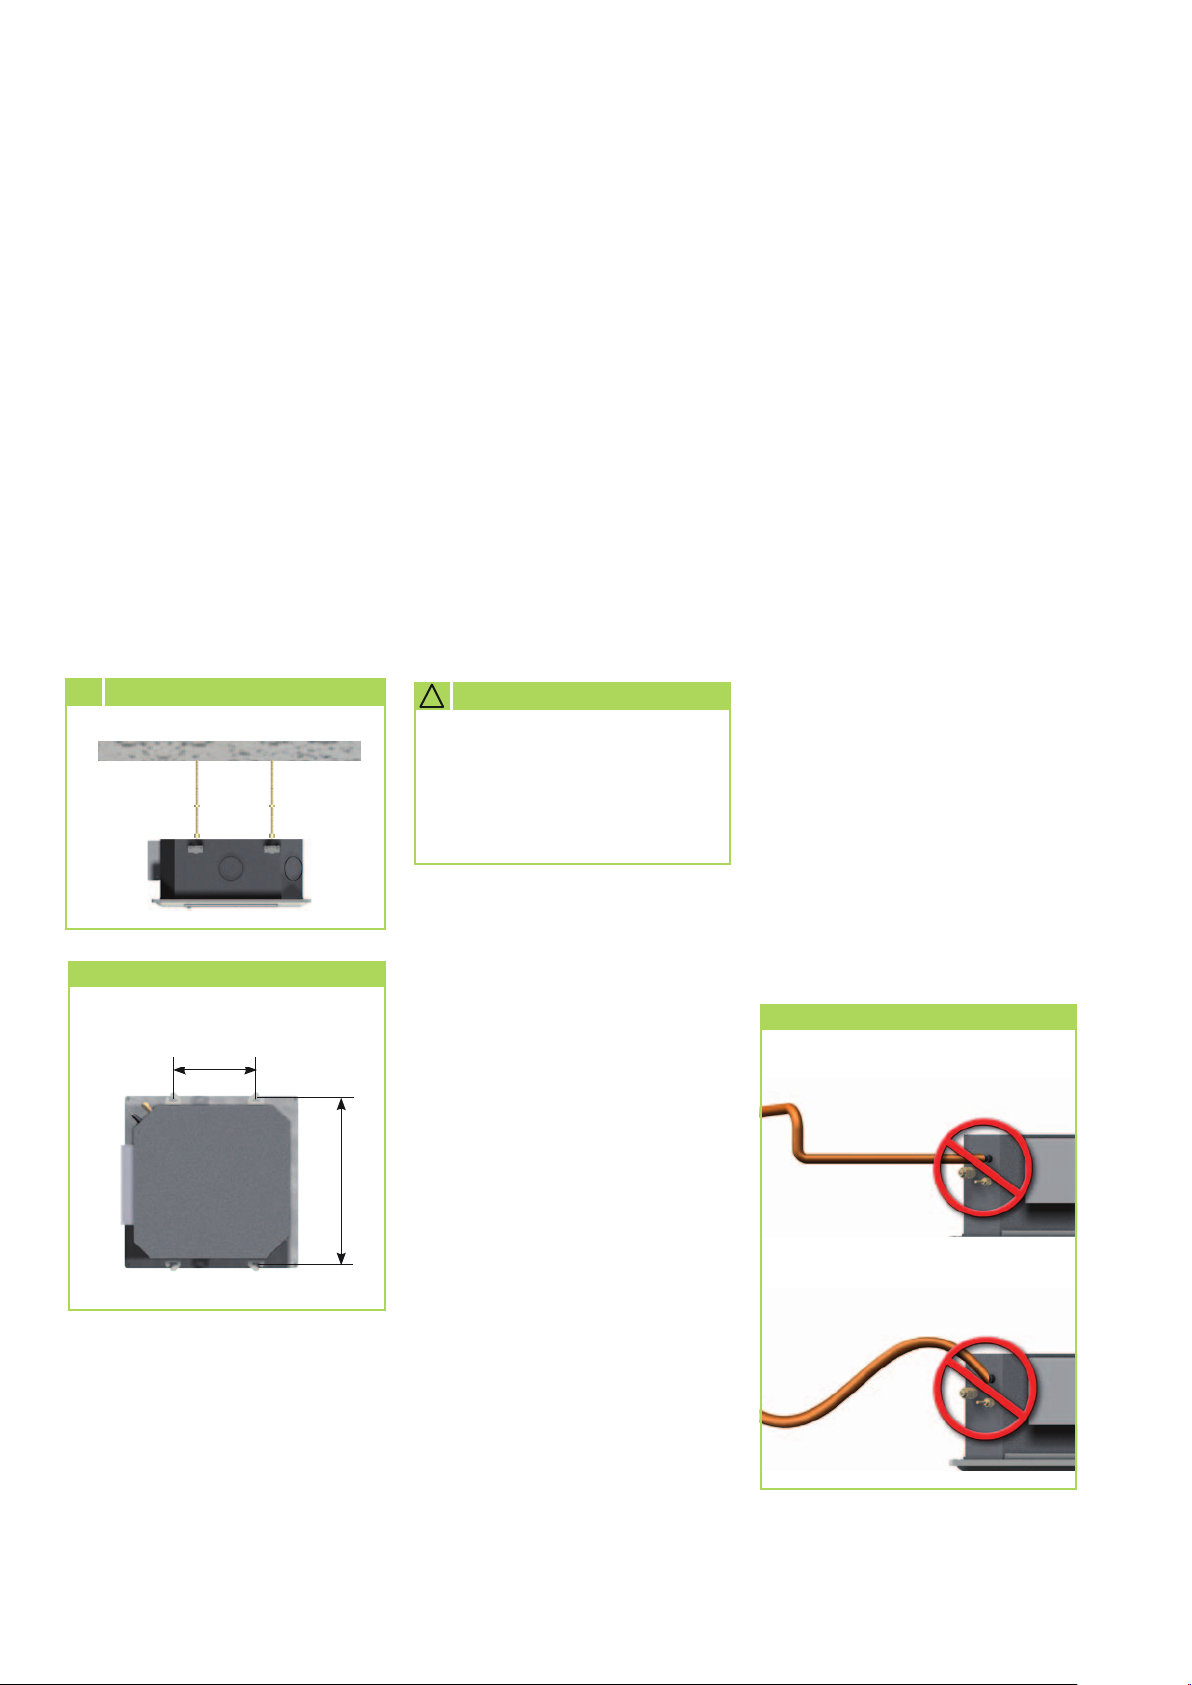
The unit is mounted on four threaded rods with the cover face down.
Take into account the ceiling grid
and any other installations.
1. Use the dimensions of the ceiling cassette to mark the fixing
points for the threaded rods on
structural parts approved to support the static load, and above
the suspended ceiling.
19
Page 20
REMKO MXD
2. Fit the indoor unit onto the
threaded rods and use the
lower nuts to level the unit
(Figure 5).
3. Ensure a clearance of 35 mm
from the ceiling. Connect the
refrigerant pipes, electrical
cables and condensation pipe
to the indoor unit as described
below.
4. Check that the unit is level.
5. The final task is to tighten the
counternuts and attach the
cover.
5 Hooking in the unit
Structural component
Connecting the
refrigerant lines
The refrigerant lines on the MXD
200-520 should be connected by
the customer to the centre of the
long side.
It may be necessary to fit a reducing or extending adapter to the
indoor units. These fittings are
included with the indoor unit as an
accessory kit. Once installed, the
connections should be sealed to
prevent vapour diffusion.
! CAUTION
The units are factory filled with
dry nitrogen to check for leaks.
The pressurised nitrogen is
released when the union nuts
are loosened.
■
If the level of the condensation
pipe on the unit is above that of
the outlet, route the pipe vertically upwards (max. see P. 21)
and then with a fall to the drain.
■
Lead the condensation line
freely to the run-off line. If the
condensation runs directly into
a sewer pipe, fit a trap to prevent
any unpleasant odours.
■
When operating the unit at
outdoor temperatures below
4 °C, ensure the condensation
pipe is laid to protect it against
frost.
If necessary, fit supplementary
pipe heating.
■
Once the pipe has been
laid, check the condensation
drains off and
permanently seal it.
Unit attachment
MXD 200-520
280
615
Condensate drain
If the temperature falls below the
dew point, condensation will form
on the cooling fins during cooling
mode.
A collection tray together with
a condensation pump and float
switch are fitted as standard below
the cooling fins. Should the float
switch trip a protective shutdown
due to inadequate removal of the
condensation, the pump will switch
on immediately and run on for approx. three minutes.
■
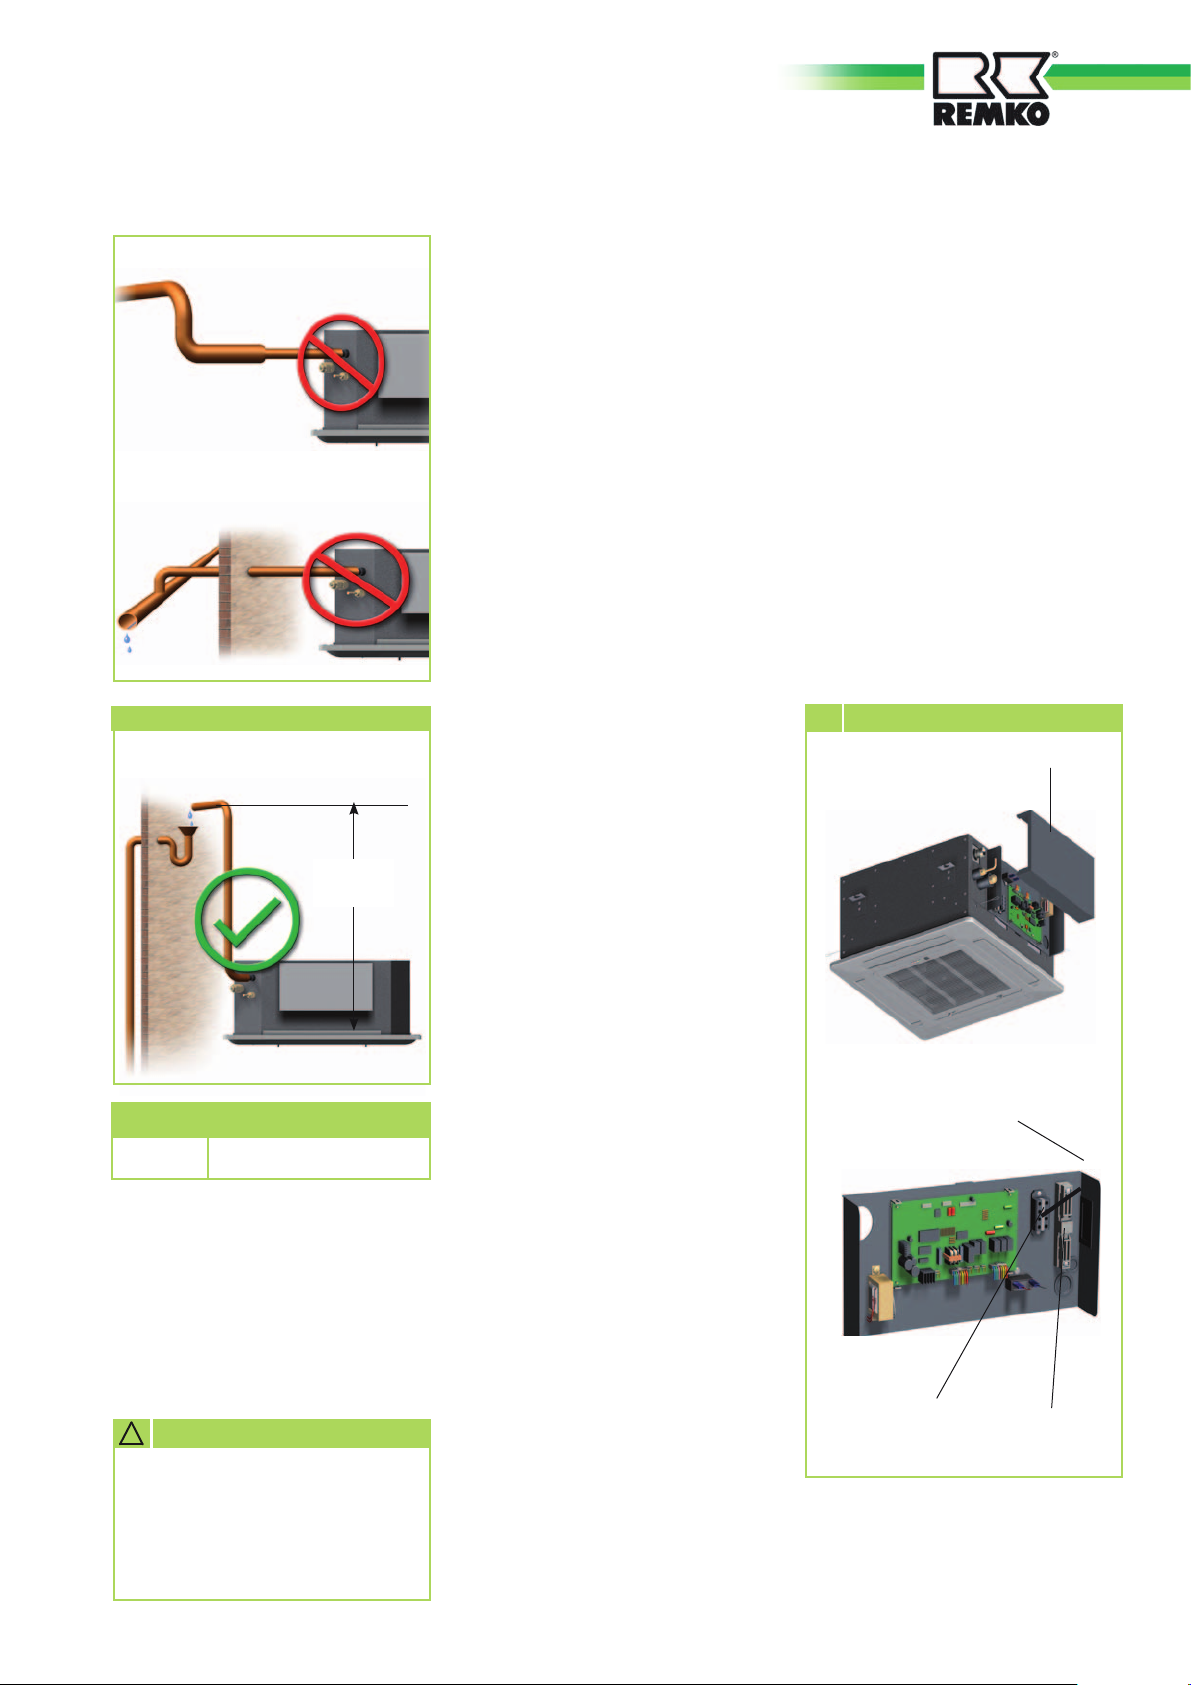
The condensation pipe should
have a fall of min. 2 %. This is the
responsibility of the customer.
If necessary, fit vapour diffusion
proof insulation.
Condensation connection - Wrong!
Riser pipe too far away
No fall
20
Page 21
Condensation pipe too large/small
Cannot freely drain away
Condensation connection - Correct!
min. 2% fall
16-20 mm
A
The unit's scope of delivery includes
a five metre long, four-core control
line for connecting the indoor unit
to the outdoor unit. The control line
to the outdoor unit contains a data
cable which makes communication
between the indoor unit and the
outdoor unit possible. This is used
for controlling cooling and heating output and for forwarding fault
indications to the indoor unit.
If the length is insufficient, you can
extend these control lines on the
indoor unit.
■
We recommend to install a main
/ repair switch on the building
near the indoor unit.
■
The terminal blocks for making
the connections are located at
the rear of the unit. When the
unit is installed, measurements
can be made from the front by
removing the cover.
4. Connect the control line that has
been pre-prepared on-site to the
terminals (see electrical connec-
tion diagram P. 22).
5. Connect the on-site pre-prepared
control line with the supplied
control cable in a professional
manner.
6. Insert the control line plug into
the corresponding socket on the
outdoor unit.
7. Re-assemble the unit.
6
Connecting the unit
Cover
MXD 200-520 IT
A 500 mm
Electrical connection
A protected mains supply cable is
to be connected to the outdoor
unit and 4-core control line is to
be connected to the indoor unit
respectively.
! CAUTION
All electrical installation work
is to be performed by specialist companies. Disconnect the
voltage supply when connecting the electrical terminals.
■
If an optional condensation
pump is used in conjunction
with the unit, it may be necessary to install an additional relay
with a higher contact rating
after the switch-off contact
on the pump to switch off the
compressor.
Make the connection as follows:
1. Open the air intake grill.
2. Unfasten the covers on the right
side (Figure 6).
3. Loosen the control line on the
terminal block and remove the
control cable.
Control cable
from the outdoor unit
Terminal strip
Control cable
Strain relief
21
Page 22
RotRot
Sensor Außentemperatur
REMKO MXD
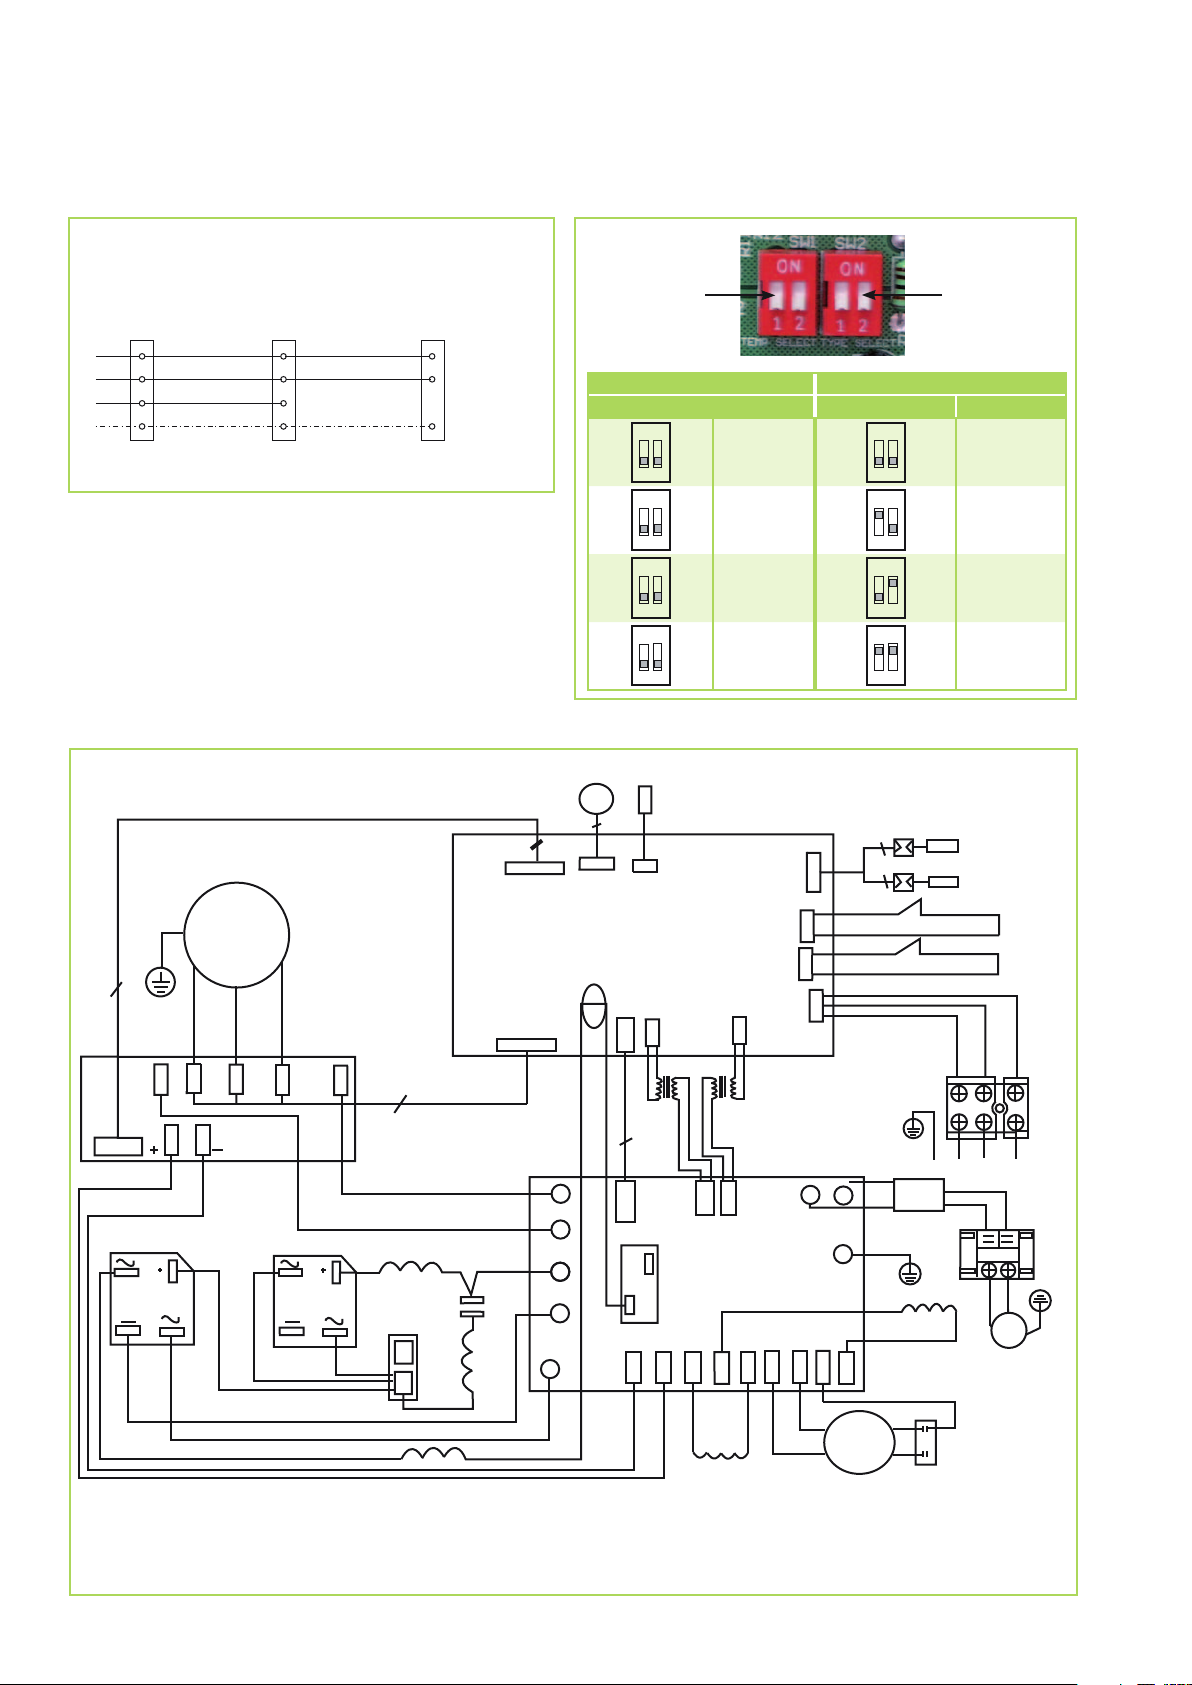
Electrical connection diagram and choice of unit
Connecting MVT 600 DC / MVT 900 DC
MVT 950 DC / MVT 1050 DC
Mains cable
L
S
PE
Data cable
Outdoor componentIndoor unit
L
Exterior conductorExterior conductor
NN
Neutral conductorNeutral conductor
S
PE
Earth conductor
Electrical circuit diagram
MXD 200 to 520
Kompressor
UWV
10PIN
P
Rot
Schwarz
Blau
U
Rot
Rot
IPM
V
Schwarz
N
W
Rot
Steckverbinder
Blau
R1815B
Rot
Weiß
L1
N
PE
Blau
Rot
Orange
R1325C
R2503
230 V~,
50 Hz,
L1 / N / PE
Elektronisches
Expansionsventil
CN4
IPM
W V
CN2
Rot
Blau
Weiß
Weiß
Choice of unit
CN12
EEW
L202
U
P-3
P-4
P-5
P-6
P-2
DIP-switch 1
(SW1)
DIP-switch 2
(SW2)
DIP-switch 1 (SW1) DIP-switch 2 (SW2)
Choice of temperature Choice of unit Unit
ON
1
2
ON
1
2
ON
1
2
ON
1
2
Sensor Austritt
Verflüssiger
CN5CN5
T5
Hauptplatine
CN11
CN16
Trans. Trans.
CN3
3
CN12
CN13
0 K
2 K
4 K
6 K
CN1
CN15
CN14
Leistungsplatine
CN5
CN7
Braun
CN4
CN6
Braun
CN27
L
CN1 CN2
P-1
Blau
CN8
Schwarz
CN9
CN28
Blau
L
H
Schwarz
CN20
N
CN10
Ventilator
Weiß
Gelb
Rot
CN9
ON
1
2
ON
1
2
ON
1
2
ON
1
2
Hochdruckschalter
Niedrigdruckschalter
Schwarz
Rot
Yellow/Green
Gelb
Rot
Gelb
Yellow/Green
zum Innengerät
Filter
Blau
Blau
Schwarz
Rot
Weiß
MXD 200
MXD 260
MXD 350
MXD 520
Sensor Heißgas
Grau
Steuerleiter
Rot
L
Schwarz
Schwarz
Schwarz
N
Steckverbinder
Yellow/Green
22
Page 23
Commissioning
NOTE
Commissioning should only be
performed by specially trained
personnel and documented
after the certificate has been
issued.
Observe the manuals for the
indoor unit and outdoor unit
when commissioning the entire system.
Functional test for
cooling mode.
NOTE
Check the DIP switch settings
on the PCB, as illustrated on
Page 22.
If necessary, set the DIP
switches to the appropriate
indoor unit type.
3. Measure and record all the
required values in the commissioning report and check the
safety functions.
4. Check the control system for
the unit using the functions
described in the chapter "Operation". Timer, temperature setting,
fan speeds and changing to air
circulation or dehumidifying
mode.
5. Check the correct function of the
condensation line by pouring
distilled water into the condensation tray.
A bottle with a spout is recommended for pouring the water
into the condensation tray.
Functional test for
heating mode.
3. Measure and record all the
required values in the commissioning report and check the
safety functions.
4. Check the control system for
the unit using the functions
described in the chapter "Operation".
Timer, temperature setting, fan
speeds.
Final tasks
■
Reassemble all disassembled
parts.
■
Familiarise the operator with
the system.
1. Switch the supply voltage on.
2. Use the remote control to turn
on the unit and select the cooling mode, maximum fan speed
and lowest nominal temperature.
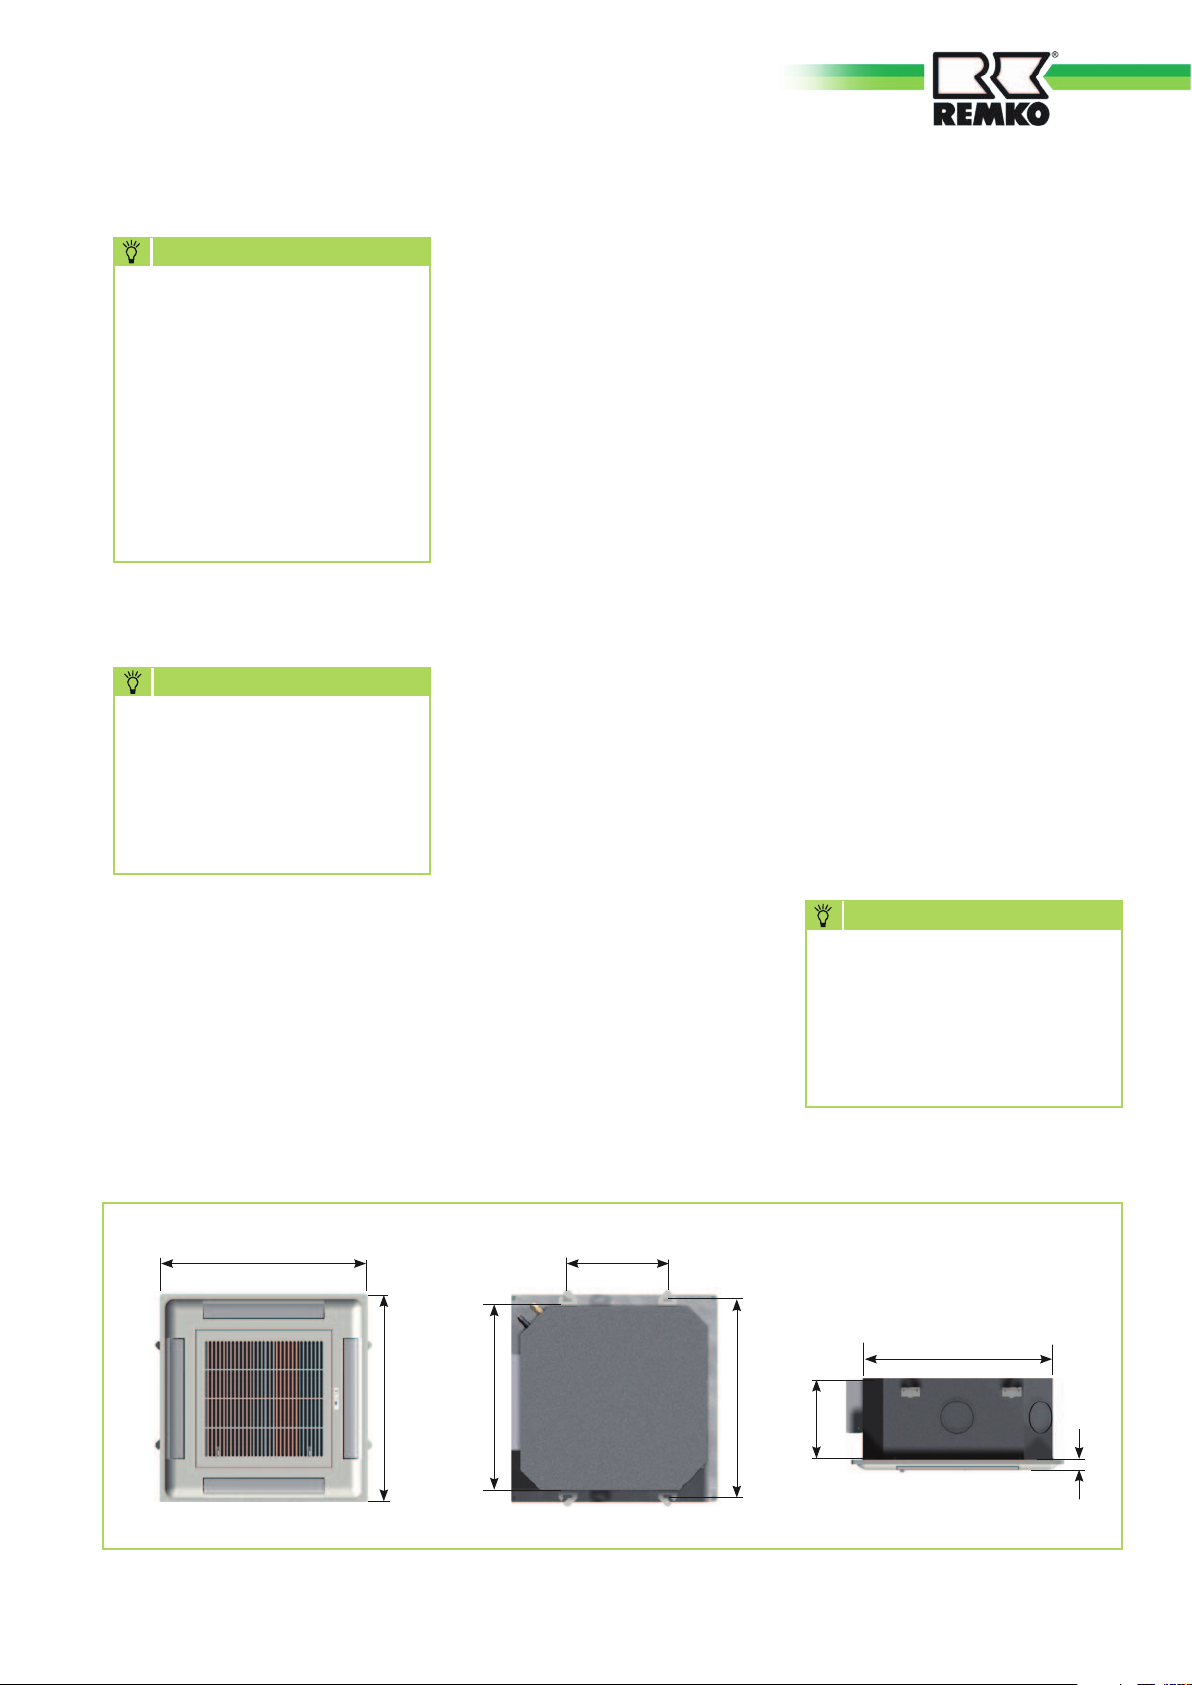
Unit dimensions
MXD 200-520 IT
650
650
1. Switch the supply voltage on.
2. Use the remote control to
switch on the unit and select
the heating mode, maximum
fan speed and highest nominal
temperature.
400
580
NOTE
Check that the stop valves
and valve caps are tight after
carrying out any work on the
refrigerant circuit. Use appropriate sealant products as
necessary.
580
620
255
28
23
Page 24
REMKO MXD
Notes
24
Page 25
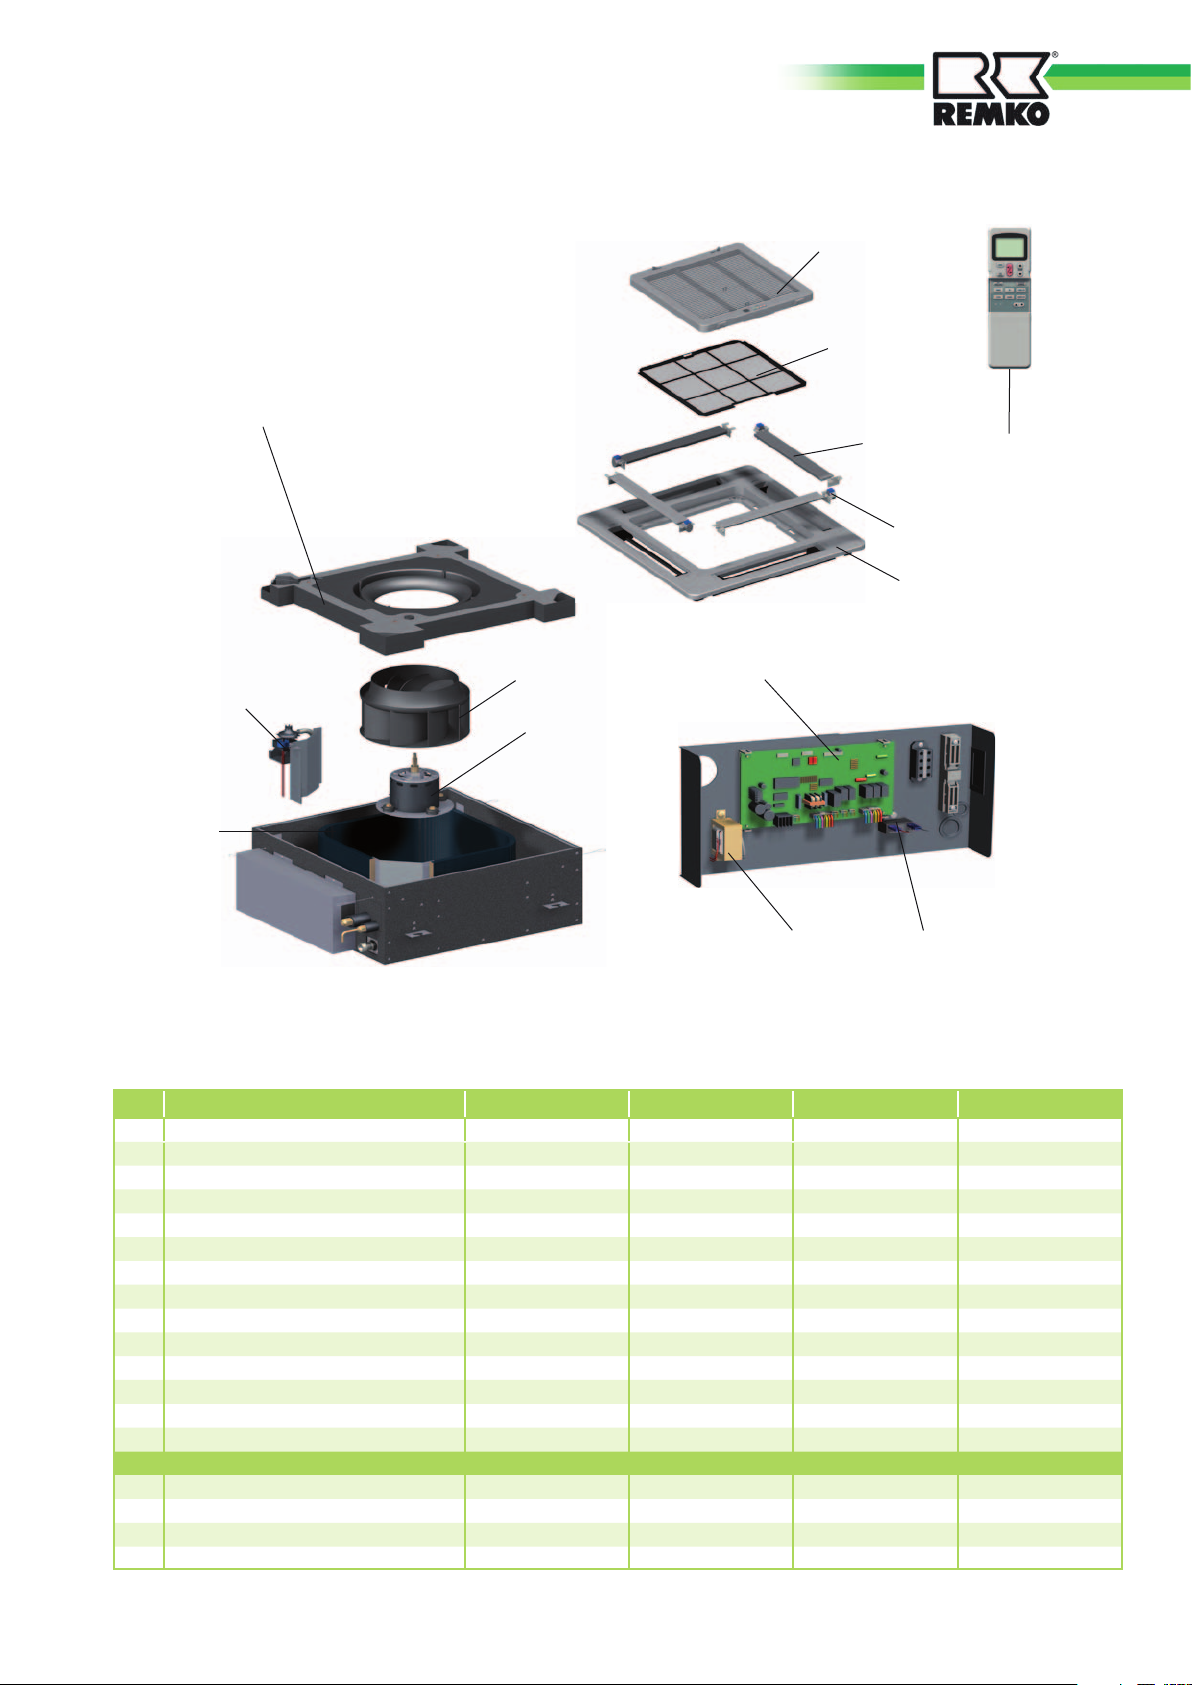
Exploded view MXD 200 to MXD 520
5
1
2
6
4
3
14
9
8
10
7
We reserve the right to modify the dimensions and structural
design as part of the ongoing technical-development process.
11
12
13
Spare parts list
No. Designation MXD 200 MXD 260 MXD 350 MXD 520
1 Air inlet guard 1111030 1111030 1111030 1111030
2 Air filter 1111031 1111031 1111031 1111031
3 Cover 1111032 1111032 1111032 1111032
4 Fin motor 1111033 1111033 1111033 1111033
5 Condensation tray 1111034 1111034 1111034 1111034
6 Outlet fins, set of 4 1111035 1111035 1111035 1111035
7 Vaporiser 1111036 1111036 1111049 1111050
8 Condensation pump, cpl. 1111037 1111037 1111037 1111037
9 Fan wheel 1111038 1111038 1111038 1111038
10 Vaporiser fan motor 1111039 1111039 1111039 1111039
11 Control board 1111040 1111040 1111040 1111040
12 Transformer 1111041 1111041 1111041 1111041
13 Condenser, vaporiser fan 1111042 1111042 1111048 1111051
14 IR remote control 1111052 1111052 1111052 1111052
Spare parts (not illustrated)
Condensation float switch 1111044 1111044 1111044 1111044
Display board 1111045 1111045 1111045 1111045
Air circulation sensor 1111046 1111046 1111046 1111046
Vaporiser sensor 1111047 1111047 1111047 1111047
When ordering spare parts, please state the computerised part no., device number and device type (see identification plate)!
25
Page 26
REMKO MXD
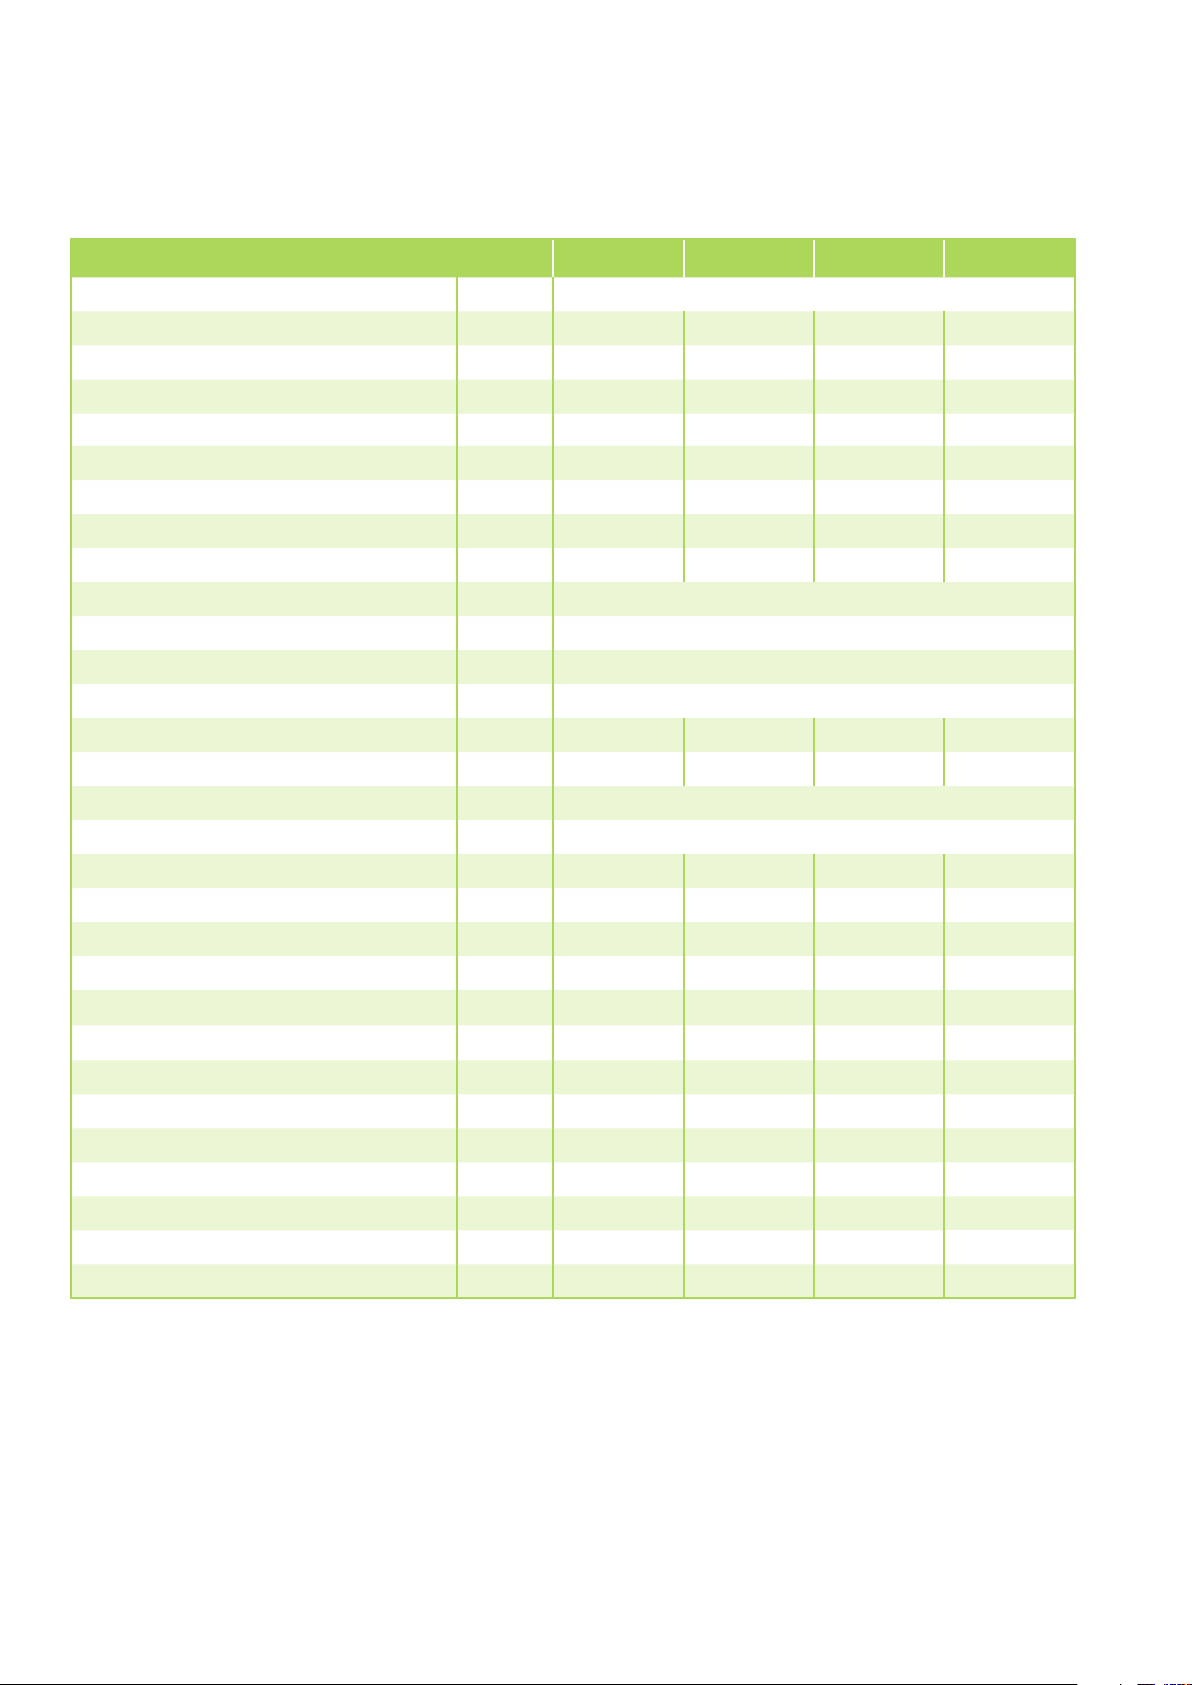
Technical data
Series MXD 200 MXD 260 MXD 350 MXD 520
Operating mode Ceiling cassette for combined cooling/heating
Nominal cooling output
Nominal heating output 2) kW 2,41 2,86 3,8 5,94
Energy efficiency class, cooling 1) A A B A
Energy efficiency class, heating 2) B B B A
Energy efficiency ratio EER
Coefficient of performance COP
Power consumption, annual, (500h) K / H 1290 / 1410 1120 / 1255 1290 / 1410 856 / 890
Operating range (room volume), approx. m³ 60 80 110 160
Room-temperature adjustment range °C +17 to +30
Operating range °C +17 to +32
Refrigerant R 410A
1)
1)
2)
kW 2,05 2,61 3,53 5,2 1
3,18 3,21 3,18 3,22
3,41 3,42 3,41 3,64
4)
Operating pressure max. / per cooling circuit kPa 4200 / 4200
Air flow volume per speed setting m³/h 300 / 330 / 400 410/460/500 420/520/680 560/650/700
Sound pressure level per speed setting
3)
dB(A) 30/ 33 / 35 32/34/36 33/35/38 38/40/42
Power supply V / Hz 230 / 1~ / 50
Protection class IP X 0
1)
Nom. electrical power consumption, cooling
Nom. electrical power consumption, heating
Nom. electrical current consumption, cooling
Nom. electrical power consumption, heating
Refrigerant connection - injection line
Coolant connection - suction line
2)
kW 0,04 0,04 0,05 0,08
2)
kW 0,04 0,04 0,04 0,08
1)
A 0,17 0,17 0,19 0,4
A 0,17 0,17 0,19 0,4
Inches
(mm)
Inches
(mm)
1/4 1/4 1/4 1/4
3/8 3/8 1/2 1/2
Condensate drain mm 25 25 25 25
Dimensions - Height mm 255 255 255 255
Width mm 580 580 580 580
Depth mm 580 580 580 580
Weight kg 21,0 21,0 21,0 21,0
Serial number 770... 771... 772.. 778
Computerised part no. 1623250 1623255 1623260 1623265
1) Air intake temp. TK 27°C / FK 19°C, outdoor temp. TK 35°C / FK 24°C, max. air volume, 5m pipe length in combination with MVT 900 / 950 DC
2) Air intake temperature TK 20°C outdoor temperature TK 7°C, FK 6°C, max. air volume, 5m pipe length in combination with MVT 900 / 950 DC
3) Distance 1 m free field
4) Contains greenhouse gas according to Kyoto protocol
26
Page 27
EC – Declaration of Conformity
in accordance with the Machinery Directive, Annex II 1A
Original Declaration of Conformity
We hereby declate that the devices described in the following section conform to the require-
ments of the specified applicable EC directives due to their design and type in the version as
marketed by us.
Name of Manufacturer: REMKO GmbH & Co. KG
Klima- und Wärmetechnik
Im Seelenkamp 12
D - 32791 Lage
Name of Authorised Agent: REMKO GmbH & Co. KG
Klima- und Wärmetechnik
Im Seelenkamp 12
D - 32791 Lage
Equipment (machinery) - Implementation: Multi-inverter ceiling cassette
Series / Model:
Series / Class Number: 770..., 771..., 772..., 778...
Applicable regulations:
MA DIR. 2006/42/EC Machinery Directive
LV DIR. 2006/95/EC Low-Voltage Directive
EMC DIR. 2004/108 EEC Electromagnetic Compatibility Directive
EnCLB DIR. 92/75/EEC Energy Consumption Labelling Directive
EC 97/23/EC Pressure Equipment Directive
Applicable Standards:
EN 292 - 1; EN 292 - 2; EN 294;
EN 14511 T1-4;
DIN 45635 - 1;
EN 378 – 1-4;
EN 55014 - 1; EN 55014 - 2; EN 55104
EN 60204 - 1; EN 60335 - 1; EN 60335 - 2 - 40;
EN 61000 - 3 - 2; EN 61000 - 3 - 3;
REMKO MXD 200, MXD 260, MXD 350, MXD 520
Lage, 22 January 2010 REMKO GmbH & Co. KG
..............................................
Signature, Product Manager
27
Page 28
REMKO INTERNATIONAL
... and also right in your neighbourhood!
Make use of our experience and advice
Consultation
Thanks to intensive training, our
consultants are always completely up-to-date in terms of
technical knowledge. This has
given us the reputation of being
more than just an excellent, reliable supplier:
REMKO, a partner helping you
find solutions to your problems.
Sales
REMKO offers not just a well
established sales network both
nationally and internationally, but
also has exceptionally highlyqualified sales specialists.
REMKO field staff are more than
just sales representatives: above
all, they must act as advisers to
our customers on air conditioning
and heating technology.
Customer Service
Our equipment operates precisely and reliably. However, in
the event of a fault, REMKO
customer service is quickly at
the scene. Our comprehensive
network of experienced dealers
always guarantees quick and
reliable service.
REMKO GmbH & Co. KG
Air conditioning and heating technology
Im Seelenkamp 12 D-32791 Lage
Postfach 1827 D-32777 Lage
Telephone +49 5232 6 06-0
Telefax +49 5232 6 06-2 60
E-mai [email protected]
Website www.remko.de
Hotline
+49 5232 606-0
Export
+49 5232 606-130
Subject to technical modifications, no responsibility taken for the correctness of information!
 Loading...