

Page 1

English ................................................................... 02-07
GAIN
GAIN
HIGH
LOW
HIGH
LOW
SEL
SEL SEL
FX BEATS // TAP
SEL
SEL SEL
FX BEATS // TAP
PARAMETER 2
PRO
KEY SYNC
PnT
SYNC OFF CENSOR
START
USER MODE
PRO
SLIP
PRO
PARAMETER 2
PRO
KEY SYNC
PnT
SYNC OFF CENSOR
START
USER MODE
PRO
SLIP
PRO
HEADPHONES CUE VOL CUE MIX MASTER VOL MASTER OUT
USB
iOS
Deutsch ................................................................. 08-13
Français ................................................................. 14-19
Español .................................................................. 20-25
Instruction Manual
CAUTION!
For your own safety, please read this operation manual carefully
before initial operation! All persons involved in the installation, setting-up, operation, maintenance and service of this device must be
appropriately qualied and observe this operation manual in detail. This product complies with the requirements of the applicable
European and national regulations. Conformity has been proven.
The respective statements and documents are deposited at the
manufacturer.
Bedienungsanleitung
ACHTUNG!
Lesen Sie sich vor der ersten Inbetriebnahme zur eigenen Sicherheit diese Bedienungsanleitung sorgfältig durch! Alle Personen,
die mit der Aufstellung, Inbetriebnahme, Bedienung, Wartung und
Instandhaltung dieses Gerätes zu tun haben, müssen entsprechend qualiziert sein und diese Betriebsanleitung genau beachten. Dieses Produkt erfüllt die Anforderungen der geltenden
europäischen und nationalen Richtlinien, die Konformität wurde
nachgewiesen, die entsprechenden Erklärungen und Unterlagen
sind beim Hersteller hinterlegt
Mode d‘emploi
ATTENTION!
Pour votre propre sécurité, veuillez lire attentivement ce mode
d‘emploi avant la première utilisation ! Toutes les personnes
chargées de l‘installation, de la mise en service, de l‘utilisation,
de l‘entretien et la maintenance de cet appareil doivent possé-
der les qualications nécessaires et respecter les instructions
de ce mode d‘emploi. Ce produit est conforme aux directives
européennes et nationales, la conformité a été certiée et les
déclarations et documents sont en possession du fabricant.
REV. 1.0
Manual de instrucciones
¡ATENCIÓN!
En aras de su propia seguridad, ¡lea detenidamente este manual
de instrucciones antes de la primera puesta en marcha! Todas
las personas relacionadas con el montaje, la puesta en marcha,
la operación, el mantenimiento y la reparación de este equipo
deben estar correctamente cualicadas y haber leído con atención este manual de instrucciones. Este producto cumple con los
requisitos de las directivas europeas y nacionales, se ha comprobado la conformidad y las declaraciones y los documentos
correspondientes están en posesión del fabricante.
WARNING!
To prevent re or avoid an electric shock do not expose the
device to water or uids!
Never open the housing!
WARNUNG!
Um Feuer oder einen elektrischen Schock zu vermeiden, setzen
Sie dieses Gerät nicht Wasser oder Flüssigkeiten aus! Öffnen Sie
niemals das Gehäuse!
ATTENTION !
An d‘éviter un incendie ou une décharge électrique, veillez à te
nir cet appareil à l‘écart des liquides et de l‘humidité ! N´ouvrez
jamais le boîtier !
¡ADVERTENCIA!
Para evitar incendios o descargas eléctricas, ¡no sumerja este
equipo en agua u otras sustancias líquidas! ¡Nunca abra la
carcasa!
Keep information for further reference!
Für weiteren Gebrauch aufbewahren!
Gardez ces instructions pour des utilisations ultérieurs!
¡Conservar para su uso posterior!
www.reloop.com
Reloop Trademark
Global Distribution GmbH & Co. KG
Schuckertstr. 28
48153 Muenster / Germany
© 2021
DEUTSCH
-
1
Page 2

CAUTION!
For your own safety, please read this operation manual carefully before initial operation! All persons involved in the installation, setting-up,
operation, maintenance and service of this device must be appropriately qualied and observe this operation manual in detail. This product
complies with the requirements of the applicable European and national regulations. Conformity has been proven. The respective statements
and documents are deposited at the manufacturer.
Please remove the Reloop Ready from its packaging. Check before initial operation to make sure that the device has not been visibly damaged
during transport. If you detect any damage to the power cable or the casing, do not operate the device. Contact your specialised dealer.
SAFETY INSTRUCTIONS
CAUTION!
Please exercise particular caution when handling AC 100 - 240 V, 50/60Hz power voltage. This voltage rating may lead to a critical electrical
shock! Any damage caused by the non-observance of this operation manual excludes any warranty claims. The manufacturer is not liable for
any damage to property or for personal injury caused by improper handling or non-observance of the safety instructions.
WARNING!
To prevent re or avoid an electric shock do not expose the device to water or uids! Never open the housing!
- This device left the factory in perfect condition. To maintain this condition and to ensure a risk-free operation the user must observe the safety
instructions and warnings contained in this operation manual.
- For reasons of safety and certication (CE) the unauthorised conversion and/or modication of the device is prohibited. Please note that in the
event of damage caused by the manual modication to this device any warranty claims are excluded.
- The inside of the device does not contain any parts which require maintenance, with the exception of wear parts that can be exchanged from
the outside. Qualied staff must carry out maintenance, otherwise the warranty does not apply!
- The fuse must exclusively be exchanged against fuses of the same class, with the same trigger features and nominal current rating.
- Ensure that the power will only be supplied after the device has been fully set up.
- Only use cables that comply with regulations. Observe that all jacks and bushes are tightened and correctly hooked up. Refer to your dealer, if
you have any questions.
- Ensure that when setting up the product, the mains cable is not squashed or damaged by sharp edges.
- Prevent the mains cable from coming into contact with other cables! Exercise great care when handling mains cables and connections. Never
touch these parts with wet hands!
- Connect the power cable exclusively to appropriate shock-proof outlets. The only supply point to be used is a supply outlet in accordance with
specications of the public supply network.
- Disconnect the device from the supply outlet when not in use and before cleaning! Be sure to hold the mains plug by the body. Never pull the
mains cord!
- Position the device on a horizontal and stable low-ame base.
- Avoid any concussions or violent impact when installing or operating the device.
- When selecting the location of installation, make sure that the device is not exposed to excessive heat, humidity and dust. Be sure that no cables
lie around openly. You will endanger your own safety and that of others!
- Do not rest any containers lled with liquid that could easily spill onto the device or in its immediate vicinity. If, however, uids should access the
inside of the device, immediately disconnect the mains plug. Have the device checked by a qualied service technician before re-use. Damage
caused by uids inside the device is excluded from warranty.
- Do not operate the device under extremely hot (in excess of 35° C) or extremely cold (below 5° C) conditions. Keep the device away from
direct exposure to the sun and heat sources such as radiators, ovens, etc. (even during transport in a closed vehicle). Always ensure sufcient
ventilation.
- The device must not be operated after being taken from a cold environment into a warm environment. The condensation caused hereby may
destroy your device. Do not switch on or operate the device until it has reached ambient temperature!
- Controls and switches should never be treated with spray-on cleaning agents and lubricants. This device should only be cleaned with a damp
ENGLISH
cloth. Never use solvents or cleaning uids with a petroleum base for cleaning.
- When relocating, the device should be transported in its original packaging.
- When starting operation, the crossfaders and volume controls of your amplier must be set to minimum level. Bring the loudspeaker switches
into the “OFF” position. Wait between 8 to 10 seconds before increasing the volume to avoid damage to loudspeakers.
- Devices supplied by voltage should not be left in the hands of children. Please exercise particular care when in the presence of children.
- At commercial facilities the regulations for the prevention of accidents as stipulated by the organization of professional associations must be
observed.
- At schools, training facilities, hobby and self-help workshops the operation of the device must be monitored with responsibility by trained staff.
- Keep this operation manual in a safe place for later reference in the event of questions or problems.
APPLICATION IN ACCORDANCE WITH REGULATIONS
- This device is a 2-channel DJ controller, which can regulate and mix audio signals. The device needs to be connected to a tablet or computer
and an audio amplier or active speakers.
- If the device is used for any other purposes than those described in the operation manual, damage can be caused to the product, leading to
the exclusion of warranty rights. Moreover, any other application that does not comply with the specied purpose harbours risks such as short
circuit, re, electric shock, etc.
- The serial number determined by the manufacturer must never be removed to uphold the warranty rights.
MAINTENANCE
- Check the technical safety of the device regularly for damage to the mains line or the casing, as well as for wear of wear parts such as rotary
and sliding switches.
- If it is to be assumed that the safe operation is no longer feasible, then the device must be disconnected and secured against accidental use.
Always disconnect the mains plug from the outlet!
- It must be assumed that a safe operation is no longer feasible, if the device bears visible defects, if the device no longer functions, following
longer storage under unfavourable conditions or after major transport stress.
2
Page 3
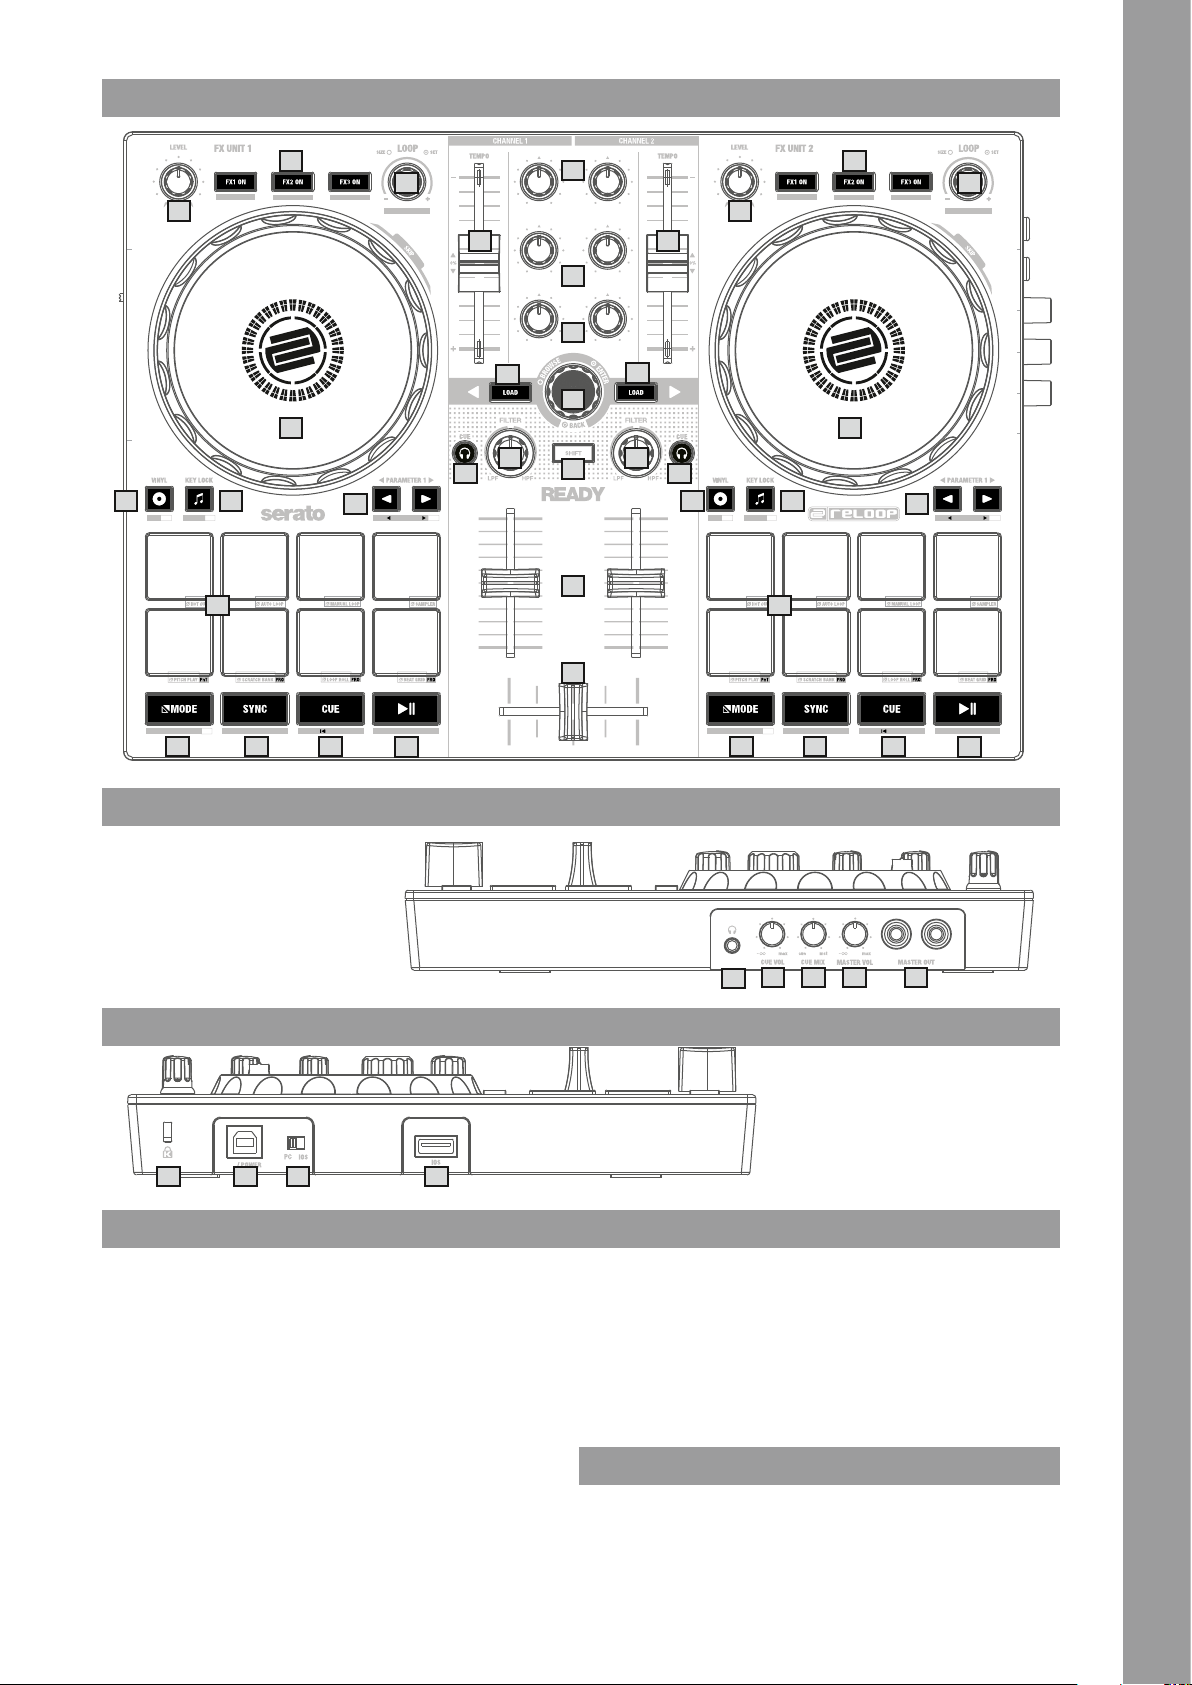
CONTROLS
17 17
SEL
SEL SEL
USB
16
FX BEATS // TAP
GAIN
HIGH
8 8
LOW
GAIN
1
HIGH
2
LOW
2
4
4
3
iOS
13 13
PnT
PRO
KEY SYNC
SLIP
11 11
PARAMETER 2
5
6 6
PRO
7
5
9
10
USER MODE
PRO
SYNC OFF CENSOR
20
START
22 22
1818
PRO
KEY SYNC
SLIP
USER MODE
1919 20
SEL
SEL SEL
1414
PnT
1212
PRO
SYNC OFF CENSOR
16
FX BEATS // TAP
HEADPHONES CUE VOL CUE MIX MASTER VOL MASTER OUT
1515
START
PARAMETER 2
PRO
2121
RIGHT PANEL
LEFT PANEL
293031
DESIGNATIONS:
1. Gain
2. Equalizer (2-band)
3. Browse Encoder
4. Track Load Button
5. Filter
6. Headphones/Cue Buttons
7. SHIFT
8. Pitch Fader
9. Linefader
10. Crossfader
11. Jog Wheel
12. Performance Pads
13. Vinyl
14. Key Lock
15. Parameter Button
16. Loop Encoder
17. FX ON Button
18. FX Control
19. MODE
20. SYNC
21. CUE
22. PLAY/PAUSE
28
26
27
23. Master Out (RCA)
24. Master Volume
25. Headphones/Cue Mix
26. Headphones/Cue Volume
27. Headphones Out (3,5mm Jack)
28. USB-A-iOS-Port
29. USB Source Switch
30. USB-B PC/Power Port
31. Kensington Lock
SCOPE OF DELIVERY:
- Reloop Ready
- RCA Cable
- USB Cable
- Instruction Manual
ENGLISH
232425
3
Page 4
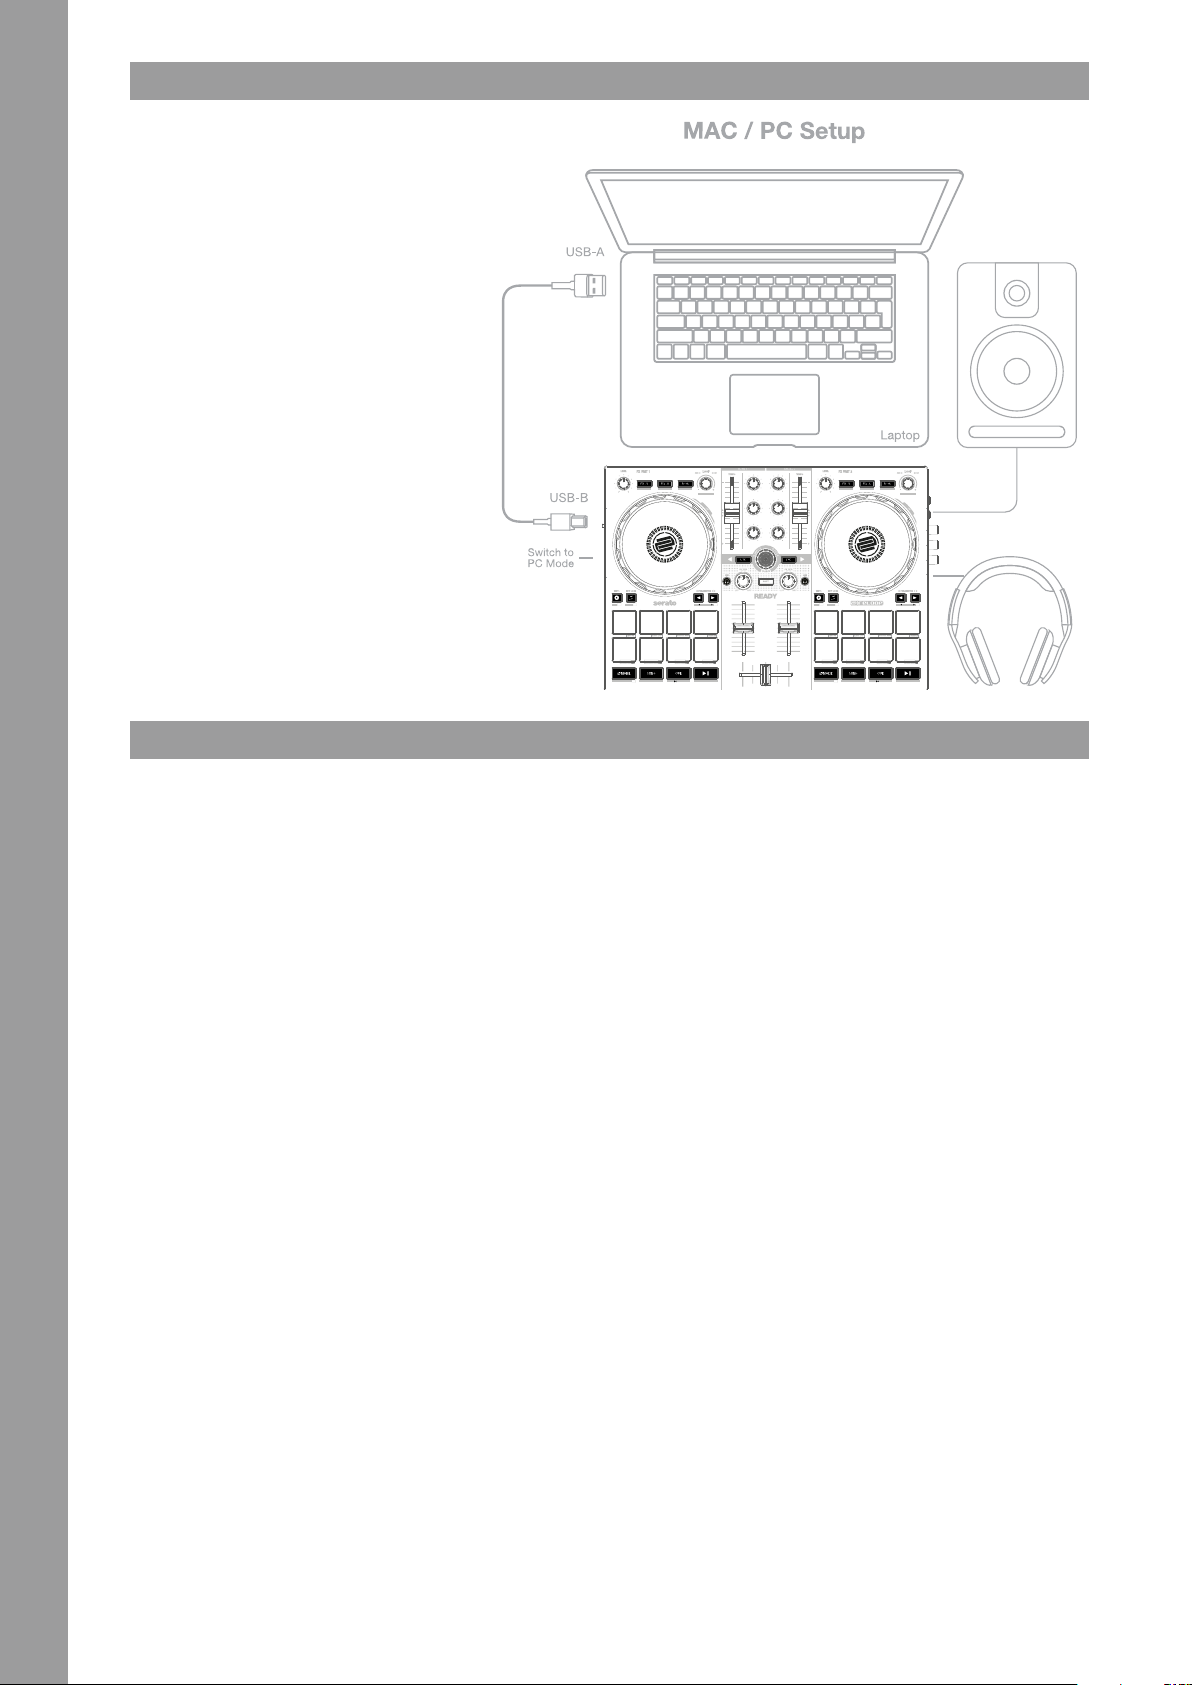
CONNECTING THE RELOOP READY:
MASTER OUT
Connect your main system (e.g. active speakers) to
Master Out (RCA) -23-.
HEADPHONES/CUE OUT
Connect your headphones to Headphones Out -27-.
USB CONNECTION
If you want to use your Reloop Ready with a computer,
connect it to the USB-B PC/Power Port -30- and set
the USB Source Switch -29- to PC.
NOTE!
If you want to use the djay app with an iOS/iPadOS
device, connect your Reloop Ready to the USB-A
iOS Port -28-, as well as a USB-power supply (5V,
2A) to the USB-B Port -30- and select iOS via the
USB Source Switch -29-.
USB
GAIN
SEL
SEL SEL
FX BEATS // TAP
GAIN
HIGH
HIGH
LOW
LOW
SEL
SEL SEL
FX BEATS // TAP
SOFTWARE INSTALLATION & CONNECTION
SERATO DJ LITE INSTALLATION MAC OS X
- Go to www.serato.com click on products and select the download for “Serato DJ Lite”.
- If you are not already logged in to www.serato.com, please create an account.
- After you have logged in and clicked on Products ¬ Serato DJ Lite, you will see the latest Serato DJ Lite version and a download banner on the
right-hand side.
- Click to download the installation le.
- Once the download is complete, you can start the installation.
- Read the terms and conditions and click „Agree“ when you are nished.
ENGLISH
- Follow the different steps until the installation is complete.
- Afterwards you will nd your Serato DJ Lite software in the Applications folder.
NOTE!
If you are running macOS High Sierra or higher, you may have to enable Serato access in your security settings.
SERATO DJ LITE INSTALLATION WINDOWS
- Go to Serato.com click on products and select the download for “Serato DJ Lite”.
- If you are not already logged in to Serato.com, please create an account.
- You will see the latest Serato DJ Lite version and a download banner on the right hand side.
- Click to download the installation le.
- The Serato DJ Lite Windows Installer appears as an ‚archived‘ zip le, which can be opened with Windows Explorer. Alternatively, you can use
your favourite archive manager, such as Winzip or 7zip.
- Once the download is complete, you can start the installation.
- If you are using the Windows Explorer, you can double-click on the downloaded le and you will see the Serato DJ Lite executable.
- If you are using a third-party archive manager, such as Winzip or 7zip, you can right-click on the context-sensitive menu and select „Extract
Here“, which will extract the Serato DJ Lite le and place it in the location you selected to save the original le.
- Double-click the resulting Serato DJ Lite exe le from the archive after opening or extracting the archive to start the Serato DJ setup. You will
now see the license terms. Check the „I agree to the license terms and conditions“ box and then click „Install“.
NOTE!
When using Windows, it is necessary to install an ASIO driver!
Go to:
https://www.reloop.com/reloop-ready#headingproduct_view_panel_features to download the ASIO driver, execute the downloaded driver le
and follow the installation steps.
iOS
SLIP
PnT
PRO
KEY SYNC
PRO
USER MODE
START
SYNC OFF CENSOR
HEADPHONES CUE VOL CUE MIX MASTER VOL MASTER OUT
PnT
PRO
PARAMETER 2
PRO
SLIP
USER MODE
KEY SYNC
PRO
SYNC OFF CENSOR
PRO
PARAMETER 2
START
DJAY IPAD/IPHONE INSTALLATION & CONNECTION:
You can download the djay app from the App Store.
- Download the djay app from the App Store.
- Set the USB source switch -29- to “iOS”.
- Connect your existing Lightning or USB-C cable to the Reloop Ready‘s USB-A “iOS” Port -28-, as well as to your “iOS” device.
- Open the previously downloaded djay app.
Your Reloop Ready will be recognized automatically and can now be operated.
Attention!
Computer and “iOS” devices cannot be used simultaneously.
4
Page 5

Always connect the supplied USB cable to the USB-B PC/Power Port -30- and connect it to a USB power supply. Please only use the original
power cable of your tablet / smartphone or use an appropriate power supply unit (5V, 2A) to ensure a sufcient power supply. Alternatively,
you can purchase the following USB power supply as a spare part: Item No.: 243382.
OPERATION SERATO DJ LITE:
1. GAIN
Use the Gain Control -1- to adjust the channel volume.
2. EQUALIZER
With the 2-band Equalizer -2- you can adjust the treble and bass for channels 1 & 2.
3. BROWSE ENCODER
Use the Browse Encoder -3- to navigate through your music libraries. Press the Browse Encoder -3- to conrm your selection.
SHIFT: To go back one menu item, press SHIFT -7- + Browse Encoder -3-.
4. TRACK LOAD
Press the Track Load button -4- to load a track to the desired deck.
5. FILTER
Channel 1 & 2 have an individual Filter -5-. In the 12 o‘clock position the lter is switched off. Turning Filter -5- clockwise creates a high-pass effect,
turning it counter-clockwise creates a low-pass effect.
6. HEADPHONES/CUE BUTTONS
With the Headphones/Cue Buttons -6- you can monitor the respective audio signal of channels 1 & 2.
7. SHIFT
Pressing SHIFT -7- + a selected button activates the respective functions of the 2nd level, according to the labelling of the device.
NOTE!
Some functions of the 2nd level can only be executed with the
Serato DJ Pro version, these can be recognized by the additional PRO labelling.
8. PITCH FADER
The Pitch Fader -8- determines the tempo of the track.
9. LINEFADER
With the Linefader -9- you can adjust the output volume for channels 1 & 2.
10. CROSSFADER
The Crossfader -10- switches between the left and right channel.
11. JOG WHEEL
The Jog Wheel -11- is active by default in pitch bend mode. The surface is touch-sensitive and reacts to body tension. Turning the outer rim -11- can
be used to perform a pitch bend.
SHIFT: By pressing SHIFT -7- + turning the Jog Wheel -11- at the same time, you can perform the SKIP/quick search function (fast scroll through track).
12. PERFORMANCE PADS
The Performance Pads -12- are colour-coded drum pads that control the selected performance mode. The different performance modes can be
activated by holding the MODE Button -19- and pressing the subsequently selected Performance Pad mode -12-.
THE FOLLOWING PERFORMANCE MODES ARE AVAILABLE:
Hot Cue Mode = Triggers the 4 available cue points per deck and the pad colours light up in the corresponding colours.
- SHIFT: By pressing SHIFT -7- and the respective Cue Pad, the selected Cue Point will be deleted.
- PRO: In Serato DJ Pro you are able to set up 8 hot cues per deck.
Auto Loop Mode = Each of the 4 Performance Pads in the rst row has a different loop length. Pressing it will activate it immediately according to the
length, pressing it again will deactivate the Auto Loop. The 4 pre-assigned loop sizes on the Drum Pads can be changed via the Parameter Buttons -15-.
The Performance Pads in the second row (5-8) are assigned as follows:
- Pad 5: Move the selected loop backwards in the track
- Pad 6: Adjust the reduction parameter to move the selected loop within the track
- Pad 7: Adjust the enlargement parameter to move the selected loop within the track
- Pad 8: Move the selected loop forward in the track
PRO: In Serato DJ Pro you can also half or double the selected loop by using the Parameter Buttons -15-.
Manual Loop Mode = The 4 Performance Pads in the rst row are assigned to the following functions:
- Pad 1: Set Loop In
- Pad 2: Set Loop Out
- Pad 3: Loop On/Off
- Pad 4: Jump to activated Loop In, pressing Pad 4 again deactivates loop
PRO: In Serato DJ Pro the pads in the second row are assigned as follows:
- Pad 5: Upward Scrolling through loops
- Pad 6: Downwards Scrolling through loops
- Pad 6: Save activated loop to empty loop slot
- Pad 8: Not assigned
Sampler Mode = Triggers the respective sample in the sample bank using the 4 drum pads -12-.
SHIFT: Pressing SHIFT -7 + the active sample drum pad will stop playback of the sample.
PRO: In Serato DJ Pro you are able to load 8 samples to the Sample Bank.
NOTE!
In Serato DJ Lite, you only have access to the 4 Performance Modes listed above. With the exception of Auto Loop Mode, the Performance
Pads in the second row (5-8) are assigned with the same function in each DJ Lite Performance Mode, as follows:
- Pad 5: Reverse On/Off
- Pad 6: Hold to rewind the track
- Pad 7: Hold to forward the track
- Pad 8: Playback from temporarily set Cue point, if the Cue is not set, the start Cue is automatically set to the beginning of the track and
will start playing immediately (CUP – Cue and Play)
If you are a Serato DJ Pro user, you will have access to 4 additional DJ Pro Performance Modes in the second row of the Performance Pad section -12-.
PRO P’n’T: Pitch Play Mode = In combination with the Pitch‘n’Time Expansion Pack you can play your cues in different keys via the Performance
Pads -12-. There are 3 scales available. To switch between the scales, press the left or right Parameter Button -15- of the respective channel. The
ENGLISH
5
Page 6

pad with the keynote is always lit white and the cue point is played in the regular pitch.
SHIFT: To select another hot cue point, hold down the SHIFT Button -7- and press the desired Performance Pad -12- (Hot Cue) at the same time.
PRO: Scratch Bank Mode = In Scratch Bank Mode you can assign 8 audio les from your Serato DJ Pro library to each of the 8 Performance Pads.
When a pad is pressed, the respective le is loaded onto the deck. The pads on the left will be loaded to deck 1 and the pads on the right will
be loaded to deck 2. To set up your Scratch Bank les, click on the Scratch Bank icon in the top toolbar of Serato DJ Pro to display the Scratch
Bank panel. In this panel you can load or eject audio les to the respective scratch banks and select the desired settings. These settings include
the starting point, repeat on/off and key lock on/off. By clicking on the button in the upper left corner of the Scratch Bank panel, you can switch
between advanced and simple view.
SHIFT: Hold down SHIFT -7- and click on any Scratch Bank Pad to unload the currently loaded le and reload the title that was last loaded on this deck.
PRO: Loop Roll-Mode = Each Performance Pad in the rst row (1-4) enables/disables a loop roll when the pad is held. Each Pad is assigned a specic
loop length of 1/8 – 1.
The Pads in the second row (5-8) control the Beat Jump function.
- Pad 5: Beat Jump backwards
- Pad 6: Adjust the reduction parameter of the Beat Jump
- Pad 7: Adjust the enlargement parameter of the Beat Jump
- Pad 8: Beat Jump forward
PRO: Beat Grid Mode = In Beat Grid mode you can adjust the grid and track timing to the selected song. The pads in the rst row (1-4) will adjust
the grid of the track and the pads in the second row (5-8) will adjust the timing of the track.
13. VINYL
Vinyl -13- switches from Pitch Bend Mode to Vinyl Mode, where you can use the Jog Wheels -11- to perform the scratch function.
PRO SHIFT: By pressing SHIFT -7- + Vinyl -13- you activate/deactivate Slip Mode. If slip mode is active, you can perform various actions (cue pionts
or scratches) and the playing track will continue at exactly the position, where the track would be if, you had not performed any actions.
14. KEY LOCK
Key Lock -14- activates/deactivates the Key Lock function.
PRO P’n’T SHIFT: In combination with the Pitch‘n’Time Expansion Pack, pressing SHIFT -7- + Key Lock activates/deactivates the Key Sync function.
This allows you to match the key of the current track to the key of the track on the other deck.
15. PARAMETER BUTTONS (PRO PARAMETERS)
The Parameter Buttons -15- control the parameter functions for each deck, depending on the selected mode (e.g. FX parameter setting).
PRO SHIFT: By pressing SHIFT -7- + Parameter Buttons -15- you can control the parameter functions of the 2nd level, depending on the selected mode.
16. LOOP ENCODER
By turning the Loop Encoder -16- you can select the loop length (1/32-32 bars). Pressing the Loop Encoder -16- activates the previously selected
loop length, pressing it again deactivates the loop.
SHIFT: By holding down SHIFT -7- and rotating the respective Loop Encoder -16-, you can set the Beats Multiplier value for the software effects
of the respective channel.
SHIFT: By holding down SHIFT -7- and pressing the loop encoder -16- to the beat, you can manually enter the timing of the software effects.
17.FX ON BUTTONS
Use the FX ON Buttons -17- to activate/deactivate the 3 selected software effects in your effect bank.
SHIFT: Holding SHIFT -7- and pressing the FX ON Keys -17-, you can select the desired software effect for the respective effect bank.
18. FX CONTROL
With FX Control -18- you can adjust the effect intensity (depth) of the effects activated in the effects bank.
19. MODE
ENGLISH
Holding the MODE button -19- + pressing a Pad Mode activates the selected Performance Mode (see: 12. Performance Pads).
PRO SHIFT: Holding down SHIFT -7- and pressing the MODE button -19- enters User Mode. Here you can assign the Performance Pads -12according to your personal preferences.
20. SYNC
SYNC -20- automatically synchronises the BPM value of one track to the other deck.
SHIFT: Pressing SHIFT -7- + SYNC -20- will deactivate SYNC mode.
21. CUE
Use the CUE Buttons -21- to create and trigger a temporary cue point. This is represented by a white cue marker. If the CUE Button -21- is pressed
during playback, it automatically stops and jumps back to the set cue point (CUE play mode). If you pause playback and press the CUE Button -21-,
a new cue point is created at the current track position (CUE pause mode).
22. PLAY/PAUSE
PLAY/PAUSE -22- starts/pauses playback of the respective deck.
23. MASTER OUT (CINCH)
Your main system (e.g. active speakers) is connected to the Master Out (RCA) -23- and controlled by the Master Volume control -24-.
24. MASTER VOLUME
The Master Volume Control -24- is used to adjust the master volume output .
25. HEADPHONES/CUE MIX
The Headphones/Cue Mix Control -25- mixes the volume balance between the channel and master signal in the headphones.
- LEFT = CUE
- CENTER = 50/50 Ratio
- RIGHT = Master
26. HEADPHONES VOLUME
Use the Headphones/Cue Volume Control -26- to adjust the volume of your headphones signal.
27. HEADPHONES/CUE OUT
The Headphones/Cue Output -27- is used to connect your headphones to your Reloop Ready.
28. USB-A “OS PORT
The USB-A iOS Port -28- is used to connect an iOS device.
Please additionally connect a USB power supply to the USB-B PC/Power Port -30-.
NOTE!
If you want to use an iOS device, make sure that the USB Source Switch -29- is set to iOS.
29. USB SOURCE SWITCH
Use the USB Source Switch -29- to switch between your desired USB mode (computer- or iOS-operation).
6
Page 7

30. USB-B PC/POWER PORT
Use the USB-B PC/Power Port -30- to connect a computer, as well as a USB power cable to charge your iOS device via the Reloop Ready.
NOTE!
If you want to use a computer, make sure that the USB Source Switch -29- is set to PC.
31. KENSINGTON LOCK
The Kensington Lock -31- serves to secure your Reloop Ready from being stolen.
NOTE
PRO: Requires the Serato DJ Pro Version to unlock the Pro features & Performance Modes.
P’n’T: Requires the Serato Pitch’n’Time Expansion Pack.
MINIMUM SYSTEM REQUIREMENTS:
You can check the current Serato DJ Lite / Serato DJ Pro system requirements for Mac or Windows at serato.com.
You can check the current djay system requirements for „iOS“/“iPadOS“, Android, Mac or Windows at algoriddim.com.
TECHNICAL DATA:
Sound Card Resolution: .................................... 24bit / 48kHz
Frequency Response: ........................................20Hz-20kHz
Signal to Noise Ratio:........................................95DB (USB)
Total Harmonic Distortion: ...............................<0.1%
Master Out: .........................................................RCA
Headphone Out: .................................................3,5mm (1/8 Jack)
Power: .................................................................. DC-5V / 2A USB-B
Power Consumption iOS connection: .............DC-5V / 2A USB-B
Power Consumption PC connection: .............. DC-5V / 500mA USB-B
Dimensions: .........................................................325mm x 48mm x 220mm
Weight: ................................................................. 1,143 kg
iPhone, iPad, iPod touch, iTunes, Mac and Mac OS are registered trademarks of Apple Inc. in the U.S. and other countries.
App Store is a service mark of Apple Inc.
iOS is a trademark containing Cisco trademark signs in the U.S. and other countries.
Windows is a registered trademark of Microsoft Corporation in the United States and other countries.
Serato DJ Lite, Serato DJ Intro, Serato DJ Pro, Serato DJ and Scratch Live are registered trademarks of Serato Limited.
Beatport is a trademark of Beatport, LLC.
Soundcloud is a trademark of SoundCloud Limited.
djay is a registered trademark of Algoriddim GmbH.
Tidal is a trademark of Aspiro AB.
Beatsource is a trademark of Beatsource, LLC.
Android, YouTube, Google Play and the Google Play logo are registered trademarks of Google Inc.
ENGLISH
7
Page 8

ACHTUNG!
Lesen Sie sich vor der ersten Inbetriebnahme zur eigenen Sicherheit diese Bedienungsanleitung sorgfältig durch! Alle Personen, die mit
der Aufstellung, Inbetriebnahme, Bedienung, Wartung und Instandhaltung dieses Gerätes zu tun haben, müss1en entsprechend qualiziert
sein und diese Betriebsanleitung genau beachten. Dieses Produkt erfüllt die Anforderungen der geltenden europäischen und nationalen
Richtlinien, die Konformität wurde nachgewiesen, die entsprechenden Erklärungen und Unterlagen sind beim Hersteller hinterlegt.
Nehmen Sie den Reloop Ready aus der Verpackung. Bitte überprüfen Sie vor der ersten Inbetriebnahme, ob kein offensichtlicher Transportschaden
vorliegt. Sollten Sie Schäden am Stromkabel oder am Gehäuse entdecken, nehmen Sie das Gerät nicht in Betrieb und setzen Sie sich bitte mit
Ihrem Fachhändler in Verbindung.
SICHERHEITSHINWEISE
ACHTUNG!
Seien Sie besonders vorsichtig beim Umgang mit der Netzspannung AC 100 - 240 V, 50/60Hz. Bei dieser Spannung können Sie einen
lebensgefährlichen, elektrischen Schlag erhalten! Bei Schäden, die durch Nichtbeachtung dieser Bedienungsanleitung verursacht werden,
erlischt jeder Gewährleistungsanspruch. Bei Sach- oder Personenschäden, die durch unsachgemäße Handhabung oder Nichtbeachtung der
Sicherheitshinweise verursacht werden, übernimmt der Hersteller keine Haftung.
WARNUNG!
Um Feuer oder einen elektrischen Schock zu vermeiden, setzen Sie dieses Gerät nicht Wasser oder Flüssigkeiten aus! Öffnen Sie niemals
das Gehäuse!
- Dieses Gerät hat das Werk in einwandfreiem Zustand verlassen. Um diesen Zustand zu erhalten und einen gefahrlosen Betrieb sicherzustellen,
muss der Anwender unbedingt die Sicherheitshinweise und die Warnvermerke beachten, die in dieser Gebrauchsanleitung enthalten sind.
- Aus Sicherheits- und Zulassungsgründen (CE) ist das eigenmächtige Umbauen und/oder Verändern des Gerätes nicht gestattet. Beachten Sie
bitte, dass Schäden, die durch manuelle Veränderungen an diesem Gerät verursacht werden, nicht unter dem Gewährleistungsanspruch fallen.
- Im Geräteinneren benden sich keine zu wartenden Teile, ausgenommen die von außen austauschbaren Verschleißteile. Die Wartung darf nur
von fachkundigem Personal durchgeführt werden, ansonsten verfällt die Gewährleistung!
- Die Sicherung darf nur gegen Sicherungen des gleichen Typs, der gleichen Auslösecharakteristik und Nennstromstärke ausgetauscht werden.
- Stellen Sie sicher, dass die Stromversorgung erst nach dem Aufbau des Gerätes erfolgt.
- Benutzen Sie nur vorschriftsmäßige Kabel. Achten Sie darauf, dass alle Stecker und Buchsen fest angeschraubt und richtig angeschlossen sind.
Bei Fragen wenden Sie sich bitte an Ihren Händler.
- Stellen Sie sicher, dass beim Aufstellen des Produktes das Netzkabel nicht gequetscht oder durch scharfe Kanten beschädigt wird.
- Lassen Sie das Netzkabel nicht mit anderen Kabeln in Kontakt kommen! Seien Sie vorsichtig beim Umgang mit Netzkabeln und -anschlüssen.
Fassen Sie diese Teile nie mit nassen Händen an!
- Stecken Sie das Stromkabel nur in geeignete Schukosteckdosen ein. Als Spannungsquelle darf dabei nur eine ordnungsgemäße Netzsteckdose
des öffentlichen Versorgungsnetzes verwendet werden.
- Trennen Sie das Gerät bei Nichtbenutzung und vor jeder Reinigung vom Netz! Fassen Sie dazu den Netzstecker an der Griffäche an und ziehen
Sie niemals an der Netzleitung!
- Stellen Sie das Gerät auf einer horizontalen und stabilen, schwer entammbaren Unterlage auf.
- Vermeiden Sie Erschütterungen und jegliche Gewaltanwendung bei der Installation oder Inbetriebnahme des Gerätes.
- Achten Sie bei der Wahl des Installationsortes darauf, dass das Gerät nicht zu großer Hitze, Feuchtigkeit und Staub ausgesetzt wird. Vergewissern
Sie sich, dass keine Kabel frei herumliegen. Sie gefährden Ihre und die Sicherheit Dritter!
- Stellen Sie keine Flüssigkeitsbehälter, die leicht umfallen können, auf dem Gerät oder in dessen Nähe ab. Falls doch einmal Flüssigkeit in das
Geräteinnere gelangen sollte, sofort den Netzstecker ziehen. Lassen Sie das Gerät von einem qualizierten Servicetechniker prüfen, bevor es
erneut genutzt wird. Beschädigungen, die durch Flüssigkeiten im Gerät hervorgerufen wurden, sind von der Gewährleistung ausgeschlossen.
- Betreiben Sie das Gerät nicht in extrem heißen (über 35° C) oder extrem kalten (unter 5° C) Umgebungen. Halten Sie das Gerät von direktem
Sonnenlicht und von Wärmequellen wie Heizkörpern, Öfen, usw. (auch beim Transport in geschlossenen Wagen) fern. Verdecken Sie niemals
vorhandene Lüfter oder Lüftungsschlitze. Sorgen Sie immer für eine ausreichende Ventilation.
DEUTSCH
- Das Gerät darf nicht in Betrieb genommen werden, wenn es von einem kalten Raum in einen warmen Raum gebracht wurde. Das dabei entstehende
Kondenswasser kann unter Umständen Ihr Gerät zerstören. Lassen Sie das Gerät solange ausgeschaltet, bis es Zimmertemperatur erreicht hat!
- Regler und Schalter sollten niemals mit Sprühreinigungsmitteln und Schmiermitteln behandelt werden. Dieses Gerät sollte nur mit einem
feuchten Tuch gereinigt werden. Verwenden Sie niemals Lösungsmittel oder Waschbenzin zum Reinigen.
- Bei Umzügen sollte das Gerät im ursprünglichen Versandkarton transportiert werden.
- Zu Beginn müssen die Überblendregler und Lautstärkeregler Ihres Verstärkers auf Minimum eingestellt und die Lautsprecherschalter in „OFF“Position geschaltet sein. Vor dem Lauterstellen 8 bis 10 Sekunden warten, um Lautsprecherschäden zu vermeiden.
- Geräte, die an Netzspannung betrieben werden, gehören nicht in Kinderhände. Lassen Sie deshalb in Anwesenheit von Kindern besondere
Vorsicht walten.
- In gewerblichen Einrichtungen sind die Unfallverhütungsvorschriften des Verbandes der gewerblichen Berufsgenossenschaft zu beachten.
- In Schulen, Ausbildungseinrichtungen, Hobby- oder Selbsthilfewerkstätten ist das Betreiben des Gerätes durch geschultes Personal
verantwortlich zu überwachen.
- Heben Sie diese Bedienungsanleitung für spätere Fragen und Probleme gut auf.
BESTIMMUNGSGEMÄSSE VERWENDUNG
- Bei diesem Gerät handelt es sich um eine 2-Kanal-DJ-Controller, mit dem sich Audiosignale regeln und mischen lassen. Das Gerät wird dabei mit
einem Computer oder Tablet und einer Audioendstufe bzw. aktiven Lautsprechern verbunden.
- Wird das Gerät anders verwendet, als in dieser Bedienungsanleitung beschrieben, kann dieses zu Schäden am Produkt führen und der
Gewährleistungsanspruch erlischt. Außerdem ist jede andere Verwendung mit Gefahren, wie z.B. Kurzschluss, Brand, elektrischem Schlag, etc. verbunden.
- Die vom Hersteller festgelegte Seriennummer darf niemals entfernt werden, da ansonsten der Gewährleistungsanspruch erlischt.
WARTUNG
- Überprüfen Sie regelmäßig die technische Sicherheit des Gerätes auf Beschädigungen des Netzkabels oder des Gehäuses, sowie auf die
Abnutzung von Verschleißteilen, wie Dreh- und Schiebereglern.
- Wenn anzunehmen ist, dass ein gefahrloser Betrieb nicht mehr möglich ist, so ist das Gerät außer Betrieb zu setzten und gegen unbeabsichtigten
Betrieb zu sichern. Netzstecker aus der Steckdose ziehen!
- Es ist anzunehmen, dass ein gefahrloser Betrieb nicht mehr möglich ist, wenn das Gerät sichtbare Beschädigungen aufweist, das Gerät nicht
mehr funktioniert, nach längerer Lagerung unter ungünstigen Verhältnissen oder nach schweren Transportbeanspruchungen.
8
Page 9

BEDIENOBERFLÄCHE
17 17
SEL
SEL SEL
USB
16
FX BEATS // TAP
GAIN
HIGH
8 8
LOW
GAIN
1
HIGH
2
LOW
2
4
4
3
iOS
13 13
PnT
PRO
KEY SYNC
SLIP
11 11
PARAMETER 2
5
6 6
PRO
7
5
9
10
USER MODE
PRO
SYNC OFF CENSOR
20
START
22 22
1818
PRO
KEY SYNC
SLIP
USER MODE
1919 20
SEL
SEL SEL
1414
PnT
1212
PRO
SYNC OFF CENSOR
16
FX BEATS // TAP
HEADPHONES CUE VOL CUE MIX MASTER VOL MASTER OUT
1515
START
PARAMETER 2
PRO
2121
RECHTE SEITENANSICHT
LINKE SEITENANISCHT
293031
28
BEZEICHNUNGEN:
1. Gain-Regler
2. Equalizer (2-Band)
3. Browse-Encoder
4. Track Load-Taste
5. Filter-Regler
6. Kopfhörer Cue-Taste
7. SHIFT-Taste
8. Pitch-Fader
9. Linefader
10. Crossfader
11. Jog Wheel
12. Performance Pads
13. Vinyl Mode-Taste
14. Key Lock-Taste
15. Parameter-Tasten
16. Loop-Encoder
17. FX On-Taste
18. FX-Regler
19. MODE-Taste
20. SYNC-Taste
21. CUE-Taste
22. PLAY/PAUSE-Taste
23. Master-Ausgang (Cinch)
26
27
24. Master Lautstärke-Regler
25. Kopfhörer Mix-Regler
26. Kopfhörer Lautstärke-Regler
27. Kopfhörer-Ausgang (3,5mm Klinke)
28. USB-A iOS Port
29. USB-Quellen-Schalter
30. USB-B PC/Power Port
31. Kensington Lock
LIEFERUMFANG:
- Reloop Ready
- Cinch-Kabel
- USB-Kabel
- Anleitung
232425
DEUTSCH
9
Page 10

ANSCHLIESSEN DES RELOOP READY:
MASTER-AUSGANG
Verbinden Sie Ihre Hauptanlage (z.B. aktive
Lautsprecher) mit dem Master-Ausgang -23-.
KOPFHÖRER-AUSGANG
Verbinden Sie Ihren Kopfhörer mit dem KopfhörerAusgang -27-.
USB-VERBINDUNG
Möchten Sie Ihren Reloop Ready mit einem Computer
verwenden, verbinden Sie diesen mit dem USB-B PC/
Power Port -30- und stellen sie den USB-QuellenSchalter -29- auf PC.
HINWEIS!
Wenn Sie die djay App mit einem iOS/iPadOS-Gerät
nutzen möchten, schließen Sie Ihren Reloop Ready
an den USB-A iOS Port -28- sowie ein USB-Netzteil
(5V, 2A) an den USB-B Port -30- an und wählen Sie
iOS über den USB-Quellen-Schalter -29- aus.
SEL
USB
SEL SEL
GAIN
GAIN
FX BEATS // TAP
HIGH
HIGH
LOW
LOW
SEL
SEL SEL
FX BEATS // TAP
SOFTWARE INSTALLATION & ANSCHLUSS
SERATO DJ LITE INSTALLATION FÜR MAC OS X
- Gehen Sie zu Serato.com und wählen Sie unter Produkte „Serato DJ Lite Download“.
- Falls Sie nicht bereits bei Serato.com angemeldet sind, erstellen Sie bitte Ihren Account.
- Nachdem Sie sich eingeloggt haben und auf Produkte ¬ Serato DJ Lite klicken, sehen Sie die neueste Version von Serato DJ Lite und einen
Download-Banner auf der rechten Seite.
- Klicken Sie auf Download um die Installationsdatei herunterzuladen.
- Sobald der Download abgeschlossen ist, können Sie mit der Installation beginnen.
- Lesen Sie die AGB und klicken Sie „Agree“, sobald Sie fertig sind.
- Folgen Sie den angegebenen Schritten bis zur fertigen Installation.
DEUTSCH
- Anschließend nden Sie Ihre Serato DJ Lite Software im Programme-Ordner.
HINWEIS!
Wenn Sie macOS High Sierra oder höher verwenden, müssen Sie möglicherweise den Serato-Zugriff in Ihren Sicherheitseinstellungen
aktivieren.
SERATO DJ LITE INSTALLATION FÜR WINDOWS
- Gehen Sie zu Serato.com und wählen Sie unter Produkte „Serato DJ Lite Download“.
- Falls Sie nicht bereits bei Serato.com angemeldet sind, erstellen Sie bitte Ihren Account.
- Nachdem Sie sich eingeloggt haben und auf Produkte ¬ Serato DJ Lite klicken, sehen Sie die neueste Version von Serato DJ Lite und ein
Download-Banner auf der rechten Seite.
- Klicken Sie auf Download, um die Installationsdatei herunterzuladen.
- Der Windows Installer für Serato DJ Lite kommt als archivierte Zip Datei, welche mit dem Windows Explorer geöffnet werden kann. Alternativ
können Sie auch Ihren bevorzugten Archiv-Manager verwenden, wie z.B. Winzip or 7zip.
- Sobald der Download abgeschlossen ist, können Sie mit der Installation beginnen.
- Falls Sie die Windows Explorer Methode wählen, können Sie die heruntergeladene Datei doppel-klicken und Sie werden das ausführbare Serato
DJ Lite Programm sehen.
- Falls Sie einen Archiv-Manager eines Drittanbieters verwenden, wie z.B. Winzip or 7zip, können Sie per Rechtsklick das kontextsensitive Menü
aufrufen und „Extract Here“ wählen, wodurch die Serato DJ Lite Datei extrahiert und an die Stelle abgelegt wird, die Sie ausgewählt haben,
um die Originaldatei zu speichern.
- Doppelklicken Sie die sich hieraus ergebende Serato DJ Lite exe Datei aus dem Archiv, nachdem Sie das Archiv geöffnet oder extrahiert haben,
um die Einrichtung von Serato DJ Lite zu starten. Nun werden Sie die Lizenzbedingungen sehen. Klicken Sie das „I agree to the license terms
and conditions“ Kästchen und klicken Sie anschliessend „Install“.
HINWEIS!
Unter Windows ist es nötig, einen ASIO-Treiber zu installieren!
Gehen Sie zu:
https://www.reloop.com/reloop-Ready#headingproduct_view_panel_features
laden Sie den ASIO-Treiber herunter und führen Sie die heruntergeladene Treiberdatei aus und folgen Sie den Installationsschritten.
iOS
SLIP
PRO
KEY SYNC
USER MODE
PnT
PRO
SYNC OFF CENSOR
HEADPHONES CUE VOL CUE MIX MASTER VOL MASTER OUT
PnT
PRO
PARAMETER 2
START
PRO
KEY SYNC
SLIP
USER MODE
PRO
SYNC OFF CENSOR
PRO
PARAMETER 2
START
10
DJAY IPAD/IPHONE INSTALLATION & ANSCHLUSS:
Die djay App können Sie im App Store herunterladen.
- Laden Sie die djay App aus dem App Store.
- Stellen Sie den USB-Quellen-Schalter -29- auf iOS.
- Schließen Sie Ihr iOS-Ladekabel sowohl an den USB-A iOS Port -28- des Reloop Ready, als auch an Ihr iOS-Gerät an.
- Öffnen Sie die zuvor heruntergeladene djay App.
Ihr Reloop Ready wird automatisch erkannt und kann nun bedient werden.
Page 11

Achtung!
Computer und iOS-Geräte können nicht gleichzeitig verwendet werden. Schließen Sie immer das im Lieferumfang enthaltene USB-Kabel an
den USB-B PC/Power Port -30- an und verbinden Sie es mit einem USB-Netzteil. Bitte benutzen Sie ausschließlich das original Netzkabel Ihres
Tablets/Smartphones oder nutzen Sie für eine ausreichende Stromversorgung ein dementsprechendes Netzteil (5V, 2.1A). Alternativ können
Sie folgendes USB-Netzteil als Ersatzteil erwerben: Art. Nr.: 243382.
BEDIENUNG:
1. GAIN-REGLER
Mit dem Gain-Regler -1- stellen Sie die Kanallautstärke ein.
2. EQUALIZER
Mit dem 2-Band-Equalizer -2- können die Höhen und Bässe für Kanal 1 & 2 eingestellt werden.
3. BROWSE-ENCODER
Verwenden Sie den Browse-Encoder -3-, um durch Ihre Bibliotheken zu navigieren. Durch Drücken des Browse-Encoders -3- bestätigen Sie Ihre Auswahl.
SHIFT: Wenn Sie einen Menüebene zurück gehen möchten, drücken Sie SHIFT -7- + Browse-Encoder -3-.
4. TRACK LOAD-TASTE
Drücken Sie die Track Load-Taste -4-, um einen Track in das jeweilige Deck zu laden.
5. FILTER
Kanal 1 & 2 verfügen über einen individuellen Filter -5-. In der 12 Uhr-Stellung ist der Filter ausgeschaltet. Drehen im Uhrzeigersinn erzeugt einen
High Pass-Effekt, drehen gegen den Uhrzeigersinn erzeugt einen Low Pass-Effekt.
6. KOPFHÖRER CUE-TASTE
Mit der Kopfhörer Cue-Taste -6- können Sie das jeweilige Audiosignal von Kanal 1 & 2 vorhören.
7. SHIFT-TASTE
Die SHIFT-Taste -7- aktiviert die jeweiligen Funktionen der 2. Ebene, gemäß der Beschriftung des Gerätes.
Hinweis!
Einige Funktionen der 2. Ebene können nur mit der kostenpichtigen Serato DJ Pro Version ausgeführt werden. Diese erkennen Sie an der
zusätzlichen Beschriftung PRO.
8. PITCH-FADER
Mit dem Pitch-Fader -8- bestimmen Sie das Tempo des Tracks.
9. LINEFADER
Mit dem Linefader -9- wird die Ausgangslautstärke für Kanal 1 & 2 eingestellt.
10. CROSSFADER
Mit dem Crossfader -10- blendet man zwischen dem linken und rechten Kanal über.
11. JOG WHEEL
Das Jog Wheel -11- ist standardmäßig im Pitch Bend-Modus aktiv. Die Oberäche ist berührungsempndlich und reagiert auf die Körperspannung.
Durch Drehen des Jog Wheel-Rands kann ein Pitch Bend ausgeführt werden.
SHIFT: Durch gleichzeitiges Drücken von SHIFT -7- + Drehen des Jog Wheel -11- führen Sie die SKIP/Quick-Search-Funktion (schnelles Spulen) aus.
12. PERFORMANCE PADS
Die Performance Pads -12- sind farbcodierte Drum Pads, welche den jeweils ausgewählten Performance Modus triggern. Die verschiedenen
Performance-Modi können über Halten der Mode-Taste -19- und gleichzeitiges Drücken des gewünschten Performance Pad-Modus -12- (siehe
Beschriftung) aktiviert werden.
FOLGENDE PERFOMANCE-MODES STEHEN ZUR AUSWAHL:
Hot Cue-Modus = Triggert die 4 verfügbaren Cue-Punkte pro Deck und die Pads leuchten in den entsprechend angezeigten Farben.
SHIFT: Durch Drücken von SHIFT -7- und des jeweiligen Cue Pads, wird der ausgewählte Cue-Punkt gelöscht.
PRO: Mit Serato DJ Pro können Sie bis zu 8 Hot Cues pro Deck einrichten.
Auto-Loop-Modus = Jedes der 4 Performance Pads in der ersten Reihe hat eine unterschiedliche Loop-Länge. Durch Drücken der Pads wird die
gewünschte Loop-Länge sofort aktiviert, erneutes Drücken deaktiviert den Auto Loop. Die 4 voreingestellten Loop-Größen auf den Drum Pads
können über die Parameter-Tasten -15- geändert werden.
Die Performance Pads in der zweiten Reihe (5-8) sind wie folgt belegt:
- Pad 5: Verschieben des ausgewählten Loops in der Spur nach hinten
- Pad 6: Einstellen des Verkleinerungsparameters, um den ausgewählten Loop in der Spur zu verschieben
- Pad 7: Einstellen des Vergrößerungsparameters, um den ausgewählten Loop in der Spur zu verschieben
- Pad 8: Verschieben des ausgewählten Loops im Track vorwärts
PRO: Mit Serato DJ Pro können Sie über die Parameter-Tasten -15- den ausgewählten Loop zudem halbieren oder verdoppeln.
Manual Loop-Modus = Die 4 Performance Pads in der ersten Reihe sind mit den folgenden Funktionen belegt:
- Pad 1: Loop-Startpunkt setzen
- Pad 2: Loop-Endpunkt setzen
- Pad 3: Loop ein/aus
- Pad 4: Sprung zu aktiviertem Loop-Startpunkt, erneutes Drücken von Pad 4 deaktiviert den Loop
PRO: In Serato DJ Pro sind die Pads in der zweiten Reihe wie folgt zugewiesen:
- Pad 5: Aufwärts-Scrollen durch Loops
- Pad 6: Abwärts-Scrollen durch Loops
- Pad 6: Aktivierten Loop in leerem Loop-Slot speichern
- Pad 8: Nicht zugewiesen
Sampler-Modus = Triggert das jeweilige Sample in der Sample-Bank über die 4 Drum-Pads -12-.
SHIFT: Wenn Sie SHIFT -7 + das aktive Sample-Drum-Pad drücken, wird die Wiedergabe des Samples gestoppt.
PRO: Mit Serato DJ Pro können Sie bis zu 8 Samples in die Sample-Bank laden.
HINWEIS!
In Serato DJ Lite haben Sie nur Zugriff auf die 4 oben aufgeführten Performance-Modi. Mit Ausnahme des Auto-Loop-Modus sind die
Performance Pads in der zweiten Reihe (5-8) in jedem DJ Lite Performance-Modus mit der gleichen Funktion belegt:
- Pad 5: Rückwärtslauf ein/aus
- Pad 6: Gedrückt halten, um den Track zurückzuspulen
- Pad 7: Gedrückt halten, um den Track vorzuspulen
- Pad 8: Abspielen ab temporär gesetztem Cue-Punkt, bei nicht gesetztem Cue wird automatisch der Start-Cue-Punkt auf den Anfang des
Tracks gesetzt und ab dort abgespielt (CUP – Cue and Play)
DEUTSCH
11
Page 12

Wenn Sie ein Serato DJ Pro-Benutzer sind, haben Sie Zugriff auf 4 weitere DJ Pro Performance-Modi, in der zweiten Reihe des Performance
Pad Bereichs -12-.
PRO P’n’T: In Kombination mit dem Pitch’n’Time Expansion Pack können Sie Ihre Cues in verschiedenen Tonarten über die Performance Pads
-12- spielen. Es stehen 3 Skalen zur Verfügung. Um zwischen den Skalen zu wechseln, drücken Sie die linke oder rechte Parametertaste -15-, des
jeweiligen Kanals. Das Pad mit dem Grundton ist immer weiß beleuchtet und der Cue-Punkt wird in der regulären Tonhöhe gespielt.
SHIFT: Um einen anderen Cue-Punkt auszuwählen, halten Sie die SHIFT-Taste -7- gedrückt und drücken Sie gleichzeitig das gewünschte Performance
Pad -12- (Hot Cue).
PRO: Scratch-Bank-Modus = Im Scratch-Bank-Modus können Sie jedem der 8 Performance Pads eine Audiodatei aus Ihrer Serato DJ Pro-Bibliothek
zuweisen. Wenn ein Pad gedrückt wird, wird die jeweilige Datei auf das Deck geladen. Die Pads auf der linken Seite werden auf Deck 1 und die Pads
auf der rechten Seite werden auf Deck 2 geladen. Um Ihre Scratch-Bank-Dateien einzurichten, klicken Sie auf das Scratch-Bank-Symbol in der
oberen Leiste von Serato DJ Pro. Dort wird Ihnen das Scratch-Bank-Panel angezeigt. In diesem Panel können Sie die gewünschten Audiodateien
in die jeweiligen Scratch-Bänke laden oder auswerfen und Ihre persönlichen Einstellungen festlegen. Die Einstellungen umfassen den Startpunkt,
Wiederholung an/aus und Key-Lock an/aus. Durch Klicken auf die Schaltäche in der oberen linken Ecke des Scratch-Bank-Panels können Sie
zwischen der erweiterten und der einfachen Ansicht umschalten.
SHIFT: Halten Sie die SHIFT-Taste -7- gedrückt und klicken Sie auf ein beliebiges Scratch-Bank-Pad, um die aktuell geladene Datei zu löschen und
den zuletzt auf dieses Deck geladenen Titel erneut zu laden.
PRO: Loop Roll-Modus = Jedes Performance Pad in der ersten Reihe (1-4) aktiviert/deaktiviert einen Loop Roll, wenn das Pad gehalten wird. Jedem
Pad ist eine bestimmte Loop-Länge von 1/8 - 1 zugeordnet. Die Pads in der zweiten Reihe (5-8) steuern hier die Beat-Jump-Funktion.
- Pad 5: Beat Jump rückwärts
- Pad 6: Einstellen des Verkleinerungsparameters des Beat Jump
- Pad 7: Einstellen des Vergrößerungsparameters des Beat Jump
- Pad 8: Beat Jump vorwärts
PRO: Beat Grid-Modus = Im Beat-Grid-Modus können Sie das Raster und das Timing der Spur an den ausgewählten Song anpassen. Mit den Pads
in der ersten Reihe (1-4) stellen Sie das Raster der Spur ein und mit den Pads in der zweiten Reihe (5-8) bestimmen Sie das Timing.
13. VINYL MODUS TASTE
Über die Vinyl Mode-Taste -13- wechseln Sie vom Pitch-Bend-Modus in den Vinyl-Modus, in dem Sie über die Jog Wheels -11- nun die ScratchFunktion ausüben können.
PRO SHIFT: Durch Drücken der SHIFT-Taste -7- + der Vinyl-Taste -13- aktivieren/deaktivieren Sie den Slip Modus. Ist der Slip Modus aktiv, so setzt
der Track nach diversen Aktionen (Cue Punkte oder Scratches) genau an der Stelle ein, an der sich der Track benden würde, wenn Sie keine
Aktionen ausgeführt hätten.
14. KEY LOCK-TASTE
Die Key Lock-Taste -14- aktiviert/deaktiviert die Key Lock-Funktion.
PRO P’n’T SHIFT: In Kombination mit dem Pitch‘n‘Time Expansion Pack können Sie durch Drücken der SHIFT-Taste -7- + Key Lock-Taste -14- die
Key Sync-Funktion aktivieren/deaktivieren. Dies erlaubt Ihnen, die Tonhöhe des jeweiligen Tracks an die Tonhöhe des Tracks im anderen Deck
bestmöglich anzupassen.
15. PARAMETER-TASTEN (PRO PARAMETER)
Mit den Parameter-Tasten -15- kontrollieren Sie die Parameter-Funktionen jedes Kanals, abhängig vom ausgewählten Modus (z.B. FX Parameter-Einstellung).
PRO SHIFT: Durch Drücken von SHIFT -7- + Parameter-Tasten -15- können Sie die Parameter-Funktionen der 2. Ebene, abhängig vom ausgewählten
Modus, einstellen.
16. LOOP-ENCODER
Durch Drehen des Loop-Encoders -16- stellen Sie die gewünschte Looplänge (1/32-32 Takte) ein. Drücken des LOOP-Encoders -16- aktiviert die
zuvor ausgewählte Looplänge, erneutes Drücken deaktiviert den Loop.
SHIFT: Durch Halten der SHIFT-Taste -7- und Drehen des jeweiligen Loop Encoders -16-, stellen Sie den Beat Multiplier-Wert für die SoftwareEffekte des jeweiligen Kanals ein.
DEUTSCH
SHIFT: Durch Halten der SHIFT-Taste -7- und rhytmisches Drücken des Loop-Encoders -16-, können Sie die Taktung der Software-Effekte manuell eingeben.
17.FX ON-TASTE
Mit der FX ON-Taste -17- aktievieren/deaktivieren Sie die 3 jeweils ausgewählten Software-Effekte in Ihrer Effektbank.
SHIFT: Durch Halten der SHIFT-Taste -7- und Drücken der FX ON-Tasten -17-, können Sie den gewüschten Software-Effekt für die jeweilige Effekbank
auswählen.
18. FX-REGLER
Mit dem FX-Regler -18- regulieren Sie den Effektanteil (Tiefe), der jeweils aktivierten Effekte in Ihrer Effektbank.
19. MODE-TASTE
Durch Halten der Mode-Taste -19- kommen Sie in die Performance Pad-Modus-Auswahl.
Hier können Sie über das jeweilige Drum Pad Ihren gewünschten Performance-Modus auswählen (siehe auch 12. Performance-Pads).
PRO SHIFT: Durch Halten der SHIFT-Taste -7- und Drücken der MODE-Tasten -19- gelangen Sie in den User Modus. Hier haben Sie die Möglichkeit,
die Performance Pads -12- nach Ihren Wünschen selbst zuzuorden.
20. SYNC-TASTE
Die SYNC-Taste -18- erlaubt es, den BPM Wert eines Tracks automatisch an das andere Deck anzupassen.
SHIFT: Um SYNC wieder zu deaktivieren, halten Sie SHIFT -7- + die SYNC-Taste -20-.
21. CUE-TASTE
Mit der CUE-Taste -21- erstellen und triggern Sie einen temporären Cue Punkt. Dieser wird durch einen weißen Cue Marker dargestellt. Wenn die
CUE-Taste -21- während der Wiedergabe gedrückt wird, stoppt die Wiedergabe und springt automatisch zum temporär gesetzten Cue Punkt zurück
(CUE Play-Mode). Wenn Sie die Wiedergabe pausieren und dann die CUE-Taste -21- drücken, wird ein neuer Cue Punkt an dieser Track-Position
erstellt (CUE Pause-Mode).
22. PLAY/PAUSE-TASTE
Die Play/Pause-Tasten -22- starten/pausieren die Wiedergabe des jeweiligen Decks.
23. MASTER-AUSGANG (CINCH)
Ihre Hauptanlage (z.B. aktive Lautsprecher) wird an den Master-Ausgang (Cinch) -23- angeschlossen und über den Master Lautstärke-Regler -24- geregelt.
24. MASTER LAUTSTÄRKE-REGLER
Mit dem Master Lautstärke-Regler -24- stellen Sie die Master Ausgangslautstärke ein.
25. KOPFHÖRER MIX-REGLER
Der Kopfhörer Mix-Regler -25- mischt das Lautstärkeverhältnis zwischen Kanal- und Master-Signal im Kopfhörer.
- Links = Cue
- Mittelstellung = 50/50 Mischverhältnis
- Rechts = Master
12
Page 13

26. KOPFHÖRER LAUTSTÄRKE-REGLER
Mit dem Kopfhörer Lautstärke-Regler -26- stellen Sie die Lautstärke Ihres Kopfhörersignals ein.
27. KOPFHÖRER-AUSGANG
Der Kopfhörer-Ausgang -27- dient zum anschließen Ihres Kopfhörers.
28. USB-A “IOS” PORT
Der USB-A “iOS” Port -28- dient zum Anschluss eines “iOS” Gerätes. Schließen Sie bitte zusätzlich ein USB-Netzteil an den USB-B PC/Power Port -30- an.
HINWEIS!
Wenn Sie ein “iOS” Gerät nutzen möchten, achten Sie darauf, dass der USB-Quellen-Schalter -29- auf “iOS” gestellt ist.
29. USB-QUELLEN-SCHALTER
Mit dem USB-Quelle-Schalter -29- wechseln Sie zwischen dem USB-Modus (Computer- oder “iOS”-Betrieb).
30. USB-B PC/POWER PORT
Der USB-B PC/Power Port -30- dient sowohl zum Anschluß eines Computers, als auch zum Anschluss eines USB-Netzkabels, um Ihr “iOS” Gerät
über den Reloop Ready aufzuladen.
HINWEIS
Wenn Sie einen Computer nutzen möchten, achten Sie darauf, dass der USB-Quellen-Schalter -29- auf PC gestellt ist.
31. KENSINGTON LOCK
Das Kensington Lock -31- dient zur Diebstahlsicherung Ihres Reloop Ready.
HINWEIS
PRO: Erfordert die Serato DJ Pro-Version, um die Pro-Funktionen und Performance-Modi freizuschalten.
P’n’T: Erfordert das Serato Pitch‘n‘Time Expansion Pack.
SYSTEMVORAUSSETZUNGEN:
Die aktuellen Serato DJ Lite & DJ Pro Systemvoraussetzungen für Mac oder Windows können Sie jederzeit auf serato.com einsehen.
Die aktuellen djay Systemvoraussetzungen für “iOS”/”iPadOS”, Android, Mac oder Windows können Sie jederzeit auf algoriddim.com einsehen.
TECHNISCHE DATEN:
Sound Card Resolution: ............................ 24bit / 48kHz
Frequency Response: ................................20Hz-20kHz
Signal to Noise Ratio:................................95DB (USB)
Total Harmonic Distortion: .......................<0.1%
Master Out: .................................................RCA
Headphone Out: .........................................3,5mm (1/8 Jack)
Power: .......................................................... DC-5V / 2A USB-B
Power Consumption iOS connection: ..... DC-5V / 2A USB-B
Power Consumption PC connection: ...... DC-5V / 500mA USB-B
Dimensions: .................................................325mm x 48mm x 220mm
Gewicht: .......................................................1,143 kg
iPhone, iPad, iPod touch, iTunes, Mac and Mac OS are registered trademarks of Apple Inc. in the U.S. and other countries.
App Store is a service mark of Apple Inc.
iOS is a trademark containing Cisco trademark signs in the U.S. and other countries.
Windows is a registered trademark of Microsoft Corporation in the United States and other countries.
Serato DJ Lite, Serato DJ Intro, Serato DJ Pro, Serato DJ and Scratch Live are registered trademarks of Serato Limited.
Beatport is a trademark of Beatport, LLC.
Soundcloud is a trademark of SoundCloud Limited.
djay is a registered trademark of Algoriddim GmbH.
Tidal is a trademark of Aspiro AB.
Beatsource is a trademark of Beatsource, LLC.
Android, YouTube, Google Play and the Google Play logo are registered trademarks of Google Inc.
DEUTSCH
13
Page 14

ATTENTION ! Pour votre propre sécurité, veuillez lire attentivement ce mode d’emploi avant la première utilisation ! Toutes les personnes
chargées de l’installation, de la mise en service, de l’utilisation, de l’entretien et la maintenance de cet appareil doivent posséder les
qualications nécessaires et respecter les instructions de ce mode d’emploi. Ce produit est conforme aux directives européennes et
nationales, la conformité a été certiée et les déclarations et documents sont en possession du fabricant.
Retirez la Reloop Ready de son emballage. Avant la première mise en service, vériez le bon état de l’appareil. Si le boîtier ou le câble sont
endommagés, n’utilisez pas l’appareil et contactez votre revendeur.
CONSIGNES DE SÉCURITÉ
ATTENTION !
Soyez particulièrement vigilant lors des branchements avec la tension secteur 100-240 V 50/60 Hz. Une décharge électrique à cette tension
peut être mortelle ! La garantie exclu tous les dégâts dus au non-respect des instructions de ce mode d’emploi. Le fabricant décline toute
responsabilité pour les dégâts matériels et personnels dus à un usage incorrect ou au non-respect des consignes de sécurité.
AVERTISSEMENT !
Pour éviter tout risque d’incendie ou de décharge électrique, n’exposez jamais cet appareil à l’humidité, à l’eau ou à d’autres liquides !
N’ouvrez jamais le boîtier !
- Cet appareil a quitté l’usine de fabrication en parfait état. An de conserver cet état et assurer la sécurité de fonctionnement, l’utilisateur doit
absolument respecter les consignes de sécurité et les avertissements indiqués dans ce mode d’emploi.
- Pour des raisons de sécurité et de certication (CE), il est interdit de transformer ou modier cet appareil. Tous les dégâts dus à une modication
de cet appareil ne sont pas couverts par la garantie.
- Le boîtier ne contient aucune pièce nécessitant un entretien, à l’exception de pièces d’usure pouvant être remplacées de l’extérieur. La
maintenance doit exclusivement être effectuée par du personnel qualié an de conserver les droits de garantie !
- Les fusibles doivent uniquement être remplacés par des fusibles de même type, dotés de caractéristiques de déclenchement et d’un ampérage identique.
- Veillez à n’effectuer le raccordement secteur qu’une fois l’installation terminée.
- Utilisez uniquement des câbles conformes. Veillez à ce que toutes les ches et douilles soient bien vissées et correctement connectées. Si vous
avez des questions, contactez votre revendeur.
- Veillez à ne pas coincer ou endommager le cordon d’alimentation par des arêtes tranchantes lorsque vous installez l’appareil.
- Prenez garde à ce que le cordon électrique n’entre pas en contact avec d’autres câbles et soyez prudent lorsque vous manipulez des lignes ou
des prises électriques. Ne touchez jamais ces éléments avec des mains humides !
- Insérez uniquement le cordon d’alimentation dans des prises électriques de sécurité. La source de tension utilisée doit uniquement être une
prise électrique en ordre du réseau d’alimentation publique.
- Débranchez l’appareil lorsque vous ne l’utilisez pas ou pour le nettoyer ! Pour débrancher l’appareil, tirez toujours sur la prise, jamais sur le câble !
- Placez l’appareil sur une surface plane, stable et difcilement inammable. En cas de larsen, éloignez les enceintes de l’appareil.
- Évitez tous les chocs et l’emploi de la force lors de l’installation et l’utilisation de l’appareil.
- Installez l’appareil dans un endroit à l’abri de la chaleur, de l’humidité et de la poussière. Ne laissez pas traîner les câbles pour votre sécurité
personnelle et celle de tiers !
- Ne placez jamais des récipients de liquides susceptibles de se renverser sur l’appareil ou à proximité directe. En cas d’inltration de liquides
dans le boîtier, retirez immédiatement la che électrique. Faites contrôler l’appareil par un technicien qualié avant de le réutiliser. La garantie
exclu tous les dégâts dus aux inltrations de liquides.
- N’utilisez pas l’appareil dans un environnement extrêmement chaud (plus de 35°C) ou froid (sous 5° C). N’exposez pas l’appareil directement
aux rayons solaires ou à des sources de chaleur telles que radiateurs, fours, etc. (également valable lors du transport). Veillez à ne pas obstruer
les ventilateurs ou les fentes de ventilation. Assurez toujours une ventilation convenable.
- N’utilisez pas l’appareil lorsqu’il est amené d’une pièce froide dans une pièce chaude. L’eau de condensation peut détruire votre appareil. Laissez
l’appareil hors tension jusqu’à ce qu’il ait atteint la température ambiante !
- Ne nettoyez jamais les touches et curseurs avec des produits aérosols ou gras. Utilisez uniquement un chiffon légèrement humide, jamais de
solvants ou d’essence.
FRANÇAISFRANÇAIS
- Utilisez l’emballage original pour transporter l’appareil.
- Réglez d’abord les curseurs de réglage et de volume de votre ampli au minimum et les interrupteurs des enceintes sur „OFF“. Attendez 8 à 10
secondes avant d’augmenter le volume an d’éviter d’endommager les enceintes et le diviseur de fréquence.
- Les appareils électriques ne sont pas des jouets. Soyez particulièrement vigilants en présence d’enfants.
- Les directives de prévention des accidents de l’association des fédérations professionnelles doivent être respectées dans les établissements commerciaux.
- Dans les écoles, instituts de formation, ateliers de loisirs etc. l’utilisation de l’appareil doit être effectuée sous la surveillance de personnel
qualié.
- Conservez ce mode d’emploi pour le consulter en cas de questions ou de problèmes.
14
UTILISATION CONFORME
Cette unité
- Cet appareil est une console DJ à 2 canaux qui permet de contrôler et de mixer des signaux audio. La console doit être connectée entre la source
de signal et l’ampli ou les haut-parleurs actifs.
- Toute utilisation non conforme peut endommager le produit et annuler les droits de garantie. En outre, toute utilisation autre que celle décrite
dans ce mode d’emploi peut être source de courts-circuits, incendies, décharge électrique, etc.
- Le numéro de série attribué par le fabricant ne doit jamais être effacé sous peine d’annuler les droits de garantie.
MAINTENANCE
- Contrôlez régulièrement le bon état de l’appareil (boîtier, cordon) et l’usure éventuelle des molettes et curseurs.
- Si vous supposez que l’appareil ne peut plus être utilisé en toute sécurité, mettez l’appareil hors-service et assurez-le contre toute réutilisation
involontaire. Débranchez la che électrique de la prise de courant !
- La sécurité d’emploi est susceptible d’être affectée lorsque l’appareil est visiblement endommagé, ne fonctionne plus correctement, après un
stockage prolongé dans des conditions défavorable ou après une forte sollicitation de transport.
Page 15

SURFACE
17 17
SEL
SEL SEL
USB
16
FX BEATS // TAP
GAIN
HIGH
8 8
LOW
GAIN
1
HIGH
2
LOW
2
4
4
3
iOS
13 13
PnT
PRO
KEY SYNC
SLIP
11 11
PARAMETER 2
5
6 6
PRO
7
5
9
10
USER MODE
PRO
SYNC OFF CENSOR
20
START
22 22
1818
PRO
KEY SYNC
SLIP
USER MODE
1919 20
SEL
SEL SEL
1414
PnT
1212
PRO
SYNC OFF CENSOR
16
FX BEATS // TAP
HEADPHONES CUE VOL CUE MIX MASTER VOL MASTER OUT
1515
START
PARAMETER 2
PRO
2121
PANNEAU DROIT
PANNEAU GAUCHE
293031
DÉSIGNATIONS:
1. Régulateur Gain
2. Égaliseur (2 voies)
3. Codeur de navigation
4. Touche Track Load
5. Filtre
6. Touche Cue du casque
7. Touche SHIFT
8. Pitch-Fader
9. Linefader
10. Crossfader
11. Roulette de navigation
12. Performance Pads
13. Touche Vinyl Mode
14. Touche Key Lock
15. Touches des paramètres
16. Codeur Loop
17. Touche FX On
18. Régulateur FX
19. Touche Mode-Taste
20. Touche Sync
21. Touche CUE
22. Touche Play/Pause
23. Sortie maître (Cinch)
28
27
26
232425
24. Régulateur du volume maître
25. Régulateur de mixage du casque
26. Régulateur de volume du casque
27. Sortie du casque (jack 3,5 mm)
28. Port USB-A “iOS”
29. Commutateur de source USB
30. Port USB-B PC/Power
31. Verrou Kensington
CONTENU DE LA LIVRAISON :
- Reloop Ready
- Câble Cinch
- Câble USB
- Mode d’emploi
FRANÇAIS
15
Page 16

RACCORDEMENT DU RELOOP READY:
SORTIE MAÎTRE
Connectez votre installation principale (p. ex. enceinte active) à la sortie maître -23-.
SORTIE DU CASQUE
Connectez votre casque à la sortie du casque -27-.
CONNEXION USB
Si vous désirez utiliser votre Reloop Ready avec un
ordinateur, connectez ce dernier au port USB-B PC/Power
-30- et mettez le commutateur de source USB -29- sur PC.
INDICATION!
Si vous souhaitez utiliser l‘application djay avec un
appareil iOS/iPadOS, connectez votre Reloop Ready au
port USB-A iOS -28- ainsi qu‘à un bloc d‘alimentation
USB (5V, 2A) au port USB-B -30- et sélectionnez iOS via
le commutateur de source USB -29-.
SEL
USB
SEL SEL
GAIN
GAIN
FX BEATS // TAP
HIGH
HIGH
LOW
LOW
SEL
SEL SEL
FX BEATS // TAP
INSTALLATION DU LOGICIEL & CONNEXION
INSTALLATION DE SERATO DJ LITE POUR MAC OS X
- Rendez-vous sur Serato.com et sélectionnez «Serato DJ Lite Download» dans Produits.
- Si vous n‘êtes pas déjà inscrit sur Serato.com, veuillez créer votre compte.
- Après vous être connecté et avoir cliqué sur Produits ¬ Serato DJ Lite, la dernière version de Serato DJ Lite et une bannière de téléchargement
sur la droite s‘afchent.
- Cliquez sur Download pour télécharger le chier d‘installation.
- Une fois le téléchargement terminé, vous pouvez commencer l‘installation.
- Lisez les CGV et cliquez sur «Accepter» lorsque vous avez terminé.
- Suivez les étapes indiquées jusqu‘à ce que l‘installation soit terminée.
- Votre logiciel Serato DJ Lite se trouve dans le dossier «Programmes».
FRANÇAIS
INDICATION!
Si vous utilisez MacOS High Sierra ou une version plus récente, il vous faudra peut-être activer l‘accès à Serato dans vos paramètres de
sécurité.
INSTALLATION DE SERATO DJ LITE POUR WINDOWS
- Rendez-vous sur Serato.com et sélectionnez «Serato DJ Lite Download» dans Produits.
- Si vous n‘êtes pas déjà inscrit sur Serato.com, veuillez créer votre compte.
- Après vous être connecté et avoir cliqué sur Produits ¬ Serato DJ Lite, la dernière version de Serato DJ Lite et une bannière de téléchargement
sur la droite s‘afchent.
- Cliquez sur Download pour télécharger le chier d‘installation.
- L‘installateur Windows pour Serato DJ Lite se présente sous la forme d‘un chier zip archivé qui peut être ouvert avec l‘explorateur Windows.
Vous pouvez également utiliser votre gestionnaire d‘archives préféré, tel que Winzip ou 7zip.
- Une fois le téléchargement terminé, vous pouvez commencer l‘installation.
- Si vous choisissez la méthode de l‘explorateur Windows, vous pouvez double-cliquer sur le chier téléchargé pour afcher l‘exécutable Serato DJ Lite.
- Si vous utilisez un gestionnaire d‘archives tiers, tel que Winzip ou 7zip, vous pouvez faire un clic droit sur le menu contextuel et sélectionner
«Extraire ici», ce qui permettra d‘extraire le chier Serato DJ Lite et de le placer à l‘endroit que vous avez choisi pour enregistrer le chier original.
- Double-cliquez sur le chier exe Serato DJ Lite provenant de l‘archive après avoir ouvert ou extrait l‘archive pour lancer l‘installation de
Serato DJ Lite. Les termes de la licence s‘afchent à présent. Cliquez sur la case «I agree to the license terms and conditions», puis cliquez sur
«Install».
INDICATION!
Sous Windows, il est nécessaire d‘installer un pilote ASIO!
Rendez-vous sur:
https://www.reloop.com/reloop-Ready#headingproduct_view_panel_features
Téléchargez le pilote ASIO et exécutez le chier de pilote téléchargé, puis suivez les étapes d‘installation.
INSTALLATION DE L‘APPLI DJAY POUR IPAD/IPHONE & CONNEXION:
Vous pouvez acheter l’appli djay de la manière suivante dans l’App Store.
- Achetez et téléchargez l’appli djay dans l’App Store.
- Mettez le commutateur de source USB -29- sur iOS.
- Raccordez votre câble de chargement iOS au port USB-A iOS -28- du Reloop Ready et à votre appareil iOS.
- Ouvrez l‘appli djay que vous avez téléchargée.
Votre Reloop Ready est automatiquement détecté et peut à présent être utilisé.
iOS
SLIP
PnT
PRO
KEY SYNC
PRO
USER MODE
START
SYNC OFF CENSOR
HEADPHONES CUE VOL CUE MIX MASTER VOL MASTER OUT
PnT
PRO
PARAMETER 2
PRO
KEY SYNC
SLIP
USER MODE
PRO
SYNC OFF CENSOR
PRO
PARAMETER 2
START
16
Page 17

Attention!
L’ordinateur et les appareils iOS ne peuvent pas être utilisés simultanément. Raccordez toujours le câble USB fourni au port USB-B PC/Power
-30- et connectez-le à un bloc d’alimentation USB. Veuillez n’utiliser que le câble secteur original de votre tablette/smartphone ou utilisez un
bloc d’alimentation (5V, 2,1A) fournissant une alimentation électrique sufsante. Vous pouvez également acheter le bloc d’alimentation USB
suivant comme pièce de rechange: Art. nº: 243382.
COMMANDE :
1. RÉGULATEUR DE GAIN
Le régulateur de gain -1- vous permet de régler le volume du canal.
2. ÉGALISEUR
L’égaliseur 2 voies -2- permet de régler les aigus et les graves pour les canaux 1 & 2.
3.CODEUR DE NAVIGATION
Utilisez le codeur de navigation -3- pour naviguer dans votre bibliothèque. Validez votre choix en appuyant sur le codeur de navigation -3-.
SHIFT: Si vous souhaitez revenir en arrière d’un niveau de menu, appuyez sur SHIFT -7- + codeur de navigation -3-.
4.TOUCHE TRACK LOAD
Appuyez sur les touches Track Load -4-, pour charger la piste sur la platine de votre choix.
5.FILTRE
Les canaux 1 & 2 disposent d’un ltre individuel -5-. Le ltre est hors service en position 12 heures. Une rotation dans le sens horaire génère un
effet Highpass, une rotation dans le sens anti-horaire génère un effet Lowpass.
6.TOUCHE CUE DU CASQUE
Avec les touches Cue du casque -6- vous pouvez pré-écouter le signal audio respectif du canal 1 & 2.
7. TOUCHE SHIFT
La touche SHIFT -7- active les fonctions respectives du 2e niveau, selon l‘étiquetage de l‘appareil.
Indication!
Certaines fonctions du 2. niveau ne peuvent être exécutées qu‘avec la version payante Serato DJ Pro. Vous pouvez les reconnaître grâce à
l‘indication supplémentaire PRO.
8.PITCH-FADER
Le Pitch-Fader -8- permet de dénir le tempo de la piste.
9.LINEFADER
Le Linefader -9- permet de régler le volume de sortir des canaux 1 & 2.
10.CROSSFADER
Le Crossfader -10- permet d’effectuer un fondu enchaîné entre les canaux gauche et droit.
11. ROULETTE DE NAVIGATION
La roulette de navigation -11- est active en standard en mode Pitch Bend. La surface est sensible au contact et réagit à la tension corporelle.
Tournez la roulette de navigation pour effectuer un Pitch Bend.
SHIFT: En tournant simultanément SHIFT -7- + en tournant la roulette de navigation -11-, vous exécutez la fonction SKIP/ Quick-Search (recherche rapide).
12. PERFORMANCE PADS
Les Performance Pads -12- sont des Drum Pads à code couleur qui déclenchent le mode Performance respectivement sélectionné. Les différents
modes Performance peuvent être activés en maintenant les touches Mode -19- et en appuyant simultanément sur le mode Performance Pad -12- de
votre choix (voir inscription).
LES MODES PERFORMANCE SUIVANTS SONT DISPONIBLES:
Mode Hot Cue = déclenche les 4 points de repère (Cue) disponibles pour chaque platine et les Pads s’allument dans les couleurs respectivement afchées.
SHIFT: Appuyez sur SHIFT -7- et le Cue Pad respectif pour supprimer le point de repère (Cue) sélectionné.
PRO: Avec Serato DJ Pro, vous pouvez installer jusqu‘à 8 Hot Cues par platine.
Mode Auto Loop = chacun des 4 Performance Pads de la première rangée a une longueur de boucle différente. Une pression sur les Pads active
immédiatement la longueur de boucle souhaitée, une nouvelle pression désactive l‘Auto Loop. Les 4 tailles de boucle préréglées sur les Drum Pads
peuvent être modiées à l‘aide des touches de paramètres -15-. Les Performance Pads de la deuxième rangée (5-8) sont répartis comme suit:
- Pad 5: déplacement de la boucle sélectionnée vers l‘arrière dans la piste
- Pad 6: réglage du paramètre de réduction pour déplacer la boucle sélectionnée dans la piste
- Pad 7: réglage du paramètre d‘agrandissement pour déplacer la boucle sélectionnée dans la piste
- Pad 8: faire avancer la boucle sélectionnée dans la piste
PRO: Avec Serato DJ Pro, vous pouvez également réduire de moitié ou doubler la boucle sélectionnée en utilisant les touches de paramètres -15-.
Mode Manual Loop = les 4 Performance Pads de la première rangée se voient attribuer les fonctions suivantes:
- Pad 1: dénir le point de départ de la boucle
- Pad 2: dénir le point nal de la boucle
- Pad 3: marche/arrêt de la boucle
- Pad 4: sauter au point de départ de la boucle activée, en appuyant à nouveau sur le pad 4, la boucle est désactivée
PRO: Dans Serato DJ Pro, les pads de la deuxième rangée sont attribués comme suit:
- Pad 5: faire déler les boucles vers le haut
- Pad 6: faire déler les boucles vers le bas
- Pad 6: enregistrer la boucle activée dans l‘emplacement de la boucle vide
- Pad 8: non attribué
Mode Sampler = déclenche le sample respectif dans la banque de samples via les 4 Drum-Pads -12-.
SHIFT: En appuyant sur SHIFT -7 + le Drum-Pad actif arrête la lecture du sample.
PRO: Avec Serato DJ Pro, vous pouvez charger jusqu‘à 8 samples dans la banque de samples.
INDICATION!
Dans Serato DJ Lite, vous n‘avez accès qu‘aux 4 modes de performance énumérés ci-dessus. À l‘exception du mode Auto Loop, les
Performance Pads de la deuxième rangée (5-8) ont la même fonction dans chaque mode de performance DJ Lite:
- Pad 5: retour marche/arrêt
- Pad 6: appuyez et maintenez pour rembobiner la piste
- Pad 7: appuyez et maintenez la touche enfoncée pour faire avancer rapidement la piste
- Pad 8: lecture à partir d‘un point de repère (Cue) déni temporairement, si le repère n‘est pas déni, le point de repère de départ est
automatiquement déni au début de la piste et joué à partir de là (CUP - Cue and Play)
FRANÇAIS
17
Page 18

Si vous êtes un utilisateur de Serato DJ Pro, vous avez accès à 4 autres modes de performance DJ Pro, dans la deuxième rangée de la section
Performance Pad -12-.
PRO P’n’T: = en combinaison avec le Pitch‘n’Time Expansion Pack, vous pouvez jouer vos repères dans différentes tonalités via les Performance
Pads -12-. 3 échelles sont disponibles. Pour passer d‘une échelle à l‘autre, appuyez sur la touche de paramètre gauche ou droite -15-, du canal
correspondant. Le pad avec la note de base est toujours éclairé en blanc et le point de repère est joué à la hauteur régulière.
SHIFT: Pour sélectionner un autre point de repère, appuyez et maintenez enfoncée la touche SHIFT -7- tout en appuyant sur le Performance Pad
-12- (Hot Cue) de votre choix.
PRO: Mode Scratch-Bank = en mode Scratch Bank, vous pouvez attribuer un chier audio de votre bibliothèque Serato DJ Pro à chacun des 8
Performance Pads. Lorsqu‘on appuie sur un pad, le chier correspondant est chargé sur la platine. Les pads du côté gauche sont chargés sur la
platine 1 et les pads du côté droit sont chargés sur la platine 2. Pour congurer vos chiers de banque Scratch, cliquez sur l‘icône de la banque
Scratch dans la barre supérieure du Serato DJ Pro. Vous y verrez le panneau de la banque Scratch. Dans ce panneau, vous pouvez charger ou
éjecter les chiers audio de votre choix dans les banques Scratch respectives et dénir vos paramètres personnels. Les paramètres comprennent
le point de départ, la répétition marche/arrêt et le verrouillage des touches marche/arrêt. Cliquer sur le bouton situé dans le coin supérieur gauche
du panneau de la banque Scratch permet de basculer entre la vue élargie et la vue simple.
SHIFT: Maintenez la touche SHIFT -7- enfoncée et cliquez sur n‘importe quel pad de la banque Scratch pour supprimer le chier actuellement
chargé et recharger la dernière piste chargée sur cette platine.
PRO: Mode Loop Roll = chaque Performance Pad de la première rangée (1-4) active/désactive un Loop Roll lorsque le pad est maintenu. Chaque
pad est affecté à une longueur de boucle déterminée entre 1/ 8/ - 1.
Les pads de la deuxième rangée (5-8) contrôlent ici la fonction Beat-Jump.
- Pad 5: Beat Jump arrière
- Pad 6: réglage du paramètre de réduction du Beat Jump
- Pad 7: réglage du paramètre d‘agrandissement du Beat Jump
- Pad 8: Beat Jump avant
PRO: Mode Beat Grid = en mode Beat Grid, vous pouvez ajuster la grille et le timing de la piste pour qu‘elle corresponde au morceau sélectionné.
Les pads de la première rangée (1-4) permettent de régler la grille de la piste et les pads de la deuxième rangée (5-8) le timing.
13. TOUCHE MODE VINYL
Les touches du mode Vinyl -13- permettent de passer du mode Pitch Bend au mode Vinyl, où vous pouvez maintenant utiliser les roulettes -11- pour
exécuter la fonction Scratch.
PRO SHIFT: Appuyez sur la touche SHIFT -7- + la touche Vinyl -13- pour activer/désactiver le mode Slip. Si le mode Slip est actif, la piste démarre
après diverses actions (points de repère ou scratch) exactement à la position où la piste se trouverait si vous n‘aviez effectué aucune action.
14. TOUCHE KEY LOCK
Les touches Key Lock -14- permettent d‘activer/désactiver la fonction Key Lock.
PRO P’n’T SHIFT: En combinaison avec le Pitch‘n‘Time Expansion Pack, vous pouvez activer/désactiver la fonction Key Sync en appuyant sur la
touche SHIFT -7- + la touche Key Lock. Cela vous permet de faire correspondre au mieux la hauteur de la piste en question à la hauteur de la piste
de l‘autre platine.
15. TOUCHE DE PARAMÈTRES (PARAMÈTRES PRO)
Les touches de paramètres -15- contrôlent les fonctions de paramétrage de chaque canal, en fonction du mode sélectionné (par exemple, paramétrage FX).
PRO SHIFT: En appuyant sur SHIFT -7- + les touches de paramètres -15- vous pouvez modier les fonctions des paramètres de la 2e rangée. Réglez
le niveau en fonction du mode sélectionné.
16. ENCODEUR LOOP
Tournez l‘encodeur Loop -16- pour régler la longueur de Loop de votre choix (1/32-32 mesures). Appuyez sur l‘encodeur LOOP -16- pour activer la
longueur de Loop préréglée, puis appuyez à nouveau pour désactiver le Loop.
SHIFT: En maintenant la touche SHIFT -7- et en tournant l‘encodeur de boucle respectif -16-, vous réglez la valeur du Beat Multiplier pour les effets
logiciels du canal respectif.
FRANÇAIS
SHIFT: En maintenant la touche SHIFT enfoncée -7- et en appuyant rythmiquement sur l‘encodeur de boucle -16-, vous pouvez saisir manuellement
le timing des effets logiciels.
17. TOUCHE FX ON
Les touches FX ON -17- permettent d‘activer/désactiver les 3 effets logiciels sélectionnés dans votre banque d‘effets.
SHIFT: En maintenant enfoncée la touche SHIFT -7- et en appuyant sur les touches FX ON -17-, vous pouvez sélectionner l‘effet logiciel souhaité
pour la banque d‘effets correspondante.
18. RÉGULATEUR FX
Le régulateur FX -18- ajuste la quantité (profondeur) des effets activés dans votre banque d‘effets.
19. TOUCHE MODE
En maintenant les touches Mode -19- enfoncées, vous accédez à la sélection du mode Performance Pad. Vous pouvez y sélectionner le mode
Performance de votre choix via le Drum Pad respectif (voir également 12. Performance-Pads).
PRO SHIFT: En maintenant enfoncé la touche SHIFT -7- et en appuyant sur les touches MODE -19- vous entrez dans le mode Utilisateur. Vous avez
ici la possibilité d‘attribuer les Performance Pads -12- comme vous le désirez.
20. TOUCHE SYNC
La touche SYNC -18- permet d’ajuster automatiquement la valeur BPM d’une piste de l’autre platine.
SHIFT: Pour désactiver SYNC à nouveau, maintenez enfoncées la touche SHIFT -7- + la touche SYNC -20-.
21. TOUCHE CUE
Les touches CUE -21- vous permettent de créer et de déclencher un point de repère temporaire. Un marqueur Cue blanc le représente. Si vous appuyez
sur la touche CUE -21- pendant la lecture, la lecture est arrêtée et revient automatiquement au point de repère déni (mode CUE Play). Si vous mettez
la lecture en pause et appuyez ensuite sur la touche CUE -21-, un nouveau point de repère est créé sur cette position de la piste (mode CUE Pause).
22. TOUCHE PLAY/PAUSE
Les touches Play/Pause -22- démarrent/mettent en pause la lecture de la platine respective.
23. SORTIE MAÎTRE (CINCH)
Votre installation principale (p. ex. enceinte active) est connecté à la sortie maître (Cinch) -23- et réglée par le régulateur du volume maître -24-.
24. RÉGULATEUR DU VOLUME MAÎTRE
Le régulateur de volume maître -24- vous permet de régler le volume de sortie maître.
25. RÉGULATEUR DE MIXAGE DU CASQUE
Le régulateur de mixage du casque -25- mixe la balance du volume entre le canal et le signal maître dans le casque.
- Gauche = Cue
- Position médiane = rapport 50/50
- Droite = maître
18
Page 19

26. RÉGULATEUR DE VOLUME DU CASQUE
Le régulateur de volume du casque -26- permet de régler la volume du signal de votre casque.
27. SORTIE DU CASQUE
La sortie du casque -27- sert à connecter votre casque.
28. PORT USB-A “IOS”
Le port USB-A “iOS” -28- sert à connecter un appareil “iOS”. Veuillez également connecter un bloc d’alimentation au port USB-B PC/Power -30-.
INDICATION!
Si vous voulez utiliser un appareil “iOS”, assurez-vous que le commutateur de source USB -29- soit réglé sur “iOS”.
29. COMMUTATEUR DE SOURCE USB
Le commutateur de source USB -29- vous permet de passer d’un mode USB à l’autre (mode ordinateur ou “iOS”).
30. PORT USB-B PC/POWER
Le port USB-B PC/Power -30- sert autant à connecter un ordinateur qu’à connecter un câble USB an de charger votre appareil «iOS» via le
Reloop Ready.
INDICATION
Si vous voulez utiliser un ordinateur, assurez-vous que le commutateur de source USB -29- soit réglé sur PC.
31. VERROU KENSINGTON
Le verrou Kensington -31- est un dispositif antivol pour votre Reloop Ready.
INDICATION
PRO: Nécessite la version Serato DJ Pro pour débloquer les fonctions et les modes de performance.
P’n’T: Nécessite le Serato Pitch‘n‘Time Expansion Pack.
CONFIGURATION REQUISE:
Vous pouvez vérier à tout moment la conguration actuelle des systèmes Serato DJ Lite & DJ Pro pour Mac ou Windows sur serato.com.
Vous pouvez vérier à tout moment la conguration requise pour «iOS»/ «iPadOS», Mac ou Windows sur algoriddim.com .
CARACTÉRISTIQUES:
Sound Card Resolution: ............................. 24bit / 48kHz
Frequency Response: .................................20Hz-20kHz
Signal to Noise Ratio:.................................95DB (USB)
Total Harmonic Distortion: ........................ <0.1%
Master Out: .................................................. RCA
Headphone Out: .......................................... 3,5mm (1/8 Jack)
Power: ........................................................... DC-5V / 2A USB-B
Power Consumption iOS connection: ...... DC-5V / 2A USB-B
Power Consumption PC connection: ....... DC-5V / 500mA USB-B
Dimensions: .................................................. 325mm x 48mm x 220mm
Gewicht: ........................................................ 1,143 kg
iPhone, iPad, iPod touch, iTunes, Mac and Mac OS are registered trademarks of Apple Inc. in the U.S. and other countries.
App Store is a service mark of Apple Inc.
iOS is a trademark containing Cisco trademark signs in the U.S. and other countries.
Windows is a registered trademark of Microsoft Corporation in the United States and other countries.
Serato DJ Lite, Serato DJ Intro, Serato DJ Pro, Serato DJ and Scratch Live are registered trademarks of Serato Limited.
Beatport is a trademark of Beatport, LLC.
Soundcloud is a trademark of SoundCloud Limited.
djay is a registered trademark of Algoriddim GmbH.
Tidal is a trademark of Aspiro AB.
Beatsource is a trademark of Beatsource, LLC.
Android, YouTube, Google Play and the Google Play logo are registered trademarks of Google Inc.
FRANÇAIS
19
Page 20

¡ATENCIÓN!
En aras de su propia seguridad, ¡lea detenidamente este manual de instrucciones antes de la primera puesta en marcha! Todas las personas
relacionadas con el montaje, la puesta en marcha, la operación, el mantenimiento y la reparación de este equipo deben estar correctamente
cualicadas y haber leído con atención este manual de instrucciones. Este producto cumple con los requisitos de las directivas europeas
y nacionales, se ha comprobado la conformidad y las declaraciones y los documentos correspondientes están en posesión del fabricante.
Extraiga la Reloop Ready de la caja. Antes de la primera puesta en marcha, compruebe si el equipo presenta daños visibles producidos por
el transporte. Si descubre daños en el cable de alimentación o en la carcasa, no ponga en marcha el equipo y contacte con su distribuidor
especializado.
INDICACIONES DE SEGURIDAD
¡ATENCIÓN!
Tenga especial cuidado al trabajar con tensiones de red de AC 100 - 240 V, 50/60Hz. Con estas tensiones, ¡podría sufrir una descarga eléctrica
mortal! Los daños ocasionados por el incumplimiento de este manual de instrucciones anulan el derecho a la garantía. El fabricante no se
hace responsable de los daños materiales o personales provocados por el manejo incorrecto del equipo o por el incumplimiento de las
indicaciones de seguridad.
¡AVISO!
¡Para evitar incendios o descargas eléctricas, no exponga el dispositivo al agua o a ningún tipo de líquidos! ¡Nunca abra la carcasa!
- Este equipo ha salido de fábrica en perfectas condiciones de funcionamiento. Para conservar el equipo en perfecto estado y garantizar un
funcionamiento seguro, el usuario debe respetar las indicaciones de seguridad y de advertencia contenidas en este manual.
- Por razones de seguridad y de licencia (CE) no está permitida la reconstrucción y/o modicación del equipo. La garantía no cubre los daños
provocados por las modicaciones manuales realizadas en el equipo.
- En el interior del equipo no hay ninguna pieza que necesite mantenimiento, a excepción de aquellas piezas que por desgaste deban cambiarse.
El mantenimiento debe ser realizado por personal cualicado; de lo contrario, ¡la garantía queda anulada!
- Los dispositivos de seguridad solo deben reemplazarse por otros dispositivos del mismo tipo, con las mismas características de activación y la
misma corriente nominal.
- Asegúrese de conectar la alimentación después de montar el equipo.
- Utilice siempre y únicamente cables que cumplan con las normativas. Asegúrese de que todos los enchufes y casquillos estén bien jados y
correctamente conectados. En caso de dudas, consulte con su distribuidor.
- Asegúrese de que durante el montaje del producto, el cable de alimentación no se dobla ni sufre daños causados por cantos alados.
- ¡No permita que el cable de red entre en contacto con otros cables! Tenga extremo cuidado al manejar el cable de red y otras conexiones. ¡Nunca
toque estas piezas con las manos mojadas!
- Inserte el cable de alimentación solo en enchufes de tipo “Schuko”. Como fuente de tensión solo debe emplearse una toma de corriente
adecuada de la red eléctrica pública.
- Desconecte el equipo de la red cuando no lo utilice y antes de los trabajos de limpieza. Nunca toque la supercie de contacto del enchufe y
nunca tire de la línea de red.
- Coloque el equipo sobre una supercie horizontal, estable y difícilmente inamable.
- Evite las vibraciones y cualquier uso violento durante la instalación o la puesta en marcha del equipo.
- Al elegir el lugar de instalación, asegúrese de que el equipo no está expuesto a altas temperaturas, a humedad y/o a polvo. Asegúrese de que no
haya cables tirados por el suelo. ¡Estos cables ponen en peligro su seguridad y la de de terceros!
- No coloque en el equipo o en sus inmediaciones recipientes que contengan líquido y puedan volcar con facilidad. En caso de que penetre líquido
en el interior del equipo, retire de inmediato el enchufe de la red. Haga que un técnico de servicio cualicado compruebe el equipo antes de
volverlo a utilizar. Los daños causados por el derrame de líquidos quedan excluidos de la garantía.
- No utilice el equipo en ambientes con una temperatura muy alta (superior a 35°) o muy baja (inferior a 5°). Proteja el equipo de la luz solar
directa y de fuentes de calor como radiadores, hornos, etc. (también durante el transporte en vehículos cerrados). Nunca cubra los ventiladores
ni los oricios de ventilación previstos. Asegúrese de que siempre haya suciente ventilación.
- El equipo no debe ponerse en funcionamiento si se traslada de un lugar frío a otro con altas temperatura. El agua condensada que se forme
ESPAÑOL
puede destruir el equipo en ciertas circunstancias. ¡Deje el equipo desconectado hasta que alcance la temperatura ambiente!
- Los reguladores e interruptores nunca deben limpiarse con lubricantes o pulverizando soluciones limpiadoras. Este equipo sólo debe limpiarse
con un paño húmedo. No utilice nunca disolventes o bencina de lavado.
- En caso de trasladar el equipo, debe transportarse en el embalaje original.
- Al principio, los controles de crossfade y volumen de su amplicador deben estar ajustados al mínimo y los interruptores de los altavoces deben
estar en la posición „OFF“. Espere de 8 a 10 segundos antes de subir el volumen para evitar daños en los altavoces y el cruce.
- Los equipos que funcionan con tensión de red no deben estar al alcance de los niños. Por este motivo tenga especial cuidado cuando haya niños cerca.
- En establecimientos industriales debe prestarse atención a las disposiciones de prevención de accidentes de la asociación profesional industrial.
- En escuelas, instituciones de aprendizaje y talleres de tiempo libre o bricolaje, el funcionamiento del equipo debe estar supervisado por personal
capacitado.
- Guarde bien este manual de instrucciones para cuestiones y problemas que puedan surgir posteriormente.
20
USO CONFORME AL DESTINO PREVISTO
- Este dispositivo es una consola de DJ de 2 canales que le permite controlar y mezclar las señales de audio. El equipo se conecta entre la fuente
de señal y un transformador de sonido de audio o altavoces activos.
- Si se utiliza el equipo de una manera distinta a la descrita en este manual de instrucciones, podrían producirse daños que anularán la garantía.
Además, cualquier otro uso podría resultar peligroso y provocar cortocircuitos, incendios, descargas eléctricas, etc.
- Nunca se debe retirar el número de serie del fabricante; de lo contrario, la garantía queda anulada.
MANTENIMIENTO
- Compruebe regularmente la seguridad técnica del equipo en cuanto a daños del cable de red o de la carcasa, así como el deterioro de las piezas
de desgaste y de los reguladores giratorios y deslizantes.
- Si se sospecha que no es posible un funcionamiento seguro, desconecte el equipo y asegúrelo contra una conexión involuntaria. ¡Retire el
enchufe de la caja de enchufe!
- Es posible que el equipo ya no funcione de manera segura si presenta daños visibles o que ya ni siquiera funcione después haberlo guardado
durante un largo período de tiempo en condiciones desfavorables o después de haberlo transportado de manera inadecuada.
Page 21

CONTROLES
17 17
SEL
SEL SEL
USB
16
FX BEATS // TAP
GAIN
HIGH
8 8
LOW
GAIN
1
HIGH
2
LOW
2
4
4
3
iOS
13 13
PnT
PRO
KEY SYNC
SLIP
11 11
PARAMETER 2
5
6 6
PRO
7
5
9
10
USER MODE
PRO
SYNC OFF CENSOR
20
START
22 22
1818
PRO
KEY SYNC
SLIP
USER MODE
1919 20
SEL
SEL SEL
1414
PnT
1212
PRO
SYNC OFF CENSOR
16
FX BEATS // TAP
HEADPHONES CUE VOL CUE MIX MASTER VOL MASTER OUT
1515
START
PARAMETER 2
PRO
2121
PARTE DERECHO
PARTE IZQZIERDA
293031
DESIGNACIONES:
1. Control de ganancia
2. Ecualizador (2 bandas)
3. Mando de exploración de listas y canciones
4. Botones de carga de pistas
5. Filtro
6. Botones de control de Cue por auriculares
7. Shift (acceso a funciones alternativas)
8. Pitch Fader
9. Linefader
10. Crossfader
11. Jog Wheel
12. Performance Pads
13. Vinyl
14. Key Lock
15. Botones de control de parámetros
16. Mando de control de bucles
17. Botones de FX On
18. Control de nivel de efectos
19. Selección de Modo
20. Sync
21. Señal
22. Reproducción/ Pausa
23. Master Out (RCA)
28
26
27
24. Volumen General
25. Control de la mezcla de auriculares
26. Volumen de señal de auriculares
27. Salida de auriculares (conector de 3,5 mm)
28. Puerto USB-A para „iOS“
29. Interruptor de fuente USB
30. Puerto de alimentación / PC USB-B
31. Ranura antirobo Kensington
SCOPE OF DELIVERY:
- Reloop Ready
- RCA Cable
- USB Cable
- Manual de operaciones
232425
ESPAÑOL
21
Page 22

CONEXIÓN DEL RELOOP READY:
MASTER OUT
Conecte su sistema principal (por ejemplo, altavoces
activos) a Master Out (RCA) -23-.
AURICULARES / CUE OUT
Conecte sus auriculares a Headphones Out -27-.
CONEXIÓN USB
Si desea usar su Reloop Ready con un ordenador,
conéctelo al puerto USB-B PC / Power -30- y ponga el
interruptor USB Source Switch -29- en la posición PC.
¡NOTA!
Si desea utilizar la aplicación djay con un dispositivo
iOS / iPadOS, conecte su Reloop Ready al puerto
USB-A iOS -28-, así como una fuente de alimentación
USB (5V, 2A) al puerto USB-B Port -30- y seleccione
iOS a través del conmutador de USB Source
Switch-29-.
GAIN
SEL
SEL SEL
USB
FX BEATS // TAP
GAIN
HIGH
HIGH
LOW
LOW
SEL
SEL SEL
FX BEATS // TAP
INSTALACIÓN DEL SOFTWARE Y CONEXIÓN
INSTALACIÓN DE SERATO DJ LITE MAC OS X
- Vaya a www.serato.com, haga clic en productos y seleccione la descarga de “Serato DJ Lite”.
- Si aún no ha iniciado sesión en www.serato.com, cree una cuenta.
- Después de iniciar sesión y hacer clic en Productos ¬ Serato DJ Lite, verá la última versión de Serato DJ Lite disponible y un botón de descarga
en el lado derecho.
- Haga clic en el botón para descargar el archivo de instalación.
- Una vez que se complete la descarga, puede iniciar la instalación.
- Lea los términos y condiciones y haga clic en „Aceptar“ cuando haya terminado.
- Siga los diferentes pasos hasta completar la instalación.
- Luego, encontrará su software Serato DJ Lite en la carpeta Aplicaciones.
ESPAÑOL
NOTA
Si está ejecutando macOS High Sierra o superior, es posible que deba habilitar el acceso a Serato en su conguración de seguridad.
INSTALACIÓN SERATO DJ LITE EN WINDOWS
- Vaya a Serato.com, haga clic en productos y seleccione la descarga para “Serato DJ Lite”.
- Si aún no ha iniciado sesión en Serato.com, cree una cuenta.
- Verá la última versión de Serato DJ Lite y un banner de descarga en el lado derecho.
- Haga clic para descargar el archivo de instalación
- El instalador de Windows de Serato DJ Lite aparece como un archivo zip ‚comprimido‘, que se puede abrir con el Explorador de Windows.
Alternativamente, puede usar su administrador de archivos comprimidos favorito, como Winzip o 7zip.
- Una vez que se complete la descarga, puede iniciar la instalación.
- Si está utilizando el Explorador de Windows, puede hacer doble clic en el archivo descargado y verá el ejecutable de Serato DJ Lite.
- Si está utilizando un administrador de archivos de terceros, como Winzip o 7zip, puede hacer clic con el botón derecho en el menú contextual
y seleccionar „Extraer aquí“, que extraerá el archivo Serato DJ Lite y lo colocará en la misma ubicación que seleccionó para guardar el archivo
original comprimido.
- Haga doble clic en el archivo .exe de Serato DJ Lite resultante del la decompresión del archivo descargado para iniciar la instalación y
conguración de Serato DJ. Ahora verá los términos de la licencia. Marque la casilla „Acepto los términos y condiciones de la licencia“ y luego
haga clic en „Instalar“.
¡NOTA!
Cuando utilice Windows, será necesario instalar un controlador de audio ASIO.
Ir:
https://www.reloop.com/reloop-ready#headingproduct_view_panel_features para descargar el controlador ASIO, ejecutar el archivo del
controlador descargado y seguir los pasos de instalación.
iOS
SLIP
PnT
PRO
KEY SYNC
PRO
USER MODE
START
SYNC OFF CENSOR
HEADPHONES CUE VOL CUE MIX MASTER VOL MASTER OUT
PnT
PRO
PARAMETER 2
PRO
SLIP
USER MODE
KEY SYNC
PRO
SYNC OFF CENSOR
PRO
PARAMETER 2
START
22
INSTALACIÓN Y CONEXIÓN DE DJAY
Instalación de djay iPad / iPhone:
Puede descargar la aplicación djay desde la App Store.
- Descargue la aplicación djay de la App Store.
- Coloque el interruptor USB source -29- en la posición “iOS”.
- Conecte su cable Lightning o USB-C existente al puerto USB-A „iOS“ de Reloop Ready -28-, así como a su dispositivo „iOS“.
- Abra la aplicación djay descargada anteriormente.
Su Reloop Ready se reconocerá automáticamente y estará listo para utilizarse inmediatamente.
Page 23

¡Atención!
Un ordenador y los dispositivos “iOS” no se pueden usar simultáneamente. Siempre conecte el cable USB suministrado al USB-B PC /
Power Port -30- y conéctelo a una fuente de alimentación USB. Utilice únicamente el cable de alimentación original de su tableta / teléfono
inteligente o utilice una fuente de alimentación adecuada (5 V, 2 A) para garantizar un suministro de alimentación suciente. Alternativamente,
puede adquirir la siguiente fuente de alimentación USB como pieza de repuesto: Número de artículo: 243382.
OPERACIÓN SERATO DJ LITE:
1. GANANCIA
Utilice el control de ganancia -1- para ajustar el volumen del canal.
2. ECUALIZADOR
Con el ecualizador de 2 bandas -2- permite ajustar los agudos y graves para los canales 1 y 2.
3. ENCODER DE BÚSQUEDA
Utilice el codicador de búsqueda y exploración -3- girándolo para navegar por sus bibliotecas de música. Presione el mando de exploración -3para conrmar su selección.
SHIFT: Para retroceder un elemento del menú, presionando SHIFT -7- + Encoder de búsqueda -3-.
4. CARGA DE CANCIONES
Presione el botón Track Load -4- para cargar una pista en el deck deseado.
5. FILTRO
Los canales 1 y 2 tienen un ltro individual -5-. En la posición de las 12 en punto, el ltro está inactivo. Girando el ltro -5- en el sentido de las agujas
del reloj crea un efecto de paso alto, al girarlo en el sentido contrario a las agujas del reloj se crea un efecto de paso bajo.
6. BOTONES HEADPHONES/CUE
Con los botones Headphones /Cue -6- se puede monitorear la señal de audio respectiva de los canales 1 y 2.
7. SHIFT
Al presionar SHIFT -7- + un botón seleccionado se activan las funciones respectivas del 2º nivel, según se puede leer en el etiquetado del panel
frontal del dispositivo.
¡NOTA!
Algunas funciones del 2do nivel solo se pueden ejecutar con la versión Serato DJ Pro, estos pueden ser reconocidos por el etiquetado PRO
adicional.
8. PITCH FADER
El Pitch Fader -8- determina el tempo al que se reproduce la pista.
9. LINEFADER
Con el Linefader -9- puede ajustar el volumen de salida para los canales 1 y 2.
10. CROSSFADER
El Crossfader -10- cambia entre el canal izquierdo y derecho.
11. JOG WHEEL
El Jog Wheel -11- por defecto está activo en el modo de inexión de tono. La supercie es sensible al tacto y reacciona a la tensión corporal. Al girar
el aro exterior -11- se puede utilizar para realizar un pitch bend.
SHIFT: Al presionar SHIFT -7- y girando el Jogwheel-11- al mismo tiempo, puede realizar la función SKIP / búsqueda rápida (desplazamiento rápido
por toda la pista para saltar a puntos de la canción más adelantados).
12. PERFORMANCE PADS
Los Performance Pads -12- son pads de batería retro-iluminados con una código de diferentes colores que nos indican el modo de interpretación
seleccionado. Los diferentes modos de interpretación se pueden activar manteniendo presionado el botón MODE -19- y presionando el Performance
Pad seleccionado posteriormente -12-.
ESTÁN DISPONIBLES LOS SIGUIENTES MODOS DE INTERPRETACIÓN:
Modo Hot Cue = Activa los 4 puntos cue disponibles por deck y los colores del pad se iluminarán en los cuatro colores correspondientes para
identicarlos.
SHIFT: Al presionar SHIFT -7- y el Cue Pad respectivo, el punto Cue seleccionado será borrado.
PRO: En Serato DJ Pro puedes congurar 8 hot cues por reproductor.
Modo Auto Loop = Cada uno de los 4 Performance Pads en la primera la tiene una duración de loop diferente. Al presionarlos, se activará
inmediatamente según la longitud, al presionarlo nuevamente se desactivará el Auto Loop. Los 4 tamaños de bucle preasignados en los pads de
batería se pueden cambiar mediante los botones de parámetro -15-. Los pads de actuación de la segunda la (5-8) se asignan de la siguiente manera:
- Pad 5: mueve el bucle seleccionado hacia atrás en la pista
- Pad 6: ajusta el parámetro de reducción para mover el bucle seleccionado dentro del pista
- Pad 7: ajusta el parámetro de ampliación para mover el bucle seleccionado dentro del pista
- Pad 8: mueve el bucle seleccionado hacia adelante en la pista
PRO: En Serato DJ Pro también puede dividir a la mitad o el doblar del bucle seleccionado utilizando los botones de parámetro -15-.
Modo de bucle manual = Los 4 pads de actuación de la primera la están asignados a las siguientes funciones:
Pad 1: Establecer Loop In o inicio de blucle
Pad 2: Establecer Loop Out o n de buble
Pad 3: Bucle activo / inactivo
Pad 4: Salta al Loop In activado, presionando el Pad 4 nuevamente desactiva el loop
PRO: En Serato DJ Pro, los pads de la segunda la se asignan de la siguiente manera:
- Pad 5: Desplazamiento hacia arriba a través de bucles
- Pad 6: Desplazamiento hacia abajo a través de bucles
- Pad 6: Guarda el bucle activado en una posición de memoria de bucles vacía
- Pad 8: no asignado
Modo de Sampler = Hace sonar la muestra respectiva en el banco de muestras utilizando los 4 pads de batería -12-.
SHIFT: Al presionar SHIFT -7 + el pad de batería de muestra activo se detendrá la reproducción de dicha muestra.
PRO: En Serato DJ Pro puede cargar hasta 8 muestras en el banco de muestras.
ESPAÑOL
23
Page 24

NOTA
En Serato DJ Lite, solo tiene acceso a los modos de rendimiento enumerados anteriormente. Con la excepción del modo Auto Loop, a los
pads de actuación de la segunda la (5-8) se les asigna la misma función en cada modo de actuación de DJ Lite, de la siguiente manera:
- Pad 5: Reverse mode activado / desactivado
- Pad 6: mantén pulsado para rebobinar la pista
- Pad 7: mantén pulsado para avanzar la pista
- Pad 8: Reproducción desde el punto Cue congurado temporalmente (volatil), si el Cue no está aún posicionado, el Cue de inicio se
posiciona automáticamente al comienzo de la pista y esta comenzará a reproducirse inmediatamente (CUP - Cue and Play)
Si es usuario de Serato DJ Pro, tendrá acceso a 4 modos de actuación DJ Pro adicionales en la segunda la de la sección Performance Pad -12-.
Modo PRO P’n’T: Pitch Play = En combinación con el paquete de expansión Pitch‘n’Time, puede tocar sus cues en diferentes tonos a través de los
Performance Pads -12-. Hay 3 escalas disponibles. Para cambiar entre las escalas, presione el Botón de Parámetro izquierdo o derecho -15- del canal
respectivo. El pad con la nota clave siempre está iluminado en blanco y el dicho punto de referencia se reproduce en el tono normal de la canción.
SHIFT: Para seleccionar otro punto de hot cue, mantenga presionado el botón SHIFT -7- y presione el Performance Pad deseado -12- (Hot Cue) al
mismo tiempo.
Modo PRO: Scratch Bank = En el modo Scratch Bank puedes asignar 8 archivos de audio de tu biblioteca Serato DJ Pro a cada uno de los 8
Performance Pads. Cuando se presiona un pad, el archivo respectivo se carga en el deck. Los pads de la izquierda se cargarán en el deck 1 y los
pads de la derecha se cargarán en el deck 2. Para congurar sus archivos de Scratch Bank, haga clic en el icono de Scratch Bank en la barra
de herramientas superior de Serato DJ Pro para mostrar el panel Scratch Bank. En este panel puede cargar o expulsar archivos de audio a los
respectivos bancos de scratch y seleccionar la conguración deseada. Estos ajustes incluyen el punto de inicio, activación / desactivación de
repetición en blucle y activación / desactivación del bloqueo de tonalidad musical. Al hacer clic en el botón en la esquina superior izquierda del
panel Scratch Bank, puede cambiar entre vista avanzada y simple.
SHIFT: Mantenga presionado SHIFT -7- y haga clic en cualquier bloc de Scratch Bank para descargar el archivo cargado actualmente y volver a
cargar el título que se cargó por última vez en este deck.
Modo PRO: Loop Roll = Cada pad de ejecución en la primera la (1-4) habilita / deshabilita un loop roll cuando se matiene el pad pulsado. A cada
pad se le asigna una longitud de bucle especíca de 1/8 - 1. Los pads de la segunda la (5-8) controlan la función Beat Jump.
- Pad 5: Beat Jump hacia atrás
- Pad 6: ajusta el parámetro de reducción del Beat Jump
- Pad 7: ajusta el parámetro de ampliación del Beat Jump
- Pad 8: Beat Jump forward
Modo PRO: Beat Grid = En el modo Beat Grid puede ajustar la rejilla y la sincronización de la pista a la canción seleccionada. Los pads de la primera
la (1-4) ajustarán la cuadrícula de la pista y los pads de la segunda la (5-8) ajustarán la sincronización de la pista.
13. VINYL
Vinyl -13- cambia del modo Pitch Bend al modo Vinyl, donde puede usar las Jog Wheels -11- para realizar la función scratch.
PRO SHIFT: Al presionar SHIFT -7- + Vinyl -13- se activa / desactiva el modo Slip. Si el modo slip está activo, puede realizar varias acciones (cue
pionts o scratches) y la pista en reproducción continuará exactamente por la posición por donde estaría dicha pista si no hubiera realizado ninguna
acción sobre ella.
14. BLOQUEO DE CLAVE MUSICAL
Key Lock -14- activa / desactiva la función Key Lock.
PRO P‘n‘T SHIFT: En combinación con el paquete de expansión Pitch‘n’Time, al presionar SHIFT -7- + Key Lock se activa / desactiva la función Key
Sync. Esto le permite hacer coincidir la clave musical (tonalidad) de la pista actual con la clave musical de la pista en el otro deck.
15. BOTONES DE PARÁMETROS (PARÁMETROS PRO)
Los botones de parámetro -15- controlan las funciones de los parámetros para cada deck, dependiendo del modo seleccionado (p. Ej., Ajuste de
parámetros FX).
PRO SHIFT: Pulsando SHIFT -7- + Botones de Parámetros -15- puede controlar las funciones de los parámetros del 2º nivel, dependiendo del modo
seleccionado.
ESPAÑOL
16. LOOP ENCODER
Girando el Loop Encoder -16- puede seleccionar la longitud del loop (1 / 32-32 compases).
Al presionar el Loop Encoder -16- se activa la duración del loop previamente seleccionada, presionarlo nuevamente desactiva el loop.
SHIFT: Manteniendo presionado SHIFT -7- y girando el Loop Encoder respectivo -16-, puede establecer el valor del multiplicador de tiempos para
los efectos de software del canal respectivo.
SHIFT: Al mantener presionado SHIFT -7- y presionar el Loop Encoder -16- rítmicamente, podemos establecer manualmente el tempo para la
sincronización de los efectos del software.
17.BOTONES FX ON
Utilice los botones FX ON -17- para activar / desactivar los 3 efectos digitales seleccionados en su banco de efectos.
SHIFT: Manteniendo SHIFT -7- y presionando las teclas FX ON -17-, puede seleccionar el efecto digital deseado para el banco de efectos respectivo.
18. CONTROL DE EFECTOS
Con FX Control -18- puede ajustar la intensidad del efecto (profundidad) de los efectos activados en el banco de efectos.
19. MODO
Si mantiene pulsado el botón MODE -19- + pulsando un pad de modo, se activa el modo de interpretación seleccionado (consulte: 12. Pads de actuación).
PRO SHIFT: Manteniendo presionado SHIFT -7- y presionando el botón MODE -19- ingresa en el modo de usuario. Aquí puede asignar los
Performance Pads -12- según sus preferencias personales.
20. SYNC
SYNC -20- sincroniza automáticamente el valor de BPM de una pista con el otro deck.
SHIFT: Al presionar SHIFT -7- + SYNC -20- se desactivará el modo SYNC.
21. CUE
Utilice los botones CUE -21- para crear y activar un punto de referencia temporal. Este queda representado por un marcador blanco sobre la
señal. Si se presiona el botón CUE -21- durante la reproducción, la reproducción se detiene automáticamente y se vuelve al punto de referencia
establecido (modo de reproducción CUE). Si pausa la reproducción, ajusta con precisión una nueva posición de la canción (por ejemplo el ataque
de un bombo) y presiona el botón CUE -21-, se crea un nuevo punto CUE en esa posición de la pista (modo de pausa CUE).
22. REPRODUCCIÓN / PAUSA
PLAY / PAUSE -22- inicia / pausa la reproducción del deck respectivo.
23. MASTER OUT (CINCH)
Su sistema principal (por ejemplo, altavoces activos) debe ser conectado a Master Out (conectores RCA o también llamados Cinch) -23- y el
volumen ser controlado por el control Master Volume -24-.
24. VOLUMEN MAESTRO
El Control de volumen maestro -24- se utiliza para ajustar el volumen de salida de la general Master Out.
24
Page 25

25. AURICULARES / CUE MIX
Headphones / Cue Mix Control -25- Permite ajustar una mezcla con la que estemos cómodos y con el balance adecuado entre el volumen del canal
en CUE y la señal que está saliendo por Master en los auriculares.
- IZQUIERDA = Solo se oye lo que hay en CUE
- CENTRO = Relación 50/50
- DERECHA = Solo se oye lo que sale por Master
26. VOLUMEN DE LOS AURICULARES
Use el Control de volumen de auriculares / Cue -26- para ajustar el volumen de la señal de sus auriculares aun volumen cómodo y adecuado.
27. AURICULARES / CUE OUT
La Salida de Auriculares / Cue -27- se utiliza para conectar sus auriculares a su Reloop Ready.
28. PUERTO USB-A “OS
El puerto USB-A iOS -28- se utiliza para conectar un dispositivo iOS.
Además, conecte una fuente de alimentación USB al puerto USB-B PC / Power -30-.
¡NOTA!
Si desea utilizar un dispositivo iOS, asegúrese de que el El interruptor de fuente USB -29- está congurado en iOS.
29. INTERRUPTOR DE USB SOURCE
Utilice el conmutador USB Source -29- para cambiar entre el modo del USB al que desee (operación con ordenador o iOS).
30. PUERTO DE ALIMENTACIÓN / PC USB-B
Utilice el puerto USB-B PC / Power -30- para conectar una computadora, así como un cable de alimentación USB para cargar su dispositivo iOS a
a través de Reloop Ready.
¡NOTA!
Si desea utilizar un ordeandor, asegúrese de que el conmutador USB Source 29- esté congurado en PC.
31. BLOQUEO KENSINGTON
El candado Kensington -31- sirve para proteger su Reloop Ready contra el robo.
¡NOTA!
PRO: Requiere la versión Serato DJ Pro para desbloquear las funciones Pro y los modos de rendimiento.
P‘n‘T: Requiere el paquete de expansión Serato Pitch‘n‘Time.
REQUERIMIENTOS MÍNIMOS DEL SISTEMA:
Puede consultar los requisitos actuales del sistema Serato DJ Lite / Serato DJ Pro para Mac o Windows en serato.com.
Puede comprobar los requisitos actuales del sistema djay para „iOS“ / „iPadOS“, Mac o Windows en algoriddim.com.
DATOS TÉCNICOS:
Sound Card Resolution: ........................... 24bit / 48kHz
Frequency Response: ............................... 20Hz-20kHz
Signal to Noise Ratio:............................... 95DB (USB)
Total Harmonic Distortion: ...................... <0.1%
Master Out: ................................................ RCA
Headphone Out: ........................................ 3, 5mm
Power: ......................................................... DC-5V / 2A USB-B
Power Consumption iOS connection: .... DC-5V / 2A USB-B
Power Consumption PC connection: ..... DC-5V / 500mA USB-B
Dimensions: ................................................ 325mm x 48mm x 220mm
ESPAÑOL
iPhone, iPad, iPod touch, iTunes, Mac and Mac OS are registered trademarks of Apple Inc. in the U.S. and other countries.
App Store is a service mark of Apple Inc.
iOS is a trademark containing Cisco trademark signs in the U.S. and other countries.
Windows is a registered trademark of Microsoft Corporation in the United States and other countries.
Serato DJ Lite, Serato DJ Intro, Serato DJ Pro, Serato DJ and Scratch Live are registered trademarks of Serato Limited.
Beatport is a trademark of Beatport, LLC.
Soundcloud is a trademark of SoundCloud Limited.
djay is a registered trademark of Algoriddim GmbH.
Tidal is a trademark of Aspiro AB.
Beatsource is a trademark of Beatsource, LLC.
Android, YouTube, Google Play and the Google Play logo are registered trademarks of Google Inc.
25
Page 26

QUICK START GUIDE FOR IOS / IPAD OS WITH DJAY
iOS / iPAD OS / ANDROID SETUP
USB-B
Switch to
PC Mode
USB-A
USB-A
USB-A
USB-B
Lightning/USB-C
Switch to
iOS Mode
5V/2A
Smartphone
Tablet
SEL
SEL SEL
KEY SYNC
PnT
SYNC OFF CENSOR
START
USER MODE
PRO
SLIP
PRO
USB
iOS
GAIN
GAIN
HIGH
LOW
HIGH
LOW
SEL
SEL SEL
FX BEATS // TAP
SEL
SEL SEL
FX BEATS // TAP
PARAMETER 2
PRO
KEY SYNC
PnT
SYNC OFF CENSOR
START
USER MODE
PRO
SLIP
PRO
PARAMETER 2
PRO
KEY SYNC
PnT
SYNC OFF CENSOR
START
USER MODE
PRO
SLIP
PRO
HEADPHONES CUE VOL CUE MIX MASTER VOL MASTER OUT
USB
iOS
1. DOWNLOAD DJAY
2. CONNECTION
iPhone
iPad
26
iPhone, iPad, iPod touch, iTunes, Mac and Mac OS are registered trademarks of Apple Inc. in the U.S. and other countries. App Store is a service mark of Apple Inc. iOS is a trademark containing Cisco
trademark signs in the U.S. and other countries. iPhone, iPad, iPod touch, iTunes, Mac and Mac OS are registered trademarks of Apple Inc. in the U.S. and other countries. App Store is a service mark of
Apple Inc. iOS is a trademark containing Cisco trademark signs in the U.S. and other countries. Windows is a registered trademark of Microsoft Corporation in the United States and other countries. Beatport
is a trademark of Beatport, LLC. Soundcloud is trademark of SoundCloud Limited. djay and Neural Mix are registered trademarks of Algoriddim GmbH. Tidal is a trademark of Aspiro AB. Beatsource is a
trademark of Beatsource, LLC. Android, YouTube, Google Play and the Google Play logo are registered trademarks of Google Inc.
Page 27

LEARN MORE ABOUT THE FULL
RELOOP PRODUCT RANGE AT
STAND HUB
27
Page 28

Reloop Distribution
Global Distribution GmbH & Co. KG,
Schuckertstrasse 28, 48153 Muenster / Germany
Fax: +49.251.6099368
Subject to alterations.
Illustrations similar to original product.
Misprints excepted.
Technische Änderungen vorbehalten.
Alle Abbildungen ähnlich.
Keine Haftung für Druckfehler.
Sous réserve de modications techniques.
Toutes les illustrations sont similaires.
Aucune responsabilité pour les erreurs d‘impression.
Reservado el derecho para realizar modicaciones técnicas.
Todas las imágenes son similares.
No se asumirá la responsabilidad por errores de impresión.
 Loading...