

Page 1
MULTI-PURPOSE STEAM CLEANER
NETTOYEUR À VAPEUR À USAGES MULTIPLES
LIMPIADORA A VAPOR MULTIPROPÓSITO
INSTRUCTION MANUAL
GUIDE D’UTILISATION
MANUAL DE INSTRUCCIONES
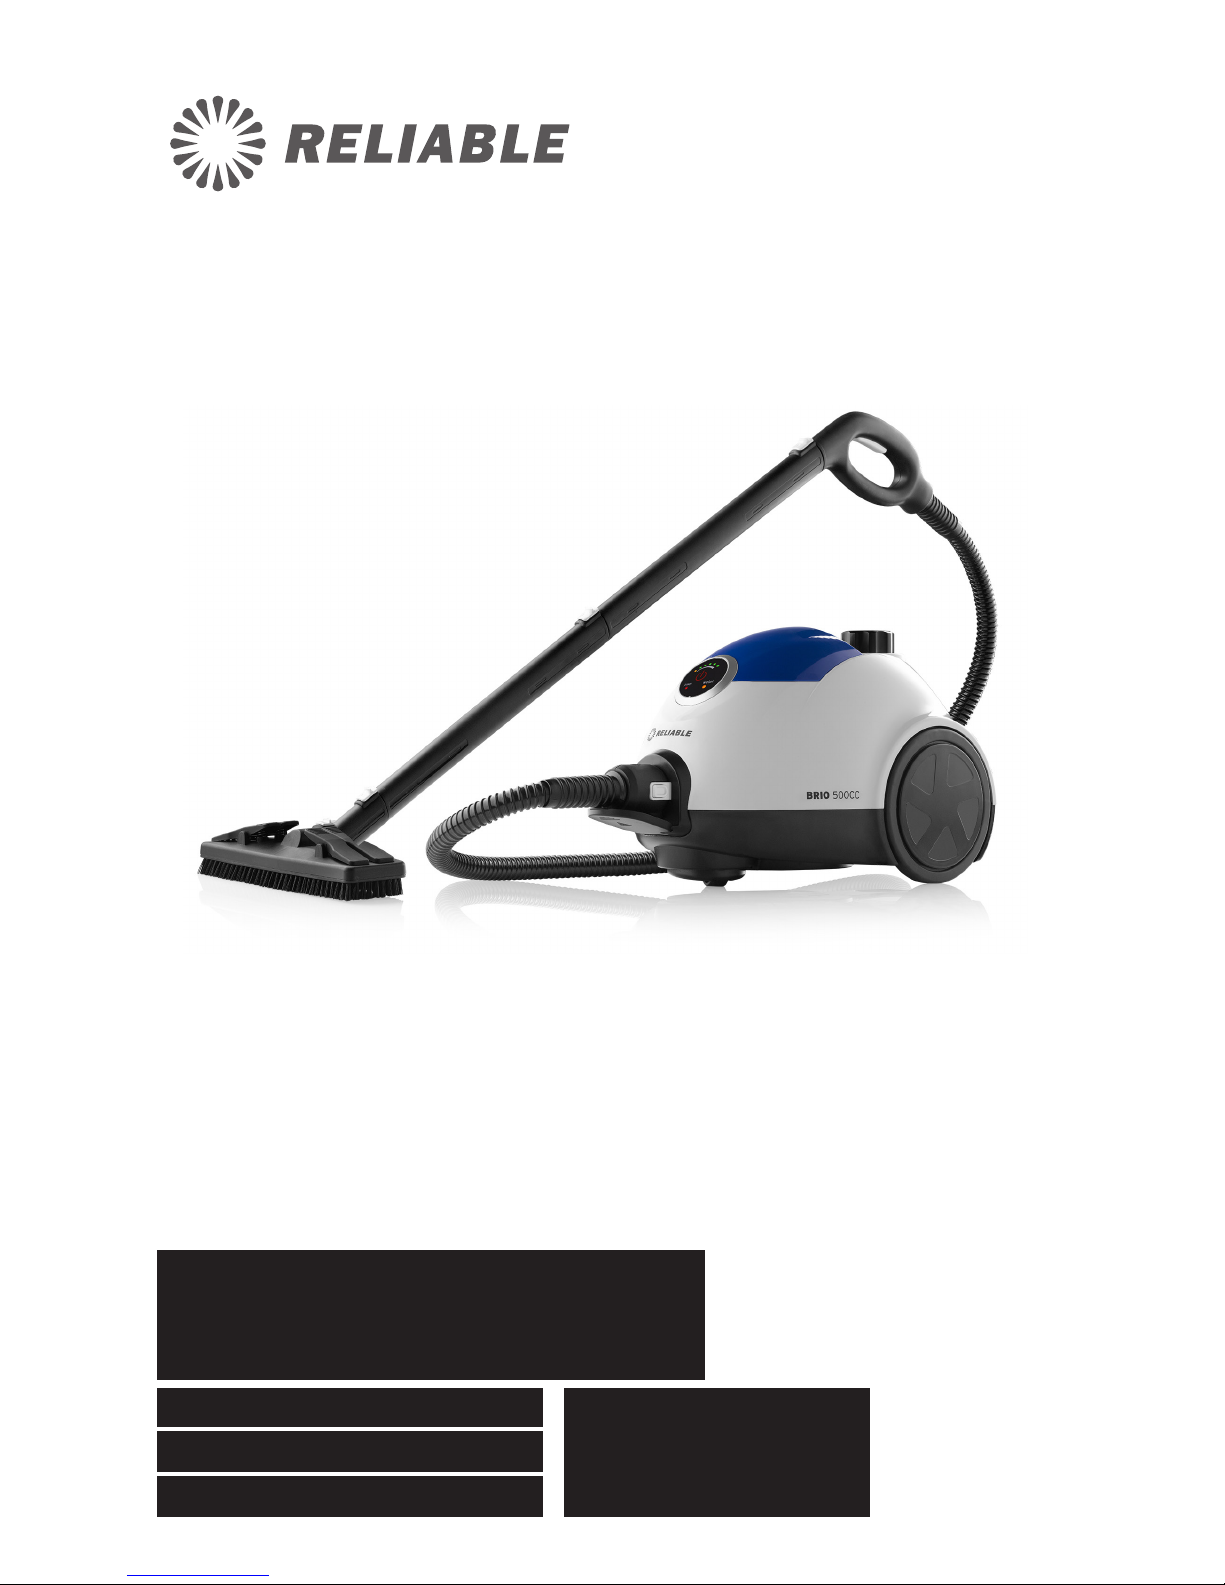
BRIO 500CC
Page 2

Page 3

ENGLISH 01
FRANÇAIS 13
ESPAÑOL 23
Page 4

BRIO 500CC
INSTRUCTION MANUAL
ENGLISH
01
Page 5

RELIABLE. RIGHT THERE WITH YOU.
At Reliable, we do what we love, and take pride in doing it right.
You want what’s best for the people, places and things that matter
in your life – from where you live to what you wear. So do we. From
the start, we approach every product with a craftsman’s attention
to detail and passion for making it right. Quality, functionality,
design and customer service play an equally important part in
delivering what’s right for you. The Brio 500CC packs a serious
punch when it comes to steam cleaning. With 5 bar working
pressure the 500CC makes quick work of dirt, grime, germs and
more.
For your safety and to fully enjoy the advantages of this product,
please take a few minutes to read all of the important safeguards
and care instructions. Keep this manual handy and review the
product warranty for your reference.
02
Page 6

IMPORTANT SAFETY INSTRUCTIONS
When using your Reliable steam cleaner, basic safety precautions should always
be followed. Please read the following instructions carefully as they provide
important information concerning how to install, use and care for this steam
cleaner. Use the steam cleaner only for its intended use.
• To protect against a risk of electric shock, do not immerse the steam cleaner in
water or any other liquids.
• The steam cleaner should always be turned OFF before plugging it into or
unplugging from a wall outlet. Never pull the power cord to disconnect from the
outlet; instead grasp the plug and pull to disconnect.
• Do not let the power cord touch hot surfaces. Let the steam cleaner cool
completely before putting it away. Wrap the power cord around the posts that
are positioned in the rear of the steam cleaner when not in use.
• Do not operate the steam cleaner with a damaged cord, plug, or if the steam
cleaner has been dropped or damaged. This will void any and all warranties.
Please contact the place of purchase for repair procedure.
• Close supervision is necessary for any appliance being used by or near children.
Do not leave the steam cleaner on while unattended.
• Do not use this unit in the presence of explosive and/or flammable fumes.
• Keep ventilation slots free from dust.
• Never drop or insert any object into ventilation slots
• To prevent overheating, unravel the electrical cord completely.
• Do not operate where aerosol (spray) products are being used or where oxygen
is being administered.
• To disconnect, turn all controls to the off position, then remove plug from the
main power.
• Never put away your steam cleaner while it is still hot. There is no need for
emptying the tank unless you intend to leave it unused for a long period of time.
• This product is intended for household use only. Follow all user instructions in
this manual.
03
Page 7

04
ELECTRICAL INSTRUCTIONS
To avoid a circuit overload, do not operate another high-wattage appliance on
the same circuit simultaneously with the steam cleaner. If an extension cord is
necessary, a 15-amp rated cord with a polarized plug should be used. Cords rated
for less may overheat and cause damage.
Page 8

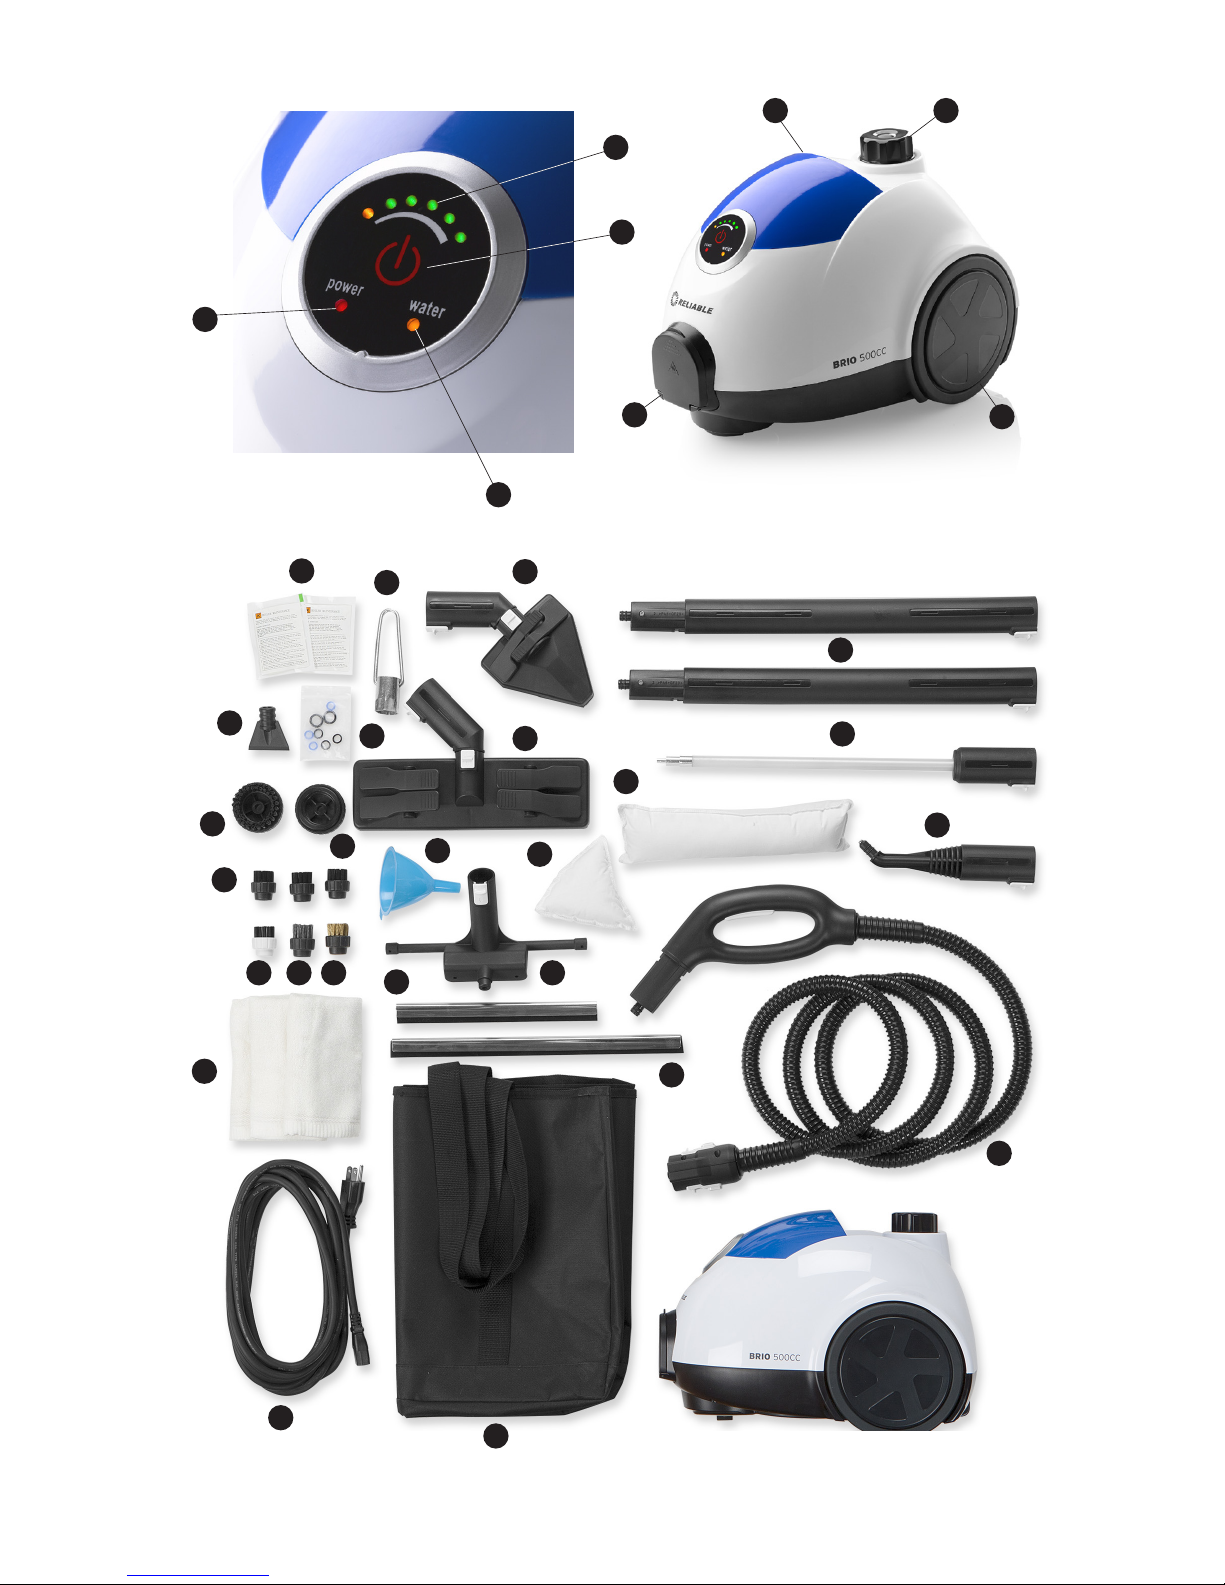
STEAM CLEANER ILLUSTRATION
1. Control panel
A. Touch power switch
B. Power indicator
C. Lower water level indicator
D. Pressure indicator
2. Water tank cap
3. Carrying handle
4. Wheel
5. Hose connection
6. Hose
7. Electrical cord
ACCESSORIES
8. 500CCAEXT – Extensions tubes (2)
9. 500CCAFLOORBRUSH – Floor brush
10. 500CCATRIANGULARBRUSH – Triangular brush
11. 500CCASQUEEGEE – Window squeegee
12. Window squeegee blade (small)
13. Window squeegee blade (large)
14. 500CCABNOZZLE – Nozzle with copper tip
15. 500CCA30N (3) – Nylon brush – 30mm (3)
16. 500CCA30NW – Nylon brush – 30mm white
17. 500CCA60NOW – Nylon brush – 60mm
18. 500CC30B – Brass brush
19. 500CCA30SS – Stainless steel brush
20. 500CCASCRAPER - Scraper
21. 500CCADRAIN – Drain cleaner
22. 500CCACLOTH (3) – Bamboo towel
23. 500CCAFLOORC – Floor brush cushion pad
24. 500CCAUPHC – Triangle brush cushion pad
25. 500CCATOTE – Accessory tote
26. 5000CCAWAND – Aluminum nozzle
27. 500CCDESALER – Descaling powder (2 packs)
28. Funnel
29. Drain plug removal tool
30. Set of O-Rings
05
Page 9
06
27
29
10
8
26
14
13
6
12
11181916
15
30
20
17
21
28
24
25
7
22
9
23
23
5
A
D
C
B
4
Page 10

INSTRUCTIONS FOR USE
FILLING THE BOILER TANK BEFORE USE
• Unscrew the boiler tank fill cap (2), and use the funnel (28) provided to add
2.6L of water to the boiler tank.
• Tighten the boiler tank cap (2).
• Fit the required tool (see the “ATTACHMENTS” paragraph) to the steam handle.
Refill the water tank using the funnel (28) and a measuring cup with 1.9L of
water if the lower water level indicator (C) flashes during use.
SWITCHING ON
• Fold the power cord at the part closest to the female plug and insert the folded
part into the strain relief at the bottom of the cleaner. Due to the power of
the machine, a thicker cord is used and this may cause some difficulty when
inserting the cord into the strain relief. Insert the female plug into the socket on
the bottom right of the cleaner.
• Plug the power cord into the wall socket (the power indicator will begin to flash).
• Insert the steam hose into the connector (5) on the cleaner and make sure
that the arrow mark on the connector of the service hose faces upward when
plugging it in. You will hear a locking sound when the connector snaps in place.
Please make sure that the connector is fastened in place before use to avoid
danger.
• Press the power touch switch (A) on the control panel. The power indicator (B)
will stop flashing and come on. The water pump will start to fill with water and
you will hear pumping and vibration sounds.
• It takes approximately 4 minutes to preheat. You can use the trigger on the
handle to start releasing steam when all of the lights on the pressure indicator
(D) come on.
• If the low water indicator (C) flashes during use, please refill the water tank.
• Unplug the power cord from the wall socket after use. Empty the water in both
the water tank and boiler if the steam cleaner will not be used for a long period
of time. Unplug the service hose and store the cleaner in a cool, dry place.
WARNING:
1. There might be a few drops of water in the initial steam release. This is caused
from the condensation of steam traveled through the relatively cold hose.
2. A drop in steam pressure may occur in the initial steam release due to the
release of the air residue in the boiler.
3. There will be some noises caused by the vibration of the solenoid pump while
the boiler is being refilled during the operation of the cleaner.
4. The exhaust hole of the safety valve is located at the bottom of the cleaner.
07
Page 11

INSTRUCTIONS FOR DRAINING THE BOILER
1. Wait until the boiler completely cools (approximately 3 to 4 hours).
2. Remove the protective cover at the bottom of the cleaner (as shown in the
picture below).
3. Unscrew the drain nut with the drain plug removal tool (29).
4. Drain the boiler, and fasten the drain nut with the drain plug removal tool (29).
5. Put the protective cover back in place, and secure it tightly.
08
SPECIAL FEATURES OF THE CLEANER
STEAM PRESSURE INDICATOR (D)
When all lights on the pressure indicator of the control panel come on, the steam
pressure has reached the max setting and is ready for use. The light bar will
change during use along with the change in pressure.
LOW WATER LEVEL INDICATOR (C)
When the low water level indicator flashes, the water level in the water tank is low,
please refill the water tank before use.
ATTACHMENTS
FLOOR BRUSH (9)
Applications: 1. Hard floors (open spaces) 2. Carpets (use with bamboo towel) and
more. Use with extension wands to achieve a comfortable length.
How to use:
1. Move the floor brush back and forth
2. For better results, it is recommended to clean the place first with a vacuum
cleaner (while cleaning carpets)
3. It is not recommended to use the cleaner on floors with wax polish or
Engineered wood floors.
TRIANGLE BRUSH (10)
Applications:
1. Hard floors, kitchen tables (limited spaces).
2. Sofas, beds (use with towel) and more.
Page 12

How to use:
1. Move the triangle brush back and forth
2. It is suggested to clean the place first with a vacuum cleaner (while cleaning
carpets)
3. It is not suggested to use the cleaner on floors with wax polish or Engineered
wood floors.
WINDOW SQUEEGEE (11)
Applications: Level and smooth surfaces such as doors and windows.
How to use:
1. First spray the steam over the glass, only start to clean the glass after it is
evenly heated to prevent the glass from cracking because of expansion caused
by heat and contraction caused by cold.
2. Two different sized are included to handle windows of different sizes.
ROUND BRUSHES
Applications: Toilets, kitchenware, floor grout, bathtubs, taps, exhausts, windows,
and more.
USE THE APPROPRIATE TYPE OF ROUND BRUSH WITH THE ANGLED NOZZLE
(14)
Selecting the brush type:
• Nylon brushes are relatively soft, which are suitable for cleaning grout and
other surfaces that can be cleaned by soft brushing.
• Brass brushes, for tougher applications, which can't be cleaned with nylon
brushes.
• Stainless steel brushes are for the toughest applications.
• Please be careful with the use of brushes and make sure that you do not scratch
too hard and damage the surface that is being cleaned.
• Clean the round brushes with water after use, and wipe them dry.
ALUMINUM NOZZLE
Application: This accessory is to provide steam at the highest temperature and
pressure, which is suitable for removing difficult stains – brushes are not required
ACCESSORY CONNECTION:
Lubricate the accessory O-rings with a safe lubricant if the connection becomes
stiff.
09
Page 13

CLEANING AND MAINTENANCE
To ensure the best performance of the product, it is suggested to clean the boiler
at least once or twice a year, the frequency of cleaning the boiler is dependent on
the use time of the machine and hardness of the water used.
HOW TO CLEAN THE BOILER
Note: Please unplug the power cord from wall socket and make sure the boiler has
cooled down before draining it.
1. Pull out the protective cover at the bottom of the cleaner.
2. Unscrew the drain nut with wrench.
3. After cleaning the boiler, fasten the drain nut.
TECHNICAL SPECIFICATIONS
• 120V-power: 1750W
• Water tank capacity: 2.6L
• Max working pressure: 5 bar
• Continuous steam generation
• Safety relief valve
• Thermal overloads
• Certification: ETL/ cETLus
10
Page 14

11
Reliable Corporation (“Reliable”) warrants to the original purchaser of the boiler noted above
from Reliable (the “Reliable Boiler Tank”) that it will be free from defects in materials and
workmanship when utilized for normal use by the original purchaser only. Should the Reliable
Boiler Tank need replacement, Reliable will do so at no parts and labor cost to the original
purchaser, exclusive of shipping.
Subject to the conditions and limitations set forth below, Reliable will either repair or replace
any part of a Reliable Boiler Tank that proves defective by reason of improper workmanship
or materials. If the defective Reliable Boiler Tank is no longer available and cannot be repaired
effectively or replaced with an identical model, Reliable shall replace the defective Reliable
Boiler Tank with a current Reliable Boiler Tank of equal or greater value. Repaired parts or
replacement products will be provided by Reliable on an exchange basis, and will be either new
or refurbished to be functionally equivalent to new. If Reliable is unable to repair or replace a
Reliable Boiler Tank, it will refund the current value of that Reliable Boiler Tank at the time the
warranty claim is made.
This limited warranty does not cover any damage to a Reliable Boiler Tank that results from
improper installation, accident, abuse, misuse, unreasonable use, natural disaster, insufficient
or excessive electrical supply, abnormal mechanical or environmental conditions or any
unauthorized disassembly, repair or modification. This limited warranty does not extend to
any indirect, consequential or incidental damages that may be suffered by a user from the
use of a Reliable Boiler Tank, including without limitation, any liability for third party claims
for damage, and is limited to the amount paid by the original purchaser for the Reliable Boiler
Tank with respect to which this limited warranty protection applies. This limited warranty does
not apply with respect to products that have been altered or which are missing serial numbers
or for products not purchased directly from Reliable or a dealer authorized by Reliable to sell
the Reliable Boiler Tank.
This limited warranty is the only warranty that applies to the Reliable Boiler Tank, supersedes
any and all terms that may be contained in any other document or purchase order and may
not be altered or amended except expressly in writing by Reliable.
To obtain a repair or replacement under the terms of this warranty, please contact our
customer service group at 1 800 268 1649 or at support@reliablecorporation.com. You will be
required to submit an original receipt via fax or e-mail. The receipt must reflect that you are
the original purchaser, the product was bought directly from Reliable or from an authorized
Reliable dealer and that the warranty claim is being made in compliance with the terms set
out in this document or any subsequent document issued by Reliable in connection with this
policy. You will be issued a return authorization number (RA#) and asked to ship the defective
product together with proof of purchase and RA#, prepaid insured to the following address:
Reliable Corporation, 5–100 Wingold Ave, Toronto, ON M6B 4K7.
Freight collect shipments will be refused. The risk of loss or damage in transit will be borne
by the customer. Once Reliable receives the defective product, it will initiate the repair or
replacement process.
RELIABLE CORPORATION LIFETIME
PRODUCT WARRANTY POLICY FOR
PRESSURIZED STEAM BOILER TANKS
Page 15

Reliable Corporation (“Reliable”) warrants to original purchaser of its products that
every product sold by Reliable (a “Reliable Product”) is free from defects in material and
workmanship for a period of one year from the date of purchase if properly used and
maintained. Subject to the conditions and limitations set forth below, Reliable will either
repair or replace any part of a Reliable Product that proves defective by reason of improper
workmanship or materials. If the defective Reliable Product is no longer available and
cannot be repaired effectively or replaced with an identical model, Reliable shall replace
the defective Reliable Product with a current Reliable Product of equal or greater value.
Repaired parts or replacement products will be provided by Reliable on an exchange basis,
and will be either new or refurbished to be functionally equivalent to new. If Reliable is
unable to repair or replace a Reliable Product, it will refund the current value of that Reliable
Product at the time the warranty claim is made.
This limited warranty does not cover any damage to a Reliable Product that results from
improper installation, accident, abuse, misuse, natural disaster, insufficient or excessive
electrical supply, abnormal mechanical or environmental conditions, wear and tear resulting
from normal use of the product, or any unauthorized disassembly, repair, or modification.
This limited warranty does not extend to any indirect, consequential or incidental damages
that may be suffered by a user or from the use of a Reliable Product, including without
limitation, any liability for third party claims for damage, and is limited to the amount paid
by the original purchaser Reliable Product with respect to which this limited warranty
protection applies. This limited warranty does not apply with respect to products that have
been altered or which are missing serial numbers or for products not purchased directly
from Reliable or a dealer authorized by us to sell Reliable Products.
This limited warranty is the only warranty that applies to any Reliable Product, supersedes
any and all terms that may be contained in any other document or purchase order and may
not be altered or amended except expressly in writing by Reliable.
To obtain a repair or replacement under the terms of this warranty, please contact our
customer service group at 1-800-268-1649 or at support@reliablecorporation.com.
You will be required to submit an original receipt via fax or e-mail. The receipt must reflect
that you are the original purchaser, the product was bought directly from
us or from an authorized Reliable dealer and that the warranty claim is being made within
the warranty period. You will be issued a return authorization number (RA#) and asked to
ship the defective product together with proof of purchase and RA#, prepaid insured to the
following address:
Reliable Corporation, 5-100 Wingold Avenue, Toronto, ON M6B 4K7. Freight collect
shipments will be refused. The risk of loss or damage in transit will be borne by
the customer. Once Reliable receives the defective product, it will initiate the repair or
replacement process.
If you have any questions regarding this warranty, you may write to:
Reliable Corporation
100 Wingold Avenue, Unit 5
Toronto, Ontario
Canada M6B 4K7
www.reliablecorporation.com
RELIABLE PRODUCTS WARRANTY
12
Page 16

BRIO 500CC
MANUEL D’INSTRUCTIONS
FRANÇAIS
13
Page 17

RELIABLE. PROCHE DE VOUS.
Chez Reliable, nous aimons ce que nous faisons, et nous sommes
fiers de ce que nous accomplissons. Vous voulez ce qu’il y a de
mieux pour les gens, les endroits et les choses qui importent dans
votre vie - depuis l’endroit où vous habitez jusqu’aux vêtements
que vous portez. Nous aussi. Depuis le début, nous concevons
chaque produit avec l’attention qu’un artisan porte aux détails et
sa passion de le réaliser parfaitement. La qualité, la fonctionnalité,
la conception et le service à la clientèle jouent des rôles également
importants pour vous fournir ce qui vous correspond. Le Brio
500CC offre une belle puissance de nettoyage à la vapeur. Avec
une pression de service de 5 bars, le 500CC fait son affaire de la
poussière, de la saleté, des germes et bien plus encore en un temps
record.
Pour votre sécurité et pour profiter pleinement des avantages
de ce produit, veuillez prendre quelques minutes pour lire toutes
les mises en garde et les instructions d'entretien importantes.
Conservez ce manuel à portée de main et consultez la garantie du
produit à titre de référence.
14
Page 18

IMPORTANTES MESURES DE SÉCURITÉ
Des mesures fondamentales de sécurité doivent toujours être respectées lorsque
vous utilisez votre nettoyeur à vapeur Reliable. Veuillez lire attentivement les
instructions suivantes, car elles fournissent des informations importantes concernant l’installation, l’utilisation et l’entretien de ce nettoyeur à vapeur.
• Utilisez le nettoyeur à vapeur uniquement pour sont utilisation prévue.
• Pour éviter tout risque de décharge électrique, ne pas immerger le nettoyeur à
vapeur dans de l’eau ou tout autre liquide.
• Le nettoyeur à vapeur doit toujours être éteint avant de le brancher ou le
débrancher d’une prise murale. Ne tirez jamais sur le cordon d’alimentation pour
le débrancher de la prise, empoignez plutôt la fiche et tirez pour débrancher.
• Ne laissez pas le cordon d’alimentation toucher des surfaces chaudes. Laissez
refroidir le nettoyeur à vapeur complètement avant de le ranger. Enroulez le
cordon d’alimentation autour des poteaux qui sont positionnés à l’arrière du
nettoyeur à vapeur lorsqu’il n’est pas utilisé.
• Ne faites pas fonctionner le nettoyeur à vapeur avec un cordon ou une prise
endommagée, ou si le nettoyeur a été échappé ou endommagé. Ceci mettra fin à
la garantie. Veuillez contacter le lieu d’achat pour la procédure de réparation.
• Porter une attention particulière lorsqu’on utilise l’appareil à proximité des
enfants. Ne laissez pas le nettoyeur à vapeur en marche lorsqu’il est sans
surveillance.
• N’utilisez pas l’appareil en présence d’explosifs et/ou de vapeurs inflammables.
• Gardez les fentes de ventilation sans poussière.
• Évitez de laisser tomber ou d’insérer un objet dans les fentes de ventilation.
• Afin de prévenir la surchauffe, déroulez complètement le cordon électrique.
• Ne faites pas fonctionner l’appareil en cas d’utilisation de produits en aérosol
vaporisateurs) ou d’administration d’oxygène.
• Pour débrancher, tournez les boutons de réglage à la position « Off » (arrêt)
puis retirez la fiche de l’alimentation principale.
• Ne rangez jamais votre nettoyeur à vapeur lorsqu’il est encore chaud. Il n’est
pas nécessaire de vider le réservoir à moins que vous souhaitiez ne pas l’utiliser
pour une longue période.
• Ce produit a été conçu seulement pour un usage ménager. Suivre toutes les
instructions de ce manuel.
15
Page 19

INSTRUCTIONS ÉLECTRIQUES
Pour éviter les surcharges de circuit, n’utilisez pas un autre appareil à puissance
élevée sur le même circuit simultanément avec votre nettoyeur à vapeur. Si un
cordon d’extension est nécessaire, un cordon nominal de 15 ampères avec une
prise polarisée doivent être utilisés. Les cordons cotés pour moins d’ampères
peuvent se surchauffer et entraîner des dommages.
16
Page 20

17
ILLUSTRATION DU NETTOYEUR À VAPEUR :
1. Tableau de commandes
A. Interrupteur tactile
B. Témoin lumineux de marche
C. Indicateur de niveau d'eau faible
D. Témoin lumineux de pression
2. Bouchon du réservoir d’eau
3. Poignée de transport
4. Roue
5. Raccordement tuyau
6. Tuyau
7. Cordon électrique
ACCESSOIRES
8. 500CCAEXT – Tubes de rallonge (2)
9. 500CCAFLOORBRUSH – Brosse pour plancher
10. 500CCATRIANGULARBRUSH – Brosse triangulaire
11. 500CCASQUEEGEE – Raclette pour vitres à 2 lames
12. Fenêtre lame de raclette (petite)
13. Fenêtre lame de raclette (grande)
14. 500CCABNOZZLE – Buse à embout en cuivre
15. 500CCA30N (3) – Brosse en nylon – 30 mm (3)
16. 500CCA30NW – Brosse en nylon – 30 mm blanche
17. 500CCA60NOW – Brosse en nylon – 60 mm
18. 500CC30B – Brosse en laiton
19. 500CCA30SS – Brosse en acier inoxydable
20. 500CCASCRAPER - Raclette
21. 500CCADRAIN – Déboucheur
22. 500CCACLOTH (3) – Serviette en bambou
23. 500CCAFLOORC – Coussin de brosse pour plancher
24. 500CCAUPHC – Coussin de brosse triangulaire
25. 500CCATOTE – Sac d’accessoires
26. 5000CCAWAND – Embout en aluminium
27. 500CCDESALER – Poudre détartrante (2 paquets)
28. Entonnoir
29. Outil de démontage du bouchon de vidange
30. Ensemble de joints toriques
Page 21

18
27
29
10
8
26
14
13
6
12
11181916
15
30
20
17
21
28
24
25
7
22
9
23
23
5
A
D
C
B
4
Page 22

19
MODE D’EMPLOI
REMPLISSAGE DU CHAUFFE-EAU AVANT L’UTILISATION
• Dévissez le bouchon du chauffe-eau (2) et, à l’aide de l’entonnoir (28) fourni,
versez 2,6 litres d’eau dans le chauffe-eau.
• Vissez le bouchon du chauffe-eau (2).
• Fixez l’accessoire désiré (voir paragraphe « ACCESSOIRES ») à la poignée
vapeur. Remplissez le réservoir d’eau à l’aide de l’entonnoir (28) et d’un verre
mesureur, avec 1,9 litres d’eau si l’indicateur de niveau d’eau faible (C) clignote
pendant l’utilisation.
MISE EN MARCHE
• Pliez le cordon d’alimentation dans la partie la plus proche de la prise femelle
et insérez la partie pliée dans le dispositif de soulagement de traction en bas
du nettoyeur. En raison de la puissance de la machine, on utilise un cordon plus
épais et cela peut causer des difficultés au moment d’insérer le cordon dans le
dispositif de soulagement de traction. Insérez la prise femelle dans la fiche en
bas à droite du nettoyeur.
• Branchez le cordon d’alimentation dans la prise murale (le témoin lumineux de
marche commence à clignoter).
• Insérez le tuyau de vapeur dans le raccord (5) sur le nettoyeur et assurez-vous
que la flèche sur le raccord du tuyau de service se trouve vers le haut lorsque
vous le branchez. Vous entendrez un bruit de verrouillage lorsque le raccord est
en place. Veuillez vous assurer que le raccord est verrouillé et en place avant
utilisation, pour éviter tout danger.
• Appuyez sur l’interrupteur tactile (A) sur le tableau de commandes. Le témoin
lumineux de marche (B) arrête de clignoter et reste allumé. La pompe à eau
commence à se remplir d’eau et vous entendrez des bruits provenant de la
pompe et des vibrations.
• Le préchauffage prend environ 4 minutes. Vous pouvez utiliser la gâchette de
la poignée pour commencer à relâcher la vapeur lorsque toutes les lumières de
l’indicateur de pression (D) s’allument.
• Si l’indicateur de niveau d’eau faible (C) clignote pendant l’utilisation, veuillez
remplir le réservoir d’eau.
• Débranchez le cordon d’alimentation de la prise murale après utilisation. Videz
l’eau du réservoir et du chauffe-eau si le nettoyeur vapeur ne sera pas utilisé
pendant une période prolongée. Débranchez le tuyau de service et rangez le
nettoyeur dans un endroit frais et sec.
Page 23

20
AVERTISSEMENT :
1. Il peut y avoir quelques gouttes d’eau dans les premiers échappements de
vapeur. Ceci est dû à la condensation de la vapeur acheminée à travers le tuyau
relativement froid.
2. Une chute de pression de la vapeur peut se produire lors du premier
échappement de vapeur en raison de l’air restant dans le chauffe-eau.
3. La vibration de la pompe du solénoïde émet des bruits lorsque l’on remplit le
chauffe-eau alors que nettoyeur est en cours d’utilisation.
4. Le trou d’échappement de la soupape de sécurité est situé en bas du nettoyeur.
INSTRUCTIONS POUR LA VIDANGE DU
CHAUFFE-EAU
1. Attendez que le chauffe-eau ait complètement refroidi (environ 3 à 4 heures).
2. Enlevez le couvercle protecteur en bas du nettoyeur (comme le montre l’image
ci-dessous).
3. Dévissez l’écrou de vidange à l’aide de la clé (29).
4. Vidangez le chauffe-eau, et resserrez l’écrou de vidange à l’aide de la clé (29).
5. Remettez le couvercle protecteur en place, et vissez-le bien.
CARACTÉRISTIQUES PARTICULIÈRES DU
NETTOYEUR
TÉMOIN LUMINEUX DE PRESSION DE VAPEUR (D)
Lorsque toutes les lumières de l’indicateur de pression du tableau de commandes
s’allument, la pression de vapeur a atteint le réglage maximum et est prête
pour utilisation. La barre lumineuse change pendant l’utilisation en fonction des
changements de pression.
INDICATEUR DE NIVEAU D'EAU FAIBLE (C)
Lorsque l’indicateur de niveau d’eau faible clignote, le niveau d’eau dans le
réservoir d’eau est faible, veuillez donc remplir le réservoir d’eau avant utilisation.
Page 24

21
ACCESSOIRES
BROSSE POUR PLANCHER (9)
Utilisations : 1. Sols durs (espaces ouverts) 2. Tapis (utiliser avec la serviette en
bambou) et autres.
Utiliser avec des baguettes d’extension pour atteindre une longueur confortable.
Comment l’utiliser :
1. Passez plusieurs fois la brosse pour planchers en avant et en arrière
2. Pour de meilleurs résultats, il est recommandé de nettoyer d’abord l’endroit
avec un aspirateur (pendant le nettoyage de tapis)
3. Il n’est pas recommandé d’utiliser le nettoyeur sur des planchers cirés ou en
bois usiné.
BROSSE TRIANGULAIRE (10)
Utilisations :
1. Sols durs, tables de cuisine (espaces limités).
2. Canapés, lits (utiliser avec serviette) et autres.
Comment l’utiliser :
1. Passez plusieurs fois la brosse triangulaire en avant et en arrière
2. Il est recommandé de nettoyer d’abord l’endroit avec un aspirateur (pendant le
nettoyage de tapis)
3. Il n’est pas suggéré d’utiliser le nettoyeur sur des planchers cirés ou en bois
usiné.
RACLETTE POUR VITRES (11)
Utilisations : Surfaces nivelées et lisses telles que les portes et les fenêtres.
Comment l’utiliser :
1. Pulvérisez d’abord la vapeur sur la vitre, et ne commencez à nettoyer la vitre
qu’après qu’elle soit chauffée sur toute sa surface, pour éviter que la vitre se
craquelle en raison de l’expansion causée par la chaleur et la contraction causée
par le froid.
2. Deux tailles différentes sont fournies pour le nettoyage de fenêtres de tailles
différentes.
BROSSES RONDES
Utilisations : Toilettes, ustensiles de cuisine, joints de sols, baignoires, robinets,
échappements, fenêtres, et plus encore.
Page 25

22
UTILISEZ LE BON TYPE DE BROSSE RONDE AVEC LA BUSE COUDÉE (14)
Choix du type de brosse :
• Les brosses en nylon sont relativement douces, et sont donc appropriées pour
le nettoyage de joints et autres surfaces qui peuvent être nettoyées par un
brossage doux.
• Les brosses en laiton, pour des applications plus dures qui ne peuvent pas être
nettoyées avec des brosses en nylon.
• Les brosses en acier inoxydable sont réservées aux applications les plus dures.
• Soyez prudent(e) lors de l’utilisation des brosses et assurez-vous de ne pas
frotter trop fort. Vous risqueriez d’endommager la surface que vous nettoyez.
• Nettoyez les brosses rondes avec de l’eau après utilisation, et séchez-les avec
une serviette ou un tissu.
BUSE D'ALUMINIUM
Utilisation : Cet accessoire permet de fournir de la vapeur à la température et à
la pression les plus hautes possibles, ce qui est approprié pour enlever les taches
difficiles – les brosses ne sont pas nécessaires
RACCORDEMENT DES ACCESSOIRES
Lubrifiez les joints toriques avec un lubrifiant si le raccord se rigidifie.
NETTOYAGE ET ENTRETIEN
Pour assurer un fonctionnement optimal du produit, nous vous suggérons
de nettoyer le chauffe-eau au moins une ou deux fois par an, la fréquence de
nettoyage du chauffe-eau dépendant de l’usage de l’appareil et de la dureté de
l’eau utilisée.
COMMENT NETTOYER LE CHAUFFE-EAU :
Remarque : Veuillez débrancher le cordon d’alimentation de la prise murale et
vous assurer que le chauffe-eau a refroidi avant de le vidanger.
1. Enlevez le couvercle de protection en bas du nettoyeur.
2. Dévissez l’écrou de vidange avec la clé.
3. Après avoir nettoyé le chauffe-eau, resserrez l’écrou de vidange.
Page 26

23
SPÉCIFICATIONS TECHNIQUES
• Alimentation électrique de 120 V : 1750 W
• Capacité du réservoir d’eau : 2,6 litre
• Pression de service maximale : 5 bars
• Système de vapeur continue
• Soupape de sécurité
• Surcharges thermiques
• Certification : ETL/ cETLus
Page 27

24
Reliable Corporation (« Reliable ») garantit à l'acheteur original du chauffe-eau susmentionné de
Reliable (le « réservoir de chauffe-eau Reliable ») qu'il sera exempt de tout défaut de fabrication
et de main d'œuvre dans le cadre d'une utilisation normale par l'acheteur original uniquement. Si
un remplacement du réservoir de chauffe-eau Reliable s'avérait nécessaire, Reliable y procédera
sans aucun frais de pièces ni de main d'œuvre pour l'acheteur original, à l'exclusion des frais
d'expédition.
Soumis aux conditions et limitations établies ci-après, Reliable réparera ou remplacera toute
pièce d'un réservoir de chauffe-eau Reliable qui s'avère défectueux en raison d'un défaut de
fabrication ou de matériaux défectueux. Si le réservoir de chauffe-eau Reliable défectueux n'est
plus disponible et ne peut pas être réparé efficacement ou remplacé par un modèle identique,
Reliable remplacera le réservoir de chauffe-eau Reliable défectueux par un réservoir de chauffeeau Reliable actuel de valeur équivalente ou supérieure. Les pièces réparées ou les produits
remplacés seront fournis par Reliable sur la base d'un échange, et seront soit neufs ou remis
à neuf pour être fonctionnellement équivalents aux neufs. Si Reliable n'est pas en mesure de
réparer ou de remplacer un réservoir de chauffe-eau Reliable, elle remboursera la valeur actuelle
dudit réservoir de chauffe-eau Reliable au moment où la réclamation de garantie est réalisée.
Cette garantie limitée ne couvre aucun dommage subi par un réservoir de chauffe-eau Reliable
résultant d'une installation incorrecte, d'un accident, d'un abus, d'une mauvaise utilisation,
d'une utilisation déraisonnable, d'une catastrophe naturelle, d'une alimentation électrique
insuffisante ou excessive, de conditions mécaniques ou environnementales anormales, ou de
tout démontage, réparation ou modification non autorisé. Cette garantie limitée ne s'étend à
aucun dommage indirect ou direct dont peut être victime un utilisateur suite à l'utilisation d'un
réservoir de chauffe-eau Reliable, y compris mais sans s'y limiter, toute responsabilité pour des
réclamations de tiers pour des dégâts, et se limite au montant payé par l'acheteur original du
réservoir de chauffe-eau auquel cette protection de garantie limitée s'applique. Cette garantie
limitée ne s'applique pas aux produits qui ont été modifiés ou dont les numéros de séries sont
manquants, ou aux produits non achetés directement auprès de Reliable ou d'un revendeur
agréé par Reliable pour vendre des réservoirs de chauffe-eau Reliable.
Cette garantie limitée est l'unique garantie qui s'applique au réservoir de chauffe-eau Reliable,
elle remplace toutes conditions qui peuvent être contenues dans un autre document ou bon de
commande et ne peut être transformée ou modifiée, sauf dérogation expressément écrite de
Reliable.
Pour obtenir une réparation ou un remplacement en vertu des conditions de cette garantie,
veuillez contacter notre service à la clientèle au 1 800 268 1649 ou par courriel à support@
reliablecorporation.com. Il vous sera demandé d'envoyer le reçu original par fax ou courriel. Le
reçu doit prouver que vous êtes l'acheteur original, que le produit a été acheté directement chez
Reliable ou chez un revendeur agréé par Reliable et que la réclamation de garantie est effectuée
conformément aux conditions définies dans le présent document ou tout document subséquent
publié par Reliable en rapport avec la présente garantie. Un numéro d'autorisation de retour (Nº
AR) vous sera donné et il vous sera demandé d'expédier le produit défectueux accompagné de la
preuve d'achat et du Nº AR, les frais d'assurances étant prépayés à l'adresse suivante : Reliable
Corporation, 5–100 Wingold Ave, Toronto, ON M6B 4K7.
Les expéditions avec fret à destination seront refusées. Le risque de perte ou
d'endommagement lors du transport sera assumé par le client. Une fois que Reliable aura reçu le
produit défectueux, elle initiera la réparation ou le remplacement.
POLITIQUE DE GARANTIE À VIE DES
RÉSERVOIRS DE CHAUFFE-EAU SOUS
PRESSION DE RELIABLE CORPORATION
Page 28

Reliable Corporation (« Reliable ») garantit à l'acheteur original de ce produit que chaque
produit vendu par Reliable (un « Produit Reliable ») est exempt de tout défaut de pièce et
de main d'œuvre pour une période d'un an à compter de la date d'achat, s'il est utilisé et
entretenu correctement. Soumis aux conditions et limitations établies ci-après, Reliable
réparera ou remplacera toute pièce d'un produit Reliable qui s'avère défectueuse en raison
d'un défaut de fabrication ou de main d'œuvre. Si le Produit Reliable défectueux n'est plus
disponible et ne peut pas être réparé efficacement ou remplacé par un modèle identique,
Reliable remplacera le Produit Reliable défectueux par un Produit Reliable actuel de
valeur équivalente ou supérieure. Les pièces réparées ou les produits remplacés seront
fournis par Reliable sur la base d'un échange, et seront ou neufs ou remis à neuf pour être
fonctionnellement équivalents aux neufs. Si Reliable n'est pas en mesure de réparer ou de
remplacer le Produit Reliable, elle remboursera la valeur actuelle du Produit Reliable au
moment où la réclamation de garantie est réalisée.
Cette garantie limitée ne couvre aucun dommage subi par un Produit Reliable résultant
d'une installation incorrecte, d'un accident, d'un abus, d'une mauvaise utilisation,
d'une catastrophe naturelle, d'une alimentation électrique insuffisante ou excessive, de
conditions mécaniques ou environnementales anormales, de l'usure et de la détérioration
résultant de l'usure normale du produit, ou de tout démontage, réparation ou modification
non autorisé(e). Cette garantie limitée ne s'étend à aucun dommage indirect ou direct dont
peut être victime un utilisateur ou suite à l'utilisation d'un Produit Reliable, y compris mais
sans s'y limiter, toute responsabilité pour des réclamations de tiers pour des dégâts, et se
limite au montant payé par l'acheteur original du Produit Reliable auquel cette protection
de garantie limitée s'applique. Cette garantie limitée ne s'applique pas aux produits qui ont
été modifiés ou dont les numéros de séries sont manquants, ou aux produits non achetés
directement auprès de Reliable ou d'un revendeur agréé pour la vente de Produits Reliable.
Cette garantie limitée est l'unique garantie qui s'applique à tout Produit Reliable, elle
remplace toutes conditions qui peuvent être contenues dans un autre document ou bon de
commande et ne peut être transformée ou modifiée, sauf dérogation expressément écrite
de Reliable.
Pour obtenir une réparation ou un remplacement en vertu des conditions de cette garantie,
veuillez contacter notre service à la clientèle au 1-800-268-1649 ou par courriel à
support@reliablecorporation.com.
Il vous sera demandé d'envoyer le reçu original par télécopie ou courriel. Le reçu doit
prouver que vous êtes l'acheteur original, que le produit a été acheté directement chez
nous ou chez un revendeur agréé par Reliable et que la réclamation de garantie est
effectuée pendant la période de garantie. Un numéro d'autorisation de retour (Nº AR) vous
sera fourni et il vous sera demandé d'expédier le produit défectueux accompagné de la
preuve d'achat et du Nº AR, les frais d'assurances étant prépayés à l'adresse suivante :
Reliable Corporation, 5-100 Wingold Avenue, Toronto, ON M6B 4K7. Les expéditions avec
fret payable à destination seront refusées. Le risque de perte ou d'endommagement lors du
transport sera assumé par le client. Une fois que Reliable aura reçu le produit défectueux,
elle initiera la réparation ou le remplacement.
Si vous avez des questions concernant la présente garantie, vous pouvez écrire à :
Reliable Corporation
100 Wingold Avenue, Unit 5
Toronto, Ontario
Canada M6B 4K7
www.reliablecorporation.com
GARANTIE DES PRODUITS RELIABLE
25
Page 29

26
Page 30

BRIO 500CC
MANUAL DE INSTRUCCIONES
ESPAÑOL
27
Page 31

RELIABLE. JUNTO A USTED.
En Reliable, hacemos lo que nos gusta, y nos enorgullece hacer
las cosas bien. Usted quiere lo mejor para las personas, los sitios y
las cosas que son importantes en su vida: ya sea el lugar en el que
vive o lo que viste. Lo mismo queremos nosotros. Desde el inicio,
abordamos cada producto con la atención al detalle de un artesano
y con pasión por hacer lo correcto. Calidad, funcionalidad, diseño y
atención al cliente tienen un rol de igual importancia para brindarle
lo que usted necesita. La Brio 500CC pega realmente fuerte en lo
que se refiere a limpieza a vapor. Con una presión de operación
de 5 bar la 500CC trabaja con rapidez contra polvo, suciedad,
gérmenes y demás.
Para su seguridad y con el propósito de disfrutar a pleno de las
ventajas de este producto, dedique unos minutos a leer todas
las medidas de seguridad e instrucciones para el cuidado del
artefacto. Conserve a mano este manual y consulte el certificado
de garantía del producto.
28
Page 32

NOTICIA IMPORTANTE PARA SU SEGURIDAD
Cuando use su limpiador de vapor marca Reliable siempre debe seguir las
instrucciones de precaución y seguridad. Por favor lea todas las instrucciones
cuidadosamente pues ellas tienen información importante concerniente a como se
debe instalar, usar y cuidar la limpiadora de vapor.
• Utilice el limpiador de vapor solo para el uso que esta previsto.
• Para que la persona que use el equipo se proteja de un electroshock, no sumerja
el limpiador de vapor en agua u otros líquidos.
• Siempre debe apagar el limpiador de vapor antes de conectarlo o desconectarlo
del tomacorriente. Nunca hale el cordón eléctrico del tomacorriente para apagar
el equipo. Primero ponga el interruptor en apagado y luego debe desenchufar el
cordón de alimentación de la corriente.
• No deje que el cordón de alimentación toque superficies calientes. El limpiador
de vapor debe estar frio antes de guardarse. Enrolle el cordón de alimentación
alrededor de la base donde debe recogerse cuando no se usa el limpiador de
vapor.
• No opere el limpiador de vapor si este tiene dañado el cordón de alimentación,
el enchufe o si el equipo se ha caído o tiene algún daño. Eso cancelaría alguna o
toda la garantía del producto. Por favor contacte el lugar donde lo compro para
que le expliquen cual es el procedimiento a seguir para su reparación.
• Es necesario mantener una alta preocupación cuando el equipo sea manipulado
por o alrededor de los niños. Nunca deje el limpiador de vapor encendido cuando
no lo este supervisando.
• No use este equipo en presencia de explosivos y/o de gases inflamables.
• Mantenga las ranuras de ventilación libre de polvo.
• Nunca introduzca o deje caer ningún objeto dentro de las ranuras de ventilación.
• Para prevenir que se sobrecaliente el equipo, desenrolle el cordón de
alimentación completamente.
• No utilice el equipo donde se estén usando productos con aerosol o donde se
este suministrando oxígeno.
• Para desconectar el equipo, ponga todos los interruptores en posición de
apagado, y luego desconecte el enchufe de la corriente principal.
• Nunca guarde el limpiador de vapor si este esta caliente. No necesita vaciar
el tanque de agua a menos que usted no lo va a usar por un largo periodo de
tiempo.
• Este equipo se ha creado para ser usado solo en el hogar. Siga todas las
instrucciones de este manual.
29
Page 33

INSTRUCCIONES ELECTRICAS
Para evitar un corto circuito, no opere ningún otro equipo de alto voltaje en el
mismo cirquito simultáneamente. Si necesita usar un cable de extensión, debe
usar uno de 15-amperes con un enchufe polarizado. Cables con menos amperes se
pueden sobrecalentar y pueden causar daño.
30
Page 34

31
ILUSTRACIÓN DE LA LIMPIADORA A VAPOR
1. Panel de control
A. Interruptor táctil de encendido
B. Indicador de encendido
C. Indicador de bajo nivel de agua
D. Indicador de presión
2. Tapa del depósito de agua
3. Asa de traslado
4. Rueda
5. Conexión de manguera
6. Manguera
7. Cable eléctrico
ACCESORIOS
8. 500CCAEXT - Tubos de extensión (2)
9. 500CCAFLOORBRUSH - Cepillo para el piso
10. 500CCATRIANGULARBRUSH - Cepillo triangular
11. 500CCASQUEEGEE - Escobilla limpia-cristales con 2 hojas
12. Hoja de ventana rasqueta (pequeño)
13. Hoja de ventana rasqueta (grande)
14. 500CCABNOZZLE - Boquilla con punta de cobre
15. 500CCA30N (3) - Cepillo de nailon de 30 mm (3)
16. 500CCA30NW - Cepillo de nailon de 30 mm blanco
17. 500CCA60NOW - Cepillo de nailon de 60 mm
18. 500CC30B - Cepillo de latón
19. 500CCA30SS - Cepillo de acero inoxidable
20. 500CCASCRAPER - Raspador
21. 500CCADRAIN - Limpiador de drenajes
22. 500CCACLOTH (3) - Toalla de bambú
23. 500CCAFLOORC - Almohadilla para el cepillo para el piso
24. 500CCAUPHC - Almohadilla para cepillo triangular
25. 500CCATOTE - Bolso para accesorios
26. 5000CCAWAND - Boquilla de aluminio
27. 500CCDESALER - Polvo descalcificador (2 paquetes)
28. Embudo
29. Herramienta para quitar el tapón del drenaje
30. Set de juntas tóricas
Page 35

32
27
29
10
8
26
14
13
6
12
11181916
15
30
20
17
21
28
24
25
7
22
9
23
23
5
A
D
C
B
4
Page 36

33
INSTRUCCIONES DE USO
LLENAR EL TANQUE CALENTADOR ANTES DE USAR
• Desenrosque la tapa del tanque calentador (2) y utilice el embudo (28)
suministrado para verter dentro 2.6 l de agua.
• Ajuste la tapa del tanque calentador (2).
• Conecte la herramienta necesaria (vea el párrafo "COMPLEMENTOS") en el asa
de vapor. Vuelva a llenar el tanque de agua, con ayuda del embudo (28) y una
taza medidora, con 1.9 l de agua si parpadea la luz del indicador de nivel de agua
bajo (C) mientras usa el aparato.
ENCENDIDO
• Doble el cable eléctrico en la parte más cercana al enchufe hembra e inserte
la parte doblada en el prensacable que se encuentra en la parte inferior de la
limpiadora. Debido a la potencia de la máquina, se utiliza un cable más grueso y
esto puede ocasionar cierta dificultad al insertarlo en el prensacable. Inserte el
enchufe hembra en el tomacorriente en el extremo derecho de la parte inferior
del artefacto.
• Enchufe el cable eléctrico en el tomacorriente de la pared (la luz indicadora de
encendido comenzará a parpadear).
• Inserte la manguera de vapor en el conector (5) de la limpiadora y asegúrese
de que la marca en forma de flecha en el conector de la manguera de trabajo
se oriente hacia arriba cuando la conecte. Oirá un sonido de traba cuando el
conector quede colocado. Asegúrese de que el conector está bien trabado antes
de usar el equipo, para evitar peligros.
• Presione el interruptor de encendido táctil (A) en el panel de control. La luz
indicadora de encendido (B) dejará de parpadear y se encenderá. La bomba de
agua comenzará a llenarse y oirá sonidos de bombeo y vibración.
• Toma unos 4 minutos en precalentarse. Puede utilizar el gatillo en el asa para
comenzar a liberar vapor cuando se enciendan todas las luces en el indicador de
presión (D).
• Si, durante el uso, parpadea la luz indicadora de nivel bajo de agua (C), vuelva a
cargar el tanque.
• Desenchufe el cable eléctrico del tomacorriente en la pared después de usar la
limpiadora. Vacíe el agua del tanque y del calentador si no usará la limpiadora
durante un largo tiempo. Desenchufe la manguera de trabajo y guarde la
máquina en un sitio fresco y seco.
Page 37

34
ADVERTENCIA:
1. Podría haber unas pocas gotas de agua en la liberación inicial de vapor. Esto es
causado por la condensación del vapor que viaja por la manguera relativamente
fría.
2. Puede producirse una caída en la presión del vapor cuando comienza a salir a
causa de la liberación de aire residual en el calentador.
3. Habrá algunos ruidos causados por la vibración de la bomba con solenoide
mientras se vuelve a llenar el calentador durante la operación de la limpiadora.
4. El orificio de escape de la válvula de seguridad se ubica en la parte inferior de la
limpiadora.
INSTRUCCIONES PARA DRENAR EL CALENTADOR
1. Espere hasta que el canlentador se enfríe por completo (unas 3 a 4 horas).
2. Quite la cubierta protectora en la parte inferior de la limpiadora (como se ve en
la imagen que sigue).
3. Desenrosque la tuerca del drenaje con la llave (29).
4. Drene el calentador y ajuste la tuerca del drenaje con la llave (29).
5. Vuelva a colocar la cubierta protectora en su lugar y ajústela.
CARACTERÍSTICAS ESPECIALES DE LA LIMPIADORA
INDICADOR DE PRESIÓN DE VAPOR (D)
Cuando se enciendan todas las luces del indicador de presión en el panel de
control, la presión del vapor habrá llegado a su configuración máxima y estará
lista para usar. La barra de luces cambiará durante el uso a medida que cambie la
presión.
INDICADOR DE BAJO NIVEL DE AGUA (C)
Cuando el indicador de bajo nivel de agua parpadea, el nivel de agua en el tanque
es bajo: llénelo antes de usar el artefacto.
COMPLEMENTOS
CEPILLO PARA EL PISO (9)
Aplicaciones: 1. Pisos duros (espacios abiertos) 2. Alfombras (debe usarse con
toalla de bambú), etc.
Page 38

35
Use las varas de extensión para lograr una longitud cómoda.
Modo de empleo:
1. Mueva el cepillo para el piso de adelante hacia atrás.
2. Para obtener mejores resultados, se recomienda limpiar primero el sitio con una
aspiradora (mientras se limpian las alfombras).
3. No se recomienda utilizar la limpiadora en pisos lustrados con cera o de madera
laminada.
CEPILLO TRIANGULAR (10)
Aplicaciones:
1. Pisos duros, mesas de la cocina (espacios limitados).
2. Sillones, camas (debe usarse con toalla), etc.
Modo de empleo:
1. Mueva el cepillo triangular de adelante hacia atrás.
2. Se sugiere limpiar primero el sitio con una aspiradora (mientras se limpian las
alfombras).
3. Se sugiere no utilizar la limpiadora en pisos lustrados con cera o de madera
laminada.
ESCOBILLA LIMPIACRISTALES (11)
Aplicaciones: Superficies lisas y niveladas como puertas y ventanas.
Modo de empleo:
1. Rocíe primero el vapor sobre el vidrio. Comience a limpiar sólo después de que
el cristal se haya calentado de manera uniforme a fin de evitar que se raje por la
expansión causada por el calor y la contracción que provoca el frío.
2. Se incluyen dos tamaños para utilizar en ventanas de diferentes proporciones.
CEPILLOS REDONDOS
Aplicaciones: Inodoros, utensilios de cocina, lechada entre losas, bañeras, grifos,
tubos de escape, ventanas, etc.
UTILICE EL TIPO APROPIADO DE CEPILLO REDONDO CON LA BOQUILLA
OBLICUA (14).
Selección del tipo de cepillo:
• Los cepillos de nailon son relativamente suaves, lo que los hace apropiados para
limpiar lechadas y otras superficies que necesitan un cepillado suave.
• Los cepillos de latón son para aplicaciones más fuertes, es decir limpiezas que
Page 39

36
no pueden hacerse con los cepillos de nailon.
• Los cepillos de acero inoxidable se emplean en las aplicaciones más fuertes de
todas.
• Tenga cuidado al utilizar cada cepillo y asegúrese de no aplicar demasiada
fuerza y dañar la superficie que está limpiando.
• Limpie los cepillos redondos con agua después de su uso, y séquelos con un
paño.
BOQUILLA DE ALUMINIO
Aplicación: Este accesorio se emplea para lanzar vapor a la máxima temperatura y
presión, lo que es apropiado para eliminar manchas difíciles: no se requiere cepillo.
CONEXIÓN DE ACCESORIOS
Lubrique las juntas tóricas accesorias con un lubricante seguro si la conexión se
pone rígida.
LIMPIEZA Y MANTENIMIENTO
Para garantizar el mejor desempeño del producto, se sugiere limpiar el calentador
al menos una o dos veces al año: la frecuencia de la limpieza del calentador
dependerá del tiempo de uso de la máquina y la dureza del agua utilizada.
CÓMO LIMPIAR EL CALENTADOR
Nota: Desenchufe el cable eléctrico del tomacorriente de pared y asegúrese de
que se ha enfriado el calentador antes de desagotarlo.
1. Retire la cubierta protectora en la parte de abajo de la limpiadora.
2. Desenrosque la tuerca del drenaje con una llave.
3. Después de limpiar el calentador, ajuste la tuerca.
ESPECIFICACIONES TÉCNICAS
• potencia de 120 V: 1750 W
• Capacidad del tanque de agua: 2.6 l
• Presión máxima de funcionamiento: 5 bar
• Generación continua de vapor
• Válvula de alivio de presión
• Sobrecargas térmicas
• Certificación: ETL/ cETLus
Page 40

37
Reliable Corporation (“Reliable”) garantiza al comprador original de la caldera descrita arriba
vendida por Reliable (la “Caldera Reliable”) que se encuentra libre de defectos de material
y mano de obra si es utilizada correctamente solo por el comprador original. Si la Caldera
Reliable necesitara algún cambio, Reliable no le cobrará al comprador original el costo de las
piezas y la mano de obra, excepto el envío.
Conforme a las condiciones y limitaciones establecidas a continuación, Reliable reparará o
cambiará la pieza de la Caldera Reliable que demuestre estar defectuosa a causa de material o
fabricación inadecuadas. Si la Caldera Reliable defectuosa deja de estar disponible y no puede
ser reparada con eficacia o reemplazada por un modelo idéntico, Reliable cambiará la Caldera
Reliable defectuosa por otra Caldera Reliable vigente de igual o mayor valor. Las piezas de
recambio o repuestos serán suministrados por Reliable a cambio de las piezas originales, y
serán piezas nuevas o piezas que estarán reacondicionadas para convertirse en productos
funcionalmente equivalentes a piezas nuevas. Si Reliable no puede reparar o reemplazar una
Caldera Reliable, la compañía reembolsará el valor de la Caldera Reliable que esté vigente al
momento de reclamar la garantía.
Esta garantía limitada no cubre los daños que sufra una Caldera Reliable como resultado de
una instalación inadecuada, accidente, abuso, uso incorrecto o irrazonable, desastre natural,
suministro de energía eléctrica insuficiente o excesivo, condiciones mecánicas o ambientales
anormales, o cualquier desarme, reparación o modificación no autorizada. Esta garantía
limitada no se extiende a ningún daño indirecto, resultante o accidental que el usuario pueda
sufrir por el uso de una Caldera Reliable, incluyendo, entre otros, la responsabilidad ante los
reclamos presentados por terceros; y se limita al monto pagado por el comprador original de
la Caldera Reliable respecto del cual tiene aplicación esta protección de garantía limitada. Esta
garantía limitada no es válida para los productos que hayan sido modificados o que no tengan
número de serie, o para los productos que no hayan sido comprados directamente a Reliable o
a través de un vendedor autorizado por Reliable para comerciar la Caldera Reliable.
Esta garantía limitada es la única garantía que se aplica a la Caldera Reliable, reemplaza todos
los términos que puedan estar contenidos en cualquier otro documento u orden de compra, y
no puede ser alterada o modificada, excepto que Reliable así lo haya autorizado expresamente
por escrito.
Para obtener la reparación o cambio según los términos de esta garantía, comuníquese
con nuestro grupo de servicio al cliente al 1 800 268 1649 o escriba a support@
reliablecorporation.com. Usted deberá presentar, por fax o correo electrónico, el comprobante
original. Este comprobante debe demostrar que usted es el comprador original, que el
producto fue adquirido directamente de nuestras oficinas o de un vendedor de Reliable
autorizado y que el reclamo de la garantía se realiza dentro del período establecido en este
documento o en un documento posterior emitido por Reliable en relación con esta póliza.
Usted recibirá un número de autorización (RA#) y deberá enviar el producto defectuoso, junto
con el comprobante de compra, el RA# y los seguros pagados por adelantado, a la siguiente
dirección: Reliable Corporation, 5-100 Wingold Ave, Toronto, ON M6B 4K7.
Los costos de envío por cobrar serán rechazados. El riesgo de sufrir una pérdida o daño en
tránsito será asumido por el cliente. Una vez que Reliable reciba el producto defectuoso, la
compañía iniciará el proceso de reparación o cambio.
RELIABLE CORPORATION – GARANTÍA DEL
PRODUCTO DE POR VIDA – PÓLIZA PARA
CALDERAS PRESURIZADAS A VAPOR
Page 41

Reliable Corporation (“Reliable”) garantiza al comprador original de sus productos que todas
las unidades vendidas por Reliable (un “Producto Reliable”) se encuentran libres de defectos
de material y de mano de obra durante el período de un año a partir de la fecha de compra,
si son utilizadas correctamente y han recibido el mantenimiento adecuado. En virtud de las
condiciones y limitaciones establecidas a continuación, Reliable reparará o reemplazará
la pieza de un Producto Reliable que demuestre estar defectuosa a causa de material o
fabricación inadecuadas. Si el Producto Reliable defectuoso deja de estar disponible y no se
lo puede reparar en forma eficaz ni reemplazar por un modelo idéntico, Reliable cambiará el
Producto Reliable defectuoso por un Producto Reliable vigente de igual o mayor valor. Reliable
proporcionará piezas reparadas o de repuesto a cambio de las piezas originales, y serán piezas
nuevas o reacondicionadas para convertirse en productos funcionalmente equivalentes a piezas
nuevas. Si Reliable no puede reparar ni reemplazar un Producto Reliable, reembolsará el valor
del Producto Reliable que esté vigente al momento de reclamar la garantía.
Esta garantía limitada no cubre los daños que sufra un Producto Reliable como resultado de una
instalación inadecuada, accidente, abuso, uso incorrecto, desastre natural, suministro de energía
eléctrica insuficiente o excesivo, condiciones mecánicas o ambientales anormales, desgaste
provocado por el uso normal del producto, o cualquier desarme, reparación o modificación no
autorizada. Esta garantía limitada no se extiende a ningún daño indirecto, resultante o accidental
que el usuario pueda sufrir o que pueda causar el uso de un Producto Reliable, incluyendo,
entre otros, la responsabilidad ante los reclamos presentados por terceros; y se limita al monto
pagado por el comprador original del Producto Reliable respecto del cual tiene aplicación
esta protección de garantía limitada. Esta garantía limitada no es válida para productos que
hayan sido modificados o que no tengan número de serie, o para productos que no hayan sido
comprados directamente a Reliable o mediante un vendedor certificado que cuente con nuestra
autorización para vender Productos Reliable.
Esta garantía limitada es la única que se aplica a todos los Productos Reliable, reemplaza todos
los términos que puedan estar contenidos en cualquier otro documento u orden de compra, y no
puede ser alterada ni modificada excepto que Reliable así lo haya autorizado expresamente por
escrito.
Para obtener una reparación o cambio según los términos de esta garantía,
comuníquese con nuestro grupo de atención al cliente al 1-800-268-1649 o escriba a
support@reliablecorporation.com.
Usted deberá presentar, por fax o correo electrónico, el comprobante original. Este comprobante
debe demostrar que usted es el comprador original, que el producto fue adquirido directamente
en nuestras oficinas o a un vendedor de Reliable autorizado y que el reclamo de la garantía se
realiza dentro del período correspondiente. Usted recibirá un número de autorización (RA#) y
deberá enviar el producto defectuoso, junto con el comprobante de compra, el RA# y seguros
pagados por adelantado, a la siguiente dirección:
Reliable Corporation, 5-100 Wingold Avenue, Toronto, ON M6B 4K7. Los costos de envío por
cobrar serán rechazados. El riesgo de sufrir una pérdida o daño en tránsito será asumido por el
cliente. Una vez que Reliable reciba el producto defectuoso, la compañía iniciará el proceso de
reparación o reemplazo.
Si tiene preguntas sobre esta garantía, puede escribir a la siguiente dirección:
Reliable Corporation
100 Wingold Avenue, Unit 5
Toronto, Ontario
Canada M6B 4K7
www.reliablecorporation.com
GARANTÍA DE LOS PRODUCTOS RELIABLE
38
Page 42

Page 43

Page 44

1 800 268 1649
www.reliablecorporation.com
DID YOU KNOW?
Our development of in-home
steam cleaning solutions
takes a page from the
equipment performance
expectations of the pros!
 Loading...