

Page 1
Owners &
Installation
U20/E21 GAS INSERT
ZERO CLEARANCE KIT
KIT # 530-936
PLEASE KEEP THESE INSTRUCTIONS
FOR FUTURE REFERENCE
WARNING:
Improper installation, adjustment,
alteration, service or maintenance
can cause injury or property damage.
Refer to this manual. For assistance
or additional information consult an
authorized installer, service agency
or the gas supplier.
FOR YOUR SAFETY
Do not store or use gasoline or other
flammable vapours and liquids in
the vicinity of this or any other
appliance.
Installation and service must be
performed by an authorized installer,
service agency or the gas supplier.
FOR YOUR SAFETY
What to do if you smell gas:
!!
! Do not try to light any
!!
appliance
!!
! Do not touch any
!!
electrical switch: do not
use any phone in your
building.
!!
! Immediately call your
!!
gas supplier from a
neighbour's phone.
Follow the gas supplier's
instructions.
!!
! If you cannot reach your
!!
gas supplier, call the fire
department.
Manual
Fireplace Products International Ltd.
6988 Venture St., Delta, B.C.
Canada, V4G 1H4
Australian Heating Distributors
10/46 James St.,
Guildford, Western Australia 6055
Tested by:
Warnock Hersey:
© Copyright 2004, FPI Fireplace Products
International Ltd. All rights reserved.
Masport Head Office - Australia
54 Boundary Rd. Braeside
P.O. Box 553
Mordialloc 3195
Ph. (03) 9586-7777
Fax. (03) 9586-2980
908-037 01/15/04
Masport Head Office - New Zealand
1-37 Mt Wellington Hwy.Panmure,
P.O. Box 14349
Auckland 6.
Ph. (9) 570-9009
Fax. (9) 527-1294
Page 2

TABLE OF CONTENTS
U20/E21 GAS INSERT ZERO CLEARANCE KIT
CONTENTS PAGE
Listings & Code Approvals ..................................................3
Specifications .......................................................................3
General Information .............................................................4
Parts.....................................................................................4
Clearances to combustibles .................................................4
Locating Your Fireplace ..................................................... 5
Framing ................................................................................ 5
Kit Assembly.........................................................................6
Venting .................................................................................7
Insert Installation .................................................................. 8
Optional Outside Combustion Air Supply Installation ...........9
Gas supply line.....................................................................9
Electrical Supply ................................................................... 9
Faceplate & Trim Installation..............................................10
Zero Clearance Top Louver ............................................... 11
Finished Facing Notes........................................................11
2
U20/E21 Gas Insert Zero Clearance Kit
Page 3
INSTALLATION
LISTINGS AND CODE APPROVALS
This gas component has been tested in accordance with National Safety Standards, and has been certified by
Warnock Hersey for installation and operation in the United States, Canada, Australia, and New Zealand as
described in these Installation and Operating Instructions.
Check with your local building code agency before you begin your installation to ensure compliance with local codes,
including the need for "permits" and follow-up inspections. If any problems are encountered regarding code
approvals, or if you wish clarification on any of the instructions contained here, contact your local dealer.
Specifications
U20/E21 Gas Insert Zero Clearance Kit
3
Page 4
INSTALLATION
GENERAL INFORMATION
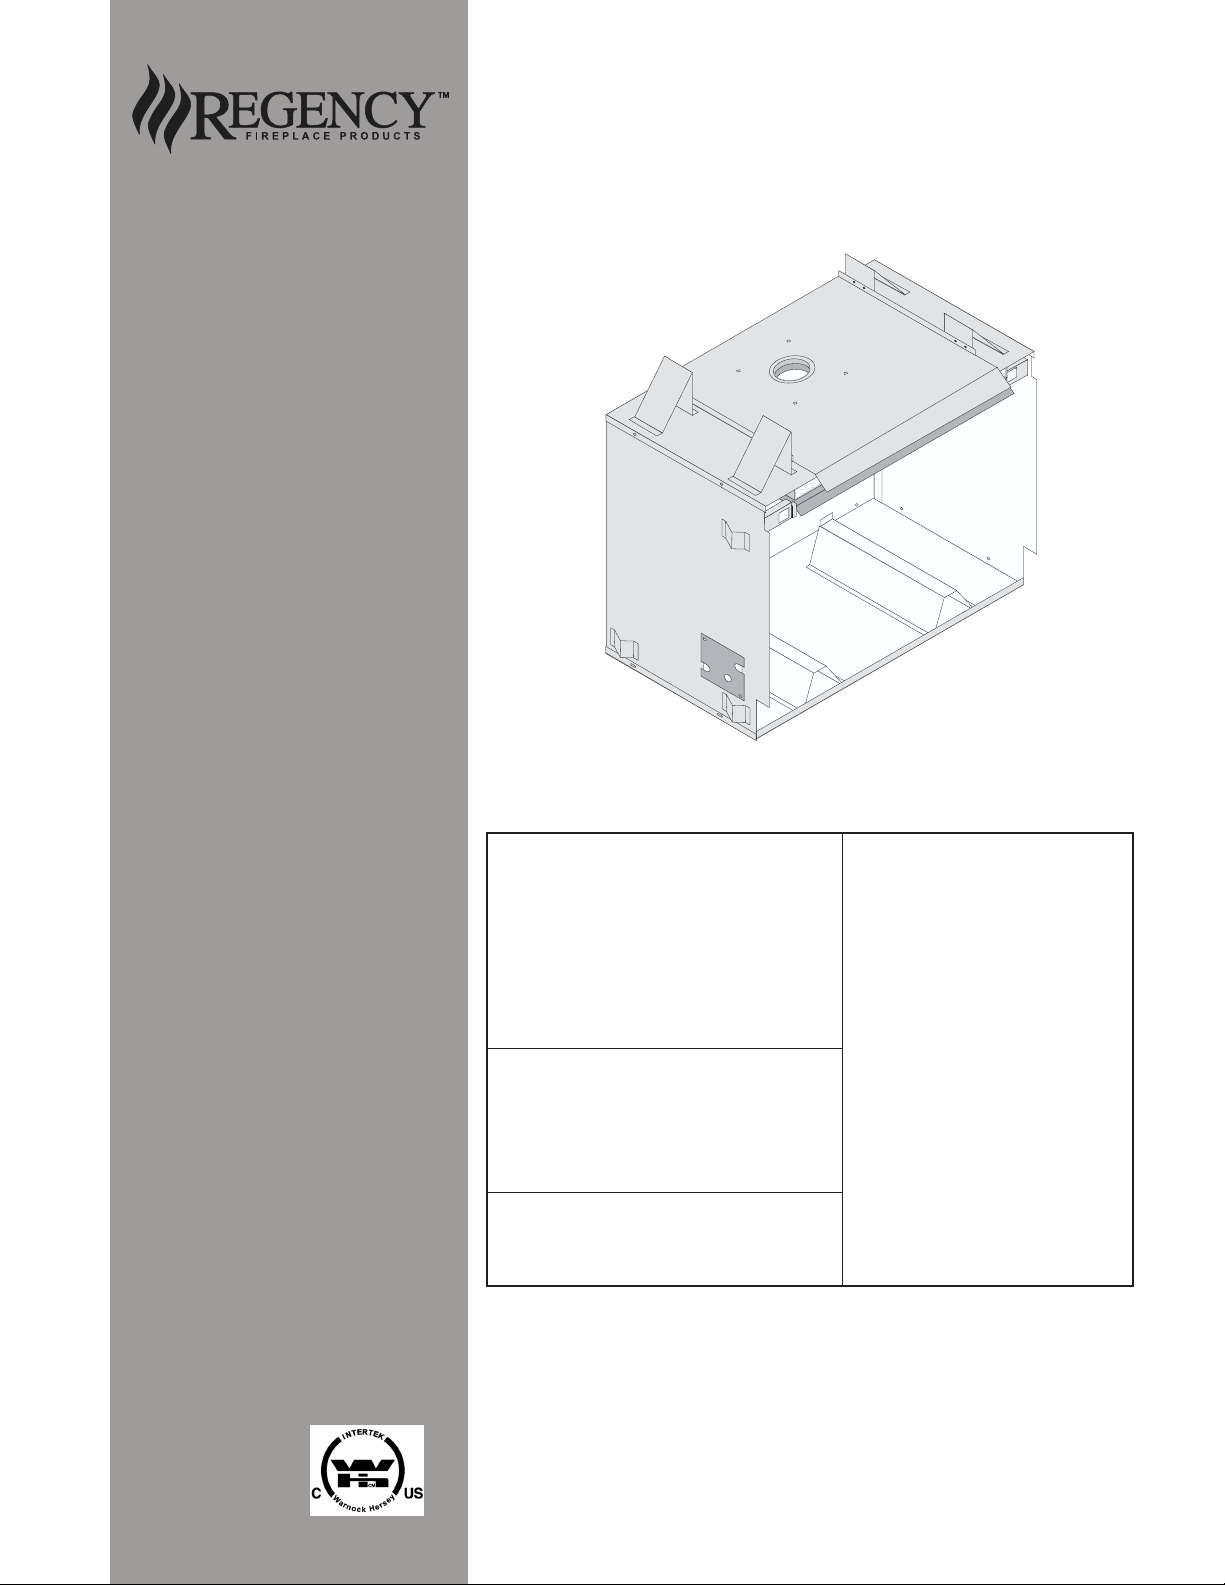
This kit consists of factory built parts that require minimal
assembly to form the Zero Clearance box for the U20/E21
Gas Insert. The Zero Clearance box can then be fixed into a
framed combustible construction, and a standard "B-vent"
installed on the assembly for the required venting. The
insert can be installed later. The faceplate will normally
overlap on top of the finished wall. Using Kit# 530-936 you
can convert the U20/E21 Gas Insert models into highly
efficient heat producing Zero Clearance Fireplaces.
Included with Kit:
1 Main Body Assembly (5 pieces)
1 Faceplate Top Insulation
1 Zero Clearance Top Louver Assembly
Sold Separately:
(Rq) 1 402-918 Faceplate 40-1/4"W x 26-1/4"H
(Rq) 1 532-926 4"(102mm) Hearth Trim
PARTS
(Rq)=Required
(1020mm W x 665mm H)
c/w faceplate trim.
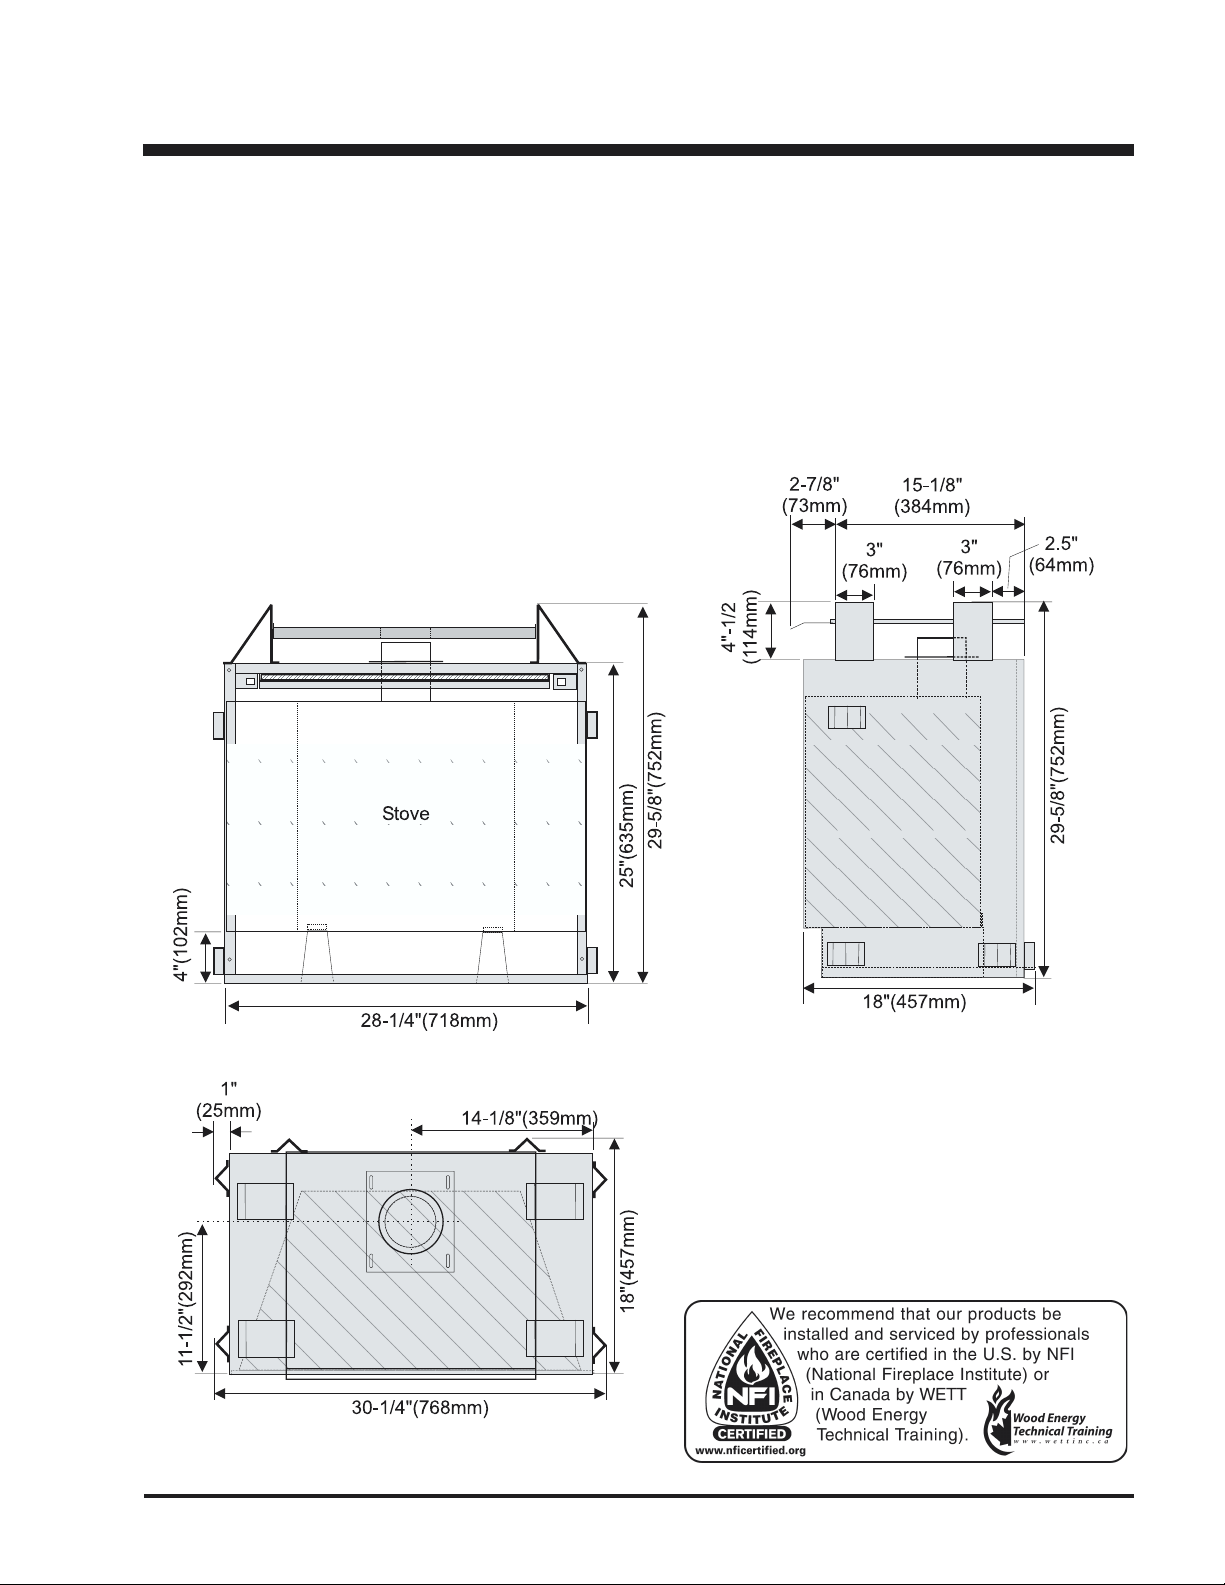
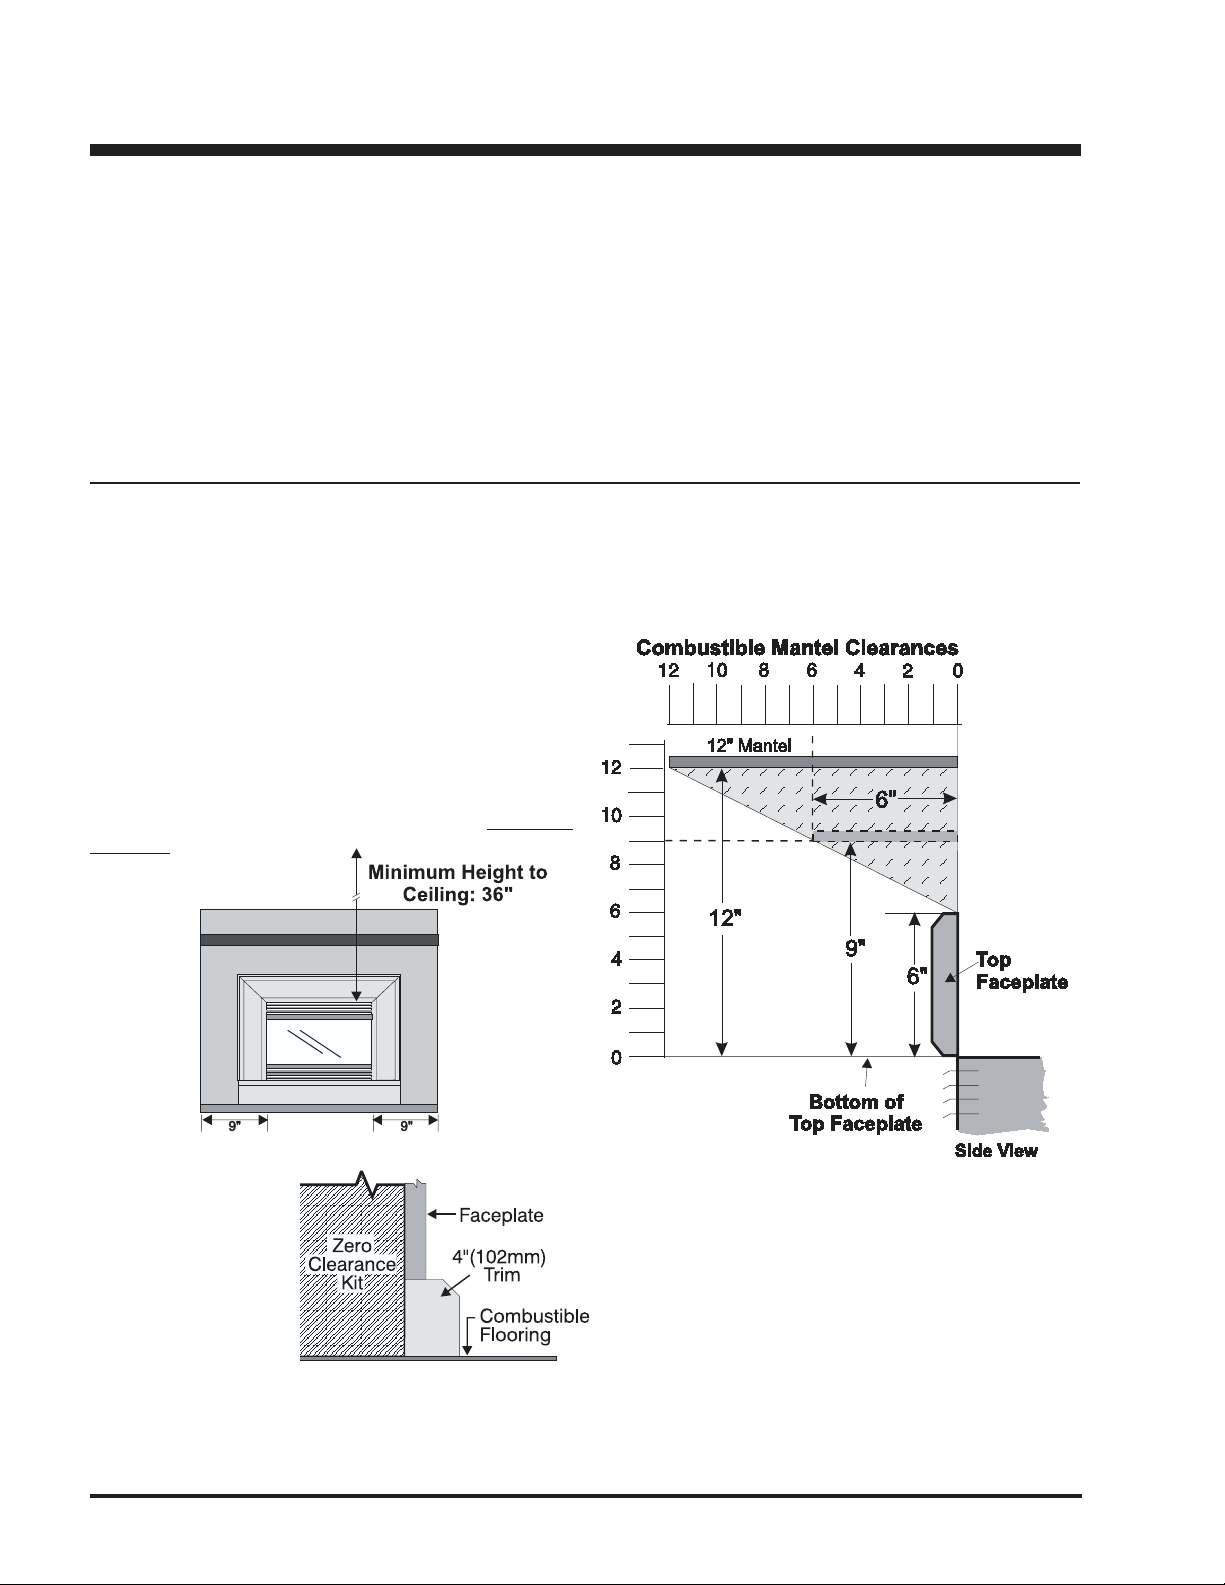
CLEARANCES TO COMBUSTIBLES
The clearances for the Zero Clearance Kit are 0" to combustibles (back, side and floor) but when planning your
installation review the clearances required for the Insert (see below) after it is installed in the Zero Clearance Kit.
Clearances to Combustibles for Insert
The minimum clearance from the side of the appliance
to a combustible side wall is 9 inches (229mm). See the
"Mantel Clearances" chart (Diagram 2) for the minimum
clearance from the bottom of the Top Faceplate to a
combustible mantel. The minimum height from the
bottom of the Top Faceplate to the ceiling is 36 inches
(914mm). See diagram 1.
Diagram 2
Diagram 1
The Zero Clearance Kit
must be installed on a
flat, solid, continuous
surface (e.g. wood,
metal, concrete). This
may be the floor, or
raised up on a platform
to enhance its visual
impact.
NOTE: The specified '0' inch floor clearance means that
the top surface of the flooring material, i.e. carpeting, tile,
etc., must not extend above the bottom edge of the 4"
Hearth Trim.
4
Diagram 2: Mantel can be installed anywhere in the
shaded area or higher. Use the grid to determine
height and depth of mantle.
Example: a 6" deep mantle must be 9" above the
bottom of the top faceplate.
Note: A non-combustible mantel may be installed
at a lower height if the framing is made of metal studs
covered with a non-combustible board.
Note: Ensure the paint that is used on the mantel and the
facing is "heat resistant" or the paint may discolour.
U20/E21 Gas Insert Zero Clearance Kit
Page 5

LOCATING YOUR U20/E21 FIREPLACE
Due to high temperatures the Insert should be located out of traffic and
away from furniture and draperies. Provide a minimum of 48" (1220mm)
front clearance to the unit.
INSTALLATION
B
A
F
D
C
This appliance is Listed for bedroom installations when used with a
Listed Millivolt Thermostat. Some areas may have further requirements,
check local codes before installation.
This appliance is Listed for Alcove installations, maintain minimum
Alcove clearances as follows, minimum ceiling height of 53-1/2",
minimum width of 48" and a maximum depth of 36".
This unit is not approved for installation into a mobile home.
a) Cross Corner d) Island
b) Room Divider e) Flush with Wall
c) Flat on wall f) Flat on Wall
E
Corner
FRAMING
1) The trim kit allows for 1/2" (13 mm) of finish facing material. The kit may be installed directly on and/or against
standard combustible building materials.
2) Frame in the Zero Clearance box for the Kit with framing
material. The framed opening for the assembled kit is 29-3/
4" (756mm) high x 30.25" (768mm) wide x 16.5" (419mm)
(17" (432mm) including drywall) deep. See diagram below.
3) For exterior walls, vapour barrier and insulate the Zero
Clearance box to the same
degree as the rest of the
house, or according to local
installation codes.
4) The appliance may be
enclosed above the
standoffs on the cabinet
but the clearances stated
on the b-vent chimney
must be maintained.
U20/E21 Gas Insert Zero Clearance Kit
5
Page 6

INSTALLATION
KIT ASSEMBLY
Parts
1) Top Assembly
2) Base Assembly
3) Back Panel
4) Left Side Panel
5) Right Side Panel
6) Gas Line Cover Plate
Kit Assembly
1) Lay the Base Assembly on a flat surface.
2) Attach the Left and Right Side panels to the Back
panel (one screw each side). NOTE: the Side
flanges are on the outside, Back flanges are on the
inside.
3) Lift the Back/Side Assembly onto the Base, position
as shown in the diagram. The Back and Sides rest
on the Base with the Base flanges on the outside.
Fasten the Back to the Base (3 screws) and the
Sides to the Base (2 screws for each side).
4) Attach the top assembly, with the top flanges on the
outside of the Sides and Back panels.
5) Do not install the Zero Clearance Top Louver until the
U20/E21 Insert has been installed.
6
U20/E21 Gas Insert Zero Clearance Kit
Page 7

INSTALLATION
VENTING
1) This fireplace must be vented with a 4" (100mm)
diameter Class “B” vent. The installation of the
venting system must conform and be in accordance
with the natural gas installation code CAN/CGA B149 (Canada), ANSI Z223.1 (U.S.A.), AG 601
(Australia), and NZS 5261 (New Zealand). Minimum
chimney height from base of fireplace must be at
least 12 feet (3.7m).
2) Masonry Chimney Installation:
This application can be connected to a masonry
chimney flue. Make sure the masonry chimney is
clean and in good working order. When an existing
masonry chimney is unlined and local experience
indicates that gas condensation may be a problem
or if local codes dictate, an approved liner should be
installed. Use “B” Vent to bridge the gap between the
fireplace and the masonry chimney. To ensure
proper flue sizing and operation it is recommended
that the masonry chimney be lined with an approved
aluminium chimney liner of the same diameter as the
“B” Vent. Make sure connection between “B” Vent
and masonry is completely sealed. Flue pipe exposed
to cold air should be insulated in a chase. If
condensation occurs, a trap should be installed at
bottom of flue.
Use a maximum of two offsets; four 45o elbows, or two
90o elbows for example. Slope horizontal pipe at least
1/4" (6.4 mm) rise per foot of run. Horizontal runs
should not exceed the vertical rise. Keep horizontal
runs to a minimum. See chart below.
NOTE: Cold Climate Installation
When this appliance is to be installed against a noninsulated wall or in a chase, fibreglass insulation should
be installed around the body of the fireplace.
Note: The draft hood must be installed parallel to the
fireplace opening, as shown below. See
Instructions in U20/E21 Installation Manual.
Install stove insert as per U20/E21 Installation Manual,
see also page 8.
U20/E21 Gas Insert Zero Clearance Kit
Variable Chimney Routes
7
Page 8

INSTALLATION
INSERT INSTALLATION
1) Insert the U20/E21 Zero Clearance box into desired
location and frame according to the instructions on
page 5.
2) Run required gas and electrical connections to the
Zero Clearance box, both are located on the left hand
side of the U20/E21 Insert. See "Gas Supply Line" on
page 9 and "Electrical Supply" on page 9.
3) Remove the screw holding the draft hood slide plate
on the U20/E21 unit and remove.
4) Attach the draft hood slide plate to the flue collar
assembly with three sheet metal screws.
NOTE: ensure that when the draft hood slide plate
is screwed in that it is the same height as the draft
hood guides or it will not slide into position.
5) Slide the gas insert in all the way back using the draft
hood guides. Draft hood must be in original position
and replace the screw holding the draft hood.
6) Make the final gas and electrical connections as per
the Insert Instruction manual. Use the gas line cover
plate that is included with the Zero Clearance box.
7) Assemble the Faceplate and Trim and the 4" Hearth
Trim to the U20/E21 zero clearance box as per the
instructions on page 10.
8) Attach the Top louver assembly to the Zero Clearance
Kit by placing the louver clamps into the square hole
on the louver holding brackets as per the instructions
on page 11.
Note: Do not operate unit if draft hood is not fastened
in original position.
8
U20/E21 Gas Insert Zero Clearance Kit
Page 9

INSTALLATION
OPTIONAL OUTSIDE COMBUSTION AIR SUPPL Y INST ALLA TION
A 4" (100 mm) dia. aluminum flex pipe or equivalent may
be installed from the outside (with a proper exterior
cover) to the Zero Clearance cabinet. There is an outside
hole provided on the rear wall of the kit. This will provide
adequate outside combustion air supply to the heater.
GAS SUPPLY LINE
An authorized service person should install the gas line in accordance with all local building codes. If codes permit,
flex gas line or coiled copper tubing may be used as gas supply line. The suggested way to install the gas supply
line is as follows: run 1/2" (9.5 mm) NPT gas line to the left side of the framed opening. (See U20/E21 installation
instructions for additional information).
Specifications
Min. Inlet Input
Gas Pressure Rating
Natural Gas 4.5" w.c. 21,000 Btu/hr
1.12 kP 22 mj/h
Propane 11" w.c. 21,000 Btu/hr
2.74 kPa 22 mj/h
ELECTRICAL SUPPLY
Provide 120 VAC, 60 Hz (in Australia and New Zealand: 240 VAC,
50 Hz) receptacle within 24"(610mm) of the left side of the appliance
(not inside the Zero Clearance Cabinet). Plug the cord on the
appliance into the receptacle.
U20/E21 Gas Insert Zero Clearance Kit
9
Page 10

INSTALLATION
FACEPLATE & TRIM
INSTALLATION
1) Lay the faceplate panels flat, facedown on something
soft so they don't scratch.
2) a) Take the top faceplate and align the holes in it
with the holes in the side panels. Using the
screws provided, attach from the top of the panel
(holes in the top panel are slightly larger than the
holes in the side panel to facilitate easier
installation). See diagram 1.
b) 4"(102mm) Hearth Trim. Attach the Hearth Trim
to the bottom of the faceplate side panels with
the screws provided. See diagram 1.
Hint: Don't tighten the screws down completely at
this point, do a trial fit to the unit. Make any
necessary adjustments and when it fits properly
then tighten down the screws.
3) Using the trim clips provided, join the left side trim
(with the ON/OFF switch) to the top trim. See
diagram 2. Connect the right side trim to the top trim.
Faceplate Assembly
Diagram 1
4) Place the trim on the assembled faceplate panels,
aligning the wire connections from the switches with
the notch on the left side panel.
5) Connect the fan switch wires by taking the black and
red wires with the male ends (in the grey harness)
and connect them with the 2 wire connectors from
the fan speed control.
6) Connect the ON/OFF switch wires by taking the
black and red wires with the female ends and
connect them to the ON/OFF switch.
7) Install these wires in the clips on the left faceplate
to ensure they don't touch the insert. See diagram 3.
8) The power cord should be run behind the faceplate
panel from the U20/E21 to electrical outlet box.
9) Place top insulation in behind the top faceplate as in
the diagram. Pressed securely into place.
Trim
Clips
Wires to
On/Off
Switch
For Gas
Connection
Trim Assembly
Diagram 2
ON/OFF
Switch
Fan Speed
Switch
(Rear View)
Self-adhesive
Wire Clip
Wires to
Fan Switch
Connectors
POWER CORD (3ft)
10
Diagram 3
U20/E21 Gas Insert Zero Clearance Kit
Page 11

1/8" (3mm) hole through the faceplate using the
hole in the trim as a guide. Fasten the trim to the
faceplate panels using the plated screws. #10
x1/2". See diagram 4 detail 'B'.
11) Attach the faceplate panels to the insert body
using the 4 remaining black screws. See diagram
4 detail 'A'. These screws will also fasten the
insert to the Zero Clearance sides.
12) Push the logo plate into the two holes in the
bottom left corner of the faceplate.
Note: This faceplate and Hearth Trim Assembly
replaces the standard Assembly as shown
in the U20/E21 Installation Manual.
INSTALLATION
Diagram 410) Attach the brass trim to the faceplate by drilling a
ZERO CLEARANCE TOP LOUVER
Attach the Top louver assembly to the Zero Clearance box by placing the
louver clamps into the square hole on the louver holding brackets.
FINISHED FACING
NOTES
Install finished facing surface
of 1/2"(13mm) thickness on
framing. Drywall 1/2" (13 mm)
thick can extend flush with the
appliance on all three sides of
the front face. The height at
which the mantle must be
installed above the top louver
depends on the depth of the
mantle. If the mantle is to be
painted, use a heat resistant
paint to prevent discolouration.
U20/E21 Gas Insert Zero Clearance Kit
11
Page 12

Printed in Canada
 Loading...