

Page 1

1
FEATURES
One touch “Auto Scan” tuning
900 MHz RF technology lets you roam freely throughout your house
Operating distance up to 150 feet
No line-of-sight limitation
Rechargeable headphone receiver
Built-in charger in the transmitter
Automatic level control (ALC) and Auto ON/OFF design
INTRODUCTION
This 900 MHz stereo wireless headphone system features a compact
design that uses the latest wireless technology that enables you to
enjoy music and TV sound anywhere inside or outside your home.
You can simply connect the system to any sound source, such as a
DVD, DBS, CD, TV, VCR, stereo receiver and radio.
HEADSET SAFETY
■ Do not play your headset at a high volume.
Hearing experts advise against continuous extended play.
■ If you experience a ringing in your ears, reduce the volume or
discontinue use.
■ Make sure the volume level of the headphone is set at a comfortable
listening level before placing it in position over your ears.
WHP160/WHP160T_IB 11/5/01 10:08 AM Page 1
Page 2
OPEN
RIGHT EARPHONE
BATTERY
DOOR
CHARGE
INPUT
LEFT EARPHONE
POWER
LED
INDICATOR
VOLUME
CONTROL
TUNING
CONTROL
ON/OFF
SWITCH
STEREO
INDICATOR
DC IN
W
I
R
E
L
E
S
S
T
R
A
N
S
M
I
T
T
E
R
9
0
0
M
H
z
POWER TUNING CHARGE
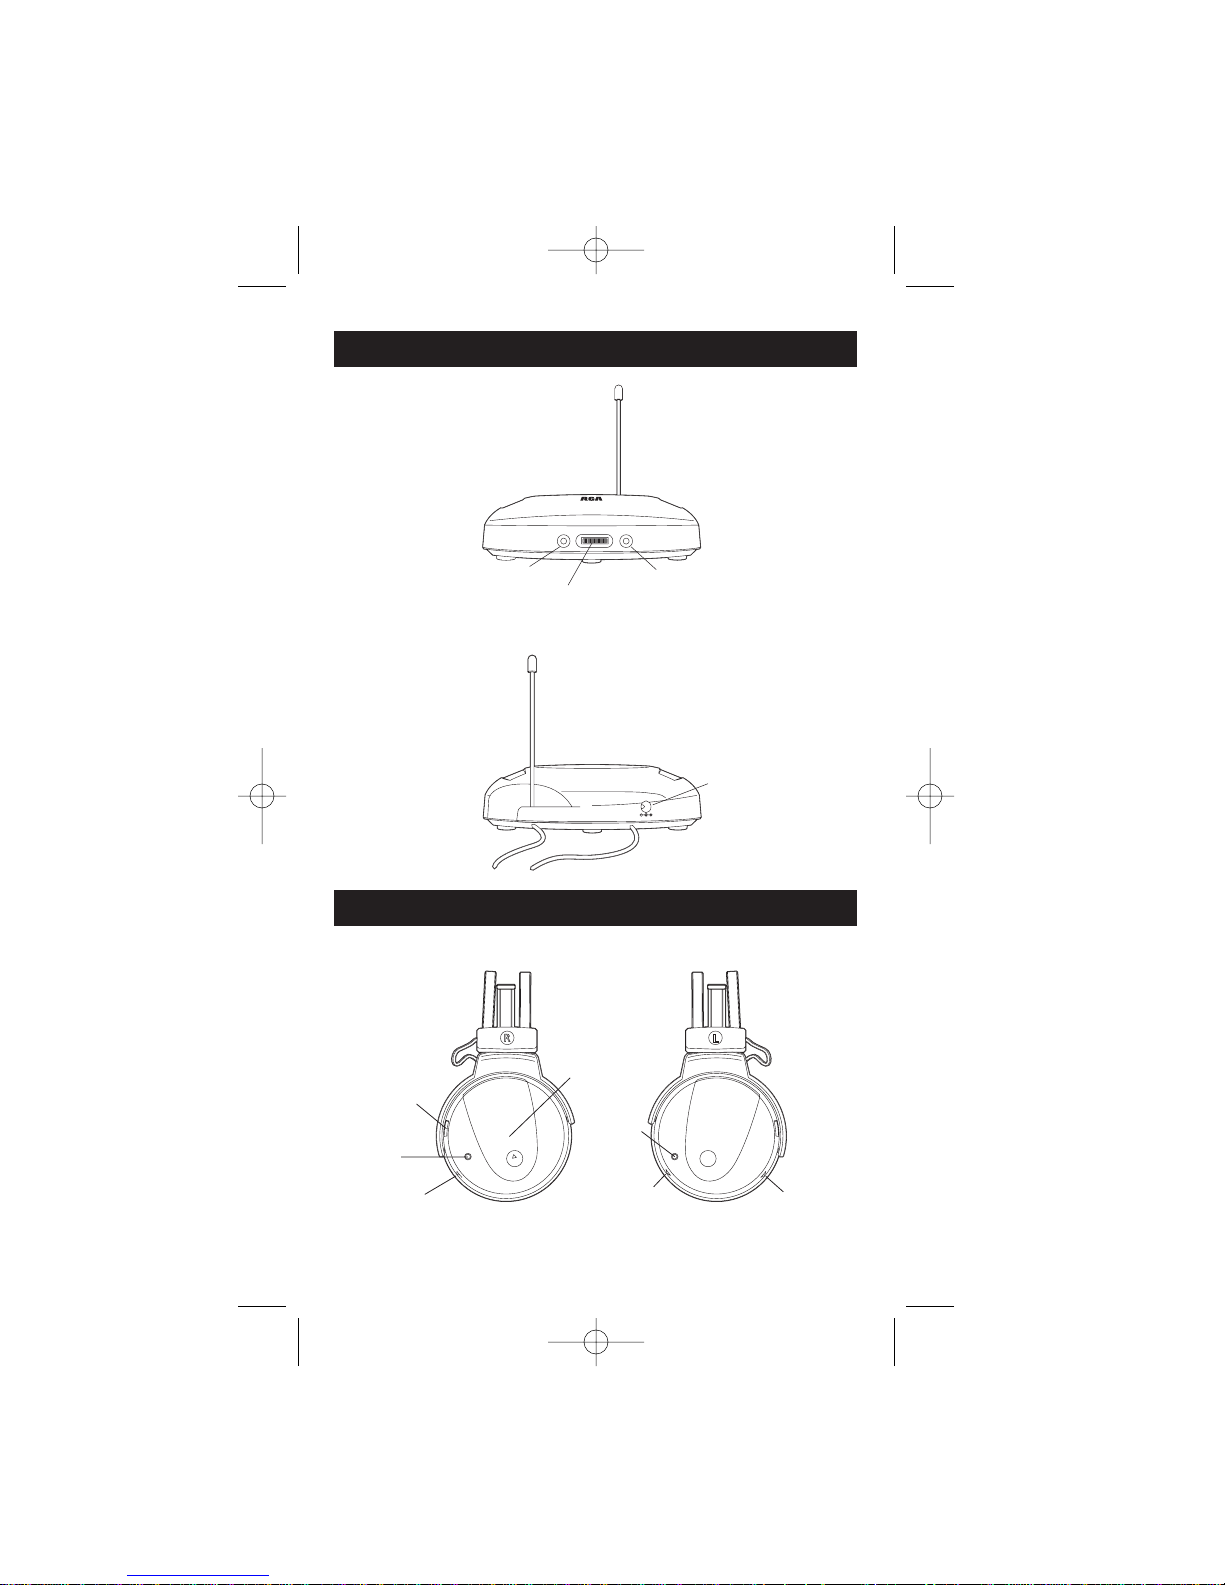
2
TRANSMITTER
HEADPHONE RECEIVER
CHARGE INDICATOR (RED)
POWER ON/SIGNAL INDICATOR (GREEN)
FREQUENCY ADJUST
AUDIO CORD
CHARGE CORD
DC POWER JACK
FRONT
BACK
WHP160/WHP160T_IB 11/5/01 10:09 AM Page 2
Page 3

AC/DC
ADAPTER
AUDIO
CORD
CHARGE
CORD
DC IN
W
I
R
E
L
E
S
S
T
R
A
N
S
M
I
T
T
E
R
9
0
0
M
H
z
POWER
GREEN
LED
RED
LED
TUNING CHARGE
3
INSTALLATION
Note that when the audio device is on, the green “SIGNAL
INDICATOR” LED light will glow (green). This indicates that the
transmitter is receiving an adequate audio signal. If the LED is not on,
you must increase the volume until the green LED is lit. If you
increase the volume and the LED still does not illuminate, then check
all your connections and make sure that the power is on for both the
device and the transmitter. Refer to the section titled
“Troubleshooting” located on page 8 of this instruction book for
assistance.
TRANSMITTER
1. Slip the antenna tube over the antenna wire located on the back.
2. Plug the AC power adapter into the DC jack located on the rear of
the transmitter.
3. Connect the AC power adapter to an electrical wall outlet.
4. The audio cord on the rear of the transmitter can be connected to
the audio output jack (R & L) of the TV, stereo receiver, VCR, DVD
or radio.
•Use a Y Splitter for R & L type RCA connections.
5. Turn on the component device.
900 MHz
WIRELESS TRANSMITTER
WHP160/WHP160T_IB 11/5/01 10:09 AM Page 3
Page 4

RIGHT EARPHONE
USE AAA
RECHARGEABLE
BATTERY ONLY
OPEN
BATTERY
DOOR
AAA
RECHARGEABLE
BATTERIES
4
OPERATION
HEADPHONE RECEIVER
1. Open the battery compartment cover on the right side of the
headphone receiver.
2. Insert two AAA size rechargeable batteries, noting the correct polarity
as indicated in the battery compartment.
3. Replace the cover by sliding it in place until it “snaps” into position.
4. The batteries must now be charged before you use the headphones.
Refer to the instructions on page 6 “Charging the Batteries” for
details.
1. Turn on the audio source (TV or audio component) to which the
transmitter is connected.
2. Slide the ON/OFF switch on the headphone to “ON.”
3. Listen to the volume coming from the ear cups on the headphone to
make certain that the volume is not too loud before placing the unit
on your head. (See the section titled “Headset Safety” on page 1.)
Adjust the volume as needed using the VOLUME CONTROL wheel
located on the left ear cup. Once the volume level is at a comfortable
setting, place the headphones over your ears and adjust the volume
as desired.
4. If the best frequency reception is not found, press the “Auto Scan”
button on the headphone to locate the frequency of the transmitter
for the best reception. The stereo LED indicator will light up.
The headphone may be operated by
using standard or alkaline batteries.
However, these may not be recharged in
the headphone. Standard zinc carbon,
manganese or alkaline batteries
may leak or explode if recharged in
the headphone, thereby voiding
the warranty. Do not attempt to
recharge any batteries in the headphone other than nickel cadmium
type cells that were included with
your unit.
WHP160/WHP160T_IB 11/5/01 10:09 AM Page 4
Page 5

W
I
R
E
L
E
S
S
T
R
A
N
S
M
I
T
T
E
R
9
0
0
M
H
z
POWER TUNING CHARGE
20 FEET
W
I
R
E
L
E
S
S
T
R
A
N
S
M
I
T
T
E
R
9
0
0
M
H
z
POWER TUNING CHARGE
20 FEET
NOTE
You should now be able to walk freely from room to room enjoying full
stereo sound. If you notice interference (noisy signal or if the sound is
distorted or breaks up), adjust the frequency by turning the thumb
wheel control located on the front of the transmitter base either left or
right. Then, push the “Auto Scan” button on the headphone to lock into
the new frequency. This should help you to obtain better reception with
the headphones. You may have to try this adjustment several times to
obtain optimum performance, depending on the conditions. Please refer
to the following drawings A and B for best tuning:
A
Keep a distance of about 20 feet between the headphone and the
transmitter when adjusting the tuning knob for best stereo reception.
For protection of the transmitter and to save power, the transmitter
will cut off automatically after about one minute when the input
signal from an audio source is too weak for operation. If the signal
from the audio source returns at a sufficient level, the transmitter will
turn on again automatically.
5
B
Whenever you find interference, readjust the frequency of the
transmitter by turning the thumb wheel and then pushing the
“Auto Scan” button on the headphone to lock in a new frequency.
WHP160/WHP160T_IB 11/5/01 10:09 AM Page 5
Page 6

OPEN
AUDIO
CORD
CHARGE
CORD
DC IN
6
CHARGING THE BATTERIES
1. Slide the ON/OFF switch on the headphone receiver to OFF.
2. Plug the charge cord into the charge input jack of the headphone
receiver to charge the batteries.
3. The charging process starts automatically when the batteries are
charged and the charging RED LED lights up. Charge the new
batteries for 24 hours prior to the first use of the headphone system.
Caution : Do not use other types of batteries to replace the rechargeable
(AAA) battery. When you are not using the headphone
receiver, please switch it to OFF to avoid damage to the
batteries.
The battery pack must be fully charged prior to operation. An initial
charge of 24 hours is required to ensure the extended life of the
rechargeable batteries. Be sure the headphone receiver is in the
OFF position during charge status.
WHP160/WHP160T_IB 11/5/01 10:09 AM Page 6
Page 7

7
Warning: Changes or modifications to this unit not expressly
approved by the party responsible for compliance could void the
user’s authority to operate the equipment.
SPECIFICATIONS
Transmission Mode : UHF stereo
Carrier Frequency : 911.5 - 913.5 MHz
Operation Voltage : Transmitter, 19 V 200 mA
:
Receiver, 2.4 V
(2 x AAA rechargeable battery)
Frequency Response : 20 Hz - 15 KHz
Distortion : 1.5%
S/N ratio : 50 dB
Separation : 30 dB
Operation distance : 150 feet
FCC operation is subject to the following two conditions: (1) this device
may not cause interference; and (2) this device must accept any
interference, including interference that may cause undesirable operation of the device.
Changes or modifications not expressly approved by the party
responsible for compliance to the FCC rules could void the user’s
authority to operate this equipment.
WHP160/WHP160T_IB 11/5/01 10:09 AM Page 7
Page 8

8
TROUBLESHOOTING
NO SOUND - Make sure the AC adapter is fully inserted into the AC
outlet and into the DC Power Jack input on the
transmitter.
- Make sure the headphone ON/OFF switch is in the
ON position.
- Headphone battery may be too weak. Charge battery.
Charge the new batteries for 24 hours prior to the first
use.
- Make sure the TV, stereo receiver or audio component
is ON and tuned to a channel with audio.
- Adjust the volume control on the headphone to
increase the volume.
- The connected audio/video equipment is not playing.
Turn on the equipment.
- The volume of the headphones is turned down.
Adjust the volume to an appropriate level.
DISTORTED - Make sure the stereo indicator light is ON. If not, adjust
the tuning wheel on the headphone until the indicator
light is on.
- Turn the FREQUENCY ADJUST control to change
operating frequency of transmitter. You must then press
the “Auto Scan” button on the headphone until the
stereo indicator lights.
- Headphone batteries may be too weak. Charge the
batteries or replace with the new batteries.
- The headphone is too far from transmitter (over 150
feet). Move closer.
- The input level of the audio signal is too low. Turn up
the volume of the audio source equipment.
WHP160/WHP160T_IB 11/5/01 10:09 AM Page 8
Page 9

Thomson Consumer Electronics, Inc. warrants that for 1 year
from date of purchase, it will replace this product if found to be
defective in materials or workmanship. Return it postage prepaid
to the Product Exchange Center address for prompt, no charge
replacement with a current equivalent. This replacement is
Thomson Consumer Electronics, Inc.’s sole obligation under this
warranty. Thomson Consumer Electronics, Inc. will not be responsible for any incidental or consequential damages, or for any loss
arising in connection with the use or inability to use this product.
Some states do not allow the exclusion or limitation of incidental
or consequential damages, so the above limitation or exclusion
may not apply to you. This warranty excludes defects or damage
due to misuse, abuse, or neglect. This warranty gives you specific
legal rights, and you may also have other rights, which vary from
state to state.
LIMITED 1 YEAR WARRANTY
© 2000 Thomson multimedia, Inc.
Product Exchange Center
11721 Alameda Ave.
Socorro, TX 79927
PWHP160/WHP160T Rev0901
Trademark(s) ® Registered
Marca(s) Registrada(s)
www.rca.com
Made In China
9
WHP160/WHP160T_IB 11/5/01 10:09 AM Page 9
Page 10

Thank you for choosing the RCA Wireless Headphones. You
have selected a fine product designed to provide years of
performance. Before attempting to use your Wireless
Headphones, please remove all parts from the box and read
the installation and use instructions carefully.
900 MHz FOLDABLE STEREO
WIRELESS HEADPHONE SYSTEM
WITH AUTO SCAN
Limited 1 Year Warranty WHP160/160T
wireless
HEADPHONES
FOLD A BLE
WHP160/WHP160T_IB 11/5/01 10:09 AM Page 10
WIRELESS TRANSMITTER
900 MHz
 Loading...