

WH P151
* Range may vary by environment.
* La portée peut varier selon l’environnement.
* El rango puede variar según el ambiente.
Wireless Headphones
With 900 MHz Transmitter
Casque sans
fil à émetteur
de 900 MHz
Audifonos
Inalámbricos
Con Transmisor
de 900 MHz
Transmits stereo signal
even outside your home!
Émet un signal stéréo même
à l’extérieur de la maison !
¡Transmite una señal
de estéreo incluso fuera
de su casa!
WHP151 US IB REVC_K.qxd 5/25/05 9:42 AM Page 1

HEADSET SAFETY
Follow these precautions to ensure safe usage of your wireless
headphones.
1. These wireless headphones have been designed for residential use
and should not be used for industrial purposes. The headphones
should be installed and used in accordance with the instructions
contained in this manual.
2. Read through these instructions completely before installation.
Follow the instructions carefully and carry them out in the correct
order. Keep the manual on hand for future reference.
3. The power for this headphone system is delivered with batteries.
Before charging, read the instructions in this manual. Disconnect
the power supply from the recharging cradle/transmitter before
installing or removing batteries.
4. Always leave easy access to the main power supply.
5. Disconnect the unit from the main power supply during storms,
or if you will be absent for a long period of time.
6. If you observe smoke or detect a burning odor, immediately
disconnect the device from the main power supply.
7. Never open the unit yourself; you may receive a severe electric
shock, leading to serious injury or even death. Take the unit to a
qualified service center when service is required.
8. Never push objects of any kind into the openings on the recharging
cradle/transmitter. They may touch dangerous voltage points and
could cause a fire, serious electric shock or even death.
9. Protect the unit from dust, humidity and sources of excessive heat
(e.g., fireplace or radiator).
10. The power source should not be in contact with liquids or exposed
to the risk of dripping or splashing liquid. Be careful not to place the
power source or recharging cradle/transmitter near any object
containing liquid (e.g., a vase, glass or bottle).
11. Do not expose the unit to direct sunlight. Its maximum ambient
temperature is 35° Celsius (95° Fahrenheit).
12. The ventilation should not be impeded by covering the unit with
any items, such as newspapers, tablecloths, curtains, etc.
13. No flame sources, such as lighted candles, should be placed on or
close to the recharging cradle/transmitter.
14. This unit has been designed for use in a dry environment. If, for
exceptional reasons, you must utilize the unit out of doors (balcony,
veranda, etc.), take care to protect it from dampness (dew, rain or
splashes of liquid).
15. The maximum ambient humidity that the device supports is
85 percent. If the unit is cold and you wish to use it in a warm room,
wait until any condensation on the unit evaporates by itself before
you turn it on.
HEADSET SAFETY
16. Clean the unit with a soft cloth soaked in a neutral detergent. You
may damage the unit if you use an alcohol-based product. If you are
unsure if the detergent is alcohol-based, test the cleaning product on
the underside of the unit.
17. Unplug this product and take it to a qualified service center under
the following conditions:
a. If liquid has been spilled into the product.
b. If the product has been exposed to rain or water.
c. If the product does not operate normally when following the
operating instructions.
Audiovox declines all liability for any use that does not comply with
the instructions in this User’s Manual.
This device complies with Part 15 of the FCC Rules. Operation of this
device is subject to the following two conditions: (1) This device may not
cause harmful interference, and (2) this device must accept any interference
received, including interference that may cause undesired operation.
WARNING
Modification of this device to receive cellular radio-telephone service
signals is prohibited under FCC rules and federal law.
Changes or modifications to this unit not expressly approved by the
party responsible for compliance could void the user’s warranty.
Keep your sales receipt to obtain warranty parts and service and for
proof of purchase. Attach it here and record the serial and model
numbers. These numbers are located on the product.
Model No. ____________________________________
Serial No. ____________________________________
Purchase Date: _________________________________
Dealer/Address/Phone: ____________________________
__________________________________________
WHP151 US IB REVC_K.qxd 4/27/07 2:08 PM Page 2
54
TABLE OF CONTENTS
Introduction.......................................................................... 5
Features ............................................................................... 5
Headphone Set Description ...................................................... 5
Recharging the Headset ........................................................... 6
Recharging Cradle/Transmitter ................................................. 7
Supplied Accessories............................................................... 7
Battery Installation and Information
Installing the Rechargeable Batteries....................................... 8
Charging the Rechargeable Batteries....................................... 8
NiMH Rechargeable Battery Memory Effect ............................. 8
NiMH Natural Power Discharge ........................................... 9
NiMH Battery Warning ....................................................... 9
Connecting the Recharging Cradle/Transmitter ............................. 9
Operation
Standard Usage .................................................................10
Maximum Performance .......................................................11
Troubleshooting .....................................................................11
Specifications ........................................................................13
Warranty ..............................................................................13
INTRODUCTION
Congratulations on your purchase of this wireless headphone system.
The WHP151 utilizes wireless, radio frequency transmission. The
headphones are induction recharged on a cradle, using an electric field.
Both the headphones and the recharging cradle/transmitter incorporate
double Phase Lock Loop (PLL) Technology, which offers three channels
for radio transmissions, to avoid interferences. This 900 MHz stereo
wireless headphone system features a compact design that enables you
to enjoy music and TV sound just about anywhere inside or outside
your home. It’s simple to connect this system to any sound source, such
as a DVD, DBS, CD, TV, VCR, stereo receiver or radio.
FEATURES
900 MHz RF technology lets you roam freely throughout your house
Operating distance up to 150ft/45m*
No line-of-sight limitations
Convenient power, volume and tuning controls located on headphones
Automatic Level Control (ALC) and Auto On/Off Function
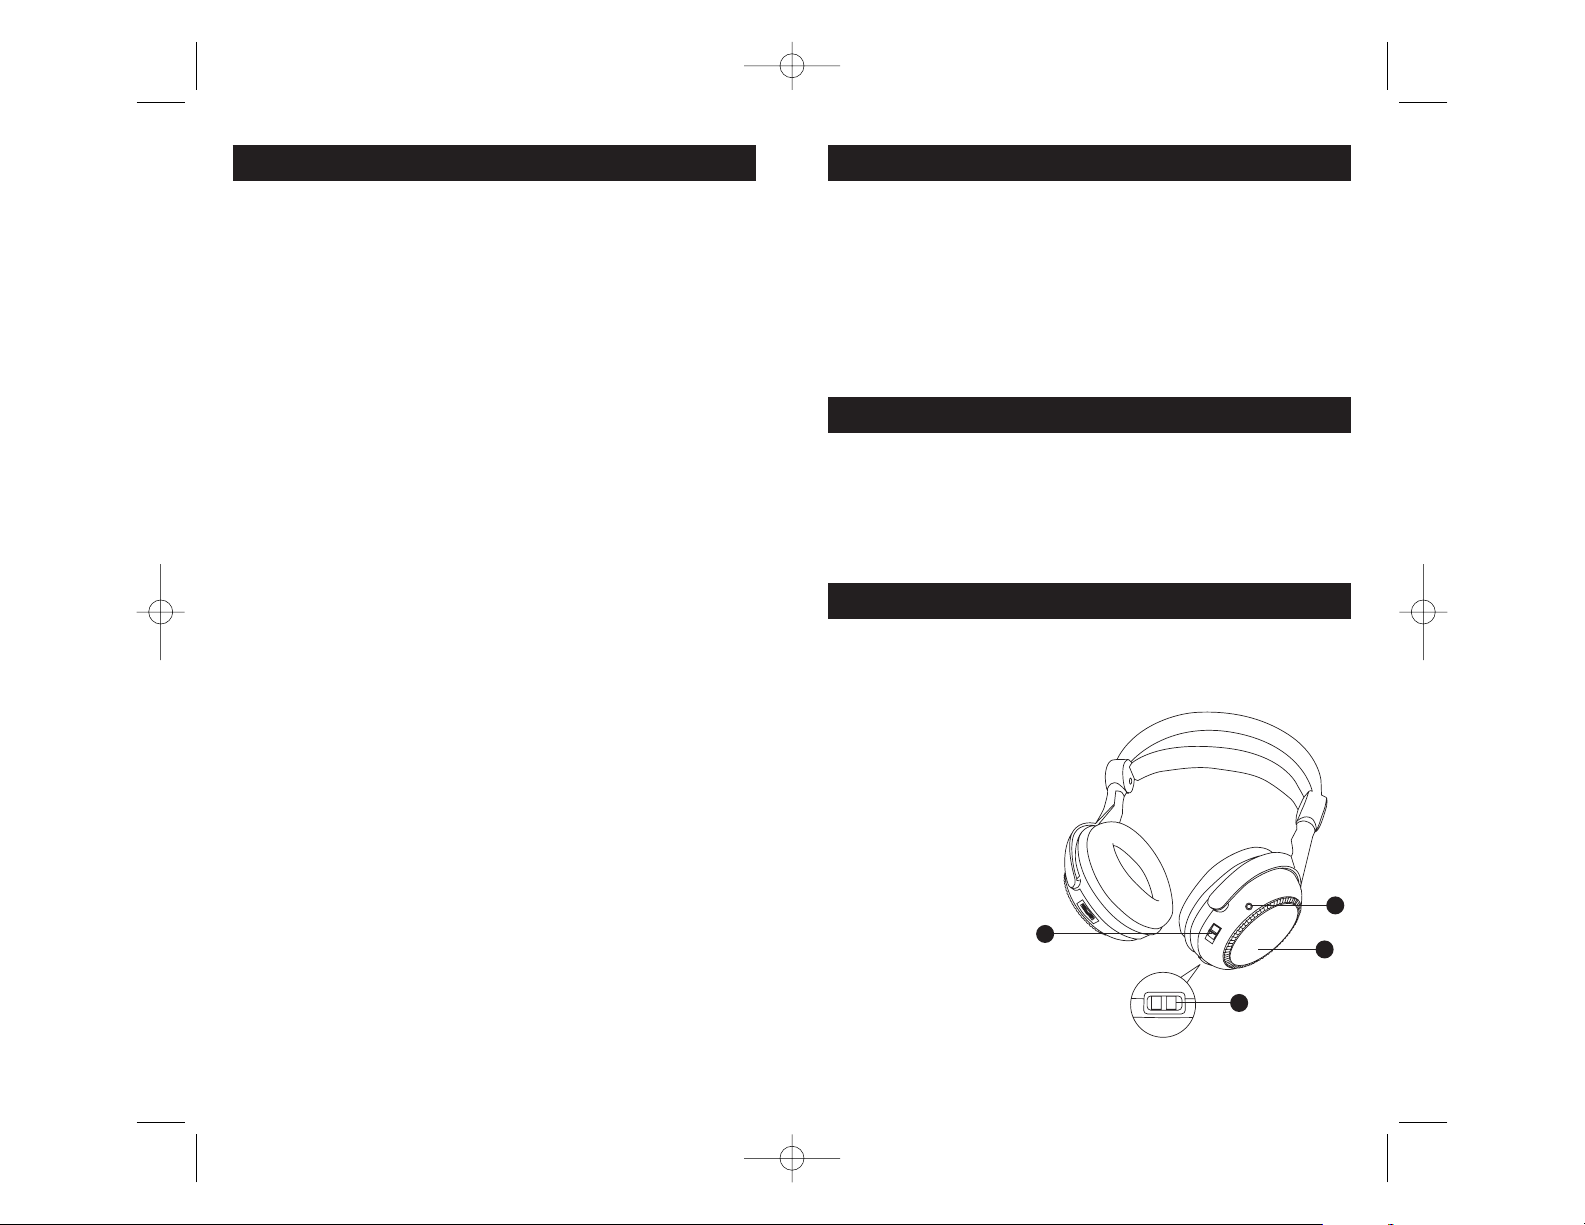
HEADPHONE SET DESCRIPTION
For stand-alone functioning, it is recommended that your wireless
headphones be powered by rechargeable batteries. The rechargeable
batteries should be installed into the battery compartment and
recharged before use. (See Battery Installation and Information, page 8).
1 Rechargeable battery
compartment
2 ON/OFF switch
3 Charging contact leads
4 Power LED
indicator light
*Range may vary by environment.
1
2
3
4
WHP151 US IB REVC_K.qxd 5/25/05 9:42 AM Page 4
76
HEADPHONE SET DESCRIPTION
(continued)
5 Stereo LED indicator light
6 VOLUME control
7 AUTO SCAN button
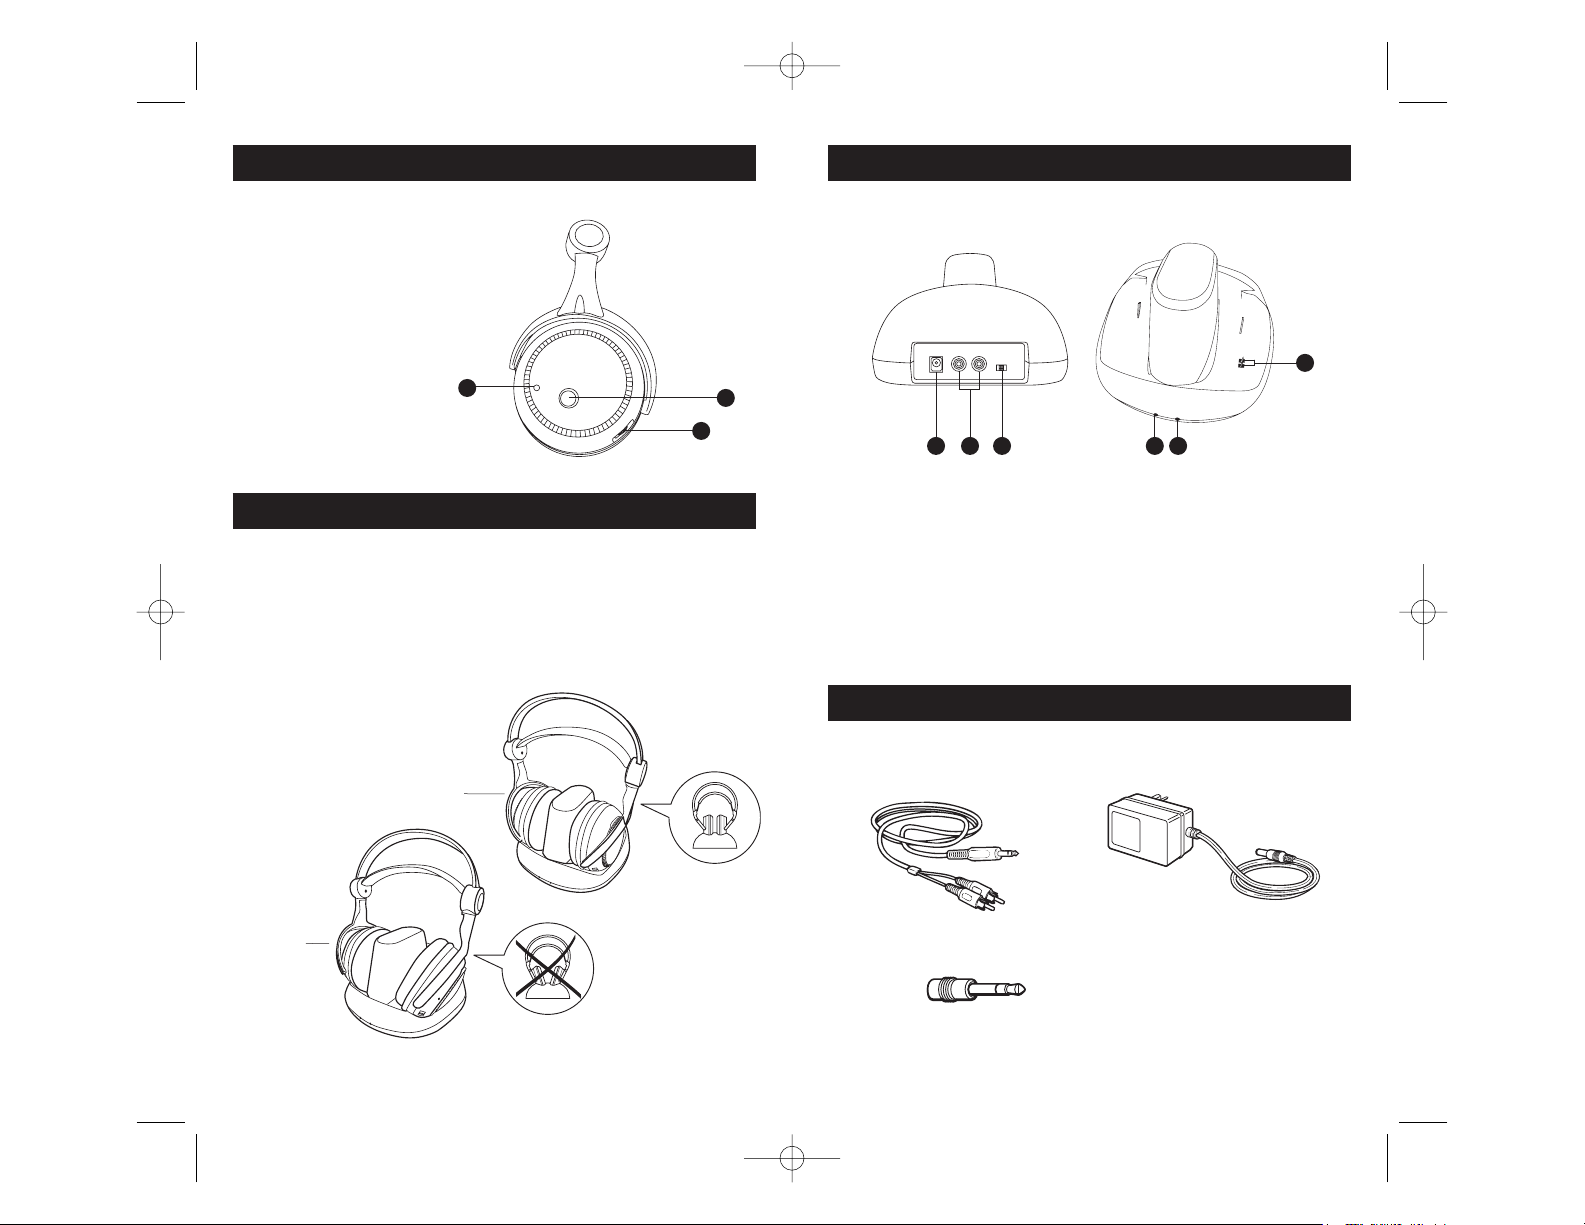
RECHARGING THE HEADSET
To recharge the headset unit verify that the ON/OFF Switch is in the
OFF position. Place the headphones into the recharging
cradle/transmitter with the red Power LED indicator light (4) on the
right headphone facing the front of the unit. The contacts (3) on the
right headphone should come into contact with the charging prongs (3)
on the cradle/transmitter. Rotate the headphone toward the back of the
unit to lock headphone into charging position. If the headphones are
placed correctly, the charging contact leads (3) will touch the charging
prongs (13). At that point, the red
charging LED indicator light on the
recharging cradle/transmitter
(8) illuminate.
RECHARGING CRADLE/TRANSMITTER
The recharging cradle/transmitter acts both as a transmitter of the
signal to the headphones as well as the recharging base.
8 Charging LED indicator light
9 Audio signal LED indicator light
10 DC IN power supply socket
11 Left and Right AUDIO inputs
12 CHANNEL switch
13 Charging prongs
SUPPLIED ACCESSORIES
This headphone system includes accessories that enable you to use your
wireless headphone set in a number of ways. (See section on Operation
and Standard Usage, page 10)
Main power adapter
(AC/DC: 120 V ~ 60 Hz, 12 V = 150 mA)
3.5mm/.25 inch jack adaptor
10 11 12
5
6
7
98
13
RCA to 3.5mm cable
Off indicator:
incorrect
recharge
On indicator:
correct recharge
WHP151 US IB REVC_K.qxd 4/30/07 9:42 AM Page 6

98
BATTERY INSTALLATION AND INFORMATION
Your wireless headphone unit requires two rechargeable AAA batteries.
Rechargeable batteries are uncharged when you purchase them. Before you
can use the wireless headphones for the first time, the batteries must be
charged for 16 hours. Follow these steps to install and charge the batteries.
Installing the Rechargeable Batteries
Take care to follow these steps to correctly install the batteries.
1. On the right headphone, locate the battery compartment (1). Turn the
battery compartment cover counterclockwise to remove the cover.
2. Insert two AAA rechargeable batteries, carefully following the
markings inside to ensure the batteries are inserted properly, with
the + and – ends in the correct positions.
3. Replace the battery compartment cover.
Charging the Rechargeable Batteries
Follow these steps to recharge the NiMH rechargeable batteries.
1. Make sure the ON/OFF switch (2), located on the right headphone,
is in the OFF position.
2. Connect the AC/DC main power adapter to the DC IN power supply
socket (10), located on the back of the recharging cradle/transmitter.
3. Plug the adapter into an electrical outlet.
4. Place the headphones into the recharging cradle/transmitter, with
the power LED indicator light (4) facing the front. Make sure
the headphones are placed in a completely vertical position, not
leaning to either side. If the headphones are placed correctly, the red
charging LED indicator lights on the recharging cradle/transmitter
(8) illuminate.
5. Charge the rechargeable batteries for 16 hours before using the
headphones for the first time.
6. Battery charges last approximately eight hours before recharging is
necessary.
NiMH Rechargeable Battery Memory Effect
When an NiMH rechargeable battery is first used, it is important to fully
charge it and then allow it to discharge three times in order to maximize
the battery’s storage capacity. Avoid recharging the battery until it is
fully discharged. When a battery is recharged before it is completely
discharged, it develops a memory that will limit the amount of charge
in the future. This reduces the battery’s storage capacity for subsequent
charges and so reduces the amount of time your headphones can be
used before recharging is necessary.
BATTERY INSTALLATION AND INFORMATION
(continued)
NiMH Natural Power Discharge
Due to their chemical design, all rechargeable batteries incur some
degree of natural discharge. This means they automatically lose their
charge in varying degrees, and the battery’s capacity drops even when
not in use. The size of this power loss varies, depending on the battery’s
type, size, design, internal resistance and, most especially, the
temperature. The higher the temperature, the greater the power loss
through natural discharge.
NiMH Battery Warning
CONNECTING THE RECHARGING
CRADLE/TRANSMITTER
Follow this quick setup guide to ensure trouble-free installation of your
headphones. To connect the recharging cradle/transmitter to the audio
source, follow these steps.
1. Connect the AC/DC main power adapter to the DC IN power
supply socket (10) at the back of the recharging cradle/transmitter.
Then, connect the adaptor to an electrical outlet.
2. Plug the stereo audio cable into the headphone jack of your audio
source (e.g., stereo, TV, CD player, DVD, etc.).
3. Connect the other end of the stereo audio cable to the Left and
Right AUDIO inputs (11) on the cradle/transmitter. The green audio
signal LED indicator light (9), located on the front of the recharging
cradle/transmitter, illuminates as soon as you have connected the
power adapter to the outlet and when an audio signal is detected by
the recharging cradle/transmitter.
WHP151 US IB REVC_K.qxd 4/30/07 5:47 PM Page 8
If you are using NiMH or NiCd batteries, the batteries will charge when
the headphones are powered with the AC power adapter. Do not power
the headphones with the AC power adapter if you installed alkaline or
other non-rechargeable batteries—this could cause the batteries to leak. Do
not mix batteries with different chemistry types (for example, a zinc
battery with an alkaline battery). Do not mix new and used batteries. Do
not leave batteries installed in the product when not in use for long
periods. Respect the environment and the law. Before disposing of
rechargeable batteries, ask your distributor if they can be recycled and
whether or not the distributor collects rechargeable batteries for recycling.
Important: This power unit is intended to be correctly oriented in a
vertical or floor mount position.

11
OPERATION
Standard Usage
1. Switch ON the audio source (TV, DVD, CD player, etc.) to which the
recharging cradle/transmitter is connected. If your audio source is a
DVD or CD player, start a disc.
Warning: The recharging cradle/transmitter has an automatic
function that switches it off if it does not receive an audio signal
for approximately four minutes. If the volume on the audio source
is too low, the recharging cradle/transmitter also switches off after
4 minutes. This feature was installed to comply with current
legislation that reduces the amount of radio emissions in the
environment. To ensure that this function is not accidentally
triggered, set the audio source volume at approximately 50 percent
capacity. Consult your component user’s manual for details on
how to set the volume for headphones.
2. The recharging cradle/transmitter is now ready to receive an audio
signal. The recharging cradle/transmitter is activated automatically
when receiving an audio signal from the audio source.
3. Check to make sure the audio signal LED indicator light (9) on
the front of the recharging cradle/transmitter is lit, indicating
that the unit is ready and is receiving a signal.
4. Place the headphone ON/OFF switch (2), located on the right
headphone, to the ON position.
5. The recharging cradle/transmitter features Phase Lock Loop (PLL)
for radio frequency transmissions. Select one of these channels,
using the CHANNEL switch (12) on the back of the recharging
cradle/transmitter. The PLL function automatically locks the chosen
channel, providing top-quality audio reception with no sound loss.
6. After selecting a channel, press the AUTO SCAN button (7), located
on the left headphone, to search for best reception.
Note: For best reception, stay approximately 23 feet away from the
recharging cradle/transmitter when pressing the AUTO SCAN
button.
7. Check to make sure the stereo LED indicator light (5) on the left
headphone is lit, indicating a strong signal.
8. Before wearing headphones adjust the volume using the VOLUME
control (6), located on the left headphone, to a comfortable volume
level.
9. When you are through using the headphones, switch them off using
the ON/OFF switch (2), and place the audio source on standby.
OPERATION
(continued)
Maximum Performance
When the audio source offers a variable volume output, maximum
performance can be achieved. Variable volume outputs include
headphone jacks, computer speakers and some TV RCA output jacks.
Variable Volume Output. When using an audio source with a variable
output jack, you can reduce any distortion and achieve maximum
performance by following these steps:
1. Set the volume of the audio source component to mid-level.
2. Adjust the headphone VOLUME control (6) until the desired result
is achieved.
3. If the headphone volume is not sufficient, adjust the source volume.
4. If distortion occurs, reduce the volume on the source component.
Fixed Volume Output. When using an audio source with a fixed
volume output, regulating the volume can be achieved through the
headphone VOLUME control (6) only. Examples of fixed volume
outputs are RCA jacks (VCR, Tape, Video or CD outputs).
TROUBLESHOOTING
Refer to this troubleshooting section if you encounter any difficulties in
setting up and using your headphones.
PROBLEM SOLUTION
No sound heard • Check that your audio source, recharging
through the cradle/transmitter and headphones are
headphones connected, supplied properly and turned on.
• Check to ensure that the rechargeable batteries are
installed in the headset correctly and have been
recharged properly.
• Check to ensure the recharging cradle/transmitter
is running and the Audio signal LED indicator
light (9) on the unit is lit.
• Check that the audio source is delivering a sufficient
signal to the recharging cradle/transmitter’s left
and right AUDIO inputs (11). Use the VOLUME
control (6) to increase the sound level.
• Press Auto Scan (7) on the left headphone once to
ensure it is tuned to the transmitter.
10
WHP151 US IB REVC_K.qxd 5/25/05 9:42 AM Page 10

12
TROUBLESHOOTING
(continued)
PROBLEM SOLUTION
Poor sound • Check to ensure that the sound provided by the
quality or audio source is loud enough and of sufficient quality.
interference Make sure the stereo LED indicator light (5) is lit.
• Check if the batteries in the headphones have
sufficient power. Recharge or replace them, if
necessary.
• Check to see if you have selected the best
transmission channel (1, 2, or 3) to provide the
optimum signal reception. If necessary, try
another channel, using the CHANNEL switch
(12). Remember to press the AUTO SCAN button
(7) to fine-tune the reception.
• Check if the distance between the headphones
and the recharging cradle/transmitter is within
the operating range. (The effective range of this
device is approximately 150ft/45m.*) Move closer
to the recharging cradle/transmitter to receive
the sound.
• Check that the audio source provides stereo sound.
Power cut off • The recharging cradle/transmitter has an
automatic power off function. When no signal is
received through the recharging cradle/
transmitter’s left and right AUDIO inputs (11), it
switches off. Switch on your audio source again,
and use the CHANNEL switch (12) and AUTO
SCAN button (7) to adjust reception. If necessary,
increase the audio source’s volume.
13
SPECIFICATIONS
Model WHP151
Description Radio Frequency
Wireless Headphone System
Transmitter
Carrier Frequency 900 MHz
Effective Range Up to 150ft/45m*
Power Supply 12 V 150 mA
Transmission Frequency UHF – 900 MHz/three channels:
912.0 MHz (1), 912.5 MHz (2), and 913.0 MHz (3)
Headset Power Supply Two AAA type 1.2V NiMH
rechargeable batteries
12 MONTH LIMITED WARRANTY
.tnemnorivne yb yrav yam egnaR*.tnemnorivne yb yrav yam egnaR*
WHP151 US IB REVC_K.qxd 4/27/07 2:22 PM Page 12
Audiovox Electronics Corporation (the “Company”) warrants to the original retail purchaser of this
product that should this product or any part thereof, under normal use and conditions, be proven
defective in material or workmanship within 12 months from the date of original purchase, such
defect(s) will be repaired or replaced (at the Company’s option) without charge for parts and repair
labor. To obtain repair or replacement within the terms of this Warranty, the product along with
any accessories included in the original packaging is to be delivered with proof of warranty
coverage (e.g. dated bill of sale), specification of defect(s), transportation prepaid, to the Company at
the address shown below. Do not return this product to the Retailer.
This Warranty is not transferable and does not cover product purchased, serviced or used outside
the United States or Canada. The warranty does not extend to the elimination of externally
generated static or noise, to costs incurred for the installation, removal or reinstallation of the
product. The warranty does not apply to any product or part thereof which, in the opinion of the
company, has suffered or been damaged through alteration, improper installation, mishandling,
misuse, neglect, accident or exposure to moisture. This warranty does not apply to damage caused
by an AC adapter not provided with the product, or by leaving non-rechargeable batteries in the
product while plugged into an AC outlet.
THE EXTENT OF THE COMPANY’S LIABILITY UNDER THIS WARRANTY IS LIMITED TO
THE REPAIR OR REPLACEMENT PROVIDED ABOVE AND, IN NO EVENT, SHALL THE
COMPANY’S LIABILITY EXCEED THE PURCHASE PRICE PAID BY PURCHASER FOR THE
PRODUCT. This Warranty is in lieu of all other express warranties or liabilities. ANY IMPLIED
WARRANTIES, INCLUDING ANY IMPLIED WARRANTY OF MERCHANTABILITY OR
FITNESS FOR A PARTICULAR PURPOSE, SHALL BE LIMITED TO DURATION OF THIS
WARRANTY. ANY ACTION FOR BREACH OF ANY WARRANTY HEREUNDER, INCLUDING
ANY IMPLIED WARRANTY, MUST BE BROUGHT WITHIN A PERIOD OF 24 MONTHS FROM
THE DATE OF ORIGINAL PURCHASE. IN NO CASE SHALL THE COMPANY BE LIABLE FOR
ANY CONSEQUENTIAL OR INCIDENTAL DAMAGES WHATSOEVER. No person or
representative is authorized to assume for the Company any liability other than expressed herein in
connection with the sale of this product. Some states/provinces do not allow limitations on how
long an implied warranty lasts or the exclusion or limitation of incidental or consequential damage
so the above limitations or exclusions may not apply to you. This Warranty gives you specific legal
rights and you may also have other rights which vary from state/province to state/province.
U.S.A.: Audiovox Electronics Corporation, 150 Marcus Blvd., Hauppauge, New York 11788
CANADA: Audiovox Return Center, c/o Genco, 6685 Kennedy Road, Unit 3, Door 16,
Mississauga, Ontario L5T 3A5

WH P151
* La portée peut varier selon l’environnement.
Casque sans fil à émetteur
de 900 MHz
Émet un signal stéréo même
à l’extérieur de la maison !
WHP151 US IB REVC_K.qxd 5/25/05 9:42 AM Page 14

1716
SÉCURITÉ DU CASQUE D’ÉCOUTE
Respectez ces mesures de sécurité pour assurer le bon fonctionnement
du casque sans fil.
1. Ce casque sans fil a été conçu pour une utilisation résidentielle et ne
doit pas être utilisé à des fins industrielles. Installez et utilisez le
casque selon les instructions contenues dans ce livret.
2. Lisez bien ces instructions avant l’installation. Suivez attentivement
les instructions, dans l’ordre approprié. Conservez ce livret pour
référence ultérieure.
3. Ce casque d’écoute est alimenté par piles. Lisez les instructions contenues
dans ce livret avant le chargement. Débranchez l’alimentation du socle de
rechargement/émetteur avant d’installer ou de retirer les piles.
4. Laissez toujours un accès facile à l’alimentation principale.
5. Débranchez l’appareil de l’alimentation principale pendant les orages
électriques ou si vous vous absentez pendant une longue période.
6. Débranchez immédiatement l’appareil de l’alimentation principale
si vous remarquez de la fumée ou détectez une odeur de brûlé.
7. N’ouvrez jamais l’appareil vous-même ; vous pourriez recevoir une
puissante décharge électrique et vous blesser gravement ou mourir.
Apportez l’appareil à un centre de service compétent si une
réparation est nécessaire.
8. N’enfoncez jamais d’objets de quelque nature que ce soit dans les
ouvertures du socle de rechargement/émetteur. Ceux-ci pourraient
toucher des points de tension dangereuse et produire un incendie,
des chocs électriques graves, voire même entraîner la mort.
9. Protégez l’appareil contre la poussière, l’humidité et les sources de
chaleur excessive (ex. : foyer ou appareil de chauffage).
10. Le source d’alimentation ne doit pas entrer en contact avec des
liquides ou être exposée à un liquide qui s’égoutte ou éclabousse.
Ne placez jamais la source d’alimentation ou le socle de
rechargement/émetteur près d’un objet contenant un liquide
(ex. : un vase, un verre ou une bouteille).
11. N’exposez pas l’appareil au soleil direct. Sa température ambiante
maximale est de 35 degrés Celsius (95 degrés Fahrenheit).
12. Il ne faut pas gêner la ventilation en couvrant l’appareil d’un article
quelconque, comme des journaux, une nappe, des rideaux, etc.
13. Il ne faut pas placer de source de flamme, comme des chandelles
allumées, sur le socle de rechargement/émetteur, ou près de celui-ci.
14. Cet appareil doit être utilisé dans un endroit sec. Si, pour des raisons
exceptionnelles, vous devez utiliser l’appareil à l’extérieur (balcon,
véranda, etc.), protégez-le bien contre l’humidité (rosée, pluie ou
éclaboussures de liquide).
15. Cet appareil supporte une humidité ambiante maximale de 85 pour
cent. Si l’appareil est froid et que vous devez l’utiliser dans une
pièce chaude, attendez que la condensation sur l’appareil s’évapore
seule avant de l’allumer.
SÉCURITÉ DU CASQUE D’ÉCOUTE
16. Nettoyez l’appareil avec un chiffon doux humecté de détergent
neutre. Vous pourriez endommager l’appareil si vous utilisez un
produit à base d’alcool. Si vous ignorez si le détergent contient de
l’alcool, testez le produit de nettoyage sous l’appareil.
17. Débranchez cet appareil et apportez-le à un centre de service
compétent dans les conditions suivantes :
a. Si un liquide a été renversé dans l’appareil.
b. Si l’appareil a été exposé à la pluie ou à l’eau.
c. Si l’appareil ne fonctionne pas normalement lorsque vous
suivez les instructions de fonctionnement suivantes.
Audiovox rejette toute responsabilité relativement à une utilisation
non conforme aux instructions contenues dans ce guide de l’utilisateur.
Cet appareil satisfait aux termes de la partie 15 des directives de la FCC.
Le fonctionnement de cet appareil est soumis aux deux conditions
suivantes : (1) ce dispositif ne peut produire d’interférence nuisible, et
(2) ce dispositif doit accepter toute interférence, y compris l’interférence
pouvant entraîner le fonctionnement indésirable du dispositif.
AVERTISSEMENT
Il est interdit de modifier cet appareil pour recevoir les signaux du
service de radiotéléphonie cellulaire en vertu de la réglementation
FCC et de la loi fédérale.
Les changements ou modifications apportés à cet appareil, non
expressément approuvés par la partie responsable de la conformité,
peuvent annuler la garantie de l’utilisateur.
Conservez votre coupon de caisse pour obtenir les pièces et le service
sous garantie et comme preuve d’achat. Fixez-le ici et inscrivez les
numéros de série et de modèle. Ces numéros se trouvent sur le produit.
No de modèle ___________________________________________________
No de série _____________________________________________________
Date d’achat : ___________________________________________________
Détaillant/adresse/téléphone : ____________________________________
________________________________________________________________
WHP151 US IB REVC_K.qxd 4/27/07 2:40 PM Page 16

1918
INTRODUCTION
Nous vous félicitons d’avoir acheté ce casque sans fil. Le WHP151 utilise la
transmission radiofréquence sans fil. Le casque est rechargé par induction
sur un socle, à l’aide d’un champ électrique. Le casque et le socle de
rechargement/émetteur incorporent la technologie PLL (boucle à phase
asservie) double qui offre trois voies de transmission radio afin d’éviter les
interférences. Ce casque d’écoute sans fil stéréo de 900 MHz se distingue pas
son design compact qui permet d’écouter la musique et la télé pratiquement
n’importe où à l’intérieur et à l’extérieur de la maison. Il suffit de le brancher
dans une source sonore comme un lecteur DVD, un système DBS, un lecteur
CD, un téléviseur, un magnétoscope, un récepteur stéréo ou une radio.
CARACTÉRISTIQUES
Grâce à la technologie RF de 900 MHz, vous pouvez vous déplacer
librement partout dans la maison
Distance de fonctionnement maximale de 150pi/45m*
Aucune limite de distance de visibilité directe
Commandes pratiques d’alimentation, de volume et de syntonisation
sur le casque
Commande automatique de niveau (CAN) et commande Marche/Arrêt
automatique
DESCRIPTION DU CASQUE
Pour un fonctionnement autonome, on recommande d’alimenter le
casque sans fil avec les piles rechargeables. Il faut installer les piles
rechargeables dans le logement à piles et les recharger avant l’utilisation.
(Voir Installation et information sur les piles à la page 22).
1 Logement à piles
rechargeables
2 Interrupteur
d’alimentation
3 Conducteurs de
contact de chargement
4 Voyant DÉL
d’alimentation
TABLE DES MATIÈRES
Introduction..........................................................................19
Caractéristiques .....................................................................19
Description du casque .............................................................19
Rechargement du casque..........................................................20
Description du socle de rechargement/émetteur............................21
Accessoires fournis .................................................................21
Installation des piles et information
Installation des piles rechargeables.........................................22
Chargement des piles rechargeables .......................................22
Effet mémoire de pile rechargeable NiMH ...............................22
Décharge d’alimentation naturelle NiMH ................................23
Avertissement de piles NiMH ...............................................23
Raccordement du socle de rechargement/émetteur ........................23
Fonctionnement
Utilisation standard............................................................24
Rendement maximal...........................................................25
Dépannage ...........................................................................25
Fiche technique......................................................................27
Garantie...............................................................................27
1
2
3
4
*La portée peut varier selon l’environnement.
WHP151 US IB REVC_K.qxd 5/25/05 9:42 AM Page 18

DESCRIPTION DU CASQUE
(suite)
5 Voyant DÉL stéréo
6 Commande de VOLUME
7 Bouton AUTO SCAN
RECHARGEMENT DU CASQUE
Pour recharger le casque, vérifier que l'interrupteur MARCHE/ARRÊT est
à la position OFF. Placez le casque dans le socle de rechargement/émetteur,
le voyant DÉL rouge (4) sur le côté droit, vers l'avant de l'appareil. Les
contacts (3) sur l’écouteur droit doivent entrer en contact avec les broches
de chargement (13) du socle/émetteur. Tournez le casque vers l’arrière de
l’appareil pour verrouiller le casque en position de chargement. Si le
casque est placé correctement, les conducteurs de contact de chargement
(3) touchent les broches de chargement (13). À ce point, le voyant DÉL de
chargement rouge sur le socle de rechargement/émetteur (8) s’allume.
2120
RECHARGEMENT DU SOCLE/ÉMETTEUR
Le socle de rechargement/émetteur agit comme un émetteur du signal
au casque et à la base de rechargement.
8 Voyant DÉL de chargement
9 Voyant DÉL de signal audio
10 Prise d’alimentation DC IN
11 Entrées AUDIO gauche et droite
12 Sélecteur de VOIE
13 Broches de chargement
ACCESSOIRES FOURNIS
Ce casque comprend les accessoires qui permettent d’utiliser le casque
sans fil de différentes façons. (Voir la section Fonctionnement et
utilisation standard, page 23)
5
6
7
Indicateur éteint :
rechargement
incorrect
Indicateur allumé :
rechargement correct
10 11 12
89
13
Adaptateur d’alimentation
(AC/DC: 120 V ~ 60 Hz, 12 V = 150 mA)
Adaptateur 3.5mm/.25”
WHP151 US IB REVC_K.qxd 4/30/07 9:42 AM Page 20
Câble RCA à 3.5mm

2322
INSTALLATION ET INFORMATION SUR LES PILES
(suite)
Décharge d’alimentation naturelle NiMH
En raison de leur structure chimique, toutes les piles rechargeables
subissent une certaine perte naturelle de la charge. Elles perdent ainsi
automatiquement leur charge à divers degrés, et leur capacité diminue
même lorsqu’elles ne sont pas utilisées. L’importance de cette perte de
charge varie selon le type, la taille, le design, la résistance interne de la
pile et, plus particulièrement, la température. Plus la température est
élevée, plus grande est la perte d’énergie par décharge naturelle.
Avertissement de piles NiMH
RACCORDEMENT DU SOCLE DE
RECHARGEMENT/ÉMETTEUR
Suivez les instructions du guide d’installation rapide pour assurer
l’installation sans problème du casque. Suivez ces étapes pour raccorder
le socle de rechargement/émetteur à la source sonore.
1. Branchez l’adaptateur d’alimentation principale C.A./C.C
dans la prise de courant DC IN (10) à l’arrière du socle de
rechargement/émetteur. Branchez ensuite l’adaptateur dans
une prise de courant.
2. Branchez le câble audio stéréo dans la prise casque de la source
sonore (ex. : chaîne stéréo, téléviseur, lecteur CD, lecteur DVD, etc.).
3. Branchez l’autre extrémité du câble audio stéréo dans les entrées
AUDIO (11) gauche et droite du socle/émetteur. Le voyant
DÉL de signal audio vert (9), situé à l’avant du socle de
rechargement/émetteur, s’allume dès que vous branchez
l’adaptateur dans la prise et lorsqu’un signal audio est détecté par
le socle de rechargement/émetteur.
INSTALLATION ET INFORMATION SUR LES PILES
Votre casque sans fil est alimenté par deux piles AAA rechargeables. Les
piles rechargeables ne sont pas chargées à leur achat. Vous devez charger les
piles pendant 16 heures avant d’utiliser le casque sans fil pour la première
fois. Suivez les étapes ci-dessous pour installer et charger les piles.
Installation des piles rechargeables
Suivez bien ces étapes pour installer correctement les piles.
1. Repérez le logement à piles sur l’écouteur droit (1). Tournez le
couvercle du logement à piles vers la gauche pour le retirer.
2. Insérez deux piles AAA rechargeables en suivant bien les marques
à l’intérieur pour vous assurer que les piles sont correctement
installées, les extrémités + et – aux bonnes positions.
3. Remettez le couvercle du logement en place.
Chargement des piles rechargeables
Suivez ces étapes pour recharger les piles NiMH rechargeables.
1. Assurez-vous que l’interrupteur (2), sur l’écouteur droit, est à OFF.
2. Branchez l’adaptateur d’alimentation principale C.A./C.C dans la prise
de courant DC IN (10) à l’arrière du socle de rechargement/émetteur.
3. Branchez l’adaptateur dans une prise de courant.
4. Placez le casque dans le socle de rechargement/émetteur, le voyant
DÉL d’alimentation (4) face à l’avant. Assurez-vous que le casque est
bien à la verticale et ne penche pas d’un côté ou de l’autre. Si le
casque est placé correctement, le voyant DÉL de chargement rouge
du socle de rechargement/émetteur (8) s’allume.
5. Chargez les piles rechargeables pendant 16 heures avant d’utiliser le
casque pour la première fois.
6. Les piles restent chargées pendant environ huit heures avant qu’il
faille les recharger.
Effet mémoire de pile rechargeable NiMH
Il faut charger complètement la pile NiMH rechargeable avant son
utilisation, puis la laisser se décharger trois fois afin de maximiser sa capacité
de stockage. Évitez de recharger la pile avant qu’elle soit complètement
déchargée. Une pile rechargée avant d’être complètement déchargée
développe une mémoire dont la charge sera limitée lors des chargements
futurs. La capacité de stockage de la pile est alors réduite, et par conséquent
la durée de fonctionnement du casque avant qu’une recharge soit nécessaire.
WHP151 US IB REVC_K.qxd 4/27/07 2:42 PM Page 22
Si vous utilisez des piles au NiMH ou NiCD, elles se chargeront alors
que le casque d’écoute est alimenté à partir de l’adaptateur c.a.
N’alimentez pas le casque d’écoute à partir de l’adaptateur si vous avez
installé des piles alcalines ou un autre type de piles non rechargeables —
car ces piles pourraient subir des fuites. Ne mélangez pas des piles ayant
une composition chimique différente (comme des piles au zinc avec des
piles alcalines). Ne mélangez pas des piles anciennes et nouvelles. Ne
laissez pas les piles installées dans le produit lorsqu’il n’est pas utilisé
pendant une période de temps prolongée. Respectez l'environnement et
la loi. Avant de jeter des piles rechargeables, demandez à votre distributeur si vous pouvez les recycler et si ce dernier récupère ou non les piles
rechargeables pour fins de recyclage.
Important : Ce bloc d’alimentation est conçu pour être orienté
correctement en position verticale ou au sol.

2524
FONCTIONNEMENT
(suite)
Rendement maximal
Vous pouvez obtenir un rendement maximal si la source sonore
comprend une sortie à volume variable. Parmi les sorties à volume
variable, notons les prises casque, les enceintes d’ordinateur et certaines
prises de sortie de téléviseur RCA.
Sortie à volume variable. Si vous utilisez une source sonore à prise
de sortie variable, vous pouvez réduire la distorsion et obtenir un
rendement maximal en procédant comme suit :
1. Réglez le volume de la source sonore à mi-course.
2. Réglez la commande VOLUME (6) du casque jusqu’à ce que le
résultat souhaité soit obtenu.
3. Si le volume du casque est trop bas, réglez le volume de la source.
4. S’il y a distorsion, baissez le volume de la source.
Sortie à volume fixe. Si vous utilisez une source sonore à sortie à
volume fixe, vous pouvez régler le volume seulement par la commande
VOLUME (6) du casque. Exemples de sorties à volume fixe : prises RCA
(sorties de magnétoscope, cassette, vidéo ou lecteur CD).
DÉPANNAGE
Consultez cette section de dépannage si vous éprouvez des difficulté à
régler et à utiliser le casque.
PROBLÈME SOLUTION
Aucun son • Assurez-vous que la source sonore, le socle
dans le casque de rechargement/émetteur et le casque sont
raccordés, alimentés correctement et allumés.
• Assurez-vous que les piles rechargeables sont
correctement installées dans le casque et sont
correctement rechargées.
• Assurez-vous que le socle de rechargement/émetteur
fonctionne et que le voyant DÉL de signal audio
(9) de l’appareil est allumé.
• Assurez-vous que la source sonore achemine un
signal suffisant aux prises AUDIO (11) gauche et
droite du socle de rechargement/émetteur. Utilisez
la commande VOLUME (6) pour monter le volume.
• Appuyez une fois sur le bouton Auto Scan (7)
de l’écouteur gauche pour vous assurer qu’il est
syntonisé à l’émetteur.
FONCTIONNEMENT
Utilisation standard
1. Allumez la source sonore (téléviseur, lecteur DVD, lecteur CD, etc.) à
laquelle le socle de rechargement/émetteur est raccordé. Si la source
sonore est un lecteur DVD ou CD, mettez un disque en marche.
Mise en garde : Le socle de rechargement/émetteur comprend une
fonction automatique qui éteint l’appareil si celui-ci ne reçoit pas de
signal audio pendant environ quatre minutes. Si le volume de la
source sonore est trop bas, le socle de rechargement/émetteur s’éteint
aussi après 4 minutes. Cette fonction a été installée afin de respecter
les lois actuelles réduisant la quantité d’émissions radio dans
l’environnement. Réglez le volume de la source sonore à environ 50
pour cent de la capacité afin d’éviter l’activation accidentelle de cette
fonction. Consultez le guide de l’utilisateur de votre appareil pour
connaître les détails sur la façon de régler le volume du casque.
2. Le socle de rechargement/émetteur est maintenant prêt à recevoir
un signal audio. Le socle de rechargement/émetteur est activé
automatiquement quand la source sonore reçoit un signal audio.
3. Assurez-vous que le voyant DÉL de signal audio (9) à l’avant du socle
de rechargement/émetteur est allumé pour indiquer que l’appareil est
prêt à recevoir un signal.
4. Placez l’interrupteur du casque (2), situé sur l’écouteur droit, à ON.
5. Le socle de rechargement/émetteur dispose d’une boucle à phase
asservie (PLL) pour les transmissions radiofréquences. Choisissez
l’une de ces voies à l’aide du sélecteur CHANNEL (12) à l’arrière
du socle de rechargement/émetteur. La fonction PLL verrouille
automatiquement la voie choisie, assurant ainsi une réception audio
de première qualité, sans perte de son.
6. Après avoir choisi une vois, appuyez sur le bouton AUTO SCAN
(7), situé sur l’écouteur gauche, pour obtenir la meilleure réception.
Note : Pour la meilleure réception, restez à environ 23 pieds du socle
de rechargement/émetteur quand vous appuyez sur le bouton
AUTO SCAN.
7. Assurez-vous que le voyant DÉL stéréo (5) sur l’écouteur gauche est
allumé pour indiquer un signal puissant.
8. Avant de mettre le casque en place, réglez le volume à l’aide de la
commande VOLUME (6), située sur l’écouteur gauche, pour obtenir
une intensité sonore agréable.
9. Si vous n’utilisez plus le casque, éteignez-le à l’aide de l’interrupteur
(2) et placez la source sonore en mode attente.
*La portée peut varier selon l’environnement.
WHP151 US IB REVC_K.qxd 5/25/05 9:42 AM Page 24

2726
DÉPANNAGE
(suite)
PROBLÈME SOLUTION
Son de mauvaise • Assurez-vous que le son acheminé par la source
qualité ou sonore est suffisamment puissant et de qualité
interférence adéquate. Assurez-vous que le voyant DÉL stéréo
(5) est allumé.
• Vérifiez si les piles du casque sont suffisamment
chargées. Rechargez-les ou remplacez-les au besoin.
• Choisissez la meilleure voie de transmission
(1, 2 ou 3) pour assurer une réception optimale du
signal. Au besoin, essayez une autre voie à l’aide
du sélecteur CHANNEL (12). N’oubliez pas
d’appuyer sur le bouton AUTO SCAN (7) pour
ajuster la réception.
• Vérifiez si la distance entre le casque et le socle
de rechargement/émetteur respecte la portée de
fonctionnement. (La portée efficace de cet appareil
est d’environ 150pi/45m*). Rapprochez-vous du
socle/émetteur pour recevoir le son.
• Vérifiez que la source sonore livre un son stéréo.
Coupe-courant • Le socle de rechargement/émetteur dispose d’une
fonction d’arrêt automatique. Il s’éteint quand
aucun signal n’est reçu par les prises d’entrée
AUDIO (11) du socle/émetteur. Mettez de
nouveau la source sonore en marche et utilisez le
sélecteur CHANNEL (12) et le bouton AUTO
SCAN (7) pour ajuster la réception. Au besoin,
montez le volume de la source sonore.
*La portée peut varier selon l’environnement.
FICHE TECHNIQUE
Modèle WHP151
Description Radiofréquence
Casque sans fil
Émetteur
Fréquence porteuse 900 MHz
Portée efficace Maximum de 150pi/45m*
Alimentation 12 V 150 mA
Fréquence de transmission UHF – 900 MHz/trois voies :
912,0 MHz (1), 912,5 MHz (2) et 913,0 MHz (3)
Alimentation du casque Deux piles rechargeables AAA de type
1,2 V NiMH
GARANTIE LIMITÉE DE 12 MOIS
WHP151 US IB REVC_K.qxd 4/27/07 2:48 AM Page 26
Audiovox Electronics Corporation (l’Entreprise) garantit à l’acheteur au détail d’origine que ce produit
est exempt de tout défaut de matériau ou de fabrication s’il est utilisé dans des conditions normales,
pendant une période de douze (12) mois à partir de la date d’achat d’origine; de tels défauts seront
réparés ou l’appareil sera remplacé (à la discrétion de l’Entreprise) sans que vous ayez à débourser des
frais pour les pièces et la main d’œuvre. Pour faire réparer ou remplacer dans le cadre de cette
Garantie, le produit et tous les accessoires inclus dans l’emballage d’origine doivent être livrés avec
preuve de couverture de garantie (par ex. : une facture), la spécification du ou des défauts et le
transport prépayé, à l’adresse de l’Entreprise indiquée ci-dessous. Ne retournez pas ce produit chez le
détaillant.
Cette garantie ne peut être transférée et ne couvre pas un produit acheté, entretenu ou utilisé à
l’extérieur des États-Unis ou du Canada. La garantie ne couvre ni l’élimination de l’électricité statique
ou du bruit produits à l’extérieur, ni les frais d’installation, de retrait et de réinstallation du produit. La
garantie ne s’applique pas à tout produit ou à une de ses parties qui, de l’avis de l’Entreprise, a subi des
dommages suite à une modification, une installation incorrecte, une manipulation inappropriée, une
mauvaise utilisation, une négligence, un accident ou une exposition à de l’humidité. Cette garantie ne
couvre pas les dommages causés par un adaptateur c.a. qui n’a pas été fourni avec le produit, ou par
des piles non rechargeables qui sont laissées dans le produit alors que ce dernier est branché dans une
prise secteur c.a.
LA RESPONSABILITÉ DE L’ENTREPRISE EN VERTU DE CETTE GARANTIE EST LIMITÉE À LA
RÉPARATION OU AU REMPLACEMENT INDIQUÉ CI-DESSUS ET EN AUCUN CAS, NE DOIT
DÉPASSER LE PRIX D’ACHAT PAYÉ PAR L’ACHETEUR DU PRODUIT. Cette Garantie remplace
toute autre garantie ou responsabilité explicite. TOUTE GARANTIE IMPLICITE, INCLUANT TOUTE
GARANTIE IMPLICITE DE QUALITÉ MARCHANDE OU D’ADAPTATION À UN USAGE
PARTICULIER EST LIMITÉE À LA DURÉE DE CETTE GARANTIE. TOUTE ACTION RELATIVE À
UNE VIOLATION DE TOUTE GARANTIE CI-DESSOUS, INCLUANT TOUTE GARANTIE
IMPLICITE, DOIT ÊTRE SOUMISE DANS LES 24 MOIS SUIVANT LA DATE DE L’ACHAT
D’ORIGINE. EN AUCUN CAS L’ENTREPRISE NE PEUT ÊTRE RESPONSABLE POUR UN
QUELCONQUE DOMMAGE CONSÉCUTIF OU INDIRECT. Aucune personne ou aucun
représentant n’est autorisé à assumer au nom de l’Entreprise une responsabilité autre que celle
exprimée dans la présente en rapport avec la vente de ce produit. Certaines juridictions ne permettent
pas les limitations implicites quant à la durée d’une garantie, non plus que l’exclusion ou la limitation
des dommages indirects ou consécutifs, de sorte que les limitations ou exclusions énoncées ci-dessus
pourraient être nulles dans votre cas. Cette Garantie vous confère des droits juridiques spécifiques qui
s’ajoutent aux autres droits éventuels qui peuvent varier d’une juridiction à l’autre.
É-U : Audiovox Electronics Corporation, 150 Marcus Blvd., Hauppauge, New York 11788
CANADA : Audiovox Return Center, c/o Genco, 6685 Kennedy Road, Unit 3, Door 16,
Mississauga, Ontario L5T 3A5

WH P151
* El rango puede variar según el ambiente.
Audifonos Inalámbricos Con
Transmisor de 900 MHz
¡Transmite una señal
de estéreo incluso fuera
de su casa!
WHP151 US IB REVC_K.qxd 5/25/05 9:42 AM Page 28

3130
MEDIDAS DE SEGURIDAD PARA AUDÍFONOS
(continuación)
15. La humedad máxima en el medio ambiente que el aparato soporta es
85 por ciento. Si el aparato está frío y usted desea utilizarlo en un
cuarto caliente, espere a que la condensación del aparato se evapore
por sí sola antes de encenderlo.
16. Limpie el aparato con un trapo limpio empapado con un detergente
neutro. Usted puede dañar el aparato si usted utiliza un detergente
con base de alcohol. Si usted no está seguro si el detergente tiene
una base de alcohol, pruébelo en la parte de abajo del aparato.
17. Desconecte este producto y llévelo a un centro de servicio calificado
bajo las siguientes condiciones:
a. Si se ha derramado líquido en el aparato.
b. Si el producto ha sido expuesto a lluvia o agua.
c. Si el producto no opera normalmente cuando se han seguido
las instrucciones de operación.
Audiovox no acepta ninguna responsabilidad por el uso de este aparato
que no vaya de acuerdo con las instrucciones en el Manual del Usuario.
Este aparato cumple con la Parte 15 del Reglamento de la FCC. La
operación de este aparato está sujeta a las siguientes dos condiciones: (1)
Que este aparato no cause ninguna interferencia dañina, y (2) que este
aparato acepte cualquier interferencia recibida, incluyendo interferencia
que pueda causar operación no deseada.
ADVERTENCIA
La modificación de este aparato para recibir señales de servicio de radioteléfono celular está prohibida bajo las reglas de la FCC y la ley federal.
Modificaciones o cambios hechos a este aparato que no han sido
aprobados expresamente por la persona responsable de su
cumplimiento podría invalidar la garantía del usuario.
Mantenga su recibo de compra para obtener partes y servicio bajo garantía
y para tener prueba de compra. Adjúntelo aquí y anote el número de serie
y de modelo. Estos números están localizados en el producto.
Número de Modelo:______________________________________________
Número de Serie: ________________________________________________
Fecha de Compra:________________________________________________
Vendedor/ Dirección/ Teléfono: ___________________________________
________________________________________________________________
MEDIDAS DE SEGURIDAD PARA AUDÍFONOS
Tome estas precauciones para asegurar el uso adecuado de sus
audífonos inalámbricos.
1. Estos audífonos inalámbricos han sido diseñados para uso
doméstico y no deben ser utilizados con propósitos industriales.
Los audífonos deben ser instalados y usados de acuerdo a las
instrucciones contenidas en este manual.
2. Lea las instrucciones completas antes de la instalación. Siga las
instrucciones cuidadosamente y llévelas a cabo en el orden correcto.
Mantenga el manual a la mano para su referencia en el futuro.
3. La corriente para este sistema de audífonos se lleva a cabo a través
de las baterías. Antes de cargar, lea las instrucciones en este manual.
Desconecte la fuente de corriente de la base/ transmisor antes de
instalar o quitar las baterías.
4. Siempre deje libre el acceso para la fuente principal de corriente.
5. Desconecte el aparato de la fuente principal de corriente cuando
haya tormentas, o si usted estará ausente por un periodo de tiempo
prolongado.
6. Si usted observa humo o detecta un holor a quemado,
inmediatamente desconecte el aparato de la fuente de corriente
principal.
7. Nunca abra el aparato usted mismo; usted puede recibir un choque
eléctrico severo, que le podría causar lastimaduras serias o incluso la
muerte. Lleve el aparato a un centro de servicio calificado cuando
usted necesite recibir servicio.
8. Nunca empuje objetos de ningún tipo dentro de las aberturas de la
base/ transmisor de carga. Estos pueden tocar puntos peligrosos de
voltaje y podrían causar un incendio, un choque eléctrico serio o
incluso la muerte.
9. Proteja el aparato contra el polvo, la humedad y fuentes de calor
excesivo (por ejemplo, una chimenea o un radiador).
10. La fuente de corriente no debe estar en contacto con líquidos, o
expuesta a un riesgo de escurrimientos o salpicaduras de líquidos.
Tenga cuidado de no colocar la fuente de corriente o la base/
transmisor de carga cerca de un objeto que contenga líquido (por
ejemplo, un jarrón, un vaso o una botella).
11. No exponga el aparato a la luz del sol directamente. Su temperatura
ambiente máxima debe ser de 35° Centígrados (95° Fahrenheit).
12. No debe impedirse la ventilación del aparato cubriéndolo con
objetos como periódicos, manteles, cortinas, etc.
13. No deben colocarse fuentes de flama, como velas encendidas, cerca o
encima de la base/ transmisor de carga.
14. Este aparato ha sido diseñado para ser utilizado en un ambiente seco.
Si, por razones excepcionales, usted debe utilizar su aparato en
exteriores (como un balcón, veranda, etc.) asegúrese de protegerlo
contra la humedad (rocío, lluvia o salpicaduras de cualquier líquido).
WHP151 US IB REVC_K.qxd 4/27/07 3:30 PM Page 30

3332
INTRODUCCION
Felicitaciones en su compra de este sistema inalámbrico de audífonos. El
WHP 151 utiliza la transmisión inalámbrica de frecuencias de radio. Los
audífonos se recargan por inducción en la base de carga, utilizando un campo
eléctrico. Tanto los audífonos como la base / transmisor de carga incorporan
la Tecnología de Fase Doble de Circuito Cerrado (PLL), la cual ofrece tres
canales para transmisiones de radio, para evitar interferencias. Este sistema
inalámbrico de audífonos de 900 MHz estéreo le ofrece un diseño compacto
que le permite disfrutar música y sonido de televisión casi en todos lados
dentro y fuera de su casa. Es simple conectar este sistema a cualquier fuente
de sonido, como un DVD, DBS, CD, TV, VCR y bocinas estéreo o radio.
FUNCIONES
La tecnología de 900 MHz RF le permite moverse libremente dentro de
su casa
Distancia de operación de hasta 150pies/45m*
No hay limitaciones de línea de visión
Convenientes controles para encender, volumen y para sintonizar
localizados en los audífonos
Nivel de Control Automático (ALC) y Función Automática para
Encender/ Apagar
DESCRIPCION DEL JUEGO DE AUDIFONOS
Para que funcionen independientemente, se recomienda que los
audífonos inalámbricos sean activados por baterías recargables.
Las baterías recargables deben ser instaladas en el compartimiento
de las baterías y recargadas antes de
ser utilizadas. (Vea la sección de
Instalación e Información de
Baterías en la página 36).
1 Compartimiento
de batería recargable
2 Selector para
ENCENDER/
APAGAR
3 Puntas de contacto
para carga
4 Indicador luminoso
de Corriente LED
CONTENIDO
Introducción .........................................................................33
Funciones.............................................................................33
Descripción del Juego de Audífonos ...........................................33
Para Recargar los Audífonos .....................................................34
Base/ transmisor de Carga .......................................................35
Accesorios Provistos ...............................................................35
Instalación e Información de las Baterías
Para Instalar las Baterías Recargables......................................36
Para Cargar las Baterías Recargables.......................................36
Efecto de Memoria en Baterías Recargables NiMH.....................36
Descarga Natural de Corriente NiMH.....................................37
Advertencia para Baterías NiMH...........................................37
Para Conectar la Base/ Transmisor .............................................37
Operación
Uso Estándar ....................................................................38
Máximo Funcionamiento .....................................................39
Solución de Problemas.............................................................39
Especificaciones .....................................................................41
Garantía...............................................................................41
1
2
3
4
* El rango varía según el medio ambiente
WHP151 US IB REVC_K.qxd 5/25/05 9:42 AM Page 32

3534
BASE/ TRANSMISOR DE CARGA
La base/ transmisor de carga actúa tanto de transmisor de señal a los
audífonos como base de carga.
8 Indicador luminoso de LED para activar
9 Indicador luminoso de LED para la recarga
10 Enchufe de entrada para la corriente DC
11 Entradas de AUDIO derecha e izquierda
12 Selector de CANAL
13 Terminales de carga
ACCESORIOS PROVISTOS
Este sistema de audífonos incluye accesorios que le permiten utilizar
sus audífonos de varias maneras. (Vea la sección de Operación y Uso
Estándar en la página 38).
5
6
7
DESCRIPCION DEL JUEGO DE AUDIFONOS
(continuación)
5 Indicador luminoso de
LED para el estéreo
6 Control de VOLUMEN
7 Botón de auto búsqueda
(“AUTO SCAN”)
PARA RECARGAR LOS AUDIFONOS
Para volver a cargar los audífonos, verifique que el selector ON/ OFF
esté en la posición de OFF. Coloque los audífonos en el transmisor/ base
de carga para volver a cargar con el indicador LED de corriente rojo (4)
en el audífono derecho, apuntando hacia delante del aparato. Los
contactos (3) en el audífono derecho deben estar en contacto con las púas
de carga (3) en la base/ transmisor. Gire los audífonos hacia la parte
trasera del aparato para poner el audífono en la posición de carga. Si los
audífonos están colocados correctamente, las puntas de contacto para
carga tocarán las púas de carga (13). En ese punto, el indicador de
corriente luminoso rojo LED en la base/ transmisor (8) se iluminará.
10 11 12
89
13
Indicador iluminado:
Carga correcta
Indicador
apagado:
Carga
incorrecta
Adaptador de corriente principal
(AC/DC: 120 V ~ 60 Hz, 12 V = 150 mA)
Adaptador 3.5mm/.25”
WHP151 US IB REVC_K.qxd 4/30/07 9:42 AM Page 34
Cable RCA a 3.5mm

3736
INSTALACIÓN Y OPERACIÓN DE LAS BATERÍAS
(continuación)
Descarga de Corriente Natural NiMH
Debido a su diseño químico, todas las baterías recargables sufren cierta
descarga natural. Esto quiere decir que automáticamente pierden su
carga a diferentes grados, y la capacidad de la batería decae aún más
cuando no se utiliza. El grado de esta pérdida de corriente varía
dependiendo del tipo de la batería, así como del tamaño, diseño,
resistencia interna y sobre todo, de la temperatura. Mientras más alta
sea la temperatura, más alta la pérdida de corriente a través de la
descarga natural.
Advertencia para Baterías NiMH
PARA CONECTAR LA BASE/ TRANSMISOR DE CARGA
Siga esta guía rápida para asegurarse de llevar a cabo la programación
de sus audífonos sin problemas. Para conectar la base/ transmisor a la
fuente de corriente, siga los siguientes pasos:
1. Conecte el adaptador de corriente principal AC/ DC en el enchufe
de entrada de corriente DC IN (10) en la parte trasera de la base/
transmisor de carga. Después, conecte el adaptador a un enchufe
eléctrico.
2. Conecte el cable de audio estéreo en el enchufe para audífonos
de su fuente de audio (por ejemplo, estéreo, TV, tocadiscos de CDs,
DVD, etc.)
3. Conecte el otro extremo del cable de audio estéreo a las entradas
Izquierda y Derecha de AUDIO (11) en la base/ transmisor. El
indicador luminoso verde LED de señal de audio (9), localizado en
la parte delantera de la base/ transmisor de re-carga, se iluminará
tan pronto como usted haya conectado el adaptador de corriente al
enchufe y cuando la señal de audio es detectada por la base/
transmidor de re-carga.
INSTALACIÓN Y OPERACIÓN DE LAS BATERÍAS
Sus audífonos inalámbricos requieren dos baterías recargables AAA.
Las baterías recargables no están cargadas cuando usted las compra.
Antes de que usted pueda utilizar los audífonos inalámbricos por
primera vez, las baterías deben ser cargadas durante 16 horas. Siga los
siguientes pasos para instalar y cargar las baterías.
Para Instalar las Baterías Recargables
Asegúrese de seguir estos pasos para instalar correctamente las baterías.
1. En al audífono derecho, localice el compartimiento de las baterías
(1). Gire la cubierta del compartimiento en la dirección contraria a
las manecillas del reloj para quitarla.
2. Introduzca dos baterías AAA, siguiendo cuidadosamente las marcas
en el interior del compartimiento para asegurarse de que las baterías
estén instaladas adecuadamente, de acuerdo a los símbolos + y – en
la posición correcta.
3. Vuelva a colocar la cubierta del compartimiento de las baterías.
Para Cargar las Baterías Recargables
Siga estos pasos para recargar las baterías recargables NiMH.
1. Asegúrese de que el selector para encender / apagar (“ON/ OFF”) (2),
localizado en el audífono derecho esté en la posición de apagado (OFF).
2. Conecte el adaptador de corriente AC/ DC en el enchufe de entrada
“DC IN” (10), localizado en la parte trasera de la base/ transmisor
de carga.
3. Conecte el adaptador en el enchufe eléctrico.
4. Coloque los audífonos en la base/ transmisor de re-carga, con el
indicador luminoso de corriente LED (4) apuntando hacia adelante.
Asegúrese de que los audífonos estén colocados en posición
completamente vertical, y no inclinados hacia ningún lado. Si los
audífonos están colocados correctamente, el indicador de corriente
luminoso rojo LED en la base/ transmisor (8) se iluminará.
5. Cargue las baterías recargables durante 16 horas antes de utilizar los
audífonos por primera vez.
6. Las cargas de las baterías duran aproximadamente ocho horas antes
de que vuelva a ser necesario recargarlas.
Efecto de la Memoria en Baterías Recargables NiMH
Cuando una batería recargable NiMH se utiliza por primera vez, es
importante que sea cargada completamente y después debe permitir
que se descargue tres veces para maximizar la capacidad de
almacenamiento de la batería. Evite volver a cargar la batería hasta que
esté completamente descargada. Cuando una batería vuelve a ser
cargada antes de estar completamente descargada, desarrolla una
memoria que limitará la cantidad de carga en el futuro. Esto reduce la
capacidad para almacenamiento de la batería para cargas subsecuentes
y reduce la cantidad de tiempo que sus audífonos se pueden utilizar
antes de necesitar ser cargados nuevamente.
WHP151 US IB REVC_K.qxd 4/27/07 3:42 AM Page 36
Si está usando baterías recargables de NiMH o NiCd, las mismas se
cargarán cuando la base se alimente con el adaptador de potencia
principal de CA/CC y los audífonos se encuentren en la base. No
intente recargar los audífonos si instaló baterías alcalinas u otras
baterías no recargables. Esto podría ocasionar fugas en las baterías. No
combine baterías de diferentes componentes químicos (por ejemplo,
una batería de zinc con una batería alcalina). No combine baterías
nuevas y usadas. No deje las baterías instaladas en el producto cuando
éste no se vaya a utilizar por períodos de tiempo prolongados.
el medio ambiente y la ley. Antes de deshacerse de baterías recargables,
pregunte a su distribuidor si pueden ser recicladas y si él/ella recibe
baterías recargables para ser recicladas.
Importante: Esta unidad de energía está hecha con el fin de estar
orientada correctamente en una posición vertical o montada en el piso.
Respete

3938
OPERACIÓN
(continuación)
Para Máximo Funcionamiento
Cuando la fuente de audio ofrece una salida variable de volumen, el
máximo funcionamiento puede ser logrado. Las salidas variables de
volumen incluyen los enchufes de los audífonos, las bocinas de la
computadora, y algunos enchufes de salida de televisión RCA.
Salida Variable de Volumen. Cuando usted utiliza una fuente de audio
con un enchufe de salida variable, usted puede reducir cualquier
distorsión y lograr un máximo funcionamiento siguiendo estos pasos:
1. Ponga el volumen de la fuente de audio a un nivel medio.
2. Ajuste el control de VOLUMEN en los audífonos (6) hasta que
obtenga el resultado deseado.
3. Si el nivel de volumen de los audífonos no es suficiente, ajuste el
volumen en la fuente de audio.
4. Si ocurre distorsión, reduzca el volumen en el componente de la fuente.
Salida Fija de Volumen. Cuando usted utiliza una fuente de audio
con una salida de volumen fija, se puede logar regular el volumen
únicamente con el control de VOLUMEN de los audífonos (6). Algunos
ejemplos de salidas fijas de volumen son los enchufes de RCA (VCR,
Cintas, Video o salidas de CD).
SOLUCION DE PROBLEMAS
Refiérase a esta sección de solución de problemas si usted encuentra
cualquier dificultad al programar y utilizar sus audífonos.
PROBLEMA SOLUCION
No se escucha • Verifique que su fuentre de audio,
nada en los base/transmisor o audífonos estén conectados,
audífonos alimentados adecuadamente y encendidos.
• Asegúrese de que las baterías recargables estén
instaladas correctamente en los audífonos y hayan
sido cargadas adecuadamente.
• Verifique para asegurarse que la base/ transmisor
de re-carga está funcionando y el indicador de
luminoso LED de la señal de Audio en el aparato
está iluminada.
• Verifique que la fuente de audio esté enviando
una señal suficiente a las entradas de AUDIO
derecha e izquierda de la base/ transmisor de
carga a través del cable de entrada de audio (13).
Utilice el control de VOLUMEN (6) para
incrementar el nivel del volumen.
• Oprima el botón de auto búsqueda (Auto Scan)
(7) en el audífono izquierdo para asegurarse de
que está sintonizado al transmisor.
OPERACIÓN
Uso Estándar
1. Encienda la fuente de audio (TV, DVD, tocadiscos de CDs, etc.) a
cuál base/ transmisor está conectado. Si su fuente de audio es un
tocador de DVD o CD, empiece a tocar un disco.
Advertencia: La base/transmisor de re-carga tiene una función
automática que apaga el aparato si éste no recibe una señal de
audio en aproximadamente cuatro minutos. Si el volumen en la
fuente de audio está demasiado bajo, la base/ transmisor también
apaga el aparato después de 4 minutos. Esta función fue instalada
para cumplir con la legislación actual que pretende reducir la
cantidad de emisiones de radio en el ambiente. Para asegurarse de
que esta función no es activada accidentalmente, programe el
volumen en la fuente de audio a aproximadamente 50 por ciento
de su capacidad. Consulte el manual de su componente para ver
los detalles sobre cómo programar el volumen de los audífonos.
2. La base/ transmisor de carga está ahora lista para recibir una señal
de audio. La base/ transmisor de carga se activa automáticamente
cuando recibe una señal de audio de una fuente de audio.
3. Verifique para asegurarse que el indicador luminoso de la señal de
audio LED (9) en la parte delantera de la base/ transmisor de recarga está iluminado, indicando que el aparato está listo y está
recibiendo una señal.
4. Coloque el selector para encender/ apagar (ON/ OFF) (2), localizado
en el audífono derecho, en la posición de encendido (ON).
5. La base/ transmisor de carga le ofrece la Fase de Circuito
Asegurado (PLL) para transmisión de frecuencias. Seleccione uno
de estos canales, utilizando el selector de CANALES (12) en la
parte trasera de la base/ transmisor de carga. La función de PLL
automáticamente asegura el aparato en el canal seleccionado,
brindándole la mejor recepcióin de audio sin pérdida de sonido.
6. Después de seleccionar el canal, oprima el botón de auto búsqueda
(AUTO SCAN) (7), localizado en el audífono izquierdo, para buscar
la mejor recepción.
Nota: Para la mejor recepción, quédese a aproximadamente 23 pies de
la base/ transmisor de carga cuando oprima el botón AUTO SCAN.
7 Verifique para asegurarse de que el indicador luminoso de estéreo
(5) en el audífono izquierdo está iluminado, indicando una señal
potente.
8 Antes de ponerse los audífonos, ajuste el volumen utilizando el
control de VOLUMEN (6), localizado en el audífono izquierdo, a un
nivel de volumen a su gusto.
9 Cuando usted haya terminado de utilizar los audífonos, apáguelos
utilizando el selector para encender/ apagar (ON/ OFF) (2) y
coloque la fuente de audio en modalidad de alerta.
WHP151 US IB REVC_K.qxd 5/25/05 9:42 AM Page 38

4140
ESPECIFICACIONES
Modelo WHP 151
Descripción Sistema de Audífonos Inalámbricos para
Frecuencia de Radio
Transmisor
Frecuencia de Portador 900 MHz
Rango efectivo Hasta 150pies/45m*
Fuente de corriente 12 V 150 mA
Frecuencia de Transmisión UHF- 900 MHz/ tres canales:
912.0 MHz (1), 912.5 MHz (2), y 913 MHz (3)
Fuente de corriente
de los audífonos Dos baterías recargables AAA de
1.2V NiMH
GARANTÍA LIMITADA DE 12 MESES
SOLUCION DE PROBLEMAS
(continuación)
PROBLEMA SOLUCION
Mala calidad • Asegúrese de que el sonido que ofrece la fuente
de sonido o de audio sea suficientemente fuerte y de buena
interferencia calidad. Asegúrese de que el indicador luminoso
de estéreo (5) esté iluminado.
• Asegúrese de que las baterías en los audífonos
tengan suficiente corriente. Recárguelas o
cámbielas si fuera necesario.
• Asegúrese de que usted ha seleccionado el mejor
canal para la transmisión (1, 2, o 3) para obtener la
mejor recepción de señal. Si fuera necesario, intente
otro canal utilizando selector de CANALES (12).
Acuérdese de oprimir el botón de auto búsqueda
(AUTO SCAN) (7) para sintonizar la recepción.
• Verifique que la distancia entre los audífonos y la
base/ transmisor de carga esté dentro del rango de
operación. (El rango efectivo de este aparato es
aproximadamente 150pies/45 m*). Acérquese a la
base/ transmisor para recibir el sonido.
• Asegúrese de que la fuente de audio provea
sonido en estéreo.
Se corta la • La base/ transmisor tiene una función automática
corriente de corte de corriente. Cuando no se recibe
ninguna señal en el cable de entrada de audio en
las entradas de AUDIO derecha e izquierda (11)
de la base/ transmisor, ésta se apaga. Vuelva a
encender nuevamente su fuente de audio, y
utilice los selectores de CANAL (12) y de
AUTO SCAN (7) para ajustar la recepción.
Si fuera necesario, aumente el volumen de la
fuente de audio.
etneibma oidem le núges aírav ognar lE *etneibma oidem le núges aírav ognar lE *
WHP151 US IB REVC_K.qxd 4/27/07 3:42 PM Page 40
Audiovox Electronics Corporation (la “Compañía”) le garantiza a usted, el comprador original de
este producto que si, bajo condiciones y uso normales, se encontrara que este producto o alguna
pieza presenta defectos materiales o de mano de obra dentro de los primeros 12 meses a partir de
la fecha de compra original, tales defectos serán reparados o reemplazados (a opción de la
Compañía) sin cargo alguno por las piezas y labores de reparación. Para obtener los servicios de
reparación o reemplazo dentro de los términos de esta Garantía, el producto junto con cualquier
accesorio incluido en el empaque original se entregarán con prueba de cubierta de garantía (por
ejemplo, factura fechada de venta), especificación de los defectos, transporte prepagado, a la
Compañía a la dirección indicada abajo. No devuelva este producto al Distribuidor.
Esta Garantía no es transferible y no cubre un producto adquirido, mantenido o utilizado fuera
de los Estados Unidos o Canadá. Esta garantía no incluye la eliminación de estática o ruido
generados externamente, ni los costos incurridos en la instalación, remoción o reinstalación del
producto. Esta garantía no aplica a ningún producto o pieza que, sea opinión de la compañía,
haya sufrido daños debido a alteraciones, instalación inadecuada, abuso, uso indebido,
negligencia, accidente o exposición a la humedad. Esta garantía no aplica a daños ocasionados
por un adaptador de CA que no haya sido suministrado con el producto, o por dejar instaladas
baterías no recargables en el producto mientras la unidad se encontraba enchufada a un
tomacorriente de CA. EL ALCANCE DE LA RESPONSABILIDAD DE LA COMPAÑÍA BAJO
ESTA GARANTÍA ESTÁ LIMITADO A LA REPARACIÓN O EL REEMPLAZO PROVISTO
ARRIBA Y, EN NINGÚN CASO, DEBERÁ LA RESPONSABILIDAD DE LA COMPAÑÍA
EXCEDER EL PRECIO DE COMPRA PAGADO POR EL COMPRADOR DE ESTE PRODUCTO.
Esta Garantía reemplaza cualesquiera otras responsabilidades o garantías expresas.
CUALESQUIERA GARANTÍAS IMPLÍCITAS, INCLUYENDO CUALQUIER GARANTÍA
IMPLÍCITA DE COMERCIABILIDAD O ADAPTABILIDAD PARA UN PROPÓSITO EN
PARTICULAR ESTARÁN LIMITADAS A LA DURACIÓN DE ESTA GARANTÍA. CUALQUIER
ACCIÓN PARA EL INCUMPLIMIENTO DE CUALQUIER GARANTÍA EN EL PRESENTE,
INCLUYENDO CUALQUIER GARANTÍA IMPLÍCITA, DEBERÁ PRESENTARSE DENTRO DE
UN PERÍODO DE 24 MESES A PARTIR DE LA FECHA DE COMPRA ORIGINAL. EN NINGÚN
CASO LA COMPAÑÍA SERÁ RESPONSABLE POR DAÑOS EMERGENTES O INCIDENTALES.
Ninguna persona ni representante está autorizado a asumir, a nombre de la Compañía, ninguna
responsabilidad salvo la expresada aquí en conexión con la venta de este producto. Algunos
estados/provincias no permiten limitaciones sobre la duración de una garantía implícita o la
exclusión o la limitación de daños incidentales o emergentes, de modo que es posible que las
limitaciones o exclusiones anteriores no se apliquen en su caso. Esta Garantía le confiere derechos
legales específicos; según el estado/provincia, puede disfrutar además de otros derechos.
EE.UU: Audiovox Electronics Corporation, 150 Marcus Blvd., Hauppauge, New York 11788
CANADÁ: Audiovox Return Center, c/o Genco, 6685 Kennedy Road, Unit 3, Door 16,
Mississauga, Ontario L5T 3A5

Trademark(s) Registered
Made in China
Marque(s) déposée(s)
Fabriqué en Chine
Marca(s) Registrada(s)
Hecho en China
WHP151 US IB REVC_K.qxd 4/27/07 3:42 PM Page 42
©2007 Audiovox Corporation
Accessories Group
111 Congressional Blvd., Suite 350
Carmel, IN 46032 USA
WHP151 NAIB 02
 Loading...