

RCA VR542 Owner’s Manual
USER'S
GUIDE
VIDEO
CASSETTE
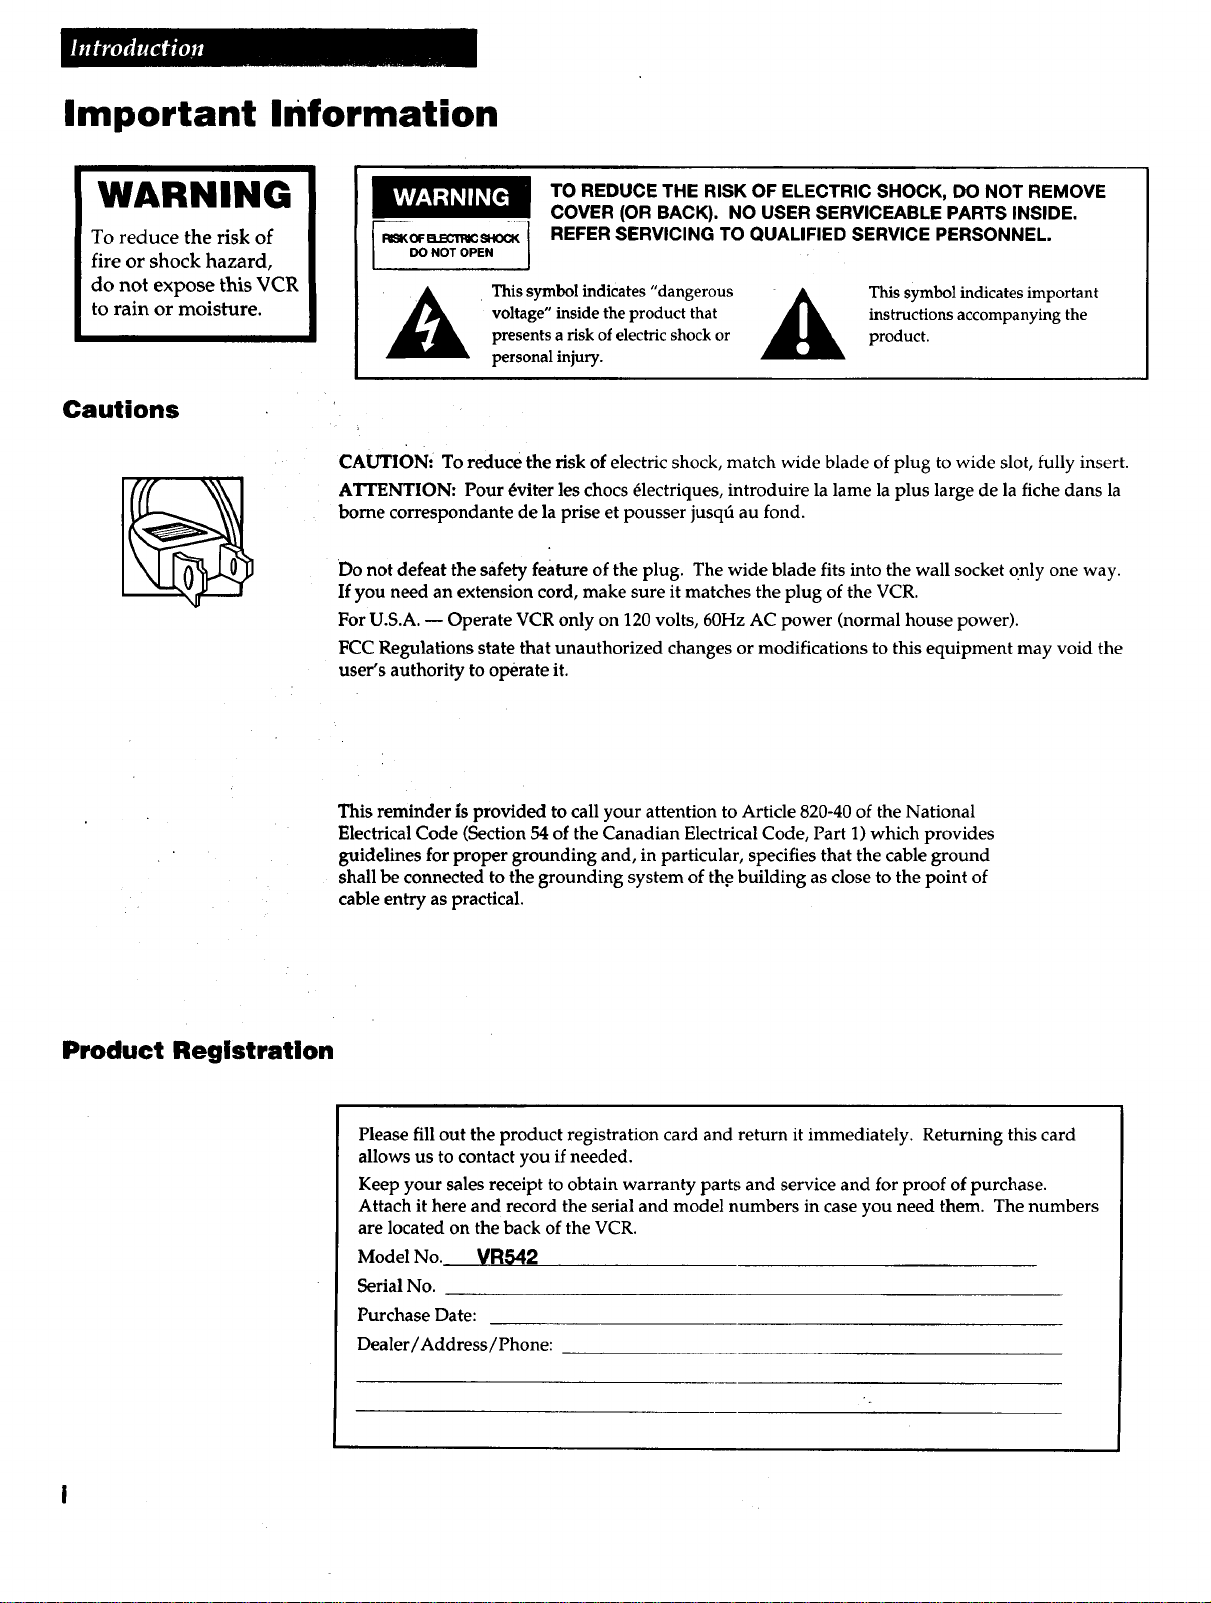
Important Information
WARNING
To reduce the risk of
fire or shock hazard,
do not expose this VCR
to rain or moisture.
Cautions
TO REDUCE THE RISK OF ELECTRIC SHOCK, DO NOT REMOVE
COVER (OR BACK). NO USER SERVICEABLE PARTS INSIDE.
REFER SERVICING TO QUALIFIED SERVICE PERSONNEL.
DO NOT OPEN I
This symbol indicates "dangerous
voltage" inside the product that
presents a risk of electric shock or
personal injury.
CAUTION: To reduce the risk of electric shock, match wide blade of plug to wide slot, fully insert.
ATrENTION: Pour 4viter les chocs 41ectriques, introduire la lame la plus large de la fiche darts la
borne correspondante de la prise et pousser jusq6 au fond.
Do not defeat the safety feature of the plug. The wide blade fits into the wall socket only one way.
If you need an extension cord, make sure it matches the plug of the VCR.
For U.S.A. -- Operate VCR only on 120 volts, 60Hz AC power (normal house power).
FCC Regulations state that unauthorized changes or modifications to this equipment may void the
user's authority to operate it.
instructions accompanying the
This symbol indicates important
product.
Product Registration
This reminder is provided to call your attention to Article 820-40 of the National
Electrical Code (Section 54 of the Canadian Electrical Code, Part 1) which provides
guidelines for proper grounding and, in particular, specifies that the cable ground
shall be connected to the grounding system of the building as close to the point of
cable entry as practical.
Please fill out the product registration card and return it immediately. Returning this card
allows us to contact you if needed.
Keep your sales receipt to obtain warranty parts and service and for proof of purchase.
Attach it here and record the serial and model numbers in case you need them. The numbers
are located on the back of the VCR.
Model No. VR542
Serial No.
Purchase Date:
Dealer/Address/Phone:
Table of Contents
Important Information
Warnings
Cautions
Note to Cable TV Installer
Product Registration
Hooking Up the VCR
Choosing a Hookup 2
Antenna or Cable System Without a
Cable Box 3
Cable System With Cable Box to
Unscramble All Channels 4
Cable System With Cable Box to
Unscramble Pay Channels 5
RCA DSS® Satellite Receiver 6-7
Connecting Two VCRs for Copying Tapes_ 8
Setting Up the VCR
Startup
Check Accessories With VCR 9
Attach Power Cord to Back of VCR 9
Insert Batteries in Remote 9
Turn on the TV 9
Use the On-Screen Menu System __ 10
Turn on the VCR 10
Auto Cable/DSS Box Setup__ 11-12
Manual Cable Box Setup 12
Auto Channel Search and Auto
Clock Set 13
Manual Channel Search 13
Manual Clock Set 14
Setup VCR Plus+ Channels __ 14
Program VCR for VGR1 or
VGR2. LD Button 14
Add or Remove Channels from
VCR's Memory 14
Use TV.VCR Button 15
Set the Auto TV/VCR Feature __ 15
Using the Remote Control
Component, VCR, TV, Cable Box, and
RCA DSS ® Receiver Buttons 16-17
Controlling a VCR 18
Controlling a TV 19
Controlling a Cable Box or
RCA DSS ® Receiver 20
Controlling an Auxiliary RCA Component _ 21
Playing a Tape
Operating Instructions
Using the Playback Features
Auto Play Feature
Auto Repeat Feature 23
i
i
i
i
Pause for Stop-Action 24
Variable Speed Picture Search ___ 24
Frame Advance 25
Slow Motion 25
Automatic Tracking 26
Manual Tracking 26
Pro-Tect Plus TM Locking Feature __ 26
DISPLAY Button 27
Time Counter 27
Index Search 28
Time Search 28
Zero Search 29
Blank Search 29
COMMERCIAL_ADVANCE TM
Feature
Recording and Playback 30-31
Recording a Program
Types of Recordings 32
Using the Recording Features
Recording Speeds 32
Recording Pause 32
Basic Recording -
Operating Instructions 33
Watch a TV Channel While VCR
is Recording a Different Channel .__ 33
Recording While You're Away
VCR Plus+ Recording 34-36
Timer Recording 37
Check, Edit, or Clear a VCR Plus+ or
Timer Recording 38
Timer Recording From the
VCR's Line Input 38
Express Recording (XPR) 39
Using Two VCRs for Copying
and Editing Tapes 40
Using Dual Remote with AutoEdit __ 40
References
Location of Controls
Front Panel 41
Back Panel 42
Display Panel 42-43
Specifications 44
Cleaning the VCR 44
Limited Warranty 45
Trouble Checks 46-47
22
23
Queskior_s and Answers About
COMMERCIAL,,ADVANCE TM .48
Index 48-49
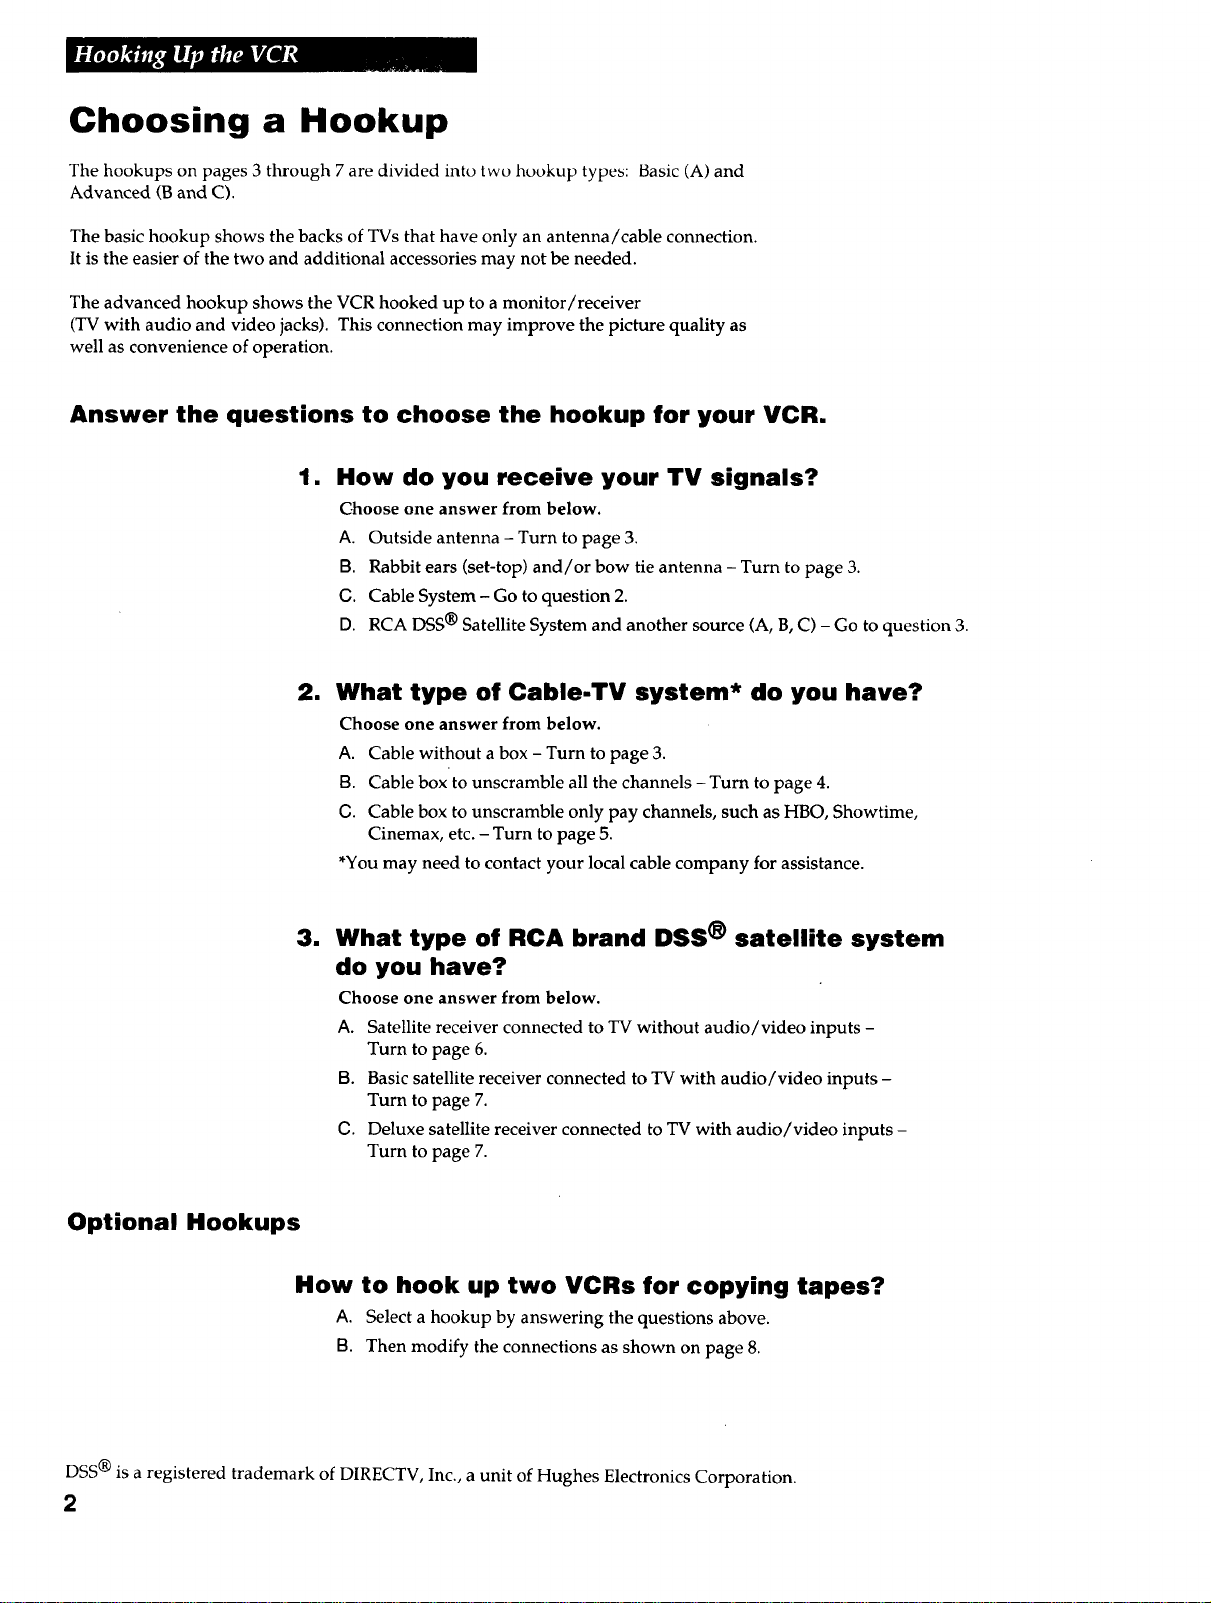
Choosing a Hookup
The hookups on pages 3 through 7 are divided into two hookup types: Basic (A) and
Advanced (B and C).
The basic hookup shows the backs of TVs that have only an antenna/cable connection.
It is the easier of the two and additional accessories may not be needed.
The advanced hookup shows the VCR hooked up to a monitor/receiver
(TV with audio and video jacks). This connection may improve the picture quality as
well as convenience of operation.
Answer the questions to choose the hookup for your VCR.
1. How do you receive your TV signals?
Choose one answer from below.
A. Outside antenna - Turn to page 3.
13. Rabbit ears (set-top) and/or bow tie antenna - Turn to page 3.
C. Cable System - Go to question 2.
D. RCA DSS ® Satellite System and another source (A, B, C) - Go to question 3.
2. What type of Cable-TV system* do you have?
Choose one answer from below.
A. Cable without a box - Turn to page 3.
13. Cable box to unscramble all the channels - Turn to page 4.
C. Cable box to unscramble only pay channels, such as HBO, Showtime,
Cinemax, etc. - Turn to page 5.
*You may need to contact your local cable company for assistance.
m
What type of RCA brand DSS ® satellite system
do you have?
Choose one answer from below.
A. Satellite receiver connected to TV without audio/video inputs -
Turn to page 6.
13. Basic satellite receiver connected to TV with audio/video inputs -
Turn to page 7.
C. Deluxe satellite receiver connected to TV with audio/video inputs -
Turn to page 7.
Optional Hookups
How to hook up two VCRs for copying tapes?
A. Select a hookup by answering the questions above.
B. Then modify the connections as shown on page 8.
DSS ® is a registered trademark of DIRECTV, Inc., a unit of Hughes Electronics Corporation.
2
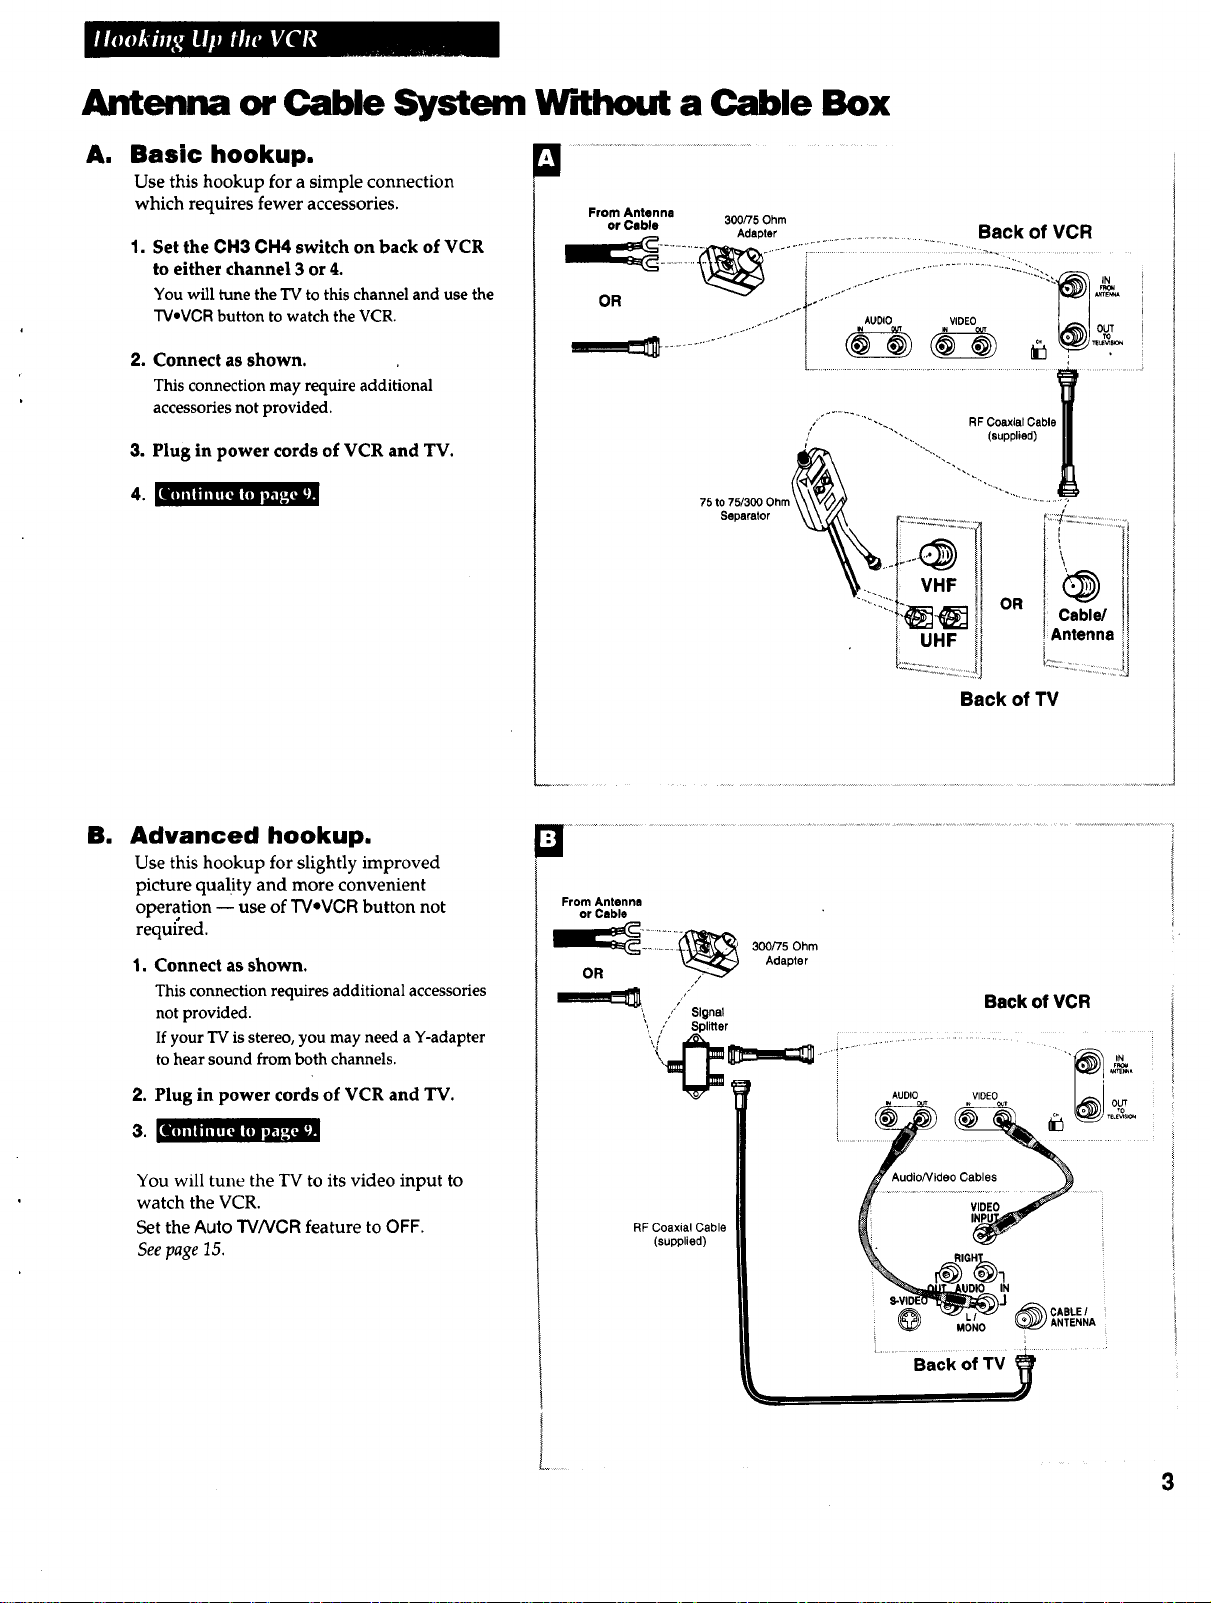
Antenna or Cable System W dhout a Cable Box
A.
Basic hookup.
Use this hookup for a simple connection
which requires fewer accessories.
1,
Set the CH3 CH4 switch on back of VCR
to either channel 3 or 4.
You will tune the TV to this channel and use the
TVeVCRbutton to watch the VCR,
2, Connect as shown.
This connection may require additional
accessories not provided.
3. Plug in power cords of VCR and TV.
=..*..==.i_L_,au
From Antenna
or Cable
OR
Be
Advanced hookup.
Use this hookup for slightly improved
picture quality and more convenient
operation -- use of TVeVCR button not
required.
1. Connect as shown.
This connection requires additional accessories
not provided.
If your TV is stereo, you may need a Y-adapter
to hear sound from both channels.
2. Plug in power cords of VCR and TV.
l,] i,.,i.
Cable System Cable Box to Unscramble All Channels
Position cable box.
Position the remote-controllable cable box on
top of the VCR. You may need to position it
at different angles before the VCR can
control it. Make sure the cable box does not
cover the transmitting window on top of the
VCR.
A|
Basic hookup.
Use this hookup for a simple connection
which requires fewer accessories.
1. Set the CH3 CH4 switch on back of VCR
to either channel 3 or 4.
You will tune the TV to this channel and use the
TV-VCR button to watch the VCR.
2,
Connect as shown.
This connection may require additional
accessories not provided.
RemoteSensor T..mnsmitting 1
w,noow.
From Cable
Cable Box RFCoaxial
:...........t.............................. i cab.,
[............................................... J
Back of VCR
AUDIO VIDEO
•.,_ IN
3.
Plug in power cords of VCR, TV, and
cable box.
Ike) i i i eil z[;i ( 0N _.J,_
El
Advanced hookup.
Use this hookup for slightly improved
picture quality and more convenient
operation -- use of TVoVGR button not
required.
1. Connect as shown.
This connection requires additional accessories
not provided.
If your TV is stereo, you may need a Y-adapter
to hear sound from both channels.
2. Plug in power cords of VCR, TV, and
cable box.
kl) i I I I i l ! [_il ( II _Ji,+I .+(_Ii
0 .............................................................................................................................i iiiii::ii:€;=;;Q;il........................................
RF Coaxial
Back of VCR
AUDIO VIDEO
Cable
W
IN
RF Coaxial Cable .
(supplied)
You will tune the TV to its video input to
watch the VCR.
Set the Auto TV/VGR feature to OFF.
See page 15.
Caution: The unauthorized recording of
satellite broadcasts, television programs, or
other materials may infringe the rights of others.
4
Back of TV

Cable System With Cable Box to Unscramble Pay Channels
(suchas HBO, ShowtJrne,Pay-Per-_r_N, etc.)
•Position cable box.
Position the remote-controllable cable box on
top of the VCR. You may need to position it
at different angles before the VCR can
control it. Make sure the cable box does not
cover the transmitting window on top of the
VCR.
A. Basic hookup.
Use this hookup for a simple connection
which requires fewer accessories.
Set the CH3 CH4 switch on back of VCR
1.
to either channel 3 or 4.
You will tune theTV to thischannel and use the
TV.VCR button to watch the VCR.
2. Connect as shown.
This connection may require additional
accessories not provided.
................................. .................+
From Cable
Cable Box REC,o_xl_
t .............................................................. ; AUDIO VIDEO OUT
7++..............................' °+.............................
/
Back of VCR
RF Coaxial Cable
", (supplied)
3. Plug in power cords of VCR, TV, and
cable box.
|i)illiil![gl(O]lid_2_l
Ell Advanced hookup.
Use this hookup for slightly improved
picture quality and more convenient
operation -- use of TVeVCR button not
required.
1. Connect as shown.
This connection requires additional accessories
not provided.
If your TV is stereo, you may need a Y-adapter
to hear sound from both channels.
2. Plug in power cords of VCR, TV, and
cable box.
From Cable
Splitter /
75 to
Separator
Back of VCR
i +.
i AUDIO VIDEO OUT
OR i Cab e/
i!Antenna
_'.__. .....:
Back of TV
lit Ill I I i I ! [;II Ill i_J'-_;il_
You will tune the TV to its video input to
watch the VCR. All pay channels are viewed
through the VCR.
RF Coaxial
Cable
(supplied)
/+++0oo+.,3
i......
Back
L
of TV '_
RCA DSS Satellite Receiver
Position RCA DSS ® receiver.
Position the receiver on top of the VCR. You
may need to position it at different angles
before the VCR can control it. Make sure the
receiver does not cover the transmitting
window on top of the VCR.
Do not stack electronic components or other
objects on top of the RCA DSS ® receiver.
The slots on top of the receiver must be
left uncovered to allow proper airflow
to the unit. Blocking the airflow to the unit
could impair performance or damage your
receiver and other components. Also, do
not stack the RCA DSS _ receiver on top of a
"hot component" such as an audio power
amplifier.
Am
Basic hookup.
Use this hookup if your TV does not have
audio/video jacks.
i.
Set the CH3 CH4 switch on back of
satellite receiver to either channel 3 or 4.
You will tune the VCR to this channel or its line
input (L1) to record from the receiver.
To watch the satellite receiver, turn off the VCR.
If you want to watch or record the signal from
your antenna, cable, or cable box, make sure the
satellite receiver is turned off.
2, Set the CH3 CH4 switch on back of VCR
to either channel 3 or 4.
You will tune the TV to this channel and use the
TVaVCRbutton to watch the VCR.
Satellite Receiver
Remote Sensor --
Transmlttlng
Windows
ll ...................,iota....................................................................
Cable, Cable Box Satelllte
or Antenna Dlsh
From
Back of Satellite Receiver A
I i
J
_Tow
t_udioNideo Cables
(supplied)
VIDEO
RF Coaxial Cable
3,
Connect as shown.
This connection may require additional
accessories not provided.
4,
Plug in power cords of VCR, TV, and
receiver.
5. Jill] i Ill | II [_i (11 _l_*_i;J
Caution: lhe unauthorized recording
of satellite broadcasts, television
programs, or other materials may
infringe the rights of others.
6
Back of VCR
Back of TV
RCA I)SS Satellite Receiver
am
Advanced hookup with
basic receiver.
Use this hookup if your TV has audio/video
jacks and your receiver has one set of
AU DIONI DEO jacks.
1. Set the CH3 CH4 switch on back of
receiver to either channel 3 or 4.
You will tune the VCR to this channel to record
from the satellite receiver.
To watch the satellite receiver, tune your TV to
its video input channel.
If you want to watch or record the signal from
your antenna, cable, or cable box, make sure the
satellite receiver is turned off.
2. Set the CH3 CH4 switch on back of VCR
to either channel 3 or 4.
You will tune the TV to this channel and use the
TV*VGR button to watch the VCR.
3. Connect as shown.
This connection may require additional
accessories not provided.
4. Plug in power cords of VCR,.TV, and
receiver.
From From
Cable, Cable Box Satellite
or Antenna Dish
_ Back of Satellite Receiver _
i m_am
eeT_
OUT
Eli il I I ii! [tll (II ti_ *_[_ll
Cm
Advanced hookup with
deluxe receiver.
Use this hookup if your TV has audio/video
jacks and your receiver has two sets of
AUDIO/VIDEO jacks.
1. Set the CH3 CH4 switch on back of VCR
to either channel 3 or 4.
You will tune the TV to this channel and use the
TV*VGR button to watch the VCR.
To record from the satellite receiver, you will
tune the VCR to its line input (L1).
To watch the satellite receiver, tune your TV to
its video input channel.
2. Connect as shown.
This connection may require additional
accessories not provided.
3. Plug in power cords of VCR, TV, and
receiver.
[t]ililill[_ I(I]lli_j.'-'[_l
Beck of Satelllte Recelver _,
Beck of VCR
Dish
hi
or Antenna
of satellite broadcasts, television
programs, or other materials may
Caution: The unauthorized recording
infringe the rights of others.
MONO ANTENNA
CABLEI
.... Back Of TV ..............
7
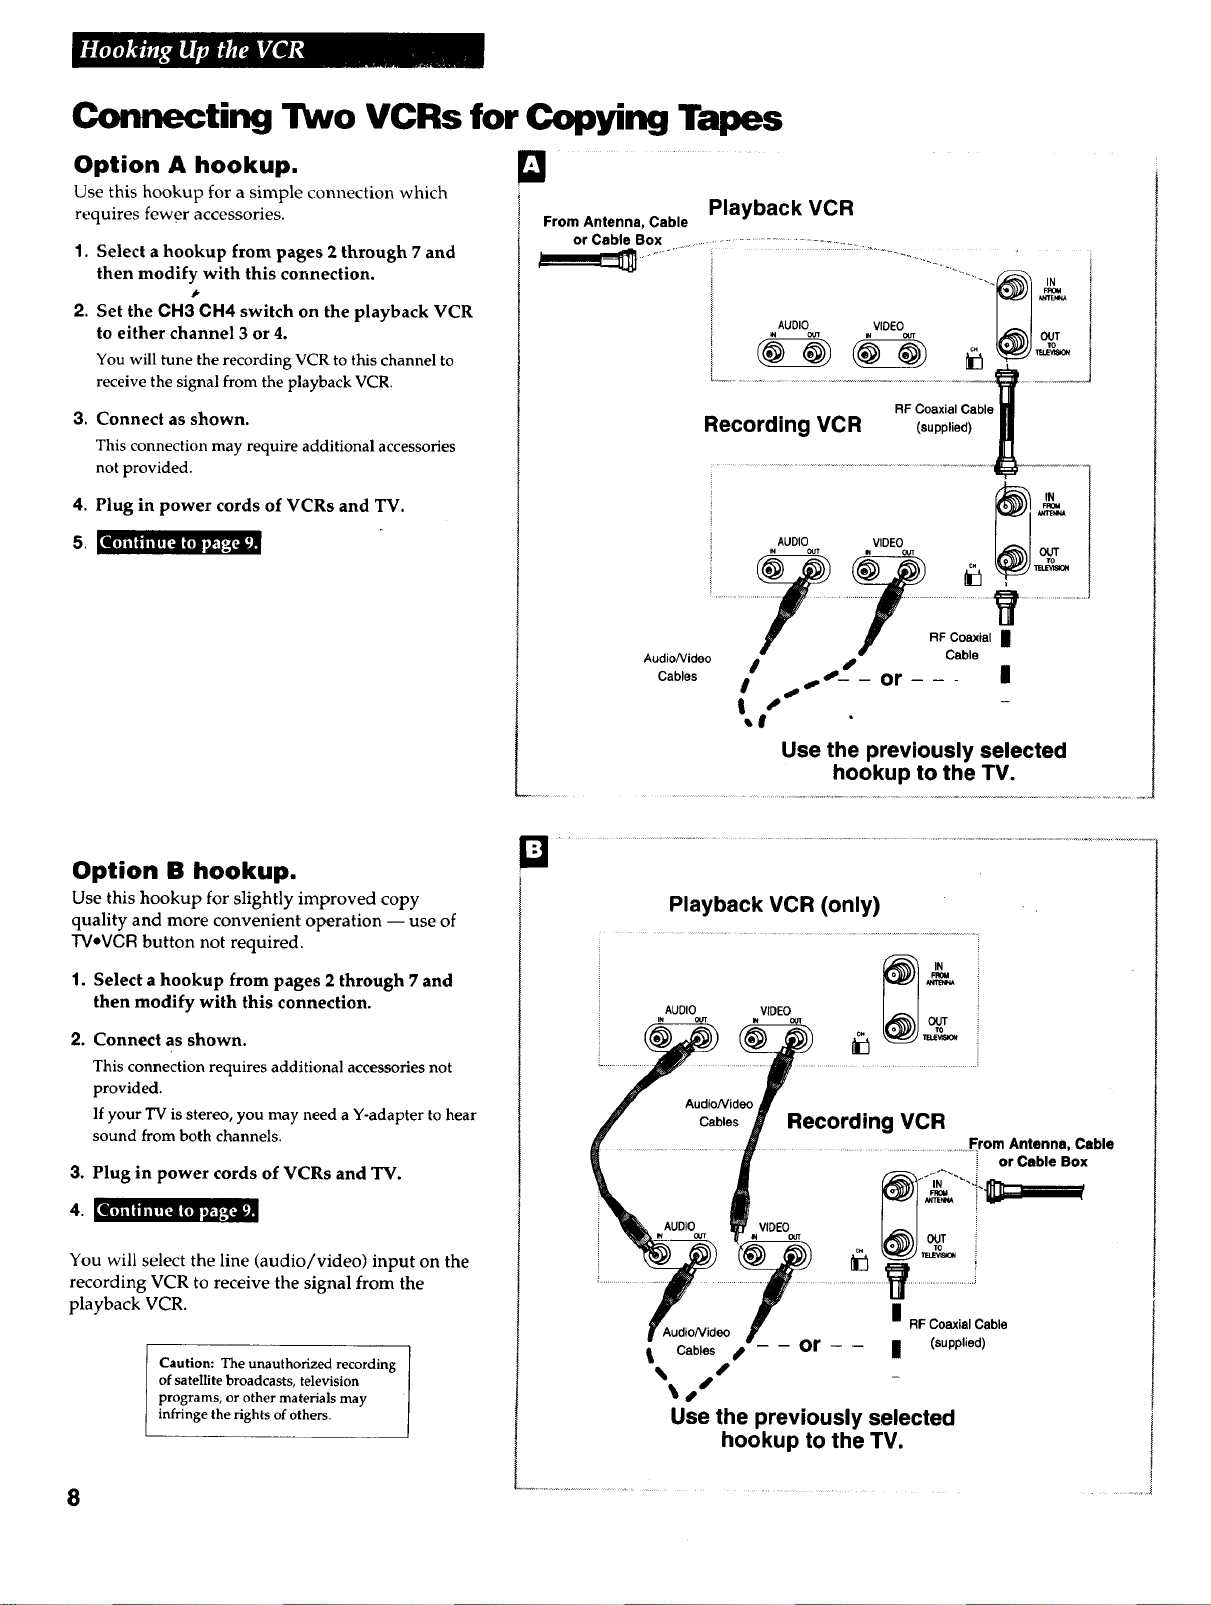
Connecting Two VCRs for Copying Tapes
Option A hookup.
Use this hookup for a simple connection which
requires fewer accessories.
1. Select a hookup from pages 2 through 7 and
then modify with this connection.
2. Set the CH3 CH4 switch on the playback VCR
to either channel 3 or 4.
You will tune the recording VCR to this channel to
receive the signal from the playback VCR.
3. Connect as shown.
This connection may require additional accessories
not provided.
4. Plug in power cords of VCRs and TV.
From Antenna, Cable
or Cable Box ..........................................
Playback VCR
i _1 _'_'_
i AU0,% VOEO ou,
Recording VCR (supp,ed)_
RF Coaxial Cabl2_i_
5. [_1[I1 i l I Iil ! [;il (ll _,,F.'_t_I;Jul
Option B hookup.
Use this hookup for slightly improved copy
quality and more convenient operation -- use of
TVoVCR button not required.
1. Select a hookup from pages 2 through 7 and
then modify with this connection.
2. Connect as shown.
This connection requires additional accessories not
provided.
If your TV is stereo, you may need a Y-adapter to hear
sound from both channels.
3. Plug in power cords of VCRs and TV.
Auo,% v,oEo
Audio/Video
Cables _
Playback VCR (only)
AUDIO VIDEO
I
| #
Use the previously selected
Recording VCR
RF Coaxial n
Cable
_,S-_- or - - - n
hookup to the TV.
IN
OUT
From Antenna, Cable
or Cable Box
4. [III i tI l i I ! ['--n=( I!1 iiZ_'-,(=,il_A
You will select the line (audio/video) input on the
recording VCR to receive the signal from the
playback VCR.
Caution: The unauthorized recording
of satellite broadcasts, television
programs, or other materials may
infringe the rights of others.
8
VIDEO
OUT
i3
I
AudioNideo
Cables _ -- -- or - - II (supplied)
s
_oS
Use the previously selected
hookup to the TV.
RF Coaxial Cable
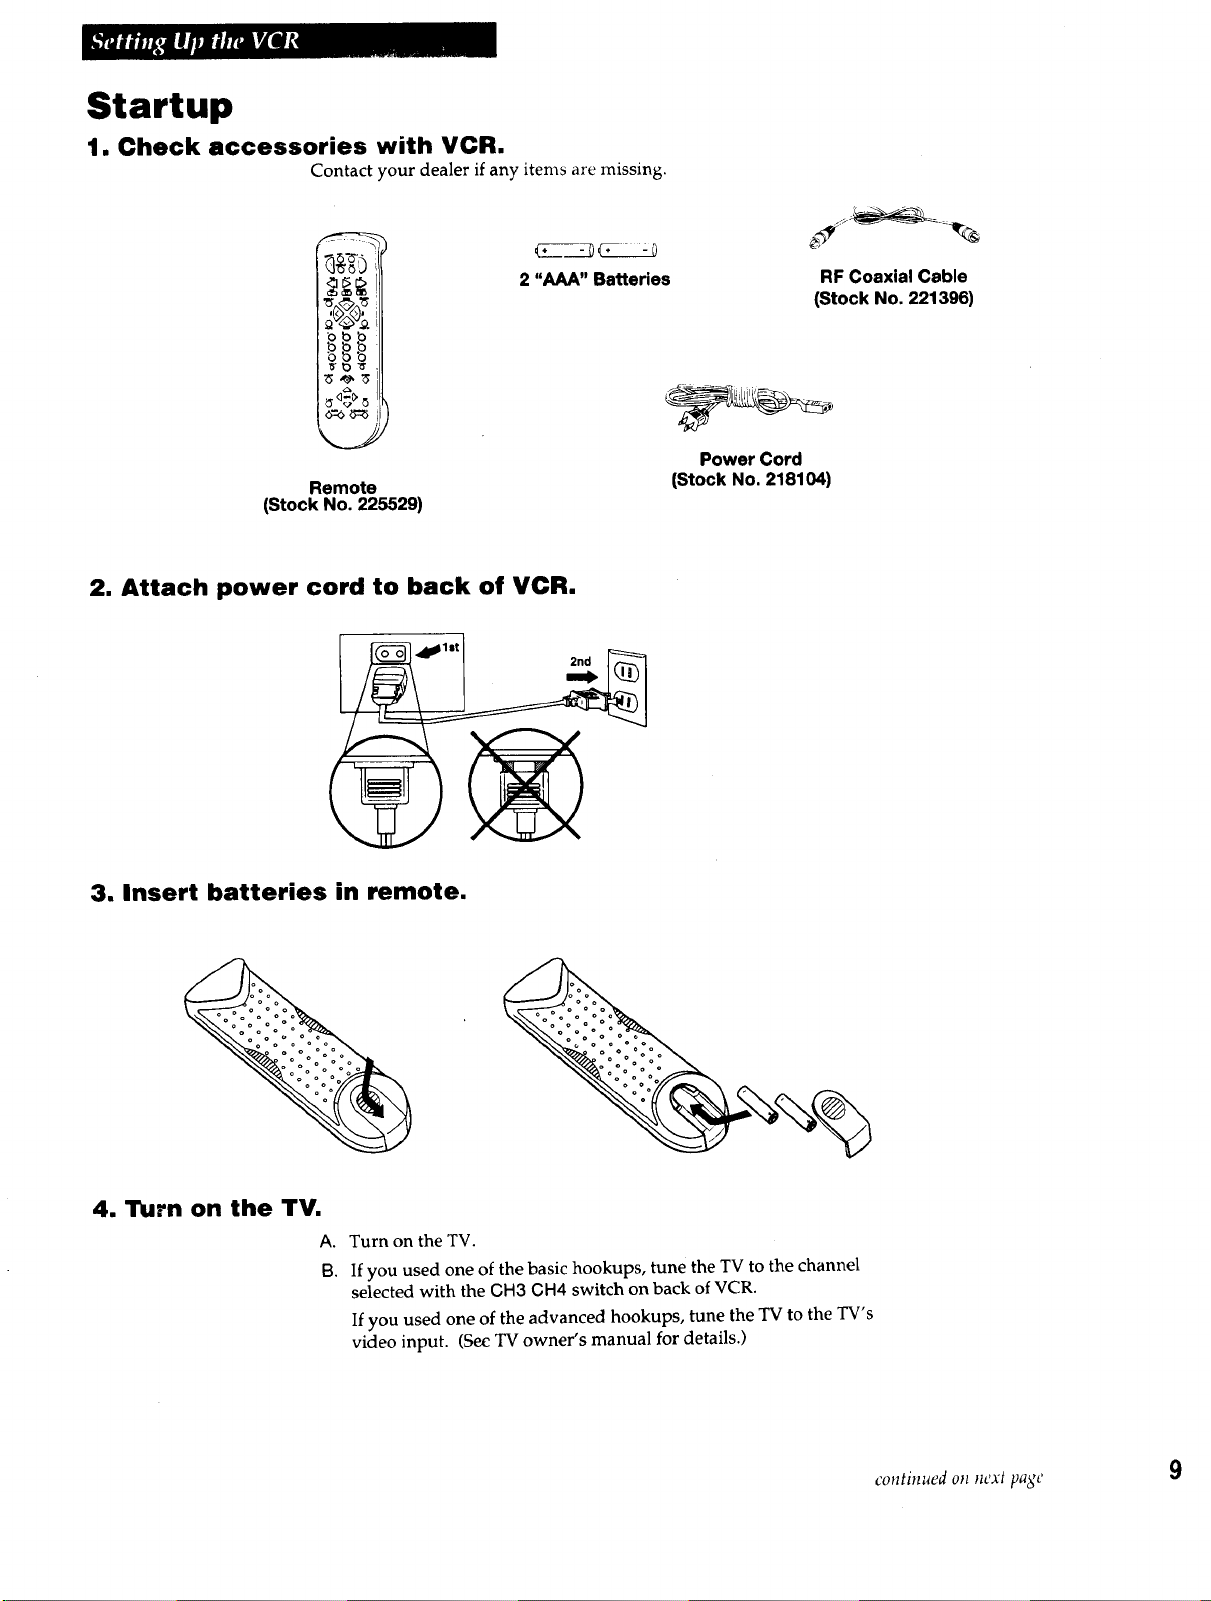
Startup
1. Check accessories with VCR.
Contact your dealer if any items are missing.
____
2 "AAA" Batteries
Remote
(Stock No. 225529)
2. Attach power cord to back of VCR.
RF Coaxial Cable
(Stock No. 221396)
Power Cord
(Stock No. 218104)
2nd
3, Insert batteries in remote.
4. Turn on the TV.
A. Turn on the TV.
B. If you used one of the basic hookups, tune the TV to the channel
selected with the OH3 CH4 switch on back of VCR.
If you used one of the advanced hookups, tune the TV to the TV's
video input. (See TV owner's manual for details.)
continued on next page 9
Startup
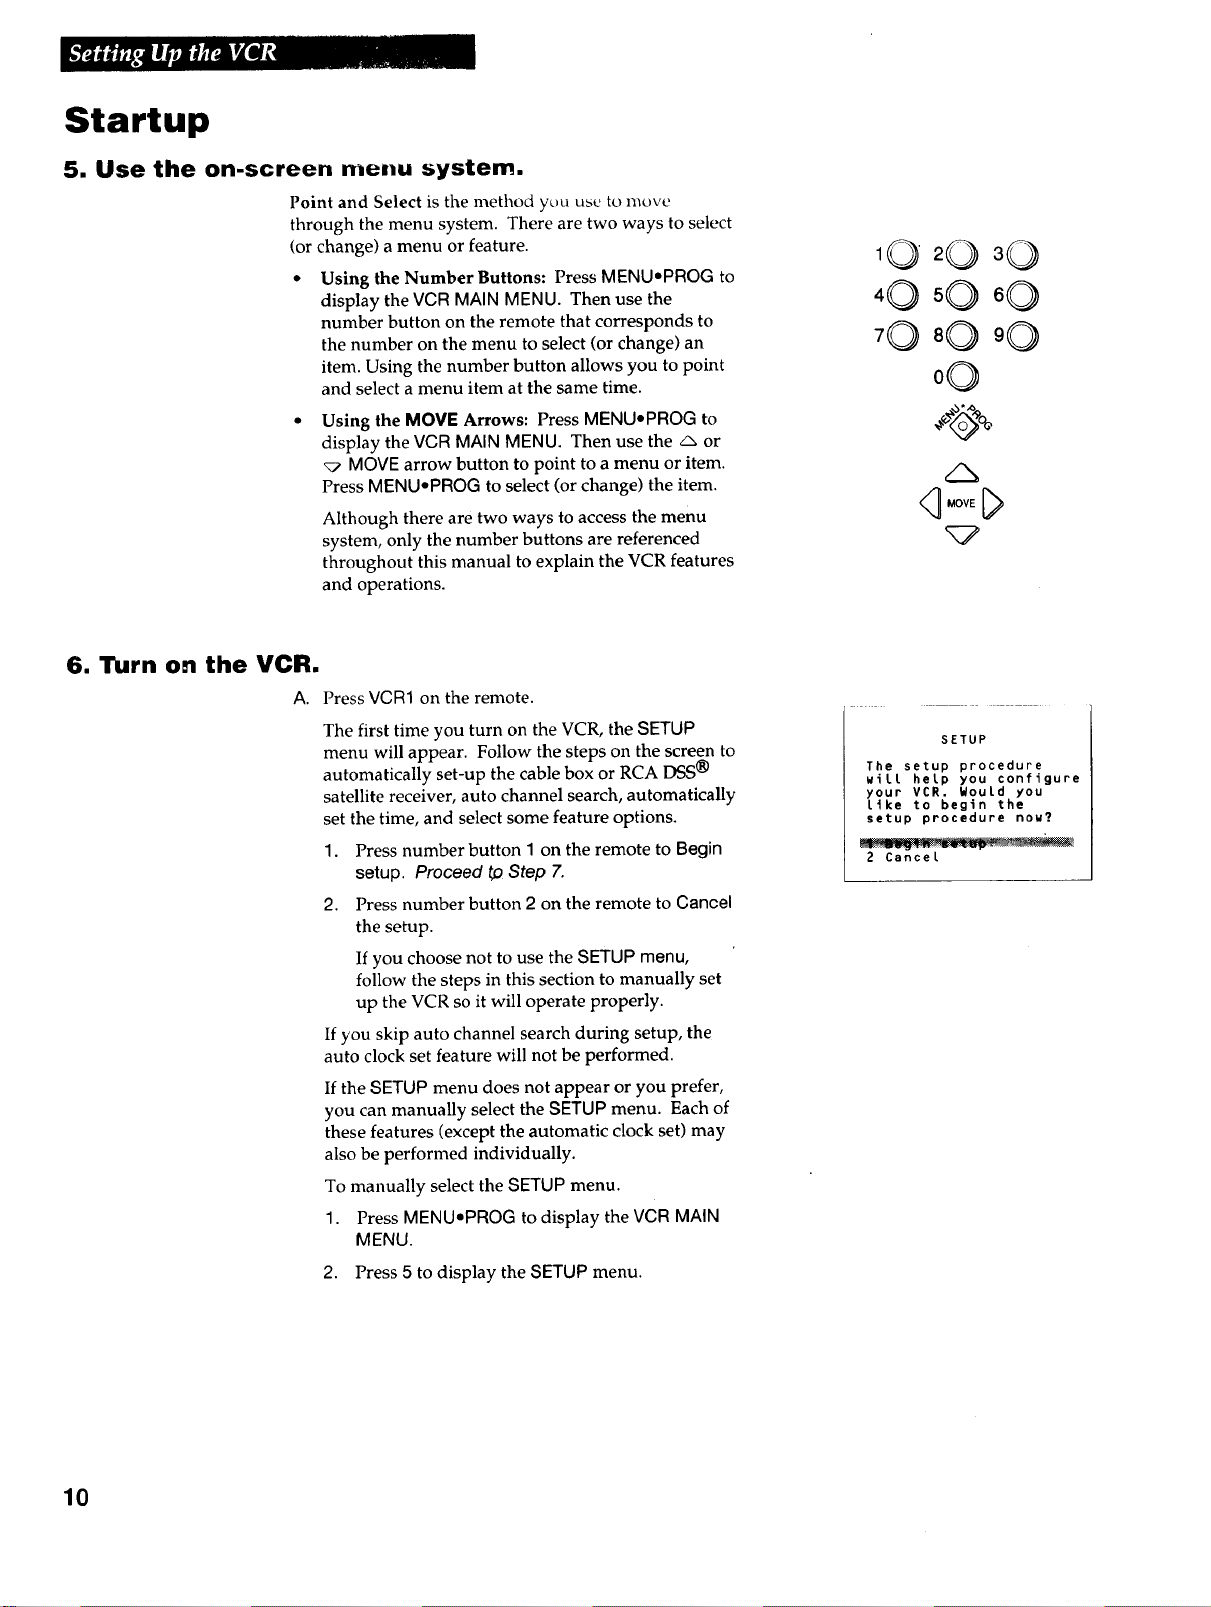
5. Use the on-screen me.u system.
Point and Select is the method yuu use to move
through the menu system. There are two ways to select
(or change) a menu or feature.
Using the Number Buttons: Press MENU.PROG to
display the VCR MAIN MENU. Then use the
number button on the remote that corresponds to
the number on the menu to select (or change) an
item. Using the number button allows you to point
and select a menu item at the same time.
Using the MOVE Arrows: Press MENUoPROG to
display the VCR MAIN MENU. Then use the/_, or
_7 MOVE arrow button to point to a menu or item.
Press MENUePROG to select (or change) the item.
Although there are two ways to access the menu
system, only the number buttons are referenced
throughout this manual to explain the VCR features
and operations.
6. Turn on the VCR.
A Press VCR1 on the remote.
The first time you turn on the VCR, the SETUP
menu will appear. Follow the steps on the screen to
automatically set-up the cable box or RCA DSS®
satellite receiver, auto channel search, automatically
set the time, and select some feature options.
1.
Press number button I on the remote to Begin
setup. Proceed to Step 7.
Press number button 2 on the remote to Cancel
2.
the setup.
If you choose not to use the SETUP menu,
follow the steps in this section to manually set
up the VCR so it will operate properly.
If you skip auto channel search during setup, the
auto clock set feature will not be performed.
If the SETUP menu does not appear or you prefer,
you can manually select the SETUP menu. Each of
these features (except the automatic clock set) may
also be performed individually.
To manually select the SETUP menu.
1. Press MENU,PROG to display the VCR MAIN
MENU.
,O
0O
/N
SETUP
The setup procedure
will help you configure
your VCR, WouLd you
like to begin the
setup procedure now?
2 Cancel
I0
2. Press 5 to display the SETUP menu.
Startup
7. Auto cable/DSS box setup.
The cable/DSS box setup allows the VCR to record
programs from the cable box or RCA DSS ® receiver.
If your cable box can be controlled by a remote,
the VCR may be able to tune it to the chann_ you
want to record during VCR Plus+ and timer
recordings and automatically set the clock after
power failures. Position the remote-controllable
cable box on top of the VCR to receive the infrared
remote signal. See pages 4-5.
The VCR will turn on an RCA DSS ® receiver and
tune it to the channel you want to record during
timer recordings. Position the receiver on top of
the VCR to receive the infrared remote signal. See
pages 6-7.
A.
Cable box or satellite receiver not used for all
channels:
Press 2. You are finished with CABLE BOX
SETUP. Skip to Step 8.
Cable box or RCA DSS ® receiver used for all
channels:
Press 1 to continue.
B, Press two numbers on the remote to enter the
output channel of your cable box or satellite
receiver. Press 0 before a single-digit number.
Valid numbers are 01 - 99.
SETUP
Is a cable box or DSS
receiver being used
with the VCR for all
channels?
2 No, skip this step
CABLE/DSS BOX SETUP
Enter the output
channel of the cable
box or DSS receiver.
,- \
Press 01-99 or INPUT
Press MENU to exit
CABLE/DSS BOX SETUP
The VCR will now receive
all channels from the
cable box or DSS
receiver on VCR Ch 03
If you connected your cable box or satellite
receiver to the VCR using the box's AUDIO/VIDEO
OUT jacks, press INPUT to select the VIDEO1
option.
Press CLEAR on the remote to correct an entry.
C. Press MENU,PROG to proceed.
The VCR now automatically enters the output
channel of your cable box or satellite receiver as
the channel to be recorded in the VCR PLUS+ and
TIMER RECORDINGS menus.
D. Press MENU.PROG to proceed.
Press MENU to proceed
CABLE/DSS BOX SETUP
Enter the code for
your cable box or DSS
recetver from the list
in your User's Manual.
Press MENU to proceed
continued on _lext page 1 1
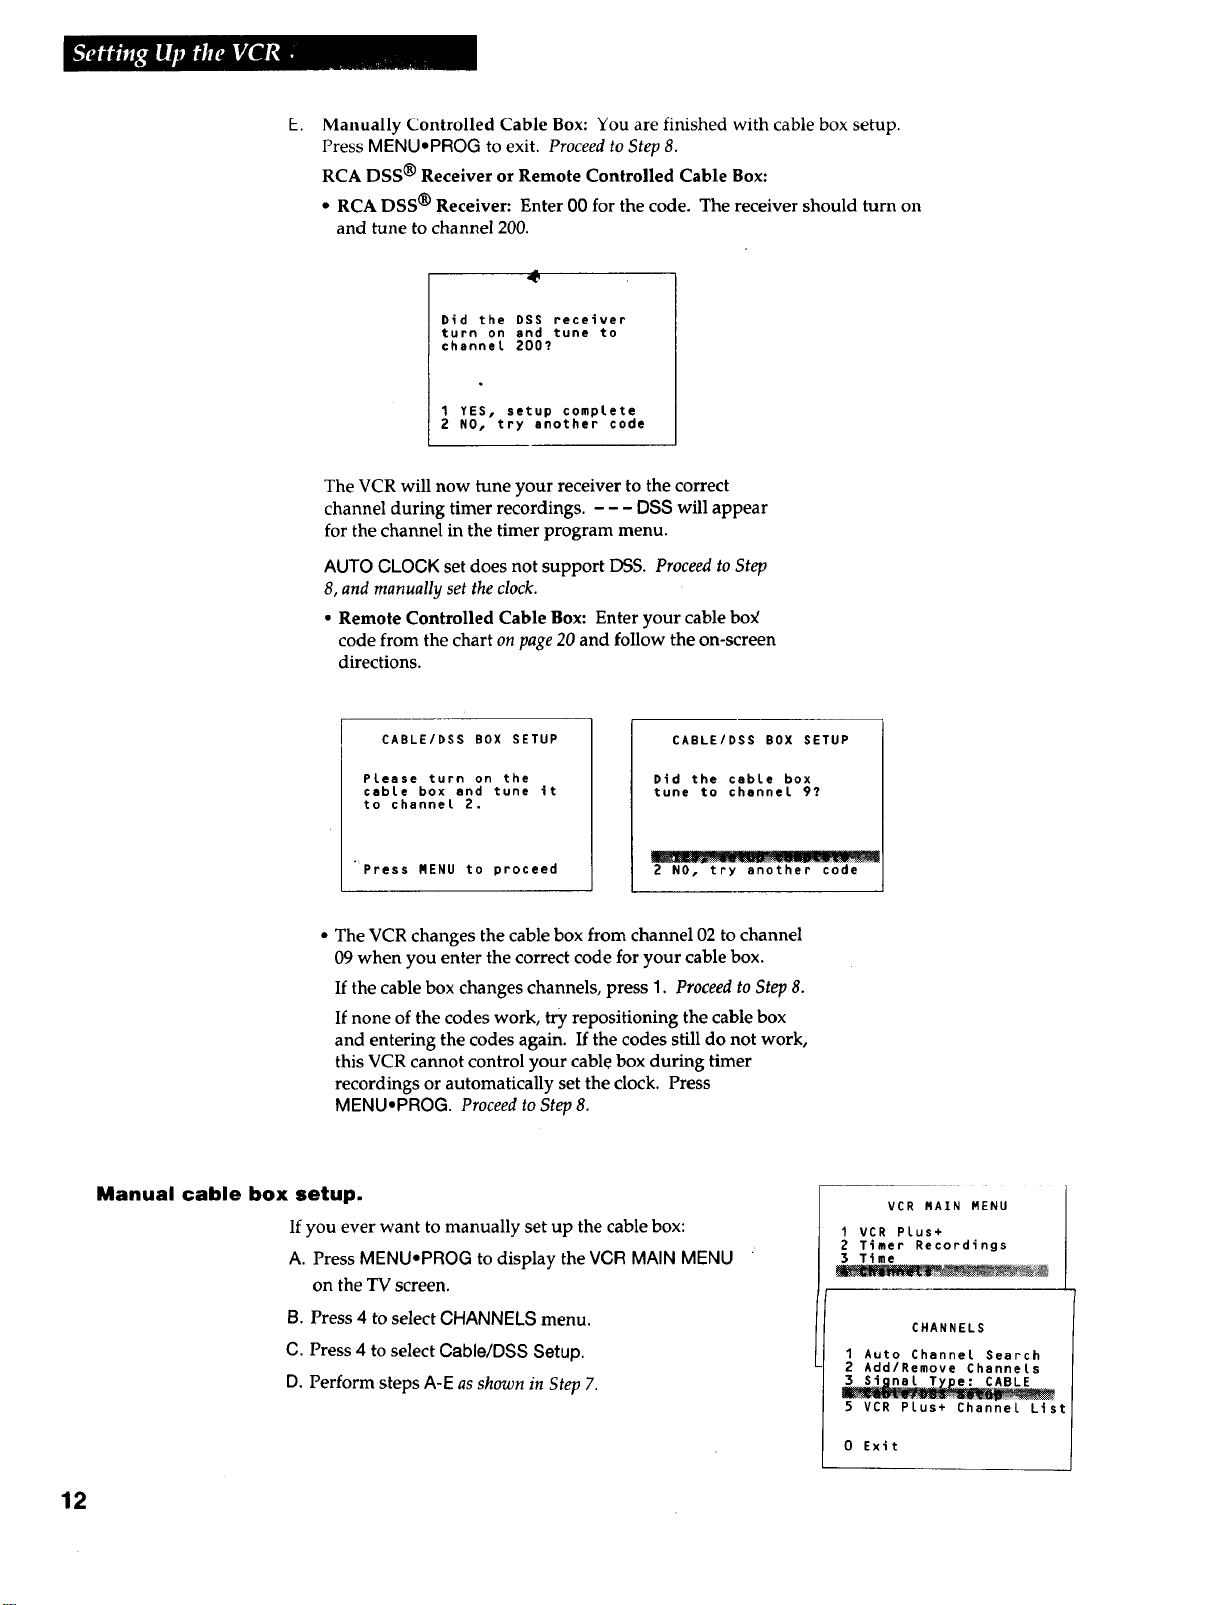
Manually Controlled Cable Box: You are finished with cable box setup.
Press MENUaPROG to exit. Proceed to Step 8.
RCA DSS ® Receiver or Remote Controlled Cable Box:
• RCA DSS ® Receiver: Enter 00 for the code. The receiver should turn on
and tune to channel 200.
Did the DSS receiver
turn on and tune to
channel Z00?
I YES, setup complete
2 NO, try another code
The VCR will now tune your receiver to the correct
channel during timer recordings. - - - DSS will appear
for the channel in the timer program menu.
AUTO CLOCK set does not support DSS. Proceed to Step
8, and manually set the clock.
• Remote Controlled Cable Box: Enter your cable box
code from the chart on page 20 and follow the on-screen
directions.
Manual cable box setup.
If you ever want to manually set up the cable box:
A. Press MENU.PROG to display the VGR MAIN MENU
on the TV screen.
B. Press 4 to select CHANNELS menu.
C. Press 4 to select Cable/DSS Setup.
D. Perform stepsA-E asshown in Step7.
CABLE/DSS BOX SETUP
Please turn on the
cable box and tune it
to channel 2.
Press MENU to proceed
CABLE/DSS BOX SETUP
Did the cable box
tune to channel 9?
2 NO, try another code
The VCR changes the cable box from channel 02 to channel
09 when you enter the correct code for your cable box.
If the cable box changes channels, press 1. Proceed to Step 8.
If none of the codes work, try repositioning the cable box
and entering the codes again. If the codes still do not work,
this VCR cannot control your cable box during timer
recordings or automatically set the clock. Press
MENUePROG. Proceed to Step 8.
VCR MAIN MENU
I VCR Plus+
2 Timer Recordings
3 Time
CHANNELS
1 Auto Channel Search
2 Add/Remove Channels
5 VCR Plus+ Channel List
12
0 Exit
Startup
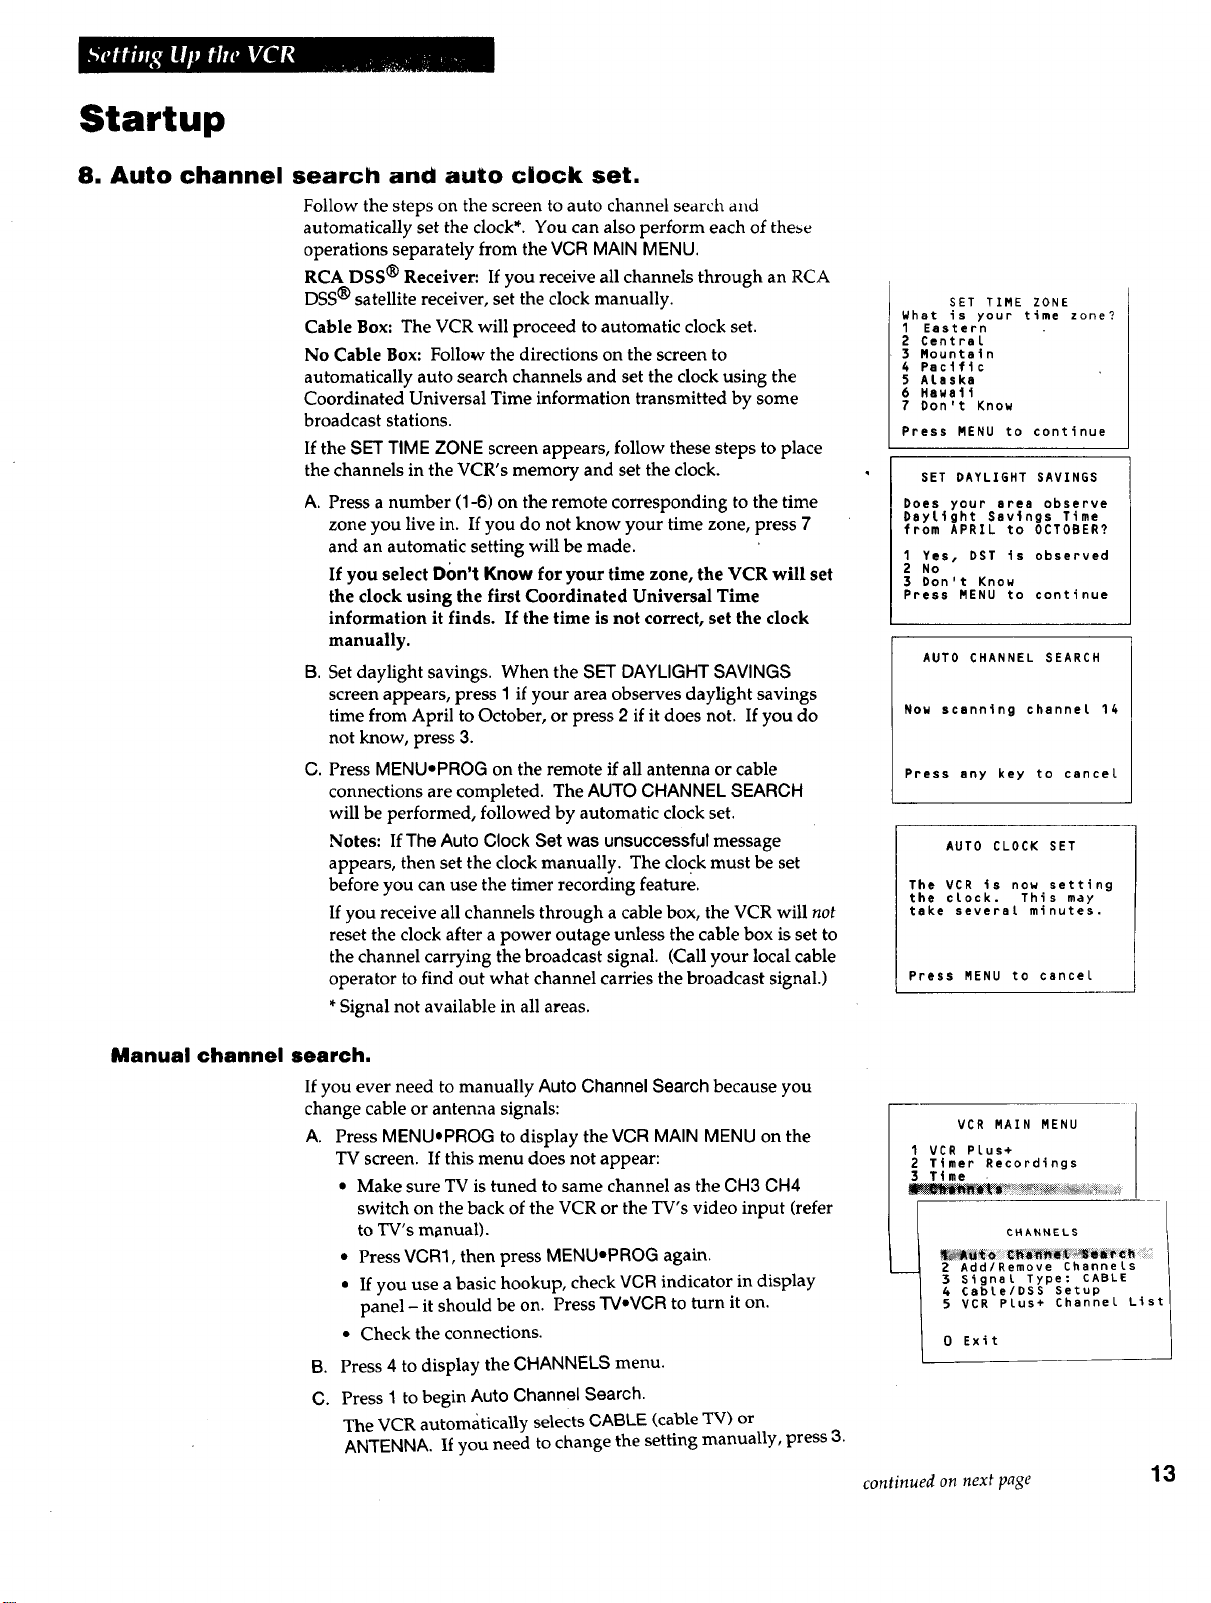
8. Auto channel search and auto clock set.
Follow the steps on the screen to auto channel searcil and
automatically set the clock*. You can also perform each of these
operations separately from the VCR MAIN MENU.
RCA DSS ® Receiver: If you receive all channels through an RCA
DSS@ satellite receiver, set the clock manually.
Cable Box: The VCR will proceed to automatic clock set.
No Cable Box: Follow the directions on the screen to
automatically auto search channels and set the clock using the
Coordinated Universal Time information transmitted by some
broadcast stations.
If the SET TIME ZONE screen appears, follow these steps to place
the channels in the VCR's memory and set the clock.
A. Press a number (1-6) on the remote corresponding to the time
zone you live in. If you do not know your time zone, press 7
and an automatic setting will be made.
If you select D()n't Know for your time zone, the VCR will set
the clock using the first Coordinated Universal Time
information it finds. If the time is not correct, set the clock
manually.
B. Set daylight savings. When the SET DAYLIGHT SAVINGS
screen appears, press I if your area observes daylight savings
time from April to October, or press 2 if it does not. If you do
not know, press 3.
C. Press MENU,PROG on the remote if all antenna or cable
connections are completed. The AUTO CHANNEL SEARCH
will be performed, followed by automatic clock set.
Notes: If The Auto Clock Set was unsuccessful message
appears, then set the clock manually. The clock must be set
before you can use the timer recording feature.
If you receive all channels through a cable box, the VCR will not
reset the clock after a power outage unless the cable box is set to
the channel carrying the broadcast signal. (Call your local cable
operator to find out what channel carries the broadcast signal.)
*Signal not available in all areas.
SET TIME ZONE
What is your time zone?
1 Eastern
2 Central
3 Mountain
4 Pacific
5 ALaska
6 Hawaii
7 Don't Know
Press MENU to continue
SET DAYLIGHT SAVINGS
Does your area observe
Daylight Savings Time
from APRIL to OCTOBER?
1 Yes, DST is observed
2 No
3 Don't Know
Press MENU to continue
AUTO CHANNEL SEARCH
Now scanning channel 14
Press any key to cancel
AUTO CLOCK SET
The VCR is now setting
the clock. This may
take several minutes.
Press MENU to cancel
Manual channel search.
If you ever need to manually Auto Channel Search because you
change cable or antenna signals:
A. Press MENUapROG to display the VCR MAIN MENU on the
B. Press 4 to display the CHANNELS menu.
C. Press 1 to begin Auto Channel Search.
TV screen. If this menu does not appear:
• Make sure TV is tuned to same channel as the CH3 CH4
switch on the back of the VCR or the TV's video input (refer
to TV's m_nual).
• Press VCR3, then press MENUmPROG again.
• If you use a basic hookup, check VCR indicator in display
panel - it should be on. Press TV•VCR to turn it on.
• Check the connections.
The VCR automatically selects CABLE (cable TV) or
ANTENNA. If you need to change the setting manually, press 3.
VCR MAIN MENU
1 VCR Plus+
2 Timer Recordings
3 Time
...... _., _ :_
CHANNELS
2 Add/Remove Channels
3 Signal Type: CABLE
& Cabte/DSS Setup
5 VCR PLus+ Channel List
0 Exit
i
continued on next page
13
Startup
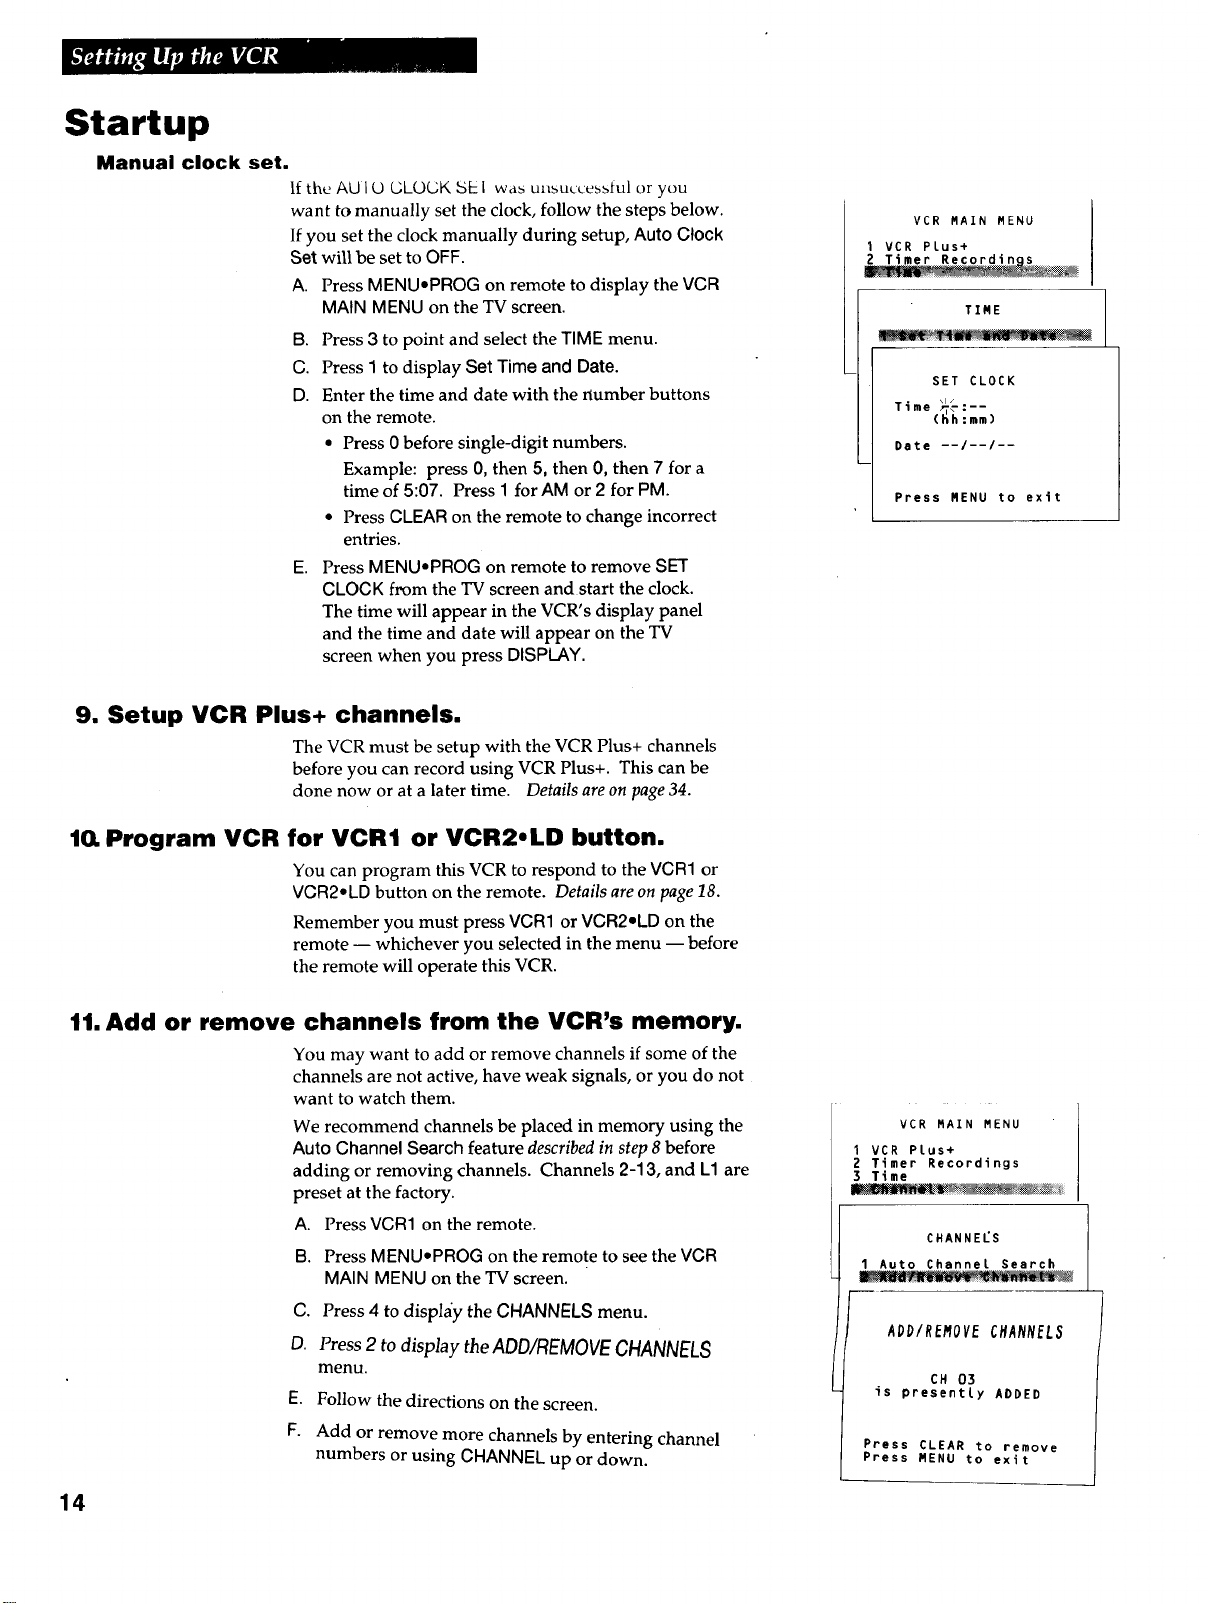
Manual clock set.
If the AUI O GLOGKSE1 was unsuccesstul or you
want to manually set the clock, follow the steps below.
If you set the clock manually during setup, Auto Clock
Set will be set to OFF.
A. Press MENU,PROG on remote to display the VCR
MAINMENU on the TV screen.
B. Press 3 to point and select the TIME menu.
C. Press I to display Set Time and Date.
D. Enter the time and date with the number buttons
on the remote.
• Press 0 before single-digit numbers.
Example: press 0, then 5, then 0, then 7 for a
time of 5:07. Press 1 for AM or 2 for PM.
• Press CLEAR on the remote to change incorrect
entries.
E. Press MENUePROG on remote to remove SET
CLOCK from the TV screen and start the clock.
The time will appear in the VCR's display panel
and the time and date will appear on the TV
screen when you press DISPLAY.
VCR MAIN MENU
I VCR Plus+
.......... _i_"ii
TIME
SET CLOCK
_o--
Time(_mm )
Date --/--/--
Press MENU to exit
9. Setup VCR Plus+ channels.
The VCR must be setup with the VCR Plus+ channels
before you can record using VCR Plus+. This can be
done now or at a later time. Details are on page 34.
10. Program VCR for VCR1 or VCR2.LD button.
You can program this VCR to respond to the VCR1 or
VCR2eLD button on the remote. Details are on page 18.
Remember you must press VCR1 or VCR2eLD on the
remote -- whichever you selected in the menu -- before
the remote will operate this VCR.
11. Add or remove channels from the VCR's memory.
You may want to add or remove channels if some of the
channels are not active, have weak signals, or you do not
want to watch them.
We recommend channels be placed in memory using the
Auto Channel Search feature described in step 8 before
adding or removing channels. Channels 2-13, and L1 are
preset at the factory.
A. Press VCR1 on the remote.
B. Press MENU-PROG on the remote to see the VCR
MAIN MENU on the TV screen.
VCR MAIN MENU
I VCR Plus+
2 Timer Recordings
3 Time
CHANNELS
1 Auto Channel Search
14
C. Press 4 to display the CHANNELS menu.
D. Press 2 to display the ADD/REMOVECHANNELS
menu.
E. Follow the directions on the screen.
F. Add or remove more channels by entering channel
numbers or using CHANNEL up or down.
ADD/REMOVECHANNEL3
CH 03
is presently ADDED
Press CLEAR to remove
Press MENU to exit
 Loading...