

Page 1
USER'S
GUIDE
RP-9520
.... ,+._ ;vvv
RECEIVED SIP 3 0 1997.
AUDIO
Page 2

Owning an RCA compact audio system is like having a
component stereo system, except you don't have the hassle of
hooking up a bunch of wires.
LOOKING FOR A GOOD READ?
You won't find this instruction book on the best seller list, but
it does contain a lot of information that you should know
before using your RCA stereo system.
I know that you want to use your stereo, not read about it, but
you really need to read the first section, _First Things First," to
learn how to hook it up; then, as you have time, you can read
about all of the great features of this stereo.
DON'T FORGET THE NOTES
Don't forget to read the notes in the margins too. They give
you extra information that can help you get the most from
your stereo.
If you have any questions, be sure to check
the Troubleshooting Tips section, the Index, or the Table of
Contents to help you find the answer.
TABLE OF CONTENTS
FI RST TH I NGS FI RST ................................................... 2
BEFORE YOU BEGIN .................................................... 2
INSTALLATION AND SET UP ..................................... 3
GENERAL CONTROLS ................................................. 4
USING THE TUNER ..................................................... 6
USING THE CD PLAYER ............................................. 8
USING THE CASSETTE DECK .............................. ...... 13
USING THE REMOTE CONTROL .............................. 14
CARE AND MAINTENANCE .................................... 15
TROU BLESHOOTING TI PS ....................................... 16
INDEX ......................................................................... 17
LIMITED WARRANTY ............................................... 18
Page 3
Now that you've chosen a stereo location, it's time to hook
it up.
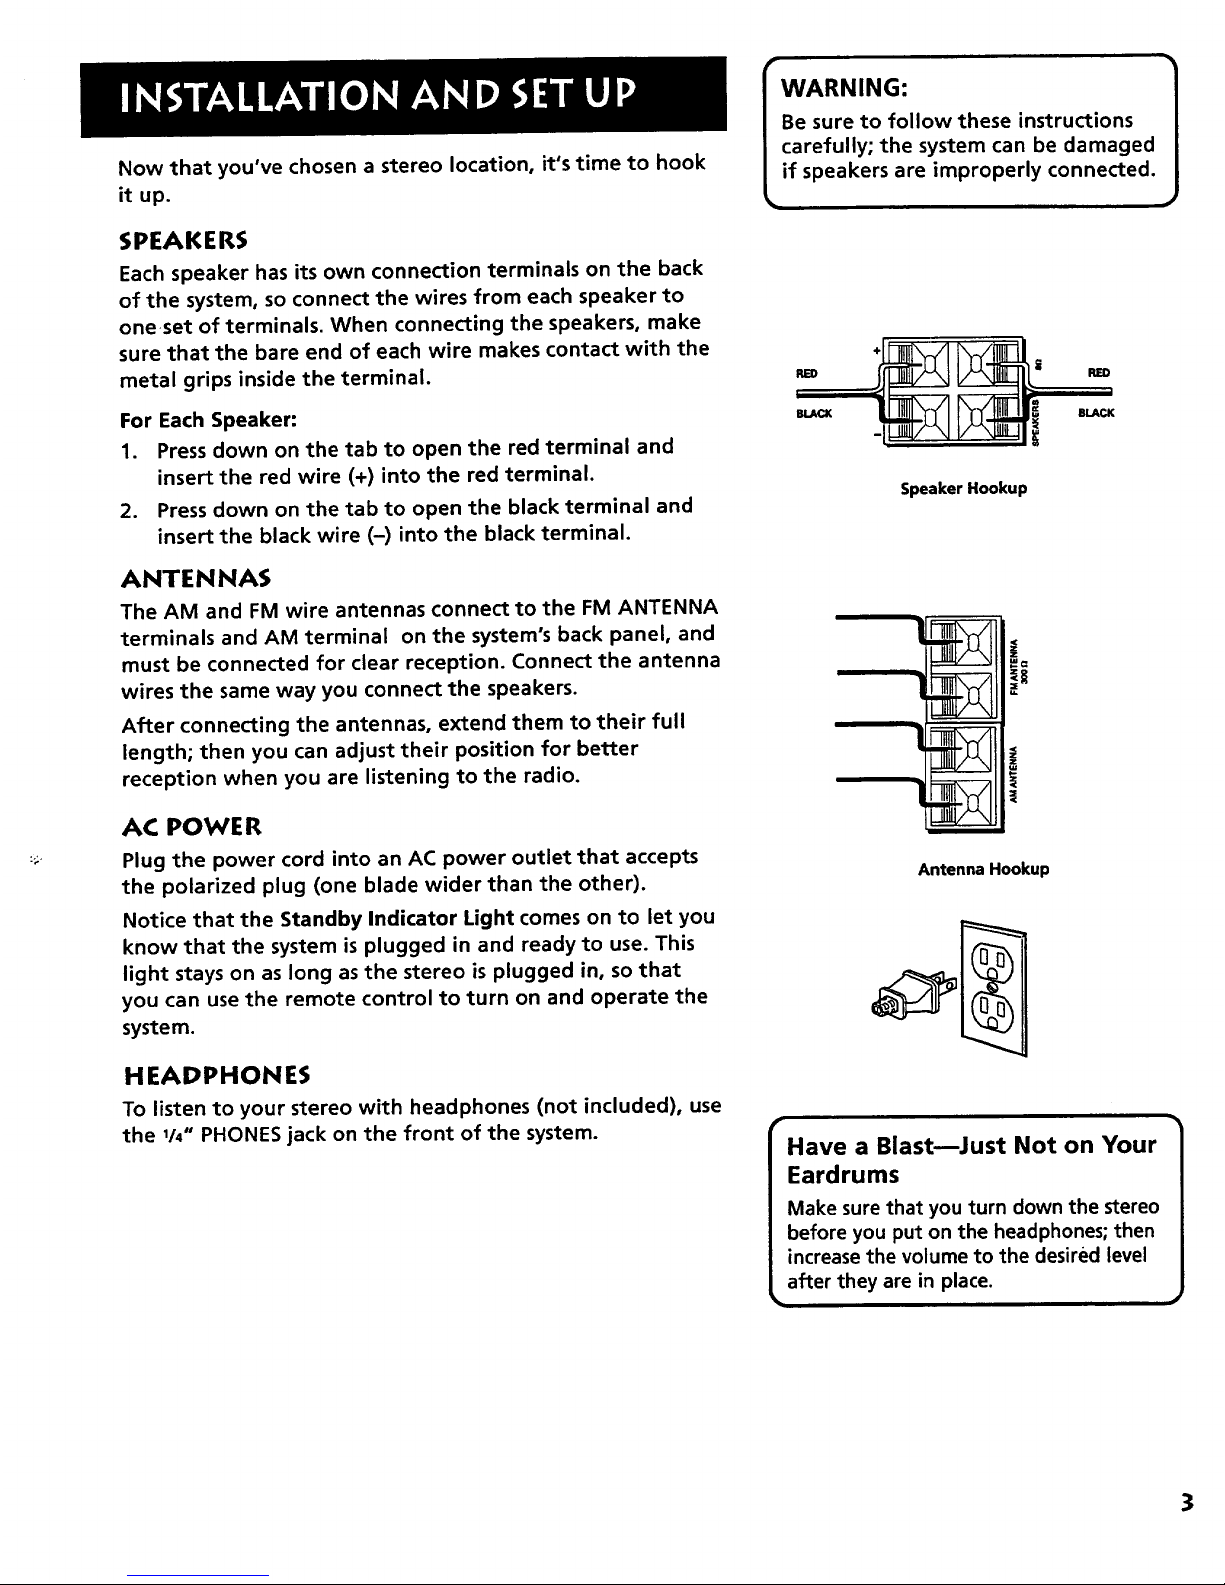
SPEAKERS
Each speaker has its own connection terminals on the back
of the system, so connect the wires from each speaker to
oneset of terminals. When connecting the speakers, make
sure that the bare end of each wire makes contact with the
metal grips inside the terminal.
For Each Speaker:
1. Press down on the tab to open the red terminal and
insert the red wire (+) into the red terminal.
2. Press down on the tab to open the black terminal and
insert the black wire (-) into the black terminal.
ANTENNAS
The AM and FM wire antennas connect to the FM ANTENNA
terminals and AM terminal on the system's back panel, and
must be connected for clear reception. Connect the antenna
wires the same way you connect the speakers.
After connecting the antennas, extend them to their full
length; then you can adjust their position for better
reception when you are listening to the radio.
AC POWER
Plug the power cord into an AC power outlet that accepts
the polarized plug (one blade wider than the other).
Notice that the Standby Indicator Light comes on to let you
know that the system is plugged in and ready to use. This
light stays on as long as the stereo is plugged in, so that
you can use the remote control to turn on and operate the
system.
HEADPHONES
To listen to your stereo with headphones (not included), use
the 1/4" PHONES jack on the front of the system.
WARNING: 1
Be sure to follow these instructions
carefully; the system can be damaged
if speakers are improperly connected.
RED
BLACK
Speaker Hookup
RED
BLACK
Antenna Hookup
Have a Blast--Just Not on Your
Eardrums
Make surethat you turn down the stereo
before you put on the headphones; then
increase the volume to the desired level
after they are in place.
3
Page 4

POWER ON
Plug in the system and the standby indicator light comes on.
The system can be operated either by using the remote
control or by pressing the POWER button. Note that the
power button is DIGITAL.
POWER OFF
Press the POWER button on the system or the remote control
to turn off the power and the standby indicator light
comes on.
REMOTE SENSOR
Next to the POWER button isthe Infrared Remote Control
sensor. Make sure that this is not covered up or blocked, or
the remote control won't work.
FUNCTION BUTTONS
Use the function buttons (CD, TAPE, TUNER) to choose which
stereo component function you want to use.
VOLUME
Turn the volume dial to increase or decrease the volume. The
volume level is displayed numerically in the display
(from 0 mute to 32).
DIGITAL EQUALIZER
Preset
Pressing the ROCK, POP, or CLASSICAL buttons control the
visual electronic equalizer. Press this button to choose one of
the preset electronic equalizer frequencies. (ROCK, POP, or
CLASSICAL) appears in the display.
Pressing the preset buttons twice will put you in the FLAT
mode not shown in the display.
BASS BOOST
Use the Bass Boost feature to enhance the quality of bass
frequencies; however, note that applying Bass Boost at
higher volumes can cause some sound distortion.
Power button
Q
Standby Indicator Ught
Infrared Remote Control Sensor
Function buttons
Volume
Preset button
BassBoostbutton
pr
Crank it up!
You may find it desirable to readjust
the volume, bass boost and equalizer
controls to optimize the sound
qualities. Some audio will be more
affected than others.
5
Page 5

AUTOMATIC PRESET FEATU RE
This is a great feature that makes storing your presets a snap,
it's just like your auto station programming on your VCR or TV.
1. Press the TUNER/BAND button to place your unit in the tuner
mode.
.
Press and hold the TUNER/BAND for five seconds. The system
will scroll through the FM band and store all the stations the
system received. Note that this feature does not scan the AM
band.
STORING RADIO STATIONS IN MEMORY
Preset as many as 32 stations for easy access.
1. Press the PRESET/TUNE button to accesstune mode. The
programmed preset number is not displayed and PROGRAM
does not light.
2. Press the + up, - down buttons to scroll through the
frequency band to the desired station.
3. Press MEMORY.
4. Press the + up, - down buttons to scroll through the presets
to desired preset number.
5. Press MEMORY again to store the station.
RECALLING PRESET STATIONS
To recall a preset station make sure you are in PRESET mode by
using the PRESET/TUNER button. Then press the (+) or (-) button to
scroll through the presets.
PROGRAM indicator
I PROGRAM _
I--I !1_1 21!_I,.
I I
Preset Number FM Station
frequency
IMemories... 1
If the unit is unplugged, your preset
stations will remain in memory
forever.
7
Page 6

1. Press the OPEN/CLOSE button to open the
CD compartment drawer.
2. Place the CD(s) into the drawer.
3. Press the DISC SELECT button to rotate the drawer
in order to load a CD(s).
4. Press the OPEN/CLOSE button to close the
CD compartment drawer.
PLAYING DISCS
After you get the discs loaded, press the DISC SELECTor the
corresponding DISC (1-5) button to choose the CD you want
to play, and then:
• Press Play/Pause to begin play.
• Press Stop to stop disc play.
Load & Play (At the Same Time
It's okay to open the CD drawer
while a disc is playing in order to
load discs into the front tray
locations.
CD PLAYING TIME
The elapsed time for a track appears in the display while the
track is playing (TIME appears above the running time).
To see how much time is remaining on the disc, press the CD
function button (REMAIN TIME appears above the time
remaining on the disc).
SHUFFLING PLAY ORDER
Turning on the Shuffle feature causes the tracks to play in a
random order.
• Press the SHUFFLE button to start random track play.
SHUFFLE appears in the display while the feature is
active.
• Press the SHUFFLE button a second time to turn it off.
REPEATING PLAY ORDER
Use the REPEAT button to repeat one track, one disc, or all
five discs.
• Pressthe REPEAT button once to repeat the current track
(REPEAT 1 appears in the display).
• Press REPEAT a second time to repeat all tracks (one disc
or all discs appear in the display). If you are in multi-disc
play and REPEAT ALL mode, all discs will play and then
repeat.
• Press REPEAT a third time to turn off the feature.
_SC TRACKALL_SCS ml: TNE 1
-I O !-i - t-IO
L- n
I
Elapsedtimeof currenttrack
Shuffle Mode indicator
I " J
tJ U F .LI J
Repeat Mode indicator
TRACKALL_$ . TIME I
J
I_1 t._!1m .!_.I _I
9
Page 7

RECALLING AND EDITING THE PROGRAM
You must be in Stop mode in order to recall and edit the
program.
1. Press the PROGRAM button to enter Program mode.
• The display shows first programmed track
(04 in the example to the right).
2. Press PROGRAM to move to the next program number
until you get to the programmed track you want to
change (Pr 02 in the example to the right).
3. Press DISC SELECT or the corresponding DISC (1-5) buttons
to choose the disc, and then press TRACK/SEARCH forward
or TRACK/SEARCH backward to choose a replacement
track (08 in the example to the right).
4. Press PROGRAM to change the current programmed track
to the one you just selected.
CLEARING THE PROGRAM
Press the PROGRAM button followed by the CLEAR button
terminates CD play and all selected play modes are then
cancelled.
USING AUTO TRACK SKIP (ATS)
Auto Track Skip (ATS) is the opposite of programmed play:
instead of programming the tracks you want to hear, you
indicate which tracks you don't want to hear.
You can choose as many as 16 tracks to be automatically
skipped. The process for creating and editing an ATS program
is nearly identical to that of programming disc play.
I " P /1
PROGR_
/ I\ TRACK
-t u i-i
Im I I--I..I
Track 04 is the 1st programmed track.
I \l/ 1
PROGP,AM
__ _j I- I_IC
Track 09 is the 2nd programmed track.
PROGRAM
!- _1 I-I_1G
The 2nd programmed track is changed from Track
09 to Track 08.
I Instant Replay 1
To play the last program you set,
press PROGRAM to enter Program
mode, and then press PLAY/PAUSE.
I P :i
2 _" n
FU
Track 08 is the first track selected in the ATS
program(Pr 01).
11
Page 8

UNDERSTANDING THE BU'rFONS
If you know what each button does, it's easy to figure out how to operate the tape decks.
RECORD • -- Press to record from the radio, CDs, VIDEO 1, or VIDEO 2. You can only record on Deck 1.
PLAY II_ -- Press to play cassettes.
REWIND _ -- From stop mode, press to rewind the tape toward the beginning.
FAST FORWARD _ -- From stop mode, press to advance
the tape toward the end.
STOP/EJECT • --Am-- Press to stop current tape activity, or to open the cassette compartment door when
no buttons are active.
PAUSEII-- Press to interrupt tape play or record. Pressa secondtime to resume tape play or tape record mode.
PLAYING CASSE'ri'E TAPES
You can play cassettes from either of the two tape decks.
1. Press TAPE function button to activate the cassette deck.
2. Press STOP/EJECT to open the cassette compartment
door.
3. Insert a tape into the compartment door, and then close
the door securely.
4. Press REWIND or FAST FORWARD to move tape
to the desired starting point.
5. Press PLAY to begin playing the tape.
RECORDING FROM THE RADIO
1. Insert a cassette tape into Deck 1.
2. Choose the TUNER/BAND function and select a radio
station.
3. Press RECORD to begin recording.
4. Press STOP/EJECT to end recording.
RECORDING FROM CD PLAYER
1. Insert a cassette tape into Deck 1.
2. Choose the CD function.
3. Insert the disc(s) to be recorded. You can start with any
track on a disc or you can create a program to record.
4. Press the RECORD button on the cassette deck to begin
recording.
5. Press PLAY/PAUSE on the CD player to begin recording.
RECORDING CASSETTES
1. Insert the pre-recorded tape you want to record into
Deck 2.
2. Insert a blank tape to into Deck 1.
3. Press the PAUSE button and then the RECORD button on
Deck 1.
4. Press the PLAY button on Deck 2. (Playback and
recording begin simultaneously.)
Erase Protection
When you record new material, the
cassette deck records over whatever
is on a tape. To protect a tape from
accidental erasure, break off one or
both plastic tabs (one for each tape
side) on the top of the cassette tape.
If you decide later to record on the
tape, seal the hole with a piece of
cellophane tape.
We're on the Level
The built-in Automatic Level Control
automatically sets the input level for
optimum recording sound. You can
listen to, and even adjust the volume
setting of the radio without affecting
the quality of the recording--just
don't change the station.
Automatic Stop Feature
When the tape deck is operating in
any mode and the end of the tape is
reached, the system automatically
shuts itself off and returns all
buttons to the off (up) position.
13
Page 9

CLEANING THE EXTERIOR
• Disconnect the system from AC power before cleaning the
exterior of the system with a soft dust cloth.
HANDLING COMPACT DISCS
• Do not touch their signal surfaces. Hold by the edges, or by
one edge and the hole.
• Do not affix labels or adhesive tape to the label surfaces.
Also, do not scratch or damage the label.
• Discs rotate at high speeds inside the player. Do not use
damaged (cracked or warped) discs.
CLEANING COMPACT DISCS
• Dirty discs can cause poor sound quality. Always keep discs
clean by wiping them gently with a soft cloth from the
inner edge toward the outer perimeter.
• if a disc becomes very dirty, wet a soft cloth in water, wring
it out well, wipe the dirt away gently, and then remove
any water drops with a dry cloth.
• Do not use record cleaning sprays or anti-static agents on
discs. Also, never clean the discswith benzene, thinner, or
other volatile solvents which may cause damage to the disc
surface.
TAPE CARE
• Don't expose tapes to sunlight or store in hot places. High
temperatures may warp the shell or damage the tape itself.
• Keep cassettes in their boxes when not in use.
• Cassette tapes can be erased by magnetic fields produced by
magnets, electric motors, electrical transformers, and other
devices. Keep tapes away from magnets and magnetic fields.
CLEANING THE TAPE HEADS
Iron oxide particles from the magnetic tape can build up on the
parts that come in contact with the tape. These deposits can
cause incomplete erasure, muffled playback sound, and might
prevent automatic stop.
Open the compartment door, push the PLAY button and gently
clean the heads, capstan, and pinch wheel with a head cleaner.
Always unplug the power cord before cleaning, and allow 30
minutes drying time when using a liquid cleaner.
Clean heads after every 25 hours of use.
• Demagnetize the head occasionally with a head
demagnetizing cassette (available from many audio
equipment stores).
• Never use any metal objects on or near the tape heads.
Do not allow any cleaning material to fall into the tape
assembly.
rQuit Slacking /_;_al 1
A little bit of slack in /_1 /
your tapes can cause _--___o.._ /
scratches on the tape, _ /
or worse yet, the tape could break. |
If you notice some slack in the tape, |
use a pencil to tighten it up before /
you insert it. J
Clean these parts
15
Page 10

A
Antenna, AM radio 3
Antenna, FM radio 3
connecting 3
ATS(Auto Track Skip) 11
ATS Program
creating 12
recalling and editing 12
B
BassBoost Indicator 4
C
Cassette player features
automatic level control 13
CD Button 8
CD Playing Time 9
REMAINTIME 9
CD Remain Time Indicator 4
Choosing Discsfor Play 10
Cleaning the Tape Heads 15
Clearing the Program 11
Compact discs
3" and 5" 8
Compact discs,cleaning 15
Compact discs,handling 15
D
DISC SELECTbutton 8
E
EQ Electronic Equalizer 5
EQ Settings
Flat,Rock,Classical5
Erase Protection 13
F
Function Buttons
TAPE,TUNER,CD 5
H
Headphones 3
safety 3
L
Loading CDs 9
loading and playingat the sametime
9
Location
speaker 2
unit 2
M
MEMORY 6
Mode Indicators 4
Moisture Condensation 2
O
OPEN/CLOSE button 9
P
Panel Display 4
Panel Display indicators
CD PlayingTime 4
EQ display 4
Number indicator 4
Radio Band 4
Panel Display Messages 9
PROGRAM 10
Programming Play Order 10
R
Radio Band Indicator 4
Recalling and Editing the Program
11
Recording on Cassette Tapes
from a CD 13
Remote Control 14
battery installation 14
CDbutton 14
EQPRESETbutton 14
MUTEbutton 14
PLAY/PAUSEbutton 14
POWERbutton 14
PRESETbutton 14
REPEATbutton 14
SEEIG_CANbuttons 14
SHUFFLEbutton 14
SKIPbutton 14
STOPbutton 14
TAPEbutton 14
TRACK/SEARCHbuttons 14
TUNERbutton 14
TUNING UPand DOWN buttons 14
VOLUPand DOWN buttons 14
REPEATbutton 9
Repeat Mode Indicator 9
Repeating Play Order 9
S
SHUFFLEbutton 9
Shuffling Play Order 9
Speaker Placement 2
Speakers
connecting 3
installation 3
placement 2
Standby indicator light 3
Storing Radio Stations in Memory 7
T
Tape Care 15
TAPE function button 13
Troubleshooting Guide 16
TUNER/BAND function button 6
Tuning In Radio Stations 6
changingradio bands 6
tuning instations 6
V
Volume dial 5
17
 Loading...